radeon® x1300 series - educamadrid® x1300 series features 1 chapter 1: introduction...
TRANSCRIPT

Radeon® X1300Series
User’s GuideP/N 137-40891-20

ii
Copyright © 2005, ATI Technologies Inc. All rights reserved.
ATI, the ATI logo, and ATI product and product-feature names are trademarks and/or registered trademarks of ATI Technologies Inc. All other company and/or product names are trademarks and/or registered trademarks of their respective owners. Features, performance and specifications are subject to change without notice. Product may not be exactly as shown in diagrams.
Reproduction of this manual, or parts thereof, in any form, without the express written permission of ATI Technologies Inc. is strictly prohibited.
Disclaimer
While every precaution has been taken in the preparation of this document, ATI Technologies Inc. assumes no liability with respect to the operation or use of ATI hardware, software or other products and documentation described herein, for any act or omission of ATI concerning such products or this documentation, for any interruption of service, loss or interruption of business, loss of anticipatory profits, or for punitive, incidental or consequential damages in connection with the furnishing, performance, or use of the ATI hardware, software, or other products and documentation provided herein.
ATI Technologies Inc. reserves the right to make changes without further notice to a product or system described herein to improve reliability, function or design. With respect to ATI products which this document relates, ATI disclaims all express or implied warranties regarding such products, including but not limited to, the implied warranties of merchantability, fitness for a particular purpose, and non-infringement.
Macrovision
Apparatus Claims of U.S. Patent Nos. 4,631,603; 4,819,098; 4,907,093; and 6,516,132 licensed for limited viewing uses only.
This product incorporates copyright protection technology that is protected by US patents and other intellectual property rights. Use of this copyright protection technology must be authorized by Macrovision, and is intended for home and other limited viewing uses only unless otherwise authorized by Macrovision. Reverse engineering or disassembly is prohibited.

iii
Note: This graphics card is for use only with compatible UL Listed personal computers that have Installation Instructions detailing user installation of card cage accessories.
IMPORTANT SAFETY INSTRUCTIONS• Read Instructions - All the safety and operating instructions should
be read before the product is operated.• Retain Instructions - The safety and operating instructions should be
retained for future reference.• Heed Warnings - All warnings on the product and the operating
instructions should be adhered to.• Compatibility - This option card is for use only with IBM AT or
compatible UL Listed personal computers that have Installation Instructions detailing user installation of card cage accessories.
• Grounding - For continued protection against risk of electric shock and fire, this accessory should be installed only in products equipped with a three-wire grounding plug, a plug having a third (grounding) pin. This plug will only fit into a grounding-type power outlet. This is a safety feature. If you are unable to insert the plug into the outlet, contact your electrician to replace the obsolete outlet. Do not defeat the safety purpose of the grounding-type plug.
• Secure Attachment - All card securement pins shall be completely tightened as to provide continuous bonding between the option card and the PC chassis.
• Lightning - For added protection for this product during a lightning storm, or when it is left unattended and unused for long periods of time, unplug it from the wall outlet, and disconnect the antenna or cable system. This will prevent damage to the product due to lightning and power-line surges.
• Power Lines - An outside antenna system should not be located in the vicinity of overhead power lines or other light or power circuits, or where it can fall into such power lines or circuits.
• Antenna Installation - When installing an outside antenna system, extreme care should be taken to keep from touching such power lines or circuits, as contact with them may be fatal.

iv

v
Table of Contents
Introduction . . . . . . . . . . . . . . . . . . . . . . . . . . . . . . . 1Radeon® X1300 Series Features 1
Graphic Features 1CrossFire™ Ready 3
System Requirements 4External Connections 4
Before You Begin 4Record Your Serial and Part Numbers 4Uninstall Previous Graphics Card Drivers 5
Installing Hardware . . . . . . . . . . . . . . . . . . . . . . . . . 7Graphics Card Bus Types 7Basic Graphics Card Installation 7Advanced Installation: AGP 9Advanced Installation: PCIe™ 11Connecting Devices 14
Using Multiple Displays . . . . . . . . . . . . . . . . . . . . 15Connecting Your Monitors 15
Display Configurations 17
Installing Software and Drivers . . . . . . . . . . . . . . 19Installing Drivers and Software in Windows® 19
Software Installation Prerequisites 19Monitor Configuration 20Reinstalling Drivers 21Installing the Catalyst® Software Suite 22
Catalyst® Control Center . . . . . . . . . . . . . . . . . . . 25Launching Catalyst® Control Center Using the Start Menu 25Other Quick Launch Access Points 26
Catalyst® Control Center Dashboard 28Catalyst® Control Center Views 29
Standard View 29Advanced View 29

vi
Custom View 29Hotkeys Manager 30Profiles Manager 31Preferences 33Help 35Information Center 36Displays Manager Advanced View 38Display Options 43Monitor Properties 46
Monitor Attributes 47Digital Panel Properties 48
Attributes 49Avivo™ Color 51HDTV Support 523D 55Standard Settings 56Anti-aliasing 57Set the Anti-Aliasing preference manually 58Anisotropic Filtering 60Catalyst® A.I. 62Mipmap Detail Level 63Adjust the Mipmap detail level 64All Settings 65
Set the Anti-Aliasing preference manually 65API Specific 68Color 70Color Desktop 71Color - FullScreen 3D 74Avivo™ Video for Radeon® X1000 Series 75Standard Settings 76
Adjustments 77Video Overlay Theater Mode 79Deinterlacing 80All Settings 82
VPU Recover 85
Using TV Display and Capture Features . . . . . . . 89Using TV Out 89
Viewing Your PC’s Display on a TV 89Connecting to a TV 89Using a Monitor vs. Using TV Display 90Viewing Text on a TV 91Using a TV as the Only Display 91

vii
Using Games and Applications 91Connecting to HDTV 91
Using Your ATI HDTV Video Cable 93
CrossFire™ FAQ . . . . . . . . . . . . . . . . . . . . . . . . . . 95
Reference . . . . . . . . . . . . . . . . . . . . . . . . . . . . . . . . 99Troubleshooting 99Product Registration 101Customer Care 101Getting Additional Accessories 103Compliance Information 103
FCC Compliance Information 103Industry Canada Compliance Statement 104Waste Electrical and Electronic Equipment (WEEE) Directive Compliance 104
Glossary . . . . . . . . . . . . . . . . . . . . . . . . . . . . . . . . 105
Index . . . . . . . . . . . . . . . . . . . . . . . . . . . . . . . . . . . 125

viii

Radeon® X1300 Series Features 1
CHAPTER 1:
Introduction
Congratulations on the purchase of your ATI Radeon® X1300 Series graphics card. We hope that you will enjoy countless hours of trouble-free computing.
Radeon® X1300 Series Features
Graphic Features • Native PCI Express® X16 bus support.• Four parallel rendering pipelines.• 32/MB/64MB/128MB/256MB/512MB GDDR3 on-board
memory.• Full support for Microsoft® DirectX® Shader Model 3.x.• High performance Ultra-Threaded shader engine.• Two vertex shader processors.• Four pixel shader processors.• 128-bit 4-channel memory interface supporting DDR/DDR2/
GDDR3 memory devices.• Native PCI Express® x16 bus interface.
SmoothVision™• Full-scene anti-aliasing method that smooths uneven edges and
improves blurred images.• 2x/4x/6x Anti-aliasing modes with a loss-less compression up to a
ratio of 6:1 at all resolutions.• 2x/4x//8x/16x Anisotropic Filtering modes with up to 128-tap
texture filtering.
HyperZ™• Ensures optimal hardware performance by discarding irrelevant
object data that is not visible to the user.• Conserves video memory bandwidth.
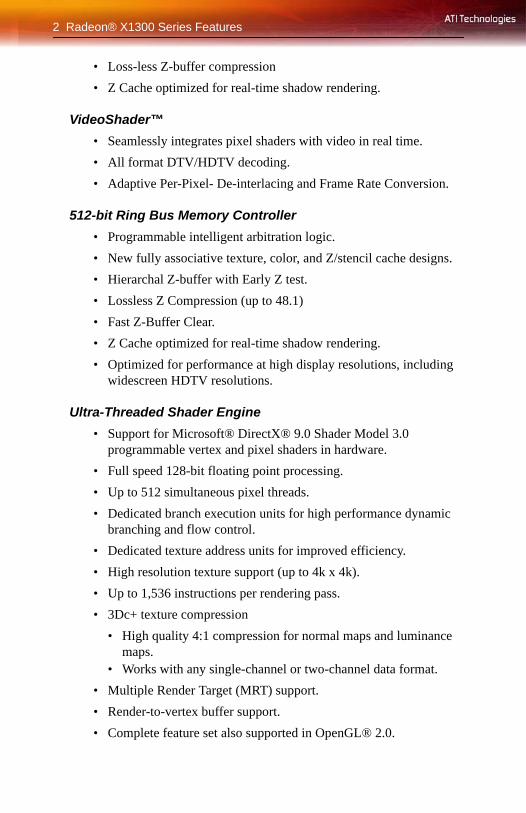
2 Radeon® X1300 Series Features
• Loss-less Z-buffer compression• Z Cache optimized for real-time shadow rendering.
VideoShader™ • Seamlessly integrates pixel shaders with video in real time.• All format DTV/HDTV decoding.• Adaptive Per-Pixel- De-interlacing and Frame Rate Conversion.
512-bit Ring Bus Memory Controller• Programmable intelligent arbitration logic.• New fully associative texture, color, and Z/stencil cache designs.• Hierarchal Z-buffer with Early Z test.• Lossless Z Compression (up to 48.1)• Fast Z-Buffer Clear.• Z Cache optimized for real-time shadow rendering.• Optimized for performance at high display resolutions, including
widescreen HDTV resolutions.
Ultra-Threaded Shader Engine• Support for Microsoft® DirectX® 9.0 Shader Model 3.0
programmable vertex and pixel shaders in hardware.• Full speed 128-bit floating point processing.• Up to 512 simultaneous pixel threads.• Dedicated branch execution units for high performance dynamic
branching and flow control.• Dedicated texture address units for improved efficiency.• High resolution texture support (up to 4k x 4k).• Up to 1,536 instructions per rendering pass.• 3Dc+ texture compression
• High quality 4:1 compression for normal maps and luminance maps.
• Works with any single-channel or two-channel data format.• Multiple Render Target (MRT) support.• Render-to-vertex buffer support.• Complete feature set also supported in OpenGL® 2.0.

Radeon® X1300 Series Features 3
High Dynamic Range (HDR) Rendering• 64-bit floating point HDR supported throughout the pipeline
• Includes support for blending and multi-sample anti-aliasing.• High precision 10:10:10:2 integer format support.
• Includes support for blending and multi-sample anti-aliasing.• 2x/4x/6x Anti-Aliasing modes
• Sparse multi-sample algorithm with gamma correction, programmable sample patterns, and centroid sampling.
• New Adaptive Anti-Aliasing modes.• Temporal Anti-Aliasing mode.• Lossless Color Compression (up to 6:1) at all resolutions,
including widescreen HDTV resolutions.• 2x/4x/8x/16x Anisotropic Filtering modes
• Up to 128-tap texture filtering.• Adaptive algorithm with performance and quality options.
Note: Not all features apply to all Radeon® X1300 Series graphics cards.
CrossFire™ ReadyYour Radeon® X1300 Series is CrossFire™ Ready and can be used in conjunction with a graphics cards of the same brand-family to complete a CrossFire™ capable system. CrossFire™ provides the best performance, flexibility, and game compatibility using multiple graphics processors in a single system. For more information see ati.com/crossfire

4 System Requirements
System Requirements
External Connections• 15-pin D-shell (female) VGA output.• DVI-I output.• S-Video output.
Before You BeginBefore you begin installing your new graphics card, please do the following.
Record Your Serial and Part NumbersThe serial number and 102 part number printed on the graphics card are required for registration. They are located on a sticker on the back of the card.
Hardware • Intel® Pentium® 4 or AMD Athlon®. • 512MB of system memory; 1GB or more for best
performance.• Optical drive for installation software (CD-ROM or
DVD-ROM drive).• Specialized PCI Express® 350 watt or greater power
supply recommended. Consult your computer system manual to ensure the power supply is designed to accommodate a high-end graphics card with a peak dissipation above 75 watts.
Operating System
• Windows® XP with Service Pack 2 (SP2).• Windows® XP Professional x64 Edition.
Monitor • High-resolution MultiSync or multi-frequency monitors or any other type of VGA monitor.
• Digital flat-panel (DFP) displays or digital CRT display.
Serial number (S/N)

Before You Begin 5
Write the numbers, shown in bold above, down before installing your new ATI product.
Uninstall Previous Graphics Card DriversTo ensure the successful installation of your new Radeon® X1300 Series card, you must uninstall the drivers for the existing graphics card before removing it from your computer.
To uninstall previous drivers
With your current graphics card still in your computer:
1 Close all applications that are currently running.
2 Navigate to the Control Panel and select Add/Remove Programs.
3 Select your current graphics card drivers and select Add/Remove. The wizard will help you remove your current display drivers.
Note: If the previously installed graphics card has any additional software installed, it should also be removed at this point.
4 Turn off your system and remove the old graphics card.
102 part number (P/N)

6 Before You Begin

Graphics Card Bus Types 7
CHAPTER 2:
Installing Hardware
This chapter will guide you through the physical installation of your new Radeon® graphics card.
Graphics Card Bus TypesThere are three possible card bus types. See the illustration below to determine if you have an AGP, PCI, or PCI Express® (PCIe™) graphics card.
AGP, PCI, and PCIe™ Graphics Cards
Basic Graphics Card InstallationThere are two types of installation. If your graphics card does not require a separate connection to the computer’s power supply, follow the Basic Install instructions below. If your graphics card requires a separate connection to the computer’s power supply, follow the Advanced Install instructions for either AGP or PCIe, as appropriate.
Bus Types
1 AGP card and AGP expansion slot
2 PCI card and PCI expansion slot
3 PCIe™ card and PCIe™ expansion slot

8 Basic Graphics Card Installation
Radeon® graphics cards that require a connection to the computer’s power supply will have a power cable connected to them.
Installing the graphics card
1 Turn off the computer, monitor, and other peripheral devices.
2 Unplug the computer’s power cord and disconnect all cables from the back of your computer.
3 Remove the computer cover.
If necessary, consult your computer’s manual for help in removing the cover.
4 Unscrew or unfasten and remove any existing graphics card from your computer.
Note: If your computer has an on-board graphics capability, you may need to disable it on the motherboard. For more information, see your computer documentation.
5 Locate the appropriate slot and, if necessary, remove the metal back-plate cover.
6 Align your ATI graphics card with the slot and press it in firmly until the card is fully seated.
7 Screw in or fasten the graphics card securely and replace the computer cover.
8 Reconnect any cables you have disconnected and plug in the computer’s power cord.
9 Turn on the monitor and then your computer.
WARNING - Wait approximately 20 seconds after unplugging the power cord before disconnecting a peripheral or removing a component from the motherboard to avoid possible damage to the motherboard.
WARNING - Remember to discharge your body’s static electricity by touching the power supply or the metal surface of the computer chassis.

Advanced Installation: AGP 9
Advanced Installation: AGPThere are two types of installation. If your graphics card does not require a separate connection to the computer’s power supply, follow the Basic Install instructions. If your graphics card require a separate connection to the computer’s power supply, follow the Advanced Install instructions for either AGP or PCIe™, as appropriate.
Graphics cards that require connection to the computer’s power supply will have a power cable connected in the upper-right corner of the card.
Consult your system builder or OEM to ensure that your system has an adequate power supply. Generally, ATI recommends a 300 watt power supply or greater to ensure normal system operation where a number of other internal devices are installed.
Graphic Card Installation
1 Graphics Card
2 Power Supply
3 Hard Drive

10 Advanced Installation: AGP
Installing the graphics card
1 Turn off the computer, monitor, and other peripheral devices.
2 Unplug the computer’s power cord and disconnect all cables from the back of your computer.
3 Remove the computer cover.
If necessary, consult your computer’s manual for help in removing the cover.
4 Unscrew or unfasten and remove any existing graphics card from your computer.
Note: If your computer has an on-board graphics capability, you may need to disable it on the motherboard. For more information, see your computer documentation.
5 Locate the appropriate slot and, if necessary, remove the metal back-plate cover.
4 Power Cable Connector
5 4-Pin Power Connection
6 Power Extension Cable: Power Connector to Graphics Card
7 Power Extension Cable: Power Connector to Hard Drive
8 Power Extension Cable: Power Connector to Power Supply
9 Hard Drive
10 Power Connector to Hard Drive
WARNING - Wait approximately 20 seconds after unplugging the power cord before disconnecting a peripheral or removing a component from the motherboard to avoid possible damage to the motherboard.
WARNING - Remember to discharge your body’s static electricity by touching the power supply or the metal surface of the computer chassis.

Advanced Installation: PCIe™ 11
6 Align your ATI graphics card with the slot and press it in firmly until the card is fully seated.
7 Remove the power cable from the hard drive power connector.
8 Connect the power extension cable to the 4-pin power connection on the graphics card.
9 Connect the power extension cable to the power supply.
10 Connect the power extension cable to the hard drive.
11 Screw in or fasten the graphics card securely. Make sure the cables are not interfering with anything inside the computer (for example, a cooling fan) and replace the computer cover.
12 Reconnect any cables you have disconnected and plug in the computer’s power cord.
13 Turn on the monitor, and then your computer.
Advanced Installation: PCIe™There are two types of installation. If your graphics card does not require a separate connection to the computer’s power supply, follow the Basic Install instructions. If your graphics card require a separate connection to the computer’s power supply, follow the Advanced Install instructions for either AGP or PCIe™, as appropriate.
Graphics cards that require connection to the computer’s power supply will have a power cable connected to them.
Consult your system builder or OEM to ensure that your system has an adequate power supply. A PCI Express® compatible system has a specialized 12V graphics card power connector. A 450 watt or greater power supply is recommended. Consult your computer system manual to ensure the power supply is designed to accommodate a high-end graphics card with a peak dissipation above 75 watts.

12 Advanced Installation: PCIe™
Installing the Radeon® graphics card
1 Turn off the computer, monitor, and other peripheral devices.
2 Unplug the computer’s power cord and disconnect all cables from the back of your computer.
Graphics Card Installation
1 Graphics Card
2 Power Supply
3 6-pin Power Cable Connector
4 6-pin Power Connection
5 Power connector to Graphics Card
6 Power connector to Power Supply
WARNING - Wait approximately 20 seconds after unplugging the power cord before disconnecting a peripheral or removing a component from the motherboard to avoid possible damage to the motherboard.

Advanced Installation: PCIe™ 13
3 Remove the computer cover.
If necessary, consult your computer’s manual for help in removing the cover.
4 Unscrew or unfasten and remove any existing graphics card from your computer.
Note: If your computer has an on-board graphics capability, you may need to disable it on the motherboard. For more information, see your computer documentation.
5 Locate the appropriate slot and, if necessary, remove the metal back-plate cover.
6 Align your ATI graphics card with the slot and press it in firmly until the card is fully seated.
7 Screw in or fasten the graphics card securely. Make sure the cables are not interfering with anything inside the computer (for example, a cooling fan) and replace the computer cover.
8 Reconnect any cables you have disconnected and plug in the computer’s power cord.
9 Turn on the monitor, and then your computer.
WARNING - Remember to discharge your body’s static electricity by touching the power supply or the metal surface of the computer chassis.
Your computer will beep, possibly show a warning message on your display, and the boot process will stop if the graphics card is not correctly connected to the power supply.
14 Connecting Devices
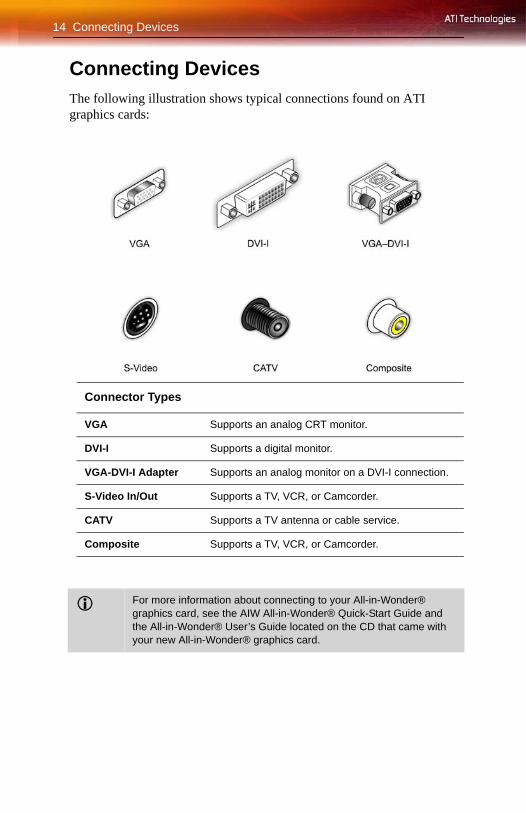
Connecting DevicesThe following illustration shows typical connections found on ATI graphics cards:
Connector Types
VGA Supports an analog CRT monitor.
DVI-I Supports a digital monitor.
VGA-DVI-I Adapter Supports an analog monitor on a DVI-I connection.
S-Video In/Out Supports a TV, VCR, or Camcorder.
CATV Supports a TV antenna or cable service.
Composite Supports a TV, VCR, or Camcorder.
For more information about connecting to your All-in-Wonder® graphics card, see the AIW All-in-Wonder® Quick-Start Guide and the All-in-Wonder® User’s Guide located on the CD that came with your new All-in-Wonder® graphics card.

15
CHAPTER 3:
Using Multiple Displays
Connecting Your MonitorsYour Radeon® X1300 Series graphics card provides hardware support for the following display configurations:
• Single VGA.• Single DVI.• Dual VGA (DVI-I-to-VGA adapter use required).
The TV Out connection supports the following TV formats (cables not provided):
• Composite.• S-video.• Component.
The TV Out connection can be combined with DVI or VGA (DVI-I-to-VGA adapter use required) for clone or extended display support.

16
Note: If you use multiple monitors, the Radeon® X1300 Series card must be the primary graphics card. Normally, the system BIOS determines which graphics card will be the primary.
To connect your monitors
1 Power off your computer and monitors.
2 Plug the monitor cables into their appropriate connectors.
Connections and Adapters for the Radeon® X1300 Series Card
1 Standard VGA Monitor Connector. To connect a VGA monitor to the DVI-I connector, plug the supplied DVI-I-to-VGA adapter into the DVI-I connector, then plug your monitor cable into the adapter.
2 DVI-I-to-VGA Adapter (optional, not included).
3 DVI-I Connection. To connect a digital display.

Display Configurations 17
3 Power on your monitors first, and then restart your computer so that Windows® can detect the new hardware settings.
4 When the New Hardware Found Wizard appears, at the appropriate prompt insert the ATI Installation CD to load the drivers for your Radeon® X1300 Series card.
To set up a multi-monitor display
1 From the Start button click Control Panel, then Display. Click the Settings tab to access the basic multi-monitor configuration settings.
Note: ATI provides Catalyst® Control Center software that provides many additional configuration features. It can be accessed by clicking the Advanced button from the Display Properties > Settings tab.
2 Select the Monitor icon identified by the number 2.
3 Click Extend my Windows desktop onto this monitor.
4 Set the Screen Resolution and Color Quality as appropriate for the second monitor. Click Apply or OK to apply these new values.
• Refer to your Windows® online help and documentation for further information on using the Settings tab.
Note: When you use multiple monitors with your card, one monitor will always be Primary. Any additional monitors will be designated as Secondary.
Display ConfigurationsYour Radeon® X1300 Series graphics card provides dual display functionality. The following table lists the different ways you can connect displays to your card.
Display Configuration
Connector(s) Used
Comments
Single CRT display
VGA connector OR DVI-I connector with DVI-I-to-VGA adapter
CRT- cathode ray tube analog display.
Single DFP display
DVI-I connector DFP - digital flat panel display.

18 Display Configurations
Single TV S-Video Out The S-Video out can also support a composite connection via the S-Video-to-Composite adapter.
Single HDTV display
S-Video Out to HDTV (YPrPb) cable
HDTV - High Definition Television
CRT display + TV
VGA connector + S-Video Out
UNSUPPORTED CONFIGURATION if the CRT display is attached to the DVI-I connector via the DVI-I-to-VGA adapter.
CRT display + HDTV
VGA connector + S-Video Out to HDTV (YPrPb) cable
DFP display + TV
DVI-I connector + S-Video out
DFP display + HDTV
DVI-I connector + S-Video Out to HDTV (YPrPb) cable
CRT display + DFP display
VGA connector + DVI-I connector
CRT display + CRT display
VGA connector + DVI-I connector with DVI-I-to-VGA adapter
The DVI-I connector can support a CRT display using the DVI-I-to-VGA adapter
CRT display + DFP display + TV
VGA connector + DVI-I connector + S-Video Out
The TV display will “clone” the image of one of the other two displays
CRT display + DFP display + HDTV
VGA connector + DVI-I connector + S-Video Out to HDTV (YPrPb) cable
CRT display + CRT display + TV
VGA connector + DVI-I connector with DVI-I-to-VGA adapter + S-Video Out
UNSUPPORTED CONFIGURATION
Display Configuration
Connector(s) Used
Comments

Display Configurations 19
CRT display + CRT display + HDTV
VGA connector + DVI-I connector with DVI-I-to-VGA adapter + S-Video Out to HDTV (YPrPb) cable
UNSUPPORTED CONFIGURATION
Display Configuration
Connector(s) Used
Comments

20 Display Configurations

Installing Drivers and Software in Windows® 21
CHAPTER 4:
Installing Software and Drivers
This chapter will guide you through the installation of the drivers and software associated with your Radeon® X1300 Series graphics card.
Installing Drivers and Software in Windows®You will need to install the Radeon® X1300 Series drivers and software in the following cases:
• After you have installed the card in your system.• After you have reinstalled or upgraded your operating system.
This procedure applies to Windows® XP.
Software Installation PrerequisitesTo install or remove the drivers, you must have administrator rights or be logged on as a user with administrator rights.
Your operating system must be installed and running before you can install the Radeon® X1300 Series drivers. Also, make sure that you have installed Service Pack 2 for Windows® XP.
Make sure your monitor cable is properly attached before you begin.
Note: The installation dialog will display in English if your operating system’s language is not supported.
To install ATI drivers and software
Note: Optical drive refers to CD-ROM or DVD-ROM drive.
1 Start your system. When the Found New Hardware Wizard appears, click Cancel. When the System Settings Change window asks you to restart your computer, click No.

22 Monitor Configuration
2 Run the ATISETUP utility. The ATISETUP utility will start automatically when you insert the ATI Installation CD-ROM into your optical drive after the operating system has started. If your CD-ROM auto-run is not enabled or the ATISETUP utility does not start automatically:
a) Click the Start button in the task bar.b) Click Run. c) Select ATISETUP.EXE from the root directory of the ATI
Installation CD-ROM. d) Click OK.
3 Click Install under Software Install.
4 Click Next.
5 Click Yes to the license agreement. ATI Easy Install will start the Installation Wizard.
6 Follow the wizard’s on-screen instructions to complete the installation.
7 When the Setup Complete message appears, select Yes, I want to restart my computer now and click Finish.
8 After the system reboots, the Found New Hardware message displays Digital Signature Not Found. Click Yes or Continue to complete the driver installation.
Monitor ConfigurationOnce the drivers and software have been installed, you can configure your monitor.
The Express installation option is recommended. By selecting this option, the HydraVision™ multi-monitor and desktop management software will automatically be installed, along with the ATI driver. Not all software components are installed using the Express installation. Custom installation allows you to select individual software components for installation.
Warning - Choosing a refresh rate unsupported by your monitor may damage your monitor. Consult your monitor’s documentation if necessary.

To set up a multi-monitor display 23
To configure your primary display
1 Navigate to the Control Panel and choose Display, or right-click on the desktop and choose Properties.
2 Choose the Settings tab and select the screen resolution and color depth that best suit your requirements and your monitor’s performance.
3 Click Advanced and select the Monitor tab.
4 Choose a refresh rate from the drop-down list.
5 Click OK to return to the desktop.
To set up a multi-monitor display1 From the Start menu click Control Panel, then Display. Click the
Settings tab to access the basic multi-monitor configuration settings.
2 Select the Monitor icon identified by the number 2.
3 Click Extend my Windows desktop onto this monitor.
4 Set the Screen Resolution and Color Quality as appropriate for the second monitor. Click Apply or OK to apply these new values.
• Refer to your Windows® online help and documentation for further information on using the Settings tab.
Note: When you use multiple monitors with your Radeon® X1300 Series card, one monitor will always be Primary. Any additional monitors will be designated as Secondary.
Note: You can also enable multiple monitors using ATI’s Catalyst® Control Center.
Reinstalling DriversYou can install new drivers or reinstall existing drivers if there was a Windows® conflict.
Reinstall the drivers at any time using the ATISETUP utility located on the ATI Installation CD-ROM. The ATISETUP utility will start automatically if you insert the ATI Installation CD-ROM into your optical drive after the operating system has started.
To manually reinstall drivers

24 Installing the Catalyst® Software Suite
If your CD-ROM auto-run is not enabled and the ATISETUP utility does not start automatically, follow these steps.
1 In the Windows® task bar, click Start.
2 From the Start menu, select Run.
3 Browse to SETUP.EXE on the root directory of the ATI Installation CD-ROM.
4 Click OK.
Installing the Catalyst® Software SuiteATI’s Catalyst® Software Suite provides software required to enjoy all the features of your ATI graphics card. The Catalyst® Software Suite has several distinct software elements, including:
• Driver• Catalyst® Control Center• HydraVision™ (not included in the Express Install)• Remote Wonder™ Software• SurroundView™
To install the Catalyst® software suite
Note: Optical drive refers to any drive capable of reading CD-ROM media.
1 Insert the ATI Installation CD-ROM into your optical drive.
If Windows® runs the CD-ROM automatically, proceed to step 5.
2 Click Start > Run.
3 Type the following: D:\ATISETUP (If D is not your optical drive, substitute the correct drive letter.)
4 Click OK.
5 Click Install under Software Install.
6 Click Next and click Yes to the license agreement.
7 Click ATI Easy Install to begin the Installation Wizard.
8 Follow the Wizard’s on-screen instructions, then choose either Express or Custom Install.

25
Not all software components are installed using the Express installation. Custom installation allows you to select individual software components for installation.

26

Catalyst® Control Center 27
CHAPTER 5:
Catalyst® Control Center The Catalyst® Control Center is a graphical user application providing access to the display features contained within the installed ATI hardware and software. Use the Catalyst® Control Center to fine-tune your graphics settings, enable or disable connected display devices, and change the orientation of your desktop. Many of the features show you a preview of the changes before they are applied.
The Catalyst® Control Center offers you two views of the software:
• Standard View is a simplified view that includes wizards to get the inexperienced user up and running.
• Advance View allows the advanced user to access and configure the complete feature set of the software.
The Catalyst® Control Center can be customized for easy access to the features you use most.
Use the Catalyst® Control Center to access a comprehensive online help system, or connect to the ATI Web site.
Launching Catalyst® Control Center Catalyst® Control Center can be launched from one of the following access points:
• Windows® Start Menu• Windows® System Tray• Desktop Shortcuts• Predefined Hotkeys
Launching Catalyst® Control Center Using the Start Menu
From the Windows® task bar, click Start:• Click to All Programs > ATI Catalyst® Control Center > ATI
Catalyst® Control Center.

28 Launching Catalyst® Control Center
Other Quick Launch Access Points
Launching Catalyst® Control Center Using the System Tray
1 Right-click the ATI icon in the Windows® System Tray.
2 Select Catalyst® Control Center from the popup menu.
Launching Catalyst® Control Center Using the Desktop Shortcut
When you first installed Catalyst® Control Center the setup wizard provided you with the option of placing a shortcut on the desktop.
• Double-click the Catalyst® Control Center desktop shortcut.
Launching Catalyst® Control Center Using Hot Keys• You can press the predefined combination of keys Ctrl+Alt+C to
launch Catalyst® Control Center, or you can define your own hot key sequence by using the Catalyst® Control Center’s Hotkey Manager.
Launching Catalyst® Control Center 29
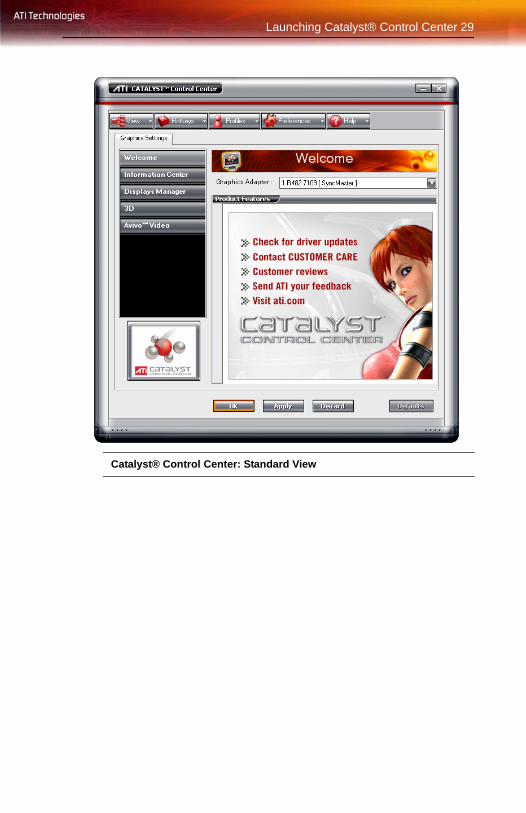
Catalyst® Control Center: Standard View

30 Launching Catalyst® Control Center
Catalyst® Control Center: Advanced View

Catalyst® Control Center Views 31
Catalyst® Control Center Dashboard
The Catalyst® Control Center Dashboard is a graphical representation of the display features of the installed ATI hardware and software. Use the Dashboard to fine-tune your graphic settings, enable or disable connected display devices, and change the orientation of your desktop. Many features present you with a preview of your changes before they are applied.
The Dashboard is only available in Advanced View and Custom View, if selected.
Use the Dashboard to access a comprehensive online help system, create a hot key, or customize the way you view the Catalyst® Control Center.
The Dashboard includes:
• Views• Hot keys• Profiles• Preferences• Help
Catalyst® Control Center ViewsThe Catalyst® Control Center Dashboard supports three types of views:
• Basic• Advanced• Custom
Basic ViewBasic View is the default view when Catalyst® Control Center is launched for the very first time. It includes a wizard that guides you through the process of configuring your display devices. Basic View is recommended for novice users.
Advanced ViewAdvanced View provides access to all the features offered by the Catalyst® Control Center. Advanced View is recommended for experienced users.

32 Hotkeys Manager
Custom ViewCustom View allows you to choose the features that appear in the left navigation pane. Custom View is recommended for experienced users who want to access only the features they adjust most often or that their 3D applications support.
Switch Views
When in Advanced view, click View button and select either Basic, or Custom View.
When in Basic view, select Advanced in the Basic View Welcome page or click the Advanced button in any other page.
Note: The Advanced button does not appear in all Basic View pages.
Create a Custom View
1 In Advanced View, click View and select Define Custom View.
2 In the Define a Custom View dialog, click the plus sign beside the graphics card name to expand the tree view.
3 Select the check box next to each aspect you wish to add to your custom view.
4 Click OK to save the changes.
Hotkeys ManagerThe Hotkeys Manager allows you to create shortcut key combinations to quickly perform tasks such as changing a graphics setting or opening an application. A hot key is a combination of one or more modifier keys, such as Ctrl, Alt, or Shift, and any letter from the alphabet.
Note: Hotkeys Manager is only available in Advanced View.
Display Hotkeys Manager
1 Click Hotkeys in the Dashboard.
2 Select Hotkeys Manager.

Hotkeys Manager 33
Enable Hotkeys feature
1 Open Hotkeys Manager.
2 Select the Enable Hotkeys feature check box.
Edit an existing hot key
1 Open Hotkeys Manager.
2 Select an option from the List Hotkeys for drop-down menu.
• Optionally, select an aspect from the According to list.
3 Click a hot key to edit.
4 Click Edit button.
5 Choose a modifier.
6 Enter any letter of the alphabet.
7 Click the OK button to save your changes.
Note: A hot key character is restricted to letters of the alphabet.
Create a list of active hot keys
1 Open Hotkeys Manager.
2 Select an option from the List Hotkeys for drop-down menu.
• Optionally, select an aspect from the According to list.
3 Select the hot key actions you want active.
Note: A hot key action must have a hot key assigned to it before the hot key can be made active.
See a list of active hot keys only
1 Open Hotkeys Manager.
2 Click List active Hotkeys only.
3 Select an option from the List Hotkeys for drop-down menu.
• Optionally, select an aspect from the According to list.
Sort hot keys
Hot keys can be sorted by their state, actions, or key combination.
1 Open Hotkeys Manager• Click Active button to sort by state.

34 Profiles Manager
• Click Hotkeys Actions button to sort by action.• Click Hotkeys button to sort by key combination.
2 Clicking the respective button toggles ascending/descending sort order.
Apply a hot key• Press and hold down the modifier(s) keys, then press the assigned
keyboard key. For example: press and hold down the Ctrl and Alt keys, then press the C key.
Profiles ManagerUse profiles to create customized environments for your desktop, video, and 3D applications. Define and save into a profile your own personal video settings that can be quickly activated manually, through a hot key, or by file association.
Note: A profile applies to a specific graphics card. If there is more than one graphics card installed in your computer, you need to select the appropriate card before creating, loading, or activating a profile.
Note: Profiles Manager is only available in Advanced View.
Display Profiles Manager
1 Click Profiles in the Dashboard.
2 Select Profiles Manager.
Create a profile
A profile can be created from any aspect of Catalyst® Control Center.
1 Make customized changes by adjusting the various sliders and buttons for the aspects to be included in your profile.
2 Open the Profiles Manager.
3 Enter a name for your Profile in Create or Edit Profile.
4 Enter a description of the profile.
5 Select the composition, activation, and applications options that you wish to apply to the profile.
6 Click Save.

Profiles Manager 35
Set the composition of the profile
1 Open the Profiles Manager.
2 Click the Composition tab.
• all Catalyst® Control Center settings applies the available settings for all graphics adapters.
• the following settings applies only the settings selected in the treeview.
Activate a profile
1 Open the Profiles Manager.
2 Select a profile from Create or Edit a Profile drop-down menu.
3 Click the Activation tab.
4 Set a profile to activate manually:
• Click Manually by then select your preferred method for activating a profile. For example, a shortcut on your desktop.
• If you choose Hotkeys assignment, select a Hot key modifier and a keyboard key.
Activate an application, file, or shortcut when a profile is started
1 Open the Profiles Manager.
2 Click the Applications tab.
3 Click opens the following application, file or shortcut.
4 Click the browse (“...”) button and browse to the file you want associated with your profile.
5 Click on the file name, then click Open to select the file.
Save a profile
1 Open the Profiles Manager.
2 Enter a name for the profile in the Enter or select a profile name box.
3 Select options for the profile.
4 Click Save.
5 Click the Activate & Close button to apply the saved profile and close the Profiles Manager.

36 Preferences
• Optionally, click the Activate button to apply the saved profile but leave the Profiles Manager open.
• Optionally, click the Close button to close the Profiles Manager without applying the saved Profile.
Delete a profile
1 Open the Profile Manager.
2 Select a profile from the Create or Edit a Profile drop-down menu.
3 Click Delete.
4 Click OK to confirm.
PreferencesUse the Preferences page to restore factory defaults, change skins, or enable/disable the System Tray icon.
The Catalyst® Control Center Preferences page contains the following options:
• Hide Tooltips• Always on Top• Enable System Tray menu• Restore factory defaults• Hide Toolbar Text• Select a Language• Select a Skin
Keep Catalyst® Control Center Always on Top of all open applications on the desktop
1 Click Preferences button in the Advanced View of the Dashboard.
2 Click Always on Top.
Note: When a check mark appears next to Always on Top the Catalyst® Control Center will always appear on top of all opened applications.
Hide or show Tooltips
1 Click the Preferences button in the Advanced View of the Dashboard.

Preferences 37
2 Click Hide Tooltips in the drop-down menu.
Note: When a check mark appears next to Hide Tooltips, all Tooltips are disabled.
Show or hide text that appears on the toolbar buttons
1 Click Preferences button in the Advanced View of the Dashboard.
2 Click Hide Toolbar Text in the drop-down menu.
Note: When a check mark appears next to Hide Toolbar Text the toolbar buttons have button icons only.
Hide the Catalyst® Control Center Splash Screen
1 Click the Preferences button in the Advanced View of the Dashboard.
2 Click Hide Splash Screen.
Note: When a check mark appears next to Hide Splash Screen the Catalyst® Control Center splash screen will not appear during start up.
Show or hide the Catalyst® Control Center icon in the Windows® System Tray
1 Click Preferences button in the Advanced View of the Dashboard.
2 Click Enable System Tray menu in the drop-down menu.
Note: When a check mark appears next to Enable System Tray Menu the Catalyst® Control Center icon appears in the Windows® System Tray.
Change Catalyst® Control Center language
1 Click Preferences in the Advanced View of the Dashboard.
2 Click Select a Language in the drop-down menu.
3 Choose a language from the list.
4 Click OK.
5 Restart Catalyst® Control Center.
Change the appearance of the Catalyst® Control Center
1 Click Preferences in the Advanced View of the Dashboard.

38 Help
2 Click Select a skin in the drop-down menu.
3 Choose a skin from the Skin drop-down menu.
4 Click OK.
Restore Catalyst® Control Center to the factory default settings
1 Click Preferences in the Advanced View of the Dashboard.
2 Select Restore factory defaults in the drop-down menu.
3 Click Yes.
HelpUse the Catalyst® Control Center Help feature to access the comprehensive online help system, generate a Problem Report, and get the installed version information.
Display help for the aspect or feature you are using
1 Click the Help button in the Advanced View of the Dashboard.
2 Select Help for this Page.
• Optionally, click anywhere in the aspect or feature you are using and press the F1 key.
Display the online help
1 Click the Help button in the Advanced View of the Dashboard.
2 Click Help Contents.
Search for Help
1 Click the Help button in the Advanced view of the Dashboard.
2 Click Search Help.
3 Enter the word(s) you wish to search for the in search box of the Catalyst® Control Center Help.
4 Click Go.

Information Center 39
Create a Problem Report
Create a problem report should you experience a problem with your ATI product. This report can be used by an ATI Customer Care agent to help diagnose and resolve the problem.
1 Click the Help button in the Advanced View of the Dashboard.
2 Click Problem Report Wizard.
3 Follow the Wizard’s instructions.
Display the version of the installed Catalyst® Control Center
1 Click the Help button in the Dashboard.
2 Click About Catalyst® Control Center.
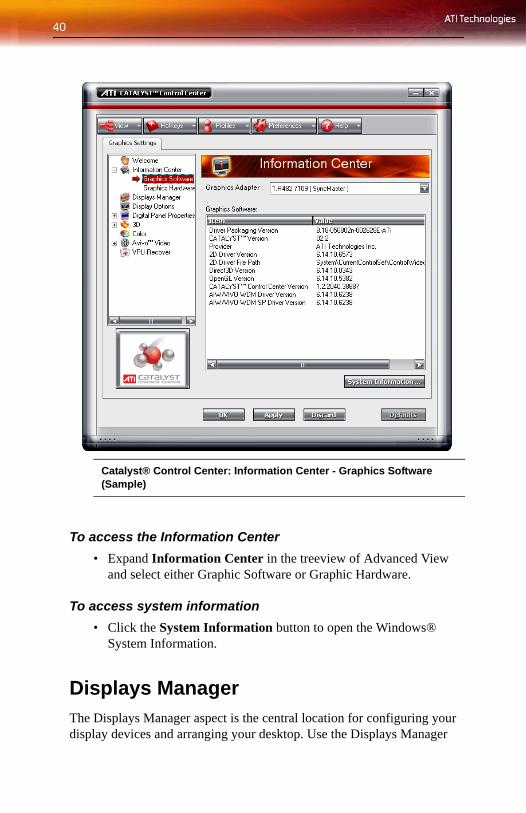
Information CenterThe Information Center provides detailed information about the installed graphics hardware and associated software.
• Graphics Software includes information such as installed 2D and 3D driver versions, OpenGL® version, and Catalyst® Control Center version.
• Graphics Hardware includes information about each installed graphics card, such as the installed graphics chipset, device ID, bus type, memory size, and BIOS version.
40
To access the Information Center• Expand Information Center in the treeview of Advanced View
and select either Graphic Software or Graphic Hardware.
To access system information• Click the System Information button to open the Windows®
System Information.
Displays ManagerThe Displays Manager aspect is the central location for configuring your display devices and arranging your desktop. Use the Displays Manager
Catalyst® Control Center: Information Center - Graphics Software (Sample)

Displays Manager Advanced View 41
aspect to quickly change your display setup, arrange your desktop in a multi-monitor environment, and enable TV Out.
Those new to the Catalyst® Control Center may use the Basic View wizard to help you configure your display preferences. Experienced users who prefer to manually configure their desktop setting should use the Advanced View.
Note: The Catalyst® Control Center will open to the Basic View the very first time it is accessed. Experienced users can easily change to Advanced View by selecting Advanced and clicking on the Next button.
Displays Manager Advanced ViewUse Display Manager Advanced View to set your desktop resolution, the display refresh rate, and arrange your displays.
Catalyst® Control Center: Displays Manager

42 Displays Manager Advanced View
To change your display configuration requires dragging and/or clicking or right-clicking a display icon
Access Displays Manager • From the Tree Menu, click Displays Manager.
Enable a secondary display device
1 From the Tree View pane, click Displays Manager.
2 Click the number 2 display icon in the right-hand box.
3 Click Yes to the Enable this display dialog.
• Optionally, right-click the number 2 icon in the right-hand box and click Enable in the pop-up menu.
Note: Repeat steps 2 and 3 above for each additional connected device. The number on the display icon will increment as more displays are added.
Enable Extended Mode
If the secondary display is disabled:
1 From the Tree View pane, click Displays Manager.
2 Click the number 2 display icon in the right-hand box.
3 Click Yes to the Enable this display? dialog.
• Optionally, right-click the number 2 icon in the right-hand box and click Enable in the pop-up menu.
If the secondary display is in Clone mode, Vertical or Horizontal Stretch mode:
1 Click and drag the display icon from the Clone box to Additional Displays box.
2 Release the mouse button and click Remove display.
• Optionally, right-click the number 2 icon in the right-hand box and click Disable in the pop-up menu.
3 Click the number 2 icon in the right-hand box.
4 Click Yes to the Enable this display? dialog.
Enable Clone Mode
If the secondary device is disabled:

Displays Manager Advanced View 43
1 From the Tree View pane, click Displays Manager.
2 Click and drag the display device icon in Attached displays currently disabled to the empty box to the right of the Main box.
3 Click Clone Main with [display device] in the pop-up menu.
If the secondary display is enabled:
1 Right click the display device icon in Desktop 2 when in Extended mode, Rightmost when in Stretch Horizontal mode, or Lower in Stretch Vertical mode.
2 Click Clone Main with [display device].
3 Click Yes to the Displays Manager Notification dialog.
Note: Display device can be CRT, DFP, TV, or HDTV.
Enable Stretch Main Vertically
If the secondary display is disabled:
1 From the Tree View pane, click Displays Manager.
2 Click and drag the display device icon from Additional Displays to the empty box to the right of the Main box.
3 Click Stretch vertically onto [display device] in the pop-up menu.
4 Click Yes in the Displays Manager Notification dialog.
If the secondary display is enabled:
1 Right click the display device icon in Desktop 2 when in Extended mode, Rightmost when in Stretch Horizontal mode, or Clone in Clone mode.
2 Click Stretch vertically onto [display device] in the pop-up menu.
3 Click Yes in the Displays Manager Notification dialog.
Note: Display device can be CRT, DFP, TV, or HDTV.
Enable Stretch Main Horizontally
If the secondary display is disabled:
1 From the Tree View pane, click Displays Manager.
2 Click and drag the display device icon from Additional Displays to the empty box to the right of the Main box.

44 Displays Manager Advanced View
3 Click Stretch horizontally onto [display device].
If the secondary display is enabled:
1 Right click the display device icon in Desktop 2 when in Extended mode, or Lower in Stretch Vertical mode, or Clone in Clone Mode.
2 Click Stretch horizontally onto [display device] in the pop-up menu.
3 Click Yes to the Displays Manager Notification dialog.
Note: Display device can be CRT, DFP, TV, or HDTV depending on the device connection.
Swap displays in Extended Mode
Use Swap displays to switch your desktops when using multiple monitors.
1 From the Tree View pane, click Displays Manager.
2 Right-click any Desktop icon.
3 Select Swap displays.
4 Click either Maintain per-display mode settings or Swap displays order only.
Note: Swap displays order only swaps displays while maintaining the existing display settings. Maintain per-display mode settings swaps displays and display settings.
Swap displays in all other modes
Use Swap display mappings to switch your desktops when using multiple monitors.
1 From the Tree View pane, click Displays Manager.
2 Right-click any Desktop icon.
3 Select Swap display mapping.
Change desktop size
1 From the Tree View pane, click Displays Manager.
2 Select a size from the Desktop Area drop-down menu.
Change Color quality
1 From the Tree View pane, click Displays Manager.

Displays Manager Advanced View 45
2 Select the desired color setting from the Color Quality drop-down menu.
Change display refresh rate
1 From the Tree View pane, click Displays Manager.
2 Choose a refresh rate from the Refresh Rate drop-down menu.
Note: See your monitor manual for supported refresh rates. Setting a refresh rate higher than recommended by the monitor manufacturer could damage the monitor.
Rotate the desktop
1 From the Tree View pane, click Displays Manager.
2 Right-click the desktop monitor icon to be rotated.
3 Select a rotation option from the pop-up menu.
• Optionally, select a rotation angle from the Rotation drop-down menu.
Detect a newly connected display device
Detect a display device, such as a Digital Flat Panel or TV without having to restart your computer
1 From the Tree View pane, click Displays Manager.
2 Click Detect Displays button.
Force changes to a specific display setting
You can force the Catalyst® Control Center to override the display settings required, or not allowed, by a specific application.
1 From the Tree View pane, click Displays Manager.
2 Click the Force button.
3 Use the mouse to cursor over to the display feature to force.
4 Highlight and then click the required setting.
Apply your settings
1 Click Apply to save your changes and leave the Catalyst® Control Center open.

46 Display Options
2 Click OK to save your changes and exit the Catalyst® Control Center.
Discard your settings• Click Discard to ignore any unsaved changes and restore the
settings that existed when the Catalyst® Control Center was opened or the last time Apply was used. Discard does not close the Catalyst® Control Center.
Clicking Discard applies to all features of an aspect, not just the feature in the current view.
Display OptionsThe Display Options aspect gives you additional control to optimize performance of OpenGL® and Direct 3D® applications.
Use 3D Refresh Rate Override to set a refresh rate of your choice when a full-screen application or game has a default refresh rate that is lower than optimal.
Choose one of the Display Detection Options to prevent screen flicker when detecting a display.
If you are using an older TV or one that has non-standard inputs that may not be automatically detected, use Force TV Detection. When a TV is detected using this method, it appears in the Displays Manager aspect and can be configured as required. However, some features that rely on automatic detection, such as extended desktop, will not be supported.

47
Select a refresh rate override
Some applications may have a default refresh rate lower than the optimal setting for your monitor. 3D Refresh Rate Override enables you to set the refresh rate for full-screen applications or games utilizing Microsoft® DirectX® or OpenGL®. You can either set an explicit refresh rate, or make the refresh rate the same as the desktop, or disable this feature allowing the application to set the refresh rate.
1 From the Tree View pane, click Display Options.
2 Select the desired refresh rate from the 3D Refresh Rate Override drop-down menu.
Catalyst® Control Center: Display Options

48
Determine how display devices are detected
Use this feature to determine how the Catalyst® Control Center detects display devices connected to your computer. You can set the Catalyst® Control Center to automatically detect all connected display devices when it is opened or you can manually detect connected devices when they are required.
1 From the Tree View pane, click Display Options.
2 Click either
• Detect whenever Catalyst® Control Center is opened.
or• Use manual detection only (I must click Detect Displays
button).
Note: The Detect Displays button is located on the Displays Manager page.
Force TV detection
Use Force TV detection if your TV is not automatically detected by the Catalyst® Control Center and does not appear in the Displays Manager page. This may be the case if your TV has non-standard inputs.
Note: If Force TV detection is required to detect your TV some features that rely on automatic detection, such as extended desktop, will not be supported.
1 From the Tree View pane, click Display Options.
2 Click Force TV detection enables this feature.
Note: This option is not available if the installed graphics card does not support TV Out.
Set resolution modes for devices with limited resolution capabilities
1 From the Tree View pane, click Display Options.
2 Select one of the following from the For displays of limited resolution capabilities drop-down menu:
• List only those modes supported by all displays • Only allow panning on limited-resolution displays• List all possible modes (including panning modes).

Monitor Properties 49
Apply your settings
1 Click Apply to save your changes and leave the Catalyst® Control Center open.
2 Click OK to save your changes and exit the Catalyst® Control Center.
Discard your settings• Click Discard to ignore any unsaved changes and restore the
settings that existed when the Catalyst® Control Center was opened or the last time Apply was used. Discard does not close the Catalyst® Control Center.
Clicking Discard applies to all features of an aspect, not just the feature in the current view.
Restore default settings
1 Move the mouse to the bottom right-hand corner of the window.
2 Click Defaults.
Note: Clicking Defaults will restore the defaults for the current view only. Previous settings are not altered and will be saved once you click OK.
Monitor PropertiesUse the Monitor Properties aspect to configure your Display Data Channel (DDC) monitor’s attributes, to display information about the connected monitor, and adjust the output display’s position and size.
Note: Catalyst® Control Center loads aspects dynamically based on what device is attached to the graphics card. If you have a display device other than a standard monitor or flat panel display (such as an HDTV screen) Digital Panel Properties will appear in the Graphics Settings listing instead of Monitor Properties.

50
Monitor AttributesMonitor Attributes provides information about the attached monitor. You can also enable Extended Display Identification Data.
Extended Display Identification Data (EDID) uses the information provided by the attached monitor to determine the limits for the resolution and refresh rate.
Enable Extended Display Identification Data (EDID)
1 From the Tree View pane, expand Monitor Properties.
2 Click Attributes.
3 Select Use Extended Display Identification Data (EDID) or driver defaults to place a check mark in the check box.
Catalyst® Control Center: Monitor Properties (Sample)

Digital Panel Properties 51
Apply your settings
1 Click Apply to save your changes and leave the Catalyst® Control Center open.
2 Click OK to save your changes and exit the Catalyst® Control Center.
Restore default settings
1 Move the mouse to the bottom right-hand corner of the window.
2 Click Defaults.
Note: Clicking Defaults will restore the defaults for the current view only. Previous settings are not altered and will be saved once you click OK.
Discard your settings• Click Discard to ignore any unsaved changes and restore the
settings that existed when the Catalyst® Control Center was opened or the last time Apply was used. Discard does not close the Catalyst® Control Center.
Clicking Discard applies to all features of an aspect, not just the feature in the current view.
Digital Panel PropertiesUse the Digital Panel Properties aspect to configure the DVI settings and Image Scaling to improve image quality without impacting performance. Use HDTV Support to add EDID information (containing information about the capabilities of the display) about your connected HDTV display to the Force button in Displays Manager.
Note: Catalyst® Control Center loads aspects dynamically based on what device is attached to the graphics card. If you have standard display device such as a CRT monitor or flat panel display Monitor Properties will appear instead of Digital Panel Properties. The latter is designed for use with such devices as HDTV displays.

52
AttributesDigital Panel Attributes provides information about the connected digital display. Use DVI Settings and Image Scaling to configure your digital display.
Set Image Scaling
1 From the Tree View pane, expand Digital Panel Properties.
2 Click Attributes.
3 Under Image Scaling, click to enable the desired setting.
Note: Enable Scale image to full panel size to fill the digital display.
Catalyst® Control Center: Digital Panel Properties (Sample)

53
Note: Use centered timings will not resize the desktop to fit the screen, and may result in a centered image with a black border around it.
Adjust the DVI Settings
1 From the Tree View pane, expand Digital Panel Properties.
2 Click Attributes.
3 Under DVI Settings, click to enable the desired setting.
Note: Reducing DVI frequency on high-resolution displays can resolve either display corruption or the complete absence of any image when a display is set to a high resolution. This should only be enabled if the Digital Panel is experiencing these types of problems.
Note: Alternate DVI operational mode, when enabled, may eliminate display corruption.
Apply your settings
1 Click Apply to save your changes and leave the Catalyst® Control Center open.
2 Click OK to save your changes and exit the Catalyst® Control Center.
Restore default settings
1 Move the mouse to the bottom right-hand corner of the window.
2 Click Defaults.
Note: Clicking Defaults will restore the defaults for the current view only. Previous settings are not altered and will be saved once you click OK.
Discard your settings• Click Discard to ignore any unsaved changes and restore the
settings that existed when the Catalyst® Control Center was opened or the last time Apply was used. Discard does not close the Catalyst® Control Center.
Clicking Discard applies to all features of an aspect, not just the feature in the current view.

54 Avivo™ Color
Avivo™ ColorUse Avivo™ Color with ATI graphics cards that supports per-display color settings. Independently set the hue and saturation for each attached and enabled display.
Set Hue
Refers to a specific color within the visible spectrum of light, defined by its dominant wavelength.
1 From the Tree View pane, expand Digital Panel Properties.
2 Click Avivo™ Color.
3 Adjust the Hue control slider to the desired position.
Set Saturation
Saturation refers to the intensity of a color in an image.
1 From the Tree View pane, expand Digital Panel Properties.
2 Click Avivo™ Color.
3 Click and drag the Saturation control slider to the desired position.
Set Color Temperature
Color temperature is a measure that compares a color to the light radiated from an equivalent incandescent black body at a given temperature in degrees Kelvin.
1 From the Tree View pane, expand Digital Panel Properties.
2 Click Avivo™ Color.
3 Adjust the Temperature control slider to the desired position.
Apply your settings
1 Click Apply to save your changes and leave the Catalyst® Control Center open.
2 Click OK to save your changes and exit the Catalyst® Control Center.
Restore default settings
1 Move the mouse to the bottom right-hand corner of the window.
2 Click Defaults.

HDTV Support 55
Note: Clicking Defaults will restore the defaults for the current view only. Previous settings are not altered and will be saved once you click OK.
Discard your settings• Click Discard to ignore any unsaved changes and restore the
settings that existed when the Catalyst® Control Center was opened or the last time Apply was used. Discard does not close the Catalyst® Control Center.
Clicking Discard applies to all features of an aspect, not just the feature in the current view.
HDTV SupportUse HDTV Support when your CRT or DFP display device supports one or more HDTV modes that are not initially listed in the Displays Manager due to an incomplete EDID (Extended Display Identification Data). Selecting one or both of the HDTV modes adds them to the Force button located in the Displays Manager when the associated display is selected.
If you have both CRT and DFP display devices and want both to support HDTV, you select both the Add 720p and Add 1080i check boxes in the corresponding HDTV Support pages.
The following formats and refresh rates are fully supported supported:
• NTSC• PAL• SECAM
Add 720p mode to the Displays Manager Force button
If the Predefined and Custom HDTV Formats list box is empty you can add a format.
1 From the Tree View pane, expand Digital Panel Properties.
2 Click HDTV Support.
3 Click Add 720p standard format to the Displays Manager.
WARNING!: Forcing a display mode that exceeds its EDID limits may result in permanent damage to your display!

56 HDTV Support
Add 1080i mode to the Displays Manager Force button
If the Predefined and Custom HDTV Formats list box is empty you can add a format.
1 From the Tree View pane, expand Digital Panel Properties.
2 Click HDTV Support.
3 Click Add 1080i standard format to the Displays Manager.
Add 1080p mode to the Displays Manager Force button
If the Predefined and Custom HDTV Formats list box is empty you can add a format.
1 From the Tree View pane, expand Digital Panel Properties.
2 Click HDTV Support.
3 Click Add 1080p standard format to the Displays Manager.
WARNING!: This option is only intended for displays that report incomplete or incorrect EDID information. Adding this setting could damage your digital flat panel display. USE WITH CAUTION!
WARNING!: This option is only intended for displays that report incomplete or incorrect EDID information. Adding this setting could damage your digital flat panel display. USE WITH CAUTION!
WARNING!: This option is only intended for displays that report incomplete or incorrect EDID information. Adding this setting could damage your digital flat panel display. USE WITH CAUTION!

HDTV Support 57
Add an HDTV format
The Predefined and Custom HDTV Formats list box should list any standard and optimized HDTV formats supported by the digital panel’s EDID. If the list is empty, then no HDTV formats are natively supported.
1 From the Tree View pane, expand Digital Panel Properties.
2 Click HDTV Support.
3 Select either 720p or 1080i in HDTV modes supported by this display.
4 Click Apply formats.
5 Click Add.
• A group of four arrow buttons and a large rectangle is overlaid on the screen. Use these arrows to increase or decrease the width and height of the rectangle until the blue background is just visible.
• Click Maintain aspect ratio to maintain the ratio between width and height while making adjustments.
6 Click Accept.
7 Click OK in the HDTV Format warning message box.
8 Click Apply to add your new HDTV format to the Predefined and Custom HDTV Formats list and the Displays Manager mode list.
Note: The format to be added must be based on one of the standard timing formats (720p or 1080i).
Remove an HDTV Format
1 From the Tree View pane, expand Digital Panel Properties.
2 Click HDTV Support.
3 Click to highlight the HDTV format to be removed in the Predefined and Custom HDTV Formats list box.
4 Click Remove button.
Note: The removed format will be removed from the Displays Manager mode list once the computer has been rebooted.
Apply an HDTV Format
1 From the Tree View pane, expand Digital Panel Properties.
2 Click HDTV Support.
58 3D
3 Click to highlight the desired an HDTV format in the Predefined and Custom HDTV Formats list box.
4 Click Apply Format.
Apply your settings
1 Click Apply to save your changes and leave the Catalyst® Control Center open.
2 Click OK to save your changes and exit the Catalyst® Control Center.
Restore default settings
1 Move the mouse to the bottom right-hand corner of the window.
2 Click Defaults.
Note: Clicking Defaults will restore the defaults for the current view only. Previous settings are not altered and will be saved once you click OK.
Discard your settings• Click Discard to ignore any unsaved changes and restore the
settings that existed when the Catalyst® Control Center was opened or the last time Apply was used. Discard does not close the Catalyst® Control Center.
Clicking Discard applies to all features of an aspect, not just the feature in the current view.
3DUse 3D to adjust features found in 3D applications, such as graphic-design, CAD programs and games.
3D is only available in advanced view. Use 3D to individually configure the following settings:
• Standard Settings• Anti-aliasing• Anisotropic Filtering• Catalyst® A.I.• Mipmap Detail Level

59
• API-Specific
Standard SettingsThe Standard settings page provides access to a universal slider control where you can simultaneously adjust all of the standard 3D settings for any type of 3D application. The slider enables you to adjust for overall system performance, overall 3D image quality, or a balance between the two.
This page is useful when you are not aware of which type of 3D settings your application uses, or when you want to use an overall adjustment control that rapidly configures your application.
Adjust your Standard settings
The default selection is Balanced.
Catalyst® Control Center: Standard Settings

60 Standard Settings
1 From the Tree View, click 3D.
2 Click Standard Settings.
3 If necessary, remove the check mark from Use custom settings.
4 Click and drag the Control slider to the left to select High or Optimal Performance, or to the right to select High or Optimal Quality.
Preview your changes• The preview image automatically displays your adjustments.
Optionally, double-click 3D Preview for a full-screen view of the adjustments you have made. To exit full-screen Preview, press the Esc key.
The Preview can be disabled by clicking the “X” button in the Preview pane. It can also be paused by clicking the “||” button in the Preview pane. Clicking the pause button again causes the preview to resume.
Apply your settings
1 Click Apply to save your changes and leave the Catalyst® Control Center open.
2 Click OK to save your changes and exit the Catalyst® Control Center.
Discard your settings• Click Discard to ignore any unsaved changes and restore the
settings that existed when the Catalyst® Control Center was opened or the last time Apply was used. Discard does not close the Catalyst® Control Center.
Clicking Discard applies to all features of an aspect, not just the feature in the current view.
Restore default settings
1 Move the mouse to the bottom right-hand corner of the window.
2 Click Defaults.
Note: Clicking Defaults will restore the defaults for the current view only. Previous settings are not altered and will be saved once you click OK.

Anti-aliasing 61
Anti-aliasingAnti-aliasing is a technique used to smooth out the jagged edges of three- dimensional curved objects or objects with diagonal edges.
Anti-aliasing can be set to favor either an increase in system processing performance or improved image quality:
• Setting for performance is best used when the 3D image is animated and smoothness of motion is the most important consideration.
• Setting for quality is best used when having highly detailed and realistic 3D objects is the primary concern.
• If you are unsure of how to configure anti-aliasing, use the Let the Application Decide option. Your display will automatically adjust to the application’s requirements.
Set the Anti-Aliasing preference manually
Set the Anti-Aliasing preference manually
1 From the Tree View pane, expand 3D.
2 Click Anti-aliasing.
3 Ensure the application override is disabled. To do so, make sure the Let the Application Decide check box is cleared. The slider control will become available.
4 Click the Control slider and move the selector to your preferred setting:
• To increase processing performance, move the slider to the left.• To increase image quality, move the slider to the right.
Set Temporal anti-aliasing (using SmoothVision™ HD)
Increases image quality without impacting performance by taking fewer image samples but at a faster rate.
1 From the Tree View pane, expand 3D.
2 Click Anti-Aliasing.
3 Uncheck Let the application decide.
4 Check Temporal anti-aliasing.
62 Set the Anti-Aliasing preference manually
Set the Transparent Anti-Aliasing
1 Expand 3D in Advanced View.
2 Click Transparent Anti-Aliasing.
3 Ensure the application override is enabled. To do so, make sure the Let the Application Decide check box is not selected.
4 Click and drag the slider to the desired setting.
Note: The slider control becomes unavailable when Let the Application Decide is enabled.
Preview your changes• The preview image automatically displays your adjustments.
Optionally, double-click 3D Preview for a full-screen view of the adjustments you have made. To exit full-screen Preview, press the Esc key.
The Preview can be disabled by clicking the “X” button in the Preview pane. It can also be paused by clicking the “||” button in the Preview pane. Clicking the pause button again causes the preview to resume.
Apply your settings
1 Click Apply to save your changes and leave the Catalyst® Control Center open.
2 Click OK to save your changes and exit the Catalyst® Control Center.
Discard your settings
• Click Discard to ignore any unsaved changes and restore the settings that existed when the Catalyst® Control Center was opened or the last time Apply was used. Discard does not close the Catalyst® Control Center.
Clicking Discard applies to all features of an aspect, not just the feature in the current view.
Restore default settings
1 Move the mouse to the bottom right-hand corner of the window.
2 Click Defaults.

Adaptive Anti-aliasing 63
Note: Clicking Defaults will restore the defaults for the current view only. Previous settings are not altered and will be saved once you click OK.
Adaptive Anti-aliasingAdaptive anti-aliasing is a technique that applies a combination of multi-sampling (MSAA) and super-sampling (SSAA) on 3D objects to improve edge smoothness and fine detail. This feature renders 3D objects containing transparencies more realistic, providing exceptional levels of image quality while maintaining performance.
Set the level of adaptive anti-aliasing
1 From the Tree View pane, expand 3D.
2 Click Adaptive Anti-Aliasing.
3 Adjust the Adaptive Anti-Aliasing control slider to the desired setting.
Anisotropic FilteringAnisotropic filtering is a technique that preserves detail on surfaces that have three-dimensional perspective and fade away into the background. It works best when used in conjunction with Mipmapping.
Anisotropic filtering can be set to favor either an increase in system processing performance or improved image quality:
• Setting for performance is best used with applications that display objects with smooth, simple surfaces, such as those seen in CAD applications.
• Setting for quality is best used with applications that display highly detailed scenes, backgrounds, and textured objects, such as those seen in 3D games.
• If you are unsure how to configure anisotropic filtering, use the Let the Application Decide option. Your display will automatically adjust to the application’s requirements.
Set the Anisotropic Filtering preference manually
1 From the Tree View pane, expand 3D.
2 Click Anisotropic Filtering.

64 Anisotropic Filtering
3 Ensure the application override is disabled. To do so, make sure the Let the Application Decide check box is cleared. The slider control will become available.
4 Click the Control slider and move the selector to your preferred setting:
• To increase processing performance, move the slider to the left.• To increase image quality, move the slider to the right.
Set the Anisotropic Filtering to automated preference
1 From the Tree View pane, expand 3D.
2 Click Anisotropic Filtering.
3 Ensure the application override is enabled. To do so, make sure the Let the Application Decide check box is selected.
Note: The slider control becomes unavailable.
Set higher quality Anisotropic Filtering
1 From the Tree View pane, expand 3D.
2 Click Anisotropic Filtering.
3 Select Enable High Quality AF.
Note: Enabling this feature may impact performance.
Note: This feature is not supported by all ATI graphics cards.
Preview your changes• The preview image automatically displays your adjustments.
Optionally, double-click 3D Preview for a full-screen view of the adjustments you have made. To exit full-screen Preview, press the Esc key.
The Preview can be disabled by clicking the “X” button in the Preview pane. It can also be paused by clicking the “||” button in the Preview pane. Clicking the pause button again causes the preview to resume.
Apply your settings
1 Click Apply to save your changes and leave the Catalyst® Control Center open.
2 Click OK to save your changes and exit the Catalyst® Control Center.
Catalyst® A.I. 65
Discard your settings• Click Discard to ignore any unsaved changes and restore the
settings that existed when the Catalyst® Control Center was opened or the last time Apply was used. Discard does not close the Catalyst® Control Center.
Clicking Discard applies to all features of an aspect, not just the feature in the current view.
Restore default settings
1 Move the mouse to the bottom right-hand corner of the window.
2 Click Defaults.
Note: Clicking Defaults will restore the defaults for the current view only. Previous settings are not altered and will be saved once you click OK.
Catalyst® A.I.Catalyst® A.I. makes use of ATI’s new texture analyzer technology to optimize performance in 3D applications while maintaining or even improving image quality. It analyzes individual textures as they are loaded to determine the best and fastest way to display them.
Use the Standard slider setting to achieve optimal results without impacting performance. Use the Advanced slider setting to achieve even better results with minimal impact on performance.
Catalyst® A.I. includes application-specific detection for various games and games engines such as Doom 3, the Half Life 2 engine, Unreal Tournament 2003, Unreal Tournament 2004, Splinter Cell, Race Driver, Prince of Persia, and Crazy Taxi 3.
Disable Catalyst® A.I.
1 From the Tree View pane, expand 3D.
2 Select Catalyst® A.I.
3 Select Disable Catalyst® A.I. to place a check mark in the check box.
Set Catalyst® A.I. settings
1 From the Tree View pane, expand 3D.

66 Catalyst® A.I.
2 Click Catalyst® A.I.
3 If necessary, clear the check mark from Disable Catalyst® A.I.
4 Click and drag to slider to the desired setting.
Note: Change to Catalyst® A.I. settings is not shown in the 3D Preview.
Preview your changes• The preview image automatically displays your adjustments.
Optionally, double-click 3D Preview for a full-screen view of the adjustments you have made. To exit full-screen Preview, press the Esc key.
The Preview can be disabled by clicking the “X” button in the Preview pane. It can also be paused by clicking the “||” button in the Preview pane. Clicking the pause button again causes the preview to resume.
Apply your settings
1 Click Apply to save your changes and leave the Catalyst® Control Center open.
2 Click OK to save your changes and exit the Catalyst® Control Center.
Discard your settings• Click Discard to ignore any unsaved changes and restore the
settings that existed when the Catalyst® Control Center was opened or the last time Apply was used. Discard does not close the Catalyst® Control Center.
Clicking Discard applies to all features of an aspect, not just the feature in the current view.
Restore default settings
1 Move the mouse to the bottom right-hand corner of the window.
2 Click Defaults.
Note: Clicking Defaults will restore the defaults for the current view only. Previous settings are not altered and will be saved once you click OK.

Mipmap Detail Level 67
Mipmap Detail LevelMipmapping is a texturing technique that preserves the detail on a 3D object’s surface as it moves into the background. A series of high- and low-resolution texture maps are stored in memory and selectively used to create the object’s surface, depending on what level of detail is needed.
Mipmap detail level can be set to favor either an increase in system processing performance or improved image quality:
• Setting for performance is best used when the 3D image is animated and smoothness of motion is the most important consideration.
• Setting for quality is best used when high surface detail is required, especially if the animated object rotates or moves into the background.
Adjust the Mipmap detail level
Set the Mipmap detail level
1 From the Tree View pane, expand 3D.
2 Click Mipmap Detail Level.
3 Click the Control slider and move the selector to the left to increase processing performance, or to the right to increase image quality.
Preview your changes• The preview image automatically displays your adjustments.
Optionally, double-click 3D Preview for a full-screen view of the adjustments you have made. To exit full-screen Preview, press the Esc key.
The Preview can be disabled by clicking the “X” button in the Preview pane. It can also be paused by clicking the “||” button in the Preview pane. Clicking the pause button again causes the preview to resume.
Apply your settings
1 Click Apply to save your changes and leave the Catalyst® Control Center open.
2 Click OK to save your changes and exit the Catalyst® Control Center.

68 All Settings
Discard your settings• Click Discard to ignore any unsaved changes and restore the
settings that existed when the Catalyst® Control Center was opened or the last time Apply was used. Discard does not close the Catalyst® Control Center.
Clicking Discard applies to all features of an aspect, not just the feature in the current view.
Restore default settings
1 Move the mouse to the bottom right-hand corner of the window.
2 Click Defaults.
Note: Clicking Defaults will restore the defaults for the current view only. Previous settings are not altered and will be saved once you click OK.
All SettingsThe All Settings page combines all of the principal 3D features onto a single page, without any preview window, allowing for quick access and adjustment. You can change the settings for the following 3D features as you normally would on each feature’s own page:
• Anti-aliasing• Anisotropic filtering• Catalyst® A.I.• Mipmap detail level• Wait for display refresh• Adaptive Anti-Aliasing
This page is useful when it is not necessary to preview the adjusted settings because the effect is already known or understood.
Set the Anti-Aliasing preference manually
Set the Anti-Aliasing preference manually
1 From the Tree View pane, expand 3D.
2 Click All Settings.

All Settings 69
3 Ensure the application override is disabled. To do so, make sure the Let the Application Decide check box is cleared. The slider control will become available.
4 Click the Control slider and move the selector to your preferred setting:
• To increase processing performance, move the slider to the left.• To increase image quality, move the slider to the right.
Set the Transparent Anti-Aliasing
1 Expand 3D in Advanced View.
2 Click All Settings.
3 Ensure the application override is enabled. To do so, make sure the Let the Application Decide check box is selected.
4 Click Transparent Anti-Aliasing.
Note: The slider control becomes unavailable.
Set the Anisotropic Filtering preference manually
Set the Anisotropic Filtering preference manually
1 From the Tree View pane, expand 3D.
2 Click All Settings.
3 Ensure the application override is disabled. To do so, make sure the Let the Application Decide check box is cleared. The slider control will become available.
4 Click the Control slider and move the selector to your preferred setting:
• To increase processing performance, move the slider to the left.• To increase image quality, move the slider to the right.
Set the Anisotropic Filtering to automated preference
1 From the Tree View pane, expand 3D.
2 Click All Settings.
3 Ensure the application override is enabled. To do so, make sure the Let the Application Decide check box is selected.
Note: The slider control becomes unavailable.

70 All Settings
Set the Catalyst® A.I. setting
1 From the Tree View pane, expand 3D.
2 Click All Settings.
3 Scroll to Catalyst® A.I.
4 Click the Control slider and move the selector to the left to increase processing performance, or to the right to increase image quality.
Set the Mipmap detail level
1 From the Tree View pane, expand 3D.
2 Click All Settings.
3 Scroll to Mipmap Detail Level.
4 Click the Control slider and move the selector to the left to increase processing performance, or to the right to increase image quality.
Set Wait for vertical refresh setting
1 From the Tree View pane, expand 3D.
2 Click All Settings.
3 Scroll to Wait for vertical refresh.
4 Click the Control slider and move the selector to the left to increase processing performance, or to the right to increase image quality.
Select a SmartShader™ effect
1 From the Tree View pane, expand 3D.
2 Click All Settings.
3 Scroll to SmartShader™ Effects.
4 Select an effect from the drop down-menu.
Note: Effects in the list not supported by Direct 3D® are appended with “(OpenGL® only)”.
Apply your settings
1 Click Apply to save your changes and leave the Catalyst® Control Center open.
2 Click OK to save your changes and exit the Catalyst® Control Center.

API Specific 71
Discard your settings• Click Discard to ignore any unsaved changes and restore the
settings that existed when the Catalyst® Control Center was opened or the last time Apply was used. Discard does not close the Catalyst® Control Center.
Clicking Discard applies to all features of an aspect, not just the feature in the current view.
Restore default settings
1 Move the mouse to the bottom right-hand corner of the window.
2 Click Defaults.
Note: Clicking Defaults will restore the defaults for the current view only. Previous settings are not altered and will be saved once you click OK.
API SpecificUse the API Specific dialog to select settings that are exclusively for the Direct 3D® and OpenGL® Application Programmable Interfaces (API). These settings are provided for resolving certain incompatibilities within 3D applications that use one of these APIs.
Use this dialog when you are know which type of API (Direct 3D® or OpenGL®) your 3D application uses, and you want to select a particular API-specific feature.
If you are not sure which API your 3D application uses, consult the documentation of your 3D application.
Set Enable geometry instancing
Geometry Instancing allows the GPU to create multiple objects from a single geometric model, rather than passing an entire new model for each item on the screen. This increases the rendering speed of images such as leaves, or grass. 1 From the Tree View pane, expand 3D.
2 Click API Specific.
3 Select Enable geometry instancing to place a check mark in the check box.

72 API Specific
Set Support DXT texture formats for Direct 3D®
This option enables support for DirectX® compressed texture formats. DXT requires half the amount of memory to draw the same amount of textures. This frees up memory while achieving high quality graphics.
1 From the Tree View pane, expand 3D.
2 Click API Specific.
3 Select Support DXT texture formats to place a check mark in the check box.
Set Alternate pixel center for Direct 3D®
This might eliminate problems with certain Direct 3D® games that display vertical and horizontal lines around textures or display text incorrectly. This setting should only be enabled if you are experiencing these issues, as it may cause problems in other games.
1 From the Tree View pane, expand 3D.
2 Click API Specific.
3 Select Alternate pixel center to place a check mark in the check box.
Set Triple buffering for OpenGL®
Enabling Triple buffering will improve the frame rate of games when vertical sync is enabled, only if the frame rate is less than the vertical sync refresh rate. In low memory situations, enabling Triple buffering may decrease application performance as there will be less frame buffer memory available for texture and geometry data. If there is insufficient memory available to support Triple buffering, it will automatically be disabled.
1 From the Tree View pane, expand 3D.
2 Click API Specific.
3 Select Triple buffering to place a check mark in the check box.
Set Force 24-bit Z-buffer depth for OpenGL®
Enables you to explicitly set the Z-buffer depth. Most applications will work best with the Disabled setting.
1 From the Tree View pane, expand 3D.
2 Click API Specific.

Color 73
3 Select Force 24-bit Z-buffer depth to place a check mark in the check box.
Apply your settings
1 Click Apply to save your changes and leave the Catalyst® Control Center open.
2 Click OK to save your changes and exit the Catalyst® Control Center.
Restore default settings
1 Move the mouse to the bottom right-hand corner of the window.
2 Click Defaults.
Note: Clicking Defaults will restore the defaults for the current view only. Previous settings are not altered and will be saved once you click OK.
Discard your settings• Click Discard to ignore any unsaved changes and restore the
settings that existed when the Catalyst® Control Center was opened or the last time Apply was used. Discard does not close the Catalyst® Control Center.
Clicking Discard applies to all features of an aspect, not just the feature in the current view.
Color Use the Color page to adjust the color properties of your Desktop and Full-screen 3D applications and games. Use the Color Correction Images to preview the changes before applying them.
The Color curve is a graphical representation of all the values of gamma, brightness, or contrast. The color curve line will reflect any changes made to these elements.

74 Color Desktop
Color DesktopAdjust the overall richness of color by using the Gamma control. To adjust the overall brightness use the Brightness control, and the overall contrast use the Contrast control.
Display Color page to configure Desktop
1 From the Tree View pane, click Color.
2 Select Desktop from the Set color correction for drop-down menu.
Set Gamma, Brightness, and Contrast simultaneously
1 From the Tree View pane, click Color.
2 Select Desktop in Set color correction for.
3 Select All Channels.
Catalyst® Control Center: Color

Color Desktop 75
4 Click and drag either the Gamma, Brightness, or Contrast to adjust all these settings simultaneously.
Revert to last known All Channel settings
1 From the Tree View pane, click Color.
2 Select Desktop in Set color correction for.
3 Select All Channels.
Reactivate your color settings
Your desktop may retain the color settings when exiting an application or game. Should this be the case the gamma, brightness, and contrast sliders are disabled. The Reactivate ATI color controls button resets the sliders to their previous settings.
1 From the Tree View pane, click Color.
2 Click Reactivate ATI color controls button.
Set Color Gamma
1 From the Tree View pane, click Color.
2 Click and drag the Control slider to your preferred setting:
• To increase the Gamma, move the slider to the right.• To decrease the Gamma, move the slider to the left.• Optionally, click the up and down arrow buttons of the
adjustment box.
Click the Reset button to restore the previous settings.
Note: The preview image automatically displays the adjustments you have made.
Set Color Brightness
1 From the Tree View pane, click Color.
2 Click and drag the Control slider to your preferred setting:
• To increase the Brightness, move the slider to the right.• To decrease the Brightness, move the slider to the left.• Optionally, click the up and down arrow buttons in the
adjustment box.
Click the Reset button to restore the previous settings.

76 Color Desktop
Note: The preview image automatically displays the adjustment you have made.
Set Color Contrast
1 From the Tree View pane, click Color.
2 Click and drag the Control slider to your preferred setting:
• To increase the Contrast, move the slider to the right.• To decrease the Contrast, move the slider to the left.• Optionally, click the up and down arrow buttons in the
adjustment box.
Click the Reset button to restore the previous settings.
Note: The preview image automatically displays the adjustment you have made.
Apply your settings
1 Click Apply to save your changes and leave the Catalyst® Control Center open.
2 Click OK to save your changes and exit the Catalyst® Control Center.
Restore default settings
1 Move the mouse to the bottom right-hand corner of the window.
2 Click Defaults.
Note: Clicking Defaults will restore the defaults for the current view only. Previous settings are not altered and will be saved once you click OK.
Discard your settings• Click Discard to ignore any unsaved changes and restore the
settings that existed when the Catalyst® Control Center was opened or the last time Apply was used. Discard does not close the Catalyst® Control Center.
Clicking Discard applies to all features of an aspect, not just the feature in the current view.

Color - FullScreen 3D 77
Color - FullScreen 3DAdjusting the Gamma control alters the overall richness of color. Adjusting the Brightness control alters the overall brightness. Adjusting the Contrast control alters the overall contrast.
• Adjusting the Gamma can be useful for CAD applications that rely heavily on color coding or applications that require realistic color.
• Adjusting the Brightness and Contrast can be useful for 3D games that display dimly lit scenes.
Display Color page to configure FullScreen 3D
1 From the Tree View pane, click Color.
2 Select FullScreen 3D from the Set color correction for: drop-down menu.
Set Color Gamma
1 From the Tree View pane, click Color.
2 Click and drag the Control slider to your preferred setting:
• To increase the Gamma, move the slider to the right.• To decrease the Gamma, move the slider to the left.• Optionally, click the up and down arrow buttons of the
adjustment box.
Click the Reset button to restore the previous settings.
Note: The preview image automatically displays the adjustments you have made.
Set Color Contrast
1 From the Tree View pane, click Color.
2 Click and drag the Control slider to your preferred setting:
• To increase the Contrast, move the slider to the right.• To decrease the Contrast, move the slider to the left.• Optionally, click the up and down arrow buttons in the
adjustment box.
Click the Reset button to restore the previous settings.
Note: The preview image automatically displays the adjustment you have made.
78 Avivo™ Video for Radeon® X1000 Series
Apply your settings
1 Click Apply to save your changes and leave the Catalyst® Control Center open.
2 Click OK to save your changes and exit the Catalyst® Control Center.
Restore default settings
1 Move the mouse to the bottom right-hand corner of the window.
2 Click Defaults.
Note: Clicking Defaults will restore the defaults for the current view only. Previous settings are not altered and will be saved once you click OK.
Discard your settings• Click Discard to ignore any unsaved changes and restore the
settings that existed when the Catalyst® Control Center was opened or the last time Apply was used. Discard does not close the Catalyst® Control Center.
Clicking Discard applies to all features of an aspect, not just the feature in the current view.
Avivo™ Video for Radeon® X1000 SeriesUse the Avivo™ Video aspect to apply standard video settings with a Wizard or selecting a video preset. Use Adjustments to configure gamma, brightness, and hue. Use Theater Mode to set aspect ratio and overlay display mode. Preview your changes before applying them.
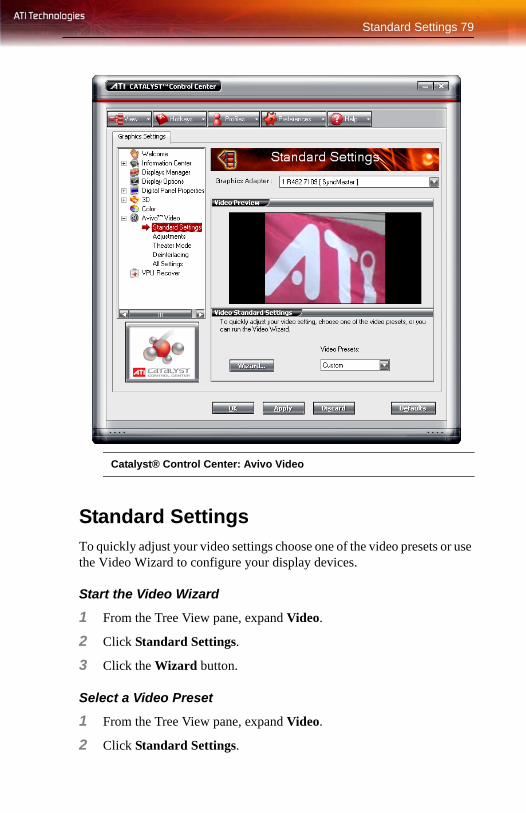
Standard Settings 79
Standard SettingsTo quickly adjust your video settings choose one of the video presets or use the Video Wizard to configure your display devices.
Start the Video Wizard
1 From the Tree View pane, expand Video.
2 Click Standard Settings.
3 Click the Wizard button.
Select a Video Preset
1 From the Tree View pane, expand Video.
2 Click Standard Settings.
Catalyst® Control Center: Avivo Video

80 Standard Settings
3 Select a preset from the Video Presets menu.
Apply your settings
1 Click Apply to save your changes and leave the Catalyst® Control Center open.
2 Click OK to save your changes and exit the Catalyst® Control Center.
Restore default settings
1 Move the mouse to the bottom right-hand corner of the window.
2 Click Defaults.
Note: Clicking Defaults will restore the defaults for the current view only. Previous settings are not altered and will be saved once you click OK.
Discard your settings• Click Discard to ignore any unsaved changes and restore the
settings that existed when the Catalyst® Control Center was opened or the last time Apply was used. Discard does not close the Catalyst® Control Center.
Clicking Discard applies to all features of an aspect, not just the feature in the current view.
AdjustmentsUse Avivo™ Video Adjustments to manually set Gamma, Brightness, Contrast, Saturation, and Hue.
Let the application control the video adjustments
1 From the Tree View pane, expand Video.
2 Click Adjustments.
3 Click Let the application control the video adjustments.
Set Gamma
Gamma controls the overall intensity of a video image.
1 From the Tree View pane, expand Video.
2 Click Adjustments.
Standard Settings 81
3 Click and drag the Gamma control slider to the desired position.
Set Contrast
Contrast is the difference between the brightest and darkest parts of an image.
1 From the Tree View pane, expand Video.
2 Click Adjustments.
3 Click and drag the Contrast control slider to the desired position.
Set Brightness
Brightness is the overall intensity, or luminosity of an image.
1 From the Tree View pane, expand Video.
2 Click Adjustments.
3 Click and drag the Brightness control slider to the desired position.
Set Saturation
Saturation is the measure of amount of color in an image.
1 From the Tree View pane, expand Video.
2 Click Adjustments.
3 Click and drag the Saturation control slider to the desired position.
Set Hue
Hue defines the tint of the red, green, and blue components of an image.
1 From the Tree View pane, expand Video.
2 Click Adjustments.
3 Click and drag the Hue control slider to the desired position.
Apply your settings
1 Click Apply to save your changes and leave the Catalyst® Control Center open.
2 Click OK to save your changes and exit the Catalyst® Control Center.

82 Standard Settings
Restore default settings
1 Move the mouse to the bottom right-hand corner of the window.
2 Click Defaults.
Note: Clicking Defaults will restore the defaults for the current view only. Previous settings are not altered and will be saved once you click OK.
Discard your settings• Click Discard to ignore any unsaved changes and restore the
settings that existed when the Catalyst® Control Center was opened or the last time Apply was used. Discard does not close the Catalyst® Control Center.
Clicking Discard applies to all features of an aspect, not just the feature in the current view.
Video Overlay Theater ModeUse Theater Mode to change the way you view streaming video.
Select an Overlay Display when in Clone Mode
1 From the Tree View pane, expand Video.
2 Click Theater Mode.
3 Under Overlay Display Mode/Clone mode shows overlay: select in Theater Mode (full-screen) if you want the video content to be displayed on both displays. The Secondary display displays the same content as the primary.
• Optionally, select in Standard Mode if you want the video content to be displayed on the primary display only.
• Optionally, the same on all displays if you want the contents displayed the same on all display devices.
Select an Overlay Display when in Extended Mode
1 From the Tree View pane, expand Video.
2 Click Theater Mode.
3 Under Extended desktop shows overlay, select in Standard Mode if you want the video content to be displayed on the primary display only.

Standard Settings 83
• Optionally, select in Theater Mode (full-screen) if you want the video content to be displayed on both displays. The Secondary display displays the same content as the primary.
Set video aspect ratio
1 From the Tree View pane, expand Video.
2 Click Theater Mode.
3 Select Match the source video to maintain the aspect ratio of original video.
• Optionally, select Scale to full-screen to have the source video fill the display area.
Apply your settings
1 Click Apply to save your changes and leave the Catalyst® Control Center open.
2 Click OK to save your changes and exit the Catalyst® Control Center.
Restore default settings
1 Move the mouse to the bottom right-hand corner of the window.
2 Click Defaults.
Note: Clicking Defaults will restore the defaults for the current view only. Previous settings are not altered and will be saved once you click OK.
Discard your settings• Click Discard to ignore any unsaved changes and restore the
settings that existed when the Catalyst® Control Center was opened or the last time Apply was used. Discard does not close the Catalyst® Control Center.
Clicking Discard applies to all features of an aspect, not just the feature in the current view.
DeinterlacingDeinterlacing creates a sharp image from the two video fields of interlaced video. Select one of five options for deinterlacing video for better viewing.

84 Standard Settings
• Auto Detect lets the multimedia driver to select the best deinterlacing scheme for different video sources and sizes.
• Bob deinterlacing, when selected, removes every other line of the video image and is recommended for motion video.
• Adaptive deinterlacing, when selected, reacts to the amount of motion in the video and apply a media filter on a motion block and apply weave on the remaining blocks.
• Motion Adaptive deinterlacing, when selected, applies the advanced motion detection to deinterlace the video.
• Weave does not apply any deinterlacing.
Select a deinterlacing mode
1 From the Tree View pane, expand Video.
2 Click Deinterlacing.
3 Select a deinterlacing mode for the drop-down menu.
Apply your settings
1 Click Apply to save your changes and leave the Catalyst® Control Center open.
2 Click OK to save your changes and exit the Catalyst® Control Center.
Restore default settings
1 Move the mouse to the bottom right-hand corner of the window.
2 Click Defaults.
Note: Clicking Defaults will restore the defaults for the current view only. Previous settings are not altered and will be saved once you click OK.
Discard your settings• Click Discard to ignore any unsaved changes and restore the
settings that existed when the Catalyst® Control Center was opened or the last time Apply was used. Discard does not close the Catalyst® Control Center.
Clicking Discard applies to all features of an aspect, not just the feature in the current view.

Standard Settings 85
All Settings
The All Settings page combines all of the principal Video features onto a single page, without any preview window, allowing quick access and adjustment.
This page is useful when it is not necessary to preview the adjusted settings because the effect is already known or understood.
Let the application control video adjustments
Enable this feature the to let the application determine the Video Adjustments settings.
1 From the Tree View pane, expand Video.
2 Click All Settings.
3 Scroll to Video Adjustments.
4 Click to place a checkmark next to Let the application control the video adjustments to enable it.
Adjust Gamma
Gamma controls the overall intensity of a video image.
1 From the Tree View pane, expand Video.
2 Click All Settings.
3 Scroll to Video Adjustments.
4 Adjust the Gamma control slider to the desired position.
Adjust Brightness
Brightness is the overall intensity, or luminosity of an image.
1 From the Tree View pane, expand Video.
2 Click All Settings.
3 Scroll to Video Adjustments.
4 Adjust the Brightness control slider to the desired position.
Adjust Contrast
Contrast is the difference between the brightest and darkest parts of an image.
1 From the Tree View pane, expand Video.
86 Standard Settings
2 Click All Settings.
3 Scroll to Video Adjustments.
4 Adjust the Contrast control slider to the desired position.
Adjust Saturation
Saturation is the measure of amount of color in an image.
1 From the Tree View pane, expand Video.
2 Click All Settings.
3 Scroll to Video Adjustments.
4 Adjust the Saturation control slider to the desired position.
Adjust Hue
Hue defines the tint of the red, green, and blue components of an image.
1 From the Tree View pane, expand Video.
2 Click All Settings.
3 Scroll to Video Adjustments.
4 Adjust the Hue control slider to the desired position.
Select an Overlay Display when in Clone Mode
1 From the Tree View pane, expand Video.
2 Click All Settings.
3 Scroll to Overlay Display Mode.
4 Under Clone mode shows overlay: select in Theater Mode (full-screen) if you want the video content to be displayed on both displays. The Secondary display displays the same content as the primary.
• Optionally, select in Standard Mode if you want the video content to be displayed on the primary display only.
• Optionally, Same on all displays if you want the contents displayed the same on all display devices.
Select an Overlay Display when in Extended Mode
1 From the Tree View pane, expand Video.
2 Click All Settings.

Standard Settings 87
3 Scroll to Overlay Display Mode.
4 Under Extended desktop shows overlay: select in Standard Mode if you want the video content to be displayed on the primary display only.
• Optionally, select in Theater Mode (full-screen) if you want the video content to be displayed on both displays. The Secondary display displays the same content as the primary.
Set video aspect ratio
1 From the Tree View pane, expand Video.
2 Click All Settings.
3 Scroll to Theater Mode Settings.
4 Select Match the source video to maintain the aspect ratio of original video.
• Optionally, select Scale to full-screen to have the source video fill the display area.
Select a deinterlacing mode
1 From the Tree View pane, expand Video.
2 Click All Settings.
3 Scroll to Deinterlacing.
4 Select a deinterlacing mode for the drop down menu.
Enable Windows® Media Settings
1 From the Tree View pane, expand Video.
2 Click All Settings.
3 Scroll to Windows® Media Settings.
4 Click Windows® Media Video Acceleration.
Apply your settings
1 Click Apply to save your changes and leave the Catalyst® Control Center open.
2 Click OK to save your changes and exit the Catalyst® Control Center.

88 VPU Recover
Restore default settings
1 Move the mouse to the bottom right-hand corner of the window.
2 Click Defaults.
Note: Clicking Defaults will restore the defaults for the current view only. Previous settings are not altered and will be saved once you click OK.
Discard your settings• Click Discard to ignore any unsaved changes and restore the
settings that existed when the Catalyst® Control Center was opened or the last time Apply was used. Discard does not close the Catalyst® Control Center.
Clicking Discard applies to all features of an aspect, not just the feature in the current view.
VPU RecoverVPU Recover enables the ATI display driver to detect when the graphics processor stops responding to display-driver instructions. When this happens, the display driver attempts to reset the graphics hardware. In most cases, VPU Recover will be able to reset the graphics processor without requiring a system restart.
Should the computer be unable to recover from a crash, VPU Recover will switch the computer to software rendering mode, allowing you to save any work in progress before restarting the computer.

89
Enable VPU Recover
1 From the Tree View pane, click VPU Recover.
2 Click Enable VPU Recover.
Prepare an error report
You can chose to send an error report to ATI if VPU Recover is activated. This report assists ATI in determining the cause of the problem. This information is then used to develop more stable graphic drivers.
1 From the Tree View pane, click VPU Recover.
2 Click Prepare an error report if VPU Recover is activated for submission to ATI Technologies.
3 Click Send Error Report button in the error report email.
Catalyst® Control Center: VPU Recover
90
An email is created containing the error report for submission to ATI Technologies.
Note: No personal information is included in the error report.
Apply your settings
1 Click Apply to save your changes and leave the Catalyst® Control Center open.
2 Click OK to save your changes and exit the Catalyst® Control Center.
Restore default settings
1 Move the mouse to the bottom right-hand corner of the window.
2 Click Defaults.
Note: Clicking Defaults will restore the defaults for the current view only. Previous settings are not altered and will be saved once you click OK.
Discard your settings• Click Discard to ignore any unsaved changes and restore the
settings that existed when the Catalyst® Control Center was opened or the last time Apply was used. Discard does not close the Catalyst® Control Center.
Clicking Discard applies to all features of an aspect, not just the feature in the current view.
Set the Transparent Anti-Aliasing
1 Expand 3D in Advanced View.
2 Click Transparent Anti-Aliasing.
3 Ensure the application override is enabled. To do so, make sure the Let the Application Decide check box is not selected.
4 Click and drag the slider to the desired setting.
Note: The slider control becomes unavailable when Let the Application Decide is enabled.
Set Catalyst® A.I. settings
1 From the Tree View pane, expand 3D.
91
2 Click Catalyst® A.I.
3 If necessary, clear the check mark from Disable Catalyst® A.I.
4 Click and drag to slider to the desired setting.
Note: Change to Catalyst® A.I. settings is not shown in the 3D Preview.
Apply your settings
1 Click Apply to save your changes and leave the Catalyst® Control Center open.
2 Click OK to save your changes and exit the Catalyst® Control Center.
Discard your settings• Click Discard to ignore any unsaved changes and restore the
settings that existed when the Catalyst® Control Center was opened or the last time Apply was used. Discard does not close the Catalyst® Control Center.
Clicking Discard applies to all features of an aspect, not just the feature in the current view.

92

Using TV Out 93
CHAPTER 6:
Using TV Display and Capture Features
This chapter describes how to use the TV display and video capture features of your Radeon® X1300 Series card.
Using TV OutYour Radeon® X1300 Series has TV Out capability.
Viewing Your PC’s Display on a TVYou can attach your Radeon® X1300 Series to a TV and a monitor at the same time.
TV display is ideal for giving presentations and watching movies, or playing games on a screen larger than a typical monitor. The following tips will help you get the most out of your TV Out feature.
Connecting to a TVTo connect your Radeon® X1300 Series card to a TV, use an S-Video cable.
To connect S-Video Out
1 Power off your computer and your TV.
2 Determine if your TV supports either a S-Video or Composite video connection.
IMPORTANT INFORMATION for European CustomersSome PC monitors in Europe cannot be used simultaneously with TV display. When you enable TV display in Europe, the refresh rate for the monitor and TV is set to 50 Hz. Some monitors may not support this refresh rate and could be damaged. • Please check the documentation supplied with your monitor to see if
your monitor supports a refresh rate of 50 Hz.• If your monitor does not support 50 Hz (or if you are not sure), turn off
your monitor before turning on your PC when using your TV as a display.
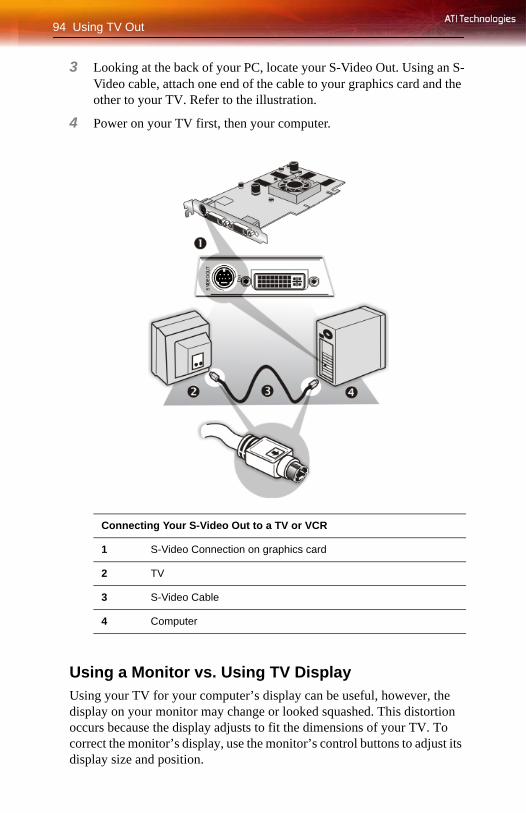
94 Using TV Out
3 Looking at the back of your PC, locate your S-Video Out. Using an S-Video cable, attach one end of the cable to your graphics card and the other to your TV. Refer to the illustration.
4 Power on your TV first, then your computer.
Using a Monitor vs. Using TV DisplayUsing your TV for your computer’s display can be useful, however, the display on your monitor may change or looked squashed. This distortion occurs because the display adjusts to fit the dimensions of your TV. To correct the monitor’s display, use the monitor’s control buttons to adjust its display size and position.
Connecting Your S-Video Out to a TV or VCR
1 S-Video Connection on graphics card
2 TV
3 S-Video Cable
4 Computer

Connecting to HDTV 95
Some single-frequency monitors may not work with TV display enabled. If you experience problems when TV display is enabled, disable TV display to restore your monitor’s display.
Viewing Text on a TVA TV is designed primarily to show moving images. The large dot pitch of a TV will yield poor quality static images. The small text sizes commonly used for PC desktops can appear blurred or unclear on a TV. You can compensate for this degradation by using larger fonts.
Using a TV as the Only DisplayIf you plan to move your computer to a place where you are using TV display only, make sure that you have the TV display feature enabled prior to removing the monitor.
The maximum display resolution for TV is 1024 x 768. Choosing a resolution higher than this will cause the TV display to disappear if it is the only display device.
Using Games and ApplicationsSome older games and applications may program your Radeon® X1300 Series directly to run under a specific display mode. This may cause your TV display to turn off automatically or become scrambled (your PC monitor or portable LCD display will not be affected). Your TV display will be restored once you exit the game or if you restart your computer.
Connecting to HDTVView computer output directly on your High Definition Television (HDTV) or other component input device. Provide a big-screen experience for your computer that is ideal for playing games, giving presentations, watching movies, and browsing the Internet.
HDTV uses YPbPr connectors to receive input. YPbPr stands for the following:
• Y = Green• Pb = Blue• Pr = Red

96 Connecting to HDTV
The HDTV Component Video Adapter can be used in place of the standard A/V Output cable to connect to an HDTV or other component input device, using component video cables.
Note: Input and output cables lengths should not exceed 50 feet (15m).
Installing your ATI HDTV video cable
1 Turn on your component input device, and set it to YPbPr input.
Note: See your HDTV or component input device manual for configuration information specific to your device.
You must have a monitor attached to your computer before installing the ATI HDTV. For proper operation of your ATI Component Video Adapter, ATI display drivers must be correctly installed.
ATI HDTV Cable
1 ATI HDTV Video Output Cable
2 Backplate of the ATI Graphics Card
3 Male RCA Patch Cables – available from consumer electronics dealer
4 Typical HDTV Video Input Connections

Connecting to HDTV 97
2 Turn on your computer.
Note: Your TV will not display anything until Windows starts. This can take several minutes.
Using Your ATI HDTV Video CableUse the HDTV Video Cable to watch DVD movies and play video games on your High Definition Television.
For maximum performance when you watch DVD movies or play computer games on your HDTV, you should find the mode and screen resolution that provide the best result on your TV, and use those settings exclusively.
Copy-protected DVDs restrict playback to 480i and 480p modes.

98 Connecting to HDTV

99
CHAPTER 7:
CrossFire™ FAQ
The following are frequently-asked questions about CrossFire™.
For the latest information, please consult the CrossFire™ Web site at:
ati.com/crossfire
1 What combination of products are required to build a working CrossFire™ system?
Two components are required:• Two CrossFire™ Edition graphics cards from the same brand-
family.• A CrossFire™ Ready motherboard with two PCIe™ X16 slots.
More information on the requirements for each of these components can be found within this FAQ.
2 What motherboards support CrossFire™?
The optimal configuration for a CrossFire™ system is one based on a Radeon® Xpress 200 CrossFire™ Edition motherboard. Motherboards from other manufactures will be certified as CrossFire™ Ready when they become available.
3 Are there specific CMOS motherboard settings for CrossFire™?
On some motherboards, the CMOS may be set by default to support only a single PCI Express® X16 slot. Ensure that both PCIe™ X16 slots are enabled in the CMOS.
4 Are there any software settings required for CrossFire™ to work?
Yes, there is a setting in the Catalyst™ Control Center that needs to be enabled for CrossFire™ to operate. When all of the hardware and software has been properly set up and installed, the following CrossFire™ aspect appears in Catalyst™ Control Center:

100
To access and enable CrossFire™ in Catalyst™ Control Center, do the following:
• In Advanced View, click CrossFire™ and check the Enable CrossFire™ box.
When CrossFire™ is successfully enabled, all display devices except the one used by CrossFire™ will be disabled. Multiple monitors/displays that are disabled when CrossFire™ is enabled reappear after CrossFire™ is disabled.
5 How are the graphics cards connected on a CrossFire™ system?
The two cards are connection through the motherboard which is used to convey information from one graphics card to the other graphics card and transmit the combined signal to a display device. No bridging cable is required.
6 Which games/applications work with CrossFire™?
CrossFire™ works with all 3D games and applications. If Catalyst™ A.I. is enabled in the Catalyst™ Control Center software, the optimal rendering mode available for the application is automatically selected.
7 Is a driver profile required to make CrossFire™ work?
No. CrossFire™ is enabled by default for all 3D games and applications.
8 What happens if you pair a 16-pipeline CrossFire™ Edition graphics card with a CrossFire™ Ready 12-pipeline graphics card?
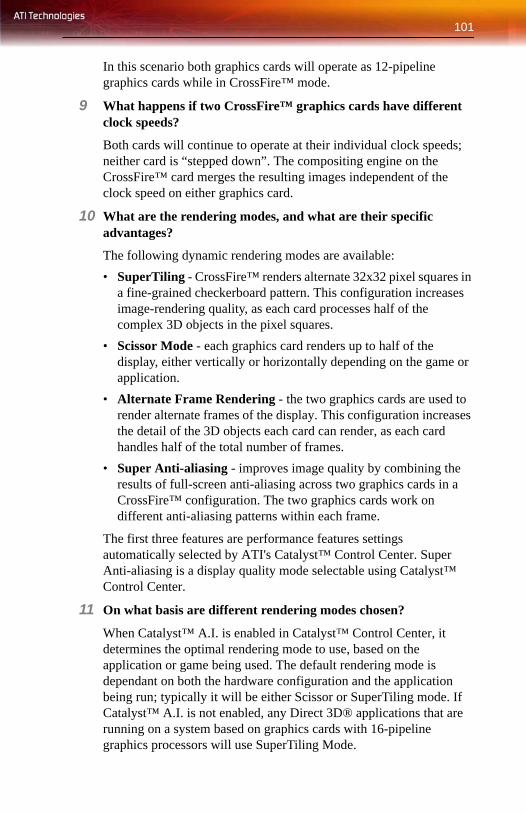
101
In this scenario both graphics cards will operate as 12-pipeline graphics cards while in CrossFire™ mode.
9 What happens if two CrossFire™ graphics cards have different clock speeds?
Both cards will continue to operate at their individual clock speeds; neither card is “stepped down”. The compositing engine on the CrossFire™ card merges the resulting images independent of the clock speed on either graphics card.
10 What are the rendering modes, and what are their specific advantages?
The following dynamic rendering modes are available: • SuperTiling - CrossFire™ renders alternate 32x32 pixel squares in
a fine-grained checkerboard pattern. This configuration increases image-rendering quality, as each card processes half of the complex 3D objects in the pixel squares.
• Scissor Mode - each graphics card renders up to half of the display, either vertically or horizontally depending on the game or application.
• Alternate Frame Rendering - the two graphics cards are used to render alternate frames of the display. This configuration increases the detail of the 3D objects each card can render, as each card handles half of the total number of frames.
• Super Anti-aliasing - improves image quality by combining the results of full-screen anti-aliasing across two graphics cards in a CrossFire™ configuration. The two graphics cards work on different anti-aliasing patterns within each frame.
The first three features are performance features settings automatically selected by ATI's Catalyst™ Control Center. Super Anti-aliasing is a display quality mode selectable using Catalyst™ Control Center.
11 On what basis are different rendering modes chosen?
When Catalyst™ A.I. is enabled in Catalyst™ Control Center, it determines the optimal rendering mode to use, based on the application or game being used. The default rendering mode is dependant on both the hardware configuration and the application being run; typically it will be either Scissor or SuperTiling mode. If Catalyst™ A.I. is not enabled, any Direct 3D® applications that are running on a system based on graphics cards with 16-pipeline graphics processors will use SuperTiling Mode.

102
12 What type of performance improvement is expected?
Performance enhancements experienced on a CrossFire™ system depend on the application or game being used. Performance improvements can be increased up to 100%, and the latest graphics-intensive programs will generally see over 80% performance improvement at high resolutions and image-quality modes.
13 How many independent displays can be connected to a CrossFire™ system?
While CrossFire™ is designed for optimal use on a single display, it is possible to drive multiple monitors using a CrossFire™ system when CrossFire™ is not enabled. On a standard CrossFire™ system, it is possible to drive four separate sets of monitors and still have one of those displays as a dedicated CrossFire™ display. If the motherboard contains an integrated video connection and SurroundView™ is enabled, more displays can be added.
Additional troubleshooting tips are covered in the “Reference” chapter.

Troubleshooting 103
CHAPTER 8:
Reference
This chapter provides information on troubleshooting, where to get additional accessories, how to register your product, plus warranty and compliance information.
TroubleshootingThe following troubleshooting tips may help if you experience problems. ATI’s documentation contains helpful installation/configuration tips and other valuable feature information. Please contact your dealer for more advanced troubleshooting information.
General Troubleshooting
Problem Possible Solution
Computer Does Not Boot-Up Properly
• Verify that the installation instructions were properly followed.
• Check that the card is properly installed in your system and connected to your monitor.
• If you have problems during start-up, restart your computer in Safe Mode.While starting Windows® XP, press and hold F8 until you see the Windows® Advanced Options Menu. Use the arrow keys to select Safe Mode, and press Enter.
• Check the system configuration utility of your operating system for the interrupt assignments.
• Contact ATI’s Customer Care or your local technical support.

104 Troubleshooting
No Display • Check that the card is seated properly in its expansion slot.
• Ensure that the monitor cable is securely fastened to the card.
• Make sure that the monitor and computer are plugged in and receiving power.
• If necessary, disable any built-in graphics capabilities on your mother board. For more information, consult your computer’s manual or manufacturer. (Note: some manufacturers do not allow the built-in graphics to be disabled or to become the secondary display.)
• Make sure that you selected the appropriate monitor when you installed your enhanced driver.
Screen Defects Appear
• Check if your monitor supports the resolution, horizontal (kHz) and vertical (Hz) refresh rates as required by the graphics card.
• Check your current resolution, refresh rate, and color depth settings in the Settings and Monitor tabs in your Display Properties dialog.
Warning! Ensure that both video card and monitor support resolution and refresh rates you select. Incompatible resolution/refresh rate selection may result in monitor damage. Refer to your monitor's documentation for recommended resolutions and refresh rates.
Off-Center Screen Image, Odd Colors or No Picture
• Try adjusting the brightness, sharpness, contrast, and color balance controls of your monitor.
• Try adjusting the centering and positioning controls of your monitor to position the picture on the screen
• Set the monitor's RGB inputs (and sync switches, if this option is available) to 75 Ohms, with the sync set to external.
• Digital Flat Panel (DFP) monitor users: refer to your monitor's documentation for the appropriate cable and connector to plug into the DVI-I connector on the graphics card.
Operating System Warns that Video Card Isn’t Properly Configured
• Check the driver installation and make sure that all software is correctly loaded corresponding to your operating system and applications.
• Re-install the ATI drivers for your Radeon® X1300 Series card.
General Troubleshooting
Problem Possible Solution

Product Registration 105
Product RegistrationTo activate Customer Care you must register your product with ATI at:
ati.com/online/registration
Customer CareFor detailed instructions on how to use your ATI product, refer to the Online User’s Guide included on your ATI installation CD-ROM.
HDTV/HDTV Adapter Troubleshooting
Problem Possible Solution
The colors on my TV display are incorrect
• Ensure that the connections between the Component Video Adapter and your HDTV are correct (Y=Green, Pb=Blue, Pr=Red).
There is no display on my TV
• Your TV will not display anything until Windows starts; this may take several minutes.
• Set your TV to YPbPr input.• Ensure that the HDTV Component Video Adapter is
properly connected, then restart your computer.
DVDs will not play in 720p or 1080i modes
• Copy-protected DVDs restrict playback to 480i and 480p modes.
I can’t see the entire display
• If your component input device supports it, try 720p mode.
The display appears tilted
• Consult your HDTV user’s manual.
My CRT display is green
• Your system is in component output mode. Restart your computer with the CRT monitor connected.

106 Customer Care
If you require further assistance with your product, the following Customer Care options are available:
ATI Customer Care will work to resolve your issue and help you to get your ATI product up and running. If your issue is not resolved, our technicians will determine whether the difficulty you are experiencing is the result of the ATI product, whether your product contains a defect, and whether your product is under warranty.
Service Availability Language Access
Online
or
24/7 English, French, Spanish, Portuguese, German
ati.comorATI TECHNOLOGIES INC.Attention: Customer Care1 Commerce Valley Drive EastMarkham, OntarioCanada L3T 7X6
Telephone US & Canada
9:00AM - 7:00PM EST. Monday to Friday.
English 1-877-284-1566 (toll-free)
or
1-905-882-2626 (International and/or local toll charges to Canada will apply).
Telephone Europe and Other Regions
10:30 to 00:00 GMT
10:30 to 19:00 GMT
12:00 to 20:30 GMT
English
German-French
Spanish-Portuguese
+00800-6677-1111 (toll-free)
or
+1-905-882-5549 (International and/or local toll charges to Canada will apply)
Telephone Latin America / South America
7:00AM to 3:30 PM EST
7:00AM to 7:00PM EST
Spanish, Portuguese
English
+0800-333-5277(Argentina)
+0800-891-9068 (Brazil)
+001800-514-3276 (Mexico)
other:+1-905-882-3277 (International and/or local toll charges to Canada will apply)

Additional Accessories 107
• ATI Customer Care is unable to assist with refunds, returns, or exchange specific inquiries. If resolving the problem being experienced is critical to your decision to keep the product, it is your responsibility to ensure that you know and are within the period of time your reseller will allow for refunds, returns or exchange.
• ATI is not responsible for any expense incurred accessing Customer Care. It is expected that customers will review the expense associated with the available support options and will choose the method that best meets their needs and budget.
• ATI Customer Care reserves the right to limit support options for products that are not registered or are at End of Life.
Additional AccessoriesAdditional and replacement cables, installation CD-ROMs, manuals, and other accessories for ATI products can be purchased from the online ATI store at:
ati.com/online/accessories
Compliance InformationThis section details the compliance information for this product.
FCC Compliance Information
This equipment has been tested and found to comply with the limits for a Class B digital device, pursuant to Part 15 of the FCC Rules. These limits are designed to provide reasonable protection against harmful interference in a residential installation. This equipment generates, uses and can radiate radio frequency energy and, if not installed and used in accordance with manufacturer's instructions, may cause harmful interference to radio communications. However, there is no guarantee that interference will not occur in a particular installation. If this equipment does cause harmful interference to radio or television reception, which can be determined by turning the equipment off and on, the user is encouraged to try to correct the interference by one or more of the following measures:
• Re-orient or relocate the receiving antenna.• Increase the separation between the equipment and receiver.
This Radeon® product complies with FCC Rules part 15. Operation is subject to the following two conditions • This device may not cause harmful interference.• This device must accept any interference received, including interference that
may cause undesired operation.

108 Compliance Information
• Connect the equipment to an outlet on a circuit different from that to which the receiver is connected.
• Consult the dealer or an experienced radio/TV technician for help.
Industry Canada Compliance StatementICES-003 This Class B digital apparatus complies with Canadian ICES-003.Cet appareil numérique de la Classe B est conforme à la norme NMB-003 du Canada.
For further compliance information:ATI Research Inc.4 Mount Royal Ave.Marlborough, MA01752-1976USA508-303-3900
CE Compliance InformationEMC Directive 89/336/EEC and amendments 91/263/EEC, 92/31/EEC and 93/68/EEC, Class B Digital Device EN 55022:2003/CISPR 22 Class B, Limits and Methods of Measurement of Radio Interference Characteristics Information Technology Equipment.EN 55024:1998/CISPR 24:1997 +A1:2001 +A2:2003, Immunity of Information Technology Equipment (ITE), including EN 61000-4-2, EN 61000-4-3, EN 61000-4-4, EN 61000-4-5, EN 61000-4-6
Informations de conformité de la CEDirective EMC 89/336/CEE et amendements 92/31/CEE et 93/68/CEE, pour dispositif numérique de Classe B.EN 55022:2003/CISPR 22:1997, - Classe B - Limites et méthodes de mesure des caractéristiques d'interférences radiophoniques, Matériel des technologies de l'information.EN 55024:1998/CISPR 24:1997 +A1:2001 +A2:2003, Norme sur l'immunité de matériel des technologies de l'information, et comprenant EN 61000-4-2, EN 61000-4-3, EN 61000-4-4, EN 61000-4-5, EN 61000-4-6
Electrical Safety73/23/EEC - The Low Voltage DirectiveIEC 60950-1:2001, IEC 60950:1999, 3rd Edition - Safety of Information Technology Equipment BS EN60950-1:2002, BS EN60950:2000, 3rd Edition UL 60950-1:2003, UL 60950:2000, 3rd Edition CAN/CSA C22.2 No. 60950-1:2002, CAN/CSA C22.2 No. 60950-00, 3rd Edition (2000) To meet UL safety requirements, the computer’s maximum room temperature should not exceed 40º C.
The use of shielded cables for connection of the monitor to the graphics card is required to ensure compliance with FCC regulations. Changes or modifications to this unit not expressly approved by the party responsible for compliance could void the user's authority to operate this equipment.

Compliance Information 109
Waste Electrical and Electronic Equipment (WEEE) Directive ComplianceThis product was manufactured by ATI Technologies Inc.

110 Compliance Information

111
CHAPTER 9:
Glossary
2DAcronym for “two dimensional,” a term applied to computer graphics that are “flat.” Typical desktop applications such as word processors, spreadsheet programs, or other programs that manipulate print or simple graphics (such as pictures or line art) are generally considered to be operating within a 2D environment, even when they include simple three dimensional elements, such as buttons.
PulldownPulldown is a telecine technique used to transfer motion picture film shot at one frame rate to a video format at a different frame rate. Typical NTSC video contains more frames per second than motion picture film for even division between frames, so that every 4 frames of film can be reproduced as 5 separate NTSC frames, the “extra frame” created by interlacing interpolated frames. The features produces a smoother NTSC video image from a motion picture film source, and can be used for better edge image processing in the Vector Adaptive Deinterlacing feature within Catalyst® Control Center.
3DAcronym for “three dimensional,” referring to computer graphics that appear to have volume and depth. Various modeling processes take the representation of a three dimensional object provided by the computer program and render it by using various lighting components, applying textures, and setting layers of transparency or opacity as required in order to produce a realistic representation of a three-dimensional object on a two-dimensional display.
3Dc™An ATI hardware-based compression technology that reduces the size of 3D texture data, rendering more finely-grained texture surfaces with greater efficiency. It significantly minimizes the memory footprint of normal maps containing information on how light reflects off textured
112
surfaces, allowing game programmers to include more texture and lighting details without affecting performance.
Adaptive Anti-aliasing
Adaptive anti-aliasing is a technique that applies a combination of multi-sampling (MSAA) and super-sampling (SSAA) on 3D objects to improve edge smoothness and fine detail. Multi-sampling works best on smoothing the edges of solid polygons, but cannot effectively smooth edges within polygons which are partially transparent. Super-sampling is able to more accurately calculate color values adjacent to transparent pixel shader values within polygons with partially transparent textures, but is not applied universally since it is more processor-intensive. Adaptive anti-aliasing works by using super-sampled anti-aliasing on transparent textures, and multi-sampled anti-aliasing on all other textures. This delivers exceptional levels of image quality, while maintaining performance.
AGPThe Accelerated Graphics Port (AGP) is a slot on the computer motherboard designed specifically for 3D graphics cards. AGP runs 3D images much more smoothly and quickly than was previously possible with PCI video cards; AGP runs at several times the bus speed of PCI and employs sideband addressing, so multiple data transfers between the graphics processor and the computer can take place concurrently. AGP is currently being phased out in favour of PCI Express® (PCIe™) on PC systems.
Alpha Blending
Alpha blending is used in 3D graphics to create transparent or opaque effects for surfaces such as glass and water. Alpha is a transparency value, so the lower the value, the more transparent the image looks. It is also used in animations to produce such things as fading effects, where one image gradually fades into another.
Alternate Frame RenderingA graphical load-balancing scheme where two graphics cards are used to render alternate frames of the display. This configuration increases the detail of the 3D objects each card can render, as each card handles half of the total number of frames. Essentially, each card has more time to render
113
a scene, delivering a noticeable increase in 3D detail. This type of graphical operation is only available in Radeon® CrossFire™ graphics cards running Microsoft® Direct 3D® and OpenGL® games or applications.
Anisotropic Filtering
A technique that preserves the surface details of an object as it recedes into the distance by utilizing and blending together the object’s texture maps. This makes 3D objects appear more realistic as the detail of their surface texture is retained in a smooth, seamless fashion on the sections that move or fade away into the background.
Anti-aliasingA method that smooths out the jagged edges of a curved object. A black curved line on a white background displayed on a computer screen will have some jaggedness along its edges due to the inherent limitations of using discrete pixels to display the image. Anti-aliasing smooths out this jaggedness by filling in the white spaces between the jagged edges with varying shades of grey.
AspectA group of related features in ATI’s Catalyst® Control Center software. For example, the Color aspect clusters together controls that handles gamma, brightness, contrast, and other features relating directly to the display of color. Similarly, the 3D aspect provides a set of related controls dealing with such features as anti-aliasing, anisotropic filtering, mipmap details levels, and more.
Aspect RatioThe proportions of a display are expressed as a ratio of its width and height. Common ratios include 4:3 for TVs and CRTs, 5:4 for LCDs, and 16:9 for widescreen displays.
Avivo™ ColorAvivo™ Color is an advanced feature within Catalyst® Control Center, providing the user with precise control over how color is displayed on a monitor. Avivo™ Color provides tools to adjust the Hue and Saturation values on a per-monitor basis, making it possible to optimize the use of a

114
single display within its existing ambient lighting environment, or to better color match two or more adjacent monitors.
Back BufferA type of offscreen memory used to provide smooth video and 2D graphics acceleration. This technique uses two frame buffers, so the process is often referred to as “double-buffering.” While the contents of one buffer are displayed, a second buffer, called the “back” buffer, holds the frame being worked on. In this way, users will only see complete, smooth frames displayed onscreen.
Bilinear FilteringThis filtering method reduces the blockiness caused when zooming into a 3D surface that is at a right angle to the viewer. A newspaper photo examined closely enough will show that the picture is made up of tiny dots. If the photo was enlarged it would start to look “blocky” and less distinct. This is also a problem for computer-generated images, especially for surface details.
Bit DepthRefers to the number of data bits required to store color information about a pixel. Larger bit depth means a greater range of color information is capable of being encoded into each pixel. For example, 1 binary bit of memory can only encode to either “0” or “1.” So a graphical bit depth of 1 means that the display can only show two colors, the black and white of a monochrome display. Four-bit color depth is capable of displaying 16 colors because there are only 16 different combinations of 4 bits (“0000”, “0001”, “0010”... to “1111”). Sixteen-bit color is capable of reproducing 65,536 colors, 24-bit color can display up to 16,777,216 individual colors, and 30-bit color can display up to one billion individual colors.
BitmapA bitmap is a graphic or character representation composed of individual pixels, arranged horizontally in rows. A monochrome bitmap uses one bit per pixel (bpp). Color bitmaps may use up to 32bpp, depending on the color depth selected.

115
BrightnessThe amount of white or black that is applied to all colors onscreen. By making the screen “brighter” you are adding more white to it. This should not be confused with luminosity, which measures the actual light level emitted from the computer display.
BufferA name referring to portions of on-board video memory. One large buffer is always used to display images to the screen; this is the “display buffer.” The rest of offscreen memory is typically used by applications as back buffers, z-buffers, and texture buffers.
Catalyst® Control Center Catalyst® Control Center is the successor technology to the Catalyst® software formerly available only through the Windows® Control Panel. It has a new user interface, providing a more interactive means of controlling such things as 2D and 3D performance while providing immediate feedback using a more intuitive graphical user interface.
Color Component
Three color components—Red, Green, and Blue—combine in various intensities to determine the color of each pixel on the screen. The values of each color component are graphically represented by a corresponding color curve.
Color Correction
Correct discrepancies between the real color value and the way a screen displays it. Color discrepancies can be caused by a variety of sources, including the lighting conditions in the work area and gradual shifts in color over time on monitors or flat panel displays.
Color DepthColor depth refers to the number of color shades available on your display and is measured in bits per pixel (bpp). Typical ranges are: 256 colors (8bpp), thousands of colors (16bpp), and millions of colors (32bpp).

116
Component VideoTypically used on DVD players and HDTV systems, component video is a standard Red/Green/Blue (RGB) color signal for televisions. The signal is split and compressed into separate luminance and color values—luminance (“Y”), red minus luminance (R-Y), and blue minus luminance (B-Y). The value for green is not transmitted. The display device automatically “fills in” the color values that are not red or blue. DVDs are encoded using component video, so display devices will provide enhanced playback when this type of connection is used. A common variant of this format used in North America is YPbPr.
Composite VideoComposite video is a type of analog video signal that combines both brightness and color information into a single signal. It typically uses a single RCA connection for the video channel, and separate RCA connections for the left and right audio channels. The quality of the video signal is reduced by the process of mixing the brightness and multiple color channels together into a single channel. For this reason it is inferior in signal quality than either S-Video or component video. Composite video is the broadcast format for analog television signals worldwide, and connections are typically available on VCRs, DVD players and video games.
Compositing EngineA chip that is available only on CrossFire™ Edition graphics cards. This chip takes the signals from the GPUs on both the Master graphics card and the Slave graphics card and combines the results according to the selected operating mode. It then sends the final frames out to the display device. It is capable of advanced blending operations without burdening either of the GPUs.
Control Point
A control point is a user-created point on the color curve. Users can change the color of the screen by moving the control points with a mouse.
CRT
Acronym for “cathode ray tube”, which is the main component of computer monitors and TVs. Color CRTs use three separate electron beams fired

117
through a shadow mask and onto the back of the glass screen. The electron beams activate separate red, green, and blue values in various strengths in order to produce a colored image.
DashboardThe dashboard is the part of the Catalyst® Control Center used to display a graphical representation of the features available in installed ATI hardware and software. The dashboard can be used to access all of the aspects (sets of related graphical features) available on a graphics card. The dashboard is only available in Advanced view and Custom view which is aimed at more experienced users.
Direct 3D®Part of Microsoft®’s DirectX API designed for rendering 3D graphics on Windows® systems. It provides software developers with low-level access to functions on graphics cards, providing the type of performance necessary for intensive 3D applications such as games.
DirectXA Microsoft® technology, DirectX is an API that provides programmers with direct access to low-level hardware functions for games and other high-performance 3D applications.
DitheringA computer graphics technique that takes advantage of the human eye’s tendency to mix two colors that are adjacent to each other to produce smooth boundary transitions. Dithering adds intermediate color values between two or more boundaries, producing smoother, more natural look to 2D images or 3D objects.
Dot pitchDot pitch specifies the sharpness of a monitor’s display. It is measured in millimeters (mm) and is the distance between the individual phosphor sub-pixels in a CRT display or cells of the same color within an LCD display. The smaller the number, the sharper the image. The most common dot pitches for monitors range from .24 mm to .31 mm. Also, if a monitor with a .24 mm dot pitch is set to its highest possible resolution, the pixel size will

118
equal the dot pitch. If the monitor is set to lower resolutions, the pixels will be comprised of multiple dots.
DVIAcronym for “Digital Video Interface,” a standard video connection used on many current computer displays. There are three types of DVI connections: DVI-A (analog), DVI-D (digital), and DVI-I (integrated, capable of either analog or digital). It supports high-bandwidth video signals over 160 Hz, so it is most often used for high-resolution displays.
EDTVAcronym for “Enhanced Definition Television”, which produces better television image quality than Standard Definition Television (SDTV). Applicable to the NTSC broadcast format, EDTV displays are capable of depicting the standard 480 horizontal scan lines in a non-interlaced format. Instead it paints all of the scan lines in one pass, which is called progressive scanning, a process which also removes the “jaggies” inherent in the interlaced television signals.
Flat ShadingA lighting technique that shades each polygon of a 3D object based on where the source of the light is and the angle of the polygon in relation to it. It enables relatively fast rendering of 3D objects, although it can make those objects appear “faceted” as each visible polygon is set to a particular color value, and consequently does not produce as realistic an effect as obtained when using Gouraud shading.
FogTerm used to describe the blending of an object using a fixed color as objects are made to appear more distant from the viewer.
Frame BufferThe portion of the memory buffer on the graphics card used to store the image being displayed. All rendering processes have been accomplished by this stage and this buffer contains only a one-to-one relationship of the data to be relayed to the display.

119
Frames Per SecondIn terms of 3D graphics, refers to the rate at which the graphic processor can render new screens per second. Higher rates equals better, more naturalistic performance for such things as games set in a 3D environment. Sometimes abbreviated to “fps.”
GammaSometimes confused with brightness, gamma actually refers to the correction that is applied to any display device in order to produce more gradual increases or decreases in the perceived brightness for that device. A change in gamma produces a non-linear change in the color curve, ensuring that perceived changes in color and intensity are consistently applied.
Gouraud ShadingA shading method used to produce a smooth lighting effect across a 3D object. A specific color is used at each vertex of a triangle or polygon and interpolated across the entire face.
HDCPHDCP is an acronym for “High-Bandwidth Digital Copy Protection.” It is a form of digital rights management designed to protect copyright of signals being transported across DVI or HDMI™ connections. Several international regulatory bodies have recommended its incorporation into high-definition display and playback devices.
HDMI™HDMI™ is an acronym for “High Definition Multimedia Interface.” It is a 19-pin connector used for transferring combined digital audio and video. HDMI™ supports standard, enhanced, and high-definition digital video signals, and is designed for use with VCRs, DVD players, personal computers, and set-top boxes. A DVI adapter can be used to transfer the video signal to an HDMI™-capable display, although audio must be transferred from a different route, as DVI output does not support audio.

120
HDTVAcronym for “High Definition Television,” a format that produces much greater picture quality than a standard television, and in a wide-screen format that matches that of a movie theater screen. The two most popular formats are 1080i and 720p, where the number represents how many horizontal scan lines they have, and the following letter represents whether the picture is interlaced, or the product of progressive scanning technology. Interlaced displays paint the odd-numbered scan lines and then the even-numbered lines to produce a picture, whereas progressive scan paints all of the scan lines at once. Both formats use an aspect ratio of 16:9. In contrast, standard North American television signals are displayed using 480 interlaced (480i) scan lines with a more square aspect ratio of 4:3.
HueRefers to a specific color within the visible spectrum of light, defined by its dominant wavelength. A light wave with a central tendency within the range of 565-590 nm is visible as yellow. In the standard RGB color space used by most computer displays, hue refers to a coordinate of the color as described by its red, green, and blue values, minus any additional brightness or saturation values for that color.
HydraVision™HydraVision™ is ATI’s multi-monitor management software, enabling users to manage the display of multiple windows and applications across two or more adjacent monitors. It also includes a range of productivity features designed to effectively manage applications in this environment.
HyperZ™ HDHyperZ™ HD includes a number of different technologies aimed at optimizing memory-bandwidth efficiency, particularly with respect to Z-buffer operations. The Z-Buffer, sometimes also called the Depth Buffer, stores information used to determine the placement of objects in a 3D environment with respect to the viewpoint of the observer. Reading and updating this buffer typically consumes more memory than any other part of the 3D rendering process, making it a major performance bottleneck. HyperZ™ HD technology reduces the memory bandwidth consumed by the Z-Buffer, thereby increasing performance while also making the 3D environment more realistic.

121
Keyframe InterpolationThis feature is also known as “morphing.” In an animation, a start and end point are picked as the key frames. In a 3D rendering, the start point could have a character with a neutral expression, and the end point could have that same character smiling. Additional frames are interpolated (inserted) between the two keyframes in order that “morphs” (transforms) the image so that there is a smooth transition between the key frames.
KTX Buffer Region ExtensionThis OpenGL® programming term refers to a feature that rapidly updates portions of the display of 3D modelling applications that change very quickly, or have been moved or occluded. It does this by optimizing the storage of buffer regions in the graphics card’s memory buffer. Other applications are typically not adversely affected when this is enabled.
LightingIn 3D computer graphics, refers to aspects and quality of the virtual light source being used to make an object visible. Lighting can strongly affect the “mood” of a scene. For example, a “harsh” light could be a bare lightbulb that is glaringly bright on the objects closest to it while casting strong shadows in the background. A “softer” light would be more diffuse and not cast shadows, such as you would get outdoors on a typical overcast day.
MipmappingThe most memory-intensive aspect of 3D graphics are the textures that give an object its realism (like wood, marble, leather, and cloth). Because objects in real life become less detailed as they move farther away from the viewer, 3D programmers simulate this by using less detailed, lower resolution texture maps on distant objects. These texture maps are merely scaled down versions of the main texture map used when the object is up close, and they use less memory.
NTSCThe name for the type of analog television signal used throughout the Americas (except Brazil) and in Japan. It draws a total of 525 vertical interlaced frames of video at a refresh rate of 60 Hz, making it relatively

122
flicker-free. The acronym refers to the National Television Systems Committee, which devised this color video standard in 1953.
Offscreen MemoryAn area of memory used to preload images so that they can be quickly drawn to the screen. Offscreen memory refers to all of the remaining video memory not taken up by the front buffer, which holds the contents of the display screen currently visible.
OpenGL®Short for “Open Graphics Library,” this is an industry standard for cross-platform 3D graphics development. It consists of a large number of functions that can be called upon in various programs, such as games, CAD, and virtual-reality systems, to produce complex 3D objects from simpler, more “primitive” building blocks. Implementations currently exist under Windows®, Mac OS® X, and various forms of Unix, including Linux®.
ATI OverdriveATI Overdrive maximizes the performance of the GPU by dynamically altering its speed to an optimal level depending on usage. An on-chip thermal sensor constantly monitors the temperature of the GPU, allowing for maximum clock speed to be maintained while avoiding overheating.
PALAn acronym for “Phase Alternating Line”, the name for a video broadcast standard used in much of Europe (except France), most of Asia, the Middle-East, Africa and Australia. It draws a total of 625 vertical interlaced frames of video at a refresh rate of 25 Hz.
PCIAcronym for “Peripheral Component Interconnect”, which is the specification for a type of computer bus used for attaching computer peripherals to a computer’s motherboard. PCI encompasses both integrated motherboard components (such as built-in graphical processors) and peripherals that fit into an expansion card slot, such as a separate graphics

123
card. PCI replaced the older ISA and VESA bus standards, and was itself superseded by the AGP standard for the main graphics card bus.
PCI Express® (PCIe™)The successor standard to the PCI and AGP bus standards, with a significantly faster serial communications system, further opening up bandwidth for more communications between such peripherals as graphics cards and the computer’s CPU. PCIe cards can come in several physical configurations, the fastest currently being X16, which is typically used for graphic cards, and X1, typically used for other peripherals, such as separate multimedia cards.
PipelineIn relation to computer graphic processors, refers to the number of separate arithmetic units available for rendering the output on a display. In general, more pipelines available on a graphical processor means there are more 3D rendering capabilities available, increasing overall 3D performance.
PixelAll computer images are made up of tiny dots. Each individual dot is called a pixel, a word created from the term “picture element.” A pixel is the smallest indivisible unit of a digital image and can be only a single color. The size of the pixel depends on how the display resolution has been set. The smallest size a pixel can be is determined by the display’s dot pitch, which is measured in millimeters (mm).
Refresh RateAlso referred to as “vertical refresh rate.” This is the rate at which a monitor or television can redraw the screen from top to bottom. NTSC television systems have a refresh rate of approximately 60 Hz whereas computer displays typically have refresh rates of 75 Hz or more. At refresh rates of 70 Hz and lower, screen flicker is often noticeable.
RenderingRendering refers to the final drawing stages where the 2D image that appears on a display is derived from its 3D descriptions. What appears on

124
the display may look three dimensional, but it is really just a 2D grid of pixels designed to appear that way.
ResolutionThe resolution of any display is the number of pixels that can be depicted on screen as specified by the number of horizontal rows against the number of vertical columns. The default VGA resolution of many video cards is capable of displaying 640 rows of pixels by 480 columns. The typical resolution of current displays is set to higher values, such as 1024x768 (XGA), 1280x1024 (SXGA), or 1600x1200 (UXGA).
SaturationRefers to the intensity of a specific hue (color). A highly saturated hue is vivid and intense, whereas a less saturated hue appears more grey. A completely unsaturated color is grey. In terms of the RGB color model, a fully saturated color exists when you have 100% brightness in one of the three channels (say, red) and 0% in the two others (green and blue). Conversely, a fully desaturated color is one where all of the color values are the same. Saturation can therefore be thought of as the relative difference between the values of the channels.
SCARTSCART is an acronym for “Syndicat des Constructeurs d'Appareils Radiorécepteurs et Téléviseurs”. SCART is an 21-pin connector used mainly in Europe for transferring analog audio and video signals between VCRs, DVD players, personal computers, and set-top boxes. It is sometimes referred to as Péritel or the Euroconnector.
Scissor ModeA graphical load-balancing scheme where two graphics cards are used to render two halves of an image display. One graphics card renders the top half of the screen while the second graphics card renders the bottom half. This configuration offers a form of dynamic load balancing between the two cards as each only needs to render 3D object details on only half of the screen instead of the full screen at any one time. This type of graphical operation is only available in Radeon® CrossFire™ graphics cards running Microsoft® Direct 3D® and OpenGL® games or applications.

125
SDTVSDTV is an acronym for “Standard Definition Television” that identifies lower resolution systems when compared to High Definition Television (HDTV) systems. SDTV systems use the same 4:3 aspect ratio and 480 scan lines to produce a picture as regular analog television sets, but digital decoding enhanced of the signal, displaying a sharper and crisper picture. SDTV broadcasts are either interlaced (480i) or use progressive scan (480p), the latter method providing the best overall image quality.
SECAMAn analog color video signal that originated in France, and is used in many other countries, including (but not limited to) much of Eastern Europe, parts of the Middle East and Asia. Like the PAL video standard, SECAM also draws a total of 625 vertical interlaced frames of video at a refresh rate of 25Hz, but uses a fundamentally different way of encoding its colors. The name is an acronym for “Séquential Couleur avec Mémoire,” which is French for “sequential color with memory.”
Shadow Mask
In CRT monitors, the shadow mask is a metal plate full of tiny holes that is attached to the inside of the glass screen. It focuses the beams from the electron guns at the back of the CRT. The distance between these holes is called the dot pitch.
SmartShader™ HDSmartShader™ HD contains advanced vertex and pixel-shading capabilities. A shader is a small program that runs on the GPU and describes how an image should be rendered. Vertex shaders manipulate the individual polygons that make up 3D objects, and pixel shaders operate on the individual pixels that fill in these polygons to create a visible image. SmartShader™ HD is designed to alleviate the resource constraints of earlier shader hardware, paving the way for more complex, detailed, and realistic shader effects in applications requiring high-performance 3D rendering.
SmoothVision™ HDSmoothVision™ HD incorporates improved anti-aliasing, anisotropic filtering and 3Dc™ compression features designed to further enhance

126
image quality. Anti-aliasing performance is improved, providing better overall detail and image quality. The enhanced anisotropic filtering ensures sharper and clearer pictures at higher frame rates, and the new 3Dc™ compression technology makes it possible to display higher polygon counts for 3D rendered objects.
Specular HighlightThe bright, usually small, intense light reflected from a 3D surface with a high refraction value. From the intensity and spread of this highlight users can differentiate between a “hard,” smooth surface, such as metal or porcelain, or a “soft,” textured surface, such as fabric or skin.
Super Anti-aliasingA feature that improves image quality by combining the results of full-screen anti-aliasing across two graphics cards in a CrossFire™ configuration. The two graphics cards work on different anti-aliasing patterns within each frame. The results of which are combined by the compositing engine on the CrossFire™ Master graphics card to produce 3D images featuring smoother contours, lines, and shading effects.
SuperTilingA graphical load-balancing scheme where two graphics cards are used to render alternate small 32x32 pixel squares in a fine-grained checkerboard pattern. This configuration increases image rendering quality, as each card processes half of the complex 3D objects in the pixel squares. SuperTiling is better optimized for most applications than Scissor Mode (where two graphics cards are used to render the top and bottom halves of the screen), since the checkerboard pattern better ensures a more even distribution of what needs to be rendered. This type of graphical operation is only available in Radeon® CrossFire™ graphics cards running Microsoft® Direct 3D® games or applications.
S-VideoShort for “Separate Video,” S-Video is a type of analog video interface that produces a higher-quality signal compared to composite video. The signal is split into two separate channels— luminance (Y) and chrominance (C). Sometimes referred to as “Y/C video” or “Y/C”, the connectors typically

127
contain 4-pins within a single connection housing and are commonly found on consumer DVD players, VCRs, game consoles, and related devices.
TexelShort for “texture element,” the 3D equivalent of a pixel, describing the base unit of the surface of a 3D object, such as a sphere; for a 2D object, such as a circle, the base unit is a pixel.
Texture Mapping
In computer graphics, two-dimensional textured surfaces are referred to as texture maps. Texture mapping is the process by which a two-dimensional surface gets wrapped around a three-dimensional object so that the 3D object takes on the same texture qualities. For example, if you take a 2D textured surface that looks like cloth and wrap it around a 3D sphere, the sphere will now appear to have a cloth-like surface.
Texture PreferenceTexture Preference is a feature enabling the user to select the texture quality level for the surface of a 3D object. Selecting the highest quality possible will provide the most realism, although it may also have some impact on the performance of any 3D intensive application.
Transition Minimized Differential Signaling (TMDS)A technology designed to reduce electromagnetic interference (EMI) and improve the digital signal delivered to flat panel displays. Its encoding algorithm converts the original 8-bit graphic data into a more fault-tolerant 10-bit signal, which is then converted back to its original 8-bit form at the display device. The signal is also DC-balanced, allowing for the option of transmitting the signal over fibre-optic cable. DVI connectors can incorporate up to two TMDS links, with each “link” comprised of the number of signals required for standard RGB output. Higher resolutions and refresh rates than standard are possible if multiple TMDS links are available by using multiple DVI connectors.

128
Trilinear FilteringA sampling method used to produce realistic-looking 3D objects. Trilinear filtering averages one of the bilinear filter mipmap levels along with the standard mipmap samples.
Vector Adaptive DeinterlacingA technique that provides smoother, less jagged edges for interlaced video playback. Interlaced video consists of alternating odd and even numbered scan lines, which are then mapped to an equivalent pixel-by-pixel display on a CRT or Flat Panel Display. Without correction, jagged lines appear in a video image either as doubled scan lines or lines that are improperly interpolated. With vector adaptive deinterlacing, the difference in pixel values is considered across multiple lines and alternating frames (using Pulldown detection on the interlaced video source), and then intelligently re-interpreted to produce smoother edges in interlaced video images.
VersaVision™An ATI technology enabling accelerated display rotation and scaling. Any desktop can now be rotated 90 degrees left or right, or even 180 degrees, while maintaining the full feature set of other ATI 2D and 3D technologies, such as SmoothVision™. VersaVision™ works with single or multiple displays.
Vertex ShaderThree-dimensional objects displayed on a screen are rendered using polygons, each of which is made up of intersecting triangles. A vertex is a corner of a triangle where it connects to another triangle, and each vertex carries a considerable amount of information describing its coordinates in 3D space, as well as its weight, color, texture coordinates, fog, and point size data. A vertex shader is a graphics processing function that manipulates these values, producing such things as more realistic lighting effects, improved complex textures such as hair and fur, and more accurate surface deformations such as waves rippling in a pool or the stretching and wrinkling of a character’s clothes as he or she moves.
Vertex shader unitsA feature built into the graphical processor which renders the texture, magnitude and direction of the individual triangles that comprise each polygon of a given 3D object. The more vertex shader units available

129
within the graphical processor, the more complex polygons that can be generated per clock cycle, and hence finer, more naturalistic detail and movement is possible.
VGA ConnectorA type of graphics connector, sometimes also called an analog connector. It is the most common type of video connector available, consisting of 15-pins set in three rows. The “VGA” is an acronym for “Video Graphics Array,” which is also the name for the video resolution mode of 640x480 pixels, the lowest standard resolution supported by virtually all video cards.
Video Immersion™ IIA technology that integrates digital video features such as advanced adaptive de-interlacing, temporal filtering, and video gamma enhancement to produce high-quality video along with an integrated digital TV decode capability. It also supports component output support for EDTV displays at 480i (interlaced scanning), 480p (progressive scanning), and for HDTV displays at 720p, and 1080i.
VideoShader™ HDA feature that integrates pixel-shading technology with video filtering and processing functions. It accelerates noise removal, de-blocking, adaptive de-interlacing, frame-rate conversion, color-space conversion, and more. It also enables better MPEG-2 decoding with motion compensation.
VPU RecoverA feature designed to significantly reduce the number of system crashes caused by problems occurring with the graphics hardware. If the display driver detects that the graphics processor has hung, VPU Recover will attempt to reset the graphics processor, eliminating the need for a system reboot and allowing users to continue using the computer without interrupting or losing their work.
YPbPrA type of analog composite video signal that splits and compresses the standard Red/Green/Blue (RGB) colors of a television signal into separate luminance and color values. The “Y” stands for the luminance channel,

130
while “Pb” and “Pr” represent the blue and red channels respectively, both of which have the luminance value subtracted from them. It is an equivalent color space to the chrominance-based YCbCr, which is used for digital video.
Z-buffer
The portion of video memory that keeps track of which onscreen elements can be viewed and which are hidden behind other objects. In the case of a 3D image, it keeps track of which elements are occluded by the foreground in relation to the user’s perspective, or by another 3D object.

131
Index
Numerics102 part number 41080i 52, 53, 54, 114, 1231080i mode 531080p 5316:9 (aspect ratio) 107, 1142D 36, 105, 108, 109, 111, 117, 118, 121, 1223:2 pulldown 1223D 29, 31, 36, 43, 44, 55, 56, 57, 58, 59, 60, 61, 62, 63, 64, 65,68, 69, 70, 74, 87, 97, 105, 106, 107, 108, 109, 111, 112, 113,114, 115, 116, 117, 118, 119, 120, 121, 122, 1243D Settings 553Dc 105, 119, 1204:3 (aspect ratio) 107, 114, 119480i 101, 114, 119, 123480p 101, 119, 1235:4 (aspect ratio) 107720p 52, 53, 54, 101, 114, 123720p mode 52AAccelerated Graphics Port (AGP) 106, 117accessories 103Activate a profile 32Activate an application, file, or shortcut when a profile is started 33Add an HDTV format 53Advanced View 28, 29, 37, 38, 39, 40, 41, 42, 44, 45, 47, 49, 50,51, 52, 53, 54, 55, 56, 58, 60, 62, 64, 65, 68, 69, 71, 72, 73, 74,76, 77, 78, 79, 80, 81, 82, 83, 84, 86, 87All Settings 65Alternate Frame Rendering (AFR) 106Alternate pixel center 69Always on Top 34AMD Athlon 4Anisotropic Filtering 55, 60, 65, 66, 107Anisotropic filtering 107, 119, 120Anisotropic Filtering preference 66Anti-aliasing 55, 57, 58, 59, 65, 106, 107, 119, 120Anti-Aliasing preference 65API-Specific 68appearance of the Catalyst Control Center 35

132
Application Programmable Interface (API) 55, 68Apply a Hotkey 31Aspect 107Aspect Ratio 54, 75, 80, 84, 107, 114, 119ATI Overdrive 116ATISETUP utility 20, 21, 22Avivo Color 51Avivo Video 76, 77, 78BBack Buffer 108back buffer 109Basic View 38Bilinear Filtering 108BIOS 37Bit depth 108Bitmap 108Brightness 78, 82brightness 70, 71, 72, 74, 75, 77, 78, 82, 100, 107, 109, 110, 113,114, 118Buffer 69, 108, 109, 112, 114, 115, 116, 124bus type 37CCatalyst 22Catalyst ™ A.I. 66Catalyst A.I. 55, 62, 87, 97Catalyst Control Center 21, 22, 25, 28, 29, 32, 33, 34, 35, 36, 42,43, 45, 46, 48, 50, 51, 52, 54, 55, 57, 59, 61, 63, 64, 67, 69, 70,73, 75, 77, 78, 79, 80, 81, 84, 85, 87, 88, 96, 97, 105, 107, 109,111Cathode Ray Tube (CRT) 40, 41, 48, 52, 122Change Catalyst A.I. settings 62, 87Change Catalyst Control Center language 35chrominance 120, 124Clone Mode 39, 40, 41, 79, 83CMOS 95Color 21, 41, 42, 51, 70, 71, 72, 73, 74, 78, 83, 100, 106, 107, 108,109, 110, 111, 112, 113, 114, 116, 117, 118, 119, 122, 123, 124Color - Full-screen 3D 74Color Brightness 72Color component 109Color Contrast 73, 74Color correction 109Color Depth 109Color Gamma 72, 74

133
Color quality 41Color Temperature 107Compliance Information 103compliance information 99component video 110Composite Video 110, 120, 123Compositing Engine 97, 98, 110, 120composition of the profile 32configuration
multiple monitors 21primary monitor 21
configuration tips 99Connecting Devices 14Contrast 71, 78contrast 70, 71, 72, 73, 74, 77, 78, 82, 83, 100, 107, 114Control Panel 5, 21, 109Control point 110Copy-protection
DVDs 101CPU 117Crazy Taxi 3 62Create a list of active Hotkeys 30Create a Profile 32Create or Edit Profile 32CrossFire 95, 96, 97, 98, 107, 118, 120CrossFire Edition 95, 96, 97, 98, 110CrossFire F.A.Q. 95CrossFire Ready 95, 98CRT 4, 101, 110, 111, 119Custom View 29Customer Care 36, 99, 101, 102, 103DDashboard 25, 28, 29, 30, 32, 34, 35, 36, 111Define Custom View 29Deinterlacing 105de-interlacing 80, 81, 84, 122, 123
adaptive 81bob 81motion adaptive 81
Delete a Profile 33Depth Buffer 114Desktop Area 41desktop size 41Detect a newly connected display device 42Detect Displays 42

134
Determine how display devices are detected 45device ID 37Digital 100Digital Flat Panel (DFP) 40, 41, 42, 52, 53, 100Digital flat-panel (DFP) display 4Digital Panel properties 48Direct 3D 43, 67, 68, 69, 107, 111, 118, 120Disable Catalyst A.I. 62Display Color page 71Display Data Channel (DDC) 46Display Detection Options 43Display Options 43Display the online help 35, 36Display the version of the installed Catalyst Control Center 36Displays Manager 37, 38Displays Manager Advanced View 38Dithering 111Doom 3 62Dot pitch 91, 111, 112, 117, 119dot pitch 91driver installation 19drivers
installing 19uninstalling 5
DVD 4, 19, 110, 113, 118, 121DVI 48, 49, 50, 96, 97, 112, 113, 121DVI Settings 50DVI-A 112DVI-D 112DVI-I 96, 97, 100, 112DXT 68DXT texture formats 68EEdit an existing Hotkey 30Electromagnetic Interference (EMI) 121Enable Hotkeys feature 30Enable VPU Recover 86Enhanced Definition Television (EDTV) 112, 123error report 86Euroconnector 118Extended Desktop 45, 79Extended Display Identification Data (EDID) 47, 48, 52, 53Extended Mode 39, 40, 41, 79, 83external connectors 4

135
FFCC Compliance 103Flat Shading 112Fog 112, 122Force 24-bit Z-buffer depth 69Force button 42Force changes to a specific display setting 42Force TV detection 45Frame Buffer 69, 112frame rate 69, 105Frames per second (fps) 113Ggames
TV display 91Gamma 77, 82gamma 70, 71, 72, 74, 75, 77, 78, 82, 107, 113, 123geometry instancing 68Getting Additional Accessories 103Gouraud Shading 112, 113GPU 110Graphical Processor Unit (GPU) 68, 116, 119graphics chipset 37Graphics Software 36HHalf Life 2 62Hardware
installing 7HDTV 91, 93HDTV Adapter Troubleshooting 101HDTV Component Video Adapter 92HDTV Support 52Help 5, 21, 25, 28, 29, 35, 36, 38, 102Hide Splash Screen 34High Definition Multimedia Interface (HDMI) 113High Definition Television 91High Definition Television (HDTV) 40, 41, 46, 48, 52, 53, 54, 101,110, 113, 114, 119, 123High-Bandwidth Digital Copy Protection (HDCP) 113Hotkeys 29Hotkeys Manager 30, 31Hue 51, 75, 77, 78, 83, 107, 114, 118HydraVision 20, 22, 114HyperZ HD 114

136
IImage Scaling 49Industry Canada Compliance 104Information Center 36installation tips 99Installing drivers 19interlaced 80, 116, 122KKeyframe interpolation 115KTX Buffer Region Extension 115LLighting 105, 106, 108, 109, 112, 113, 115, 122Linux 116luminance 110, 120, 123, 124MMac OS X 116Master graphics card 95, 96, 97, 110, 120Match the source video 80, 84memory size 37Microsoft DirectX 44, 68, 111mipmap 107Mipmap detail level 64, 66Mipmapping 60, 63, 115Monitor Attributes 47motherboard 96, 106, 116MPEG-2 123multimedia 81, 117multi-monitor 38, 114Multi-Sample Anti-Aliasing (MSAA) 59, 106NNTSC 105, 112, 115, 117OOffscreen Memory 116OpenGL 36, 43, 44, 67, 68, 115, 116Overlay Display 75, 79, 83PPAL 116, 119PCI 116, 117PCI Express 4, 95, 96PCI Express (PCIe) 106, 117Pentium 4Péritel 118Pipeline 117Pixel 69, 106, 108, 109, 111, 117, 119, 120, 121, 122, 123

137
pixel shaders 119power supply 4Predefined and Custom HDTV Formats 52, 53Preferences 29, 33Preview your changes 57, 59, 61, 62, 64primary slot 96Prince of Persia 62Product Registration 101Profile Manager 33Profiles 29profiles 31Profiles Manager 31, 32, 33RRace Driver 62Radeon 118, 120RCA connection 110Reactivate your color settings 72Red Green Blue (RGB) 100, 110, 114, 118, 121, 123Refresh Rate 20, 21, 38, 42, 43, 44, 47, 69, 100, 115, 116, 117, 119Refresh Rate Override 43refresh rate override 44registration 4Remote Wonder 22Remove an HDTV Format 54Rendering 117rendering modes 85, 98Resolution 4, 21, 38, 45, 47, 50, 63, 91, 100, 111, 112, 115, 117,118, 119, 123resolution modes 45Restore factory defaults 35RGB 110Rotate the desktop 42rotation 42, 122SSafe Mode 99safety instructions iiiSame on all 83Saturation 51, 77, 78, 83, 107, 114, 118Save your Profile 33Scale to full screen 80, 84scaling 122SCART 118Scissor Mode 118, 120Search for Help 36

138
SECAM 119secondary display device 39See a list of active Hotkeys 31Select a de-interlacing mode 81Select a deinterlacing mode 84Select a skin 35Select a SmartShader effect 67Select Language 35Separate Video 120serial number 4Set a higher quality Anisotropic Filtering 61Set the Anisotropic Filtering preference manually 60Set the Anisotropic Filtering to automated preference 61Set the Anti-Aliasing preference manually 58, 70Set the Anti-Aliasing to automated preference 58shader 106, 119shader effects 119Shadow mask 119Show Toolbar Text 34Slave graphics card 95, 97, 110slot zero 95SmartShader 67SmartShader HD 119SmoothVision HD 119Software
installing 19Sort Hotkeys 31Specular highlight 120Splinter Cell 62Standard Definition Television (SDTV) 112, 119Standard Mode 79, 83, 84Standard settings 56Standard View 28, 29Stretch Main Horizontally 40Stretch Main Vertically 40Super Anti-aliasing 120Super-Sample Anti-Aliasing (SSAA) 59, 106SuperTiling 120SurroundView 22, 98S-Video 110, 120Swap display 41Switch Views 29SXGA 118system requirements 4

139
System Tray Icon 35TTemperature 51Temporal anti-aliasing 58temporal filtering 123Texel 121texture buffer 109Texture mapping 121Texture Preference 121the same on all 79Theater Mode 75, 79, 80, 83, 84Theater Mode Settings 84ToolTips 34Transition Minimized Differential Signaling (TMDS) 121Transparent Anti-Aliasing 65Trilinear filtering 122Triple buffering 69Troubleshooting 99, 101
HDTV adapter 101troubleshooting 99TV 38, 40, 41, 42, 43, 45, 90, 91, 101, 123TV display 89, 91
games 91TV Out 89UUnreal Tournament 62UXGA 118VVCR 110, 113, 121Vector Adaptive Deinterlacing 105VersaVision 122Vertex shader 122Vertex shader units 122vertex shaders 119VGA 4, 118, 123VGA connector 123Video 76, 77, 78, 79, 80, 81, 82, 83, 84, 85, 100, 101, 110, 112,120, 123Video Adjustments 85video aspect ratio 80, 84Video Immersion II 123video memory 109VideoShader HD 123Views 29

140
VPU Recover 85, 86, 123WWait for vertical refresh setting 67Warranty 102warranty 99Waste Electrical and Electronic Equipment (WEEE) Compliance 104Windows 19, 21, 22, 84, 101, 111, 116Windows Advanced Options Menu 99Windows Control Panel 109Windows Media Settings 84Windows Media Video Acceleration. 84Windows System Information 37Windows System Tray 35Windows XP 4, 19, 99Wizard 36, 38, 75, 76XXGA 118YY/C 120Y/C video 120YCbCr 124YPbPr 101, 110, 123YPbPr connector 91ZZ-buffer 69, 114, 124z-buffer 109