radical-7 pulse co-oximeter - queen's...
TRANSCRIPT

© 2010-2011 Masimo CorporationSTT-0229B CO-006911Please see operator’s manual for further information
Radical-7 Pulse CO-Oximeter
Touch Screen Training

© 2010-2011 Masimo CorporationSTT-0229B CO-006911Please see operator’s manual for further information
Learning Objectives
Upon completing this course, the participant will be able to:
> Identify the key features, components, and controls of the Radical-7
Pulse CO-Oximeter
> Describe and navigate the touch screen menu structure of the
Radical-7
> Describe how to check the software versions on the Radical-7
> Describe how to use PI and SIQ to identify unreliable measurements
and to troubleshoot common pulse oximetry challenges
> Identify other key troubleshooting concepts
> Identify components on the rear panel of the Radical-7 docking
station
> Describe the cleaning process for the Radical-7
© 2010-2011 Masimo CorporationSTT-0229B CO-006911Please see operator’s manual for further information
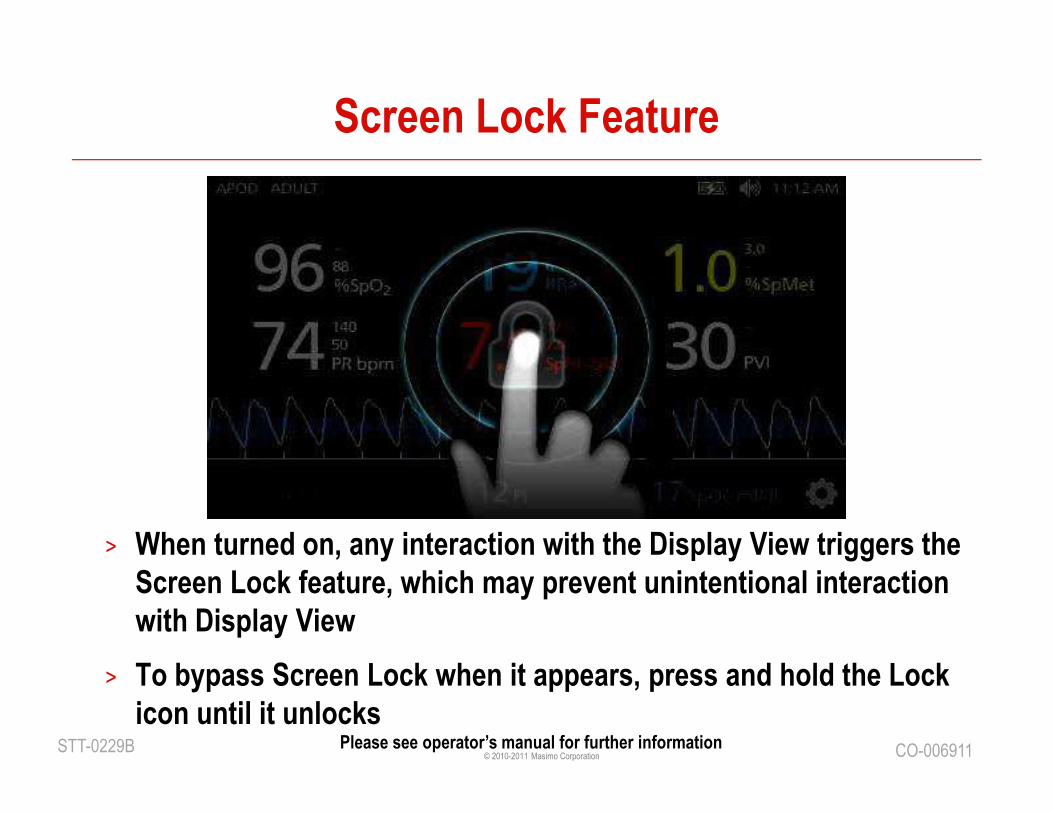
Screen Lock Feature
> When turned on, any interaction with the Display View triggers the
Screen Lock feature, which may prevent unintentional interaction
with Display View
> To bypass Screen Lock when it appears, press and hold the Lock
icon until it unlocks

© 2010-2011 Masimo CorporationSTT-0229B CO-006911Please see operator’s manual for further information
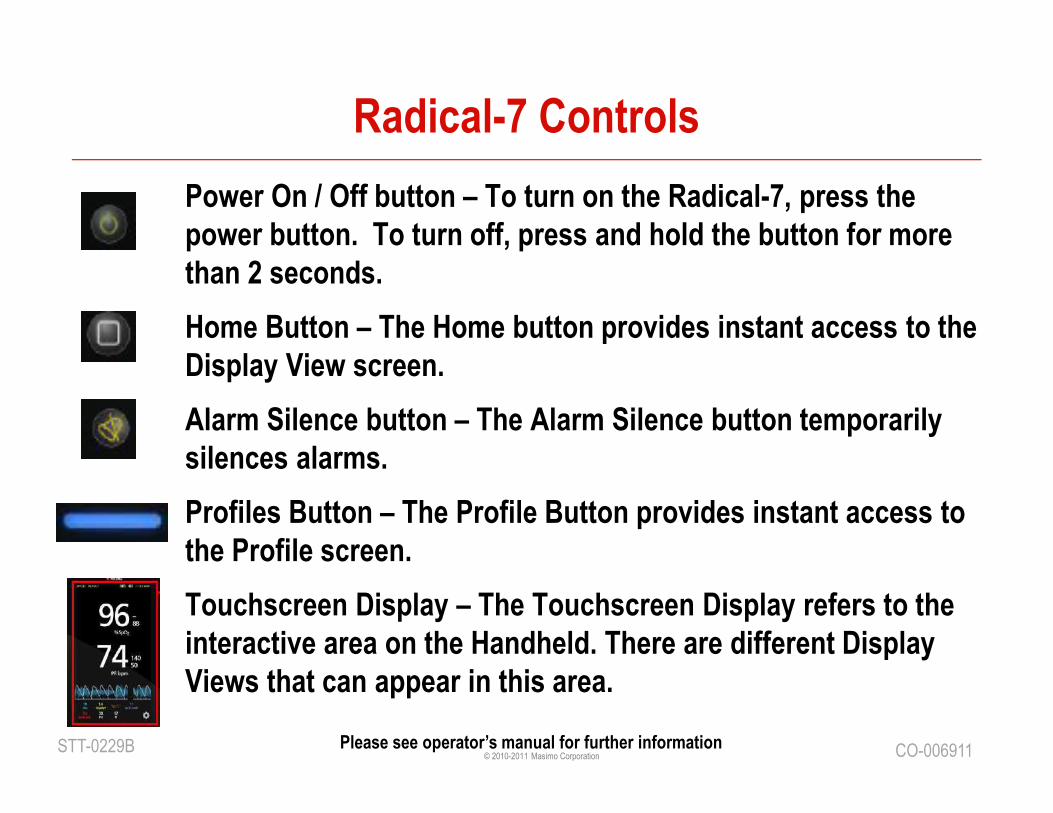
Radical-7 Controls
Alarm Silence /
Reset Button
Power On/Off Button
Docking
Indicator
AC Power
Indicator
Visual Alarm
Indicator
Handheld
Battery
Charging
Indicator
Handheld Release
Button
Profiles ButtonHome Button
Touchscreen Display
© 2010-2011 Masimo CorporationSTT-0229B CO-006911Please see operator’s manual for further information
Radical-7 Controls
Power On / Off button – To turn on the Radical-7, press the
power button. To turn off, press and hold the button for more
than 2 seconds.
Home Button – The Home button provides instant access to the
Display View screen.
Alarm Silence button – The Alarm Silence button temporarily
silences alarms.
Profiles Button – The Profile Button provides instant access to
the Profile screen.
Touchscreen Display – The Touchscreen Display refers to the
interactive area on the Handheld. There are different Display
Views that can appear in this area.

© 2010-2011 Masimo CorporationSTT-0229B CO-006911Please see operator’s manual for further information
Radical-7 Controls
Handheld Release Button – Press down the Handheld Release Button to pull the handheld device off the Docking Station.
Handheld Battery Charging Indicator – Illuminated when the handheld battery is charging and blinks just prior to charging. Does not illuminate when battery is fully charged or not present.
Visual Alarm Indicator – Illuminated when an alarm condition is active and the Alarm Status Indicator is shown.
AC Power Indicator – Illuminated when the Radical-7 Docking Station is plugged into AC line power.
Docking Indicator – Illuminated when the handheld instrument is turned on and properly interfaced to the Docking Station. If handheld is not replaced into the Docking Station correctly, this will not illuminate and the battery will not be charging.
© 2010-2011 Masimo CorporationSTT-0229B CO-006911Please see operator’s manual for further information
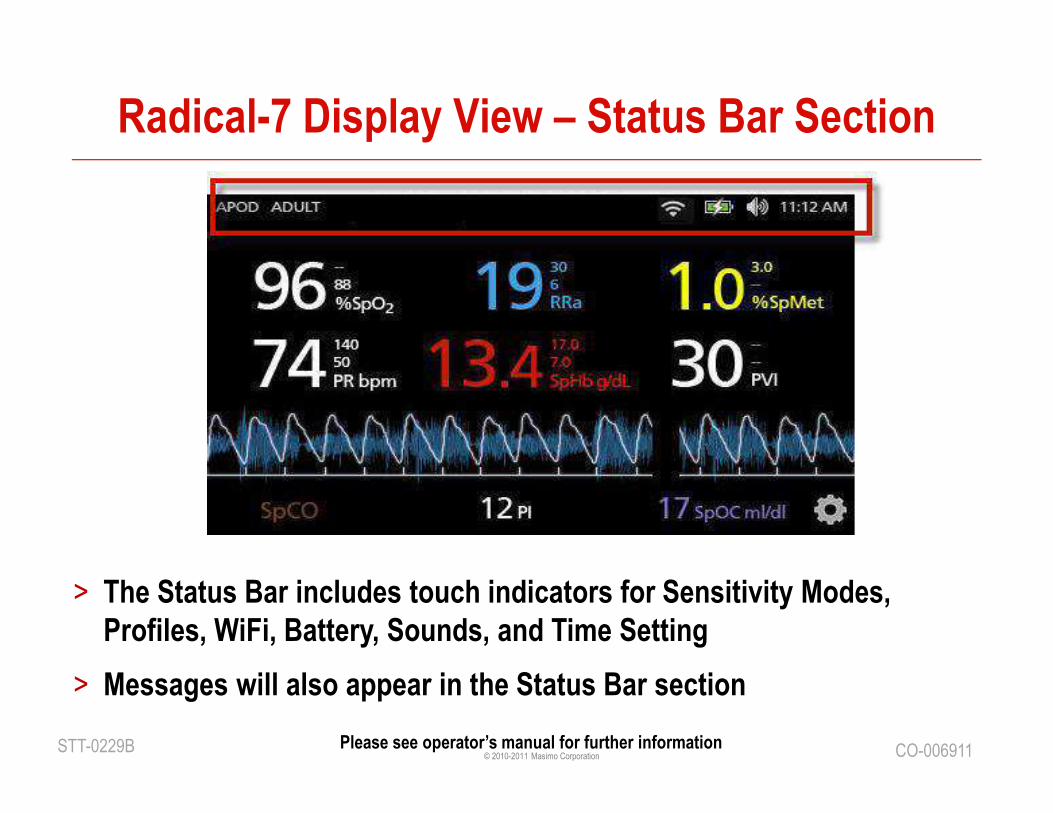
Radical-7 Display View – Status Bar Section
> The Status Bar includes touch indicators for Sensitivity Modes,
Profiles, WiFi, Battery, Sounds, and Time Setting
> Messages will also appear in the Status Bar section
© 2010-2011 Masimo CorporationSTT-0229B CO-006911Please see operator’s manual for further information
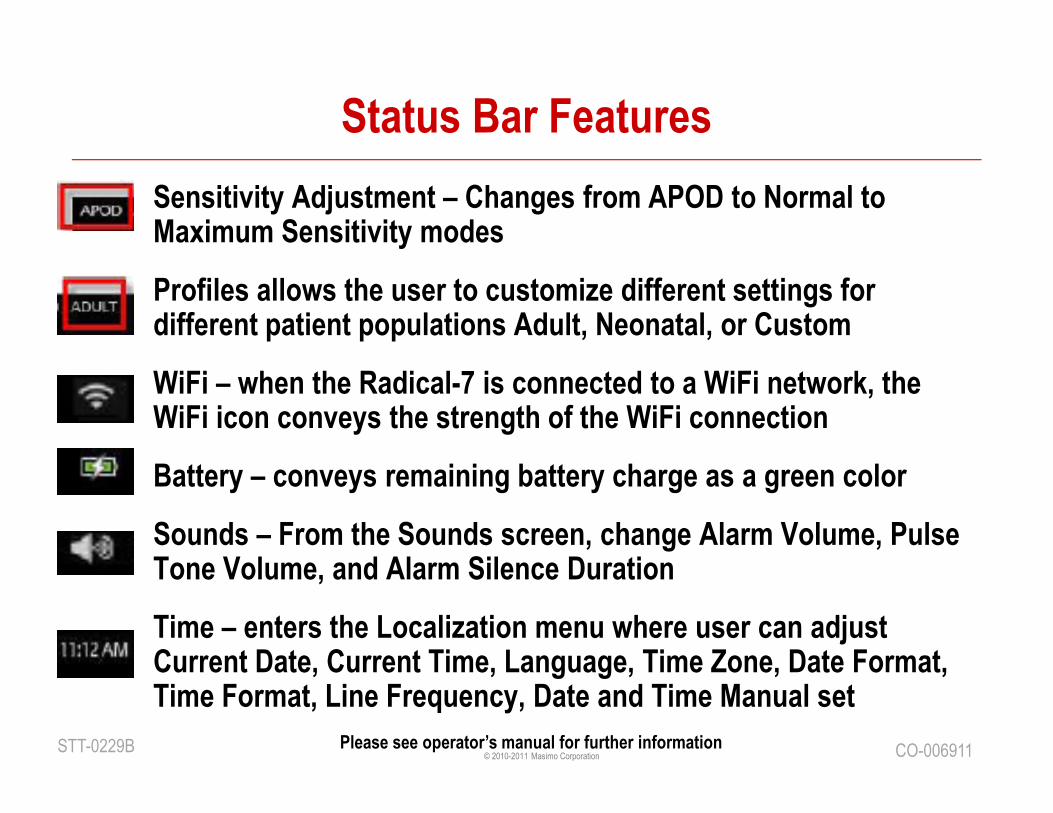
Status Bar Features
Sensitivity Adjustment – Changes from APOD to Normal to Maximum Sensitivity modes
Profiles allows the user to customize different settings for different patient populations Adult, Neonatal, or Custom
WiFi – when the Radical-7 is connected to a WiFi network, the WiFi icon conveys the strength of the WiFi connection
Battery – conveys remaining battery charge as a green color
Sounds – From the Sounds screen, change Alarm Volume, Pulse Tone Volume, and Alarm Silence Duration
Time – enters the Localization menu where user can adjust Current Date, Current Time, Language, Time Zone, Date Format, Time Format, Line Frequency, Date and Time Manual set
© 2010-2011 Masimo CorporationSTT-0229B CO-006911Please see operator’s manual for further information
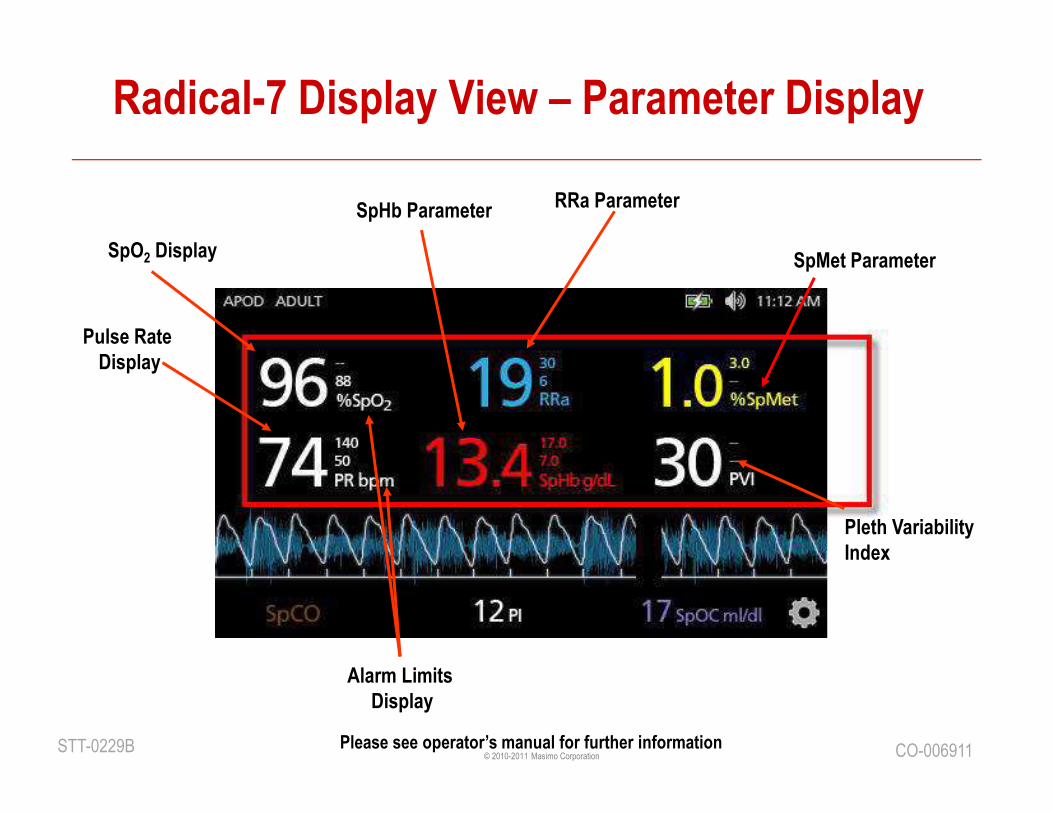
Radical-7 Display View – Parameter Display
Pulse Rate
Display
SpO2 Display
Alarm Limits
Display
SpHb ParameterRRa Parameter
Pleth Variability
Index
SpMet Parameter
© 2010-2011 Masimo CorporationSTT-0229B CO-006911Please see operator’s manual for further information
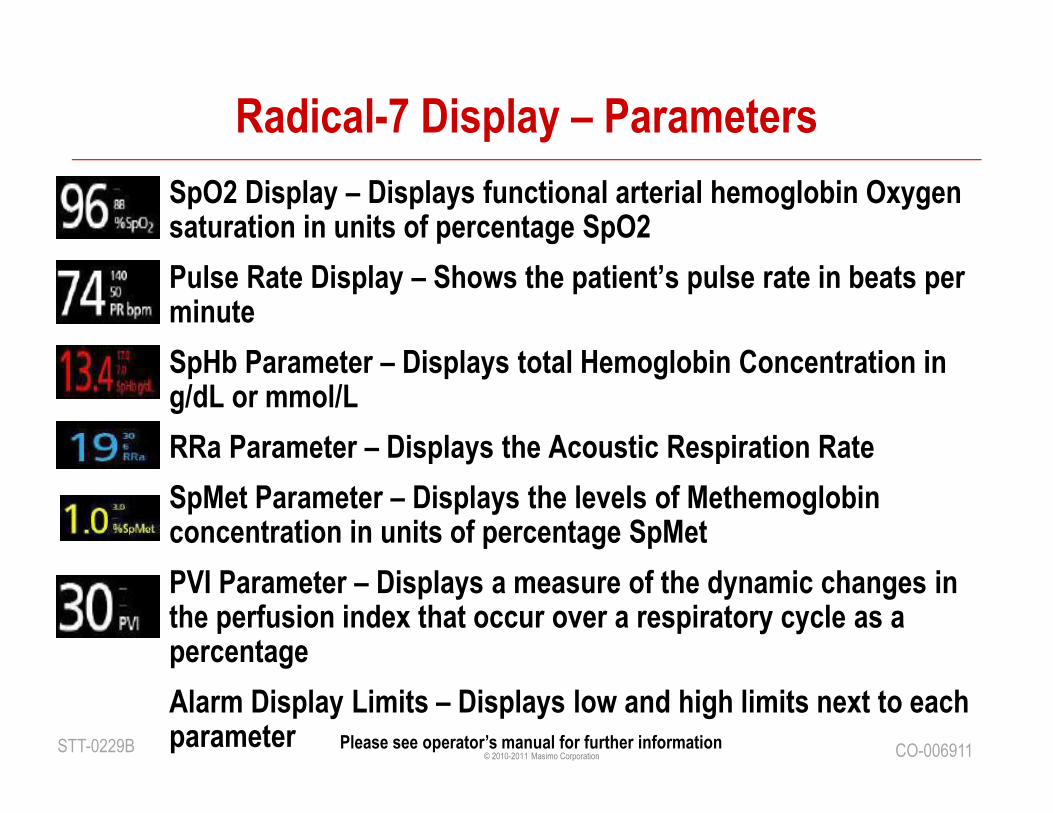
Radical-7 Display – Parameters
SpO2 Display – Displays functional arterial hemoglobin Oxygen saturation in units of percentage SpO2
Pulse Rate Display – Shows the patient’s pulse rate in beats per minute
SpHb Parameter – Displays total Hemoglobin Concentration in g/dL or mmol/L
RRa Parameter – Displays the Acoustic Respiration Rate
SpMet Parameter – Displays the levels of Methemoglobin concentration in units of percentage SpMet
PVI Parameter – Displays a measure of the dynamic changes in the perfusion index that occur over a respiratory cycle as a percentage
Alarm Display Limits – Displays low and high limits next to each parameter
© 2010-2011 Masimo CorporationSTT-0229B CO-006911Please see operator’s manual for further information
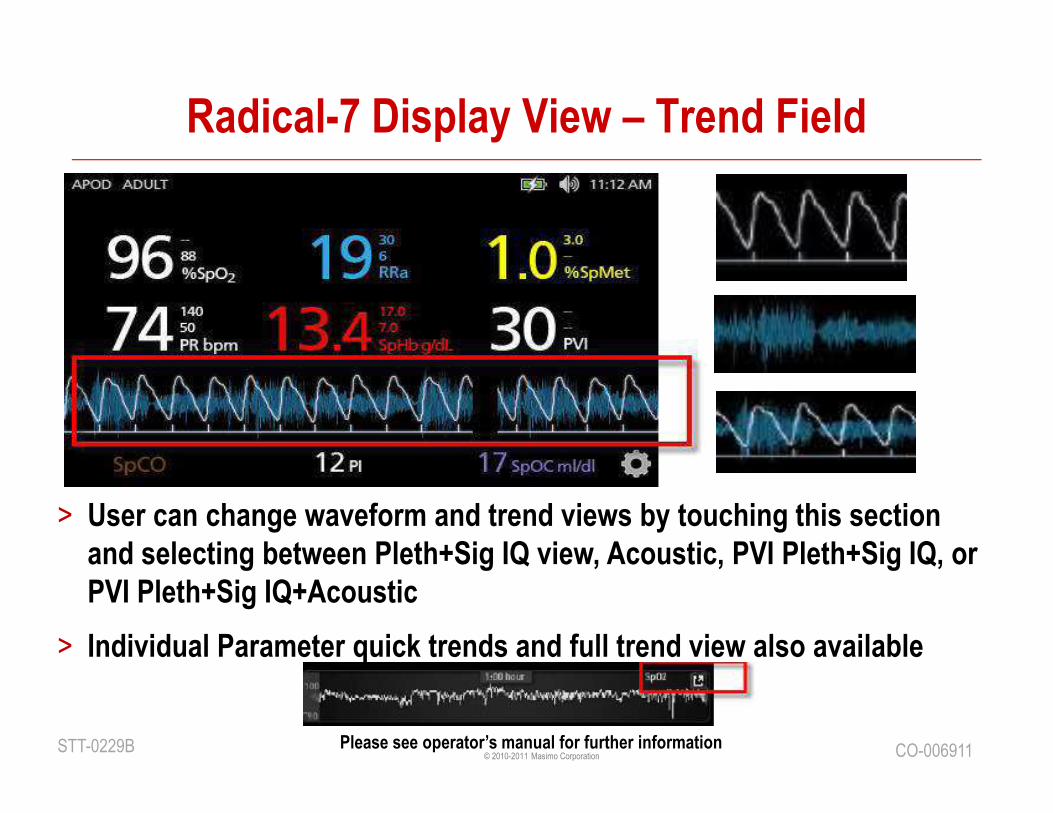
Radical-7 Display View – Trend Field
> User can change waveform and trend views by touching this section
and selecting between Pleth+Sig IQ view, Acoustic, PVI Pleth+Sig IQ, or
PVI Pleth+Sig IQ+Acoustic
> Individual Parameter quick trends and full trend view also available
© 2010-2011 Masimo CorporationSTT-0229B CO-006911Please see operator’s manual for further information
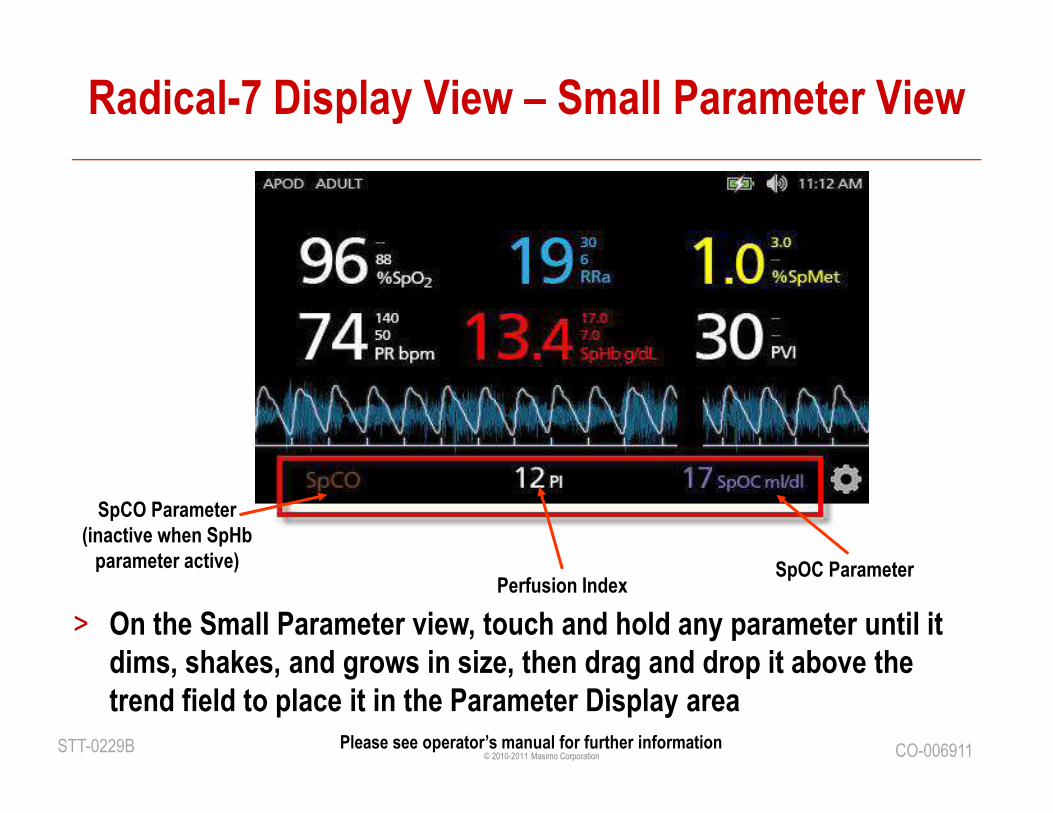
Radical-7 Display View – Small Parameter View
Perfusion IndexSpOC Parameter
SpCO Parameter
(inactive when SpHb
parameter active)
> On the Small Parameter view, touch and hold any parameter until it
dims, shakes, and grows in size, then drag and drop it above the
trend field to place it in the Parameter Display area

© 2010-2011 Masimo CorporationSTT-0229B CO-006911Please see operator’s manual for further information
Radical-7 Display – Parameters
SpCO Parameter – Displays the levels of Carboxyhemoglobin concentration in the blood in percent SpCO.
Perfusion Index – Displays the ratio of the pulsatile blood flow to the non-pulsatile or static blood in peripheral tissue in percentage. PI represents a non-invasive measure of peripheral perfusion that can be continuously and non-invasively obtained from a pulse oximeter.
SpOC Display – Provides a calculated measurement of the amount of oxygen in arterial blood, which may provide useful information about oxygen both dissolved in plasma and combined with hemoglobin.
© 2010-2011 Masimo CorporationSTT-0229B CO-006911Please see operator’s manual for further information
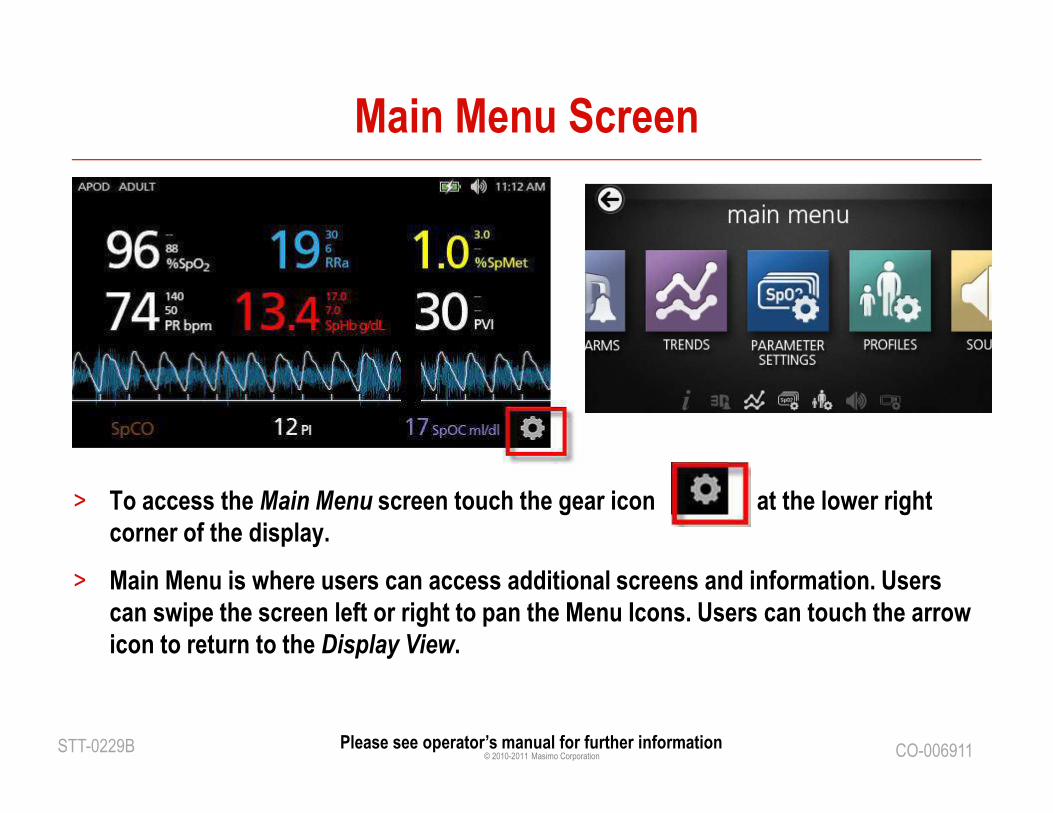
Main Menu Screen
> To access the Main Menu screen touch the gear icon at the lower right
corner of the display.
> Main Menu is where users can access additional screens and information. Users
can swipe the screen left or right to pan the Menu Icons. Users can touch the arrow
icon to return to the Display View.
© 2010-2011 Masimo CorporationSTT-0229B CO-006911Please see operator’s manual for further information
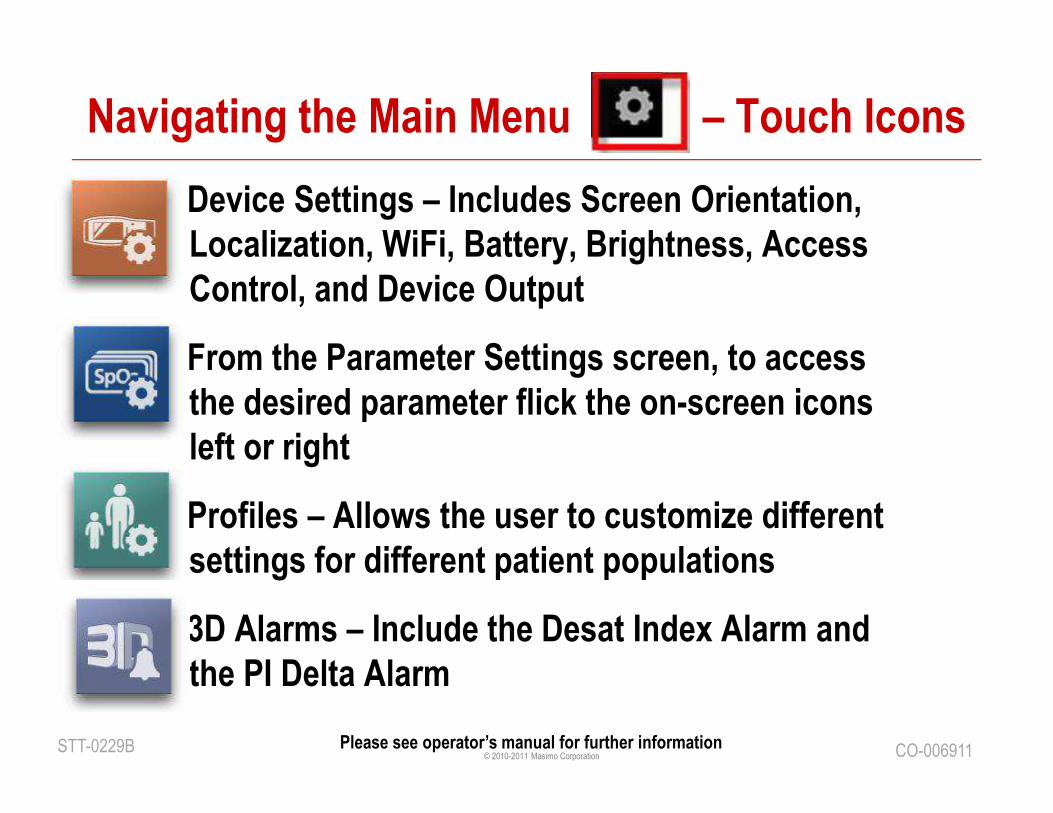
Navigating the Main Menu – Touch Icons
Device Settings – Includes Screen Orientation,
Localization, WiFi, Battery, Brightness, Access
Control, and Device Output
From the Parameter Settings screen, to access
the desired parameter flick the on-screen icons
left or right
Profiles – Allows the user to customize different
settings for different patient populations
3D Alarms – Include the Desat Index Alarm and
the PI Delta Alarm
© 2010-2011 Masimo CorporationSTT-0229B CO-006911Please see operator’s manual for further information
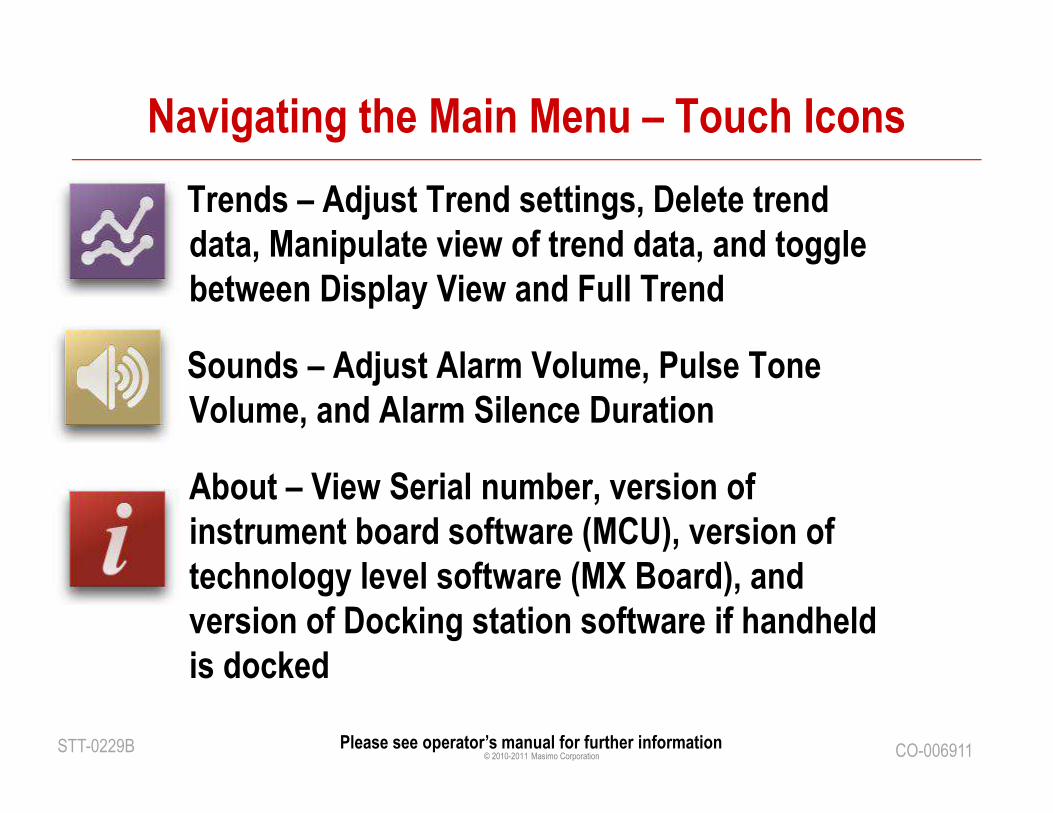
Navigating the Main Menu – Touch Icons
Trends – Adjust Trend settings, Delete trend
data, Manipulate view of trend data, and toggle
between Display View and Full Trend
Sounds – Adjust Alarm Volume, Pulse Tone
Volume, and Alarm Silence Duration
About – View Serial number, version of
instrument board software (MCU), version of
technology level software (MX Board), and
version of Docking station software if handheld
is docked
© 2010-2011 Masimo CorporationSTT-0229B CO-006911Please see operator’s manual for further information
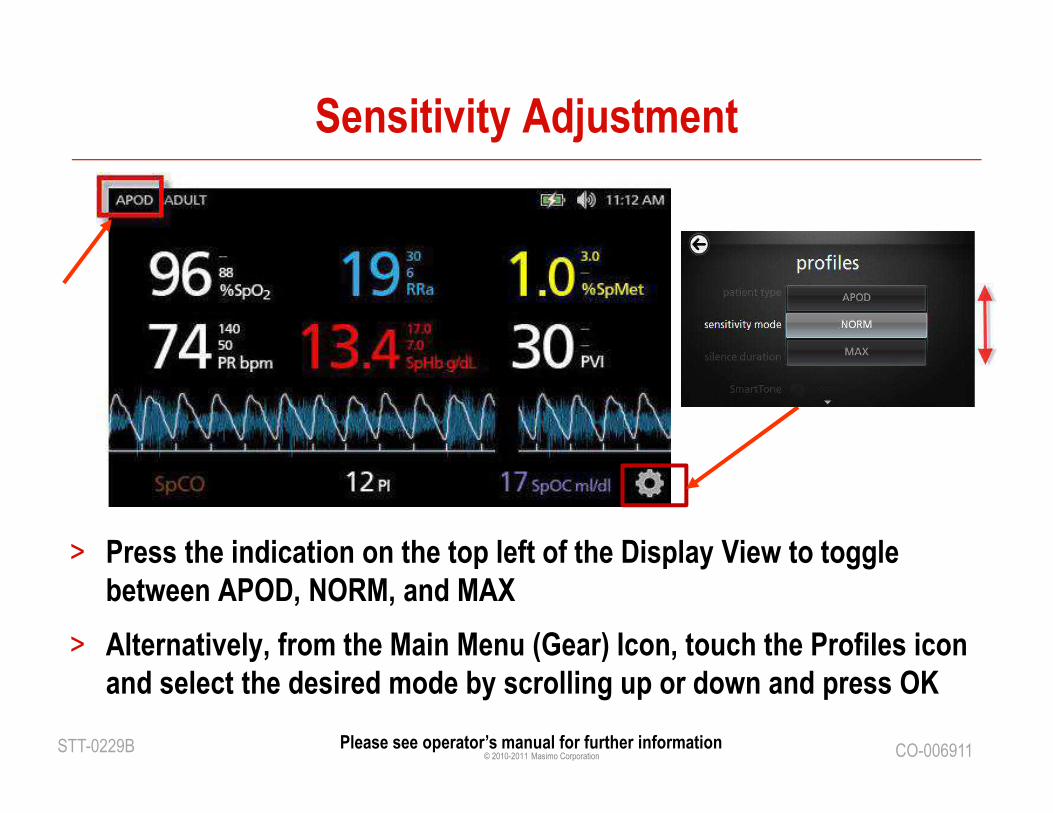
Sensitivity Adjustment
> Press the indication on the top left of the Display View to toggle
between APOD, NORM, and MAX
> Alternatively, from the Main Menu (Gear) Icon, touch the Profiles icon
and select the desired mode by scrolling up or down and press OK
© 2010-2011 Masimo CorporationSTT-0229B CO-006911Please see operator’s manual for further information
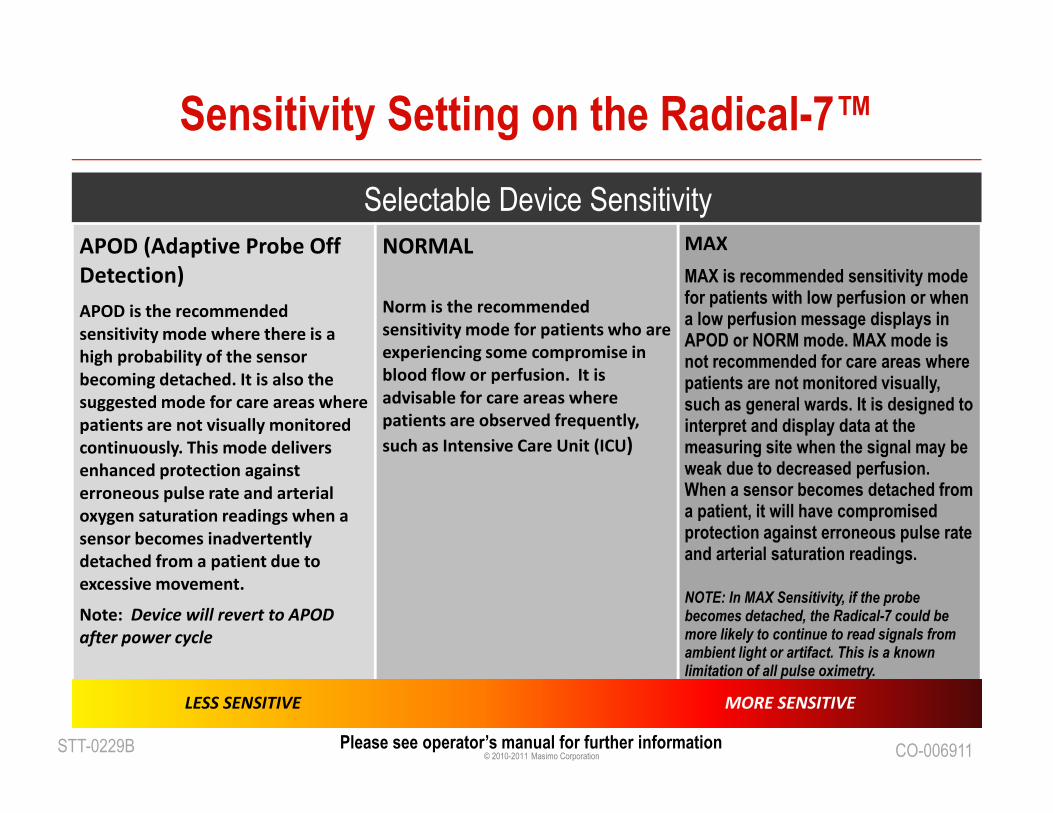
Selectable Device Sensitivity
APOD (Adaptive Probe Off
Detection)
APOD is the recommended
sensitivity mode where there is a
high probability of the sensor
becoming detached. It is also the
suggested mode for care areas where
patients are not visually monitored
continuously. This mode delivers
enhanced protection against
erroneous pulse rate and arterial
oxygen saturation readings when a
sensor becomes inadvertently
detached from a patient due to
excessive movement.
Note: Device will revert to APOD
after power cycle
NORMAL
Norm is the recommended
sensitivity mode for patients who are
experiencing some compromise in
blood flow or perfusion. It is
advisable for care areas where
patients are observed frequently,
such as Intensive Care Unit (ICU)
MAX
MAX is recommended sensitivity mode for patients with low perfusion or when a low perfusion message displays in APOD or NORM mode. MAX mode is not recommended for care areas where patients are not monitored visually, such as general wards. It is designed to interpret and display data at the measuring site when the signal may be weak due to decreased perfusion. When a sensor becomes detached from a patient, it will have compromised protection against erroneous pulse rate and arterial saturation readings.
NOTE: In MAX Sensitivity, if the probe becomes detached, the Radical-7 could be more likely to continue to read signals from ambient light or artifact. This is a known limitation of all pulse oximetry.
LESS SENSITIVE MORE SENSITIVE
Sensitivity Setting on the Radical-7™
© 2010-2011 Masimo CorporationSTT-0229B CO-006911Please see operator’s manual for further information
Perfusion Index and Signal IQ
Perfusion index (PI) is an assessment of the pulse
strength at the monitoring site
Signal IQ is used to indicate confidence level in the measurement
Signal IQ
Perfusion Index
© 2010-2011 Masimo CorporationSTT-0229B CO-006911Please see operator’s manual for further information
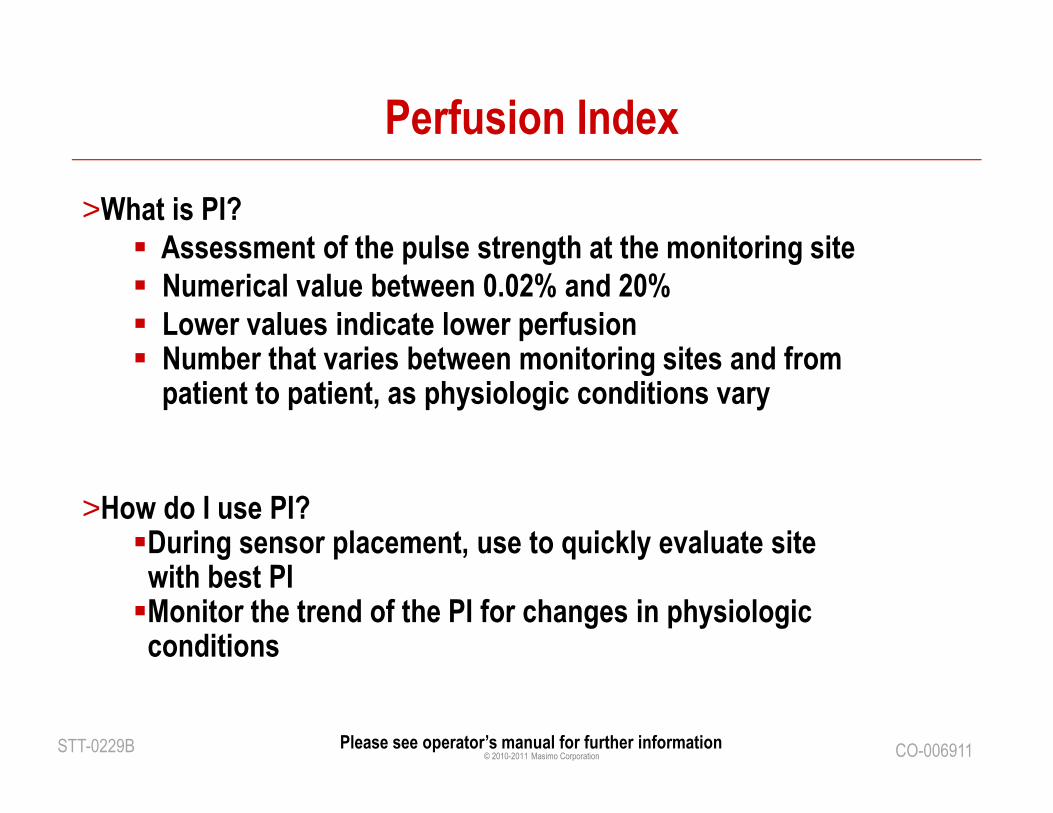
Perfusion Index
>What is PI?
� Assessment of the pulse strength at the monitoring site
� Numerical value between 0.02% and 20%
� Lower values indicate lower perfusion� Number that varies between monitoring sites and from
patient to patient, as physiologic conditions vary
>How do I use PI?�During sensor placement, use to quickly evaluate site with best PI �Monitor the trend of the PI for changes in physiologic conditions
© 2010-2011 Masimo CorporationSTT-0229B CO-006911Please see operator’s manual for further information
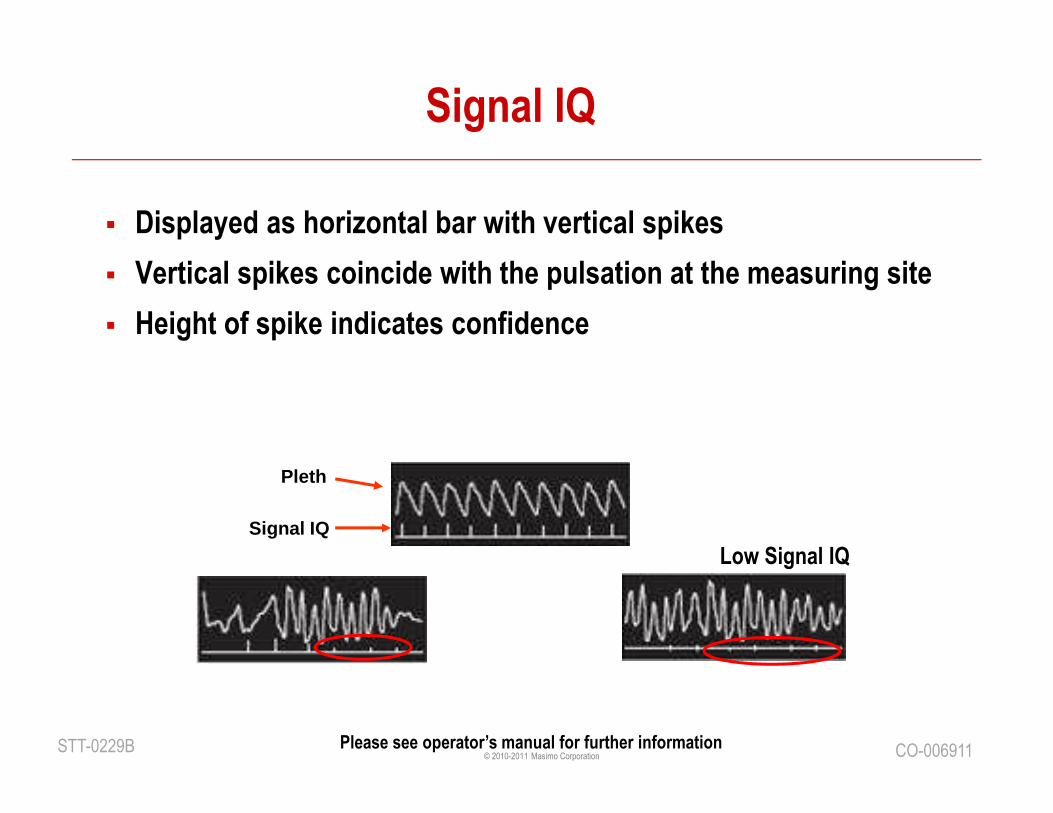
� Displayed as horizontal bar with vertical spikes
� Vertical spikes coincide with the pulsation at the measuring site
� Height of spike indicates confidence
Signal IQ
Pleth
Signal IQ
Low Signal IQLow Signal IQ
© 2010-2011 Masimo CorporationSTT-0229B CO-006911Please see operator’s manual for further information
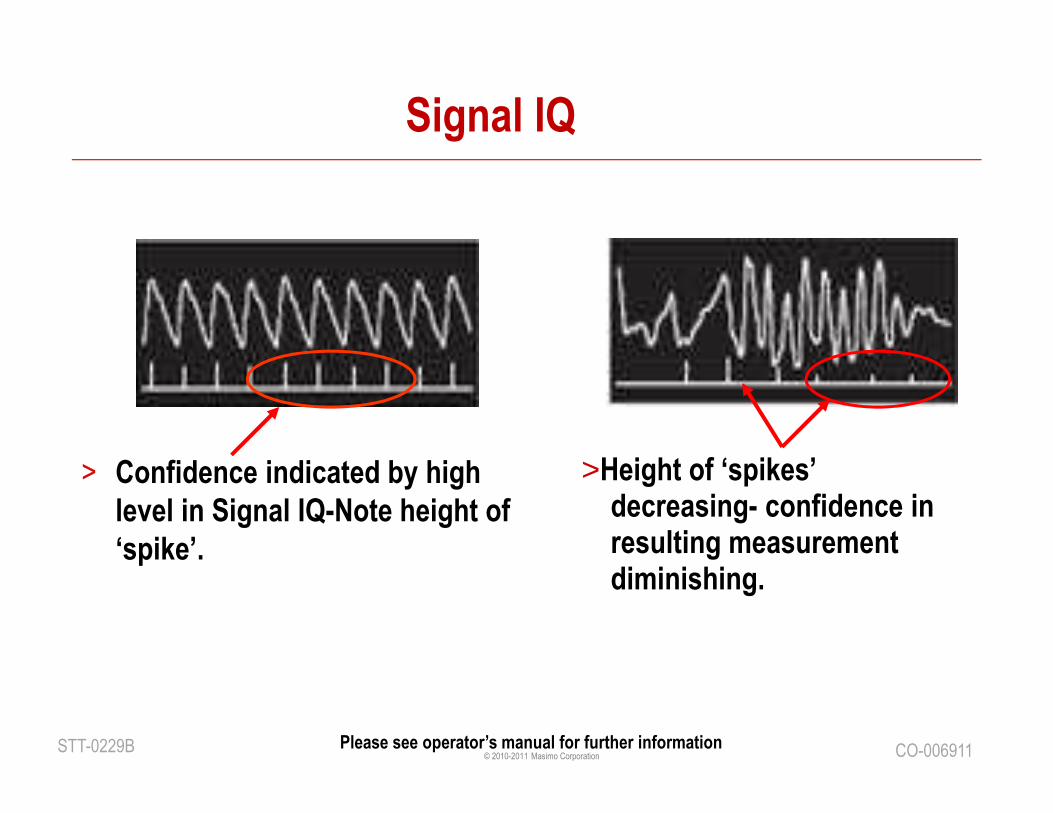
> Confidence indicated by high
level in Signal IQ-Note height of
‘spike’.
>Height of ‘spikes’ decreasing- confidence in resulting measurement diminishing.
Signal IQ
© 2010-2011 Masimo CorporationSTT-0229B CO-006911Please see operator’s manual for further information
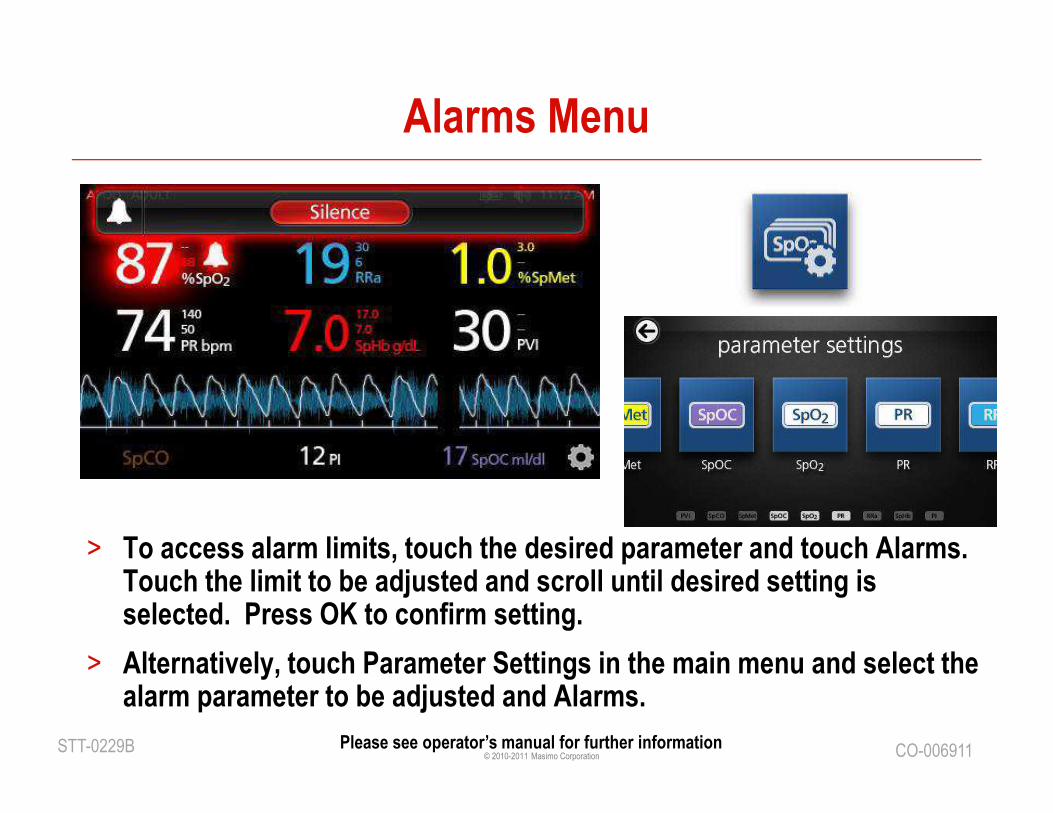
Alarms Menu
> To access alarm limits, touch the desired parameter and touch Alarms. Touch the limit to be adjusted and scroll until desired setting is selected. Press OK to confirm setting.
> Alternatively, touch Parameter Settings in the main menu and select the alarm parameter to be adjusted and Alarms.
© 2010-2011 Masimo CorporationSTT-0229B CO-006911Please see operator’s manual for further information
Troubleshooting
© 2010-2011 Masimo CorporationSTT-0229B CO-006911Please see operator’s manual for further information
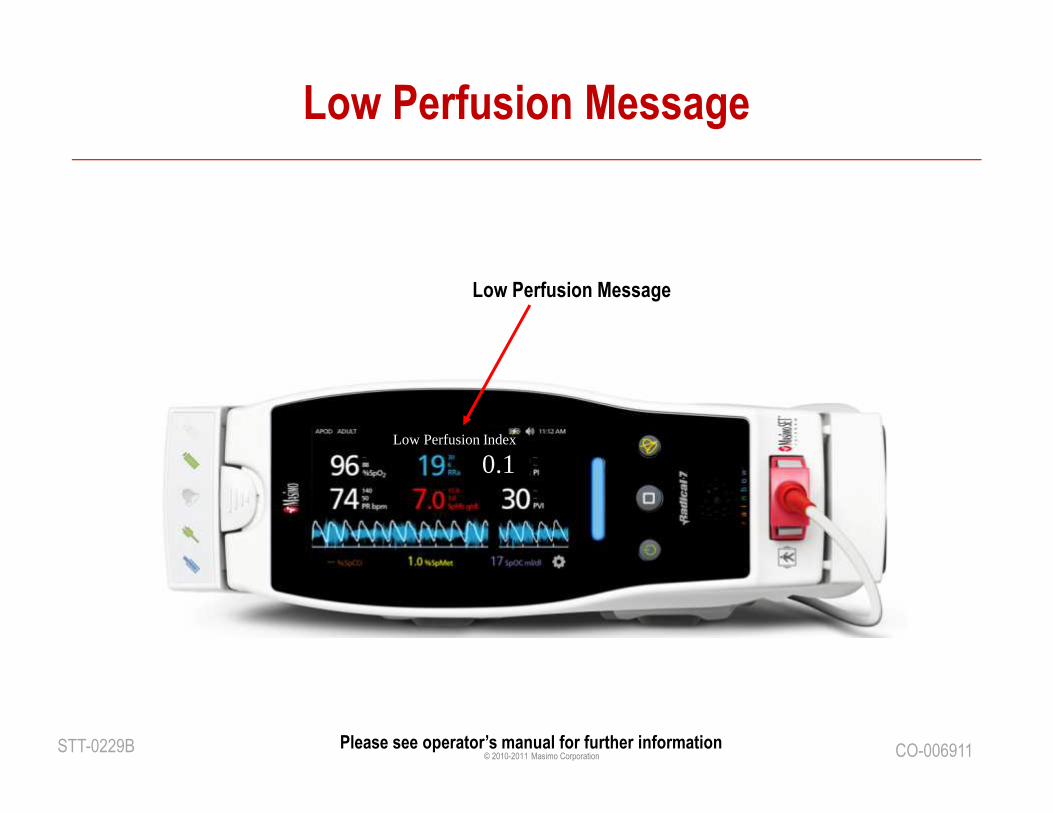
Low Perfusion Message
Low Perfusion Message
0.1Low Perfusion Index
© 2010-2011 Masimo CorporationSTT-0229B CO-006911Please see operator’s manual for further information
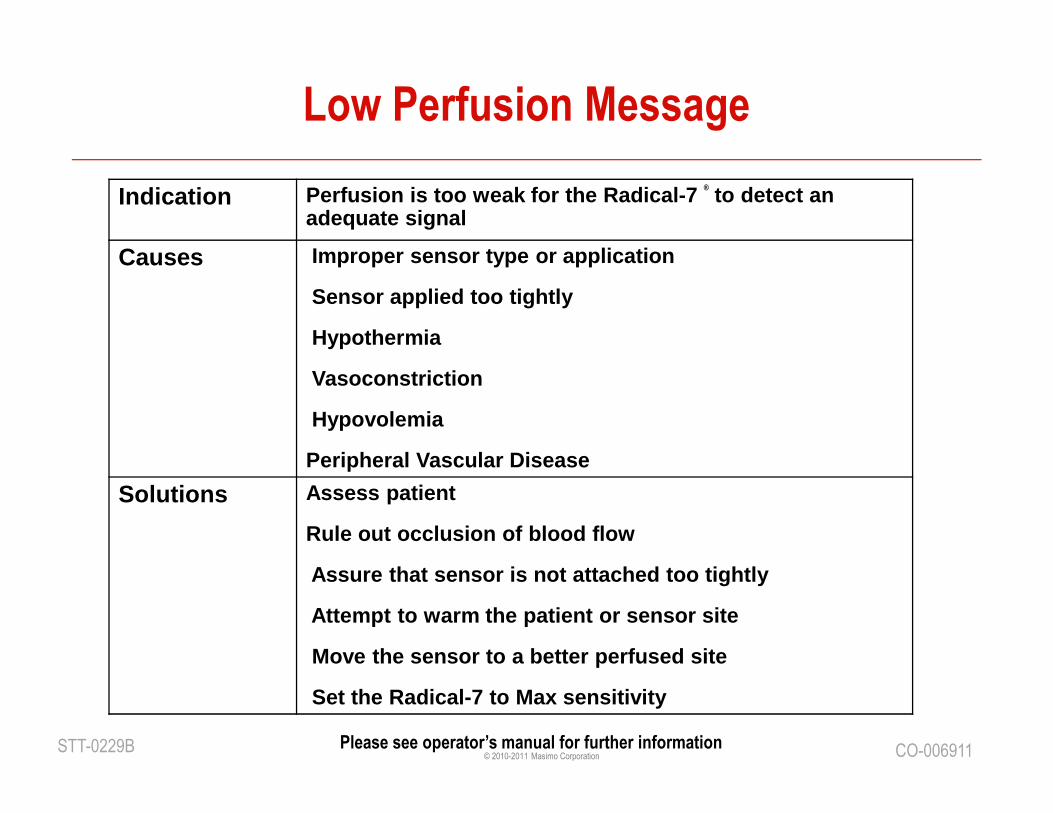
Low Perfusion Message
Indication Perfusion is too weak for the Radical-7 ® to detect an adequate signal
Causes Improper sensor type or application
Sensor applied too tightly
Hypothermia
Vasoconstriction
Hypovolemia
Peripheral Vascular Disease
Solutions Assess patient
Rule out occlusion of blood flow
Assure that sensor is not attached too tightly
Attempt to warm the patient or sensor site
Move the sensor to a better perfused site
Set the Radical-7 to Max sensitivity
© 2010-2011 Masimo CorporationSTT-0229B CO-006911Please see operator’s manual for further information
Low Signal IQ Message
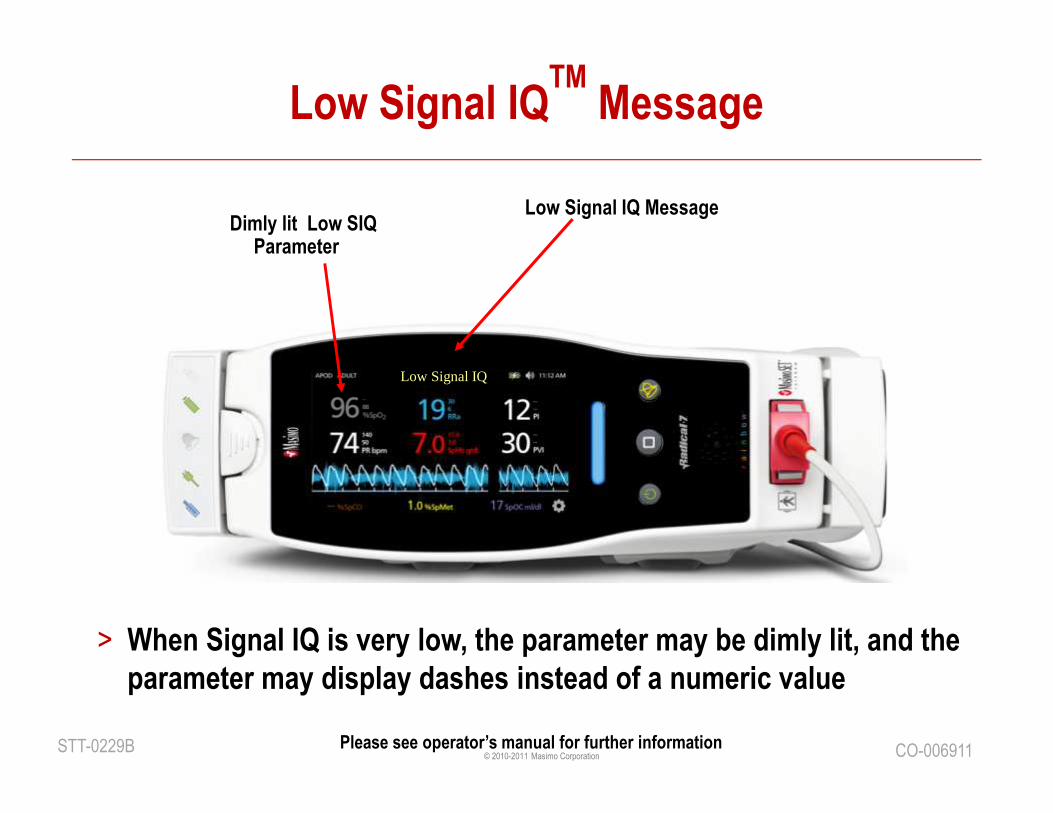
Low Signal IQTM
Message
Low Signal IQ
Dimly lit Low SIQ Parameter
> When Signal IQ is very low, the parameter may be dimly lit, and the
parameter may display dashes instead of a numeric value
© 2010-2011 Masimo CorporationSTT-0229B CO-006911Please see operator’s manual for further information
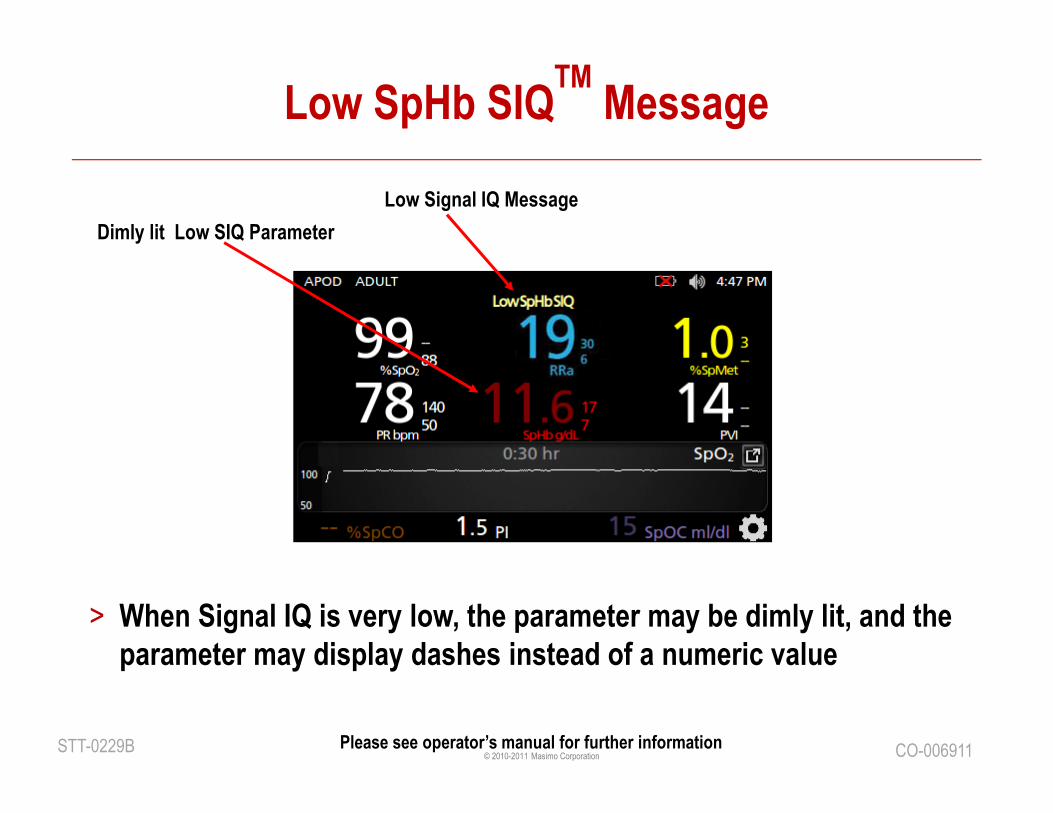
Low Signal IQ Message
Low SpHb SIQTM
Message
Dimly lit Low SIQ Parameter
> When Signal IQ is very low, the parameter may be dimly lit, and the
parameter may display dashes instead of a numeric value
© 2010-2011 Masimo CorporationSTT-0229B CO-006911Please see operator’s manual for further information
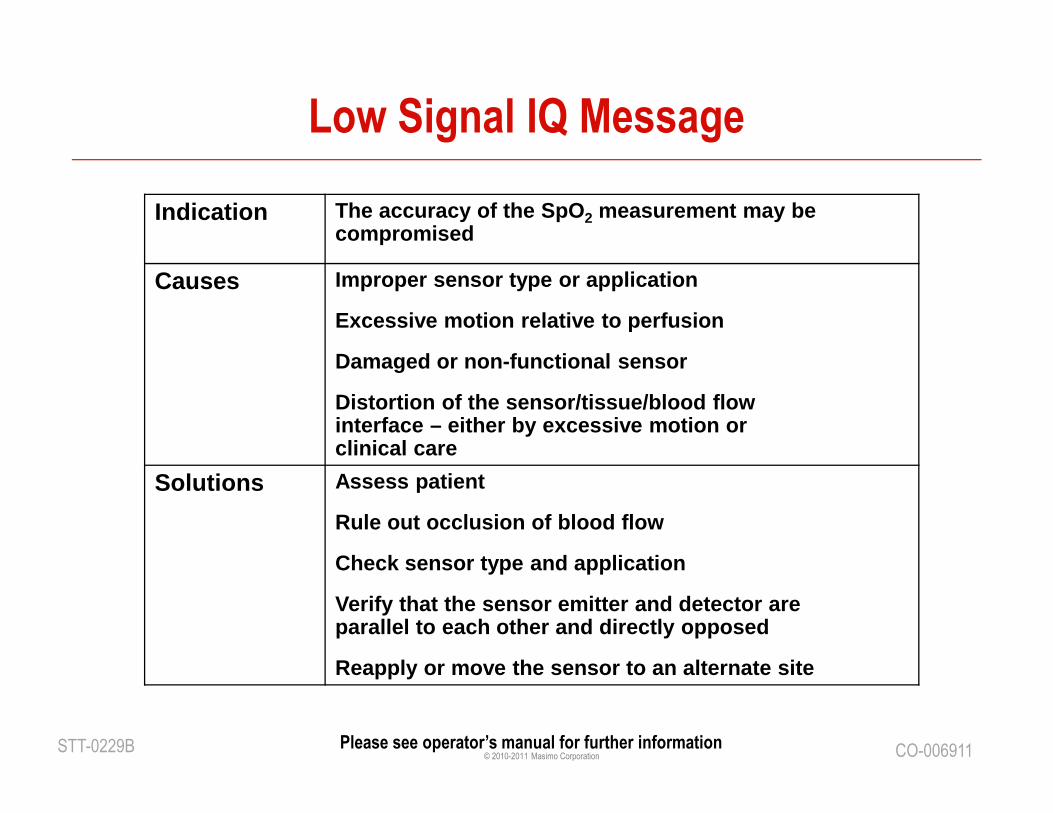
Indication The accuracy of the SpO 2 measurement may be compromised
Causes Improper sensor type or application
Excessive motion relative to perfusion
Damaged or non-functional sensor
Distortion of the sensor/tissue/blood flow interface – either by excessive motion or clinical care
Solutions Assess patient
Rule out occlusion of blood flow
Check sensor type and application
Verify that the sensor emitter and detector are parallel to each other and directly opposed
Reapply or move the sensor to an alternate site
Low Signal IQ Message
© 2010-2011 Masimo CorporationSTT-0229B CO-006911Please see operator’s manual for further information
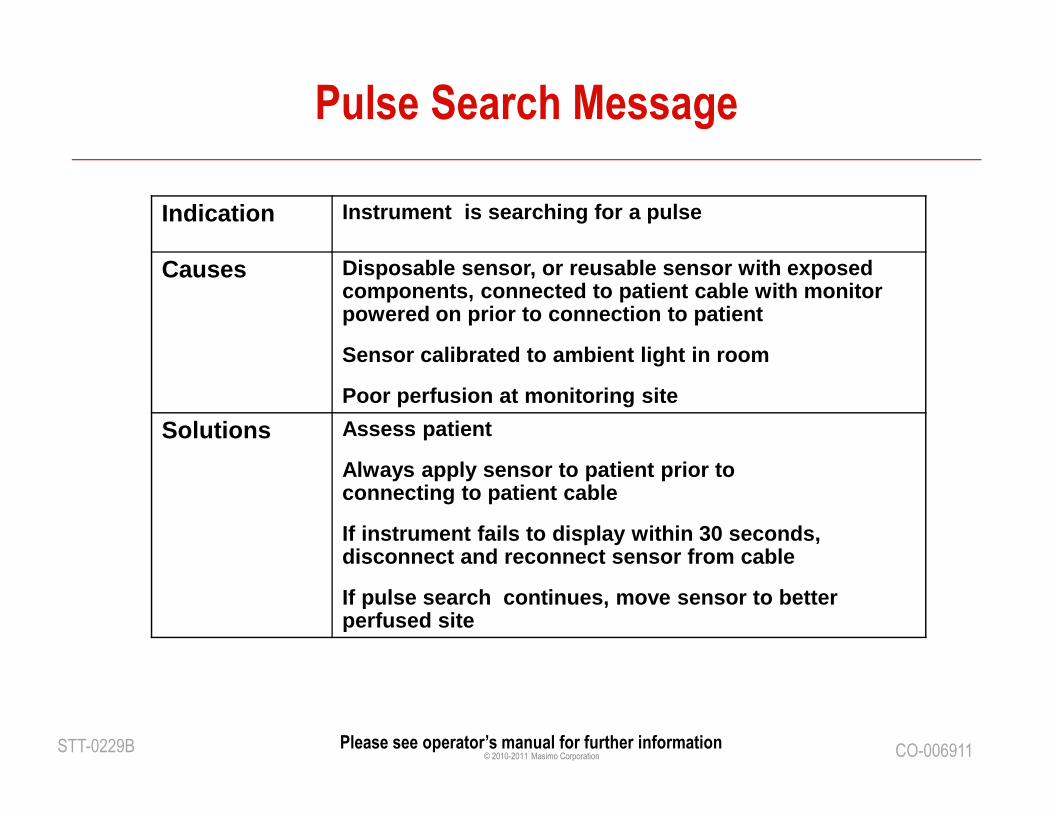
Pulse Search Message
Indication Instrument is searching for a pulse
Causes Disposable sensor, or reusable sensor with exposed components, connected to patient cable with monitor powered on prior to connection to patient
Sensor calibrated to ambient light in room
Poor perfusion at monitoring site
Solutions Assess patient
Always apply sensor to patient prior to connecting to patient cable
If instrument fails to display within 30 seconds, disconnect and reconnect sensor from cable
If pulse search continues, move sensor to better perfused site
© 2010-2011 Masimo CorporationSTT-0229B CO-006911Please see operator’s manual for further information
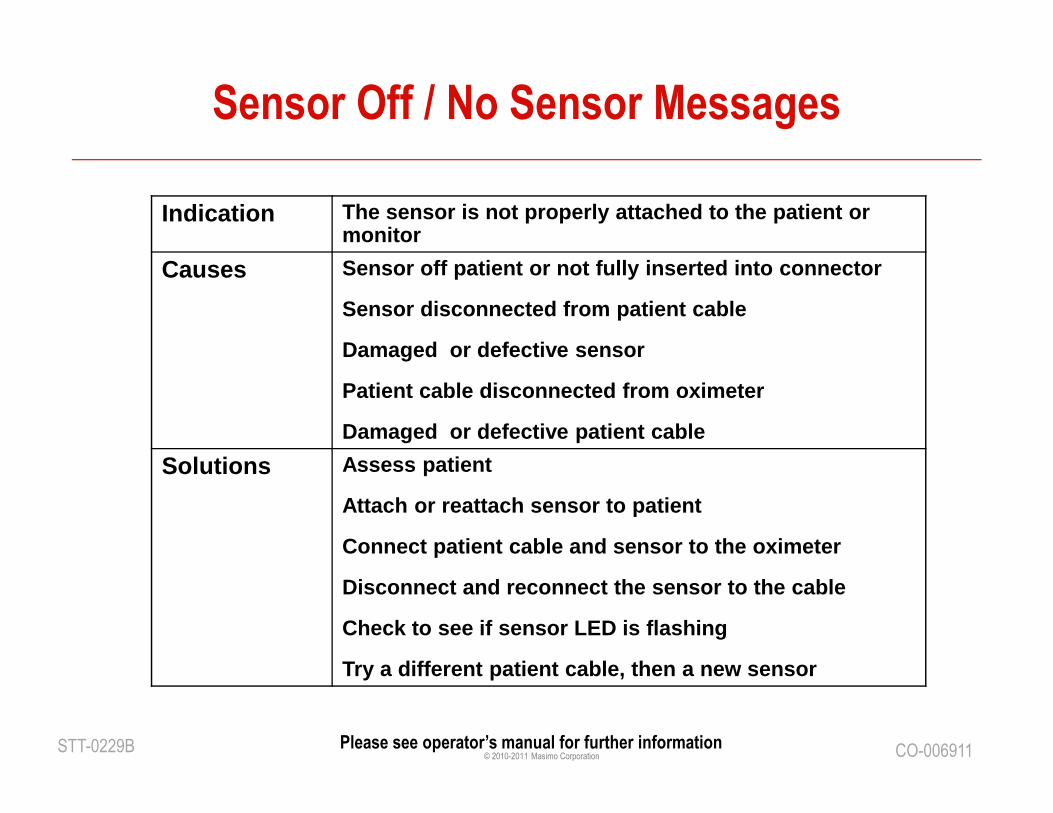
Sensor Off / No Sensor Messages
Indication The sensor is not properly attached to the patient or monitor
Causes Sensor off patient or not fully inserted into conne ctor
Sensor disconnected from patient cable
Damaged or defective sensor
Patient cable disconnected from oximeter
Damaged or defective patient cable
Solutions Assess patient
Attach or reattach sensor to patient
Connect patient cable and sensor to the oximeter
Disconnect and reconnect the sensor to the cable
Check to see if sensor LED is flashing
Try a different patient cable, then a new sensor
© 2010-2011 Masimo CorporationSTT-0229B CO-006911Please see operator’s manual for further information
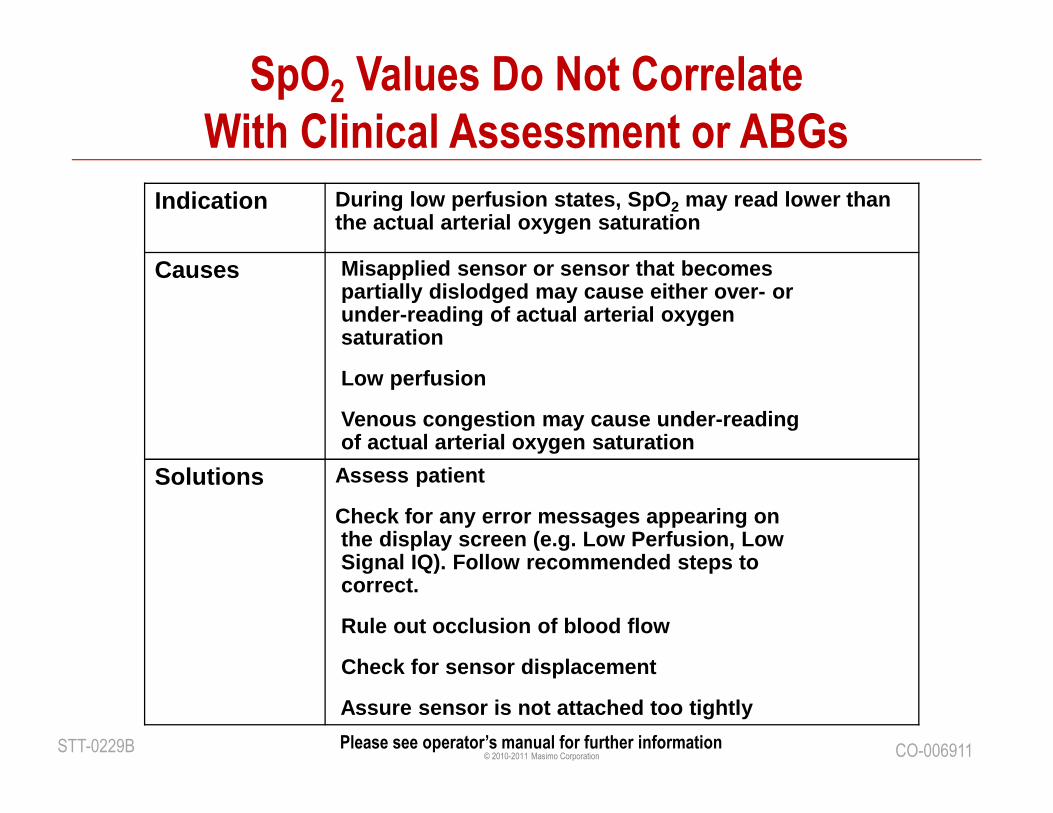
SpO2 Values Do Not Correlate
With Clinical Assessment or ABGs
Indication During low perfusion states, SpO 2 may read lower than the actual arterial oxygen saturation
Causes Misapplied sensor or sensor that becomes partially dislodged may cause either over- or under-reading of actual arterial oxygen saturation
Low perfusion
Venous congestion may cause under-reading of actual arterial oxygen saturation
Solutions Assess patient
Check for any error messages appearing on the display screen (e.g. Low Perfusion, LowSignal IQ). Follow recommended steps to correct.
Rule out occlusion of blood flow
Check for sensor displacement
Assure sensor is not attached too tightly
© 2010-2011 Masimo CorporationSTT-0229B CO-006911Please see operator’s manual for further information
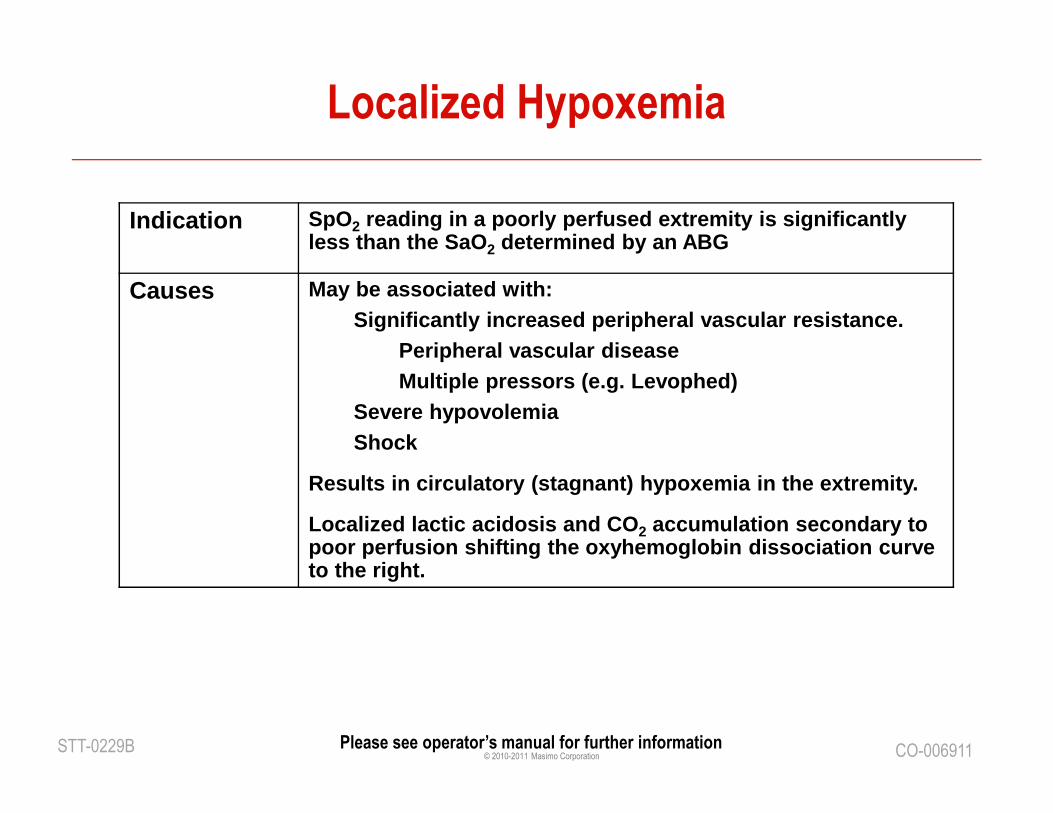
Localized Hypoxemia
Indication SpO2 reading in a poorly perfused extremity is significa ntly less than the SaO 2 determined by an ABG
Causes May be associated with:Significantly increased peripheral vascular resista nce.
Peripheral vascular diseaseMultiple pressors (e.g. Levophed)
Severe hypovolemiaShock
Results in circulatory (stagnant) hypoxemia in the extremity.
Localized lactic acidosis and CO 2 accumulation secondary to poor perfusion shifting the oxyhemoglobin dissociat ion curveto the right.
© 2010-2011 Masimo CorporationSTT-0229B CO-006911Please see operator’s manual for further information
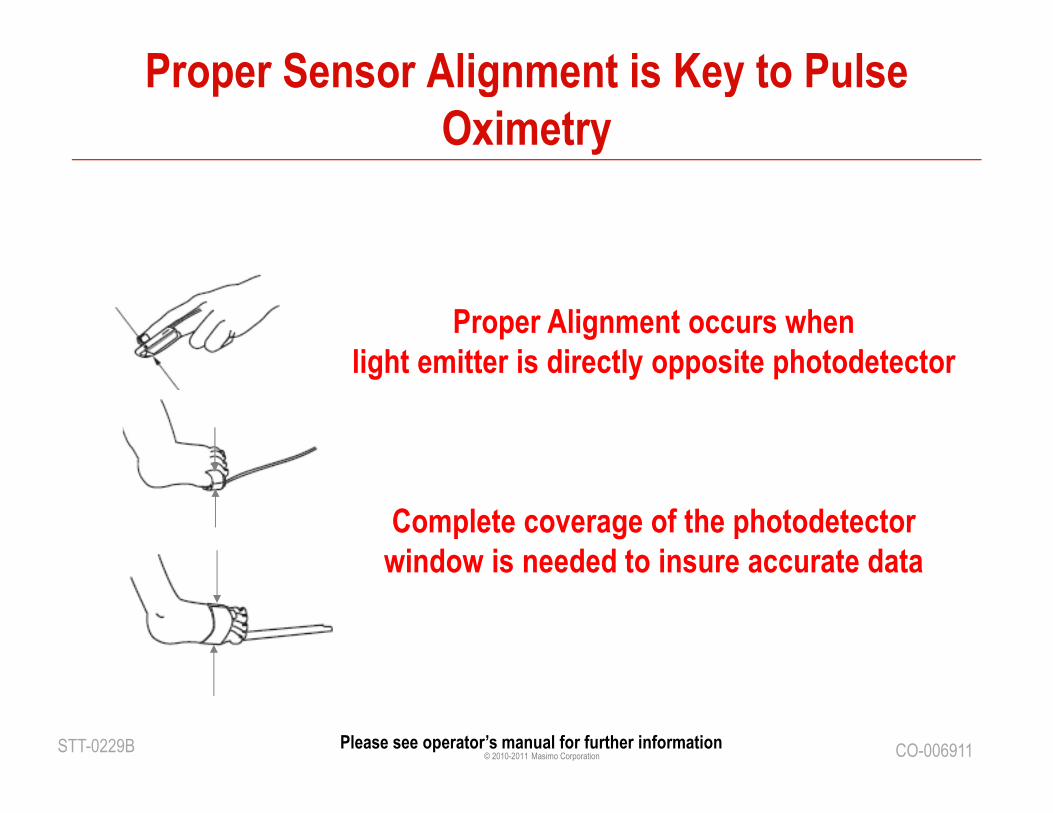
Proper Alignment occurs when
light emitter is directly opposite photodetector
Complete coverage of the photodetector
window is needed to insure accurate data
Proper Sensor Alignment is Key to Pulse
Oximetry

© 2010-2011 Masimo CorporationSTT-0229B CO-006911Please see operator’s manual for further information
Cleaning the Radical-7 and Patient Cable
>Clean device with 70% Isopropyl alcohol, mild detergent and
warm water solution, 3.4% Glutaraldehyde, or 10% bleach
solution. Cables should be cleaned with 70% Isopropyl Alcohol.
>Do not spray anything directly onto the Radical-7. Spray the cloth
and then wipe the Radical-7, cable, and power cord. Do not allow
liquids to enter the interior of the instrument.
>Do not autoclave, pressure sterilize, or gas sterilize the Radical-
7 Oximeter.
>Do not soak or immerse the monitor in any liquid.
>Do not use petroleum based or acetone solutions or
other harsh solvents to clean the oximeter.