radiolink eletronic limited … eletronic limited - 1 - ultrasonic sensor su04 user manual...
TRANSCRIPT

RADIOLINK ELETRONIC LIMITED
www.radiolink.com
- 1 -
Ultrasonic Sensor SU04
User Manual
Introduction:
SU04 is a transmitting receiving hybrid ultrasonic sensor, it compatible with PIXHAWK and
MINI PIX. SU04 will helps the drones achieve autonomous obstacle avoidance in 8 directions
horizontal, obstacle avoidance to the upward side and altitude hold to the downward. The
detection distance of SU04 is 40cm to 450cm.
Function One:Obstacle Avoidance
1. Firmware ask for PIXHAWK
Automatic obstacle avoidance function asks the firmware of PIXHAWK is version 3.5 or later
version.
2. How to connect
Connect to PIXHAWK:
Use the 6pin wire connect the Ultrasonic Sensor SU04 to the TELEM1 or TELEM2 port of PIX
Please use a LiPo battery power for SU04, do not power it with the USB cable directly when

RADIOLINK ELETRONIC LIMITED
www.radiolink.com
- 2 -
you use the SU04.
3. How to setup
3.1 Module type setup
PIXHAWK support four kind of obstacle avoidance module, you can choose SU04 to work by
setup PRX_TYPE in Mission Planner.
Setting steps:
Choose CONFIG/TUNING--click “Full Parameter List”--write down “PRX_TYPE” (obstacle
avoidance module type) in search column and then press Enter button, it will shows the
options of proximity sensor type in the MP. Please setup the value of proximity sensor type is
2(that means the ultrasonic sensor SU04 will connect to the flight controller with MAVLink
communication by TELEM port). Click “Write Params” after all the parameters finished setup
to save the settings.
3.2 Setup the avoidance distance and the avoidance enable/disable
1) The avoidance distance of ultrasonic sensor SU04 can setup by change the value of
AVOID_DIST_MAX or AVOID_MARGIN.
AVOID_DIST_MAX: the max avoidance distance at AltHold mode, the unit is meter
AVOID_MARGIN: the max avoidance distance at Loiter mode, the unit is meter
2) The avoidance enable/disable of ultrasonic sensor SU04 can setup by change the value of
AVOID_ENABLE.
AVOID_ENABLE: setup the value of AVOID_ENABLE is 0(options is None) means the avoidance
function is off and the value is 2(options is Use Proximity Sensor) means the avoidance
function is on.
RADIOLINK ELETRONIC LIMITED
www.radiolink.com
- 3 -
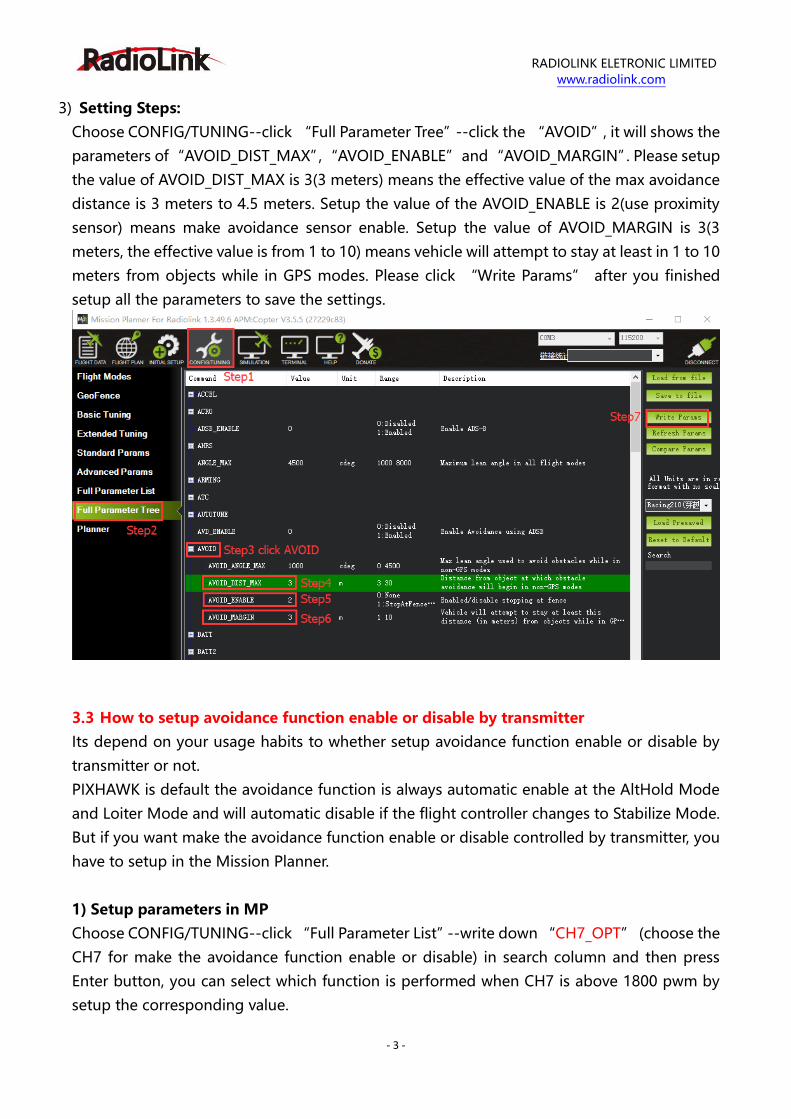
3) Setting Steps:
Choose CONFIG/TUNING--click “Full Parameter Tree”--click the “AVOID”, it will shows the
parameters of “AVOID_DIST_MAX”, “AVOID_ENABLE” and “AVOID_MARGIN”. Please setup
the value of AVOID_DIST_MAX is 3(3 meters) means the effective value of the max avoidance
distance is 3 meters to 4.5 meters. Setup the value of the AVOID_ENABLE is 2(use proximity
sensor) means make avoidance sensor enable. Setup the value of AVOID_MARGIN is 3(3
meters, the effective value is from 1 to 10) means vehicle will attempt to stay at least in 1 to 10
meters from objects while in GPS modes. Please click “Write Params” after you finished
setup all the parameters to save the settings.
3.3 How to setup avoidance function enable or disable by transmitter
Its depend on your usage habits to whether setup avoidance function enable or disable by
transmitter or not.
PIXHAWK is default the avoidance function is always automatic enable at the AltHold Mode
and Loiter Mode and will automatic disable if the flight controller changes to Stabilize Mode.
But if you want make the avoidance function enable or disable controlled by transmitter, you
have to setup in the Mission Planner.
1) Setup parameters in MP
Choose CONFIG/TUNING--click “Full Parameter List”--write down “CH7_OPT” (choose the
CH7 for make the avoidance function enable or disable) in search column and then press
Enter button, you can select which function is performed when CH7 is above 1800 pwm by
setup the corresponding value.

RADIOLINK ELETRONIC LIMITED
www.radiolink.com
- 4 -
Please setup the value is 40(Object Avoidance), it means to press the switch which control
CH7 will makes the avoidance function enable or disable. Click “Write Params” after all the
parameters finished setup to save the settings.
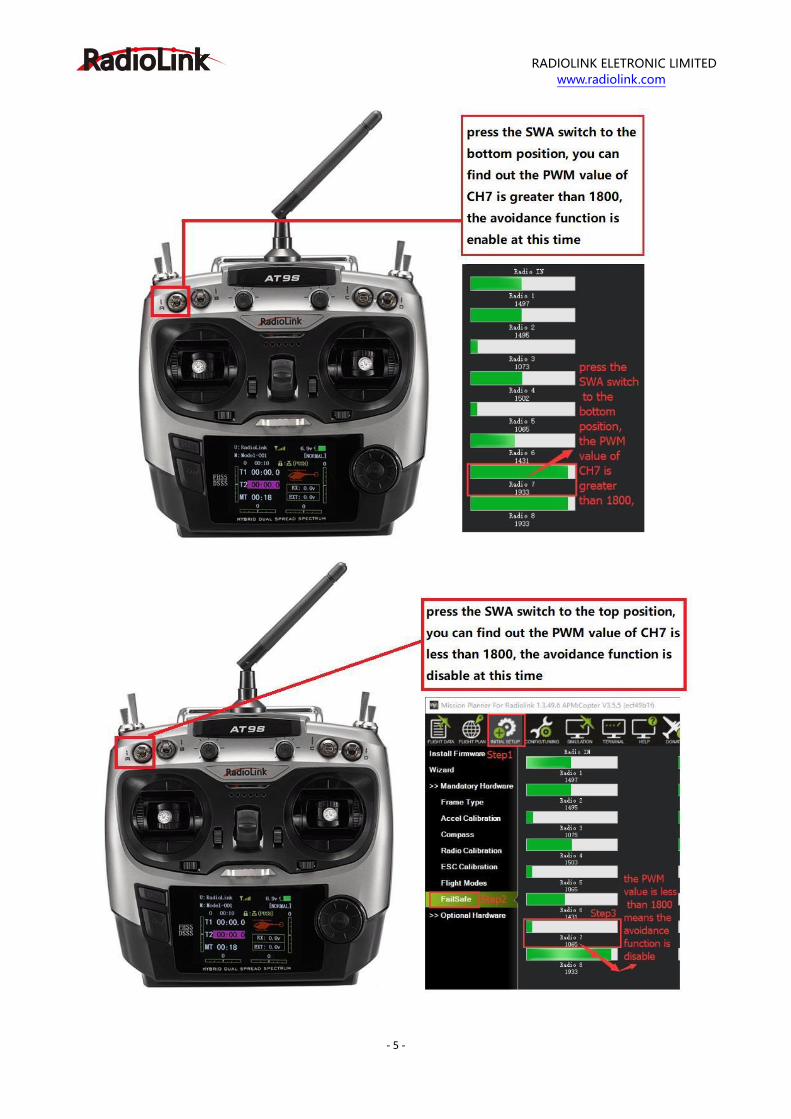
2) Setup parameters in transmitter
Choose a 2 position switch(the SWA of AT9S for example) to control CH7 and then you can
check the PWM value of CH7 in the FailSafe menu of MP.
Click “INITIAL SETUP”-- click “FailSafe”--press the SWA switch to the bottom position, you
can find out the PWM value of CH7 is greater than 1800, the avoidance function is enable at
this time while press the SWA switch to the top position, you can find out the PWM value of
CH7 is less than 1800, the avoidance function is disable at this time.

RADIOLINK ELETRONIC LIMITED
www.radiolink.com
- 6 -
4. Check the avoidance effect
You can check the avoidance effect of the Ultrasonic Sensor SU04 after all the parameters
have setup and connect the sensor SU04 to the PIXHAWK.
Disconnect the PIXHAWK and reopen the Mission Planner, it will automatic open a new menu
that will shows the working condition of sensor SU04(Please click the icon of this sensor on
the desktop taskbar if the working condition menu have not open automatically).

RADIOLINK ELETRONIC LIMITED
www.radiolink.com
- 7 -
5. Flight Modes
Flight modes need to setup after the parameters of PIXHAWK have setup and the Ultrasonic
Sensor SU04 work normal, the basic flight modes is
1: Stabilize, 2: AltHold, 3: Loiter.
6. Working Condition
Pay attention: please reconnect the PIXHAWK and reopen the MP after all the parameters
setup as all the above steps.
After verifying setup all the parameters success, you can find a wide range of locations with
walls or other obstacles to have a test when you ready for the first flight.
The usual sequence of flight testing steps are:
1) Power on your drones and wait till the blue LED of PIXHAWK blinking that means the
initialization of PIXHAWK is complete.
2) Press the safety switch about 1 to 2 seconds till the red LED of safety switch is on when the
blue LED of PIXHAWK is blinking.
3) Disarmed by put the throttle stick to the bottom right corner(if your transmitter is Mode2,
while put the throttle stick to the bottom left corner and the aileron stick to the bottom if
your transmitter is Mode1), the motor will begin to move when disarmed successful, and then
push the throttle stick slowly, change the flight mode to Loiter when the drone going to
flight.

RADIOLINK ELETRONIC LIMITED
www.radiolink.com
- 8 -
4) Press the SWA(or any other 2 position switch, it depends on which you setup at the very
begging) to turn on the avoidance function, push the throttle and aileron sticks to make the
drone close to the wall or the obstacle, the drone will control the racing speed and stopped at
the 3 meters far from the wall or obstacle automatically. The drone will flight back to the
position where 3 meters far from the wall or obstacle automatically if the drone is less than 3
meters far from the obstacle because the speed is too fast or because of the inertia effect.
7. Notes:
1) PIXHAWK have to powered by LiPo battery, cannot power by USB when you use the
Ultrasonic
Sensor SU04. SU04 cannot work normal if power by USB cable which connect to computer.
2) When you ready for the first flight, please make your drone at a lower speed to keep the safe
flight.
3) At AltHold mode, when the drone encounter an obstacle the slant angle of drone will
combine pitch with roll and then make a response, it may too late to brake if the drone flight
as the full speed. While, the drone will stop to go ahead when encounter an obstacle no
mater how fast both the pitch and roll are at the PosHold Mode. So, it suggest use the
horizontal obstacle avoidance function at the PosHold Mode.
4) SU04 will helps the drones achieve autonomous obstacle avoidance in 8 directions
horizontal, you can change the direction of the module by press the button on the sensor
module(it default the direction is forward, it will rotate 45 degrees clockwise when press the
button and the LED of the sensor will blinking corresponding times same as the times you
press the button(that is: it will rotate 90 degrees and the LED will blinking twice if you press
the button twice).

RADIOLINK ELETRONIC LIMITED
www.radiolink.com
- 9 -
You can check the direction of the sensor in MP.
This picture shows the direction of obstacle avoidance is towards to right

RADIOLINK ELETRONIC LIMITED
www.radiolink.com
- 10 -
5) When the LED(green) of module is always on means the SU04 is detected the obstacle while
if the LED is blinking that means the module cannot detected the obstacle.
6) The LED of module will blinking quickly 4 to 6 times when connect it to the computer and
Then always on if connect successful.
7) The fade area of SU04 zero, but it will shows 40cm if the detection distance is less than 40cm
because the SU04 is a transmitting receiving hybrid ultrasonic sensor, the detection distance
of SU04 is 40cm to 450cm.
8) You just can check the detection distance of horizontal direction in the sensor SU04 menu, if
there’s no detection distance value, it maybe the direction of obstacle avoidance is towards
to upward, you have to check the distance by DataFlash Logs.
Function Two:Collision Avoidance Towards to Upward
1. The collision avoidance towards to upward function is same as the obstacle avoidance
function, you just need setup the direction of collision avoidance is towards to upward by
press the direction button. The LED of direction adjustment will blinking quickly about 5-6
times at the first time, you can check the value like this picture below:
This picture shows the direction of obstacle avoidance is towards to upwards
The collision avoidance distance can be setup in MP, the AVOID_MARGIN menu

RADIOLINK ELETRONIC LIMITED
www.radiolink.com
- 11 -
Function Three:AltHold Function
1. How to Connect
One port of the 4pin wire connect to the I2C port of PIXHAWK and the other port of 4pin wire
connect to the sensor SU04, as the picture below:
Please make sure the direction of the sensor is to the downward
2. Parameters Setup
Click “INITIAL SETUP”-- click “Optional Hardware”--click “Range Finder”--setup the
RangeFinder is “MaxbotixI2C” or “LightWareI2C”

RADIOLINK ELETRONIC LIMITED
www.radiolink.com
- 12 -
After the Range Finder setup, reconnect the flight controller and back to this Range Finder
parameter setup menu, it will shows the detection distance details means all the Range Finder
parameters setup successful.

RADIOLINK ELETRONIC LIMITED
www.radiolink.com
- 13 -
Setup the value of RNGFND_MAX_CM is 450 and the value of RNGFND_MIN_CM is 40(the
unit is meter), please click “Write Params” after all the parameters setup to save the settings.
RNGFND_MAX_CM means the max detection distance that can identify at the AltHold Mode.
RNGFND_MIN_CM means the minimum detection distance that can identify at the AltHold
Mode.
The flight controller cannot identify the detection distance when the sensor is far from the
obstacle more than 450cm, it will altitude hold by barometer.