rap installation updated
TRANSCRIPT

RAP Installation - Updated
August 01, 2012
Aruba Controller Release 6.1.3.2
The Controller has several “wizards’ that can guide you through a variety of configuration processes. On the
“Configuration” tab look for the “AP Wizard” and remember to check “remote” and “administrator-provisioned”
setup options depending on your setup needs. Additional information can be obtained from the specific release
“User Guide”.
Contents Firewall NOTEs .................................................................................................................................................................... 2
Recreating the Corporate Network SSID for RAP’s ............................................................................................................. 3
Create the RAP AP Group .................................................................................................................................................... 4
Add an internal VPN Address Pool for the RAP .................................................................................................................. 5
Add the RAP MAC address to the RAP Whitelist ................................................................................................................ 6
Configuration of the RAP .................................................................................................................................................... 7
Troubleshooting and Checks ............................................................................................................................................... 8
User Notes – IP Addressing ............................................................................................................................................... 10

Firewall NOTEs One of the most technical aspects of RAP deployment for most users (depending on their level of expertise) is the
configuration of the Internet Firewall. The Aruba RAP communicates to the Aruba controller by building an IPSec tunnel
to it using port 4500. You will have to configure your internet firewall /router to allow this port through and direct it to
the Aruba controller from the Internet. Depending on your device and IP addresses available this can be accomplished in
several ways.
One to One NAT – an external Internet routable IP address is directly translated to a private IP address on the internal
DMZ. (Another vendor term used is ‘MIP’ for ‘Mapped IP’ but the same as one-to-one NAT)
Port Forwarding – configuring the internet firewall so that anytime it receives a connection request from an Internet IP
address using destination port 4500 it will forward this to the IP address of the Aruba controller in the DMZ.
If the Internet Firewall / Router is already configured as a VPN concentrator you could run into difficulties – the Internet
Firewall mistaking the incoming RAP IPSec connection for another of your VPN devices or IPSec clients and attempting to
terminate the RAP connection to that configuration.
You must enable one of the above methods on your Internet Firewall to allow communications to from the RAP (in the
public internet) to the Aruba controller (in your private network). If your organization has available Internet addresses
you could program one of these to the Aruba controller ports, placing this port directly on the public internet – ENSURE
you use caution and consider programming additional policies on the Aruba controller port to maintain security and
prevent unauthorized access to the controller from the internet.
IMPORTANT - Please review the entire document before beginning your RAP deployment
Creating a new RAP Virtual AP Profile In this example the Aruba controller has an existing 802.1x authenticated SSID broadcasting from AP’s at the corporate
location (“myemployee”). The existing SSID will be used as the basis to replicate the SSID on the Users RAP at home. (See
Airheads Social “For the Beginner – Configuring an 802.1x WLAN with the Controller GUI”)
Creating a new RAP Virtual AP profile allows for future changes to the RAP (and Users connecting to it) without changing
the existing Campus AP’s Virtual AP profile such as; VLAN’s, Remote-AP operation and Forward mode. The new RAP
profile will broadcast the corporate WLAN SSID and allow a User to take their laptop home and connect to the RAP with
the same Wireless Profile used at corporate. Review “User Notes – IP Addressing” at the end of this document.
In this example the RAP is configured and connected to the Master Controller through the Internet Firewall.
Go to “Configuration” > “Advanced Services” > “All Profiles”
Expand the “Wireless LAN” profile and select “Virtual AP profile”
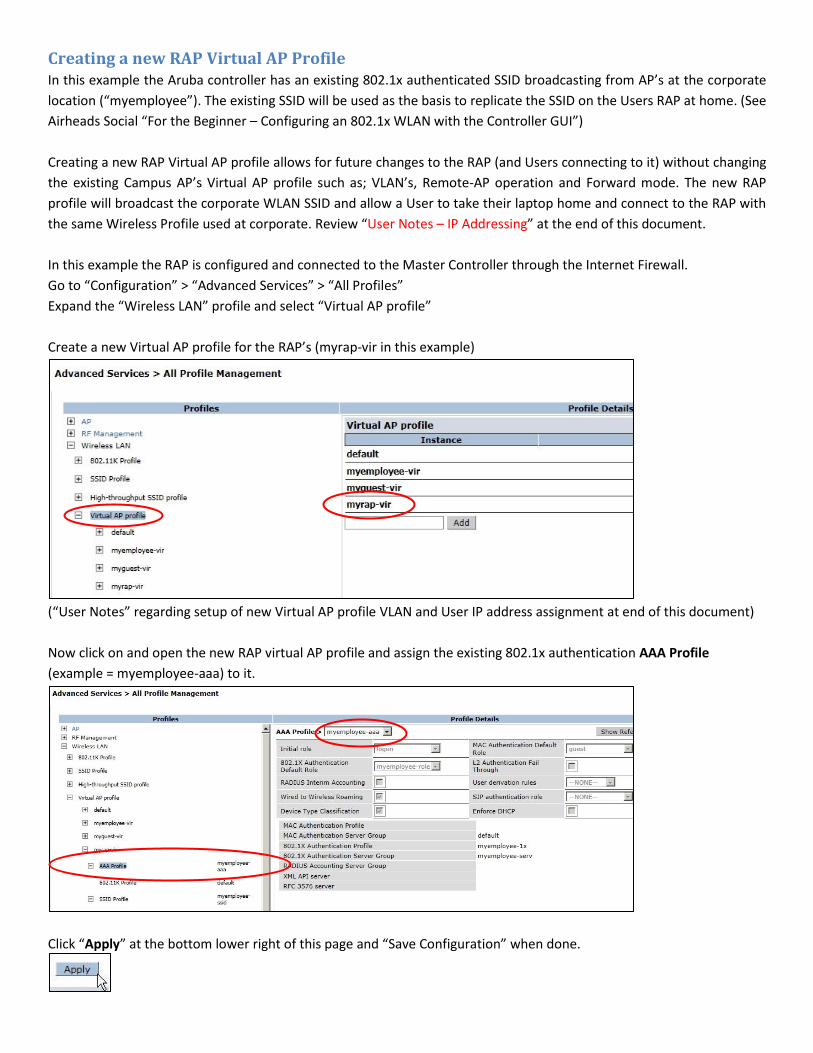
Create a new Virtual AP profile for the RAP’s (myrap-vir in this example)
(“User Notes” regarding setup of new Virtual AP profile VLAN and User IP address assignment at end of this document)
Now click on and open the new RAP virtual AP profile and assign the existing 802.1x authentication AAA Profile
(example = myemployee-aaa) to it.
Click “Apply” at the bottom lower right of this page and “Save Configuration” when done.

Within the RAP virtual AP profile click on and assign the existing 802.1x authentication SSID Profile (example =
myemployee-ssid) to it.
Click “Apply” at the bottom lower right of this page and “Save Configuration” when done.
Create the RAP AP Group Setup a new AP Group for the RAP’s “Configuration” > “Wireless” > “AP Configuration” > New
Add the new AP Group Name (in this example “myRAP”) Click “Add” to finish and “Save Configuration”

Now select the new “myRAP” AP Group, expand the “Wireless LAN” Profile > “Virtual AP” and use the pull down to add the “myrap-vir” (virtual AP profile) previously created with associated AAA and SSID profiles.
Click “Apply” at the bottom lower right of this page and “Save Configuration” when done.
Add an internal VPN Address Pool for the RAP From the “Configuration” > “Advanced Services” and enter the “VPN Services” menu
Go to the “Address Pools” section and select “Add”
Enter a pool name and a start and end IP address that will be assigned to the RAP when connecting to and communicating with the Controller (this is for internal Controller <> RAP communications) This address is used only for internal communications between the RAP and the Controller. When the entries are completed select “Done”

When back to the Main page (VPN Services) at the bottom lower right of this page click “Apply”
Add the RAP MAC address to the RAP Whitelist Go to “Configuration” > “Wireless” > “AP Installation”
Select the “RAP Whitelist” tab
Enter the MAC address of the RAP and additional data related to the user and assign to the “RAP” AP Group
Click “Add” when completed “Save Configuration”

Configuration of the RAP The remainder of this text is taken from the Release 6.0 User Guide page 849. Connect the RAP Ethernet port 0 to the modem connecting to the internet - Ensure the internet modem can provide DHCP Connect your PC to the RAP Ethernet port 1 - Ensure your PC Ethernet port is set for DHCP Open a web browser and connect to http://rapconsole.arubanetworks.com/ Note the connection to the ‘home router’ – Ethernet port 0 – is UP, the RAP has an IP address (from the home router DHCP) and the RAP is running release 5.x (for connection to a release 6.x controller and upgrading)
Enter the IP address (public IP address) of the Controller reachable over the internet Click “Continue” Have the user watch the screen for information as the RAP connects to the Controller.
NOTE - “Testing connectivity to gateway” If this step fails you do not have basic IP connectivity to the Controller! Check your route table, start basic IP troubleshooting; ping, traceroute, etc.

Troubleshooting and Checks (Aruba3200) #show datapath session table | include 4500 (review IPSec traffic information)
If no IPSec (4500) is getting to the controller no IPSec tunnel will be built, the RAP will not connect In this example (local demo) the RAP is IP address 192.168.4.100 connecting to controller interface IP address 192.168.10.3 (Aruba3200) #show crypto isakmp sa
In this example (local demo) the RAP isakmp is IP address 192.168.4.100 connecting to controller IP address 172.16.0.3 (Aruba3200) #show crypto ipsec sa
(Aruba3200) #show ap association ap-group <ap group name>

(Aruba3200) #show user (Aruba3200) #show user ip x.x.x.x (ip address of rap user)
If everything else appears correct but the rap group has an authorization profile it may not connect (Thanks to CJoseph)
“Make sure that there is no AP authorization Profile accidentally attached to that ap-group:”
Once the RAP is up and running (Aruba3200) #show ap image version ap-name <name>
Shows RAP version image production and backup
User Notes – IP Addressing The information above provides the basic steps necessary for the connection of a RAP an the Aruba controller but do not
address the network details when a User connects to the RAP SSID - in particular IP address assignment to the User
when connecting to the Corporate SSID or RAP SSID.
The methodology for creation of a new RAP Virtual AP profile is to allow for a different IP address assignment to the
User when connected at the RAP SSID vs. the User connecting at the corporate location SSID. This is keeping within
typical IT organizations best practices.
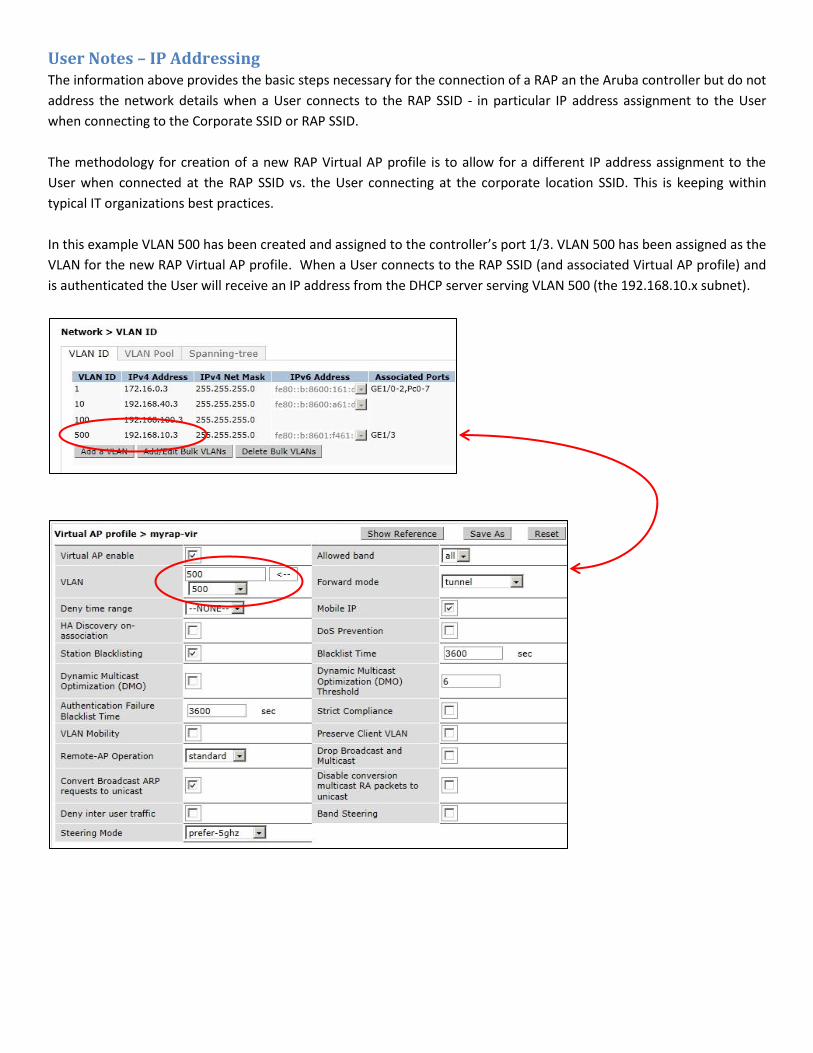
In this example VLAN 500 has been created and assigned to the controller’s port 1/3. VLAN 500 has been assigned as the
VLAN for the new RAP Virtual AP profile. When a User connects to the RAP SSID (and associated Virtual AP profile) and
is authenticated the User will receive an IP address from the DHCP server serving VLAN 500 (the 192.168.10.x subnet).