raptor 3.0 user manual - forensicsandediscovery.com · whether it is a mac os x, windows, another...
TRANSCRIPT

1
2
Contents Introduction ................................................................................................................................................. 3
Document Conventions ............................................................................................................................ 3
What is Raptor? ........................................................................................................................................ 3
Why Use Raptor? ...................................................................................................................................... 4
WARNING!! ........................................................................................................................................... 4
How does Raptor Work? .......................................................................................................................... 4
Imaging Macintosh Computers in Target Disk Mode ................................................................................... 5
Booting Raptor ......................................................................................................................................... 6
The Raptor Acquisition Wizard ................................................................................................................. 7
Navigating Raptor and the Raptor Toolbox ................................................................................................ 10
Creating a Raptor USB Boot Device ........................................................................................................ 11
Raptor Toolbox: Imaging ........................................................................................................................ 13
Raptor Image Logs .............................................................................................................................. 17
Raptor Toolbox: Image to Two Separate Destinations in Two Different Formats ............................................... 18
Raptor Toolbox: Image Conversion with Verify ...................................................................................... 19
Raptor Toolbox: Verify ........................................................................................................................... 21
Raptor Toolbox: Mounting Devices ........................................................................................................ 22
Raptor Toolbox: Find .............................................................................................................................. 24
Raptor Toolbox: Unallocated .................................................................................................................. 25
Raptor Toolbox: Format ......................................................................................................................... 27
Raptor Toolbox: Wipe ............................................................................................................................ 28
Raptor Toolbox: Update ......................................................................................................................... 29
Raptor Toolbox: Task Log ....................................................................................................................... 33
All Done: Shutting Down Raptor ............................................................................................................ 34
Support ....................................................................................................................................................... 34

3
Introduction Welcome to Raptor 3.0 by Alvarez & Marsal. This manual will cover all the information that is necessary to utilize the basic features programmed into this application.
Document Conventions This manual conforms to a set of conventions that attach specific meanings to typefaces used in explanations and procedures. The following table defines these conventions.
Item Convention Example Acronyms All uppercase; may be
spelled out on first use Target Disk Mode (TDM) Multipurpose Internet Mail Extensions (MIME)
Book titles Title caps, italic Raptor 3.0 Release Documentation Chapter and section titles Title caps, in quotation
marks See the section, “Raptor Toolbox: Image Conversion with Verify.”
Dialog box options Bold Click Continue. Dialog box titles Bold the Find dialog box Emphasis or new words Italic or within quotation
marks This cannot be said enough . . . the "suspect" device
File names Title capitalization; internal capitalization can be used for readability.
Filename.doc FileName.doc
Folder and directory names
Bold in procedures; regular font elsewhere
the TMP folder Destination Drive (E:)
Icon names Bold, title capitalization Right-click on the Networking icon. Key names All uppercase Hold down the T key.
Press ENTER to boot. Menu names Bold, title capitalization the Select Source dropdown menu Parameters, titles, stand-ins for text to be entered
Italic enter a Name Filename
Program names Title capitalization Raptor Microsoft Word
URLs Lowercase http://www.alvarezandmarsal.com Windows, named Title caps the Tasks window Windows, unnamed Lowercase a status window
What is Raptor? Raptor is a Ubuntu Linux-based Live DVD used for performing various forensic processes on computers, developed by Dave Loveall for Alvarez & Marsal. The function of this live DVD is to perform various forensic processes on Intel 32 and 64 bit processor-based computers, including Windows, Macintosh, and Linux systems. The processes that Raptor performs include forensic imaging and verification, forensic image conversion, forensic sterilization of media (“wiping“), and additional features. Raptor can be used on any Intel-based computer, including computers from Dell, HP, Sony, and Intel processor-based Macintosh computers.

4
Why Use Raptor? Raptor is incredibly easy to use and works on nearly every computer. It allows imaging to be performed without the need to disassemble the computer to access internal hard drives. This is an especially important feature when attempting to access a Macintosh, since they are known to be especially difficult to take apart. Additionally, since Raptor is based on Ubuntu Linux, it is a perfect platform to acquire forensically sound images of computer hard drives, and it maintains all the built-in write protection that is a hallmark of the Linux operating system. When this version of the Linux operating system boots, any media device that is found on the system is automatically locked. This means that it is impossible to make writes to the media without the user explicitly allowing it. Linux also allows media to be mounted in a read-only fashion, eliminating the need for write-blocking hardware. Raptor is a free program that is easily downloadable from the following page: https://www.forensicsandediscovery.com/Training/InformationProtection/Raptor.aspx.
WARNING!! Raptor is a very powerful forensic tool that will do exactly what you tell it to do. It is therefore important to understand the implication of each of its functions. You should understand what this tool does and how it works, so that you can testify to it should the need arise. As with all tools, it is also important to test and validate this software. By doing so, you can see the functions for yourself and become comfortable in the knowledge that Raptor does what it was designed to do.
How does Raptor Work? Raptor is used as a replacement for the operating system that is installed on a computer’s hard drive. In order to be forensically sound, you want to ensure that you do not change the data on the source system hard drive. The operating system of the host is not always trustworthy, whether it is a Mac OS X, Windows, another version of Linux, or any other PC-based operating system. Using Raptor’s version of Linux to boot the hardware will give you access to the hard drive(s) within the computer. Since Raptor cannot write to the “suspect” hard drives as configured, you can perform your actions with confidence. In order to use Raptor, you need to ensure that Raptor is the media that is booted during the initial start-up of the computer by making sure that either the DVD-ROM drive or USB device (depending on which medium your copy of Raptor is stored on) is selected as the first bootable device. Ensure this in PC-based computers by accessing and changing the boot priority in the BIOS. With non-Apple PCs, this is accomplished by pushing a button on boot up, though the specific button varies by PC manufacturer, make, and model. In order to determine the correct button to push to enter the system’s BIOS, use a search engine or test on a machine identical to the one you will be using Raptor to image, if one is available. When using a Mac, hold down the OPTION key at the same time that you press the Power Button, and subsequently you are given an option to select the boot device. If you select the appropriate device, then Raptor will boot, leaving the “suspect“ hard drive alone. To ensure that Raptor doesn’t make changes to any attached hard drive or media, the entire Linux operating system contained on the Raptor disk is loaded into RAM. Once the operating system is loaded, a desktop will appear which displays the Raptor Toolbox. It is from this menu that all the features of Raptor are accessed.

5
Imaging Macintosh Computers in Target Disk Mode Target Disk Mode (TDM) is a feature of Macintosh computers that allows a Macintosh computer to behave like an external hard drive. A Macintosh in TDM can be connected to another computer through the Firewire or Thunderbolt port. While this is a useful feature in the digital forensics environment, Macs can have a number of different partitions that are formatted with various file systems, which can create a problem. For instance, on a Mac running Bootcamp, there will be at least two OS partitions: HFS+ for OS X and NTFS for the Windows installation. Depending on the combination of file systems and the operating system on the forensic computer, the partitions may auto-mount, which would change data on the “suspect“ hard drive. As another example, if you have a Windows-based forensic computer and you put a Mac in TDM and connect it to the forensic computer, and there is a FAT or NTFS partition on the Mac, it would be auto-mounted by the host Windows machine in Read/Write mode and would be modified. Conversely, auto-mounting is the default behavior for known file systems on a Mac, and connecting a Mac in TDM mode to another Mac would cause the “suspect“ HFS+ hard drive to be mounted, resulting in changes to the source data. Both of these situations are undesirable, because one of the key principles of computer forensics is, if at all possible, “Make No Changes!“ Using Raptor to make your forensic image solves these problems. Since Raptor does not mount drives in Read/Write mode, changes will not be made to any attached devices. For example, if your forensic computer is a Windows-based computer which is connected to a TDM-enabled Mac, and you boot it with Raptor, Raptor would “see“ the device as an external hard drive, enabling imaging of the device in Read Only mode. Similarly, if your forensic computer is a Mac which is attached to a TDM-enabled Mac, and you boot it with Raptor, the same Read Only status would be enabled. To place a Mac into Target Disk Mode, boot the computer while holding down the T key. Continue holding the T key until the screen displays a Firewire or Thunderbolt symbol (shown at right). The computer is now in TDM, and can be written to if you connect to a computer that is not booted with Raptor. Connect this device to the Firewire or Thunderbolt port of a computer that will boot with Raptor and follow the imaging instructions provided below. NOTE: “Target Disk Mode“ only applies to Macintosh computers that have a Firewire or Thunderbolt port; older, non-Pro MacBooks do not have either. Also note that TDM only sees the first physical disk in a Mac computer, and any additional disks will not be accessible in TDM. Since modern MacBook Pros can now have multiple hard drives installed, TDM will miss any additional disks installed.
6
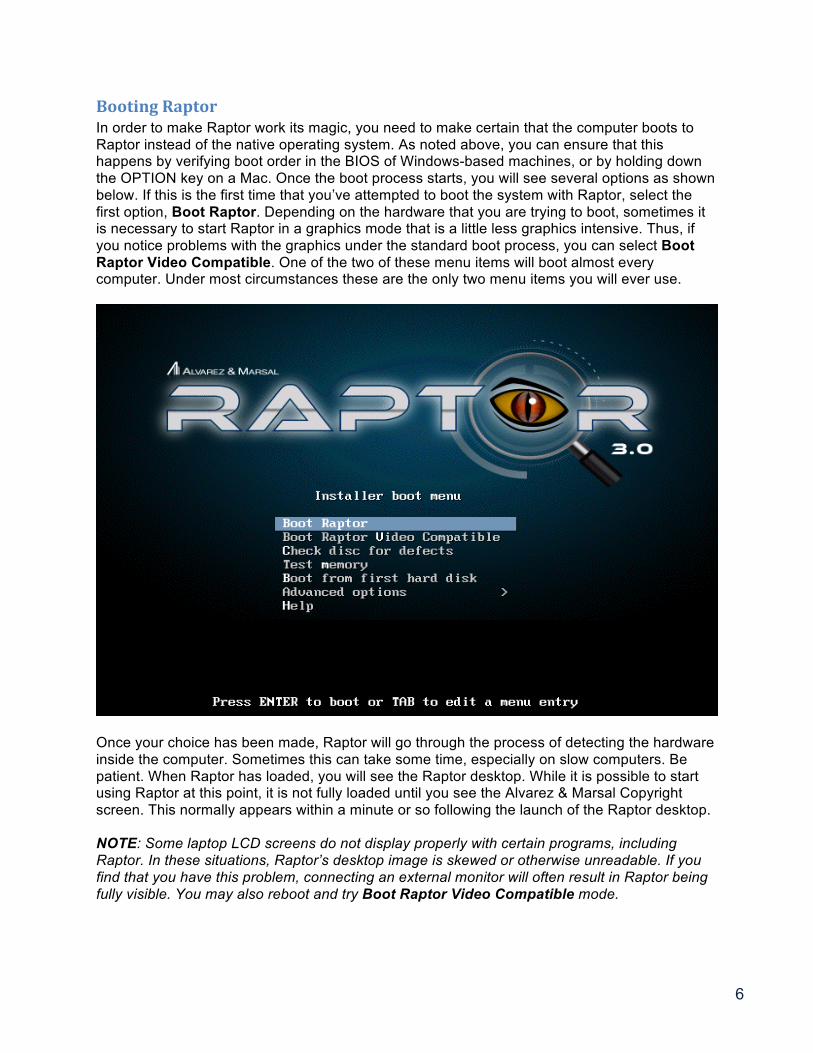
Booting Raptor In order to make Raptor work its magic, you need to make certain that the computer boots to Raptor instead of the native operating system. As noted above, you can ensure that this happens by verifying boot order in the BIOS of Windows-based machines, or by holding down the OPTION key on a Mac. Once the boot process starts, you will see several options as shown below. If this is the first time that you’ve attempted to boot the system with Raptor, select the first option, Boot Raptor. Depending on the hardware that you are trying to boot, sometimes it is necessary to start Raptor in a graphics mode that is a little less graphics intensive. Thus, if you notice problems with the graphics under the standard boot process, you can select Boot Raptor Video Compatible. One of the two of these menu items will boot almost every computer. Under most circumstances these are the only two menu items you will ever use.
Once your choice has been made, Raptor will go through the process of detecting the hardware inside the computer. Sometimes this can take some time, especially on slow computers. Be patient. When Raptor has loaded, you will see the Raptor desktop. While it is possible to start using Raptor at this point, it is not fully loaded until you see the Alvarez & Marsal Copyright screen. This normally appears within a minute or so following the launch of the Raptor desktop. NOTE: Some laptop LCD screens do not display properly with certain programs, including Raptor. In these situations, Raptor’s desktop image is skewed or otherwise unreadable. If you find that you have this problem, connecting an external monitor will often result in Raptor being fully visible. You may also reboot and try Boot Raptor Video Compatible mode.
7
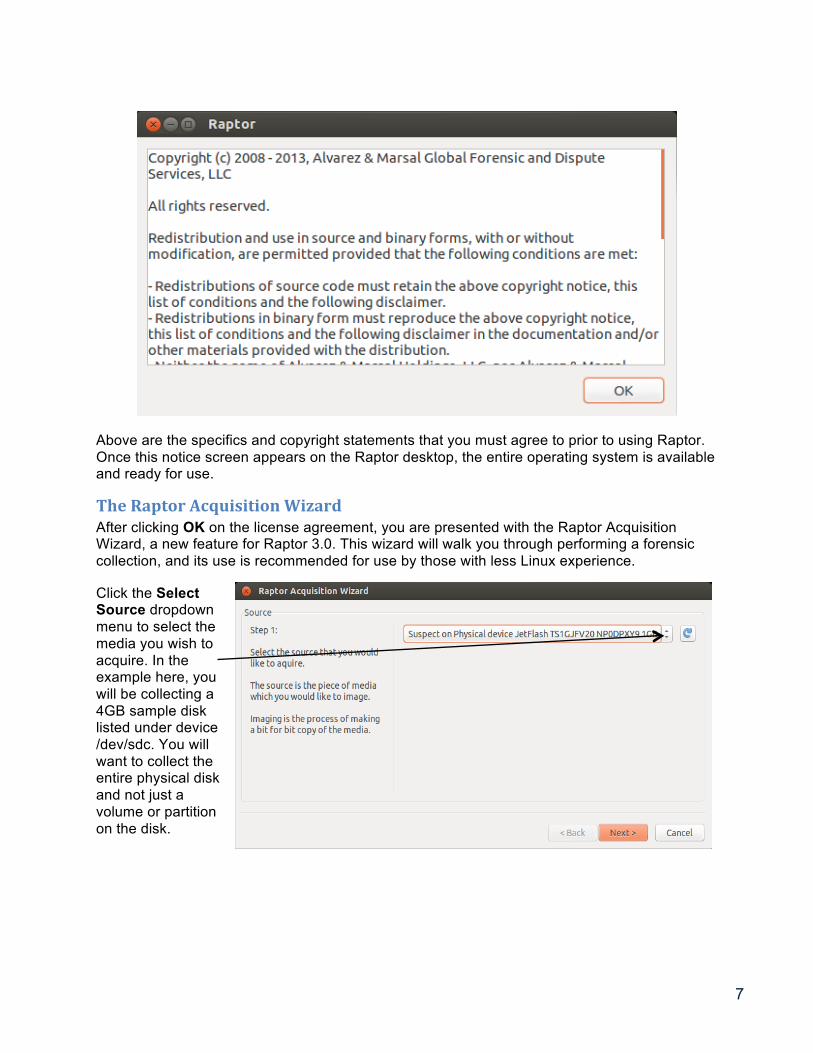
Above are the specifics and copyright statements that you must agree to prior to using Raptor. Once this notice screen appears on the Raptor desktop, the entire operating system is available and ready for use.
The Raptor Acquisition Wizard After clicking OK on the license agreement, you are presented with the Raptor Acquisition Wizard, a new feature for Raptor 3.0. This wizard will walk you through performing a forensic collection, and its use is recommended for use by those with less Linux experience. Click the Select Source dropdown menu to select the media you wish to acquire. In the example here, you will be collecting a 4GB sample disk listed under device /dev/sdc. You will want to collect the entire physical disk and not just a volume or partition on the disk.

8
Next, insert your USB target disk for storing the forensic image into the system, and click Next. You’re writing the data to an 8GB USB flash storage device, commonly referred to as a “thumb drive.“ Here, you select the partition of the thumb drive where you want to write your data. You will also fill out the File Name to use for the output file(s), the Examiner Name, a Case Identifier, an Evidence Number, and a Description. You also select to Verify the forensic image NOTE: While it is not shown in the above screenshot, the output for the forensic image will be in the EnCase E01 format. If you need to use another format, such as a dd raw disk image, please see the following section on converting between image formats, “Raptor Toolbox: Image Conversion with Verify”, or skip the imaging wizard and go straight to the “Raptor Toolbox”, also covered later in this document. This takes you to a Summary page which details everything you’ve entered into the previous screens, as well as the commands that will be executed to accomplish the imaging task. Verify that everything looks correct here, and if you find any errors, click the Back button and fix any input that may need correcting. Once you are ready to proceed with imaging, click Start.

9
You are now presented with an imaging progress screen which gives you statistics about your current imaging task, including percentage complete, estimated time to completion, and throughput.
Once completed, the verification process will kick off (because you previously selected the Verify After Imaging option). When the process is completed, you will get a verification status message.
Once verification is complete, you will be asked if you want to shut down; doing so will safely unmount all target media.

10
Navigating Raptor and the Raptor Toolbox The icons located on the left side of the Raptor desktop represent the Raptor Toolbox. For those with more Linux experience, this is a much more powerful interface for using Raptor. For those who are familiar with Raptor 2.x, this toolbar format will look very familiar. Double-clicking the icon labeled RAPTOR will open bring up the Toolbox that contains the forensic processes of Raptor. This is where the Imaging, Verification, Mounting, Formatting, Find, Unallocated, Wiping, Update, and Task Lists can be accessed.
This is the TERMINAL icon, which will allow you command line access to Raptor’s Linux base. Unless you are very familiar with Linux, you’ll likely avoid this area. Double-clicking the VOLUME BROWSER icon will open the Volume Browser, allowing you to browse programs and files.
Double-clicking the A&M Logo icon will open a window containing informational PDF files that detail the digital forensics and information security training offerings currently available from Alvarez & Marsal, the creator of Raptor. This icon is the Ubuntu STARTUP DISK CREATOR, used to create a USB launch device (See below).

11
Creating a Raptor USB Boot Device New to Raptor 3.0 is a menu-driven way to create a Raptor boot device using removable USB media such as a thumb drive. In Raptor 2.x, this was an extensive process that involved accessing the command line and internals of Raptor to create, but now it’s a simple point-and-click process.
First, inside of a booted Raptor 3.0 system, click the Startup Disk Creator icon in the toolbar, and it will launch the Make Startup Disk wizard. On a booted Raptor system, the ISO image used to create the startup disk will default to the booted Raptor ISO, so you won’t have to do anything there.
Now, simply insert a USB device into the booted Raptor system, and it will be displayed in the Disk to Use section at the bottom of the menu. Select the device, and click the Erase Disk button to prepare the disk for use.
Caution! This action will erase all data on the disk, so make sure you are using the correct media. Until you erase the media, the Make Startup Disk button will be inactive. Once the media is erased, the button will become active and you can create the Startup Disk.

12
As the boot disk is created, you’ll get a status update window as shown above.
When the process is completed, you’ll get the above completion message and your USB device will be ready to boot Raptor.

13
Raptor Toolbox: Imaging The Imaging tab of the Raptor Toolbox is where the Forensic Image is created. To perform this function, several drop-down boxes must be selected and other items must be entered.
The Raptor Toolbox allows imaging to two different destinations in a multitude of different forensic formats. Included in these formats is: Device, which is a drive-to-drive clone; E01, which is a compressed Encase® format; dmg, which is a forensic version of the Apple Inc. disk image; and dd (Raw) which is a raw encapsulated image often seen in a Linux/Unix environment. All of these image formats are forensically sound and can be used by most, if not all, forensic applications. Imaging is started by selecting your source device. This is sometimes referred to as the “suspect“ device. In this case, you are trying to capture a 1 GB USB storage device. Click the Select Source drop-down box and you will be presented with a list of devices that are present on the system. In most cases, you want an image of the Entire Physical device. If you only want the Logical Partition, you are presented with that option as well.
14
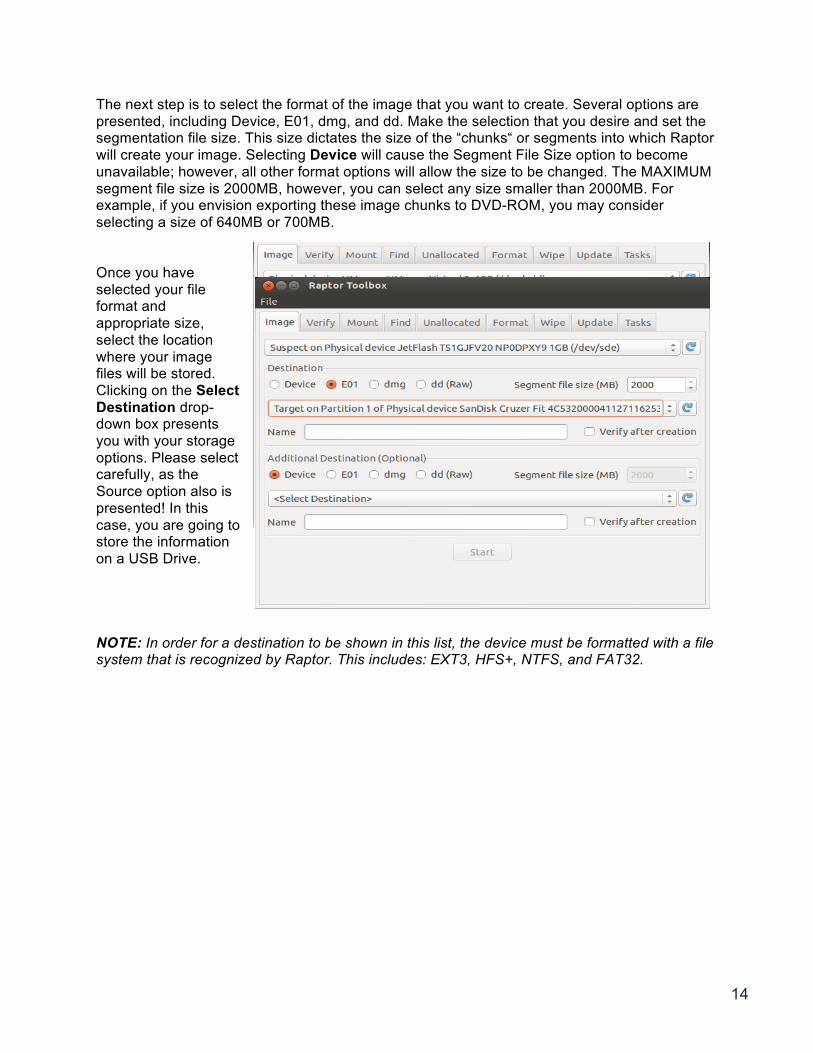
The next step is to select the format of the image that you want to create. Several options are presented, including Device, E01, dmg, and dd. Make the selection that you desire and set the segmentation file size. This size dictates the size of the “chunks“ or segments into which Raptor will create your image. Selecting Device will cause the Segment File Size option to become unavailable; however, all other format options will allow the size to be changed. The MAXIMUM segment file size is 2000MB, however, you can select any size smaller than 2000MB. For example, if you envision exporting these image chunks to DVD-ROM, you may consider selecting a size of 640MB or 700MB. Once you have selected your file format and appropriate size, select the location where your image files will be stored. Clicking on the Select Destination drop-down box presents you with your storage options. Please select carefully, as the Source option also is presented! In this case, you are going to store the information on a USB Drive. NOTE: In order for a destination to be shown in this list, the device must be formatted with a file system that is recognized by Raptor. This includes: EXT3, HFS+, NTFS, and FAT32.

15
Once your selections have been made, select Verify After Creation. This setting will cause Raptor to create an MD5 and SHA1 hash of the original as well as the image file and store this in a log file that Raptor creates during imaging. When the creations and verification hash values match, the image and original are identical.
You are now ready to image, so click Start and the desktop will appear as below. At the top of the desktop, you will see a status window that shows the current status of the imaging process.

16
Once imaging is completed, the log file of the collection will be displayed. If Verify After Creation was checked, the top right window will then show the status of the verification process.
When the verification process is completed, it will append to the log file and display the status on the desktop.

17
Raptor Image Logs Examination of the Destination that was selected for the forensic image shows at least two items. One is the image file segment and the other is an imaging log file. In this case, the image file was large enough that an additional image file segment was created. Had the image been smaller there would have been only one image file segment. The image log file, which is created automatically, contains very important information. It includes: The command used to create the image The date and time of the imaging process and the number of records (blocks) read and written The hash value of the original media. The verification hash values (if selected)

18
Raptor Toolbox: Image to Two Separate Destinations in Two Different Formats It is often good forensic practice to make multiple copies of a forensic image for the purposes of disaster recovery. With Raptor, two copies can be sent to two different locations at the same time. Additionally, Raptor gives you the option to image in two different formats at the same time. In order to perform this function, only one change is needed from the process listed above. First, a second destination must be selected and a second file format, and a file Name must be entered. Prepare the imaging specifics as before: select the destinations carefully and activate the Verify After Creation checkbox. In this case, you are imaging the same 1GB drive to two different destinations in two different file formats. When Start is selected, the following screen will be visible. The Imaging and Imaging title on the window is indicative of two different images being created at the same time.
NOTE: You also can send two images to the same destination if you prefer. Should you decide to do this, you will need to select different file types; otherwise only one image file set will be created. Additionally, creating two image file sets on one device will not give you any disaster recovery security.

19
Raptor Toolbox: Image Conversion with Verify Raptor has an added capability that can be very helpful in many situations. Raptor will allow you to convert a forensic image from one format to another. Raptor will also allow you to change the file segmentation settings within a particular forensic image type. In order to perform this function, the selected Source must be the forensic image that you want to convert. In this case, the forensic image that was just created was an E01 (EnCase®) file format with 2000MB file segments. After selecting the forensic image you wish to convert, you must select the new file format, the new file Segment Size, the new Destination and the new file Name. Verify After Creation should ALWAYS be selected. You have the option of merely changing the file segment size and can accomplish this by keeping the file type the same as the original; however, either the destination or the filename would have to be changed to avoid overwriting the original. As with the original creation of the forensic image, a status window is shown during the process. In this case, the title Converting is used to indicate the process that is taking place.
20
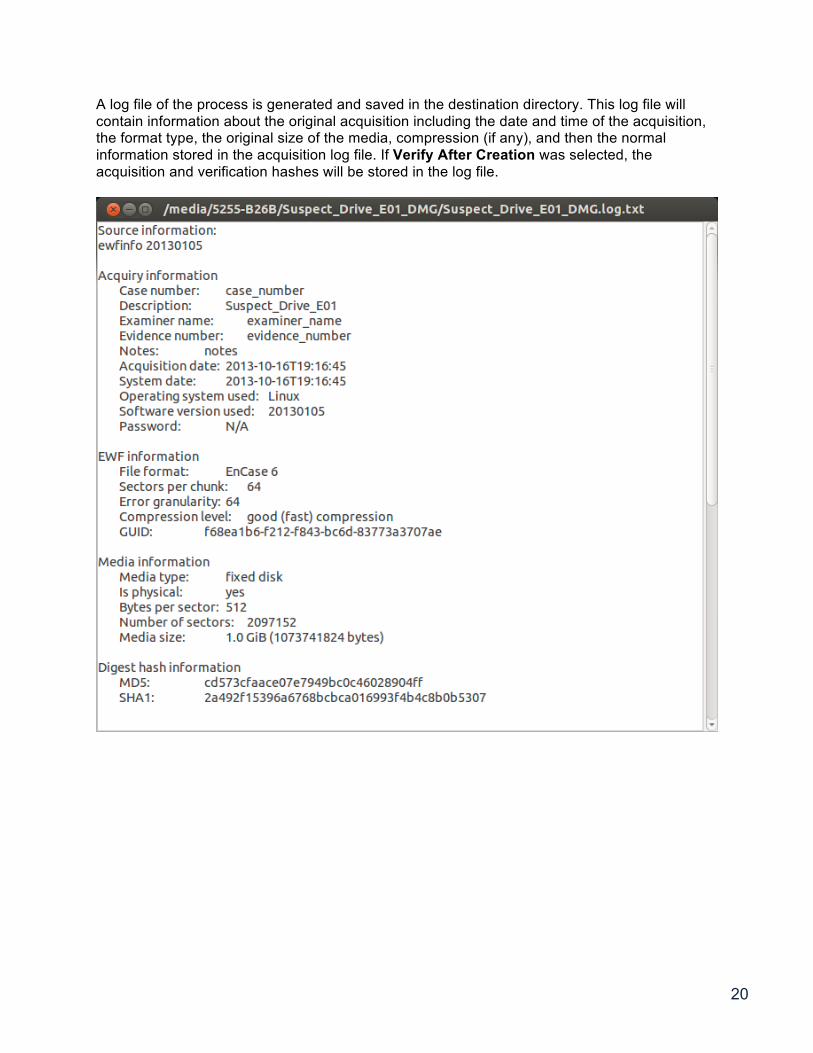
A log file of the process is generated and saved in the destination directory. This log file will contain information about the original acquisition including the date and time of the acquisition, the format type, the original size of the media, compression (if any), and then the normal information stored in the acquisition log file. If Verify After Creation was selected, the acquisition and verification hashes will be stored in the log file.

21
Raptor Toolbox: Verify The Verify tab in the Raptor Toolbox is useful for a variety of tasks. For instance, despite all our warnings, sometimes it is possible to “forget“ to select Verify After Creation. In this situation, rather than cancelling the imaging process, you can wait until the process is completed and perform verification on the image file. The default window for the Verify tab is shown. Should the need arise to verify a forensic image, select the Verify tab and then click on the drop-down box. Select the forensic image (E01 shown here). Then click Verify.
22
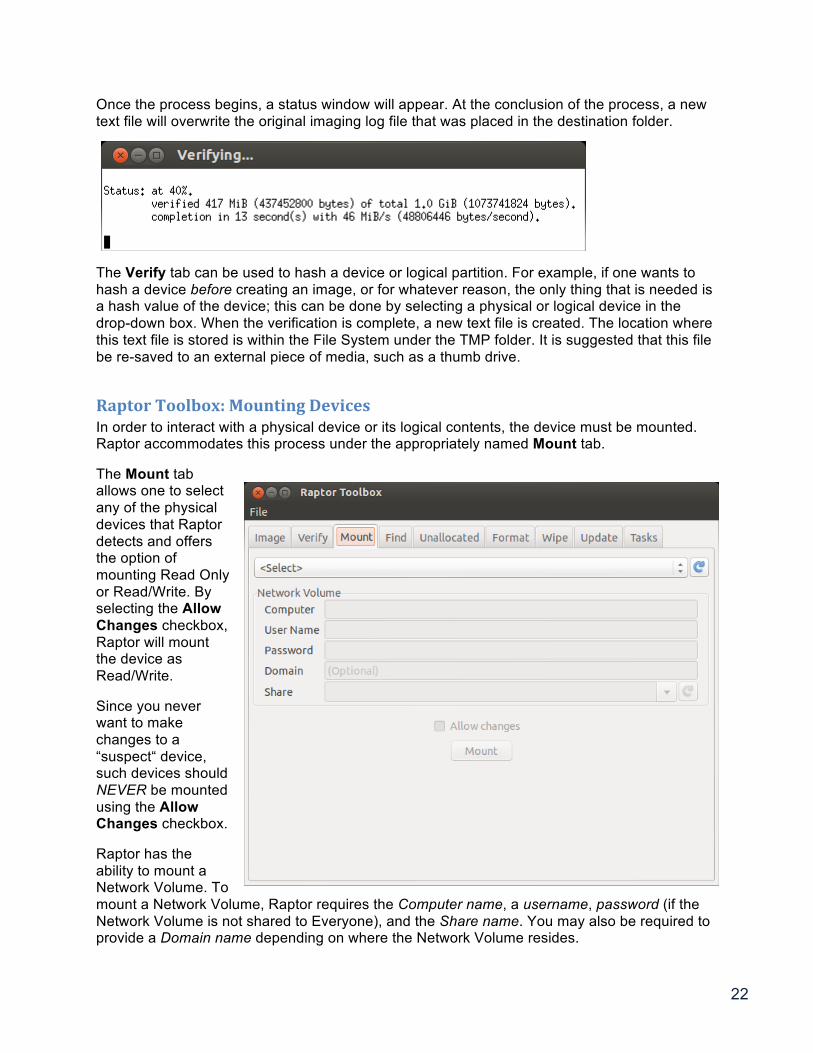
Once the process begins, a status window will appear. At the conclusion of the process, a new text file will overwrite the original imaging log file that was placed in the destination folder.
The Verify tab can be used to hash a device or logical partition. For example, if one wants to hash a device before creating an image, or for whatever reason, the only thing that is needed is a hash value of the device; this can be done by selecting a physical or logical device in the drop-down box. When the verification is complete, a new text file is created. The location where this text file is stored is within the File System under the TMP folder. It is suggested that this file be re-saved to an external piece of media, such as a thumb drive.
Raptor Toolbox: Mounting Devices In order to interact with a physical device or its logical contents, the device must be mounted. Raptor accommodates this process under the appropriately named Mount tab.
The Mount tab allows one to select any of the physical devices that Raptor detects and offers the option of mounting Read Only or Read/Write. By selecting the Allow Changes checkbox, Raptor will mount the device as Read/Write.
Since you never want to make changes to a “suspect“ device, such devices should NEVER be mounted using the Allow Changes checkbox.
Raptor has the ability to mount a Network Volume. To mount a Network Volume, Raptor requires the Computer name, a username, password (if the Network Volume is not shared to Everyone), and the Share name. You may also be required to provide a Domain name depending on where the Network Volume resides.
23
The same rules apply for mounting a Network Volume that applied to mounting locally-mounted devices: “Suspect“ devices should NEVER be mounted using the Allow Changes checkbox.
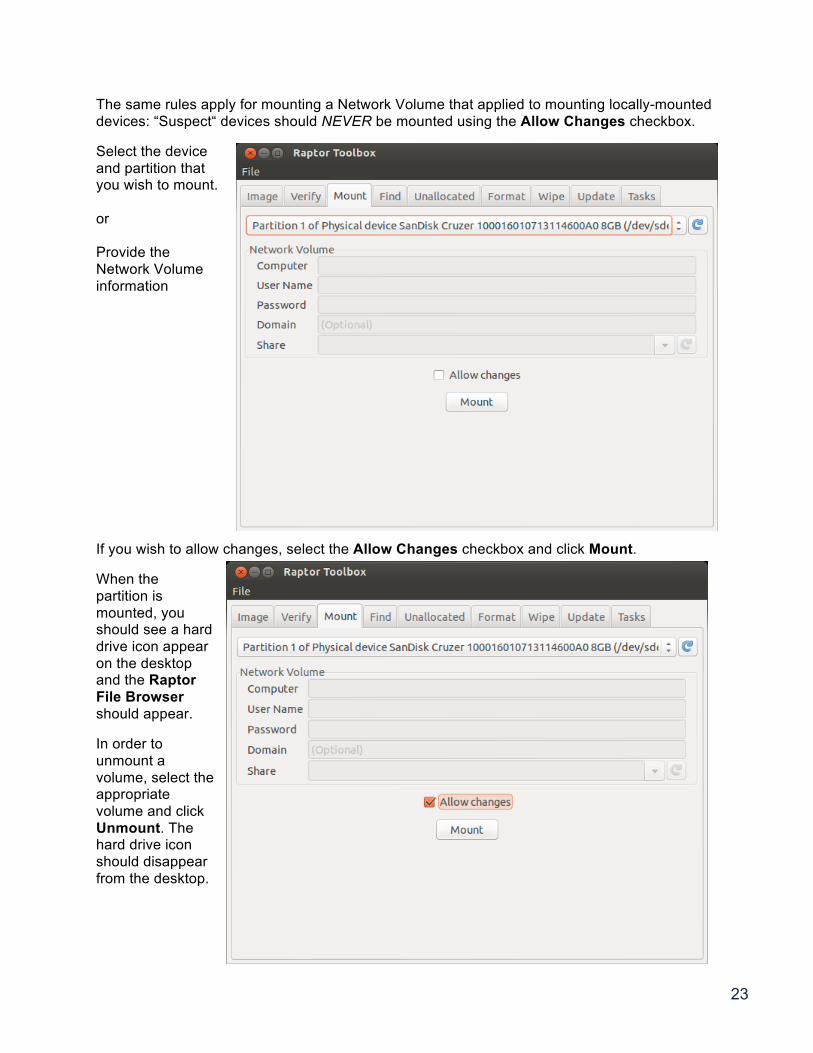
Select the device and partition that you wish to mount. or Provide the Network Volume information
If you wish to allow changes, select the Allow Changes checkbox and click Mount.
When the partition is mounted, you should see a hard drive icon appear on the desktop and the Raptor File Browser should appear.
In order to unmount a volume, select the appropriate volume and click Unmount. The hard drive icon should disappear from the desktop.

24
Raptor Toolbox: Find The Find tab can be used to search for filenames, file content, or Multipurpose Internet Mail Extensions (MIME) types. Devices available to be searched appear in the top window. Multiple devices can be selected at once. Once devices have been selected, Raptor allows you to input search Criteria. The options are Name, Content, and Type, and each field allows for multiple entries. In the example to the right, Find will return any results where the file name is name.txt or the content contains the word Content or the MIME type is Image/jpeg or Text/plain. Finally, the Destination drop-down shows mounted devices where the data can be written to and the name of the folder where the results will be created. The Find status window appears while the search is ongoing.

25
Once the search finishes, two files are created in the user-specified folder. The first file is a .rfc file which contains the XML file containing the search query. The second file is a .rfr file which contains a SQLite3 database file containing the search results.
Raptor Toolbox: Unallocated The Unallocated tab is used to collect Unallocated space from a device. To collect unallocated space, Raptor requires the user to select a Source, a Destination, and a Name. The source can be a logical or physical volume, while the destination must be a mounted device. The user inputted Name will be used both to create the folder name and to be appended to the created file name.
26
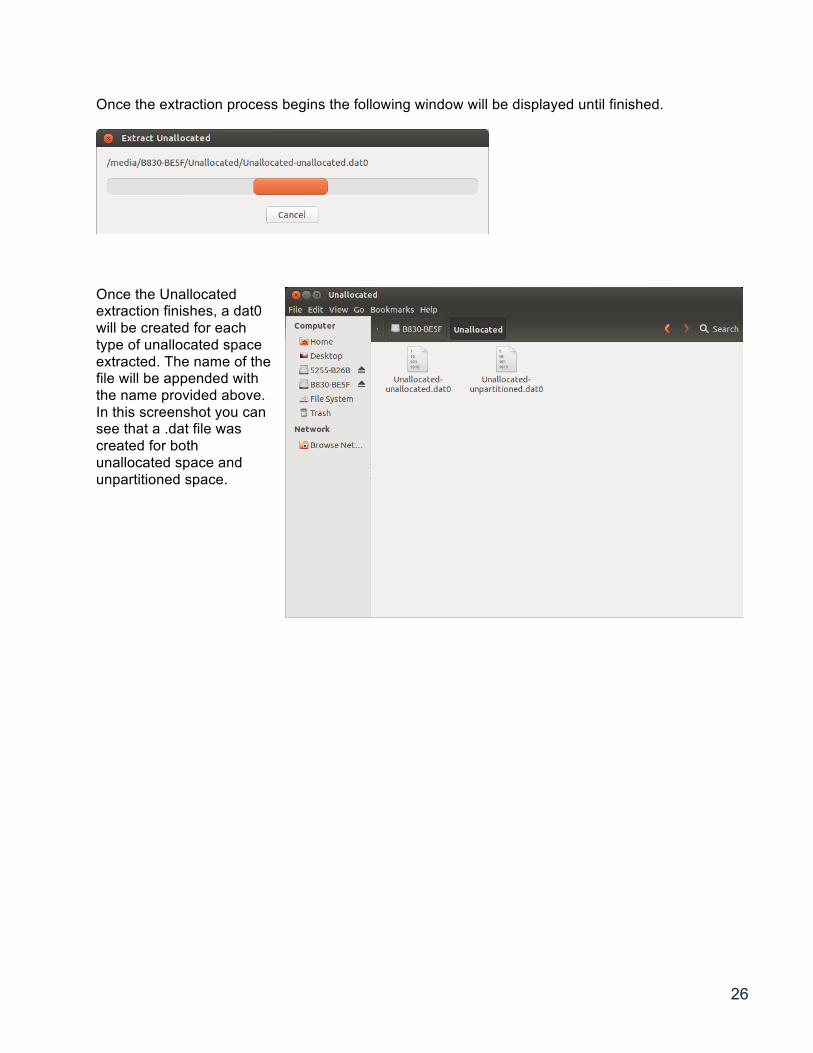
Once the extraction process begins the following window will be displayed until finished.
Once the Unallocated extraction finishes, a dat0 will be created for each type of unallocated space extracted. The name of the file will be appended with the name provided above. In this screenshot you can see that a .dat file was created for both unallocated space and unpartitioned space.
27
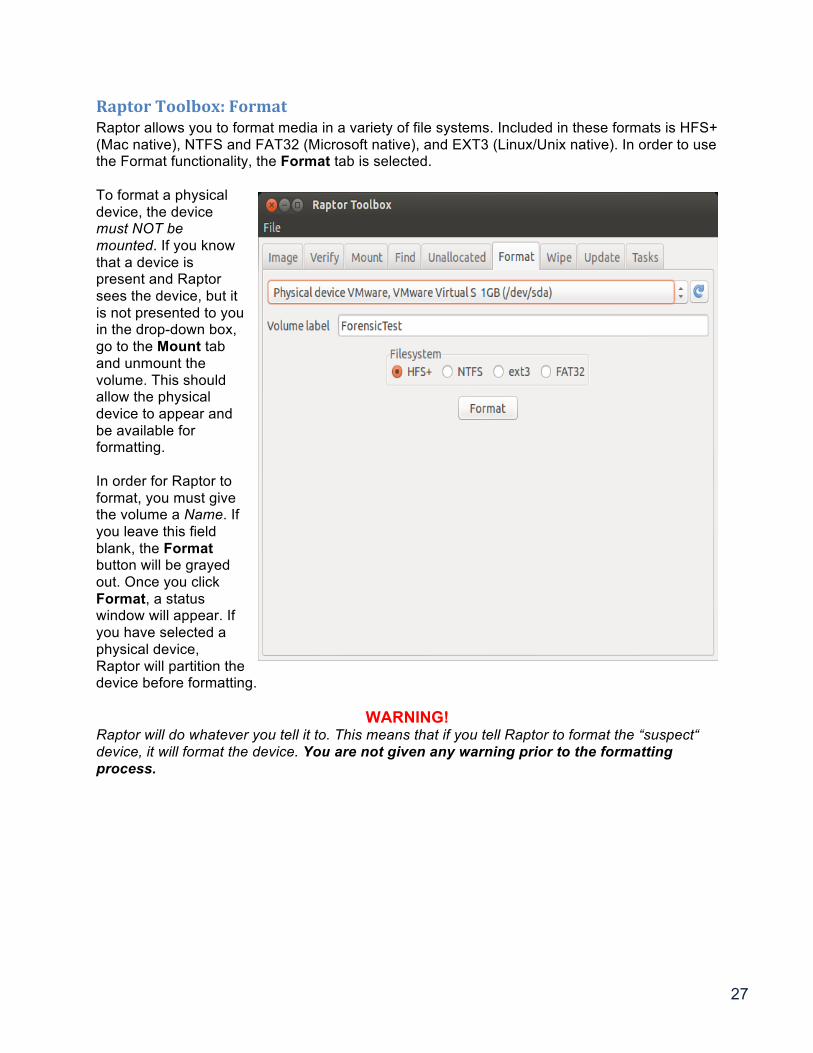
Raptor Toolbox: Format Raptor allows you to format media in a variety of file systems. Included in these formats is HFS+ (Mac native), NTFS and FAT32 (Microsoft native), and EXT3 (Linux/Unix native). In order to use the Format functionality, the Format tab is selected. To format a physical device, the device must NOT be mounted. If you know that a device is present and Raptor sees the device, but it is not presented to you in the drop-down box, go to the Mount tab and unmount the volume. This should allow the physical device to appear and be available for formatting. In order for Raptor to format, you must give the volume a Name. If you leave this field blank, the Format button will be grayed out. Once you click Format, a status window will appear. If you have selected a physical device, Raptor will partition the device before formatting.
WARNING! Raptor will do whatever you tell it to. This means that if you tell Raptor to format the “suspect“ device, it will format the device. You are not given any warning prior to the formatting process.
28
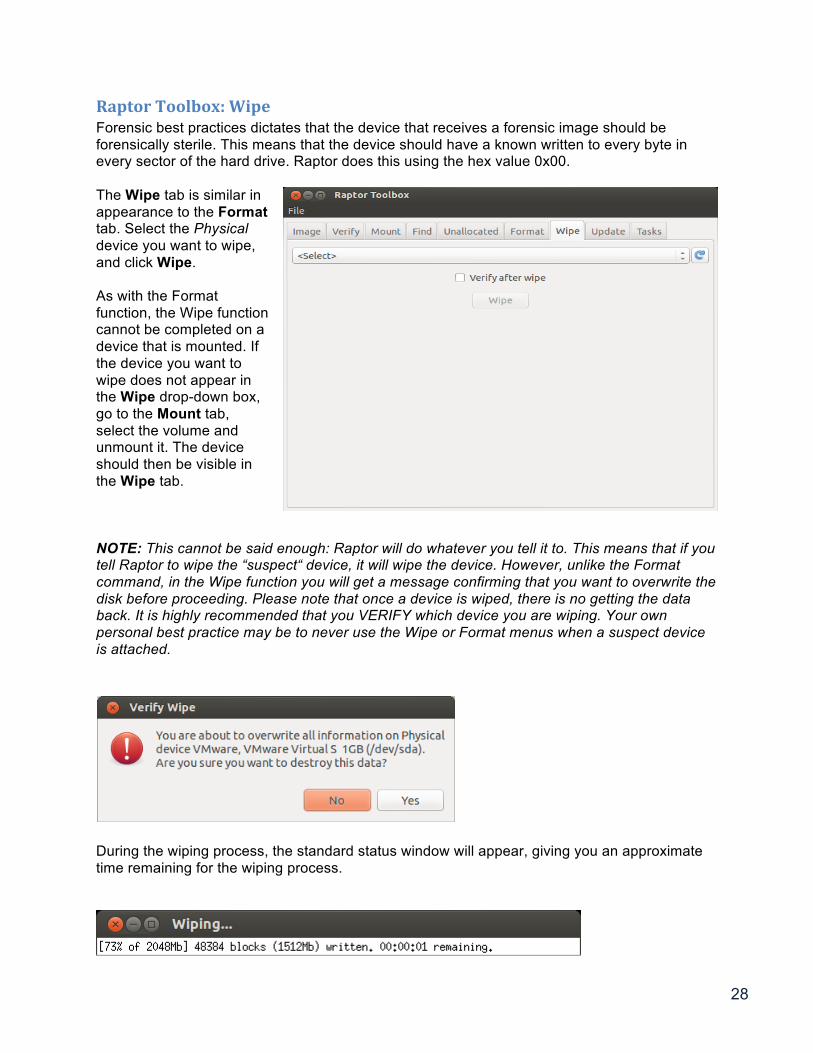
Raptor Toolbox: Wipe Forensic best practices dictates that the device that receives a forensic image should be forensically sterile. This means that the device should have a known written to every byte in every sector of the hard drive. Raptor does this using the hex value 0x00. The Wipe tab is similar in appearance to the Format tab. Select the Physical device you want to wipe, and click Wipe. As with the Format function, the Wipe function cannot be completed on a device that is mounted. If the device you want to wipe does not appear in the Wipe drop-down box, go to the Mount tab, select the volume and unmount it. The device should then be visible in the Wipe tab. NOTE: This cannot be said enough: Raptor will do whatever you tell it to. This means that if you tell Raptor to wipe the “suspect“ device, it will wipe the device. However, unlike the Format command, in the Wipe function you will get a message confirming that you want to overwrite the disk before proceeding. Please note that once a device is wiped, there is no getting the data back. It is highly recommended that you VERIFY which device you are wiping. Your own personal best practice may be to never use the Wipe or Format menus when a suspect device is attached.
During the wiping process, the standard status window will appear, giving you an approximate time remaining for the wiping process.

29
Raptor Toolbox: Update The Update tab, new to Raptor 3, is used to download Raptor updates from the Alvarez & Marsal website. In order to use the Update functionality using a network connection, the connection needs to be created. Network connections can be created by right-clicking the Network icon in the upper left hand corner and choosing Edit Connections.
The first tab— Wired—is used to create a connection when a network cable is attached to the computer.
30
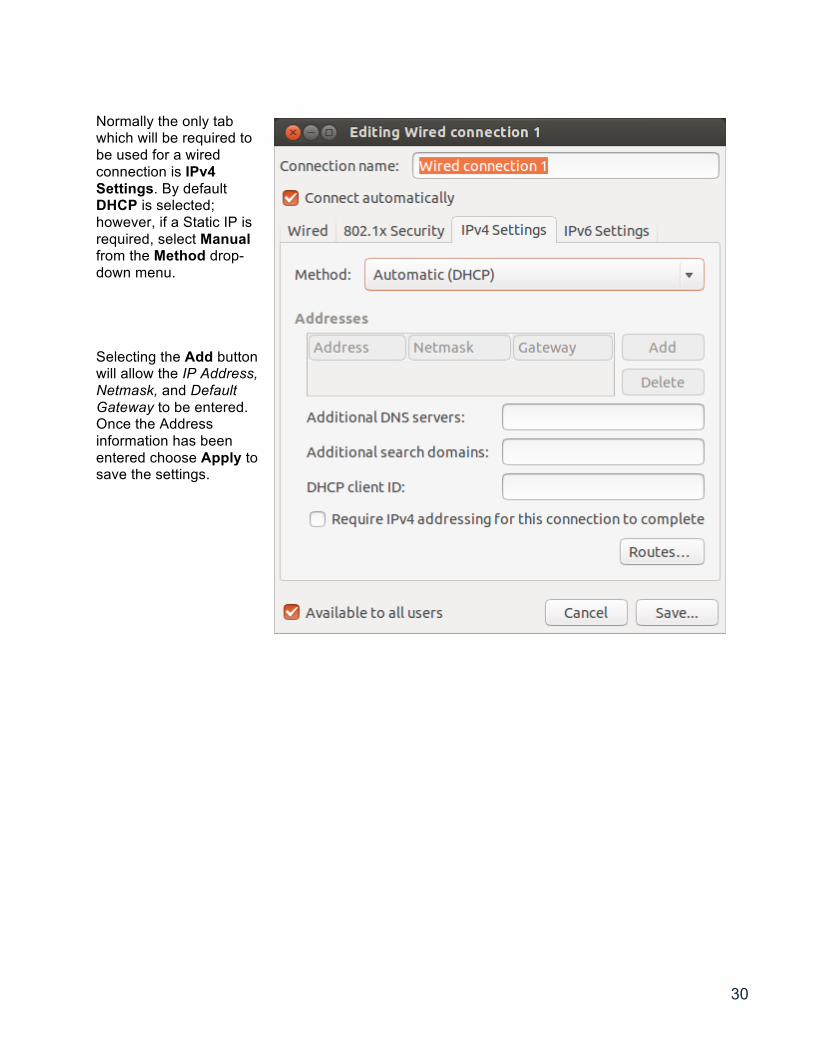
Normally the only tab which will be required to be used for a wired connection is IPv4 Settings. By default DHCP is selected; however, if a Static IP is required, select Manual from the Method drop-down menu. Selecting the Add button will allow the IP Address, Netmask, and Default Gateway to be entered. Once the Address information has been entered choose Apply to save the settings.

31
To create a wireless connection some additional settings may be required. After selecting the Wireless tab there are two additional tabs which include wireless connection-specific information. The default tab is Wireless. The Wireless tab contains the SSID field which is used to provide the SSID of the wireless network. The Wireless Security tab is used to select the type of Security. Depending on the type of security chosen, some additional information may be required. Normally a network administrator will be able to advise as to the type of security and the settings required to connect to the wireless network.

32
Once the wired or wireless settings have been entered, right-click on the Networking icon in the upper right hand corner and choose Enable Networking. If all of the settings are correctly set, the icon in the upper right hand corner will change and the desktop will display a connection-established message.
After the connection is created, changing the source to Network and choosing Update will allow Raptor to install updates from the Alvarez & Marsal website (if updates are available).

33
Raptor Toolbox: Task Log The last and final tab on the Raptor Toolbox is the Tasks tab. This tab contains a listing of all the functions performed via the Raptor Toolbox. Included in the task list is the Action, the current State (either Running, Pending, or Finished), and the Command used to perform that function. This tab can be useful if you need to verify whether a given function has been performed. For example, if you need to image several hard drives in one computer, you could use the Tasks tab to verify which hard drives had already been imaged. A sample of the Tasks window is shown below, and it includes both wipe and format functions in addition to an image creation to two destinations and the associated image verifications.

34
All Done: Shutting Down Raptor As most will agree, shutting down a Linux/Unix system properly is important. In order to do that in Raptor, click the Power Button icon in the upper right hand corner of the desktop.
Selecting Shut Down from the Menu will start the shutdown process.
When Restart or Shut Down is selected Raptor will first ask you to confirm the shutdown or restart process; then you will go through a normal shutdown/restart process. You will also be asked to eject the DVD-ROM before turning the computer off or restarting.
Support If you have questions or need support when using Raptor, please email us at [email protected].