rational rose 2000e, rose extensibility user's...
TRANSCRIPT
Rational Rose 2000eRose ExtensibilityUser’s Guide

Copyright © 1998-2000 Rational Software Corporation.Copyright © 1998-2000 Rational Software Corporation.Copyright © 1998-2000 Rational Software Corporation.Copyright © 1998-2000 Rational Software Corporation.All rights reserved.All rights reserved.All rights reserved.All rights reserved.
Part Number 800-023328-000
Revision 7.0, March 2000, (Software Release 2000e)
This document is subject to change without notice.
GOVERNMENT RIGHTS LEGEND: Use, duplication, or disclosure by the U.S.Government is subject to restrictions set forth in the applicable RationalSoftware Corporation license agreement and as provided in DFARS 227.7202-1(a) and 227.7202-3(a) (1995), DFARS 252.227-7013(c)(1)(ii) (Oct 1988), FAR12.212(a) (1995), FAR 52.227-19, or FAR 52.227-14, as applicable.
Rational, the Rational logo, Rational Rose, ClearCase, and Rational UnifiedProcess are trademarks or registered trademarks of Rational SoftwareCorporation in the United States and in other countries. All other names areused for identification purposes only and are trademarks or registeredtrademarks of their respective companies. Basic Script is a trademark ofSummit Software, Inc.
ii Rational Rose 2000e, Rose Extensibility User’s Guide

Contents
List of Figures xiii
List of Tables xv
Preface xvii
Prerequisites xvii
How This Manual Is Organized xviii
Online Help xviii
Online Manual xix
Related Documentation xix
File Names xix
Chapter 1 Basic Extensibility Concepts 1
Rational Rose Extensibility 1
The REI Model and Rational Rose Extensibility 1
Rational Rose Scripting 4
Rational Rose Automation 4
Rational Rose Add-In Manager 5
Default Properties and Property Sets 5
Rational Rose Extensibility Type Libraries 5
Rational Rose 2000e, Rose Extensibility User’s Guide iii

Contents
Chapter 2 Customizing Rational Rose Menus 7
Extending Rational Rose Menus 7
Customizing Rational Rose Main Menus 7Procedure 8Adding Entries to a Rational Rose Menu File 9
Menu File Keywords 10Menu Actions 11Menu File Variables and Modifiers 12
Syntax Rules for Rational Rose Menu File Entries 15Adding Scripts to a Rational Rose Menu 16Adding or Editing the Virtual Path for Scripts 17Sample Rational Rose Menu File 19
Customizing Rational Rose Shortcut Menus 21Benefits 21Limitations 22Key Terms and Concepts 22
Language-Dependent 22Language-Neutral 23Language Add-In 23Non-Language Add-In 24
Behind the Scenes of Shortcut Menus... 24How Rational Rose Formats and Displays Shortcut Menu Items 24Shortcut Menu Scenarios 26Shortcut Menu Design Considerations 28Procedure 29Creating Events for Shortcut Menus 30
OnActivate 30OnEnableContextMenuItems 30OnSelectedContextMenuItem 31
Adding Menu Items to the Shortcut Menu 31Working with Shortcut Menu Items 31Working with the Shortcut Menu Item Collection 31Editing Shortcut Menu Items 31Changing the State of a Shortcut Menu Item 32Sample Shortcut Menu Implementation Code 32Sample Rational Rose Script Shortcut Menu Code 34
iv Rational Rose 2000e, Rose Extensibility User’s Guide
Chapter 3 Using the REI to Work with Rational Rose 39
Introduction 39
Getting the Rational Rose Application Object 39Using Rational Rose Script 39Using Rational Rose Automation 40
Associating Files and URLs with Classes 40
Managing Default Properties 41
Adding a Property to a Set 42How To 42Example 43Notes on the Example 43
Creating a New Property 44How To 44Example 44Notes on the Example 44
Deleting Model Properties 44
Getting Model Properties 45
Setting Model Properties 45Setting Model Properties Using OverrideProperty 45
How To 45Example 46Notes on the Example 46
Setting Model Properties Using InheritProperty 46How To 46Example 47Notes on the Example 47
Creating a New Property Set 47
Cloning a Property Set 47How To 47Example 48Notes on the Example 48
Rational Rose 2000e, Rose Extensibility User’s Guide v

Contents
Deleting a Property Set 49How To 49Example 49Notes on the Example 49
Getting and Setting the Current Property Set 49How To 49Example 50Notes on the Example 50
Creating a User-Defined Property Type 51How To 51Example 52Notes on the Example 52
Creating a New Tool 53
Placing Classes in Categories 53
Using Type Libraries for Rational Rose Automation 53How To 53Example 53
Working with Controllable Units 54
Working with Rational Rose Diagrams 54
Getting an Element from a Collection 55Accessing Collection Elements By Count 55
How To 55Example 55
Accessing Collection Elements By Unique ID 56How To 56Example 56
Accessing Collection Elements By Name 56How To 56Example 56
vi Rational Rose 2000e, Rose Extensibility User’s Guide
Chapter 4 Using the Rational Rose Script Editor 57
The Script Editor Window 57
Opening a Script 58
Creating New Rational Rose Scripts 58Creating a New Script from Scratch 58Creating a New Script from an Existing Script 59
Moving the Insertion Point in a Script 59Moving the Insertion Point with the Mouse 59Moving the Insertion Point to a Specified Line in Your Script 60
Selecting Text 60Selecting Text with the Mouse 61Selecting Text with the Keyboard 61Selecting an Entire Line 62
Deleting, Cutting, Copying, and Pasting Text 62Deleting Text 62Cutting a Selection 62Copying a Selection 62Pasting the Contents of the Clipboard into Your Script 63
Adding Comments to a Script 63Adding a Full-Line Comment 63Adding a Comment at the End of a Line of Code 63
Finding and Replacing Text 64Finding Specified Text 64Replacing Specified Text 65
Running, Pausing, and Stopping Your Script 66Running Your Script 66Pausing an Executing Script 66Stopping an Executing Script 66
Tracing Script Execution 67Stepping Through Your Script 67Displaying the Calls Dialog Box 68
Rational Rose 2000e, Rose Extensibility User’s Guide vii
Contents
Setting and Removing Breakpoints 69Starting Debugging Partway through a Script 69Continuing Debugging at a Line Outside the CurrentSubroutine 69Debugging Selected Portions of Your Script 70Removing a Single Breakpoint Manually 70Removing All Breakpoints Manually 70
Working with Watch Variables 71Adding Watch Variables 71Selecting Variables on the Watch List 72Deleting Watch Variables 73Modifying the Value of Variables on the Watch Variable List 73
Compiling Your Script 74
Using Interscript Calls 74Guidelines for Using a Script to Call Another Script 74Debugging Interscript Calls 75
Working with the Dialog Editor 75Inserting a Dialog Box into Your Script 75Editing an Existing Dialog Box 75Displaying and Adjusting the Grid 76Changing Titles and Labels 77Assigning Accelerator Keys 78Capturing Standard Windows Dialog Boxes 78Testing Your Dialog Boxes 79Incorporating Dialog Boxes or Controls into Your Script 80Selecting Controls 81Selecting Dialog Boxes 81Repositioning Items 82
Repositioning Items with the Mouse 82Repositioning Items with the Arrow Keys 82Repositioning Dialog Boxes with the Dialog Information DialogBox 83Repositioning Controls with the Dialog Information DialogBox 83
viii Rational Rose 2000e, Rose Extensibility User’s Guide

Resizing Items 84Resizing Items with the Mouse 84Resizing Items with the Information Dialog Box 84Resizing Selected Items Automatically 84
Adding Controls 85Duplicating Controls 86Adding Pictures to a Dialog 86
Adding Pictures from Files 86Adding Pictures from Picture Libraries 87
Pasting Items into Dialog Editor 87Pasting Existing Dialog Boxes into Dialog Editor 87Pasting Controls from Existing Dialog Boxes into DialogEditor 88
Displaying the Information Dialogs 88Displaying the Information Dialog Boxes for Dialogs 88Attributes You Can Adjust with the Dialog Box InformationDialog Box 89Displaying the Information Dialog Boxes for Controls 90Attributes You Can Adjust with the Information Dialog Boxes forControls 90
Appendix A Rational Rose Script Editor Shortcuts 95
General Shortcuts 95
Navigating Shortcuts 96
Editing Shortcuts 97
Debugging Shortcuts 98
File Menu Shortcuts 98
Edit Menu Shortcuts 99
Debugger Menu Shortcuts 100
Rational Rose 2000e, Rose Extensibility User’s Guide ix

Contents
Appendix B Developing Add-Ins for Rational Rose 101
Introduction 101
Why Create Add-Ins? 103
Types of Add-Ins 103
What is in an add-in? 103Main menus 104Shortcut menu 104Custom Specifications 104Properties 105Data types 105Stereotypes 105Online help 105Context-sensitive help 105Registering for events 105Functionality 106
UNIX versus Windows 106
Creating portable add-ins 107
How to develop add-ins 108Customizing Main Menus 109Customizing the Shortcut Menu 110Creating Custom Specifications 110Customizing Properties 110
Design Considerations 110Information in Property Files 111Format for Property Files 112Sample Property File 117Creating Property Files 119Testing Property Files 119
Customizing Data types 120Customizing Stereotypes 120
Steps for Creating Add-In Stereotypes 121Additional online help 126
Adding Online Help for Your Add-In 127
x Rational Rose 2000e, Rose Extensibility User’s Guide

Additional context-sensitive help 128Main Menu Items 128Model Properties 129
User manuals 129Registering for events 129
Interface Versus Script Events 130What events are available? 130How to add events to your add-in 131
Updating the Registry 134Registry Entries 134Registering Custom Stereotypes 137Updating the registry during installation 137Registry File Anatomy 138
Installing, Setting up, and Uninstalling your add-in 139Installation Reminders 139Installing Add-Ins 140Uninstalling Add-Ins 140
Activating and deactivating add-ins 141
Index 143
Rational Rose 2000e, Rose Extensibility User’s Guide xi


List of Figures
Figure 1 Rational Rose Extensibility Model — Logical View 2Figure 2 Rational Rose Application and Extensibility Components 3Figure 3 Adding Virtual Path for Scripts 18Figure 4 Sample Rational Rose Menu File 19Figure 5 Sample Code for Shortcut Menus 34Figure 6 Property Specification Editor 41Figure 7 Rational Rose Script Editor 58Figure 8 Goto Line Dialog Box 60Figure 9 Selected Script Text 61Figure 10 Find Script Text Dialog Box 64Figure 11 Replace Dialog Box 65Figure 12 Script Calls Dialog Box 68Figure 13 Add Watch Dialog Box 71Figure 14 Modify Variable Dialog Box 73Figure 15 Grid Dialog Box 76Figure 16 Dialog Editor with Grid Displayed 77Figure 17 Capturing a Dialog Box 78Figure 18 Sample Dialog Box in Basic Script 81Figure 19 Dialog Box Information Dialog Box 89Figure 20 Control Information Dialog Box 90Figure 21 Rational Rose Add-Ins Architecture 102Figure 22 Sample Custom Properties 117Figure 23 OLEServer Windows Registry Entry 131Figure 24 Windows Registry Entries for Rational Rose Events 132
Rational Rose 2000e, Rose Extensibility User’s Guide xiii

List of Figures
Figure 25 Sample Event Handler Defining an Add-In’s Interfaces for Rational RoseEvents 133
Figure 26 Windows Registry Entries for an Add-In 134Figure 27 Windows Registry Entry for an Add-In’s Custom Stereotype Configuration
File 137
xiv Rational Rose 2000e, Rose Extensibility User’s Guide

Rational Rose 2000e, Rose Extensibility User’s Guide xv
List of Tables
Table 1 Menu File Keywords 10Table 2 Menu Actions 11Table 3 Menu File Variables 13Table 4 Menu File Modifiers 13Table 5 Displaying Shortcut Menu Items 26Table 6 Sample Watch Expressions 72Table 7 General Shortcuts 95Table 8 Navigating Shortcuts 96Table 9 Editing Shortcuts 97Table 10 Debugging Shortcuts 98Table 11 File Menu Shortcuts 98Table 12 Edit Menu Shortcuts 99Table 13 Debugger Menu Shortcuts 100Table 14 UNIX versus Windows 106Table 15 Property file data types 115


Preface
The Rational Rose 2000e, Rose Extensibility User’s Guide describes theRational Rose Extensibility Interface (REI) and provides procedures for:
� Customizing (extending) Rational Rose menus
� Working with Rational Rose using the REI
� Working with the Rational Rose Script Editor, which is the scriptingenvironment for working with the REI
Prerequisites
This manual assumes that you are familiar with the Windows 95,Windows 98, or Windows NT 4.0 operating environment, objectoriented design concepts, and how to use Rational Rose.
If you are unfamiliar with Rational Rose or object oriented designconcepts, you should refer to the Rational Rose 2000e, Using Rosemanual, as well as run the Rational Rose tutorial, which is included onyour product CD.
Also note that you may need to adapt the syntax listed for each REIproperty and method to your particular programming language. If thelisted syntax, does not meet your needs, consult your programmingenvironment’s help, programming language books, and outsidedocumentation on the subject.
Rational Rose 2000e, Rose Extensibility User’s Guide xvii

Preface
How This Manual Is Organized
This manual contains the following four chapters and two appendixes:
� Chapter 1—Chapter 1—Chapter 1—Chapter 1—Basic Extensibility Concepts
Provides an overview of Rational Rose extensibility concepts.
� Chapter 2Chapter 2Chapter 2Chapter 2—Customizing Rational Rose Menus
Provides syntax, examples, and procedures for adding submenusand menu commands to Rational Rose main and shortcut menus.Also, describes how Rational Rose formats and displays shortcutmenu items.
� Chapter 3Chapter 3Chapter 3Chapter 3—Using the REI to Work with Rational Rose
Tells how to perform many common Rational Rose tasks by usingthe Rational Rose Extensibility Interface, rather than the userinterface.
� Chapter 4Chapter 4Chapter 4Chapter 4—Using the Rational Rose Script Editor
Provides detailed instructions for working in the Rational RoseScript Editor, your environment for creating, debugging andrunning Rational Rose Script.
� Appendix A—Appendix A—Appendix A—Appendix A—Rational Rose Script Editor ShortCuts
Lists the shortcuts available when working in the Rational RoseScript editor.
� Appendix BAppendix BAppendix BAppendix B—Developing Add-Ins for Rational Rose
Provides additional information for users who want to explore theuse of add-ins. Tells how to combine Rational Rose customizationsand automations into one package.
Online Help
Rational Rose includes comprehensive online help with hypertext linksand a two-level index. The online help includes all of the informationfound in this guide, as well as all of the information contained in theRational Rose 2000e, Rose Extensibility Reference.
xviii Rational Rose 2000e, Rose Extensibility User’s Guide

Online Manual
Online Manual
Rational Rose includes all the user manuals online. Please refer to theReadme.txt file (found in the Rational Rose installation directory) formore information.
Related Documentation
After installation and before you begin using Rational Rose and theExtensibility Interface, please review any readme.txt files andRelease Notes to ensure that you have the latest information aboutthe product. The release notes are included with your productdocumentation and are available online from the Start menu. Therelease notes also list the new and updated classes, properties, andmethods. This information allows existing users to quickly discoverwhat has changed since the last version of Rational Rose.
For additional resources, refer to the Using Rational Rose guide andonline help. If you are new to Rational Rose, visual modeling, or theUnified Modeling Language (UML), you may also want to read the book,Visual Modeling with Rational Rose and UML, included with yourproduct documentation.
File Names
Where file names appear in examples, Windows syntax is depicted. Toobtain a legal UNIX file name, eliminate any drive prefix and change thebackslashes to slashes:
c:\project\username
becomes
/project/username
Rational Rose 2000e, Rose Extensibility User’s Guide xix


Chapter 1
Basic Extensibility Concepts
Rational Rose Extensibility
Rational Rose provides several ways for you to extend and customizeits capabilities to meet your specific software development needs. Youcan:
� Customize Rational Rose menus.
� Automate manual Rational Rose functions with Rational RoseScripts (for example, diagram and class creation, model updates,document generation, etc.).
� Execute Rational Rose functions from within another applicationby using the Rational Rose Automation object (RoseApp).
� Access Rational Rose classes, properties and methods right withinyour software development environment by including the RationalRose Extensibility Type Library in your environment.
� Activate Rational Rose add-ins using the Add-In Manager.
The REI Model and Rational Rose Extensibility
The purpose of Rational Rose is to enable component based softwaredevelopment. As you would expect, the Rational Rose application isitself component-based, and is defined in the Rational RoseExtensibility Interface (REI) Model.
The REI Model is essentially a metamodel of a Rational Rose model,exposing the packages, classes, properties and methods that defineand control the Rational Rose application and all of its functions.
Rational Rose 2000e, Rose Extensibility User’s Guide 1

Chapter 1 Basic Extensibility Concepts
Figure 1 shows the logical packages that comprise the Rational RoseExtensibility Interface Model. Refer to the Rational Rose ExtensibilityInterface Reference or online help for details on the classes containedin each package, and the properties and methods defined for eachclass.
Figure 1 Rational Rose Extensibility Model — Logical View
You communicate with the Rational Rose Extensibility Interfacethrough Rational Rose Scripts or through Rational Rose Automation.In either case, you will use the REI calls defined in the Rational RoseExtensibility Model and described in the Rational Rose ExtensibilityReference and online help.
Figure 2 shows the components of Rational Rose and the Rational Roseextensibility interface, and illustrates the relationships between them.These components are:
� Rational Rose Application
The Rational Rose Extensibility objects that interface to RationalRose’s application functionality.
2 Rational Rose 2000e, Rose Extensibility User’s Guide

The REI Model and Rational Rose Extensibility
� Rational Rose Extensibility Interface
This is the common set of interfaces used by Rational Rose Scriptand Rational Rose Automation to access Rational Rose.
� Rational Rose Script
The set of Rational Rose Script objects that allow Rational RoseScripts to automate Rational Rose Functionality.
� Rational Rose Automation
The set of Rational Rose Automation objects that allow RationalRose to function as an OLE automation controller or server.
� Diagrams
The Rational Rose Extensibility objects that interface to RationalRose’s diagrams and views.
� Model Elements
The Rational Rose Extensibility objects that interface to RationalRose’s model elements.
Figure 2 Rational Rose Application and Extensibility Components
Rational Rose 2000e, Rose Extensibility User’s Guide 3

Chapter 1 Basic Extensibility Concepts
Rational Rose Scripting
The Rational Rose Scripting language is an extended version of theSummit BasicScript language. The Rational Rose extensions allow youto automate Rational Rose-specific functions, and in some cases,perform functions that are not available through the Rational Roseuser interface.
The Rational Rose script editor runs in the Rational Rose environmentand provides access to the scripting environment. Start the scripteditor by clicking either Tools > New Script or Tools > Open Script.
Rational Rose provides a set of sample scripts that you can use as abase from which to create your own scripts.
� Check the Scripts folder in your Rational Rose installationdirectory for the complete list of available scripts.
� Use the Rational Rose Script Editor (click Tools > Open Script) toview a sample script. If you want to edit the script, click File > SaveScript As to create a copy for your own use, leaving the sampleintact.
Use the online BasicScript and Rational Rose Script LanguageReferences for complete script language information.
Rational Rose Automation
Rational Rose automation allows you to integrate other applicationswith Rational Rose in two ways:
� Using Rational Rose as an automation controller, you can call anOLE automation object from within a Rational Rose script. Forexample, a Rational Rose script can use OLE automation toexecute functions in applications such as Word and Visual Basic.
� Using Rational Rose as an automation server, you can call its OLEautomation object from within other OLE-compliant applications.
Rational Rose Automation is accessible to automation controllerenvironments, such as Visual Basic, EXCEL, Summit BasicScript,Softbridge Basic Language, C, C++, and others.
4 Rational Rose 2000e, Rose Extensibility User’s Guide

Rational Rose Add-In Manager
Rational Rose Add-In Manager
The Rational Rose Add-In Manager provides you with the facilitiesrequired to install extensions you create as add-in components in theRational Rose Environment.
In the extensibility environment, you can manipulate add-ins usingcalls to the RoseAddInManager object.
Default Properties and Property Sets
Each Rational Rose model has its own default properties. These defaultproperties are defined in a property file and are grouped into sets basedon:
� Type of model element
Class, component, relation, attributes, operations; and so on; theobjects that make up the model.
� Tool
Correponds to a tab in the property specification; a tool can be aprogramming language tool, such as Java or C++; a database tool,such as Oracle8; a user-defined add-in to Rational Rose, or someother tool.
� Properties
The actual properties and property values defined in the set; thesemust be appropriate to the model element and tool for which theyare being defined.
Note: You can define multiple sets of default properties for the same tooland model element. For example, you might want one set of propertiesfor a class with a stereotype of Actor and a different set of properties fora class with a stereotype of Interface. Both of these sets are stillconsidered default properties in that they are predefined for the model.Defining multiple sets saves you work by minimizing the need to overrideproperties later.
Rational Rose Extensibility Type Libraries
Loading a type library for Rational Rose automation allows you to useRational Rose class names to access the Rational Rose ExtensibilityInterface from your programming environment.
Rational Rose 2000e, Rose Extensibility User’s Guide 5

Chapter 1 Basic Extensibility Concepts
For example, if you are working in Visual Basic, instead of using theBasic object type Object, you can use the name of the actual RationalRose class. You can also check the syntax of the properties andmethods at compile time (early binding) instead of when the code isexecuted (late binding).
If you are working in Visual C, you can import RationalRose.tlb intoan MFC project. This generates ColeDispatchDriverColeDispatchDriverColeDispatchDriverColeDispatchDriver subclasses foreach REI class, and methods allowing access to REI properties andmethods.
Important:::: When you specify a Rational Rose class name in anautomation environment, you must add the prefix RoseRoseRoseRose to the classname, unless the class name itself contains the word Rose already. (Forexample, the Rational Rose class, RoseItem, does not require a prefix.)This prefix prevents class name conflicts across applications.
For example, in Rational Rose Script, the syntax for declaring aCategory variable is:
Dim theCategory As Category
In Rational Rose Automation, the syntax for declaring a Categoryvariable is:
Dim theCategory As RoseCategory
For details on using type libraries in any automation environment,refer to the documentation for your particular programmingenvironment.
6 Rational Rose 2000e, Rose Extensibility User’s Guide

Chapter 2
Customizing Rational Rose Menus
Extending Rational Rose Menus
Using the Rational Rose Extensibility Interface, you may add your ownmenu options to one of Rational Rose’s menus (for example, File, Edit).You can also add your own menu options to the Rational Rose shortcutmenu (displayed when you right-click).
This chapter explains how to customize:
� Rational Rose main menus
� Rational Rose shortcut menu
Customizing Rational Rose Main Menus
You can extend or customize Rational Rose menus by updating theRational Rose menu file, which Rational Rose reads during startup.
You can extend Rational Rose menus by adding:
� Submenus
� Menu options that execute any of the following:
❑ Rational Rose primitives
❑ Rational Rose scripts
Rational Rose 2000e, Rose Extensibility User’s Guide 7

Chapter 2 Customizing Rational Rose Menus
❑ System commands
❑ External programs
� Menu separators (lines between menu options, used to groupsimilar menu items)
Note: You can add information to existing menus (for example, File, Edit,etc.); however, you cannot add new menus to the Rational Rose menubar.
The content of Rational Rose menus is defined in the Rose.mnu file. Ifyou want to customize Rational Rose menus, you must edit this file.
While you cannot add new menus to the Rational Rose menu bar, youcan add commands to the existing Rational Rose menus.
Use the procedures, commands, and syntax described in this chapterto add Rational Rose menu commands that:
� Execute a program or shell script
� Execute a Rational Rose script
� Load or save controllable units
� Display a dialog for user input
� Change write protection for a controllable unit
� Execute an interface in a COM server (for example, from your add-in)
Procedure
The following procedure outlines the general steps for customizingRational Rose menus.
The subsections following the procedure provide information oncommand syntax, variables, and modifiers to use as you complete theprocedure.
Check the sample menu file at the end of this chapter for a completeexample that illustrates how to put the various menu elementstogether into a working menu file.
1. Using any text editor, open the Rose.mnu file. (The file resides inthe directory where Rational Rose is installed.)
2. Add entries to Rose.mnu for any or all of the following:
❑ Submenus
8 Rational Rose 2000e, Rose Extensibility User’s Guide

Customizing Rational Rose Main Menus
❑ Menu options
❑ Menu separators
Note: Pay close attention to the syntax rules that apply to yourentries to the Rational Rose menu file. For example, the syntax of themenu specifications includes opening and closing braces. You mustinclude these braces in your specifications, or they will not workproperly. For complete details, see Syntax Rules for Rational RoseMenu File Entries, later in this chapter.
3. If the menu item executes a script, add or edit Rational Rose’svirtual path for scripts, unless one is already defined.
4. Save the file.
❑ To create another menu file while leaving the Rose.mnu fileintact, save the file under a different name. (Recommended)
❑ To overwrite the file, save it as Rose.mnu
Adding Entries to a Rational Rose Menu File
Using any text editor and the following information, you can add menuentries to the Rational Rose menu file. The entries will appear on theRational Rose menu in the order in which you specify them.
As you add menu entries, you will specify:
� KeywordsKeywordsKeywordsKeywords that determine what to add to the menu (a submenu, amenu option, a separator).
� Menu actionsMenu actionsMenu actionsMenu actions that specify what action to take when the menu itemis selected.
� ArgumentsArgumentsArgumentsArguments that further define a menu action, or that determinethe conditions under which a menu command is enabled ordisabled in Rational Rose.
Remember to follow all of the syntax rules as described in Syntax Rulesfor Rational Rose Menu File Entries, later in this chapter. For example,the syntax of the menu specifications includes opening and closingbraces. You must include these braces in your specifications, or theywill not work properly. Remember that each opening brace ({{{{) requiresa corresponding closing brace (}}}}).
Rational Rose 2000e, Rose Extensibility User’s Guide 9

Chapter 2 Customizing Rational Rose Menus
Menu File Keywords
Table 1 describes the valid keywords for your entries in the RationalRose menu file:
Table 1 Menu File Keywords
Keyword Description
Menu RoseMenu Enter the Menu keyword, followed by the Rational Rosemenu name to indicate the name of the menu beingextended.For example, enter Menu Tools as the first line of anentry that extends the Tools menu.
Menu “Menu Text” Enter the Menu keyword, followed by a text string toindicate the name of a submenu being added to themenu. Note that quotation marks are required if thetext string contains spaces.For example, enter Menu “My Scripts” to add asubmenu called My Scripts.
Separator Enter the Separator keyword to add a separator to alist of menu options. Remember the placement of theSeparator keyword controls the placement of theseparator line on the menu.
Option “Commandtext”
Enter the Option keyword, followed by a text string toindicate the name of the menu command being added tothe menu. Note that quotation marks are required if thetext string contains spaces.For example, enter Option “Run My Script” to add amenu command called Run My Script.
10 Rational Rose 2000e, Rose Extensibility User’s Guide
Customizing Rational Rose Main Menus
Menu Actions
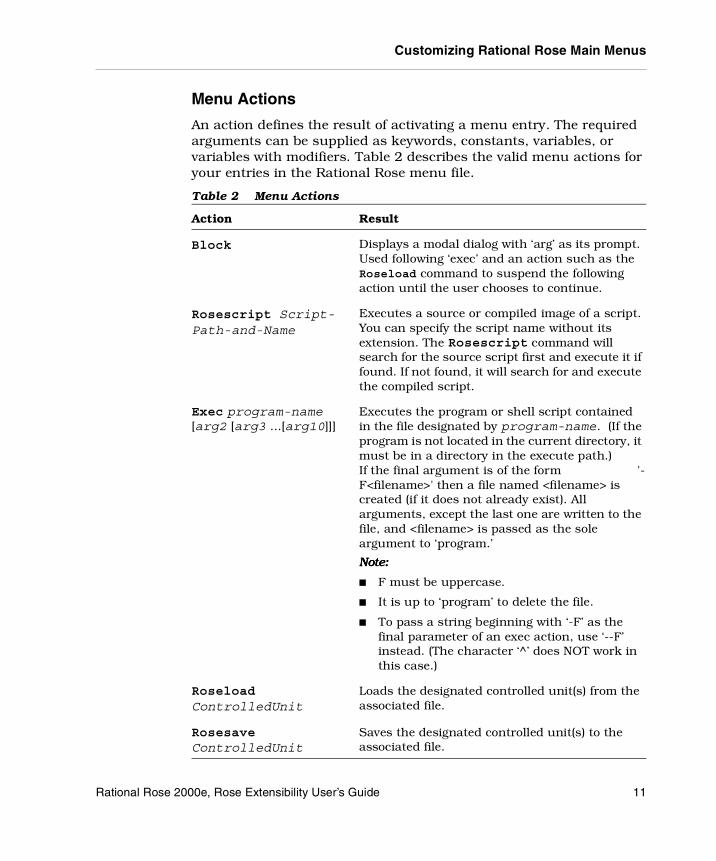
An action defines the result of activating a menu entry. The requiredarguments can be supplied as keywords, constants, variables, orvariables with modifiers. Table 2 describes the valid menu actions foryour entries in the Rational Rose menu file.
Table 2 Menu Actions
Action Result
Block Displays a modal dialog with ‘arg’ as its prompt.Used following ‘exec’ and an action such as theRoseload command to suspend the followingaction until the user chooses to continue.
Rosescript Script-Path-and-Name
Executes a source or compiled image of a script.You can specify the script name without itsextension. The Rosescript command willsearch for the source script first and execute it iffound. If not found, it will search for and executethe compiled script.
Exec program-name[arg2 [arg3 ...[arg10]]]
Executes the program or shell script containedin the file designated by program-name. (If theprogram is not located in the current directory, itmust be in a directory in the execute path.)If the final argument is of the form '-F<filename>' then a file named <filename> iscreated (if it does not already exist). Allarguments, except the last one are written to thefile, and <filename> is passed as the soleargument to ‘program.’
Note:Note:Note:Note:
� F must be uppercase.
� It is up to ‘program’ to delete the file.
� To pass a string beginning with ‘-F’ as thefinal parameter of an exec action, use ‘--F’instead. (The character ‘^’ does NOT work inthis case.)
RoseloadControlledUnit
Loads the designated controlled unit(s) from theassociated file.
RosesaveControlledUnit
Saves the designated controlled unit(s) to theassociated file.
Rational Rose 2000e, Rose Extensibility User’s Guide 11
Chapter 2 Customizing Rational Rose Menus
Menu File Variables and Modifiers
Rational Rose provides a set of variables that correspond to variousRational Rose model items. You can use these variables in conjunctionwith a set of modifiers to determine the conditions under which menuitems are enabled or disabled, as well as to specify specific menuactions.
The format for specifying variables with modifiers is:
variable[:mod1[:mod2[...[:mod10]]]
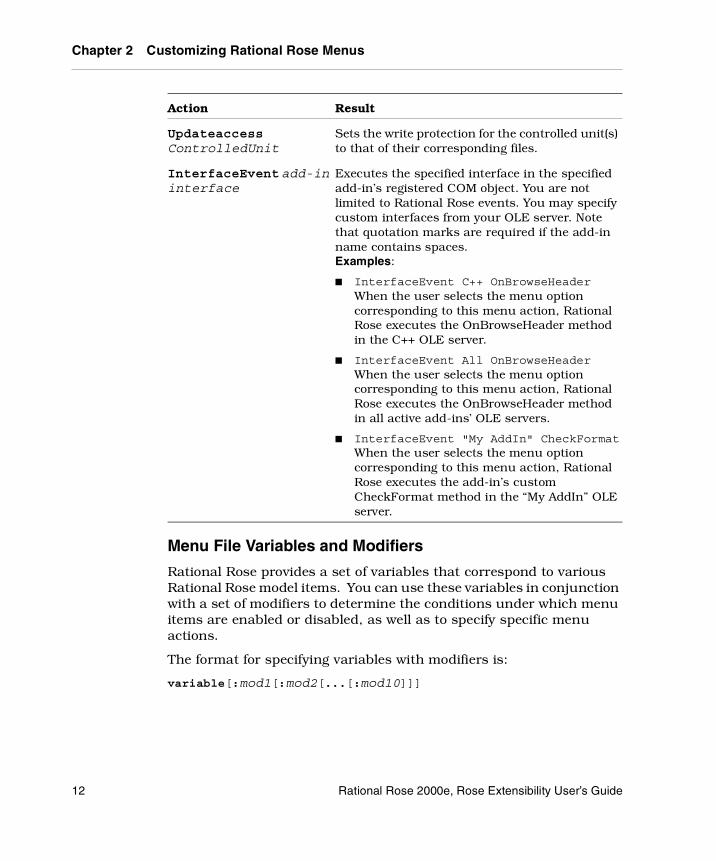
UpdateaccessControlledUnit
Sets the write protection for the controlled unit(s)to that of their corresponding files.
InterfaceEventadd-ininterface
Executes the specified interface in the specifiedadd-in’s registered COM object. You are notlimited to Rational Rose events. You may specifycustom interfaces from your OLE server. Notethat quotation marks are required if the add-inname contains spaces.Examples:
� InterfaceEvent C++ OnBrowseHeaderWhen the user selects the menu optioncorresponding to this menu action, RationalRose executes the OnBrowseHeader methodin the C++ OLE server.
� InterfaceEvent All OnBrowseHeaderWhen the user selects the menu optioncorresponding to this menu action, RationalRose executes the OnBrowseHeader methodin all active add-ins’ OLE servers.
� InterfaceEvent "My AddIn" CheckFormatWhen the user selects the menu optioncorresponding to this menu action, RationalRose executes the add-in’s customCheckFormat method in the “My AddIn” OLEserver.
Action Result
12 Rational Rose 2000e, Rose Extensibility User’s Guide
Customizing Rational Rose Main Menus
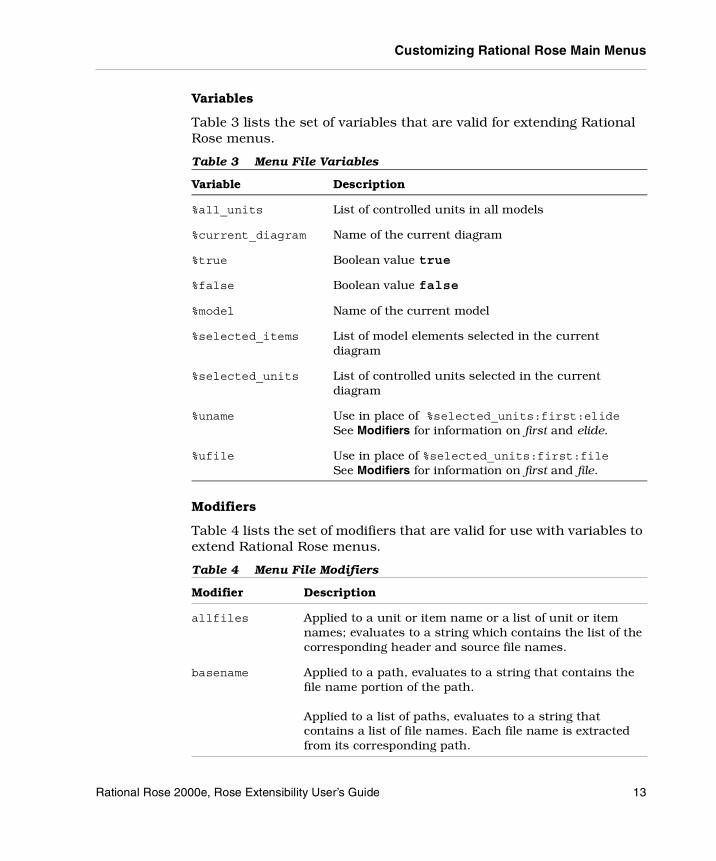
Variables
Table 3 lists the set of variables that are valid for extending RationalRose menus.
Table 3 Menu File Variables
Modifiers
Table 4 lists the set of modifiers that are valid for use with variables toextend Rational Rose menus.
Table 4 Menu File Modifiers
Variable Description
%all_units List of controlled units in all models
%current_diagram Name of the current diagram
%true Boolean value true
%false Boolean value false
%model Name of the current model
%selected_items List of model elements selected in the currentdiagram
%selected_units List of controlled units selected in the currentdiagram
%uname Use in place of %selected_units:first:elideSee Modifiers for information on first and elide.
%ufile Use in place of %selected_units:first:fileSee Modifiers for information on first and file.
Modifier Description
allfiles Applied to a unit or item name or a list of unit or itemnames; evaluates to a string which contains the list of thecorresponding header and source file names.
basename Applied to a path, evaluates to a string that contains thefile name portion of the path.
Applied to a list of paths, evaluates to a string thatcontains a list of file names. Each file name is extractedfrom its corresponding path.
Rational Rose 2000e, Rose Extensibility User’s Guide 13

Chapter 2 Customizing Rational Rose Menus
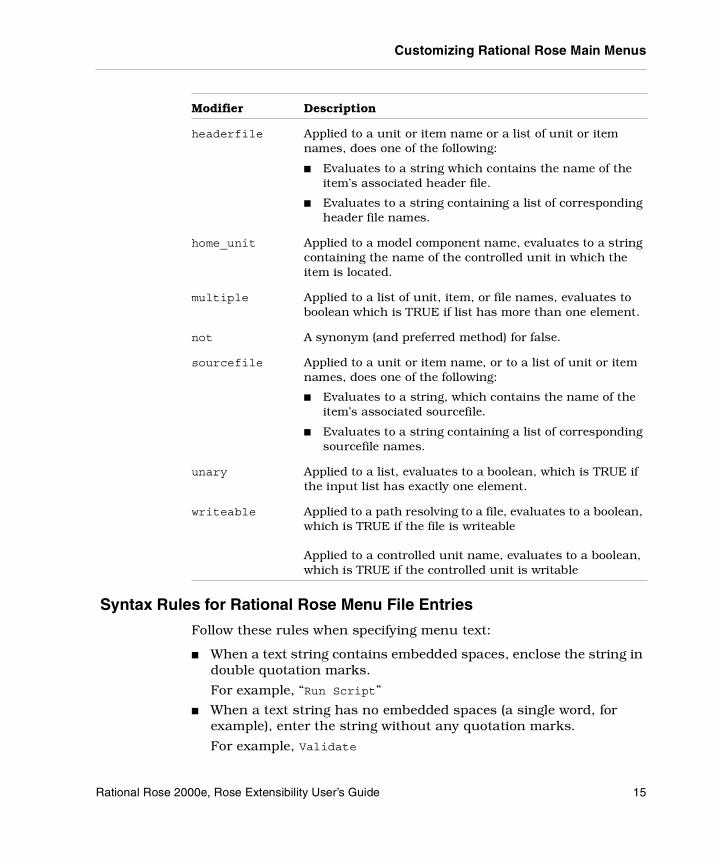
codefile Applied to a unit or item name or a list of unit or itemnames, does one of the following:
� Evaluates to a string which contains the complete pathof the codefile attribute associated with the unit.
� Evaluates to a string containing the name of thecontrolled unit in which the item is located.
Applied to a list, evaluates to a string which contains thelist of corresponding file names.
directory Applied to a path which resolves to a file, evaluates to astring that contains the directory portion of the path.
Applied to a path which resolves to a directory, evaluatesto a string that contains that path—no modification isperformed.
Applied to a list of paths, evaluates to a string thatcontains a list of directories. Each directory is extractedfrom its corresponding path using the preceding rules.
elide Applied to a unit or item name, evaluates to the firstspace-delimited word in the name.
Applied to a list, equivalent to <list>:first:elide.
empty Applied to a list; evaluates to a boolean which is TRUE ifthe list is empty.
false Applied to a boolean, evaluates to a boolean which is thelogical negation of its input.
file Applied to a controlled unit name, evaluates to a stringthat contains the path of the file associated with (providingpersistent storage for) that controlled unit.
Applied to a list of controlled unit names, evaluates to astring that contains a list of paths using the preceding rulefor each controlled unit name in the input list.
first Applied to an empty list, evaluates to NULL.
Applied to a non-empty list; evaluates to a string thatcontains the first element of the list.
Modifier Description
14 Rational Rose 2000e, Rose Extensibility User’s Guide
Customizing Rational Rose Main Menus
Syntax Rules for Rational Rose Menu File Entries
Follow these rules when specifying menu text:
� When a text string contains embedded spaces, enclose the string indouble quotation marks.
For example, “Run Script”
� When a text string has no embedded spaces (a single word, forexample), enter the string without any quotation marks.
For example, Validate
headerfile Applied to a unit or item name or a list of unit or itemnames, does one of the following:
� Evaluates to a string which contains the name of theitem’s associated header file.
� Evaluates to a string containing a list of correspondingheader file names.
home_unit Applied to a model component name, evaluates to a stringcontaining the name of the controlled unit in which theitem is located.
multiple Applied to a list of unit, item, or file names, evaluates toboolean which is TRUE if list has more than one element.
not A synonym (and preferred method) for false.
sourcefile Applied to a unit or item name, or to a list of unit or itemnames, does one of the following:
� Evaluates to a string, which contains the name of theitem’s associated sourcefile.
� Evaluates to a string containing a list of correspondingsourcefile names.
unary Applied to a list, evaluates to a boolean, which is TRUE ifthe input list has exactly one element.
writeable Applied to a path resolving to a file, evaluates to a boolean,which is TRUE if the file is writeable
Applied to a controlled unit name, evaluates to a boolean,which is TRUE if the controlled unit is writable
Modifier Description
Rational Rose 2000e, Rose Extensibility User’s Guide 15

Chapter 2 Customizing Rational Rose Menus
� When a text string that is not enclosed in quotes includes a specialcharacter, the special character could be misinterpreted as avariable. For this reason, you must precede any special characters(such as ^, “, or %) with an escape character. The escape characterfor all special characters is ^.
Examples:
❑ Option Calculate^%
Creates a menu option whose text reads Calculate %.
❑ exec Notepad ^””c:\my files\file.txt”^”
Creates a menu action that executes the followingcommand line: notepad “c:\my files\file.txt”.
Note the escape character followed by an additional set ofquotation marks. One set of quotation marks is necessarybecause there is a space in my files. The second set, each ofwhich is preceded by the ^ escape character, causes the actualcommand line to include the quotation marks as part of thecommand.
� To create a mnemonic for the menu, add an ampersand (&) beforethe menu text.
For example, “&Run Script”
Allows users to execute the menu item by pressing CTRL+R.
� Menu text can include variables and modifiers.
For example, Option “Validate ”%model
Creates a menu option with the text Validate MyCurrentModel(assuming the current model is called MyCurrentModel).
See Menu File Variables and Modifiers, earlier in this chapter, formore information.
Adding Scripts to a Rational Rose Menu
If you create a Rational Rose script that you will use over and overagain, you may want to add it to a Rational Rose menu. For example,if you write a script to create a particular report based on the contentsof a model, you will probably run that script periodically.
16 Rational Rose 2000e, Rose Extensibility User’s Guide
Customizing Rational Rose Main Menus
Follow these steps to add such scripts to a Rational Rose menu:
1. Open the Rational Rose Menu file, or create a new one to use in itsplace.
2. Edit the Path Map so that it includes a virtual script path. (SeeAdding or Editing the Virtual Path for Scripts, next in this chapter.)
3. Modify the Rational Rose menu file to add the script under theappropriate menu, being careful to follow all of the menu filesyntax rules. To do this:
❑ In the menu file, locate the menu specification that correspondsto the Rational Rose menu to which you want to add the script.Each menu specification is comprised of the Menu keywordfollowed by the name of a Rational Rose menu. For example,the Tools menu specification begins with Menu Tools.
❑ Within the appropriate menu specification, add a menu optionthat specifies the text of the menu command that will run thescript (for example, Run Conversion Wizard).
❑ Enter a RoseScript menu action to cause the script to executewhen a user selects the menu command.
4. Save the updated menu file.
Adding or Editing the Virtual Path for Scripts
When you edit the Rational Rose menu file to include scriptcommands, you must include one of the following:
� The fully qualified name of the script file to execute
� The virtual path that maps to the actual path
Defining a virtual path for scripts simplifies the process of editing themenu file by allowing you to specify the symbolic virtual path nameinstead of the complete file path.
Rational Rose 2000e, Rose Extensibility User’s Guide 17

Chapter 2 Customizing Rational Rose Menus
Use the following procedure to add or edit a virtual path for scripts:
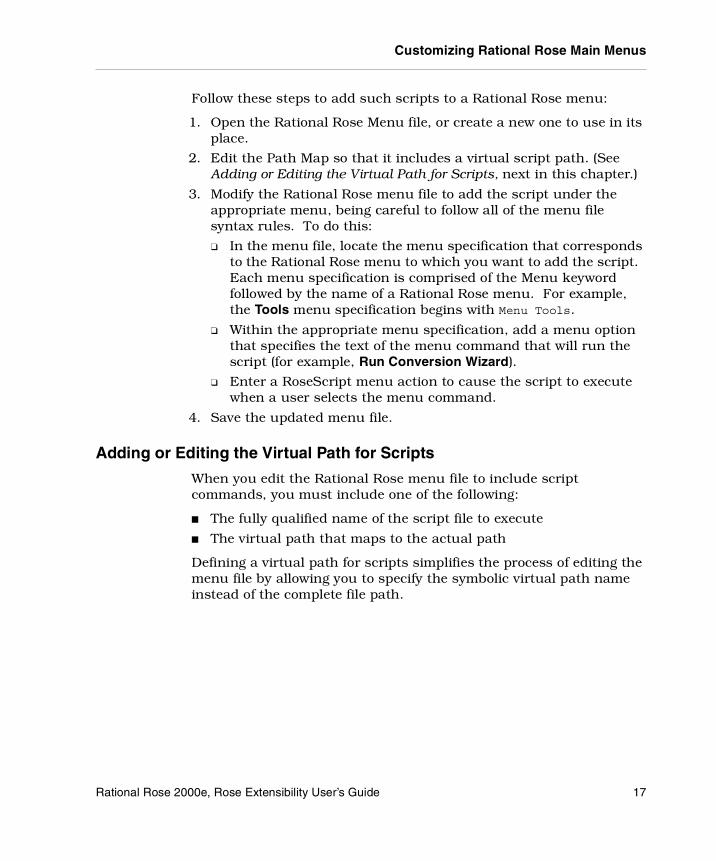
1. Start Rational Rose.
2. Click File > Edit Path Map to display the Virtual Path Map dialog box.
Figure 3 Adding Virtual Path for Scripts
3. Check for the $SCRIPT_PATH virtual symbol and do one of thefollowing:
❑ If the symbol exists, select it in the dialog to display its currentmapping information in the lower portion of the dialog.
❑ If the symbol does not exist, enter it in the Symbol field in thelower portion of the dialog.
❑ Enter the actual path to your Rational Rose scripts, or use theBrowse button to locate and select the path. (Normally thesescripts reside in a ScriptsScriptsScriptsScripts subdirectory of the Rational Roseinstallation directory.)
❑ When you make changes in the dialog, the Close buttonbecomes an OK button. Click OK to save your changes and exitthe Virtual Path Map dialog box.
18 Rational Rose 2000e, Rose Extensibility User’s Guide

Customizing Rational Rose Main Menus
Sample Rational Rose Menu File
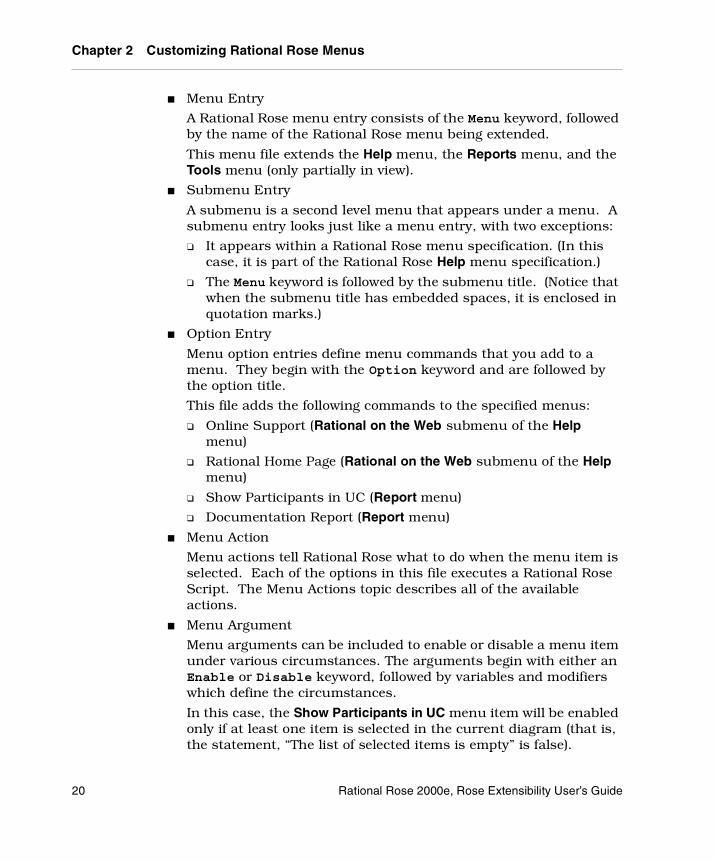
The following figure shows a portion of a Rational Rose menu file.
Figure 4 Sample Rational Rose Menu File
Note the following entries as you examine the menu specifications thatcomprise this file:
� Separator Entry
A separator entry causes a separator line to appear between themenu item above the keyword and the menu item below thekeyword. In this case, a separator line will appear above theRational on the Web submenu.
Rational Rose 2000e, Rose Extensibility User’s Guide 19
Chapter 2 Customizing Rational Rose Menus
� Menu Entry
A Rational Rose menu entry consists of the Menu keyword, followedby the name of the Rational Rose menu being extended.
This menu file extends the Help menu, the Reports menu, and theTools menu (only partially in view).
� Submenu Entry
A submenu is a second level menu that appears under a menu. Asubmenu entry looks just like a menu entry, with two exceptions:
❑ It appears within a Rational Rose menu specification. (In thiscase, it is part of the Rational Rose Help menu specification.)
❑ The Menu keyword is followed by the submenu title. (Notice thatwhen the submenu title has embedded spaces, it is enclosed inquotation marks.)
� Option Entry
Menu option entries define menu commands that you add to amenu. They begin with the Option keyword and are followed bythe option title.
This file adds the following commands to the specified menus:
❑ Online Support (Rational on the Web submenu of the Helpmenu)
❑ Rational Home Page (Rational on the Web submenu of the Helpmenu)
❑ Show Participants in UC (Report menu)
❑ Documentation Report (Report menu)
� Menu Action
Menu actions tell Rational Rose what to do when the menu item isselected. Each of the options in this file executes a Rational RoseScript. The Menu Actions topic describes all of the availableactions.
� Menu Argument
Menu arguments can be included to enable or disable a menu itemunder various circumstances. The arguments begin with either anEnable or Disable keyword, followed by variables and modifierswhich define the circumstances.
In this case, the Show Participants in UC menu item will be enabledonly if at least one item is selected in the current diagram (that is,the statement, “The list of selected items is empty” is false).
20 Rational Rose 2000e, Rose Extensibility User’s Guide
Customizing Rational Rose Shortcut Menus
� Braces
Every menu specification entry must begin with a left brace ({) and endwith a right brace (}). The nested braces allow you to define thehierarchy of a menu specification from the Rational Rose menu at thehigh end to a submenu option at the low end.
Customizing Rational Rose Shortcut Menus
When you or the user of your add-in to Rational Rose right-clicks inRational Rose, a shortcut menu appears. The commands displayed onthe shortcut menu are determined by where you or your add-in userclicks the mouse and what items are selected in the diagram orbrowser. You can take advantage of this feature in your add-in’sfunctionality so that your add-in user sees your shortcut menu itemswhen they right-click. If your add-in has features that you want toinclude on a shortcut menu, the shortcut menu help topics explainhow to add items to the Rational Rose shortcut menu by using theRational Rose Extensibility Interface (REI).
Benefits
The REI exposure of Rational Rose’s shortcut menu interface providesthe following benefits:
� Quicker access to your add-in’s features for your customers
� Control of when the menu item displays on the shortcut menu
❑ Default (any time the user selects multiple different items, e.g.,classes and packages, or has nothing selected)
❑ Diagram
❑ Package
❑ UseCase
❑ Class
❑ Attribute
❑ Operation
❑ Component
❑ Role
❑ Properties
❑ Model
Rational Rose 2000e, Rose Extensibility User’s Guide 21

Chapter 2 Customizing Rational Rose Menus
❑ DeploymentUnit
❑ ExternalDoc
� Control of the state in which your menu item displays on theshortcut menu (enabled, disabled, checked, unchecked)
� Control of the order (but not position) of multiple menu items onthe shortcut menu
� Ability to add submenus to shortcut menu items
� Ability to add separator lines to the shortcut menu and submenus
� Ability to create one shortcut menu item that works for itemsselected in the browser as well as in a diagram (you do not have tocreate one menu item for items selected in the browser andanother menu item for items selected in the diagram)
Limitations
The position on the shortcut menu where your menu item displays iscontrolled by Rational Rose. If you have more than one item on theshortcut menu, however, you can control the order in which thoseitems display by adding the items (using the AddContextMenuItemmethod) in the order in which you want the menu items displayed.
Key Terms and Concepts
Language-Dependent
Rational Rose model elements are language-dependent if they can beassociated with a specific language add-in, especially for codegeneration. These model elements are:
� Associations
� Attributes
� Classes
� Components
� Operations
� Roles
22 Rational Rose 2000e, Rose Extensibility User’s Guide

Customizing Rational Rose Shortcut Menus
Language-Neutral
Rational Rose model elements are language-neutral if they are notassociated with a specific language. They are not generated into code(although model elements within them can be generated into code).These model elements are:
� Activities*
� Decisions*
� DeploymentUnits
� Diagrams*
� ExternalDocs
� Models
� Packages*
� Properties
� States*
� Subsystems*
� Swimlanes*
� Synchronizations*
� Transitions*
� UseCases*
* These model elements make up a special subset of language-neutralitems. A language add-in can add shortcut menu items for these modelelements and get the OnContextMenuItem event for them, as long asthe language add-in is set as the default language.
In other words, if your language add-in is the default language, whena user right-clicks on any of the above special language-neutral modelelements, the user sees your language add-in’s shortcut menu itemsfor these model elements. If your language add-in is not the defaultlanguage and the user right-clicks on one of these special language-neutral model elements, the user does not see your shortcut menuitems for these model elements.
Language Add-In
A language add-in is an add-in whose Rational Rose Registry setting for“LanguageAddIn” is set to Yes.
Rational Rose 2000e, Rose Extensibility User’s Guide 23

Chapter 2 Customizing Rational Rose Menus
Non-Language Add-In
A non-language add-in is an add-in whose Rational Rose Registrysetting for “LanguageAddIn” is set to No.
Behind the Scenes of Shortcut Menus...
When Rational Rose is started, it issues the OnActivate event and getsshortcut menu items (ContextMenuItem) from each add-in.
When you or the user of your add-in right-clicks, Rational Rose sendsthe OnEnableContextMenuItems event to the appropriate add-ins toget the applicable menu states for the add-in’s ContextMenuItems.Rational Rose then formats and displays the shortcut menu withappropriate add-in menu items depending on:
� Where the user right-clicked
� What items are selected (e.g., class, package)
� For what context the add-in’s shortcut menu items are defined(ContextMenuItemType)
See How Rational Rose Formats and Displays Shortcut Menu Items.
When the user selects a menu item from the shortcut menu, RationalRose sends the OnSelectedContextMenuItem to the appropriate add-ins. It is then up to the add-in to map the event and arguments to oneof its methods.
The add-in then runs the method that corresponds to the selectedshortcut menu item.
How Rational Rose Formats and Displays Shortcut Menu Items
The methodology for which shortcut menu items display and whenthey display makes the add-in a smart, seamless part of Rational Rose.Rational Rose only displays your shortcut menu when it is appropriateto do so. For example, Rational Rose displays your class shortcut itemsfor that particular class if the following conditions are all true:
� Your add-in is a language add-in (defined by the registry setting)
� Your user creates a class with your language
� You have created the appropriate shortcut menu items(ContextMenuItems)
24 Rational Rose 2000e, Rose Extensibility User’s Guide

Customizing Rational Rose Shortcut Menus
However, if your user creates a class with a different language add-in,Rational Rose does not display your class shortcut menu items. (Amenu item for C++ classes might not make sense for a Visual Basicclass.) Because of the flexibility that Rational Rose gives you throughthe REI to create shortcut menu items, it is also a complex concept. Ashortcut menu item might not display when expected. It is, therefore,important to understand the scenarios (explained later in this chapter)for the complete explanation of what is displayed and when it isdisplayed.
Shortcut menu items created by a non-language add-in are alwaysdisplayed on the appropriate menu. Those items created by a languageadd-in are displayed when the selected items have that languageassignment. Shortcut menu items created by a Language add-in arealso displayed when language-neutral items are selected and thatlanguage is the Default Language. Whether Rational Rose displays aparticular shortcut menu item is dependent on the followingconsiderations:
� The Default Language setting (click Tools > Options > Notation)
� Whether the selected items are the same type
� Whether the selected items are language-dependent or language-neutral
� Whether the selected items are associated with a particularLanguage add-in
See the Scenarios for examples of how these issues affect shortcutmenu items.
Rational Rose 2000e, Rose Extensibility User’s Guide 25

Chapter 2 Customizing Rational Rose Menus
Shortcut Menu Scenarios
The following table describes all the possible scenarios for displayingshortcut menu items.
Table 5 Displaying Shortcut Menu Items
Description Example Selected Items Displayed Shortcut Menu Items
SameLanguagedependenttypes selected
Class 1 (Language A)(Any Default Language)
Language add-in A’s rsClassshortcut menu itemsAll non-language add-in’s rsClassshortcut menu items
Class 1 (Language A)Class 2 (Language A)(Any Default Language)
Language add-in A’s rsClassshortcut menu itemsAll non-language Add-in’s rsClassshortcut menu items
Class 1 (Language A)Class 2 (Language B)(Any Default Language)
Language add-in A’s rsClassshortcut menu itemsLanguage add-in B’s rsClassshortcut menu itemsAll non-language Add-in’s rsClassshortcut menu items
Attribute 1 (Language A)Attribute 2 (Language B)(Any Default Language)
Language add-in A’s rsAttributeshortcut menu itemsLanguage add-in B’s rsAttributeshortcut menu itemsAll non-language add-in’srsAttribute shortcut menu items
Differentlanguagedependenttypes selected
Class 1 (Language A)Class 2 (Language B)Attribute 3 (Language A)Attribute 4 (Language C)(Any Default Language)
Language add-in A’s rsDefaultshortcut menu itemsLanguage add-in B’s rsDefaultshortcut menu itemsLanguage add-in C’s rsDefaultshortcut menu itemsAll non-language add-in’srsDefault shortcut menu items
Operation 1 (Language A)Operation 2 (Language B)Role 3 (Language A)(Any Default Language)
Language add-in A’s rsDefaultshortcut menu itemsLanguage add-in B’s rsDefaultshortcut menu itemsAll non-language add-in’srsDefault shortcut menu items
26 Rational Rose 2000e, Rose Extensibility User’s Guide

Customizing Rational Rose Shortcut Menus
Nothingselected
(Default Language set toLanguage A)
Language add-in A’s rsDefaultshortcut menu itemsAll non-language add-in’srsDefault shortcut menu items
(Default Language set toLanguage B)
Language add-in B’s rsDefaultshortcut menu itemsAll non-language add-in’srsDefault shortcut menu items
Samelanguageneutral typeselected
Diagram 1 (Created withany language)(Default Language set toLanguage A)
Language add-in A’s rsDiagramshortcut menu itemsAll non-language add-in’srsDiagram shortcut menu items
Diagram 1 (Created withany language)(Default Language set toLanguage B)
Language add-in B’s rsDiagramshortcut menu itemsAll non-language add-in’srsDiagram shortcut menu items
Diagram 1 (Created withany language)Diagram 2 (Created withany language)(Default Language set toLanguage A)
Language add-in A’s rsDiagramshortcut menu itemsAll non-language add-in’srsDiagram shortcut menu items
Samelanguageneutral typeselected(cont’d)
Diagram 1 (Created withany language)Diagram 2 (Created withany language)(Default Language set toLanguage B)
Language add-in B’s rsDiagramshortcut menu itemsAll non-language add-in’srsDiagram shortcut menu items
Differentlanguageneutral typesselected
Diagram 1 (Created withany language)Package 2 (Created withany language)Package 3 (Created withany language)(Default Language set toLanguage A)
Language add-in A’s rsDefaultshortcut menu itemsAll non-language add-in’srsDefault shortcut menu items
Description Example Selected Items Displayed Shortcut Menu Items
Rational Rose 2000e, Rose Extensibility User’s Guide 27

Chapter 2 Customizing Rational Rose Menus
Note: If you want a shortcut menu item to display on more than onemenu (for example, for classes and the default), you must create aseparate ContextMenuItem for each item type (for example, one forrsClassrsClassrsClassrsClass and one for rsDefaultrsDefaultrsDefaultrsDefault). See the sample code later in this chapter.
For more information on rsClassrsClassrsClassrsClass, rsAttributersAttributersAttributersAttribute, rsDefaultrsDefaultrsDefaultrsDefault, orrsDiagramrsDiagramrsDiagramrsDiagram see ContextMenuItemType Enumeration in the RationalRose 2000e, Rose Extensibility Reference.
Shortcut Menu Design Considerations
To keep the shortcut menu from becoming too cluttered with manydifferent add-in menu options, try to keep menu items on the mainshortcut menu to a minimum. Use submenus as much as possible.However, put all the important menu options on the main shortcutmenu. Put less important menu options on a submenu under a genericmain shortcut menu option.
Subsystem 1 (Createdwith any language)UseCase 2 (Created withany language)(Default Language set toLanguage B)
Language add-in B’s rsDefaultshortcut menu itemsAll non-language add-in’srsDefault shortcut menu items
Combinationof Language-dependentandLanguage-neutral typesselected
Class 1 (Language A)Package 2 (Created withany language)(Default Language set toLanguage B)
Language add-in A’s rsDefaultshortcut menu itemsAll non-language add-in’srsDefault shortcut menu items
Class 1 (Language A)Class 2 (Language B)Package 3 (Created withany language)Package 4 (Created withany language)(Default Language set toLanguage C)
Language add-in A’s rsDefaultshortcut menu itemsLanguage add-in B’s rsDefaultshortcut menu itemsAll non-language add-in’srsDefault shortcut menu items
Description Example Selected Items Displayed Shortcut Menu Items
28 Rational Rose 2000e, Rose Extensibility User’s Guide
Customizing Rational Rose Shortcut Menus
Also, Generate Code and Browse Code menu options are no longerstandard Rational Rose shortcut menu options. Each language add-inis now responsible for creating and manipulating these optionsaccording to their needs. This gives you greater control and flexibilitywith these features. When creating menu items, make the captionspecific to your language (for example, Generate C++ Code, GenerateVisual Basic Code). This reduces confusion since the user of your add-in could be using more than one language add-in in Rational Rose.Place Generate Code and Browse Code at the top level of the shortcutmenu (as opposed to in a submenu).
You could also place shortcut menu items that open a customspecification sheet at the top level of the shortcut menu. However, ifyour add-in supports the OnPropertySpecOpen event, do not add acustom specification menu item because it would be redundant. Thisis due to the fact that when Rational Rose detects that theOnPropertySpecOpen event is supported for an item, Rational Roseadds the “Open Standard Specification” shortcut menu item (whichdisplays the standard Rational Rose specification) immediately afterthe “Open Specification” shortcut menu item (which, in this context,displays the add-in’s custom specification sheet).
Procedure
Follow these steps to customize the Rational Rose shortcut menu:
1. In order to use this feature of the REI, you must register yourproduct in the Rational Rose Add-In Manager.
2. Determine the following:
❑ What are your menu items?
❑ Through what states will each menu item go?
❑ Where should each menu item display (main shortcut menu or asubmenu)?
❑ In what order should your menu items display on the shortcutmenu or submenu?
❑ In which contexts should your menu options display (e.g.,rsDefault, rsClass, rsPackage, etc.).
❑ What circumstances will change menu states for each menuitem?
❑ Which access keys, if any, should you assign to each menuoption?
Rational Rose 2000e, Rose Extensibility User’s Guide 29
Chapter 2 Customizing Rational Rose Menus
❑ Are there any other considerations that are specific to yourimplementation?
3. Create the prototyped event methods, OnActivate,OnEnableContextMenuItems, andOnSelectedContextMenuItem customizing for your specificneeds.
4. Create ContextMenuItem objects for each menu item by using theAddContextMenuItem method for each menu item. UseAddContextMenuItem in the order in which you want the menuitems displayed on the shortcut menu.
5. Create your specific methods to support each ContextMenuItem(shortcut menu item) that maps to a specific function of your add-in. If the method already exists, update it as needed to takeadvantage of the Rational Rose shortcut menu.
6. Create and incorporate menu state changes as needed for youradd-in. Use the MenuState property of the ContextMenuItem tochange menu states.
7. Determine if there are any additional steps necessary for yourspecific implementation and perform those steps.
Creating Events for Shortcut Menus
To customize the Rational Rose shortcut menu feature, your add-inmust provide the following events:
OnActivate
Add shortcut menu items when your add-in gets the OnActivateOnActivateOnActivateOnActivate event.If you do not already have this event in your add-in, you can customizeit using the following prototype:
void OnActivate (LPDISPATCH pRoseApp)
OnEnableContextMenuItems
Provide an OnEnableContextMenuItemsOnEnableContextMenuItemsOnEnableContextMenuItemsOnEnableContextMenuItems method in your add-in’s OLEserver with the following prototype:
Boolean OnEnableContextMenuItems (LPDISPATCH pRoseApp, VT_I2itemType)
If your add-in does not provide this OnEnableContextMenuItemsOnEnableContextMenuItemsOnEnableContextMenuItemsOnEnableContextMenuItemsmethod, the system enables the shortcut menu items by default.
30 Rational Rose 2000e, Rose Extensibility User’s Guide

Customizing Rational Rose Shortcut Menus
OnSelectedContextMenuItem
Provide an OnSelectedContextMenuItemOnSelectedContextMenuItemOnSelectedContextMenuItemOnSelectedContextMenuItem method in your add-in’sOLE server with the following prototype:
Boolean OnSelectedContextMenuItem (LPDISPATCH pRoseApp, BSTRinternalName)
where internalName indicates the mapping from the selected shortcutmenu item to the add-in's corresponding functionality.
If your add-in does not provide this event, your add-in cannot respondto a shortcut menu item selection.
Adding Menu Items to the Shortcut Menu
To create and add menu items to the shortcut menu, use theAddContextMenuItemAddContextMenuItemAddContextMenuItemAddContextMenuItem Method.
Note: An add-in should add context menu items when it gets theOnActivateOnActivateOnActivateOnActivate event.
Working with Shortcut Menu Items
When the user activates the shortcut menu with items selected in thebrowser or a diagram, Rational Rose sends theOnEnableContextMenuItemsOnEnableContextMenuItemsOnEnableContextMenuItemsOnEnableContextMenuItems event to the specified language Add-In.The language add-in can then call GetSelectedItemsGetSelectedItemsGetSelectedItemsGetSelectedItems at the model levelto get all selected items, regardless of whether the user selected theitems in the browser or in a diagram.
Working with the Shortcut Menu Item Collection
To work with a subset or the set of all shortcut menu items, use theGetContextMenuItemsGetContextMenuItemsGetContextMenuItemsGetContextMenuItems Method.
The add-in can then iterate through the collection ofContextMenuItemsContextMenuItemsContextMenuItemsContextMenuItems by using the GetAtGetAtGetAtGetAt method, and setting theMenuStateMenuStateMenuStateMenuState property accordingly.
Editing Shortcut Menu Items
To change the properties of the shortcut menu item, see theContextMenuItemContextMenuItemContextMenuItemContextMenuItem class properties and methods.
Rational Rose 2000e, Rose Extensibility User’s Guide 31
Chapter 2 Customizing Rational Rose Menus
Changing the State of a Shortcut Menu Item
To enable, disable, check, or uncheck a particular shortcut menu item,change the ContextMenuItem’sContextMenuItem’sContextMenuItem’sContextMenuItem’s MenuStateMenuStateMenuStateMenuState property.
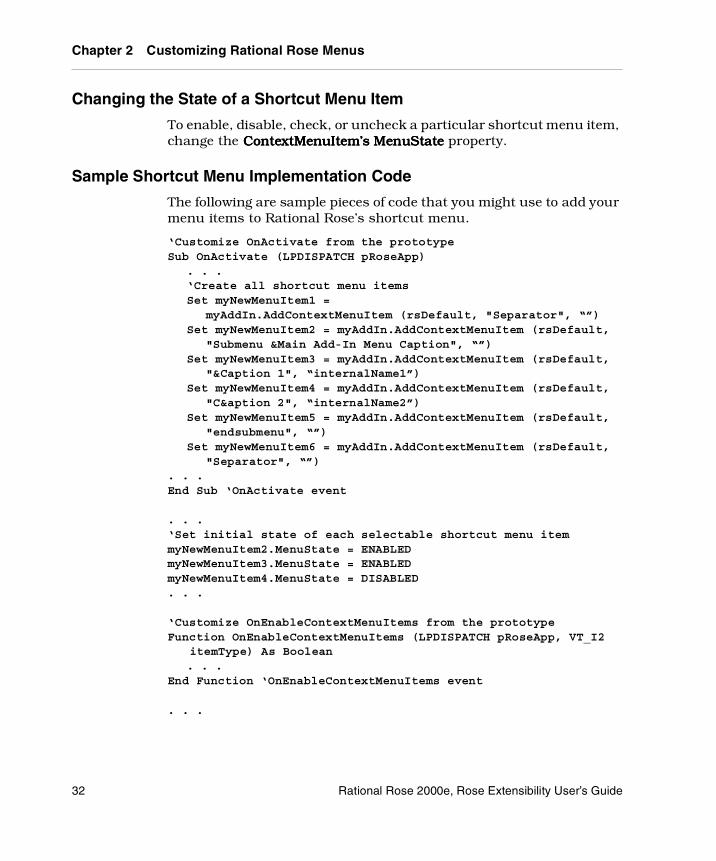
Sample Shortcut Menu Implementation Code
The following are sample pieces of code that you might use to add yourmenu items to Rational Rose’s shortcut menu.
‘Customize OnActivate from the prototypeSub OnActivate (LPDISPATCH pRoseApp)
. . .‘Create all shortcut menu itemsSet myNewMenuItem1 =
myAddIn.AddContextMenuItem (rsDefault, "Separator", “”)Set myNewMenuItem2 = myAddIn.AddContextMenuItem (rsDefault,
"Submenu &Main Add-In Menu Caption", “”)Set myNewMenuItem3 = myAddIn.AddContextMenuItem (rsDefault,
"&Caption 1", “internalName1”)Set myNewMenuItem4 = myAddIn.AddContextMenuItem (rsDefault,
"C&aption 2", “internalName2”)Set myNewMenuItem5 = myAddIn.AddContextMenuItem (rsDefault,
"endsubmenu", “”)Set myNewMenuItem6 = myAddIn.AddContextMenuItem (rsDefault,
"Separator", “”). . .End Sub ‘OnActivate event
. . .‘Set initial state of each selectable shortcut menu itemmyNewMenuItem2.MenuState = ENABLEDmyNewMenuItem3.MenuState = ENABLEDmyNewMenuItem4.MenuState = DISABLED. . .
‘Customize OnEnableContextMenuItems from the prototypeFunction OnEnableContextMenuItems (LPDISPATCH pRoseApp, VT_I2
itemType) As Boolean. . .
End Function ‘OnEnableContextMenuItems event
. . .
32 Rational Rose 2000e, Rose Extensibility User’s Guide

Customizing Rational Rose Shortcut Menus
‘Create each routine that corresponds to a selectable shortcut‘menu itemSub DoMenuOption1 (argument1, argument 2, …)
. . .End Sub ‘DoMenuOption1 subroutine
Function DoMenuOption2 (argument1, argument2, …) AsreturnValue2. . .
End Function ‘DoMenuOption2 function
. . .
‘Customize OnSelectedContextMenuItem from the prototype to map‘selectable shortcut menu items to functionality in this‘ add-in.Function OnSelectedContextMenuItem (LPDISPATCH pRoseApp, BSTR
internalName) As BooleanSelect Case internalName
Case internalName1DoMenuOption1 (argument1, argument2, …)
Case internalName2x = DoMenuOption2 (argument1, argument2, …)
End Select ‘internalName. . .
End Function ‘OnSelectedContextMenuItem event
‘Main program functionalitySub Main
. . .End Sub ‘Main Program
Rational Rose 2000e, Rose Extensibility User’s Guide 33

Chapter 2 Customizing Rational Rose Menus
Sample Rational Rose Script Shortcut Menu Code
The sample RoseScript code below produced the following shortcutmenu:
Figure 5 Sample Code for Shortcut Menus
‘Subroutines to which the selectable shortcut menu items mapSub internalName1
End Sub
Sub internalName2
End Sub
Sub internalName3
End Sub
Sub internalNameSub1
End Sub
Sub internalNameSub2
34 Rational Rose 2000e, Rose Extensibility User’s Guide

Customizing Rational Rose Shortcut Menus
End Sub
Sub internalNameClass1
End Sub
Sub internalNameClass2
End Sub
Sub internalNameClass3
End Sub
Sub internalNameClassSub1
End Sub
Sub internalNameClassSub2
End Sub
Sub Main‘Create a sample shortcut menuDim myAddIn As RoseAddInDim myMenuItem As ContextMenuItemDim myMenuItem2 As ContextMenuItemDim myMenus As ContextMenuItemCollectionDim menuCount As IntegerDim i As IntegerDim classFound As BooleanDim myItems As ItemCollectionDim itemCount As IntegerDim anItem As RoseItemDim myModel As Model
‘ContextMenuItemType enumerationConst rsDefault As Integer = 0Const rsClass As Integer = 4
‘MenuState enumerationConst rsDisabled As Integer = 0Const rsEnabled As Integer = 1
Rational Rose 2000e, Rose Extensibility User’s Guide 35

Chapter 2 Customizing Rational Rose Menus
Set myAddIn = ... ‘Get the add-in to which you want to add‘shortcut menu items.
‘Create shortcut menu items for rsDefaultSet myMenuItem = myAddIn.AddContextMenuItem(rsDefault, "Add-
In Caption &1", "internalName1")Set myMenuItem = myAddIn.AddContextMenuItem (rsDefault,
"Add-In Caption &2", "internalName2")Set myMenuItem = myAddIn.AddContextMenuItem (rsDefault,
"Add-In Caption &3", "internalName3")Set myMenuItem = myAddIn.AddContextMenuItem (rsDefault,
"Separator", "")Set myMenuItem = myAddIn.AddContextMenuItem (rsDefault,
"Submenu &Main Add-In Menu Caption", "")Set myMenuItem = myAddIn.AddContextMenuItem (rsDefault,
"&Caption 1", "internalNameSub1")Set myMenuItem2 = myAddIn.AddContextMenuItem (rsDefault,
"C&aption 2", "internalNameSub2")Set myMenuItem2.MenuState = rsDisabledSet myMenuItem = myAddIn.AddContextMenuItem (rsDefault,
"endsubmenu", "")Set myMenuItem = myAddIn.AddContextMenuItem (rsDefault,
"Separator", "")
‘Create exact same shortcut menu items for rsClassSet myMenuItem = myAddIn.AddContextMenuItem (rsClass, "Add-
In Caption &1", "internalNameClass1")Set myMenuItem = myAddIn.AddContextMenuItem (rsClass, "Add-
In Caption &2", "internalNameClass2")Set myMenuItem = myAddIn.AddContextMenuItem (rsClass, "Add-
In Caption &3", "internalNameClass3")Set myMenuItem = myAddIn.AddContextMenuItem (rsClass,
"Separator", "")Set myMenuItem = myAddIn.AddContextMenuItem (rsClass,
"Submenu &Main Add-In Menu Caption", "")Set myMenuItem = myAddIn.AddContextMenuItem (rsClass,
"&Caption 1", "internalNameClassSub1")Set myMenuItem2 = myAddIn.AddContextMenuItem (rsClass,
"C&aption 2", "internalNameClassSub2")Set myMenuItem2.MenuState = rsDisabledSet myMenuItem = myAddIn.AddContextMenuItem (rsClass,
"endsubmenu", "")Set myMenuItem = myAddIn.AddContextMenuItem (rsClass,
"Separator", "")
36 Rational Rose 2000e, Rose Extensibility User’s Guide

Customizing Rational Rose Shortcut Menus
‘Check to see if the user has selected only Class items. If‘so, enable the disabled shortcut menu option (Caption 2‘on the submenu).classFound = TrueSet myItems = RoseApp.CurrentModel.GetSelectedItems ()itemCount = myItems.CountFor i = 1 To itemCount
Set anItem = myItems.GetAt (i)If anItem.Stereotype <> "Class" Then
classFound = FalseEnd If
Next i
If classFound = True ThenmyMenuItem2.MenuState = rsEnabled
End If
End Sub
Rational Rose 2000e, Rose Extensibility User’s Guide 37


Chapter 3
Using the REI to Work with RationalRose
Introduction
This chapter explains how to use the Rational Rose ExtensibilityInterface (REI) to accomplish many tasks that you would otherwiseperform manually in the Rational Rose user interface.
This information is meant to orient you and to provide examples thatyou can use as starting points in your work with the REI.
The information in this chapter is not exhaustive. You should refer tothe Extensibility Reference and Extensibility online help for completedescriptions of all of the REI classes, properties and methods. As youfamiliarize yourself with these, you will be able to realize the fullcapabilities that the REI makes available to you.
Getting the Rational Rose Application Object
Whether you are using Rational Rose Script or Rational RoseAutomation, you must get the Rational Rose Application object in orderto control the Rational Rose application.
Using Rational Rose Script
All Rational Rose Script programs have a global object called RoseApp,which has a property called CurrentModel. You must useRoseApp.CurrentModel to initialize the global Rational Rose object andsubsequently open, control, save, or close a Rational Rose model fromwithin a script.
Rational Rose 2000e, Rose Extensibility User’s Guide 39

Chapter 3 Using the REI to Work with Rational Rose
The following sample code shows how to get the Rational Roseapplication object in a Rational Rose Scripting context:
Sub GenerateCode (theModel As Model)‘ This generates code
End Sub
Sub MainGenerateCode RoseApp.CurrentModel
End Sub
Using Rational Rose Automation
To use Rational Rose as an automation server, you must initialize aninstance of a Rational Rose application object. You do this by callingeither CreateObject or GetObject (or their equivalents) from within theapplication you are using as the OLE controller. These calls return theOLE Object which implements Rational Rose API’s application object.
Refer to the documentation for the application you are using as OLEcontroller for details on calling OLE automation objects.
The following sample code shows how to get the Rational Roseapplication object in a Rational Rose Automation context:
Sub GenerateCode (theModel As Object)‘ This generates code
End Sub
Sub MainDim RoseApp As ObjectSet RoseApp = CreateObject (“Rose.Application”)GenerateCode RoseApp.CurrentModel
End Sub
Associating Files and URLs with Classes
Because Class objects inherit properties from RoseItem, you can definea set of external documents for any class. Each External Documenthas either a path property or a URL property.
� The Path property specifies a path to the file that contains theexternal document.
� The URL property specifies a Universal Resource Locator (URL) of acorresponding internet document.
40 Rational Rose 2000e, Rose Extensibility User’s Guide
Managing Default Properties
Note: Use Extensibility online help or refer to the Extensibility Referencefor syntax and other information.
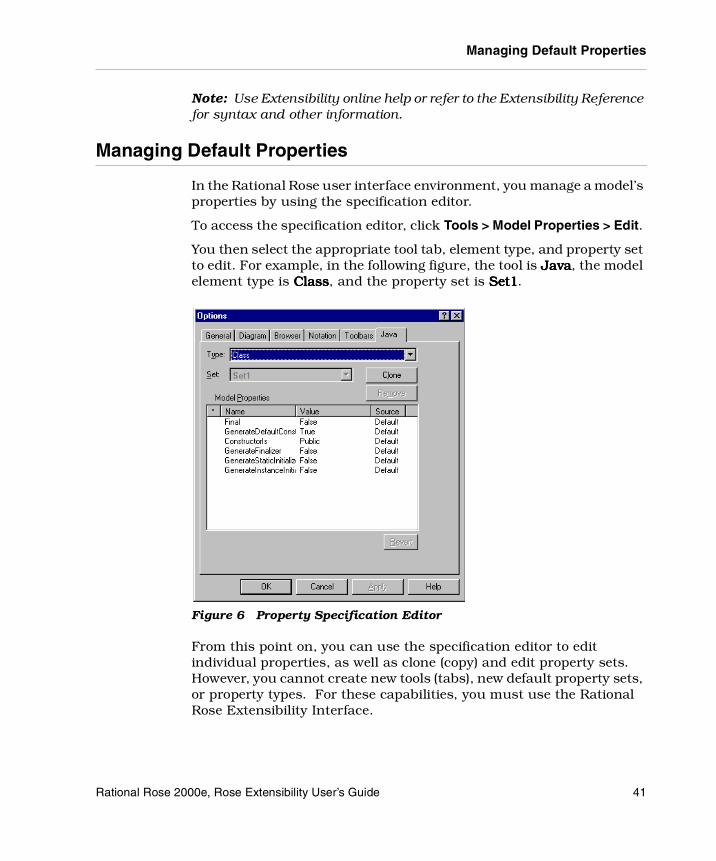
Managing Default Properties
In the Rational Rose user interface environment, you manage a model’sproperties by using the specification editor.
To access the specification editor, click Tools > Model Properties > Edit.
You then select the appropriate tool tab, element type, and property setto edit. For example, in the following figure, the tool is JavaJavaJavaJava, the modelelement type is ClassClassClassClass, and the property set is Set1Set1Set1Set1.
Figure 6 Property Specification Editor
From this point on, you can use the specification editor to editindividual properties, as well as clone (copy) and edit property sets.However, you cannot create new tools (tabs), new default property sets,or property types. For these capabilities, you must use the RationalRose Extensibility Interface.
Rational Rose 2000e, Rose Extensibility User’s Guide 41

Chapter 3 Using the REI to Work with Rational Rose
For more information on editing default properties and sets in theRational Rose user interface, check the online help for information onspecifications, or refer to the Rational Rose 2000e, Using Rose manual.
The next sections of this chapter explain how to work with propertiesand property sets in the extensibility environment.
In the Extensibility Interface, the DefaultModelProperties objectmanages the default model properties for the current model, and isitself a property of the model (expressed asRoseApp.CurrentModel.DefaultProperties). For this reason, defaultproperties are applied to the current model only. When you createdefault properties they are applied and saved for the current model,but are not available to any new models you create.
To apply new properties to another model, re-run the script thatcreates the properties, specifying the new model as the current model
Adding a Property to a Set
How To
To add a property to a property set, define a subroutine that uses theDefaultModelProperties.AddDefaultProperty method. You willnotice that this method requires you to pass 6 parameters:
� Class Name
� Tool Name
� Set Name
� Name of the New Property
� Property Type
� Value of the New Property
42 Rational Rose 2000e, Rose Extensibility User’s Guide

Adding a Property to a Set
ExampleSub AddDefaultProperties (theModel As Model)
Dim DefaultProps As DefaultModelPropertiesSet DefaultProps = theModel.DefaultPropertiesmyClass$ = theModel.RootCategory.GetPropertyClassName ()b = DefaultProps.AddDefaultProperty (myClass$,
“ThisTool”, "Set1", "StringProperty", "String", "")b = DefaultProps.AddDefaultProperty (myClass$,
myTool$, "Set1", "IntegerProperty", "Integer", "0")b = DefaultProps.AddDefaultProperty (myClass$,
myTool$, "Set1", "FloatProperty", "Float", "0")b = DefaultProps.AddDefaultProperty (myClass$,
myTool$, "Set1", "CharProperty", "Char", " ")b = DefaultProps.AddDefaultProperty (myClass$,
myTool$, "Set1", "BooleanProperty", "Boolean", "True")End Sub
Notes on the Example1. When you specify the Class Name parameter, you must specify the
internal name of the model element. There are two ways to obtainthis information:
❑ If properties are already defined for this element, it will appearin the specification dialog in the Rational Rose user interface.Simply check the specification editor and use the Type drop-down list to find the appropriate class name.
❑ Use the Element.GetPropertyClassName method. This is themethod used in the sample script. This example retrieves theinternal name and returns it in myClass$, which is then passedas the class name parameter.
2. If the tool you specify does not exist, a new tool will be created. Thisis actually the only way to add a new tool to a model.
3. This example adds a property of each of the predefined propertytypes (string, integer, float, char, boolean), with the exception of theenumeration type. You use the enumerated type to create yourown property types and add enumerated properties to a set. SeeCreating a User-Defined Property Type, later in this chapter, forinstructions and an example.
Rational Rose 2000e, Rose Extensibility User’s Guide 43

Chapter 3 Using the REI to Work with Rational Rose
Creating a New Property
How To
To create a new property that is not based on an existing property, usethe Element.CreateProperty method. However, if you simply want toset an existing property to a different current value, you should useElement.InheritProperty or Element.OverrideProperty instead.
Example' Property creation:b = theModel.RootCategory.CreateProperty (myTool,
"Saved", "True", "Boolean")b = theModel.RootCategory.InheritProperty (myTool, "Saved")
Notes on the Example1. The CreateProperty call in the example creates a new property
called SavedSavedSavedSaved. It applies to the tool MyToolMyToolMyToolMyTool, its value is TrueTrueTrueTrue andits type is BooleanBooleanBooleanBoolean.
2. The InheritProperty call in the example deletes the property justcreated. Because there is no default value to which such a propertycan return, InheritProperty effectively deletes it from the model.
3. For more information, see Setting Model Properties UsingInheritProperty, Setting Model Properties Using OverrideProperty,and Deleting Model Properties, later in this chapter.
Deleting Model Properties
If you are deleting a property that belongs to a property set, you canuse the DefaultModelProperties.DeleteDefaultProperty method todelete the property from a model.
However, if you created a property using the Element.CreatePropertymethod, that property is not part of a property set. To delete such aproperty, use the Element.InheritProperty method.
44 Rational Rose 2000e, Rose Extensibility User’s Guide

Getting Model Properties
Getting Model Properties
The Element class provides two methods for retrieving informationabout model properties:
� To get the current value for a model property, whether inherited oroverridden, use the Element.GetPropertyValue method. Thismethod returns the value as a string.
� To retrieve the property object itself, use the Element.FindPropertymethod.
Setting Model Properties
There are several ways to set model properties using the ExtensibilityInterface:
� Use the Element.OverrideProperty method to change only the valueof a property, and keep all other aspects of the property definitionintact.
� Use the Element.InheritProperty method to return a previouslyoverridden property to its original value.
� Use the Element.CreateProperty or theDefaultModelProperties.AddDefaultProperty method to define anew property from scratch.
For more information, see Creating a New Property, earlier in thischapter.
Setting Model Properties Using OverrideProperty
How To
The Element.OverrideProperty method allows you to use the defaultproperty definition and simply change its current value. Alternately,you could create a brand new property by calling theElement.CreateProperty method, but that would require you to specifythe complete property definition, not just the new value.
If the property you specify does not exist in the model’s default set, anew property is created for the specified object only. This new propertyis created as a string property.
Rational Rose 2000e, Rose Extensibility User’s Guide 45

Chapter 3 Using the REI to Work with Rational Rose
ExampleSub OverrideRadioProps (theCategory As Category)
b = theCategory.OverrideProperty (myTool$, "StringProperty","This string is overridden")
b = theCategory.OverrideProperty (myTool$,"IntegerProperty", "1")
b = theCategory.OverrideProperty (myTool$, "FloatProperty","111.1")
b = theCategory.OverrideProperty (myTool$,"EnumeratedProperty", "Value2")
End Sub
Notes on the Example1. Each of the 4 lines of the sample subroutine changes the current
value of a specific property as follows:
❑ The property called StringPropertyStringPropertyStringPropertyStringProperty now has a value of ThisThisThisThisstring is overriddenstring is overriddenstring is overriddenstring is overridden.
❑ The property called IntegerPropertyIntegerPropertyIntegerPropertyIntegerProperty now has a value of 1.
❑ The property called FloatPropertyFloatPropertyFloatPropertyFloatProperty now has a value of 111.1.
❑ The property called EnumeratedPropertyEnumeratedPropertyEnumeratedPropertyEnumeratedProperty now has a value ofValue2Value2Value2Value2.
2. Everything except for current value (tool name, class name, set,property name and property type) remains the same for theproperties.
Setting Model Properties Using InheritProperty
How To
Use the Element.InheritProperty method to reset an overriddenproperty to its original value.
You can also use this method to delete a property that you createdusing the Element.CreateProperty method. Because there is no defaultvalue to which such a property can return, InheritProperty effectivelydeletes it from the model.
46 Rational Rose 2000e, Rose Extensibility User’s Guide

Creating a New Property Set
ExampleSub InheritRadioProps (theCategory As Category)
b = theCategory.InheritProperty (myTool$, "StringProperty")b = theCategory.InheritProperty (myTool$, "IntegerProperty")b = theCategory.InheritProperty (myTool$, "FloatProperty")b = theCategory.InheritProperty (myTool$,
"EnumeratedProperty")End Sub
Notes on the Example
Each of the 4 lines of the sample subroutine returns the current valueof the specified property to its original value.
Creating a New Property Set
To create a new property set from scratch, use theDefaultModelProperties.CreateDefaultPropertySet method.
Cloning a Property Set
How To
Cloning allows you to create a copy of an existing property set for thepurpose of creating another property set. This is the easiest way tocreate a new property set, and is particularly useful for creatingmultiple sets of the same properties, but with different values specifiedfor some or all of the properties.
To clone a property set in a model, use theDefaultModelProperties.CloneDefaultPropertySet method.
Rational Rose 2000e, Rose Extensibility User’s Guide 47

Chapter 3 Using the REI to Work with Rational Rose
ExampleSub CloneDefaultProperties (theModel As Model)
Dim DefaultProps As DefaultModelPropertiesSet DefaultProps = theModel.DefaultPropertiesAddDefaultProperties theModelmyClass$ = theModel.RootCategory.GetPropertyClassName ()b = DefaultProps.CloneDefaultPropertySet (myClass$, myTool$,
"default", "SecondSet")b = DefaultProps.CloneDefaultPropertySet (myClass$, myTool$,
"default", "ThirdSet")b = DefaultProps.AddDefaultProperty (myClass$, myTool$,
"SecondSet", "StringProperty", "String", "Unique toSecondSet")
b = DefaultProps.AddDefaultProperty (myClass$, myTool$,"SecondSet", "IntegerProperty", "Integer", "11")
b = DefaultProps.AddDefaultProperty (myClass$, myTool$,"SecondSet", "FloatProperty", "Float", "89.9000")
b = DefaultProps.AddDefaultProperty (myClass$, myTool$,"SecondSet", "EnumeratedProperty","EnumerationDefinition", "Value2")
b = DefaultProps.AddDefaultProperty (myClass$, myTool$,"ThirdSet", "StringProperty", "String", "Unique toThirdSet")
b = DefaultProps.AddDefaultProperty (myClass$, myTool$,"ThirdSet", "IntegerProperty", "Integer", "20")
b = DefaultProps.AddDefaultProperty (myClass$, myTool$,"ThirdSet", "FloatProperty", "Float", "90.9000")
b = DefaultProps.AddDefaultProperty (myClass$, myTool$,"ThirdSet", "EnumeratedProperty","EnumerationDefinition", "Value3")
End Sub
Notes on the Example1. This example clones an existing property set twice in order to
define a total of three sets for the class and tool to which the setsapply.
2. All three sets have the same properties as those defined in theoriginal set. In addition, several new properties are added to thesecond set and several other new properties are added to the thirdset.
48 Rational Rose 2000e, Rose Extensibility User’s Guide

Deleting a Property Set
Deleting a Property Set
How To
To delete an entire property set from a model, use theDefaultModelProperties.DeleteDefaultPropertySet method.
ExampleSub DeleteDefaultProperties (theModel As Model)
Dim DefaultProps As DefaultModelPropertiesSet DefaultProps = theModel.DefaultPropertiesmyClass$ = theModel.RootCategory.GetPropertyClassName ()
b = DefaultProps.DeleteDefaultPropertySet (myClass$,myTool$, "SecondSet")
b = DefaultProps.DeleteDefaultPropertySet (myClass$,myTool$, "ThirdSet")
b = theModel.RootCategory.SetCurrentPropertySetName(myTool$, "default")
End Sub
Notes on the Example1. The Element.GetPropertyClassName retrieves the valid internal
class name to pass as a parameter on the delete calls.
2. Each DefaultModelProperties.DeleteDefaultPropertySet call deletesa property set from the model.
3. The Element.SetCurrentPropertySetName call sets the tool’scurrent property set to its original set, which happens to be calleddefaultdefaultdefaultdefault.
Getting and Setting the Current Property Set
How To
To find out which property set is the current set for a tool, use theElement.GetCurrentPropertySetName method.
Rational Rose 2000e, Rose Extensibility User’s Guide 49

Chapter 3 Using the REI to Work with Rational Rose
To set the current property set to a particular set name, use theElement.SetCurrentPropertySetName and specify the set of yourchoice.
Note: When setting the current property set, you must supply a setname that is valid for the specified tool. To retrieve a list of valid setnames for a tool, use Element.GetDefaultSetNames.
ExampleSub RetrieveElementProperties (theElement As Element)
Dim AllTools As StringCollectionDim theProperties As PropertyCollectionDim theProperty As PropertySet AllTools = theElement.GetToolNames ()For ToolID = 1 To AllTools.Count
ThisTool$ = AllTools.GetAt (ToolID)theSet$ = theElement.GetCurrentPropertySetName (ThisTool$)Set theProperties = theElement.GetToolProperties
(ThisTool$)For PropID = 1 To theProperties.Count
Set theProperty = theProperties.GetAt (PropID)Next PropID
Next ToolIDEnd Sub
Notes on the Example1. GetToolNames retrieves the tool names that apply to the model
element type called ElementElementElementElement and returns them as a stringcollection called AllToolsAllToolsAllToolsAllTools.
2. The current property set is retrieved for each tool name.
3. GetToolProperties retrieves the property collection that belongs tothe current tool.
4. Each property that belongs to the tool’s property collection isretrieved.
50 Rational Rose 2000e, Rose Extensibility User’s Guide
Creating a User-Defined Property Type
Creating a User-Defined Property Type
How To
Rational Rose Extensibility predefines the following set of propertytypes:
� String
� Integer
� Float
� Char
� Boolean
� Enumeration
When you add properties to a set, you specify one of these types.
In addition, you can define your own property types and add propertiesof that type to a property set.
To create a user-defined property type, add a property whose type isenumeration and whose value is a string that defines the possiblevalues for the enumeration.
Once you have defined the new type, adding a property of this new typeis like adding any other type of property.
Rational Rose 2000e, Rose Extensibility User’s Guide 51

Chapter 3 Using the REI to Work with Rational Rose
ExampleSub AddDefaultProperties (theModel As Model)
Dim DefaultProps As DefaultModelPropertiesSet DefaultProps = theModel.DefaultPropertiesmyClass$ = theModel.RootCategory.GetPropertyClassName ()b = DefaultProps.AddDefaultProperty (myClass$, "myTool",
"Set1", "MyNewEnumeration", "Enumeration","Value1,Value2,Value3")
b = DefaultProps.AddDefaultProperty (myClass$, "myTool","Set1", "MyEnumeratedProperty", "MyNewEnumeration","Value1")
b = DefaultProps.AddDefaultProperty (myClass$, "myTool","Set1", "isAppropriate", "Boolean", "True")
b = DefaultProps.AddDefaultProperty (myClass$, "myTool","Set1", "mySpace", "Integer", "5")
End Sub
Sub MainAddDefaultProperties (RoseApp.CurrentModel)
End Sub
Notes on the Example1. This example uses Element.GetPropertyClassName to retrieve the
internal name of the class to which the property type will apply.
2. The first AddDefaultProperty call adds the enumeration anddefines its possible values in the string “Value1, Value2, Value3.”
3. The second AddDefaultProperty call adds a new property of thenew enumerated type; the property value is set to “Value1.”
4. If you want a new type to appear in the specification dialog in theRational Rose user interface, you must actually add a property ofthat type to the set. Using the above example, if you simply createdthe type MyNewEnumerationMyNewEnumerationMyNewEnumerationMyNewEnumeration, but did not add the propertyMyEnumeratedPropertyMyEnumeratedPropertyMyEnumeratedPropertyMyEnumeratedProperty, MyNewEnumerationMyNewEnumerationMyNewEnumerationMyNewEnumeration would not appearin Type drop-down. Once you add the actual property,MyNewEnumerationMyNewEnumerationMyNewEnumerationMyNewEnumeration would appear in the list of types.
52 Rational Rose 2000e, Rose Extensibility User’s Guide
Creating a New Tool
Creating a New Tool
There is no explicit way to add a new tool (tab) to a model. However,when you create a new property set or add a new property to a model,you must specify the tool to which the property or set applies. If thetool you specify does not already exist, it will be added during thecreate or add process.
Placing Classes in Categories
� To create a new class and place it in a category, you use theCategory.AddClass method.
� To relocate an existing class from one category to another, use theCategory.RelocateClass method.
Using Type Libraries for Rational Rose Automation
How To
When you specify an REI class in an automation environment, youmust add the prefix RoseRoseRoseRose to the class name, unless the word Rose isalready part of the REI class name.
For more information on using Type Libraries with Rational Rose, seeRational Rose Extensibility Type Libraries, in Chapter 1 of this guide.
Example� In Rational Rose Script, the syntax for retrieving the Root Category
of a model (that is, its logical view) is:
Model.RootCategory
� In Rational Rose Automation, the syntax for retrieving the RootCategory of a model is:
RoseModel.RootCategory
� In both Rational Rose Script and Rational Rose Automation, thesyntax for retrieving the documentation belonging to a RoseItem is:
RoseItem.Documentation
Rational Rose 2000e, Rose Extensibility User’s Guide 53
Chapter 3 Using the REI to Work with Rational Rose
Working with Controllable Units
Working with controllable units allows you to divide a model intosmaller units. This is particularly useful for multi-user development,as well as for placing a model under configuration management.
The methods that apply to working with controllable units are:
� ControllableUnit.Control method, which associates a controllableunit with a file name, so that it can be passed to a configurationmanagement application.
� ControllableUnit.Uncontrol method, which removes the fileassociation from the unit.
� ControllableUnit.Load and Unload methods, which load or unloadparts of a model (for example, the units for which a person isresponsible).
� ControllableUnit.Save or ControllableUnit.SaveAs methods, whichactually write the specified controllable unit to a file.
Note: When you save a model, that will also save its controllable units.
Working with Rational Rose Diagrams
Each kind of Rational Rose diagram (class, component, scenario, etc.)inherits from the Diagram class.
A diagram is made up of Items and ItemViews. An Itemview is thephysical representation of the actual Rational Rose item. As such, it isan object with properties and methods that define its appearance in thediagram window (position, color, size, etc). You can define multipleItemViews for any given RoseItem.
� Use Diagram.ItemViews to iterate through the collection of itemviews belonging to a diagram.
� Use Diagram.Items to iterate through the items that exist in thediagram.
� Use Diagram.GetViewFrom to find the first itemview of a givenitem.
Note: You can only use GetViewFrom to retrieve the first itemviewdefined for the item. Even if you have more than one view, you’llalways only get the first.
54 Rational Rose 2000e, Rose Extensibility User’s Guide

Getting an Element from a Collection
� To find out which itemviews are currently selected in a diagram,iterate through the diagram’s itemviews. As you retrieve eachitemview, use the ItemView.IsSelected method to find out whetherit is currently selected in the diagram. You can then retrieve theselected itemview, or do any other processing you wish to do basedon whether itemview is selected.
� A short way to retrieve all selected items from a diagram is to usethe Diagram.GetSelectedItems method. Instead of iteratingthrough the diagram and checking each itemview, this methodsimply returns everything that is selected.
Getting an Element from a Collection
There are three ways to get an individual model element from acollection:
� Use the GetwithUniqueID method to directly access the element.
� Iterate through the collection using the element’s name usingFindFirst, FindNext, and GetAt.
� Iterate through the collection using Count followed by GetAt.
For more information, check the Extensibility Reference or online helpfor Collection Properties and Methods.
Accessing Collection Elements By Count
How To
Follow these steps to access collection elements by count:
1. Iterate through the collection using the Count property.
2. Retrieve the specific element using the GetAt method when thespecific element is found.
ExampleDim AllClasses As ClassCollectionDim theClass As ClassFor ClsID = 1 To AllClasses.Count
Set theClass = AllClasses.GetAt (ClsID)' ToDo: Add your code here...
Next ClsID
Rational Rose 2000e, Rose Extensibility User’s Guide 55

Chapter 3 Using the REI to Work with Rational Rose
Accessing Collection Elements By Unique ID
How To
The most direct and easiest way to get an element from within acollection is by unique ID. Follow these steps to access collectionelements by unique ID:
1. Use the GetUniqueID method to obtain the element’s unique ID.
2. Use the GetwithUniqueID method, specifying the ID you obtainedin step 1.
ExampleDim theClasses As ElementCollectionDim theClass As ElementtheID =theClasses.theClass.GetUniqueID ()theClass = theClass.GetwithUniqueID (theID)
Accessing Collection Elements By Name
How To
Follow these steps to access an operation belonging to a class:
1. Use FindFirst to find the first occurrence of the specified operationin the collection
2. Use FindNext to iterate through subsequent occurrences of theoperation
3. Retrieve the specific operation using the GetAt method when thespecific operation is found
ExampleSub PrintOperations (theClass As Class, OperationName As
String)Dim theOperation As OperationOperID = theClass.Operations.FindFirst (OperationName$)Do
Set theOperation = theClass.Operations.GetAt (OperID)' ToDo: Add your code here...OperID = theClass.Operations.FindNext (OperID,
OperationName$)Loop Until OperID = 0
End Sub
56 Rational Rose 2000e, Rose Extensibility User’s Guide
Chapter 4
Using the Rational Rose Script Editor
The Rational Rose Script Editor provides your environment forcreating, debugging, and compiling scripts that work with the RationalRose Extensibility Interface.
The Script Editor Window
As shown in Figure 7, the Script Editor's application window containsthe following elements:
� Toolbar:Toolbar:Toolbar:Toolbar: a collection of tools that you can use to provideinstructions to the Script Editor
� Edit pane:Edit pane:Edit pane:Edit pane: a window containing the source code for the script youare currently editing
� Watch pane:Watch pane:Watch pane:Watch pane: a window that opens to display the watch variable listafter you have added one or more variables to that list
� Pane separator:Pane separator:Pane separator:Pane separator: a divider that appears between the edit pane andthe watch pane when the watch pane is open
Rational Rose 2000e, Rose Extensibility User’s Guide 57

Chapter 4 Using the Rational Rose Script Editor
� Status bar:Status bar:Status bar:Status bar: displays the current location of the insertion pointwithin your script
Figure 7 Rational Rose Script Editor
Opening a Script
Use the following procedure to open a script in the Script Editor.
1. Click Tools > Open Script.
2. Select the script to open and select OK.
The script is displayed in a new Script Editor window.
Creating New Rational Rose Scripts
Creating a New Script from Scratch
Use the following procedure to create a new script in the Script Editor.
1. Click Tools > New Script.
2. Enter your script in the new Script Editor window.
3. Enter your script text.
4. Click File > Save As and save the new script.
58 Rational Rose 2000e, Rose Extensibility User’s Guide

Moving the Insertion Point in a Script
Creating a New Script from an Existing Script
Use the following procedure to create a new script from an existingscript:
1. Click Tools > Open Script.
2. Select a file from the list of available scripts.
3. Click OK to enter the Script Editor and display the script.
4. Select the script text and click Copy to save the script text to theclipboard.
5. Click Tools > New Script.
6. Click Paste to paste the existing script text into the new scriptwindow.
7. Click File > Save As and save the new script.
Moving the Insertion Point in a Script
There are two ways to move the insertion point in a script:
� With the mouse
� By specifying a line number
Moving the Insertion Point with the Mouse
Use the following procedure to use the mouse to reposition theinsertion point. This approach is especially fast if the area of the screento which you want to move the insertion point is currently visible.
1. Use the scroll bars at the right and bottom of the display to scrollthe target area of the script into view if it is not already visible.
2. Place the mouse pointer where you want to position the insertionpoint.
3. Click the left mouse button.
The insertion point is repositioned.
Note: When you scroll the display with the mouse, the insertion pointremains in its original position until you reposition it with a mouse click.If you attempt to perform an editing operation when the insertion pointis not in view, the Script Editor automatically scrolls the insertion pointinto view before performing the operation.
Rational Rose 2000e, Rose Extensibility User’s Guide 59
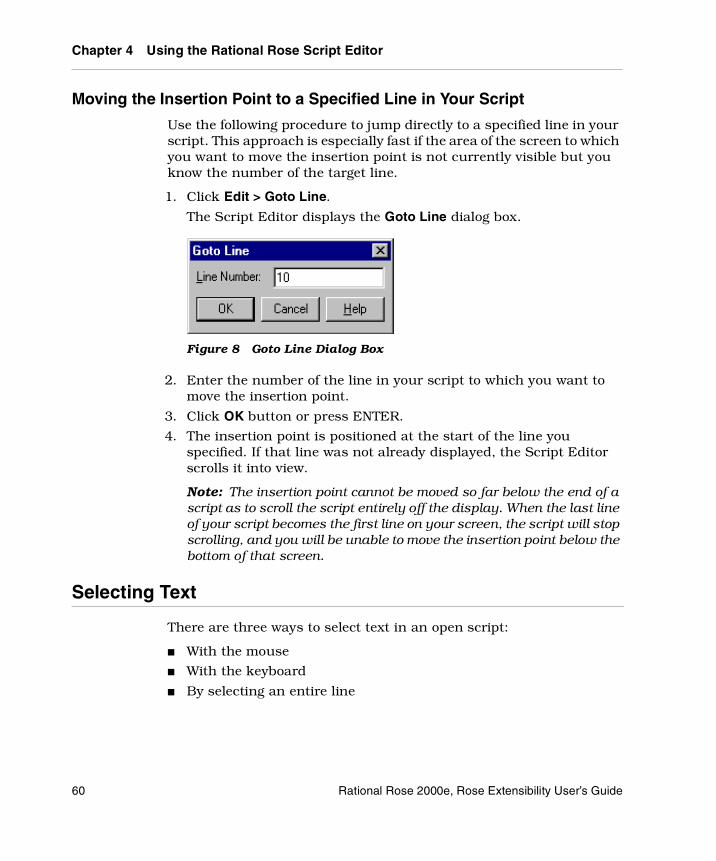
Chapter 4 Using the Rational Rose Script Editor
Moving the Insertion Point to a Specified Line in Your Script
Use the following procedure to jump directly to a specified line in yourscript. This approach is especially fast if the area of the screen to whichyou want to move the insertion point is not currently visible but youknow the number of the target line.
1. Click Edit > Goto Line.
The Script Editor displays the Goto Line dialog box.
Figure 8 Goto Line Dialog Box
2. Enter the number of the line in your script to which you want tomove the insertion point.
3. Click OK button or press ENTER.
4. The insertion point is positioned at the start of the line youspecified. If that line was not already displayed, the Script Editorscrolls it into view.
Note: The insertion point cannot be moved so far below the end of ascript as to scroll the script entirely off the display. When the last lineof your script becomes the first line on your screen, the script will stopscrolling, and you will be unable to move the insertion point below thebottom of that screen.
Selecting Text
There are three ways to select text in an open script:
� With the mouse
� With the keyboard
� By selecting an entire line
60 Rational Rose 2000e, Rose Extensibility User’s Guide

Selecting Text
Selecting Text with the Mouse
Use the following procedure to use the mouse to select text in yourscript.
1. Place the mouse pointer where you want your selection to begin.
2. Do one of the following:
❑ While pressing the left mouse button, drag the mouse until youreach the end of your selection, and release the mouse button.
❑ While pressing SHIFT, place the mouse pointer where you wantyour selection to end and click the left mouse button.
The selected text is highlighted on your display.
Figure 9 Selected Script Text
Selecting Text with the Keyboard
Use the following procedure to use keyboard shortcuts to select text inyour script.
1. Place the insertion point where you want your selection to begin.
2. While pressing SHIFT, use one of the navigating keyboardshortcuts to extend the selection to the desired ending point.
The selected text is highlighted on your display.
Rational Rose 2000e, Rose Extensibility User’s Guide 61

Chapter 4 Using the Rational Rose Script Editor
Selecting an Entire Line
Use the following procedure to use the keyboard to select one or morewhole lines in your script.
1. Place the insertion point at the beginning of the line you want toselect.
2. Press SHIFT + DOWN ARROW.
The entire line, including the end-of-line character, is selected.
3. To extend your selection to include additional whole lines of text,repeat step 2.
Deleting, Cutting, Copying, and Pasting Text
Deleting Text
Do one of the following to remove characters, selected text, or entirelines from your script.
� To remove a single character to the left of the insertion point, pressBACKSPACE once; to remove a single character to the right of theinsertion point, press DELETE once. To remove multiplecharacters, hold down BACKSPACE or DELETE.
� To remove text that you have selected, press BACKSPACE orDELETE.
� To remove an entire line, place the insertion point in that line andpress CTRL+Y.
Cutting a Selection
To cut text from your script and place it on the Clipboard, pressCTRL+X.
Copying a Selection
To copy text from your script and place it on the Clipboard, pressCTRL+C.
62 Rational Rose 2000e, Rose Extensibility User’s Guide

Adding Comments to a Script
Pasting the Contents of the Clipboard into Your Script
To paste the contents of the Clipboard into your script:
1. Position the insertion point where you want to place the contents ofthe Clipboard.
2. Press CTRL+V.
Adding Comments to a Script
There are two types of comments you can add to a script:
� Adding a Full-Line Comment
� Adding a Comment at the End of a Line of Code
Adding a Full-Line Comment
Use the following procedure to designate an entire line as a comment.
1. Type an apostrophe ( ' ) at the start of the line.
2. Type your comment following the apostrophe.
When your script is run, the presence of the apostrophe at the start ofthe line will cause the entire line to be ignored.
Adding a Comment at the End of a Line of Code
Use the following procedure to designate the last part of a line as acomment.
1. Position the insertion point in the empty space beyond the end ofthe line of code.
2. Type an apostrophe ( ' ).
3. Type your comment following the apostrophe.
When your script is run, the code on the first portion of the line will beexecuted, but the presence of the apostrophe at the start of thecomment will cause the remainder of the line to be ignored.
Rational Rose 2000e, Rose Extensibility User’s Guide 63

Chapter 4 Using the Rational Rose Script Editor
Finding and Replacing Text
Finding Specified Text
Use the following procedure to locate instances of specified text quicklyanywhere within your script.
1. Move the insertion point to where you want to start your search.(To start at the beginning of your script, press CTRL+HOME.)
2. Press CTRL+F.
The Script Editor displays the Find dialog box:
Figure 10 Find Script Text Dialog Box
3. In the Find What field, specify the text you want to find or select itfrom the list of previous searches.
4. Click Find Next or press ENTER.
The Find dialog box remains displayed, and the Script Editor eitherhighlights the first instance of the specified text or indicates that itcannot be found.
5. If the specified text has been found, repeat step 4 to search for thenext instance of it.
Note: If the FindFindFindFind dialog box blocks your view of an instance of thespecified text, you can move the dialog box out of your way andcontinue with your search. You can also click Cancel, which removesthe Find dialog box while maintaining the established search criteria,and then press F3 to find successive occurrences of the specified text.(If you press F3 when you have not previously specified text for whichyou want to search, the Script Editor displays the Find dialog box soyou can specify the desired text.)
64 Rational Rose 2000e, Rose Extensibility User’s Guide

Finding and Replacing Text
Replacing Specified Text
Use the following procedure to automatically replace either allinstances or selected instances of specified text.
1. Move the insertion point to where you want to start thereplacement operation. (To start at the beginning of your script,press CTRL+HOME.)
2. Click Edit > Replace.
The Script Editor displays the Replace dialog box:
Figure 11 Replace Dialog Box
3. In the Find What field, specify the text you want to replace or selectit from the list of previous searches.
4. In the Replace With field, specify the replacement text or select itfrom the list of previous replacements.
5. To replace selected instances of the specified text, click Find Next.
The Script Editor either highlights the first instance of the specifiedtext or indicates that it cannot be found.
6. If the specified text has been found, either click Replace to replacethat instance of it or click Find Next to highlight the next instance(if any).
Each time you click Replace, the Script Editor replaces thatinstance of the specified text and automatically highlights the nextinstance.
Rational Rose 2000e, Rose Extensibility User’s Guide 65

Chapter 4 Using the Rational Rose Script Editor
Running, Pausing, and Stopping Your Script
Running Your Script
To compile and run your script from within the Script Editor, click Goon the toolbar or press F5.
The script is compiled (if it has not already been compiled), the focus isswitched to the parent window, and the script is executed.
Note: During script execution, the Script Editor's application window isavailable only in a limited manner. Some of the menu commands may bedisabled, and the toolbar tools may be inoperative.
You can also use the Application Class ExecuteScript method to runscripts. See the ExecuteScript method for details.
Pausing an Executing Script
To suspend the execution of a script that you are running, pressCTRL+BREAK.
Execution of the script is suspended, and the instruction pointer (agray highlight) appears on the line of code where the script stoppedexecuting.
Note: The instruction pointer designates the line of code that will beexecuted next if you resume running your script.
Stopping an Executing Script
Use the following procedure to stop the execution of a script that youare running.
1. If it is not paused, pause the script.
2. Click StopDebugging on the toolbar (or press SHIFT+F5).
Note: Many of the functions of the Script Editor's application windowmay be unavailable while you are running a script. If you want to stopyour script, but find that the toolbar is currently inoperative, pressCTRL+BREAK to pause your script, then click StopDebugging.
66 Rational Rose 2000e, Rose Extensibility User’s Guide

Tracing Script Execution
Tracing Script Execution
Stepping Through Your Script
Use the following procedure to trace the execution of your script witheither the StepInto or StepOver method:
1. Do one of the following:
❑ Click the StepInto or StepOver tool on the toolbar.
❑ Press F11(StepInto) or F10 (StepOver).
The Script Editor places the instruction pointer on the sub mainline of your script.
Note: When you initiate execution of your script using either of thesemethods, the script will first be compiled, if necessary. Therefore,there may be a slight pause before execution actually begins. If yourscript contains any compile errors, it will not be executed. To debugyour script, first correct any compile errors, and then execute it again.
2. To continue tracing the execution of your script, repeat step 1.
Each time you repeat step 1, the Script Editor executes the line orthe procedure that contains the instruction pointer and thenmoves the instruction pointer to the next line or procedure to beexecuted.
3. When you finish tracing the execution of your script, either clickGo on the toolbar (or press F5) to run the script at full speed orclick Stop Debugging to halt execution of the script.
Rational Rose 2000e, Rose Extensibility User’s Guide 67

Chapter 4 Using the Rational Rose Script Editor
Displaying the Calls Dialog Box
When you are stepping through a subroutine, you may need todetermine the procedure calls by which you arrived at that point inyour script. Use the following procedure to use the Calls dialog box toobtain this information.
1. Click Calls on the toolbar.
The Script Editor displays the Calls dialog box, which lists theprocedure calls made by your script in the course of arriving at thepresent subroutine.
Figure 12 Script Calls Dialog Box
2. From the Calls dialog box, select the name of the procedure youwish to view.
3. Click the Show button.
The Script Editor highlights the currently executing line in theprocedure you selected, scrolling that line into view if necessary.(During this process, the instruction pointer remains in its originallocation in the subroutine.)
68 Rational Rose 2000e, Rose Extensibility User’s Guide
Setting and Removing Breakpoints
Setting and Removing Breakpoints
You set and remove breakpoints in your script as part of the debuggingprocess.
Starting Debugging Partway through a Script
Use the following procedure to begin the debugging process at aselected point in your script:
1. Place the insertion point in the line where you want to startdebugging.
2. To set a breakpoint on that line, click Toggle Breakpoint on thetoolbar (or press F9).
The line on which you set the breakpoint now appears incontrasting type.
3. Click Go on the toolbar (or press F5).
The Script Editor runs your script at full speed from the beginningand then pauses prior to executing the line containing thebreakpoint. It places the instruction pointer on that line todesignate it as the line that will be executed next when you eitherproceed with debugging or resume running the script.
Continuing Debugging at a Line Outside the Current Subroutine
If you want to continue debugging at a line that isn't within the samesubroutine, use the following procedure to move the instructionpointer to that line.
1. Place the insertion point in the line where you want to continuedebugging.
2. To set a breakpoint on that line, press F9.
3. To run your script, click Go on the toolbar (or press F5).
The script executes at full speed until it reaches the line containingthe breakpoint and then pauses with the instruction pointer onthat line. You can now resume stepping through your script fromthat point.
Rational Rose 2000e, Rose Extensibility User’s Guide 69
Chapter 4 Using the Rational Rose Script Editor
Debugging Selected Portions of Your Script
If you only need to debug parts of your script, use the followingprocedure to facilitate the task by using breakpoints.
1. Place a breakpoint at the start of each portion of your script thatyou want to debug.
Note: Up to 255 lines in your script can contain breakpoints.
2. To run the script, click Go on the toolbar or press F5.
The script executes at full speed until it reaches the line containingthe first breakpoint and then pauses with the instruction pointeron that line.
3. Step through as much of the code as you need to.
4. To resume running your script, click Go on the toolbar or press F5.
The script executes at full speed until it reaches the line containingthe second breakpoint and then pauses with the instructionpointer on that line.
5. Repeat steps 3 and 4 until you have finished debugging theselected portions of your script.
Removing a Single Breakpoint Manually
Use the following procedure to delete breakpoints manually one at atime.
1. Place the insertion point on the line containing the breakpoint thatyou want to remove.
2. Click Toggle Breakpoint on the toolbar, or press F9.
The breakpoint is removed, and the line no longer appears incontrasting type.
Removing All Breakpoints Manually
To delete all breakpoints manually in a single operation, clickDebugger > Clear All Breakpoints.
70 Rational Rose 2000e, Rose Extensibility User’s Guide

Working with Watch Variables
Working with Watch Variables
Watch variables allow you to track the changing values of variables ina script.
Adding Watch Variables
Use the following procedure to add a variable to the Script Editor'swatch variable list.
1. Click Add Watch on the toolbar or press SHIFT+F9.
The Script Editor displays the Add Watch dialog box.
Figure 13 Add Watch Dialog Box
2. Use the controls in the Context box to specify where the variable isdefined (locally, publicly, or privately) and, if it is defined locally, inwhich routine it is defined.
3. In the Variable Name field, enter the name of the variable you wantto add to the watch variable list.
You can only watch variables of fundamental data types, such asInteger, Long, Variant, and so on; you cannot watch complexvariables such as structures or arrays. You can, however, watchindividual elements of arrays or structure members.
Use the following syntax to watch individual elements of arrays orstructure members in a script:[variable [(index,...)] [.member [(index,...)]]...]
Where variable is the name of the structure or array variable,index is a literal number, and member is the name of a structuremember.
Rational Rose 2000e, Rose Extensibility User’s Guide 71

Chapter 4 Using the Rational Rose Script Editor
For example, the following are valid watch expressions:Table 6 Sample Watch Expressions
Note: If you are executing the script, you can display the names of allthe variables that are “in scope,” or defined within the currentfunction or subroutine, on the drop-down Variable Name list andselect the variable you want from that list.
4. Click OK or press ENTER.
If this is the first variable you are placing on the watch variable list,the watch pane opens far enough to display that variable. If thewatch pane was already open, it expands far enough to display thevariable you just added.
Note: Although you can add as many watch variables to the list asyou want, the watch pane only expands until it fills half of the ScriptEditor's application window. If your list of watch variables becomeslonger than that, you can use the watch pane's scroll bars to bringhidden portions of the list into view.
Selecting Variables on the Watch List
In order to delete a variable from the Script Editor's watch variable listor modify the value of a variable on the list, do one of the following:
� Place the mouse pointer on the variable you want to select andclick the left mouse button.
� If one of the variables on the watch list is already selected, use thearrow keys to move the selection highlight to the desired variable.
Watch Variable Description
a(1) Element 1 of array a
person.age Member age of structure person
company(10,23).person.age Member age of structure personthat is at element 10,23 withinthe array of structures calledcompany
72 Rational Rose 2000e, Rose Extensibility User’s Guide

Working with Watch Variables
� If the insertion point is in the edit pane, press F6 to highlight themost recently selected variable on the watch list and then use thearrow keys to move the selection highlight to the desired variable.
Note: Pressing F6 again returns the insertion point to its previousposition in the edit pane.
Deleting Watch Variables
Use the following procedure to delete a selected variable from the ScriptEditor's watch variable list.
1. Select the variable on the watch list.
2. Click Debugger > Delete Watch, or press DELETE.
Modifying the Value of Variables on the Watch Variable List
When the debugger has control, you can modify the value of any of thevariables on the Script Editor's watch variable list. Use the followingprocedure to change the value of a selected watch variable.
1. Place the mouse pointer on the name of the variable whose valueyou want to modify and double-click the left mouse button.
2. Select the name of the variable whose value you want to modifyand press ENTER or F2.
The Script Editor displays the Modify Variable dialog box.
Figure 14 Modify Variable Dialog Box
Note: The name of the variable you selected on the watch variablelist appears in the Name field.
When you use the Modify Variable dialog box to change the value ofa variable, you don't have to specify the context. The Script Editorfirst searches locally for the definition of that variable, thenprivately, then publicly.
Rational Rose 2000e, Rose Extensibility User’s Guide 73
Chapter 4 Using the Rational Rose Script Editor
3. Enter the new value for your variable in the Value field.
4. Click OK.
The new value of your variable appears on the watch variable list.
Compiling Your Script
Use the following procedure to create compiled script files from yourscript source:
1. Click Tools > Open Script and select the file that contains the scriptyou want to compile.
2. Click Debugger > Compile, or press F7.
3. Enter the name of the file in which to save the compiled script andselect OK.
The script is compiled and saved in a file with a .ebx extension.
Note: You can also use the Application.CompileScriptFile method tocompile scripts. Check the Extensibility Reference or the ExtensibilityOnline Help for more details.
Using Interscript Calls
Guidelines for Using a Script to Call Another Script
You can write a script that includes code that calls and executesanother script. The following guidelines apply to this process:
� You can only call and execute a compiled script from withinanother script.
� Use the LoadScript method to load the script into memory.
� Use the FreeScript to unload the script from memory.
� Even if you call LoadScript multiple times, the script is only loadedinto memory one time. However, for each LoadScript call you make,you must include a corresponding FreeScript call. If you do not dothis, the script will not be unloaded from memory.
74 Rational Rose 2000e, Rose Extensibility User’s Guide

Working with the Dialog Editor
Debugging Interscript Calls
Use the following procedure to debug a script that uses interscriptcalls:
1. Enter the call to the compiled script you are including and set abreakpoint on the call.
2. Click Debugger > StepInto.
The Script Editor displays the source code for the compiled script youare calling, and steps through it line by line.
When the trace of the called script is complete, the Script Editorredisplays the calling script.
Note: The script you are calling must be compiled with debuggingturned on. See Compiling Your Script, earlier in this chapter, for details.
Working with the Dialog Editor
Inserting a Dialog Box into Your Script
To insert a dialog box into your script:
1. Place the insertion point where you want the BasicScript code forthe dialog box to appear in your script.
2. Click Edit > Insert Dialog.
The Script Editor's application window is temporarily disabled, andDialog Editor appears, displaying a new dialog box in itsapplication window.
3. Use the Dialog Editor to create your dialog box.
4. Exit and Return from Dialog Editor and return to the Script Editor.
The Script Editor automatically places the code for the dialog boxin your script at the location of the insertion point.
Editing an Existing Dialog Box
To edit an existing dialog box template in your script:
1. Select the BasicScript code for the entire dialog box template.
2. Click Edit > Edit Dialog.
Rational Rose 2000e, Rose Extensibility User’s Guide 75

Chapter 4 Using the Rational Rose Script Editor
The Script Editor's application window is temporarily disabled,and Dialog Editor appears, displaying in its application windowa dialog box created from the code you selected.
3. Use the Dialog Editor to modify your dialog box.
4. Exit from the Dialog Editor and return to the Script Editor.
The Script Editor automatically replaces the BasicScript codeyou originally selected with the revised code generated by theDialog Editor.
Displaying and Adjusting the Grid
Use the following procedure to display and adjust the X and Y settings,which can help you position controls more precisely within your dialogbox:
1. Press CTRL+G.
The Dialog Editor displays the following dialog box:
Figure 15 Grid Dialog Box
2. To display the grid in your dialog box, click Show grid.
3. To change the current X and Y settings, enter new values in the Xand Y fields.
Note: The values of X and Y in the Grid dialog box determine thegrid's spacing. Assigning smaller X and Y values produces a moreclosely spaced grid, which enables you to move the mouse pointer insmaller horizontal and vertical increments as you position controls.Assigning larger X and Y values produces the opposite effect on boththe grid's spacing and the movement of the mouse pointer. The X andY settings entered in the Grid dialog box remain in effect regardlessof whether you choose to display the grid.
4. Click OK or press ENTER.
76 Rational Rose 2000e, Rose Extensibility User’s Guide

Working with the Dialog Editor
The Dialog Editor displays the grid with the settings you specified.
Figure 16 Dialog Editor with Grid Displayed
5. With the grid displayed, line up the crosshairs on the mousepointer with the dots on the grid to position controls precisely andalign them with respect to other controls.
Changing Titles and Labels
Use the following procedure to change the title of a dialog box, as wellas the labels of group boxes, option buttons, push buttons, textcontrols, and check boxes:
1. Display the Information dialog box for the dialog box whose title youwant to change or for the control whose label you want to change.
2. Enter the new title or label in the Text$ field.
Note: Dialog box titles and control labels are optional. Therefore, youcan leave the Text$ field blank.
3. If the information in the Text$ field should be interpreted as avariable name rather than a literal string, click Variable Name.
4. Click OK or press ENTER.
The new title or label is now displayed on the title bar or on thecontrol.
Rational Rose 2000e, Rose Extensibility User’s Guide 77

Chapter 4 Using the Rational Rose Script Editor
Assigning Accelerator Keys
Use the following procedure to designate a letter from a control's labelto serve as the accelerator key for that control.
1. Display the Information dialog box for the control to which youwant to assign an accelerator key.
2. In the Text$ field, type an ampersand (&) before the letter you wantto designate as the accelerator key.
3. Click OK or press ENTER.
The letter you designated is now underlined on the control's label,and users will be able to access the control by pressing ALT + theunderlined letter.
Capturing Standard Windows Dialog Boxes
Use the following procedure to capture the standard Windows controlsfrom any standard Windows dialog box in another application, andinsert those controls into the Dialog Editor for editing:
1. Display the dialog box you want to capture.
2. Open the Dialog Editor.
3. Click File > Capture Dialog.
The Dialog Editor displays a dialog box that lists all open dialogboxes that it is able to capture:
Figure 17 Capturing a Dialog Box
4. Select the dialog box that you want to capture, then click OK.
Note: The Dialog Editor only supports standard Windows controlsand standard Windows dialog boxes. Therefore, if the target dialogbox contains both standard Windows controls and custom controls,
78 Rational Rose 2000e, Rose Extensibility User’s Guide
Working with the Dialog Editor
only the standard Windows controls will appear in the Dialog Editor'sapplication window. If the target dialog box is not a standardWindows dialog box, you will be unable to capture the dialog box orany of its controls.
Testing Your Dialog Boxes
The Dialog Editor lets you run your edited dialog box purposes. Whenyou click Test, your dialog box comes alive, which gives you anopportunity to make sure it functions properly and fix any problemsbefore you incorporate the dialog box template into your script.
Before you run your dialog box, take a moment to look it over for basicproblems such as the following:
� Does the dialog box contain a command button—that is, a defaultOK or Cancel button, a push button, or a picture button?
� Does the dialog box contain all the necessary push buttons?
� Does the dialog box contain a Help button if one is needed?
� Are the controls aligned and sized properly?
� If there is a text control, is its font set properly?
� Are the close box and title bar displayed (or hidden) as youintended?
� Are the control labels and dialog box title spelled and capitalizedcorrectly?
� Do all the controls fit within the borders of the dialog box?
� Could you improve the design of the dialog box by adding one ormore group boxes to set off groups of related controls?
� Could you clarify the purpose of any unlabeled control (such as atext box, list box, combo box, drop list box, picture, or picturebutton) by adding a text control to serve as a de facto label for it?
� Have you made all the necessary accelerator key assignments?
� After you’ve fixed any elementary problems, you’re ready to runyour dialog box so you can check for problems that don’t becomeapparent until a dialog box is activated.
Testing your dialog box is an iterative process that involves running thedialog box to see how well it works, identifying problems, stopping thetest and fixing those problems, then running the dialog box again to
Rational Rose 2000e, Rose Extensibility User’s Guide 79

Chapter 4 Using the Rational Rose Script Editor
make sure the problems are fixed and to identify any additionalproblems, and so forth—until the dialog box functions the way youintend.
Use the following procedure to test your dialog box and fine-tune itsperformance:
1. Click Run on the toolbar, or press F5, to make the dialog boxoperational.
2. Check the dialog box’s functions.
3. To stop the test, click Run, press F5, or double-click the dialogbox's close box (if it has one).
4. Make any necessary adjustments to the dialog box.
5. Repeat steps 1-4 as many times as you need in order to get thedialog box working properly.
Incorporating Dialog Boxes or Controls into Your Script
You create dialog boxes and dialog box controls in the Dialog Editor. Toincorporate them into a script, you copy them to the Clipboard. Whenyou copy the dialog to the Clipboard, it is stored in the form of BasicScript statements. You then paste the contents of the Clipboard intothe script.
Use the following procedure to incorporate a dialog box or control intoyour script:
1. Select the dialog box or control that you want to incorporate intoyour script.
2. Press CTRL+C.
3. Open your script and paste in the contents of the Clipboard at thedesired point.
80 Rational Rose 2000e, Rose Extensibility User’s Guide
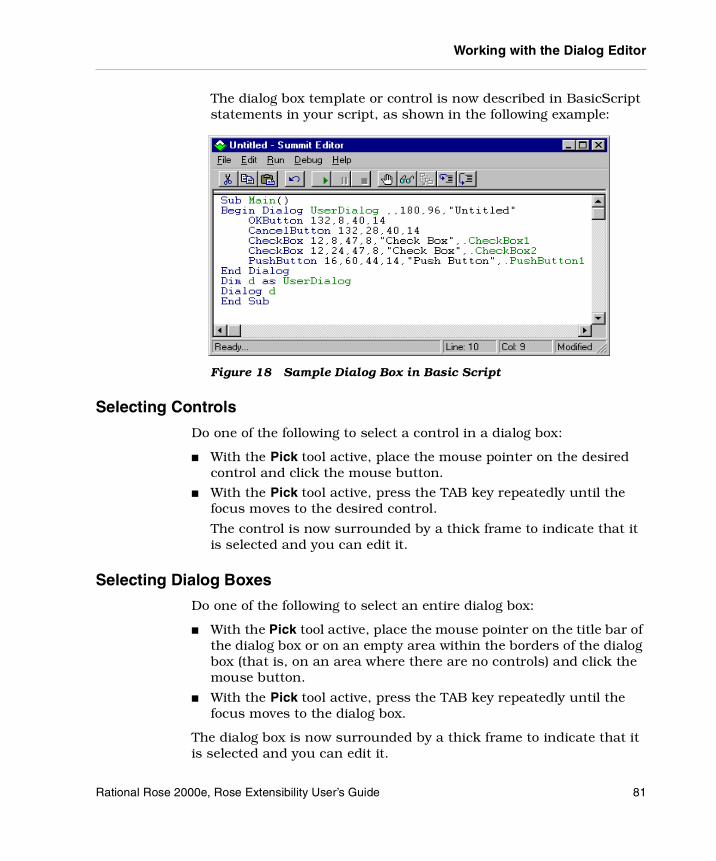
Working with the Dialog Editor
The dialog box template or control is now described in BasicScriptstatements in your script, as shown in the following example:
Figure 18 Sample Dialog Box in Basic Script
Selecting Controls
Do one of the following to select a control in a dialog box:
� With the Pick tool active, place the mouse pointer on the desiredcontrol and click the mouse button.
� With the Pick tool active, press the TAB key repeatedly until thefocus moves to the desired control.
The control is now surrounded by a thick frame to indicate that itis selected and you can edit it.
Selecting Dialog Boxes
Do one of the following to select an entire dialog box:
� With the Pick tool active, place the mouse pointer on the title bar ofthe dialog box or on an empty area within the borders of the dialogbox (that is, on an area where there are no controls) and click themouse button.
� With the Pick tool active, press the TAB key repeatedly until thefocus moves to the dialog box.
The dialog box is now surrounded by a thick frame to indicate that itis selected and you can edit it.
Rational Rose 2000e, Rose Extensibility User’s Guide 81

Chapter 4 Using the Rational Rose Script Editor
Repositioning Items
Repositioning Items with the Mouse
Use the following procedure to reposition items in a dialog box orcontrol by dragging it with the mouse:
1. With the Pick tool active, place the mouse pointer on an empty areaof the dialog box or on a control.
2. Depress the mouse button and drag the dialog box or control to thedesired location.
Note: The increments by which you can move a control with themouse are governed by the grid setting. For example, if the grid's Xsetting is 4 and its Y setting is 6, you'll be able to move the controlhorizontally only in increments of 4 X units and vertically only inincrements of 6 Y units. This feature is handy if you're trying to aligncontrols in your dialog box. If you want to move controls in smaller orlarger increments, press CTRL+G to display the Grid dialog box andadjust the X and Y settings.
Repositioning Items with the Arrow Keys
Use the following procedure to reposition items in a dialog box orcontrol by dragging it with the arrow keys:
1. Select the dialog box or control that you want to move.
2. Do one of the following:
❑ Press an arrow key once to move the item by 1 X or Y unit in thedesired direction.
❑ Steadily press an arrow key to “nudge” the item gradually alongin the desired direction.
Note: When you reposition an item with the arrow keys, a faint,partial afterimage of the item may remain visible in the item's originalposition. These afterimages are rare and will disappear once you testyour dialog box.
82 Rational Rose 2000e, Rose Extensibility User’s Guide

Working with the Dialog Editor
Repositioning Dialog Boxes with the Dialog InformationDialog Box
Use the following procedure to reposition items in a dialog box orcontrol by using the Dialog Information dialog box.
1. Display the Dialog Box Information dialog box.
Note: For information on displaying the Dialog Information dialogbox, see Displaying the Dialog Information Dialog Box, later in thischapter.
2. Do one of the following:
❑ Change the X and Y coordinates in the Position group box.
❑ Leave the X and/or Y coordinates blank.
3. Click OK or press ENTER.
If you specified X and Y coordinates, the dialog box moves to thatposition. If you left the X coordinate blank, the dialog box will becentered horizontally relative to the parent window of the dialogbox when the dialog box is run. If you left the Y coordinate blank,the dialog box will be centered vertically relative to the parentwindow of the dialog box when the dialog box is run.
Repositioning Controls with the Dialog Information DialogBox1. Use the following procedure to move a selected control by changing
its coordinates in the Dialog Information dialog box for that control.
Note: For information on displaying the Dialog Information dialogbox, see Displaying the Dialog Information Dialog Box, later in thischapter.
2. Display the Information dialog box for the control that you want tomove.
3. Change the X and Y coordinates in the Position group box.
4. Click OK or press ENTER.
The control moves to the specified position.
Rational Rose 2000e, Rose Extensibility User’s Guide 83

Chapter 4 Using the Rational Rose Script Editor
Resizing Items
Resizing Items with the Mouse
Use the following procedure to change the size of a selected dialog boxor control by dragging its borders or corners with the mouse:
1. With the Pick tool active, select the dialog box or control that youwant to resize.
2. Place the mouse pointer over a border or corner of the item.
3. Depress the mouse button and drag the border or corner until theitem reaches the desired size.
Resizing Items with the Information Dialog Box
Use the following procedure to change the size of a selected dialog boxor control by changing its Width or Height settings in the Informationdialog box.
1. Display the Information dialog box for the dialog box or control thatyou want to resize.
2. Change the Width and Height settings in the Size group box.
3. Click the OK button or press ENTER.
The dialog box or control is resized to the dimensions you specified.
Resizing Selected Items Automatically
Use the following procedure to adjust the borders of certain controlsautomatically to fit the text displayed on them.
To resize selected controls automatically:
1. With the Pick tool active, select the option button, text control,push button, check box, or text box that you want to resize.
2. Press F2.
The borders of the control will expand or contract to fit the textdisplayed on it.
84 Rational Rose 2000e, Rose Extensibility User’s Guide

Working with the Dialog Editor
Adding Controls
Use the following procedure to add one or more controls to your dialogbox using simple mouse and keyboard methods.
1. From the toolbar, choose the tool corresponding to the type ofcontrol you want to add.
Note: When you pass the mouse pointer over an area of the displaywhere a control can be placed, the pointer becomes an image of theselected control with crosshairs (for positioning purposes) to its upperleft. The name and position of the selected control appear on thestatus bar. When you pass the pointer over an area of the displaywhere a control cannot be placed, the pointer changes into a circlewith a slash through it (the “prohibited” symbol).
Note: You can only insert a control within the borders of the dialogbox you are creating. You cannot insert a control on the dialog box'stitle bar or outside its borders.
2. Place the pointer where you want the control to be positioned andclick the mouse button.
The control you just created appears at the specified location. (Tobe more specific, the upper left corner of the control willcorrespond to the position of the pointer's crosshairs at themoment you clicked the mouse button.) The control is surroundedby a thick frame, which means that it is selected, and it may alsohave a default label.
After the new control has appeared, the mouse pointer becomes anarrow, to indicate that the Pick tool is active and you can onceagain select any of the controls in your dialog box.
3. To add another control of the same type as the one you just added,press CTRL+D.
A duplicate copy of the control appears.
4. To add a different type of control, repeat steps 1 and 2.
5. To reactivate the Pick tool, do one of the following:
❑ Click the arrow-shaped tool on the toolbar.
❑ Place the mouse pointer on the title bar of the dialog box oroutside the borders of the dialog box (that is, on any area wherethe mouse pointer turns into the “prohibited” symbol) and clickthe mouse button.
Rational Rose 2000e, Rose Extensibility User’s Guide 85
Chapter 4 Using the Rational Rose Script Editor
Duplicating Controls
Use the following procedure to use the Dialog Editor's duplicatingfeature, which saves you the work of creating additional controlsindividually if you need one or more copies of a particular control:
1. Select the control that you want to duplicate.
2. Press CTRL+D.
A duplicate copy of the selected control appears in your dialog box.
3. Repeat step 2 as many times as necessary to create the desirednumber of duplicate controls.
Adding Pictures to a Dialog
You can add pictures to a dialog from a file or from a picture library.
Adding Pictures from Files
Use the following procedure to display a Windows bitmap or metafilefrom a file on a picture control or picture button control by using thecontrol's Information dialog box to indicate the file in which the pictureis contained.
1. Display the Information dialog box for the picture control or picturebutton control whose picture you want to specify.
2. In the Picture source option button group, click File.
3. In the Name$ field, enter the name of the file containing the pictureyou want to display in the picture control or picture button control.
Note: By clicking the Browse button, you can display the Select a PictureFile dialog box and use it to find the file.
4. Click the OK button or press ENTER.
The picture control or picture button control now displays thepicture you specified.
86 Rational Rose 2000e, Rose Extensibility User’s Guide

Working with the Dialog Editor
Adding Pictures from Picture Libraries
Use the following procedure to display a Windows bitmap or metafilefrom a file on a picture control or picture button control by using thecontrol's Information dialog box to indicate the file in which the pictureis contained.
1. Display the Information dialog box for the picture control or picturebutton control whose picture you want to specify.
2. In the Picture source option button group, click File.
3. In the Name$ field, enter the name of the file containing the pictureyou want to display in the picture control or picture button control.
Note: By clicking the Browse button, you can display the Select a PictureFile dialog box and use it to find the file.
4. Click OK or press ENTER.
The picture control or picture button control now displays thepicture you specified.
Pasting Items into Dialog Editor
Pasting Existing Dialog Boxes into Dialog Editor
If you want to modify a BasicScript dialog box template contained inyour script, use the following procedure to select the template andpaste it into dialog editor for editing:
1. Copy the entire BasicScript dialog box template (from the BeginDialog instruction to the End Dialog instruction) from your scriptto the Clipboard.
2. Open the Dialog Editor.
3. Press CTRL+V.
4. When the Dialog Editor asks whether you want to replace theexisting dialog box, click Yes.
The Dialog Editor creates a new dialog box corresponding to thetemplate contained on the Clipboard.
Rational Rose 2000e, Rose Extensibility User’s Guide 87
Chapter 4 Using the Rational Rose Script Editor
Pasting Controls from Existing Dialog Boxes into DialogEditor
If you want to modify the BasicScript statements in your script thatcorrespond to one or more dialog box controls, use the followingprocedure to select the statements and paste them into Dialog Editorfor editing:
1. Copy the BasicScript description of the control(s) from your scriptto the Clipboard.
2. Open Dialog Editor.
3. Press CTRL+V.
Dialog Editor adds to your current dialog box one or more controlscorresponding to the description contained on the Clipboard.
Displaying the Information Dialogs
There are two types of Information dialog boxes:
� Information Dialog Box for Dialogs
� Information Dialog Box for Controls
Displaying the Information Dialog Boxes for Dialogs
Do one of the following to display the Dialog Box Information dialog boxto check and adjust attributes that pertain to the dialog box as a whole:
� With the Pick tool active, place the mouse pointer on an area of thedialog box where there are no controls and double-click the mousebutton.
� With the Pick tool active, select the dialog box and either click theInformation tool on the toolbar, press ENTER, or press CTRL+I.
88 Rational Rose 2000e, Rose Extensibility User’s Guide

Working with the Dialog Editor
The following figure shows the Dialog Box Information dialog box:
Figure 19 Dialog Box Information Dialog Box
Attributes You Can Adjust with the Dialog Box InformationDialog Box
The Dialog Box Information dialog box can be used to check and adjustthe following attributes, which pertain to the dialog box as a whole.
� Position (optional): X and Y coordinates on the display, in dialogunits
� Size (mandatory): width and height of the dialog box, in dialogunits
� Style (optional): options that allow you to determine whether theclose box and title bar are displayed
� Text$ (optional): text displayed on the title bar of the dialog box
� Name (mandatory): name by which you refer to this dialog boxtemplate in your BasicScript code
� Function (optional): name of a BasicScript function in your dialogbox
� Picture Library (optional): picture library from which one or morepictures in the dialog box are obtained
Rational Rose 2000e, Rose Extensibility User’s Guide 89
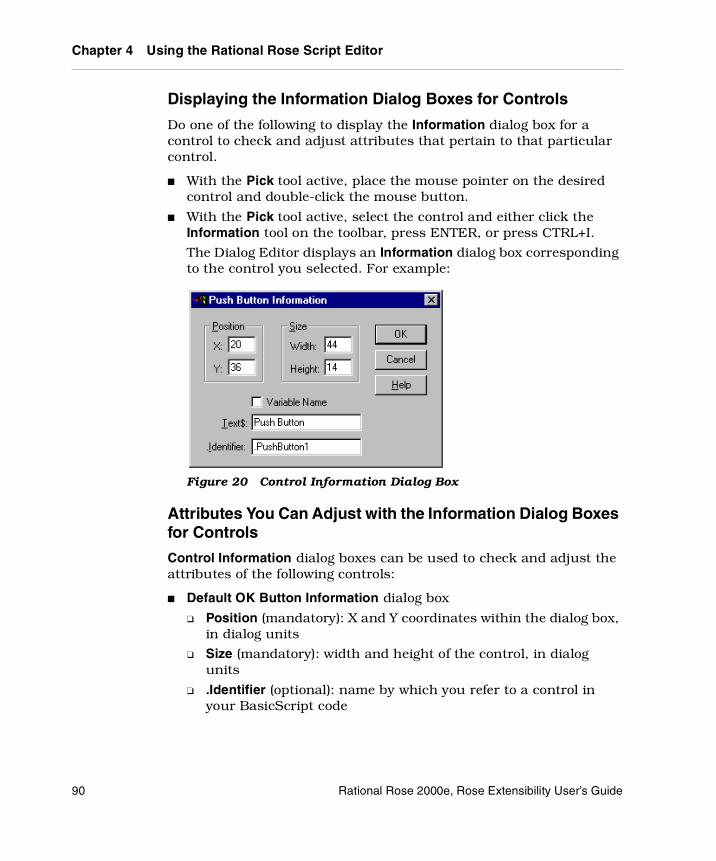
Chapter 4 Using the Rational Rose Script Editor
Displaying the Information Dialog Boxes for Controls
Do one of the following to display the Information dialog box for acontrol to check and adjust attributes that pertain to that particularcontrol.
� With the Pick tool active, place the mouse pointer on the desiredcontrol and double-click the mouse button.
� With the Pick tool active, select the control and either click theInformation tool on the toolbar, press ENTER, or press CTRL+I.
The Dialog Editor displays an Information dialog box correspondingto the control you selected. For example:
Figure 20 Control Information Dialog Box
Attributes You Can Adjust with the Information Dialog Boxesfor Controls
Control Information dialog boxes can be used to check and adjust theattributes of the following controls:
� Default OK Button Information dialog box
❑ Position (mandatory): X and Y coordinates within the dialog box,in dialog units
❑ Size (mandatory): width and height of the control, in dialogunits
❑ .Identifier (optional): name by which you refer to a control inyour BasicScript code
90 Rational Rose 2000e, Rose Extensibility User’s Guide

Working with the Dialog Editor
� Default Cancel Button Information dialog box
❑ Position (mandatory): X and Y coordinates within the dialog box,in dialog units
❑ Size (mandatory): width and height of the control, in dialogunits
❑ .Identifier (optional): name by which you refer to a control inyour BasicScript code
� Help Button Information dialog box
❑ Position (mandatory): X and Y coordinates within the dialog box,in dialog units
❑ Size (mandatory): width and height of the control, in dialogunits
❑ FileName$ (optional): Name of the help file that you want toinvoke
❑ Context& (mandatory): The context ID specifying which helptopic to jump to
❑ .Identifier (optional): name by which you refer to a control inyour BasicScript code
� Push Button Information dialog box
❑ Position (mandatory): X and Y coordinates within the dialog box,in dialog units
❑ Size (mandatory): width and height of the control, in dialogunits
❑ Text$ (optional): text displayed on a control
❑ .Identifier (optional): name by which you refer to a control inyour BasicScript code
� Option Button Information dialog box
❑ Position (mandatory): X and Y coordinates within the dialog box,in dialog units
❑ Size (mandatory): width and height of the control, in dialogunits
❑ Text$ (optional): text displayed on a control
❑ .Identifier (optional): name by which you refer to a control inyour BasicScript code
❑ .Option Group (mandatory): name by which you refer to a groupof option buttons in your BasicScript code
Rational Rose 2000e, Rose Extensibility User’s Guide 91

Chapter 4 Using the Rational Rose Script Editor
� Check Box Information dialog box
❑ Position (mandatory): X and Y coordinates within the dialog box,in dialog units
❑ Size (mandatory): width and height of the control, in dialogunits
❑ Text$ (optional): text displayed on a control
❑ .Identifier (mandatory): name by which you refer to a control inyour BasicScript code; also contains the result of the controlafter the dialog box has been processed
� Group Box Information dialog box
❑ Position (mandatory): X and Y coordinates within the dialog box,in dialog units
❑ Size (mandatory): width and height of the control, in dialogunits
❑ Text$ (optional): text displayed on a control
❑ .Identifier (optional): name by which you refer to a control inyour BasicScript code
� Text Information dialog box
❑ Position (mandatory): X and Y coordinates within the dialog box,in dialog units
❑ Size (mandatory): width and height of the control, in dialogunits
❑ Text$ (optional): text displayed on a control
❑ Font (optional): font in which text is displayed
❑ .Identifier (optional): name by which you refer to a control inyour BasicScript code
� Text Box Information dialog box
❑ Position (mandatory): X and Y coordinates within the dialog box,in dialog units
❑ Size (mandatory): width and height of the control, in dialogunits
❑ Multiline (optional): option that allows you to determine whetherusers can enter a single line of text or multiple lines
❑ .Identifier (mandatory): name by which you refer to a control inyour BasicScript code; also contains the result of the controlafter the dialog box has been processed
92 Rational Rose 2000e, Rose Extensibility User’s Guide

Working with the Dialog Editor
� List Box Information dialog box
❑ Position (mandatory): X and Y coordinates within the dialog box,in dialog units
❑ Size (mandatory): width and height of the control, in dialogunits
❑ .Identifier (mandatory): name by which you refer to a control inyour BasicScript code; also contains the result of the controlafter the dialog box has been processed
❑ Array$ (mandatory): name of an array variable in yourBasicScript code
� Combo Box Information dialog box
❑ Position (mandatory): X and Y coordinates within the dialog box,in dialog units
❑ Size (mandatory): width and height of the control, in dialogunits
❑ .Identifier (mandatory): name by which you refer to a control inyour BasicScript code; also contains the result of the controlafter the dialog box has been processed
❑ Array$ (mandatory): name of an array variable in yourBasicScript code
� Drop List Box Information dialog box
❑ Position (mandatory): X and Y coordinates within the dialog box,in dialog units
❑ Size (mandatory): width and height of the control, in dialogunits
❑ .Identifier (mandatory): name by which you refer to a control inyour BasicScript code; also contains the result of the controlafter the dialog box has been processed
❑ Array$ (mandatory): name of an array variable in yourBasicScript code
� Picture Information dialog box
❑ Position (mandatory): X and Y coordinates within the dialog box,in dialog units
❑ Size (mandatory): width and height of the control, in dialogunits
❑ .Identifier (optional): name by which you refer to a control inyour BasicScript code
Rational Rose 2000e, Rose Extensibility User’s Guide 93

Chapter 4 Using the Rational Rose Script Editor
❑ .Identifier (optional): name of the file containing a picture thatyou want to display or the name of a picture that you want todisplay from a specified picture library
❑ Frame (optional): option that allows you to display a 3-D frame
� Picture Button Information dialog box
❑ Position (mandatory): X and Y coordinates within the dialog box,in dialog units
❑ Size (mandatory): width and height of the control, in dialogunits
❑ .Identifier (optional): name by which you refer to a control inyour BasicScript code
❑ .Identifier (optional): name of the file containing a picture thatyou want to display or the name of a picture that you want todisplay from a specified picture library
94 Rational Rose 2000e, Rose Extensibility User’s Guide

Appendix A
Rational Rose Script Editor Shortcuts
This appendix identifies the shortcuts that can be used with theRational Script Editor.
General ShortcutsTable 7 General Shortcuts
Key Name(s) Description
F1 Provides context-sensitive help for selected menucommands and variables in the watch pane, for BasicScriptterms in the edit pane that have been selected or thatcontain the insertion point, and for displayed dialog boxes.
CTRL+F Displays the Find dialog box, which allows you to specifytext for which you want to search.
F3 Searches for the next occurrence of previously specifiedtext. If you have not previously specified text for which youwant to search, displays the Find dialog box.
ESC Deactivates the Help pointer if it is active. Otherwise,compiles your script and returns you to the hostapplication.
Rational Rose 2000e, Rose Extensibility User’s Guide 95
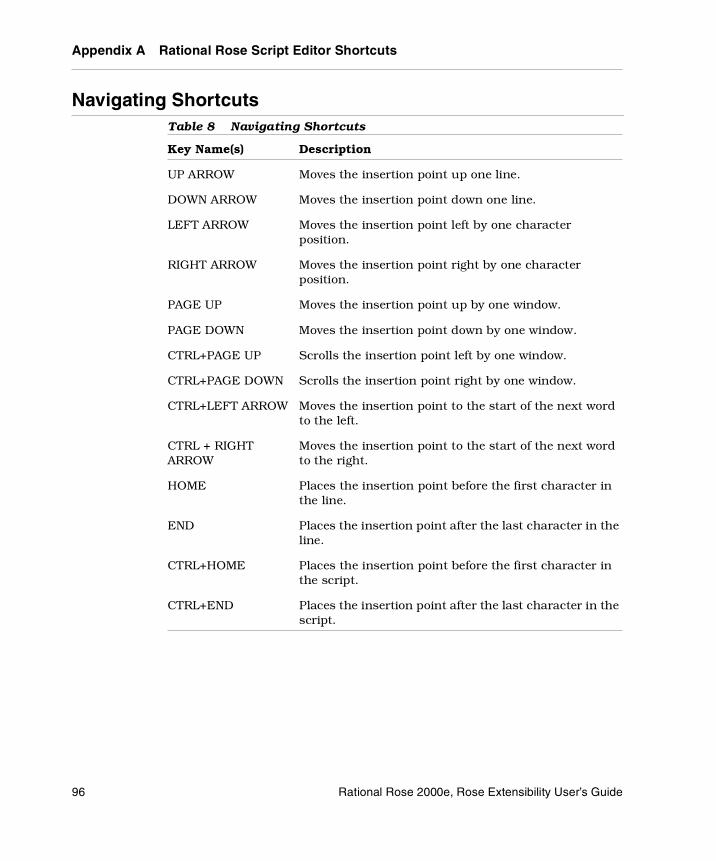
Appendix A Rational Rose Script Editor Shortcuts
Navigating ShortcutsTable 8 Navigating Shortcuts
Key Name(s) Description
UP ARROW Moves the insertion point up one line.
DOWN ARROW Moves the insertion point down one line.
LEFT ARROW Moves the insertion point left by one characterposition.
RIGHT ARROW Moves the insertion point right by one characterposition.
PAGE UP Moves the insertion point up by one window.
PAGE DOWN Moves the insertion point down by one window.
CTRL+PAGE UP Scrolls the insertion point left by one window.
CTRL+PAGE DOWN Scrolls the insertion point right by one window.
CTRL+LEFT ARROW Moves the insertion point to the start of the next wordto the left.
CTRL + RIGHTARROW
Moves the insertion point to the start of the next wordto the right.
HOME Places the insertion point before the first character inthe line.
END Places the insertion point after the last character in theline.
CTRL+HOME Places the insertion point before the first character inthe script.
CTRL+END Places the insertion point after the last character in thescript.
96 Rational Rose 2000e, Rose Extensibility User’s Guide
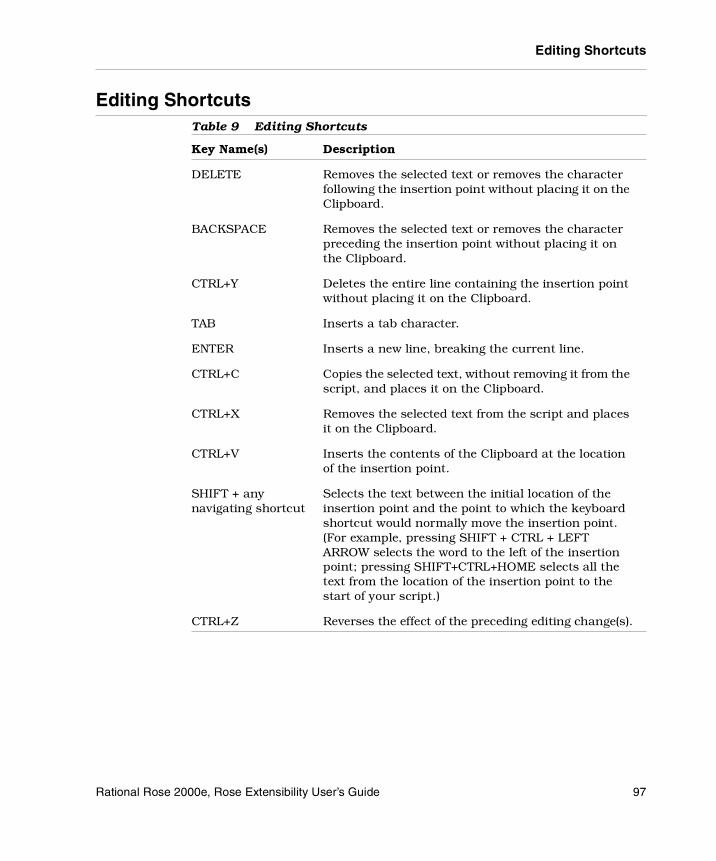
Editing Shortcuts
Editing ShortcutsTable 9 Editing Shortcuts
Key Name(s) Description
DELETE Removes the selected text or removes the characterfollowing the insertion point without placing it on theClipboard.
BACKSPACE Removes the selected text or removes the characterpreceding the insertion point without placing it onthe Clipboard.
CTRL+Y Deletes the entire line containing the insertion pointwithout placing it on the Clipboard.
TAB Inserts a tab character.
ENTER Inserts a new line, breaking the current line.
CTRL+C Copies the selected text, without removing it from thescript, and places it on the Clipboard.
CTRL+X Removes the selected text from the script and placesit on the Clipboard.
CTRL+V Inserts the contents of the Clipboard at the locationof the insertion point.
SHIFT + anynavigating shortcut
Selects the text between the initial location of theinsertion point and the point to which the keyboardshortcut would normally move the insertion point.(For example, pressing SHIFT + CTRL + LEFTARROW selects the word to the left of the insertionpoint; pressing SHIFT+CTRL+HOME selects all thetext from the location of the insertion point to thestart of your script.)
CTRL+Z Reverses the effect of the preceding editing change(s).
Rational Rose 2000e, Rose Extensibility User’s Guide 97

Appendix A Rational Rose Script Editor Shortcuts
Debugging ShortcutsTable 10 Debugging Shortcuts
File Menu ShortcutsTable 11 File Menu Shortcuts
Key Name(s) Description
SHIFT+F9 Displays the Add Watch dialog box, in which you canspecify the name of a BasicScript variable. The ScriptEditor then displays the value of that variable, if any, inthe watch pane of its application window.
ENTER or F2 Displays the Modify Variable dialog box for the selectedwatch variable, which enables you to modify the value ofthat variable.
F6 If the watch pane is open, switches the insertion pointbetween the watch pane and the edit pane.
CTRL+BREAK Suspends execution of an executing script and places theinstruction pointer on the next line to be executed.
F9 Sets or removes a breakpoint on the line containing theinsertion point.
F10 Activates the Step Over command, which executes thenext line of a BasicScript script and then suspendsexecution of the script. If the script calls anotherBasicScript procedure, BasicScript will run the calledprocedure in its entirety.
F11 Activates the Step Into command, which executes thenext line of a BasicScript script and then suspendsexecution of the script. If the script calls anotherBasicScript procedure, execution will continue into eachline of the called procedure.
Key Name(s) Description
CTRL+W Compiles your script and returns you to the hostapplication.
CTRL+S Saves the currently open script.
98 Rational Rose 2000e, Rose Extensibility User’s Guide

Edit Menu Shortcuts
Edit Menu ShortcutsTable 12 Edit Menu Shortcuts
Key Name(s) Description
CTRL+Z Reverses the effect of the preceding editing change(s).
CTRL+X Removes the selected text from the script and places it onthe Clipboard.
CTRL+C Copies the selected text, without removing it from thescript, and places it on the Clipboard.
CTRL+V Inserts the contents of the Clipboard at the currentposition of the insertion point.
CTRL+A Selects all the text in the edit window.
CTRL+F Displays the Find dialog box, which allows you to specifytext for which you want to search. Remembers andallows you to choose from a list of previous searchstrings.
CTRL+H Displays the Replace dialog box, which allows you tosubstitute replacement text for instances of specifiedtext. Remembers and allows you to choose from a list ofprevious search and replace strings.
CTRL+G Presents the Goto Line dialog box, which allows you tomove the insertion point to the start of a specified linenumber in your script.
Rational Rose 2000e, Rose Extensibility User’s Guide 99

Appendix A Rational Rose Script Editor Shortcuts
Debugger Menu ShortcutsTable 13 Debugger Menu Shortcuts
Key Name(s) Description
F5 Runs the current script.
CTRL+SHIFT+F5 Restarts the current script beginning with the line atwhich it was stopped using the Break command.
SHIFT+F5 Stops script execution.
F11 Steps through the script code line by line, tracing intocalled procedures.
F10 Steps through the script code line by line withouttracing into called procedures.
F7 Compiles the current script without executing it.
SHIFT+F9 Displays the Add Watch dialog box, in which you canspecify the name of a BasicScript variable. Thatvariable, together with its value (if any), is thendisplayed in the watch pane of the Script Editor'sapplication window.
DELETE Deletes a selected variable from the watch variable list.
ENTER Displays the Modify Variable dialog box for a selectedvariable, which enables you to modify the value of thatvariable.
F9 Toggles a breakpoint on the line containing theinsertion point.
100 Rational Rose 2000e, Rose Extensibility User’s Guide
Appendix B
Developing Add-Ins for Rational Rose
Introduction
This appendix is provided to give additional information for customerswanting to explore the use of add-ins. However, creation of add-ins isnot directly supported by Rational Technical Support. Additionalsupport for add-ins is available through the Rational Unified SolutionsPartner Program and Rational University.
For more information on the Rational Unified Solutions PartnerProgram see:
http://www.rational.com/corpinfo/partners/
For training on Rational Rose’s REI and add-ins see the “ExtendingRational Rose” course from Rational University:
http://www.rational.com/university/description/
Rational Rose 2000e, Rose Extensibility User’s Guide 101
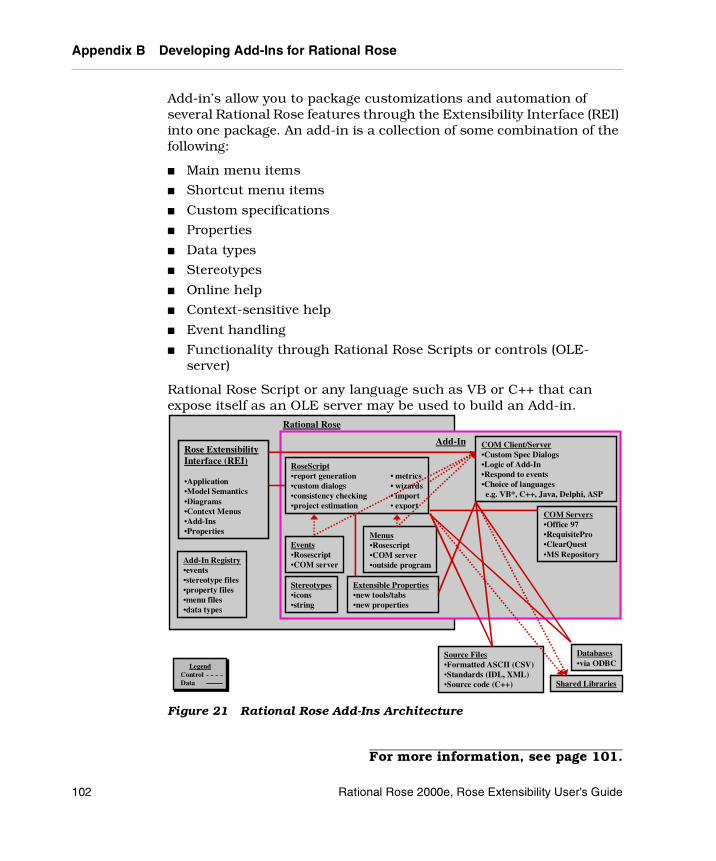
Appendix B Developing Add-Ins for Rational Rose
For more information, see page 101.
Add-in’s allow you to package customizations and automation ofseveral Rational Rose features through the Extensibility Interface (REI)into one package. An add-in is a collection of some combination of thefollowing:
� Main menu items
� Shortcut menu items
� Custom specifications
� Properties
� Data types
� Stereotypes
� Online help
� Context-sensitive help
� Event handling
� Functionality through Rational Rose Scripts or controls (OLE-server)
Rational Rose Script or any language such as VB or C++ that canexpose itself as an OLE server may be used to build an Add-in.
Figure 21 Rational Rose Add-Ins Architecture
Rational Rose
Add-In
Source Files•Formatted ASCII (CSV)•Standards (IDL, XML)•Source code (C++)
COM Servers•Office 97•RequisitePro•ClearQuest•MS Repository
Rose ExtensibilityInterface (REI)
•Application•Model Semantics•Diagrams•Context Menus•Add-Ins•Properties
Add-In Registry•events•stereotype files•property files•menu files•data types
Menus•Rosescript•COM server•outside program
Extensible Properties•new tools/tabs•new properties
COM Client/Server•Custom Spec Dialogs•Logic of Add-In•Respond to events•Choice of languages
e.g. VB*, C++, Java, Delphi, ASP
Shared Libraries
Databases•via ODBC
Events•Rosescript•COM server
Stereotypes•icons•string
RoseScript•report generation • metrics•custom dialogs • wizards•consistency checking • import•project estimation • export
LegendControlData
LegendControlData
102 Rational Rose 2000e, Rose Extensibility User’s Guide
Why Create Add-Ins?
For more information, see page 101.
Note: Servers that wish to use Rational Rose must use the suppliedtypelib included with Rational Rose.
Why Create Add-Ins?
You might want to create an add-in as opposed to a script or programif you answer “yes” to any of the following questions:
� Do you want to take advantage of Rational Rose events likeOnNewModel, OnAppInit?
� Do you want to interact with other Rational Rose add-ins?
Types of Add-Ins
There are two types of add-ins: basic and language. They are definedbelow:
� Basic: A basic add-in is a non-language add-in that supplies itsown responses for events to execute third-party scripts orexecutables, such as a Visual Basic program. It does not use thecomponent view for code generation. A basic add-in cannot registerfor certain code generation-related events.
� Language: A language add-in takes advantage of the mapping tocomponents by defining a target language. It also supplies its ownresponses for events that pertain to code generation and round-tripengineering integration. Code generation and round-tripengineering events include OnGenerateCode, OnBrowseBody, andOnBrowseHeader. Language add-ins support custom data typesand overriding the default specification.
What is in an add-in?
Add-in’s customize or contain one or more of the following:
� Main menus
� Shortcut menu
� Custom specifications
� Properties
Rational Rose 2000e, Rose Extensibility User’s Guide 103

Appendix B Developing Add-Ins for Rational Rose
For more information, see page 101.
� Data types
� Stereotypes
� Online help
� Context-sensitive help
� Registering for events
� Functionality
Each of these are explained in the next sections.
Main menus
The Rational Rose main menus are the menus at the top of the RationalRose window, such as File, Edit, etc. These menus connect the userinterface to functionality in Rational Rose. You can customize thesemenus to link functionality in your add-in to the Rational Rose userinterface.
Shortcut menu
The Rational Rose shortcut menu displays whenever you or your userright-clicks on part of the user interface. The shortcut menu is anotherlink between the user interface and functionality in Rational Rose. Youcan customize this menu to link functionality in your add-in to theRational Rose user interface.
Custom Specifications
Rational Rose displays a standard specification dialog for each modelelement to allow definition and description of that model element. Ifyou are writing a language add-in, you can override the standardRational Rose specification dialog and display your own custom dialog.This is useful to:
� Remove non-relevant or inappropriate information
� Target the dialog to your end-user’s needs
� Drive the dialog by stereotype or other characteristics, for example,naming conventions
104 Rational Rose 2000e, Rose Extensibility User’s Guide

What is in an add-in?
For more information, see page 101.
Properties
Rational Rose model properties allow you to extend Rational Rosemodel elements through additional properties and their values. Youcan add custom tools (a tab on the specification dialog), sets, andproperties to store the information relevant to your add-in with eachRational Rose model element. You can also use this information todetermine when functionality in your add-in should occur.
Data types
Rational Rose data types allow you to customize which selections youruser sees in the type drop down boxes for model elements associatedwith your add-in.
Stereotypes
Rational Rose stereotypes allow you to customize the look of differentmodel elements as makes sense to your add-in. This custom look canbe as simple as an additional text string (for example, <<SpecialClass>>), or as fancy as new icons for the diagram editor, toolbarbuttons, and browser icons.
Online help
Rational Rose provides extensive online help to explain the product.You can also add your online help.
Context-sensitive help
Rational Rose provides context-sensitive help to provide quick, briefinformation on the context. You can add context-sensitive help to youradd-in’s user interface. and your custom Rational Rose main menuitems, shortcut menu items, and properties.
Registering for events
Rational Rose provides several COM events for which your add-in canregister and respond.
Rational Rose 2000e, Rose Extensibility User’s Guide 105

Appendix B Developing Add-Ins for Rational Rose
For more information, see page 101.
Functionality
Finally, you can write code to provide the dialogs and otherfunctionality desired in your add-in.
UNIX versus Windows
If you are developing add-ins for UNIX, you will run into the followingdifferences:
Table 14 UNIX versus Windows
The basic difference is that to create an add-in for UNIX, you must“fake” setting up the “registry”. When creating a UNIX version, followthese steps:
1. Copy the contents of rose.version/addins/cm directory to a newdirectory in the rose.version/addins directory where version is theinstalled version of Rational Rose.
For example:
cd rose.4.5.8153/addinsmkdir my_addincp cm/* my_addin
2. Change to the new directory
For example:
cd my_addin
Windows UNIX
GUI painter and capture GUI painter and capture
Custom dialogs Custom dialogs
API through COM MainWin—MainSoft Technology
Rose as COM client MainWin—MainSoft Technology
ODBC functions none
GUI drivers (for example, Send Keys) n/a
106 Rational Rose 2000e, Rose Extensibility User’s Guide

Creating portable add-ins
For more information, see page 101.
3. Rename cm.mnu and cm.reg to the name of your add-in
For example:
mv cm.mnu my_addin.mnumv cm.reg my_addin.reg
4. Edit your menu file (.mnu) to add the menus you want
The format is the same on Windows and UNIX
5. Edit the registry file (.reg) and replace “cm” with the name of youradd-in. You should change:
❑ HKEY_LOCAL_MACHINE
❑ InstallDir
❑ MenuFile
A global search and replace on the document should help.
6. Copy your add-in’s custom help file to the rose.version/helpdirectory where version is the installed version of Rational Rose.
For example:
cd rose.4.5.8153/helpcp /somepath/MyHelpFile.hlp .cp /somepath/MyHelpFile.cnt .
Creating portable add-ins
To create add-ins that will be portable to other platforms, keep thefollowing recommendations in mind:
� Keep the logic of the integration in Rational Rose Script
� Keep dialogs and graphical user interfaces (GUIs) in Rational RoseScript
� Import and export through ASCII files
� Do not use COM calls—write shell-accessible commands
� Test the operating system with the BasicScript object (for example,Basic.OS)
� Use path map variables
Rational Rose 2000e, Rose Extensibility User’s Guide 107

Appendix B Developing Add-Ins for Rational Rose
For more information, see page 101.
How to develop add-ins
The following procedure gives you a high-level look at what you need todo to develop your add-in:
1. Decide which language to use to create your add-in (Rational RoseScript or a COM-enabled language such as Visual Basic, C++).
2. Decide whether you will be a basic or language add-in.
3. Decide which parts of Rational Rose you want to customize or use:
❑ Main menus
❑ Shortcut menus
❑ Custom Specifications
❑ Properties
❑ Data types
❑ Stereotypes
❑ Online help
❑ Context-sensitive help
❑ Registering for events
4. Design your add-in’s functionality.
5. Create all the pieces for your add-in that you decided you needed:
❑ Menu file (.mnu)
❑ Property file (.pty) to add new tools, sets, and properties
❑ Data types
❑ Stereotypes (.ini, .bmp, .wmf, .emf)
❑ Online and context-sensitive help (.hlp)
❑ Method for updating the registry file (.reg)
❑ Code to
– perform all the functions of your add-in (.ebs, .ebx, .exe, .dll,etc.)
– register for and handle events
– create shortcut menu items
– define your custom specification dialogs
❑ Installation routine
108 Rational Rose 2000e, Rose Extensibility User’s Guide

How to develop add-ins
For more information, see page 101.
❑ Uninstallation routine
❑ Hardcopy documentation
❑ Anything else specific to your needs
6. Test your add-in and its pieces
❑ Installation
❑ Activation
❑ New functionality
– Menu items
– Shortcut menu items
– Custom Specifications
– Properties
– Data types
– Stereotypes
– Online help
– Context-sensitive help
– Events
– All other add-in functionality
❑ Deactivation
❑ Uninstallation
7. Package your add-in and distribute to your customers (whetherinternal or external).
Working with and customizing each of the items listed above (forexample, menus, properties) are explained in more detail in the nextsections.
Customizing Main Menus
Each add-in may introduce additions to the menus specific for thatadd-in, using the menu file technology (*.mnu). This is the only way anadd-in can provide main menu items.
For more information on the syntax for the Rational Rose menu file(*.mnu), see the Customizing Rational Rose Main Menus section earlierin this User’s Guide.
Rational Rose 2000e, Rose Extensibility User’s Guide 109

Appendix B Developing Add-Ins for Rational Rose
For more information, see page 101.
Note: If you choose to customize the main menus, you must update theregistry (discussed later in this appendix).
Customizing the Shortcut Menu
For information on customizing the shortcut menu, see theCustomizing Rational Rose Shortcut Menus section earlier in this User’sGuide.
Creating Custom Specifications
To create and activate custom specifications, do the following:
1. Create a language add-in.
2. Register for the OnPropertySpecOpen event.
3. Implement an OnPropertySpecOpen interface in your add-in’s OLEserver.
4. Code your custom specification dialogs.
Customizing Properties
Properties are added to Rational Rose items by add-ins using theexisting property file (pty-file) technology. Each Add-in can optionallysupply its own property file that defines a name space for its propertiesand a tab in the specification editor to hold the custom tool, sets, andproperties. You can only define one property file per add-in, but youcan define multiple tools, sets, and properties within that one file. Theproperty file is automatically enabled and disabled as your add-in isenabled and disabled. Even when the property file is disabled, however,your custom properties are persisted with the model file. To hide a tab,the user can deactivate the corresponding add-in in Rational Rose.
Design Considerations
The ordering of the tabs (tools) must be independent of when, where,and what add-ins are installed or activated. The tab name (tool name)must be unique for each Add-in. Rational Rose has no capability todetect conflicts. You must always have a “default” set for each of yourcustom tools.
110 Rational Rose 2000e, Rose Extensibility User’s Guide

How to develop add-ins
For more information, see page 101.
Note: If you choose to add a property file, you must update the registry(discussed later in this appendix).
You can also add, delete, and clone properties through the extensibilityinterface. For more information on how to do this, see ManagingDefault Properties and subsequent sections earlier in this User’s Guide.
Information in Property Files
Property Files contain the following information:
version
tool 1
default set__model element 1
property 1
property 2
...
property n
default set__model element 2
property 1
property 2
...
property n
default set__last model element
...
next set__model element 1
property 1
property 2
...
property n
next set__model element 2
...
next set__last model element
...
last set__model element 1
Rational Rose 2000e, Rose Extensibility User’s Guide 111

Appendix B Developing Add-Ins for Rational Rose
For more information, see page 101.
...
last set__last model element
...
tool 2
default set__model element 1
...
last set__last model element
...
last tool
...
Format for Property Files
Now that you have seen an overview of the information contained inproperty files, it is time to look at their actual format. Keywords areshown in bold, while variable information, that you need to set, isshown in italics. Each element is explained at the end of the propertyfile format.
# Comments about the property file# Begin version information(object Petal
version number_written "add-in name"charSet 0)
# End version information
# Begin tool definition(list Attribute_Set
# Tool setup(object Attribute
tool "tool"name "propertyID"value "809135966")
# Begin set and model element definition(object Attribute
tool "tool"name "set__model element"
112 Rational Rose 2000e, Rose Extensibility User’s Guide

How to develop add-ins
For more information, see page 101.
value (list Attribute_Set# Define first property(object Attribute
tool "tool"name "property"value datatype)
# Define second property(object Attribute
tool "tool"name "property"value datatype)
...
# Define nth property(object Attribute
tool "tool"name "property"value datatype)
)# End property list
)# End set and model element list
# Begin next set and model element list(
...)# End next set and model element list
)# End tool definition
# Begin next tool definition. Repeat format.(
...)# End next tool definition# End property file
Rational Rose 2000e, Rose Extensibility User’s Guide 113

Appendix B Developing Add-Ins for Rational Rose
For more information, see page 101.
The property file is composed of the following elements:
� comments: Place a number sign (#) at the beginning of the line toindicate that it is a comment line.
� number: Enter the petal version number that corresponds to theversion of Rational Rose for which you are writing your add-in. Tofind out what this number is, first locate a model file (.mdl) savedin the same version of Rational Rose. Next, open the model file in atext editor, such as Notepad.
� add-in name: Enter the name you want to call your add-in. Forexample, Rose/MyAddin v1.0
� tool: Enter the name of your tool. For example, My Tool. You maydefine multiple tools for your add-in in one property file.
� value: Use the same value (809135966) for each of your tools. Ifyou run into problems, add 1 to the number.
� set__model element: Enter the name of your set and modelelement. For example, default_Project, CompilerV1.0_Project,CompilerV2.0_Project, default_Class. You may have multiple setsand multiple model elements per tool. Valid model elements are:
❑ Association
❑ Attribute
❑ Category
❑ Class
❑ Has
❑ Inherit
❑ Module-Spec
❑ Module-Body
❑ Operation
❑ Param
❑ Project
❑ Role
❑ Subsystem
❑ Uses
114 Rational Rose 2000e, Rose Extensibility User’s Guide

How to develop add-ins
For more information, see page 101.
� property: Enter the name of your property. For example,minCount
� datatype: Enter the default value for the data type of yourproperty. For example, if your property is
❑ an integer, your default value may be 0
❑ a string, your default value may be “” or “Unknown”
❑ a boolean, your default value may be TRUE
The following table lists examples for each of the different datatypes and how to format them in your property file. Note the caseswhere quotes are used versus where they are not used.
Table 15 Property file data types
Data typeExample andDefault Format
String Nameblank
(object Attributetool "MyTool"name "Name"value "")
Integer minCount0
(object Attributetool "myTool"name "minCount"value 0 )
Boolean isRelatedFALSE
(object Attributetool "myTool"name "isRelated"value FALSE)
Rational Rose 2000e, Rose Extensibility User’s Guide 115

Appendix B Developing Add-Ins for Rational Rose
For more information, see page 101.
Multi-linestring
DescriptionBlank
(object Attributetool "myTool"name "Description"value (value Text ""))
Enumeration(setup)
Colorn/a
(object Attributetool "myTool"name "Color"value (list Attribute_Set
(object Attributetool "myTool"name "Red"value 100)
(object Attributetool "myTool"name "Blue"value 110)
(object Attributetool "myTool"name "Green"value 120))
Enumeration(usage)
Shade“Red”
(object Attributetool "myTool"name "Shade"value ("Color" 100))
Data typeExample andDefault Format
116 Rational Rose 2000e, Rose Extensibility User’s Guide

How to develop add-ins
For more information, see page 101.
Sample Property File
To add the tool, set, and properties (with default values) displayed inthe following property dialog box,
Figure 22 Sample Custom Properties
we created the following property file:
(object Petalversion 43)
(list Attribute_Set(object Attribute
tool "myTool"name "default__Category"value (list Attribute_Set
Rational Rose 2000e, Rose Extensibility User’s Guide 117

Appendix B Developing Add-Ins for Rational Rose
For more information, see page 101.
(object Attributetool "myTool"name "MyNewEnumeration"value (list Attribute_Set
(object Attributetool "myTool"name "Value1"value 1)
(object Attributetool "myTool"name "Value2"value 2)
(object Attributetool "myTool"name "Value3"value 3)))
(object Attributetool "myTool"name "MyEnumeratedProperty"value ("MyNewEnumeration" 1))
(object Attributetool "myTool"name "isAppropriate"value TRUE)
(object Attributetool "myTool"name "mySpace"value 5))))
Note: This tool tab only displays on package specifications, since weonly defined them for packages (default__Category). To display this tabfor classes, duplicate the default__Category section and rename it todefault__Class.
For more examples of property files, see the .pty files that come withRational Rose.
118 Rational Rose 2000e, Rose Extensibility User’s Guide

How to develop add-ins
For more information, see page 101.
Creating Property Files
To create a property file, for inclusion with your add-in, do thefollowing:
1. Create a new text file with extension .pty in a text editor or copy anexisting .pty file.
2. Edit the property file (.pty) as desired. Use the explanations givenpreviously and existing property files to guide you.
Testing Property Files1. Create and save a test model with all the model elements for which
you added properties.
2. Add the new property file by following menu path: Tools > ModelProperties > Add and selecting your property file (.pty).
3. Check the error log to make sure your model properties were allloaded okay. For example:
16:35:51| [Add Model Properties]16:35:51| Adding model properties from file C:\ProgramFiles\Rational\Rose 2000e\my model properties.pty.16:35:51| A total of 4 model properties have been added tothe original model.
4. Test your new properties by opening the specification for eachaffected model element. Look for:
� A new tab or tabs with your tool name or names
� Correct sets (default, plus any others) on each tool tab
� Correct properties for each set
� Correct default values for each property
� Correct data types for each property. For example, click on anenumerated type to make sure that Rational Rose displays adrop down box that includes all the valid values for yourenumeration.
Rational Rose 2000e, Rose Extensibility User’s Guide 119
Appendix B Developing Add-Ins for Rational Rose
For more information, see page 101.
Customizing Data types
Add-ins may also choose to optionally supply a set of default data typesto be presented to the user for typing attributes, parameters, etc., inRational Rose specifications. These data types are defined in theregistry setting called FundamentalTypes. For information onupdating the FundamentalTypes registry setting, see the section inthis appendix, Updating the Registry.
Customizing Stereotypes
An Add-in may supply a set of stereotypes and an additional set ofmetafile icons to represent them. These stereotypes will be loaded andmade available to Rational Rose when the Add-in is activated. Yourcustom stereotypes are added to Rational Rose’s default set ofstereotypes for the UML. Custom stereotypes do not replace standardones. The location of your custom stereotypes is defined in the registrysetting called StereotypeCfgFile. For information on updating theStereotypeCfgFile registry setting, see the section in this appendix,Updating the Registry.
You may provide icons for your stereotypes or text. Stereotypes areapplicable to the following model elements:
� Association
� Attribute
� Class
� Component
� Component Package
� Connection
� Dependency
� Device
� Generalization
� Logical Package
� Operation
� Processor
� Use Case
120 Rational Rose 2000e, Rose Extensibility User’s Guide

How to develop add-ins
For more information, see page 101.
� Use Case Package
You may create custom icons for one or more of the following:
� Diagram editor icons (.wmf, .emf) to display on diagrams
� Diagram toolbar icons (.bmp) to display on the toolbar buttons
� Browser list icons (.bmp) to display in the browser
Note: You only need one bitmap file for your diagram toolbar icons anda separate bitmap file for all your custom browser icons. You do not needseparate bitmap files for each of these icons. An index into the bitmap isused to indicate which bitmap goes with which stereotype.
Steps for Creating Add-In Stereotypes1. Decide on the model element(s) and text stereotype name(s)
2. Decide which, if any, graphical representations you want tocustomize:
� Editor
� ToolBar
� Browser
3. Define the stereotype in the stereotype INI file for the add-in
4. Create the custom icon graphics (.wmf, .emf, .bmp)
General INI File Format
Note: In addition to the description in the next pages, you can also findinformation on custom stereotypes and the stereotype configuration filein the Stereotypes chapter of the Rational Rose 2000e, Using Rose bookand online help.
The stereotype INI file contains the following information:
[General]
This section contains add-in specific settings such as the nameof the add-in and whether it is a language add-in.
Rational Rose 2000e, Rose Extensibility User’s Guide 121

Appendix B Developing Add-Ins for Rational Rose
For more information, see page 101.
[Stereotyped Items]
This section is like a table of contents for the stereotypes. Itcontains a list of stereotyped REI objects. For example,Class:Control, Component:DLL, Operation:Set.
[REI Item:Stereotype name]
This section contains the settings for each stereotype, includingany optional icon files and settings.
Example:
[General]ConfigurationName=NameIsLanguageConfiguration=Yes or No
[Stereotyped Items]REI item:Stereotype nameREI item:Stereotype name...[REI item:Stereotype name]Item=REI itemStereotype=Stereotype nameoptional icon settings:Metafile=&/model-element.wmfSmallPaletteImages=&/palette_icons.bmpSmallPaletteIndex=IndexMediumPaletteImages=&/palette_icons.bmpMediumPaletteIndex=IndexListImages=&/stereotypes.bmpListIndex=Index...[REI item:Stereotype name]Item=REI itemStereotype=Stereotype nameoptional icon settings:Metafile=&/model-element.wmfSmallPaletteImages=&/palette_icons.bmpSmallPaletteIndex=IndexMediumPaletteImages=&/palette_icons.bmpMediumPaletteIndex=IndexListImages=&/stereotype.bmpListIndex=Index
122 Rational Rose 2000e, Rose Extensibility User’s Guide

How to develop add-ins
For more information, see page 101.
The stereotype INI file is composed of the following elements:
� ConfigurationNameConfigurationNameConfigurationNameConfigurationName: This is the name of the add-in or name usedfor maintenance.
� IsLanguageConfigurationIsLanguageConfigurationIsLanguageConfigurationIsLanguageConfiguration: Type Yes if your add-in is a languageadd-in. Otherwise, type No. This information conditionalizesstereotypes so that they only appear if the language of the modelelement in Rational Rose is the same as the ConfigurationNamelisted above.
� ItemItemItemItem: The model element for which you are defining a stereotype.
� StereotypeStereotypeStereotypeStereotype: The text string stereotype. This is the text to bedisplayed between guillemets (<< >>).
� MetafileMetafileMetafileMetafile: The windows metafile (.wmf) or enhanced metafile (.emf)containing your diagram editor icon stereotype.
❑ Windows Meta Files (wmf) may require additional extent settings
❑ Enhanced Meta Files (emf) are preferred
� SmallPaletteImagesSmallPaletteImagesSmallPaletteImagesSmallPaletteImages: The bitmap file (.bmp) containing all yoursmall icons for your toolbar buttons. This defines non-large icons(15 pixels high x 16n wide).
� SmallPaletteIndexSmallPaletteIndexSmallPaletteIndexSmallPaletteIndex: The integer number indicating the location inthe bitmap file of the small toolbar button icon for this stereotype.This index starts with 1.
� MediumPaletteImagesMediumPaletteImagesMediumPaletteImagesMediumPaletteImages: The bitmap file (.bmp) containing all yourmedium icons for your toolbar buttons. This defines large icons (24pixels high x 24n wide).
� MediumPaletteIndexMediumPaletteIndexMediumPaletteIndexMediumPaletteIndex: The integer number indicating the locationin the bitmap file of the medium toolbar button icon for thisstereotype. This index starts with 1.
� ListImagesListImagesListImagesListImages: The bitmap file (.bmp) containing all your custombrowser icons.
❑ device independent bitmaps
❑ 16 high x 16n pixels wide
❑ white background
❑ use paint or bitmap editor
❑ & is the installation directory
Rational Rose 2000e, Rose Extensibility User’s Guide 123

Appendix B Developing Add-Ins for Rational Rose
For more information, see page 101.
� ListIndexListIndexListIndexListIndex: The integer number indicating the location in thebitmap file of the custom browser icon for this stereotype. Thisindex starts with 1.
The following sections focus on the different types of text and iconstereotypes you can create. You do not need separate files for each ofthese items; all text and icon information can go in one INI file.
Text-Only Stereotypes INI File
No custom icons are included—only the text stereotypes
Example:
[Stereotyped Items]Class:InterfaceComponent:DLLComponent:ActiveXComponent:Application
[Class:Interface]Item=ClassStereotype=Interface
[Component:DLL]Item=ComponentStereotype=DLL
[Component:ActiveX]Item=ComponentStereotype=ActiveX
[Component:Application]Item=ComponentStereotype=Application
124 Rational Rose 2000e, Rose Extensibility User’s Guide

How to develop add-ins
For more information, see page 101.
Custom Diagram Editor Icons INI File
Metafile must be used in the optional icon settings section to definediagram icons.
Example:
[Class:Actor]Item=ClassStereotype=ActorMetafile=&/Objectory/color/actor.wmfSmallPaletteImages=&/Objectory/palette_icons.bmpSmallPaletteIndex=1MediumPaletteImages=&/Objectory/palette_icons.bmpMediumPaletteIndex=2ListImages=&/Objectory/list_icons.bmpListIndex=1
Custom Toolbar Button Icons INI File
SmallPaletteImages, SmallPaletteIndex, MediumPaletteImages, andMediumPaletteIndex must be used in the optional icons settingssection to define diagram palette icons.
Example:
[Class:Actor]Item=ClassStereotype=ActorMetafile=&/Objectory/color/actor.wmfSmallPaletteImages=&/Objectory/palette_icons.bmpSmallPaletteIndex=1MediumPaletteImages=&/Objectory/palette_icons.bmpMediumPaletteIndex=2ListImages=&/Objectory/list_icons.bmpListIndex=1
Rational Rose 2000e, Rose Extensibility User’s Guide 125

Appendix B Developing Add-Ins for Rational Rose
For more information, see page 101.
Custom Browser List Icons INI File
The [General] section is needed. ListImages and ListIndex must beused in the optional icon settings section.
Example:
[General]ConfigurationName=Oracle8IsLanguageConfiguration=Yes
[Stereotyped Items]Class:ObjectTypeClass:ObjectTable...
[Class:ObjectType]Item=ClassStereotype=ObjectTypeListImages=&/o8stereo.bmpListIndex=3
[Class:ObjectTable]Item=ClassStereotype=ObjectTableListImages=&/o8stereo.bmpListIndex=4
Additional online help
Each add-in may introduce additions to the on-line help when installedor activated. These additions are activated when your add-in isactivated.
On-line help should cover the capabilities of the installed add-in. Eachadd-in should have only one first level help book in the master table ofcontents. So, for example, your add-in should add a single book, forexample “My AddIn”. There may be many books under that book, butonly one book should appear in the main Rational Rose help table ofcontents.
126 Rational Rose 2000e, Rose Extensibility User’s Guide

How to develop add-ins
For more information, see page 101.
Adding Online Help for Your Add-In
To be included in the Rational Rose Help, the add-in .hlp and .cnt filesmust reside in the same directory as the rest of the Rational Rose help.
� In Windows, the help directory is specified by the HelpFileDirgeneral Rational Rose registry setting. The registry key for thissetting is [HKEY_LOCAL_MACHINE\SOFTWARE\RationalSoftware\Rose\HelpFileDir].
� In UNIX, the help directory is fixed: /rose.version/help whereversion is the version of the currently installed Rational Rose (forexample, /rose.4.5.8153/help).
In addition, you must include the add-in.cnt file in the roseu.cnt file.This is accomplished by doing the following:
1. Locate the Rational Rose help files.
2. Identify the roseX.cnt file you wish to use:
� Roseu.cnt supports the UML help variant
� Rosec.cnt supports the COM help variant
You may choose to maintain both if you refer to both the UML andCOM notations when running Rational Rose.
3. Make a backup copy of the RoseX.cnt file.
4. Open the roseX.cnt file.
5. Add the following lines to the top of the roseX.cnt file along with theother Index and Link definitions::INDEX = title =filename.hlp:LINK filename.hlp
Add the following line at the bottom of the roseX.cnt file:
:INCLUDE filename.cnt
where title is the text that appears in the title bar of the Contentswindow of the add-in help file, filename.hlp is the name of the add-in help file, and filename.cnt is the name of the add-ins’s contentsfile.
Rational Rose 2000e, Rose Extensibility User’s Guide 127

Appendix B Developing Add-Ins for Rational Rose
For more information, see page 101.
Additional context-sensitive help
To be consistent with Rational Rose, you can include context-sensitivehelp in your add-in for your custom menu items, properties, and userinterface (your add-in’s dialogs, for example). Each context-sensitivehelp topic must have an A-Keyword defined for it. Since menu itemsand properties are Rational Rose features, we explain the formatneeded to connect your custom menu items and properties to yourcontext-sensitive help. Create your A-Links for your context-sensitivehelp in your chosen help authoring tool.
Main Menu Items
For main menu items, added via the menu file (.mnu), the format forthe A-Keyword is explained below.
For items on submenus:
Menu, Submenu, menu item
For items not on submenus (items located directly on Rational Rosemain menus)
Menu, menu item
For example, Tools, MyAddIn, MyScript would be the alias for acontext-sensitive help topic that explains the “MyScript” menu optionon the “MyAddIn” submenu of the “Tools” menu (Tools > MyAddIn >MyScript).
Menu, submenu, and menu item names in the A-Keyword mustinclude all punctuation. For example, if your menu path includesellipsis:
Tools > My Language > Project Specification...
Your A-Keyword must also include ellipsis:
Tools, My Language, Project Specification...
Note: There is no F1 help for intermediary submenus, only for menuitems. So for the examples listed previously, there is no F1 help for“MyAddIn” or “My Language”. If you have defined help topics andA-Keywords, however, there is F1help for “MyScript” and “ProjectSpecification...”.
128 Rational Rose 2000e, Rose Extensibility User’s Guide

How to develop add-ins
For more information, see page 101.
Model Properties
The format for the A-Keyword is:
property (model element, tool)
where property is the name of your custom property, model element isthe name of the model element to which your property is applied, andtool is the name of your tab (tool) in the specification.
For example, isAppropriate (Category, myTool) would be the alias for acontext-sensitive help topic that defines the “isAppropriate” propertythat applies to the myTool Packages.
User manuals
You may supply your own soft or hard copy documentation, for youradd-in, that covers its installation, use and limitations.
Registering for events
You may register your add-in for Rational Rose’s events, thus triggeringfunctionality in your add-in when that event occurs in Rational Rose.Since any number of add-ins may trigger on the same event, the orderin which your add-in entry points are called, must be independent ofwhen, where, and what add-ins are installed or activated.
Responses to events are usually coded as COM server interfaces, butsome events can be mapped to Rational Rose Scripts. Events map toeither an interface on your COM server or a Rational Rose Script, if theparticular event allows Rational Rose Script.
Some events only apply to language add-ins (for example,OnGenerateCode, OnPropertySpecOpen).
Events fall into one of the following categories:
� Registry entry required
❑ Interface events
❑ Script events
� No registry entry needed, but an OLE server is required
Interface and Script Events are explained further in the next section.
Rational Rose 2000e, Rose Extensibility User’s Guide 129

Appendix B Developing Add-Ins for Rational Rose
For more information, see page 101.
Interface Versus Script Events
Rational Rose’s registry-required events can be implemented in one oftwo ways, interface or script. An interface event requires a registeredCOM server (.dll) that includes an interface, named the same as theevent, to handle the event. A script event requires a script that can beexecuted (.ebx) to handle the event.
What events are available?
General Events:
� Model-related: OnNewModel, OnCancelModel, OnCloseModel,OnOpenModel, OnSaveModel
� Model element-related: OnNewModelElement,OnModifiedModelElement, OnDeletedModelElement
� When the Rational Rose application is initialized: OnAppInit
� Add-In activation/deactivation: OnActivate, OnDeactivate
Code Generation-Related:
� Generating source code: OnGenerateCode
� Browsing source code: OnBrowseHeader, OnBrowseBody
GUI-related:
� Override the specification dialog box: OnPropertySpecOpen
� Extends the context menu: OnSelectedContextMenuItem,OnEnableContextMenuItems
Each of these events are described in detail in the Rational Rose 2000eExtensibility Reference Manual and online help along with warningsand precautions. The detailed descriptions also include a Registry andServer Requirements section explaining whether the event requires aregistry entry or OLE server.
130 Rational Rose 2000e, Rose Extensibility User’s Guide
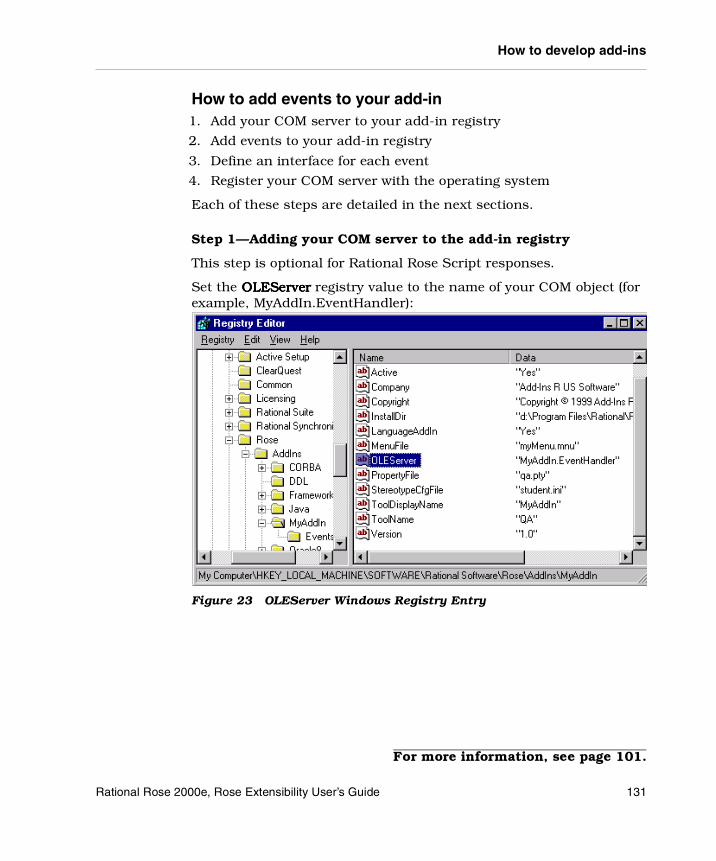
How to develop add-ins
For more information, see page 101.
How to add events to your add-in1. Add your COM server to your add-in registry
2. Add events to your add-in registry
3. Define an interface for each event
4. Register your COM server with the operating system
Each of these steps are detailed in the next sections.
Step 1—Adding your COM server to the add-in registry
This step is optional for Rational Rose Script responses.
Set the OLEServerOLEServerOLEServerOLEServer registry value to the name of your COM object (forexample, MyAddIn.EventHandler):
Figure 23 OLEServer Windows Registry Entry
Rational Rose 2000e, Rose Extensibility User’s Guide 131

Appendix B Developing Add-Ins for Rational Rose
For more information, see page 101.
Step 2—Adding events to the add-in registry
1. Create an Events registry subkey under your add-in’s subkey.
2. List each event your add-in is registering for in the Name column.
3. Set the Data column to the Value as indicated:
� “Interface” indicates a COM server call
� “eventName.ebx” indicates Rational Rose Script execution
Figure 24 Windows Registry Entries for Rational Rose Events
Note: The script file must reside in the add-in’s installation directory, asspecified by the add-in’s InstallDirInstallDirInstallDirInstallDir registry setting, or a subdirectory ofthe add-in’s installation directory. If you choose to put the script in asubdirectory of your add-in’s installation directory (for example,\scripts), specify the subdirectory as part of the script file name (forexample, \scripts\OnNewModel.ebx).
132 Rational Rose 2000e, Rose Extensibility User’s Guide

How to develop add-ins
For more information, see page 101.
Step 3—Defining an interface for each event
For each event for which your add-in is registering, name yourinterface or Rational Rose Script the same. For example, if your add-inis registering for the OnNewModel event, you would have one of thefollowing:
� OnNewModel() interface in your OLE server
For example
Figure 25 Sample Event Handler Defining an Add-In’s Interfaces forRational Rose Events
Note: Your COM server should only contain those events that you areresponding to in your add-in.
� OnNewModel.ebx compiled Rational Rose Script
While the signature of the interface varies by event, most interfacesignatures are:
void event name (LPDispatch pRoseApp)
Step 4—Register your COM server with the operating system
Add your COM server to the windows registry so that a client can getto it by COM object name (for example, CreateObject/GetObject). Thisis usually taken care of by the Integrated Development Environment(IDE). For example, Visual Basic registers your dll for you. Otherwise,to register your COM server, execute the command line:
regsvr32 file.dll
EventHandler
OnNewModel()OnAppInit()OnActivate()OnDeactivate()
<<Interface>>
Rational Rose 2000e, Rose Extensibility User’s Guide 133

Appendix B Developing Add-Ins for Rational Rose
For more information, see page 101.
To verify that your COM server is registered, add a reference to it in theobject browser of your IDE.
Updating the Registry
Once the add-in is created, the following registry settings are necessaryto enable an add-in. They are placed as sub-keys to a sub-key thatrepresents the add-in name. The following would be an example of anadd-in named MyAddIn:
[HKEY_LOCAL_MACHINE\SOFTWARE\RationalSoftware\Rose\AddIns\MyAddIn]
The add-in registry information should be placed in the Rose\AddInsfolder of the registry.
Registry Entries
The following registry entries are available when introducing add-ins.
Figure 26 Windows Registry Entries for an Add-In
134 Rational Rose 2000e, Rose Extensibility User’s Guide

How to develop add-ins
For more information, see page 101.
This list shows the registry sub-key names, descriptions, and defaults:
Active—Whether the Add-in is active or not. Settable by the userthrough the Rational Rose Add-in Manager. Default set to “Yes.”
Company—Name of the independent software vendor (ISV) thatproduced the add-in. For example, “Custom Software, Inc.”
Copyright—Specifies the copyright date of the add-in. For example,“©1996-1997”
FundamentalTypes—A String list of data types that appear in pulldown menus for attributes when the add-in is active. This setting isrequired for all language add-ins. For example,“LOGICAL;CHAR;REAL” Note that this field is case sensitive.
HelpFileName—Name of the help file for the add-in, without any pathor extension. For example, “myOnlineHelp”
Note: All add-in help files, including .cnt files, need to be located in thehelp directory specified by the HelpFileDir general Rational Roseregistry setting ([HKEY_LOCAL_MACHINE\SOFTWARE\RationalSoftware\Rose]).
InstallDir—Directory where the add-in is installed. For example,“d:\My AddIn”
LanguageAddIn—Whether the add-in is a Round Trip Engineering(RTE) language add-in that wishes to use the component mappingfeature. For example, “Yes”
MenuFile—Name of the menu file (*.mnu) file that tailors RationalRose. It needs to be installed in InstallDir. For example,“anaddin.mnu”
OLEServer—The name of the object that represents the OLE serverthat Rational Rose communicates with, if the add-in uses an OLEserver. For example, “MyAddIn.EventHandler”
Note: The OLEServer value is case sensitive and only required if theadd-in is using an OLE server to handle events.
PropertyFile—Name of the *.pty property file for the Add-in forexample,“user.pty”. This needs to be installed in InstallDir. Thisregistry setting is required if the add-in is introducing properties.
Rational Rose 2000e, Rose Extensibility User’s Guide 135
Appendix B Developing Add-Ins for Rational Rose
For more information, see page 101.
StereotypeCfgFile—Specifies the custom stereotype configuration filefor the add-in for example, “stereotypes.ini”. This setting is required ifthe add-in is introducing stereotypes. This needs to be installed inInstallDir.
ToolDisplayName—Specifies the add-in’s tool name that getsdisplayed on the properties tab and in the drop down list of languagesin Rational Rose. This name can be different than the name that isused in the .pty file. Note that this is not a required setting. If thissetting is not specified, the ToolName is displayed on the propertiestab and in the drop down list of languages in Rational Rose. If thissetting is specified, this is the name that gets assigned to a component.For example, “myLang” is the ToolName for the add-in, but “MyProprietary Language” is the ToolDisplayName.
ToolList—Displays the list of additional tools or property pagesintroduced by the add-in. Each tool is separated by a semi-colon. Forexample, “myLang;Tool2”. This setting is only required if the add-inintroduces more than one property page.
ToolName—Specifies the add-in’s tool name, which must match thetool name in the add-in’s .pty file (the name that gets assigned to acomponent). For example, “myLang”, unless it’s overridden by aToolDisplayName. In that case, the ToolDisplayName is assigned tothe component.
Version—Version number of the add-in, (not Rational Rose). Forexample, “1.2.3"
136 Rational Rose 2000e, Rose Extensibility User’s Guide

How to develop add-ins
For more information, see page 101.
Registering Custom Stereotypes
Add your stereotype INI file to the StereotypeCfgFiles subkey under theRose Subkey. Name your entry FileX where X is the next availableinteger:
Figure 27 Windows Registry Entry for an Add-In’s Custom StereotypeConfiguration File
The stereotype configuration file (.ini) must be located in the directorylisted in the InstallDirInstallDirInstallDirInstallDir registry setting.
Updating the registry during installation
Since manual updates during installation are error-prone, werecommend that you avoid manual updates, like regedit. Instead, wesuggest that you use an installation utility or execute a custom registryfile.
Installation utilities
Most installation utilities (for example, InstallShield) provideprogrammatic interfaces to the registry. Follow your installationutility’s directions for updating the registry.
Rational Rose 2000e, Rose Extensibility User’s Guide 137

Appendix B Developing Add-Ins for Rational Rose
For more information, see page 101.
Executing registry files
You can also update the registry by creating a registry file (.reg), thenexecuting it during the installation of your add-in. To create a customregistry file, use one of the following methods:
� Create a registry file (.reg) from scratch in a text editor such asNotepad following the traditional INI file format, or
� Copy and edit an existing registry file (.reg), or
� Manually create your registry entries (in regedit, for example) thenreverse engineer the format into a registry file (.reg):
❑ select existing add-in registry settings in a registry editor
❑ select the menu option to export the registry
Registry File Anatomy
A registry file (.reg) looks like the following:
REGEDIT4
[HKEY_LOCAL_MACHINE\SOFTWARE\RationalSoftware\Rose\AddIns\MyAddIn]"Active"="Yes""Company"="Add-Ins R US Software""Copyright"="Copyright © 1999 Add-Ins R US Software Corp.""LanguageAddIn"="Yes""Version"="1.0""PropertyFile"="qa.pty""MenuFile"="myMenu.mnu""StereotypeCfgFile"="student.ini""OLEServer"="MyAddIn.EventHandler""InstallDir"="d:\\ProgramFiles\\Rational\\Rose 2000e\\My AddIn""ToolName"="QA""ToolDisplayName"="MyAddIn"...
138 Rational Rose 2000e, Rose Extensibility User’s Guide

How to develop add-ins
For more information, see page 101.
Installing, Setting up, and Uninstalling your add-in
After you finish designing and coding your add-in, it will consist of acombination of the following:
� Main menu items (.mnu)
� Shortcut menu items
� Custom specifications
� Properties (.pty)
� Data types
� Stereotypes (.ini, .bmp, .wmf, .emf)
� Online help (.hlp, .cnt)
� Context-sensitive help (.hlp)
� Event handling (.dll)
� Functionality through Rational Rose Scripts (.ebx) or controls(OLE-server) (.dll, .exe)
� Installation script
� Uninstall script
The purpose of the last two items, installation and uninstall scripts, isto introduce the files into the Rational Rose file structure and toregister their locations, as well as other data needed by the framework,and to undo all this at a later time when the add-in is not wanted.
Installation Reminders
When creating your installation script, remember the following:
� Install the pieces of your add-in (menu file, property file, etc.) in thesubdirectory indicated in your add-ins InstallDir registry subkey.
� Update the roseX.cnt file as needed and install your help (.hlp) andcontents (.cnt) file in the same directory as the Rational Rose helpfiles.
� Update the windows registry, using your chosen method.Remember to do the following:
❑ Create a registry subkey for your add-in (for example,[HKEY_LOCAL_MACHINE\SOFTWARE\RationalSoftware\Rose\AddIns\MyAddIn])
Rational Rose 2000e, Rose Extensibility User’s Guide 139

Appendix B Developing Add-Ins for Rational Rose
For more information, see page 101.
❑ Populate this subkey with the appropriate names and values(for example, InstallDir, MenuFile)
❑ If using events, create an Events subkey under your add-insubkey. Populate the events subkey with event names and“Interface” or “EventName.ebx” values.
❑ If using custom stereotypes, add your stereotype configurationfile name (.ini) to the StereotypeCfgFile subkey.
❑ Create any other subkeys and registry entries needed for yourimplementation.
Installing Add-Ins
It is possible for an add-in supplier to provide a programmatic andcomplete install of the add-in, for example, by using InstallShield. Thesame applies to reinstalls and updates. Installation changes will nottake affect while Rational Rose is running, but will take affect uponstart-up of Rational Rose.
Use the following steps to install an add-in on your Windows 95,Windows 98, or Windows NT system:
1. Exit Rational Rose.
2. Insert the application’s CD ROM or other media and run thesetup.exe program.
3. Respond to the installation program’s dialogs to complete yourinstallation.
4. Restart Rational Rose. Confirm that your add-in is installed andactivated (checked) via the Rational Rose Add-In Manager menu.
Uninstalling Add-Ins
We recommend that you provide a programmatic and completeuninstall of your add-in. Uninstall must remove not only the scripts,menu files, properties files, and help files, but must also clean theregistry entries for the add-in.
140 Rational Rose 2000e, Rose Extensibility User’s Guide

How to develop add-ins
For more information, see page 101.
Activating and deactivating add-ins
Once an add-in is installed, it can be in an activated or deactivatedstate. Immediately after installation, new add-ins start out asactivated.
When deactivated, an add-in is all but uninstalled:
� All menu items added by the add-in are removed.
� All property tabs added by the add-in disappear.
� All event bindings added by the add-in are disengaged.
Note: A user may want to deactivate an add-in for a short time to keepit from functioning without actually uninstalling it.
Add-ins are activated and deactivated in the Rational Rose userinterface with the Add-In Manager. Add-ins are activated anddeactivated programmatically with the REI AddInManager class.
Rational Rose 2000e, Rose Extensibility User’s Guide 141


Index
Symbols# 114$SCRIPT_PATH 18%all_units variable 13%current_diagram variable 13%false variable 13%model variable 13%selected_items variable 13%selected_units variable 13%true variable 13%ufile variable 13%uname variable 13.bmp 121.emf 121.mnu 109.pty 110, 112.reg 138.wmf 121
Aaccelerator key, assigning 78accessing collections
by count 55by name 56by unique id 56
activating, add-ins 141Active registry entry 135AddDefaultProperty method 45
Rational Rose 2000e, Rose Extensibility User’s Guid
Add-In Manager 5adding
comments to scripts 63controls 85menu entries 9property to a property set 42tools 53virtual path for scripts 17
add-insactivating 141active 135A-Keywords 128architecture 102basic 103COM servers 131company name 135contacting support 101contents 103context-sensitive help 105, 128copyright 135creating for UNIX 106creating portable 107data types 105, 120, 135deactivating 141developing 101, 108events 105, 129, 130, 131, 132, 133F1 128functionality 106help file name 135inactive 135
e 143

Index
add-ins, continuedinstallation directory 135installation utilities 137installing 137, 139, 140interface events 130interfaces 133language 103, 135main menus 104, 109manuals 129menu file name 135OLE server 135online help 105, 126, 127portable 107properties 105, 110, 136property files 111, 112, 135Rational Unified Solutions Partner
Program 101registering COM servers 133registry 134script events 130setting up 139shortcut menus 21, 104, 110specifications 104, 110stereotypes 105, 120, 121, 136support 101technical support 101tool list 136tools 136training 101types 103uninstalling 139, 140UNIX 106updating registry 137user manuals 129version 136why create 103
adjusting attributes 89, 90adjusting grid 76A-Keywords
add-ins 128properties 129
allfiles modifier 13
144 Ra
application object 40assigning accelerator keys 78Associating Files and URLs with Classes
40Attribute 112Attribute_Set 112attributes, adjusting 89, 90automation controller 4automation server 4Automation, Rose 4
Bbasename modifier 13basic add-ins 103BasicScript language 4Block Action 11Boolean 51Braces 21breakpoints
deleting manually 70setting and removing 69
Browse Code 28browser icons 120, 123, 124, 126
adding 105
CCalls dialog box 68capturing dialog boxes 78Category.AddClass method 53Category.RelocateClass method 53changing
titles and labels 77value of watch variable 73write protection for a controllable
unit 8Char 51Classes in Categories 53clipboard, pasting from 63CloneDefaultPropertySet method 47Cloning a property set 47
tional Rose 2000e, Rose Extensibility User’s Guide
Index
codefile modifier 14collections
accessing by count 55accessing by name 56accessing by unique id 56getting element from 55
COM servers 12, 129registering 131, 133
commentsadding to script 63property files 114
company name, add-ins 135Company registry entry 135compiling scripts 74configuration files, stereotypes 121ConfigurationName 123context menus
See shortcut menuscontext-sensitive help
add-ins 105, 128main menus 128properties 129
controllable units, working with 54ControllableUnit.Control method 54ControllableUnit.Load method 54ControllableUnit.Save 54ControllableUnit.SaveAs 54ControllableUnit.Uncontrol method 54ControllableUnit.Unload method 54controller, automation 4controls
adding 85duplicating 86incorporating in script 80pasting into editor 88repositioning 83selecting 81
copying text 62Copyright registry entry 135copyright, add-ins 135CreateDefaultPropertySet method 47CreateProperty method 44, 45
Rational Rose 2000e, Rose Extensibility User’s Guid
creatingadd-ins 103custom specifications 110new default property sets 41new property 44new property set 47new property types 41new scripts
from existing script 59from scratch 58
new tools 41portable add-ins 107tool 53UNIX add-ins 106user-defined property type 51
current property set, getting and setting49
Customized menus, capabilities of 8customizing properties 110customizing Rose menus, procedure 8cutting text 62
Ddata types
add-ins 105, 120, 135customizing 105, 120properties 115property files 115
deactivating, add-ins 141debugging a script 69, 70default properties 5DefaultModelProperties object 42DeleteDefaultProperty method 44DeleteDefaultPropertySet method 49deleting
breakpoints manually 70property 44property set 49text 62watch variables 73
developing add-ins 101, 108
e 145

Index
diagram editor icons 120, 125adding 105
diagram toolbar icons 120Diagram.GetSelectedItems method 55Diagram.GetViewFrom method 54Diagram.Items method 54Diagram.ItemViews method 54Diagrams 3dialog box
capturing 78editing 75incorporating in script 80inserting in script 75pasting into editor 87repositioning 83selecting 81testing 79
dialog editor, working with 75dialogs
adding pictures to 86, 87displaying information about 88
directoriesadd-ins 135installation 135
directory modifier 14displaying
dialog for user input 8grid 76information about dialogs 88
duplicating controls 86
Eediting dialogs 75elide modifier 14empty modifier 14Enumeration 51events
adding to your add-in 131add-ins 105, 129available 130COM 105
146 Ra
events, continueddefining interfaces for 133details 130interface 130, 132main menus 12OnActivate 30, 130OnAppInit 130OnBrowseBody 130OnBrowseHeader 130OnCancelModel 130OnCloseModel 130OnDeactivate 130OnDeletedModelElement 130OnEnableContextMenuItems 30,
130OnGenerateCode 130OnModifiedModelElement 130OnNewModel 130OnNewModelElement 130OnOpenModel 130OnPropertySpecOpen 28, 130OnSaveModel 130OnSelectedContextMenuItem 31,
130registering 129, 132registering COM servers 133script 130, 132
Exec Action 11executing
program or shell script 8registry files 138Rose script 8
Extending Rational Rose course 101extending Rose, ways to 1Extensibility Components 2
FF1, add-ins 128false modifier 14file modifier 14file names xix
tional Rose 2000e, Rose Extensibility User’s Guide

Index
Files, associating with Classes 40finding
first itemview 54procedure calls 68text 64
FindProperty method 45first modifier 14Float 51FundamentalTypes registry entry 120,
135
GGenerate Code 28GetCurrentPropertySetName method 49GetPropertyValue method 45getting
current property set 49element from collection 55model properties 45Rose Application object
Automation 40Scripting 39
grid, displaying and adjusting 76
Hheaderfile modifier 15help
context-sensitive 105online 105
help file name, add-ins 135HelpFileName registry entry 135home_unit modifier 15
Iicons
adding 105, 120stereotypes 120
InheritProperty method 44, 45inserting dialog in script 75
Rational Rose 2000e, Rose Extensibility User’s Guid
insertion point, moving 59, 60installation directories, add-ins 135installation utilities 137InstallDir registry entry 135installing, add-ins 139, 140Integer 51interface events 130, 132InterfaceEvent action 12interfaces 129
accessing 12defining for events 133
interscript callsdebugging 75guidelines for 74
IsLanguageConfiguration 123Items 54itemview
currently selected 55finding first 54
ItemView.IsSelected method 55ItemViews 54iterating
through item views 54through the items 54
Llabels, changing 77language add-ins 23, 103
registry entry 135LanguageAddIn registry entry 135language-dependent 22language-neutral 23ListImages 123ListIndex 124Load or save controllable units 8Logical View of REI Model 2
e 147

Index
Mmain menus
add-ins 109COM interfaces 12context-sensitive help 128customizing and extending 7, 104,
109events 12
managing default properties 41manuals, add-ins 129MediumPaletteImages 123MediumPaletteIndex 123Menu Action 11, 20Menu Argument 20Menu Entry 20menu files
Keywords 10Modifiers 13name 135registry entry 135syntax rules 15Variables 13
MenuFile registry entry 135menus
See also main menusSee also shortcut menus
Metafile 123model elements 3
property files 114stereotypes 123
modifying value of watch variable 73multiple modifier 15multiple sets 5
Nnon-language add-ins 24, 103not modifier 15
148 Ra
OOLEServer registry entry 131, 135OnActivate event 30, 130OnAppInit event 130OnBrowseBody event 130OnBrowseHeader event 130OnCancelModel event 130OnCloseModel event 130OnDeactivate event 130OnDeletedModelElement event 130OnEnableContextMenuItems event 30,
130OnGenerateCode event 130online help
adding 105, 127add-ins 126REI xviii
OnModifiedModelElement event 130OnNewModel event 130OnNewModelElement event 130OnOpenModel event 130OnPropertySpecOpen event 28, 110, 130OnSaveModel event 130OnSelectedContextMenuItem event 31,
130opening a script 58Option Entry 20Option Keyword 10organization of the manual xviiiOverrideProperty method 44, 45
Ppasting
controls into editor 88dialog box into editor 87text from clipboard 63
pausing an executing script 66petal version number, property files 114pictures, adding to dialog 86, 87portable add-ins 107
tional Rose 2000e, Rose Extensibility User’s Guide

Index
prefix, Rose 53prerequisites xviiprocedure calls, finding 68properties
adding to a property set 42add-ins 110A-Keywords 129context-sensitive help 129creating 44customizing 105, 110data types 115default 5defined 5deleting 44getting model 45in add-ins 105registry entry 136sets 110setting 45tool display name 136tool name 136tool registry entry 136tools 110tools list 136types 51
property files 5comments 114creating 119customizing 110data types 115design considerations 110format 111, 112model elements 114petal version number 114property name 115registry entry 135sample 117sets 114testing 119tools 114
property name, property files 115
Rational Rose 2000e, Rose Extensibility User’s Guid
property setscloning 47creating 47deleting 49multiple 5
Property Specification Editor 41PropertyFile registry entry 135
RRational Rose Add-In Manager 5Rational Rose Application 2Rational Rose Application Components 2Rational Rose Automation 3, 4
syntax for 6type libraries for 53
Rational Rose diagrams, working with 54Rational Rose Extensibility Interface 3Rational Rose Extensibility Interface
(REI) Model 1Rational Unified Solutions Partner Pro-
gram 101readme.txt xixregedit 138registering for events 105, 129registry
installing 138updating 134, 137
registry entries 129Active 135Company 135Copyright 135FundamentalTypes 135HelpFileName 135InstallDir 135LanguageAddIn 135MenuFile 135OLEServer 135PropertyFile 135StereotypeCfgFile 136ToolDisplayName 136ToolList 136
e 149

Index
registry entries, continuedToolName 136Version 136
registry filesexecuting 138format 138
registry settings, exporting 138regsvr32 133REI Model
description 1Logical View 2
release notes xixremoving breakpoints 70replacing text 65repositioning
controls 83dialog boxes 83items 82
resizing items 84retrieving
all selected items 55model properties 45
Rose menu file, sample 19Rose Menus, Customizing 7Rose prefix 53Rose Script 3Rose script editor 4Rose Scripting language 4Rose Scripts 129Roseload Action 11Rosesave Action 11Rosescript Action 11running a script 66
Ssample
property file 117Rose menu file 19scripts 4
Script Editor, application window 57script events 130, 132
150 Ra
Scripting language 4scripts
sample 4virtual path for 17
selectingcontrol 81dialog boxes 81text 61, 62variables 72
Separator Entry 19Separator Keyword 10server, automation 4SetCurrentPropertySetName method 50sets
properties 110property files 114
settingcurrent property set 49model properties 45
Using InheritProperty 46Using OverrideProperty 45
setting up, add-ins 139shortcut menu items
adding 31changing states 32displaying 26editing 31formatting and displaying 24retrieving 31
shortcut menusactivities 23add-ins 104, 110benefits 21customizing 21, 29, 104, 110decisions 23deployment units 23designing 28diagrams 23events 30, 31extending 7, 104external documents 23formatting 26
tional Rose 2000e, Rose Extensibility User’s Guide
Index
shortcut menus, continuedhow it works 24language-neutral model elements 23limitations 22menu items
adding 31changing states 32editing 31formatting and displaying 24retrieving 31
models 23packages 23properties 23sample scripts 32, 34scenarios 26states 23subsystems 23swimlanes 23synchronizations 23transitions 23use cases 23
SmallPaletteImages 123SmallPaletteIndex 123sourcefile modifier 15specifications
add-ins 104, 110custom, opening 28customizing 104, 110standard, opening 28
StepInto tool 67StepOver tool 67Stereotype 123StereotypeCfgFile registry entry 120, 136StereotypeCfgFiles 137stereotypes
add-in type 123add-ins 105bitmap files 123, 124browser icons 123, 124, 126configuration file format 121configuration name 123creating 121
Rational Rose 2000e, Rose Extensibility User’s Guid
stereotypes, continuedcustomizing 105, 120diagram editor icons 123, 125enhanced metafile 123icons 105model elements 123registering 137registry entry 136text string 123text-only 124toolbar button icons 123, 125windows metafile 123
stopping an executing script 66String 51Submenu Entry 20Summit BasicScript language 4syntax
in Rose Automation 6in Rose Script 6REI xvii
syntax rules, menu file 15
Ttesting dialog boxes 79text-only stereotypes 124titles, changing 77Tool, defined 5toolbar button icons 123, 125
adding 105stereotypes 123
ToolDisplayName registry entry 136ToolList registry entry 136ToolName registry entry 136tools
display name 136list 136name 136properties 110property files 114registry entry 136
tracing script execution 67
e 151

Index
tracking variables 71type libraries 5, 53Type, defined 5type, property 51
Uunary modifier 15uninstalling, add-ins 139, 140UNIX file names xixUNIX versus Windows, add-ins 106Updateaccess Action 12URL, associating with Classes 40user manuals, add-ins 129using type libraries 53utilities, installation 137
VVariables 13variables with modifiers, syntax 12variables, tracking 71Version registry entry 136virtual path for scripts 17
Wwatch list 72watch variables, adding 71working with controllable units 54working with Rose diagrams 54writeable modifier 15
152 Ra
tional Rose 2000e, Rose Extensibility User’s Guide