r/c model flight simulation 3 - horizon hobby · thank you for choosing phoenix r/c – the...
TRANSCRIPT

Phoenix R/C
Professional Model Flight Simulation
User Manual
Version 3.0

Contents
• Introduction
• Getting started
• Using Phoenix
• System o Setup new transmitter o Your transmitter o Your controls o Your keys o Program Setup o Check for Updates o Quit
• Models o Changing models o Editing models o Setup failures o Reset o Launch settings o Position settings o Recently used models
• Flying sites o Changing flying sites o Weather o Layouts o Buddies o Recently used flying sites
• Cameras and views o The camera menu o Views and Heads Up Displays o Toolbars
• Flight Recorder
• Training
• Competition
• Multiplayer
• Help

Introduction
Thank you for choosing Phoenix R/C – the professional model flight simulator for all levels of R/C pilots, beginner to competition standard, and for all types of R/C aircraft, whether you fly electric indoor shock‐fliers, .90‐sized IC 3‐D capable helicopters or scale warbirds.
Phoenix has been developed, tested and approved by a huge selection of competition pilots, industry veterans and ex‐champions to provide an accurate and realistic simulation of R/C flight combined with state of the art graphics and a huge range of innovative features.
Included in the software is a wide range of training and tuition aids which will help you improve your skills as a pilot, no matter your current level of proficiency, and the ability to fly (and crash) your model in a safe virtual environment will save you a great deal of time and money.
Phoenix comes with a very large selection of models out‐of‐the‐box, and more are made available on a regular basis, which you can download free‐of‐charge and add to your aircraft list. Almost all types of R/C model are represented, and each one has been set up by established experts to fly accurately out‐of‐the‐box with no tweaking or fine‐tuning required.
If you do wish to delve into the more advanced aspects of Phoenix, every model is fully customisable with a huge range of attributes and parameters that can be altered to represent almost any model setup possible.
Phoenix also includes a fully‐featured online service which lets you connect and fly with pilots from all over the World. Full voice‐chat capability is built into the system to make learning from other pilots as easy as possible.
This manual will guide you through all of the features included in Phoenix, and we wish you many happy and productive hours of virtual R/C flight.
‐ The Phoenix R/C Team

Getting Started
To use Phoenix successfully, you will require:
• A compatible transmitter (see below)
• A genuine Phoenix USB interface (supplied with your Phoenix simulator)
• A genuine Phoenix installation DVD (supplied with your Phoenix simulator)
• Any additional adaptors that may be required to connect your radio (see below)
• A computer of at least the minimum specification or above (see below)
Minimum requirements
Phoenix requires that you have a computer of at least the following specification or above to run successfully:
• IBM‐compatible PC computer with 1.0 Ghz Pentium 3/4 or AMD Athlon/64 compatible processor
• Microsoft Windows XP, Windows Vista or Windows 7 operating system • 256MB system memory (RAM) • 1.5 GB free, uncompressed hard‐disk space* • ATI Radeon 9800/NVidia Geforce Ti4200 with at least 128MB memory • Microsoft DirectX 9.0c or higher • DVD‐ROM Drive for installation • 1 free USB 1.1/2.0 port • 100% DirectX 9 compatible sound card (optional)
Or alternatively:
• An Intel‐based Apple Macintosh computer running Microsoft Windows XP, Vista or 7 under one of the following systems:
• Bootcamp (recommended) • VMWare Fusion (latest version) • Parallels (latest version)
Supported transmitters
The following list of radios and transmitter makes and models have been tested and are supported by Phoenix. Some radios may require an extra adaptor to connect the Phoenix USB interface to the training port – these are listed when applicable.
• All JR MC/MX (no adaptor required) ‐ ** MC‐series requires "DSC Interface" Accessory ** • Spektrum DX6 / DX6i / DX7 / DSX9 (no adaptor required) ‐ ** NOT new DX7 Special Edition "SE" version
** • Spektrum DX5e older‐style with SIDE training port ("DX5e adaptor" required) • Spektrum DX5e new‐style with REAR training port (no adaptor required) • All Futaba ("Futaba/Hitec round" or "Futaba square" adaptor required) • Futaba FX‐18 with 2.5mm stereo training port ("Futaba FX‐18" adaptor required) • Hitec Aurora (no adaptor required) • All Hitec except "Aurora" ("Futaba/Hitec adaptor" required ‐ "Aurora" requires no adaptor) • All Multiplex ("Multiplex" adaptor required) • All Sanwa RD and RDS series ("Sanwa adaptor" required) • E‐sky ETB41 2.4 ghz (no adaptor required)

• Other E‐sky ("Mini‐DIN adaptor" required) • Co‐Pilot ("Mini‐DIN adaptor" required) • Blade CX, CX‐2, CX‐3, CP, CP+, CP Pro, CP Pro 2 and Blade SR (no adaptor required) • Parkzone Transmitters with training jack ("DX5e adaptor" required) • Art‐tech 100B (no adaptor required) • Art‐tech 100C ("Art‐tech 100C adaptor" required) • Walkera 2401, 2601 (Using "MINI‐DIN adaptor" supplied with transmitter) • Walkera 2402, 2602 ("Walkera 2801 adaptor" required) • Walkera 2801 ("Walkera 2801 adaptor" required)
Please note that the following transmitters are not supported:
• USB controller devices and joysticks • Spektrum DX7 "SE" version (This radio has no training output for R/C simulators) • Hobbyzone transmitters and any transmitter included with ParkZone or E‐Flite Ultra Micro products • All Walkera except 2401, 2601, 2402, 2602 and 2801 (see above) • Any other transmitter without a compatible training port
Installing Phoenix
Installing Phoenix onto your computer is very simple.
• Insert the DVD into your computer’s DVD‐ROM drive, and wait for the “Autoplay” menu to appear. • Once this menu appears, select that you wish to “Run Setup.exe” (the exact wording may vary by operating
system version).
If the “Autoplay” menu does not appear, or you have this feature disabled, please do the following:
• Open a Windows Explorer window. • Locate your DVD‐ROM drive with the Phoenix DVD loaded (It will have the title “PhoenixRC v...”). • Open the “SetupFiles” folder. • Locate the “Setup.exe” application and double‐click this to start the installation process.
The installation wizard will start, and you will be able to follow the onscreen instructions to install Phoenix to your computer.
Please note: During installation you will be asked whether you wish to “Install Microsoft DirectX”. Even if you think that you have the most recent version of this already installed, we strongly recommend installing the version on the installation DVD regardless.
Starting Phoenix
Once the program has been successfully installed, a “PhoenixRC” icon will be created on your Windows Desktop. You can start the program by double‐clicking on this icon. The Phoenix window will then appear and the simulator will load.
The simulator on first load will start with the “Initial Setup Wizard” which will guide you through some basic setup options, calibrating your radio and selecting a control profile. You can now connect your radio and USB interface for the first time to your computer.
Connecting your radio and USB interface
Before you can begin to enjoy Phoenix, you will need to connect your radio and USB interface to your computer. You will then be prompted to calibrate the radio so that Phoenix knows the full motion of every stick and switch, and select a control profile so that Phoenix knows which sticks/switches control which functions on the virtual model.

To begin, connect your genuine Phoenix USB interface to a spare USB port on your computer.
Once you have done so, you should connect any additional adaptors (if required) to the 3.5mm “jack plug” end of the USB interface.
At this stage, please make sure that your radio’s batteries have been installed correctly, and that the radio is fully charged. Please make sure that the charger is not still connected to your radio before connecting the Phoenix USB interface.
Now you should connect the USB interface/adaptor firmly into the training port of your radio, with the radio switched off.
Many modern radios have a special “Simulator/Trainer Mode” which is triggered by connecting the Phoenix USB interface to the radio’s training port with the radio switched off. This allows the radio to function without wasting battery life transmitting any R/C signals, and vastly increases the time required between charges. If your radio has this feature, it will “power on” automatically when you connect the USB interface.
If your radio does not automatically switch itself on when you connect the USB interface, you should now switch the radio’s power switch on.
Radio Setup
Before using your radio with Phoenix, please make sure that:
• If the radio is not a 2.4 ghz type that it is set to PPM modulation mode, and not PCM modulation mode • If the radio is set to HELI mode, that the Swashplate/CCPM mixing setting is set to 90‐degrees/single‐servo.
Calibrating your radio
During the Initial Setup Wizard, you will be prompted to calibrate your radio. This lets Phoenix know the full range of travel of all of the sticks on your radio, as well as any switches or sliders that may be present.
When calibrating, please make sure that:
• When prompted to centre all sticks that you have your throttle stick in the centre of its travel – not in the idle position
• That you do not have any built‐in functions such as rates, throttle‐hold or idle‐up switches activated at any time
Once the calibration phase is complete, each stick should move a bar on the display (your throttle stick may move two bars if your radio is setup for HELI mode), smoothly and from one extent to the other.
You can get back to this wizard at any time using the system > your transmitter > calibrate menu.
Control Profile Setup
After calibration you will be prompted to select a control profile for your radio. A control profile tells Phoenix which controls on your radio (i.e. sticks and switches) will affect which functions on the model (i.e. elevator, gear, etc).
Phoenix comes with a range of preset profiles, and you should choose the one which is most similar to the radio make and model you are using. The control profiles are sorted into categories – double‐click a category to expand it and see the profiles inside.
If your radio is not featured in the list of preset profiles then select the “My transmitter is not listed here” option. You will then be taken to a new wizard where you can very easily create a new, custom control profile for your radio make and model.

You can get back to this wizard at any time using the system > your controls menu.
Setup complete
Once you have completed the Initial Setup Wizard, you will be taken to the main Phoenix screen, with the default model on the field ready for take‐off.
From here, you can choose a different model using the model > change menu, or change to a different flying site using the flying site > change menu.
To change settings, open the system > program setup menu, and to exit the program, use the system > quit menu.
Many menus, dialogs and toolbars have a green “help” button with a magnifying glass icon. Clicking this will open this user manual at the appropriate page for more detailed information and help.
Please continue reading for a much more detailed look at Phoenix, including an explanation of all menus, functions and settings, or start enjoying the program.

Using Phoenix
The main window
This is your view for most of the time when using Phoenix. This view shows your currently selected flying site, with all present models either on the field or flying above it.
When you move your mouse, the main menu bar will appear, as well as any toolbars that are enabled and visible along the sides and bottom of the window area. When you leave your mouse stationary for a few seconds, the main menu bar and any visible retracted toolbars will fade and disappear to leave the window uncluttered.
The main menu
The main menu appears if you move your mouse, and disappears when the mouse is stationary for a few seconds.
This contains all of the menus required to setup and change the simulation, access modes and features, or to exit the program. A brief outline of the menus is as follows:
System – contains all program related setup menus, and allows you to quit the program
Model – contains all menus and options related to the selected model
Flying site – contains all menus and options related to the environment and weather
View – all display and camera‐related options and menus are contained here
Flight recorder – accesses and controls the flight recorder
Training – contains all training modes and features
Competition – contains all competition modes and features
Multiplayer – all multiplayer‐related options and menus are contained in this menu
Help – accesses this manual and program version information
All of these menus, features and options are described in greater detailed later in the manual.
To open a sub‐menu, click the left‐button on your mouse when pointing at the required option in the menu bar. To close an open sub‐menu, either click on another sub‐menu, or left‐button‐click on the main window space.
Controlling your model
Phoenix lets you take control of the simulated model using your transmitter connected via your genuine Phoenix USB interface to your computer (See Getting Started above for more details on this). The two main parts of this are your transmitter calibration, which tells Phoenix the extents of your radio’s sticks, switches and sliders, and the control profile which tells Phoenix which controls (sticks, switches, etc) on your radio affect which functions (elevator, aileron, etc) on the simulated model.
For more information on calibrating your radio or setting a control profile, please see the Getting Started section above, or the more detailed explanations later on in the manual under the system > your transmitter and system > your controls menu topics.

Toolbars
Toolbars allow quick access to often‐used features, and can be hidden conveniently when not being used. If you close a toolbar, you can open it again using the view > toolbars menu.
Any visible toolbars are located along the sides and bottom of the main view. All toolbars are either retracted or expanded, and only one toolbar can be expanded at a time on the left, bottom or right of the main window.
When a toolbar is retracted, it will disappear when the mouse has been left for a few seconds. If the toolbar is expanded it will stay visible even when the mouse and main menu have disappeared. Toolbars have both a retract/expand button and a close button located beside the toolbar name/icon. Clicking the expand/retract button will toggle the expanded state of that toolbar. Clicking the close button will close the toolbar completely.

System
The System menu contains all system and program‐related menus and options, access to the automatic update system, and lets you quit the program.
The first four entries let you setup and configure your radio and keyboard to control Phoenix:
Setup new transmitter
Selecting this option opens the Setup new transmitter Wizard, which guides you through the calibration and control‐profile setup of your radio/controller ready to be used with Phoenix.
If you have changed your radio, choose this option to be guided through the complete radio setup process in a step‐by‐step manner.
Your transmitter
This menu opens the Your transmitter menu, which contains all functions and options for calibrating your radio/controller ready for use with Phoenix.
Before your radio can be used with Phoenix, it must be calibrated. This lets Phoenix know the ranges of motion for every stick, switch and slider on your radio. Every time that you change to a different radio, you must go through the calibration process using this menu.
To begin the calibration process, connect your radio to your computer (see the Getting Started section for more information on this), and click the Calibrate button at the top of the menu.
The Calibrate transmitter wizard will appear. Follow the step‐by‐step instructions to calibrate your radio ready for use with Phoenix.
When calibrating, please make sure that:
• When prompted to centre all sticks that you have your throttle stick in the centre of its travel – not in the idle position
• That you do not have any built‐in functions such as rates, throttle‐hold or idle‐up switches activated at any time
Once the calibration phase is complete, each stick should move a bar on the display (your throttle stick may move two bars if your radio is setup for HELI mode), smoothly and from one extent to the other. If the calibration has been successful, click the Finished button to return to the main view.
Your controls
This menu opens the Your controls menu, which contains all functions and options for setting, creating and editing control profiles.
A “control profile” lets Phoenix know which controls on your radio (sticks, switches and sliders) control which functions on the simulated model (i.e. “elevator” or “retract gear”).

Phoenix comes with a large selection of preset control profiles for a range of different transmitter makes and models. These are shown in the main “Saved control profiles” list to the left side of the menu. All control profiles are organised by radio manufacturer – double‐click a category to expand it and see the profiles contained within.
You should select the control profile which is most similar to the one you are using with Phoenix from the list. If your radio make and model is not featured in the list, you can create a new one by using the New Profile button on the right of the Saved Profiles list.
When you create a new control profile, or edit a system profile, your new profiles are stored in the “Custom” category at the top of the list.
Creating a new control profile
Clicking the New Profile button on the right of the Saved Profiles list opens the New control profile Wizard, which guides you through creating a new control profile for the radio you are using.
The first screen of this wizard lets you type a name for your control profile, which should match the radio you are using – for instance, “My Futaba 10C” or “My Spektrum DX7”.
Below this, you can choose between Quick setup or Advanced setup:
Quick Setup takes you through creating a new control profile in a step‐by‐step manner with full onscreen instructions. This is the recommended method for most users.
Advanced Setup gives you more control over how the control profile is created, and also gives access to more advanced controls and features. For more information on Advanced Setup, see the Edit Profile section below.
Editing a control profile
Clicking the Edit Profile button on the right of the Saved Profiles list opens the Edit control profile menu, which lets you edit a previously created (or preset) control profile, changing the controls on your radio (or keyboard) that control the simulated model’s functions.
When you edit a preset system control profile, a copy is automatically made for you, and “Copy” is appended to the control profile name. The altered profile will appear inside the “Custom” category.
Name of profile
This edit‐box lets you set a name for your new control profile. You should typically set this to the same as the make and model of radio you are using – for instance, “My Futaba 10C” or “My Spektrum DX7”.
Simple/Detailed controls
To the top‐right of the menu is the Simple/Detailed controls selector. This lets you choose between a smaller list of controls which let you change the most common functions easily, or a more advanced full list of controls.
Controls list
The controls list takes up most of the Edit Control Profile window, and contains all of the available model functions and which radio or keyboard control(s) they are assigned to.
This list is divided into seven categories:
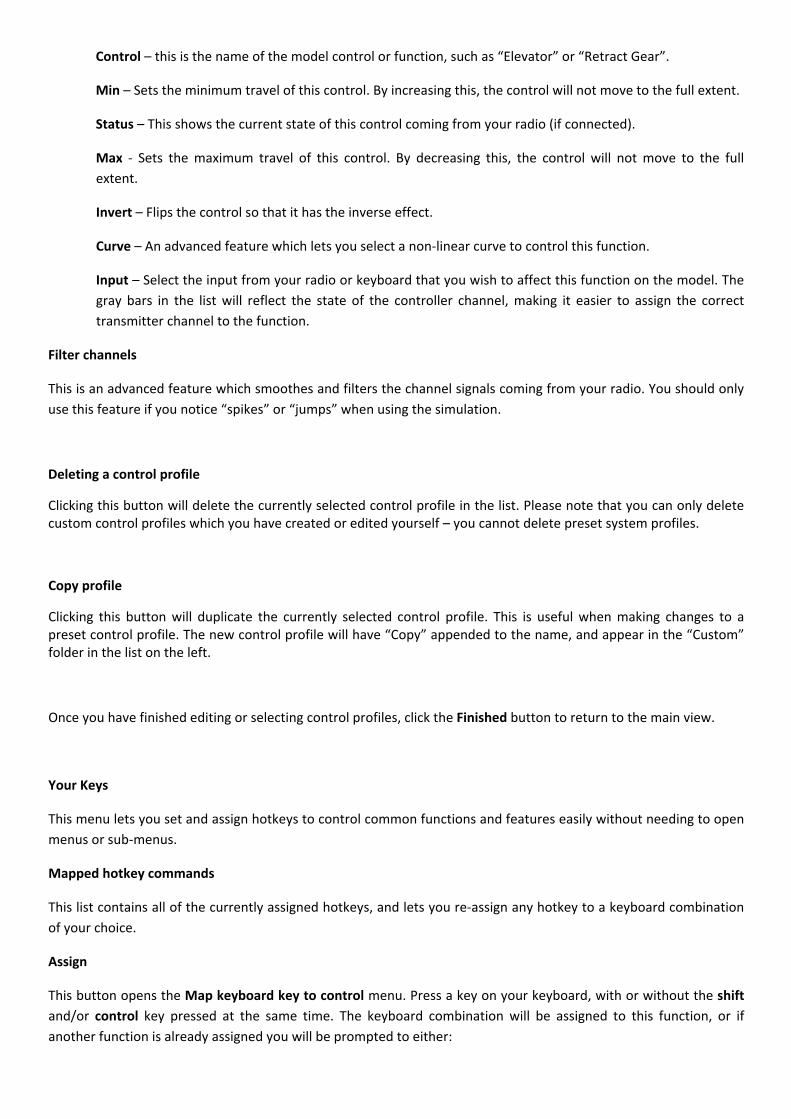
Control – this is the name of the model control or function, such as “Elevator” or “Retract Gear”.
Min – Sets the minimum travel of this control. By increasing this, the control will not move to the full extent.
Status – This shows the current state of this control coming from your radio (if connected).
Max ‐ Sets the maximum travel of this control. By decreasing this, the control will not move to the full extent.
Invert – Flips the control so that it has the inverse effect.
Curve – An advanced feature which lets you select a non‐linear curve to control this function.
Input – Select the input from your radio or keyboard that you wish to affect this function on the model. The gray bars in the list will reflect the state of the controller channel, making it easier to assign the correct transmitter channel to the function.
Filter channels
This is an advanced feature which smoothes and filters the channel signals coming from your radio. You should only use this feature if you notice “spikes” or “jumps” when using the simulation.
Deleting a control profile
Clicking this button will delete the currently selected control profile in the list. Please note that you can only delete custom control profiles which you have created or edited yourself – you cannot delete preset system profiles.
Copy profile
Clicking this button will duplicate the currently selected control profile. This is useful when making changes to a preset control profile. The new control profile will have “Copy” appended to the name, and appear in the “Custom” folder in the list on the left.
Once you have finished editing or selecting control profiles, click the Finished button to return to the main view.
Your Keys
This menu lets you set and assign hotkeys to control common functions and features easily without needing to open menus or sub‐menus.
Mapped hotkey commands
This list contains all of the currently assigned hotkeys, and lets you re‐assign any hotkey to a keyboard combination of your choice.
Assign
This button opens the Map keyboard key to control menu. Press a key on your keyboard, with or without the shift and/or control key pressed at the same time. The keyboard combination will be assigned to this function, or if another function is already assigned you will be prompted to either:

• Ignore – ignore the conflict, assigning both functions to this keyboard shortcut (not recommended)
• Clear conflict – clear the other keyboard shortcut.
• Try again – assign a different keyboard shortcut to the function.
Clear
Clicking this button clears this hotkey assignment, leaving no hotkey controlling this function.
Default
Re‐assigns the default, system hotkey to this function as it was when the program was first run.
Reset all
Resets all entries in the list to the default, system hotkeys to all functions as they were when the program was first run.
When you have finished changing hotkey assignments, click the finished button to return to the main view.
Program setup
This menu contains all of the program setup options and settings used for configuring the way that the software looks and performs. The Program Setup menu is divided into several categories to make changed easier.
At the bottom of the menu are three buttons: Cancel, Accept and Apply. Clicking Cancel will take you back to the main view without applying any of the settings that you may have changed while in this menu. Clicking Apply will apply the settings without closing the Program Setup menu. Clicking Accept will apply the settings you may have changed and close the menu, taking you back to the main view.
General
This section contains all personalisation and user‐interface settings.
Personal settings
This section contains all personalisation settings, and lets you set information that others can see when flying online.
Avatar
This lets you change your avatar – an image which represents you on the field and during an online multiplayer session. Clicking the avatar will open the Choose avatar menu, letting you select from a list of preset supplied avatar images.
Username
Choose your username which will represent you on the field and during an online multiplayer session.
Detailed personal information
The other information settings let you supply more detailed optional personal information which can be seen online by others.

User interface theme
Select the user‐interface theme that you wish to use in Phoenix from a selection. This will change the way that all of the user‐interface elements appear while using the program.
Display hotkeys
This option controls whether model‐specific hotkeys are shown when you select a new model for the first time.
Reset help messages
Clicking this button will reset all help/warning messages that appear when you select certain program options. Many of these options, such as the Quit Program confirmation message have an option to “Not show this message again”. If you have previously hidden a message using this feature, click this button to reset them so that they are shown in future.
Physics
The Physics section controls simulation settings.
Camera Speed
This slider controls how quickly the camera will follow your model. A higher (faster) setting means that the camera will stay more rigidly pointing at the exact position of the model, while a lower (slower) setting will let the model move to the edges of the screen when it is travelling faster. A realistic setting is around the default of 50% value.
Simulation Speed
This slider controls the total speed of the simulation. The default (100%) value is the normal speed of the simulation, where all models are moving at realistic velocities.
Reducing this slider below 100% will cause the simulation to appear in slow‐motion, making it easier to control the simulated models.
Increasing the slider above 100% will cause the simulation to take on a “fast forward” effect, making it harder to control the simulated models.
We would not usually recommend changing this to other values than 100% except when attempting to perfect a very tricky manoeuvre, where you would set the slider to a low setting and gradually increase back to 100% as you gain proficiency.
This slider is linked to the Simulation Speed Widget which is accessed through the View > Displays menu.
Crash/Breakage handling
This drop‐down box lets you set how Phoenix will act when your model has sustained a crash or damage, i.e. from impacting the ground, an obstacle or another model.
• Immediately – When any impact or damage occurs, immediately reset the model
• After 1 second – When any impact or damage occurs, reset the model after waiting 1 second
• After 3 seconds (Default) – When any impact or damage occurs, reset the model after waiting 3 seconds
• After 10 seconds – When any impact or damage occurs, reset the model after waiting 10 seconds

• No auto‐restart – When any impact or damage occurs, do not reset the model. When this setting is selected, you will need to use the Reset Model Hotkey (default = “B”) to reset the model, or assign a channel on your radio to the Reset Model Control and activate this.
• At idle throttle – When any impact or damage occurs, do not reset the model until the user has put their throttle back to the idle position (minimum stick). This is useful to learn to do when flying a real‐life model to avoid accidents caused by starting the model with throttle.
Start engine/rotors at throttle speed
This option tells Phoenix to start the rotors of a helicopter, or the propeller on a fixed‐wing model instantly spinning at the correct speed for your throttle stick position after a model reset, saving time waiting for them to spool up.
Display
This section contains all of the settings and options related to the graphical presentation of the software. Here you can adjust options to improve graphical quality at the expense of performance.
Graphics Quality
This slider is an overall control for changing many other parameters at the same time easily and quickly. Unless you are an advanced user, we usually recommend changing this slider instead of the more advanced individual options below.
Setting this slider to the “Low” (left‐hand) setting will set all graphical quality options to their lowest setting. This will mean that there is less demand placed on the graphics‐card and CPU, therefore improving the smoothness of the simulation on lower‐specification graphics hardware.
As you increase the slider up to the “Highest” setting, the graphical quality will increase gradually, but more demand will be placed on the graphics‐card and CPU.
Higher graphical quality settings should only be used when more modern/expensive graphics hardware is installed in your computer, or you may find the simulation becomes less smooth. We would usually recommend starting at the “Medium” setting, testing the simulation for smoothness, and then increasing or decreasing the graphics quality by one step until you are happy with both the quality and smoothness.
Fullscreen mode
These settings control the fullscreen mode of Phoenix.
Phoenix can be run in the default normal Windowed mode where the Windows Title Bar and Start Menu can be seen. This mode is useful if you switch windows on a regular basis while Phoenix is still running (i.e. to check emails or run a music player in the background).
However, you can also choose to run Phoenix in Fullscreen mode, where the simulator will take up the entire screen. This improves the general immersiveness of the simulation, and also provides performance benefits, allowing you to run the program with higher graphics quality settings than you would be able to in Windowed mode, while still maintaining program smoothness.
If you do not regularly switch to other Windows while using Phoenix, we would recommend running in Fullscreen mode. The Hotkey for changing between Windowed and Fullscreen mode is ALT+ENTER.
The first drop‐down box under this section is the Fullscreen Resolution. This lets you select the graphical “clarity” of the display mode used when in Fullscreen mode. A higher setting means that more pixels will be used, giving the model a sharper look. This is generally set to the highest available setting, or alternatively to the same setting as you have your Windows Desktop set to.
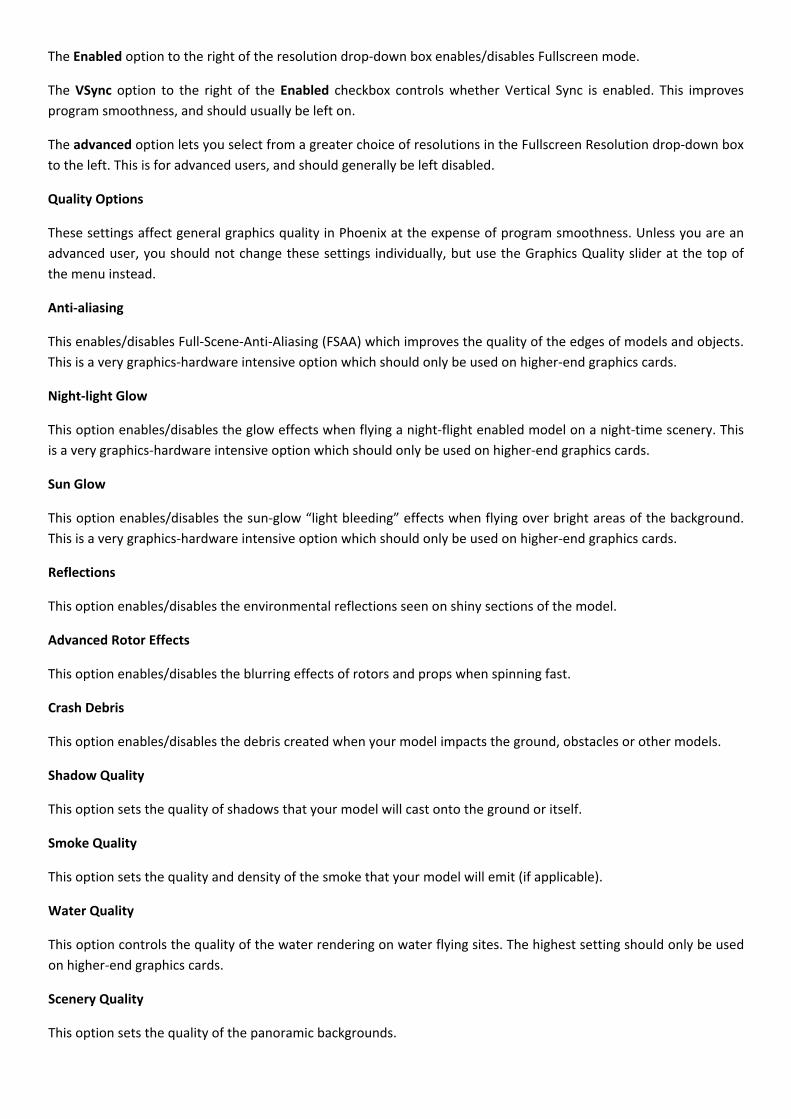
The Enabled option to the right of the resolution drop‐down box enables/disables Fullscreen mode.
The VSync option to the right of the Enabled checkbox controls whether Vertical Sync is enabled. This improves program smoothness, and should usually be left on.
The advanced option lets you select from a greater choice of resolutions in the Fullscreen Resolution drop‐down box to the left. This is for advanced users, and should generally be left disabled.
Quality Options
These settings affect general graphics quality in Phoenix at the expense of program smoothness. Unless you are an advanced user, you should not change these settings individually, but use the Graphics Quality slider at the top of the menu instead.
Anti‐aliasing
This enables/disables Full‐Scene‐Anti‐Aliasing (FSAA) which improves the quality of the edges of models and objects. This is a very graphics‐hardware intensive option which should only be used on higher‐end graphics cards.
Night‐light Glow
This option enables/disables the glow effects when flying a night‐flight enabled model on a night‐time scenery. This is a very graphics‐hardware intensive option which should only be used on higher‐end graphics cards.
Sun Glow
This option enables/disables the sun‐glow “light bleeding” effects when flying over bright areas of the background. This is a very graphics‐hardware intensive option which should only be used on higher‐end graphics cards.
Reflections
This option enables/disables the environmental reflections seen on shiny sections of the model.
Advanced Rotor Effects
This option enables/disables the blurring effects of rotors and props when spinning fast.
Crash Debris
This option enables/disables the debris created when your model impacts the ground, obstacles or other models.
Shadow Quality
This option sets the quality of shadows that your model will cast onto the ground or itself.
Smoke Quality
This option sets the quality and density of the smoke that your model will emit (if applicable).
Water Quality
This option controls the quality of the water rendering on water flying sites. The highest setting should only be used on higher‐end graphics cards.
Scenery Quality
This option sets the quality of the panoramic backgrounds.

Rotor Disk Visibility
This slider lets you tune how visible the rotor “disk” is when your helicopter’s rotors are spinning very fast.
Audio
The audio menu contains settings for controlling all sound‐related functions.
Sound volume
This slider controls how loud all sound effects will play in the simulator.
Sound library
This drop‐down box lets you select an alternative sound library in the case of the default “XAudio” library being incompatible with your sound card. This setting should only be changed if you have attempted to solve any sound‐related errors or problems by updating your sound‐card drivers and DirectX version.
Wind Sound
Enable this option to allow the wind sound effects in high‐wind flying sites or weather setups.
Play ambient effects
Enable this option to allow ambient background sound effects such as waves, trees and bird noises.
Enable reverb
Enable this option to allow reverb/echo effects in interior halls and spaces.
Mute sound during voice chat
This slider sets how much the simulation sound effects will be muted to when a voice‐chat message is received when flying online. When set to 100%, no muting will occur. When set to 0%, all sound will be fully muted. The default value of 33% is recommended.
Units
This menu contains options for setting up the units of measurements used throughout Phoenix.
Scheme
This drop‐down box lets you easily change between Imperial and Metric systems of measurements. It is recommended that you use either one system or the other, and do not mix units in order to avoid mistakes caused by mixed measurements units.
Custom units
Use the drop‐down boxes in this section to set the required units of measurement for each type of measure.
Language

This menu lets you change the language used throughout Phoenix. To change language, click on the required language from the list, and then click Accept.
Please note that you will need to restart Phoenix in order for your language changes to take effect.
Check for Updates
This menu opens the auto‐update system, which is used to update the program to the latest version, and also to install new models, flying sites and colour schemes when they become available.
Whenever you start Phoenix with your computer connected to the internet, Phoenix will automatically check the update server to see if there are any new updates available for you to download. If a new program version or update is found a message will appear, and you will be given the option to install it. If you wish to install a previously found update, or you have the automatic update check disabled, then use this menu to view all updates found on the server.
Please note that you must be connected to the internet, with Phoenix allowed access through any firewalls or virus‐checking software that you have active, and have your Phoenix USB interface connected to your computer to use the update system.
Selecting and installing updates
When updates are found, they will appear in the updates list, sorted by category. You can also see various other pieces of information about each update, such as the manufacturer and description of new models.
When you have located an update in the list that you wish to download and install, highlight it with your mouse and left‐click the item. Repeat this until all items you wish to install have been highlighted and selected in the list.
Once you have selected every item you wish to install, click the Install button in the bottom‐right of the menu. You can also use the Select All and Clear All buttons to quickly select all available items or clear your selection.
Always check for updates when I run Phoenix
Toggle this option if you wish Phoenix to automatically query the update server for new updates every time you start the program. If you disable this option, you will need to regularly open the system > check for updates menu to make sure that you are fully up‐to‐date.
Show Installed Updates
This option lets you reinstall a previously installed update, showing previously installed updates in the updates list.
Quit
Clicking this menu option will exit Phoenix, saving all settings and taking you back to your Windows desktop.

Models
Phoenix comes complete with a huge selection of models included out‐of‐the‐box, with more available for free download on a regular basis. Almost all types of R/C flying model are featured, from indoor electric Shock‐fliers, to 3D capable high‐performance helicopters and airplanes and scale warbirds – and everything in between.
When you select a model, it appears on the selected flying site ready for take‐off. You can only select and fly one model at a time. All models are beautifully rendered in high‐detail, and have been set up by established experts to fly realistically without the need for tuning or tweaking. In addition, many models come with several preset variations to reflect common setups, and some also have alternate colour schemes to further your enjoyment.
All options and settings relating to models in Phoenix can be found under the Model menu on the main menu bar.
The Model menu
This menu contains all model‐specific menus and options, including the ability to change or edit the currently selected model, setup user‐defined failures that may occur, and setup model launch and position options.
Change
Clicking this menu option will open the Change model menu, where you can select the model you wish to fly and create and organise favourites for easy model selection.
This menu is divided into two main sections: The available model list on the left, and information about the currently selected model on the right.
The model list
This list displays all models that you currently have installed. Models in the list are sorted into their main model categories (Fixed‐wing, Helicopters, Gliders and Others) as well as additional sorting categories which you can select using the sort by drop‐down box at the top of the list:
• Default ‐ This is the default sorting method. Models are sorted into a simple and easy to understand system.
• Class ‐ This option sorts the models by a more detailed and in‐depth class system.
• Power ‐ This option sorts models by the power system that they use.
• Manufacturer ‐ This option sorts models by their manufacturer.
• Difficulty ‐ This option sorts models by how difficult they are to fly.
When you select a different sorting method from the options above, the list will change to reflect your choice.
Locate the model you wish to fly by scrolling through the list. Categories in the list will have a small arrow to the left of the entry, and are expanded/contracted by either double‐clicking the item’s name, or single‐clicking the small arrow.
When you find a model you wish to fly, left‐click on the item in the list to select it. It will be highlighted in the available model list, and it will appear in the right‐hand window pane along with information about it.
Colour schemes

Below the model selection list you will find another drop‐down box. Many models in Phoenix feature more than one colour‐scheme, and when this is the case you will be able to select them in this box.
Variants
When you edit a model, Phoenix creates a “Variant” of it which is saved so you can select it later. Variants are stored in your My Documents/PhoenixRC/Variants folder, and can be shared with other Phoenix users. Many models also feature preset or “system” variants which reflect common model setups.
If a model has a preset variant present, or has been edited by the user, you will see a small “expand/contract” arrow to the left of its name in the available model list. Clicking the arrow will expand the list entry and show the available variants which can be selected as you would the default model setup.
Below the model selection list you will see a button with a Waste‐paper‐bin icon. Clicking this will delete a model variant if one is selected in the model selection list. Please note that you cannot delete preset or system variants.
Favourites
The three buttons in the lower‐middle of the Change Model menu let you create and organise favourites. Favourites are models that you commonly use, and let you quickly and easily change between your most‐used models without using the Change Model menu or sorting through the model selection list.
Add favourite
To create a new favourite, select a model/variant in the model selection list, and click the left‐most of the three buttons. The new favourite will appear at the top of the model selection list under the Favourites category. If you have the Favourites Toolbar open, you will also be able to click on a previously created favourite and select it.
Delete favourite
When a favourite is selected in the list, click the centre of the three buttons to delete it and remove it from the Favourites category.
Organise favourites
Clicking this button opens the Organise Favourites menu. From here you can delete and move your favourites up and down the list, and rename them.
The model preview pane
To the right of the Change Model menu is the model preview pane, where you can see a three‐dimensional animated preview of the currently selected model.
By default the preview will rotate, but you can alter the angle of the preview model by left or right dragging your mouse in the preview window pane.
Below the preview pane is also displayed the model name as well as some basic information and specifications.
Once you are happy with your model selection, click the finished button to set the new model and return to the main view. Alternatively, click Cancel to return without changing any settings.
Edit
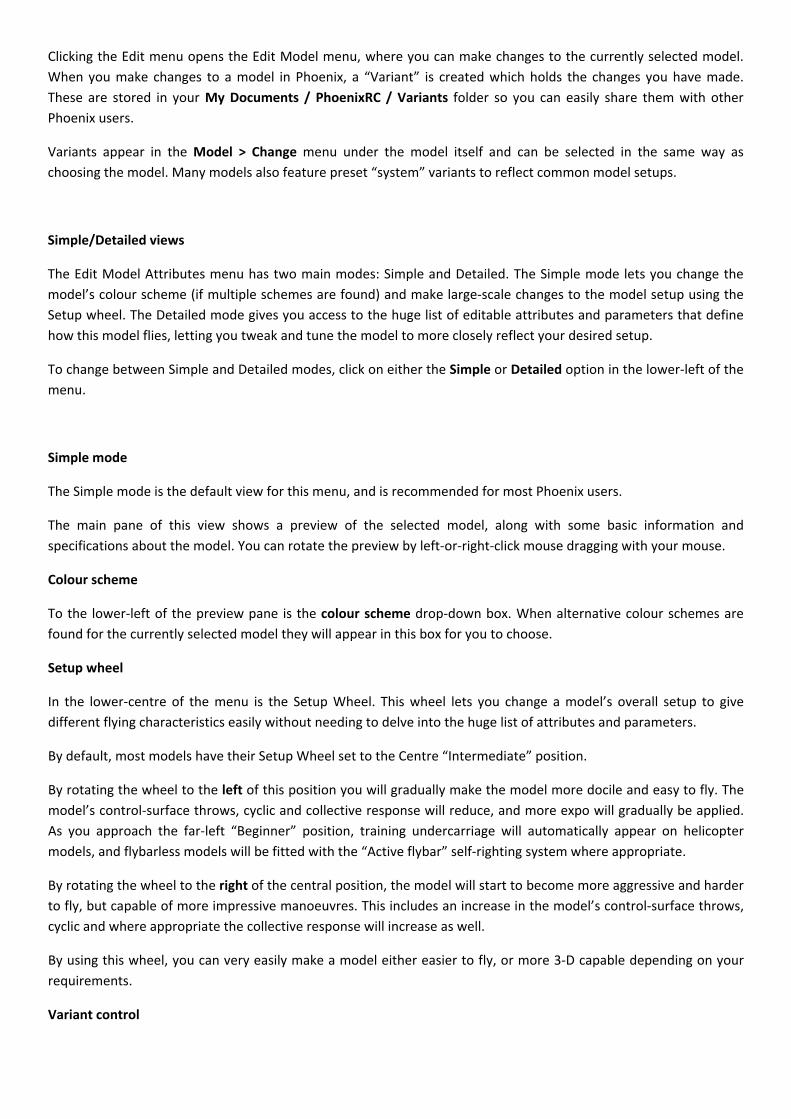
Clicking the Edit menu opens the Edit Model menu, where you can make changes to the currently selected model. When you make changes to a model in Phoenix, a “Variant” is created which holds the changes you have made. These are stored in your My Documents / PhoenixRC / Variants folder so you can easily share them with other Phoenix users.
Variants appear in the Model > Change menu under the model itself and can be selected in the same way as choosing the model. Many models also feature preset “system” variants to reflect common model setups.
Simple/Detailed views
The Edit Model Attributes menu has two main modes: Simple and Detailed. The Simple mode lets you change the model’s colour scheme (if multiple schemes are found) and make large‐scale changes to the model setup using the Setup wheel. The Detailed mode gives you access to the huge list of editable attributes and parameters that define how this model flies, letting you tweak and tune the model to more closely reflect your desired setup.
To change between Simple and Detailed modes, click on either the Simple or Detailed option in the lower‐left of the menu.
Simple mode
The Simple mode is the default view for this menu, and is recommended for most Phoenix users.
The main pane of this view shows a preview of the selected model, along with some basic information and specifications about the model. You can rotate the preview by left‐or‐right‐click mouse dragging with your mouse.
Colour scheme
To the lower‐left of the preview pane is the colour scheme drop‐down box. When alternative colour schemes are found for the currently selected model they will appear in this box for you to choose.
Setup wheel
In the lower‐centre of the menu is the Setup Wheel. This wheel lets you change a model’s overall setup to give different flying characteristics easily without needing to delve into the huge list of attributes and parameters.
By default, most models have their Setup Wheel set to the Centre “Intermediate” position.
By rotating the wheel to the left of this position you will gradually make the model more docile and easy to fly. The model’s control‐surface throws, cyclic and collective response will reduce, and more expo will gradually be applied. As you approach the far‐left “Beginner” position, training undercarriage will automatically appear on helicopter models, and flybarless models will be fitted with the “Active flybar” self‐righting system where appropriate.
By rotating the wheel to the right of the central position, the model will start to become more aggressive and harder to fly, but capable of more impressive manoeuvres. This includes an increase in the model’s control‐surface throws, cyclic and where appropriate the collective response will increase as well.
By using this wheel, you can very easily make a model either easier to fly, or more 3‐D capable depending on your requirements.
Variant control

To the lower‐right of the menu are buttons and controls for selecting and organising variants. When you change the central wheel, a variant will automatically be created and will appear in this drop‐down menu. You can then select this in future very easily from this menu, or from the Model > Change menu. You can also find any preset or “system” variants of this model in this drop‐down box which reflect common model setups.
The button to the right of the drop‐down box lets you create a new variant, or copies the variant you currently have selected. You can then edit it without losing your previous variant.
The button to the far‐right of the drop‐down box lets you delete any custom variants you have made of this model. Please note that you cannot delete preset/system variants (these are marked with a cog icon).
Scale Wizard
In the far‐lower‐centre of the menu is the Scale Wizard button. Clicking this opens the Scale Wizard (see below for more information on using this feature).
Once you are satisfied with your changes, click the Finished button to return to the Main View. Alternatively, click Cancel to return without changing any settings.
Detailed Mode
Selecting the Detailed Mode option gives you access to the huge range of attributes and parameters which define how the selected model flies and sounds.
To the left of the menu is the Attribute List, which contains all of the available editable parameters, sorted into categories for easy location. To the right of the menu is the preview pane, colour scheme selection, and variant control options. You can rotate the 3‐d model preview by left‐or‐right‐click mouse dragging with your mouse.
The Attribute List
On the left of the menu is the Attribute List. This list contains every available editable attribute for the selected model, and will be different depending on whether you have a helicopter, fixed‐wing or other type of model selected. The list is sorted into categories and sub‐categories which can be expanded or contracted by single‐clicking on them to make reading and navigating the list easier.
Changing an attribute
Every attribute in the list will show the name of the parameter to the left, and show the units of measurement (where applicable) to the right. By holding your mouse cursor over any attribute in the list, you can see a detailed explanation of the attribute, what it changes, units of measurement and the range of values allowed.
When you change an attribute in the list, a variant will be created for you and selected. This can then be selected later using the Model > Change menu, or from this menu using the variant selection box (see below).
The different types of attribute are as follows:
• Edit boxes – These are for simple numerical values. To change this type of attribute, simply click on the edit‐box and type in a new value. Please note that some attributes may have more than one edit‐box where appropriate for multi‐value attributes.
• Sliders – These are for attributes which have a set range – usually from 0 – 100%. Change a slider attribute by clicking on the small slider control node above the slider bar and left‐dragging it to the left or right.

• Drop‐down boxes – These are for attributes which have a set number of possible selections, such as which pilot a model features in its cockpit. To change this type of attribute, click on the drop‐down box to open it and select a new option from the list that appears.
• Check‐boxes – These are for attributes which only have a single enabled/disabled value. Change these by left‐clicking once on the check‐box to toggle it. Sometimes checkboxes will enable or disable other attributes/sets of attributes where marked.
• Colour swatches – These are for colour attributes such as display‐smoke colour on fixed‐wing models. To change a colour attribute, left‐click on the colour swatch to open the Colour Selector, select a new colour, then click finished.
Enabled/disabled attributes
Some attributes in the list may be disabled by default. These are recognised by being greyed‐out when compared to a normal, enabled, attribute.
Usually these attributes are enabled by toggling another check‐box which will usually be above the disabled attribute(s). When this is the case, it will be explained in the detailed tooltip which appears when you hover your mouse cursor over the disabled attribute.
Colour scheme
To the right of the attribute list, below the preview pane is the colour scheme drop‐down box. When alternative colour schemes are found for the currently selected model they will appear in this box for you to choose.
Variant settings and controls
Below the Colour Scheme drop‐down box are the controls for creating and organising any variants attached to this model. The left‐most drop‐down box contains a list of all variants currently available for the model you are editing. When you edit a model, a new variant is automatically created and will appear in this list.
To the right of this drop‐down box is the Variant Name edit‐box. If you have a custom‐made variant selected, this box will become active, letting you rename your new variant to a more easily recognisable ID. Please note that you cannot rename system/preset variants (marked with a cog icon).
The button to the right of the edit‐box is the Create New Variant button. This lets you create a new variant, copying the attributes of whichever setup you currently have selected. You can then edit this using the Attribute List, or rename it using the edit‐box to the left.
The far‐right button in this group is the Delete Variant button. This lets you delete a custom variant. Please note that you cannot delete a system/preset variant (marked with a cog icon).
Change units
Clicking this button opens the System > Program Setup menu to the Units section. From here you can change the units of measurements that Phoenix uses throughout the Edit Model menu and the rest of the program.
Inflight Tuning
Clicking this button enables Inflight Tuning. Inflight tuning is an innovative feature that lets you select one or more attributes from the Attribute List, which are then displayed when you return to the Main View in the Inflight Tuning Toolbar. You can then adjust these attributes while you fly your model, without needing to return to the Edit Model menu, making it much faster to apply small changes to the model and achieve the correct feel.

When you toggle this option on, small check‐boxes will appear to the left of any attribute in the Attribute List that is compatible with Inflight tuning. Toggling one of these check‐boxes will enable Inflight tuning for that attribute. To disable Inflight tuning, either disable all small checkboxes, or toggle the Inflight tuning option off.
Scale wizard
Clicking the Scale Wizard button in either Simple or Detailed mode will open the Scale wizard dialog. This wizard lets you quickly and easily apply large changes to a model without needing to adjust many attributes.
The first stage of the Scale wizard is the main scaling step. Here you will see a representation of the selected model, along with some basic specifications to the top‐left of the preview pane.
At the bottom of the menu is the scaling slider. Moving this slider to the left (below 100%) will cause the model to shrink a proportionate amount, while moving it to the right (above 100%) will cause the model to grow larger a proportionate amount. Setting the slider back to 100% will leave the model at the normal size.
As you move the slider, the specifications at the top‐right of the menu will change accordingly to reflect the new size. When you scale a model in either direction, many parameters are changed to accommodate the new size so that the model will fly in a realistic manner. However, as some models would not respond well to extreme changes in scale in a real‐life scenario, the same applies in Phoenix, so it is not often advisable to make very large scale changes, and you may be required to further edit the model after scaling to achieve perfectly realistic and accurate results.
To the left of the scale slider is the Starting Variant drop‐down box. This lets you “Start” from any previously created variant, instead of the default model setup.
When you are happy with the new size, click the Next >> button to move to the next stage. Alternatively, click Cancel to return without changing any settings.
The final stage to the Scale Wizard is the “Set Model Options” step. This lets you set some additional options for the newly created variant before finalising the scale process.
The New Profile Name drop‐down box lets you choose a new name for the scaled model. A default name is created for you, but you may wish to enter an alternative.
Below this is the Engine Sound drop‐down box. This lets you choose an alternative engine sound profile for the model. This is useful for making larger models smaller, where you would most likely change to an electric profile.
Finally the Colour Scheme drop‐down box lets you set another colour scheme for this model.
When you are satisfied with the options, click the Finish button to apply all changes and create the variant. You will be returned to the Edit Model menu, with your new variant selected. Alternatively, click Cancel to return without changing any settings.
Setting up model failures
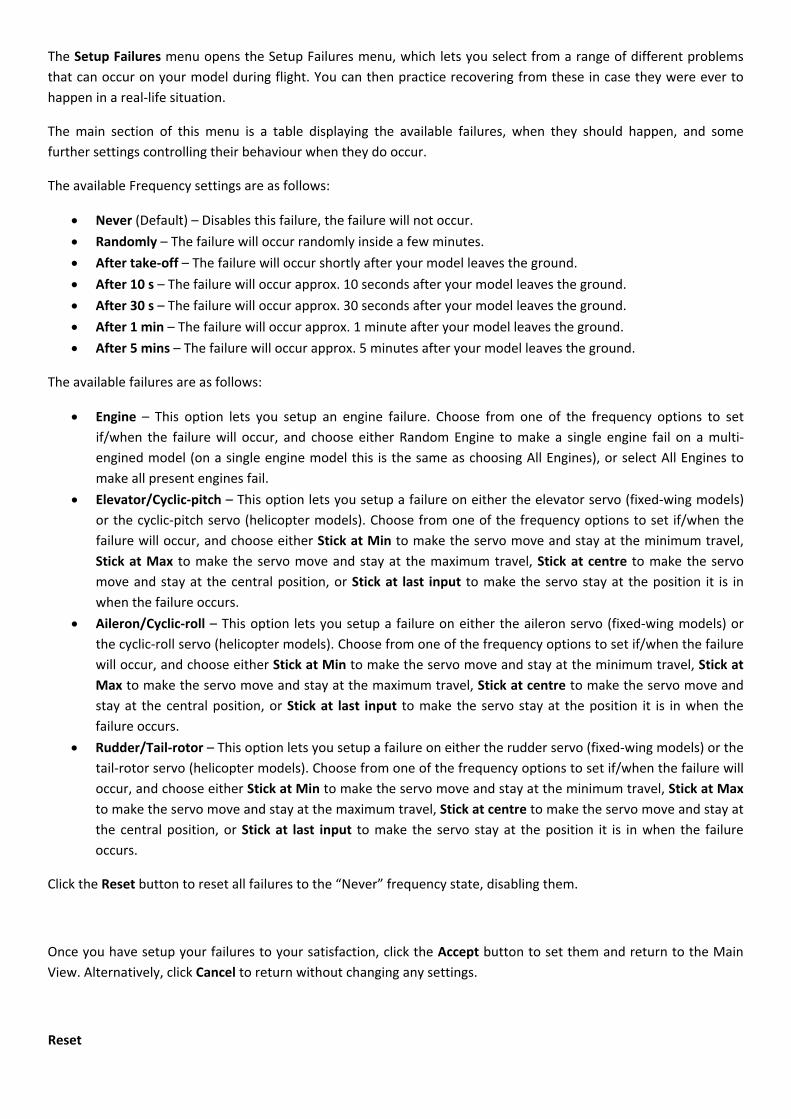
The Setup Failures menu opens the Setup Failures menu, which lets you select from a range of different problems that can occur on your model during flight. You can then practice recovering from these in case they were ever to happen in a real‐life situation.
The main section of this menu is a table displaying the available failures, when they should happen, and some further settings controlling their behaviour when they do occur.
The available Frequency settings are as follows:
• Never (Default) – Disables this failure, the failure will not occur.
• Randomly – The failure will occur randomly inside a few minutes.
• After take‐off – The failure will occur shortly after your model leaves the ground.
• After 10 s – The failure will occur approx. 10 seconds after your model leaves the ground.
• After 30 s – The failure will occur approx. 30 seconds after your model leaves the ground.
• After 1 min – The failure will occur approx. 1 minute after your model leaves the ground.
• After 5 mins – The failure will occur approx. 5 minutes after your model leaves the ground.
The available failures are as follows:
• Engine – This option lets you setup an engine failure. Choose from one of the frequency options to set if/when the failure will occur, and choose either Random Engine to make a single engine fail on a multi‐engined model (on a single engine model this is the same as choosing All Engines), or select All Engines to make all present engines fail.
• Elevator/Cyclic‐pitch – This option lets you setup a failure on either the elevator servo (fixed‐wing models) or the cyclic‐pitch servo (helicopter models). Choose from one of the frequency options to set if/when the failure will occur, and choose either Stick at Min to make the servo move and stay at the minimum travel, Stick at Max to make the servo move and stay at the maximum travel, Stick at centre to make the servo move and stay at the central position, or Stick at last input to make the servo stay at the position it is in when the failure occurs.
• Aileron/Cyclic‐roll – This option lets you setup a failure on either the aileron servo (fixed‐wing models) or the cyclic‐roll servo (helicopter models). Choose from one of the frequency options to set if/when the failure will occur, and choose either Stick at Min to make the servo move and stay at the minimum travel, Stick at Max to make the servo move and stay at the maximum travel, Stick at centre to make the servo move and stay at the central position, or Stick at last input to make the servo stay at the position it is in when the failure occurs.
• Rudder/Tail‐rotor – This option lets you setup a failure on either the rudder servo (fixed‐wing models) or the tail‐rotor servo (helicopter models). Choose from one of the frequency options to set if/when the failure will occur, and choose either Stick at Min to make the servo move and stay at the minimum travel, Stick at Max to make the servo move and stay at the maximum travel, Stick at centre to make the servo move and stay at the central position, or Stick at last input to make the servo stay at the position it is in when the failure occurs.
Click the Reset button to reset all failures to the “Never” frequency state, disabling them.
Once you have setup your failures to your satisfaction, click the Accept button to set them and return to the Main View. Alternatively, click Cancel to return without changing any settings.
Reset
This menu item will reset your model to its default position on the flying field. This will also occur if you have crashed or damaged your model and have the Auto‐reset options configured correctly under the System > Program Setup > Physics menu, or you press the Reset Model hotkey (default = “B” on your keyboard).
Launch settings
The Launch menu controls how the selected model will take‐off (launch) from the flying field. Using this menu you can choose from a variety of different launch methods (please note that some launch options are not available for all model types) and settings, and also contains the Throw Model command.
Launch options
The first section of this menu has the following launch options which you can choose from. When you select a launch option, the model will automatically reset, and launch with the new setting:
• Automatic – Phoenix will choose the most common launch option for the model type and class selected. For instance, unpowered gliders and hand‐launched models will start with the “Hand Launch” method, while most models with undercarriage will start from a “Ground launch” position.
• Ground launch – The model will start sitting on the field ready for take‐off. This is the most common launch method. Please note that if you have a model without undercarriage selected, Phoenix will automatically select “Hand Launch” for the model.
• Hand launch – This launch mode lets you rotate the view using your transmitter’s elevator/aileron sticks or by right‐click dragging your mouse with the selected model held in front of the camera. When you are happy with the direction the model is pointed in, throttle‐up with your radio, or hold the left mouse button down to launch the model in the current camera direction.
• Tow launch – This model is for unpowered gliders only, and places an AI‐controlled tow pilot in front of your model. The tow pilot will automatically take‐off, dragging your model behind on its tow‐line, and ascend to 75m in height. It will then circle until you disengage the tow‐line. You can disengage the tow‐line at any point by throttling up with your radio.
Auto launch when landed
This option controls whether Phoenix will automatically reset and re‐launch your model when it is on the ground. This option only applies to models launched with the hand‐launch or tow‐launch facility.
Throw model
Clicking this menu item will “throw” your model into the air, increasing its height and speed. You can also throw your model by pressing the Throw Model hotkey (default = “T” on your keyboard). This command only functions with glider models which have been launched with the hand‐launch or tow‐launch facility.
Position settings
This menu contains functions for changing the starting position of your model:
Change
Click this menu option to start the Change Model Position mode. When in this mode, you will see all of the available starting positions for the model type you have selected. Scroll around the landscape by right‐click‐dragging your mouse, and left‐click on a circle to select that as the new default starting position for your model.

Once you have selected a starting circle, you can then also select a starting angle by again left‐clicking when the red direction indicator is at a satisfactory angle.
Once you are happy with your new position, press the Finished button in the bottom‐centre of the screen to exit the position changing mode and return to normal flight.
Store
Clicking this menu option stores the current model’s position, orientation and velocity. Every time you reset your model, it will restart at these settings until you change to a different type of model, flying site, or press the Reset menu item.
Reset
Clicking this option resets a stored starting position to the default position, orientation and velocity.
Recently used model list
The bottom sub‐menu under the models menu stores a list of your recently flown models. Every time you change models, this list is updated up to a maximum of your last 10 models. Clicking an item in this list will quickly switch to that model without the need to open the model > change menu.

Flying sites
Phoenix uses high‐resolution photographic panoramic flying sites which give you photo‐realistic backgrounds that function smoothly on a wide range of computer specifications. There is a great selection of flying sites out‐of‐the‐box, and more are released on a regular basis from the automatic updates system.
Phoenix includes a wide variety of different sites to fly on, from grassy club fields and tarmac airstrips to more exotic locations such as bridges, beaches and cities from across the world.
All Phoenix flying sites are packed with three‐dimensional collision geometry which means that your model will impact obstacles, roll over bumpy terrain and interact with water realistically.
All options and settings relating to the current flying field can be located in the Flying site menu on the main menu bar.
Changing flying sites
To choose another flying site, click the Change menu. This menu lets you choose from a wide range of varying landscapes and terrains on which you fly your virtual models, and is divided into two main sections: The available scenery list, and the scenery preview pane.
Available scenery list
The list to the left of the Change flying site menu shows you all of the flying sites which have been downloaded and installed on your computer. Remember to regularly check for new flying sites as they become available to expand your selection.
To choose a new flying site, simply scroll down the list until you find one that you wish to preview and left‐click on the item with your mouse. It will become highlighted in the list, and the preview pane will change to show a rotation preview of the flying site.
The preview pane shows you a low‐quality preview of the currently highlighted flying site, as well as some basic information on the selected scenery. By default the preview will be rotating to give you a full 360‐degree view, but you can manually rotate and look around the preview by left‐or‐right‐dragging your mouse across the preview pane.
Once you are happy with the new flying site selection, click the Accept button to apply the change and return to the Main View. Alternatively, click Cancel to return without changing any settings.
Weather
When flying your model in real‐life, it is very rare for there never to be any wind or turbulence present. Wind/turbulence can make flying far trickier, and adds a random element to R/C model flight. By default, Phoenix does not add any weather effects to a flying field. These are configured using the Weather menu from the main menu bar.
Changing weather settings

Click the Change menu to open the Setup Weather menu, where you can configure any wind, turbulence or thermal settings to be added to the flying field.
Saved setups
To the left of the Change Weather menu is the Saved Setups list. This list contains all of the preset weather setups, as well as any weather setups that you create yourself. A weather setup contains all of the wind, turbulence and thermal settings for easy changing.
Phoenix comes with a selection of common weather setups based on normal flying conditions. To select a weather setup, left‐click your mouse on one of the items in the list – you will see the weather settings in the rest of the panel change to the new values.
You can also alter an existing setup, or create your own custom weather conditions using the controls to the right of the menu:
Wind speed (base)
This controls the main constant “base” wind speed over the whole flying site.
Heading (base)
This controls the heading of the main “base” wind speed (see above) that the wind will blow towards.
Randomness (base)
This controls how much random variation is applied to base wind speed. For instance, when set to 50%, the base speed will vary plus or minus 50% of the speed set above.
Wind speed (gusts)
This controls the maximum gust speed that is applied on top of the base speed set above. Gusts will vary randomly based on the frequency set (see below).
Heading (gusts)
This controls the heading that gusts set above will blow towards.
Randomness (gusts)
This controls how much random variation is applied to gust wind speed. For instance, when set to 50%, the gust speed will vary plus or minus 50% of the speed set above.
Gust frequency
Sets how often a gust will occur. The higher this value is set, the more common a gust will be.
Turbulence
Controls the amount of air turbulence that models will experience when flying. Turbulence affects the stability of models, and adds a random element into flight characteristics.
Thermal strength
Controls how strong thermals will be when active, and how many thermals will be present on the field. A stronger thermal will produce more upward lift on models flying inside the thermal’s diameter. A setting under 30% will cause a single thermal to be present. A setting between 30% and 60% will cause two thermals to be present, and a setting

above 60% will cause three thermals to appear on the flying field. Thermals can only be seen by the user if the View > Displays > Thermals menu option is selected.
Thermal duration
Controls how long a thermal will last for before dissipating and reforming in another location. A setting of 100% will cause the thermal to stay active for at least 5 minutes before dissipating and reforming.
When you are happy with the setting you have chosen, you can save them into a saved setup by pressing the Save setup button in the bottom left of the menu. You will be prompted to enter a name for the new setup, and it will appear in the Saved Setups list in future. You can delete a non‐preset setup by selecting it in the list and clicking the Delete setup button.
Once you have finished adjusting weather conditions or selecting and changing setups, click the Finished button to return to the Main View, or click the Cancel button to return without applying any changes.
Layouts
Layouts are constructions of lines, flags or targets which can be added on top of the flying field. Selecting a layout in solo flight mode will also change your starting position automatically.
Currently, the available layouts are as follows:
• None – Disables all layouts
• Landing target – Enables the “Landing Target” layout, which places a large circular target on the flying field. The model will start in the centre of this target when this layout is active in solo flight mode.
• Precision target – Enables the “Precision Target” layout, which places a large circular target with distance measurements on the flying field. The model will start in the centre of this target when this layout is active in solo flight mode.
• F3C Box – Enables the “F3C Box” layout, which recreates the standard F3C 10m x 10m 6‐flag layout, and places the model in the centre, facing away from you.
• F3C Area – Enables the “F3C Area” layout, which recreates the standard F3C flight line with two 5m‐distant flags and places the model in the centre, facing away from you.
Buddies
Buddies are artificially intelligent computer‐controlled pilots who fly with you on the field when in solo flight mode and in some competitions. Buddies give you a chance to learn what it is like to fly on a field with other models, which can quite often be the case in a real‐life situation.
You can fly with up to three Buddies at a time, and fully configure each pilot as you wish. You can also spectate buddies and view their control responses as they fly various manoeuvres, making them a valuable learning/training tool.
Configuring buddies
To add, remove or change buddies, click on either the Buddies > Configure menu, or the Configure button at the bottom of the Buddies toolbar. This will open the Configure Buddies menu.
The Configure Buddies menu contains three buddy panels, each of which represents a buddy that can be enabled and flown with on the field.

Each panel consists of the following settings:
Buddy avatar
At the top of the panel is a large button displaying the buddy’s avatar icon. This is used to recognise the buddy on the field when there are multiple pilots present. Click the avatar icon button to open the Select Avatar menu, where you can choose an alternative avatar for the buddy. See the System > Program Setup > General menu for more information on choosing an avatar.
Buddy name
Below the avatar icon is an edit‐box which lets you choose a name for the buddy. A name is randomly chosen for each buddy the first time you start Phoenix, but you can type your own name in here instead if you wish.
Buddy skill
This drop‐down box lets you choose the skill level of this buddy. The options are as follows:
• Random – Randomly selects a skill level from the other options below
• Beginner – The buddy will only perform very basic manoeuvres such as hovering and simple flying.
• Intermediate – The buddy will perform more complex manoeuvres such as stall turns and circuits.
• Expert – The buddy will perform complicated manoeuvres such as tick‐tocks and prop‐hanging.
Buddy model
Select the model you wish this buddy to fly using this drop‐down box. Choosing Random will select a random model every time the buddy resets their model. Choosing Helicopter will cause the buddy to select a random helicopter from the available models. Choosing Fixed‐wing will cause the buddy to select a random fixed‐wing model from the available model list. Below these options are the available models that can be selected for the skill level chosen above.
Random
Press this button to randomly cycle the above settings.
Disable
Press this button to disable the buddy. The settings will be stored, but the buddy will not appear on the field.
Enable
When the buddy is disabled, this button will appear. Pressing this button will enable the buddy and it will appear on the field.
Clear all buddies
Click this menu item to quickly disable all active buddies, removing them from the field.
Buddy toolbar
The Buddies toolbar contains settings and options for controlling buddies. When visible, each enabled buddy is displayed with their avatar icon, name and model selection. To the top‐left of each buddy in the toolbar is a small “X” button. Clicking this will disable the buddy without needing to access the Configure Buddies menu.

At the bottom of the Buddies Toolbar is a Configure button which can be used to quickly access the Configure Buddies menu.
Recently used flying site list
The bottom sub‐menu under the flying site menu stores a list of your recently used flying sites. Every time you change flying site, this list is updated up to a maximum of your last 10 sites. Clicking an item in this list will quickly switch to that flying site without the need to open the flying site > change menu.

Cameras and views
The View menu contains all options and settings for controlling the current view, cameras and Heads‐Up‐Display (HUD) elements. This menu also contains the toolbars sub‐menu, which lets you show/hide the various toolbars available.
Camera
This menu controls the virtual camera, which views your model when flying. This menu can be used to change how the camera reacts to your model’s position, and even change which model the camera is looking at.
Autozoom
When your model moves away from the pilot’s position, the camera will automatically zoom into it to make seeing and controlling your model easier. You should still attempt to keep your model within a reasonable distance of your position as you would in real‐life, as flying far away from yourself can be dangerous and difficult to ascertain your model’s orientation. Enabling/disabling this menu item will enable or disable auto‐zooming.
Zoom small models
Phoenix will automatically zoom in an extra amount when you are flying particularly small models. Disable this menu option to prevent this from happening.
Reset zoom level
You can use your mouse wheel to manually zoom in and out an extra amount on top of the camera’s auto‐zoom. Clicking this menu option will reset to the default amount of camera zoom.
Camera modes
The virtual camera can be set to act in different ways to the model’s position and speed depending on your preference:
• Normal (Default) – This is the standard camera mode. The camera will attempt to keep the model in the centre of the screen, and will move faster or slower depending on your camera speed setting under the system > program setup > physics menu. In this mode, the camera will also shift vertically a small amount to make keeping track of the ground easier.
• Keep ground in view – This model will automatically zoom in and out and shift vertically in order to attempt to keep the ground directly under your model inside the view at all times. Please note that manual zoom is not supported under this camera mode.
• Free‐look – When this mode is selected, the camera will not track the model. Instead, right‐drag your mouse across the screen to pan the camera around the flying site.
• Shift‐look – This is a special camera mode which will only track the model when it is close to the edges of the view. This mode is designed to more closely resemble a person’s head tracking the model.
Look at
This menu lets you choose a different model for the camera to track. This menu will contain all of the valid models which can be viewed, and will update to include any buddies or online pilots that may be in the session. To track another pilot or buddy, click their name in the list. To return back to viewing your own model, click the My model entry at the top of the list.
Please note that this is only valid when Free look is not selected from the camera modes above, and if the currently viewed pilot leaves the session, the camera will return to view your own model.
Displays
This menu contains all of the Heads‐Up‐Display (HUD) elements that can be selected to be displayed on top of the simulation view. Clicking any of the items in this list will toggle the display on or off.
Widgets
Many of the displays are in the form of Widgets, which are controllable and configurable items on the over the display. Each widget has the same controls to let you configure its size and shape on the main view, as well as buttons to hide it. Some widgets also have an additional settings button where appropriate.
To reposition a widget, move your mouse over the widget control to show its frame, then left‐drag its title‐bar with your mouse until it lies in the correct position on the view. If you drag a widget to one of the sides or corners of the main view, the widget will “dock” to that position. When docked, the widget will automatically move if you change the size of the Phoenix window.
To resize a widget, move your mouse over the widget control to show its resize handles. Place your mouse cursor over the resize handle you wish to change, then left‐drag with your mouse to change the widget’s size.
Simulation speed
This widget lets you control the speed of the simulation easily and quickly without using the system > program setup > physics menu. The central readout on the widget shows the currently set simulation speed, with 100% being the normal simulation rate. For more information on simulation speed, see the system > program setup > physics menu.
To change the simulation speed using this widget, place your mouse cursor over the wheel, and left‐drag to move the small chevron and change the simulation rate. The central readout will change to reflect the new speed.
Controller
This widget gives you an onscreen transmitter/controller that will show the control movements of whichever model is currently being looked at by the camera. In default mode, this is a display of your own transmitter movements, but if you go online and spectate another pilot, this will show you their control movements instead, making this a valuable training and learning aid. Similarly, if you have a buddy active, and use the View > Camera > Look at menu to look at a buddy instead of your own model, you will be shown that buddy’s control motions.
To the top of the onscreen controller you can see any software‐controller functions such as Gear, Flaps or Stunt/Throttle‐hold (if these are being controlled by the software and not using the built‐in switches on your radio – if your radio has these features).
At the bottom of the onscreen controller is the Mode Selector. By default, this is set to “Mode 2”, but if you are using your radio in a different mode, click the “Mode 2” readout to cycle through the available modes until it matches your real‐life radio movements.
Flight info
This widget displays a range of vital information on the model and environment, and can be configured to show more or less data as you wish. As you resize the Flight Info widget using the resize handles, the data display will change to different orientations, letting you have the information in a vertical or horizontal list.

Click the Blue “Settings” button at the top of the Flight Info widget to configure the different data items that are shown. All of the possible pieces of information are featured in the Items to Display list, with a check‐box denoting whether that item will appear in the Flight Info panel or not. Simply click the check‐box next to an item in the list to include it in the Flight Info panel, or clear the checkbox to hide it.
Currently, the following data items are available for the Flight Info panel:
• FPS – This item shows the current Frames Per Second (FPS) of the system. If you have VSync enabled (see the system > program setup > display menu for more information on this) then the FPS will be locked to the refresh‐rate of your display.
• Resolution – This item displays the current display resolution you are running Phoenix in.
• Altitude – This item shows the current altitude of the model above ground level, in your currently selected units for distance.
• Velocity – This item shows the current velocity of the model, in your currently selected units for speed.
• Heading – This item shows the current heading that the model is pointing towards.
• Distance – This item shows the current distance of the model from your pilot’s viewing position.
• Wind Heading – This item displays the current wind heading.
• Wind Speed – This item displays the total wind speed, including any gusts.
• Throttle – This item shows your current throttle input from 0 – 100%.
• Gear – This item shows the current state of your model’s landing gear.
• Elevator – This item shows the current elevator deflection in degrees.
• Rudder – This item shows the current rudder deflection in degrees.
• Left/Right Aileron – These items show the current deflection of the left and right ailerons in degrees.
• Flaps – This item shows the current flaps deflection in degrees.
• Rotor RPM – This shows the current Revolutions Per Minute (RPM) of the rotor‐head.
• Collective – This item shows the current collective pitch of the main rotors in degrees.
When you are finished, press Accept to return to Main View with your changes, or Cancel to return without saving.
Variometer
This menu displays the Variometer Widget, which shows information related mainly to glider models such as vertical rate of ascent/descent and altitude.
The main display on the left of the Variometer shows the current rate of ascent or descent of the model in bar‐form. The higher the ascent‐rate of the model, the more green bars will fill. As the ascent rate drops, less green bars will be filled until none remain. At this point the model will be level. As the model starts to descend, more red bars will start to fill. There is also a readout to the top‐right of the Variometer showing the current rate of ascent/descent in your currently selected units for speed.
Beneath the ascent/descent rate readout is a larger readout showing the current altitude of the model in your currently selected units for distance.
As well as the visual ascent/descent display, the Variometer will also emit an audio tone which lets you keep track of the rate of ascent/descent without needing to look at the Variometer display. When your model is ascending, the tone will be broken, and will rise in frequency the faster your model ascends. When your model is descending, the tone will be constant, and will lower in frequency the faster your model descends.
You can use the larger Mute/unmute button at the bottom‐right of the Variometer to mute/unmute the audio tone. The smaller buttons to the top and bottom right of the mute/unmute button will turn the Variometer tone volume up and down respectively.

Binoculars
The Binoculars widget shows a zoomed‐in view of your model at all times, no matter how far away from your location the model actually is. This is especially useful for keeping track of the orientation of the model even when it is a large distance away.
The binocular view always shows the model at the same size, and does not show any background details or other objects. You can also resize the widget to get a larger or smaller view of the aircraft.
Wind Compass
This widget lets you keep track of the current wind heading, relative to your current viewpoint, and the direction your model is facing.
The main Wind Compass display will rotate relative to the direction that your viewpoint is facing, so that the heading at the top of the Wind Compass will always be the heading of the camera’s view direction.
The orange airplane‐shaped “arrow” points in the direction/heading that your model is facing.
The other pointer is the wind direction indicator. The actual arrows themselves point to the direction that the wind is blowing towards, while the head of the head of this pointer is pointing in the direction that the wind is blowing from. This makes it easy to read off both of these pieces of information.
Timer
The Timer widget lets you keep track of time using a common “stopwatch” layout. The timer is displayed in both analog and digital formats. On the analog displays, the smaller green pointer will show minutes while the larger red pointer records seconds. There is also a smaller clock at the bottom of the widget showing hours with a blue pointer.
To start the timer, press the green Start button once. The timer will start, and both the analog clocks and digital readouts will begin timing. To stop the timer once timing, press either the Start or Stop button once. Press the stop button again to reset the timer to zero, or press Start to resume timing.
Logbook
The Logbook widget records useful information about the currently selected model, such as the number of flights/crashes, and your favourite setups or colour schemes.
On the left of the Logbook widget is shown the currently selected model information and icon. Beneath this is the total time spent flying this model. Beneath this is both the number of distinct flights and number of times the model has been damaged or crashed.
At the bottom of the Logbook is a display showing your favourite variant, colour scheme and flying field used with this model.
At the very bottom of the widget is the Reset button. Clicking this will reset all data on the selected model.
The right hand side of the Logbook widget is taken up by a multi‐line edit‐box letting you record any notes you may have on this model.
Windsock
Clicking this menu option will toggle the Windsock. This is an onscreen 3‐D windsock complete with moving flag which sits on the flying field, and will show you the current wind speed and heading.
Thermals
Clicking this menu option will enable the thermal display. When thermals are activated either through the flying site > weather > change menu, or by a competition mode such as thermal gliding, they will appear on the flying site as large semi‐transparent cylinders which show the extent of the thermal’s radius. Flying inside the cylinder will provide thermal lift to the model.
Sky orientation
Clicking this menu option will enable the Sky orientation display. When active, the Sky orientation shows as a series of rings and lines onscreen which make it easier to keep track of your model’s position, especially against a uniform blue sky. The Sky orientation also shows headings at uniform intervals.
Show pilot names
When this menu is active, any model not currently being tracked by the camera will by tagged by a small pointer and frame with the pilot’s avatar icon and name. When the model moves outside the main view boundary, the frame will stay at the edge of the screen to show the direction of the model. When the model moves behind the pilot’s eye view, the frame will move to the bottom of the view.
Toolbars
The toolbars menu lets you re‐enable (or disable) any toolbar which you may have disabled using the toolbar’s close button. Toolbars let you access commonly used program features easily and quickly without needing to go through any sub‐menus. Each toolbar has a tab which contains the name of the toolbar, along with its icon and control buttons.
The first of these is the expand/retract button (marked with either an < or > icon). Clicking this will cause the toolbar to move into or out of the side of the screen. When the toolbar is retracted, only the tab of the toolbar is visible, and this will disappear when the mouse has not been moved for a short time. When the toolbar is expanded, it will remain visible even when the main menu or mouse has disappeared.
The other button is the close button (marked with an x). Clicking this button will close the toolbar completely, and you will need to use the Toolbars menu to re‐enable the toolbar at a later time.
Favourites
The Favourites toolbar lets you access any favourites you may have created using the Model > Change menu. When you have saved favourites, they will appear in this toolbar – you can then select one by clicking on it in the toolbar.
Notifications
This toolbar contains any failures or problems that may occur with your model. The first two items are the “crashed model” and the “fuel empty” notifications. The last section is devoted to any failures that have been setup using the model > failures menu (see this topic for more information on failures).
When the model crashes, runs out of fuel, or an active failure triggers, the notifications bar will automatically expand for a short time if visible, notifying you of the failure, and letting you reset the problem by left‐clicking on the flashing icon.
Buddies
The Buddies toolbar lets you configure any Buddies that you may have configured. Each active buddy will appear in the toolbar along with their model and skill level. Clicking on the small “X” button to the top‐right of each entry in

the toolbar will disable that Buddy. There is also a Configure button at the bottom of the toolbar which will quickly bring up the Configure Buddies menu (see this topic for more information on Buddies).
Multiplayer
The multiplayer toolbar gives you full control over any multiplayer‐related features and settings, including session and user control if you are the host, and chatting with other pilots. See the Multiplayer section later on for more information on the Multiplayer toolbar.

Flight Recorder
Phoenix features a powerful and full‐featured flight recorder which lets you record a flight (or series of flights), and then save these to disk to share with other Phoenix users or analyse at a later time. The flight recorder will record your model and flying site changes when active, and when you play the recording back these will automatically take effect.
Clicking the Open menu will open the Flight Recorder display. This can then be repositioned around the screen as you wish. Clicking the Close menu or the red close button (marked with an “X”) on the flight recorder display will close the Flight Recorder, stopping the current playback or recording.
The final menu option is the Minimise/Maximise menu. Clicking this will cause the Flight Recorder to change to a smaller profile so that it takes up less space on the main view. When in this mode, only the main functions are visible – play, stop and record. When minimised, the display will automatically hide when the mouse is not moved for a short time. The flight recorder can also be minimised using the blue minimise button on the recorder title‐bar.
Recording a flight
To record a flight you wish to save, open the Flight Recorder by pressing the Flight recorder > open menu. This will bring up the recorder display in its default, idle mode.
When you are ready, press the Record button (see below for more information) once to begin the recording process. The status bar will begin to read “REC” and show the time you have recorded so far. Fly around the flying site, change flying sites or change model, and all will be recorded for you to playback later.
Once you have finished with your recording, press the “Stop” button or the “Record” button again to end the recording process. You can now either play back the recording (see below) or save the recording by pressing the Save button (see Save button below for more details).
Playing a previously recorded flight
If you have just recorded a flight it will stay in memory until you record another, and can be quickly played back by pressing the Play button once (see the Play button below for more details). You can also load a previously saved recording by pressing the Load button (see the Load button below for more details).
Once your recording is in memory, press the Play button to start playback. Depending on your currently selected View Mode (see View Modes below), the recorded model will appear on its own or alongside your currently selected model, allowing you to fly alongside the playback.
When playing, the flight recorder may change to a different flying site depending on the contents of the recorded file it is currently playing. When you are in Spectate View Mode (see below), you will also be able to see the recorded controller movements if you have the onscreen controller visible (see the View > Displays > Controller menu above for more details).
View mode
The left‐most button is the View mode control. This has three modes:
• Fly with recording – In this mode, the currently loaded recording will play alongside the model you are currently flying so that you can fly with your recordings.
• Spectate recording – In this mode, your model will not appear on the screen, and the camera will automatically track your currently playing recording. You will also be able to see the recorded controller

movements if you have the onscreen controller visible. (see the View > Displays > Controller menu above for more details).
• Free‐look – In this mode, you have full control over the camera using the mouse. Change the camera’s viewpoint by right‐dragging with your mouse. Your model will not appear on the screen in this mode.
Loop playback
The next button is the loop playback toggle. When this is enabled the current recording will begin again at the beginning of the recording when it reaches the end.
Rewind playback
When you hold your left mouse button on this button, the current recording will rewind to the beginning.
Play/Pause
When the current recording is not playing, clicking this button will start the playback sequence. Once playing, clicking the button will pause the playback.
Stop
Clicking this button will stop the playback and rewind the recording to the beginning.
Fast‐forward playback
When you hold your left mouse button on this button, the current recording will fast forward to the end of the recording.
Save
Clicking this button will open the Save Recording menu. In this menu you can choose to overwrite an existing file by selecting it in the Saved Recordings list, or type in a new filename to create a new file. You can view more information on the selected file by clicking the small “expand” arrow to the left of an item in the list. You can also supply an optional pilot name and description which will appear when the video is loaded in future.
Click the Save button to save the file, the Delete button to delete the currently selected file in the list, or the Cancel button to return to the Main View without saving.
Load
Clicking this button will open the Load Recording menu. Select a previously saved recording by clicking on it in the list. You can also view more information on the recording file by clicking the small “expand” arrow to the left of an item in the list. Click the Load button to load the selected file, the Delete button to delete the currently selected file in the list, or the Cancel button to return to the Main View without loading.
Playback speed
Clicking this button toggles the playback speed bar at the bottom of the Flight Recorder display. Once this is active you can adjust the speed of the playback by dragging the slider to the left or right. When the slider is in the centre, the playback speed is as it was recorded. When the slider is to the left, the playback will be slower, and when it is to the right, the playback will be faster.
Playback colour

Clicking this button toggles the playback colour bar at the bottom of the Flight Recorder display. Once this is active you can adjust the colour tint of the playback model using the sliders on the bar. In this way, you can adjust how the playback model appears onscreen – i.e. make it more or less transparent.
Main playback bar
The centre of the Flight Recorder is the playback bar. This shows the current status of the recorded file. When no file is playing, this will show “idle”. When you start playing a previously recorded file, this will change to “play” along with the current time played. The status bar will also begin to fill – when the bar is fully filled, the playback will be at the end of the total play time. When you are recording a new file, the status will change to “Rec” along with the time you have currently recorded.
When you are playing a recorded file, you can “scrub” back and forth by left‐click dragging along the bar with your mouse to quickly jump to a position in the playback.
Set in‐point/out‐point
To the right of the main playback bar are the set in‐point and out‐point buttons. Clicking these will set where the playback will start and stop when playing.

Training
Phoenix features a wide range of different ways to learn to fly R/C models, including dedicated training models which are easy to fly, the flight recorder where you can record and playback a flight, the Simulation Speed widget which lets you alter the speed of the simulation to learn a complex manoeuvre more easily, and the online multiplayer which lets you learn from other pilots.
Alongside these are also special dedicated training modes which change the way that the simulator function in order to try to teach you specific areas of R/C flight more easily. These are contained in the Training menu.
Please note that when using these special training modes, you will not be able to use Weather or fly with Buddies, or use the Online service.
Tutorial video browser
The video browser is a library of useful recordings made by established expert pilots which cover a wide range of topics from basic controls to complex manoeuvres and tricks. Each video in the library is accompanied by a commentary voice‐over which explains what is happening on‐screen and gives useful advice and tips.
Open the tutorial video browser by clicking the Tutorial video browser menu. This opens the video library at the default starting video.
The tutorial video library is arranged in Fixed‐Wing and Helicopter categories to make finding the video you wish to view easier. Each of these main categories is then divided into several sub‐categories:
• The Basics – This section contains very simple topics such as the basic controls for your helicopter or airplane, taking of and landing, and some simple manoeuvres.
• Starting Aerobatics – Once you have completed and understood all of the content in the “Basics” folder, or you are a higher level of R/C pilot, you can move on to this section, which contains some more complex manoeuvres.
• Advanced Aerobatics – For skilled pilots only, this section contains advanced manoeuvres and tricks which should only be attempted by an accomplished and experienced person.
• Demonstrations – This folder contains any demonstration flights you have downloaded, which are “showcase” flights recorded by expert pilots and show a range of manoeuvres put together.
As you can see, these categories form a natural progression from basic to advanced skill level, and you should only attempt a new category once you fully understand the previous one.
Playing a video
When you have found a video you wish to view, select it in the list. A full description will appear in the pane to the right of the video list. Press the Start button to open and play the video. You can also use the “<<” and “>>” buttons to quickly and easily move to the next or previous video in the main list. Phoenix will remember your last played video so you can always find where you are in the overall progression.
When you start a tutorial video, the Tutorial Video playback control panel will appear at the bottom of the screen. This is a special version of the Flight Recorder panel which lets you control how the tutorial video will play, and auto‐hides when you have not moved your mouse for a short time.
To the left of the Tutorial Video playback control panel is the View Mode button. Clicking this will cycle through the available view modes (see the Flight Recorder topic for more information on view modes).
Next to this is the Show/hide onscreen controller button. Clicking this will toggle the onscreen controller display on or off while viewing the tutorial video. This is a valuable training tool which lets you see what control inputs are used to perform the various manoeuvres and tricks.
The next button is the mute/unmute audio commentary button. This lets you toggle the voice‐over commentary on or off. Please note that the voice commentary is only played when the video is playing at normal (100%) speed.
The next controls on this panel are the Rewind, Play/Pause, Stop and Fast‐forward buttons. Please see the Flight Recorder topic for more information on these controls and what they do.
The last button toggles the playback speed bar. When enabled, you can slow down or speed up the tutorial video playback by adjusting this slider. Please note that the voice commentary is only played when the video is playing at normal (100%) speed.
At the bottom of the panel is the status bar which shows the current state and time of the recording. You can also “scrub” back and forth through the video quickly by left‐dragging your mouse across this bar.
When you have finished viewing a video, click the Stop button or small round “X” button o the top‐right of the panel to return to the Tutorial Video Browser window.
Hover training
The Hover Trainer is a special simulation mode which is designed to teach you the basics of hovering your helicopter model as quickly as possible. In this mode, your model is placed on the flying field at an appropriate height, and not allowed to fall or rise – preventing you from crashing.
You can then take control of as many or few controls as you wish ‐ with the simulator controlling the others ‐ until you are confident at hovering the model with all controls enabled. You can therefore gradually build up from one simple control to all controls at your own pace, decreasing the learning curve dramatically.
If you lose control of the model, and it moves a certain distance away from your position, or rotates too far over, the Hover Trainer will automatically restart without you needing to go through the usual take‐off routine – thereby speeding up the time taken to master this technique.
Please note that the Hover Trainer is only available to helicopter models. If you attempt to start the trainer with another type of model selected, or change to another type of model after starting the trainer, you will be taken back to the main view and standard free flight mode.
When the Hover Trainer is active, the Hover Training Toolbar will appear at the bottom of the screen. This contains settings for configuring the Hover Trainer to your preferences:
Setup
The left‐hand drop‐down box lets you change the model functions that you have control over. For instance, the default, easiest setting is “Elevator only” which only gives you control over the elevator, and only lets the model rotate forwards and backwards. The model will still move forwards and backwards in the direction of travel however, so you will still need to keep the elevator under control and the model in a stable hover. As you progress down this list, you will take control of the other functions until you are hovering with all controls active.
Restart
The next button in the panel is the Restart button. Clicking this will restart the model at the initial position and orientation.
Auto‐restart
This button lets you toggle the auto‐restart on or off. When enabled, the model will automatically restart if it moves a certain distance away from your position, or rotates too far over from level.
Inverted
This button lets you toggle between inverted and upright hovering. Once you have mastered the standard upright hovering, you can use this feature to learn to hover a 3‐d capable helicopter upside‐down, which is a much more challenging manoeuvre.
Orientation
The right‐hand drop‐down box lets you change the starting orientation of the model. Using this, you can easily practice tail‐in, side‐on and nose‐in hovering techniques.
Once you have finished with the Hover Trainer, either click the small round “X” button to the top‐right of the control panel, or select the Training > None menu option to close and return to the main view and standard free flight mode.
Autorotation training
This training mode lets you practice your autorotations efficiently without needing to go through the routine of powering up, taking off and gaining height and position. Instead, this trainer sets your model up in the perfect position, speed and orientation for performing an autorotation, as well as automatically cutting your model’s throttle. A landing target is also placed on the ground, letting you practice landing your model under autorotation in a precise location.
Please note that the Autorotation Trainer is only available to helicopter models. If you attempt to start the trainer with another type of model selected, or change to another type of model after starting the trainer, you will be taken back to the main view and standard free flight mode.
When the Autorotation Trainer is active, the Autorotation Training Toolbar will appear at the bottom of the screen. This contains settings for configuring the Autorotation Trainer to your preferences:
Height
This drop‐down box lets you select from a range of starting heights, from 40m to 70m. Using this you can practice different styles of autorotation.
Restart
The next button in the panel is the Restart button. Clicking this will restart the model at the initial position and orientation.
Auto‐restart
This button lets you toggle the auto‐restart on or off. When enabled, the model will automatically restart if it has landed on the ground.
Orientation

The right‐hand drop‐down box lets you select the starting position of the model – whether it will be coming in from the left or right of the central target position. Using this setting you can also setup the Autorotation Trainer to practice inverted autorotations – a difficult and advanced manoeuvre.
Once you have finished with the Autorotation Trainer, either click the small round “X” button to the top‐right of the control panel, or select the Training > None menu option to close and return to the main view and standard free flight mode.
Torque (Prop‐hang) training
The Torque Trainer is a special simulation mode which is designed to teach you the basics of prop‐hanging/torque‐rolling your 3‐d capable airplane model as quickly as possible. In this mode, your model is placed on the flying field at an appropriate height, orientation and position, and will not break on impact.
You can then take control of as many or few controls as you wish ‐ with the simulator controlling the others ‐ until you are confident at prop‐hanging/torque‐rolling the model with all controls enabled. You can therefore gradually build up from one simple control to all controls at your own pace, decreasing the learning curve dramatically.
If you lose control of the model, and it moves a certain distance away from your position, or rotates too far over, the Torque Trainer will automatically restart without you needing to go through the usual take‐off routine – thereby speeding up the time taken to master this technique.
Please note that the Torque Trainer is only available to fixed‐wing models. If you attempt to start the trainer with another type of model selected, or change to another type of model after starting the trainer, you will be taken back to the main view and standard free flight mode.
When the Torque Trainer is active, the Torque Training Toolbar will appear at the bottom of the screen. This contains settings for configuring the Torque Trainer to your preferences:
Setup
The left‐hand drop‐down box lets you change the model functions that you have control over. For instance, the default, easiest setting is “Throttle only” which only gives you control over the throttle, and only lets the model move vertically up and down. As you progress down this list, you will take control of the other functions until you are prop‐hanging/torque‐rolling with all controls active.
Restart
The next button in the panel is the Restart button. Clicking this will restart the model at the initial position and orientation.
Auto‐restart
This button lets you toggle the auto‐restart on or off. When enabled, the model will automatically restart if it moves a certain distance away from your position, or rotates too far over from level.
Orientation
The right‐hand drop‐down box lets you change the starting orientation of the model. Using this, you can easily practice prop‐hanging/torque‐rolling from all sides of the model.

Once you have finished with the Torque Trainer, either click the small round “X” button to the top‐right of the control panel, or select the Training > None menu option to close and return to the main view and standard free flight mode.
Landing training
This training mode lets you practice your landings efficiently without needing to go through the routine of powering up, taking off and gaining height and position. Instead, this trainer sets your model up in the perfect position, speed and orientation for performing a landing. A landing target is also placed on the ground, letting you practice landing your model in a precise location.
Please note that the Landing Trainer is only available to fixed‐wing models. If you attempt to start the trainer with another type of model selected, or change to another type of model after starting the trainer, you will be taken back to the main view and standard free flight mode.
When the Landing Trainer is active, the Landing Training Toolbar will appear at the bottom of the screen. This contains settings for configuring the Landing Trainer to your preferences:
Height
Select from a Low, Medium or High starting height, letting you practice landing from various angles of descent.
Restart
The next button in the panel is the Restart button. Clicking this will restart the model at the initial position and orientation.
Auto‐restart
This button lets you toggle the auto‐restart on or off. When enabled, the model will automatically restart if it has landed on the ground.
Distance
The right‐hand drop‐down box controls the distance the model will start away from your position. Choose from Near, Medium and Far to practice different landing styles and techniques.
Once you have finished with the Landing Trainer, either click the small round “X” button to the top‐right of the control panel, or select the Training > None menu option to close and return to the main view and standard free flight mode.
Cancelling training modes
At the bottom of the Training menu is the None option, which lets you quickly and easily cancel any currently selected training mode and return to standard, free‐flight.

Competition
Phoenix Competition modes give you a chance to try out your new skills in a fun and challenging manner. Starting one of these modes will teach you to fly your model in complex ways that you may not encounter when flying in the standard free‐flight mode, and so may increase your skill‐level faster than you would otherwise.
Many of the competition modes have both a challenge mode and a high‐score mode. When in challenge mode, the competition will gradually get more and more difficult through a series of “stages” – try to get as far as you can. In high‐score mode, fly against the clock to gain as many points as possible, and beat your previous high score.
In addition to solo competitions, some of these modes are also available online so you can show off your skills with other pilots. To start a competition mode online you will need to be the host of the online session (see the Multiplayer section for more details on starting competitions online).
Please note that while flying a competition mode, all weather settings will be disabled, and your normal Buddies will also not appear on the field.
Bomb drop
This competition mode lets you fly around the selected field, trying to drop as many bombs as close to the targets on the ground as you can in the time limit specified.
Trigger a bomb‐drop using the same switch or keyboard key as GEAR (by default), and remember to take gravity and velocity into account to hit the targets at precisely as possible. You will gain points for hitting a target, and more points for hitting the target as close to the centre as possible.
In challenge mode, you will need to hit all the target(s) placed on the field in the time limit specified in order to progress to the next level. As the levels increase, the targets will rise in number, the time limit will decrease, and the targets will get smaller ‐ and even start moving at the higher levels.
At the start of the round, the following options are available:
• Difficulty – This lets you set the difficulty of the round. At higher difficulty levels, the targets will become smaller, and will move position.
• Time – This lets you select the round time, in minutes.
Please note that this competition is available for fixed‐wing models only, and also available in an online session for up to 4 pilots to play.
Balloon bursting
In the Balloon Bursting competition, your job is to “burst” or collide with as many of the floating balloon‐targets as you can in the time limit specified.
Use your sense of depth‐perception to try to fly into the balloons ranged across the field. When you hit a balloon, you will gain points – more or less depending on the difficulty level set at the beginning of the game round.
In challenge mode, you will need to hit all the balloon(s) on the field in the time limit specified in order to progress to the next level. As the levels increase, the number of balloons will rise in number, the time limit will decrease, and the balloons will get smaller ‐ and even start moving at the higher levels.

At the start of the round, the following options are available:
• Difficulty – This lets you set the difficulty of the round. At higher difficulty levels, the balloons will become smaller, and will move position.
• Time – This lets you select the round time, in minutes.
Please note that this competition is available in an online session for up to 4 pilots to play.
Streamer cutting
Fly against one or more AI‐controlled pilots with streamers attached to the wings of your plane. Try to fly into the streamers of the opposing pilots without letting them fly into (and cutting) yours.
Every time you “cut” another pilot’s streamer, you will gain points. If you cut both of their streamers they will restart on the ground with new streamers. Depending on the difficulty level set at the start of the game round, the streamers will be longer or shorter, and you will gain more points for cutting them.
At the start of the round, the following options are available:
• Difficulty – This lets you set the difficulty of the round. At higher difficulty levels, the streamers will become shorter and harder to cut.
• Time – This lets you select the round time, in minutes.
• AI opponents – This lets you select the number of AI‐controlled opponents you will face when in solo‐flight mode (not online).
Please note that this competition is available for fixed‐wing models only, and also available in an online session for up to 4 pilots to play.
Laser combat
Fly against one or more AI‐controlled pilots. Each pilot has a laser pointing device attached to the bottom of their model – try to point your laser at the other pilots’ models to win points, while trying to avoid being lasered by another pilot.
At the start of the round, the following options are available:
• Difficulty – This lets you set the difficulty of the round.
• Time – This lets you select the round time, in minutes.
• AI opponents – This lets you select the number of AI‐controlled opponents you will face when in solo‐flight mode (not online).
Please note that this competition is available in an online session for up to 4 pilots to play.
Thermal gliding
This competition lets you test your thermal gliding expertise. Your model will start at a predetermined height, and thermals will be automatically generated on the field. Your task is to stay aloft for as long as possible before landing.
At the start of the round, the following options are available:

• Difficulty – This lets you set the difficulty of the round. The easier the difficulty level, the higher you will start.
Please note that this is a solo‐only competition and is available for gliders only.
Precise autorotation
This competition lets you test your autorotation expertise. Your model will start at the correct height, orientation and speed for an autorotation, but with no throttle. Your task is to safely land your model as close to the centre of the supplied target as you can.
At the start of the round, the following options are available:
• Orientation – This lets you set the initial position and direction that the model will be set to at the start of the round.
• Height – This option lets you select the initial height of the model.
• Inverted – This option lets you add extra difficulty by setting the model up for an inverted autorotation.
Please note that this is a solo‐only competition and is available for helicopters only.
Spot landing
This competition lets you test your landing expertise. Your model will start at the correct height, orientation and speed for a landing. Your task is to safely land your model as close to the centre of the supplied target as you can.
At the start of the round, the following options are available:
• Orientation – This lets you set the initial position and direction that the model will be set to at the start of the round.
• Height – This option lets you select the initial height of the model.
Please note that this is a solo‐only competition and is available for fixed‐wing models only.
Exiting a competition mode
Each competition mode has its own small round “X” button which lets you stop the competition. You can also use the Exit option at the bottom of the competition menu to quickly and easily end a competition mode at any time.
Please note that if you are competing online in a competition, and are not the host, if you exit a competition mode then you will also exit the session.

Multiplayer
Online flying can add a whole new element of randomness and excitement to flying on Phoenix, as well as let you network and socialise with a huge number of pilots from around the world. Phoenix includes a fully‐featured online networking and matchmaking system called Phoenix Online which lets you find other Phoenix pilots and fly with them over the internet.
To start your online flying experience, open the multiplayer menu and click the Go Online button.
Online sign‐in
Before you can go online, you must set up your online profile so that other pilots can recognise you on the field. The Online Sign‐in menu lets you create an online persona that other pilots can view when you join an online session. The two main pieces of information are your Avatar and Username:
Avatars
Your avatar is your online icon or image when flying with other pilots, and is most quickly associated with you. Your avatar appears when chatting in the Online Lobby or in an Online Session, on the multiplayer toolbar, and next to your model on the virtual flying field.
When you first start Phoenix, a random avatar is assigned to you. If you wish to change this, click the large avatar image/icon button on the far left of the Online Sign‐in panel to open the Choose Avatar menu:
Choosing an internet avatar
The main panel of this menu shows you all of the available avatars to choose from, with your current avatar displayed with an orange highlight around it. Scroll down the list until you find an avatar that you like, and left‐click it with your mouse to choose it.
When you are happy with your new choice, click the Finished button to close the menu and save your new avatar choice. Clicking the Cancel button will close the menu without changing the selected avatar. Clicking the Random button will automatically choose a random icon for you and close the menu.
Username
The other most important piece of online information is your username. This identifies you to the system and to other players. Type the username that you would like to be known as online into the Username edit‐box. This will be displayed when chatting in the Online Lobby or in an Online Session, on the multiplayer toolbar, and next to your model on the virtual flying field.
Please note that your username must be at least five characters long.
Other personal information
As well as your avatar and username, Phoenix lets you enter much more information about yourself, creating an online personality that others can see and learn more about you from.
Please note that all of this information is completely optional and you should not enter this information unless you are absolutely sure you wish to. You should also not enter any detailed information such as telephone number or your street address.
When you have selected a username and avatar, and entered any other information you wish, you can sign into the Phoenix Online service by pressing the Sign In button, or return to solo flight by pressing the Cancel button.

Phoenix Online Lobby
Once you have successfully signed into the online service, you will be taken to the Phoenix Online lobby screen. This menu connects you will Phoenix pilots all over the world, and acts as a matchmaking service to help you find available sessions close to your location.
Available Sessions List
To the left of the menu is the Available Session List. This contains a list of all Phoenix sessions that other pilots have created. The list is divided into two main categories: Local Sessions and Internet Sessions. Local sessions are those found on your Local Area Network (LAN), while Internet Sessions are those found online, on the internet.
The Internet Sessions category is sorted by location to make finding a session close to you easier. When joining an online session, it is always advisable to join one that is as close to you geographically as possible, as these will typically have less lag while makes the session smoother and more enjoyable as well as avoiding any language difficulties that may arise from flying in a session located in another country.
When you place your mouse cursor over any session in this list, a description will appear to the right in a special tooltip frame. This contains details on the session such as the session name, address and hosting username. You can also see the current session state such as the flying site, number of pilots and competition mode underway. If the session has a password set, this will appear at the bottom of the details tooltip.
The Chat Window
The larger panel to the right of the Online Lobby menu is the Lobby Chat Window. Any Phoenix pilot who is not already flying in an online session appears in the lobby chat window, and is able to chat with all other pilots currently in the lobby. This is useful for meeting and arranging new sessions.
If you see a message in this panel informing you “Master Server not found”, please check that your computer is successfully connected to the internet and any firewalls or virus‐checking software you may have has been configured to allow Phoenix access to the internet.
When a new pilot joins the lobby, a notification appears in the chat window, and their avatar and username appears in the panel along the bottom of the chat window screen. Any chat messages they type will now appear in the chat window, alongside their username and a small version of their avatar.
You can chat with the other lobby users by clicking in the edit‐box marked “<Type a message here>”, typing your message, and then either clicking the Send button to the right, or pressing <ENTER> on your keyboard. You can type a multi‐line message by pressing <CTRL+ ENTER > to start a new line when typing a message.
When chatting with other online users, please be civil. The online system will filter any perceived swear‐words automatically, but we ask that all users refrain from using course or threatening language.
Joining a Session
When you have located a suitable session that you wish to join, select it by left‐clicking with your mouse in the Available Sessions List, and then press the Join Session button below. Phoenix will then attempt to join the session, and a status‐bar will inform you of the progress.
If the session is password‐protected, a notification will appear and you will be asked to enter the password to continue joining the session. You must know the password beforehand to be able to join the session.
If the session is successfully joined, you will be taken to the Main View, and the other pilots who are flying in the session will appear.
If a problem occurred when joining the session (such as the session is full) you will be informed of this and taken by to the Online Lobby menu.
Creating a Session
If you did not locate a session you wish to join you can create a new session by clicking the Create Session button below the Available Sessions List. This will display the Create Session menu where you can setup your new session:
• Session name – Type a name for your new session here. This will be displayed in the Available Sessions List for all other Phoenix users to find and join.
• Session type – Select a type of session to start. The default is Free‐Flight, where pilots fly around the selected field. You can also choose one of the available multiplayer‐enabled competition modes here if you wish (this can be changed during the session).
• Password – Enter an optional password for the session here. Any user wishing to join the session must know this password beforehand or they will not be able to join your session.
• Session location – Select the closest match to your current location from this drop‐down box. This is important as it will help others choose the most appropriate session when browsing the Available Sessions List. Selecting the correct option here will also prevent users from far away joining your session and causing lag.
• Maximum Pilots – Phoenix lets a maximum of four pilots actively fly in a session, but up to eight pilots can be in the session, spectating and using the chat facilities. Set the maximum number of pilots that can join the session here.
• Advertise session – If you wish your session to be available online for others to join, make sure that this option is checked. If it is not, your session will not appear in the Available Sessions List.
• Allow voice‐chat – This option enables/disables the voice‐chat functionality in Phoenix. When this is enabled, voice‐chat will be enabled in the session, and pilots with microphones and speakers/headphones will be able to chat with each other.
• Allow model collisions – This option enables/disables model to model collisions during an online session. With this enabled, models that impact each other will be damaged, usually resulting in a crash. With this disabled, models will not impact in an online session.
• Kick high‐lag users – With this option enabled, if Phoenix detects a user has too high a ping, they will be automatically ejected from the session to preserve the session smoothness.
• Allowed models – This drop‐down box lets you select the type of models that are allowed in the session. The default “All Models” option allows any model to be flown in the session. Selecting one of the other options only allows that type of model to be flown in the session.
Once you have set all of the options that you wish for your new session, click the create button to start the session. Click the cancel button to return to the Online Lobby.
Flying in an online session
Once you have successfully created or joined an online session, you will be taken to the Main View, and the Multiplayer Toolbar will appear at the bottom of the screen. The rest of the Multiplayer menu will also become available.
You can now fly around the selected field with the other pilots in the session (if any), chat with them using the voice‐chat or text‐chat systems, and spectate their models and view their control movements. If you are the host of the session, you will also be able to change the current flying site or competition mode, and also kick and ban users from the session.
Exiting an online session
If at any time you wish to leave an online session you have created or joined, press the “Go Offline” button at the top‐left of the Multiplayer Toolbar, or the Go Offline menu item under the Multiplayer menu. If you were the host of the session you have just left, the pilot who joined the session first will become the new host of the session.
Fly/Spectate
There are two main ways to use the online part of Phoenix – you can either fly with the other pilots much as you would in a solo flight session, or enter the spectate mode, where the camera tracks the other pilots in the session and you can view their control movements using the onscreen controller (see the view > displays > controller menu for more details on this).

To fly in an online session, you must have your transmitter connected and functioning. If you switch your radio off or disconnect it while in an online session, you will automatically be placed in Spectate Mode. If you wish to manually change to Spectate Mode, press the <SPACE BAR> on your keyboard, or click the multiplayer > spectate button at the bottom of the menu.
When in Spectate mode, you can track the model of another pilot easily by pressing the <N> key on your keyboard, or by using the view > camera > look at menu. The onscreen controller will change to reflect the control movements of whichever pilot you are spectating. When you wish to change back to flight mode again, make sure that your radio is connecting and functioning, and then press either the <SPACE BAR> or click the multiplayer > fly button at the bottom of the menu.
Multiplayer toolbar
When online, the multiplayer toolbar controls your interaction with the other pilots in the session. If you are the host of the session, this toolbar also contains controls for kicking or banning users. If the multiplayer toolbar is not visible when you move your mouse, enable it by clicking the multiplayer > multiplayer toolbar menu option, or the view > toolbars > multiplayer menu option. Expand the toolbar by clicking the expand/retract button in the toolbar’s tab (see the Toolbars topic for more information on using toolbars).
To the left of the multiplayer toolbar are the session control buttons:
• Go Offline – Clicking this button will close your online session, returning you to solo mode quickly and easily. If you were the host of the session, the pilot who joined the session first will become the new host.
• Kick User – Available if you are the host only, this button will kick the selected user from the session. The user will be informed that they have been kicked from your session, and will not be able to join again for at least 30 seconds.
• Ban User ‐ Available if you are the host only, this button will permanently ban the selected user from the session. The user will be informed that they have been banned from the session, and will not be able to join your session again.
• Mute/un‐mute User – This button lets you completely mute a user. Once muted, you will not receive any more text or voice‐chat messages from that user until you un‐mute them. When a user has been muted, you will see a small “muted” icon appear next to them in the multiplayer toolbar.
Beside the session controls you will see all of the users currently in the session. Each user is displayed with their avatar image/icon, name and the model they are currently flying (or if they are spectating). You can select a user by highlighting them with your mouse cursor, then left‐clicking. You can then use one of the session controls. De‐select a user by again left‐clicking them.
To the far‐right of the multiplayer toolbar is the chat pane. This lets you text‐chat with the other users in the session, as well as notifying you of any session changes such as pilots joining or leaving, changing model or spectating, or the flying site or session type changing. To send a chat message to the other pilots, type a message in the edit‐box marked “<Type a message here>” and press enter to send.
With the multiplayer toolbar retracted or closed, notifications and chat messages will appear directly on the Main View before disappearing after a short time. You can also open the toolbar with the chat bar selected by pressing the <C> key on your keyboard. You can then type a message straight away.
Voice chat
As well as the text‐based chat, Phoenix also allows users to voice‐chat with each other if they have a compatible sound‐card, speakers/headphones and a microphone.
Voice‐chat is only enabled if the host of the session has set this option. You are also asked when you join a session which has voice‐chat enabled if you would like to use this feature. If you click “No” then your voice will not be broadcast to the other pilots. You can also control the voice‐chat feature using the multiplayer > voice chat menu:
• Enabled – With this option selected, voice‐chat will be active if the host has enabled this functionality, and you have a compatible sound‐card, speakers/headphone and a microphone.
• Voice activated – This option controls whether the voice‐chat is automatically broadcast when you speak. With this option enabled, Phoenix will detect sounds over a certain volume level and send them to the other

pilots. With this option disabled, you will need to hold down the Voice Activation keyboard key (<V> by default) to broadcast voice‐chat to the other pilots.
• Mute all Users – Clicking this option will mute all users in the session. With this set, you will not receive any voice‐chat messages from any pilot in the session.
Starting an online competition mode
As well as the solo high‐score and challenge modes, some competition modes can be flown online against other pilots. The multiplayer‐compatible modes are as follows:
• Bomb‐drop – Compete to drop as many bombs as possible as close to the target centres as you can to earn more points than the other pilots in the session. This competition is for fixed‐wing models only.
• Balloon Bursting – Fly with the other pilots around the flying site, bursting as many balloons as you can to earn as many points as possible.
• Streamer Cutting – You and the other pilots will each have two streamers attached to your model’s wings. Gain points by “cutting” the other pilots’ streamers. This competition is for fixed‐wing models only.
• Laser Combat – All pilots have a laser pointer attached to their model. Point your laser at the other pilots’ models to gain points.
• Thermal Gliding – All pilots start high in the sky and compete to find the thermals on the flying site and stay aloft for as long as possible. This competition is for glider models only.
Please note that you can only start an online competition mode if you are the host of the session. You can specify a competition mode when you start the session, using the Session Type drop‐down box in the Create Session menu, or choose from the Competition menu while the session is underway.
When you start a competition mode online, you will see all of the session pilots in the competition start and options menu. Only the session users who were present during this stage (before the competition begins) can actually compete in the competition. Other pilots who join while the competition is underway are notified that a competition is ongoing, and must wait until the round ends before they can fly.
If you are not the host of the session, and the host decides to start a competition mode, you must wait for the host to start the competition round before you can fly. If you exit or cancel the competition menus, you will be ejected from the session.

Help
There are several ways to gain help in Phoenix. By opening the help menu, you can access this manual in your currently selected language by clicking the user manual option. If you are in Fullscreen Mode (See the System > Program Setup > Display menu for more information) then Phoenix will automatically change you to Windowed Mode so that the manual can be viewed.
Many menus, displays and notifications in Phoenix also have a green “Help” button marked with a magnifying glass in the top‐right of the frame. Clicking this button will open this manual at the appropriate page for the display, message or menu that is open.
The other option in this menu is the About menu. This menu lets you see the current program version that is installed, as well as some other program‐specific information.