read me first! - hsqglobal · • triángwulo de advertencia • wear eye protection • usar gafas...
TRANSCRIPT

READ ME FIRST!ADDENDUM for PS1411S
OPERATING INSTRUCTIONS / INSTRUCCIONES DE OPERACION
PORT-A-SAW Masonry / Refractory SawPS1411S Electric Model
MODEL: PS1411S (1-1/2 HP, 115 Volt Electric)
0A7794 © March 25, 2002Printed in U.S.A.
117400 West 119th StreetOlathe, Kansas 66061, USACustomer Service ..............800-288-5040Corporate. Office ............... 913-928-1000Customer Service-FAX ...... 800-825-0028Corporate Office FAX ........ 913-438-7951International FAX ............... 913-438-7938
Target Products JapanRoom 806Taichi Roppongi Mansion6-3-15 RoppongiMinato-Ku, Tokyo,Japan 106Telephone ...................….. 03-5411-2775FAX ................................... 03-5411-2776
Diamant Boart/Target Australia26/7 Salisbury RoadCastle Hill, N.S.W. 2154AustraliaTelephone ......................... 02-96344677FAX ................................... 02-96804982

1
IMPORTANT!This document describes only the specific features of the
PS1411S model. For the complete operating instructions andparts list please refer to the OPERATING INSTRUCTIONS
AND PARTS LIST document supplied with the saw.
BEFORE YOU BEGIN: Read and understand all warnings and instructions before operating the Machine described inthis manual. WARNINGS AND CAUTIONS IN THIS MANUAL MUST BE UNDERSTOOD AND FOLLOWED!FAILURE TO OBEY WARNINGS MAY RESULT IN SERIOUS INJURY OR DEATH. IT IS YOUR RESPONSIBILITYto make sure persons who use this machine have read this manual.
CONTENTS PageSymbol Definitions (English & Spanish).............................................................................................. 2 - 3Figures: FIG. 9 .................................................................................................................................... 4Parts Identification .............................................................................................................................. 4Wiring Diagrams ................................................................................................................................ 4SAFETY WARNINGS - DO’s & DO NOT’s......................................................................................... 5 - 6 Specifications & Power Sources ...................................................................................................... 7 Saw Dimensions…………………………………………………………………………………See Operating Instructions Instructions:
1 - Features............................................................................................................................ 8 - 92 - Assembly .......................................................................................................................... 8 - 93 - Check before Operating, 4 - Fitting The Blade................................................................ 8 - 95 - Operating Instructions ...................................................................................................... 8 - 96 - Incidents During Operation............................................................................................... 8 - 97 - Maintenance ..................................................................................................................... 8 - 98 - V-Belt Tension .................................................................................................................. 8 - 99 - Important Advise............................................................................................................... 8 – 910 - Accessories .................................................................................................................... 8 - 911 - Repairs, 12 - Spare Parts .............................................................................................. 10
Parts List Information.......................................................................................................................... 10Warranty ............................................................................................................................................. 12

2
SYMBOL DEFINITIONSDEFINICIÓN DE SIMBOLOS
____________________________________________________________________________________________
• Please read the instructions for use prior to operating the machine for the first time.• Antes de la puesta en marcha, lea detenidamente las instrucciones y familiaricese con la máquina.
• Mandatory• Obligatorio
• Indication• Indicación
• Prohibition• Prohibición
• Warning Triangle• Triángwulo De Advertencia
• Wear Eye Protection• Usar Gafas De Protección
• Wear Head Protection• Usar Casco De Protección
• Wear Breathing Protection• Usar Máscara De Protección
• The Use Of Ear Protection Is Mandatory• Es Obligatorio El Uso De Protección Auditiva
• Wear Safety Shoes• Usar Zapatos De Seguridad
• Wear Appropriate Clothing• Usar Ropa Adecuada
• Motor Off• Parar El Motor
• Use In Well Ventilated Area• Usar En Una Área Bien Ventilada
• Do Not Use In Flammable Areas• No Usar In Áreas Inflamables
• Machinery Hazard, Keep Hands And Feet Clear.• Máquina Peligrosa - Mantenga Manos Y Pies Alejados De La Máquina

3
• Danger, Poison Exhaust Gas• Peligro, Gases De Escape Tóxicos
• No Non-working Personnel In Area• Prohibido Para Personas Ajenas A La Obra
• No Smoking• No Fumar
• Do Not Operate Without All Guards In Place• No Operar Sin Todas Las Protecciones In Su Sitio
• Always Keep the Blade Guards In Place• Mantenga Siempre Las Protecciones De La Hoja En Su Sitio
• Keep Work Area Clean/Well Lit, Remove All Safety Hazards• Mantenga Limpio El Sitio De Trabajo/Bien Iluminado, Elimine Todos Los Riesgos De Seguridad
• Dangerously High Noise Level• Nivel De Ruido Elevadamente Peligroso
• Pay Extreme Attention To The Care And Protection Of The Machine Before Starting Up• Ponga Extrema Atención Al Cuidado Y Preparación De La Máquina Antes De Ponerla En Marcha
• Remove Tools From Area and Machine• Elimine Las Herramientas Del Área Y De La Máquina
• Oil Required• Necesita Aceite
• Dipstick, Maintain Proper Oil Level• Varilla De Control, Mantenga El Nivel De Aceite Correcto
• Lubrication Point• Punto De Lubrication
• Unleaded Fuel Only• Solamente Combustible Sin Plomo
• Repairs Are To Be Done By An Authorized Dealer Only• Las Reparaciones Deben Ser Efectuadas Únicamente Por Un Distribuidor Autorizado
• Diamond Blade• Sierra Diamantada
• Blade Diameter• Diámetro De La Hoja

4
FIGURES (Model PS1411S):
Only Unique Items For Model PS1411S Shown(See Operating Instruction Document for items not shown on FIG. 9)
PS1411S Parts Identification:
PP. Reset Button (PS1411S Only)
RR. ON / OFF Power Switch (PS1411S Only)
WIRING DIAGRAM: 1-1/2 HP ELECTRIC MOTOR (Model PS1411S)

5
SAFETY WARNINGS FOR OPERATION OF THIS MACHINEDO read this entire operator’s manual before operating this machine. Understand all warnings, instructions, and controls.DO keep all guards in place and in good condition.DO wear safety-approved hearing, eye, head and respiratory protection.DO read and understand all warnings and instructions on the machine.DO read and understand the symbol definitions contained in this manual.DO keep all parts of your body away from the blade and all other moving parts.DO know how to stop the machine quickly in case of emergency.DO shut off the engine and allow it to cool before refueling.DO inspect the blade, flanges and shafts for damage before installing the blade.DO use only reinforced abrasive blades or steel center diamond blades manufactured for use on masonry saws.DO use only blades marked with a maximum operating speed greater than the blade shaft speed. Verify speed by
checking blade shaft rpm and pulley diameters and blade flange diameters.DO verify saw drive configuration by checking blade shaft RPM, pulley diameters, and blade flange diameter.DO read all safety materials and instructions that accompany any blade used with this machine.DO inspect each blade carefully before using it. If there are any signs of damage or unusual wear, DO NOT USE THE
BLADE.DO mount the blade solidly and firmly, Wrench tighten the arbor nut.DO make sure the blade and flanges are clean and free of dirt and debris before mounting the blade on the saw.DO use dry cutting diamond blades with a 1� diameter arbor only. Never use damaged or worn blade flanges.DO use the correct blade for the type of work being done. Check with blade manufacturer if you do not know if blade is
correct.DO operate this machine only in well ventilated areas.DO instruct bystanders on where to stand while the machine is in operation.DO establish a training program for all operators of this machine.DO clear the work area of unnecessary people. Never allow anyone to stand in front of or behind the blade while the
engine is running.DO make sure the blade is not contacting anything before starting the engine.DO always tie down the machine when transporting.DO use caution and follow instructions when setting up or transporting the machine.DO have all service performed by competent service personnelDO verify the blade arbor hole matches the machine spindle before mounting the blade.DO make sure the gas caps of the machine and the fuel can are properly tightened before starting the engine. Move fuel
can at least 10 feet from machine after fueling.DO clean the machine after each day’s use.DO remove adjusting keys and wrenches from tool before turning it on.DO keep the handles dry, clean and free of oil and dirt.DO carefully maintain and clean for better and safer performance. Follow instructions for changing accessories. Inspect
tool cords periodically and, if damaged, have repaired by authorized service facility.DO use the proper blade flange size for each blade size. Never use damaged or worn blade flanges.DO use caution when handling fuel.DO only cut in a straight line.DO only saw as deep as the job specifications require.DO always give a copy of this manual to the equipment user. If you need extra copies, call TOLL FREE 1-800-288-5040.DO make sure electric powered machines are plugged into a properly grounded circuit.DO make sure power cords are the proper size and in good condition.DO follow all electrical codes in your area.DO use correct voltage and proper extension cords. Never carry tool by cord or yank it to disconnect it from receptacle.
Keep cord away from heat, oil and sharp edges.DO disconnect tools from power source when not in use, before servicing and, when changing accessories.DO carefully maintain and clean for better and safer performance. Follow instructions for changing accessories. Inspect
tool cards periodically and, if damaged, have repaired by authorized service facility.

6
SAFETY WARNINGS FOR OPERATION OF THIS MACHINE
DO NOT operate this machine unless you have read and understood this operator’s manual.DO NOT operate this machine without the blade guard, or other protective guards in place.DO NOT Leave this machine unattended while the engine is running.DO NOT Work on this machine while the engine is running.DO NOT Operate this machine when you are tired or fatigued.DO NOT Use a wet blade without adequate water supply to the blade.DO NOT Exceed maximum blade speed shown for each blade size. Excessive speed could result in blade breakage.DO NOT Operate the machine if you are uncertain of how to run the machine.DO NOT Use damaged equipment or blades.DO NOT Touch or try to stop a moving blade with your hand.DO NOT Cock, jam, wedge or twist the blade in a cut.DO NOT Transport a cutting machine with the blade mounted on the machine.DO NOT Use a blade that has been dropped or damagedDO NOT Use carbide tipped blades.DO NOT Use segmented diamond blades without water unless specifically designed for dry cutting.DO NOT Touch a dry cutting diamond blade immediately after use. These blades require several minutes to cool after
each cut.DO NOT Use damaged or worn blade flanges.DO NOT Allow other persons to be near the machine when starting, refueling, or when the machine is in operation.DO NOT Operate this machine in an enclosed area unless it is properly vented.DO NOT Operate this machine in the vicinity of anything that is flammable. Sparks could cause a fire or an explosion.DO NOT Allow blade exposure from the guard to be more than 180 degrees.DO NOT Operate this machine while under the influence of drugs or alcohol.DO NOT Operate this machine with the belt guard or blade guard removed.DO NOT Operate this machine unless you are specifically trained to do so.DO NOT Use a blade that has been over heated (Core has a bluish color).DO NOT Jam material into the blade.DO NOT Grind on the side of the blade.DO NOT Start cutting with a saw until you have a clear work area and secure footing.
*****************
This saw was designed for certain applications only. DO NOT modify this saw or use for any application other thanfor which is it was designed. If you have any questions relative to its application, DO NOT use the saw until you havewritten Diamant Boart, Inc. and we have advised you.
Diamant Boart, Inc.17400 W. 119th Street
Olathe, Kansas 66061

7
PORT-A-SAW SPECIFICATIONS (Model PS1411S Only)MODEL NO. PS1411S **
TYPE 1-1/2 HP Electric (115 Volts)Item No.
(with Water Pump) M50114Blade Guard
Capacity10 – 14”
(250 – 350 mm)Blade Shaft RPM 2150
Max. Depth Of Cut 5.0” (127 mm)Blade Arbor Size 1.00” (25.4 mm)
Blade Shaft: Sealed Ball BearingsBlade Shaft Drive: One 360J6 Poly-V Belt
Blade Guard: One Piece Steel, Sta-Level™ Design, 14” (350 mm) Maximum CapacityBlade Coolant: Water
Water Pan: 3.86 x 17.73 x 30.73 Inch (98 x 450 x 780.5 mm), 6.75 Gallon (25 Liter) Capacity (At 3 ” Depth)Conveyor Cart: Cast Aluminum w/ Vulcanized Rubber Top, Adjustable Measuring Rule, 45° / 90° Cutting Guide
Water Pump:PS1411S
Electric Model Only:100 Gallons / Hour, Submersible, Totally Epoxy Sealed, Thermal Over Load Protected
Frame: Heavy duty, Jig Welded “X” Braced Steel, Open Throat Design For Unlimited RippingWeight, Pounds (kg):
Saw Crated: 171 (77.7)Saw Uncrated: 160 (72.7)Saw Operating(Water In Pan): 221 (100.5)Folding Stand
(Unboxed): 24 (10.9)Foot Pedal Kit
(Boxed): 14 (6.4)Electric Cord: N / A
PORT-A-SAW POWER SOURCEMODEL NO. SPS-1S **
TYPE ElectricEngine / Motor: BaldorHorsepower (kw): 1-1/2 (1.1)RPM: 1725Specifications: T.E.F.CVoltage: 115Cycle (Hz) / Current / Phase: 60 / A.C. / 1Full Load Amps: 14.4 (at 115 V) **Displacement: ------
Bore: ------Stroke: ------
Cylinders / Cycle: ------Fuel Capacity: ------Oil Capacity: ------Air Filter: ------Starter: CapacitorCoolant: Air
** Motor On PS1411S is designed to run on a 15 Amp SinglePhase Electrical Circuit (Household Electrical Current)

8
• Mandatory• Obligatorio
• Prohibition• Prohibición
• Indication• Indicación
• Warning Triangle• Triángwulo DeAdvertencia
These signs will give advice for your safety
Before leaving our factory every machineis thoroughly tested.
Follow our instructions strictly and your machinewill give you long service in normal operatingconditions.
1. Features
See Operating Instructions / PartsList Document
Nominal Weight: See “Specifications on thisdocument”
Operating Weight: See “Specifications on thisdocument”
Blade Shaft RPM: See “Specifications” See“Specifications on this document”
Before starting up machine make sure youread these instructions and the separateOPERATING INSTRUCTIONS documentsupplied with the unit, also make sure thatyou are familiar with the operation of thismachine.
The working area must be completely clear,well lit and all safety hazards removed (nowater or dangerous objects in the vicinity)
The operator must wearprotective clothingappropriate to the work heis doing.We recommend hearing,respiratory and eyeprotection.
Any persons not involved in the work,should leave the area.
Use only blades marked with a maximumoperating speed greater than the bladeshaft speed.
2. Assembly
PS1411S Electric Model:
♦ Assemble the PS1411S Model using theinstructions provided in the OPERATING
INSTRUCTIONS AND PARTS LIST documentsupplied with this saw.
PS1411S Electric Model: ♦ The single phase masonry saw motor is furnished
with the correct NEMA configuration PLUG (OO)on the motor pigtail. The matching connectors areas follows:
Electric Motor Plugs & Connectors
MotorRating
Motor PigtailPlug
(NEMA No.)
ConnectorRequired
(NEMA No.)
1-1/2 HP 15A, 125V 5-15P 5-15R
IMPORTANT NOTE: The PS1411S model has a singlevoltage ONLY motor. The motor CAN NOT be rewiredfor 208-230 volts. Also the motor on this saw DOESNOT have a voltage change switch mounted on theterminal box like the PS1411 model.
WARNING: Always make sure the saw inconnected to a properly grounded electricaloutlet. Failure to comply with this warningcould result in serious bodily injury ordeath!
WARNING: DO NOT operate on low voltage!Low voltage causes loss of power, motoroverheating, and possibly motor windingburnout. Voltage should be checked at themotor while it is operating.
Good motor performance depends on proper voltage.Extension cords that are too long and / or too smallreduce the voltage to a motor under load. Useextension cords NO SMALLER than the sizes indicatedin the chart shown below:
EXTENSION CORD SIZE (Minimum)MOTOR 50 ft Long 75 ft Long 100 ft LongHP 120 V 230 V 120 V 230 V 120 V 230 V
1-1/2 # 12 N. A. # 10 N. A. # 10 N. A.
3. Check Before Operating
See Operating Instructions / PartsList Document
All Models:
Electric Models Only:

9
♦ Make sure that the extension cord length isproperly sized for the motor used on this saw. Seethe chart in Section 2 of this document.
WARNING: Make sure the unit is connected toa properly grounded outlet. Failure to complywith this warning could result in serious bodilyinjury or death!
4. Fitting The Blade (See FIG. 7)
See Operating Instructions / PartsList Document
WARNING: Conventional “Wet” diamondblades MUST be used with water. DO NOTuse conventional “Wet” diamond bladeswithout water. Using conventional “wet”diamond blades without water can result ininjury or death of the operator or persons in thework area!
Warning: Use only Abrasive blades of areinforced type. Never use an abrasive bladewith water.
5. Operating Instructions
♦ STARTING / STOPPING THE UNIT (PS1411S Electric Model Only):
The ON / OFF POWER SWITCH (See FIG. 9) islocated on the front of the motor. It is NOT remotemounted on the head platform, as with the 115/208-230V 1-1/2 hp motor.
Stop the unit by turning the POWER SWITCH(RR), located on the motor, to the OFFposition (See FIG. 9 on this document). Waitfor all blade movement to stop beforeremoving material from the machine.
See Operating Instructions / PartsList Document for Complete
Operating InstructionsWARNING: Conventional “Wet” diamondblades MUST be used with water. DO NOTuse conventional “Wet” diamond bladeswithout water. Using conventional “wet”diamond blades without water can result ininjury or death of the operator or persons in thework area!
WARNING: When cutting without water useonly diamond blades that are intended to beused dry (without water). Conventional “Wet”diamond blades MUST be used with water.
WARNING: Keep hands clear of rotating bladeduring operation. READ ALL SAFETYWARINGS before operating this machine.
6. Incidents During Operation
♦ If the engine or motor stops during sawing, checkthe following:
a) Interruption to electrical connection:Check all electrical connections.
b) Manual Overload switch has been tripped:Single phase, 60 Hertz motors are equipped with amanual overload RESET BUTTON (PP) (See FIG. 9).If the motor stops because of an electrical overload andthe overload RESET BUTTON (PP) trips, turn themotor POWER SWITCH (RR) (On the motor) to theOFF position (See FIG. 9). Allow the motor to cool for5 to 10 minutes, then push the RESET BUTTON (PP).A click indicates that the motor is reset and ready foroperation. Restart the motor by turning the POWERSWITCH (RR) to the ON position.
See Operating Instructions / PartsList Document
7. Maintenance
WARNING: Before performing anymaintenance, ALWAYS locate the machine ona level surface with the engine / motor OFF,and the start switch in the OFF position, andthe power source disconnected.
See Operating Instructions / PartsList Document
8. V-Belt Tension
See Operating Instructions / PartsList Document
9. Important Advise
See Operating Instructions / PartsList Document
WARNING: Never use fire bricks to “sharpen”or dress diamond blades!
10. Accessories
See Operating Instructions / PartsList Document

10
11. Repairs
See Operating Instructions / PartsList Document
12. Spare Parts
See Operating Instructions / PartsList Document
PARTS LISTLISTA DE PIEZAS
See Operating Instructions and Parts List DocumentSupplied with the unit.
Note: Use a document dated April 1998 or later to getthe correct parts for the model PS1411S.

11
Notes:
12
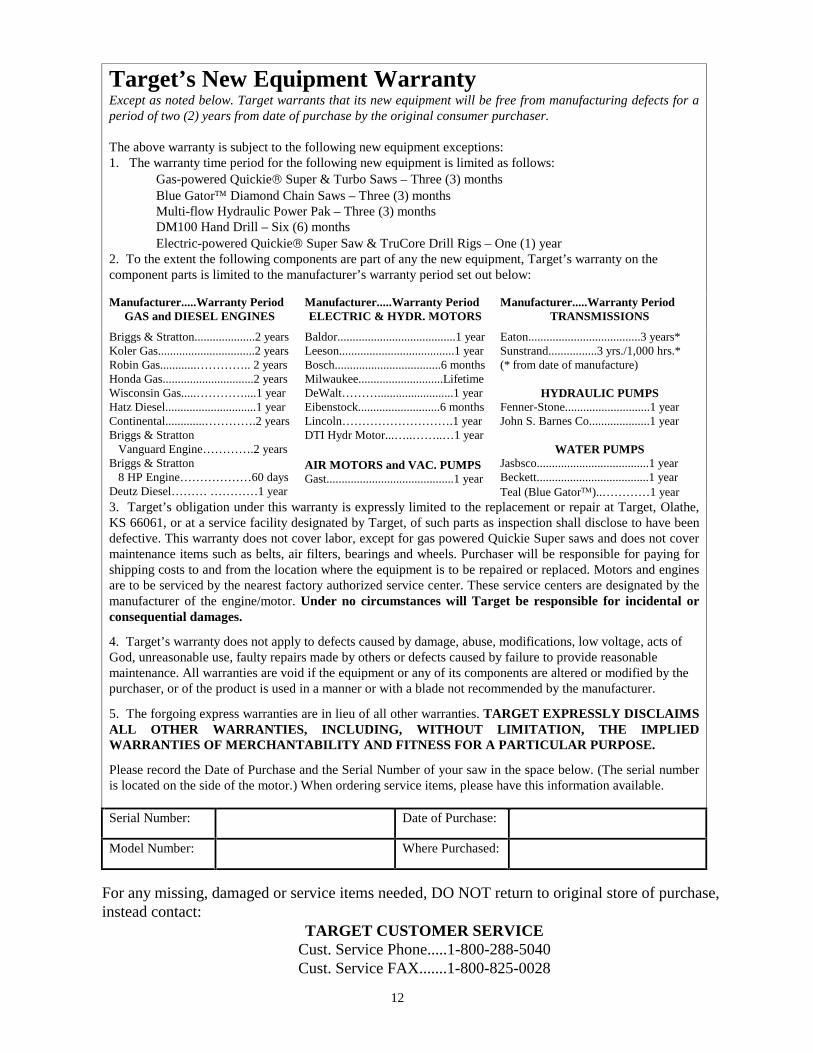
Target’s New Equipment WarrantyExcept as noted below. Target warrants that its new equipment will be free from manufacturing defects for aperiod of two (2) years from date of purchase by the original consumer purchaser.
The above warranty is subject to the following new equipment exceptions:1. The warranty time period for the following new equipment is limited as follows: Gas-powered Quickie Super & Turbo Saws – Three (3) months Blue Gator Diamond Chain Saws – Three (3) months Multi-flow Hydraulic Power Pak – Three (3) months DM100 Hand Drill – Six (6) months Electric-powered Quickie Super Saw & TruCore Drill Rigs – One (1) year2. To the extent the following components are part of any the new equipment, Target’s warranty on thecomponent parts is limited to the manufacturer’s warranty period set out below:
Manufacturer.....Warranty PeriodGAS and DIESEL ENGINES
Manufacturer.....Warranty PeriodELECTRIC & HYDR. MOTORS
Manufacturer.....Warranty PeriodTRANSMISSIONS
Briggs & Stratton....................2 yearsKoler Gas................................2 yearsRobin Gas............………….. 2 yearsHonda Gas..............................2 yearsWisconsin Gas.....…………....1 yearHatz Diesel..............................1 yearContinental.............………….2 yearsBriggs & Stratton Vanguard Engine………….2 yearsBriggs & Stratton 8 HP Engine………………60 daysDeutz Diesel……… …………1 year
Baldor.......................................1 yearLeeson......................................1 yearBosch...................................6 monthsMilwaukee............................LifetimeDeWalt……….........................1 yearEibenstock...........................6 monthsLincoln……………………….1 yearDTI Hydr Motor...…..……..…1 year
AIR MOTORS and VAC. PUMPSGast..........................................1 year
Eaton.....................................3 years*Sunstrand................3 yrs./1,000 hrs.*(* from date of manufacture)
HYDRAULIC PUMPSFenner-Stone............................1 yearJohn S. Barnes Co....................1 year
WATER PUMPSJasbsco.....................................1 yearBeckett.....................................1 yearTeal (Blue Gator)..…………1 year
3. Target’s obligation under this warranty is expressly limited to the replacement or repair at Target, Olathe,KS 66061, or at a service facility designated by Target, of such parts as inspection shall disclose to have beendefective. This warranty does not cover labor, except for gas powered Quickie Super saws and does not covermaintenance items such as belts, air filters, bearings and wheels. Purchaser will be responsible for paying forshipping costs to and from the location where the equipment is to be repaired or replaced. Motors and enginesare to be serviced by the nearest factory authorized service center. These service centers are designated by themanufacturer of the engine/motor. Under no circumstances will Target be responsible for incidental orconsequential damages.
4. Target’s warranty does not apply to defects caused by damage, abuse, modifications, low voltage, acts ofGod, unreasonable use, faulty repairs made by others or defects caused by failure to provide reasonablemaintenance. All warranties are void if the equipment or any of its components are altered or modified by thepurchaser, or of the product is used in a manner or with a blade not recommended by the manufacturer.
5. The forgoing express warranties are in lieu of all other warranties. TARGET EXPRESSLY DISCLAIMSALL OTHER WARRANTIES, INCLUDING, WITHOUT LIMITATION, THE IMPLIEDWARRANTIES OF MERCHANTABILITY AND FITNESS FOR A PARTICULAR PURPOSE.
Please record the Date of Purchase and the Serial Number of your saw in the space below. (The serial numberis located on the side of the motor.) When ordering service items, please have this information available.
Serial Number: Date of Purchase:
Model Number: Where Purchased:
For any missing, damaged or service items needed, DO NOT return to original store of purchase,instead contact:
TARGET CUSTOMER SERVICECust. Service Phone.....1-800-288-5040Cust. Service FAX.......1-800-825-0028

13

14
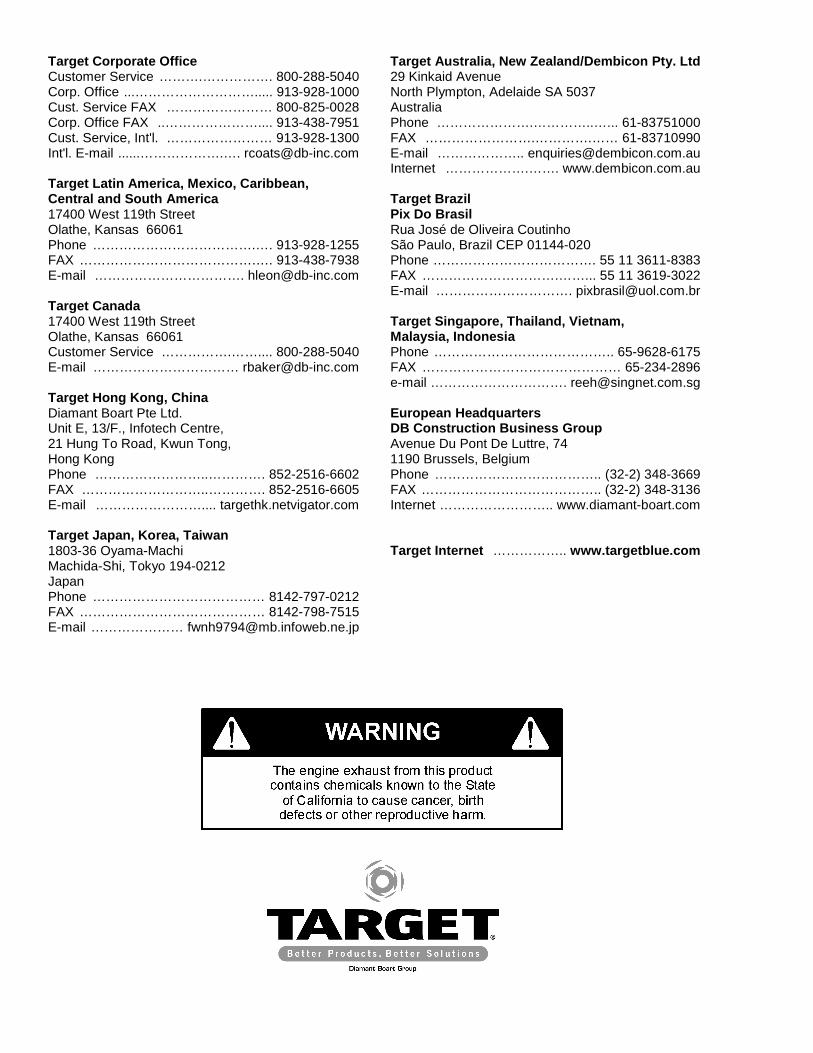
Target Corporate OfficeCustomer Service ……….……………. 800-288-5040Corp. Office ...………………………..... 913-928-1000Cust. Service FAX …………………… 800-825-0028Corp. Office FAX ..………………….... 913-438-7951Cust. Service, Int'l. …………………… 913-928-1300Int'l. E-mail ......……………….…. [email protected]
Target Latin America, Mexico, Caribbean,Central and South America17400 West 119th StreetOlathe, Kansas 66061Phone ……………………………….…. 913-928-1255FAX ………………………………….…. 913-438-7938E-mail ……………………………. [email protected]
Target Canada17400 West 119th StreetOlathe, Kansas 66061Customer Service …………….…….... 800-288-5040E-mail …………………………… [email protected]
Target Hong Kong, ChinaDiamant Boart Pte Ltd.Unit E, 13/F., Infotech Centre,21 Hung To Road, Kwun Tong,Hong KongPhone ……………………..…………. 852-2516-6602FAX ………………………..…………. 852-2516-6605E-mail …………………….... targethk.netvigator.com
Target Japan, Korea, Taiwan1803-36 Oyama-MachiMachida-Shi, Tokyo 194-0212JapanPhone ………………………………… 8142-797-0212FAX …………………………………… 8142-798-7515E-mail ………………… [email protected]
Target Australia, New Zealand/Dembicon Pty. Ltd29 Kinkaid AvenueNorth Plympton, Adelaide SA 5037AustraliaPhone ………………….…………..…... 61-83751000FAX …………………….………….…… 61-83710990E-mail ……………….. [email protected] ……………….……. www.dembicon.com.au
Target BrazilPix Do BrasilRua José de Oliveira CoutinhoSão Paulo, Brazil CEP 01144-020Phone ………………………………. 55 11 3611-8383FAX ………………………….……... 55 11 3619-3022E-mail …………………………. [email protected]
Target Singapore, Thailand, Vietnam,Malaysia, IndonesiaPhone ………………………………….. 65-9628-6175FAX ……………………………………… 65-234-2896e-mail …………………………. [email protected]
European HeadquartersDB Construction Business GroupAvenue Du Pont De Luttre, 741190 Brussels, BelgiumPhone ……………………………….. (32-2) 348-3669FAX ………………………………….. (32-2) 348-3136Internet …………………….. www.diamant-boart.com
Target Internet …………….. www.targetblue.com