read this manual carefully before using the equipment! · read this manual carefully before using...
TRANSCRIPT
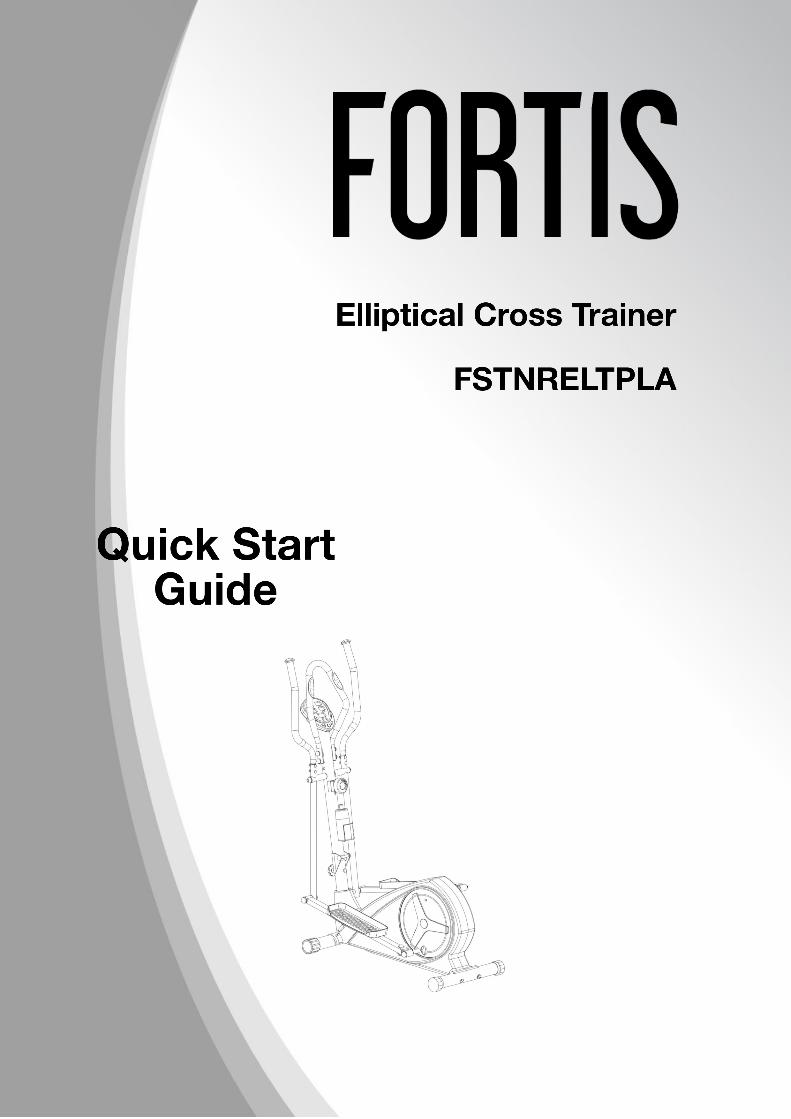

Read this manual carefully before using the equipment!
Table of ContentsImportant Safety Information............................................................................................................ 2Exploded Product Diagram................................................................................................................ 3Part List....................................................................................................................................................... 4Assembly.................................................................................................................................................... 5Exercise Meter Instruction.................................................................................................................. 8
Function Buttons............................................................................................................................... 8Functions & Operations.................................................................................................................. 8
Stretch Exercises..................................................................................................................................... 9
If you have any questions, please contact the Kogan customer support team.
1
Important Safety Information
Thank you for choosing our product. To guarantee your safety and health, as well as ensuring you get the best results from the equipment, please read and follow the following information carefully.
1. It is important to read the entire manual before assembling and using the equipment. Safe and effective use can only be achieved if the machine is assembled, maintained and used properly.
2. Before starting any exercise program, you should consult with your doctor to determine if you have any medical or physical conditions that could put your health and safety at risk or prevent you from using the equipment properly. Your doctor's advice is essential if you are taking medication that affects your heart rate, blood pressure or cholesterol level.
3. Be aware of your body's signals. Incorrect or excessive exercise can damage your health. Stop exercising if you experience any of the following symptoms:• pain• tightness in your chest• irregular heartbeat• extreme shortness of breath• lightheadedness• dizziness or feelings of nauseaIf you do experience any of these conditions, you should consult with your doctor before continuing with your exercise program.
4. Keep children and pets away from the equipment. The equipment is designed for adult use only.
5. Use the equipment on a solid, flat level surface with a protective cover for your floor or carpet. To ensure safety, the equipment should have at least 0.5m of free space in all directions.
6. Before using equipment, ensure all nuts and bolts are securely tightened. If you hear any unusual noises coming from the equipment during use, stop immediately. Do not use the equipment until the problem has been rectified.
7. The computer has a number of display functions. It is based on the amountof human movement to reflect the different levels of the corresponding values. These figures are approximations and are not 100% accurate.
8. Wear suitable clothing while using the equipment. Avoid wearing loose clothing that may get caught in the equipment or that may restrict or prevent movement.
9. This equipment is designed for indoor use.10. The maximum weight of the user is 120kg.11. Care must be taken when lifting or moving the equipment to ensure that
you do not injure your back.12. Please keep a copy of this instruction manual and tools handy for quick
reference.13. This equipment is not designed for therapeutic use.
2
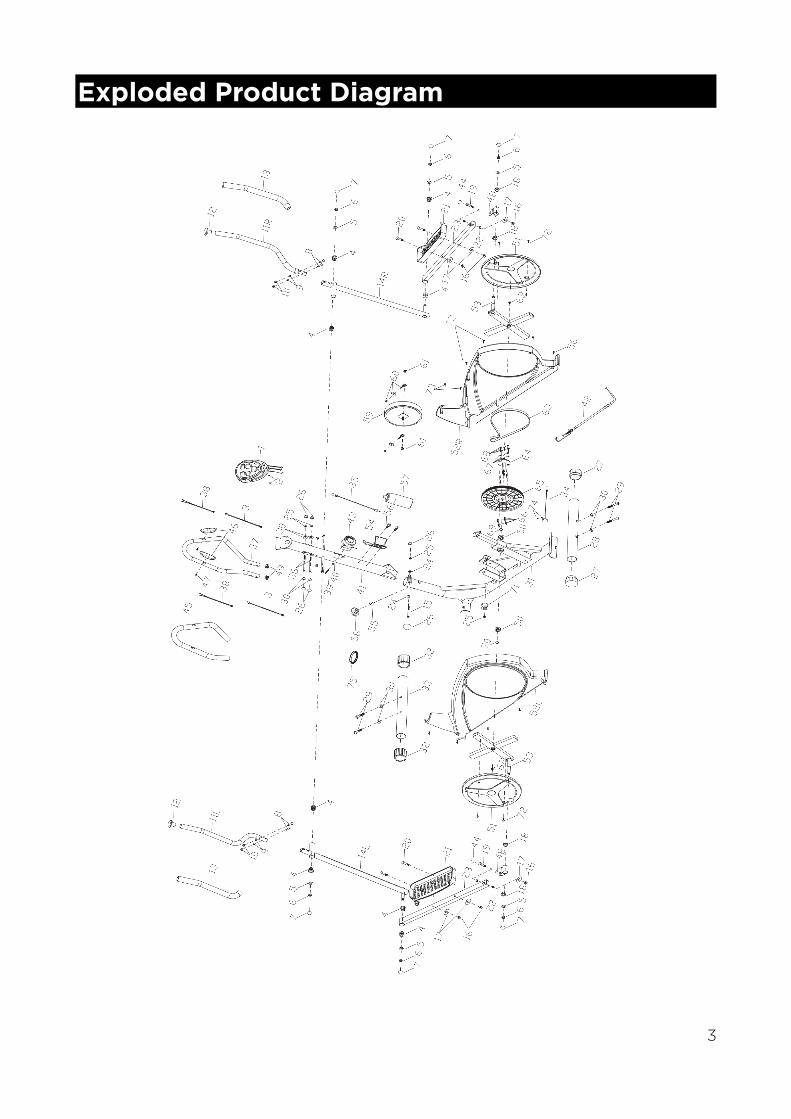
Exploded Product Diagram
3
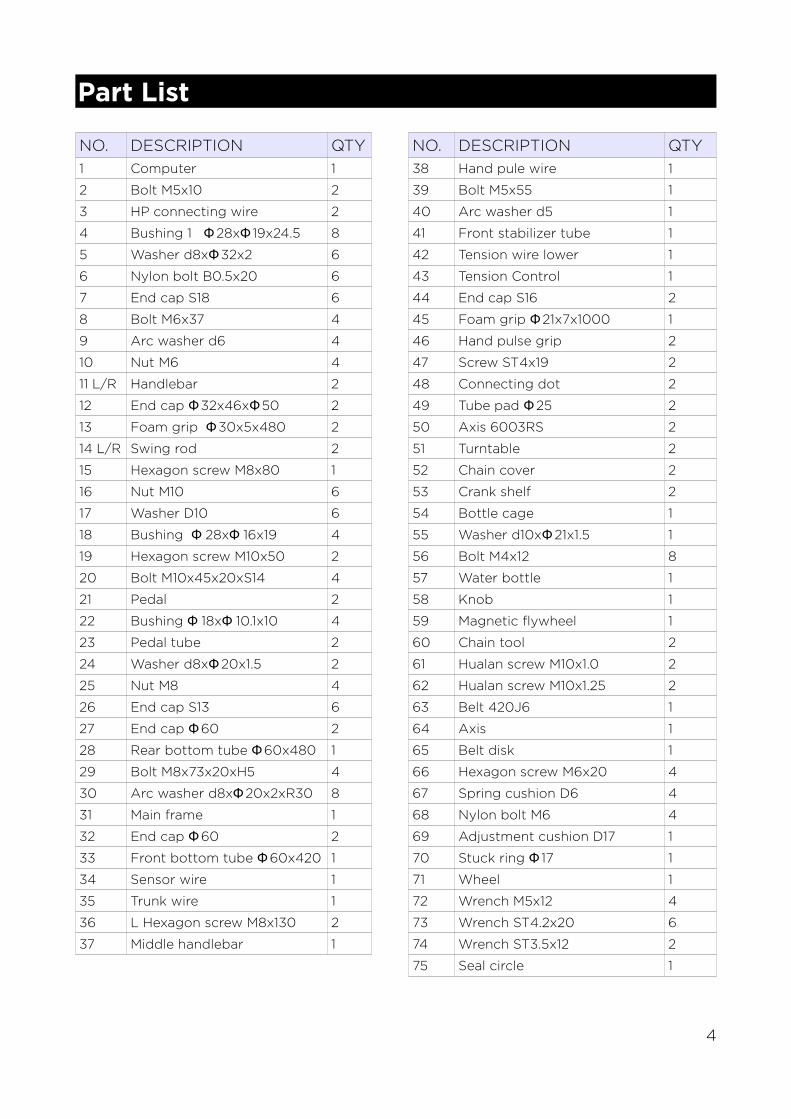
Part List
NO. DESCRIPTION QTY NO. DESCRIPTION QTY
1 Computer 1 38 Hand pule wire 1
2 Bolt M5x10 2 39 Bolt M5x55 1
3 HP connecting wire 2 40 Arc washer d5 1
4 Bushing 1 Φ28x Φ 19x24.5 8 41 Front stabilizer tube 1
5 Washer d8x Φ32x2 6 42 Tension wire lower 1
6 Nylon bolt B0.5x20 6 43 Tension Control 1
7 End cap S18 6 44 End cap S16 2
8 Bolt M6x37 4 45 Foam grip Φ21x7x1000 1
9 Arc washer d6 4 46 Hand pulse grip 2
10 Nut M6 4 47 Screw ST4x19 2
11 L/R Handlebar 2 48 Connecting dot 2
12 End cap Φ32x46x Φ50 2 49 Tube pad Φ25 2
13 Foam grip 30x5x480Φ 2 50 Axis 6003RS 2
14 L/R Swing rod 2 51 Turntable 2
15 Hexagon screw M8x80 1 52 Chain cover 2
16 Nut M10 6 53 Crank shelf 2
17 Washer D10 6 54 Bottle cage 1
18 Bushing 28x 16x19Φ Φ 4 55 Washer d10x 21x1.5Φ 1
19 Hexagon screw M10x50 2 56 Bolt M4x12 8
20 Bolt M10x45x20xS14 4 57 Water bottle 1
21 Pedal 2 58 Knob 1
22 Bushing 18x 10.1x10Φ Φ 4 59 Magnetic flywheel 1
23 Pedal tube 2 60 Chain tool 2
24 Washer d8x 20x1.5Φ 2 61 Hualan screw M10x1.0 2
25 Nut M8 4 62 Hualan screw M10x1.25 2
26 End cap S13 6 63 Belt 420J6 1
27 End cap 60Φ 2 64 Axis 1
28 Rear bottom tube 60x480Φ 1 65 Belt disk 1
29 Bolt M8x73x20xH5 4 66 Hexagon screw M6x20 4
30 Arc washer d8x 20x2xR30Φ 8 67 Spring cushion D6 4
31 Main frame 1 68 Nylon bolt M6 4
32 End cap 60Φ 2 69 Adjustment cushion D17 1
33 Front bottom tube 60x420Φ 1 70 Stuck ring 17Φ 1
34 Sensor wire 1 71 Wheel 1
35 Trunk wire 1 72 Wrench M5x12 4
36 L Hexagon screw M8x130 2 73 Wrench ST4.2x20 6
37 Middle handlebar 1 74 Wrench ST3.5x12 2
75 Seal circle 1
4
Assembly
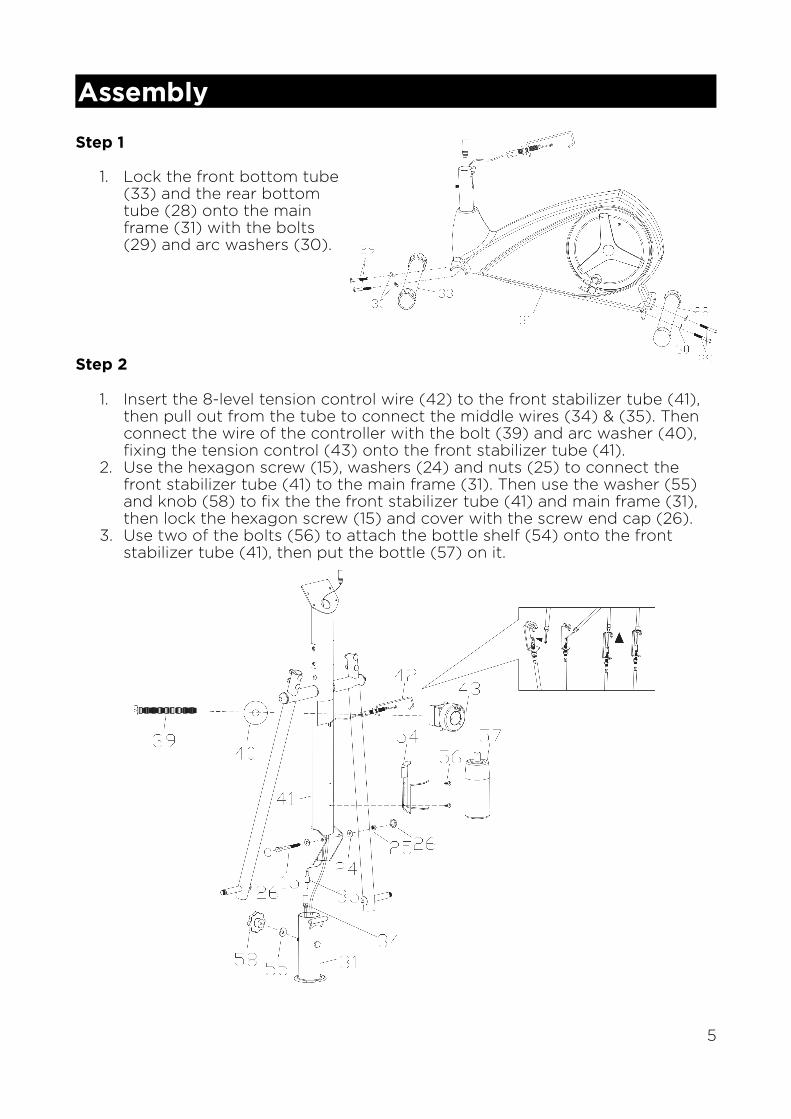
Step 1
1. Lock the front bottom tube(33) and the rear bottomtube (28) onto the mainframe (31) with the bolts(29) and arc washers (30).
Step 2
1. Insert the 8-level tension control wire (42) to the front stabilizer tube (41), then pull out from the tube to connect the middle wires (34) & (35). Then connect the wire of the controller with the bolt (39) and arc washer (40), fixing the tension control (43) onto the front stabilizer tube (41).
2. Use the hexagon screw (15), washers (24) and nuts (25) to connect the front stabilizer tube (41) to the main frame (31). Then use the washer (55) and knob (58) to fix the the front stabilizer tube (41) and main frame (31), then lock the hexagon screw (15) and cover with the screw end cap (26).
3. Use two of the bolts (56) to attach the bottle shelf (54) onto the front stabilizer tube (41), then put the bottle (57) on it.
5
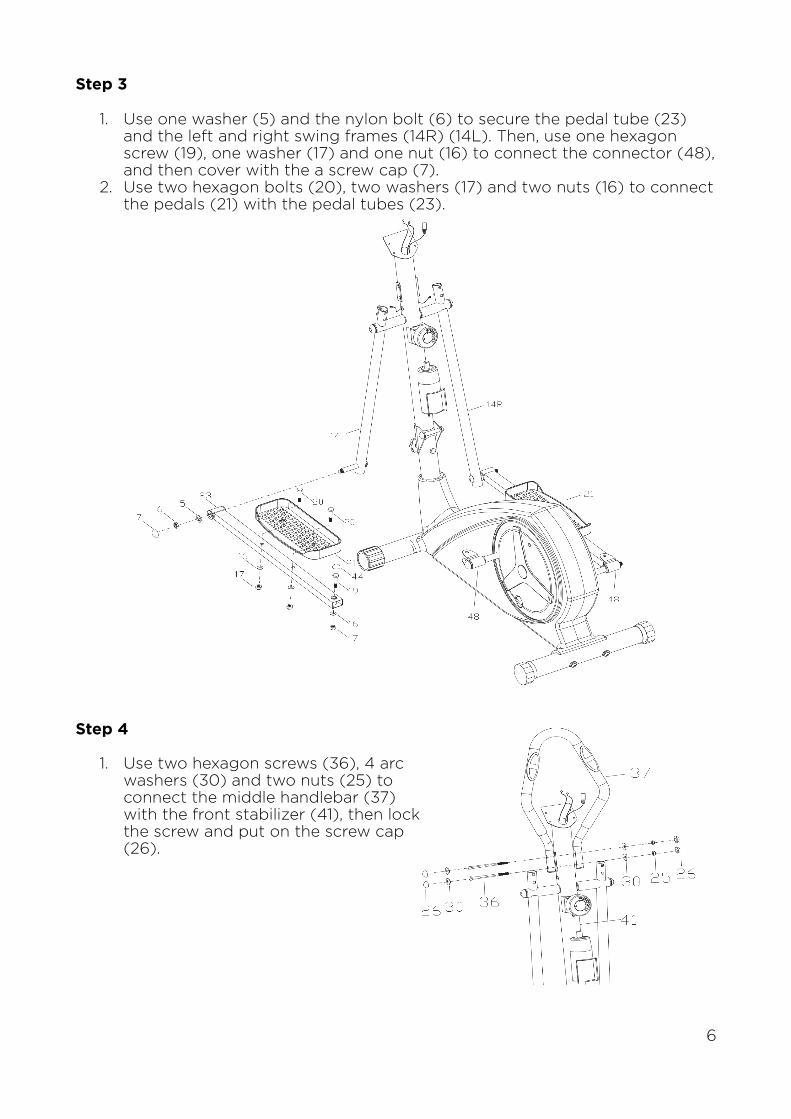
Step 3
1. Use one washer (5) and the nylon bolt (6) to secure the pedal tube (23) and the left and right swing frames (14R) (14L). Then, use one hexagon screw (19), one washer (17) and one nut (16) to connect the connector (48),and then cover with the a screw cap (7).
2. Use two hexagon bolts (20), two washers (17) and two nuts (16) to connectthe pedals (21) with the pedal tubes (23).
Step 4
1. Use two hexagon screws (36), 4 arcwashers (30) and two nuts (25) toconnect the middle handlebar (37)with the front stabilizer (41), then lockthe screw and put on the screw cap(26).
6
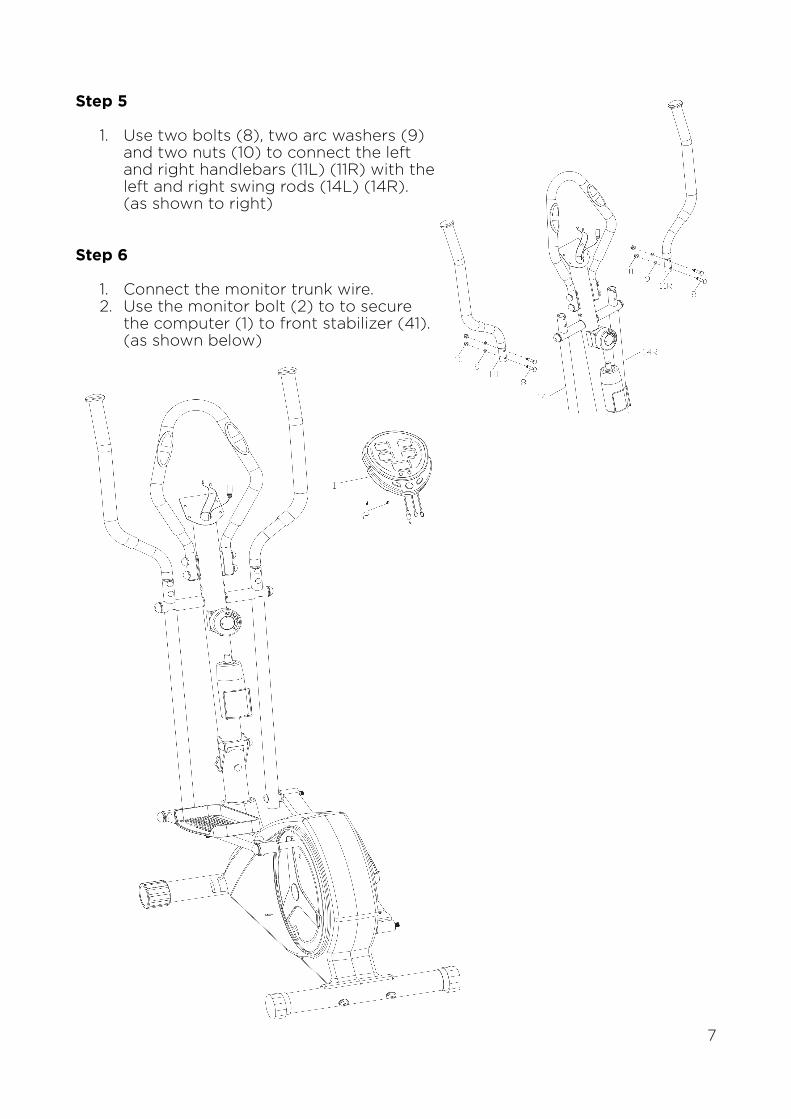
Step 5
1. Use two bolts (8), two arc washers (9)and two nuts (10) to connect the leftand right handlebars (11L) (11R) with theleft and right swing rods (14L) (14R).(as shown to right)
Step 6
1. Connect the monitor trunk wire.2. Use the monitor bolt (2) to to secure
the computer (1) to front stabilizer (41).(as shown below)
7
Exercise Meter Instruction
Function ButtonsMode
• Press to select between TIME, SPEED, DISTANCE, CAL, ODO, PULSE and RPM to preset.• Press to select the function display value on the LCD.• Press and hold for two seconds to reset all values to zero.
(When the batteries are replaced, all values are reset to zero automatically.)
Set• To set up a target value for TIME, DISTANCE, CAL and PULSE.• Press and hold to speed up increment.
Reset• Press to reset the function values when setting.• Press and hold for two seconds to reset all values except the odometer to zero.
Functions & Operations1. Auto Scan
After the monitor is powered on or the mode key is pressed, the LCD will display all functions of Time, Speed, Distance, Calories, Odometer, Pulse. Each value will be displayed for six seconds.
2. TimeAccumulates the total time from 00:00 up to 99:59. The user may preset a target time by pressing SET & MODE buttons. Each increment is 1 minute.Automatically counts down from the target value during exercise.
3. SpeedDisplays the current training speed from 0.0 to 999.9 KPH or MPH
4. DistanceAccumulates the total distance from 0.0 up to 9999km or miles. The user may preset a target distance by pressing the SET & MODE buttons. Automatically counts down from the target value during exercise.
5. CaloriesAccumulates calories burned during training from 0 to 9999 calories. The user may also preset the target amount by pressing the SET & MODE buttons. Automatically counts down from the target value during exercise.Note: This data is a rough guide which can not be used in medical treatment.
6. OdometerDisplays the total accumulated distance from 0 to 9999. User can also press the mode keyto display the odometer value.
7. PulseThe monitor will display the user's heart rate in beats per minute during training.
Notes• If the computer display is abnormal, please remove, then replace the batteries.• The batteries must be removed from the unit before it is scrapped, and they must be
disposed of safely.• When the user starts to perform exercise, the display will show the workout value
automatically. Once exercise has been stopped for over 256 seconds, the display will turn off.
8
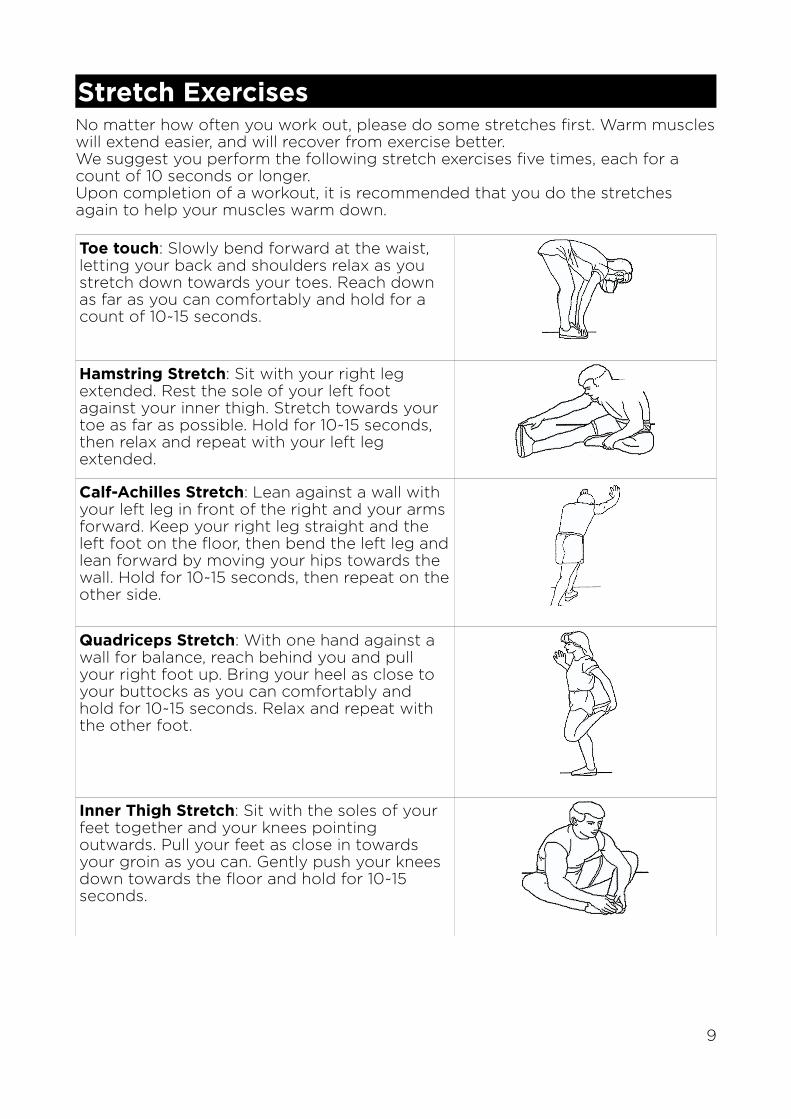
Stretch ExercisesNo matter how often you work out, please do some stretches first. Warm muscleswill extend easier, and will recover from exercise better.We suggest you perform the following stretch exercises five times, each for a count of 10 seconds or longer. Upon completion of a workout, it is recommended that you do the stretches again to help your muscles warm down.
Toe touch: Slowly bend forward at the waist, letting your back and shoulders relax as you stretch down towards your toes. Reach down as far as you can comfortably and hold for a count of 10~15 seconds.
Hamstring Stretch: Sit with your right leg extended. Rest the sole of your left foot against your inner thigh. Stretch towards your toe as far as possible. Hold for 10~15 seconds, then relax and repeat with your left leg extended.
Calf-Achilles Stretch: Lean against a wall with your left leg in front of the right and your arms forward. Keep your right leg straight and the left foot on the floor, then bend the left leg andlean forward by moving your hips towards the wall. Hold for 10~15 seconds, then repeat on theother side.
Quadriceps Stretch: With one hand against a wall for balance, reach behind you and pull your right foot up. Bring your heel as close to your buttocks as you can comfortably and hold for 10~15 seconds. Relax and repeat with the other foot.
Inner Thigh Stretch: Sit with the soles of your feet together and your knees pointing outwards. Pull your feet as close in towards your groin as you can. Gently push your knees down towards the floor and hold for 10~15 seconds.
9