fltk 1.3.0 tutorial - tim lindquist asu polytechnic...
TRANSCRIPT
FLTK 1.3.0 Tutorial
This a tutorial can be used by the absolute FLTK beginner. In the course of the tutorial the most common widgets will be explained and you will gain a good overview of the FLTK toolkit. The examples have been kept as short and simple as possible so it will not take a lot of time to understand them.
I ported FLTK to DOS and took the screenshots in DOS. The examples will work without any changes on any platform FLTK can be used for.
Contents
1. Introduction
2. The FLTK structure
3. Installation of the FLTK toolkit
4. The first program
5. The button widget
6. Callback functions
7. Input and Output boxes
8. The editor widget
9. The browser widget
10. The menubar widget
11. Toolbar and drop-down list
12. A dialog window with radio buttons
13. Displaying images
14. Grouping widgets in Tabs
15. Handling mouse events part1
16. Handling mouse events part2
17. Displaying the events generated by FLTK
18. The tree widget
19. References

1. Introduction
FLTK shall stand for Fast Light ToolKit and is a GUI written in C++ for C++ programs. It can be used on Linux, Windows, Apple Mac and DOS. FLTK has lower memory requirements than other toolkits and can be linked as a static library with an application. It can also be compiled as a shared library too.
FLTK has been in development over many years and the currently latest version is 1.3.0. There had been a version 2.0 before but unfortunately this branch never got out of alpha and development of that has been canceled now in favor of version 1.3.0. So 1.3.0 is the version any new development should be based on.
2. The FLTK structure
Being written in C++ FLTK defines a class for every widget. GUI toolkits usually refer to all sorts of objects, like buttons, input boxes, scrollbars etc as widgets.
The base class for all widgets is the Fl_Widget class. All widgets are subclasses from the Fl_Widget class or again subclasses from these subclasses.
This are some of the direct subclasses of Fl_Widget: Fl_Box, Fl_Button, Fl_Group, Fl_Input_, Fl_Menu_, Fl_Progress and Fl_Timer.
A subclass of Fl_Group again is Fl_Window, a class you will be using in every program.
An example of a long tree of subclasses is FL_Radio_Round_Button. As shown below this button type is a subclass of Fl_Round_Button which is a subclass of Fl_Light_Button which is again a subclass of Fl_Button.
The FL_Radio_Round_Button class has access to all methods or functions defined in one of the classes it is a subclass of. You will have to check in the documentation whether any of these classes has a method which does what you want to achieve.
There is also the FL global (static) class containing state information and global methods for the current application.
In addition several non-class functions and symbols are provided, they are grouped into
header files with lower-case names.
3. Installation of the FLTK toolkit
a.) Linux
download the latest source, unpack it and then do configure,make,install. Then compile your program e.g. as:"fltk-config' --compile example.cxx" or if you use images: "fltk-config --use-images --compile example.cxx"
Further details can be found in the FLTK manual here: http://www.fltk.org/doc-1.3/basics.html There is a section called "Compiling Programs with Standard Compilers" further below on that page. You can also read the README.Unix.txt file that is included in the FLTK source code package. This also covers using FLTK with the Code::Blocks IDE.
b.) Windows
There are a number of alternatives to develop FLTK programs on Windows. The FLTK site just has the source code so you either compile FLTK on Windows or download binaries from the net as described below.
b1.) DEV-CPP
This is an IDE which uses MinGW to generate C and C++ programs on Windows. You can download it here: http://www.bloodshed.net/dev/devcpp.html
Then you can download a "devpak" of FLTK 1.3.0 here:http://nanox-microwindows-nxlib-fltk-for-dos.googlecode.com/files/fltk-130-1gp.DevPak
After starting DEV-CPP select "Tools" from the menu and "Package Manager". In there select "Install" and open the downloaded DevPak to install it.
Then open a new project (File->New->Project), select the "GUI" tab and in there select "FLTK". After a few questions how to name the project and the program file this will come up with the default FLTK program which you can build and run by entering "F9".
b2.) Code::Blocks
This is another good IDE using MinGW. If you open a new project, you can select the FLTK icon in there. After that you will have enter the location of the FLTK files. You can download the binaries here: http://code.google.com/p/fltkwinbin/downloads/listand then put them into a directory of your choice. Then enter that path into the Code::Blocks' input box. Code::Blocks just needs the path to the root FLTK directory where bin, include, lib, share and test are in.
You can then select file->new->empty file and save that as main. Then cut and past one of the examples in this tutorial into the edit window and save the file.
Then right-click on the project, select "Build options" and add the following libraries to the linker settings:libcomctl32.a, libcomdlg32.a, libole32.a,libgdi32.a and libuuid.a. You find these libraries in the "CodeBlocks\MinGW\lib\" directory.
After this select Build->Run or CTRL-F10 that should build the project and run it.
b3.) Compile FLTK on Windows with MinGW.
Both DEV-CPP and Code::Blocks install MinGW on your PC. If you install MinGW after you already have installed one of these IDEs Windows will point to the new MinGW directory and and that causes problems with DEV-CPP.
Details how to compile FLTK with MinGW are in the file README.MSWindows.txt which is included in the FLTK source code package. It also described in there how to use FLTK with Cygwin.
You can also compile FLTK on Windows with Code::Blocks if you follow this tutorial:http://gintasdx.althirius-studios.com/2011/08/tutorial-codeblocks-with-fltk.html
b4.) Microsoft Visual C++
This is covered in the file README.MSWindows.txt.
Further details can also be found here:http://research.cs.wisc.edu/graphics/Courses/559-f2009/Main/Tutorial1
c.) Apple OS X
Please read the file README.OSX.txt which is included in the FLTK source code package.
d.) DOS
Download the DJGPP package from http://code.google.com/p/nanox-microwindows-nxlib-fltk-for-dos/downloads/list , edit the start.bat file in there to your paths. The required FLTK libraries are already included in the DJGPP package but can be downloaded from that site separately as well.
You can compile the examples either with this line (observe the line wrap here):
gpp -g -I/djgpp/include -o example.exe example.cxx -L/djgpp/lib -lfltk -lNX11 -lnano-X -lfreetype
For the examples which load an image you have to add additional parameters to this line:
gpp -g -I/djgpp/include -o ex13.exe ex13.cxx -L/djgpp/lib -lfltk_images -lfltk -lNX11 -lnano-X -lfreetype -ljpeg -lpng -lz
Or you enter a shell with "sh" and use the "fltk-config" script:
sh-2.04$ 'fltk-config' --compile example.cxxsh-2.04$ 'fltk-config' --use-images --compile example.cxx
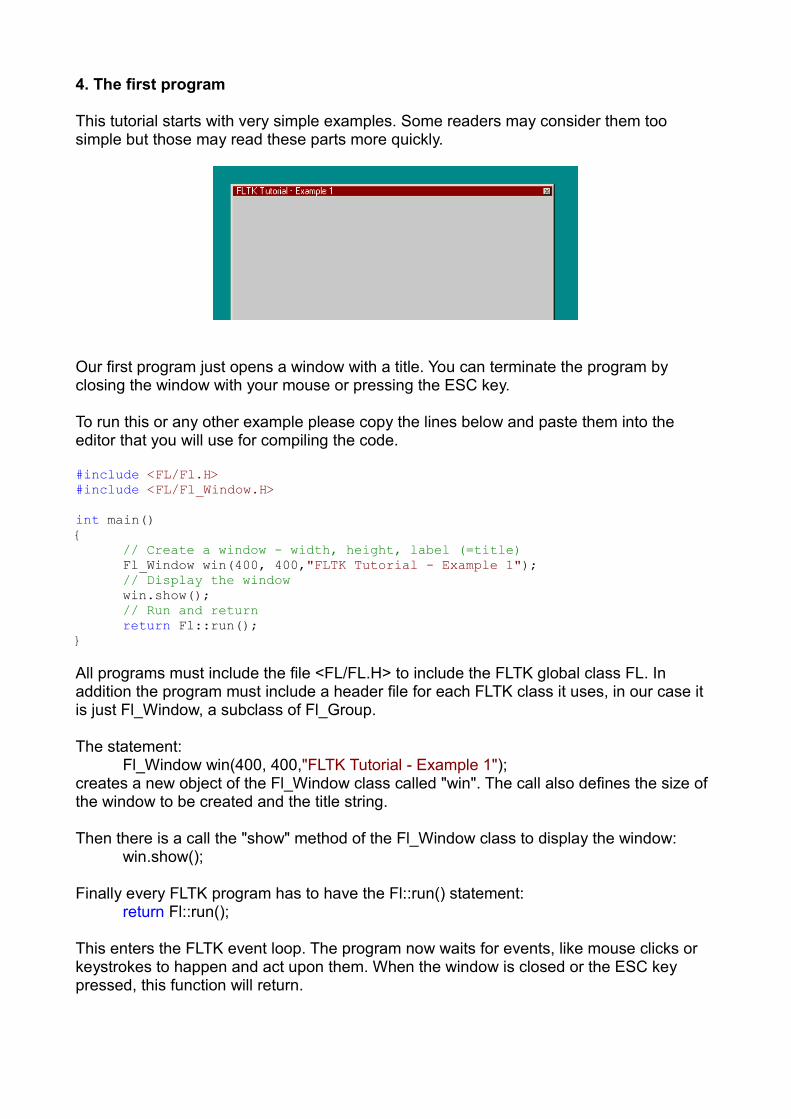
4. The first program
This tutorial starts with very simple examples. Some readers may consider them too simple but those may read these parts more quickly.
Our first program just opens a window with a title. You can terminate the program by closing the window with your mouse or pressing the ESC key.
To run this or any other example please copy the lines below and paste them into the editor that you will use for compiling the code.
#include <FL/Fl.H>#include <FL/Fl_Window.H>
int main(){
// Create a window - width, height, label (=title) Fl_Window win(400, 400,"FLTK Tutorial - Example 1"); // Display the window
win.show();// Run and return
return Fl::run();}
All programs must include the file <FL/FL.H> to include the FLTK global class FL. In addition the program must include a header file for each FLTK class it uses, in our case it is just Fl_Window, a subclass of Fl_Group.
The statement:Fl_Window win(400, 400,"FLTK Tutorial - Example 1");
creates a new object of the Fl_Window class called "win". The call also defines the size of the window to be created and the title string.
Then there is a call the "show" method of the Fl_Window class to display the window:win.show();
Finally every FLTK program has to have the Fl::run() statement:return Fl::run();
This enters the FLTK event loop. The program now waits for events, like mouse clicks or keystrokes to happen and act upon them. When the window is closed or the ESC key pressed, this function will return.
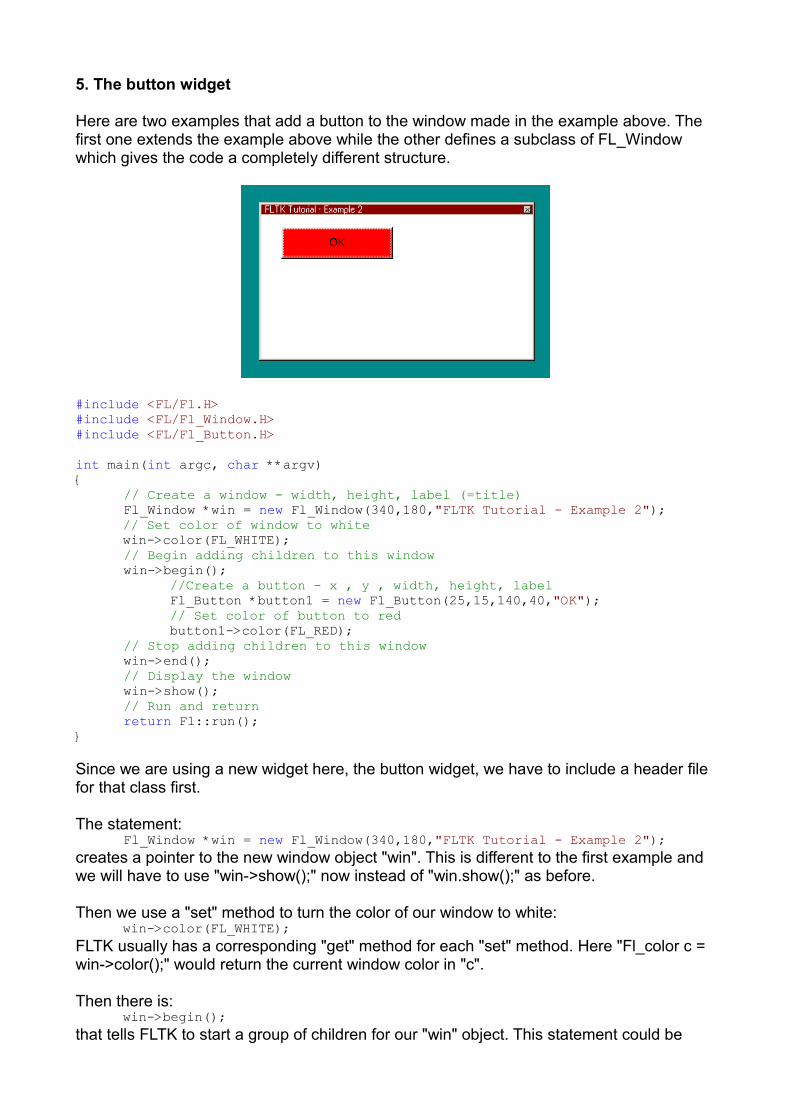
5. The button widget
Here are two examples that add a button to the window made in the example above. The first one extends the example above while the other defines a subclass of FL_Window which gives the code a completely different structure.
#include <FL/Fl.H>#include <FL/Fl_Window.H>#include <FL/Fl_Button.H>
int main(int argc, char **argv) { // Create a window - width, height, label (=title) Fl_Window *win = new Fl_Window(340,180,"FLTK Tutorial - Example 2");
// Set color of window to whitewin->color(FL_WHITE);
// Begin adding children to this window win->begin(); //Create a button - x , y , width, height, label Fl_Button *button1 = new Fl_Button(25,15,140,40,"OK");
// Set color of button to redbutton1->color(FL_RED);
// Stop adding children to this window win->end(); // Display the window win->show(); // Run and return return Fl::run();}
Since we are using a new widget here, the button widget, we have to include a header file for that class first.
The statement: Fl_Window *win = new Fl_Window(340,180,"FLTK Tutorial - Example 2");creates a pointer to the new window object "win". This is different to the first example and we will have to use "win->show();" now instead of "win.show();" as before.
Then we use a "set" method to turn the color of our window to white:win->color(FL_WHITE);
FLTK usually has a corresponding "get" method for each "set" method. Here "Fl_color c = win->color();" would return the current window color in "c".
Then there is:win->begin();
that tells FLTK to start a group of children for our "win" object. This statement could be
omitted and FLTK will add this implicitly then.
Following that we create a pointer to a new button object: Fl_Button *button1 = new Fl_Button(25,15,140,40,"OK");and make a "set" statement to set its color to red.
The statement win->end();
will tell FLTK that we are done defining the children for the "win" object. The defined group will be set to the parent of the window, in this case to NULL because "win" does not have a parent.
The following statements will cause the window to be displayed and enter the FLTK event loop.
So far we have not defined classes in the examples. To show how this can be done using FLTK classes and inheritance we rewrite the example above:
#include <FL/Fl.H>#include <FL/Fl_Window.H>#include <FL/Fl_Button.H>
class MyWindow : public Fl_Window{public:
MyWindow(int width, int height, const char* title=0) : Fl_Window(width,height,title){// Set color of window to whitecolor(FL_WHITE);// Begin adding children to this windowbegin();
//Create a button - x , y , width, height, labelFl_Button *button1 = new Fl_Button(25,15,140,40,"OK");// Set color of button to redbutton1->color(FL_RED);
// Stop adding children to this window end(); // Display the window show(); }};
int main() { // Create a window with our new class - width, height, label (=title) MyWindow win(340,180,"FLTK Tutorial - Example 2++"); // Run and return return Fl::run();}
Here the statementclass MyWindow : public Fl_Window
creates a class called MyWindow which is derived from the Fl_Window class. In the constructor of this class we define the color of the window, the button as a child of the window and display the window. Since the "this" pointer is implicit, you do not need a pointer in front of the begin(), end() and show() statements.
In the main function we just create a new object of the MyWindow class called "win" and then enter the FLTK event loop.
6. Callback functions
Now we will add a callback function which will be called by FLTK as soon as the button is clicked. This callback function will then change the color of the button.
There is no screenshot provided since it looks like the one in the previous example.
#include <FL/Fl.H>#include <FL/Fl_Window.H>#include <FL/Fl_Button.H>
void button1_cb(Fl_Widget* buttonptr){if (buttonptr->color() == FL_BLUE) {buttonptr->color(FL_RED); //toggle}else {buttonptr->color(FL_BLUE);//toggle}
}
int main(int argc, char **argv) { // Create a window - width, height, label (=title) Fl_Window *win = new Fl_Window(340,180,"FLTK Tutorial - Example 3");
win->color(FL_WHITE); // Begin adding children to this window win->begin(); //Create a button - x , y , width, height, label Fl_Button *button1 = new Fl_Button(25,15,140,40,"Click me!");
button1->color(FL_RED);//register callback function with this buttonbutton1->callback(button1_cb);
// Stop adding children to this window win->end(); // Display the window win->show(); // Run and return return Fl::run();}
The statement:button1->callback(button1_cb);
defines that the callback "button1_cb" will be called when the user clicks on it.
This function is defined asvoid button1_cb(Fl_Widget* buttonptr)
Please observe that a pointer to the Fl_Widget class is passed and not to Fl_Button. This way we can only use methods defined in Fl_Widget. For this example this is fine since we will only be using the "color" method defined in Fl_Widget. If we want to use methods defined in the Fl_Button class we will have to cast the buttonptr to a Fl_Button class e.g:
Fl_Button* b = (Fl_Button*)buttonptr;
The rest of the function checks if the button color is blue and if yes turns it to red and vice versa.
7. Input and Output boxes
This example will display an input and an output widget. The text you enter in the input box will be copied into the output box and the label of the input box will be changed.
#include <FL/Fl.H>#include <FL/Fl_Window.H>#include <FL/Fl_Input.H>#include <FL/Fl_Output.H>
Fl_Input input1(90, 10, 180, 20, "Input : ");Fl_Output output1(90, 40, 180, 20, "Output : ");
static void cb_input1(Fl_Input*, void* userdata) { input1.label((const char*)userdata); output1.value(input1.value()); input1.value(""); //clear again}
int main(int argc, char **argv) {
Fl_Window win(300, 90, "Example for Input and Output boxes"); win.begin(); win.add(input1);
input1.callback((Fl_Callback*)cb_input1,(void *)"Enter next:"); input1.when(FL_WHEN_RELEASE | FL_WHEN_ENTER_KEY);
win.add(output1);win.end();
win.show(); return Fl::run();}
Here input1 and output1 are defined as globals so they can be accessed in the input1 callback function.
In the main function we define a window object called "win" and add the input1 and output1 widgets to that using the "win.add()" statements.
In the next line:
input1.callback((Fl_Callback*)cb_input1,(void *)"Enter next:");
the callback function "cb_input1" is set to be called if an event regarding the input1 widget occurs.
As an example we have used the second parameter of the callback function here to pass a
void pointer to the string "Enter next:". This parameter is called the "userdata" parameter. Here the pointer will be used as label text in the callback function.
Following that using the ".when()" method it is defined what event shall trigger the callback function. This will be the Enter key and when the input widget is released.
In the callback function the label of the input1 widget is changed to the userdata string. The value of the input widget, i.e. the text entered into this widget, is copied into the output widget und the input widget is cleared again after that.
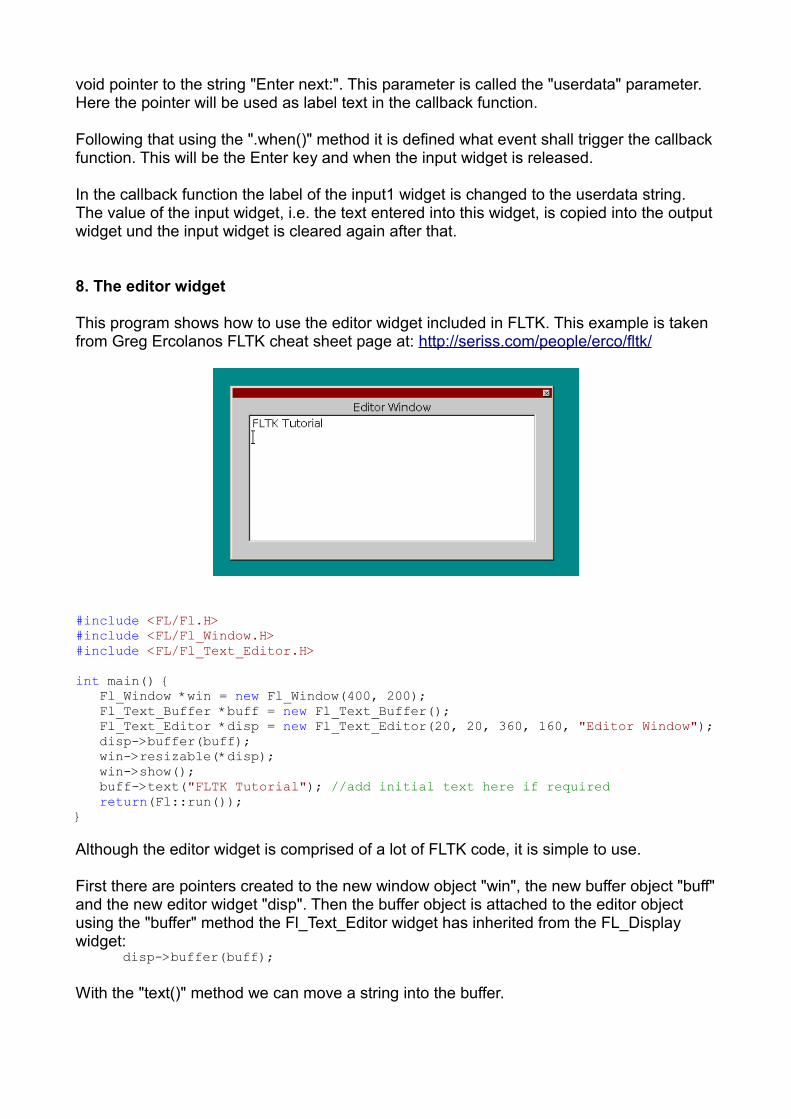
8. The editor widget
This program shows how to use the editor widget included in FLTK. This example is taken from Greg Ercolanos FLTK cheat sheet page at: http://seriss.com/people/erco/fltk/
#include <FL/Fl.H>#include <FL/Fl_Window.H>#include <FL/Fl_Text_Editor.H>
int main() { Fl_Window *win = new Fl_Window(400, 200); Fl_Text_Buffer *buff = new Fl_Text_Buffer(); Fl_Text_Editor *disp = new Fl_Text_Editor(20, 20, 360, 160, "Editor Window"); disp->buffer(buff); win->resizable(*disp); win->show(); buff->text("FLTK Tutorial"); //add initial text here if required return(Fl::run());}
Although the editor widget is comprised of a lot of FLTK code, it is simple to use.
First there are pointers created to the new window object "win", the new buffer object "buff" and the new editor widget "disp". Then the buffer object is attached to the editor object using the "buffer" method the Fl_Text_Editor widget has inherited from the FL_Display widget:
disp->buffer(buff);
With the "text()" method we can move a string into the buffer.
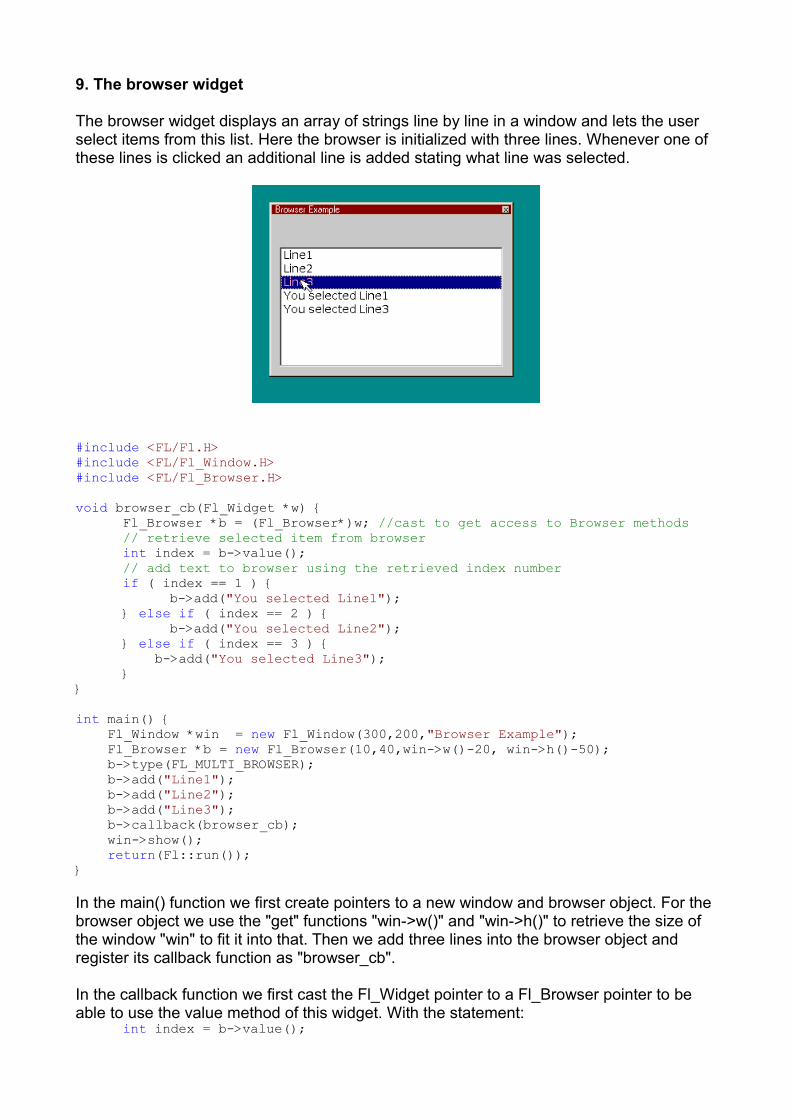
9. The browser widget
The browser widget displays an array of strings line by line in a window and lets the user select items from this list. Here the browser is initialized with three lines. Whenever one of these lines is clicked an additional line is added stating what line was selected.
#include <FL/Fl.H>#include <FL/Fl_Window.H>#include <FL/Fl_Browser.H>
void browser_cb(Fl_Widget *w) { Fl_Browser *b = (Fl_Browser*)w; //cast to get access to Browser methods
// retrieve selected item from browserint index = b->value();// add text to browser using the retrieved index numberif ( index == 1 ) {
b->add("You selected Line1");} else if ( index == 2 ) {
b->add("You selected Line2");} else if ( index == 3 ) { b->add("You selected Line3");}
}
int main() { Fl_Window *win = new Fl_Window(300,200,"Browser Example"); Fl_Browser *b = new Fl_Browser(10,40,win->w()-20, win->h()-50); b->type(FL_MULTI_BROWSER); b->add("Line1"); b->add("Line2"); b->add("Line3"); b->callback(browser_cb); win->show(); return(Fl::run());}
In the main() function we first create pointers to a new window and browser object. For the browser object we use the "get" functions "win->w()" and "win->h()" to retrieve the size of the window "win" to fit it into that. Then we add three lines into the browser object and register its callback function as "browser_cb".
In the callback function we first cast the Fl_Widget pointer to a Fl_Browser pointer to be able to use the value method of this widget. With the statement:
int index = b->value();
we can retrieve which of the three lines the user has clicked last and thus selected it. The index of this line is used to add additional lines to the browser specifying which line had been selected on each click.
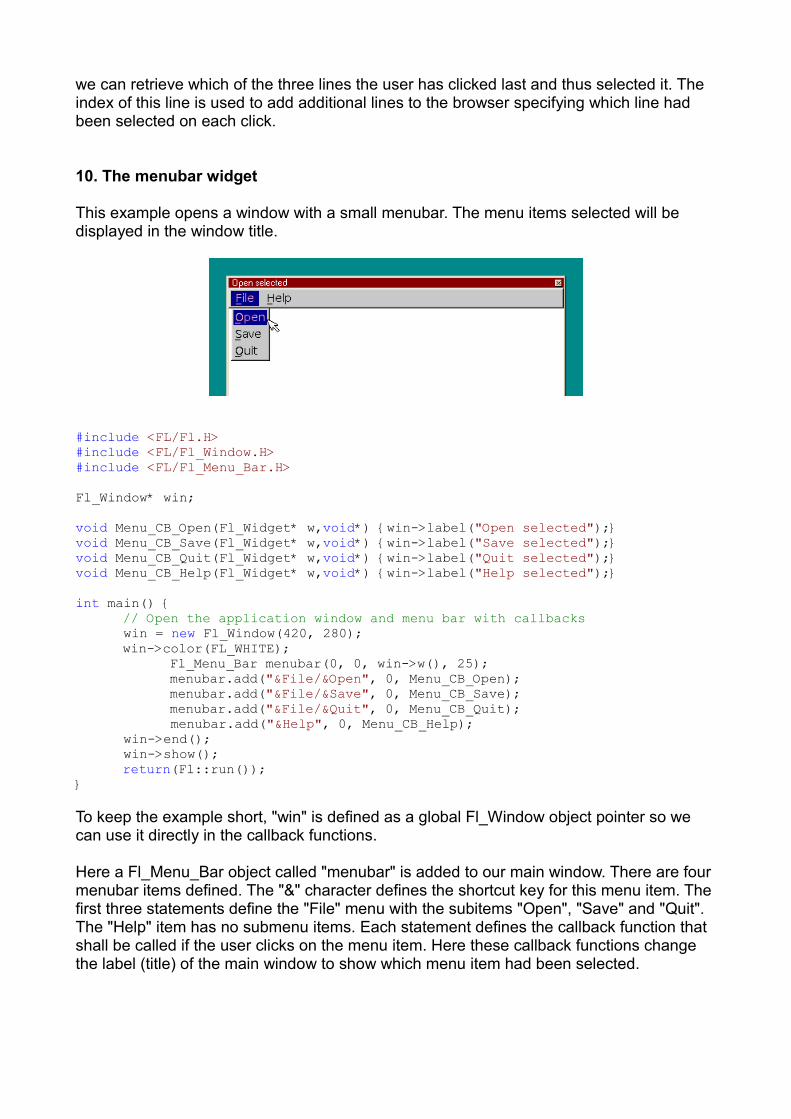
10. The menubar widget
This example opens a window with a small menubar. The menu items selected will be displayed in the window title.
#include <FL/Fl.H>#include <FL/Fl_Window.H>#include <FL/Fl_Menu_Bar.H>
Fl_Window* win;
void Menu_CB_Open(Fl_Widget* w,void*) {win->label("Open selected");}void Menu_CB_Save(Fl_Widget* w,void*) {win->label("Save selected");}void Menu_CB_Quit(Fl_Widget* w,void*) {win->label("Quit selected");}void Menu_CB_Help(Fl_Widget* w,void*) {win->label("Help selected");}
int main() {// Open the application window and menu bar with callbacks
win = new Fl_Window(420, 280);win->color(FL_WHITE);
Fl_Menu_Bar menubar(0, 0, win->w(), 25); menubar.add("&File/&Open", 0, Menu_CB_Open);
menubar.add("&File/&Save", 0, Menu_CB_Save);menubar.add("&File/&Quit", 0, Menu_CB_Quit);
menubar.add("&Help", 0, Menu_CB_Help); win->end(); win->show();
return(Fl::run());}
To keep the example short, "win" is defined as a global Fl_Window object pointer so we can use it directly in the callback functions.
Here a Fl_Menu_Bar object called "menubar" is added to our main window. There are four menubar items defined. The "&" character defines the shortcut key for this menu item. The first three statements define the "File" menu with the subitems "Open", "Save" and "Quit". The "Help" item has no submenu items. Each statement defines the callback function that shall be called if the user clicks on the menu item. Here these callback functions change the label (title) of the main window to show which menu item had been selected.
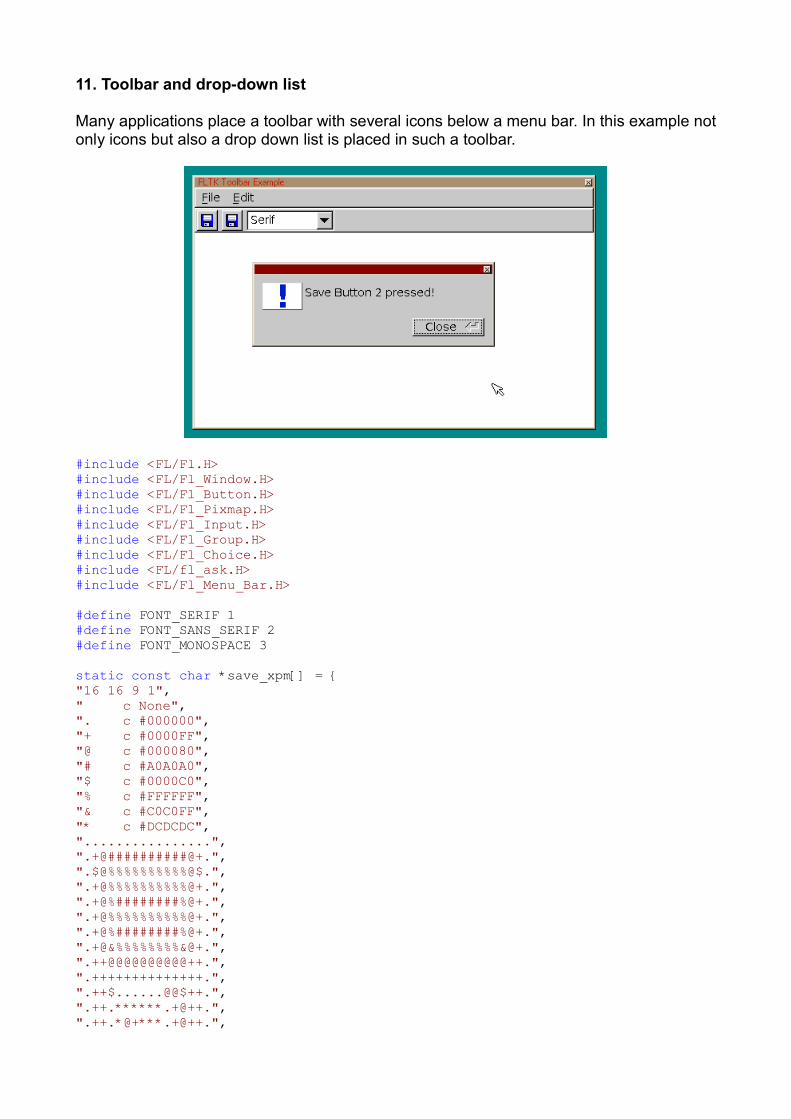
11. Toolbar and drop-down list
Many applications place a toolbar with several icons below a menu bar. In this example not only icons but also a drop down list is placed in such a toolbar.
#include <FL/Fl.H>#include <FL/Fl_Window.H>#include <FL/Fl_Button.H>#include <FL/Fl_Pixmap.H>#include <FL/Fl_Input.H>#include <FL/Fl_Group.H>#include <FL/Fl_Choice.H>#include <FL/fl_ask.H>#include <FL/Fl_Menu_Bar.H>
#define FONT_SERIF 1#define FONT_SANS_SERIF 2#define FONT_MONOSPACE 3
static const char *save_xpm[] = {"16 16 9 1"," c None",". c #000000","+ c #0000FF","@ c #000080","# c #A0A0A0","$ c #0000C0","% c #FFFFFF","& c #C0C0FF","* c #DCDCDC","................",".+@##########@+.",".$@%%%%%%%%%%@$.",".+@%%%%%%%%%%@+.",".+@%########%@+.",".+@%%%%%%%%%%@+.",".+@%########%@+.",".+@&%%%%%%%%&@+.",".++@@@@@@@@@@++.",".++++++++++++++.",".++$......@@$++.",".++.******.+@++.",".++.*@+***.+@++.",
".++.*@+***.+@++.",".@+.******.+@++."," ..............."};
class Toolbar : public Fl_Group {public:
Fl_Button *save1;Fl_Button *save2;
Fl_Pixmap *p_save;
Fl_Choice *font_group;Fl_Menu_Item *font_group_items;
static void cb_save(Fl_Widget*, void*);static void cb_fonts(Fl_Widget*, void*);
Toolbar(int Xpos, int Ypos, int Width, int Height);};
void Toolbar::cb_save(Fl_Widget *w, void *data){fl_alert("Save Button %d pressed!",(int)data);}
void Toolbar::cb_fonts(Fl_Widget *w, void *data){fl_alert("Font number %d selected!",(int)data);}
Toolbar::Toolbar(int Xpos, int Ypos, int Width, int Height) :Fl_Group(Xpos, Ypos, Width, Height)
{ box(FL_UP_BOX);
Ypos += 2; Height -= 4; Xpos += 3; Width = Height; int i;
save1 = new Fl_Button(Xpos, Ypos, Width, Height); Xpos += Width + 5; save2 = new Fl_Button(Xpos, Ypos, Width, Height); Xpos += Width + 5; font_group = new Fl_Choice(Xpos, Ypos, 110, Height); Xpos += 111; p_save = new Fl_Pixmap(save_xpm); save1->image(p_save); save2->image(p_save); save1->tooltip("Save file1"); save1->callback(cb_save,(void*)1); save2->tooltip("Save file2"); save2->callback(cb_save,(void*)2);
font_group_items = new Fl_Menu_Item[4]; for (i = 0; i < 4; i++) font_group_items[i].text = NULL; font_group_items->add("Serif", 0, cb_fonts, (void*) FONT_SERIF, 0); font_group_items->add("Sans-Serif", 0, cb_fonts,(void*) FONT_SANS_SERIF, 0); font_group_items->add("Monospace", 0, cb_fonts, (void*) FONT_MONOSPACE, 0); font_group->menu(font_group_items);}
int main(){ Fl_Window win(500, 300,"FLTK Toolbar Example"); win.color(FL_WHITE); win.begin();
Fl_Menu_Bar menubar(0, 0, win.w(), 25);menubar.add("&File", 0, 0);menubar.add("&Edit", 0, 0);
Toolbar tool(0,26,win.w(),30);tool.clear_visible_focus(); //just use mouse, no TABs

win.end(); win.show(); return Fl::run();}
In the main window first there is defined a menubar and below that an object of the Toolbar class which is defined in this program. When this Toolbar object is created its position and size is specified.
The constructor will first make a box of the size of the toolbar. Then two icons and a drop-down list widget are placed in this box. The icons are defined as an XPM image which again is specified at the top of the code. An XPM image can e.g. be created on Windows with the xpmedit program: http://www.jland.org/swat/xpmedit/ . To save space the same icon is used here twice in the example.
Then an FL-Pixmap object of the XPM image is made in the constructor and using image() it is set as the image for both buttons. Further for each button a tooltip and a callback function is specified.
Following that the drop-down list is defined. The items of this list are specified as menu items. These items have the same callback function, just different userdata is passed. After calling menu() the items are shown in the drop-down list on the screen.
The callback functions use the "fl_alert" function to display the userdata passed and indicate which button or item has been selected by the user. The "fl_alert" function can take the message text in an sprintf-like format.
FLTK features a number of common dialog functions which are documented in the "modules" section of the FLTK documentation. These are defined with lower-case letter names.
12. A dialog window with radio buttons
This example shows how to open a dialog window when a menu item is selected. It is often necessary to define a window where the user can make a number of selections.

#include <FL/Fl.H>#include <FL/Fl_Group.H>#include <FL/Fl_Window.H>#include <FL/Fl_Button.H>#include <FL/Fl_Round_Button.H>#include <FL/Fl_Menu_Bar.H>
class Dialog_Window : public Fl_Window{public:
int status;int radio;static Dialog_Window *dw_this;static void cb_button(Fl_Widget *w, void *d);static void cb_radio(Fl_Widget *b, void *d);
Dialog_Window(int xpos, int ypos, int width, int height, const char* title=0) : Fl_Window(xpos,ypos,width,height,title)
{dw_this = this;color(FL_WHITE);// Begin adding children to this windowbegin();Fl_Group* rb_group = new Fl_Group(15, 10, 105, 105);rb_group->box(FL_UP_FRAME);
{ Fl_Round_Button* rb1 = new Fl_Round_Button(20, 15, 70, 30, "&Coffee"); rb1->type(102); rb1->down_box(FL_ROUND_DOWN_BOX); rb1->callback(cb_radio,(void*)1); } { Fl_Round_Button* rb2 = new Fl_Round_Button(20, 45, 70, 30, "&Espresso"); rb2->type(102); rb2->down_box(FL_ROUND_DOWN_BOX);
rb2->callback(cb_radio,(void*)2); }
{ Fl_Round_Button* rb3 = new Fl_Round_Button(20, 75, 70, 30, "Ca&ppucino");
rb3->type(102); rb3->down_box(FL_ROUND_DOWN_BOX); rb3->callback(cb_radio,(void*)3); }
rb_group->end();
Fl_Button *button_ok = new Fl_Button(10,150,80,40,"OK");Fl_Button *button_c = new Fl_Button(110,150,80,40,"Cancel");button_ok->callback(cb_button,(void*)1);button_c->callback(cb_button,(void*)2);
end();set_modal();
show(); }};
Dialog_Window *Dialog_Window::dw_this = NULL;
void Dialog_Window::cb_radio(Fl_Widget *b, void *d) {char msg[64];dw_this->radio=(int)d;sprintf(msg, "Radio Button: %d", dw_this->radio);dw_this->label(msg);
}
void Dialog_Window::cb_button(Fl_Widget *w, void *d)

{dw_this->hide();dw_this->status = (int)d;
}
void cb_file(Fl_Widget *w, void *data){Fl_Window* parent=(Fl_Window*)data;parent->label("Please enter data now");
Dialog_Window* dw = new Dialog_Window(parent->x()+20,parent->y()+20, 200, 200, NULL);
}
int main(){ Fl_Window win(300, 250,"FLTK Dialog Window Example");
win.color(FL_WHITE); win.begin();
Fl_Menu_Bar menubar(0, 0, win.w(), 25); menubar.add("&Coffee", 0, cb_file,(void*)&win);
win.end();win.show();return Fl::run();
}
In this example the main window just has a menu bar with one item to call the dialog window. The menu item passes a pointer to the main window as userdata in the callback. The callback can then change the label of the main window and read its position so the dialog window is created at a fixed position relative to the main window no matter where this currently is on the screen. The callback makes an object of the Dialog_window class called "dw". This class defines the dialog window called Dialog_window.
The constructor of this class opens the dialog window and defines a group with three radio buttons or round buttons. There is a box drawn around the group of radio buttons.Also there are an OK and a Cancel button defined in the dialog window. The dialog window is opened "modal" so user input is directed to this window only while it is displayed.
The callback functions of each button are passed the number of the button in the userdata parameter. Thes callback function makes a msg string with this number and writes it to the title of the dialog window. It also writes the number to the public integer variable "radio" in the Dialog_window object.
The OK and Cancel button callbacks hide the dialog window and write a status value into the public variable of the Dialog_window object.
This example also shows how to make the "this" pointer of the Dialog_window dw object available in the entire program. The "this" pointer of this object is written into the static variable "dw_this" which is also initialized outside the class definition and therefore can be accessed from anywhere in the program.
13. Displaying images
The first example displays a PNG image in a window, the second displays a JPG image in a smaller window and lets you scroll the image using scrollbars. Both examples were developed by Greg Ercolano.

#include <FL/Fl.H>#include <FL/Fl_Window.H>#include <FL/Fl_Shared_Image.H>#include <FL/Fl_PNG_Image.H>#include <FL/Fl_Box.H>
int main() { fl_register_images(); // initialize image lib Fl_Window win(500,400); // make a window Fl_Box box(10,10,500-20,400-20); // widget that will contain image Fl_PNG_Image png("jolly.png"); // load png image into ram box.image(png); // attach png image to box win.show(); return(Fl::run());}
The included comments explain the example already. There is a new widget used here: Fl_Box. This box is not visible since when you attach the image to this object you see the image in the defined box.
When creating the Fl_PNG_Image object the image file is already read from disk because the constructor of this class loads the named PNG image from the given png filename.
This is the second example:
#include <stdio.h>#include <stdlib.h>#include <FL/Fl.H>#include <FL/Fl_Shared_Image.H>#include <FL/Fl_Double_Window.H>#include <FL/Fl_Scroll.H>#include <FL/Fl_JPEG_Image.H>#include <FL/Fl_Box.H>
#define JPGFILE "jolly.jpg"
int main() { fl_register_images(); Fl_Double_Window win(520,400,"Example image viewer with scrollbars"); Fl_Scroll scr(0,0,520,400); Fl_JPEG_Image jpg(JPGFILE); if ( jpg.h() == 0 ) { perror(JPGFILE); exit(1); } // error check Fl_Box box(0,0,jpg.w(),jpg.h()); box.image(jpg); win.resizable(win); win.show(); return(Fl::run());}
In this example the Fl_Scroll widget is used. This is a container widget and will let scrollbars appear if its child widget, here the JPEG image, is larger than the size of this scroll widget. In this program the size of the scroll widget is set to the size of the main window.
The main window is defined using the Fl_Double_Window subclass. This subclass will be using a double-buffered window. If possible this window widget will use the X double buffering extension (Xdbe). If not, it will draw the window data into an off-screen pixmap, and then copy it to the on-screen window.
You can take any PNG or JPEG image. I made Google image search for "Jolly Roger" and converted the result into a PNG and a JPEG file for this example.
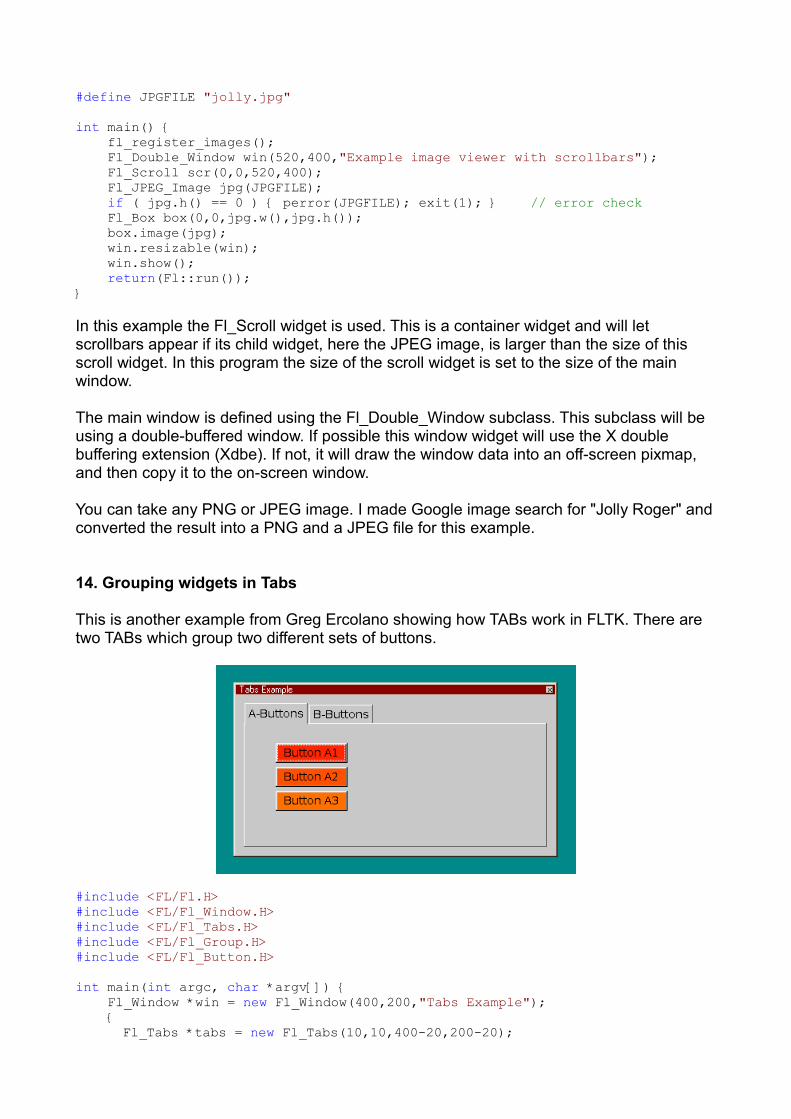
14. Grouping widgets in Tabs
This is another example from Greg Ercolano showing how TABs work in FLTK. There are two TABs which group two different sets of buttons.
#include <FL/Fl.H>#include <FL/Fl_Window.H>#include <FL/Fl_Tabs.H>#include <FL/Fl_Group.H>#include <FL/Fl_Button.H>
int main(int argc, char *argv[]) { Fl_Window *win = new Fl_Window(400,200,"Tabs Example"); { Fl_Tabs *tabs = new Fl_Tabs(10,10,400-20,200-20);
{ // A tab Fl_Group *aaa = new Fl_Group(10,35,400-20,200-45,"A-Buttons"); { Fl_Button *b1 = new Fl_Button(50, 60,90,25,"Button A1");
b1->color(88+1); Fl_Button *b2 = new Fl_Button(50, 90,90,25,"Button A2");
b2->color(88+2); Fl_Button *b3 = new Fl_Button(50,120,90,25,"Button A3");
b3->color(88+3); } aaa->end();
// B tab Fl_Group *bbb = new Fl_Group(10,35,400-10,200-35,"B-Buttons"); { Fl_Button *b1 = new Fl_Button( 50,60,90,25,"Button B1");
b1->color(88+1); Fl_Button *b2 = new Fl_Button(150,60,90,25,"Button B2");
b2->color(88+3); Fl_Button *b3 = new Fl_Button(250,60,90,25,"Button B3");
b3->color(88+5); } bbb->end(); } tabs->end(); } win->end(); win->show(); return(Fl::run());}
In the examples we have used so far we declared a window object and our buttons and other widgets were in the group of this window object. Here the window has one child which is the TABs widget. This widget has two Fl_Group object groups as its childen, the group "aaa" and "bbb". Each of these groups has three buttons as its children again.
The TABs widget will just display the group belonging to the currently selected TAB.
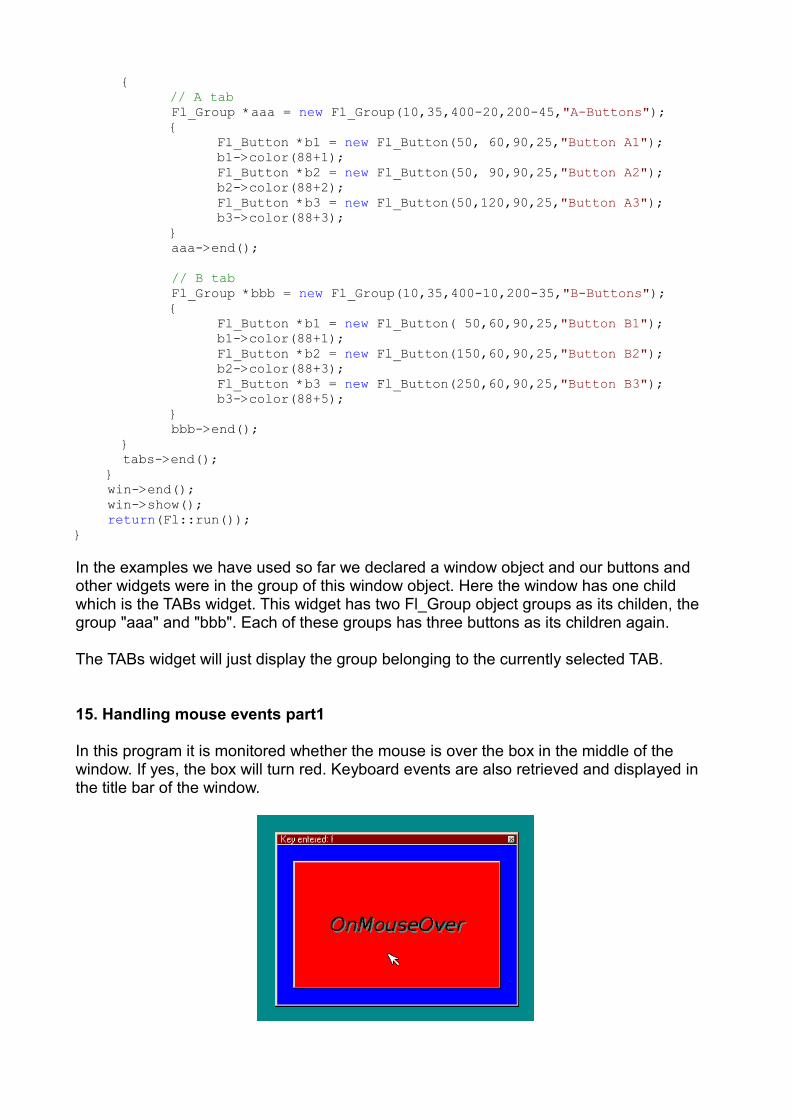
15. Handling mouse events part1
In this program it is monitored whether the mouse is over the box in the middle of the window. If yes, the box will turn red. Keyboard events are also retrieved and displayed in the title bar of the window.
#include <FL/Fl_Window.H>#include <FL/Fl_Double_Window.H>#include <FL/Fl.H>#include <FL/Fl_Box.H>
Fl_Window* win;
class EventWindow: public Fl_Box{
private:int handle_key(int e,int key);
public:EventWindow(int t, int l, int width, int height);int handle(int e);
};
EventWindow::EventWindow(int t, int l, int width, int height):Fl_Box(FL_UP_BOX, t, l, width, height, ""){ labelfont(FL_ITALIC);
labelsize(24);labeltype(FL_SHADOW_LABEL);label("OnMouseOver");Fl::focus(this);
}
int EventWindow::handle(int e){
switch(e) {case FL_ENTER:
color (FL_RED);labelcolor(FL_BLACK);damage(1);return 1;
case FL_LEAVE:color(FL_GRAY);labelcolor(FL_BLACK);damage(1);return 1;
case FL_KEYDOWN:return handle_key(e,Fl::event_key());
default:return Fl_Box::handle(e);
};}
int EventWindow::handle_key(int e,int key){
char labeltext[20];sprintf(labeltext,"Key entered: %c ",key);win->label(labeltext);return 1;
}
int main(){
win = new Fl_Window(300, 200);win->color(FL_BLUE);EventWindow ewin(20, 20, 260, 160);ewin.show();win->end();win->show();return Fl::run();
}

In the main() function a new window object is created and this time there is not a button or a box object as before but a new window object called "ewin" is added as the child. This window is created using the class EventWindow which is defined in this example as a subclass of the Fl_Window class. The constructor of this class will write the text "OnMouseOver" into this window.
This class also has a method that overwrites the Fl_Widget::handle() virtual method. This way all the events are sent to this handle() method by FLTK. The method checks for three different events and returns a one for those to indicate to FLTK that these events are handled by this function: FL_ENTER, FL_LEAVE and FL_KEYDOWN. A FL_ENTER event occurs when the mouse is over the window created by the "ewin" object while a FL_LEAVE event occurs when the mouse has been moved outside this window. These events are used here to change the color of this window.
When a FL_KEYDOWN event occured, the function handle_key() will be called which displays the key value in the title bar of the main window.
Retrieving keyboard events is usually not necessary with FLTK since you will be using input boxes etc. for keyboard input which do not require you to keep track of every keystroke.
16. Handling mouse events part2
The example is somewhat similar to a paint program. When you click and drag the mouse, a line will be painted following the mouse movement. When you click once a line will be drawn to the point of the next click with the LEFT mouse button. If you click with the RIGHT mouse button a frame will be drawn instead.
This example is based on one posted by Ian MacArthur. Drawing with FLTK is usually done inside the virtual draw() method. You then implement your own version of this method for drawing that overwrites FLTK's draw() virtual method. Whenever draw() is called it will draw the screen again as defined in this method.
For incremental drawing you better draw into an offscreen buffer that is copied to the screen whenever the draw() method is called. Since FLTK does not store the screen contents these will be erased when the window is iconized and restored. The contents in
the offscreen buffer will be preserved though. This example does incremental drawing and shows the use of such an offscreen buffer.
#include <Fl/Fl.H>#include <FL/Fl_Double_Window.H>#include <Fl/Fl_Box.H>#include <Fl/fl_draw.H>
#define window_size 400static Fl_Double_Window *main_window = 0; // the main app windowstatic Fl_Offscreen offscreen_buffer = 0; // the offscreen surface
/*****************************************************************************//* This class provides a view to copy the offscreen surface to */class canvas : public Fl_Box { void draw(); int handle(int event);public: canvas(int x, int y, int w, int h);};
/*****************************************************************************//* Constructor */canvas::canvas(int x, int y, int w, int h) : Fl_Box(x,y,w,h){} // Constructor
/*****************************************************************************/void canvas::draw() { if(offscreen_buffer) { // offscreen exists // blit the required view from the offscreen onto the box
fl_copy_offscreen(x(), y(), w(), h(), offscreen_buffer, 0,0);}
else { // create the offscreen main_window->make_current(); //ensures suitable graphic context offscreen_buffer = fl_create_offscreen( w(), h() );
if(!offscreen_buffer){fprintf(stderr,"Failed buffer creation"); exit(1);} fl_begin_offscreen(offscreen_buffer); /* Open the offscreen context */ fl_color(FL_WHITE); fl_rectf(0, 0, w(), h() );
fl_end_offscreen(); /* close the offscreen context *//* init screen with offscreen buffer */fl_copy_offscreen(x(), y(), w(), h(), offscreen_buffer, 0,0);
}} // draw method/*****************************************************************************/int canvas::handle(int event) { static char labeltext[100]; int button,x,y; int retvalue = 0; static int x_old,y_old; static int push1st=0;
if (!offscreen_buffer) return 1; retvalue = Fl_Box::handle(event); switch (event) { case FL_PUSH: case FL_DRAG: button = Fl::event_button(); x = Fl::event_x(); y = Fl::event_y(); };
switch ( button ) {
case 1: // Left button sprintf(labeltext,"Last mouse button= Left | Mouse at %d,%d now",x,y); window()->label(labeltext);
retvalue = 1; break;
case 3: // Right button sprintf(labeltext,"Last mouse button= Right | Mouse at %d,%d now",x,y); window()->label(labeltext); retvalue = 1; break;
}
switch(event) { case FL_PUSH: if (push1st == 0) { x_old = x; y_old = y; push1st = 1; break; } else { push1st = 0; /* Open the offscreen context for drawing */ fl_begin_offscreen(offscreen_buffer); if (button==1){ //left mouse button
fl_color(FL_RED); fl_line(x_old,y_old,x,y);
} else { //right mouse button fl_draw_box(FL_BORDER_FRAME,x_old,y_old,(x-x_old),
(y-y_old),FL_BLUE); }
fl_end_offscreen(); /* close the offscreen context */ redraw(); } case FL_DRAG:
{push1st=0; //clear if dragging /* Open the offscreen context for drawing */ fl_begin_offscreen(offscreen_buffer); fl_color(FL_BLACK); fl_point(x,y); fl_end_offscreen(); // close the offscreen context redraw();} break;
default: redraw(); break;
} return retvalue;} // handle
/*****************************************************************************/int main (int argc, char **argv) { main_window = new Fl_Double_Window(window_size, window_size,
"Drawing with mouse example"); main_window->begin(); // a view of the offscreen, inside the main window static canvas *os_box = new canvas(5,5,(window_size-10),(window_size-10)); main_window->end(); main_window->resizable(os_box); main_window->show(argc, argv);
return Fl::run();} // main
A new window class called canvas is defined in this example as a subclass of Fl_Box. This defines the area that will be used for drawing. A new object of this canvas class is created as a child widget of the main_window in the main() function.
The canvas class also defines a handle() method which overwrites the Fl_Widget::handle() virtual method. This way all the events are sent to the canvas handle() method by FLTK. This method checks for two different mouse events and returns a one for those to indicate to FLTK that they are handled by this function: FL_PUSH and FL_DRAG. If one of these events is received, this method will write into the title of the window which mouse button has been clicked last and what the current position of the mouse is.
Then, if the event is a FL_DRAG it will draw a pixel at the current mouse position. If the event is a FL_PUSH, just the mouse position will be stored. On a second FL_PUSH event it depends whether the left or the right mouse button has been clicked. If the left mouse button was clicked, a line will be drawn from the position of the first click to the current mouse position. If the click was done with the right mouse button, a box will be drawn instead of the line. The drawing to the offscreen buffer has to be done after a call to fl_begin_offscreen() and end with a call to fl_end_offscreen().
The draw method just copies the offscreen buffer to the screen. When it is called for the first time it will use fl_create_offscreen() to allocate the offscreen buffer and then use fl_rectf() to clear the buffer to white. When the buffer is drawn to the screen it will turn the drawing area to white. Just to ensure we have a suitable graphic context to base the offscreen on the main_window is made current.
17. Displaying the events generated by FLTK
This example is based on the one given by Robert Arkiletian in his tutorial. There are two buttons defined in the window which will cause events when the mouse moves over them or clicks them, also keyboard events etc. will be displayed in a scrolling FLTK browser window. The callback functions defined for the buttons are called when the buttons are clicked or the letters 'a' or 'b' are entered.
The size of the example could be reduced by using the new fl_eventnames array in FLTK version 1.3.0.
#include <FL/Fl.H>#include <FL/Fl_Window.H>#include <FL/Fl_Browser.H>#include <FL/Fl_Button.H>#include <FL/names.h>
Fl_Window *win;Fl_Browser *b;
class MyButton : public Fl_Button{ static int count;public: char linetext[100];
MyButton(int x,int y,int w,int h,const char*l=0) :Fl_Button(x,y,w,h,l) {}
int handle(int e) { int ret = Fl_Button::handle(e); sprintf(linetext,"Button %s got event: %s, returns: %d ", \
label(),fl_eventnames[e],ret);b->add(linetext);b->bottomline(32000); //always display the last line
return(ret); }};
int MyButton::count=0;
void but_a_cb(Fl_Widget* w, void* v){ win->label("Button A callback!");}
void but_b_cb(Fl_Widget* w, void* v){ win->label("Button B callback!");}
int main(){ win= new Fl_Window(530,350,"FLTK events example"); win->begin();
b = new Fl_Browser(140,20,win->w()-160, win->h()-50); b->type(FL_MULTI_BROWSER);
MyButton but_a(10,20,100,25,"A"); but_a.color(FL_BLUE); but_a.shortcut('a'); but_a.callback(but_a_cb);
MyButton but_b(10,60,100,25,"B"); but_b.color(FL_GREEN); but_b.shortcut('b'); but_b.callback(but_b_cb);
win->end(); win->show(); return(Fl::run());
}
In the main() function a new window object is created and a multi browser widget plus two buttons are added as children. The browser widget will list the events generated by FLTK on the screen. For each button a callback function is defined which will display a message in the window's title bar when clicked or when selected by a shortcut key. Shortcut keys are just the letters 'a' and 'b' here, not an ALT- or CTRL- combination.
To create the button objects a new class has been defined called "MyButton" which is a subclass of the Fl_Button class. All that this class does is to overwrite the Fl_Widget::handle() virtual method. This way all the events are sent to this handle() method by FLTK and can then be displayed in the browser window. As you can see in the screenshot, some events are sent to both buttons. If the handle() function would return a one, the event would be considered handled by FLTK and not be send to other widgets to give these a chance to process the event.
18. The tree widget
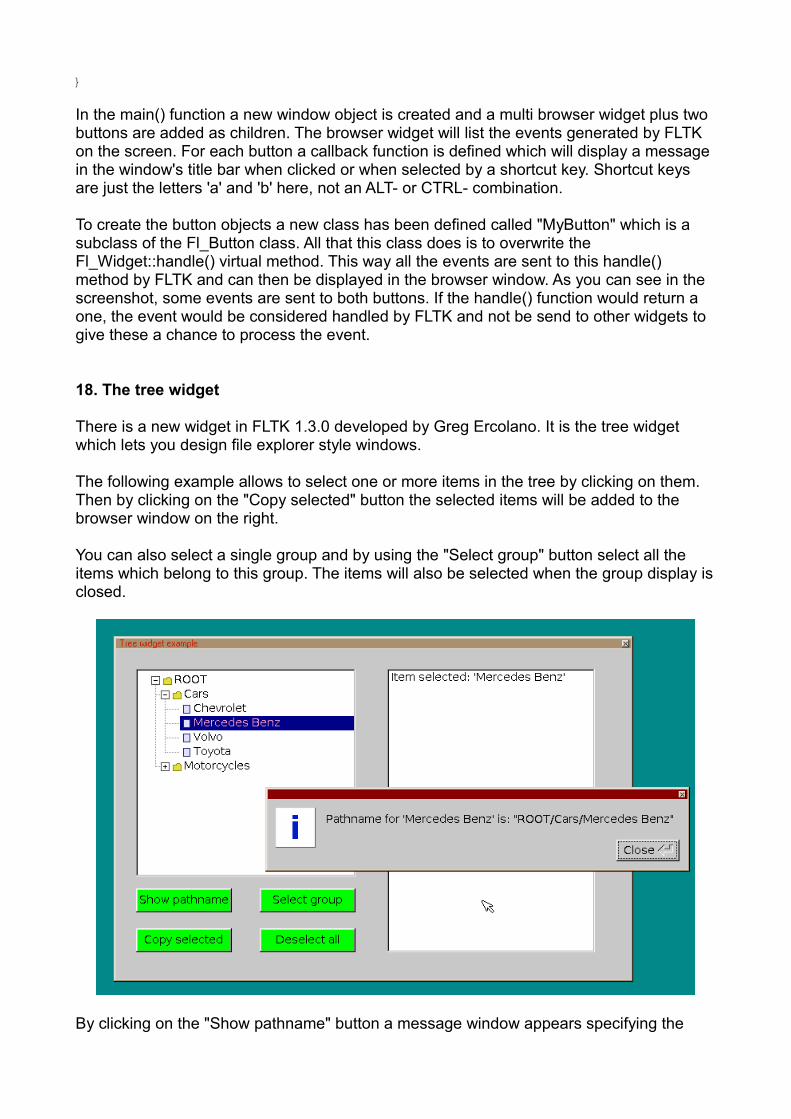
There is a new widget in FLTK 1.3.0 developed by Greg Ercolano. It is the tree widget which lets you design file explorer style windows.
The following example allows to select one or more items in the tree by clicking on them. Then by clicking on the "Copy selected" button the selected items will be added to the browser window on the right.
You can also select a single group and by using the "Select group" button select all the items which belong to this group. The items will also be selected when the group display is closed.
By clicking on the "Show pathname" button a message window appears specifying the
path of the selected item. Finally the "Deselect all" button removes all selections.
#include <FL/Fl.H>#include <FL/Fl_Double_Window.H>#include <FL/Fl_Tree.H>#include <FL/Fl_Button.H>#include <FL/Fl_Browser.H>#include <FL/fl_message.H>
Fl_Double_Window* win = new Fl_Double_Window(645, 414,"Tree widget example");Fl_Tree* tree = new Fl_Tree(25, 25, 275, 260); Fl_Browser *b;
/** Assign user icons to the items*/void AssignUserIcons() { static const char *L_folder_xpm[] = { "11 11 3 1", ". c None", "x c #d8d833", "@ c #808011", "...........", ".....@@@@..", "....@xxxx@.", "@@@@@xxxx@@", "@xxxxxxxxx@", "@xxxxxxxxx@", "@xxxxxxxxx@", "@xxxxxxxxx@", "@xxxxxxxxx@", "@xxxxxxxxx@", "@@@@@@@@@@@"}; static Fl_Pixmap L_folderpixmap(L_folder_xpm); static const char *L_document_xpm[] = { "11 11 3 1", ". c None", "x c #d8d8f8", "@ c #202060", ".@@@@@@@@@.", ".@xxxxxxx@.", ".@xxxxxxx@.", ".@xxxxxxx@.", ".@xxxxxxx@.", ".@xxxxxxx@.", ".@xxxxxxx@.", ".@xxxxxxx@.", ".@xxxxxxx@.", ".@xxxxxxx@.", ".@@@@@@@@@."}; static Fl_Pixmap L_documentpixmap(L_document_xpm); // Assign user icons to tree items for ( Fl_Tree_Item *item = tree->first(); item; item=item->next()) // Assign custom icons item->usericon(item->has_children() ? &L_folderpixmap : &L_documentpixmap); //item->usericon(0); // Don't assign custom icons tree->redraw();}
void tree_cb(Fl_Tree* w, void*){
Fl_Tree *tree = (Fl_Tree*)w;// Find item that was clicked
Fl_Tree_Item *item = (Fl_Tree_Item*)tree->item_clicked();
if ( item->is_selected() ) { //item is already selected } else { //click on additional item
tree->select(item); // select this one too } AssignUserIcons(); //includes tree->redraw();}
//Now the button callbacks for four buttonsvoid button_pathname_cb(Fl_Widget*){ char pathname[256]; Fl_Tree_Item *item = tree->first_selected_item(); if ( !item ) { fl_message("No item was selected"); } else { tree->item_pathname(pathname, sizeof(pathname), item); fl_message("Pathname for '%s' is: \"%s\"", (item->label() ? item->label() : \
"???"), pathname); }}void button_copy_cb(Fl_Widget*){
char linetext[100];for ( Fl_Tree_Item *item = tree->first(); item; item = tree->next(item)) { if ( item->is_selected()) { sprintf(linetext,"Item selected: '%s'\n", item->label()); b->add(linetext); b->bottomline(32000); //always display the last line }
}}void button_select_group_cb(Fl_Widget*){
Fl_Tree_Item *item = (Fl_Tree_Item*)tree->first_selected_item();if (item->has_children()) {
tree->select_all(item);tree->deselect(item,0); //do not select the folder itself
//2nd parameter=0 - no callback triggeredAssignUserIcons(); //includes tree->redraw();
} else {fl_message("Please select just a folder first!");return;
}}
void button_deselect_cb(Fl_Widget*){tree->deselect_all(0,0); //2nd parameter=0 - no callback triggeredAssignUserIcons(); //includes tree->redraw();
}
int main(int argc, char **argv) { // Create tree and add items tree->add("Cars/Chevrolet"); tree->add("Cars/Mercedes Benz"); tree->add("Cars/Volvo"); tree->add("Cars/Toyota"); tree->add("Motorcycles/Harley Davidson"); tree->add("Motorcycles/Honda"); tree->add("Motorcycles/Suzuki"); tree->close("/Motorcycles");
tree->selectmode(FL_TREE_SELECT_MULTI); // Multiple Items tree->callback((Fl_Callback*)tree_cb);
tree->end(); //Create buttons and define callbacks Fl_Button *button_pathname = new Fl_Button(25,300,120,30,"Show pathname"); button_pathname->color(FL_GREEN); button_pathname->callback(button_pathname_cb);
Fl_Button *button_select_group = new Fl_Button(180,300,120,30,"Select group"); button_select_group->color(FL_GREEN); button_select_group->callback(button_select_group_cb);
Fl_Button *button_copy = new Fl_Button(25,350,120,30,"Copy selected"); button_copy->color(FL_GREEN); button_copy->callback(button_copy_cb);
Fl_Button *button_deselect = new Fl_Button(180,350,120,30,"Deselect all"); button_deselect->color(FL_GREEN); button_deselect->callback(button_deselect_cb);
//Create browser window b = new Fl_Browser(340,25,260,355); b->type(FL_MULTI_BROWSER);
win->end();
// Display the window win->show(); AssignUserIcons(); //includes tree->redraw(); // Run and return return Fl::run();}
The main window object, the tree widget object and the browser object are defined as globals here to simplify access to them from the callback functions.
In the main function the tree widget is set up with the tree_cb as its callback. This callback just allows to select several items simultaneously which is possible since the browser type is set to FL_MULTI_BROWSER.
Then four buttons are defined with separate callbacks. The "Show pathname" button callback retrieves the first selected item in the tree and then uses the item_pathname() method to get its pathname which it then displays in a message window.
The "Copy selected" button callback walks in a loop through all items in the tree and if one of them is selected it will copy that to the browser window.
The "Select group" button callback looks if the first selected item in the tree is a folder, i.e. it has children, and if yes will select all items belonging to the folder. The folder item itself will be deselected again in this example.
The "Deselect all" button callback uses the deselect_all() method to deselect all items in the tree.
The AssignUserIcons function at the beginning of the code is frequently called in this example. This is taken from the "Tree" example in the FLTK package. It defines two icons using the XPM format and these will be added to the connector line depending whether it is a folder or a file. Then it calls tree_redraw() to refresh the tree display. These icons just make the tree look better, they are not required.
19. References
I read the following resources and got most of my knowledge from them.
a) Robert Artiletian's tutorial:
http://www3.telus.net/public/robark/
b) Greg Ercolano's FLTK Cheat page:
http://seriss.com/people/erco/fltk/
c) Tutorials on the National Taiwan University site:
http://graphics.csie.ntust.edu.tw/courses/index.php/Main/Tutorial
d) The FLTK manual:
http://www.fltk.org/doc-1.3/index.html
6th of March 2012 - Georg Potthast