real studio quick start
DESCRIPTION
bbTRANSCRIPT
REAL Studio Quickstart
Welcome to REAL Studio!
REAL Studio is an application builder based on a modern version of the BASIC programming language. It is made up of a rich set of graphical user interface objects, a modern object-oriented language, an integrated debugger, and a cross-platform compiler. Together they make up REAL Studio’s Integrated Development Environment or IDE.
With the graphical user interface, you can build your application’s interface simply by dragging and dropping interface objects into the application’s windows and dialogs. We will show you how easy it is in this QuickStart.
REAL Studio provides you with all the tools you need to build virtually any application you can imagine.
This QuickStart is for people who are new to programming and new to REAL Studio. It will give you a gentle introduction to the REAL Studio development environment, lead you through the development of a real application, and show you what kinds of other applications can be built with REAL Studio.
You will build a simple web browser. It uses REAL Studio’s built-in HTML Viewer control to display web pages. It should take you 15-20 minutes to complete this Quickstart.
1REAL Studio Quickstart
Presentation ConventionsThe Quickstart uses screen snapshots taken from the Windows and Macintosh versions of REAL Studio. REAL Software also offers a Linux version of REAL Studio. The interface design and feature set are identical on all platforms, so the differences between platforms are cosmetic and have to do with the differences between the Vista Aero interface and the Mac OS X Leopard interface.
Italic type is used to emphasize the first time a new term is used and to highlight important concepts. In addition, titles of books, such as REAL Studio User’s Guide, are italicized.
When you are instructed to choose an item from one of REAL Studio’s menus, you will see something like “choose File . New Project”. This is equivalent to “choose New Project from the File menu.”
Starting REAL Studio
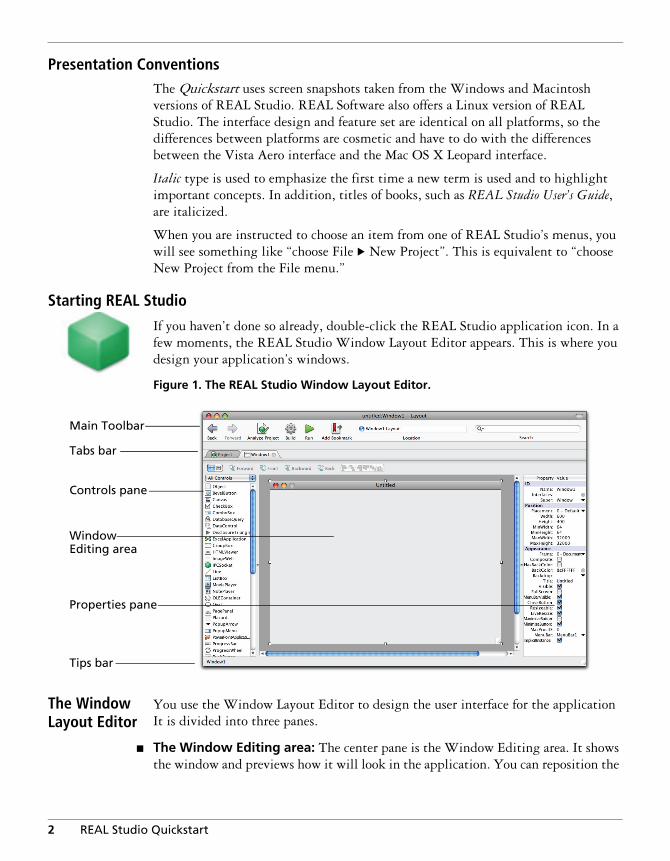
If you haven’t done so already, double-click the REAL Studio application icon. In a few moments, the REAL Studio Window Layout Editor appears. This is where you design your application’s windows.
Figure 1. The REAL Studio Window Layout Editor.
The Window Layout Editor
You use the Window Layout Editor to design the user interface for the application It is divided into three panes.
n The Window Editing area: The center pane is the Window Editing area. It shows the window and previews how it will look in the application. You can reposition the
Main Toolbar
Tabs bar
Tips bar
Controls pane
Window Editing area
Properties pane
2 REAL Studio Quickstart
window by dragging its Title bar. In Figure 1, the window is blank because you haven’t added any interface items yet.
n The Controls pane: The pane on the left lists the controls or interface elements that you can add to a window. You design the window by dragging controls from the list to the window.
n The Properties pane: The pane on the right shows the properties of the selected item in the Window editing area. Properties are characteristics of a control or window. Examples are its name, its width and height, and its location. In Figure 1, the window is selected (it has selection handles), so the Properties pane shows the properties of the window.
The contents of the Properties pane changes as you click a different item in the Window Editing area. You change a property by entering a new value in the field to the right of a field label and pressing Enter on the keyboard.
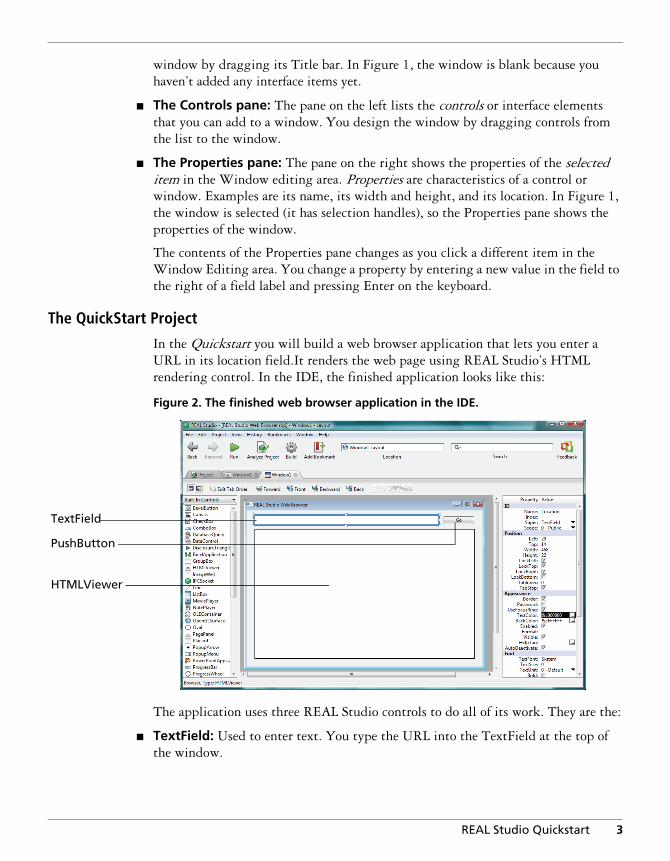
The QuickStart Project
In the Quickstart you will build a web browser application that lets you enter a URL in its location field.It renders the web page using REAL Studio’s HTML rendering control. In the IDE, the finished application looks like this:
Figure 2. The finished web browser application in the IDE.
The application uses three REAL Studio controls to do all of its work. They are the:
n TextField: Used to enter text. You type the URL into the TextField at the top of the window.
TextField
PushButton
HTMLViewer
3REAL Studio Quickstart
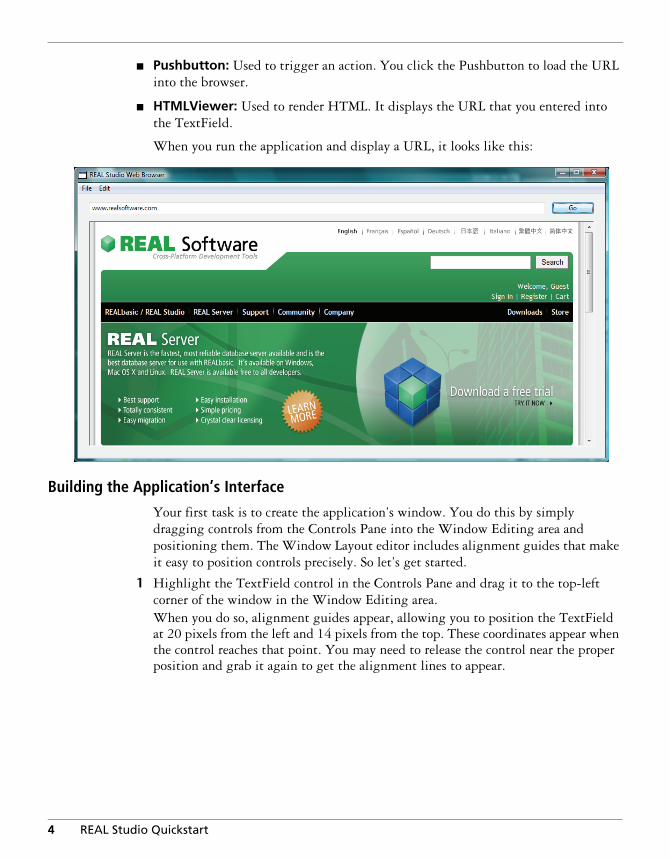
n Pushbutton: Used to trigger an action. You click the Pushbutton to load the URL into the browser.
n HTMLViewer: Used to render HTML. It displays the URL that you entered into the TextField.
When you run the application and display a URL, it looks like this:
Building the Application’s Interface
Your first task is to create the application’s window. You do this by simply dragging controls from the Controls Pane into the Window Editing area and positioning them. The Window Layout editor includes alignment guides that make it easy to position controls precisely. So let’s get started.
1 Highlight the TextField control in the Controls Pane and drag it to the top-left corner of the window in the Window Editing area. When you do so, alignment guides appear, allowing you to position the TextField at 20 pixels from the left and 14 pixels from the top. These coordinates appear when the control reaches that point. You may need to release the control near the proper position and grab it again to get the alignment lines to appear.
4 REAL Studio Quickstart

Figure 3. Positioning the TextField control at the top-left corner of the window.
2 Next, drag a PushButton control from the Controls Pane and drag it to the top-right corner of the window. Use the alignment guides to align it with the top of the TextField and position it 20 pixels from the right side of the window.
Figure 4. Positioning the PushButton at the top-right corner of the window.
5REAL Studio Quickstart
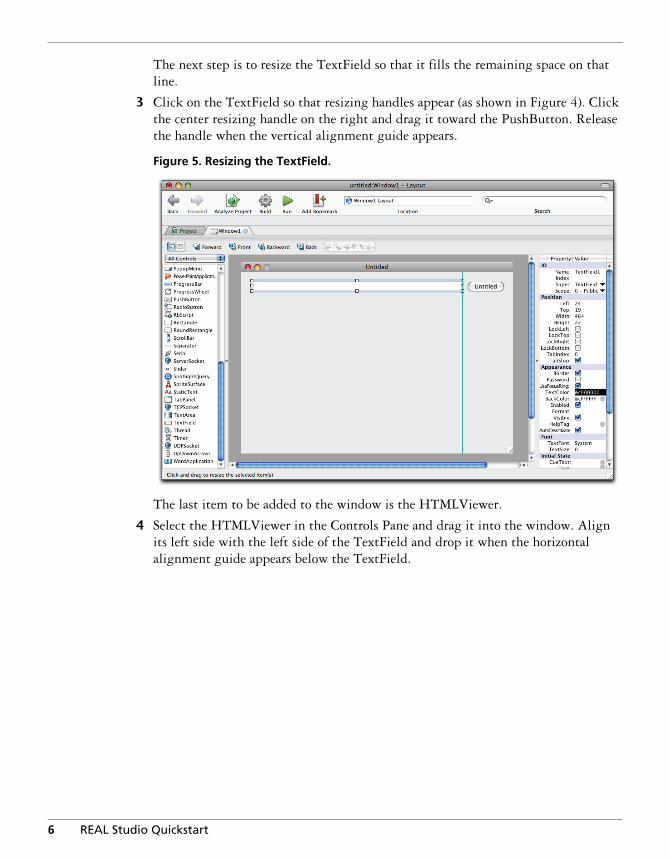
The next step is to resize the TextField so that it fills the remaining space on that line.
3 Click on the TextField so that resizing handles appear (as shown in Figure 4). Click the center resizing handle on the right and drag it toward the PushButton. Release the handle when the vertical alignment guide appears.
Figure 5. Resizing the TextField.
The last item to be added to the window is the HTMLViewer.
4 Select the HTMLViewer in the Controls Pane and drag it into the window. Align its left side with the left side of the TextField and drop it when the horizontal alignment guide appears below the TextField.
6 REAL Studio Quickstart
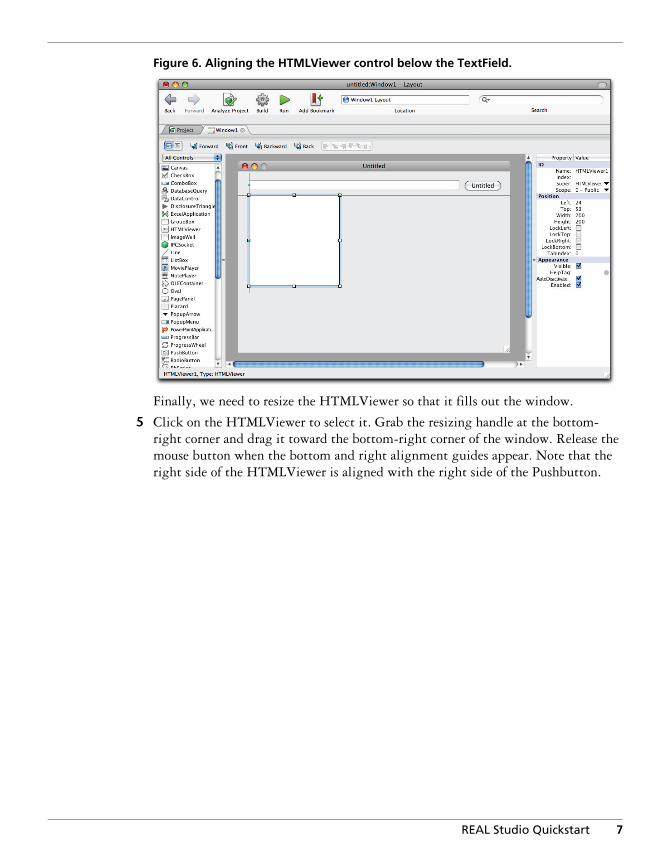
Figure 6. Aligning the HTMLViewer control below the TextField.
Finally, we need to resize the HTMLViewer so that it fills out the window.
5 Click on the HTMLViewer to select it. Grab the resizing handle at the bottom-right corner and drag it toward the bottom-right corner of the window. Release the mouse button when the bottom and right alignment guides appear. Note that the right side of the HTMLViewer is aligned with the right side of the Pushbutton.
7REAL Studio Quickstart
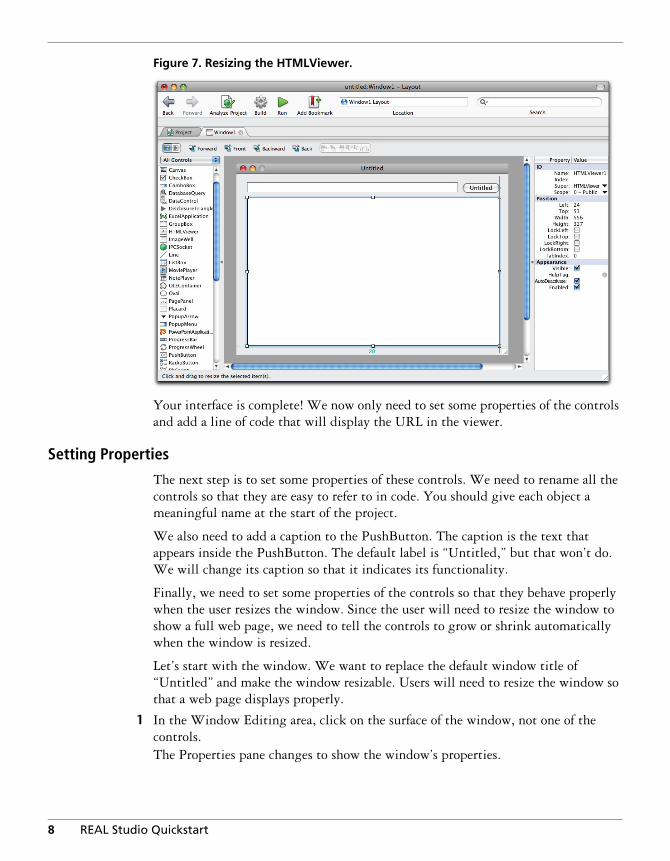
Figure 7. Resizing the HTMLViewer.
Your interface is complete! We now only need to set some properties of the controls and add a line of code that will display the URL in the viewer.
Setting Properties
The next step is to set some properties of these controls. We need to rename all the controls so that they are easy to refer to in code. You should give each object a meaningful name at the start of the project.
We also need to add a caption to the PushButton. The caption is the text that appears inside the PushButton. The default label is “Untitled,” but that won’t do. We will change its caption so that it indicates its functionality.
Finally, we need to set some properties of the controls so that they behave properly when the user resizes the window. Since the user will need to resize the window to show a full web page, we need to tell the controls to grow or shrink automatically when the window is resized.
Let’s start with the window. We want to replace the default window title of “Untitled” and make the window resizable. Users will need to resize the window so that a web page displays properly.
1 In the Window Editing area, click on the surface of the window, not one of the controls.The Properties pane changes to show the window’s properties.
8 REAL Studio Quickstart

Figure 8. The Properties pane for the default window.
2 In the Title field, replace the default title (“Untitled”) with the text “REAL Studio Web Browser” and press Enter.
When you complete the entry, the new title appears in the Title bar in the Window Editing area.
3 Next, click the “Resizable” checkbox in the Appearance group if it is not already checked.Setting this property gives the window a resizing handle and allows the user to resize the window. Your window should now look like this
9REAL Studio Quickstart
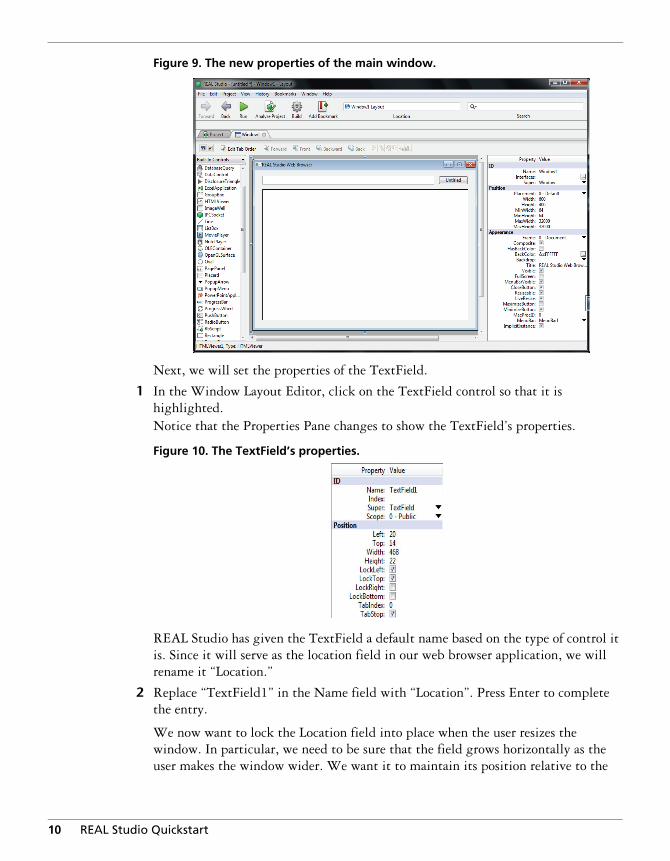
Figure 9. The new properties of the main window.
Next, we will set the properties of the TextField.
1 In the Window Layout Editor, click on the TextField control so that it is highlighted.Notice that the Properties Pane changes to show the TextField’s properties.
Figure 10. The TextField’s properties.
REAL Studio has given the TextField a default name based on the type of control it is. Since it will serve as the location field in our web browser application, we will rename it “Location.”
2 Replace “TextField1” in the Name field with “Location”. Press Enter to complete the entry.
We now want to lock the Location field into place when the user resizes the window. In particular, we need to be sure that the field grows horizontally as the user makes the window wider. We want it to maintain its position relative to the
10 REAL Studio Quickstart
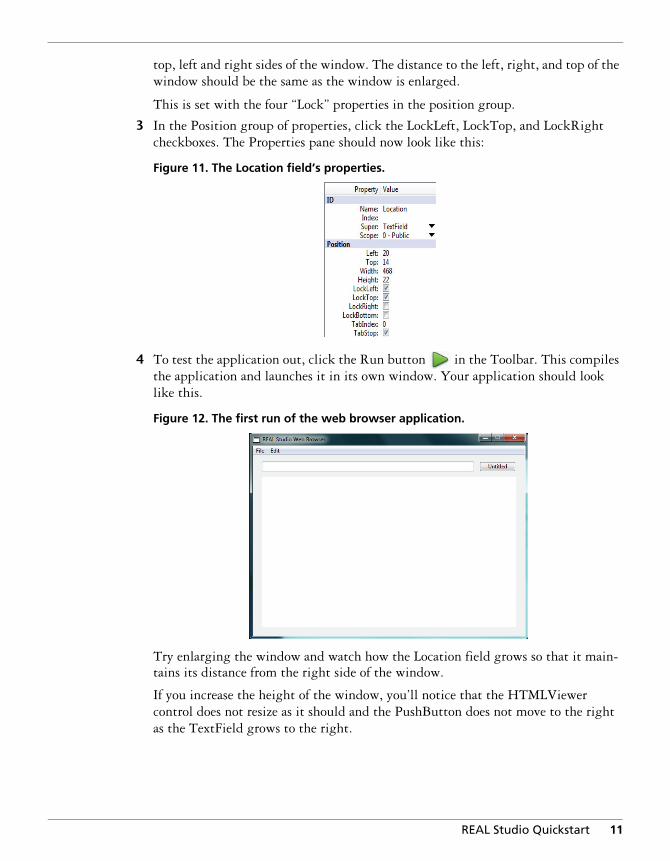
top, left and right sides of the window. The distance to the left, right, and top of the window should be the same as the window is enlarged.
This is set with the four “Lock” properties in the position group.
3 In the Position group of properties, click the LockLeft, LockTop, and LockRight checkboxes. The Properties pane should now look like this:
Figure 11. The Location field’s properties.
4 To test the application out, click the Run button in the Toolbar. This compiles the application and launches it in its own window. Your application should look like this.
Figure 12. The first run of the web browser application.
Try enlarging the window and watch how the Location field grows so that it main-tains its distance from the right side of the window.
If you increase the height of the window, you’ll notice that the HTMLViewer control does not resize as it should and the PushButton does not move to the right as the TextField grows to the right.
11REAL Studio Quickstart
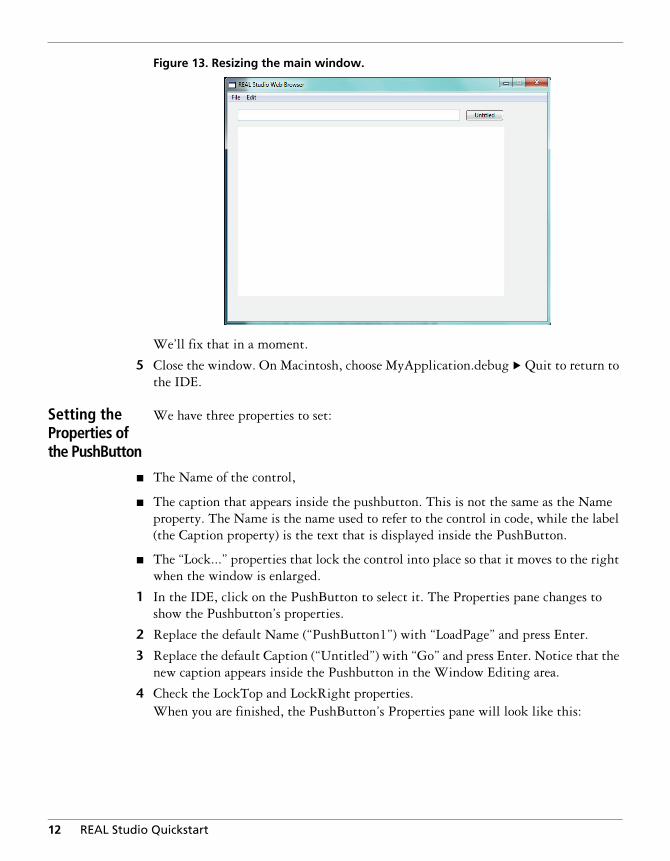
Figure 13. Resizing the main window.
We’ll fix that in a moment.
5 Close the window. On Macintosh, choose MyApplication.debug . Quit to return to the IDE.
Setting the Properties of the PushButton
We have three properties to set:
n The Name of the control,
n The caption that appears inside the pushbutton. This is not the same as the Name property. The Name is the name used to refer to the control in code, while the label (the Caption property) is the text that is displayed inside the PushButton.
n The “Lock...” properties that lock the control into place so that it moves to the right when the window is enlarged.
1 In the IDE, click on the PushButton to select it. The Properties pane changes to show the Pushbutton’s properties.
2 Replace the default Name (“PushButton1”) with “LoadPage” and press Enter.
3 Replace the default Caption (“Untitled”) with “Go” and press Enter. Notice that the new caption appears inside the Pushbutton in the Window Editing area.
4 Check the LockTop and LockRight properties.When you are finished, the PushButton’s Properties pane will look like this:
12 REAL Studio Quickstart
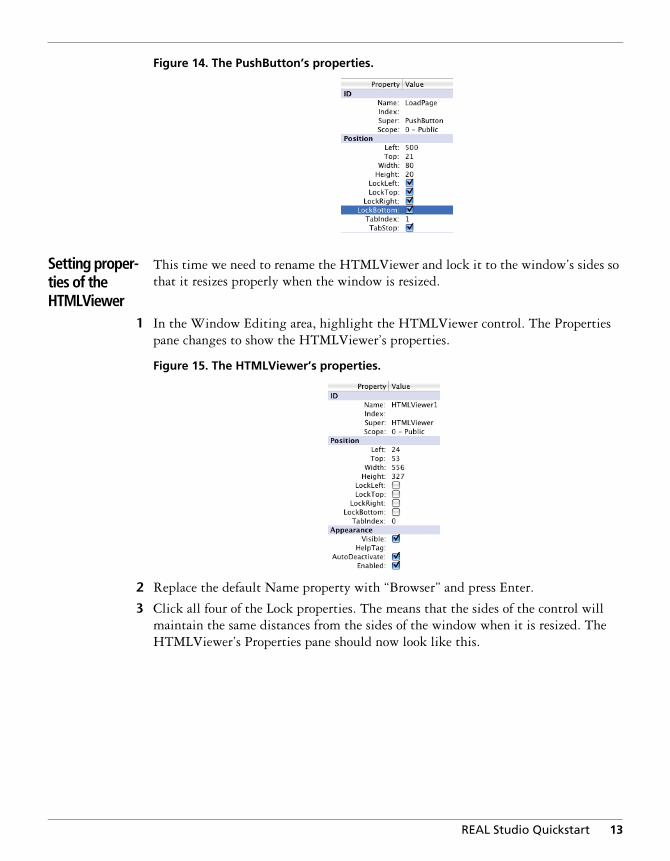
Figure 14. The PushButton’s properties.
Setting proper-ties of the HTMLViewer
This time we need to rename the HTMLViewer and lock it to the window’s sides so that it resizes properly when the window is resized.
1 In the Window Editing area, highlight the HTMLViewer control. The Properties pane changes to show the HTMLViewer’s properties.
Figure 15. The HTMLViewer’s properties.
2 Replace the default Name property with “Browser” and press Enter.
3 Click all four of the Lock properties. The means that the sides of the control will maintain the same distances from the sides of the window when it is resized. The HTMLViewer’s Properties pane should now look like this.
13REAL Studio Quickstart
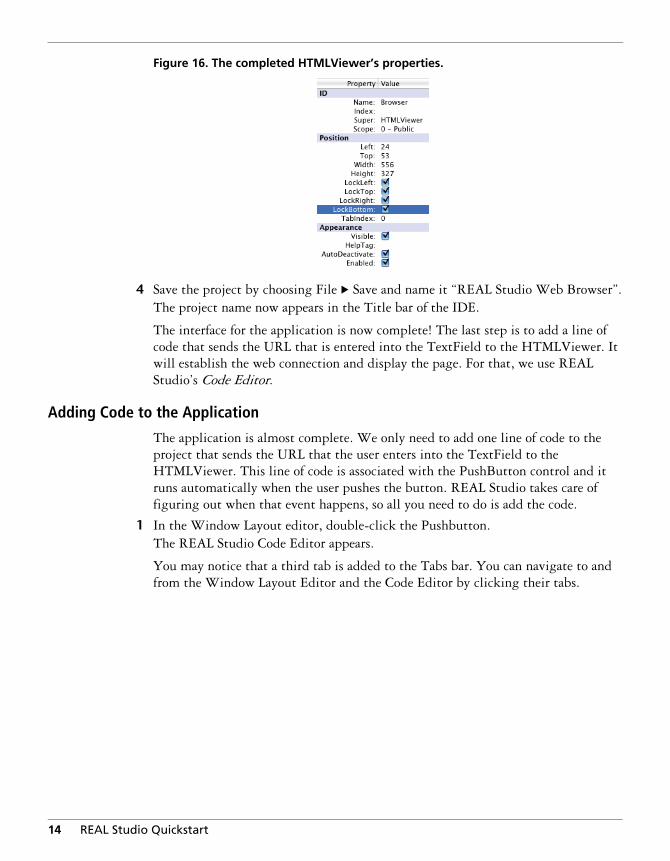
Figure 16. The completed HTMLViewer’s properties.
4 Save the project by choosing File . Save and name it “REAL Studio Web Browser”.The project name now appears in the Title bar of the IDE.
The interface for the application is now complete! The last step is to add a line of code that sends the URL that is entered into the TextField to the HTMLViewer. It will establish the web connection and display the page. For that, we use REAL Studio’s Code Editor.
Adding Code to the Application
The application is almost complete. We only need to add one line of code to the project that sends the URL that the user enters into the TextField to the HTMLViewer. This line of code is associated with the PushButton control and it runs automatically when the user pushes the button. REAL Studio takes care of figuring out when that event happens, so all you need to do is add the code.
1 In the Window Layout editor, double-click the Pushbutton.The REAL Studio Code Editor appears.
You may notice that a third tab is added to the Tabs bar. You can navigate to and from the Window Layout Editor and the Code Editor by clicking their tabs.
14 REAL Studio Quickstart
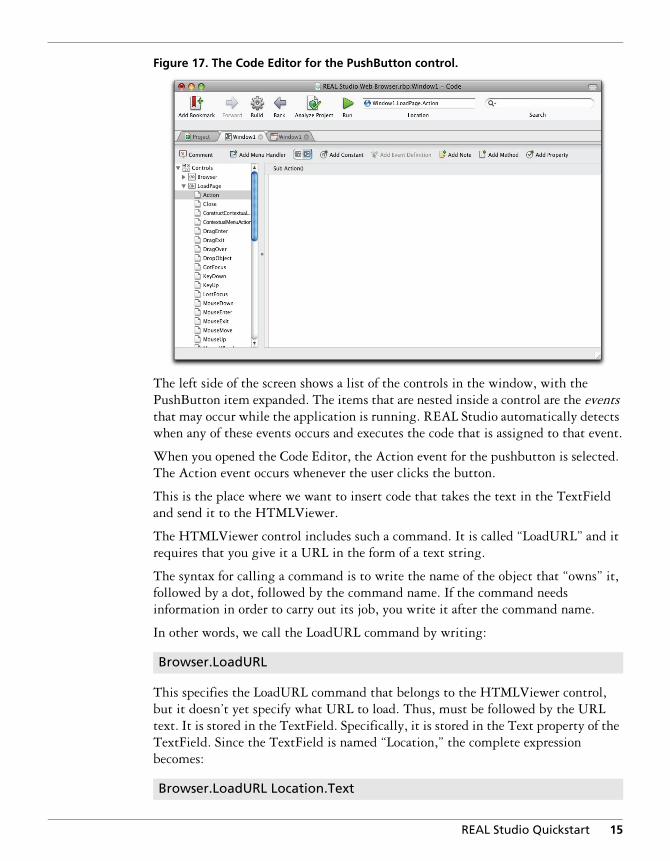
Figure 17. The Code Editor for the PushButton control.
The left side of the screen shows a list of the controls in the window, with the PushButton item expanded. The items that are nested inside a control are the events that may occur while the application is running. REAL Studio automatically detects when any of these events occurs and executes the code that is assigned to that event.
When you opened the Code Editor, the Action event for the pushbutton is selected. The Action event occurs whenever the user clicks the button.
This is the place where we want to insert code that takes the text in the TextField and send it to the HTMLViewer.
The HTMLViewer control includes such a command. It is called “LoadURL” and it requires that you give it a URL in the form of a text string.
The syntax for calling a command is to write the name of the object that “owns” it, followed by a dot, followed by the command name. If the command needs information in order to carry out its job, you write it after the command name.
In other words, we call the LoadURL command by writing:
This specifies the LoadURL command that belongs to the HTMLViewer control, but it doesn’t yet specify what URL to load. Thus, must be followed by the URL text. It is stored in the TextField. Specifically, it is stored in the Text property of the TextField. Since the TextField is named “Location,” the complete expression becomes:
Browser.LoadURL
Browser.LoadURL Location.Text
15REAL Studio Quickstart
2 Place the insertion point in the text area for LoadPage’s Action event (just below the “Sub Action()” heading, and type this expression:
That’s it! The application is complete.
Contextual Help
You may have noticed a couple of features that provide context-sensitive help in the Code Editor. First, the Tips bar tries to tell you the syntax of a command whenever it can.
n Place the insertion point in the “LoadURL” term in the Code Editor.
The Tips bar changes to show you the syntax for LoadURL:
“HTMLViewer” is the type of control that owns the command and the “(url as String)” portion is the information that the command requires. The Tips bar tells you that the required information must be a string or else the command won’t work. Also, you must include the url or the command will fail.
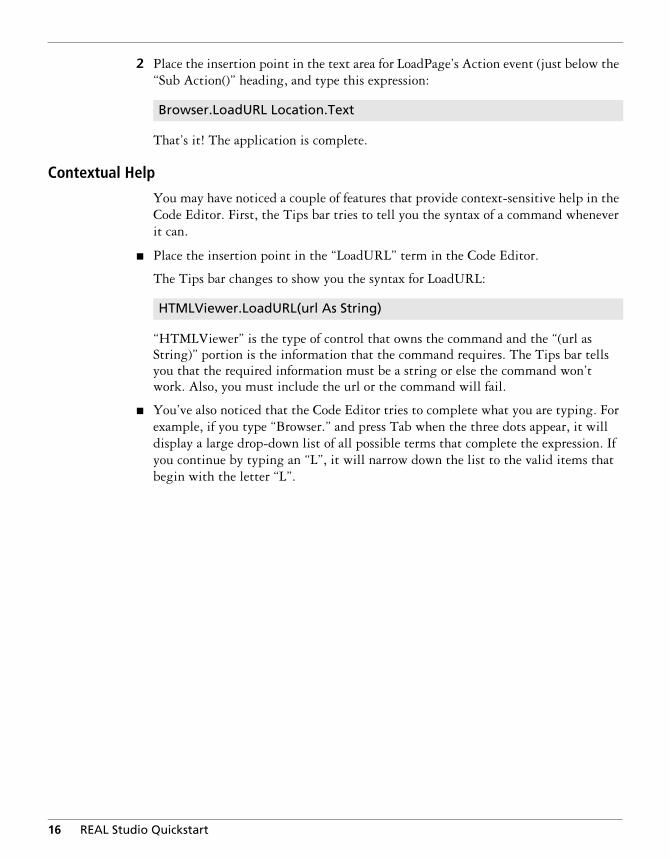
n You’ve also noticed that the Code Editor tries to complete what you are typing. For example, if you type “Browser.” and press Tab when the three dots appear, it will display a large drop-down list of all possible terms that complete the expression. If you continue by typing an “L”, it will narrow down the list to the valid items that begin with the letter “L”.
Browser.LoadURL Location.Text
HTMLViewer.LoadURL(url As String)
16 REAL Studio Quickstart
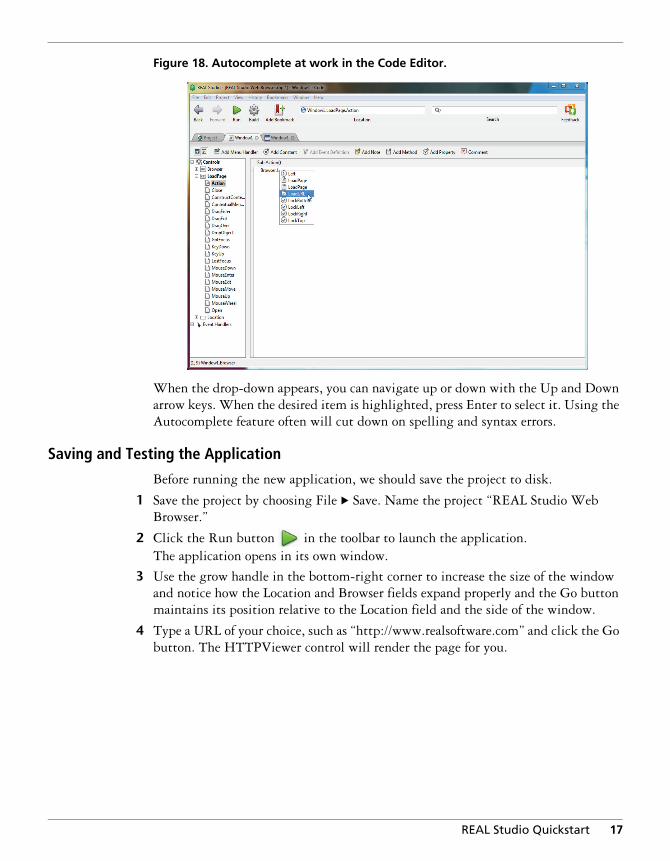
Figure 18. Autocomplete at work in the Code Editor.
When the drop-down appears, you can navigate up or down with the Up and Down arrow keys. When the desired item is highlighted, press Enter to select it. Using the Autocomplete feature often will cut down on spelling and syntax errors.
Saving and Testing the Application
Before running the new application, we should save the project to disk.
1 Save the project by choosing File . Save. Name the project “REAL Studio Web Browser.”
2 Click the Run button in the toolbar to launch the application. The application opens in its own window.
3 Use the grow handle in the bottom-right corner to increase the size of the window and notice how the Location and Browser fields expand properly and the Go button maintains its position relative to the Location field and the side of the window.
4 Type a URL of your choice, such as “http://www.realsoftware.com” and click the Go button. The HTTPViewer control will render the page for you.
17REAL Studio Quickstart
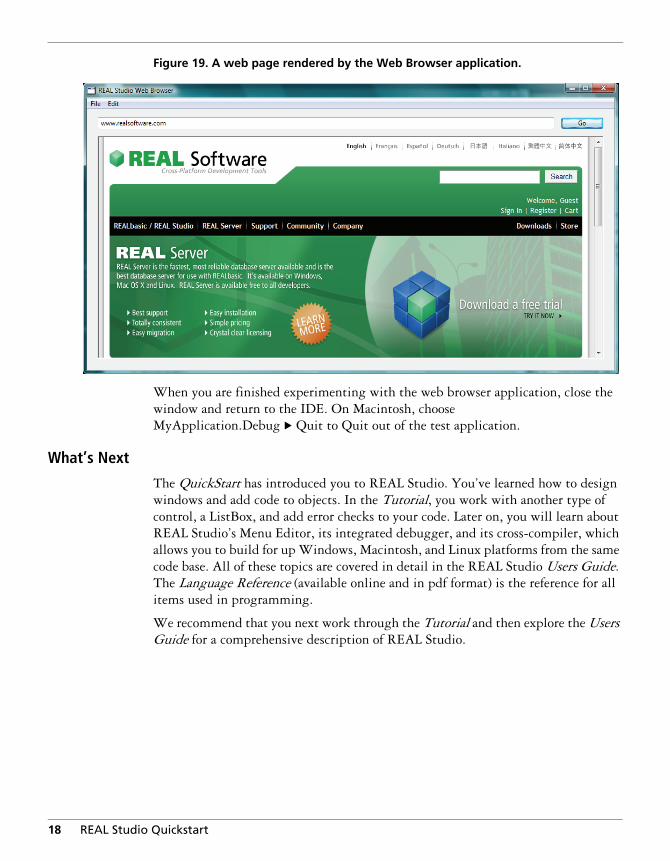
Figure 19. A web page rendered by the Web Browser application.
When you are finished experimenting with the web browser application, close the window and return to the IDE. On Macintosh, choose MyApplication.Debug . Quit to Quit out of the test application.
What’s Next
The QuickStart has introduced you to REAL Studio. You’ve learned how to design windows and add code to objects. In the Tutorial, you work with another type of control, a ListBox, and add error checks to your code. Later on, you will learn about REAL Studio’s Menu Editor, its integrated debugger, and its cross-compiler, which allows you to build for up Windows, Macintosh, and Linux platforms from the same code base. All of these topics are covered in detail in the REAL Studio Users Guide. The Language Reference (available online and in pdf format) is the reference for all items used in programming.
We recommend that you next work through the Tutorial and then explore the Users Guide for a comprehensive description of REAL Studio.
18 REAL Studio Quickstart