real-time integration business insight 12.2.1.1.0 using a ... · real-time integration business...
TRANSCRIPT

Setup Real-Time Integration
Business Insight 12.2.1.1.0 using a native installation For AstraTeq Help Desk
Tutorial
Real-Time Integration Business Insight 12.2.1.1.0: AstraTeq Help Desk Tutorial Page 2 of 26
Table of Contents
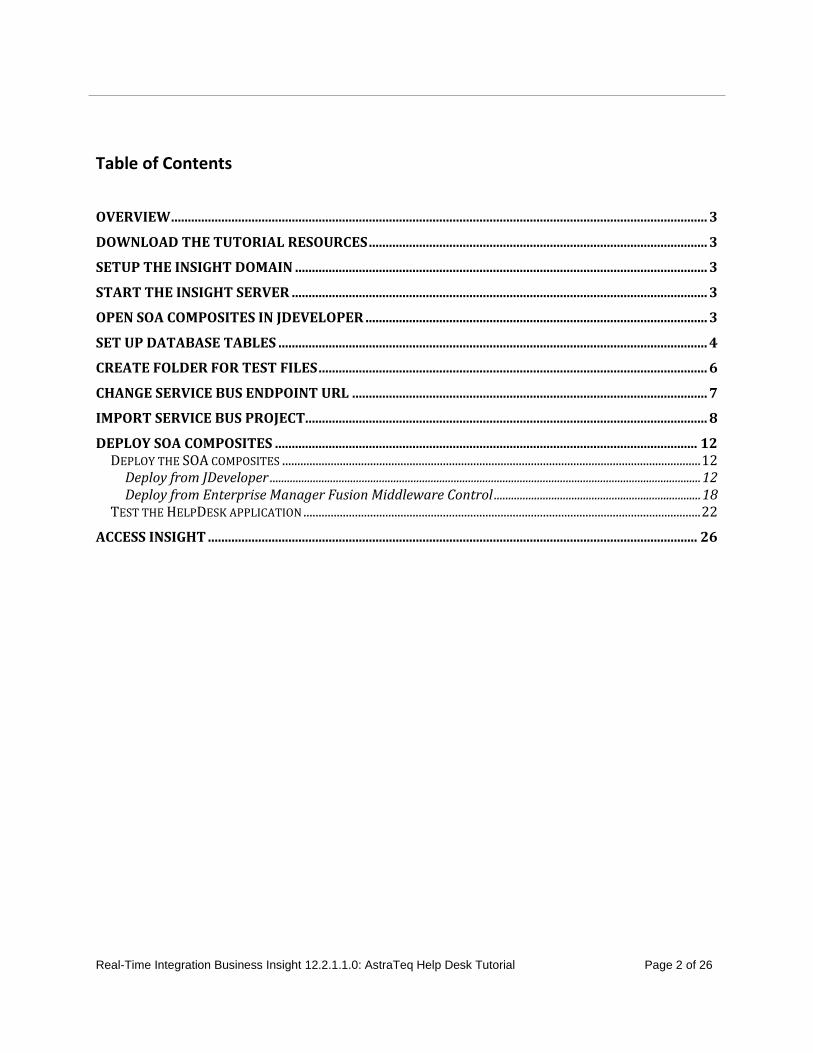
OVERVIEW ................................................................................................................................................................ 3
DOWNLOAD THE TUTORIAL RESOURCES ..................................................................................................... 3
SETUP THE INSIGHT DOMAIN ........................................................................................................................... 3
START THE INSIGHT SERVER ............................................................................................................................ 3
OPEN SOA COMPOSITES IN JDEVELOPER ...................................................................................................... 3
SET UP DATABASE TABLES ................................................................................................................................ 4
CREATE FOLDER FOR TEST FILES .................................................................................................................... 6
CHANGE SERVICE BUS ENDPOINT URL .......................................................................................................... 7
IMPORT SERVICE BUS PROJECT........................................................................................................................ 8
DEPLOY SOA COMPOSITES .............................................................................................................................. 12 DEPLOY THE SOA COMPOSITES .......................................................................................................................................... 12
Deploy from JDeveloper ...................................................................................................................................................... 12 Deploy from Enterprise Manager Fusion Middleware Control ........................................................................ 18
TEST THE HELPDESK APPLICATION ................................................................................................................................... 22
ACCESS INSIGHT .................................................................................................................................................. 26

Real-Time Integration Business Insight 12.2.1.1.0: AstraTeq Help Desk Tutorial Page 3 of 26
Overview
This document describes the steps to setup your environment for the Oracle Real-Time Integration Business Insight AstraTeq Help Desk tutorial.
For more information about Oracle Real-Time Integration Business Insight, please visit the Oracle Real-Time Integration Business Insight product page.
Download the tutorial resources
Download AstraTeqHelpDeskTutorial.zip from the Insight Tutorials OTN page and extract into a folder of your choice. Let’s call this folder AstraTeqHelpDeskTutorialROOT.
Setup the Insight domain
Install Oracle Real-Time Integration Business Insight natively and configure a compact domain, following the steps in the Real-Time Integration Business Insight 12.2.1.1.0 Quick Start Guide.
Make sure you include the necessary patch and setup of the Insight demo users.
Start the Insight Server
After you finished your installation and domain configuration, start WebLogic Server in your Insight domain.
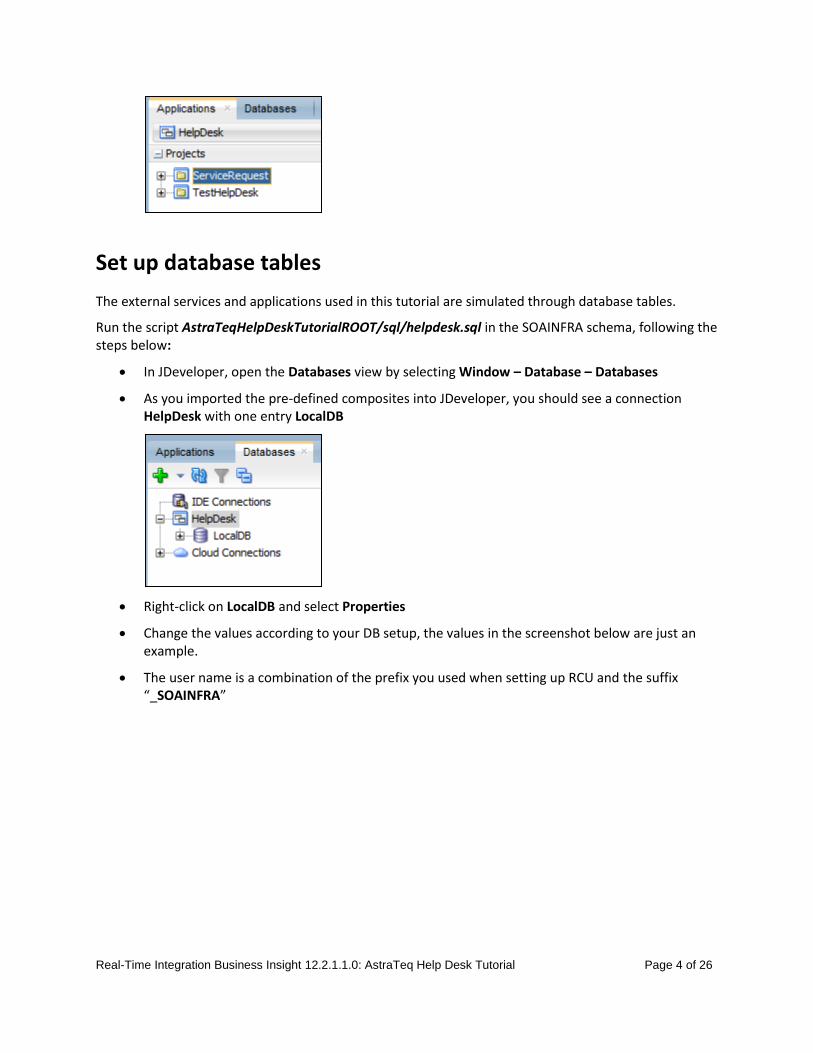
Open SOA composites in JDeveloper
The AstraTeq help desk application consists of two SOA composites and one Service Bus project.
ServiceRequest includes the actual implementation of the help desk application
TestHelpDesk is used to simulate the mobile app used by customers to report their problems
The source code for the projects is included in AstraTeqHelpDeskTutorialROOT/apps/HelpDesk.zip
Unzip HelpDesk.zip
Open the SOA application in JDeveloper by selecting HelpDesk/HelpDesk.jws
You will now see both composites in JDeveloper
Real-Time Integration Business Insight 12.2.1.1.0: AstraTeq Help Desk Tutorial Page 4 of 26
Set up database tables
The external services and applications used in this tutorial are simulated through database tables.
Run the script AstraTeqHelpDeskTutorialROOT/sql/helpdesk.sql in the SOAINFRA schema, following the steps below:
In JDeveloper, open the Databases view by selecting Window – Database – Databases
As you imported the pre-defined composites into JDeveloper, you should see a connection HelpDesk with one entry LocalDB
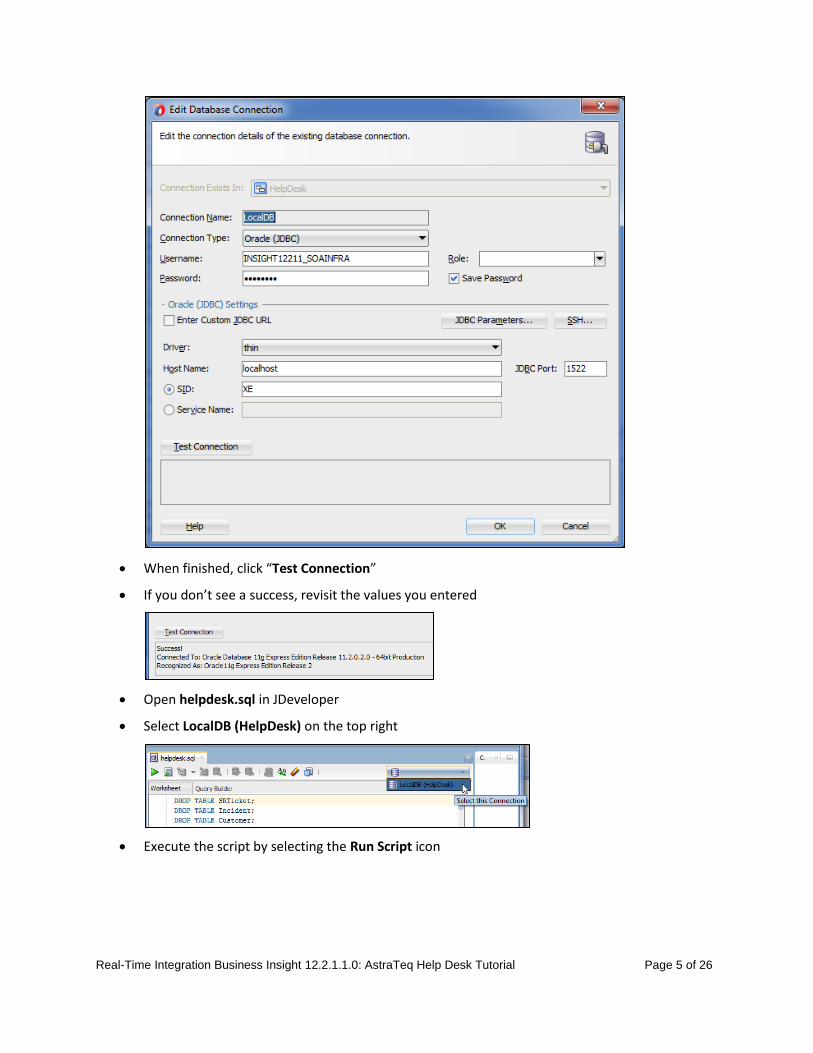
Right-click on LocalDB and select Properties
Change the values according to your DB setup, the values in the screenshot below are just an example.
The user name is a combination of the prefix you used when setting up RCU and the suffix “_SOAINFRA”
Real-Time Integration Business Insight 12.2.1.1.0: AstraTeq Help Desk Tutorial Page 5 of 26
When finished, click “Test Connection”
If you don’t see a success, revisit the values you entered
Open helpdesk.sql in JDeveloper
Select LocalDB (HelpDesk) on the top right
Execute the script by selecting the Run Script icon
Real-Time Integration Business Insight 12.2.1.1.0: AstraTeq Help Desk Tutorial Page 6 of 26
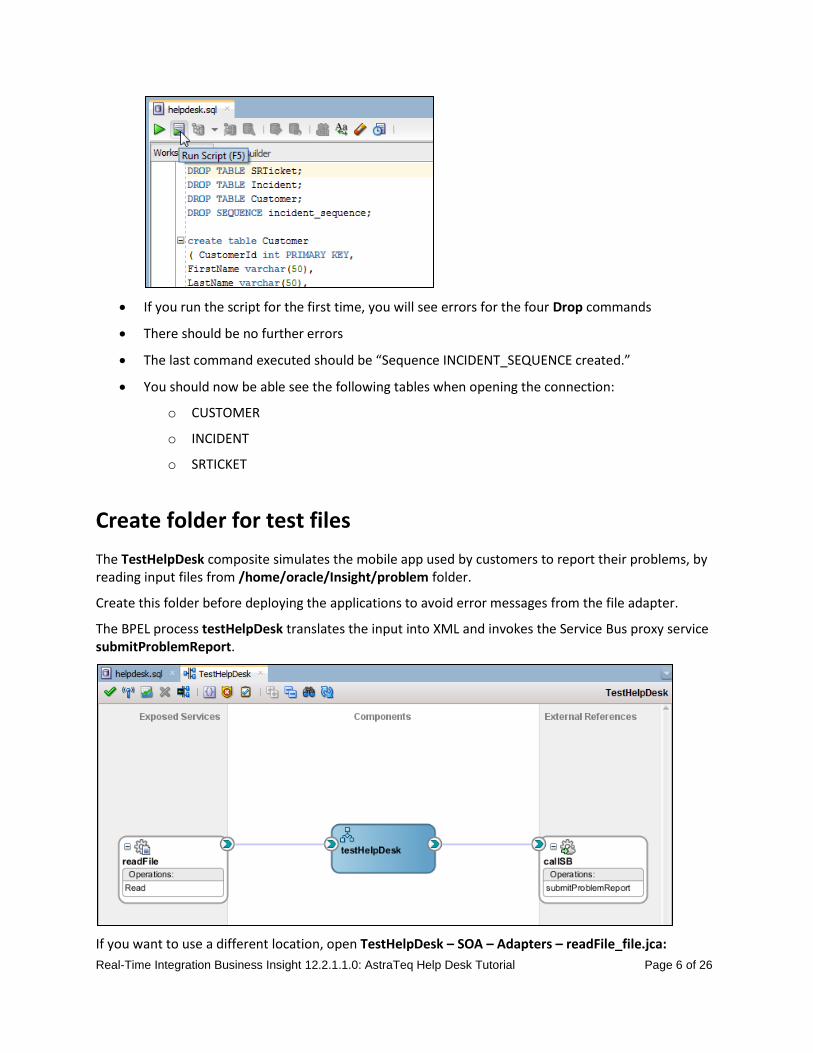
If you run the script for the first time, you will see errors for the four Drop commands
There should be no further errors
The last command executed should be “Sequence INCIDENT_SEQUENCE created.”
You should now be able see the following tables when opening the connection:
o CUSTOMER
o INCIDENT
o SRTICKET
Create folder for test files
The TestHelpDesk composite simulates the mobile app used by customers to report their problems, by reading input files from /home/oracle/Insight/problem folder.
Create this folder before deploying the applications to avoid error messages from the file adapter.
The BPEL process testHelpDesk translates the input into XML and invokes the Service Bus proxy service submitProblemReport.
If you want to use a different location, open TestHelpDesk – SOA – Adapters – readFile_file.jca:
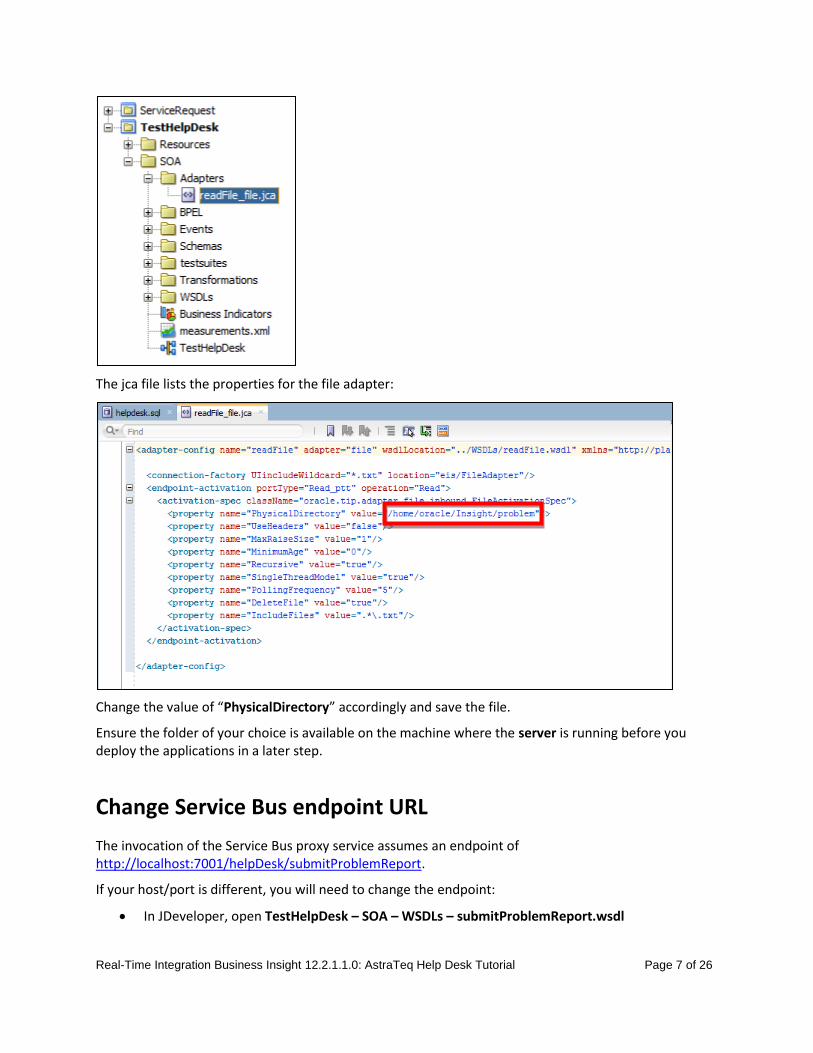
Real-Time Integration Business Insight 12.2.1.1.0: AstraTeq Help Desk Tutorial Page 7 of 26
The jca file lists the properties for the file adapter:
Change the value of “PhysicalDirectory” accordingly and save the file.
Ensure the folder of your choice is available on the machine where the server is running before you deploy the applications in a later step.
Change Service Bus endpoint URL
The invocation of the Service Bus proxy service assumes an endpoint of http://localhost:7001/helpDesk/submitProblemReport.
If your host/port is different, you will need to change the endpoint:
In JDeveloper, open TestHelpDesk – SOA – WSDLs – submitProblemReport.wsdl
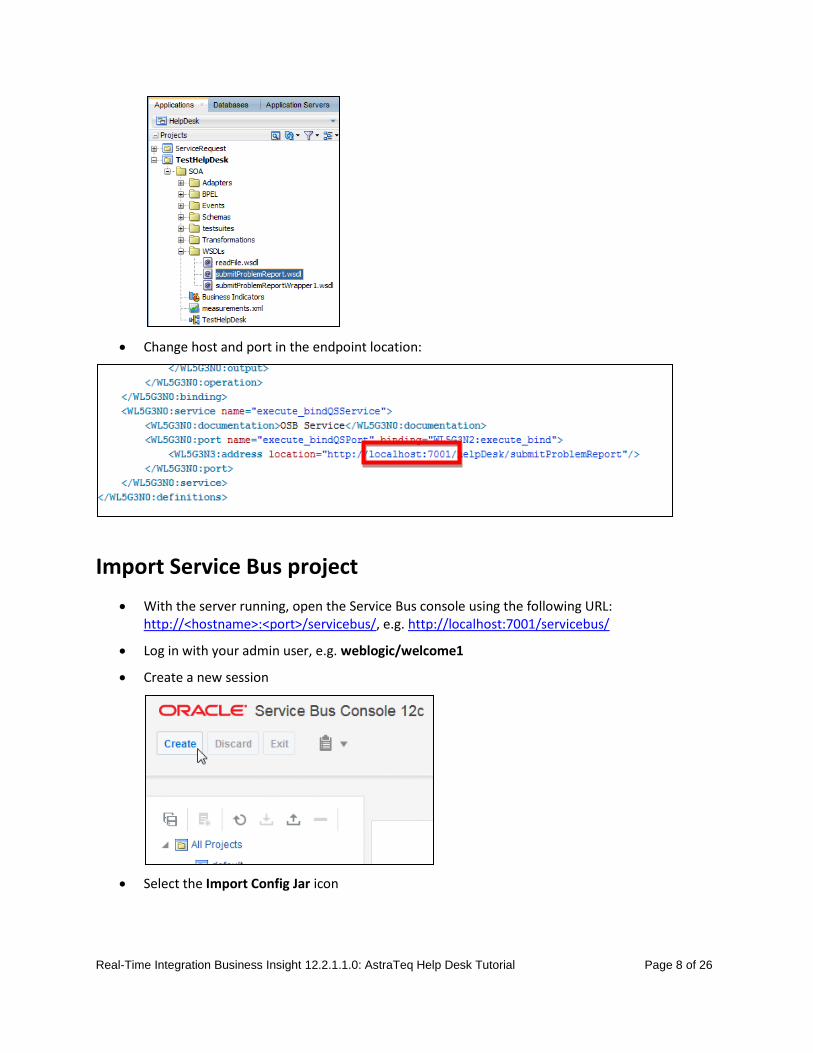
Real-Time Integration Business Insight 12.2.1.1.0: AstraTeq Help Desk Tutorial Page 8 of 26
Change host and port in the endpoint location:
Import Service Bus project
With the server running, open the Service Bus console using the following URL: http://<hostname>:<port>/servicebus/, e.g. http://localhost:7001/servicebus/
Log in with your admin user, e.g. weblogic/welcome1
Create a new session
Select the Import Config Jar icon
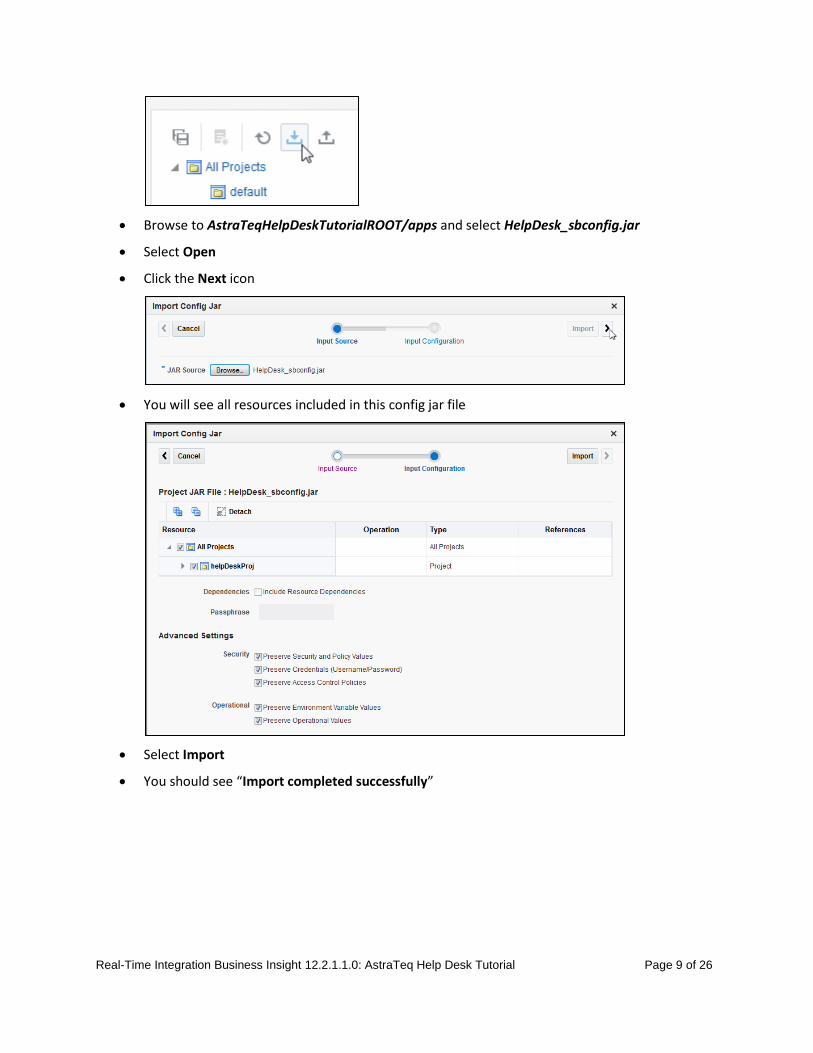
Real-Time Integration Business Insight 12.2.1.1.0: AstraTeq Help Desk Tutorial Page 9 of 26
Browse to AstraTeqHelpDeskTutorialROOT/apps and select HelpDesk_sbconfig.jar
Select Open
Click the Next icon
You will see all resources included in this config jar file
Select Import
You should see “Import completed successfully”

Real-Time Integration Business Insight 12.2.1.1.0: AstraTeq Help Desk Tutorial Page 10 of 26
Select Close
You will now see the new project in the list
Activate the session
Enter a description and click Activate
Real-Time Integration Business Insight 12.2.1.1.0: AstraTeq Help Desk Tutorial Page 11 of 26
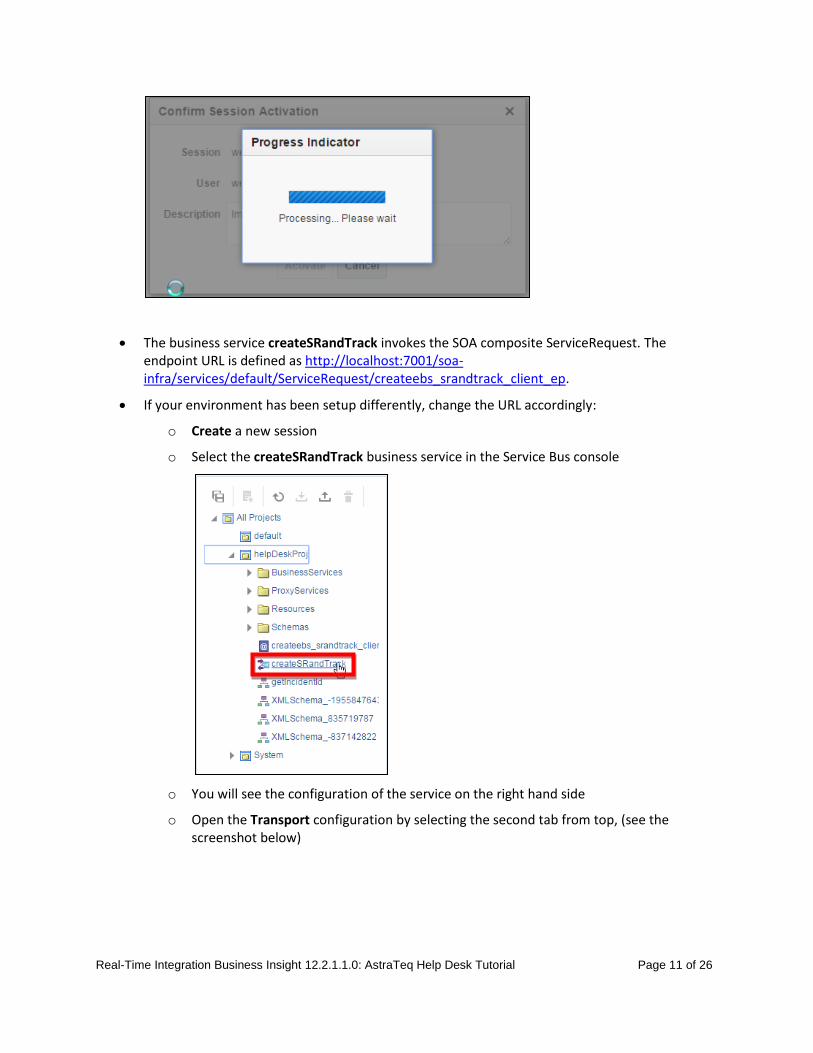
The business service createSRandTrack invokes the SOA composite ServiceRequest. The endpoint URL is defined as http://localhost:7001/soa-infra/services/default/ServiceRequest/createebs_srandtrack_client_ep.
If your environment has been setup differently, change the URL accordingly:
o Create a new session
o Select the createSRandTrack business service in the Service Bus console
o You will see the configuration of the service on the right hand side
o Open the Transport configuration by selecting the second tab from top, (see the screenshot below)
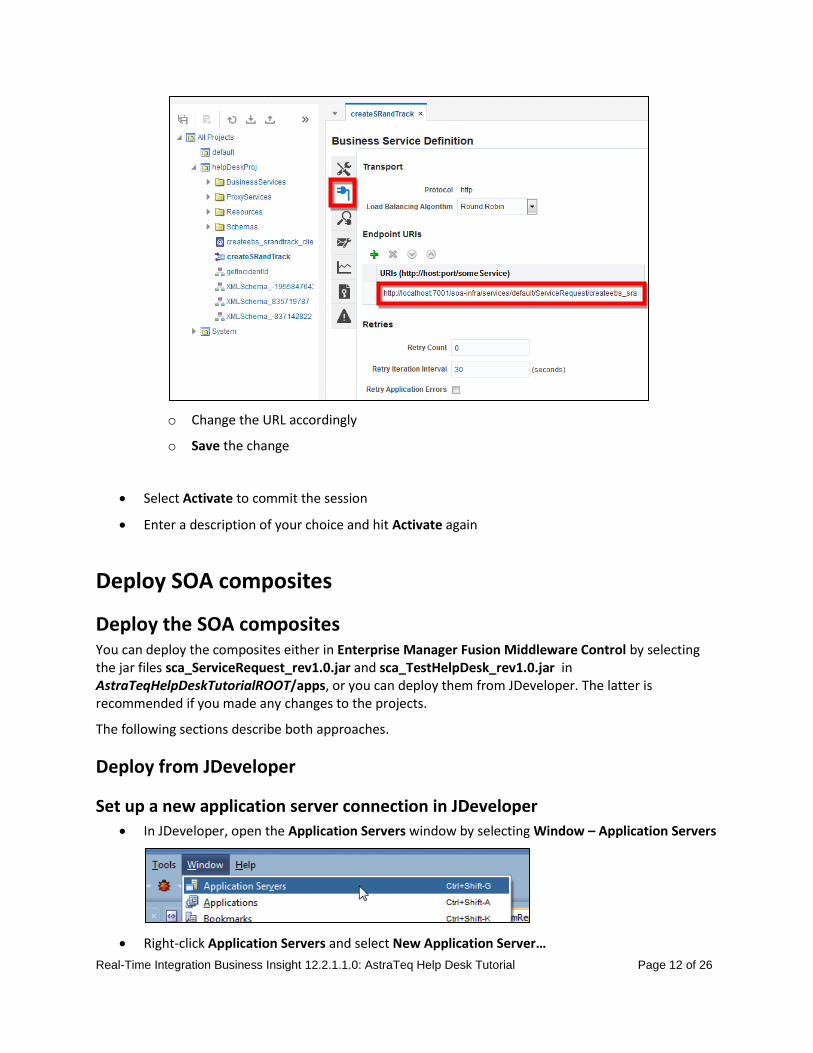
Real-Time Integration Business Insight 12.2.1.1.0: AstraTeq Help Desk Tutorial Page 12 of 26
o Change the URL accordingly
o Save the change
Select Activate to commit the session
Enter a description of your choice and hit Activate again
Deploy SOA composites
Deploy the SOA composites You can deploy the composites either in Enterprise Manager Fusion Middleware Control by selecting the jar files sca_ServiceRequest_rev1.0.jar and sca_TestHelpDesk_rev1.0.jar in AstraTeqHelpDeskTutorialROOT/apps, or you can deploy them from JDeveloper. The latter is recommended if you made any changes to the projects.
The following sections describe both approaches.
Deploy from JDeveloper
Set up a new application server connection in JDeveloper
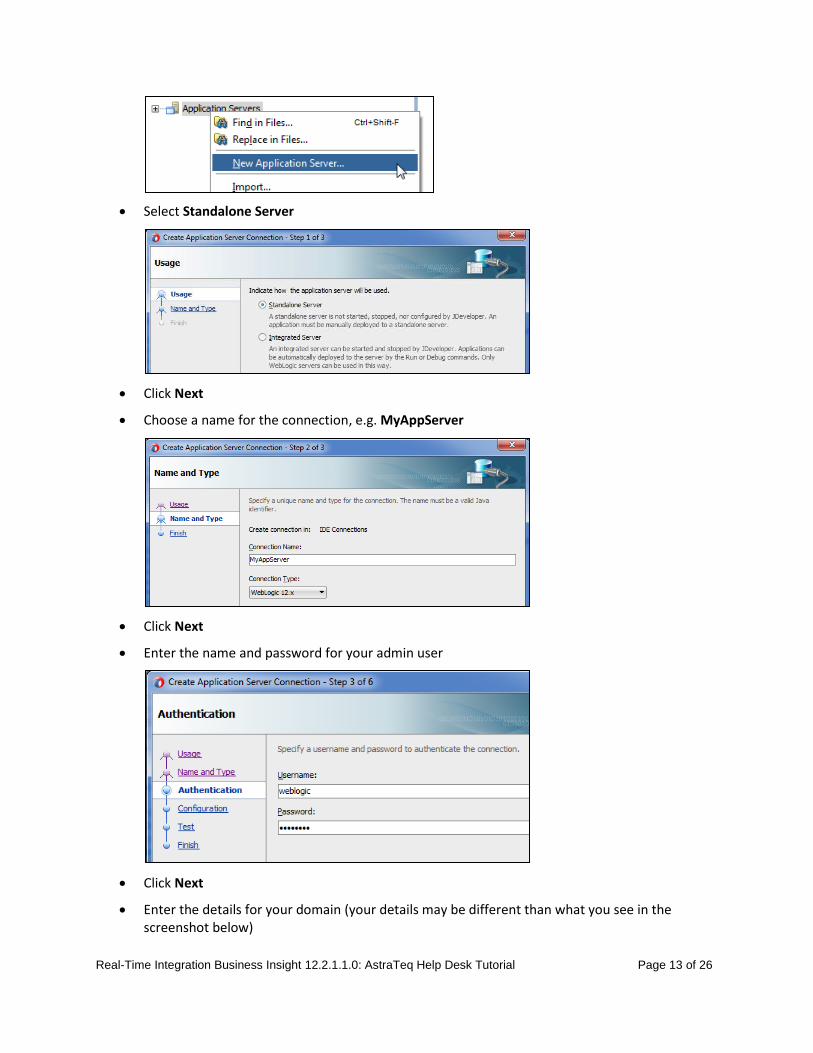
In JDeveloper, open the Application Servers window by selecting Window – Application Servers
Right-click Application Servers and select New Application Server…
Real-Time Integration Business Insight 12.2.1.1.0: AstraTeq Help Desk Tutorial Page 13 of 26
Select Standalone Server
Click Next
Choose a name for the connection, e.g. MyAppServer
Click Next
Enter the name and password for your admin user
Click Next
Enter the details for your domain (your details may be different than what you see in the screenshot below)
Real-Time Integration Business Insight 12.2.1.1.0: AstraTeq Help Desk Tutorial Page 14 of 26
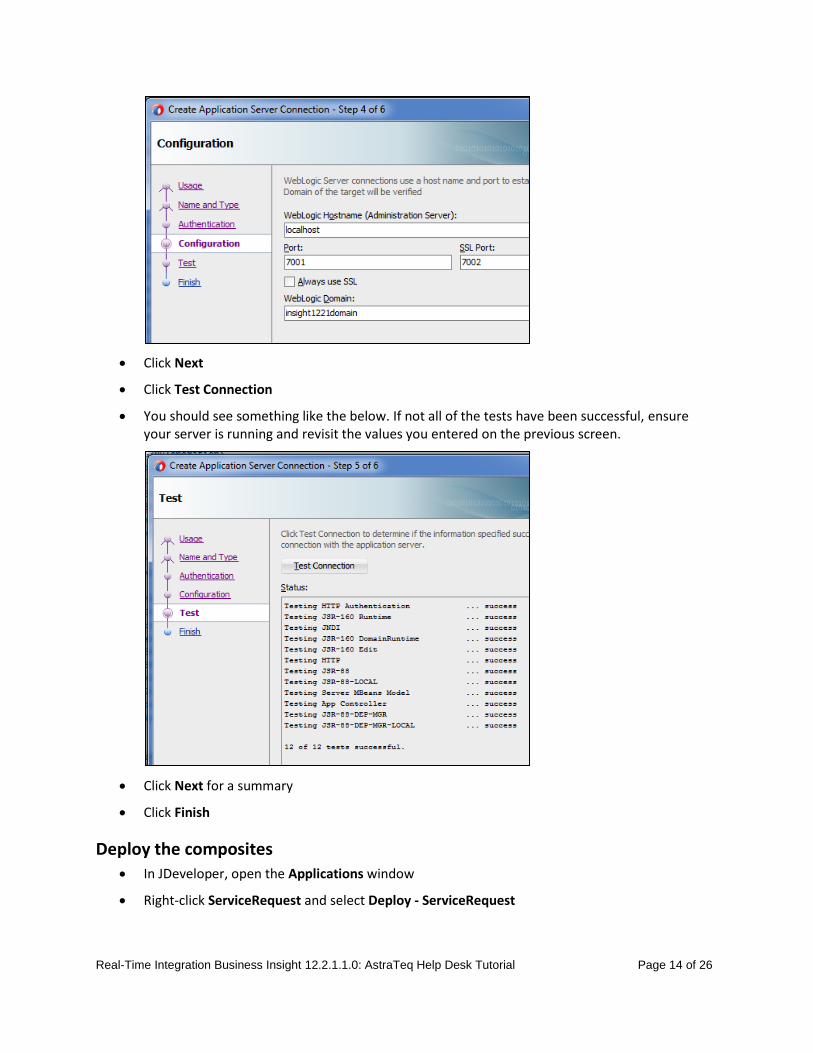
Click Next
Click Test Connection
You should see something like the below. If not all of the tests have been successful, ensure your server is running and revisit the values you entered on the previous screen.
Click Next for a summary
Click Finish
Deploy the composites
In JDeveloper, open the Applications window
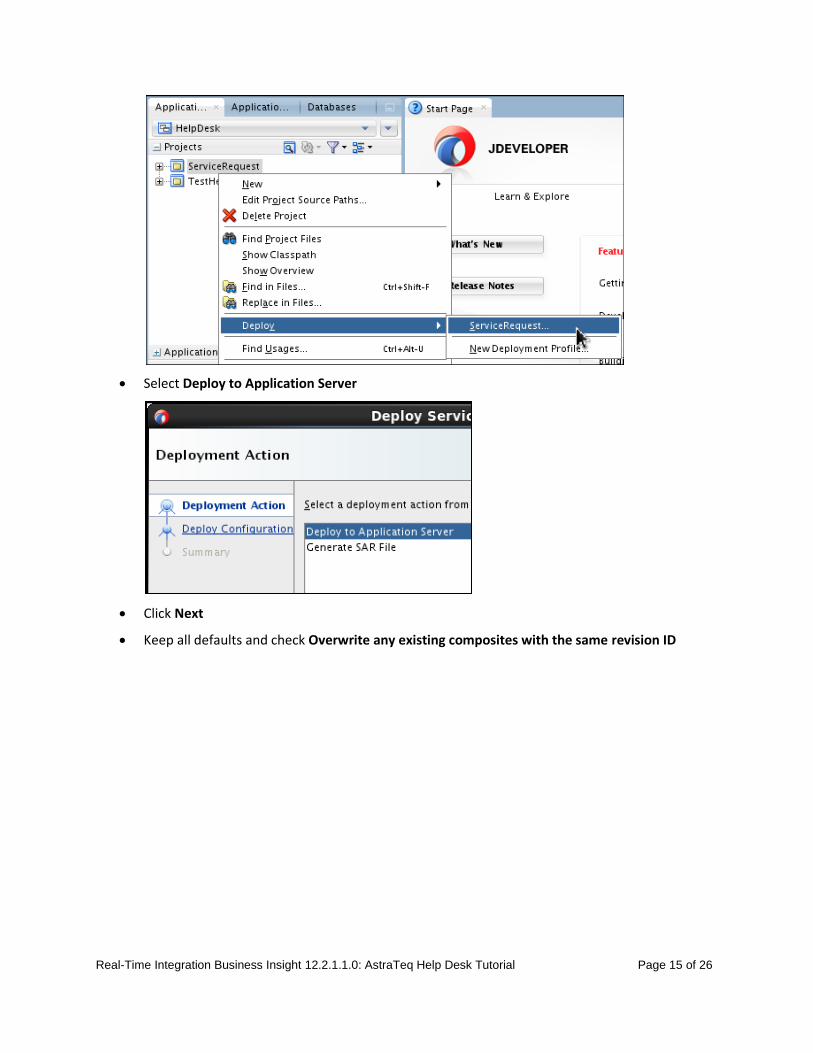
Right-click ServiceRequest and select Deploy - ServiceRequest
Real-Time Integration Business Insight 12.2.1.1.0: AstraTeq Help Desk Tutorial Page 15 of 26
Select Deploy to Application Server
Click Next
Keep all defaults and check Overwrite any existing composites with the same revision ID
Real-Time Integration Business Insight 12.2.1.1.0: AstraTeq Help Desk Tutorial Page 16 of 26
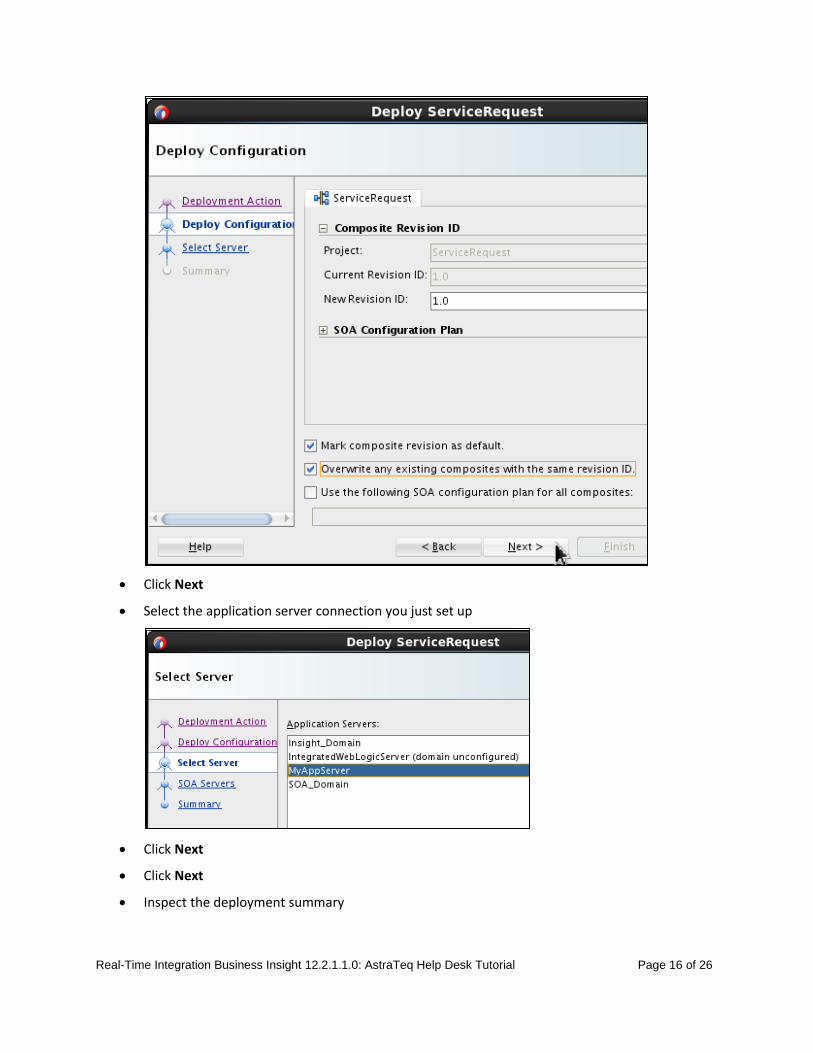
Click Next
Select the application server connection you just set up
Click Next
Click Next
Inspect the deployment summary
Real-Time Integration Business Insight 12.2.1.1.0: AstraTeq Help Desk Tutorial Page 17 of 26
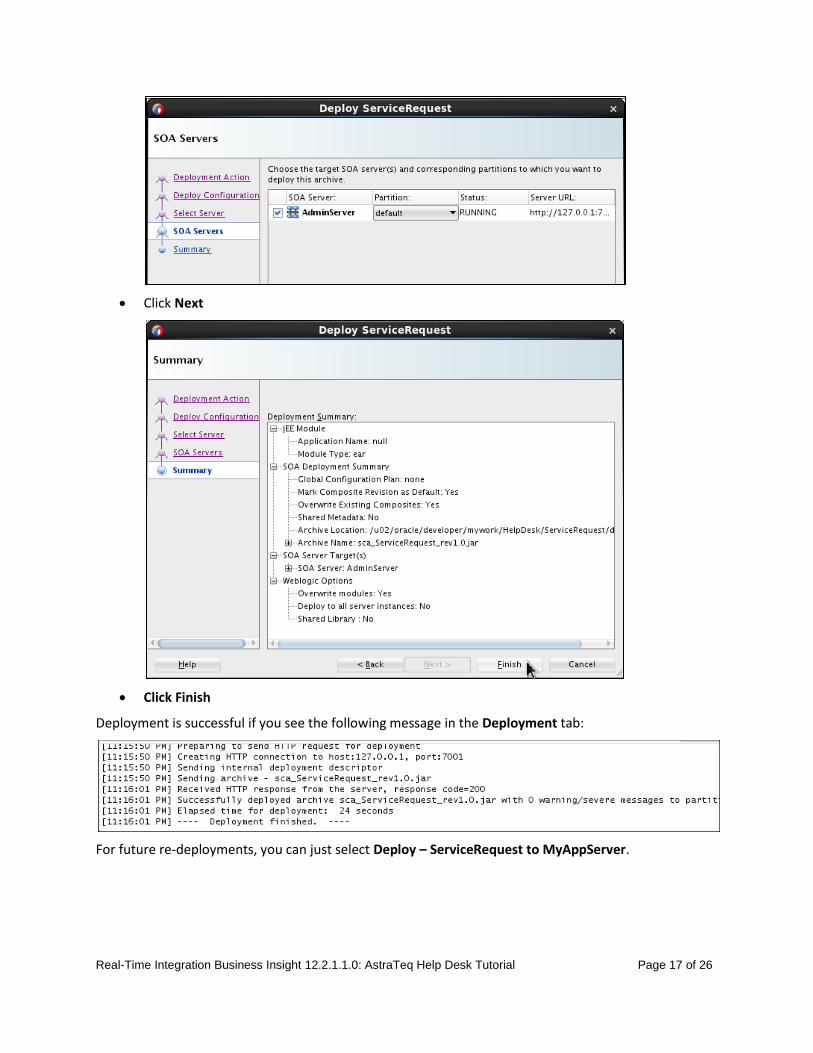
Click Next
Click Finish
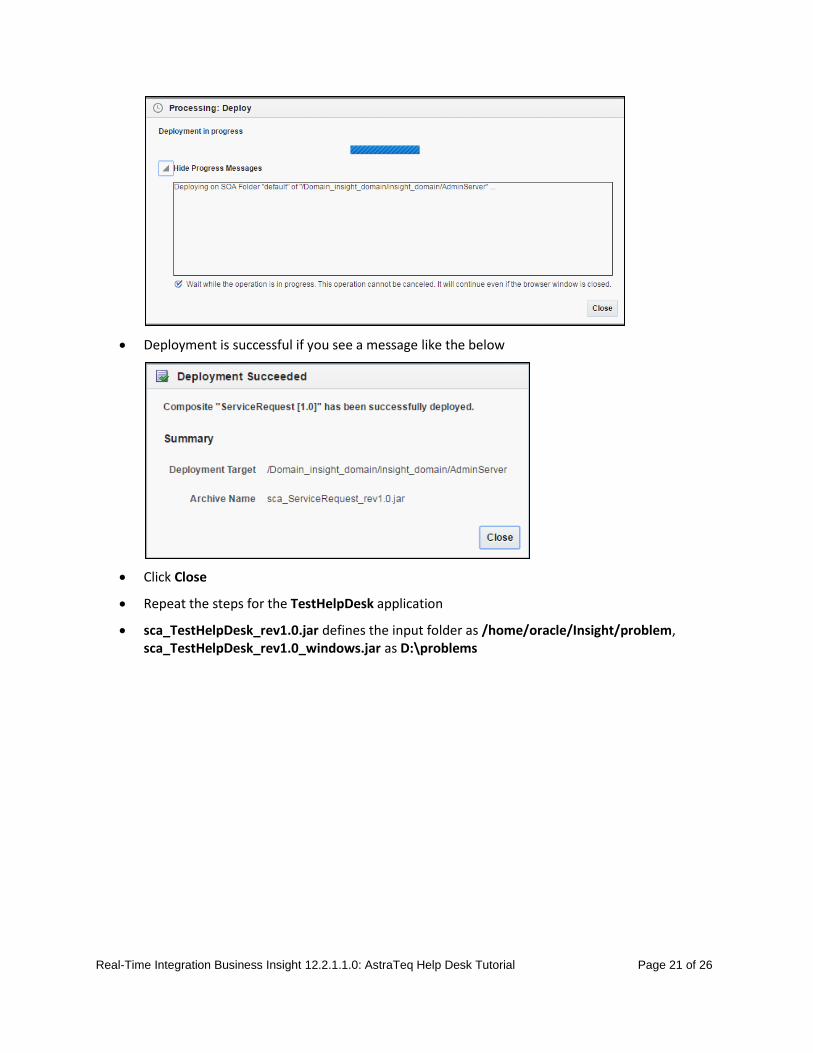
Deployment is successful if you see the following message in the Deployment tab:
For future re-deployments, you can just select Deploy – ServiceRequest to MyAppServer.
Real-Time Integration Business Insight 12.2.1.1.0: AstraTeq Help Desk Tutorial Page 18 of 26
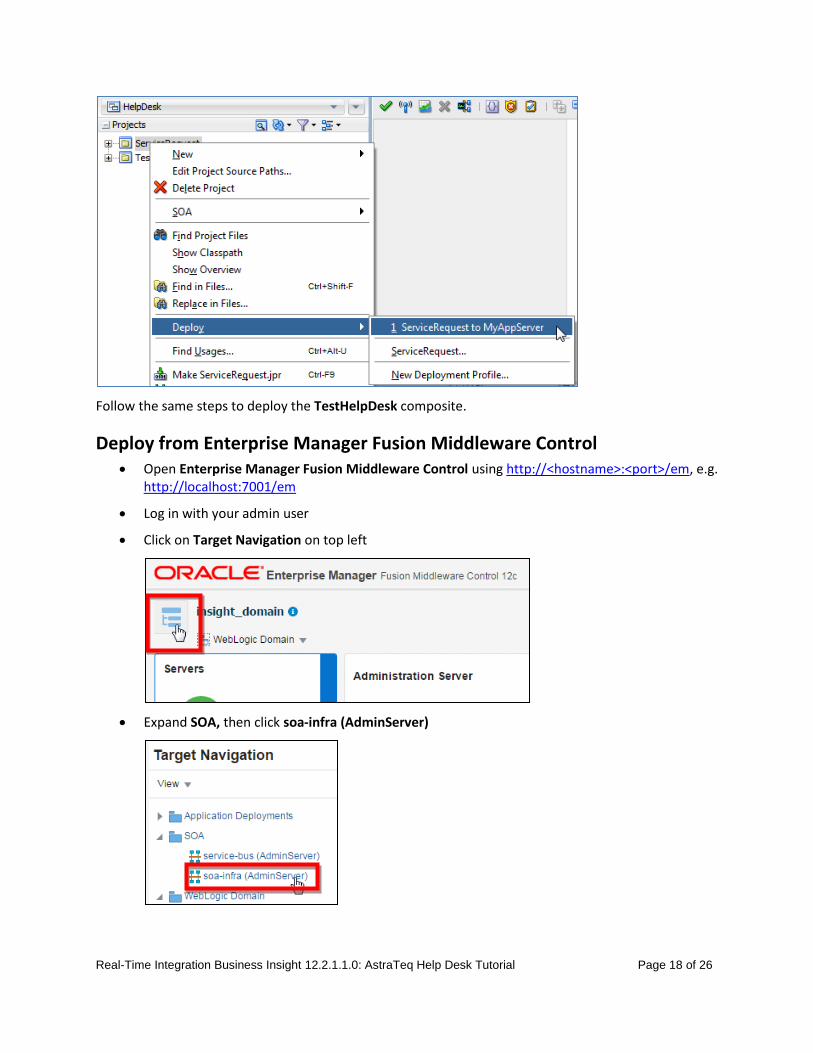
Follow the same steps to deploy the TestHelpDesk composite.
Deploy from Enterprise Manager Fusion Middleware Control Open Enterprise Manager Fusion Middleware Control using http://<hostname>:<port>/em, e.g.
http://localhost:7001/em
Log in with your admin user
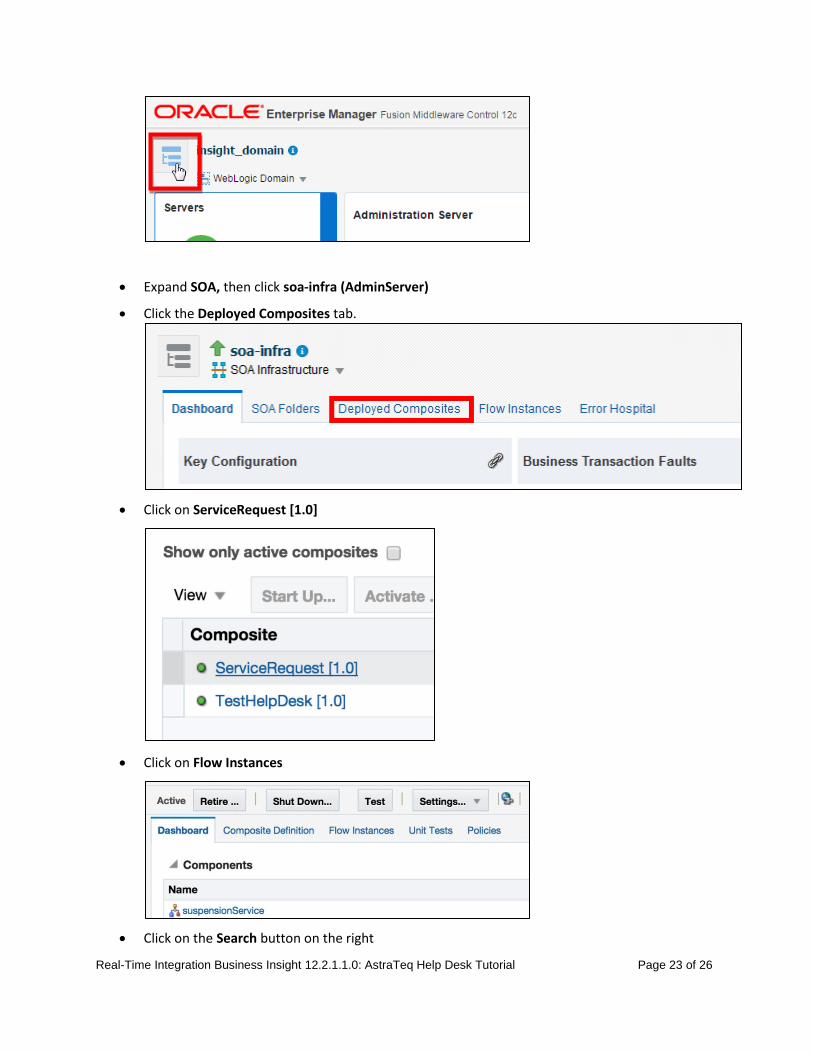
Click on Target Navigation on top left
Expand SOA, then click soa-infra (AdminServer)
Real-Time Integration Business Insight 12.2.1.1.0: AstraTeq Help Desk Tutorial Page 19 of 26
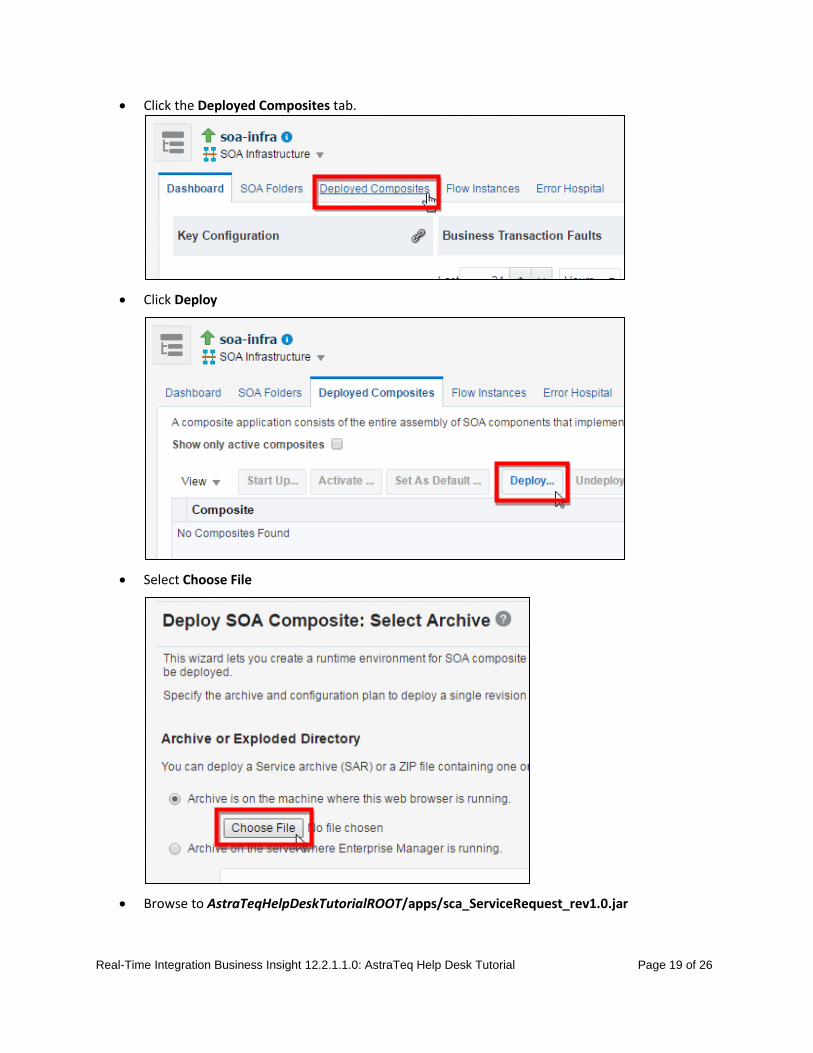
Click the Deployed Composites tab.
Click Deploy
Select Choose File
Browse to AstraTeqHelpDeskTutorialROOT/apps/sca_ServiceRequest_rev1.0.jar

Real-Time Integration Business Insight 12.2.1.1.0: AstraTeq Help Desk Tutorial Page 20 of 26
Select Next
Under SOA Folder, select default
Click Next
Click Deploy
Real-Time Integration Business Insight 12.2.1.1.0: AstraTeq Help Desk Tutorial Page 21 of 26
Deployment is successful if you see a message like the below
Click Close
Repeat the steps for the TestHelpDesk application
sca_TestHelpDesk_rev1.0.jar defines the input folder as /home/oracle/Insight/problem, sca_TestHelpDesk_rev1.0_windows.jar as D:\problems

Real-Time Integration Business Insight 12.2.1.1.0: AstraTeq Help Desk Tutorial Page 22 of 26
Test the HelpDesk application Unzip AstraTeqHelpDeskTutorialROOT/input/HelpDeskInput.zip into a folder of your choice
Copy one of the test files, e.g customerReport1.txt, into /home/oracle/Insight/problem (or the folder you defined earlier)
A successful test will show a server output similar to the below, or you can just follow the steps to check in Enterprise Manager Fusion Middleware Control.
Now let’s double check Enterprise Manager Fusion Middleware Control:
Open Enterprise Manager Fusion Middleware Control using http://<hostname>:<port>/em, e.g http://localhost:7001/em
Log in with your admin user
Click on Target Navigation on top left
Real-Time Integration Business Insight 12.2.1.1.0: AstraTeq Help Desk Tutorial Page 23 of 26
Expand SOA, then click soa-infra (AdminServer)
Click the Deployed Composites tab.
Click on ServiceRequest [1.0]
Click on Flow Instances
Click on the Search button on the right
Real-Time Integration Business Insight 12.2.1.1.0: AstraTeq Help Desk Tutorial Page 24 of 26
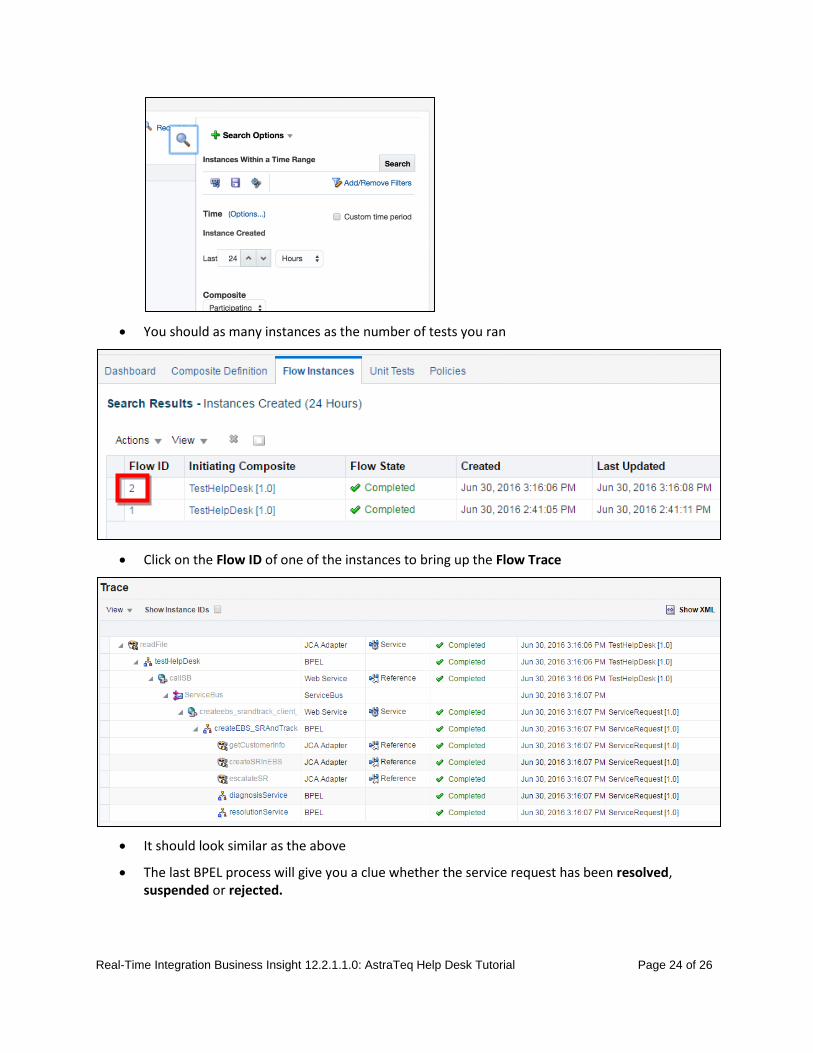
You should as many instances as the number of tests you ran
Click on the Flow ID of one of the instances to bring up the Flow Trace
It should look similar as the above
The last BPEL process will give you a clue whether the service request has been resolved, suspended or rejected.

Real-Time Integration Business Insight 12.2.1.1.0: AstraTeq Help Desk Tutorial Page 25 of 26
The composite has been implemented in a way that service requests assigned to a specific support engineer are stuck after they have been assigned to make the demo richer. Those instances will show in aborted state. That is expected and nothing to worry about.
Real-Time Integration Business Insight 12.2.1.1.0: AstraTeq Help Desk Tutorial Page 26 of 26
Access Insight
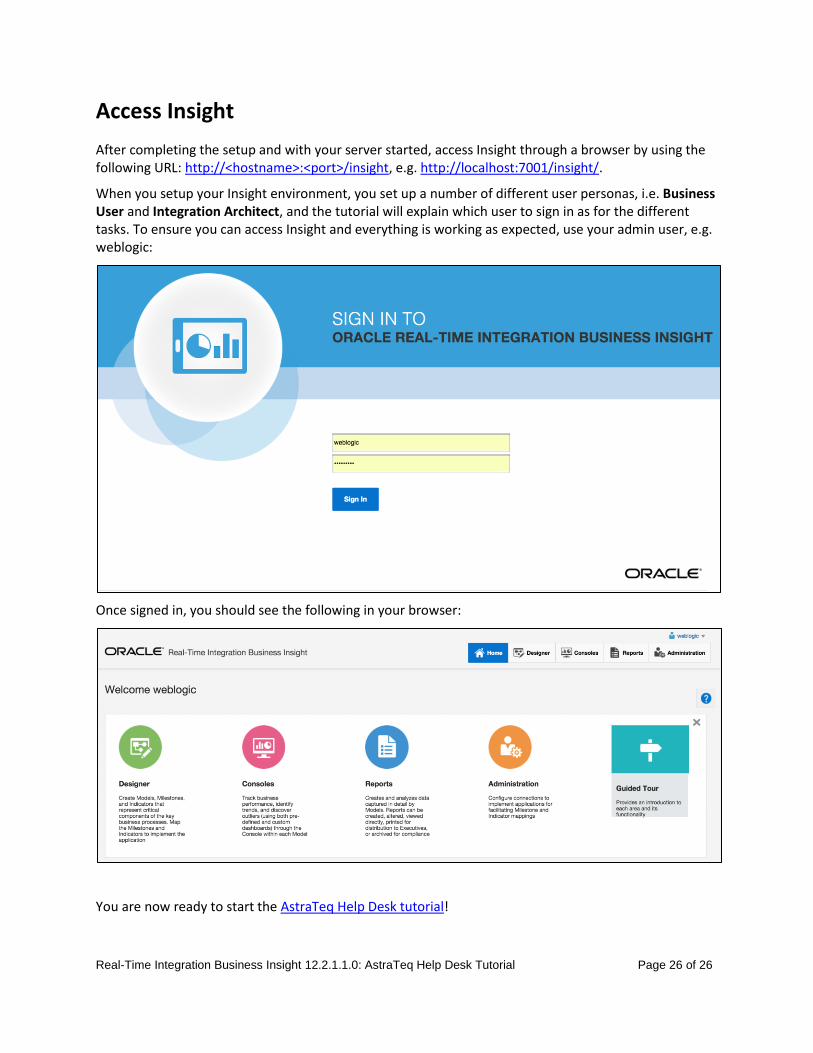
After completing the setup and with your server started, access Insight through a browser by using the following URL: http://<hostname>:<port>/insight, e.g. http://localhost:7001/insight/.
When you setup your Insight environment, you set up a number of different user personas, i.e. Business User and Integration Architect, and the tutorial will explain which user to sign in as for the different tasks. To ensure you can access Insight and everything is working as expected, use your admin user, e.g. weblogic:
Once signed in, you should see the following in your browser:
You are now ready to start the AstraTeq Help Desk tutorial!