realtyjuggler tasks tutorial - realtyjuggler™ real … · printing labels from the tasks list ......
TRANSCRIPT
RealtyJuggler Tasks Tutorial
Version 3.4 Nov 1, 2017 RealOrganized™, Inc. Organizational Software for Real Estate

RealtyJuggler Tasks Tutorial 2
Copyright © 2009-2016 RealOrganized, Inc. All rights reserved. RealOrganized and RealtyJuggler are trademarks of RealOrganized, Inc. ISBN-978-0-557-12131-1 http://www.RealtyJuggler.com Email: [email protected] Phone: (970) 672-3467

RealtyJuggler Tasks Tutorial 3
Table of Contents
Introduction ............................................................................................................................................................. 4Video Tutorials ....................................................................................................................................................... 4Tracking Birthdays and Anniversaries .................................................................................................................... 5Microsoft Outlook Birthday and Anniversary Alarms ........................................................................................... 6Let's Create a Task .................................................................................................................................................. 6Adding Phone Numbers/Mailing Address to a Task .............................................................................................. 7Printing Labels from the Tasks List ........................................................................................................................ 7Setting an Alarm for a Task .................................................................................................................................... 8All Tasks ................................................................................................................................................................. 8Automatic Tasks ..................................................................................................................................................... 9
Automatic Tasks for Prospect Records ............................................................................................................... 9Automatic Tasks for Buyer Records ................................................................................................................. 10
Showings and Offers ..................................................................................................................................... 11Creating a CALL List ....................................................................................................................................... 11Automatic Tasks for Closing Records .............................................................................................................. 12
Documents Tab ............................................................................................................................................. 12Parties Tab .................................................................................................................................................... 13Contingencies Tab ........................................................................................................................................ 14Escrow Tab ................................................................................................................................................... 14Status of a Closing Record ............................................................................................................................ 15Extra Status Values for Buyer, Listing, Closing, and Rental Records ......................................................... 15
Automatic Tasks for Listing Records ............................................................................................................... 16Sign Tab ........................................................................................................................................................ 16Promotions Tab ............................................................................................................................................. 17
Task Preferences ................................................................................................................................................... 18Activity Plans vs Task Plans ................................................................................................................................. 18Creating A Task Plan ............................................................................................................................................ 19Creating an Advanced Task Plan .......................................................................................................................... 20Applying A Task Plan ........................................................................................................................................... 21How to Rebuild a Task Plan ................................................................................................................................. 21Shifting a Late Task Plan Forward in Time .......................................................................................................... 21Default Records and Tasks ................................................................................................................................... 22Mixing Letters and Tasks Together ...................................................................................................................... 23Converting Old Activity Plans .............................................................................................................................. 23Handling Short-Sales ............................................................................................................................................ 25Printed Letters and Failed Email ........................................................................................................................... 25Assigning Tasks to Team Members ...................................................................................................................... 27Adding Dates to your Calendar ............................................................................................................................. 28Alarms – Tasks vs. Appointments ........................................................................................................................ 28Conclusion ............................................................................................................................................................ 29

RealtyJuggler Tasks Tutorial 4
Introduction RealtyJuggler has the ability to assign tasks to your deals, Contacts, and Prospects. You can assign a bundle of tasks (this bundle of tasks is called a Task Plan) to a deal, or you can automatically assign tasks whenever you create a new record. RealtyJuggler also has what are called Automatic Tasks. Automatic Tasks are generated (and deleted) automatically based upon the information you enter into your records. When the information is updated, these tasks are updated automatically. For example, let's say you have a Closing and have not yet set the "Close Date:" for the record. You will have an automatic task in your Tasks tab that asks you to set the Close Date. Once you have set the Close date, that task will go away. Automatic Tasks are used to help you keep track of deadlines and other important responsibilities. They help you work your deals and make sure you don't forget anything obvious, like a listing expire date. This document walks you through using RealtyJuggler tasks. It is recommended that you print out this document and then start at the beginning and follow along using your own RealtyJuggler account. By the time you have reached the end of this tutorial, you will have a firm understanding of how to use Tasks.
Video Tutorials RealtyJuggler comes with video tutorials that provide specific walkthroughs for the most common things that you will want to do. To access these videos, go to the RealtyJuggler channel by clicking on the link below or look for the YouTube icons throughout RealtyJuggler. By clicking on those icons, you will be directed to the tutorial describing how to use the specific screen that you are on.
http://www.youtube.com/RealtyJuggler

RealtyJuggler Tasks Tutorial 5
Tracking Birthdays and Anniversaries Sign into RealtyJuggler and click on the "Contacts" icon. Next, click on the "New Contact" button at the top of the screen. This will create a new contact and put you into the "General" tab (the tabs are along the left side of the window) for that contact. Next, enter
your contact's information. About halfway down the page are two date fields for Birthday and Anniversary. You will notice that the date ("No Date") is a blue link. Set your contact's Birthday or Anniversary by clicking on that "No Date" link. If you would like to enter two birthdays (for a husband and wife, for example) you can change the second drop-down menu to "B-Day", just like the first.
If you have more than two special annual dates for a single contact, do not worry. Once you have filled in the first two dates, additional dates appear. You can enter up to 9 anniversary dates for each contact record.
From the drop-down menu to the left of the date, select what kind of annual date you are entering. For some dates (like child's b-day and closing anniversary) you will have the option of entering additional information – such as the name of the child in the "for:" text field immediately below. We recommend that for Closing anniversary that you enter the address and year of the closing. For child's b-day, we recommend entering the first name of the child and the year of birth.
Now that you have entered some basic contact information, click on the "Tasks" tab at the left of the screen. You can see where you are by looking in the upper-left corner of the screen, where you will see Main:Contacts:Tasks. This means that you are inside of the contacts section and looking at the tasks tab. Click on any piece of that text to immediately jump to that location. If you click on the "Main", you would immediately go back to the Main section of RealtyJuggler. In the upper-right corner of the screen is a description of the record that you are currently viewing. Since you are now working on a contact record of yourself, you will see your name in the upper-right corner of the screen. If you click on that name, you will go directly to the
"General" tab. The Tasks list has one task already. This task is for the Birthday that you entered in the "General" section. You will notice that the Category for that task is AutoTask and B-Day. That means that the task is automatically generated based upon the information that you enter. In the case of Birthday and Anniversary reminders, they will show up as Tasks. You can check a task done by clicking on the checkbox. The reminder will be bumped up 1 year to a birthday reminder for next year. Many agents like to call their contacts on their Birthday and Anniversary and this is an easy way for you to do that.

RealtyJuggler Tasks Tutorial 6
If this is something that you do not do, you can turn off this automatic task, by going to the Main:Settings:Preferences:Tasks section of RealtyJuggler. If you uncheck the "Contact B-Day Reminders:" check-box no automatic tasks will be generated for Birthdays and Anniversaries. You cannot delete automatic tasks. They are generated based upon the information you enter (in this case the Birthday) and the preference settings that you have set. Let's assume that you like to send out your birthday and anniversary cards once a week. So, you would like to have an easy way to see all of the Birthdays and Anniversaries for the upcoming week. To do that, click on the All Tasks icon from the Main part of RealtyJuggler. There are some tabs along the top of the screen – click Week. In the upper-right corner of the screen is a filter – select B-Day from the drop-down menu. That will display all of the Birthdays and Anniversaries for all of your Contacts that are due within the next week.
Microsoft Outlook Birthday and Anniversary Alarms RealtyJuggler will remind you of Contact Birthdays and Anniversaries using Auto Tasks. This can be handy because it allows you to see these reminders and check them as done. Microsoft Outlook takes a slightly different approach and will automatically generate a repeating Appointment when you set the Birthday or Anniversary field for an Outlook Contact record. If you synchronize with Microsoft Outlook, you may notice that you have these reminders in both locations. This is why. These two approaches can peacefully coexist without conflict.
Let's Create a Task The Birthday and Anniversary fields are a great way to keep up with your contacts twice a year. However, it is likely that you have a close circle of contacts that you talk to more frequently. So, let's create a repeating task that reminds us to call a person every 3 months. Start with the contact record you created in the previous section. Click on the "Tasks" tab for that contact record. Click on the "New Task" button at the top of the screen. There are several fields that you can fill in. Type in: "Call Rachael". There's no need to enter the phone number as this task is attached to the contact record. The "Categories" field can be used to organize your tasks. If you work in a team, you can assign the task to a team member by typing in their name into that field. We can leave this field blank for now.
Since you are just now creating the Task, you should leave the "Done" checkbox blank. The "Date Completed" should also be blank. We are going to have a fixed due date of today so we can leave those two fields alone. Next, we select from the "Repeat" drop-down menu and select monthly. A few additional fields appear once we select the repeat and we can fill in the number 3 for repeating every 3 months.
RealtyJuggler Tasks Tutorial 7
The "Repeat New Due Date from:" field is a little tricky. There are two choices. If we select "Old Due Date", then once we mark the task done, a new task will be generated (remember, this is a repeating task) with a new due date which is 3 months after the old due date. If we select "Old Date Completed", then the new task will have a due date that is three months past the day you marked the task done. For example; let's say you want to call someone on June 3rd every year as that is the day that their child was born. Then, you would want to select "Old Due Date". Alternately, let's say you want to call someone at 3-month intervals. If you call them a few weeks early, you want the timer to start ticking from the date of last all, then you would want to use "Old Date Completed". When you are done filling in this information, click on the "Done" button at the top of the screen and the task is created. You will then go back to the Tasks screen and see the task in the list.
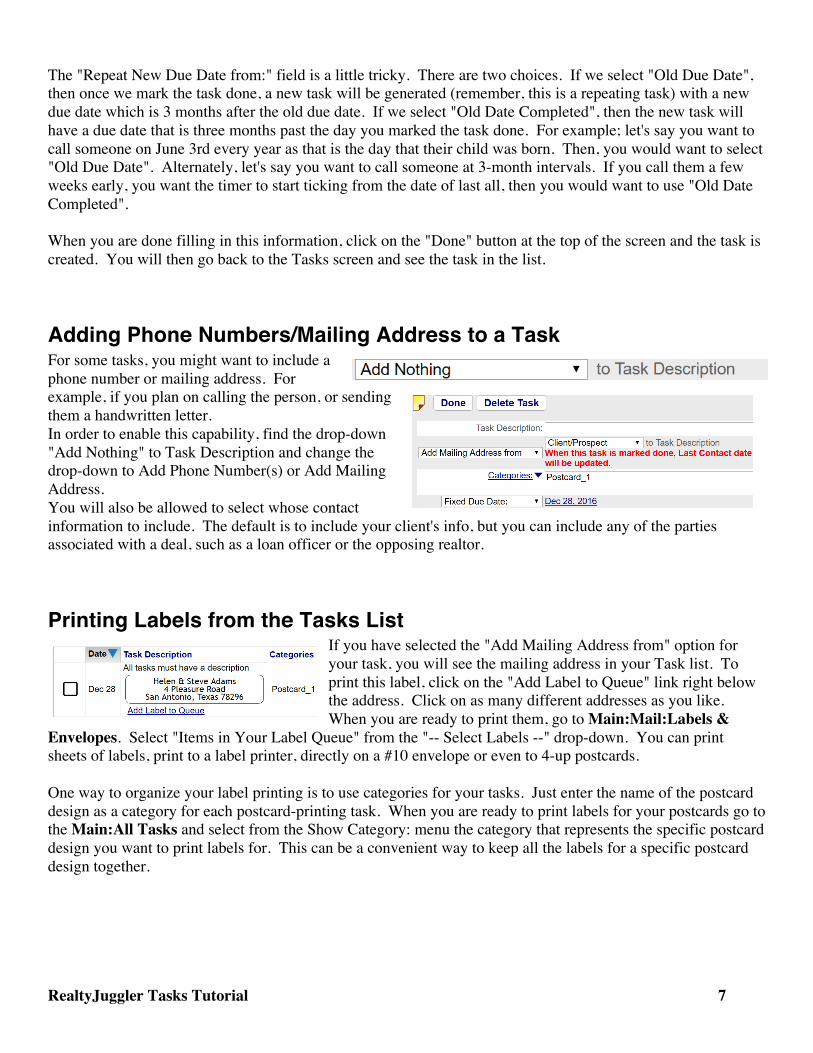
Adding Phone Numbers/Mailing Address to a Task For some tasks, you might want to include a phone number or mailing address. For example, if you plan on calling the person, or sending them a handwritten letter. In order to enable this capability, find the drop-down "Add Nothing" to Task Description and change the drop-down to Add Phone Number(s) or Add Mailing Address. You will also be allowed to select whose contact information to include. The default is to include your client's info, but you can include any of the parties associated with a deal, such as a loan officer or the opposing realtor.
Printing Labels from the Tasks List If you have selected the "Add Mailing Address from" option for your task, you will see the mailing address in your Task list. To print this label, click on the "Add Label to Queue" link right below the address. Click on as many different addresses as you like. When you are ready to print them, go to Main:Mail:Labels &
Envelopes. Select "Items in Your Label Queue" from the "-- Select Labels --" drop-down. You can print sheets of labels, print to a label printer, directly on a #10 envelope or even to 4-up postcards. One way to organize your label printing is to use categories for your tasks. Just enter the name of the postcard design as a category for each postcard-printing task. When you are ready to print labels for your postcards go to the Main:All Tasks and select from the Show Category: menu the category that represents the specific postcard design you want to print labels for. This can be a convenient way to keep all the labels for a specific postcard design together.

RealtyJuggler Tasks Tutorial 8
Setting an Alarm for a Task If you would like to be notified by email of a task, select from the Email Alarm: drop-down. If you have a task that is due on the 16th of June and you set the Alarm to go off 1 Day before Due Date, you will receive an email around 12 Midnight on June 15th.
All Tasks So far, we have been creating tasks inside of an individual record. The "Tasks" tab is available for Contacts, Prospects, Buyers, Listings, Closings
and Rental records. Generally, you should put tasks that relate to a deal into the particular deal record (Closing, for example) and tasks that are of a personal nature into the Contact record. That way, your tasks always have context attached to them. There are times when you will want to see all the tasks for all of your deals. Click on the "Main" part of the Main:Contacts:Tasks text in the upper left corner of the screen. This will take you back to the Main section of RealtyJuggler. Click on the "All Tasks" icon. This section will display all of your tasks for all of your records. There are a number of options available to filter and sort your tasks. In the Upper-right corner of the screen, you can select from the "Showing Category:" drop-down menu to filter your contacts based upon category. The tabs at the top of the screen can be used to filter the tasks based upon due date. You can also hide completed tasks and Automatic tasks by checking the checkboxes at the top of the screen.
You can do two things with your tasks. The first is to check the task done. To do this, click on the checkbox to the left of the task description and the task is marked done. The second thing you can do is to view detailed information relating to the task. To do this, click on the text of the task.
In the case of an Automatic Task, you will go to the tab that relates to the Automatic Task. In the case of tasks that you have created, you can click on the edit link to edit the task or click on the task text to go to a screen that allows you to act on your task.

RealtyJuggler Tasks Tutorial 9
There may be tasks that you need to create which have nothing to do with a particular deal or contact. In that case, click on the "New Global Task" button on this screen.
TIP: When you are first learning about Tasks you will probably want to keep the two checkboxes "Hide Completed Tasks" and "Hide Automatic Tasks" Unchecked. That way, you can see what is going on with your tasks and the automatic tasks. Once you become comfortable with task management, these checkboxes are an excellent way to filter your tasks. TIP: If you wish to refresh the tasks list to see which tasks have been marked done, click on the "Tasks" tab on the left of the screen. That will save any tasks marked done. It will also recalculate Automatic Tasks.
Automatic Tasks Automatic Tasks are automatically generated based upon the data you enter and what needs to be done to close a deal. Each Automatic task will bring you closer to closing a deal. The overall intent of Automatic tasks is to be unobtrusive and to point out things that need to be done and when they need to be done. The best way to explain Automatic Tasks is to walk through a deal to see what happens. Automatic tasks can usually be marked done by checking the task off. For example, in the above list of tasks, you
could check off the "Put Up Sign" Auto Task. By marking that task done, RealtyJuggler will update the "Sign Up:" date field in the Main:Listings:Sign section with today's date. This will cause the automatic task to go away when you refresh the screen (Click on the Tasks tab at the left of the screen to refresh the Tasks screen.) If there is no checkbox to the far left of an Automatic Task, you will need to click on the task text to go to the appropriate section in RealtyJuggler. From there, you can make the appropriate changes to RealtyJuggler fields. Once the appropriate changes have been made, the Auto Task will go away.
Automatic Tasks for Prospect Records From the "Main" section of RealtyJuggler, click on the "Prospects" icon. Click on the "New Prospect" button at the top of the screen. Next, type in the contact information for your Prospect. You will notice that the mailing address can be different from the home address.
If you have contact information for a Prospect in your Contacts database, you can click on the text label called "First Name:". This will bring up a drop-down menu and you can select the "LookUp Contact" menu item. You can then click on the contact from the list that you want to use as your Prospect.
If you do that, you will see a blue double arrow >> to the right of the first name field. If you click on that blue arrow, you will view the Contact record that you are using for your Prospect.

RealtyJuggler Tasks Tutorial 10
Now that we have the contact information filled in, let's fill in the "Contact Every __" field with the number 12. This means that you intend to call this
prospect every 12 days. This is a repeating reminder. If you want just a single reminder, select "Contact again in:" from the drop-down menu. Next, click on the "Tasks" tab to the left of the window. You should see a single task reminding you to contact the Prospect. Click the task done and then click on the "Tasks" tab to the left of the screen. That will refresh the screen and recalculate the Automatic Tasks.
Notice that the 'Contact every __ days' Automatic Task won't go away! Even when you mark it done, it comes back. That's because this automatic task will automatically make sure that you contact your Prospect every 14 days. If you want to stop being reminded to contact your Prospect, empty the Contact Every __ field out. If you are ready to contact your Prospect, click on the body of the task. That will take you to detailed information on your Prospect as well as provide you space for notes. Make your call and type your notes. Before you get off the phone, schedule your follow-up call by updating the Last Contact date or contact every __ values. The Automatic Task will then be recalculated using your new values. If you want to add a time-date-stamped note, click on the yellow note icon in the upper-left corner of the screen. Next, click on the "Transfer" tab to the left of the screen. Click on the "Buyer" icon on that screen. That will create a new Buyer record based upon your Prospect record. You will be asked if you want to delete the Prospect record. Normally you will want to click "OK", but in this situation, let's click "Cancel" as we will want to use that Prospect record later on.
Automatic Tasks for Buyer Records You will now be in the Main:Buyers:General section of RealtyJuggler. The information you entered from your Prospect record has been copied over to the new Buyer record.
Click on the Parties tab. You will see two parties, one for your Buyer and a second Party for the loan officer. Click on the "Mortgage" party and enter information about the loan. If you don't want to track that information or your client is not using a loan, you can delete the party by clicking on the Mortgage line and clicking on the "Delete Party" button.

RealtyJuggler Tasks Tutorial 11
Click on the Tasks tab and you will see your repeating "Contact every __ days" task as well as a new automatic task regarding the loan status for your Buyer.
Automatic Tasks depend upon the status of your deal record. Click on the "General" tab and you will see that "Buy Status:" is set to "Active". Once you have a contract, you should set the status to "Contract". If for some reason, your buyer abandons the house search, you can set the status to "Inactive". If you transfer a Buyer to Closing, the status of the Buyer record will automatically be set to "Contract".
Most Automatic tasks go away for a Buyer record that has the status set to Inactive or Contract.
Let's transfer our Buyer to Closing. Click on the "Transfer" tab and then click on the "Buyer Closing" icon. This will copy over our Buyer information to a new Closing record, and mark the Buyer record to a status of "Contract". If we have any unfinished tasks in the buyer record, they
will be deleted, as they are no longer necessary. We have entered a new phase where we are closing a deal and we are no longer looking for the perfect home for our client.
Showings and Offers The Showings tab (and Offers tab) allows you to keep track of the homes that you have shown your Buyer. You can track what the buyer thought of a home, when a home was seen and who the listing agent is. If you enter this information, Automatic Tasks will keep you on track. If you have offers, Automatic tasks will keep up with expire dates, counter-offers, and the like.
Creating a CALL List To create a list of all of the people you need to call for the day:
1. Click on the All Tasks icon on the Main screen.
2. Select the appropriate Tab at the top of the screen, for example Today.
3. Select Show Category: Touch from drop-down in the upper-right corner of the screen.
4. If you would like to print this list, click on the Print icon in the upper-left corner of the screen.

RealtyJuggler Tasks Tutorial 12
The resulting list will display all of the people that you have scheduled to call for the day. To schedule a call, use the Contact every __ days option that is described in the Automatic Tasks for Prospect Records section. Click on the body of a task to go to a detailed view of the person you need to call and to enter notes. Touch Tasks are scheduled relative to a record’s Last Contact Date. The Last Contact Date is automatically updated when you send emails, print letters, or complete a Birthday or Anniversary reminder Task. If you would like to use your Touch Tasks exclusively for phone calls, we recommend adjusting your Touch Preferences on the Main:Settings:Preferences:Touch page so that the Last Contact Date is only changed under the conditions that you specify. By default, RealtyJuggler considers any form of communication (phone call, SMS text message, or an email) a valid touch.
Automatic Tasks for Closing Records Now that we have transferred our Buyer to Closing, the old Buyer record is retained but the status for that record is set to "Contract". We do this just in case the Closing falls through and you need to go back and reactivate the old Buyer record. Click on the "Tasks" tab. You will see several automatic tasks. Automatic tasks are generated based upon what you have in your Parties, General, Sign, Contingencies, Escrow, and Documents sections. If you enter the data into RealtyJuggler, Automatic Tasks will be generated for you.
Documents Tab There are Automatic Tasks that relate to signing of documents. These tasks are controlled from the "Documents" tab. From Documents, you can track who needs to sign which documents. You can set expire dates for specific documents as well. If a deal does not require a document, you can delete that
document and the automatic tasks that relate to that document will go away. Similarly if there are additional documents you want to track, you can create new documents and the automatic tasks will automatically track signatures, expire dates and the like. Do not confuse scanned versions of documents with the information you are entering into the Documents tab. If you wish to upload

RealtyJuggler Tasks Tutorial 13
scanned versions of contracts, you should place those files into the Notes and Files tab. You can control the type of document by selecting from the "Type:" drop-down menu. Based upon that menu selection, different fields become available.
Parties Tab The tasks that relate to the Loan Status and Inspections are built based upon the "Parties" section. Click on a particular Party from the Parties section. You will see detailed information for your parties. You can enter address information as well as up to 9 phone numbers and email addresses. Only 2 will be visible to start with, but additional phone number and email fields will appear as needed.
The "Role:" drop-down menu allows you to specify what role a party is playing in your transaction. By selecting the role, the bottom part of the screen will change. This allows you to enter information specific to the Party. The Parties section has the Buyer and Seller party at the top of the list. These parties cannot be deleted, as they are required for every closing.
If you have several buyers (or sellers) for a particular deal, you can add additional buyers (or sellers), but keep in mind: You can only delete those additional buyers (or sellers), not the first buyer and seller. Those are reserved.
You can add parties that are not listed and delete parties that are already there. If you have a favorite set of parties you like to work with for every deal, take a look at the Main:Settings:Defaults section of RealtyJuggler. From there, you can set up defaults for your parties.

RealtyJuggler Tasks Tutorial 14
Contingencies Tab The "Contingencies" tab allows you to track all Contingencies for your closing. Automatic Tasks will be displayed in your "Tasks" section that relate to the deadline date and status of each
contingency. Once all contingencies have been met, you will be prompted (via an Automatic Task) to update the "Closing Status:" to "Pre-Close", which means that all necessary conditions have been met prior to closing. You can also add notes to each contingency to track progress. The "Document" checkbox means that there is an associated document for that particular contingency. You can generate a set of default contingencies for all of your deals by going to the Main:Settings:Defaults section of RealtyJuggler. Once you have done that, you can delete (and add) any contingencies on a case-by-case basis, for each deal. For example, by default you will probably want a Mortgage contingency. If your buyer is paying cash, then you can delete the contingency for that particular deal.
For a Short Sale, you should enter "Lender Approval of Short Sale" as a contingency and mark the status of that Contingency as a "Deal Blocker". Until all "Deal Blocker" contingencies are met, other tasks like inspections, and other contingencies, will be put on hold.
Escrow Tab The Escrow tab allows you to track planned escrow payments and which payments have been made. This tab also tracks when disbursements have been made. Automatic tasks are generated based upon what has been entered into the Escrow section. This is particularly handy if you are working a deal which requires more than one payment to be made on a specific date. The total escrow balance is listed
on this tab and Automatic Tasks will be generated to close that balance out prior to closing. To create a new earnest payment or withdrawal, click on the "New Earnest $" button. You will then see a detailed view.

RealtyJuggler Tasks Tutorial 15
Status of a Closing Record Closings start out with a status of "Under Contract". If the deal falls through, you can change the status to "Cancelled". Once you have met all Contingencies and have set a close date, an automatic task
will prompt you to set the status to "Pre-Close". Once the Closing date has past, you will be prompted to change the status to "Closed".
If you represented the Buyer and have added the Buyer to the Contacts database using the "Add To Contacts" menu item, an AutoTask will remind you to update the Buyers Home Address.
Click on the Body of that task and it will take you to the Contact record of your Buyer. At the bottom of the Address tab is a drop-down that will allow you to automatically update the Home Address based upon the Property Address. RealtyJuggler will also ask if you want to add a closing Anniversary to the contact record as well. Once you have picked up your commission check, you will be asked to set the status to "Complete". After closing, there are a few tasks that show up regarding follow-up calls to your client. These automatic tasks depend upon your preference setting in the Main:Settings:Preferences:Tasks section. By default, you will be reminded to contact your Buyer after 1 day, 7 days, and 30 days later, and then on an annual basis on the closing anniversary. Many agents like to make these follow-up calls so we make it easy to do that. If this is not your style you can uncheck these tasks in your preference settings (Go to the Main:Settings:Preferences:Tasks). Status Description Under Contract Buyer and Seller have an agreement. Contingencies have NOT yet been met. In the
case of a Short Sale, lender has NOT yet given approval. Pre-Close All Contingencies have been met. If a Short Sale, the lender has agreed to the deal. Closed The closing has taken place. Complete The deal is complete, you have updated your clients new home address information, and
you have been paid your Commission. Gave Referral This is not your deal, but you gave a referral to another agent and have a financial
interest in the deal outcome. A record with this status is a handy way to track the progress of the deal, and your Referral Fee and when it has been paid.
Cancelled The deal has failed. You may want to hold on to this record for a while, just in case the deal is revived.
Extra Status Values for Buyer, Listing, Closing, and Rental Records If you need an additional Status value for your Closing record (or Buyer, Seller, Rental), enter the additional Status value into the Extra Status: field. You can edit the drop-down list of Extra Status values by going to Main:Settings:Preferences:General.
RealtyJuggler Tasks Tutorial 16
The Contacts, Calendar, Expenses and Prospects databases use Categories for the same purpose. Categories can be edited from Main:Settings:Preferences.
Automatic Tasks for Listing Records Let's go back to our old Prospect record. Let's assume that our Prospect needs to sell their current home and purchase another and they have decided to use us for both transactions. We have already created the Buyer record, so now we need to create a Listing record.
You will notice that the Categories for the Prospect are set to "Client". Because of that, we haven't been bothered with any automatic tasks for this record. Click on the "Transfer" tab then click on the "Listing" icon. You can click on the "OK" button when asked if you want to delete the Prospect record.
You will now be in the Main:Listings:General section of RealtyJuggler. Click on the Tasks tab to see the tasks that are automatically generated for our Listing record. These tasks will walk you through organizing your lockbox, sign, and other particulars.
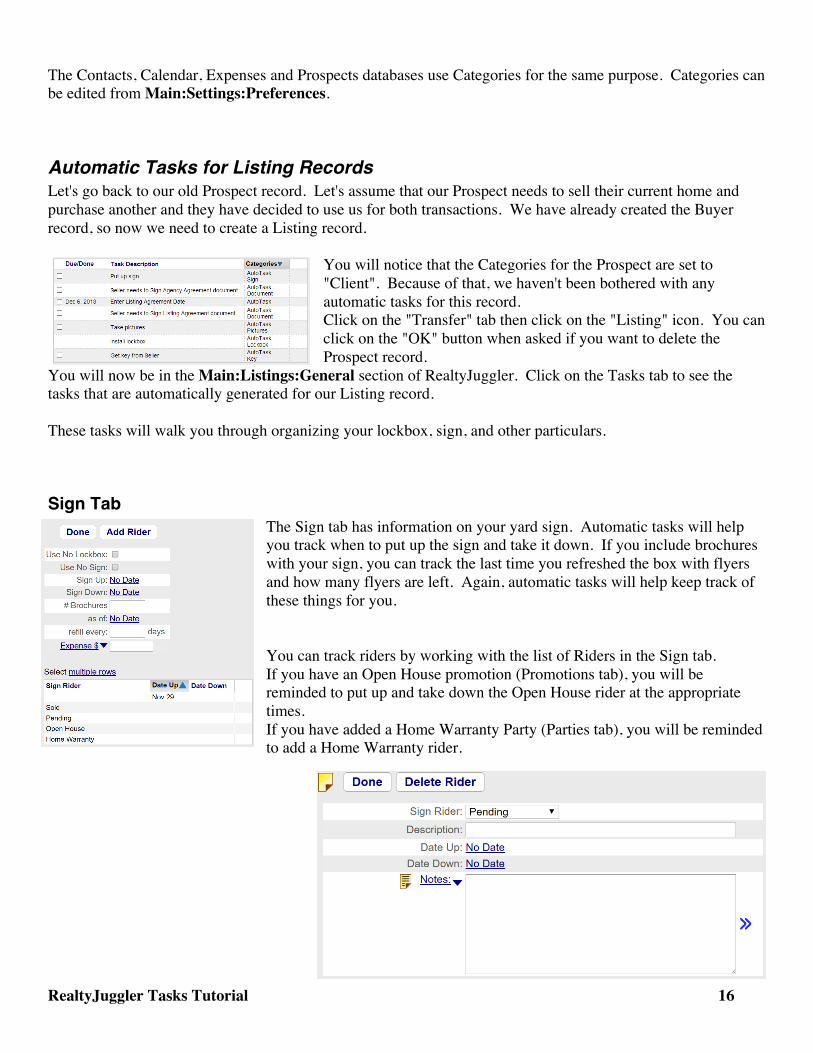
Sign Tab The Sign tab has information on your yard sign. Automatic tasks will help you track when to put up the sign and take it down. If you include brochures with your sign, you can track the last time you refreshed the box with flyers and how many flyers are left. Again, automatic tasks will help keep track of these things for you. You can track riders by working with the list of Riders in the Sign tab. If you have an Open House promotion (Promotions tab), you will be reminded to put up and take down the Open House rider at the appropriate times. If you have added a Home Warranty Party (Parties tab), you will be reminded to add a Home Warranty rider.

RealtyJuggler Tasks Tutorial 17
Lockboxes and Automatic Tasks An Automatic Task will ask that you "Install Lockbox" for your Listing. Click on the body of that task to go to the Main:Listings:General section of RealtyJuggler. From there, you can checkbox the "No Lockbox:" if your listing has no lockbox. If your listing does have a lockbox, you will want to follow the steps below to attach a lockbox to your Listing record.
Enter All your Lockboxes into Lockboxes Section of RealtyJuggler
1. Go to the Main section of RealtyJuggler and click on the Lockboxes icon.
2. Click on "New Lockbox" button at the top of the screen 3. Enter information about your lockbox. Click Done 4. Repeat for every lockbox in your inventory
Link a Lockbox to your Listing
1. Go to the Main section of RealtyJuggler and click on the Listings icon. 2. Click on your Listing record. 3. Click on the LockBox # link which will bring up a yellow
drop-down menu. 4. Select "LookUp Lockbox". A screen will come up with
your Lockbox inventory. Click on the lockbox you want to associate with this listing by clicking on the appropriate row.
5. You will then see the lockbox that is associated with your listing. A blue double arrow >> will be displayed to the right. If you click on the blue double arrow, you can go to the Lockbox record
Promotions Tab The Promotions tab allows you to track all of the promotions that you have planned for your listing. You can schedule Open Houses, advertisements, and any other promotions using this tab. Automatic tasks will keep you on track with these promotions.
To create a new promotion, click on the "New Promotion" button at the top of the screen. You should select from the 'Promotion Type:" drop-down menu to select what kind of promotion you will be tracking. The fields that are displayed change.

RealtyJuggler Tasks Tutorial 18
Task Preferences There are several preferences that relate to tasks and Automatic Tasks. You can edit those Preferences by clicking on the "Settings" icon from the Main section and clicking on the "Preferences" icon. We refer to this as Main:Settings:Preferences:Tasks section. The Contact B-Day Reminders preference setting controls whether you want to have Automatic Task reminds you of your Contacts B-Day and Anniversary dates. The "Close after 1, 7 and 30 days" option will generate Automatic Tasks for post-close follow-up calls. Many agents like to do that. If you don't, change the drop-down to "Skip". The Housewarming gift reminder, when checked, will remind you to send a housewarming gift to your Buyer Closing client. Uncheck if you don't do that.
"Retain Completed Tasks for:" option specifies how long you want to keep your completed tasks. Tasks are retained in full for that period of time. After that period of time, only the Date and Task Description are retained for the task. You can still view all completed tasks regardless of date, by using the "Service Report" tab. You can assign specific AutoTasks to individual team members by filling in the text fields on the Tasks tab with the first name of the team member that is assigned those auto tasks. The screen shot to the left shows these text fields. You can assign multiple categories by placing a comma between each category. This will add a category to the AutoTasks that matches the name you enter. You can also use color coding. The colors that are available are: blue, green, purple, red, yellow, orange, turquoise, gray, boldblue, boldgreen, boldred. Type in one of these colors into the text field, and those AutoTasks will be color coded for you.
Activity Plans vs Task Plans RealtyJuggler has two tabs for each deal record, the Tasks tab and the Mail tab. Occasionally, you need to apply a sequence of letters and a sequence of tasks together. For example, perhaps you have a DRIP letter sequence and want to be notified with a Task when that sequence is complete. Alternatively, perhaps you would like to send a letter and make a few phone calls as part of your follow-up plan for a prospect. Other real-estate CRM products, like Top Producer, offer Activity Plans. These plans are a combination of tasks and letters. To do this same thing in RealtyJuggler, go to the Main:Settings:Mail Forms section of RealtyJuggler. Create your DRIP letter sequence (see the users manual on Letters for instructions on how to do that), and then click on the "New DRIP Task" button. Fill in the information for your task and be sure that it has the same DRIP Group name as that of your letters. When you apply that letter sequence, the tasks will be added as well.

RealtyJuggler Tasks Tutorial 19
Creating A Task Plan A task plan is a bundle of tasks that you can apply all at once. To create your own Task Plan, following the instructions below. Task plans can be created in the Main:Settings:Task Plans section of RealtyJuggler. YouTube Video Tutorial 19 will show the below process visually.
For the first task in our plan, let's request that a DRIP Letter sequence be applied to this Prospect. Click on the "New Task" button.
This will bring up information for our task. The Task Plan Group is the name of the bundle of tasks that you are going to create. Lets fill that in with the text "FSBO Prospect". For the Task, let's fill in "Start DRIP FSBO Letter Sequence". We can leave everything else blank. Click Done. We have created a single task in our task plan sequence.
Let's create a second task for our Task Plan. For this task, we are going to create a reminder to call our prospect once a week for 6 weeks. Below are instructions on how to do that. Click on the "New Task" button. For the Task Plan Group, we want to use the exact same task plan group name as we used before. This group will be available by clicking on the "Task Plan Group:" blue link, to the left of the first text field and selecting the group from the yellow drop-down menu. You can also just type in your task plan group name as well. For the Task Description, let's fill in "Call Prospect". For the due date, let's fill in the
number 7. This means that this task will be due 7 days from the date you apply the plan. The "Repeat New Due Date Calculated from:" drop-down menu allows us to have the new repeat due date adjust based upon the last time we checked off the old task. In this situation, that's what we want. For example, if we don't make our call for 2 weeks, then the next call would be still 7 days after that late call. If we had selected the "Old Due Date" option, then the next due date would be calculated precisely 1 week after the first due date. We would have selected this option if we had wanted to call our prospect always on Monday's, for example. Click "Done", to create this second task. The Tasks list should look like this:
Tip: If you have several tasks with the same due date, you can specify the order by using a numeric order as part of your task description. For example, if the below task descriptions were used for three tasks that were due on the exact same Due Date: 01 – Pick Up Letter 02 – Take Letter To Buyer

RealtyJuggler Tasks Tutorial 20
03 – Take Signed Letter to Escrow Company They would be ordered based upon the numeric order that is part of the Task Description.
Creating an Advanced Task Plan For Closings, we are going to need a task plan that uses due dates based upon Close Date and Contract Date. Let's create a plan like that. Go to the Main:Settings:Task Plans section of RealtyJuggler. Click on the "New Task" button at the top of the screen.
For our first task, we are going to want to send by postal mail the final ratified contract to our client, right after the contract has been signed by all parties. Click on the "New Task" button. For the "Task Plan Group:", enter "Sell Side Closing" . For the "Task:" enter "Send By US Mail Signed Contract to Seller". Select from the "Start Date" drop-down menu and select "Acceptance Date". This means that this task is due 0 days after the Acceptance date. Click Done.
Let's create a second task to call our Seller 3 days before the Close Date to remind them of the closing Date. Click on the "New Task" button. For the "Task Plan Group:", enter "Sell Side Closing" . For the "Task:" enter "Contact Seller to Remind of Closing". Enter 3 for the Due Date and select "Before" from the "After" drop-down menu. Select from the "Start Date" drop-down menu and select "Close Date". This means that this task is due on the Acceptance date. Click "Done". We now have a plan with two tasks in it. The tasks have due dates that
will automatically adjust based upon the Close date and Acceptance Date. If one of these dates has not yet been set, then the due date for the task will have no date displayed. When you look at the Task Plans list, things can get a little confusing because all of the Task Plans are listed at once. To filter the list so that you see just the tasks that relate to a single task plan, click on the "Show Task Plan Group:" drop-down menu in the upper-right corner of the screen. You can also sort by any of the columns by clicking on the column heading.
RealtyJuggler Tasks Tutorial 21
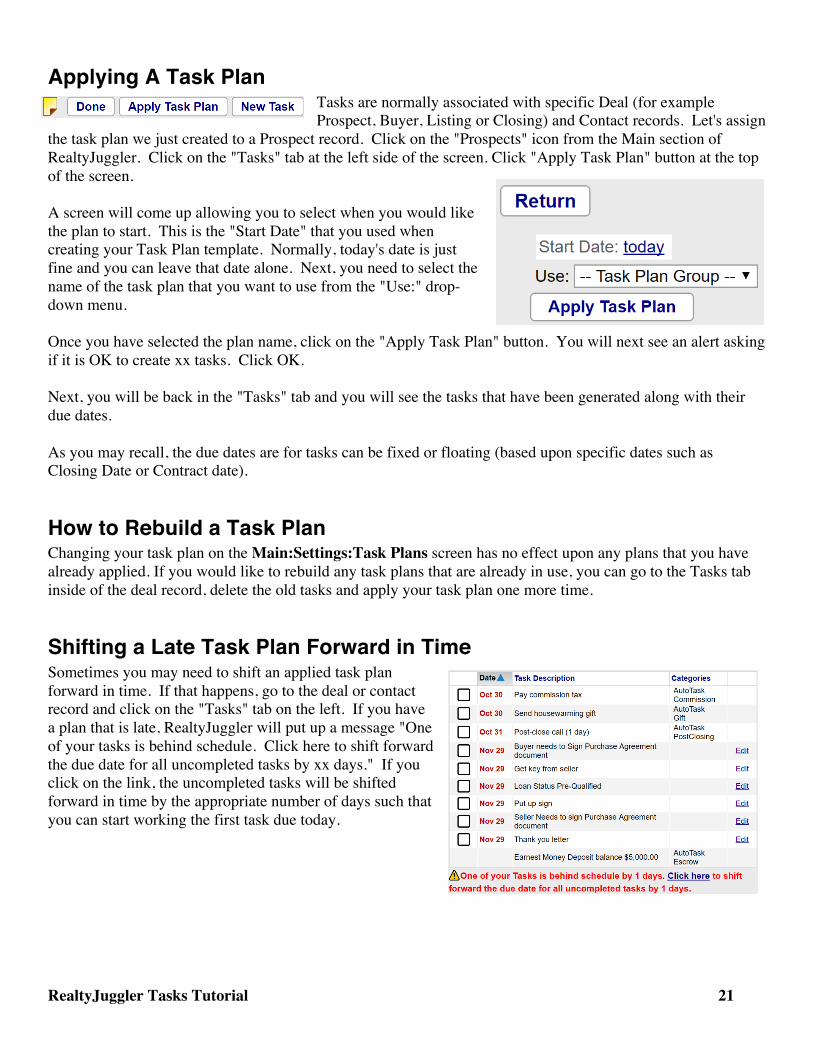
Applying A Task Plan Tasks are normally associated with specific Deal (for example Prospect, Buyer, Listing or Closing) and Contact records. Let's assign
the task plan we just created to a Prospect record. Click on the "Prospects" icon from the Main section of RealtyJuggler. Click on the "Tasks" tab at the left side of the screen. Click "Apply Task Plan" button at the top of the screen. A screen will come up allowing you to select when you would like the plan to start. This is the "Start Date" that you used when creating your Task Plan template. Normally, today's date is just fine and you can leave that date alone. Next, you need to select the name of the task plan that you want to use from the "Use:" drop-down menu. Once you have selected the plan name, click on the "Apply Task Plan" button. You will next see an alert asking if it is OK to create xx tasks. Click OK. Next, you will be back in the "Tasks" tab and you will see the tasks that have been generated along with their due dates. As you may recall, the due dates are for tasks can be fixed or floating (based upon specific dates such as Closing Date or Contract date).
How to Rebuild a Task Plan Changing your task plan on the Main:Settings:Task Plans screen has no effect upon any plans that you have already applied. If you would like to rebuild any task plans that are already in use, you can go to the Tasks tab inside of the deal record, delete the old tasks and apply your task plan one more time.
Shifting a Late Task Plan Forward in Time Sometimes you may need to shift an applied task plan forward in time. If that happens, go to the deal or contact record and click on the "Tasks" tab on the left. If you have a plan that is late, RealtyJuggler will put up a message "One of your tasks is behind schedule. Click here to shift forward the due date for all uncompleted tasks by xx days." If you click on the link, the uncompleted tasks will be shifted forward in time by the appropriate number of days such that you can start working the first task due today.

RealtyJuggler Tasks Tutorial 22
Default Records and Tasks RealtyJuggler has the ability to set default values for your Prospect, Buyer, Listing, Buy Side Closing, and Sell Side Closing records. These default values are used whenever you create a new record or transfer an existing record. The default values can be edited and viewed by going to the Main:Settings:Defaults section of RealtyJuggler.
Click on the type of record that you want to edit (Prospect, Buyer, Listing, Buy Side Closing, Sell Side Closing, Rental). You will see tabs along the left side of the screen allowing you to edit the Parties, Contingencies, Tasks, Promotions and other particulars about your default record. RealtyJuggler has a rather minimal set of defaults. So, it is likely that you will want to put together your own defaults that suit your region, and the way you like to work. For parties, you can add any inspection parties that you commonly need, such as Radon and Septic. The Contingencies tab is a great way to set up default contingencies that you normally expect, such as Mortgage, Termite, and Inspection. Not all tabs are available for all record types. However, the tabs that are available match up with the tabs that are available for a record of that type. You can also put together a default set of tasks by clicking on the "Tasks" tab and creating tasks. These tasks can have a due date that is based upon the creation date of the record (Start Date), or they can be based upon another date, such as the Contract Date or Closing date.
It is to your advantage to use the other default tabs first and use the Tasks for things that don't fit within the other tabs. For example, let's say you have specific promotions that you do with all your Listing records (Listings) such as CraigsList, specific web sites, virtual walkthroughs etc. It would be best for you to setup default Promotions to track that as that information can be tracked most easily that way. Automatic tasks will remind you to do the items on your Promotions list.
Similarly, if you normally need to contact specific people relating to your deals, like for a mortgage or an inspection, then you should add default parties and contingencies. Every Party has a "Contact again in __ days" field. If you fill that in with a number in your default record, you will be reminded via an Automatic Task to contact that party. There are always tasks that fall between the cracks (or tabs, in this case) and the default Tasks are ideal for that need. There is no way to put together a DRIP sequence of letters using the Default records. If you need to do that, you should create a default task with a Task Description like this "Apply DRIP sequence FSBO Prospect" to record. Then, when you see that task in your task list, you can apply your DRIP sequence and click the task done.

RealtyJuggler Tasks Tutorial 23
If you have a Task Plan that you would like to apply to a default record, you can also do that. Just keep in mind that if you edit the task plan (by going to Main:Settings:Task Plans), your default record will not be updated. So, you will want to go into the default record (Main:Settings:Defaults) and edit that as well as your task plan.
Mixing Letters and Tasks Together If you have a task plan that includes a sequence of letters, you can go to Main:Settings:Mail Forms and create your DRIP letter sequence. Then, you can add tasks to that letter sequence by clicking on the "New DRIP Task" button on that screen. Just make sure that your tasks and your letters all have the same DRIP group. That is how RealtyJuggler knows that they are bundled together. When you apply your DRIP letter sequence, any tasks associated with that letter sequence is added to the tasks list for the record that you apply your DRIP letter sequence to.
Converting Old Activity Plans Do you have old activity plans that you would like to load into RealtyJuggler? If so, follow the below:
1. If your plan is primarily one of letters and emails with a few tasks sprinkled in, then you will want to enter your plan into the Mail Forms section of RealtyJuggler located at Main:Settings:Mail Forms. These kinds of plans, are typically used for Prospecting and keeping up with your Contacts.
2. If you would like to determine a set of default activities that you will perform whenever you create a new Prospect, Buyer, Listing, Buy-Side Closing or Sell-Side Closing, then you will want to go to Main:Settings:Defaults and modify the appropriate default records. The following steps describe how to do that.
3. First, print out your old Activity Plans. You should have a single plan for each of the default records described above. You can apply additional variations later, but for now we are going to focus upon the default plans that you want to have applied automatically. It is important to break out your plans such that you have tasks that need to be done prior to a ratified contract and tasks that are done after the contract is ratified. The first list goes into the Buyer and Listing records and the second lists go into the Buy-Side and Sell-Side Closing records.
4. We are going to first cross out any tasks that are handled by RealtyJuggler using Automatic tasks. Typically, that will eliminate around 80% of your old tasks.
5. Watch YouTube Video Tutorial 38 and 39. These videos explain how the AutoTasks work. 6. For your Listing record:
a. Look for any tasks that relate to your promotions. This will include open houses, caravans, production of flyers, postcards, entry of data into web sites, printing of any material etc. Take those tasks and enter them into the Promotions tab for your Default Listing record. Since these are default values, you will just want to enter the descriptions. Automatic tasks will prompt you to enter the scheduled dates for each promotion. For now, we are just entering the slots that will be filled in later. You can cross these old tasks; they will be handled using Automatic Tasks.
b. Cross off any tasks that have to do with getting a key, installing lockbox, putting up a yard sign, putting up riders, installing a brochure holder on the sign and populating it with flyers. Those tasks will be handled using Automatic Tasks. If you have any favorite riders (home warrantee etc.) that you like to use for your yard signs, you can enter them into the Sign section of the Listing default record. If you typically check your brochure box every so many days, you can enter that into the Default Sign tab and RealtyJuggler will automatically remind you to do that.

RealtyJuggler Tasks Tutorial 24
c. Identify tasks that relate to getting documents signed, sending documents to someone, and tracking expire dates for documents. This includes your listing agreement (and its associated expire date), your agency agreement. Enter these documents into the Documents tab. You can use the Other document type for custom documents that you can name whatever you like. Eliminate those tasks from your old list.
d. If you typically have your sellers purchase a home warranty, you can enter that document here. e. If you routinely check tax records for appraised value, back taxes, deed transfer fees and the like,
then you can enter a "Tax Records" document here. f. If there are disclosure documents that you typically use signed, they can be added to the Documents
tab. g. Identify all tasks that relate to any parties that might be related to your Listing. This includes a
referral party (and any gifts to be sent, fees paid and thanks given to a referring agent). You can enter this information into the Parties tab. For the default record, you would enter the parties that you anticipate. If it turns out that you do not need a party for a particular deal, you can always delete that party from the deal record. Listing records typically have few parties as it is not until you have a ratified contract and move to a Closing record that you will need all those extra parties.
h. Place any tasks that relate to taking photos of the home or doing a video walkthrough into the "Promotions" tab inside of your default Listing record.
i. By now, you have probably eliminated about 80% of your old Tasks. Take the remaining tasks and enter them into the "Tasks" tab for the Default Listing record.
7. Lets convert your old Action plan for a Buy Side Closing. Go to Main:Settings:Defaults and click on the Buy Side Closing icon. a. Look at your old Action plan and find all of the tasks that relate to parties. This may include a
Referral party, possibly an Attorney. If you typically recommend a home warranty, you can add that here as well as well as fire insurance party, title insurance, closing company etc. Auto Tasks will handle those dates for you.
b. If you typically check with a particular party regularly - like a loan officer, enter the value into the Contact every xx days field for that party. Auto Tasks will handle that for you, so you can eliminate all of those reminders from your old checklist.
c. The Mortgage party has slots for the approval status and the expiration date. d. If you normally do any inspections (termite, well, septic, radon), you can add an inspector party and
name the kind of inspection (e.g. termite). RealtyJuggler will prompt you to schedule each inspection, wait for results and even track expire date for the inspection (such as termite)
e. Enter any contingencies that are typical for your buy-side deals into the Contingencies tab. This will likely include mortgage approval, one of more inspection contingencies. If you do short sales, you can add approval of Seller note-holder (YouTube Video Tutorial 33 shows how to do that). You can eliminate all tasks that relate to contingencies and their approval from your old list. AutoTasks will handle those.
f. Enter any documents that are typical for your buy-side closings into the Documents tab. This will likely include your purchase agreement, HOA/POA documents, power of attorney etc. You can now eliminate any tasks that relate to signing documents or tracking expiration dates for documents.
g. Remove all tasks relating to scheduling (and attending) closing and walk-thru. h. Remove all tasks relating to updating mailing address of buyer once they have moved in. i. Remove all tasks regarding picking up commission check. j. Remove all tasks relating to earnest money, scheduled earnest money etc. These are handled
automatically using the Escrow tab. k. Remove all tasks relating to calling the buyer after closing and sending a housewarming gift. Those
are handled automatically. RealtyJuggler will also automatically remind you to contact your buyer on their closing anniversary.
RealtyJuggler Tasks Tutorial 25
l. It is likely that you have eliminated about 80% of your old tasks. Whatever remains can be added to the Tasks tab of your Buy-Side closing default record.
Handling Short-Sales Below is a brief description how to organize a Short Sale:
1. The Parties tab within both the Listings and Closings database has the ability to track the first and second lien holder as well as any other parties that you might need. Create a new Party and then select Role of Seller Mortgage, Second Seller Loan or Third Seller Loan. Enter contact information, notes, payoff amount, loan # as well as a contact every xx days field.
2. The Documents tab in both the Listings and Closings database can be used to track all of the documentation that you have sent and received. It also allows you to track specific notes about each document, expire date of that document and who has seen and signed the document.
3. The Contingencies tab in the Closing record can be used to track what is required to close the deal. We recommend that you enter a contingency for bank approval with a status of "Deal Blocker". It is likely that there are additional deal-blocker contingencies that you will need to document as well (for example a second lien holder and BPO). Video Tutorial 33 has an explanation of how this works.
4. You can use the Extra Status values available within the Listing and Closing record to describe at what point within the short-sale process you are. This allows you to see at a glance the status of your deals in the summary view for both Listings and Closings. For example, if you are awaiting bank-approval, you can add that status as an Extra Status value. Additional information on this is available in Video Tutorial 33.
5. If you have a specific set of tasks for short-sales, you can create your own task plan and then apply this to the short-sale deals. Information on task plans is available in Video Tutorial 19. We recommend that you create a plan for the Listing record; a second plan for everything prior to approval by the bank and then a third final plan for after the bank has given approval. The advantage of three plans is that you will only see the tasks that you need to complete in order to get to the next stage. No point in doing (or dwelling upon) tasks that needs to be done at later stages until you are ready for that stage.
6. The notes and contact every xx days fields will provide the best way to stay current with each party in a deal. Video Tutorial 44 shows how to create a touch-cycle. This is the perfect way to call the lien holder every few days to make sure that the deal is progressing.
7. The Offers tab within the Listing record has the ability to track multiple simultaneous offers as well as stacking of offers.
8. If your Closing falls through, you can go back to the old Listing record, change the status of that record to Active and continue with the active listing.
9. The service report tab allows you to see all of your notes, documents, parties and any other information that relates to the deal in one summary view.
Printed Letters and Failed Email When you schedule a letter to be printed using RealtyJuggler, an Auto Task is created with the date of when that letter should be printed. From the Tasks list, click on the Task text for that row in the table and you will go to the Mail section of the record that needs to have the letter printed. Click on the "Download" link on that screen to download the letter(s) that need to be printed. Once you have completed the download, the AutoTask for that letter will go away.

RealtyJuggler Tasks Tutorial 26
You can then click on that task to correct the problem. Possible issues that may result in your email not being sent are: contact does not have a valid email address, contact unsubscribed from your mailing. In either case, you can click on the individual message and make a correction to get things going again. You may want to change the "Media:" to Print or fill in an email address. Just make sure that you reset the "Status:" to "Pending" so that RealtyJuggler can take a fresh try at the message.
If you set the Status for a Mail message to "Draft" it will not be sent but a task will be displayed for that letter. Some realtors like to use DRIP mail, but proof each letter before it goes out and setting the status of your message to Draft is perfect for that situation. You get the benefit of putting together an automatic sequence of letters, while at the same time being in total control of when the letter is sent, and whether it goes out via email or Printed letter.

RealtyJuggler Tasks Tutorial 27
Assigning Tasks to Team Members When you create a Task, one of the fields that you can edit is the Categories field. This field can be used for any purpose. If you work in a team, you can fill in this field with the name of the person who is assigned to handle the task. To add a Category, click on the text field and type it in. You can assign as many categories to a single task you like. Just put a comma between each category.
Make sure to enter your categories into the Main:Settings:Preferences:Tasks section of RealtyJuggler. From there, you can add any task categories you want into the Categories section, filling in one category per line. This is a text field, so you can click on any line and just hit enter to add your task categories. Once your categories have been added, you can click on the Categories: ( ) link and a yellow drop-down menu will appear. Select the category what you want from the menu and you are all set. Categories can be used to filter your tasks from the Main:All Tasks section by selecting from the "Show Category:" drop-down menu in the upper-right corner of the screen. This filtering can be particularly useful for team members who would like to look at all the tasks that are assigned to a particular team member.
Automatic Tasks will have the category AutoTask assigned to them. Additionally, many of the automatic tasks will have an additional category assigned to them to allow you to organize your Tasks in a logical way. These categories cannot be edited and are built into RealtyJuggler. You can use color names for Categories. The list of color names are as follows: blue, green, purple, red, yellow, orange, turquoise, gray, boldblue, boldgreen, boldred.

RealtyJuggler Tasks Tutorial 28
Adding Dates to your Calendar The dates throughout RealtyJuggler are editable by clicking on either the "No Date" link or by clicking on the date itself. When you click on the
link, a Pick Date window will appear allowing you to select the date. Similarly, if a time is available, you can select the time by clicking on the time part of the field and entering it.
Most dates in RealtyJuggler have a blue down arrow ( ) adjacent to the date name. If you click on the date name or the blue arrow, a drop-down menu will appear. You can select the "Add to Calendar" menu item if you would like to have the date (and time, if it is available) added to your calendar as an appointment.
If you do select this option, the date will no longer be editable and a blue double arrow >> will be displayed to the right of the date. You can click on that double arrow to go directly to the Appointment record that will show up in your calendar. From there you can add notes, assign categories and fill in the Location of the appointment. Click "Done" and you will go back to where you were before. Many dates that are entered into RealtyJuggler will automatically be used within Automatic Tasks. For example, if you have a contingency that is not complete, the Deadline date will be used for the Contingency, in your Tasks tab. If you have a date in RealtyJuggler that you would like to have on your Calendar click on the blue down arrow ( ) and select the "Add to Calendar" menu item.
Alarms – Tasks vs. Appointments Appointments normally have a date and a time associated with them. If you miss an appointment, you have missed it. There's no point showing up for an appointment 5 hours late, no one will be there. Due to the time-sensitive nature of Appointments, RealtyJuggler offers the ability to set an alarm for Appointments using the Alarm check-box. RealtyJuggler will then send you an email reminding you of the Appointment. By default, you need to check the Alarm check-box for each Appointment you want to have an alarm for. However, you can adjust this behavior by going to the Main:Settings:Preferences:Calendar section of RealtyJuggler. You will find default values you can set for new appointments there. Tasks do not have a time associated with them. They are also unique in that if you miss doing a task by the due date, the task stays around until you get the task done and the due date for the task is bold and in red. This distinction is a critical one and should guide you when deciding whether to create a new task or a new Appointment.
RealtyJuggler Tasks Tutorial 29
A good habit to get into when using RealtyJuggler is to take a quick look at both your "All Tasks" and "Calendar" sections first thing in the morning. Your Appointments in your Calendar are your highest priority while the Tasks can be fit in between your Appointments, as they are not time sensitive. There will sometimes be overlap between the two, but the more you differentiate between the two, the easier it will be to organize and prioritize your day. Here's a specific scenario that will explain the distinction:
1. A lead comes into RealtyJuggler and you immediately call this lead. They tell you that they are interested, but need to think about it. Can you call me in 2 weeks?
2. You enter 14 into the Contact Again in __ days field. Every morning when you sign into RealtyJuggler you click on the All Tasks Icon and next click on the Calendar to review what you need to do for the day. If you do that, you will be reminded to contact this person again in 14 days. Since this was a loose commitment on your part, it makes sense to make it a task. Lets work through a slightly different scenario:
1. A lead comes into RealtyJuggler and you immediately call this lead. They tell you that they are interested, but would like the spouse to be present. Can you call next Sunday 11PM?
2. You click on the Appointments tab inside of the Prospect record. You enter the date and time of the appointment and click on the blue down arrow to add the appointment to your calendar,
This time an appointment shows up in your calendar. You can synchronize this appointment with Outlook and your phone. You can even set up an email reminder to be sent to you so that you don't miss the appointment. The key between these two scenarios is the time-critical nature of the appointment compared with the rather loose requirements of a Task. If you have a vague commitment to call someone in a 'few' days, that would be a task not an appointment.
Conclusion Tasks are an excellent way to automate your workflow. They provide a way for you to ensure a uniform level of service to every client. They also provide an important level of documentation your Sellers will appreciate. For closings, tasks allow you to identify little problems before they become large ones. For Prospects, you can use tasks to follow up on leads even if the incubation process takes months. The result is less stress for you and a happier client.