red hat enterprise linux-6-identity management guide-en-us
DESCRIPTION
redhat identity managementTRANSCRIPT

Red Hat EnterpriseLinux 6.3
Identity Management GuideManaging Identity and Authorization
Policies for Linux-Based Infrastructures
Ella Deon Lackey

Identity Management Guide
Red Hat Enterprise Linux 6.3 Identity Management GuideManaging Identity and Authorization Policies for Linux-BasedInfrastructuresEdition 2.2.0
Author Ella Deon Lackey [email protected]
Copyright © 2012 Red Hat.
The text of and illustrations in this document are licensed by Red Hat under a Creative CommonsAttribution–Share Alike 3.0 Unported license ("CC-BY-SA"). An explanation of CC-BY-SA is availableat http://creativecommons.org/licenses/by-sa/3.0/. In accordance with CC-BY-SA, if you distribute thisdocument or an adaptation of it, you must provide the URL for the original version.
Red Hat, as the licensor of this document, waives the right to enforce, and agrees not to assert,Section 4d of CC-BY-SA to the fullest extent permitted by applicable law.
Red Hat, Red Hat Enterprise Linux, the Shadowman logo, JBoss, MetaMatrix, Fedora, the InfinityLogo, and RHCE are trademarks of Red Hat, Inc., registered in the United States and other countries.
Linux® is the registered trademark of Linus Torvalds in the United States and other countries.
Java® is a registered trademark of Oracle and/or its affiliates.
XFS® is a trademark of Silicon Graphics International Corp. or its subsidiaries in the United Statesand/or other countries.
MySQL® is a registered trademark of MySQL AB in the United States, the European Union and othercountries.
All other trademarks are the property of their respective owners.
1801 Varsity Drive Raleigh, NC 27606-2072 USA Phone: +1 919 754 3700 Phone: 888 733 4281 Fax: +1 919 754 3701
Identity and policy management — for both users and machines — is a core function for almost anyenterprise environment. IPA provides a way to create an identity domain that allows machines to enrollto a domain and immediately access identity information required for single sign-on and authenticationservices, as well as policy settings that govern authorization and access. This manual covers allaspects of installing, configuring, and managing IPA domains, including both servers and clients. Thisguide is intended for IT and systems administrators.
iii
Preface xiii1. Audience and Purpose .................................................................................................. xiii2. Examples and Formatting .............................................................................................. xiii
2.1. Brackets ............................................................................................................ xiii2.2. Client Tool Information ........................................................................................ xiii2.3. Text Formatting and Styles ................................................................................. xiv
3. Giving Feedback ........................................................................................................... xiv4. Document Change History ............................................................................................. xv
Release Information xvii1. New Features in 6.3 .................................................................................................... xvii2. Upgrade Notes for IPA 2.2 ........................................................................................... xviii3. Fixed in 6.3 ................................................................................................................ xviii4. Known Issues in 6.3 ..................................................................................................... xix
4.1. A Note on Internet Explorer Support on Windows ................................................. xix4.2. List of Issues ...................................................................................................... xx
1. Introduction to Identity Management 11.1. IPA v. LDAP: A More Focused Type of Service .............................................................. 1
1.1.1. A Working Definition for Identity Management ..................................................... 11.1.2. Contrasting Identity Management with a Standard LDAP Directory ........................ 2
1.2. Bringing Linux Services Together .................................................................................. 31.2.1. Authentication: Kerberos KDC ............................................................................ 41.2.2. Data Storage: 389 Directory Server .................................................................... 51.2.3. Authentication: Dogtag Certificate System ........................................................... 51.2.4. Server/Client Discovery: DNS ............................................................................. 51.2.5. Management: NTP ............................................................................................ 5
1.3. Relationships Between Servers and Clients ................................................................... 61.3.1. About IPA Servers and Replicas ......................................................................... 61.3.2. About IPA Clients .............................................................................................. 7
2. Installing an IPA Server 112.1. Supported Server Platforms ........................................................................................ 112.2. Preparing to Install the IPA Server .............................................................................. 11
2.2.1. Hardware Recommendations ............................................................................ 112.2.2. Software Requirements .................................................................................... 112.2.3. Supported Web Browsers ................................................................................. 122.2.4. System Prerequisites ....................................................................................... 12
2.2.4.1. Hostname and IP Address Requirements ............................................... 122.2.4.2. Directory Server .................................................................................... 122.2.4.3. System Files ....................................................................................... 132.2.4.4. System Ports ........................................................................................ 132.2.4.5. NTP ..................................................................................................... 132.2.4.6. NSCD ................................................................................................... 13
2.2.5. Networking ...................................................................................................... 142.2.5.1. Configuring Networking Services ............................................................ 142.2.5.2. Configuring the /etc/hosts File ................................................................ 14
2.3. Installing the IPA Server Packages .............................................................................. 152.4. Creating an IPA Server Instance ................................................................................. 15
2.4.1. About ipa-server-install ..................................................................................... 152.4.2. Setting up an IPA Server: Basic Interactive Installation ....................................... 172.4.3. Examples of Creating the IPA Server ................................................................ 19
2.4.3.1. Non-Interactive Basic Installation ........................................................... 192.4.3.2. Using Different CA Configurations .......................................................... 202.4.3.3. Using DNS ........................................................................................... 21
Identity Management Guide
iv
2.4.4. Troubleshooting Installation Problems ............................................................... 222.5. Setting up IPA Replicas .............................................................................................. 23
2.5.1. Prepping and Installing the Replica Server ........................................................ 232.5.2. Creating the Replica ........................................................................................ 242.5.3. Troubleshooting Replica Installation .................................................................. 27
2.6. Uninstalling IPA Servers and Replicas ......................................................................... 282.7. Upgrading Identity Management from Red Hat Enterprise Linux 6.2 to 6.3 ...................... 28
2.7.1. Upgrading Packages ........................................................................................ 282.7.2. Removing Browser Configuration for Ticket Delegation ....................................... 292.7.3. Testing Before Upgrading the IPA Server .......................................................... 31
3. Setting up Systems as IPA Clients 333.1. What Happens in Client Setup .................................................................................... 333.2. System Ports ............................................................................................................. 343.3. Configuring a Red Hat Enterprise Linux System as an IPA Client ................................... 353.4. Manually Configuring a Linux Client ............................................................................ 383.5. Setting up a Linux Client Through Kickstart .................................................................. 433.6. Configuring a Microsoft Windows System to Join the IPA Realm .................................... 433.7. Troubleshooting Client Installations .............................................................................. 44
3.7.1. The client can't resolve reverse hostnames when using an external DNS. ............ 453.7.2. The client is not added to the DNS zone. .......................................................... 45
3.8. Uninstalling an IPA Client ........................................................................................... 45
4. Basic Usage 474.1. About the IPA Client Tools .......................................................................................... 47
4.1.1. About the IPA Command-Line Tools .................................................................. 474.1.1.1. The Structure of the ipa Command ........................................................ 474.1.1.2. Positional Elements in ipa Commands .................................................... 494.1.1.3. Managing Entry Attributes with --setattr, --addattr, and --delattr ................. 494.1.1.4. Using Special Characters with IPA Tools ................................................ 504.1.1.5. Logging into the IPA Domain Before Running .......................................... 51
4.1.2. Looking at the IPA UI ...................................................................................... 514.1.2.1. The UI Layout ....................................................................................... 514.1.2.2. Page Elements ..................................................................................... 544.1.2.3. Showing and Changing Group Members ................................................ 56
4.2. Logging into IPA ......................................................................................................... 574.2.1. Logging into IPA .............................................................................................. 574.2.2. Logging in When an IPA User Is Different Than the System User ........................ 584.2.3. Checking the Current Logged in User ............................................................... 584.2.4. Caching User Kerberos Tickets ........................................................................ 58
4.3. Using the IPA Web UI ................................................................................................ 594.3.1. Supported Web Browsers ................................................................................. 594.3.2. Opening the IPA Web UI .................................................................................. 594.3.3. Configuring the Browser ................................................................................... 594.3.4. Using a Browser on Another System ................................................................ 624.3.5. Logging in with Simple Username/Password Credentials .................................... 634.3.6. Using the UI with Proxy Servers ....................................................................... 654.3.7. Troubleshooting UI Connection Problems .......................................................... 65
4.4. Understanding Search Limits and Settings ................................................................... 664.4.1. Types of Search Limits and Where They Apply .................................................. 664.4.2. Setting IPA Search Limits ................................................................................. 67
4.4.2.1. With the Web UI ................................................................................... 674.4.2.2. With the Command Line ........................................................................ 69
4.4.3. Overriding the Search Defaults ......................................................................... 694.4.4. Setting Search Attributes .................................................................................. 69
v
4.4.4.1. Setting User Search Attributes ............................................................... 704.4.4.2. Setting Group Search Attributes ............................................................. 71
4.4.5. Attributes Returned in Search Results ............................................................... 73
5. Identity: Managing Users and User Groups 755.1. Setting up User Home Directories ............................................................................... 75
5.1.1. About Home Directories ................................................................................... 755.1.2. Enabling the PAM Home Directory Module ........................................................ 765.1.3. Manually Mounting Home Directories ................................................................ 77
5.2. Managing User Entries ............................................................................................... 775.2.1. About Username Formats ................................................................................ 775.2.2. Adding Users .................................................................................................. 78
5.2.2.1. From the Web UI .................................................................................. 785.2.2.2. From the Command Line ....................................................................... 81
5.2.3. Editing Users ................................................................................................... 815.2.3.1. From the Web UI .................................................................................. 815.2.3.2. From the Command Line ....................................................................... 84
5.2.4. Activating and Deactivating User Accounts ........................................................ 845.2.4.1. From the Web UI .................................................................................. 855.2.4.2. From the Command Line ....................................................................... 86
5.2.5. Deleting Users ................................................................................................. 865.2.5.1. With the Web UI ................................................................................... 875.2.5.2. From the Command Line ....................................................................... 88
5.3. Managing Public SSH Keys for Users (TECH PREVIEW) .............................................. 885.4. Changing Passwords .................................................................................................. 89
5.4.1. From the Web UI ............................................................................................. 895.4.2. From the Command Line ................................................................................. 91
5.5. Unlocking User Accounts After Password Failures ........................................................ 925.6. Managing User Private Groups ................................................................................... 92
5.6.1. Disabling Private Groups for a Specific User ..................................................... 925.6.2. Disabling Private Groups Globally ..................................................................... 92
5.7. Managing Unique UID and GID Number Assignments .................................................. 935.7.1. About ID Range Assignments During Installation ............................................... 935.7.2. Adding New Ranges ........................................................................................ 94
5.8. Managing User and Group Schema ............................................................................ 945.8.1. About Changing the Default User and Group Schema ........................................ 965.8.2. Applying Custom Object Classes to New User Entries ....................................... 96
5.8.2.1. From the Web UI .................................................................................. 965.8.2.2. From the Command Line ....................................................................... 98
5.8.3. Applying Custom Object Classes to New Group Entries ..................................... 995.8.3.1. From the Web UI .................................................................................. 995.8.3.2. From the Command Line ..................................................................... 101
5.9. Managing User Groups ............................................................................................. 1015.9.1. Creating User Groups .................................................................................... 102
5.9.1.1. With the Web UI ................................................................................. 1025.9.1.2. With the Command Line ...................................................................... 104
5.9.2. Adding Group Members ................................................................................. 1055.9.2.1. With the Web UI (Group Page) ............................................................ 1055.9.2.2. With the Web UI (User's Page) ............................................................ 1075.9.2.3. With the Command Line ...................................................................... 1105.9.2.4. Viewing Direct and Indirect Members of a Group ................................... 111
5.9.3. Deleting User Groups .................................................................................... 1125.9.3.1. With the Web UI ................................................................................. 1125.9.3.2. With the Command Line ...................................................................... 113
Identity Management Guide
vi
5.10. Searching for Users and Groups ............................................................................. 1145.10.1. With the UI .................................................................................................. 1145.10.2. With the Command Line ............................................................................... 114
5.11. Specifying Default User and Group Settings ............................................................. 1165.11.1. Viewing Settings from the Web UI ................................................................. 1175.11.2. Viewing Settings from the Command Line ...................................................... 118
6. Identity: Managing Hosts and Services 1216.1. About Hosts, Services, and Machine Identity and Authentication .................................. 1216.2. Adding Host Entries .................................................................................................. 122
6.2.1. Adding Host Entries from the Web UI .............................................................. 1226.2.2. Adding Host Entries from the Command Line .................................................. 125
6.3. Enrolling Clients Manually ......................................................................................... 1266.3.1. Performing a Split Enrollment ......................................................................... 126
6.4. Manually Unconfiguring Client Machines .................................................................... 1276.5. Managing Services ................................................................................................... 128
6.5.1. Adding and Editing Service Entries and Keytabs .............................................. 1286.5.1.1. Adding Services and Keytabs from the Web UI ..................................... 1286.5.1.2. Adding Services and Keytabs from the Command Line .......................... 131
6.5.2. Adding Services and Certificates for Services .................................................. 1326.5.2.1. Adding Services and Certificates from the Web UI ................................. 1326.5.2.2. Adding Services and Certificates from the Command Line ...................... 135
6.5.3. Storing Certificates in NSS Databases ............................................................ 1366.5.4. Configuring Clustered Services ....................................................................... 1366.5.5. Using the Same Service Principal for Multiple Services .................................... 137
6.6. Disabling and Re-enabling Host and Service Entries ................................................... 1376.6.1. Disabling Host and Service Entries ................................................................. 1386.6.2. Re-enabling Hosts and Services ..................................................................... 138
6.7. Extending Access Permissions over Other Hosts and Services .................................... 1386.7.1. Delegating Service Management .................................................................... 1396.7.2. Delegating Host Management ......................................................................... 1406.7.3. Delegating Host or Service Management in the Web UI .................................... 1406.7.4. Accessing Delegated Services ........................................................................ 141
6.8. Managing Public SSH Keys for Hosts (TECH PREVIEW) ............................................ 1426.8.1. About IPA Clients and OpenSSH .................................................................... 1426.8.2. Adding Host Keys .......................................................................................... 1436.8.3. Removing Host Keys ..................................................................................... 143
6.9. Renaming Machines and Reconfiguring IPA Client Configuration ................................. 1446.10. Managing Host Groups ........................................................................................... 145
6.10.1. Creating Host Groups .................................................................................. 1456.10.1.1. Creating Host Groups from the Web UI ............................................... 1456.10.1.2. Creating Host Groups from the Command Line ................................... 147
6.10.2. Adding Group Members ............................................................................... 1476.10.2.1. Adding Group Members from the Web UI ........................................... 1476.10.2.2. Adding Group Members from the Command Line ................................ 149
6.11. Troubleshooting Host Problems ............................................................................... 1506.11.1. Certificate Not Found/Serial Number Not Found Errors ................................... 1506.11.2. Debugging Client Connection Problems ......................................................... 150
7. Identity: Integrating with NIS Domains and Netgroups 1537.1. About NIS and Identity Management ......................................................................... 1537.2. Setting the NIS Port for Identity Management ............................................................. 1547.3. Creating Netgroups ................................................................................................... 155
7.3.1. Adding Netgroups .......................................................................................... 1557.3.1.1. With the Web UI ................................................................................. 155

vii
7.3.1.2. With the Command Line ...................................................................... 1577.3.2. Adding Netgroup Members ............................................................................. 158
7.3.2.1. With the Web UI ................................................................................. 1587.3.2.2. With the Command Line ...................................................................... 160
7.4. Exposing Automount Maps to NIS Clients .................................................................. 1617.5. Migrating from NIS to IPA ......................................................................................... 161
7.5.1. Preparing Netgroup Entries in IPA .................................................................. 1617.5.2. Enabling the NIS Listener in Identity Management ........................................... 1627.5.3. Exporting and Importing the Existing NIS Data ................................................. 162
7.5.3.1. Importing User Entries ......................................................................... 1637.5.3.2. Importing Group Entries ....................................................................... 1637.5.3.3. Importing Host Entries ......................................................................... 1647.5.3.4. Importing Netgroup Entries .................................................................. 1657.5.3.5. Importing Automount Maps .................................................................. 166
7.5.4. Setting Weak Password Encryption for NIS User Authentication to IPA ............... 167
8. Identity: Integrating with Microsoft Active Directory 1698.1. About Active Directory and Identity Management ........................................................ 1698.2. About Synchronized Attributes ................................................................................... 170
8.2.1. User Attribute Synchronization ........................................................................ 1708.2.1.1. User Schema Differences between Identity Management and ActiveDirectory ......................................................................................................... 1728.2.1.2. Active Directory Entries and RFC 2307 Attributes .................................. 173
8.2.2. Group Attribute Synchronization ...................................................................... 1748.2.2.1. About Windows Group Types ............................................................... 1748.2.2.2. Group Attributes Synchronized between Identity Management andActive Directory ............................................................................................... 1748.2.2.3. Group Schema Differences between Identity Management and ActiveDirectory ......................................................................................................... 175
8.3. Setting up Active Directory for Synchronization ........................................................... 1758.4. Managing Synchronization Agreements ..................................................................... 176
8.4.1. Trusting the Active Directory and IPA CA Certificates ....................................... 1768.4.2. Creating Synchronization Agreements ............................................................. 1788.4.3. Changing the Behavior for Syncing User Account Attributes .............................. 1798.4.4. Changing the Synchronized Windows Subtree ................................................. 1818.4.5. Configuring Uni-Directional Sync ..................................................................... 1828.4.6. Deleting Synchronization Agreements ............................................................. 1838.4.7. Winsync Agreement Failures .......................................................................... 183
8.5. Managing Password Synchronization ......................................................................... 1848.5.1. Setting up the Windows Server for Password Synchronization .......................... 1848.5.2. Setting up Password Synchronization .............................................................. 1868.5.3. Exempting Active Directory Users from Password Synchronization .................... 188
9. Identity: Managing DNS 1899.1. About DNS in IPA ..................................................................................................... 1899.2. The IPA-Generated DNS File .................................................................................... 1899.3. Setting up DNS After IPA Server Installation .............................................................. 1909.4. Managing DNS Zone Entries ..................................................................................... 190
9.4.1. Adding DNS Zones ........................................................................................ 1909.4.1.1. Adding DNS Zones from the Web UI .................................................... 1919.4.1.2. Adding DNS Zones from the Command Line ......................................... 193
9.4.2. Modifying DNS Zones .................................................................................... 1949.4.2.1. Editing the Zone Configuration in the Web UI ........................................ 1969.4.2.2. Editing the Zone Configuration in the Command Line ............................. 198
9.4.3. Enabling and Disabling Zones ........................................................................ 198

Identity Management Guide
viii
9.4.3.1. Disabling Zones in the Web UI ............................................................ 1989.4.3.2. Disabling Zones in the Command Line ................................................. 200
9.5. Managing DNS Record Entries .................................................................................. 2009.5.1. Adding Records to DNS Zones ....................................................................... 200
9.5.1.1. Adding DNS Resource Records from the Web UI .................................. 2019.5.1.2. Adding DNS Resource Records from the Command Line ....................... 203
9.5.2. Deleting Records from DNS Zones ................................................................. 2069.5.2.1. Deleting Records with the Web UI ........................................................ 2069.5.2.2. Deleting Records with the Command Line ............................................ 210
9.6. Configuring the bind-dyndb-ldap Plug-in ..................................................................... 2109.6.1. Changing the DNS Cache Setting ................................................................... 2119.6.2. Enabling Zone Refreshes ............................................................................... 211
9.7. Changing Recursive Queries Against Forwarders ....................................................... 2119.8. Enabling Dynamic DNS Updates ............................................................................... 212
9.8.1. Enabling Dynamic DNS Updates in the Web UI ............................................... 2129.8.2. Enabling Dynamic DNS Updates in the Command Line .................................... 215
9.9. Configuring Forwarders and Forward Policy ............................................................... 2159.9.1. Configuring Global Forwarders ....................................................................... 2159.9.2. Configuring Zone Forwarders ......................................................................... 2159.9.3. Configuring Forwarder Policy for a Zone ......................................................... 215
9.10. Enabling Zone Transfers ......................................................................................... 2169.11. Defining DNS Queries ............................................................................................. 2169.12. Synchronizing Forward and Reverse Zone Entries .................................................... 2179.13. Setting DNS Access Policies ................................................................................... 2179.14. Resolving Hostnames in the IPA Domain ................................................................. 2189.15. Changing Load Balancing for IPA Servers and Replicas ............................................ 218
10. Policy: Using Automount 21910.1. About Automount and IPA ....................................................................................... 21910.2. Configuring Automount ............................................................................................ 220
10.2.1. Configuring autofs on Red Hat Enterprise Linux ............................................. 22010.3. Setting up a Kerberized NFS Server ........................................................................ 221
10.3.1. Setting up a Kerberized NFS Server ............................................................. 22210.3.2. Setting up a Kerberized NFS Client ............................................................... 224
10.4. Configuring Kerberized CIFS ................................................................................... 22510.4.1. Setting up Samba Groups in IPA .................................................................. 22510.4.2. Configuring the CIFS Client .......................................................................... 227
10.5. Configuring Locations ............................................................................................. 22810.5.1. Configuring Locations through the Web UI ..................................................... 22810.5.2. Configuring Locations through the Command Line .......................................... 229
10.6. Configuring Maps ................................................................................................... 23010.6.1. Configuring Direct Maps ............................................................................... 230
10.6.1.1. Configuring Direct Maps from the Web UI ........................................... 23010.6.1.2. Configuring Direct Maps from the Command Line ................................ 233
10.6.2. Configuring Indirect Maps ............................................................................. 23310.6.2.1. Configuring Indirect Maps from the Web UI ......................................... 23310.6.2.2. Configuring Indirect Maps from the Command Line .............................. 235
10.6.3. Importing Automount Maps ........................................................................... 236
11. Policy: Defining Password Policies 23711.1. About Password Policies and Policy Attributes .......................................................... 23711.2. Viewing Password Policies ...................................................................................... 239
11.2.1. Viewing the Global Password Policy .............................................................. 23911.2.1.1. With the Web UI ................................................................................ 24011.2.1.2. With the Command Line .................................................................... 242
ix
11.2.2. Viewing Group-Level Password Policies ........................................................ 24211.2.2.1. With the Web UI ................................................................................ 24211.2.2.2. With the Command Line .................................................................... 243
11.2.3. Viewing the Password Policy in Effect for a User ............................................ 24411.3. Creating and Editing Password Policies ................................................................... 244
11.3.1. Creating Password Policies in the Web UI ..................................................... 24411.3.2. Creating Password Policies with the Command Line ....................................... 24711.3.3. Editing Password Policies with the Command Line ......................................... 247
11.4. Managing Password Expiration Limits ...................................................................... 24711.5. Changing the Priority of Group Password Policies ..................................................... 24811.6. Setting Account Lockout Policies ............................................................................. 249
11.6.1. In the UI ...................................................................................................... 24911.6.2. In the CLI .................................................................................................... 251
11.7. Enabling a Password Change Dialog ....................................................................... 252
12. Policy: Managing the Kerberos Domain 25312.1. About Kerberos ...................................................................................................... 253
12.1.1. About Principal Names ................................................................................. 25312.1.2. About Protecting Keytabs ............................................................................. 254
12.2. Setting Kerberos Ticket Policies .............................................................................. 25412.2.1. Setting Global Ticket Policies ........................................................................ 254
12.2.1.1. From the Web UI .............................................................................. 25412.2.1.2. From the Command Line ................................................................... 255
12.2.2. Setting User-Level Ticket Policies ................................................................. 25612.3. Refreshing Kerberos Tickets .................................................................................... 25612.4. Caching Kerberos Passwords .................................................................................. 25812.5. Removing Keytabs .................................................................................................. 25812.6. Troubleshooting Kerberos Errors ............................................................................. 259
13. Policy: Using sudo 26113.1. About sudo and IPA ................................................................................................ 261
13.1.1. General sudo Configuration in Identity Management ....................................... 26113.1.2. sudo and Netgroups ..................................................................................... 26113.1.3. Supported sudo Clients ................................................................................ 262
13.2. Setting up sudo Commands and Command Groups .................................................. 26213.2.1. Adding sudo Commands .............................................................................. 262
13.2.1.1. Adding sudo Commands with the Web UI ........................................... 26213.2.1.2. Adding sudo Commands with the Command Line ................................ 264
13.2.2. Adding sudo Command Groups .................................................................... 26413.2.2.1. Adding sudo Command Groups with the Web UI ................................. 26413.2.2.2. Adding sudo Command Groups with the Command Line ...................... 267
13.3. Defining sudo Rules ................................................................................................ 26713.3.1. About External Users and Hosts ................................................................... 26713.3.2. About sudo Options Format .......................................................................... 26813.3.3. Defining sudo Rules in the Web UI ............................................................... 26913.3.4. Defining sudo Rules in the Command Line .................................................... 277
13.4. An Example of Configuring sudo ............................................................................. 28013.4.1. Server Configuration for sudo Rules .............................................................. 28013.4.2. Client Configuration for sudo Rules ............................................................... 281
14. Policy: Configuring Host-Based Access Control 28314.1. About Host-Based Access Control ........................................................................... 28314.2. Creating Host-Based Access Control Entries for Services and Service Groups ............ 284
14.2.1. Adding HBAC Services ................................................................................ 28514.2.1.1. Adding HBAC Services in the Web UI ................................................ 285

Identity Management Guide
x
14.2.1.2. Adding Services in the Command Line ............................................... 28614.2.2. Adding Service Groups ................................................................................ 286
14.2.2.1. Adding Service Groups in the Web UI ................................................ 28614.2.2.2. Adding Service Groups in the Command Line ..................................... 289
14.3. Defining Host-Based Access Control Rules .............................................................. 29014.3.1. Setting Host-Based Access Control Rules in the Web UI ................................ 29014.3.2. Setting Host-Based Access Control Rules in the Command Line ..................... 297
14.4. Testing Host-Based Access Control Rules ................................................................ 30014.4.1. The Limits of Host-Based Access Control Configuration .................................. 30014.4.2. Test Scenarios for Host-Based Access Control (CLI-Based) ............................ 30114.4.3. Testing Host-Based Access Control Rules in the UI ........................................ 302
15. Policy: Defining Automatic Group Membership for Users and Hosts 30515.1. About Automembership ........................................................................................... 30515.2. Defining Automembership Rules (Basic Procedure) .................................................. 306
15.2.1. From the Web UI ......................................................................................... 30615.2.2. From the CLI ............................................................................................... 309
15.3. Examples of Using Automember Groups .................................................................. 31015.3.1. Setting an All Users/Hosts Rule .................................................................... 31115.3.2. Defining Default Automembership Groups ..................................................... 31115.3.3. Using Automembership Groups with Windows Users ...................................... 312
16. Configuration: Defining Access Control within IPA 31316.1. About Access Controls for IPA Entries ..................................................................... 313
16.1.1. A Brief Look at Access Control Concepts ...................................................... 31316.1.2. Access Control Methods in Identity Management ........................................... 314
16.2. Defining Self-Service Settings .................................................................................. 31416.2.1. Creating Self-Service Rules from the Web UI ................................................. 31516.2.2. Creating Self-Service Rules from the Command Line ..................................... 31616.2.3. Editing Self-Service Rules ............................................................................ 316
16.3. Delegating Permissions over Users ......................................................................... 31816.3.1. Delegating Access to User Groups in the Web UI .......................................... 31816.3.2. Delegating Access to User Groups in the Command Line ............................... 319
16.4. Defining Role-Based Access Controls ...................................................................... 32016.4.1. Creating Roles ............................................................................................. 323
16.4.1.1. Creating Roles in the Web UI ............................................................ 32316.4.1.2. Creating Roles in the Command Line ................................................. 325
16.4.2. Creating New Permissions ............................................................................ 32616.4.2.1. Creating New Permissions from the Web UI ........................................ 32616.4.2.2. Creating New Permissions from the Command Line ............................. 329
16.4.3. Creating New Privileges ............................................................................... 33016.4.3.1. Creating New Privileges from the Web UI ........................................... 33016.4.3.2. Creating New Privileges from the Command Line ................................ 333
17. Configuration: Configuring the IPA Server 33517.1. Identity Management Files and Logs ........................................................................ 335
17.1.1. A Reference of IPA Server Configuration Files and Directories ........................ 33517.1.2. About default.conf and Context Configuration Files ......................................... 33717.1.3. Checking IPA Server Logs ............................................................................ 338
17.1.3.1. Enabling Server Debug Logging ......................................................... 33917.1.3.2. Debugging Command-Line Operations ............................................... 340
17.2. Disabling Anonymous Binds .................................................................................... 34217.3. Configuring Alternate Certificate Authorities .............................................................. 34317.4. Configuring CRLs and OCSP Responders ............................................................... 344
17.4.1. Using an OSCP Responder with SELinux ...................................................... 344
xi
17.4.2. Changing the CRL Update Interval ................................................................ 34517.4.3. Changing the OCSP Responder Location ...................................................... 345
17.5. Setting an IPA Server as an Apache Virtual Host ...................................................... 34617.6. Setting DNS Entries for Multi-Homed Servers ........................................................... 34717.7. Managing Replication Agreements Between IPA Servers ........................................... 347
17.7.1. Listing Replication Agreements ..................................................................... 34817.7.2. Creating and Removing Replication Agreements ............................................ 34917.7.3. Forcing Replication ...................................................................................... 34917.7.4. Reinitializing IPA Servers .............................................................................. 34917.7.5. Resolving Replication Conflicts ..................................................................... 350
17.7.5.1. Solving Naming Conflicts ................................................................... 35017.7.5.2. Solving Orphan Entry Conflicts ........................................................... 351
17.8. Moving CRL Generation from the Master (Original) Server to Another Replica ............. 35217.8.1. About the Master Server, Replicas, and Generating CRLs ............................... 35217.8.2. Promoting a Replica ..................................................................................... 353
17.9. Removing a Replica ................................................................................................ 35417.10. Troubleshooting .................................................................................................... 354
17.10.1. Starting IPA with Expired Certificates ........................................................... 35417.10.2. There are SASL, GSS-API, and Kerberos errors in the 389 Directory Serverlogs when the replica starts. .................................................................................... 355
18. Migrating from an LDAP Directory to IPA 35718.1. An Overview of LDAP to IPA Migration .................................................................... 357
18.1.1. Planning the Client Configuration .................................................................. 35718.1.1.1. Initial Client Configuration (Pre-Migration) ........................................... 35718.1.1.2. Recommended Configuration for Red Hat Enterprise Linux Clients ........ 35818.1.1.3. Alternative Supported Configuration .................................................... 359
18.1.2. Planning Password Migration ........................................................................ 36018.1.2.1. Method 1: Using Temporary Passwords and Requiring a Change .......... 36018.1.2.2. Method 2: Using the Migration Web Page ........................................... 36118.1.2.3. Method 3: Using SSSD (Recommended) ............................................ 36118.1.2.4. Migrating Cleartext LDAP Passwords ................................................. 36118.1.2.5. Automatically Resetting Passwords That Do Not Meet Requirements .... 362
18.1.3. Migration Considerations and Requirements .................................................. 36218.1.3.1. LDAP Servers Supported for Migration ............................................... 36218.1.3.2. Migration Environment Requirements ................................................. 36218.1.3.3. Migration Tools .................................................................................. 36318.1.3.4. Migration Sequence ........................................................................... 363
18.2. Examples for Using migrate-ds ................................................................................ 36418.2.1. Migrating Specific Subtrees .......................................................................... 36418.2.2. Specifically Including or Excluding Entries ..................................................... 36518.2.3. Excluding Entry Attributes ............................................................................. 36518.2.4. Setting the Schema to Use ........................................................................... 366
18.3. Scenario 1: Using SSSD as Part of Migration ........................................................... 36618.4. Scenario 2: Migrating an LDAP Server Directly to Identity Management ...................... 368
A. Frequently Asked Questions 371Frequently Asked Questions ............................................................................................ 371
B. Working with certmonger 373B.1. Requesting a Certificate with certmonger ................................................................... 373B.2. Storing Certificates in NSS Databases ....................................................................... 374B.3. Tracking Certificates with certmonger ........................................................................ 374
C. IPA Tools Reference 375C.1. Using Special Characters with IPA Tools ................................................................... 375
Identity Management Guide
xii
C.2. ipa ........................................................................................................................... 375C.2.1. Location ........................................................................................................ 375C.2.2. Syntax .......................................................................................................... 375
C.2.2.1. Adding, Editing, and Deleting Entries with ipa ....................................... 375C.2.2.2. Finding and Displaying Entries with ipa ................................................ 376C.2.2.3. Adding Members to Groups and Containers with ipa ............................. 377C.2.2.4. Positional Elements in ipa Commands ................................................. 377
C.2.3. Help Topics ................................................................................................... 377C.2.4. Global Options .............................................................................................. 378C.2.5. Managing Attributes with --setattr, --addattr, and --delattr .................................. 379C.2.6. Return Codes ................................................................................................ 380C.2.7. Commands ................................................................................................... 380
C.3. ipa DNS Commands ................................................................................................ 381C.3.1. ipa dnszone-add ............................................................................................ 381
C.3.1.1. Syntax ............................................................................................... 381C.3.1.2. Options .............................................................................................. 381
C.3.2. ipa dnsrecord-add ......................................................................................... 382C.3.2.1. Syntax ............................................................................................... 382C.3.2.2. Options .............................................................................................. 383
C.4. ipa Host Commands ................................................................................................ 389C.4.1. ipa host-add .................................................................................................. 389
C.4.1.1. Syntax ............................................................................................... 389C.4.1.2. Options .............................................................................................. 389
C.5. Server Scripts .......................................................................................................... 390C.5.1. A Quick Summary of Configuration Scripts ...................................................... 390C.5.2. ipa-replica-install ........................................................................................... 392
C.5.2.1. Location ............................................................................................. 392C.5.2.2. Syntax ............................................................................................... 392C.5.2.3. Options .............................................................................................. 392
C.5.3. ipa-replica-prepare ......................................................................................... 394C.5.3.1. Location ............................................................................................. 395C.5.3.2. Syntax ............................................................................................... 395C.5.3.3. Options .............................................................................................. 395
C.5.4. ipa-server-install ............................................................................................ 395C.5.4.1. Location ............................................................................................. 396C.5.4.2. Syntax ............................................................................................... 396C.5.4.3. Options .............................................................................................. 396
C.6. Client Scripts ........................................................................................................... 399C.6.1. ipa-client-install ............................................................................................. 399
C.6.1.1. Location ............................................................................................. 400C.6.1.2. Syntax ............................................................................................... 400C.6.1.3. Options .............................................................................................. 400
Glossary 403
Index 417
xiii
PrefaceIdentity Management is a Red Hat Enterprise Linux-based way to create a security, identity, andauthentication domain. The different security and authentication protocols available to Linux and Unixsystems (like Kerberos, NIS, DNS, PAM, and sudo) are complex, unrelated, and difficult to managecoherently, especially when combined with different identity stores.
Identity Management provides a layer that unifies all of these disparate services and simplifies theadministrative tasks for managing users, systems, and security. IPA breaks management down intotwo categories: identity and policy. It centralizes the functions of managing the users and entitieswithin your IT environment (identity) and then provides a framework to define authentication andauthorization for a global security framework and user-friendly tools like single sign-on (policy).
1. Audience and PurposeWith Identity Management, a Red Hat Enterprise Linux system can easily become the center of anidentity/authentication domain and even provide access to the domain for clients of other operatingsystems. IPA is an integrated system, that builds on existing and reliable technologies like LDAP andcertificate protocols, with a robust yet straightforward set of tools (including a web-based UI). The keyto identity/policy management with IPA is simplicity and flexibility:
• Centralized identity stores for authentication and single sign-on using both integrated LDAP services(with 389 Directory Server) and, optionally, NIS services
• Clear and manageable administrative control over system services like PAM, NTP, and sudo
• Simplified DNS domains and maintenance
• Scalable Kerberos realms and cross-realms which clients can easily join
This guide is written for systems administrators and IT staff who will manage IPA domains, usersystems, and servers. This assumes a moderate knowledge of Linux-based systems administrationand familiarity with important concepts like access control, LDAP, and Kerberos.
This guide covers every aspect of using IPA, including preparation and installation processes,administrative tasks, and the IPA tools. This guide also explains the major concepts behind bothidentity and policy management, generally, and IPA features specifically. Administrative tasks inthis guide are categorized as either Identity or Policy in the chapter title to help characterize theadministrative functions.
2. Examples and FormattingEach of the examples used in this guide, such as file locations and commands, have certain definedconventions.
2.1. BracketsSquare brackets ([]) are used to indicate an alternative element in a name. For example, if a tool isavailable in /usr/lib on 32-bit systems and in /usr/lib64 on 64-bit systems, then the tool locationmay be represented as /usr/lib[64].
2.2. Client Tool InformationThe tools for IPA are located in the /usr/bin and the /usr/sbin directories.

Preface
xiv
The LDAP tools used to edit the IPA directory services, such as ldapmodify and ldapsearch, arefrom OpenLDAP. OpenLDAP tools use SASL connections by default. To perform a simple bind using ausername and password, use the -x argument to disable SASL.
2.3. Text Formatting and StylesCertain words are represented in different fonts, styles, and weights. Different character formatting isused to indicate the function or purpose of the phrase being highlighted.
Formatting Style Purpose
Monospace with a backgroundThis type of formatting is used for anythingentered or returned in a command prompt.
Italicized text Any text which is italicized is a variable, such asinstance_name or hostname. Occasionally, thisis also used to emphasize a new term or otherphrase.
Bolded text Most phrases which are in bold are applicationnames, such as Cygwin, or are fields or optionsin a user interface, such as a User Name Here:field or Save button. This can also indicate afile, package, or directory name, such as /usr/sbin.
Other formatting styles draw attention to important text.
NOTE
A note provides additional information that can help illustrate the behavior of the system orprovide more detail for a specific issue.
IMPORTANT
Important information is necessary, but possibly unexpected, such as a configuration change thatwill not persist after a reboot.
WARNING
A warning indicates potential data loss, as may happen when tuning hardware for maximumperformance.
3. Giving FeedbackIf there is any error in this book or there is any way to improve the documentation, please let us know.Bugs can be filed against the documentation for IPA through Bugzilla, http://bugzilla.redhat.com/

Document Change History
xv
bugzilla. Make the bug report as specific as possible, so we can be more effective in correcting anyissues:
1. Select the Red Hat group and the Red Hat Enterprise Linux 6 product.
2. Set the component to doc-Enterprise_Identity_Management_Guide.
3. For errors, give the page number (for the PDF) or URL (for the HTML), and give a succinctdescription of the problem, such as incorrect procedure or typo.
For enhancements, put in what information needs to be added and why.
4. Give a clear title for the bug. For example, "Incorrect command example for setupscript options" is better than "Bad example".
We appreciate receiving any feedback — requests for new sections, corrections, improvements,enhancements, even new ways of delivering the documentation or new styles of docs. You arewelcome to contact Red Hat Content Services directly at [email protected].
4. Document Change HistoryRevision 6.2-8 December 16, 2011 Ella Deon Lackey [email protected]
Fixing sudoers_debug example in sudo client configuration procedure, Bugzilla #768792.Fixing migration command example, Bugzilla #766089.
Revision 6.2-7 December 6, 2011 Ella Deon Lackey [email protected] for GA of Red Hat Enterprise Linux 6.2.
1 mailto:[email protected]

xvi

xvii
Release InformationIdentity Management is part of Red Hat Enterprise Linux 6, so major features, known issues, andbug fixes are covered in the Red Hat Enterprise Linux release notes. This section is provided as aconvenient reference for significant issues that are in Identity Management 2.2. The full list of knownissues related to Identity Management is in the Red Hat Enterprise Linux 6.3 Technical Notes1.
1. New Features in 6.3
Automatic Group Membership for Users and HostsMost of the policies configured in Identity Management are based on group membership, somanaging group membership is critical as a part of managing the policies for both users and hosts.Automembership allows administrators to set up filters for new users and hosts so that they areassigned, automatically, to the appropriate user groups and host groups. Automembership, includingexamples, is covered in Chapter 15, Policy: Defining Automatic Group Membership for Users andHosts.
Disabling User Private GroupsOn Red Hat Enterprise Linux systems, every time a user is created, a corresponding, secret usergroup is automatically created with that new user as its only member. This is a user private group.There may be certain users or types of users which do not require a private group or the environmentmay already have those GIDs assigned to NIS groups or other system groups. In that case, userprivate group creation can be disabled. See Section 5.6, “Managing User Private Groups”.
Better Web UI PerformanceA number of performance and usability changes have been made in IPA 2.2, including improvedsession handling and adding support for Services4Unix Proxy. Along with overall better performance,these changes have introduced two new features for the web UI:• Self-service management supported in Internet Explorer
• Form-based authentication for the web UI, in addition to Kerberos
Enhanced DNS Resource Record SupportThe way that IPA handles DNS resource records has been improved to make it easier to create andedit records. The UI and CLI tooling have both been enhanced to provide type-specific options forcommon resource record types. For more information, see Section 9.5, “Managing DNS RecordEntries”.
SSH Key Management (Tech Preview)OpenSSH uses public-private key pairs to authenticate hosts. The machine then stores user and hostpublic keys in a central file, such as the known_hosts file. Clients can simple check that central keyfile and then grant access automatically to approved users and hosts. However, since all of those filesare created locally, it can be difficult to maintain host and user key files across an entire enterprise.The System Security Services Daemon (SSSD) can be configured to cache and retrieve SSH keys
1 http://docs.redhat.com/docs/en-US/Red_Hat_Enterprise_Linux/6/html/6.3_Technical_Notes/authentication_issues.html
Release Information
xviii
so that applications and services only have to look in one location for keys. Because SSSD can useIdentity Management as one of its identity information providers, Identity Management provides auniversal and centralized repository of keys. For more information, see Section 5.3, “Managing PublicSSH Keys for Users (TECH PREVIEW)”.
2. Upgrade Notes for IPA 2.2• Upgrade procedures are covered in Section 2.7, “Upgrading Identity Management from Red Hat
Enterprise Linux 6.2 to 6.3”.
• Existing replicas and servers in a domain can use different versions of IPA. However, when creatinga new replica, the new replica must be the same version as the master server which it is beingcreated from.
• Because of UI session enhancements in IPA 2.2, it is no longer necessary to enable ticket-grantingticket (TGT) creation for browser sessions. For existing IPA servers, a new configure.jar filecan be created that no longer enables TGT delegation as part of client browser configuration.For existing IPA clients, TGT delegation can be disabled again in the browser. This is covered inSection 2.7.2, “Removing Browser Configuration for Ticket Delegation”.
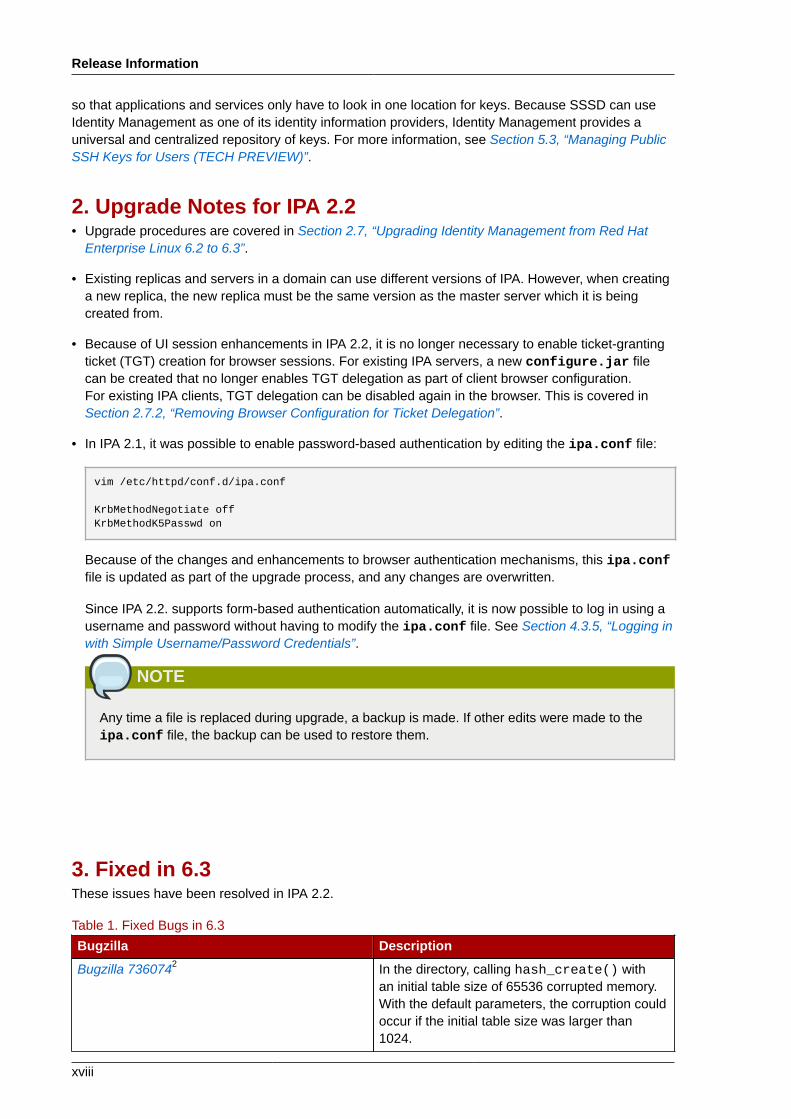
• In IPA 2.1, it was possible to enable password-based authentication by editing the ipa.conf file:
vim /etc/httpd/conf.d/ipa.conf
KrbMethodNegotiate offKrbMethodK5Passwd on
Because of the changes and enhancements to browser authentication mechanisms, this ipa.conffile is updated as part of the upgrade process, and any changes are overwritten.
Since IPA 2.2. supports form-based authentication automatically, it is now possible to log in using ausername and password without having to modify the ipa.conf file. See Section 4.3.5, “Logging inwith Simple Username/Password Credentials”.
NOTE
Any time a file is replaced during upgrade, a backup is made. If other edits were made to theipa.conf file, the backup can be used to restore them.
3. Fixed in 6.3These issues have been resolved in IPA 2.2.
Table 1. Fixed Bugs in 6.3
Bugzilla Description
Bugzilla 7360742 In the directory, calling hash_create() withan initial table size of 65536 corrupted memory.With the default parameters, the corruption couldoccur if the initial table size was larger than1024.

Known Issues in 6.3
xix
Bugzilla Description
Bugzilla 7436803 When an IPA server was installed with a customhostname that was not resolvable, the ipa-server-install command failed to adda record to the static hostname lookup tablein /etc/hosts, which prevented furtherconfiguration of Identity Management integratedservices.
The record is now properly added to /etc/hosts when an IP address is passed as an CLIoption and not interactively.
Bugzilla 7517764 If a zone entry contained an invalid record, theentire zone failed to load. None of the recordsin the DNS zone, including root records, wereserviced.
Now, the DNS zone loads and skips the invalidresource record. All of the other DNS resourceentries are served, can be resolved, and respondto requests.
Bugzilla 7545395 Once a connection between a replica and serverwas deleted using ipa-replica-manage del,a new connection could not be created. It failedwith this error:
unexpected error: list index out of range
Bugzilla 7591006 The IPA server could not be installed on amachine with a dual NIC. When two DNS Arecords existed for the same hostname, theinstaller failed with this error:
Server host name [server1.example.com]:
Warning: skipping DNS resolution of host server1.example.comThe domain name has been calculated based on the host name.
Please confirm the domain name [example]:
Unable to resolve IP address for host namePlease provide the IP address to be used for this host name:
4. Known Issues in 6.3
4.1. A Note on Internet Explorer Support on WindowsThe enhancements for Services4Unix Proxy support have made steps in adding support to use theIPA web UI on Internet Explorer on Windows. However, this is still a nascent feature. In IPA 2.2,Internet Explorer can be used for self-service management, such as resetting account detailsand changing passwords.
Release Information
xx
When using Internet Explorer to perform other tasks in the IPA web UI, there can be issues with UIperformance and layout or some operations may not be possible.
These are some of the known issues specifically for Internet Explorer and the web UI:
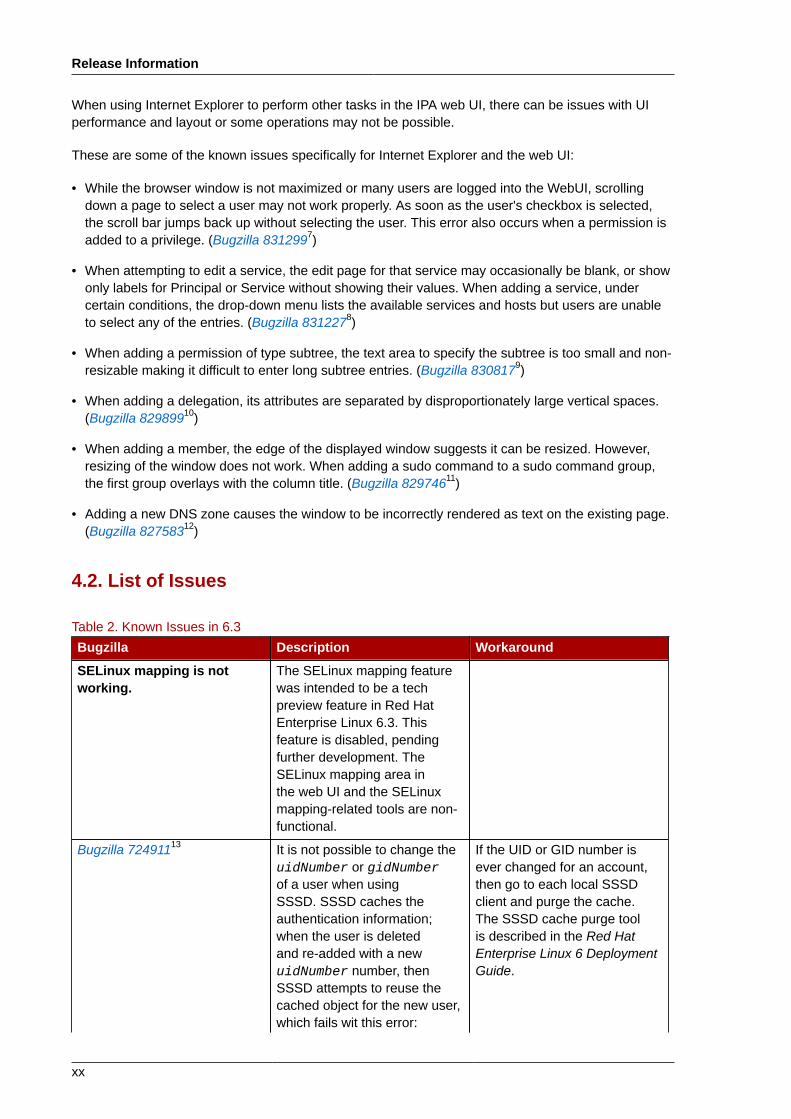
• While the browser window is not maximized or many users are logged into the WebUI, scrollingdown a page to select a user may not work properly. As soon as the user's checkbox is selected,the scroll bar jumps back up without selecting the user. This error also occurs when a permission isadded to a privilege. (Bugzilla 8312997)
• When attempting to edit a service, the edit page for that service may occasionally be blank, or showonly labels for Principal or Service without showing their values. When adding a service, undercertain conditions, the drop-down menu lists the available services and hosts but users are unableto select any of the entries. (Bugzilla 8312278)
• When adding a permission of type subtree, the text area to specify the subtree is too small and non-resizable making it difficult to enter long subtree entries. (Bugzilla 8308179)
• When adding a delegation, its attributes are separated by disproportionately large vertical spaces.(Bugzilla 82989910)
• When adding a member, the edge of the displayed window suggests it can be resized. However,resizing of the window does not work. When adding a sudo command to a sudo command group,the first group overlays with the column title. (Bugzilla 82974611)
• Adding a new DNS zone causes the window to be incorrectly rendered as text on the existing page.(Bugzilla 82758312)
4.2. List of Issues
Table 2. Known Issues in 6.3
Bugzilla Description Workaround
SELinux mapping is notworking.
The SELinux mapping featurewas intended to be a techpreview feature in Red HatEnterprise Linux 6.3. Thisfeature is disabled, pendingfurther development. TheSELinux mapping area inthe web UI and the SELinuxmapping-related tools are non-functional.
Bugzilla 72491113 It is not possible to change theuidNumber or gidNumberof a user when usingSSSD. SSSD caches theauthentication information;when the user is deletedand re-added with a newuidNumber number, thenSSSD attempts to reuse thecached object for the new user,which fails wit this error:
If the UID or GID number isever changed for an account,then go to each local SSSDclient and purge the cache.The SSSD cache purge toolis described in the Red HatEnterprise Linux 6 DeploymentGuide.

List of Issues
xxi
Bugzilla Description Workaround
Cache file [/tmp/krb5cc_1866400007_wPJrHJ] exists, but is owned by [1866400007] instead of [1866400008].
Bugzilla 72645614 SSSD does not support theLDAP password expirationcontrols, so it does notsupport password expirationnotifications or warnings. The389 Directory Server instanceused by Identity Managementdoes support these controls.
Bugzilla 74126415 The way that Active Directoryperforms referrals isdifferent than the way thatthe OpenLDAP libraries(used by the 389 DirectoryServer instance in IdentityManagement) performreferrals. Intermittently,Active Directory may return areferral during an LDAP bindattempt that is denied by theOpenLDAP libraries. This cancause performance problems,information loss, or for SSSD togo offline.
Set this parameter insssd.conf:
ldap_referrals = False
This disables referral chasing inSSSD.
Bugzilla 74195716 When updating the list ofobject classes for a user orgroup entry, it is possible todelete object classes which arerequired by IPA. The UI andCLI do not prevent the requiredobject classes from beingdeleted, but adding a user orgroup after the change will failwith object class violations.
Bugzilla 74226317 The previous and next buttonswere not displayed in the UI ifthe number of entries returnedis larger than the configuredsize limit.
Increase the number of entriesdisplayed in a search to areasonable level. This isdescribed in Section 4.4.2,“Setting IPA Search Limits”.
Bugzilla 74368018 When an IPA server is installedwith a custom hostname thatis not resolvable, the ipa-server-install commandshould add a record to thestatic hostname lookup tablein /etc/hosts and enable
There are two ways to workaround this issue:• Run the ipa-server-install without the --ip-address option and passthe IP address interactively.
Release Information
xxii
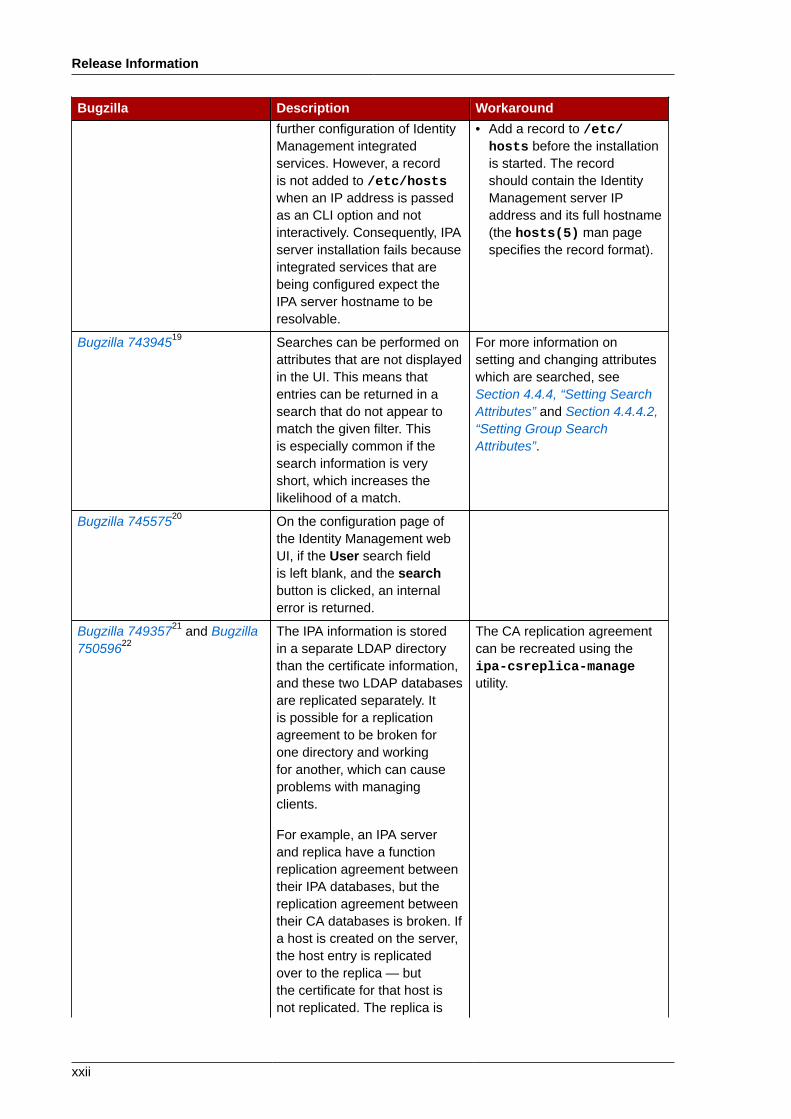
Bugzilla Description Workaroundfurther configuration of IdentityManagement integratedservices. However, a recordis not added to /etc/hostswhen an IP address is passedas an CLI option and notinteractively. Consequently, IPAserver installation fails becauseintegrated services that arebeing configured expect theIPA server hostname to beresolvable.
• Add a record to /etc/hosts before the installationis started. The recordshould contain the IdentityManagement server IPaddress and its full hostname(the hosts(5) man pagespecifies the record format).
Bugzilla 74394519 Searches can be performed onattributes that are not displayedin the UI. This means thatentries can be returned in asearch that do not appear tomatch the given filter. Thisis especially common if thesearch information is veryshort, which increases thelikelihood of a match.
For more information onsetting and changing attributeswhich are searched, seeSection 4.4.4, “Setting SearchAttributes” and Section 4.4.4.2,“Setting Group SearchAttributes”.
Bugzilla 74557520 On the configuration page ofthe Identity Management webUI, if the User search fieldis left blank, and the searchbutton is clicked, an internalerror is returned.
Bugzilla 74935721 and Bugzilla75059622
The IPA information is storedin a separate LDAP directorythan the certificate information,and these two LDAP databasesare replicated separately. Itis possible for a replicationagreement to be broken forone directory and workingfor another, which can causeproblems with managingclients.
For example, an IPA serverand replica have a functionreplication agreement betweentheir IPA databases, but thereplication agreement betweentheir CA databases is broken. Ifa host is created on the server,the host entry is replicatedover to the replica — butthe certificate for that host isnot replicated. The replica is
The CA replication agreementcan be recreated using theipa-csreplica-manageutility.

List of Issues
xxiii
Bugzilla Description Workaroundaware of the client, but anymanagement operations forthat client will fail because thereplica doesn't have a copy ofits certificate.
Bugzilla 75169423 Installing the IPA client failsif the 32-bit packages areinstalled on a 64-bit systembecause required NSSdependencies are not installed.
Bugzilla 75218124 If any previous version ofRed Hat Enterprise IPA or theIdentity Management techpreview are installed, theymust be uninstalled beforethe latest version of IdentityManagement can be installedand configured. Otherwise,there are problems connectingto the Identity ManagementLDAP server.
Bugzilla 75473925 When a replica is uninstalled,the ipa-replica-managelist command still lists thereplica as being in the servertopology.
Bugzilla 75497326 The ipa-replica-managescript manages both replicationagreements between IPAservers and synchronizationagreements between an IPAserver and an Active Directoryserver.
The force-sync, del,and re-initializesubcommands with ipa-replica-manage donot work when managingsync agreements, so theseoperations fail when runagainst an Active Directoryserver.
Bugzilla 75543627 The uidNumber andgidNumber attributes onActive Directory user entriesare not synced over to IPA.
Bugzilla 78350228 The Identity Managementpermission plug-in does notverify that the set of attributes
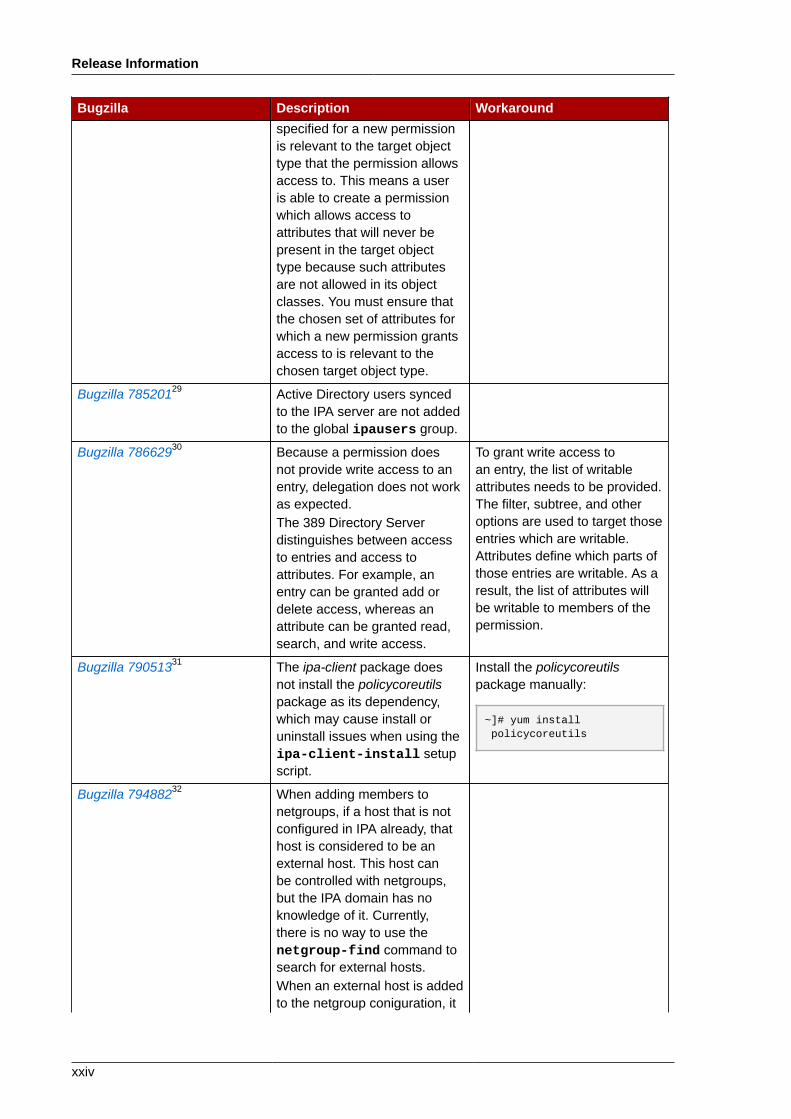
Release Information
xxiv
Bugzilla Description Workaroundspecified for a new permissionis relevant to the target objecttype that the permission allowsaccess to. This means a useris able to create a permissionwhich allows access toattributes that will never bepresent in the target objecttype because such attributesare not allowed in its objectclasses. You must ensure thatthe chosen set of attributes forwhich a new permission grantsaccess to is relevant to thechosen target object type.
Bugzilla 78520129 Active Directory users syncedto the IPA server are not addedto the global ipausers group.
Bugzilla 78662930 Because a permission doesnot provide write access to anentry, delegation does not workas expected.The 389 Directory Serverdistinguishes between accessto entries and access toattributes. For example, anentry can be granted add ordelete access, whereas anattribute can be granted read,search, and write access.
To grant write access toan entry, the list of writableattributes needs to be provided.The filter, subtree, and otheroptions are used to target thoseentries which are writable.Attributes define which parts ofthose entries are writable. As aresult, the list of attributes willbe writable to members of thepermission.
Bugzilla 79051331 The ipa-client package doesnot install the policycoreutilspackage as its dependency,which may cause install oruninstall issues when using theipa-client-install setupscript.
Install the policycoreutilspackage manually:
~]# yum install policycoreutils
Bugzilla 79488232 When adding members tonetgroups, if a host that is notconfigured in IPA already, thathost is considered to be anexternal host. This host canbe controlled with netgroups,but the IPA domain has noknowledge of it. Currently,there is no way to use thenetgroup-find command tosearch for external hosts.When an external host is addedto the netgroup coniguration, it
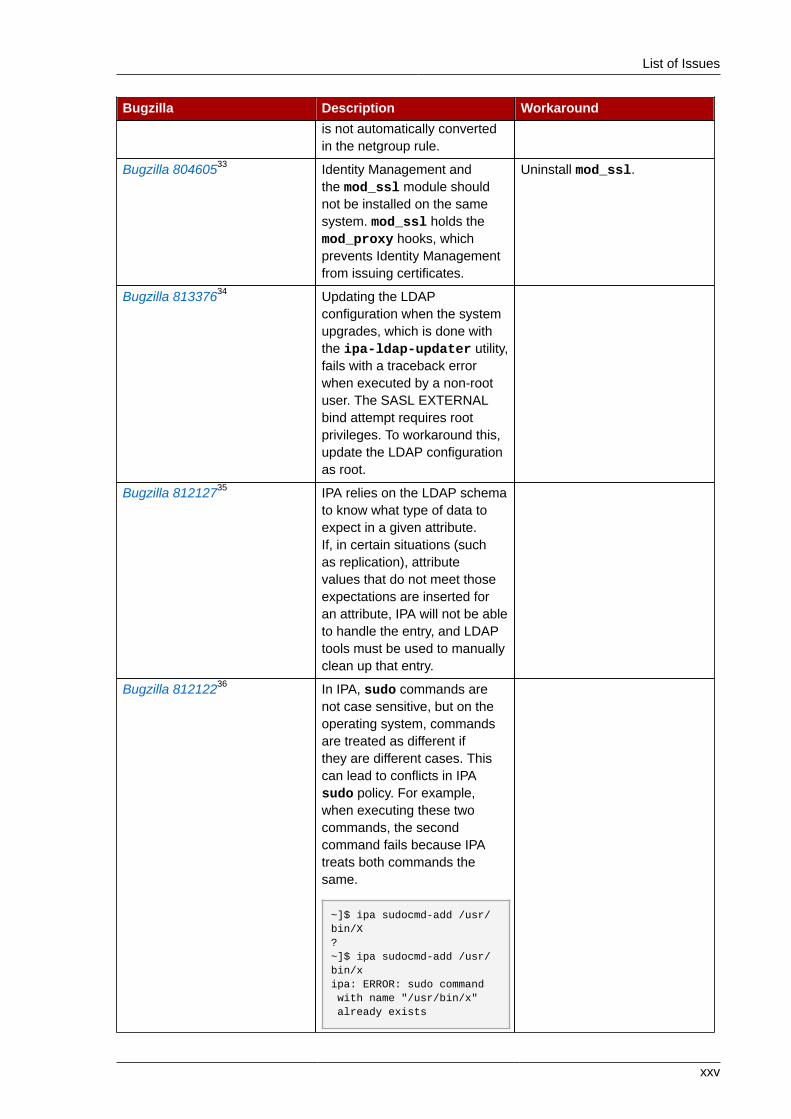
List of Issues
xxv
Bugzilla Description Workaroundis not automatically convertedin the netgroup rule.
Bugzilla 80460533 Identity Management andthe mod_ssl module shouldnot be installed on the samesystem. mod_ssl holds themod_proxy hooks, whichprevents Identity Managementfrom issuing certificates.
Uninstall mod_ssl.
Bugzilla 81337634 Updating the LDAPconfiguration when the systemupgrades, which is done withthe ipa-ldap-updater utility,fails with a traceback errorwhen executed by a non-rootuser. The SASL EXTERNALbind attempt requires rootprivileges. To workaround this,update the LDAP configurationas root.
Bugzilla 81212735 IPA relies on the LDAP schemato know what type of data toexpect in a given attribute.If, in certain situations (suchas replication), attributevalues that do not meet thoseexpectations are inserted foran attribute, IPA will not be ableto handle the entry, and LDAPtools must be used to manuallyclean up that entry.
Bugzilla 81212236 In IPA, sudo commands arenot case sensitive, but on theoperating system, commandsare treated as different ifthey are different cases. Thiscan lead to conflicts in IPAsudo policy. For example,when executing these twocommands, the secondcommand fails because IPAtreats both commands thesame.
~]$ ipa sudocmd-add /usr/bin/X?~]$ ipa sudocmd-add /usr/bin/xipa: ERROR: sudo command with name "/usr/bin/x" already exists
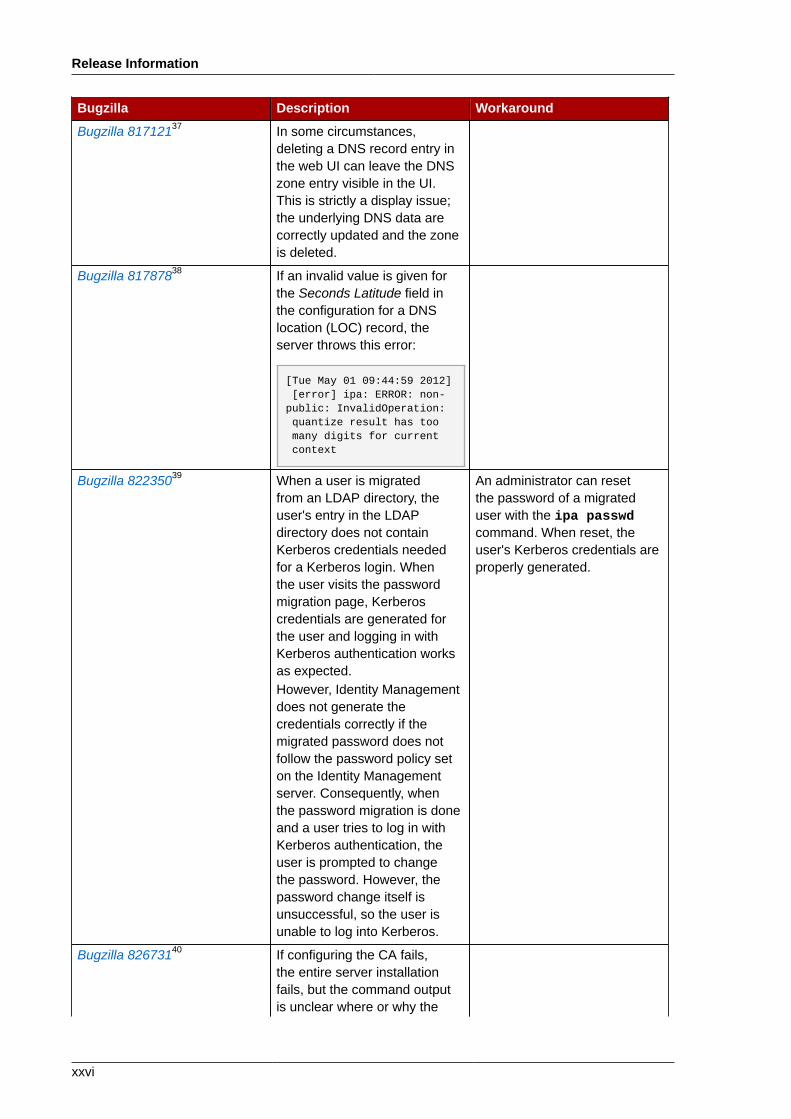
Release Information
xxvi
Bugzilla Description Workaround
Bugzilla 81712137 In some circumstances,deleting a DNS record entry inthe web UI can leave the DNSzone entry visible in the UI.This is strictly a display issue;the underlying DNS data arecorrectly updated and the zoneis deleted.
Bugzilla 81787838 If an invalid value is given forthe Seconds Latitude field inthe configuration for a DNSlocation (LOC) record, theserver throws this error:
[Tue May 01 09:44:59 2012] [error] ipa: ERROR: non-public: InvalidOperation: quantize result has too many digits for current context
Bugzilla 82235039 When a user is migratedfrom an LDAP directory, theuser's entry in the LDAPdirectory does not containKerberos credentials neededfor a Kerberos login. Whenthe user visits the passwordmigration page, Kerberoscredentials are generated forthe user and logging in withKerberos authentication worksas expected.However, Identity Managementdoes not generate thecredentials correctly if themigrated password does notfollow the password policy seton the Identity Managementserver. Consequently, whenthe password migration is doneand a user tries to log in withKerberos authentication, theuser is prompted to changethe password. However, thepassword change itself isunsuccessful, so the user isunable to log into Kerberos.
An administrator can resetthe password of a migrateduser with the ipa passwdcommand. When reset, theuser's Kerberos credentials areproperly generated.
Bugzilla 82673140 If configuring the CA fails,the entire server installationfails, but the command outputis unclear where or why the
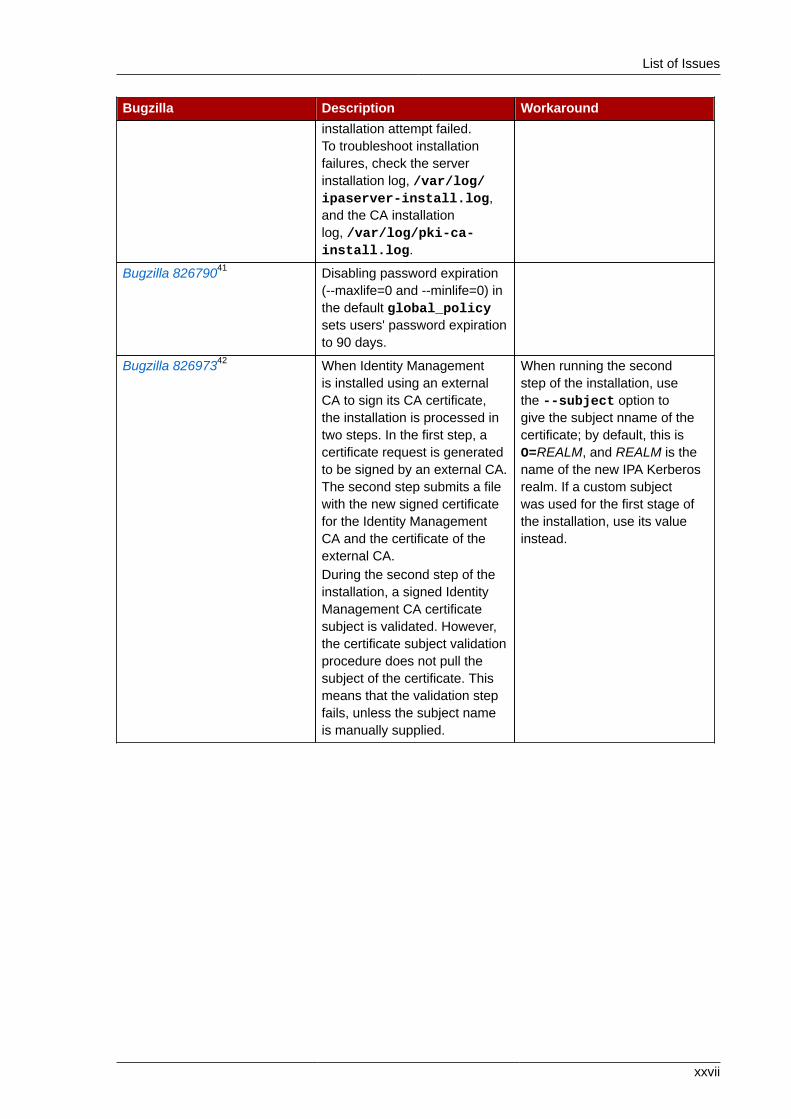
List of Issues
xxvii
Bugzilla Description Workaroundinstallation attempt failed.To troubleshoot installationfailures, check the serverinstallation log, /var/log/ipaserver-install.log,and the CA installationlog, /var/log/pki-ca-install.log.
Bugzilla 82679041 Disabling password expiration(--maxlife=0 and --minlife=0) inthe default global_policysets users' password expirationto 90 days.
Bugzilla 82697342 When Identity Managementis installed using an externalCA to sign its CA certificate,the installation is processed intwo steps. In the first step, acertificate request is generatedto be signed by an external CA.The second step submits a filewith the new signed certificatefor the Identity ManagementCA and the certificate of theexternal CA.During the second step of theinstallation, a signed IdentityManagement CA certificatesubject is validated. However,the certificate subject validationprocedure does not pull thesubject of the certificate. Thismeans that the validation stepfails, unless the subject nameis manually supplied.
When running the secondstep of the installation, usethe --subject option togive the subject nname of thecertificate; by default, this isO=REALM, and REALM is thename of the new IPA Kerberosrealm. If a custom subjectwas used for the first stage ofthe installation, use its valueinstead.

xxviii
Chapter 1.
1
Introduction to Identity ManagementRed Hat Enterprise Linux IPA is a way to create identity stores, centralized authentication, domaincontrol for Kerberos and DNS services, and authorization policies — all on Linux systems, using nativeLinux tools. While centralized identity/policy/authorization software is hardly new, Identity Managementis one of the only options that supports Linux/Unix domains.
Identity Management provides a unifying skin for standards-defined, common network services,including PAM, LDAP, Kerberos, DNS, NTP, and certificate services, and it allows Red Hat EnterpriseLinux systems to serve as the domain controllers.
Identity Management defines a domain, with servers and clients who share centrally-managedservices, like Kerberos and DNS. This chapter first explains what Identity Management is. This chapteralso covers how all of these services work together within the domain and how servers and clientswork with each other.
1.1. IPA v. LDAP: A More Focused Type of ServiceAt the most basic level, Red Hat Identity Management is a domain controller for Linux and Unixmachines. Identity Management defines the domain, using controlling servers and enrolled clientmachines. This provides centralized structure that has previously been unavailable to Linux/Unixenvironments, and it does it using native Linux applications and protocols.
1.1.1. A Working Definition for Identity ManagementSecurity information frequently relates to identities of users, machines, and services. Once the identityis verified, then access to services and resources can be controlled.
For efficiency, risk management, and ease of administration, IT administrators try to manage identitiesas centrally as possible and to unite identity management with authentication and authorizationpolicies. Historically, Linux environments have had a very difficult time establishing this centralizedmanagement. There are a number of different protocols (such as NIS and Kerberos) which definedomains, while other applications store data (such as LDAP) and still others manage access (suchas sudo). None of these applications talk to each other or use the same management tools. Everyapplication had to be administered separately and it had to be managed locally. The only way to geta consistent identity policy was to copy configuration files around manually or to try to develop aproprietary application to manage identities and policies.
The goal of Identity Management is to simplify that administrative overhead. Users, machines,services, and polices are all configured in one place, using the same tools. Because IPA createsa domain, multiple machines can all use the same configuration and the same resources simplyby joining the domain. Users only have to sign into services once, and administrators only have tomanage a single user account.
IPA does three things:
• Create a Linux-based and Linux-controlled domain. Both IPA servers and IPA clients are Linux orUnix machines. While IPA can synchronize data with an Active Directory domain to allow integrationwith Windows servers, it is not an administrative tools for Windows machines and it does notsupport Windows clients. Identity Management is a management tool for Linux domains.
• Centralize identity management and identity policies.
• Build on existing, native Linux applications and protocols. While IPA has its own processes andconfiguration, its underlying technologies are familiar and trusted by Linux administrators and arewell established on Linux systems.

Chapter 1. Introduction to Identity Management
2
In a sense, Identity Management isn't making administrators do something new; it is helping them do itbetter. There are a few ways to illustrate that.
On one extreme is the low control environment. Little Example Corp. has several Linux and Unixservers, but each one is administered separately. All passwords are kept on the local machine, sothere is no central identity or authentication process. Tim the IT Guy just has to manage users onevery machine, set authentication and authorization policies separately, and maintain local passwords.With IPA, things come to order. There is a simple way to have central user, password, and policystores, so Tim the IT Guy only has to maintain the identities on one machine (the IPA server) andusers and policies are uniformly applied to all machines. Using host-based access control, delegation,and other rules, he can even set different access levels for laptops and remote users.
In the middle is the medium control environment. Mid-Example Corp. has several Linux and Unixservers, but Bill the IT Guy has tried to maintain a greater degree of control by creating a NIS domainfor machines, an LDAP directory for users, and Kerberos for authentication. While his environmentis well under control, every application has to be maintained separately, using different tools. He alsohas to update all of the services manually whenever a new machine is added to his infrastructure orwhen one is taken offline. In this situation, IPA greatly reduces his administrative overhead becauseit integrates all of the different applications together seamlessly, using a single and simplified tool set.It also makes it possible for him to implement single sign-on services for all of the machines in hisdomain.
On the other extreme is the absent control environment. At Big Example Corp., most of the systemsare Windows based and are managed in a tightly-knit Active Directory forest. However, development,production, and other teams have many Linux and Unix systems — which are basically excludedfrom the Windows controlled environment. IPA brings native control to the Linux/Unix servers, usingtheir native tools and applications — something that is not possible in an Active Directory forest.Additionally, because IPA is Windows-aware, data can be synchronized between Active Directory andIPA, preserving a centralized user store.
IPA provides a very simple solution to a very common, very specific problem: identity management.
1.1.2. Contrasting Identity Management with a Standard LDAPDirectoryThe closest relative to Identity Management is a standard LDAP directory like 389 Directory Server,but there are some intrinsic differences between what they do and what they're intended to do.
First, it helps to understand what a directory service is. A directory service is a collection of software,hardware, and processes that stores information. While directory services can be highly specific (forexample, DNS is a directory service because it stores information on hostnames), a generic directoryservice can store and retrieve any kind of information. LDAP directories like 389 Directory Server aregeneric directories. They have a flexible schema that supports entries for users, machines, networkentities, physical equipment, and buildings, and that schema can be customized to define entries ofalmost anything. Because of its extensibility, LDAP servers like 389 Directory Server are frequentlyused as backends that store data for other applications. 389 Directory Server not only containsinformation, it organizes information. LDAP directories uses a hierarchical structure, a directorytree, that organize entries into root entries (suffixes), intermediate or container entries (subtrees orbranches), and leaf entries (the actual data). Directory trees can be very complex, with a lot of branchpoints, or very simple (flat) with few branch points.
The primary feature of an LDAP directory is its generality. It can be made to fit into a variety ofapplications.
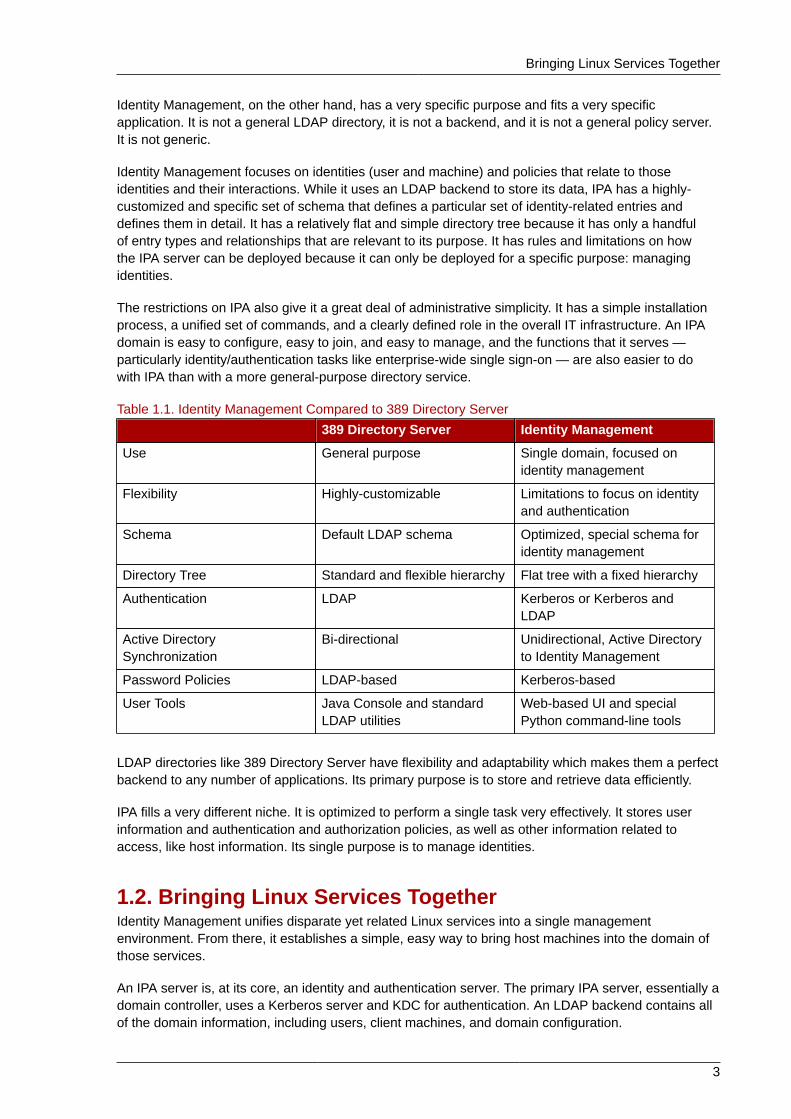
Bringing Linux Services Together
3
Identity Management, on the other hand, has a very specific purpose and fits a very specificapplication. It is not a general LDAP directory, it is not a backend, and it is not a general policy server.It is not generic.
Identity Management focuses on identities (user and machine) and policies that relate to thoseidentities and their interactions. While it uses an LDAP backend to store its data, IPA has a highly-customized and specific set of schema that defines a particular set of identity-related entries anddefines them in detail. It has a relatively flat and simple directory tree because it has only a handfulof entry types and relationships that are relevant to its purpose. It has rules and limitations on howthe IPA server can be deployed because it can only be deployed for a specific purpose: managingidentities.
The restrictions on IPA also give it a great deal of administrative simplicity. It has a simple installationprocess, a unified set of commands, and a clearly defined role in the overall IT infrastructure. An IPAdomain is easy to configure, easy to join, and easy to manage, and the functions that it serves —particularly identity/authentication tasks like enterprise-wide single sign-on — are also easier to dowith IPA than with a more general-purpose directory service.
Table 1.1. Identity Management Compared to 389 Directory Server
389 Directory Server Identity Management
Use General purpose Single domain, focused onidentity management
Flexibility Highly-customizable Limitations to focus on identityand authentication
Schema Default LDAP schema Optimized, special schema foridentity management
Directory Tree Standard and flexible hierarchy Flat tree with a fixed hierarchy
Authentication LDAP Kerberos or Kerberos andLDAP
Active DirectorySynchronization
Bi-directional Unidirectional, Active Directoryto Identity Management
Password Policies LDAP-based Kerberos-based
User Tools Java Console and standardLDAP utilities
Web-based UI and specialPython command-line tools
LDAP directories like 389 Directory Server have flexibility and adaptability which makes them a perfectbackend to any number of applications. Its primary purpose is to store and retrieve data efficiently.
IPA fills a very different niche. It is optimized to perform a single task very effectively. It stores userinformation and authentication and authorization policies, as well as other information related toaccess, like host information. Its single purpose is to manage identities.
1.2. Bringing Linux Services TogetherIdentity Management unifies disparate yet related Linux services into a single managementenvironment. From there, it establishes a simple, easy way to bring host machines into the domain ofthose services.
An IPA server is, at its core, an identity and authentication server. The primary IPA server, essentially adomain controller, uses a Kerberos server and KDC for authentication. An LDAP backend contains allof the domain information, including users, client machines, and domain configuration.

Chapter 1. Introduction to Identity Management
4
Figure 1.1. The IPA Server: Unifying Services
Other services are included to provide support for the core identity/authentication functions. DNSis used for machine discovery and for connecting to other clients in the domain. NTP is used tosynchronize all domain clocks so that logging, certificates, and operations can occur as expected. Acertificate service provides certificates for Kerberos-aware services. All of these additional serviceswork together under the control of the IPA server.
The IPA server also has a set of tools which are used to manage all of the IPA-associated services.Rather than managing the LDAP server, KDC, or DNS settings individually, using different tools onlocal machines, IPA has a single management toolset (CLI and web UI) that allows centralized andcohesive administration of the domain.
1.2.1. Authentication: Kerberos KDCKerberos is an authentication protocol. Kerberos uses symmetric key cryptography to generate ticketsto users. Kerberos-aware services check the ticket cache (a keytab) and authenticate users with validtickets.
Kerberos authentication is significantly safer than normal password-based authentication becausepasswords are never sent over the network — even when services are accessed on other machines.
In Identity Management, the Kerberos administration server is set up on the IPA domain controller, andall of the Kerberos data are stored in IPA's backend Directory Server. The Directory Server instancedefines and enforces access controls for the Kerberos data.

Data Storage: 389 Directory Server
5
NOTE
The IPA Kerberos server is managed through IPA tools instead of Kerberos tools because all ofits data are stored in the Directory Server instance. The KDC is unaware of the Directory Server,so managing the KDC with Kerberos tools does not effect the IPA configuration.
1.2.2. Data Storage: 389 Directory ServerIdentity Management contains an internal 389 Directory Server instance. All of the Kerberosinformation, user accounts, groups, services, policy information, DNS zone and host entries, and allother information in IPA is stored in this 389 Directory Server instance.
When multiple servers are configured, they can talk to each other because 389 Directory Serversupports multi-master replication. Agreements are automatically configured between the initial serverand any additional replicas which are added to the domain.
1.2.3. Authentication: Dogtag Certificate SystemKerberos can use certificates along with keytabs for authentication, and some services requirecertificates for secure communication. Identity Management includes a certificate authority, throughDogtag Certificate System, with the server. This CA issues certificates to the server, replicas, andhosts and services within the IPA domain.
The CA can be a root CA or it can have its policies defined by another, external CA (so that it issubordinate to that CA). Whether the CA is a root or subordinate CA is determined when the IPAserver is set up.
1.2.4. Server/Client Discovery: DNSIdentity Management defines a domain — multiple machines with different users and services, eachaccessing shared resources and using shared identity, authentication, and policy configuration. Theclients need to be able to contact each other, as IPA servers. Additionally, services like Kerberosdepend on hostnames to identify their principal identities.
Hostnames are associated with IP address using the Domain Name Service (DNS). DNS mapshostnames to IP addresses and IP addresses to hostnames, providing a resource that clients can usewhen they need to look up a host. From the time a client is enrolled in the IPA domain, it uses DNS tolocate the IPA server and then all of the services and clients within the domain.
Multiple DNS servers are usually configured, each one working as an authoritative resource formachines within a specific domain. Having the IPA server also be a DNS server is optional, but it isstrongly recommended. When the IPA server also manages DNS, there is tight integration betweenthe DNS zones and the IPA clients and the DNS configuration can be managed using native IPA tools.Even if an IPA server is a DNS server, other external DNS servers can still be used.
1.2.5. Management: NTPMany services require that servers and clients have the same system time, within a certain variance.For example, Kerberos tickets use time stamps to determine their validity. If the times between theserver and client skew outside the allowed range, then any Kerberos tickets are invalidated.
Chapter 1. Introduction to Identity Management
6
Clocks are synchronized over a network using Network Time Protocol (NTP). A central server acts asan authoritative clock and all of the clients which reference that NTP server sync their times to match.
When the IPA server is the NTP server for the domain, all times and dates are synchronized beforeany other operations are performed. This allows all of the date-related services — including passwordexpirations, ticket and certificate expirations, account lockout settings, and entry create dates — tofunction as expected.
The IPA server, by default, works as the NTP server for the domain. Other NTP servers can also beused for the hosts.
1.3. Relationships Between Servers and ClientsIdentity Management itself defines a domain, a group of machines that have shared configuration,policies, and identity stores. This shared configuration allows the machines (and users) within thedomain to be aware of each other and operate together. This awareness can be used to enable cross-platform compatibility, like unifying Windows and Linux systems, or to enable infrastructure-wide singlesign-on.
1.3.1. About IPA Servers and ReplicasIdentity Management works by having identified servers which are the master stores of information foruser and machine identities and domain-wide policies. These servers host domain-related servicessuch as certificate authorities, NTP, Kerberos, SSH, and DNS. The server also acts as a centralrepository of identity and policy information.
Clients interact indirectly with IPA servers when they attempt to access domain resources, such asfileshares, services, remote machines, or authentication (through SSSD and Kerberos).
As said, an IPA server is a controller for a lot of associated services. While a number of those servicesare support, most of them are not required. For example, a server may have a CA, a DNS server, oran NTP server — or it can be installed without those services.
Once an IPA server is set up, its configuration can be copied and used as the basis for another IPAserver. When an IPA server is copied, that copy is called a replica.
NOTE
The only real different between an IPA server and an IPA replica is that a server is a newinstallation and a replica is based on an existing server. Once the instance is configured, serversand replicas are basically identical in functionality and behavior within the IPA domain.
There is a good deal of flexibility in the IPA server (and replica) topology. For example, Server A canbe installed with a CA and DNS services, while Replica A can be based on Server A's configurationbut not host either DNS or CA services. Server B can be added to the domain, also without CA or DNSservices. At any time in the future, a CA or DNS service can be created and configured on Replica Aor Server B.
Servers and replicas both use underlying LDAP directories to store user and host entries,configuration data, policy configuration, and keytabs, certificates, and keys. Servers and replicaspropagate data among each other through multi-master replication agreements. Both servers andreplicas are masters in the replication topology.

About IPA Clients
7
Figure 1.2. Server and Replica Interactions
TIP
The replication topology essentially creates a cloud of IPA servers. One benefit of a serverdomain is automatic load balancing, using the SRV records in DNS. The SRV record prioritysets the order that servers and replicas are contacted, while weight distributed the load betweenservers/replicas with the same priority. The server and replica DNS entries can be edited tochange the load balancing, which is covered in Example 9.4, “SRV Record” and Section 9.15,“Changing Load Balancing for IPA Servers and Replicas”.
1.3.2. About IPA ClientsA client is simply any machine which is configured to operate within the IPA domain, using its Kerberosand DNS services, NTP settings, and certificate services. That's an important distinction: a client doesnot require a daemon or (necessarily) an installed product. It requires only system configurationswhich direct it to use IPA services.
For Red Hat Enterprise Linux systems, a certain number of platform tools are available for IPA to use,such as SSSD. These are IPA-enabled platform applications, which is simply a way of saying that theyare aspects of the underlying platform that work with IPA services. Other tools, like certain PAM andNSS modules and IPA command-line utilities, are provided as IPA-specific packages that must beinstalled on the machine. These are IPA-related components.

Chapter 1. Introduction to Identity Management
8
Figure 1.3. Server and Client Interactions
IPA uses the local storage (cache) on a client to improve performance in a few ways:
• Store IPA information when the machine is offline.
• Keep information active beyond its normal timeout period if the client cannot access the centralserver. The cache is persistent even after rebooting the machine.
• Reduce the round-trip time of requests by checking information locally before looking at the server.
Information is stored either in an LDB database (similar to LDAP) or the local filesystem (as XML files),depending on the type of information.
• Identity information (about users, machines, and groups) is stored in the LDB database, whichuses the same syntax as an LDAP directory. This identity information is originally stored in theIPA server's 389 Directory Server instance. Because this information changes frequently and isreferenced frequently, it is important to be able to call the more current information quickly, which ispossible using an LDB database on the client and the Directory Server on the server.
• Policy information is more static than identity information, and it can include configuration forSELinux or sudo. These policies are set globally on the server and then are propagated to theclients. On the client, the policy information is stored in the filesystem in XML files which can bedownloaded and converted into a native file for whatever service is being managed.
A specific set of services on the IPA server interact with a subset of services and modules on the IPAclient. A client is any machine (a host) which can retrieve a keytab or certificates from the IPA domain.

About IPA Clients
9
Figure 1.4. Interactions Between IPA Services

Chapter 1. Introduction to Identity Management
10
Figure 1.4, “Interactions Between IPA Services” shows that Red Hat Enterprise Linux uses two nativedaemons to interact with the IPA server:
• SSSD provides the user authentication for the machine and enforces host-based access controlrules.
• certmonger monitors and renews the certificates on the client. It can request new certificates forthe services on the system, including virtual machines.
When a Red Hat Enterprise Linux client is added to the domain (enrolled), its SSSD and certmongerare configured to connect to the IPA server and the required Kerberos keytab and host certificates arecreated. (The host certificate is not used directly by IPA; it may be used by other services, such as aweb server.)
Chapter 2.
11
Installing an IPA ServerThe IPA domain is defined and managed by an IPA server which is essentially a domain controller.There can be multiple domain controllers within a domain for load-balancing and failover tolerance.These additional servers are called replicas of the master IPA server.
Both IPA servers and replicas only run on Red Hat Enterprise Linux systems. For both serversand replicas, the necessary packages must be installed and then the IPA server or replica itself isconfigured through setup scripts, which configure all of the requisite services.
2.1. Supported Server PlatformsIPA 2.2 is supported on these platforms:
• Red Hat Enterprise Linux 6 i386
• Red Hat Enterprise Linux 6 x86_64
2.2. Preparing to Install the IPA ServerBefore you install IPA, ensure that the installation environment is suitably configured. You also needto provide certain information during the installation and configuration procedures, including realmnames and certain usernames and passwords. This section describes the information that you need toprovide.
2.2.1. Hardware RecommendationsA basic user entry is about 1 KB in size, as is a simple host entry with a certificate. The most importanthardware feature to size properly is RAM. While all deployments are different, depending on thenumber of users and groups and the type of data stored, there is a rule of thumb to use to helpdetermine how much RAM to use:
• For 10,000 users and 100 groups, have at least 2GB of RAM and 1GB swap space.
• For 100,000 users and 50,000 groups, have at least 16GB of RAM and 4GB of swap space.
TIP
For larger deployments, it is more effective to increase the RAM than to increase disk spacebecause much of the data are stored in cache.
The underlying Directory Server instance used by the IPA server can be tuned to increaseperformance. For tuning information, see the Directory Server documentation at http://docs.redhat.com/docs/en-US/Red_Hat_Directory_Server/8.2/html/Performance_Tuning_Guide/system-tuning.html.
2.2.2. Software RequirementsMost of the packages that an IPA server depends on are installed as dependencies when the IPApackages are installed. There are some packages, however, which are required before installing theIPA packages:

Chapter 2. Installing an IPA Server
12
• Kerberos 1.9
• The named and bind-dyndb-ldap packages for DNS
2.2.3. Supported Web BrowsersThe only supported browser to access the IPA web UI is Firefox 3.x or 4.x.
2.2.4. System PrerequisitesThe IPA server is set up using a configuration script, and this script makes certain assumption aboutthe host system. If the system does not meet these prerequisites, then server configuration may fail.
2.2.4.1. Hostname and IP Address RequirementsRegardless of whether the DNS is within the IPA server or external, the server host must have DNSproperly configured:
• The hostname must be a fully-qualified domain name. For example, ipaserver.example.com.
IMPORTANT
This must be a valid DNS name, which means only numbers, alphabetic characters, andhyphens (-) are allowed. Other characters, like underscores, in the hostname will cause DNSfailures.
• The hostname must be all lower-case.
• The server's A record must be set and resolve to its public IP address.
The fully-qualified domain name cannot resolve to the loopback address. It must resolve to themachine's public IP address, not to 127.0.0.1. The output of the hostname command cannot belocalhost or localhost6.
• The server's hostname and IP address must be in its own /etc/hosts file.
• It is recommended that a separate DNS domain be allocated for the IPA server. While not required(clients from other domains can still be enrolled in the IPA domain), this is a convenience for overallDNS management.
TIP
If the IPA server is configured to host its own DNS server, any previous existing DNS ignored. Arecords and PTR records do not need to match for the IPA server machine, and the machine canhave any configured IP address.
2.2.4.2. Directory ServerThere must not be any instances of 389 Directory Server installed on the host machine.

System Prerequisites
13
2.2.4.3. System FilesThe server script overwrites system files to set up the IPA domain. The system should be clean,without custom configuration for services like DNS and Kerberos, before configuring the IPA server.
2.2.4.4. System PortsIPA uses a number of ports to communicate with its services. These ports, listed in Table 2.1, “IPAPorts”, must be open and available for IPA to work. They cannot be in use by another service orblocked by a firewall. To make sure that these ports are available, try iptables to list the availableports or nc, telnet, or nmap to connect to a port or run a port scan.
To open a port:
[root@server ~]# iptables -A INPUT -p tcp --dport 389 -j ACCEPT
The iptables man page has more information on opening and closing ports on a system.
Table 2.1. IPA Ports
Service Ports Type
HTTP/HTTPS 80443
TCP
LDAP/LDAPS 389636
TCP
Kerberos 88464
TCP and UDP
DNS 53 TCP and UDP
NTP 123 UDP
Dogtag Certificate System -LDAP
7389 TCP
2.2.4.5. NTPIf a server is being installed on a virtual machine, that server should not run an NTP server. To disableNTP for IPA, use the --no-ntp option.
2.2.4.6. NSCDIt is strongly recommended that you avoid or restrict the use of nscd in an IPA deployment. Thenscd service is extremely useful for reducing the load on the server, and for making clients moreresponsive, but there can be problems when a system is also using SSSD, which performs its owncaching.
nscd caches authentication and identity information for all services that perform queries throughnsswitch, including getent. Because nscd performs both positive and negative caching, if a requestdetermines that a specific IPA user does not exist, it marks this as a negative cache. Values storedin the cache remain until the cache expires, regardless of any changes that may occur on the server.The results of such caching is that new users and memberships may not be visible, and users andmemberships that have been removed may still be visible.
Avoid clashes with SSSD caches and to prevent locking out users, avoid using nscd altogether.Alternatively, use a shorter cache time by resetting the time-to-live caching values in the /etc/nscd.conf file:
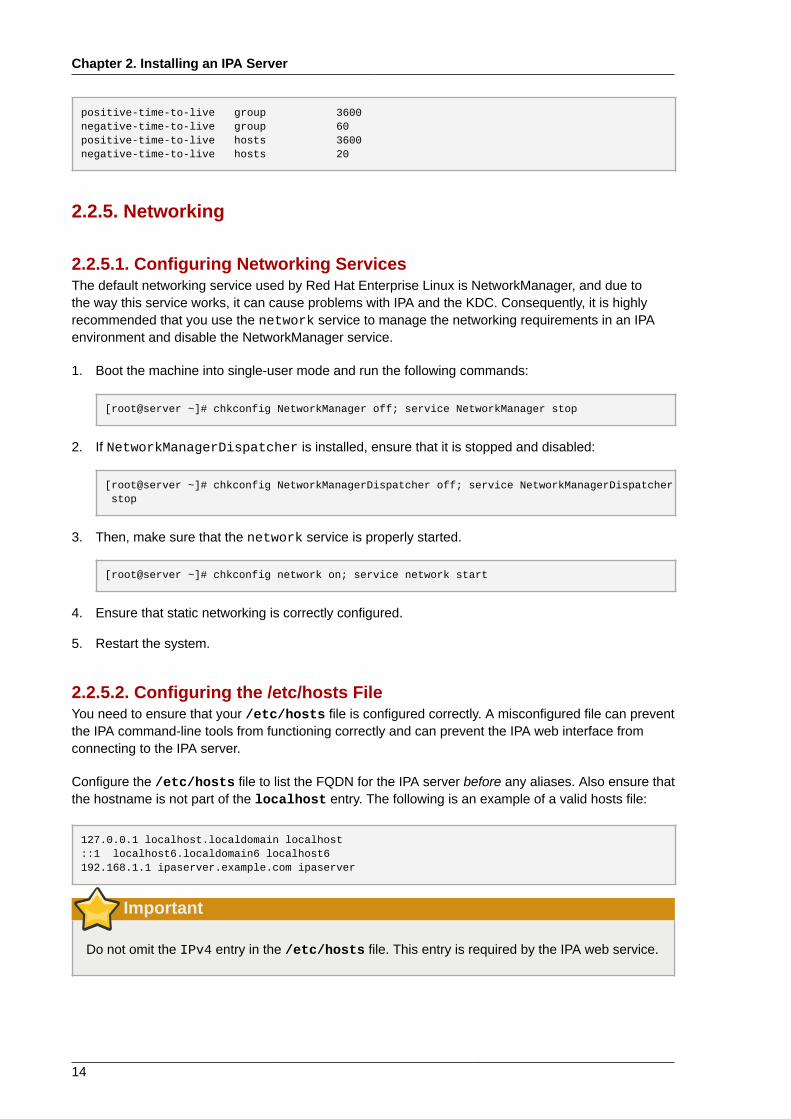
Chapter 2. Installing an IPA Server
14
positive-time-to-live group 3600negative-time-to-live group 60positive-time-to-live hosts 3600negative-time-to-live hosts 20
2.2.5. Networking
2.2.5.1. Configuring Networking ServicesThe default networking service used by Red Hat Enterprise Linux is NetworkManager, and due tothe way this service works, it can cause problems with IPA and the KDC. Consequently, it is highlyrecommended that you use the network service to manage the networking requirements in an IPAenvironment and disable the NetworkManager service.
1. Boot the machine into single-user mode and run the following commands:
[root@server ~]# chkconfig NetworkManager off; service NetworkManager stop
2. If NetworkManagerDispatcher is installed, ensure that it is stopped and disabled:
[root@server ~]# chkconfig NetworkManagerDispatcher off; service NetworkManagerDispatcher stop
3. Then, make sure that the network service is properly started.
[root@server ~]# chkconfig network on; service network start
4. Ensure that static networking is correctly configured.
5. Restart the system.
2.2.5.2. Configuring the /etc/hosts FileYou need to ensure that your /etc/hosts file is configured correctly. A misconfigured file can preventthe IPA command-line tools from functioning correctly and can prevent the IPA web interface fromconnecting to the IPA server.
Configure the /etc/hosts file to list the FQDN for the IPA server before any aliases. Also ensure thatthe hostname is not part of the localhost entry. The following is an example of a valid hosts file:
127.0.0.1 localhost.localdomain localhost::1 localhost6.localdomain6 localhost6192.168.1.1 ipaserver.example.com ipaserver
Important
Do not omit the IPv4 entry in the /etc/hosts file. This entry is required by the IPA web service.
Installing the IPA Server Packages
15
2.3. Installing the IPA Server PackagesInstalling only the IPA server requires a single package, ipa-server. If the IPA server will alsomanage a DNS server, then it requires two additional packages to set up the DNS.
All of these packages can be installed using the yum command:
[root@server ~]# yum install ipa-server bind bind-dyndb-ldap
Installing the ipa-server also installs a large number of dependencies, such as 389-ds-base for theLDAP service and krb5-server for the Kerberos service, along with IPA tools.
After the packages are installed, the server instance must be created using the ipa-server-install command. The options for configuring the new server instance are described in Section 2.4,“Creating an IPA Server Instance”.
2.4. Creating an IPA Server InstanceThe IPA setup script creates a server instance, which includes configuring all of the required servicesfor the IPA domain:
• The network time daemon (ntpd)
• A 389 Directory Server instance
• A Kerberos key distribution center (KDC)
• Apache (httpd)
• An updated SELinux targeted policy
• The Active Directory WinSync plug-in
• A certificate authority
• Optional. A domain name service (DNS) server
The IPA setup process can be minimal, where the administrator only supplies some requiredinformation, or it can be very specific, with user-defined settings for many parts of the IPA services.The configuration is passed using arguments with the ipa-install-server script.
NOTE
The port numbers and directory locations used by IPA are all defined automatically, as definedin Section 2.2.4.4, “System Ports” and . These ports and directories cannot be changed orcustomized.
2.4.1. About ipa-server-installAn IPA server instance is created by running the ipa-server-install script. This script can acceptuser-defined settings for services, like DNS and Kerberos, that are used by the IPA instance, or it cansupply predefined values for minimal input from the administrator.
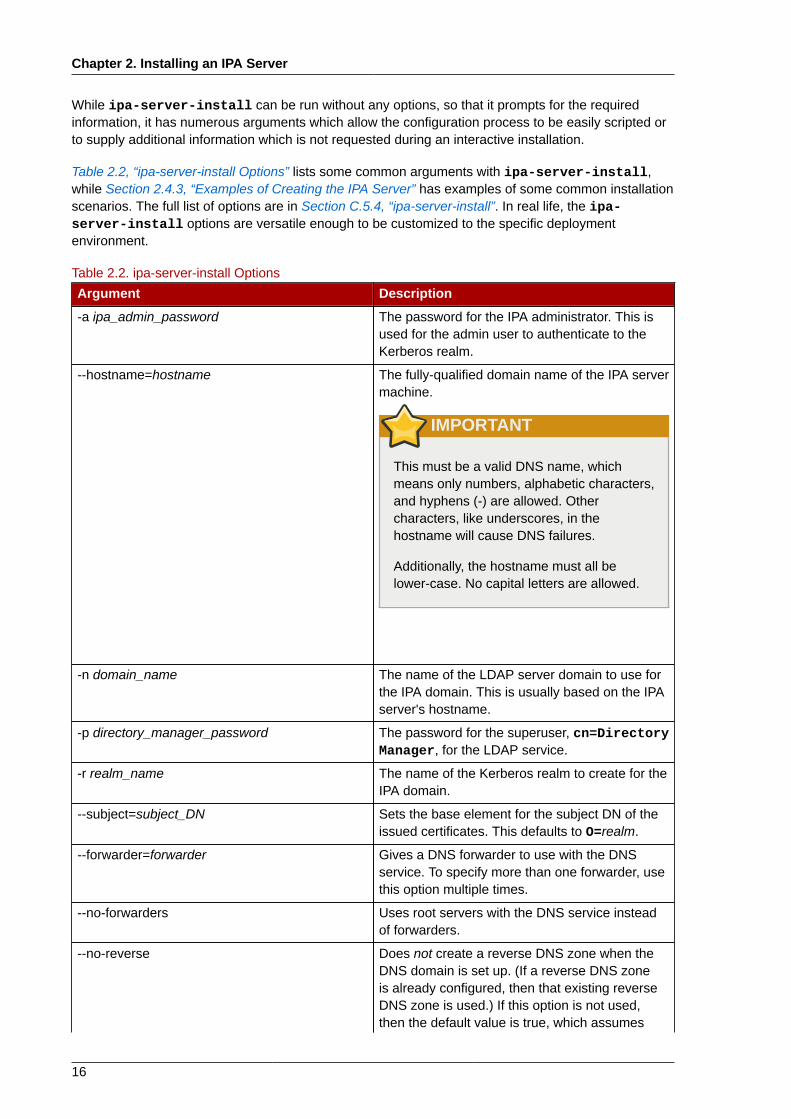
Chapter 2. Installing an IPA Server
16
While ipa-server-install can be run without any options, so that it prompts for the requiredinformation, it has numerous arguments which allow the configuration process to be easily scripted orto supply additional information which is not requested during an interactive installation.
Table 2.2, “ipa-server-install Options” lists some common arguments with ipa-server-install,while Section 2.4.3, “Examples of Creating the IPA Server” has examples of some common installationscenarios. The full list of options are in Section C.5.4, “ipa-server-install”. In real life, the ipa-server-install options are versatile enough to be customized to the specific deploymentenvironment.
Table 2.2. ipa-server-install Options
Argument Description
-a ipa_admin_password The password for the IPA administrator. This isused for the admin user to authenticate to theKerberos realm.
--hostname=hostname The fully-qualified domain name of the IPA servermachine.
IMPORTANT
This must be a valid DNS name, whichmeans only numbers, alphabetic characters,and hyphens (-) are allowed. Othercharacters, like underscores, in thehostname will cause DNS failures.
Additionally, the hostname must all belower-case. No capital letters are allowed.
-n domain_name The name of the LDAP server domain to use forthe IPA domain. This is usually based on the IPAserver's hostname.
-p directory_manager_password The password for the superuser, cn=DirectoryManager, for the LDAP service.
-r realm_name The name of the Kerberos realm to create for theIPA domain.
--subject=subject_DN Sets the base element for the subject DN of theissued certificates. This defaults to O=realm.
--forwarder=forwarder Gives a DNS forwarder to use with the DNSservice. To specify more than one forwarder, usethis option multiple times.
--no-forwarders Uses root servers with the DNS service insteadof forwarders.
--no-reverse Does not create a reverse DNS zone when theDNS domain is set up. (If a reverse DNS zoneis already configured, then that existing reverseDNS zone is used.) If this option is not used,then the default value is true, which assumes
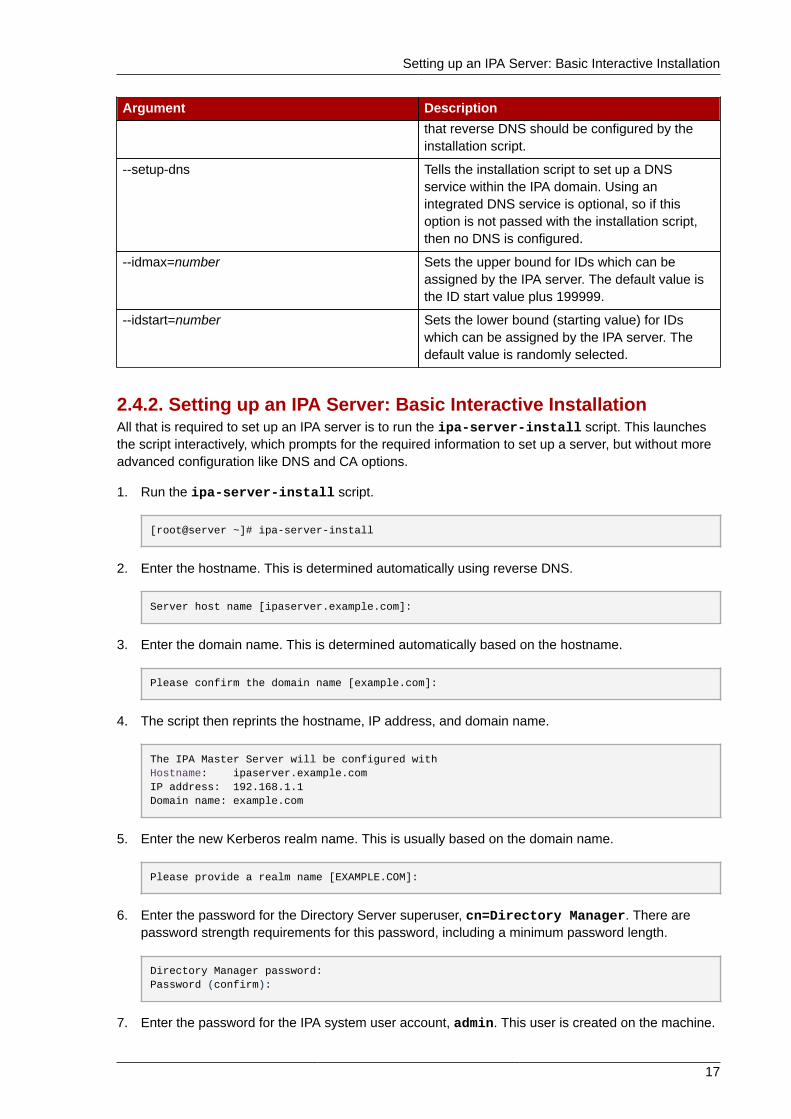
Setting up an IPA Server: Basic Interactive Installation
17
Argument Descriptionthat reverse DNS should be configured by theinstallation script.
--setup-dns Tells the installation script to set up a DNSservice within the IPA domain. Using anintegrated DNS service is optional, so if thisoption is not passed with the installation script,then no DNS is configured.
--idmax=number Sets the upper bound for IDs which can beassigned by the IPA server. The default value isthe ID start value plus 199999.
--idstart=number Sets the lower bound (starting value) for IDswhich can be assigned by the IPA server. Thedefault value is randomly selected.
2.4.2. Setting up an IPA Server: Basic Interactive InstallationAll that is required to set up an IPA server is to run the ipa-server-install script. This launchesthe script interactively, which prompts for the required information to set up a server, but without moreadvanced configuration like DNS and CA options.
1. Run the ipa-server-install script.
[root@server ~]# ipa-server-install
2. Enter the hostname. This is determined automatically using reverse DNS.
Server host name [ipaserver.example.com]:
3. Enter the domain name. This is determined automatically based on the hostname.
Please confirm the domain name [example.com]:
4. The script then reprints the hostname, IP address, and domain name.
The IPA Master Server will be configured withHostname: ipaserver.example.comIP address: 192.168.1.1Domain name: example.com
5. Enter the new Kerberos realm name. This is usually based on the domain name.
Please provide a realm name [EXAMPLE.COM]:
6. Enter the password for the Directory Server superuser, cn=Directory Manager. There arepassword strength requirements for this password, including a minimum password length.
Directory Manager password:Password (confirm):
7. Enter the password for the IPA system user account, admin. This user is created on the machine.
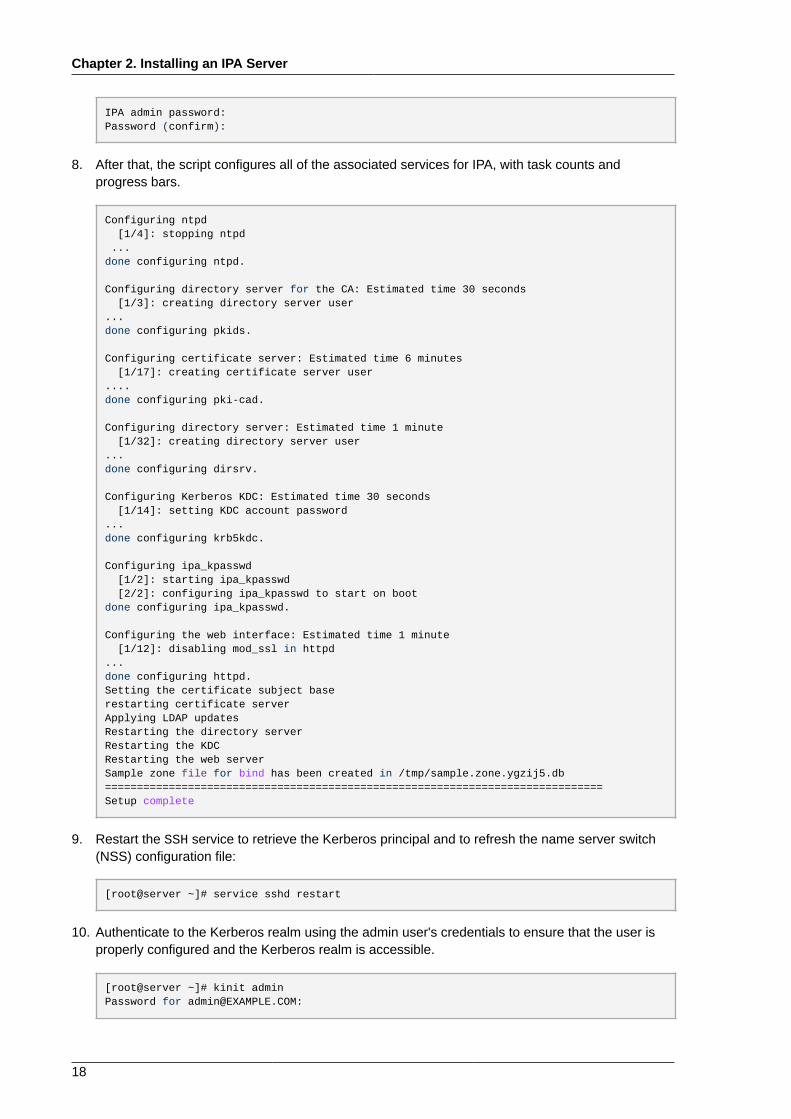
Chapter 2. Installing an IPA Server
18
IPA admin password:Password (confirm):
8. After that, the script configures all of the associated services for IPA, with task counts andprogress bars.
Configuring ntpd [1/4]: stopping ntpd ...done configuring ntpd.
Configuring directory server for the CA: Estimated time 30 seconds [1/3]: creating directory server user...done configuring pkids.
Configuring certificate server: Estimated time 6 minutes [1/17]: creating certificate server user....done configuring pki-cad.
Configuring directory server: Estimated time 1 minute [1/32]: creating directory server user...done configuring dirsrv.
Configuring Kerberos KDC: Estimated time 30 seconds [1/14]: setting KDC account password...done configuring krb5kdc.
Configuring ipa_kpasswd [1/2]: starting ipa_kpasswd [2/2]: configuring ipa_kpasswd to start on bootdone configuring ipa_kpasswd.
Configuring the web interface: Estimated time 1 minute [1/12]: disabling mod_ssl in httpd...done configuring httpd.Setting the certificate subject baserestarting certificate serverApplying LDAP updatesRestarting the directory serverRestarting the KDCRestarting the web serverSample zone file for bind has been created in /tmp/sample.zone.ygzij5.db==============================================================================Setup complete
9. Restart the SSH service to retrieve the Kerberos principal and to refresh the name server switch(NSS) configuration file:
[root@server ~]# service sshd restart
10. Authenticate to the Kerberos realm using the admin user's credentials to ensure that the user isproperly configured and the Kerberos realm is accessible.
[root@server ~]# kinit adminPassword for [email protected]:
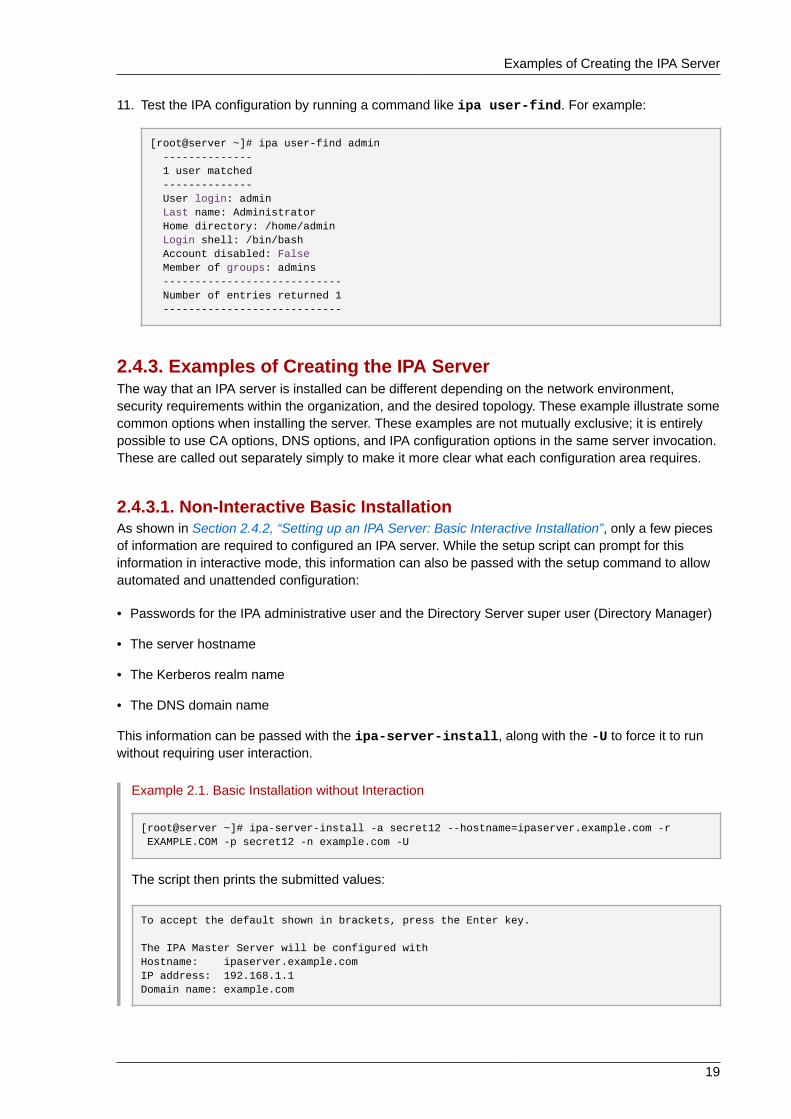
Examples of Creating the IPA Server
19
11. Test the IPA configuration by running a command like ipa user-find. For example:
[root@server ~]# ipa user-find admin -------------- 1 user matched -------------- User login: admin Last name: Administrator Home directory: /home/admin Login shell: /bin/bash Account disabled: False Member of groups: admins ---------------------------- Number of entries returned 1 ----------------------------
2.4.3. Examples of Creating the IPA ServerThe way that an IPA server is installed can be different depending on the network environment,security requirements within the organization, and the desired topology. These example illustrate somecommon options when installing the server. These examples are not mutually exclusive; it is entirelypossible to use CA options, DNS options, and IPA configuration options in the same server invocation.These are called out separately simply to make it more clear what each configuration area requires.
2.4.3.1. Non-Interactive Basic InstallationAs shown in Section 2.4.2, “Setting up an IPA Server: Basic Interactive Installation”, only a few piecesof information are required to configured an IPA server. While the setup script can prompt for thisinformation in interactive mode, this information can also be passed with the setup command to allowautomated and unattended configuration:
• Passwords for the IPA administrative user and the Directory Server super user (Directory Manager)
• The server hostname
• The Kerberos realm name
• The DNS domain name
This information can be passed with the ipa-server-install, along with the -U to force it to runwithout requiring user interaction.
Example 2.1. Basic Installation without Interaction
[root@server ~]# ipa-server-install -a secret12 --hostname=ipaserver.example.com -r EXAMPLE.COM -p secret12 -n example.com -U
The script then prints the submitted values:
To accept the default shown in brackets, press the Enter key.
The IPA Master Server will be configured withHostname: ipaserver.example.comIP address: 192.168.1.1Domain name: example.com
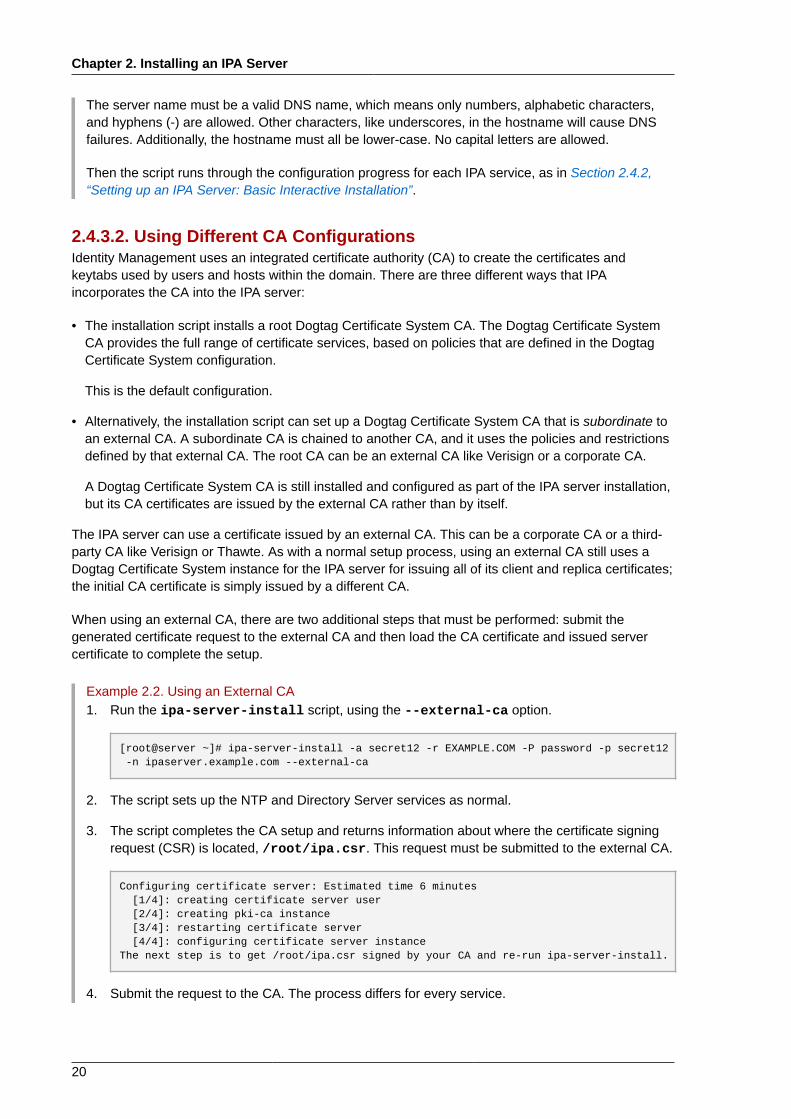
Chapter 2. Installing an IPA Server
20
The server name must be a valid DNS name, which means only numbers, alphabetic characters,and hyphens (-) are allowed. Other characters, like underscores, in the hostname will cause DNSfailures. Additionally, the hostname must all be lower-case. No capital letters are allowed.
Then the script runs through the configuration progress for each IPA service, as in Section 2.4.2,“Setting up an IPA Server: Basic Interactive Installation”.
2.4.3.2. Using Different CA ConfigurationsIdentity Management uses an integrated certificate authority (CA) to create the certificates andkeytabs used by users and hosts within the domain. There are three different ways that IPAincorporates the CA into the IPA server:
• The installation script installs a root Dogtag Certificate System CA. The Dogtag Certificate SystemCA provides the full range of certificate services, based on policies that are defined in the DogtagCertificate System configuration.
This is the default configuration.
• Alternatively, the installation script can set up a Dogtag Certificate System CA that is subordinate toan external CA. A subordinate CA is chained to another CA, and it uses the policies and restrictionsdefined by that external CA. The root CA can be an external CA like Verisign or a corporate CA.
A Dogtag Certificate System CA is still installed and configured as part of the IPA server installation,but its CA certificates are issued by the external CA rather than by itself.
The IPA server can use a certificate issued by an external CA. This can be a corporate CA or a third-party CA like Verisign or Thawte. As with a normal setup process, using an external CA still uses aDogtag Certificate System instance for the IPA server for issuing all of its client and replica certificates;the initial CA certificate is simply issued by a different CA.
When using an external CA, there are two additional steps that must be performed: submit thegenerated certificate request to the external CA and then load the CA certificate and issued servercertificate to complete the setup.
Example 2.2. Using an External CA1. Run the ipa-server-install script, using the --external-ca option.
[root@server ~]# ipa-server-install -a secret12 -r EXAMPLE.COM -P password -p secret12 -n ipaserver.example.com --external-ca
2. The script sets up the NTP and Directory Server services as normal.
3. The script completes the CA setup and returns information about where the certificate signingrequest (CSR) is located, /root/ipa.csr. This request must be submitted to the external CA.
Configuring certificate server: Estimated time 6 minutes [1/4]: creating certificate server user [2/4]: creating pki-ca instance [3/4]: restarting certificate server [4/4]: configuring certificate server instanceThe next step is to get /root/ipa.csr signed by your CA and re-run ipa-server-install.
4. Submit the request to the CA. The process differs for every service.
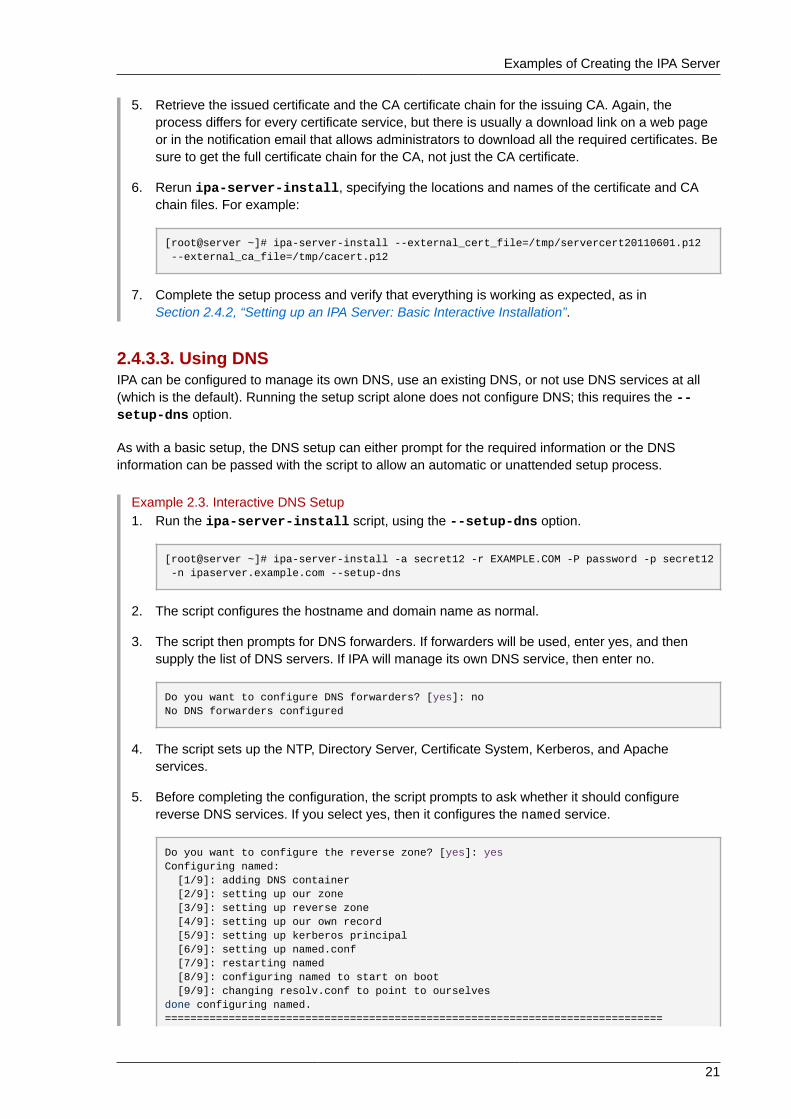
Examples of Creating the IPA Server
21
5. Retrieve the issued certificate and the CA certificate chain for the issuing CA. Again, theprocess differs for every certificate service, but there is usually a download link on a web pageor in the notification email that allows administrators to download all the required certificates. Besure to get the full certificate chain for the CA, not just the CA certificate.
6. Rerun ipa-server-install, specifying the locations and names of the certificate and CAchain files. For example:
[root@server ~]# ipa-server-install --external_cert_file=/tmp/servercert20110601.p12 --external_ca_file=/tmp/cacert.p12
7. Complete the setup process and verify that everything is working as expected, as inSection 2.4.2, “Setting up an IPA Server: Basic Interactive Installation”.
2.4.3.3. Using DNSIPA can be configured to manage its own DNS, use an existing DNS, or not use DNS services at all(which is the default). Running the setup script alone does not configure DNS; this requires the --setup-dns option.
As with a basic setup, the DNS setup can either prompt for the required information or the DNSinformation can be passed with the script to allow an automatic or unattended setup process.
Example 2.3. Interactive DNS Setup1. Run the ipa-server-install script, using the --setup-dns option.
[root@server ~]# ipa-server-install -a secret12 -r EXAMPLE.COM -P password -p secret12 -n ipaserver.example.com --setup-dns
2. The script configures the hostname and domain name as normal.
3. The script then prompts for DNS forwarders. If forwarders will be used, enter yes, and thensupply the list of DNS servers. If IPA will manage its own DNS service, then enter no.
Do you want to configure DNS forwarders? [yes]: noNo DNS forwarders configured
4. The script sets up the NTP, Directory Server, Certificate System, Kerberos, and Apacheservices.
5. Before completing the configuration, the script prompts to ask whether it should configurereverse DNS services. If you select yes, then it configures the named service.
Do you want to configure the reverse zone? [yes]: yesConfiguring named: [1/9]: adding DNS container [2/9]: setting up our zone [3/9]: setting up reverse zone [4/9]: setting up our own record [5/9]: setting up kerberos principal [6/9]: setting up named.conf [7/9]: restarting named [8/9]: configuring named to start on boot [9/9]: changing resolv.conf to point to ourselvesdone configuring named.==============================================================================

Chapter 2. Installing an IPA Server
22
Setup complete
6. Verify that everything is working as expected, as in Section 2.4.2, “Setting up an IPA Server:Basic Interactive Installation”.
If DNS is used with IPA, then two pieces of information are required: any DNS forwarders that willbe used and using (or not) reverse DNS. To perform a non-interactive setup, this information can bepassed using the --forwarder or --no-forwarders option and --no-reverse option.
Example 2.4. Setting up DNS Non-InteractivelyTo use DNS always requires the --setup-dns. To user forwarders, use the --forwarder option;for multiple forwarders, use multiple invocations of --forwarder.
[root@server ~]# ipa-server-install ... --setup-dns --forwarder=1.2.3.0 --forwarder=1.2.255.0
Some kind of forwarder information is required. If no external forwarders will be used with the IPADNS service, then use the --no-forwarders option to indicate that only root servers will be used.
The script always assumes that reverse DNS is configured along with DNS, so it is not necessary touse any options to enable reverse DNS. To disable reverse DNS, use the --no-reverse option;if a reverse DNS zone is already configured, then using the --no-reverse option means thatexisting reverse DNS zone is used.
[root@server ~]# ipa-server-install ... --setup-dns --no-reverse
2.4.4. Troubleshooting Installation ProblemsThe server installation log is located in /var/log/ipaserver-install.log. The IPA logs, bothfor the server and for IPA-associated services, are covered in Section 17.1.3, “Checking IPA ServerLogs”.
GSS Failures When Running IPA CommandsImmediately after installation, there can be Kerberos problems when trying to run an ipa-* command.For example:
ipa: ERROR: Kerberos error: ('Unspecified GSS failure. Minor code may provide more information', 851968)/('Decrypt integrity check failed', -1765328353)
There are two potential causes for this:
• DNS is not properly configured.
• Active Directory is in the same domain as the IPA server.
named Daemon Fails to StartIf an IPA server is configured to manage DNS and is set up successfully, but the named service fails tostart, this can indicate that there is a package conflict. Check the /var/log/messages file for errormessages related to the named service and the ldap.so library:
ipaserver named[6886]: failed to dynamically load driver 'ldap.so': libldap-2.4.so.2: cannot open shared object file: No such file or directory
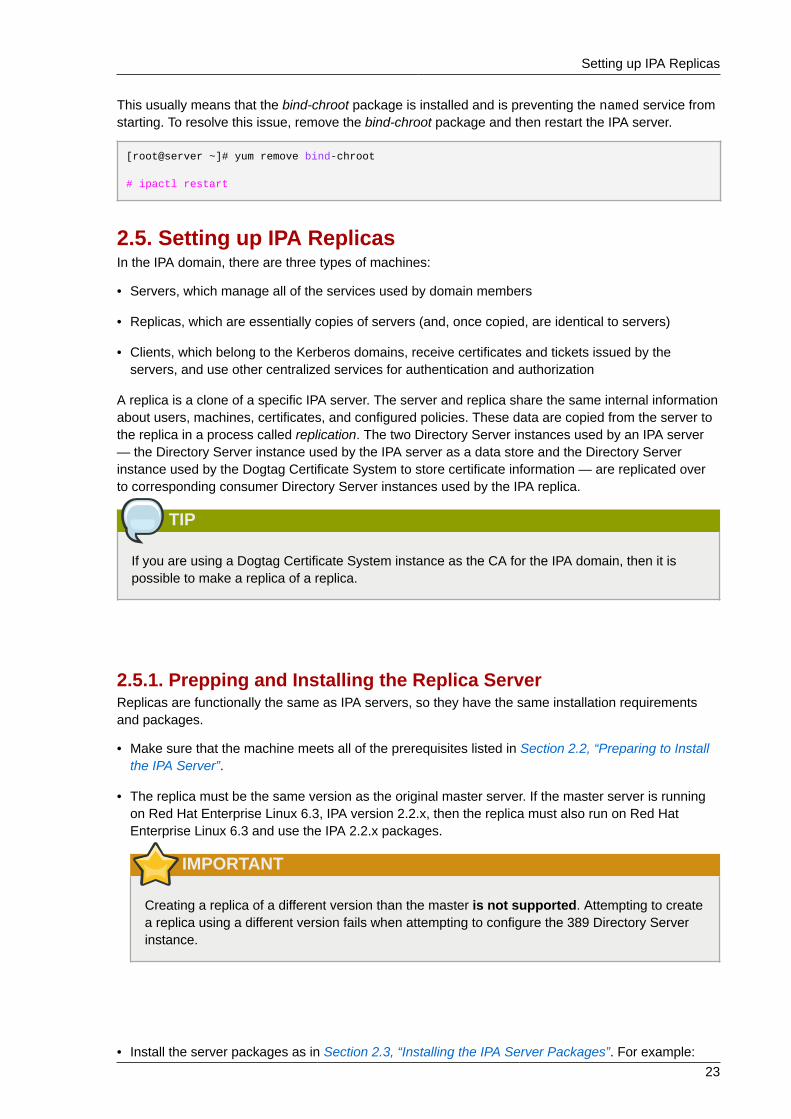
Setting up IPA Replicas
23
This usually means that the bind-chroot package is installed and is preventing the named service fromstarting. To resolve this issue, remove the bind-chroot package and then restart the IPA server.
[root@server ~]# yum remove bind-chroot
# ipactl restart
2.5. Setting up IPA ReplicasIn the IPA domain, there are three types of machines:
• Servers, which manage all of the services used by domain members
• Replicas, which are essentially copies of servers (and, once copied, are identical to servers)
• Clients, which belong to the Kerberos domains, receive certificates and tickets issued by theservers, and use other centralized services for authentication and authorization
A replica is a clone of a specific IPA server. The server and replica share the same internal informationabout users, machines, certificates, and configured policies. These data are copied from the server tothe replica in a process called replication. The two Directory Server instances used by an IPA server— the Directory Server instance used by the IPA server as a data store and the Directory Serverinstance used by the Dogtag Certificate System to store certificate information — are replicated overto corresponding consumer Directory Server instances used by the IPA replica.
TIP
If you are using a Dogtag Certificate System instance as the CA for the IPA domain, then it ispossible to make a replica of a replica.
2.5.1. Prepping and Installing the Replica ServerReplicas are functionally the same as IPA servers, so they have the same installation requirementsand packages.
• Make sure that the machine meets all of the prerequisites listed in Section 2.2, “Preparing to Installthe IPA Server”.
• The replica must be the same version as the original master server. If the master server is runningon Red Hat Enterprise Linux 6.3, IPA version 2.2.x, then the replica must also run on Red HatEnterprise Linux 6.3 and use the IPA 2.2.x packages.
IMPORTANT
Creating a replica of a different version than the master is not supported. Attempting to createa replica using a different version fails when attempting to configure the 389 Directory Serverinstance.
• Install the server packages as in Section 2.3, “Installing the IPA Server Packages”. For example:

Chapter 2. Installing an IPA Server
24
[root@server ~]# yum install ipa-server bind bind-dyndb-ldap
IMPORTANT
Do not run the ipa-server-install script.
The replica and the master server must be running the same version of IPA.
• If there is an existing Dogtag Certificate System or Red Hat Certificate System instance on thereplica machine, make sure that port 7389 is free. This port is used by the master IPA server tocommunicate with the replica.
• Make sure the appropriate ports are open on both the server and the replica machine during andafter the replica configuration. Servers and replicas connect to each other over ports 9443, 9444,9445, and 7389 during the replica configuration. Once the replica is set up, the server and replicacommunicate over port 7389.
2.5.2. Creating the Replica1. On the master server, create a replica information file. This contains realm and configuration
information taken from the master server which will be used to configure the replica server.
Run the ipa-replica-prepare command on the master IPA server. The command requiresthe fully-qualified domain name of the replica machine. Using the --ip-address optionautomatically creates DNS entries for the replica, including the A and PTR records for the replicato the DNS.
[root@server ~]# ipa-replica-prepare ipareplica.example.com --ip-address 192.168.1.2
Determining current realm nameGetting domain name from LDAPPreparing replica for ipareplica.example.com from ipaserver.example.comCreating SSL certificate for the Directory ServerCreating SSL certificate for the Web ServerCopying additional filesFinalizing configurationPackaging the replica into replica-info-ipareplica.example.com
IMPORTANT
This must be a valid DNS name, which means only numbers, alphabetic characters, andhyphens (-) are allowed. Other characters, like underscores, in the hostname will cause DNSfailures.
Additionally, the hostname must all be lower-case. No capital letters are allowed.
For more options with ipa-replica-prepare, see Section C.5.3, “ipa-replica-prepare”.
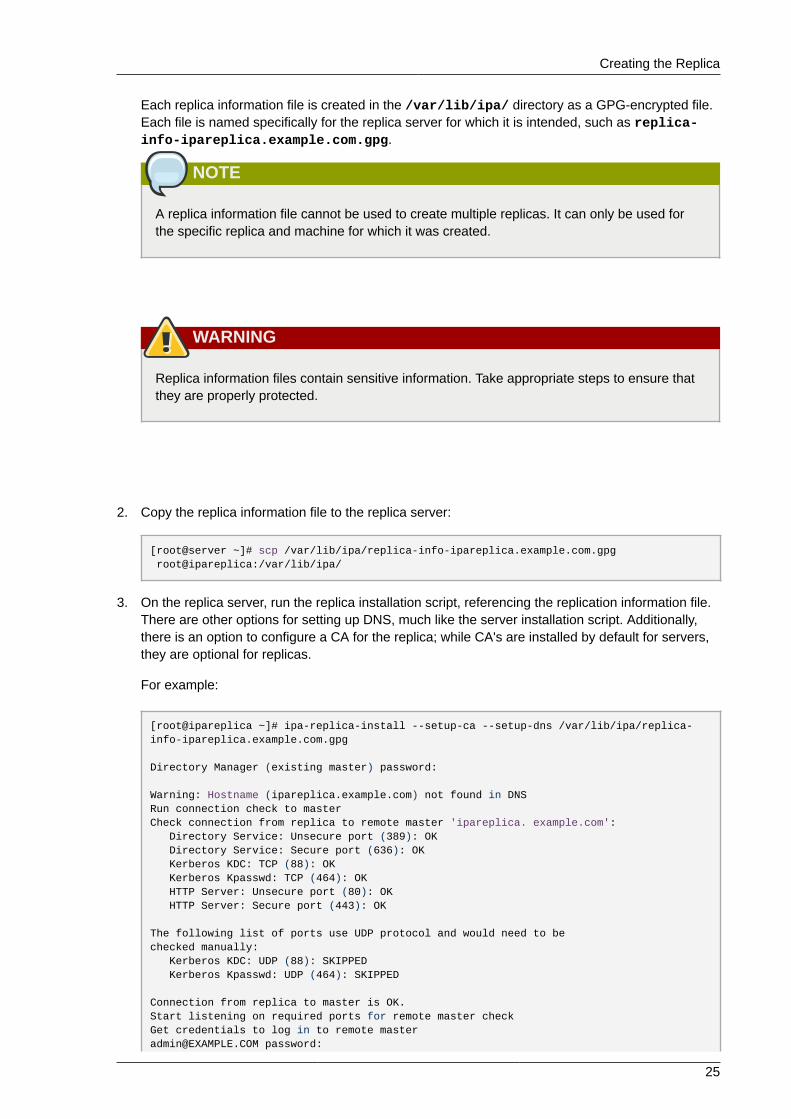
Creating the Replica
25
Each replica information file is created in the /var/lib/ipa/ directory as a GPG-encrypted file.Each file is named specifically for the replica server for which it is intended, such as replica-info-ipareplica.example.com.gpg.
NOTE
A replica information file cannot be used to create multiple replicas. It can only be used forthe specific replica and machine for which it was created.
WARNING
Replica information files contain sensitive information. Take appropriate steps to ensure thatthey are properly protected.
2. Copy the replica information file to the replica server:
[root@server ~]# scp /var/lib/ipa/replica-info-ipareplica.example.com.gpg root@ipareplica:/var/lib/ipa/
3. On the replica server, run the replica installation script, referencing the replication information file.There are other options for setting up DNS, much like the server installation script. Additionally,there is an option to configure a CA for the replica; while CA's are installed by default for servers,they are optional for replicas.
For example:
[root@ipareplica ~]# ipa-replica-install --setup-ca --setup-dns /var/lib/ipa/replica-info-ipareplica.example.com.gpg
Directory Manager (existing master) password:
Warning: Hostname (ipareplica.example.com) not found in DNSRun connection check to masterCheck connection from replica to remote master 'ipareplica. example.com': Directory Service: Unsecure port (389): OK Directory Service: Secure port (636): OK Kerberos KDC: TCP (88): OK Kerberos Kpasswd: TCP (464): OK HTTP Server: Unsecure port (80): OK HTTP Server: Secure port (443): OK
The following list of ports use UDP protocol and would need to bechecked manually: Kerberos KDC: UDP (88): SKIPPED Kerberos Kpasswd: UDP (464): SKIPPED
Connection from replica to master is OK.Start listening on required ports for remote master checkGet credentials to log in to remote [email protected] password:
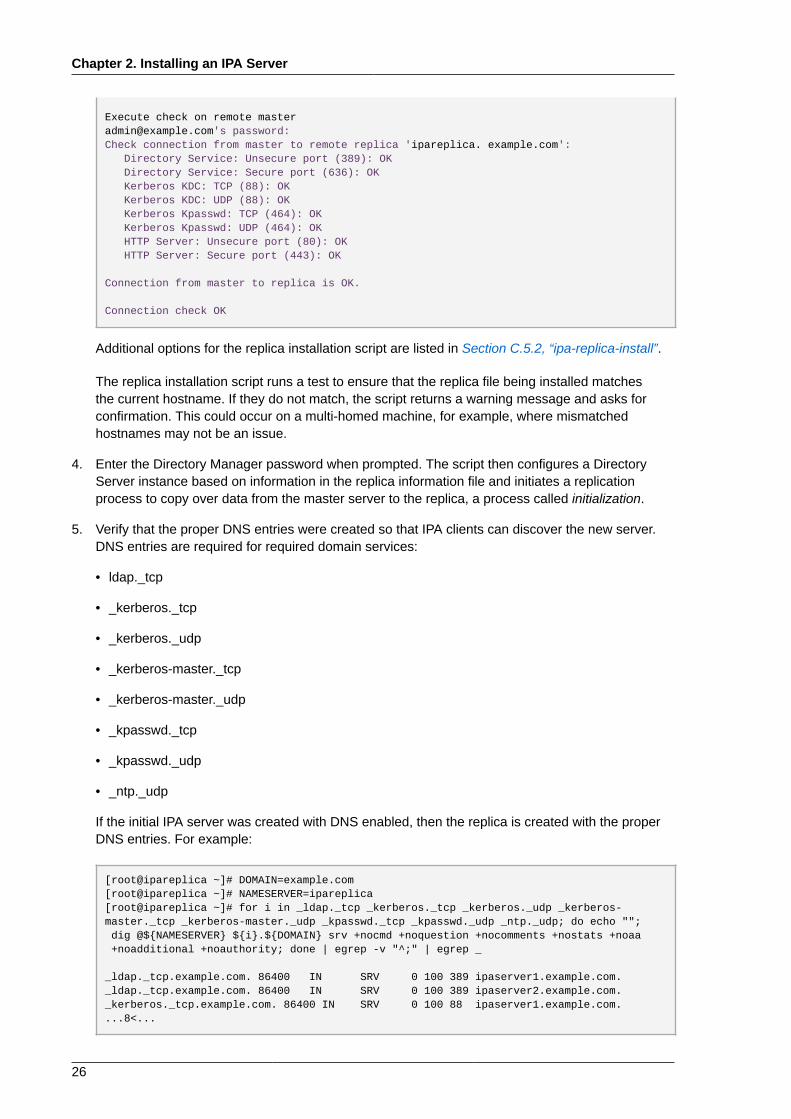
Chapter 2. Installing an IPA Server
26
Execute check on remote [email protected]'s password:Check connection from master to remote replica 'ipareplica. example.com': Directory Service: Unsecure port (389): OK Directory Service: Secure port (636): OK Kerberos KDC: TCP (88): OK Kerberos KDC: UDP (88): OK Kerberos Kpasswd: TCP (464): OK Kerberos Kpasswd: UDP (464): OK HTTP Server: Unsecure port (80): OK HTTP Server: Secure port (443): OK
Connection from master to replica is OK.
Connection check OK
Additional options for the replica installation script are listed in Section C.5.2, “ipa-replica-install”.
The replica installation script runs a test to ensure that the replica file being installed matchesthe current hostname. If they do not match, the script returns a warning message and asks forconfirmation. This could occur on a multi-homed machine, for example, where mismatchedhostnames may not be an issue.
4. Enter the Directory Manager password when prompted. The script then configures a DirectoryServer instance based on information in the replica information file and initiates a replicationprocess to copy over data from the master server to the replica, a process called initialization.
5. Verify that the proper DNS entries were created so that IPA clients can discover the new server.DNS entries are required for required domain services:
• ldap._tcp
• _kerberos._tcp
• _kerberos._udp
• _kerberos-master._tcp
• _kerberos-master._udp
• _kpasswd._tcp
• _kpasswd._udp
• _ntp._udp
If the initial IPA server was created with DNS enabled, then the replica is created with the properDNS entries. For example:
[root@ipareplica ~]# DOMAIN=example.com[root@ipareplica ~]# NAMESERVER=ipareplica[root@ipareplica ~]# for i in _ldap._tcp _kerberos._tcp _kerberos._udp _kerberos-master._tcp _kerberos-master._udp _kpasswd._tcp _kpasswd._udp _ntp._udp; do echo ""; dig @${NAMESERVER} ${i}.${DOMAIN} srv +nocmd +noquestion +nocomments +nostats +noaa +noadditional +noauthority; done | egrep -v "^;" | egrep _
_ldap._tcp.example.com. 86400 IN SRV 0 100 389 ipaserver1.example.com._ldap._tcp.example.com. 86400 IN SRV 0 100 389 ipaserver2.example.com._kerberos._tcp.example.com. 86400 IN SRV 0 100 88 ipaserver1.example.com....8<...
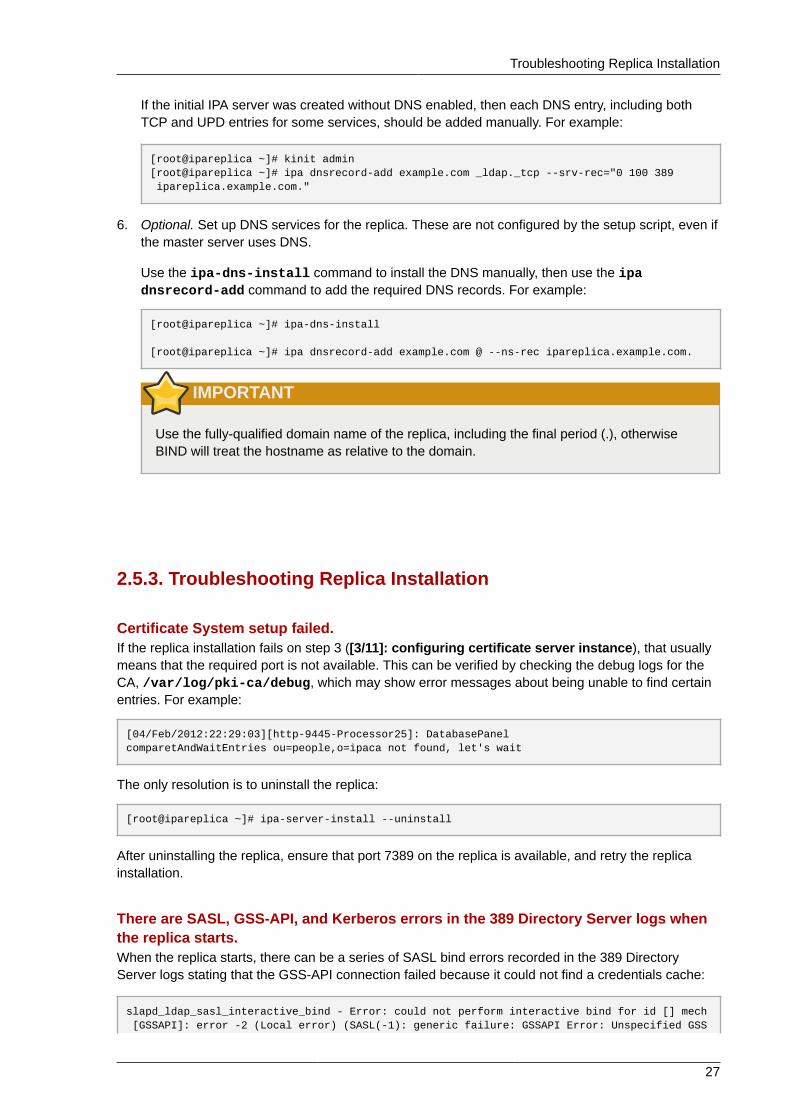
Troubleshooting Replica Installation
27
If the initial IPA server was created without DNS enabled, then each DNS entry, including bothTCP and UPD entries for some services, should be added manually. For example:
[root@ipareplica ~]# kinit admin[root@ipareplica ~]# ipa dnsrecord-add example.com _ldap._tcp --srv-rec="0 100 389 ipareplica.example.com."
6. Optional. Set up DNS services for the replica. These are not configured by the setup script, even ifthe master server uses DNS.
Use the ipa-dns-install command to install the DNS manually, then use the ipadnsrecord-add command to add the required DNS records. For example:
[root@ipareplica ~]# ipa-dns-install
[root@ipareplica ~]# ipa dnsrecord-add example.com @ --ns-rec ipareplica.example.com.
IMPORTANT
Use the fully-qualified domain name of the replica, including the final period (.), otherwiseBIND will treat the hostname as relative to the domain.
2.5.3. Troubleshooting Replica Installation
Certificate System setup failed.If the replica installation fails on step 3 ([3/11]: configuring certificate server instance), that usuallymeans that the required port is not available. This can be verified by checking the debug logs for theCA, /var/log/pki-ca/debug, which may show error messages about being unable to find certainentries. For example:
[04/Feb/2012:22:29:03][http-9445-Processor25]: DatabasePanelcomparetAndWaitEntries ou=people,o=ipaca not found, let's wait
The only resolution is to uninstall the replica:
[root@ipareplica ~]# ipa-server-install --uninstall
After uninstalling the replica, ensure that port 7389 on the replica is available, and retry the replicainstallation.
There are SASL, GSS-API, and Kerberos errors in the 389 Directory Server logs whenthe replica starts.When the replica starts, there can be a series of SASL bind errors recorded in the 389 DirectoryServer logs stating that the GSS-API connection failed because it could not find a credentials cache:
slapd_ldap_sasl_interactive_bind - Error: could not perform interactive bind for id [] mech [GSSAPI]: error -2 (Local error) (SASL(-1): generic failure: GSSAPI Error: Unspecified GSS
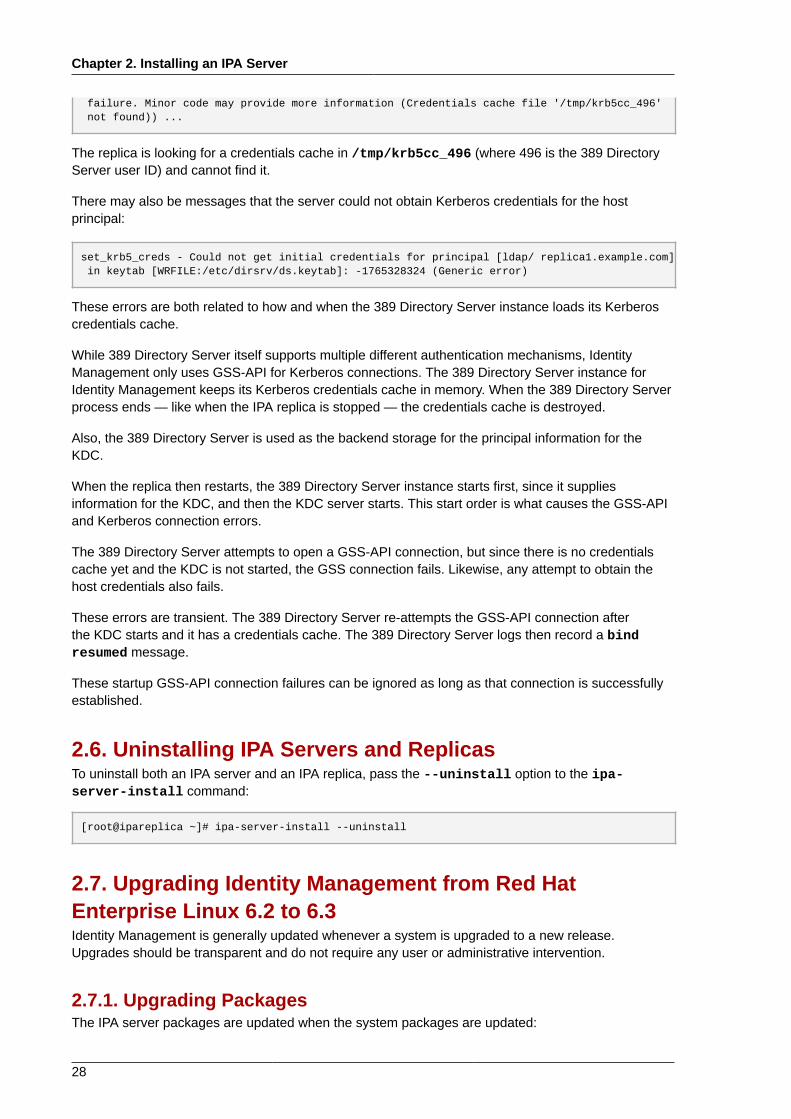
Chapter 2. Installing an IPA Server
28
failure. Minor code may provide more information (Credentials cache file '/tmp/krb5cc_496' not found)) ...
The replica is looking for a credentials cache in /tmp/krb5cc_496 (where 496 is the 389 DirectoryServer user ID) and cannot find it.
There may also be messages that the server could not obtain Kerberos credentials for the hostprincipal:
set_krb5_creds - Could not get initial credentials for principal [ldap/ replica1.example.com] in keytab [WRFILE:/etc/dirsrv/ds.keytab]: -1765328324 (Generic error)
These errors are both related to how and when the 389 Directory Server instance loads its Kerberoscredentials cache.
While 389 Directory Server itself supports multiple different authentication mechanisms, IdentityManagement only uses GSS-API for Kerberos connections. The 389 Directory Server instance forIdentity Management keeps its Kerberos credentials cache in memory. When the 389 Directory Serverprocess ends — like when the IPA replica is stopped — the credentials cache is destroyed.
Also, the 389 Directory Server is used as the backend storage for the principal information for theKDC.
When the replica then restarts, the 389 Directory Server instance starts first, since it suppliesinformation for the KDC, and then the KDC server starts. This start order is what causes the GSS-APIand Kerberos connection errors.
The 389 Directory Server attempts to open a GSS-API connection, but since there is no credentialscache yet and the KDC is not started, the GSS connection fails. Likewise, any attempt to obtain thehost credentials also fails.
These errors are transient. The 389 Directory Server re-attempts the GSS-API connection afterthe KDC starts and it has a credentials cache. The 389 Directory Server logs then record a bindresumed message.
These startup GSS-API connection failures can be ignored as long as that connection is successfullyestablished.
2.6. Uninstalling IPA Servers and ReplicasTo uninstall both an IPA server and an IPA replica, pass the --uninstall option to the ipa-server-install command:
[root@ipareplica ~]# ipa-server-install --uninstall
2.7. Upgrading Identity Management from Red HatEnterprise Linux 6.2 to 6.3Identity Management is generally updated whenever a system is upgraded to a new release.Upgrades should be transparent and do not require any user or administrative intervention.
2.7.1. Upgrading PackagesThe IPA server packages are updated when the system packages are updated:
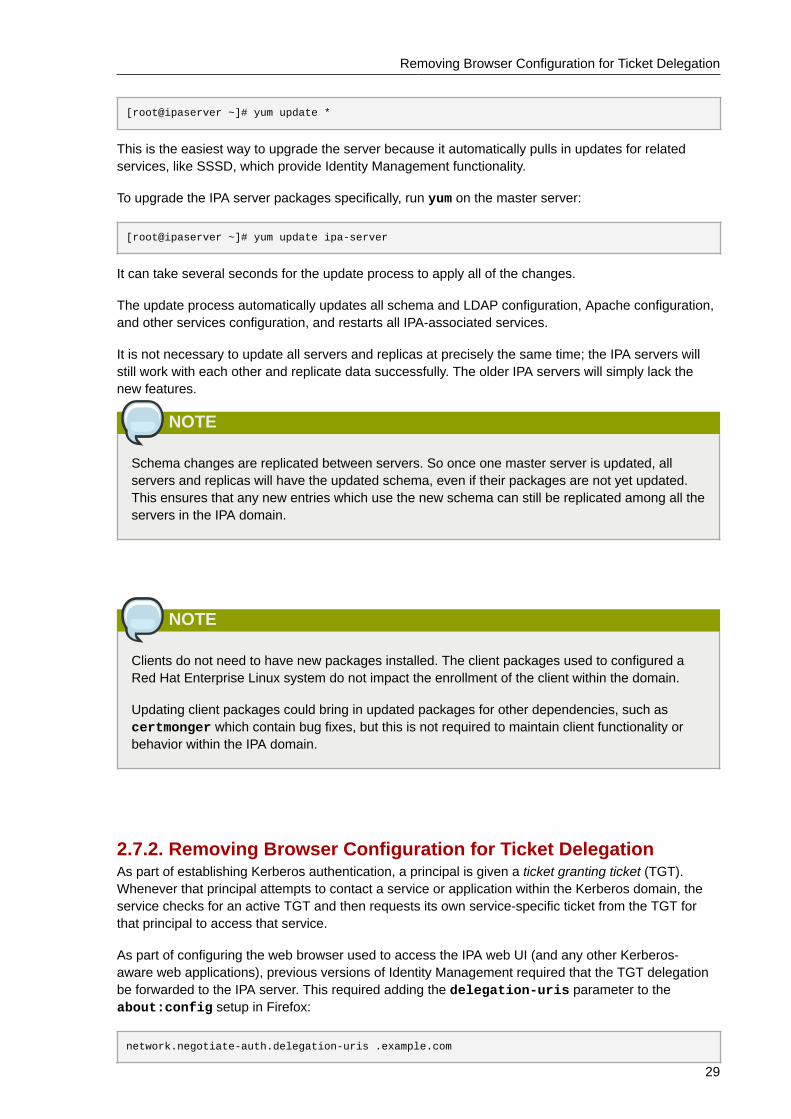
Removing Browser Configuration for Ticket Delegation
29
[root@ipaserver ~]# yum update *
This is the easiest way to upgrade the server because it automatically pulls in updates for relatedservices, like SSSD, which provide Identity Management functionality.
To upgrade the IPA server packages specifically, run yum on the master server:
[root@ipaserver ~]# yum update ipa-server
It can take several seconds for the update process to apply all of the changes.
The update process automatically updates all schema and LDAP configuration, Apache configuration,and other services configuration, and restarts all IPA-associated services.
It is not necessary to update all servers and replicas at precisely the same time; the IPA servers willstill work with each other and replicate data successfully. The older IPA servers will simply lack thenew features.
NOTE
Schema changes are replicated between servers. So once one master server is updated, allservers and replicas will have the updated schema, even if their packages are not yet updated.This ensures that any new entries which use the new schema can still be replicated among all theservers in the IPA domain.
NOTE
Clients do not need to have new packages installed. The client packages used to configured aRed Hat Enterprise Linux system do not impact the enrollment of the client within the domain.
Updating client packages could bring in updated packages for other dependencies, such ascertmonger which contain bug fixes, but this is not required to maintain client functionality orbehavior within the IPA domain.
2.7.2. Removing Browser Configuration for Ticket DelegationAs part of establishing Kerberos authentication, a principal is given a ticket granting ticket (TGT).Whenever that principal attempts to contact a service or application within the Kerberos domain, theservice checks for an active TGT and then requests its own service-specific ticket from the TGT forthat principal to access that service.
As part of configuring the web browser used to access the IPA web UI (and any other Kerberos-aware web applications), previous versions of Identity Management required that the TGT delegationbe forwarded to the IPA server. This required adding the delegation-uris parameter to theabout:config setup in Firefox:
network.negotiate-auth.delegation-uris .example.com

Chapter 2. Installing an IPA Server
30
In Red Hat Enterprise Linux 6.3, Identity Management uses the Kerberos Services for User to Proxy(S4U2Proxy), so this additional delegation step is no longer required.
Updating Existing Configured BrowsersFor browsers which have already been configured to use the Identity Management web UI, thedelegation-uris setting can be cleared after upgrading to ipa-server-2.2.0 or ipa-client-2.2.0.
There is no need to restart the browser after changing the delegation-uris setting.
Updating configure.jar for New Browser ConfigurationThe browser configuration is defined in the configure.jar file. This JAR file is generated when theserver is installed and it is not updated with other files when IPA is updated. Any browsers configuredwill still have the delegation-uris parameter set unnecessarily, even after the IPA server isupgraded. However, the configure.jar file can be updated.
The preference.html file in configure.jar sets the delegation-uris parameter. Theupdated preference.html file can be added to configure.jar, and then configure.jar canbe re-signed and re-deployed on the IPA servers.
NOTE
Only update the configure.jar file on the initial IPA server. This is the master server, and itis the only server which has a signing certificate. Then propagate the updated file to the otherservers and replicas.
1. Update the packages on the initial IPA master server (the first instance). This will bring in the 2.2UI packages, including the configure.jar file.
2. Back up the existing configure.jar file.
[root@ipaserver ~]# mv /usr/share/ipa/html/configure.jar /usr/share/ipa/html/configure.jar.old
3. Create a temporary working directory.
[root@ipaserver ~]# mkdir /tmp/sign
4. Copy the updated preference.html file to the working directory.
[root@ipaserver ~]# cp /usr/share/ipa/html/preferences.html /tmp/sign
5. Use the signtool command (one of the NSS utilities) to add the new preference.html fileand re-sign the configure.jar file.
[root@ipaserver ~]# signtool -d /etc/httpd/alias -k Signing-Cert -Z /usr/share/ipa/html/configure.jar -e ".html" -p `cat /etc/httpd/alias/pwdfile.txt` /tmp/sign
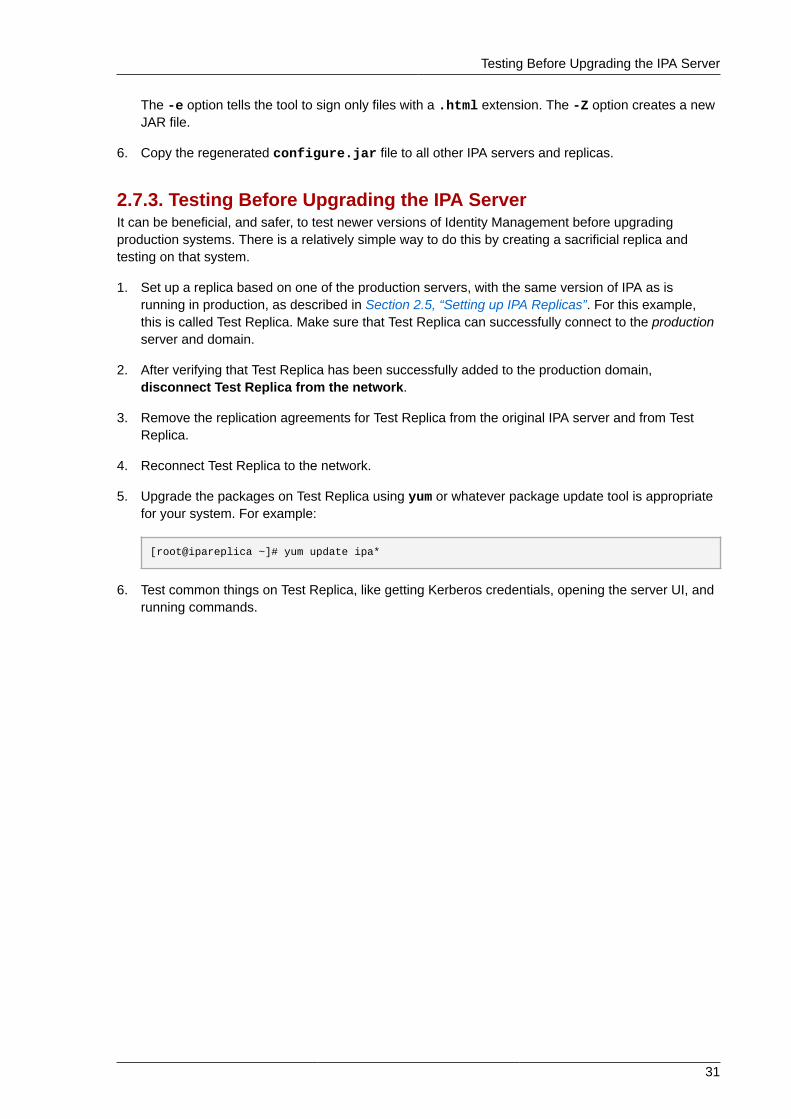
Testing Before Upgrading the IPA Server
31
The -e option tells the tool to sign only files with a .html extension. The -Z option creates a newJAR file.
6. Copy the regenerated configure.jar file to all other IPA servers and replicas.
2.7.3. Testing Before Upgrading the IPA ServerIt can be beneficial, and safer, to test newer versions of Identity Management before upgradingproduction systems. There is a relatively simple way to do this by creating a sacrificial replica andtesting on that system.
1. Set up a replica based on one of the production servers, with the same version of IPA as isrunning in production, as described in Section 2.5, “Setting up IPA Replicas”. For this example,this is called Test Replica. Make sure that Test Replica can successfully connect to the productionserver and domain.
2. After verifying that Test Replica has been successfully added to the production domain,disconnect Test Replica from the network.
3. Remove the replication agreements for Test Replica from the original IPA server and from TestReplica.
4. Reconnect Test Replica to the network.
5. Upgrade the packages on Test Replica using yum or whatever package update tool is appropriatefor your system. For example:
[root@ipareplica ~]# yum update ipa*
6. Test common things on Test Replica, like getting Kerberos credentials, opening the server UI, andrunning commands.

32
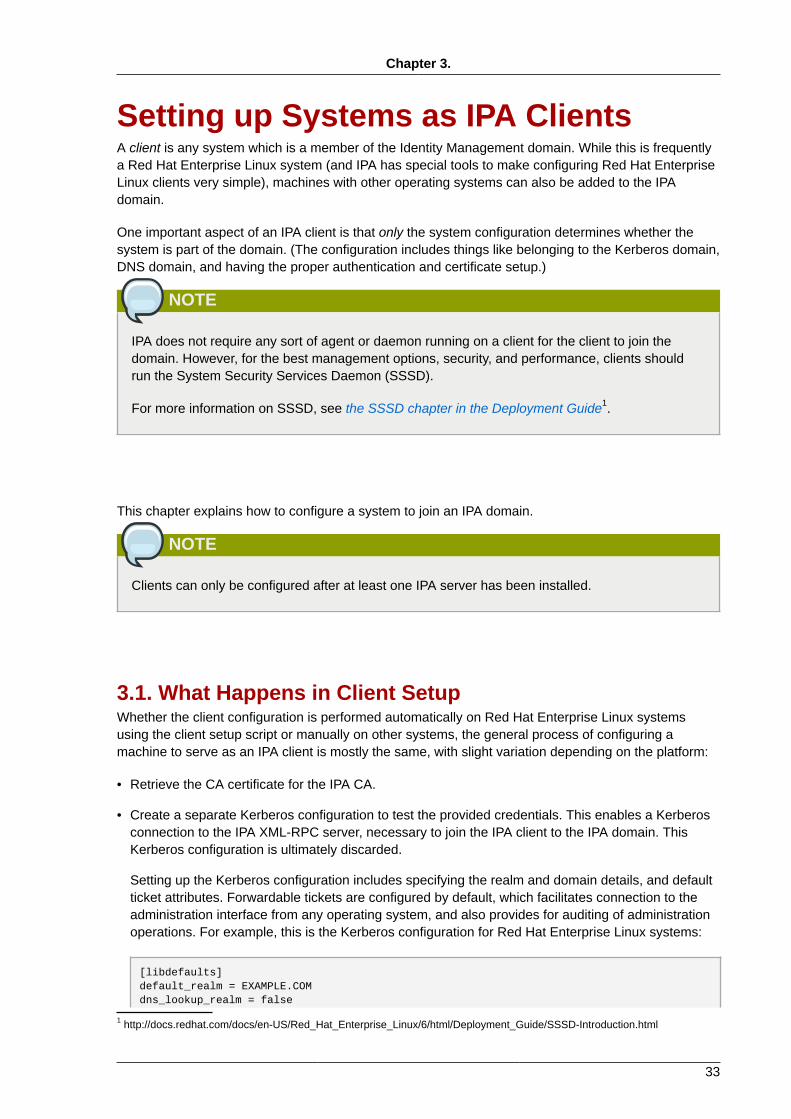
Chapter 3.
33
Setting up Systems as IPA ClientsA client is any system which is a member of the Identity Management domain. While this is frequentlya Red Hat Enterprise Linux system (and IPA has special tools to make configuring Red Hat EnterpriseLinux clients very simple), machines with other operating systems can also be added to the IPAdomain.
One important aspect of an IPA client is that only the system configuration determines whether thesystem is part of the domain. (The configuration includes things like belonging to the Kerberos domain,DNS domain, and having the proper authentication and certificate setup.)
NOTE
IPA does not require any sort of agent or daemon running on a client for the client to join thedomain. However, for the best management options, security, and performance, clients shouldrun the System Security Services Daemon (SSSD).
For more information on SSSD, see the SSSD chapter in the Deployment Guide1.
This chapter explains how to configure a system to join an IPA domain.
NOTE
Clients can only be configured after at least one IPA server has been installed.
3.1. What Happens in Client SetupWhether the client configuration is performed automatically on Red Hat Enterprise Linux systemsusing the client setup script or manually on other systems, the general process of configuring amachine to serve as an IPA client is mostly the same, with slight variation depending on the platform:
• Retrieve the CA certificate for the IPA CA.
• Create a separate Kerberos configuration to test the provided credentials. This enables a Kerberosconnection to the IPA XML-RPC server, necessary to join the IPA client to the IPA domain. ThisKerberos configuration is ultimately discarded.
Setting up the Kerberos configuration includes specifying the realm and domain details, and defaultticket attributes. Forwardable tickets are configured by default, which facilitates connection to theadministration interface from any operating system, and also provides for auditing of administrationoperations. For example, this is the Kerberos configuration for Red Hat Enterprise Linux systems:
[libdefaults]default_realm = EXAMPLE.COMdns_lookup_realm = false
1 http://docs.redhat.com/docs/en-US/Red_Hat_Enterprise_Linux/6/html/Deployment_Guide/SSSD-Introduction.html

Chapter 3. Setting up Systems as IPA Clients
34
dns_lookup_kdc = falserdns = falseforwardable = yesticket_lifetime = 24h
[realms]EXAMPLE.COM = { kdc = ipaserver.example.com:88 admin_server = ipaserver.example.com:749 }[domain_realm].example.com = EXAMPLE.COMexample.com = EXAMPLE.COM
• Run the ipa-join command to perform the actual join
• Obtain a service principal for the host service and installs it into /etc/krb5.keytab. For example,host/[email protected].
• Enable certmonger, retrieve an SSL server certificate, and install the certificate in /etc/pki/nssdb.
• Disable the nscd daemon.
• Configures SSSD or LDAP/KRB5, including NSS and PAM configuration files.
• Configures an OpenSSH server and client, as well as enabling the host to create DNS SSHFPrecords.
• Configure NTP.
3.2. System PortsIPA uses a number of ports to communicate with its services. These ports, listed in Table 3.1, “IPAPorts”, must be open and available for IPA to work. They cannot be in use by another service orblocked by a firewall. To make sure that these ports are available, try iptables to list the availableports or nc, telnet, or nmap to connect to a port or run a port scan.
To open a port:
# iptables -A INPUT -p tcp --dport 389 -j ACCEPT
The iptables man page has more information on opening and closing ports on a system.
Table 3.1. IPA Ports
Service Ports Type
HTTP/HTTPS 80443
TCP
LDAP/LDAPS 389636
TCP
Kerberos 88464
TCP and UDP
DNS 53 TCP and UDP
NTP 123 UDP

Configuring a Red Hat Enterprise Linux System as an IPA Client
35
3.3. Configuring a Red Hat Enterprise Linux System as anIPA ClientThere are two elements to prepare before beginning the client setup process for the Red HatEnterprise Linux client:
• There must be a way to connect the client machine to the Kerberos domain, either by having anavailable Kerberos identity (such as the admin user) or by manually adding the client machine to theKDC on the server with a one-time password before beginning the enrollment process for the clientmachine.
• If there is an Active Directory server on the same network that serves DNS records, the ActiveDirectory DNS records could prevent the client from automatically detecting the IPA server address.The ipa-client-install script retrieves the Active Directory DNS records instead of anyrecords that were added for IPA.
In this case, it is necessary to pass the IPA server address directly to the ipa-client-installscript.
To configure the client:
1. Install the client packages. These packages provide a simple way to configure the system as aclient; they also install and configure SSSD.
For a regular user system, this requires only the ipa-client package:
# yum install ipa-client
An administrator machine requires the ipa-admintools package, as well:
# yum install ipa-client ipa-admintools
2. If the IPA server is configured as the DNS server and is in the same domain as the client, add theserver's IP address as the first entry in the client's /etc/resolv.conf file.
TIP
If every machine in the domain will be an IPA client, then add the IPA server address to theDHCP configuration.
3. Run the client setup command.
# ipa-client-install --enable-dns-updates
The --enable-dns-updates option updates DNS with the client machine's IP address. Thisoption should only be used if the IPA server was installed with integrated DNS or if the DNS serveron the network accepts DNS entry updates with the GSS-TSIG protocol.
When using the --server option to specify the IPA server to register with, the server name mustbe a fully-qualified domain name.

Chapter 3. Setting up Systems as IPA Clients
36
IMPORTANT
This must be a valid DNS name, which means only numbers, alphabetic characters, andhyphens (-) are allowed. Other characters, like underscores, in the hostname will cause DNSfailures.
Other options for ipa-client-install are listed in Section C.6.1, “ipa-client-install”.
NOTE
There is an --on-master option that is used as part of configuring an IPA server (whichalso is an IPA client, since it is within the domain). This option should never be used whenconfiguring a regular IPA client, because it results in slightly different client configurationwhich may not work on a non-IPA server machine.
4. If prompted, enter the domain name for the IPA DNS domain.
DNS discovery failed to determine your DNS domainPlease provide the domain name of your IPA server (ex: example.com): example.com
5. If prompted, enter the fully-qualified domain name of the IPA server. Alternatively, use the --server option with the client installation script to supply the fully-qualified domain name of theIPA server.
DNS discovery failed to find the IPA ServerPlease provide your IPA server name (ex: ipa.example.com): ipaserver.example.com
IMPORTANT
This must be a valid DNS name, which means only numbers, alphabetic characters, andhyphens (-) are allowed. Other characters, like underscores, in the hostname will cause DNSfailures.
6. The client script then prompts for a Kerberos identity to use to contact and then join the Kerberosrealm. When these credentials are supplied, then the client is able to join the IPA Kerberos domainand then complete the configuration:
Continue to configure the system with these values? [no]: yesUser authorized to enroll computers: adminPassword for [email protected]:

Configuring a Red Hat Enterprise Linux System as an IPA Client
37
Enrolled in IPA realm EXAMPLE.COMCreated /etc/ipa/default.confConfigured /etc/sssd/sssd.confConfigured /etc/krb5.conf for IPA realm EXAMPLE.COMSSSD enabledKerberos 5 enabledNTP enabledClient configuration complete.
7. Test that the client can connect successfully to the IPA domain and can perform basic tasks. Forexample, check that the IPA tools can be used to get user and group information:
$ id$ getent passwd userID$ getent group ipausers
8. Set up NFS to work with Kerberos.
TIP
To help troubleshoot potential NFS setup errors, enable debug information in the /etc/sysconfig/nfs file.
RPCGSSDARGS="-vvv"RPCSVCGSSDARGS="-vvv"
a. On an IPA server, add an NFS service principal for the NFS client.
# ipa service-add nfs/ipaclient.example.com@EXAMPLE
NOTE
This must be run from a machine with the ipa-admintools package installed so that theipa command is available.
b. On the IPA server, obtain a keytab for the NFS service principal.
# ipa-getkeytab -s ipaserver.example.com -p nfs/ipaclient.example.com@EXAMPLE -k /tmp/krb5.keytab

Chapter 3. Setting up Systems as IPA Clients
38
NOTE
Some versions of the Linux NFS implementation have limited encryption type support.If the NFS server is hosted on a version older than Red Hat Enterprise Linux 6, usethe -e des-cbc-crc option to the ipa-getkeytab command for any nfs/<FQDN>service keytabs to set up, both on the server and on all clients. This instructs the KDC togenerate only DES keys.
When using DES keys, all clients and servers that rely on this encryption type need tohave the allow_weak_crypto option enabled in the [libdefaults] section of the/etc/krb5.conf file. Without these configuration changes, NFS clients and serversare unable to authenticate to each other, and attempts to mount NFS filesystems mayfail. The client's rpc.gssd and the server's rpc.svcgssd daemons may log errorsindicating that DES encryption types are not permitted.
c. Copy the keytab from the IPA server to the IPA client. For example:
# scp /tmp/krb5.keytab [email protected]:/etc/krb5.keytab
d. Configure the /etc/exports file on the NFS server.
/ipashare gss/krb5p(rw,no_root_squash,subtree_check,fsid=0)
e. On the client, mount the NFS share. Use the same -o sec setting as is used in the /etc/exports file for the NFS server.
[root@client ~]# mount -v -t nfs4 -o sec=krb5p nfs.example.com:/ /mnt/ipashare
3.4. Manually Configuring a Linux ClientThe ipa-client-install command automatically configures services like Kerberos, SSSD, PAM,and NSS. However, if the ipa-client-install command cannot be used on a system for somereason, then the IPA client entries and the services can be configured manually.
1. Install SSSD 1.5.x or later, if it is not already installed.
2. Optional. Install the IPA tools so that administrative tasks can be performed from the host.
# yum install ipa-admintools
3. On an IPA server. Create a host entry for the client.
$ ipa host-add --force --ip-address=192.168.166.31 ipaclient.example.com
Creating hosts manually is covered in Section 6.2, “Adding Host Entries”.
4. On an IPA server. Create keytabs for the client.

Manually Configuring a Linux Client
39
a. Log in as IPA administrator.
$ kinit admin
b. Set the client host to be managed by the server.
$ ipa host-add-managedby --hosts=ipaserver.example.com ipaclient.example.com
c. Generate the keytab for the client.
$ ipa-getkeytab -s ipaserver.example.com -p host/ipaclient.example.com -k /tmp/ipaclient.keytab
5. Copy the keytab to the client machine and rename it /etc/krb5.keytab.
TIP
If there is an existing /etc/krb5.keytab that should be preserved, the two files can becombined using ktutil.
6. Set the correct user permissions and, if necessary, SELinux contexts for the /etc/krb5.keytabfile.
chown root:root 0600system_u:object_r:krb5_keytab_t:s0
7. Configure SSSD by editing the /etc/sssd/sssd.conf file to point to the IPA domain.
[sssd]config_file_version = 2services = nss, pam
domains = example.com[nss]
[pam]
[domain/example.com]cache_credentials = Truekrb5_store_password_if_offline = Trueipa_domain = example.comid_provider = ipaauth_provider = ipaaccess_provider = ipaipa_hostname = ipaclient.example.comchpass_provider = ipaipa_server = ipaserver.example.comldap_tls_cacert = /etc/ipa/ca.crt
8. Configure NSS to use SSSD for passwords, groups, users, and netgroups.
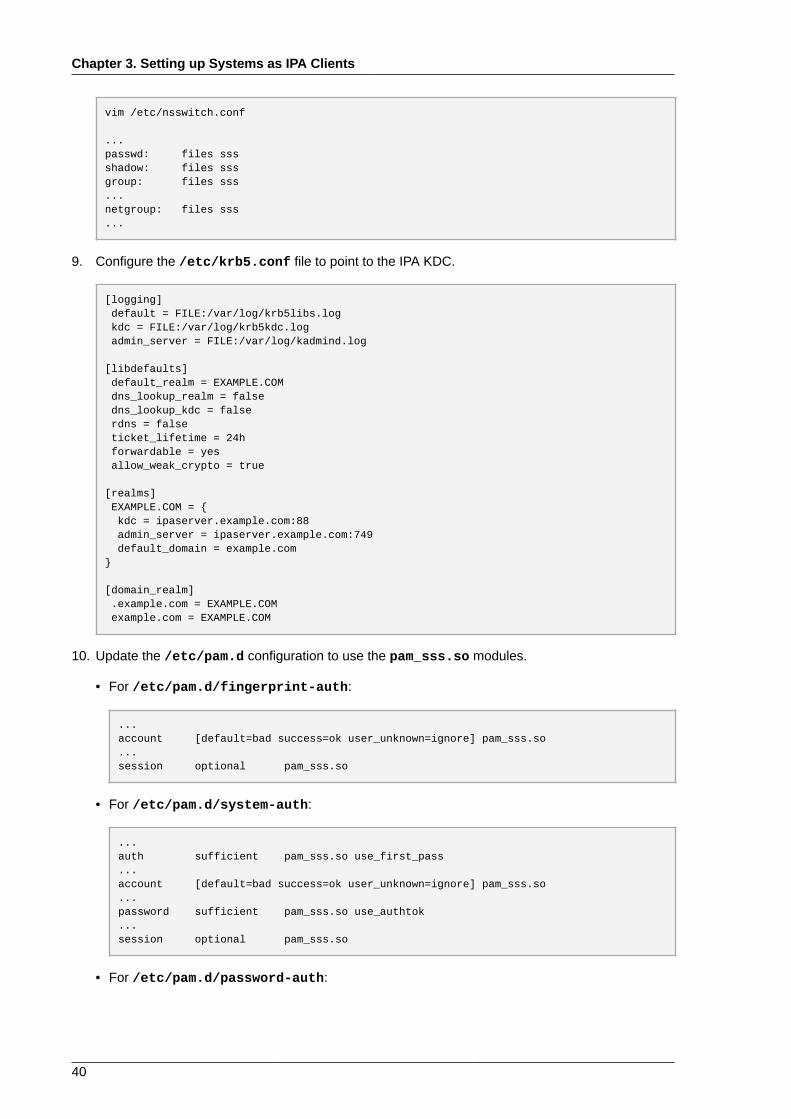
Chapter 3. Setting up Systems as IPA Clients
40
vim /etc/nsswitch.conf
...passwd: files sssshadow: files sssgroup: files sss...netgroup: files sss...
9. Configure the /etc/krb5.conf file to point to the IPA KDC.
[logging] default = FILE:/var/log/krb5libs.log kdc = FILE:/var/log/krb5kdc.log admin_server = FILE:/var/log/kadmind.log
[libdefaults] default_realm = EXAMPLE.COM dns_lookup_realm = false dns_lookup_kdc = false rdns = false ticket_lifetime = 24h forwardable = yes allow_weak_crypto = true
[realms] EXAMPLE.COM = { kdc = ipaserver.example.com:88 admin_server = ipaserver.example.com:749 default_domain = example.com}
[domain_realm] .example.com = EXAMPLE.COM example.com = EXAMPLE.COM
10. Update the /etc/pam.d configuration to use the pam_sss.so modules.
• For /etc/pam.d/fingerprint-auth:
...account [default=bad success=ok user_unknown=ignore] pam_sss.so...session optional pam_sss.so
• For /etc/pam.d/system-auth:
...auth sufficient pam_sss.so use_first_pass...account [default=bad success=ok user_unknown=ignore] pam_sss.so...password sufficient pam_sss.so use_authtok...session optional pam_sss.so
• For /etc/pam.d/password-auth:
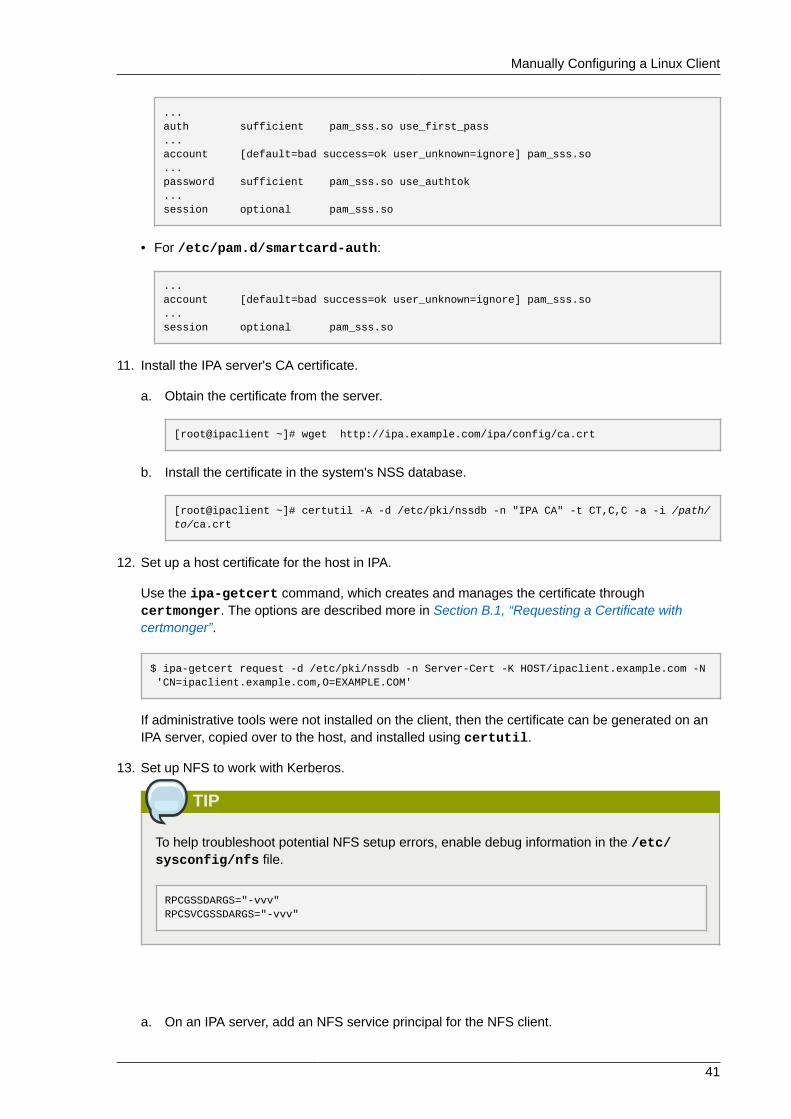
Manually Configuring a Linux Client
41
...auth sufficient pam_sss.so use_first_pass...account [default=bad success=ok user_unknown=ignore] pam_sss.so...password sufficient pam_sss.so use_authtok...session optional pam_sss.so
• For /etc/pam.d/smartcard-auth:
...account [default=bad success=ok user_unknown=ignore] pam_sss.so...session optional pam_sss.so
11. Install the IPA server's CA certificate.
a. Obtain the certificate from the server.
[root@ipaclient ~]# wget http://ipa.example.com/ipa/config/ca.crt
b. Install the certificate in the system's NSS database.
[root@ipaclient ~]# certutil -A -d /etc/pki/nssdb -n "IPA CA" -t CT,C,C -a -i /path/to/ca.crt
12. Set up a host certificate for the host in IPA.
Use the ipa-getcert command, which creates and manages the certificate throughcertmonger. The options are described more in Section B.1, “Requesting a Certificate withcertmonger”.
$ ipa-getcert request -d /etc/pki/nssdb -n Server-Cert -K HOST/ipaclient.example.com -N 'CN=ipaclient.example.com,O=EXAMPLE.COM'
If administrative tools were not installed on the client, then the certificate can be generated on anIPA server, copied over to the host, and installed using certutil.
13. Set up NFS to work with Kerberos.
TIP
To help troubleshoot potential NFS setup errors, enable debug information in the /etc/sysconfig/nfs file.
RPCGSSDARGS="-vvv"RPCSVCGSSDARGS="-vvv"
a. On an IPA server, add an NFS service principal for the NFS client.
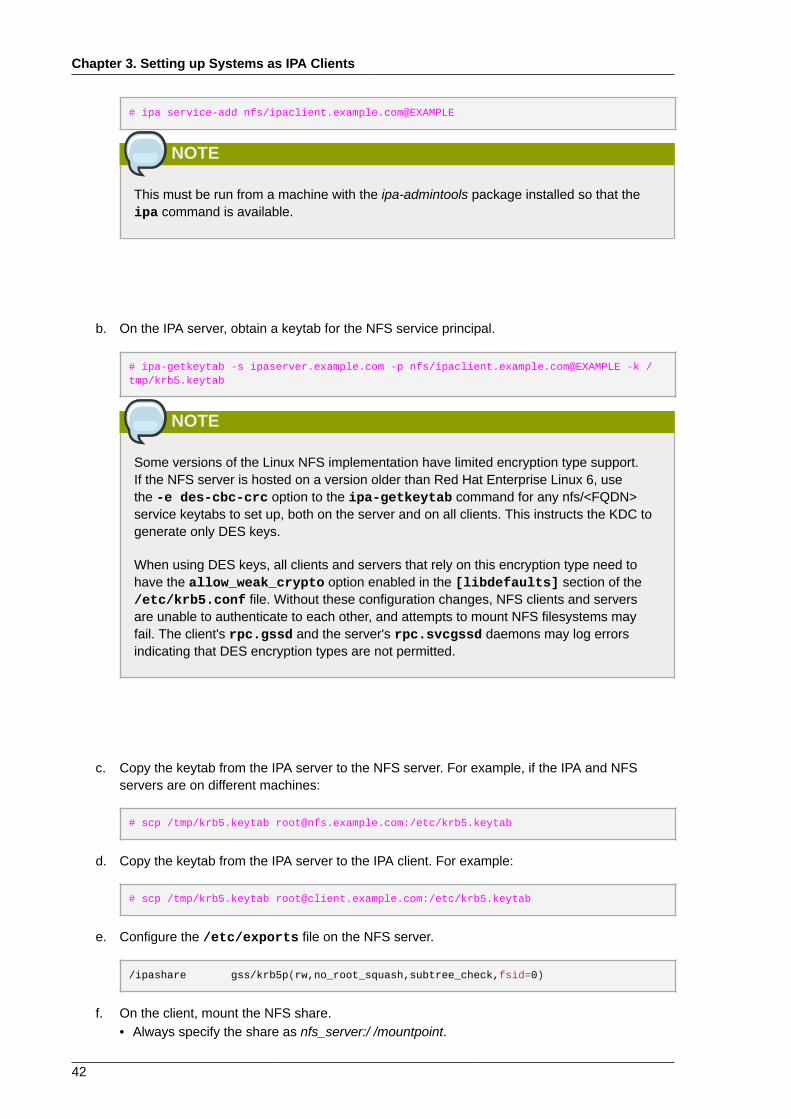
Chapter 3. Setting up Systems as IPA Clients
42
# ipa service-add nfs/ipaclient.example.com@EXAMPLE
NOTE
This must be run from a machine with the ipa-admintools package installed so that theipa command is available.
b. On the IPA server, obtain a keytab for the NFS service principal.
# ipa-getkeytab -s ipaserver.example.com -p nfs/ipaclient.example.com@EXAMPLE -k /tmp/krb5.keytab
NOTE
Some versions of the Linux NFS implementation have limited encryption type support.If the NFS server is hosted on a version older than Red Hat Enterprise Linux 6, usethe -e des-cbc-crc option to the ipa-getkeytab command for any nfs/<FQDN>service keytabs to set up, both on the server and on all clients. This instructs the KDC togenerate only DES keys.
When using DES keys, all clients and servers that rely on this encryption type need tohave the allow_weak_crypto option enabled in the [libdefaults] section of the/etc/krb5.conf file. Without these configuration changes, NFS clients and serversare unable to authenticate to each other, and attempts to mount NFS filesystems mayfail. The client's rpc.gssd and the server's rpc.svcgssd daemons may log errorsindicating that DES encryption types are not permitted.
c. Copy the keytab from the IPA server to the NFS server. For example, if the IPA and NFSservers are on different machines:
# scp /tmp/krb5.keytab [email protected]:/etc/krb5.keytab
d. Copy the keytab from the IPA server to the IPA client. For example:
# scp /tmp/krb5.keytab [email protected]:/etc/krb5.keytab
e. Configure the /etc/exports file on the NFS server.
/ipashare gss/krb5p(rw,no_root_squash,subtree_check,fsid=0)
f. On the client, mount the NFS share.• Always specify the share as nfs_server:/ /mountpoint.

Setting up a Linux Client Through Kickstart
43
• Use the same -o sec setting as is used in the /etc/exports file for the NFS server.
[root@client ~]# mount -v -t nfs4 -o sec=krb5p nfs.example.com:/ /mnt/ipashare
3.5. Setting up a Linux Client Through KickstartA kickstart enrollment automatically adds a new system to the IPA domain at the time it is provisioned.
This requires pre-creating the hosts on the IPA server, with a predefined password that can be used toauthenticate to complete the enrollment operation.
1. Create the host entry on the IPA server and set a temporary Kerberos password for the entry.
When the ipa-client-install script is run normally (interactively), it prompts forauthentication credentials to access the IPA domain. However, when the script is runautomatically, the system has to have some way to access the IPA domain without using anexisting IPA user; this is done by setting the host principal in the script and using a Kerberospassword (configured for the host account) to access the IPA domain.
For example:
[jsmith@ipaserver ~]$ ipa host-add kickstart-server.example.com --password=secret
The password expires after the first authentication attempt. After enrollment completes, the host isauthenticated using its keytab.
2. Include the ipa-client package with the other install packages.
%packages@ X Window System @ Desktop @ Sound and Video ipa-client...
3. Create a post-install instruction that runs the ipa-client-install script, passes all therequired information to access and configure the IPA domain services, and specifies the pre-setpassword. Use the --unattended option to instruct the script to run non-interactively.
%post --log=/root/ks-post.log
# Get the hostname to set as the host principal /bin/hostname > /tmp/hostname.txt
# Run the client install script/usr/sbin/ipa-client-install --domain=EXAMPLEDOMAIN --enable-dns-updates --mkhomedir -w secret --realm=EXAMPLEREALM --server=ipaserver.example.com --unattended
4. Run the kickstart script.
3.6. Configuring a Microsoft Windows System to Join theIPA Realm1. Download the MIT Kerberos 3.x package for Windows.

Chapter 3. Setting up Systems as IPA Clients
44
http://web.mit.edu/kerberos/dist/index.html
2. Run the kfw-3.x-exe file to launch the MIT Kerberos Installation Wizard.
3. Read and accept the license agreement.
4. Install the KfW client. All other components are optional.
5. Accept the default destination path.
6. Select Download from web path, and enter the URL to the IPA server. For example:
http://ipaserver.example.com/ipa/config/
Include the trailing backslash, or the configuration will fail.
7. Select Autostart the Network Identity Manager each time you login to Windows.
8. Click Install to begin the installation. When the installation is complete, click Finish to exit theWizard.
9. Edit the hosts file and add the IPA server. For example:
1.2.3.4 ipaserver.example.com ipaserver
Depending on the version of Windows, the HOSTS file could be located in different directories. ForWindows XP and later systems, this is in C:\WINDOWS\system32\drivers\etc\.
NOTE
One potential problem is that a ticket is not generated by Kerberos on Windows. Windows canuse multiple ticket caches with MIT Kerberos. This can create odd scenarios, where it is possibleto authenticate against IPA's domain in the command line, but not to open the web UI.
MIT Kerberos for Windows provides some debugging tools which can be used to troubleshootWindows Kerberos problems, available at http://web.mit.edu/Kerberos/dist/index.html#kfw-3.2.
3.7. Troubleshooting Client Installations
For clients configured using ipa-client-install, the client installation log is located in /var/log/ipaclient-install.log. The IPA logs, both for the server and client and for IPA-associatedservices, are covered in Section 17.1.3, “Checking IPA Server Logs”.
These are some issues and workarounds for client installation problems.
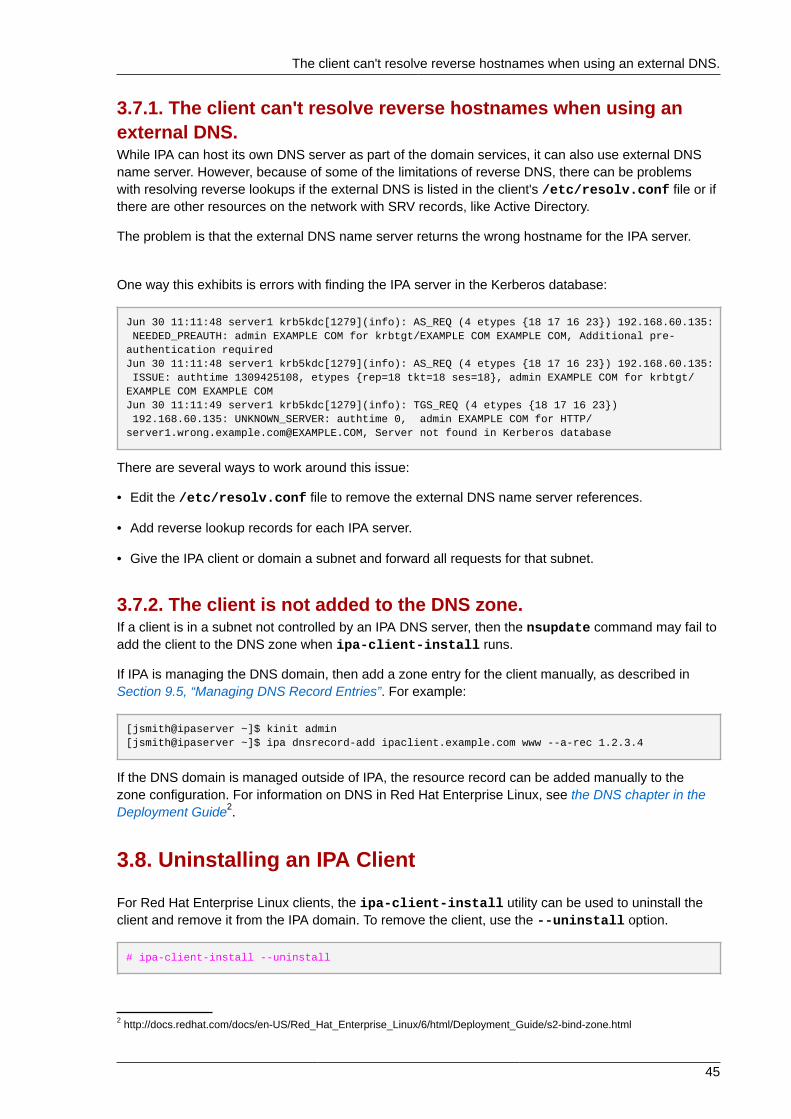
The client can't resolve reverse hostnames when using an external DNS.
45
3.7.1. The client can't resolve reverse hostnames when using anexternal DNS.While IPA can host its own DNS server as part of the domain services, it can also use external DNSname server. However, because of some of the limitations of reverse DNS, there can be problemswith resolving reverse lookups if the external DNS is listed in the client's /etc/resolv.conf file or ifthere are other resources on the network with SRV records, like Active Directory.
The problem is that the external DNS name server returns the wrong hostname for the IPA server.
One way this exhibits is errors with finding the IPA server in the Kerberos database:
Jun 30 11:11:48 server1 krb5kdc[1279](info): AS_REQ (4 etypes {18 17 16 23}) 192.168.60.135: NEEDED_PREAUTH: admin EXAMPLE COM for krbtgt/EXAMPLE COM EXAMPLE COM, Additional pre-authentication requiredJun 30 11:11:48 server1 krb5kdc[1279](info): AS_REQ (4 etypes {18 17 16 23}) 192.168.60.135: ISSUE: authtime 1309425108, etypes {rep=18 tkt=18 ses=18}, admin EXAMPLE COM for krbtgt/EXAMPLE COM EXAMPLE COMJun 30 11:11:49 server1 krb5kdc[1279](info): TGS_REQ (4 etypes {18 17 16 23}) 192.168.60.135: UNKNOWN_SERVER: authtime 0, admin EXAMPLE COM for HTTP/[email protected], Server not found in Kerberos database
There are several ways to work around this issue:
• Edit the /etc/resolv.conf file to remove the external DNS name server references.
• Add reverse lookup records for each IPA server.
• Give the IPA client or domain a subnet and forward all requests for that subnet.
3.7.2. The client is not added to the DNS zone.If a client is in a subnet not controlled by an IPA DNS server, then the nsupdate command may fail toadd the client to the DNS zone when ipa-client-install runs.
If IPA is managing the DNS domain, then add a zone entry for the client manually, as described inSection 9.5, “Managing DNS Record Entries”. For example:
[jsmith@ipaserver ~]$ kinit admin[jsmith@ipaserver ~]$ ipa dnsrecord-add ipaclient.example.com www --a-rec 1.2.3.4
If the DNS domain is managed outside of IPA, the resource record can be added manually to thezone configuration. For information on DNS in Red Hat Enterprise Linux, see the DNS chapter in theDeployment Guide2.
3.8. Uninstalling an IPA Client
For Red Hat Enterprise Linux clients, the ipa-client-install utility can be used to uninstall theclient and remove it from the IPA domain. To remove the client, use the --uninstall option.
# ipa-client-install --uninstall
2 http://docs.redhat.com/docs/en-US/Red_Hat_Enterprise_Linux/6/html/Deployment_Guide/s2-bind-zone.html

Chapter 3. Setting up Systems as IPA Clients
46
NOTE
There is an uninstall option with the ipa-join command. This is called by ipa-client-install --uninstall as part of the uninstallation process. However, while the ipa-joinoption removes the client from the domain, it does not actually uninstall the client or properlyremove all of the IPA-related configuration. Do not run ipa-join -u to attempt to uninstall theIPA client. The only way to uninstall a client completely is to use ipa-client-install --uninstall.

Chapter 4.
47
Basic UsageAll of the access to Identity Management, both through the web UI and through the command line,is done by a user authenticating to the IPA domain. This chapter covers the basics of setting upbrowsers to handle Kerberos authentication, logging into Identity Management, and troubleshootingsome common connection issues.
4.1. About the IPA Client ToolsIPA creates a domain of recognized services, host machines, and users with universally-appliedauthentication sources and common policies. From the perspective of a client machine and an IPAuser, the domain itself is fairly transparent after the initial configuration. All users need to do is log intothe domain using Kerberos, and that's it.
However, an administrator has two ongoing tasks: add principals to the IPA Kerberos domain and setthe domain policies and server configuration that govern domain interactions. Identity Managementhas both command-line and web-based interfaces for administrators to use to manage the domain,services, and IPA entries.
4.1.1. About the IPA Command-Line ToolsThe most common method to maintain the domain is using the command-line tools. IdentityManagement has an incredibly broad set of scripts and commands that are available to administrators.The entry management functions of the domain are carried out with a single script: ipa. This script isa parent or control script for associated subcommands; each subcommand relates to a specific entrytype.
The command-line scripts offer a number of benefits:
• The scripts allow management tasks to be automated and performed repeatedly in a consistent waywithout manual intervention.
• Entries can be added with all possible attributes configured (or a desired subset of attributes) in asingle step. The web UI frequently requires two steps to fully configure an entry: the first to createthe entry and the next to add optional attributes.
• The command-line scripts support adding additional attributes which may not be available in the UIor even custom attributes to entries, if the schema is configured.
4.1.1.1. The Structure of the ipa CommandThe ipa command is essentially a big plug-in container. It supports dozens of subcommands; thesesubcommands are actually plug-ins which manage specific types of objects in Identity Management.
The first type of a subcommand identifies the object type (such as user, sudo, group, host, or dns),and the second part identifies the operation being performed on that object.
ipa objectType-operation objectName --option=value
For example, adding a user is done using the user-add subcommand:
ipa user-add entryName options
Related subcommands are grouped together into plug-in modules. Commands for managing DNSentries like dnszone-add and dnsrecord-add all belong to the dns module or topic. All of the
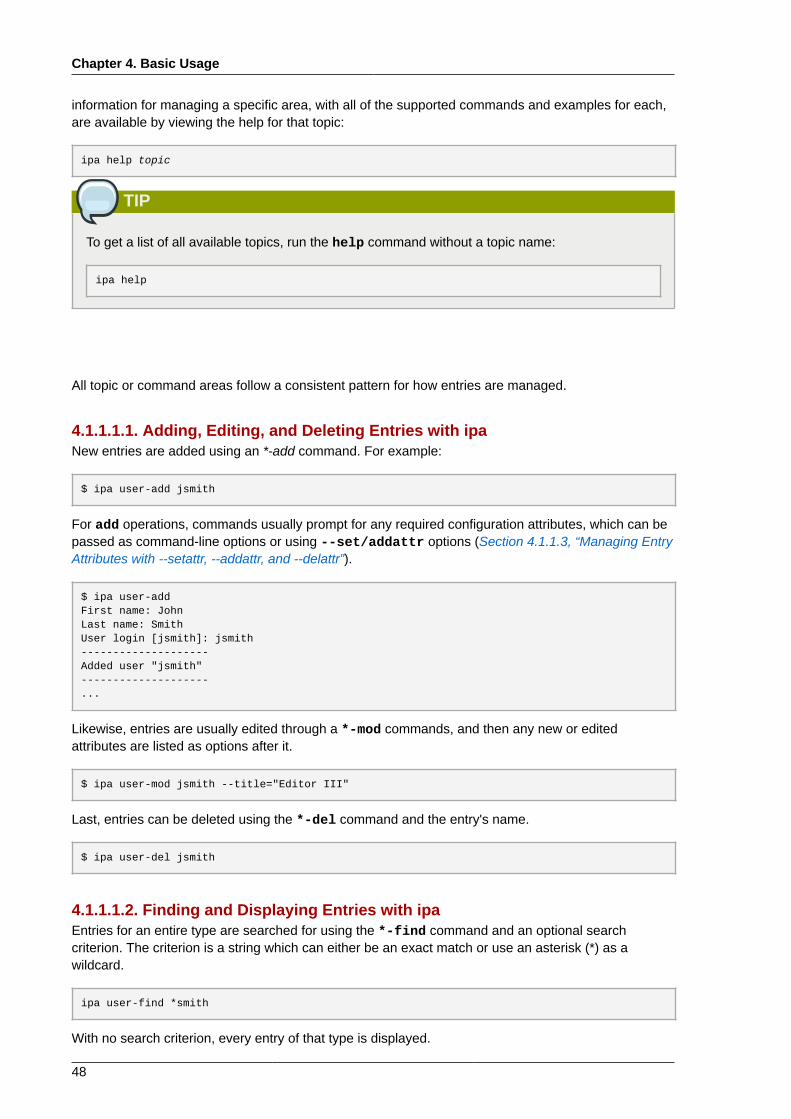
Chapter 4. Basic Usage
48
information for managing a specific area, with all of the supported commands and examples for each,are available by viewing the help for that topic:
ipa help topic
TIP
To get a list of all available topics, run the help command without a topic name:
ipa help
All topic or command areas follow a consistent pattern for how entries are managed.
4.1.1.1.1. Adding, Editing, and Deleting Entries with ipaNew entries are added using an *-add command. For example:
$ ipa user-add jsmith
For add operations, commands usually prompt for any required configuration attributes, which can bepassed as command-line options or using --set/addattr options (Section 4.1.1.3, “Managing EntryAttributes with --setattr, --addattr, and --delattr”).
$ ipa user-addFirst name: JohnLast name: SmithUser login [jsmith]: jsmith--------------------Added user "jsmith"--------------------...
Likewise, entries are usually edited through a *-mod commands, and then any new or editedattributes are listed as options after it.
$ ipa user-mod jsmith --title="Editor III"
Last, entries can be deleted using the *-del command and the entry's name.
$ ipa user-del jsmith
4.1.1.1.2. Finding and Displaying Entries with ipaEntries for an entire type are searched for using the *-find command and an optional searchcriterion. The criterion is a string which can either be an exact match or use an asterisk (*) as awildcard.
ipa user-find *smith
With no search criterion, every entry of that type is displayed.

About the IPA Command-Line Tools
49
Searches (any *-find command) have certain limits imposed as part of the server configuration,specifically how many entries are returned (size limits) and how long a search will run (time limits).This is covered in Section 4.4.2, “Setting IPA Search Limits”. Part of the server configuration is settingglobal defaults for size and time limits on searches. While these limits are always enforced in the webUI, they can be overridden with any *-find command with the --sizelimit and --timelimitoptions. For example, if the default time limit is 60 seconds and a search is going to take longer, thetime limit can be increased to 120 seconds:
[jsmith@ipaserver ~]$ ipa user-find *sen --timelimit=120
Not every possible attribute in an entry type can be searched for. A certain subset of attributes arepredefined and indexed for searches. (This list is configurable for users and groups, but not for othertypes of entries.)
When entries are returned, only certain default attributes are displayed with the entry; to return allattributes currently set for entries, use the --all option.
To display a specific entry, use the *-show command and the entry name. As with searches, only asubset of attributes are displayed with the entry unless the --all option is used.
4.1.1.1.3. Adding Members to Groups and Containers with ipaGroup members are added and removed with separate commands, apart from simply modifying anentry. Member commands essentially create a relationship between different IPA entries. While this isobvious in traditional group-member roles, it is also true for some policy entries (like SELinux and sudopolicies) where entries are associated with another entry.
Most commonly, the command format for adding a member entry is *-add-member, although thecommand may specify an entry type, such as *-add-user.
Likewise, entries are removed as members (not deleted) using a *-remove-member or *-remove-type command.
4.1.1.2. Positional Elements in ipa CommandsUsually, ipa subcommands have only two elements: the name of the entry being modified (the object)and then any options available for the subcommand:
ipa command entryName --options=values
With a few types of entries, however, not only the entry name itself needs to be specified; the entry'sparent must also be specified. This is the case with automount commands, for example. Withautomount, the location must be included whenever a new key or map is created.
The parent entry name is given first, and then the child entry name. For example, for automount, thelocation is given first, and then the map or key entry name.
ipa command parentEntryName chidlEntryName --childOptions=childValues
4.1.1.3. Managing Entry Attributes with --setattr, --addattr, and --delattrAll identities and configuration in Identity Management are stored as LDAP entries, with standardattribute-value assertions (AVAs). Whether an entry is created through the UI or the CLI, there are

Chapter 4. Basic Usage
50
certain attributes which are required and others which are available, depending on the default andcustom object classes for that entry type.
For the most common attributes, the ipa use specified command-line arguments to set values. Forexample, adding a mail attribute to a user can be done with the --mail argument; enabling dynamicupdates for a DNS zone can be done with the --allow-dynupdate option with zone commands;and a map key for an automount map is given in the --key option.
However, entries can also allow attributes that may not have command-line (or UI) options for settingthem. Partially, this is because the underlying LDAP schema is very rich, particularly for user entries,with many possible allowed attributes. Additionally, Identity Management allows schema extensionsfor users and groups, and those custom schema elements are not necessarily reflected in the UI orcommand-line tools.
Any supported attribute can be added or edited to an entry using the --setattr and --addattroptions.
Both options have this format:
--setattr=attribute=value
The --setattr option sets one value for the given attribute; any existing values are overwritten,even for multi-valued attributes.
The --addattr option adds a new value for an attribute; for a multi-valued attribute, it adds the newvalue while preserving any existing values.
Both --setattr option and --addattr can be used multiple times in the same commandinvocation. For example:
$ ipa user-mod jsmith [email protected] [email protected] --setattr=description="backup IT manager for the east coast branch"
Likewise, an attribute or specific attribute value can be removed from an entry using the --delattroption. For a single-valued attribute, this removes the attribute; for a multi-valued attribute, it removesonly the specified value. For example:
$ ipa user-mod jsmith [email protected]
NOTE
Deleting attributes is evaluated last, after adding or editing attributes. If the same attribute isadded and deleted in the same modify operation, it is a no-op.
$ ipa user-mod jsmith [email protected] [email protected]
4.1.1.4. Using Special Characters with IPA ToolsThe IPA command-line tools are run as any other utilities in a shell. If there are special characters inthe command — such as angle brackets (> and <), ampersands (&), asterisks (*), and pipes (|) — the
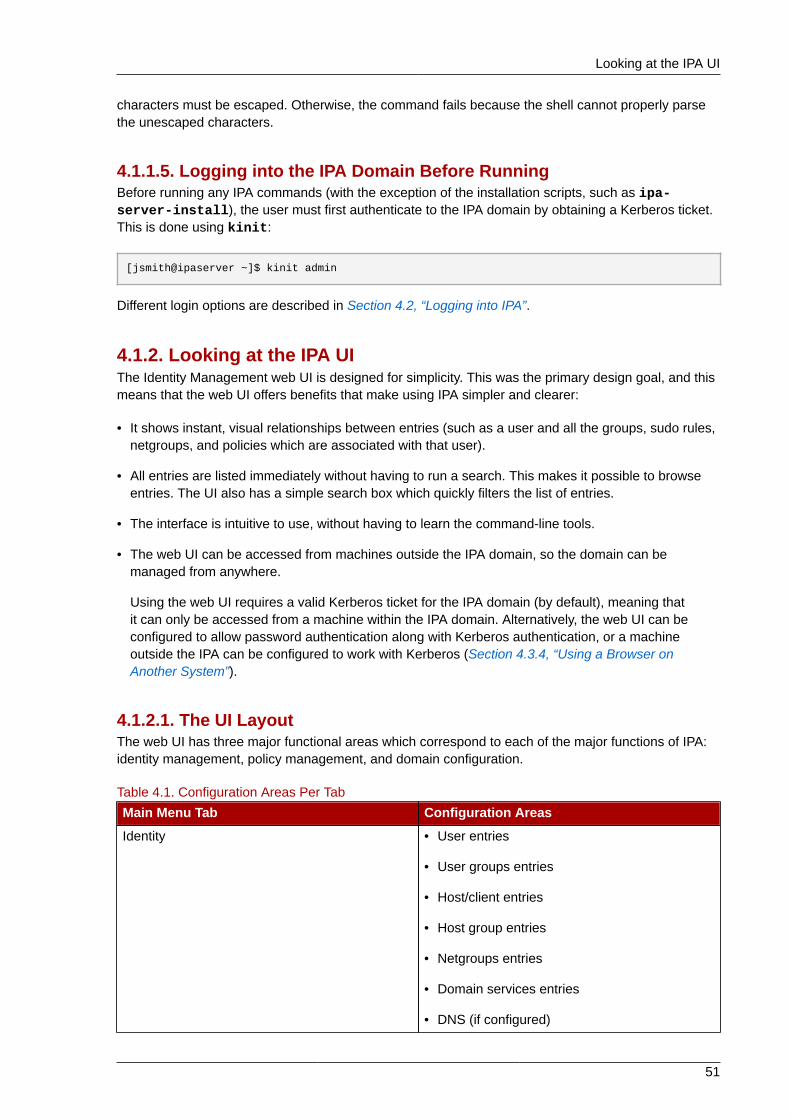
Looking at the IPA UI
51
characters must be escaped. Otherwise, the command fails because the shell cannot properly parsethe unescaped characters.
4.1.1.5. Logging into the IPA Domain Before RunningBefore running any IPA commands (with the exception of the installation scripts, such as ipa-server-install), the user must first authenticate to the IPA domain by obtaining a Kerberos ticket.This is done using kinit:
[jsmith@ipaserver ~]$ kinit admin
Different login options are described in Section 4.2, “Logging into IPA”.
4.1.2. Looking at the IPA UIThe Identity Management web UI is designed for simplicity. This was the primary design goal, and thismeans that the web UI offers benefits that make using IPA simpler and clearer:
• It shows instant, visual relationships between entries (such as a user and all the groups, sudo rules,netgroups, and policies which are associated with that user).
• All entries are listed immediately without having to run a search. This makes it possible to browseentries. The UI also has a simple search box which quickly filters the list of entries.
• The interface is intuitive to use, without having to learn the command-line tools.
• The web UI can be accessed from machines outside the IPA domain, so the domain can bemanaged from anywhere.
Using the web UI requires a valid Kerberos ticket for the IPA domain (by default), meaning thatit can only be accessed from a machine within the IPA domain. Alternatively, the web UI can beconfigured to allow password authentication along with Kerberos authentication, or a machineoutside the IPA can be configured to work with Kerberos (Section 4.3.4, “Using a Browser onAnother System”).
4.1.2.1. The UI LayoutThe web UI has three major functional areas which correspond to each of the major functions of IPA:identity management, policy management, and domain configuration.
Table 4.1. Configuration Areas Per Tab
Main Menu Tab Configuration Areas
Identity • User entries
• User groups entries
• Host/client entries
• Host group entries
• Netgroups entries
• Domain services entries
• DNS (if configured)

Chapter 4. Basic Usage
52
Main Menu Tab Configuration Areas
Policy • Host-based access control
• Sudo rules
• Automount
• User password policies
• Kerberos ticket policy
IPA Server (access controls within IdentityManagement)
• Role-based access control (permissions basedon group membership)
• Self permissions
• Delegations (user access control over otherusers)
The main menu at the top of every page has three tabs which correspond to the functional areas listedin Table 4.1, “Configuration Areas Per Tab”. When a tab is selected, there is a submenu of the differentconfiguration areas. Some configuration areas may have multiple possible entries; for example, role-based access controls define user roles/groups, the areas that access can be granted or denied(privileges), and then the permissions granted to those areas. Each separate configuration entry hasits own task area beneath the primary configuration area.
Figure 4.1. The Main Menu
All entries for a configuration area are listed together on the main page for that area. This pageprovides direct links to individual entry pages, as well as basic information (the attributes) about theentry. (This is usually just the description, but user entries show a lot more information.)
The page also has some tasks that can be performed on it. For a list page that shows entries, this canbe creating or deleting an entry. For a list page for groups, the tasks are for establishing relationshipsbetween entities, either by adding (enrolling) or removing an entity from that group. Both individualentries and groups can be searched for through the list page.
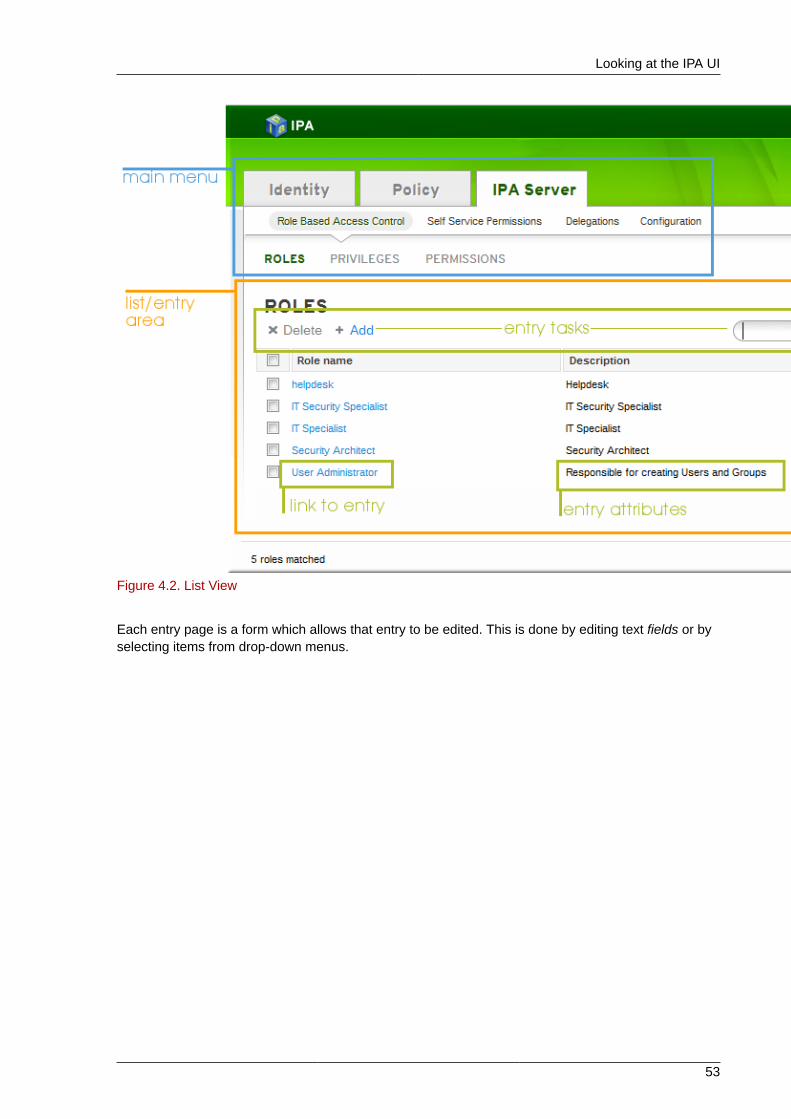
Looking at the IPA UI
53
Figure 4.2. List View
Each entry page is a form which allows that entry to be edited. This is done by editing text fields or byselecting items from drop-down menus.

Chapter 4. Basic Usage
54
Figure 4.3. Form/Entry View
4.1.2.2. Page ElementsThe web UI uses common elements on all pages.
The most basic is that all blue text is a link to an entry or to an action.
When a task like adding an entry or saving a change is possible, the task link is blue. When it is notpossible (such as no items have been selected to be deleted) then the task is grayed out.
Figure 4.4. Active Task Link
All list pages display direct links to entry pages. However, some entries are essentially nested.For example, in automount configuration, the primary entry is the location, and then keys, mountpoints, and maps are associated with that location as children entries. This hierarchy is reflected inbreadcrumb navigation near the top of the page, so it is easy to identify where you are in the UI andhow this entry relates to any other related entries.

Looking at the IPA UI
55
Figure 4.5. Entry Breadcrumbs
Most entries have a variety of different configuration areas. A simple user entry has account activitysettings, personal information, address information, organizational information, and other contactinformation. Related attributes are grouped together logically in the UI. These entry form areas can becollapsed or expanded using the arrows to control the amount of information displayed on the page.
Figure 4.6. Collapsing and Expanding Form Elements
When entries are created, they are added with only the required attributes. Additional attributes can beadded manually. Some attributes have default values added to the entry and simply need to be edited;other attributes may not exist at all in the new entry and need to be added.
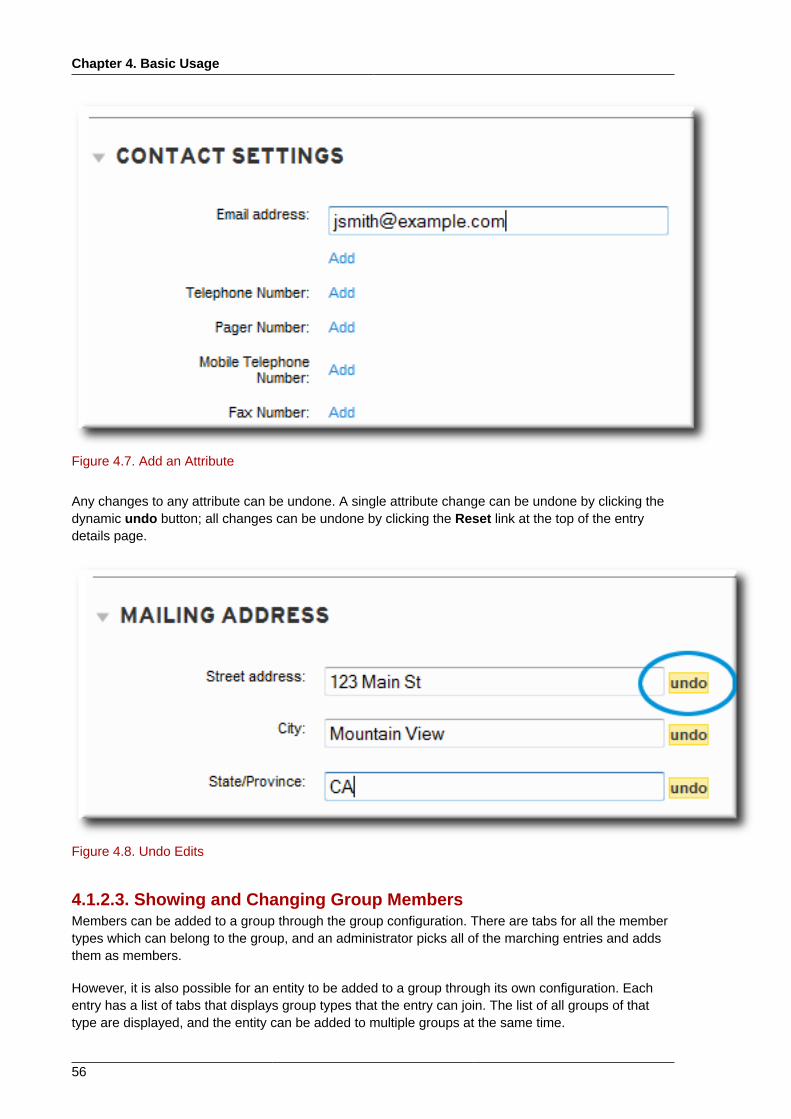
Chapter 4. Basic Usage
56
Figure 4.7. Add an Attribute
Any changes to any attribute can be undone. A single attribute change can be undone by clicking thedynamic undo button; all changes can be undone by clicking the Reset link at the top of the entrydetails page.
Figure 4.8. Undo Edits
4.1.2.3. Showing and Changing Group MembersMembers can be added to a group through the group configuration. There are tabs for all the membertypes which can belong to the group, and an administrator picks all of the marching entries and addsthem as members.
However, it is also possible for an entity to be added to a group through its own configuration. Eachentry has a list of tabs that displays group types that the entry can join. The list of all groups of thattype are displayed, and the entity can be added to multiple groups at the same time.

Logging into IPA
57
Figure 4.9. Member Of...
4.2. Logging into IPAUsers are authenticated to IPA services, including the command-line tools and the web UI, usingKerberos authentication. This means that logging into Identity Management requires running kinit.
Running kinit issues the user a Kerberos ticket. This ticket is checked by any IPA or Kerberos-aware service, so that a user only needs to log in once to access all domain services. Domain servicesinclude the IPA web UI, mounted file shares, wikis, or any other application which uses IPA as itsidentity/authentication store.
4.2.1. Logging into IPALogging into Identity Management requires running kinit on a client within the IPA domain.
$ kinit
The kinit command must be run from a machine which has been configured as a client within theIPA domain, so that the client retrieves authenticates with the IPA KDC.
Simply running kinit logs into IPA as the currently logged-in user account. This user account mustalso be an IPA user for them to authenticate to the IPA Kerberos domain successfully. For example, ifyou are logged into the machine as jsmith:
$ kinitPassword for [email protected]:
NOTE
If SSSD or pam_krb5 is configured on the IPA client machine, then when a user logs into themachine, a ticket is created which can be used for machine services which require authentication,such as sudo.
Chapter 4. Basic Usage
58
4.2.2. Logging in When an IPA User Is Different Than the SystemUserTo specify an IPA username — because a person's system username is different then the IPAusername or to switch IPA user accounts — simply rerun the kinit command, specifying the newuser. For example:
$ kinit userName Password for [email protected]:
When the server was first set up, an administrative user, admin, is created to perform normaladministrative activities. To authenticate as the admin user, use the name admin when running kinit:
$ kinit admin
NOTE
Only one set of tickets can be stored per logged-in user. The current stored credentials are theones that will be used when accessing IPA services.
If you were already connected to the IPA web UI as another user, refresh the browser to displaythe updated details for the new user.
4.2.3. Checking the Current Logged in UserUse the klist command to verify the identity and the ticket granting ticket (TGT) from the server:
$ klistTicket cache: FILE:/tmp/krb5cc_500Default principal: [email protected]
Valid starting Expires Service principal11/10/08 15:35:45 11/11/08 15:35:45 krbtgt/[email protected]
Kerberos 4 ticket cache: /tmp/tkt500klist: You have no tickets cached
It's important to know who the authenticated user is because the currently-authenticated user isthe only one who can access the IPA services. The Kerberos client libraries for kinit have somelimitation, one of them being that the current ticket is overwritten with any new invocation of kinit.Authenticating as User A and then authenticating as User B overwrites User A's ticket.
To allow there to be multiple authenticated users on a machine, set the KRB5CCNAME environmentvariable. This variable keeps credential caches separate in different shells.
4.2.4. Caching User Kerberos Tickets
Only one set of tickets can be stored per logged-in user. The current stored credentials are the onesthat will be used when accessing IPA services.
For example, if you authenticated as admin, added a new user, set the password, and then tried toauthenticate as that user, the administrator's ticket is lost.
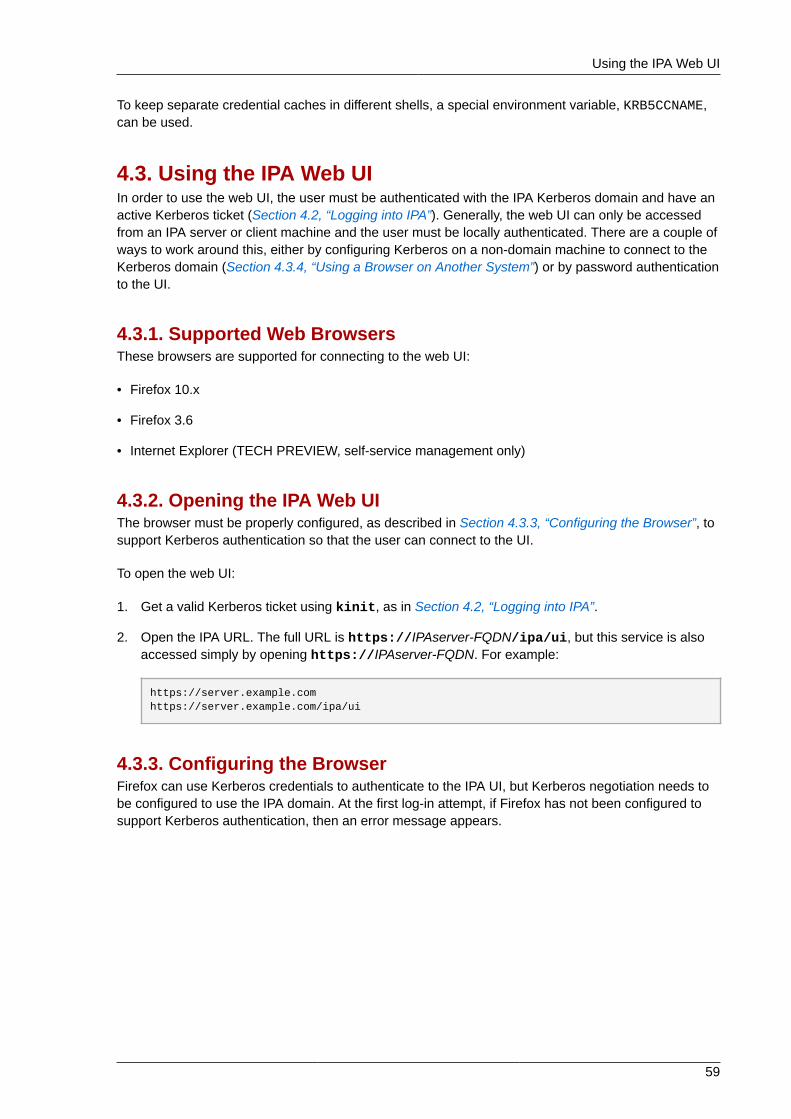
Using the IPA Web UI
59
To keep separate credential caches in different shells, a special environment variable, KRB5CCNAME,can be used.
4.3. Using the IPA Web UIIn order to use the web UI, the user must be authenticated with the IPA Kerberos domain and have anactive Kerberos ticket (Section 4.2, “Logging into IPA”). Generally, the web UI can only be accessedfrom an IPA server or client machine and the user must be locally authenticated. There are a couple ofways to work around this, either by configuring Kerberos on a non-domain machine to connect to theKerberos domain (Section 4.3.4, “Using a Browser on Another System”) or by password authenticationto the UI.
4.3.1. Supported Web BrowsersThese browsers are supported for connecting to the web UI:
• Firefox 10.x
• Firefox 3.6
• Internet Explorer (TECH PREVIEW, self-service management only)
4.3.2. Opening the IPA Web UIThe browser must be properly configured, as described in Section 4.3.3, “Configuring the Browser”, tosupport Kerberos authentication so that the user can connect to the UI.
To open the web UI:
1. Get a valid Kerberos ticket using kinit, as in Section 4.2, “Logging into IPA”.
2. Open the IPA URL. The full URL is https://IPAserver-FQDN/ipa/ui, but this service is alsoaccessed simply by opening https://IPAserver-FQDN. For example:
https://server.example.comhttps://server.example.com/ipa/ui
4.3.3. Configuring the BrowserFirefox can use Kerberos credentials to authenticate to the IPA UI, but Kerberos negotiation needs tobe configured to use the IPA domain. At the first log-in attempt, if Firefox has not been configured tosupport Kerberos authentication, then an error message appears.

Chapter 4. Basic Usage
60
Figure 4.10. Kerberos Authentication Error
If you see that error, then the IPA web UI can perform the required configuration:
1. Click the follow these directions link.
2. Click the link to import the CA certificate for the IPA server.
3. Set the web site and software developer (first and last) trust bits for the CA certificate.
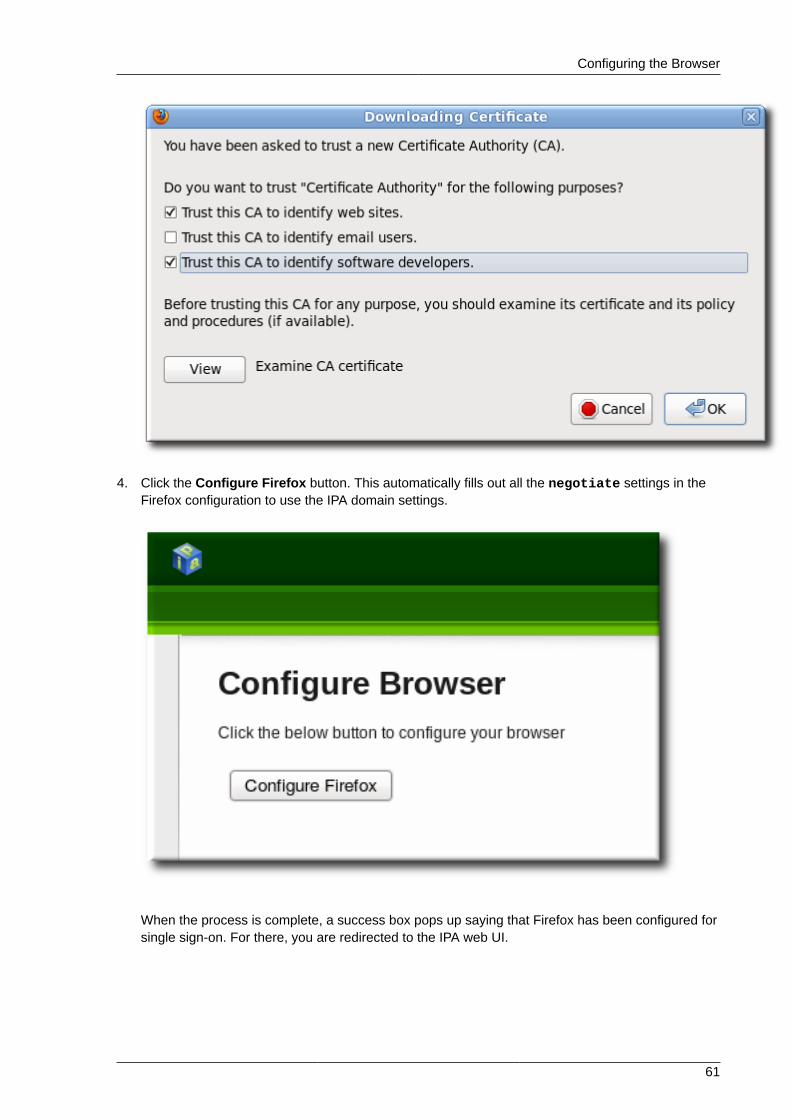
Configuring the Browser
61
4. Click the Configure Firefox button. This automatically fills out all the negotiate settings in theFirefox configuration to use the IPA domain settings.
When the process is complete, a success box pops up saying that Firefox has been configured forsingle sign-on. For there, you are redirected to the IPA web UI.

Chapter 4. Basic Usage
62
This can also be done manually:
1. Open Firefox.
2. Type about:config in the address bar.
3. In the Search field, type negotiate to filter out the Kerberos-related parameters.
4. On Red Hat Enterprise Linux, enter the domain name for the URI parameters, including thepreceding period (.) and set the gsslib parameter to true:
network.negotiate-auth.trusted-uris .example.comnetwork.negotiate-auth.using-native-gsslib true
On Windows, set the trusted URIs and library path, and disable the built-in Microsoft Kerberos forauthentication:
network.negotiate-auth.trusted-uris .example.comnetwork.auth.use-sspi false network.negotiate-auth.gsslib: C:\Program Files\MIT\Kerberos\bin\gssapi32.dll
On a 64-bit system, the library location is in C:\Program Files(x86)\MIT\Kerberos\bin\gssapi32.dll.
5. Open the web UI by going to the fully-qualified domain name of the IPA server such as http://ipaserver.example.com. Make sure that you can open the web UI and that there are noKerberos authentication errors.
6. Next, download the IPA server's CA certificate from http://ipa.example.com/ipa/config/ca.crt.
7. Select the first (Trust this CA to identify web sites) and third (Trust this CA to identifysoftware developers) check boxes.
4.3.4. Using a Browser on Another SystemIt is possible to connect to the Identity Management web UI from a system which is not a member ofthe IPA domain. In this case, it is possible to specify an IPA-specific Kerberos configuration file on theexternal (non-IPA) machine before running kinit, and then the user can authenticate against the IPAserver domain.
This is especially useful there are multiple realms or overlapping domains across your infrastructure.
Logging in with Simple Username/Password Credentials
63
1. Copy the /etc/krb5.conf file from the IPA server.
# scp /etc/krb5.conf [email protected]:/etc/krb5_ipa.conf
WARNING
Do not overwrite the existing krb5.conf file.
2. On the external machine, set the terminal session to use the copied IPA Kerberos configurationfile:
$ export KRB5_CONFIG=/etc/krb5_ipa.conf
3. Configure Firefox on the external machine as in Section 4.3.3, “Configuring the Browser”.
4.3.5. Logging in with Simple Username/Password CredentialsIf Kerberos authentication fails, then browser login also fails. That prevents access to the IPA web UI.Simple authentication for the UI allows users to log in even if there are problems with the Kerberosservice or if the system is outside the IPA domain.
When the IPA server cannot find a valid Kerberos ticket for the user attempting to log into theweb UI, it splashes an error message. Since the preferred method of connecting to IPA domainservices (including the UI) is using Kerberos authentication, the error first says to renew the Kerberoscredentials or to configure the browser to support Kerberos authentication.
The second part of the message offers the alternative of using simple authentication. The form-basedauthentication link opens a login page.
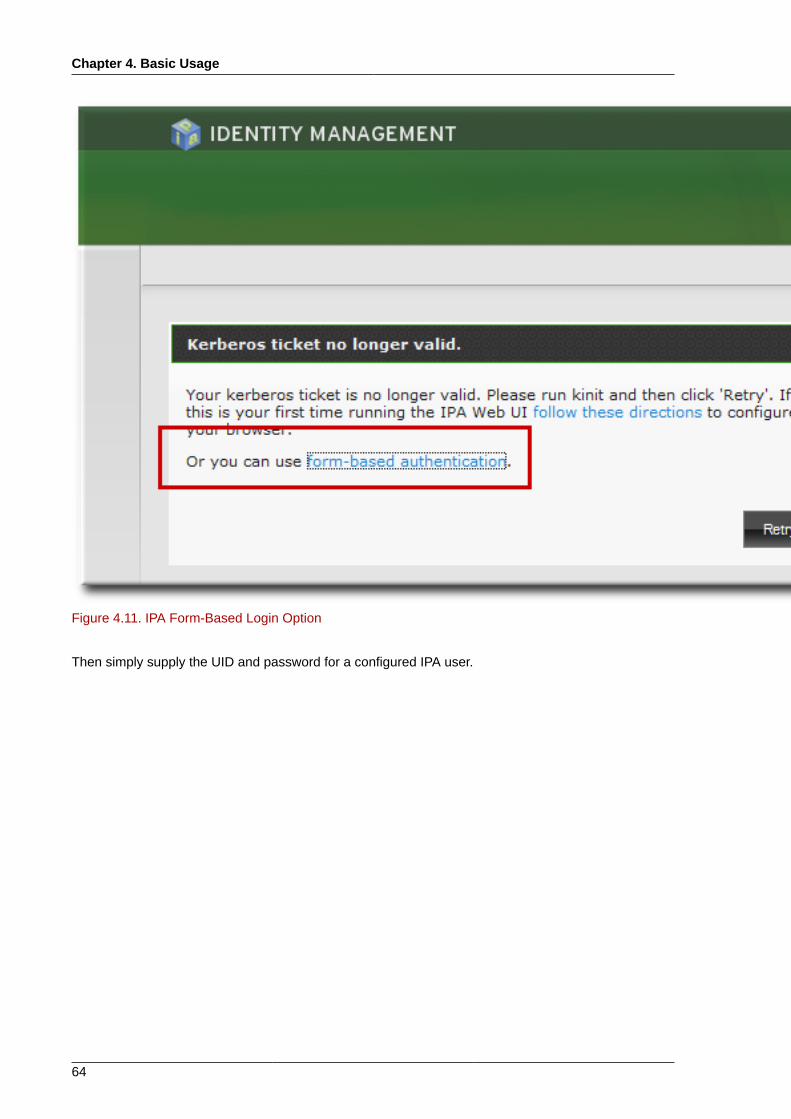
Chapter 4. Basic Usage
64
Figure 4.11. IPA Form-Based Login Option
Then simply supply the UID and password for a configured IPA user.
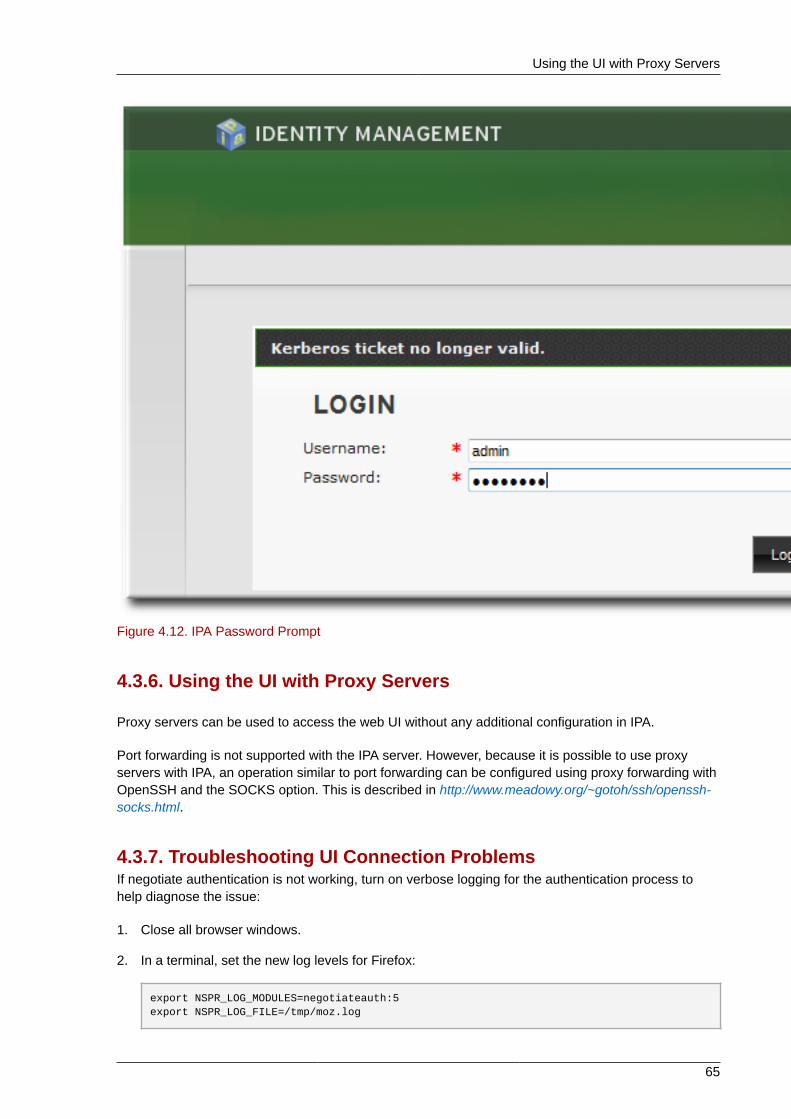
Using the UI with Proxy Servers
65
Figure 4.12. IPA Password Prompt
4.3.6. Using the UI with Proxy Servers
Proxy servers can be used to access the web UI without any additional configuration in IPA.
Port forwarding is not supported with the IPA server. However, because it is possible to use proxyservers with IPA, an operation similar to port forwarding can be configured using proxy forwarding withOpenSSH and the SOCKS option. This is described in http://www.meadowy.org/~gotoh/ssh/openssh-socks.html.
4.3.7. Troubleshooting UI Connection ProblemsIf negotiate authentication is not working, turn on verbose logging for the authentication process tohelp diagnose the issue:
1. Close all browser windows.
2. In a terminal, set the new log levels for Firefox:
export NSPR_LOG_MODULES=negotiateauth:5export NSPR_LOG_FILE=/tmp/moz.log
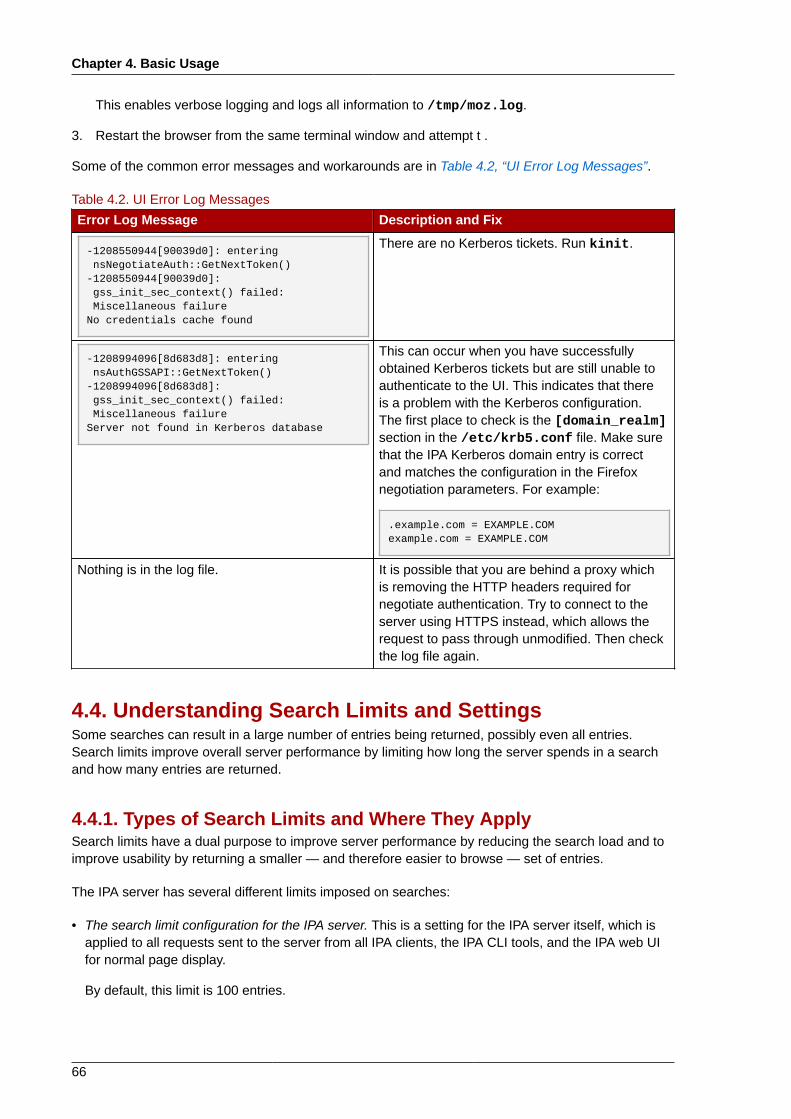
Chapter 4. Basic Usage
66
This enables verbose logging and logs all information to /tmp/moz.log.
3. Restart the browser from the same terminal window and attempt t .
Some of the common error messages and workarounds are in Table 4.2, “UI Error Log Messages”.
Table 4.2. UI Error Log Messages
Error Log Message Description and Fix
-1208550944[90039d0]: entering nsNegotiateAuth::GetNextToken()-1208550944[90039d0]: gss_init_sec_context() failed: Miscellaneous failureNo credentials cache found
There are no Kerberos tickets. Run kinit.
-1208994096[8d683d8]: entering nsAuthGSSAPI::GetNextToken()-1208994096[8d683d8]: gss_init_sec_context() failed: Miscellaneous failureServer not found in Kerberos database
This can occur when you have successfullyobtained Kerberos tickets but are still unable toauthenticate to the UI. This indicates that thereis a problem with the Kerberos configuration.The first place to check is the [domain_realm]section in the /etc/krb5.conf file. Make surethat the IPA Kerberos domain entry is correctand matches the configuration in the Firefoxnegotiation parameters. For example:
.example.com = EXAMPLE.COMexample.com = EXAMPLE.COM
Nothing is in the log file. It is possible that you are behind a proxy whichis removing the HTTP headers required fornegotiate authentication. Try to connect to theserver using HTTPS instead, which allows therequest to pass through unmodified. Then checkthe log file again.
4.4. Understanding Search Limits and SettingsSome searches can result in a large number of entries being returned, possibly even all entries.Search limits improve overall server performance by limiting how long the server spends in a searchand how many entries are returned.
4.4.1. Types of Search Limits and Where They ApplySearch limits have a dual purpose to improve server performance by reducing the search load and toimprove usability by returning a smaller — and therefore easier to browse — set of entries.
The IPA server has several different limits imposed on searches:
• The search limit configuration for the IPA server. This is a setting for the IPA server itself, which isapplied to all requests sent to the server from all IPA clients, the IPA CLI tools, and the IPA web UIfor normal page display.
By default, this limit is 100 entries.

Setting IPA Search Limits
67
• The time limit configuration for the IPA server. Much like the search size limit, the time limit sets amaximum amount of time that the IPA server, itself, waits for searches to run. Once it reaches thatlimit, the server stops the search and returns whatever entries were returned in that time.
By default, this limit is two seconds.
• The page size limit. Although not strictly a search limit, the page size limit does limit how manyentries are returned per page. The server returns the set of entries, up to the search limit, andthen randomly selects up to 20 entries per page for display. Paging results makes the results moreunderstandable and more viewable.
This is hard-coded to 20 for all searches.
• The LDAP search limit (--pkey option). All searches performed in the UI, and CLI searches whichuse the --pkey option, override the search limit set in the IPA server configuration and use thesearch limit set in the underlying LDAP directory.
By default, this limit is 2000 entries. It can be edited by editing the 389 Directory Serverconfiguration.
4.4.2. Setting IPA Search LimitsSearch limits set caps on the number of records returned or the time spent searching when queryingthe database for user or group entries. There are two types of search limits: time limits and size(number) limits.
With the default settings, users are limited to two-second searches and no more than 100 recordsreturned per search.
IMPORTANT
Setting search size or time limits too high can negatively affect IPA server performance.
4.4.2.1. With the Web UI1. Open the IPA Server tab.
2. Select the Configuration subtab.
3. Scroll to the Search Options area.

Chapter 4. Basic Usage
68
4. Change the search limit settings.
• Search size limit, the maximum number of records to return in a search.
• Search time limit, the maximum amount of time, in seconds, to spend on a search before theserver returns results.
TIP
Setting the time limit or size limit value to -1 means that there are no limits on searches.
5. When the changes are complete, click the Update link at the top of the Configuration page.

Overriding the Search Defaults
69
4.4.2.2. With the Command LineThe search limits can be changed using the config-mod command.
$ ipa config-mod --searchtimelimit=5 --searchrecordslimit=500
Max. username length: 32 Home directory base: /home Default shell: /bin/sh Default users group: ipausers Default e-mail domain for new users: example.com Search time limit: 5 Search size limit: 50 User search fields: uid,givenname,sn,telephonenumber,ou,title Group search fields: cn,description Enable migration mode: FALSE Certificate Subject base: O=EXAMPLE.COM Password Expiration Notification (days): 4
TIP
Setting the time limit or size limit value to -1 means that there are no limits on searches.
4.4.3. Overriding the Search DefaultsPart of the server configuration is setting global defaults for size and time limits on searches. Whilethese limits are always enforced in the web UI, they can be overridden with any *-find command runthrough the command line.
The --sizelimit and --timelimit options set alternative size and time limits, respectively, forthat specific command run. The limits can be higher or lower, depending on the kinds of results youneed.
For example, if the default time limit is 60 seconds and a search is going to take longer, the time limitcan be increased to 120 seconds:
[jsmith@ipaserver ~]$ ipa user-find *sen --timelimit=120
4.4.4. Setting Search AttributesA search for users or groups does not automatically search every possible attribute for that attribute.Rather, it searches a specific subset of attributes, and that list is configurable.
When adding attributes to the user or group search fields, make sure that there is a correspondingindex within the LDAP directory for that attribute. Searches are performed based on indexes. Moststandard LDAP attributes have indexes, but any custom attributes must have indexes created forthem. Creating indexes is described in the indexes chapter in the Directory Server Administrator'sGuide1.
1 http://docs.redhat.com/docs/en-US/Red_Hat_Directory_Server/9.0/html/Administration_Guide/Managing_Indexes-Creating_Indexes.html
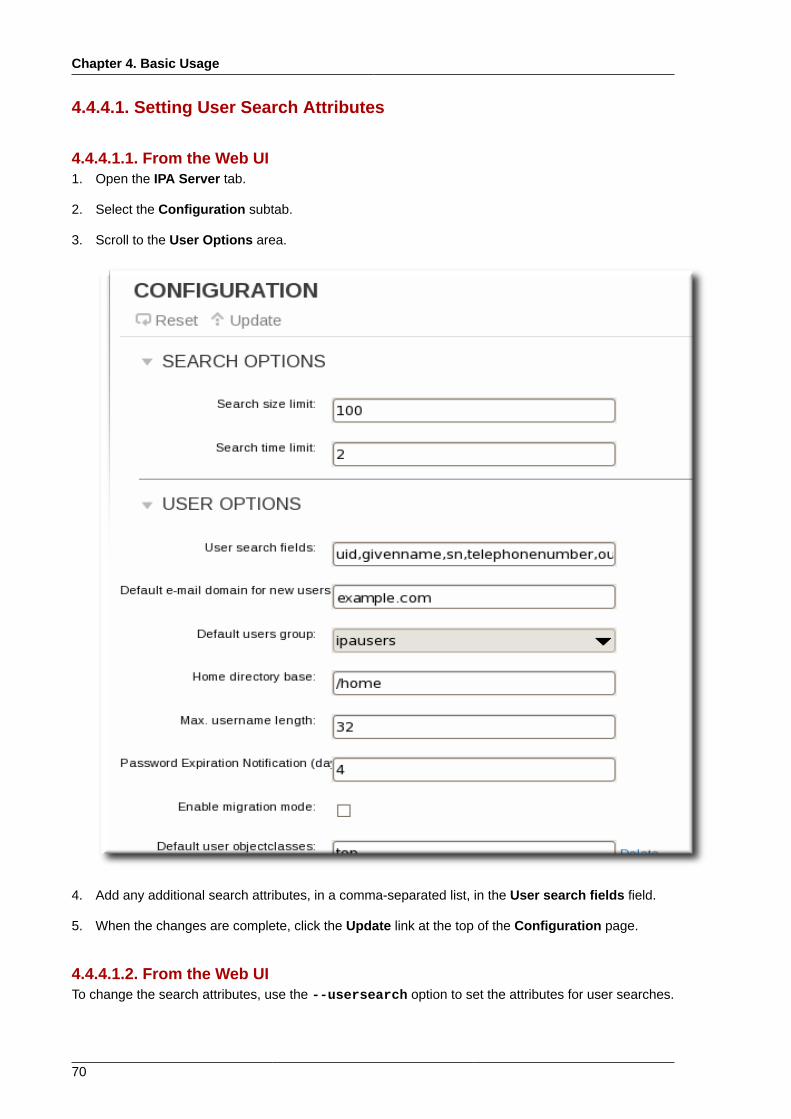
Chapter 4. Basic Usage
70
4.4.4.1. Setting User Search Attributes
4.4.4.1.1. From the Web UI1. Open the IPA Server tab.
2. Select the Configuration subtab.
3. Scroll to the User Options area.
4. Add any additional search attributes, in a comma-separated list, in the User search fields field.
5. When the changes are complete, click the Update link at the top of the Configuration page.
4.4.4.1.2. From the Web UITo change the search attributes, use the --usersearch option to set the attributes for user searches.
Setting Search Attributes
71
$ ipa config-mod --usersearch=uid,givenname,sn,telephonenumber,ou,title
NOTE
Always give the complete list of search attributes. Whatever values are passed with theconfiguration argument overwrite the previous settings.
4.4.4.2. Setting Group Search AttributesA search for users or groups does not automatically search every possible attribute for that attribute.Rather, it searches a specific subset of attributes, and that list is configurable.
When adding attributes to the user or group search fields, make sure that there is a correspondingindex within the LDAP directory for that attribute. Searches are performed based on indexes. Moststandard LDAP attributes have indexes, but any custom attributes must have indexes created forthem. Creating indexes is described in the indexes chapter in the Directory Server Administrator'sGuide2.
4.4.4.2.1. From the Web UI1. Open the IPA Server tab.
2. Select the Configuration subtab.
3. Scroll to the Group Options area.
2 http://docs.redhat.com/docs/en-US/Red_Hat_Directory_Server/9.0/html/Administration_Guide/Managing_Indexes-Creating_Indexes.html
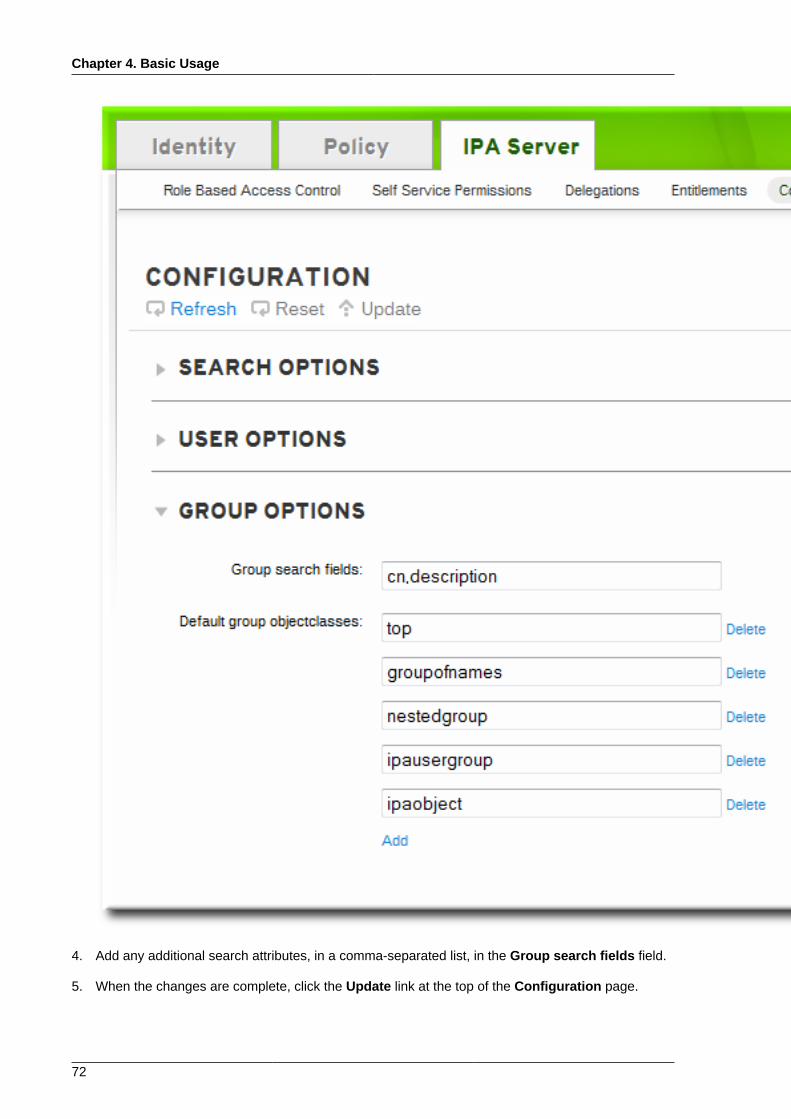
Chapter 4. Basic Usage
72
4. Add any additional search attributes, in a comma-separated list, in the Group search fields field.
5. When the changes are complete, click the Update link at the top of the Configuration page.

Attributes Returned in Search Results
73
4.4.4.2.2. From the Command LineTo change the search attributes, use the --groupsearch options to set the attributes for groupsearches.
$ ipa config-mod --groupsearch=cn,description
NOTE
Always give the complete list of search attributes. Whatever values are passed with theconfiguration argument overwrite the previous settings.
4.4.5. Attributes Returned in Search ResultsSearches can be performed on attributes that are not displayed in the UI. This means that entries canbe returned in a search that do not appear to match the given filter. This is especially common if thesearch information is very short, which increases the likelihood of a match.

74

Chapter 5.
75
Identity: Managing Users and UserGroupsUsers in Identity Management are able to access services and servers within the domain throughKerberos authentication. This chapter covers general management tasks for users, groups, passwordpolicies, and other configuration for users.
5.1. Setting up User Home DirectoriesA home directory is required for any IPA user. Without a home directory in the expected location,a user may be unable to log into the domain. While systems administrators can manage homedirectories outside of IPA, it is also possible to use a PAM module to create home directoriesautomatically on both IPA servers and clients.
5.1.1. About Home DirectoriesIPA, as part of managing users, can manage user home directories. However, IPA has certain definedparameters for any managed home directories:
• The default prefix for users' home directories is /home.
• IPA does not automatically create home directories when users log in. Automatically creating homedirectories requires either the pam_oddjob_mkhomedir module or the pam_mkhomedir module.This module can be configured as part of client installation or after installation, as described inSection 5.1.2, “Enabling the PAM Home Directory Module”.
The home directory process for IPA first attempts to use the pam_oddjob_mkhomedir modulebecause this requires fewer user privileges and access to create the home directories, as well asintegrating smoothly with SELinux. If this module is not available, then the process falls back to thepam_mkhomedir module.
NOTE
On Red Hat Enterprise Linux 5 clients, the client installation script uses the pam_mkhomedirmodule even if the pam_oddjob_mkhomedir module is available. To use thepam_oddjob_mkhomedir module on Red Hat Enterprise Linux 5, edit the PAM configurationmanually.
• It is possible to use an NFS file server that provides /home that can be made available to allmachines in the domain and then automounted on the IPA server.
There are potential issues when using NFS, such as security issues related to granting root accessto the NFS user, performance issues with loading the entire /home tree, and network performanceissues for using remote servers for home directories. There are some general guidelines for usingNFS with Identity Management:
• Use automount to mount only the user's home directory and only when the user logs in, ratherthan loading the entire /home tree.
Chapter 5. Identity: Managing Users and User Groups
76
• Use a remote user who has limited permissions to create home directories and mount the shareon the IPA server as that user. Since the IPA server runs as an httpd process, it is possible touse sudo or a similar program to grant limited access to the IPA server to create home directorieson the NFS server.
• Use a mechanism, such as the pam_oddjob_mkhomedir module, to create the home directoryas that user.
Using automounts for home directories is described in Section 5.1.3, “Manually Mounting HomeDirectories”.
• If a suitable directory and mechanism are not available for to create home directories, users may notbe able to log in.
5.1.2. Enabling the PAM Home Directory ModuleFor a home directory to be created automatically when a user logs in, IPA can use either thepam_oddjob_mkhomedir module or the pam_mkhomedir module. Because it requires fewerpermissions and works well with SELinux, IPA preferentially uses the pam_oddjob_mkhomedirmodule. If that module is not installed, then it falls back to the pam_mkhomedir module.
NOTE
IPA does not require the pam_oddjob_mkhomedir module or pam_mkhomedir module. Thisis because the *_mkhomedir module may try to create home directories even when the sharedstorage is not available. If the module is unable to create the home directory, then users can beblocked from logging into the IPA domain.
The system administrator must activate this module on each client or server as needed.
There are two ways to enable the pam_oddjob_mkhomedir (or pam_mkhomedir) module:
• The --mkhomedir option can be used with the ipa-client-install command. While this ispossible for clients, this option is not available to servers when they are set up.
• The pam_oddjob_mkhomedir module can be enabled using the system's authconfigcommand. For example:
authconfig --enablemkhomedir --update
This option can be used for both server and client machines post-installation.

Manually Mounting Home Directories
77
NOTE
On Red Hat Enterprise Linux 5 clients, the client installation script uses the pam_mkhomedirmodule even if the pam_oddjob_mkhomedir module is available. To use thepam_oddjob_mkhomedir module on Red Hat Enterprise Linux 5, edit the PAM configurationmanually.
5.1.3. Manually Mounting Home DirectoriesWhile PAM modules can be used to create home directories for users automatically, this may not bedesirable behavior in every environment. In that case, home directories can be manually added to theIPA server from separate locations using NFS shares and automount.
1. Create a new location for the user directory maps:
$ ipa automountlocation-add userdirsLocation: userdirs
2. Add a direct map to the new location's auto.direct file. In this example, the mount point is /share:
$ ipa automountkey-add userdirs auto.direct --key=/share --info="-ro,soft, ipaserver.example.com:/home/share"
Key: /shareMount information: -ro,soft, ipaserver.example.com:/home/share
Using automounts with IPA is described in detail in Chapter 10, Policy: Using Automount.
5.2. Managing User Entries
5.2.1. About Username FormatsThe default length for usernames is 32 characters.
IPA supports a wide range of username formats, based on this regular expression:
[a-zA-Z0-9_.][a-zA-Z0-9_.-]{0,252}[a-zA-Z0-9_.$-]?
TIP
The trailing $ symbol is permitted for Samba 3.x machine support.
Any system limits — such as starting a username with a number on Unix systems — apply to theusernames in IPA.
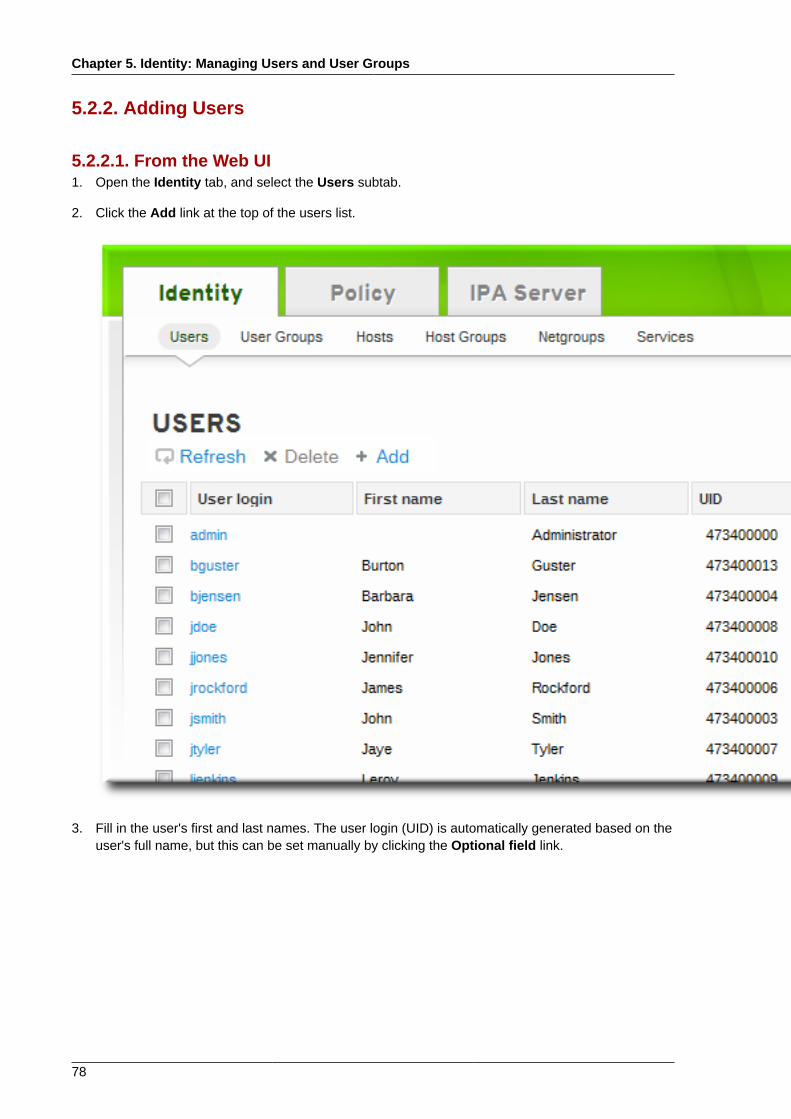
Chapter 5. Identity: Managing Users and User Groups
78
5.2.2. Adding Users
5.2.2.1. From the Web UI1. Open the Identity tab, and select the Users subtab.
2. Click the Add link at the top of the users list.
3. Fill in the user's first and last names. The user login (UID) is automatically generated based on theuser's full name, but this can be set manually by clicking the Optional field link.

Adding Users
79
4. Click the Add and Edit button to go directly to the expanded entry page and fill in more attributeinformation, as in Section 5.2.3.1, “From the Web UI”. The user entry is created with some basicinformation already filled in, based on the given user information and the user entry template.
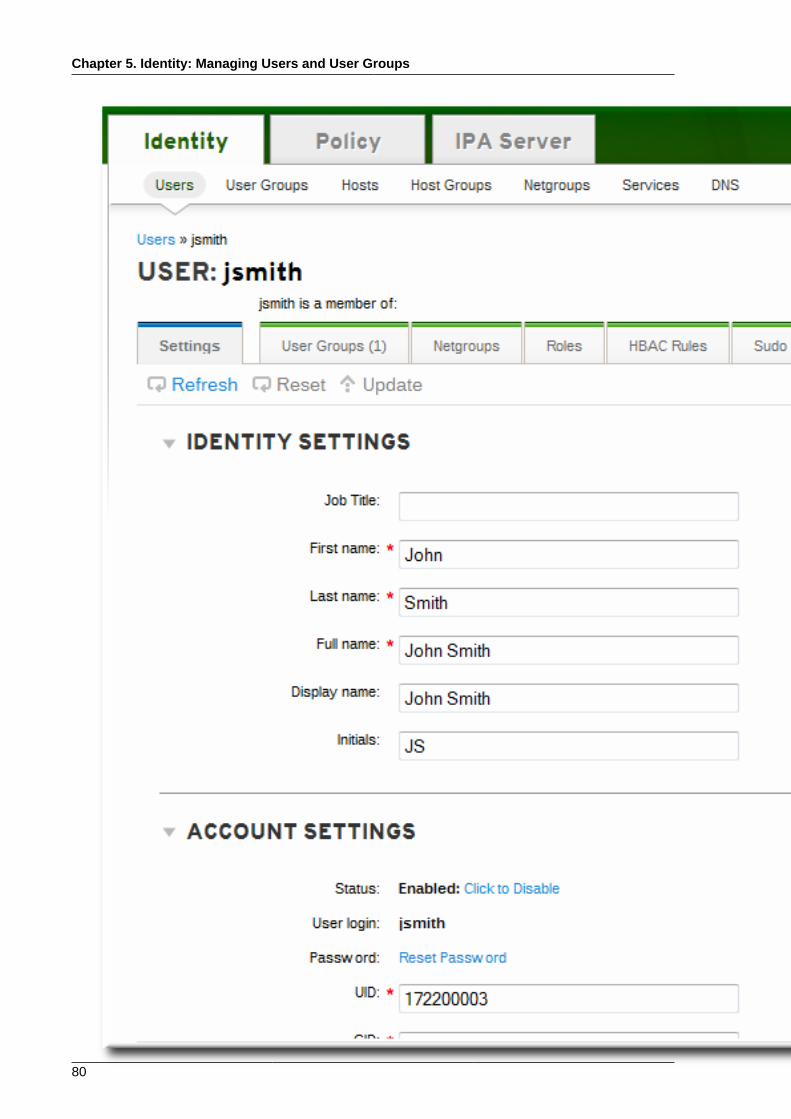
Chapter 5. Identity: Managing Users and User Groups
80
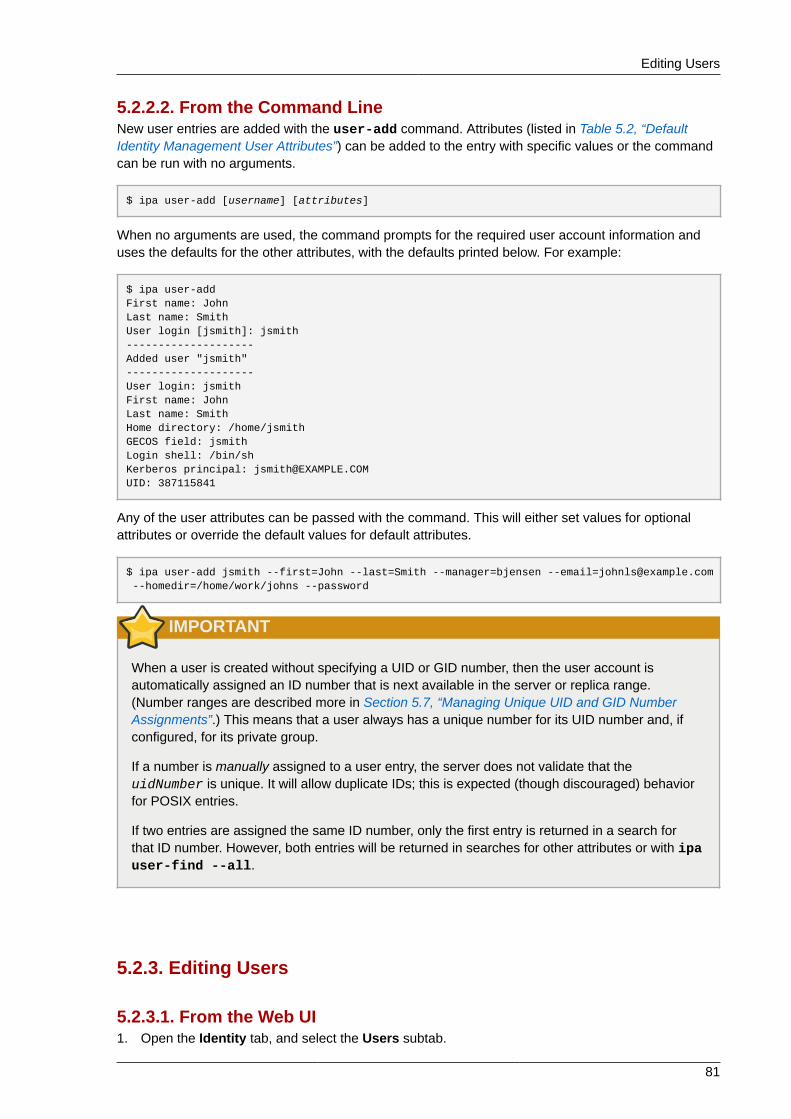
Editing Users
81
5.2.2.2. From the Command LineNew user entries are added with the user-add command. Attributes (listed in Table 5.2, “DefaultIdentity Management User Attributes”) can be added to the entry with specific values or the commandcan be run with no arguments.
$ ipa user-add [username] [attributes]
When no arguments are used, the command prompts for the required user account information anduses the defaults for the other attributes, with the defaults printed below. For example:
$ ipa user-addFirst name: JohnLast name: SmithUser login [jsmith]: jsmith--------------------Added user "jsmith"--------------------User login: jsmithFirst name: JohnLast name: SmithHome directory: /home/jsmithGECOS field: jsmithLogin shell: /bin/shKerberos principal: [email protected]: 387115841
Any of the user attributes can be passed with the command. This will either set values for optionalattributes or override the default values for default attributes.
$ ipa user-add jsmith --first=John --last=Smith --manager=bjensen [email protected] --homedir=/home/work/johns --password
IMPORTANT
When a user is created without specifying a UID or GID number, then the user account isautomatically assigned an ID number that is next available in the server or replica range.(Number ranges are described more in Section 5.7, “Managing Unique UID and GID NumberAssignments”.) This means that a user always has a unique number for its UID number and, ifconfigured, for its private group.
If a number is manually assigned to a user entry, the server does not validate that theuidNumber is unique. It will allow duplicate IDs; this is expected (though discouraged) behaviorfor POSIX entries.
If two entries are assigned the same ID number, only the first entry is returned in a search forthat ID number. However, both entries will be returned in searches for other attributes or with ipauser-find --all.
5.2.3. Editing Users
5.2.3.1. From the Web UI1. Open the Identity tab, and select the Users subtab.

Chapter 5. Identity: Managing Users and User Groups
82
2. Click the name of the user to edit.
3. There are a number of different types of attributes that can be edited for the user. All of the defaultattributes are listed in Table 5.2, “Default Identity Management User Attributes”. Most of theattributes in the Identity Settings and Account Settings areas have default values filled in forthem, based on the user information or on the user entry template.
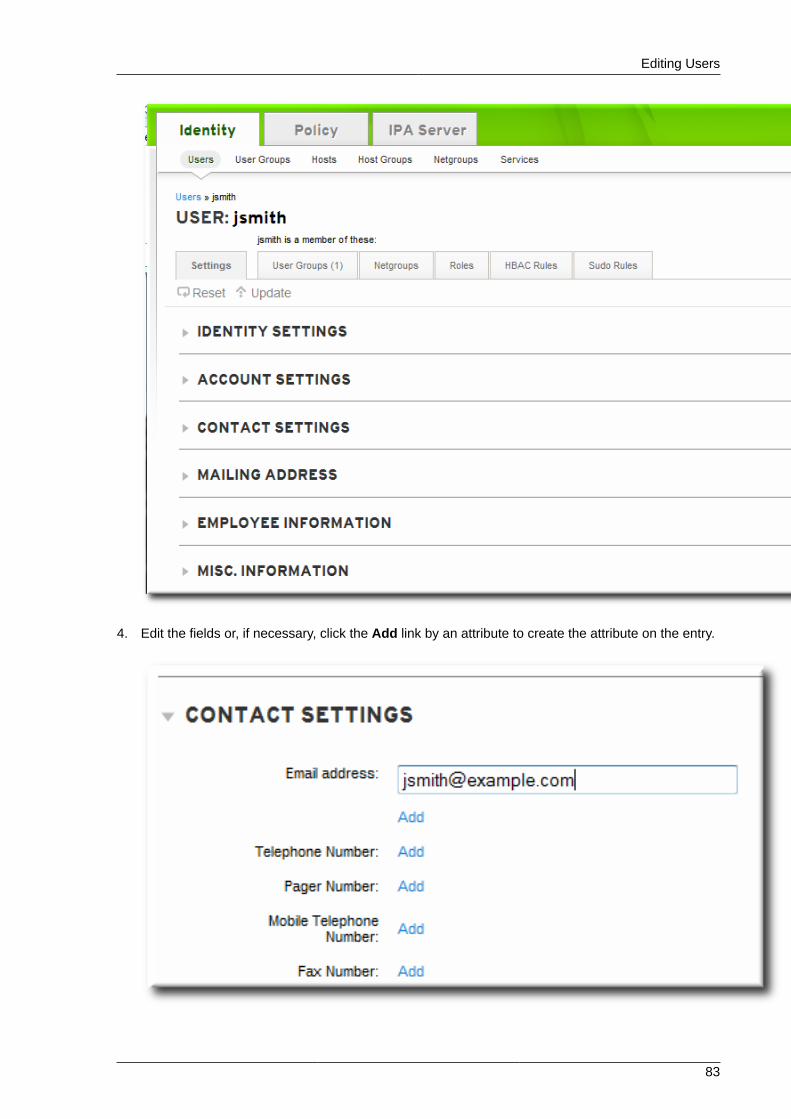
Editing Users
83
4. Edit the fields or, if necessary, click the Add link by an attribute to create the attribute on the entry.
Chapter 5. Identity: Managing Users and User Groups
84
5. When the edits are done, click the Update link at the top of the page.
5.2.3.2. From the Command LineThe user-mod command edits user accounts by adding or changing attributes. At its most basic, theuser-mod specifies the user account by login ID, the attribute to edit, and the new value:
$ ipa user-mod loginID --attributeName=newValue
For example, to change a user's work title from Editor II to Editor III:
$ ipa user-mod jsmith --title="Editor III"
Identity Management allows multi-valued attributes, based on attributes in LDAP that are allowed tohave multiple values. For example, a person may have two email addresses, one for work and one forpersonal, that are both stored in the mail attribute. Managing multi-valued attributes can be done usingthe --addattr option.
If an attribute allows multiple values — like mail — simply using the command-line argument willoverwrite the value with the new value. This is also true for using --setattr. However, using --addattr will add a new attribute; for a multi-valued attribute, it adds the new value in addition to anyexisting values.
Example 5.1. Multiple Mail AttributesA user is created first using his work email account.
$ ipa user-add jsmith --first=John --last=Smith [email protected]
Then, his personal email account is added.
$ ipa user-mod jsmith [email protected]
Both email addresses are listed for the user.
$ ipa user-find jsmith --all--------------1 user matched-------------- dn: uid=jsmith,cn=users,cn=accounts,dc=example,dc=com User login: jsmith ..... Email address: [email protected], [email protected]
To set two values at the same time, use the --addattr option twice:
$ ipa user-add jsmith --first=John --last=Smith [email protected] [email protected] [email protected]
5.2.4. Activating and Deactivating User AccountsUser accounts can be deactivated. A deactivated user cannot log into IPA or its related services (likeKerberos) and he cannot perform any tasks. However, the user account still exists within IdentityManagement and all of the associated information remains unchanged.
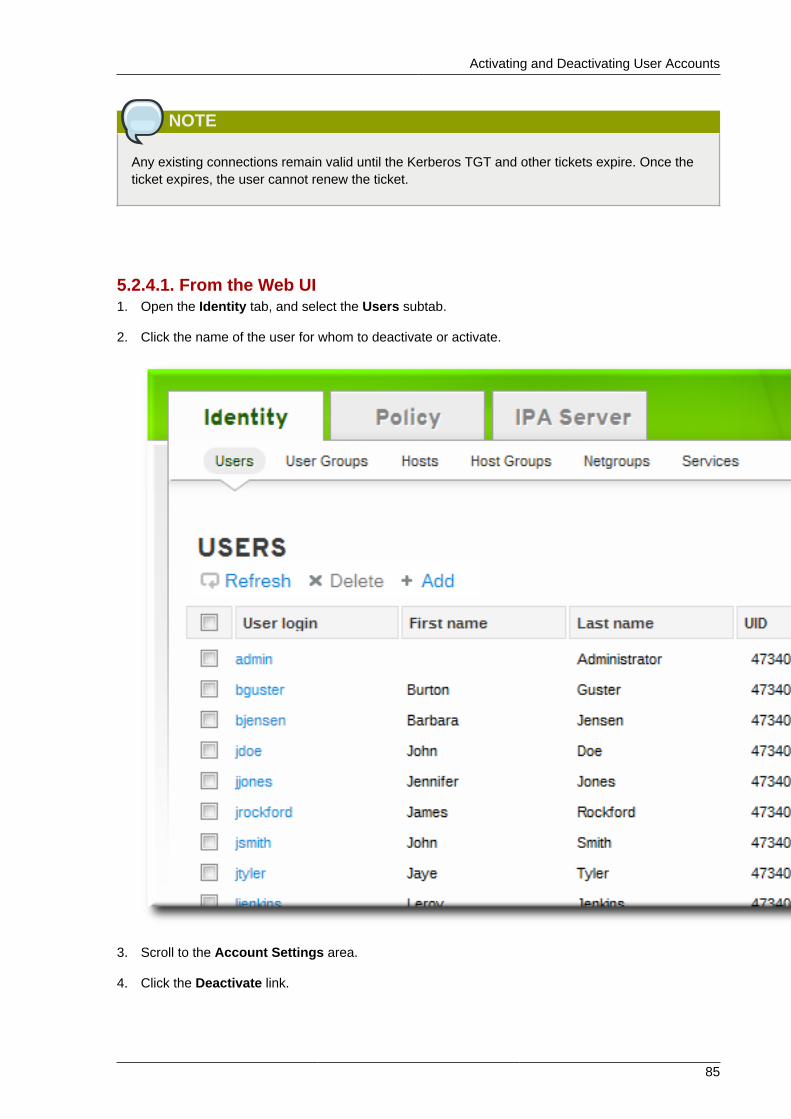
Activating and Deactivating User Accounts
85
NOTE
Any existing connections remain valid until the Kerberos TGT and other tickets expire. Once theticket expires, the user cannot renew the ticket.
5.2.4.1. From the Web UI1. Open the Identity tab, and select the Users subtab.
2. Click the name of the user for whom to deactivate or activate.
3. Scroll to the Account Settings area.
4. Click the Deactivate link.
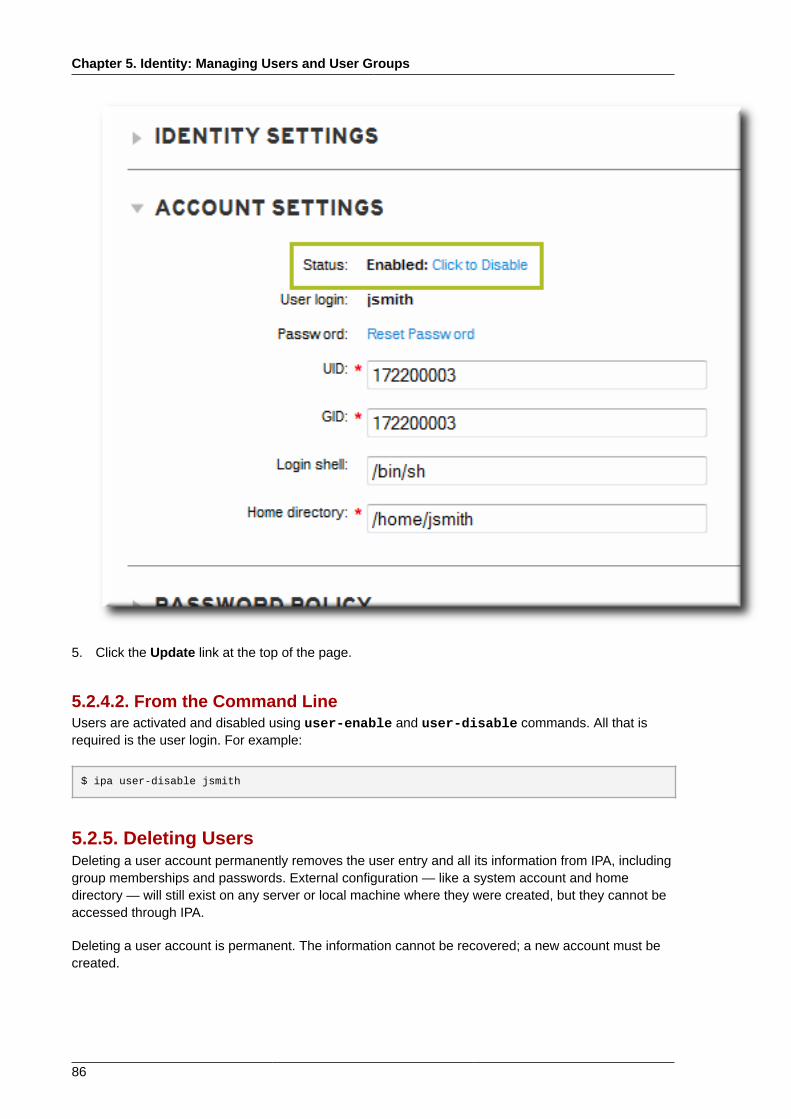
Chapter 5. Identity: Managing Users and User Groups
86
5. Click the Update link at the top of the page.
5.2.4.2. From the Command LineUsers are activated and disabled using user-enable and user-disable commands. All that isrequired is the user login. For example:
$ ipa user-disable jsmith
5.2.5. Deleting UsersDeleting a user account permanently removes the user entry and all its information from IPA, includinggroup memberships and passwords. External configuration — like a system account and homedirectory — will still exist on any server or local machine where they were created, but they cannot beaccessed through IPA.
Deleting a user account is permanent. The information cannot be recovered; a new account must becreated.

Deleting Users
87
NOTE
If all admin users are deleted, then you must use the Directory Manager account to create a newadministrative user.
Alternatively, any user who belongs in the group management role can also add a new adminuser.
5.2.5.1. With the Web UI1. Open the Identity tab, and select the Users subtab.
2. Select the checkboxes by the names of the users to delete.
3. Click the Delete link at the top of the task area.
4. When prompted, confirm the delete action.

Chapter 5. Identity: Managing Users and User Groups
88
5.2.5.2. From the Command LineUsers are deleted using the user-del command and then the user login. For example, a single user:
$ ipa user-del jsmith
To delete multiple users, simply list the users, separated by spaces.
$ ipa user-del jsmith bjensen mreynolds cdickens
When deleting multiple users, use the --continue option to force the command to continueregardless of errors. A summary of the successful and failed operations is printed to stdout when thecommand completes. If --continue is not used, then the command proceeds with deleting usersuntil it encounters an error, and then it exits.
5.3. Managing Public SSH Keys for Users (TECH PREVIEW)OpenSSH uses public-private key pairs to authenticate users. A user attempts to access somenetwork resource and presents its key pair. The first time the user authenticates, the administrator onthe target machine has to approve the request manually. The machine then stores the user's publickey in an authorized_keys file. Any time that the user attempts to access the resource again, themachine simply checks its authorized_keys file and then grants access automatically to approvedusers.
There are a couple of problems with this system:
• SSH keys have to be distributed manually and separately to all machines in an environment.
• Administrators have to approve user keys to add them to the configuration, but it is difficult to verifyeither the user or key issuer properly, which can create security problems.
On Red Hat Enterprise Linux, the System Security Services Daemon (SSSD) can be configuredto cache and retrieve user SSH keys so that applications and services only have to look in onelocation for user keys. Because SSSD can use Identity Management as one of its identity informationproviders, Identity Management provides a universal and centralized repository of keys. Administratorsdo not need to worry about distributing, updating, or verifying user SSH keys.
Changing Passwords
89
User SSH keys are added to user entries in IPA, either when the user is created or by modifying theentry later. In a key file, such as a user's id_rsa.pub file, a key entry is identified by its type and thenthe key itself. For example, for an RSA key:
ssh-rsa ABCD1234==
Only the second part, the base 64-encoded key itself, is uploaded to the user entry.
The --sshpubkey option uploads the 64 bit-encoded public key to the user entry. For example:
[jsmith@server ~]$ ipa user-mod jsmith --sshpubkey="12345abcde="
With a real key, the key is longer and usually ends with an equals sign (=).
To upload multiple keys, pass a comma-separated list of keys with a single --sshpubkey option:
--sshpubkey="12345abcde==,key2==,key3=="
After uploading the user keys, configure SSSD to use Identity Management as one of its identitydomains and set up OpenSSH to use the SSSD tooling for managing user keys. This is covered in theRed Hat Enterprise Linux Deployment Guide1.
5.4. Changing PasswordsPassword policies (Chapter 11, Policy: Defining Password Policies) and minimal access restrictionscan be applied to a password change operation:
• Regular, non-administrative users can change only their personal passwords, and all passwords areconstrained by the IPA password policies.
This allows administrators to create intro passwords or to reset passwords easily, while stillkeeping the final password confidential. Since any password sent by an administrator to the user istemporary, there is little security risk.
• Changing a password as the IPA admin user overrides any IPA password policies, but the passwordexpires immediately. This requires the user to change the password at the next login. Similarly,any user who has password change rights can change a password and no password policies areapplied, but the other user must reset the password at the next log in.
• Changing a password as the LDAP Directory Manager user, using LDAP tools, overrides any IPApassword policies.
5.4.1. From the Web UI1. Open the Identity tab, and select the Users subtab.
2. Click the name of the user for whom to reset the password. All users can change their ownpassword; only administrators or users with delegated permissions can change other user'spasswords.
1 http://docs.redhat.com/docs/en-US/Red_Hat_Enterprise_Linux/6/html/Deployment_Guide/openssh-sssd.html
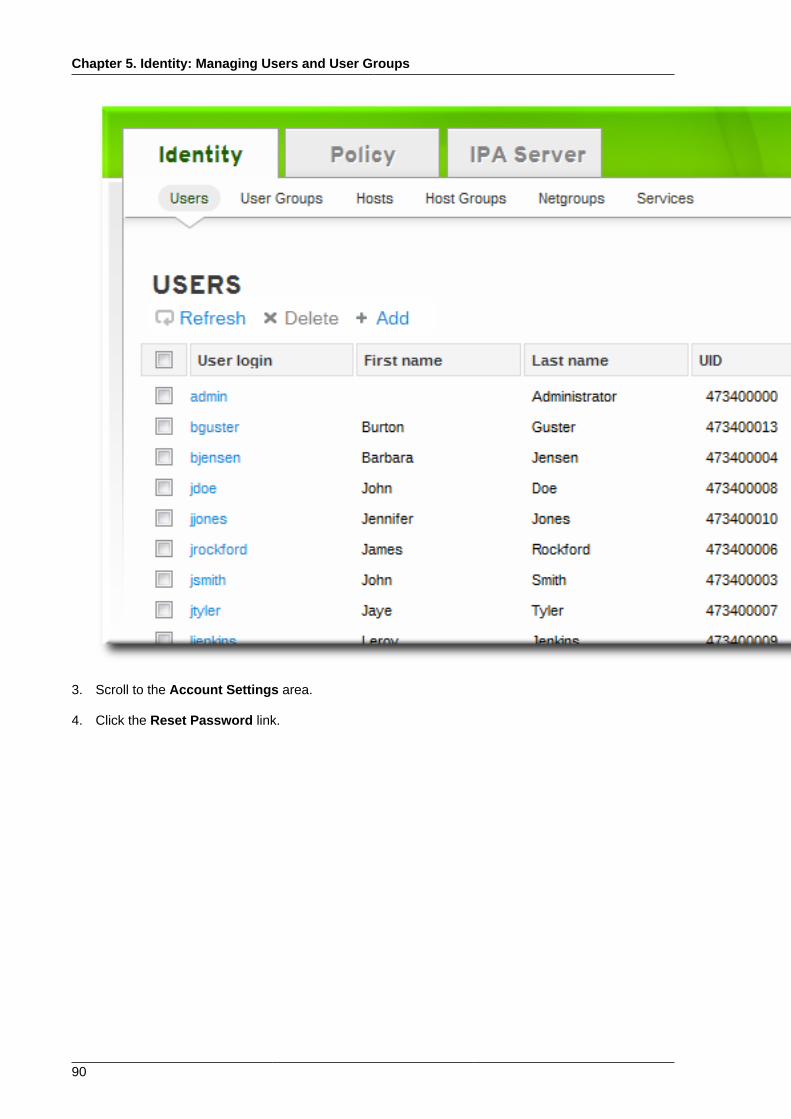
Chapter 5. Identity: Managing Users and User Groups
90
3. Scroll to the Account Settings area.
4. Click the Reset Password link.

From the Command Line
91
5. In the pop-up box, enter and confirm the new password.
5.4.2. From the Command LineChanging a password — your own or another user's — is done using the user-mod command, aswith other user account changes.
[bjensen@ipaserver ~]$ kinit admin

Chapter 5. Identity: Managing Users and User Groups
92
[bjensen@ipaserver ~]$ ipa user-mod jsmith --password
5.5. Unlocking User Accounts After Password FailuresIf a user attempts to log in and uses the wrong password a certain number of times, then that useraccount is locked. The exact number of failed attempts that locks and account and the duration of thelockout is defined as part of the password policy (Section 11.6, “Setting Account Lockout Policies”).
A password policy can implicitly define a reset period, where the account unlocks naturally after acertain amount of time lapses. However, if the duration is fairly long or if the deployment requiresstronger security checks before unlocking an account, then an administrator can unlock an accountmanually.
An account is unlocked using the user-unlock command. For example:
[bjensen@ipaserver ~]$ kinit admin[bjensen@ipaserver ~]$ ipa user-unlock jsmith
5.6. Managing User Private GroupsOn Red Hat Enterprise Linux systems, every time a user is created, a corresponding, secret usergroup is automatically created with that new user as its only member. This is a user private group.Using user private groups makes it simpler and safer to manage file and directory permissionsbecause umask defaults only have to restrict user access, not group access.
When a new user is created in the IPA domain, it is also created with a corresponding private group,following the Red Hat Enterprise Linux convention. For most environments, this is an acceptabledefault behavior, but there may be certain users or types of users which do not require a private groupor the environment may already have those GIDs2 assigned to NIS groups or other system groups.
5.6.1. Disabling Private Groups for a Specific UserPrivate group creation can be disabled when the user is created by using the --noprivate option.
[jsmith@server ~]$ ipa user-add jsmith --first=John --last=Smith --noprivate
5.6.2. Disabling Private Groups GloballyUser private groups are managed through the Managed Entries Plug-in in 389 Directory Server. Thisplug-in can be disabled, which effectively disables private group creation for all new users.
This is done using the ipa-managed-entries command.
1. Use the ipa-managed-entries command to list possible Managed Entries Plug-in definitions.By default, there are two, one for new users (UPG) and one for netgroups (NGP).
[root@ipaserver ~]# ipa-managed-entries --list -p DMpasswordAvailable Managed Entry Definitions:UPG DefinitionNGP Definition
2 See Section 5.7, “Managing Unique UID and GID Number Assignments” for information on changing GID/UID assignmentranges.

Managing Unique UID and GID Number Assignments
93
2. Disable the desired Managed Entries Plug-in instance. For example:
[root@ipaserver ~]# ipa-managed-entries -e "UPG Definition" -p DMpassword disableDisabling Plugin
3. Restart the 389 Directory Server to load the new plug-in configuration.
[root@ipaserver ~]# service dirsrv restart
Managed Entries Plug-in instances can be re-enabled with the enable option.
5.7. Managing Unique UID and GID Number AssignmentsAn IPA server must generate random UID and GID values and simultaneously ensure that replicasnever generate the same UID or GID value. The need for unique UID and GID numbers might evencross IPA domains, if a single organization has multiple disparate domains.
The UID and GID numbers are divided into ranges. By keeping separate numeric ranges for individualservers and replicas, the chances are minimal that any numbers issued by one server or replicawill duplicate those from another. Ranges are updated and shared intelligently between serversand replicas through the Dynamic Numeric Assignment (DNA) Plug-in, as part of the backend 389Directory Server instance for the domain. The same range is used for user IDs (uidNumber) andgroup IDs (gidNumber). A user and a group may have the same ID, but since the ID is set in differentattributes, there is no conflict. Using the same ID number for both a user and a group also allows anadministrator to configure user private groups, where a unique system group is created for each userand the ID number is the same for both the user and the group.
IMPORTANT
When a user is created interactively or without specifying a UID or GID number, then the useraccount is created with an ID number that is next available in the server or replica range. Thismeans that a user always has a unique number for its UID number and, if configured, for itsprivate group.
If a number is manually assigned to a user entry, the server does not validate that theuidNumber is unique. It will allow duplicate IDs; this is expected (though discouraged) behaviorfor POSIX entries. The same is true for group entries: a duplicate gidNumber can be manuallyassigned to the entry.
If two entries are assigned the same ID number, only the first entry is returned in a search forthat ID number. However, both entries will be returned in searches for other attributes or with ipauser-find --all.
5.7.1. About ID Range Assignments During InstallationThe IPA administrator can initially define a range during server installation, using the --idstart and--idmax options with ipa-server-install. These options are not required, so the setup scriptcan assign random ranges during installation.
If no range is set manually when the first IPA server is installed, a range of 200,000 IDs is randomlyselected. There are 10,000 possible ranges. Selecting a random range from that number provides ahigh probability of non-conflicting IDs if two separate IPA domains are ever merged in the future.

Chapter 5. Identity: Managing Users and User Groups
94
With a single IPA server, IDs are assigned to entries in order through the range. With replicas, theinitial server ID range is split and distributed.
When a replica is installed, it is configured with an invalid range. It also has a directory entry (that isshared among replicas) that instructs the replica where it can request a valid range. When the replicastarts, or as its current range is depleted so that less than 100 IDs are available, it can contact one ofthe available servers for a new range allotment. A special extended operation splits the range in two,so that the original server and the replica each have half of the available range.
5.7.2. Adding New RangesIf the range for the entire domain is close to depletion, a new range can be manually selectedand assigned to one of the master servers. All replicas then request ID ranges from the master asnecessary.
The changes to the range are done by editing the 389 Directory Server configuration to change theDNA Plug-in instance. The range is defined in the dnaNextRange parameter. For example:
ldapmodify -x -D "cn=Directory Manager" -W -h server.example.com -p 389Enter LDAP Password: *******dn: cn=Posix IDs,cn=Distributed Numeric Assignment Plugin,cn=plugins,cn=configchangetype: modifyadd: dnaNextRangednaNextRange: 123400000-123500000
NOTE
This command only adds the specified range of values; it does not check that the values in thatrange are actually available. This check is performed when an attempt is made to allocate thosevalues. If a range is added that contains mostly values that were already allocated, the systemwill cycle through the entire range searching for unallocated values, and then the operationultimately fails if none are available.
5.8. Managing User and Group SchemaWhen a user entry is created, it is automatically assigned certain LDAP object classes which, inturn, make available certain attributes. LDAP attributes are the way that information is stored in thedirectory. (This is discussed in detail in the Directory Server Deployment Guide and the DirectoryServer Schema Reference.)
Table 5.1. Default Identity Management User Object Classes
Description Object Classes
IPA object classes ipaobject
Person object classes personorganizationalpersoninetorgpersoninetuserposixaccount
Kerberos object classes krbprincipalauxkrbticketpolicyaux
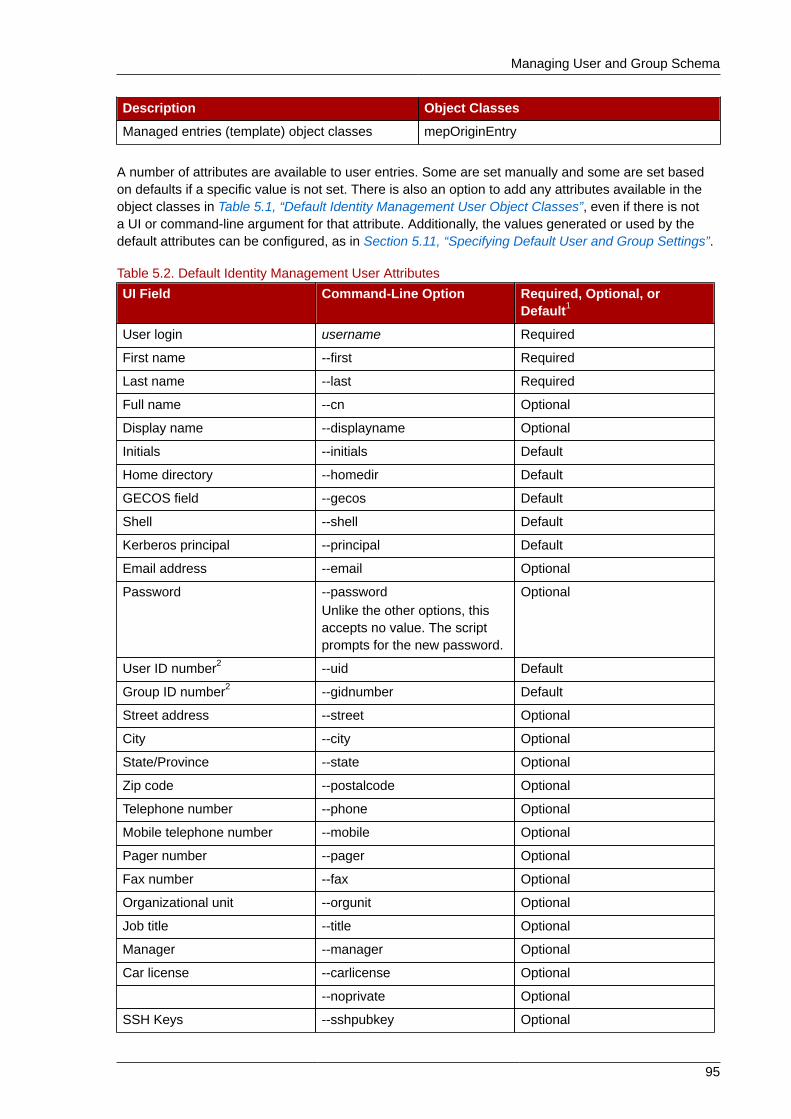
Managing User and Group Schema
95
Description Object Classes
Managed entries (template) object classes mepOriginEntry
A number of attributes are available to user entries. Some are set manually and some are set basedon defaults if a specific value is not set. There is also an option to add any attributes available in theobject classes in Table 5.1, “Default Identity Management User Object Classes”, even if there is nota UI or command-line argument for that attribute. Additionally, the values generated or used by thedefault attributes can be configured, as in Section 5.11, “Specifying Default User and Group Settings”.
Table 5.2. Default Identity Management User Attributes
UI Field Command-Line Option Required, Optional, orDefault1
User login username Required
First name --first Required
Last name --last Required
Full name --cn Optional
Display name --displayname Optional
Initials --initials Default
Home directory --homedir Default
GECOS field --gecos Default
Shell --shell Default
Kerberos principal --principal Default
Email address --email Optional
Password --passwordUnlike the other options, thisaccepts no value. The scriptprompts for the new password.
Optional
User ID number2 --uid Default
Group ID number2 --gidnumber Default
Street address --street Optional
City --city Optional
State/Province --state Optional
Zip code --postalcode Optional
Telephone number --phone Optional
Mobile telephone number --mobile Optional
Pager number --pager Optional
Fax number --fax Optional
Organizational unit --orgunit Optional
Job title --title Optional
Manager --manager Optional
Car license --carlicense Optional
--noprivate Optional
SSH Keys --sshpubkey Optional
Chapter 5. Identity: Managing Users and User Groups
96
UI Field Command-Line Option Required, Optional, orDefault1
Additional attributes --addattr Optional1 Required attributes must be set for every entry. Optional attributes may be set, while default attributes are automatically addedwith a pre-defined value unless a specific value is given.2 When a user is created without specifying a UID number, then the user account is automatically assigned an ID number thatis next available in the server or replica range. (Number ranges are described more in Section 5.7, “Managing Unique UID andGID Number Assignments”.) This means that a user always has a unique number for its UID number and, if configured, for itsprivate group.If a number is manually assigned to a user entry, the server does not validate that the uidNumber is unique. It will allowduplicate IDs; this is expected (though discouraged) behavior for POSIX entries.
If two entries are assigned the same ID number, only the first entry is returned in a search for that ID number. However, bothentries will be returned in searches for other attributes or with ipa user-find --all.
5.8.1. About Changing the Default User and Group SchemaIt is possible to add or change the object classes and attributes used for user and group entries(Section 5.8, “Managing User and Group Schema”).
The IPA configuration provides some validation when object classes are changed:
• All of the object classes and their specified attributes must be known to the LDAP server.
• All default attributes that are configured for the entry must be supported by the configured objectclasses.
There are limits to the IPA schema validation, however. Most important, the IPA server does not checkthat the defined user or group object classes contain all of the required object classes for IPA entries.For example, all IPA entries require the ipaobject object class. However, when the user or groupschema is changed, the server does not check to make sure that this object class is included; if theobject class is accidentally deleted, then future entry add operations will fail.
Also, all object class changes are atomic, not incremental. The entire list of default object classeshas to be defined every time there is a change. For example, a company may create a custom objectclass to store employee information like birthdays and employment start dates. The administratorcannot simply add the custom object class to the list; he must set the entire list of current defaultobject classes plus the new object class. The existing default object classes must always be includedwhen the configuration is updated. Otherwise, the current settings will be overwritten, which causesserious performance problems.
5.8.2. Applying Custom Object Classes to New User EntriesUser and group accounts are created with a pre-defined set of LDAP object classes applied to theentry. Any attributes which belong to the object class can be added to the user entry.
While the standard and IPA-specific LDAP object classes will cover most deployment scenarios,administrators may have custom object classes with custom attributes which should be applied to userentries.
5.8.2.1. From the Web UI1. Add all of the custom schema elements to the 389 Directory Server instance used by Identity
Management. Adding schema elements is described in the schema chapter of the DirectoryServer Administrator's Guide3.
2. Open the IPA Server tab.
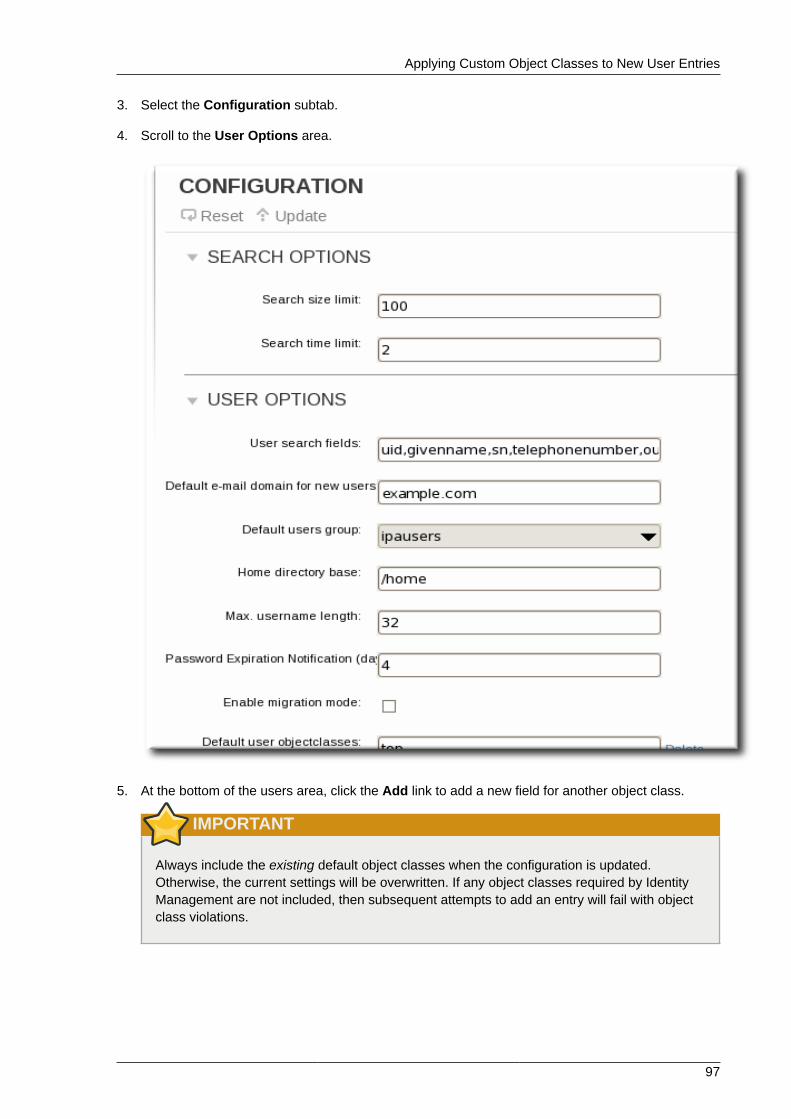
Applying Custom Object Classes to New User Entries
97
3. Select the Configuration subtab.
4. Scroll to the User Options area.
5. At the bottom of the users area, click the Add link to add a new field for another object class.
IMPORTANT
Always include the existing default object classes when the configuration is updated.Otherwise, the current settings will be overwritten. If any object classes required by IdentityManagement are not included, then subsequent attempts to add an entry will fail with objectclass violations.
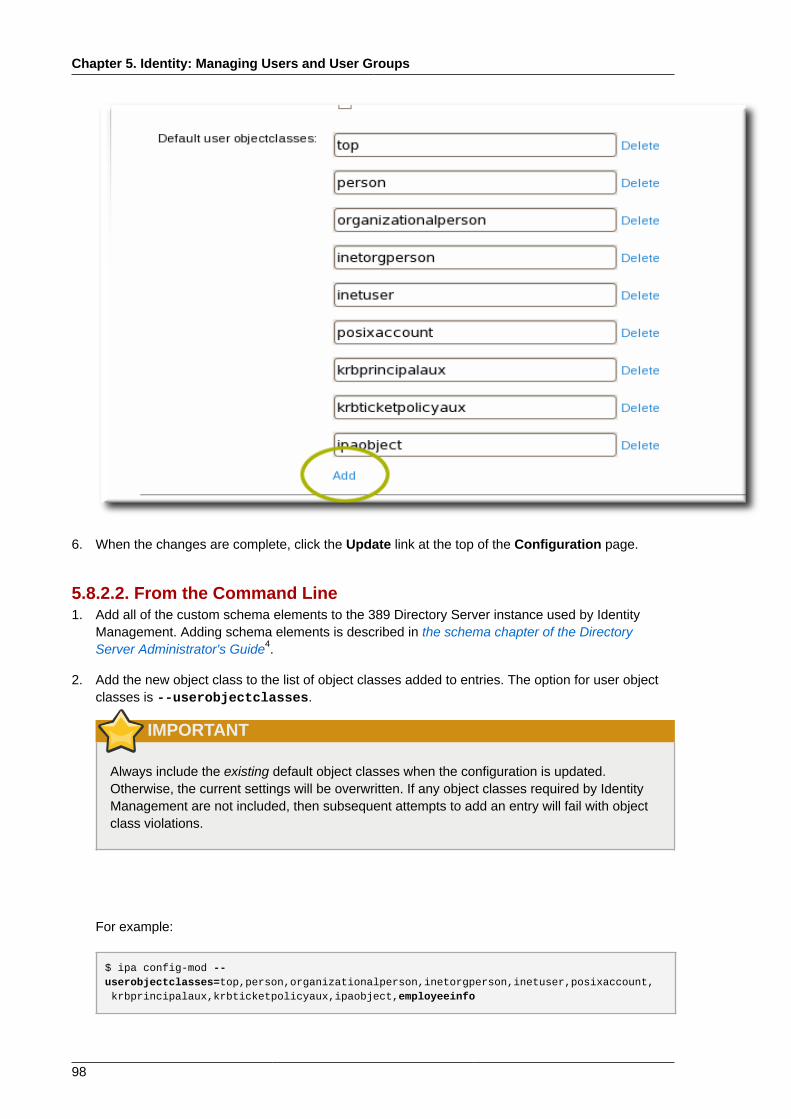
Chapter 5. Identity: Managing Users and User Groups
98
6. When the changes are complete, click the Update link at the top of the Configuration page.
5.8.2.2. From the Command Line1. Add all of the custom schema elements to the 389 Directory Server instance used by Identity
Management. Adding schema elements is described in the schema chapter of the DirectoryServer Administrator's Guide4.
2. Add the new object class to the list of object classes added to entries. The option for user objectclasses is --userobjectclasses.
IMPORTANT
Always include the existing default object classes when the configuration is updated.Otherwise, the current settings will be overwritten. If any object classes required by IdentityManagement are not included, then subsequent attempts to add an entry will fail with objectclass violations.
For example:
$ ipa config-mod --userobjectclasses=top,person,organizationalperson,inetorgperson,inetuser,posixaccount, krbprincipalaux,krbticketpolicyaux,ipaobject,employeeinfo

Applying Custom Object Classes to New Group Entries
99
5.8.3. Applying Custom Object Classes to New Group EntriesAs with user entries, administrators may have custom object classes with custom attributes whichshould be applied to group entries. These can be added automatically by adding the object classes tothe IPA server configuration.
5.8.3.1. From the Web UI1. Add all of the custom schema elements to the 389 Directory Server instance used by Identity
Management. Adding schema elements is described in the schema chapter of the DirectoryServer Administrator's Guide5.
2. Open the IPA Server tab.
3. Select the Configuration subtab.
4. Scroll to the Group Options area.

Chapter 5. Identity: Managing Users and User Groups
100
5. Click the Add link to add a new field for another object class.

Managing User Groups
101
IMPORTANT
Always include the existing default object classes when the configuration is updated.Otherwise, the current settings will be overwritten. If any object classes required by IdentityManagement are not included, then subsequent attempts to add an entry will fail with objectclass violations.
6. When the changes are complete, click the Update link at the top of the Configuration page.
5.8.3.2. From the Command Line1. Add all of the custom schema elements to the 389 Directory Server instance used by Identity
Management. Adding schema elements is described in the schema chapter of the DirectoryServer Administrator's Guide6.
2. Add the new object class to the list of object classes added to entries. The option for group objectclasses is --groupobjectclasses.
IMPORTANT
Always include the existing default object classes when the configuration is updated.Otherwise, the current settings will be overwritten. If any object classes required by IdentityManagement are not included, then subsequent attempts to add an entry will fail with objectclass violations.
For example:
$ ipa config-mod --groupobjectclasses=top,groupofnames,nestedgroup,ipausergroup,ipaobject,employeegroup
5.9. Managing User GroupsUser groups are a way of centralizing control over important management tasks, particularly accesscontrol and password policies. Three groups are created during the installation, specifically for use byIPA operations:
• ipausers, which contains all users.
• admins, which contains administrative users. The initial admin user belongs to this group.
• editors, which is a special group for users working through the web UI. This group allows users toedit other users' entries, though without all of the rights of the admin user.
All groups in Identity Management are essentially static groups, meaning that the members of thegroup are manually and explicitly added to the group. Tangentially, IPA allows nested groups, where
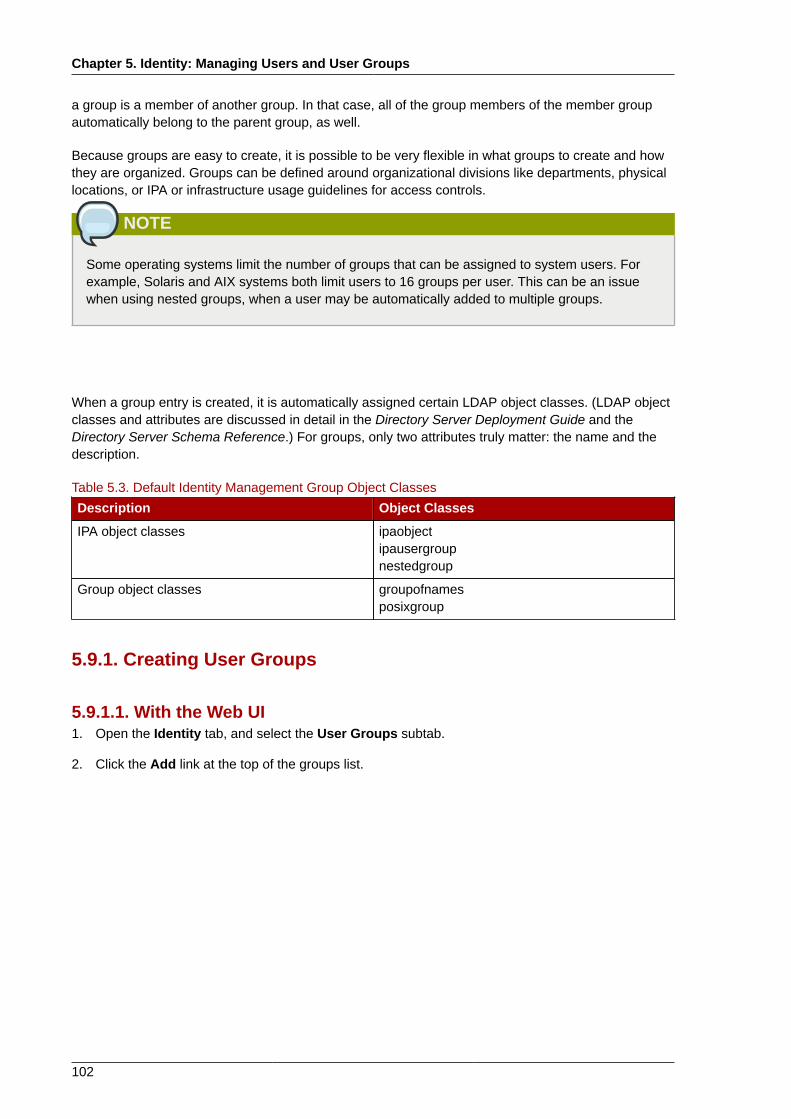
Chapter 5. Identity: Managing Users and User Groups
102
a group is a member of another group. In that case, all of the group members of the member groupautomatically belong to the parent group, as well.
Because groups are easy to create, it is possible to be very flexible in what groups to create and howthey are organized. Groups can be defined around organizational divisions like departments, physicallocations, or IPA or infrastructure usage guidelines for access controls.
NOTE
Some operating systems limit the number of groups that can be assigned to system users. Forexample, Solaris and AIX systems both limit users to 16 groups per user. This can be an issuewhen using nested groups, when a user may be automatically added to multiple groups.
When a group entry is created, it is automatically assigned certain LDAP object classes. (LDAP objectclasses and attributes are discussed in detail in the Directory Server Deployment Guide and theDirectory Server Schema Reference.) For groups, only two attributes truly matter: the name and thedescription.
Table 5.3. Default Identity Management Group Object Classes
Description Object Classes
IPA object classes ipaobjectipausergroupnestedgroup
Group object classes groupofnamesposixgroup
5.9.1. Creating User Groups
5.9.1.1. With the Web UI1. Open the Identity tab, and select the User Groups subtab.
2. Click the Add link at the top of the groups list.

Creating User Groups
103
3. Enter all of the information for the group.
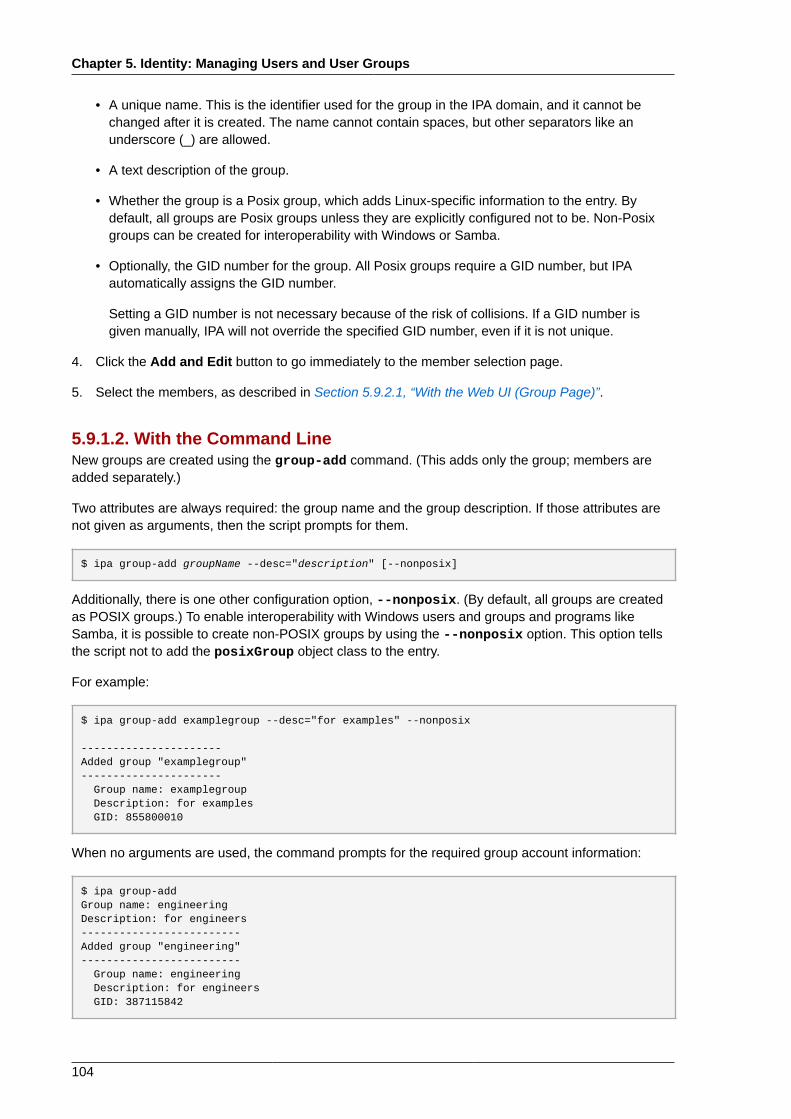
Chapter 5. Identity: Managing Users and User Groups
104
• A unique name. This is the identifier used for the group in the IPA domain, and it cannot bechanged after it is created. The name cannot contain spaces, but other separators like anunderscore (_) are allowed.
• A text description of the group.
• Whether the group is a Posix group, which adds Linux-specific information to the entry. Bydefault, all groups are Posix groups unless they are explicitly configured not to be. Non-Posixgroups can be created for interoperability with Windows or Samba.
• Optionally, the GID number for the group. All Posix groups require a GID number, but IPAautomatically assigns the GID number.
Setting a GID number is not necessary because of the risk of collisions. If a GID number isgiven manually, IPA will not override the specified GID number, even if it is not unique.
4. Click the Add and Edit button to go immediately to the member selection page.
5. Select the members, as described in Section 5.9.2.1, “With the Web UI (Group Page)”.
5.9.1.2. With the Command LineNew groups are created using the group-add command. (This adds only the group; members areadded separately.)
Two attributes are always required: the group name and the group description. If those attributes arenot given as arguments, then the script prompts for them.
$ ipa group-add groupName --desc="description" [--nonposix]
Additionally, there is one other configuration option, --nonposix. (By default, all groups are createdas POSIX groups.) To enable interoperability with Windows users and groups and programs likeSamba, it is possible to create non-POSIX groups by using the --nonposix option. This option tellsthe script not to add the posixGroup object class to the entry.
For example:
$ ipa group-add examplegroup --desc="for examples" --nonposix
----------------------Added group "examplegroup"---------------------- Group name: examplegroup Description: for examples GID: 855800010
When no arguments are used, the command prompts for the required group account information:
$ ipa group-addGroup name: engineeringDescription: for engineers-------------------------Added group "engineering"------------------------- Group name: engineering Description: for engineers GID: 387115842

Adding Group Members
105
IMPORTANT
When a group is created without specifying a GID number, then the group entry is assigned theID number that is next available in the server or replica range. (Number ranges are describedmore in Section 5.7, “Managing Unique UID and GID Number Assignments”.) This means that agroup always has a unique number for its GID number.
If a number is manually assigned to a group entry, the server does not validate that thegidNumber is unique. It will allow duplicate IDs; this is expected (though discouraged) behaviorfor POSIX entries.
If two entries are assigned the same ID number, only the first entry is returned in a search forthat ID number. However, both entries will be returned in searches for other attributes or with ipagroup-find --all.
NOTE
You cannot edit the group name. The group name is the primary key, so changing it is theequivalent of deleting the group and creating a new one.
5.9.2. Adding Group Members
5.9.2.1. With the Web UI (Group Page)
NOTE
This procedure adds a user to a group. User groups can contain other user groups as theirmembers. These are nested groups.
It can take up to several minutes for the members of the child group to show up as members ofthe parent group. This is especially true on virtual machines where the nested groups have morethan 500 members.
When creating nested groups, be careful not to create recursive groups. For example, if GroupAis a member of GroupB, do not add GroupB as a member of GroupA. Recursive groups are notsupported and can cause unpredictable behavior.
1. Open the Identity tab, and select the User Groups subtab.
2. Click the name of the group to which to add members.
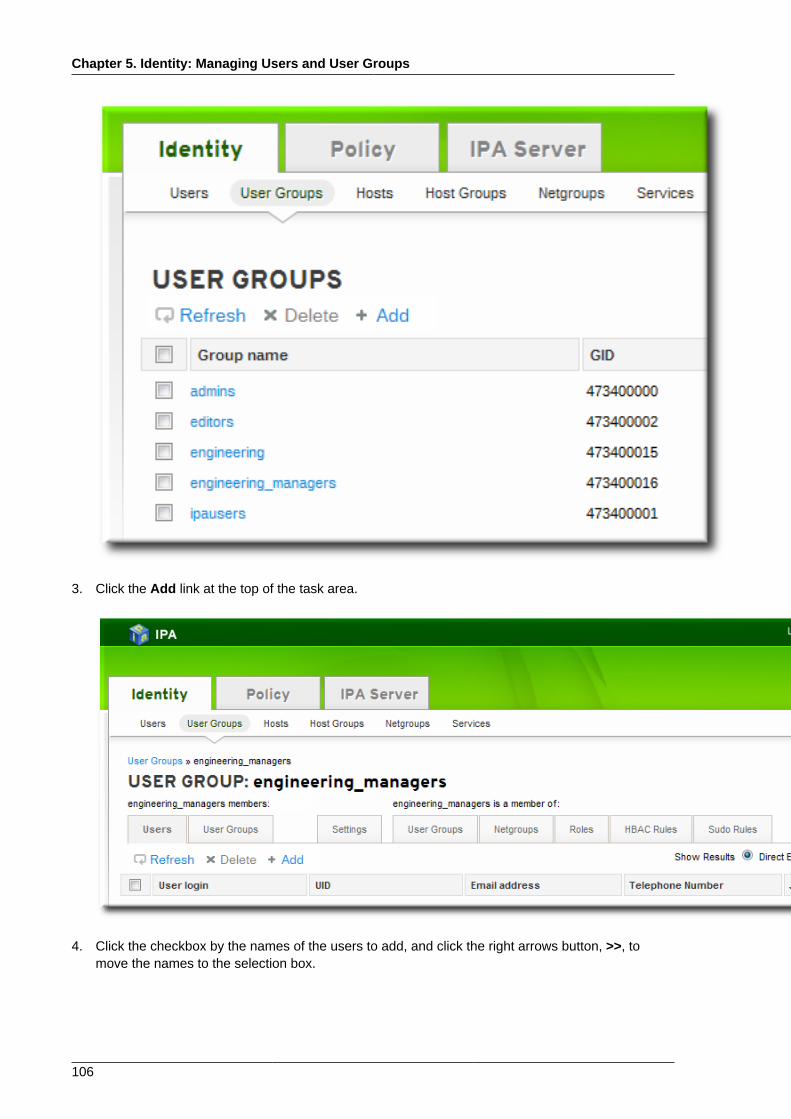
Chapter 5. Identity: Managing Users and User Groups
106
3. Click the Add link at the top of the task area.
4. Click the checkbox by the names of the users to add, and click the right arrows button, >>, tomove the names to the selection box.
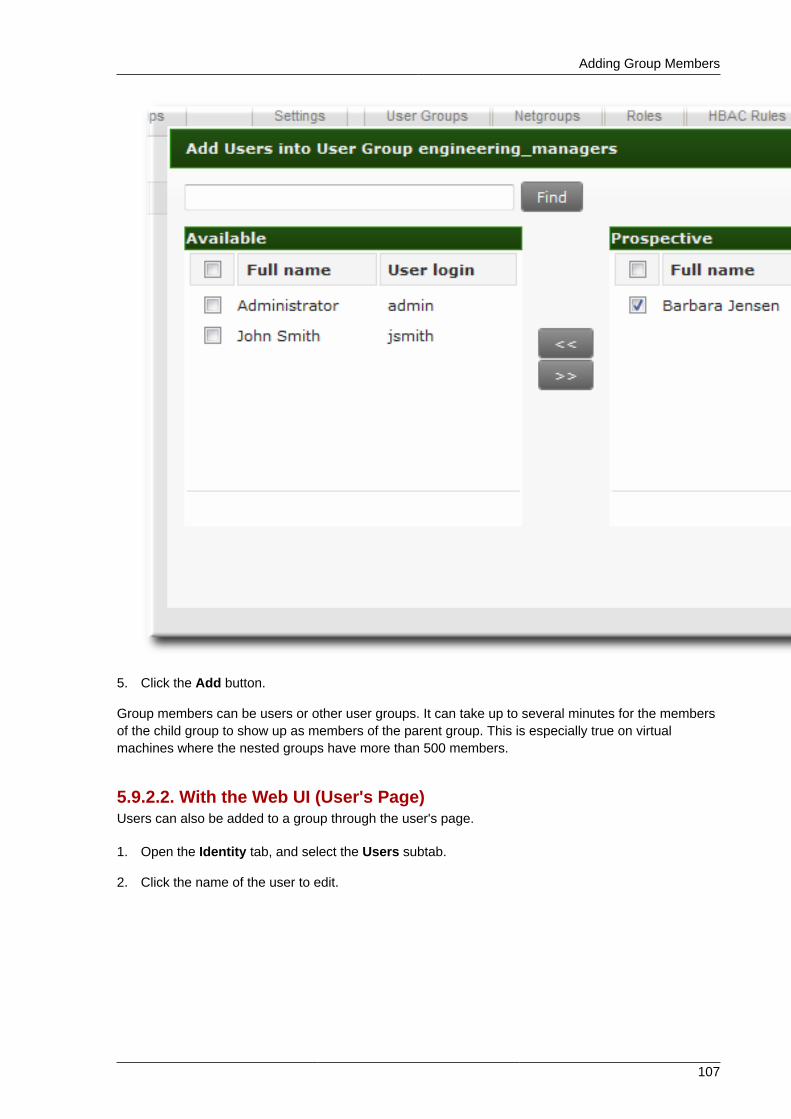
Adding Group Members
107
5. Click the Add button.
Group members can be users or other user groups. It can take up to several minutes for the membersof the child group to show up as members of the parent group. This is especially true on virtualmachines where the nested groups have more than 500 members.
5.9.2.2. With the Web UI (User's Page)Users can also be added to a group through the user's page.
1. Open the Identity tab, and select the Users subtab.
2. Click the name of the user to edit.
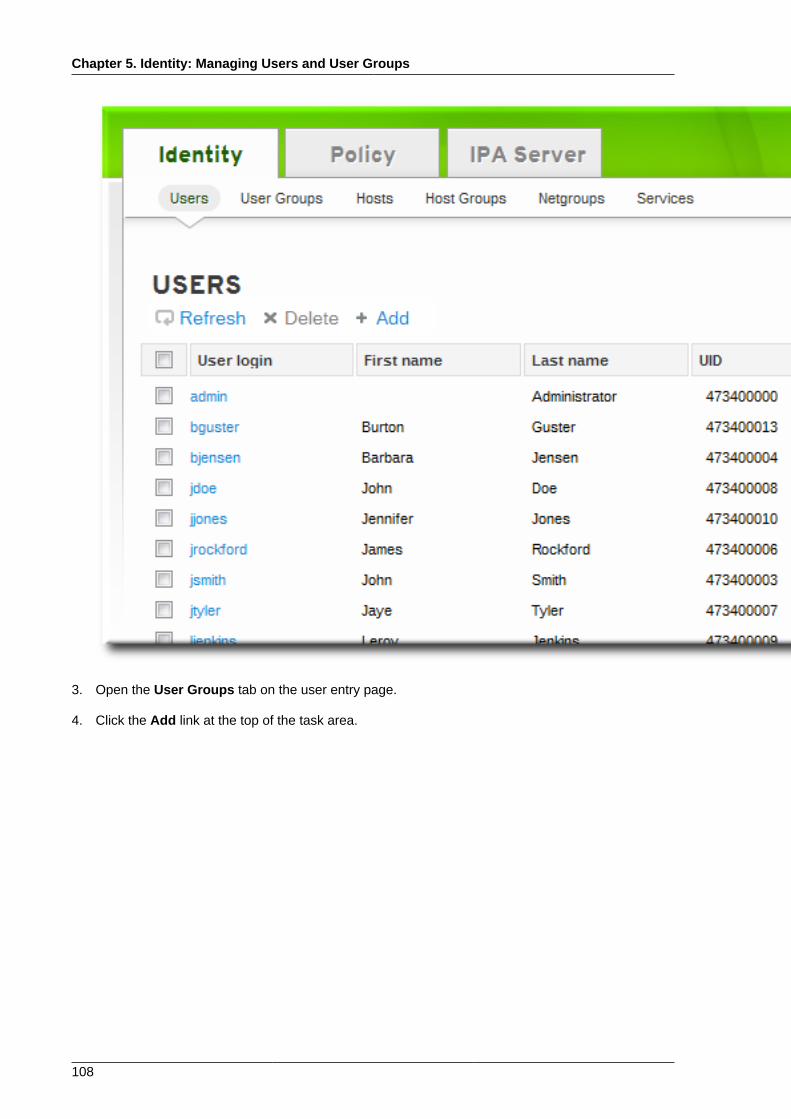
Chapter 5. Identity: Managing Users and User Groups
108
3. Open the User Groups tab on the user entry page.
4. Click the Add link at the top of the task area.
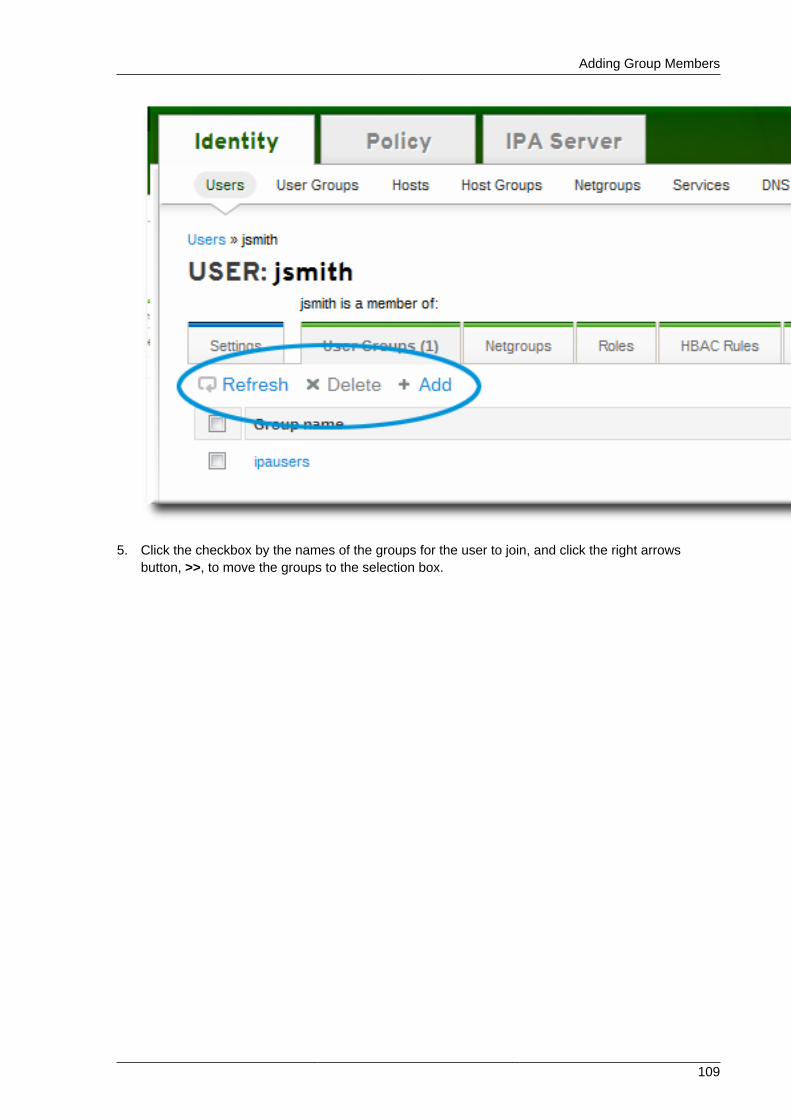
Adding Group Members
109
5. Click the checkbox by the names of the groups for the user to join, and click the right arrowsbutton, >>, to move the groups to the selection box.
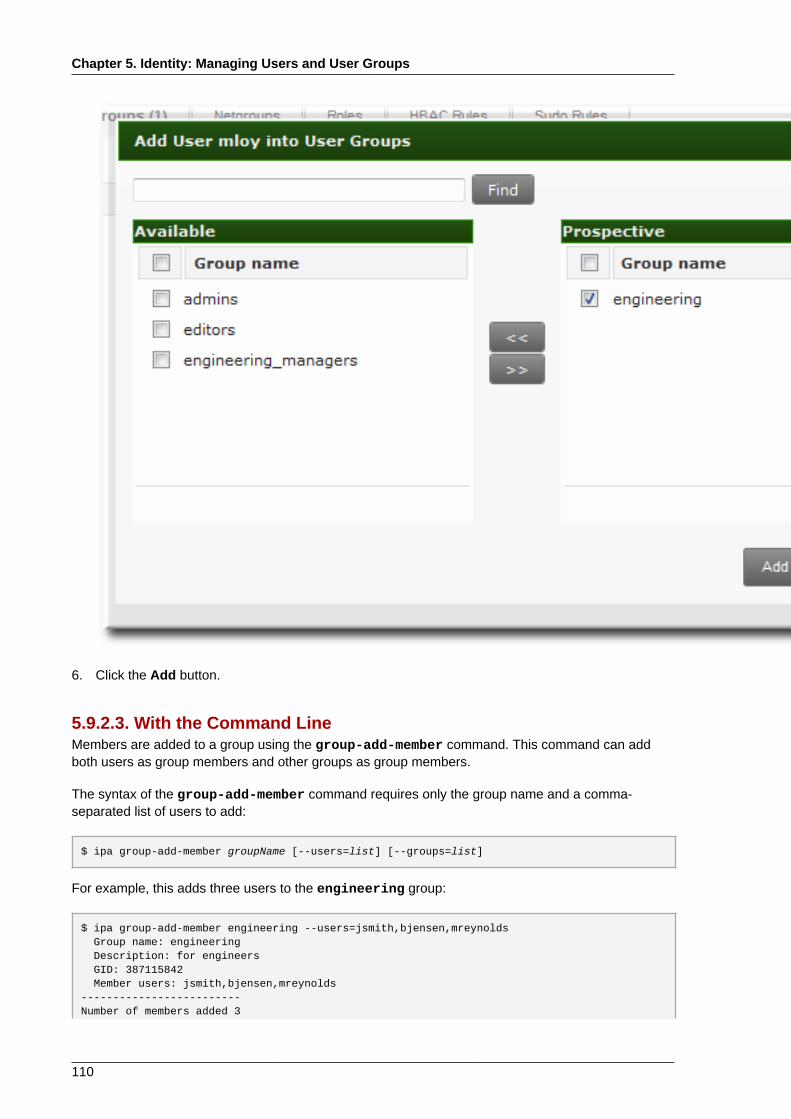
Chapter 5. Identity: Managing Users and User Groups
110
6. Click the Add button.
5.9.2.3. With the Command LineMembers are added to a group using the group-add-member command. This command can addboth users as group members and other groups as group members.
The syntax of the group-add-member command requires only the group name and a comma-separated list of users to add:
$ ipa group-add-member groupName [--users=list] [--groups=list]
For example, this adds three users to the engineering group:
$ ipa group-add-member engineering --users=jsmith,bjensen,mreynolds Group name: engineering Description: for engineers GID: 387115842 Member users: jsmith,bjensen,mreynolds-------------------------Number of members added 3
Adding Group Members
111
-------------------------
Likewise, other groups can be added as members, which creates nested groups:
$ ipa group-add-member engineering --groups=dev,qe1,dev2 Group name: engineering Description: for engineers GID: 387115842 Member groups: dev,qe1,dev2 ------------------------- Number of members added 3 -------------------------
When displaying nested groups, members are listed as members and the members of any membergroups are listed as indirect members. For example:
$ ipa group-show examplegroup Group name: examplegroup Description: for examples GID: 93200002 Member users: jsmith,bjensen,mreynolds Member groups: californiausers Indirect Member users: sbeckett,acalavicci
It can take up to several minutes for the members of the child group to show up as members of theparent group. This is especially true on virtual machines where the nested groups have more than 500members.
NOTE
When creating nested groups, be careful not to create recursive groups. For example, if GroupAis a member of GroupB, do not add GroupB as a member of GroupA. Recursive groups are notsupported and can cause unpredictable behavior.
A group member is removed using the group-remove-member command.
$ ipa group-remove-member engineering --users=jsmith
Group name: engineering Description: for engineers GID: 855800009 Member users: bjensen,mreynolds---------------------------Number of members removed 1---------------------------
5.9.2.4. Viewing Direct and Indirect Members of a GroupUser groups can contain other user groups as members. This is called a nested group. This alsomeans that a group has two types of members:
• Direct members, which are added explicitly to the group
• Indirect members, which are members of the group because they are members of another usergroup which is a member of the group
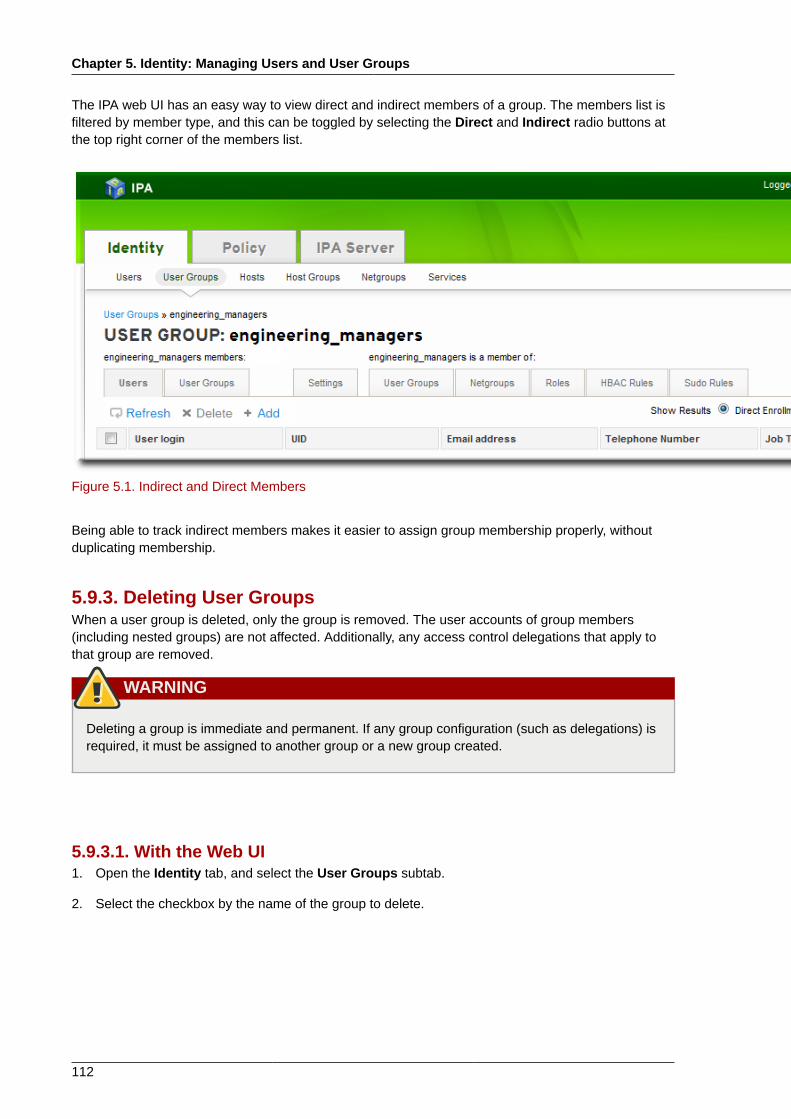
Chapter 5. Identity: Managing Users and User Groups
112
The IPA web UI has an easy way to view direct and indirect members of a group. The members list isfiltered by member type, and this can be toggled by selecting the Direct and Indirect radio buttons atthe top right corner of the members list.
Figure 5.1. Indirect and Direct Members
Being able to track indirect members makes it easier to assign group membership properly, withoutduplicating membership.
5.9.3. Deleting User GroupsWhen a user group is deleted, only the group is removed. The user accounts of group members(including nested groups) are not affected. Additionally, any access control delegations that apply tothat group are removed.
WARNING
Deleting a group is immediate and permanent. If any group configuration (such as delegations) isrequired, it must be assigned to another group or a new group created.
5.9.3.1. With the Web UI1. Open the Identity tab, and select the User Groups subtab.
2. Select the checkbox by the name of the group to delete.

Deleting User Groups
113
3. Click the Delete link at the top of the task area.
4. When prompted, confirm the delete action.
5.9.3.2. With the Command LineThe group-del command to deletes the specified group. For example:
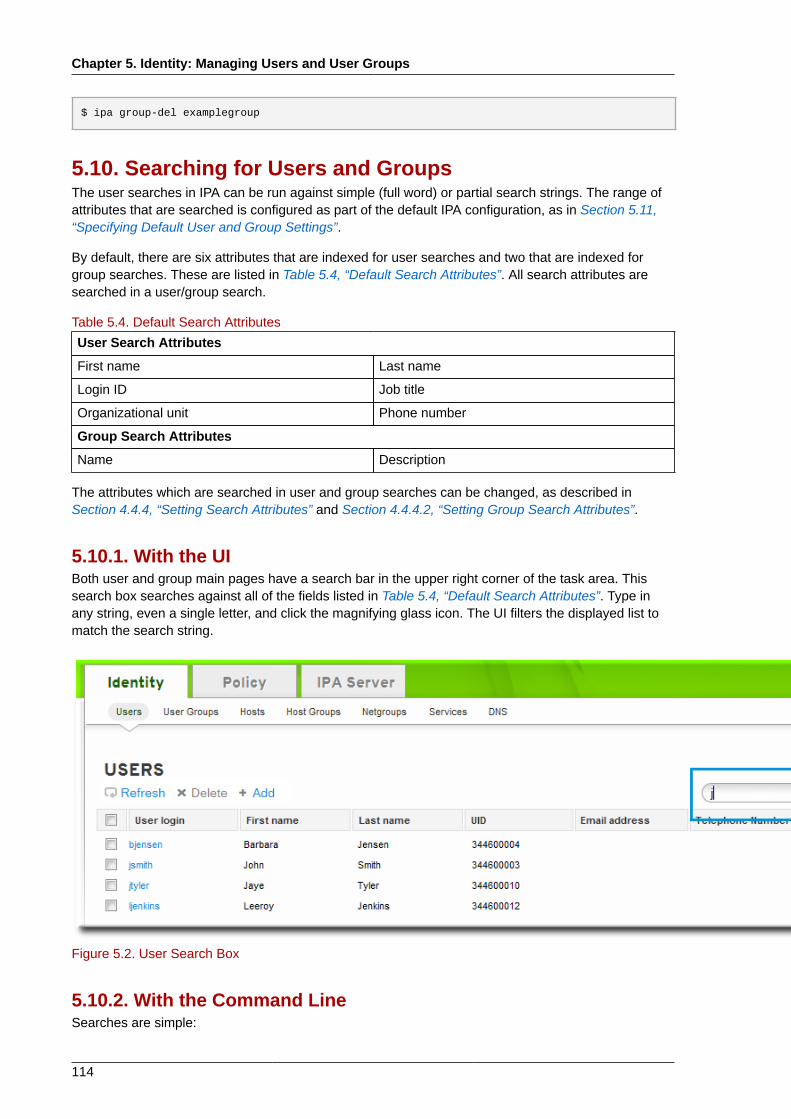
Chapter 5. Identity: Managing Users and User Groups
114
$ ipa group-del examplegroup
5.10. Searching for Users and GroupsThe user searches in IPA can be run against simple (full word) or partial search strings. The range ofattributes that are searched is configured as part of the default IPA configuration, as in Section 5.11,“Specifying Default User and Group Settings”.
By default, there are six attributes that are indexed for user searches and two that are indexed forgroup searches. These are listed in Table 5.4, “Default Search Attributes”. All search attributes aresearched in a user/group search.
Table 5.4. Default Search Attributes
User Search Attributes
First name Last name
Login ID Job title
Organizational unit Phone number
Group Search Attributes
Name Description
The attributes which are searched in user and group searches can be changed, as described inSection 4.4.4, “Setting Search Attributes” and Section 4.4.4.2, “Setting Group Search Attributes”.
5.10.1. With the UIBoth user and group main pages have a search bar in the upper right corner of the task area. Thissearch box searches against all of the fields listed in Table 5.4, “Default Search Attributes”. Type inany string, even a single letter, and click the magnifying glass icon. The UI filters the displayed list tomatch the search string.
Figure 5.2. User Search Box
5.10.2. With the Command LineSearches are simple:

With the Command Line
115
$ ipa user-find|group-find string options
There are a few general rules with searches:
• If there is no string, then the search returns every entry in IPA, up to the search limit.
• With the command-line tools, only a single search string can be used for user and group searches.With the UI, multiple strings can be used.
• Searches are case insensitive.
• Search results are displayed alphabetically, with exact matches listed first, followed by partialmatches.
• Wildcards cannot be used in searches. The search string must include at least one character thatappears in one of the indexed search fields.
Example 5.2. User Search for JohnThe basic search looks for the string john, which can appear in any of the search indexes.
$ ipa user-find john
---------------2 users matched--------------- User login: jpeterson First name: john Last name: peterson Home directory: /home/jpeterson Login shell: /bin/sh UID: 855800007 GID: 855800007 Account disabled: False
User login: jsmith First name: john Last name: smith Home directory: /home/jsmith Login shell: /bin/sh UID: 855800004 GID: 855800004 Account disabled: False----------------------------Number of entries returned 2----------------------------
A search can also accept options like --raw. --raw prints the LDAP attributes for the user accountrather than the reading-friendly field names.
$ ipa user-find john --raw
---------------2 users matched--------------- uid: jpeterson givenname: john sn: peterson homedirectory: /home/jpeterson loginshell: /bin/sh uidnumber: 855800007 gidnumber: 855800007
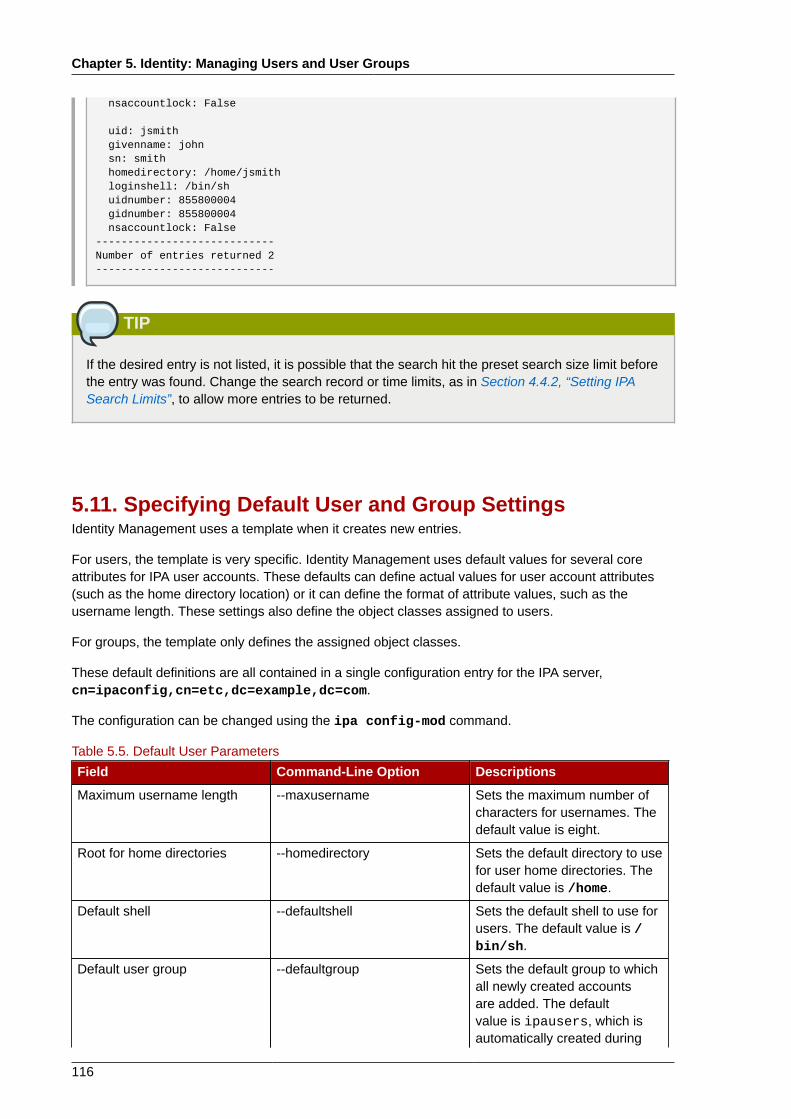
Chapter 5. Identity: Managing Users and User Groups
116
nsaccountlock: False
uid: jsmith givenname: john sn: smith homedirectory: /home/jsmith loginshell: /bin/sh uidnumber: 855800004 gidnumber: 855800004 nsaccountlock: False----------------------------Number of entries returned 2----------------------------
TIP
If the desired entry is not listed, it is possible that the search hit the preset search size limit beforethe entry was found. Change the search record or time limits, as in Section 4.4.2, “Setting IPASearch Limits”, to allow more entries to be returned.
5.11. Specifying Default User and Group SettingsIdentity Management uses a template when it creates new entries.
For users, the template is very specific. Identity Management uses default values for several coreattributes for IPA user accounts. These defaults can define actual values for user account attributes(such as the home directory location) or it can define the format of attribute values, such as theusername length. These settings also define the object classes assigned to users.
For groups, the template only defines the assigned object classes.
These default definitions are all contained in a single configuration entry for the IPA server,cn=ipaconfig,cn=etc,dc=example,dc=com.
The configuration can be changed using the ipa config-mod command.
Table 5.5. Default User Parameters
Field Command-Line Option Descriptions
Maximum username length --maxusername Sets the maximum number ofcharacters for usernames. Thedefault value is eight.
Root for home directories --homedirectory Sets the default directory to usefor user home directories. Thedefault value is /home.
Default shell --defaultshell Sets the default shell to use forusers. The default value is /bin/sh.
Default user group --defaultgroup Sets the default group to whichall newly created accountsare added. The defaultvalue is ipausers, which isautomatically created during

Viewing Settings from the Web UI
117
Field Command-Line Option Descriptionsthe IPA server installationprocess.
Default e-mail domain --emaildomain Sets the email domain to useto create email addressedbased on the new accounts.The default is the IPA serverdomain.
Search time limit --searchtimelimit Sets the maximum amountof time, in seconds, to spendon a search before the serverreturns results.
Search size limit --searchrecordslimit Sets the maximum number ofrecords to return in a search.
User search fields --usersearch Sets the fields in a user entrythat can be used as a searchstring. Any attribute listedhas an index kept for thatattribute, so setting too manyattributes could affect serverperformance.
Group search fields --groupsearch Sets the fields in a group entrythat can be used as a searchstring.
Certificate subject base Sets the base DN to use whencreating subject DNs for clientcertificates. This is configuredwhen the server is set up.
Default user object classes --userobjectclasses Sets a list of object classes thatare used to create IPA useraccounts.
Default group object classes --groupobjectclasses Sets a list of object classes thatare used to create IPA groupaccounts.
Password expiration notification --pwdexpnotify Sets how long, in days, beforea password expires for theserver to send a notification.
Password plug-in features Sets the format of passwordsthat are allowed for users.
5.11.1. Viewing Settings from the Web UI1. Open the IPA Server tab.
2. Select the Configuration subtab.
3. The complete configuration entry is shown in three sections, one for all search limits, one for usertemplates, and one for group templates.
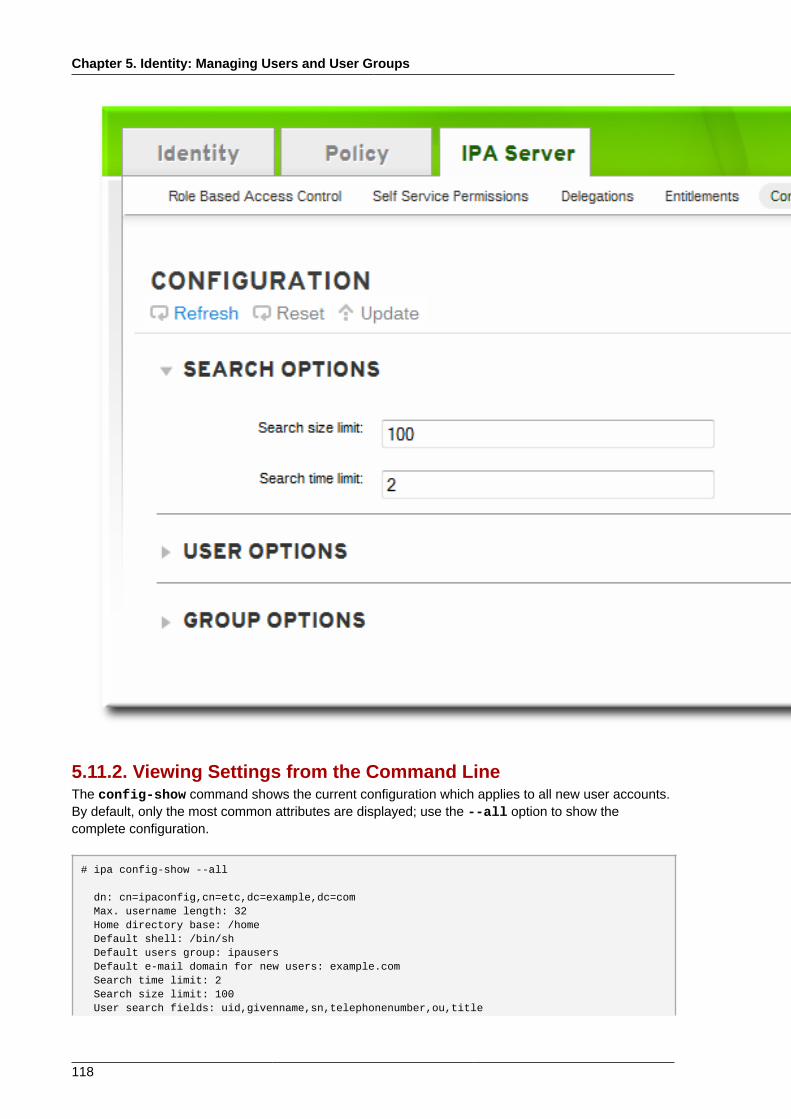
Chapter 5. Identity: Managing Users and User Groups
118
5.11.2. Viewing Settings from the Command LineThe config-show command shows the current configuration which applies to all new user accounts.By default, only the most common attributes are displayed; use the --all option to show thecomplete configuration.
# ipa config-show --all
dn: cn=ipaconfig,cn=etc,dc=example,dc=com Max. username length: 32 Home directory base: /home Default shell: /bin/sh Default users group: ipausers Default e-mail domain for new users: example.com Search time limit: 2 Search size limit: 100 User search fields: uid,givenname,sn,telephonenumber,ou,title

Viewing Settings from the Command Line
119
Group search fields: cn,description Enable migration mode: FALSE Certificate Subject base: O=EXAMPLE.COM Default group objectclasses: top, groupofnames, nestedgroup, ipausergroup, ipaobject Default user objectclasses: top, person, organizationalperson, inetorgperson, inetuser, posixaccount, krbprincipalaux, krbticketpolicyaux, ipaobject Password Expiration Notification (days): 4 Password plugin features: AllowNThash cn: ipaConfig objectclass: nsContainer, top, ipaGuiConfig, ipaConfigObject

120
Chapter 6.
121
Identity: Managing Hosts and ServicesBoth DNS and Kerberos are configured as part of the initial client configuration. This is requiredbecause these are the two services that bring the machine within the IPA domain and allow it toidentify the IPA server it will connect with. After the initial configuration, IPA has tools to manage bothof these services in response to changes in the domain services, changes to the IT environment,or changes on the machines themselves which affect Kerberos, certificate, and DNS services, likechanging the client hostname.
This chapter describes how to manage identity services that relate directly to the client machine:
• DNS entries and settings
• Machine authentication
• Hostname changes (which affect domain services)
6.1. About Hosts, Services, and Machine Identity andAuthenticationThe basic function of an enrollment process is to create a host entry for the client machine in the IPAdirectory. This host entry is used to establish relationships between other hosts and even serviceswithin the domain. These relationships are part of delegating authorization and control to hosts withinthe domain.
A host entry contains all of the information about the client within IPA:
• Service entries associated with the host
• The host and service principal
• Access control rules
• Machine information, such as its physical location and operating system
Some services that run on a host can also belong to the IPA domain. Any service that can store aKerberos principal or an SSL certificate (or both) can be configured as an IPA service. Adding aservice to the IPA domain allows the service to request an SSL certificate or keytab from the domain.(Only the public key for the certificate is stored in the service record. The private key is local to theservice.)
An IPA domain establishes a commonality between machines, with common identity information,common policies, and shared services. Any machine which belongs to a domain functions as aclient of the domain, which means it uses the services that the domain provides. An IPA domain (asdescribed in Section 1.2, “Bringing Linux Services Together”) provides three main services specificallyfor machines:
• DNS
• Kerberos
• Certificate management
Machines are treated as another identity that is managed by IPA. Clients use DNS to identify IPAservers, services, and domain members — which, like user identities are stored in the 389 DirectoryServer instance for the IPA server. Like users, machines can be authenticated to the domain usingKerberos or certificates to verify the machine's identity.
Chapter 6. Identity: Managing Hosts and Services
122
From the machine perspective, there are several tasks that can be performed that access thesedomain services:
• Joining the DNS domain (machine enrollment)
• Managing DNS entries and zones
• Managing machine authentication
Authentication in IPA includes machines as well as users. Machine authentication is required for theIPA server to trust the machine and to accept IPA connections from the client software installed on thatmachine. After authenticating the client, the IPA server can respond to its requests. IPA supports threedifferent approaches to machine authentication:
• SSH keys. The SSH public key for the host is created and uploaded to the host entry. From there,the System Security Services Daemon (SSSD) uses IPA as an identity provider and can workin conjunction with OpenSSH and other services to reference the public keys located centrallyin Identity Management. This is described in Section 6.8, “Managing Public SSH Keys for Hosts(TECH PREVIEW)” and the Red Hat Enterprise Linux Deployment Guide1.
• Key tables (or keytabs, a symmetric key resembling to some extent a user password) and machinecertificates. Kerberos tickets are generated as part of the Kerberos services and policies definedby the server. Initially granting a Kerberos ticket, renewing the Kerberos credentials, and evendestroying the Kerberos session are all handled by the IPA services. Managing Kerberos is coveredin Chapter 12, Policy: Managing the Kerberos Domain.
• Machine certificates. In this case, the machine uses an SSL certificate that is issued by the IPAserver's certificate authority and then stored in IPA's Directory Server. The certificate is then sent tothe machine to present when it authenticates to the server. On the client, certificates are managedby a service called certmonger, which is described in Appendix B, Working with certmonger.
6.2. Adding Host EntriesA host entry is always created when a client is configured. On Red Hat Enterprise Linux systems, thisis done automatically with the ipa-client-install script. On other platforms — and in alternativeenrollment scenarios, as in Section 6.3, “Enrolling Clients Manually” — the host entry is createdmanually.
6.2.1. Adding Host Entries from the Web UI1. Open the Identity tab, and select the Hosts subtab.
2. Click the Add link at the top of the hosts list.
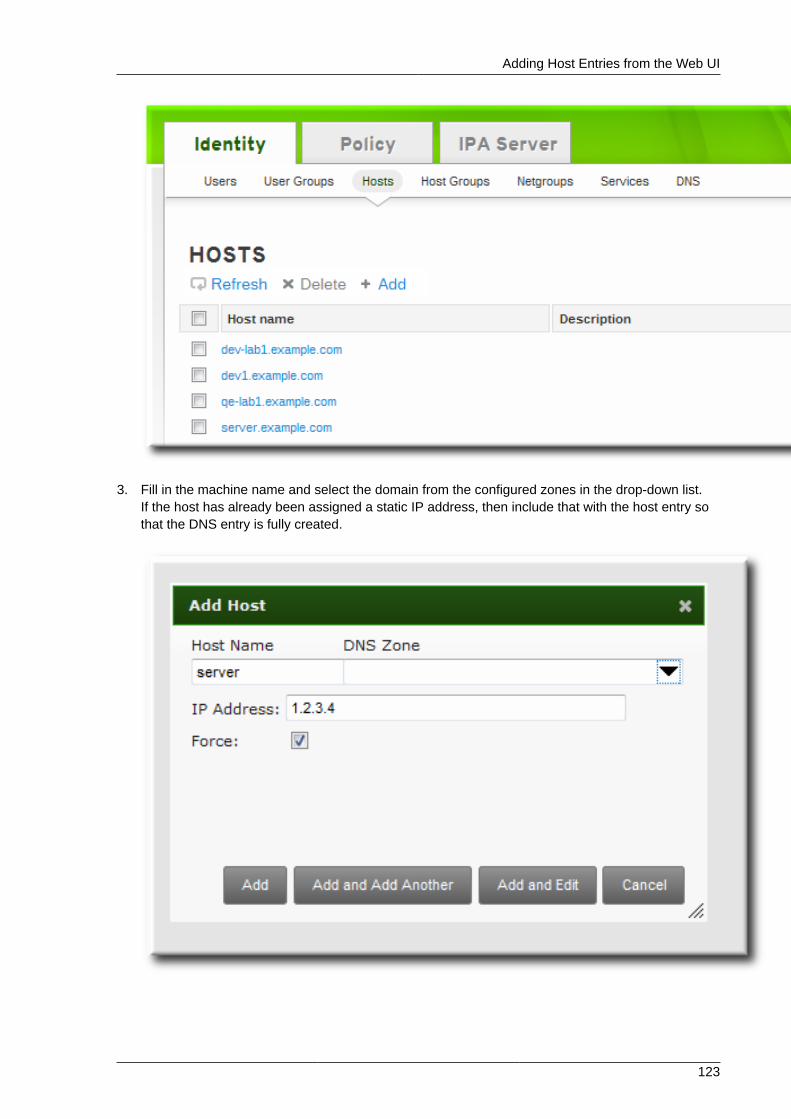
Adding Host Entries from the Web UI
123
3. Fill in the machine name and select the domain from the configured zones in the drop-down list.If the host has already been assigned a static IP address, then include that with the host entry sothat the DNS entry is fully created.

Chapter 6. Identity: Managing Hosts and Services
124
DNS zones can be created in IPA, which is described in Section 9.4.1, “Adding DNS Zones”. If theIPA server does not manage the DNS server, the zone can be entered manually in the menu area,like a regular text field.
NOTE
Select the Force checkbox to add the host DNS record, even if the hostname cannot beresolved.
This is useful for hosts which use DHCP and do not have a static IP address. This essentiallycreates a placeholder entry in the IPA DNS service. When the DNS service dynamicallyupdates its records, the host's current IP address is detected and its DNS record is updated.
4. Click the Add and Edit button to go directly to the expanded entry page and fill in more attributeinformation. Information about the host hardware and physical location can be included with thehost entry.
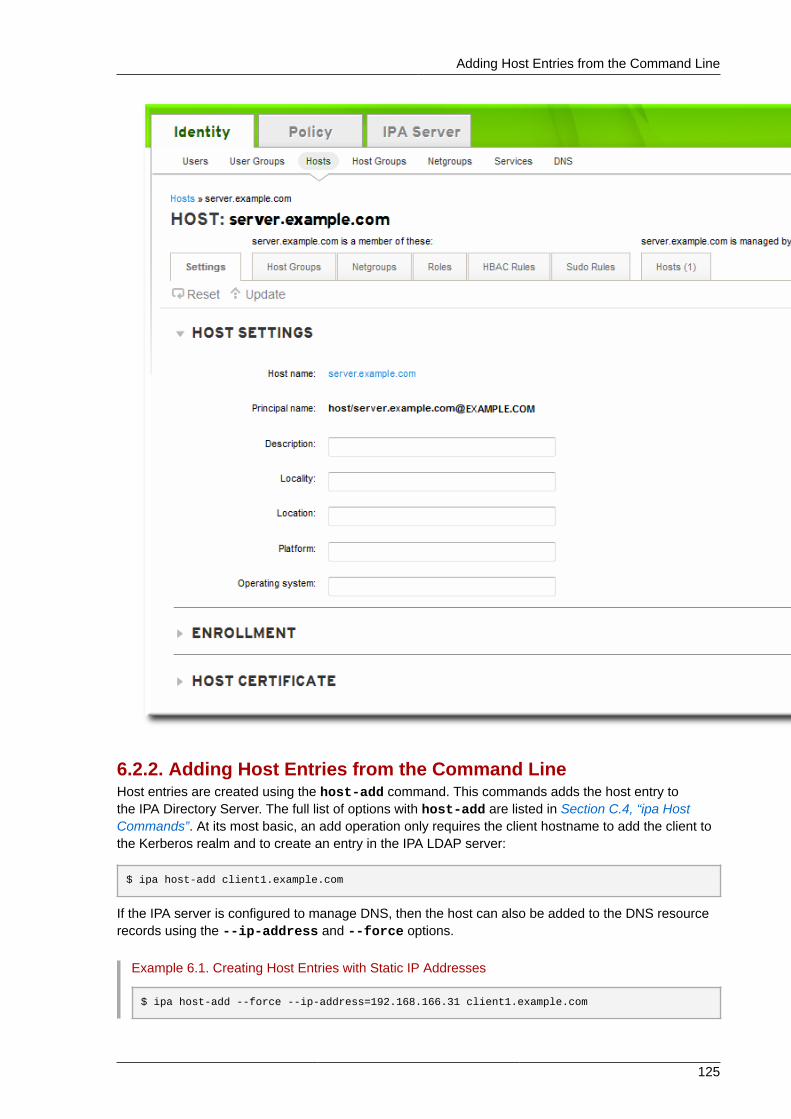
Adding Host Entries from the Command Line
125
6.2.2. Adding Host Entries from the Command LineHost entries are created using the host-add command. This commands adds the host entry tothe IPA Directory Server. The full list of options with host-add are listed in Section C.4, “ipa HostCommands”. At its most basic, an add operation only requires the client hostname to add the client tothe Kerberos realm and to create an entry in the IPA LDAP server:
$ ipa host-add client1.example.com
If the IPA server is configured to manage DNS, then the host can also be added to the DNS resourcerecords using the --ip-address and --force options.
Example 6.1. Creating Host Entries with Static IP Addresses
$ ipa host-add --force --ip-address=192.168.166.31 client1.example.com
Chapter 6. Identity: Managing Hosts and Services
126
Commonly, hosts may not have a static IP address or the IP address may not be known at the timethe client is configured. For example, laptops may be preconfigured as Identity Management clients,but they do not have IP addresses at the time they're configured. Hosts which use DHCP can still beconfigured with a DNS entry by using --force. This essentially creates a placeholder entry in the IPADNS service. When the DNS service dynamically updates its records, the host's current IP address isdetected and its DNS record is updated.
Example 6.2. Creating Host Entries with DHCP
$ ipa host-add --force client1.example.com
Host records are deleted using the host-del command. If the IPA domain uses DNS, then the --updatedns option also removes the associated records of any kind for the host from the DNS.
$ ipa host-del --updatedns client1.example.com
6.3. Enrolling Clients ManuallyEnrolling machines as clients in the IPA domain is a two-part process. A host entry is created for theclient (and stored in the 389 Directory Server instance), and then a keytab is created to provision theclient.
Both parts are performed automatically by the ipa-client-install command. It is also possibleto perform those steps separately; this allows for administrators to prepare machines and IPA inadvance of actually configuring the clients. This allows more flexible setup scenarios, including bulkdeployments.
When performing a manual enrollment, the host entry is created separately, and then enrollment iscompleted when the client script is run, which creates the requisite keytab.
NOTE
There are two ways to set the password. You can either supply your own or have IPA generate arandom one.
6.3.1. Performing a Split EnrollmentThere may be a situation where an administrator in one group is prohibited from creating a host entryand, therefore, from simply running the ipa-client-install command and allowing it to createthe host. However, that administrator may have the right to run the command after a host entry exists.In that case, one administrator can create the host entry manually, then the second administrator cancomplete the enrollment by running the ipa-client-install command.
1. An administrator creates the host entry, as described in Section 6.2, “Adding Host Entries”.
2. The second administrator installs the IPA client packages on the machine, as in Section 3.3,“Configuring a Red Hat Enterprise Linux System as an IPA Client”.
3. When the second administrator runs the setup script, he must pass his Kerberos password andusername (principal) with the ipa-client-install command. For example:

Manually Unconfiguring Client Machines
127
$ ipa-client-install -w secret -p admin2
4. The keytab is generated on the server and provisioned to the client machine, so that theclient machine is not able to connect to the IPA domain. The keytab is saved with root:rootownership and 0600 permissions.
6.4. Manually Unconfiguring Client MachinesA machine may need to be removed from one IPA domain and moved to another domain or a virtualmachine may be copied. There are a number of different situations where an IPA client needs to bereconfigured. The easiest solution is to uninstall the client and then configure it afresh.
ipa-client-install --uninstall
If it is not possible to uninstall the client directly, then the IPA configuration can be manually removedfrom the virtual machine.
WARNING
When a machine is unenrolled, the procedure cannot be undone. The machine can only beenrolled again.
1. Remove the old hostname from the main keytab. This can be done by removing every principal inthe realm or by removing specific principals. For example, to remove all principals:
$ ipa-rmkeytab -k /etc/krb5.keytab -r EXAMPLE.COM
To remove specific principals:
$ ipa-rmkeytab -k /etc/krb5.keytab -p host/[email protected]
2. Disable tracking in certmonger for every certificate. Each certificate must be removed fromtracking individually.
$ ipa-getcert stop-tracking -n Server-Cert -d /etc/pki/nssdb $ ipa-getcert stop-tracking -n Server2-Cert -d /etc/pki/nssdb
3. Remove the old host from the IPA DNS domain. While this is optional, it cleans up the old IPAentries associated with the system and allows it to be re-enrolled cleanly at a later time.
$ ipa host-del server.example.com
4. If the system should be re-added to a new IPA domain — such as a virtual machine which wasmoved from one location to another — then the system can be rejoined to IPA using the ipa-join command.
$ ipa-join
Chapter 6. Identity: Managing Hosts and Services
128
6.5. Managing Services
6.5.1. Adding and Editing Service Entries and KeytabsAs with host entries, service entries for the host (and any other services on that host which will belongto the domain) must be added manually to the IPA domain. This is a two step process. First, theservice entry must be created, and then a keytab must be created for that service which it will use toaccess the domain.
By default, Identity Management saves its HTTP keytab to /etc/httpd/conf/ipa.keytab.
NOTE
This keytab is used for the web UI. If a key were stored in ipa.keytab and that keytab file isdeleted, the IPA web UI will stop working, because the original key would also be deleted.
Similar locations can be specified for each service that needs to be made Kerberos aware. There isno specific location that must be used, but, when using ipa-getkeytab, you should avoid using /etc/krb5.keytab. This file should not contain service-specific keytabs; each service should have itskeytab saved in a specific location and the access privileges (and possibly SELinux rules) should beconfigured so that only this service has access to the keytab.
6.5.1.1. Adding Services and Keytabs from the Web UI1. Open the Identity tab, and select the Services subtab.
2. Click the Add link at the top of the services list.
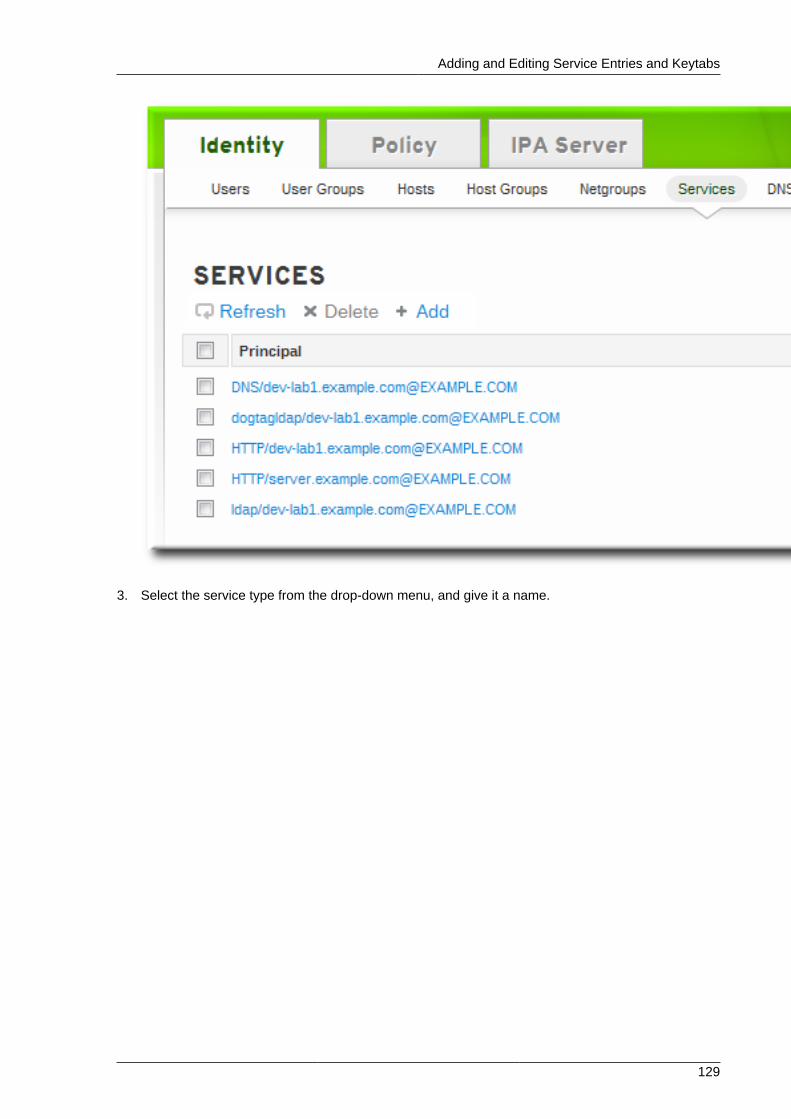
Adding and Editing Service Entries and Keytabs
129
3. Select the service type from the drop-down menu, and give it a name.
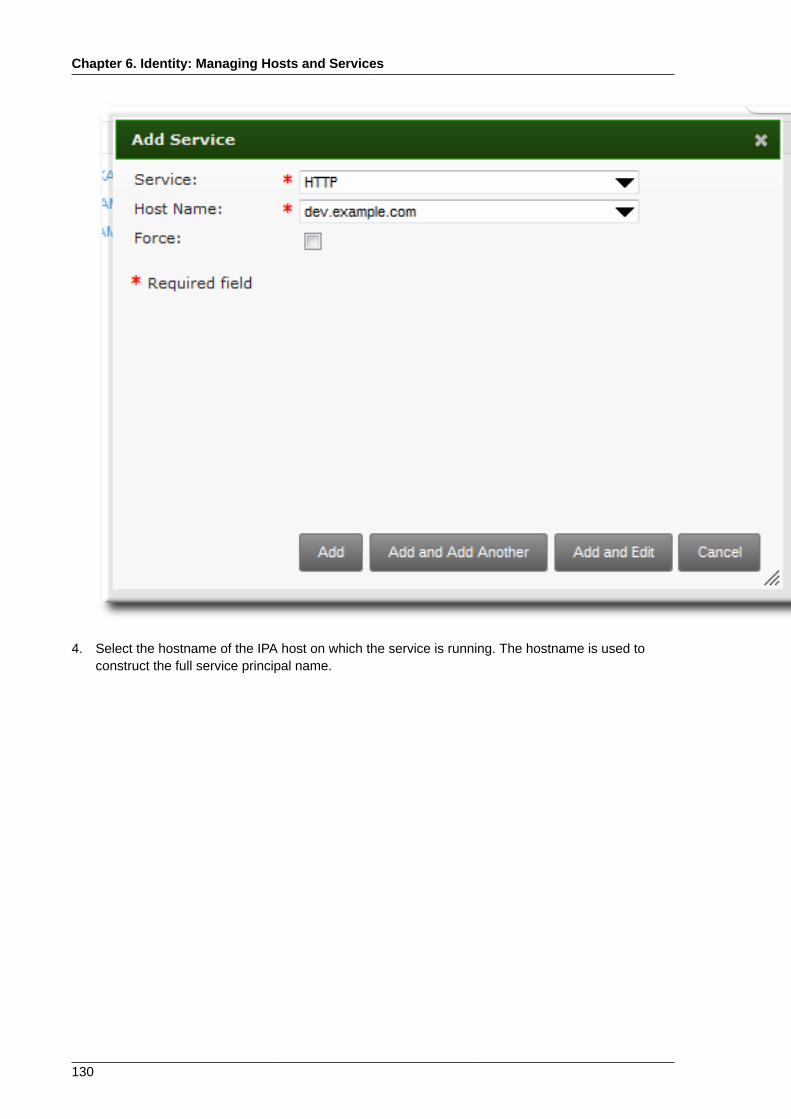
Chapter 6. Identity: Managing Hosts and Services
130
4. Select the hostname of the IPA host on which the service is running. The hostname is used toconstruct the full service principal name.
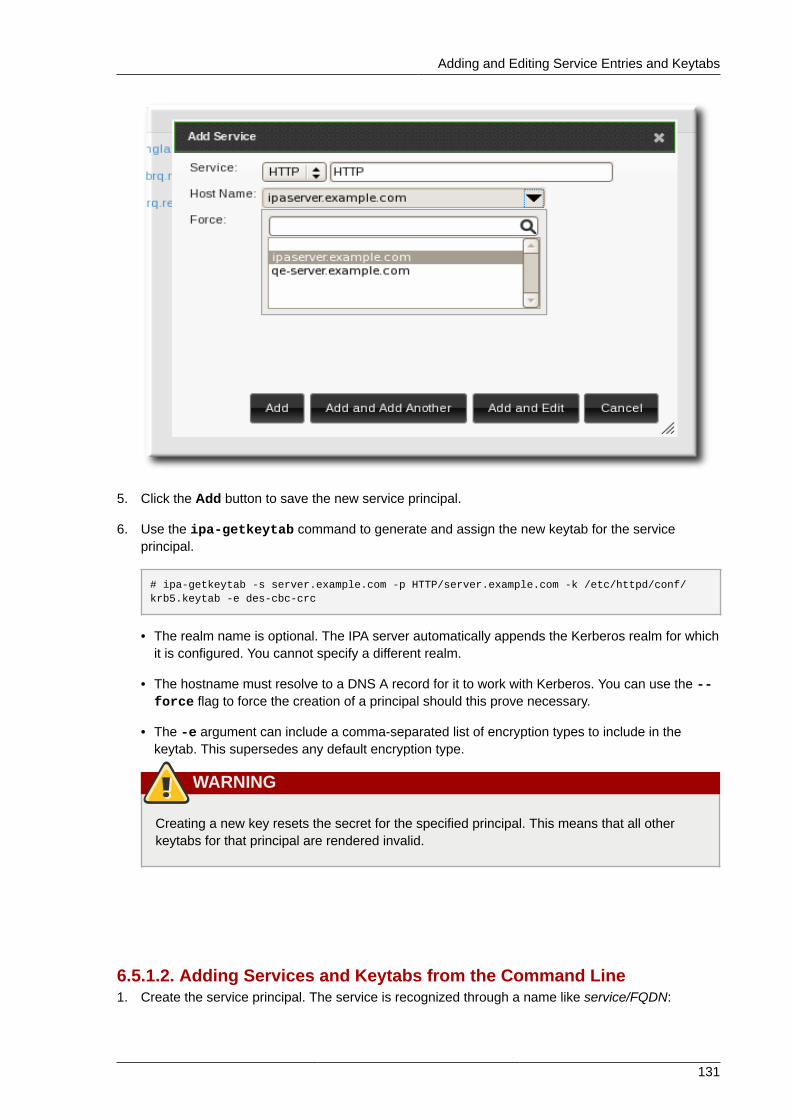
Adding and Editing Service Entries and Keytabs
131
5. Click the Add button to save the new service principal.
6. Use the ipa-getkeytab command to generate and assign the new keytab for the serviceprincipal.
# ipa-getkeytab -s server.example.com -p HTTP/server.example.com -k /etc/httpd/conf/krb5.keytab -e des-cbc-crc
• The realm name is optional. The IPA server automatically appends the Kerberos realm for whichit is configured. You cannot specify a different realm.
• The hostname must resolve to a DNS A record for it to work with Kerberos. You can use the --force flag to force the creation of a principal should this prove necessary.
• The -e argument can include a comma-separated list of encryption types to include in thekeytab. This supersedes any default encryption type.
WARNING
Creating a new key resets the secret for the specified principal. This means that all otherkeytabs for that principal are rendered invalid.
6.5.1.2. Adding Services and Keytabs from the Command Line1. Create the service principal. The service is recognized through a name like service/FQDN:

Chapter 6. Identity: Managing Hosts and Services
132
# ipa service-add serviceName/hostname
For example:
$ ipa service-add HTTP/server.example.com-------------------------------------------------------Added service "HTTP/[email protected]"------------------------------------------------------- Principal: HTTP/[email protected] Managed by: ipaserver.example.com
2. Create the service keytab file using the ipa-getkeytab command. This command is run onthe client in the IPA domain. (Actually, it can be run on any IPA server or client, and then the keyscopied to the appropriate machine. However, it is simplest to run the command on the machinewith the service being created.)
The command requires the Kerberos service principal (-p), the IPA server name (-s), the file towrite (-k), and the encryption method (-e). Be sure to copy the keytab to the appropriate directoryfor the service.
For example:
# ipa-getkeytab -s server.example.com -p HTTP/server.example.com -k /etc/httpd/conf/krb5.keytab -e des-cbc-crc
• The realm name is optional. The IPA server automatically appends the Kerberos realm for whichit is configured. You cannot specify a different realm.
• The hostname must resolve to a DNS A record for it to work with Kerberos. You can use the --force flag to force the creation of a principal should this prove necessary.
• The -e argument can include a comma-separated list of encryption types to include in thekeytab. This supersedes any default encryption type.
WARNING
The ipa-getkeytab command resets the secret for the specified principal. This means thatall other keytabs for that principal are rendered invalid.
6.5.2. Adding Services and Certificates for ServicesWhile services can use keytabs, some services require certificates for access. In that case, a servicecan be added (or modified) to include a certificate with its service entry.
6.5.2.1. Adding Services and Certificates from the Web UI1. Open the Identity tab, and select the Services subtab.
2. Click the Add link at the top of the services list.

Adding Services and Certificates for Services
133
3. Select the service type from the drop-down menu, and give it a name.

Chapter 6. Identity: Managing Hosts and Services
134
4. Select the hostname of the IPA host on which the service is running. The hostname is used toconstruct the full service principal name.

Adding Services and Certificates for Services
135
5. Click the Add and Edit button to go directly to the service entry page.
6. Scroll to the bottom of the page, to the Service Certificate section.
7. Click the New Certificate button to create the service certificate.
6.5.2.2. Adding Services and Certificates from the Command Line1. Create the service principal. The service is recognized through a name like service/FQDN:
[jsmith@ipaserver ~]$ kinit admin[jsmith@ipaserver ~]$ ipa service-add serviceName/hostname
For example:
$ ipa service-add HTTP/server.example.com
-------------------------------------------------------Added service "HTTP/[email protected]"-------------------------------------------------------
Chapter 6. Identity: Managing Hosts and Services
136
Principal: HTTP/[email protected] Managed by: ipaserver.example.com
2. Create a certificate for the service. Be sure to copy the keytab to the appropriate directory for theservice.
For example:
$ ipa cert-request --principal=HTTP/web.example.com example.csr
TIP
Use the --add option to create the service automatically when requesting the certificate.
Alternatively, use the getcert command, which creates and manages the certificate throughcertmonger. The options are described more in Section B.1, “Requesting a Certificate withcertmonger” and .
$ ipa-getcert request -d /etc/httpd/alias -n Server-Cert -K HTTP/client1.example.com -N 'CN=client1.example.com,O=EXAMPLE.COM'
6.5.3. Storing Certificates in NSS DatabasesWhen services use certificates, the certificates and keys can be stored in NSS databases (which mayalso be used by the services themselves, as well as Identity Management).
1. Create the NSS databases.
$ certutil -N -d /path/to/database/dir
2. Request the certificate using certutil, an NSS tool.
$ certutil -R -s "CN=client1.example.com,O=EXAMPLE.COM" -d /path/to/database/dir -a > example.csr
If the IPA domain is using Certificate System for its CA, only the CN of the subject name is used.With a self-signed CA, the subject must match the configured certificate subject base. The IPA serverrejects requests with a subject base that differs from this value.
6.5.4. Configuring Clustered ServicesThe IPA server is not cluster aware. However, it is possible to configure a clustered service to be partof IPA by synchronizing Kerberos keys across all of the participating hosts and configuring servicesrunning on the hosts to respond to whatever names the clients use.
1. Enroll all of the hosts in the cluster into the IPA domain.
2. Create any service principals and generate the required keytabs.
Using the Same Service Principal for Multiple Services
137
3. Collect any keytabs that have been set up for services on the host, including the host keytab at /etc/krb5.keytab.
4. Use the ktutil command to produce a single keytab file that contains the contents of all of thekeytab files.
a. For each file, use the rkt command to read the keys from that file.
b. Use the wkt command to write all of the keys which have been read to a new keytab file.
5. Replace the keytab files on each host with the newly-created combined keytab file.
6. At this point, each host in this cluster can now impersonate any other host.
7. Some services require additional configuration to accommodate cluster members which do notreset hostnames when taking over a failed service.• For sshd, set GSSAPIStrictAcceptorCheck no in /etc/ssh/sshd_config.
• For mod_auth_kerb, set KrbServiceName Any in /etc/httpd/conf.d/auth_kerb.conf.
NOTE
For SSL servers, the subject name or a subject alternative name for the server's certificatemust appear correct when a client connects to the clustered host. If possible, share theprivate key among all of the hosts. If each cluster member contains a subject alternative namewhich includes the names of all the other cluster members will satisfy any client connectionrequirements.
6.5.5. Using the Same Service Principal for Multiple ServicesWithin a cluster, the same service principal can be used for multiple services, spread across differentmachines.
1. Retrieve a service principal using the ipa-getkeytab command.
# ipa-getkeytab -s kdc.example.com -p HTTP/server.example.com -k /etc/httpd/conf/krb5.keytab -e des-cbc-crc
2. Either direct multiple servers or services to use the same file, or copy the file to individual serversas required.
6.6. Disabling and Re-enabling Host and Service Entries
Active services and hosts can be accessed by other services, hosts, and users within the domain.There can be situations when it is necessary to remove a host or a service from activity. However,deleting a service or a host removes the entry and all the associated configuration, and it removes itpermanently.
Chapter 6. Identity: Managing Hosts and Services
138
6.6.1. Disabling Host and Service EntriesDisabling a host or service prevents domain users from access it without permanently removing it fromthe domain. This can be done by using the host-disable and service-disable commands.
For example, for a host:
[jsmith@ipaserver ~]$ kinit admin[jsmith@ipaserver ~]$ ipa host-disable server.example.com
For a service, specify the principal rather than the hostname:
$ ipa service-disable http/server.example.com
IMPORTANT
Disabling a host entry not only disables that host. It disables every configured service on that hostas well.
6.6.2. Re-enabling Hosts and ServicesDisabling a service or host essentially kills its current, active keytabs. Removing the keytabs effectivelyremoves the host or service from the IPA domain without otherwise touching its configuration entry.
To re-enable a host or service, simply use the ipa-getkeytab command. The -s option sets whichIPA server to request the keytab, -p gives the principal name, and -k gives the file to which to savethe keytab.
For example, requesting a new host keytab:
[jsmith@ipaserver ~]$ ipa-getkeytab -s ipaserver.example.com -p host/server.example.com -k /etc/krb5.keytab -D fqdn=server.example.com,cn=computers,cn=accounts,dc=example,dc=com -w password
If the ipa-getkeytab command is run on an active IPA client or server, then it can be run withoutany LDAP credentials (-D and -w). The IPA user uses Kerberos credentials to authenticate tothe domain. To run the command directly on the disabled host, then supply LDAP credentials toauthenticate to the IPA server. The credentials should correspond to the host or service which is beingre-enabled.
6.7. Extending Access Permissions over Other Hosts andServicesAs discussed in Section 1.3, “Relationships Between Servers and Clients”, within the IPA domain,manage means being able to retrieve a keytab and certificates for another host or service. Every hostand service has a managedby entry which lists what hosts or services can manage it. By default, ahost can manage itself and all of its services. It is also possible to allow a host to manage other hosts,or services on other hosts, by updating the appropriate delegations or providing a suitable managedbyentry.
An IPA service can be managed from any IPA host, as long as that host has been granted, ordelegated, permission to access the service. Likewise, hosts can be delegated permissions to otherhosts within the domain.

Delegating Service Management
139
Figure 6.1. Host and Service Delegation
NOTE
If a host is delegated authority to another host through a managedBy entry, it does not mean thatthe host has also been delegated management for all services on that host. Each delegation hasto be performed independently.
6.7.1. Delegating Service ManagementA host is delegated control over a service using the service-add-host command. There aretwo parts to delegating the service: specifying the principal and identifying the hosts (in a comma-separated list) with control:
# ipa service-add-host principal --hosts=hostnames
For example:
# ipa service-add-host http/web.example.com --hosts=client1.example.com
Once the host is delegated authority, the host principal can be used to manage the service:
# kinit -kt /etc/krb5.keytab host/`hostname`# ipa-getkeytab -s `hostname` -k /tmp/test.keytab -p http/web.example.comKeytab successfully retrieved and stored in: /tmp/test.keytab
To create a ticket for this service, create a certificate request on the host with the delegated authorityand use the cert-request command to create a service entry and load the certification information:
# ipa cert-request --add --principal=http/web.example.com web.csr Certificate: MIICETCCAXqgA...[snip] Subject: CN=web.example.com,O=EXAMPLE.COM Issuer: CN=EXAMPLE.COM Certificate Authority Not Before: Tue Feb 08 18:51:51 2011 UTC Not After: Mon Feb 08 18:51:51 2016 UTC Fingerprint (MD5): c1:46:8b:29:51:a6:4c:11:cd:81:cb:9d:7c:5e:84:d5 Fingerprint (SHA1): 01:43:bc:fa:b9:d8:30:35:ee:b6:54:dd:a4:e7:d2:11:b1:9d:bc:38 Serial number: 1005
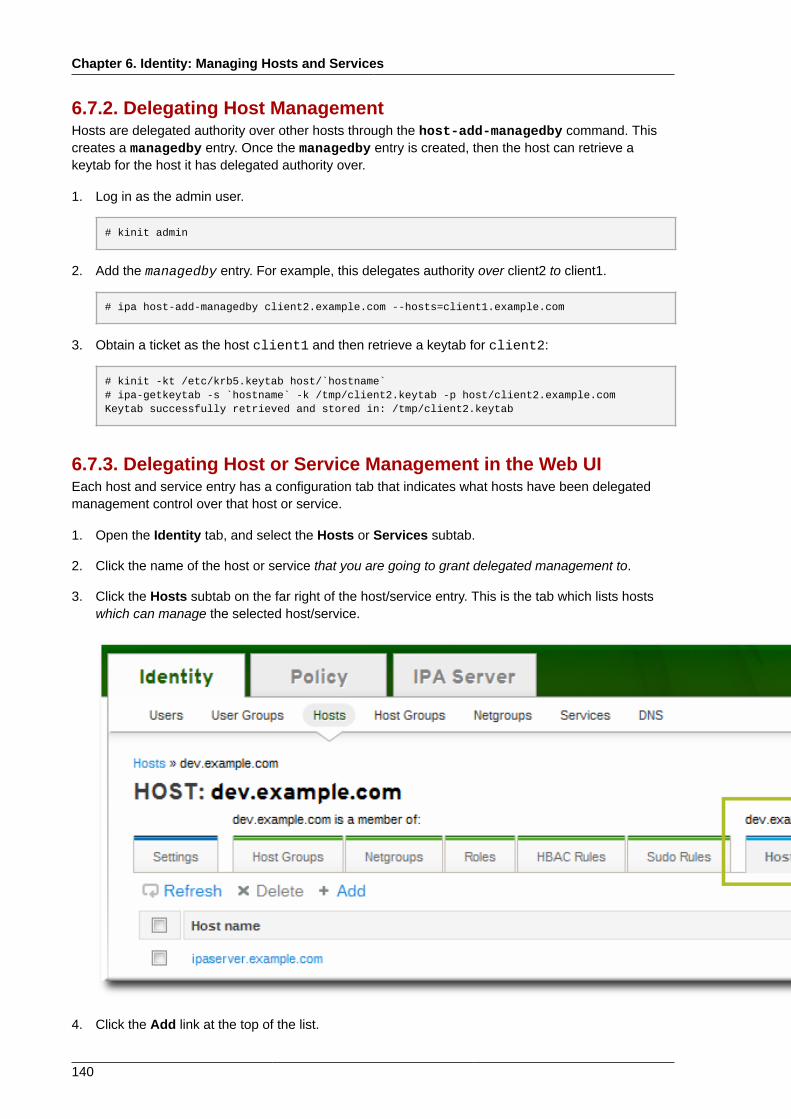
Chapter 6. Identity: Managing Hosts and Services
140
6.7.2. Delegating Host ManagementHosts are delegated authority over other hosts through the host-add-managedby command. Thiscreates a managedby entry. Once the managedby entry is created, then the host can retrieve akeytab for the host it has delegated authority over.
1. Log in as the admin user.
# kinit admin
2. Add the managedby entry. For example, this delegates authority over client2 to client1.
# ipa host-add-managedby client2.example.com --hosts=client1.example.com
3. Obtain a ticket as the host client1 and then retrieve a keytab for client2:
# kinit -kt /etc/krb5.keytab host/`hostname`# ipa-getkeytab -s `hostname` -k /tmp/client2.keytab -p host/client2.example.comKeytab successfully retrieved and stored in: /tmp/client2.keytab
6.7.3. Delegating Host or Service Management in the Web UIEach host and service entry has a configuration tab that indicates what hosts have been delegatedmanagement control over that host or service.
1. Open the Identity tab, and select the Hosts or Services subtab.
2. Click the name of the host or service that you are going to grant delegated management to.
3. Click the Hosts subtab on the far right of the host/service entry. This is the tab which lists hostswhich can manage the selected host/service.
4. Click the Add link at the top of the list.

Accessing Delegated Services
141
5. Click the checkbox by the names of the hosts to which to delegate management for the host/service. Click the right arrows button, >>, to move the hosts to the selection box.
6. Click the Add button to close the selection box and to save the delegation settings.
6.7.4. Accessing Delegated ServicesFor both services and hosts, if a client has delegated authority, it can obtain a keytab for that principalon the local machine. For services, this has the format service/hostname@REALM. For hosts, theservice is host.
With kinit, use the -k option to load a keytab and the -t option to specify the keytab.
For example, to access a host:
# kinit -kt /etc/krb5.keytab host/[email protected]
To access a service:
# kinit -kt /etc/httpd/conf/krb5.keytab http/[email protected]
Chapter 6. Identity: Managing Hosts and Services
142
6.8. Managing Public SSH Keys for Hosts (TECH PREVIEW)OpenSSH uses public-private key pairs to authenticate hosts. One machine attempts to accessanother machine and presents its key pair. The first time the host authenticates, the administrator onthe target machine has to approve the request manually. The machine then stores the host's publickey in a known_hosts file. Any time that the remote machine attempts to access the target machineagain, the target machine simply checks its known_hosts file and then grants access automatically toapproved hosts.
There are a few problems with this system:
• The known_hosts file stores host entries in a triplet of the host IP address, hostname, and key.This file can rapidly become out of date if the IP address changes (which is common in virtualenvironments and data centers) or if the key is updated.
• SSH keys have to be distributed manually and separately to all machines in an environment.
• Administrators have to approve host keys to add them to the configuration, but it is difficult to verifyeither the host or key issuer properly, which can create security problems.
On Red Hat Enterprise Linux, the System Security Services Daemon (SSSD) can be configuredto cache and retrieve host SSH keys so that applications and services only have to look in onelocation for host keys. Because SSSD can use Identity Management as one of its identity informationproviders, Identity Management provides a universal and centralized repository of keys. Administratorsdo not need to worry about distributing, updating, or verifying host SSH keys.
6.8.1. About IPA Clients and OpenSSH
The ipa-client-install script, by default, configures an OpenSSH server and client on the IPAclient machine. It also configures SSSD to perform host and user key caching. Essentially, simplyconfiguring the client does all of the configuration necessary for the host to use SSSD, OpenSSH, andIdentity Management for key caching and retrieval.
NOTE
Even if the machine is added as an IPA client using ipa-client-install, the client is notcreated with any SSH keys. These keys need to be created separately and added to the hostaccount, as described in Section 6.8.2, “Adding Host Keys”.
There is an additional client configuration option, --ssh-trust-dns, which can be run with ipa-client-install and automatically configures OpenSSH to trust the IPA DNS records, where thehost keys are stored.
Alternatively, it is also possible to disable OpenSSH at the time the client is installed, using the --no-sshd option. This prevents the install script from configuring the OpenSSH server.
Another option, --no-dns-sshfp, prevents the host from creating DNS SSHFP records with its ownDNS entries. This can be used with or without the --no-sshd option.

Adding Host Keys
143
6.8.2. Adding Host KeysHost SSH keys are added to host entries in IPA, either when the host is created using host-add or bymodifying the entry later.
In a key file, such as a user's id_rsa.pub file, a key entry is identified by its type and then the keyitself. For example, for an RSA key:
ssh-rsa ABCD1234==
Only the second part, the base 64-encoded key itself, is uploaded to the user entry.
NOTE
Host keys are not created by the ipa-client-install command.
1. Run the host-mod command with the --sshpubkey option to upload the 64 bit-encoded publickey to the host entry.
Adding a host key also changes the DNS SSHFP entry for the host, so also use the --updatedns option to update the host's DNS entry.
For example:
[jsmith@server ~]$ ipa host-mod --sshpubkey="12345abcde=" --updatedns host1.example.com
With a real key, the key is longer and usually ends with an equals sign (=).
To upload multiple keys, pass a comma-separated list of keys with a single --sshpubkey option:
--sshpubkey="12345abcde==,key2==,key3=="
TIP
A host can have multiple public keys.
2. After uploading the user keys, configure SSSD to use Identity Management as one of its identitydomains and set up OpenSSH to use the SSSD tooling for managing user keys. This is covered inthe Red Hat Enterprise Linux Deployment Guide2.
6.8.3. Removing Host KeysHost keys can be removed once they expire or are no longer valid.
Use the --sshpubkey= with a blank value; this removes all public keys for the host. Also, use the --updatedns option to update the host's DNS entry.
For example:

Chapter 6. Identity: Managing Hosts and Services
144
[jsmith@server ~]$ ipa host-mod --sshpubkey= --updatedns host1.example.com
6.9. Renaming Machines and Reconfiguring IPA ClientConfigurationThe hostname of a system is critical for the correct operation of Kerberos and SSL. Both of thesesecurity mechanisms rely on the hostname to ensure that communication is occurring between thespecified hosts. Infrastructures which use virtual machines or clustered servers will commonly havehosts which are renamed because systems are copied, moved, or renamed.
Red Hat Enterprise Linux does not provide a simple rename command to facilitate the renaming of anIPA host. Renaming a host in an IPA domain involves deleting the entry in IPA, uninstalling the clientsoftware, changing the hostname, and re-enrolling using the new name. Additionally, part of renaminghosts requires regenerating service principals.
To reconfigure the client:
1. Identify which services are running on the machine. These need to be re-created when themachine is re-enrolled.
# ipa service-find server.example.com
Each host has a default service which does not appear in the list of services. This service can bereferred to as the "host service". The service principal for the host service is host/<hostname>,such as host/server.example.com. This principal can also be referred to as the hostprincipal.
2. Identify all host groups to which the machine belongs.
# ipa hostgroup-find server.example.com
Identify which of the services have certificates associated with them. This can be done using theldapsearch command to check the entries in the IPA LDAP database directly:
# ldapsearch -x -b "cn=accounts,dc=example,dc=com" "(&(objectclass=ipaservice)(userCertificate=*))" krbPrincipalName
3. For any service principals (in addition to the host principal), determine the location of thecorresponding keytabs on server.example.com. The keytab location is different for eachservice, and IPA does not store this information.
Each service on the client system has a Kerberos principal in the form service name/hostname@REALM, such as ldap/[email protected].
4. Unenroll the client machine from the IPA domain:
# ipa-client-install --uninstall
5. For each identified keytab other than /etc/krb5.keytab, remove the old principals:
# ipa-rmkeytab -k /path/to/keytab -r EXAMPLE.COM
Managing Host Groups
145
6. On another IPA machine, as an IPA administrator, remove the host entry. This removes allservices and revokes all certificates issued for that host:
# ipa host-del server.example.com
At this point, the host is completely removed from IPA.
7. Rename the machine.
8. Re-enroll the system with IPA:
# ipa-client-install
This generates a host principal for with the new hostname in /etc/krb5.keytab.
9. For every service that needs a new keytab, run the following command:
# ipa service-add serviceName/new-hostname
10. To generate certificates for services, use either certmonger or the IPA administration tools.
11. Re-add the host to any applicable host groups.
6.10. Managing Host GroupsHost groups are a way of centralizing control over important management tasks, particularly accesscontrol.
All groups in Identity Management are essentially static groups, meaning that the members of thegroup are manually and explicitly added to the group. Tangentially, IPA allows nested groups, wherea group is a member of another group. In that case, all of the group members of the member groupautomatically belong to the parent group, as well.
Because groups are easy to create, it is possible to be very flexible in what groups to create and howthey are organized. Groups can be defined around organizational divisions like departments, physicallocations, or IPA or infrastructure usage guidelines for access controls.
6.10.1. Creating Host Groups
6.10.1.1. Creating Host Groups from the Web UI1. Open the Identity tab, and select the Host Groups subtab.
2. Click the Add link at the top of the groups list.

Chapter 6. Identity: Managing Hosts and Services
146
3. Enter the name and a description for the group.
4. Click the Add and Edit button to go immediately to the member selection page.
5. Select the members, as described in Section 6.10.2.1, “Adding Group Members from the Web UI”.
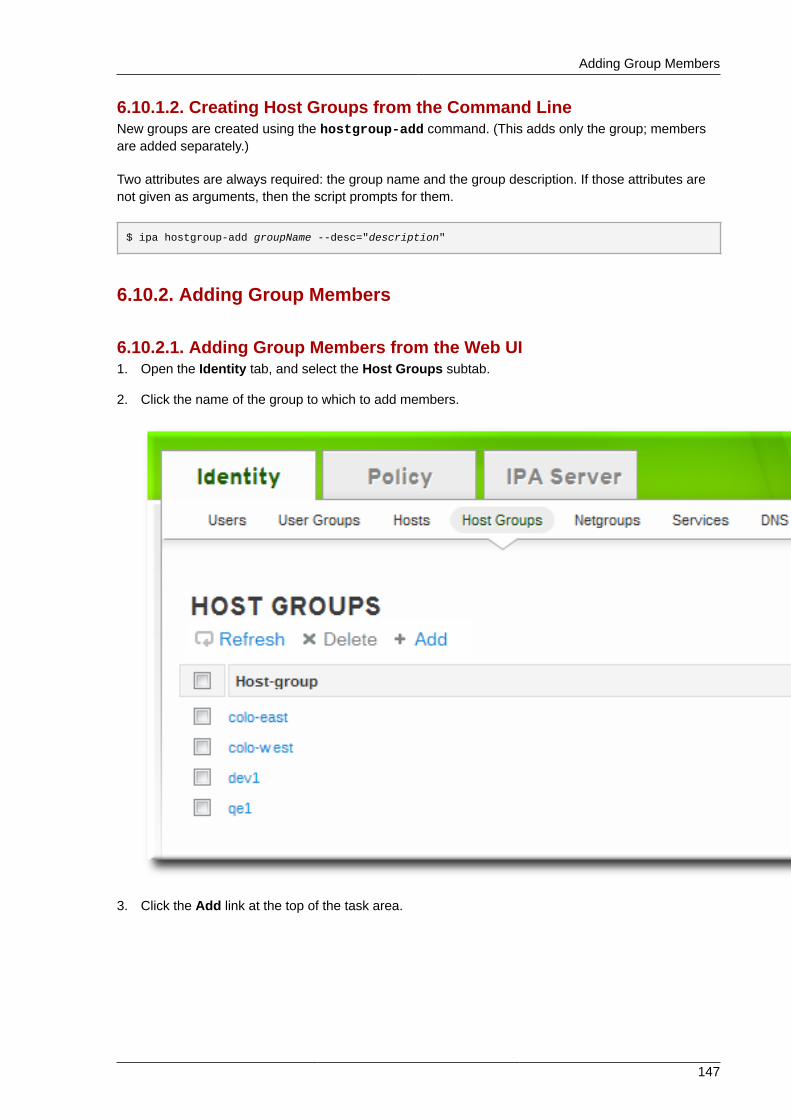
Adding Group Members
147
6.10.1.2. Creating Host Groups from the Command LineNew groups are created using the hostgroup-add command. (This adds only the group; membersare added separately.)
Two attributes are always required: the group name and the group description. If those attributes arenot given as arguments, then the script prompts for them.
$ ipa hostgroup-add groupName --desc="description"
6.10.2. Adding Group Members
6.10.2.1. Adding Group Members from the Web UI1. Open the Identity tab, and select the Host Groups subtab.
2. Click the name of the group to which to add members.
3. Click the Add link at the top of the task area.

Chapter 6. Identity: Managing Hosts and Services
148
4. Click the checkbox by the names of the hosts to add, and click the right arrows button, >>, tomove the hosts to the selection box.
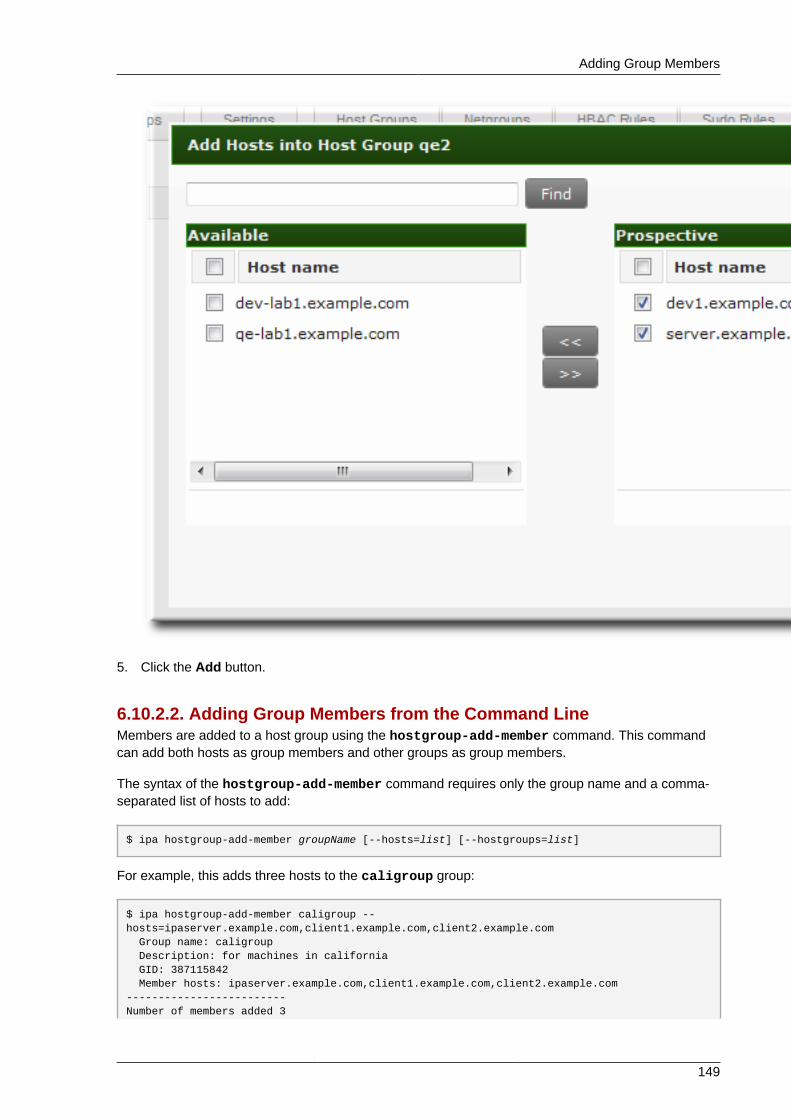
Adding Group Members
149
5. Click the Add button.
6.10.2.2. Adding Group Members from the Command LineMembers are added to a host group using the hostgroup-add-member command. This commandcan add both hosts as group members and other groups as group members.
The syntax of the hostgroup-add-member command requires only the group name and a comma-separated list of hosts to add:
$ ipa hostgroup-add-member groupName [--hosts=list] [--hostgroups=list]
For example, this adds three hosts to the caligroup group:
$ ipa hostgroup-add-member caligroup --hosts=ipaserver.example.com,client1.example.com,client2.example.com Group name: caligroup Description: for machines in california GID: 387115842 Member hosts: ipaserver.example.com,client1.example.com,client2.example.com-------------------------Number of members added 3
Chapter 6. Identity: Managing Hosts and Services
150
-------------------------
Likewise, other groups can be added as members, which creates nested groups:
$ ipa hostgroup-add-member caligroup --groups=mountainview,sandiego Group name: caligroup Description: for machines in california GID: 387115842 Member groups: mountainview,sandiego ------------------------- Number of members added 2 -------------------------
6.11. Troubleshooting Host Problems
6.11.1. Certificate Not Found/Serial Number Not Found ErrorsThe IPA information is stored in a separate LDAP directory than the certificate information, and thesetwo LDAP databases are replicated separately. It is possible for a replication agreement to be brokenfor one directory and working for another, which can cause problems with managing clients.
Specifically, if the replication agreement between the two CA databases is broken, then a server maynot be able to find certificate information about a valid IPA client, causing certificate errors:
Certificate operation cannot be completed: EXCEPTION (Certificate serial number 0x2d not found)
For example, an IPA server and replica have a function replication agreement between their IPAdatabases, but the replication agreement between their CA databases is broken. If a host is createdon the server, the host entry is replicated over to the replica — but the certificate for that host is notreplicated. The replica is aware of the client, but any management operations for that client will failbecause the replica doesn't have a copy of its certificate.
6.11.2. Debugging Client Connection ProblemsClient connection problems are apparent immediately. This can mean that users cannot log intoa machine or attempts to access user and group information fails (for example, getent passwdadmin).
Authentication in IPA is managed with the SSSD daemon, which is described in the Red HatEnterprise Linux Deployment Guide. If there are problems with client authentication, then check theSSSD information.
First, check the SSSD logs in /var/log/sssd/. There is a specific log file for the DNS domain, suchas sssd_example.com.log. If there is not enough information in the logs at the default logginglevel, then increase the log level.
To increase the log level:
1. Open the sssd.conf file.
vim /etc/sssd/sssd.conf
2. In the [domain/example.com] section, set debug_level.

Debugging Client Connection Problems
151
debug_level = 9
3. Restart the sssd daemon.
service sssd restart
4. Check the /var/log/sssd/sssd_example.com.log file for the debug messages.

152

Chapter 7.
153
Identity: Integrating with NIS Domainsand NetgroupsNetwork information service (NIS) is one of the most common ways to manage identities andauthentication on Unix networks. It is simple and easy to use, but it also has inherent security risksand a lack of flexibility that can make administering NIS domains problematic.
Identity Management supplies a way to integrate netgroups and other NIS data into the IPA domain,which incorporates the stronger security structure of IPA over the NIS configuration. Alternatively,administrators can simply migrate user and host identities from a NIS domain into the IPA domain.
7.1. About NIS and Identity ManagementNetwork information service (NIS) centrally manages authentication and identity information such asusers and passwords, hosts and IP addresses, and POSIX groups. This was originally called YellowPages (abbreviated YP) because of its simple focus on identity and authentication lookups.
NIS is considered too insecure for most modern network environments because it provides no hostauthentication mechanisms and it transmits all of its information over the network unencrypted,including password hashes. Still, while NIS has been falling out of favor with administrators, it is stillactively used by many system clients. There are ways to work around those insecurities by integratingNIS with other protocols which offer enhanced security.
In Identity Management, NIS objects are integrated into IPA using the underlying LDAP directory.LDAP services offer support for NIS objects (as defined in RFC 23071), which Identity Managementcustomizes to provide better integration with other domain identities. The NIS object is created insidethe LDAP service and then a module like nss_ldap or SSSD fetches the object using an encryptedLDAP connection.
NIS entities are stored in netgroups. A netgroup allows nesting (groups inside groups), which standardUnix groups don't support. Also, netgroups provide a way to group hosts, which is also missing in Unixgroup.
NIS groups work by defining users and hosts as members of a larger domain. A netgroup sets a trio ofinformation — host, user, domain. This is called a triple.
host,user,domain
A netgroup triple associates the user or the host with the domain; it does not associate the user andthe host with each other. Therefore, a triple usually defines a host or a user for better clarity andmanagement.
host.example.com,,nisdomain.example.com-,jsmith,nisdomain.example.com
NIS distributes more than just netgroup data. It stores information about users and passwords, groups,network data, and hosts, among other information. Identity Management can use a NIS listener to mappasswords, groups, and netgroups to IPA entries.
1 http://tools.ietf.org/html/rfc2307

Chapter 7. Identity: Integrating with NIS Domains and Netgroups
154
In IPA LDAP entries, the users in a netgroup can be a single user or a group; both are identified bythe memberUser parameter. Likewise, hosts can be either a single host or a host group; both areidentified by the memberHost attribute.
dn: ipaUniqueID=d4453480-cc53-11dd-ad8b-0800200c9a66,cn=ng,cn=accounts,...objectclass: topobjectclass: ipaAssociationobjectclass: ipaNISNetgroupipaUniqueID: d4453480-cc53-11dd-ad8b-0800200c9a66cn: netgroup1memberHost: fqdn=host1.example.com,cn=computers,cn=accounts,...memberHost: cn=VirtGuests,cn=hostgroups,cn=accounts,...memberUser: cn=jsmith,cn=users,cn=accounts,...memberUser: cn=bjensen,cn=users,cn=accounts,...memberUser: cn=Engineering,cn=groups,cn=accounts,...nisDomainName: nisdomain.example.com
In Identity Management, these netgroup entries are handled using the netgroup-* commands,which show the basic LDAP entry:
# ipa netgroup-show netgroup1Netgroup name: netgroup1Description: my netgroupNIS domain name: nisdomainMember User: jsmithMember User: bjensenMember User: EngineeringMember Host: host1.example.comMember Host: VirtGuests
When a client attempts to access the NIS netgroup, then Identity Management translates the LDAPentry into a traditional NIS map and sends it to a client over the NIS protocol (using a NIS plug-in) or ittranslates it into an LDAP format that is compliant with RFC 2307 or RFC 2307bis.
For more information on NIS, see the Berkeley lab manpages at http://compute.cnr.berkeley.edu/cgi-bin/man-cgi?netgroup+4.
7.2. Setting the NIS Port for Identity ManagementThe IPA server binds to its NIS services over a random port that is selected when the server starts. Itsends that port assignment to the portmapper so that NIS clients know what port to use to contact theIPA server.
Administrators may need to open a firewall for NIS clients or may have other services that need toknow the port number in advance and need that port number to remain the same. In that case, anadministrator can specify the port to use.
NOTE
Any available port number below 1024 can be used for the NIS Plug-in setting.
The NIS configuration is in the NIS Plug-in in Identity Management's internal Directory Serverinstance. To specify the port:

Creating Netgroups
155
1. Edit the plug-in configuration and add the port number as an argument. For example, to set theport to 514:
[root@ipaserver ~]# ldapmodify -x -D 'cn=directory manager' -w secret dn: cn=NIS Server,cn=plugins,cn=config changetype: modifyadd: nsslapd-pluginarg0nsslapd-pluginarg0: 514
modifying entry "cn=NIS Server,cn=plugins,cn=config"
2. Restart the Directory Server to load the new plug-in configuration.
[root@ipaserver ~]# service dirsrv restart
7.3. Creating NetgroupsAll netgroups in Identity Management are essentially static groups, meaning that the members of thegroup are manually and explicitly added to the group. Tangentially, IPA allows nested groups, wherea group is a member of another group. In that case, all of the group members of the member groupautomatically belong to the parent group, as well.
Netgroups are added in two steps: the group itself is created, and then members are added to it.
7.3.1. Adding Netgroups
7.3.1.1. With the Web UI1. Open the Identity tab, and select the Netgroups subtab.
2. Click the Add link at the top of the netgroups list.
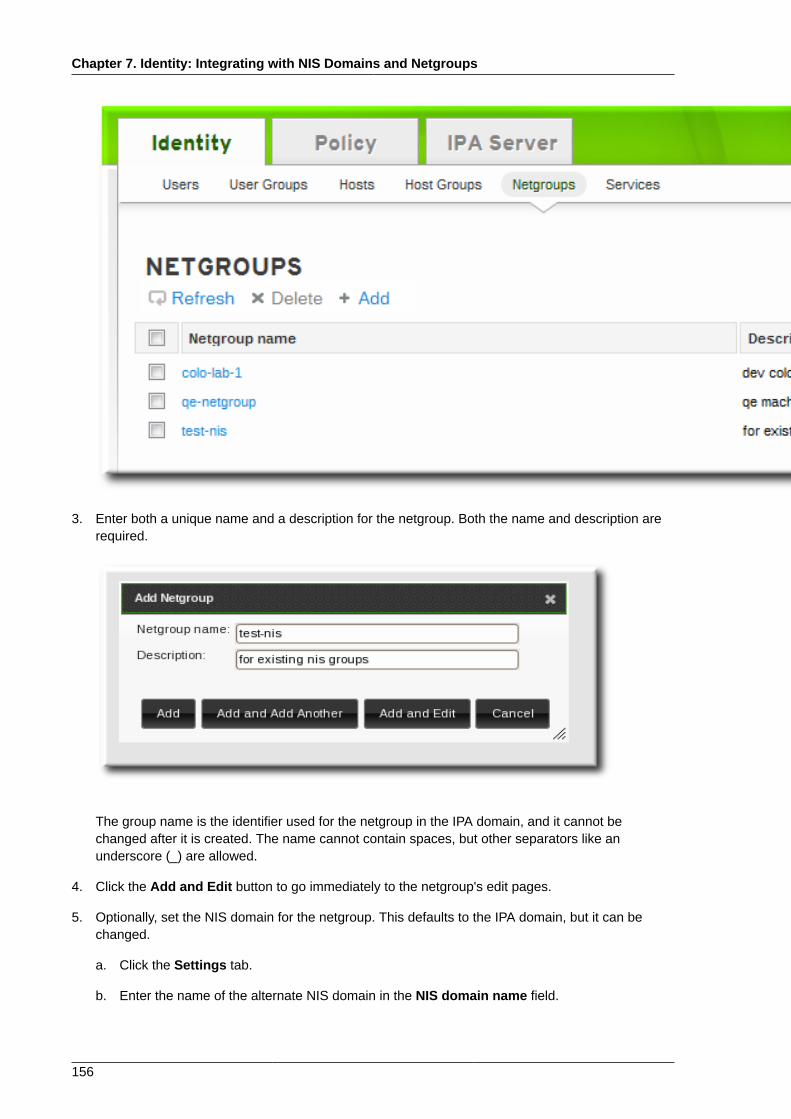
Chapter 7. Identity: Integrating with NIS Domains and Netgroups
156
3. Enter both a unique name and a description for the netgroup. Both the name and description arerequired.
The group name is the identifier used for the netgroup in the IPA domain, and it cannot bechanged after it is created. The name cannot contain spaces, but other separators like anunderscore (_) are allowed.
4. Click the Add and Edit button to go immediately to the netgroup's edit pages.
5. Optionally, set the NIS domain for the netgroup. This defaults to the IPA domain, but it can bechanged.
a. Click the Settings tab.
b. Enter the name of the alternate NIS domain in the NIS domain name field.
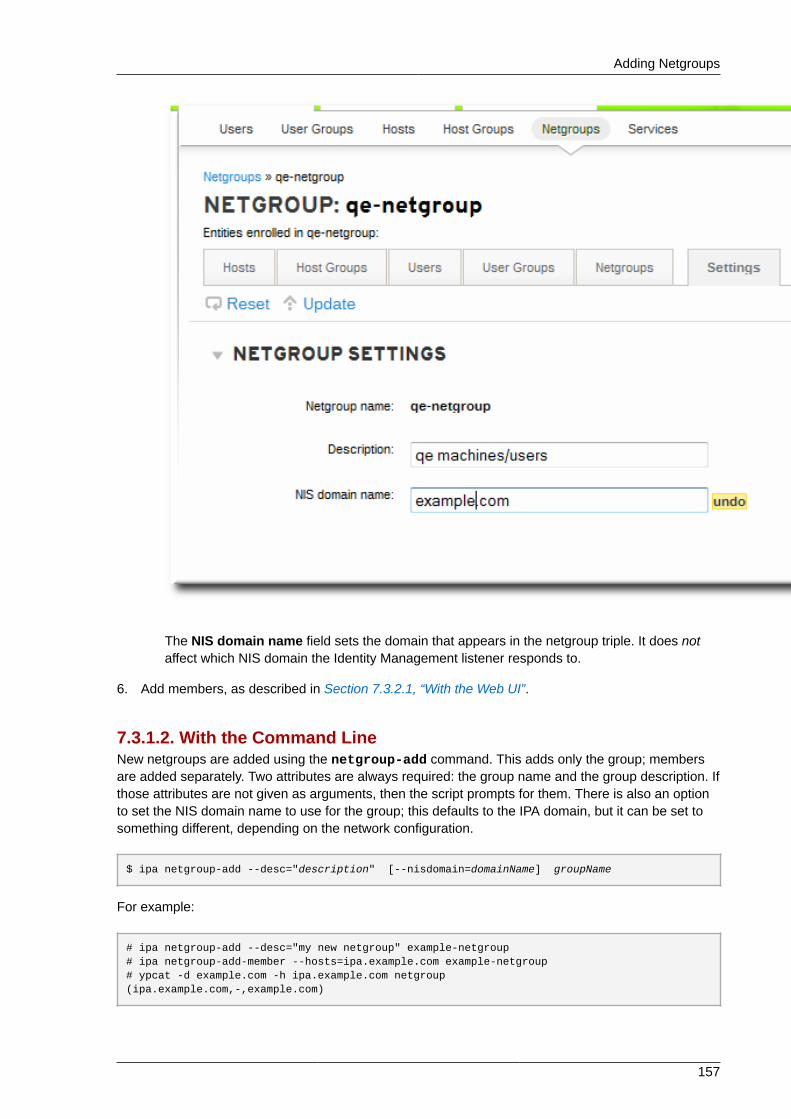
Adding Netgroups
157
The NIS domain name field sets the domain that appears in the netgroup triple. It does notaffect which NIS domain the Identity Management listener responds to.
6. Add members, as described in Section 7.3.2.1, “With the Web UI”.
7.3.1.2. With the Command LineNew netgroups are added using the netgroup-add command. This adds only the group; membersare added separately. Two attributes are always required: the group name and the group description. Ifthose attributes are not given as arguments, then the script prompts for them. There is also an optionto set the NIS domain name to use for the group; this defaults to the IPA domain, but it can be set tosomething different, depending on the network configuration.
$ ipa netgroup-add --desc="description" [--nisdomain=domainName] groupName
For example:
# ipa netgroup-add --desc="my new netgroup" example-netgroup# ipa netgroup-add-member --hosts=ipa.example.com example-netgroup# ypcat -d example.com -h ipa.example.com netgroup(ipa.example.com,-,example.com)
Chapter 7. Identity: Integrating with NIS Domains and Netgroups
158
NOTE
The --nisdomain option sets the domain that appears in the netgroup triple. It does not affectwhich NIS domain the Identity Management listener responds to.
7.3.2. Adding Netgroup Members
NOTE
Netgroups can contain user groups, host groups, and other netgroups as their members. Theseare nested groups.
It can take up to several minutes for the members of the child group to show up as members ofthe parent group. This is especially true on virtual machines where the nested groups have morethan 500 members.
When creating nested groups, be careful not to create recursive groups. For example, if GroupAis a member of GroupB, do not add GroupB as a member of GroupA. Recursive groups are notsupported and can cause unpredictable behavior.
7.3.2.1. With the Web UI1. Open the Identity tab, and select the Netgroups subtab.
2. Click the name of the netgroup to which to add members.
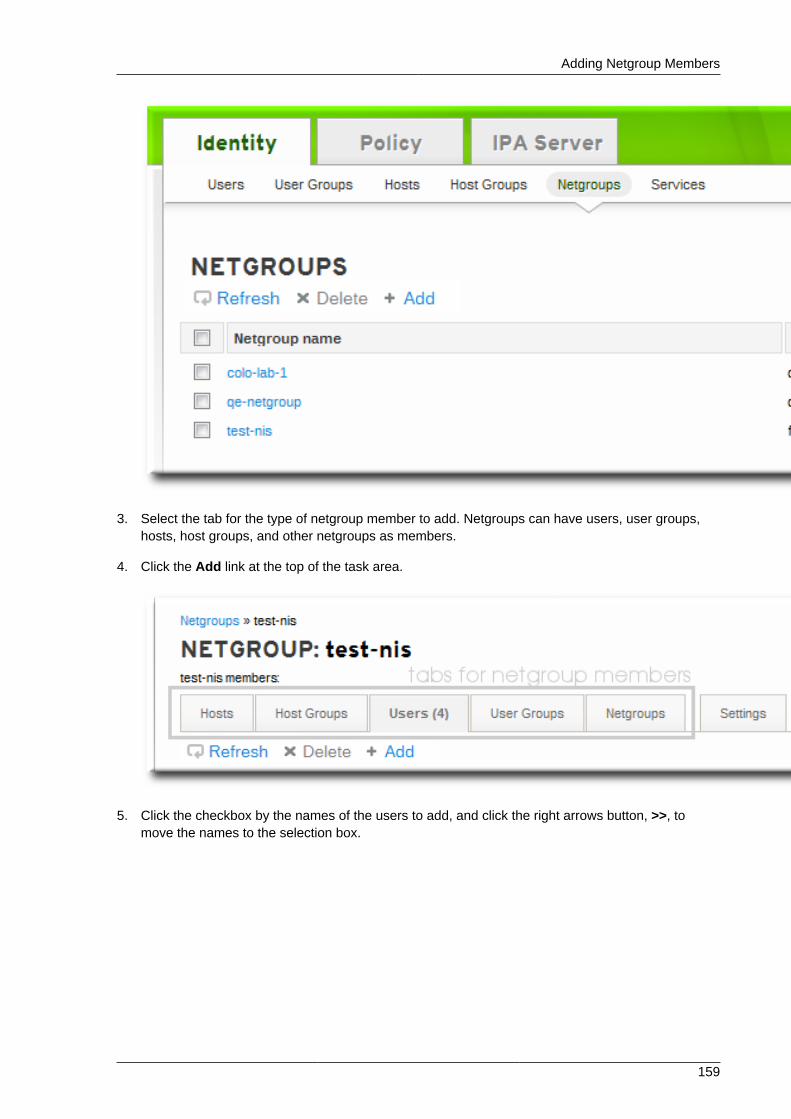
Adding Netgroup Members
159
3. Select the tab for the type of netgroup member to add. Netgroups can have users, user groups,hosts, host groups, and other netgroups as members.
4. Click the Add link at the top of the task area.
5. Click the checkbox by the names of the users to add, and click the right arrows button, >>, tomove the names to the selection box.

Chapter 7. Identity: Integrating with NIS Domains and Netgroups
160
6. Click the Add button.
7.3.2.2. With the Command LineOnce the group is configured, begin adding netgroup members with the netgroup-add-membercommand. Users, groups, hosts, host groups, and other netgroups can all be added to the netgroupentry. The entry name of the NIS group being edited usually comes at the end of the command:
# ipa netgroup-add-member --users=users --groups=groups --hosts=hosts --hostgroups=hostGroups --netgroups=netgroups groupName
To set more than one member, use a comma-separated list with the option. For example, this sets twousers and two hosts with the other configuration:
# ipa netgroup-add-member --users=jsmith,bjensen --groups=ITadmin --hosts=host1.example.com,host2.example.com --hostgroups=EngDev --netgroups=nisgroup2 example-group

Exposing Automount Maps to NIS Clients
161
7.4. Exposing Automount Maps to NIS ClientsWhen the NIS service is enabled on a system, the IPA server is automatically configured to set the NISdomain to the IPA domain's name, and to include IPA users, groups, and netgroups as passwd, group,and netgroup maps in the NIS domain.
If any automount maps are already defined, these maps need to be manually added to the NISconfiguration in Identity Management for them to be exposed to NIS clients. The NIS server ismanaged by a special plug-in entry in the IPA LDAP directory; this is a container entry, and each NISdomain and map used by the NIS server is configured as a child entry beneath that container. The NISdomain entry in the must have the name of the NIS domain, the name of the NIS map, how to find thedirectory entries to use as the NIS map's contents, and which attributes to use as the NIS map's keyand value. Most of these settings will be the same for every map.
The IPA server stores the automount maps, grouped by automount location, in the cn=automountbranch of the IPA directory tree.
The NIS domain and map is added using LDAP tools, like ldapadd, and editing the directory directly.For example, this adds an automount map that is named auto.example in a location nameddefault and for a server named nisserver:
ldapadd -h nisserver.example.com -x -D "cn=Directory Manager" -w secret
dn: nis-domain=example.com+nis-map=auto.example,cn=NIS Server,cn=plugins,cn=configobjectClass: extensibleObjectnis-domain: example.comnis-map: auto.examplenis-filter: (objectclass=automount)nis-key-format: %{automountKey}nis-value-format: %{automountInformation}nis-base: automountmapname=auto.example,cn=default,cn=automount,dc=example,dc=com
A similar add operation needs to be run for every map that is configured.
7.5. Migrating from NIS to IPAThere is no direct migration path from NIS to Identity Management. This is a manual process withthree major steps: setting up netgroup entries in IPA, exporting the existing data from NIS, andimporting that data into IPA. There are several options for how to set up the IPA environment and howto export data; the best option depends on the type of data and the overall network environment thatyou have.
7.5.1. Preparing Netgroup Entries in IPAThe first step is to identify what kinds of identities are being managed by NIS. Frequently, a NIS serveris used for either user entries or host entries, but not for both, which can simplify the data migrationprocess.
For user entriesDetermine what applications are using the user information in the NIS server. While some clients (likesudo) require NIS netgroups, many clients can use Unix groups instead. If no netgroups are required,then simply create corresponding user accounts in IPA and delete the netgroups entirely. Otherwise,create the user entries in IPA and then create an IPA-managed netgroup and add those users asmembers. This is described in Section 7.3, “Creating Netgroups”.

Chapter 7. Identity: Integrating with NIS Domains and Netgroups
162
For host entriesWhenever a host group is created in IPA, a corresponding shadow NIS group is automatically created.These netgroups can then be managed using the ipa-host-net-manage command.
For a direct conversionIt may be necessary to have an exact conversion, with every NIS user and host having an exactcorresponding entry in IPA. In that case, each entry can be created using the original NIS names:
1. Create an entry for every user referenced in a netgroup.
2. Create an entry for every host referenced in a netgroup.
3. Create a netgroup with the same name as the original netgroup.
4. Add the users and hosts as direct members of the netgroup. Alternatively, put add the users andhosts into IPA groups or other netgroups, and then add those groups as members to the netgroup.
7.5.2. Enabling the NIS Listener in Identity ManagementThe IPA Directory Server can function as a limited NIS server. The slapi-nis plug-in sets up aspecial NIS listener that receives incoming NIS requests and manages the NIS maps within theDirectory Server. Identity Management uses three NIS maps:
• passwd
• group
• netgroup
Using IPA as an intermediate NIS server offers a reasonable way to handle NIS requests whilemigrating NIS clients and data.
The slapi-nis plug-in is not enabled by default. To enable NIS for Identity Management:
1. Obtain new Kerberos credentials as an IPA admin user.
[root@ipaserver ~]# kinit admin
2. Enable the NIS listener and compatibility plug-ins:
[root@ipaserver ~]# ipa-nis-manage enable[root@ipaserver ~]# ipa-compat-manage enable
3. Restart the DNS and Directory Server service:
[root@server ~]# service restart rpcbind[root@server ~]# service restart dirsrv
7.5.3. Exporting and Importing the Existing NIS DataNIS can contain information for users, groups, DNS and hosts, netgroups, and automount maps. Anyof these entry types can be migrated over to the IPA server.
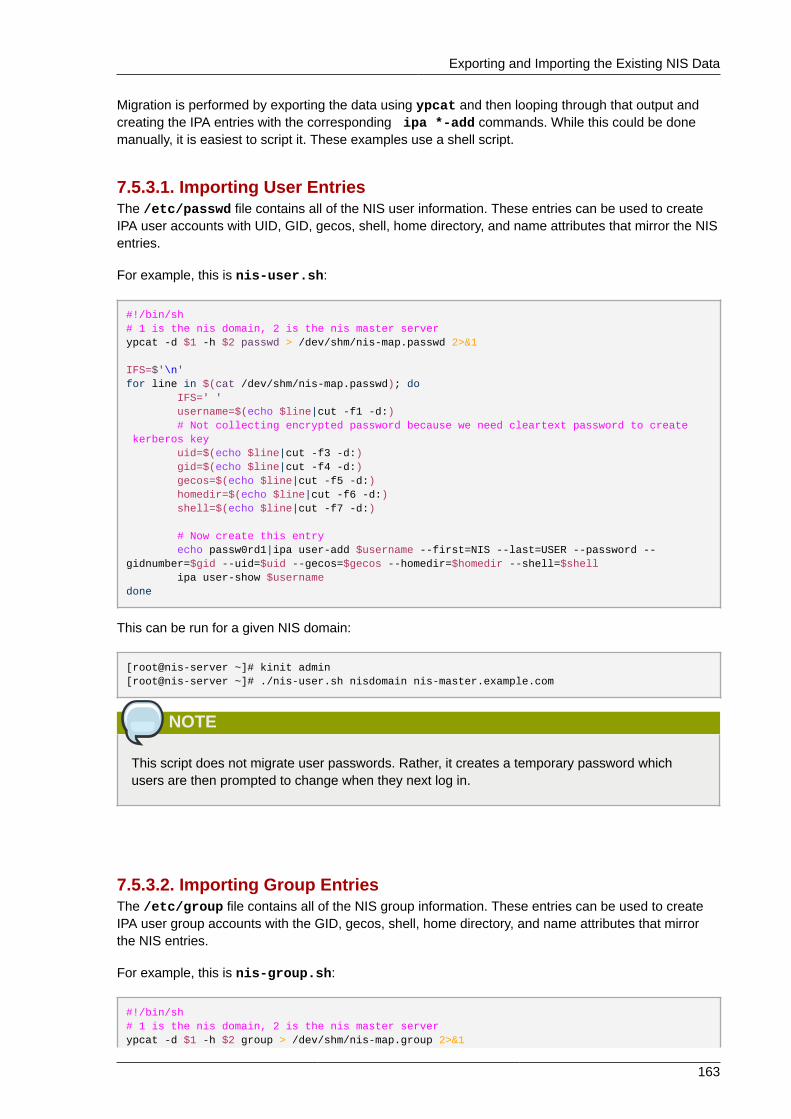
Exporting and Importing the Existing NIS Data
163
Migration is performed by exporting the data using ypcat and then looping through that output andcreating the IPA entries with the corresponding ipa *-add commands. While this could be donemanually, it is easiest to script it. These examples use a shell script.
7.5.3.1. Importing User EntriesThe /etc/passwd file contains all of the NIS user information. These entries can be used to createIPA user accounts with UID, GID, gecos, shell, home directory, and name attributes that mirror the NISentries.
For example, this is nis-user.sh:
#!/bin/sh# 1 is the nis domain, 2 is the nis master serverypcat -d $1 -h $2 passwd > /dev/shm/nis-map.passwd 2>&1 IFS=$'\n' for line in $(cat /dev/shm/nis-map.passwd); do IFS=' ' username=$(echo $line|cut -f1 -d:) # Not collecting encrypted password because we need cleartext password to create kerberos key uid=$(echo $line|cut -f3 -d:) gid=$(echo $line|cut -f4 -d:) gecos=$(echo $line|cut -f5 -d:) homedir=$(echo $line|cut -f6 -d:) shell=$(echo $line|cut -f7 -d:) # Now create this entry echo passw0rd1|ipa user-add $username --first=NIS --last=USER --password --gidnumber=$gid --uid=$uid --gecos=$gecos --homedir=$homedir --shell=$shell ipa user-show $username done
This can be run for a given NIS domain:
[root@nis-server ~]# kinit admin[root@nis-server ~]# ./nis-user.sh nisdomain nis-master.example.com
NOTE
This script does not migrate user passwords. Rather, it creates a temporary password whichusers are then prompted to change when they next log in.
7.5.3.2. Importing Group EntriesThe /etc/group file contains all of the NIS group information. These entries can be used to createIPA user group accounts with the GID, gecos, shell, home directory, and name attributes that mirrorthe NIS entries.
For example, this is nis-group.sh:
#!/bin/sh# 1 is the nis domain, 2 is the nis master serverypcat -d $1 -h $2 group > /dev/shm/nis-map.group 2>&1

Chapter 7. Identity: Integrating with NIS Domains and Netgroups
164
IFS=$'\n' for line in $(cat /dev/shm/nis-map.group); do IFS=' ' groupname=$(echo $line|cut -f1 -d:) # Not collecting encrypted password because we need cleartext password to create kerberos key gid=$(echo $line|cut -f3 -d:) members=$(echo $line|cut -f4 -d:) # Now create this entry ipa group-add $groupname --desc=NIS_GROUP_$groupname --gid=$gid if [ -n "$members" ]; then ipa group-add-member $groupname --users=$members fi ipa group-show $groupname done
This can be run for a given NIS domain:
[root@nis-server ~]# kinit admin[root@nis-server ~]# ./nis-group.sh nisdomain nis-master.example.com
7.5.3.3. Importing Host EntriesThe /etc/hosts file contains all of the NIS host information. These entries can be used to create IPAhost accounts that mirror the NIS entries.
For example, this is nis-hosts.sh:
#!/bin/sh# 1 is the nis domain, 2 is the nis master serverypcat -d $1 -h $2 hosts | egrep -v "localhost|127.0.0.1" > /dev/shm/nis-map.hosts 2>&1 IFS=$'\n' for line in $(cat /dev/shm/nis-map.hosts); do IFS=' ' ipaddress=$(echo $line|awk '{print $1}') hostname=$(echo $line|awk '{print $2}') master=$(ipa env xmlrpc_uri |tr -d '[:space:]'|cut -f3 -d:|cut -f3 -d/) domain=$(ipa env domain|tr -d '[:space:]'|cut -f2 -d:) if [ $(echo $hostname|grep "\." |wc -l) -eq 0 ]; then hostname=$(echo $hostname.$domain) fi zone=$(echo $hostname|cut -f2- -d.) if [ $(ipa dnszone-show $zone 2>/dev/null | wc -l) -eq 0 ]; then ipa dnszone-add --name-server=$master --admin-email=root.$master fi ptrzone=$(echo $ipaddress|awk -F. '{print $3 "." $2 "." $1 ".in-addr.arpa."}') if [ $(ipa dnszone-show $ptrzone 2>/dev/null|wc -l) -eq 0 ]; then ipa dnszone-add $ptrzone --name-server=$master --admin-email=root.$master fi # Now create this entry ipa host-add $hostname --ip-address=$ipaddress ipa host-show $hostname done
This can be run for a given NIS domain:
[root@nis-server ~]# kinit admin[root@nis-server ~]# ./nis-hosts.sh nisdomain nis-master.example.com

Exporting and Importing the Existing NIS Data
165
NOTE
This script example does not account for special host scenarios, such as using aliases.
7.5.3.4. Importing Netgroup EntriesThe /etc/netgroup file contains all of the NIS netgroup information. These entries can be used tocreate IPA netgroup accounts that mirror the NIS entries.
For example, this is nis-netgroup.sh:
#!/bin/sh# 1 is the nis domain, 2 is the nis master serverypcat -k -d $1 -h $2 netgroup > /dev/shm/nis-map.netgroup 2>&1 IFS=$'\n' for line in $(cat /dev/shm/nis-map.netgroup); do IFS=' ' netgroupname=$(echo $line|awk '{print $1}') triples=$(echo $line|sed "s/^$netgroupname //") echo "ipa netgroup-add $netgroupname --desc=NIS_NG_$netgroupname" if [ $(echo $line|grep "(,"|wc -l) -gt 0 ]; then echo "ipa netgroup-mod $netgroupname --hostcat=all" fi if [ $(echo $line|grep ",,"|wc -l) -gt 0 ]; then echo "ipa netgroup-mod $netgroupname --usercat=all" fi for triple in $triples; do triple=$(echo $triple|sed -e 's/-//g' -e 's/(//' -e 's/)//') if [ $(echo $triple|grep ",.*,"|wc -l) -gt 0 ]; then hostname=$(echo $triple|cut -f1 -d,) username=$(echo $triple|cut -f2 -d,) domain=$(echo $triple|cut -f3 -d,) hosts=""; users=""; doms=""; [ -n "$hostname" ] && hosts="--hosts=$hostname" [ -n "$username" ] && users="--users=$username" [ -n "$domain" ] && doms="--nisdomain=$domain" echo "ipa netgroup-add-member $hosts $users $doms" else netgroup=$triple echo "ipa netgroup-add $netgroup --desc=NIS_NG_$netgroup" fi done done
As explained briefly in Section 7.1, “About NIS and Identity Management”, NIS entries exist in a setof three values, called a triple. The triple is host,user,domain, but not every component is required;commonly, a triple only defines a host and domain or user and domain. The way this script is written,the ipa netgroup-add-member command always adds a host, user, and domain triple to thenetgroup.
if [ $(echo $triple|grep ",.*,"|wc -l) -gt 0 ]; then hostname=$(echo $triple|cut -f1 -d,) username=$(echo $triple|cut -f2 -d,) domain=$(echo $triple|cut -f3 -d,) hosts=""; users=""; doms=""; [ -n "$hostname" ] && hosts="--hosts=$hostname"
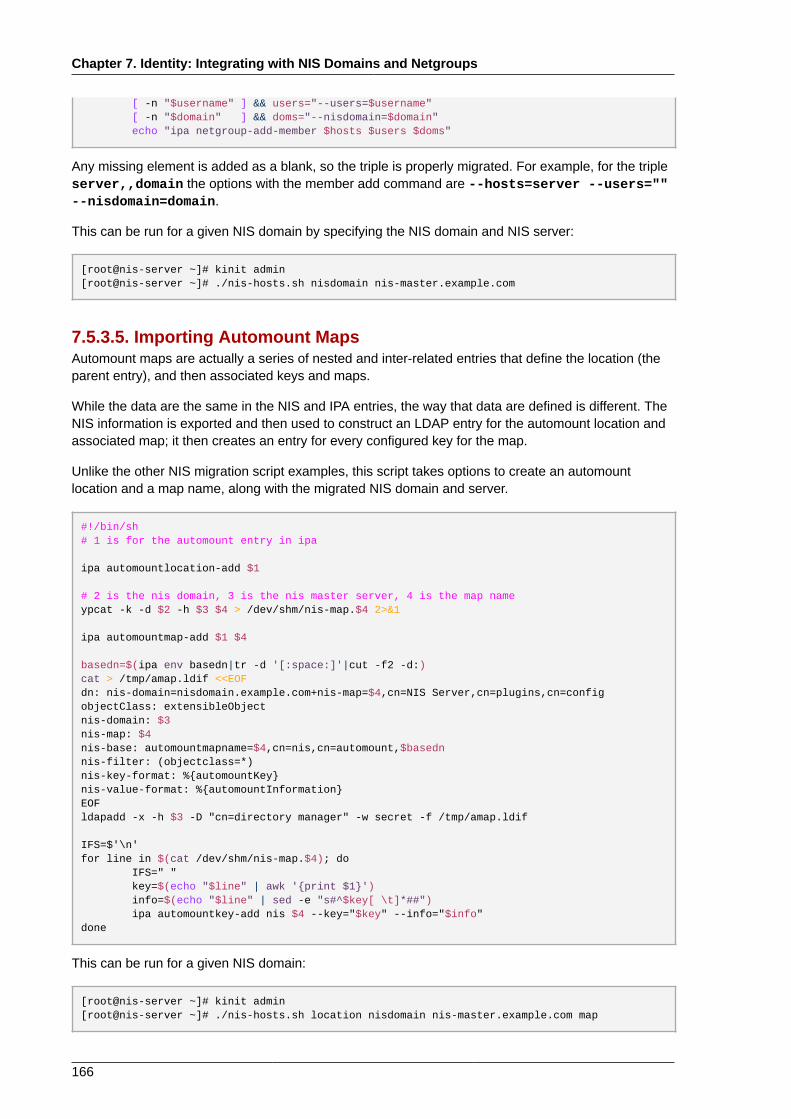
Chapter 7. Identity: Integrating with NIS Domains and Netgroups
166
[ -n "$username" ] && users="--users=$username" [ -n "$domain" ] && doms="--nisdomain=$domain" echo "ipa netgroup-add-member $hosts $users $doms"
Any missing element is added as a blank, so the triple is properly migrated. For example, for the tripleserver,,domain the options with the member add command are --hosts=server --users=""--nisdomain=domain.
This can be run for a given NIS domain by specifying the NIS domain and NIS server:
[root@nis-server ~]# kinit admin[root@nis-server ~]# ./nis-hosts.sh nisdomain nis-master.example.com
7.5.3.5. Importing Automount MapsAutomount maps are actually a series of nested and inter-related entries that define the location (theparent entry), and then associated keys and maps.
While the data are the same in the NIS and IPA entries, the way that data are defined is different. TheNIS information is exported and then used to construct an LDAP entry for the automount location andassociated map; it then creates an entry for every configured key for the map.
Unlike the other NIS migration script examples, this script takes options to create an automountlocation and a map name, along with the migrated NIS domain and server.
#!/bin/sh# 1 is for the automount entry in ipa
ipa automountlocation-add $1 # 2 is the nis domain, 3 is the nis master server, 4 is the map name ypcat -k -d $2 -h $3 $4 > /dev/shm/nis-map.$4 2>&1 ipa automountmap-add $1 $4 basedn=$(ipa env basedn|tr -d '[:space:]'|cut -f2 -d:) cat > /tmp/amap.ldif <<EOF dn: nis-domain=nisdomain.example.com+nis-map=$4,cn=NIS Server,cn=plugins,cn=config objectClass: extensibleObject nis-domain: $3 nis-map: $4 nis-base: automountmapname=$4,cn=nis,cn=automount,$basedn nis-filter: (objectclass=*) nis-key-format: %{automountKey} nis-value-format: %{automountInformation} EOF ldapadd -x -h $3 -D "cn=directory manager" -w secret -f /tmp/amap.ldif IFS=$'\n' for line in $(cat /dev/shm/nis-map.$4); do IFS=" " key=$(echo "$line" | awk '{print $1}') info=$(echo "$line" | sed -e "s#^$key[ \t]*##") ipa automountkey-add nis $4 --key="$key" --info="$info" done
This can be run for a given NIS domain:
[root@nis-server ~]# kinit admin[root@nis-server ~]# ./nis-hosts.sh location nisdomain nis-master.example.com map

Setting Weak Password Encryption for NIS User Authentication to IPA
167
7.5.4. Setting Weak Password Encryption for NIS UserAuthentication to IPAA NIS server can handle CRYPT password hashes. Once an existing NIS server is migrated toIPA (and its underlying LDAP database), it may still be necessary to preserve the NIS-supportedCRYPT passwords. However, the LDAP server does not use CRYPT hashes by default. It uses SSHAor SSHA-256. If the 389 Directory Server password hash is not changed, then NIS users cannotauthenticate to the IPA domain, and kinit fails with password failures.
To set the underlying 389 Directory Server to use CRYPT as the password hash, change thepasswordStorageScheme attribute using ldapmodify:
[root@server ~]# ldapmodify -D "cn=directory server" -w secret -p 389 -h ipaserver.example.com
dn: cn=configchangetype: modifyreplace: passwordStorageSchemepasswordStorageScheme: crypt
NOTE
Changing the password storage scheme only applies the scheme to new passwords; it does notretroactively change the encryption method used for existing passwords.
If weak crypto is required for password hashes, it is better to change the setting as early aspossible so that more user passwords use the weaker password hash.

168
Chapter 8.
169
Identity: Integrating with MicrosoftActive DirectoryIdentity Management uses active synchronization to integrate user data stored in an Active Directorydomain and the user data stored in the IPA domain. Critical user attributes, including passwords, aresynchronized between the services.
The capability to sync Active Directory and IPA domains is inherent when an IPA server is firstinstalled. The synchronization process is configured by creating agreements between the IPA serverand the Active Directory domain controller.
This chapter describes how to configure synchronization, how to configure Active Directory forintegration with IPA, and how to configure Windows systems within the Active Directory domain to beaware of the IPA domain.
8.1. About Active Directory and Identity ManagementWithin the IPA domain, information is shared among servers and replicas by copying that information,reliably and predictably, between the data masters (servers) and other data masters. This process isreplication.
A similar process can be used to share data between the IPA domain and a Microsoft Active Directorydomain. This is synchronization.
Synchronization is the process of copying data back and forth between Active Directory and IdentityManagement.
Synchronization is defined in an agreement between an IPA server and an Active Directory domaincontroller. The sync agreement defines all of the information required to identify sync-able user entries(like the subtree to synchronize and requisite object classes in the user entries) as well as defininghow account attributes are handled. The sync agreements are created with default values which canbe tweaked to meet the needs of a specific domain. When two servers are involved in synchronization,they are called peers.
Synchronization is most commonly bi-directional. Information is sent back and forth between the IPAdomain and the Windows domain in a process that is very similar to how IPA servers and replicasshare information among themselves. It is possible to configure synchronization — or certain dataareas — to only sync one way. That is uni-directional synchronization.
To prevent the risk of data conflicts, synchronization is configured between one Identity Managementserver and one Active Directory domain controller. The Identity Management server propagateschanges back to the IPA domain, while the domain controller propagates changes back to theWindows domain.
There are some key features to IPA synchronization:
• A synchronization operation runs every five minutes.
• Synchronization can only be configured with one Active Directory domain. Multiple domains are notsupported.
• Synchronization can only be configured with one Active Directory domain controller. However, it ispossible to have a list of failover Active Directory domain controllers. Likewise, there can be a list offailover IPA servers to keep synchronization uninterrupted.
Chapter 8. Identity: Integrating with Microsoft Active Directory
170
• Only user information is synchronized.
• Both user attributes and passwords can be synchronized.
• While modifications are bi-directional (going both from Active Directory to IPA and from IPA to ActiveDirectory), creating or adding accounts are only uni-directional, from Active Directory to IdentityManagement. New accounts created in Active Directory are synchronized over to IPA automatically.However, user accounts created in IPA must also be created in Active Directory before they will besynchronized.
• Account lock information is synchronized by default, so a user account which is disabled in onedomain is disabled in the other.
• Password synchronization changes take effect immediately.
When Active Directory users are synchronized over to IPA, certain attributes (including Kerberos andPOSIX attributes) will have IPA attributes are automatically added to the user entries. These attributesare used by IPA within its domain. They are not synchronized back over the corresponding ActiveDirectory user entry.
Some of the data in synchronization can be modified as part of the synchronization process. Forexamples, certain attributes can be automatically added to Active Directory user accounts when theyare synced over to the IPA domain. These attribute changes are defined as part of the synchronizationagreement and are described in Section 8.4.3, “Changing the Behavior for Syncing User AccountAttributes”.
8.2. About Synchronized Attributes
8.2.1. User Attribute SynchronizationIdentity Management synchronizes a subset of user attributes between IPA and Active Directory userentries. Any other attributes present in the entry, either in Identity Management or in Active Directory,are ignored by synchronization.
NOTE
Most POSIX attributes are not synchronized.
Although there are significant schema differences between the Active Directory LDAP schema andthe 389 Directory Server LDAP schema used by Identity Management, there are many attributes thatare the same. These attributes are simply synchronized between the Active Directory and IPA userentries, with no changes to the attribute name or value format.
User Schema That Are the Same in Identity Management and Windows Servers• cn1
• physicalDeliveryOfficeName
• description
• postOfficeBox
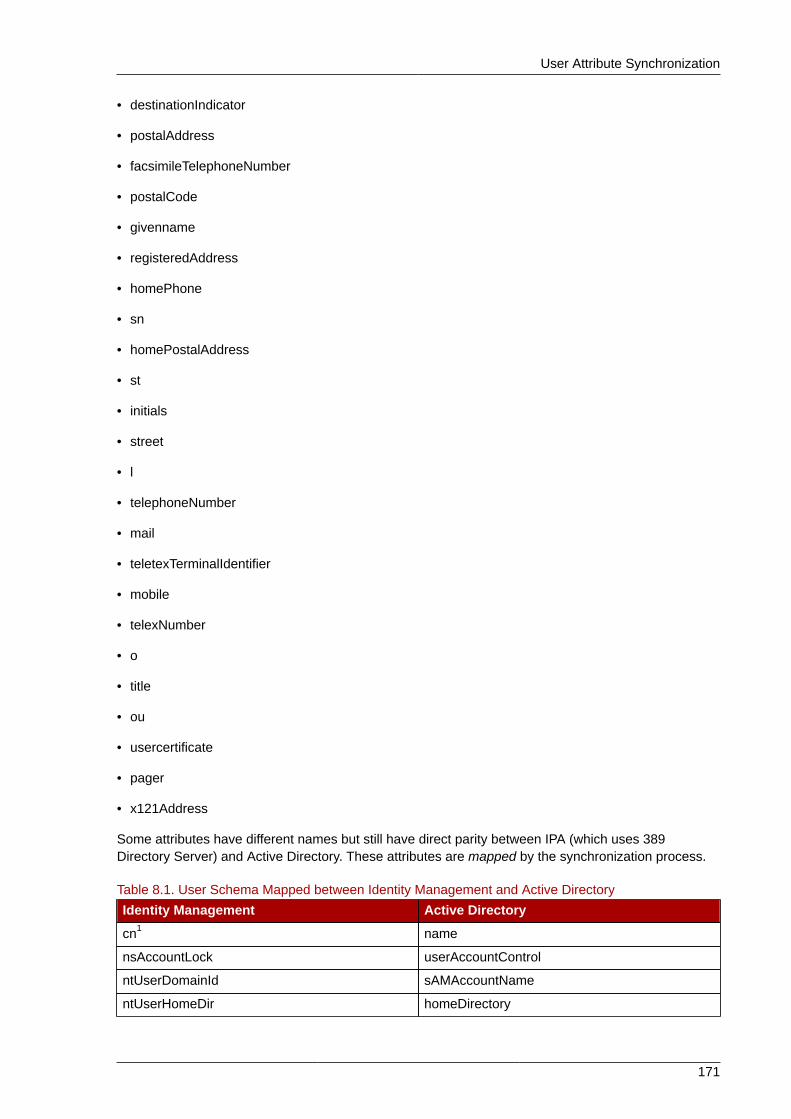
User Attribute Synchronization
171
• destinationIndicator
• postalAddress
• facsimileTelephoneNumber
• postalCode
• givenname
• registeredAddress
• homePhone
• sn
• homePostalAddress
• st
• initials
• street
• l
• telephoneNumber
• teletexTerminalIdentifier
• mobile
• telexNumber
• o
• title
• ou
• usercertificate
• pager
• x121Address
Some attributes have different names but still have direct parity between IPA (which uses 389Directory Server) and Active Directory. These attributes are mapped by the synchronization process.
Table 8.1. User Schema Mapped between Identity Management and Active Directory
Identity Management Active Directory
cn1 name
nsAccountLock userAccountControl
ntUserDomainId sAMAccountName
ntUserHomeDir homeDirectory

Chapter 8. Identity: Integrating with Microsoft Active Directory
172
Identity Management Active Directory
ntUserScriptPath scriptPath
ntUserLastLogon lastLogon
ntUserLastLogoff lastLogoff
ntUserAcctExpires accountExpires
ntUserCodePage codePage
ntUserLogonHours logonHours
ntUserMaxStorage maxStorage
ntUserProfile profilePath
ntUserParms userParameters
ntUserWorkstations userWorkstations1 The cn is mapped directly (cn to cn) when syncing from Identity Management to Active Directory. When syncing from ActiveDirectory cn is mapped from the name attribute in Active Directory to the cn attribute in Identity Management.
8.2.1.1. User Schema Differences between Identity Management andActive Directory
Even though attributes may be successfully synced between Active Directory and IPA, there may stillbe differences in how Active Directory and Identity Management define the underlying X.500 objectclasses. This could lead to differences in how the data are handled in the different LDAP services.
This section describes the differences in how Active Directory and Identity Management handle someof the attributes which can be synchronized between the two domains.
8.2.1.1.1. Values for cn Attributes
In 389 Directory Server, the cn attribute can be multi-valued, while in Active Directory this attributemust have only a single value. When the Identity Management cn attribute is synchronized, then, onlyone value is sent to the Active Directory peer.
What this means for synchronization is that,potentially, if a cn value is added to an Active Directoryentry and that value is not one of the values for cn in Identity Management, then all of the IdentityManagement cn values are overwritten with the single Active Directory value.
One other important difference is that Active Directory uses the cn attribute as its naming attribute,where Identity Management uses uid. This means that there is the potential to rename the entryentirely (and accidentally) if the cn attribute is edited in the Identity Management. If that cn changeis written over to the Active Directory entry, then the entry is renamed, and the new named entry iswritten back over to Identity Management.
8.2.1.1.2. Values for street and streetAddress
Active Directory uses the attribute streetAddress for a user or group's postal address; this is theway that 389 Directory Server uses the street attribute. There are two important differences in theway that Active Directory and Identity Management use the streetAddress and street attributes,respectively:

User Attribute Synchronization
173
• In 389 Directory Server, streetAddress is an alias for street. Active Directory also has thestreet attribute, but it is a separate attribute that can hold an independent value, not an alias forstreetAddress.
• Active Directory defines both streetAddress and street as single-valued attributes, while 389Directory Server defines street as a multi-valued attribute, as specified in RFC 4519.
Because of the different ways that 389 Directory Server and Active Directory handle streetAddressand street attributes, there are two rules to follow when setting address attributes in Active Directoryand Identity Management:
• The synchronization process maps streetAddress in the Active Directory entry to streetin Identity Management. To avoid conflicts, the street attribute should not be used in ActiveDirectory.
• Only one Identity Management street attribute value is synced to Active Directory. If thestreetAddress attribute is changed in Active Directory and the new value does not already existin Identity Management, then all street attribute values in Identity Management are replaced withthe new, single Active Directory value.
8.2.1.1.3. Constraints on the initials Attribute
For the initials attribute, Active Directory imposes a maximum length constraint of six characters,but 389 Directory Server does not have a length limit. If an initials attribute longer than sixcharacters is added to Identity Management, the value is trimmed when it is synchronized with theActive Directory entry.
8.2.1.1.4. Requiring the surname (sn) Attribute
Active Directory allows person entries to be created without a surname attribute. However, RFC 4519defines the person object class as requiring a surname attribute, and this is the definition used inDirectory Server.
If an Active Directory person entry is created without a surname attribute, that entry will not besynced over to IPA since it fails with an object class violation.
8.2.1.2. Active Directory Entries and RFC 2307 AttributesWindows uses unique, random security IDs (SIDs) to identify users. These SIDs are assigned inblocks or ranges, identifying different system user types within the Windows domain. When usersare synchronized between Identity Management and Active Directory, Windows SIDs for users aremapped to the Unix UIDs used by the Identity Management entry. Another way of saying this isthat the Windows SID is the only ID within the Windows entry which is used as an identifier in thecorresponding Unix entry, and then it is used in a mapping.
When Active Directory domains interact with Unix-style applications or domains, then the ActiveDirectory domain may use Services for Unix or IdM for Unix to enable Unix-style uidNumber andgidNumber attributes. This allows Windows user entries to follow the specifications for thoseattributes in RFC 23072.
2 http://www.faqs.org/rfcs/rfc2307.html
Chapter 8. Identity: Integrating with Microsoft Active Directory
174
However, the uidNumber and gidNumber attributes are not actually used as the uidNumber andgidNumber attributes for the Identity Management entry. The Identity Management uidNumber andgidNumber attributes are generated when the Windows user is synced over.
NOTE
The uidNumber and gidNumber attributes defined and used in Identity Management are not thesame uidNumber and gidNumber attributes defined and used in the Active Directory entry, andthe numbers are not related.
8.2.2. Group Attribute Synchronization
8.2.2.1. About Windows Group TypesIn Active Directory, there are two major types of groups: security and distribution. Security groups aremost similar to groups in Identity Management, since security groups can have policies configuredfor access controls, resource restrictions, and other permissions. Distribution groups are for mailingdistribution. These are further broken down into global and local groups. The Identity ManagementntGroupType supports all four group types:
• -21483646 for global/security (the default)
• -21483644 for domain local/security
• 2 for global/distribution
• 4 for domain local/distribution
8.2.2.2. Group Attributes Synchronized between Identity Managementand Active DirectoryOnly a subset of Identity Management and Active Directory attributes are synchronized. Theseattributes are hard-coded and are defined regardless of which way the entry is being synchronized.Any other attributes present in the entry, either in Identity Management or in Active Directory, remainunaffected by synchronization.
Some attributes used in Identity Management and Active Directory group entries are identical. Theseare usually attributes defined in an LDAP standard, which are common among all LDAP services.These attributes are synchronized to one another exactly. Table 8.3, “Group Entry Attributes That Arethe Same between Identity Management and Active Directory” shows attributes that are the samebetween the IPA and Windows servers.
Some attributes define the same information, but the names of the attributes or their schemadefinitions are different. These attributes are mapped between Active Directory and IPA, so thatattribute A in one server is treated as attribute B in the other. For synchronization, many of theseattributes relate to Windows-specific information. Table 8.2, “Group Entry Attribute Mapping betweenIdentity Management and Active Directory” shows the attributes that are mapped between the IPA andWindows servers.
For more information on the differences in ways that IPA and Active Directory handle some schemaelements, see Section 8.2.2.3, “Group Schema Differences between Identity Management and ActiveDirectory”.

Setting up Active Directory for Synchronization
175
Table 8.2. Group Entry Attribute Mapping between Identity Management and Active Directory
Identity Management Active Directory
cn name
ntUserDomainID name
ntGroupType groupType
uniqueMembermember
Member1
1 The Member attribute in Active Directory is synced to the uniqueMember attribute in Identity Management.
Table 8.3. Group Entry Attributes That Are the Same between Identity Management and ActiveDirectory
cn o
description ou
l seeAlso
8.2.2.3. Group Schema Differences between Identity Management andActive Directory
Although Active Directory supports the same basic X.500 object classes as Identity Management,there are a few incompatibilities of which administrators should be aware.
Nested groups (where a group contains another group as a member) are supported and for WinSyncare synchronized. However, Active Directory imposes certain constraints as to the composition ofnested groups. For example, a global group contain a domain local group as a member. IdentityManagement has no concept of local and global groups, and, therefore, it is possible to create entriesin Identity Management that violate Active Directory's constraints when synchronized.
8.3. Setting up Active Directory for SynchronizationSynchronizing user accounts alone is enabled within IPA, so all that is necessary is to set up a syncagreement (Section 8.4.2, “Creating Synchronization Agreements”). On the Windows server, it isnecessary to create the user that the IPA server will use to connect to the Active Directory domain.
The process for creating a user in Active Directory is covered in the Windows server documentation athttp://technet.microsoft.com/en-us/library/cc732336.aspx. The new user account must have the properpermissions:
• Grant the sync user account Replicating directory changes rights to the synchronized ActiveDirectory subtree. Replicator rights are required for the sync user to perform synchronizationoperations.
Replicator rights are described in http://support.microsoft.com/kb/303972.
• Add the sync user as a member of the Account Operator and Enterprise Read-Only Domaincontroller groups. It is not necessary for the user to belong to the full Domain Admin group.
Chapter 8. Identity: Integrating with Microsoft Active Directory
176
8.4. Managing Synchronization Agreements
8.4.1. Trusting the Active Directory and IPA CA CertificatesBoth Active Directory and Identity Management use certificates for server authentication. For theActive Directory and IPA SSL server certificates to be trusted by each other, both servers need to trustthe CA certificate for the CA which issued those certificates. This means that the Active Directory CAcertificate needs to be imported into the IPA database, and the IPA CA certificate needs to be importedinto the Active Directory database.
1. On the Active Directory server, download the IPA server's CA certificate from http://ipa.example.com/ipa/config/ca.crt.
2. Install the IPA CA certificate in the Active Directory certificate database. This can be done usingthe Microsoft Management Console or the certutil utility3. For example:
certutil -installcert -v -config "ipaserver.example.com\Example Domain CA" c:\path\to\ca.crt
For more details, see the Active Directory documentation.
3. Export the Active Directory CA certificate.
a. In My Network Places, open the CA distribution point. For example, the location on WindowsServer 2003 is C:\WINDOWS\system32\certsrv\CertEnroll\.
b. Double-click the security certificate file (.crt file) to display the Certificate dialog box.
c. On the Details tab, click Copy to File to start the Certificate Export Wizard.
d. Click Next, and then select Base-64 encoded X.509 (.CER).

Trusting the Active Directory and IPA CA Certificates
177
e. Specify a suitable directory and file name for the exported file. Click Next to export thecertificate, and then click Finish.
4. Copy the Active Directory certificate over to the IPA server machine.
5. Download the IPA server's CA certificate from http://ipa.example.com/ipa/config/ca.crt.
6. Copy both the Active Directory CA certificate and the IPA CA certificate into the /etc/openldap/cacerts/ directory.
7. Update the hash symlinks for the certificates.
cacertdir_rehash /etc/openldap/cacerts/
8. Edit the /etc/openldap/ldap.conf file, and add the information to point to and use thecertificates in the /etc/openldap/cacerts/ directory.
TLS_CACERTDIR /etc/openldap/cacerts/TLS_REQCERT allow
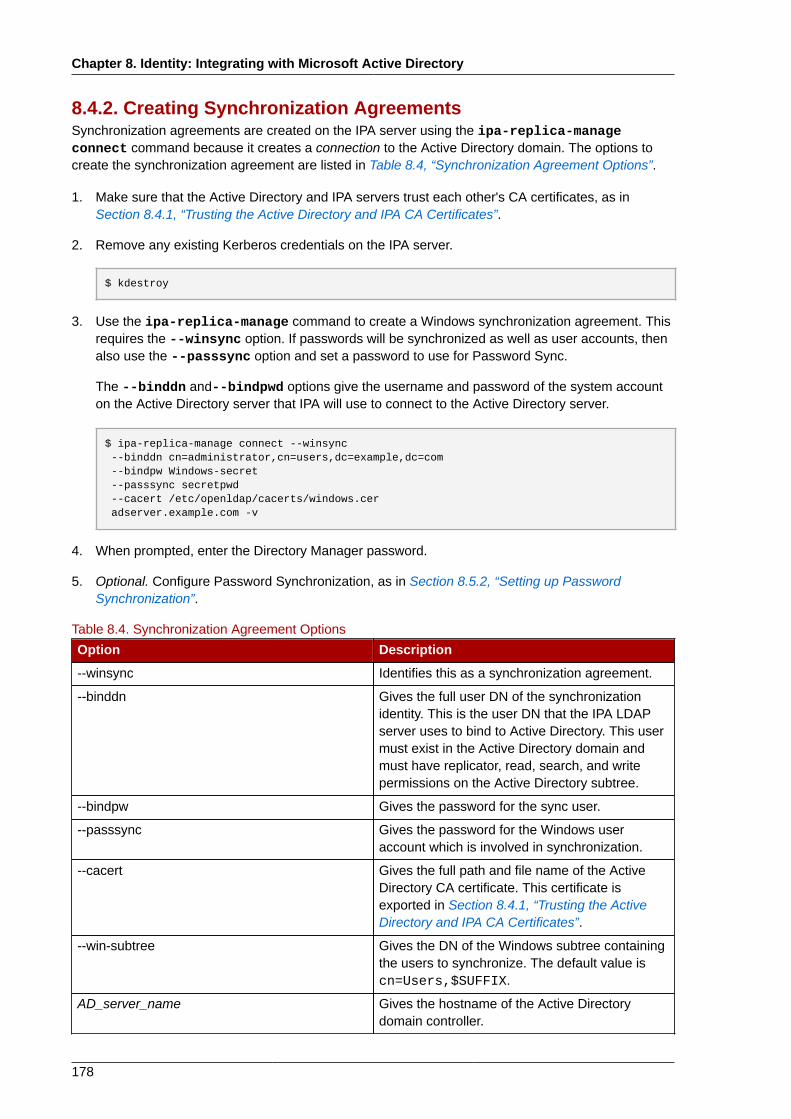
Chapter 8. Identity: Integrating with Microsoft Active Directory
178
8.4.2. Creating Synchronization AgreementsSynchronization agreements are created on the IPA server using the ipa-replica-manageconnect command because it creates a connection to the Active Directory domain. The options tocreate the synchronization agreement are listed in Table 8.4, “Synchronization Agreement Options”.
1. Make sure that the Active Directory and IPA servers trust each other's CA certificates, as inSection 8.4.1, “Trusting the Active Directory and IPA CA Certificates”.
2. Remove any existing Kerberos credentials on the IPA server.
$ kdestroy
3. Use the ipa-replica-manage command to create a Windows synchronization agreement. Thisrequires the --winsync option. If passwords will be synchronized as well as user accounts, thenalso use the --passsync option and set a password to use for Password Sync.
The --binddn and--bindpwd options give the username and password of the system accounton the Active Directory server that IPA will use to connect to the Active Directory server.
$ ipa-replica-manage connect --winsync --binddn cn=administrator,cn=users,dc=example,dc=com --bindpw Windows-secret --passsync secretpwd --cacert /etc/openldap/cacerts/windows.cer adserver.example.com -v
4. When prompted, enter the Directory Manager password.
5. Optional. Configure Password Synchronization, as in Section 8.5.2, “Setting up PasswordSynchronization”.
Table 8.4. Synchronization Agreement Options
Option Description
--winsync Identifies this as a synchronization agreement.
--binddn Gives the full user DN of the synchronizationidentity. This is the user DN that the IPA LDAPserver uses to bind to Active Directory. This usermust exist in the Active Directory domain andmust have replicator, read, search, and writepermissions on the Active Directory subtree.
--bindpw Gives the password for the sync user.
--passsync Gives the password for the Windows useraccount which is involved in synchronization.
--cacert Gives the full path and file name of the ActiveDirectory CA certificate. This certificate isexported in Section 8.4.1, “Trusting the ActiveDirectory and IPA CA Certificates”.
--win-subtree Gives the DN of the Windows subtree containingthe users to synchronize. The default value iscn=Users,$SUFFIX.
AD_server_name Gives the hostname of the Active Directorydomain controller.
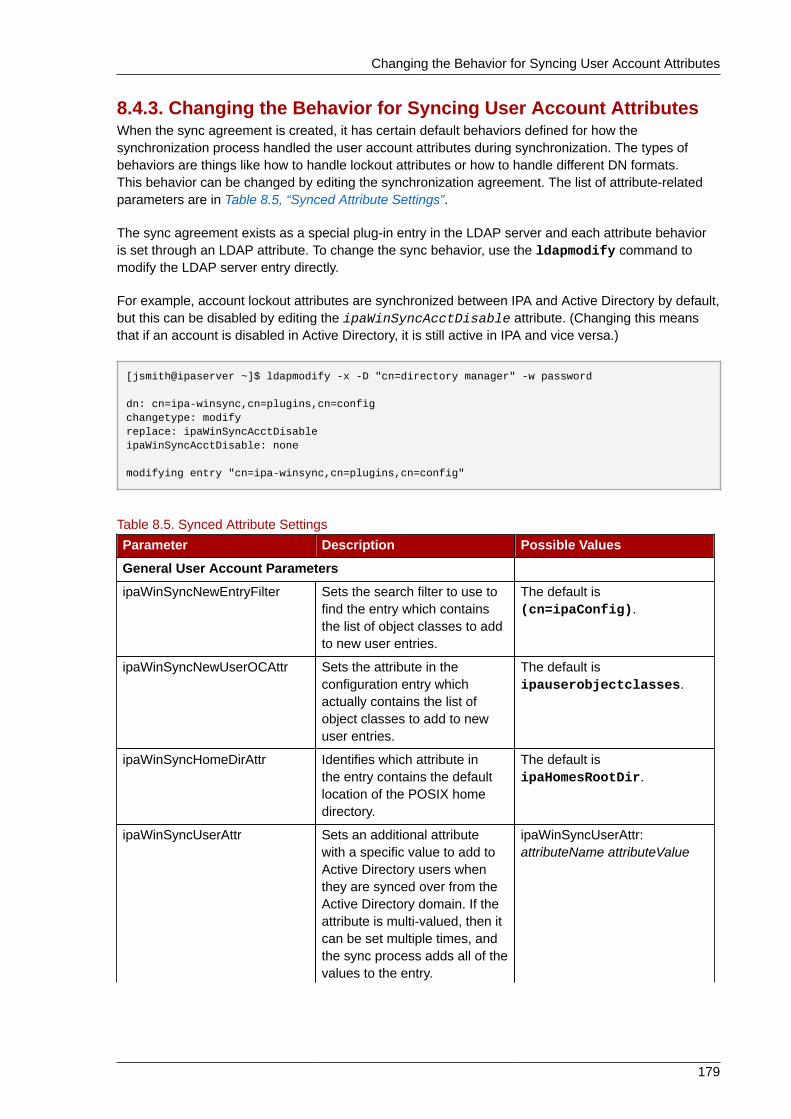
Changing the Behavior for Syncing User Account Attributes
179
8.4.3. Changing the Behavior for Syncing User Account AttributesWhen the sync agreement is created, it has certain default behaviors defined for how thesynchronization process handled the user account attributes during synchronization. The types ofbehaviors are things like how to handle lockout attributes or how to handle different DN formats.This behavior can be changed by editing the synchronization agreement. The list of attribute-relatedparameters are in Table 8.5, “Synced Attribute Settings”.
The sync agreement exists as a special plug-in entry in the LDAP server and each attribute behavioris set through an LDAP attribute. To change the sync behavior, use the ldapmodify command tomodify the LDAP server entry directly.
For example, account lockout attributes are synchronized between IPA and Active Directory by default,but this can be disabled by editing the ipaWinSyncAcctDisable attribute. (Changing this meansthat if an account is disabled in Active Directory, it is still active in IPA and vice versa.)
[jsmith@ipaserver ~]$ ldapmodify -x -D "cn=directory manager" -w password
dn: cn=ipa-winsync,cn=plugins,cn=configchangetype: modifyreplace: ipaWinSyncAcctDisableipaWinSyncAcctDisable: none
modifying entry "cn=ipa-winsync,cn=plugins,cn=config"
Table 8.5. Synced Attribute Settings
Parameter Description Possible Values
General User Account Parameters
ipaWinSyncNewEntryFilter Sets the search filter to use tofind the entry which containsthe list of object classes to addto new user entries.
The default is(cn=ipaConfig).
ipaWinSyncNewUserOCAttr Sets the attribute in theconfiguration entry whichactually contains the list ofobject classes to add to newuser entries.
The default isipauserobjectclasses.
ipaWinSyncHomeDirAttr Identifies which attribute inthe entry contains the defaultlocation of the POSIX homedirectory.
The default isipaHomesRootDir.
ipaWinSyncUserAttr Sets an additional attributewith a specific value to add toActive Directory users whenthey are synced over from theActive Directory domain. If theattribute is multi-valued, then itcan be set multiple times, andthe sync process adds all of thevalues to the entry.
ipaWinSyncUserAttr:attributeName attributeValue
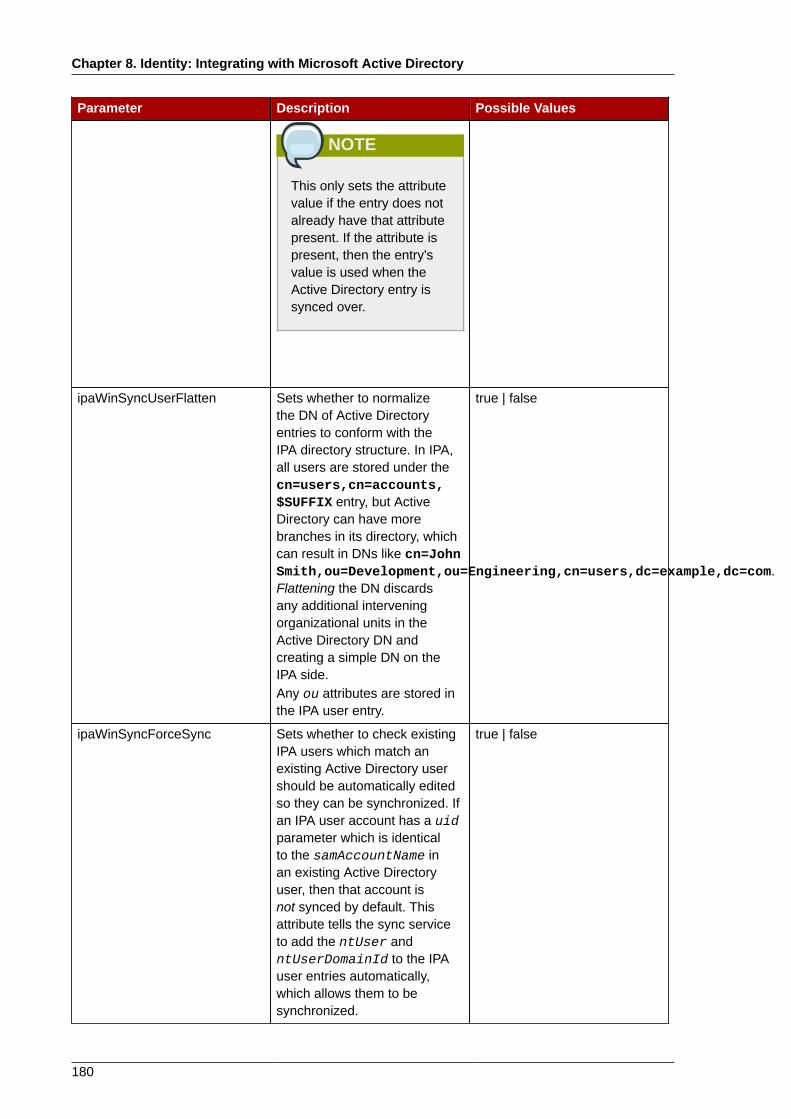
Chapter 8. Identity: Integrating with Microsoft Active Directory
180
Parameter Description Possible Values
NOTE
This only sets the attributevalue if the entry does notalready have that attributepresent. If the attribute ispresent, then the entry'svalue is used when theActive Directory entry issynced over.
ipaWinSyncUserFlatten Sets whether to normalizethe DN of Active Directoryentries to conform with theIPA directory structure. In IPA,all users are stored under thecn=users,cn=accounts,$SUFFIX entry, but ActiveDirectory can have morebranches in its directory, whichcan result in DNs like cn=JohnSmith,ou=Development,ou=Engineering,cn=users,dc=example,dc=com.Flattening the DN discardsany additional interveningorganizational units in theActive Directory DN andcreating a simple DN on theIPA side.Any ou attributes are stored inthe IPA user entry.
true | false
ipaWinSyncForceSync Sets whether to check existingIPA users which match anexisting Active Directory usershould be automatically editedso they can be synchronized. Ifan IPA user account has a uidparameter which is identicalto the samAccountName inan existing Active Directoryuser, then that account isnot synced by default. Thisattribute tells the sync serviceto add the ntUser andntUserDomainId to the IPAuser entries automatically,which allows them to besynchronized.
true | false

Changing the Synchronized Windows Subtree
181
Parameter Description Possible Values
User Account Lock Parameters
ipaWinSyncAcctDisable Sets which way to synchronizeaccount lockout attributes. Itis possible to control whichaccount lockout settings arein effect. For example, to_admeans that when accountlockout attribute is set in IPA, itsvalue is synced over to ActiveDirectory and overrides thelocal Active Directory value.By default, account lockoutattributes are synced from bothdomains.
• both (default)
• to_ad
• to_ds
• none
ipaWinSyncInactivatedFilter Sets the search filter to use tofind the DN of the group usedto hold inactivated (disabled)users. This does not need to bechanged in most deployments.
The default is(&(cn=inactivated)(objectclass=groupOfNames)).
ipaWinSyncActivatedFilter Sets the search filter to use tofind the DN of the group usedto hold active users. This doesnot need to be changed in mostdeployments.
The default is(&(cn=activated)(objectclass=groupOfNames)).
Group Parameters
ipaWinSyncDefaultGroupAttr Sets the attribute in the newuser account to reference tosee what the default group forthe user is. The group name inthe entry is then used to findthe gidNumber for the useraccount.
The default isipaDefaultPrimaryGroup.
ipaWinSyncDefaultGroupFilter Sets the search filter to mapthe group name to the POSIXgidNumber.
The default is(&(gidNumber=*)(objectclass=posixGroup)(cn=groupAttr_value)).
Realm Parameters
ipaWinSyncRealmAttr Sets the attribute whichcontains the realm name in therealm entry.
The default is cn.
ipaWinSyncRealmFilter Sets the search filter to use tofind the entry which containsthe IPA realm name.
The default is(objectclass=krbRealmContainer).
8.4.4. Changing the Synchronized Windows SubtreeCreating a synchronization agreement automatically sets the two subtrees to use as the synchronizeduser database. In IPA, the default is cn=users,cn=accounts,$SUFFIX, and for Active Directory,the default is CN=Users,$SUFFIX.
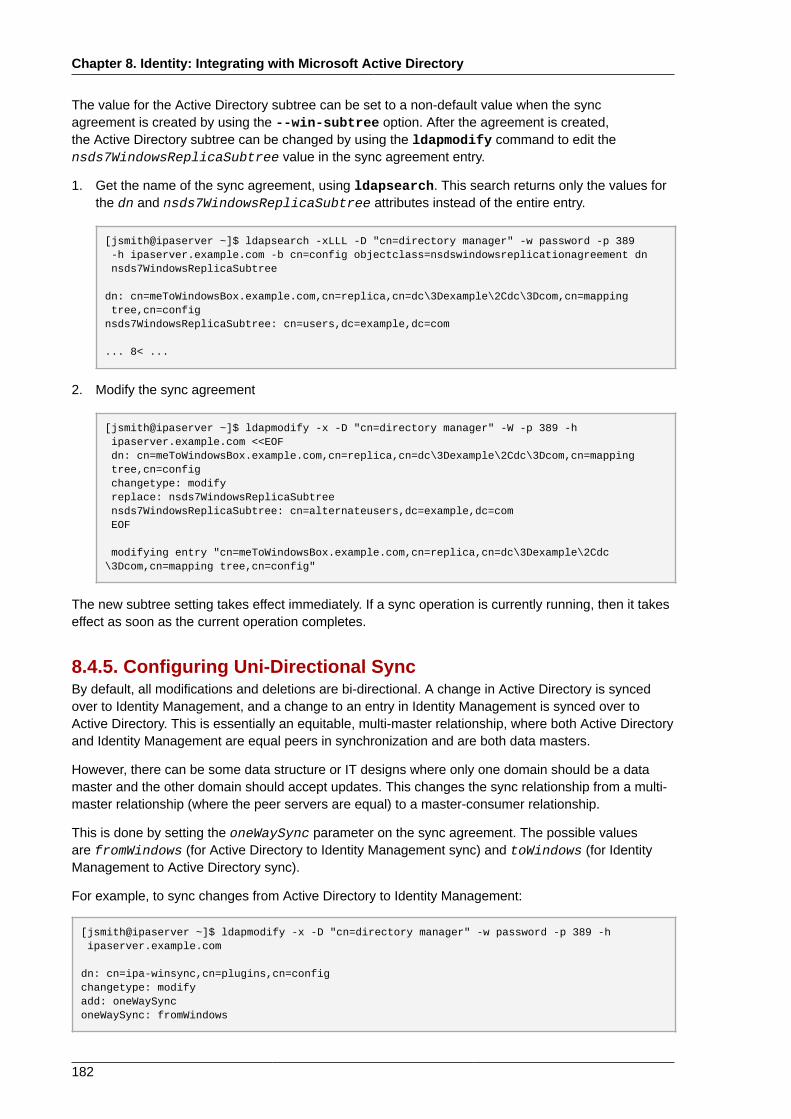
Chapter 8. Identity: Integrating with Microsoft Active Directory
182
The value for the Active Directory subtree can be set to a non-default value when the syncagreement is created by using the --win-subtree option. After the agreement is created,the Active Directory subtree can be changed by using the ldapmodify command to edit thensds7WindowsReplicaSubtree value in the sync agreement entry.
1. Get the name of the sync agreement, using ldapsearch. This search returns only the values forthe dn and nsds7WindowsReplicaSubtree attributes instead of the entire entry.
[jsmith@ipaserver ~]$ ldapsearch -xLLL -D "cn=directory manager" -w password -p 389 -h ipaserver.example.com -b cn=config objectclass=nsdswindowsreplicationagreement dn nsds7WindowsReplicaSubtree
dn: cn=meToWindowsBox.example.com,cn=replica,cn=dc\3Dexample\2Cdc\3Dcom,cn=mapping tree,cn=confignsds7WindowsReplicaSubtree: cn=users,dc=example,dc=com
... 8< ...
2. Modify the sync agreement
[jsmith@ipaserver ~]$ ldapmodify -x -D "cn=directory manager" -W -p 389 -h ipaserver.example.com <<EOF dn: cn=meToWindowsBox.example.com,cn=replica,cn=dc\3Dexample\2Cdc\3Dcom,cn=mapping tree,cn=config changetype: modify replace: nsds7WindowsReplicaSubtree nsds7WindowsReplicaSubtree: cn=alternateusers,dc=example,dc=com EOF
modifying entry "cn=meToWindowsBox.example.com,cn=replica,cn=dc\3Dexample\2Cdc\3Dcom,cn=mapping tree,cn=config"
The new subtree setting takes effect immediately. If a sync operation is currently running, then it takeseffect as soon as the current operation completes.
8.4.5. Configuring Uni-Directional SyncBy default, all modifications and deletions are bi-directional. A change in Active Directory is syncedover to Identity Management, and a change to an entry in Identity Management is synced over toActive Directory. This is essentially an equitable, multi-master relationship, where both Active Directoryand Identity Management are equal peers in synchronization and are both data masters.
However, there can be some data structure or IT designs where only one domain should be a datamaster and the other domain should accept updates. This changes the sync relationship from a multi-master relationship (where the peer servers are equal) to a master-consumer relationship.
This is done by setting the oneWaySync parameter on the sync agreement. The possible valuesare fromWindows (for Active Directory to Identity Management sync) and toWindows (for IdentityManagement to Active Directory sync).
For example, to sync changes from Active Directory to Identity Management:
[jsmith@ipaserver ~]$ ldapmodify -x -D "cn=directory manager" -w password -p 389 -h ipaserver.example.com
dn: cn=ipa-winsync,cn=plugins,cn=configchangetype: modifyadd: oneWaySynconeWaySync: fromWindows
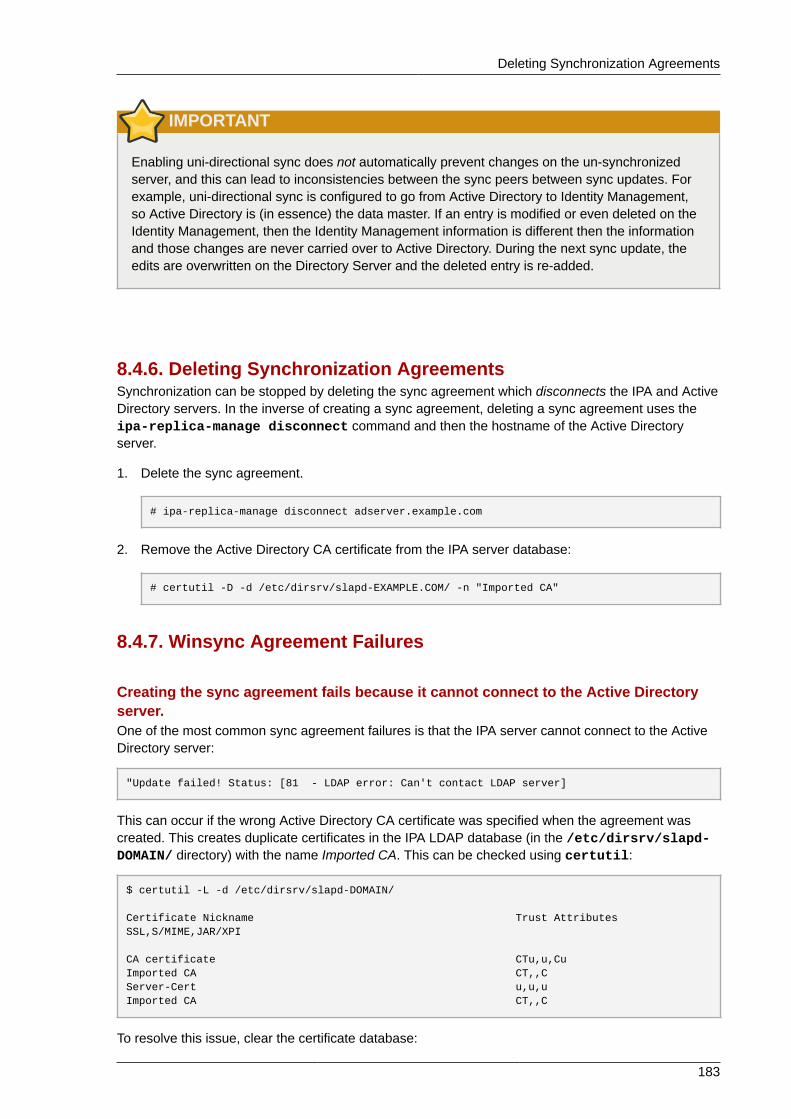
Deleting Synchronization Agreements
183
IMPORTANT
Enabling uni-directional sync does not automatically prevent changes on the un-synchronizedserver, and this can lead to inconsistencies between the sync peers between sync updates. Forexample, uni-directional sync is configured to go from Active Directory to Identity Management,so Active Directory is (in essence) the data master. If an entry is modified or even deleted on theIdentity Management, then the Identity Management information is different then the informationand those changes are never carried over to Active Directory. During the next sync update, theedits are overwritten on the Directory Server and the deleted entry is re-added.
8.4.6. Deleting Synchronization AgreementsSynchronization can be stopped by deleting the sync agreement which disconnects the IPA and ActiveDirectory servers. In the inverse of creating a sync agreement, deleting a sync agreement uses theipa-replica-manage disconnect command and then the hostname of the Active Directoryserver.
1. Delete the sync agreement.
# ipa-replica-manage disconnect adserver.example.com
2. Remove the Active Directory CA certificate from the IPA server database:
# certutil -D -d /etc/dirsrv/slapd-EXAMPLE.COM/ -n "Imported CA"
8.4.7. Winsync Agreement Failures
Creating the sync agreement fails because it cannot connect to the Active Directoryserver.One of the most common sync agreement failures is that the IPA server cannot connect to the ActiveDirectory server:
"Update failed! Status: [81 - LDAP error: Can't contact LDAP server]
This can occur if the wrong Active Directory CA certificate was specified when the agreement wascreated. This creates duplicate certificates in the IPA LDAP database (in the /etc/dirsrv/slapd-DOMAIN/ directory) with the name Imported CA. This can be checked using certutil:
$ certutil -L -d /etc/dirsrv/slapd-DOMAIN/
Certificate Nickname Trust AttributesSSL,S/MIME,JAR/XPI
CA certificate CTu,u,CuImported CA CT,,CServer-Cert u,u,uImported CA CT,,C
To resolve this issue, clear the certificate database:

Chapter 8. Identity: Integrating with Microsoft Active Directory
184
# certutil -d /etc/dirsrv/slapd-DOMAIN-NAME -D -n "Imported CA"
This deletes the CA certificate from the LDAP database.
There are errors saying passwords are not being synced because it says the entryexistsFor some entries in the user database, there may be an informational error message that thepassword is not being reset because the entry already exists:
"Windows PassSync entry exists, not resetting password"
This is not an error. This message occurs when an exempt user, the Password Sync user, it not beingchanged. The Password Sync user is the operational user which is used by the service to change thepasswords in IPA.
8.5. Managing Password SynchronizationPassword synchronization is configured separately from Windows Synchronization.
8.5.1. Setting up the Windows Server for Password SynchronizationTo synchronize passwords requires that Active Directory be running in SSL and that the PasswordSync Service be installed on each Active Directory domain controller. The Password Sync Servicerecords password changes and synchronizes them, over a secure connection, to the IPA entry.
TIP
Install the Microsoft Certificate System in Enterprise Root Mode. Active Directory will thenautomatically enroll to retrieve its SSL server certificate.
1. Make sure that the Active Directory password complexity policies are enabled so that thePassword Sync service will run.
a. Run secpol.msc from the command line.
b. Select Security Settings.
c. Open Account Policies, and then open Password Policy.
d. Enable the Password must meet complexity requirements option and save.
2. If SSL is not already enabled, set up SSL on the Active Directory server. Setting up LDAPSis explained in more detail in the Microsoft knowledgebase at http://support.microsoft.com/kb/321051.
a. Install a certificate authority in the Windows Components section in Add/RemovePrograms.
b. Select the Enterprise Root CA option.

Setting up the Windows Server for Password Synchronization
185
c. Reboot the Active Directory server. If IIS web services are running, the CA certificate can beaccessed by opening http://servername/certsrv.
d. Set up the Active Directory server to use the SSL server certificate.
i. Create a certificate request .inf, using the fully-qualified domain name of the ActiveDirectory as the certificate subject. For example:
;----------------- request.inf -----------------
[Version]
Signature="$Windows NT$
[NewRequest]
Subject = "CN=ad.server.example.com, O=Engineering, L=Raleigh, S=North Carolina, C=US"KeySpec = 1 KeyLength = 2048 Exportable = TRUE MachineKeySet = TRUE SMIME = False PrivateKeyArchive = FALSE UserProtected = FALSE UseExistingKeySet = FALSE ProviderName = "Microsoft RSA SChannel Cryptographic Provider" ProviderType = 12RequestType = PKCS10 KeyUsage = 0xa0
[EnhancedKeyUsageExtension]
OID=1.3.6.1.5.5.7.3.1
;-----------------------------------------------
For more information on the .inf request file, see the Microsoft documentation, such ashttp://technet.microsoft.com/en-us/library/cc783835.aspx.
ii. Generate the certificate request.
certreq -new request.inf request.req
iii. Submit the request to the Active Directory CA. For example:
certreq -submit request.req certnew.cer
NOTE
If the command-line tool returns an error message, then use the Web browser toaccess the CA and submit the certificate request. If IIS is running, then the CA URLis http://servername/certsrv.
Chapter 8. Identity: Integrating with Microsoft Active Directory
186
iv. Accept the certificate request. For example:
certreq -accept certnew.cer
v. Make sure that the server certificate is present on the Active Directory server.
In the File menu, click Add/Remove, then click Certificates and Personal>Certificates.
vi. Import the CA certificate from Directory Server into Active Directory. Click Trusted RootCA, then Import, and browse for the Directory Server CA certificate.
e. Reboot the domain controller.
8.5.2. Setting up Password SynchronizationInstall the Password Sync Service on every domain controller in the Active Directory domain in orderto synchronize Windows passwords.
1. Download the PassSync.msi file from the Red Hat Enterprise Linux channels, and save it to theActive Directory machine.
NOTE
There are two PassSync packages available, one for 32-bit Windows servers and one for 64-bit. Make sure to select the appropriate packages for your Windows platform.
2. Double-click the PassSync.msi file to install it.
3. The Password Sync Setup window appears. Hit Next to begin installing.
4. Fill in the information to establish the connection to the IPA server.
• The IPA server connection information, including the hostname and secure port number.
• The username of the system user which Active Directory uses to connect to the IPA machine.This account is configured automatically when sync is configured on the IPA server. The defaultaccount is uid=passsync,cn=sysaccounts,cn=etc,dc=example,dc=com.
• The password set in the --passsync option when the sync agreement was created.
• The search base for the people subtree on the IPA server. The Active Directory serverconnects to the IPA server similar to an ldapsearch or replication operation, so ithas to know where in the IPA subtree to look for user accounts. The user subtree iscn=users,cn=accounts,dc=example,dc=com.
• The certificate token is not used at this time, so that field should be left blank.

Setting up Password Synchronization
187
Hit Next, then Finish to install Password Sync.
5. Import the IPA server's CA certificate into the Active Directory certificate store.
a. Download the IPA server's CA certificate from http://ipa.example.com/ipa/config/ca.crt.
b. Copy the IPA CA certificate to the Active Directory server.
c. Install the IPA CA certificate in the Password Sync database. For example:
cd "C:\Program Files\Red Hat Directory Server Password Synchronization" certutil.exe -d . -A -n "IPASERVER.EXAMPLE.COM IPA CA" -t CT,, -a -i ipaca.crt
6. Reboot the Windows machine to start Password Sync.

Chapter 8. Identity: Integrating with Microsoft Active Directory
188
NOTE
The Windows machine must be rebooted. Without the rebooting, PasswordHook.dll is notenabled, and password synchronization will not function.
The first attempt to synchronize passwords, which happened when the Password Sync applicationis installed, will always fail because of the SSL connection between the Directory Server and ActiveDirectory sync peers. The tools to create the certificate and key databases is installed with the .msi.
8.5.3. Exempting Active Directory Users from PasswordSynchronizationThe passwords in password change operations are still subject to the password policy settings, suchas password expiration times. For example, in IPA every password change requires an immediatepassword reset. While normal user passwords need to be subject to password policies, administrativepasswords should be exempt from any password rules. A list of user DNs can be set in the passwordsynchronization configuration that are exempted from the password policy.
NOTE
The Directory Manager password is always exempt from password policy.
Edit the password synchronization entry, cn=ipa_pwd_extop,cn=plugins,cn=config, and addthe passSyncManagersDNs attribute with the name of the user. This attribute is multi-valued. Forexample:
$ ldapmodify -x -D "cn=Directory Manager" -w secret -h ldap.example.com -p 389
dn: cn=ipa_pwd_extop,cn=plugins,cn=configchangetype: modifyadd: passSyncManagersDNspassSyncManagersDNs: uid=admin,cn=users,cn=accounts,dc=example,dc=com

Chapter 9.
189
Identity: Managing DNSIf the IPA server was installed with DNS configured, then all of the DNS entries for the domain — hostentries, locations, records — can be managed using the IPA tools.
9.1. About DNS in IPADNS is one of the services that can be configured and maintained by the IPA domain. DNS is criticalto the performance of the IPA domain; DNS is used for the Kerberos services and SSL connections forall servers and clients and for connections to domain services like LDAP.
While IPA can use an external DNS service, there is a lot more flexibility and control over IPA — DNSinteractions when the DNS service is configured within the domain. For example, DNS records andzones can be managed within the domain using IPA tools, and clients can update their own DNSrecords dynamically. When a host is added to IPA, a DNS record is automatically created in IPA's DNSservice for that host machine.
IPA stores all DNS information as LDAP entries. Every resource record for each machine is storedfor the domain. For example, the client1 resource has three IPv4 (A) records and one IPv6 (AAAA)record:
dn: idnsname=client1,idnsname=example.com,cn=dns,dc=example,dc=comidnsname: client1arecord: 10.0.0.1arecord: 10.0.0.2arecord: 10.0.0.3aaaarecord: fc00::1objectclass: topobjectclass: idnsrecord
The schema used to define the DNS entries is in the /usr/share/ipa/60basev2.ldif schemafile1.
The BIND service communicates with the Directory Server using the system bind-dyndb-ldap plug-in. When Identity Management is configured to manage DNS (Section 9.3, “Setting up DNS After IPAServer Installation”), IPA creates a dynamic-db configuration section in the /etc/named.conf filefor the BIND service. This configures the bind-dyndb-ldap plug-in for the BIND (named) service.
When this plug-in is properly configured, it delivers the DNS records from the Directory Server to thenamed service. The configuration can be changed to adapt the behavior of the plug-in and, therefore,the LDAP-BIND interactions.
9.2. The IPA-Generated DNS FileTo help create and configure a suitable DNS setup, the IPA installation script creates a sample zonefile. During the installation, IPA displays a message similar to the following:
Sample zone file for bind has been created in /tmp/sample.zone.F_uMf4.db
If a DNS server is already configured in the network, then the configuration in the IPA-generatedfile can be added to the existing DNS zone file. This allows IPA clients to find LDAP and Kerberos
1 Any updated schema files, included updated DNS schema elements, are located in the /usr/share/ipa/updatesdirectory.

Chapter 9. Identity: Managing DNS
190
servers that are required for them to participate in the IPA domain. For example, this DNS zoneconfiguration is created for an IPA server with the KDC and DNS servers all on the same machine inthe EXAMPLE.COM realm:
; ldap servers_ldap._tcp IN SRV 0 100 389 ipaserver.example.com.
;kerberos realm_kerberos IN TXT EXAMPLE.COM
; kerberos servers_kerberos._tcp IN SRV 0 100 88 ipaserver.example.com._kerberos._udp IN SRV 0 100 88 ipaserver.example.com._kerberos-master._tcp IN SRV 0 100 88 ipaserver.example.com._kerberos-master._udp IN SRV 0 100 88 ipaserver.example.com._kpasswd._tcp IN SRV 0 100 464 ipaserver.example.com._kpasswd._udp IN SRV 0 100 464 ipaserver.example.com.
9.3. Setting up DNS After IPA Server InstallationDNS can be configured as part of the IPA server installation, simply by using the --setup-dnsoption. If DNS is not configured then, it can be configured later using the ipa-dns-installcommand. For example:
ipa-dns-install -p secret --ip-address=1.2.34.56 --no-forwarders [--zone-refresh=60 | --zone-notif]
• -p gives the password for the Directory Manager user in the 389 Directory Server. All of the DNSentries are stored in the LDAP directory, so this directory must be accessed to add the DNSconfiguration.
• --ip-address gives the IP address for the master DNS server.
• --no-forwarders means that there are no forwarders used with the DNS service, only rootservers. Alternatively, use the --forwarder option to define a forward to use; to specify multipleforwarders, use the --forwarder option multiple times.
• Reverse DNS is configured automatically. It is possible to disable reverse DNS by using the --no-reverse option.
If an existing reverse DNS zone is already configured, using the --no-reverse option uses theexisting reverse zone rather than creating a new reverse zone.
• The IPA server can actively check to see when new DNS zones are added and to update its DNSserver accordingly. If no value is explicitly given, the zone refresh period is 30 seconds. The refreshinterval can be set to another value using the --zone-refresh option, which sets the pollinginterval in seconds.
• If the --zone-notif option is used to configure DNS, then the automatic zone refresh is disabled.
9.4. Managing DNS Zone Entries
9.4.1. Adding DNS Zones
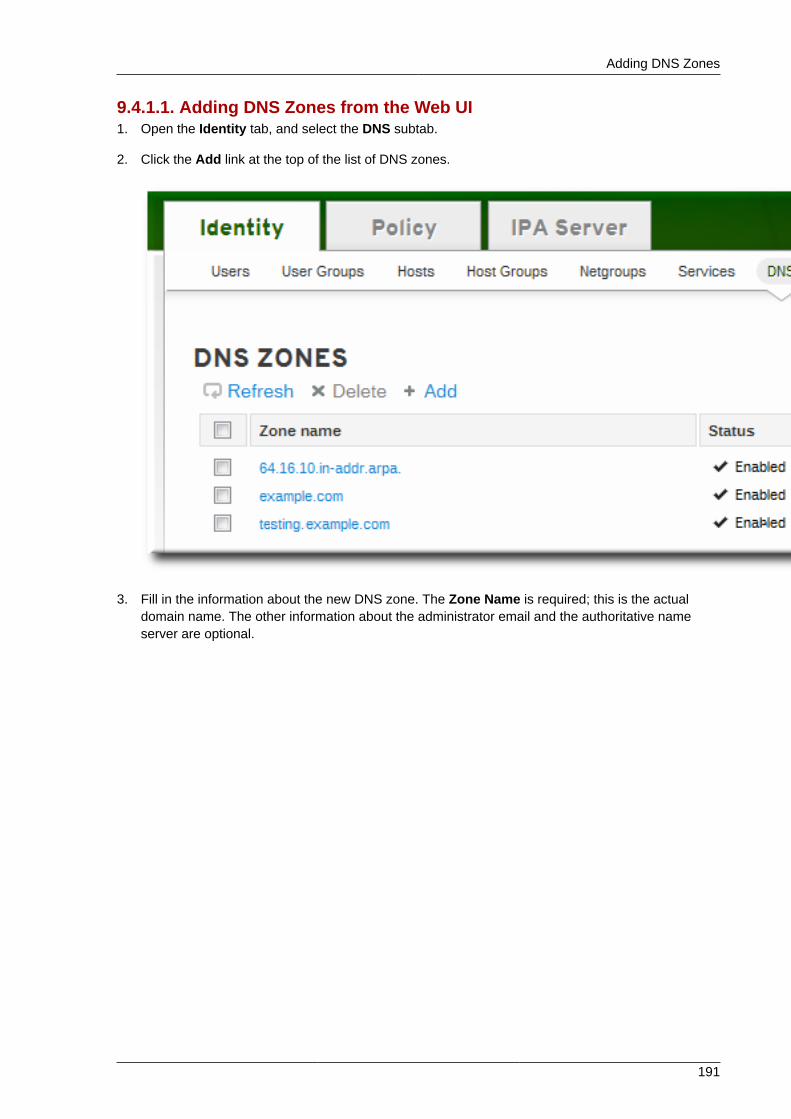
Adding DNS Zones
191
9.4.1.1. Adding DNS Zones from the Web UI1. Open the Identity tab, and select the DNS subtab.
2. Click the Add link at the top of the list of DNS zones.
3. Fill in the information about the new DNS zone. The Zone Name is required; this is the actualdomain name. The other information about the administrator email and the authoritative nameserver are optional.
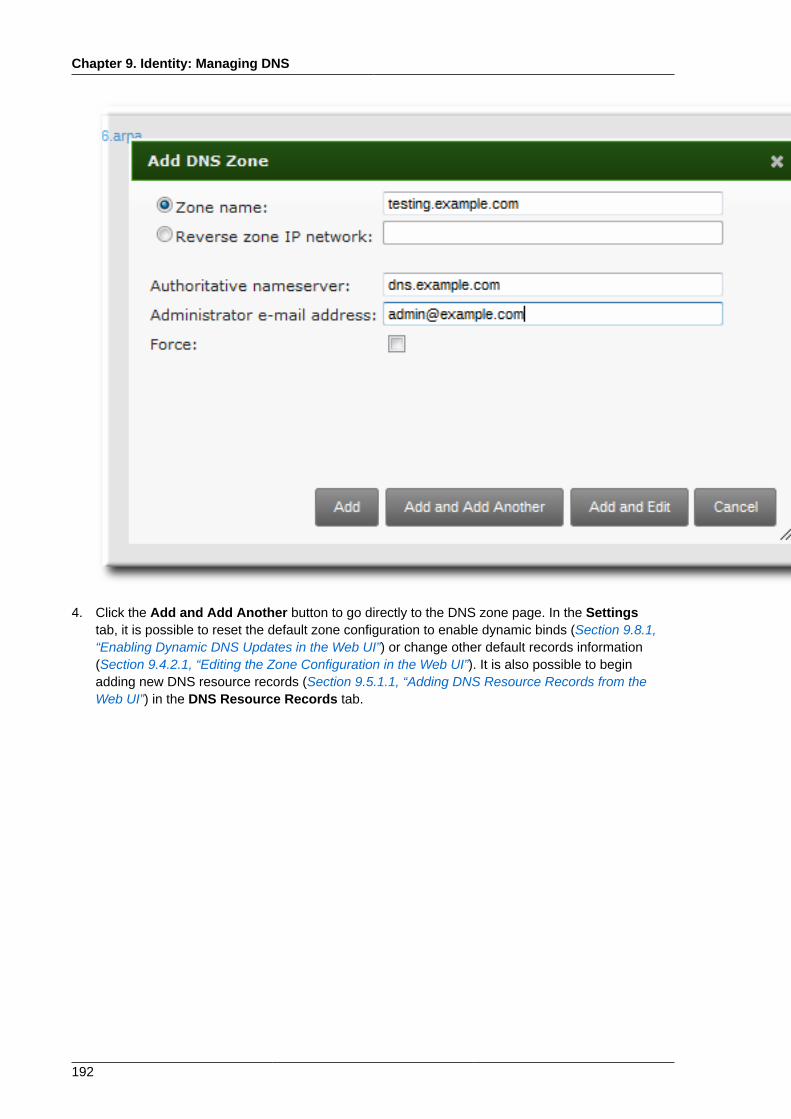
Chapter 9. Identity: Managing DNS
192
4. Click the Add and Add Another button to go directly to the DNS zone page. In the Settingstab, it is possible to reset the default zone configuration to enable dynamic binds (Section 9.8.1,“Enabling Dynamic DNS Updates in the Web UI”) or change other default records information(Section 9.4.2.1, “Editing the Zone Configuration in the Web UI”). It is also possible to beginadding new DNS resource records (Section 9.5.1.1, “Adding DNS Resource Records from theWeb UI”) in the DNS Resource Records tab.
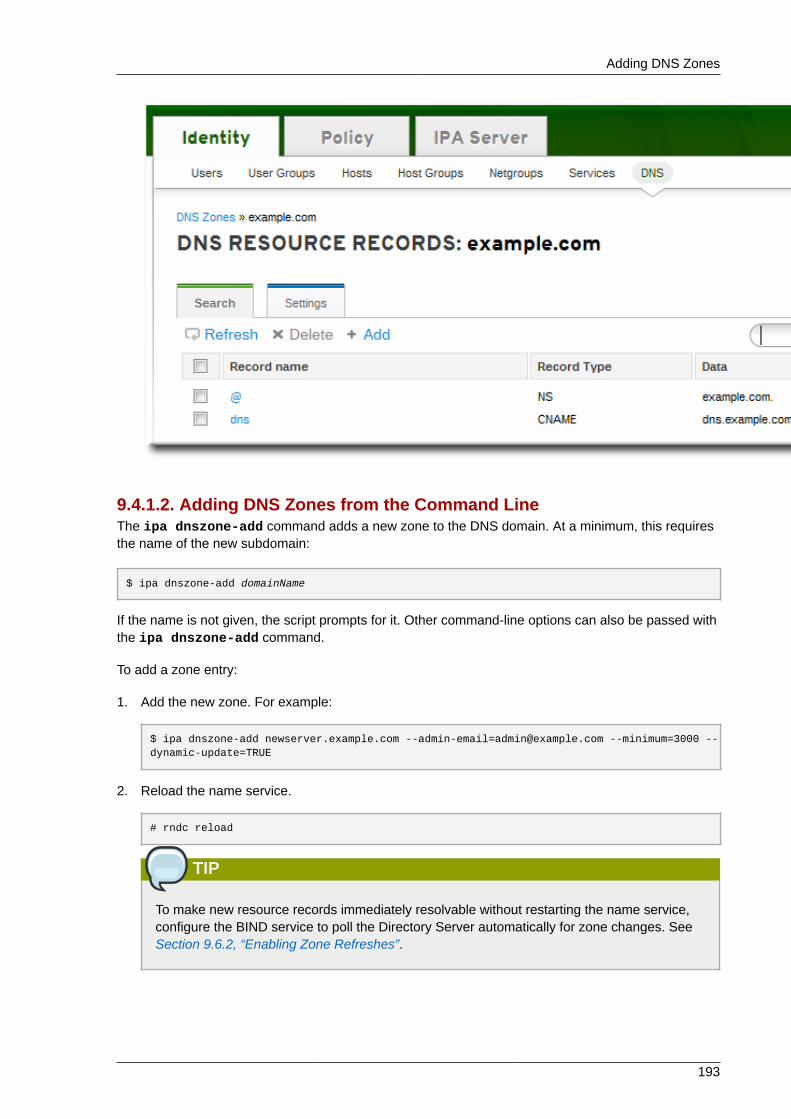
Adding DNS Zones
193
9.4.1.2. Adding DNS Zones from the Command LineThe ipa dnszone-add command adds a new zone to the DNS domain. At a minimum, this requiresthe name of the new subdomain:
$ ipa dnszone-add domainName
If the name is not given, the script prompts for it. Other command-line options can also be passed withthe ipa dnszone-add command.
To add a zone entry:
1. Add the new zone. For example:
$ ipa dnszone-add newserver.example.com [email protected] --minimum=3000 --dynamic-update=TRUE
2. Reload the name service.
# rndc reload
TIP
To make new resource records immediately resolvable without restarting the name service,configure the BIND service to poll the Directory Server automatically for zone changes. SeeSection 9.6.2, “Enabling Zone Refreshes”.

Chapter 9. Identity: Managing DNS
194
9.4.2. Modifying DNS ZonesA zone is created with a certain amount of configuration, set to default values.
Example 9.1. Default DNS Zone Entry Settings
dn: idnsname=example.com,cn=dns,dc=example,dc=com idnsname: example.com idnssoamname: server.example.com. idnssoarname: root.server.example.com. idnssoaserial: 2011130701 idnssoarefresh: 3600 idnssoaretry: 900 idnssoaexpire: 1209600 idnssoaminimum: 3600 idnsupdatepolicy: grant EXAMPLE.COM krb5-self * A; grant EXAMPLE.COM krb5-self * AAAA; idnszoneactive: TRUE idnsallowdynupdate: TRUE nsrecord: server.example.com. objectclass: top objectclass: idnsrecord objectclass: idnszone
All of the possible zone settings are listed in Table 9.1, “Zone Attributes”. Along with setting the actualinformation for the zone, the settings define how the DNS server handles the start of authority (SOA)record entries and how it updates its records from the DNS name server.
Table 9.1. Zone Attributes
Attribute Command-Line Option Description
Zone name --name Sets the name of the zone.
Authoritative nameserver --name-server Sets the fully-qualified domainname of the DNS name server.
Administrator e-mail address --admin-email Sets the email address to usefor the zone administrator. Thisdefaults to the root account onthe host.
SOA serial --serial Sets a version number for theSOA record file.
SOA refresh --refresh Sets the interval, in seconds,for a secondary DNS server towait before requesting updatesfrom the primary DNS server.
SOA retry --retry Sets the time, in seconds, towait before retrying a failedrefresh operation.
SOA expire --expire Sets the time, in seconds, thata secondary DNS server willtry to perform a refresh updatebefore ending the operationattempt.
SOA minimum --minimum Sets the minimum amount oftime, in seconds, that data arekept in cache.

Modifying DNS Zones
195
Attribute Command-Line Option Description
SOA time to live --ttl Sets the maximum time, inseconds, that information iskept in the data cache.
SOA class --class Sets the type of record. This isalmost always IN, which standsfor Internet.
BIND update policy --update-policy Sets the permissions allowed toclients in the DNS zone.
IMPORTANT
If this is set to false, IPAclient machines will notbe able to add or updatetheir IP address. SeeSection 9.8, “EnablingDynamic DNS Updates”for more information.
Dynamic update --dynamic-update=TRUE|FALSE
Enables dynamic updates toDNS records for clients.
Name server --ip-address Adds the DNS name server byits IP address.
Allow transfer --allow-transfer=string Gives a semi-colon-separatedlisted of IP addresses ornetwork names which areallowed to transfer the givenzone.
Allow query --allow-query Gives a semi-colon-separatedlisted of IP addresses ornetwork names which areallowed to issue DNS queries.
Allow PTR sync --allow-sync-ptr=TRUE|FALSE Sets whether A or AAAArecords (forward records) forthe zone will be automaticallysynchronized with the PTR(reverse) records.
Zone forwarders --forwarder=string Specifies a forwarderspecifically configured for theDNS zone. This is separatefrom any global forwardersused in the IPA domain.To specificy multipleforwarders, use the optionmultiple times.

Chapter 9. Identity: Managing DNS
196
Attribute Command-Line Option Description
Forward policy --forward-policy=only|first Sets whether the zone will onlyforward requests to configuredthe DNS name servers (aforward-only zone) or whetherit will check the forwardersfirst for DNS records and thencheck its own local records.
9.4.2.1. Editing the Zone Configuration in the Web UI1. Open the Identity tab, and select the DNS subtab.
2. Click the name of the DNS zone to edit.
3. Open the Settings tab.
4. Change any of the DNS zone settings. The full list of attributes is described in Table 9.1, “ZoneAttributes”. There are some common attributes to change:
• Authoritative name server, the fully-qualified domain name of the DNS name server.
• Dynamic update, to enable dynamic updates to DNS records for clients.
• SOA refresh, the interval, in seconds, for a secondary DNS server to wait before requestingupdates from the primary DNS server.
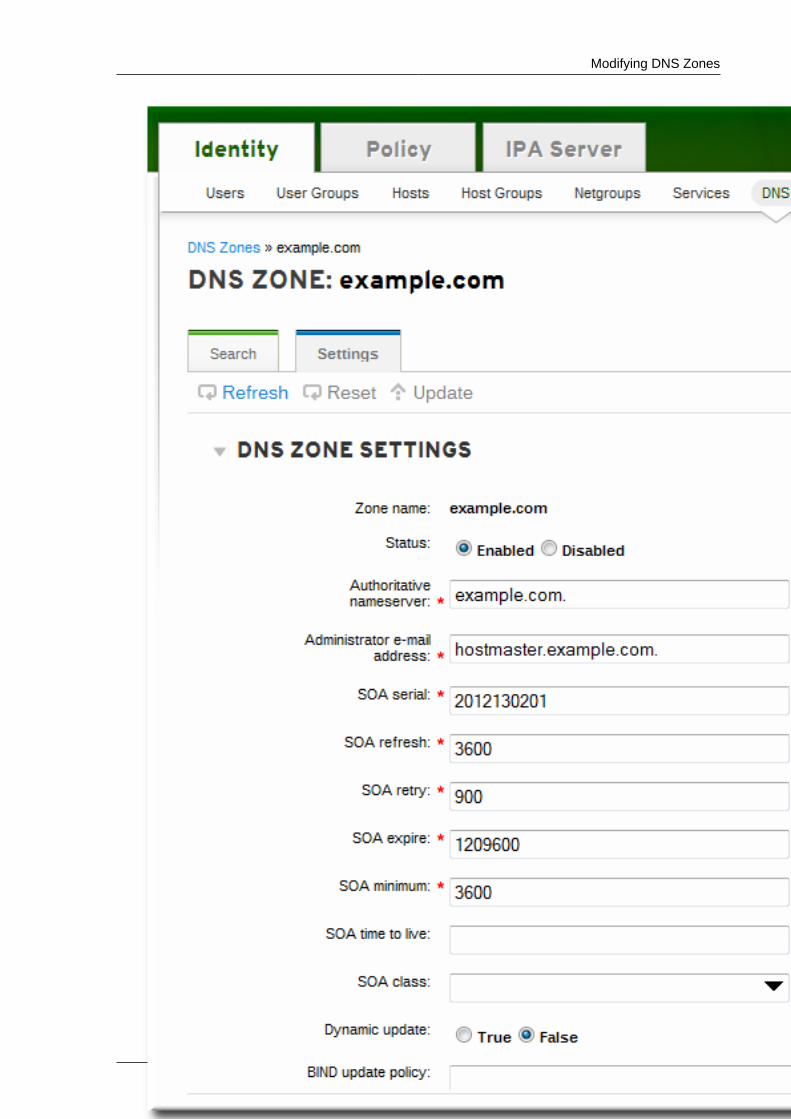
Modifying DNS Zones
197
Chapter 9. Identity: Managing DNS
198
5. Click the Update link at the top of the settings page.
9.4.2.2. Editing the Zone Configuration in the Command LineThe zone can be created with additional attributes and values different from the default by passingadditional options with the dnszone-add command. Likewise, attributes can be added or modifiedin the zone entry by passing the same attribute options with the dnszone-mod command. These arelisted in Table 9.1, “Zone Attributes”.
If an attribute does not exist in the DNS zone entry, than the dnszone-mod command adds theattribute. If the attribute exists, then it overwrites the current value with the specified value.
For example, to set a time to live for SOA records:
$ ipa dnszone-mod server.example.com --ttl=1800
This adds a new attribute to the DNS zone entry:
dn: idnsname=example.com,cn=dns,dc=example,dc=com idnsname: example.com idnssoamname: server.example.com. idnssoarname: root.server.example.com. idnssoaserial: 2011130701 idnssoarefresh: 3600 idnssoaretry: 900 idnssoaexpire: 1209600 idnssoaminimum: 3600 dnsttl: 1800 idnsupdatepolicy: grant EXAMPLE.COM krb5-self * A; grant EXAMPLE.COM krb5-self * AAAA; idnszoneactive: TRUE idnsallowdynupdate: TRUE nsrecord: server.example.com. objectclass: top objectclass: idnsrecord objectclass: idnszone
9.4.3. Enabling and Disabling Zones
Active zones can have clients added to them, are available for lookups, and are used by IPA serviceslike Kerberos. Deleting a DNS zone removes the zone entry and all the associated configuration.
There can be situations when it is necessary to remove a zone from activity without permanentlyremoving the zone. This is done by disabling the zone.
9.4.3.1. Disabling Zones in the Web UI1. Open the Identity tab, and select the DNS subtab.
2. Click the name of the DNS zone to edit.
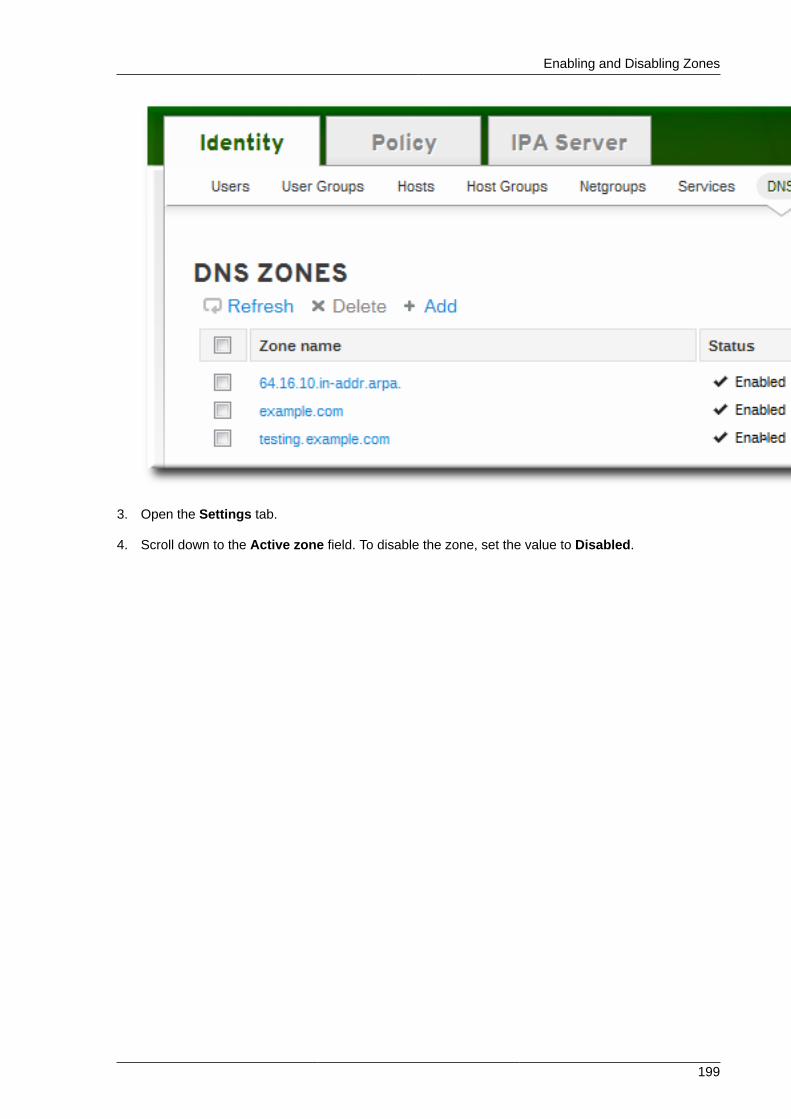
Enabling and Disabling Zones
199
3. Open the Settings tab.
4. Scroll down to the Active zone field. To disable the zone, set the value to Disabled.
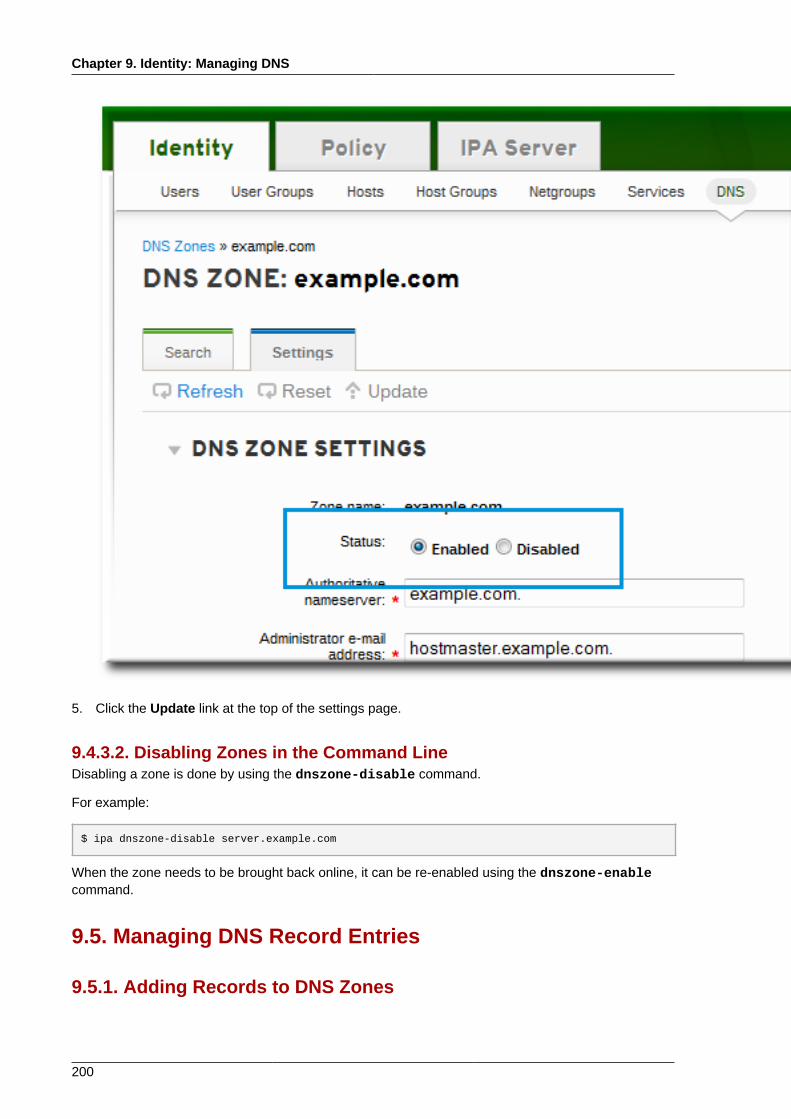
Chapter 9. Identity: Managing DNS
200
5. Click the Update link at the top of the settings page.
9.4.3.2. Disabling Zones in the Command LineDisabling a zone is done by using the dnszone-disable command.
For example:
$ ipa dnszone-disable server.example.com
When the zone needs to be brought back online, it can be re-enabled using the dnszone-enablecommand.
9.5. Managing DNS Record Entries
9.5.1. Adding Records to DNS Zones

Adding Records to DNS Zones
201
IPA supports several different types of DNS records, listed in Table 9.2, “DNS Record Types”.
Table 9.2. DNS Record Types
A CERT KX NS SIG
AAAA CNAME LOC NSEC SRV
A6 DNAME MX PTR SSHFP
AFSDB DS NAPTR RRSIG TXT
9.5.1.1. Adding DNS Resource Records from the Web UI
TIP
To make new resource records immediately resolvable without restarting the name service,configure the BIND service to poll the Directory Server automatically for zone changes. SeeSection 9.6.2, “Enabling Zone Refreshes”.
1. Open the Identity tab, and select the DNS subtab.
2. Click the name of the DNS zone to which to add records.
3. In the DNS Resource Records tab, click the Add link.
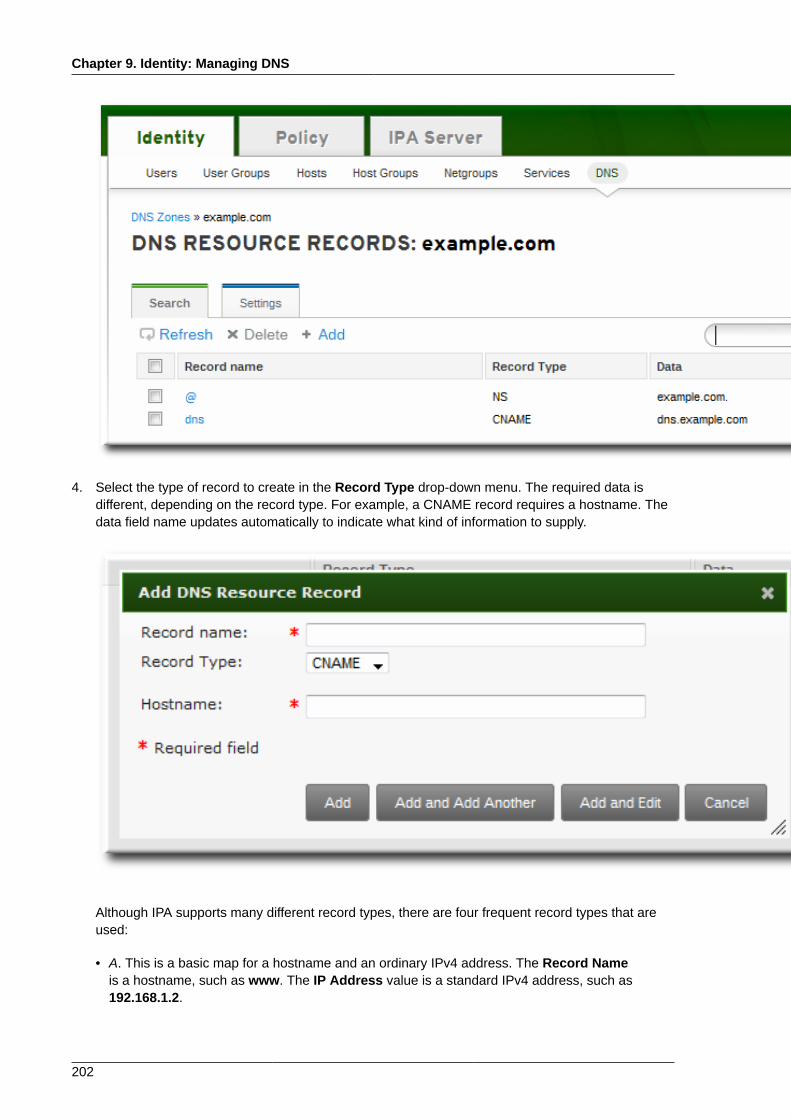
Chapter 9. Identity: Managing DNS
202
4. Select the type of record to create in the Record Type drop-down menu. The required data isdifferent, depending on the record type. For example, a CNAME record requires a hostname. Thedata field name updates automatically to indicate what kind of information to supply.
Although IPA supports many different record types, there are four frequent record types that areused:
• A. This is a basic map for a hostname and an ordinary IPv4 address. The Record Nameis a hostname, such as www. The IP Address value is a standard IPv4 address, such as192.168.1.2.

Adding Records to DNS Zones
203
More information about A records is in RFC 10352.
• AAAA. This is a basic map for a hostname and an IPv6 address. The Record Name is ahostname, such as www. The IP Address value is a standard hexadecimal IPv6 address, suchas fe80::20c:29ff:fe02:a1b3.
More information about AAAA records is in RFC 35963.
• SRV. Service (SRV) resource records map service names to the DNS name of the server that isproviding that particular service. The Record Name has the format _service._protocol, such as_ldap._tcp. There are individual fields to set the priority, weight, port number, and hostname forthe target service.
More information about SRV records is in RFC 27824.
• PTR. A pointer record type (PTR) record adds a reverse DNS record, which maps an IP addressto a domain name. In this case, the Record Name is the record ID number for the DNS entryof the resource and the Hostname value is the hostname with a terminal period, such asserver.example.com..
More information about PTR records is in RFC 10355.
5. Click the Add button to save the new resource record.
9.5.1.2. Adding DNS Resource Records from the Command LineThe same script, ipa dnsrecord-add, is used to add resource records of any type, but the optionsfor the script and the required data are different, based on the resource record type.
9.5.1.2.1. About the Commands to Add DNS RecordsThe ipa dnsrecord-add command adds records to DNS zones, based on the type. Adding arecord has the same basic command format:
$ ipa dnsrecord-add zoneName recordName --recordType-option=data
The zoneName is the name of the DNS zone to which the record is being added. The recordName isan identifier for the new DNS resource record.
Table 9.3, “Common dnsrecord-add Options” lists options for the most common resource record types:A (IPv4), AAAA (IPv6), SRV, and PTR. The options for all of the supported records (Table 9.2, “DNSRecord Types”) are listed in Section C.3.2, “ipa dnsrecord-add”.
NOTE
The ipa dnsrecord-add command only creates forward entries, not reverse entries.
Table 9.3. Common dnsrecord-add Options
General Record Options
Option Description
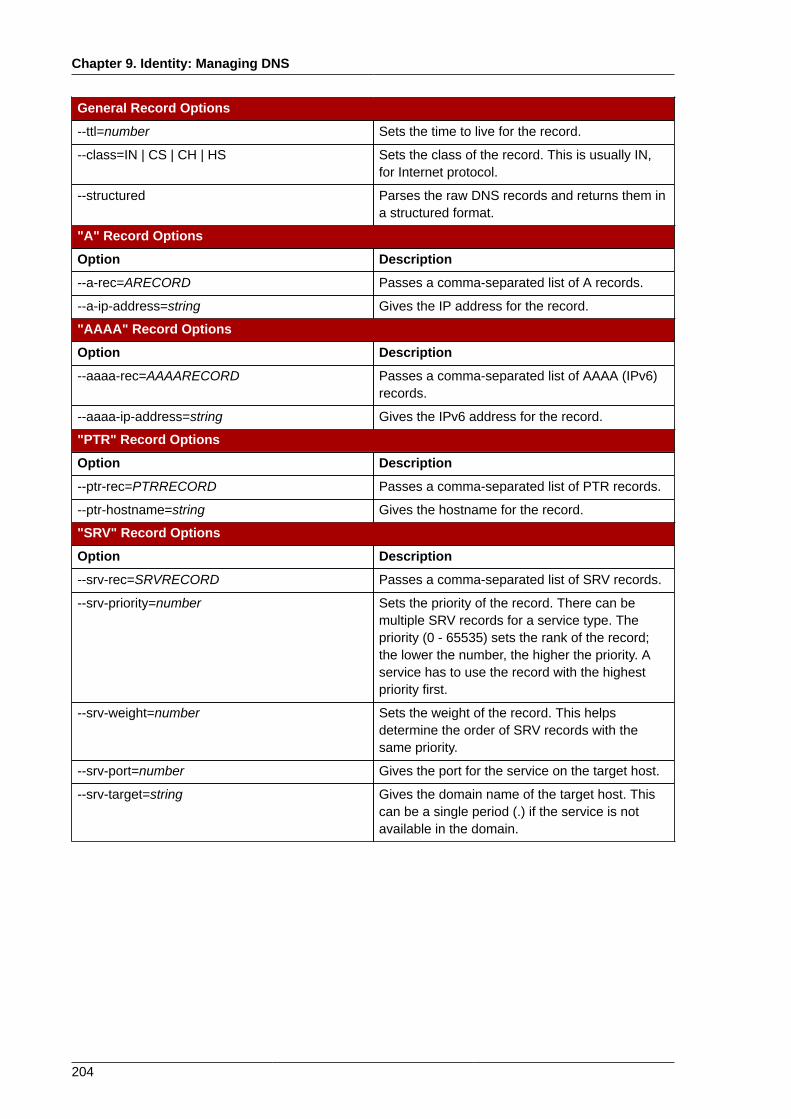
Chapter 9. Identity: Managing DNS
204
General Record Options
--ttl=number Sets the time to live for the record.
--class=IN | CS | CH | HS Sets the class of the record. This is usually IN,for Internet protocol.
--structured Parses the raw DNS records and returns them ina structured format.
"A" Record Options
Option Description
--a-rec=ARECORD Passes a comma-separated list of A records.
--a-ip-address=string Gives the IP address for the record.
"AAAA" Record Options
Option Description
--aaaa-rec=AAAARECORD Passes a comma-separated list of AAAA (IPv6)records.
--aaaa-ip-address=string Gives the IPv6 address for the record.
"PTR" Record Options
Option Description
--ptr-rec=PTRRECORD Passes a comma-separated list of PTR records.
--ptr-hostname=string Gives the hostname for the record.
"SRV" Record Options
Option Description
--srv-rec=SRVRECORD Passes a comma-separated list of SRV records.
--srv-priority=number Sets the priority of the record. There can bemultiple SRV records for a service type. Thepriority (0 - 65535) sets the rank of the record;the lower the number, the higher the priority. Aservice has to use the record with the highestpriority first.
--srv-weight=number Sets the weight of the record. This helpsdetermine the order of SRV records with thesame priority.
--srv-port=number Gives the port for the service on the target host.
--srv-target=string Gives the domain name of the target host. Thiscan be a single period (.) if the service is notavailable in the domain.
Adding Records to DNS Zones
205
9.5.1.2.2. Examples of Adding DNS Resource Records
TIP
To make new resource records immediately resolvable without restarting the name service,configure the BIND service to poll the Directory Server automatically for zone changes. SeeSection 9.6.2, “Enabling Zone Refreshes”.
Example 9.2. IPv4 RecordType A resource records map hostnames to IPv4 addresses. The record value for these commands,then, is a standard IPv4 address. The URL label is usually www.
$ ipa dnsrecord-add example.com www --a-rec 10.64.14.165
This creates the record www.example.com with the IP address 10.64.14.165.
More information about A records is in RFC 10356.
Example 9.3. IPv6 RecordType AAAA resource records (quad-A records) map hostnames to IPv6 addresses. The recordvalue for these commands is an IPv6 address. As with Type A records, the URL label is usuallywww.
$ ipa dnsrecord-add example.com www --aaaa-rec fe80::20c:29ff:fe02:a1b3
This creates the record www.example.com with the IP address fe80::20c:29ff:fe02:a1b3. Moreinformation about AAAA records is in RFC 35967.
Example 9.4. SRV RecordService (SRV) resource records map service names to the DNS name of the server that is providingthat particular service. For example, this record type can map a service like an LDAP directory tothe DNS server which manages it.
As with Type A and Type AAAA records, SRV records specify a way to connect to and identify theservice, but the record format is different.
The recordName identifies the service type and the connection protocol, in the format_service._protocol.
The record information has the format "priority weight port target".
6 http://tools.ietf.org/html/rfc10357 http://tools.ietf.org/html/rfc3596
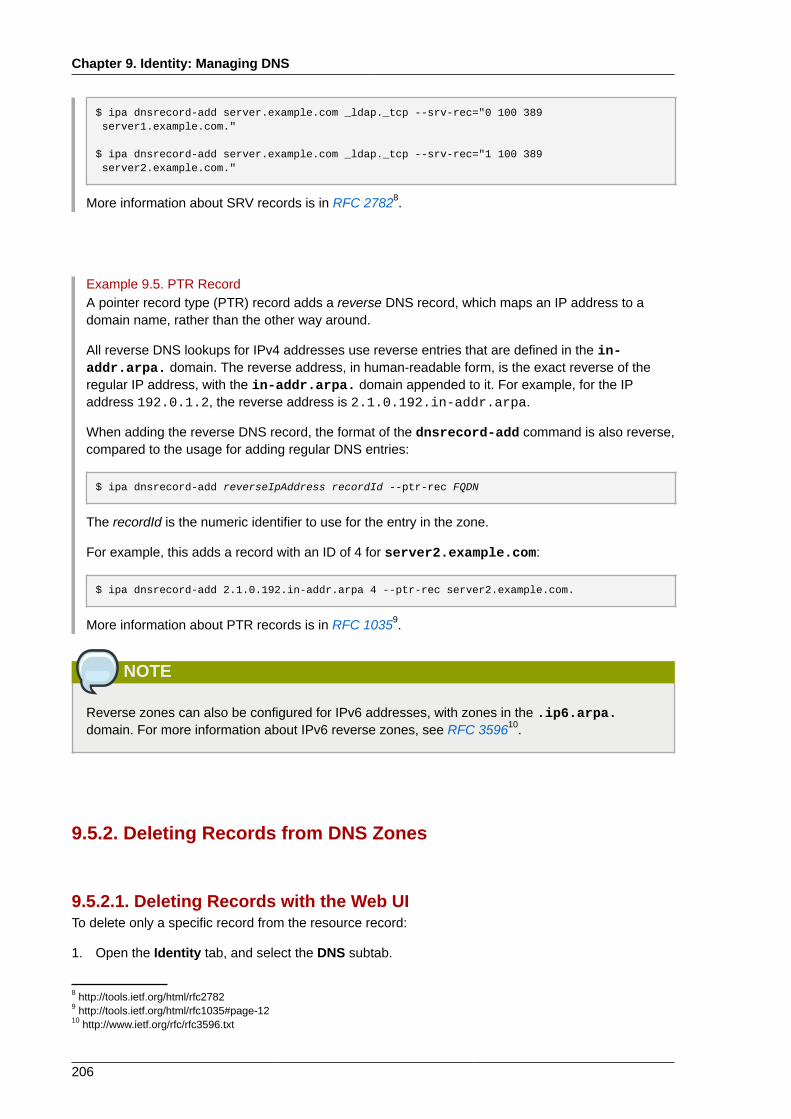
Chapter 9. Identity: Managing DNS
206
$ ipa dnsrecord-add server.example.com _ldap._tcp --srv-rec="0 100 389 server1.example.com."
$ ipa dnsrecord-add server.example.com _ldap._tcp --srv-rec="1 100 389 server2.example.com."
More information about SRV records is in RFC 27828.
Example 9.5. PTR RecordA pointer record type (PTR) record adds a reverse DNS record, which maps an IP address to adomain name, rather than the other way around.
All reverse DNS lookups for IPv4 addresses use reverse entries that are defined in the in-addr.arpa. domain. The reverse address, in human-readable form, is the exact reverse of theregular IP address, with the in-addr.arpa. domain appended to it. For example, for the IPaddress 192.0.1.2, the reverse address is 2.1.0.192.in-addr.arpa.
When adding the reverse DNS record, the format of the dnsrecord-add command is also reverse,compared to the usage for adding regular DNS entries:
$ ipa dnsrecord-add reverseIpAddress recordId --ptr-rec FQDN
The recordId is the numeric identifier to use for the entry in the zone.
For example, this adds a record with an ID of 4 for server2.example.com:
$ ipa dnsrecord-add 2.1.0.192.in-addr.arpa 4 --ptr-rec server2.example.com.
More information about PTR records is in RFC 10359.
NOTE
Reverse zones can also be configured for IPv6 addresses, with zones in the .ip6.arpa.domain. For more information about IPv6 reverse zones, see RFC 359610.
9.5.2. Deleting Records from DNS Zones
9.5.2.1. Deleting Records with the Web UITo delete only a specific record from the resource record:
1. Open the Identity tab, and select the DNS subtab.
8 http://tools.ietf.org/html/rfc27829 http://tools.ietf.org/html/rfc1035#page-1210 http://www.ietf.org/rfc/rfc3596.txt
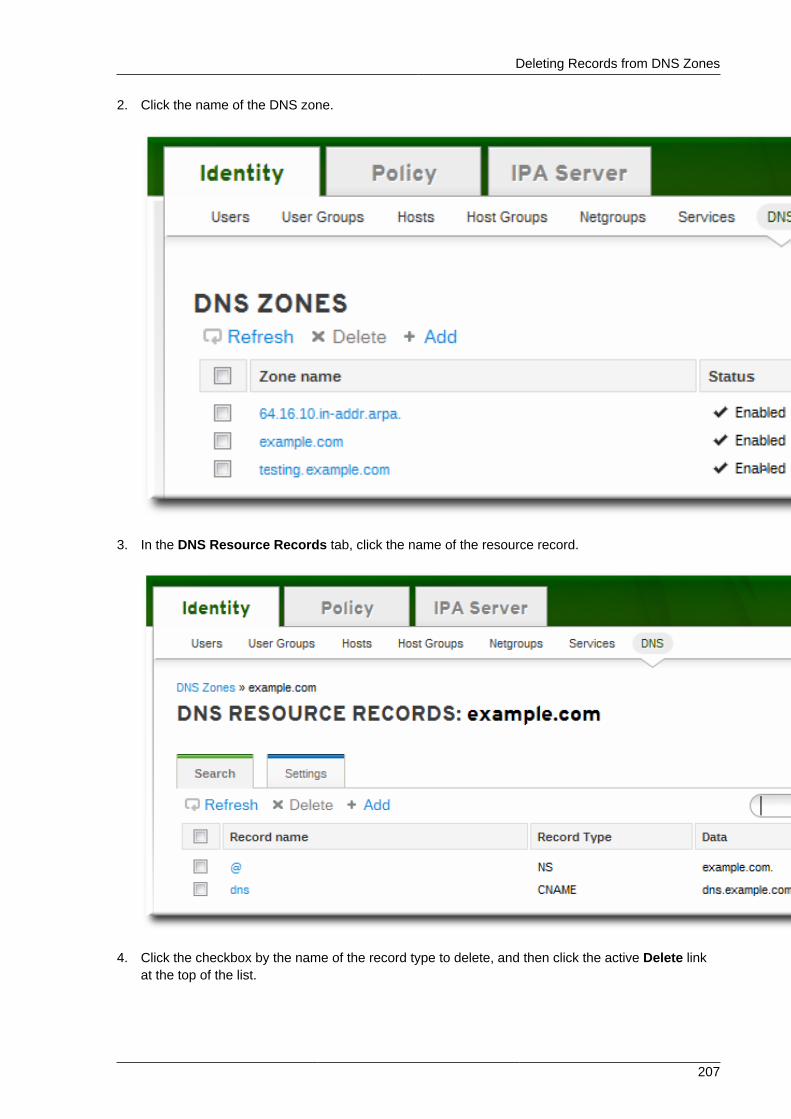
Deleting Records from DNS Zones
207
2. Click the name of the DNS zone.
3. In the DNS Resource Records tab, click the name of the resource record.
4. Click the checkbox by the name of the record type to delete, and then click the active Delete linkat the top of the list.
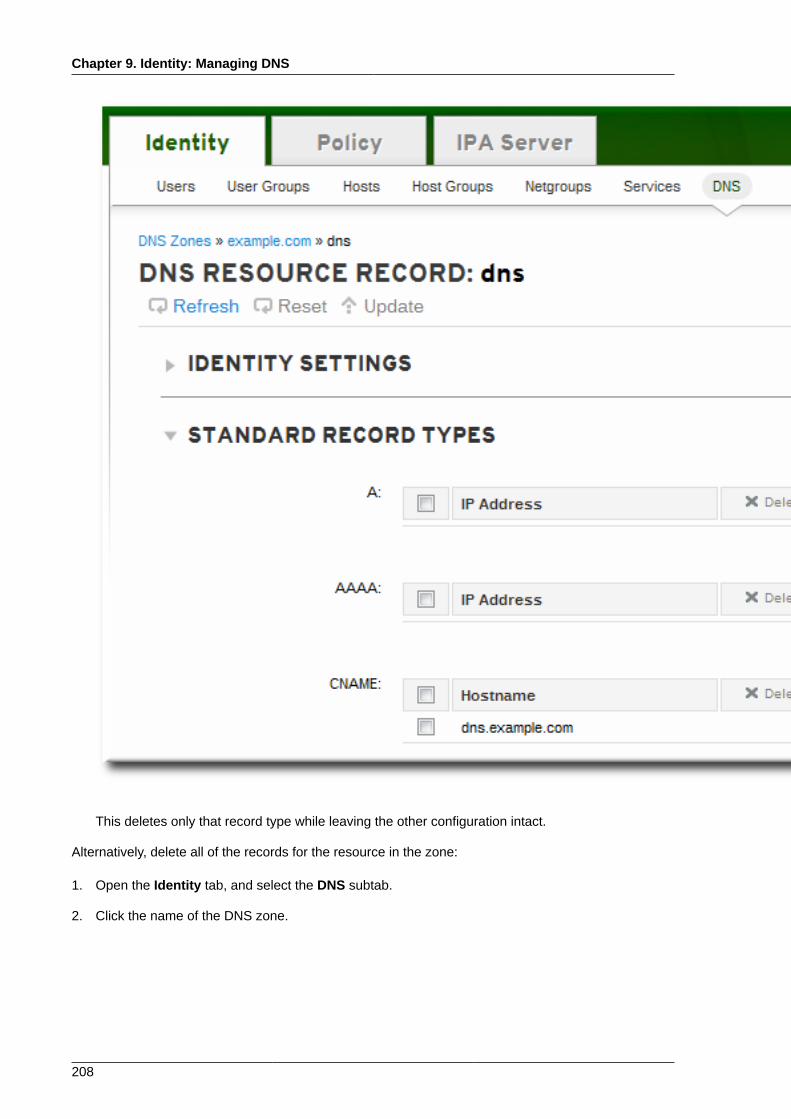
Chapter 9. Identity: Managing DNS
208
This deletes only that record type while leaving the other configuration intact.
Alternatively, delete all of the records for the resource in the zone:
1. Open the Identity tab, and select the DNS subtab.
2. Click the name of the DNS zone.

Deleting Records from DNS Zones
209
3. In the DNS Resource Records tab, select the checkbox by the name of the resource record todelete. This deletes the entire record.
4. Click the Delete link at the top of the zone records page.

Chapter 9. Identity: Managing DNS
210
9.5.2.2. Deleting Records with the Command LineRecords are removed from the zone using the ipa dnsrecord-del command. As with addingrecords, records are deleted using an option that specifies the type of record (--recordType-rec) andthe record value.
For example, to remove the A type record:
$ ipa dnsrecord-del example.com www --a-rec 10.64.14.213
If you run the ipa dnsrecord-del command without any options, the command prompts forinformation about the record to delete.
Alternatively, using the --del-all option removes all associated records for the zone.
9.6. Configuring the bind-dyndb-ldap Plug-inThe bind-dyndb-ldap system plug-in contains a DNS record cache for zones and a history ofsuccessful DNS resolutions. Maintaining the cache improves lookup performance in the DirectoryServer because it is not necessary to query the directory services every time there is a new DNSrequest.
When this plug-in is installed and IPA is configured to manage DNS, then a new configuration sectionis added to the plug-in configuration.
Example 9.6. Default dynamic-db Configuration
dynamic-db "ipa" { library "ldap.so"; arg "uri ldapi://%2fvar%2frun%2fslapd-EXAMPLE-COM.socket"; arg "base cn=dns, dc=example,dc=com"; arg "fake_mname server.example.com."; arg "auth_method sasl"; arg "sasl_mech GSSAPI"; arg "sasl_user DNS/server.example.com";};
This configuration uses implied default values for other plug-in behaviors, like how long it maintainsthe cache. The assumed, default configuration can be changed by adding arguments to the dynamic-db "ipa" entry.
arg "argument value";
The additional parameters are listed in Table 9.4, “Additional bind-dyndb-ldap ConfigurationParameters”.
NOTE
Both cache updates and new zone detection can be forced by reloading the name server:
# rndc reload
Changing the DNS Cache Setting
211
Table 9.4. Additional bind-dyndb-ldap Configuration Parameters
Parameter Description Default Value
cache_ttl Checks the DNS configurationin the Directory Server for newzones.
120 (seconds); this is defined inthe bind-dyndb-ldap plug-in.
zone_refresh Checks frequency, in seconds,that the server checks the DNSconfiguration in the DirectoryServer for new zones.
60 (seconds); this is configuredby ipa-dns-install. Ifthis is not set in the /etc/named.conf file, the bind-dyndb-ldap plug-in setsthis value to zero (0), whichdisables zone refresh.
9.6.1. Changing the DNS Cache SettingTo improve DNS performance, it may be necessary to change the cache setting. By default, DNSrecords are kept in cache and considered valid for 120 seconds. This means that if a DNS recordchanges, it will not (necessarily) be propagated to the name server for up to 120 seconds. If theDirectory Server has a high traffic volume or if records do not change frequently, then the cache timecan be increased to improve performance by adding the cache_ttl parameter.
dynamic-db "ipa" { ... arg "cache_ttl 1800"; };
9.6.2. Enabling Zone RefreshesThe DNS service receives its information through the bind-dyndb-ldap plug-in. The plug-inresolves only zones which were configured and enabled in the Directory Server when the name serverstarted. When the name service restarts, the plug-in reloads its configuration and identifies any newzones or any new resource records.
However, the bind-dyndb-ldap plug-in pulls zone and resource record information from the IPALDAP directory, and it is possible to pull information from that directory apart from simply restartingthe plug-in. The bind-dyndb-ldap plug-in search for zone changes actively either by refreshing thezone data.
Periodically checking for new zones is the same as refreshing the zone configuration. This is set in thezone_refresh argument.
dynamic-db "ipa" { ... arg "zone_refresh 30"; };
9.7. Changing Recursive Queries Against ForwardersThe ipa-client-install script sets a configuration statement in the /etc/named.conf file thatallows name resolution against hosts that are outside the IPA DNS domain. (This requires that the IPAserver be set up with DNS configured and with forwarders configured.) What this means is that anyhost is permitted to issue recursive queries against configured forwarders.

Chapter 9. Identity: Managing DNS
212
By default, any host is permitted to issue recursive queries against configured forwarders. The IPAinstallation script automatically adds a line to the /etc/named.conf file to allow these recursivequeries.
forward first; forwarders { 10.16.36.29; }; allow-recursion { any; };
This behavior can be changed in the allow-recursion statement.
1. Open the /etc/named.conf file.
2. Reset the allow-recursion statement. This is set to any by default, which allows all hosts toresolve names against all forwarders.
forward first; forwarders { 10.16.36.29; }; allow-recursion { any; };
3. Restart the named service.
service named restart
The name server documentation has more details on editing configuration statements.
9.8. Enabling Dynamic DNS Updates
Dynamic DNS updates are not enabled by default for new DNS zones in IPA. If dynamic updates arenot allowed, then it may not be possible for the ipa-client-install script to join a client to thedomain because it cannot add a DNS record pointing to the new client.
9.8.1. Enabling Dynamic DNS Updates in the Web UI1. Open the Identity tab, and select the DNS subtab.
2. Click the name of the DNS zone to edit.

Enabling Dynamic DNS Updates in the Web UI
213
3. Open the Settings tab.
4. Scroll down to the Dynamic update field, and set the value to True.
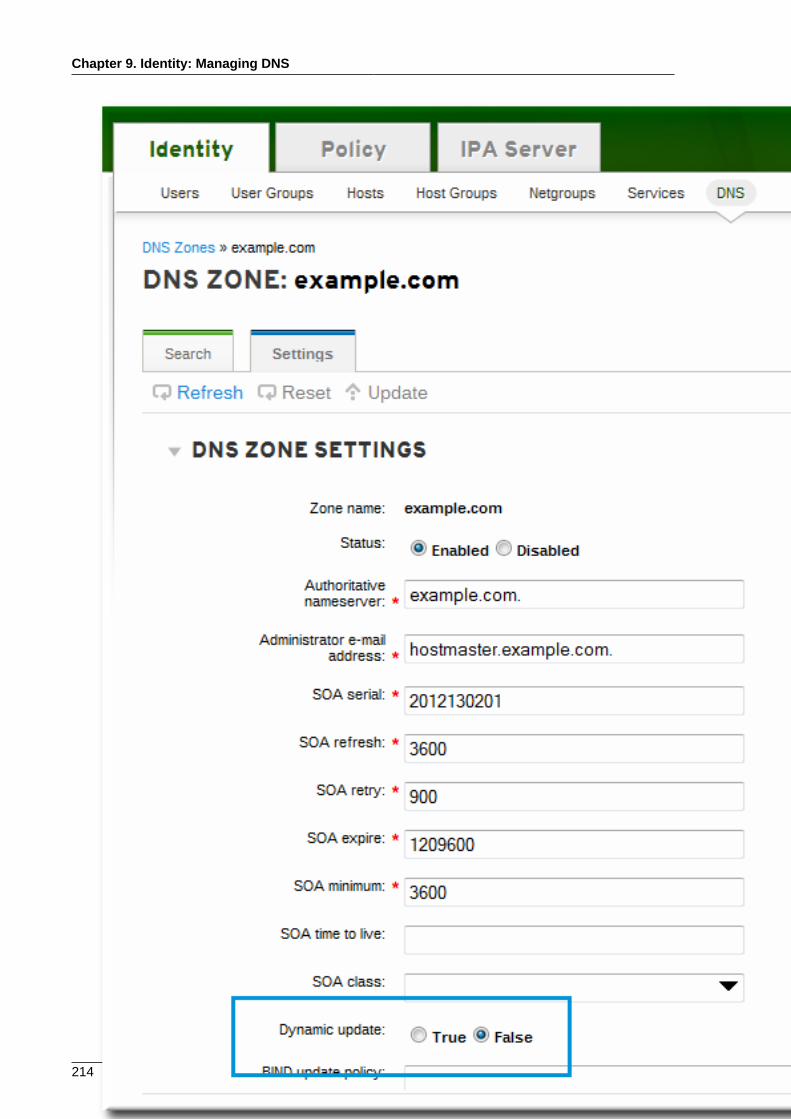
Chapter 9. Identity: Managing DNS
214

Enabling Dynamic DNS Updates in the Command Line
215
5. Click the Update link at the top of the settings page.
9.8.2. Enabling Dynamic DNS Updates in the Command LineTo allow dynamic updates to the DNS zones, set the --dynamic-update option.
$ ipa dnszone-mod server.example.com --dynamic-update=TRUE
9.9. Configuring Forwarders and Forward PolicyA DNS forwarder is a server which passes DNS queries on to another, external DNS name serverfor resolution. Within the IPA DNS domain, there are three configuration properties that define howforwarders are used:
• A list of global forwarders which are used by all zones in IPA
• A list of forwarders which are used by a single, specific zone (as part of the zone configuration)
• A policy which defines how the zone sends requests to the forwarders
9.9.1. Configuring Global ForwardersGlobal forwarders are configured as part of the IPA server configuration itself. Forwarders are(optionally) set up when the server is installed with the setup-dns option or when the ipa-dns-install script is used.
After server configuration, the list of global forwarders can be edited using the dnsconfig-modcommand. For example:
[jsmith@server ~]$ ipa dnsconfig-mod --forwarder=0.9.8.7 Global forwarders: 0.9.8.7
9.9.2. Configuring Zone ForwardersForwarders can be configured to be used with a specific DNS zone as part of the zone configuration.The --forwarder option sets a semi-colon-separated list of forwarders to use with the zone.
For example:
[jsmith@server ~]$ ipa dnszone-mod --forwarder=1.2.3.4;255.255.255.255 example.com
Zone name: example.com... Zone forwarders: 1.2.3.4;255.255.255.255
NOTE
DNS forwarders must be specified as IP addresses, not as hostnames.
9.9.3. Configuring Forwarder Policy for a ZoneOnce forwarders are configured, there are different ways that the zone can use them to servicerequests.
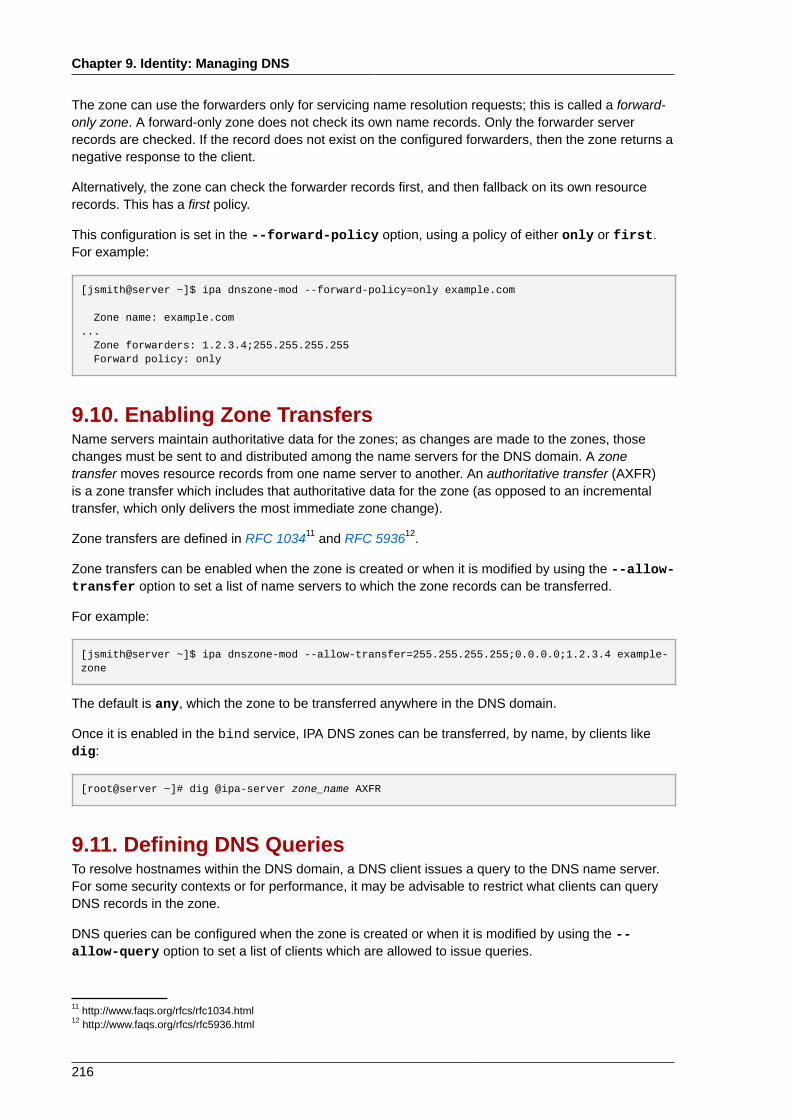
Chapter 9. Identity: Managing DNS
216
The zone can use the forwarders only for servicing name resolution requests; this is called a forward-only zone. A forward-only zone does not check its own name records. Only the forwarder serverrecords are checked. If the record does not exist on the configured forwarders, then the zone returns anegative response to the client.
Alternatively, the zone can check the forwarder records first, and then fallback on its own resourcerecords. This has a first policy.
This configuration is set in the --forward-policy option, using a policy of either only or first.For example:
[jsmith@server ~]$ ipa dnszone-mod --forward-policy=only example.com
Zone name: example.com... Zone forwarders: 1.2.3.4;255.255.255.255 Forward policy: only
9.10. Enabling Zone TransfersName servers maintain authoritative data for the zones; as changes are made to the zones, thosechanges must be sent to and distributed among the name servers for the DNS domain. A zonetransfer moves resource records from one name server to another. An authoritative transfer (AXFR)is a zone transfer which includes that authoritative data for the zone (as opposed to an incrementaltransfer, which only delivers the most immediate zone change).
Zone transfers are defined in RFC 103411 and RFC 593612.
Zone transfers can be enabled when the zone is created or when it is modified by using the --allow-transfer option to set a list of name servers to which the zone records can be transferred.
For example:
[jsmith@server ~]$ ipa dnszone-mod --allow-transfer=255.255.255.255;0.0.0.0;1.2.3.4 example-zone
The default is any, which the zone to be transferred anywhere in the DNS domain.
Once it is enabled in the bind service, IPA DNS zones can be transferred, by name, by clients likedig:
[root@server ~]# dig @ipa-server zone_name AXFR
9.11. Defining DNS QueriesTo resolve hostnames within the DNS domain, a DNS client issues a query to the DNS name server.For some security contexts or for performance, it may be advisable to restrict what clients can queryDNS records in the zone.
DNS queries can be configured when the zone is created or when it is modified by using the --allow-query option to set a list of clients which are allowed to issue queries.
11 http://www.faqs.org/rfcs/rfc1034.html12 http://www.faqs.org/rfcs/rfc5936.html
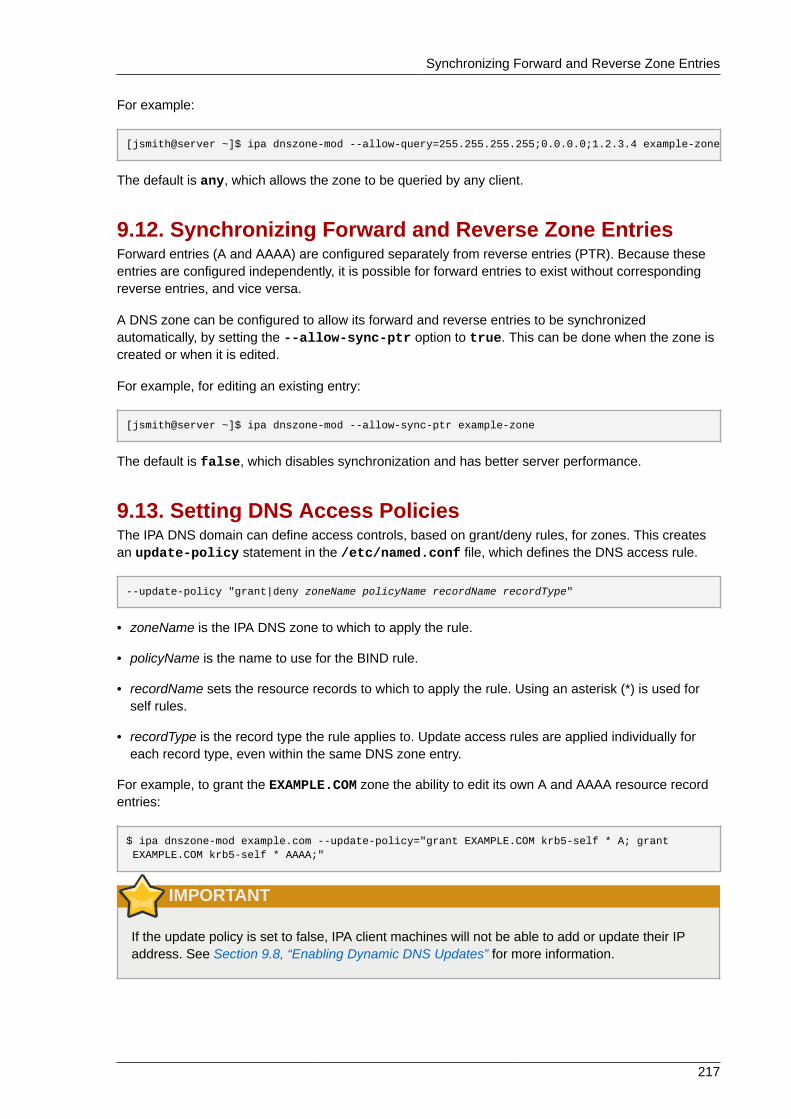
Synchronizing Forward and Reverse Zone Entries
217
For example:
[jsmith@server ~]$ ipa dnszone-mod --allow-query=255.255.255.255;0.0.0.0;1.2.3.4 example-zone
The default is any, which allows the zone to be queried by any client.
9.12. Synchronizing Forward and Reverse Zone EntriesForward entries (A and AAAA) are configured separately from reverse entries (PTR). Because theseentries are configured independently, it is possible for forward entries to exist without correspondingreverse entries, and vice versa.
A DNS zone can be configured to allow its forward and reverse entries to be synchronizedautomatically, by setting the --allow-sync-ptr option to true. This can be done when the zone iscreated or when it is edited.
For example, for editing an existing entry:
[jsmith@server ~]$ ipa dnszone-mod --allow-sync-ptr example-zone
The default is false, which disables synchronization and has better server performance.
9.13. Setting DNS Access PoliciesThe IPA DNS domain can define access controls, based on grant/deny rules, for zones. This createsan update-policy statement in the /etc/named.conf file, which defines the DNS access rule.
--update-policy "grant|deny zoneName policyName recordName recordType"
• zoneName is the IPA DNS zone to which to apply the rule.
• policyName is the name to use for the BIND rule.
• recordName sets the resource records to which to apply the rule. Using an asterisk (*) is used forself rules.
• recordType is the record type the rule applies to. Update access rules are applied individually foreach record type, even within the same DNS zone entry.
For example, to grant the EXAMPLE.COM zone the ability to edit its own A and AAAA resource recordentries:
$ ipa dnszone-mod example.com --update-policy="grant EXAMPLE.COM krb5-self * A; grant EXAMPLE.COM krb5-self * AAAA;"
IMPORTANT
If the update policy is set to false, IPA client machines will not be able to add or update their IPaddress. See Section 9.8, “Enabling Dynamic DNS Updates” for more information.
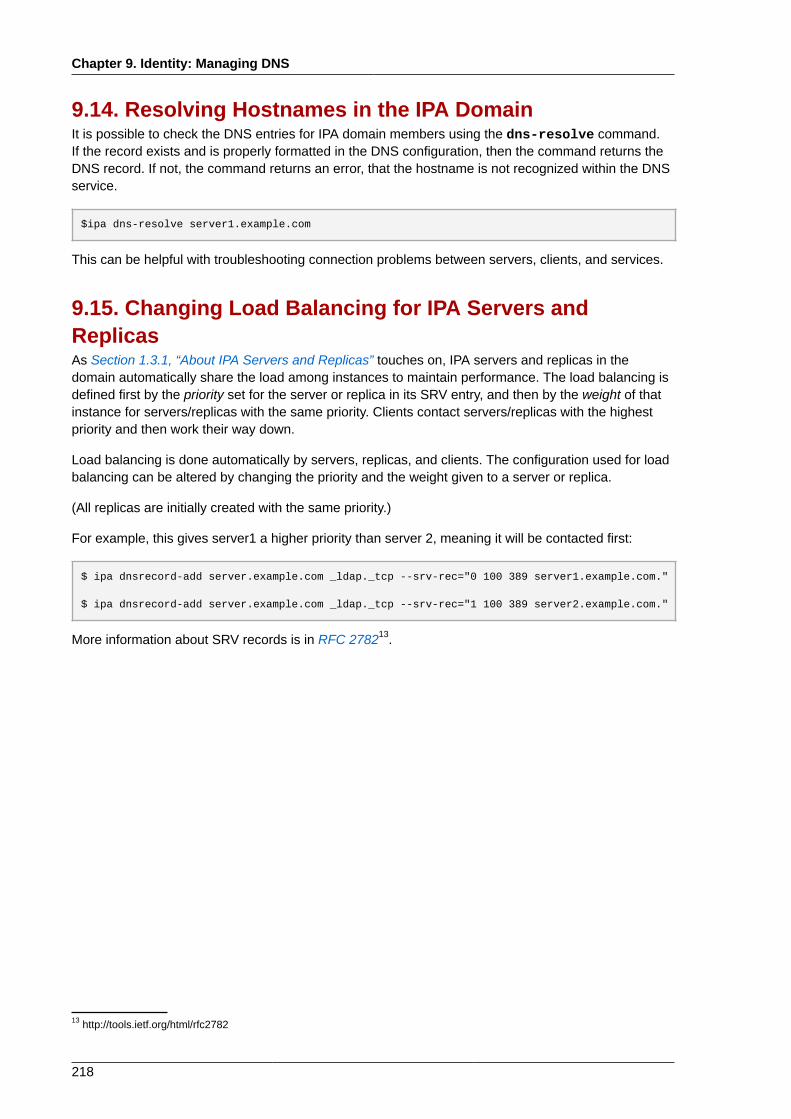
Chapter 9. Identity: Managing DNS
218
9.14. Resolving Hostnames in the IPA DomainIt is possible to check the DNS entries for IPA domain members using the dns-resolve command.If the record exists and is properly formatted in the DNS configuration, then the command returns theDNS record. If not, the command returns an error, that the hostname is not recognized within the DNSservice.
$ipa dns-resolve server1.example.com
This can be helpful with troubleshooting connection problems between servers, clients, and services.
9.15. Changing Load Balancing for IPA Servers andReplicasAs Section 1.3.1, “About IPA Servers and Replicas” touches on, IPA servers and replicas in thedomain automatically share the load among instances to maintain performance. The load balancing isdefined first by the priority set for the server or replica in its SRV entry, and then by the weight of thatinstance for servers/replicas with the same priority. Clients contact servers/replicas with the highestpriority and then work their way down.
Load balancing is done automatically by servers, replicas, and clients. The configuration used for loadbalancing can be altered by changing the priority and the weight given to a server or replica.
(All replicas are initially created with the same priority.)
For example, this gives server1 a higher priority than server 2, meaning it will be contacted first:
$ ipa dnsrecord-add server.example.com _ldap._tcp --srv-rec="0 100 389 server1.example.com."
$ ipa dnsrecord-add server.example.com _ldap._tcp --srv-rec="1 100 389 server2.example.com."
More information about SRV records is in RFC 278213.
13 http://tools.ietf.org/html/rfc2782
Chapter 10.
219
Policy: Using AutomountAutomount is a way of making directories on different servers available, automatically, when requestedby a user. This works exceptionally well within an IPA domain since it allows directories on clientswithin the domain to be shared easily. This is especially important with user home directories(Section 5.1, “Setting up User Home Directories”).
In IPA, automount works with the internal LDAP directory and, if it is configured, DNS services.
10.1. About Automount and IPAAutomount is a way to manage, organize, and access directories across multiple systems. Automountautomatically mounts a directory whenever that resource is requested. Automount also provides acoherent structure to the way that these directories are organized. Every single directory, or mountpoint is called a key. Multiple keys that are grouped together are a map, and maps are associatedaccording to their physical or conceptual location.
The base configuration file for autofs is the auto.master file in the /etc/ directory. There can bemultiple auto.master configuration files in separate server locations, if necessary.
When autofs is configured on a server and that server is a client in an IPA domain, then all of theconfiguration information for automount is stored in the IPA directory. Rather than being stored inseparate text files, the autofs configuration — maps, locations, and keys — are stored as LDAPentries. For example, the default map file, auto.master, is stored as:
dn: automountmapname=auto.master,cn=default,cn=automount,dc=example,dc=comobjectClass: automountMapobjectClass: topautomountMapName: auto.master
IMPORTANT
Identity Management does not set up or configure autofs. That must be done separately. IdentityManagement works with an existing autofs deployment.
Each new location is added as a container entry under cn=automount,dc=example,dc=com, andeach map and each key are stored beneath that location.
As with other IPA domain services, automount works with IPA natively. The automount configurationcan be managed by IPA tools:
• Locations, using ipa automountlocation* commands
• Both direct and indirect maps, using ipa automountmap* commands
• Keys, using ipa automountkey* commands
For automount to work within the IPA domain, the NFS server must be configured as an IPA client.Configuring NFS itself is covered in the Red Hat Enterprise Linux Storage Administration Guide1.
1 http://docs.redhat.com/docs/en-US/Red_Hat_Enterprise_Linux/6/html/Storage_Administration_Guide/ch-nfs.html

Chapter 10. Policy: Using Automount
220
10.2. Configuring Automount
IMPORTANT
Identity Management does not set up or configure autofs. That must be done separately, asdescribed in these procedures. Identity Management works with an existing autofs deployment.
TIP
Test that the /home directory can be mounted from the command line successfully beforechanging the automount configuration. Making sure that NFS is already working properly makes iteasier to troubleshoot any potential IPA automount configuration errors later.
10.2.1. Configuring autofs on Red Hat Enterprise Linux1. Edit the /etc/sysconfig/autofs file to specify the schema attributes that autofs searches for:
## Other common LDAP naming#MAP_OBJECT_CLASS="automountMap"ENTRY_OBJECT_CLASS="automount"MAP_ATTRIBUTE="automountMapName"ENTRY_ATTRIBUTE="automountKey"VALUE_ATTRIBUTE="automountInformation"
2. Specify the LDAP configuration. There are two ways to do this. The simplest is to let theautomount service discover the LDAP server and locations on its own:
LDAP_URI="ldap:///dc=example,dc=com"
Alternatively, explicitly set which LDAP server to use and the base DN for LDAP searches:
LDAP_URI="ldap://ipa.example.com"SEARCH_BASE="cn=location,cn=automount,dc=example,dc=com"
Note
The default value for location is default. If additional locations are added (Section 10.5,“Configuring Locations”), then the client can be pointed to use those locations, instead.
Setting up a Kerberized NFS Server
221
3. Edit the /etc/autofs_ldap_auth.conf file so that autofs allows client authentication withthe IPA LDAP server. Change authrequired to yes and set the principal to the Kerberos hostprincipal:
<autofs_ldap_sasl_conf usetls="no" tlsrequired="no" authrequired="yes" authtype="GSSAPI" clientprinc="host/server.example.com@EXAMPLE COM" />
If necessary, run klist -k to get the exact host principal information.
4. Check the /etc/nssswitch.conf file, so that LDAP is listed as a source for automountconfiguration:
automount: files ldap
5. Restart autofs:
# service autofs restart
6. Test the configuration by listing a user's /home directory:
# ls /home/userName
If this does not mount the remote file system, check the /var/log/messages file for errors.If necessary, increase the debug level in the /etc/sysconfig/autofs file by setting theLOGGING parameter to debug.
TIP
If there are problems with automount, then cross-reference the automount attempts with the 389Directory Server access logs for the IPA instance, which will show the attempted access, user,and search base.
It is also simple to run automount in the foreground with debug logging on.
automount -f -d
This prints the debug log information directly, without having to cross-check the LDAP access logwith automount's log.
10.3. Setting up a Kerberized NFS ServerIdentity Management can be used to set up a Kerberized NFS server.
Chapter 10. Policy: Using Automount
222
NOTE
The NFS server does not need to be running on Red Hat Enterprise Linux.
10.3.1. Setting up a Kerberized NFS Server1. Obtain a Kerberos ticket before running IPA tools.
[jsmith@server ~]$ kinit admin
2. If the NFS host machine has not been added as a client to the IPA domain, then create the hostentry. See Section 6.2, “Adding Host Entries”.
3. Create the NFS service entry in the IPA domain. For example:
[jsmith@server ~]$ ipa service-add nfs/nfs-server.example.com
For more information, see Section 6.5.1, “Adding and Editing Service Entries and Keytabs”.
4. Generate an NFS service keytab for the NFS server using the ipa-getkeytab command.
The NFS server may be on a Red Hat Enterprise Linux machine in the IPA domain or a differentUnix machine. For a Red Hat Enterprise Linux machine, the ipa-getkeytab command can berun on the NFS server machine. Otherwise, the ipa-getkeytab command should be run on aRed Hat Enterprise Linux machine in the IPA domain and then copied over to the NFS server.
If ipa-getkeytab command is run on the NFS server, then save the keys directly to the hostkeytab. For example:
[jsmith@server ~]$ ipa-getkeytab -s server.example.com -p nfs/nfs-server.example.com -k /etc/krb5.keytab
For a Red Hat Enterprise Linux machine, that's all you need to do.
NOTE
Only DES keys are supported on Red Hat Enterprise Linux 5.
When generating keys to copy over to another system, then generate the key but do not save itin the host keytab. The key must be added separately to the keytab after it is copied to the NFSserver:
a. Save the keytab to a temporary file. For example:
[jsmith@server ~]$ ipa-getkeytab -s server.example.com -p nfs/nfs-server.example.com -k /tmp/nfs.keytab
Setting up a Kerberized NFS Server
223
b. Copy the keytabs over to the NFS server.
c. Set the file permissions to 0700.
d. Add the service key to the keytab file.
[root@nfs-server ~]# ( echo rkt /tmp/nfs.keytab; echo wkt /etc/krb5.keytab) |ktutil
TIP
Verify that the NFS service has been properly configured in IPA, with its keytab, by checkingthe service entry:
[jsmith@server ~]$ ipa service-show nfs/ipaclient2.example.comPrincipal: NFS/[email protected]: True
5. Install the NFS packages. For example:
[root@nfs-server ~]# yum install nfs-utils
6. Configure weak crypto support. This is required for every NFS client if any client (such as a RedHat Enterprise Linux 5 client) in the domain will use older encryption options like DES.
a. Edit the krb5.conf file to allow weak crypto.
[root@nfs-server ~]# vim /etc/krb5.conf
allow_weak_crypto = true
b. Update the IPA server Kerberos configuration to support the DES encryption type.
[jsmith@ipaserver ~]$ ldapmodify -x -D "cn=directory manager" -w password -h ipaserver.example.com -p 389
dn: cn=EXAMPLEREALM,cn=kerberos,dc=example,dc=comchangetype: modifyadd: krbSupportedEncSaltTypeskrbSupportedEncSaltTypes: des-cbc-crc:normal-add: krbSupportedEncSaltTypeskrbSupportedEncSaltTypes: des-cbc-crc:special-add: krbDefaultEncSaltTypeskrbDefaultEncSaltTypes: des-cbc-crc:special
7. Edit the NFS server configuration to use NFSv4 security by uncommenting the SECURE_NFS line.
[root@nfs-server ~]# vim /etc/sysconfig/nfs
Chapter 10. Policy: Using Automount
224
SECURE_NFS="yes"
8. If the NFS server and client are in different DNS domains, then configure the NFS domain.
[root@nfs-server ~]# vim /etc/idmapd.conf
Domain = example.com
9. Edit the /etc/exports file and add the Kerberos information:
/export *(rw,sec=sys:krb5:krb5i:krb5p)
10. Restart the NFS server.
[root@nfs-server ~]# service nfs restart
11. Configure the NFS server as an NFS client, following the directions in Section 10.3.2, “Setting up aKerberized NFS Client”.
10.3.2. Setting up a Kerberized NFS Client1. Obtain a Kerberos ticket before running IPA tools.
[jsmith@server ~]$ kinit admin
2. If the NFS client is not enrolled as a client in the IPA domain, then set up the required host entries,as described in Section 6.2, “Adding Host Entries”.
3. Generate an NFS service keytab for the NFS client using the ipa-getkeytab command.
The NFS client may be on a Red Hat Enterprise Linux machine in the IPA domain or a differentUnix machine. For a Red Hat Enterprise Linux machine, the ipa-getkeytab command can berun on the NFS client machine. Otherwise, the ipa-getkeytab command should be run on aRed Hat Enterprise Linux machine in the IPA domain and then copied over to the NFS client.
If ipa-getkeytab command is run on the NFS client, then save the keys directly to the hostkeytab. For example:
[jsmith@server ~]$ ipa-getkeytab -k /etc/krb5.keytab -p host/[email protected]
For a Red Hat Enterprise Linux machine, that's all you need to do.
When generating keys to copy over to another system, then generate the key but do not save itin the host keytab. The key must be added separately to the keytab after it is copied to the NFSserver:
a. Save the keytab to a temporary file. For example:
[jsmith@server ~]$ ipa-getkeytab -p host/[email protected] -k /tmp/nfs.keytab
b. Copy the keytabs over to the NFS client.
Configuring Kerberized CIFS
225
c. Set the file permissions to 0700.
d. Add the service key to the keytab file.
[root@nfs-client-server ~]# ( echo rkt /root/nfs-client.keytab; echo wkt /etc/krb5.keytab) |ktutil
4. Edit the NFS common configuration to enable client-side secure NFS, by uncommenting theSECURE_NFS line.
[root@nfs-client-server ~]# vim /etc/sysconfig/nfs
SECURE_NFS="yes"
5. If the NFS server and client are in different DNS domains, then configure the NFS domain. Theidmapd.conf must be the same on the NFS client as it is on the NFS server.
[root@nfs-client-server ~]# vim /etc/idmapd.conf
Domain = example.com
6. Start the GSS daemon.
[root@nfs-client-server ~]# service rpcgssd start[root@nfs-client-server ~]# service rpcbind start[root@nfs-client-server ~]# service rpcidmapd start
7. Mount the directory.
[root@nfs-client-server ~]# echo "$NFSSERVER:/this /mnt/this nfs4 sec=krb5i,rw,proto=tcp,port=2049" >>/etc/fstab[root@nfs-client-server ~]# mount -av
10.4. Configuring Kerberized CIFSWhile Identity Management and Samba can be integrated together, that is not done automatically.The IPA server needs to be configured to create and manage Samba groups, and then the Red HatEnterprise Linux machine can be configured to use a Kerberos-aware CIFS client.
10.4.1. Setting up Samba Groups in IPAIPA is not configured to create Samba groups by default. It is possible to change the IPA configurationso that groups are automatically configured as Samba groups that work with the CIFS server.
NOTE
IPA works with a Samba file server, not a Samba domain controller.
1. Obtain the Samba Windows security ID (SID) for the Samba domain. This ID is used as part of theIPA group configuration.
Chapter 10. Policy: Using Automount
226
[root@ipaserver ~]# net getlocalsidSID for EXAMPLE domain is: S-1-2-3-4
2. Obtain a Kerberos ticket before editing the IPA configuration.
[root@server ~]# kinit admin
3. Add two Samba-related object classes, sambaSAMAccount for users and sambaGroupMappingfor groups, to the IPA configuration entry.
IMPORTANT
The object class list is the complete list of object classes for the user and group entries.Be sure to include all existing object classes in the list along with the new attribute, or newentries will be created with the wrong object classes and will not work in the IPA domain.
Add sambaSAMAccount for users:
$ ipa config-mod --userobjectclasses=top,person,organizationalperson,inetorgperson,inetuser,posixaccount, krbprincipalaux,krbticketpolicyaux,ipaobject,sambaSAMAccount
Add sambaGroupMapping for groups:
$ ipa config-mod --groupobjectclasses=top,groupofnames,nestedgroup,ipausergroup,ipaobject,sambaGroupMapping
4. Unique Samba IDs must be created for groups as they are added, with the Samba file server SIDused as a prefix to identify the CIFS domain. This is configured by creating a Distributed NumericAttribute Plug-in instance in the internal 389 Directory Server instance for the IPA server.
The DNA Plug-in configuration includes:
• The attribute to create on entries (dnatype).
• The entries to add the attribute to, based on an LDAP filter (dnafilter).
• The Samba file server SID to prepend to the attribute numbers (dnaprefix); this include ahyphen on the end of the number.
• The directory suffix to check for matching entries (dnascope); since this includes both usersand groups, it should be the root suffix.
• The number to use to begin counting Samba IDs (dnanextvalue).
[root@server ~]# ldapadd -x -D "cn=Directory Manager" -w secret dn: cn=SambaGroupSid,cn=Distributed Numeric Assignment Plugin,cn=plugins,cn=configobjectClass: topobjectClass: extensibleObjectcn: SambaSid

Configuring the CIFS Client
227
dnatype: sambaSIDdnaprefix: S-1-2-3-4-dnafilter: (|(objectclass=sambasamaccount)(objectclass=sambagroupmapping))dnascope: dc=example,dc=comdnanextvalue: 1
The DNA Plug-in is described in the Red Hat Directory Server 9.0 Administrator's Guide2.
5. Every Samba groups requires a sambaGroupType attribute. Since this value is always 4, thiscan be defined automatically by using a class of service (CoS) to supply the value. A CoS uses atemplate entry with a defined value and then automatically applies that value to all entries withinthe scope of the template.
a. Create the CoS definition entry in the groups subtree(cn=groups,cn=accounts,dc=example,dc=com), so that all the group entries areupdated with the sambaGroupType attribute.
[root@ipaserver ~]# ldapadd -x -D "cn=directory manager" -w secret dn: cn=SambaCoS,cn=groups,cn=accounts,dc=example,dc=comobjectclass: topobjectclass: cosSuperDefinitionobjectclass: cosPointerDefinitioncosTemplateDn: cn=SambaCoS,cn=ipaConfig,dc=etc,dc=example,dc=comcosAttribute: sambaGrouptType
b. Create the CoS template entry, which defines the sambaGroupType attribute. This is doneoutside the groups subtree, such as the cn=ipaConfig subtree.
[root@ipaserver ~]# ldapadd -x -D "cn=directory manager" -w secret dn: cn=SambaCoS,cn=ipaConfig,dc=etc,dc=example,dc=comchangetype: addobjectclass: topobjectclass: extensibleObjectobjectclass: cosTemplatesambaGroupType: 4
Classes of service are described in the Red Hat Directory Server 9.0 Administrator's Guide3.
10.4.2. Configuring the CIFS Clientmount.cifs is described in detail in its manpage4.
1. Obtain a Kerberos ticket before running IPA tools.
[jsmith@server ~]$ kinit admin
2. If the CIFS client is not enrolled as a client in the IPA domain, then set up the required hostentries, as described in Section 6.2, “Adding Host Entries”.
3. Generate an CIFS service keytab for the CIFS client using the ipa-getkeytab command, andsave the keys directly to the host keytab. For example:
4 http://linux.die.net/man/8/mount.cifs

Chapter 10. Policy: Using Automount
228
[jsmith@server ~]$ ipa-getkeytab -k /etc/krb5.keytab -p host/[email protected]
4. If the CIFS server and client are in different DNS domains, then configure the CIFS domain. Theidmapd.conf must be the same on the CIFS client as it is on the CIFS server.
[root@cifs-client ~]# vim /etc/idmapd.conf
Domain = example.com
5. Start the GSS daemon.
[root@cifs-client ~]# service rpcgssd start[root@cifs-client ~]# service rpcbind start[root@cifs-client ~]# service rpcidmapd start
6. Edit the fstab file.
[root@cifs-client ~]# vim /etc/fstab
//cifs-client.example.com /mnt/this cifs sec=krb5i,rw,proto=tcp,port=2049
7. Mount the directory.
[root@cifs-client ~]# mount -t cifs
10.5. Configuring LocationsA location is a set of maps, which are all stored in auto.master, and a location can storemultiple maps. The location entry only works as a container for map entries; it is not an automountconfiguration in and of itself.
IMPORTANT
Identity Management does not set up or configure autofs. That must be done separately. IdentityManagement works with an existing autofs deployment.
10.5.1. Configuring Locations through the Web UI1. Click the Policy tab.
2. Click the Automount subtab.
3. Click the Add link at the top of the list of automount locations.
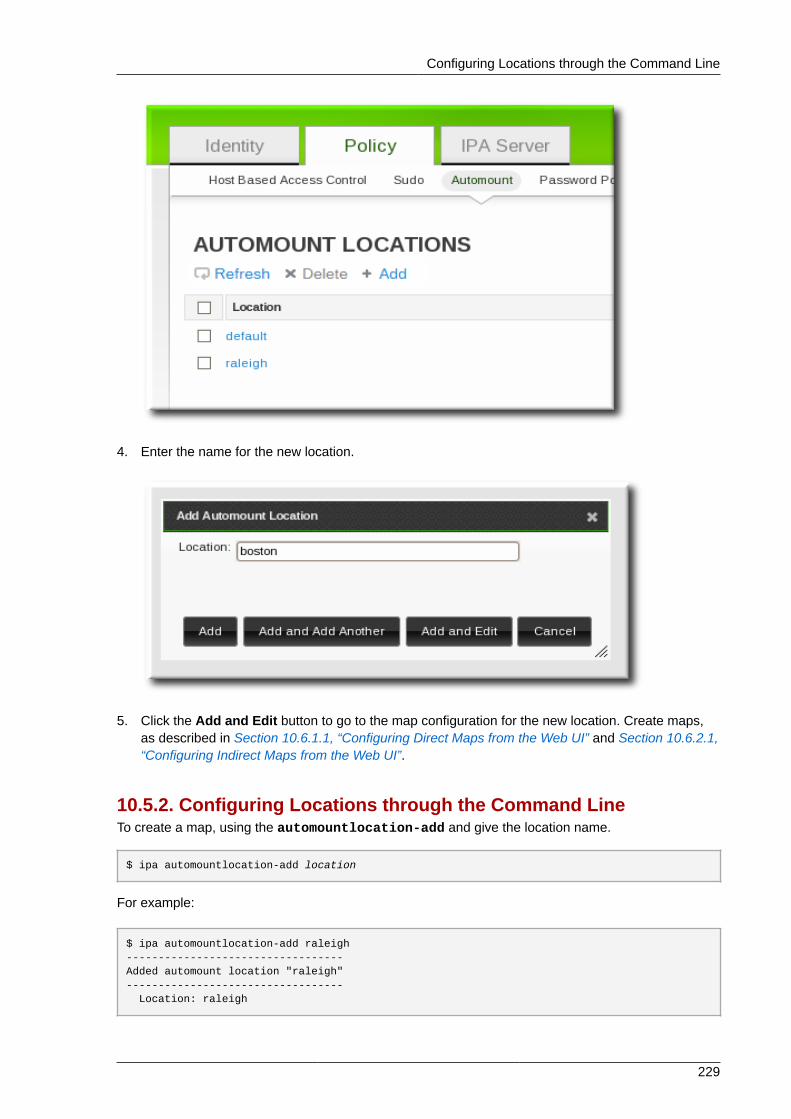
Configuring Locations through the Command Line
229
4. Enter the name for the new location.
5. Click the Add and Edit button to go to the map configuration for the new location. Create maps,as described in Section 10.6.1.1, “Configuring Direct Maps from the Web UI” and Section 10.6.2.1,“Configuring Indirect Maps from the Web UI”.
10.5.2. Configuring Locations through the Command LineTo create a map, using the automountlocation-add and give the location name.
$ ipa automountlocation-add location
For example:
$ ipa automountlocation-add raleigh----------------------------------Added automount location "raleigh"---------------------------------- Location: raleigh

Chapter 10. Policy: Using Automount
230
When a new location is created, two maps are automatically created for it, auto.master andauto.direct. auto.master is the root map for all automount maps for the location. auto.directis the default map for direct mounts and is mounted on /-.
To view all of the maps configured for a location as if they were deployed on a filesystem, use theautomountlocation-tofiles command:
$ ipa automountlocation-tofiles raleigh/etc/auto.master:/- /etc/auto.direct---------------------------/etc/auto.direct:
10.6. Configuring MapsConfiguring maps not only creates the maps, it associates mount points through the keys and itassigns mount options that should be used when the directory is accessed. IPA supports both directand indirect maps.
NOTE
Different clients can use different map sets. Map sets use a tree structure, so maps cannot beshared between locations.
IMPORTANT
Identity Management does not set up or configure autofs. That must be done separately. IdentityManagement works with an existing autofs deployment.
10.6.1. Configuring Direct MapsDirect maps define exact locations, meaning absolute paths, to the file mount. In the location entry, adirect map is identified by the preceding forward slash:
---------------------------/etc/auto.direct:/shared/man server.example.com:/shared/man
10.6.1.1. Configuring Direct Maps from the Web UI1. Click the Policy tab.
2. Click the Automount subtab.
3. Click name of the automount location to which to add the map.
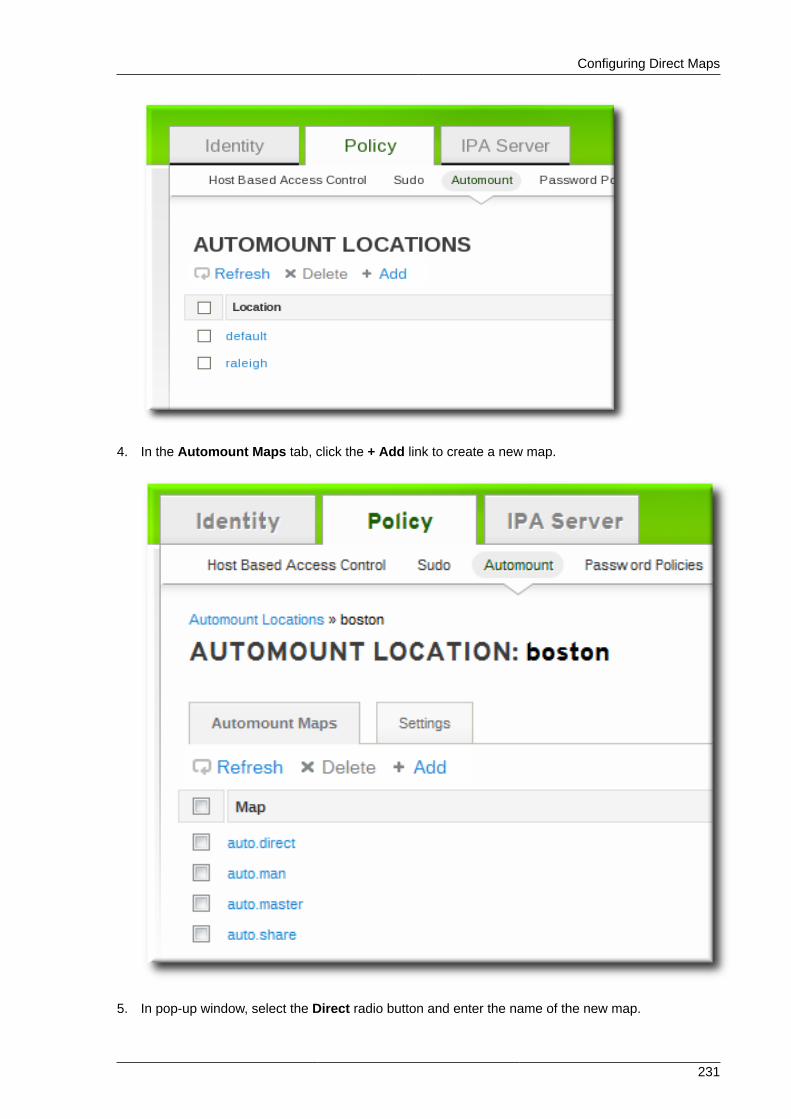
Configuring Direct Maps
231
4. In the Automount Maps tab, click the + Add link to create a new map.
5. In pop-up window, select the Direct radio button and enter the name of the new map.
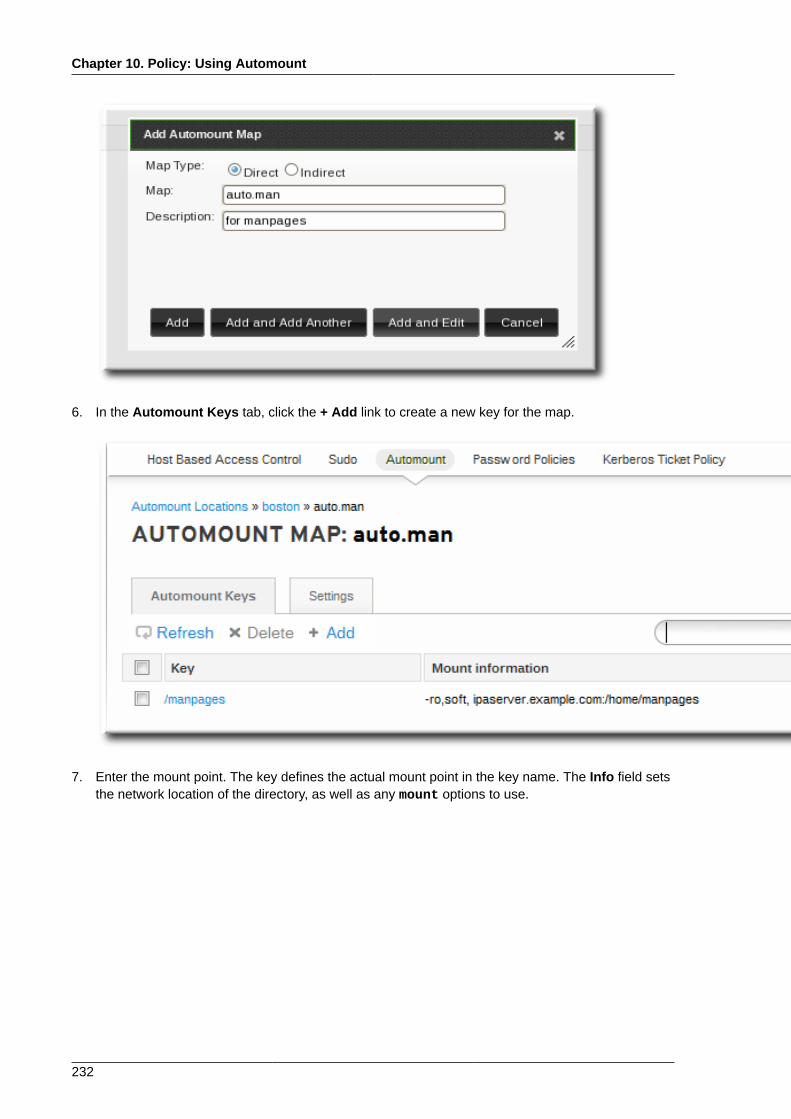
Chapter 10. Policy: Using Automount
232
6. In the Automount Keys tab, click the + Add link to create a new key for the map.
7. Enter the mount point. The key defines the actual mount point in the key name. The Info field setsthe network location of the directory, as well as any mount options to use.
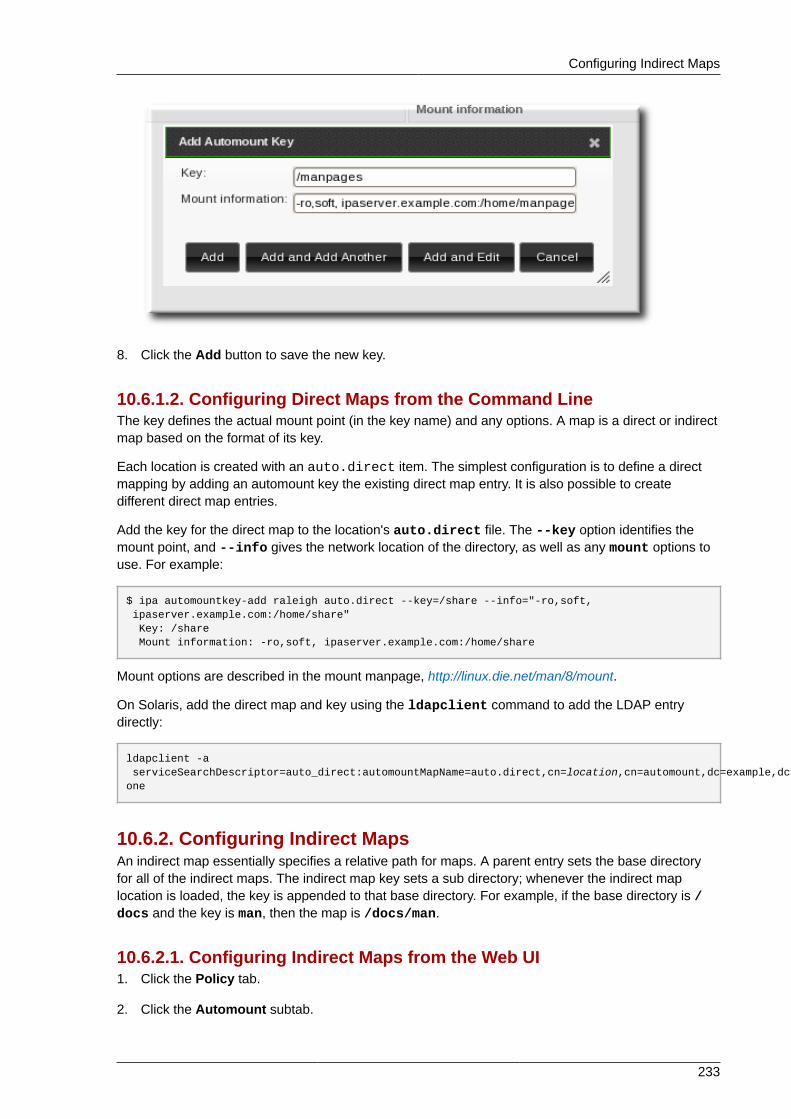
Configuring Indirect Maps
233
8. Click the Add button to save the new key.
10.6.1.2. Configuring Direct Maps from the Command LineThe key defines the actual mount point (in the key name) and any options. A map is a direct or indirectmap based on the format of its key.
Each location is created with an auto.direct item. The simplest configuration is to define a directmapping by adding an automount key the existing direct map entry. It is also possible to createdifferent direct map entries.
Add the key for the direct map to the location's auto.direct file. The --key option identifies themount point, and --info gives the network location of the directory, as well as any mount options touse. For example:
$ ipa automountkey-add raleigh auto.direct --key=/share --info="-ro,soft, ipaserver.example.com:/home/share" Key: /share Mount information: -ro,soft, ipaserver.example.com:/home/share
Mount options are described in the mount manpage, http://linux.die.net/man/8/mount.
On Solaris, add the direct map and key using the ldapclient command to add the LDAP entrydirectly:
ldapclient -a serviceSearchDescriptor=auto_direct:automountMapName=auto.direct,cn=location,cn=automount,dc=example,dc=com?one
10.6.2. Configuring Indirect MapsAn indirect map essentially specifies a relative path for maps. A parent entry sets the base directoryfor all of the indirect maps. The indirect map key sets a sub directory; whenever the indirect maplocation is loaded, the key is appended to that base directory. For example, if the base directory is /docs and the key is man, then the map is /docs/man.
10.6.2.1. Configuring Indirect Maps from the Web UI1. Click the Policy tab.
2. Click the Automount subtab.
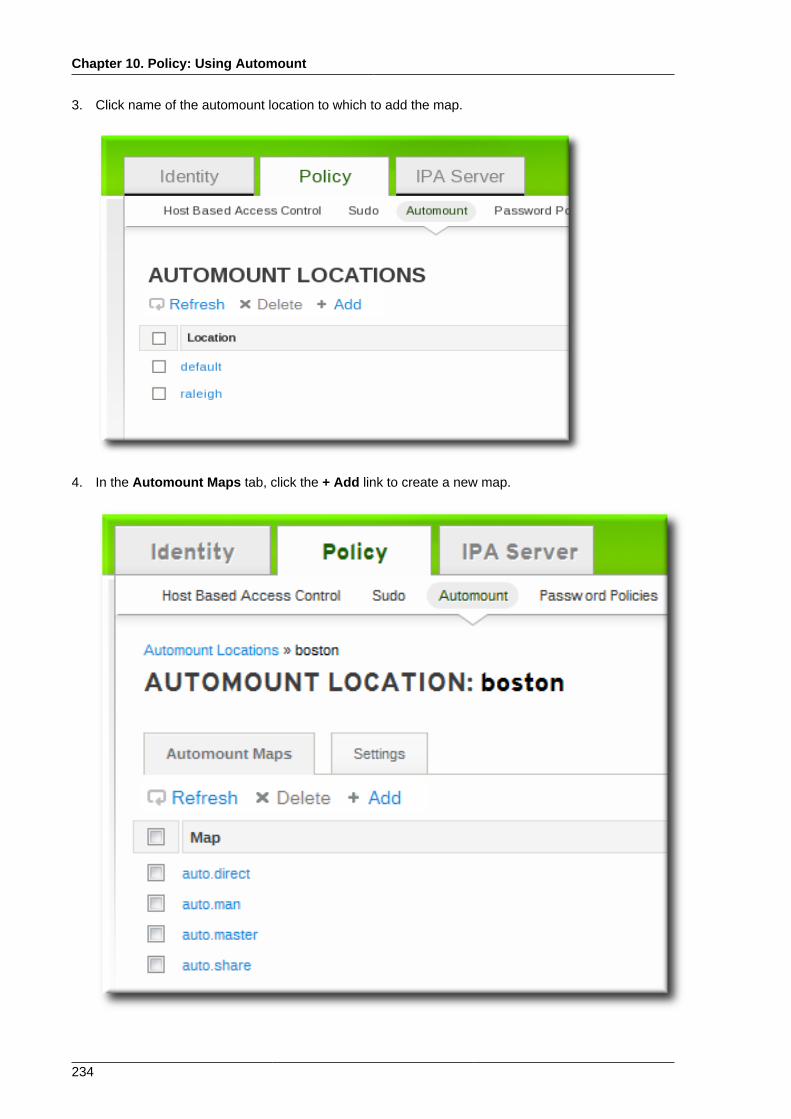
Chapter 10. Policy: Using Automount
234
3. Click name of the automount location to which to add the map.
4. In the Automount Maps tab, click the + Add link to create a new map.

Configuring Indirect Maps
235
5. In pop-up window, select the Indirect radio button and enter the required information for theindirect map:
• The name of the new map
• The mount point. The Mount field sets the base directory to use for all the indirect map keys.
• Optionally, a parent map. The default parent is auto.master, but if another map exists whichshould be used, that can be specified in the Parent Map field.
6. Click the Add button to save the new key.
10.6.2.2. Configuring Indirect Maps from the Command LineThe primary difference between a direct map and an indirect map is that there is no forward slash infront of an indirect key.
---------------------------/etc/auto.share:man ipa.example.com:/docs/man---------------------------
1. Create an indirect map to set the base entry using the automountmap-add-indirectcommand. The --mount option sets the base directory to use for all the indirect map keys. Thedefault parent entry is auto.master, but if another map exists which should be used, that can bespecified using the --parentmap option.
$ ipa automountmap-add-indirect location mapName --mount=directory [--parentmap=mapName]
For example:
$ ipa automountmap-add-indirect raleigh auto.share --mount=/share--------------------------------Added automount map "auto.share"--------------------------------
2. Add the indirect key for the mount location:
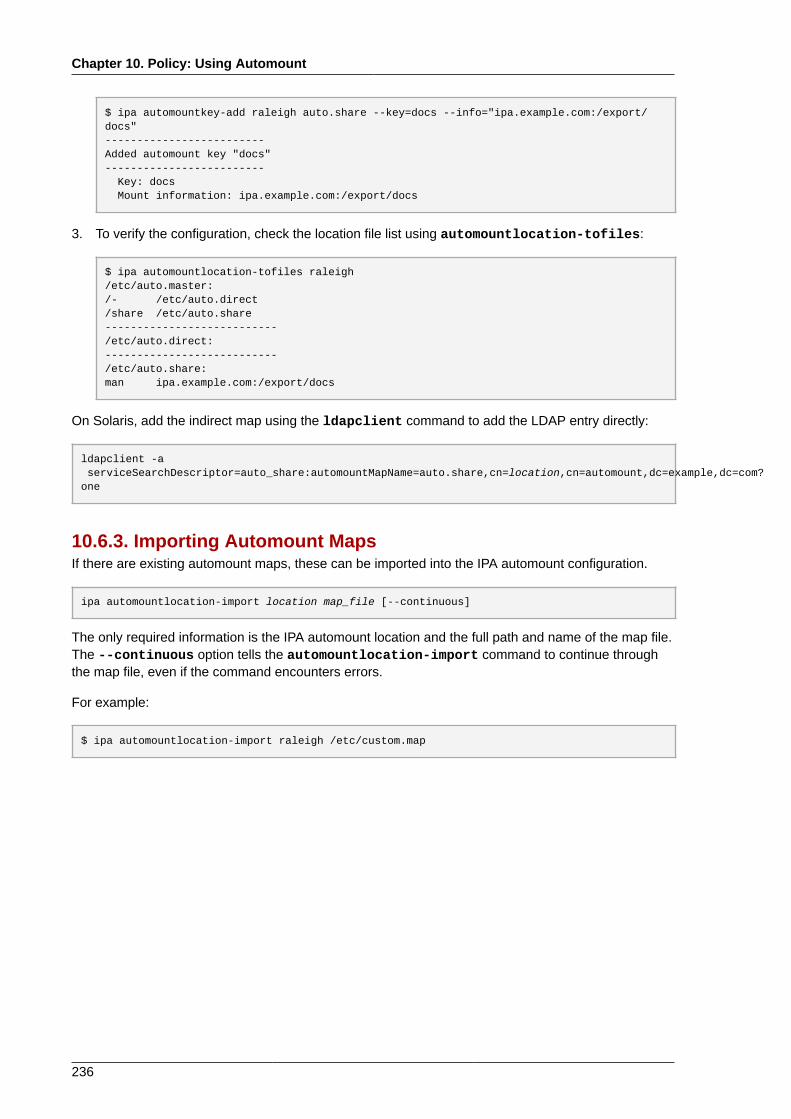
Chapter 10. Policy: Using Automount
236
$ ipa automountkey-add raleigh auto.share --key=docs --info="ipa.example.com:/export/docs"-------------------------Added automount key "docs"------------------------- Key: docs Mount information: ipa.example.com:/export/docs
3. To verify the configuration, check the location file list using automountlocation-tofiles:
$ ipa automountlocation-tofiles raleigh/etc/auto.master:/- /etc/auto.direct/share /etc/auto.share---------------------------/etc/auto.direct:---------------------------/etc/auto.share:man ipa.example.com:/export/docs
On Solaris, add the indirect map using the ldapclient command to add the LDAP entry directly:
ldapclient -a serviceSearchDescriptor=auto_share:automountMapName=auto.share,cn=location,cn=automount,dc=example,dc=com?one
10.6.3. Importing Automount MapsIf there are existing automount maps, these can be imported into the IPA automount configuration.
ipa automountlocation-import location map_file [--continuous]
The only required information is the IPA automount location and the full path and name of the map file.The --continuous option tells the automountlocation-import command to continue throughthe map file, even if the command encounters errors.
For example:
$ ipa automountlocation-import raleigh /etc/custom.map

Chapter 11.
237
Policy: Defining Password PoliciesAll users must have a password which they use to authenticate to the Kerberos domain. IdentityManagement defines and enforces rules about password complexity, password histories, and accountlockouts in order to maintain security.
NOTE
IPA, by default, does not expose passwords to clients, even hashed passwords, for systemsecurity.
11.1. About Password Policies and Policy AttributesA password policy sets certain standards for passwords, such as the password complexity and therules for changing passwords. A password policy minimizes the inherent risk of using passwords byensuring that they meet adequate complexity standards to thwart brute force attacks and they arechanged frequently enough to mitigate the risk of someone revealing or discovering a password.
There are three main configuration areas that are defined within the password policy:
• Strength or complexity requirements
• History
• Account lockout
The IPA password policy is enforced jointly by the KDC and the LDAP server. While the passwordpolicy is set in the LDAP directory and is based on 389 Directory Server password policy attributes,the policy is ultimately constrained by the KDC password policy framework. The KDC policy isless flexible than the 389 Directory Server policy framework, so the IPA password policy can onlyimplement password policy elements supported in the KDC. Any other policy settings made within the389 Directory Server are not visible or enforced in Identity Management.
Password policies are assigned either globally or to groups in IPA, not to individual users. Thepassword policy is assigned a weight, so that if a user belongs to multiple groups with differentpassword policies, the policy with the highest priority will take precedence.
The different policy attributes that can be set are listed in Table 11.1, “Password Policy Settings”.
Table 11.1. Password Policy Settings
Configuration Property Command-Line Option Description
Options for both the UI and CLI
Minimum Password Lifetime --minlife Sets the minimum period oftime, in hours, that a user'spassword must be in effectbefore the user can change it.This can prevent a user fromchanging a password and thenimmediately changing it tothe original value. The defaultvalue is one hour.

Chapter 11. Policy: Defining Password Policies
238
Configuration Property Command-Line Option Description
Maximum Password Lifetime --maxlife Sets the maximum period oftime, in days, that a user'spassword can be in effectbefore it must be changed. Thedefault value is 90 days.
Minimum Number of CharacterClasses
--minclasses Sets the minimum numberof different classes, or types,of character that must existin a password before it isconsidered valid. For example,setting this value to 3 requiresthat any password must havecharacters from at least threecategories in order to beapproved. The default value iszero (0), meaning there are norequired classes.There are six characterclasses:
• Upper-case characters
• Lower-case characters
• Digits
• Special characters (forexample, punctuation)
• 8-bit characters (characterswhose decimal code starts at128 or below)
• Number of repeatedcharacters
This weights in the oppositedirection, so that if youhave too many repeatedcharacters you will notmeet the quorum to satisfythe "level" expressed bykrbPwdMinDiffChars.
Minimum Length of Password --minlength Sets the minimum number ofcharacters for a password.The default value is eightcharacters.
Password History --history Sets the number of previouspasswords that are storedand which a user is preventedfrom using. For example, if thisis set to ten, IPA prevents auser from reusing any of their
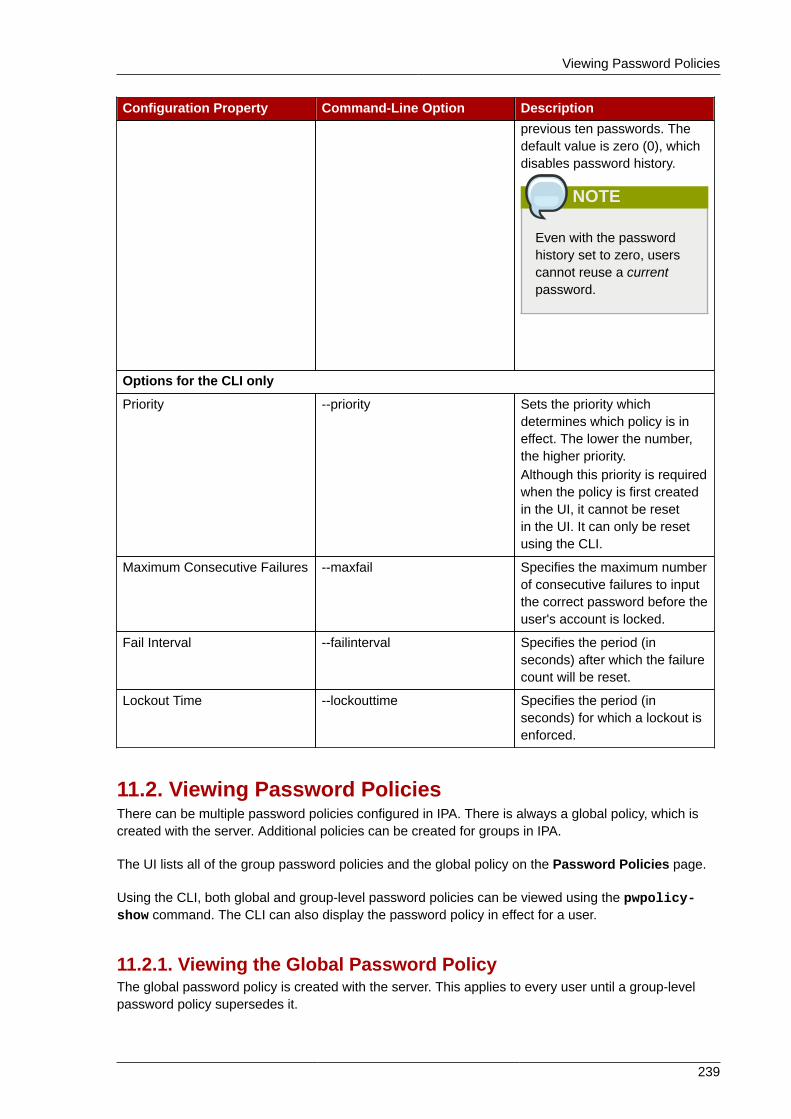
Viewing Password Policies
239
Configuration Property Command-Line Option Descriptionprevious ten passwords. Thedefault value is zero (0), whichdisables password history.
NOTE
Even with the passwordhistory set to zero, userscannot reuse a currentpassword.
Options for the CLI only
Priority --priority Sets the priority whichdetermines which policy is ineffect. The lower the number,the higher priority.Although this priority is requiredwhen the policy is first createdin the UI, it cannot be resetin the UI. It can only be resetusing the CLI.
Maximum Consecutive Failures --maxfail Specifies the maximum numberof consecutive failures to inputthe correct password before theuser's account is locked.
Fail Interval --failinterval Specifies the period (inseconds) after which the failurecount will be reset.
Lockout Time --lockouttime Specifies the period (inseconds) for which a lockout isenforced.
11.2. Viewing Password PoliciesThere can be multiple password policies configured in IPA. There is always a global policy, which iscreated with the server. Additional policies can be created for groups in IPA.
The UI lists all of the group password policies and the global policy on the Password Policies page.
Using the CLI, both global and group-level password policies can be viewed using the pwpolicy-show command. The CLI can also display the password policy in effect for a user.
11.2.1. Viewing the Global Password PolicyThe global password policy is created with the server. This applies to every user until a group-levelpassword policy supersedes it.
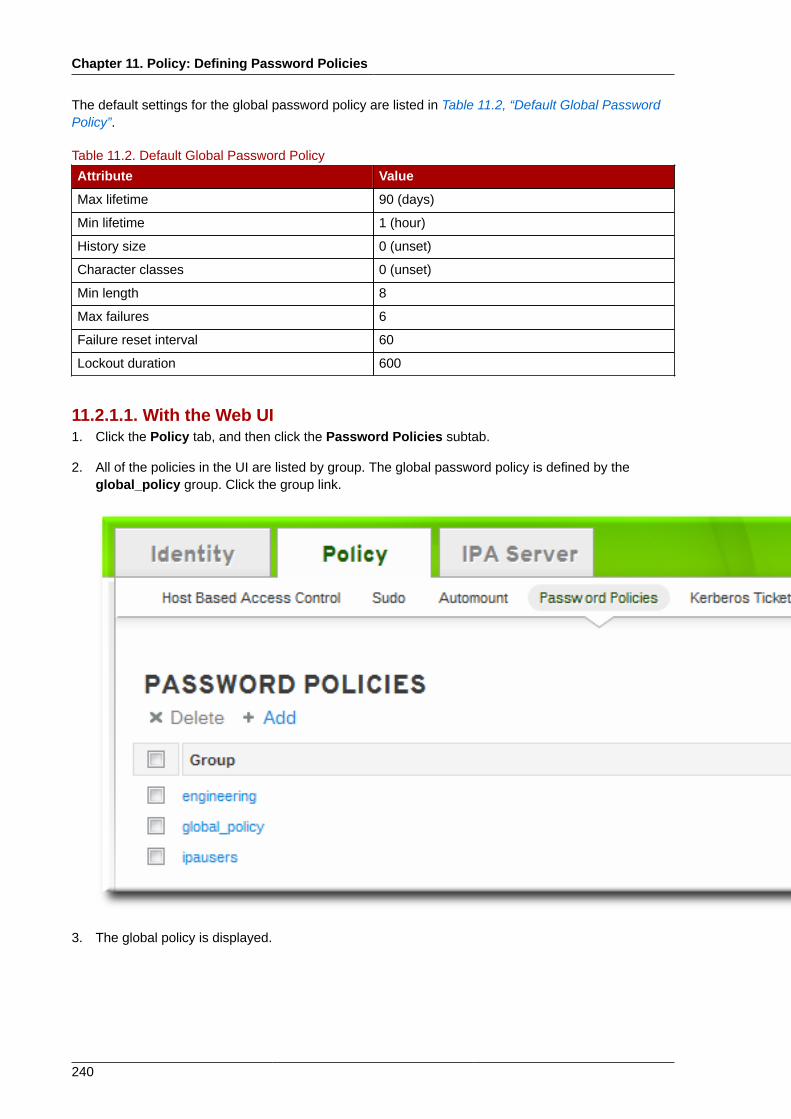
Chapter 11. Policy: Defining Password Policies
240
The default settings for the global password policy are listed in Table 11.2, “Default Global PasswordPolicy”.
Table 11.2. Default Global Password Policy
Attribute Value
Max lifetime 90 (days)
Min lifetime 1 (hour)
History size 0 (unset)
Character classes 0 (unset)
Min length 8
Max failures 6
Failure reset interval 60
Lockout duration 600
11.2.1.1. With the Web UI1. Click the Policy tab, and then click the Password Policies subtab.
2. All of the policies in the UI are listed by group. The global password policy is defined by theglobal_policy group. Click the group link.
3. The global policy is displayed.

Viewing the Global Password Policy
241
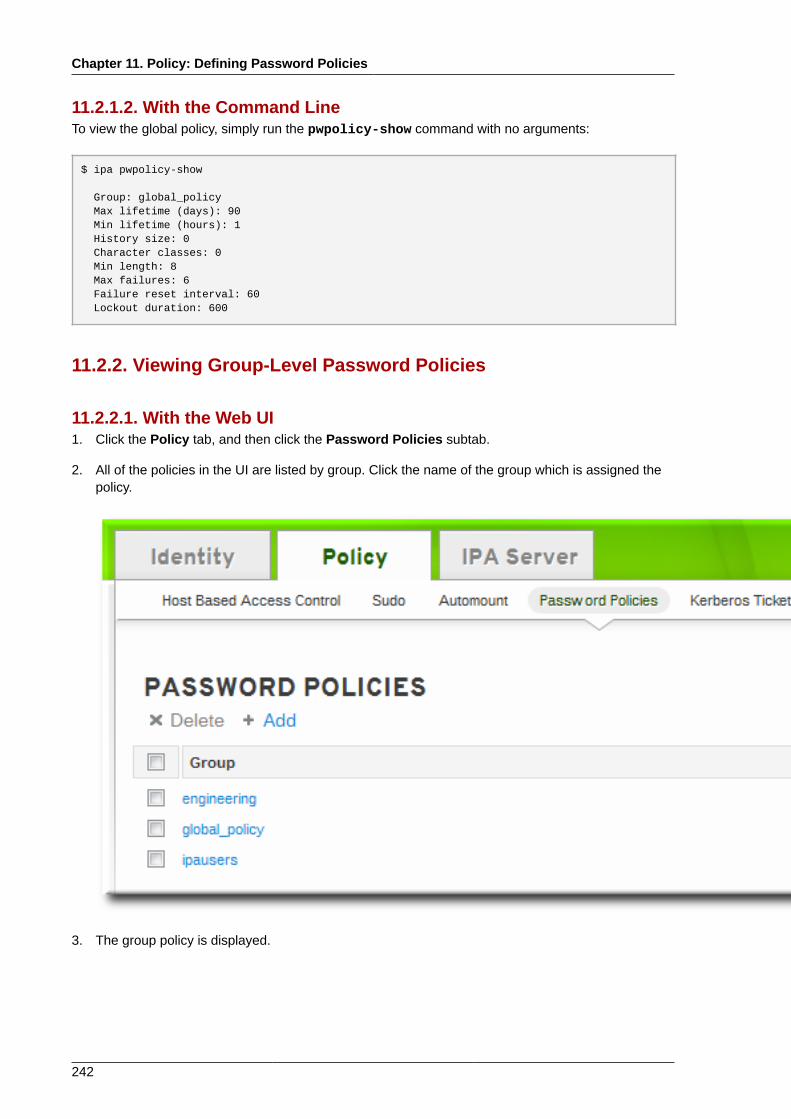
Chapter 11. Policy: Defining Password Policies
242
11.2.1.2. With the Command LineTo view the global policy, simply run the pwpolicy-show command with no arguments:
$ ipa pwpolicy-show
Group: global_policy Max lifetime (days): 90 Min lifetime (hours): 1 History size: 0 Character classes: 0 Min length: 8 Max failures: 6 Failure reset interval: 60 Lockout duration: 600
11.2.2. Viewing Group-Level Password Policies
11.2.2.1. With the Web UI1. Click the Policy tab, and then click the Password Policies subtab.
2. All of the policies in the UI are listed by group. Click the name of the group which is assigned thepolicy.
3. The group policy is displayed.
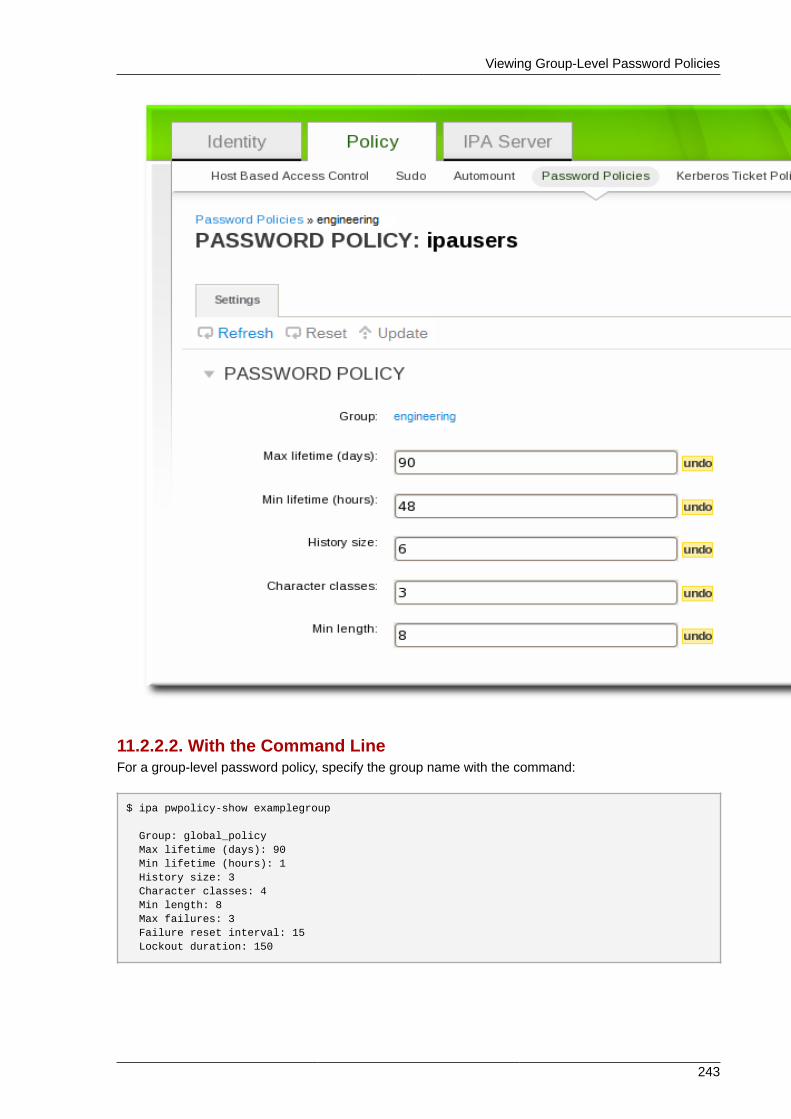
Viewing Group-Level Password Policies
243
11.2.2.2. With the Command LineFor a group-level password policy, specify the group name with the command:
$ ipa pwpolicy-show examplegroup
Group: global_policy Max lifetime (days): 90 Min lifetime (hours): 1 History size: 3 Character classes: 4 Min length: 8 Max failures: 3 Failure reset interval: 15 Lockout duration: 150
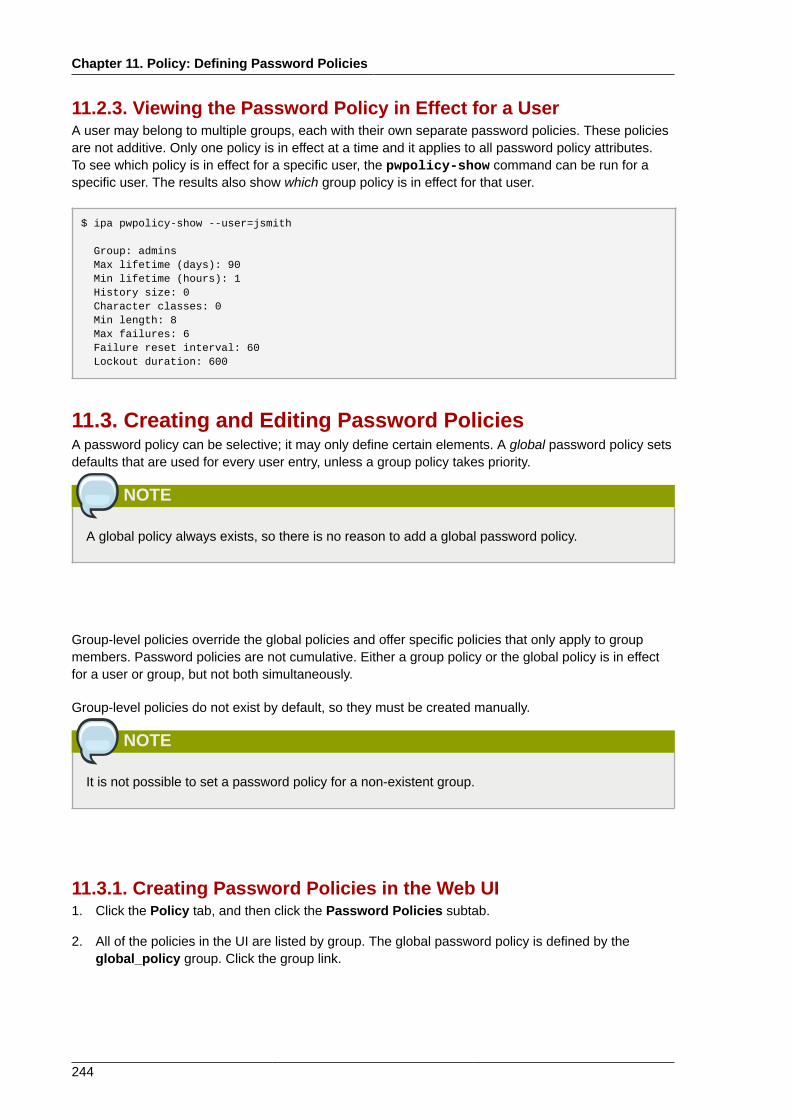
Chapter 11. Policy: Defining Password Policies
244
11.2.3. Viewing the Password Policy in Effect for a UserA user may belong to multiple groups, each with their own separate password policies. These policiesare not additive. Only one policy is in effect at a time and it applies to all password policy attributes.To see which policy is in effect for a specific user, the pwpolicy-show command can be run for aspecific user. The results also show which group policy is in effect for that user.
$ ipa pwpolicy-show --user=jsmith
Group: admins Max lifetime (days): 90 Min lifetime (hours): 1 History size: 0 Character classes: 0 Min length: 8 Max failures: 6 Failure reset interval: 60 Lockout duration: 600
11.3. Creating and Editing Password PoliciesA password policy can be selective; it may only define certain elements. A global password policy setsdefaults that are used for every user entry, unless a group policy takes priority.
NOTE
A global policy always exists, so there is no reason to add a global password policy.
Group-level policies override the global policies and offer specific policies that only apply to groupmembers. Password policies are not cumulative. Either a group policy or the global policy is in effectfor a user or group, but not both simultaneously.
Group-level policies do not exist by default, so they must be created manually.
NOTE
It is not possible to set a password policy for a non-existent group.
11.3.1. Creating Password Policies in the Web UI1. Click the Policy tab, and then click the Password Policies subtab.
2. All of the policies in the UI are listed by group. The global password policy is defined by theglobal_policy group. Click the group link.
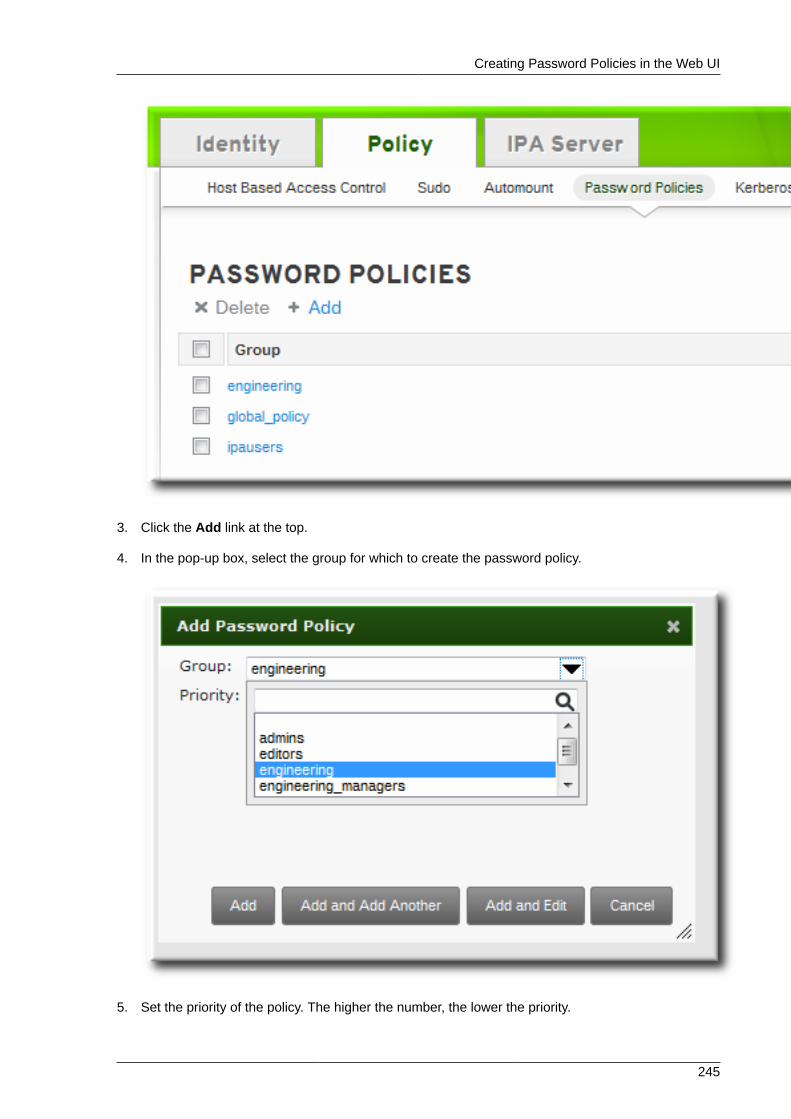
Creating Password Policies in the Web UI
245
3. Click the Add link at the top.
4. In the pop-up box, select the group for which to create the password policy.
5. Set the priority of the policy. The higher the number, the lower the priority.
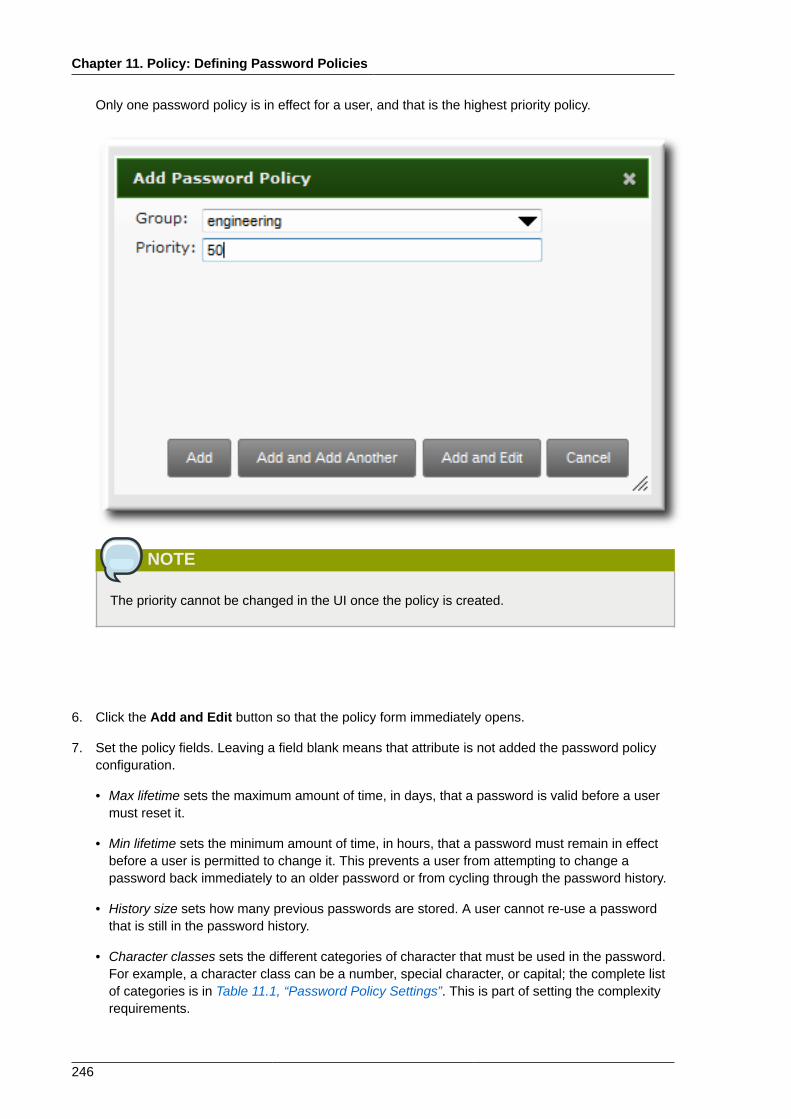
Chapter 11. Policy: Defining Password Policies
246
Only one password policy is in effect for a user, and that is the highest priority policy.
NOTE
The priority cannot be changed in the UI once the policy is created.
6. Click the Add and Edit button so that the policy form immediately opens.
7. Set the policy fields. Leaving a field blank means that attribute is not added the password policyconfiguration.
• Max lifetime sets the maximum amount of time, in days, that a password is valid before a usermust reset it.
• Min lifetime sets the minimum amount of time, in hours, that a password must remain in effectbefore a user is permitted to change it. This prevents a user from attempting to change apassword back immediately to an older password or from cycling through the password history.
• History size sets how many previous passwords are stored. A user cannot re-use a passwordthat is still in the password history.
• Character classes sets the different categories of character that must be used in the password.For example, a character class can be a number, special character, or capital; the complete listof categories is in Table 11.1, “Password Policy Settings”. This is part of setting the complexityrequirements.
Creating Password Policies with the Command Line
247
• Min length sets how many characters must be in a password. This is part of setting thecomplexity requirements.
11.3.2. Creating Password Policies with the Command LinePassword policies are added with the pwpolicy-add command.
$ ipa pwpolicy-add groupName --attribute-value
For example:
$ ipa pwpolicy-add exampleGroup --minlife=7 --maxlife=49 --history= --priority=1 Group: exampleGroupMax lifetime (days): 49Min lifetime (hours): 7Priority: 1
TIP
Setting an attribute to a blank value effectively removes that attribute from the password policy.
11.3.3. Editing Password Policies with the Command LineAs with most IPA entries, a password policy is edited by using a *-mod command, pwpolicy-mod,and then the policy name. However, there is one difference with editing password policies: there is aglobal policy which always exists. Editing a group-level password policy is slightly different than editingthe global password policy.
Editing a group-level password policy follows the standard syntax of *-mod commands. It uses thepwpolicy-mod command, the name of the policy entry, and the attributes to change. For example:
[jsmith@ipaserver ~]$ ipa pwpolicy-mod exampleGroup --lockouttime=300 --history=5 --minlength=8
To edit the global password policy, use the pwpolicy-mod command with the attributes to change,but without specifying a password policy name. For example:
[jsmith@ipaserver ~]$ ipa pwpolicy-mod --lockouttime=300 --history=5 --minlength=8
11.4. Managing Password Expiration Limits
Password policies are applied at the time a password is changed. So, when a password is set, itconforms to the password policy in effect at that time. If the password policy is changed later, thatchange is not applied, retroactively, to the password.
Setting password expiration periods is configured as part of the group password policy. Creating andediting password policies (including the expiration attribute in the policy) is covered in Section 11.3,“Creating and Editing Password Policies”.
Chapter 11. Policy: Defining Password Policies
248
With password expiration periods, there are two attributes that are related:
• The maximum lifetime setting given in the password policy (--maxlife)
• The actual date that the password for a given user expires (krbPasswordExpiration)
Changing the password expiration time in the password policy does not affect the expiration datefor a user, until the user password is changed. If the password expiration date needs to be changedimmediately, it can be changed by editing the user entry.
To force the expiration date to change, reset the krbPasswordExpiration attribute value for theuser. This can be done using the IPA CLI with the --setattr option:
[bjensen@ipaserver ~]$ kinit[bjensen@ipaserver ~]$ ipa user-mod jsmith --setattr=krbPasswordExpiration=20121231011529Z
If the new expiration date should be applied to multiple entries, it may be simpler to use ldapmodifyand edit multiple entries simultaneously through an LDIF file in the -f option. For example, editing asingle entry (with a modify statement similar to the LDIF file in -f):
[bjensen@ipaserver ~]$ ldapmodify -Y GSSAPI -h ipaserver.example.com -p 389 -vv
dn: uid=jsmith,cn=users,cn=accounts,dc=example,dc=comchangetype: modifyreplace: krbpasswordexpirationkrbpasswordexpiration: 20140202203734Z-
TIP
If an administrator resets a password, it expires the previous password and forces the userto update the password. When the user updates the password, it automatically uses the newpassword policies, including a new expiration date.
11.5. Changing the Priority of Group Password PoliciesA user may belong to multiple groups, each with different password policies. Since only one policy canbe in effect for a user, there has to be a method to assign precedence to policies. That is done throughpriority.
The highest priority is zero (0). The lower the number, the higher the priority.
This is set initially when the password policy is created. It can be modified after the policy is created byresetting the --priority option.
$ ipa pwpolicy-mod examplegroup --priority=10
When a user belongs to multiple groups, the group password policy with the lowest number has thepriority.
Setting Account Lockout Policies
249
NOTE
The password policy priority cannot be changed in the UI after it is created.
11.6. Setting Account Lockout PoliciesA brute force attack occurs when a malefactor attempts to guess a password by simply slamming theserver with multiple login attempts. An account lockout policy prevents brute force attacks by blockingan account from logging into the system after a certain number of login failures — even if the correctpassword is subsequently entered.
NOTE
A user account can be manually unlocked by an administrator using the ipa user-unlock.Refer to Section 5.5, “Unlocking User Accounts After Password Failures”.
11.6.1. In the UIThese attributes are available in the password policy form when a group-level password policy iscreated or when any password policy (including the global password policy) is edited.
1. Click the Policy tab, and then click the Password Policies subtab.
2. Click the name of the policy to edit.

Chapter 11. Policy: Defining Password Policies
250
3. Set the account lockout attribute values.
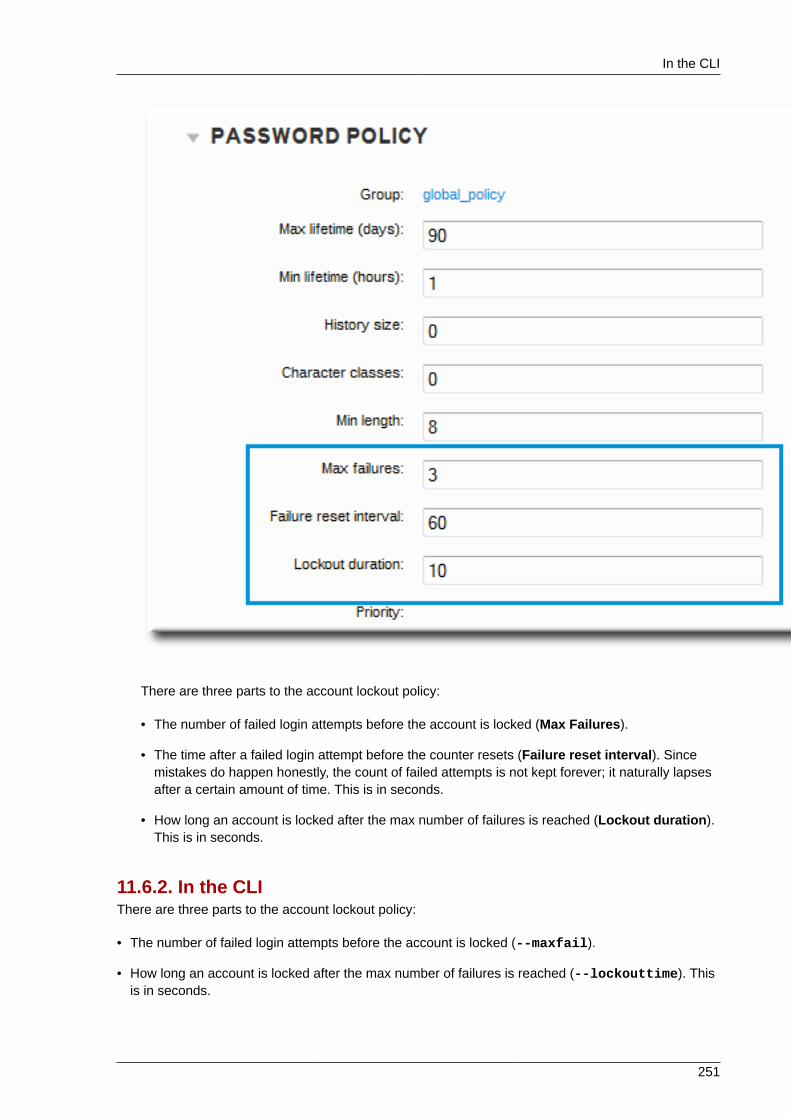
In the CLI
251
There are three parts to the account lockout policy:
• The number of failed login attempts before the account is locked (Max Failures).
• The time after a failed login attempt before the counter resets (Failure reset interval). Sincemistakes do happen honestly, the count of failed attempts is not kept forever; it naturally lapsesafter a certain amount of time. This is in seconds.
• How long an account is locked after the max number of failures is reached (Lockout duration).This is in seconds.
11.6.2. In the CLIThere are three parts to the account lockout policy:
• The number of failed login attempts before the account is locked (--maxfail).
• How long an account is locked after the max number of failures is reached (--lockouttime). Thisis in seconds.

Chapter 11. Policy: Defining Password Policies
252
• The time after a failed login attempt before the counter resets (--failinterval). Since mistakesdo happen honestly, the count of failed attempts is not kept forever; it naturally lapses after a certainamount of time. This is in seconds.
These account lockout attributes can all be set when a password policy is created with pwpolicy-add or added later using pwpolicy-mod. For example:
[jsmith@ipaserver ~]$ kinit admin[jsmith@ipaserver ~]$ ipa pwpolicy-mod examplegroup --maxfail=4 --lockouttime=600 --failinterval=30
11.7. Enabling a Password Change DialogThere may be situations when a user exists in Identity Management but does not have a validKerberos ticket, meaning he cannot authenticate to the IPA domain. This is possible for new users orfor users whose domain passwords have expired. Much like enabling password authentication in theweb UI, it is possible to enable password-based authentication to the client. This opens up a passwordchange dialog box to allow the user to reset the expired password.
The password change dialog is enabled by using OpenSSH's challenge-response authentication.
The challenge-response dialog is optional. In many environments, it is not necessary because SSSDcan handle changing expired passwords by invoking the required PAM modules. However, using thechallenge-response option in OpenSSH makes it possible to do password changes directly in PAMand to support full PAM conversations.
This is not enabled by default, but it can be enabled by editing the OpenSSH configuration.
1. Open the /etc/ssh/sshd_config file.
2. Set ChallengeResponseAuthentication to yes.

Chapter 12.
253
Policy: Managing the Kerberos DomainKerberos authentication is the core of authentication within the IPA domain. The IPA server actuallyruns a Kerberos server within it, and this Kerberos server can be configured for custom policies formanaging tickets and keytabs.
For more information on Kerberos concepts, see the MIT Kerberos documentation, http://web.mit.edu/kerberos/www/.
IMPORTANT
Identity Management has its own command-line tools to use to manage Kerberos policies. Donot use kadmin or kadmin.local to manage IPA Kerberos settings.
12.1. About Kerberos
Kerberos provides an authentication layer between services and users. Kerberos centralizesauthentication into a single location; a user authenticates to the Kerberos server, and then when thatuser attempts to access any resource on the network, that resource can check the key distributioncenter (KDC) for the stored user credentials. This allows users to access multiple resources withouthaving to supply credentials separately to each and every one.
All of the users and services, combined, and all of the KDCs and Kerberos servers that are awareof each other constitute a realm. Each user, machine, and service within the realm is identified by aunique name called the principal. The user or service uses the principal and a verifying credential(usually a password) to authenticate to the KDC. The credential that is shared with the KDC is a keyand it is stored in a file called a key table or keytab.
When the KDC verifies the user's identity, it issues a ticket. The ticket is a long-term pass to anyservice and machine on the realm. The KDC issues the user a special kind of ticket called a ticket-granting ticket (TGT). Whenever the user tries to access a resource within the Kerberos realm, theresource sends a request for a ticket specifically for it. The TGT is used to issue a resource-specificticket that the resource then uses to authenticate the user and grant access.
NOTE
When an IPA client is first configured, the host principal is automatically retrieved by the setupscript and stored in the /etc/krb5.keytab file. This host principal is stored within the hostrecord so that local service commands cannot be used with this principal. This prepares the clientto function in the IPA realm.
12.1.1. About Principal NamesThe principal identifies not only the user or service, but also the realm that that entity belongs to. Aprincipal name has two parts, the identifier and the realm:
identifier@REALM

Chapter 12. Policy: Managing the Kerberos Domain
254
For a user, the identifier is only the Kerberos username. For a service, the identifier is a combination ofthe service name and the hostname of the machine it runs on:
service/FQDN@REALM
The service name is a case-sensitive string that is specific to the service type, like host, ldap, http,and dns. Not all services have obvious principal identifiers; the sshd daemon, for example, uses thehost service principal.
The host principal is usually stored in /etc/krb5.keytab.
When Kerberos requests a ticket, it always resolves the domain name aliases (DNS CNAME records)to the corresponding DNS address (A or AAAA records). The hostname from the address record isthen used when service or host principals are created.
For example:
www.example.com CNAME web-01.example.comweb-01.example.com A 192.0.2.145
A service attempts to connect to the host using its CNAME alias:
$ ssh www.example.com
The Kerberos server requests a ticket for the resolved hostname,[email protected], so the host principal must be host/[email protected].
12.1.2. About Protecting KeytabsTo protect keytab files, reset the permissions and ownership to restrict access to the files to only thekeytab owner. For example, set the owner of the Apache keytab (/etc/httpd/conf/ipa.keytab)to apache and the mode to 0600.
12.2. Setting Kerberos Ticket Policies
The Kerberos ticket policy sets basic restrictions on managing tickets within the Kerberos realm, suchas the maximum ticket lifetime and the maximum renewal age (the period during which the ticket isrenewable).
The Kerberos ticket policy is set globally so that it applies to every ticket issued within the realm. IPAalso has the ability to set user-level ticket policies which override the global policies. This can be used,for example, to set extended expiration times for administrators or to set shorter expiration times forsome employees.
12.2.1. Setting Global Ticket Policies
12.2.1.1. From the Web UI1. Click the Policy tab, and then click the Kerberos Ticket Policy subtab.

Setting Global Ticket Policies
255
2. Change the ticket lifetime policies.
• Max renew sets the period after a ticket expires that it can be renewed.
• Max life sets the active period (lifetime) of a Kerberos ticket.
3. Click the Update link at the top of the policy page.
4. Restart the KDC.
# service krb5kdc restart
IMPORTANT
Any change to the global Kerberos ticket policy requires a restart of the KDC for the changesto take effect.
12.2.1.2. From the Command LineThe ipa krbtpolicy-mod command modifies the policy, while the ipa krbtpolicy-resetcommand resets the policy to the default values.
For example:
# ipa krbtpolicy-mod --maxlife=3600 --maxrenew=18000 Max life: 3600 Max renew: 18000
Chapter 12. Policy: Managing the Kerberos Domain
256
IMPORTANT
Any change to the global Kerberos ticket policy requires a restart of the KDC for the changes totake effect. Restart the KDC:
# service krb5kdc restart
12.2.2. Setting User-Level Ticket Policies
User-level Kerberos ticket policies are set using the same commands as global policies, but the user isspecified in the command.
For example:
# ipa krbtpolicy-mod jsmith --maxlife=3600 Max life: 3600
IMPORTANT
User-level policies take effect immediately on the next requested ticket (such as running kinit),without having to restart the KDC service.
12.3. Refreshing Kerberos TicketsKerberos keys are analogous to passwords. Like passwords, security policies may require thatKerberos tickets are manually refreshed after a specified interval.
The version of the key is shown in its key version number (KVNO). Refreshing (also called rotating)the principal's key increments the KVNO in the keytab entry. When a key is refreshed, a new entry isadded to the keytab with a higher KVNO. The original key remains in the keytab but is no longer usedto issue tickets.
Each keytab for the IPA realm has an entry in the IPA LDAP server, which includes its last changetime. The principals which need to be refreshed can be regenerated using the ipa-getkeytabcommand.
NOTE
The ipa-getkeytab command does not delete the old keytab in case it already exists in thefile.
1. Find all keytabs issued before the requisite date. For example, this looks for any principals createdbetween midnight on January 1, 2010, and 11:59 PM on December 31, 2010:
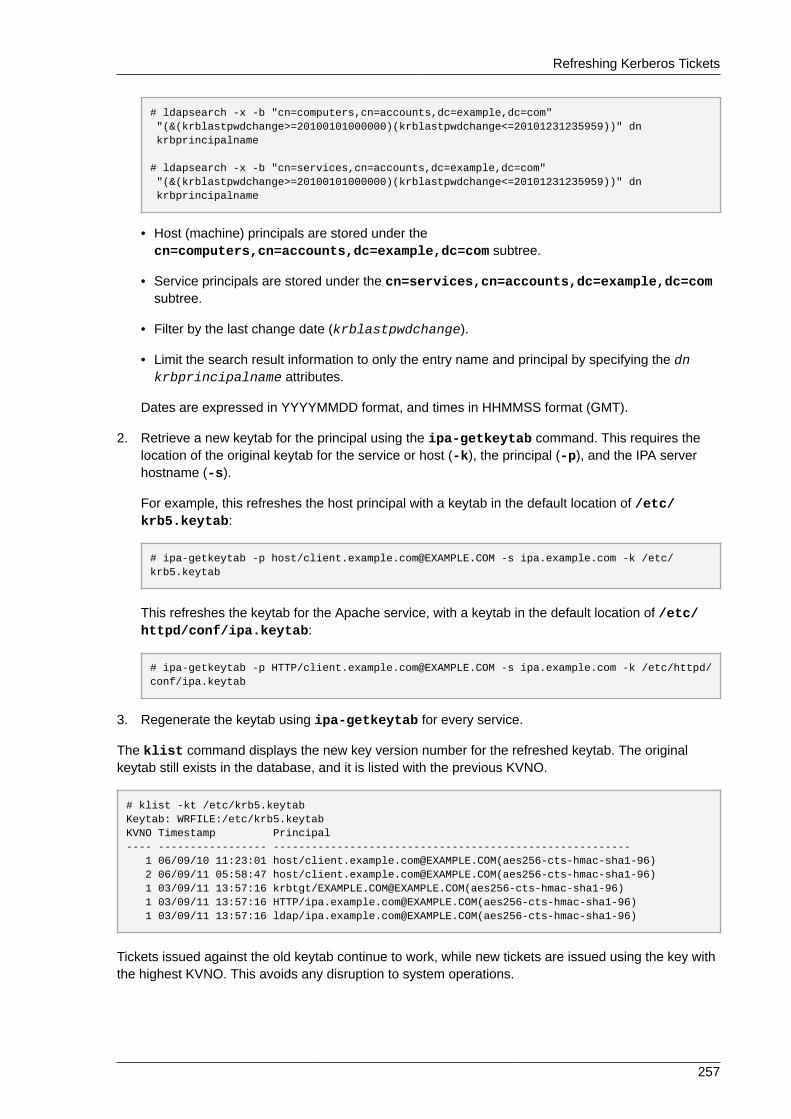
Refreshing Kerberos Tickets
257
# ldapsearch -x -b "cn=computers,cn=accounts,dc=example,dc=com" "(&(krblastpwdchange>=20100101000000)(krblastpwdchange<=20101231235959))" dn krbprincipalname # ldapsearch -x -b "cn=services,cn=accounts,dc=example,dc=com" "(&(krblastpwdchange>=20100101000000)(krblastpwdchange<=20101231235959))" dn krbprincipalname
• Host (machine) principals are stored under thecn=computers,cn=accounts,dc=example,dc=com subtree.
• Service principals are stored under the cn=services,cn=accounts,dc=example,dc=comsubtree.
• Filter by the last change date (krblastpwdchange).
• Limit the search result information to only the entry name and principal by specifying the dnkrbprincipalname attributes.
Dates are expressed in YYYYMMDD format, and times in HHMMSS format (GMT).
2. Retrieve a new keytab for the principal using the ipa-getkeytab command. This requires thelocation of the original keytab for the service or host (-k), the principal (-p), and the IPA serverhostname (-s).
For example, this refreshes the host principal with a keytab in the default location of /etc/krb5.keytab:
# ipa-getkeytab -p host/[email protected] -s ipa.example.com -k /etc/krb5.keytab
This refreshes the keytab for the Apache service, with a keytab in the default location of /etc/httpd/conf/ipa.keytab:
# ipa-getkeytab -p HTTP/[email protected] -s ipa.example.com -k /etc/httpd/conf/ipa.keytab
3. Regenerate the keytab using ipa-getkeytab for every service.
The klist command displays the new key version number for the refreshed keytab. The originalkeytab still exists in the database, and it is listed with the previous KVNO.
# klist -kt /etc/krb5.keytabKeytab: WRFILE:/etc/krb5.keytabKVNO Timestamp Principal---- ----------------- -------------------------------------------------------- 1 06/09/10 11:23:01 host/[email protected](aes256-cts-hmac-sha1-96) 2 06/09/11 05:58:47 host/[email protected](aes256-cts-hmac-sha1-96) 1 03/09/11 13:57:16 krbtgt/[email protected](aes256-cts-hmac-sha1-96) 1 03/09/11 13:57:16 HTTP/[email protected](aes256-cts-hmac-sha1-96) 1 03/09/11 13:57:16 ldap/[email protected](aes256-cts-hmac-sha1-96)
Tickets issued against the old keytab continue to work, while new tickets are issued using the key withthe highest KVNO. This avoids any disruption to system operations.

Chapter 12. Policy: Managing the Kerberos Domain
258
IMPORTANT
Some services, such as NFSv4, only support a limited set of encryption types. Pass theappropriate arguments to the ipa-getkeytab command to configure the keytab properly.
12.4. Caching Kerberos Passwords
A machine may not always be on the same network as the IPA domain; for example, a machine mayneed to be logged into a VPN before it can access the IPA domain. If a user logs into a system whenit is offline and then later attempts to connect to IPA services, then the user is blocked because thereis no IPA Kerberos ticket for that user. IPA works around that limitation by using SSSD to store theKerberos passwords in the SSSD cache.
This is configured by default by the ipa-client-install script. A configuration parameter isadded to the /etc/sssd/sssd.conf file which specifically instructs SSSD to store those Kerberospasswords for the IPA domain:
[domain/example.com]cache_credentials = Trueipa_domain = example.comid_provider = ipaauth_provider = ipaaccess_provider = ipachpass_provider = ipaipa_server = _srv_, server.example.comkrb5_store_password_if_offline = true
This default behavior can be disabled during the client installation by using the --no-krb5-offline-passwords option.
This behavior can also be disabled by editing the /etc/sssd/sssd.conf file and removing thekrb5_store_password_if_offline line or changing its value to false.
[domain/example.com]...krb5_store_password_if_offline = false
The SSSD configuration options for Kerberos authentication is covered in the "Configuring Domains"section of the SSSD chapter in the Red Hat Enterprise Linux Deployment Guide1.
12.5. Removing KeytabsRefreshing Kerberos tickets adds a new key to the keytab, but it does not clear the keytab. If a hostis being unenrolled and re-added to the IPA domain or if there are Kerberos connection errors, then itmay be necessary to remove the keytab and create a new keytab.
1 http://docs.redhat.com/docs/en-US/Red_Hat_Enterprise_Linux/6/html/Deployment_Guide/Configuring_Domains.html
Troubleshooting Kerberos Errors
259
This is done using the ipa-rmkeytab command. To remove all principals on the host, specify therealm with the -r option:
# ipa-rmkeytab -r EXAMPLE.COM -k /etc/krb5.keytab
To remove the keytab for a specific service, use the -p option to specify the service principal:
# ipa-rmkeytab -p ldap/client.example.com -k /etc/krb5.keytab
12.6. Troubleshooting Kerberos ErrorsKerberos errors frequently become apparent when trying to connect to the realm using kinit or asimilar client. For information related to Kerberos, first check the Kerberos manpages, help files, andother resources.
IMPORTANT
Identity Management has its own command-line tools to use to manage Kerberos policies. Donot use kadmin or kadmin.local to manage IPA Kerberos settings.
There are several places to look for Kerberos error log information:• For kinit problems or other Kerberos server problems, look at the KDC log in /var/log/krb5kdc.log.
• For IPA-specific errors, look in /var/log/httpd/error_log.
The IPA logs, both for the server and for IPA-associated services, are covered in Section 17.1.3,“Checking IPA Server Logs”.
Problems making connections with SSH when using GSS-APIIf there are bad reverse DNS entries in the DNS configuration, then it may not be possible to log intoIPA resources using SSH. When SSH attempts to connect to a resource using GSS-API as its securitymethod, GSS-API first checks the DNS records. The bad records prevent SSH from locating theresource.
It is possible to disable reverse DNS lookups in the SSH configuration. Rather than using reverse DNSrecords, SSH passes the given username directly to GSS-API.
To disable reverse DNS lookups with SSH, add or edit the GSSAPITrustDNS directive and set thevalue to no.
# vim /etc/ssh/ssh_config GSSAPITrustDNS no
There are problems connecting to an NFS server after changing a keytabClients attempting to mount NFS exports rely on the existence of a valid principal and secret keyon both the NFS server and the client host. Clients themselves should not have access to the NFSkeytab. The ticket for the NFS connection will be given to clients from the KDC.

Chapter 12. Policy: Managing the Kerberos Domain
260
Failure to export an updated keytab can cause problems that are difficult to isolate. For example,existing service connections may continue to function, but no new connections may be possible.
Chapter 13.
261
Policy: Using sudoIdentity Management provides a mechanism for predictably and consistently apply sudo policiesacross the IPA domain. The sudo policies apply to domain users and domain hosts.
13.1. About sudo and IPAThe sudo command allows a system administrator to delegate authority to specific users to runspecific commands as root or another specified user. sudo provides an audit trail of the commandsand their arguments, so access can be tracked.
13.1.1. General sudo Configuration in Identity Managementsudo uses a local configuration file, /etc/sudoers, which defines the commands and users withsudo access. While this file can be shared among machines, there's no native way to distribute sudoconfiguration files among machines.
Identity Management uses its centralized LDAP database to contain the sudo configuration, whichmakes it globally available to all domain hosts. Identity Management also has a specialized LDAPschema for sudo entries that allows a lot more flexible and simpler configuration. This schema addstwo key features:
• The Identity Management schema supports host groups in addition to netgroups for sudo, whilesudo only supports netgroups.
For every host group, Identity Management also creates a corresponding shadow netgroup. Thisallows IPA administrators to create sudo rules that reference host groups, while the local sudocommand uses the corresponding netgroup.
• Identity Management introduces the concept of a sudo command group. The group containsmultiple commands, and then the command group can be referenced in the sudo configuration.
Because sudo does not support host groups and command groups, Identity Management translatesthe IPA sudo configuration into native sudo configuration when the sudo rules are created.
Because the sudo information is not available anonymously over LDAP by default, IdentityManagement defines a default sudo user, uid=sudo,cn=sysaccounts,cn=etc,$SUFFIX, whichcan be set in the LDAP/sudo configuration file, /etc/nslcd.conf. (The /etc/nslcd.conf file iscreated by the nss-pam-ldapd package. However, if nss-pam-ldapd is not installed, then the /etc/nslcd.conf file can be created manually.)
Both sudo and Identity Management support user groups as part of the sudo configuration. Usergroups can be either Unix or non-POSIX groups. Creating non-POSIX groups can create some accessissues because any users in the group inherit non-POSIX rights from the group. Having the choicebetween Unix and non-POSIX groups allows administrators the choice in group formatting and toavoid problems with inherited permissions or GID information.
13.1.2. sudo and NetgroupsAs Section 13.1.1, “General sudo Configuration in Identity Management” mentions, the LDAPschema used for sudo entries in Identity Management supports host group-style groups in additionto netgroups. Really, Identity Management creates two groups, a visible host group and a shadownetgroup. sudo itself only supports NIS-style netgroups for group formats.
One important thing to consider is that even though sudo uses NIS netgroups, it is not necessary tohave a NIS server installed or a NIS client configured. When any group is created for sudo, the NIS

Chapter 13. Policy: Using sudo
262
object is created in the Directory Server instance, and then the information is retrieved by NSS_LDAPor by SSSD. The client (in this case, sudo) then extracts the required NIS information from theinformation provided by Identity Management's Directory Server.
In short, sudo configuration required NIS-formatted netgroups. It does not require NIS.
The Identity Management Directory Server instance uses the standard LDAP schema for NIS objects,defined in RFC 2307.
13.1.3. Supported sudo ClientsAny system which is supported as an IPA client system can be configured as a sudo client in IPA.
13.2. Setting up sudo Commands and Command GroupsJust as in regular sudo configuration, any command which will be governed by sudo access must belisted in the configuration. Identity Management adds an extra control measure with sudo commandgroups, which allow a group of commands to be defined and then applied to the sudo configuration asone.
Adding a command or a command group makes it available to IPA to be defined in a sudo rule; simplyadding a command does not automatically include it in a sudo rule.
13.2.1. Adding sudo Commands
13.2.1.1. Adding sudo Commands with the Web UI1. Click the Policy tab.
2. Click the Sudo subtab, and then select the Sudo Commands link.
3. Click the Add link at the top of the list of commands.
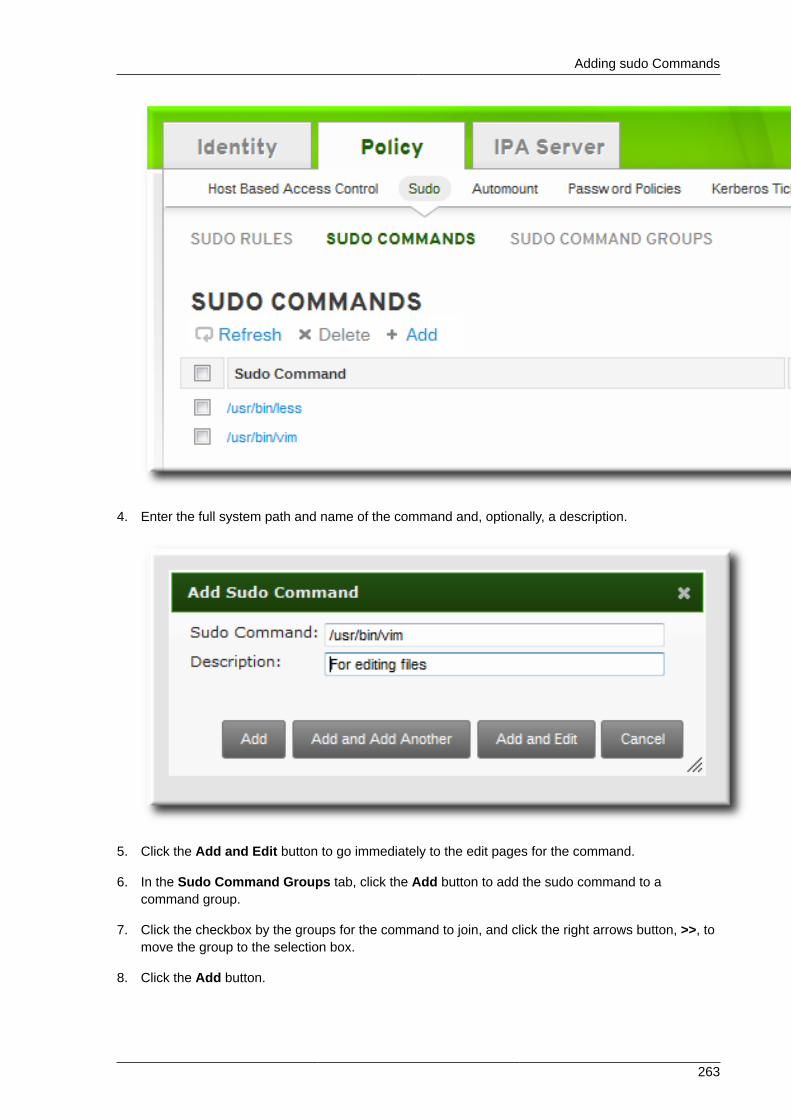
Adding sudo Commands
263
4. Enter the full system path and name of the command and, optionally, a description.
5. Click the Add and Edit button to go immediately to the edit pages for the command.
6. In the Sudo Command Groups tab, click the Add button to add the sudo command to acommand group.
7. Click the checkbox by the groups for the command to join, and click the right arrows button, >>, tomove the group to the selection box.
8. Click the Add button.

Chapter 13. Policy: Using sudo
264
13.2.1.2. Adding sudo Commands with the Command LineTo add a single command, use the sudocmd-add command. This requires the full, local path to thecommand executable and a description of the command:
$ ipa sudocmd-add --desc "description" /local/path/to/command
For example:
$ ipa sudocmd-add --desc 'For reading log files' '/usr/bin/less'----------------------------------Added sudo command "/usr/bin/less"---------------------------------- sudo Command: /usr/bin/less Description: For reading log files
13.2.2. Adding sudo Command Groups
13.2.2.1. Adding sudo Command Groups with the Web UI1. Click the Policy tab.
2. Click the Sudo subtab, and then select the Sudo Command Groups link.
3. Click the Add link at the top of the list of command groups.
4. Enter the name and description for the new command group.
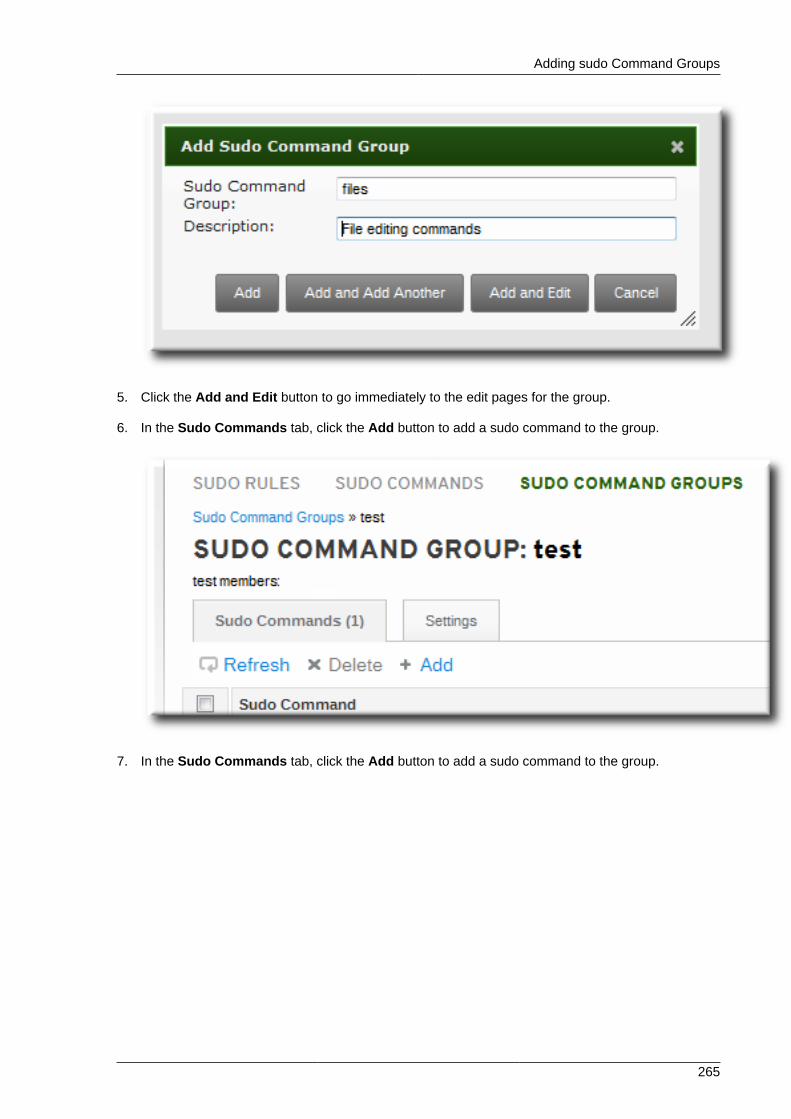
Adding sudo Command Groups
265
5. Click the Add and Edit button to go immediately to the edit pages for the group.
6. In the Sudo Commands tab, click the Add button to add a sudo command to the group.
7. In the Sudo Commands tab, click the Add button to add a sudo command to the group.
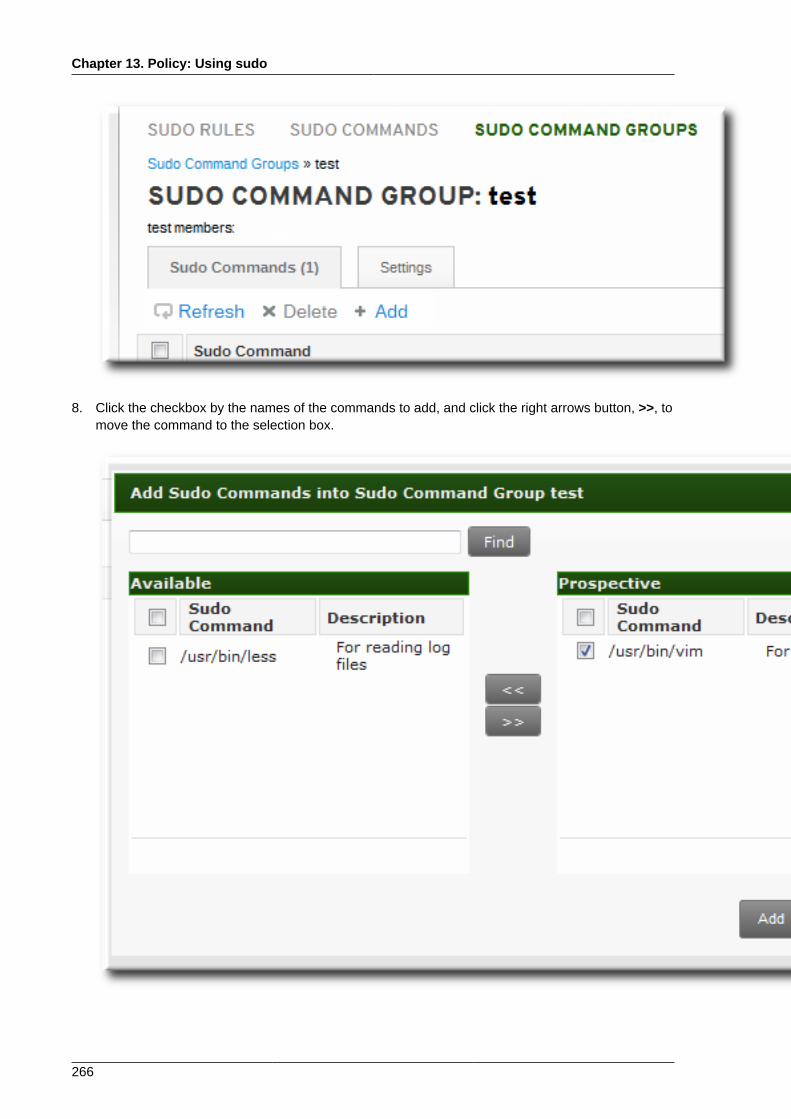
Chapter 13. Policy: Using sudo
266
8. Click the checkbox by the names of the commands to add, and click the right arrows button, >>, tomove the command to the selection box.

Defining sudo Rules
267
9. Click the Add button.
13.2.2.2. Adding sudo Command Groups with the Command LineCreating a command group requires creating two entries, one for the group and one for the commanditself:
1. Create the command group using the sudocmdgroup-add command:
$ ipa sudocmdgroup-add --desc 'File editing commands' files-----------------------------------Added sudo command group "files"----------------------------------- sudo Command Group: files Description: File editing commands
2. Create a command entry using the sudocmd-add command:
$ ipa sudocmd-add --desc 'For editing files' '/usr/bin/vim'----------------------------------Added sudo command "/usr/bin/vim"---------------------------------- sudo Command: /usr/bin/vim Description: For editing files
3. Add the command, using its full directory location as its name, to the command group using thesudocmdgroup-add-member command:
$ ipa sudocmdgroup-add-member --sudocmds '/usr/bin/vim' files sudo Command Group: files Description: File editing commands Member sudo commands: /usr/bin/vim-------------------------Number of members added 1-------------------------
13.3. Defining sudo Rulessudo rules are in a sense similar to access control rules: they define users who are granted access,the commands which are within the scope of the rule, and then the target hosts to which the ruleapplies. In IPA, additional information can be configured in the rule, such as sudoers options and run-as settings, but the basic elements always define who, what (services), and where (hosts).
13.3.1. About External Users and Hostssudo rules define four elements: who can do what, where, and as whom. The who is the regular user,and the as whom is the system or other user identity which the user uses to perform tasks. Thosetasks are system commands that can be run (or specifically not run) on a target machine.
Three of those elements — who, as whom, and where — are identities. They are uses and hosts.Most of the time, those identities are going to be entities within the IPA domain because there willbe overlap between the system users and machines in the environment and the users and hostsbelonging to the IPA domain.
However, that is not necessarily the case with all identities that a sudo policy may realistically cover.For example, sudo rules could be used to grant root access to member of the IT group in IPA, and
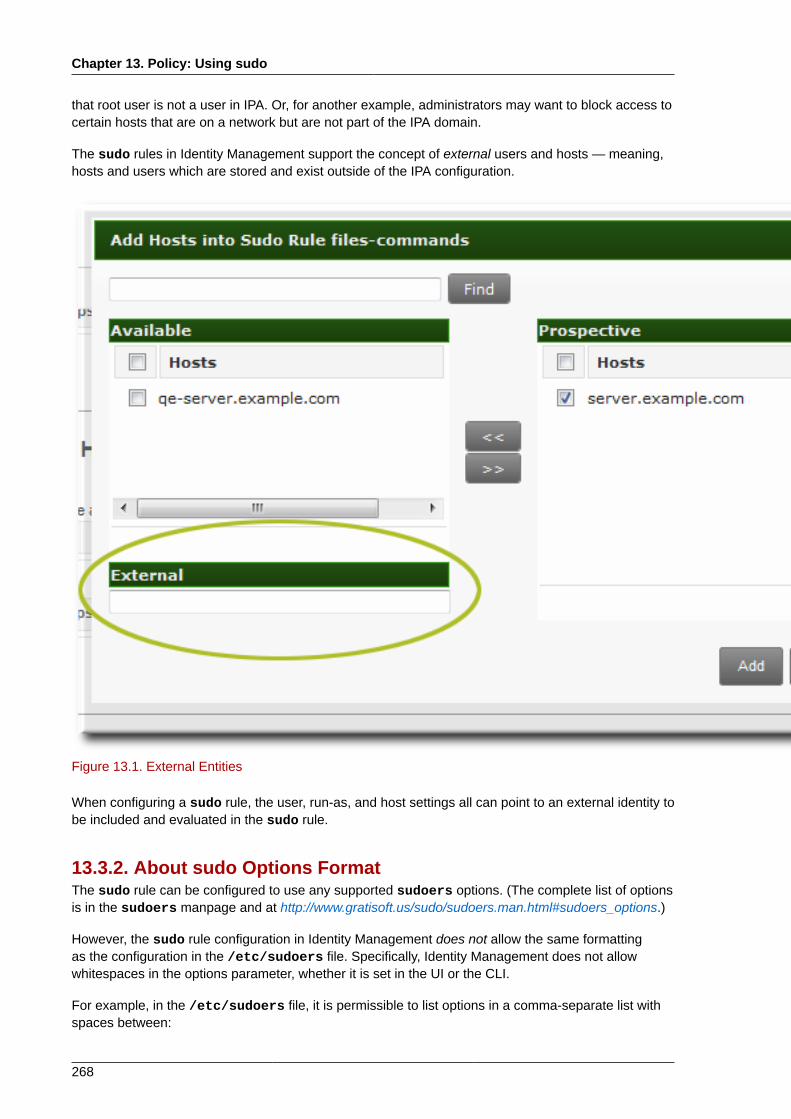
Chapter 13. Policy: Using sudo
268
that root user is not a user in IPA. Or, for another example, administrators may want to block access tocertain hosts that are on a network but are not part of the IPA domain.
The sudo rules in Identity Management support the concept of external users and hosts — meaning,hosts and users which are stored and exist outside of the IPA configuration.
Figure 13.1. External Entities
When configuring a sudo rule, the user, run-as, and host settings all can point to an external identity tobe included and evaluated in the sudo rule.
13.3.2. About sudo Options FormatThe sudo rule can be configured to use any supported sudoers options. (The complete list of optionsis in the sudoers manpage and at http://www.gratisoft.us/sudo/sudoers.man.html#sudoers_options.)
However, the sudo rule configuration in Identity Management does not allow the same formattingas the configuration in the /etc/sudoers file. Specifically, Identity Management does not allowwhitespaces in the options parameter, whether it is set in the UI or the CLI.
For example, in the /etc/sudoers file, it is permissible to list options in a comma-separate list withspaces between:

Defining sudo Rules in the Web UI
269
mail_badpass, mail_no_host, mail_no_perms, syslog = local2
However, in Identity Management, that same configuration would be interpreted as different arguments— including the equals sign (=) since it has spaces around it.
Likewise, linebreaks that are ignored in the /etc/sudoers file are not allowed in the IdentityManagement configuration:
env_keep = "COLORS DISPLAY EDITOR HOSTNAME HISTSIZE INPUTRC KDEDIR LESSSECURE LS_COLORS MAIL PATH PS1 PS2 QTDIR USERNAME LANG LC_ADDRESS LC_CTYPE LC_COLLATE LC_IDENTIFICATION LC_MEASUREMENT LC_MESSAGES LC_MONETARY LC_NAME LC_NUMERIC LC_PAPER LC_TELEPHONE LC_TIME LC_ALL LANGUAGE LINGUAS _XKB_CHARSET XAUTHORITY"
To use multiple sudoers options in Identity Management, configure each one as a separate optionsetting, rather than all on one line, as is allowed in the /etc/sudoers file.
13.3.3. Defining sudo Rules in the Web UI1. Click the Policy tab.
2. Click the Sudo subtab, and then select the Sudo Rules link.
3. Click the Add link at the top of the list of sudo rules.
4. Enter the name for the rule.
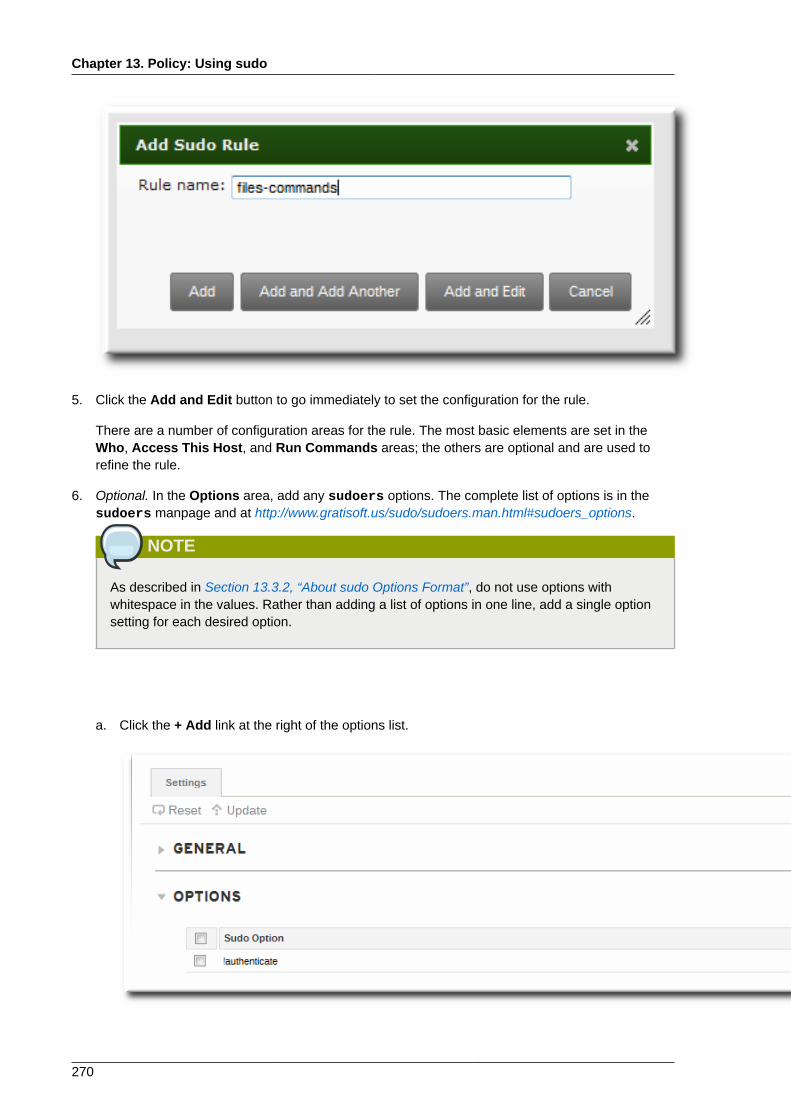
Chapter 13. Policy: Using sudo
270
5. Click the Add and Edit button to go immediately to set the configuration for the rule.
There are a number of configuration areas for the rule. The most basic elements are set in theWho, Access This Host, and Run Commands areas; the others are optional and are used torefine the rule.
6. Optional. In the Options area, add any sudoers options. The complete list of options is in thesudoers manpage and at http://www.gratisoft.us/sudo/sudoers.man.html#sudoers_options.
NOTE
As described in Section 13.3.2, “About sudo Options Format”, do not use options withwhitespace in the values. Rather than adding a list of options in one line, add a single optionsetting for each desired option.
a. Click the + Add link at the right of the options list.
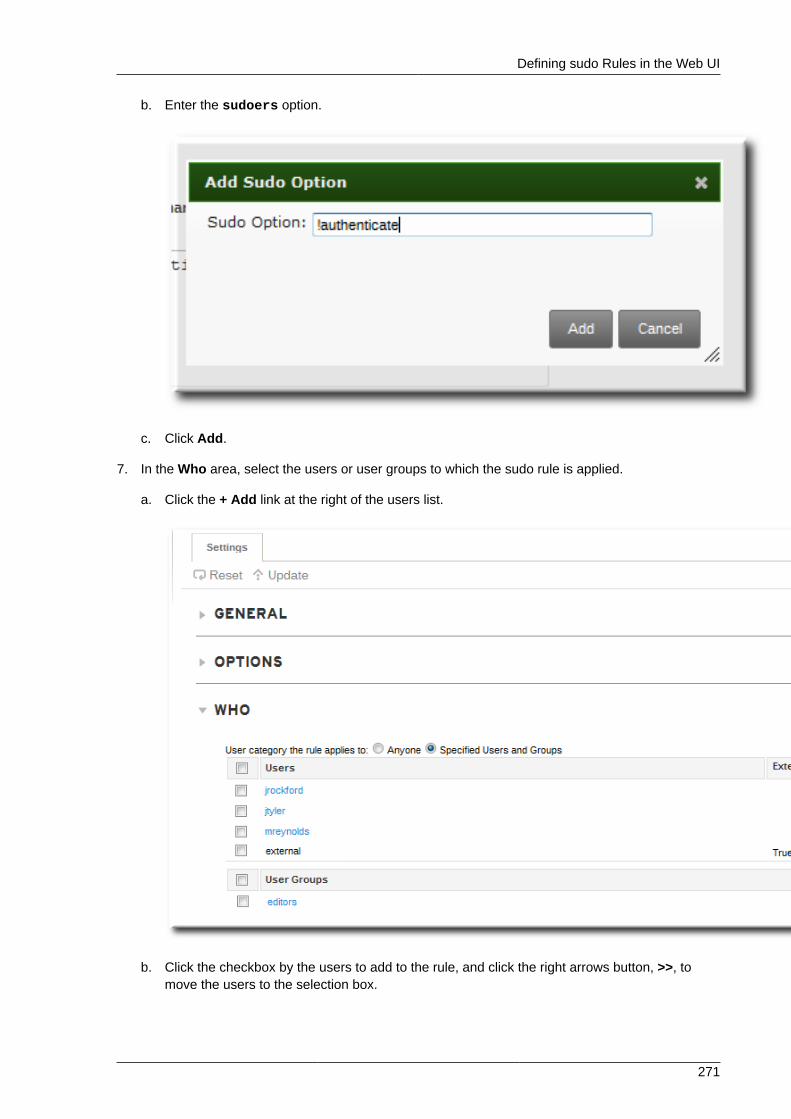
Defining sudo Rules in the Web UI
271
b. Enter the sudoers option.
c. Click Add.
7. In the Who area, select the users or user groups to which the sudo rule is applied.
a. Click the + Add link at the right of the users list.
b. Click the checkbox by the users to add to the rule, and click the right arrows button, >>, tomove the users to the selection box.
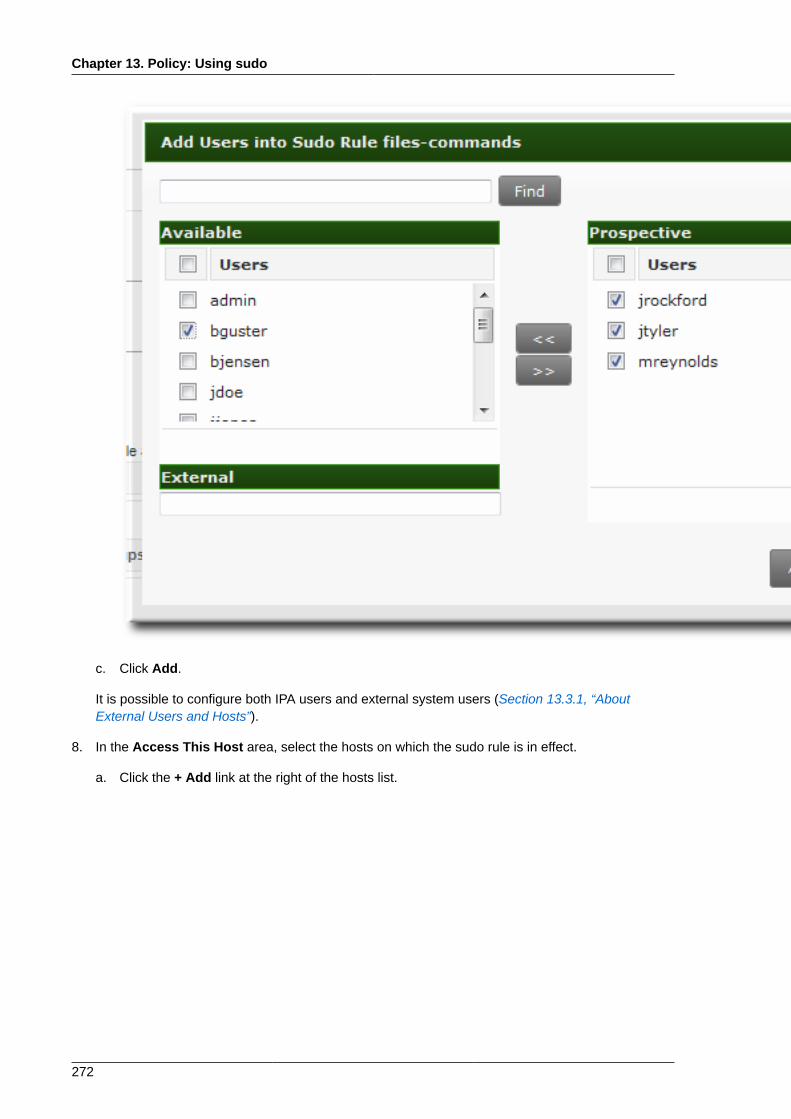
Chapter 13. Policy: Using sudo
272
c. Click Add.
It is possible to configure both IPA users and external system users (Section 13.3.1, “AboutExternal Users and Hosts”).
8. In the Access This Host area, select the hosts on which the sudo rule is in effect.
a. Click the + Add link at the right of the hosts list.

Defining sudo Rules in the Web UI
273
b. Click the checkbox by the hosts to include with the rule, and click the right arrows button, >>,to move the hosts to the selection box.
c. Click Add.

Chapter 13. Policy: Using sudo
274
It is possible to configure both IPA clients and external hosts (Section 13.3.1, “About ExternalUsers and Hosts”).
9. In the Run Commands area, select the commands which are included in the sudo rule. Thesudo rule can grant access or deny access to commands, and it can grant allow access to onecommand and also deny access to another.
a. In the Allow/Deny area, click the + Add link at the right of the commands list.
b. Click the checkbox by the commands or command groups to include with the rule, and clickthe right arrows button, >>, to move the commands to the selection box.
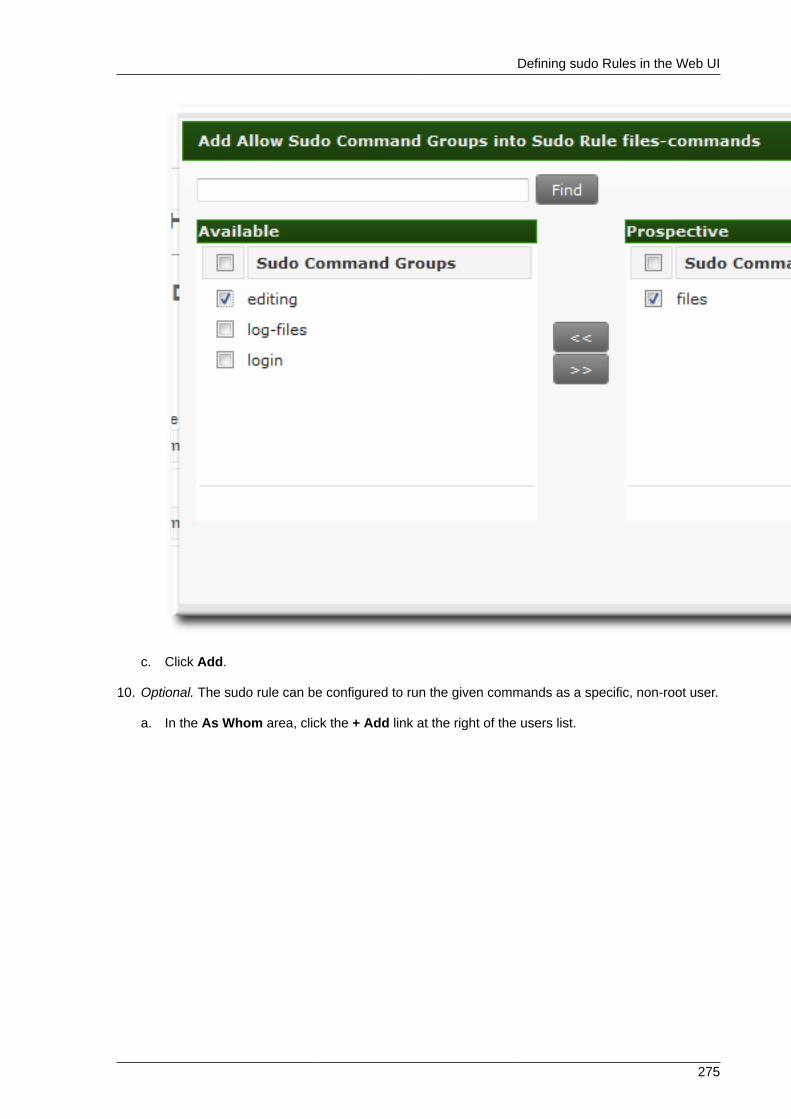
Defining sudo Rules in the Web UI
275
c. Click Add.
10. Optional. The sudo rule can be configured to run the given commands as a specific, non-root user.
a. In the As Whom area, click the + Add link at the right of the users list.
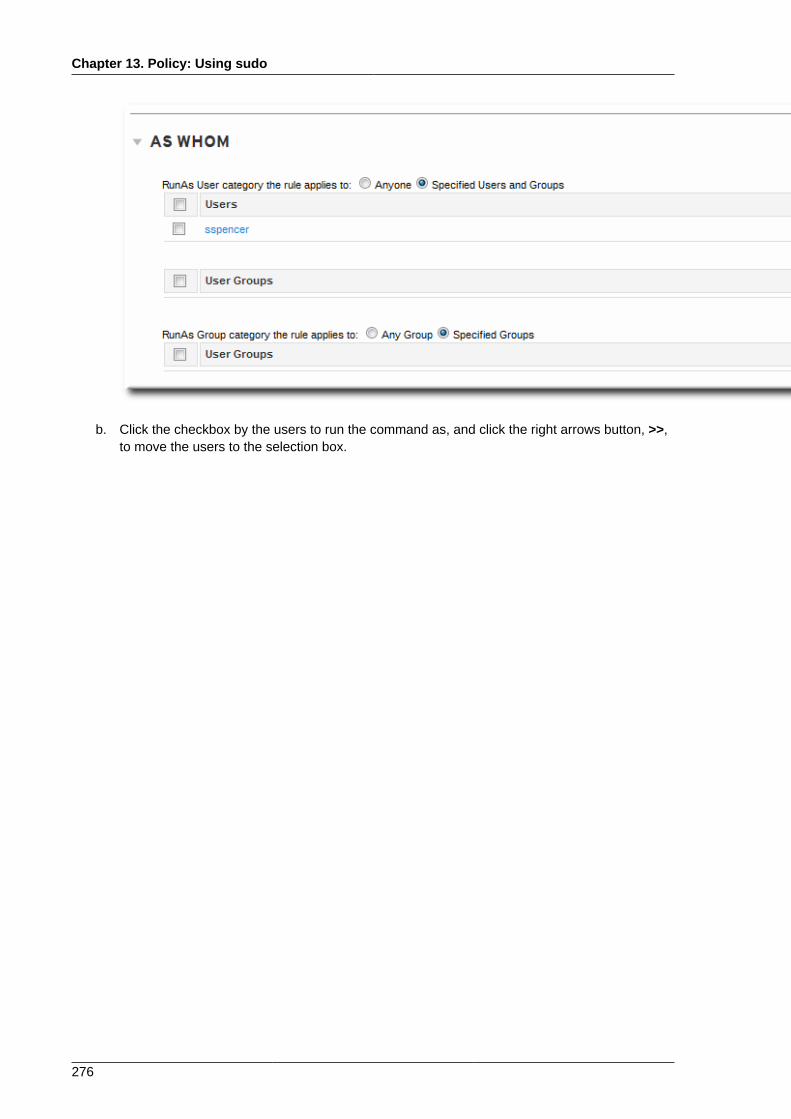
Chapter 13. Policy: Using sudo
276
b. Click the checkbox by the users to run the command as, and click the right arrows button, >>,to move the users to the selection box.
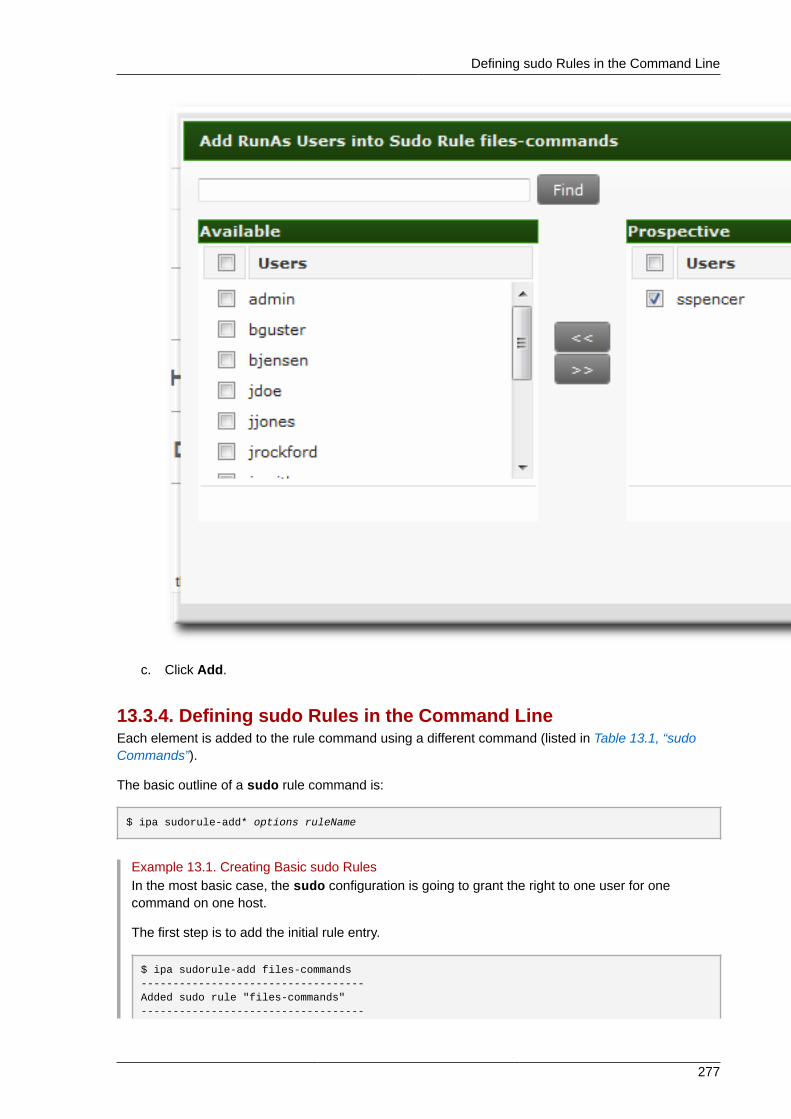
Defining sudo Rules in the Command Line
277
c. Click Add.
13.3.4. Defining sudo Rules in the Command LineEach element is added to the rule command using a different command (listed in Table 13.1, “sudoCommands”).
The basic outline of a sudo rule command is:
$ ipa sudorule-add* options ruleName
Example 13.1. Creating Basic sudo RulesIn the most basic case, the sudo configuration is going to grant the right to one user for onecommand on one host.
The first step is to add the initial rule entry.
$ ipa sudorule-add files-commands-----------------------------------Added sudo rule "files-commands"-----------------------------------

Chapter 13. Policy: Using sudo
278
Rule name: files-commands Enabled: TRUE
Next, add the commands to grant access to. This can be a single command, using --sudocmd, ora group of commands, using --sudocmdgroups.
$ ipa sudorule-add-allow-command --sudocmd "/usr/bin/vim" files-commands Rule name: files-commands Enabled: TRUE sudo Commands: /usr/bin/vim-------------------------Number of members added 1-------------------------
Add a host or a host group to the rule.
$ ipa sudorule-add-host --host server.example.com files-commands Rule name: files-commands Enabled: TRUE Hosts: server.example.com sudo Commands: /usr/bin/vim-------------------------Number of members added 1-------------------------
Last, add the user or group to the rule. This is the user who is allowed to use sudo as defined in therule; if no "run-as" user is given, then this user will run the sudo commands as root.
$ ipa sudorule-add-user --user jsmith files-commands Rule name: files-commands Enabled: TRUE Users: jsmith Hosts: server.example.com sudo Commands: /usr/bin/vim"-------------------------Number of members added 1-------------------------
Example 13.2. Allowing and Denying CommandsThe sudo rule can grant access or deny access to commands. For example, this rule would allowread access to files but prevent editing:
$ ipa sudorule-add-allow-command --sudocmd "/usr/bin/less" readfiles$ ipa sudorule-add-allow-command --sudocmd "/usr/bin/tail" readfiles$ ipa sudorule-add-deny-command --sudocmd "/usr/bin/vim" readfiles
Example 13.3. Using sudoers OptionsThe sudoers file has a lot of potential flags that can be set to control the behavior of sudo users,like requiring (or not requiring) passwords to offer a user to authenticate to sudo or using fully-qualified domain names in the sudoers file. The complete list of options is in the sudoersmanpage and at http://www.gratisoft.us/sudo/sudoers.man.html#sudoers_options.
Any of these options can be set for the IPA sudo rule using the sudorule-add-optioncommand. When the command is run, it prompts for the option to add:
$ ipa sudorule-add-option readfiles

Defining sudo Rules in the Command Line
279
Sudo Option: !authenticate-----------------------------------------------------Added option "!authenticate" to Sudo rule "readfiles"-----------------------------------------------------
NOTE
As described in Section 13.3.2, “About sudo Options Format”, do not use options with whitespacein the values. Rather than adding a list of options in one line, add a single option setting for eachdesired option.
Example 13.4. Running as Other UsersThe sudo rule also has the option of specifying a non-root user or group to run the commands as.The initial rule has the user or group specified using the --sudorule-add-runasuser or --sudorule-add-runasgroup command, respectively.
$ ipa sudorule-add-runasuser --users=jsmith readfiles$ ipa sudorule-add-runasgroup --groups=ITadmins readfiles
When creating a rule, the sudorule-add-runasuser or sudorule-add-runasgroupcommand can only set specific users or groups. However, when editing a rule, it is possible to runsudo as all users or all groups by using the --runasusercat or --runasgroupcat option. Forexample:
$ ipa sudorule-mod --runasgroupcat=all ruleName
NOTE
The --sudorule-add-runasuser and --sudorule-add-runasgroup commands do notsupport an all option, only specific user or group names. Specifying all users or all groups canonly be used with options with the sudorule-mod command.
Example 13.5. Referencing External Users or HostsThe "who" in a sudo rule can be an IPA user, but there are many logical and useful rules whereone of the referents is a system user. Similarly, a rule may need to grant or deny access to a hostmachine on the network which is not an IPA client.
In those cases, the sudo policy can refer to an external user or host — an identity created andstored outside of IPA (Section 13.3.1, “About External Users and Hosts”).
There are three options to add an external identity to a sudo rule:
• --externaluser
• --runasexternaluser
• --externalhost
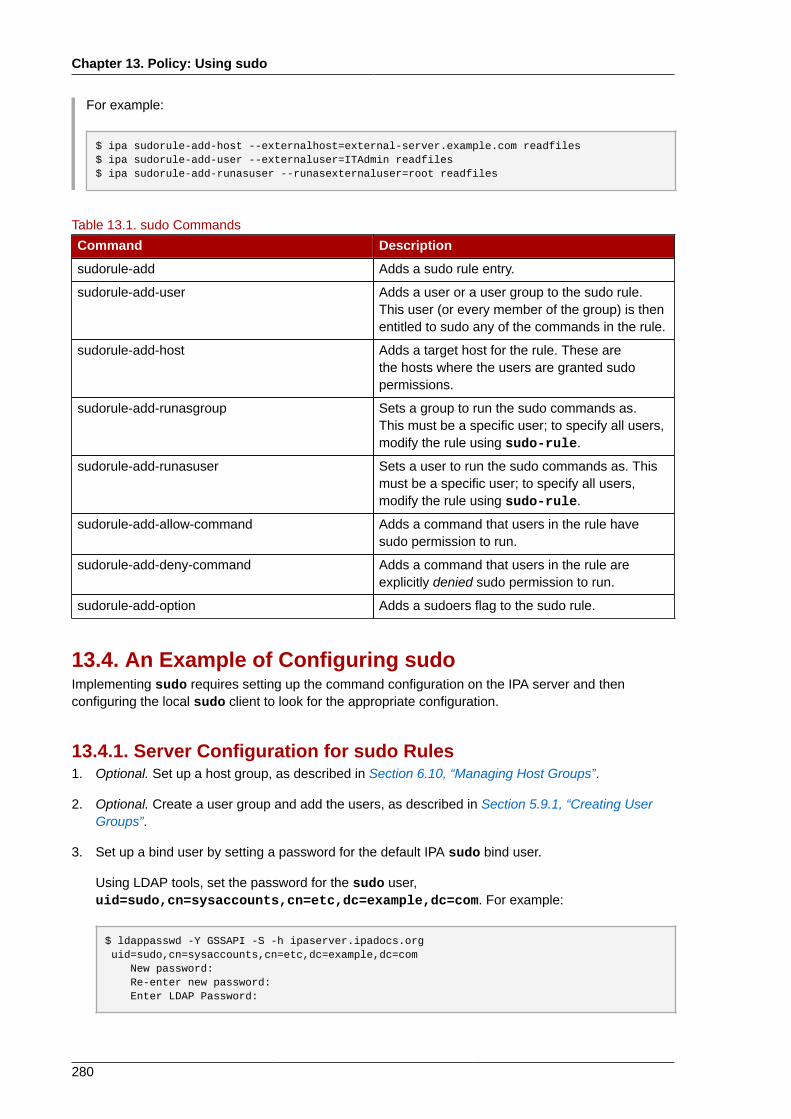
Chapter 13. Policy: Using sudo
280
For example:
$ ipa sudorule-add-host --externalhost=external-server.example.com readfiles$ ipa sudorule-add-user --externaluser=ITAdmin readfiles$ ipa sudorule-add-runasuser --runasexternaluser=root readfiles
Table 13.1. sudo Commands
Command Description
sudorule-add Adds a sudo rule entry.
sudorule-add-user Adds a user or a user group to the sudo rule.This user (or every member of the group) is thenentitled to sudo any of the commands in the rule.
sudorule-add-host Adds a target host for the rule. These arethe hosts where the users are granted sudopermissions.
sudorule-add-runasgroup Sets a group to run the sudo commands as.This must be a specific user; to specify all users,modify the rule using sudo-rule.
sudorule-add-runasuser Sets a user to run the sudo commands as. Thismust be a specific user; to specify all users,modify the rule using sudo-rule.
sudorule-add-allow-command Adds a command that users in the rule havesudo permission to run.
sudorule-add-deny-command Adds a command that users in the rule areexplicitly denied sudo permission to run.
sudorule-add-option Adds a sudoers flag to the sudo rule.
13.4. An Example of Configuring sudoImplementing sudo requires setting up the command configuration on the IPA server and thenconfiguring the local sudo client to look for the appropriate configuration.
13.4.1. Server Configuration for sudo Rules1. Optional. Set up a host group, as described in Section 6.10, “Managing Host Groups”.
2. Optional. Create a user group and add the users, as described in Section 5.9.1, “Creating UserGroups”.
3. Set up a bind user by setting a password for the default IPA sudo bind user.
Using LDAP tools, set the password for the sudo user,uid=sudo,cn=sysaccounts,cn=etc,dc=example,dc=com. For example:
$ ldappasswd -Y GSSAPI -S -h ipaserver.ipadocs.org uid=sudo,cn=sysaccounts,cn=etc,dc=example,dc=com New password: Re-enter new password: Enter LDAP Password:
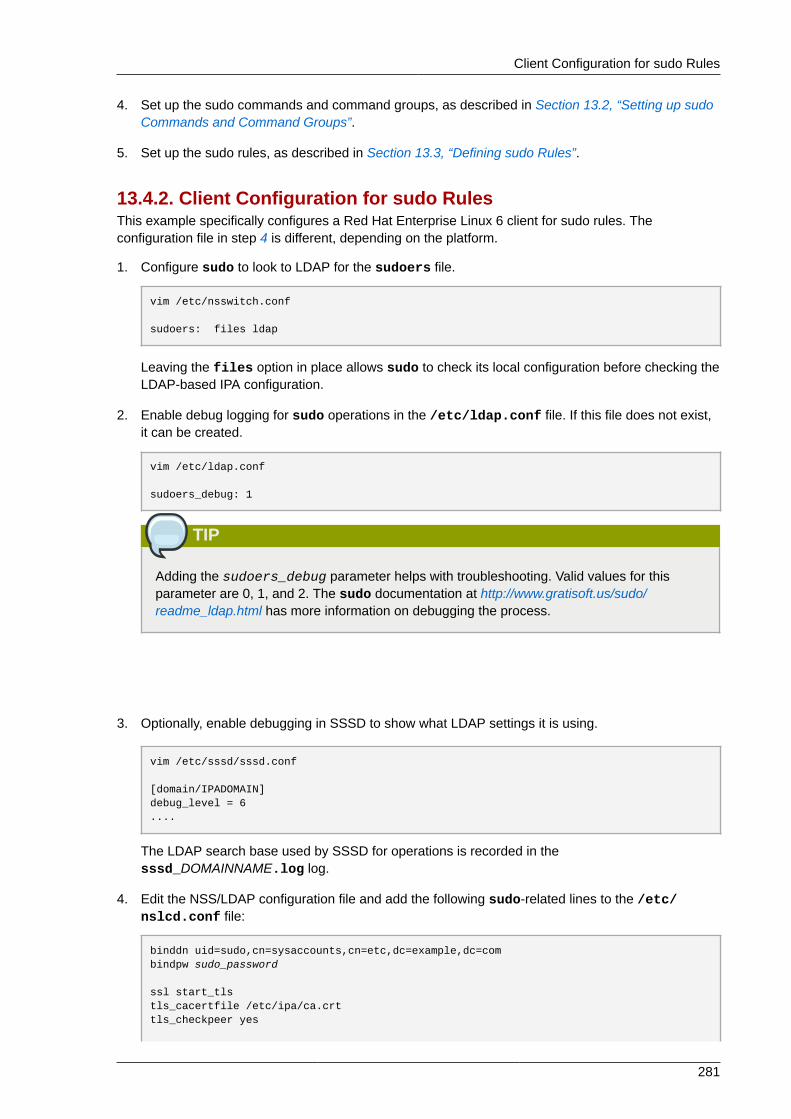
Client Configuration for sudo Rules
281
4. Set up the sudo commands and command groups, as described in Section 13.2, “Setting up sudoCommands and Command Groups”.
5. Set up the sudo rules, as described in Section 13.3, “Defining sudo Rules”.
13.4.2. Client Configuration for sudo RulesThis example specifically configures a Red Hat Enterprise Linux 6 client for sudo rules. Theconfiguration file in step 4 is different, depending on the platform.
1. Configure sudo to look to LDAP for the sudoers file.
vim /etc/nsswitch.conf
sudoers: files ldap
Leaving the files option in place allows sudo to check its local configuration before checking theLDAP-based IPA configuration.
2. Enable debug logging for sudo operations in the /etc/ldap.conf file. If this file does not exist,it can be created.
vim /etc/ldap.conf
sudoers_debug: 1
TIP
Adding the sudoers_debug parameter helps with troubleshooting. Valid values for thisparameter are 0, 1, and 2. The sudo documentation at http://www.gratisoft.us/sudo/readme_ldap.html has more information on debugging the process.
3. Optionally, enable debugging in SSSD to show what LDAP settings it is using.
vim /etc/sssd/sssd.conf
[domain/IPADOMAIN]debug_level = 6....
The LDAP search base used by SSSD for operations is recorded in thesssd_DOMAINNAME.log log.
4. Edit the NSS/LDAP configuration file and add the following sudo-related lines to the /etc/nslcd.conf file:
binddn uid=sudo,cn=sysaccounts,cn=etc,dc=example,dc=combindpw sudo_password
ssl start_tlstls_cacertfile /etc/ipa/ca.crttls_checkpeer yes

Chapter 13. Policy: Using sudo
282
bind_timelimit 5timelimit 15
uri ldap://ipaserver.example.com ldap://backup.example.com:3890sudoers_base ou=SUDOers,dc=example,dc=com
Multiple LDAP servers can be configured in a space-separated list, and other options (like SSLand non-standard ports) can be used with the LDAP URL. The sudo LDAP configuration iscovered in the sudo manpages, http://www.sudo.ws/sudo/man/1.8.2/sudoers.ldap.man.html.
IMPORTANT
The uri directive must give the fully-qualified domain name of the LDAP server, not an IPaddress. Otherwise, sudo fails to connect to the LDAP server.
NOTE
The /etc/nslcd.conf file is created by the nss-pam-ldapd package. However, if nss-pam-ldapd is not installed, then the /etc/nslcd.conf file can be created manually and thesudo configuration works fine.
5. Set a name for the NIS domain in the sudo configuration. sudo uses NIS netgroups, so the NISdomain name must be set in the system configuration for sudo to be able to find the host groupsused in the IPA sudo configuration.a. Open the /etc/rc.d/rc.local file. Setting the NIS domain name in this file allows the
value to persist between reboots.
# vim /etc/rc.d/rc.local
b. Add the command to set the NIS domain name.
nisdomainname example.com
IMPORTANT
Even though sudo uses NIS-style netgroups, it is not necessary to have a NIS serverinstalled. Netgroups require that a NIS domain be named in their configuration, so sudorequires that a NIS domain be named for netgroups. However, that NIS domain does notactually need to exist.

Chapter 14.
283
Policy: Configuring Host-Based AccessControlIPA can control access to both machines and the services on those machines within the IPA domain.The rules define who can access what within the domain, not the level of access (which are defined bysystem or application settings). These access control rules grant access, with all other users and hostsimplicitly denied.
This is called host-based access control because the rule defines what hosts (source) are allowed toaccess other hosts (targets) within the domain. This access can be further broken down to users andservices.
NOTE
Using host-based access control requires SSSD to be installed and configured on the IPA clientmachine.
14.1. About Host-Based Access ControlHost-based access control rules (which are described in Chapter 14, Policy: Configuring Host-BasedAccess Control) can be applied to individual hosts. However, using host groups allows centralized, andpotentially simplified, access control management because an access control rule only needs to bedefined once and then it is applied immediately and consistently to all the hosts within the group.
Figure 14.1. Host Groups and Host-Based Access Control

Chapter 14. Policy: Configuring Host-Based Access Control
284
NOTE
While access must be explicitly granted to users and hosts within the IPA domain, IPA servers areconfigured by default with an allow all access control rule which allows access for every hostwithin the domain to every host within the domain.
To create an IPA server without the default allow all rule, run ipa-server-install withthe --no_hbac_allow option.
The rule first defines things that can be accessed, and there are two types of entities:
• Hosts, or target hosts, within the IPA domain.
• Services on the target hosts. Multiple services can be combined into service groups. The servicegroup can be modified without having to edit the access control rule itself.
The rule also sets who can have access (the IPA domain user) and what they can use to access thetargets (the source host).
TIP
It is possible to use categories for users, source hosts, and target hosts instead of adding eachone individually to the access control rule. The only supported category is all.
The entities in host-based access control rules follow the Kerberos principal entries: users, hosts(machines), and services. Users, source hosts, and target hosts can be added directly to host-basedaccess control rules. However, services must be flagged first and then added to the access controlrules.
14.2. Creating Host-Based Access Control Entries forServices and Service GroupsAny PAM service can be identified as to the host-based access control (HBAC) system in IPA.The service entries used in host-based access control are separate from adding a service to theIPA domain. Adding a service to the domain makes it a recognized resource which is available toother resources. Adding a domain resource to the host-based access control configuration allowsadministrators to exert defined control over what domain users and what domain clients can accessthat service.
Some common services are already configured as HBAC services, so they can be used in host-basedaccess control rules. Additional services can be added, and services can be added into service groupsfor simpler management.
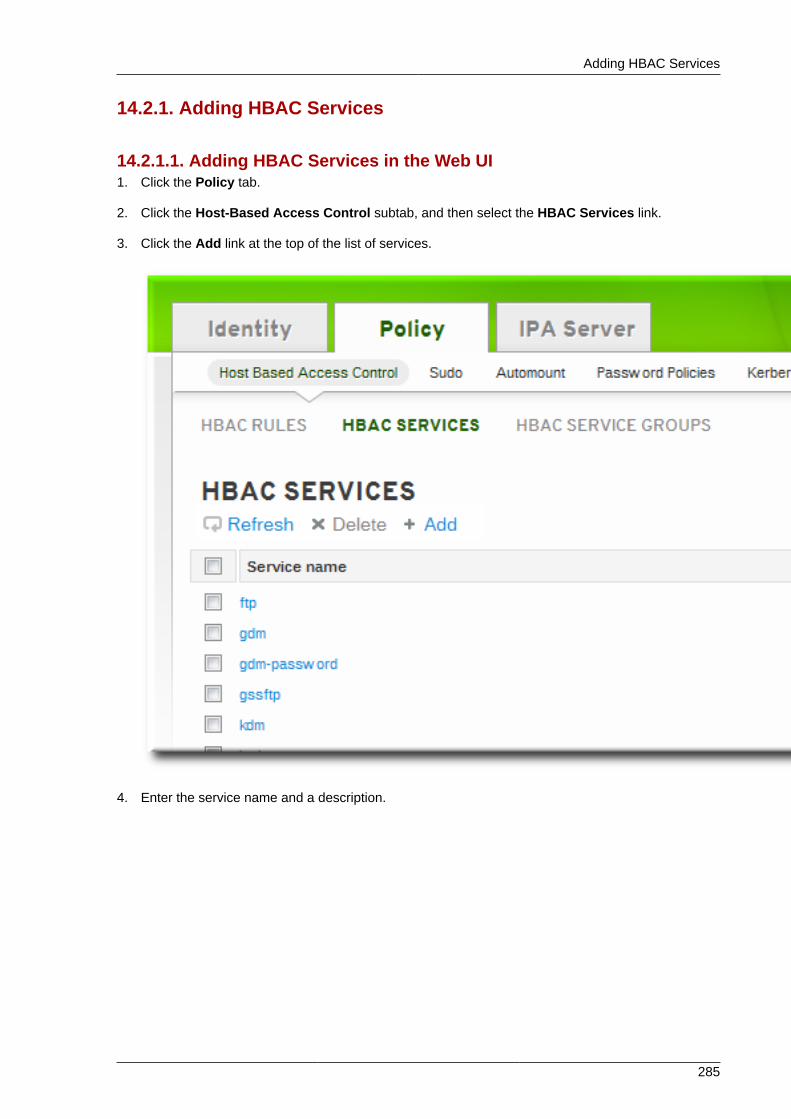
Adding HBAC Services
285
14.2.1. Adding HBAC Services
14.2.1.1. Adding HBAC Services in the Web UI1. Click the Policy tab.
2. Click the Host-Based Access Control subtab, and then select the HBAC Services link.
3. Click the Add link at the top of the list of services.
4. Enter the service name and a description.

Chapter 14. Policy: Configuring Host-Based Access Control
286
5. Click the Add button to save the new service.
6. If a service group already exists, then add the service to the desired group, as described inSection 14.2.2.1, “Adding Service Groups in the Web UI”.
14.2.1.2. Adding Services in the Command LineThe service is added to the access control system using the hbacsvc-add command, specifying theservice by the name that PAM uses to evaluate the service.
For example, this adds the tftp service:
# ipa hbacsvc-add --desc="TFTP service" tftp-------------------------Added HBAC service "tftp"-------------------------
If a service group already exists, then the service can be added to the group using thehbacsvcgroup-add-member command, as in Section 14.2.2.2, “Adding Service Groups in theCommand Line”.
14.2.2. Adding Service GroupsOnce the individual service is added, it can be added to the access control rule. However, if there alarge number of services, then it can require frequent updates to the access control rules as serviceschange. Identity Management also allows groups of services to added to access control rules. Thismakes it much easier to manage access control, because the members of the service group can bechanged without having to edit the rule itself.
14.2.2.1. Adding Service Groups in the Web UI1. Click the Policy tab.
2. Click the Host-Based Access Control subtab, and then select the HBAC Service Groups link.
3. Click the Add link at the top of the list of service groups.

Adding Service Groups
287
4. Enter the service group name and a description.
5. Click the Add and Edit button to go immediately to the service configuration page.
6. At the top of the HBAC Services tab, click the Add link.

Chapter 14. Policy: Configuring Host-Based Access Control
288
7. Click the checkbox by the names of the services to add, and click the right arrows button, >>, tomove the command to the selection box.
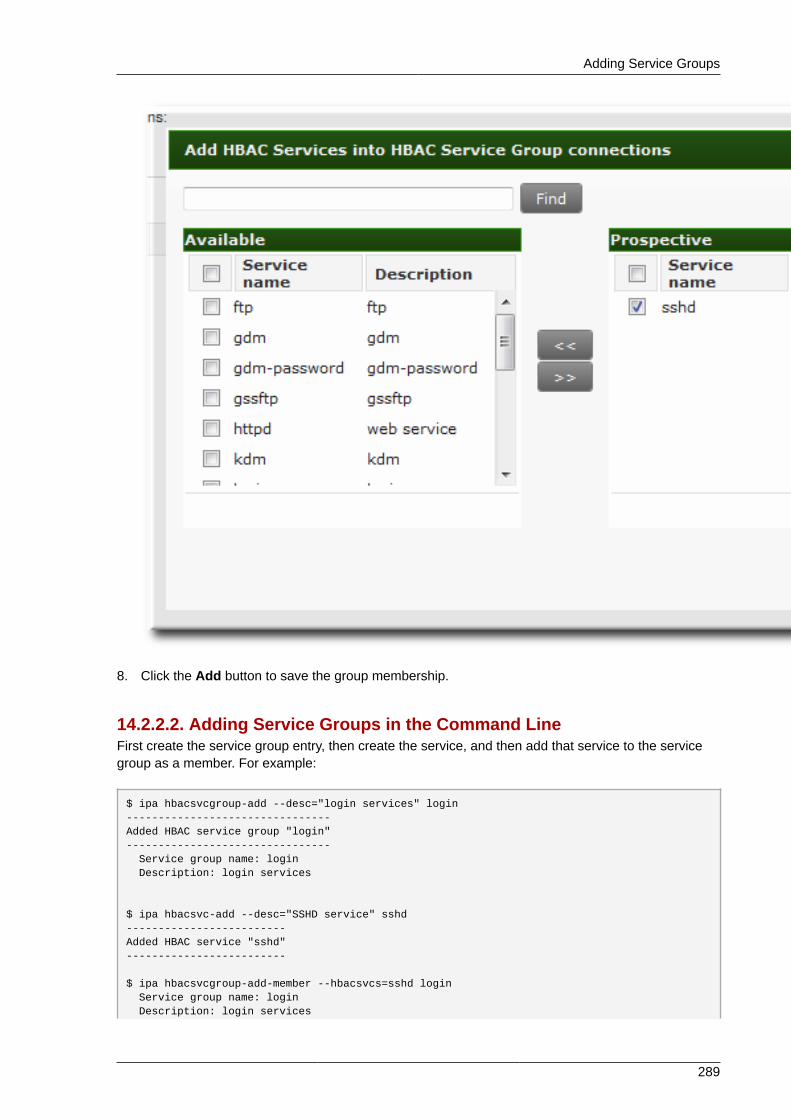
Adding Service Groups
289
8. Click the Add button to save the group membership.
14.2.2.2. Adding Service Groups in the Command LineFirst create the service group entry, then create the service, and then add that service to the servicegroup as a member. For example:
$ ipa hbacsvcgroup-add --desc="login services" login--------------------------------Added HBAC service group "login"-------------------------------- Service group name: login Description: login services
$ ipa hbacsvc-add --desc="SSHD service" sshd-------------------------Added HBAC service "sshd"-------------------------
$ ipa hbacsvcgroup-add-member --hbacsvcs=sshd login Service group name: login Description: login services

Chapter 14. Policy: Configuring Host-Based Access Control
290
-------------------------Number of members added 1-------------------------
NOTE
IPA defines two default service groups: SUDO for sudo services and FTP for services whichprovide FTP access.
14.3. Defining Host-Based Access Control RulesAccess controls, at a high level, define who has access to what. The who can be either a user or ahost (the source host), and the what can be either a host (target host), service, or service group, or acombination of the three.
14.3.1. Setting Host-Based Access Control Rules in the Web UI1. Click the Policy tab.
2. Click the Host-Based Access Control subtab, and then select the HBAC Rules link.
3. Click the Add link at the top of the list of host-based access control rules.
4. Enter the name for the rule.
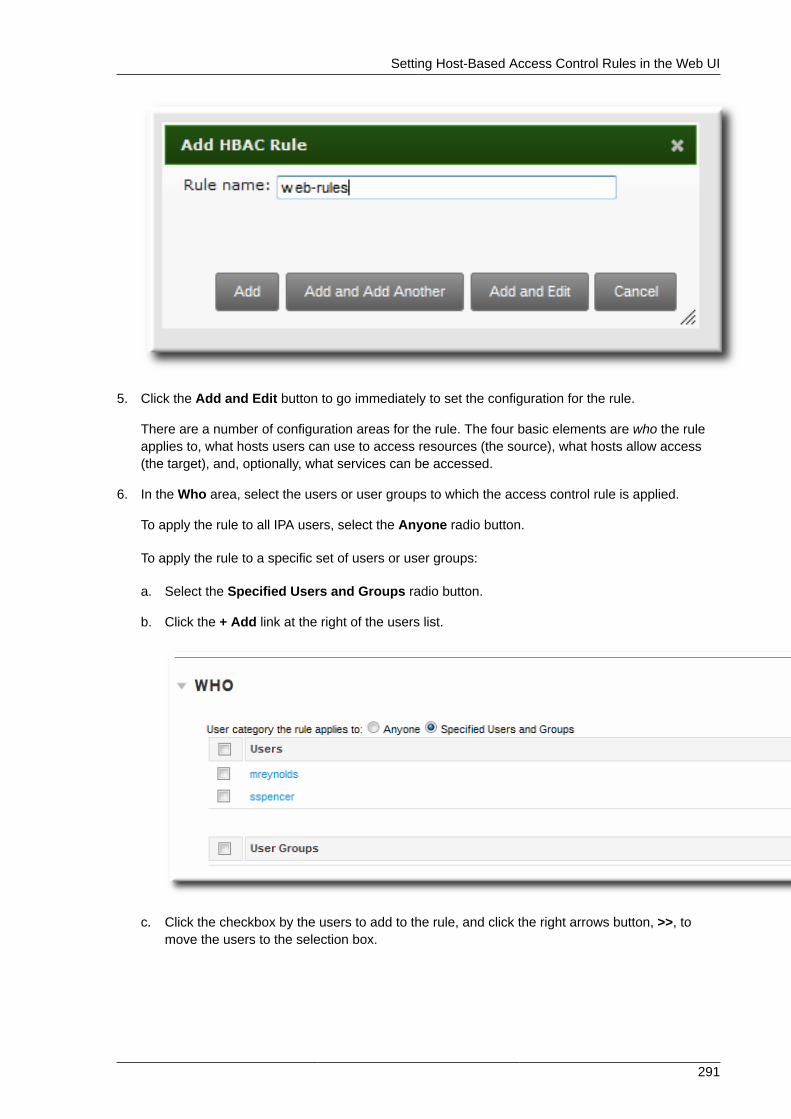
Setting Host-Based Access Control Rules in the Web UI
291
5. Click the Add and Edit button to go immediately to set the configuration for the rule.
There are a number of configuration areas for the rule. The four basic elements are who the ruleapplies to, what hosts users can use to access resources (the source), what hosts allow access(the target), and, optionally, what services can be accessed.
6. In the Who area, select the users or user groups to which the access control rule is applied.
To apply the rule to all IPA users, select the Anyone radio button.
To apply the rule to a specific set of users or user groups:
a. Select the Specified Users and Groups radio button.
b. Click the + Add link at the right of the users list.
c. Click the checkbox by the users to add to the rule, and click the right arrows button, >>, tomove the users to the selection box.
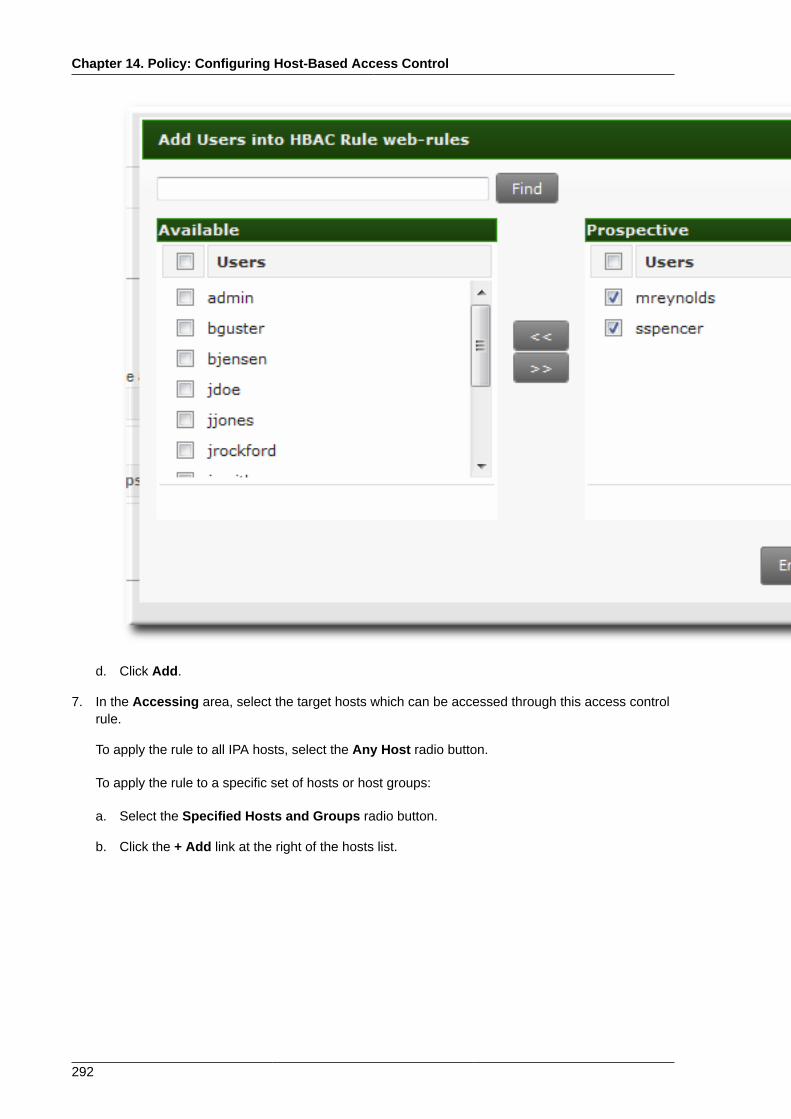
Chapter 14. Policy: Configuring Host-Based Access Control
292
d. Click Add.
7. In the Accessing area, select the target hosts which can be accessed through this access controlrule.
To apply the rule to all IPA hosts, select the Any Host radio button.
To apply the rule to a specific set of hosts or host groups:
a. Select the Specified Hosts and Groups radio button.
b. Click the + Add link at the right of the hosts list.

Setting Host-Based Access Control Rules in the Web UI
293
c. Click the checkbox by the hosts to include with the rule, and click the right arrows button, >>,to move the hosts to the selection box.
d. Click Add.
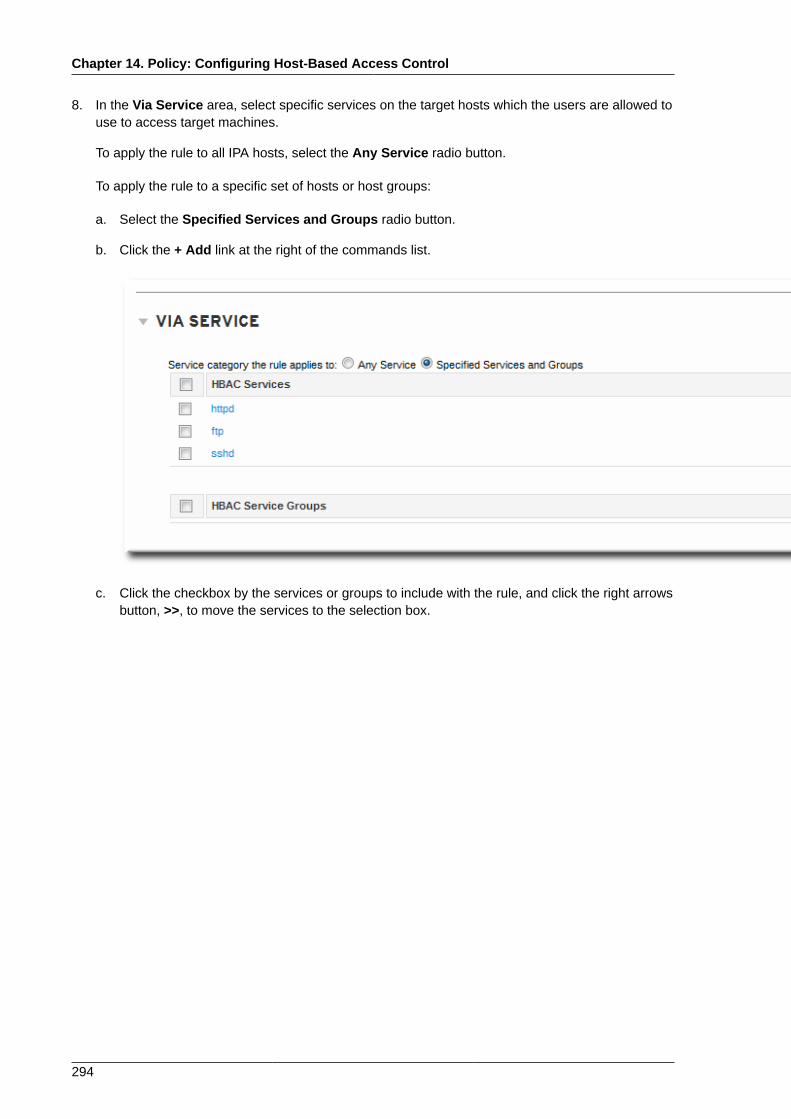
Chapter 14. Policy: Configuring Host-Based Access Control
294
8. In the Via Service area, select specific services on the target hosts which the users are allowed touse to access target machines.
To apply the rule to all IPA hosts, select the Any Service radio button.
To apply the rule to a specific set of hosts or host groups:
a. Select the Specified Services and Groups radio button.
b. Click the + Add link at the right of the commands list.
c. Click the checkbox by the services or groups to include with the rule, and click the right arrowsbutton, >>, to move the services to the selection box.

Setting Host-Based Access Control Rules in the Web UI
295
d. Click Add.
9. In the From area, select the source hosts, from which users can access the target hosts.
To apply the rule to all IPA hosts, select the Any Host radio button.
To apply the rule to a specific set of hosts or host groups:
a. Select the Specified Hosts and Groups radio button.
b. Click the + Add link at the right of the hosts list.
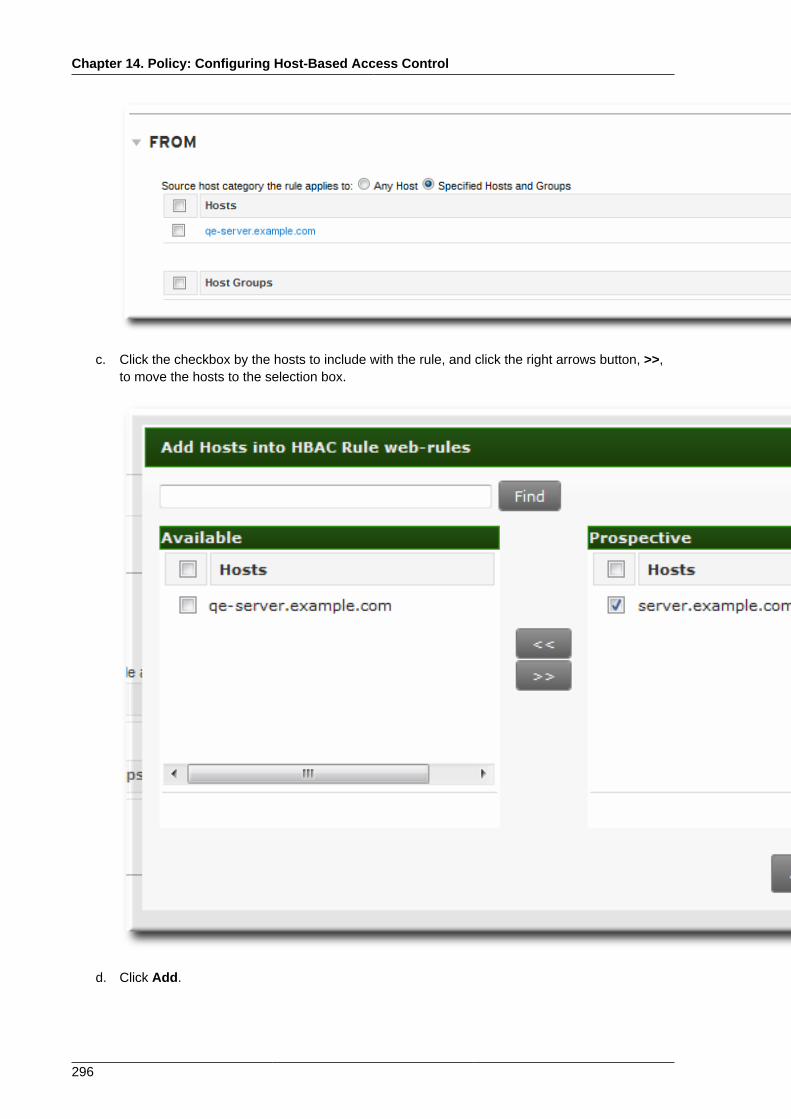
Chapter 14. Policy: Configuring Host-Based Access Control
296
c. Click the checkbox by the hosts to include with the rule, and click the right arrows button, >>,to move the hosts to the selection box.
d. Click Add.

Setting Host-Based Access Control Rules in the Command Line
297
14.3.2. Setting Host-Based Access Control Rules in the CommandLineAccess control rules are created using the hbacrule-* commands (listed in Table 14.1, “Host-BasedAccess Control Command and Options”). The first step is to create a container entry; from there,users, hosts, and services can be added to the access control entry.
The basic outline of all the access control commands is:
$ ipa hbacrule-add* options ruleName
TIP
To set every user, every host as a source host, or every host as a target, use the categoryoptions, such as --usercat=all.
Example 14.1. Granting All Access to One HostOne simple rule is to grant every user and every source host access to a single server. The firstcommand creates the entry and uses the category options to apply every user and every host as asource host.
$ ipa hbacrule-add --usercat=all --srchostcat=all allGroup--------------------------Added HBAC rule "allGroup"-------------------------- Rule name: allGroup User category: all Source host category: all Enabled: TRUE
The second rule adds the target host, using the hbacrule-add-host command:
$ ipa hbacrule-add-host --hosts=server.example.com allGroup Rule name: allGroup User category: all Source host category: all Enabled: TRUE Successful hosts/hostgroups: member host: server.example.com-------------------------Number of members added 1-------------------------
Example 14.2. Adding Control for a Single User to a ServiceAnother access control method is to specify which services users are allowed to use to access thetarget hosts.
First, for the user to have access to every machine, every host must be added as both a host andtarget. This can be done using the category options:
$ ipa hbacrule-add --hostcat=all --srchostcat=all sshd-jsmith

Chapter 14. Policy: Configuring Host-Based Access Control
298
Since the access control rule applies to a specific user, the user is added to the rule using thehbacrule-add-user command:
$ ipa hbacrule-add-user --users=jsmith sshd-jsmith
Then, the service is added to the access control rule. (The service should have already been addedto the access control system using the hbacsvc-add command.) This is the service that the usercan use to connect to the machine.
$ ipa hbacrule-add-service --hbacsvcs=sshd sshd-jsmith
Example 14.3. Adding a Service Group to the RuleWhile a single service can be added to a rule, it is also possible to add an entire service group.Like a single service, this uses the hbacrule-add-service command, only with the --hbacsvcgroups option that specifies the group name.
$ ipa hbacrule-add-service --hbacsvcgroups=login loginRule
Table 14.1. Host-Based Access Control Command and Options
Command Description Arguments Source or TargetEntry
hbacrule-add Adds a new host-basedaccess control rule.
• --usercat=all, whichapplies the rule toevery user
• --hostcat=all, whichsets every host as anallowed target server
• --srchostcat=all,which sets everyhost as an allowedsource server
• --servicecat=all,which sets everyconfigured serviceas an allowed targetservice
• ruleName, which isthe required uniqueidentifier for the newrule
hbacrule-add-host Adds a target hostto the access controlrule. A target host canbe accessed by otherservers and users inthe domain.
• --hosts, whichadds an individualserver or command-separated list ofservers as anallowed target server
Target

Setting Host-Based Access Control Rules in the Command Line
299
Command Description Arguments Source or TargetEntry
• --hostgroups, whichadds a host groupto the rule and everyhost within the hostgroup is an allowedtarget server
• ruleName, which isthe rule to which toadd the target server
hbacrule-add-service Adds a service type tothe rule.
• --hbacsvcs, whichadds an individualservice type or acomma-separatedlist of service typeas an allowed targetservice
• --hbacsvcgroups,which adds a servicegroup to the rule andevery service withinthe service groupis an allowed targetservice
• ruleName, whichis the rule to whichto add the targetservice
Target
hbacrule-add-sourcehost
Adds a server to the listof servers that can beused to access domainservices and targetservers.
• --hosts, whichadds an individualserver or command-separated list ofservers as anallowed sourceserver
• --hostgroups, whichadds a host groupto the rule and everyhost within the hostgroup is an allowedsource server
• ruleName, whichis the rule to whichto add the sourceserver
Source
hbacrule-add-user Adds a user to theaccess control rule.
• --users, which addsan individual user or
Source
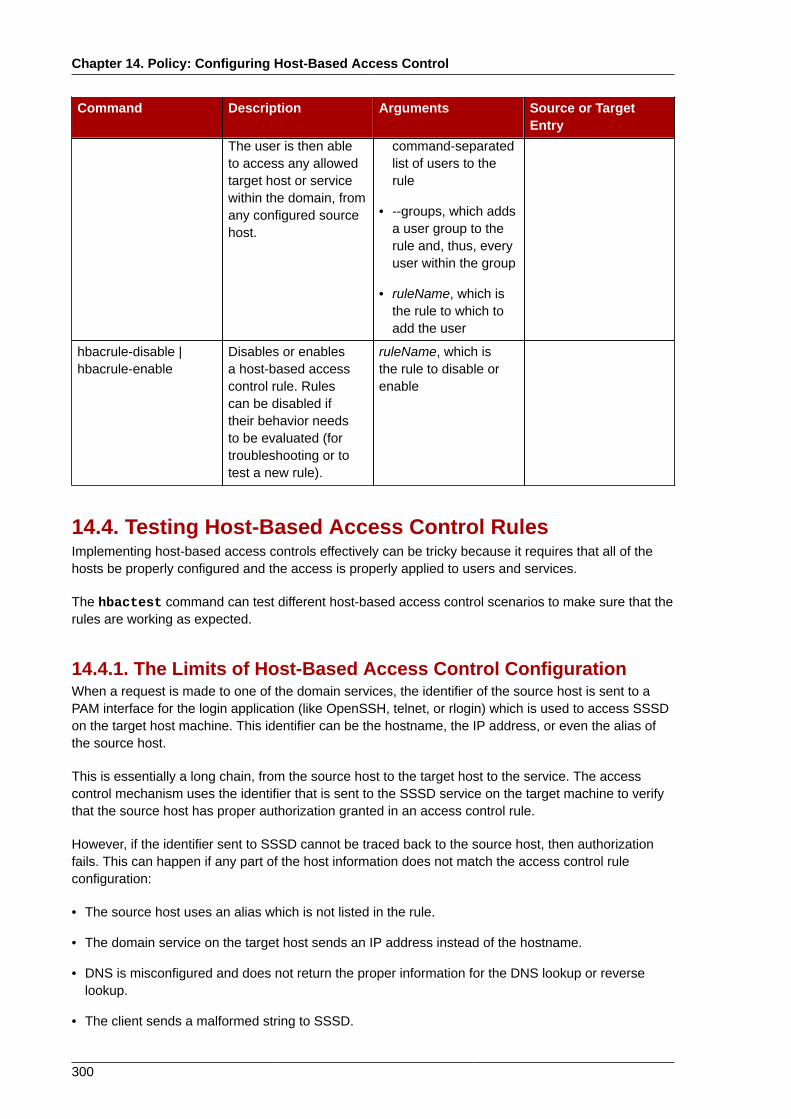
Chapter 14. Policy: Configuring Host-Based Access Control
300
Command Description Arguments Source or TargetEntry
The user is then ableto access any allowedtarget host or servicewithin the domain, fromany configured sourcehost.
command-separatedlist of users to therule
• --groups, which addsa user group to therule and, thus, everyuser within the group
• ruleName, which isthe rule to which toadd the user
hbacrule-disable |hbacrule-enable
Disables or enablesa host-based accesscontrol rule. Rulescan be disabled iftheir behavior needsto be evaluated (fortroubleshooting or totest a new rule).
ruleName, which isthe rule to disable orenable
14.4. Testing Host-Based Access Control RulesImplementing host-based access controls effectively can be tricky because it requires that all of thehosts be properly configured and the access is properly applied to users and services.
The hbactest command can test different host-based access control scenarios to make sure that therules are working as expected.
14.4.1. The Limits of Host-Based Access Control ConfigurationWhen a request is made to one of the domain services, the identifier of the source host is sent to aPAM interface for the login application (like OpenSSH, telnet, or rlogin) which is used to access SSSDon the target host machine. This identifier can be the hostname, the IP address, or even the alias ofthe source host.
This is essentially a long chain, from the source host to the target host to the service. The accesscontrol mechanism uses the identifier that is sent to the SSSD service on the target machine to verifythat the source host has proper authorization granted in an access control rule.
However, if the identifier sent to SSSD cannot be traced back to the source host, then authorizationfails. This can happen if any part of the host information does not match the access control ruleconfiguration:
• The source host uses an alias which is not listed in the rule.
• The domain service on the target host sends an IP address instead of the hostname.
• DNS is misconfigured and does not return the proper information for the DNS lookup or reverselookup.
• The client sends a malformed string to SSSD.
Test Scenarios for Host-Based Access Control (CLI-Based)
301
The name that is sent by the client must match the name in the rule, otherwise host-based accesscontrol fails.
The access control configuration should always be tested before it is implemented to preventauthorization failures.
Host-based access control rules depend on a lot of interactions — between hosts, services, DNSlookups, and users. If any element is misconfigured, then the rule can behave in unexpected ways.
Identity Management includes a testing tool to verify that access control rules are behaving in theexpected way by testing the access in a defined scenario. There are several situations where thistesting is useful:
• A new rule needs to be tested before it is implemented.
• There are problems with the existing rules, and the testing tool can identify what rule is behavingbadly.
• A subset of existing rules can be tested to see how they are performing.
14.4.2. Test Scenarios for Host-Based Access Control (CLI-Based)The hbactest command tests configured host-based access control rules in very specific situations.A test run defines:
• The user to run the operation as to test the rule performance for that user (--user).
• From the source host X (--srchost).
• Using the login client Y (--service).
• To target host Z (--host).
• The rule to test (--rules); if this is not used, then all enabled rules are tested.
• Optional The hbactest returns detailed information about which rules were matched, not matched,or invalid. This detailed rule output can be disabled using --nodetail, so the test simply runs andreturns whether access was granted.
NOTE
The hbactest script does not actually connect to the target host. Instead, it uses the rules withinthe IPA database to simulate how those rules would be applied in a specific situation as if anSSSD client were connecting to the IPA server.
More briefly, it performs a simulated test run based on the given information and configuration,but it does not actually attempt a service request against the target host.
Example 14.4. Testing All Active RulesThe most basic command checks all active rules. It requires a specific connection scenario, so theuser, login service, source host, and target host have to be given, and the testing tool checks theconnection.
$ ipa hbactest --user=jsmith --srchost=source.example.com --host=target.example.com --service=ssh
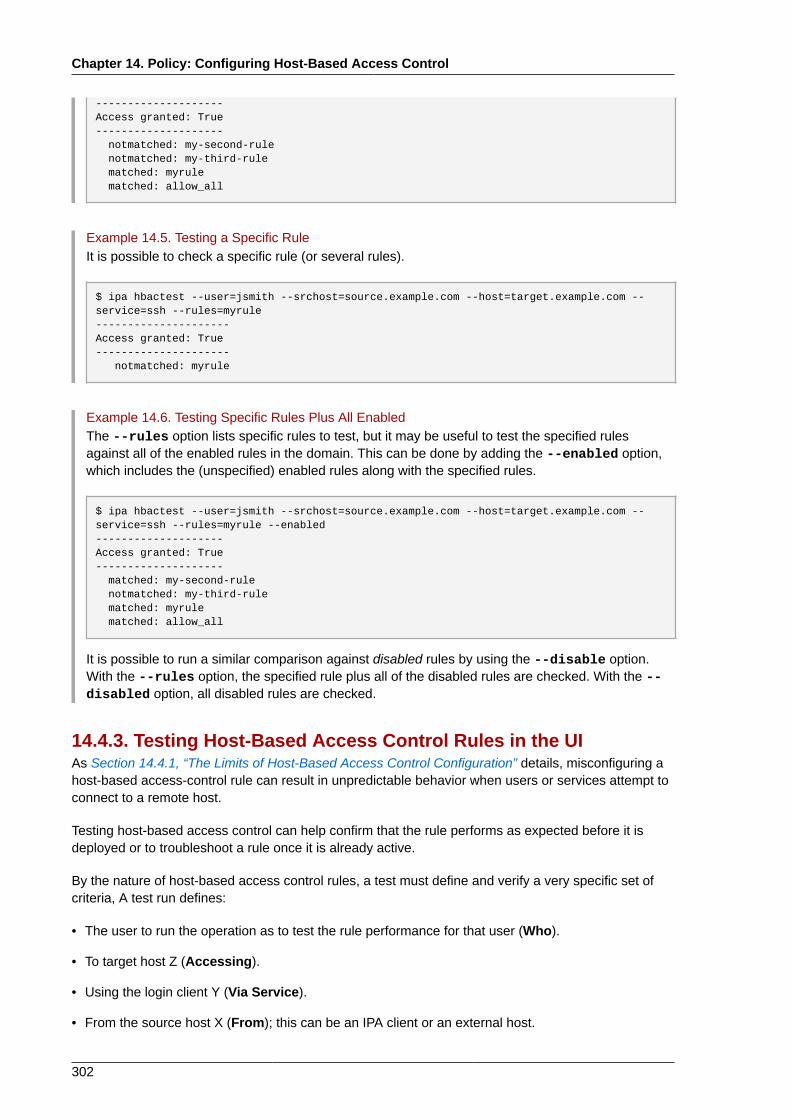
Chapter 14. Policy: Configuring Host-Based Access Control
302
--------------------Access granted: True-------------------- notmatched: my-second-rule notmatched: my-third-rule matched: myrule matched: allow_all
Example 14.5. Testing a Specific RuleIt is possible to check a specific rule (or several rules).
$ ipa hbactest --user=jsmith --srchost=source.example.com --host=target.example.com --service=ssh --rules=myrule---------------------Access granted: True--------------------- notmatched: myrule
Example 14.6. Testing Specific Rules Plus All EnabledThe --rules option lists specific rules to test, but it may be useful to test the specified rulesagainst all of the enabled rules in the domain. This can be done by adding the --enabled option,which includes the (unspecified) enabled rules along with the specified rules.
$ ipa hbactest --user=jsmith --srchost=source.example.com --host=target.example.com --service=ssh --rules=myrule --enabled--------------------Access granted: True-------------------- matched: my-second-rule notmatched: my-third-rule matched: myrule matched: allow_all
It is possible to run a similar comparison against disabled rules by using the --disable option.With the --rules option, the specified rule plus all of the disabled rules are checked. With the --disabled option, all disabled rules are checked.
14.4.3. Testing Host-Based Access Control Rules in the UIAs Section 14.4.1, “The Limits of Host-Based Access Control Configuration” details, misconfiguring ahost-based access-control rule can result in unpredictable behavior when users or services attempt toconnect to a remote host.
Testing host-based access control can help confirm that the rule performs as expected before it isdeployed or to troubleshoot a rule once it is already active.
By the nature of host-based access control rules, a test must define and verify a very specific set ofcriteria, A test run defines:
• The user to run the operation as to test the rule performance for that user (Who).
• To target host Z (Accessing).
• Using the login client Y (Via Service).
• From the source host X (From); this can be an IPA client or an external host.

Testing Host-Based Access Control Rules in the UI
303
• The rule to test; if this is not used, then all enabled rules are tested (Rules).
The test environment is defined on the HBAC TEST page in the Host Based Access Control tabunder Policy. A series of tabs is set up for each configuration step.
Figure 14.2. The From Tab to Set up an HBAC Test
Once the environment is defined, then the test is run simply by clicking a button on the Run Testpage. The results show clearly whether access was granted or denied to the users, and then runsthrough the rules which matched the given parameters.

Chapter 14. Policy: Configuring Host-Based Access Control
304
Figure 14.3. HBAC Test Results
NOTE
To change some of the parameters and check for other results, click the New Test button at thebottom of the test results page. If that button is not selected, the form is not reset, so a new testwill not run, even if test settings are changed.

Chapter 15.
305
Policy: Defining Automatic GroupMembership for Users and HostsMost of the policies and configuration within the Identity Management domain are based on groups.Settings from sudo rules to automount to access control are defined for groups, and then thosesettings are applied to group members.
Managing group membership is an important factor in managing users and hosts. Creatingautomember groups defines rules to add users and hosts to specified groups automatically, as soonas a new entry is added.
15.1. About AutomembershipOne of the most critical tasks for managing policies, identities, and security is managing groupmembership in Identity Management. Groups are the core of most policy configuration.
By default, hosts do not belong to any group when they are created; users are added to the catchallipausers group. Even if custom groups are configured and all policy configuration is in place, usersand hosts cannot take advantage of those policies until they are joined to groups. Of course, thiscan be done manually, but it is both more efficient and more consistent if group membership can beassigned automatically.
This is done with automembership groups.
Automembership is essentially an automatic, global entry filter that organizes entries, at least in part,based on specific criteria. An automember rule, then, is the way that that filter is specified.
For example, there can be a lot of different, repeatable ways that to categorize identities within the ITand organizational environment:
• Adding all hosts or all users to a single global group.
• Adding employees to specific groups based on their employee type, ID number, manager, orphysical location.
• Dividing hosts based on their IP address or subnet.
Automembers provide a way to pre-sort those entries. That makes it easier to configure the actualbehavior that you want to configure — like granting different sudo rules to different user types ormachines on different subnets or have different automount settings for different users.
NOTE
Automembership only applies to new users or groups. Changing the configuration on an existinguser or group does not affect group membership, either by adding or removing the user/host inthe group.
Automembership is a flag or a target set on an existing user group or host group. An automembershiprule is created as a policy. This is a sister entry to the actual group entry and it signals that the givengroup is used for automatic group membership.
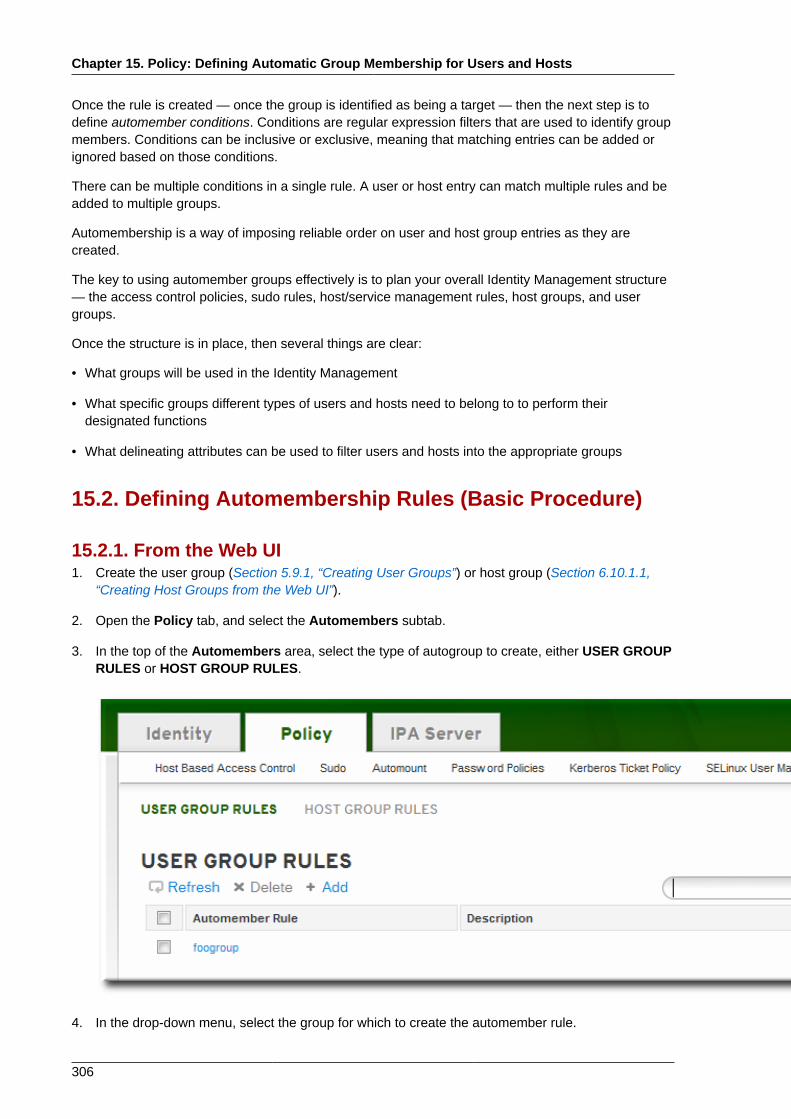
Chapter 15. Policy: Defining Automatic Group Membership for Users and Hosts
306
Once the rule is created — once the group is identified as being a target — then the next step is todefine automember conditions. Conditions are regular expression filters that are used to identify groupmembers. Conditions can be inclusive or exclusive, meaning that matching entries can be added orignored based on those conditions.
There can be multiple conditions in a single rule. A user or host entry can match multiple rules and beadded to multiple groups.
Automembership is a way of imposing reliable order on user and host group entries as they arecreated.
The key to using automember groups effectively is to plan your overall Identity Management structure— the access control policies, sudo rules, host/service management rules, host groups, and usergroups.
Once the structure is in place, then several things are clear:
• What groups will be used in the Identity Management
• What specific groups different types of users and hosts need to belong to to perform theirdesignated functions
• What delineating attributes can be used to filter users and hosts into the appropriate groups
15.2. Defining Automembership Rules (Basic Procedure)
15.2.1. From the Web UI1. Create the user group (Section 5.9.1, “Creating User Groups”) or host group (Section 6.10.1.1,
“Creating Host Groups from the Web UI”).
2. Open the Policy tab, and select the Automembers subtab.
3. In the top of the Automembers area, select the type of autogroup to create, either USER GROUPRULES or HOST GROUP RULES.
4. In the drop-down menu, select the group for which to create the automember rule.
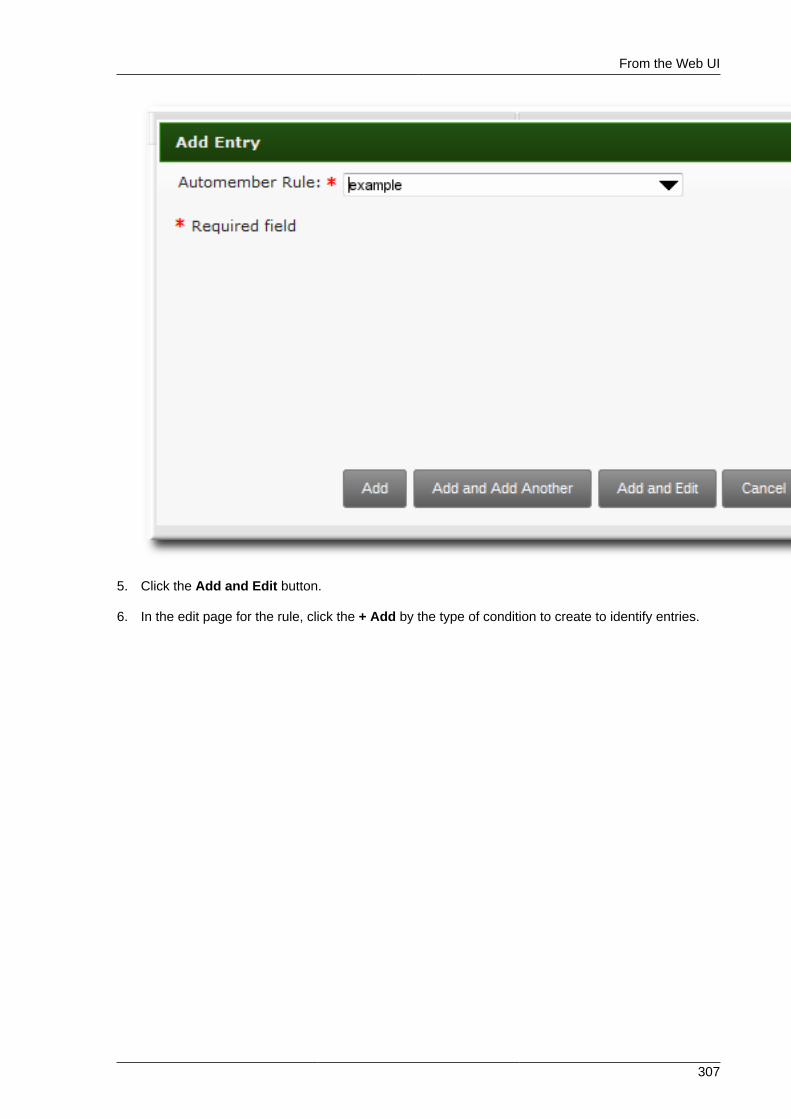
From the Web UI
307
5. Click the Add and Edit button.
6. In the edit page for the rule, click the + Add by the type of condition to create to identify entries.

Chapter 15. Policy: Defining Automatic Group Membership for Users and Hosts
308
7. Select the attribute to use as the basis for the search and then set the regular expression to use tomatch the attribute value.
Conditions can look for entries either to include in the group or to explicitly exclude from the group.The format of a condition is a Perl-compatible regular expression (PCRE). For more information onPCRE patterns, see the pcresyntax(3) man page1.
NOTE
Exclude conditions are evaluated first and take precedence over include conditions.

From the CLI
309
8. Click Add and Add Another to add another condition. A single rule can have multiple include andexclude conditions. When all conditions have been configured, click the Add button to save thelast condition and close the dialog window.
15.2.2. From the CLIThere are two commands used to define an automember policy:
• A command to flag the group as an automember group, automember-add
• A command to add regular expression conditions to identify group members, automember-add-condition
For example:
1. Create the user group (Section 5.9.1.2, “With the Command Line”) or host group (Section 6.10.1.2,“Creating Host Groups from the Command Line”).
2. Create the automember policy entry for the group. Use the --type to identify whether the targetgroup is a user group (group) or a host group (hostgroup). This command has the format:
ipa automember-add --type=group|hostgroup groupName
For example:
[jsmith@server ~]$ ipa automember-add --type=group exampleGroup
3. Create the conditions for the rule. To set multiple patterns, either give a comma-separated listof patterns in the --inclusive-regex|--exclusive-regex options or run the commandmultiple times.
This command has the format:
ipa automember-add-condition --type=group|hostgroup --key=attribute --inclusive-regex=regex | --exclusive-regex=regex groupName

Chapter 15. Policy: Defining Automatic Group Membership for Users and Hosts
310
As with the automember rule, the condition must specify the type of group (--type) and the nameof the target group (groupName).
The condition must also specify the attribute (the key) and any patterns for the attribute value. The--key is the attribute name that is the focus of the condition. Then, there is a regular expressionpattern to identify matching values; matching entries can either be included (--inclusive-regex) or excluded (--exclusive-regex) from the group. Exclusion rules take precedence.
For example, to include all employees with Barbara Jensen as a manager, but excluding thetemporary employees:
[jsmith@server ~]$ ipa automember-add-condition --type=group --key=manager --inclusive-regex=^uid=bjensen$ exampleGroup[jsmith@server ~]$ ipa automember-add-condition --type=group --key=employeetype --exclusive-regex=^temp exampleGroup
TIP
The regular expression can match any port of the string. Using a caret (^) means that it mustmatch at the beginning, and using a dollar sign ($) means that it must match at the end.Wrapping the pattern in ^ and $ means that it must be an exact match.
For more information on Perl-compatible regular expression (PCRE) patterns, see thepcresyntax(3) man page2.
To remove a condition for a rule, pass the full condition information, both the key and the regularexpression:
[jsmith@server ~]$ ipa automember-remove-condition --key=fqdn --type=hostgroup --inclusive-regex=^web[1-9]+\.example\.com webservers
To remove the entire rule, simply run the automember-del command.
15.3. Examples of Using Automember Groups
NOTE
These examples are shown using the CLI; the same configuration can be performed in the webUI.
A Note on Creating Default GroupsOne common environment requirement is to have some sort of default group that users or hosts areadded to. There are a couple of different ways to approach that.
• All entries can be added to a single, global group regardless of what other groups they are alsoadded to.

Setting an All Users/Hosts Rule
311
• Entries can be added to specific automember groups. If the new entry does not match anyautogroup, then it is added to a default or fallback group.
These strategies are mutually exclusive. If an entry matches a global group, then it does match anautomember group and would, therefore, not be added to the fallback group.
15.3.1. Setting an All Users/Hosts RuleTo add all users or all hosts to a single group, use an inclusive regular expression for some attribute(such as cn or fqdn) which all entries will contain.
A regular expression to match all entries is simply .*. For example, to add all hosts to the same hostgroup:
[jsmith@server ~]$ ipa automember-add-condition --type=hostgroup allhosts --inclusive-regex=.* --key=fqdn--------------------------------Added condition(s) to "allhosts"-------------------------------- Automember Rule: allhosts Inclusive Regex: fqdn=.*----------------------------Number of conditions added 1----------------------------
Every host added after that is automatically added to the allhosts group:
[jsmith@server ~]$ ipa host-add test.example.com-----------------------------Added host "test.example.com"----------------------------- Host name: test.example.com Principal name: host/[email protected] Password: False Keytab: False Managed by: test.example.com
[jsmith@server ~]$ ipa hostgroup-show allhosts Host-group: allhosts Description: Default hostgroup Member hosts: test.example.com
For more information on PCRE patterns, see the pcresyntax(3) man page3.
15.3.2. Defining Default Automembership GroupsThere is a special command to set a default group, automember-default-group-set. This setsthe group name (--default-group) and group type(--type), similar to an automember rule, butthere is no condition to match. By definition, default group members are unmatched entries.
For example:
[jsmith@server ~]$ ipa automember-default-group-set --default-group=ipaclients --type=hostgroup[jsmith@server ~]$ ipa automember-default-group-set --default-group=ipausers --type=group
3 http://regexkit.sourceforge.net/Documentation/pcre/pcresyntax.html
Chapter 15. Policy: Defining Automatic Group Membership for Users and Hosts
312
A default group rule can be removed using the automember-default-group-remove command.Since there is only one default group for a group type, it is only necessary to give the group type, notthe group name:
[jsmith@server ~]$ ipa automember-default-group-remove --type=hostgroup
15.3.3. Using Automembership Groups with Windows UsersWhen a user is created in IPA, that user is automatically added as a member to the ipausers group(which is the default group for all new users, apart from any automember group). However, whena Windows user is synced over from Active Directory, that user is not automatically added to theipausers group.
New Windows users can be added to the ipausers group, as with users created in IdentityManagement, by using an automember group. Every Windows user is added with the ntUser objectclass; that object class can be used as an inclusive filter to identify new Windows users to add to theautomember group.
First, define the ipausers group as an automember group:
[jsmith@server ~]$ ipa automember-add --type=group ipausers
Then, use the ntUser object class as a condition to add users:
[jsmith@server ~]$ ipa automember-add-condition ipausers --key=objectclass --type=group --inclusive-regex=ntUser

Chapter 16.
313
Configuration: Defining Access Controlwithin IPAAccess control is a security system which defines who can access certain resources — frommachines to services to entries — and what kinds of operations they are allowed to perform. IdentityManagement provides several access control areas to make it very clear what kind of access is beinggranted and to whom it is granted. As part of this, Identity Management draws a distinction betweenaccess controls to resources within the domain and access control to the IPA configuration itself.
This chapter details the different internal access control mechanisms that are available for users withinIPA to the IPA server and other IPA users.
16.1. About Access Controls for IPA EntriesAccess control defines the rights or permissions users have been granted to perform operations onother users or objects.
16.1.1. A Brief Look at Access Control ConceptsThe Identity Management access control structure is based on standard LDAP access controls.Access within the IPA server is based on the IPA users (who are stored in the backend DirectoryServer instance) who are allowed to access other IPA entities (which are also stored as LDAP entriesin the Directory Server instance).
An access control rule has three parts:
• Who can perform the operation. This is the entity who is being granted permission to do something;this is the actor. In LDAP access control models, this is called the bind rule because it defines whothe user is (based on their bind information) and can optionally require other limits on the bindattempt, such as restricting attempts to a certain time of day or a certain machine.
• What can be accessed. This defines the entry which the actor is allowed to perform operations on.This is the target of the access control rule.
• What type of operation can be performed. The last part is determining what kinds of actions theuser is allowed to perform. The most common operations are add, delete, write, read, and search.In Identity Management, all users are implicitly granted read and search rights to all entries inthe IPA domain, with restrictions only for sensitive attributes like passwords and Kerberos keys.(Anonymous users are restricted from seeing security-related configuration, like sudo rules andhost-based access control.)
The only rights which can be granted are add, delete, and write — the permissions required tomodify an entry.
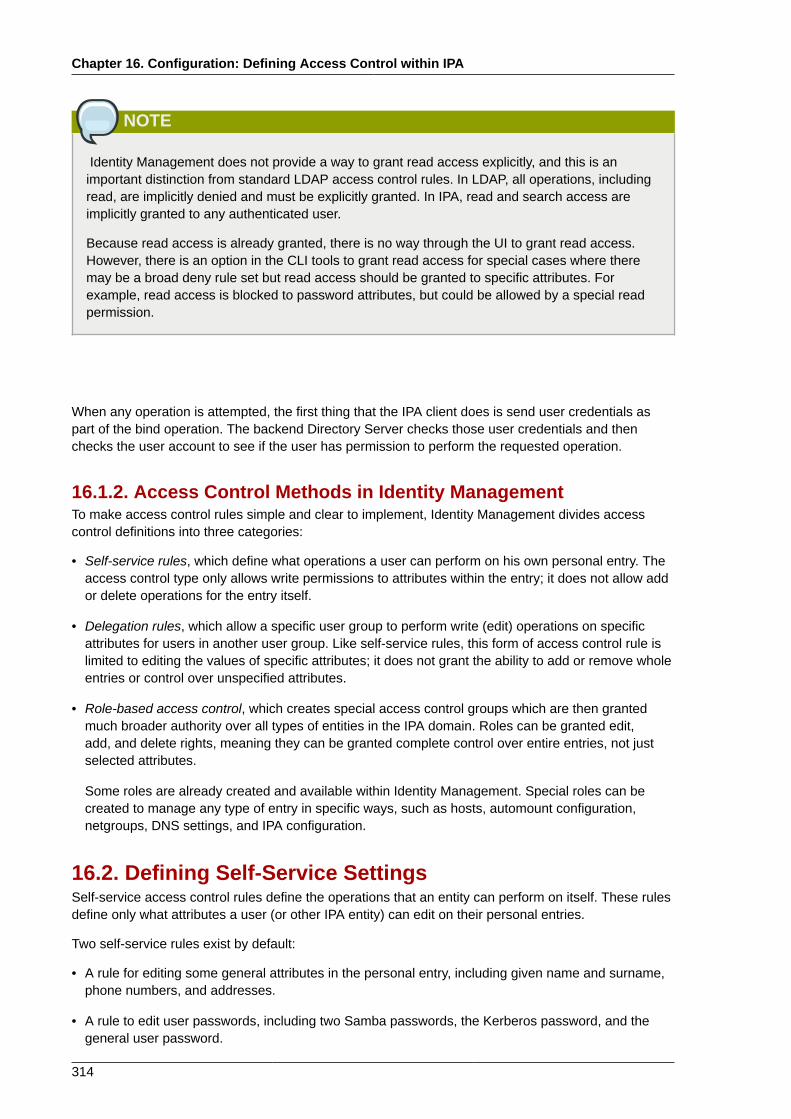
Chapter 16. Configuration: Defining Access Control within IPA
314
NOTE
Identity Management does not provide a way to grant read access explicitly, and this is animportant distinction from standard LDAP access control rules. In LDAP, all operations, includingread, are implicitly denied and must be explicitly granted. In IPA, read and search access areimplicitly granted to any authenticated user.
Because read access is already granted, there is no way through the UI to grant read access.However, there is an option in the CLI tools to grant read access for special cases where theremay be a broad deny rule set but read access should be granted to specific attributes. Forexample, read access is blocked to password attributes, but could be allowed by a special readpermission.
When any operation is attempted, the first thing that the IPA client does is send user credentials aspart of the bind operation. The backend Directory Server checks those user credentials and thenchecks the user account to see if the user has permission to perform the requested operation.
16.1.2. Access Control Methods in Identity ManagementTo make access control rules simple and clear to implement, Identity Management divides accesscontrol definitions into three categories:
• Self-service rules, which define what operations a user can perform on his own personal entry. Theaccess control type only allows write permissions to attributes within the entry; it does not allow addor delete operations for the entry itself.
• Delegation rules, which allow a specific user group to perform write (edit) operations on specificattributes for users in another user group. Like self-service rules, this form of access control rule islimited to editing the values of specific attributes; it does not grant the ability to add or remove wholeentries or control over unspecified attributes.
• Role-based access control, which creates special access control groups which are then grantedmuch broader authority over all types of entities in the IPA domain. Roles can be granted edit,add, and delete rights, meaning they can be granted complete control over entire entries, not justselected attributes.
Some roles are already created and available within Identity Management. Special roles can becreated to manage any type of entry in specific ways, such as hosts, automount configuration,netgroups, DNS settings, and IPA configuration.
16.2. Defining Self-Service SettingsSelf-service access control rules define the operations that an entity can perform on itself. These rulesdefine only what attributes a user (or other IPA entity) can edit on their personal entries.
Two self-service rules exist by default:
• A rule for editing some general attributes in the personal entry, including given name and surname,phone numbers, and addresses.
• A rule to edit user passwords, including two Samba passwords, the Kerberos password, and thegeneral user password.

Creating Self-Service Rules from the Web UI
315
16.2.1. Creating Self-Service Rules from the Web UI1. Open the IPA Server tab in the top menu, and select the Self Service Permissions subtab.
2. Click the Add link at the top of the list of self-service ACIs.
3. Enter the name of the rule in the pop-up window. Spaces are allowed.

Chapter 16. Configuration: Defining Access Control within IPA
316
4. Select the checkboxes by the attributes which this ACI will permit users to edit.
5. Click the Add button to save the new self-service ACI.
16.2.2. Creating Self-Service Rules from the Command LineA new self-service rule can be added using the selfservice-add command. There are two requiredoptions, --permissions to set whether the ACI grants write, add, or delete permission and --attrs to give the full list of attributes which this ACI grants permission to.
$ ipa selfservice-add "Users can manage their own name details" --permissions=write --attrs=givenname,displayname,title,initials-----------------------------------------------------------Added selfservice "Users can manage their own name details"----------------------------------------------------------- Self-service name: Users can manage their own name details Permissions: write Attributes: givenname, displayname, title, initials
16.2.3. Editing Self-Service RulesIn the self-service entry in the web UI, the only element that can be edited is the list of attributes thatare included in the ACI. The checkboxes can be selected or deselected.
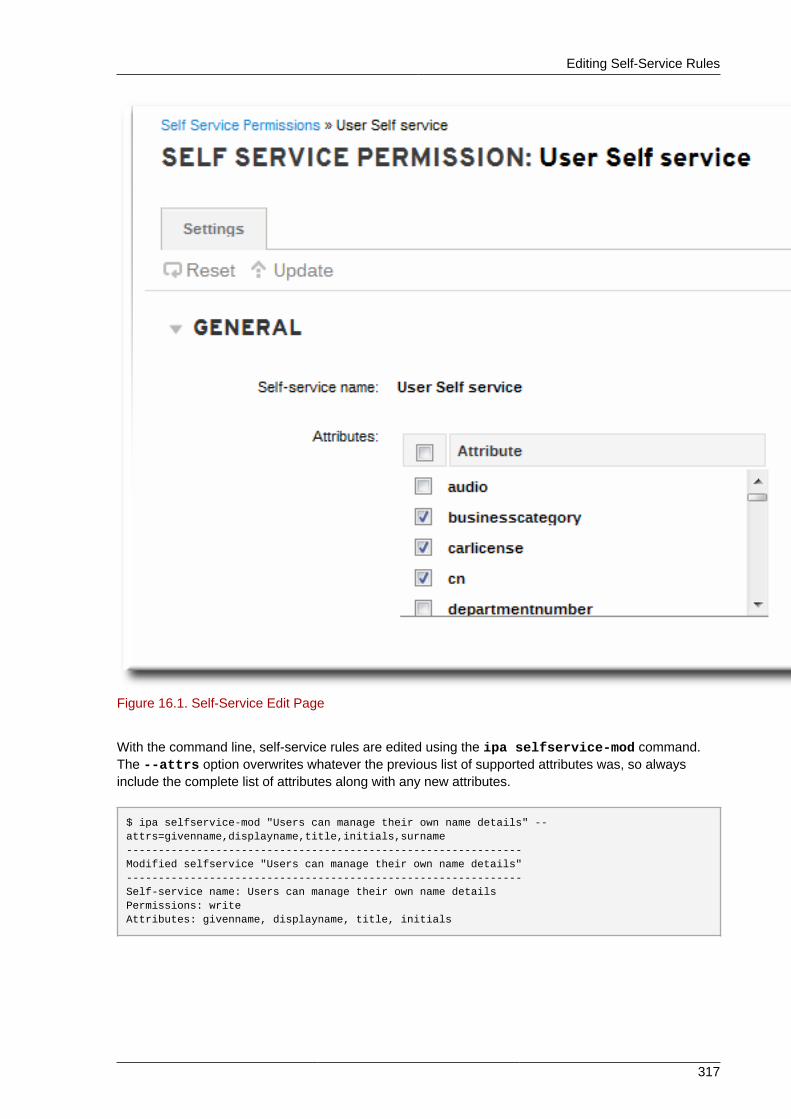
Editing Self-Service Rules
317
Figure 16.1. Self-Service Edit Page
With the command line, self-service rules are edited using the ipa selfservice-mod command.The --attrs option overwrites whatever the previous list of supported attributes was, so alwaysinclude the complete list of attributes along with any new attributes.
$ ipa selfservice-mod "Users can manage their own name details" --attrs=givenname,displayname,title,initials,surname--------------------------------------------------------------Modified selfservice "Users can manage their own name details"--------------------------------------------------------------Self-service name: Users can manage their own name detailsPermissions: writeAttributes: givenname, displayname, title, initials
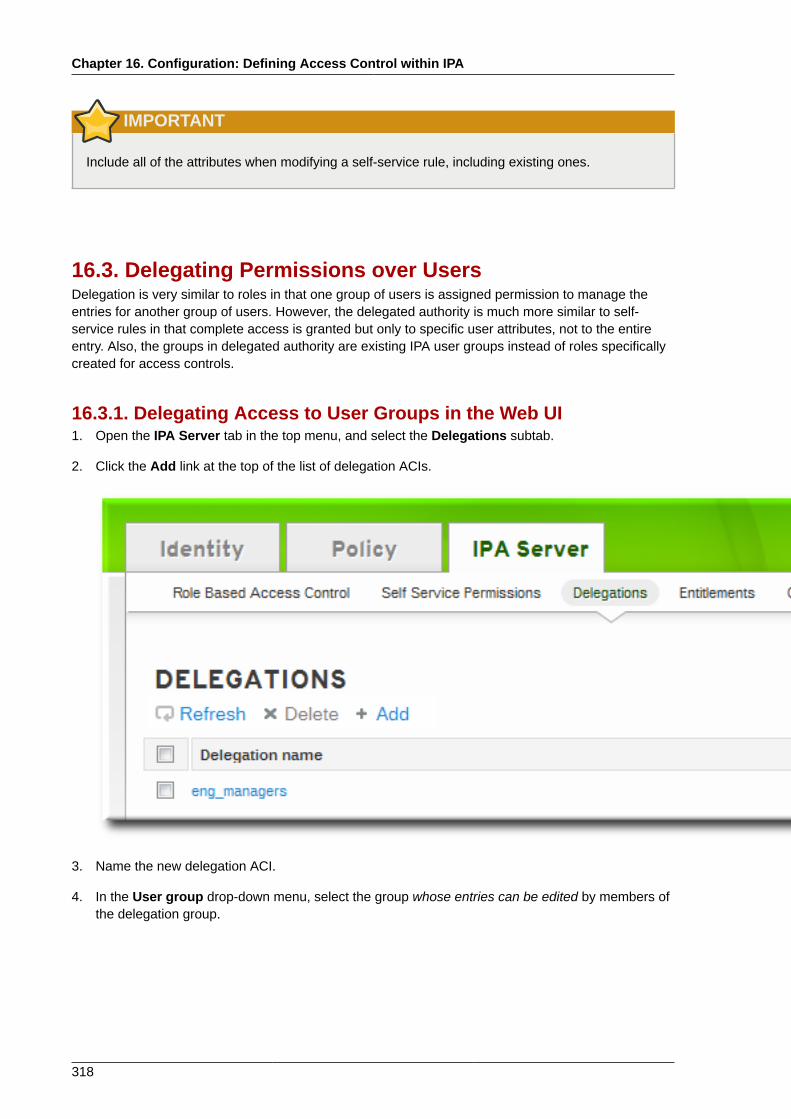
Chapter 16. Configuration: Defining Access Control within IPA
318
IMPORTANT
Include all of the attributes when modifying a self-service rule, including existing ones.
16.3. Delegating Permissions over UsersDelegation is very similar to roles in that one group of users is assigned permission to manage theentries for another group of users. However, the delegated authority is much more similar to self-service rules in that complete access is granted but only to specific user attributes, not to the entireentry. Also, the groups in delegated authority are existing IPA user groups instead of roles specificallycreated for access controls.
16.3.1. Delegating Access to User Groups in the Web UI1. Open the IPA Server tab in the top menu, and select the Delegations subtab.
2. Click the Add link at the top of the list of delegation ACIs.
3. Name the new delegation ACI.
4. In the User group drop-down menu, select the group whose entries can be edited by members ofthe delegation group.
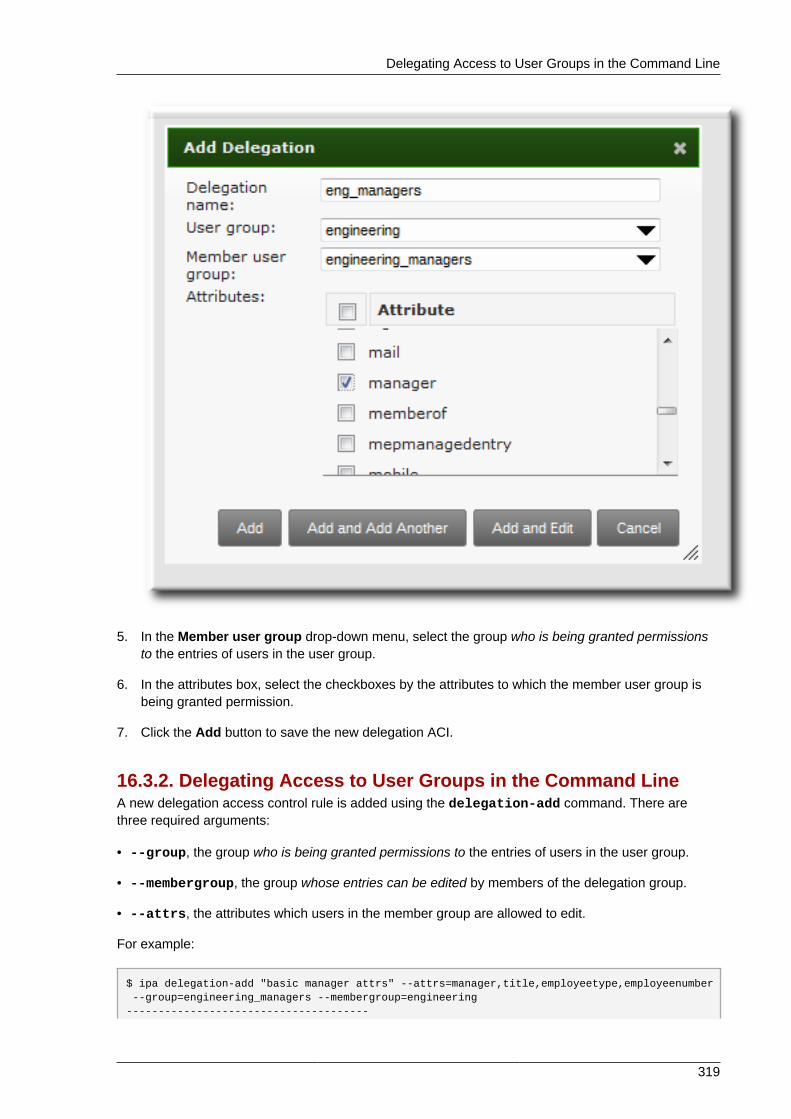
Delegating Access to User Groups in the Command Line
319
5. In the Member user group drop-down menu, select the group who is being granted permissionsto the entries of users in the user group.
6. In the attributes box, select the checkboxes by the attributes to which the member user group isbeing granted permission.
7. Click the Add button to save the new delegation ACI.
16.3.2. Delegating Access to User Groups in the Command LineA new delegation access control rule is added using the delegation-add command. There arethree required arguments:
• --group, the group who is being granted permissions to the entries of users in the user group.
• --membergroup, the group whose entries can be edited by members of the delegation group.
• --attrs, the attributes which users in the member group are allowed to edit.
For example:
$ ipa delegation-add "basic manager attrs" --attrs=manager,title,employeetype,employeenumber --group=engineering_managers --membergroup=engineering--------------------------------------
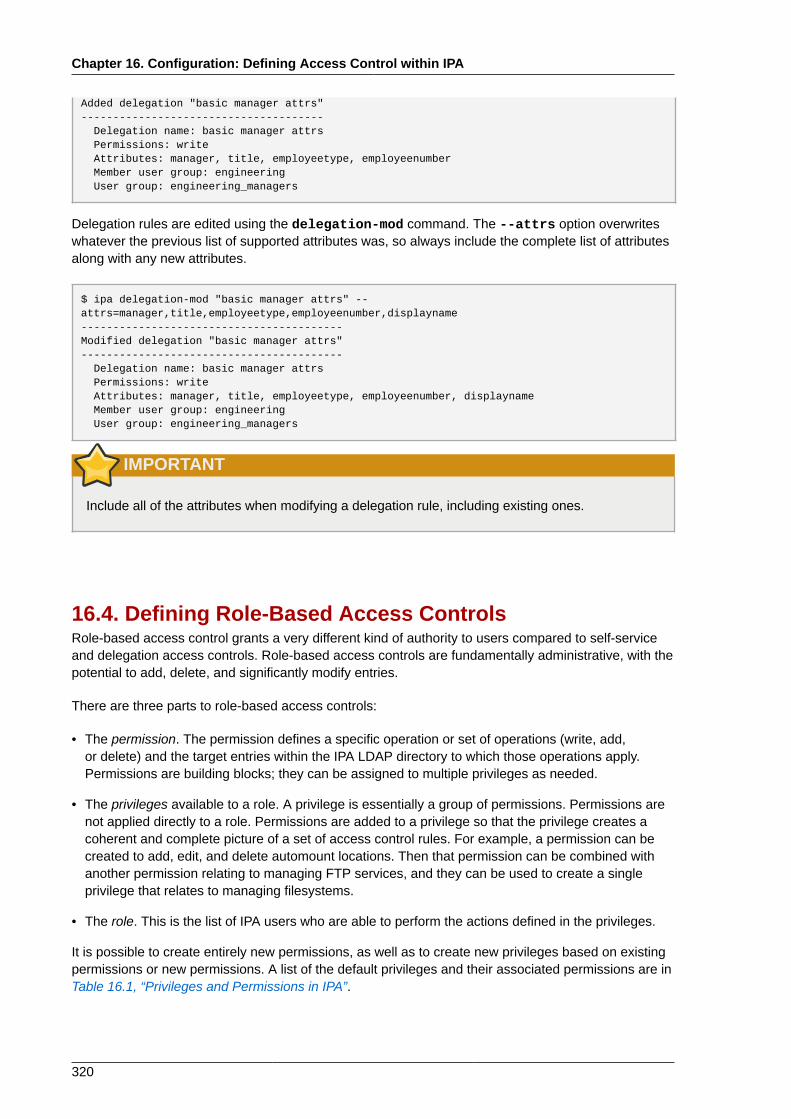
Chapter 16. Configuration: Defining Access Control within IPA
320
Added delegation "basic manager attrs"-------------------------------------- Delegation name: basic manager attrs Permissions: write Attributes: manager, title, employeetype, employeenumber Member user group: engineering User group: engineering_managers
Delegation rules are edited using the delegation-mod command. The --attrs option overwriteswhatever the previous list of supported attributes was, so always include the complete list of attributesalong with any new attributes.
$ ipa delegation-mod "basic manager attrs" --attrs=manager,title,employeetype,employeenumber,displayname-----------------------------------------Modified delegation "basic manager attrs"----------------------------------------- Delegation name: basic manager attrs Permissions: write Attributes: manager, title, employeetype, employeenumber, displayname Member user group: engineering User group: engineering_managers
IMPORTANT
Include all of the attributes when modifying a delegation rule, including existing ones.
16.4. Defining Role-Based Access ControlsRole-based access control grants a very different kind of authority to users compared to self-serviceand delegation access controls. Role-based access controls are fundamentally administrative, with thepotential to add, delete, and significantly modify entries.
There are three parts to role-based access controls:
• The permission. The permission defines a specific operation or set of operations (write, add,or delete) and the target entries within the IPA LDAP directory to which those operations apply.Permissions are building blocks; they can be assigned to multiple privileges as needed.
• The privileges available to a role. A privilege is essentially a group of permissions. Permissions arenot applied directly to a role. Permissions are added to a privilege so that the privilege creates acoherent and complete picture of a set of access control rules. For example, a permission can becreated to add, edit, and delete automount locations. Then that permission can be combined withanother permission relating to managing FTP services, and they can be used to create a singleprivilege that relates to managing filesystems.
• The role. This is the list of IPA users who are able to perform the actions defined in the privileges.
It is possible to create entirely new permissions, as well as to create new privileges based on existingpermissions or new permissions. A list of the default privileges and their associated permissions are inTable 16.1, “Privileges and Permissions in IPA”.

Defining Role-Based Access Controls
321
NOTE
Identity Management does not provide a way to grant read access explicitly, and this is animportant distinction from standard LDAP access control rules. In LDAP, all operations, includingread, are implicitly denied and must be explicitly granted. In IPA, read and search access areimplicitly granted to any authenticated user.
Because read access is already granted, there is no way through the UI to grant read access.However, there is an option in the CLI tools to grant read access for special cases where theremay be a broad deny rule set but read access should be granted to specific attributes. Forexample, read access is blocked to password attributes, but could be allowed by a special readpermission.
Table 16.1. Privileges and Permissions in IPA
Privilege Associated Permissions
Automount Administrators Add_Automount_mapsRemove_Automount_mapsAdd_Automount_keysRemove_Automount_keys
Certificate Administrators Retrieve_Certificates_from_the_CARequest_CertificateRequest_Certificates_from_a_different_hosGet_Certificates_status_from_the_CARevoke_CertificateCertificate_Remove_Hold
Delegation Administrator Add_RolesRemove_RolesModify_RolesModify_Role_membershipModify_privilege_membership
DNS Administrators (for users) add_dns_entriesremove_dns_entriesupdate_dns_entries
DNS Servers (for machines) add_dns_entriesremove_dns_entriesupdate_dns_entries
Group Administrators Add_GroupsRemove_GroupsModify_GroupsModify_Group_membership
HBAC Administrator Add_HBAC_ruleDelete_HBAC_ruleModify_HBAC_ruleManage_HBAC_rule_membershipAdd_HBAC_servicesDelete_HBAC_servicesAdd_HBAC_service_groups
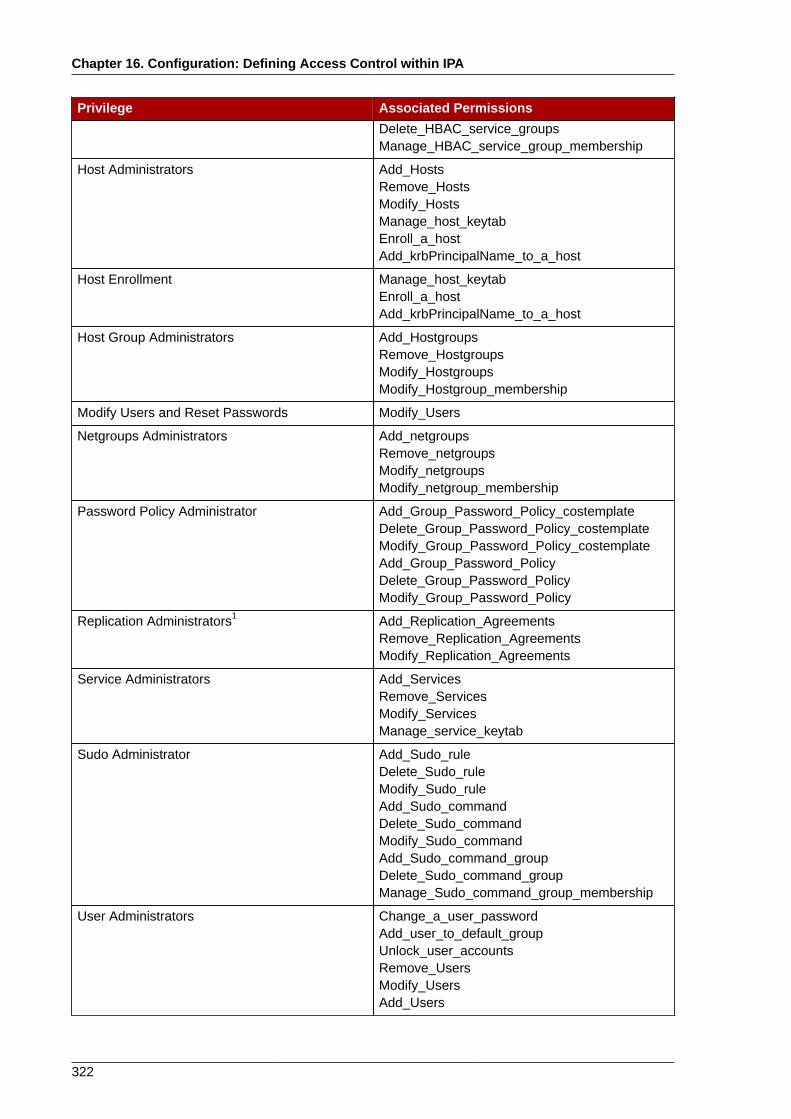
Chapter 16. Configuration: Defining Access Control within IPA
322
Privilege Associated PermissionsDelete_HBAC_service_groupsManage_HBAC_service_group_membership
Host Administrators Add_HostsRemove_HostsModify_HostsManage_host_keytabEnroll_a_hostAdd_krbPrincipalName_to_a_host
Host Enrollment Manage_host_keytabEnroll_a_hostAdd_krbPrincipalName_to_a_host
Host Group Administrators Add_HostgroupsRemove_HostgroupsModify_HostgroupsModify_Hostgroup_membership
Modify Users and Reset Passwords Modify_Users
Netgroups Administrators Add_netgroupsRemove_netgroupsModify_netgroupsModify_netgroup_membership
Password Policy Administrator Add_Group_Password_Policy_costemplateDelete_Group_Password_Policy_costemplateModify_Group_Password_Policy_costemplateAdd_Group_Password_PolicyDelete_Group_Password_PolicyModify_Group_Password_Policy
Replication Administrators1 Add_Replication_AgreementsRemove_Replication_AgreementsModify_Replication_Agreements
Service Administrators Add_ServicesRemove_ServicesModify_ServicesManage_service_keytab
Sudo Administrator Add_Sudo_ruleDelete_Sudo_ruleModify_Sudo_ruleAdd_Sudo_commandDelete_Sudo_commandModify_Sudo_commandAdd_Sudo_command_groupDelete_Sudo_command_groupManage_Sudo_command_group_membership
User Administrators Change_a_user_passwordAdd_user_to_default_groupUnlock_user_accountsRemove_UsersModify_UsersAdd_Users

Creating Roles
323
Privilege Associated Permissions
Write IPA Configuration Write_IPA_Configuration1 This permission can only be granted to servers, not to users.
16.4.1. Creating Roles
16.4.1.1. Creating Roles in the Web UI1. Open the IPA Server tab in the top menu, and select the Role Based Access Control subtab.
2. Click the Add link at the top of the list of role-based ACIs.
3. Enter the role name and a description.
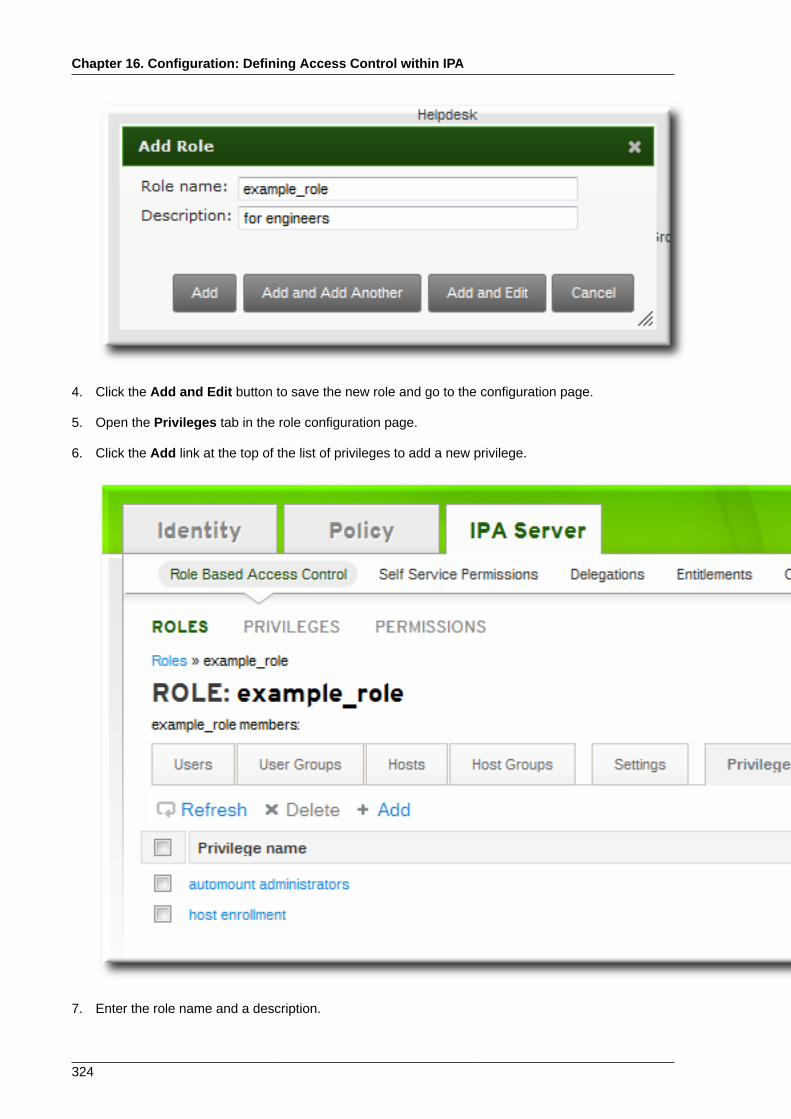
Chapter 16. Configuration: Defining Access Control within IPA
324
4. Click the Add and Edit button to save the new role and go to the configuration page.
5. Open the Privileges tab in the role configuration page.
6. Click the Add link at the top of the list of privileges to add a new privilege.
7. Enter the role name and a description.
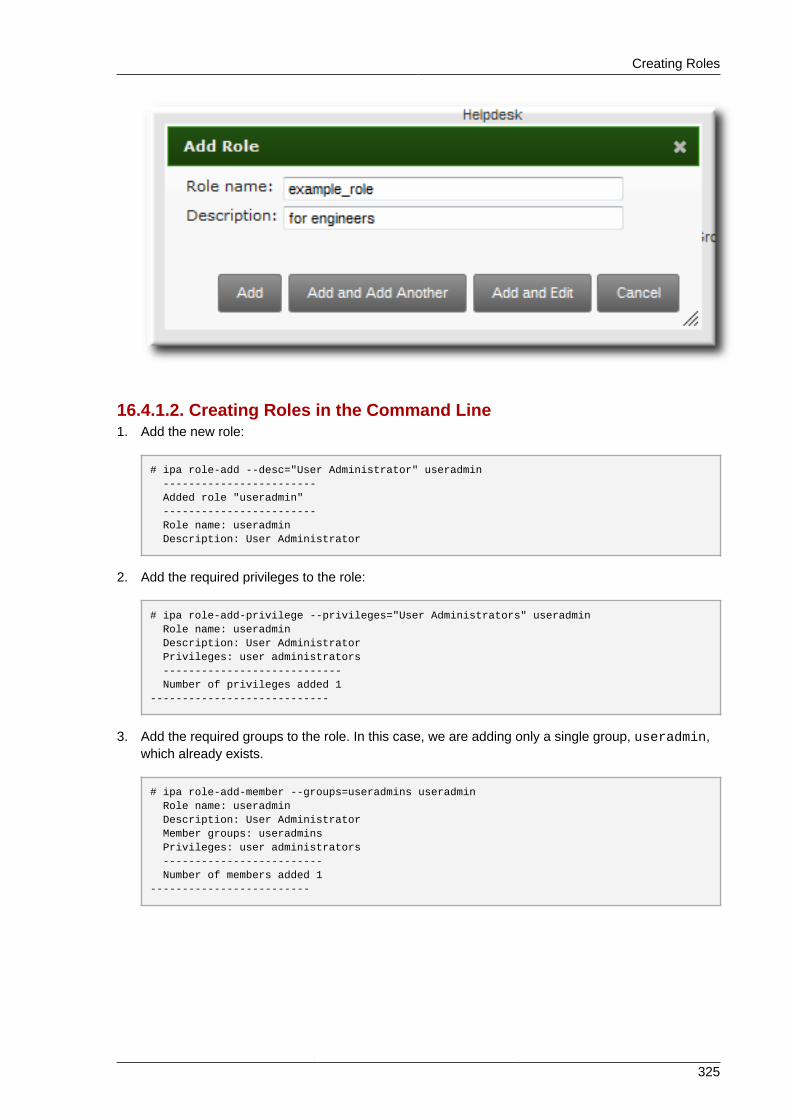
Creating Roles
325
16.4.1.2. Creating Roles in the Command Line1. Add the new role:
# ipa role-add --desc="User Administrator" useradmin ------------------------ Added role "useradmin" ------------------------ Role name: useradmin Description: User Administrator
2. Add the required privileges to the role:
# ipa role-add-privilege --privileges="User Administrators" useradmin Role name: useradmin Description: User Administrator Privileges: user administrators ---------------------------- Number of privileges added 1----------------------------
3. Add the required groups to the role. In this case, we are adding only a single group, useradmin,which already exists.
# ipa role-add-member --groups=useradmins useradmin Role name: useradmin Description: User Administrator Member groups: useradmins Privileges: user administrators ------------------------- Number of members added 1-------------------------

Chapter 16. Configuration: Defining Access Control within IPA
326
16.4.2. Creating New Permissions
NOTE
Identity Management does not provide a way to grant read access explicitly, and this is animportant distinction from standard LDAP access control rules. In LDAP, all operations, includingread, are implicitly denied and must be explicitly granted. In IPA, read and search access areimplicitly granted to any authenticated user.
Because read access is already granted, there is no way through the UI to grant read access.However, there is an option in the CLI tools to grant read access for special cases where theremay be a broad deny rule set but read access should be granted to specific attributes. Forexample, read access is blocked to password attributes, but could be allowed by a special readpermission.
16.4.2.1. Creating New Permissions from the Web UI1. Open the IPA Server tab in the top menu, and select the Role Based Access Control subtab.
2. Select the Permissions task link.
3. Click the Add link at the top of the list of permissions.
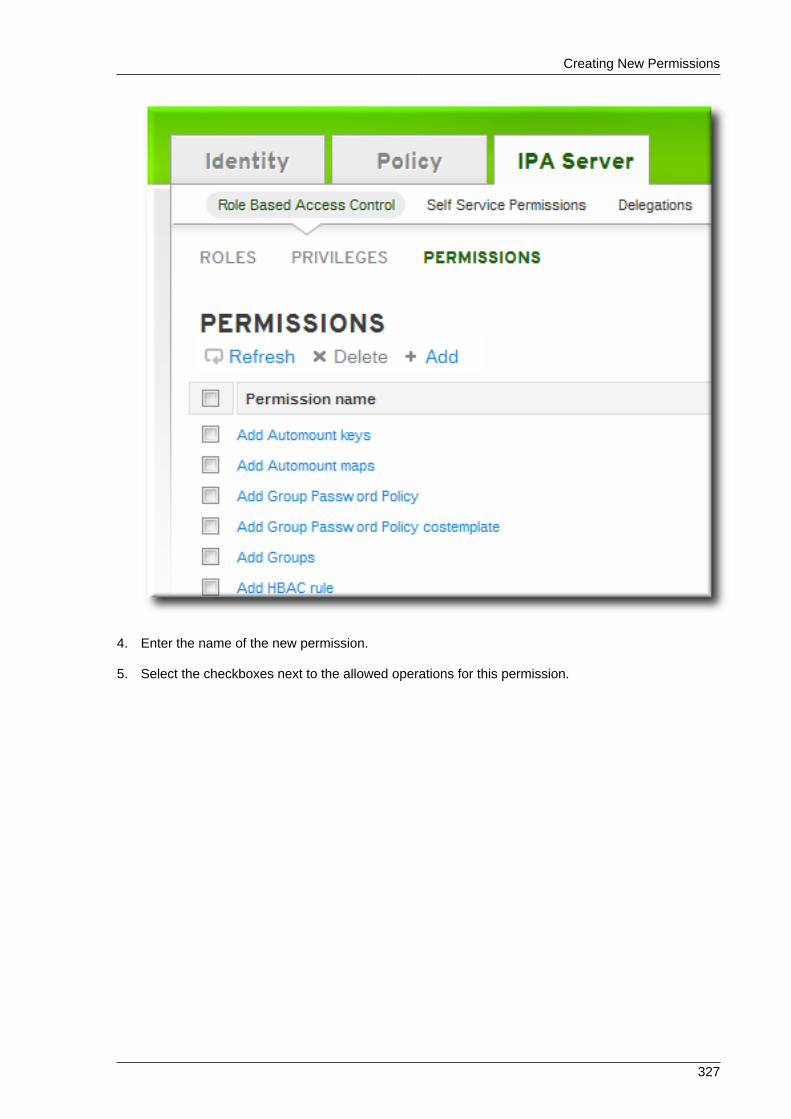
Creating New Permissions
327
4. Enter the name of the new permission.
5. Select the checkboxes next to the allowed operations for this permission.
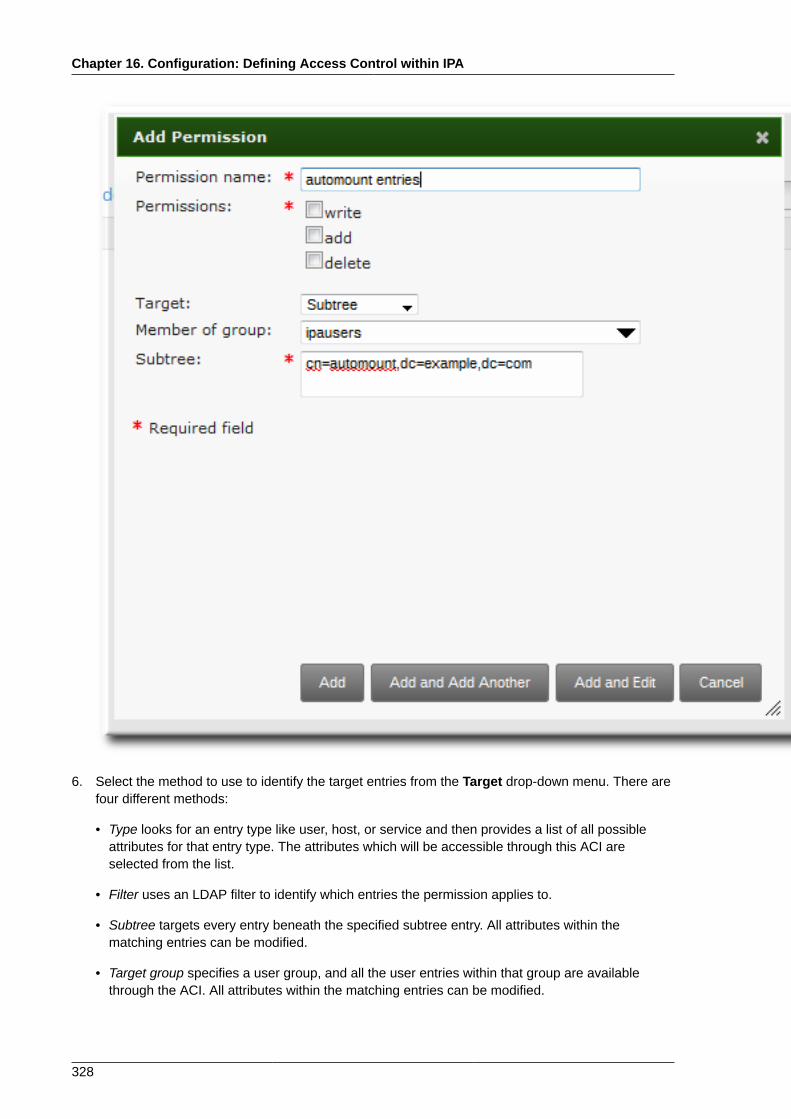
Chapter 16. Configuration: Defining Access Control within IPA
328
6. Select the method to use to identify the target entries from the Target drop-down menu. There arefour different methods:
• Type looks for an entry type like user, host, or service and then provides a list of all possibleattributes for that entry type. The attributes which will be accessible through this ACI areselected from the list.
• Filter uses an LDAP filter to identify which entries the permission applies to.
• Subtree targets every entry beneath the specified subtree entry. All attributes within thematching entries can be modified.
• Target group specifies a user group, and all the user entries within that group are availablethrough the ACI. All attributes within the matching entries can be modified.
Creating New Permissions
329
NOTE
For Filter, Subtree, and Target group methods, no attributes are set in the UI. These mustbe added later using ipa permission-mod --attrs. If no attributes are set for thepermission then, by default, all attributes are excluded.
7. Fill in the required information to identify the target entries, depending on the selected type.
8. Click the Add button to save the permission.
9. For Filter, Subtree, and Target group methods, set the attributes for the ACI to include. This mustbe done from the command line.
For example:
[jsmith@ipaserver ~]$ ipa permission-mod "manage Windows groups" --attrs=description,member
16.4.2.2. Creating New Permissions from the Command LineA new permission is added using the permission-add command. All permissions require a list ofattributes over which permission is granted (--attr), a list of allowed actions (--permissions), andthe target entries for the ACI. There are four methods to identify the target entries:
• --type looks for an entry type like user, host, or service and then provides a list of all possibleattributes for that entry type.
• --filter uses an LDAP filter to identify which entries the permission applies to.
• --subtree targets every entry beneath the specified subtree entry.
• --targetgroup specifies a user group, and all the user entries within that group are available throughthe ACI.
Example 16.1. Adding a Permission with a FilterA filter can be any valid LDAP filter.
$ ipa permission-add "manage Windows groups" --filter="(!(objectclass=posixgroup))" --permissions=write --attrs=description
NOTE
The permission-add command does not validate the given LDAP filter. Verify that the filterreturns the expected results before configuring the permission.

Chapter 16. Configuration: Defining Access Control within IPA
330
Example 16.2. Adding a Permission for a SubtreeAll a subtree filter requires is a DN within the directory. Since IPA uses a simplified, flat directorytree structure, this can be used to target some types of entries, like automount locations, which arecontainers or parent entries for other configuration.
$ ipa permission-add "manage automount locations" --subtree="ldap://ldap.example.com:389/cn=automount,dc=example,dc=com" --permissions=write --attrs=automountmapname,automountkey,automountInformation
Example 16.3. Adding a Permission Based on Object TypeThere seven object types that can be used to form a permission:
• user
• group
• host
• service
• hostgroup
• netgroup
• dnsrecord
Each type has its own set of allowed attributes, in a comma-separated list.
$ ipa permission-add "manage service" --permissions=all --type=service --attrs=krbprincipalkey,krbprincipalname,managedby
The attributes (--attrs) must exist and be allowed attributes for the given object type, or thepermission operation fails with schema syntax errors.
16.4.3. Creating New Privileges
16.4.3.1. Creating New Privileges from the Web UI1. Open the IPA Server tab in the top menu, and select the Role Based Access Control subtab.
2. Select the Privileges task link.
3. Click the Add link at the top of the list of privileges.
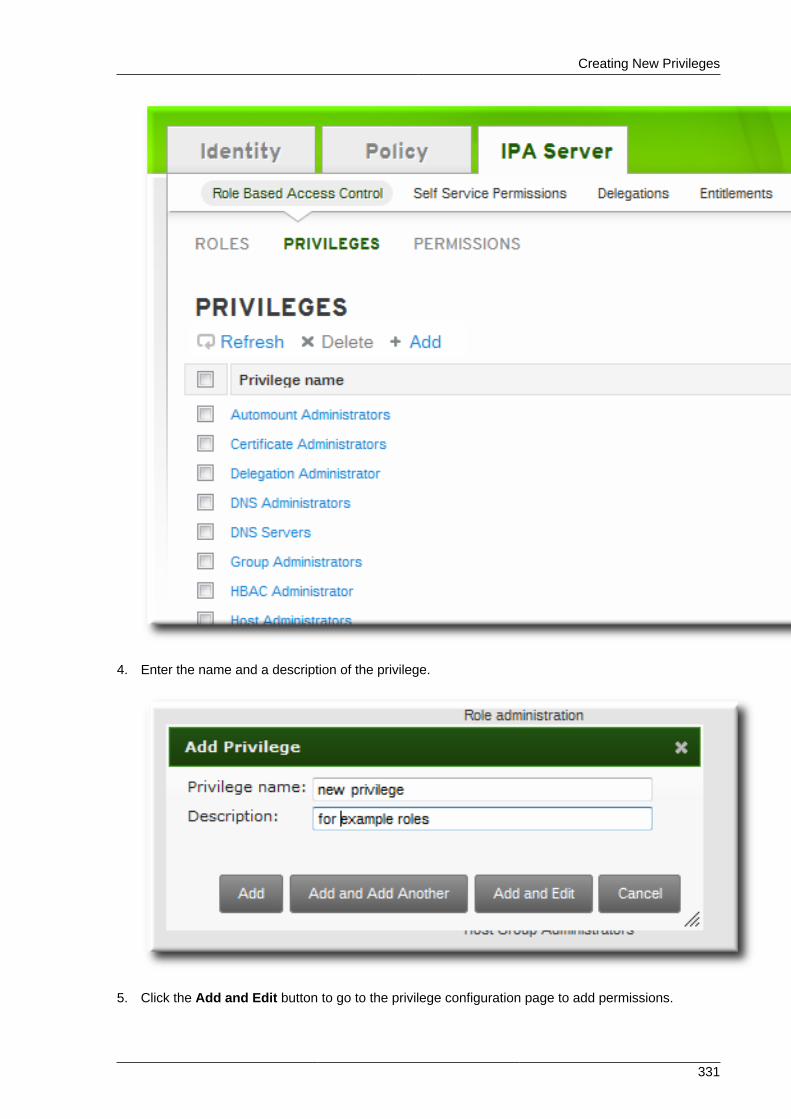
Creating New Privileges
331
4. Enter the name and a description of the privilege.
5. Click the Add and Edit button to go to the privilege configuration page to add permissions.

Chapter 16. Configuration: Defining Access Control within IPA
332
6. Select the Permissions tab.
7. Click the Add link at the top of the list of permissions to add permission to the privilege.
8. Click the checkbox by the names of the permissions to add, and click the right arrows button, >>,to move the permissions to the selection box.
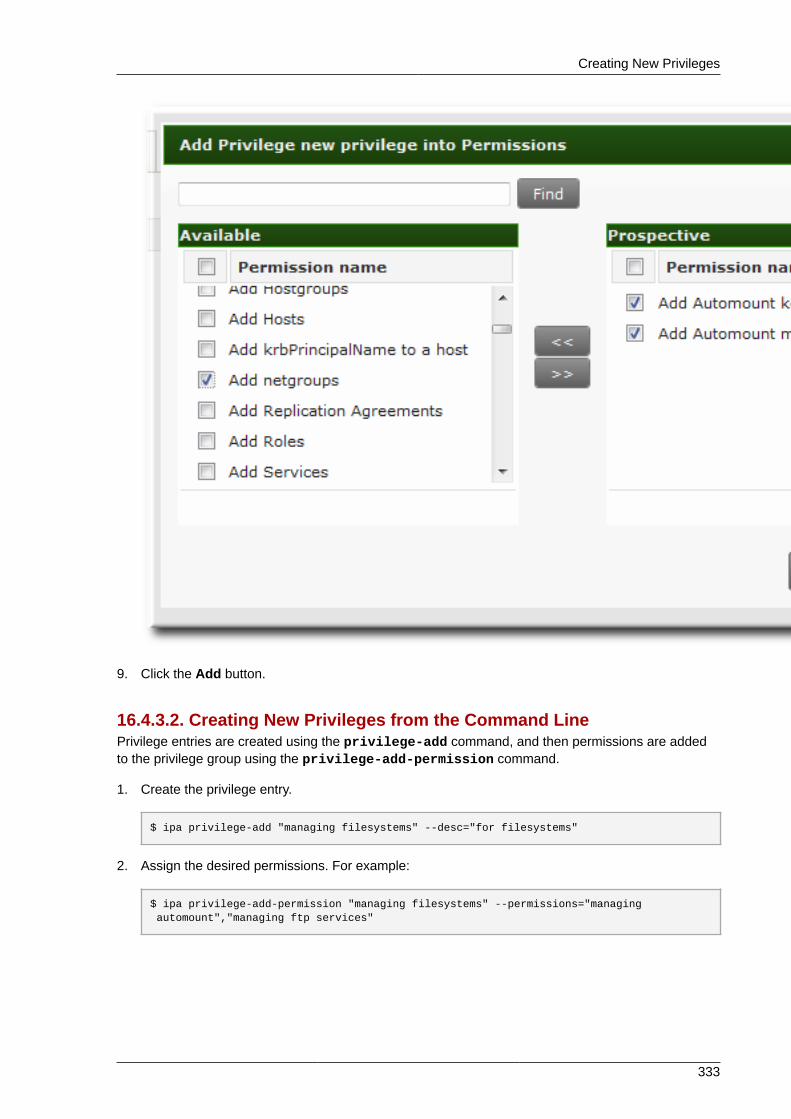
Creating New Privileges
333
9. Click the Add button.
16.4.3.2. Creating New Privileges from the Command LinePrivilege entries are created using the privilege-add command, and then permissions are addedto the privilege group using the privilege-add-permission command.
1. Create the privilege entry.
$ ipa privilege-add "managing filesystems" --desc="for filesystems"
2. Assign the desired permissions. For example:
$ ipa privilege-add-permission "managing filesystems" --permissions="managing automount","managing ftp services"

334

Chapter 17.
335
Configuration: Configuring the IPAServerThe IPA servers and backend services are configured with default settings that are applicable in mostenvironments.
There are some configuration areas where the IPA server configuration can be tweaked to improvesecurity or performance in certain situations.
This chapter covers information about the IPA configuration, including files and logs used by the IPAserver, and procedures for updating the IPA server configuration itself.
17.1. Identity Management Files and LogsIdentity Management is a unifying framework that combines disparate Linux services into a singlemanagement context. However, the underlying technologies — such as Kerberos, DNS, 389 DirectoryServer, and Dogtag Certificate System — retain their own configuration files and log files. IdentityManagement directly manages each of these elements through their own configuration files and tools.
This section covers the directories, files, and logs used specifically by IPA. For more information aboutthe configuration files or logs for a specific server used within IPA, see the product documentation.
17.1.1. A Reference of IPA Server Configuration Files andDirectories
Table 17.1. IPA Server Configuration Files and Directories
Directory or File Description
Server Configuration
/etc/ipa The main IPA configuration directory.
/etc/ipa/default.conf The primary configuration file for IPA.
/etc/ipa/ca.crt The CA certificate issued by the IPA server's CA.
~/.ipa/ A user-specific IPA directory that is createdon the local system in the system user's homedirectory the first time the user runs an IPAcommand.
IPA Logs
~/.ipa/log/cli.log The log file for all XML-RPC calls and responsesby the IPA command-line tools. This is created inthe home directory for the system user who runsthe tools, who may have a different name thanthe IPA user.
/var/log/ipaclient-install.log The installation log for the client service.
/var/log/ipaserver-install.log The installation log for the IPA server.
System Services
/etc/rc.d/init.d/ipa The IPA server init script.
/etc/rc.d/init.d/ipa_kpasswd The init script for the IPA control daemon forKerberos passwords.
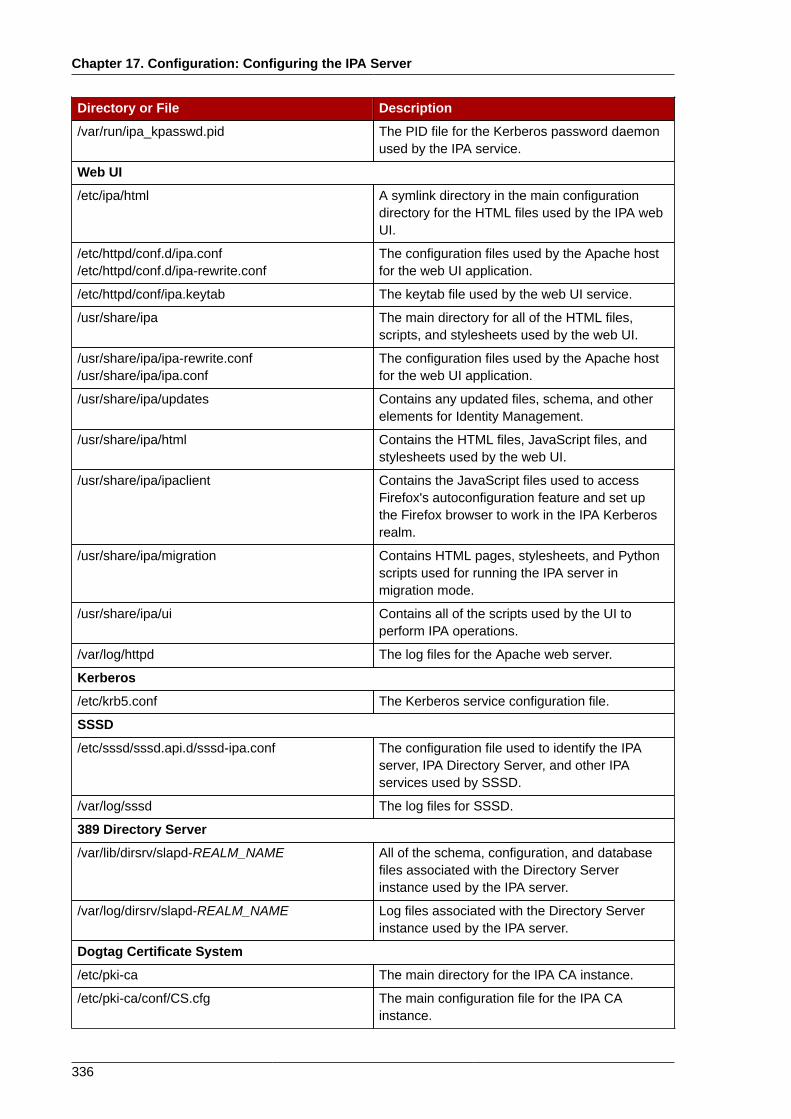
Chapter 17. Configuration: Configuring the IPA Server
336
Directory or File Description
/var/run/ipa_kpasswd.pid The PID file for the Kerberos password daemonused by the IPA service.
Web UI
/etc/ipa/html A symlink directory in the main configurationdirectory for the HTML files used by the IPA webUI.
/etc/httpd/conf.d/ipa.conf/etc/httpd/conf.d/ipa-rewrite.conf
The configuration files used by the Apache hostfor the web UI application.
/etc/httpd/conf/ipa.keytab The keytab file used by the web UI service.
/usr/share/ipa The main directory for all of the HTML files,scripts, and stylesheets used by the web UI.
/usr/share/ipa/ipa-rewrite.conf/usr/share/ipa/ipa.conf
The configuration files used by the Apache hostfor the web UI application.
/usr/share/ipa/updates Contains any updated files, schema, and otherelements for Identity Management.
/usr/share/ipa/html Contains the HTML files, JavaScript files, andstylesheets used by the web UI.
/usr/share/ipa/ipaclient Contains the JavaScript files used to accessFirefox's autoconfiguration feature and set upthe Firefox browser to work in the IPA Kerberosrealm.
/usr/share/ipa/migration Contains HTML pages, stylesheets, and Pythonscripts used for running the IPA server inmigration mode.
/usr/share/ipa/ui Contains all of the scripts used by the UI toperform IPA operations.
/var/log/httpd The log files for the Apache web server.
Kerberos
/etc/krb5.conf The Kerberos service configuration file.
SSSD
/etc/sssd/sssd.api.d/sssd-ipa.conf The configuration file used to identify the IPAserver, IPA Directory Server, and other IPAservices used by SSSD.
/var/log/sssd The log files for SSSD.
389 Directory Server
/var/lib/dirsrv/slapd-REALM_NAME All of the schema, configuration, and databasefiles associated with the Directory Serverinstance used by the IPA server.
/var/log/dirsrv/slapd-REALM_NAME Log files associated with the Directory Serverinstance used by the IPA server.
Dogtag Certificate System
/etc/pki-ca The main directory for the IPA CA instance.
/etc/pki-ca/conf/CS.cfg The main configuration file for the IPA CAinstance.
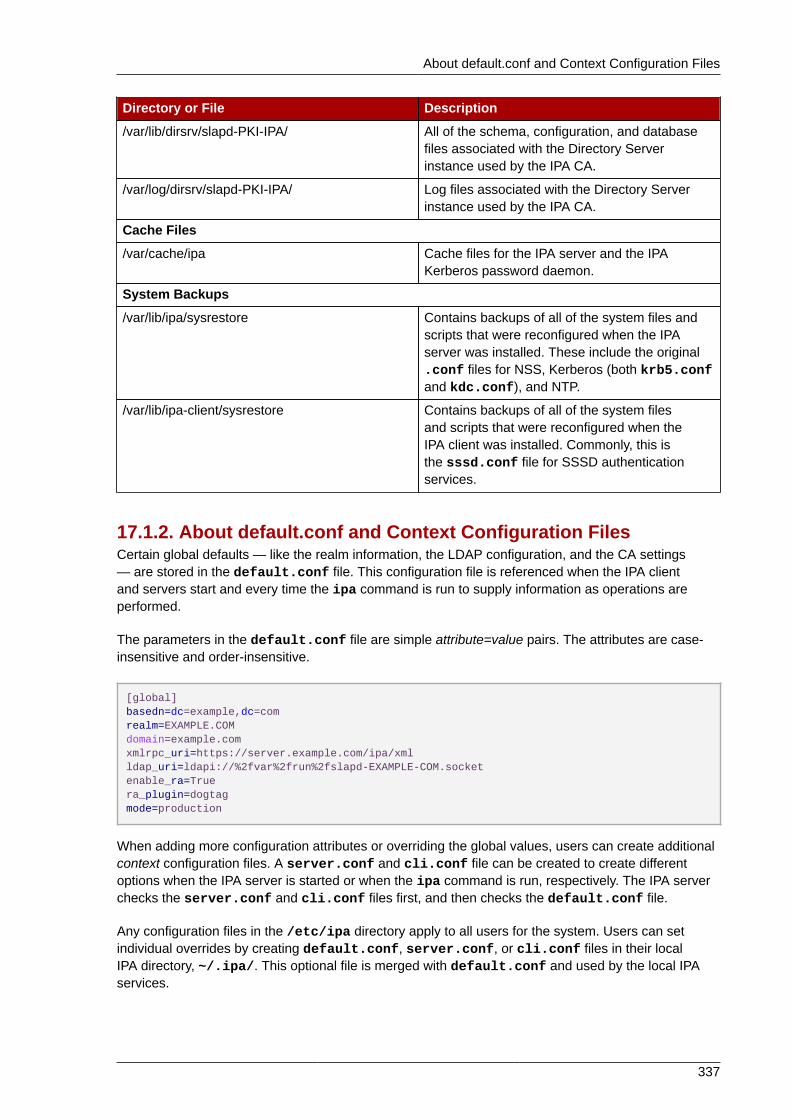
About default.conf and Context Configuration Files
337
Directory or File Description
/var/lib/dirsrv/slapd-PKI-IPA/ All of the schema, configuration, and databasefiles associated with the Directory Serverinstance used by the IPA CA.
/var/log/dirsrv/slapd-PKI-IPA/ Log files associated with the Directory Serverinstance used by the IPA CA.
Cache Files
/var/cache/ipa Cache files for the IPA server and the IPAKerberos password daemon.
System Backups
/var/lib/ipa/sysrestore Contains backups of all of the system files andscripts that were reconfigured when the IPAserver was installed. These include the original.conf files for NSS, Kerberos (both krb5.confand kdc.conf), and NTP.
/var/lib/ipa-client/sysrestore Contains backups of all of the system filesand scripts that were reconfigured when theIPA client was installed. Commonly, this isthe sssd.conf file for SSSD authenticationservices.
17.1.2. About default.conf and Context Configuration FilesCertain global defaults — like the realm information, the LDAP configuration, and the CA settings— are stored in the default.conf file. This configuration file is referenced when the IPA clientand servers start and every time the ipa command is run to supply information as operations areperformed.
The parameters in the default.conf file are simple attribute=value pairs. The attributes are case-insensitive and order-insensitive.
[global]basedn=dc=example,dc=comrealm=EXAMPLE.COMdomain=example.comxmlrpc_uri=https://server.example.com/ipa/xmlldap_uri=ldapi://%2fvar%2frun%2fslapd-EXAMPLE-COM.socketenable_ra=Truera_plugin=dogtagmode=production
When adding more configuration attributes or overriding the global values, users can create additionalcontext configuration files. A server.conf and cli.conf file can be created to create differentoptions when the IPA server is started or when the ipa command is run, respectively. The IPA serverchecks the server.conf and cli.conf files first, and then checks the default.conf file.
Any configuration files in the /etc/ipa directory apply to all users for the system. Users can setindividual overrides by creating default.conf, server.conf, or cli.conf files in their localIPA directory, ~/.ipa/. This optional file is merged with default.conf and used by the local IPAservices.
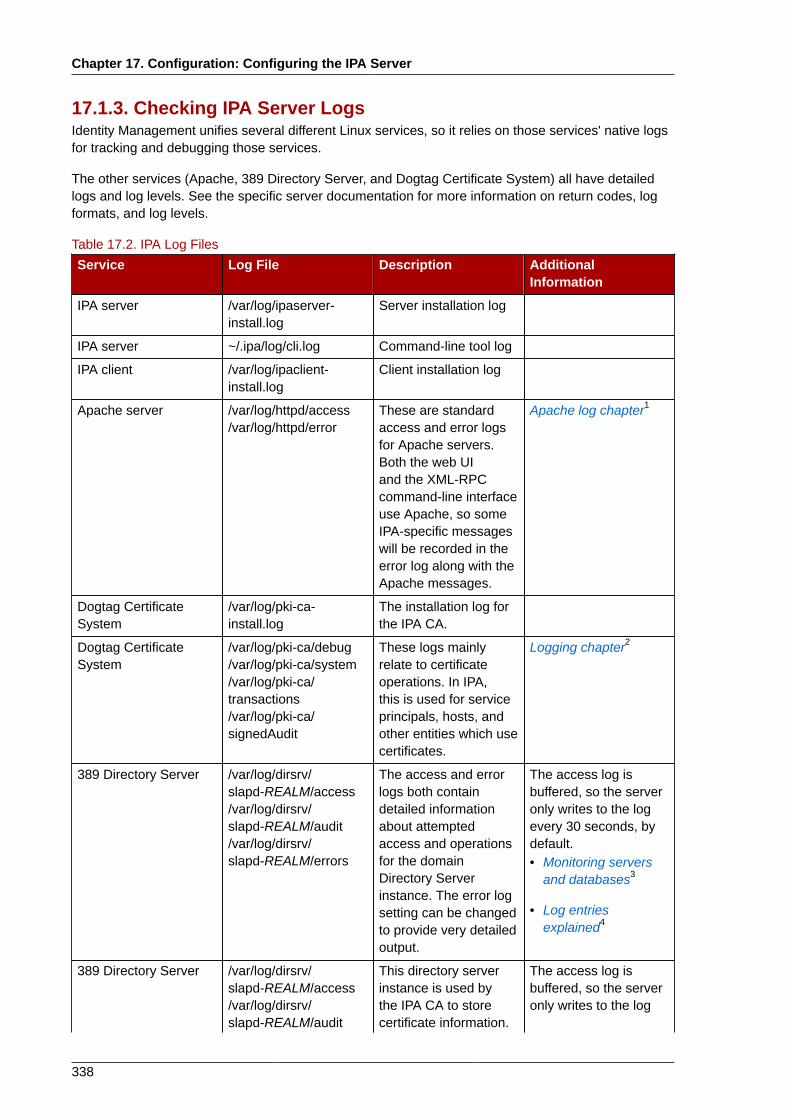
Chapter 17. Configuration: Configuring the IPA Server
338
17.1.3. Checking IPA Server LogsIdentity Management unifies several different Linux services, so it relies on those services' native logsfor tracking and debugging those services.
The other services (Apache, 389 Directory Server, and Dogtag Certificate System) all have detailedlogs and log levels. See the specific server documentation for more information on return codes, logformats, and log levels.
Table 17.2. IPA Log Files
Service Log File Description AdditionalInformation
IPA server /var/log/ipaserver-install.log
Server installation log
IPA server ~/.ipa/log/cli.log Command-line tool log
IPA client /var/log/ipaclient-install.log
Client installation log
Apache server /var/log/httpd/access/var/log/httpd/error
These are standardaccess and error logsfor Apache servers.Both the web UIand the XML-RPCcommand-line interfaceuse Apache, so someIPA-specific messageswill be recorded in theerror log along with theApache messages.
Apache log chapter1
Dogtag CertificateSystem
/var/log/pki-ca-install.log
The installation log forthe IPA CA.
Dogtag CertificateSystem
/var/log/pki-ca/debug/var/log/pki-ca/system/var/log/pki-ca/transactions/var/log/pki-ca/signedAudit
These logs mainlyrelate to certificateoperations. In IPA,this is used for serviceprincipals, hosts, andother entities which usecertificates.
Logging chapter2
389 Directory Server /var/log/dirsrv/slapd-REALM/access/var/log/dirsrv/slapd-REALM/audit/var/log/dirsrv/slapd-REALM/errors
The access and errorlogs both containdetailed informationabout attemptedaccess and operationsfor the domainDirectory Serverinstance. The error logsetting can be changedto provide very detailedoutput.
The access log isbuffered, so the serveronly writes to the logevery 30 seconds, bydefault.• Monitoring servers
and databases3
• Log entriesexplained4
389 Directory Server /var/log/dirsrv/slapd-REALM/access/var/log/dirsrv/slapd-REALM/audit
This directory serverinstance is used bythe IPA CA to storecertificate information.
The access log isbuffered, so the serveronly writes to the log
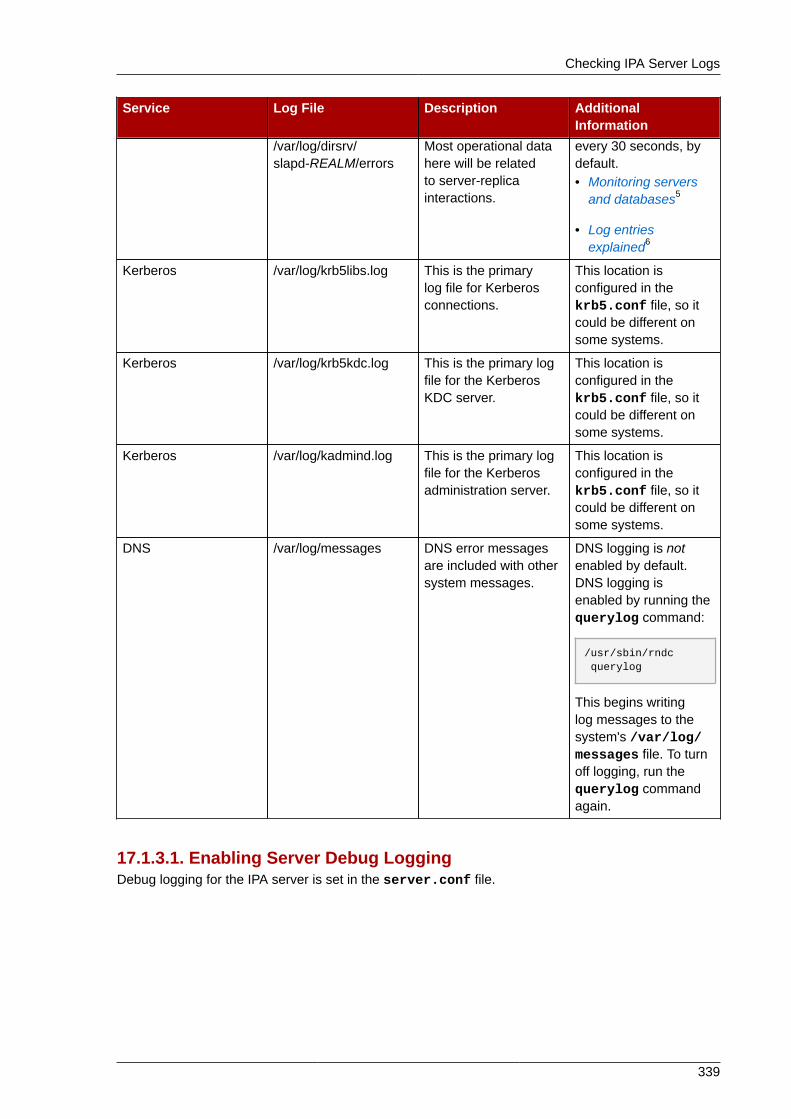
Checking IPA Server Logs
339
Service Log File Description AdditionalInformation
/var/log/dirsrv/slapd-REALM/errors
Most operational datahere will be relatedto server-replicainteractions.
every 30 seconds, bydefault.• Monitoring servers
and databases5
• Log entriesexplained6
Kerberos /var/log/krb5libs.log This is the primarylog file for Kerberosconnections.
This location isconfigured in thekrb5.conf file, so itcould be different onsome systems.
Kerberos /var/log/krb5kdc.log This is the primary logfile for the KerberosKDC server.
This location isconfigured in thekrb5.conf file, so itcould be different onsome systems.
Kerberos /var/log/kadmind.log This is the primary logfile for the Kerberosadministration server.
This location isconfigured in thekrb5.conf file, so itcould be different onsome systems.
DNS /var/log/messages DNS error messagesare included with othersystem messages.
DNS logging is notenabled by default.DNS logging isenabled by running thequerylog command:
/usr/sbin/rndc querylog
This begins writinglog messages to thesystem's /var/log/messages file. To turnoff logging, run thequerylog commandagain.
17.1.3.1. Enabling Server Debug LoggingDebug logging for the IPA server is set in the server.conf file.
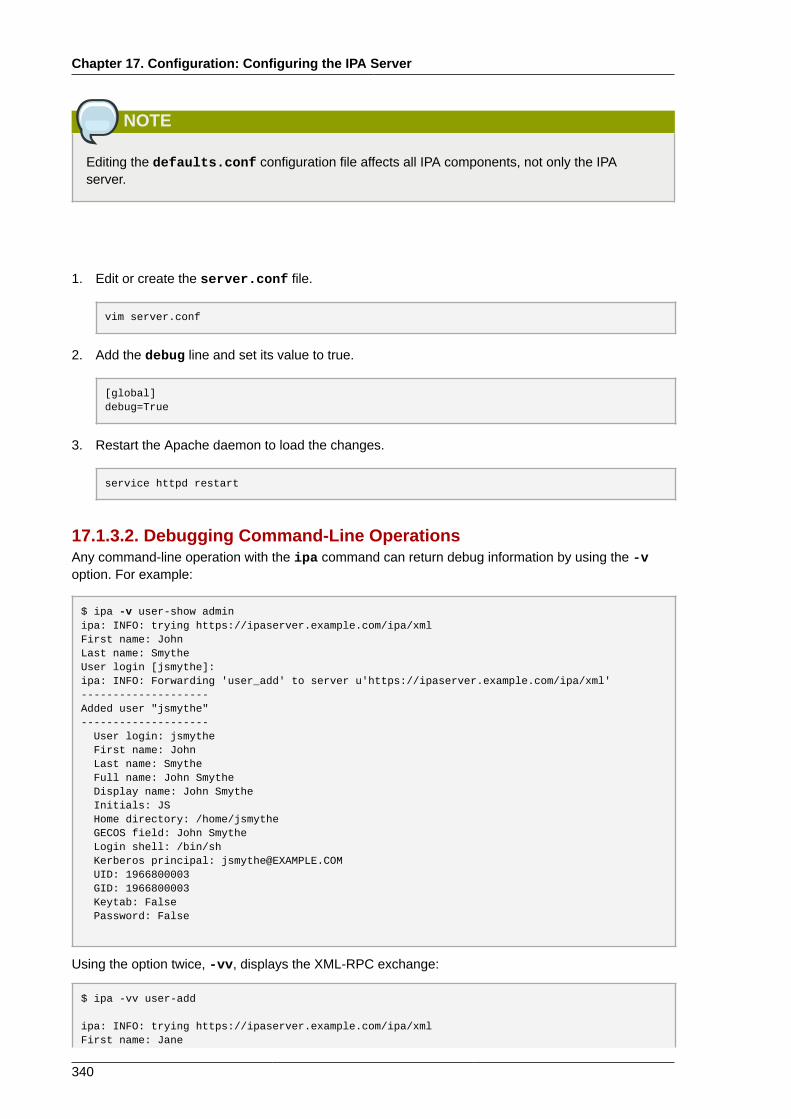
Chapter 17. Configuration: Configuring the IPA Server
340
NOTE
Editing the defaults.conf configuration file affects all IPA components, not only the IPAserver.
1. Edit or create the server.conf file.
vim server.conf
2. Add the debug line and set its value to true.
[global]debug=True
3. Restart the Apache daemon to load the changes.
service httpd restart
17.1.3.2. Debugging Command-Line OperationsAny command-line operation with the ipa command can return debug information by using the -voption. For example:
$ ipa -v user-show adminipa: INFO: trying https://ipaserver.example.com/ipa/xmlFirst name: JohnLast name: SmytheUser login [jsmythe]:ipa: INFO: Forwarding 'user_add' to server u'https://ipaserver.example.com/ipa/xml'--------------------Added user "jsmythe"-------------------- User login: jsmythe First name: John Last name: Smythe Full name: John Smythe Display name: John Smythe Initials: JS Home directory: /home/jsmythe GECOS field: John Smythe Login shell: /bin/sh Kerberos principal: [email protected] UID: 1966800003 GID: 1966800003 Keytab: False Password: False
Using the option twice, -vv, displays the XML-RPC exchange:
$ ipa -vv user-add ipa: INFO: trying https://ipaserver.example.com/ipa/xmlFirst name: Jane
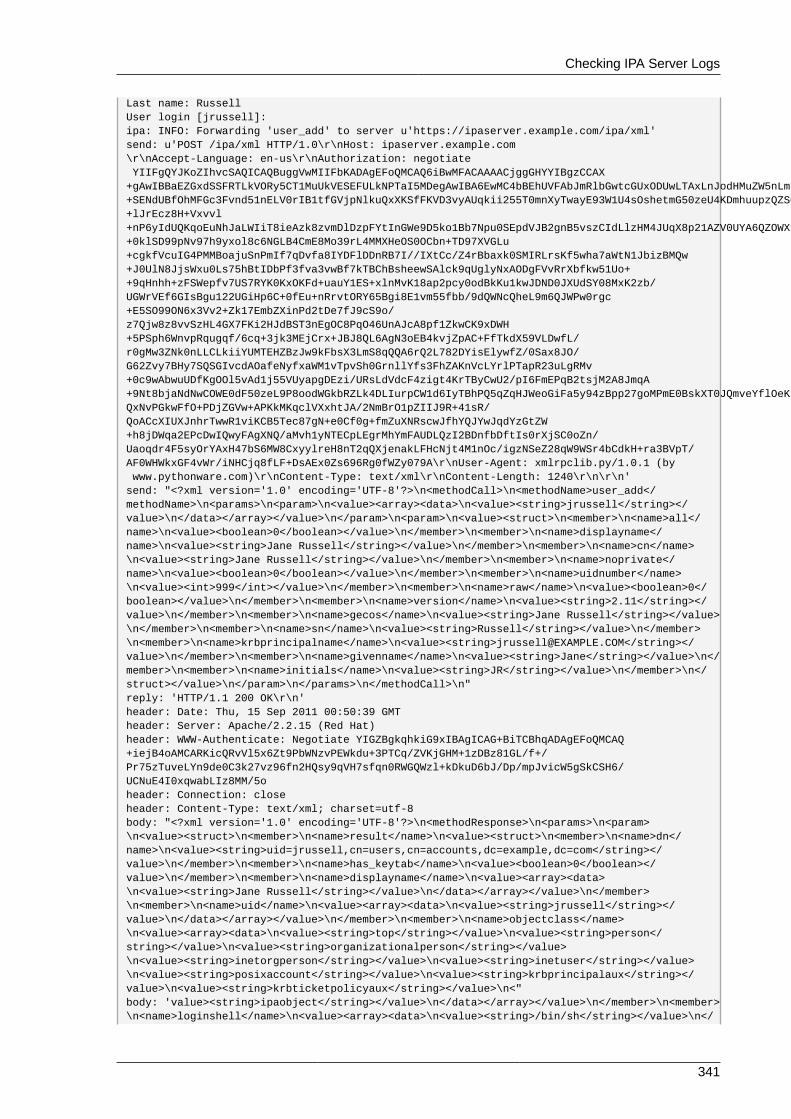
Checking IPA Server Logs
341
Last name: RussellUser login [jrussell]:ipa: INFO: Forwarding 'user_add' to server u'https://ipaserver.example.com/ipa/xml'send: u'POST /ipa/xml HTTP/1.0\r\nHost: ipaserver.example.com\r\nAccept-Language: en-us\r\nAuthorization: negotiate YIIFgQYJKoZIhvcSAQICAQBuggVwMIIFbKADAgEFoQMCAQ6iBwMFACAAAACjggGHYYIBgzCCAX+gAwIBBaEZGxdSSFRTLkVORy5CT1MuUkVESEFULkNPTaI5MDegAwIBA6EwMC4bBEhUVFAbJmRlbGwtcGUxODUwLTAxLnJodHMuZW5nLmJvcy5yZWRoYXQuY29to4IBIDCCARygAwIBEqEDAgECooIBDgSCAQpV2YEWv03X+SENdUBfOhMFGc3Fvnd51nELV0rIB1tfGVjpNlkuQxXKSfFKVD3vyAUqkii255T0mnXyTwayE93W1U4sOshetmG50zeU4KDmhuupzQZSCb5xB0KPU4HMDvP1UnDFJUGCk9tcqDJiYE+lJrEcz8H+Vxvvl+nP6yIdUQKqoEuNhJaLWIiT8ieAzk8zvmDlDzpFYtInGWe9D5ko1Bb7Npu0SEpdVJB2gnB5vszCIdLlzHM4JUqX8p21AZV0UYA6QZOWX9OXhqHdElKcuHCN2s9FBRoFYK83gf1voS7xSFlzZaFsEGHNmdA0qXbzREKGqUr8fmWmNvBGpDiR2ILQep09lL56JqSCA8owggPGoAMCARKiggO9BIIDuarbB67zjmBu9Ax2K+0klSD99pNv97h9yxol8c6NGLB4CmE8Mo39rL4MMXHeOS0OCbn+TD97XVGLu+cgkfVcuIG4PMMBoajuSnPmIf7qDvfa8IYDFlDDnRB7I//IXtCc/Z4rBbaxk0SMIRLrsKf5wha7aWtN1JbizBMQw+J0UlN8JjsWxu0Ls75hBtIDbPf3fva3vwBf7kTBChBsheewSAlck9qUglyNxAODgFVvRrXbfkw51Uo++9qHnhh+zFSWepfv7US7RYK0KxOKFd+uauY1ES+xlnMvK18ap2pcy0odBkKu1kwJDND0JXUdSY08MxK2zb/UGWrVEf6GIsBgu122UGiHp6C+0fEu+nRrvtORY65Bgi8E1vm55fbb/9dQWNcQheL9m6QJWPw0rgc+E5SO99ON6x3Vv2+Zk17EmbZXinPd2tDe7fJ9cS9o/z7Qjw8z8vvSzHL4GX7FKi2HJdBST3nEgOC8PqO46UnAJcA8pf1ZkwCK9xDWH+5PSph6WnvpRqugqf/6cq+3jk3MEjCrx+JBJ8QL6AgN3oEB4kvjZpAC+FfTkdX59VLDwfL/r0gMw3ZNk0nLLCLkiiYUMTEHZBzJw9kFbsX3LmS8qQQA6rQ2L782DYisElywfZ/0Sax8JO/G62Zvy7BHy7SQSGIvcdAOafeNyfxaWM1vTpvSh0GrnllYfs3FhZAKnVcLYrlPTapR23uLgRMv+0c9wAbwuUDfKgOOl5vAd1j55VUyapgDEzi/URsLdVdcF4zigt4KrTByCwU2/pI6FmEPqB2tsjM2A8JmqA+9Nt8bjaNdNwCOWE0dF50zeL9P8oodWGkbRZLk4DLIurpCW1d6IyTBhPQ5qZqHJWeoGiFa5y94zBpp27goMPmE0BskXT0JQmveYflOeKEMSzyiWPL2mwi7KEMtfgCpwTIGP2LRE/QxNvPGkwFfO+PDjZGVw+APKkMKqclVXxhtJA/2NmBrO1pZIIJ9R+41sR/QoACcXIUXJnhrTwwR1viKCB5Tec87gN+e0Cf0g+fmZuXNRscwJfhYQJYwJqdYzGtZW+h8jDWqa2EPcDwIQwyFAgXNQ/aMvh1yNTECpLEgrMhYmFAUDLQzI2BDnfbDftIs0rXjSC0oZn/Uaoqdr4F5syOrYAxH47bS6MW8CxyylreH8nT2qQXjenakLFHcNjt4M1nOc/igzNSeZ28qW9WSr4bCdkH+ra3BVpT/AF0WHWkxGF4vWr/iNHCjq8fLF+DsAEx0Zs696Rg0fWZy079A\r\nUser-Agent: xmlrpclib.py/1.0.1 (by www.pythonware.com)\r\nContent-Type: text/xml\r\nContent-Length: 1240\r\n\r\n'send: "<?xml version='1.0' encoding='UTF-8'?>\n<methodCall>\n<methodName>user_add</methodName>\n<params>\n<param>\n<value><array><data>\n<value><string>jrussell</string></value>\n</data></array></value>\n</param>\n<param>\n<value><struct>\n<member>\n<name>all</name>\n<value><boolean>0</boolean></value>\n</member>\n<member>\n<name>displayname</name>\n<value><string>Jane Russell</string></value>\n</member>\n<member>\n<name>cn</name>\n<value><string>Jane Russell</string></value>\n</member>\n<member>\n<name>noprivate</name>\n<value><boolean>0</boolean></value>\n</member>\n<member>\n<name>uidnumber</name>\n<value><int>999</int></value>\n</member>\n<member>\n<name>raw</name>\n<value><boolean>0</boolean></value>\n</member>\n<member>\n<name>version</name>\n<value><string>2.11</string></value>\n</member>\n<member>\n<name>gecos</name>\n<value><string>Jane Russell</string></value>\n</member>\n<member>\n<name>sn</name>\n<value><string>Russell</string></value>\n</member>\n<member>\n<name>krbprincipalname</name>\n<value><string>[email protected]</string></value>\n</member>\n<member>\n<name>givenname</name>\n<value><string>Jane</string></value>\n</member>\n<member>\n<name>initials</name>\n<value><string>JR</string></value>\n</member>\n</struct></value>\n</param>\n</params>\n</methodCall>\n"reply: 'HTTP/1.1 200 OK\r\n'header: Date: Thu, 15 Sep 2011 00:50:39 GMTheader: Server: Apache/2.2.15 (Red Hat)header: WWW-Authenticate: Negotiate YIGZBgkqhkiG9xIBAgICAG+BiTCBhqADAgEFoQMCAQ+iejB4oAMCARKicQRvVl5x6Zt9PbWNzvPEWkdu+3PTCq/ZVKjGHM+1zDBz81GL/f+/Pr75zTuveLYn9de0C3k27vz96fn2HQsy9qVH7sfqn0RWGQWzl+kDkuD6bJ/Dp/mpJvicW5gSkCSH6/UCNuE4I0xqwabLIz8MM/5oheader: Connection: closeheader: Content-Type: text/xml; charset=utf-8body: "<?xml version='1.0' encoding='UTF-8'?>\n<methodResponse>\n<params>\n<param>\n<value><struct>\n<member>\n<name>result</name>\n<value><struct>\n<member>\n<name>dn</name>\n<value><string>uid=jrussell,cn=users,cn=accounts,dc=example,dc=com</string></value>\n</member>\n<member>\n<name>has_keytab</name>\n<value><boolean>0</boolean></value>\n</member>\n<member>\n<name>displayname</name>\n<value><array><data>\n<value><string>Jane Russell</string></value>\n</data></array></value>\n</member>\n<member>\n<name>uid</name>\n<value><array><data>\n<value><string>jrussell</string></value>\n</data></array></value>\n</member>\n<member>\n<name>objectclass</name>\n<value><array><data>\n<value><string>top</string></value>\n<value><string>person</string></value>\n<value><string>organizationalperson</string></value>\n<value><string>inetorgperson</string></value>\n<value><string>inetuser</string></value>\n<value><string>posixaccount</string></value>\n<value><string>krbprincipalaux</string></value>\n<value><string>krbticketpolicyaux</string></value>\n<"body: 'value><string>ipaobject</string></value>\n</data></array></value>\n</member>\n<member>\n<name>loginshell</name>\n<value><array><data>\n<value><string>/bin/sh</string></value>\n</

Chapter 17. Configuration: Configuring the IPA Server
342
data></array></value>\n</member>\n<member>\n<name>uidnumber</name>\n<value><array><data>\n<value><string>1966800004</string></value>\n</data></array></value>\n</member>\n<member>\n<name>initials</name>\n<value><array><data>\n<value><string>JR</string></value>\n</data></array></value>\n</member>\n<member>\n<name>gidnumber</name>\n<value><array><data>\n<value><string>1966800004</string></value>\n</data></array></value>\n</member>\n<member>\n<name>gecos</name>\n<value><array><data>\n<value><string>Jane Russell</string></value>\n</data></array></value>\n</member>\n<member>\n<name>sn</name>\n<value><array><data>\n<value><string>Russell</string></value>\n</data></array></value>\n</member>\n<member>\n<name>homedirectory</name>\n<value><array><data>\n<value><string>/home/jrussell</string></value>\n</data></array></value>\n</member>\n<member>\n<name>has_password</name>\n<value><boolean>0</'body: 'boolean></value>\n</member>\n<member>\n<name>krbprincipalname</name>\n<value><array><data>\n<value><string>[email protected]</string></value>\n</data></array></value>\n</member>\n<member>\n<name>givenname</name>\n<value><array><data>\n<value><string>Jane</string></value>\n</data></array></value>\n</member>\n<member>\n<name>cn</name>\n<value><array><data>\n<value><string>Jane Russell</string></value>\n</data></array></value>\n</member>\n<member>\n<name>ipauniqueid</name>\n<value><array><data>\n<value><string>bba27e6e-df34-11e0-a5f4-001143d2c060</string></value>\n</data></array></value>\n</member>\n</struct></value>\n</member>\n<member>\n<name>value</name>\n<value><string>jrussell</string></value>\n</member>\n<member>\n<name>summary</name>\n<value><string>Added user "jrussell"</string></value>\n</member>\n</struct></value>\n</param>\n</params>\n</methodResponse>\n'---------------------Added user "jrussell"--------------------- User login: jrussell First name: Jane Last name: Russell Full name: Jane Russell Display name: Jane Russell Initials: JR Home directory: /home/jrussell GECOS field: Jane Russell Login shell: /bin/sh Kerberos principal: [email protected] UID: 1966800004 GID: 1966800004 Keytab: False Password: False
IMPORTANT
The -v and -vv options are global options and must be used before the subcommand whenrunning ipa.
17.2. Disabling Anonymous BindsAccessing domain resources and running client tools always require Kerberos authentication.However, the backend LDAP directory used by the IPA server allows anonymous binds by default.This potentially opens up all of the domain configuration to unauthorized users, including informationabout users, machines, groups, services, netgroups, and DNS configuration.
It is possible to disable anonymous binds on the 389 Directory Server instance by using LDAP tools toreset the nsslapd-allow-anonymous-access attribute.
1. Change the nsslapd-allow-anonymous-access attribute to rootdse.
ldapmodify -x -D "cn=Directory Manager" -w secret -h server.example.com -p 389
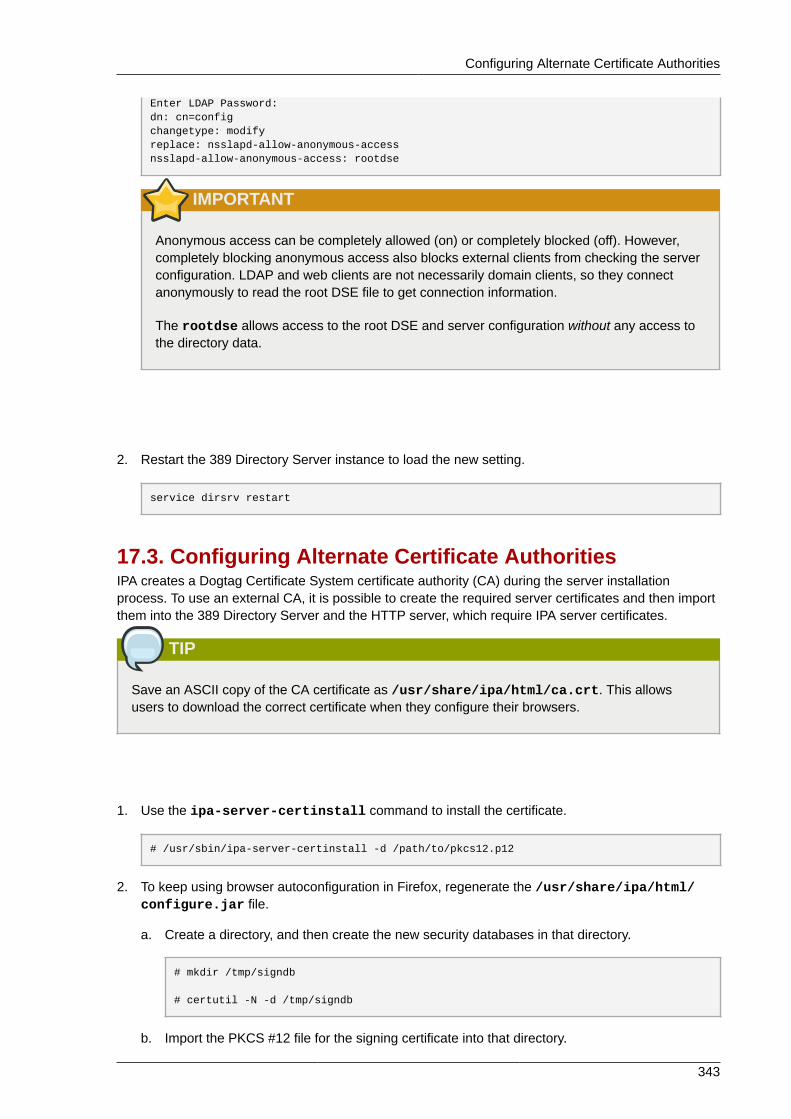
Configuring Alternate Certificate Authorities
343
Enter LDAP Password:dn: cn=configchangetype: modifyreplace: nsslapd-allow-anonymous-accessnsslapd-allow-anonymous-access: rootdse
IMPORTANT
Anonymous access can be completely allowed (on) or completely blocked (off). However,completely blocking anonymous access also blocks external clients from checking the serverconfiguration. LDAP and web clients are not necessarily domain clients, so they connectanonymously to read the root DSE file to get connection information.
The rootdse allows access to the root DSE and server configuration without any access tothe directory data.
2. Restart the 389 Directory Server instance to load the new setting.
service dirsrv restart
17.3. Configuring Alternate Certificate AuthoritiesIPA creates a Dogtag Certificate System certificate authority (CA) during the server installationprocess. To use an external CA, it is possible to create the required server certificates and then importthem into the 389 Directory Server and the HTTP server, which require IPA server certificates.
TIP
Save an ASCII copy of the CA certificate as /usr/share/ipa/html/ca.crt. This allowsusers to download the correct certificate when they configure their browsers.
1. Use the ipa-server-certinstall command to install the certificate.
# /usr/sbin/ipa-server-certinstall -d /path/to/pkcs12.p12
2. To keep using browser autoconfiguration in Firefox, regenerate the /usr/share/ipa/html/configure.jar file.
a. Create a directory, and then create the new security databases in that directory.
# mkdir /tmp/signdb
# certutil -N -d /tmp/signdb
b. Import the PKCS #12 file for the signing certificate into that directory.
Chapter 17. Configuration: Configuring the IPA Server
344
# pk12util -i /path/to/pkcs12.p12 -d /tmp/signdb
c. Make a temporary signing directory, and copy the IPA JavaScript file to that directory.
# mkdir /tmp/sign# cp /usr/share/ipa/html/preferences.html /tmp/sign
d. Use the object signing certificate to sign the JavaScript file and to regenerate theconfigure.jar file.
# signtool -d /tmp/signdb -k Signing_cert_nickname -Z /usr/share/ipa/html/configure.jar -e .html /tmp/sign
17.4. Configuring CRLs and OCSP RespondersA certificate is created with a validity period, meaning it has a point where it expires and is no longervalid. The expiration date is contained in the certificate itself, so a client always checks the validityperiod in the certificate to see if the certificate is still valid.
However, a certificate can also be revoked before its validity period is up, but this information isnot contained in the certificate. A CA publishes a certificate revocation list (CRL), which containsa complete list of every certificate that was issued by that CA and subsequently revoked. A clientcan check the CRL to see if a certificate within its validity period has been revoked and is, therefore,invalid.
Validity checks are performed using the online certificate status protocol (OCSP), which sends arequest to an OCSP responder. Each CA integrated with the IPA server uses an internal OCSPresponder, and any client which runs a validity check can check the IPA CA's internal OCSPresponder.
Every certificate issued by the IPA CA puts its OCSP responder service URL in the certificate. Forexample:
http://ipaserver.example.com:9180/ca/ocsp
NOTE
For the IPA OCSP responder to be available, port 9180 needs to be open in the firewall.
17.4.1. Using an OSCP Responder with SELinuxClients can use the Identity Management OCSP responder to check certificate validity or to retrieveCRLs. A client can be a number of different services, but is most frequently an Apache server and themod_revocator module (which handles CRL and OCSP operations).
The Identity Management CA has an OCSP responder listening over port 9180, which is also the portavailable for CRL retrieval. This port is protected by default SELinux policies to prevent unauthorizedaccess. If an Apache server attempts to connect to the OCSP port, then it may be denied access bySELinux.
Changing the CRL Update Interval
345
The Apache server, on the local machine, must be granted access to port 9180 for it to be able toconnect to the Identity Management OCSP responder. There are two ways to work around this bychanging the SELinux policies:
• Edit the SELinux policy to allow Apache servers using the mod_revocator module to connect to port9180:
semodule -i revoker.pp
• Generate a new SELinux policy to allow access based on the SELinux error logs for themod_revocator connection attempt.
audit2allow -a -M revoker
17.4.2. Changing the CRL Update IntervalThe CRL file is automatically generated by the Dogtag Certificate System CA every four hours. Thisinterval can be changed by editing the Dogtag Certificate System configuration.
1. Stop the CA server.
service pki-ca stop
2. Open the CS.cfg file.
vim /etc/pki-ca/CS.cfg
3. Change the ca.crl.MasterCRL.autoUpdateInterval to the new interval setting.
4. Restart the CA server.
service pki-ca start
17.4.3. Changing the OCSP Responder LocationEach IPA server generates its own CRL. Likewise, each IPA server uses its own OCSP responder,with its own OCSP responder URL in the certificates it issues.
A DNS CNAME can be used by IPA clients, and then from there be redirected to the appropriate IPAserver OCSP responder.
1. Open the certificate profile.
vim /var/lib/pki-ca/profiles/ca/caIPAserviceCert.cfg
2. Change thepolicyset.serverCertSet.9.default.params.crlDistPointsPointName_0parameter to the DNS CNAME hostname.
3. Restart the CA server.
service pki-ca restart
Chapter 17. Configuration: Configuring the IPA Server
346
That change must be made on every IPA server, with the crlDistPointsPointName_0 parameterset to the same hostname.
17.5. Setting an IPA Server as an Apache Virtual HostIf a standard Apache instance is already running on port 80, then the IPA server can be configured torun on a secondary port, such as port 8089.
NOTE
In this configuration, IPA uses standard HTTP, not a secure connection using SSL.
NOTE
Do not use port 8080. This port is used by the IPA web UI.
1. Log in as the root user.
2. Edit the /etc/httpd/conf.d/ipa.conf file so that it is formatted as an Apache virtual host.Add three lines to the beginning of the file to set the new port number for the IPA web service andto create the root <VirtualHost> element.
Listen 8089NameVirtualHost *:8089<VirtualHost *:8089>
3. Close the <VirtualHost> element by adding this line to the end of the file:
</VirtualHost>
4. Comment out the rewrite rules from the /etc/httpd/conf.d/ipa.conf file:
----------------------------------------------------------------------# Redirect to the fully-qualified hostname. Not redirecting to secure# port so configuration files can be retrieved without requiring SSL.RewriteCond %{HTTP_HOST} !^host.foo.com$ [NC]RewriteRule ^/(.*) http://host.foo.com/$1 [L,R=301]
# Redirect to the secure port if not displaying an error or retrieving# configuration.RewriteCond %{SERVER_PORT} !^443$RewriteCond %{REQUEST_URI} !^/(errors|config|favicon.ico)RewriteRule ^/(.*) https://host.foo.com/$1 [L,R=301,NC]---------------------------------------------------------------------
5. Restart the httpd service.
# service httpd reload
Setting DNS Entries for Multi-Homed Servers
347
17.6. Setting DNS Entries for Multi-Homed ServersSome server machines may support multiple network interface cards (NICs). Multi-homed machinestypically have multiple IPs, all assigned to the same hostname. This works fine in IPA most of the timebecause it listens on all available interfaces, except localhost. For a server to be available through anyNIC, edit the DNS zone file and add entries for each IP address. For example:
ipaserver IN A 192.168.1.100ipaserver IN A 192.168.1.101ipaserver IN A 192.168.1.102
17.7. Managing Replication Agreements Between IPAServersInformation is shared between the IPA servers and replicas using multi-master replication. What thismeans is that servers and replicas all receive updates and, therefore, are data masters. The domaininformation is copied between the servers and replicas using replication.
As replicas are added to the domain, mutual replication agreements are automatically createdbetween the replica and the server it is based on. Additional replication agreements can be createdbetween other replicas and servers or the configuration of the replication agreement can be changedusing the ipa-replica-manage command.
When a replica is created, the replica install script creates two replication agreements: one going fromthe master server to the replica and one going from the replica to the master server.

Chapter 17. Configuration: Configuring the IPA Server
348
Figure 17.1. Server and Replica Agreements
As more replicas and servers are added to the domain, there can be replicas and servers that havereplication agreements to other servers and replicas but not between each other. For example, the firstIPA server is Server A. Then, the admin creates Replica B, and the install script creates a Server A =>Replica B replication agreement and a Replica B => Server A replication agreement. Next, the admincreates Replica C based on Server A. The install script creates a Server A => Replica C replicationagreement and a Replica C => Server A replication agreement. Replica B and Replica C both havereplication agreements with Server A — but they do not have agreements with each other. For dataavailability, consistency, failover tolerance, and performance, it can be beneficial to create a pair ofreplication agreements between Replica B and Replica C, even though their data will eventually bereplicated over to each other through replication with Server A.
17.7.1. Listing Replication AgreementsThe ipa-replica-manage command can list all of the servers and replicas in the replicationtopology, using the list command:
# ipa-replica-manage listsrv1.example.comsrv2.example.comsrv3.example.comsrv4.example.com
After getting the server/replica list, then it is possible to list the replication agreements for the server.These are the other servers/replicas to which the specified server sends updates.

Creating and Removing Replication Agreements
349
# ipa-replica-manage list srv1.example.comsrv2.example.comsrv3.example.com
17.7.2. Creating and Removing Replication AgreementsReplication agreements are created by connecting one server to another server.
ipa-replica-manage server1 server2
If only one server is given, the replication agreements are created between the local host and thespecified server.
For example:
# ipa-replica-manage connect srv2.example.com srv4.example.com
Replication occurs over standard LDAP; to enable SSL, then include the CA certificate for the localhost (or the specified server1). The CA certificate is then installed in the remote server's certificatedatabase to enable TLS/SSL connections. For example:
# ipa-replica-manage connect --cacert=/etc/ipa/ca.crt srv2.example.com srv4.example.com
To remove a replication agreement between specific servers/replicas, use the disconnectcommand:
# ipa-replica-manage disconnect srv2.example.com srv4.example.com
Using the disconnect command removes that one replication agreement but leaves both theserver/replica instances in the overall replication topology. To remove a server entirely from the IPAreplication topology, with all its data, (and, functionally, removing it from the IPA domain as a server),use the del server:
# ipa-replica-manage del srv2.example.com
17.7.3. Forcing ReplicationReplication between servers and replicas occurs on a schedule. Although replication is frequent,there can be times when it is necessary to initiate the replication operation manually. For example, ifa server is being taken offline for maintenance, it is necessary to flush all of the queued replicationchanges out of its changelog before taking it down.
To initiate a replication update manually, use the force-sync command. The server which receivesthe update is the local server; the server which sends the updates is specified in the --from option.
# ipa-replica-manage force-sync --from srv1.example.com
17.7.4. Reinitializing IPA ServersWhen a replica is first created, the database of the master server is copied, completely, over to thereplica database. This process is called initialization. If a server/replica is offline for a long period of
Chapter 17. Configuration: Configuring the IPA Server
350
time or there is some kind of corruption in its database, then the server can be re-initialized, with afresh and updated set of data.
This is done using the re-initialize command. The target server being initialized is the local host.The server or replica from which to pull the data to initialize the local database is specified in the --from option:
# ipa-replica-manage re-initialize --from srv1.example.com
17.7.5. Resolving Replication ConflictsChanges — both for IPA domain data and for certificate and key data — are replicated between IPAservers and replicas (and, in similar paths, between IPA and Active Directory servers).
Even though replication operations are run continuously, there is a chance that changes can be madeon one IPA server at the same time different changes are made to the same entry on a different IPAserver. When replication begins to process those entries, the changes collide — this is a replicationconflict.
Every single directory modify operation is assigned a server-specific change state number (CSN) totrack how those modifications are propagated during replication. The CSN also contains a modifytimestamp. When there is a replication conflict, the timestamp is checked and the last change wins.
Simply accepting the most recent change is effective for resolving conflicts with attribute values.That method is too blunt for some types of operations, however, which affect the directory tree.Some operations, like modrdn, DN changes, or adding or removing parent and child entries, requireadministrator review before the conflict is resolved.
NOTE
Replication conflicts are resolved by editing the entries directory in the LDAP database.
When there is a replication conflict, both entries are added to the directory and are assigned ansds5ReplConflict attribute. This makes it easy to search for entries with a conflict:
ldapsearch -x -D "cn=directory manager" -w password -b "dc=example,dc=com" "nsds5ReplConflict=*" \* nsds5ReplConflict
17.7.5.1. Solving Naming Conflicts
When two entries are added to the IPA domain with the same DN, both entries are added to thedirectory, but they are renamed to use the nsuniqueid attribute as a naming attribute. For example:
nsuniqueid=0a950601-435311e0-86a2f5bd-3cd26022+uid=jsmith,cn=users,cn=accounts,dc=example,dc=com
Those entries can be searched for and displayed in the IPA CLI, but they cannot be edited or deleteduntil the conflict is resolved and the DN is updated.
To resolve the conflict:
1. Rename the entry using a different naming attribute, and keep the old RDN. For example:
Resolving Replication Conflicts
351
ldapmodify -x -D "cn=directory manager" -w secret -h ipaserver.example.com -p 389 dn: nsuniqueid=66446001-1dd211b2+uid=jsmith,cn=users,cn=accounts,dc=example,dc=com changetype: modrdn newrdn: cn=TempValue deleteoldrdn: 0
2. Remove the old RDN value of the naming attribute and the conflict marker attribute. For example:
ldapmodify -x -D "cn=directory manager" -w secret -h ipaserver.example.com -p 389 dn: cn=TempValue,cn=users,cn=accounts,dc=example,dc=com changetype: modify delete: uid dc: jsmith - delete: nsds5ReplConflict -
NOTE
The unique identifier attribute nsuniqueid cannot be deleted.
3. Rename the entry with the intended attribute-value pair. For example:
ldapmodify -x -D "cn=directory manager" -w secret -h ipaserver.example.com -p 389 dn: cn=TempValue,dc=example,dc=com changetype: modrdn newrdn: uid=jsmith deleteoldrdn: 1
Setting the value of the deleteoldrdn attribute to 1 deletes the temporary attribute-value paircn=TempValue. To keep this attribute, set the value of the deleteoldrdn attribute to 0.
17.7.5.2. Solving Orphan Entry ConflictsWhen a delete operation is replicated and the consumer server finds that the entry to be deleted haschild entries, the conflict resolution procedure creates a glue entry to avoid having orphaned entriesin the directory.
In the same way, when an add operation is replicated and the consumer server cannot find the parententry, the conflict resolution procedure creates a glue entry representing the parent so that the newentry is not an orphan entry.
Glue entries are temporary entries that include the object classes glue and extensibleObject.Glue entries can be created in several ways:
• If the conflict resolution procedure finds a deleted entry with a matching unique identifier, theglue entry is a resurrection of that entry, with the addition of the glue object class and thensds5ReplConflict attribute.
In such cases, either modify the glue entry to remove the glue object class and thensds5ReplConflict attribute to keep the entry as a normal entry or delete the glue entry and itschild entries.

Chapter 17. Configuration: Configuring the IPA Server
352
• The server creates a minimalistic entry with the glue and extensibleObject object classes.
In such cases, modify the entry to turn it into a meaningful entry or delete it and all of its child entries.
17.8. Moving CRL Generation from the Master (Original)Server to Another ReplicaThe first IPA server installed owns the master CA in the PKI hierarchy. The master CA is theauthoritative CA; it has the root CA signing key and generates CRLs which are distributed among theother servers and replicas in the topology. All subsequent replica databases are cloned (or copied)directly from that master database as part of running ipa-replica-install.
NOTE
The only reason to replace the master server is if the master server is being taken offline. Therehas to be a root CA which can issue CRLs and ultimately validate certificate checks.
17.8.1. About the Master Server, Replicas, and Generating CRLsAs explained in Section 1.3.1, “About IPA Servers and Replicas”, all servers and replicas worktogether to share data. This arrangement is the server topology.
Servers — which are created with ipa-server-install — can host DNS or CA services. Theseare the original services. When a replica is created (with ipa-replica-install), it is based on theconfiguration of an existing server. A replica, likewise, can host DNS and CA services, but this is notrequired.
After they are created, servers and replicas are equal peers in the server topology. They are all read-write data masters and replicate information to each other through multi-master replication. Serversand replicas which host a CA are also equal peers in the topology. They can all issue certificates andkeys to IPA clients, and they all replicate information amongst themselves.
The only difference between a server and a replica is which IPA server issues the CRL.
When the first server is installed, it is configured to issue CRLs. In its CA configuration file (/var/lib/pki-ca/conf/CS.cfg), it has CRL generation enabled:
ca.crl.issuingPointId.enableCRLCache=trueca.crl.issuingPointId.enableCRLUpdates=trueca.certStatusUpdateInterval=600ca.listenToCloneModifications=false
All replicas point to that master CA as the source for CRL information and disable the CRL settings:
master.ca.agent.host=hostnamemaster.ca.agent.port=port numberca.certStatusUpdateInterval=0ca.crl.issuingPointId.enableCRLUpdates=false
Promoting a replica to a master server changes its configuration and enables it to issue CRLs andfunction as the root CA.
Promoting a Replica
353
17.8.2. Promoting a Replica1. If the replica was originally installed without a CA, then create a CA. This requires the replica file
that was used to create the replica. (A new one can be created from the original IPA server, if needbe.)
[root@ipareplica ~]# ipa-ca-install -p DMpassword -w adminpassword /var/lib/ipa/replica-info-ipareplica.example.com.gpg
2. On the replica server, stop the CA server.
service pki-cad stop
3. Open the CA's configuration directory.
cd /var/lib/pki-ca/conf
4. Edit the CS.cfg file to configure the replica's CA as a master.
a. Delete each line which begins with the ca.crl. prefix.
b. Copy each line beginning with the ca.crl. prefix from the CA CS.cfg file on the masterserver into the replica server's CA CS.cfg file.
c. Enable control of the database maintenance thread; the default value for a master CA is 600.
ca.certStatusUpdateInterval=600
d. Enable monitoring database replication:
ca.listenToCloneModifications=true
e. Enable maintenance of the CRL cache:
ca.crl.IssuingPointId.enableCRLCache=true
f. Enable CRL generation:
ca.crl.IssuingPointId.enableCRLUpdates=true
g. Disable the redirect settings for CRL generation requests:
master.ca.agent.host=hostnamemaster.ca.agent.port=port number
5. Start the CA server.
service pki-cad start

Chapter 17. Configuration: Configuring the IPA Server
354
17.9. Removing a ReplicaDeleting or demoting a replica removes the IPA replica from the server/replica topology so that it nolonger processes IPA requests and it also remove the host machine itself from the IPA domain.
1. On an IPA server, obtain a Kerberos ticket before running IPA tools.
[root@replica ~]#kinit admin
2. List all of the configured replication agreements for the IPA domain.
[root@replica ~]# ipa-replica-manage listDirectory Manager password:
ipaserver.example.com: masteripaserver2.example.com: masterreplica.example.com: masterreplica2.example.com: master
3. Removing the replica from the topology involves deleting all the agreements between the replicaand the other servers in the IPA domain and all of the data about the replica in the domainconfiguration.
[root@replica ~]# ipa-replica-manage del replica.example.com
4. If the replica was configured with its own CA, then also use the ipa-csreplica-managecommand to remove all of the replication agreements between the certificate databases for thereplica.
This is required if the replica itself was configured with a Dogtag Certificate System CA. It is notrequired if only the master server or other replicas were configured with a CA.
[root@replica ~]# ipa-csreplica-manage del replica.example.com
5. On the replica, uninstall the replica packages.
[root@replica ~]# ipa-server-install --uninstall -U
17.10. Troubleshooting
17.10.1. Starting IPA with Expired CertificatesIf IPA administrative server certificates expire, then most IPA services will be inaccessible, includingadministrative services. The underlying Apache and 389 Directory Server services can be configuredto allow SSL access to those services, even if the certificates are expired.
There are SASL, GSS-API, and Kerberos errors in the 389 Directory Server logs when the replica starts.
355
NOTE
Allowing limited access with expired certificates permits Apache, Kerberos, DNS, and 389Directory Server services to continue working. With those services active, users are able to loginto the domain.
Client services such as sudo that require SSL for access will still fail because of the expiredserver certificates.
1. Change the mod_nss configuration for the Apache server to not enforce valid certificates, in theNSSEnforceValidCerts parameter. If this parameter is not already in the file, then add it.
Set the value to off.
[root@ipaserver ~]# vim /etc/httpd/conf.d/nss.conf
NSSEnforceValidCerts off
2. Restart Apache.
[root@ipaserver ~]# service httpd restart
3. Change the nsslapd-validate-cert attribute in the 389 Directory Server configuration towarn instead of true to disable validity checks.
[root@ipaserver ~]# ldapmodify -D "cn=directory manager" -w secret -p 389 -h ipaserver.example.com dn: cn=configchangetype: modifyreplace: nsslapd-validate-certnsslapd-validate-cert: warn
4. Restart 389 Directory Server.
[root@ipaserver ~]# service dirsrv restart
17.10.2. There are SASL, GSS-API, and Kerberos errors in the 389Directory Server logs when the replica starts.When the replica starts, there can be a series of SASL bind errors recorded in the 389 DirectoryServer logs stating that the GSS-API connection failed because it could not find a credentials cache:
slapd_ldap_sasl_interactive_bind - Error: could not perform interactive bind for id [] mech [GSSAPI]: error -2 (Local error) (SASL(-1): generic failure: GSSAPI Error: Unspecified GSS failure. Minor code may provide more information (Credentials cache file '/tmp/krb5cc_496' not found)) ...
The replica is looking for a credentials cache in /tmp/krb5cc_496 (where 496 is the 389 DirectoryServer user ID) and cannot find it.
Chapter 17. Configuration: Configuring the IPA Server
356
There may also be messages that the server could not obtain Kerberos credentials for the hostprincipal:
set_krb5_creds - Could not get initial credentials for principal [ldap/ replica1.example.com] in keytab [WRFILE:/etc/dirsrv/ds.keytab]: -1765328324 (Generic error)
These errors are both related to how and when the 389 Directory Server instance loads its Kerberoscredentials cache.
While 389 Directory Server itself supports multiple different authentication mechanisms, IdentityManagement only uses GSS-API for Kerberos connections. The 389 Directory Server instance forIdentity Management keeps its Kerberos credentials cache in memory. When the 389 Directory Serverprocess ends — like when the IPA replica is stopped — the credentials cache is destroyed.
Also, the 389 Directory Server is used as the backend storage for the principal information for theKDC.
When the replica then restarts, the 389 Directory Server instance starts first, since it suppliesinformation for the KDC, and then the KDC server starts. This start order is what causes the GSS-APIand Kerberos connection errors.
The 389 Directory Server attempts to open a GSS-API connection, but since there is no credentialscache yet and the KDC is not started, the GSS connection fails. Likewise, any attempt to obtain thehost credentials also fails.
These errors are transient. The 389 Directory Server re-attempts the GSS-API connection afterthe KDC starts and it has a credentials cache. The 389 Directory Server logs then record a bindresumed message.
These startup GSS-API connection failures can be ignored as long as that connection is successfullyestablished.

Chapter 18.
357
Migrating from an LDAP Directory toIPAWhen an infrastructure has previously deployed an LDAP server for authentication and identitylookups, it is possible to migrate the user data, including passwords, to a new Identity Managementinstance, without losing user or password data.
Identity Management has migration tools to help move directory data and only requires minimalupdates to clients. However, the migration process assumes a simple deployment scenario (one LDAPnamespace to one IPA namespace). For more complex environments, such as ones with multiplenamespaces or custom schema, contact Red Hat support services for assistance.
18.1. An Overview of LDAP to IPA MigrationThe actual migration part of moving from an LDAP server to Identity Management — the process ofmoving the data from one server to the other — is fairly straightforward. The process is simple: movedata, move passwords, and move clients.
The crucial part of migration is not data migration; it is deciding how clients are going to beconfigured to use Identity Management. For each client in the infrastructure, you need to decidewhat services (such as Kerberos and SSSD) are being used and what services can be used in thefinal, IPA deployment.
A secondary, but significant, consideration is planning how to migrate passwords. IdentityManagement requires Kerberos hashes for every user account in addition to passwords. Some of theconsiderations and migration paths for passwords are covered in Section 18.1.2, “Planning PasswordMigration”.
18.1.1. Planning the Client ConfigurationIdentity Management can support a number of different client configurations, with varying degrees offunctionality, flexibility, and security. Decide which configuration is best for each individual client basedon its operating system, functional area (such as development machines, production servers, or userlaptops), and your IT maintenance priorities.
IMPORTANT
The different client configurations are not mutually exclusive. Most environments will have a mixof different ways that clients use to connect to the IPA domain. Administrators must decide whichscenario is best for each individual client.
18.1.1.1. Initial Client Configuration (Pre-Migration)Before deciding where you want to go with the client configuration in Identity Management, firstestablish where you are before the migration.
The initial state for almost all LDAP deployments that will be migrated is that there is an LDAP serviceproviding identity and authentication services.
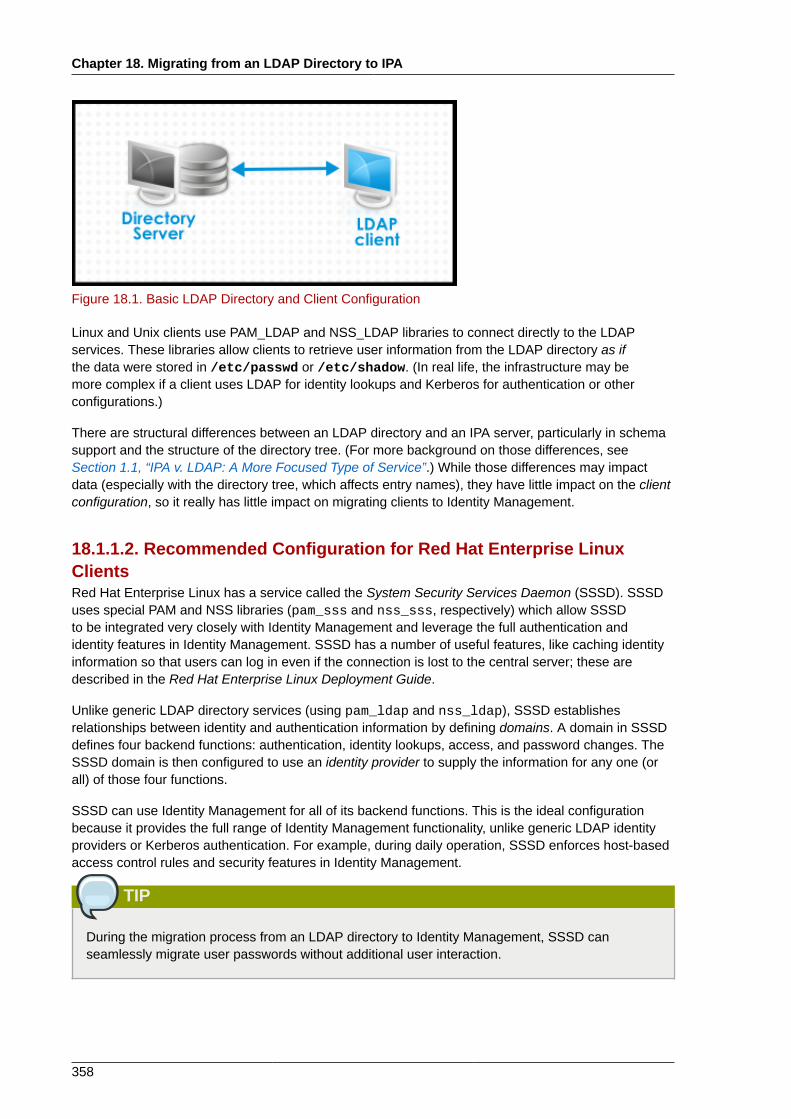
Chapter 18. Migrating from an LDAP Directory to IPA
358
Figure 18.1. Basic LDAP Directory and Client Configuration
Linux and Unix clients use PAM_LDAP and NSS_LDAP libraries to connect directly to the LDAPservices. These libraries allow clients to retrieve user information from the LDAP directory as ifthe data were stored in /etc/passwd or /etc/shadow. (In real life, the infrastructure may bemore complex if a client uses LDAP for identity lookups and Kerberos for authentication or otherconfigurations.)
There are structural differences between an LDAP directory and an IPA server, particularly in schemasupport and the structure of the directory tree. (For more background on those differences, seeSection 1.1, “IPA v. LDAP: A More Focused Type of Service”.) While those differences may impactdata (especially with the directory tree, which affects entry names), they have little impact on the clientconfiguration, so it really has little impact on migrating clients to Identity Management.
18.1.1.2. Recommended Configuration for Red Hat Enterprise LinuxClientsRed Hat Enterprise Linux has a service called the System Security Services Daemon (SSSD). SSSDuses special PAM and NSS libraries (pam_sss and nss_sss, respectively) which allow SSSDto be integrated very closely with Identity Management and leverage the full authentication andidentity features in Identity Management. SSSD has a number of useful features, like caching identityinformation so that users can log in even if the connection is lost to the central server; these aredescribed in the Red Hat Enterprise Linux Deployment Guide.
Unlike generic LDAP directory services (using pam_ldap and nss_ldap), SSSD establishesrelationships between identity and authentication information by defining domains. A domain in SSSDdefines four backend functions: authentication, identity lookups, access, and password changes. TheSSSD domain is then configured to use an identity provider to supply the information for any one (orall) of those four functions.
SSSD can use Identity Management for all of its backend functions. This is the ideal configurationbecause it provides the full range of Identity Management functionality, unlike generic LDAP identityproviders or Kerberos authentication. For example, during daily operation, SSSD enforces host-basedaccess control rules and security features in Identity Management.
TIP
During the migration process from an LDAP directory to Identity Management, SSSD canseamlessly migrate user passwords without additional user interaction.

Planning the Client Configuration
359
Figure 18.2. Clients and SSSD with an IPA Backend
The ipa-client-install script automatically configured SSSD to use IPA for all four of itsbackend services, so Red Hat Enterprise Linux clients are set up with the recommended configurationby default.
NOTE
This client configuration is only supported for Red Hat Enterprise Linux 6.1 and later and RedHat Enterprise Linux 5.7 later, which support the latest versions of SSSD and ipa-client.Older versions of Red Hat Enterprise Linux can be configured as described in Section 18.1.1.3,“Alternative Supported Configuration”.
18.1.1.3. Alternative Supported ConfigurationUnix and Linux systems such as Mac, Solaris, HP-UX, AIX, and Scientific Linux support all of theservices that IPA manages but do not use SSSD. Likewise, older Red Hat Enterprise Linux versions(6.1 and 5.6) support SSSD but have an older version, which does not support IPA as an identityprovider.
When it is not possible to use a modern version of SSSD on a system, then clients can be configuredto connect to the IPA server as if it were an LDAP directory service for identity lookups (usingnss_ldap) and to IPA as if it were a regular Kerberos KDC (using pam_krb5).
Figure 18.3. Clients and IPA with LDAP and Kerberos
Chapter 18. Migrating from an LDAP Directory to IPA
360
If a Red Hat Enterprise Linux client is using an older version of SSSD, SSSD can still be configured touse the IPA server as its identity provider and its Kerberos authentication domain; this is described inthe SSSD configuration section of the Red Hat Enterprise Linux Deployment Guide.
Any IPA domain client can be configured to use nss_ldap and pam_krb5 to connect to the IPAserver. For some maintenance situations and IT structures, a scenario that fits the lowest commondenominator may be required, using LDAP for both identity and authentication (nss_ldap andpam_ldap). However, it is generally best practice to use the most secure configuration possible for aclient (meaning SSSD and Kerberos or LDAP and Kerberos).
18.1.2. Planning Password MigrationProbably the most visible issue that can impact LDAP-to-Identity Management migration is migratinguser passwords.
Identity Management (by default) uses Kerberos for authentication and requires that each user haveKerberos hashes stored in the Identity Management Directory Server in addition to the standard userpasswords. To generate these hashes, the user password needs to be available to the IPA serverin cleartext. This is the case when the user is created in Identity Management. However, when theuser is migrated from an LDAP directory, the associated user password is already hashed, so thecorresponding Kerberos key cannot be generated.
IMPORTANT
Users cannot authenticate to the IPA domain or access IPA resources until they have Kerberoshashes.
If a user does not have a Kerberos hash1, that user cannot log into the IPA domain even if he has auser account. There are three options for migrating passwords: forcing a password change, using aweb page, and using SSSD.
Migrating users from an existing system provides a smoother transition but also requires parallelmanagement of LDAP directory and IPA during the migration and transition process. If you do notpreserve passwords, the migration can be performed more quickly but it requires more manual workby administrators and users.
18.1.2.1. Method 1: Using Temporary Passwords and Requiring a ChangeWhen passwords are changed in Identity Management, they will be created with the appropriateKerberos hashes. So one alternative for administrators is to force users to change their passwordsby resetting all user passwords when user accounts are migrated. (This can also be done simplyby re-creating the LDAP directory accounts in IPA, which automatically creates accounts with theappropriate keys.) The new users are assigned a temporary password which they change at the firstlogin. No passwords are migrated.
1 It is possible to use LDAP authentication in Identity Management instead of Kerberos authentication, which meansthat Kerberos hashes are not required for users. However, this limits the capabilities of Identity Management and is notrecommended.

Planning Password Migration
361
18.1.2.2. Method 2: Using the Migration Web PageWhen it is running in migration mode, Identity Management has a special web page in its web UI thatwill capture a cleartext password and create the appropriate Kerberos hash.
https://ipaserver.example.com/ipa/migration
Administrators could tell users to authenticate once to this web page, which would properly updatetheir user accounts with their password and corresponding Kerberos hash, without requiring passwordchanges.
18.1.2.3. Method 3: Using SSSD (Recommended)SSSD can work with IPA to mitigate the user impact on migrating by generating the required userkeys. For deployments with a lot of users or where users shouldn't be burdened with passwordchanges, this is the best scenario.
1. A user tries to log into a machine with SSSD.
2. SSSD attempts to perform Kerberos authentication against the IPA server.
3. Even though the user exists in the system, the authentication will fail with the error key type is notsupported because the Kerberos hashes do not yet exist.
4. SSSD the performs a plaintext LDAP bind over a secure connection.
5. IPA intercepts this bind request. If the user has a Kerberos principal but no Kerberos hashes, thenthe IPA identity provider generates the hashes and stores them in the user entry.
6. If authentication is successful, SSSD disconnects from IPA and tries Kerberos authenticationagain. This time, the request succeeds because the hash exists in the entry.
That entire process is entirely transparent to the user; as far as users known, they simply log into aclient service and it works as normal.
18.1.2.4. Migrating Cleartext LDAP PasswordsAlthough in most deployments LDAP passwords are stored encrypted, there may be some users orsome environments that use cleartext passwords for user entries.
When users are migrated from the LDAP server to the IPA server, their cleartext passwords are notmigrated over. Identity Management does not allow cleartext passwords. Instead, a Kerberos principleis created for the user, the keytab is set to true, and the password is set as expired. This means thatIdentity Management requires the user to reset the password at the next login.
NOTE
If passwords are hashed, the password is successfully migrated through SSSD and the migrationweb page, as in Section 18.1.2.3, “Method 3: Using SSSD (Recommended)”.

Chapter 18. Migrating from an LDAP Directory to IPA
362
18.1.2.5. Automatically Resetting Passwords That Do Not MeetRequirementsIf user passwords in the original directory do not meet the password policies defined in IdentityManagement, then the passwords must be reset after migration.
Password resets are done automatically the first time the users attempts to kinit into the IPAdomain.
[jsmith@server ~]$ kinit Password for [email protected]: Password expired. You must change it now.Enter new password: Enter it again:
18.1.3. Migration Considerations and RequirementsAs you are planning migrating from an LDAP server to Identity Management, make sure that yourLDAP environment is able to work with the Identity Management migration script.
18.1.3.1. LDAP Servers Supported for MigrationThe migration process from an LDAP server to Identity Management uses a special script, ipamigrate-ds, to perform the migration. This script has certain expectations about the structure of theLDAP directory and LDAP entries in order to work. Migration is supported only for LDAPv3-compliantdirectory services, which include several common directories:
• SunONE Directory Server
• Apache Directory Server
• OpenLDAP
Migration from an LDAP server to Identity Management has been tested with Red Hat DirectoryServer.
NOTE
Migration using the migration script is not supported for Microsoft Active Directory because it isnot an LDAPv3-compliant directory. For assistance with migrating from Active Directory, contactRed Hat Professional Services.
18.1.3.2. Migration Environment RequirementsThere are many different possible configuration scenarios for both Red Hat Directory Server andIdentity Management, and any of those scenarios may affect the migration process. For the examplemigration procedures in this chapter, these are the assumptions about the environment:
• A single LDAP directory domain is being migrated to one IPA realm. No consolidation is involved.
• User passwords are stored as a hash in the LDAP directory that the IPA Directory Server cansupport.

Migration Considerations and Requirements
363
• The LDAP directory instance is both the identity store and the authentication method. Clientmachines are configured to use pam_ldap or nss_ldap to connect to the LDAP server.
• Entries use only standard LDAP schema. Custom attributes will not be migrated to IdentityManagement.
18.1.3.3. Migration ToolsIdentity Management uses a specific command, ipa migrate-ds, to drive the migration process sothat LDAP directory data are properly formatted and imported cleanly into the IPA server.
The Identity Management server must be configured to run in migration mode, and then the migrationscript can be used.
18.1.3.4. Migration SequenceThere are four major steps when migrating to Identity Management, but the order varies slightlydepending on whether you want to migrate the server first or the clients first.
With a client-based migration, SSSD is used to change the client configuration while an IPA server isconfigured:
1. Deploy SSSD.
2. Reconfigure clients to connect to the current LDAP server and then fail over to IPA.
3. Install the IPA server.
4. Migrate the user data using the IPA ipa-migrate-ds script. This exports the data from theLDAP directory, formats for the IPA schema, and then imports it into IPA.
5. Take the LDAP server offline and allow clients to fail over to Identity Management transparently.
With a server migration, the LDAP to Identity Management migration comes first:
1. Install the IPA server.
2. Migrate the user data using the IPA ipa-migrate-ds script. This exports the data from theLDAP directory, formats it for the IPA schema, and then imports it into IPA.
3. Optional. Deploy SSSD.
4. Reconfigure clients to connect to IPA. It is not possible to simply replace the LDAP server. The IPAdirectory tree — and therefore user entry DNs — is different than the previous directory tree.
While it is required that clients be reconfigured, clients do not need to be reconfiguredimmediately. Updated clients can point to the IPA server while other clients point to the old LDAPdirectory, allowing a reasonable testing and transition phase after the data are migrated.
NOTE
Do not run both an LDAP directory service and the IPA server for very long in parallel. Thisintroduces the risk of user data being inconsistent between the two services.

Chapter 18. Migrating from an LDAP Directory to IPA
364
Both processes provide a general migration procedure, but it may not work in every environment.Set up a test LDAP environment and test the migration process before attempting to migrate the realLDAP environment.
18.2. Examples for Using migrate-dsThe data migration is performed with the ipa migrate-ds command. At its simplest, the commandtakes the LDAP URL of the directory to migrate and exports the data based on common defaultsettings.
ipa migrate-ds ldap://ldap.example.com:389
It is possible to customize how the migrate-ds commands identifies and exports data. This is usefulif the original directory tree has a unique structure or if some entries or attributes within entries shouldbe excluded from migration.
18.2.1. Migrating Specific SubtreesThe default directory structure places person entries in the ou=People subtree and group entries inthe ou=Groups subtree. These subtrees are container entries for those different types of directorydata. If no options are passed with the migrate-ds command, then the utility assumes that the givenLDAP directory uses the ou=People and ou=Groups structure.
Many deployments may have an entirely different directory structure (or may only want to exportcertain parts of the directory tree). There are two options which allow administrators to give the RDN ofa different user or group subtree:
• --user-container
• --group-container
NOTE
In both cases, the subtree must be the RDN only and must be relative to the base DN. Forexample, the ou=Employees,dc=example,dc=com subtree can be migrated using --user-container=ou=Employees, but ou=Employees,ou=People,dc=example,dc=com cannotbe migrated with that option because ou=Employees is not a direct child of the base DN.
For example:
[root@ipaserver ~]# ipa migrate-ds --user-container=ou=employees --group-container="ou=employee groups" ldap://ldap.example.com:389
There is a third option that allows administrators to set a base DN for migration: --base-dn. With thisoption, it is possible to change the target for container subtrees. For example:
[root@ipaserver ~]# ipa migrate-ds --user-container=ou=employees --base-dn="ou=people,dc=example,dc=com" ldap://ldap.example.com:389
Now, the ou=Employees user subtree can be migrated from within the larger ou=People subtreewithout migrating every people-related subtree.
Specifically Including or Excluding Entries
365
18.2.2. Specifically Including or Excluding EntriesBy default, the migrate-ds script exports every user entry with the person object class and everygroup entry within the given user and group subtrees.
In some migration paths, only specific types of users and groups may need to be exported, or,conversely, specific users and groups may need to be excluded.
On option is to set positively which types of users and groups to include. This is done by setting whichobject classes to search for when looking for user or group entries.
This is a really useful option when there are custom object classes used in an environment for differentuser types. For example, this migrates only users with the custom fullTimeEmployee object class:
[root@ipaserver ~]# ipa migrate-ds --user-objectclass=fullTimeEmployee ldap://ldap.example.com:389
Because of the different types of groups, this is also very useful for migrating only certain typesof groups (such as user groups) while excluding other types of groups, like certificate groups. Forexample:
[root@ipaserver ~]# ipa migrate-ds --group-objectclass=groupOfNames,groupOfUniqueNames ldap://ldap.example.com:389
Positively specifying user and groups to migrate based on object class implicitly excludes all otherusers and groups from migration.
Alternatively, it can be useful to migrate all user and group entries except for just a small handful ofentries. Specific user or group accounts can be excluded while all others of that type are migrated. Forexample, this excludes a hobbies group and two users:
[root@ipaserver ~]# ipa migrate-ds --exclude-groups="Golfers Group" --exclude-users=jsmith,bjensen ldap://ldap.example.com:389
Specifying an object class to migrate can be used together with excluding specific entries. Forexample, this specifically includes users with the fullTimeEmployee object class, yet excludesthree managers:
[root@ipaserver ~]# ipa migrate-ds --user-objectclass=fullTimeEmployee --exclude-users=jsmith,bjensen,mreynolds ldap://ldap.example.com:389
18.2.3. Excluding Entry AttributesBy default, every attribute and object class for a user or group entry is migrated. There are somecases where that may not be realistic, either because of bandwidth and network constraintsor because the attribute data are no longer relevant. For example, if users are going to beassigned new user certificates as they join the IPA domain, then there is no reason to migrate theuserCertificate attribute.
Specific object classes and attributes can be ignored by the migrate-ds by using any of severaldifferent options:
• --user-ignore-objectclass
• --user-ignore-attribute
• --group-ignore-objectclass
Chapter 18. Migrating from an LDAP Directory to IPA
366
• --group-ignore-attribute
For example, to exclude the userCertificate attribute and strongAuthenticationUser objectclass for users and the groupOfCertificates object class for groups:
[root@ipaserver ~]# ipa migrate-ds --user-ignore-attribute=userCertificate --user-ignore-objectclass=strongAuthenticationUser --group-ignore-objectclass=groupOfCertificates ldap://ldap.example.com:389
NOTE
Make sure not to ignore any required attributes. Also, when excluding object classes, make sureto exclude any attributes which are only supported by that object class.
18.2.4. Setting the Schema to UseBy default, Identity Management uses RFC2307bis2 schema to define user, host, hostgroup, and othernetwork identities. This schema option can be reset to use RFC23073 schema instead:
[root@ipaserver ~]# ipa migrate-ds --schema=RFC2307 ldap://ldap.example.com:389
18.3. Scenario 1: Using SSSD as Part of Migration
IMPORTANT
This is a general migration procedure, but it may not work in every environment.
It is strongly recommended that you set up a test LDAP environment and test the migrationprocess before attempting to migrate the real LDAP environment.
1. Set up SSSD. Using SSSD allows the required Kerberos keys and server certificates to bedelivered to the clients.
a. Install SSSD on every client machine:
# yum install sssd
b. Configure an LDAP identity provider in SSSD to use the existing Directory Server for allfunctions (authentication, identity lookups, access, and password changes). This ensuresevery client works properly with the existing directory service.
2. Install Identity Management, including any custom LDAP directory schema4, on a differentmachine from the existing LDAP directory.
2 http://www.padl.com/~lukeh/rfc2307bis.txt3 http://www.faqs.org/rfcs/rfc2307.html
Scenario 1: Using SSSD as Part of Migration
367
3. Enable the IPA server to allow migration:
# ipa config-mod --enable-migration=TRUE
4. Disable the compat plug-in.
# ipa-compat-manage disable
5. Restart the IPA Directory Server instance.
# service dirsrv restart
6. Run the IPA migration script, ipa migrate-ds. At its most basic, this requires only the LDAPURL of the LDAP directory instance to migrate:
# ipa migrate-ds ldap://ldap.example.com:389
Simply passing the LDAP URL migrates all of the directory data using common default settings.The user and group data can be selectively migrated by specifying other options, as covered inSection 18.2, “Examples for Using migrate-ds”.
Once the information is exported, the script adds all required IPA object classes and attributes andconverts DNs in attributes to match the IPA directory tree.
7. Re-enable the compat plug-in.
# ipa-compat-manage enable
8. Restart the IPA Directory Server instance.
# service dirsrv restart
9. Move clients that have SSSD installed from the LDAP backend to the Identity Managementbackend and enroll them as client with IPA. This downloads the required keys and certificates.
On Red Hat Enterprise Linux clients, this can be done using the ipa-client-installcommand. For example:
# ipa-client-install --enable-dns-updates
10. Have users log into a machine with SSSD and Identity Management backend. This generates therequired Kerberos keys for the user.
To monitor the user migration process, query the existing LDAP directory to see which useraccounts have a password but do not yet have a Kerberos principal key.
$ ldapsearch -LL -x -D 'cn=Directory Manager' -w secret -b 'ou=people,dc=example,dc=com' '(&(!(krbprincipalkey=*))(userpassword=*))' uid

Chapter 18. Migrating from an LDAP Directory to IPA
368
NOTE
Include the quotes around the filter so that it is not interpreted by the shell.
11. Once users have been migrated over, configure non-SSSD clients to use the IPA domain, asrequired.
12. When the migration of all clients and users is complete, decommission the LDAP directory.
18.4. Scenario 2: Migrating an LDAP Server Directly toIdentity Management
IMPORTANT
This is a general migration procedure, but it may not work in every environment.
It is strongly recommended that you set up a test LDAP environment and test the migrationprocess before attempting to migrate the real LDAP environment.
1. Install the IPA server, including any custom LDAP directory schema5, on a different machine fromthe existing LDAP directory.
2. Disable the compat plug-in.
# ipa-compat-manage disable
3. Restart the IPA Directory Server instance.
# service dirsrv restart
4. Enable the IPA server to allow migration:
# ipa config-mod --enable-migration=TRUE
5. Run the IPA migration script, ipa migrate-ds. At its most basic, this requires only the LDAPURL of the LDAP directory instance to migrate:
# ipa migrate-ds ldap://ldap.example.com:389
Simply passing the LDAP URL migrates all of the directory data using common default settings.The user and group data can be selectively migrated by specifying other options, as covered inSection 18.2, “Examples for Using migrate-ds”.
Scenario 2: Migrating an LDAP Server Directly to Identity Management
369
Once the information is exported, the script adds all required IPA object classes and attributes andconverts DNs in attributes to match the IPA directory tree.
6. Re-enable the compat plug-in.
# ipa-compat-manage enable
7. Restart the IPA Directory Server instance.
# service dirsrv restart
8. Update the client configuration to use PAM_LDAP and NSS_LDAP to connect to IPA instead ofconnecting to an LDAP directory, NIS, or local files.
9. Optional. Set up SSSD. Using SSSD migrates user passwords without additional user interaction,as described in Section 18.1.2, “Planning Password Migration”.
a. Install SSSD on every client machine:
# yum install sssd
b. Run the ipa-client-install to configure SSSD and related services to use the IPAserver for identity and Kerberos authentication.
10. Instruct users to log into IPA using either SSSD client or the migration web page if SSSD isnot available on the client. Both methods automatically migrate the user password into IdentityManagement.
https://ipaserver.example.com/ipa/migration
11. Optional. Reconfigure non-SSSD clients to use Kerberos authentication (pam_krb5) instead ofLDAP authentication (pam_ldap).
NOTE
Use PAM_LDAP modules until all of the users have been migrated; then it is possible to usePAM_KRB5.
12. When the migration of all clients and users is complete, decommission the LDAP directory.

370

371
Appendix A. Frequently AskedQuestionsQ: Is it possible to change the IP address of the master server?
A: Yes. If you are only changing the IP address, it is sufficient to update the /etc/hosts file, thesystem configuration, and the DNS entry.
Q: Why are there restrictions on the length of user and group names? How can I change this?
A: User and group name lengths are specified in the policy. The default maximum username lengthis 32 characters. The maximum configurable length for user or group names is 255 characters.This complements some supported client operating systems which limit the length of usernames.
The default settings can be changed in the IPA UI or using the ipa config-mod command. Forexample:
4 ipa config-mod --maxusername=50
Q: What is the difference between a replica and a master server?
A: A master server maintains a certificate authority. A replica server has its certificate issued by themaster CA.
Q: Can I promote a replica to function as the master?
A: Yes. This is described in Section 17.8, “Moving CRL Generation from the Master (Original)Server to Another Replica”.
Q: Why does the ipa-client-install script fail to find the IPA server on a network that usesActive Directory DNS?
A: Active Directory has its own SRV records for Kerberos and LDAP. The ipa-client-installscript can retrieve those records instead of any that have been added for the IPA domain.
When running ipa-client-install, manually enter the server information to ensure thatthe script uses the IPA SRV records instead of Active Directory records. The ipa-client-install options are listed in Section C.6.1, “ipa-client-install”.
Q: Can an administrator who is connected to "Server B" revoke a certificate issued by "Server A"?
A: Yes, assuming that Servers A and B contain non-cloned CAs which have their databaseinformation replicated to share revocation information only.

372
373
Appendix B. Working with certmongerPart of managing machine authentication is managing machine certificates. On clients, IPA managesthe certificate lifecycle with the certmonger service, which works together with the certificate authority(CA) provided by IPA.
The certmonger daemon and its command-line clients simplify the process of generating public/private key pairs, creating certificate requests, and submitting requests to the CA for signing. As partof managing certificates, the certmonger daemon monitors certificates for expiration and can renewcertificates that are about to expire. The certificates that certmonger monitors are tracked in filesstored in a configurable directory. The default location is /var/lib/certmonger/requests.
certmonger uses the IPA getcert command to manage all certificates. As covered inSection 2.4.3.2, “Using Different CA Configurations”, an IPA server can be configured to use differenttypes of certificate authorities. The most common (and recommended) configuration is to use a fullCA server, but it is also possible to use a much more limited, self-signed CA. The exact getcertcommand used by certmonger to communicate with the IPA backend depends on which type ofCA is used. The ipa-getcert command is used with a full CA, while the selfsign-getcertcommand is used with a self-signed CA.
NOTE
Because of general security issues, self-signed certificates are not typically used in production,but can be used for development and testing.
B.1. Requesting a Certificate with certmongerWith the IPA CA, certmonger uses the ipa-getcert command.
Certificates and keys are stored locally in plaintext files (.pem) or in an NSS database, identified bythe certificate nickname. When requesting a certificate, then, the request should identify the locationwhere the certificate will be stored and the nickname of the certificate. For example:
# ipa-getcert request -d /etc/pki/nssdb -n Server-Cert
The /etc/pki/nssdb file is the global NSS database, and Server-Cert is the nickname of thiscertificate. The certificate nickname must be unique within this database.
When requesting a certificate to be used with an IPA service, the -K option is required to specifythe service principal. Otherwise, certmonger assumes the certificate is for a host. The -N optionmust specify the certificate subject DN, and the subject base DN must match the base DN for the IPAserver, or the request is rejected.
$ ipa-getcert request -d /etc/httpd/alias -n Server-Cert -K HTTP/client1.example.com -N 'CN=client1.example.com,O=EXAMPLE.COM'
Example B.1. Using certmonger for a Service
$ ipa-getcert request -r -f /etc/httpd/conf/ssl.crt/server.crt -k /etc/httpd/conf/ssl.key/server.key -N CN=`hostname --fqdn` -D `hostname` -U id-kp-serverAuth

Appendix B. Working with certmonger
374
The options vary depending on whether you are using a self-signed certificate (selfsign-getcert)and the desired configuration for the final certificate, as well as other settings. In Example B.1, “Usingcertmonger for a Service”, these are common options:
• The -r option will automatically renew the certificate if the key pair already exists. This is used bydefault.
• The -f option stores the certificate in the given file.
• The -k option either stores the key in the given file or, if the key file already exists, uses the key inthe file.
• The -N option gives the subject name.
• The -D option gives the DNS domain name.
• The -U option sets the extended key usage flag.
B.2. Storing Certificates in NSS DatabasesBy default, certmonger uses plaintext files to store the key and the certificate, but these keys andcertificates can also be stored in NSS databases. This is done using the -d option to set the securitydatabase location and -n to give the certificate nickname which is used for the certificate in thedatabase. These options are used instead of the PEM files given in the -f and -k options.
For example:
# ipa-getcert request -d /export/alias -n ServerCert ...
B.3. Tracking Certificates with certmongercertmonger can manage the entire certificate lifecycle. Along with generating requests,certmonger can track a certificate and automatically renew it when it expires at the end of its validityperiod.
This is done using the start-tracking command with the getcert command. The -I optioncreates the tracking entry, along with pointers to the key and certificate files, either in an NSSdatabase (-d and -n) or in the PEM file (-f and -k). The -r option tells certmonger to renew thecertificate.
# ipa-getcert start-tracking -I cert1-tracker -d /export/alias -n ServerCert -r
TIP
The -r option can be passed with the request command, in Example B.1, “Using certmongerfor a Service”. In that case, the requested certificate is automatically tracked and renewed bycertmonger. Then, it is not necessary to configure tracking manually.
A certificate can be untracked by certmonger by using the stop-tracking command.
375
Appendix C. IPA Tools ReferenceIdentity Management provides a variety of command-line tools that can be used to manage IPAservers and clients, allowing an extensive range of functionality that can be managed remotely,scheduled, or scripted.
C.1. Using Special Characters with IPA ToolsThe IPA command-line tools are run as any other utilities in a shell. If there are special characters inthe command — such as angle brackets (> and <), ampersands (&), asterisks (*), and pipes (|) — thecharacters must be escaped. Otherwise, the command fails because the shell cannot properly parsethe unescaped characters.
C.2. ipaThe primary Identity Management command-line tool is the ipa command. This command has severaldozen subcommands, grouped by configuration areas, to give specific control over different areasof the IPA domain configuration. These subcommands are really plug-ins, that are implemented andcalled through the ipa command.
One crucial feature of the ipa command is that it is pluggable. Custom behavior can be defined for theIPA domain through custom ipa subcommands.
C.2.1. Location
Description Location
Tool directory /usr/bin
Package ipa-admintools
C.2.2. Syntaxipa [ global_options ] commands [ command_options ]
The ipa command is essentially a big plug-in container. It supports dozens of subcommands; thesesubcommands are actually plug-ins which manage specific types of objects in Identity Management.
The first type of a subcommand identifies the object type (such as user, sudo, group, host, or dns),and the second part identifies the operation being performed on that object.
ipa objectType-operation objectName --option=value
For example, adding a user is done using the user-add subcommand:
ipa user-add entryName options
All topic or command areas follow a consistent pattern for how entries are managed.
C.2.2.1. Adding, Editing, and Deleting Entries with ipaNew entries are added using an *-add command. For example:
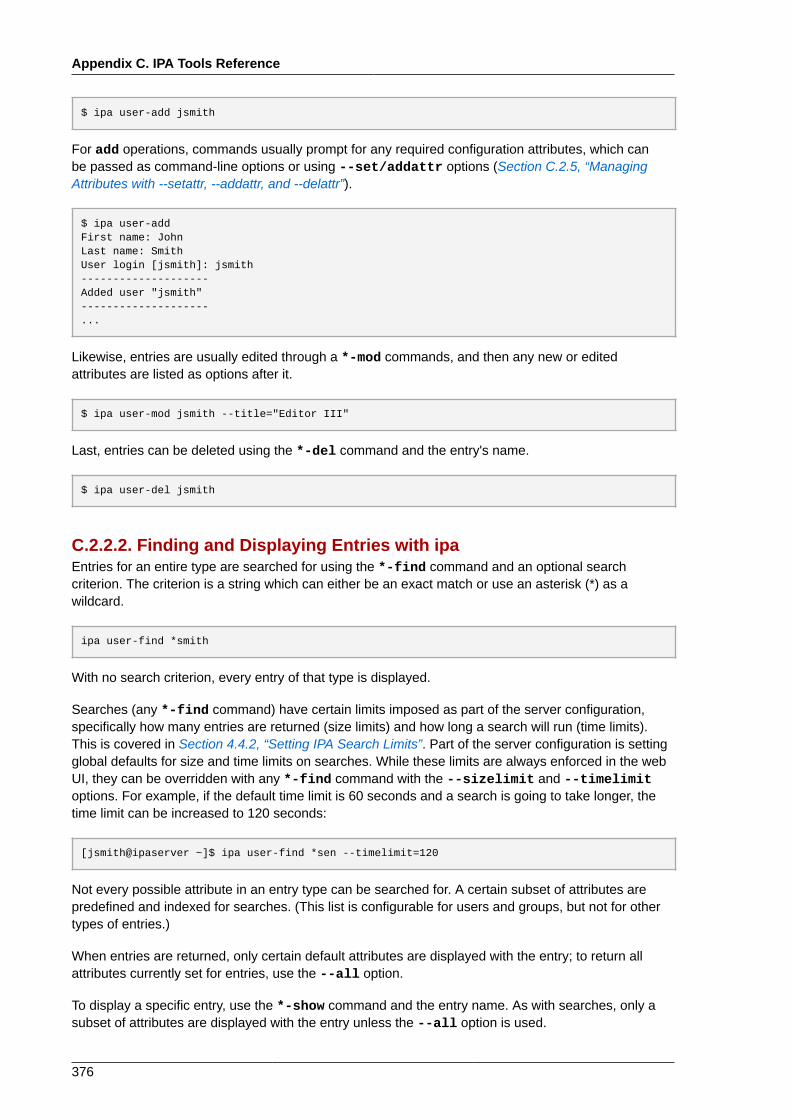
Appendix C. IPA Tools Reference
376
$ ipa user-add jsmith
For add operations, commands usually prompt for any required configuration attributes, which canbe passed as command-line options or using --set/addattr options (Section C.2.5, “ManagingAttributes with --setattr, --addattr, and --delattr”).
$ ipa user-addFirst name: JohnLast name: SmithUser login [jsmith]: jsmith--------------------Added user "jsmith"--------------------...
Likewise, entries are usually edited through a *-mod commands, and then any new or editedattributes are listed as options after it.
$ ipa user-mod jsmith --title="Editor III"
Last, entries can be deleted using the *-del command and the entry's name.
$ ipa user-del jsmith
C.2.2.2. Finding and Displaying Entries with ipaEntries for an entire type are searched for using the *-find command and an optional searchcriterion. The criterion is a string which can either be an exact match or use an asterisk (*) as awildcard.
ipa user-find *smith
With no search criterion, every entry of that type is displayed.
Searches (any *-find command) have certain limits imposed as part of the server configuration,specifically how many entries are returned (size limits) and how long a search will run (time limits).This is covered in Section 4.4.2, “Setting IPA Search Limits”. Part of the server configuration is settingglobal defaults for size and time limits on searches. While these limits are always enforced in the webUI, they can be overridden with any *-find command with the --sizelimit and --timelimitoptions. For example, if the default time limit is 60 seconds and a search is going to take longer, thetime limit can be increased to 120 seconds:
[jsmith@ipaserver ~]$ ipa user-find *sen --timelimit=120
Not every possible attribute in an entry type can be searched for. A certain subset of attributes arepredefined and indexed for searches. (This list is configurable for users and groups, but not for othertypes of entries.)
When entries are returned, only certain default attributes are displayed with the entry; to return allattributes currently set for entries, use the --all option.
To display a specific entry, use the *-show command and the entry name. As with searches, only asubset of attributes are displayed with the entry unless the --all option is used.
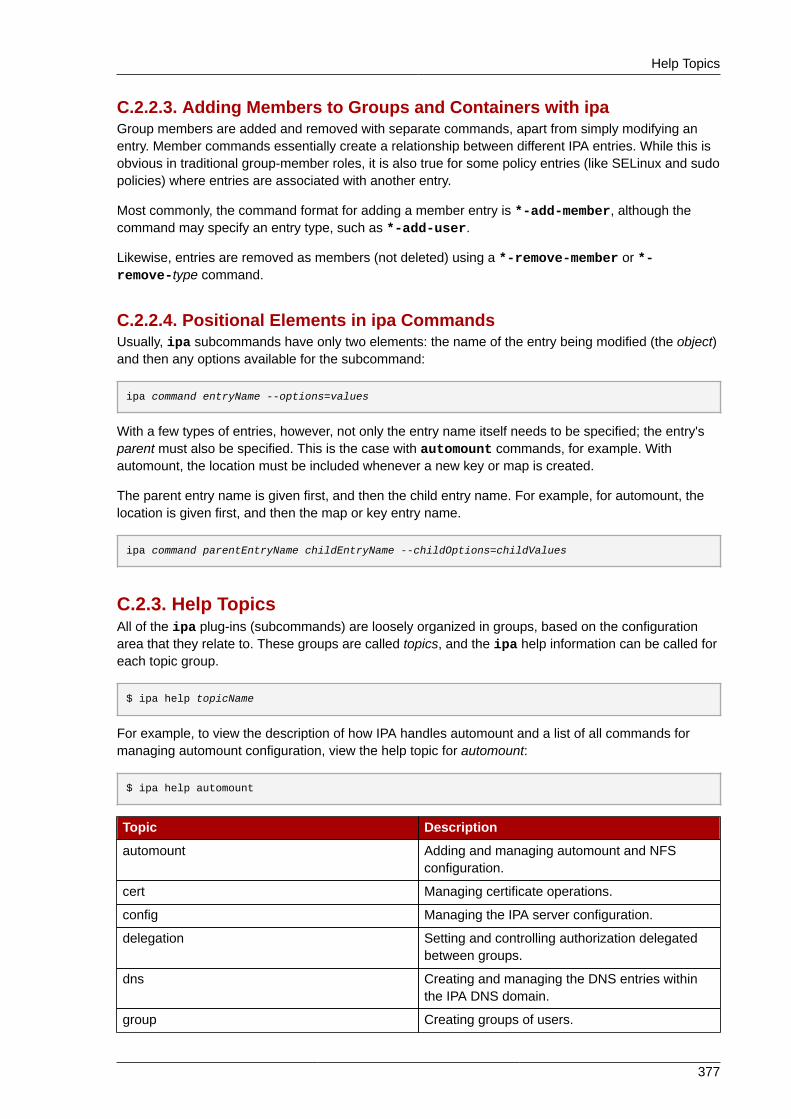
Help Topics
377
C.2.2.3. Adding Members to Groups and Containers with ipaGroup members are added and removed with separate commands, apart from simply modifying anentry. Member commands essentially create a relationship between different IPA entries. While this isobvious in traditional group-member roles, it is also true for some policy entries (like SELinux and sudopolicies) where entries are associated with another entry.
Most commonly, the command format for adding a member entry is *-add-member, although thecommand may specify an entry type, such as *-add-user.
Likewise, entries are removed as members (not deleted) using a *-remove-member or *-remove-type command.
C.2.2.4. Positional Elements in ipa CommandsUsually, ipa subcommands have only two elements: the name of the entry being modified (the object)and then any options available for the subcommand:
ipa command entryName --options=values
With a few types of entries, however, not only the entry name itself needs to be specified; the entry'sparent must also be specified. This is the case with automount commands, for example. Withautomount, the location must be included whenever a new key or map is created.
The parent entry name is given first, and then the child entry name. For example, for automount, thelocation is given first, and then the map or key entry name.
ipa command parentEntryName childEntryName --childOptions=childValues
C.2.3. Help TopicsAll of the ipa plug-ins (subcommands) are loosely organized in groups, based on the configurationarea that they relate to. These groups are called topics, and the ipa help information can be called foreach topic group.
$ ipa help topicName
For example, to view the description of how IPA handles automount and a list of all commands formanaging automount configuration, view the help topic for automount:
$ ipa help automount
Topic Description
automount Adding and managing automount and NFSconfiguration.
cert Managing certificate operations.
config Managing the IPA server configuration.
delegation Setting and controlling authorization delegatedbetween groups.
dns Creating and managing the DNS entries withinthe IPA DNS domain.
group Creating groups of users.

Appendix C. IPA Tools Reference
378
Topic Description
hbac Setting and testing host-based access controls.
host Creating and managing client (host) entrieswithin the IPA domain.
hostgroup Creating and managing groups of hosts.
krbtpolicy Managing the Kerberos ticket policy.
migration Managing migration to IPA.
misc Viewing current environment variables and plug-ins.
netgroup Managing netgroups within the IPA domain.
passwd Managing user passwords.
permission Setting access control rules for users, groups,and roles within IPA to IPA resources.
privilege Managing a group of permissions.
pwpolicy Managing the IPA domain password policy.
role Creating and managing user roles, as part ofaccess control.
selfservice Managing rights that users have to their ownpersonal IPA entries.
service Creating and managing system services that aremanaged as an IPA resource.
sudo Creating and managing sudo rules and policies.
user Creating and managing IPA user accounts.
C.2.4. Global OptionsGlobal options are available to every subcommand.
Short Option Long Option Description
-h --help Prints the help for thecommand and exits.
-e key=value Sets a given environmentvariable (key) to the specifiedvalue before running thecommand.
-c file Loads the server configurationfrom a different file instead ofdefault.conf.
-d --debug Uses debug logging whenrunning the command.
-v --verbose Prints verbose messagesto stdout when running thecommand. If two -v optionsare used, then the commandreturns the full XML-RPCrequest.

Managing Attributes with --setattr, --addattr, and --delattr
379
Short Option Long Option Description
-a --prompt-all Prompts for every argument forthe command, even optionalones.
-n --no-prompt Does not prompt for anyargument, even required ones.
-f --no-fallback Uses only the server specifiedin the local default.confand does not fallback toanother server if that one isunavailable.
--all For find and show commands.Returns all of the attributesfor the entry, not just the onesrelated to the command orconfiguration area.
--raw For find and show commands.Returns the raw, LDIF-formatted LDAP entry insteadof the friendly-formattedversions.
--addattr=attribute=value For add and mod commands.Adds a new attribute with thegiven value.
--setattr=attribute=value For add and mod commands.Replaces the value of a givenattribute with the new value.
C.2.5. Managing Attributes with --setattr, --addattr, and --delattrAll identities and configuration in Identity Management are stored as LDAP entries, with standardattribute-value assertions (AVAs). Whether an entry is created through the UI or the CLI, there arecertain attributes which are required and others which are available, depending on the default andcustom object classes for that entry type.
For the most common attributes, the ipa use specified command-line arguments to set values. Forexample, adding a mail attribute to a user can be done with the --mail argument; enabling dynamicupdates for a DNS zone can be done with the --allow-dynupdate option with zone commands;and a map key for an automount map is given in the --key option.
However, entries can also allow attributes that may not have command-line (or UI) options for settingthem. Partially, this is because the underlying LDAP schema is very rich, particularly for user entries,with many possible allowed attributes. Additionally, Identity Management allows schema extensionsfor users and groups, and those custom schema elements are not necessarily reflected in the UI orcommand-line tools.
Any supported attribute can be added or edited to an entry using the --setattr and --addattroptions.
Both options have this format:
--setattr=attribute=value

Appendix C. IPA Tools Reference
380
The --setattr option sets one value for the given attribute; any existing values are overwritten,even for multi-valued attributes.
The --addattr option adds a new value for an attribute; for a multi-valued attribute, it adds the newvalue while preserving any existing values.
Both --setattr option and --addattr can be used multiple times in the same commandinvocation. For example:
$ ipa user-mod jsmith [email protected] [email protected] --setattr=description="backup IT manager for the east coast branch"
Likewise, an attribute or specific attribute value can be removed from an entry using the --delattroption. For a single-valued attribute, this removes the attribute; for a multi-valued attribute, it removesonly the specified value. For example:
$ ipa user-mod jsmith [email protected]
NOTE
Deleting attributes is evaluated last, after adding or editing attributes. If the same attribute isadded and deleted in the same modify operation, it is a no-op.
$ ipa user-mod jsmith [email protected] [email protected]
C.2.6. Return Codes
Return Code Description
0 An error occurred.
1 The operation was successful.
2 A resource or object was not found.
C.2.7. Commands
Table C.1. dnsrecord* Commands
Command Description
dnsrecord-add Creates a new DNS zone in the IPA server.
dnsrecord-del Deletes a DNS zone from the DNS domainmaintained by the IPA server.
dnsrecord-find Searches for a DNS zone which matches thefilter.
dnsrecord-mod Edits the configuration of an existing DNSdomain.
dnsrecord-show Lists the details for any or all DNS zones,depending on the filter

ipa DNS Commands
381
Table C.2. dnszone-* Commands
Command Description
dnszone-add Creates a new DNS zone in the IPA server.
dnszone-del Deletes a DNS zone from the DNS domainmaintained by the IPA server.
dnszone-find Searches for a DNS zone which matches thefilter.
dnszone-mod Edits the configuration of an existing DNSdomain.
dnszone-show Lists the details for any or all DNS zones,depending on the filter
dnszone-disable Disables a DNS zone, which removes it frombeing used but does not delete the zone or itsconfiguration.
dnszone-enable Enables an existing DNS zone, which restores itto the IPA domain with its previous configurationintact.
C.3. ipa DNS CommandsThere are a collection of commands used to add and manage DNS zones and DNS records.
C.3.1. ipa dnszone-addCreates a new DNS zone in the IPA server.
C.3.1.1. Syntaxipa dnszone-add zoneName [ --name-server=name ] [ --ip-address=IPaddress ] [ --name-from-ip=IPaddress ] [ --admin-email=email ] [ --serial=# ] [ --refresh=# ] [ --retry=# ] [ --expire=#] [ --minimum=# ] [ --ttl=# ] [ --class=name ] [ --update-policy=string ] [ --dynamic-update=TRUE|FALSE ] [ --allow-query=string ] [ --allow-transfer=string ] [ --allow-sync-ptr=TRUE|FALSE ] [ --forwarder=string ] [ --forward-policy=only|first ] [ --force ]
C.3.1.2. Options
Parameter Description
zoneName Sets the name of the new zone. This is required.
--name-server=name Gives the name of the authoritative DNS serverto use, based on the hostname.
--ip-address=IPaddress Sets a DNS name server to use with the IPAdomain, based on the IP address.
--name-from-ip=IPaddress Gives an IP address for the DNS zone to use tocreate a reverse zone name.
--admin-email=email Gives the email address of the DNS domainadministrator.
--serial=# Sets the serial number to use for the DNS startof authority (SOA) record.

Appendix C. IPA Tools Reference
382
Parameter Description
--refresh=# Sets the time interval to use to check for updatedSOA records.
--retry=# Sets the time to wait before retrying a failedname resolution attempt.
--expire=# Sets the time to hold successful resolutionattempts in the cache before they expire.
--minimum=# Sets the time to hold negative or failed resolutionattempts in the cache.
--ttl=# Sets how long to hold SOA records in the cache.
--class=name Sets a SOA record class for zone entries.
--update-policy=string Sets a BIND service policy.
--dynamic-update=TRUE|FALSE Enables domain clients to update their own DNSentries dynamically.
--allow-query=string Gives a semi-colon-separated listed of IPaddresses or network names which are allowedto issue DNS queries.
--allow-transfer=string Gives a semi-colon-separated listed of IPaddresses or network names which are allowedto transfer the given zone.
--allow-sync-ptr=TRUE|FALSE Sets whether A or AAAA records (forwardrecords) for the zone will be automaticallysynchronized with the PTR (reverse) records.
--forwarder=string Specifies a forwarder specifically configured forthe DNS zone. This is separate from any globalforwarders used in the IPA domain.To specify multiple forwarders, use the optionmultiple times.
--forward-policy=only|first Sets whether the zone will only forward requeststo configured the DNS name servers (a forward-only zone) or whether it will check the forwardersfirst for DNS records and then check its ownlocal records.
--force Forces a zone to be created in the IPAconfiguration even if the name server is notrecognized by the DNS.
C.3.2. ipa dnsrecord-addAdds a new resource record.
Each resource record type has its own set of options, based on the required information to configurethe record.
C.3.2.1. Syntaxipa dnsrecord-add zoneName recordName [ --recordType_options=value ]

ipa dnsrecord-add
383
C.3.2.2. Options
General Record Options
Option Description
--ttl=number Sets the time to live for the record.
--class=IN | CS | CH | HS Sets the class of the record. This is usually IN,for Internet protocol.
--structured Parses the raw DNS records and returns them ina structured format.
"A" Record Options
Option Description
--a-rec=ARECORD Passes a comma-separated list of A records.
--a-ip-address=string Gives the IP address for the record.
"A6" Record Options
Option Description
--a6-rec=A6RECORD Passes a comma-separated list of A6 records.
--a6-data=string Gives the data for the record.
"AAAA" Record Options
Option Description
--aaaa-rec=AAAARECORD Passes a comma-separated list of AAAA (IPv6)records.
--aaaa-ip-address=string Gives the IPv6 address for the record.
"AFSDB" Record Options
Option Description
--afsdb-rec=AFSDBRECORD Passes a comma-separated list of AFSDBrecords.
--afsdb-subtype=1 | 2 Gives the subtype of the AFS database.
--afsdb-hostname=string Gives the hostname of the AFS database.
"CERT" Record Options
Option Description
--cert-rec=CERTRECORD Passes a comma-separated list of CERTrecords.
--cert-type=number Gives the type of certificate. Common valuesinclude 1 (X.509 certificate), 3 (PGP packet), 4(URL of an X.509 certificate), and 254 (privateOID).
--cert-key-tag=number Contains a 16-bit computed value thatrepresents the certificate key. This is generatedbased on the given key algorithm in thecertificate.
--cert-algorithm=number Contains the algorithm used to create the publickey.
--cert-certificate-or-crl=number Contains the base 64-encoded blob of the X.509object (certificate or CRL).

Appendix C. IPA Tools Reference
384
"CNAME" Record Options
Option Description
--cname-rec=CNAMERECORD Passes a comma-separated list of CNAMErecords.
--cname-hostname=string Gives the real hostname that the CNAME aliashostname points to.
"DNAME" Record Options
Option Description
--dname-rec=DNAMERECORD Passes a comma-separated list of DNAMErecords.
--dname-target=string Gives the domain name of the target DNSdomain.
"DS" Record Options
Option Description
--ds-rec=DSRECORD Passes a comma-separated list of DNSSEC keyrecords.
--ds-key-tag=number Contains a 16-bit computed value thatrepresents the certificate key. This is generatedbased on the given key algorithm.
--ds-algorithm=number Contains the algorithm used to create the publickey.
--ds-digest-type=number Contains the algorithm used to create the digest.This is 1, for SHA-1.
--ds-digest=string Contains the digest for the DNSKEY. This iscalculated by combining the fully qualified ownername of the DNSKEY resource record, theDNSKEY data, and the digest algorithm.
"KEY" Record Options
Option Description
--key-rec=KEYRECORD Passes a comma-separated list of KEY records.
--key-flags=number Gives a series of bits the indicate aspects of thekey. Bits 0-1 show key usage, bits 6-7 show thekey entity type (such as a user or account), andbits 12-15 show the key signature settings. Formore information, see http://tools.ietf.org/html/rfc2535#section-3.
--key-protocol=number Shows what Internet protocols the key can beused with. This value can be 1 (TLS), 2 (email), 3(DNSSEC), 4 (IPSEC), or 255 (all).
--key-algorithm=number Contains the algorithm used to create the key.
--key-public-key=number Contains the public key.
"KX" Record Options
Option Description
--kx-rec=KXRECORD Passes a comma-separated list of KX records.
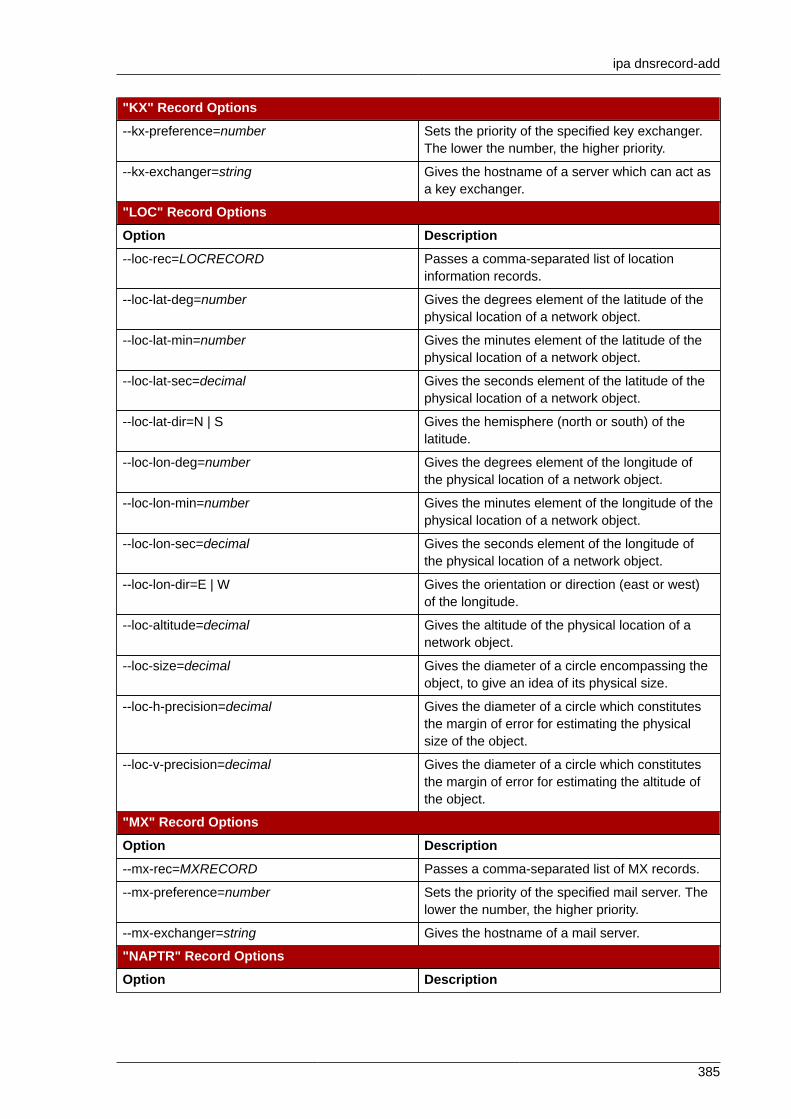
ipa dnsrecord-add
385
"KX" Record Options
--kx-preference=number Sets the priority of the specified key exchanger.The lower the number, the higher priority.
--kx-exchanger=string Gives the hostname of a server which can act asa key exchanger.
"LOC" Record Options
Option Description
--loc-rec=LOCRECORD Passes a comma-separated list of locationinformation records.
--loc-lat-deg=number Gives the degrees element of the latitude of thephysical location of a network object.
--loc-lat-min=number Gives the minutes element of the latitude of thephysical location of a network object.
--loc-lat-sec=decimal Gives the seconds element of the latitude of thephysical location of a network object.
--loc-lat-dir=N | S Gives the hemisphere (north or south) of thelatitude.
--loc-lon-deg=number Gives the degrees element of the longitude ofthe physical location of a network object.
--loc-lon-min=number Gives the minutes element of the longitude of thephysical location of a network object.
--loc-lon-sec=decimal Gives the seconds element of the longitude ofthe physical location of a network object.
--loc-lon-dir=E | W Gives the orientation or direction (east or west)of the longitude.
--loc-altitude=decimal Gives the altitude of the physical location of anetwork object.
--loc-size=decimal Gives the diameter of a circle encompassing theobject, to give an idea of its physical size.
--loc-h-precision=decimal Gives the diameter of a circle which constitutesthe margin of error for estimating the physicalsize of the object.
--loc-v-precision=decimal Gives the diameter of a circle which constitutesthe margin of error for estimating the altitude ofthe object.
"MX" Record Options
Option Description
--mx-rec=MXRECORD Passes a comma-separated list of MX records.
--mx-preference=number Sets the priority of the specified mail server. Thelower the number, the higher priority.
--mx-exchanger=string Gives the hostname of a mail server.
"NAPTR" Record Options
Option Description

Appendix C. IPA Tools Reference
386
"NAPTR" Record Options
--naptr-rec=NAPTRRECORD Passes a comma-separated list of pointerrecords.
--naptr-order=number Contains a 16-bit unsigned number which setsthat order to use to process naming authoritypointer records.
--napter-preference=number Contains a 16-bit unsigned number which is thesecondary method used to determine the weightor priority of naming authority pointer recordswith the same order value.
--napter-flags=string Contains an application-specific series ofcharacters which sets how to manage fieldvalues.
--napter-service=string Contains application-specific values which areused to configure the NAPTR service.
--napter-regexp=string Contains a substitution expression which is usedto help look up the next domain name in thequeue.
--napter-replacement=string Contains a fully-qualified domain name to usewith --napter-regexp if the expression is asimple replacement.
"NS" Record Options
Option Description
--ns-rec=NSRECORD Passes a comma-separated list of NS records.
--ns-hostname=string Gives the hostname of the authoritative nameserver.
"NSEC" Record Options
Option Description
--nsec-rec=NSECRECORD Passes a comma-separated list of NSEC keyrecords.
--nsec-next=string Gives the next domain name in the canonicalorder of the DNS zone.
--nsec-types=types Contains a list of record types supported in thedomain. The types can be SOA, A, AAAA, A6,AFSDB, APL, CERT, CNAME, DHCID, DLV,DNAME, DNSKEY, DS, HIP, IPSECKEY, KEY,KX, LOC, MX, NAPTR, NS, NSEC, NSEC3,NSEC3PARAM, PTR, RRSIG, RP, SIG, SPF,SRV, SSHFP, TA, TKEY, TSIG, TXT.
"PTR" Record Options
Option Description
--ptr-rec=PTRRECORD Passes a comma-separated list of PTR records.
--ptr-hostname=string Gives the hostname for the record.
"RRSIG" Record Options
Option Description
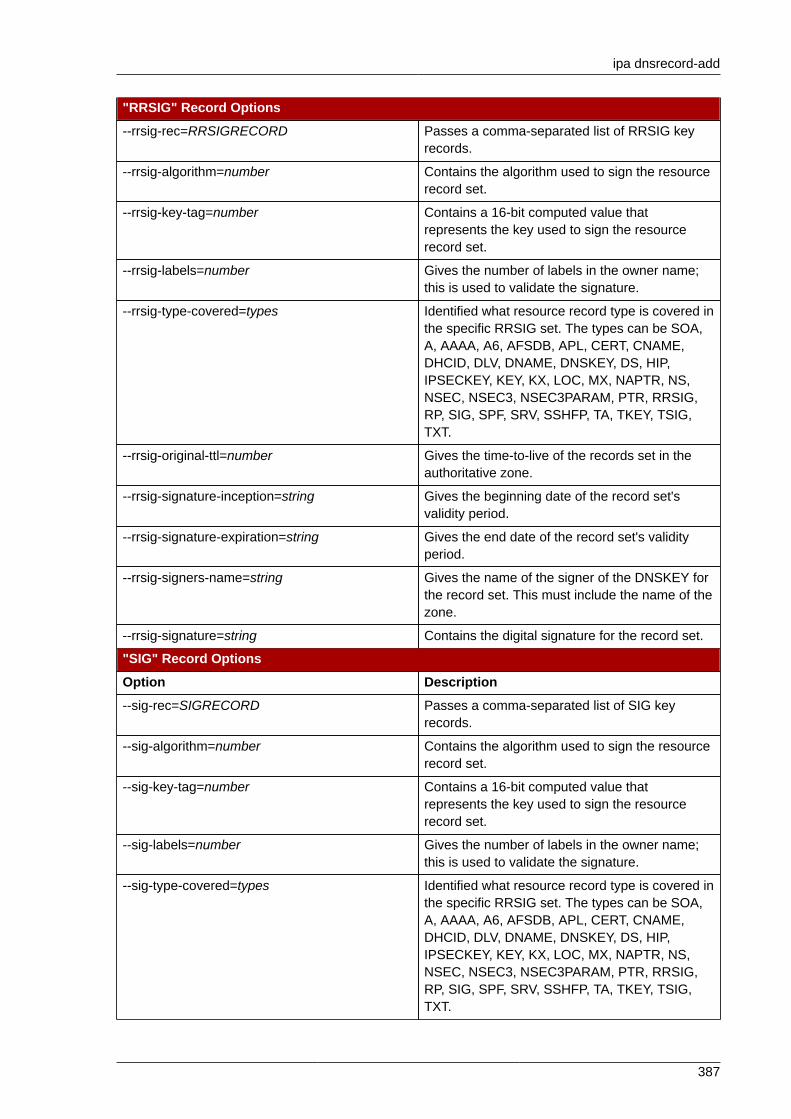
ipa dnsrecord-add
387
"RRSIG" Record Options
--rrsig-rec=RRSIGRECORD Passes a comma-separated list of RRSIG keyrecords.
--rrsig-algorithm=number Contains the algorithm used to sign the resourcerecord set.
--rrsig-key-tag=number Contains a 16-bit computed value thatrepresents the key used to sign the resourcerecord set.
--rrsig-labels=number Gives the number of labels in the owner name;this is used to validate the signature.
--rrsig-type-covered=types Identified what resource record type is covered inthe specific RRSIG set. The types can be SOA,A, AAAA, A6, AFSDB, APL, CERT, CNAME,DHCID, DLV, DNAME, DNSKEY, DS, HIP,IPSECKEY, KEY, KX, LOC, MX, NAPTR, NS,NSEC, NSEC3, NSEC3PARAM, PTR, RRSIG,RP, SIG, SPF, SRV, SSHFP, TA, TKEY, TSIG,TXT.
--rrsig-original-ttl=number Gives the time-to-live of the records set in theauthoritative zone.
--rrsig-signature-inception=string Gives the beginning date of the record set'svalidity period.
--rrsig-signature-expiration=string Gives the end date of the record set's validityperiod.
--rrsig-signers-name=string Gives the name of the signer of the DNSKEY forthe record set. This must include the name of thezone.
--rrsig-signature=string Contains the digital signature for the record set.
"SIG" Record Options
Option Description
--sig-rec=SIGRECORD Passes a comma-separated list of SIG keyrecords.
--sig-algorithm=number Contains the algorithm used to sign the resourcerecord set.
--sig-key-tag=number Contains a 16-bit computed value thatrepresents the key used to sign the resourcerecord set.
--sig-labels=number Gives the number of labels in the owner name;this is used to validate the signature.
--sig-type-covered=types Identified what resource record type is covered inthe specific RRSIG set. The types can be SOA,A, AAAA, A6, AFSDB, APL, CERT, CNAME,DHCID, DLV, DNAME, DNSKEY, DS, HIP,IPSECKEY, KEY, KX, LOC, MX, NAPTR, NS,NSEC, NSEC3, NSEC3PARAM, PTR, RRSIG,RP, SIG, SPF, SRV, SSHFP, TA, TKEY, TSIG,TXT.
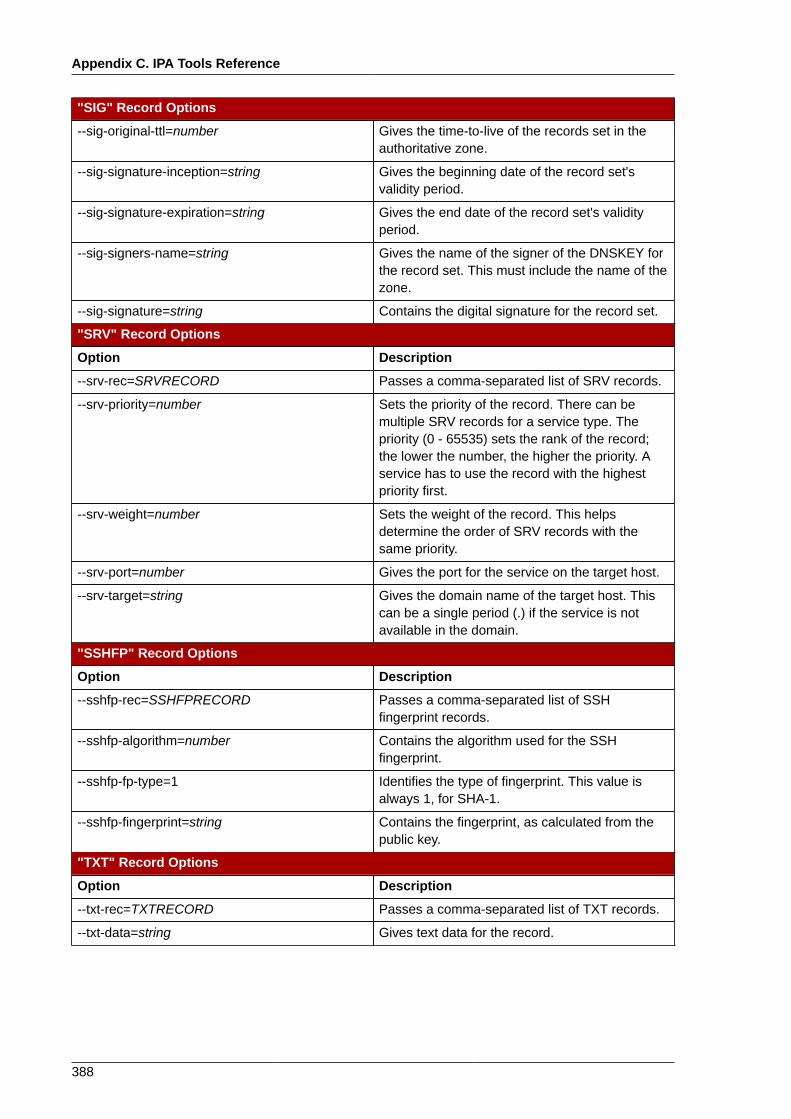
Appendix C. IPA Tools Reference
388
"SIG" Record Options
--sig-original-ttl=number Gives the time-to-live of the records set in theauthoritative zone.
--sig-signature-inception=string Gives the beginning date of the record set'svalidity period.
--sig-signature-expiration=string Gives the end date of the record set's validityperiod.
--sig-signers-name=string Gives the name of the signer of the DNSKEY forthe record set. This must include the name of thezone.
--sig-signature=string Contains the digital signature for the record set.
"SRV" Record Options
Option Description
--srv-rec=SRVRECORD Passes a comma-separated list of SRV records.
--srv-priority=number Sets the priority of the record. There can bemultiple SRV records for a service type. Thepriority (0 - 65535) sets the rank of the record;the lower the number, the higher the priority. Aservice has to use the record with the highestpriority first.
--srv-weight=number Sets the weight of the record. This helpsdetermine the order of SRV records with thesame priority.
--srv-port=number Gives the port for the service on the target host.
--srv-target=string Gives the domain name of the target host. Thiscan be a single period (.) if the service is notavailable in the domain.
"SSHFP" Record Options
Option Description
--sshfp-rec=SSHFPRECORD Passes a comma-separated list of SSHfingerprint records.
--sshfp-algorithm=number Contains the algorithm used for the SSHfingerprint.
--sshfp-fp-type=1 Identifies the type of fingerprint. This value isalways 1, for SHA-1.
--sshfp-fingerprint=string Contains the fingerprint, as calculated from thepublic key.
"TXT" Record Options
Option Description
--txt-rec=TXTRECORD Passes a comma-separated list of TXT records.
--txt-data=string Gives text data for the record.

ipa Host Commands
389
C.4. ipa Host CommandsThis is a collection of subcommands which manage the client, or host, configuration within the IPAdomain.
C.4.1. ipa host-addAdds a new IPA client machine to the domain manually. This is done as part of the enrollment process.
C.4.1.1. Syntaxipa host-add hostname [ --desc="description" ] [ --locality="cityName" ] [ --location="location" ] [ --platform="hardware_description" ] [ --os="OS_version" ] [ --password="enrollment_password" ] [ --random ] [ --certificate="base64_cert" ] [ --force ] [ --no-reverse ] [ --ip-address=IPaddress ]
C.4.1.2. Options
Command Description
choice="plain"> hostname Sets the name of the host entry to create, basedon the fully-qualified domain name of the host.
IMPORTANT
This must be a valid DNS name, whichmeans only numbers, alphabetic characters,and hyphens (-) are allowed. Othercharacters, like underscores, in thehostname will cause DNS failures.
--desc="description" Gives a text description of the host.
--locality="cityName" Gives the geographical location, usually a city,where the host machine is.
--location="location" Gives the physical location, like a colocationfacility, room number, or rack, where the hostmachine is.
--platform="hardware_description" Gives a hardware description of the hostmachine.
--os="OS_version" Gives the operating system type, such as "RedHat Enterprise Linux 6".
--password="enrollment_password" For a bulk enrollment, manually sets a passwordto use to proceed with the enrollment.
--random For a bulk enrollment, randomly generates apassword to use to proceed with the enrollment.
--certificate="base64_cert" Contains the full base 64-encoded blob for aserver certificate for the host.
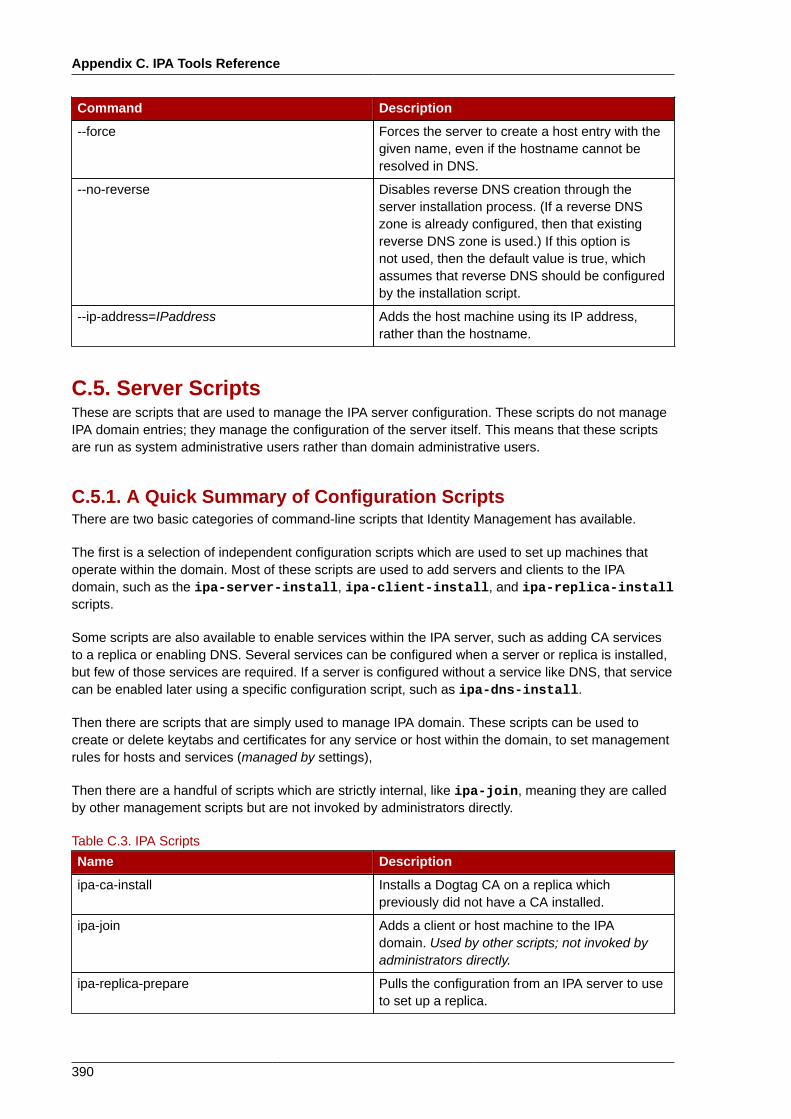
Appendix C. IPA Tools Reference
390
Command Description
--force Forces the server to create a host entry with thegiven name, even if the hostname cannot beresolved in DNS.
--no-reverse Disables reverse DNS creation through theserver installation process. (If a reverse DNSzone is already configured, then that existingreverse DNS zone is used.) If this option isnot used, then the default value is true, whichassumes that reverse DNS should be configuredby the installation script.
--ip-address=IPaddress Adds the host machine using its IP address,rather than the hostname.
C.5. Server ScriptsThese are scripts that are used to manage the IPA server configuration. These scripts do not manageIPA domain entries; they manage the configuration of the server itself. This means that these scriptsare run as system administrative users rather than domain administrative users.
C.5.1. A Quick Summary of Configuration ScriptsThere are two basic categories of command-line scripts that Identity Management has available.
The first is a selection of independent configuration scripts which are used to set up machines thatoperate within the domain. Most of these scripts are used to add servers and clients to the IPAdomain, such as the ipa-server-install, ipa-client-install, and ipa-replica-installscripts.
Some scripts are also available to enable services within the IPA server, such as adding CA servicesto a replica or enabling DNS. Several services can be configured when a server or replica is installed,but few of those services are required. If a server is configured without a service like DNS, that servicecan be enabled later using a specific configuration script, such as ipa-dns-install.
Then there are scripts that are simply used to manage IPA domain. These scripts can be used tocreate or delete keytabs and certificates for any service or host within the domain, to set managementrules for hosts and services (managed by settings),
Then there are a handful of scripts which are strictly internal, like ipa-join, meaning they are calledby other management scripts but are not invoked by administrators directly.
Table C.3. IPA Scripts
Name Description
ipa-ca-install Installs a Dogtag CA on a replica whichpreviously did not have a CA installed.
ipa-join Adds a client or host machine to the IPAdomain. Used by other scripts; not invoked byadministrators directly.
ipa-replica-prepare Pulls the configuration from an IPA server to useto set up a replica.
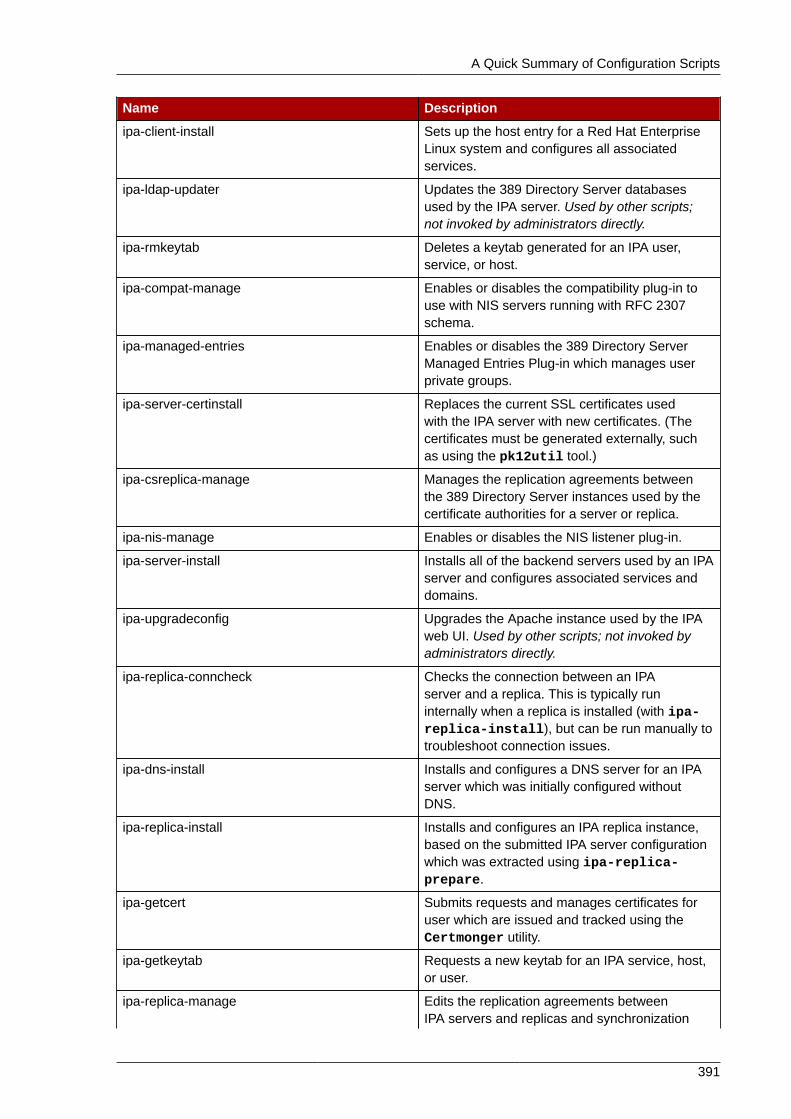
A Quick Summary of Configuration Scripts
391
Name Description
ipa-client-install Sets up the host entry for a Red Hat EnterpriseLinux system and configures all associatedservices.
ipa-ldap-updater Updates the 389 Directory Server databasesused by the IPA server. Used by other scripts;not invoked by administrators directly.
ipa-rmkeytab Deletes a keytab generated for an IPA user,service, or host.
ipa-compat-manage Enables or disables the compatibility plug-in touse with NIS servers running with RFC 2307schema.
ipa-managed-entries Enables or disables the 389 Directory ServerManaged Entries Plug-in which manages userprivate groups.
ipa-server-certinstall Replaces the current SSL certificates usedwith the IPA server with new certificates. (Thecertificates must be generated externally, suchas using the pk12util tool.)
ipa-csreplica-manage Manages the replication agreements betweenthe 389 Directory Server instances used by thecertificate authorities for a server or replica.
ipa-nis-manage Enables or disables the NIS listener plug-in.
ipa-server-install Installs all of the backend servers used by an IPAserver and configures associated services anddomains.
ipa-upgradeconfig Upgrades the Apache instance used by the IPAweb UI. Used by other scripts; not invoked byadministrators directly.
ipa-replica-conncheck Checks the connection between an IPAserver and a replica. This is typically runinternally when a replica is installed (with ipa-replica-install), but can be run manually totroubleshoot connection issues.
ipa-dns-install Installs and configures a DNS server for an IPAserver which was initially configured withoutDNS.
ipa-replica-install Installs and configures an IPA replica instance,based on the submitted IPA server configurationwhich was extracted using ipa-replica-prepare.
ipa-getcert Submits requests and manages certificates foruser which are issued and tracked using theCertmonger utility.
ipa-getkeytab Requests a new keytab for an IPA service, host,or user.
ipa-replica-manage Edits the replication agreements betweenIPA servers and replicas and synchronization
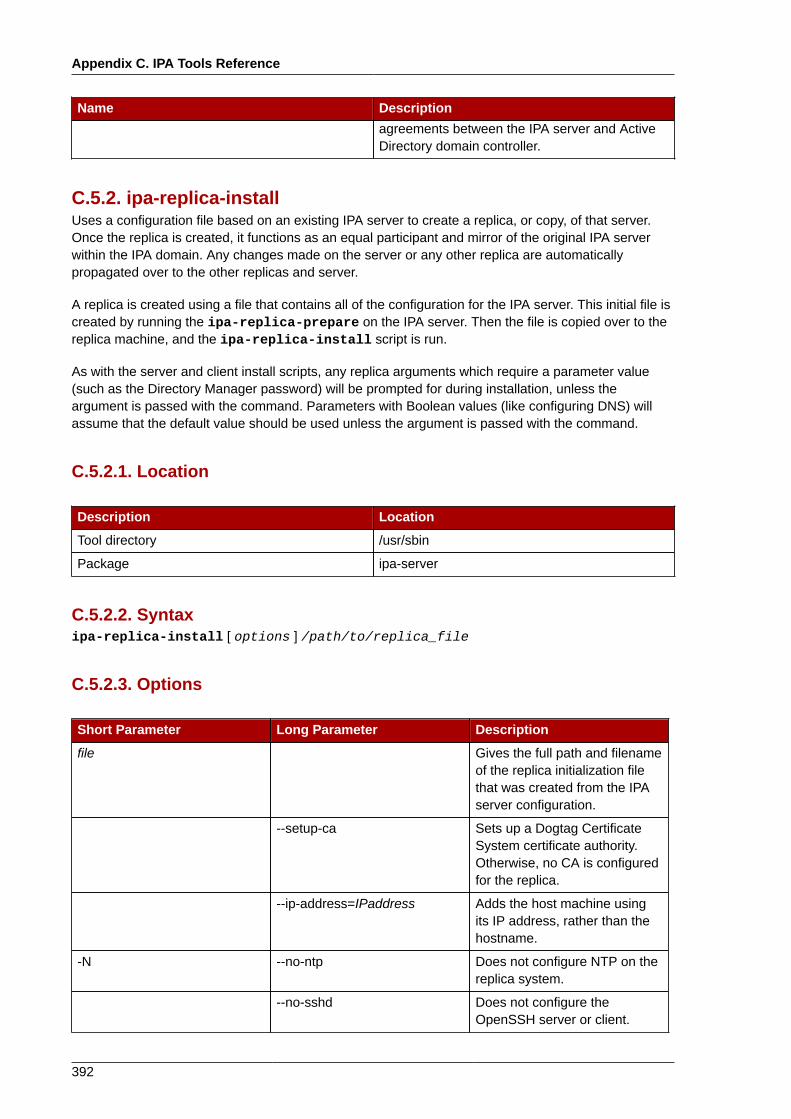
Appendix C. IPA Tools Reference
392
Name Descriptionagreements between the IPA server and ActiveDirectory domain controller.
C.5.2. ipa-replica-installUses a configuration file based on an existing IPA server to create a replica, or copy, of that server.Once the replica is created, it functions as an equal participant and mirror of the original IPA serverwithin the IPA domain. Any changes made on the server or any other replica are automaticallypropagated over to the other replicas and server.
A replica is created using a file that contains all of the configuration for the IPA server. This initial file iscreated by running the ipa-replica-prepare on the IPA server. Then the file is copied over to thereplica machine, and the ipa-replica-install script is run.
As with the server and client install scripts, any replica arguments which require a parameter value(such as the Directory Manager password) will be prompted for during installation, unless theargument is passed with the command. Parameters with Boolean values (like configuring DNS) willassume that the default value should be used unless the argument is passed with the command.
C.5.2.1. Location
Description Location
Tool directory /usr/sbin
Package ipa-server
C.5.2.2. Syntaxipa-replica-install [ options ] /path/to/replica_file
C.5.2.3. Options
Short Parameter Long Parameter Description
file Gives the full path and filenameof the replica initialization filethat was created from the IPAserver configuration.
--setup-ca Sets up a Dogtag CertificateSystem certificate authority.Otherwise, no CA is configuredfor the replica.
--ip-address=IPaddress Adds the host machine usingits IP address, rather than thehostname.
-N --no-ntp Does not configure NTP on thereplica system.
--no-sshd Does not configure theOpenSSH server or client.
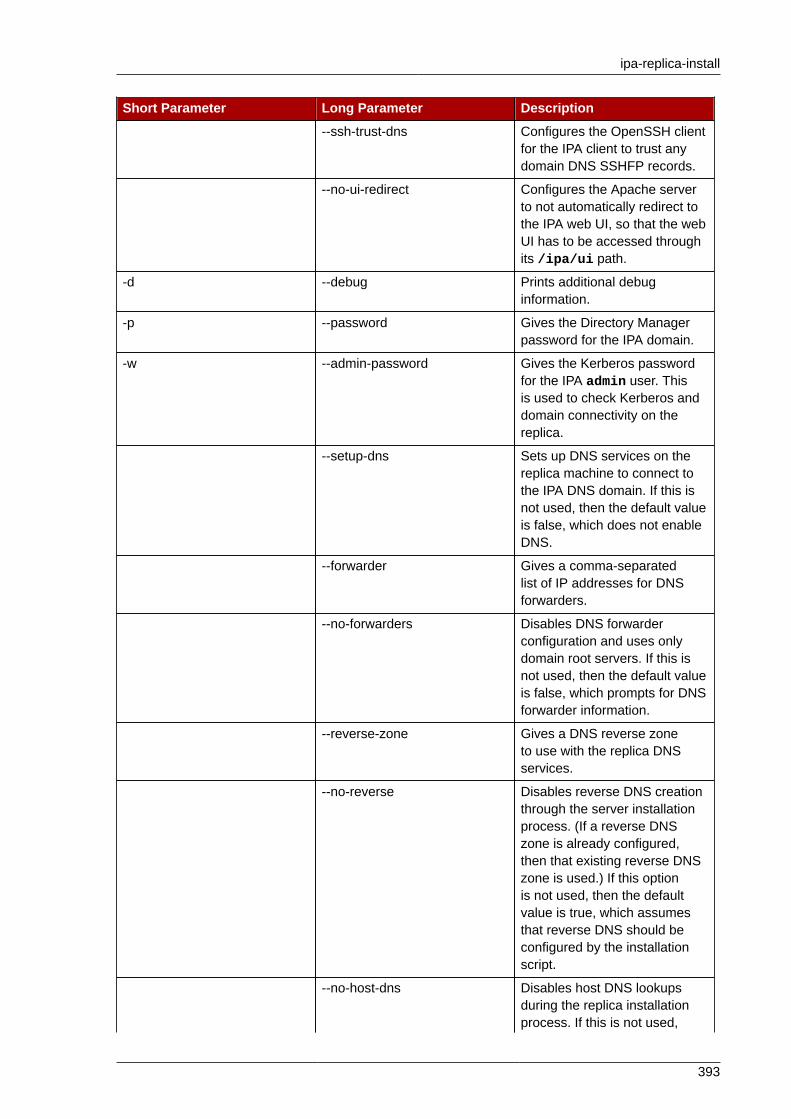
ipa-replica-install
393
Short Parameter Long Parameter Description
--ssh-trust-dns Configures the OpenSSH clientfor the IPA client to trust anydomain DNS SSHFP records.
--no-ui-redirect Configures the Apache serverto not automatically redirect tothe IPA web UI, so that the webUI has to be accessed throughits /ipa/ui path.
-d --debug Prints additional debuginformation.
-p --password Gives the Directory Managerpassword for the IPA domain.
-w --admin-password Gives the Kerberos passwordfor the IPA admin user. Thisis used to check Kerberos anddomain connectivity on thereplica.
--setup-dns Sets up DNS services on thereplica machine to connect tothe IPA DNS domain. If this isnot used, then the default valueis false, which does not enableDNS.
--forwarder Gives a comma-separatedlist of IP addresses for DNSforwarders.
--no-forwarders Disables DNS forwarderconfiguration and uses onlydomain root servers. If this isnot used, then the default valueis false, which prompts for DNSforwarder information.
--reverse-zone Gives a DNS reverse zoneto use with the replica DNSservices.
--no-reverse Disables reverse DNS creationthrough the server installationprocess. (If a reverse DNSzone is already configured,then that existing reverse DNSzone is used.) If this optionis not used, then the defaultvalue is true, which assumesthat reverse DNS should beconfigured by the installationscript.
--no-host-dns Disables host DNS lookupsduring the replica installationprocess. If this is not used,

Appendix C. IPA Tools Reference
394
Short Parameter Long Parameter Descriptionthen the default value is true,which performs the host DNSlookups.
--no-dns-sshfp Configures the client to notconfigure DNS SSHFP records.
--skip-conncheck Disables checks for thereplica's connection to the IPAdomain. If this is not used, thenthe default value is true, whichchecks that the replica canconnect to the Kerberos realm.
This can be useful if the replicais unable to reach the DirectoryServer or the CA used bythe original IPA server, suchas the server is offline or theserver's firewall is blockingaccess on the required ports(Section 2.2.4.4, “SystemPorts”).
-U --unattended Disables user prompts so thatthe replica installation scriptruns without user interaction.
C.5.3. ipa-replica-prepareCreates a file that can be used to create a copy, or replica, of the IPA server.
Each replica initialization file is unique to the replica machine because the configuration is based,in part, on the IP address and hostname of the replica machine. This host-specific configuration isespecially critical for setting up services like Kerberos which use SSL because SSL certificates arecreated based on the hostname.
When the replica file is created, the prep script requires the hostname and, optionally, accepts the IPaddress.
Once the configuration file is created on the server using the ipa-replica-prepare command,then the replica file is copied over to the replica machine and the replica is configured using the ipa-replica-install command.
NOTE
If DNS is managed by IPA, then use either the --ip-address option or configure DNSforwarders and allow reverse DNS lookups.
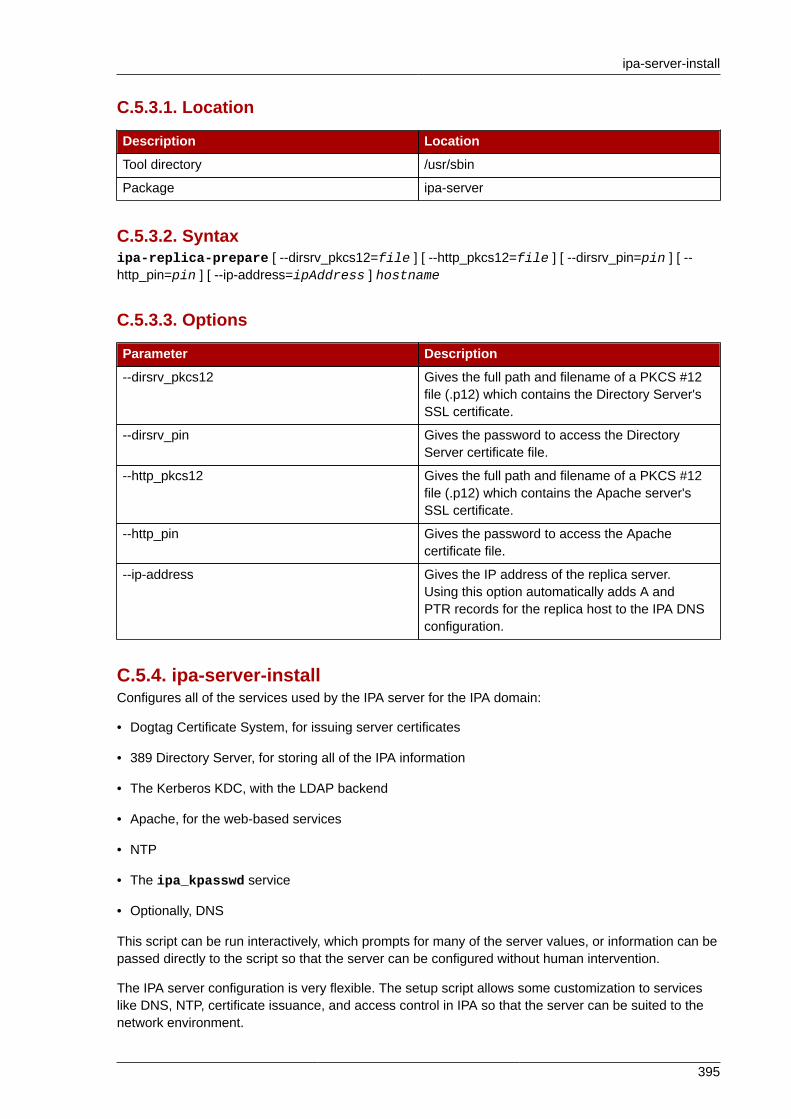
ipa-server-install
395
C.5.3.1. Location
Description Location
Tool directory /usr/sbin
Package ipa-server
C.5.3.2. Syntaxipa-replica-prepare [ --dirsrv_pkcs12=file ] [ --http_pkcs12=file ] [ --dirsrv_pin=pin ] [ --http_pin=pin ] [ --ip-address=ipAddress ] hostname
C.5.3.3. Options
Parameter Description
--dirsrv_pkcs12 Gives the full path and filename of a PKCS #12file (.p12) which contains the Directory Server'sSSL certificate.
--dirsrv_pin Gives the password to access the DirectoryServer certificate file.
--http_pkcs12 Gives the full path and filename of a PKCS #12file (.p12) which contains the Apache server'sSSL certificate.
--http_pin Gives the password to access the Apachecertificate file.
--ip-address Gives the IP address of the replica server.Using this option automatically adds A andPTR records for the replica host to the IPA DNSconfiguration.
C.5.4. ipa-server-installConfigures all of the services used by the IPA server for the IPA domain:
• Dogtag Certificate System, for issuing server certificates
• 389 Directory Server, for storing all of the IPA information
• The Kerberos KDC, with the LDAP backend
• Apache, for the web-based services
• NTP
• The ipa_kpasswd service
• Optionally, DNS
This script can be run interactively, which prompts for many of the server values, or information can bepassed directly to the script so that the server can be configured without human intervention.
The IPA server configuration is very flexible. The setup script allows some customization to serviceslike DNS, NTP, certificate issuance, and access control in IPA so that the server can be suited to thenetwork environment.

Appendix C. IPA Tools Reference
396
C.5.4.1. Location
Description Location
Tool directory /usr/sbin
Package ipa-server
C.5.4.2. Syntaxipa-server-install -a ipa_admin_password --hostname=hostname -pdirectory_manager_password -n domain_name -r realm_name [[ --external-ca ] | [ --external_ca_file=CA_cert_chain_file ] | [ --external_cert_file=certificate_file ]] [ --selfsign ] [ --subject=subject_DN ] [ --setup-dns ] [ --forwarder=forwarder ] [ --no-forwarders ][ --no-reverse ] [ --zone-refresh=seconds ] [ --zone-notif ] [ --zonemgr=email_address ] [ --ip-address=ip_address ] [ -P kerberos_master_password ] [ --no-ntp ] [ --idmax=number ] [ --idstart=number ] [ --no_hbac_allow ] [ --no-host-dns ] [ -U ] [ --uninstall ] [ --debug ] [ --help ] [ --version ]
C.5.4.3. Options
Argument Alternate Argument Description
Required Options1
-a ipa_admin_password --admin-password=ipa_admin_password
The password for the IPAadministrator. This is used forthe admin user to authenticateto the Kerberos realm.
--hostname=hostname The fully-qualified domainname of the IPA servermachine.
IMPORTANT
This must be a validDNS name, whichmeans only numbers,alphabetic characters,and hyphens (-) areallowed. Other characters,like underscores, in thehostname will cause DNSfailures.
Additionally, the hostnamemust all be lower-case. Nocapital letters are allowed.
-n domain_name --domain=domain_name The name of the LDAP serverdomain to use for the IPA
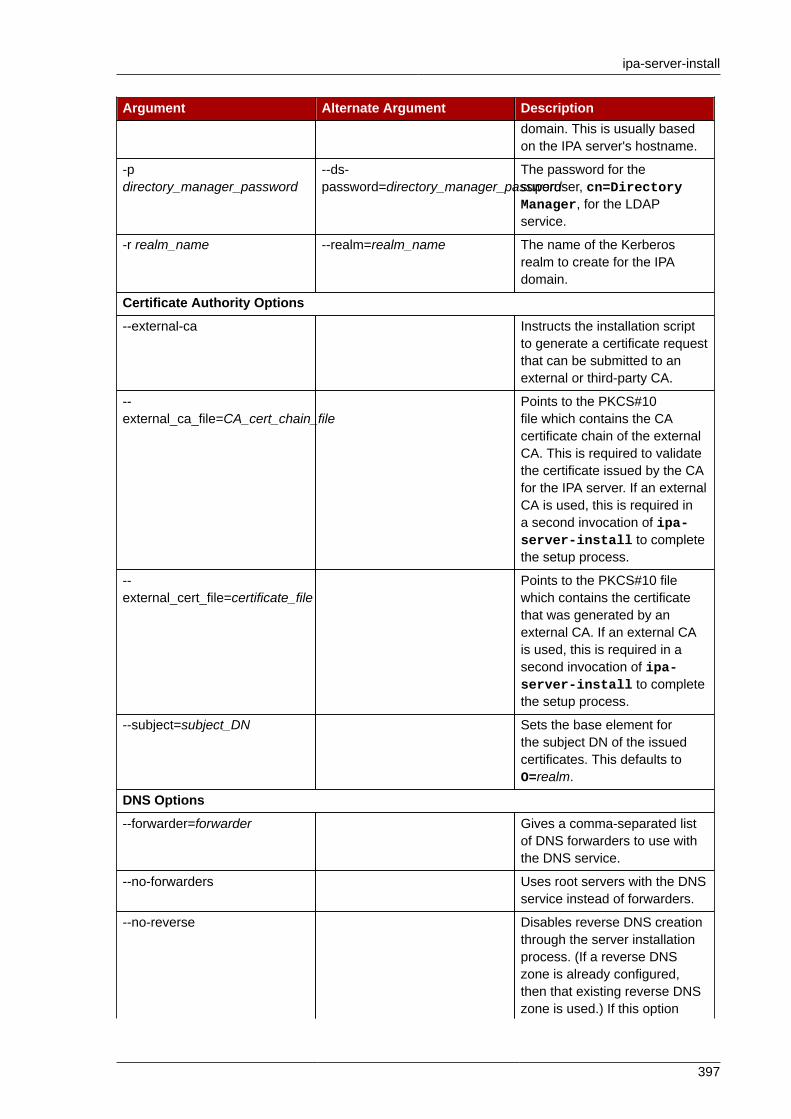
ipa-server-install
397
Argument Alternate Argument Descriptiondomain. This is usually basedon the IPA server's hostname.
-pdirectory_manager_password
--ds-password=directory_manager_password
The password for thesuperuser, cn=DirectoryManager, for the LDAPservice.
-r realm_name --realm=realm_name The name of the Kerberosrealm to create for the IPAdomain.
Certificate Authority Options
--external-ca Instructs the installation scriptto generate a certificate requestthat can be submitted to anexternal or third-party CA.
--external_ca_file=CA_cert_chain_file
Points to the PKCS#10file which contains the CAcertificate chain of the externalCA. This is required to validatethe certificate issued by the CAfor the IPA server. If an externalCA is used, this is required ina second invocation of ipa-server-install to completethe setup process.
--external_cert_file=certificate_file
Points to the PKCS#10 filewhich contains the certificatethat was generated by anexternal CA. If an external CAis used, this is required in asecond invocation of ipa-server-install to completethe setup process.
--subject=subject_DN Sets the base element forthe subject DN of the issuedcertificates. This defaults toO=realm.
DNS Options
--forwarder=forwarder Gives a comma-separated listof DNS forwarders to use withthe DNS service.
--no-forwarders Uses root servers with the DNSservice instead of forwarders.
--no-reverse Disables reverse DNS creationthrough the server installationprocess. (If a reverse DNSzone is already configured,then that existing reverse DNSzone is used.) If this option
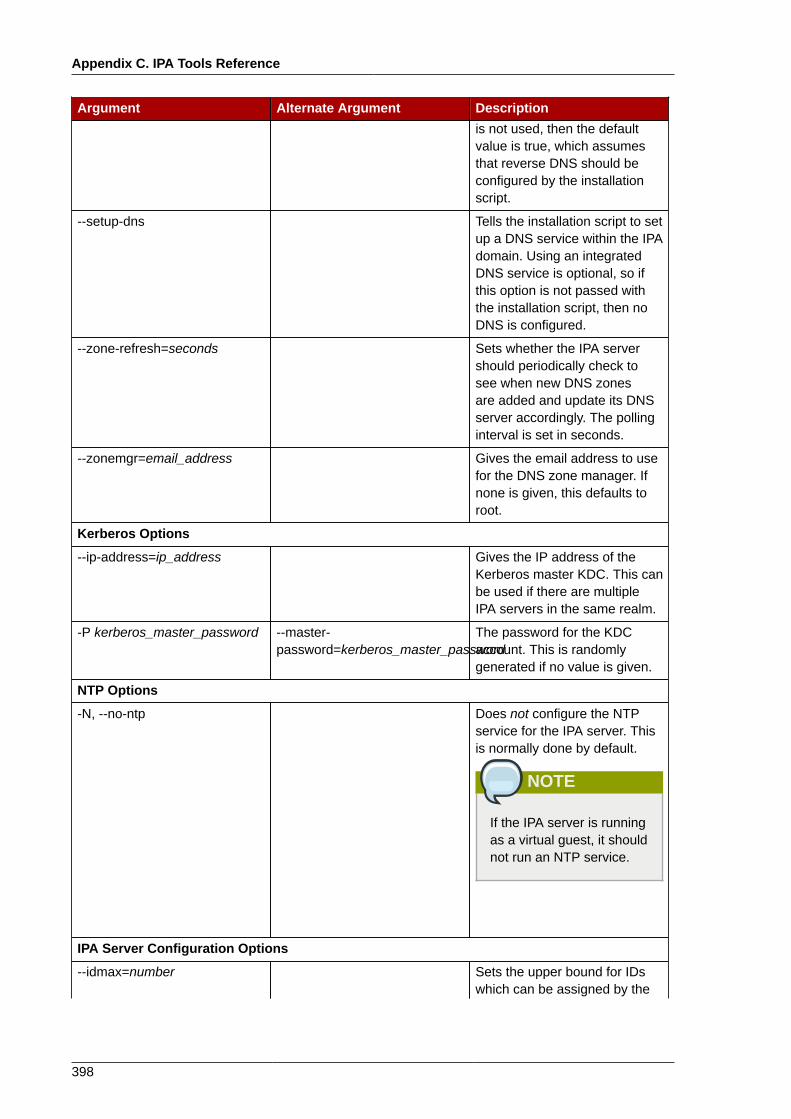
Appendix C. IPA Tools Reference
398
Argument Alternate Argument Descriptionis not used, then the defaultvalue is true, which assumesthat reverse DNS should beconfigured by the installationscript.
--setup-dns Tells the installation script to setup a DNS service within the IPAdomain. Using an integratedDNS service is optional, so ifthis option is not passed withthe installation script, then noDNS is configured.
--zone-refresh=seconds Sets whether the IPA servershould periodically check tosee when new DNS zonesare added and update its DNSserver accordingly. The pollinginterval is set in seconds.
--zonemgr=email_address Gives the email address to usefor the DNS zone manager. Ifnone is given, this defaults toroot.
Kerberos Options
--ip-address=ip_address Gives the IP address of theKerberos master KDC. This canbe used if there are multipleIPA servers in the same realm.
-P kerberos_master_password --master-password=kerberos_master_password
The password for the KDCaccount. This is randomlygenerated if no value is given.
NTP Options
-N, --no-ntp Does not configure the NTPservice for the IPA server. Thisis normally done by default.
NOTE
If the IPA server is runningas a virtual guest, it shouldnot run an NTP service.
IPA Server Configuration Options
--idmax=number Sets the upper bound for IDswhich can be assigned by the

Client Scripts
399
Argument Alternate Argument DescriptionIPA server. The default value isthe ID start value plus 199999.
--idstart=number Sets the lower bound (startingvalue) for IDs which can beassigned by the IPA server.The default value is randomlyselected.
--no_hbac_allow Disables the allow_all rulefor host-based access controlin the IPA domain.
Other Setup Options
--no-host-dns Does not use DNS to look upthe hostname of the IPA servermachine during the installationprocess.
-U --unattended Runs the ipa-server-install command withoutany interactive prompts.
--uninstall Uninstalls an existing IPAserver.
General Tool Options
-d --debug Runs the ipa-server-install command in debugmode and outputs debugginginformation.
-h --help Prints the help information forthe ipa-server-installcommand.
--version Prints the version number ofthe ipa-server-installcommand.
1 The installation script will prompt for these options if they are not passed with the script.
C.6. Client ScriptsThese tools are used to manage client machines.
C.6.1. ipa-client-installConfigures a client machine. This script uses the local SSSD service to connect to the IPA serverduring the setup process. It is also possible to connect to the server through PAM/NSS using LDAP.
This script is also used to uninstall clients, which removes them from the IPA domain and removes allIPA-related configuration.
This script is only available for Red Hat Enterprise Linux platforms.

Appendix C. IPA Tools Reference
400
C.6.1.1. Location
Description Location
Tool directory /usr/sbin/
Package ipa-client
C.6.1.2. Syntaxipa-client-install [ -d | --debug ] [ --domain=domainName ] [ --enable-dns-updates ] [ -f, --force ] [ --hostname=clientHostname ] [ --mkhomedir ] [ -N, --no-ntp ] [ --no-krb5-offline-passwords ] [ -ntp-server=NTP_server ] [ --ssh-trust-dns ] [ --no-sshd ] [ --no-dns-sshfp ] [ --on-master ] [ -p | --principal ] [ --permit ] [ --realm=realmName ] [ -S | --no-sssd ] [ --preserve-sssd ] [ --server=IPA_server_fqdn ] [ -U | --unattended ] [ --uninstall ] [ -w password | --password=password | -W ]
C.6.1.3. Options
Long Parameter Short Parameter Description
--domain=domainName Gives the domain name for theIPA domain.
--enable-dns-updates Tells SSSD to update DNS withthe IP address of this client.
--force -f Forces the script to apply thesettings even if errors occur.
--hostname=clientHostname Sets the fully-qualified domainname of the client server. If thisis not given, the script uses thenodename given in uname.
IMPORTANT
This must be a validDNS name, whichmeans only numbers,alphabetic characters,and hyphens (-) areallowed. Other characters,like underscores, in thehostname will cause DNSfailures.
Additionally, the hostnamemust all be lower-case. Nocapital letters are allowed.
--mkhomedir Configures PAM to create auser's home directory if it doesnot exist.
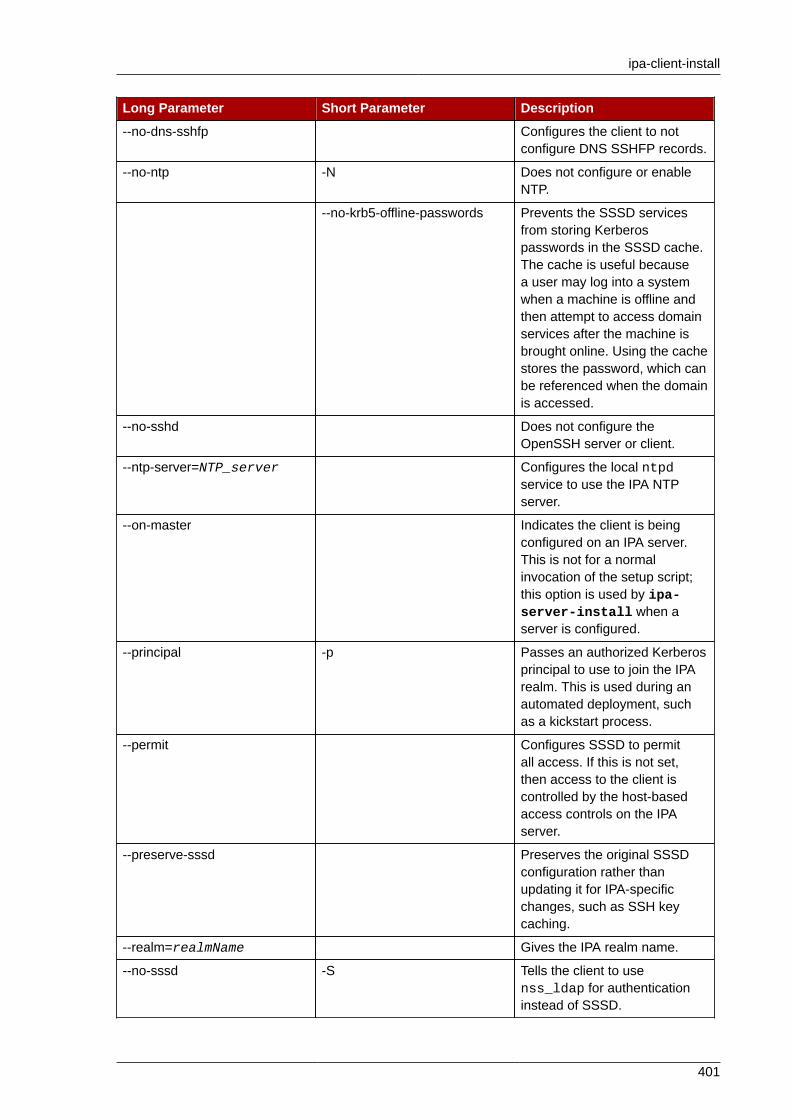
ipa-client-install
401
Long Parameter Short Parameter Description
--no-dns-sshfp Configures the client to notconfigure DNS SSHFP records.
--no-ntp -N Does not configure or enableNTP.
--no-krb5-offline-passwords Prevents the SSSD servicesfrom storing Kerberospasswords in the SSSD cache.The cache is useful becausea user may log into a systemwhen a machine is offline andthen attempt to access domainservices after the machine isbrought online. Using the cachestores the password, which canbe referenced when the domainis accessed.
--no-sshd Does not configure theOpenSSH server or client.
--ntp-server=NTP_server Configures the local ntpdservice to use the IPA NTPserver.
--on-master Indicates the client is beingconfigured on an IPA server.This is not for a normalinvocation of the setup script;this option is used by ipa-server-install when aserver is configured.
--principal -p Passes an authorized Kerberosprincipal to use to join the IPArealm. This is used during anautomated deployment, suchas a kickstart process.
--permit Configures SSSD to permitall access. If this is not set,then access to the client iscontrolled by the host-basedaccess controls on the IPAserver.
--preserve-sssd Preserves the original SSSDconfiguration rather thanupdating it for IPA-specificchanges, such as SSH keycaching.
--realm=realmName Gives the IPA realm name.
--no-sssd -S Tells the client to usenss_ldap for authenticationinstead of SSSD.
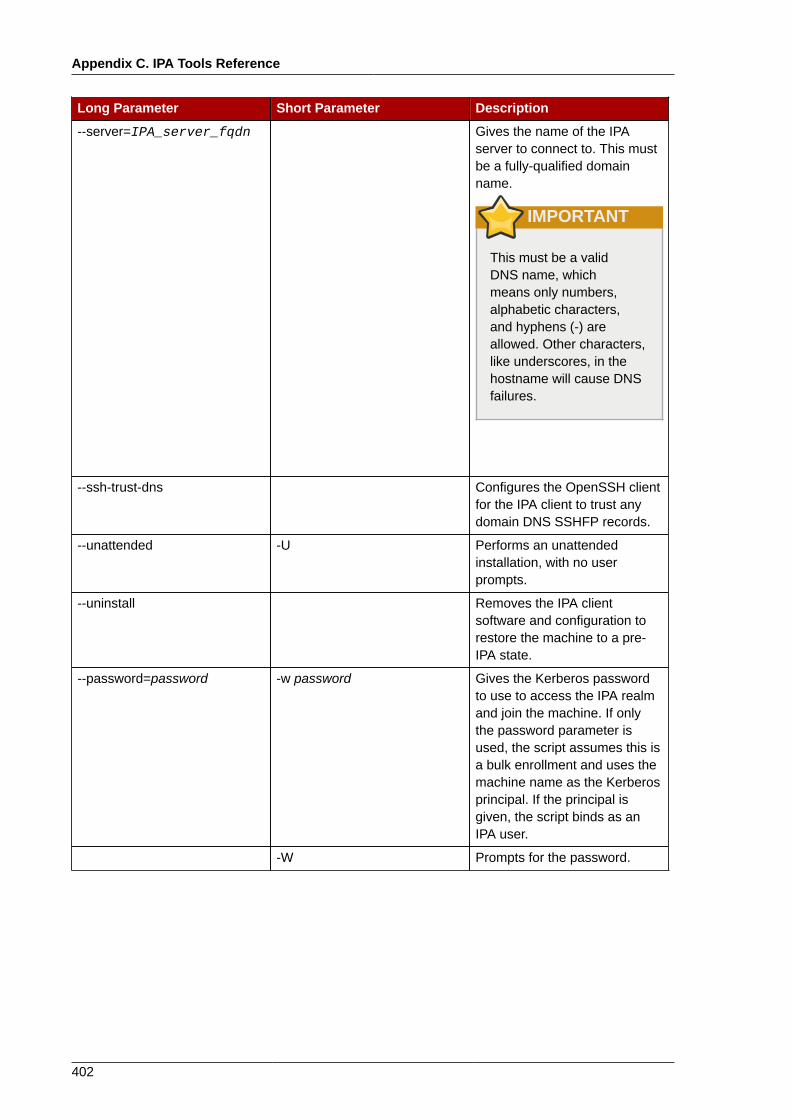
Appendix C. IPA Tools Reference
402
Long Parameter Short Parameter Description
--server=IPA_server_fqdn Gives the name of the IPAserver to connect to. This mustbe a fully-qualified domainname.
IMPORTANT
This must be a validDNS name, whichmeans only numbers,alphabetic characters,and hyphens (-) areallowed. Other characters,like underscores, in thehostname will cause DNSfailures.
--ssh-trust-dns Configures the OpenSSH clientfor the IPA client to trust anydomain DNS SSHFP records.
--unattended -U Performs an unattendedinstallation, with no userprompts.
--uninstall Removes the IPA clientsoftware and configuration torestore the machine to a pre-IPA state.
--password=password -w password Gives the Kerberos passwordto use to access the IPA realmand join the machine. If onlythe password parameter isused, the script assumes this isa bulk enrollment and uses themachine name as the Kerberosprincipal. If the principal isgiven, the script binds as anIPA user.
-W Prompts for the password.
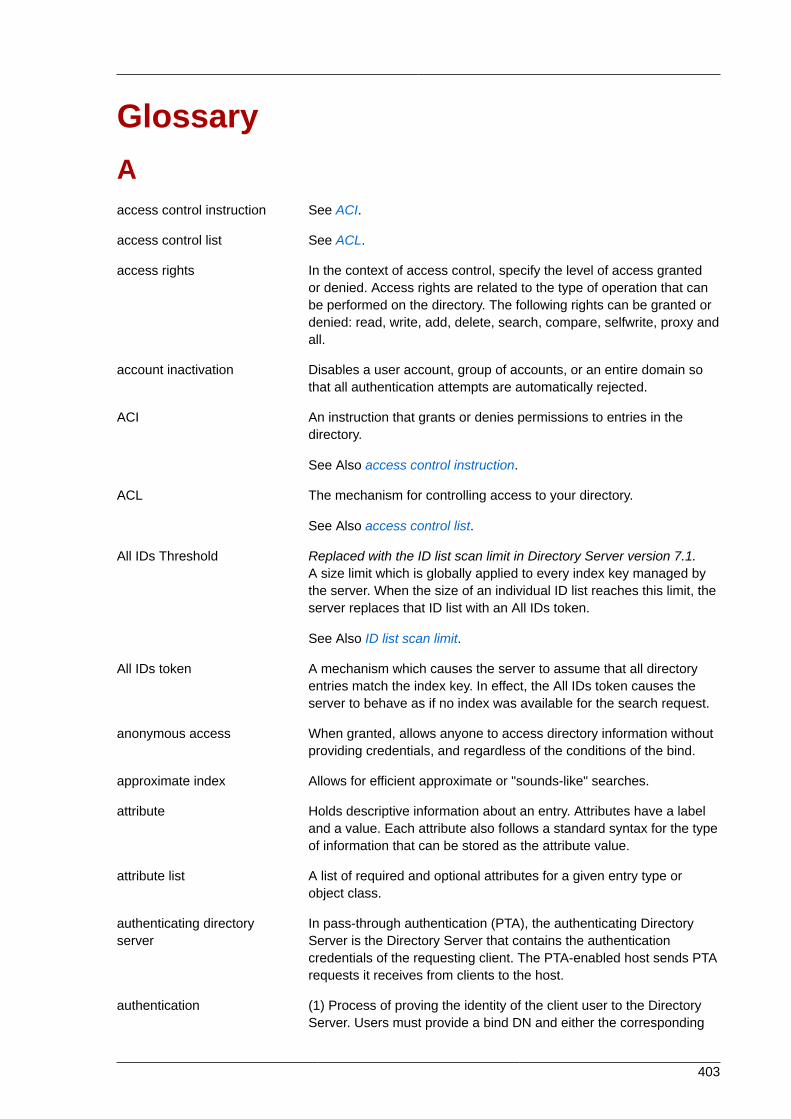
403
GlossaryAaccess control instruction See ACI.
access control list See ACL.
access rights In the context of access control, specify the level of access grantedor denied. Access rights are related to the type of operation that canbe performed on the directory. The following rights can be granted ordenied: read, write, add, delete, search, compare, selfwrite, proxy andall.
account inactivation Disables a user account, group of accounts, or an entire domain sothat all authentication attempts are automatically rejected.
ACI An instruction that grants or denies permissions to entries in thedirectory.
See Also access control instruction.
ACL The mechanism for controlling access to your directory.
See Also access control list.
All IDs Threshold Replaced with the ID list scan limit in Directory Server version 7.1.A size limit which is globally applied to every index key managed bythe server. When the size of an individual ID list reaches this limit, theserver replaces that ID list with an All IDs token.
See Also ID list scan limit.
All IDs token A mechanism which causes the server to assume that all directoryentries match the index key. In effect, the All IDs token causes theserver to behave as if no index was available for the search request.
anonymous access When granted, allows anyone to access directory information withoutproviding credentials, and regardless of the conditions of the bind.
approximate index Allows for efficient approximate or "sounds-like" searches.
attribute Holds descriptive information about an entry. Attributes have a labeland a value. Each attribute also follows a standard syntax for the typeof information that can be stored as the attribute value.
attribute list A list of required and optional attributes for a given entry type orobject class.
authenticating directoryserver
In pass-through authentication (PTA), the authenticating DirectoryServer is the Directory Server that contains the authenticationcredentials of the requesting client. The PTA-enabled host sends PTArequests it receives from clients to the host.
authentication (1) Process of proving the identity of the client user to the DirectoryServer. Users must provide a bind DN and either the corresponding
Glossary
404
password or certificate in order to be granted access to the directory.Directory Server allows the user to perform functions or access filesand directories based on the permissions granted to that user by thedirectory administrator.
(2) Allows a client to make sure they are connected to a secureserver, preventing another computer from impersonating the server orattempting to appear secure when it is not.
authentication certificate Digital file that is not transferable and not forgeable and is issued by athird party. Authentication certificates are sent from server to client orclient to server in order to verify and authenticate the other party.
Bbase distinguished name See base DN.
base DN Base distinguished name. A search operation is performed on thebase DN, the DN of the entry and all entries below it in the directorytree.
bind distinguished name See bind DN.
bind DN Distinguished name used to authenticate to Directory Server whenperforming an operation.
bind rule In the context of access control, the bind rule specifies the credentialsand conditions that a particular user or client must satisfy in order toget access to directory information.
branch entry An entry that represents the top of a subtree in the directory.
browser Software, such as Mozilla Firefox, used to request and view WorldWide Web material stored as HTML files. The browser uses the HTTPprotocol to communicate with the host server.
browsing index Speeds up the display of entries in the Directory Server Console.Browsing indexes can be created on any branch point in the directorytree to improve display performance.
See Also virtual list view index .
CCA See Certificate Authority.
cascading replication In a cascading replication scenario, one server, often called the hubsupplier, acts both as a consumer and a supplier for a particularreplica. It holds a read-only replica and maintains a changelog. Itreceives updates from the supplier server that holds the master copyof the data and in turn supplies those updates to the consumer.
certificate A collection of data that associates the public keys of a network userwith their DN in the directory. The certificate is stored in the directoryas user object attributes.
405
Certificate Authority Company or organization that sells and issues authenticationcertificates. You may purchase an authentication certificate from aCertification Authority that you trust. Also known as a CA.
CGI Common Gateway Interface. An interface for external programs tocommunicate with the HTTP server. Programs written to use CGI arecalled CGI programs or CGI scripts and can be written in many of thecommon programming languages. CGI programs handle forms orperform output parsing that is not done by the server itself.
chaining A method for relaying requests to another server. Results for therequest are collected, compiled, and then returned to the client.
changelog A changelog is a record that describes the modifications that haveoccurred on a replica. The supplier server then replays thesemodifications on the replicas stored on replica servers or on othermasters, in the case of multi-master replication.
character type Distinguishes alphabetic characters from numeric or other charactersand the mapping of upper-case to lower-case letters.
ciphertext Encrypted information that cannot be read by anyone without theproper key to decrypt the information.
class definition Specifies the information needed to create an instance of a particularobject and determines how the object works in relation to otherobjects in the directory.
class of service See CoS.
classic CoS A classic CoS identifies the template entry by both its DN and thevalue of one of the target entry's attributes.
client See LDAP client.
code page An internal table used by a locale in the context of theinternationalization plug-in that the operating system uses to relatekeyboard keys to character font screen displays.
collation order Provides language and cultural-specific information about how thecharacters of a given language are to be sorted. This informationmight include the sequence of letters in the alphabet or how tocompare letters with accents to letters without accents.
consumer Server containing replicated directory trees or subtrees from asupplier server.
consumer server In the context of replication, a server that holds a replica that is copiedfrom a different server is called a consumer for that replica.
CoS A method for sharing attributes between entries in a way that isinvisible to applications.
CoS definition entry Identifies the type of CoS you are using. It is stored as an LDAPsubentry below the branch it affects.
CoS template entry Contains a list of the shared attribute values.

Glossary
406
See Also template entry.
Ddaemon A background process on a Unix machine that is responsible for
a particular system task. Daemon processes do not need humanintervention to continue functioning.
DAP Directory Access Protocol. The ISO X.500 standard protocol thatprovides client access to the directory.
data master The server that is the master source of a particular piece of data.
database link An implementation of chaining. The database link behaves like adatabase but has no persistent storage. Instead, it points to datastored remotely.
default index One of a set of default indexes created per database instance.Default indexes can be modified, although care should be takenbefore removing them, as certain plug-ins may depend on them.
definition entry See CoS definition entry.
Directory Access Protocol See DAP.
Directory Manager The privileged database administrator, comparable to the root user inUNIX. Access control does not apply to the Directory Manager.
directory service A database application designed to manage descriptive, attribute-based information about people and resources within an organization.
directory tree The logical representation of the information stored in the directory. Itmirrors the tree model used by most filesystems, with the tree's rootpoint appearing at the top of the hierarchy. Also known as DIT.
distinguished name String representation of an entry's name and location in an LDAPdirectory.
DIT See directory tree.
DM See Directory Manager.
DN See distinguished name.
DNS Domain Name System. The system used by machines on a networkto associate standard IP addresses (such as 198.93.93.10) withhostnames (such as www.example.com). Machines normally get theIP address for a hostname from a DNS server, or they look it up intables maintained on their systems.
DNS alias A DNS alias is a hostname that the DNS server knows points to adifferent host�specifically a DNS CNAME record. Machines alwayshave one real name, but they can have one or more aliases. Forexample, an alias such as www.yourdomain.domain might point toa real machine called realthing.yourdomain.domain where theserver currently exists.
407
Eentry A group of lines in the LDIF file that contains information about an
object.
entry distribution Method of distributing directory entries across more than one serverin order to scale to support large numbers of entries.
entry ID list Each index that the directory uses is composed of a table of indexkeys and matching entry ID lists. The entry ID list is used by thedirectory to build a list of candidate entries that may match the clientapplication's search request.
equality index Allows you to search efficiently for entries containing a specificattribute value.
Ffile extension The section of a filename after the period or dot (.) that typically
defines the type of file (for example, .GIF and .HTML). In the filenameindex.html the file extension is html.
file type The format of a given file. For example, graphics files are oftensaved in GIF format, while a text file is usually saved as ASCII textformat. File types are usually identified by the file extension (forexample, .GIF or .HTML).
filter A constraint applied to a directory query that restricts the informationreturned.
filtered role Allows you to assign entries to the role depending upon the attributecontained by each entry. You do this by specifying an LDAP filter.Entries that match the filter are said to possess the role.
Ggeneral access When granted, indicates that all authenticated users can access
directory information.
GSS-API Generic Security Services. The generic access protocol that is thenative way for UNIX-based systems to access and authenticateKerberos services; also supports session encryption.
Hhostname A name for a machine in the form machine.domain.dom, which is
translated into an IP address. For example, www.example.com isthe machine www in the subdomain example and com domain.
HTML Hypertext Markup Language. The formatting language used fordocuments on the World Wide Web. HTML files are plain text fileswith formatting codes that tell browsers such as the Mozilla Firefox
Glossary
408
how to display text, position graphics, and form items and to displaylinks to other pages.
HTTP Hypertext Transfer Protocol. The method for exchanging informationbetween HTTP servers and clients.
HTTPD An abbreviation for the HTTP daemon or service, a program thatserves information using the HTTP protocol. The daemon or serviceis often called an httpd.
HTTPS A secure version of HTTP, implemented using the Secure SocketsLayer, SSL.
hub In the context of replication, a server that holds a replica that is copiedfrom a different server, and, in turn, replicates it to a third server.
See Also cascading replication.
IID list scan limit A size limit which is globally applied to any indexed search operation.
When the size of an individual ID list reaches this limit, the serverreplaces that ID list with an all IDs token.
index key Each index that the directory uses is composed of a table of indexkeys and matching entry ID lists.
indirect CoS An indirect CoS identifies the template entry using the value of one ofthe target entry's attributes.
international index Speeds up searches for information in international directories.
International StandardsOrganization
See ISO.
IP address Also Internet Protocol address. A set of numbers, separated by dots,that specifies the actual location of a machine on the Internet (forexample, 198.93.93.10). Directory Server supports both IPv4 andIPv6 IP addresses.
ISO International Standards Organization.
Kknowledge reference Pointers to directory information stored in different databases.
LLDAP Lightweight Directory Access Protocol. Directory service protocol
designed to run over TCP/IP and across multiple platforms.
LDAP client Software used to request and view LDAP entries from an LDAPDirectory Server.
See Also browser.
409
LDAP Data InterchangeFormat
See LDAP Data Interchange Format.
LDAP URL Provides the means of locating Directory Servers using DNS and thencompleting the query via LDAP. A sample LDAP URL is ldap://ldap.example.com.
LDAPv3 Version 3 of the LDAP protocol, upon which Directory Server basesits schema format.
LDBM database A high-performance, disk-based database consisting of a set of largefiles that contain all of the data assigned to it. The primary data storein Directory Server.
LDIF LDAP Data Interchange Format. Format used to represent DirectoryServer entries in text form.
leaf entry An entry under which there are no other entries. A leaf entry cannotbe a branch point in a directory tree.
Lightweight DirectoryAccess Protocol
See LDAP.
locale Identifies the collation order, character type, monetary format andtime / date format used to present data for users of a specific region,culture, and/or custom. This includes information on how data of agiven language is interpreted, stored, or collated. The locale alsoindicates which code page should be used to represent a givenlanguage.
Mmanaged object A standard value which the SNMP agent can access and send to the
NMS. Each managed object is identified with an official name and anumeric identifier expressed in dot-notation.
managed role Allows creation of an explicit enumerated list of members.
management informationbase
See MIB.
mapping tree A data structure that associates the names of suffixes (subtrees) withdatabases.
master See supplier.
master agent See SNMP master agent.
matching rule Provides guidelines for how the server compares strings during asearch operation. In an international search, the matching rule tellsthe server what collation order and operator to use.
MD5 A message digest algorithm by RSA Data Security, Inc., which canbe used to produce a short digest of data that is unique with highprobability and is mathematically extremely hard to produce; a pieceof data that will produce the same message digest.
Glossary
410
MD5 signature A message digest produced by the MD5 algorithm.
MIB Management Information Base. All data, or any portion thereof,associated with the SNMP network. We can think of the MIB asa database which contains the definitions of all SNMP managedobjects. The MIB has a tree-like hierarchy, where the top levelcontains the most general information about the network and lowerlevels deal with specific, separate network areas.
MIB namespace Management Information Base namespace. The means for directorydata to be named and referenced. Also called the directory tree.
monetary format Specifies the monetary symbol used by specific region, whether thesymbol goes before or after its value, and how monetary units arerepresented.
multi-master replication An advanced replication scenario in which two servers each holda copy of the same read-write replica. Each server maintains achangelog for the replica. Modifications made on one server areautomatically replicated to the other server. In case of conflict, atime stamp is used to determine which server holds the most recentversion.
multiplexor The server containing the database link that communicates with theremote server.
Nn + 1 directory problem The problem of managing multiple instances of the same information
in different directories, resulting in increased hardware and personnelcosts.
name collisions Multiple entries with the same distinguished name.
nested role Allows the creation of roles that contain other roles.
network managementapplication
Network Management Station component that graphically displaysinformation about SNMP managed devices, such as which device isup or down and which and how many error messages were received.
network managementstation
See NMS.
NIS Network Information Service. A system of programs and datafiles that Unix machines use to collect, collate, and share specificinformation about machines, users, filesystems, and networkparameters throughout a network of computers.
NMS Powerful workstation with one or more network managementapplications installed. Also network management station.
ns-slapd Red Hat's LDAP Directory Server daemon or service that isresponsible for all actions of the Directory Server.
See Also slapd.

411
Oobject class Defines an entry type in the directory by defining which attributes are
contained in the entry.
object identifier A string, usually of decimal numbers, that uniquely identifies aschema element, such as an object class or an attribute, in an object-oriented system. Object identifiers are assigned by ANSI, IETF orsimilar organizations.
See Also OID.
OID See object identifier.
operational attribute Contains information used internally by the directory to keep track ofmodifications and subtree properties. Operational attributes are notreturned in response to a search unless explicitly requested.
Pparent access When granted, indicates that users have access to entries below their
own in the directory tree if the bind DN is the parent of the targetedentry.
pass-through authentication See PTA.
pass-through subtree In pass-through authentication, the PTA directory server will passthrough bind requests to the authenticating directory server from allclients whose DN is contained in this subtree.
password file A file on Unix machines that stores Unix user login names,passwords, and user ID numbers. It is also known as /etc/passwdbecause of where it is kept.
password policy A set of rules that governs how passwords are used in a givendirectory.
PDU Encoded messages which form the basis of data exchanges betweenSNMP devices. Also protocol data unit.
permission In the context of access control, permission states whether access tothe directory information is granted or denied and the level of accessthat is granted or denied.
See Also access rights.
pointer CoS A pointer CoS identifies the template entry using the template DNonly.
presence index Allows searches for entries that contain a specific indexed attribute.
protocol A set of rules that describes how devices on a network exchangeinformation.
protocol data unit See PDU.

Glossary
412
proxy authentication A special form of authentication where the user requesting access tothe directory does not bind with its own DN but with a proxy DN.
proxy DN Used with proxied authorization. The proxy DN is the DN of anentry that has access permissions to the target on which the client-application is attempting to perform an operation.
PTA Mechanism by which one Directory Server consults another to checkbind credentials. Also pass-through authentication.
PTA directory server In pass-through authentication (PTA), the PTA Directory Server is theserver that sends (passes through) bind requests it receives to theauthenticating directory server.
PTA LDAP URL In pass-through authentication, the URL that defines theauthenticating directory server, pass-through subtree(s), and optionalparameters.
RRAM Random access memory. The physical semiconductor-based memory
in a computer. Information stored in RAM is lost when the computer isshut down.
rc.local A file on Unix machines that describes programs that are run whenthe machine starts. It is also called /etc/rc.local because of itslocation.
RDN The name of the actual entry itself, before the entry's ancestors havebeen appended to the string to form the full distinguished name. Alsorelative distinguished name.
read-only replica A replica that refers all update operations to read-write replicas. Aserver can hold any number of read-only replicas.
read-write replica A replica that contains a master copy of directory information and canbe updated. A server can hold any number of read-write replicas.
referential integrity Mechanism that ensures that relationships between related entriesare maintained within the directory.
referral (1) When a server receives a search or update request from an LDAPclient that it cannot process, it usually sends back to the client apointer to the LDAP sever that can process the request.
(2) In the context of replication, when a read-only replica receivesan update request, it forwards it to the server that holds thecorresponding read-write replica. This forwarding process is called areferral.
relative distinguished name See RDN.
replica A database that participates in replication.
replica-initiated replication Replication configuration where replica servers, either hub orconsumer servers, pull directory data from supplier servers. Thismethod is available only for legacy replication.

413
replication Act of copying directory trees or subtrees from supplier servers toreplica servers.
replication agreement Set of configuration parameters that are stored on the supplier serverand identify the databases to replicate, the replica servers to whichthe data is pushed, the times during which replication can occur, theDN and credentials used by the supplier to bind to the consumer, andhow the connection is secured.
RFC Request for Comments. Procedures or standards documentssubmitted to the Internet community. People can send comments onthe technologies before they become accepted standards.
role An entry grouping mechanism. Each role has members, which are theentries that possess the role.
role-based attributes Attributes that appear on an entry because it possesses a particularrole within an associated CoS template.
root The most privileged user available on Unix machines. The root userhas complete access privileges to all files on the machine.
root suffix The parent of one or more sub suffixes. A directory tree can containmore than one root suffix.
SSASL An authentication framework for clients as they attempt to bind to a
directory. Also Simple Authentication and Security Layer .
schema Definitions describing what types of information can be stored asentries in the directory. When information that does not match theschema is stored in the directory, clients attempting to access thedirectory may be unable to display the proper results.
schema checking Ensures that entries added or modified in the directory conform to thedefined schema. Schema checking is on by default, and users willreceive an error if they try to save an entry that does not conform tothe schema.
Secure Sockets Layer See SSL.
self access When granted, indicates that users have access to their own entries ifthe bind DN matches the targeted entry.
Server Console Java-based application that allows you to perform administrativemanagement of your Directory Server from a GUI.
server daemon The server daemon is a process that, once running, listens for andaccepts requests from clients.
Server Selector Interface that allows you select and configure servers using abrowser.
server service A process on Windows that, once running, listens for and acceptsrequests from clients. It is the SMB server on Windows NT.
Glossary
414
service A background process on a Windows machine that is responsiblefor a particular system task. Service processes do not need humanintervention to continue functioning.
SIE Server Instance Entry. The ID assigned to an instance of DirectoryServer during installation.
Simple Authentication andSecurity Layer
See SASL.
Simple NetworkManagement Protocol
See SNMP.
single-master replication The most basic replication scenario in which multiple servers, upto four, each hold a copy of the same read-write replicas to replicaservers. In a single-master replication scenario, the supplier servermaintains a changelog.
SIR See supplier-initiated replication.
slapd LDAP Directory Server daemon or service that is responsible for mostfunctions of a directory except replication.
See Also ns-slapd.
SNMP Used to monitor and manage application processes running on theservers by exchanging data about network activity. Also SimpleNetwork Management Protocol.
SNMP master agent Software that exchanges information between the various subagentsand the NMS.
SNMP subagent Software that gathers information about the managed device andpasses the information to the master agent. Also called a subagent.
SOA See start of authority (SOA).
SSL A software library establishing a secure connection between twoparties (client and server) used to implement HTTPS, the secureversion of HTTP. Also called Secure Sockets Layer.
standard index An index maintained by default.
start of authority (SOA) A record which contains the core information about a DNS zone.
sub suffix A branch underneath a root suffix.
subagent See SNMP subagent.
substring index Allows for efficient searching against substrings within entries.Substring indexes are limited to a minimum of two characters for eachentry.
suffix The name of the entry at the top of the directory tree, below whichdata is stored. Multiple suffixes are possible within the same directory.Each database only has one suffix.
superuser The most privileged user available on Unix machines. The superuserhas complete access privileges to all files on the machine. Also calledroot.
415
supplier Server containing the master copy of directory trees or subtrees thatare replicated to replica servers.
supplier server In the context of replication, a server that holds a replica that is copiedto a different server is called a supplier for that replica.
supplier-initiated replication Replication configuration where supplier servers replicate directorydata to any replica servers.
symmetric encryption Encryption that uses the same key for both encrypting and decrypting.DES is an example of a symmetric encryption algorithm.
system index Cannot be deleted or modified as it is essential to Directory Serveroperations.
Ttarget In the context of access control, the target identifies the directory
information to which a particular ACI applies.
target entry The entries within the scope of a CoS.
TCP/IP Transmission Control Protocol/Internet Protocol. The main networkprotocol for the Internet and for enterprise (company) networks.
template entry See CoS template entry.
time/date format Indicates the customary formatting for times and dates in a specificregion.
TLS The new standard for secure socket layers; a public key basedprotocol. Also Transport Layer Security.
topology The way a directory tree is divided among physical servers and howthese servers link with one another.
Transport Layer Security See TLS.
Uuid A unique number associated with each user on a Unix system.
URL Uniform Resource Locater. The addressing system used by theserver and the client to request documents. It is often called alocation. The format of a URL is protocol://machine:port/document.The port number is necessary only on selected servers, and it is oftenassigned by the server, freeing the user of having to place it in theURL.
Vvirtual list view index Speeds up the display of entries in the Directory Server Console.
Virtual list view indexes can be created on any branch point in thedirectory tree to improve display performance.
See Also browsing index.

Glossary
416
XX.500 standard The set of ISO/ITU-T documents outlining the recommended
information model, object classes and attributes used by directoryserver implementation.
417
Index
Aaccess control
read permission, 314, 321, 326Active Directory
schema differences between IdentityManagement, 172schema differences between IPA, 175
attributessetting multi-valued, 84
Bbind
DNS and LDAP, 189
Cclient
troubleshootinginstallation, 44
uninstalling, 45
DDHCP, 126DNS
adding zone records, 200adding zones, 190bind-dyndb-ldap and Directory Server, 189disabling zones, 198dynamic updates, 212hosts with DHCP, 126
DNS zone records, 200deleting, 206format for adding, 203IPv4 example, 205IPv6 example, 205PTR example, 206SRV example, 205types of records, 201
Gglue entries, 351
Hhosts
creatingwith DHCP, 126
disabling, 137
Iinstalling clients
disabling OpenSSH, 142
KKerberos, 253
separate credentials cache, 58SSSD password cache, 258ticket policies, 254
global, 254user-level, 256
troubleshooting Windows problems, 44
Llogging in
separate credentials cache, 58
Nnaming conflicts
in replication, 350
Ppassword expiration, 247password policies
expiration, 247port forwarding
for the UI, 65proxy servers
for the UI, 65
Sschema
differences between Identity Management andActive Directory, 172
cn, 172initials, 173sn, 173street and streetAddress, 172
differences between IPA and Active Directory,175
servicesdisabling, 137
SSHdisabling at client install, 142
SSSDand Kerberos passwords, 258
disabling cache, 258
Tticket policies, 254troubleshooting
client installation, 44Kerberos on Windows, 44Kerberos, unknown server error, 45resolving hostnames on client, 45

Index
418
Uuninstalling
clients, 45users
multi-valued attributes, 84password expiration, 247separate credentials cache, 58
Wweb UI
port forwarding, 65proxy servers, 65
Windowstroubleshooting Kerberos problems, 44
WinSyncschema differences, 175
Zzone records, 200
deleting, 206format for adding, 203IPv4 example, 205IPv6 example, 205PTR example, 206SRV example, 205types, 201