reference book - keralascert.kerala.gov.in/images/2016/vhse/biology/12-fashion and apparel... ·...
TRANSCRIPT

Government of KeralaDepartment of Education
State Council of Educational Research and Training (SCERT),KERALA
2016
Vocational Higher SecondaryEducation (VHSE)
FASHION ANDAPPAREL DESIGNING
Second Year
Reference Book

Reference Book
2
Participants1. Maya. R.
Voc. Teacher in Clothing & EmbroideryGovt. VHSS, North Edapally
2. Manjusha. M.Voc. Teacher in Clothing & EmbroideryGovt. VHSS (Girls), Pettah, Thiruvananthapuram
3. Asha JasmineVoc. Teacher in Clothing & EmbroideryGovt. VHSS, Kottarakara
4. Neena AbrahamVoc. Instructor in Clothing & EmbroideryGovt. VHSS (Girls), Pettah, Thiruvananthapuram
5. Bindhu C.G.Voc. Instructor in Clothing & EmbroideryGovt. VHSS (Girls), Irinjalakuda
Experts1. Smt. Saritha R.
Principal, ATDC TOT Academy,Thiruvananthapuram
2. Smt. Neenu ThomasGuest Lucturer in B.Voc (Fashion Designing)Alphonsa College, Pala
Academic Co-ordinatorDr. N. Kala
Research Officer, SCERT
List of Contributors
FASHION AND APPAREL DESIGNING
3
FOREWORD
Dear Learners,This book is intended to serve as a ready reference for learners of vocationalhigher secondary schools. It offers suggested guidelines for the transactionof the concepts highlighted in the course content. It is expected that thelearners achieve significant learning outcomes at the end of the course asenvisaged in the curriculum if it is followed properly. In the context of the Right- based approach, quality education has to beensured for all learners. The learner community of Vocational HigherSecondary Education in Kerala should be empowered by providing themwith the best education that strengthens their competencies to becomeinnovative entrepreneurs who contribute to the knowledge society. Thechange of course names, modular approach adopted for the organisationof course content, work-based pedagogy and the outcome focused assessmentapproach paved the way for achieving the vision of Vocational HigherSecondary Education in Kerala. The revised curriculum helps to equip thelearners with multiple skills matching technological advancements and toproduce skilled workforce for meeting the demands of the emergingindustries and service sectors with national and global orientation. Therevised curriculum attempts to enhance knowledge, skills and attitudes bygiving higher priority and space for the learners to make discussions insmall groups, and activities requiring hands-on experience.The SCERT appreciates the hard work and sincere co-operation of thecontributors of this book that includes subject experts, industrialists andthe teachers of Vocational Higher Secondary Schools. The developmentof this reference book has been a joint venture of the State Council ofEducational Research and Training (SCERT) and the Directorate ofVocational Higher Secondary Education.The SCERT welcomes constructive criticism and creative suggestions forthe improvement of the book.With regards
Dr. P. A. FathimaDirector, SCERT Kerala
Reference Book
4
CONTENTS
PART A
1. ABOUT THE COURSE.......................................................................................... 05
2. MAJOR SKILLS ................................................................................................... 07
3. SYLLABUS ......................................................................................................... 09
PART B
4. MODULE - III - PATTERN MAKING AND GARMENT CONSTRUCTION ..................... 11
3.1 BODY MEASUREMENTS ............................................................................ 12
3.2 PATTERN MAKING .................................................................................... 20
3.3 GARMENT DESIGN DEVELOPMENT ........................................................... 43
3.4 CONSTRUCTION OF HOUSEHOLD TEXTILES ................................................ 61
3.5 CONSTRUCTION OF CHILDREN'S AND LADIES' GARMENTS ......................... 68
3.6 CONSTRUCTION OF GENT'S GARMENTS .................................................... 79
5. LIST OF PRACTICALS .......................................................................................... 96
6. MODULE - IV - FASHION DESIGNING AND BOUTIQUE MANAGEMENT ................. 98
4.1 ELEMENTS OF DESIGN .............................................................................. 99
4.2 PRINCIPLES OF DESIGN ........................................................................... 114
4. 3 COLOUR ................................................................................................. 119
4.4 FASHION ILLUSTRATION .......................................................................... 132
4. 5 DESIGNING & PORTFOLIO DEVELOPMENT ............................................... 151
4. 6 FASHION MERCHANDISING AND BOUTIQUE MANAGEMENT ................... 156
7. LIST OF PRACTICALS ........................................................................................ 161
8. REFERENCES ................................................................................................... 164
FASHION AND APPAREL DESIGNING
5
ABOUT THE COURSE
Profession related to clothing and apparel is one of the oldest and most basicoccupations of human beings, with a rich and varied past. Fashion has become anintegral part of contemporary society. It is one of the focal topics of the print andelectronic media, television, Internet, advertisements, music, movies and marketing.Hence a fashion related study is a key for several opportunities in many industriesrelated to apparel, accessories, textiles, automobiles, films and advertisement.
India is known for its rich heritage of textiles and costumes. The global interest anddemand for traditional Indian textiles and craftsmanship has aroused hugeopportunities in the field of fashion and apparel industry for domestic market andexport. Production of textiles and garments for Indian as well as international marketsled to setting up of manufacturing and export units all over the country. TheFashion and Apparel industry in India is spreading and growing by leaps andbounds, providing employment to over a million people. Skilled and trainedprofessionals are required by these units largely.
Professional in this area is mostly employed by wholesale or manufacturingoutlets, where garments are typically created for mass production. In thesesettings, they tend to work as full or part-time members within a team. A numberof apparel designers are self employed; they often create custom clothing andcan work unusual hours to meet clients' needs.
In response to such a scenario the course 'Fashion and Apparel Designing' isbeing introduced at Vocational Higher Secondary Schools as an independentcourse in the vocational stream. Fashion and Apparel Design, as a profession,includes the entire process of designing and producing fashion apparels fromthe fibre and yarn stage to the finished product. This course offers skill indesigning, construction and ornamentation of garments. It develops the students'skill in all aspects of fashion and apparel design such as pattern making, draping,sewing, finishing of garments, embroidery and other value addition techniques, marketing and merchandising. Students develop a fashion portfolio at the endof the course. They can undertake fashion projects from the initial stage to thefinished garment.
Fashion Studies help the students to develop self confidence by improving theirskill in selection and making of their own clothes. This course gives moreimportance to self employment, thereby increasing the living standard of a person
Reference Book
6
as well as his community. It also helps students to make an informed decisionabout their future goals. It enables vertical mobility to students who wish forhigher education after VHSE. After successful completion of this training thestudents may be able to join:
a. B.Voc in Fashion Designing.
b. B.Voc in Apparel Manufacturing Technology.
c. B.Sc Fashion Technology / Costume and Fashion Designing.
d. Diploma in Fashion Designing/ Apparel Manufacturing.

FASHION AND APPAREL DESIGNING
7
MAJOR SKILLS
1. Measure and record body measurements for drafting and garmentconstruction accurately.
2. Draft Basic Pattern Set.
a) Handle pattern making tools effectively.
b) Identify terms, symbols and information used in pattern making.
c) Distinguish different methods of pattern making.
d) Draft basic block patterns.
3. Skills in drafting patterns with variation.
a) Draft patterns of sleeve variations.
b) Draft patterns of skirt variations.
4. Constructing Household textiles.
a) Choose suitable materials for household textiles.
b) Construct pillow cover with standard measurement.
c) Construct apron with standard measurement.
5. Skills in custom tailoring.
a) Construct A-line frock.
b) Construct Kameez.
c) Construct Salwar.
6. Skills in industrial tailoring.
a) Construct shirt.
7. Skills in commercial tailoring.
a) Construct Kurtha.
8. Skills in applying elements and principles of design in fashion designing.
a) Identify types of design.
b) Select suitable lines, shapes, forms, colour, texture etc in designing ofgarments.
Reference Book
8
c) Create different textural effects for garment designing.
d) Create designs on the basis of the principle such as balance, proportion,rhythm, emphasis, harmony.
9. Skill in applying colour in fashion designing.
a) Skill in colour mixing.
b) Choose pleasing colour schemes for garments.
c) Skill in colour rendering.
10. Skills in developing fashion figures.
11. Skills in developing fashion portfolio.
a) Identify different boards in fashion portfolio.
b) Visualize a theme by taking inspirations for designing.
c) Create different boards in fashion portfolio.
d) Design garments.
12. Attain skills in boutique management.
FASHION AND APPAREL DESIGNING
9
SyllabusMODULE - III PATTERN MAKING & GARMENT
CONSTRUCTION3.1 BODY MEASUREMENTS 20 periods
Introduction - Learning outcomes - Body Measurements - Important BodyMeasurements - Standard Body Measurements - Points to be consideredwhile taking body measurements - Figure Types - Normal Figure &Abnormality in Figures - Practicals - Assessment Activities - TE Questions.
3.2 PATTERN MAKING 80 periodsIntroduction - Learning outcomes - Patterns - Importance of Pattern Making- Computer Aided Pattern Making - Types of Patterns - Tools & Equipments- Pattern Making Terminology - Pattern Development - Draping - Drafting- Finishing of Patterns - Pattern Defects - Drafting - Basic Pattern Set -Pattern Grading - Practicals - Assessment Activities - TE Questions.
3.3 GARMENT DESIGN DEVELOPMENT 70 periodsIntroduction - Learning outcomes - Dart Manipulation - Stylelines - SleeveVariations - Puff, Bell, Cape, Petal - Skirt Variation - A line, Flare, Circular- Pattern Alteration - Pattern Layout - Practicals - Assessment Activities -TE Questions.
3.4 CONSTRUCTION OF HOUSEHOLD TEXTILES 40 periodsIntroduction - Learning outcomes - Household Textiles - Types and Use -Construction of Pillow Cover - Construction of Apron - Practicals -Assessment Activities - TE Questions.
3.5 CONSTRUCTION OF CHILDREN'S AND LADIES' GARMENTS 70 periodsIntroduction - Learning outcomes - Construction of A - Line Frock -Construction of Salwar - Construction of Kameez - Practicals - AssessmentActivities - TE Questions.
3.6 CONSTRUCTION OF GENTS' GARMENTS 60 periodsIntroduction - Learning outcomes - Construction of Shirt - Construction ofKurtha - Practicals - Assessment Activities - TE Questions.
Reference Book
10
MODULE - IV - FASHION DESIGNING & BOUTIQUEMANAGEMENT
4.1 ELEMENTS OF DESIGN 30 periods
Introduction - Learning outcomes - Design - Types of Design - Elements ofDesign - Lines - Shape - Form - Colour - Texture - Light - Practicals -Assessment Activities - TE Questions.
4.2 PRINCIPLES OF DESIGN 50 periods
Introduction - Learning outcomes - Design Principles - Balance - Proportion- Rhythm - Emphasis - Harmony - Practical - Assessment Activities - TEQuestions.
4.3 COLOUR 40 periods
Introduction - Learning outcomes - Dimensions of Colour - Prang ColourSystem - Colour Schemes - Colour schemes in dress - Colour Rendering -Practical - Assessment Activities - TE Questions.
4.4 FASHION ILLUSTRATION 100 periods
Introduction - Learning outcomes - Figure Illustration - 10 Head theory -Fashion Figure - Stick Figure - Fashion Figure - Block Figure - FashionFigure - Flesh Figure - Figure Detailing - Illustration of hair styles. - Typesof Necklines - Types of Collars - Types of Sleeves - Types of Trousers -Types of Skrits - Practical - Assessment Activities - TE Questions.
4.5 DESIGNING & PORTFOLIO DEVELOPMENT 100 periods
Introduction - Learning outcomes - Fashion Portfolio - Practical -Assessment Activities - TE Questions.
4.6 FASHION MERCHANDISING AND BOUTIQUE MANAGEMENT20 periods
Introduction - Learning outcomes - Fashion Merchandising - Duties andresponsibilities of a Fashion Merchandiser - Visual Merchandising -Boutique - Meaning - Boutique Management - Practical - AssessmentActivities - TE Questions.
FASHION AND APPAREL DESIGNING
11
MODULE - IIIPATTERN MAKING & GARMENT CONSTRUCTION
The global fashion apparel industry is one of the most important sectors of theeconomy, in terms of investment, revenue, trade and employment generation allover the world. The importance of fashion in recent years has increased tremendously.Fashion has its impact on every stage of life. Fashion trends keep changing rapidlyand one has to keep abreast of new developments to be in par with it. Patternmaking plays a pivotal role in garment construction. Good knowledge of patternmaking can help in pattern alteration which is essential in fashion industry. Takingbody measurements, making patterns, laying out patterns and of creating garmentsfor ladies, gents and children have been included in the third module. These areessential and fundamental steps which help in designing dress according to a person'sbody, figure and latest trends. Successful completion of module - III will enable thelearners to construct garments using standard measurements.
Reference Book
12
UNIT - 3.1BODY MEASUREMENTS
3.1.1. INTRODUCTIONFor a garment to be well tailored, the first and foremost essential requirementis to understand about the standard body measurements and to record individualbody measurements accurately. Knowledge of standard body figure is a mustfor pattern making. However some manufacturers prefer not to use standardizedmeasurements and to change measurements quickly to suit customer needs. Thischapter deals with the points to be taken care of while taking measurementsalong with the different measuring points and types of figures in detail.
3.1.2. LEARNING OUTCOMESThe learner:
• Explains the need of taking accurate body measurements.
• Identifies and lists the important body measurements like bodices'measurements, skirt or trouser measurements and sleeve measurements.
• Recognizes and compares the given / taken measurements with standardmeasurements.
• Uses the standard measurements in garment construction.
• Identifies the points to be considered while taking body measurements.
• Measures and records the body measurements accurately.
• Distinguishes between different figure types.
• Explains the alterations to be carried out while taking measurements ofabnormal figures.
3.1.3. BODY MEASUREMENTSHuman figure is composed of complex geometric shapes. The accuracy of any patternmaking or garment construction method depends largely on relevant and correctbody measurements. It is very necessary to understand the different measurements,in order to perform a proper drafting method and stitching procedure. So knowledgeabout body measurements is important in pattern making and garment construction.

FASHION AND APPAREL DESIGNING
13
3.1.4. IMPORTANT BODY MEASUREMENTSa) Bodice Measurements: These are the measurements required for developing
garments which covers the upper part of the body.1. Neck: This measurement is taken for making collars and necklines.
Measure around the neck, passing tape just above the collar bone infront and along the base of the neck at the back.
2. Chest: The measurement of chest is taken for making all upper torsogarments like blouses, kurta, kameez, shirts etc. This is taken belowthe scye point and above the bust point.
3. Bust: Bust measurement is taken for ladies and chest measurements forkids and men. This measurement is taken across the chest, at 2'' belowscye point, over centre front bust point. Take the measurement aroundthe bust using the measuring tape allowing 2 fingers loose.
4. Waist: This measurement is taken, around the lower point of the waist(Where cords are tied or trousers are fit). The measurement of waistis taken for making all garments that cover the waist like blouses, kurta,kameez, shirts, skirts, trousers etc. Waist is the narrowest part of thebody.
5. Hip: This measurement is taken at the most wider part of the hip.6. Front Waist Length / Waist Height: This is the measurement from the
base of throat to waist line.7. Back Waist Length: This measurement is taken from nape to waist line.8. Shoulder Width: Shoulder measurements are required for all types of
upper torso garments. It is the measurement from the nape of neck toeach sides of the hand. Measuring tape placed at the middle of the neckand measurement taken at both sides of the upper hands.
9. Back Width: This is taken from 1'' above the midpoint of the scye.10. Scye Depth: Hand is placed straight and the measurement is taken around
the armhole. The measurement of armhole is taken for making sleeves.b) Sleeve Measurements
11. Sleeve Length: Measure from tip of shoulder to required length ofsleeve.
12. Under Arm Length: This measurement is taken from inner part of thehand to the scye to the wrist.
13. Upper Arm Circumference: Measure around the fullest part of the arm14. Wrist: This measurement is taken around the wrist and this is used for
stitching full sleeve

Reference Book
14
Fig.3.1.1. Body Measurements
c) Skirt/Trouser Measurements:15. Waist: This measurement is taken, around the lower point of the waist
(Where cords are tied or trousers are fit).16. Hip: This measurement is taken around the wider part of the hip. the
measurement of hip is taken for making all garments that cover the hiplike kurta, kameez, skirts, trousers etc.
17. Waist to Hip: Measure down from waist at centre back to fullest partof the hip.
18. Skirt Length: From waist to desired length for skirt.19. Crotch Length: Measurement from centre back under the crotch to the
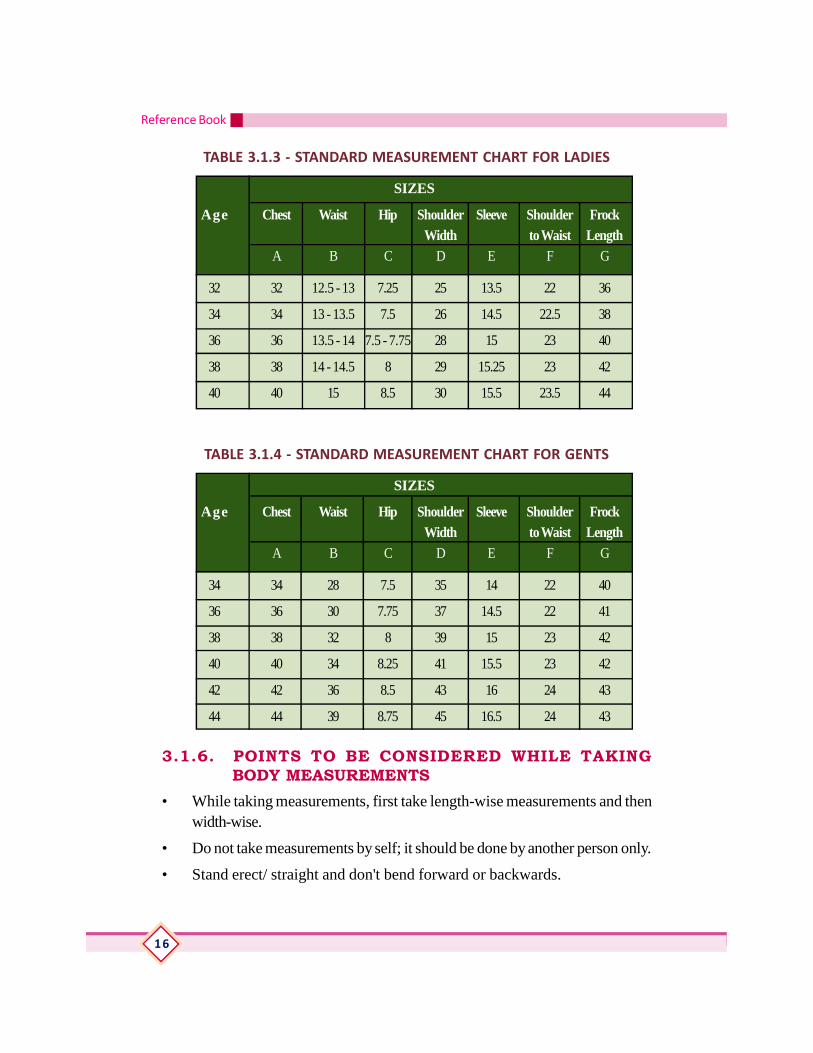
centre front waist. This measurement is useful for pants, pyjamas etc.3.1.5. STANDARD BODY MEASUREMENTSThese are the measurements of standard human figure. These measurements areused in readymade garment industry. In direct measurement method we must takethe measurement of customer for constructing garments. This method is notapplicable in the industry or where the garment production is in bulk. In suchcases the chest measurement method is followed. Drafts are prepared fordifferent chest measurements and measurements according to age.
Standard measurement charts are followed for children, in which age is thebasic factor (Table 3.1.1 and Table 3.1.2) Standard measurements charts areavailable for adolescent and adults in which chest is the basic factor fordetermining all other sizes (Table 3.1.3 and Table 3.1.4). These charts are veryuseful for professional pattern makers and tailors.

FASHION AND APPAREL DESIGNING
15
SIZES
Age Chest Waist Hip Shoulder Sleeve Shoulder Frock PantWidth to Waist Length Length
A B C D E F G H
1 Year 18 '' 18 '' 18 '' 8 '' 10 '' 7 '' 15-16 '' 16-18 ''
46 cm 46 cm 46 cm 20 cm 25 cm 18 cm 38-41 cm 41-46 cm
2 Years 20 '' 20 '' 20 '' 8.5 '' 11 '' 7.5 '' 16-18 '' 18-20 ''
51 cm 51 cm 51 cm 22 cm 28 cm 19 cm 41-46cm 46-51cm
3-4 22 '' 22 '' 22 '' 9 '' 12 '' 8 '' 20-22 '' 20-22 ''
Years 56 cm 56 cm 56 cm 23 cm 31 cm 21 cm 51-56cm 51-56cm
5-6 24 '' 22 '' 24 '' 10 '' 14 '' 9 '' 24 '' 22-24 ''
Years 61 cm 56 cm 61 cm 25 cm 36 cm 23 cm 60 cm 56-61cm
7-8 26 '' 23 '' 28 '' 11 '' 17 '' 10 '' 26 '' 26-28 ''
Years 66 cm 58 cm 71 cm 28 cm 43 cm 25 cm 66 cm 66-71 cm
9-10 27 '' 24 '' 30 '' 12 '' 19 '' 11.5 '' 28 '' 28-30 ''
Years 68 cm 61 cm 79 cm 31 cm 48 cm 29 cm 71 cm 71-76 cm
11-12 28 '' 24-25 '' 32 '' 13 '' 21 '' 13 '' 30 '' 30-32 ''
Years 71 cm 61-64 cm 81 cm 33 cm 54 cm 33 cm 77 cm 76-81 cm
TABLE 3.1.1 - STANDARD MEASUREMENT CHART FOR CHILDREN
SIZES
Age Chest Waist Hip Shoulder Sleeve Shoulder FrockWidth to Waist Length
A B C D E F G
12 - 13 30 12.5 6 24 12.5 16.5 32
Years
14- 15 32 13 6.5 25 13.5 17 34
Years
16 - 17 34 13.5 7.25 25.5 14.5 17.5 36
Years
18 - 19 35 14 7.5 26 15 18 37
Years
TABLE 3.1.2 - STANDARD MEASUREMENT CHART FOR TEENAGERS
Reference Book
16
SIZES
Age Chest Waist Hip Shoulder Sleeve Shoulder FrockWidth to Waist Length
A B C D E F G
32 32 12.5 - 13 7.25 25 13.5 22 36
34 34 13 - 13.5 7.5 26 14.5 22.5 38
36 36 13.5 - 14 7.5 - 7.75 28 15 23 40
38 38 14 - 14.5 8 29 15.25 23 42
40 40 15 8.5 30 15.5 23.5 44
TABLE 3.1.3 - STANDARD MEASUREMENT CHART FOR LADIES
SIZES
Age Chest Waist Hip Shoulder Sleeve Shoulder FrockWidth to Waist Length
A B C D E F G
34 34 28 7.5 35 14 22 40
36 36 30 7.75 37 14.5 22 41
38 38 32 8 39 15 23 42
40 40 34 8.25 41 15.5 23 42
42 42 36 8.5 43 16 24 43
44 44 39 8.75 45 16.5 24 43
TABLE 3.1.4 - STANDARD MEASUREMENT CHART FOR GENTS
3.1.6. POINTS TO BE CONSIDERED WHILE TAKING BODY MEASUREMENTS
• While taking measurements, first take length-wise measurements and thenwidth-wise.
• Do not take measurements by self; it should be done by another person only.
• Stand erect/ straight and don't bend forward or backwards.

FASHION AND APPAREL DESIGNING
17
• The person who is taking measurements should stand at the right side ofthe person whose measurements are to be taken.
• While taking chest measurements one finger loose should be given.
• Measurements should be noted down while measuring it.
• While taking measurements body type of the person should be taken intoconsideration and therefore changes should be made accordingly.
• While taking measurements, the person's (whose measurement are taken) likesand needs should be taken care of and the measurements should be takenaccordingly.
3.1.7.FIGURE TYPES1. Normal Figure: This figure has height according to the age and the body parts
are all proportional. So it is called proportional figure or normal figure.
2. Abnormality in Figure: Figures differ from a normal figure is called as abnormalfigure. Some figures have disproportionate body part. Some abnormal figure sare listed below:-
a. Short & Stout: Relative to the normal figure, this figure has less bodylength and are fattier in nature. Here, body shape is balanced on the behindpart of the body. The shoulder length and shoulder width are less.Length of the neck is less but length of the front part is greater.
b. Tall & Thin: Relative to the normal figure, this body type has lesschest, hip, buttocks measurements. Height of the body is higher and isless fatty. Muscles are well built and weight less and the neck portionis lengthy.
Fig.3.1.2 - Figure Types

Reference Book
18
c. Stooping Shoulder: Relative to the normal figure, shoulder slope ishigher. Depth of the scye is greater and length of the neck is higher.
Fig.3.1.4 - Figure Types
d. Square Shoulder: Relative to the normal figure, shoulder slope is lesser.Besides, shoulder width is in a rectangular shape. For this person, length ofthe neck portion is less and the shoulder level is higher and length of theneck is shorter.
e. Sloping Shoulder: Relative to the normal figure, shoulder slope is more.For this person, length of the neck portion is more and the shoulder level islower and length of the neck is higher.
Fig.3.1.3 - Figure Types
3.1.8. LIST OF PRACTICALS1. Body Measurements
Take body measurements of 5-6 classmates & record it. Prepare a chart.

FASHION AND APPAREL DESIGNING
19
3.1.9. ASSESSMENT ACTIVITIES1. Assignment 2. Seminar
3. Practical activity 4. Work diary
5. Class Test 6. Portfolio
3.1.10.T E QUESTIONS1. A friend of your wants to take accurate body measurements for stitching a
dress. Help her by explaining important points to be considered while takingbody measurements.
2. Differentiate the figure types on the basis of their body measurements.
3. Name the body measurements required for the construction of a:
a) Kameez
b) Salwar

Reference Book
20
UNIT - 3.2PATTERN MAKING
3.2.1. INTRODUCTIONPattern making is an art of manipulating and shaping a flat piece of fabric toconform to one or more curves of the human figure. Creating basic patternsbegins with a two-dimensional piece of paper (for drafting) or muslin (fordraping). Patterns confine the dimensions of the figure by a series of straightlines and curved lines. A completed pattern has seam allowance, patternsymbols, grain line and pattern information. Pattern alteration and pattern gradingare essential as they help in creating patterns suitable for all figure types. Thischapter gives an insight into the basics of pattern making.
3.2.2. LEARNING OUTCOMESThe learner;
• explains the concept of pattern making and its importance.
• explains computer-aided pattern making.
• distinguishes between different types of patterns and explain theirspecific uses.
• uses and handle patternmaking tools effectively.
• identifies and explain the terms used in pattern making.
• distinguishes between different methods of pattern making.
• explains the flat / drafting & draping methods of pattern making.
• distinguishes between the advantages and disadvantages ofpatternmaking methods
• identifies the symbols and information in the patterns.
• explains the use of notches, punches and symbols in patterns
• uses the symbols and information in the patterns for its proper use.
• identifies and explain the pattern defects.
• identifies the basic parts of pattern.

FASHION AND APPAREL DESIGNING
21
• draft basic pattern set.
• explain pattern grading.
3.2.3. PATTERNSPatterns are the outline of each components of a garment. Pattern making is thetechnique to make patterns for all components of a garment. It is an art of manipulatingand shaping a flat piece of 2D fabric into 3D garment form. Pattern making is abridge between design and production. Asketch can be turned into a garment througha pattern which interprets the design in theform of the garment components. The jobof a pattern maker is to interpret the designsinto sample pattern pieces then draftingthem. Pattern for a garment is the blue printon the basis of which the fabric is cut.Patterns are achieved by two methodsnamely, Flat method and Draping method.
3.2.4. IMPORTANCE OF PATTERN MAKING• Basic pattern can be used for making dresses with same measurements.
• New patterns can be made by making changes in the basic pattern.
• Used for changing shapes & sizes.
• It is useful for both beginners and well-experienced persons.
• It helps to save time and cloth while cutting cloth using patterns.
3.2.5. COMPUTER AIDED PATTERN MAKINGThere is computer software programs designed for pattern making for both industrialand home use. Computer-aided design (CAD) software can be purchased andloaded onto one's home computer in order to help design new patterns or modifyexisting ones. These programs allow the user to resize and alter patterns for a morecustom fit or to modify patterns according to one's preference or need. The CADwill draw, adjust and calculate measurements for the pattern. The sewer then prints,cuts out and uses the pattern for project.
3.2.6. TYPES OF PATTERNS1. Basic Pattern / Block Pattern: The pattern we make for garment manufacturing
is called a basic pattern. Different patterns suitable for different styles can be
Fig.3.2.1. - Patterns

Reference Book
22
developed from this basic pattern. It is also called Sloper or Block pattern.e.g. Basic Bodice, Basic Skirt, Basic Sleeve etc
2. Working Pattern: For developing styles from a pattern, for slashing &manipulating, we use pattern, and these patterns are called working patterns.Different experiments and changes can be made in this pattern. e.g., Collarband, Pocket etc.
3. Production Pattern: The patterns we build up after completing it with necessaryseam allowance and marking required is called production pattern. Theinformation such as symbol, cut number, allowances etc. are marked. We cutclothes using this pattern.
4. Industrial Patterns: The patterns which we use for mass production in readymadegarment industry are known as industrial pattern. e.g., Shirt patterns
5. Commercial Patterns: It is readymade patterns available in the market. It isconstructed according to the standard measurements. It contains all instructionsto cut and stitch the garments.
6. Personal Patterns: The Pattern which is used for customized tailoring is comingunder this category which is being prepared for a specific measurementexclusively for a person.
7. Graded Pattern: In industry the patterns are graded according to the sizerequirement based on the order. Usually, the medium size patterns are gradedto other sizes by applying grade rules.
8. Computer Aided patterns: Nowadays patterns are made through software withthe given measurements and it is being graded to other sizes also.
3.2.7. TOOLS & EQUIPMENTS
1. Dress Forms: A standardized duplication ofa human form, cotton padded and canvascovered, set on a movable, light adjustablestand and compressible shoulders and sloper.It is used to take measurements, developpatterns, fit garment samples, to altergarments, to establish style lines for thegarment.
Fig.3.2.2. - Dress Forms

FASHION AND APPAREL DESIGNING
23
2. Measuring Tape: Measuring tapes are veryessential for acute drafting and perfection. Itis used to measure a figure or a model formas well as drafting patterns. It is 60'' long and½'' wide with metal strip on one side. Metaltips on either side help the tape to flat andkeep the ends from fraying.
3. Rulers: It is a 12"/24'' ruler used for drawingstraight lines as per measurements. Wooden,metal and plastic rulers are available. Themarking and divisions on the ruler should beclear and accurate.
Fig.3.2.4. - Ruler
4. Tailors square/ 'L' Square: A 24"X14" metalruler with two arms that form a 90 degreeangle. To find a 45 degree angle mark outsideand inside corners extend line through corners.Tailors square are also available in plastic.
Fig.3.2.5. - L-Scale
5. French curve: A curved ruler to draw curvedlines of armholes and necklines in women'swear.
Fig.3.2.3. - Measuring Tape
Fig.3.2.6. - French Curve
Reference Book
24
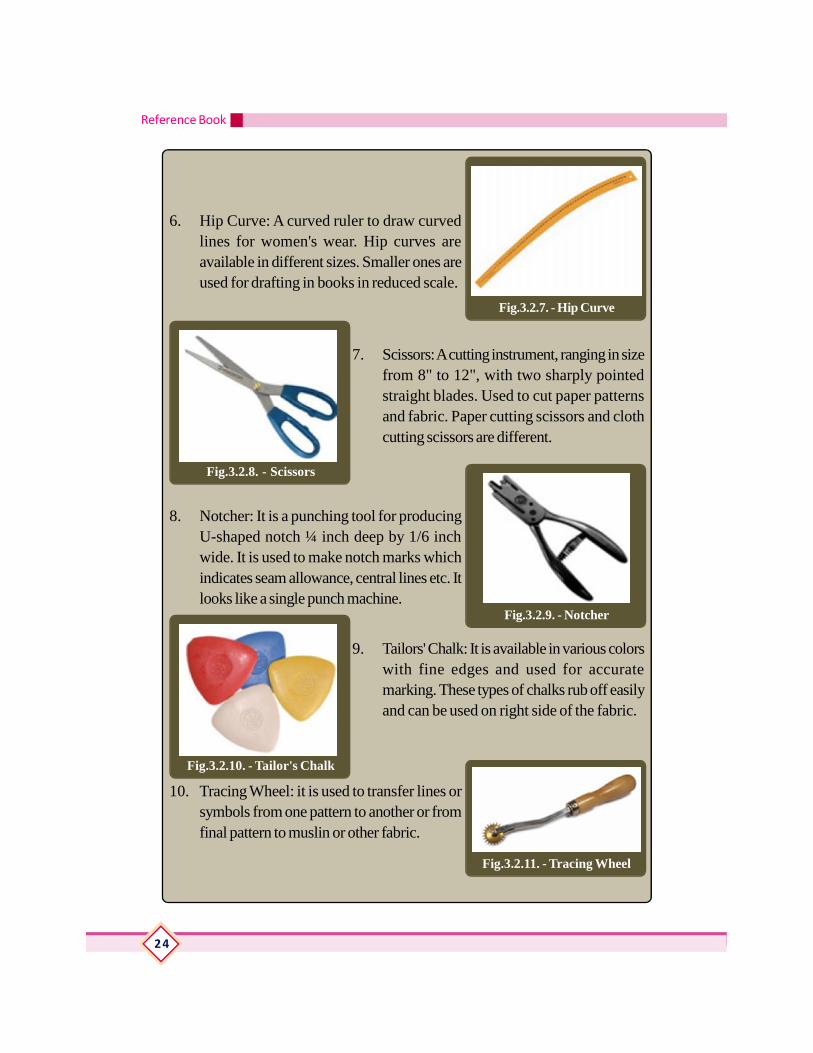
6. Hip Curve: A curved ruler to draw curvedlines for women's wear. Hip curves areavailable in different sizes. Smaller ones areused for drafting in books in reduced scale.
Fig.3.2.7. - Hip Curve
7. Scissors: A cutting instrument, ranging in sizefrom 8" to 12", with two sharply pointedstraight blades. Used to cut paper patternsand fabric. Paper cutting scissors and clothcutting scissors are different.
Fig.3.2.8. - Scissors
8. Notcher: It is a punching tool for producingU-shaped notch ¼ inch deep by 1/6 inchwide. It is used to make notch marks whichindicates seam allowance, central lines etc. Itlooks like a single punch machine.
Fig.3.2.9. - Notcher
9. Tailors' Chalk: It is available in various colorswith fine edges and used for accuratemarking. These types of chalks rub off easilyand can be used on right side of the fabric.
Fig.3.2.10. - Tailor's Chalk
10. Tracing Wheel: it is used to transfer lines orsymbols from one pattern to another or fromfinal pattern to muslin or other fabric.
Fig.3.2.11. - Tracing Wheel
FASHION AND APPAREL DESIGNING
25
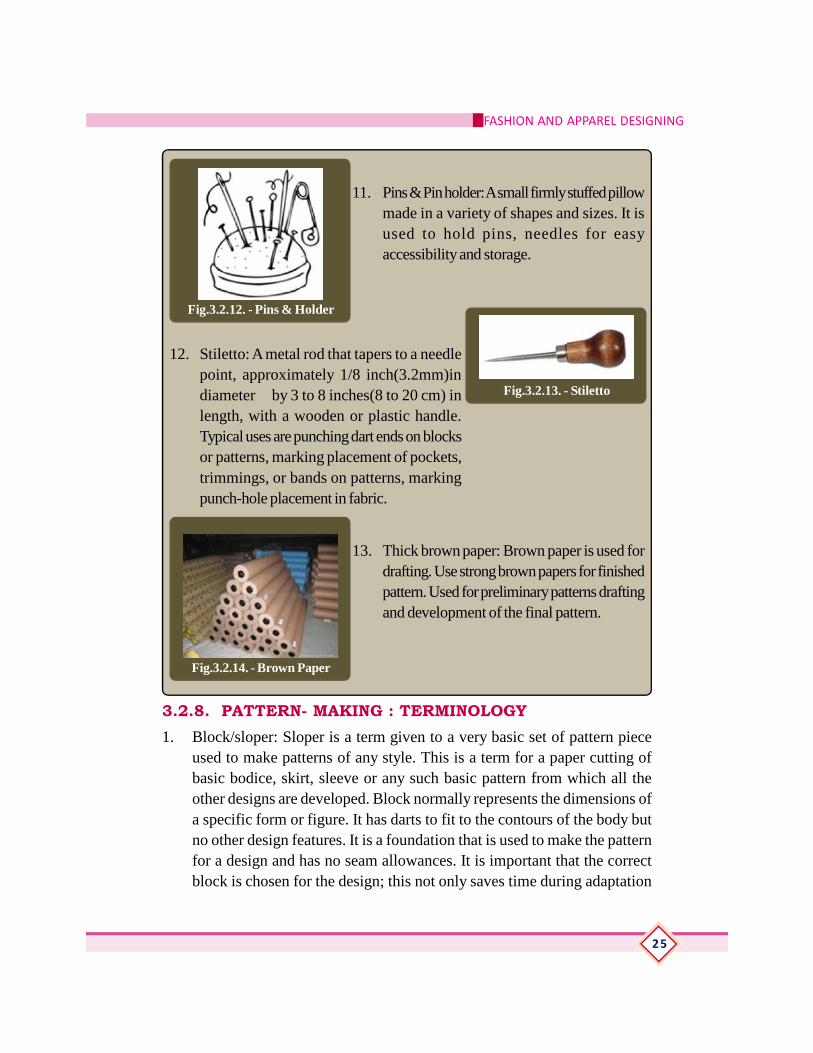
11. Pins & Pin holder: A small firmly stuffed pillowmade in a variety of shapes and sizes. It isused to hold pins, needles for easyaccessibility and storage.
Fig.3.2.12. - Pins & Holder
12. Stiletto: A metal rod that tapers to a needlepoint, approximately 1/8 inch(3.2mm)indiameter by 3 to 8 inches(8 to 20 cm) inlength, with a wooden or plastic handle.Typical uses are punching dart ends on blocksor patterns, marking placement of pockets,trimmings, or bands on patterns, markingpunch-hole placement in fabric.
Fig.3.2.13. - Stiletto
13. Thick brown paper: Brown paper is used fordrafting. Use strong brown papers for finishedpattern. Used for preliminary patterns draftingand development of the final pattern.
Fig.3.2.14. - Brown Paper
3.2.8. PATTERN- MAKING : TERMINOLOGY1. Block/sloper: Sloper is a term given to a very basic set of pattern piece
used to make patterns of any style. This is a term for a paper cutting ofbasic bodice, skirt, sleeve or any such basic pattern from which all theother designs are developed. Block normally represents the dimensions ofa specific form or figure. It has darts to fit to the contours of the body butno other design features. It is a foundation that is used to make the patternfor a design and has no seam allowances. It is important that the correctblock is chosen for the design; this not only saves time during adaptation

Reference Book
26
but can affect the final shape. The basic blocks can be drafted to fit individualfigures by using personal measurements instead of the standardmeasurements listed in the size chart.
2. Muslin: Muslin is used for making test fits. This is basically an unbleachedplain woven cotton fabric. It is available in light, medium and heavy weight.Medium quality is used for test fitting and draping.
3. Pattern: Pattern is developed from the block that includes all the informationneeded for cutting and production of the garment including seam allowance.
4. Seam Allowances: The amount of seam allowance required for each seam linemay vary depending on the location and end purpose. Generally the seamallowances as followed in the industry are -
• ¼" - for sharp curves
• ½" - for smoother curves like neckline, armhole, waistline, style line, etc.
• 1" - for straight seam line like side seam, centre line, shoulder, plackets,etc.
• 2" - for straight edge hem line in dresses, skirts, etc.
5. Ease: Ease is the amount of a garment allows the wearer beyond themeasurements of their body. Ease is not generally included in sizingmeasurements. Ease is comprised of two separate measurements,wearing ease and design ease. Wearing ease is the amount added to aperson's body measurements so one can move in a garment. Designease is the amount of fullness added at the key body points, that createsthe overall look or style of a garment. Wearing ease for different bodyparts are :
- Bust area - Add 2 to 4 inches to the bust measurement. The larger thebust and body size the more ease to factor in.
- Waist area - Add ½ to 1 ½ inches to allow for turning around, bendingand raising arms.
- Hip area - Add 2 to 4 inches, again, the larger the body size or give ofthe fabric, the more ease to consider.
6. Grain Line: Grain line is a line drawn from end to end on each patternpiece to indicate how the pattern should align with the lengthwise grain ofthe fabric. The pattern pieces will always be placed parallel to the selvedge
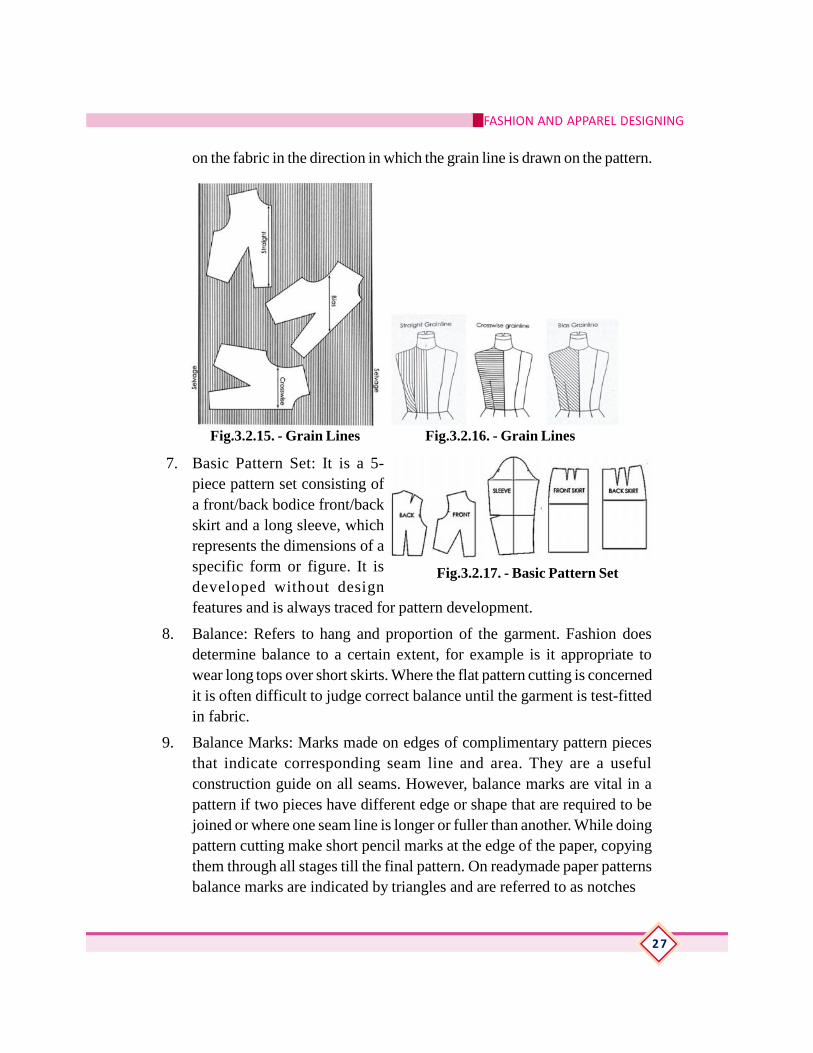
FASHION AND APPAREL DESIGNING
27
Fig.3.2.15. - Grain Lines Fig.3.2.16. - Grain Lines
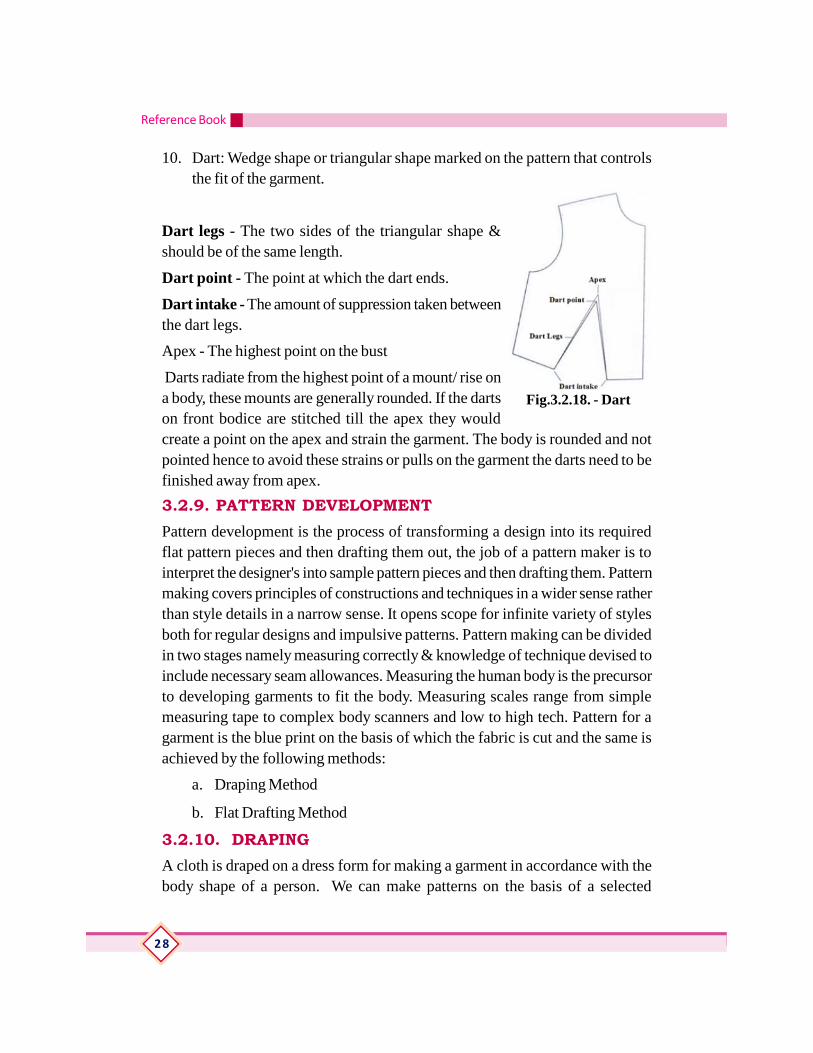
7. Basic Pattern Set: It is a 5-piece pattern set consisting ofa front/back bodice front/backskirt and a long sleeve, whichrepresents the dimensions of aspecific form or figure. It isdeveloped without designfeatures and is always traced for pattern development.
8. Balance: Refers to hang and proportion of the garment. Fashion doesdetermine balance to a certain extent, for example is it appropriate towear long tops over short skirts. Where the flat pattern cutting is concernedit is often difficult to judge correct balance until the garment is test-fittedin fabric.
9. Balance Marks: Marks made on edges of complimentary pattern piecesthat indicate corresponding seam line and area. They are a usefulconstruction guide on all seams. However, balance marks are vital in apattern if two pieces have different edge or shape that are required to bejoined or where one seam line is longer or fuller than another. While doingpattern cutting make short pencil marks at the edge of the paper, copyingthem through all stages till the final pattern. On readymade paper patternsbalance marks are indicated by triangles and are referred to as notches
on the fabric in the direction in which the grain line is drawn on the pattern.
Fig.3.2.17. - Basic Pattern Set
Reference Book
28
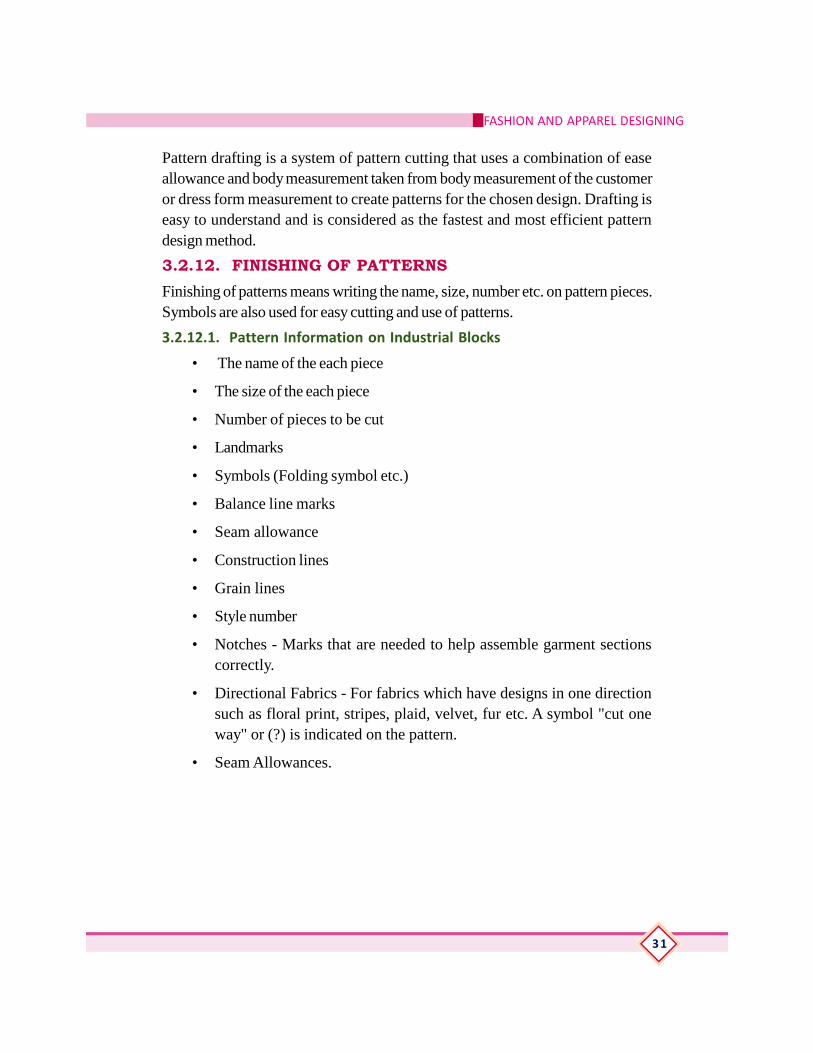
10. Dart: Wedge shape or triangular shape marked on the pattern that controlsthe fit of the garment.
Dart legs - The two sides of the triangular shape &should be of the same length.
Dart point - The point at which the dart ends.
Dart intake - The amount of suppression taken betweenthe dart legs.
Apex - The highest point on the bust
Darts radiate from the highest point of a mount/ rise ona body, these mounts are generally rounded. If the dartson front bodice are stitched till the apex they wouldcreate a point on the apex and strain the garment. The body is rounded and notpointed hence to avoid these strains or pulls on the garment the darts need to befinished away from apex.
3.2.9. PATTERN DEVELOPMENTPattern development is the process of transforming a design into its requiredflat pattern pieces and then drafting them out, the job of a pattern maker is tointerpret the designer's into sample pattern pieces and then drafting them. Patternmaking covers principles of constructions and techniques in a wider sense ratherthan style details in a narrow sense. It opens scope for infinite variety of stylesboth for regular designs and impulsive patterns. Pattern making can be dividedin two stages namely measuring correctly & knowledge of technique devised toinclude necessary seam allowances. Measuring the human body is the precursorto developing garments to fit the body. Measuring scales range from simplemeasuring tape to complex body scanners and low to high tech. Pattern for agarment is the blue print on the basis of which the fabric is cut and the same isachieved by the following methods:
a. Draping Method
b. Flat Drafting Method
3.2.10. DRAPINGA cloth is draped on a dress form for making a garment in accordance with thebody shape of a person. We can make patterns on the basis of a selected
Fig.3.2.18. - Dart

FASHION AND APPAREL DESIGNING
29
pattern. A dress form with correct (accurate)measurement helps to make a suitable dress model andalso helps to do construction of garments more easily.Dress form can be used as dress stand also. For makinga dress for a person, we drape the dress in the dressform having his/her correct measurements.Draping method is the oldest pattern making method andis generally regarded as a creative approach. In thismethod a piece of two-dimensional fabric is drapeddirectly on a dress form or figure and made to fit on thedress form to achieve the desired look or shape. Thefabric may conform to the basic shape of the form orarranged artistically in folds for a specific design. Thismuslin pattern is then transferred on the paper, corrections are made, if any, andthen the same are converted into a final pattern. 3.2.10.1. Three Stages of Draping• A muslin cloth is spread on a dress form & attached it to using a pin. Mark
darts using tailor's chalk for getting correct size& shape. After fitting thedress correctly in the dress form, it is removed from the dress form.
• Then, using tracing wheel & carbon paper, the parts we marked in themuslin cloth and darts are copied on a brown paper. Thus, we can developsuitable patterns.
• Using temporary stitches we can make a dress and wear it on a dress formand after rectifying the defects it can be stitched.
3.2.10.2. Principles of Draping
• Always use grain lines.
• Straight grain should always run perpendicular to the floor and cross grainparallel to the floor.
• The body lines such as bust line, waistline, hipline etc should be parallelto the floor
• Use good quality pins that do not loose shape easily.
• Establish seam lines on the form
• Tear the muslin piece instead of cutting
• Check the balance of the warp and weft
Fig.3.2.19 - Draping

Reference Book
30
Fig.3.2.20. - Drafting
• Mark grain line on muslin; mark cross grain at the fullest part of the dressform
• Place the muslin on the form as per the marked lines, place it in positionwith pins
3.2.10.3. Advantages of Draping
Draping is advantageous because without cutting the fabric one can know theentire effect of a garment rather than just minute details. It is a three dimensionalmethod, the design can be visualized while draping and any necessary changescan also be made. Dress form can be of particular size or of standardmeasurements. This helps the designer to achieve the difficult designs by drapingdifferent fabrics. For designs such as cowls this method alone can offer goodresults. In draping we can see the features of garment, and characteristics posturesin relation to fabric and time into which we are going drape it, and immediatelywe can sense the harmony between draped fabric and wearer.
3.2.10.4. Disadvantages of Draping
It is an expensive technique of garment construction. Draping requires more talentthan required for flat pattern design. Initially dresses are draped on dummywith a cheaper fabric so sometimes the look of the garment cannot be assessedprecisely by this method.
3.2.11. DRAFTINGFlat Pattern Drafting is a method where body or dress form measurements aretaken for developing a pattern. With step by step procedure, the measurements arethen converted into a pattern. This system depends on accurate measurements tocomplete the paper pattern. There are limitless designs, which can be achieved forworkable garments. Flat drafting may bedone in conjunction with a dress form sothat as the design evolves, proportion andbalance in the garment can be checked sideby side. It is important to transfer the patternon to a muslin to test the fit, on a dress formor a human figure. Flat pattern cutting is nowwidely used because of its accuracy of sizingand the speed with which complicateddesigns are made. By manipulating basicblocks we can create new designs.
FASHION AND APPAREL DESIGNING
31
Pattern drafting is a system of pattern cutting that uses a combination of easeallowance and body measurement taken from body measurement of the customeror dress form measurement to create patterns for the chosen design. Drafting iseasy to understand and is considered as the fastest and most efficient patterndesign method.
3.2.12. FINISHING OF PATTERNSFinishing of patterns means writing the name, size, number etc. on pattern pieces.Symbols are also used for easy cutting and use of patterns.
3.2.12.1. Pattern Information on Industrial Blocks
• The name of the each piece
• The size of the each piece
• Number of pieces to be cut
• Landmarks
• Symbols (Folding symbol etc.)
• Balance line marks
• Seam allowance
• Construction lines
• Grain lines
• Style number
• Notches - Marks that are needed to help assemble garment sectionscorrectly.
• Directional Fabrics - For fabrics which have designs in one directionsuch as floral print, stripes, plaid, velvet, fur etc. A symbol "cut oneway" or (?) is indicated on the pattern.
• Seam Allowances.

Reference Book
32
3.2.12.2. Symbol keys used in Pattern making
Fig.3.2.21. - Pattern Symbols
FASHION AND APPAREL DESIGNING
33
3.2.12.3. Abbreviations in pattern making
CB Centre Back CF Centre Front
BP Bust Point SS Side Seam
SW Side Waist SH Shoulder
HPS High Point Shoulder CH W Chest Width
FL Full Length WL Waist Length
Sl. L Sleeve Length AH Arm Hole
X-B Across Back X-F Across Front
X-SH Across Shoulder Pkt Pocket
Plkt Placket CB L Center Back Length
CF L Centre Front Length NK Neck
B to BH Button to Button Hole CLR Collar
CLR P to P Collar Point to Point SH L Shoulder Length
SL Side Length NW Neck Width
NK R Neck Round HBL Horizontal Balance Line
VBL Vertical Balance Line
3.2.13. PATTERN DEFECTS• Some parts of pattern are missing, -- probably because the marker did not
include the correct number of parts.
• Mixed parts-- probably because the marker is not correctly labeled, resultingin a marriage of wrong sized parts.
• Patterns not facing in correct direction on napped fabrics. Not all patternsfacing in same direction (either way) on a one-way fabric.
• Patterns not aligned with respect to the fabric grain.
• Poor line definition -- (e.g. too thick chalk; indistinctly printed line,perforated lay not powdered) leading to inaccurate cutting.
• Skimpy marking, --- caused by either the marker did not use the outsideedge of the pattern; or the pattern was moved or swung after partial marking

Reference Book
34
to squeeze the pattern into a smaller space for economizing the fabric.Marking back from miniature markers also can cause trouble unless theminiature marker making is in the hands of experienced operators.Alternatively the full size pattern may be having worn out edges.
• Generous marking, especially in combination with skimpy marking resultsin components being sewn together with puckering and pleating. When themarker is too wide, the garment part at the edges of the lay get cut with bitsmissing. Not enough knife clearance freedom.
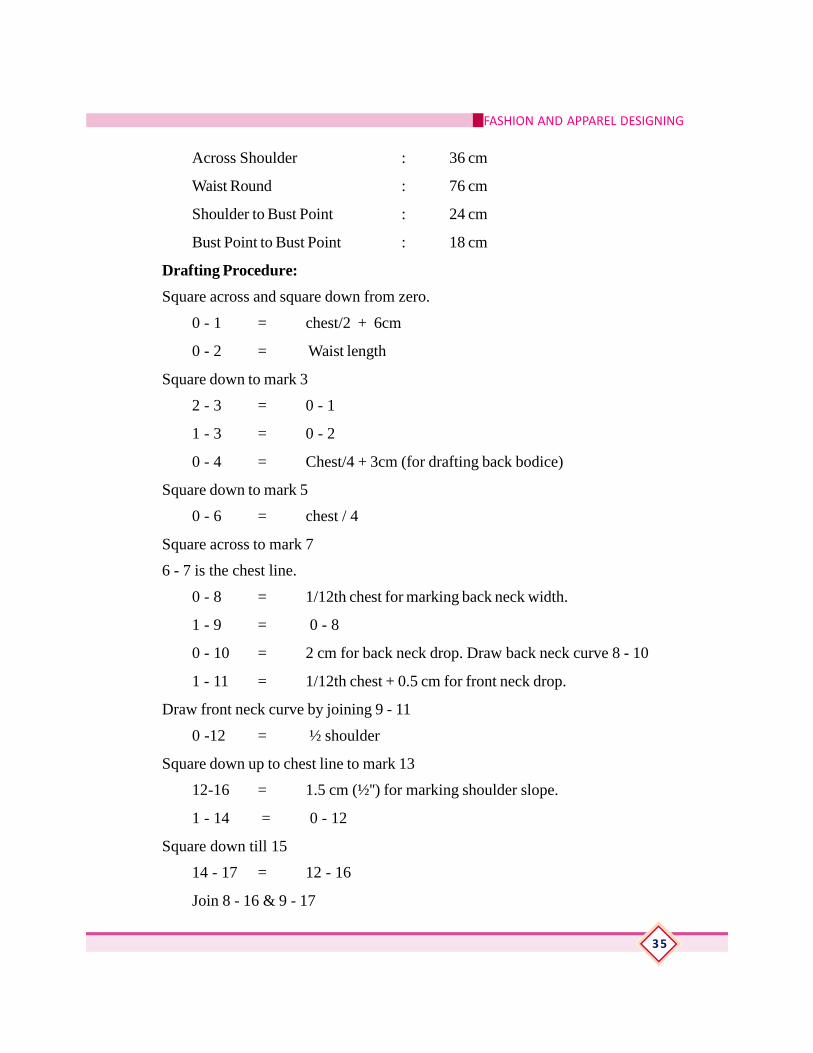
3.2.14. DRAFTING - BASIC PATTERN SETThe basic pattern is the foundation upon which pattern making, fit, and designs arebased. The basic dresses made up of five distinct parts - Front bodice, BackBodice, Front Skirt, Back Skirt and Sleeve.
3.2.14.1. Basic Bodice
Basic Bodice is one of the basic patterns that come under basic pattern setwhich covers the upper body part. It has darts to fit to the contours of the bodybut no other design features. It is a foundation that is used to make the patternfor a design and has no seam allowances. It is important that the correct blockis chosen for the design; this not only saves time during adaptation but canaffect the final shape. The basic blocks can be drafted to fit individual figuresby using personal measurements instead of the standard measurements.
Measurements Required:
Center Back length (Full length) : 40 cm
Chest/Bust : 88 cm
Fig.3.2.22. - Basic Pattern Set
FASHION AND APPAREL DESIGNING
35
Across Shoulder : 36 cm
Waist Round : 76 cm
Shoulder to Bust Point : 24 cm
Bust Point to Bust Point : 18 cm
Drafting Procedure:
Square across and square down from zero.
0 - 1 = chest/2 + 6cm
0 - 2 = Waist length
Square down to mark 3
2 - 3 = 0 - 1
1 - 3 = 0 - 2
0 - 4 = Chest/4 + 3cm (for drafting back bodice)
Square down to mark 5
0 - 6 = chest / 4
Square across to mark 7
6 - 7 is the chest line.
0 - 8 = 1/12th chest for marking back neck width.
1 - 9 = 0 - 8
0 - 10 = 2 cm for back neck drop. Draw back neck curve 8 - 10
1 - 11 = 1/12th chest + 0.5 cm for front neck drop.
Draw front neck curve by joining 9 - 11
0 -12 = ½ shoulder
Square down up to chest line to mark 13
12-16 = 1.5 cm (½'') for marking shoulder slope.
1 - 14 = 0 - 12
Square down till 15
14 - 17 = 12 - 16
Join 8 - 16 & 9 - 17

Reference Book
36
Fig.3.2.23. - Basic Bodice
Mark point 18 where the chest line 6 - 7 intersect the centre line 4 to 5
Take the mid of 15 & 17 and mark 'a'.
a - a1 = 1.5 cm
Complete the curve by joining 17,'a1' and 18.
Take the mid of 13 & 16 and mark 'b'.
Complete the curve by joining 16,'b' and 18.
Measure 1.5 cm from point 5 on both side and mark 5a and 5 b.
Join 18 to 5a &15 to 5b for side seam.
Shoulder to bust point = 24 cm
Bust point to Bust point = 18 cm.
Dart
Dart width/ intake calculations
Front dart(x) = Bust round - Waist round + side deduction/3
= 88 - 76 + 4 /3
= 88 - 70/3=8/3==2.66
Back dart(y) = Half of the front dart(x)
= 2.66/2
= 1.33

FASHION AND APPAREL DESIGNING
37
Shoulder dart (z) = Bust /36 = 88/36
= 2.4
Front Dart
Measure 3cm down for front waist dart from bust point and label dart point as'd'.
From 'd' draw a line down till the waistline, mark 'x'.
x - x1 = ½ waist dart width towards left.
x - x2 = ½ waist dart width towards right.
Join x1 - d - x2.
Back Dart
Measure 1 cm right from bust point and label dart point 'd'.
From 'd' draw a line down till the waistline, mark 'y'.
y - y1 = ½ waist dart width towards left.
y - y2 = ½ waist dart width towards right.
Join y1 - d - y2.
Shoulder Dart
Find the mid-point on shoulder line mark z.
Draw a line from Z directing to Bust point, away by 3.5 cm and mark dartpoint'd'.
z - z1 = ½ waist dart width towards left.
z - z2 = ½ waist dart width towards right.
Join z1 - d - z2.
Apply dart allowance for all the darts (Front Waist, Front Shoulder and BackWaist).
(Dart allowance should be approx. half dart width extended in the direction ofcenter line (outside the block) of the dart and joined at the ends)
Complete the pattern with required pattern information
Mark grain lines and required land marks.

Reference Book
38
= 2.4
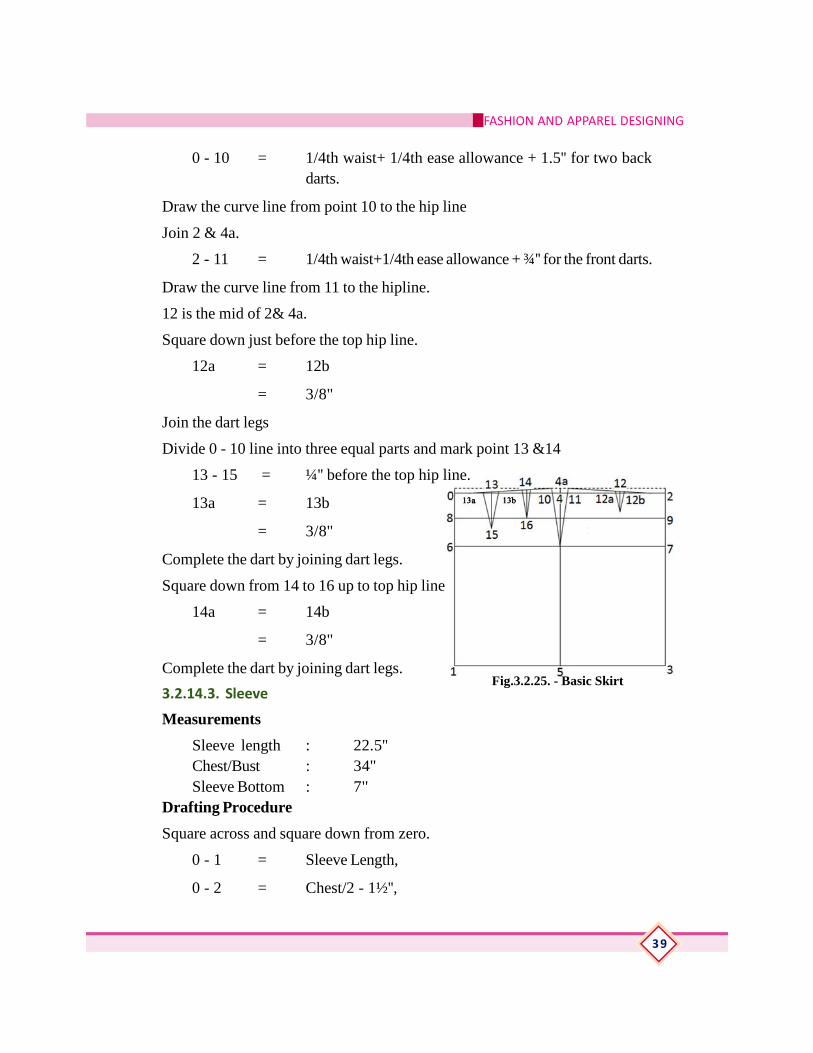
3.2.14.2. Basic Skirt
Measurements Required
Skirt Length : 29''
Waist Round : 28''
Hip Round : 34''
Drafting Procedure
Square across and square down from zero.
0 - 1 = Skirt length
0 - 2 = 1/2 hip+1/2''
Square across from 1
and square down from 2 to mark the point 3.
0 - 4 = 1/4th hip+ 1/2''
Square down to 5
Mark CB &CF.
0 - 6 = 1/4th hip as waist to hip length.
Square across to 7 and mark line as hipline.
8 is the mid of 0 - 6
Square across from 8 to 9.Mark the line as top hipline.
4 - 4a = 1/2''
Join 0 - 4a
Fig.3.2.24. - Basic Bodice
FASHION AND APPAREL DESIGNING
39
Fig.3.2.25. - Basic Skirt
0 - 10 = 1/4th waist+ 1/4th ease allowance + 1.5'' for two backdarts.
Draw the curve line from point 10 to the hip line
Join 2 & 4a.
2 - 11 = 1/4th waist+1/4th ease allowance + ¾'' for the front darts.
Draw the curve line from 11 to the hipline.
12 is the mid of 2& 4a.
Square down just before the top hip line.
12a = 12b
= 3/8''
Join the dart legs
Divide 0 - 10 line into three equal parts and mark point 13 &14
13 - 15 = ¼'' before the top hip line.
13a = 13b
= 3/8''
Complete the dart by joining dart legs.
Square down from 14 to 16 up to top hip line
14a = 14b
= 3/8''
Complete the dart by joining dart legs.
3.2.14.3. Sleeve
Measurements
Sleeve length : 22.5''Chest/Bust : 34''Sleeve Bottom : 7''
Drafting Procedure
Square across and square down from zero.
0 - 1 = Sleeve Length,
0 - 2 = Chest/2 - 1½'',

Reference Book
40
now square down from 2 - 3 and complete the block with dotted line.
4 is the mid of 0 - 2 and square down the line to 5.Now the block has beenseparated for applying front and back sleeve armhole curves.
0 - 6 = 1/8 chest
Square across to 7
6 - 7 is the bicep line
Join 4 - 6 & 4 - 7
5 - 8 = 5 - 9
= 1/2 bottom
8 - 8a = 9 - 9a
= 5/8''
Join the wrist curve 8a, 5, 9a
Join 6 - 8a & 7 to 9a
Divide 4-6 into three equal part and mark as 'a' and 'b'
a - a1 = 3/4" upward,
b - b1 = 5/8" upward
Take the mid of 4 - 7 and mark 'c'.
Find the mid of 4 - c &7 - c and mark point d & e.
d - d1 = 5/8'' upward,
c - c1 = 1/8'' upward
e - e1 = 1/4'' down ward
join the curve line 6 - a1 - b1 - 4 - d1 - c1 - e1- 7
Fig.3.2.27. - Sleeve
FASHION AND APPAREL DESIGNING
41
3.2.15. PATTERN GRADINGGrading is the process used for creating sized patterns. Grading is a method ofenlarging or reducing a pattern of a particular size proportionately to someother size. There are certain proportional rules and set increments that form thebasis of grading. These rules are set on the basis of analysis on bodymeasurements of the general population. The clothing firms also help in patterngrading using the specifications provided by the apparel manufacturers andsome of them also assist the manufacturers in establishing specifications fortheir product. The grade rules are developed keeping in view the market segmentfor which the product is intended such as men, women, youth, child, toddleretc. These firms mostly use the software available in the market for checkingthe accuracy of the grades.
Methods of grading
There are three basic methods of grading:
Cut-and-spread method: The easiest method, which is the basis of the othertwo methods, is to cut the pattern and spread the pieces by a specific amount tograde up, or overlap them to grade down. No special training or tools arerequired-just scissors, a pencil, tape, and a ruler that breaks 1 in. down to 1/64
Pattern shifting: Pattern shifting is the process of increasing the overalldimensions of a pattern by moving it to a measured distance up and down andleft and right, (using a specially designed ruler) and redrawing the outline, toproduce the same results as the cut-and-spread method.
Computer Grading, is the fastest method, but tends to be an investment intensiveand only larger manufacturers can afford. However, sophisticated home computersoftware is becoming affordable.
3.2.16. PRACTICAL1. Drafting of Basic Bodice- Front and Back.
Draft and prepare paper pattern for front and back basic bodice with standardmeasurements.
2. Drafting of Basic Skirt - Front and Back.
Draft and prepare paper pattern for front and back basic skirt with standardmeasurements.

Reference Book
42
3. Drafting of Basic Sleeve.
Draft and prepare paper pattern for basic sleeve with standardmeasurements.
3.2.17. ASSESSMENT ACTIVITIES1. Assignment
2. Seminar
3. Practical activity
4. Work diary
5. Class Test
6. Portfolio
3.2.18. TE QUESTIONS1. Explain the advantages/disadvantages of drafting to your sister who is a
student of Fashion and Apparel designing.
2. List the methods of pattern developing.
3. Explain the methods of pattern making in which dress form and muslincloth is used.
4. Write and essay/a note about pattern grading.
5. List the different parts of a pattern.
6. Discuss the importance of pattern making and present it in your class as aseminar topic.

FASHION AND APPAREL DESIGNING
43
UNIT - 3.3GARMENT DESIGN DEVELOPING
3.3.1. INTRODUCTIONDeveloping a garment design is an indispensible part of fashion designing. With thehelp of a basic pattern, patterns suitable to specific body shape and purposes canbe designed. Topics such as dart manipulation, pattern variations, pattern alteration,and layout are certain topics included in this chapter for enabling the learners tounderstand garment design development.
3.3.2. LEARNING OUTCOMESThe learner;
• understands the dart manipulation of basic bodice
• identifies sleeve variations
• drafts patterns of sleeve variations
• identifies skirt variations
• drafts patterns of skirt variations
• explains the importance of pattern alteration.
• explains the different methods of pattern alteration.
• alters patterns according to figure type.
• explains the importance and guidelines for laying out patterns
• layout patterns with minimum fabric wastage.
3.3.3. DART MANIPULATIONFlat pattern making is the fastest and most efficient method devised for developingdesign patterns that control consistency of size and fit of mass produced garments.Flat pattern making is based on three major pattern making principles and techniques:
• dart manipulation(relocating darts) : A dart may be transferred to any locationaround the patterns outlines from a designated pivotal point Without affectingthe size or fit of a garment.
• added fullness(adding more fabric in the design) : To increase fabric in a garmentto an amount greater than that provided by the dart excess of the working
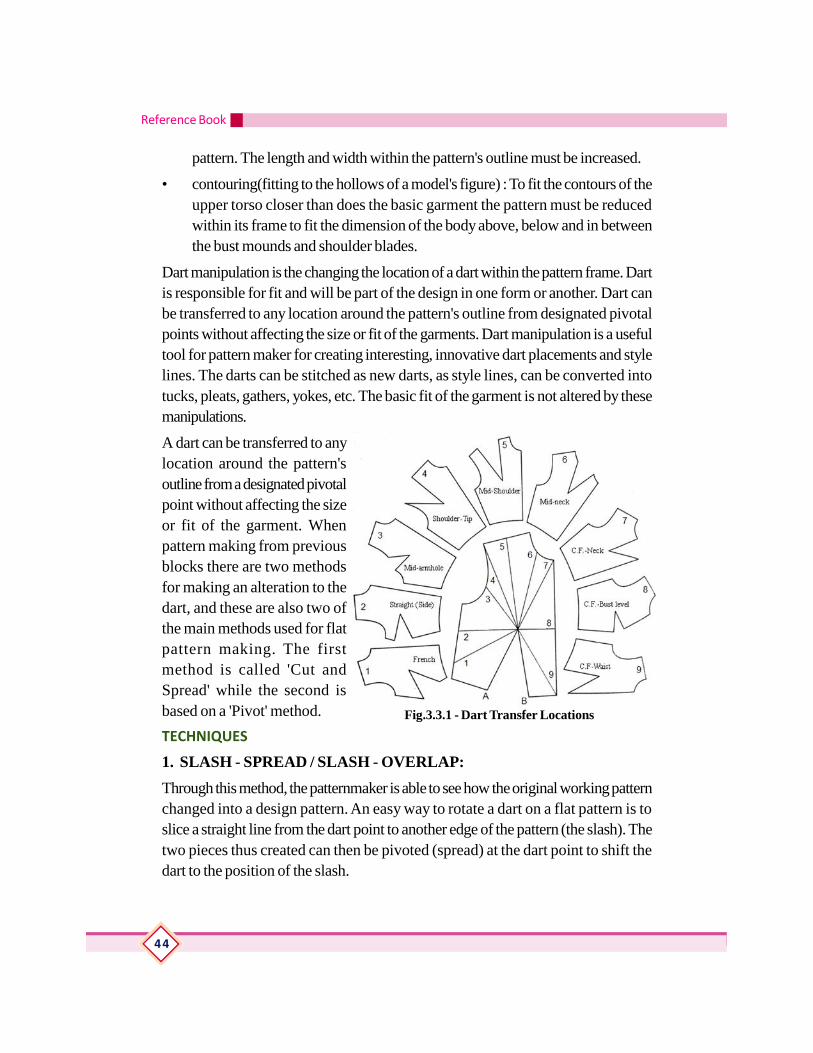
Reference Book
44
Fig.3.3.1 - Dart Transfer Locations
pattern. The length and width within the pattern's outline must be increased.
• contouring(fitting to the hollows of a model's figure) : To fit the contours of theupper torso closer than does the basic garment the pattern must be reducedwithin its frame to fit the dimension of the body above, below and in betweenthe bust mounds and shoulder blades.
Dart manipulation is the changing the location of a dart within the pattern frame. Dartis responsible for fit and will be part of the design in one form or another. Dart canbe transferred to any location around the pattern's outline from designated pivotalpoints without affecting the size or fit of the garments. Dart manipulation is a usefultool for pattern maker for creating interesting, innovative dart placements and stylelines. The darts can be stitched as new darts, as style lines, can be converted intotucks, pleats, gathers, yokes, etc. The basic fit of the garment is not altered by thesemanipulations.
A dart can be transferred to anylocation around the pattern'soutline from a designated pivotalpoint without affecting the sizeor fit of the garment. Whenpattern making from previousblocks there are two methodsfor making an alteration to thedart, and these are also two ofthe main methods used for flatpattern making. The firstmethod is called 'Cut andSpread' while the second isbased on a 'Pivot' method.
TECHNIQUES
1. SLASH - SPREAD / SLASH - OVERLAP:
Through this method, the patternmaker is able to see how the original working patternchanged into a design pattern. An easy way to rotate a dart on a flat pattern is toslice a straight line from the dart point to another edge of the pattern (the slash). Thetwo pieces thus created can then be pivoted (spread) at the dart point to shift thedart to the position of the slash.

FASHION AND APPAREL DESIGNING
45
a. Trace the pattern. Mark the centre front waist dart. Label dart legs A andB.
b. Draws slash line from the dart point to the new position the dart. Heremoving waist dart to shoulder dart. (Fig. 3.3.2_(A)).
c. Slash through the line to the dart point. (Fig. 3.3.2_(B)).
d. Close up the old dart to open the new one and tape the old one close. (Fig.3.3.2_(C)).
e. Place pattern on paper and retrace. Centre dart point 5/8 " from bust point.Draw dart legs to dart points.
2. PIVOTAL TRANSFER
This method does not require the working pattern to be slashed in order to changeits original shape into a design pattern. It is a faster method and, with experience it ispreferred. The pattern is slashed to, or pivoted from, this point. This allows thepattern shape to be altered without changing its size or fit.
a. Place the pattern on paper with a push pin through the bust point (PivotalPoint).
b. Then one dart leg - A of the original dart is traced onto the paper.
c. Mark the new dart location as C (Here mid-neck location).
d. Trace the section of pattern from dart leg A to C on new paper. (Fig.3.3.3_(A)).
Fig.3.3.2 - Slash and Spread Technique

Reference Book
46
e. The pattern is then rotated around the pinned dart point until the dart leg Blines up with the traced dart leg A. (Closes waist dart and opens space forthe mid-neck dart).
f. Trace the remaining section of the pattern from dart leg B to point C on thepattern. (shaded area in figure) (Fig. 3.3.3_(B)).
g. Draw the dart leg to bust point.
h. Mark the centre the dart point 5/8" from the bust point. Redraw dart legsto the dart points. (Fig. 3.3.3_(C)).
3.3.4. STYLELINESStylelines are two types - those that cross over bust and those that do not crossover bust. Stylelines that absorb dart excess within stitch lines, control the fit of thegarment are called dart equivalents. Princess line is the name commonly given topanel lines that go through bust point, absorbing the dart value into the panel line.The seam line commonly curves from the armhole, down to the waistline throughbust point, or from the center of the shoulder down through bust point to the waistline.Princess styleline is a popular base for design variations. Here we discuss aboutArmhole Princess Styleline.
1. ARMHOLE PRINCESS STYLELINE
The armhole princess styleline curves from the bust point in front and the shoulderblades in back to mid - armhole. The design can be developed through followingsteps.
Fig.3.3.3 - Pivotal Technique

FASHION AND APPAREL DESIGNING
47
Procedure
a. Trace pattern onto a new piece of paper. (Fig.3.3.4 - (A))
b. Next draw guideline for mid - armhole styleline by drawing through thebust point and along the dart arms into the armhole. (Fig.3.3.4 - (B))
c. Cut the pattern along the guidelines, discarding the dart value. (Design linesare often drawn through the highest and lowest curves of the body forclose fitting garments, such as the bust point, or around the waist. Thisenables the panels to be cut in as close to the body as possible.) (Fig.3.3.4- (C))
d. Place the patterns onto a new sheet. Trace the outlines of the patterns andsmooth the curve of the panel lines by hand or by using a french curve ruler.
e. Draw the seam allowance onto the new panel lines and transfer the notchmarks.
f. Cut out the pattern pieces making sure that all markings have beentransferred. (Fig.3.3.4 - (D)).
3.3.5. SLEEVE VARIATIONSSleeve style best suited to one's figure, dress design, fabric and fashion does wondersto one's appearance. From a plain sleeve pattern one can develop different varietyof sleeve styles. Puff sleeve, bell sleeve, petal sleeve, raglan, kimono etc are someof the sleeve variation.
3.3.5.1. Puff Sleeves
Puff sleeves are designed by fullness adding method. They are designed with gathersat the hemline, at the capline or at the hemline and capline.
Fig.3.3.4 - Armhole Princess Styleline

Reference Book
48
A) Puff sleeve gathered at capline only: - This type of sleeve has no fullness atthe lower edge. The top edge has fullness in the form of gathers.
Procedure:
a. Trace the sleeve block.
b. Draw vertical lines on sleeve block 1'' apart. The centre line should beexactly between the two adjacent drawn lines.
c. Cut right through all slash lines from top (capline) to near bottom edge(hemline).
d. Keep the slashed pattern on top of another paper and spread opens theupper edge to get maximum amount of fullness.
e. Increase sleeve length by 1'' or 2'' for puffing.
f. Draw the puff sleeve on the new sheet of paper.
B) Puff sleeve gathered at hemline only: - This type of sleeve has no fullnessat the upper edge. The bottom edge has fullness in the form of gathers finishedwith a band or bias binding or using elastic.
Procedure:
a. Trace the sleeve block.
b. Draw vertical lines on sleeve block 1'' apart. The centre line should beexactly between the two adjacent drawn lines.
c. Cut right through all slash lines from hemline, near to capline.
d. Keep the slashed pattern on top of another paper and spread opens thelower edge to get maximum amount of fullness.
e. Increase sleeve length by 1'' or 2'' for puffing.
f. Draw the puff sleeve on the new sheet of paper.
Fig.3.3.5 - Puff Sleeve - Top Gathering
FASHION AND APPAREL DESIGNING
49
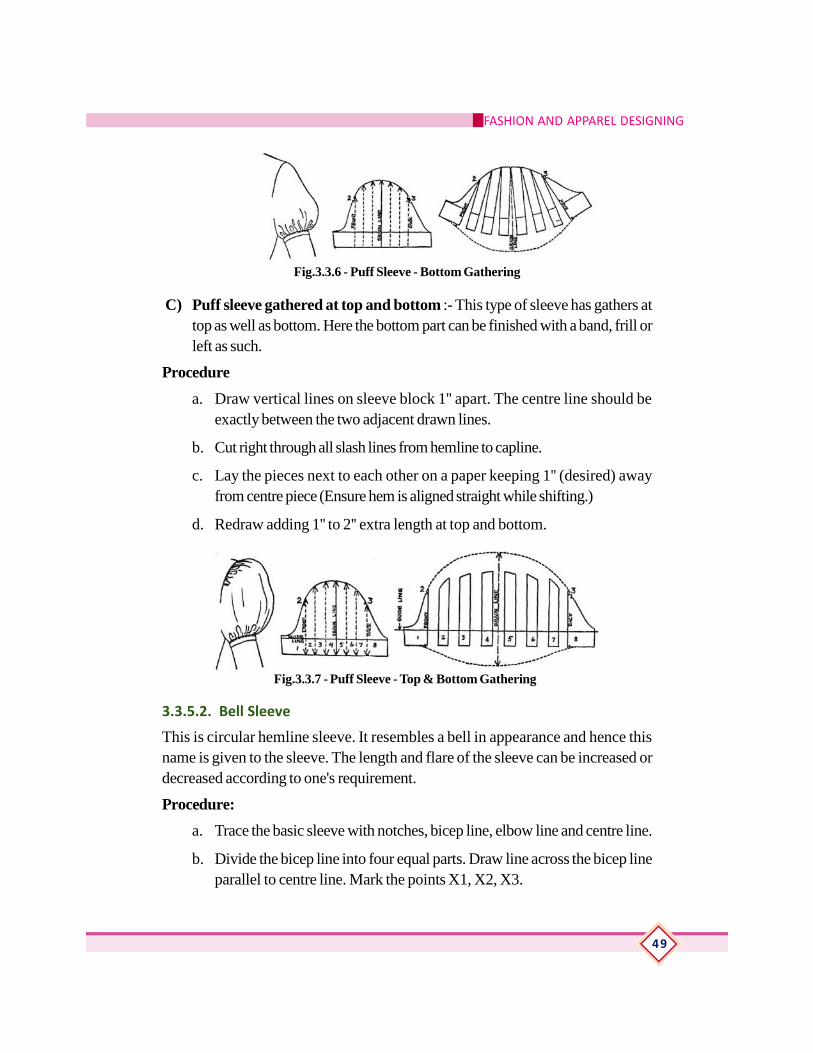
C) Puff sleeve gathered at top and bottom :- This type of sleeve has gathers attop as well as bottom. Here the bottom part can be finished with a band, frill orleft as such.
Procedure
a. Draw vertical lines on sleeve block 1'' apart. The centre line should beexactly between the two adjacent drawn lines.
b. Cut right through all slash lines from hemline to capline.
c. Lay the pieces next to each other on a paper keeping 1'' (desired) awayfrom centre piece (Ensure hem is aligned straight while shifting.)
d. Redraw adding 1'' to 2'' extra length at top and bottom.
Fig.3.3.6 - Puff Sleeve - Bottom Gathering
3.3.5.2. Bell Sleeve
This is circular hemline sleeve. It resembles a bell in appearance and hence thisname is given to the sleeve. The length and flare of the sleeve can be increased ordecreased according to one's requirement.
Procedure:
a. Trace the basic sleeve with notches, bicep line, elbow line and centre line.
b. Divide the bicep line into four equal parts. Draw line across the bicep lineparallel to centre line. Mark the points X1, X2, X3.
Fig.3.3.7 - Puff Sleeve - Top & Bottom Gathering

Reference Book
50
c. Slash the marked lines through X1,X2, X3 up to sleeve cap.
d. Draw a centre line on a paper. Mark the bicep line and elbow line.
e. Place the slashed pattern in accordance with the bicep line and centre line.
f. Spread each slash line at a distance of 1'' and fix it with stitch.
g. Draw the outline of the sleeve on both sides.
h. Extend 1''out from sleeve bottom with elbow line as shown in the figure.
i. Redraw the sleeve bottom curve.
3.3.5.3. Cape Sleeve
Cap sleeve is little more than a cap itself, and it does not cover the armhole. Capsleeve can be constructed in crosswise grain, lengthwise grain and bottom part flaredetc. But usually cap sleeve is constructed in crosswise grain.
Procedure:
a. First draft a basic sleeve pattern.
b. Shorten the sleeve by 3/4" from capline and 2" from the bicepsline.
c. Trim ¼ " from each side of under arm.
d. Place the pattern on cross wise (bias grain) with bottom folded.
Fig.3.3.8 - Bell Sleeve
Fig.3.3.9 - Cape Sleeve
FASHION AND APPAREL DESIGNING
51
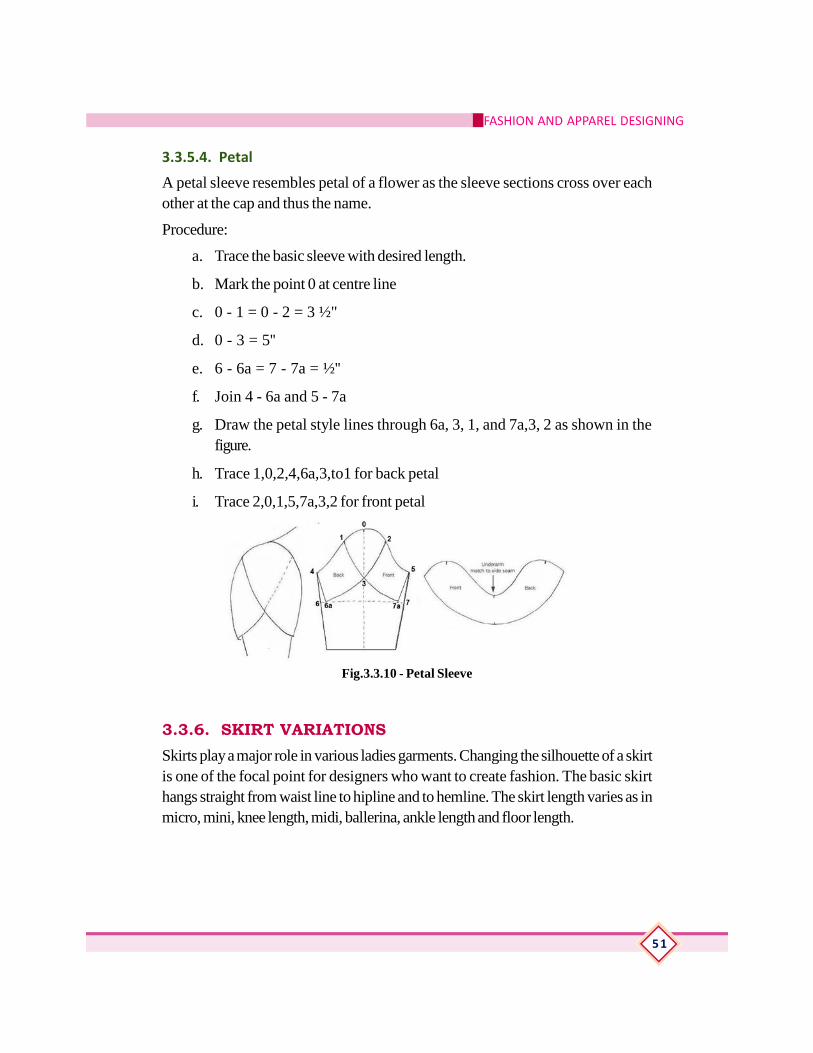
3.3.5.4. Petal
A petal sleeve resembles petal of a flower as the sleeve sections cross over eachother at the cap and thus the name.
Procedure:
a. Trace the basic sleeve with desired length.
b. Mark the point 0 at centre line
c. 0 - 1 = 0 - 2 = 3 ½"
d. 0 - 3 = 5''
e. 6 - 6a = 7 - 7a = ½''
f. Join 4 - 6a and 5 - 7a
g. Draw the petal style lines through 6a, 3, 1, and 7a,3, 2 as shown in thefigure.
h. Trace 1,0,2,4,6a,3,to1 for back petal
i. Trace 2,0,1,5,7a,3,2 for front petal
Fig.3.3.10 - Petal Sleeve
3.3.6. SKIRT VARIATIONSSkirts play a major role in various ladies garments. Changing the silhouette of a skirtis one of the focal point for designers who want to create fashion. The basic skirthangs straight from waist line to hipline and to hemline. The skirt length varies as inmicro, mini, knee length, midi, ballerina, ankle length and floor length.

Reference Book
52
3.3.6.1. A - line :
It is a casual wear skirt made up of all types of material. An A-line skirt is a skirt thatgradually extends outwards from the waist (or hip) towards the hemline, creating atriangular shape (or the shape of an 'A' as the name suggests).
Procedure:
a. Draft a basic skirt block with preferred length and hem allowance.
b. Draw slah line, from the tip of the dart (nearest side seam) down to thehemline.
c. Cut along this line, until 1-2 mm away from the dart point.
d. Cut down the outside dart arm, towards the dart point.
e. Close the waist dart.
f. After closing the dart, opened up the hemline. A and B
g. Label side seam at hem 'X'.
h. X - Y = ½ AB
i. Draw a line from Y to the outermost part of the hipline, where the lineintersects, label Z.
j. Z - Y = Z - X
k. Draw blending line along hem giving the skirt an A-line shape.
l. Repeat steps for back pattern piece.
Fig.3.3.11 - Skirts

FASHION AND APPAREL DESIGNING
53
3.3.6.2. Flare:
A flared skirt has more sweep along its hemline than basic skirt. All of the dart'sexcess is transferred to the hemline to increase flare. Flared skirts have triangularsilhouette. No pleats are used at the waist but hemline has fullness.
Procedure :
a. Trace front and back basic skirt pattern.
b. Draw lines from dart points to hemlines parallel with centre lines.
c. Cut slash lines to (not through) waistline.
d. Close darts.
e. Place on paper and spread each hemline sections 5 inches or more.
f. Trace patterns.
g. Place front on top of back pattern, matching centre lines.
h. Measure and divide the difference between the front and back skirt at theside hem.
i. Add ½ of this amount to front and remove ½ from the back.
j. Blend side seams to hipline.
k. Add ½" to ¾" hem allowance.
l. Blend across hemline.
Fig.3.3.12 - A-Line Skirts

Reference Book
54
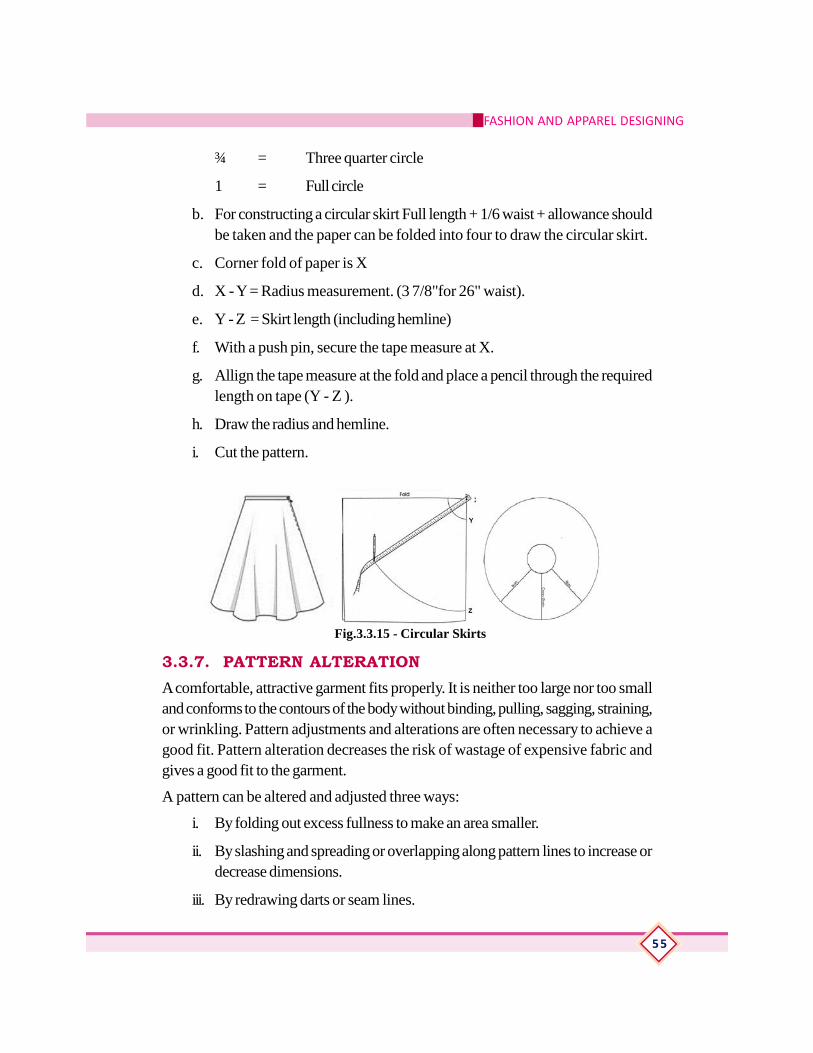
3.3.6.3. Circular Skirts
It is a flared skirt made of thin material. This skirt is cut on the bias grain. The fullcircular skirt has no side seam, because it is cut on an angle of 3600. Half circularskirt has side seams. Circular skirt has even fullness all around the waist.
Procedure - 1
a. From a basic skirt pattern one can create a pattern for circular skirt, withoutaltering the waist measurement.
b. First close the darts on the skirt pattern. Then make slashes from hemline tillnear waist line. Spread this slashed pattern evenly and pin /paste it on anothersheet of paper as shown in the figure.
c. Mark the new pattern on the paper.
Fig.3.3.13 - Flared Skirts
Procedure - 2
a. A circle can be divided into four equal parts (1/4, 2/4, 3/4, 4/4) accordingto the fullness required.
¼ = Quarter circle
½ = Half circle
Fig.3.3.14 - Circular Skirts
FASHION AND APPAREL DESIGNING
55
¾ = Three quarter circle
1 = Full circle
b. For constructing a circular skirt Full length + 1/6 waist + allowance shouldbe taken and the paper can be folded into four to draw the circular skirt.
c. Corner fold of paper is X
d. X - Y = Radius measurement. (3 7/8"for 26" waist).
e. Y - Z = Skirt length (including hemline)
f. With a push pin, secure the tape measure at X.
g. Allign the tape measure at the fold and place a pencil through the requiredlength on tape (Y - Z ).
h. Draw the radius and hemline.
i. Cut the pattern.
3.3.7. PATTERN ALTERATIONA comfortable, attractive garment fits properly. It is neither too large nor too smalland conforms to the contours of the body without binding, pulling, sagging, straining,or wrinkling. Pattern adjustments and alterations are often necessary to achieve agood fit. Pattern alteration decreases the risk of wastage of expensive fabric andgives a good fit to the garment.
A pattern can be altered and adjusted three ways:
i. By folding out excess fullness to make an area smaller.
ii. By slashing and spreading or overlapping along pattern lines to increase ordecrease dimensions.
iii. By redrawing darts or seam lines.
Fig.3.3.15 - Circular Skirts

Reference Book
56
General Guidelines for Pattern alteration:
i. Place the patterns according to fabric grain.
ii. The original style of the garment should be preserved.
iii. Alteration should be made on all related patterns accordingly. For exampleif back shoulder seam is shortened, the front seam line should also beshortened.
iv. As far as possible use slash and spread method or slash and fold/overlappingmethod.
v. All slashes/folds should be made parallel or perpendicular to the grain line.
vi. When darts or tucks are used for making a pattern smaller, the width shouldbe half the amount to be removed.
vii. Where there are darts, make changes between the tip of the dart and theoutside edge.
viii. Maintain ease allowance for comfort.
ix. Lengthening patterns is done by cutting the pattern apart on the alterationlines and spreading the amount required. Garments can be lengthened byadding to the bottom of the pattern in some cases.
x. Shortening the pattern is done by folding the pattern along the alterationlines up half the desired amount. Some garments like skirt are also shortenedby cutting the pattern off at the desired length.
3.3.7.1. ALTERATIONS OF BODICES
a. Large Bust: Slash across the pattern along bust dartfold line to center front. Slash across the pattern fromwaist to shoulder along waist dart fold line. Spreadthe desired amount at center front and bust area. Donot spread at shoulder seam. Redraw seam lines anddarts. (New darts will be larger than the originaldarts. Fig.3.3.16)
b. Small Bust: Slash across the pattern along bust dartfoldline to center front. Slash across pattern fromwaist to shoulder along waist dart foldline. Overlapdarts the desired amount to decrease the bust area.
Fig.3.3.16_Alterations for
Large Bust

FASHION AND APPAREL DESIGNING
57
Do not overlap at shoulder seam. (New darts willbe smaller than the original darts. Fig.3.3.17)
c. Gaping Neckline: Slash from neckline downthrough bust area to waist. Overlap the desired
amount on neck edge; thewaistline dart will becomelarger. Remember to alter theneckline facing and collarpatterns to fit the alteredneckline. (Fig.3.3.18)
d. Sloping Shoulders:Redraw shoulder seam andarmscye seams, sloping andlowering them the desiredamount. Be sure to redraw
seams on both front and back pattern pieces.(Fig.3.3.19)
e. Broad Shoulders:Slash from midpoint ofshoulder down and across tothe middle of armscye. Spreadpattern the desired amount.Redraw seam from neckline to armscye. Be sure tocomplete alterations for both bodice front and back.(Fig.3.3.20)
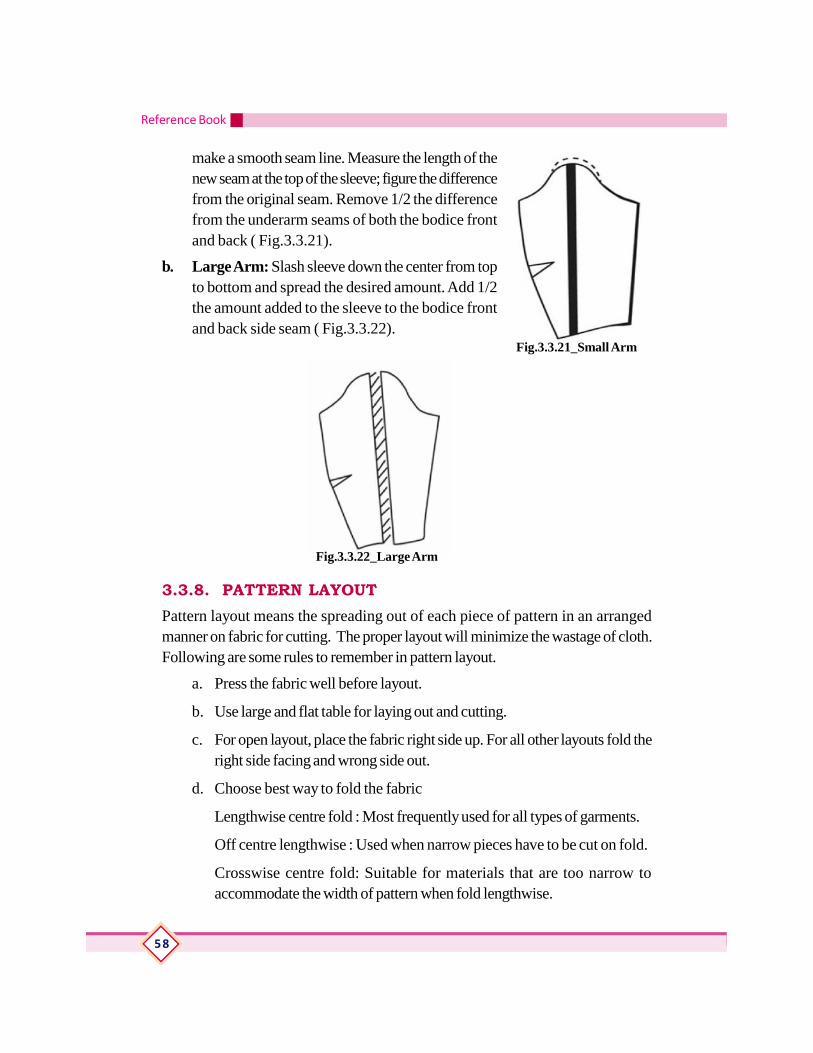
3.3.7.2. ALTERATIONS OF SLEEVES
a. Small Arm: Measure the length of the original seam at the top of the sleeveand record the measurement. On the pattern, fold out the desired amount alonga line from top to bottom of sleeve. Redraw lines at hem of sleeve and cap to
Fig.3.3.17_ Alterations for
Small Bust
Fig.3.3.18_ Alterations for
Gaping Neckline
Fig.3.3.19_ Alterations for
Sloping Shoulder
Fig.3.3.20_ Alterations for
Broad Shoulders
Reference Book
58
make a smooth seam line. Measure the length of thenew seam at the top of the sleeve; figure the differencefrom the original seam. Remove 1/2 the differencefrom the underarm seams of both the bodice frontand back ( Fig.3.3.21).
b. Large Arm: Slash sleeve down the center from topto bottom and spread the desired amount. Add 1/2the amount added to the sleeve to the bodice frontand back side seam ( Fig.3.3.22).
3.3.8. PATTERN LAYOUTPattern layout means the spreading out of each piece of pattern in an arrangedmanner on fabric for cutting. The proper layout will minimize the wastage of cloth.Following are some rules to remember in pattern layout.
a. Press the fabric well before layout.
b. Use large and flat table for laying out and cutting.
c. For open layout, place the fabric right side up. For all other layouts fold theright side facing and wrong side out.
d. Choose best way to fold the fabric
Lengthwise centre fold : Most frequently used for all types of garments.
Off centre lengthwise : Used when narrow pieces have to be cut on fold.
Crosswise centre fold: Suitable for materials that are too narrow toaccommodate the width of pattern when fold lengthwise.
Fig.3.3.21_Small Arm
Fig.3.3.22_Large Arm

FASHION AND APPAREL DESIGNING
59
Double fold: Used when many pattern pieces that are not too wide must becut on fold.
Combination fold : Lengthwise fold and crosswise fold are combined.
Open layout : The fabric is not folded at all. This is used especially fordesigns which require right and left halves to be cut separately.
e. Straight grain lines on patterns must be kept parallel to the selvedge.
f. Leave enough space between patterns for cutting outward notches andmarking seam allowances.
g. The pattern must be placed in most economic way.
Main pieces must be placed at first.
Wider end of large pieces should be placed at the cut edges.
Lay the pattern pieces close together.
Fit pieces similar in shape next to each other (dovetailing)
h. Take care to use special layouts for asymmetric designs and for fabric forspecial designs, stripes or checked deigns.
3.3.9. PRACTICALS1. Dart Manipulation
Prepare patterns of dart manipulation for different bodice darts.
2. Drafting Stylelines
Prepare a pattern of princess armhole style line in bodice.
3. Sleeve Variations
Prepare patterns of
a. Puff sleeve - Top gathering
b. Puff sleeve - Bottom gathering
c. Puff sleeve - Top and bottom gathering
d. Bell sleeve
e. Cape sleeve
f. Petal sleeve
Reference Book
60
4. Skirt Variation.
Prepare patterns of
a. A - Line Skirt
b. Flared Skirt
c. Circular Skirt
5. Pattern Alterations
Make alterations in basic patterns for
a. Large bustb. Small Bustc. Gaping necklined. Sloping Shouldere. Broad Shouldersf. Large Sleeveg. Small Sleeve
3.3.10. ASSESSMENT ACTIVITIES1. Assignment
2. Seminar
3. Practical activity
4. Work diary
5. Class Test
6. Portfolio
3.3.11. TE QUESTIONS1. With the help of illustration, describe the two methods of manipulating
darts.
2. Illustrate the converting of the centre waist dart to French dart.
3. Draft different puff sleeves.
4. Discuss the slash and fold methods of pattern alteration used in garmentdesigning.
5. Your friend approaches you to learn about cutting garments with minimal wastageof cloth. Explain to him the method of laying out.

FASHION AND APPAREL DESIGNING
61
UNIT - 3.4CONSTRUCTION OF HOUSEHOLD TEXTILES
3.4.1. INTRODUCTIONHousehold textile is a big industry which is equally promising as garmentindustry. Changes in fashion trends also affects household textiles sector. Thedesign, colour, ornamentation, cloth types and stitching styles also keep changing.Household textiles or home furnishing include a wide range of products frombed linen, bathroom furnishing, kitchen linen, table linen to curtains, windowtreatments, hammocks, carpets and rugs. This unit gives some basic knowledgeabout the types of household textiles and their use. This unit also deals with theof construction of pillow cover and apron and also the proper selection,construction and ornamentation of these household textiles.
3.4.2. LEARNING OUTCOMESThe learner;
• Identifies the different types of household textiles.
• Identifies and analyze the use of different fabric for household textiles.
• Chooses suitable materials for household textiles.
• Drafts pillow cover with standard measurements.
• Constructs pillow cover with surface ornamentation.
• Drafts an apron with standard measurements.
• Constructs apron with patch pocket and surface ornamentation.
3.4.3. HOUSEHOLD TEXTILESHome textile is a branch of textiles comprising of textiles used for household purposes.It consists of a various range of functional as well as decorative products usedmainly for decorating our houses. The fabrics used for home textiles consist of bothnatural and man-made fibers. Sometimes we also blend these fibers to make thefabrics stronger. Generally, home textiles are produced by weaving, knitting,crocheting, knotting, or pressing fibers together.
3.4.4. TYPES AND USE OF HOUSEHOLD TEXTILESDifferent types of household textiles include
Reference Book
62
3.4.4.1. Bed Linen:
This group comprises of items such as bedcovering, bed throw, bed skirt, pillowcovers, cushion covers etc Sheets and pillowcases are generally related to fabricswoven with a plain weave of cotton, or more often, cotton / polyester blendedyarns or linen. Sheets are made in two types: flat and fitted. Both types are made tofit five typical size mattresses: crib, twin, full or double, queen, and king. Pillowcasesare generally produced in sizes to fit pillows of standard, queen and king size. Commonmaterials used to create bed sheets include cotton, linen, satin, silk, rayon, bamboofiber, polypropylene spun bond, and blends of cotton with polyester.
3.4.4.2. Bathroom Furnishings:
Include bath mats and bath towels. Terry towels are divided by size into five groups,guest, hand, bath, extra large, and beach. Terry towels are made either of all-cotton,or a combination of cotton and polyester. While polyester provides increasedstrength, lighter weight, faster drying after laundering and less shrinkage, all-cottontowels provide greater absorbency. Towels must be strong enough to withstand thestrain of the rubbing and pulling, twisting and tugging of the user, and of constantlaundering.
3.4.4.3. Kitchen Linen:
These include aprons, dishcloths, kitchen gloves etc. A dishcloth is used in the kitchento clean dishes and other surfaces. Typically they are made of cotton or other cloth,such as microfiber, and measure 11" to 13 inches square. An apron is a garmentdesigned to be a protective layer that covers the front of the body.
3.4.4.4. Table Linen:
Table cloth, chair covers and chair mats are together referred to as table linens.Table cloths are generally made of cotton, linen, rayon, polyester, or blends of anycombination of these fibres. They are produced in various ways, designs, and patterns.Among the most popular are damask and lace constructions. Cotton tablecloths areeasy to care, available in a wide range of colours, patterns, casual prints and sizes.Linen is relatively easy to take care of, since it resists dirt and stains. With a littleforethought linen care, linen tablecloths will last the lifetime. Silk and organza aremore expensive tablecloths, but they offer a more luxurious appearance and a numberof formal style options. Polyester based satin tablecloths are more common becausewhile they are just as beautiful as silk ones, they are also less expensive, moredurable, and machine washable. Plastic tablecloths have little elegance and no realreusability factor since they are easily torn and stained.

FASHION AND APPAREL DESIGNING
63
3.4.4.5. Curtains:
Curtains are very common in households. Curtains with large designs are fit for usein small rooms. Narrow windows may be mark to appear broad by the use ofsuitable curtains. Pale blue and green will give a cool effect. A curtain is usually hungby inserting the curtain rod or spring from first to last the casing stitched on its tophem. Draperies are made with pleated materials and are attached to the rod byhooks and rings so that they can be drawn open or closed easily. Linen is a naturalfiber used by manufacturers in the design of curtains due to its airy and spaciousappeal, a fantastic asset in a room on a breezy summer's day. Linen mixtures ofcotton, nylon and linen itself are also used. A luxurious and elegant look can beachieved in a room if large silk curtains grace the window. However, they can be onthe expensive side and may also not withstand direct and constant exposure tosunlight. Lighter curtains may provoke a subtle and airy appearance, adding to thecasual appearance of a room and are generally more affordable for the averagehomemaker. More formal areas of a house suit heavier curtain fabrics.
3.4.4.6. Rugs and Carpets:
Rugs and carpets are the best floor coverings; they add charm to the flooring andprovide colour and pattern to the home. Wall to wall carpet will help to make theroom appear larger. It will promote a feeling of luxury and formality as well asserenity and quiet. Carpet minimize, or eliminate noise problems, that is they canabsorb noise [ voices, music, sound of appliances and so on ] and also floor surfacenoise. [Foot steps]. A carpet is a textile floor typically having wall to wall length.Traditionally these are made from wool, but, since the 20th century, synthetic fibressuch as polypropylene, nylon or polyester are often used, as these fibres are lessexpensive than wool.
"Carpet" can be applied to a floor covering that covers an entire house, whereas a"rug" is generally smaller for a single room. Rugs are flow mats, usually smaller thancarpet. Rugs are more easily handled and cleaned. They can be shifted to differentrooms and also in different house. A room size rug is one that comes with in 12" orless from walls on all size. An area rug is smaller rug used to define a certain area. Ina large room, rug may be used to separate different activities like reading, eating etc.Scattered rug is a very small rug used to complement a room feature in front of bed,dressing table etc. usually rugs have definite color and pattern. Rugs are the perfectaccessory to add texture, softness and warmth to any room.
Reference Book
64
3.4.5. CONSTRUCTION OF PILLOW COVERPillows add color, pattern and texture to a room. They soften hard edges offurniture and create a much warmer space. They can be elegant or just plainfun. Pillow cases are generally produced in sizes to fit pillows of standard,queen and king size. Pillow covers are a quick, easy and inexpensive sewingproject.
a. Specifications:
Standard Size
Surface ornamentation with embroidery / printing / fabric painting.
b. Materials required:
Cotton plain cloth- 1.20 mts. (36" width)
Matching thread
Materials for surface ornamentation
Drafting, Cutting & Stitching Tools
c. Measurements:
Standard size of pillow : 20''x 26''
d. Drafting Procedure:
Part I = Full dimension ABCD
Length = 26''+1½''+1½'' (for 2 flap width) + 1''seam allowance
Part II = CDEF
Length = 20''+ 1½'' (for 1flap) +1'' seam allowance
Part III = ABGH
Length = 6''+3'' (for underlapping) +1½'' (for 1flap) +1''seamallowance
Width = 20''+1½'' +1½'' (for 2flap width) +1'' forseam allowance. (Thewidth of the materialrequired forconstruction of all pieces of pillow cover is the same).
Fig.3.4.1 - Pillow Cover - Draft

FASHION AND APPAREL DESIGNING
65
e. Pattern Making:
Prepare paper patterns.
f. Layout:
Fig.3.4.2 - Pillow Cover - Layout
g. Estimation of Cloth:
Width of cloth = 36"
Amount of cloth required = (2 x width of pillow cover) + (4 x flapwidth) + seam allowance
= (2 x 20) + (4 x 1½) + 2
= 48"
= 1.20 mts.
h. Construction Details:
1) Place Ist part ABCD on table.
2) Place overlapping flap CDEF on top of ABCD.
3) On top of that place III rd part ABGH such that overlapping occursonly over a small area of 3''.
4) Make a row of stitches along the dotted line, so that a flap is formed onall sides of the pillow cover. All these are arranged on wrong side, sothat after making a row of stitches, when turned over to the right side,the pillow cover has CDEF overlapping over ABGH.
5) Finish the raw edges of the pillow cover using overcast stitch, buttonhole stitch, lace, piping or binding.

Reference Book
66
3.4.6. CONSTRUCTION OF APRONAn apron is a garment that protects the body or clothing from damage or stains.It is derived from the French word "naperon," which means napkin or smalltablecloth. A comfortable apron in a washable fabric with pockets isrecommended since it contacts many types of materials over the course of theday. Aprons can be made in a number of colours and prints so they fit with otherclothing. Aprons can be solid, printed, colourful, drab, personalized,monogrammed, embroidered, embellished, and altered. Pockets, trim, or rufflescan be added to make the apron unique or more feminine. Embroidery can beused to monogram a name or title so the wearer is easily identified on the job.Since aprons have a variety of uses in domestic or commercial environments,they can be made from many different materials.
a. Specifications:
Surface ornamentation with embroidery / painting
Patch Pocket
b. Materials required:
Cotton plain / printed cloth - 1.20 mts. (36" width)
Matching thread
Cloth for piping
Materials for surface ornamentation
Drafting, Cutting & Stitching Tools
c. Measurements:
Full length - 32''
Chest - 32''
Shoulder - 14''
d. Drafting Procedure:
0 - 1 = Full length + 1 ½ ''
0 - 2 = ¼ Chest
2 - 3 = ¼ Chest + 1''
4 is squared down from 3
FASHION AND APPAREL DESIGNING
67
0 - 5 = 1/12 Chest0 - 6 = 1/12 Chest + ½"Join 5 - 6 with a smooth curve.0 - 7 = ½ Shoulder - 2 ½ ''8 is squared down from 78 - 9 = 2 ½ ''Shape armhole 7 - 9 - 34 - 10 = 1½ ''10 - 11 = 1½ ''Shape bottom 1 - 11Join 3 - 11Mark 2" below 3 for strap placementPocket2 - 12 = 4"12 - 13 = 4"12 - 14 = 3"13 - 5 = 2 ½"Join 12 - 14 - 15 - 13Waist Strap (2 piece)Width - 5"Length - 22"Neck Strap( 2 pieces)Width - 5"Length - 15"
e. Pattern making:
Prepare paper patterns.
f. Layout:
Fig.3.4.3- Apron - Drafting
Fig.3.4.4 - Apron - Layout
Reference Book
68
g. Estimation of Cloth:
Width of cloth = 36"
Amount of cloth required = Length of apron + (2 x seam allowance)
= 32 + (2 x 2)
= 36"
= 90 cm.
h. Construction Details:
Cut bias strips of 2'' width and finish the edges with bias binding all over.
Make a patch pocket of any shape and finish with bias binding on top.
Attach pocket.
Attach neck belt.
Attach side belt.
3.4.7. PRACTICALS1. Draft and Construct a Pillow Cover
Draft and construct a pillow cover with standard measurements. Decorateit with embroidery / fabric painting.
2. Draft and Construct an Apron
Draft and construct an apron with standard measurements. Decorate it withembroidery / fabric painting.
3.4.8. ASSESSMENT ACTIVITIES1 Assignment 2 Seminar
3 Practical activity 4 Work diary
5 Class Test 6 Portfolio
3.4.9. TE QUESTIONS1. Prepare a seminar report on the household textiles and their use.
2. Suggest suitable fabrics for Kitchen linens with reason.
3. Discuss Curtains with regard to different fabric suitable for its construction.
4. Draft an apron for an housewife with standard measurements.

FASHION AND APPAREL DESIGNING
69
UNIT - 3.5CONSTRUCTION OF CHILDREN'S AND LADIES'
GARMENTS
3.5.1. INTRODUCTIONA good fashion designer should master stitching skills to do well in his/hercareer. Hence this chapter concentrates on construction of ladies' and kid'sgarments. All steps from taking measurement, drafting, pattern making, layoutand construction of different ladies and kids garments like, A-line frock, Salwar,and Kameez have been included for learners to construct dresses on their own.These unit gives importance to custom tailoring.
3.5.2. LEARNING OUTCOMESThe learner;
• Lists the standard measurements for an A-line dress.
• Drafts an A-line dress.
• Develops paper pattern for an A-line dress.
• Layouts the pattern with minimum wastage of cloth.
• Constructs an A-line dress.
• Lists the standard measurements for a salwar.
• Drafts a salwar.
• Develops paper pattern for a salwar.
• Layouts the pattern with minimum wastage of cloth.
• Constructs a salwar.
• Lists the standard measurements for a kameez.
• Drafts a kameez.
• Develops paper pattern for a kameez.
• Layouts the pattern with minimum wastage of cloth.
• Constructs a kameez.

Reference Book
70
3.5.3. CONSTRUCTION OF A - LINE FROCKa. Specifications:
Peterpan Collar
One piece placket with hook and eye
Cape sleeve
b. Materials required:
Printed cotton cloth - 1.20 mts
Matching thread
Accessories - Lace, show button, hook & eye.
Drafting and stitching tools.
c. Measurements:
Chest : 60 cmFull length : 56 cmShoulder : 25 cmSleave length : 10 cm
d. Drafting Procedure:
Front Part
0 - 1 = Full length + 1 ½ cm
0 - 2 = ¼ Chest + 1 ½ cm
2 - 3 = ¼ Chest + 4 cm
1 - 4 = ¼ Chest + 10 cm
Join 3 - 4.
0 - 5 = ½ Shoulder + 1cm.
6 is squared down from 5.
0 - 7 = 1/12 Chest + 1cm.
0 - 8 = 1/12 Chest + 2.5 cm
5 - 9 = 1.5 cm
6 - 10 = 2.5 cm
FASHION AND APPAREL DESIGNING
71
Join 7 - 9 and shape the front arm hole from 9 - 10 - 3.
4 - 11 = 1.5 cm
Shape bottom 1 to 11 as shown.
Back Part
0 - 12 = 2.5 cm.
Shape the back neck 7 - 12.
10 - 13 = 1.25 cm
Shape the back armhole 9 - 13 - 3.
Length of opening at centre back = ¼ chest from 12.
Collar
0 - 1 = 1/12 chest + 2.5 cm0 - 2 = 1/12 chest + 1 cm.0 - 3 = 2.5 cm1 - 4 = 6.5 cm2 - 5 = 5.5 cm3 - 6 = 5.0 cm4 - 7 = 2.5 cm6-8 = 2.5 cm
Sleeve
0 - 1 = Sleeve Length,0 - 2 = Chest/4 - 2 cm
Now square down from 2 to 3 andcomplete the block.
2 - 4 = Chest / 8 - 1 ½ cm3 - 5 = 2 cmComplete the curve 0 - 4Join 4 - 5
e. Pattern making:
Prepare paper patterns
Fig.3.5.1 - A-Line frock - Draft

Reference Book
72
f. Layout:
Fig.3.5.2 - A-Line frock - Layout
g. Estimation of Cloth:
Width of the cloth = 36" (90 cm)
Amount of cloth required = 2 x bodice length + seamallowance
= 2 x 56 + 4
= 120 cm
h. Construction Details:
Join shoulder.
Finish back opening with a continuous bound placket.
Prepare peter pan collar and attach the collar to the bodice.
Finish neckline with piping.
Attach cape sleeve.
Join sides.
Finish bottom.

FASHION AND APPAREL DESIGNING
73
3.5.4. CONSTRUCTION OF SALWARSalwar is a garment used with kameez or kurta. It is prepared with a casing atthe waist for inserting a cloth tape. A canvas or interfacing material is used inthe inturns at the bottom with any suitable design
a. Specifications:
Pleated bottom
b. Materials required:
Plain cotton cloth - 2.00 mts
Matching thread
Accessories - Canvas.
Drafting and stitching tools.
c. Measurements:
Full length : 38''
Seat : 34''
Waist : 38''
Bottom round : 13''
d. Drafting Procedure:
Waist Piece
0 - 1 = 1/6 Seat + 1''
0 - 2 = ¼ Waist + 2 ½ ''
1 - 3 = 03
Leg Piece
4 - 5 = Full length - (0 -1) (length of waist piece)
4 - 6 = ½ seat + 1''
6 - 8 = 1/6 seat +1''
7 - 8 = 2''
5 - 9 = ½ bottom + ½ ''
Join 8 - 9
Shape at 7. Fig.3.5.3 - Salwar - Draft

Reference Book
74
e. Pattern making:
Prepare paper patterns
f. Layout:
Fig.3.5.4 - Salwar - Layout
g. Estimation of Cloth:
Width of the cloth = 36" (90 cm)
Amount of cloth required = (2 x full length) + seamallowance
= (2 x 38) + 4
= 80"
= 2.00 mts.
h. Construction Details:
Join separate inturns at the bottom of the leg piece and stiffen usingseveral rows of stitches at the bottom.
Take gathers at the leg part so as to make it equal in width to the waistpiece .
Join the leg part to the waist piece.
Make in turns in the front part of the waist piece.
Join the leg seam of both left & right sides. Prepare the two legsseparately.
Join the upper part of the two legs as usual.
Prepare facing at the top and insert a cloth tape.

FASHION AND APPAREL DESIGNING
75
3.5.5. CONSTRUCTION OF KAMEEZKameez is the traditional women's wear of India. It is accepted because of itsconvenience and is used by all age groups. It can be used as a casual wear as wellas a party wear when embellished. Changes are commonly made at the necklinesand sleeves. It is worn along with salwar or churidar.
a. Specifications:
Short Sleeve
Neckline - Shaped facing
Slit
b. Materials required:
Printed / plain cotton cloth - 2.15 mts
Matching thread
Drafting and stitching tools.
c. Measurements:
Full length : 36''
Bust / Chest : 32"
Waist length : 14''
Shoulder : 14''
Waist : 28''
Seat : 36''
Sleeve length : 6''
Sleeve bottom : 11''
Shoulder to slit : 20''
(Abdomen Length)
d. Drafting Procedure:
Front Part
0 - 1 = Full length + 1 ½''
0 - 2 = ¼ Bust - 1 ''

Reference Book
76
0 - 3 = Waist length
0 - 4 = 20'' (Shoulder to Seat line)
0 - 5 = ½ Shoulder + ¼ ''
6 is squared down from 5.
2 - 7 = ¼ Bust + 1 ½ ''(1''for seamallowance and ½ '' for loose)
3 - 8 = ¼ Waist round + 1 ½ ''
4 - 9 = ¼ Seat round + 1 ½ ''
1 - 10 = (4 - 9) + 2'' (1'' for loose and1''for seam allowance)
10 - 11 = ½ ''
Shape 1 - 11.
9 - 11 = slit
0 - 13 = 1/12 Bust
0 - 14 = 1/6 Bust
Shape the front neck as shown.
5 - 15 = ¼ '' (Shoulder slope)
Join 13 - 15
6 - 16 = 1 ½ ''
Shape the front arm hole 15 - 16 - 7.
Back Part
0 - 17 = 3''
Shape back neck 13 - 17
16 - 18 = ¾ ''
Shape the armhole 15 - 18 - 7
Sleeve
0 - 1 = Sleeve Length

FASHION AND APPAREL DESIGNING
77
1 - 2 = 1 ½ '' for turning
0 - 3 = ¼ bust- 1''
2 - 4 = 0 - 3
3 - 5 = 1/8 bust - ½ ''
0 - 6 = 1 ''
5 - 7 = 1/3 of 0 - 5
Shape the front and back armhole asshown.
1 - 8 = ½ Sleeve bottom + ½ ''
e. Pattern making:
Prepare patterns
f. Layout:
Fig.3.5.5 - Kameez - Draft
Fig.3.5.6 - Kameez - Layout
Reference Book
78
g. Estimation of Cloth:
Width of the cloth = 36" (90 cm)
Amount of cloth required = 2 x bodice length + sleeve length + seam
allowance.
= 2 x 37 ½ + 7 ½ + 3 ½
= 86" = 2.15 mts.
h. Construction Details:
Apply shaped facing on front & back neckline using canvas.
Join front & back shoulder seam.
Join side seam up to the slit
Attach sleeve to bodice
Finish Slits & bottom with machine stitch, hemming or bias binding.
Stitching Sleeve
Turn over the bottom of the sleeve & make a row of stitches.
Join side seam.
Place the notch over the line joining the shoulder seam & join the sleeve tothe bodice.
3.5.6. PRACTICALS1. Construction of A - Line Frock
Draft, make paper pattern and construct an A-Line frock with standardmeasurements.
2. Construction of SalwarDraft, make paper pattern and construct a salwar with standard measurements.
3. Construction of KameezDraft, make paper pattern and construct a Kameez with standard measurements.
3.5.7. ASSESSMENT ACTIVITIESAssignment Practical activityWork diary Class TestPortfolio
3.5.8. TE QUESTIONS1. List the standard measurements for an A- Line frock2. Using the standard measurements draft an A-Line frock.3. Draft and draw a Layout for a Salwar4. Draft and draw a Layout for a Kameez
FASHION AND APPAREL DESIGNING
79
UNIT - 3.6CONSTRUCTION OF GENTS' GARMENTS
3.6.1. INTRODUCTIONConstruction of gents' garments like Kurtha and shirt, using all steps, like takingmeasurement, drafting, pattern making, layout and construction gives a chance tomaster the learners construction skills. The learners will understand the basicdifferences in the construction of ladies and gents garments.
3.6.2. LEARNING OUTCOMESThe learner;
• Lists the standard measurements for a Shirt.
• Drafts a Shirt.
• Develops paper pattern for a Shirt.
• Layouts the pattern with minimum wastage of cloth.
• Constructs a Shirt.
• Understands the standard measurements for a kurtha.
• Drafts a kurtha.
• Develops paper pattern for a kurtha.
• Layouts the pattern with minimum wastage of cloth.
• Constructs a kurtha.
3.6.3. CONSTRUCTION OF SHIRTShirt is a unisex garment which covers the upper torso of body. The major differencebetween ladies' and gent's shirt is the difference in placket placement. For gent'sshirt the buttonhole placket is placed left over right. Whereas in ladies' shirt it is rightover left. Parts of a shirt are:
Main bodices Collar band and Collar
Pocket Sleeve and Sleeve placket
Placket Back yoke
Cuff
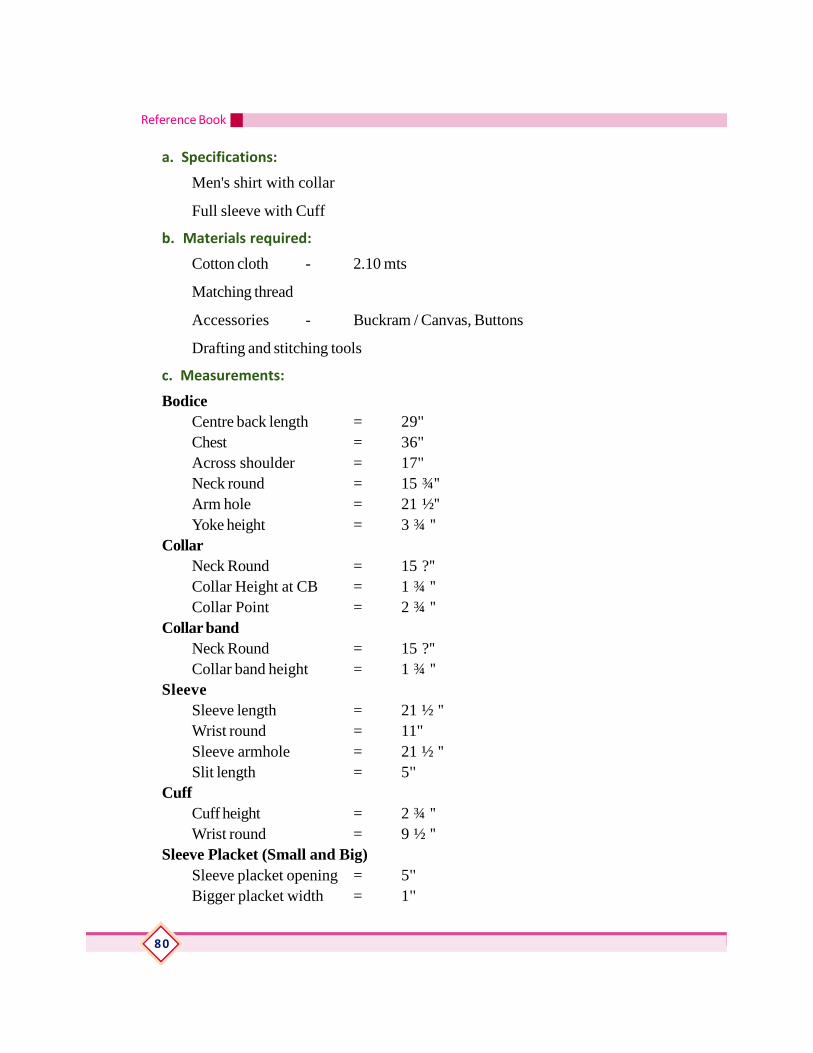
Reference Book
80
a. Specifications:
Men's shirt with collar
Full sleeve with Cuff
b. Materials required:
Cotton cloth - 2.10 mts
Matching thread
Accessories - Buckram / Canvas, Buttons
Drafting and stitching tools
c. Measurements:
BodiceCentre back length = 29''Chest = 36''Across shoulder = 17''Neck round = 15 ¾''Arm hole = 21 ½''Yoke height = 3 ¾ ''
CollarNeck Round = 15 ?''Collar Height at CB = 1 ¾ ''Collar Point = 2 ¾ ''
Collar bandNeck Round = 15 ?''Collar band height = 1 ¾ ''
SleeveSleeve length = 21 ½ ''Wrist round = 11''Sleeve armhole = 21 ½ ''Slit length = 5''
CuffCuff height = 2 ¾ ''Wrist round = 9 ½ ''
Sleeve Placket (Small and Big)Sleeve placket opening = 5''Bigger placket width = 1''

FASHION AND APPAREL DESIGNING
81
Small placket width = ½ ''Pocket
Pocket height/length = 5 ½ ''Pocket width = 5''Pocket length at side = 4 ¾ ''
d. Drafting Procedure:
Front And Back Shirt
0 - 1 = shirt length
0 - 2 = ½ chest + 4''
3 is squared down from 2
0 - 4 = ¼ chest + 2''
4 - 2 = 0 - 4
5 is squared down from 4
0 - 6 = 1/4 chest + 1½''
0 - 6 = 4-7= 2 - 8
5 - 9 = 8''
6 - 9 = 7 - 10 = 8 - 11
0 - 12 = ½ shoulder
13 is squared down from 12
2 - 14 = ½ shoulder
15 is squared down from14
2 - 14 = 8 - 15
0 - 16 = 1/6 neck round + 3/8''
16 - 17 = ¾ ''
Shape 0 - 17
2 - 18 = 1/6 neck round + 3/16''
2 - 19 = 1/6 neck round + ½''

Reference Book
82
Shape 18-19
4 - 20 = 1 ½''
4 - 21 = 1 3/4 ''
Join 17 - 20 and mark the intersecting point on the line 12 - 13 as a
Join 18-21 and mark the intersecting point on the line 14 - 15 as b
a1 is the midpoint of a - 13
b1 is the midpoint of b - 15
Shape a - a1 - 7 (back scye)
b1 - b2 = 3/8''
Shape b - b2 - 7(front scye)
0 - 22 = 3 ¾ ''(yoke height)
0 - 22 = 12 - 23
Note
1. Show all the base lines as broken lines. Apply required information.
2. Balancing of front and back is required.
3. Place front and back meeting shoulder lines together. Measure ¾'' in onshoulder line of front, mark a line and cut the same, attach the same to backshoulder line.
Fig.3.6.1-Shirt Bodice
FASHION AND APPAREL DESIGNING
83
Collar
Square down and square across from zero.
0 - 1 = Collar height at CB.
0 - 2 = ½ Neck round
Square down to 3 and complete the block.
4 is the mid of 0 - 2
5 in the mid of 1 - 3
Measure ?'' down from 3 and mark the point 'a'
Measure ?'' from the point 2 and mark 'b'
Join 'a' to 'b' and extend the line.
a - c = Collar point
Join 5 to a and 4 to c as curve to complete the pattern.
Collar Band
Square across and square down from zero.
0 - 1 = Collar band height at CB
0 - 2 = ½ Neck round + ¾''(button extension)
Square down to 3 and complete the block.
4 is the mid of 0 - 2
5 is the mid of 1 - 3
2 - 2a = 3 - 3a = ¾ " (button extension)
3 - 3b = 2''
2 - 2b = 5/8''
From 3b mark ¼'' down 3c
Join 2a - 3a with dotted line
Join 5,3c & 3
Join 4 ,2b & 3

Reference Book
84
Fig.3.6.2_Shirt Collar
Sleeve
0 - 1 = Sleeve length
0 - 2 = ¼ chest - 1"
3 is squared down from 2
0 - 4 = 1/8 chest
2 - 5 = 0 - 4
Join 0 - 5
6 is midpoint of 0 - 5
7 is midpoint of 0 - 6
8 is midpoint of 6 - 5
6 - 9 = ¾ '' (upward at 90 degree angle)
7 - 10 = 5/8'' (upward at 90 degree angle)
8 - 11 = ¼ " (downwards at 90 degree angle)
Shape 0 - 10 - 9 - 5 with a smooth curve (back shape)
Shape 0 - 10 - 11 - 5 with a smooth curve (front shape)
1 - 12 = ½ sleeve bottom
Note
Calculation for sleeve bottom:
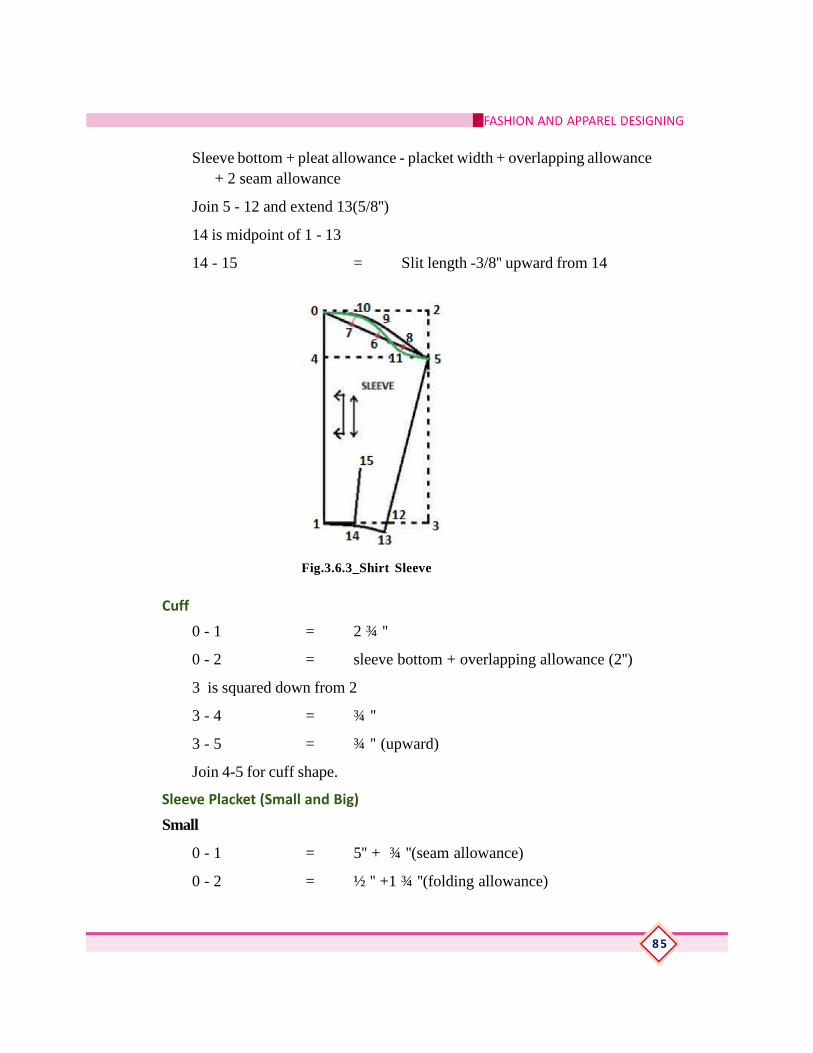
FASHION AND APPAREL DESIGNING
85
Sleeve bottom + pleat allowance - placket width + overlapping allowance+ 2 seam allowance
Join 5 - 12 and extend 13(5/8'')
14 is midpoint of 1 - 13
14 - 15 = Slit length -3/8'' upward from 14
Fig.3.6.3_Shirt Sleeve
Cuff
0 - 1 = 2 ¾ ''
0 - 2 = sleeve bottom + overlapping allowance (2'')
3 is squared down from 2
3 - 4 = ¾ ''
3 - 5 = ¾ '' (upward)
Join 4-5 for cuff shape.
Sleeve Placket (Small and Big)
Small
0 - 1 = 5'' + ¾ ''(seam allowance)
0 - 2 = ½ '' +1 ¾ ''(folding allowance)
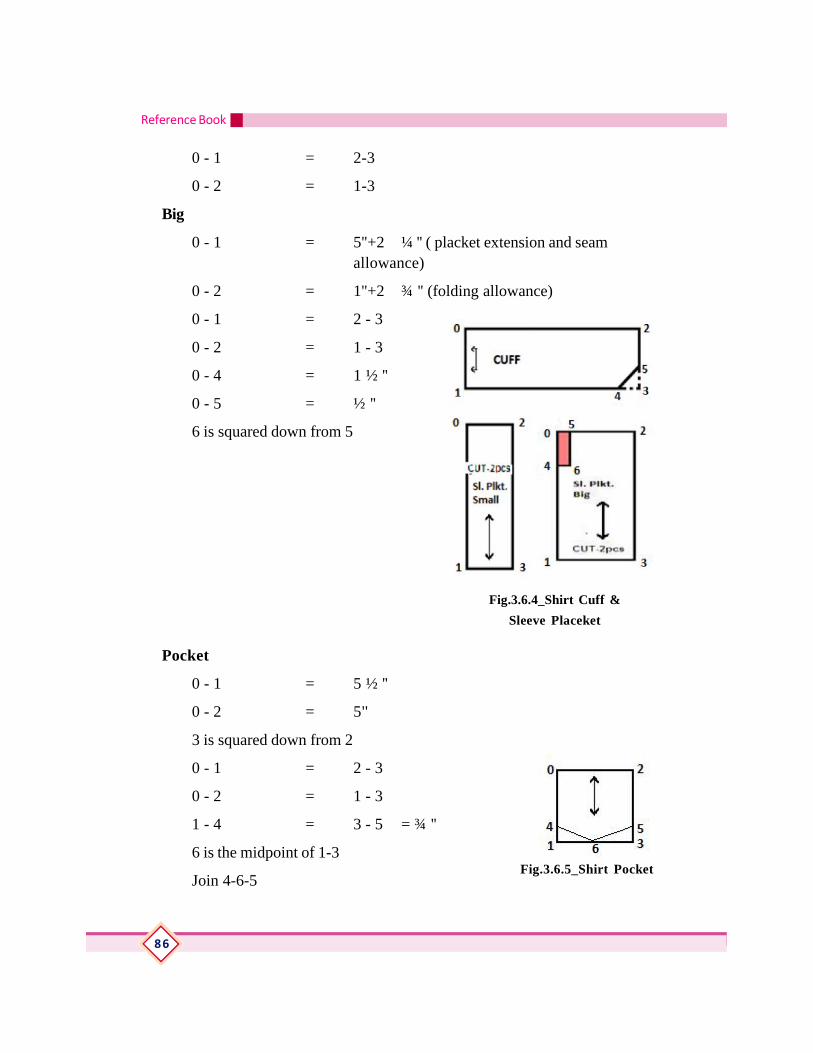
Reference Book
86
0 - 1 = 2-3
0 - 2 = 1-3
Big
0 - 1 = 5''+2 ¼ '' ( placket extension and seamallowance)
0 - 2 = 1''+2 ¾ '' (folding allowance)
0 - 1 = 2 - 3
0 - 2 = 1 - 3
0 - 4 = 1 ½ ''
0 - 5 = ½ ''
6 is squared down from 5
Fig.3.6.4_Shirt Cuff &
Sleeve Placeket
0 - 1 = 5 ½ ''
0 - 2 = 5''
3 is squared down from 2
0 - 1 = 2 - 3
0 - 2 = 1 - 3
1 - 4 = 3 - 5 = ¾ ''
6 is the midpoint of 1-3
Join 4-6-5Fig.3.6.5_Shirt Pocket
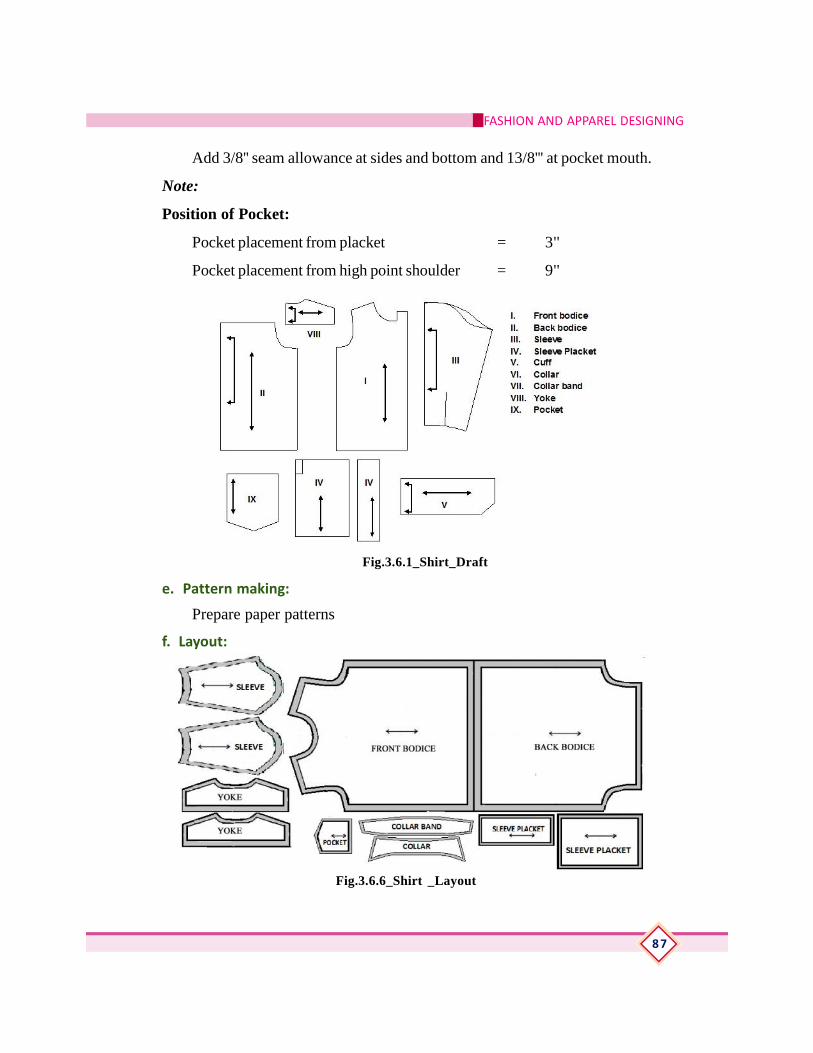
FASHION AND APPAREL DESIGNING
87
Add 3/8'' seam allowance at sides and bottom and 13/8''' at pocket mouth.
Note:
Position of Pocket:
Pocket placement from placket = 3''
Pocket placement from high point shoulder = 9''
Fig.3.6.1_Shirt_Draft
e. Pattern making:
Prepare paper patterns
f. Layout:
Fig.3.6.6_Shirt _Layout

Reference Book
88
g. Estimation of Cloth:
Width of the cloth = 36" (90 cm)
Amount of cloth required = (2 x full length) + seam allowance +sleeve length
= (2 x 29) + 4 + 24
= 84"
= 2.10 mts
h. Construction Details:
Front
Sew front pocket
Sew right opening and attach label
Sew pocket mouth
Press pocket
Attach pocket
Sew buttonhole placket x 6
Sew button x 6 + 2spare button
Bartack at pocket mouth x 2
Back
Sew label at back yoke
Sew pleats x 2
Attach yoke to back
Sleeve
Press sleeve placket x 2
Sew under slits x 2
Attach sleeve placket x 2
Sew buttonhole sleeve placket
Sew button at under slits

FASHION AND APPAREL DESIGNING
89
Cuff
Fuse to cuffs
Trim and run stitch of cuff
Topstitch cuffs ¼''
Sew buttonhole cuff x 2
Collar
Fuse to upper collar
Run stitch collar
Cut collar edges
Trim collar and turn collar
Press collar
Topstitch collar ¼''
Cut collar hem
Fuse collar band
Topstitch collar band
Cut collar band edge
Attach upper collar with collar band
Trim collar band
Press collar band
Topstitch collar band 1/16''
Trim collar band bottom
Mark point (neckline)
Sew buttonhole x 1
Sew button x 1
Assembling
Join shoulder
Attach sleeve opening pleats x 2
Attach sleeve x 2

Reference Book
90
Topstitch sleeve x 2
Join side seam
Attach cuff x 2
Attach and close collar
Sew bottom
3.6.4. CONSTRUCTION OF KURTHAKurtha is generally worn with Pajama or dhoti. The neckline is finished with abound hem or stand up collar. Slit is kept at both the side seams.
a. Specifications:
Stand up collar
Side slit
Tailed placket
Patch pocket
b. Materials required:
Cotton cloth - 2.40 mts
Matching thread
Accessories - Buckram / Canvas, Buttons
Drafting and stitching tools
c. Measurements:
Full length = 35''
Chest = 36''
Waist length = 16''
Neck = 15''
Shoulder = 16''
Sleeve length = 23''
d. Drafting Procedure:
Front Part
0 - 1 = full length
0 - 2 = ¼ chest
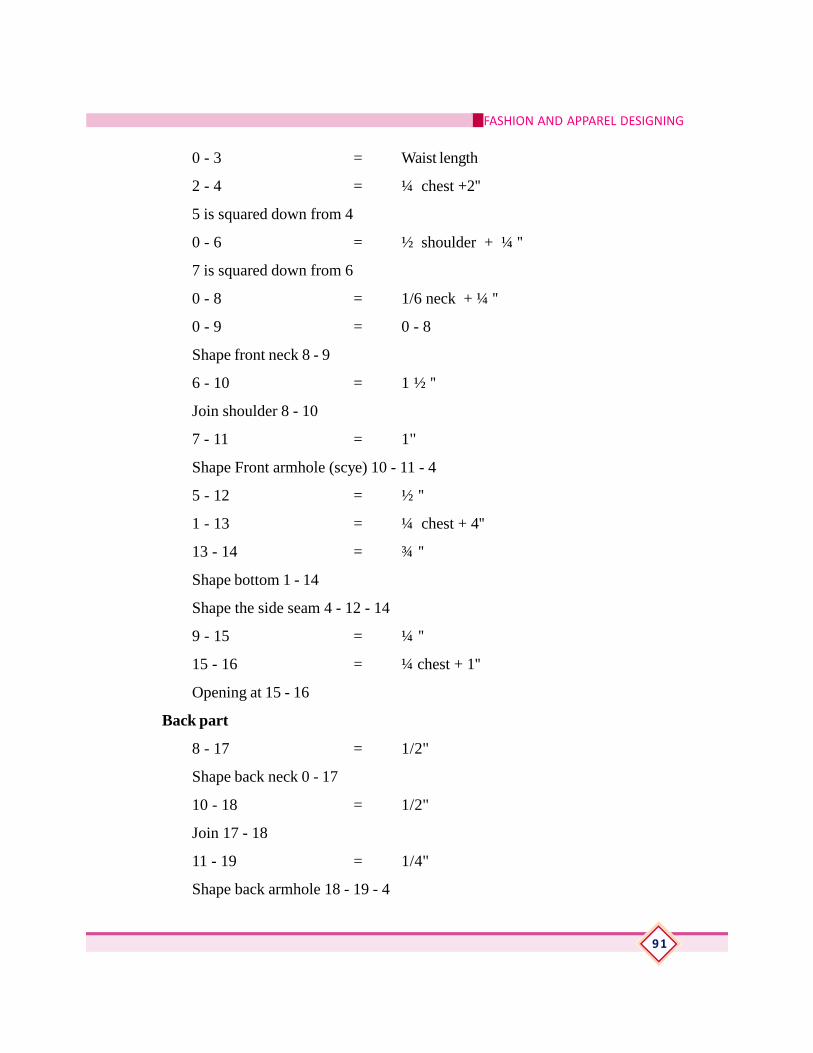
FASHION AND APPAREL DESIGNING
91
0 - 3 = Waist length
2 - 4 = ¼ chest +2''
5 is squared down from 4
0 - 6 = ½ shoulder + ¼ ''
7 is squared down from 6
0 - 8 = 1/6 neck + ¼ ''
0 - 9 = 0 - 8
Shape front neck 8 - 9
6 - 10 = 1 ½ ''
Join shoulder 8 - 10
7 - 11 = 1''
Shape Front armhole (scye) 10 - 11 - 4
5 - 12 = ½ ''
1 - 13 = ¼ chest + 4''
13 - 14 = ¾ ''
Shape bottom 1 - 14
Shape the side seam 4 - 12 - 14
9 - 15 = ¼ ''
15 - 16 = ¼ chest + 1''
Opening at 15 - 16
Back part
8 - 17 = 1/2''
Shape back neck 0 - 17
10 - 18 = 1/2''
Join 17 - 18
11 - 19 = 1/4''
Shape back armhole 18 - 19 - 4
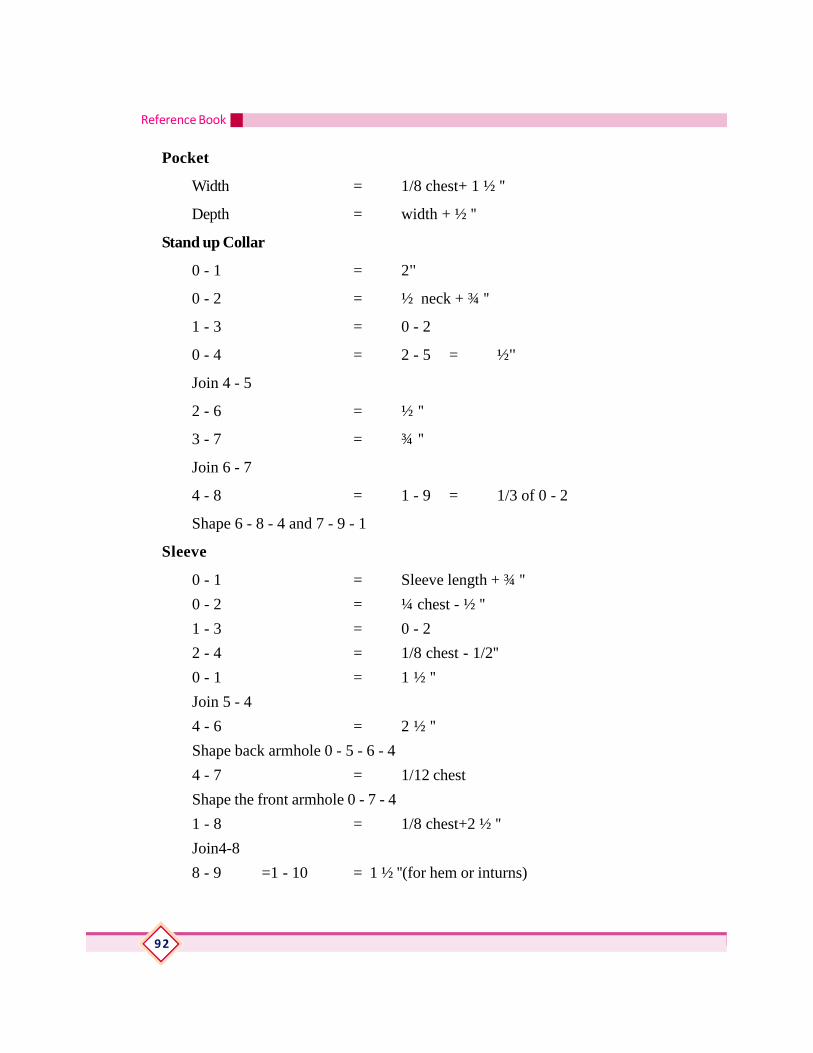
Reference Book
92
Width = 1/8 chest+ 1 ½ ''
Depth = width + ½ ''
Stand up Collar
0 - 1 = 2''
0 - 2 = ½ neck + ¾ ''
1 - 3 = 0 - 2
0 - 4 = 2 - 5 = ½''
Join 4 - 5
2 - 6 = ½ ''
3 - 7 = ¾ ''
Join 6 - 7
4 - 8 = 1 - 9 = 1/3 of 0 - 2
Shape 6 - 8 - 4 and 7 - 9 - 1
Sleeve
0 - 1 = Sleeve length + ¾ ''
0 - 2 = ¼ chest - ½ ''
1 - 3 = 0 - 2
2 - 4 = 1/8 chest - 1/2''
0 - 1 = 1 ½ ''
Join 5 - 4
4 - 6 = 2 ½ ''
Shape back armhole 0 - 5 - 6 - 4
4 - 7 = 1/12 chest
Shape the front armhole 0 - 7 - 4
1 - 8 = 1/8 chest+2 ½ ''
Join4-8
8 - 9 =1 - 10 = 1 ½ ''(for hem or inturns)

FASHION AND APPAREL DESIGNING
93
e. Pattern making:
f. Layout:
Fig.3.6.7-Kurtha-Draft
Fig.3.6.8-Kurtha-Layout
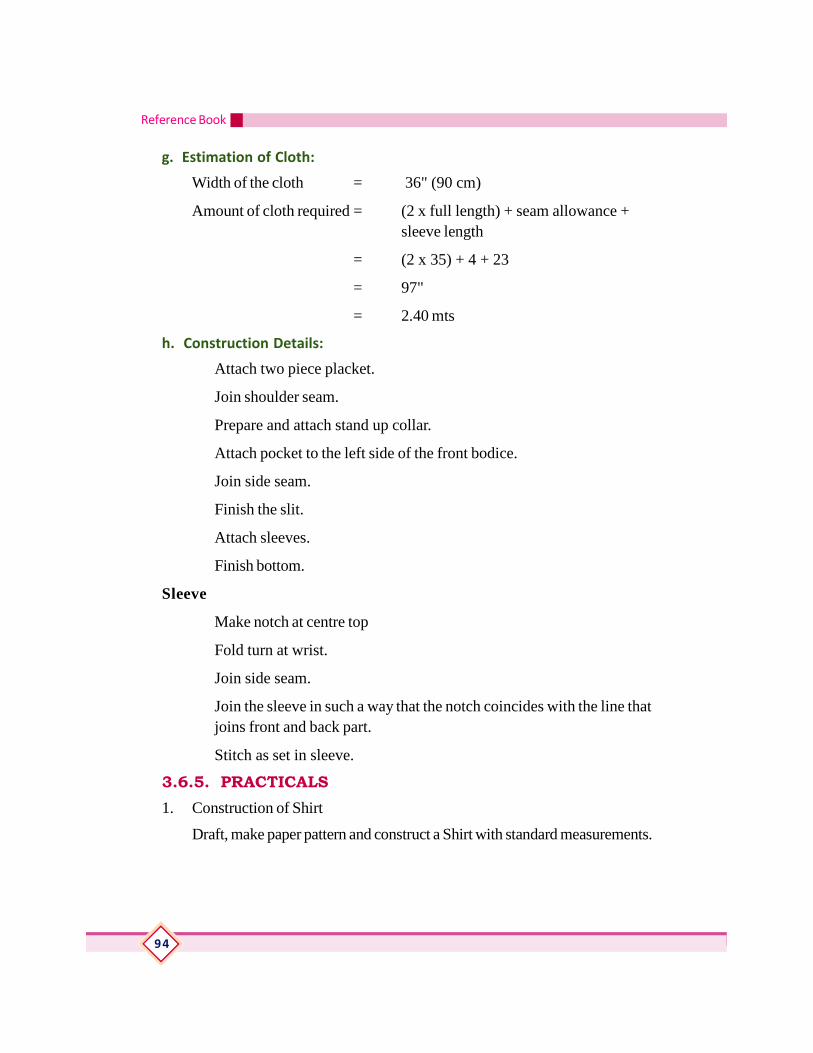
Reference Book
94
g. Estimation of Cloth:
Width of the cloth = 36" (90 cm)
Amount of cloth required = (2 x full length) + seam allowance +sleeve length
= (2 x 35) + 4 + 23
= 97"
= 2.40 mts
h. Construction Details:
Attach two piece placket.
Join shoulder seam.
Prepare and attach stand up collar.
Attach pocket to the left side of the front bodice.
Join side seam.
Finish the slit.
Attach sleeves.
Finish bottom.
Sleeve
Make notch at centre top
Fold turn at wrist.
Join side seam.
Join the sleeve in such a way that the notch coincides with the line thatjoins front and back part.
Stitch as set in sleeve.
3.6.5. PRACTICALS1. Construction of Shirt
Draft, make paper pattern and construct a Shirt with standard measurements.

FASHION AND APPAREL DESIGNING
95
2. Construction of Kurtha
Draft, make paper pattern and construct a Kurtha with standardmeasurements
3.6.6. ASSESSMENT ACTIVITIESAssignment Practical activity
Work diary Class Test
Portfolio
3.6.7. TE QUESTIONS1. List the standard measurements for:-Kurtha
2. Using the standard measurements draft a Kurtha.
3. Using the standard measurements draft a Shirt
4. Draw a Layout for a Kurtha
5. Draw a Layout for a Shirt.

Reference Book
96
Module III - List of practical works
1. Body MeasurementsTake body measurements of 5 - 6 classmates & record it. Prepare a chart.
2. Drafting of Basic Bodice- Front and Back.Draft and prepare paper pattern for front and back basic bodice with standardmeasurements.
3. Drafting of Basic Skirt - Front and Back.Draft and prepare paper pattern for front and back basic skirt with standardmeasurements
4. Drafting of Basic Sleeve.Draft and prepare paper pattern for basic sleeve with standard measurements
5. Dart ManipulationPrepare patterns of dart manipulation of differ bodice darts.
6. Drafting StylelinesPrepare a pattern of princess armhole style line in bodice.
7. Sleeve VariationsPrepare patterns of
g. Puff Sleeve - Top gathering
h. Puff Sleeve - Bottom gathering
i. Puff Sleeve - Top and bottom gathering
j. Bell Sleeve
k. Cape Sleeve
l. Petal Sleeve
8. Skirt VariationsPrepare patterns of
d. A - Line Skirt
e. Flared Skirt
f. Circular Skirt

FASHION AND APPAREL DESIGNING
97
9. Pattern Alternations
Make alternations in basic patterns for
h. Large bust
i. Small Bust
j. Gaping neckline
k. Sloping Shoulder
l. Broad Shoulders
m. Large Sleeve
n. Small Sleeve
10. Construction of Pillow CoverDraft and construct a pillow cover with standard measurements. Decorate itwith embroidery / fabric painting.
11. Construction of ApronDraft and construct an apron with standard measurements. Decorate it withembroidery / fabric painting.
12. Construction of A - Line DressDraft, make paper pattern and construct an A-Line dress for a girl child with standardmeasurements.
13. Construction of SalwarDraft, make paper pattern and construct a Salwar for a lady with standardmeasurements.
14. Construction of KameezDraft, make paper pattern and construct a kameeez for a lady with standardmeasurements.
15. Construction of ShirtDraft, make paper pattern and construct a Shirt for an adult man with standardmeasurements.
16. Construction of KurthaDraft, make paper pattern and construct a Kurtha for an adult man with standardmeasurements

Reference Book
98
MODULE - IVFashion Designing & Boutique Management
OVER VIEWFashion designing is a combination of perception of one's ideas, giving it a form,designing it in a suitable colour and illustrating it in an appealing way. To excel infashion and apparel designing, a sound knowledge regarding the basics of elementsof design and how to use it according to the principles is also essential. This impartscompleteness to a design. Dresses designed with variety, uniqueness and beauty arevery popular with the consumers. Though fashion trends keep changing every day,the basic elements remain the same forever.
Module 4 has been designed to include all relevant chapters to attain a thoroughknowledge regarding Fashion and Apparel designing. The last chapter of this moduledeals with fashion merchandising and boutique management which will help the learnerto know about the marketing sector of the fashion industry. After completing thismodule, the learner would be able to create a portfolio on their own.
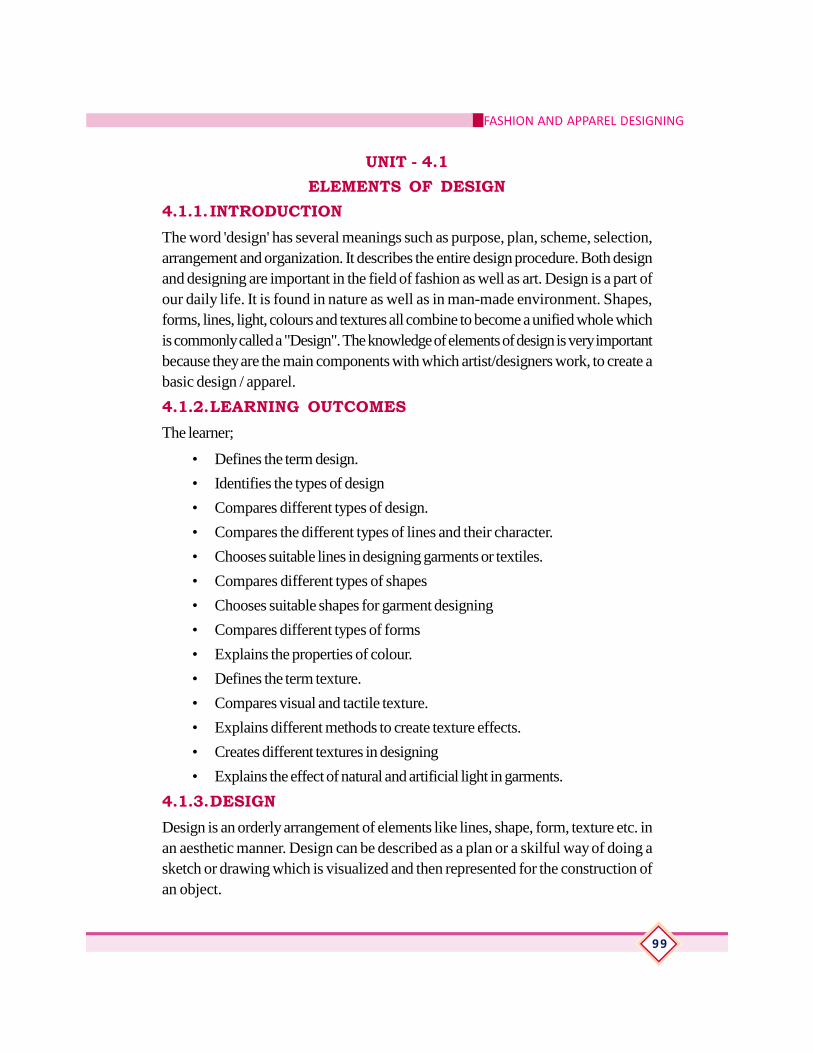
FASHION AND APPAREL DESIGNING
99
UNIT - 4.1ELEMENTS OF DESIGN
4.1.1.INTRODUCTIONThe word 'design' has several meanings such as purpose, plan, scheme, selection,arrangement and organization. It describes the entire design procedure. Both designand designing are important in the field of fashion as well as art. Design is a part ofour daily life. It is found in nature as well as in man-made environment. Shapes,forms, lines, light, colours and textures all combine to become a unified whole whichis commonly called a "Design". The knowledge of elements of design is very importantbecause they are the main components with which artist/designers work, to create abasic design / apparel.
4.1.2.LEARNING OUTCOMESThe learner;
• Defines the term design.
• Identifies the types of design
• Compares different types of design.
• Compares the different types of lines and their character.
• Chooses suitable lines in designing garments or textiles.
• Compares different types of shapes
• Chooses suitable shapes for garment designing
• Compares different types of forms
• Explains the properties of colour.
• Defines the term texture.
• Compares visual and tactile texture.
• Explains different methods to create texture effects.
• Creates different textures in designing
• Explains the effect of natural and artificial light in garments.
4.1.3.DESIGNDesign is an orderly arrangement of elements like lines, shape, form, texture etc. inan aesthetic manner. Design can be described as a plan or a skilful way of doing asketch or drawing which is visualized and then represented for the construction ofan object.

Reference Book
100
4.1.4.TYPES OF DESIGNDesigns can be broadly classified into two types:
4.1.4.1. Structural Design
Structural designs are made by joining together lines, forms, etc together. It is asimple design, which is suitable to the purpose for which the article is made. It is theoverall design of a garment. In apparel structural design is more important becauseit is the fundamental component of design. The requirements of a good structuraldesign are:
i. The design must be functional in sense. It should be suitable for the purpose forwhich it is made.
ii. The design must have correct proportions.
iii. It must be simple.
iv. It must be suited to the material of which it is made.
Fig. 4.1.1 - Structural Design Fig. 4.1.2 - Decorative Design
4.1.4.2. Decorative Design
A decorative design is an additional enrichment on a structural design. A decorativedesign consists of any lines, colours, or materials that have been applied to a structuraldesign for the purpose of adding a richer quality to it. In garments decoration can becreated through various types of prints, braids, embroidery, buttons etc. Thedecorative design should fulfil several requirements:-
i. The decoration should be used in moderation and should be placed in structuralpoints, to strengthen the shape of the object.

FASHION AND APPAREL DESIGNING
101
ii. The decoration should be suitable for the purpose for which the object is made.
iii. There should be enough background space to give an effect of simplicity anddignity to the design.
Another classification of designs are as follows:-
4.1.4.3. Naturalistic design
It imitates or copies the nature in a photographic manner. I include pictures/designs/photographs of flowers, fruits, animals.
4.1.4.4. Stylized design
These are simple designs which have its original structure from natural design. Theseare modified natural designs.
Fig.4.1.3 - Naturalistic Design Fig.4.1.4 - Stylized Design
4.1.4.5. Geometric design
Combination of geometric forms like line, circle, square etc
4.1.4.6. Historic design
These are designs which indicate our glorious past or stories of history.
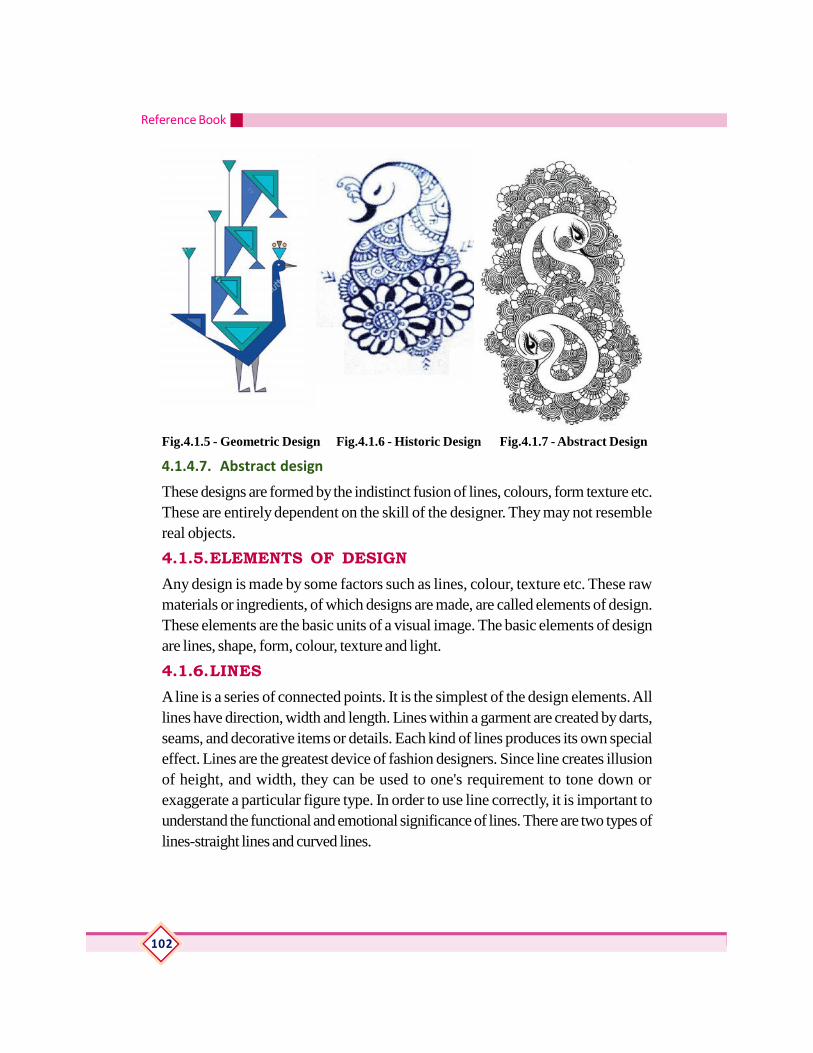
Reference Book
102
Fig.4.1.5 - Geometric Design Fig.4.1.6 - Historic Design Fig.4.1.7 - Abstract Design
4.1.4.7. Abstract design
These designs are formed by the indistinct fusion of lines, colours, form texture etc.These are entirely dependent on the skill of the designer. They may not resemblereal objects.
4.1.5.ELEMENTS OF DESIGNAny design is made by some factors such as lines, colour, texture etc. These rawmaterials or ingredients, of which designs are made, are called elements of design.These elements are the basic units of a visual image. The basic elements of designare lines, shape, form, colour, texture and light.
4.1.6.LINESA line is a series of connected points. It is the simplest of the design elements. Alllines have direction, width and length. Lines within a garment are created by darts,seams, and decorative items or details. Each kind of lines produces its own specialeffect. Lines are the greatest device of fashion designers. Since line creates illusionof height, and width, they can be used to one's requirement to tone down orexaggerate a particular figure type. In order to use line correctly, it is important tounderstand the functional and emotional significance of lines. There are two types oflines-straight lines and curved lines.

FASHION AND APPAREL DESIGNING
103
Types of Lines
There are two types of lines - Straight lines & Curved lines
4.1.6.1. Straight Lines -
Vertical, Horizontal, Diagonal, Zigzag
Straight lines are opposite to curved lines as they are rigid and crisp. They arebold and suggest dignity, power and formality. Straight lines as create an opticalillusion. Straight line and shape denote force and strength and have masculinequality,
a. Vertical lines
- They generally add height or length to the body.
- Gives the impression of being taller/thinner.
- Gives a feeling of dignity, strength, poise and sophistication.
- Vertical lines carry the eye upward and downward direction whichwill give the illusion of tallness.
- Vertical lines can also be achieved by a row of knife pleats or pintucks or by piping inserted in a vertical seam, so as to emphasis theline.
- Vertical lines are also associated with formal wear.
b. Horizontal lines
- They make the eye travel from side to side and so give the effect ofwidth and shorten the body.
- Can attract attention towards one part of the body.
- They carry the eye across the body.
- Horizontal lines by spacing can produce the illusion of length.
- Gives the impression of being shorter and heavier.
- Gives a relaxed and calm feeling, suggests rest and gentleness.
- These lines are not flexible and informal and a horizontal effect canalso be achieved by rows of tucks or lace.
c. Diagonal lines
- Diagonal lines satisfy combination of both.
- They always show a movement or motion.
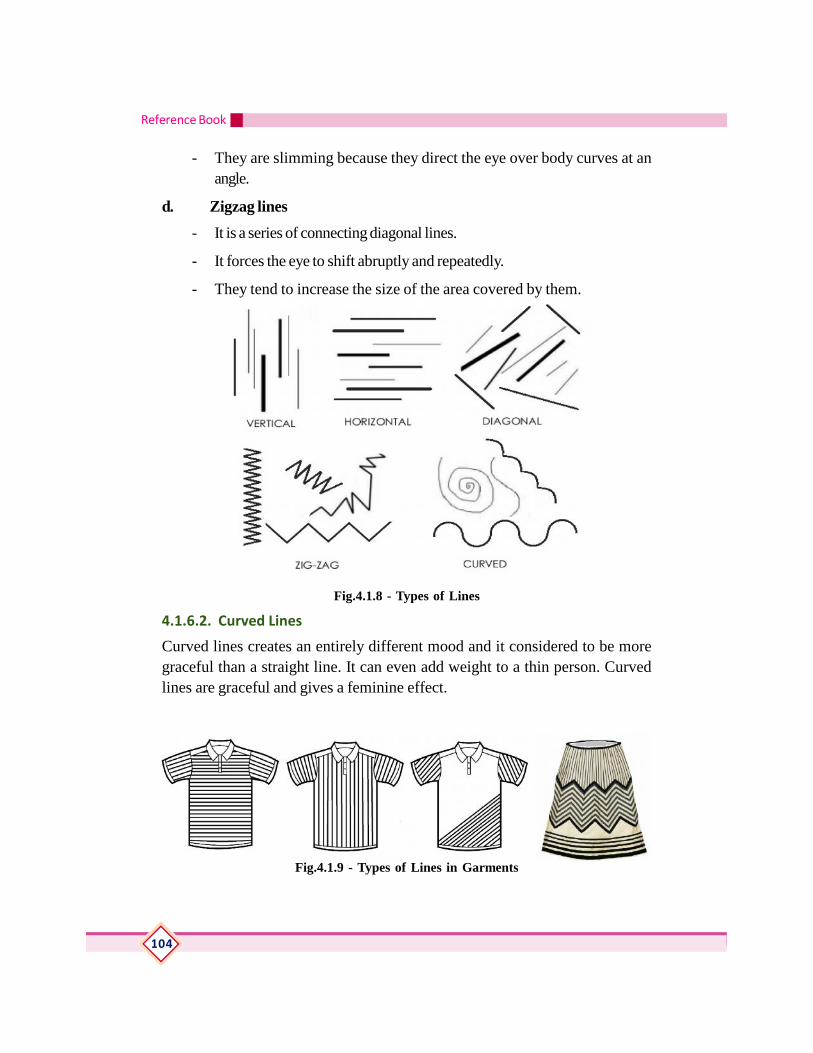
Reference Book
104
- They are slimming because they direct the eye over body curves at anangle.
d. Zigzag lines
- It is a series of connecting diagonal lines.
- It forces the eye to shift abruptly and repeatedly.
- They tend to increase the size of the area covered by them.
Fig.4.1.8 - Types of Lines
4.1.6.2. Curved Lines
Curved lines creates an entirely different mood and it considered to be moregraceful than a straight line. It can even add weight to a thin person. Curvedlines are graceful and gives a feminine effect.
Fig.4.1.9 - Types of Lines in Garments

FASHION AND APPAREL DESIGNING
105
4.1.7. SHAPEA shape is defined as a two dimensional area that stands out from the space. Allobjects are composed of shapes. Basic shapes are:
a. Geometric shape
b. Organic shape
c. Inorganic shape
The overall shape of a garment is its shape or silhouette. Wide, full shapes in clothingmake the wearer to look larger. Trim, compact silhouettes shapes in clothing makethe wearer to look smaller. Straight tubular shapes in clothing make the wearer looktaller. Silhouettes in fashion change over time. Learning to recognize fashion silhouettescan make it easier to date fashions, as well as help to understand which silhouetteswork best for a body type. There are mainly four types of silhouette or the outline ofthe garment:
Fig.4.1.10 - Shapes of Gown
a. A-line - An A-line dress will flair out from waist and will have a silhouette likethe letter "A" as it falls to the ground. It is softly shaped at the waist. It gracefullyhugs the natural curves of the upper body and then it flares out into the "A"shape as it falls. This silhouette is flattering to most body types, but it doesemphasize the waist.
b. Ball gown - Fitted bodice and waist with a skirt that flares for the maximum atthe hemline looks. This gives fantastic look for taller brides.
c. Empire - The empire-style gown has a high waistline under the bust and flaresout the skirt. This silhouette involves a line below the bust that creates twopanels dividing the garment. It elongates the body, giving an appearance ofbeing taller.

Reference Book
106
d. Sheath - The sheath silhouette is a straight cylindrical shape to a garmentachieved by giving the same measurements to the chest, waist and hem.
e. Mermaid- This silhouette is used to refer dresses that are firm-fitting fromthe bust through the length of the knee and then flares out. This is generallyrecommended for thin women who have gentle to no curves.
f. Asymmetrical - This garment style does not have a symmetrical form.This can be achieved by varying the panels, fabric used for hemline.
4.1.8. FORMIt is a three dimensional object. It can bemeasured by its height, width, and depth. Formand line are closely related. Basic forms arethe sphere, the cone, the cube, ovals, cylindersand rectangles.
4.1.9.COLOURColour plays a large role in the designing of garments. Used in a planned, controlledarrangement; colours can produce many moods; can reduce tensions or increasetensions etc. Colours are often described in three particular terms - hue, value andintensity. These are the qualities of colour or dimensions of colour.
a. Hue : Hue refers to the name of thecolour itself such as 'red' or 'blue' etc.There are six basic hues red, yellow,blue, green, orange and violet.
b. Value : Value of a colour means the lightness and darknessof a hue. The lightest or highest value is white and thedarkest or the lowest value is black.
Fig.4.1.11 - Form
Fig.4.1.12 - Basic Hues
Fig.4.1.13 - Values of
Green Hue

FASHION AND APPAREL DESIGNING
107
c. Intensity / Chroma : The intensity of acolour refers to the brightness or dullnessof the colour.
4.1.10. TEXTURETexture refers to surface characteristic andappearance of an object. Texture is one elementwhich can be seen and felt. It may be explained as a material feels when thefingertips are run lightly along its surface. Texture is created in fabric by thefiber type, weaving or knitting process, or by the fabric finishes. Loopy, fuzzy,furry, soft, shiny, dull, bulky, rough, crisp, smooth, sheer are some of the textures.A thin organza is not appropriate for a coat nor is a thick wool fabric appropriatefor a clinging evening gown. The professional designers must consider thedifference between fabrics and then style them accordingly.
Each of the elements of texture will have an influence on the total appearanceof the garment and the figure wearing it. Shiny and glossy texture reflects lightand thus increases the apparent size of the wearer. They also reveal the trueshape of the person. Slender well proportionate persons can wear satins andother shiny surfaced fabrics. Dull fabrics absorb light and thus tend to decreasethe apparent size of the wearer and to conceal the true silhouette. Stiff or crispfabrics increase the size but conceal the true figure, as they hang away from thenatural contour of the body. Heavy fabrics also increase the size of the wearer.
Fig.4.1.14 - Intensity Scale ofBlue and Red
Fig.4.1.15 - Texture in Garments

Reference Book
108
4.1.10.1. Types of Texture
There are two types of texture:
ii. Tactile Texture:- Texture that can be felt by touch. (rough, pricky). Theactual texture needs to either be felt, or seen with light raking across itssurface to make the texture visible
iii. Visual Texture:- Visual texture refers to the illusion of the surface's texture.Texture that can be seen. (Shiny, dull, matte)
4.1.10.2. Illusions created by Textures in Clothing
- Smooth, flat textures make people look smaller.
- Shiny Textures make the body look larger because they reflect light. Theymake fabric colours look lighter and brighter, thus making the body look larger.
- Rough textures tend to subdue the colours of fabrics.
- Sheer fabrics reveal the true body shape. It tends to soften the figure whenused over a soft lining.
- Dull textures make a person appear smaller because they absorb light.
- Clinging, soft textures reveal the body's true silhouette.
- Stiff crisp textures make the total shape appear bigger because they standaway from the body.
- A small, overall print tends to make the wearer look smaller.
- Large, bold patterns increase the apparent size of the wearer.
4.1.11. LIGHTLight is another element of design which creates many dramatic effects in theappearance of design. Artificial lights tend to change the colour and appearance ofclothes. Hence the dress to be worn under daylight should be selected in naturallight. Evening party wears and night wear dresses should preferably be selectedunder artificial light to look attractive.
Physical Effects of LightThe quality of light is determined by the source. Light can accent, distort, subordinate,minimize, and rearrange contours of shape.
1. Small sharp source will create
a. Bright highlights,

FASHION AND APPAREL DESIGNING
109
b. Sharp edges of the beam of light and the objects illuminated,
c. Darker shadows with defined edges,
d. Accents differences,
2. Broad diffused source will
a. Soften shadows and highlights,
b. Flatten shapes,
c. Smoothens textures
3. The angle of incidence of light is equal to the angle of reflection
a. Sharp focus/low angle on shiny fabric creates more bounce towardaudience/viewer, flattens objects and causes objects to appear bright.
b. Sharp focus/high angle on shiny fabric will reflect more light reflectedback to viewer causing colours to appears brighter.
c. Sharp focus/high angle on dull fabric will be absorbed causing coloursto appear duller.
4. The intensity of the light source changes the perception of density
a. A dim source will cause all surfaces to appear more opaque than theyare.
b. A bright source will cause transparent or semi-transparent surfaces toappear nonexistent or more transparent than they are
5. Temperature is both a physical and psychological attribute of light
a. Shiny surfaces are cool to the touch and reflect light making the viewerfeel cold.
b. Dull surfaces are warm to the touch and absorb light making the viewerfeel warm.
Psychological Effects of Light
Our moods and sense of well-being are affected by the qualities of light.Lightness is associated with openness, clarity, awareness, alertness, andknowldge. Expressions of lightness include "Seeing the light", "The age ofenlightenment" or " have a bright idea"
• Too much light is tiring.

Reference Book
110
• Too bright/high intensity. Illuminates too large of a surface.
• Illuminates too evenly, causes objects to look flat or 2D.
Darkness is associated with gloom, mystery, quietness, seriousness, depression,threat, fear of the unknown, ignorance, age, sophistication, and experience.
Not enough light is tiring and make the viewer work too hard to see. The older theviewer the more light is required to see as the eyes age. Hearing clearly can also beaffected by the ability to see what is making the noise or who is talking.
4.1.12. PRACTICALS1. Illustration of Types of Design
Make a portfolio illustrating application of the following types of designs in garments.
a. Structural Design
b. Decorative Design
c. Natural design
d. Geometric Design
e. Stylized Design
f. Historic Design
g. Abstract Design
2. Illustration of Elements of Design - Line
Make a portfolio illustrating application of the following types of lines in garments.
a. Vertical Lines
b. Horizontal Lines
c. Diagonal Lines
d. Zig - zag Lines
e. Curved Lines
3. Illustration of Elements of Design - Shape
Make a portfolio illustrating different shape (silhouette) of any garment (Gown/Frock/Skirt/Shirt/Trousers). (2 - 4 illustrations)
FASHION AND APPAREL DESIGNING
111
4. Illustration of Elements of Design - Form
Make a portfolio illustrating different forms in garments. (2 - 4 illustrations).
5. Illustration of Elements of Design - Colour
Make a portfolio illustrating application of colours in garments. (2 - 4illustrations)
6. Illustration of Elements of Design - Texture
Make a portfolio illustrating different textures using the following methods ofcreating textured effects. (5 - 10 illustrations)
a. Thread Rolling: Take thick thread and ramp it roundly on any circularobject like pencil. Apply colour on the thread. Now roll the pencilwith the coloured thread on a piece of paper. This gives the threadrolling texture. The number of colours has no restriction.
b. Thread Pulling: Take a normal thread, probably white in colour. Holdtwo ends of the thread randomly on a paper holding one end. Cover itwith another paper Hold the paper tightly and pull the thread. This isthe thread pulling texture.
c. Thread dabbing: Take a piece of thread, crush and hold it in hand.Apply the colour to the thread, while holding. Remove the extra colourand then dab it to attain the texture.
d. Paper fold texture: Take a piece of paper and fold it at the centre, andthen so open the paper and sprinkle few drops of poster colour at thecentre fold line. Now, fold the paper and rub it hard to spread thecolour. Open the fold, you get beautiful textures. This paper fold texturealso known as "Butterfly texture".
e. Paper dabbing: Take a piece of paper and crush it. Apply poster colourto the crushed paper and dab it on another piece of paper to on get therequired texture. Before dabbing, remove the extra colour by pressingit against some extra paper.
f. Wax drop texture: For this type of texture, make any design on a pieceof paper with a pencil. Light a candle and drop the wax drop by dropon the design. Once this is done, by using any colour, paint the entirepaper. After sometime, remove the dried wax drops with the help ofsome sharp object, without tearing the paper. This would leave thedesign in white and the remaining part in colour.
Reference Book
112
g. Blow Texture: Take a piece of paper and sprinkle a few drops ofwater proof ink or oil paint, blow hard. When you blow, the ink wouldflow. This forming blow texturing and the number of colours have norestriction.
h. Water drop texture: Take a piece of paper and apply a layer of wateron paper using brush and then sprinkle water proof ink or oil paint onit. Because of the wet paper, the colour would spread.
i. Gum drop Texture: Apply a layer of gum with brush on a piece ofpaper and immediately sprinkle poster colour over it. The colour spreadbecause of the gum base. This gives the required texture.
j. Marble Texture: Take water in a container in which the texture has tobe done, can dip easily. Mix -2-3 drops of white poster colour in thewater. Let the water stand still. Then sprinkle few drops of water proofink or oil paint to the container and dip the paper on it and shake. Whenthe paper is taken up, it will have the waves of different colours andthis is the required texture.
k. Jute Texture (With dry medium): Take a piece of jute and place a pieceof paper over it and rub. Use only dry colour such as pencil colour orwax or crayons to rub on the paper. This would give the texture of thejute on the paper.
l. Jute Texture (With wet medium): Take a piece of Jute and apply postercolour thickly, do not add water. Place this jute on the paper piece andrub, So that, the colour from the jute comes on the paper. This wouldgive the required texture.
m. Thumb Texture: In this, take a piece of paper and apply colour on thethumb and then dab it on the paper piece, the texture is said to becorrect, when the finger prints are most prominent.
n. Vegetable Texture (Potato Texture): Cut the potato in two pieces. Thencarve out the design on it and colour it with any Fabric paint. Applycolour to the carved surface and then dab it on the paper to achieve thetexture. This is another type of block printing method.
o. Vegetable Texture (Onion Texture): Cut onion horizontally in to twopieces and wipe off to remove extra water: now apply fabric colourand dab it on the paper to get the texture.
FASHION AND APPAREL DESIGNING
113
p. Match stick texture: Take a piece of card board and stick the matchstick on the board, forming any design. Remove the black portion ofthe stick before using. After that, apply colour on the match stick, anddab it on the paper. This give the match stick texture and is a type ofblock print.
q. Blade Texture: Take any thick paint on the corner of the blade andscrub it on a piece of paper. This would give the blade texture.
r. Batik Texture: Make any design on a piece of paper and colour it withwater proof ink or oil paint. Once this ink or paint dries, apply white postercolour to the sheet and immediately put the paper under the running tap.This would result in the removal of black colour from some place andwould appear in some places. On the design, giving it a crated effect. Thisis batik texture.
s. Rubber Solution: Draw any design on a piece of paper and apply thicklayer of rubber solution on it. Let it dry. Next, paint the entire sheet withany coloured water proof ink or oil paint. Let the ink or paint dry. Thenremove the rubber solution with the circular portion of the finger.
4.1.13. ASSESSMENT ACTIVITIES1. Assignment
2. Class Test
3. Puzzles
4. Seminar
5. Practical Activity
TE QUESTIONS1. Differentiate Structural and decorative design.
2. Explain the properties of different types of lines.
3. Illustrate different types of shapes in a garment.
4. Create a garment design with a soft texture.
5. Suggest a garment shape for a shot and stout girl.

Reference Book
114
UNIT - 4.2PRINCIPLES OF DESIGN
4.2.1. INTRODUCTIONDesigning is not an end in itself but a means of accomplishment. It is a tool forchange towards meaningful objectives. Through thoughtful balancing moving,repeating, emphasizing and contrasting the design elements, a thoroughly satisfyingand unified art form can be achieved. These principles of design are also used infashion designing and so this chapter is designed in such a way to impart relevantinformation.
4.2.2. LEARNING OUTCOMESThe learner:
• Defines the principles of design.
• Compares types of balance.
• Applies the principle of balance in fashion designing.
• Explains the principle of proportion.
• Applies the principle of proportion in fashion designing.
• Compares the different ways of producing rhythm.
• Applies the principle rhythm in fashion designing.
• Explains the principle emphasis.
• Applies the principle emphasis in fashion designing.
• Explains the principle harmony.
• Uses the principle harmony in designing.
4.2.3. DESIGN PRINCIPLESDesign principles should be regarded as guides rather than rigid rules. Theseprinciples are not actually formulae for creating beauty, but they help one tojudge the clothing selected is artistically good or bad. One can acquire thistaste by experience and by becoming sensitive to beauty. The major principlesof design are:
1. Balance
2. Proportion
3. Rhythm

FASHION AND APPAREL DESIGNING
115
Fig. 4.2.1 - Balance in Dress
4. Emphasis
5. Harmony
4.2.4. BALANCEBalance is the principle of design that produces a feeling of rest and equilibrium.It is the concept of visual equilibrium, and relates to our physical sense ofbalance. It is attained by grouping lines, shapes or colours around a centralpoint in such a way that the general effect has sense of equilibrium. Balance isof two types - Formal & Informal.
4.2.4.1. Formal balance (Symmetrical balance):
It is also known as symmetrical balance. Here objects of equal interests andweight or identical objects are placed on either side of the imaginary centre.Most dresses and suits have formally balanced designs. In formal balance upperand lower portions of a design are arranged in such a way that equal weight isgiven to both parts. Too much weight at the bottom gives an heavy appearance.For example a dark blouse and light skirt would make a short person shorter.
4.2.4.2. Informal balance (Asymmetrical balance):
Here objects are placed not in equal distance,but placed such that they appear to be inequilibrium. Lighter or smaller objects areplaced closer to the central point, whileheavier and bigger objects are placed fartheraway. Dissimilar designs are used in informalbalance.
4.2.5. PROPORTIONThe principle of proportion, is also known as the 'law of relationships'. It refersto how an object, idea or colour is related to other with regard to size, numbers,quantity etc. Proportion is consideredas a scale or ratio of the different partsof a design. Every time two or morethings are put together, good or badproportion are established.
Articles of apparel worn togethershould not show too great a difference Fig. 4.2.2 - Proportion in Dress

Reference Book
116
Fig. 4.2.3 - Rhythm in Dress
in size relationship to wearer. The articles should not differ too greatly in sizefrom each other. The individual sections of the garment such as sleeves, pockets,collars, motifs or surface patterns must all be related to the size of the wearerand to one another.
'The Greek Oblong' is considered as most appropriate ratio of space divisions andit is also called as "the Golden Oblong". It is recognized standard for spacerelationship. This oblong always uses the ratio of 2 : 3 or 3 : 5 in case of flat surfaces,and 5 : 7 : 11 in the case of solids.
4.2.6. RHYTHMRhythm as an art principle is defined as easy, connected path along which the eyefollows a regular arrangement of motifs. This creates interests and reduces monotony.Rhythm can be achieved in the following ways. It allows the eye to glide smoothlyfrom the centre of interest to other parts of design by means of rhythmic movementthrough related lines, shapes or colours. This orderly movement may be obtained byfollowing means:
4.2.6.1. Rhythm by Repetition:
Rhythm is produced when a line, shape or colour is repeated at regular intervals. Acommon example for rhythm in dress is a series of buttons placed along the frontopening of dress.
4.2.6.2. Rhythm by Gradation:-
It refers to gradual changes in colours, shapes or sizes. Gradation means a sequenceor regular progression of objects in a series. In dress it can be produced by the useof tucks, ruffles of varying width etc. Gradation of colour is very forcible andeffective in garments.
4.2.6.3. Rhythm byRadiation:
In this type, the eyemovement is from thecentral part of the design toouter portions.
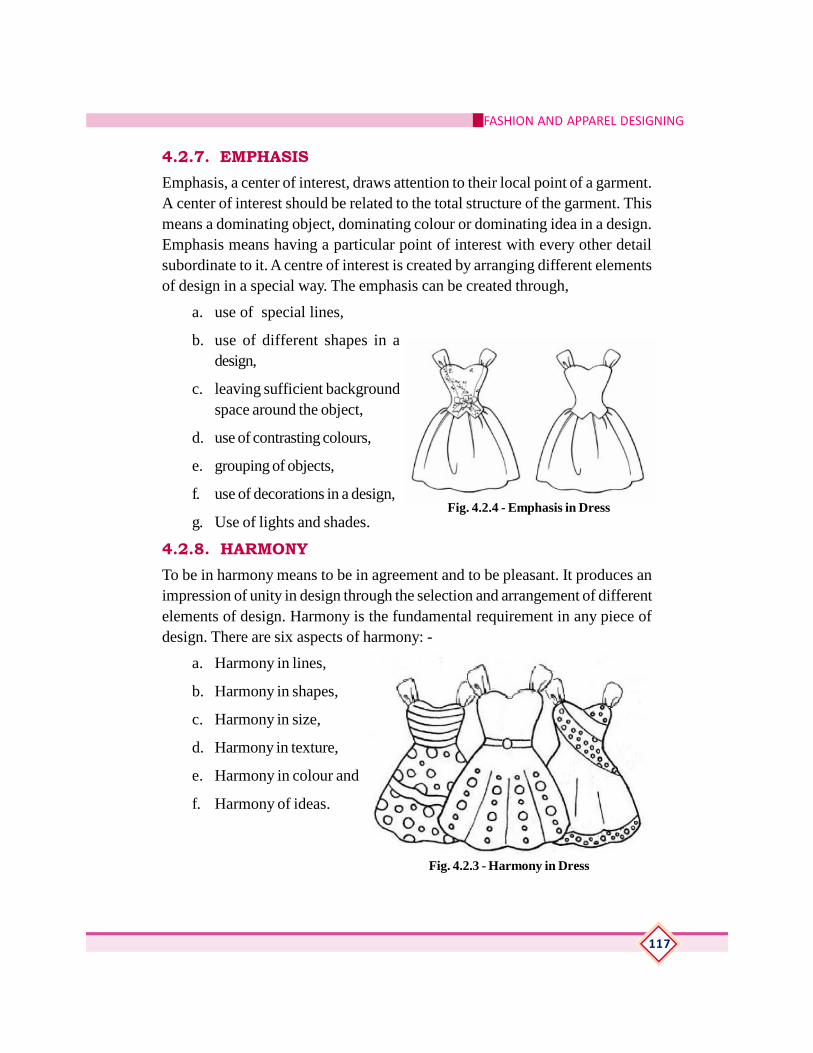
FASHION AND APPAREL DESIGNING
117
4.2.7. EMPHASISEmphasis, a center of interest, draws attention to their local point of a garment.A center of interest should be related to the total structure of the garment. Thismeans a dominating object, dominating colour or dominating idea in a design.Emphasis means having a particular point of interest with every other detailsubordinate to it. A centre of interest is created by arranging different elementsof design in a special way. The emphasis can be created through,
a. use of special lines,
b. use of different shapes in adesign,
c. leaving sufficient backgroundspace around the object,
d. use of contrasting colours,
e. grouping of objects,
f. use of decorations in a design,
g. Use of lights and shades.
4.2.8. HARMONYTo be in harmony means to be in agreement and to be pleasant. It produces animpression of unity in design through the selection and arrangement of differentelements of design. Harmony is the fundamental requirement in any piece ofdesign. There are six aspects of harmony: -
a. Harmony in lines,
b. Harmony in shapes,
c. Harmony in size,
d. Harmony in texture,
e. Harmony in colour and
f. Harmony of ideas.
Fig. 4.2.4 - Emphasis in Dress
Fig. 4.2.3 - Harmony in Dress

Reference Book
118
4.2.9. PRACTICAL1. Illustration of the Design Principle - Formal Balance
Make a portfolio illustrating application of the design principle Balance -Formal Balance in garments.
2. Illustration of the Design Principle - Informal Balance
Make a portfolio illustrating application of the design principle Balance -Informal Balance in garments.
3. Illustration of the Design Principle - Proportion
Make a portfolio illustrating application of the design principle Proportionin garments.
4. Illustration of the Design Principle - Rhythm through Repetition
Make a portfolio illustrating application of the design principle Rhythmthrough Repetition in garments.
5. Illustration of the Design Principle - Rhythm through Gradation
Make a portfolio illustrating application of the design principle Rhythmthrough Gradation in garments.
6. Illustration of the Design Principle - Rhythm through Radiation
Make a portfolio illustrating application of the design principle Rhythmthrough Radiation in garments.
7. Illustration of the Design Principle - Emphasis
Make a portfolio illustrating application of the design principle Emphasisin garments.
8. Illustration of the Design Principle - Harmony
Make a portfolio illustrating application of the design principle Harmonyin garments.
4.2.10. ASSESSMENT ACTIVITIES1. Assignment 2. Class Test 3. Puzzles
4. Seminar 5. Practical Activity
TE QUESTIONS1. List the principles of design and its relevance in fashion designing.2. Compare between Formal balance and informal balance.3. Define the Law of Relationship giving suitable examples.4. Illustrate the methods by which rhythm can be obtained in garments.5. Define emphasis and list the ways through which emphasis can be created.6. Discuss the principle of harmony and list major aspects of the same.

FASHION AND APPAREL DESIGNING
119
UNIT - 4.3COLOUR
4.3.1. INTRODUCTIONColour plays an important role in any design. Colour is the first attraction in agarment. Used in a planned, controlled arrangement, colours can produce manymoods and can reduce tensions or increase tensions. The colour of an objectdepends on the light falling on it and also the pigments used in its making. Thereare two colour systems used by designers and various colour schemes that aidin creating a good garment design. This chapter deals with different colours,their classification, properties, and different schemes. It also gives an idea ofhow well to use colour in designing. Colour is the most exciting design elementas it is the first thing noticed in a garment and attracts the consumers.
4.3.2. LEARNING OUTCOMESThe learner:
• Explains the dimensions of colours.
• Differentiates the primary, secondary and intermediate colours.
• Makes colours through mixing of various colours in different proportions.
• Chooses the appropriate colours for a design.
• Differentiates the colour schemes.
• Applies different colour schemes in designing of garments.
• Chooses most pleasing colour schemes for garments.
• Explains the concept of colour rendering
• Creates designs using rendering of colours.
4.3.3. DIMENSIONS OF COLOURColours are often described in three particular terms - hue, value and intensity.These are called as the qualities of colour or dimensions of colour.
4.3.3.1. Hue :
Hue refers to the name of the colour itselfsuch as 'red' or 'blue' etc. There are six basichues-red, yellow, blue, green, orange andviolet
Fig.4.3.1 - Hue

Reference Book
120
4.3.3.2. Value
Value of a colour means thelightness and darkness of a hue.The lightest or highest value is whiteand the darkest or the lowest valueis black. Lightest values of a colourare also called 'tints'. By addingwhite to the colour one obtains 'tints'which are lighter than the normalvalue. 'Shades' are darker than thenormal value. By adding black tothe normal colour one gets 'shades'which are below the normal value. Value scale is a graded scale of tints and shades,ranging from white at the top to black at the bottom.
4.3.3.3. Intensity / Chroma :
The intensity of a colour refers to the brightness ordullness of the colour. The effects of intense coloursmay be reduced by adding grey to them. Adding grayor mixing the complementary colour to normal huesresults in dull colours. A dull colour is unsaturatedor low in intensity. A color without any brightnessis achromatic (black, white and gray).
4.3.4. PRANG COLOUR SYSTEMThere are several theories regarding colours in pigment. One of the simplest isthe prang colour system. This explains the primary, secondary and intermediatecolours of pigments.
4.3.4.1. Primary Colours
Red, yellow and blue are the primary colours availablein pigments. They cannot be obtained by thecombination of other colours and all other colours areobtained by the combination of these primary coloursin different proportion.
Fig.4.3.2 - Value Scale of Blue
Fig.4.3.3 - Intensity
Fig.4.3.4 - Primary Colours

FASHION AND APPAREL DESIGNING
121
Fig.4.3.5 - Secondary
Colours
4.3.4.2. Secondary Colours
When two primary colours are mixed in equal proportion a secondary colour isobtained.
Yellow + Blue = Green
Blue + Red = Violet
Red + Yellow = Orange
4.3.4.3. Intermediate colours
If a primary colour is combined with an adjacent secondary colour the resultantcolour is called intermediate colour.
Fig.4.3.6- Intermediate Colours
Yellow+ Green = Yellow - Green
Green + Blue = Blue - Green
Blue + Violet = Blue - Violet
Violet + Red = Red - Violet
Red + Orange = Red - Orange
Orange +Yellow = Yellow - Orange
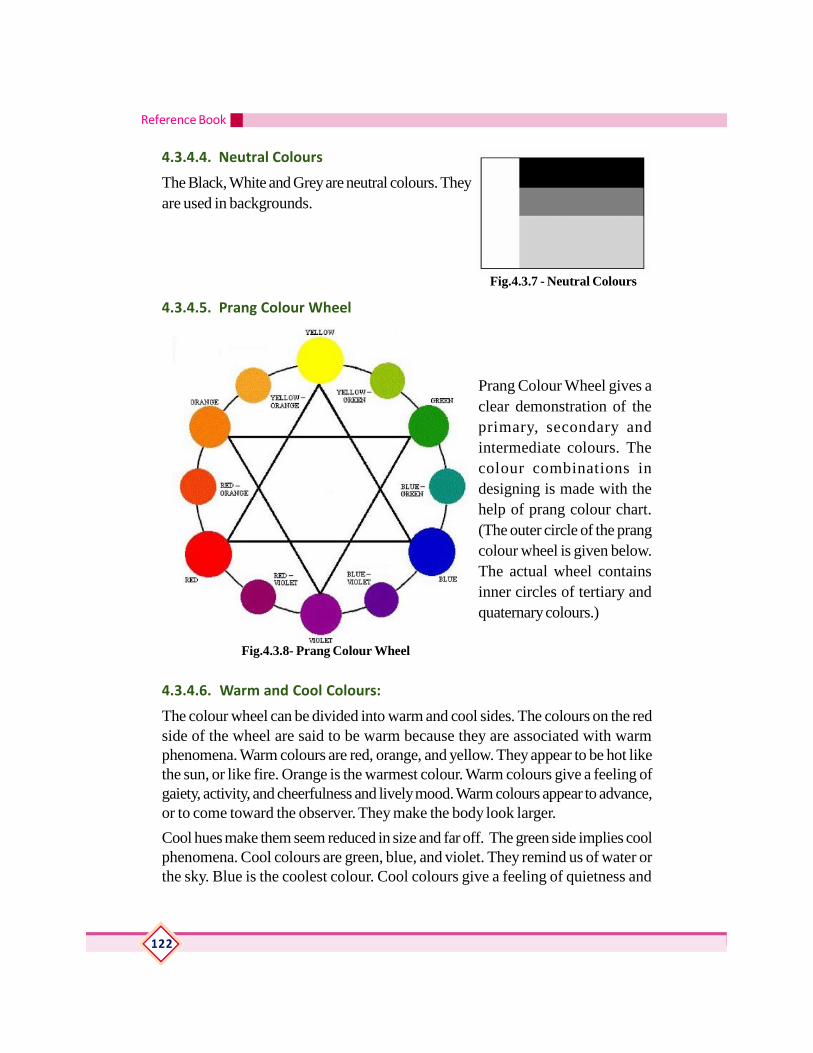
Reference Book
122
4.3.4.4. Neutral Colours
The Black, White and Grey are neutral colours. Theyare used in backgrounds.
4.3.4.5. Prang Colour Wheel
Prang Colour Wheel gives aclear demonstration of theprimary, secondary andintermediate colours. Thecolour combinations indesigning is made with thehelp of prang colour chart.(The outer circle of the prangcolour wheel is given below.The actual wheel containsinner circles of tertiary andquaternary colours.)
4.3.4.6. Warm and Cool Colours:
The colour wheel can be divided into warm and cool sides. The colours on the redside of the wheel are said to be warm because they are associated with warmphenomena. Warm colours are red, orange, and yellow. They appear to be hot likethe sun, or like fire. Orange is the warmest colour. Warm colours give a feeling ofgaiety, activity, and cheerfulness and lively mood. Warm colours appear to advance,or to come toward the observer. They make the body look larger.
Cool hues make them seem reduced in size and far off. The green side implies coolphenomena. Cool colours are green, blue, and violet. They remind us of water orthe sky. Blue is the coolest colour. Cool colours give a feeling of quietness and
Fig.4.3.7 - Neutral Colours
Fig.4.3.8- Prang Colour Wheel

FASHION AND APPAREL DESIGNING
123
Fig.4.3.9- Warm and Cool Colours
Fig.4.3.10 - Monochromatic ColourScheme
Fig.4.3.11 - Analogous Colour Scheme
restfulness. They suggest a subduedmood. If overdone, they can bedepressing. Cool colours appear torecede, or to back away from theobserver. They make the body looksmaller. Designers often use coolcolours for garments in large sizes. Sothose people look smaller. Whilewarm colours are cheerful, cool colours are calm and restful.
4.3.5. COLOUR SCHEMESColour schemes or colour harmonies mean the different combinations of colours ina design in a pleasing way. Colour schemes which are produced through the aid ofa prang colour wheel are of three types:
i. Related Colour Schemes
ii. Contrasting Colour Schemes
iii. Achromatic Colour Schemes
4.3.5.1. Related Colour Schemes:
They are produced by combining colours that lie near to each other on the prangcolour wheel. Monochromatic Colour Scheme and Analogous Colour Scheme arerelated colour schemes.
a. Monochromatic Colour Scheme : It is aone colour scheme ('mono' means 'one' and'chrome' means 'colour'). It consists ofcombining different values or intensities ofthe same hue.
E.g.:- Green, Light green and Dark green
b. Analogous Colour Scheme : An analogous colour scheme or adjacent colourscheme is a combination of two or threeneighbouring colours on the colour wheel.A combination of colours within one -quarter of the Prang Colour Wheel, whichinclude only one primary colour, onesecondary colour and one intermediatecolour, is more pleasing.
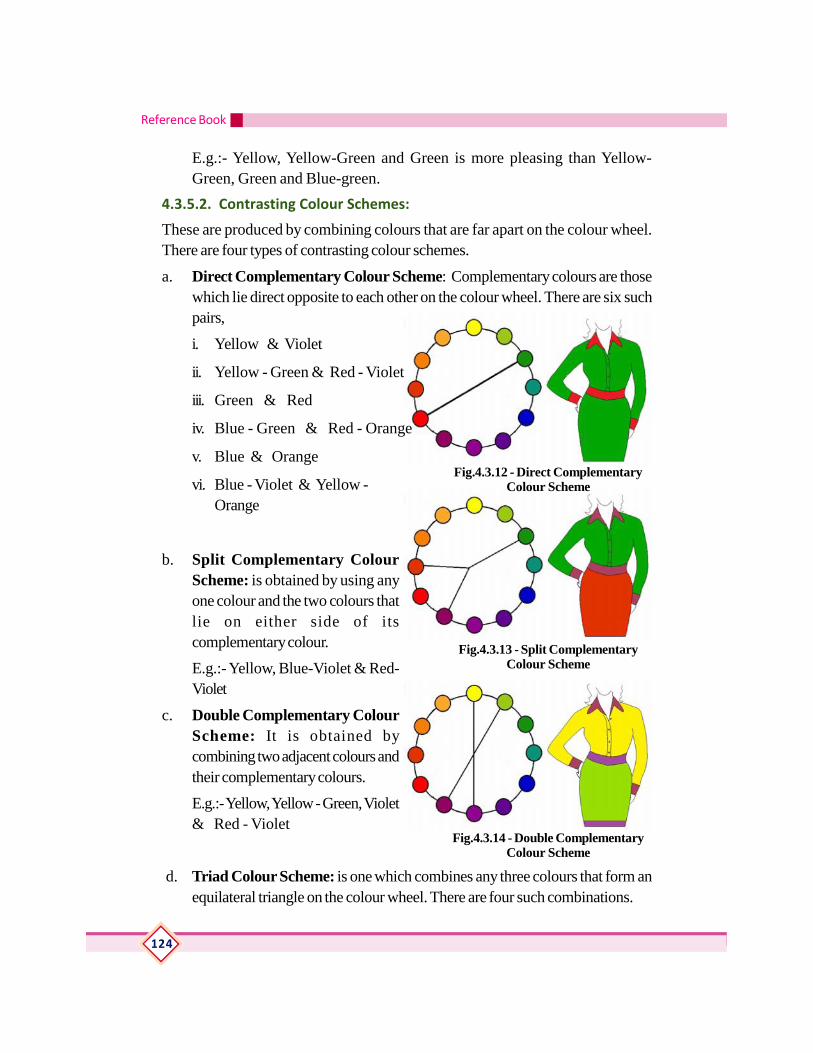
Reference Book
124
Fig.4.3.13 - Split ComplementaryColour Scheme
Fig.4.3.12 - Direct ComplementaryColour Scheme
E.g.:- Yellow, Yellow-Green and Green is more pleasing than Yellow-Green, Green and Blue-green.
4.3.5.2. Contrasting Colour Schemes:
These are produced by combining colours that are far apart on the colour wheel.There are four types of contrasting colour schemes.
a. Direct Complementary Colour Scheme: Complementary colours are thosewhich lie direct opposite to each other on the colour wheel. There are six suchpairs,
i. Yellow & Violet
ii. Yellow - Green & Red - Violet
iii. Green & Red
iv. Blue - Green & Red - Orange
v. Blue & Orange
vi. Blue - Violet & Yellow -Orange
b. Split Complementary ColourScheme: is obtained by using anyone colour and the two colours thatlie on either side of itscomplementary colour.
E.g.:- Yellow, Blue-Violet & Red-Violet
c. Double Complementary ColourScheme: It is obtained bycombining two adjacent colours andtheir complementary colours.
E.g.:- Yellow, Yellow - Green, Violet& Red - Violet
d. Triad Colour Scheme: is one which combines any three colours that form anequilateral triangle on the colour wheel. There are four such combinations.
Fig.4.3.14 - Double ComplementaryColour Scheme
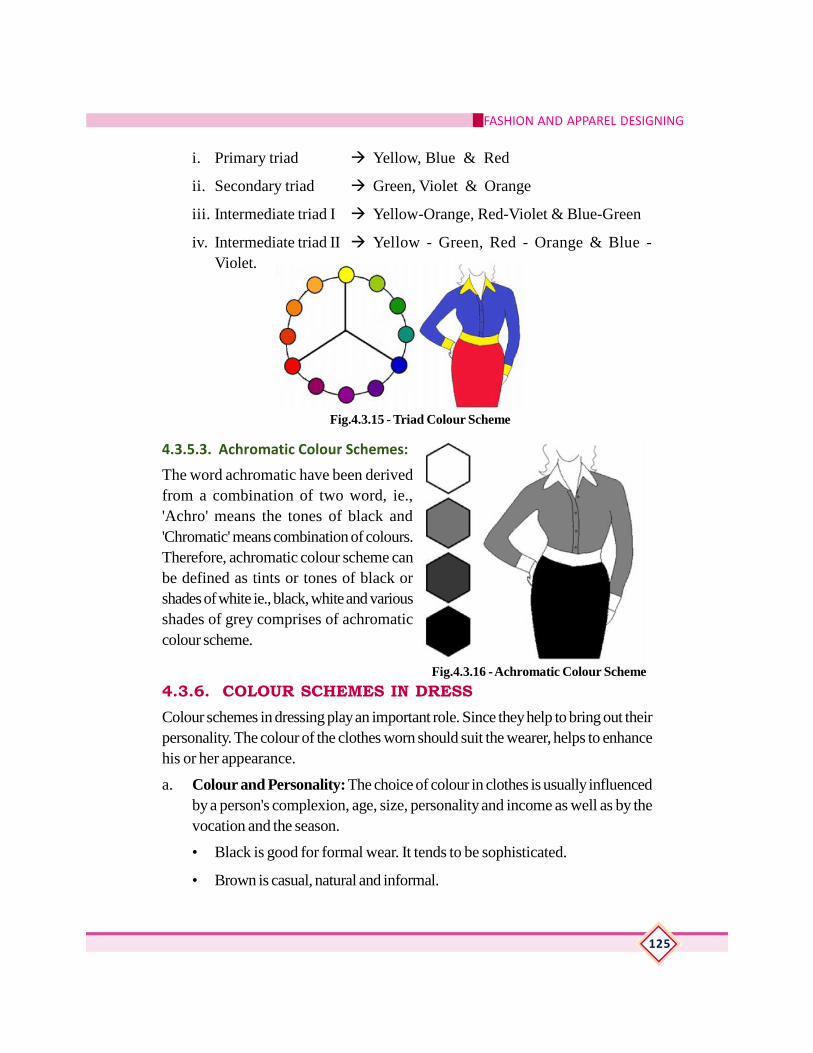
FASHION AND APPAREL DESIGNING
125
i. Primary triad Yellow, Blue & Red
ii. Secondary triad Green, Violet & Orange
iii. Intermediate triad I Yellow-Orange, Red-Violet & Blue-Green
iv. Intermediate triad II Yellow - Green, Red - Orange & Blue -Violet.
Fig.4.3.15 - Triad Colour Scheme
4.3.5.3. Achromatic Colour Schemes:
The word achromatic have been derivedfrom a combination of two word, ie.,'Achro' means the tones of black and'Chromatic' means combination of colours.Therefore, achromatic colour scheme canbe defined as tints or tones of black orshades of white ie., black, white and variousshades of grey comprises of achromaticcolour scheme.
4.3.6. COLOUR SCHEMES IN DRESSColour schemes in dressing play an important role. Since they help to bring out theirpersonality. The colour of the clothes worn should suit the wearer, helps to enhancehis or her appearance.
a. Colour and Personality: The choice of colour in clothes is usually influencedby a person's complexion, age, size, personality and income as well as by thevocation and the season.
• Black is good for formal wear. It tends to be sophisticated.
• Brown is casual, natural and informal.
Fig.4.3.16 - Achromatic Colour Scheme

Reference Book
126
• Navy blue looks good on almost everyone and is good for sportswearor classic styles.
• White looks good with all other colours.
• Off-white is better for most people than pure white.
• Red, green, and blue have many tints, shades and intensities which makethese hues suitable for almost all occasions.
• Yellow is good for casual, fun clothes, but it is not pleasing for many skintones.
• Bright colours are fun for active sportswear or as accents with neutrals.
b. Colour and Character: It may be said that colours are index of character. Itis said that if you prefer:-
Purple - you are magnetic
Pink - you are truly feminine.
Green - you are neighbourly.
Yellow - you are idealistic.
Red - you are passionate.
Blue - you are colour competent.
Orange - you are sociable.
c. Colour and Texture: Lighter shades suit thinner fabrics better than darkershades. Darker shades and colours are becoming in thicker material. Pale lilacmay be unbecoming in a heavy khaki cotton sari, but will look charming innylon or georgette.
d. Colour and Age: Young, active and vigorous people can choose clothing ofeither related or contrasting colour harmony. However, only clothing of relatedcolour harmonies is suitable for use by older persons. Persons past middle agewill do well to wear clothing of duller intensities.
e. Colour and Occasions: Bright and cheerful colours befit festive occasions,parties or marriages. White, silver, yellow, gold are most suitable for weddingsand generally adorn the bridal array. Men use clothing of dark coloured materialsuch as, navy blue, black, associative with sorrow and gayness. Cool coloursuch as white, blue, green, are refreshing the summer while warm colours suchas red, pink orange and yellow, suitable in winter.

FASHION AND APPAREL DESIGNING
127
Fig.4.3.17 - Shadow
f. Colour and Light: Garments to be worn in the day time should be selectedin day light. Apparel for evening wear or for night should be viewed underartificial light. Electric light can change red colour to brown, orange tokhaki and yellow to acid yellow green.
g. Visual Effects of Colour in Dress: Colours react with each other and theeffects they give depend on how light, dark or strong the colours are. Dark,cool and dull colours make objects appear smaller than the same objects inwarm, light or bright colours. Warm and bright colours make a form seemlarger due the colours' advancing characteristics. Such colours are white, yellow,orange and red. A single colour for an entire outfit makes a person look thinnerand taller. When combining two colours in an outfit, special precautions areneeded. Sharply contrasting colours appear to shorten the body. This effectcan best be used for a very tall person, dividing the top & bottom of the dress.When two hues of identical tones are used together, they cause visual 'clashing'-colours appear to jump around because they both compete equally for attention.This effect is reduced by changing the tone of one or both the colours. In mostcases one should not use more than three major colours in an outfit. It is best touse one colour for a large area and another colour or two for smaller areas.Students of Apparel Design need to perceive the light and dark shades of ahue that appear on garments when folded.
4.3.7. COLOUR RENDERINGColor rendering relates to the way objects appear under a given light source.The measure is called the "color rendering index", or CRI. A low CRI indicatesthat the objects may appear unnatural under the source, while a light with a highCRI rating will allow an object's colors to appear more natural. For lights witha "warm" color temperature the reference point is an incandescent light.
The amount of light and shade includedin drawing is part of the whole structureof the work. It is the use of light and shadethat creates illusionary three dimensionalresulting in a sense of volume. When onehas to express the volume of something,two things which are to be noted are:
• The shade which falls on the object
• The shadow the object creates on another surface i.e. the cast shadow

Reference Book
128
Black and White
The term 'Black and White' refers to a special kind ofdrawing which uses the white of paper and black of lineswithout any intermediate tone of grey. It requirestremendous skill to master the technique. Since blackand white drawings clearly define outline and solidareas, they are suitable for lithographs (a process whichmaintains the clarity of the line and uniformity of thetone). Pen and ink is suited for this technique because ofthe clarity of lines.
Light and Shade
One can use repeated strokes, half toned or bending or can choose between thetexture of a soft or medium grade charcoal pencil, crayon graphite or any kind ofblack pencil. Light and shade can be rendered with simple pencil strokes. Whileshading an object, the shape of the shade should be considered and filled withhatching (Cross hatching created b ystrokes crossing in differentdirections), dots or SFUMATO (atechnique of creating a shadowyand smoky tone which covers theform of a figure).It gives body to theimage and brings out the unseensides of the object. Whereasdrawing cast shadow detaches theobject from the surface. Usingcharcoal can give an instant tonaleffect by blending the hard outlinewith a finger or paper stump. There is more carbon on a graphite lead and issofter.
When light and shade effects are combined into a drawing, the subject is givena three dimensional form by interpreting the relationship between variousdegrees of brightness and darkness.
In black and white drawings the impression of light is conveyed with contrastingareas of shade.
Fig.4.3.18 - Black & White
Fig.4.3.19 - Cross hatching
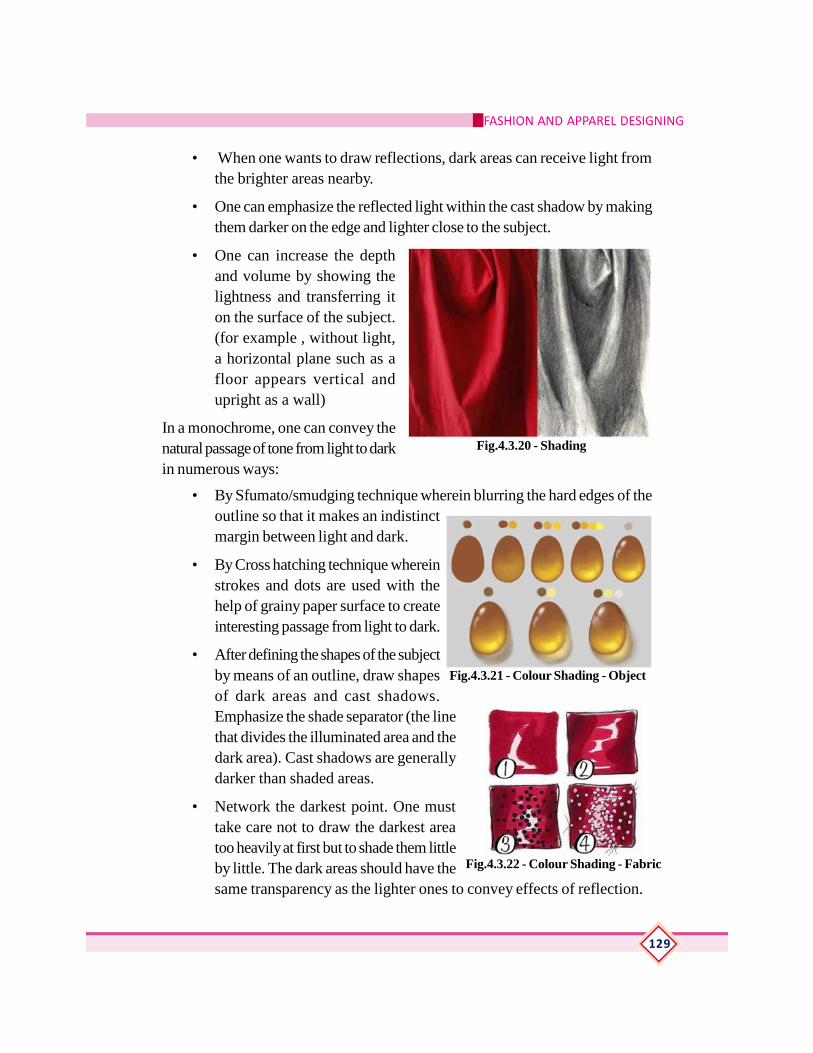
FASHION AND APPAREL DESIGNING
129
• When one wants to draw reflections, dark areas can receive light fromthe brighter areas nearby.
• One can emphasize the reflected light within the cast shadow by makingthem darker on the edge and lighter close to the subject.
• One can increase the depthand volume by showing thelightness and transferring iton the surface of the subject.(for example , without light,a horizontal plane such as afloor appears vertical andupright as a wall)
In a monochrome, one can convey thenatural passage of tone from light to darkin numerous ways:
• By Sfumato/smudging technique wherein blurring the hard edges of theoutline so that it makes an indistinctmargin between light and dark.
• By Cross hatching technique whereinstrokes and dots are used with thehelp of grainy paper surface to createinteresting passage from light to dark.
• After defining the shapes of the subjectby means of an outline, draw shapesof dark areas and cast shadows.Emphasize the shade separator (the linethat divides the illuminated area and thedark area). Cast shadows are generallydarker than shaded areas.
• Network the darkest point. One musttake care not to draw the darkest areatoo heavily at first but to shade them littleby little. The dark areas should have thesame transparency as the lighter ones to convey effects of reflection.
Fig.4.3.20 - Shading
Fig.4.3.21 - Colour Shading - Object
Fig.4.3.22 - Colour Shading - Fabric

Reference Book
130
• Shade and shadow look darker near the edges because of the lightreflected on to their inner areas.
4.3.8. PRACTICAL1. Basic Hues
Prepare a chart showing basic hues.
2. Value scale
Prepare values scale of any hue.
3. Primary Colours
Prepare a chart of primary colours.
4. Secondary Colours
Prepare a chart of secondary colours.
5. Prang Colour Wheel
Illustrate prang colour wheel
6. Illustration of Colour Schemes
Illustrate the following colour schemes in garments.
a. Monochromatic
b. Analogous
Fig.4.3.23 - Colour Shading

FASHION AND APPAREL DESIGNING
131
c. Direct Complementary
d. Split Complementary
e. Double Complementary
f. Triad
g. Neutral Colours
7. Colour Rendering
Illustrate the colour rendering in garments
4.3.9. ASSESSMENT ACTIVITIES1. Assignment
2. Practical activity
3. Class Test
4. Puzzles
5. Work diary
6. Portfolio
TE QUESTIONS1. Explain the properties of colours.
2. Draw Prang Colour Wheel.
3. Suggest any four colour schemes for a 3 year old girl child.
4. Illustrate direct complimentary and split complimentary colour schemes.
5. Explain the importance of colours in dress designing.
6. List the factors to be considered while rendering colour to an object.

Reference Book
132
UNIT - 4.4FASHION ILLUSTRATION
4.1.1.INTRODUCTIONFashion illustrations are the drawings or paintings which illustrates the ideas andconcepts of a garment by its designer. The ability to present/express/detail a threedimensional dress into a two dimensional sketch, which will clearly express the detailsand uniqueness of apparel is what is meant by illustration. Fashion illustration illustratesfashion apparel as well as accessories used along with the garment.
4.1.2.LEARNING OUTCOMESThe learner:
Differentiates normal human figure and fashion figure
Illustrates 10 head theory
Illustrates different poses of fashion figure – Stick Figures Illustrates different poses of fashion figure – Block Figures Illustrates different poses of fashion figure – Flesh Figures Illustrates the face / head.
Illustrates the different hairstyles
Compares the different types of necklines used in garments.
Illustrates the different types of neckliness used in garments.
Compares the different types of collars used in garments.
Illustrates the different types of collars used in garments.
Compares the different types of sleeves used in garments.
Illustrate the different types of sleeves used in garments.
Compare the different types of skirts used in garments.
Illustrate the different types of skirts used in garments.
Compare the different types of trousers used in garments.
Iillustrate the different types of trousers used in garments.
4.1.3.FASHION ILLUSTRATIONFashion Illustration is considered as the most fundamental component of FashionDesign. It is used to present the design ideas. Fashion illustration can be presentedthrough many forms and textures with plenty of creative themes and impressions. Itbegins with the sketching of a croquis, the extra notation of the garment, and also
FASHION AND APPAREL DESIGNING
133
technological, before it is produced. Fashion illustration on a figure is widely usedby designers, fashion prediction or making companies, fashion magazines and tradejournals and students. In fashion industry, the fashion illustration is used to show thefollowing information:
- A mood or feeling which is relevant to current fashion.
- A total look of the garment and wearer including the styling of pose,face, hair, hands, feet and garment design.
- Use of colours and fabric combinations in a design or garment.
4.1.4. FASHION FIGURE – 10 Head theoryA croqui which has ten-headed figure outline, is the basis of fashion illustration.The method of creating Croquis is: Stick Figure Contour figure femaleor male Croqui. To create Croqui, first we have to choose perfect texturedsketch book which should not have smoother surface, then all croqui handouts,ruler, pencils, coloring tools. The purpose of using “ten head” theory of FashionIllustrations are to identify the figure exactly.Here the total body length is divided in to ten heads. One head is taken as 1½”.(Some drawings one head is equal to 1" or 2"). All other parts are proportionateto this measurement. In following figure 1 head = 10 blocks = 1¼” and 1 B = 1
8
1. Draw a central balance line about 15 ¼ “ (0 – 11).2. Divide the line into 10 equal sections with 1¼” and mark 0 – 10 to each
section.3. Head Block (Point 0 to 1)
0 – 1 = 10 B (1¼”)a – 0 = 0 – b = 3B ( 3
8 )4. Neck Block (Point 1 + 4B down)
e – f = g – h = 2 B (¼”)e – g = f – h = 4B (½”)
5. Shoulder Level (2B down from neck block)6 B (¾”) downwards from point 1i – j = 7B + 7B = ( 7
8 ”)6. Bust Level ( at point 2)
k – 2 = 2 – l = 6B (¾”)7. Waist Level (at point 3)
m – 3 = 3 – n = 4B (½”)8. Waist Curve (4B down from point 3)
o – p = 4 ¼ B + 4 ¼ B = (1 1/16")
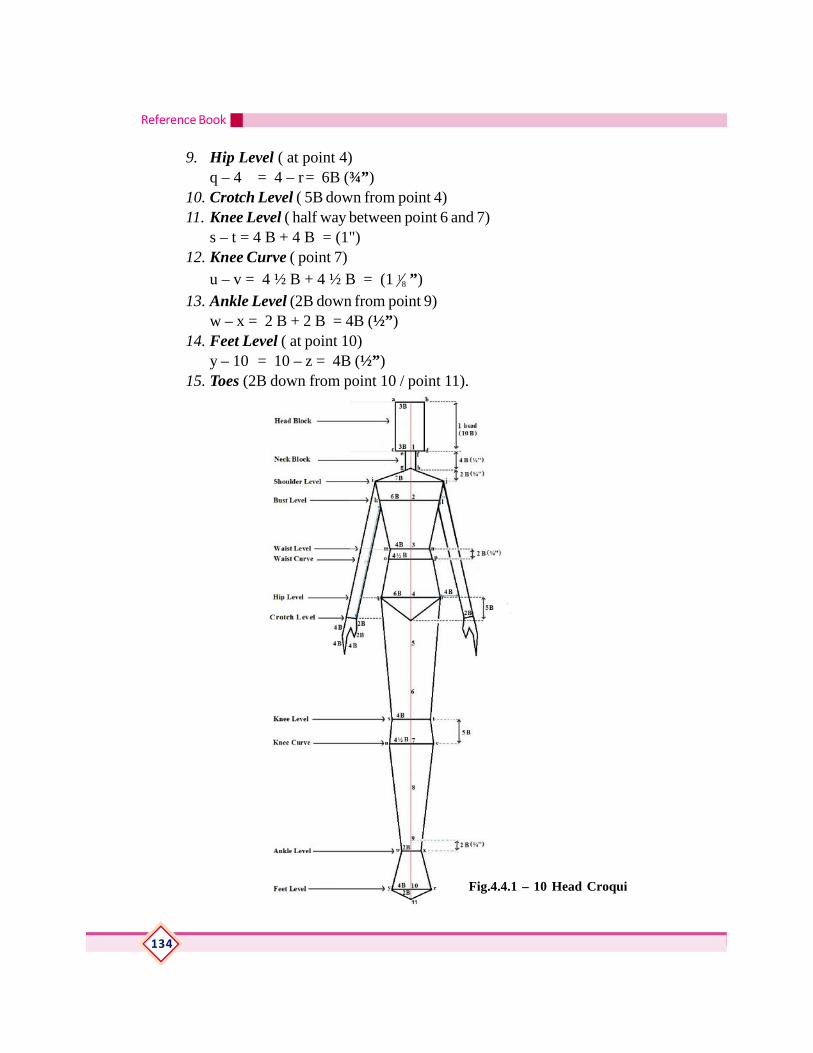
Reference Book
134
9. Hip Level ( at point 4)q – 4 = 4 – r= 6B (¾”)
10. Crotch Level ( 5B down from point 4)11. Knee Level ( half way between point 6 and 7)
s – t = 4 B + 4 B = (1")12. Knee Curve ( point 7)
u – v = 4 ½ B + 4 ½ B = (1 18 ”)
13. Ankle Level (2B down from point 9)w – x = 2 B + 2 B = 4B (½”)
14. Feet Level ( at point 10)y – 10 = 10 – z = 4B (½”)
15. Toes (2B down from point 10 / point 11).
Fig.4.4.1 – 10 Head Croqui

FASHION AND APPAREL DESIGNING
135
Fig.4.4.2 - 10 Head Croqui Male & Female
4.1.5. Fashion Figure – Stick FigureThese figures are the basic outline of three important components of croqui – balanceline, hip line and shoulder line. To draw the stick figures:
1. Draw the balance line from neck to ground , it should be straight.
2. Add the shoulder and hip line.

Reference Book
136
3. Draw loose swipes to represent the movement of the figure.
4. Outline the the body shape – chest, waist, hip
Fig.4.4.3 - Stick Figures - Different Poses
4.1.6. Fashion Figure – Block FigureDrawing block figures are the next step to develop fashion figures. Shape the stickfigure into blocks of body parts.
1. Fill the body blocks or shape – chest, waist, hip
2. The body has two major solid sections with a soft spot in between. The shouldersand the rib cage are one section, and the hip bones form the other.
3. Draw simple trapezoidal shapes to represent each section, centre on the spine.
4. Draw shapes for the hands. Hands hang at about crotch level, at the centremark. Elbows hang at the fourth mark, aligned with the navel.
5. Draw oval shapes to represent the thighs and calves
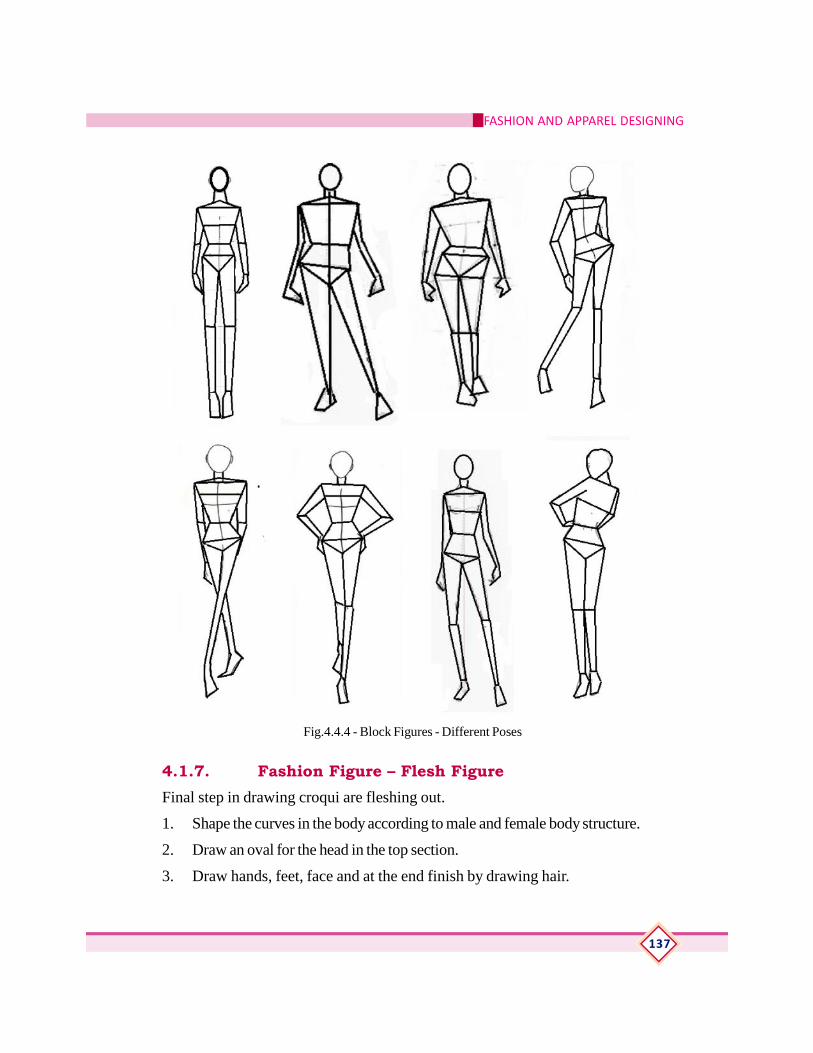
FASHION AND APPAREL DESIGNING
137
Fig.4.4.4 - Block Figures - Different Poses
4.1.7. Fashion Figure – Flesh FigureFinal step in drawing croqui are fleshing out.
1. Shape the curves in the body according to male and female body structure.
2. Draw an oval for the head in the top section.
3. Draw hands, feet, face and at the end finish by drawing hair.
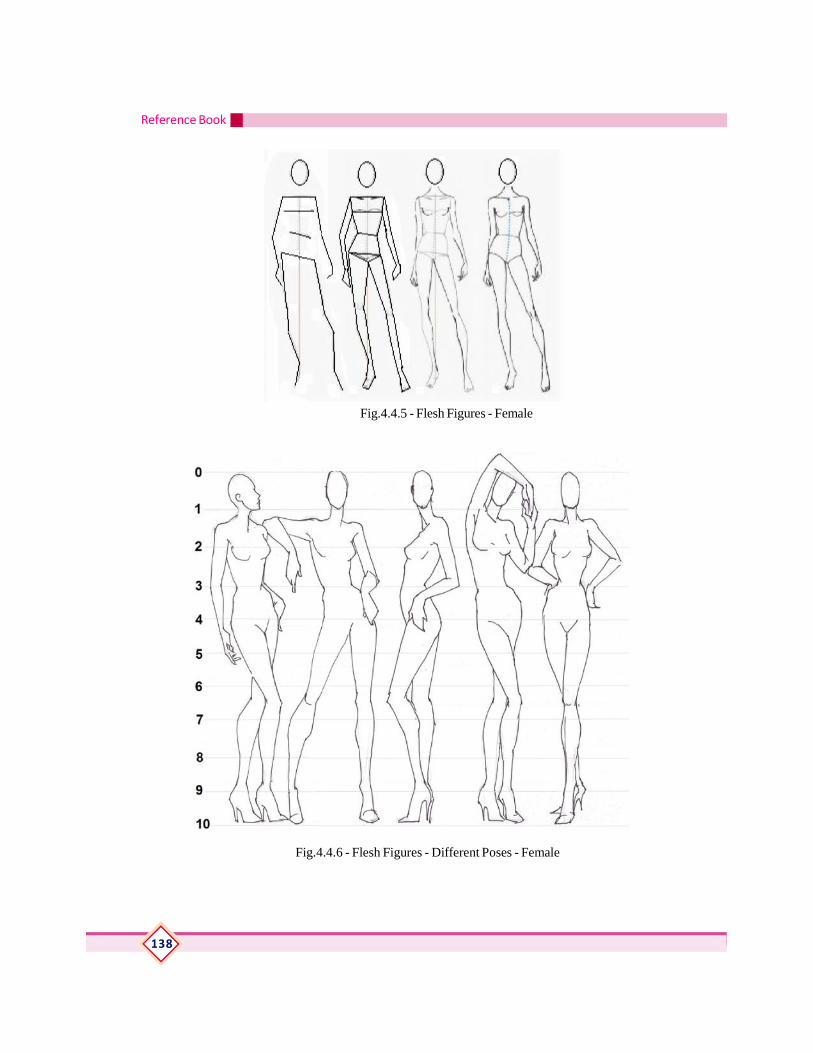
Reference Book
138
Fig.4.4.5 - Flesh Figures - Female
Fig.4.4.6 - Flesh Figures - Different Poses - Female
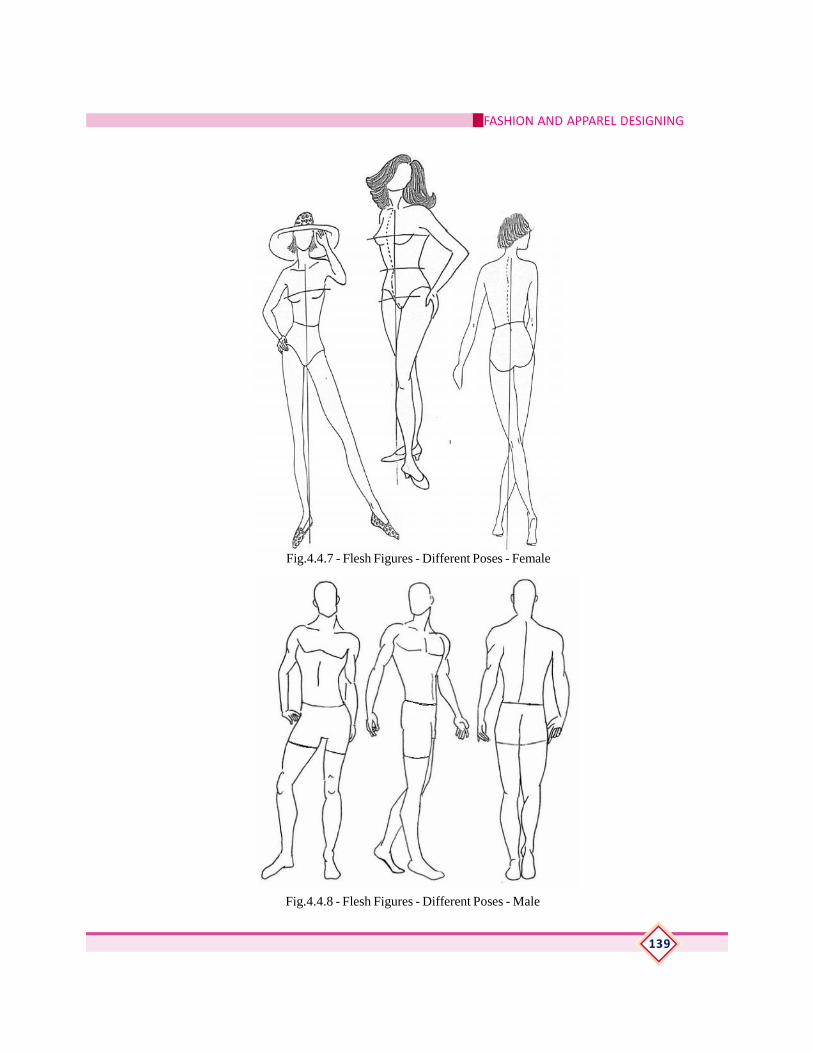
FASHION AND APPAREL DESIGNING
139
Fig.4.4.7 - Flesh Figures - Different Poses - Female
Fig.4.4.8 - Flesh Figures - Different Poses - Male

Reference Book
140
4.1.8. Figure DetailingFigure detailing includes illustration of different body features like head, face,hand, leg etc.
4.1.8.1. Head and Face
Draw the basic oval shaped head in a block measuring a ‘head’. Eyes in the fashionface are glamorously elongated and emphasized. Fashion eyes are shaped with oneeye length between the eyebrows. Add details such as eye lashes and spot highlightsin the pupil as a last touch. The ears are oval with its top slanted towards the back ofthe head. The basic shape of nose is triangular wedge and round at the tip of thenose. The width of the nose is equal to the width of the eyes. When drawing lips, thetop lip is smaller than bottom one. The positioning of mouth is directly below thenose. Curves of the mouth projects moods or attitude.
Fig.4.4.9 - Figure Detailing - Eyes
Fig.4.4.10 - Figure Detailing - Ears

FASHION AND APPAREL DESIGNING
141
Fig.4.4.11- Figure Detailing - Nose
Fig.4.4.12 - Figure Detailing - Lips
Fig.4.4.13 - Figure Detailing - Female Head

Reference Book
142
Fig.4.4.14 - Figure Detailing - Male Head
4.4.8.2. Arms / Hand
The arm is the upper limb of the body and is made up of four moving parts: shoulder,upper arm, forearm and hand. Fashion figure has elongated arms. It has two equalparts – shoulder to elbow and elbow to wrist. Width of hand gradually reduces fromshoulder to elbow. It widens below the elbow and then reduces.
The upper arm extends from the shoulder to the waist, the forearm from the waist tothe crotch line. The hand extends approximately halfway down the thigh.

FASHION AND APPAREL DESIGNING
143
Fig.4.4.15 - Figure Detailing - Arm
Fig.4.4.16 - Figure Detailing - Hand

Reference Book
144
4.4.8.3. Leg / Feet
The leg is the lower limb of the body. Proportionately the leg, including the foot, hasa height of approximately four units of measure of the overall figure. Structurally thelimb is made up of three moving parts: the thigh, the leg and the foot, which areconnected by the joints of the hip, the knee and the ankle.
The Length of the thigh is equal to that of the lower leg. In the first and third drawings(front and back views), the rhythmic structure assumes a curved aspect which startsfrom the hip joint going as far as the centre of the knee, then it descends vertically tothe inside of the foot. Unlike the hand, the foot is more closed and compact and itswedge-like shape and broad sole ensure that the foot functions as a support for thebody. Structurally it consists of four main parts: the heel, the two malleoli (projectionson either sides of ankle), the bridge of the foot and the five toes.
Fig.4.4.17 - Figure Detailing - Leg

FASHION AND APPAREL DESIGNING
145
Fig.4.4.18 - Figure Detailing - Foot
4.4.9. Illustration of hair styles
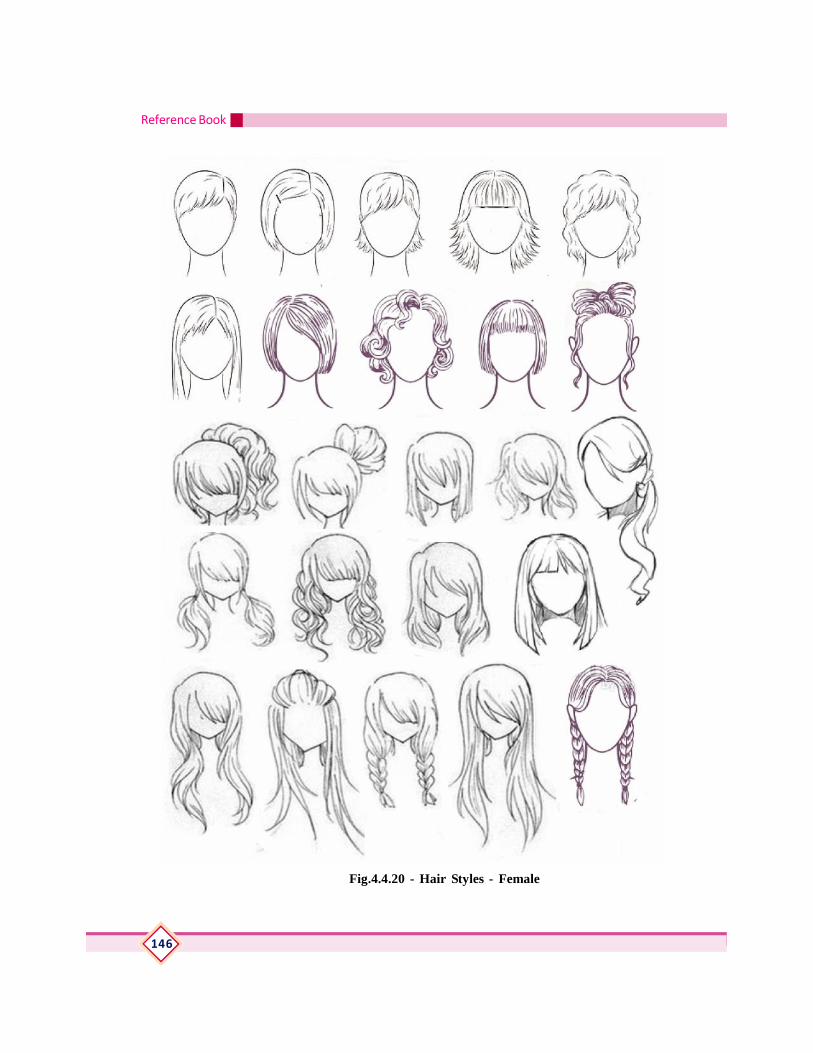
Reference Book
146
Fig.4.4.20 - Hair Styles - Female

FASHION AND APPAREL DESIGNING
147
Fig.4.4.22 - Collars
Fig.4.4.21 - Necklines
4.4.11. Types of Collars
4.4.10. Types of Necklines
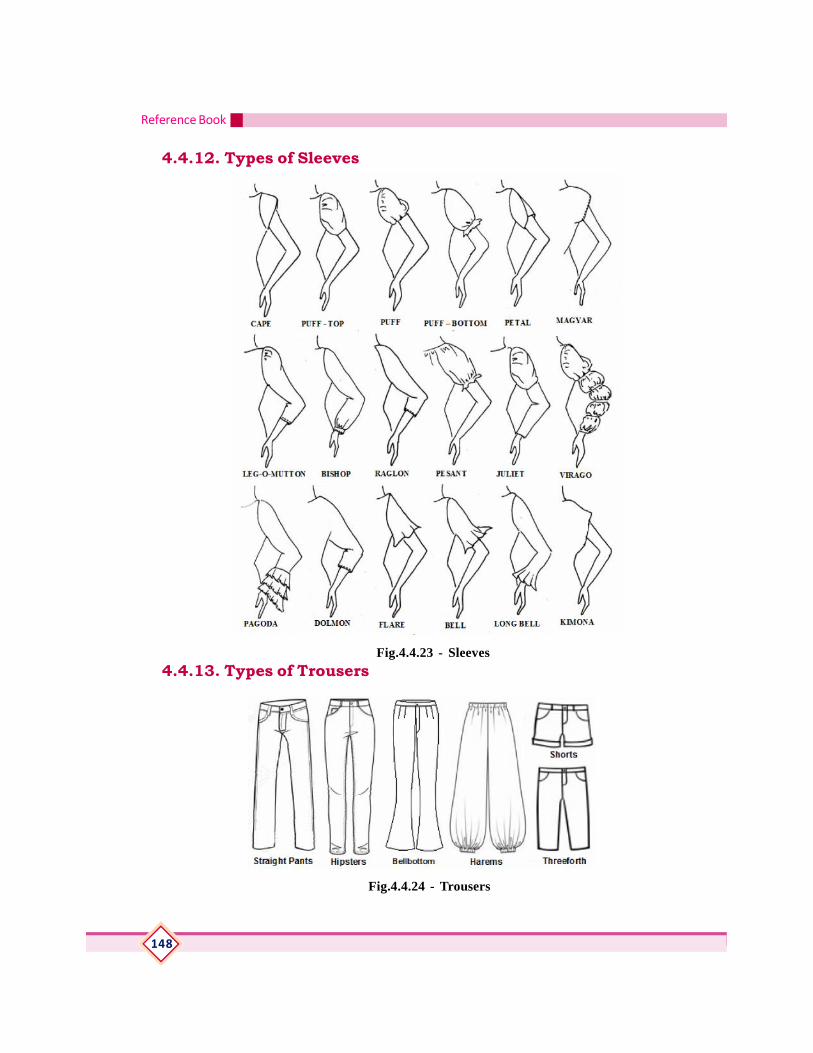
Reference Book
148
Fig.4.4.23 - Sleeves
Fig.4.4.24 - Trousers
4.4.12. Types of Sleeves
4.4.13. Types of Trousers

FASHION AND APPAREL DESIGNING
149
4.4.15. Practical1. Illustration of 10 head fashion croqui.
Draw a 10 head croqui figure.2. Illustration of different poses of female fashion figure.
Different poses – Front, ¾ th (Oblique) and back (Stick, Block and Flesh)3. Illustration of different poses of male fashion figure.
Different poses – Front, ¾th (Oblique) and back (Stick, Block and Flesh)4. Figure detailing – Head
Draw head / face with details.5. Illustration of Types of Hair Styles6. Illustration of Types of Necklines
4.4.14. Types of Collars
Fig.4.4.25- Skirts

Reference Book
150
7. Illustration of Types of Collars8. Illustration of Types of Sleeve9. Illustration of Types of Skirt10. Illustration of Types of Trousers
4.4.16. Assessment Activities1. Assignment
2. Seminar
3. Project Work
4. Practical activity
5. Work diary
6. Portfolio
4.4.17. TE Questions1. Illustrate 10 head fashion croqui.
2. Illustrate different poses of female fashion figure.
3. Explain the different types of necklines with example.
4. Compare the following types of sleeves
a. Cape Sleeve b. Bell sleeve c. Raglan Sleeve
5. Illustrate any skirt for a college going girl.

FASHION AND APPAREL DESIGNING
151
UNIT - 4.5DESIGNING AND PORTFOLIO DEVELOPMENT
4.5.1. INTRODUCTIONFashion designing is the process of developing new designs according to the trendsin fashion by a creative designer. These designs are illustrated through differentsketches and boards. The design portfolio development is explained in this unit.
4.5.2. LEARNING OUTCOMESThe learner:
Defines apparel designing.
Identifies and define the different boards in a fashion portfolio
Describes how to create different boards in a fashion portfolio.
Visualizes and present a theme by taking inspirations for designing.
Develops a fashion portfolio.
4.5.3. DESIGNINGFashion designing is the process of developing clothing, apparel and its accessories.Apparel designing and manufacturing is mainly focused on the production of garments.Apparel designing is the art of creating apparels or garments.
Apparel designers, also called clothing or fashion designers, conceptualize and createitems of clothing. They often specialize in one type of design, such as casual, eveningor active wear. Common duties include tracking current fashion trends and predictingfuture ones, sketching new designs, selecting patterns and fabrics to use in garmentsand overseeing production. They may then show items to clients or retailers,depending on if the garments are to be custom designed or mass produced.
4.5.4. FASHION PORTFOLIOPortfolio is an expression of one’s creativity, design, ability, technical expertise, andillustration and presentation skills. It exhibits the designer’s inclination towards aparticular segment of the industry by identifying the target customers, designrequirements and pricing. The designing process includes the developing of differentboards which helps in the production of final garment. Different boards developedduring the designing process are described here.

Reference Book
152
4.5.4.1 Client Board : This board gives the details such as age group, season,target market and exact or approximate costing of the line etc. The layoutof these sheets could be changed as desired by the designer. An imageof the customer is also frequently included to show the customer “ type”and targeted market.
4.5.4.2 Theme / Mood Board: Theme board, also known as mood or conceptboard, is the page that tells the designer’s story. It is designed on thebasis of an idea, object, story, incident etc. It contains anything that sparksthe designer’s creativity process. Fashion designers mainly use a varietyof photographic images to get inspired to work on every line of newcollection. The selection of colour, fabrics, prints and silhouette will beinspired by the theme of the mood board.
4.5.4.3 Inspiration Board: These boards take start from a source of inspiration.This specific expression of designs or ideas developed on the basis ofthe theme / mood board. This board comprises the visual pictures in theform of cutouts, photographs or natural items that are collected and pastedin the form of a board.
4.5.4.4 Colour Board: After the inspiration board has been formulated, a visualpresentation of colours in the form of swatches, write up, pantone chipsetc is done. Pantone contains standard colours, which are numbered.This number is indicated along with the colour for accuracy in colourshade and tone.
Fig.4.5.1- Client Board & Theme Board

FASHION AND APPAREL DESIGNING
153
4.5.4.5 Fabric / Swatch Board: This contains fabric swatches. Swatches arecuttings of fabrics indicating the selection of fabric to be suitable forgarment style. Swatches could be a small clipping or could be largeenough to show a print repeat, embroidery details or trims.
4.5.4.6 Trim Board : This board gives the details of trims and accessories (lace,thread, buttons, zipper etc.) that can be used in the garment. It can bedepicted through pictures or samples.
Fig.4.5.2-Inspiration Board & Colour Board
4.5.4.7 Accessories Board: This board includes the pictures or photographsof accessories that can be used with the designed garment such as bags,chapples, jewels etc.
4.5.4.8 Illustration Board / Design Board: The illustration board talks offashion drawings of human forms (women, men or kids) with garmentsrendered on them. This rendering of garments on the figure sketches
Fig.4.5.3-Swatch Board, Trim Board & Accessories Board

Reference Book
154
create an element of interest. Illustrations could be hand rendered orworked on the computer using latest software like Adobe Photoshop,Illustrator, etc.
Fig.4.5.4-Illustration Board
4.5.4.9 Spec Sheet (Flat Drawing and Measurements): Flats are miniaturedrawings of garments when drawn flat on table. On the design sheets, itis important, to indicate flats or specification drawings. Generally boththe front and back view of the design is done for complete visualization.It also indicate the measurement required for production.
Fig.4.5.5-Spec Sheet & Pattern Board

FASHION AND APPAREL DESIGNING
155
4.5.4.10 Pattern Board:The patterns of different parts of the garment is illustratedin this board.
4.5.5 PRACTICAL1. Develop a Fashion Portfolio.
2. Develop the different design board according to the design andrequirement.
4.5.6 ASSESSMENT ACTIVITIES1. Assignment2. Seminar3. Project Work4. Practical activity5. Class Test6. Work diary7. Portfolio
4.5.7 TE QUESTIONS1. Explain the different boards in a fashion portfolio.
2. Write about the importance of inspiration board in a fashion portfolio.
3. List the information we get from a client board and spec sheet.
Fig.4.5.6-Final Garment

Reference Book
156
UNIT - 4.6FASHION MERCHANDISING AND BOUTIQUE
MANAGEMENT4.6.1. INTRODUCTIONFashion merchandising is practically combining, marketing and advertising withthe creative and imaginative talents of fashion professionals. Fashionmerchandising need to analyze changing market trends, oversee production cost,supervise sales and create rise in income. Merchandisers are some of the mostpowerful employees within an apparel company, and they have large bottomline and personal management responsibilities.
Boutiques are small specialized shops which are mushrooming in modernsociety, They cater to the demands of elite urban society. As these two areasare gaining popularity day to day, these topics are detailed in this chapter.
4.6.2. LEARNING OUTCOMESThe learner:
Defines fashion merchandizing. Identifies and explain the duties and responsibilities of a fashion
merchandiser. Identifies the career prospects of fashion merchandising. Explains term visual merchandising Develops skills for visual merchandisingü Defines the term boutiqueü Identifies and explain the working of a boutique.ü Develops the skills required for managing a boutique.4.6.3 FASHION MERCHANDISINGFashion merchandisers are also known as a Merchandiser or Apparel Merchandiser.Fashion merchandising is a profession that incorporates the A-to-Z processes in thefashion business ranging from producing, product development, promoting and buyingand selling fashion items such as clothing, accessories, jewellery, cosmetics andshoes.
4.6.4. DUTIES AND RESPONSIBILITIES OF A FASHIONMERCHANDISER
1. A fashion merchandiser may work for a textile manufacturer, a designer ora fashion retail outlet such as a department store, children’s clothingstore or a discount store.

FASHION AND APPAREL DESIGNING
157
2. He or she is well-versed with the fashion industry as well as the socio,cultural and economic aspects of textile production.
3. A fashion merchandiser is required to be in touch with market trends, fashionupdates as well as popular preferences in a particular locality.
4. The job can be rewarding offering ample opportunities to work in theglamorous fashion world and with popular fashion brand names.
5. Like all professions, the salaries of fashion merchandisers increase accordingto experience and qualification. The highest earnings for professionals whoare in this field are those who have climbed the ladder from fashion displayartist, designers or assistants to management or executive levels.
6. Depending on which industry a fashion merchandiser works in, the jobtitles associated with this field include fashion buyers, fashion directors,retail store managers, textile merchandisers, designers, showroom salesrepresentatives, product development managers, catalogue productionmanagers, event Planner, Window dresser, fashion promotion specialistand merchandise display artists.
7. The job responsibilities of a fashion merchandiser are varied depending onthe kind of fashion business one is in.
8. A fashion merchandiser is required to have an incredible amount of creativityand flair for fashion, often contributing inputs and opinions on market trendsand latest fashion directions.
9. When working for textile manufacturers, fashion merchandisers are involvedin the manufacturing processes of textile materials, which include the wholeamount of delivering production capacity, quality control and managementof workers.
10. A fashion merchandiser can also work in department stores or clothingoutlets as a fashion designer, fashion buyer, catalogue production managersor merchandise display artists.
11. Store decoration and merchandise displays are also the responsibilities offashion merchandisers where the latest apparels and items are displayedprominently to align with the store’s branding and image.
12. Efficiently track store profits.

Reference Book
158
13. A good fashion merchandising professional must be resourceful,creative, confident, imaginative, and full of ideas.
14. In order to succeed in this field, a fashion merchandiser should have goodjudgement and must be willing to take risks.
15. Highly skilled fashion merchandising professionals are capable of assessingthe changing needs of the consumers, predicting new style trends, andconceptualizing superb promotional campaigns.
4.6.5. VISUAL MERCHANDISINGVisual Merchandising is purely aesthetics of science and it’s the backbone ofretail industry. Visual Merchandising plays a highly major role in retail industry.Nowadays, Visual Merchandising became one of the major tools of businesspromotion which is widely used to attract customers and increase sales. Visualmerchandising commonly occurs in retail spaces such as retail stores and trade shows.
Many elements can be used by visual merchandisers in creating displays includingcolour, lighting, space, product information, sensory inputs (such as smell, touch,and sound), as well as technologies such as digital displays and interactive installations.As methods of visual merchandising can be used colour and style, symmetry andrhythm, face and side presentation etc. To capture the attention of the customer, theretailer must consider the customer’s needs during this process. Factors that contributeto the overall in- store design include; the store layout, store design, point of purchasesdisplays, item display, assortment display and signage. When applied successfully toa store, these factors can meet the needs of the consumer and provide a positive in-store purchasing environment.
Mannequins are used by apparel retailers to display their products in-store and inthe window display. They are a tool used to show consumers what their productslook like on a person. Visual merchandising consists of mainly two techniques -interior and exterior displays, also known as in-store design and window displays.The most common forms of store layouts include:
1. A grid layout is generally organized in a rectangular shape, which allowscustomers to shop quickly and maximize shop floor space, ideal for asupermarket or hardware store.
2. A racetrack layout ensures that the consumer only follows one path whenbrowsing the store. This is beneficial in the sense that the consumer willcome into contact with every product on the shelf. However, this can irritate

FASHION AND APPAREL DESIGNING
159
customers. Customers may feel that they are being forced to follow acertain path, and can be frustrating when trying to make a quick purchase.
3. Free form layout is a suitable layout for a store that encourages browsing.This type of layout is more relaxed in its structure, which leaves the customerfeeling less rushed.
4.6.6. BOUTIQUEBoutique is a word derived from old French which means a small shop. Boutique issometimes referred as a small retail shop that sells women’s clothes and jewellery.
Boutique management consultancy firms tend to be small, expensive and highlyspecialist. A boutique is riskier than an established consultancy. Boutiques (particularlythose with only one or two people) may not have established clients, methodologiesor administrative processes. Worse, they may not have the resources to train newemployees who have limited consulting experience.
4.6.7. BOUTIQUE MANAGEMENT- Successful boutiques deliver a small number of very-high-quality services.
- Although some boutiques specialize in hand-made items and other uniqueproducts, others simply produce T-shirts, stickers, and other fashionaccessories and sell them at high prices.
- No consultancy can exist without clients. Most boutiques struggle to buildenough market awareness so that potential clients know they exist. Thefirm must learn to identify potential business opportunities and close dealswith strangers
- Boutiques must move beyond armchair consulting. Although experienceprovides valuable perspective, clients also expect consultants to base theirfindings and recommendations on rigorous analysis.
- Boutique consultants can’t force clients to implement their ideas; they mustsell them. This requires collaboration with the client and a willingness tohave one’s ideas modified.
- Boutique consultants must be proficient with Excel and PowerPoint andwilling and able to write their own reports as boutiques rarely employ juniorconsultants and usually have limited administrative help.

Reference Book
160
- Some people who choose boutiques find that they miss the status andperks of a large organization. Corporate executives will miss havingan executive assistant.
Boutiques may experience large cycles of feast and famine, and most have limitedfunding to pay the staff during idle periods. Boutique management requires one tobe prepared financially.
4.6.8. PRACTICALS1. Prepare a list required for starting a boutique.
4.6.9. ASSESSMENT ACTIVITIES1. Assignment – Collections2. Seminar
3. Field Visit
4. Work diary
5. Class Test
6. Portfolio
4.6.1. TE QUESTIONS1. Define the term ‘Fashion Merchandizing’.2. Identify & explain the duties and responsibilities of a fashion merchandiser.
3. Identify the career prospects of Fashion Merchandizing.
4. Define the term ‘ Boutique’5. List the services offered by a boutique.
6. What are the skills required for managing a boutique? Explain.

FASHION AND APPAREL DESIGNING
161
List of practicals
1. Illustration of Types of Design
Make a portfolio illustrating application of the following types of designs ingarments.
a. Structural Design
b. Decorative Design
c. Natural design
d. Geometric Design
e. Stylized Design
f. Historic Design
g. Abstract Design
2. Illustration of Elements of Design – LineMake a portfolio illustrating application of the following types of lines in garments.
a. Vertical Lines
b. Horizontal Lines
c. Diagonal Lines
d. Zig – zag Linese. Curved Lines
3. Illustration of Elements of Design – ShapeMake a portfolio illustrating different shape (silhouette) of any garment (Gown/Frock/Skirt/Shirt/Trousers). (2 – 4 illustrations)
4. Illustration of Elements of Design – FormMake a portfolio illustrating different forms in garments. (2 – 4 illustrations).
5. Illustration of Elements of Design – ColourMake a portfolio illustrating application of colours in garments. (2 – 4illustrations)
6. Illustration of Elements of Design – TextureMake a portfolio illustrating textures using the different methods of creatingtextured effects. (5 – 10 illustrations)
7. Illustration of the Design Principle – Formal BalanceMake a portfolio illustrating application of the design principle Balance – Formalin garments.
Reference Book
162
8. Illustration of the Design Principle – Informal BalanceMake a portfolio illustrating application of the design principle Balance – Informalin garments.
9. Illustration of the Design Principle – ProportionMake a portfolio illustrating application of the design principle Proportion ingarments.
10. Illustration of the Design Principle – Rhythm through RepetitionMake a portfolio illustrating application of the design principle Rhythm throughRepetition in garments.
11. Illustration of the Design Principle – Rhythm through GradationMake a portfolio illustrating application of the design principle Rhythm throughGradation in garments.
12. Illustration of the Design Principle – Rhythm through RadiationMake a portfolio illustrating application of the design principle Rhythm throughRadiation in garments.
13. Illustration of the Design Principle – EmphasisMake a portfolio illustrating application of the design principle Emphasis ingarments.
14. Illustration of the Design Principle – HarmonyMake a portfolio illustrating application of the design principle Harmony ingarment
15. Basic Hues
Prepare a chart showing basic hues.
16. Value scale
Prepare values scale of any hue.
17. Primary Colours
Prepare a chart of primary colours.
18. Secondary Colours
Prepare a chart of secondary colours.
19. Prang Colour Wheel
Illustrate prang colour wheel

FASHION AND APPAREL DESIGNING
163
20. Illustration of Colour Schemes
Illustrate the following colour schemes in garments.
a. Monochromatic
b. Analogous
c. Direct Complementary
d. Split Complementary
e. Double Complementary
f. Triad
g. Neutral Colours
21. Colour Rendering
Illustrate the colour rendering in garments
22. Illustration of 10 head fashion croqui
Draw a 10 head croqui figure.
23. Illustration of different poses of female fashion figure
Different poses – Front, ¾ th (Oblique) and back (Stick, Block and Flesh)24. Illustration of different poses of male fashion figure
Different poses – Front, ¾th (Oblique) and back (Stick, Block and Flesh)25. Figure detailing – Head
Draw head / face with details.
26. Illustration of Types of Hair Styles
27. Illustration of Types of Necklines
28. Illustration of Types of Collars
29. Illustration of Types of Sleeve
30. Illustration of Types of Skirt
31. Illustration of Types of Trousers
32. Develop a Fashion Portfolio.
Develop the different design board according to the design and requirement.

Reference Book
164
Reference books1. Armstrong, H.J Pattern Making for Fashion designers
Prentice Hall, New Jercy
2. McKelvey, K & Munslow Illustrating Fashion Blackwell Science, Australia
3. Grate and Storm Concepts in Clothing McGraw Hill Book Co. New York
4. Carr, H and Lathan, B The Technology of Clothing ManufactureOxford BSP Professional Book London.
5. Julian, S Professional Fashion Illustration, B.T. Batsord Ltd.London.
6. Seaman, A.A & Julian, B.T, Fashion Drawing The Basic Principles, BatsfordLtd. London.
7. Mathews, M, Practical Clothing Construction, ( Part I & II)
8. SITTTER Fashion Design & Garment, Technology – Learning material, StateInstitute of Technical Teachers Training & Research, Kalamassery