reflection of light from spherical mirrors
TRANSCRIPT
Chapter 3: Mirrors
Please remember to photocopy 4 pages onto one sheet by going A3→A4 and using back to back on the photocopier
Questions to make you think
1. Draw a diagram of a book sitting on a table with a stick person beside it, and a light-bulb higher up.Show, using arrowed lines on the diagram, how the person sees the book.
2. Imagine that the book in the previous question is a blue book and that there’s a lightbulb shining on it which emits white light. Why does the book appear blue?
3. When both you and your friend look at the same blue book, is there any way to show that both you and your friend see the same colour?
4. Why does shoe polish (a yucky mucky substance) make your shoes shiny?
5. Did you know that you can look back in time (in fact you’re doing so right now)? Explain how.
6. Is it possible to build an instrument which would allow you to see yourself being born – or conceived?
7. How far away would this instrument have to be to allow you to see dinosaurs roaming the Earth?
1
Student NotesObjects that emit light are known as luminous objects, while those which we can only see due to light reflecting off of them are known as illuminated objects.
Reflection is defined as the bouncing of light off an object
When light hits off most everyday objects it scatters in all directions – this is known as diffuse reflection, but when the surface it shines off of is flat and silvered – a plane mirror – then it behaves in a much more predictable way. In fact, we can say two things for definite about it; these two things are known as ‘The laws of reflection of light’.
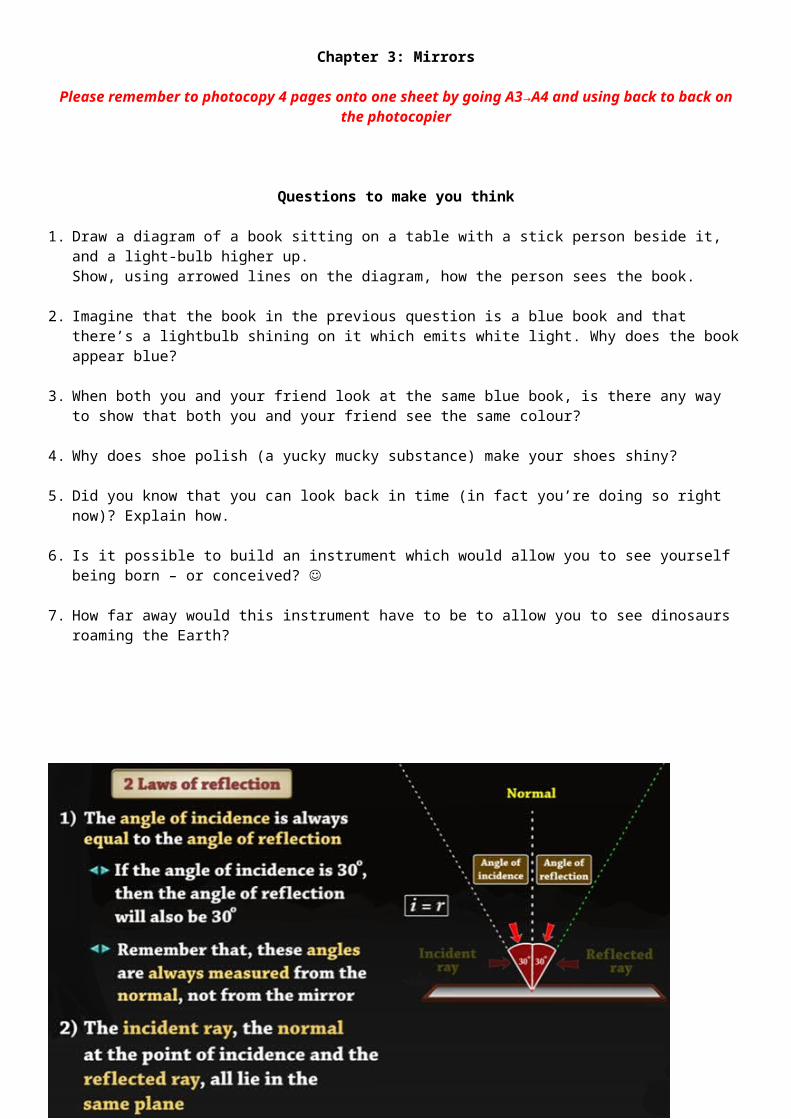
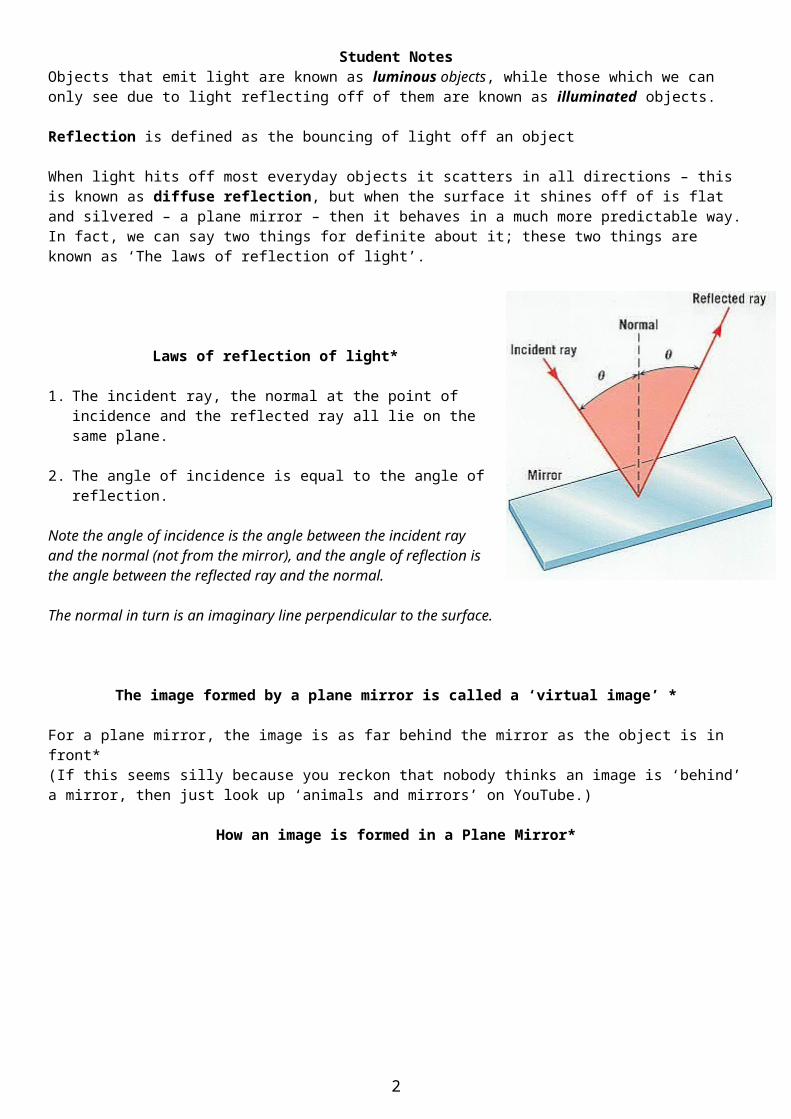
Laws of reflection of light*
1. The incident ray, the normal at the point of incidence and the reflected ray all lie on the same plane.
2. The angle of incidence is equal to the angle of reflection.
Note the angle of incidence is the angle between the incident ray and the normal (not from the mirror), and the angle of reflection is the angle between the reflected ray and the normal.
The normal in turn is an imaginary line perpendicular to the surface.
The image formed by a plane mirror is called a ‘virtual image’ *
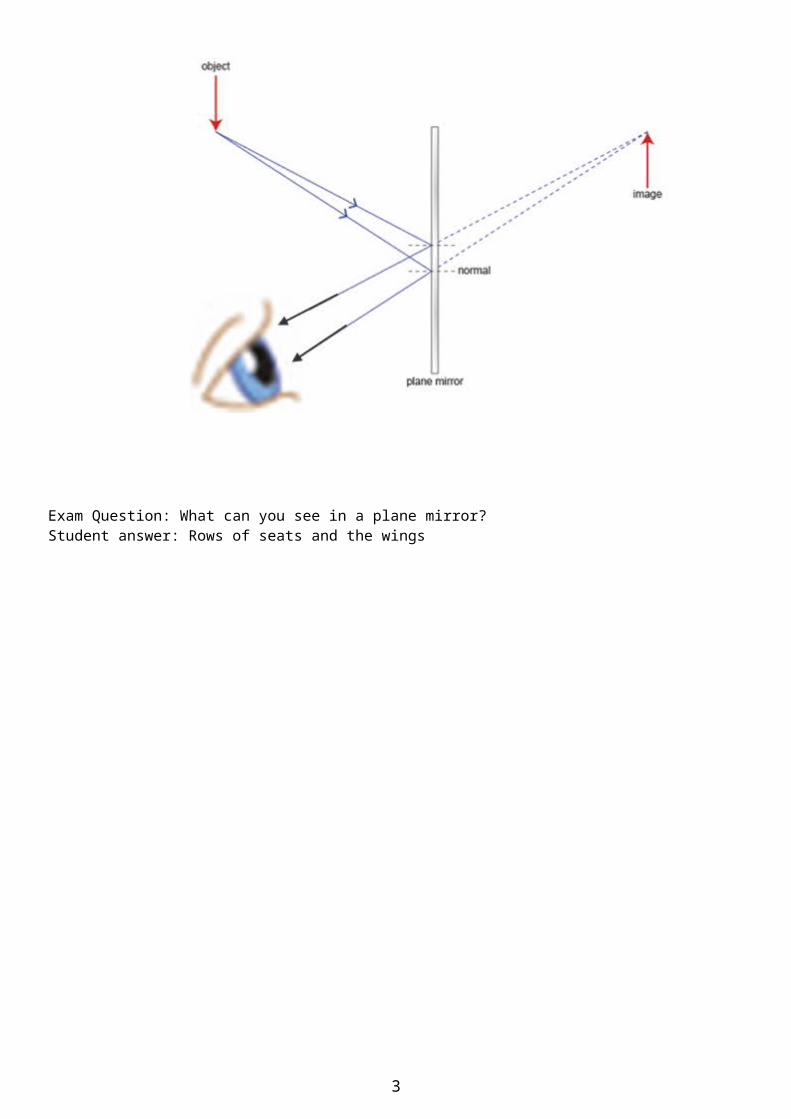
For a plane mirror, the image is as far behind the mirror as the object is in front*(If this seems silly because you reckon that nobody thinks an image is ‘behind’ a mirror, then just look up ‘animals and mirrors’ on YouTube.)
How an image is formed in a Plane Mirror*
Exam Question: What can you see in a plane mirror? Student answer: Rows of seats and the wings
2
Spherical Mirrors
There are two types of spherical mirror; Concave and Convex. A concave mirror ‘caves in’ at the centre (as you look at it), whereas a convex mirror bulges out.
Real and Virtual Images*A Real Image is an image formed by the actual intersection of light rays.A real image can be located on a screen.
A virtual image is formed by the apparent intersection of light rays.A virtual image cannot be formed on a screen (because there are no actual rays to intersect behind the mirror)
Concave Mirrors – ray diagrams
In order to find out what an image of an object will look like after reflection from a spherical mirror, we draw two following simple rules, and where these lines intersect represents the position of the image.
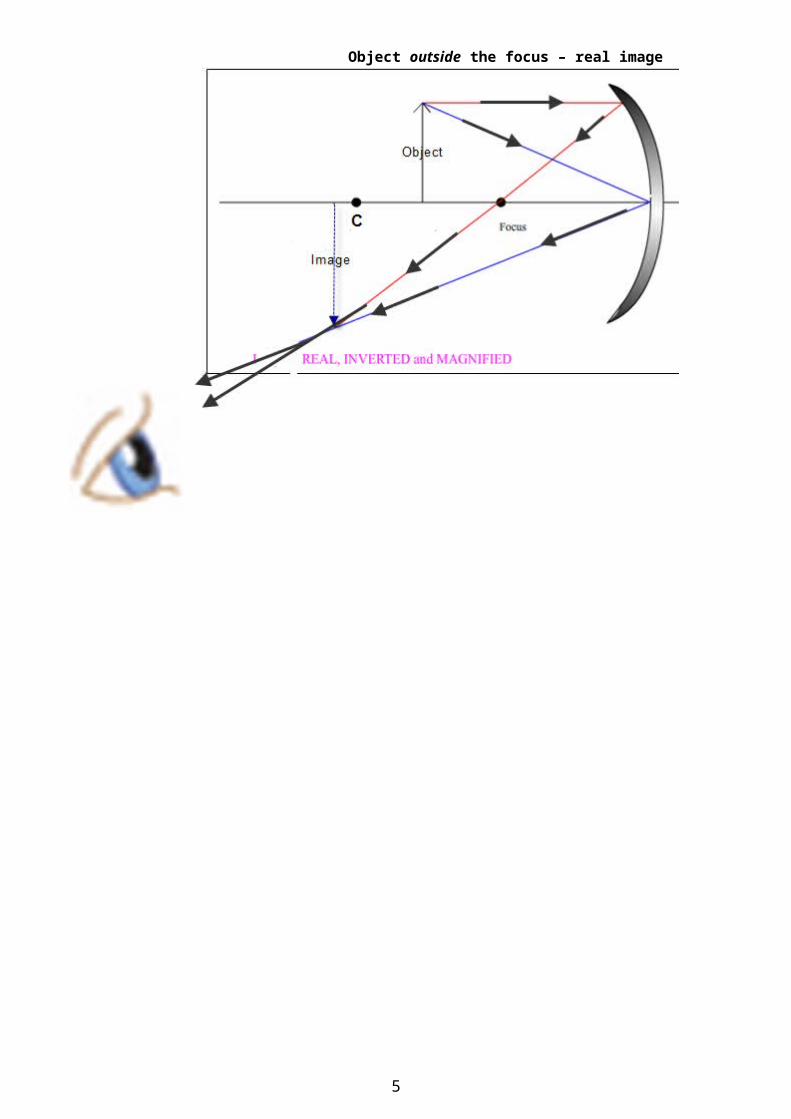
You should be able to draw a ray diagram showing how a concave mirror forms an image of an object which is placed (i) outside the focus – resulting in a real image(ii) inside the focus – resulting in a virtual image
Two Rules*(i) From top of object to mirror (parallel to principal axis); back through the focus.(ii) From top of object, hitting the mirror on the principle axis and back out at same angle on the other side.
For each of the following; label the centre of curvature (C), the focus (f), the Object and the Image.
Note that the focus is half-way between the centre of curvature and the mirror).
Note Just put a very slight curvature on the mirror to begin with, or better still make the mirror a straight line while
drawing the rays, and only afterwards put in a slight curve. Put arrows on all rays – do this for all the images below Label the object and the image – do this for all the images below State whether the image is real or virtual, upright or inverted, magnified or diminished
Object outside the focus – real image
3
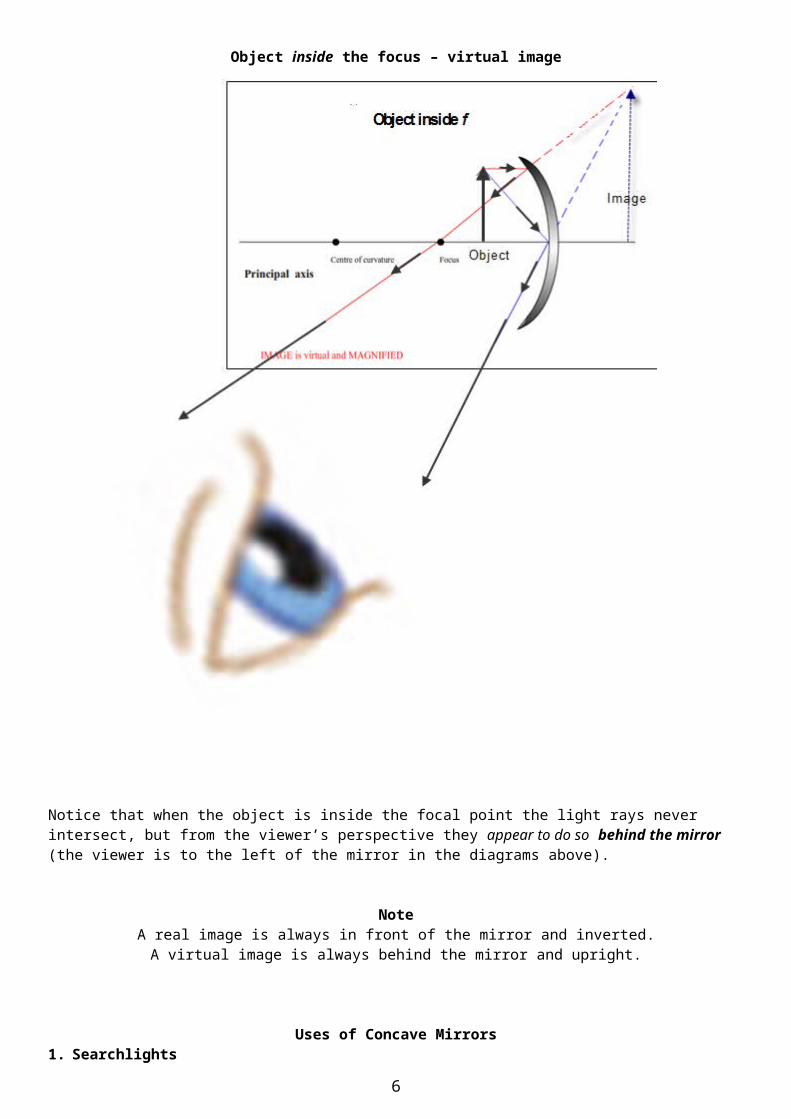
Object inside the focus – virtual image
Notice that when the object is inside the focal point the light rays never intersect, but from the viewer’s perspective they appear to do so behind the mirror (the viewer is to the left of the mirror in the diagrams above).
NoteA real image is always in front of the mirror and inverted.A virtual image is always behind the mirror and upright.
Uses of Concave Mirrors1. Searchlights2. Floodlights3. Headlights in a car4. Shaving and make-up mirrors, dentist’s mirror.
For applications 1 – 3 above the light bulb is placed at the focus; this means that all light going backwards from the bulb hits the mirror and gets reflected back out parallel to the principal axis instead of spreading out in all directions.
Point 4 – Cosmetic mirrors; if your face/tooth inside the focus the image is magnified and upright.
4
Convex Mirrors – ray diagramsHere only one diagram is needed; the image is always diminished, upright and virtual.
Two Rules(i) From top of object to mirror parallel to principle axis; back up as if coming from the focus on the other side.(ii) From top of object, hitting the mirror on the principle axis and back out at same angle on the other side.
Notice that in this situation (similar to the concave mirror when the object is inside the focus) the light rays never intersect, but from the viewer’s perspective they appear to do so behind the mirror. The image is therefore always virtual, regardless of where the object is placed.
Uses of Convex Mirrors1. Door mirror of a car2. In shops to deter shoplifters3. At concealed entrances to give a view of oncoming traffic
All of these are based on the principle that a convex mirror gives a wide field of view, even if does give a diminished image.
5
Maths Problems
Relationship between focal length (f), object distance (u) and image distance (v) for spherical mirrors
Which is the object distance; U or V?Remember that U comes before V in the alphabet, and you need an object before you can have an image, so U = object distance
Convention:For a concave mirror f is positiveFor a convex mirror f is negative
If you are looking for v and it turns out to be positive, it means that the image is a real image.If you are looking for v and it turns out to be negative, it means that the image is a virtual image.
This is referred to as the real is positive convention (Think ‘RIP’).
MagnificationMagnification refers to the ratio of the height of the image to the height of the object (if the image is 2 times higher than the object then the magnification is 2. It can be shown that this ratio is the same as the ratio of the image distance to the object distance v:u)
2014 Question 12 (b) [Higher Level]A person looks at her image in a shiny spherical decoration when her face is 30 cm from the surface of the decoration. The diameter of the decoration is 20 cm. Find the position of the image.
Solution{Note that the focus is half-way between the centre of curvature and the mirror. The diameter of the decoration is 20 cm. Therefore the radius is 10 cm. Therefore the centre of curvature is 10 cm from the mirror. Therefore f = 5 cm.}
Note also that we make f negative to represent the fact that we are dealing with a convex mirror.
1f=1
u+ 1
v1
−5= 1
30+ 1
v−15
− 130
=1v
−730
=1v v = −30
7 = - 4.3 cm
The negative sign indicates that the image is virtual and is formed behind the mirror
Mandatory Experiment: To Measure the focal length of a Concave Mirror
6
M= image heightobject height
= vu
1f=1
u+ 1
v

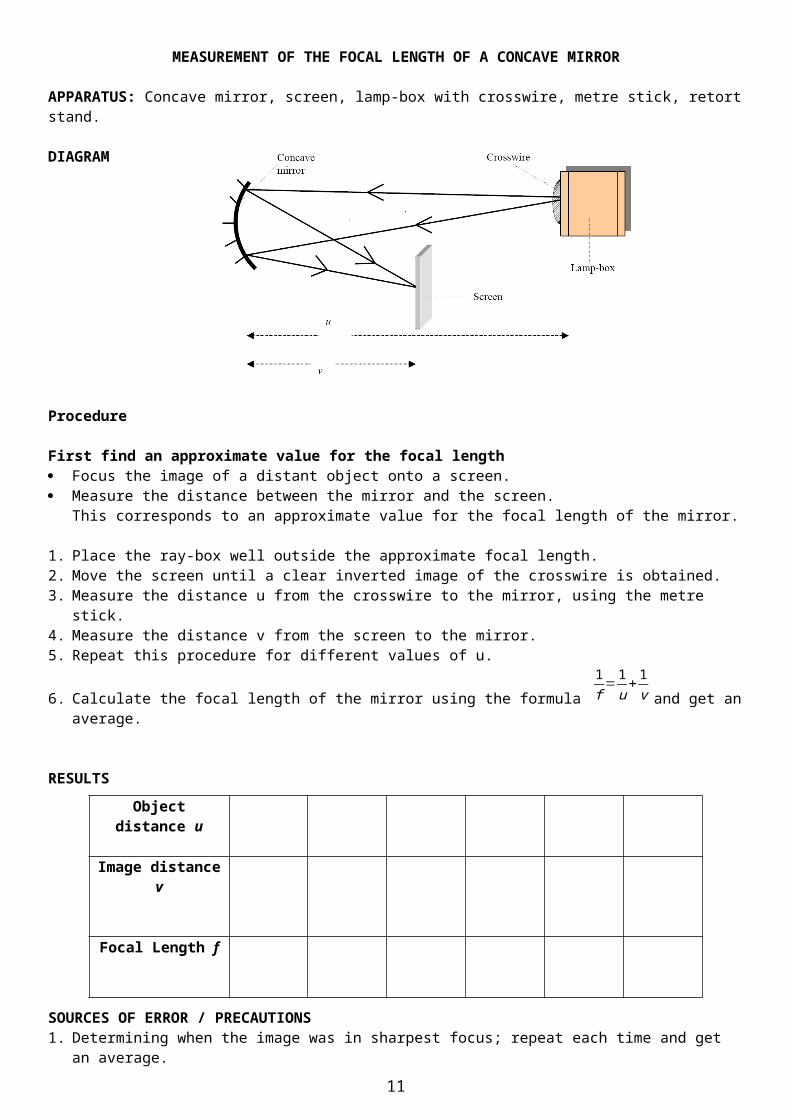
MEASUREMENT OF THE FOCAL LENGTH OF A CONCAVE MIRROR
APPARATUS: Concave mirror, screen, lamp-box with crosswire, metre stick, retort stand.
DIAGRAM
Procedure
First find an approximate value for the focal length Focus the image of a distant object onto a screen. Measure the distance between the mirror and the screen.
This corresponds to an approximate value for the focal length of the mirror.
1. Place the ray-box well outside the approximate focal length. 2. Move the screen until a clear inverted image of the crosswire is obtained. 3. Measure the distance u from the crosswire to the mirror, using the metre stick. 4. Measure the distance v from the screen to the mirror. 5. Repeat this procedure for different values of u.
6. Calculate the focal length of the mirror using the formula
1f= 1
u+ 1
v and get an average.
RESULTS
SOURCES OF ERROR / PRECAUTIONS1. Determining when the image was in sharpest focus; repeat each time and get an average.2. Parallax error associated with measuring u and v; ensure your line of sight is at right angles to the metre stick.3. Take all measurements from the back of the mirror.
Question: Why did the farmer call his ranch “The Focal Point”?Answer: It was the place where the sons raise meatGeddit?
7
Object distance u
Image distance v
Focal Length f

Leaving Cert Physics Syllabus
Content Depth of Treatment Activities STS1. Laws of Reflection Demonstration using ray
box or laser or other suitable method.
2. Mirrors Images formed by plane and spherical mirrors.
1f=1
u+ 1
v
M= vu
Real-is-positive sign convention.Simple exercises on mirrors by ray tracing or use of formula.
Practical uses of spherical mirrors:Concave
Dentists Floodlights Projectors.
Convex Supermarkets Driving mirrors
Experiment:Measurement of the focal length of a concave mirror
8

Extra CreditDid you know that you can look back in time?Did you realise that when you are looking at the person beside you, you don’t see them as they are, but as they were a fraction of a second ago?This is because it took time for the light which is entering your eye to travel from your friend to you. It actually takes eight minutes for light from the sun to reach the earth, which means that when you look at the sun, don’t see it as it is now, but rather as it was eight minutes ago! You are therefore looking back in time! Now if you look up at the night sky you can see objects which are so far away that it has taken light millions of years to reach us. Some of these objects may well have exploded a million years ago, but we won’t know for another million years. So when some of this light left its star, humans had not even appeared on Earth.Back to the sun: this means that if someone were to ‘switch off’ the sun right now, we wouldn’t know anything about it for another eight minutes.
Experimental work*To Demonstrate the Laws of Reflection of Light: potential issues1. To begin with, bear in mind that most of the material in a ‘mirror’ is not actually there for reflection. The glass
part is there to act as protection for the reflective metal backing, as well as to prevent oxidation (rusting). Therefore when measuring distances to or from a mirror, the front of the metal backing should be used to represent the position of the mirror.
2. You might have noticed that the incident ray of light seems to bend somewhat as it passes in and out of the glass. This is an important phenomenon and is called ‘Refraction’. We deal with it in detail in Chapter 4.
3. You might also have noticed that some light bounces off of the glass instead of passing through it – this is because no glass is perfectly transparent to light.Can you use this information to help explain why when it’s dark outside but bright inside (you’ve got the light on) you can see your reflection in the window?
4. The usual method of drawing a light ray is to mark two dots on the path of the light-ray, then remove the ray-box and complete the line. The problem is that the ray itself may actually be a little wide, so it is important that each of the dots is in the middle of the ray; if one is in the middle and the second is a little to one side, the resulting line will not be an accurate representation of the original light ray.
*How an image is formed in a plane mirror …Let’s take a little time to look at what’s going on here; Each ray of light from the object is bouncing off the mirror and into the viewer’s eye. Each of the three rays is diverging as they enter the eye. Now our brain normally figures out distance by analysing diverging rays and assuming that the objects position is back where the lines intersect. This usually works, except when the diverging light is coming back off a mirror. But until your brain realises that there’s a mirror involved, it will continue to be fooled, and trace the lines that the rays make back to where it thinks they should intersect – namely, behind the mirror. Because of the geometry involved, the rays appear to intersect as far behind the mirror as the object is in front.We will verify this by experiment shortly.
*For a Plane Mirror, the image is as far behind the mirror as the object is in front.I really think that to appreciate this you’ve got to look at the image of a (lighting) candle through a sheet of plane glass and try to get the image to ‘stand’ in a beaker of water placed behind the glass. This phenomenon was used quite a bit in the theatre (in conjunction with mirrors) to make images appear out of thin air. You can do some neat tricks with this – one of the coolest is called ‘Peppers Ghost’ (check it out on youtube).In case you think this is hogwash watch a young baby (or my video of some chimps) try to come to terms with their image in a mirror – it’s great fun. Alternatively, look out the window at dusk; you can see the light bulb from your room seemingly hanging outside in mid-air, as far beyond the window as it is away from the window on the inside. You can do the same with your own reflection.
Note Demonstrating this experiment is not on the syllabus and therefore cannot get asked on the Leaving Cert exam.However you do have to be able to show geometrically (i.e. by using a ray-diagram) that object distance equals image distance.
9
When drawing the diagram it is very useful to ‘cheat’ and put the image the same distance behind the mirror as the object is in front. This should now make the diagram a lot more accurate, and lo and behold, when you’re finished the image will be the same distance behind the mirror as the object is in front!
*The image formed by a plane mirror is called a ‘virtual image’ In explaining the meaning of a virtual image textbooks give some variation of the following; “The image in a plane mirror appears to be behind the mirror. The fact that it is not means the image is a ‘virtual’ mirror.”This may sound straightforward to a physics professor, but trust me; it makes little sense to a sixteen year-old student who (if you have ever thought about it at all) would have thought that the image is in the mirror. The misconception arises because, although our brain is indeed fooled into thinking that the image is behind the mirror, we quickly come to realise as infants that there is actually nothing behind there. From then on we accept that the image is (apparently) in the mirror. This is worth a class discussion in itself to try and sort out the confusion. I have a documentary on chimpanzees where the scientist involved placed a full-length mirror against a tree and waited to see what the response would be. The first chimp to see it immediately thought there was another animal behind the mirror and poked its head around to see. When it couldn’t find anyone it became confused, but quickly tired of the puzzle and resumed its previous activities. Some students may be lucky enough to try this with a young sibling.The concept of a virtual image will also be dealt with later in the chapter, when we compare it to something called a ‘real image’.We do this a lot in physics unfortunately – talk about something which we will only study later on (if at all). This is because so many physics concepts are interconnected. I only tell you this to reassure you that it’s okay to be confused. I’m not saying that you will be any less confused at the end of two years, but at least (like the sign on the door says) you’ll be confused on a higher level. This also means that some of the most confused men and women who ever lived were also the greatest scientists – including Albert Einstein. So there.
The single greatest way to explain/demonstrate the properties of a real image is with what’s called a ‘Magic Mirror’.Because it’s a real image it means it sits there in mid-air. You don’t generally notice images in mid-air because the light forming the image is swamped by background light. But if you cover off this background light by using a screen then the image becomes visible. This image in turn acts like a real object in that it can be magnified further, which is how microscopes work; it really is quite impressive. If you are a teacher you need to purchase a ‘Mirage Mirror’ – see www.sciplus.com. for about €30.
*Two RulesYou could theoretically use any two out of the three or even four options. I went with the two above because they are the easiest to remember and work in all situations. You will find others in various textbooks or simulations.However if using the incident angle = reflected angle, be aware that it can be very inaccurate unless using a protractor, or – like the text book – a computer.
10
DemosEnsure that you spend time playing with concave mirrors; look at the image of a distant object; now look at an image of your own face when it is very close to the mirror – what differences can you notice?
Use a concave mirror to form an image of a distant object on a sheet of A4 paper. Try to use a colourful object – the colour image is impressive – can you notice anything else about it?Use the ray-box and a slit which forms three parallel rays of light to reflect off of the mirror. What do you notice?
Archimedes is said to have focussed sunlight on to advancing ships from the harbour, using soldiers to create a large concave mirror with their shields, causing the ships to burn up in the water (it’s a good story at any rate).
Lenses and mirrors: ignite paper by placing paper (ignition of bugs is not condoned!) at the focal point. This is only likely to work on a sunny day with no wind.
I have a larger mirror which, if a container of water is placed at the focal point, will cause it to boil in a surprisingly short time. You will not be able to place your hand at the focal point for even a second if there is strong sunlight!
11
Exam questions: Mirrors 1. [2005 OL](i) What is meant by the reflection of light?(ii) State the laws of reflection of light.(iii) Describe an experiment to demonstrate one of the laws of reflection of light.
2. [2005]An object O is placed 30 cm in front of a concave mirror of focal length 10 cm. How far from the mirror is the image formed?
3. [2004 OL]A concave mirror has a focal length of 20 cm. An object is placed 30 cm in front of the mirror. How far from the mirror will the image be formed?
4. [2004 OL]Use a ray diagram to show the formation of a real image by a concave mirror.
5. [2006 OL]Copy and complete in your answer-book the following diagram to show how a concave mirror forms an image of an object O, which is placed outside the focus F of the mirror.
6. [2003 OL] [2007 OL]Describe the image that is formed in a concave mirror when an object is placed inside the focus.
7. [2009] Draw a ray diagram to show the formation of an image in a convex mirror.
8. [2004 OL]A concave mirror can produce a real or a virtual image, depending on the position of the object.Give one difference between a real image and a virtual image.
9. [2004 OL] Give two uses for a concave mirror.
10. [2002 OL][2010 OL]A student carried out an experiment to measure the focal length of a concave mirror. The student placed an object at different positions in front of the mirror so that a real image was formed in each case. The table shows the measurements recorded by the student for the object distance u and the image distance v.
u/cm 20 30
40 50
v/cm 64 43
41 35
(i) Draw a labelled diagram showing how the apparatus was arranged.
(ii) Describe how the student found the position of the image.
(iii) Show on your diagram the object distance u and the image distance v.
(iv) Using the formula or otherwise and the above data, find an average value for the focal length f of the mirror.
11. [2007]In an experiment to measure the focal length of a concave mirror, an approximate value for the focal length was found. The image distance v was then found for a range of values of the object distance u.
The following data was recorded.
(i) How was an approximate value for the focal length found?
(ii) What was the advantage of finding the approximate value for the focal length?
12
u/cm
15.0 20.0 25.0 30.0 35.0 40.0
v/cm
60.5 30.0 23.0 20.5 18.0 16.5

(iii) Describe, with the aid of a labelled diagram, how the position of the image was found.
(iv) Calculate the focal length of the concave mirror graph based on the recorded data.
13

Exam solutions: Mirrors 1.(i) Reflection is the bouncing of light from a surface.(ii) The incident ray, the normal at the point of incidence and the reflected ray all lie on the same plane.
The angle of incidence is equal to the angle of reflection (i = r).(iii) Apparatus: raybox, mirror.
Procedure: mark the position of the rays and measure the angles i and r.Observation/conclusion: i = r.
2. 1/u + 1/v = 1/f 1/30 + 1/v = 1/10 1/v = 1/10 - 1/30 v = 15 cm = 0.15 m
3.1f=1
u+ 1
v 1/20 = 1/30 + 1/v 1/v = 1/20 - 1/30 v = 60 cm
4.
5.
6. The image is virtual, magnified and upright.
7.
8. A real image can be obtained on a screen; a virtual image cannot.9. Torch, headlights, searchlight, dentist mirror, cosmetic mirror, solar
furnace.10.(i) See diagram(ii) The position of the screen was adjusted until the image of the cross-wires
came into focus.(iii) See diagram.(iv) 1/f: 0.066, 0.057, 0.049, 0.049 f: 15.2, 17.67, 20.2, 20.6
average value for f = 18.4 cm.
11.(i) An image of a distant object was focused on a screen.
Measure the distance from the screen to the mirror.(ii) To avoid placing object inside f during the experiment) which would
have meant that the image couldn’t be formed on the screen.(iii) Apparatus: object, concave mirror, screen
Adjust the position of the the screen until a clear image of the crosswire is obtained.
(iv)
Focal length = 12.0 cm
14
u/cm 15.0 20.0 25.0
30.0 35.0 40.0
v/cm 60.5 30.0 23.0
20.5 18.0 16.5
1/u1/v