reflective objects - in-tools.comin-tools.com/downloads/docs/reflectiveobjects.pdf · simply...
TRANSCRIPT

Reflective Objects
CS3/CS4/CS5 InDesign Plug-in
version 1.0.5 last revision: January 9, 2011

Reflective ObjectsReflective Objects
2
Contents
3 What’s A Reflective Object?But Who Needs Them?
6 InstallationMacintosh InstallWindows Install
8 Purchasing Licenses and Activation
10 Okay. So, How Do I Use It?Basic Application of Settings:Using Reflective Objects:Other Settings Options:Reflective Defaults:Setting Object Styles:LibrariesBook FilesTransferring Documents
16 ScriptingApplying SettingsUsing Event Handler Codes
19 AddendumWhat is “APID ToolAssistant”?
21 Acknowledgements
22 License Agreement

3
What’s A Reflective Object? / But Who Needs Them?
What’s A Reflective Object?The need for reflective objects might not be apparent at first, but we are con-fident that once you start using them, you will not know how you worked without them!
Simply put: a reflective object is any page item which keeps its page position relative to the spine (whether it’s a text frame, graphic, etc.).
Even guides can be set as reflective, so you don’t need to create separate mas-ters just because you need a different set of guides in part of your document.
But Who Needs Them?When laying out documents with facing pages, design elements which have a distinct position relative to the spine are usually present. For example, look at the placement of the number tabs in this manual. While in many situa-tions, creating design elements on master pages is ideal, often it is not. A primary example is master text frames.
The problem with these elements become apparent when pages are added or removed. Very often a recto page becomes a verso page or vice versa. This causes the layout to become reversed. Correcting these pages can be an extremely time consuming process! Defining these objects as “reflective” causes them to take a mirrored position when the page changes sides.
To illustrate this point, we are including two screen shots of a document which uses Reflective Objects for positioning graphic elements in the side bar area. In this document, these elements couldn’t be created as anchored ob-jects because of the text wrap applied to many of them. When the top right page was removed from the figure on the left, the layout on all the following

Reflective ObjectsReflective Objects
4
pages was automatically adjusted as shown in the figure on the right. A spe-cial thank you to Brad Walrod for providing these illustrations.
Before AfterAnother use for reflective objects is simplifying symmetrical design. Design elements which appear in symmetrical positions on both recto and verso
5
What’s A Reflective Object?
pages only need to be created once. After creating them on one side, they can be copied to the facing page en mass, and each object will take an oppos-ing position to its original! The page number tabs and headers in this manual for example, were created using this method.

Reflective ObjectsReflective Objects
6
InstallationReflective Objects was developed using a product called “APID ToolAssis-tant” created by Rorohiko. This necessary central controller does a lot of the low-level processing. If you are interested in the technology behind the develop-ment, you can read the addendum on page 19.All the necessary components of Reflective Objects are installed in a single step by our installers. The installer includes APID ToolAssistant as well.
To run the installer, simply double click on the installer package on Macin-tosh or the installer wizard on Windows, and it will walk you through the few steps required.
Macintosh Install
On Macintosh you will be offered the option to install on CS3, CS4, or CS5 as shown above. The option to install any version not currently installed will

7
Installation / Windows Install
be greyed out. We advise that you keep the option to install the documenta-tion checked.
➠ Please note: If your installation of InDesign is not in the default location, you will not be able to install on Macintosh! Before run-ning the installer, make sure InDesign is located in: /Applications/Adobe InDesign CSX.
Windows Install
The Windows installer has the additional step that allows you to select your InDesign folder:

Reflective ObjectsReflective Objects
8
Purchasing Licenses and ActivationIn-Tools suites and plugin are activated from within InDesign using the In-Tools Dashboard. To access the Dashboard, select “InTools ➛ In-Tools Dashboard...”. That will bring up the following dialog:
The Dashboard shows all the information you need to know about your pl-ugins (or suites). To activate, simply click on the “Activate” button next to the product you would like to activate. If it is installed as part of a suite, all the components of the suite will be activated as a whole. Wait a few mo-ments while the activation process completes. When it does, you will need to restart InDesign.

9
Purchasing Licenses and Activation
To activate, you must have a valid In-Tools account, and you will need to log in from the Dashboard:
We recommend keeping both the “Login Automatically” and the “Remem-ber Login” check-boxes checked. This will ensure you are always logged in when the dialog is opened (assuming you have an internet connection). If you try to log in with an email account which is not registered, you will be given the option to create a new account.
You also must have purchased a license of the plugin to activate it. If you have not yet purchased a license, you can do so using the “Buy” button:
For further questions and issues regarding licensing and activation, please refer to the FAQ web page; or for more help, please visit our forum.

Reflective ObjectsReflective Objects
10
Okay. So, How Do I Use It?
Basic Application of Settings:
Using Reflective Objects is very easy. Objects can be set either by selecting the menu command, or by right clicking, and selecting from the context menu. Simply select an object (or multiple objects), and select InTools ➛ Reflec-tive Objects ➛ Reflect Position. Removing settings are done the same way.
Using Reflective Objects:Once an object is set to reflect, it can be moved around like any other object. The plug-in works in the background keeping track of its position. If the ob-ject is moved to an opposing page—either manually, or by adding/remov-ing pages — it will immediately jump to the correct position. The same is true for objects which are copied and pasted.

11
Okay. So, How Do I Use It? / Other Settings Options:
➠ If you want to get some design elements temporarily out of the way, but you don’t want to lose their position, do the following: Set the objects as reflective, and then drag them to the paste-board. When you move them back to the page, each object will automatically take its original page position.
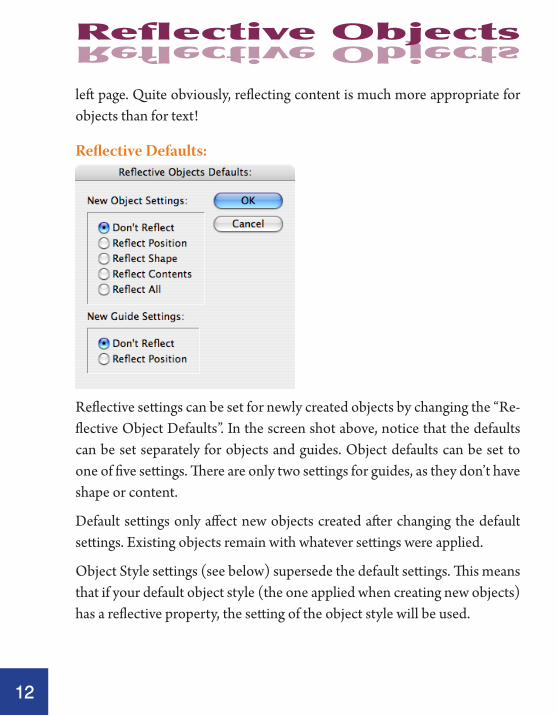
Other Settings Options:You might have noticed some more reflective options: Besides setting ob-jects to keep their reflective position, they can be automatically flipped. The four reflective settings are as follows: Reflect Positions keeps the position. Reflect Shape will flip the frame but not the content. Reflect Content will flip the content but not the frame. Reflect All will flip both the frame and the content.
In the above screen shot, the items on the left are the original objects and a guide. The objects on the right have been reflected by duplicating the
Reflective ObjectsReflective Objects
12
left page. Quite obviously, reflecting content is much more appropriate for objects than for text!
Reflective Defaults:
Reflective settings can be set for newly created objects by changing the “Re-flective Object Defaults”. In the screen shot above, notice that the defaults can be set separately for objects and guides. Object defaults can be set to one of five settings. There are only two settings for guides, as they don’t have shape or content.
Default settings only affect new objects created after changing the default settings. Existing objects remain with whatever settings were applied.
Object Style settings (see below) supersede the default settings. This means that if your default object style (the one applied when creating new objects) has a reflective property, the setting of the object style will be used.

13
Okay. So, How Do I Use It? / Setting Object Styles:
Setting Object Styles:The full power of reflective objects can only be realized by using object styles.
In the above dialog you will see two distinct sections. The top half is where you define the settings, while the bottom half is strictly informational. (Changing the selections in the drop down lists does nothing.)
To define reflective settings for an object style:
1. Select your style from the top drop-down list “Object Style to Define”.
2. Select the appropriate setting from the second drop down list “With Set-tings”.
Please note: There is a distinct difference between “No Settings”, and “Don’t Reflect”. If “No Settings” is selected, new objects created with the selected style will have the settings defined as your defaults. If “Don’t Reflect” is

Reflective ObjectsReflective Objects
14
selected, new objects will not reflect regardless of your defaults. Addition-ally, applying an object style which is set to “Don’t Reflect” will remove any reflective settings, while applying ones set to “No Settings” will preserve prior settings.
3. To apply the settings to existing objects of the selected style, check “Ap-ply to Existing Objects”. If you just want to create settings for new objects, uncheck the option.
LibrariesReflective objects can be saved in a library, and will retain their reflective set-tings. However, they will not retain their position information when placed in a document. After placing objects from a library, the new position infor-mation may not be recorded for up to a second or so. Make sure not to move newly placed objects for a second or two.
Book FilesWhen changing page numbers in book files, the page sides might change. To insure that objects reflect properly when adding documents to a book, or updating page numbers, make sure the documents are open. If they are not open, the objects will not reflect. If for whatever reason reflective objects did not reflect when they should have, it is still possible to force them to reflect manually. Simply select: InTools ➛ Reflective Objects ➛ Trigger Object Reflection. This will only effect objects which changed page sides, but were not reflected. It will not effect objects which remain in their proper position. It is therefore safe to repeatedly select this menu option.
15
Okay. So, How Do I Use It? / Transferring Documents
Transferring DocumentsAll reflective settings are stored within the document. These settings are saved even if the document is transferred to a computer which doesn’t have Reflective Objects installed. The stored information includes each object’s po-sition and page side. Documents can therefore be successfully transferred without issues.
One issue which can come up is as follows: Lets assume the document is transferred to a computer which doesn’t have Reflective Objects installed, and reflective objects are moved. When the document is transferred back to a computer with Reflective Objects installed, objects will have their original po-sition stored. This can cause the object to move to unexpected places.
To solve this issue, reflective objects should be “Deactivated”. All this does is erase the stored positions of all the objects in the document. To start record-ing position information again, simply select “Activate Reflective Objects”. Deactivating reflective objects does not change the reflective settings. They remain reflective. It simply removes the information of where they are po-sitioned.
Another reason you might want to deactivate objects would be for copying between documents. If you copy a reflective object to an opposing page even in another document, Reflective Objects will attempt to move it to its reflective position. This might cause you to have to fight against Reflective Objects for correct positioning in the new document. One way to avoid this, is to deacti-vate all reflective objects in the source document before copying the objects. Another way would be to deactivate the objects in the target document.

Reflective ObjectsReflective Objects
16
Please note: The deactivated state of reflective objects is a document-wide setting. All objects in a deactivated document will remain deactivated until the document is activated once more. Objects copied between documents will take on the activated state of the target document. For example: an ob-ject copied from a deactivated document to an activated one will become activated. However, the position of the object will be the new position, not the old position in the deactivated document. An object copied to a deac-tivated document will become deactivated, and no positioning data will be recorded. Copying objects between two activated documents will have the same effect as copying objects to another page in the same document.
CS3ME users please note: Winsoft changed behavior in right-to-left docu-ments in CS3 version 5.0.1. Previously, the zero point of the document was at the top left in all documents regardless of document direction. In version 5.0.1, the zero point was moved to the top right on right-to-left documents. This causes all measurements on the page to be negative numbers. When changing document direction, all the reflective positions become invalid. If you are using Reflective Objects in CS3ME version 5.0.1 you must reactivate objects after changing document direction. Failure to do so may cause ob-jects to disappear! This issue has been fixed in the 5.0.2 update. We strong-ly advise updating to 5.0.2.
Scripting
Applying SettingsThe main functions of Reflective Objects can be accessed through scripting. To apply reflective settings to objects, simply append one of four strings to an object’s label: “<ReflectiveObject1>”, “<ReflectiveObject2>”,

17
Scripting / Using Event Handler Codes
“<ReflectiveObject3>”, “<ReflectiveObject4>”. These labels correspond to the four reflective options in order. So an object with a script label which contains <ReflectiveObject1> will be set to reflect position, and so on. Sim-ply applying the script lables will just assign the objects as being reflective. They will not cause any position data to be recorded. To insure that the data is recorded, and the objects will be automatically reflected, make sure to modify them in some way after the label is changed or manually activate the reflective properties of the reflective objects. (see below).
Using Event Handler CodesBesides applying the settings to the objects, the plug-in can be communi-cated with directly. This is accomplished by sending event handlers to the plug-in.
To send an event handler to Reflective Objects you must first get a refer-ence to the plug-in. The plug-in is accessed using the document load-ed plugins method. The correct syntax in Javascript would be: doc.loadedScriptedPlugins ("reflectiveobjects"). In AppleScript that would be (within a document “tell”): loaded scripted plugins label "reflectiveobjects". No matter which scripting language is being used, the plug-in is returned as a single-item array. So if you get a reference to the first item of that array you then have a valid reference to Reflective Objects. To further illustrate this point, this line of code (assuming a valid reference to a document) will return a reference to Reflective Objects in javascript: var reflectivObjectsPlugin=doc.loadedScriptedPlugins("reflectiveobjects")[0]
Once you have a reference to the plug-in, you can then send event handlers to the plug-in . There are three different event handlers which can be used:

Reflective ObjectsReflective Objects
18
externalReflectObjects, externalDeactivateReflection,
and externalActivateReflection. These three event han-dler codes correspond to the three last menu options un-der Reflective Objects namely: “Deactivate Reflective Objects”, “Activate Reflective Objects”, and “Trigger Object Reflection”. To send the event handler codes to the plug-in you should do something like this: reflectivObjectsPlugin.handleScriptEvent ("externalReflectObjects")
The event code “externalReflectObjects” is used to simulate the effect of modifying all reflective objects in the document. This is useful to force the immediate reflection of objects within a script. The reflection normally hap-pens at idle time, and if a script closes the document or makes modifications too quickly, the reflection may not happen automatically. Another situation where you would want to invoke this event handler, would be when book documents have been updated while they were closed. As explained in sec-tion on books, changing book files while the documents are closed will cause them to not be reflected automatically. Invoking externalReflectObjects will fix this issue.
If your script will be moving around objects, and you do not want to fight Reflective Objects for positon of the objects make sure to invoke “externalDeactivateReflection” before moving things around.
The event code “externalActivateReflection” commonly has two uses. First of all it should be used the same way Activate Reflective Objects is used in the user interface: to activate reflection after it has been disabled. The sec-ond use in scripting is to cause the position data to be written when objects are assigned reflective properties by changing their script label.

19
Addendum / What is “APID ToolAssistant”?
For further illustration on scripting Reflective Objects download the sam-ple scripts from In-Tools’ website.
Addendum
What is “APID ToolAssistant”?Classically, there are only two ways to automate InDesign. One way is by scripting. Scripts are a series of commands written in one of the three sup-ported scripting languages — AppleScript for the Macintosh, Visual Basic for Windows, or ExtendScript for both platforms. ExtendScript is Adobe’s version of javascript. For scripts to run, they must be placed in the applica-tion script folder and explicitly run. For automation to be truly automatic, it requires “event processing”. This means that certain events trigger specific processes to take place. There is limited event-triggered scripting available in CS3.
To achieve true integration, plug-ins must be programmed using C++. De-veloping C++ plug-ins is a very involved, and lengthy process. APID ToolAs-sistant is a plug-in which allows very fine grained event processing using ExtendScript. It allows for creation of advanced plug-ins in a fraction of the time required when programming using C++. It also aids in the creation of hybrid plug-ins which mix ExtendScript and C++ for maximum efficiency.
Without the APID ToolAssistant, it would not have been possible to cre-ate the collection of plug-ins we offer in the same amount of development time. This increased programming efficiency means more functionality for the end user and lower prices.

Reflective ObjectsReflective Objects
20
Additionally, APID ToolAssistant offers the ability to attach scripts to spe-cific objects. These attached scripts can be run automatically when triggered by specific events. Anyone who has a licensed version of the APID ToolAs-sistant plug-in installed can create and use these attached scripts. There are also additional scripting properties and methods which are usable by scripters. For more information see Rorohiko’s web site.

21
Acknowledgements
AcknowledgementsWe wish to thank the many people who have helped make In-Tools plug-ins possible.
To those who give graciously of their time and expertise on the InDesign scripting forum: thank you for introducing us to automating within InDe-sign. Most specifically, Dave Saunders, Olav Kvern, and Peter Kahrel.
To Kris Coppieters, thank you for your incredible support throughout the entire development process. Your help with product improvements and with coding tips and techniques has been incredible. Your support has been above and beyond what we could have reasonably expected. It has really been a pleasure working together. Thank you.
To all our beta testers, thank you for the valuable input which helped shaped our plug-ins. To Brad Walrod: a special thank you for your unrelenting com-ments and suggestions. To Peter Gold and Raphael Freeman: thank you for your many useful suggestions.

Reflective ObjectsReflective Objects
22
License AgreementPlease read the following document carefully!
This is a legal agreement (the Agreement) between you and Print Israel LLC (In-Tools), the developer of the In-Tools software. This Agreement pertains to your use of the In-Tools software and documentation which are provided to you by In-Tools (col-lectively, the Software). By copying, installing, or otherwise using the Software, you accept all the terms and provisions of the Agreement.
Terms of UseThe provisions of the In-Tools Privacy Policy are incorporated herein and made a part hereof.
LicenseThis Agreement grants you a personal, non-exclusive, non-transferable, non-sublicens-able right to use one copy of the Software for use on a single computer and/or worksta-tion for each license that you purchase. You may try the Software before purchasing a license, for the specified amount of time in the materials accompanying the Software. YOU UNDERSTAND AND AGREE THAT BY USING THE TRIAL SOFTWARE, AFTER THE AMOUNT OF TIME YOU MAY NOT BE ABLE TO CONTINUE TO USE THE SOFTWARE UNLESS YOU PURCHASE A LICENSE.
In-Tools reserves all rights in the Software not expressly granted herein, including without limitation ownership and proprietary rights.
License RestrictionsYou may not reverse engineer, decompile or disassemble the Software. The restrictions contained herein apply equally to any updates that may be provided to you by In-Tools.

23
License Agreement
Intellectual Property Rights and Third Party MaterialsAll service marks, logos, trade names, trade dress, and trademarks of In-Tools (col-lectively Marks) are the exclusive property of In-Tools and nothing in this Agreement shall grant you the license to use such Marks. All intellectual property rights in the Software are owned exclusively by In-Tools and are protected by United States of America copyright laws and international copyright treaty provisions. Any violation of the terms set forth herein is expressly prohibited by law and may result in severe civil and criminal penalties.
Disclaimer of WarrantiesALL SOFTWARE PROVIDED BY IN-TOOLS ARE PROVIDED AS IS. IN-TOOLS AND ITS AGENTS, PARTNERS, OR EMPLOYEES MAKE NO REPRESENTA-TION OR WARRANTY TO YOU OR ANY OTHER PERSON OR ENTITY, WHETHER EXPRESS, IMPLIED, OR STATUTORY, AS TO THE DESCRIP-TION, QUALITY, TITLE, NON-INFRINGEMENT, MERCHANTABILITY, COMPLETENESS, OR FITNESS FOR A PARTICULAR USE OR PURPOSE AS TO THE SOFTWARE PROVIDED TO YOU, OR AS TO ANY OTHER MATTER, ALL SUCH WARRANTIES HEREBY BEING EXPRESSLY EXCLUDED AND DISCLAIMED.
NEITHER IN-TOOLS NOR ANY OF ITS AGENTS, PARTNERS, OR EMPLOY-EES WARRANTS THAT THE SOFTWARE OR SERVICES ARE ERROR FREE OR WILL OPERATE WITHOUT CAUSING LOSS OR INTERRUPTION YOUR COMPUTER USAGE OR DATA. YOU ASSUME TOTAL RESPONSIBILITY AND RISK FOR YOUR USE OF THE SOFTWARE.
Limitation of LiabilityIN NO EVENT SHALL IN-TOOLS, ITS AFFILIATES, SUBSIDIARIES, PAR-ENT COMPANIES, AGENTS, NETWORK SERVICE PROVIDERS, PARTNERS, OR EMPLOYEES BE LIABLE TO YOU OR ANY THIRD PARTY IN ANY RE-SPECT FOR ANY COSTS OR DAMAGES ARISING EITHER DIRECTLY OR

Reflective ObjectsReflective Objects
24
INDIRECTLY FROM THE USE OF IN-TOOLS SOFTWARE INCLUDING WITHOUT LIMITATION ANY ACTUAL, INCIDENTAL, CONSEQUENTIAL, EXEMPLARY, PUNITIVE, RELIANCE OR SPECIAL DAMAGES, OR FOR ANY LOSS OF REVENUE, PROFITS, USE, DATA, GOODWILL OR BUSINESS OP-PORTUNITIES OF ANY KIND OR NATURE WHATSOEVER, ARISING IN ANY MANNER FROM ANY CAUSE OF ACTION OR CLAIM RELATING TO THIS AGREEMENT, TO THE SERVICES PROVIDED BY IN-TOOLS OR TO THE USE OF THE SOFTWARE. THIS LIMITATION OF LIABILITY APPLIES EQUALLY TO ANY THIRD PARTIES WITH WHOM IN-TOOLS ENTERS INTO A BIND-ING AGREEMENT TO MARKET, DISPLAY AND/OR DISTRIBUTE THE SOFTWARE TO END USERS AND SUCH THIRD PARTIES SHALL NOT BE LI-ABLE TO YOU OR ANY OTHER THIRD PARTY FOR ANY OF THE DAMAGES SET FORTH ABOVE.
Export Control Laws.You agree to comply with all laws, rules and regulations applicable to the export of the Software. Specifically, you shall not export, re-export or transship the Software, or the direct product thereof, in violation of any United States laws and regulations which may from time to time be applicable. None of the Software or underlying information or technology may be downloaded or otherwise exported or re-exported (i) into, or to a national or resident of, Cuba, Iran, Iraq, Libya, North Korea, Sudan, Syria or any other country to which the U.S. has embargoed goods; or (ii) to anyone on the U.S. Treasury Department›s list of Specially Designated Nationals or the U.S. Commerce Department›s Table of Denial Order. By downloading or using the Software, you are agreeing to the foregoing and you are representing and warranting that you are not located in, under the control of, or a national or resident of any such country or on any such list.
Jurisdiction and Other ProvisionsThis Agreement and the relationship between In-Tools and you shall be governed in ac-cordance with the laws of the State of New York. Any dispute between you and In-Tools

25
License Agreement
regarding this Agreement will be subject to the exclusive jurisdiction of the state and federal courts in the State of New York. You agree to submit to exclusive jurisdiction in the State of New York, and you expressly waive all defenses to jurisdiction.
This Agreement is the entire agreement between you and In-Tools relating to your use of the Software and supersedes any other communications or advertising with respect to the Software. If any provision of this Agreement is held invalid, the remainder of this Agreement will continue in full force and effect. In-Tools failure to insist upon or enforce strict performance of any provision of this Agreement shall not be construed as a waiver of any provision or right. Neither the course of conduct between the par-ties nor trade practice shall act to modify any provision of this Agreement. In-Tools may assign its rights and duties under this Agreement to any party at any time without notice to you.
Modifications of Agreement In-Tools may modify this Agreement at any time without providing notice to you. Such modification will be made by posting a revised agreement on its web site and such modification shall be deemed effective immediately upon posting of the modified Agreement. Your continued access or use of the Software or Services shall be deemed your acceptance of the modified Agreement. You agree to check our web site periodi-cally to review such modifications.
Termination or Modifications of Software You may terminate this Agreement at any time. The In-Tools may immediately termi-nate the Agreement if you breach any representation, warranty, agreement or obliga-tion contained or referred to in the Agreement. Upon termination, you must dispose of the Software and all copies or versions of the Software by destroying the Software. In-Tools reserves the right to modify the Software at any time without providing notice to you. In-Tools right to modify the Software applies to all or any aspect of the Software.

Reflective ObjectsReflective Objects
26
YOU ACKNOWLEDGE THAT YOU HAVE READ THIS AGREEMENT AND UNDERSTAND IT AND THAT, BY USING THE SOFTWARE, WEB SITE, YOU AGREE TO BE BOUND BY ITS TERMS AND CONDITIONS.