reflectix radiant barrier installation...
TRANSCRIPT
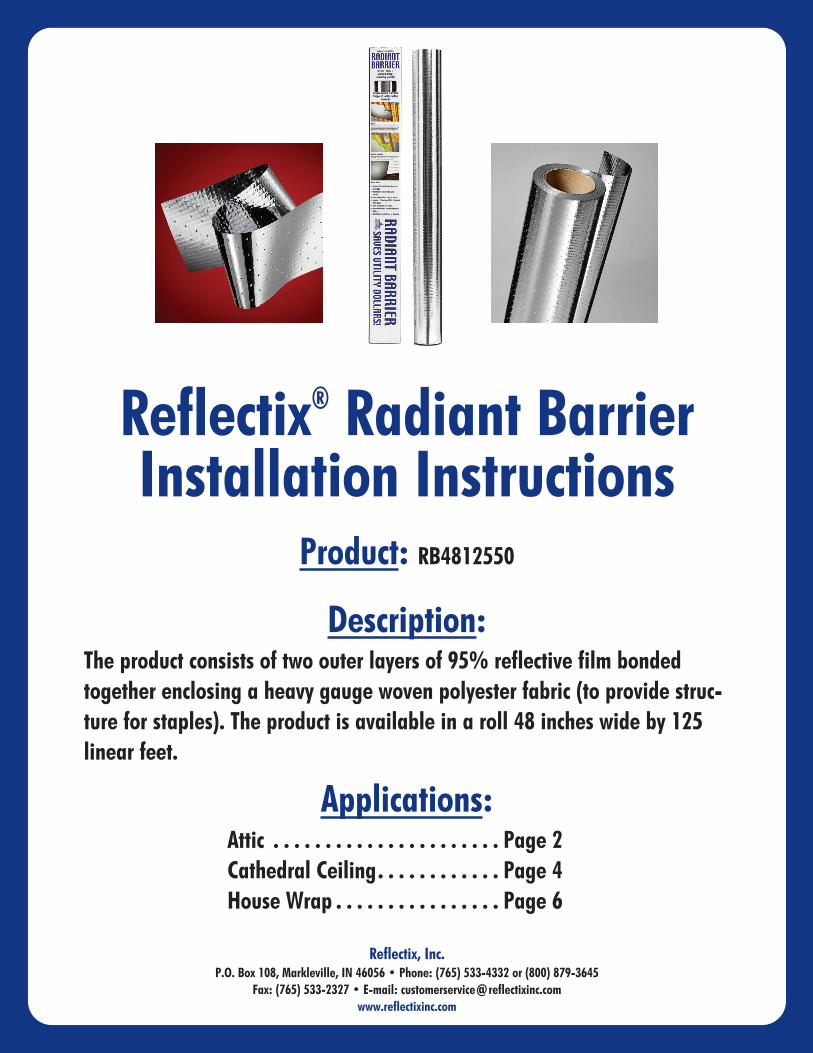
Reflectix® Radiant BarrierInstallation Instructions
Product: RB4812550
Description:The product consists of two outer layers of 95% reflective film bondedtogether enclosing a heavy gauge woven polyester fabric (to provide struc-ture for staples). The product is available in a roll 48 inches wide by 125linear feet.
Applications: Attic . . . . . . . . . . . . . . . . . . . . . . Page 2Cathedral Ceiling. . . . . . . . . . . . Page 4House Wrap . . . . . . . . . . . . . . . . Page 6
Reflectix, Inc.P.O. Box 108, Markleville, IN 46056 • Phone: (765) 533-4332 or (800) 879-3645
Fax: (765) 533-2327 • E-mail: [email protected]
Radiant BarrierInstallation Instructions: (There are 2 options)1. Underside of Rafter Method (depicted in illustration)
• Check the attic area and make any needed repairs before installing Reflectix®.
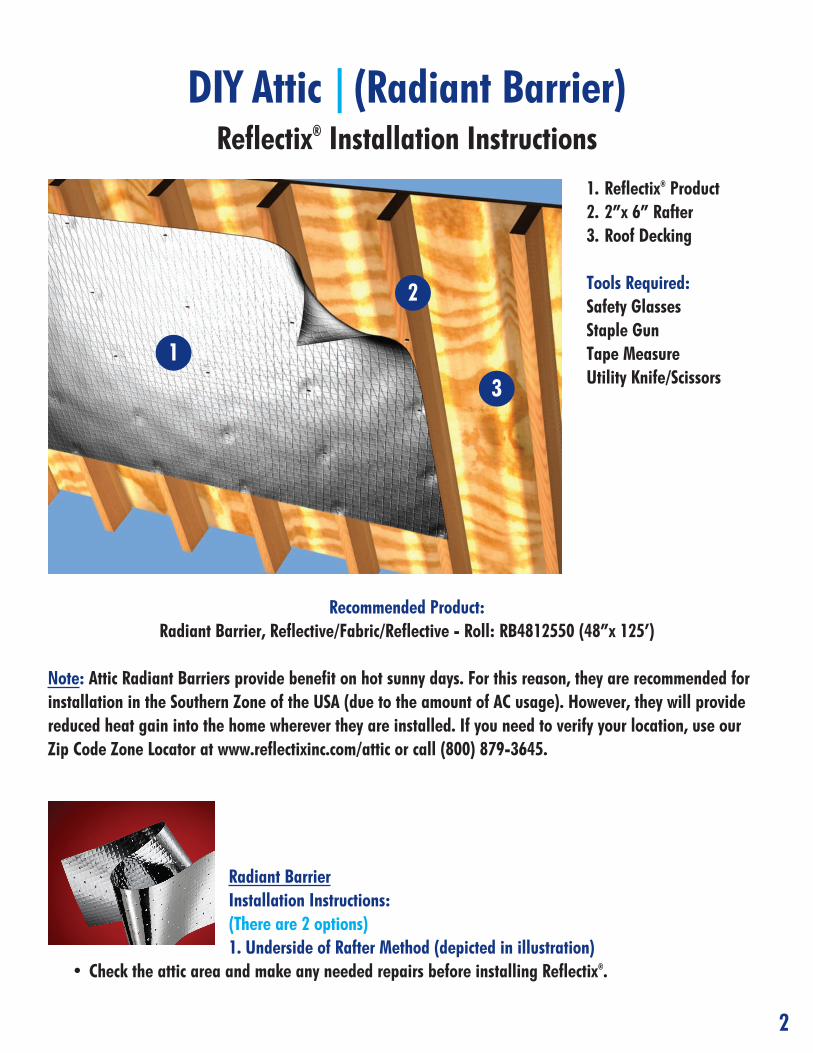
1. Reflectix® Product2. 2”x 6” Rafter3. Roof Decking
Tools Required:Safety GlassesStaple GunTape MeasureUtility Knife/Scissors
DIY Attic | (Radiant Barrier)Reflectix® Installation Instructions
1
2
2
3
Recommended Product:Radiant Barrier, Reflective/Fabric/Reflective - Roll: RB4812550 (48”x 125’)
Note: Attic Radiant Barriers provide benefit on hot sunny days. For this reason, they are recommended forinstallation in the Southern Zone of the USA (due to the amount of AC usage). However, they will providereduced heat gain into the home wherever they are installed. If you need to verify your location, use ourZip Code Zone Locator at www.reflectixinc.com/attic or call (800) 879-3645.
• Unroll the Reflectix® as you work and cut it to suitable lengths (8’ to 12’) with scissors or utility knife.• If a helper is available, rolling out longer lengths of product with one person stapling and the other holding the end of the product makes for a quicker installation.
• Allow for proper ventilation. See note below on ventilation.• Install product perpendicular to the rafters with a 2” overlap on the seams (no taping required). Staple the product to the rafters at 2” to 3” intervals.
• Leave a 2” to 3” gap on each side of the roof peak and a gap at the lower edge of the roof line (within 18” OK).
• Staple to the face of the studs on gables and insure at least a 1” gap around all vents.
2. Staple to the Deck Method - Southern Zone of the USA OnlyFor the Regional Recommendation for this Installation Method, please verify the location of your home withthe “Zip Code Zone Locator” function on the “Application - DIY - Attic” webpage at www.reflectixinc.com
• Cut the entire roll of product into 16” or 24” lengths with a miter saw (depending on rafter spacing).• Begin at the top of the cavity. Run product flush to the decking, parallel to the rafter.• Staple sheet directly to the deck (Nails poking through sheet from above will not interfere with performance).
• Do not block any venting (cut around).• No need to cover rafters (no loop around).
Ventilation: Good ventilation in your attic increases your comfort and helps the materials of your house last longer. Be sure not to block ventilation paths when youinstall Reflectix®.
Review These Important Safety Guidelines Prior to Installation:• ALWAYS check local building codes before installing Reflectix®.• ALWAYS check the area you are insulating and make any needed repairs. Any worn wiring should be replaced before you begin installing Reflectix®.• ALWAYS make sure work areas are well ventilated and well lighted.• ALWAYS use eye protection when operating a staple gun.• ALWAYS use caution and common sense when using a staple gun. Be aware of where electrical wiring is located. Stapling into a wire can cause severe shock or death. NEVER staple into electrical wiring.
• ALWAYS be careful when working with large pieces of Reflectix® on windy days.• When installing Reflectix® on bright sunny days, it is best to wear sun glasses.• Do not work in areas such as attics when temperatures are too hot. • Visit our website at www.reflectixinc.com for additional product and installation information.
Please Note:The intention of these Installation Instructions and 3-D renderings are for the sole purpose of illustrating the correct location and relative position ofthe Reflectix® products in specific building assemblies. The correct construction methods and techniques are the responsibility of the installer or contrac-tor. The methods outlined are recommendations on location of the Reflectix® products as a guideline. There are no claims on the part of Reflectix, Inc.that these building assemblies are finite standards or meet building code requirements (as they can vary by region).
3
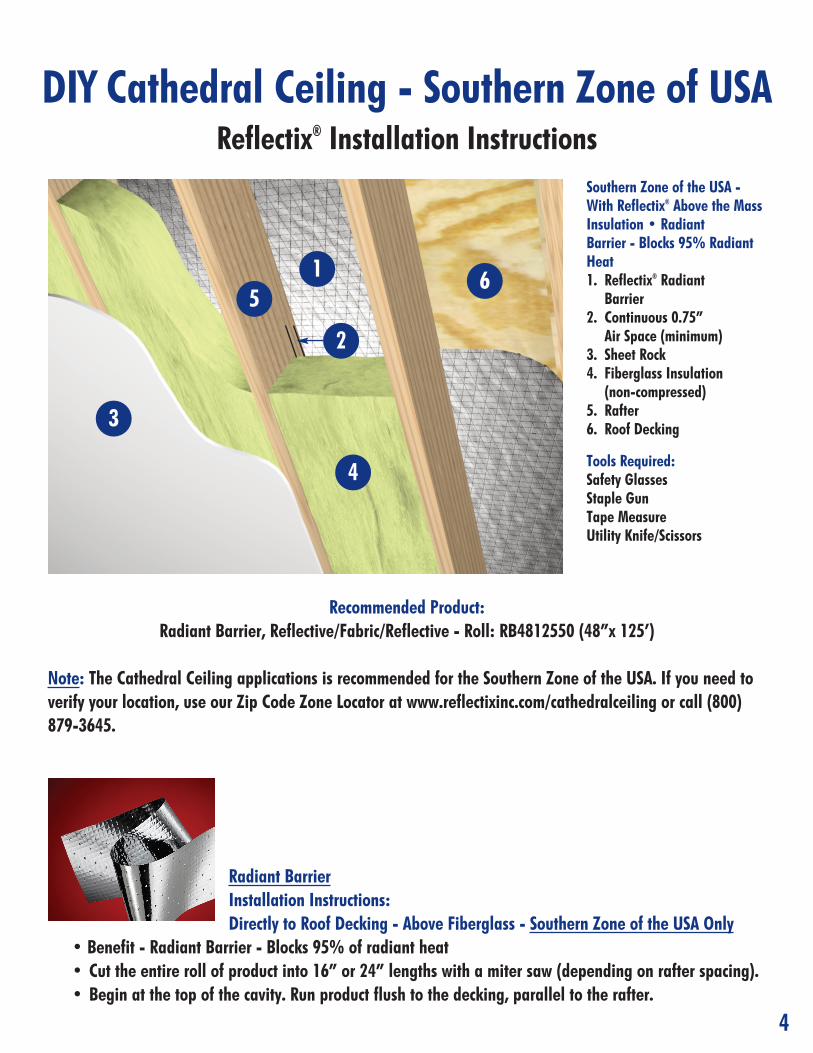
Southern Zone of the USA -With Reflectix® Above the MassInsulation • RadiantBarrier - Blocks 95% RadiantHeat1. Reflectix® Radiant
Barrier2. Continuous 0.75”
Air Space (minimum)3. Sheet Rock4. Fiberglass Insulation
(non-compressed)5. Rafter6. Roof Decking
Tools Required:Safety GlassesStaple GunTape MeasureUtility Knife/Scissors
DIY Cathedral Ceiling - Southern Zone of USAReflectix® Installation Instructions
Radiant BarrierInstallation Instructions:Directly to Roof Decking - Above Fiberglass - Southern Zone of the USA Only
• Benefit - Radiant Barrier - Blocks 95% of radiant heat• Cut the entire roll of product into 16” or 24” lengths with a miter saw (depending on rafter spacing).• Begin at the top of the cavity. Run product flush to the decking, parallel to the rafter.
Recommended Product:Radiant Barrier, Reflective/Fabric/Reflective - Roll: RB4812550 (48”x 125’)
Note: The Cathedral Ceiling applications is recommended for the Southern Zone of the USA. If you need toverify your location, use our Zip Code Zone Locator at www.reflectixinc.com/cathedralceiling or call (800)879-3645.
1
4
65
2
3
4
• Staple sheet directly to the deck (Nails poking through the Reflectix® product from above will not interfere with performance).
• Do not block any venting (cut around).• No need to cover rafters (no loop around).• Ensure that a continuous air space (0.75 inch minimum) is on the bottom side of the Reflectix® product(required and for ventilation).
• Install venting and mass insulation per local codes and manufacturer’s installation instructions.
Ventilation: Good ventilation in your attic increases your comfort and helps the materials of your house last longer. Be sure not to block ventilation paths when youinstall Reflectix®.
Review These Important Safety Guidelines Prior to Installation:• ALWAYS check local building codes before installing Reflectix®.• ALWAYS check the area you are insulating and make any needed repairs. Any worn wiring should be replaced before you begin installing Reflectix®.• ALWAYS make sure work areas are well ventilated and well lighted.• ALWAYS use eye protection when operating a staple gun.• ALWAYS use caution and common sense when using a staple gun. Be aware of where electrical wiring is located. Stapling into a wire can cause severe shock or death. NEVER staple into electrical wiring.
• ALWAYS be careful when working with large pieces of Reflectix® on windy days.• When installing Reflectix® on bright sunny days, it is best to wear sun glasses.• Do not work in areas such as attics when temperatures are too hot. • Visit our website at www.reflectixinc.com for additional product and installation information.
Please Note:The intention of these Installation Instructions and 3-D renderings are for the sole purpose of illustrating the correct location and relative position ofthe Reflectix® products in specific building assemblies. The correct construction methods and techniques are the responsibility of the installer or contrac-tor. The methods outlined are recommendations on location of the Reflectix® products as a guideline. There are no claims on the part of Reflectix, Inc.that these building assemblies are finite standards or meet building code requirements (as they can vary by region).
5
Recommended Product: Radiant Barrier, Reflective/Fabric/Reflective - Roll: RB4812550 (48”x 125’)
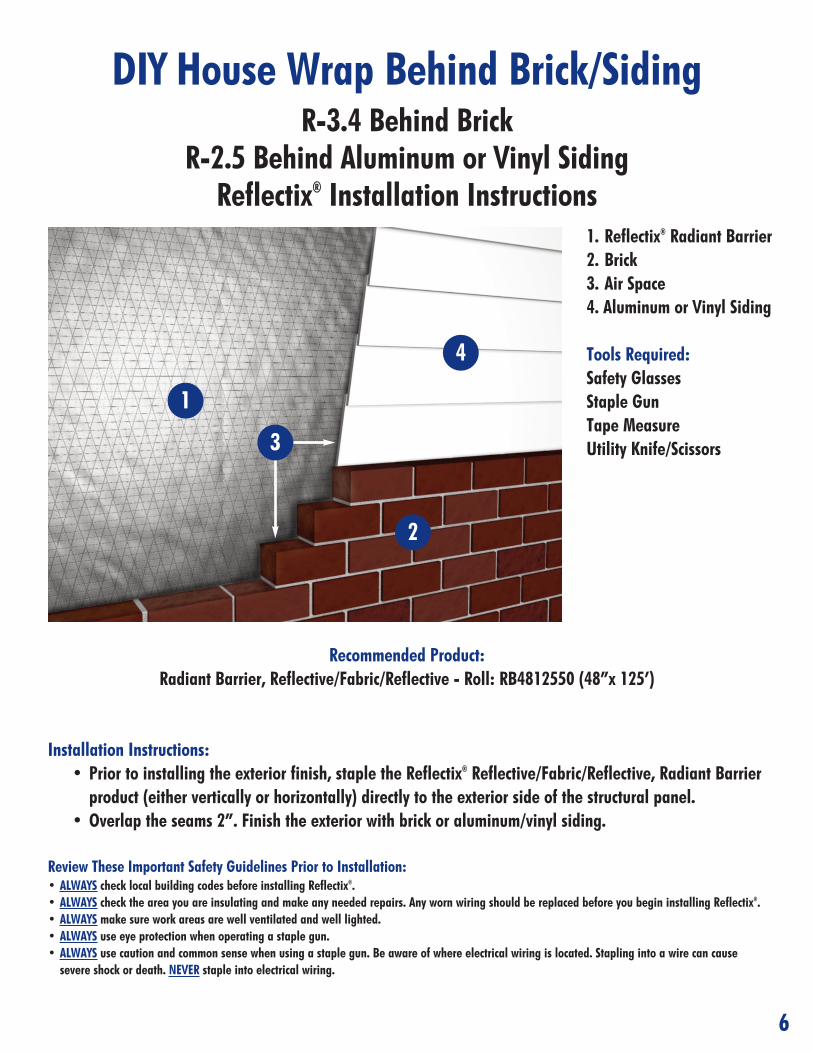
Installation Instructions:• Prior to installing the exterior finish, staple the Reflectix® Reflective/Fabric/Reflective, Radiant Barrier product (either vertically or horizontally) directly to the exterior side of the structural panel.
• Overlap the seams 2”. Finish the exterior with brick or aluminum/vinyl siding.
Review These Important Safety Guidelines Prior to Installation:• ALWAYS check local building codes before installing Reflectix®.• ALWAYS check the area you are insulating and make any needed repairs. Any worn wiring should be replaced before you begin installing Reflectix®.• ALWAYS make sure work areas are well ventilated and well lighted.• ALWAYS use eye protection when operating a staple gun.• ALWAYS use caution and common sense when using a staple gun. Be aware of where electrical wiring is located. Stapling into a wire can cause severe shock or death. NEVER staple into electrical wiring.
1. Reflectix® Radiant Barrier2. Brick3. Air Space4. Aluminum or Vinyl Siding
Tools Required:Safety GlassesStaple GunTape MeasureUtility Knife/Scissors
1
3
4
2
DIY House Wrap Behind Brick/SidingR-3.4 Behind Brick
R-2.5 Behind Aluminum or Vinyl SidingReflectix® Installation Instructions
6
• ALWAYS be careful when working with large pieces of Reflectix® on windy days.• When installing Reflectix® on bright sunny days, it is best to wear sun glasses.• Do not work in areas such as attics when temperatures are too hot. • Visit our website at www.reflectixinc.com for additional product and installation information.
Please Note:The intention of these Installation Instructions and 3-D renderings are for the sole purpose of illustrating the correct location and relative position ofthe Reflectix® products in specific building assemblies. The correct construction methods and techniques are the responsibility of the installer or contrac-tor. The methods outlined are recommendations on location of the Reflectix® products as a guideline. There are no claims on the part of Reflectix, Inc.that these building assemblies are finite standards or meet building code requirements (as they can vary by region).
Reflectix, Inc.P.O. Box 108, Markleville, IN 46056
Phone: (765) 533-4332 or (800) 879-3645Fax: (765) 533-2327
E-mail: [email protected]
7