remote access laboratory for testing advanced … · the project objectives are to: 1) develop...
TRANSCRIPT

REMOTE ACCESS LABORATORY
FOR TESTING ADVANCED TRAFFIC SIGNAL SYSTEMS:
OPERATIONAL MANUAL AND APPLICATION GUIDE
Final Report
KLK240
N06-16
National Institute for Advanced Transportation Technology
University of Idaho
December 2006
Ahmed Abdel-Rahim

DISCLAIMER
The contents of this report reflect the views of the authors,
who are responsible for the facts and the accuracy of the
information presented herein. This document is disseminated
under the sponsorship of the Department of Transportation,
University Transportation Centers Program, in the interest of
information exchange. The U.S. Government assumes no
liability for the contents or use thereof.

1. Report No.
2. Government Accession No.
3. Recipient’s Catalog No.
4. Title and Subtitle
Remote Access Laboratory for Testing Advanced Traffic Signal Systems:
Operational Manual and Application Guide
5. Report Date
January 2006
6. Performing Organization Code
KLK240
7. Author(s) Ahmed Abdel-Rahim
8. Performing Organization Report No.
NN06-16
9. Performing Organization Name and Address
National Institute for Advanced Transportation Technology
University of Idaho
10. Work Unit No. (TRAIS)
PO Box 440901; 115 Engineering Physics Building
Moscow, ID 838440901
11. Contract or Grant No.
DTRS98-G-0027
12. Sponsoring Agency Name and Address
US Department of Transportation
Research and Special Programs Administration
13. Type of Report and Period Covered
Final Report: August 2004- December
2005
400 7th Street SW
Washington, DC 20509-0001
14. Sponsoring Agency Code
USDOT/RSPA/DIR-1
Supplementary Notes:
16. Abstract
The NIATT traffic controller laboratory, with its world class combination of software and hardware and remote access
capabilities, provides educators throughout the nation with a unique opportunity to integrate real-time traffic controller operations
in undergraduate and graduate traffic engineering education. It also provides researchers, vendors, consultants, and transportation
professionals in state and local agencies with a tool that allows them to test advanced traffic signal control systems in laboratory
environment.
In this project we developed an operational manual for the lab’s remote access testing and a set of case studies that are based on
field problems with different complexity levels. The case studies will serve as an application guide for the lab users. The
development of such materials will improve the lab utilization and the quality of service of the lab and its users. The project
objectives are to: 1) develop operational manual for the remote access use of NIATT’s traffic controller laboratory, and 2)
develop a set of case studies based on field problems to demonstrate the potential use of the remote access lab in education and
research.
17. Key Words
Traffic signal controllers; real time control; research
and educational facilities, simulation
18. Distribution Statement
Unrestricted; Document is available to the public through the National
Technical Information Service; Springfield, VT.
19. Security Classif. (of this report)
Unclassified
20. Security Classif. (of this page)
Unclassified
21. No. of Pages
67
22. Price
…
Form DOT F 1700.7 (8-72) Reproduction of completed page authorized


Remote Access Laboratory for Testing Advanced Traffic Signal Systems: i
Operational Manual and Application Guide
TABLE OF CONTENTS
1. INTRODUCTION............................................................................................................... 2
1.1 BACKGROUND AND PROJECT DESCRIPTION ...................................................................... 2
1.2 PROJECT TASKS ................................................................................................................ 2
1.3 PROJECT DELIVERABLES .................................................................................................. 4
APPENDIX I
APPENDIX II
APPENDIX III
APPENDIX IV

Remote Access Laboratory for Testing Advanced Traffic Signal Systems: 2
Operational Manual and Application Guide
1. INTRODUCTION
1.1 Background and Project Description
With the availability and the knowledge gained through the development of NIATT’s
Remote-Access Hardware-In-the-Loop Simulation (RAHILS) laboratory, there is a need to
develop course activities and application guide that leverage the RAHILS concept. The
NIATT traffic controller laboratory, with its world class combination of software and
hardware and remote access capabilities, provides educators throughout the nation with a
unique opportunity to integrate real-time traffic controller operations in undergraduate and
graduate traffic engineering education. It also provides researchers, vendors, consultants, and
transportation professionals in state and local agencies with a tool that allows them to test
advanced traffic signal control systems in laboratory environment.
In this project we developed an operational manual for the lab’s remote access testing and a
set of case studies that are based on field problems with different complexity levels. The case
studies will serve as an application guide for the lab users. The development of such
materials will improve the lab utilization and the quality of service of the lab and its users.
The project objectives are to: 1) develop operational manual for the remote access use of
NIATT’s traffic controller laboratory, and 2) develop a set of case studies based on field
problems to demonstrate the potential use of the remote access lab in education and research.
1.2 Project Tasks
Project activities included the following major tasks:
Task 1: Develop procedures for the RAHILS laboratory testing utilizing the tools developed
by NIATT in previous UTC projects (Figure 1).
Task 2: Review and integrate the help and user manual documentations for all tools included
in the testing procedure such as the CID configuration tool and the Communication Interface
Network (CIN).

Remote Access Laboratory for Testing Advanced Traffic Signal Systems: 3
Operational Manual and Application Guide
Figure 1 Testing Procedure Diagram for RAHILS
Task 3: Develop the RAHILS on-line manuals for the initial design of the system that used
Virtual Network Communication Protocol (VNC)
Task 4: Conduct initial beta-testing for the RAHIL system to examine the accessibility and
reliability of the system and servers. The results of these tests identified several security and
functionality problems in the VNC-based system.
Edit the microsimulation
model input file
(CORSIM, VISSIM,
SIMTRAFFIC)
Configure the input file
for HILS simulation
(NIATT CID tool)
Configure the
communication system
for the experiment
(NIATT CIN tool)
Input control parameters
to the controllers
(vendor software or
control software)
Run the HILS
microsimulation model
(CORSIM, VISSIM,
SIMTRAFFIC)
Analyze the output files
(model output)
(NIATT output processor)
Download output
Remote Access Server
Simulation machine
Configuration machine

Remote Access Laboratory for Testing Advanced Traffic Signal Systems: 4
Operational Manual and Application Guide
Task 5: Based on the results of the initial beta-tests, a decision was made by the project team
to redesign the RAHILS system using Microsoft Remote Desktop connections rather than the
VNC-based system.
Task 6: A new set of on-line manuals was developed to address the changes in the system
design.
Task 7: A second set of beta-tests was conducted to test and validate the new Remote
Desktop-based RAHIL system. Results from the tests were all positive. The project team will
proceed to develop application guide and a final set of beta-tests for the system functionality.
These activities will be part of the second phase of the project.
1.3 Project Deliverables
The followings are the project deliverables:
RAHILS programmer guide (presented in Appendix I of this document)
RAHILS administrative guide (presented in Appendix II of this document)
RAHILS Remote Desktop user manual (presented in Appendix III of this document)
RAHILS User Guide (presented in Appendix IV of this document)

1
APPENDIX I
RR AA HH II LL SS
P R O G R A M M E R ’ S G U I D E

2
TABLE OF CONTENTS
I. SYSTEM CONCEPT.............................................................................................................. 3
II. SYSTEM COMPONENTS:.................................................................................................... 4
1. Gateway Server (GWS) ...................................................................................................... 4
2. Hosts the RAHILS website. ................................................................................................ 4
3. Lab Computers (PC) ........................................................................................................... 4
4. Traffic Controllers (TC) ...................................................................................................... 4
5. Controller Interface Devices (CID) .................................................................................... 4
6. Controller Interconnection Networks (CIN) ....................................................................... 4
III. DATABASE ....................................................................................................................... 4
IV. ROUTING THROUGH TUNNELS ................................................................................... 6
V. WEBSITE ............................................................................................................................... 7
7. Banner ................................................................................................................................. 7
8. Side-Panel ........................................................................................................................... 7
9. Main Menu .......................................................................................................................... 7
10. Main Window ................................................................................................................. 7
VI. FILE DISTRIBUTION ....................................................................................................... 8
VII. IMPORTANT FUNCTIONS ............................................................................................ 10
11. Database Connections (…/Include/db-con.php) ........................................................... 10
12. Login Check (…/Include/login_check.php) ................................................................. 10
13. Validate Data (…/Include/validate.php) ....................................................................... 11
14. Email (…/Include/functions.php) ................................................................................. 11
15. Linux Functions (…/Include/linux_functions.php) ...................................................... 11
16. Schedule Functions (…/schedule/sch_functions.php) .................................................. 11
VIII. http://gw1.niatt.uidaho.edu/ .............................................................................................. 13
17. Sign in (login.php) ........................................................................................................ 13
18. Register (register.php)................................................................................................... 14
19. Forgot password (forgot_password.php) ...................................................................... 14
IX. MEMBER LOG IN ........................................................................................................... 15
20. Home (mem_home.php) ............................................................................................... 15
21. Member profile (mem_view_info.php) ........................................................................ 15
22. Change Password (mem_change_passwd.php) ............................................................ 16
23. Lab Schedule (adm_man_comps.php) .......................................................................... 16
24. Sign Out (signout.php) .................................................................................................. 18
X. ADMIN LOGIN.................................................................................................................... 19
25. Home (mem_home.php) ............................................................................................... 19
26. Administrator’s profile (mem_view_info.php) ............................................................. 19
27. Change Password (mem_change_passwd.php) ............................................................ 19
28. Authorize users (adm_auth_users.php) ......................................................................... 19
29. Manage users (adm_man_users.php) ............................................................................ 21
30. Manage Lab Schedule (adm_man_comps.php) ............................................................ 21
31. Manage computer groups (adm_man_comps.php) ....................................................... 22
32. Sign out (signout.php) ................................................................................................... 23

3
I. SYSTEM CONCEPT
RAHILS stands for Remote Access Hardware-In-the-Loop Simulation. In other words, it
is Hardware-in-the-loop simulation done remotely. NIATT’s traffic controller lab, also
called RAHILS lab, boasts a wide range of traffic controllers, simulation software, and
other hardware. RAHILS makes the facilities at University of Idaho available to other
educational, government and research bodies around the globe (provided that they have a
fast enough internet connection) and the RAHILS website (gw1.niatt.uidaho.edu) is the
window for the rest of the world to use those facilities. The figure above displays the
basic idea behind the system. What the figure does not show is all the hardware and
software related to traffic control and simulations that are connected to the computers in
the RAHILS lab or installed on them, which are now accessible to the remote user.
This document is specifically written for programmers who might be involved with this
project in the future and assumes that the programmer has basic knowledge of HTML,
php, Perl, and the Linux operating system. It provides a detailed information on how the
website is organized, what files are used for what purposes and how the whole system
works. It is highly recommended that this document be used in conjunction with RAHILS
user’s manual and RAHILS administration manual.

4
II. SYSTEM COMPONENTS:
1. Gateway Server (GWS)
The gateway server performs the following functions:
a. Hosts the RAHILS website.
b. Hosts the database used to store all the information.
c. Acts as a firewall for security.
d. Routes incoming traffic to the appropriate computers in the lab (will be explained
in detail later).
2. Lab Computers (PC)
The lab computers are divided in groups of two. Each computer group consists of a
laptop and a desktop PC. The desktop is normally used to run simulation software and the
laptop is used to run other necessary software related to traffic controller setup or CIN
setup depending on the nature of the project.
3. Traffic Controllers (TC)
There are five traffic controllers with each computer group. TCs are required for
hardware-in-the-loop simulations (HILS).
4. Controller Interface Devices (CID)
CIDs interface TCs with the simulation software via USB (refer to CID manual for more
information).
5. Controller Interconnection Networks (CIN)
CINs can be used to network traffic controllers (refer to CIN Manual for more
information).
III. DATABASE
The database is a very vital part of the system. All the client information, the schedule
dates and times, usernames and passwords needed to make RAHILS work are stored in
the database. The data is accessed by different web pages, and Perl scripts that open and
close tunnels from the server to the computers in the INTRANET.
The database used is postgreSQL (www.postgresql.com). It is the most advanced
Open Source database software and is automatically installed with FreeBSD operating
system.
Table 1 gives detailed information on the structure of the database. The field
names are the actual names used in the database.

5
Table 1: Database Structure
Database: db_customer
Table name Field name Comment
tbl_customer: customerid Contains the client’s login
name, password and the date
the account was created.
password
date_created
tbl_customer_info: firstname Personal information. Each
client is given two port
numbers to use and is
expected to use only those two
ports to connect to the lab
computers. In the database
only the even port number is
stored, which is always the
lesser one. They are assigned
to new clients in the same
fashion. For example, if a
client is assigned 6910, he
may use the ports 6910 and
6911.
lastname
companyname
street1
street2
city
state
zipcode
homephone
workphone
fax
customerid
status
port
tbl_customer_log customerid Records the date and time of
client login, and the IP address
of the computer used. logdate
logtime
v_ip
tbl_comp_group groupid Contains the group ID of the
computer group, IP address of
the two computers connected
and a short description.
description
ip_comp1
ip_comp2
tbl_schedule customerid Contains the client ID, client’s
port #, and date and time
scheduled by the user to use
the lab.
date
starttime
endtime
computer
port

6
IV. ROUTING THROUGH TUNNELS
A very critical part of the system is routing incoming connections to appropriate
computers in the lab depending on the source of the connections and the schedule of the
lab. VNC in the client side connects to the server using the server address and a port
number assigned to the client separated by a semi-colon. For example if a client X wants
to connect VNC to server www.server.com on port 7000, then he would enter
“www.server.com:7000”.
A Perl script “/root/scheduler2.pl” is run every fifteen minutes as a “cron” job on the
server. The script reads the schedule from the database and determines if any client has
scheduled to use the lab starting now (this is done every 15 minutes, schedules can only
start on the hour or half an hour past the hour). If it finds one, the script creates a tunnel
between the two ports assigned to the client and the two computers in the computer
group. The client has no control over which port tunnels to which computer. This is
predetermined by the administrator – the even port tunnels to ip_comp1 and the odd
tunnels to ip_comp2.
The command that creates the tunnel (for example, between $port1 and $ip_comp1):
iptables –t nat –A PREROUTING –p tcp –I eth0 –dport $port1 –j DNAT --to-destination
$ip_comp1:5900
The number 5900 is used after $ip_comp1 because the VNC servers in the lab computers
are setup to accept incoming connections on port 5900. It is easier to always make this
5900 if new computers are added.
Likewise, if a schedule is ending:
iptables –t nat –D PREROUTING –p tcp –I eth0 –dport $port1 –j DNAT --to-destination
$ip_comp1:5900
This removes the tunnel. However, just to make sure that there are no unwanted iptable
rules floating around, the iptable is restarted with default rules everyday after the normal
lab operating hours using the following commands in sequence.
/etc/rc.d/init.d/iptables restart
/etc/sysconfig/iptables-gw1.sh

7
V. WEBSITE
The code for the website is all manually written in php or HTML. The main objectives of
the website are:
Provide information to anyone interested about Remote access hardware-in-the-
loop simulation (RAHILS).
Allow interested personnel to register by submitting necessary information.
Provide a means for authorized personnel to effectively and efficiently schedule
times to use the lab services without manual intervention.
Keep track of member activity.
Provide a means for RAHILS administrator to efficiently and easily administer
the users, and manage the schedule and resources that are available to the remote users.
Web page layout:
All these sections are implemented in frames for quicker loading of the web pages. The
layout of the web page can be divided into 4 sections namely:
6. Banner
This contains the name and logo and never changes.
7. Side-Panel
This is used to sign-in a user and also to display context-sensitive side menus.
8. Main Menu
This contains main menu items that are accessible all the time.
9. Main Window
This displays all the information and forms.
Banner
Side-
panel Main Menu
Main Window

8
VI. FILE DISTRIBUTION
All files for the website are located at “/var/www/html/RAHILS/”. Table 2 shows the
distribution of all the files that make the RAHILS website work. The file names are pretty
suggestive and simple. Table 2 can be used to locate any file if need be.
Table 2. File distribution.
Directory Contents Comments
/var/www/html/RAHILS/
This folder contains all
the “.php” files for
Main Menu, Banner,
Sidepanel, Security
which is used to make
sure that users who are
not logged on do not
have access to certain
pages that should only
be viewed after
logging in.
…/RAHILS/admin/
Files used when the
administrator logs in.
Administrator log in
displays a different
side menu than a
normal member log in.
Administrator has
more privileges.

9
…/RAHILS/images/
Images used in the
website.
…/RAHILS/Include/
PHP and Perl files
containing various
functions necessary for
other files to function
correctly.
…/RAHILS/mem_services/
Files that perform
certain functions on a
member account. For
example, authorize or
remove a member
account.
…/RAHILS/members/
Files used when a
normal member logs
in or registers. For
example, member’s
side menu etc.

10
…/RAHILS/schedule/
Files used to display
and set the schedule
for RAHILS
computers in the lab.
…/Themes Cascading Style Sheet.
VII. IMPORTANT FUNCTIONS
10. Database Connections (…/Include/db-con.php)
These are the functions that are used to connect to the database, close connections and
display error messages.
a. Connection()
Establishes connection with the postgreSQL database.
b. CloseConnection()
Closes connection with the database.
c. OnError()
Displays error if connection cannot be made.
11. Login Check (…/Include/login_check.php)
These functions make sure a valid user with a valid username and password logs in.
d. CheckID (id)
Checks if the user id is valid.
e. CheckStatus (id)
Determines if the user is authorized, suspended or pending authorization.
f. CheckLogin (id, password)
Validates the user id and password.
g. LogCustomer (id)
Logs user’s IP address, ID, log in date and time in the database.

11
12. Validate Data (…/Include/validate.php)
These functions validate the information like phone numbers, email addresses, zip code,
state etc. entered by the users.
h. is_phone (phone #)
i. is_email (email address)
j. is_zip (zipcode)
k. is_state (state)
13. Email (…/Include/functions.php)
l. Send_mail (to, subject, message)
Sends email to the specified address. This is a base function and is used by other
functions to send email for other specific purposes.
14. Linux Functions (…/Include/linux_functions.php)
These functions are used to perform user administration in the server.
m. sys_add_newuser(user, password)
Adds new users to samba and Linux server using “…/Include/add_new_user.pl”
script in Perl.
n. sys_change_passwd(user, password)
Changes password for a user in samba and Linux server using
“…/Include/change_pwd.pl” in Perl.
o. sys_remove_user(user)
Deletes a user from samba and Linux server.
15. Schedule Functions (…/schedule/sch_functions.php)
p. display_sch_dates(arguments)
It displays the dates in the header of the schedule table and in the “select date”
section.
q. display_sch_times(arguments)
It displays the times in the schedule table and in the “select times” sections.
r. display_schedule(arguments)
This function gathers data from the database about who is scheduled when and
displays it accordingly.
s. remove(user)
It removes a client from schedule.
t. calculate_span(arguments)
This function is calculated by display_schedule function to calculate, how long is
a client scheduled and how big a space should it cover in the schedule.
u. validate_time(arguments)

12
This function validates the time or date selected by the client when setting up a
schedule. It makes sure that there is no conflicting schedule on a computer or
across computers and it also makes sure, the client selects a time in the future.
13
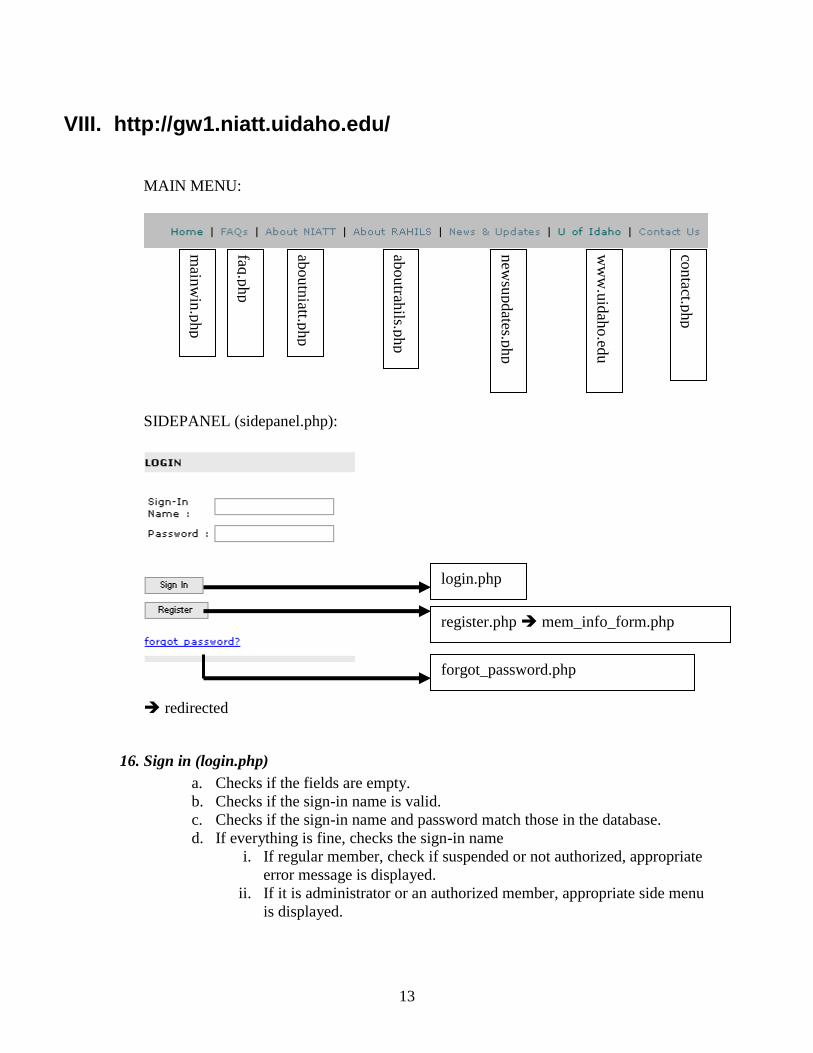
VIII. http://gw1.niatt.uidaho.edu/
MAIN MENU:
SIDEPANEL (sidepanel.php):
redirected
16. Sign in (login.php)
a. Checks if the fields are empty.
b. Checks if the sign-in name is valid.
c. Checks if the sign-in name and password match those in the database.
d. If everything is fine, checks the sign-in name
i. If regular member, check if suspended or not authorized, appropriate
error message is displayed.
ii. If it is administrator or an authorized member, appropriate side menu
is displayed.
main
win
.php
faq.p
hp
aboutn
iatt.php
aboutrah
ils.php
new
supdates.p
hp
ww
w.u
idah
o.ed
u
contact.p
hp
login.php
register.php mem_info_form.php
forgot_password.php

14
17. Register (register.php)
External dependencies: mem_info_form.php
Displays a form for the user to fill in main window.
a. Submit (submit_new_info.php):
i. Checks if all the required fields are filled.
ii. Checks if the zipcode, state, phone, fax number, email address are valid using
functions in “validate.php”.
iii. If everything is fine, connects and sends data to the database.
iv. Displays confirmation and sends confirmation email to both the client and the
administrator informing that a new client has registered.
b. Cancel (cancelform.php):
Goes back to last page (with the picture).
18. Forgot password (forgot_password.php)
This prompts the users for his email address and the password to the emailed to the
email address specified after it is verified.
submit_new_info.php cancel_form.php

15
IX. MEMBER LOG IN
Member’s Side Menu:
All the side menu items display appropriate forms or information on the main window.
19. Home (mem_home.php)
20. Member profile (mem_view_info.php)
Connects to the database, gathers member’s information and it in a tabulated form in
the main window and allows the member to edit the information.
a. Edit Info (mem_edit_info.php):
Allows the member to edit his profile.
mem_home.php
mem_view_info.php
mem_change_passwd.php
adm_man_comps.php
signout.php
mem_edit_info.php
update_info.php

16
21. Change Password (mem_change_passwd.php)
a. Change Password (change_password.php)
Verifies that the old password is correct and the two new passwords match and
changes the password in the database and in the server system using
“…/Include/change_pwd.php” file.
22. Lab Schedule (adm_man_comps.php)
Displays a list of computer groups available for use and allows the user to view the
schedule for any of the groups.
a. View Schedule (mem_schedule.php)
External dependencies: …/schedule/sch_functions.php
The schedule of the lab for this week is displayed and the user is given the option
to schedule a time to use the lab. Currently, the user can view the schedule and set
a schedule only for next fourteen days
The user can view the schedule for the next 14 days divided in two weeks
– this week and next week. A session variable “offset” keeps track of which week
of schedule to display. So when a user wants to view next week’s schedule, it
calls the same function but with a different value for “offset”. However, Next
week goes through “next_week.php” and this week goes through
“this_week.php”. These files just change the value for “offset” and redirect to
“mem_schedule.php”.
change_password.php
mem_schedule.php

17
i) Next week (mem_schedule.php)
This reloads the same page but with a different offset value so that next
week’s schedule is displayed. Next week’s schedule will contain a “This
week” button in place a “Next week” button and it works exactly the same
way.
ii) Select Different Computer (adm_man_comps.php)
This takes the user back to the page that lists the available computer groups.
iii) Cancel Reservation (unscheduled.php)
This removes the user’s reservation from the database using “remove()”
function and if the user happens to cancel during his scheduled time, it also
removes the tunnel between the user’s computers the lab computers so that
other users can use them.
iv) Submit (set_schedule.php)
This checks to make sure the date, start time, and end time selected by the
user are all valid and if they are, the schedule data is entered in the database
and confirmation is displayed on the screen. A confirmation email is sent to
both the user and the administrator informing about the confirmed
scheduled. If not, the same page is reloaded with an appropriate error
message.
adm_man_comps.php mem_schedule.php
set_schedule.php
unschedule.php

18
23. Sign Out (signout.php)
This destroys all the session variables and loads the topmost home page.

19
ADMIN LOGIN
Administrator’s Side Menu:
All the side menu items display appropriate forms or information on the main window.
24. Home (mem_home.php)
This is Administrator’s home page. It has no special function besides being
informative.
25. Administrator’s profile (mem_view_info.php)
See IX.2.
26. Change Password (mem_change_passwd.php)
See IX.3.
27. Authorize users (adm_auth_users.php)
The administrator has the responsibility and power to authorize valid registered users
and re-authorize users who have been suspended. These users will appear on the list.
The administrator can either authorize a client or remove the client and delete his
information from the database permanently.
adm_home.php
mem_view_info.php
mem_change_passwd.php
adm_auth_users.php
adm_man_users.php
adm_man_comps.php
adm_man_comps.php signout.php
mem_view_info.php mem_authorize_.php

20
a. View Info (mem_view_info.php)
See IX.2
b. Edit Info (mem_edit_info.php)
See IX.2.a
c. Authorize (mem_authorize.php)
External dependencies: adduser.php
add_new_user.pl
When authorizing a brand new client, the status of the user in the database
is changed and a samba and Linux server account with username and password
(provided by the user for the website when first registering) is created. If a
suspended user (already has the server accounts) is being authorized, the access
mode to the user’s home directory is changed (user given access to his home
directory).
If the authorization process is successful, a confirmation page will be
displayed. It will also show the newly assigned port numbers for the user. A
confirmation email is also sent to the user.
d. Remove (mem_remove.php)
External dependencies: linux_functions.php
When a user is removed, all information relating to that user is deleted
from the database. If the user account was suspended (or active), then the server
accounts are also deleted using sys_remove_user() function.
mem_edit_info.php mem_remove.php

21
28. Manage users (adm_man_users.php)
The “manage users” option allows the administrator to manage the existing active
accounts. Besides the normal viewing and editing member profile, the administrator
can choose to suspend an account for whatever reason or remove the account
completely.
The options available to the administrator are:
a. View Info (mem_view_info.php)
See IX.2
b. Edit Info (mem_edit_info.php)
See IX.2.a
c. Suspend (mem_old_suspend.php)
This process is very much similar to authorize but with minor differences.
When a user is suspended, his status is changed accordingly in the database. Also
his server accounts are disabled by changing the access mode of the user’s home
directory so that the directory cannot be accessed by anyone but the superuser.
If the suspension is successful, a confirmation page will appear and an
email will be sent to the user informing him of his suspension.
d. Remove (mem_remove.php)
See 4.d above.
29. Manage Lab Schedule (adm_man_comps.php)
See IX.4
mem_view_info.php
mem_edit_info.php
mem_old_suspend_.php
mem_remove.php
22
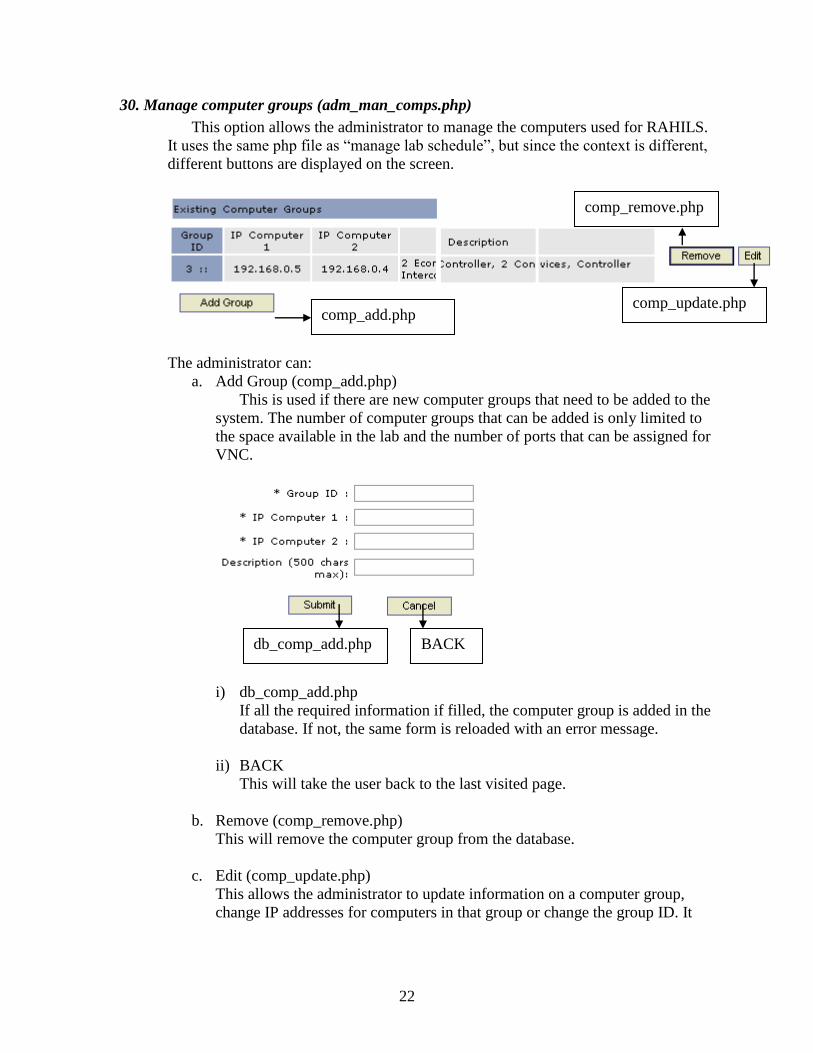
30. Manage computer groups (adm_man_comps.php)
This option allows the administrator to manage the computers used for RAHILS.
It uses the same php file as “manage lab schedule”, but since the context is different,
different buttons are displayed on the screen.
The administrator can:
a. Add Group (comp_add.php)
This is used if there are new computer groups that need to be added to the
system. The number of computer groups that can be added is only limited to
the space available in the lab and the number of ports that can be assigned for
VNC.
i) db_comp_add.php
If all the required information if filled, the computer group is added in the
database. If not, the same form is reloaded with an error message.
ii) BACK
This will take the user back to the last visited page.
b. Remove (comp_remove.php)
This will remove the computer group from the database.
c. Edit (comp_update.php)
This allows the administrator to update information on a computer group,
change IP addresses for computers in that group or change the group ID. It
db_comp_add.php BACK
comp_remove.php
comp_update.php comp_add.php

23
uses the same form as “add group” and uses the same file
“db_comp_add.php” but with different context flags.
31. Sign out (signout.php)
See IX.5

APPENDIX II
RAHILS
ADMINISTRATION
REMOTE
ACCESS
HARDWARE
IN
THE
LOOP
SIMULATION

2
Table of Contents
I. Administrator’s Side Panel ...................................................................................... 3
II. Administrative Tools ................................................................................................ 4 1. Home ....................................................................................................................... 4
2. Admin Profile.......................................................................................................... 4
3. Change password .................................................................................................... 5
4. Authorize Users ...................................................................................................... 5
a. View the information provided by the user. ....................................................... 6
b. Edit the information provided by the user. ......................................................... 6
c. Authorize the user. .............................................................................................. 7
d. Remove the user from the database. ................................................................... 7
5. Manage Users.......................................................................................................... 7
e. View a user‟s profile. .......................................................................................... 7
f. Edit a user‟s profile. ............................................................................................ 8
g. Suspend a user..................................................................................................... 8
h. Remove a user from the database. ...................................................................... 8
6. Manage Lab Schedule ............................................................................................. 8
i. Computer Group ID. ........................................................................................... 9
j. IP address of computer 1..................................................................................... 9
k. IP address of computer 2..................................................................................... 9
l. Description of the equipments in that computer group. ...................................... 9
7. Manage Computer Groups .................................................................................... 10
m. Remove the computer group (make it unavailable for use). ......................... 10
n. Edit the Description, IP addresses of computers or group ID........................... 10
o. Add a new group. .............................................................................................. 11
III. Connecting new computers to the RAHILS network. ......................................... 11

3
RAHILS ADMINISTRATION
I. Administrator’s Side Panel If you log in as an administrator, you will see the menu on the side panel as
shown in fig. 1. This menu gives the administrator access to all the tools required to
manage the RAHILS system. This includes:
a. Managing the users.
b. Managing the Schedule.
c. Managing the Computers.
As an administrator, you will have full access to the schedule, that is, you will be
able to view the schedule and delete any scheduled event if needed. You will be able to
delete or suspend users from the system, authorize new users to use the RAHILS
services. Add or remove computer groups or computers in groups. This manual gives a
detailed information on how to perform all these tasks necessary to ensure a smooth
functioning of Remote Access Hardware-in-the-Loop Simulation (RAHILS).
Fig. 1. Administrator‟s Side Panel

4
Table 1. Summary of options:
Menu Function
Home Opens the Home page in the main window.
Admin Profile Displays the administrators profile with information like:
1. Name
2. Address
3. Phone numbers
4. Email address
5. Ports
Change Password Allows the administrator to change his/her password
Authorize Users Displays a list of users that have registered but pending
authorization.
Manage Users Displays a list of users who have already been authorized and
are active or suspended.
Manage Lab Schedule Displays a list of computer groups that are available for
scheduling.
Manage Computer
Groups
Displays the list of computer groups and allows the
administrator to remove, edit or add computer groups.
II. Administrative Tools
1. Home
See Summary.
2. Admin Profile
Displays the current information of the administrator in the database and also
allows the administrator to edit the information. This should be changed if the
Fig. 2. Administrator‟s Profile

5
Fig. 4. New clients list (suspended or pending authorization)
Fig. 3. Change password.
RAHILS administrator is changed. However, the email address will remain the
same. The new administrator‟s email address will have to be changed by the
NIATT system administrator.
3. Change password
Prompts the user to enter the old password and new password twice.
4. Authorize Users
The main window displays a list of users who have registered by submitting the
required information but have yet to be authorized to use the services. This list
also displays members who have been authorized before but were suspended for
whatever reason. The administrator can:

6
Fig. 5. User profile.
Fig. 6. Edit user profile.
a. View the information provided by the user.
This will display the user profile and allows the administrator to authorize or
remove the user.
b. Edit the information provided by the user.
This will display the use profile and allow the administrator to edit the
information.

7
Fig. 9. Client list (authorized and active).
c. Authorize the user.
You will see the confirmation in fig. 7 if the user is successfully authorized.
d. Remove the user from the database.
The following message will appear if a user is successfully removed from
the system.
5. Manage Users
The main window displays a list of users who have registered and were
authorized and are not suspended. So the users are active and can use the services.
The administrator has the options to:
e. View a user’s profile.
This displays the user‟s profile and allows the administrator to suspend or
remove the user.
Fig. 7. Authorization confirmation.
Fig. 8. Deletion confirmation.

8
Fig. 12. Available computers list (manage schedule).
Fig. 11. Suspension confirmation.
f. Edit a user’s profile.
This displays the user‟s profile and allows the administrator to edit the
information and suspend or remove the user. The format is the same as in
section 4 b.
g. Suspend a user.
A message as shown in fig. 11 confirms successful suspension of a user.
h. Remove a user from the database.
See above. Same as described in „Authorize Users‟.
6. Manage Lab Schedule
The main window displays a list of computer groups available for scheduling in a
tabulated form as shown in fig. 12. The table contains:
Fig. 10. User profile.

9
Fig. 13. Lab Schedule.
i. Computer Group ID.
j. IP address of computer 1.
k. IP address of computer 2.
l. Description of the equipments in that computer group.
The administrator can view the schedule for the available computer groups by
clicking the “View Schedule” button, which will display the schedule for that
computer as shown in fig. 13. The user can pick a date within the next 14 days.
They can pick the start time and end time as long as there is no one else scheduled
at those times. The user can also choose to select other computer groups or cancel
the reservation if needed.

10
Manage Computer Groups
The main window displays the same list as the „Manage Lab Schedule‟ option but
with this option the administrator has more options as seen in fig. 14.
The administrator can now:
m. Remove the computer group (make it unavailable for use).
n. Edit the Description, IP addresses of computers or group ID.
The „Edit‟ option will display a form in fig. 15 and allows the administrator
to make the necessary changes.
A few things administrator should be careful about:
i. Group ID should be unique or the website will generate and error
message.
ii. The right IP addresses should be used. IP addresses should be double-
checked to make sure that the computer belongs to that group.
iii. The description should be short and informative. Although it is not
required, it is very helpful and highly recommended.
Fig. 14. Computers list (manage computers).
Fig. 15. Edit computer group information form.

11
o. Add a new group.
The „Add Group‟ Option will take you to a form show in fig. 16. The Group
ID, IP addresses of the computers in the group are required but the
description is not.
III. Connecting new computers to the RAHILS network
Following steps should be taken when connecting new computers to the RAHILS
network:
1. Make sure the wireless connection is disabled if there is one.
2. Connect an Ethernet cable from the computer to the RAHILS switch (currently by
the gw1 server, this might be moved in the future, contact NIATT system
administrator for more details).
3. Setup your TCP/IP settings as follows:
i. We are not going to obtain an IP address automatically. So, select the
other option, which is “use the following IP address”.
IP address: 192.168.0.X
Subnet mask: 255.255.255.0
Default gateway: 192.168.0.253
X should be chosen carefully. Do not choose an IP address that is already
on the network. If you do, an error message will be displayed. This IP
address will be needed when adding computer groups through the website.
ii. Use the following DNS server address (these might change, if they do
contact ITS at 885-2725):
Preferred DNS Server: 129.101.119.223
Alternate DNS Server: 129.101.119.220
Fig. 16. Add new computer group form.

12
4. After the computer is connected to the network, it is time to assign a domain to
the computer or make the computer a part of a domain. The domain is RAHILS in
our case. This can be done from
My computer properties Computer name Change Domain
The domain is RAHILS and the username and password should be the SAMBA
username and password (will be provided).
5. Restart the computer.

APPENDIX III
RAHILS
Remote Desktop User Manual
Kyle King
William Brinkerhoff
Document Revision 1.0
July 25, 2005

Remote Desktop User Manual
1
1
Table of Contents
1.0 INTRODUCTION .................................................................................................................................. 2
1.1 PROJECT MOTIVATION .......................................................................................................................... 2 1.3 DEFINITIONS & TERMS ......................................................................................................................... 2
2.0 USAGE DESCRIPTION ........................................................................................................................ 3
2.1 REGISTERING ........................................................................................................................................ 3 2.2 SCHEDULING TIMES .............................................................................................................................. 3 2.3 CONNECTING ........................................................................................................................................ 4
2.3.1 Connecting with Windows ............................................................................................................ 4 2.3.2 Connecting with Unix / Linux ...................................................................................................... 5 2.3.2 Connecting with Mac OS X .......................................................................................................... 6
2.4 MANAGING USERS ................................................................................................................................ 6 2.5 MANAGING SCHEDULED TIMES ............................................................................................................ 6 2.6 MANAGING COMPUTER BANKS ............................................................................................................ 7 2.7 CONTROLLING THE RAHILS SERVICE .................................................................................................. 7
3.0 INSTALLATION ................................................................................................................................... 7
3.1 PREREQUISITES ..................................................................................................................................... 8 3.2 WEB SERVER ........................................................................................................................................ 8 3.3 DOMAIN CONTROLLER ......................................................................................................................... 8 HTTP://WWW.BEYONDLOGIC.ORG/SOLUTIONS/REMOTEPROCESS/BEYONDEXEC.HTM ................................. 9 3.4 COMPUTER BANKS ............................................................................................................................... 9 3.5 CLIENT SETUP......................................................................................................................................10

Remote Desktop User Manual
2
2
1.0 INTRODUCTION
This document is the usage, installation, and technical documentation for the Remote Access
Hardware in the Loop Simulation (RAHILS) software being developed for the National Institute
of Advanced Transportation Technology.
This section gives the basic information necessary for someone not familiar with RAHILS to read
the rest of this document and understand the basic function and motivation of the system.
1.1 Project Motivation
NIATT has a large array of hardware traffic controllers that can be used to run various traffic
simulations. These controllers can only be used locally in the lab they’re stored. Consequently,
there are a number of users outside Moscow that cannot use the traffic controllers.
RAHILS makes these traffic controllers available remotely. The traffic controllers’ are
proprietary hardware that can only be controlled with software that does not have any built-in
remote capabilities. To overcome this, RAHILS makes the entire operating system of lab
computers with a hardware connection to traffic controllers available remotely. RAHILS allows
NIATT to make its resources available to those that cannot physically be at their offices. RAHILS
primary focuses are security, speed, and functionality.
1.2 References & Applicable Documents
1. Jennifer Westberg is the original developer of the project. Her thesis describes the functionality
and purpose of RAHILS before its revision in June of 2005.
2. Meetings with clients Michael Kyte, Ahmed Abdel-Rahim, and Paul Oman.
1.3 Definitions & Terms
NIATT The National Institute of Advanced
Transportation Technology at the University of
Idaho
RAHILS Remote Access in the Loop Simulation
Microsoft Domain Controller (MSDC) A computer running a Windows Server that
manages user access to a network, which
includes logging on, authentication, and access
to Active Directory and shared resources
(Microsoft 2005).
Microsoft Management Console (MMC) Provides a common host environment for snap-
ins, provided by Microsoft® and third party
software vendors. Snap-ins provide the actual
management behavior

Remote Desktop User Manual
3
3
2.0 USAGE DESCRIPTION
This section describes how users can operate RAHILS through its front-end interfaces; this
section is written from the perspective of a non-technical user or administrator and assumes all
RAHILS services are operating normally.
RAHILS front-end is a web interface accessible at rahils.niatt.uidaho.edu at the time of writing
this document.
2.1 Registering
Before a user can enter the RAHILS system, they must register. There is a link to the registration
page on the main page below the sign in form. Every field in the registration form must be filled
out with a unique email and username.
Administrators can approve any registered users by using the “Manage Users” page discussed in
more detail in the section 2.3.
Once approved, user will be informed with the following email:
From: [email protected] Subject: RAHILS Account Information
You request for a NIATT RAHILS account has been approved. Please keep this email as it contains important information needed to connect to RAHILS computer network.
Now that you have an account, you can log into the RAHILS system at
http://rahils.niatt.uidaho.edu
You can schedule time on our system. Once your request for a time has been approved, you will receive an email with
further instructions and details.
==========================
RAHILS ACCOUNT INFORMATION
==========================
Username: example
Password: password Registered Email: [email protected]
It is important that this information be kept up-to-date. Should your email or any other important information change it can be updated on the RAHILS website. Thanks for using our system.
The user can use the emailed information to log into RAHILS web front end. The front end can
be used to schedule times, edit account information, and change passwords.
2.2 Scheduling Times
Once the user has entered into the RAHILS web front end (see previous section) they can
navigate to the scheduling page using the navigation menu on the left. There is no limit on the
number of hours, or days for that matter, of a scheduled time. Users must choose a bank to
schedule. Users have sole access to the computers in their bank during their scheduled times and
can connect to them simultaneously.

Remote Desktop User Manual
4
4
Scheduled times, like registrations, must be approved by an administrator. Times cannot be
scheduled before the approval time the next day; the default approval time is 8:30 am. Once the
time has been approved, the user will receive the following confirmation email:
From: [email protected]
Subject: RAHILS Connection Information
Your requested time on RAHILS computer has been confirmed. Use the connection information listed below to connect to
the RAHILS computer bank. For detailed information on how to use the connection information, please visit the Frequently Asked Question section of
the RAHILS website that you used to register at
http://rahils.niatt.uidaho.edu/faq.php
========================
CONNECTION INFORMATION ========================
Time: July 26, 10:15 PM - July 30, 7:30 PM Bank ID: 1
Remote Desktop Addresses: 129.101.xxx.xxx:xxxx 129.101.xxx.xxx:xxxx
============
PLEASE NOTE
============
You can connect at the above time to either (or both) of the remote desktop addresses. You may only use those computers
at the scheduled time. You will be forced off (losing all work) if you remain on past your scheduled time. There will be a five minute warning.
Administrators should not schedule times, as the RAHILS service will disable their account once
their time has expired. Administrators have unrestricted remote desktop access to the RAHILS
computers.
2.3 Connecting
Once a user has scheduled a time they will receive the above email. The email contains all
information required to connect. How you connect is different depending on which operating
system you’re connecting from. Following are the typical ways to connect for Windows XP,
Linux, and Mac OS X.
2.3.1 Connecting with Windows
To connect to RAHILS from Windows XP, click Start, point to Programs or All Programs,
point to Accessories, point to Communications, and then click Remote Desktop Connection.
The following window will appear:

Remote Desktop User Manual
5
5
The two addresses listed in the email are the addresses that can be put in the “Computer” field of
the above window. The “Options” button can be used to customize certain aspects of the session
such as screen size, logon information, and performance options. Performance options can be
customized for your connection speed.
The “Local Resources” pane of “Options” can be used to mount local resources. This will make
all information on the connecting computer’s hard disk available to the remote computer and vise
versa. This is the best way to make data files available on the remote system. Remote Desktop
will issue a warning that this data will be available.
2.3.2 Connecting with Unix / Linux
To connect to RAHILS from Unix / Linux, you must first download the Remote Desktop client
from Microsoft’s website at http://www.rdesktop.org/
The file is a tarfile that can be untarred with the tar command. This file can also be found untarred
in the Third Party Applications folder of the RAHILS disk.
rdesktop uses a typical GNU-style build procedure:
% ./configure [options]
% make
% make install
where documentation for [options] can be found by running "./configure --help". Usually no
options are necessary. The default is to install under /usr/local, this can be changed with --
prefix=directory.
To invoke rdesktop open a terminal and type
% rdesktop [options] server
where server is the connection address to the RAHILS in the email send upon authorization of the
scheduled time. If you receive "Connection refused", this probably there is a firewall blocking
access. In that event the local network administrator must be notified.
The rdesktop manual page lists the possible connection options (man rdesktop).

Remote Desktop User Manual
6
6
2.3.2 Connecting with Mac OS X
To connect to RAHILS from Mac OS X, you must first download the Remote Desktop client
from Microsoft’s website at
www.microsoft.com/mac/otherproducts/otherproducts.aspx?pid=remotedesktopclient
This file will be a disk image that should automatically mount. Drag the content of the image to
you Applications folder and open the Remote Desktop executable. This file can also be found in
the Third Party Applications folder of the RAHILS disk. At the point, you can follow the step-by-
step instructions outlined in section 2.3.1.
2.4 Managing Users
This section describes how RAHILS administrators can manage users in the RAHILS system. If
no Administrators are in the system upon installation, a user must register with system. The
newly registered user’s status must be set to “Approved” and their user level to “Admin” with
some direct interface to the database. phpMyAdmin is the recommended method.
To manage RAHILS users, select the “Manage Users” link from the navigation menu once
logged in. The Mange Users page has two sections: Edit / Delete Users, and Authorize Pending
Users.
To edit or delete users, highlight the user you wish to modify and click the appropriate button.
The Edit User page is identical to the Edit Profile page available to users with the exception that
Administrators can change User Level. Administrator’s can assign and remove administrative
privileges from other authorized users.
Users that register with the system will appear in the Authorize Users queue. Once authorized
users can log in and schedule times. Upon authorizing a user, the system creates a user on the
RAHILS domain. The domain username and password will be the same as the username and
password that the user uses to login to the RAHILS webpage.
Users in the authorize queue can also be edited or deleted. Users can be given administrative
privileges by checking the “Make Administrator” upon authorization. Administrators in the
RAHILS system will also be administrative users on the RAHILS domain.
2.5 Managing Scheduled Times
This section describes how RAHILS administrators can manage times scheduled by RAHILS
users. Once logged in, select the “Manage Schedule” link from the navigation menu. The Mange
Scheduled Times page has two sections: Edit / Delete Scheduled Times, and Authorize Requested
Times.
To edit or delete times, highlight the time you wish to modify and click the appropriate button.
The Edit Scheduled Times page is identical respective page available to users with the exception
that Administrators can modify already authorized times.
Scheduled times will appear in the Authorize Times queue. Once a time is authorized, the
scheduled bank will be reserved for the scheduled time and only the scheduled user will be able
to log in at that time.
Remote Desktop User Manual
7
7
2.6 Managing Computer Banks
This section describes how RAHILS administrators can manage computer banks in the RAHILS
system. A bank is a pair of computers, typically a laptop and a desktop. This way, users can run
tests on more hardware.
Once logged in, select the “Manage Computers” link from the navigation menu. The Mange
Computers page has three sections: Current Configuration, Edit / Delete Computers, and Add
Computer.
The Current Configuration section shows information for the computers in the RAHILS system.
It shows each computer’s network name, connection address, and the bank number it belongs to.
It is extremely important that all information is correct since this is the information the system
uses to manage connections.
The computer name must be the name the domain controller uses to identify the computer on its
domain. The connection address should be the IP address the remote desktop client uses to
connect to the computer. The connection address should include the port number if the
connection is made through a port other than the default port 3389.
To edit or delete computer, highlight the computer you wish to modify and click the appropriate
button. The system has no way to verify this information, so it is important to insure it is correct.
To add a computer to the system, simply fill out every field of the Add Computer section and
click submit. As of the time this document, the RAHILS system has a limit of eight computers.
2.7 Controlling the RAHILS Service
This section describes how network administrators can control the RAHILS Service that runs on
the RAHILS Domain Controller. Refer to the installation section to instructions on installing the
service if it is not already. The administrator must have an account on the domain controller to
use the service.
A Windows service provides functionality to the operating system and user accounts regardless of
whether anyone is logged into a system. Right clicking on My Computer and selecting Manage
will open the Microsoft Management Console (MMC). Expand the Services and Applications
section and highlight Services to see a list of all installed services on the computer.
The RAHILS service controllers which users are allowed to log into which banks at any given
time. The service can be stopped, started, and restarted through the MMC.
3.0 INSTALLATION
This section provides instructions on installing RAHILS to a domain and web server. This section
also explains how RAHILS operates technically. This section requires an understanding of
windows domains, PHP, MySQL, and Apache or some other web server. All documents and files
referred to in this section can be found on the RAHILS disk.

Remote Desktop User Manual
8
8
3.1 Prerequisites The installing user must have administrator privileges on both the web server and domain
controller. A web server must be installed on a Windows Server 2003 machine and configured to
process PHP scripts.
MySQL 4.1 or higher must also be installed on an available machine. RAHILS defaults to
localhost, but the common.php script can be edited to allow for another location. phpMyAdmin is
highly recommended, but not required. A RAHILS or www user should exist that the web scripts
can use to access the database. This information should also be specified in the common.php
script.
3.2 Web Server
The installing user must have administrator privileges on the web server. The web server
must be installed on a Windows Server 2003 machine and configured to process PHP
scripts.
To install the RAHILS web front-end simply copy the contents of the Web Front End
folder on the RAHILS disk to the web directory it will be served from. Next, locate the
php.ini file for your PHP installation, typically c:\windows\php.ini.
At the time of writing, PHP notices must be disabled in php.ini for proper webpage
display.
To enable communication from the web server to the domain controller, RAHILS uses
the psexec.exe. psexec.exe can be downloaded from the SysInternal’s site at: http://www.sysinternals.com/Utilities/PsExec.html
This executable can also be found in the Third Party Applications folder of the RAHILS
disk. The executable should be placed in the c:\windows\system32\ folder of the web
server.
At the time of writing, the users.php and password.php script must be modified so that
each psexec command uses the network name of the RAHILS domain controller (i.e.
localhost). The psexec command must be run as a domain administrator. A “rahils”
domain administrator account must be created with username and password hand coded
into each psexec command.
In order for the system to send automated email, the web server should either have an
SMTP server configured on port 25 or the users.php and times.php scripts must be
modified for another SMTP server.
3.3 Domain Controller
Before the RAHILS service can be installed, the communication pathway between the
service and database must be created. RAHILS uses a third party application called
MyODBC. The MyODBC setup file can be downloaded from MySQL’s website at
http://dev.mysql.com/downloads/connector/odbc/

Remote Desktop User Manual
9
9
or installed from the Third Party Application folder on the RAHILS disk. Once
MyODBC is installed, create a new MySQL DSN connection named “rahils”. To do this
go to Administrative Tools -> Data Sources (ODBC) and fill out all fields on the MySQL
tab.
Once the DSN connection is set up, the RAHILS service can be installed. To install the
service, double click schedulechecksetup.exe in the Service\Setup\Debug folder on the
RAHILS disk. Once setup has been run, the service can be started from the MMC (see
section 2.7).
The RAHILS service sends warning messages and logoffs to client computers using
beyondexecv2.exe. The executable can be downloaded from Beyond Logic at
http://www.beyondlogic.org/solutions/remoteprocess/BeyondExec.htm
or from the Third Party Applications folder on the RAHILS disk. The executable must be
placed in the c:\windows\system32\ folder on the domain controller.
The RAHILS service source is also included on the disk in the case that adjustments to it
become necessary. Rebuilding the service is too complicated to cover here, but there is an
MSDN article that covers it well:
http://msdn.microsoft.com/library/default.asp?url=/library/en-
us/vbcon/html/vbwlkwalkthroughcreatingwindowsserviceapplication.asp
As of the writing of this documentation, the RAHILS service uses the net user command to limit
users to only machines they are scheduled to use. The net user command has a limit of eight
computers that can be specified in one command, and consequently the RAHILS can only support
eight machines in its computer banks.
The final task for domain controller installation is the creation of the RAHILS user group. Users
will automatically be added to this group upon creation. This process eases the configuration of
computers in the RAHILS banks (see next section).
3.4 Computer Banks
The computer banks require little adjustment. Each computer must be a Windows XP machine or
greater. Each computer must be added to the RAHILS domain and be accessible via remote
desktop through any firewalls from each location users are able to login from. The Windows
firewall must be disabled for each computer in the RAHILS banks.
Each machine must have remote desktop enabled. This can be done by right clicking on My
Computer and selecting the Remote tab. On the remote tab check the “Allow remote users to
connect to this computer remotely” checkbox. Next click the Remote Users button, navigate
through domain user groups and add the RAHILS user group. This group prevents administrators
from adding and removing users by hand from each computer in the RAHILS system.

Remote Desktop User Manual
10
10
3.5 Client Setup
The remote desktop protocol is TCP and should get through most client side firewalls. Encryption
is based on server configuration, so no VPN or tunneling is required on the client side. Client
installation varies for each operating system. Section 2.3 outlines the installation process for
clients in detail.

APPENDIX III
RAHILS
Remote Desktop User Manual
Kyle King
William Brinkerhoff
Document Revision 1.0
July 25, 2005

Remote Desktop User Manual
1
1
Table of Contents
1.0 INTRODUCTION .................................................................................................................................. 2
1.1 PROJECT MOTIVATION .......................................................................................................................... 2 1.3 DEFINITIONS & TERMS ......................................................................................................................... 2
2.0 USAGE DESCRIPTION ........................................................................................................................ 3
2.1 REGISTERING ........................................................................................................................................ 3 2.2 SCHEDULING TIMES .............................................................................................................................. 3 2.3 CONNECTING ........................................................................................................................................ 4
2.3.1 Connecting with Windows ............................................................................................................ 4 2.3.2 Connecting with Unix / Linux ...................................................................................................... 5 2.3.2 Connecting with Mac OS X .......................................................................................................... 6
2.4 MANAGING USERS ................................................................................................................................ 6 2.5 MANAGING SCHEDULED TIMES ............................................................................................................ 6 2.6 MANAGING COMPUTER BANKS ............................................................................................................ 7 2.7 CONTROLLING THE RAHILS SERVICE .................................................................................................. 7
3.0 INSTALLATION ................................................................................................................................... 7
3.1 PREREQUISITES ..................................................................................................................................... 8 3.2 WEB SERVER ........................................................................................................................................ 8 3.3 DOMAIN CONTROLLER ......................................................................................................................... 8 HTTP://WWW.BEYONDLOGIC.ORG/SOLUTIONS/REMOTEPROCESS/BEYONDEXEC.HTM ................................. 9 3.4 COMPUTER BANKS ............................................................................................................................... 9 3.5 CLIENT SETUP......................................................................................................................................10

Remote Desktop User Manual
2
2
1.0 INTRODUCTION
This document is the usage, installation, and technical documentation for the Remote Access
Hardware in the Loop Simulation (RAHILS) software being developed for the National Institute
of Advanced Transportation Technology.
This section gives the basic information necessary for someone not familiar with RAHILS to read
the rest of this document and understand the basic function and motivation of the system.
1.1 Project Motivation
NIATT has a large array of hardware traffic controllers that can be used to run various traffic
simulations. These controllers can only be used locally in the lab they’re stored. Consequently,
there are a number of users outside Moscow that cannot use the traffic controllers.
RAHILS makes these traffic controllers available remotely. The traffic controllers’ are
proprietary hardware that can only be controlled with software that does not have any built-in
remote capabilities. To overcome this, RAHILS makes the entire operating system of lab
computers with a hardware connection to traffic controllers available remotely. RAHILS allows
NIATT to make its resources available to those that cannot physically be at their offices. RAHILS
primary focuses are security, speed, and functionality.
1.2 References & Applicable Documents
1. Jennifer Westberg is the original developer of the project. Her thesis describes the functionality
and purpose of RAHILS before its revision in June of 2005.
2. Meetings with clients Michael Kyte, Ahmed Abdel-Rahim, and Paul Oman.
1.3 Definitions & Terms
NIATT The National Institute of Advanced
Transportation Technology at the University of
Idaho
RAHILS Remote Access in the Loop Simulation
Microsoft Domain Controller (MSDC) A computer running a Windows Server that
manages user access to a network, which
includes logging on, authentication, and access
to Active Directory and shared resources
(Microsoft 2005).
Microsoft Management Console (MMC) Provides a common host environment for snap-
ins, provided by Microsoft® and third party
software vendors. Snap-ins provide the actual
management behavior

Remote Desktop User Manual
3
3
2.0 USAGE DESCRIPTION
This section describes how users can operate RAHILS through its front-end interfaces; this
section is written from the perspective of a non-technical user or administrator and assumes all
RAHILS services are operating normally.
RAHILS front-end is a web interface accessible at rahils.niatt.uidaho.edu at the time of writing
this document.
2.1 Registering
Before a user can enter the RAHILS system, they must register. There is a link to the registration
page on the main page below the sign in form. Every field in the registration form must be filled
out with a unique email and username.
Administrators can approve any registered users by using the “Manage Users” page discussed in
more detail in the section 2.3.
Once approved, user will be informed with the following email:
From: [email protected] Subject: RAHILS Account Information
You request for a NIATT RAHILS account has been approved. Please keep this email as it contains important information needed to connect to RAHILS computer network.
Now that you have an account, you can log into the RAHILS system at
http://rahils.niatt.uidaho.edu
You can schedule time on our system. Once your request for a time has been approved, you will receive an email with
further instructions and details.
==========================
RAHILS ACCOUNT INFORMATION
==========================
Username: example
Password: password Registered Email: [email protected]
It is important that this information be kept up-to-date. Should your email or any other important information change it can be updated on the RAHILS website. Thanks for using our system.
The user can use the emailed information to log into RAHILS web front end. The front end can
be used to schedule times, edit account information, and change passwords.
2.2 Scheduling Times
Once the user has entered into the RAHILS web front end (see previous section) they can
navigate to the scheduling page using the navigation menu on the left. There is no limit on the
number of hours, or days for that matter, of a scheduled time. Users must choose a bank to
schedule. Users have sole access to the computers in their bank during their scheduled times and
can connect to them simultaneously.

Remote Desktop User Manual
4
4
Scheduled times, like registrations, must be approved by an administrator. Times cannot be
scheduled before the approval time the next day; the default approval time is 8:30 am. Once the
time has been approved, the user will receive the following confirmation email:
From: [email protected]
Subject: RAHILS Connection Information
Your requested time on RAHILS computer has been confirmed. Use the connection information listed below to connect to
the RAHILS computer bank. For detailed information on how to use the connection information, please visit the Frequently Asked Question section of
the RAHILS website that you used to register at
http://rahils.niatt.uidaho.edu/faq.php
========================
CONNECTION INFORMATION ========================
Time: July 26, 10:15 PM - July 30, 7:30 PM Bank ID: 1
Remote Desktop Addresses: 129.101.xxx.xxx:xxxx 129.101.xxx.xxx:xxxx
============
PLEASE NOTE
============
You can connect at the above time to either (or both) of the remote desktop addresses. You may only use those computers
at the scheduled time. You will be forced off (losing all work) if you remain on past your scheduled time. There will be a five minute warning.
Administrators should not schedule times, as the RAHILS service will disable their account once
their time has expired. Administrators have unrestricted remote desktop access to the RAHILS
computers.
2.3 Connecting
Once a user has scheduled a time they will receive the above email. The email contains all
information required to connect. How you connect is different depending on which operating
system you’re connecting from. Following are the typical ways to connect for Windows XP,
Linux, and Mac OS X.
2.3.1 Connecting with Windows
To connect to RAHILS from Windows XP, click Start, point to Programs or All Programs,
point to Accessories, point to Communications, and then click Remote Desktop Connection.
The following window will appear:

Remote Desktop User Manual
5
5
The two addresses listed in the email are the addresses that can be put in the “Computer” field of
the above window. The “Options” button can be used to customize certain aspects of the session
such as screen size, logon information, and performance options. Performance options can be
customized for your connection speed.
The “Local Resources” pane of “Options” can be used to mount local resources. This will make
all information on the connecting computer’s hard disk available to the remote computer and vise
versa. This is the best way to make data files available on the remote system. Remote Desktop
will issue a warning that this data will be available.
2.3.2 Connecting with Unix / Linux
To connect to RAHILS from Unix / Linux, you must first download the Remote Desktop client
from Microsoft’s website at http://www.rdesktop.org/
The file is a tarfile that can be untarred with the tar command. This file can also be found untarred
in the Third Party Applications folder of the RAHILS disk.
rdesktop uses a typical GNU-style build procedure:
% ./configure [options]
% make
% make install
where documentation for [options] can be found by running "./configure --help". Usually no
options are necessary. The default is to install under /usr/local, this can be changed with --
prefix=directory.
To invoke rdesktop open a terminal and type
% rdesktop [options] server
where server is the connection address to the RAHILS in the email send upon authorization of the
scheduled time. If you receive "Connection refused", this probably there is a firewall blocking
access. In that event the local network administrator must be notified.
The rdesktop manual page lists the possible connection options (man rdesktop).

Remote Desktop User Manual
6
6
2.3.2 Connecting with Mac OS X
To connect to RAHILS from Mac OS X, you must first download the Remote Desktop client
from Microsoft’s website at
www.microsoft.com/mac/otherproducts/otherproducts.aspx?pid=remotedesktopclient
This file will be a disk image that should automatically mount. Drag the content of the image to
you Applications folder and open the Remote Desktop executable. This file can also be found in
the Third Party Applications folder of the RAHILS disk. At the point, you can follow the step-by-
step instructions outlined in section 2.3.1.
2.4 Managing Users
This section describes how RAHILS administrators can manage users in the RAHILS system. If
no Administrators are in the system upon installation, a user must register with system. The
newly registered user’s status must be set to “Approved” and their user level to “Admin” with
some direct interface to the database. phpMyAdmin is the recommended method.
To manage RAHILS users, select the “Manage Users” link from the navigation menu once
logged in. The Mange Users page has two sections: Edit / Delete Users, and Authorize Pending
Users.
To edit or delete users, highlight the user you wish to modify and click the appropriate button.
The Edit User page is identical to the Edit Profile page available to users with the exception that
Administrators can change User Level. Administrator’s can assign and remove administrative
privileges from other authorized users.
Users that register with the system will appear in the Authorize Users queue. Once authorized
users can log in and schedule times. Upon authorizing a user, the system creates a user on the
RAHILS domain. The domain username and password will be the same as the username and
password that the user uses to login to the RAHILS webpage.
Users in the authorize queue can also be edited or deleted. Users can be given administrative
privileges by checking the “Make Administrator” upon authorization. Administrators in the
RAHILS system will also be administrative users on the RAHILS domain.
2.5 Managing Scheduled Times
This section describes how RAHILS administrators can manage times scheduled by RAHILS
users. Once logged in, select the “Manage Schedule” link from the navigation menu. The Mange
Scheduled Times page has two sections: Edit / Delete Scheduled Times, and Authorize Requested
Times.
To edit or delete times, highlight the time you wish to modify and click the appropriate button.
The Edit Scheduled Times page is identical respective page available to users with the exception
that Administrators can modify already authorized times.
Scheduled times will appear in the Authorize Times queue. Once a time is authorized, the
scheduled bank will be reserved for the scheduled time and only the scheduled user will be able
to log in at that time.

Remote Desktop User Manual
7
7
2.6 Managing Computer Banks
This section describes how RAHILS administrators can manage computer banks in the RAHILS
system. A bank is a pair of computers, typically a laptop and a desktop. This way, users can run
tests on more hardware.
Once logged in, select the “Manage Computers” link from the navigation menu. The Mange
Computers page has three sections: Current Configuration, Edit / Delete Computers, and Add
Computer.
The Current Configuration section shows information for the computers in the RAHILS system.
It shows each computer’s network name, connection address, and the bank number it belongs to.
It is extremely important that all information is correct since this is the information the system
uses to manage connections.
The computer name must be the name the domain controller uses to identify the computer on its
domain. The connection address should be the IP address the remote desktop client uses to
connect to the computer. The connection address should include the port number if the
connection is made through a port other than the default port 3389.
To edit or delete computer, highlight the computer you wish to modify and click the appropriate
button. The system has no way to verify this information, so it is important to insure it is correct.
To add a computer to the system, simply fill out every field of the Add Computer section and
click submit. As of the time this document, the RAHILS system has a limit of eight computers.
2.7 Controlling the RAHILS Service
This section describes how network administrators can control the RAHILS Service that runs on
the RAHILS Domain Controller. Refer to the installation section to instructions on installing the
service if it is not already. The administrator must have an account on the domain controller to
use the service.
A Windows service provides functionality to the operating system and user accounts regardless of
whether anyone is logged into a system. Right clicking on My Computer and selecting Manage
will open the Microsoft Management Console (MMC). Expand the Services and Applications
section and highlight Services to see a list of all installed services on the computer.
The RAHILS service controllers which users are allowed to log into which banks at any given
time. The service can be stopped, started, and restarted through the MMC.
3.0 INSTALLATION
This section provides instructions on installing RAHILS to a domain and web server. This section
also explains how RAHILS operates technically. This section requires an understanding of
windows domains, PHP, MySQL, and Apache or some other web server. All documents and files
referred to in this section can be found on the RAHILS disk.

Remote Desktop User Manual
8
8
3.1 Prerequisites The installing user must have administrator privileges on both the web server and domain
controller. A web server must be installed on a Windows Server 2003 machine and configured to
process PHP scripts.
MySQL 4.1 or higher must also be installed on an available machine. RAHILS defaults to
localhost, but the common.php script can be edited to allow for another location. phpMyAdmin is
highly recommended, but not required. A RAHILS or www user should exist that the web scripts
can use to access the database. This information should also be specified in the common.php
script.
3.2 Web Server
The installing user must have administrator privileges on the web server. The web server
must be installed on a Windows Server 2003 machine and configured to process PHP
scripts.
To install the RAHILS web front-end simply copy the contents of the Web Front End
folder on the RAHILS disk to the web directory it will be served from. Next, locate the
php.ini file for your PHP installation, typically c:\windows\php.ini.
At the time of writing, PHP notices must be disabled in php.ini for proper webpage
display.
To enable communication from the web server to the domain controller, RAHILS uses
the psexec.exe. psexec.exe can be downloaded from the SysInternal’s site at: http://www.sysinternals.com/Utilities/PsExec.html
This executable can also be found in the Third Party Applications folder of the RAHILS
disk. The executable should be placed in the c:\windows\system32\ folder of the web
server.
At the time of writing, the users.php and password.php script must be modified so that
each psexec command uses the network name of the RAHILS domain controller (i.e.
localhost). The psexec command must be run as a domain administrator. A “rahils”
domain administrator account must be created with username and password hand coded
into each psexec command.
In order for the system to send automated email, the web server should either have an
SMTP server configured on port 25 or the users.php and times.php scripts must be
modified for another SMTP server.
3.3 Domain Controller
Before the RAHILS service can be installed, the communication pathway between the
service and database must be created. RAHILS uses a third party application called
MyODBC. The MyODBC setup file can be downloaded from MySQL’s website at
http://dev.mysql.com/downloads/connector/odbc/
Remote Desktop User Manual
9
9
or installed from the Third Party Application folder on the RAHILS disk. Once
MyODBC is installed, create a new MySQL DSN connection named “rahils”. To do this
go to Administrative Tools -> Data Sources (ODBC) and fill out all fields on the MySQL
tab.
Once the DSN connection is set up, the RAHILS service can be installed. To install the
service, double click schedulechecksetup.exe in the Service\Setup\Debug folder on the
RAHILS disk. Once setup has been run, the service can be started from the MMC (see
section 2.7).
The RAHILS service sends warning messages and logoffs to client computers using
beyondexecv2.exe. The executable can be downloaded from Beyond Logic at
http://www.beyondlogic.org/solutions/remoteprocess/BeyondExec.htm
or from the Third Party Applications folder on the RAHILS disk. The executable must be
placed in the c:\windows\system32\ folder on the domain controller.
The RAHILS service source is also included on the disk in the case that adjustments to it
become necessary. Rebuilding the service is too complicated to cover here, but there is an
MSDN article that covers it well:
http://msdn.microsoft.com/library/default.asp?url=/library/en-
us/vbcon/html/vbwlkwalkthroughcreatingwindowsserviceapplication.asp
As of the writing of this documentation, the RAHILS service uses the net user command to limit
users to only machines they are scheduled to use. The net user command has a limit of eight
computers that can be specified in one command, and consequently the RAHILS can only support
eight machines in its computer banks.
The final task for domain controller installation is the creation of the RAHILS user group. Users
will automatically be added to this group upon creation. This process eases the configuration of
computers in the RAHILS banks (see next section).
3.4 Computer Banks
The computer banks require little adjustment. Each computer must be a Windows XP machine or
greater. Each computer must be added to the RAHILS domain and be accessible via remote
desktop through any firewalls from each location users are able to login from. The Windows
firewall must be disabled for each computer in the RAHILS banks.
Each machine must have remote desktop enabled. This can be done by right clicking on My
Computer and selecting the Remote tab. On the remote tab check the “Allow remote users to
connect to this computer remotely” checkbox. Next click the Remote Users button, navigate
through domain user groups and add the RAHILS user group. This group prevents administrators
from adding and removing users by hand from each computer in the RAHILS system.

Remote Desktop User Manual
10
10
3.5 Client Setup
The remote desktop protocol is TCP and should get through most client side firewalls. Encryption
is based on server configuration, so no VPN or tunneling is required on the client side. Client
installation varies for each operating system. Section 2.3 outlines the installation process for
clients in detail.

APPENDIX IV
RAHILS USER MANUAL
Prepared by
NATIONAL INSTITUTE FOR ADVANCED TRANSPORTATION TECHNOLOGY
UNIVERSITY OF IDAHO
Zhen Li
Ahmed Abdel-Rahim
Judy B. LaLonde
Steven C. Taylor

RAHILS: User Manual i
TABLE OF CONTENTS
Chapter 1 ............................................................................................................................. 1
Introduction: NIATT Traffic Controller Laboratory II ....................................................... 1
I. General Description ........................................................................................ 1
II. TCLAB II Components................................................................................... 1
III. Manual Overview............................................................................................ 2
Chapter 2 ............................................................................................................................. 4
Establishing an Account ..................................................................................................... 4
Chapter 3 ............................................................................................................................. 6
Scheduling a Time to Access TCLAB II ............................................................................ 6
I. Checking the Availability of Hardware and Software and Scheduling a Time
Slot ................................................................................................................. 6
II. Installing Remote Desktop .............................................................................. 8
III. Connecting to the TCLABII with Remote Desktop ....................................... 9
III. Transferring a File for Hardware-in-the-Loop Simulation ........................... 11
Chapter 4 ........................................................................................................................... 13
Programming the Traffic Controllers................................................................................ 13
I. Communication Network Set Up .................................................................. 13
II. Check the Status of the CIDs ........................................................................ 14

RAHILS: User Manual i
LIST OF FIGURES
Figure 1: TCLAB II ............................................................................................................ 2
Figure 2 RAHILS Homepage. .......................................................................................... 4
Figure 3 Member Home Screen. ....................................................................................... 6
Figure 3 Choice and description of banks......................................................................... 7
Figure 5 Requesting a time. ............................................................................................... 7
Figure 6 Edit or Delete a requested time. ......................................................................... 8
Figure 7 Launching Remote Desktop Connection from Run. ........................................... 8
Figure 8 Launching Remote Desktop Connection from Start Menu. ................................ 9
Figure 9 Remote Desktop Connection Details. ............................................................... 10
Figure 10 Enable Remote Disk Drives. .......................................................................... 10
Figure 11 Remote Desktop Login Screen. ...................................................................... 11
Figure 12 Network drives on RAHILS computer. .......................................................... 12
Figure 13 Controller Interconnection Network menu. .................................................... 13
Figure 14 COM port selection. ....................................................................................... 13
Figure 15 Controller Interconnection Network GUI. ..................................................... 14
Figure 16 CID software suite menu. ............................................................................... 15
Figure 17 CID Hardware Tester screen. ......................................................................... 15

RAHILS: User Manual: Chapter I 1
Chapter 1
Introduction: NIATT Traffic Controller Laboratory II
I. General Description
NIATT’s Traffic Controller Lab II (TCLAB II) houses 20 CIDs and controllers, an
instructor area, and a communications system that allows users to test traffic networks
with up to 20 intersections. The lab includes five dedicated personal computers running
industry-standard simulation software and the CID Software Suite.
A distinguishing feature of TCLAB II is that users from all over the work can access and
make use of its capabilities via the Internet. By providing access to remote users from all
over the world, NIATT gives students and instructors of transportation engineering the
ability to run hardware-in-the-loop traffic simulations and use other traffic management
software remotely and in real time.
II. TCLAB II Components
A. Controllers
Each bank has a different type of controller:
Bank-1 Econolite ASC/2S—2100
Bank-2 Econolite 2070
Bank-3 EAGLE
Bank-4 PEEK 3000
Each bank includes five CIDs, which are connected by a USB hub to a host
computer. The computer runs CID software suite and three types of traffic
simulation software (CORSIM, VISSIM and SimTraffic). Four versions of traffic
management software (Arise, QuicNet, ACTRA and MIST) are also installed on
each host computer.
B. Current Hardware
Computers: 1 Dell P4 PRECISION 360; 4 DELL LATITUTE C840; 4 DELL
OPTIPLEX GX270.
Traffic Controllers: EAGLE Traffic Control System, Econolite ASC/2S –
2100, PEEK 3000, LMD 9200, LMD 8000, and Econolite 2070.
McCAIN-NIATT CID IIs
Video Detection Devices
Autoscope 34523
C. Current Software
Microsoft Windows XP Professional and Microsoft Office 2003
Traffic Management Software: Arise, QuicNet, ACTRA and MIST

RAHILS: User Manual: Chapter I 2
Type 2070 Controller Firmware: Next Phase 1.5.2, BITRAN Systems Program
233RV, OASIS 3.00.70, ASC software suite 35219G1 1.01
GIS Software: ArcView
Traffic Simulation Software: TSIS (CORSIM), VISSIM and SimTraffic
Signal Timing Design Software: PASSER II, Synchro and Transit-7F
CID Software: Hardware-in-the-Loop Simulation Software Suite, Suitcase Tester
Emulator, and Controller Automated Test Tool
Figure 1: TCLAB II
III. Manual Overview
This TCLAB II User Manual provides step-by-step instructions for accessing and using
the lab’s hardware and software capabilities.
A. Setting up a User Account
The first step for users wishing to access and use NIATT’s TCLAB II is to
establish a user account and receive a password. Chapter 2 provides this
information.
B. Downloading Remote Access Software
To access the TCLAB II remotely, the user must use a Microsoft Terminal
Services client such as Microsoft Remote Desktop Connection. Chapter 2
provides step-by-step instructions for use of this of software.

RAHILS: User Manual: Chapter I 3
C. Scheduling a Time Slot and Appropriate Hardware and Software
With an account and password established, the user must then schedule a specific
time to establish a remote connection. The choice of a computer bank will depend
upon the hardware and software the user wishes to access. Chapter 3 describes the
method for scheduling time.
D. Transferring the User’s Traffic Simulation Input File to the TCLAB II
Chapter 3 also includes information about using the Remote Desktop Client to
upload the user’s simulation input file.
E. Setting up the Controllers and Checking the Controller Interface Devices
Using Remote Desktop, a user establishes 2 different network connections to
access two remote host computers. Using Remote Desktop and a given IP address,
the user connects to the first host computer to run traffic management software in
order to program the traffic controllers. Using Remote Desktop with a second
given IP address, the user connects to the second host computer to verify that all
CIDs are working properly. Chapter 4 outlines these procedures.
F. Conducting Remote Access Hardware-in-the-Loop Simulations (RAHILS)
The RAHILS website provides detailed instructions for conducting simulations
using CORSIM, VISSIM or SIMTRAFFIC.

RAHILS: User Manual: Chapter 2 4
Chapter 2
Establishing an Account
Users wishing to access and use NIATT’s TCLAB II must first establish a user account
and password and then download and install software that will allow the user to establish
remote access to the lab.
Step 1: Go to website http://rahils.niatt.uidaho.edu/ and select ―Click here to
register‖ (Fig. 2).
Figure 2 RAHILS Homepage.
Step 2: Complete the required information on the registration page and click
―Register.‖
Step 3: You should receive an email from the RAHILS administrator,
approving and confirming your registration. Please note that the
account review process is not automated, so the response will not be
immediate.

RAHILS: User Manual: Chapter 2 5
If you receive a message notifying you of failure to become a
registered user and you believe you have received it in error, please
email the NIATT Administrator at [email protected].
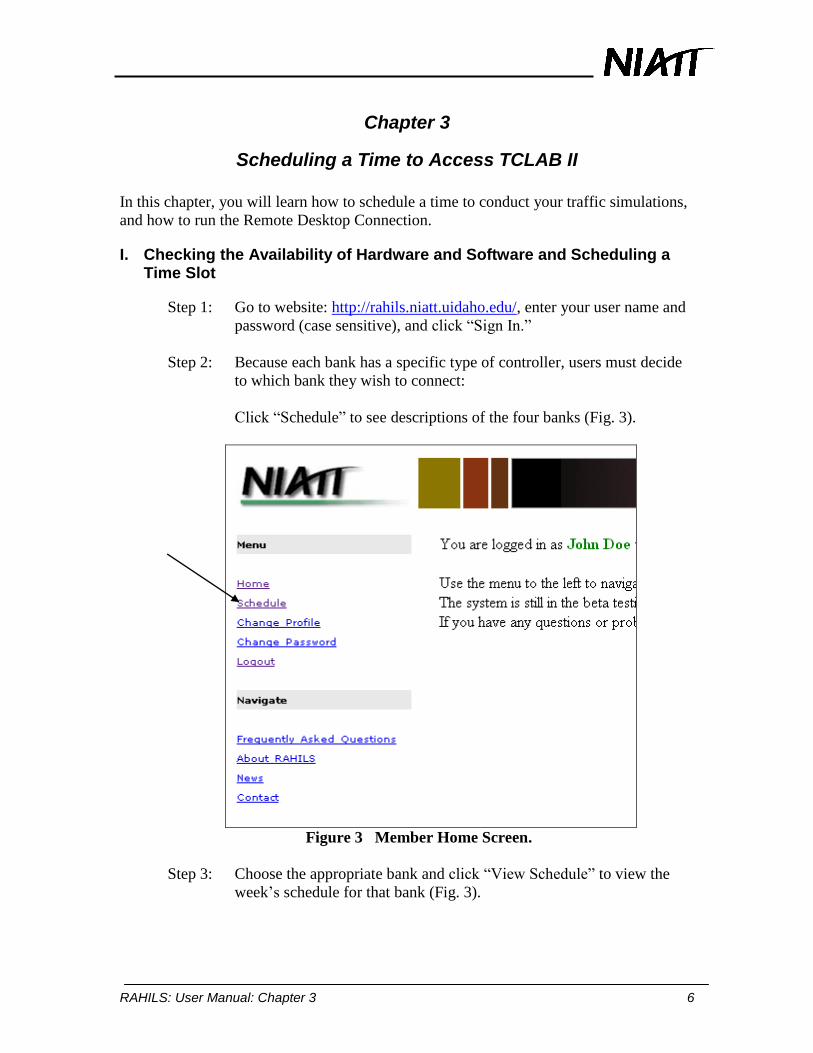
RAHILS: User Manual: Chapter 3 6
Chapter 3
Scheduling a Time to Access TCLAB II
In this chapter, you will learn how to schedule a time to conduct your traffic simulations,
and how to run the Remote Desktop Connection.
I. Checking the Availability of Hardware and Software and Scheduling a Time Slot
Step 1: Go to website: http://rahils.niatt.uidaho.edu/, enter your user name and
password (case sensitive), and click ―Sign In.‖
Step 2: Because each bank has a specific type of controller, users must decide
to which bank they wish to connect:
Click ―Schedule‖ to see descriptions of the four banks (Fig. 3).
Figure 3 Member Home Screen.
Step 3: Choose the appropriate bank and click ―View Schedule‖ to view the
week’s schedule for that bank (Fig. 3).

RAHILS: User Manual: Chapter 3 7
Figure 3 Choice and description of banks.
Step 4: After you see if the day and the time you prefer is free, return to the
schedule page by clicking the ―Schedule‖ link on the left menu (or the
return button).
Step 5: Use the drop-down menus to select the start and end times and click
―Request Time‖ (Fig. 5).
Figure 5 Requesting a time.
NOTE: All times are given in Pacific Standard Time. The TCLAB II is
available only between 8 am and 5 pm Pacific Standard Time.
Step 6: The RAHILS administrator must authorize your time--you will receive
a confirmation email that includes the scheduled time and connection
information. You will refer back to this information when you connect
to the lab (see below).
Step 7: Once you have successfully reserved a time slot, you are able to verify
by clicking ―View Schedule.‖
Prior to authorization, you can edit or delete your time request by
using the ―Edit Time‖ or ―Delete Time‖ buttons. However, after you
have received authorization, you are unable to make changes (Fig. 6).

RAHILS: User Manual: Chapter 3 8
Figure 6 Edit or Delete a requested time.
Step 8: If you do need to cancel or change a time that has already been
authorized, please contact the RAHILS administrator.
II. Installing Remote Desktop
Before connecting with the TCLAB II, users must insure they have remote desktop
client software installed that is compatible with Microsoft Remote Desktop.
Directions for a variety of operating systems follow:
A. Microsoft Windows XP
Microsoft Remote Desktop Connection is most likely already installed on computers
running Windows XP. If you are unable to launch the program using the directions
below, please talk to your system administrator.
Microsoft Remote Desktop Connection can be executed in either of the following
ways. Chose method you prefer.
(1) Drag from the Start menu to run; type ―mstsc‖ and click ―OK‖ (Fig. 7).
Figure 7 Launching Remote Desktop Connection from Run.
OR
(2) From the Start menu, go to All Programs, drag to Accessories, to
Communications, and to Remote Desktop Connection‖ (Fig. 8)

RAHILS: User Manual: Chapter 3 9
Figure 8 Launching Remote Desktop Connection from Start Menu.
B. Microsoft Windows NT/95/98/ME/2000
Users running a version of Microsoft Windows older than Windows XP can
download Microsoft Remote Desktop Connection from Microsoft at the following
URL.
http://www.microsoft.com/windowsxp/downloads/tools/rdclientdl.mspx
Users should follow Microsoft’s installation instructions. Once installed, the Remote
Desktop Connection software can be executed as shown above for users of Windows
2000/XP.
C. Mac OS X
Users running Mac OS X can download Microsoft Remote Desktop Connection from
Microsoft at the following URL:
http://www.microsoft.com/mac/otherproducts/otherproducts.aspx?pid=remotedesktopclient
D. Linux/UNIX/BSD
A variety of open-source and commercial remote desktop software available for
Users running a Linux, UNIX, or BSD based operating systems. Please consult your
vendor or distribution documentation for information about their recommended
solution.
III. Connecting to the TCLABII with Remote Desktop
After you reserve a time slot (see above), you will have access to the two remote host
computers in the chosen bank. One computer is used to set up the traffic controller
interface network and program traffic controller signal timing and the other is used to
conduct RAHILS.
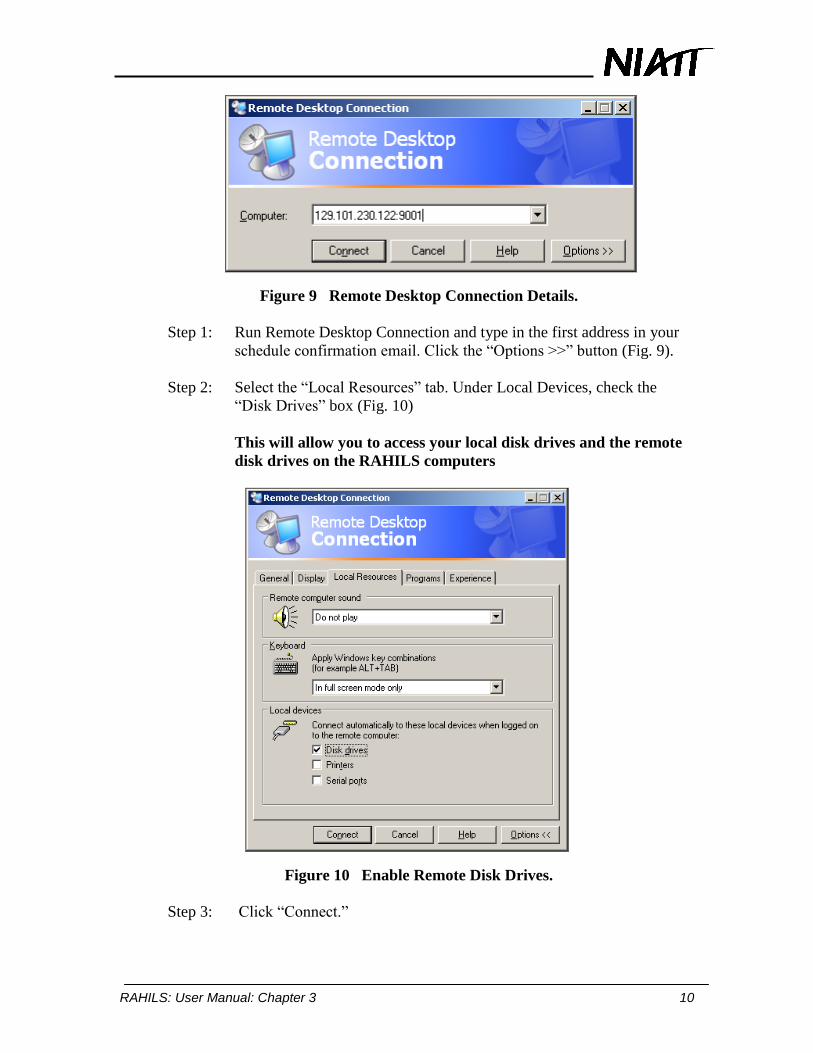
RAHILS: User Manual: Chapter 3 10
Figure 9 Remote Desktop Connection Details.
Step 1: Run Remote Desktop Connection and type in the first address in your
schedule confirmation email. Click the ―Options >>‖ button (Fig. 9).
Step 2: Select the ―Local Resources‖ tab. Under Local Devices, check the
―Disk Drives‖ box (Fig. 10)
This will allow you to access your local disk drives and the remote
disk drives on the RAHILS computers
Figure 10 Enable Remote Disk Drives.
Step 3: Click ―Connect.‖

RAHILS: User Manual: Chapter 3 11
Figure 11 Remote Desktop Login Screen.
Step 4: If a connection is successfully made, you should be prompted for your
username and password. Enter your user name and password (case
sensitive). Make sure that the ―Log on to‖ field has ―NIATTAD‖
selected. Press ―OK‖ (Fig. 11).
Step 5: You are now logged onto the remote system.
Step 6: Repeat the process to connect to the second computer in the bank.
III. Transferring a File for Hardware-in-the-Loop Simulation
Step 1: Open ―My Computer‖ on the remote computer to which you will
transfer your files. Your local computer’s drives will show up as
network drives on the RAHILS computer (Fig. 12).

RAHILS: User Manual: Chapter 3 12
Figure 12 Network drives on RAHILS computer.
Step 2: On the RAHILS computer, navigate to the file or files you want to
transfer using the network drives. For example, if you want to transfer
a file located at ―C:\simulations‖ from your local computer, then open
the ―C on YOURLOCALCOMPUTER‖ drive and navigate to the
―simulations‖ folder (where YOURLOCALCOMPUTER is the name
of your local computer).
Step 3: Once you have located the file or files you would like to transfer,
simply drag and drop or copy and paste the files from the network drive
to the RAHILS computer’s local drive
Step 4: If you need to transfer files from the RAHILS computer to your local
computer, simply reverse the process (when would they need to do
this? Drag and drop or copy and paste files from the RAHILS local
drives to a location on your network drive (e.g., since you are unable to
watch animation in real-time using RAHILS, you may want to save the
animation file and copy it to your own computer for viewing later).

RAHILS: User Manual: Chapter 4 13
Chapter 4
Programming the Traffic Controllers
Before conducting simulations, users must program signal timing plan parameters on the
remote traffic controllers. Using the Controller Interface Network Device (CIN), users
will run traffic management software for each of the controllers in the bank they are
using.
I. Communication Network Set Up
The Controller Interface Network (CIN) device is a COM (RS232) port switch box that
allows Host computer 1 to connect to the traffic controllers in the lab.
Step 1: If you have not already done so, run the Remote Desktop Connection to
connect to the computer that runs traffic management software (Chap. 3
has detailed directions for running Remote Desktop Connection.)
Step 2: From the start menu of the ―Remote Desktop Connection,‖ select
―Programs,‖ scroll to ―Controller Interconnection Network‖ and to
―Controller Interconnection Network‖ and release the mouse (Fig. 13).
Figure 13 Controller Interconnection Network menu.
Step 3: In the ―COM Port Configuration for Controller Interconnection
Network‖ dialog box, select ―COM1‖and click ―Proceed‖ (Fig. 14).
Figure 14 COM port selection.
Step 4: In the ―Controller Interconnection Network‖ GUI, a ―Setup‖ button
appears above the image of each controller (Fig. 15). Press ―Setup‖ for

RAHILS: User Manual: Chapter 4 14
the first controller. The line between the host computer and traffic
controller will change from dashes to a solid green line, indicating that
the controller is connected to the host computer.
Figure 15 Controller Interconnection Network GUI.
Step 5: Use the desired software (Arise, QuicNet, ACTRA or MIST) to
program the controller.
Step 6: Once the controller has been programmed, the ―Setup‖ button will read
―Done.‖ Click ―Done.‖
Step 7: Repeat Steps 3 through 5 until all five controllers are programmed.
II. Check the Status of the CIDs
NIATT’s controller interface devices (CIDs) should be ready for remote access through
Host computer 2. However, the user needs to verify the status of the CIDs using the
Hardware Tester software.
Step 1: From the Remote Desktop Connection ―Start, scroll to ―Programs,‖ to
―McCain-NIATT CID II‖ and then to ―CID Hardware Tester‖ (Fig. 16).

RAHILS: User Manual: Chapter 4 15
Figure 16 CID software suite menu.
Step 2: The right side of the ―CID ―Hardware Tester‖ (Fig. 17) displays the CID
identification numbers. Press the ―Space‖ bar to toggle between the
CIDs. The CIDs are working properly if five different ID numbers are
displayed.
Figure 17 CID Hardware Tester screen.
Note: If none or only some of the CID IDs show, there is a problem. To
solve the problem, (a) reboot the host computer by selecting “Start” at the
bottom left of the screen and scroll to and release “Shut Down.” (b) Click
“OK” in the “Shut Down Windows” dialog box. This shuts down the host
CID
number

RAHILS: User Manual: Chapter 4 16
computer in the TCLAB II. (c) Launch Remote Desktop Connection again
and log in a second time. (d) Repeat “Step 2.” If the problem persists,
please contact the RAHILS Administrator at [email protected].
Step 3: When the Hardware Tester indicates that everything is working
properly, exit the ―CID Hardware Tester.‖
You are now ready to run real-time hardware-in-the-loop simulations.
The RAHILS website provides detailed instructions for conducting simulations using
CORSIM, VISSIM or SIMTRAFFIC.