remote controller guidance - reefbreeders.com
TRANSCRIPT

Remote�Controller�Guidance
POWER
LED����Wireless�intel l ingent�l ight ing
MENU OK
00/
CH
Power Key
SUNNY Mode
CLOUDY Mode
MOON Mode
CUSTOM Mode
: modify/
the value
Enter Menu Confirm Key
: menu switch/
and selection
Wifi Signal
Channel
Intensity
Time
USB�Connector
Tips:�
1. The remote controller battery is shipped with partial charge which maybe out of power during storage. Please fully charge the controller before using it. Charging time will take approximately six hours from 0% to 100%.��Do not use a computer of any kind to charge your remote. Instead use a cell phone charger or similar USB power supply.
2.�The�battery�life�of�the�device�can�last�up�to�six�months�on�a�full�charge�in�standby�state�but�actual�results�vary�depending�on�how�frequently�you�use�i t�and�other�settings.���������������������������������������������������������

1. Remote Controller ON/OFF
(1) Turns on: One touch of the ."P
(2) Turns off: Touch the and hold for about 3 seconds."Po
2. Light ON/OFF
(1) Light OFF: If light is on → Touch the → Light OFF→����������appears on the screen."Po w
(2) Light ON: If light is off → Touch the → Light ON→�Controller restores "Po w
to the previous saved settin g .
Functions Instructions
POWER
POWER
POWER
POWER
00/
CH
Light ONLight OFF
3. SUNNY, CLOUDY, MOON and CUSTOM Mode
(1) Mode Selection
Step1: Touch and or����� to switch between 4 modes
Step2: Touch to enter a selected mode
00/
CH
00/
CH
00/
CH
MENU
OK
Select SUNNY mode, display
shows flashing.
(2) SUNNY, CLOUDY, MOON Mode Settings
Take SUNNY mode for an example. Setting CLOUDY, MOON mode in the same way.
Step1: Touch and������or������to select SUNNY mode. Display shows�� �� flashing
Step2: Touch or��� �to select Channel, ��������������flash. Press �����or � to select CH-1���
Step3: Touch or to select intensity, flash. Press or to increase/�
reduce the intensity�of CH-1 �Intensity value changes from 0 to 100.
MENU
00/
CH
1
Functions Instructions
Time
Intensity Variation
9:00
0%
9:06
10%
9:12
20%
9:18
30%
9:24
40%
9:30
50%
9:36
60%
9:42
70%
9:48
80%
9:54
90%
10:00
100%
2
Repeat step2 and step3 to set up your own intensity for CH-2 /-3 /-4 /-5 /-6 � � � �
00/
CHStep1
Step2
Step3
(3) CUSTOM Mode Setting
Time is set from 0:00 to 23:00 per hour only.
Before setting the CUSTOM mode, we suggest you make a graph of the values.
Step1: Touch and or to select CUSTOM mode. Display shows ������������flashing
Step2: Touch or to select�the time, flash. Press or to set hour
Step3: Touch or to select channel, flash. Press or to select�CH-1
Step4: Touch or to select intensity, flash. Press or ��to increase/reduce
the intensity of CH-1.
Repeat step 2 through 4 to set up your own intensity for for all 24 hours.
MENU
Note: While you set the steps in one hour increments, the controller will actually
divide each hour up into 10 smaller steps between each hour.This is illustrated in the
table below.
CH
00/
00/
CH
Step1
Step2
Step3
Step4

Functions Instructions
3
00/
CH
4. Set up Your Local Time
5. Reset Data to Factory Settings
Press and Hold + at the same time to restore the factory settings. Then
appears and system will automatically delete all programmed data and return the
remote to factory settings.
MENU POWER
00/
CH Step1: Press and Hold + at the same time, flash
Step2:Touch or to select “hour” or “minute”
Step3:Touch or to change “hour” or “minute”
00/ ON
CH
00/
CH
00/ OFF
CH
6. Simulate the Effect of Lightning
Step1: Enter a selected mode
Step2:�Press to select Lightning flash
Step3: Press or to turn on/off
Step4: Press to confirm.The lightening simulation will happen immediately,
then re-occur at randon points throughout the day while it is set to ON.
OK
00/
CH
Mode
5
0
0
0
0
0
1
0
3
3
6
10
15
20
27
30
27
20
15
10
6
3
3
0
CH-1 CH-2
0
5
0
0
0
0
0
0
0
1
3
5
7
12
14
15
14
12
7
5
3
1
0
0
0
0
10
0
0
0
0
0
0
3
6
10
15
20
27
30
27
20
15
10
6
3
0
0
CH-3 CH-4
0
0
0
2
0
0
0
10
1
3
6
10
15
20
27
30
27
20
15
10
6
3
1
0
0
0
0
0
5
0
0
0
0
3
6
10
15
20
27
30
27
20
15
10
6
3
0
2
CH-5
0
0
0
0
0
2
0
0
3
3
6
10
15
20
27
30
27
20
15
10
6
3
3
0
CH-6
0:00
1:00
2:00
3:00
4:00
5:00
6:00
7:00
8:00
9:00
10:00
11:00
12:00
13:00
14:00
15:00
16:00
17:00
18:00
19:00
20:00
21:00
22:00
23:00
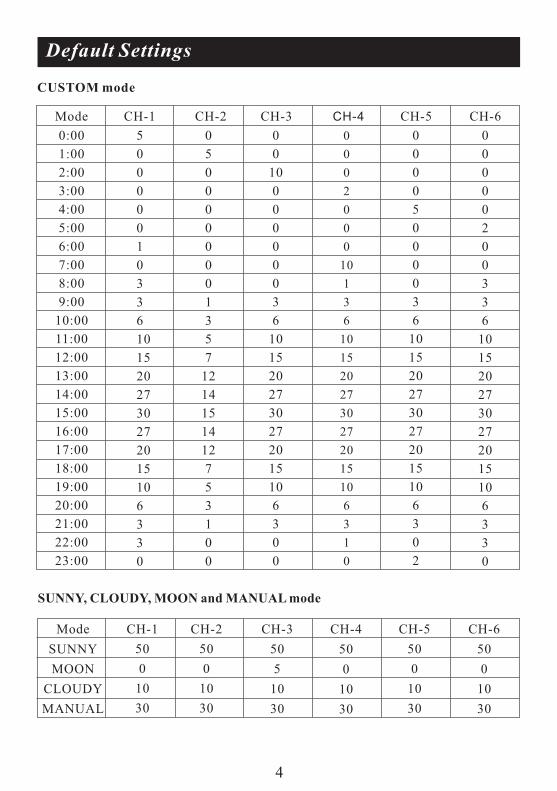
SUNNY, CLOUDY, MOON and MANUAL mode
Mode
SUNNY
MOON
CLOUDY
MANUAL
CH-1
50
0
10
30
CH-2
50
0
10
30
CH-3
50
5
10
30
CH-4
50
0
10
30
CH-5
50
0
10
30
CH-6
50
0
10
30
CUSTOM mode
Default Settings
4
Functions Instructions
3
00/
CH
4. Set up Your Local Time
5. Reset Data to Factory Settings
Press and Hold + at the same time to restore the factory settings. Then
appears and system will automatically delete all programmed data and return the
remote to factory settings.
MENU POWER
00/
CH Step1: Press and Hold + at the same time, flash
Step2:Touch or to select “hour” or “minute”
Step3:Touch or to change “hour” or “minute”
00/ ON
CH
00/
CH
00/ OFF
CH
6. Simulate the Effect of Lightning
Step1: Enter a selected mode
Step2:�Press to select Lightning flash
Step3: Press or to turn on/off
Step4: Press to confirm.The lightening simulation will happen immediately,
then re-occur at randon points throughout the day while it is set to ON.
OK
00/
CH
Mode
5
0
0
0
0
0
1
0
3
3
6
10
15
20
27
30
27
20
15
10
6
3
3
0
CH-1 CH-2
0
5
0
0
0
0
0
0
0
1
3
5
7
12
14
15
14
12
7
5
3
1
0
0
0
0
10
0
0
0
0
0
0
3
6
10
15
20
27
30
27
20
15
10
6
3
0
0
CH-3 CH-4
0
0
0
2
0
0
0
10
1
3
6
10
15
20
27
30
27
20
15
10
6
3
1
0
0
0
0
0
5
0
0
0
0
3
6
10
15
20
27
30
27
20
15
10
6
3
0
2
CH-5
0
0
0
0
0
2
0
0
3
3
6
10
15
20
27
30
27
20
15
10
6
3
3
0
CH-6
0:00
1:00
2:00
3:00
4:00
5:00
6:00
7:00
8:00
9:00
10:00
11:00
12:00
13:00
14:00
15:00
16:00
17:00
18:00
19:00
20:00
21:00
22:00
23:00
SUNNY, CLOUDY, MOON and MANUAL mode
Mode
SUNNY
MOON
CLOUDY
MANUAL
CH-1
50
0
10
30
CH-2
50
0
10
30
CH-3
50
5
10
30
CH-4
50
0
10
30
CH-5
50
0
10
30
CH-6
50
0
10
30
CUSTOM mode
Default Settings
4

Example CUSTOM Settings
5
Time
0
2
5
6
8
9
9
9
8
6
5
2
0
Channel 1 Deep Red
Channel 2 Green
0
2
4
5
6
7
8
7
6
5
4
2
0
1
8
15
21
26
29
30
29
26
21
15
8
0
Channel 3 Royal Blue
0
6
11
16
19
22
23
22
19
16
11
6
0
1
7
14
20
25
28
29
28
25
20
14
7
0
Channel 5 Cool Blue
1
7
14
19
23
26
27
26
23
19
14
7
0
Channel 6 Violet
9:00
10:00
11:00
12:00
13:00
14:00
15:00
16:00
17:00
18:00
19:00
20:00
21:00
Channel 4 Cool White
0
5
10
15
20
25
30
35
9:00 10:00 11:00 12:00 13:00 14:00 15:00 16:00 17:00 18:00 19:00 20:00 21:00
Time Table
Light Output
Channel 1 Deep Red Channel 2 Green Channel 3 Royal Blue
Channel 4 Cool White Channel 5 Cool Blue Channel 6 Violet
Example Graph of Time table 1 : Hour to start light is 9:00 Example Graph of Time table 2 : Hour to start light is 9:00
Example CUSTOM Settings
Time
0
0
2
5
10
15
20
20
20
15
10
5
2
0
0
0
Channel 1 Deep Red
Channel 2 Green
0
0
2
5
10
15
20
20
20
15
10
5
2
0
0
0
2
4
4
11
20
31
40
40
40
31
20
11
7
7
2
0
Channel 3Royal Blue
0
0
4
11
20
31
40
40
40
31
20
11
4
0
0
0
0
4
7
11
20
31
40
40
40
31
20
11
7
7
0
0
Channel 5 Cool Blue
0
2
4
11
20
31
40
40
40
31
20
11
4
2
0
0
Channel 6 Violet
9:00
10:00
11:00
12:00
13:00
14:00
15:00
16:00
17:00
18:00
19:00
20:00
21:00
22:00
23:00
00:00
Channel 4Cool White
6
0
10
20
30
40
50
9:00
10:0
0
11:0
0
12:00
13:0
0
14:0
0
15:0
0
16:00
17:0
0
18:0
0
19:00
20:00
21:00
22:00
23:00
0:00
%
Time Table
Light Output
Channel 1 Deep Red Channel 2 Green Channel 3 Royal Blue
Channel 4 Cool White Channel 5 Cool Blue Channel 6 Violet

Example CUSTOM Settings
5
Time
0
2
5
6
8
9
9
9
8
6
5
2
0
Channel 1 Deep Red
Channel 2 Green
0
2
4
5
6
7
8
7
6
5
4
2
0
1
8
15
21
26
29
30
29
26
21
15
8
0
Channel 3 Royal Blue
0
6
11
16
19
22
23
22
19
16
11
6
0
1
7
14
20
25
28
29
28
25
20
14
7
0
Channel 5 Cool Blue
1
7
14
19
23
26
27
26
23
19
14
7
0
Channel 6 Violet
9:00
10:00
11:00
12:00
13:00
14:00
15:00
16:00
17:00
18:00
19:00
20:00
21:00
Channel 4 Cool White
0
5
10
15
20
25
30
35
9:00 10:00 11:00 12:00 13:00 14:00 15:00 16:00 17:00 18:00 19:00 20:00 21:00
Time Table
Light Output
Channel 1 Deep Red Channel 2 Green Channel 3 Royal Blue
Channel 4 Cool White Channel 5 Cool Blue Channel 6 Violet
Example Graph of Time table 1 : Hour to start light is 9:00 Example Graph of Time table 2 : Hour to start light is 9:00
Example CUSTOM Settings
Time
0
0
2
5
10
15
20
20
20
15
10
5
2
0
0
0
Channel 1 Deep Red
Channel 2 Green
0
0
2
5
10
15
20
20
20
15
10
5
2
0
0
0
2
4
4
11
20
31
40
40
40
31
20
11
7
7
2
0
Channel 3Royal Blue
0
0
4
11
20
31
40
40
40
31
20
11
4
0
0
0
0
4
7
11
20
31
40
40
40
31
20
11
7
7
0
0
Channel 5 Cool Blue
0
2
4
11
20
31
40
40
40
31
20
11
4
2
0
0
Channel 6 Violet
9:00
10:00
11:00
12:00
13:00
14:00
15:00
16:00
17:00
18:00
19:00
20:00
21:00
22:00
23:00
00:00
Channel 4Cool White
6
0
10
20
30
40
50
9:00
10:0
0
11:0
0
12:00
13:0
0
14:0
0
15:0
0
16:00
17:0
0
18:0
0
19:00
20:00
21:00
22:00
23:00
0:00
%
Time Table
Light Output
Channel 1 Deep Red Channel 2 Green Channel 3 Royal Blue
Channel 4 Cool White Channel 5 Cool Blue Channel 6 Violet
