renovator classic air manual 67398 issue · pdf filecommisioning/troubleshooting phasing rams...
TRANSCRIPT

Owners Manual
Head Office:P.O. Box 2018Hilton Highway, WashdykeTimaru, New ZealandTelephone (03) 688 2029Facsimile (03) 688 2821
Australian Branch:4B Silverton CloseLaverton North 3026Melbourne, AustraliaTelephone (03) 9314-9666Facsimile (03) 9314-6810
Renovator Classic AirORIGINAL INSTRUCTIONS
Pt. No. 67398Issue 0913


1
Pt. No. 67398Issue 0913
Introduction . . . . . . . . . . . . . . . . . . . . . . . . . . . . . . . . . . . . . . 2
Acquisition & Warranty . . . . . . . . . . . . . . . . . . . . . . . . . . . . . . . . . . . . . . 2
Disclaimer . . . . . . . . . . . . . . . . . . . . . . . . . . . . . . . . . . . . . . 2
Description of Machine Working Principle. . . . . . . . . . . . . . . . . . . . . . . 3
Specification Dimensions & Capacities . . . . . . . . . . . . . . . . 5
SAFETY - General Safety Symbols on Machine . . . . . . . . . . . . . . 6 Operator Safety . . . . . . . . . . . . . . . . . . . . . . . . 7 Be Prepared for Emergencies. . . . . . . . . . . . . 7 Appropriate Dress . . . . . . . . . . . . . . . . . . . . . . 8 Transport This Machine Safely . . . . . . . . . . . . 8 Handle Agricultural Chemicals Safely . . . . . . . 9 Avoid High Pressure Fluids. . . . . . . . . . . . . . . 9 Safe Work Practices . . . . . . . . . . . . . . . . . . . . 9 Practise Safe Maintenance . . . . . . . . . . . . . . . 10 SAFETY - Machine Specific Hazard Points . . . . . . . . . . . . . . . . . . . . . . . . . 11 Safety Decals & Safety Guards. . . . . . . . . . . . 13 Transport . . . . . . . . . . . . . . . . . . . . . . . . . . . . . . . . . . . . . . 14
Setup, Calibration & Operating Procedure Read Before Operation . . . . . . . . . . . . . . . . . . 15 Pre-calibration setup flowchart . . . . . . . . . . . . 16 Calibration procedure . . . . . . . . . . . . . . . . . . . 17 Hand Crank Turns for Seed Rate Calibration . 18 Calibration Deviations . . . . . . . . . . . . . . . . . . . 19 19R Classic Sowing Chart. . . . . . . . . . . . . . . . 20 Airflow & Fan Speed . . . . . . . . . . . . . . . . . . . . 22 Operation. . . . . . . . . . . . . . . . . . . . . . . . . . . . . 23 Depth Control . . . . . . . . . . . . . . . . . . . . . . . . . 24 Farmscan Jackal Settings . . . . . . . . . . . . . . . . 25 Blank Page for your Calibration Notes . . . . . . 27
Maintenance & Care General . . . . . . . . . . . . . . . . . . . . . . . . . . . . . . 28 Lubrication Instructions . . . . . . . . . . . . . . . . . . 29 Maintenance Schedule . . . . . . . . . . . . . . . . . . 30 Storage . . . . . . . . . . . . . . . . . . . . . . . . . . . . . . 32 Troubleshooting/Maintenance Notes. . . . . . . . 33 Commisioning/Troubleshooting Phasing Rams 34
Parts List Base Machine . . . . . . . . . . . . . . . . . . . . . . . . . 39 Optional Extras . . . . . . . . . . . . . . . . . . . . . . . . 72
Renovator Classic Air Contents Page

2
Introduction
Acquisition & WarrantyOn delivery of your new Duncan Renovator Classic Air please check that the machine is not damaged. In cases of shipping damage, please ask your dealer to arrange for the appropriate claim to be lodged immediately. Assemble any parts supplied loose and inspect your machine with the aid of this manual to familiarise yourself with its features. If you have any queries ask your dealer straight away. The machine is covered by our 12 month warranty on faulty parts, subject to normal use.
Record below the serial number of your machine and keep it in a secure place to help trace the machine and assist us when you order parts.The Owner’s Manual
Your new Duncan Renovator Classic Air will give long and efficient service if given normal care and operated properly.
This owner’s manual is provided so that you can become thoroughly familiar with the design of the machine and to furnish information on correct operation, adjustment and maintenance. Only persons well acquainted with these guidelines should be allowed to use the equipment.
A separate illustrated parts section has been provided so that if any parts are required your dealer will be able to supply them by reference to part numbers.
The manual is considered as part of your machine and must remain with the machine when it is sold.
Right and left hand references in this manual are determined by standing behind the machine and facing in the direction of travel.
Model: . . . . . . . . . . . . . . . . . . . . . . . . . . . . . . . . . . . . . . Serial No: . . . . . . . . . . . . . . . . . . . . . . . . . . . . . . . . . . .
Owner:. . . . . . . . . . . . . . . . . . . . . . . . . . . . . . . . . . . . . .
. . . . . . . . . . . . . . . . . . . . . . . . . . . . . . . . . . . . . . . . . . . . .
. . . . . . . . . . . . . . . . . . . . . . . . . . . . . . . . . . . . . . . . . . . . .
Delivery Date:. . . . . . . . . . . . . . . . . . . . . . . . . . . . . . . Dealer:. . . . . . . . . . . . . . . . . . . . . . . . . . . . . . . . . . . . . .
. . . . . . . . . . . . . . . . . . . . . . . . . . . . . . . . . . . . . . . . . . . . .
. . . . . . . . . . . . . . . . . . . . . . . . . . . . . . . . . . . . . . . . . . . . .
Disclaimer Every effort has been made to ensure that the information in this manual was accurate and up to date at the time of going to press. Clough Agriculture reserves the right to make subsequent changes to the machine, where necessary, without notification.
The Company will not be responsible for any damage or consequential loss arising out of misinterpretation or failure to follow recommended procedures. Nor will it be liable for any damage caused by or arising out of modification or misuse of its product.
The owner has a responsibility to protect himself and others by observing all safety information and by ensuring all operators are well acquainted with the safety information, trained in the correct use of the machine and applying safe work practices.
This Document contains the Original Operating Instructions for this machine and are verified by the Manufacturer.
Signed:......................................
Product Development Manager

3
Pt. No. 67398Issue 0913
Description of MachineThe Duncan ‘Renovator Classic Air’ is a Coil Tine T-boot drill.The large split hopper is mounted on a robust frame accommodating large diameter tyres.Sowing depth is controlled by adjusting the hydraulic ram as required. The quality European air metering units handle all seeds from turnip and rape through to peas and maize and permits easy calibration. The seeders are driven via a jockey wheel with individually selected high or low ranges. For transport, the drive is easily disconnected by raising the drill to its transport height.
Working PrincipleThe air flow and metering units are set to give the desired sowing and/or fertilizer rate. The coil tine and T-boot, create the seed bed. Seed flows down the flexible tubes between seeder and tee-boot units, and drops into the prepared seed bed. Optional tine harrows and following roller enhance seed to soil contact.

4

5
Pt. No. 67398Issue 0913
Dimensions & CapacitiesDimensions & Capacities
Width (over wheels /mm) 3026Height (Groundwheels up /mm) 2320Height (Groundwheels down /mm) 2665Overall Length (mm) 3500Tyre Size 10/80/12Recommended Tyre Pressure 4 Bar (58psi) Maximum speed (km/hr) 30 km/hrJockey Tyre Size 410/350 x 6 x 4 plyJockey Tyre Pressure* 3.44 Bar (50 psi) - TYRE IS FILLED WITH ANTI-PUNCTURE SEALANT*Row Spacing 147.5Effective Sowing Width 2802.5Box Capacity (litres per box) 700Tractor HP Rating Range 110 to 180
*Pressure gauges may be damaged if they are not fi ltered OVERALL LENGTH (refer specification table)
(excluding optional rear tow-hitch)
WIDTH OVER WHEELS (refer specification table)
HEI
GH
T (r
efer
sp
ecifi
cati
on
tab
le)

6
Do not ride or allow passengers on the machine.Under no circumstances are passengers to be permitted on the machine while it is in operation or being transported. Any footboards and/or footsteps are provided solely for the purpose of preparing the machine for use.
Keep clothing and body extremities well clear of pinch points while the machine is operating (seeding or calibrating). Keep well clear of moving parts at all times.These signs typically occur wherever trapping points exist. These include drive chains, sprockets, shafts, wheels, discs, pivot points, etc. Guards are provided with the machine for safety reasons (where practical without compromising machine performance). Ensure these are always fitted during operation.
Always exercise extreme caution in the vicinity of sharp edges and points.Where possible guards are provided with the machine for safety reasons (where practical without compromising machine performance). Ensure these are always fitted during operation.
Footboards, footsteps, drawbars and other machine surfaces may be slippery when wet. Apply extra caution in wet conditions and in the early morning when surfaces are wet.
Keep Clear. (It is dangerous to be in this area when the machine is operating.)
! ATTENTIONOn the machine important safety information is indicated by these symbols.
These highlight general safety aspects in regard to the machine rather than specific hazards.
‘Renovator Classic Air’ Safety

7
Pt. No. 67398Issue 0913
SAFETY - GeneralThis section of the manual offers general guidelines for the safe operation of machinery. It does not replace local safety regulations. These guidelines were current at the time of publication, but may be superseded by later regulations.
Clough Agriculture has made every effort to highlight all risks to personnel or property. Owners and operators have a responsibility to exercise care and safe work practices at all times in the vicinity of the machine.
Owners are advised to keep up to date on safety issues and to communicate these to all users of the machine.
Contact the Occupational Safety and Health Service (OSH) for further information about general safety aspects. If you have safety concerns specifically related to this machine, contact your dealer immediately.
Operator SafetyRead this manual carefully before operating new equipment. Learn how to use this machine safely.Be thoroughly familiar with the controls and the proper use of the equipment before using it.
Take careful note of all safety instructions both in this manual and on the machine itself. Failure to comply with instructions could result in personal injury and/or damage to the machine.
Replace missing or damaged safety signs on the machine and ensure that these remain clearly visible.
It is the owner’s responsibility to ensure that anyone who operates, adjusts, lubricates, maintains, cleans or uses the machine in any way has had suitable instruction and is familiar with the information in this manual (particularly with regard to safety aspects).
Operators and other users of the machine should be aware of potential hazards and operating limitations.
Be Prepared for EmergenciesKeep a first aid kit and fire extinguisher handy.
Keep emergency numbers for doctors, ambulance, hospital and fire department near your telephone.
N.B. Throughout this manual important safety information is indicated by these symbols in the margin:
A prohibition should be observed under all circumstances.
A warning indicates a hazard that could cause death or injury if the
warning is ignored.
A caution indicates a hazard that may cause damage to property if
the caution is ignored.
‘Renovator Classic Air’ Safety

8
SAFETY - General (Continued)Appropriate DressWear close fitting clothing and avoid rings or other forms of jewellery which could become caught in the machinery.
People with long hair must have it securely fixed and confined close to the head.
Refer to local safety standards for protective clothing and recommended safety equipment.
Adequate protection, such as a face mask, should be worn if operating this machine in dry and dusty conditions.
Transport This Machine SafelyEnsure that all linkage pins and security clips are fitted correctly. With trailing machines tow with the drawbar only, as this is the only safe towing point on the machine.
Always check that bystanders (especially children) are well clear (front and rear) before starting and moving the tractor and the machine.
Plan safe routes of travel, and be aware of power lines and other roadside hazards. Take particular care when towing implements on hillsides.
Do not ride or allow passengers on the machine. This machine is not designed to carry passengers, and no riders are permitted.
Road transportOn public roads,• A speed of 40km/h must not be exceeded.• Do not operate during the hours of darkness unless standard lights are fitted and clearly visible. (This also applies when visibility is limited, e.g., in foggy conditions.)See the guidelines in the Vehicle Dimensions and Mass Rule, issued by the Land & Transport Safety Authority.
Avoid tip-oversAvoid holes, ditches and obstructions which may cause the machine to tip over, especially on hillsides. Never drive near the edge of a gully or steep embankment - it might cave in. Slow down for hillsides, rough ground and sharp turns.
‘Renovator Classic Air’ Safety

9
Pt. No. 67398Issue 0913
SAFETY - General (Continued)
Handle Agricultural Chemicals SafelyAll farm chemicals should be stored, used, handled and disposed of safely and in accordance with the supplier’s/manufacturer’s recommendations.
Read the product label before using, noting any warnings or special cautions, including any protective clothing or equipment that may be required, ie. respirator.
Do not eat or smoke while handling sprays, fertilisers, coated seeds, etc. Afterwards, always wash your hands and face before you eat, drink, smoke, or use the toilet.
Store sprays, fertilisers, coated seeds, etc. out of reach of children and pets, and away from food and animal feeds.
Any symptoms of illness during or after using chemicals should be treated according to the supplier’s/manufacturer’s recommendations. If severe, call a physician or get the patient to hospital immediately. Keep the container and/or label for reference.
Avoid High Pressure FluidsAvoid any contact with fluids leaking under pressure, because the fluids can penetrate the skin surface.
Any fluid which penetrates the skin, will need to be removed immediately by a medical expert. Seek specialist advice on this type of injury.
Relieve the pressure before disconnecting any hydraulic or other lines. Make all repairs and tighten all fittings before re-connection to pressurised fluid.
Keep your hands and body away from any pinholes or high pressure jets. Search for leaks with a piece of cardboard instead of using your hand directly.
Safe Work PracticesAll farm machinery is potentially dangerous and should be treated with caution and respect.
Before starting the machine, ensure that all controls are placed in neutral and that bystanders are well clear. Check that the guards have been securely fitted and that any adjustments have been made correctly.
Where possible, disconnect or isolate the drive mechanism to the implement. Lower the machine onto the ground when not in use.
Do not operate this equipment when severe weather conditions appear imminent.
‘Renovator Classic Air’ Safety

10
SAFETY - General (Continued)
Practice Safe MaintenanceKeep the machine in safe working condition. Routine maintenance and regular servicing will help reduce risks and prolong the life of the machine.
General MaintenanceAccidents occur most frequently during servicing and repair. The following general rules must be followed when maintaining or working with machinery:• All operating and maintenance manuals must be read before and referred to while using or servicing any piece ofequipment.• Turn off all machinery power sources and isolate the machine before making adjustments, doing lubrication, repairs or any other maintenance on the machine.• Ensure that the machine hydraulics are disconnected from the power source.• Wear gloves when handling components with cutting edges, such as any ground cutting components.• Beware of the following hazards when dismantling or maintaining the machine:- > Hydraulics under pressure > Springs under tension or compression• It is recommended that you clean the machine with a water blaster or similar apparatus before commencing maintenance.
Make Sure the Machine is Well SupportedWhen machinery is fitted with hydraulics, do not rely on the hydraulics to support the machine. During maintenance or while making adjustments under the machine, always lock the hydraulics and support the machine securely. Place blocks or other stable supports under elevated parts before working on these.
Electrical MaintenanceDisconnect the electrical supply from the tractor before doing any electrical maintenance.
Welding With electronic equipment in modern tractors it is advisable to disconnect the machine from the tractor, or at least disconnect the alternator and battery before attempting any welding.
Use Only Genuine Spare PartsUnauthorised modifications or non-genuine spare parts may be hazardous and impair the safe operation and working life of the machine.
Excess lubricants must be disposed of safely so as not to become a hazard.
‘Renovator Classic Air’ Safety

11
Pt. No. 67398Issue 0913
SAFETY - Machine Specific
This section of the manual gives specific guidelines for the safe operation of the Renovator Classic Air. These guidelines were current at the time of publication, but may be superseded by later circumstances. They do not necessarily cover every possible hazard and must be read in conjunction with the SAFETY - General section (Page 7 to 10).
Hazard Points on the Renovator Classic AirThe lists below are not all-inclusive and serve only to highlight the more obvious areas of risk.
The decals attached to the machine are a general reminder that there are hazardous areas on the machine, rather than specifically highlighting all possible hazards.For decal locations on machine, refer Page 13.
No RidePassengers are not permitted anywhere on the machine.
Pinch Points/Moving PartsHazardous areas include:• Drive chains.• Sprockets between the jockey wheel, the transfer shaft and the output shaft.• Universal joints and drive shafts • Seed Metering units, box shaft and shaft connectors.• Wheel legs and main frame assemblies• Between discs and other sub-assembly parts (where fitted).• Finger tine assemblies (where fitted).• Hydraulic Fan.• Row Markers.
Slippery When WetHazardous areas include:• Footboards and footstep. • All smooth surfaces on the frame structure.
Keep ClearHazardous areas include:• Between the tractor and the Renovator Classic Air.• Immediately adjacent to the Renovator Classic Air side.
‘Renovator Classic Air’ Safety

12
SAFETY - Machine Specific(Continued)
Hazard Points on the Renovator Classic Air(Continued)For guard locations on machine, refer Page 13.
TransportThe two wheels located at the sides of the machine are for the purpose of controlling sowing depth. These are also used to support the machine weight during transport (while linked to the tractor).
Important - Refer to safety cautions in the Transport section, page 14 of the manual. Ensure that all linkage pins and security clips are fitted correctly.
MaintenanceRefer Page 38 for reference to the Maintenance and Care section of the manual.
LubricationRefer Page 39 for reference to the Maintenance and Care section of the manual.
‘Renovator Classic Air’ Safety

13
Pt. No. 67398Issue 0913
SAFETY - Machine Specific(Continued)
On row markers when fitted
1
1
2
3
45
Item Decal/Guard Pt. No. Qty1 ‘No Ride’ 43900 32 ‘Pinch Point/Moving Parts’ 43901 53 ‘Slippery When Wet’ 43902 24 ‘Keep Clear’ 43904 25 Jockey Drive Swing Guard 25745 16 ‘30 km/hr’ 43911 27 Lift Point’ 14389 2
7
6
‘Renovator Classic Air’ Safety
On end of footboard
2

14
Transport1 Raise the drill into the transport position and hold at the full
extent of the rams for a few seconds to allow cylinders to rephase/equalise.
2 Important - To avoid machine damage due to drill lowering during transport, always close the hydraulic valve on the drawbar. Move the handle to a position at 900 to the hydraulic line. This applies to the drawbar and disc opener hydraulic valves where fitted.
3 Locate jack stand in transport position, if fitted.
4 Ensure lighting and oversize warning requirements meet recommendations published by the local Land Transport Authority or equivalent.
5 Maximum towing speed 30 km/hr. For countries other than New Zealand other speed
restrictions may apply, please refer to your local transport authority.
Ensure towing vehicle requirements are adequate for the towed vehicle e.g. mass, brakes. Refer to recommendations published by the local Land Transport Authority or equivalent.
Braking when towing can cause the load to jackknife. Use extra care when towing in adverse conditions such as mud, inclines and sharp bends.
Lower towing speeds are recommmended on farm roads/tracks and where one wheel is on or over a road verge.
6 Attach safety chains to tractor. Refer Fig 3. Safety chains must be crossed over underneath the
coupling and attached to the towing vehicle. The attachment points must be as close as practical to the towing coupling and one each side.The towbar on the towing vehicle must be rated for the towed mass. Do not remove or replace the safety chains provided with any other than those specified in the parts manual.
Note: The safety chains are provided with sufficient length to cater for all towing vehicles. Safety chains must be shortened by cutting off excess length so that if the coupling fails the drawbar will not hit the ground.
7 If the machine is fitted with row markers or other vertical extensions, check clearance under power lines en route.
8 Important - For greater disc opener ground clearance, adjust the ram or turnbuckle on the disc opener unit so they are at maximum height, and/or extend the drawbar ram or turnbuckle to level the machine chassis.
‘Renovator Classic Air’ Transport

15
Pt. No. 67398Issue 0913
‘Renovator Classic Air’ Read Before Operation
Components Referred to in the Pre-Calibration Setup and Calibration ProcessThe following pages describe how to set the machine up for calibration, the calibration process and subsequent adjustments to obtain the desired seed and/or fertilizer output.Terms and words used in those instructions are shown below:-
Adjustment Handle
Toggle
‘NORMAL’ POSITION
‘FINE’ POSITION
‘IDLER GEAR’HIGH = PUSHED INLOW= PULLED OUT Adjustment Handle
Normal/Fine Toggle
high (idler in)
low (idler out)
Wing Nut & Keeper
Elbow
Only switch from normal to fi ne seed if the seed hopper is empty
Do not open the setting above ‘25’ with the toggle set to ‘fi ne’ as the adjuster will break.
Metering Setting Scale

16
Start
Is seed size between 4 and
10mm?
Locate product in 'Normal' seed table.
Look up 'Setting Postion' for desired output.
No
Yes
Is Setting Position 25mm or less?
No
Yes
Pull idler gear to 'out' position. The metering shaft will rotate
at half speed for smoother delivery at low rates. Look up revised rates on 'Increased Accuracy' chart for normal
sized seed.
Ensure that idler gear is pushed in and not meshing to
the external gear. The metering shaft will rotate at high speed when seeding.
Turn handle on the metering housing to the desired 'Setting
Position' for the chosen product from the table.
Ensure that the normal/fine toggle is not engaged with the hex shaft and that the end is pointing toward the metering
housing.
Locate product in 'Fine' seed table.
Look up 'Setting Postion' and 'Rate' for desired output.
Does 'Rate' in table specify
'low'?
Yes
No
Ensure that idler gear is pushed in and not meshing to
the external gear. The metering shaft will rotate at high speed when seeding.
Ensure that the normal/fine toggle is engaged with the hex shaft. You will need to turn the
the metering handle so the scale reads zero and engage
the toggle with the cutout in thehex shaft.
Turn handle on the metering housing to the desired 'Setting
Position' for the chosen product from the table.
Perform Calibration - refer to next page.
Perform Calibration - refer to next page.
Pull idler gear to 'out' position. The metering shaft will rotate
at half speed.
Empty boxes and clear old seed and fertilizer from
metering unit. high (idler in)
low (idler out)
normal/fi ne toggle
‘Renovator Classic Air’ Pre-Calibration Setup
Only switch from normal to fi ne seed if the seed hopper is empty

17
Pt. No. 67398Issue 0913
‘Renovator Classic Air’ Calibration
Seed CalibrationThe calibration test should be done to confirm the settings of the required seed rate and is done with the drill stationary and level with the fan off.The metering units must be set prior to filling with seed.
Seed Calibration Procedures1 Ensure that the metering unit is free from debris. Close
the trap-door.
2 Fill the appropriate bin. A minimum depth of 300mm is required for calibration with normal seeds.
3 Release the elbows from under the metering housings by unscrewing the wing nut and swinging the keeper out of the way. Move the elbow to one side.
4 Unhook the calibration tray from the rear of the machine, locate it on the guides and slide the tray under the bin outlets.
5 The bins are calibrated one-at-a-time; on the drive pedestal (outboard) end, remove the lynch pin and disconnect the unused driveshaft. Attach the end to the dummy shaft provided on the pedestal.
6 Place the crank handle over the hexagonal drive dog turn anti-clockwise until the seed flows consistently.To ensure complete filling of the seed unit continue turning the crank until an even flow of seed is coming out of the seeder units, then empty into the seedbox. The drill is now ready for calibration.
8 Refer to the table on the next page and turn the crank handle anticlockwise the number of turns for your machine. Crank at a steady rate of 1.5 seconds per revolution of the handle.
Note The Calibration is usually done for 1/40th Hectare. For very small seed rates or when using inaccurate scales (i.e. unable to measure to the nearest gram) the calculation based on 1/10th hectare should be used. ie: In the case of a 19R 3.0m machine, turn the crank handle 130 turns.
Scales must be accurate to 2 grams as any error will be multiplied by either 10 or 40 giving inaccurate calibration results.
For 1/40 Hectare (250m2) CalibrationSeed Rate = Actual Seed Collected (kg) x 40
For 1/10 Hectare (1000m2) CalibrationSeed Rate = Actual Seed Collected (kg) x 10
18
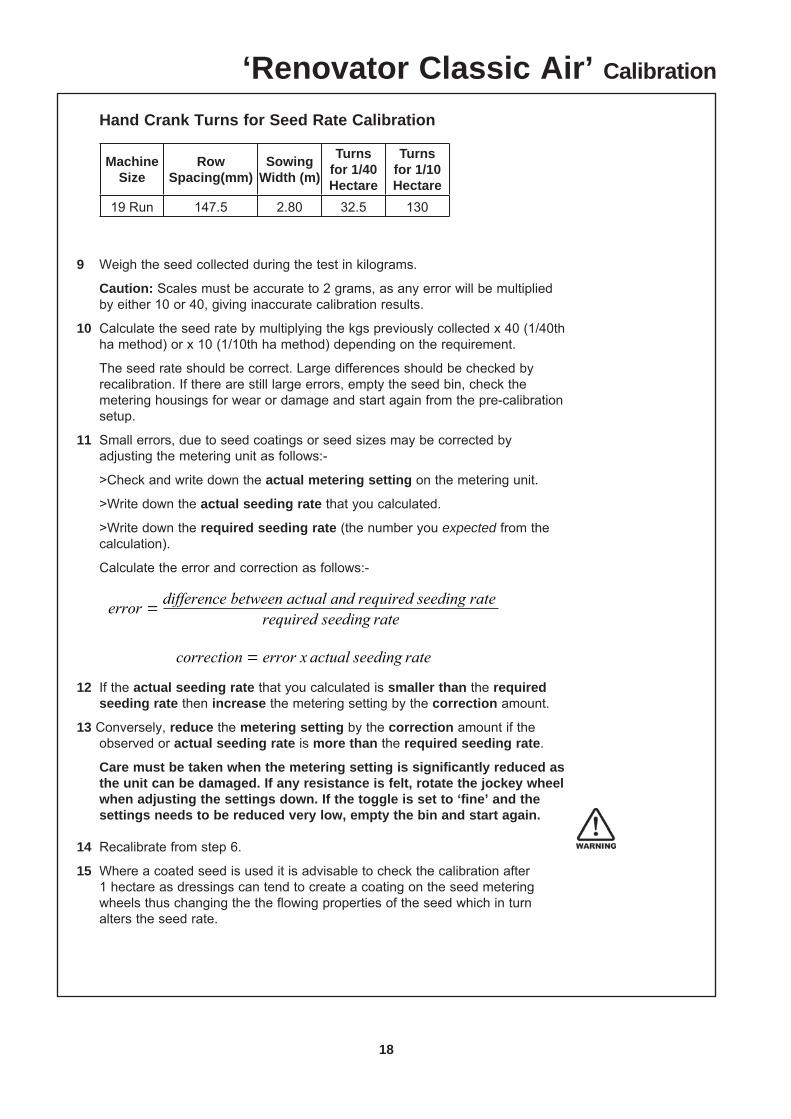
Hand Crank Turns for Seed Rate Calibration
9 Weigh the seed collected during the test in kilograms.
Caution: Scales must be accurate to 2 grams, as any error will be multiplied by either 10 or 40, giving inaccurate calibration results.
10 Calculate the seed rate by multiplying the kgs previously collected x 40 (1/40th ha method) or x 10 (1/10th ha method) depending on the requirement.
The seed rate should be correct. Large differences should be checked by recalibration. If there are still large errors, empty the seed bin, check the metering housings for wear or damage and start again from the pre-calibration setup.
11 Small errors, due to seed coatings or seed sizes may be corrected by adjusting the metering unit as follows:-
>Check and write down the actual metering setting on the metering unit.
>Write down the actual seeding rate that you calculated.
>Write down the required seeding rate (the number you expected from the calculation).
Calculate the error and correction as follows:-
12 If the actual seeding rate that you calculated is smaller than the required seeding rate then increase the metering setting by the correction amount.
13 Conversely, reduce the metering setting by the correction amount if the observed or actual seeding rate is more than the required seeding rate.
Care must be taken when the metering setting is significantly reduced as the unit can be damaged. If any resistance is felt, rotate the jockey wheel when adjusting the settings down. If the toggle is set to ‘fine’ and the settings needs to be reduced very low, empty the bin and start again.
14 Recalibrate from step 6.
15 Where a coated seed is used it is advisable to check the calibration after 1 hectare as dressings can tend to create a coating on the seed metering wheels thus changing the the flowing properties of the seed which in turn alters the seed rate.
‘Renovator Classic Air’ Calibration
Machine Size
Row Spacing(mm)
Sowing Width (m)
Turns for 1/40 Hectare
Turns for 1/10 Hectare
19 Run 147.5 2.80 32.5 130
19
Pt. No. 67398Issue 0913
‘Renovator Classic Air’ Calibration
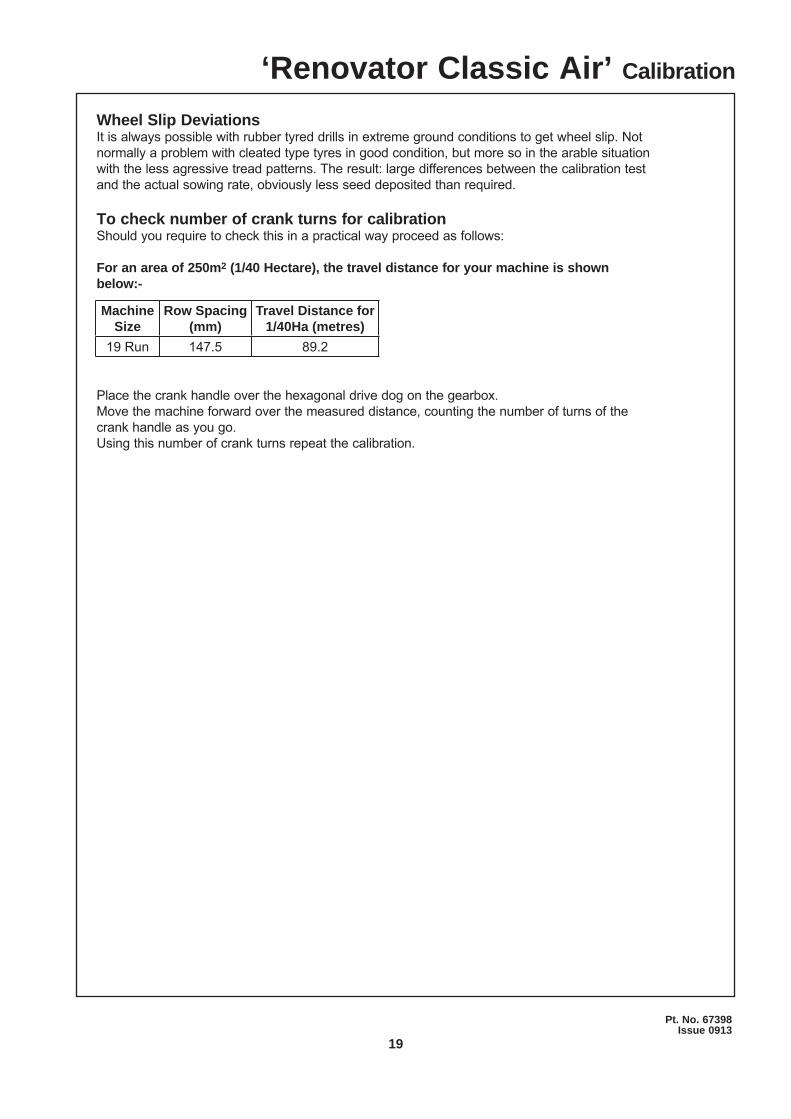
Wheel Slip DeviationsIt is always possible with rubber tyred drills in extreme ground conditions to get wheel slip. Not normally a problem with cleated type tyres in good condition, but more so in the arable situation with the less agressive tread patterns. The result: large differences between the calibration test and the actual sowing rate, obviously less seed deposited than required.
To check number of crank turns for calibrationShould you require to check this in a practical way proceed as follows:
For an area of 250m2 (1/40 Hectare), the travel distance for your machine is shown below:-
Place the crank handle over the hexagonal drive dog on the gearbox. Move the machine forward over the measured distance, counting the number of turns of the crank handle as you go. Using this number of crank turns repeat the calibration.
Machine Size
Row Spacing (mm)
Travel Distance for 1/40Ha (metres)
19 Run 147.5 89.2

20
‘19 Run Classic Air’ Sowing Chart Normal
1
5
2
34B
ox c
onte
nts
But
terfl
y P
ositi
on (a
ffect
s re
ar b
ox)
Fan
Spee
d/rp
m*
FRO
NT
REA
Rse
ed (N
orm
al)
seed
(Nor
mal
)op
en -
520
00se
ed (N
orm
al)
seed
(Fin
e)cl
osed
- 1
2000
Ferti
lizer
seed
(Nor
mal
)cl
osed
-220
00 to
250
0Fe
rtiliz
erse
ed (F
ine)
clos
ed -
120
00 to
250
0
*MA
XIM
UM
PE
RM
ISS
AB
LE S
PE
ED
400
0 R
PM
19 R
un C
lass
icN
OR
MA
L SE
ED (t
oggl
e N
OR
MA
L, B
utte
rfl y
Val
ve S
ettin
gs s
how
n be
low
and
on
page
22)
PRO
DU
CT
SPEC
IFIC
G
RAV
ITY
(kg/
l)Se
tting
Po
sitio
n>*1
0**1
5**2
0**2
5*30
3540
4550
5560
6570
7580
8590
9510
010
511
0R
ATE*
Whe
at
0.8
high
3552
7087
106
124
142
159
177
195
213
232
250
268
285
303
321
340
358
376
393
Oat
s0.
5hi
gh24
3648
6072
8395
108
120
132
143
155
168
180
192
203
215
228
240
252
264
Bar
ley
0.7
high
3349
6580
9611
312
914
516
117
719
320
922
524
225
727
228
830
532
133
735
3R
yeco
rn
0.7
high
3450
6784
102
119
136
153
171
187
203
220
239
256
273
290
307
324
342
360
377
Pea
s0.
8hi
gh21
4160
7999
119
138
157
177
197
216
236
255
274
294
314
333
352
372
391
410
Gra
ss0.
4hi
gh18
2635
4351
Pas
ture
Mix
-hi
gh18
2635
4351
DA
P1.
0hi
gh40
5978
9911
813
715
717
719
621
623
625
527
429
531
433
335
337
339
241
243
2S
uper
phos
phat
e1.
3hi
gh35
7111
114
017
420
723
927
030
834
137
239
642
845
849
753
256
759
563
267
0
INC
REA
SED
AC
CU
RA
CY
FOR
SET
TIN
G P
OSI
TIO
N<2
5mm
(tog
gle
NO
RM
AL,
But
terfl
y V
alve
Set
tings
sho
wn
belo
w a
nd o
n pa
ge 2
2)
PRO
DU
CT
SPEC
IFIC
G
RAV
ITY
(kg/
l)Se
tting
Po
sitio
n>*1
0**1
5**2
0**2
5*30
RAT
E*W
heat
0.
8lo
w17
.325
.935
.043
.752
.8O
ats
0.5
low
12.2
17.8
23.9
30.0
36.1
Bar
ley
0.7
low
16.3
24.4
32.5
40.1
48.2
Rye
corn
0.
7lo
w16
.824
.933
.542
.150
.8P
eas
0.8
low
10.7
20.3
30.0
39.6
49.3
Gra
ss0.
4lo
w-
9.1
13.2
17.3
21.3
Pas
ture
Mix
-lo
w-
9.1
13.2
17.3
21.3

21
Pt. No. 67398Issue 0913
Box contentsButterfl y Position (affects rear box) Fan Speed/rpm*
FRONT REARseed (Normal) seed (Normal) open - 5 2000seed (Normal) seed (Fine) closed - 1 2000
Fertilizer seed (Normal) closed -2 2000 to 2500Fertilizer seed (Fine) closed - 1 2000 to 2500
* MAXIMUM PERMISSABLE
FAN SPEED 4000 RPM
‘19 Run Classic Air’ Sowing Chart Fine
FINE SEED (toggle ‘FINE’, Butterfl y Valve Settings shown below and on page 22)19R Classic
PRODUCTSPECIFIC
GRAVITY (kg/l)Setting
Position> 2.5 5 7.5 10 12.5 15 17.5 20 22.5 25RATE ONCE SET DO NOT REDUCE/CLOSE WITH SEED IN BIN**
Lucerne (Alfalfa) 0.77 low 1.12 3.11 4.67 6.59 8.05 9.49 11.46 13.15 14.61 15.74Turnip 0.65 low 1.12 2.34 3.45 4.62 5.79 6.96 8.07 9.24 10.41 11.58Kale 0.65 low 1.12 2.34 3.45 4.62 5.79 6.96 8.07 9.24 10.41 11.58Swedes 0.65 low 1.12 2.34 3.45 4.62 5.79 6.96 8.07 9.24 10.41 11.58Canola/Rape 0.65 low 1.12 2.34 3.45 4.62 5.79 6.96 8.07 9.24 10.41 11.58White Clover 0.77 low 1.17 2.69 4.37 6.09 7.77 9.14 10.82 12.19 13.51 13.96Red Clover 0.77 low 1.17 2.69 4.37 6.09 7.77 9.14 10.82 12.19 13.51 13.96Grass 0.36 low 1.42 2.64 3.66 4.67 5.69 6.70 7.62 8.23Millet 0.64 low 1.14 2.34 3.70 4.88 5.89 6.91 8.33 9.34 10.46Grain Sorghum 0.56 low 0.33 2.84 6.09 7.62 8.63 10.66 12.39 13.91 15.95Forage Sorghum 0.56 low 0.33 2.84 6.09 7.62 8.63 10.66 12.39 13.91 15.95Chicory 0.54 low 0.59 1.87 2.95 4.14 5.14 6.34 7.65 8.74 9.69 10.55
Lucerne (Alfalfa) 0.77 high 2.23 6.22 9.34 13.18 16.11 18.97 22.91 26.30 29.23 31.48Turnip 0.65 high 2.23 4.67 6.91 9.24 11.58 13.91 16.15 18.48 20.82 23.16Kale 0.65 high 2.23 4.67 6.91 9.24 11.58 13.91 16.15 18.48 20.82 23.16Swedes 0.65 high 2.23 4.67 6.91 9.24 11.58 13.91 16.15 18.48 20.82 23.16Canola/Rape 0.65 high 2.23 4.67 6.91 9.24 11.58 13.91 16.15 18.48 20.82 23.16White Clover 0.77 high 2.34 5.38 8.73 12.19 15.54 18.28 21.63 24.38 27.02 27.93Red Clover 0.77 high 2.34 5.38 8.73 12.19 15.54 18.28 21.63 24.38 27.02 27.93Grass 0.36 high 2.84 5.28 7.31 9.34 11.38 13.41 15.23 16.45Millet 0.64 high 2.28 4.67 7.39 9.75 11.78 13.81 16.66 18.69 20.92Grain Sorghum 0.56 high 0.65 5.69 12.19 15.23 17.27 21.33 24.78 27.83 31.89Forage Sorghum 0.56 high 0.65 5.69 12.19 15.23 17.27 21.33 24.78 27.83 31.89Chicory 0.54 high 1.18 3.74 5.89 8.29 10.28 12.68 15.30 17.49 19.38 21.10
**Setting may only be reduced by a large amount if unit is turning or bin and metering device clear of product else damage will occur. Do not open the setting above ‘25’ with the toggle set to ‘fi ne’ as the adjuster will break.

22
‘Renovator Classic Air’ Airflow & Fan Speed
Airflow and Fan Settings1. The return hose for the hydraulic fan must only be connected to the tractor’s
low pressure return circuit.
If this is not carried out, the hydraulic motor seals will fail. The hose is fitted with a 3/4” female Quick Release Coupling. A 3/4” male QR Coupling is provided to fit to your tractor. The return hose is large to prevent back pressure on the motor, case drain and
seal.
2. A higher fan speed is usually required to correctly deliver high rate or heavier product such as fertilizer from the front box. The airflow to the rear box is reduced by setting the butterfly valve to the approriate position as shown in the table. If this is not done the seed delivered to the T-Boot units from the rear box may well bounce out of the seed slot.
The following table shows box fill combinations, butterfly position and recommended fan speeds for normal/fine seeds and fertilizer:-
Box contentsButterfl y Position (affects rear box) Fan Speed/rpm*
FRONT REARseed (Normal) seed (Normal) open - 5 2000seed (Normal) seed (Fine) closed - 1 2000
Fertilizer seed (Normal) closed -2 2000 to 2500Fertilizer seed (Fine) closed - 1 2000 to 2500
* MAXIMUM PERMISSABLE
FAN SPEED 4000 RPM
1
5
2
3
4
The Fan Speed shown on the Farmscan Jackal is for illustrative purposes only. Refer to the table for the correct setting.

23
Pt. No. 67398Issue 0913
OperationGeneral Operation Guidelines
1 The return hose for the hydraulic fan must only be connected to the tractor’s low pressure return circuit.
If this is not carried out, the hydraulic motor seals will fail. The hose is fitted with a 3/4” female Quick Release Coupling. A 3/4” male QR Coupling is provided to fit to your tractor. The return hose is large to prevent back pressure on the motor,
case drain and seal. 2 Use a sufficiently powerful tractor which is heavy enough to tow the
drill safely.
3 Operate the drill at a speed of 6-12 km/hr (4-8 mph). In stony and uneven ground conditions a lower speed is more
appropriate
4 Check that the drill is level during calibration and while seeding.
5 Check tyre pressure before seeding. Refer page 5.
6 Double check seed rates before seeding.
7 Raise the drill out of the ground when making any turns.
8 Raise the drill out of the ground before backing up.
9 After prolonged storage, check to see that all drive mechanisms and hydraulic equipment are functioning correctly. Check that the seed tubes are not perished or blocked.
Sowing SpeedTypical travel speeds when sowing range from 6-12 km/hr in good conditions. In stoney and uneven ground conditions a lower speed is recommended to minimise rapid part deterioration. Sowing too fast can result in:1 Poor contour following and uneven sowing depth.2 Impact damage to: a Ground engaging components. b Bearings, housings & axles. c Fasteners & structural components.3 More extreme conditions will result in greater vibration
and uneven seed flow at low seeding rates.
‘Renovator Classic Air’ Operation

24
Sowing Depth ControlThe sowing depth is dependent on:1 The wheel height in relation to the chassis2 Tyre pressure3 Ground condition i.e. hard or soft The wheel height in relation to the chassis is controlled using the threaded depth adjustment collars on the wheel leg rams.
Level DrillUse the drawbar turnbuckle or ram to tilt the drill so it is sitting level. An adjustment may be required after a short period of use because the paint wears off the discs and the discs sharpen which in turn improves the penetration abilities.Ensure that the front and rear rows are at an even depth.
Transport PositionWhen in the transport position the hydraulic cylinders are fully extended. In this position the cylinders fully equalise by allowing oil to bypass the master cylinder piston. It is recommended to raise the drill into the transport position when turning at headlands or regularly to counteract the effects of oil leakage past the piston and ensure cylinder rods are equally extended and minimise variations in sowing depth.
‘Renovator Classic Air’ General Operation
1

25
Pt. No. 67398Issue 0913
Farmscan Jackal Settings Setup
Refer to the manual supplied with your Farmscan Jackal kit for information and operation.
Farmscan Jackal Factory Setup for Renovator Classic Air
Refer to pages 9 , 11 & 28 of the Farmscan Jackal manual. Cycle through the input screens by pressing the MENU key.
Input 1 -Two wire ‘reed’ sensor for Speed/Area measurement taken from shaft on drive pedestal.The white ‘signal’ lead is connected to input B1.
Input 2 - Three wire ‘reed’ sensor for fan RPM measurement.The white ‘signal’ lead is connected to input B2.
Refer to the Farmscan manual if you want to make additional sensor connections.
It is advisable, as with all things electronic, to have a backup of your totals. We suggest you record these on a daily basis in a notebook or diary.
1 SPEED km/Hr
WHEEL (m) 2.750WIDTH (m) 2.802DIST (m) 0DISPLAY AREAPULSES 0
2 RPM
RPM 0ALM LOW 0ALM HIGH 3500DIVIDE 1PULSES 0
‘Renovator Classic Air’ Jackal Areameter
B1 B2 B3 B4 B5 B6 B7 B8 B9 B10 B11
A1 A2 A3 A4 A5 A6 A7 A8 A9 A10 A11
B2 Signal
A1 Gnd
B9 +12v
A1 Gnd
B1 Signal
Connect to Fan RPM3 Wire Sensor via extension cable.
Connect to Pedestal Shaft2 Wire Sensor via extension cable.
Connect directlyto Tractor Battery
+12v
0v

26

27
Pt. No. 67398Issue 0913
Renovator Classic Air Calibration Notes

28
Maintenance & CareGeneral Safety and Accident Prevention Advice
1 Make sure that if the tractor remains attached to the drill that the ignition key is removed.
2 During maintenance the drill should be supported in such a manner that if hydraulic failure was to occur the machine would still be adequately supported.
3 Wear gloves when handling components with cutting edges such as worn discs etc.
4 Disconnect the electrical supply from the tractor before doing any electrical maintenance.
5 Refer to safety sections for more safety information.
General Cautionary Maintenance Advice
1 Electric Welding - With the electronic equipment in modern tractors it is advisable to completely disconnect the implement from the tractor, or at the very least disconnect the alternator before attempting any welding.
2 Hydraulics - Ensure hydraulic couplings (male & female) are clean before connecting. Dirty couplings will result in hydraulic oil contamination and hydraulic cylinder seal/poppet valve damage and bore scores. This in turn will result in oil leakage past the piston seals.
No filter is fitted to the hydraulic system. If hydraulic fittings and oil supply are not going to be kept clean it is recommended that a filter be fitted to prevent hydraulic cylinder damage.
3 Water Blasting - Water blasting, steam cleaning or other pressurised cleaning processes can force dirt etc. into undesirable places that may cause damage or rapid part wear to items such as bearings, seals, chains, bushes etc.Caution must be exercised.
‘Renovator Classic Air’ Maintenance & Care
29
Pt. No. 67398Issue 0913
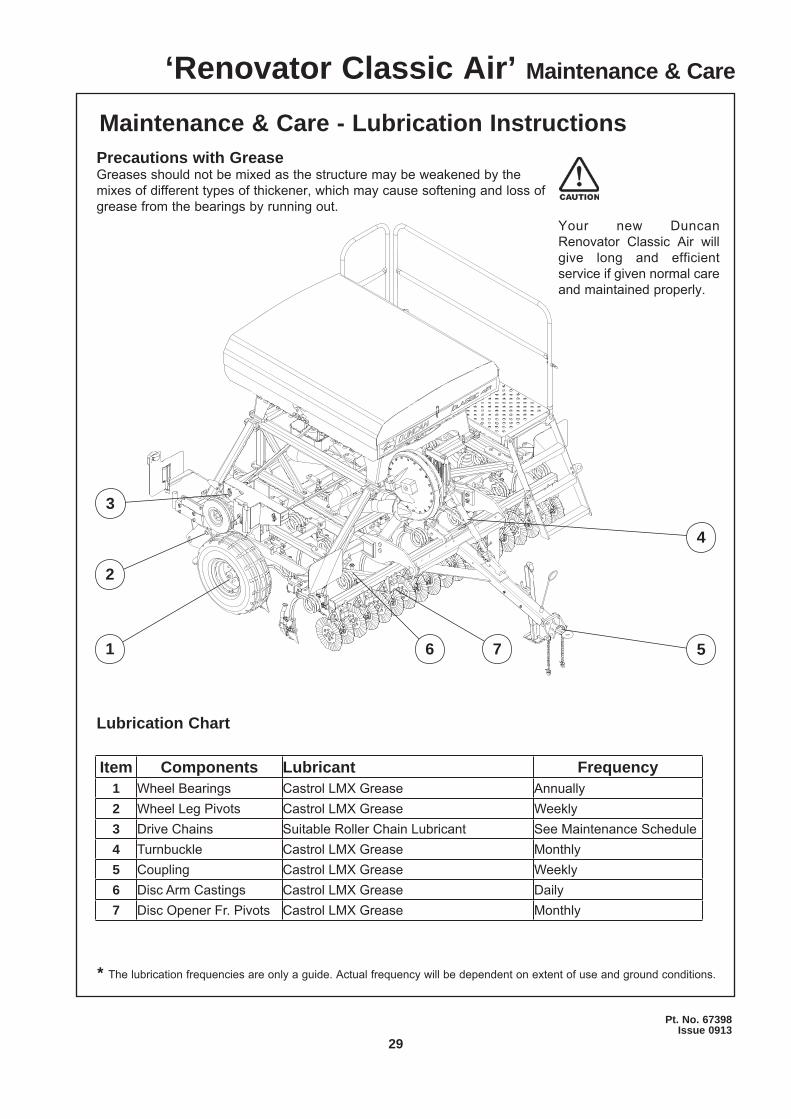
Your new Duncan Renovator Classic Air will give long and efficient service if given normal care and maintained properly.
Lubrication Chart
Maintenance & Care - Lubrication Instructions
* The lubrication frequencies are only a guide. Actual frequency will be dependent on extent of use and ground conditions.
Precautions with GreaseGreases should not be mixed as the structure may be weakened by the mixes of different types of thickener, which may cause softening and loss of grease from the bearings by running out.
Item Components Lubricant Frequency1 Wheel Bearings Castrol LMX Grease Annually2 Wheel Leg Pivots Castrol LMX Grease Weekly3 Drive Chains Suitable Roller Chain Lubricant See Maintenance Schedule4 Turnbuckle Castrol LMX Grease Monthly5 Coupling Castrol LMX Grease Weekly6 Disc Arm Castings Castrol LMX Grease Daily7 Disc Opener Fr. Pivots Castrol LMX Grease Monthly
1
2
3
4
5
‘Renovator Classic Air’ Maintenance & Care
6 7
30
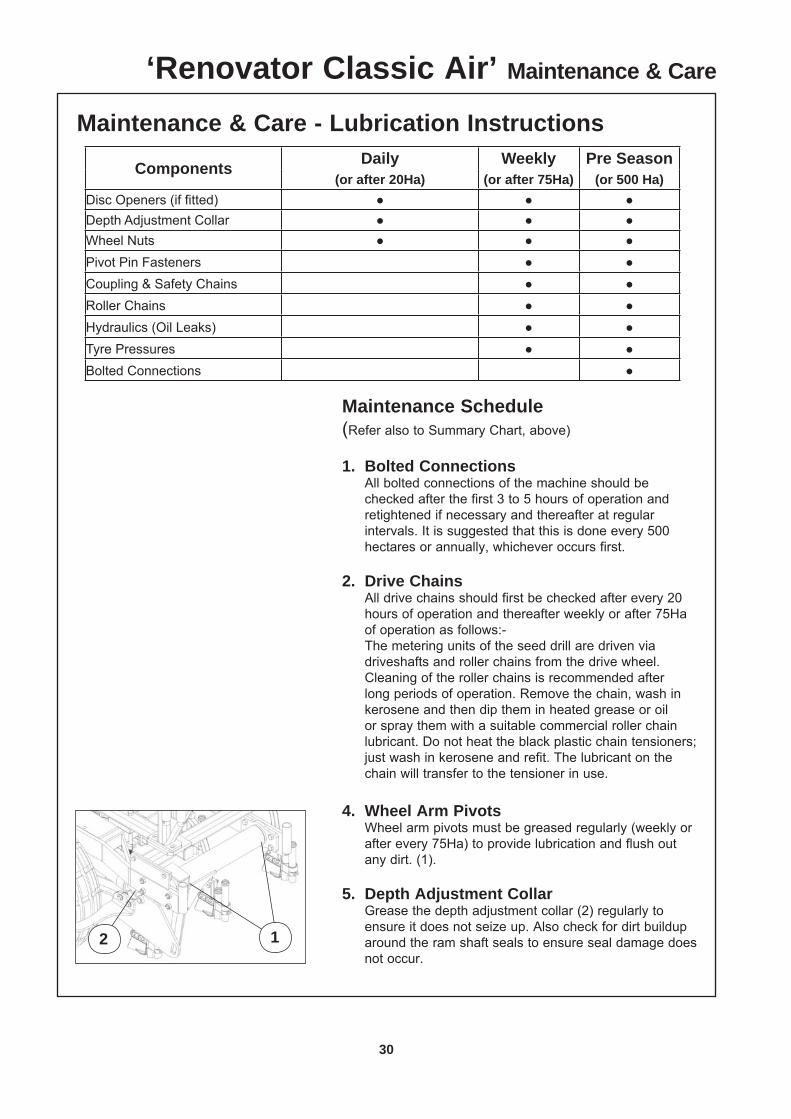
Maintenance Schedule (Refer also to Summary Chart, above)
1. Bolted Connections All bolted connections of the machine should be
checked after the first 3 to 5 hours of operation and retightened if necessary and thereafter at regular intervals. It is suggested that this is done every 500 hectares or annually, whichever occurs first.
2. Drive Chains All drive chains should first be checked after every 20
hours of operation and thereafter weekly or after 75Ha of operation as follows:-
The metering units of the seed drill are driven via driveshafts and roller chains from the drive wheel.
Cleaning of the roller chains is recommended after long periods of operation. Remove the chain, wash in kerosene and then dip them in heated grease or oil or spray them with a suitable commercial roller chain lubricant. Do not heat the black plastic chain tensioners; just wash in kerosene and refit. The lubricant on the chain will transfer to the tensioner in use.
4. Wheel Arm Pivots Wheel arm pivots must be greased regularly (weekly or
after every 75Ha) to provide lubrication and flush out any dirt. (1).
5. Depth Adjustment CollarGrease the depth adjustment collar (2) regularly to ensure it does not seize up. Also check for dirt buildup around the ram shaft seals to ensure seal damage does not occur.
Maintenance & Care - Lubrication Instructions
Components Daily Weekly Pre Season(or after 20Ha) (or after 75Ha) (or 500 Ha)
Disc Openers (if fi tted) ● ● ●Depth Adjustment Collar ● ● ●Wheel Nuts ● ● ●Pivot Pin Fasteners ● ●Coupling & Safety Chains ● ●Roller Chains ● ●Hydraulics (Oil Leaks) ● ●Tyre Pressures ● ●Bolted Connections ●
‘Renovator Classic Air’ Maintenance & Care
12

31
Pt. No. 67398Issue 0913
Maintenance Schedule (continued)
6. Tyre Pressure The recommended tyre pressure is listed on Page 5. Weekly checks are recommended.
7. Disc Openers Front coulter bearings are sealed and do not require
lubrication. Check discs for any lateral movement (wobble) on a regular basis. Replace bearings if there any noticable wobble.
There is one grease nipple on each disc opener frame pivot and disc assembly casting. Frame pivots should be greased monthly while disc castings should be greased daily to provide lubrication and to flush out any dirt.
8. Framework The framework structure should be inspected annually
for defects, i.e., cracks in members or welded connections. The framework should be cleaned prior to the inspection.
9. Metering Units Ensure that the metering units are clean and that the
rubber sealing lip is not damaged. The sealing lip is located along the base of the trap door hinge. A damaged sealing lip can cause seed delivery problems.
10. Fan Hydraulic Motor The return hose for the hydraulic fan must only be
connected to the tractor’s low pressure return circuit. If this is not carried out, the hydraulic motor seals will
fail. The hose is fitted with a 3/4” female Quick Release
Coupling. A 3/4” male QR Coupling is provided to fit to your
tractor. The return hose is large to prevent back pressure on
the motor, case drain and seal.
‘Renovator Classic Air’ Maintenance & Care

32
Maintenance & Care (Continued)
Preparing the Machine for Storage.Locate on a dry level surface. The machine should be stored wherever possible so the rams are not supporting any weight. The drive chains should be lubricated with suitable roller chain lubricant before prolonged periods of storage.
It is recommended that maintenance be carried out at the end of the season, giving sufficient time to obtain spare parts and/or carry out repairs if required.
The seed and fertilizer bins must be completely emptied and cleaned
Leave the metering unit trap doors open.
Fit the cover to the bin.
‘Renovator Classic Air’ Maintenance & Care

33
Pt. No. 67398Issue 0913
Problem Possible Cause Action Refer to Page…
Over Sowing
Jockey wheel under infl ated Check pressure 5 Are the Jackal meter settings correct? Check settings 25
Has the setup/calibration procedure been followed correctly?
Check setup and recalibrate 20
Gearwheel position incorrect Check setup for seed type 20
Crank handle turned too quickly when calibrating
Only 1.5 seconds per revolution 21
Under Sowing
Has the setup/calibration procedure been followed correctly?
Check setup and recalibrate 20
Gearwheel position incorrect Check setup for seed type 20
Are the calibration scales in kg (not lbs)? Check scales -
Sowing at shallow depths. Is there suffi cient pressure on the jockey wheel?
Check and adjust spring pressure -
Metering unit is clogged Clean metering unit -
Cracking noises coming from the metering unit
Very large seed Remove roll pins from agitator shaft
Drill sowing deeper on one side/leaking down on one side
Hydraulic lift rams have not rephased properly Rephase rams 36
Dirt in the poppet valve of the ram Clean/replace valve
Tines are moving Too much turning with drill in the ground Keep turning to minimum -
Drill not penetrating into ground/drill riding out of ground
Operating the drill in the fl oat position Do not operate in fl oat -
Disc openers are keeping the drill from penetrating into the ground Lift discs out of the ground -
‘Renovator Classic Air’ Troubleshooting

34
Commisioning Phasing Cylinders
1. General
(a) The cylinders will re-phase in both directions. Each piston is fitted with 2 poppet valves which open at the end of the stroke to allow oil to bypass the piston. The bypass of oil at the end of the stroke allows for initial bleeding of the system and re-phasing in operation.
(b) The valve in the piston is a precision device, CLEANLINESS IS OF THE UTMOST IMPORTANCE. Contamination in the oil will accelerate deterioration of the valve seat. Cylinders will creep once the integrity of the seating is lost.
2. Bleeding the System
(a) Initial bleeding after connection to the tractorPurge all air from the system by fully stroking rams in both directions. Allow the oil to flow through the cylinders with the tractor at an idle for a minimum of 2 minutes at each end of the stroke.
(b) Re-phasing after initial bleedingAfter initial bleeding the cylinders will only require occasional re-phasing during operation. This is done by extending the rams for about 30 seconds or until all cylinders have reached the end of their stroke.
3. Fault Finding
1. Cylinders creeping during operationThere are two primary causes of this:(i) Air in the hydraulic system(ii) By passing of the poppet valve.
(a) Check that there is no air in the system. Raise and lower the machine. All cylinders should move instantaneously, any lag indicates that there is air in the system. Other signs of air in the system are hoses vibrating/squealing or the control handle shuddering. Re-bleed the system if necessary.
(b) If there is no sign of air in the system and the cylinders still creep, raise the machine off the depth stop and measure the movement of each cylinder rod.
(c) If both cylinders move at the same rate it is likely to be the control valve/lock out valve that is leaking.
(d) If the slave continues moving after the master cylinder has hit the depth stop it is likely to be the piston in the master cylinder that is bypassing.
(e) If the slave cylinder extends while the master cylinder retracts it is likely to the the piston in the master cylinder that is bypassing.
(f) If the master cylinder does not move but the slave does it is likely to be the piston in the slave cylinder that is bypassing.
(g) If the piston is bypassing it is likely to be contamination in the phasing valve. The cylinder will have to be dismantled, cleaned and fitted with a new poppet valve.
‘Renovator Classic Air’ Phasing Cylinders

35
Pt. No. 67398Issue 0913
Commisioning Phasing Cylinders (continued)
3. Fault Finding (continued)
2. Cylinders moving at different rates
(a) Check that there is no air in the system. Raise and lower the machine; all cylinders should move at the same time, any lag indicates that there is air in the system. Re-bleed the system if necessary.
(b) Ensure that the cylinders have been connected correctly. The cylinders should be connected in series so that the bore sizes go down in 1/4” increments. The Rod end port of the master cylinder (3.5” bore) is connected to the piston end port of the slave cylinder (3.25” bore).
‘Renovator Classic Air’ Phasing Cylinders

36
Renovator Classic Air Maintenance Notes

37
Pt. No. 67398Issue 0913

38

39
Pt. No. 67398Issue 0913
Parts List
‘Renovator Classic Air’Seed Drill
Head Office: P.O. Box 2018 Hilton Highway, Washdyke Timaru, New Zealand Telephone (03) 688 2029 Facsimile (03) 688 2821
Australian Branch:4B Silverton CloseLaverton North 3026Melbourne, AustraliaTelephone (03) 9314-9666Facsimile (03) 9314-6810

40
7
12
5
1
2
4
9
3
6
8
10
‘Renovator Classic Air’ Complete Assembly

41
Pt. No. 67398Issue 0913
ITEM PART No. DESCRIPTION QTY1 Refer Page 42-45 Main Frame & Drawbar Assembly -2 Refer Page 46 Wheel Leg 23 Refer Page 50-51 Tine Assemblies -4 Refer Page 52-57 Seed Metering Drive Pedestal 15 Refer Page 58-59 Adapter Frame 16 Refer Page 60-61 Box Mounting Frame 17 Refer Page 62-63 Footboard & Ladder 18 Refer Page 64-67 Seed Box & Metering Units 19 Refer Page 68-69 Fan & Air Hoses 1
10 Refer Page 71 Farmscan Jackal 111 Refer Page 72-73 Lighting Kit (Optional) -12 Refer Page 74-77 Disc Openers (Optional) -13 Refer Page 78-81 Row Markers (Optional) -
‘Renovator Classic Air’ Complete Assembly

42
1
2
3
4
5, 6
7 14, 15
10
9
12, 13 20, 21
23
20
25 26
27 28
24
18
8
16
11
17
‘Renovator Classic Air’ Mainframe & Drawbar

43
Pt. No. 67398Issue 0913
ITEM PART No. DESCRIPTION QTY1 26512 19R Mainframe 12 Refer page 50 Coil Tines & Boots -3 26550 Drawbar Assembly 14 4800315 Hose Support 15 60094 Drawbar Axle 16 45285 Roll Pin Ø10 27 60192 Centre Hitch Welded Assembly 18 26580 Towing Eye Assembly 19 26577 LH Support Stay 1
10 26578 RH Support Stay 111 43830 Safety Chain Assembly 212 45066 M20 x 70 Grade 8.8 Bolt 413 45141 M20 Nyloc Nut 614 47244 7/8" UNF Bolt x 6.5" 115 47548 7/8" UNF Nut 116 45181 M8 x 12 S/H Grub Screw 117 45075 M20 x 150 Grade 8.8 Bolt 118 45042 M16 x 60 Grade 8.8 Bolt 419 45140 M16 Nyloc Nut 420 45033 M12 x 120 Grade 8.8 Bolt 221 45139 M12 Nyloc Nut 323 - Jack Stand Kit – Optional 124 43007 Grease Nipple 125 22262 Clevis Pin Tabbed 126 45001s M10 x 20 S/Screw Grade 8.8 Z/P 127 45152 M10 Light Flat Washer 128 45166 M10 Spring Washer 1
‘Renovator Classic Air’ Mainframe & Drawbar
44
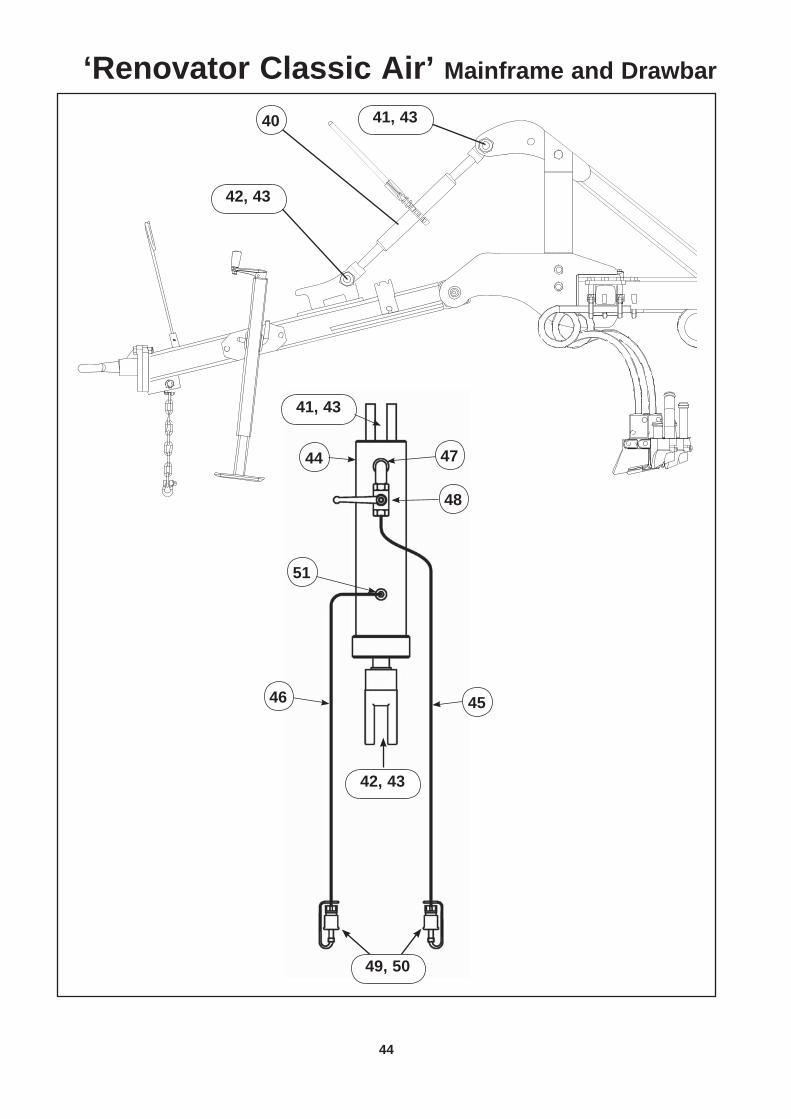
‘Renovator Classic Air’ Mainframe and Drawbar
41, 4340
42, 43
44
41, 43
48
51
46 45
42, 43
49, 50
47

45
Pt. No. 67398Issue 0913
‘Renovator Classic Air’ Mainframe and DrawbarITEM PART No. DESCRIPTION QTY
40 43395 H/D Ratchet Turnbuckle 141 47254 Bolt 1" UNF x 5" HT 142 47251 Bolt 1" UNF x 3.5" HT 143 47552 1" UNF Nyloc Nut 244 43852 Hydraulic Cylinder 145 26723 Hydraulic Hose 2.80m 146 26724 Hydraulic Hose 2.50m 147 43496 3/4” UNO to 3/8”BSPT Elbow 148 43393 3/8” BSP S/S Ball Valve 149 43147 1/2” BSP Quick Release Coupling 250 43617 Dust Cover 251 43280 3/4” UNO to 3/8” BSPM Nipple 1
Note:Drawbar hydraulic parts (41-51) can be purchased as a kit, part number 26720K.

46
‘Renovator Classic Air’ Wheel Rocker System
1
3
20 2122
23 24
18
10 4 5 12 6
7
1381114
9

47
Pt. No. 67398Issue 0913
‘Renovator Classic Air’ Wheel Rocker SystemITEM PART No. DESCRIPTION QTY
1 62013 LH Wheel Rocker Welded Assy 12 62014 RH Wheel Rocker Welded Assy (not shown) 13 26585 Rocker Pivot Assy 44 43596 ADR M16-1.5P x45 Hub Stud 105 43597 ADR M16-1.5P Wheel Nut 106 43598 ADR M27-1.5P Castle Nut 27 43599 ADR 62mm Hub Cap 28 43600 ADR Hub MkII 29 26620 ADR MkII Stub Axle (Welded to Wheel Rockers) 2
10 43976 Seal Kit 211 43421 30209 J2 Inner Bearing 212 10282 30206 J2 Outer Bearing 213 45303 3.5 Diameter x 40 Long Cotter Pin 214 Trash Shield (part of item 10) 215 43836 Mk 2 ADR Hub and Stub Assembly Complete (Items 4-14) 216 43833 Wheel 10/80-12 217 26592 Rocker Shaft Plug (Not Shown) 418 62028 LH Wheel Scraper Assy 119 62029 RH Wheel Scraper Assy (not shown) 120 45437 M12x 50 Bolt 421 45139 M12 Nyloc Nut 422 45153 M12 Light Flat Washer 423 45042 M16 x 60Grade 8.8 Bolt 1624 45140 M16 Nyloc Nut 1625 43120 M8 x 1.25 Pitch Grease Nipple x 90 degree (Not Shown) 4

48
2
6
3
1
4
7
13, 14
SlaveCylinder
MasterCylinder
1515
5
4 8 10 17
9 11
19 9 10
5
18
12
16
‘Renovator Classic Air’ Wheel Rocker Hydraulics
21, 22
20

49
Pt. No. 67398Issue 0913
‘Renovator Classic Air’ Wheel Rocker HydraulicsITEM PART No. DESCRIPTION QTY
1 26702 3.5” x 6.5” Master Rephasing Cylinder (Includes pin) 12 26703 3.25” x 6.5” Slave Rephasing Cylinder (Includes pin) 13 43848 Stroke Limiting Collar 7/8” (where fi tted) 14 60866 Hydraulic Hose, 2.70m 15 26713 Hydraulic Hose, 2.33m 16 26714 Hydraulic Hose, 2.80m 17 26715 Hydraulic Hose, 5.30m 18 43028 3/8" Flow Control 19 43391 3/8" Dowty Washer 3
10 43392 3/8" BSPP Male Nipple 211 43393 3/8” BSP S/S Ball Valve 112 60856 Hydraulic Valve Support Assy 113 43147 1/2” BSP Quick Release Coupling 214 43617 Dust Cover 215 43280 3/4” UNO to 3/8” BSP Nipple 416 45033 M12 x 120 Bolt 117 45139 M12 Nyloc Nut 118 44957 M6 X 50 Bolt 219 45136 M6 Nyloc Nut 220 22262 Clevis Pin Assembly 221 45418s M10 x 25 Set Screw 222 45166 M10 Spring Washer 2

50
Left Hand Tine Shown
11
12
10
1
4
2
7
813
3
9
5
14
9
‘Renovator Classic Air’ Tine & Boot Assembly
6

51
Pt. No. 67398Issue 0913
‘Renovator Classic Air’ Tine & Boot AssemblyITEM PART No. DESCRIPTION QTY
1 21413 LH Coil Tine 101 21414 RH Coil Tine 192 26848 LH Inverted Tee Clamp 193 25615 RH Inverted Tee Clamp 194 26849 Cast Inverted Tee Point 195 25608 Fertilizer Tube, Standard (dual box) 136 25613 Fertilizer Tube, Angle (dual box) 67 45010 M10 x 65 Bolt, Class 8.8 388 45003 M10 x 30 Bolt, Class 8.8 389 45138 M10 Nyloc Nut 76
10 21691 Tine Clamp Casting 3811 45466 M16 x 80 (4.6) Zinc Plated Bolt 3812 21690 75 x 75 RHS Clamp Plate 1913 45413 M8 x 35 Bolt (dual box) 1914 45137 M8 Nyloc Nut (dual box) 1915 43691 Feed Hose 38mm per mtr16 43500 Cray Clip 47-49mm (fi tted to top of hose not shown) 19

52
‘Renovator Classic Air’ Jockey Drive
8
8
756 4
9
1 2
74
10
3 12 14
17 14
13
18
21 2220
23
24
25
11
26 27 28
15
36
34
54 6
33
16
30
2931
30
29
1237
65
4 39
36
12
65
4
3
34
36 34 36
6
5Components for both drivesare the same
3
19
35
38
40 - 44
32
45

53
Pt. No. 67398Issue 0913
‘Renovator Classic Air’ Seed Drill Jockey ITEM PART No. DESCRIPTION QTY
1 63128 21T Sprocket 1/2”P 20mm Bore 2
2 25758 Box Drive Shaft 2
3 22294 Sprocket Key (6 x 6 x 25) 6
4 45137 M8 Nyloc Nut 17
5 45151 M8 Light Flat Washer Z/P 17
6 44992s M8 x 20 Grade 8.8 Z/P S/Screw … 17
7 43387 Bearing Housing PF47 (1 housing = 2 fl anges) 4
8 43385 Bearing YET204 20mm 4
9 45181 M8 x 12 Socket/HD Grub Screw (knurled point) 6
10 25744 Jockey Wheel and Axle W/Assy 1
11 25724 13T Sprocket 1/2”x 20mm Bore 1
12 45180 M8 x 10 Socket/HD Grub Screw (knurled point) 6
13 47625 M16 Bellville Washer S/S304 1
14 17127 Bearing 6204 2
15 25739 Jockey Axle Inner Spacer 1
16 25735 Jockey Wheel Arm W/Assembly 1
17 25727 Jockey Axle Outer Spacer 1
18 45140 M16 Nyloc Nut 1
19 25746 Jockey Drive Swing Guard 1
20 45156 M6 H/D Flat Washer Z/P 2
21 45164 M6 Spring Washer 2
22 44951s M6 x 16 Grade 8.8 Z/P S/Screw 2
23 45119 M16 Grade 8.8 Hex Half-Nut Z/P 1
24 23376 Chain Tensioner Anchor 30 Ext 1
25 22523 Torsion Spring Right Hand 1
26 22535 Chain Tension Roller 1
27 23373 Chain Tensioner Short L/H Assy 1
28 45043 M16 x 65 Grade 8.8 Z/P Bolt 1
29 25725 Jockey Arm Pivot Spacer 2
30 43939 Bearing 6205 2
31 25729 Jockey Arm Pivot Outer Spacer 1
32 45163 M24 H/D Flat Washer Z/P 1
33 25742 38T Sprocket 1/2” x 25mm Bore 1
34 43386 Bearing YET205 25mm 3
35 44033 Jackal Clamp & Magnet AA-117 1
36 30359 Bearing Housing PF52 (1 housing = 2 fl anges) 3
37 22050 Crank Adapter Assembly 1
38 63127 15T Double Sprocket 1/2”P 25mm 1
39 63126 Drive Pedestal Main Shaft 1
40 26567 Sensor Mounting bracket 1
41 44034 Jackal Sensor AA-110P 1
42 45002s M10 x 25 Grade 8.8 Z/P S/Screw 1
43 45152 M10 Light Flat Washer Z/P 1
44 45138 M10 Nyloc Nut 1
45 45186 M10 x 12 SKT HD Grubscrew (knurled point) 2

54
‘Renovator Classic Air’ Chains & Tensioners
1 12
3
For Jockey Chain Tensioner see items 23 to 28 on previous page

55
Pt. No. 67398Issue 0913
‘Renovator Classic Air’ Chains & TensionersITEM PART No. DESCRIPTION QTY
1 63125 1/2” BS Chain x 63 Links 22 44014 Plastic Chain Tensioner 23 24103 1/2” BS Chain x 61 Links 14 43388 1/2” P Joiner Link 3

56
‘Renovator Classic Air’ Driveshafts (Metering)
4
2
1
3
‘OUTBOARD’ END(20mm x 20mm)
‘INBOARD’ END(25mm X 25mm)
‘OUTBOARD’ END
‘INBOARD’ END
5

57
Pt. No. 67398Issue 0913
‘Renovator Classic Air’ Driveshafts (Metering)ITEM PART No. DESCRIPTION QTY
1 63230 O/Board Universal Shaft W/Assy 22 63231 InBoard Universal Shaft W/Assy 23 47615 6 x 40 Pipe Lynch Pin 24 44956SS M6 x 40 304 S/Steel Bolt 25 45136SS M6 Nyloc Nut Grade 316 S/S 2

58
‘Renovator Classic Air’ Adapter Frame
2
3
1
4
6
49
8
7
5
10

59
Pt. No. 67398Issue 0913
‘Renovator Classic Air’ Adapter FrameITEM PART No. DESCRIPTION QTY
1 64401 Adapter Frame 12 64417 Foot Stand W/Assy 23 45039 M16 x 45 Grade 8.8 Z/P Bolt 44 45140 M16 Nyloc Nut 125 45139 M12 Nyloc Nut 46 45020s M12 x 35 Grade 8.8 Z/P S/Screw 47 63835 Clamp 50 x 25 48 64407P Shim Profi le 49 21690 Clamp Plate (75 x 75 RHS) 4
10 45057 M16 x 230 Grade 8.8 Z/P Bolt 8

60
‘Renovator Classic Air’ Seedbox Frame
1
2
2
987
3
4
5, 6
5, 6
5, 6 5, 6
5, 6
5, 6

61
Pt. No. 67398Issue 0913
‘Renovator Classic Air’ Seedbox FrameITEM PART No. DESCRIPTION QTY
1 64116 Hopper Mount Frame W/Assy 12 63195 Side Support W/Assy 23 63199 RH Frame Brace Front 14 63205 RH Frame Brace Rear 15 45039 M16 x 45 Grade 8.8 Z/P Bolt 86 45140 M16 Nyloc Nut 227 45037 M16 x 35 Grade 8.8 Z/P Bolt 48 45168 M16 Spring Washer Z/P 49 45160 M16 HD Flat Washer Z/P 4

62
‘Renovator Classic Air’ Footboard & Ladder
10
13
9
1211
7
6
5
43
2
1
8 910

63
Pt. No. 67398Issue 0913
‘Renovator Classic Air’ Footboard & LadderITEM PART No. DESCRIPTION QTY
1 60163 End Guard Rail W/Assy 12 61705 Side Guard Rail W/Assy 13 43757 Drop Lock 14 45138 M10 Nyloc Nut 15 61700 RH Footboard Assembly 16 60170 Footboard Step Bracket W/Assy 17 63219 Ladder Assembly 18 64122 Guard Rail Multi-Purpose Frame 19 45023 M12 x 50 Grade 8.8 Z/P Bolt 8
10 45139 M12 Nyloc Nut 811 45155 M20 Light Flat Washer Z/P 212 45062 M20 x 50 Grade 8.8 Z/P Bolt 213 45141 M20 Nyloc Nut 2

64
‘Renovator Classic Air’ Seed/Fert Box
2
4
8
21
76
14
1312
6 11
15
9
75
8
1
18 19 20
16 176
10
24OUTLET3

65
Pt. No. 67398Issue 0913
‘Renovator Classic Air’ Seed/Fert BoxITEM PART No. DESCRIPTION QTY
1 44064 Air Distributor Head 24 Outlet 22 44059 Blanking Plug Seed Distr Head 103 44071 Tube 24 63150 MS Hopper W/Assy 15 63194 9 Hole Tube Inset Panel W/Assy 26 63175 10 Hole Tube Inset Panel W/Assy 27 45401sss M6 x 16 316 S/S S/Screw 488 45136ss M6 Nyloc Nut S/S 609 43373 Edgetrim Black (per metre) -
10 63167 Mesh Grid Filter Hopper Bottom 211 Refer Page 66 Metering Unit 212 63260P Hopper Gasket Support Profi le 213 45909ss M6 x 20 Pan Pozi S/S M/C Screw 1214 63258 Rubber Gasket 215 63173 Cover Holding Extrusion 116 22568 Location Tab Calibration Tray 217 45907 M6 x 12 Pan Pozi Z/P M/C Screw 418 45908 M6 x 16 Pan Pozi Z/P M/C Screw 219 45122 M6 Grade 8.8 Hex Nut Z/P 220 45150 M6 Light Flat Washer 421 63182 Hopper Cover Support Rod 222 43430 Plastic lashing Hooks (not shown) 1123 63174 Ripstop Hopper Cover (not shown) 124 63251 Air Delivery Hose Long (not shown) 125 63252 Air Delivery Hose Short (not shown) 126 44021 32mm Nylafl ow Air Seeder Hose -27 43691 38mm Nylafl ow Air Seeder Hose -28 45702 Pop Rivet (for item 14) 8

66
‘Renovator Classic Air’ Metering Unit
3
1
2
92
9
5 8
7
5 6
4

67
Pt. No. 67398Issue 0913
ITEM PART No. DESCRIPTION QTY1 44063 Metering Device 12 45152 M10 Light Flat Washer Z/P 63 45138 M10 Nyloc Nut 44 44068 Elbow 15 45151 M8 Light Flat Washer Z/P 86 45137 M8 Nyloc Nut 47 63259 Cover 18 44993s M8 x 25 Grade 8.8 Z/P S/Screw 49 45004 M10 x 35 Grade 8.8 Z/P Bolt 4
10 44101 Bracket (spare) -11 44099 Toggle (spare) -
‘Renovator Classic Air’ Metering Unit
10 11

68
‘Renovator Classic Air’ Fan & Air HosesITEM PART No. DESCRIPTION QTY
1 44017 Blower 15 Series 12 44992s M8 x 20 Grade 8.8 Z/P S/Screw 63 44018 Flanged Blower Manifold Splitter 14 45137 M8 Nyloc Nut 65 45139 M12 Nyloc Nut 26 45032 M12 x 110 Grade 8.8 Z/P Bolt 27 63237 Fan Support Block 18 63251 Air Delivery Hose Long (not shown) 19 63252 Air Delivery Hose Short (not shown) 1
10 44019 Galtech 11cc Hydraulic Motor 1
5 4 3 2 1
7
6

69
Pt. No. 67398Issue 0913
‘Renovator Classic Air’ Fan HydraulicsITEM PART No. DESCRIPTION QTY
1 44072 Hydraulic Hose (4.0m) 12 44073 Hydraulic Hose (4.2m) 13 44074 Hydraulic Hose (0.3m) 14 44075 7/8” UN’O x 1/2” BSPPM Nipple 15 44076 1-1/16” UN’O x 1-1/16” JIC Nipple 16 44077 1-1/16” JIC MMF Tee 17 44078 9/16” JIC F x 1/4” BSPM 90° 18 44079 1-1/16” x 9/16” JIC M Nipple 19 44080 3/4” BSP Female Q.R. Coupling 1
10 44081 3/4” BSP Male Q.R. Coupling 111 43147 1/2” BSP Male Q.R Coupling 112 44019 Galtech 11cc Hydraulic Motor 113 43617 1/2” Female Dust Cover 114 44128 3/4” Male Dust Cover 1
5
6 2 9 10
1114
83
7
12
Item 10 -Fit to TractorLow Pressurereturn port.
14
13

70

71
Pt. No. 67398Issue 0913
‘Renovator Classic Air’ JackalITEM PART No. DESCRIPTION QTYKIT 44026K Contains the following:1 44027 Areameter A-Jackal 12 44028 Window Mount AH-407 13 44029 Power Cable AC-105 14 44030 Hardware pack AH-JACK 15 44031 7.5m Cable AC-088 16 44032 0.3m Cable AC-213P 17 44033 Shaft Magnet AA-117 18 44034 Reed Sensor AA-110P 19 44035 Proximity Sensor -Blue AA2010P 1
10 44037 Owner’s Manual AM-Jackal 1

72
5 mm Ensure outer casing of cable protrudes past cable clamp by at least 5 mm
Terminals viewed from direction of cable entry
Cable Colour
Terminal Number Function
Yellow 1 Left IndicatorWhite 3 EarthGreen 4 Right IndicatorRed 6 Brake/Stop
Brown 7 Tail/Side Lights
‘Renovator Classic Air’ Lighting (Optional)
Front Left
Front Right
Rear Left
Rear Right10
17

73
Pt. No. 67398Issue 0913
‘Renovator Classic Air’ Lighting (Optional)ITEM PART No. DESCRIPTION QTYKIT TBC Contains items 1 to 20:1 45664 Hazard Decal Full Set 22 61718P# Hazard Panel Front Profi le 23 61719P# Hazard Panel Rear Profi le 24 61715 Viz Plate Holding Bracket 45 64128 FR-RH Viz Frame (Front right) 16 64127 FR-LH Viz Frame (Front left) 17 61709 RR-RH Viz Frame 18 61710 RR-LH Viz Frame 19 64125P# Viz Frame Clamp Plate 2
10 60881 Loom (includes Plug and LED lights prewired) 111 45033 M12 x 120 Grade 8.8 Z/P Bolt 812 45139 M12 Nyloc Nut 813 45013 M10 x 80 Grade 8.8 Z/P Bolt 414 45138 M10 Nyloc Nut 415 44951s M6 x 16 Grade 8.8 Z/P Set Screw 1616 45150 M6 Light Flat Washer 1617 45136 M6 Nyloc Nut 1618 43675 1/4” X 1 1/2” Linch Pin 419 43333 Plastic Tie Strap 1220 47620 “P” Clip 421 43437 Trailer Round Connector Plug (spares) 1
13
27 or18
3
4
16 1715
Lamps are prewired into loom
14
11
12
5 or 6
9
8
Front Right and Rear Right shown

74
‘Renovator Classic Air’ (Optional) Disc Opener
15
3
4
9
10
1211
18
19
20
8
14
17
21 8
22 23 24
27
25
26
29
30
28
7
8
5
6
3
4
232 33

75
Pt. No. 67398Issue 0913
‘Renovator Classic Air’ (Optional) Disc OpenerITEM PART No. DESCRIPTION QTY
1 C/RCDO Disc Opener Complete 12 62040 Disc Opener Frame 13 45051 M16 X 130 Class 8.8 Bolt 244 21690 Clamp Plate 125 25562 Disc Opener Frame Support Welded Assy 26 21245 Pivot Pin Assy 27 45001s M10 x 20 Class 8.8 Set Screw 28 45138 M10 Nyloc Nut 1089 60460 Mounting Bracket 10
10 45140 M16 Nyloc Nut 2411 21244 Double Pivot Pin Assembly 1012 45004 M10 x 35 Class 8.8 Bolt 1013 60455 Double Disc Assembly 914 60459 Double Axle Arm Welded Assy 915 60452 Single Disc Assembly LH 116 60456 Single Axle Arm Welded Assy 117 43118 Grease Nipple Straight 1018 26310 T Bolt Spring Rod 1019 60294 Disc Opener Spring 1020 45141 M20 Nyloc Nut 1021 45650 Seal 1922 60466 Housing 1923 45652 Bearing 1924 60469 Bearing Retainer (Outer Race) 1925 60444 Bearing Retainer (Inner Race) 1926 45662 M10 x 30 CSK Screw 1927 45653 O Ring Seal 1928 22035 Fluted Disc 318mm Dia. 1929 45002s M10 x 25 Class 8.8 Set Screw 11430 60468 Cover Plate Stainless Steel 1931 43395 H/D Ratchet Turnbuckle 132 47254 Bolt 1” UNF x 5” HT 233 47552 1” UNF Nyloc Nut 4

76
4
2
5 6 5 6
7
12
2
11 10
9
8 3
13
1
7
3
‘Renovator Classic Air’ (Optional) Disc Opener

77
Pt. No. 67398Issue 0913
‘Renovator Classic Air’ (Optional) Disc OpenerITEM PART No. DESCRIPTION QTY
1 45655 Hydraulic Cylinder 12 60874 Hydraulic Hose 2.70m 13 26695 Hydraulic Hose 0.60m 14 26696 Hydraulic Hose 3.5m 15 43147 1/2” BSP Quick Release Coupling 26 43617 Dust Cover 27 43280 3/4” UNO to 3/8” BPSM Nipple 28 43393 3/8” BSP S/S Ball Valve 19 60856 Hydraulic Valve Support Assembly 1
10 45035 M12 x 140 Grade 8.8 Bolt 111 45139 M12 Nyloc Nut 112 44957 M6 x 50 Bolt 213 45136 M6 Nyloc Nut 214 47254 1.0 UNF X 5.0" HT Bolt 215 47552 1.0"UNF Nyloc Nut 2
NOTE: Items 1 to 13 may be ordered as a kit. Part number 60076K

78
‘Renovator Classic Air’ Row Marker (Optional)
Right hand Row Marker shown
1
2
8
11Right
Left
Right
Left
15
15
1421
23
24
22
17
12 7
13
16
11
18
109
4
5
76
17
Parts specific to Left hand Row Marker
1920
25 7
3

79
Pt. No. 67398Issue 0913
‘Renovator Classic Air’ Row Marker (Optional)ITEM PART No. DESCRIPTION QTYKIT 61725K Row Marker Kit:-1 10192 Disc 12 23535 Bearing Stud 13 14443 Bearing Housing 14 44952s M6 x 20 Grade 8.8 Z/P S/Screw 65 45136 M6 Nyloc Nut 66 45160 M16 H/D Flat Washer Z/P 17 45140 M16 Nyloc Nut 28 23542 Disc Arm Assembly 19 45131 M12 Grade 8.8 Hex Nut Z/P 2
10 45020s M12 x 35 Grade 8.8 Z/P S/Screw 211 61735 LH Frame W/Assembly 111 61736 RH Frame W/Assembly 112 45039 M16 x 45 Grade 8.8 Z/P Bolt 113 22416 Spacer 414 61726 Hinge Frame W/Assembly 215 61730 L/H Ram Mount W/Assembly 115 61731 R/H Ram Mount W/Assembly 116 23589 Ram Pivot Pin 217 45272 R Clip (S12) OR (AG7) 818 61749 Ball Valve Mount W/Assy 119 44962 M8 x 30 Grade 8.8 Z/P Bolt 220 45137 M8 Nyloc Nut 221 61751 D/A Ram 2” x 1” x 8” Compact S 222 61740 Frame Ram Spacer 423 45163 M24 H/D Flat Washer Z/P 424 61742 Ram Pivot Pin 126 Long 225 45044 M16 x 70 Grade 8.8 Z/P Bolt 4
Hydraulic hoses and component detail are shown on the next page.

80
‘Renovator Classic Air’ Row Marker (Optional)
91 8 2
3
8
7
3
98 14
9 108
12 1411 1211
98
14
10
1211 13
2
5
6 15

81
Pt. No. 67398Issue 0913
‘Renovator Classic Air’ Row Marker (Optional)ITEM PART No. DESCRIPTION QTYKIT 61743K Hydraulic hose & Fittings Kit:-1 61751 D/A RAM 2” x 1” x 8” Compact S (3/8” Ports) 22 61745 Hose 1.65m (Tee to Outer Cylinder via Needle Valve) 23 61744 Hose 3.80m (Tractor to Tee) 24 61746 Hose 1.60m (Tee to Inner Cylinder) 15 61747 Hose 1.15m (Tee to Ball Valve) 16 61748 Hose 0.70m (Ball Valve to Inner Cylinder) 17 43147 1/2” BSP Male Q.R. Coupling 28 44103 1/4” BSPM x 3/8” BSPPM Nipple 49 43391 3/8” Dowty Washer/Seal 4
10 44108 1/4” BSPPM x 1/4” BSPPF Swiv 90° 211 44104 1/4” BSPPM MM Nipple 412 44105 1/4” Dowty Washer/Seal 413 44106 1/4” BSP Tee MMM 214 44107 1/4” BSP Needle Valve 215 61749 1/4” Ball Valve with bracket mount 116 44962 M8 x 30 Grade 8.8 Z/P Bolt 217 45137 M8 Nyloc Nut 218 43617 1/2” Female Carrier Dust Plug 2