report builder
TRANSCRIPT

Progress Report BuilderUser’s Guide

© 2001 Progress Software Corporation. All rights reserved.
Progress® software products are copyrighted and all rights are reserved by Progress Software Corporation.This manual is also copyrighted and all rights are reserved. This manual may not, in whole or in part, becopied, photocopied, translated, or reduced to any electronic medium or machine-readable form withoutprior consent, in writing, from Progress Software Corporation.
The information in this manual is subject to change without notice, and Progress Software Corporationassumes no responsibility for any errors that may appear in this document.
The references in this manual to specific platforms supported are subject to change.
Progress, Progress Results, Provision and WebSpeed are registered trademarks of Progress SoftwareCorporation in the United States and other countries. Apptivity, AppServer, ProVision Plus, SmartObjects,IntelliStream, and other Progress product names are trademarks of Progress Software Corporation.
SonicMQ is a trademark of Sonic Software Corporation in the United States and other countries.
Progress Software Corporation acknowledges the use of Raster Imaging Technology copyrighted bySnowbound Software 1993-1997 and the IBM XML Parser for Java Edition.
© IBM Corporation 1998-1999. All rights reserved. U.S. Government Users Restricted Rights — Use,duplication or disclosure restricted by GSA ADP Schedule Contract with IBM Corp.
Progress is a registered trademark of Progress Software Corporation and is used by IBM Corporation in the
mark Progress/400 under license. Progress/400 AND 400® are trademarks of IBM Corporation and are usedby Progress Software Corporation under license.
Java and all Java-based marks are trademarks or registered trademarks of Sun Microsystems, Inc. in theUnited States and other countries.
Any other trademarks and/or service marks contained herein are the property of their respective owners.
.
Product Code: 4518
Item Number: 81086W;9.1C
May 2001

Contents
Preface . . . . . . . . . . . . . . . . . . . . . . . . . . . . . . . . . . . . . . . . . . . . . . . . . . . . . . . . . . . . . xixPurpose . . . . . . . . . . . . . . . . . . . . . . . . . . . . . . . . . . . . . . . . . . . . . . . . . . . . . . . . . xixAudience . . . . . . . . . . . . . . . . . . . . . . . . . . . . . . . . . . . . . . . . . . . . . . . . . . . . . . . . xixOrganization of This Manual . . . . . . . . . . . . . . . . . . . . . . . . . . . . . . . . . . . . . . . . . xixTypographical Conventions . . . . . . . . . . . . . . . . . . . . . . . . . . . . . . . . . . . . . . . . . . xxiSyntax Notation . . . . . . . . . . . . . . . . . . . . . . . . . . . . . . . . . . . . . . . . . . . . . . . . . . . xxiiExample Procedures . . . . . . . . . . . . . . . . . . . . . . . . . . . . . . . . . . . . . . . . . . . . . . . xxviProgress Messages . . . . . . . . . . . . . . . . . . . . . . . . . . . . . . . . . . . . . . . . . . . . . . . . xxviiiOther Useful Documentation . . . . . . . . . . . . . . . . . . . . . . . . . . . . . . . . . . . . . . . . . xxix
Getting Started . . . . . . . . . . . . . . . . . . . . . . . . . . . . . . . . . . . . . . . . . . . . xxixDevelopment Tools . . . . . . . . . . . . . . . . . . . . . . . . . . . . . . . . . . . . . . . . . xxxReporting Tools . . . . . . . . . . . . . . . . . . . . . . . . . . . . . . . . . . . . . . . . . . . . xxxi4GL . . . . . . . . . . . . . . . . . . . . . . . . . . . . . . . . . . . . . . . . . . . . . . . . . . . . . xxxiiDatabase . . . . . . . . . . . . . . . . . . . . . . . . . . . . . . . . . . . . . . . . . . . . . . . . . xxxiiiDataServers. . . . . . . . . . . . . . . . . . . . . . . . . . . . . . . . . . . . . . . . . . . . . . . xxxiiiSQL-89/Open Access . . . . . . . . . . . . . . . . . . . . . . . . . . . . . . . . . . . . . . . xxxivSQL-92 . . . . . . . . . . . . . . . . . . . . . . . . . . . . . . . . . . . . . . . . . . . . . . . . . . xxxivDeployment . . . . . . . . . . . . . . . . . . . . . . . . . . . . . . . . . . . . . . . . . . . . . . . xxxvWebSpeed. . . . . . . . . . . . . . . . . . . . . . . . . . . . . . . . . . . . . . . . . . . . . . . . xxxvReference . . . . . . . . . . . . . . . . . . . . . . . . . . . . . . . . . . . . . . . . . . . . . . . . xxxvi
1. Report Builder Basics . . . . . . . . . . . . . . . . . . . . . . . . . . . . . . . . . . . . . . . . . . . . . 1–11.1 How Report Builder Generates Reports . . . . . . . . . . . . . . . . . . . . . . . . . 1–21.2 Before You Get Started . . . . . . . . . . . . . . . . . . . . . . . . . . . . . . . . . . . . . 1–51.3 Starting Report Builder . . . . . . . . . . . . . . . . . . . . . . . . . . . . . . . . . . . . . . 1–71.4 The Report Builder Main Window . . . . . . . . . . . . . . . . . . . . . . . . . . . . . . 1–8
1.4.1 Menu Bar . . . . . . . . . . . . . . . . . . . . . . . . . . . . . . . . . . . . . . . . . 1–101.4.2 Tool Bar . . . . . . . . . . . . . . . . . . . . . . . . . . . . . . . . . . . . . . . . . . 1–111.4.3 Format Bar . . . . . . . . . . . . . . . . . . . . . . . . . . . . . . . . . . . . . . . 1–11

Contents
iv
1.4.4 Horizontal and Vertical Rulers. . . . . . . . . . . . . . . . . . . . . . . . . . 1–121.4.5 Bands and Band Lines . . . . . . . . . . . . . . . . . . . . . . . . . . . . . . . 1–141.4.6 Layout Area. . . . . . . . . . . . . . . . . . . . . . . . . . . . . . . . . . . . . . . . 1–171.4.7 Status Bar . . . . . . . . . . . . . . . . . . . . . . . . . . . . . . . . . . . . . . . . . 1–191.4.8 Cursor Locator . . . . . . . . . . . . . . . . . . . . . . . . . . . . . . . . . . . . . 1–20
1.5 Connecting Databases . . . . . . . . . . . . . . . . . . . . . . . . . . . . . . . . . . . . . . 1–221.6 Exiting Report Builder . . . . . . . . . . . . . . . . . . . . . . . . . . . . . . . . . . . . . . . 1–23
2. Report Definitions and Report Libraries . . . . . . . . . . . . . . . . . . . . . . . . . . . . . . 2–12.1 Managing Report Definitions . . . . . . . . . . . . . . . . . . . . . . . . . . . . . . . . . . 2–2
2.1.1 Creating Report Definitions . . . . . . . . . . . . . . . . . . . . . . . . . . . . 2–22.1.2 Saving Report Definitions . . . . . . . . . . . . . . . . . . . . . . . . . . . . . 2–62.1.3 Closing Report Definitions. . . . . . . . . . . . . . . . . . . . . . . . . . . . . 2–72.1.4 Opening Report Definitions . . . . . . . . . . . . . . . . . . . . . . . . . . . 2–72.1.5 Copying Report Definitions . . . . . . . . . . . . . . . . . . . . . . . . . . . . 2–82.1.6 Deleting Report Definitions . . . . . . . . . . . . . . . . . . . . . . . . . . . . 2–9
2.2 Managing Report Libraries . . . . . . . . . . . . . . . . . . . . . . . . . . . . . . . . . . . 2–102.2.1 Specifying a Default Report Library Directory . . . . . . . . . . . . . . 2–102.2.2 Creating Report Libraries . . . . . . . . . . . . . . . . . . . . . . . . . . . . . 2–112.2.3 Opening Report Libraries . . . . . . . . . . . . . . . . . . . . . . . . . . . . . 2–122.2.4 Copying or Deleting Report Libraries . . . . . . . . . . . . . . . . . . . . 2–12
2.3 Viewing Report Definition Specifications . . . . . . . . . . . . . . . . . . . . . . . . . 2–12
3. Bands . . . . . . . . . . . . . . . . . . . . . . . . . . . . . . . . . . . . . . . . . . . . . . . . . . . . . . . . . . 3–13.1 Understanding Bands and Band Lines . . . . . . . . . . . . . . . . . . . . . . . . . . 3–2
3.1.1 Band Type. . . . . . . . . . . . . . . . . . . . . . . . . . . . . . . . . . . . . . . . . 3–23.1.2 Band Line Status . . . . . . . . . . . . . . . . . . . . . . . . . . . . . . . . . . . 3–5
3.2 Creating Bands . . . . . . . . . . . . . . . . . . . . . . . . . . . . . . . . . . . . . . . . . . . . 3–73.3 Inserting Band Lines . . . . . . . . . . . . . . . . . . . . . . . . . . . . . . . . . . . . . . . . 3–83.4 Inserting Page Breaks . . . . . . . . . . . . . . . . . . . . . . . . . . . . . . . . . . . . . . . 3–83.5 Selecting Band Lines . . . . . . . . . . . . . . . . . . . . . . . . . . . . . . . . . . . . . . . . 3–103.6 Modifying Band Line Characteristics . . . . . . . . . . . . . . . . . . . . . . . . . . . 3–10
3.6.1 Specifying Band Line Height . . . . . . . . . . . . . . . . . . . . . . . . . . . 3–103.7 Modifying Field Properties for All Fields on a Band Line . . . . . . . . . . . . . 3–133.8 Specifying Conditional Line Printing . . . . . . . . . . . . . . . . . . . . . . . . . . . . 3–133.9 Copying Band Lines . . . . . . . . . . . . . . . . . . . . . . . . . . . . . . . . . . . . . . . . 3–163.10 Moving Band Lines . . . . . . . . . . . . . . . . . . . . . . . . . . . . . . . . . . . . . . . . . 3–163.11 Deleting Band Lines . . . . . . . . . . . . . . . . . . . . . . . . . . . . . . . . . . . . . . . . 3–17
4. Fields . . . . . . . . . . . . . . . . . . . . . . . . . . . . . . . . . . . . . . . . . . . . . . . . . . . . . . . . . . . 4–14.1 How Report Builder Handles Database Fields . . . . . . . . . . . . . . . . . . . . 4–2
4.1.1 Arrays . . . . . . . . . . . . . . . . . . . . . . . . . . . . . . . . . . . . . . . . . . . . 4–24.1.2 DECIMAL and INTEGER Data Types. . . . . . . . . . . . . . . . . . . . 4–24.1.3 UNKNOWN Values . . . . . . . . . . . . . . . . . . . . . . . . . . . . . . . . . . 4–2

Contents
4.1.4 Case Sensitivity . . . . . . . . . . . . . . . . . . . . . . . . . . . . . . . . . . . . 4–74.2 Field Properties . . . . . . . . . . . . . . . . . . . . . . . . . . . . . . . . . . . . . . . . . . . 4–8
4.2.1 Modifying an Individual Field’s Properties . . . . . . . . . . . . . . . . 4–84.2.2 Modifying the Properties of All the Fields on a Band Line . . . . 4–10
4.3 Selecting Fields . . . . . . . . . . . . . . . . . . . . . . . . . . . . . . . . . . . . . . . . . . . 4–104.4 Specifying How Report Builder Represents Fields on the Layout . . . . . 4–11
4.4.1 Changing the Field Width Indicator . . . . . . . . . . . . . . . . . . . . . 4–124.4.2 Displaying Field Names . . . . . . . . . . . . . . . . . . . . . . . . . . . . . 4–13
4.5 Specifying How Tables and Fields Appear in Selection Lists . . . . . . . . 4–134.5.1 Displaying Fields in Alphabetical Order . . . . . . . . . . . . . . . . . . 4–134.5.2 Showing Hidden Tables . . . . . . . . . . . . . . . . . . . . . . . . . . . . . . 4–13
4.6 Creating Fields . . . . . . . . . . . . . . . . . . . . . . . . . . . . . . . . . . . . . . . . . . . . 4–134.6.1 Database Fields . . . . . . . . . . . . . . . . . . . . . . . . . . . . . . . . . . . . 4–144.6.2 User-defined Fields . . . . . . . . . . . . . . . . . . . . . . . . . . . . . . . . . 4–14
4.7 Inserting Fields . . . . . . . . . . . . . . . . . . . . . . . . . . . . . . . . . . . . . . . . . . . . 4–154.7.1 Creating Text Fields . . . . . . . . . . . . . . . . . . . . . . . . . . . . . . . . . 4–16
4.8 Copying and Pasting Fields . . . . . . . . . . . . . . . . . . . . . . . . . . . . . . . . . . 4–164.9 Moving Fields . . . . . . . . . . . . . . . . . . . . . . . . . . . . . . . . . . . . . . . . . . . . . 4–174.10 Deleting Fields . . . . . . . . . . . . . . . . . . . . . . . . . . . . . . . . . . . . . . . . . . . . 4–184.11 Applying Fonts, Styles, Effects, and Color . . . . . . . . . . . . . . . . . . . . . . . 4–18
4.11.1 Font Characteristics . . . . . . . . . . . . . . . . . . . . . . . . . . . . . . . . 4–184.11.2 Specifying the Default Font, Style, and Color . . . . . . . . . . . . . 4–194.11.3 Changing a Field’s Font, Style, Effects, and Color . . . . . . . . . 4–20
4.12 Specifying Alignment . . . . . . . . . . . . . . . . . . . . . . . . . . . . . . . . . . . . . . . 4–234.12.1 Alignment Defaults and Options . . . . . . . . . . . . . . . . . . . . . . . 4–234.12.2 Changing Field Alignment . . . . . . . . . . . . . . . . . . . . . . . . . . . . 4–25
4.13 Eliminating Blank Spaces Between Fields . . . . . . . . . . . . . . . . . . . . . . . 4–264.14 Modifying Field Formats . . . . . . . . . . . . . . . . . . . . . . . . . . . . . . . . . . . . . 4–29
4.14.1 Format Options . . . . . . . . . . . . . . . . . . . . . . . . . . . . . . . . . . . . 4–304.15 Specifying Default Logical String Settings . . . . . . . . . . . . . . . . . . . . . . . 4–40
5. Aggregate Fields . . . . . . . . . . . . . . . . . . . . . . . . . . . . . . . . . . . . . . . . . . . . . . . . . 5–15.1 Aggregate Field Basics . . . . . . . . . . . . . . . . . . . . . . . . . . . . . . . . . . . . . 5–2
5.1.1 Aggregate Field Type. . . . . . . . . . . . . . . . . . . . . . . . . . . . . . . . 5–25.1.2 Reset Frequency . . . . . . . . . . . . . . . . . . . . . . . . . . . . . . . . . . . 5–35.1.3 Accumulation Frequency . . . . . . . . . . . . . . . . . . . . . . . . . . . . . 5–45.1.4 Processing Rate. . . . . . . . . . . . . . . . . . . . . . . . . . . . . . . . . . . . 5–55.1.5 Included Values . . . . . . . . . . . . . . . . . . . . . . . . . . . . . . . . . . . . 5–65.1.6 Case Sensitivity . . . . . . . . . . . . . . . . . . . . . . . . . . . . . . . . . . . . 5–7
5.2 Aggregate Field Considerations . . . . . . . . . . . . . . . . . . . . . . . . . . . . . . . 5–75.3 Creating Aggregate Fields . . . . . . . . . . . . . . . . . . . . . . . . . . . . . . . . . . 5–8
5.3.1 Inserting Aggregate Fields . . . . . . . . . . . . . . . . . . . . . . . . . . . 5–125.4 Editing Aggregate Fields . . . . . . . . . . . . . . . . . . . . . . . . . . . . . . . . . . . . 5–125.5 Removing Aggregate Fields . . . . . . . . . . . . . . . . . . . . . . . . . . . . . . . . . 5–13
v

Contents
vi
5.5.1 Cutting Aggregate Fields. . . . . . . . . . . . . . . . . . . . . . . . . . . . . . 5–145.5.2 Deleting Aggregate Fields . . . . . . . . . . . . . . . . . . . . . . . . . . . . 5–155.5.3 Purging Aggregate Fields . . . . . . . . . . . . . . . . . . . . . . . . . . . . . 5–15
5.6 Using Aggregate Fields in Reports . . . . . . . . . . . . . . . . . . . . . . . . . . . . . 5–175.6.1 Using Aggregates in Calculations . . . . . . . . . . . . . . . . . . . . . . 5–265.6.2 Sorting on Aggregates . . . . . . . . . . . . . . . . . . . . . . . . . . . . . . . 5–265.6.3 Filtering on Aggregates . . . . . . . . . . . . . . . . . . . . . . . . . . . . . . 5–27
6. Calculated Fields . . . . . . . . . . . . . . . . . . . . . . . . . . . . . . . . . . . . . . . . . . . . . . . . . 6–16.1 Calculated Field Basics . . . . . . . . . . . . . . . . . . . . . . . . . . . . . . . . . . . . . . 6–2
6.1.1 Types of Expressions . . . . . . . . . . . . . . . . . . . . . . . . . . . . . . . . 6–26.1.2 Parts of an Expression . . . . . . . . . . . . . . . . . . . . . . . . . . . . . . . 6–36.1.3 Error Conditions in Evaluating Expressions . . . . . . . . . . . . . . . 6–106.1.4 Case Sensitivity. . . . . . . . . . . . . . . . . . . . . . . . . . . . . . . . . . . . . 6–10
6.2 Calculated Field Considerations . . . . . . . . . . . . . . . . . . . . . . . . . . . . . . . 6–126.2.1 UNKNOWN Values . . . . . . . . . . . . . . . . . . . . . . . . . . . . . . . . . . 6–126.2.2 Server-evaluatable Fields . . . . . . . . . . . . . . . . . . . . . . . . . . . . . 6–13
6.3 Creating a Calculated Field . . . . . . . . . . . . . . . . . . . . . . . . . . . . . . . . . . . 6–156.4 Editing a Calculated Field . . . . . . . . . . . . . . . . . . . . . . . . . . . . . . . . . . . . 6–196.5 Removing a Calculated Field . . . . . . . . . . . . . . . . . . . . . . . . . . . . . . . . . 6–21
6.5.1 Cutting Calculated Fields . . . . . . . . . . . . . . . . . . . . . . . . . . . . . 6–226.5.2 Deleting a Calculated Field . . . . . . . . . . . . . . . . . . . . . . . . . . . 6–226.5.3 Purging Calculated Fields . . . . . . . . . . . . . . . . . . . . . . . . . . . . 6–23
7. User-defined Functions . . . . . . . . . . . . . . . . . . . . . . . . . . . . . . . . . . . . . . . . . . . . 7–17.1 User-defined Function Basics . . . . . . . . . . . . . . . . . . . . . . . . . . . . . . . . . 7–27.2 Creating User-defined Functions . . . . . . . . . . . . . . . . . . . . . . . . . . . . . . . 7–27.3 Editing User-defined Functions . . . . . . . . . . . . . . . . . . . . . . . . . . . . . . . 7–77.4 Deleting User-defined Functions . . . . . . . . . . . . . . . . . . . . . . . . . . . . . . 7–87.5 Sample User-defined Functions . . . . . . . . . . . . . . . . . . . . . . . . . . . . . . . 7–9
7.5.1 Displaying Date in “Month dd, yyyy” Format . . . . . . . . . . . . . . . 7–97.5.2 Calculating the Amount of Deposit . . . . . . . . . . . . . . . . . . . . . . 7–117.5.3 Determining Whether a Date Falls on a Weekend . . . . . . . . . . 7–12
8. Joins . . . . . . . . . . . . . . . . . . . . . . . . . . . . . . . . . . . . . . . . . . . . . . . . . . . . . . . . . . . 8–18.1 Join Basics . . . . . . . . . . . . . . . . . . . . . . . . . . . . . . . . . . . . . . . . . . . . . . . 8–2
8.1.1 Inner Joins. . . . . . . . . . . . . . . . . . . . . . . . . . . . . . . . . . . . . . . . . 8–38.1.2 Left Outer Joins . . . . . . . . . . . . . . . . . . . . . . . . . . . . . . . . . . . . 8–48.1.3 Right Outer Joins . . . . . . . . . . . . . . . . . . . . . . . . . . . . . . . . . . . 8–58.1.4 Join Considerations . . . . . . . . . . . . . . . . . . . . . . . . . . . . . . . . . 8–7
8.2 Defining Database Joins . . . . . . . . . . . . . . . . . . . . . . . . . . . . . . . . . . . . 8–78.3 Editing Database Joins . . . . . . . . . . . . . . . . . . . . . . . . . . . . . . . . . . . . . . 8–108.4 Deleting Database Joins . . . . . . . . . . . . . . . . . . . . . . . . . . . . . . . . . . . . 8–118.5 Using the No Join Reorder Option . . . . . . . . . . . . . . . . . . . . . . . . . . . . . 8–12

Contents
8.6 Changing the Master Table for a Report . . . . . . . . . . . . . . . . . . . . . . . . 8–12
9. Sorting and Grouping Data . . . . . . . . . . . . . . . . . . . . . . . . . . . . . . . . . . . . . . . . 9–19.1 Sorting Data . . . . . . . . . . . . . . . . . . . . . . . . . . . . . . . . . . . . . . . . . . . . . . 9–2
9.1.1 Sort Levels and Ascending/Descending Order . . . . . . . . . . . . 9–29.1.2 Sorting Considerations. . . . . . . . . . . . . . . . . . . . . . . . . . . . . . . 9–39.1.3 Specifying the Sort Order. . . . . . . . . . . . . . . . . . . . . . . . . . . . . 9–49.1.4 Changing the Sort Order . . . . . . . . . . . . . . . . . . . . . . . . . . . . . 9–6
9.2 Grouping Data . . . . . . . . . . . . . . . . . . . . . . . . . . . . . . . . . . . . . . . . . . . . 9–89.2.1 Group Levels . . . . . . . . . . . . . . . . . . . . . . . . . . . . . . . . . . . . . . 9–89.2.2 Relationship Between Sorting and Grouping . . . . . . . . . . . . . . 9–99.2.3 Specifying the Group Order . . . . . . . . . . . . . . . . . . . . . . . . . . . 9–99.2.4 Group Order Attributes. . . . . . . . . . . . . . . . . . . . . . . . . . . . . . . 9–109.2.5 Changing the Group Order . . . . . . . . . . . . . . . . . . . . . . . . . . . 9–14
9.3 Sort-group Techniques . . . . . . . . . . . . . . . . . . . . . . . . . . . . . . . . . . . . . . 9–16
10. Filters . . . . . . . . . . . . . . . . . . . . . . . . . . . . . . . . . . . . . . . . . . . . . . . . . . . . . . . . . . 10–110.1 Filtering Basics . . . . . . . . . . . . . . . . . . . . . . . . . . . . . . . . . . . . . . . . . . . . 10–210.2 Filtering Considerations . . . . . . . . . . . . . . . . . . . . . . . . . . . . . . . . . . . . . 10–4
10.2.1 Filtering on Aggregate Values . . . . . . . . . . . . . . . . . . . . . . . . . 10–510.2.2 Filtering on Calculated Values . . . . . . . . . . . . . . . . . . . . . . . . . 10–610.2.3 Filtering on Memo Fields . . . . . . . . . . . . . . . . . . . . . . . . . . . . . 10–710.2.4 Server-evaluatable Filters . . . . . . . . . . . . . . . . . . . . . . . . . . . . 10–7
10.3 Creating a Filter . . . . . . . . . . . . . . . . . . . . . . . . . . . . . . . . . . . . . . . . . . . 10–810.4 Editing a Filter . . . . . . . . . . . . . . . . . . . . . . . . . . . . . . . . . . . . . . . . . . . . 10–9
10.4.1 Editing an Existing Condition . . . . . . . . . . . . . . . . . . . . . . . . . . 10–1010.4.2 Inserting a New Condition . . . . . . . . . . . . . . . . . . . . . . . . . . . . 10–1010.4.3 Appending a New Condition . . . . . . . . . . . . . . . . . . . . . . . . . . 10–1110.4.4 Deleting a Condition . . . . . . . . . . . . . . . . . . . . . . . . . . . . . . . . 10–12
10.5 Deleting a Filter . . . . . . . . . . . . . . . . . . . . . . . . . . . . . . . . . . . . . . . . . . . 10–12
11. Lines, Rectangles, and Shading . . . . . . . . . . . . . . . . . . . . . . . . . . . . . . . . . . . . 11–111.1 Line and Rectangle Placement Guidelines and Restrictions . . . . . . . . . 11–211.2 Lines . . . . . . . . . . . . . . . . . . . . . . . . . . . . . . . . . . . . . . . . . . . . . . . . . . . . 11–3
11.2.1 Drawing Lines . . . . . . . . . . . . . . . . . . . . . . . . . . . . . . . . . . . . . 11–311.2.2 Moving Lines . . . . . . . . . . . . . . . . . . . . . . . . . . . . . . . . . . . . . . 11–411.2.3 Copying Lines . . . . . . . . . . . . . . . . . . . . . . . . . . . . . . . . . . . . . 11–411.2.4 Cutting and Pasting Lines . . . . . . . . . . . . . . . . . . . . . . . . . . . . 11–411.2.5 Resizing Lines . . . . . . . . . . . . . . . . . . . . . . . . . . . . . . . . . . . . . 11–411.2.6 Changing Line Thickness. . . . . . . . . . . . . . . . . . . . . . . . . . . . . 11–511.2.7 Changing Line Color . . . . . . . . . . . . . . . . . . . . . . . . . . . . . . . . 11–511.2.8 Deleting Lines . . . . . . . . . . . . . . . . . . . . . . . . . . . . . . . . . . . . . 11–6
11.3 Rectangles . . . . . . . . . . . . . . . . . . . . . . . . . . . . . . . . . . . . . . . . . . . . . . . 11–611.3.1 Drawing Rectangles . . . . . . . . . . . . . . . . . . . . . . . . . . . . . . . . 11–7
vii

Contents
viii
11.3.2 Moving Rectangles . . . . . . . . . . . . . . . . . . . . . . . . . . . . . . . . . . 11–711.3.3 Copying Rectangles . . . . . . . . . . . . . . . . . . . . . . . . . . . . . . . . . 11–711.3.4 Cutting and Pasting Rectangles . . . . . . . . . . . . . . . . . . . . . . . . 11–711.3.5 Resizing Rectangles . . . . . . . . . . . . . . . . . . . . . . . . . . . . . . . . 11–811.3.6 Changing Rectangle Border Thickness. . . . . . . . . . . . . . . . . . . 11–911.3.7 Changing Rectangle Border Color . . . . . . . . . . . . . . . . . . . . . . 11–911.3.8 Excluding One or More Rectangle Edges . . . . . . . . . . . . . . . . 11–1011.3.9 Adding Shading to Rectangles . . . . . . . . . . . . . . . . . . . . . . . . . 11–1011.3.10 Deleting Rectangles . . . . . . . . . . . . . . . . . . . . . . . . . . . . . . . . . 11–11
12. Images . . . . . . . . . . . . . . . . . . . . . . . . . . . . . . . . . . . . . . . . . . . . . . . . . . . . . . . . . . 12–112.1 Image Basics . . . . . . . . . . . . . . . . . . . . . . . . . . . . . . . . . . . . . . . . . . . . . . 12–2
12.1.1 Supported Image File Types . . . . . . . . . . . . . . . . . . . . . . . . . . . 12–212.1.2 Images and Band Line Height. . . . . . . . . . . . . . . . . . . . . . . . . . 12–4
12.2 Importing Images . . . . . . . . . . . . . . . . . . . . . . . . . . . . . . . . . . . . . . . . . . 12–412.3 Pasting Images from the Clipboard . . . . . . . . . . . . . . . . . . . . . . . . . . . . . 12–512.4 Moving Images . . . . . . . . . . . . . . . . . . . . . . . . . . . . . . . . . . . . . . . . . . . . 12–612.5 Sizing Images . . . . . . . . . . . . . . . . . . . . . . . . . . . . . . . . . . . . . . . . . . . . . 12–7
12.5.1 Sizing Images on the Report Layout . . . . . . . . . . . . . . . . . . . . 12–712.5.2 Sizing Images in the Image Properties Dialog Box . . . . . . . . . . 12–8
12.6 Replacing Image Files . . . . . . . . . . . . . . . . . . . . . . . . . . . . . . . . . . . . . . . 12–9
13. Layout Manipulation . . . . . . . . . . . . . . . . . . . . . . . . . . . . . . . . . . . . . . . . . . . . . . 13–113.1 Layout Basics . . . . . . . . . . . . . . . . . . . . . . . . . . . . . . . . . . . . . . . . . . . . . 13–213.2 Using the Instant Layout Option . . . . . . . . . . . . . . . . . . . . . . . . . . . . . . . 13–2
13.2.1 Specifying Default Prompting . . . . . . . . . . . . . . . . . . . . . . . . . . 13–413.2.2 Using the Instant Layout in an Existing Report Definition . . . . . 13–5
13.3 Displaying or Hiding the Tool and Format Bars . . . . . . . . . . . . . . . . . . . . 13–513.4 Manipulating the Rulers . . . . . . . . . . . . . . . . . . . . . . . . . . . . . . . . . . . . . . 13–6
13.4.1 Displaying or Hiding the Rulers. . . . . . . . . . . . . . . . . . . . . . . . . 13–613.4.2 Changing the Ruler Spacing . . . . . . . . . . . . . . . . . . . . . . . . . . . 13–7
13.5 Manipulating the Grid . . . . . . . . . . . . . . . . . . . . . . . . . . . . . . . . . . . . . . . 13–813.5.1 Displaying or Hiding the Grid . . . . . . . . . . . . . . . . . . . . . . . . . . 13–813.5.2 Changing the Grid Spacing . . . . . . . . . . . . . . . . . . . . . . . . . . . . 13–913.5.3 Enabling or Disabling Snap To Grid . . . . . . . . . . . . . . . . . . . . . 13–9
13.6 Displaying or Hiding the Scroll Bars . . . . . . . . . . . . . . . . . . . . . . . . . . . . 13–913.7 Representing Fields on the Report Layout . . . . . . . . . . . . . . . . . . . . . . . 13–10
13.7.1 Changing the Field Width Indicator . . . . . . . . . . . . . . . . . . . . . . 13–1013.7.2 Displaying Field Names Instead of Field Formats. . . . . . . . . . . 13–10
13.8 Specifying Paper Size . . . . . . . . . . . . . . . . . . . . . . . . . . . . . . . . . . . . . . . 13–1113.8.1 Specifying the Paper Size for Individual Reports . . . . . . . . . . . 13–1113.8.2 Specifying the Default Paper Size for All Reports . . . . . . . . . . 13–12
13.9 Specifying Page Orientation . . . . . . . . . . . . . . . . . . . . . . . . . . . . . . . . . . 13–1213.10 Specifying Page Margins . . . . . . . . . . . . . . . . . . . . . . . . . . . . . . . . . . . . . 13–13

Contents
13.10.1 Specifying the Page Margins for Individual Reports . . . . . . . . 13–1313.10.2 Specifying the Default Page Margins for All Reports . . . . . . . . 13–13
13.11 Specifying Fonts . . . . . . . . . . . . . . . . . . . . . . . . . . . . . . . . . . . . . . . . . . . 13–1413.11.1 Specifying the Font Characteristics for Individual Fields . . . . . 13–1413.11.2 Specifying the Default Font Characteristics for All Reports . . . 13–15
14. Form Letters . . . . . . . . . . . . . . . . . . . . . . . . . . . . . . . . . . . . . . . . . . . . . . . . . . . . 14–114.1 Form Letter Basics . . . . . . . . . . . . . . . . . . . . . . . . . . . . . . . . . . . . . . . . . 14–214.2 Form Letter Considerations . . . . . . . . . . . . . . . . . . . . . . . . . . . . . . . . . . 14–3
14.2.1 Word-wrap Format of Memo Fields . . . . . . . . . . . . . . . . . . . . . 14–314.2.2 Width of Memo Fields . . . . . . . . . . . . . . . . . . . . . . . . . . . . . . . 14–414.2.3 Field Width and Format of Embedded Fields. . . . . . . . . . . . . . 14–514.2.4 Conditionally Including Memo Fields . . . . . . . . . . . . . . . . . . . . 14–514.2.5 Blank Lines . . . . . . . . . . . . . . . . . . . . . . . . . . . . . . . . . . . . . . . 14–614.2.6 Page Breaks . . . . . . . . . . . . . . . . . . . . . . . . . . . . . . . . . . . . . . 14–7
14.3 Generating Form Letters . . . . . . . . . . . . . . . . . . . . . . . . . . . . . . . . . . . . 14–714.3.1 Preparing the Memo File . . . . . . . . . . . . . . . . . . . . . . . . . . . . . 14–7
14.4 Creating the Initial Report Layout . . . . . . . . . . . . . . . . . . . . . . . . . . . . . . 14–1614.5 Attaching the Memo File . . . . . . . . . . . . . . . . . . . . . . . . . . . . . . . . . . . . 14–1614.6 Formatting the Report Layout . . . . . . . . . . . . . . . . . . . . . . . . . . . . . . . . 14–1714.7 Printing the Form Letters . . . . . . . . . . . . . . . . . . . . . . . . . . . . . . . . . . . . 14–18
15. Printing . . . . . . . . . . . . . . . . . . . . . . . . . . . . . . . . . . . . . . . . . . . . . . . . . . . . . . . . . 15–115.1 Selecting a Printer . . . . . . . . . . . . . . . . . . . . . . . . . . . . . . . . . . . . . . . . . 15–215.2 Specifying Print Settings . . . . . . . . . . . . . . . . . . . . . . . . . . . . . . . . . . . . 15–215.3 Previewing Reports . . . . . . . . . . . . . . . . . . . . . . . . . . . . . . . . . . . . . . . . 15–4
15.3.1 Dealing with Low Memory Conditions . . . . . . . . . . . . . . . . . . . 15–515.4 Printing Reports . . . . . . . . . . . . . . . . . . . . . . . . . . . . . . . . . . . . . . . . . . . 15–6
15.4.1 Printing Using the Current Print Settings . . . . . . . . . . . . . . . . . 15–715.4.2 Changing the Print Settings . . . . . . . . . . . . . . . . . . . . . . . . . . . 15–715.4.3 Printing to a File . . . . . . . . . . . . . . . . . . . . . . . . . . . . . . . . . . . . 15–7
15.5 Controlling Pagination . . . . . . . . . . . . . . . . . . . . . . . . . . . . . . . . . . . . . . 15–1015.5.1 Page Layout Settings. . . . . . . . . . . . . . . . . . . . . . . . . . . . . . . . 15–1015.5.2 Record Layout Settings . . . . . . . . . . . . . . . . . . . . . . . . . . . . . . 15–1015.5.3 Word-wrapped Fields . . . . . . . . . . . . . . . . . . . . . . . . . . . . . . . . 15–1115.5.4 Line Heights . . . . . . . . . . . . . . . . . . . . . . . . . . . . . . . . . . . . . . . 15–1115.5.5 New-page Lines . . . . . . . . . . . . . . . . . . . . . . . . . . . . . . . . . . . . 15–1115.5.6 Widow/Orphan Control. . . . . . . . . . . . . . . . . . . . . . . . . . . . . . . 15–12
A. Report Builder Administration . . . . . . . . . . . . . . . . . . . . . . . . . . . . . . . . . . . . . . A–1A.1 Frequently Asked Questions . . . . . . . . . . . . . . . . . . . . . . . . . . . . . . . . . A–2
A.1.1 Connection Information . . . . . . . . . . . . . . . . . . . . . . . . . . . . . . A–2A.1.2 CTRL-BREAK Issue . . . . . . . . . . . . . . . . . . . . . . . . . . . . . . . . A–3A.1.3 Arithmetic Limitations . . . . . . . . . . . . . . . . . . . . . . . . . . . . . . . A–3
ix

Contents
x
A.1.4 Version Compatibility . . . . . . . . . . . . . . . . . . . . . . . . . . . . . . . . A–3A.1.5 Viewing Report Library Contents . . . . . . . . . . . . . . . . . . . . . . . A–4A.1.6 Sorting Issue . . . . . . . . . . . . . . . . . . . . . . . . . . . . . . . . . . . . . . A–4A.1.7 Value Returned Differently . . . . . . . . . . . . . . . . . . . . . . . . . . . . A–4
A.2 Startup Parameters . . . . . . . . . . . . . . . . . . . . . . . . . . . . . . . . . . . . . . . . . A–4A.2.1 Using Parameters When Starting Report Builder andReport Engine
A–5A.2.2 Progress Startup Parameters . . . . . . . . . . . . . . . . . . . . . . . . . . A–6A.2.3 Report Builder Startup Parameters . . . . . . . . . . . . . . . . . . . . . A–6A.2.4 Report Engine Parameters . . . . . . . . . . . . . . . . . . . . . . . . . . . . A–10
A.3 Internationalization . . . . . . . . . . . . . . . . . . . . . . . . . . . . . . . . . . . . . . . . . A–15A.3.1 Code Pages . . . . . . . . . . . . . . . . . . . . . . . . . . . . . . . . . . . . . . . A–16A.3.2 Collation . . . . . . . . . . . . . . . . . . . . . . . . . . . . . . . . . . . . . . . . . . A–19A.3.3 Double-byte Characters . . . . . . . . . . . . . . . . . . . . . . . . . . . . . . A–22A.3.4 Using a Translated Version of Report Builder or
Report Engine . . . . . . . . . . . . . . . . . . . . . . . . . . . . . . . . .A–22A.4 Security . . . . . . . . . . . . . . . . . . . . . . . . . . . . . . . . . . . . . . . . . . . . . . . . . . A–23
A.4.1 Table and Field-level Security . . . . . . . . . . . . . . . . . . . . . . . . . A–23A.4.2 Passwords . . . . . . . . . . . . . . . . . . . . . . . . . . . . . . . . . . . . . . . . A–24
A.5 Triggers . . . . . . . . . . . . . . . . . . . . . . . . . . . . . . . . . . . . . . . . . . . . . . . . . . A–25A.5.1 Database Triggers . . . . . . . . . . . . . . . . . . . . . . . . . . . . . . . . . . A–25A.5.2 FIND Triggers . . . . . . . . . . . . . . . . . . . . . . . . . . . . . . . . . . . . . . A–26
A.6 Deployment Issues . . . . . . . . . . . . . . . . . . . . . . . . . . . . . . . . . . . . . . . . . A–26A.6.1 Registry or PROGRESS.INI File Settings . . . . . . . . . . . . . . . . A–26A.6.2 Environment Variables . . . . . . . . . . . . . . . . . . . . . . . . . . . . . . . A–34A.6.3 Report Builder Search Rules . . . . . . . . . . . . . . . . . . . . . . . . . . A–35
B. Report Builder Functions . . . . . . . . . . . . . . . . . . . . . . . . . . . . . . . . . . . . . . . . . . B–1B.1 Guidelines for Using Report Builder Functions . . . . . . . . . . . . . . . . . . . . B–2B.2 Quick Reference Tables . . . . . . . . . . . . . . . . . . . . . . . . . . . . . . . . . . . . . B–3
B.2.1 Quick Reference Table Conventions . . . . . . . . . . . . . . . . . . . . B–3B.2.2 Day, Date, and Time Functions . . . . . . . . . . . . . . . . . . . . . . . . B–4B.2.3 String-manipulation Functions . . . . . . . . . . . . . . . . . . . . . . . . . B–5B.2.4 Numeric Functions . . . . . . . . . . . . . . . . . . . . . . . . . . . . . . . . . . B–7B.2.5 Report Management Functions . . . . . . . . . . . . . . . . . . . . . . . . B–8B.2.6 Miscellaneous . . . . . . . . . . . . . . . . . . . . . . . . . . . . . . . . . . . . . B–8
B.3 Alphabetical List of Report Builder Functions . . . . . . . . . . . . . . . . . . . . . B–10 ABSOLUTE . . . . . . . . . . . . . . . . . . . . . . . . . . . . . . . . . . . . . . . . . . . . . . . . . . . . . B–10ASC . . . . . . . . . . . . . . . . . . . . . . . . . . . . . . . . . . . . . . . . . . . . . . . . . . . . . . . . . B–11 CAPS . . . . . . . . . . . . . . . . . . . . . . . . . . . . . . . . . . . . . . . . . . . . . . . . . . . . . . . . . B–11 CASE . . . . . . . . . . . . . . . . . . . . . . . . . . . . . . . . . . . . . . . . . . . . . . . . . . . . . . . . . B–12CHR . . . . . . . . . . . . . . . . . . . . . . . . . . . . . . . . . . . . . . . . . . . . . . . . . . . . . . . . . B–14 DATE . . . . . . . . . . . . . . . . . . . . . . . . . . . . . . . . . . . . . . . . . . . . . . . . . . . . . . . . . B–14DAY . . . . . . . . . . . . . . . . . . . . . . . . . . . . . . . . . . . . . . . . . . . . . . . . . . . . . . . . . B–15

Contents
DBNAME . . . . . . . . . . . . . . . . . . . . . . . . . . . . . . . . . . . . . . . . . . . . . . . . . . . . . . . B–15 DLLFUNC . . . . . . . . . . . . . . . . . . . . . . . . . . . . . . . . . . . . . . . . . . . . . . . . . . . . . . B–16 ENCODE . . . . . . . . . . . . . . . . . . . . . . . . . . . . . . . . . . . . . . . . . . . . . . . . . . . . . . . B–17ENTRY . . . . . . . . . . . . . . . . . . . . . . . . . . . . . . . . . . . . . . . . . . . . . . . . . . . . . . . . B–18EXP . . . . . . . . . . . . . . . . . . . . . . . . . . . . . . . . . . . . . . . . . . . . . . . . . . . . . . . . B–19 FILL . . . . . . . . . . . . . . . . . . . . . . . . . . . . . . . . . . . . . . . . . . . . . . . . . . . . . . . . B–19FLIP . . . . . . . . . . . . . . . . . . . . . . . . . . . . . . . . . . . . . . . . . . . . . . . . . . . . . . . . B–21IIF . . . . . . . . . . . . . . . . . . . . . . . . . . . . . . . . . . . . . . . . . . . . . . . . . . . . . . . . B–23 INDEX . . . . . . . . . . . . . . . . . . . . . . . . . . . . . . . . . . . . . . . . . . . . . . . . . . . . . . . . B–24INDEX-NTH . . . . . . . . . . . . . . . . . . . . . . . . . . . . . . . . . . . . . . . . . . . . . . . . . . . . . . B–25INITIAL-CAPS . . . . . . . . . . . . . . . . . . . . . . . . . . . . . . . . . . . . . . . . . . . . . . . . . . . . B–26IN-LIST . . . . . . . . . . . . . . . . . . . . . . . . . . . . . . . . . . . . . . . . . . . . . . . . . . . . . . . . B–27IN-RANGE . . . . . . . . . . . . . . . . . . . . . . . . . . . . . . . . . . . . . . . . . . . . . . . . . . . . . . . B–28INTEGER . . . . . . . . . . . . . . . . . . . . . . . . . . . . . . . . . . . . . . . . . . . . . . . . . . . . . . . B–29IS-LETTER . . . . . . . . . . . . . . . . . . . . . . . . . . . . . . . . . . . . . . . . . . . . . . . . . . . . . . B–30IS-LOWER . . . . . . . . . . . . . . . . . . . . . . . . . . . . . . . . . . . . . . . . . . . . . . . . . . . . . . . B–31IS-UPPER . . . . . . . . . . . . . . . . . . . . . . . . . . . . . . . . . . . . . . . . . . . . . . . . . . . . . . . B–32LC . . . . . . . . . . . . . . . . . . . . . . . . . . . . . . . . . . . . . . . . . . . . . . . . . . . . . . . . B–33LEFT-TRIM . . . . . . . . . . . . . . . . . . . . . . . . . . . . . . . . . . . . . . . . . . . . . . . . . . . . . . B–34LENGTH . . . . . . . . . . . . . . . . . . . . . . . . . . . . . . . . . . . . . . . . . . . . . . . . . . . . . . . . B–35LOG . . . . . . . . . . . . . . . . . . . . . . . . . . . . . . . . . . . . . . . . . . . . . . . . . . . . . . . . B–36LOOKUP . . . . . . . . . . . . . . . . . . . . . . . . . . . . . . . . . . . . . . . . . . . . . . . . . . . . . . . . B–37MAXIMUM . . . . . . . . . . . . . . . . . . . . . . . . . . . . . . . . . . . . . . . . . . . . . . . . . . . . . . . B–38MINIMUM . . . . . . . . . . . . . . . . . . . . . . . . . . . . . . . . . . . . . . . . . . . . . . . . . . . . . . . B–39MONTH . . . . . . . . . . . . . . . . . . . . . . . . . . . . . . . . . . . . . . . . . . . . . . . . . . . . . . . . B–40NUM-ENTRIES . . . . . . . . . . . . . . . . . . . . . . . . . . . . . . . . . . . . . . . . . . . . . . . . . . . B–41NUMERIC . . . . . . . . . . . . . . . . . . . . . . . . . . . . . . . . . . . . . . . . . . . . . . . . . . . . . . . B–42 OPSYS . . . . . . . . . . . . . . . . . . . . . . . . . . . . . . . . . . . . . . . . . . . . . . . . . . . . . . . . B–43PAGE-NUMBER . . . . . . . . . . . . . . . . . . . . . . . . . . . . . . . . . . . . . . . . . . . . . . . . . . B–44 PREVIOUS . . . . . . . . . . . . . . . . . . . . . . . . . . . . . . . . . . . . . . . . . . . . . . . . . . . . . B–44QUARTER . . . . . . . . . . . . . . . . . . . . . . . . . . . . . . . . . . . . . . . . . . . . . . . . . . . . . . . B–45QUARTER-START . . . . . . . . . . . . . . . . . . . . . . . . . . . . . . . . . . . . . . . . . . . . . . . . B–46R-INDEX . . . . . . . . . . . . . . . . . . . . . . . . . . . . . . . . . . . . . . . . . . . . . . . . . . . . . . . . B–47RECORD-NUMBER . . . . . . . . . . . . . . . . . . . . . . . . . . . . . . . . . . . . . . . . . . . . . . . B–48 REPLACE . . . . . . . . . . . . . . . . . . . . . . . . . . . . . . . . . . . . . . . . . . . . . . . . . . . . . . B–48 REPLACE-INDEXED . . . . . . . . . . . . . . . . . . . . . . . . . . . . . . . . . . . . . . . . . . . . . B–49 REPORT-COPY . . . . . . . . . . . . . . . . . . . . . . . . . . . . . . . . . . . . . . . . . . . . . . . . . B–50 REPORT-FILTER . . . . . . . . . . . . . . . . . . . . . . . . . . . . . . . . . . . . . . . . . . . . . . . . B–51 REPORT-LIBRARY . . . . . . . . . . . . . . . . . . . . . . . . . . . . . . . . . . . . . . . . . . . . . . . B–51REPORT-NAME . . . . . . . . . . . . . . . . . . . . . . . . . . . . . . . . . . . . . . . . . . . . . . . . . . B–52 RIGHT-TRIM . . . . . . . . . . . . . . . . . . . . . . . . . . . . . . . . . . . . . . . . . . . . . . . . . . . . B–52 ROUND . . . . . . . . . . . . . . . . . . . . . . . . . . . . . . . . . . . . . . . . . . . . . . . . . . . . . . . . B–53 RUNTIME . . . . . . . . . . . . . . . . . . . . . . . . . . . . . . . . . . . . . . . . . . . . . . . . . . . . . . B–54RUNTIME-PARAMETER . . . . . . . . . . . . . . . . . . . . . . . . . . . . . . . . . . . . . . . . . . . B–55 SPACE . . . . . . . . . . . . . . . . . . . . . . . . . . . . . . . . . . . . . . . . . . . . . . . . . . . . . . . . B–55
xi

Contents
xii
SPELL-MONTH . . . . . . . . . . . . . . . . . . . . . . . . . . . . . . . . . . . . . . . . . . . . . . . . . . . B–56 SPELL-NUMBER . . . . . . . . . . . . . . . . . . . . . . . . . . . . . . . . . . . . . . . . . . . . . . . . . B–56 SPELL-WEEKDAY . . . . . . . . . . . . . . . . . . . . . . . . . . . . . . . . . . . . . . . . . . . . . . . . B–57 SQRT . . . . . . . . . . . . . . . . . . . . . . . . . . . . . . . . . . . . . . . . . . . . . . . . . . . . . . . . . B–58STRING . . . . . . . . . . . . . . . . . . . . . . . . . . . . . . . . . . . . . . . . . . . . . . . . . . . . . . . . . B–59SUBSTRING . . . . . . . . . . . . . . . . . . . . . . . . . . . . . . . . . . . . . . . . . . . . . . . . . . . . . B–60SUBSTRING-COUNT . . . . . . . . . . . . . . . . . . . . . . . . . . . . . . . . . . . . . . . . . . . . . . B–61 TIME . . . . . . . . . . . . . . . . . . . . . . . . . . . . . . . . . . . . . . . . . . . . . . . . . . . . . . . . . B–61TODAY . . . . . . . . . . . . . . . . . . . . . . . . . . . . . . . . . . . . . . . . . . . . . . . . . . . . . . . . . B–62 TRIM . . . . . . . . . . . . . . . . . . . . . . . . . . . . . . . . . . . . . . . . . . . . . . . . . . . . . . . . . B–62TRUNCATE . . . . . . . . . . . . . . . . . . . . . . . . . . . . . . . . . . . . . . . . . . . . . . . . . . . . . . B–63WEEKDAY . . . . . . . . . . . . . . . . . . . . . . . . . . . . . . . . . . . . . . . . . . . . . . . . . . . . . . . B–64YEAR . . . . . . . . . . . . . . . . . . . . . . . . . . . . . . . . . . . . . . . . . . . . . . . . . . . . . . . . . B–65
C. Operators . . . . . . . . . . . . . . . . . . . . . . . . . . . . . . . . . . . . . . . . . . . . . . . . . . . . . . . C–1C.1 Guidelines for Using Report Builder Operators . . . . . . . . . . . . . . . . . . . . C–2
C.1.1 Operator Precedence . . . . . . . . . . . . . . . . . . . . . . . . . . . . . . . . C–2C.1.2 Order of Expression Evaluation . . . . . . . . . . . . . . . . . . . . . . . . C–4
C.2 Quick Reference Table . . . . . . . . . . . . . . . . . . . . . . . . . . . . . . . . . . . . . . C–5C.2.1 Relational Operator Restrictions . . . . . . . . . . . . . . . . . . . . . . . C–6
C.3 Alphabetical List of Report Builder Operators . . . . . . . . . . . . . . . . . . . . . C–7+ Unary Positive . . . . . . . . . . . . . . . . . . . . . . . . . . . . . . . . . . . . . . . . . . . . . . . . . . . C–7 + Addition . . . . . . . . . . . . . . . . . . . . . . . . . . . . . . . . . . . . . . . . . . . . . . . . . . . . . . . C–7+ Concatenation . . . . . . . . . . . . . . . . . . . . . . . . . . . . . . . . . . . . . . . . . . . . . . . . . . . C–8- Concatenation . . . . . . . . . . . . . . . . . . . . . . . . . . . . . . . . . . . . . . . . . . . . . . . . . . . C–9+ Date Addition . . . . . . . . . . . . . . . . . . . . . . . . . . . . . . . . . . . . . . . . . . . . . . . . . . . . C–11 - Unary Negative . . . . . . . . . . . . . . . . . . . . . . . . . . . . . . . . . . . . . . . . . . . . . . . . . C–11 - Subtraction . . . . . . . . . . . . . . . . . . . . . . . . . . . . . . . . . . . . . . . . . . . . . . . . . . . . . C–12- Concatenation . . . . . . . . . . . . . . . . . . . . . . . . . . . . . . . . . . . . . . . . . . . . . . . . . . . C–13- Date Subtraction . . . . . . . . . . . . . . . . . . . . . . . . . . . . . . . . . . . . . . . . . . . . . . . . . C–14 * Multiplication . . . . . . . . . . . . . . . . . . . . . . . . . . . . . . . . . . . . . . . . . . . . . . . . . . . C–14 / Division . . . . . . . . . . . . . . . . . . . . . . . . . . . . . . . . . . . . . . . . . . . . . . . . . . . . . . . . C–15AND . . . . . . . . . . . . . . . . . . . . . . . . . . . . . . . . . . . . . . . . . . . . . . . . . . . . . . . . . C–16 BEGINS . . . . . . . . . . . . . . . . . . . . . . . . . . . . . . . . . . . . . . . . . . . . . . . . . . . . . . . . C–16 EQ or = . . . . . . . . . . . . . . . . . . . . . . . . . . . . . . . . . . . . . . . . . . . . . . . . . . . . . . . . . C–17GE or >= . . . . . . . . . . . . . . . . . . . . . . . . . . . . . . . . . . . . . . . . . . . . . . . . . . . . . . . . C–18GT or > . . . . . . . . . . . . . . . . . . . . . . . . . . . . . . . . . . . . . . . . . . . . . . . . . . . . . . . . . C–19 LE or < = . . . . . . . . . . . . . . . . . . . . . . . . . . . . . . . . . . . . . . . . . . . . . . . . . . . . . . . . C–19 LT or < . . . . . . . . . . . . . . . . . . . . . . . . . . . . . . . . . . . . . . . . . . . . . . . . . . . . . . . . . C–20MATCHES . . . . . . . . . . . . . . . . . . . . . . . . . . . . . . . . . . . . . . . . . . . . . . . . . . . . . . . C–21MODULO . . . . . . . . . . . . . . . . . . . . . . . . . . . . . . . . . . . . . . . . . . . . . . . . . . . . . . . . C–22 NE or <> . . . . . . . . . . . . . . . . . . . . . . . . . . . . . . . . . . . . . . . . . . . . . . . . . . . . . . . . C–22 NOT . . . . . . . . . . . . . . . . . . . . . . . . . . . . . . . . . . . . . . . . . . . . . . . . . . . . . . . . . C–23OR . . . . . . . . . . . . . . . . . . . . . . . . . . . . . . . . . . . . . . . . . . . . . . . . . . . . . . . . . C–24

Contents
Glossary . . . . . . . . . . . . . . . . . . . . . . . . . . . . . . . . . . . . . . . . . . . . . . . . . . . . . . . . . Glossary–1
Index . . . . . . . . . . . . . . . . . . . . . . . . . . . . . . . . . . . . . . . . . . . . . . . . . . . . . . . . . . . . Index–1
xiii

Contents
xiv
Figures
Figure 1–1: Creating a Report Definition . . . . . . . . . . . . . . . . . . . . . . . . . . . . . . . . . 1–2Figure 1–2: Joining on a Common Field . . . . . . . . . . . . . . . . . . . . . . . . . . . . . . . . . 1–3Figure 1–3: How Report Builder Generates a Report . . . . . . . . . . . . . . . . . . . . . . . 1–4Figure 1–4: How Report Libraries Store Report Definitions . . . . . . . . . . . . . . . . . . . 1–5Figure 1–5: Report Builder Main Window . . . . . . . . . . . . . . . . . . . . . . . . . . . . . . . . . 1–8Figure 1–6: Main Window with Report Definition . . . . . . . . . . . . . . . . . . . . . . . . . . . 1–8Figure 1–7: Tool Bar . . . . . . . . . . . . . . . . . . . . . . . . . . . . . . . . . . . . . . . . . . . . . . . . . 1–11Figure 1–8: Format Bar . . . . . . . . . . . . . . . . . . . . . . . . . . . . . . . . . . . . . . . . . . . . . . 1–11Figure 1–9: Empty Layout with Rulers Visible . . . . . . . . . . . . . . . . . . . . . . . . . . . . . 1–13Figure 1–10: Bands and Band Lines . . . . . . . . . . . . . . . . . . . . . . . . . . . . . . . . . . . . . 1–15Figure 1–11: Bands with Status Indicators . . . . . . . . . . . . . . . . . . . . . . . . . . . . . . . . . 1–16Figure 1–12: Default Representation of Fields in Layout . . . . . . . . . . . . . . . . . . . . . . 1–17Figure 1–13: Layout with Field Names Enabled . . . . . . . . . . . . . . . . . . . . . . . . . . . . . 1–18Figure 1–14: Graphics in the Layout . . . . . . . . . . . . . . . . . . . . . . . . . . . . . . . . . . . . . 1–19Figure 1–15: Status Bar Showing Field Description . . . . . . . . . . . . . . . . . . . . . . . . . . 1–20Figure 1–16: Cursor Location Shown on Horizontal Ruler . . . . . . . . . . . . . . . . . . . . . 1–21Figure 2–1: Layout Produced by Instant Layout Option . . . . . . . . . . . . . . . . . . . . . . 2–3Figure 3–1: Band Type Placement on Report Page . . . . . . . . . . . . . . . . . . . . . . . . . 3–3Figure 3–2: Report Layout Showing Bands . . . . . . . . . . . . . . . . . . . . . . . . . . . . . . . 3–4Figure 3–3: Layout with Band Status Indicator . . . . . . . . . . . . . . . . . . . . . . . . . . . . . 3–6Figure 4–1: Field Properties Dialog Box . . . . . . . . . . . . . . . . . . . . . . . . . . . . . . . . . . 4–9Figure 4–2: Representation of Fields in Report Layout . . . . . . . . . . . . . . . . . . . . . . 4–11Figure 4–3: Numeric Format Dialog . . . . . . . . . . . . . . . . . . . . . . . . . . . . . . . . . . . . . 4–31Figure 5–1: Aggregate Field for Grand Total . . . . . . . . . . . . . . . . . . . . . . . . . . . . . . 5–18Figure 5–2: Report with a Grand Total . . . . . . . . . . . . . . . . . . . . . . . . . . . . . . . . . . . 5–18Figure 5–3: Aggregate Field for Page Total . . . . . . . . . . . . . . . . . . . . . . . . . . . . . . . 5–19Figure 5–4: Report with a Page Total . . . . . . . . . . . . . . . . . . . . . . . . . . . . . . . . . . . . 5–19Figure 5–5: Aggregate Field for Group Total . . . . . . . . . . . . . . . . . . . . . . . . . . . . . . 5–20Figure 5–6: Report with Group Aggregates . . . . . . . . . . . . . . . . . . . . . . . . . . . . . . . 5–21Figure 5–7: Aggregate Field for Running Page Total . . . . . . . . . . . . . . . . . . . . . . . . 5–22Figure 5–8: Report with a Running Page Total . . . . . . . . . . . . . . . . . . . . . . . . . . . . 5–22Figure 5–9: Aggregate Field for Running Total byGroup . . . . . . . . . . . . . . . . . . . . . 5–23Figure 5–10: Report with Running Group Total . . . . . . . . . . . . . . . . . . . . . . . . . . . . . 5–24Figure 5–11: Aggregate Field for Running Record Total . . . . . . . . . . . . . . . . . . . . . . 5–25Figure 5–12: Report with Running Record Total . . . . . . . . . . . . . . . . . . . . . . . . . . . . 5–26Figure 8–1: Inner Joins . . . . . . . . . . . . . . . . . . . . . . . . . . . . . . . . . . . . . . . . . . . . . . . 8–3Figure 8–2: Left Outer Joins . . . . . . . . . . . . . . . . . . . . . . . . . . . . . . . . . . . . . . . . . . . 8–4Figure 8–3: Right Outer Joins . . . . . . . . . . . . . . . . . . . . . . . . . . . . . . . . . . . . . . . . . 8–6Figure 8–4: Example of Two Join Field Pairs in a Single Join . . . . . . . . . . . . . . . . . 8–9Figure 9–1: Swapped Headers . . . . . . . . . . . . . . . . . . . . . . . . . . . . . . . . . . . . . . . . . 9–12Figure 9–2: Swapped Footers . . . . . . . . . . . . . . . . . . . . . . . . . . . . . . . . . . . . . . . . . 9–13Figure 13–1: Main Window with Default Layout Settings . . . . . . . . . . . . . . . . . . . . . . 13–2Figure 13–2: Example of Instant Layout Results . . . . . . . . . . . . . . . . . . . . . . . . . . . . 13–3

Contents
Figure 14–1: How Report Builder Uses Memo Files . . . . . . . . . . . . . . . . . . . . . . . . . 14–2Figure 14–2: How Report Builder Incorporates Memo Fields . . . . . . . . . . . . . . . . . . 14–2Figure 14–3: Layout Showing Memo Fields . . . . . . . . . . . . . . . . . . . . . . . . . . . . . . . 14–4Figure 14–4: Report with Two Memo Fields . . . . . . . . . . . . . . . . . . . . . . . . . . . . . . . 14–4Figure 14–5: Recall Memo File . . . . . . . . . . . . . . . . . . . . . . . . . . . . . . . . . . . . . . . . . 14–8Figure 14–6: Beginning and Ending Braces . . . . . . . . . . . . . . . . . . . . . . . . . . . . . . . 14–9Figure 14–7: Embedded Field Names . . . . . . . . . . . . . . . . . . . . . . . . . . . . . . . . . . . 14–10Figure 14–8: Line Ending Codes . . . . . . . . . . . . . . . . . . . . . . . . . . . . . . . . . . . . . . . . 14–11Figure 14–9: Embedded Style Codes . . . . . . . . . . . . . . . . . . . . . . . . . . . . . . . . . . . . 14–14Figure 14–10: Recall Form Letter . . . . . . . . . . . . . . . . . . . . . . . . . . . . . . . . . . . . . . . . 14–15Figure 14–11: Form Letter Layout . . . . . . . . . . . . . . . . . . . . . . . . . . . . . . . . . . . . . . . . 14–17Figure 15–1: Preview Buttons . . . . . . . . . . . . . . . . . . . . . . . . . . . . . . . . . . . . . . . . . . 15–4
xv

Contents
xvi
Tables
Table 1–1: Report Builder Menus . . . . . . . . . . . . . . . . . . . . . . . . . . . . . . . . . . . . . . 1–10Table 1–2: Default Field Alignment . . . . . . . . . . . . . . . . . . . . . . . . . . . . . . . . . . . . . 1–12Table 1–3: Band Types . . . . . . . . . . . . . . . . . . . . . . . . . . . . . . . . . . . . . . . . . . . . . . 1–14Table 3–1: Effects of Band Choice on Data Presentation . . . . . . . . . . . . . . . . . . . . 3–2Table 3–2: Effects of Band Line Status . . . . . . . . . . . . . . . . . . . . . . . . . . . . . . . . . . 3–5Table 3–3: Positioning Page Breaks . . . . . . . . . . . . . . . . . . . . . . . . . . . . . . . . . . . . 3–9Table 3–4: Print Values for Control Fields . . . . . . . . . . . . . . . . . . . . . . . . . . . . . . . 3–14Table 4–1: UNKNOWN Value Processing . . . . . . . . . . . . . . . . . . . . . . . . . . . . . . . 4–4Table 4–2: Changing Field Formats . . . . . . . . . . . . . . . . . . . . . . . . . . . . . . . . . . . . 4–8Table 4–3: Font Defaults . . . . . . . . . . . . . . . . . . . . . . . . . . . . . . . . . . . . . . . . . . . . . 4–19Table 4–4: Field Alignment Defaults and Options . . . . . . . . . . . . . . . . . . . . . . . . . . 4–23Table 4–5: Format Dialog Box Field Format . . . . . . . . . . . . . . . . . . . . . . . . . . . . . . 4–30Table 5–1: Aggregate Field Types . . . . . . . . . . . . . . . . . . . . . . . . . . . . . . . . . . . . . 5–2Table 5–2: Reset Choices . . . . . . . . . . . . . . . . . . . . . . . . . . . . . . . . . . . . . . . . . . . . 5–4Table 5–3: Accumulation Choices . . . . . . . . . . . . . . . . . . . . . . . . . . . . . . . . . . . . . . 5–5Table 5–4: Processing Options . . . . . . . . . . . . . . . . . . . . . . . . . . . . . . . . . . . . . . . . 5–5Table 5–5: Aggregate/Field Data Types . . . . . . . . . . . . . . . . . . . . . . . . . . . . . . . . . 5–10Table 5–6: Case Sensitivity for Aggregate Fields . . . . . . . . . . . . . . . . . . . . . . . . . . 5–11Table 6–1: Types of Calculated Expressions . . . . . . . . . . . . . . . . . . . . . . . . . . . . . 6–2Table 6–2: Report Builder Constant Types . . . . . . . . . . . . . . . . . . . . . . . . . . . . . . . 6–5Table 6–3: Arithmetic Operators . . . . . . . . . . . . . . . . . . . . . . . . . . . . . . . . . . . . . . . 6–6Table 6–4: Operator Precedence . . . . . . . . . . . . . . . . . . . . . . . . . . . . . . . . . . . . . . 6–7Table 6–5: Using the User Interface Elements to Create an
Expression . . . . . . . . . . . . . . . . . . . . . . . . . . . . . . . . . . . . . . . . . . . . . . 6–17Table 7–1: Using the User Interface Elements to Create an
Expression 7–5Table 9–1: Ascending Sort Order by Data Type . . . . . . . . . . . . . . . . . . . . . . . . . . . 9–3Table 10–1: Filter Comparison Operators . . . . . . . . . . . . . . . . . . . . . . . . . . . . . . . . . 10–2Table 12–1: Supported Image File Types . . . . . . . . . . . . . . . . . . . . . . . . . . . . . . . . . 12–2Table 13–1: Instant Layout Use Options . . . . . . . . . . . . . . . . . . . . . . . . . . . . . . . . . . 13–4Table 13–2: Instant Report Use Options . . . . . . . . . . . . . . . . . . . . . . . . . . . . . . . . . . 13–5Table 14–1: Memo File Style Codes . . . . . . . . . . . . . . . . . . . . . . . . . . . . . . . . . . . . . 14–13Table 15–1: Print Preview Buttons . . . . . . . . . . . . . . . . . . . . . . . . . . . . . . . . . . . . . . 15–5Table 15–2: Actions to Deal with Low Memory . . . . . . . . . . . . . . . . . . . . . . . . . . . . . 15–6Table A–1: Valid Parameter Locations . . . . . . . . . . . . . . . . . . . . . . . . . . . . . . . . . . A–5Table A–2: Report Builder Startup Parameters . . . . . . . . . . . . . . . . . . . . . . . . . . . . A–6Table A–3: Report Engine Startup Parameters . . . . . . . . . . . . . . . . . . . . . . . . . . . . A–10Table A–4: RB-STATUS Values . . . . . . . . . . . . . . . . . . . . . . . . . . . . . . . . . . . . . . . A–15Table A–5: Image File Search Order . . . . . . . . . . . . . . . . . . . . . . . . . . . . . . . . . . . . A–35Table A–6: Memo File Search Order . . . . . . . . . . . . . . . . . . . . . . . . . . . . . . . . . . . . A–36Table A–7: Database Files Search Order . . . . . . . . . . . . . . . . . . . . . . . . . . . . . . . . A–37Table A–8: Report Library Search Order . . . . . . . . . . . . . . . . . . . . . . . . . . . . . . . . . A–38Table B–1: Function Syntax Conventions . . . . . . . . . . . . . . . . . . . . . . . . . . . . . . . . B–3

Contents
Table B–2: Input and Output Data Types . . . . . . . . . . . . . . . . . . . . . . . . . . . . . . . . B–4Table B–3: Day, Date, and Time Functions . . . . . . . . . . . . . . . . . . . . . . . . . . . . . . B–5Table B–4: String-manipulation Functions . . . . . . . . . . . . . . . . . . . . . . . . . . . . . . . B–5Table B–5: Numeric Functions . . . . . . . . . . . . . . . . . . . . . . . . . . . . . . . . . . . . . . . . B–7Table B–6: Report Management Functions . . . . . . . . . . . . . . . . . . . . . . . . . . . . . . B–8Table B–7: Miscellaneous Functions . . . . . . . . . . . . . . . . . . . . . . . . . . . . . . . . . . . B–8Table C–1: Operator Precedence . . . . . . . . . . . . . . . . . . . . . . . . . . . . . . . . . . . . . . C–2Table C–2: Operators . . . . . . . . . . . . . . . . . . . . . . . . . . . . . . . . . . . . . . . . . . . . . . . C–5
xvii

Contents
xviii
Procedures
rblib.p . . . . . . . . . . . . . . . . . . . . . . . . . . . . . . . . . . . . . . . . . . . . . . . . . . . . . . . . . . . . . . . A–4

Preface
Purpose
This book is a user’s guide for the Progress Report Builder. The book describes how to run reports using the Report Builder and Report Engine.
Audience
This book is intended for developers who want to use the Report Builder to generate reports. A knowledge of Progress and MS-Windows is assumed.
Organization of This Manual
Chapter 1, “Report Builder Basics”
Describes what a Report Builder report is and how to produce one. It also describes how to access the Report Builder and the Report Builder interface.
Chapter 2, “Report Definitions and Report Libraries”
Explains how to manage report definitions and report libraries.
Chapter 3, “Bands”
Explains how to create and manipulate band lines and areas.
Chapter 4, “Fields”
Explains how the Report Builder handles fields and how to insert, move, copy, and format fields in reports.

Progress Report Builder User’s Guide
Chapter 5, “Aggregate Fields”
Explains how to create and use aggregate fields in reports, including how to use them to sort and filter records.
Chapter 6, “Calculated Fields”
Explains how to define and use calculated fields in the Report Builder, including descriptions of calculated field expression syntax and server-evaluatable fields.
Chapter 7, “User-defined Functions”
Explains how to create, edit, and use user-defined functions in the Report Builder, including descriptions of some sample user-defined functions.
Chapter 8, “Joins”
Explains how to create database joins to access data in the database for your report.
Chapter 9, “Sorting and Grouping Data”
Explains how to sort and group data to provide the optimum presentation of data.
Chapter 10, “Filters”
Explains how to create, edit, and use a filter to select records for a report.
Chapter 11, “Lines, Rectangles, and Shading”
Explains how to add lines and rectangles to reports and how to add levels of shading to report areas.
Chapter 12, “Images”
Explains how to insert and size bitmapped images in Report Builder reports.
Chapter 13, “Layout Manipulation”
Describes how to manipulate the report layout, including page layout, record layout, and how fields appear on the layout.
Chapter 14, “Form Letters”
Explains how to use memo fields to import text from a file into a report.
xx

Preface
Chapter 15, “Printing”
Explains how to preview and print Report Builder reports.
Appendix A, “Report Builder Administration”
Provides information about administering the Report Builder for other users.
Appendix B, “Report Builder Functions”
Describes the built-in Report Builder functions in alphabetical order.
Appendix C, “Operators”
Describes the operators that you can use in Report Builder calculated fields, user-defined functions, and filter conditions.
“Glossary”
Typographical Conventions
This manual uses the following typographical conventions:
• Bold typeface indicates:
– Commands or characters that the user types
– That a word carries particular weight or emphasis
• Italic typeface indicates:
– Progress variable information that the user supplies
– New terms
– Titles of complete publications
• Monospaced typeface indicates:
– Code examples
– System output
– Operating system filenames and pathnames
xxi

Progress Report Builder User’s Guide
The following typographical conventions are used to represent keystrokes:
• Small capitals are used for Progress key functions and generic keyboard keys.
END-ERROR, GET, GO
ALT, CTRL, SPACEBAR, TAB
• When you have to press a combination of keys, they are joined by a dash. You press and hold down the first key, then press the second key.
CTRL-X
• When you have to press and release one key, then press another key, the key names are separated with a space.
ESCAPE HESCAPE CURSOR-LEFT
Syntax Notation
The syntax for each component follows a set of conventions:
• Uppercase words are keywords. Although they are always shown in uppercase, you can use either uppercase or lowercase when using them in a procedure.
In this example, ACCUM is a keyword:
• Italics identify options or arguments that you must supply. These options can be defined as part of the syntax or in a separate syntax identified by the name in italics. In the ACCUM function above, the aggregate and expression options are defined with the syntax for the ACCUM function in the Progress Language Reference.
• You must end all statements (except for DO, FOR, FUNCTION, PROCEDURE, and REPEAT) with a period. DO, FOR, FUNCTION, PROCEDURE, and REPEAT statements can end with either a period or a colon, as in this example:
SYNTAX
ACCUM aggregate expression
FOR EACH Customer: DISPLAY Name.END.
xxii

Preface
• Square brackets ([ ] ) around an item indicate that the item, or a choice of one of the enclosed items, is optional.
In this example, STREAM stream, UNLESS-HIDDEN, and NO-ERROR are optional:
In some instances, square brackets are not a syntax notation, but part of the language.
For example, this syntax for the INITIAL option uses brackets to bound an initial value list for an array variable definition. In these cases, normal text brackets ( [ ] ) are used:
NOTE: The ellipsis (...) indicates repetition, as shown in a following description.
• Braces ({ }) around an item indicate that the item, or a choice of one of the enclosed items, is required.
In this example, you must specify the items BY and expression and can optionally specify the item DESCENDING, in that order:
In some cases, braces are not a syntax notation, but part of the language.
For example, a called external procedure must use braces when referencing arguments passed by a calling procedure. In these cases, normal text braces ( { } ) are used:
SYNTAX
DISPLAY [ STREAM stream ] [ UNLESS-HIDDEN ] [ NO-ERROR ]
SYNTAX
INITIAL [ constant [ , constant ] ... ]
SYNTAX
{ BY expression [ DESCENDING ] }
SYNTAX
{ &argument-name }
xxiii

Progress Report Builder User’s Guide
• A vertical bar (|) indicates a choice.
In this example, EACH, FIRST, and LAST are optional, but you can only choose one:
In this example, you must select one of logical-name or alias:
• Ellipses (...) indicate that you can choose one or more of the preceding items. If a group of items is enclosed in braces and followed by ellipses, you must choose one or more of those items. If a group of items is enclosed in brackets and followed by ellipses, you can optionally choose one or more of those items.
In this example, you must include two expressions, but you can optionally include more. Note that each subsequent expression must be preceded by a comma:
In this example, you must specify MESSAGE, then at least one of expression or SKIP, but any additional number of expression or SKIP is allowed:
In this example, you must specify {include-file, then optionally any number of argument or &argument-name = "argument-value", and then terminate with }:
SYNTAX
PRESELECT [ EACH | FIRST | LAST ] record-phrase
SYNTAX
CONNECTED ( { logical-name | alias } )
SYNTAX
MAXIMUM ( expression , expression [ , expression ] ... )
SYNTAX
MESSAGE { expression | SKIP [ (n) ] } ...
SYNTAX
{ include-file
[ argument | &argument-name = "argument-value" ] ... }
xxiv

Preface
• In some examples, the syntax is too long to place in one horizontal row. In such cases, optional items appear individually bracketed in multiple rows in order, left-to-right and top-to-bottom. This order generally applies, unless otherwise specified. Required items also appear on multiple rows in the required order, left-to-right and top-to-bottom. In cases where grouping and order might otherwise be ambiguous, braced (required) or bracketed (optional) groups clarify the groupings.
In this example, WITH is followed by several optional items:
In this example, ASSIGN requires one of two choices: either one or more of field, or one of record. Other options available with either field or record are grouped with braces and brackets. The open and close braces indicate the required order of options:
SYNTAX
WITH [ ACCUM max-length ] [ expression DOWN ] [ CENTERED ] [ n COLUMNS ] [ SIDE-LABELS ] [ STREAM-IO ]
SYNTAX
ASSIGN { { [ FRAME frame ] { field [ = expression ] } [ WHEN expression ] } ... | { record [ EXCEPT field ... ] } }
xxv

Progress Report Builder User’s Guide
Example Procedures
This manual provides numerous example procedures that illustrate syntax and concepts. Examples use the following conventions:
• They appear in boxes with borders.
• If they are available online, the name of the procedure appears above the left corner of the box and starts with a prefix associated with the manual that references it, as follows:
– e- - Progress External Program Interfaces, for example, e-ddeex1.p
– lt- - Progress Language Tutorial, for example, lt-05-s3.p
– p- - Progress Programming Handbook, for example, p-br01.p
– r- - Progress Language Reference, for example, r-dynbut.p
If the name does not start with a listed prefix, the procedure is not available online.
• If they are not available online, they compile as shown, but might not execute for lack of completeness.
Accessing Files in Procedure Libraries on Windows Platforms
Documentation examples are stored in procedure libraries, prodoc.pl and prohelp.pl, in the src directory where Progress is installed.
You must first create all subdirectories required by a library before attempting to extract files from the library. You can see what directories and subdirectories a library needs by using the PROLIB -list command to view the contents of the library. See the Progress Client Deployment Guide for more details on the PROLIB utility.
Extracting source files from a procedure library involves running PROENV to set up your Progress environment, creating the directory structure for the files you want to extract, and running PROLIB.
1 ♦ From the Control Panel or the Progress Program Group, double-click the Proenv icon.
2 ♦ The Proenv Window appears, with the proenv prompt.
Running Proenv sets the DLC environment variable to the directory where you installed Progress (by default, C:\Program Files\Progress). Proenv also adds the DLC environment variable to your PATH environment variable and adds the bin directory (PATH=%DLC%;%DLC%\bin;%PATH%).
xxvi

Preface
3 ♦ Enter the following command at the proenv prompt to create the prodoc directory in your
Progress working directory (by default, C:\Progress\Wrk):
4 ♦ Create the langref directory under prodoc:
5 ♦ To extract all examples in a procedure library directory, run the PROLIB utility. Note that you must use double quotes because “Program Files” contains an embedded space:
PROLIB extracts all examples into prodoc\langref.
To extract one example, run PROLIB and specify the file that you want to extract as it is stored in the procedure library:
PROLIB extracts r-syshlp.p into prodoc\langref.
MKDIR prodoc
MKDIR prodoc\langref
PROLIB "%DLC%\src\prodoc.pl" -extract prodoc\langref\*.*
PROLIB "%DLC%\src\prodoc.pl" -extract prodoc/langref/r-syshlp.p
xxvii

Progress Report Builder User’s Guide
Progress Messages
Progress displays several types of messages to inform you of routine and unusual occurrences:
• Execution messages inform you of errors encountered while Progress is running a procedure (for example, if Progress cannot find a record with a specified index field value).
• Compile messages inform you of errors found while Progress is reading and analyzing a procedure prior to running it (for example, if a procedure references a table name that is not defined in the database).
• Startup messages inform you of unusual conditions detected while Progress is getting ready to execute (for example, if you entered an invalid startup parameter).
After displaying a message, Progress proceeds in one of several ways:
• Continues execution, subject to the error-processing actions that you specify, or that are assumed, as part of the procedure. This is the most common action taken following execution messages.
• Returns to the Progress Procedure Editor so that you can correct an error in a procedure. This is the usual action taken following compiler messages.
• Halts processing of a procedure and returns immediately to the Procedure Editor. This does not happen often.
• Terminates the current session.
Progress messages end with a message number in parentheses. In this example, the message number is 200:
Use Progress online help to get more information about Progress messages. Many Progress tools include the following Help menu options to provide information about messages:
• Choose Help→ Recent Messages to display detailed descriptions of the most recent Progress message and all other messages returned in the current session.
• Choose Help→ Messages, then enter the message number to display a description of any Progress message. (If you encounter an error that terminates Progress, make a note of the message number before restarting.)
• In the Procedure Editor, press the HELP key (F2 or CTRL-W).
** Unknown table name table. (200)
xxviii

Preface
Other Useful Documentation
This section lists Progress Software Corporation documentation that you might find useful. Unless otherwise specified, these manuals support both Windows and Character platforms and are provided in electronic documentation format on CD-ROM.
Getting Started
Progress Electronic Documentation Installation and Configuration Guide (Hard copy only)
A booklet that describes how to install the Progress EDOC viewer and collection on UNIX and Windows.
Progress Installation and Configuration Guide Version 9 for UNIX
A manual that describes how to install and set up Progress Version 9.1 for the UNIX operating system.
Progress Installation and Configuration Guide Version 9 for Windows
A manual that describes how to install and set up Progress Version 9.1 for all supported Windows and Citrix MetaFrame operating systems.
Progress Version 9 Product Update Bulletin
A guide that provides a brief description of each new feature of the release. The booklet also explains where to find more detailed information in the documentation set about each new feature.
Progress Application Development Environment — Getting Started (Windows only)
A practical guide to graphical application development within the Progress Application Development Environment (ADE). This guide includes an overview of the ADE and its tools, an overview of Progress SmartObject technology, and tutorials and exercises that help you better understand SmartObject technology and how to use the ADE to develop applications.
Progress Language Tutorial for Windows and Progress Language Tutorial for Character
Platform-specific tutorials designed for new Progress users. The tutorials use a step-by-step approach to explore the Progress application development environment using the 4GL.
xxix

Progress Report Builder User’s Guide
Progress Master Glossary for Windows and Progress Master Glossary for Character (EDOC only)
Platform-specific master glossaries for the Progress documentation set. These books are in electronic format only.
Progress Master Index and Glossary for Windows and Progress Master Index and Glossary for Character (Hard copy only)
Platform-specific master indexes and glossaries for the Progress hard-copy documentation set.
Progress Startup Command and Parameter Reference
A reference manual that describes the Progress startup commands and parameters in alphabetical order.
Welcome to Progress (Hard copy only)
A booklet that explains how Progress software and media are packaged. An icon-based map groups the documentation by functionality, providing an overall view of the documentation set. Welcome to Progress also provides descriptions of the various services Progress Software Corporation offers.
Development Tools
Progress ADM 2 Guide
A guide to using the Application Development Model, Version 2 (ADM 2) application architecture to develop Progress applications. It includes instructions for building and using Progress SmartObjects.
Progress ADM 2 Reference
A reference for the Application Development Model, Version 2 (ADM 2) application. It includes descriptions of ADM 2 functions and procedures.
Progress AppBuilder Developer’s Guide (Windows only)
A programmer’s guide to using the Progress AppBuilder visual layout editor. AppBuilder is a Rapid Application Development (RAD) tool that can significantly reduce the time and effort required to create Progress applications.
xxx

Preface
Progress Basic Database Tools (Character only; information for Windows is in online help)
A guide for the Progress Database Administration tools, such as the Data Dictionary.
Progress Basic Development Tools (Character only; information for Windows is in online help)
A guide for the Progress development toolset, including the Progress Procedure Editor and the Application Compiler.
Progress Debugger Guide
A guide for the Progress Application Debugger. The Debugger helps you trace and correct programming errors by allowing you to monitor and modify procedure execution as it happens.
Progress Help Development Guide (Windows only)
A guide that describes how to develop and integrate an online help system for a Progress application.
Progress Translation Manager Guide (Windows only)
A guide that describes how to use the Progress Translation Manager tool to manage the entire process of translating the text phrases in Progress applications.
Progress Visual Translator Guide (Windows only)
A guide that describes how to use the Progress Visual Translator tool to translate text phrases from procedures into one or more spoken languages.
Reporting Tools
Progress Report Builder Deployment Guide (Windows only)
An administration and development guide for generating Report Builder reports using the Progress Report Engine.
Progress Report Builder Tutorial (Windows only)
A tutorial that provides step-by-step instructions for creating eight sample Report Builder reports.
xxxi

Progress Report Builder User’s Guide
Progress Results Administration and Development Guide (Windows only)
A guide for system administrators that describes how to set up and maintain the Results product in a graphical environment. This guide also describes how to program, customize, and package Results with your own products. In addition, it describes how to convert character-based Results applications to graphical Results applications.
Progress Results User’s Guide for Windows and Progress Results User’s Guide for UNIX
Platform-specific guides for users with little or no programming experience that explain how to query, report, and update information with Results. Each guide also helps advanced users and application developers customize and integrate Results into their own applications.
4GL
Building Distributed Applications Using the Progress AppServer
A guide that provides comprehensive information about building and implementing distributed applications using the Progress AppServer. Topics include basic product information and terminology, design options and issues, setup and maintenance considerations, 4GL programming details, and remote debugging.
Progress External Program Interfaces
A guide to accessing non-Progress applications from Progress. This guide describes how to use system clipboards, UNIX named pipes, Windows dynamic link libraries, Windows dynamic data exchange, Windows ActiveX controls, and the Progress Host Language Call Interface to communicate with non-Progress applications and extend Progress functionality.
Progress Internationalization Guide
A guide to developing Progress applications for markets worldwide. The guide covers both internationalization—writing an application so that it adapts readily to different locales (languages, cultures, or regions)—and localization—adapting an application to different locales.
xxxii

Preface
Progress Language Reference
A three-volume reference set that contains extensive descriptions and examples for each statement, phrase, function, operator, widget, attribute, method, and event in the Progress language.
Progress Programming Handbook
A two-volume handbook that details advanced Progress programming techniques.
Database
Progress Database Design Guide
A guide that uses a sample database and the Progress Data Dictionary to illustrate the fundamental principles of relational database design. Topics include relationships, normalization, indexing, and database triggers.
Progress Database Administration Guide and Reference
This guide describes Progress database administration concepts and procedures. The procedures allow you to create and maintain your Progress databases and manage their performance.
DataServers
Progress DataServer Guides
These guides describe how to use the DataServers to access non-Progress databases. They provide instructions for building the DataServer modules, a discussion of programming considerations, and a tutorial. Each DataServer has its own guide, for example, the Progress DataServer for ODBC Guide, the Progress DataServer for ORACLE Guide, or the Progress/400 Product Guide.
MERANT ODBC Branded Driver Reference
The Enterprise DataServer for ODBC includes MERANT ODBC drivers for all the supported data sources. For configuration information, see the MERANT documentation, which is available as a PDF file in installation-path\odbc. To read this file you must have the Adobe Acrobat Reader Version 3.1 or higher installed on your system. If you do not have the Adobe Acrobat Reader, you can download it from the Adobe Web site at: http://www.adobe.com/prodindex/acrobat/readstep.html.
xxxiii

Progress Report Builder User’s Guide
SQL-89/Open Access
Progress Embedded SQL-89 Guide and Reference
A guide to Progress Embedded SQL-89 for C, including step-by-step instructions on building ESQL-89 applications and reference information on all Embedded SQL-89 Preprocessor statements and supporting function calls. This guide also describes the relationship between ESQL-89 and the ANSI standards upon which it is based.
Progress Open Client Developer’s Guide
A guide that describes how to write and deploy Java and ActiveX applications that run as clients of the Progress AppServer. The guide includes information about how to expose the AppServer as a set of Java classes or as an ActiveX server.
Progress SQL-89 Guide and Reference
A user guide and reference for programmers who use interactive Progress/SQL-89. It includes information on all supported SQL-89 statements, SQL-89 Data Manipulation Language components, SQL-89 Data Definition Language components, and supported Progress functions.
SQL-92
Progress Embedded SQL-92 Guide and Reference
A guide to Progress Embedded SQL-92 for C, including step-by-step instructions for building ESQL-92 applications and reference information about all Embedded SQL-92 Preprocessor statements and supporting function calls. This guide also describes the relationship between ESQL-92 and the ANSI standards upon which it is based.
Progress JDBC Driver Guide
A guide to the Java Database Connectivity (JDBC) interface and the Progress SQL-92 JDBC driver. It describes how to set up and use the driver and details the driver’s support for the JDBC interface.
xxxiv

Preface
Progress ODBC Driver Guide
A guide to the ODBC interface and the Progress SQL-92 ODBC driver. It describes how to set up and use the driver and details the driver’s support for the ODBC interface.
Progress SQL-92 Guide and Reference
A user guide and reference for programmers who use Progress SQL-92. It includes information on all supported SQL-92 statements, SQL-92 Data Manipulation Language components, SQL-92 Data Definition Language components, and Progress functions. The guide describes how to use the Progress SQL-92 Java classes and how to create and use Java stored procedures and triggers.
Deployment
Progress Client Deployment Guide
A guide that describes the client deployment process and application administration concepts and procedures.
Progress Developer’s Toolkit
A guide to using the Developer’s Toolkit. This guide describes the advantages and disadvantages of different strategies for deploying Progress applications and explains how you can use the Toolkit to deploy applications with your selected strategy.
Progress Portability Guide
A guide that explains how to use the Progress toolset to build applications that are portable across all supported operating systems, user interfaces, and databases, following the Progress programming model.
WebSpeed
Getting Started with WebSpeed
Provides an introduction to the WebSpeed Workshop tools for creating Web applications. It introduces you to all the components of the WebSpeed Workshop and takes you through the process of creating your own Intranet application.
WebSpeed Installation and Configuration Guide
Provides instructions for installing WebSpeed on Windows and UNIX systems. It also discusses designing WebSpeed environments, configuring WebSpeed Brokers, WebSpeed Agents, and the NameServer, and connecting to a variety of data sources.
xxxv

Progress Report Builder User’s Guide
WebSpeed Developer’s Guide
Provides a complete overview of WebSpeed and the guidance necessary to develop and deploy WebSpeed applications on the Web.
WebSpeed Product Update Bulletin
A booklet that provides a brief description of each new feature of the release. The booklet also explains where to find more detailed information in the documentation set about each new feature.
Welcome to WebSpeed! (Hard copy only)
A booklet that explains how WebSpeed software and media are packaged. Welcome to WebSpeed! also provides descriptions of the various services Progress Software Corporation offers.
Reference
Pocket Progress (Hard copy only)
A reference that lets you quickly look up information about the Progress language or programming environment.
Pocket WebSpeed (Hard copy only)
A reference that lets you quickly look up information about the SpeedScript language or the WebSpeed programming environment.
xxxvi

1Report Builder Basics
The Progress Report Builder allows you to generate reports using databases from multiple sources. This chapter describes:
• How Report Builder generates reports
• Starting Report Builder
• The Report Builder main window
• Connecting databases

Progress Report Builder User’s Guide
1.1 How Report Builder Generates ReportsBefore Report Builder can produce a report, you must first connect to the database or databases that contain the data you want to display. Then you use Report Builder to create the report definition. The report definition defines the report characteristics that tell Report Builder where to find the data and how to display and print the data. Although Report Builder displays the data in the database according to the information in the report definition, it does not in any way change the data or store the data itself in the report definition. Figure 1–1 illustrates how Report Builder uses database information in the report definition.
Figure 1–1: Creating a Report Definition
The first step in creating a report definition is to specify the master table from which to draw the report data. The master table is the database table that Report Builder uses as the initial source of data for the report.
The next step is to determine whether you have to access data in other database tables. To access fields in another database table, you must join that table to the master table. When you join the table, you establish a connection to the master table or another related table through a common field or fields. All tables that you join to the master table are called related tables. You can join tables either directly to the master table or through other related tables.
Data
Report Builder
ReportDefinition
1–2

Report Builder Basics
Figure 1–2 illustrates how Report Builder joins tables.
Figure 1–2: Joining on a Common Field
When you join a table, you gain access to all the data in the table. However, to use the data from the database tables in the report, you must specify how to present data in the report definition.
When you create the report definition, you not only specify what database tables you want to access, but also how you want to arrange, analyze, and format the data. For example, by default Report Builder displays records in the order in which they are read from the master table. However, you can change the sort order in the report definition to display the data in any order. Regardless of how you present the data, Report Builder does not change the data in the database. For example, if you change the sort order and field formats in a report, the changes do not affect the actual schema or data.
You can manipulate the data to produce different types of reports. As you design a report, you can move text and data around the report layout, create calculated fields that analyze the data, and apply fonts and styles to different areas of the report. You can also preview the report to see how Report Builder will present the data.
Cust-NumNameAddress . . .Postal-Code
Order-NumCust-Num . . .Order-Date
Order-NumLine-Num . . .Item-Num
Master Table(Customer Table)
Related Table(OrderTable)
Related Table(Order-Line Table)
1–3

Progress Report Builder User’s Guide
Once you finish the report definition, Report Builder can generate the report. Figure 1–3 shows how Report Builder uses the database and report definition to produce a report.
Figure 1–3: How Report Builder Generates a Report
Report Builder accesses the database and presents the data according to the criteria in the report definition.
You must save the report definition if you want to generate the report in a future session. When you save a report definition, Report Builder stores the definition in a file called a report library. A report library is an operating system file that can contain one or more report definitions. You can assign a report library any eight-character name, and Report Builder automatically appends the .prl extension. This extension identifies the library as a Progress report library.
Figure 1–4 shows how Report Builder stores report definitions in a report library.
Figure 1–4: How Report Libraries Store Report Definitions
Data
Report Builder
ReportDefinition
Report
Report Defintion1Report Definition2 . . .Report Defintionn
Report Library(sample.prl)
1–4

Report Builder Basics
When you save a report definition to a report library, Report Builder saves all the information relevant to the report. This information includes:
• Database and table information
• Field placement
• Sort and group information
• Field definitions for calculations and aggregates derived from data in the tables
• Selection conditions (called filters) that specify the records you want to include in the report
• Formatting information indicating which fonts and/or styles to use in the report
• Filenames for imported images
• Lines and rectangles added as graphic enhancements
Because the definition contains all the information required to generate the report, you can use the report definition to generate the report at any time using the specified database.
1.2 Before You Get StartedBefore you start Progress Report Builder, consider the following issues:
• To have full Report Builder functionality, you must first install an MS-Windows printer driver (the physical printer does not have to be installed). If you do not have a printer driver installed, Report Builder will not have access to the font information that it requires to generate reports.
• Report Builder cannot create file system directories. Thus, if you want to store your reports in a location other than where you installed Report Builder, you must first create the directory.
• If you specify black as your MS-Windows highlight color, you will have difficulty viewing selected options in some of the Report Builder dialog boxes. To avoid this problem, choose another highlight color.
1–5

Progress Report Builder User’s Guide
• If you want to access the same Progress database with Report Builder simultaneously with any other Progress tool, such as the Data Dictionary, you must start a database server on that database. See the Progress Database Administration Guide and Reference for information about starting a Progress database server.
• If you want to access a local database, you must have a version of Progress that allows you to connect to a local database.
1.3 Starting Report BuilderThere are three ways to start Report Builder:
• Choose the Report Builder icon from the ADE desktop.
• Create and choose the Report Builder icon from an MS-Windows program group. When you create the Windows icon, specify the following path in the Command Line field:
See Appendix A, “Report Builder Administration,” for a complete description of the parameters you can specify in the Command Line field.
• Choose Tools→ Report Builder from the ADE desktop main menu or from the menu of any other Progress tool, except Results.
prorb32.exe parameters
1–6

Report Builder Basics
1.4 The Report Builder Main Window When you start Report Builder, the window in Figure 1–5 opens.
Figure 1–5: Report Builder Main Window
Figure 1–6 shows how the Report Builder main window appears with a report definition open.
Figure 1–6: Main Window with Report Definition
1–7

Progress Report Builder User’s Guide
The Report Builder main window has the following user interface elements:
• Title Bar — Displays the report name.
• Menu Bar — Provides access to the menu options. See the “Menu Bar” section for a description of each option.
• Tool Bar — Contains buttons that perform many of the actions available from the menu bar.
• Format Bar — Provides quick access to fonts, styles, effects, and alignment options.
• Horizontal and Vertical Rulers — Help you align fields and text in a report.
• Band Lines — Control the placement of data in a report. See the “Bands and Band Lines” section for a complete description of the different types of band lines.
• Band Labels — Identify the band type.
• Band Line Status Area — Indicates whether the band line is a fixed height and whether it prints only when a specified condition is met. If a band line is a fixed height, up and down arrows appear in the status area. If you specify a condition upon which to print a band line, a question mark appears in the status area.
• Band Area — Identifies the type of each band line on the layout.
• Layout Area — Indicates area where you create a report layout. The report layout is the schematic representation of the report that contains the fields, text, and any lines, rectangles, or images that will appear in the report.
• Status Bar — Displays information about the currently highlighted field.
• Cursor Locator — Identifies the position of the edit cursor in the layout.
• Horizontal and Vertical Scroll Bars — Allows scrolling to the components of the band and layout areas.
The following sections describe some of the Report Builder window features in more detail.
1–8

Report Builder Basics
1.4.1 Menu BarTable 1–1 describes the menus you can access from the menu bar.
Selecting Menu Options
There are three ways to choose options from the menu bar:
• Choose the option with the mouse.
• Press ALT and the underlined letter in the option.
• Press F10, use the cursor keys to highlight the option, then press ENTER.
You can access many Report Builder features using the tool bar and format bar. See the following sections for descriptions of each.
Table 1–1: Report Builder Menus
Menu Description
Report Manipulates report definitions, database connections, and exits Report Builder.
Edit Modifies report elements.
View Controls layout options, such as displaying or hiding the tool bar, format bar, grid, and rulers.
Create Inserts band lines, lines, rectangles, and images.
Properties Controls and displays the attributes of fields, band lines, lines, rectangles, and images.
Database Specifies the tables from which Report Builder draws data for the report, sorts and groups data, and filters records.
Calculations Creates and edits calculated fields, aggregate fields, and user-defined functions.
Options Specifies window preferences, default settings, and default directories.
Help Accesses the Report Builder online help system.
1–9

Progress Report Builder User’s Guide
1.4.2 Tool Bar The tool bar allows you to access menu bar options by simply choosing a button. Choosing a button either executes a Report Builder command or opens a dialog box in which you can select or change various options.
To see what each button does, place your mouse pointer over the button to display the associated tool tip. Report Builder displays a brief description of the button’s function in the status bar. Figure 1–7 shows the full selection of tool bar buttons.
Figure 1–7: Tool Bar
Use the View menu to control display of the tool bar. Choose View→ Tool Bar to hide or display the bar. A check mark appears beside the menu item when the tool bar is displayed.
1.4.3 Format Bar The format bar provides a quick way to format fields and text in your report. After you select one or more items on the report layout, you can specify font, point size, style, effect, and alignment by using the drop-down list boxes and buttons on this bar.
Figure 1–8 shows an example of the format bar.
Figure 1–8: Format Bar
Use the View menu to control display of the format bar. Choose View→ Format Bar to hide or display the format bar. A check mark appears beside the menu item when the format bar is displayed.
Report Builder assigns a default alignment to each field when it is inserted on the layout. A field’s default alignment depends on its data type. Table 1–2 lists the default alignment by data type.
Current Font Current Point Size Alignment Trash Can
Auto/Freeform Line
Style Effect Merge Left Snap To Grid
1–10

Report Builder Basics
There are three ways to determine the alignment of any field:
• Select the field, then choose Properties→ Alignment to open the Alignment dialog box.
• Select the field, then press F4 to open the Field Properties dialog box.
• Double-click the field to open the Field Properties dialog box.
See Chapter 4, “Fields,” for more information about fields.
1.4.4 Horizontal and Vertical RulersCalibrated horizontal and vertical rulers help you place fields and text at specific positions on the report layout. For example, if you type a column heading on the layout immediately under the 1-inch position on the horizontal ruler, the column heading will begin printing 1 inch from the left margin of the report.
Table 1–2: Default Field Alignment
Data Type Alignment
NUMERIC Right-aligned
MEMO Word-wrapped, left-aligned
All others Left-aligned
1–11

Progress Report Builder User’s Guide
Figure 1–9 shows an empty report layout with both rulers visible. Notice that the numbers on the vertical ruler restart at zero for each type of band line:
Figure 1–9: Empty Layout with Rulers Visible
Settings for the horizontal and vertical ruler scales determine the grid display (when the grid is turned on). Grid dots are spaced according to the Units per inch settings specified for the rulers.
To change the calibration of the ruler lines, double-click on either ruler to open the Ruler dialog box:
1–12

Report Builder Basics
By default, both the horizontal and vertical rulers have 10 units per inch. To change ruler spacing, in the Units per inch field enter a number from 4 to 30, representing the number of ruler divisions per inch, then choose OK. For example, if you set Units per inch for the horizontal ruler to 4, the horizontal ruler scale and grid markings are arranged in .25-inch increments.
NOTE: Although you can specify to run Report Builder using centimeters by changing the code page, the horizontal and vertical rulers will still use inches.
1.4.5 Bands and Band LinesBands are areas on the report layout that control where Report Builder displays and prints data. Bands consist of one or more band lines, which are horizontal bars that control how and where data appears.
The band area on the Report Builder main window identifies the band type. There are seven types of bands. Each type of band displays data in a different place on the report and with a different frequency. Table 1–3 describes the different band types.
Table 1–3: Band Types
Band Location and Frequency in Report Output
Title Once per report at the beginning of the first page or on a separate title page.
Page header At the top of each page or after the title on the first page.
Group header Before each group of records. See Chapter 9, “Sorting and Grouping Data,” for information about group headers.
Record Once per record. Note that the record band might display as a single line on the layout, but the printed report will have many record lines — one for each record in the table.
Group footer After each group of records. See Chapter 9, “Sorting and Grouping Data,” for information about group footers.
Summary Once per report at the end of the last page or on a separate summary page.
Page footer At the bottom of each page.
1–13

Progress Report Builder User’s Guide
Bands always appear on the report layout in the order shown in Table 1–3. The band position on the layout does not indicate where the data appears on the report, but do not be concerned that you cannot reorder the bands. It is the band’s type, not its position, that controls where data appears in the report output.
Figure 1–10 shows how bands and band lines appear on the report layout.
Figure 1–10: Bands and Band Lines
Notice that the band area contains a band label for each band, or group of band lines, on the layout. The band label applies not only to the band line where it appears, but also to all band lines below it separated by dotted lines. Dotted lines separate band lines of the same band. A solid line separates the band lines of different bands.
The narrow channel at the right edge of the band area is the band line status area. The band line status can be:
• Default — Band line has an automatic height and is always printed. The band line status area is blank.
• Freeform height — Band line is a freeform line with a fixed line height. Up and down arrows in the band line status area indicate the top and bottom border of any freeform line.
1–14

Report Builder Basics
• Conditional printing — Band line prints only when a specific condition is met. A question mark indicates that a logical condition has been assigned to control printing of that line.
For a full explanation of band line height and conditional band line printing, see Chapter 3, “Bands.”
Figure 1–11 shows band lines with status indicators.
Figure 1–11: Bands with Status Indicators
The question marks on the group header and record band lines indicate that those band lines will print only when a specific condition is met. In this example, the print condition is set on the Backordered field. Report Builder will display only those records for which the Backordered field contains a false (No) value.
The arrows on the second summary band line indicate that the line has a fixed height. Because the specified height is .5 inches, the arrows are set .5 inches apart.
1–15

Progress Report Builder User’s Guide
1.4.6 Layout AreaThe layout area contains a combination of text fields and data fields. The text fields appear on the layout exactly as you enter them on the layout. However, by default, Report Builder represents data fields with symbols that indicate the field type, such as xxxxxx for character data and 99999 for numeric data. Data fields can be database fields or user-defined fields, such as aggregate or calculated fields. (See Chapter 4, “Fields,” for a complete description of the different types of fields.)
By default, Report Builder indicates a field’s position and width on the layout with a shaded area called the field width indicator. Figure 1–12 shows the default manner in which Report Builder represents fields on the report layout. Notice that Report Builder displays the text of the field labels. This is because the labels are text fields, not data fields.
Figure 1–12: Default Representation of Fields in Layout
You can change how Report Builder represents data fields on the layout by modifying the field width indicator or by displaying the actual data field names. You can modify the field width indicator by changing the shading color or by using an outline box instead of a shaded area. If you prefer to see the actual data field names, enable the Field Names setting on the View menu.
1–16

Report Builder Basics
Figure 1–13 shows the same report definition, except that here the Field Names setting is enabled.
p
Figure 1–13: Layout with Field Names Enabled
In addition to text and data fields, you can also place lines, rectangles, and bitmap images on the report layout. Report Builder represents the images as they appear in the bitmap file.
1–17

Progress Report Builder User’s Guide
Figure 1–14 shows rectangles and a bitmap image on the report layout.
Figure 1–14: Graphics in the Layout
Notice that the image is on a freeform band line. When you insert an image, Report Builder automatically converts the band line to freeform (fixed height) and resizes it to accommodate the image.
You can create report layouts containing up to a maximum of 256 lines; the maximum layout width is determined by the horizontal ruler setting and the page layout settings.
1.4.7 Status BarNear the bottom of the window, the status bar displays information about current operations and/or the position of a selected object. When you are working in the layout area, the status bar identifies the position of the edit cursor on the layout. At other times, the status bar might contain descriptions of command options or information about the currently highlighted field.
1–18

Report Builder Basics
Figure 1–15 shows a field description in the status bar.
Figure 1–15: Status Bar Showing Field Description
Notice that the Name field is selected. Therefore, Report Builder displays the Name field’s description in the status bar.
1.4.8 Cursor LocatorThe cursor locator identifies the location of the edit cursor on the layout by line number and position on the horizontal ruler.
1–19

Progress Report Builder User’s Guide
Figure 1–16 shows the current edit-cursor position in the cursor locator.
Figure 1–16: Cursor Location Shown on Horizontal Ruler
When you highlight a field, Report Builder identifies the cursor position by the field’s alignment. For example, if you highlight the Balance field, the cursor locator identifies the cursor position as Line 6 Inch 4.60. This is because the right edge of the Balance field is at the 4.60-inch mark, and the field is right-aligned. If you highlight the Name field, the cursor locator identifies the cursor position as “Line 6 Inch 0.00.” The Name field is left-aligned and it begins at the 0.0-inch mark (or the left margin).
1–20

Report Builder Basics
1.5 Connecting DatabasesBefore you can create the report definition, you must connect to at least one database. Follow these steps to connect to the sports database:
1 ♦ Choose Report→ Database Connections. The Connect Database dialog box appears:
2 ♦ Type the full path of the first database you want to connect in the Physical Name field. If you must specify security information or startup parameters, choose the Options button. The Connect Database dialog box expands as shown below:
See the Progress Client Deployment Guide for a complete description of the expanded Connect Database dialog box.
1–21

Progress Report Builder User’s Guide
3 ♦ Specify the necessary information, then choose OK. After Report Builder connects to the database, the Database Connections dialog box appears:
The Database Connections dialog box lists all the databases to which you are connected. Because you connected to only one database, newsport is the only database in the list.
4 ♦ Choose Close to return to the main window or New Connection to connect to another database.
See Appendix B, “Report Builder Functions,” for information about connecting databases from the command line at Report Builder startup.
1.6 Exiting Report BuilderTo exit Report Builder, choose Report→ Exit. If you do not have a report definition open or if you have an open definition to which you have not made any changes, Report Builder simply terminates. However, if you have an open definition to which you have made changes, Report Builder prompts you to save the changes before it closes the definition and terminates.
1–22

2Report Definitions and Report Libraries
The first step in generating a report is developing a report definition. A report definition defines the report characteristics that tell Report Builder where to find the data and how to display and print the data. After you complete the report definition, you save it in a report library. A report library is an operating system file that can contain one or more report definitions.
This chapter explains how to manage report definitions and libraries.

Progress Report Builder User’s Guide
2.1 Managing Report DefinitionsBecause report definitions are the basis for all Report Builder reports, it is important that you know how to create and maintain them. This section describes how to perform the following tasks:
• Create a report definition
• Save a report definition
• Close a report definition
• Open a report definition
• Copy a report definition
• Delete a report definition
2.1.1 Creating Report DefinitionsTo assist you in creating report definitions, Report Builder provides the Instant Layout option. The Instant Layout option creates a basic, usable report layout on which to define your report definition. The Instant Layout option allows you to specify the fields to include in the report, then automatically formats them on the report layout. It also provides a layout with five different types of band lines and some useful fields.
2–2

Report Definitions and Report Libraries
Figure 2–1 illustrates a report layout generated with the Instant Layout option.
Figure 2–1: Layout Produced by Instant Layout Option
This report layout shows the Name, Address, Address2, and Balance fields from the Customer table in the Newsport database. Notice that the layout includes more fields than the four chosen from the Customer table. The Instant Layout option automatically includes Report Builder calculated fields, text fields, and an aggregate field. The calculated fields display the date (Date_rb), time (Time_rb), number of records printed (Recno_rb), and page number (Page_rb). The text fields display the master table name and identify the database and calculated fields. Lastly, the aggregate field (GrSum1) computes and displays the total for the Balance field.
Report Builder prompts you to use the Instant Layout option when you create a new report definition. You can also invoke it from the Report menu after you have started creating a report definition. However, if you use the Instant Layout option after you have started creating the layout, Report Builder replaces the layout you created with the one generated by the Instant Layout option.
Although the Instant Layout option can be very useful, you might want to start creating the report definition with the default (blank) report layout. If you use the default layout, the Report Builder provides a layout that includes only one blank record band line.
2–3

Progress Report Builder User’s Guide
Follow these steps to create a report definition:
1 ♦ Connect to the database(s) that will be used for the report.
a) Choose Report→ Database Connections. If you have no database connected yet, the Connect Database dialog box appears:
Enter the full path of the first database you want to connect in the Physical Name field, then choose OK. The Database Connections dialog box appears:
The Database Connections dialog box lists all the databases to which you are connected. In this example, the only connected database is the Progress Newsport database.
b) Choose New Connection to connect to an additional database. Choose Close when you have connected to all the databases you need.
2 ♦ Choose Report→ New. The Database Tables dialog box appears:
2–4

Report Definitions and Report Libraries
3 ♦ Select a table to serve as the initial source of data, or master table, for the report, then choose OK. Unless you have changed the setting in Options→ Preferences (see Chapter 13, “Layout Manipulation”), you will be prompted about the Instant Layout option:
4 ♦ If you choose to use Instant Layout, this dialog box will appear:
Specify the fields to use in the report using the Add and Remove buttons, then choose OK. Report Builder displays the fields on the layout in the order they appear in the Selected Fields list. Use the Move Up and Move Down buttons to change the order in the Selected Fields list. This example shows the fields in the Customer table of the Newsport database.
When you have finished with this dialog box, your report is fully defined.
5 ♦ If you choose not to use Instant Layout, you will begin with a single record band line.
You can develop the report definition by specifying how to access and order the data, defining new fields, and designing the report layout. This guide provides instructions on how to perform each of these tasks.
2–5

Progress Report Builder User’s Guide
2.1.2 Saving Report DefinitionsAfter you complete the report definition, you can save it so that you can use it to generate reports in a later session. Follow these steps to save a report definition:
1 ♦ Choose Report→ Save to save the report in the current library, or choose Report→ Save As to save the report to a different library or with a new name. (See the “Managing Report Libraries” section for information about creating and selecting libraries.) The Save As dialog box appears:
If you have not created a report library, by default Report Builder saves the report definition in the reports.prl library.
2 ♦ Specify the report name. Report names can be up to 32 characters long and can contain any type of characters, including spaces, but not commas. The report name must be unique within the report library and cannot begin or end with a blank space.
3 ♦ Choose OK to save the report definition.
After you have created and saved a report definition, you can close it or modify it, then save it under the same name or with a new name.
2–6

Report Definitions and Report Libraries
2.1.3 Closing Report DefinitionsBecause you can create only one report definition at a time, you must close any currently open definition to create a new one. Follow these steps to close a report definition:
1 ♦ Choose Report→ Close.
If you have not previously saved the open report definition or have made changes since you last saved it, the following dialog box appears:
2 ♦ Specify whether to save the report definition before closing it:
• Choose Yes to save the report definition. The Save or Save As dialog box appears. Specify the report definition name in the appropriate library, then choose OK.
• Choose No to close the report definition without saving it.
Regardless of whether you save the report definition before closing it, the Report Builder main window appears with no layout.
After you save and close a report definition, you can open it, modify it, and run it at any time.
2.1.4 Opening Report Definitions Follow these steps to open a report definition:
1 ♦ Choose Report→ Open Report. The Open Report dialog box appears:
2–7

Progress Report Builder User’s Guide
2 ♦ Select the report definition you want to open:
• To open a report definition that is in the current library, select the report from the Reports list, then choose OK.
• To open a report that is stored in a different report library, choose Open Library, select the appropriate library file and report from the available options, then choose OK.
If you are not logged into the database for the selected report and you created the report definition with a database connection that required a user ID and password, Report Builder prompts you for the login information required by that database.
The Report Builder opens and displays the selected report definition.
2.1.5 Copying Report DefinitionsFollow these steps to copy a report definition from the current library to another report library:
1 ♦ Choose Report→ Open Report. The Open Report dialog box appears.
2 ♦ Select the report that you want to copy.
3 ♦ Choose Copy Report. The Copy Report To dialog box appears:
4 ♦ Specify a destination library in the File Name field. (If necessary, change the drive/directory designation to choose from library files in a different location.) You can select any library except the current one as the destination library.
2–8

Report Definitions and Report Libraries
5 ♦ Choose OK. The Copy Report dialog box appears:
6 ♦ Enter a name for the new report, then choose OK. (By default, Report Builder displays the current report definition name.) The Connect Database dialog box appears. It displays the database connection information for the new copy of the report.
7 ♦ To retain the saved database connection information, choose OK. To copy the report with a different database connection information, specify the new information.
8 ♦ Choose OK to copy the report definition and return to the Open Report dialog box.
9 ♦ Choose OK to open the report definition or Cancel to return to the report layout.
2.1.6 Deleting Report DefinitionsFollow these steps to delete a report definition:
1 ♦ Choose Report→ Open Report. The Open Report dialog box appears.
2 ♦ Select the report definition you want to delete. If the report definition is not in the current library, choose the Open Library button, then access the correct library.
3 ♦ Choose Delete Report. Report Builder prompts you to verify that you want to delete the specified report definition.
NOTE: Deleting a report permanently erases it. Once you have confirmed the deletion, you cannot retrieve that report.
4 ♦ Choose Yes to confirm that you want to delete the report definition.
Report Builder deletes the report definition from the report library.
2–9

Progress Report Builder User’s Guide
2.2 Managing Report LibrariesWhen you create a report definition, you store it in a report library. Report libraries provide a convenient way of grouping related reports. You can have an unlimited number of report libraries and store an unlimited number of reports in a report library. However, if you store too many reports in a library or have too many libraries, you might find it difficult to locate report definitions.
To properly manage and maintain report libraries, you must be able to perform the following tasks:
• Specify a default report library directory
• Create a report library
• Open a report library
• Copy or delete a report library
2.2.1 Specifying a Default Report Library DirectoryBy default, Report Builder stores your libraries in the Windows working directory. Follow these steps to set a default directory for your report libraries:
1 ♦ Choose Options→ Default Directories. The Default Directories dialog box appears:
2 ♦ In the Library field, specify the directory to which you want to save report libraries.
3 ♦ Choose OK to save the new default directory.
2–10

Report Definitions and Report Libraries
2.2.2 Creating Report LibrariesThe first time you use Report Builder and save a report definition, Report Builder prompts you to create a report library. The default library is reports.prl.
Follow these steps to create a new library:
1 ♦ Choose Report→ Save As. The Save As dialog box appears:
2 ♦ Choose New Library. The New Report Library dialog box appears:
3 ♦ Specify the library name for the new library file. There is no limitation on the length of the library filename. The default extension is .prl. You can change the extension, but using the default extension makes it easier for Report Builder to find the library file when you want to open it later.
4 ♦ Choose OK. Report Builder creates the library and returns you to the Save As dialog box.
5 ♦ Choose OK to save the report and return to the report layout.
2–11

Progress Report Builder User’s Guide
2.2.3 Opening Report LibrariesFollow these steps to open an existing library:
1 ♦ Choose Report→ Open or Report→ Save As. If you do not have a report open and choose Report→ Open, the Open Report dialog box appears. If you currently have a report open and choose Report→ Save As, the Save As dialog box appears.
2 ♦ To open or save a report in a different library for either dialog box, choose Open Library. The Open Report Library dialog box appears and lists the libraries in the default library directory (or the current directory, if you have not specified a default library directory).
3 ♦ Choose a library. If the library you want is not displayed, change the drive/directory designation to display a list of libraries in a different location. The library you select then becomes the current library, and you can open or save reports in that library.
2.2.4 Copying or Deleting Report LibrariesBecause a report library is an operating system file, you can simply use the MS-Windows File Manager to copy or delete them. You must copy or delete the library at the operating system level.
2.3 Viewing Report Definition SpecificationsReport Builder allows you to display or print a report definition specification that summarizes the report definition.
Follow these steps to print or display a report definition specification:
1 ♦ Choose Report→ Print. The Print dialog box appears:
2–12

Report Definitions and Report Libraries
2 ♦ Select Report Specification from the Print drop-down list.
3 ♦ To view the specifications, choose Preview.
4 ♦ To print the specifications to a printer or file, optionally choose the Print to File option and specify the filename, then choose Print. Report Builder prints the specification to that destination. For printed output, Report Builder uses the first fixed-pitch font available on the current printer.
This specification summarizes the following report information:
• Versions of the software used to create the report definition (Report Builder, MS-Windows, and MS-DOS)
• Report definition name and version
• Current date and time
• Report library that contains the report definition
• Date and time the report definition was saved
• Printer format information, including print options, page layout, and record layout
• Database information, including connection information, and all tables and text memo files used in the report definition
• Image files used in the report definition
• All fields used in the report definition
• Filter, if any
• Sort/group fields
• Any conditional line printing settings
Report definition specifications are especially useful when you call Progress Software Technical Support. The Technical Support representative can use the specifications to help you solve a Report Builder problem.
2–13

Progress Report Builder User’s Guide
2–14

3Bands
Bands are areas on the report layout that control where Report Builder displays and prints data. Bands consist of one or more band lines which are horizontal bars that control how and where data appears. By manipulating bands and band lines, you define the structure for the report layout.
This chapter describes bands and band lines in the following sections:
• Understanding bands and band lines
• Creating bands
• Inserting band lines
• Inserting page breaks
• Selecting band lines
• Modifying band line characteristics
• Printing band lines based on specific conditions
• Copying band lines
• Moving band lines
• Deleting band lines

Progress Report Builder User’s Guide
3.1 Understanding Bands and Band LinesBands and band lines control how and where data appears using:
• Band type
• Band line status
3.1.1 Band TypeThe first way bands affect data presentation is by defining where the data appears on a report. The band type dictates where data appears on the report page. There are seven types of bands. Table 3–1 explains where and how often data placed in each band type appears in a report.
You can include as few or as many bands on the layout as the report requires. For example, you can create a report with only a record band, or you can include only page header, record, and page footer bands. Report Builder does not require you to use every band type in every report.
It is important to realize that the order in which the bands appear on the layout is not necessarily the order in which the data appears in a report. The band type, not the band’s placement on the report layout, controls where Report Builder displays or prints data in a report. Therefore, not being able to reorder the band types on the report layout does not mean that you cannot control where the data appears.
Table 3–1: Effects of Band Choice on Data Presentation
Band Location and Frequency in Report Output
Title Once per report at the beginning of the first page or on a separate title page.
Page header At the top of each page.
Group header Before each group of records. See Chapter 9, “Sorting and Grouping Data,” for more information about group headers.
Record Once per record.
Group Footer After each group of records. See Chapter 9, “Sorting and Grouping Data,” for more information about group headers.
Summary Once per report at the end of the last report page or on a separate summary page.
Page footer At the bottom of each page.
3–2

Bands
Figure 3–1 illustrates where the data from each band type appears in a generated report.
Figure 3–1: Band Type Placement on Report Page
Notice that although the summary band appears below the page footer band on the layout area, Report Builder displays the page footer information below the summary data on the final page of a report.
Report Builder identifies the band type on the report layout in the band area. The band area is the far left column of the window.
Cust Order AmountXXXXXXX ### $$$ ### $$$ Total $$$XXXXXXX ### $$$ ### $$$ Total $$$XXXXXXX ### $$$ ### $$$ Total $$$
Grand Total $$$$$
page 4
Record
Last Report Page
Title
Page Header
Group Header
Group Footer
Summary
Page Footer
BandType Orderon report Layout
Customer Report
Cust Order AmountXXXXXXX ### $$$ ### $$$ Total $$$XXXXXXX ### $$$ ### $$$ Total $$$XXXXXXX ### $$$ ### $$$ Total $$$
page 1
First Report Page
3–3

Progress Report Builder User’s Guide
Figure 3–2 shows the layout for the report.
Figure 3–2: Report Layout Showing Bands
Notice that all bands are not the same size. This is because a band consists of one or more band lines. All the band lines within a band are the same type. For example, every band line within the title band is a title band line. In the band area, a dotted line separates band lines of the same type, and a solid line separates band lines of different types. The band type label applies not only to the band line where it appears, but also to all band lines below it separated by dotted lines.
Because the type of band line dictates how Report Builder presents the information, you cannot place fields so that they straddle band line boundaries. If you attempt to place a field so that it crosses a band line boundary, Report Builder moves the field so that it is fully within one of the band lines.
3–4

Bands
3.1.2 Band Line StatusThe second way that bands affect data presentation is how the data appears on the report.The band line status controls how the data appears on the report. Table 3–2 describes the three types of band line status.
Report Builder indicates the band line status in the narrow channel at the right edge of the band area called the band line status area.
Table 3–2: Effects of Band Line Status
Status Description Indicator
Default Band line has an automatic height and is always printed.
None; the band line status area is blank.
Freeform height Band line is a freeform line with a fixed-line height.
Up and down arrows indicate the top and bottom border of the line.
Conditional printing
Band line prints only when a specific condition is met.
A question mark.
3–5

Progress Report Builder User’s Guide
Figure 3–3 shows a report layout with an example of band line status indicator.
Figure 3–3: Layout with Band Status Indicator
See the “Specifying Band Line Height” section for more information about freeform band lines. See the “Specifying Conditional Line Printing” section for more information about conditionally printing band lines.
3–6

Bands
3.2 Creating BandsTo create a new band, you simply create one or more band lines of the desired types. Follow these steps to create a band line:
1 ♦ Choose Create→ Band Line, press F11, or right-click in the band area and choose Band Line. The Create Band Line dialog box appears:
2 ♦ In the Number To Create fill-in field, specify the number of lines you want to insert in the band area. The default is 1.
3 ♦ Choose the type of band line you want to insert. There are two options:
• Choose the Another Record Line radio button if you want to insert a band line of the same type as the one currently selected. Type indicates which type of band line you have currently selected. Then choose Above Current Line or Below Current Line to specify the line location.
• Choose the Different Type radio button if you want to insert a different band line type. Then select the type of band line you want to create from the drop-down list. Report Builder inserts the band line after the last existing band line of the selected type.
The drop-down list displays the available band types. GH and GF represent the group headers and group footers. Notice that there are multiple group header and footer options. The numbers preceding the group header and group footer options correspond to the eight levels of grouping available when you select the fields by which you group data. See Chapter 9, “Sorting and Grouping Data,” for an explanation of grouping fields.
3–7

Progress Report Builder User’s Guide
4 ♦ Choose OK. Report Builder inserts the specified number of lines of the specified type in the appropriate place on the layout.
Notice that the bands appear on the layout in the order described in the “Understanding Bands and Band Lines” section.
3.3 Inserting Band LinesWhen you create a band, you create one or more blank band lines in that band. In some cases you might need additional lines. You can insert new band lines in three ways:
• Choose Edit→ Insert Band Line to insert an additional line of the same band type above the currently selected band line.
• Press SHIFT-INSERT to insert an additional line of the same band type above the currently selected band line.
• Choose Create→ Band Line to insert one or more lines of any band line type. You can also insert a band line of the same type as the currently selected type above or below the currently selected band line.
See the “Creating Bands” section for information about creating band lines.
3.4 Inserting Page BreaksYou specify page breaks in the report by inserting new-page band lines where you want the break to occur. You can place a new-page band line anywhere on the layout. However, Report Builder ignores new-page band lines in certain bands, such as a page header/footer or a swapped group header/footer. You can also use the options in the Group Level dialog box to automatically start a new page when group fields change. See Chapter 9, “Sorting and Grouping Data,” for information on swapped headers and footers.
You can also produce conditional page breaks by using the conditional printing option. The conditional printing option assigns a logical condition to a new-page line and only prints the band line when the condition is met. For example, if some of your purchase orders require an additional page for footnotes and others do not, you can specify that the inserted new-page line will cause a page break only when a field contains a specified value. For more information on how to conditionally print band lines, see the “Specifying Conditional Line Printing” section.
3–8

Bands
Follow these steps to insert page breaks in your report:
1 ♦ Choose Create→ Band Line or right-click in the band area. The Create Band Line dialog box appears.
2 ♦ Choose either Another Type Line or Different Type to specify the band line type.
3 ♦ If you are creating a band line of the same type as the currently selected line, specify the line position (above or below the currently selected line).
4 ♦ If you are creating a band line of a different type, select the type from the drop-down list.
5 ♦ Activate the New Page Line toggle box. An “x” appears in the box indicating that the line you are inserting is a new-page line.
6 ♦ Choose OK to create the band line and return to the report layout.
The Report Builder inserts a dashed line in the specified area of your report layout, indicating a page break. You can place a page break anywhere on the report layout. Table 3–3 explains how the location of new-page lines controls the page break’s location.
You can move, copy, or delete a new-page line just like other lines on your report layout.
Table 3–3: Positioning Page Breaks
If you place a new-page line in . . . Then the page break occurs . . .
The last line in the title band After the title
The last line in the group footer band After the group
The last line in the record band After each record
The first line in the summary band Before the summary
3–9

Progress Report Builder User’s Guide
3.5 Selecting Band LinesTo work with one or more band lines, you must first select the band lines you want to manipulate. You can select band lines using:
• The mouse
– To select a band line, click on the band line in the band area.
– To select additional band lines, CTRL-click on each line. If the lines you want to select are multiple contiguous lines, you can select them by dragging the mouse up or down in the band area until all lines are highlighted.
• The keyboard
– To select a line, press SHIFT-SPACEBAR.
– To select additional band lines, use the cursor keys. When you are finished working with the selected lines, press ESCAPE to unmark them.
When you select a band line, Report Builder highlights all the fields and text strings on the selected band line.
3.6 Modifying Band Line Characteristics Band line characteristics specify additional information about how to present data on the band line. After you have created and inserted band lines, you can modify line characteristics in the following ways:
• Specify automatic or free form line height.
• Specify a condition to control when a line prints.
3.6.1 Specifying Band Line HeightYou can specify a band line’s height to be automatic or freeform. By default, Report Builder creates all band lines with an Automatic height setting, but if you insert an image on a line, the line height changes to Freeform.
3–10

Bands
For automatic lines, Report Builder automatically adjusts line height to accommodate the largest font on the line. Because Report Builder by default adds interline spacing (also called leading) to provide a small amount of “white space” between lines, the Automatic line height option provides appropriate line spacing in most cases. Because of the interline spacing, the actual height of a line with a height setting of Automatic is slightly more than that of the largest font on the line.
Freeform lines allow you to specify a fixed size for the line. Because the line height of freeform lines automatically expands to accommodate any image you insert on them, they are useful for areas of a report where you plan to insert images. Also, if you increase the height of an inserted image, Report Builder adjusts the line height to accommodate the increased size of the image. When Snap To Grid is enabled, you must specify a line height that is a multiple of the distance between grid lines. You cannot set a line height smaller than the smallest font used on the line.
However, a freeform line does not automatically adjust the line height if you decrease the image height. You must manually adjust the line height to match the decreased image size.
Also, freeform lines do not expand to accommodate a word-wrapped field placed on it. You must specify a height for the freeform line that is sufficient for the maximum number of lines that the word-wrapped field occupies in the report output.
Report Builder indicates a freeform line in the report layout by placing up and down arrows in the line status area (the narrow channel at the right edge of the band area).
Follow these steps to specify a band line’s height:
1 ♦ Select one or more band lines for which you want to change the height.
2 ♦ If you select a single band line, double-click or choose Properties→ Band Line Properties. If you select multiple band lines, choose Properties→ Band Line Properties. The Band Line Properties dialog box appears:
3 ♦ Choose the Automatic or Freeform radio buttons to control the line height. The default is Automatic.
3–11

Progress Report Builder User’s Guide
4 ♦ If you chose the Freeform radio button in Step 3, choose the Inches (Centimeters) or Points radio button to specify the line height in inches or points.
5 ♦ If you chose the Freeform radio button in Step 3, specify the line height in the measurement system you chose in Step 4 (inches or points).
6 ♦ Choose OK.
Follow these steps to use the format bar to switch line height settings:
1 ♦ Select the lines for which you want to change the band line height.
2 ♦ Choose the Auto/Freeform Line button on the format bar. If you select only one line or if all the lines are the same line type, the Auto/Freeform Line button acts as a toggle—a freeform line becomes automatic, and vice versa. If the selected lines are a mixture of automatic and freeform, they all become automatic.
Sizing a Freeform Line in the Report Layout
Follow these steps to size a freeform line on the layout:
1 ♦ Click and hold on the bottom arrow in the band line status area. The cursor changes to a vertical double arrow.
2 ♦ Drag the cursor up or down to increase or decrease the line height.
3 ♦ When the line is the desired height, release the mouse button.
3–12

Bands
Eliminating Interline Spacing for Automatic Lines
If you do not want Report Builder to add interline spacing to all lines with an Automatic line height setting, follow these steps:
1 ♦ Choose Properties→ Page Layout. The Page Layout dialog box appears:
2 ♦ Deactivate Interline Spacing. See Chapter 15, “Printing,” for more information about the Page Layout dialog box settings.
3 ♦ Choose OK to return to the report layout.
3.7 Modifying Field Properties for All Fields on a Band LineYou can change the field properties for all the fields on a band line simultaneously by selecting the band lines that contain the fields, then modifying the field properties. See Chapter 4, “Fields,” for more information about changing field properties.
3.8 Specifying Conditional Line PrintingBy default, Report Builder prints every band line. If you want to print a line only when a specific condition occurs, you can specify that condition based on the value of a field. You can use any field (except a page total) in any table used in the report except a page total as a control field to trigger line printing. This allows you to print only the information needed.
3–13

Progress Report Builder User’s Guide
Follow these steps to specify a print condition:
1 ♦ Select one or more band lines.
2 ♦ If you select a single band line, double-click or choose Properties→ Band Line Properties. If you select multiple band lines, choose Properties→ Band Line Properties. The Band Line Properties dialog box appears.
3 ♦ In the Print Conditional Field field, select the field that you want to use as the basis for the print condition.
4 ♦ Choose the appropriate condition. The condition choices vary depending on the field type. Table 3–4 lists the available choices.
5 ♦ Choose OK to return to the report layout.
For example, if you have an invoice that subtotals line item amounts before calculating tax, you might not want a subtotal to print if there is only one line item. In this case, you can suppress printing the group footer line that contains the Subtotal field by following these steps:
1 ♦ Create a report using the Order-Line table.
2 ♦ Create an aggregate field called Total-Items, which counts the number of line items for each order.
Table 3–4: Print Values for Control Fields
Field Data Type True Option False Option
NUMERIC Prints when the field has non-zero contents
Prints when the field is zero, empty, or the value is UNKNOWN
CHARACTER Prints when the field has contents
Prints when the field is empty or the value is UNKNOWN
LOGICAL Prints when the value is TRUE Prints when the field is false or the value is UNKNOWN
DATE Print when field has contents Prints when the field is empty or the value is UNKNOWN
MEMO Prints when the field has contents
Prints when the field is empty or the value is UNKNOWN
3–14

Bands
3 ♦ Create a logical calculated field called Print-Line to control printing of the subtotal group footer line.
4 ♦ Set the Print field’s expression as follows:
This means that Print is a logical field whose value is true when there is more than one item.
5 ♦ Assign the control field to the group footer line by selecting the line.
6 ♦ Choose Properties→ Band Line Properties. The Band Line Properties dialog box appears.
7 ♦ Choose Print-Line from the Print Conditional Field drop-down list to display the names of all fields that can be used to control printing.
8 ♦ Choose OK to return to the report layout.
9 ♦ Choose Report→ Preview. The Print Preview window appears.
When you display the report, the group footer line prints only when the value in the Print-Line field is true, meaning that it prints only when the invoice contains more than one line item.
The Report Builder indicates that a logical field has been assigned to control printing by placing a question mark in the band line status area.
Removing Print Conditions
Follow these steps to remove a print condition from one or more lines:
1 ♦ Select the band lines.
2 ♦ Choose Properties→ Band Line Properties. The Band Line Properties dialog box appears. The name of the field assigned to control printing of the selected lines appears in the Print Conditional Field box.
3 ♦ Deactivate the Enable Conditional Printing toggle box.
4 ♦ Choose OK to return to the report layout.
Total-Items > 1
3–15

Progress Report Builder User’s Guide
3.9 Copying Band LinesFollow these steps to copy one or more lines, including all fields currently on those lines:
1 ♦ Select the band lines you want to copy.
2 ♦ Choose Edit→ Copy or the Copy button.
3 ♦ Place the edit cursor where you want to place the lines.
4 ♦ Choose Edit→ Paste Lines or the Paste button. The Paste dialog box appears.
5 ♦ Specify where you want to place the line copy. By default, the band type of the pasted lines will be the same as that of the current line. If you choose a band type that currently exists on the layout from the Select Band option, Report Builder appends the pasted lines to the bottom of that band. If the band type does not exist, Report Builder creates the band and pastes the lines there.
3.10 Moving Band LinesFollow these steps to move one or more lines and all fields on those lines:
1 ♦ Select the band lines you want to move.
2 ♦ Choose Edit→ Cut or the Cut button.
3 ♦ Place the edit cursor where you want to place the lines.
4 ♦ Choose Edit→ Paste Lines or the Paste button. The Paste dialog box appears.
5 ♦ Specify where you want to paste the lines. If you choose a band type that currently exists on the layout from the Select Band option, Report Builder appends the pasted lines to the bottom of that band. If the band type does not exist, Report Builder creates the band and pastes the lines there.
3–16

Bands
3.11 Deleting Band LinesThere are three ways to delete band lines:
• Select the lines and choose Edit→ Delete.
• Select the lines and choose the Trash Can button.
• Select the lines and press DELETE.
When you delete a line, you cannot use Edit→ Paste to put the line back into the report. If you delete a line by mistake, you can either choose Edit→ Undo Last Delete or choose the Trash Can button again to re-insert the most recently deleted line in its original position.
3–17

Progress Report Builder User’s Guide
3–18

4Fields
This chapter explains how Report Builder handles fields in the following sections:
• How Report Builder handles database fields
• Field properties
• Selecting fields
• Specifying how Report Builder represents fields on the report layout
• Specifying how tables and fields appear in selection lists
• Creating fields
• Inserting fields
• Copying fields
• Moving fields
• Deleting fields
• Applying fonts, styles, effects, and color
• Specifying alignment
• Eliminating blank spaces between fields
• Modifying field formats
• Specifying default logical string settings

Progress Report Builder User’s Guide
4.1 How Report Builder Handles Database FieldsThis section describes how Report Builder handles:
• Arrays
• DECIMAL and INTEGER data types
• UNKNOWN values
• Case sensitivity
4.1.1 ArraysReport Builder treats each array element as a separate field and supports only references to individual elements of the array with constant subscripts. Report Builder does not support unsubscripted references to the array field itself.
4.1.2 DECIMAL and INTEGER Data TypesReport Builder merges the DECIMAL and INTEGER data types into the NUMERIC data type. When Report Builder reads data from an INTEGER or DECIMAL database field, it converts the data into NUMERIC data for use in Report Builder. This means that you cannot specify a number specifically as a decimal or integer value—Report Builder handles them the same way.
4.1.3 UNKNOWN ValuesReport Builder displays an UNKNOWN value if:
• A database field has an UNKNOWN value
• A calculated or aggregate field value depends on a field that has an UNKNOWN value
• An error occurs in a calculated, aggregate, or memo field
A field with a blank value is different than a field with an UNKNOWN value. For example, if you specify to suppress empty record lines in the record layout, Report Builder prints any line containing an UNKNOWN value.
This section describes how Report Builder processes and displays UNKNOWN values.
4–2

Fields
How Report Builder Displays an UNKNOWN Value
Report Builder displays UNKNOWN values in different ways. The following table describes the different types of UNKNOWN values and how Report Builder displays them:
Report Builder also displays question marks (????) if a numeric or date field’s value is too big for the field format.
You can specify that Report Builder display a value other than a question mark when a field is UNKNOWN. This option applies only to values that are themselves UNKNOWN; it does not apply to UNKNOWN values generated by errors.
To change the display value, follow these steps:
1 ♦ Access the Set Unkown Value dialog box. You can either:
• Double-click on the field to access the Properties dialog box, then choose the Unknown button.
• Select the field, choose Properties→ Unknown Value.
The Set Unknown Value dialog box appears:
2 ♦ Enter the string you want to appear in place of the default question mark.
The string appears everywhere on the report that an UNKNOWN value appears in this field. Report Builder does not use the value of the string when computing other calculated or aggregate fields.
If . . . Then Report Builder displays . . .
The value itself is UNKNOWN A question mark (?) or a user-specified string
The UNKNOWN value is generated by an error
A specific number of question marks (????)
4–3

Progress Report Builder User’s Guide
How an UNKNOWN Value Can Occur in Report Builder
An UNKNOWN value can occur in Report Builder when:
• Report Builder reads a database field with an UNKNOWN value.
• You enter the constant value (?) in a calculated field or a user-defined function expression, or in a filter condition.
• Report Builder encounters an error evaluating a calculated field, aggregate field, or memo field. In a memo field, when Report Builder encounters an embedded reference to a nonexistent field, Report Builder replaces the reference with a question mark that indicates an UNKNOWN value.
How Report Builder Processes an UNKNOWN Value
Once an UNKNOWN value occurs, it generally causes every operation in which it occurs to result in an UNKNOWN value. Table 4–1 describes how Report Builder processes UNKNOWN values in different types of operations.
Table 4–1: UNKNOWN Value Processing (1 of 3)
Operation/Function Condition Result
Binary operations If either of the operands is UNKNOWN
UNKNOWN
Unary operations If the operand (unary +, -, or NOT) is UNKNOWN
UNKNOWN
Relational operators – –
– = or EQ If both operands are UNKNOWN TRUE
If one operand is UNKNOWN FALSE
<> or NE If both operands are UNKNOWN FALSE
If one operand is UNKNOWN UNKNOWN1
4–4

Fields
– >= or GE, <= or LE
If both operands are UNKNOWN TRUE
If one operand is UNKNOWN UNKNOWN
< or LT,> or GT
If both operands are UNKNOWN FALSE
If one operand is UNKNOWN UNKNOWN
Built-in functions, except for IIF, CASE, and IN-LIST
If one or more of the arguments is UNKNOWN
UNKNOWN
IIF function If the condition is UNKNOWN The false-value
If the condition is “True” The true-value, regardless of whether it is UNKNOWN
If the condition is “False” The false-value, regardless of whether it is UNKNOWN
CASE function If the expression argument is UNKNOWN, the when-value argument is UNKNOWN, and the default argument is any value
The corresponding return-value
If the expression argument is UNKNOWN, the when-value argument is any real value, and the default argument is any value
The default-return-value
If the expression argument is UNKNOWN, the when-value argument is any real value, and the default argument is UNKNOWN
UNKNOWN
Table 4–1: UNKNOWN Value Processing (2 of 3)
Operation/Function Condition Result
4–5

Progress Report Builder User’s Guide
NOTE: Report Builder sorts UNKNOWN values higher than any real value.
When you use a literal UNKNOWN value (a question mark) as an operand or as a function argument, Report Builder attempts to interpolate the data type of the UNKNOWN value using the context of the operand or argument.
For example, Report Builder deduces that the UNKNOWN value in the following expression is a numeric because it is part of an arithmetic operation:
When you enter the following expression, Report Builder deduces that the UNKNOWN value is a numeric because SQRT takes numeric arguments:
When there is not enough information for the parser to determine the data type, it rejects the expression. The following expression does not provide a data type for either the second or third arguments and, therefore, Report Builder cannot deduce the data type of the UNKNOWN values or of the entire IIF expression:
IN-LIST function If the value argument is UNKNOWN, and the list contains an UNKNOWN value
The position of the UNKNOWN value in the list
If the value argument is UNKNOWN, and the list does not contain any UNKNOWN values
0 (zero)
User-defined functions If one of the arguments is UNKNOWN
The natural value of the UDF’s expression
1 The not equals operator (<> or NE) treats the UNKNOWN value differently than the Progress 4GL. If a calculated field uses the not equals operator, Report Builder evaluates the operator as UNKNOWN if only one of the operands is UNKNOWN. The 4GL would evaluate the same expression as TRUE.
3 * ?
SQRT(?)
IIF(bool, ?, ?)
Table 4–1: UNKNOWN Value Processing (3 of 3)
Operation/Function Condition Result
4–6

Fields
4.1.4 Case SensitivityBy default, all Report Builder elements are case insensitive. However, you can specify that the following be case sensitive when you create them:
• Character calculated fields
• Character aggregate fields
• Character UDF parameters
You define the case sensitivity for database fields in the Data Dictionary.
Memo file fields are case insensitive unless you specify case sensitivity in the Attach Memo File dialog box. All the fields in the memo file have the same case sensitivity.
4–7

Progress Report Builder User’s Guide
4.2 Field PropertiesYou can change field properties in two ways:
• For an individual field
• For all the fields on a band line
4.2.1 Modifying an Individual Field’s PropertiesYou can modify a field’s properties in many ways. Table 4–2 lists the field properties you can change and which Report Builder options you can use to change them.
Table 4–2: Changing Field Formats
Field Property
You can change the characteristics using the . . .
Properties Menu
Format Bar
Field Properties Dialog Box
Default Settings
Dialog Box
Alignment √ √ √ –
Font and size √ √ √ √
Font, style, and effect
√ √ √ –
Font color √ – √ √
Field format √ – √ –
Merge left √ √ √ –
UNKNOWN value display
√ – √ –
Expression1 – – √ –
1 You define or modify a calculated or aggregate field expression from the Calculations menu.
4–8

Fields
Notice that the Field Properties dialog box provides access to all field properties settings. You access the Field Properties dialog box by selecting a field and double-clicking. Figure 4–1 shows the Field Properties dialog box for a numeric field.
Figure 4–1: Field Properties Dialog Box
This dialog box contains the following user-interface elements:
Field
Identifies the field name.
Type
Identifies the Report Builder data type and Progress data type.
Alignment
Displays the current alignment.
Font
Displays the current font.
Format
Displays the field format.
Merge Left
Specifies whether merge left is enabled.
4–9

Progress Report Builder User’s Guide
Unknown
Specifies how the field displays UNKNOWN values.
Expression
Displays the field’s expression, if applicable.
The buttons in the dialog box fall into two categories: local and global properties. The local properties affect only the selected instance of the field. The global properties affect all copies of the field.
Each of the buttons access the dialog boxes for specifying the corresponding field information. For example, when you choose the Alignment button, the Alignment dialog box appears.
4.2.2 Modifying the Properties of All the Fields on a Band LineTo save time, you can simultaneously modify the properties of all the fields on a band line.
4.3 Selecting FieldsBefore you can modify fields on the report layout, you must first select them. You can select fields using:
• The mouse
– To select a field, click on the field.
– To select additional fields, CTRL-click on each. If the fields you want to select are in the same section of the layout, you can also select them by dragging the mouse to form a rectangle that touches each field you want to select. The rectangle only has to touch a part of a field to select it.
• The keyboard
– To select a field, tab to the field and press SPACEBAR.
– To select additional fields, tab to each and press CTRL-SPACEBAR.
4–10

Fields
4.4 Specifying How Report Builder Represents Fields on the LayoutBy default, Report Builder represents fields on the report layout by indicating the field width with a shaded rectangle and specifying the field’s format. Figure 4–2 shows how Report Builder represents fields using a shaded background and the field format.
Figure 4–2: Representation of Fields in Report Layout
If a field’s width is set to inches (in the Field Format dialog box), Report Builder calculates the length of the shaded rectangle for that field based on the average character width of the font. Therefore, if the data being displayed in that field has an average character width that is larger than the average character width for the font, the data might actually take up more space than Report builder shows on the layout.
You can change how Report Builder represents fields by:
• Changing the field width indicator
• Displaying field names
4–11

Progress Report Builder User’s Guide
4.4.1 Changing the Field Width IndicatorAlthough by default Report Builder uses a shaded rectangle, you can change the field width indicator by changing the shading color or using only a rectangular outline.
Follow these steps to change Report Builder default settings for the field width indicator:
1 ♦ Choose Options→ Default Settings. The Default Settings dialog box appears:
2 ♦ Specify how you want to represent the field width. You can:
• Choose Outline Box to represent the field width with a rectangular outline.
• Select a different color from the Indicator Color drop-down list to represent the field width with a shaded area but with a different shading color.
3 ♦ Choose OK to return to the report layout.
When you change this setting, you change the default for the current report definition and any new report definitions you create.
4–12

Fields
4.4.2 Displaying Field NamesBy default, Report Builder represents data fields by displaying the field’s format in the shaded rectangle. However, it can be difficult to identify a field solely by its format. To make identifying fields easier, you can display the field name instead of the field format.
To display the field names, choose View→ Field Names. A check mark appears before the Field Names option on the View menu, and Report Builder displays the field names for all fields on the report layout. If a field name is longer than the field width, Report Builder truncates the field name on the layout.
4.5 Specifying How Tables and Fields Appear in Selection ListsBy default, Report Builder displays the fields in selection lists in the order in which they are created in the database schema and does not include fields from hidden tables. For example, by default in the Instant Layout Fields dialog box, Report Builder does not include any hidden tables and lists the available fields for each table in the order in which they are created.
However, you can specify to:
• Display fields in alphabetical order
• Show hidden tables
4.5.1 Displaying Fields in Alphabetical OrderTo display fields in selection lists in alphabetical order, choose View→ Order Field Alphabetically. A check mark appears next to the option when it is enabled.
4.5.2 Showing Hidden TablesTo display hidden tables in selection lists, choose View→ Show Hidden Tables. A check mark appears next to the option when it is enabled.
4.6 Creating FieldsYou use two types of fields in Report Builder:
• Database fields
• User-defined fields
4–13

Progress Report Builder User’s Guide
4.6.1 Database FieldsDatabase fields are the fields you use from the connected databases. You define the database fields you use in the report definition in the Progress Data Dictionary when you create or modify the database schema. See the Progress Database Administration Guide and Reference for information about creating database schemas, including fields.
4.6.2 User-defined FieldsUser-defined fields are fields you create in Report Builder. There are four types of user-defined fields:
• Calculated fields
• Aggregate fields
• Memo fields
• Text fields
Calculated Fields
Calculated fields are user-defined fields that calculate values as Report Builder generates the report. You create calculated fields for each report definition. See Chapter 6, “Calculated Fields,” for information about creating and using calculated fields.
Aggregate Fields
Aggregate fields are user-defined fields that compute summary information about a set of records in the report. For example, you use aggregate fields to calculate totals or subtotals. You create aggregate fields for each report definition to summarize the data for the report. See Chapter 5, “Aggregate Fields,” for information about creating and using aggregate fields.
Memo Fields
Memo fields are portions of text in an unformatted text file that you include in the report layout. You can combine this text with data from fields in a database. See Chapter 14, “Form Letters,” for more information about memo fields.
Text Fields
Text fields are text strings entered on the report layout, such as column labels. While text fields are technically not fields and are not listed in the Insert Fields dialog box, you format and manipulate them the way you do all other types of fields.
4–14

Fields
4.7 Inserting FieldsYou can insert database fields and all types of user-defined fields, except text fields, on the report layout. Follow these steps to insert a field:
1 ♦ Do one of the following:
• Choose Edit→ Insert Field.
• Press INSERT.
• Click the right mouse button.
The Insert Field dialog box appears:
The Database/Table Selection list displays the names of all the connected databases and an option called User Defined Fields. The User Defined Fields option accesses all the user-defined fields for the report definition. That is, it accesses all the calculated, aggregate, and memo fields available for this report definition.
To display fields in the Field List, click the table name or the type of field. For example, if you click on the Customer Table, all the fields defined for the Customer table appear in the Field List.
2 ♦ Position the edit cursor where you want to insert the field. If the Insert Field dialog box covers the area of the layout where you want to insert the field, move the dialog box to another part of the screen.
3 ♦ Select the field you want to insert from the Fields List.
4 ♦ If you want to automatically insert the field label on the report layout, activate the Include Field Label toggle box.
When Report Builder inserts the fields, it places the field name on the band line directly above the inserted field and underlines the field name.
4–15

Progress Report Builder User’s Guide
5 ♦ Choose Insert. If you want to insert additional fields, repeat Steps 2 through 4.
6 ♦ When you are done inserting fields, choose Close to return to the report layout.
4.7.1 Creating Text FieldsYou can create text fields anywhere on the report layout. One of the most common uses for text fields is as field labels. Follow these steps to insert text fields on the report layout:
1 ♦ Position the edit cursor where you want to insert the text.
2 ♦ Type the text.
For large amounts of text, create a separate text file and attach it to your report as a memo file. See Chapter 14, “Form Letters,” for information about creating and attaching a memo file.
4.8 Copying and Pasting FieldsYou can copy any field and insert that copy elsewhere on the layout. When you copy a field, the original field remains in position. The field copy retains the field name, value, and all characteristics (width, format, font, and attribute) of the original. Although you can change the copy’s characteristics without affecting the original or any other copies, when you run the report, both the original and the copy display the same value.
This rule applies to all types of fields, including aggregate and calculated fields. When you copy an aggregate or calculated field on the report layout, all the instances of the field share the field name and definition. See Chapter 5, “Aggregate Fields,” and Chapter 6, “Calculated Fields,” for more information.
Follow these steps to copy a field:
1 ♦ Select the field you want to copy.
2 ♦ Choose Edit→ Copy to copy the field.
3 ♦ Place the edit cursor where you want to place the new field. Report Builder places the left edge of the field at the edit cursor.
4 ♦ Choose Edit→ Paste to paste the field.
4–16

Fields
4.9 Moving FieldsYou can move any field or group of fields on the layout to another location. If you are moving multiple fields at the same time, those fields retain their positions relative to one another when moved to a new location.
Follow these steps to move one or more fields on the report layout:
1 ♦ Select the fields you want to move.
2 ♦ Do one of the following:
• Drag the field to the new location and release the mouse button. The mouse cursor changes to a four-way arrow as you move the fields.
• Choose Edit→ Cut. Place the edit cursor where you want to insert the fields and choose Edit→ Paste Objects.
When you paste a group of fields, the alignment of the upper-left field in the group determines the starting point of the paste location. The following table explains how Report Builder positions the fields:
The other fields in the group maintain their positions relative to the upper-left field.
NOTE: You might have to insert additional lines in a band so that you can copy fields to lines of the proper type.
If the top left field is . . . Report Builder . . .
Left-aligned Positions its left edge at the edit cursor
Center-aligned Centers it on the edit cursor
Right-aligned Positions its right edge at the edit cursor
4–17

Progress Report Builder User’s Guide
4.10 Deleting FieldsFollow these steps to delete any field on the report layout:
1 ♦ Select the field you want to delete.
2 ♦ Do one of the following:
• Choose Edit→ Delete.
• Choose the Trash Can button.
• Press DELETE.
Report Builder deletes the selected field.
Deleting differs from cutting in that you cannot paste the deleted fields elsewhere on the report. The exceptions to this rule are aggregate and calculated fields. If you delete fields by mistake, however, you can choose Edit→ Undo Last Delete or choose the Trash Can button again to insert the most recently deleted fields in their original position.
When you delete an aggregate or calculated field from the report layout, you do not remove it from the report definition. It is still defined and available for use in the report definition. To remove an aggregate or calculated field from the report definition, you must delete or purge it. See Chapter 5, “Aggregate Fields,” for information about removing aggregate fields; see Chapter 6, “Calculated Fields,” for information about removing calculated fields.
4.11 Applying Fonts, Styles, Effects, and ColorWhen you print a Report Builder report, the text fields and data print in a particular font (print type and size). Depending on the currently selected printer, you can access a range of fonts to vary the style and size of selected areas of your reports. For example, you could use a large font for report titles and a smaller font for record areas.
With many fonts you can also apply styles (such as bold and italic), effects (such as strikeout and underline), and color to further emphasize specific fields or areas of a report. By combining fonts, styles, effects, and colors, you can enhance the appearance and improve the readability of report output.
4.11.1 Font Characteristics When you apply fonts to fields in a report, you select fonts by font name (such as Times New Roman or Helvetica) and point size. The spacing, pitch, and point size of the fonts you select can affect the placement and alignment of fields in your report output.
4–18

Fields
Spacing and Pitch
Fonts that have characters of equal widths are called monospaced (or fixed-pitch) fonts. The character spacing of a monospaced font is expressed as pitch, the number of characters per horizontal inch. You can calculate the pitch of a monospaced font by dividing 120 by the point size. For example, the pitch of 12-point Courier is 10 (120/12 points = 10 pitch), or 10 characters per inch.
Fonts that have characters of different widths are called proportional fonts. Since a proportional font does not have a fixed number of characters per inch, it does not have an absolute pitch.
Point Size
A font’s point size refers to its height measured in printers’ points (1 point = 1/72 inch) which is the standard unit of measurement used by professional printers. For example, the body text of this manual is printed in a 10-point font; that is, the distance from the top of the highest character to the bottom of the lowest character is 10-points (10/72 inch). Some fonts (called bitmapped fonts) are available only in predetermined point sizes. Other fonts (often called scalable or outline fonts) are available in almost any point size.
4.11.2 Specifying the Default Font, Style, and Color Report Builder automatically applies a default font, point size, and color to all fields in a report. When you create or insert a field, Report Builder applies the default font settings, as shown in Table 4–3.
The range of fonts available to be applied to report fields depends on the currently selected printer and the fonts installed on your system. See the documentation that came with your Windows Operating System for information about selecting printers.
Table 4–3: Font Defaults
Setting Default
Font Arial (TrueType)
Size 12 point
Style Regular
Effect None
Color Black
4–19

Progress Report Builder User’s Guide
Follow these steps to change the Report Builder default font, point size, and color:
1 ♦ Choose Options→ Default Settings. The Default Settings dialog box appears:
2 ♦ Select a font from the Font drop-down list.
3 ♦ Specify a point size in the Size field.
4 ♦ Select a color from the Foreground Color drop-down list.
5 ♦ Choose OK to return to the report layout.
NOTE: Any font changes you make will not affect fields currently in the layout, but will be applied to fields you insert after changing the default.
4.11.3 Changing a Field’s Font, Style, Effects, and Color Although Report Builder applies the default font, style, and color specified to a field, you can change these characteristics for individual fields. To see a field’s current font information, select the field. When you select the field, the format bar displays the font name and point size.
The following sections describe how to change a field’s font information using the Font dialog box. You can also apply any font, style, or effect that is available on the current printer using the format bar. See Chapter 1, “Report Builder Basics,” for information about using the format bar.
4–20

Fields
Specifying Fonts
Follow these steps to change the font and point size for one or more fields on the current report layout:
1 ♦ Select the fields to which you want to apply a different font.
2 ♦ Choose Properties→ Font. The Font dialog box appears:
3 ♦ Select a font from the Font selection list.
4 ♦ Select a point size from the Size selection list. If the font you select is scalable and the point size you want does not appear on the list, enter the desired point size.
5 ♦ Choose OK to apply the new font information and return to the report layout.
Specifying Styles and Effects
In addition to specifying size, with many fonts you can also apply bold, italic, strikeout, or underline (or a combination of these). Bold and italic styles are not available with all fonts. See your printer or font documentation for information about styles.
Follow these steps to change the style or effect for one or more fields on the current report layout:
1 ♦ Select the fields to which you want to apply a different style or effect.
2 ♦ Choose Properties→ Font. The Font dialog box appears.
4–21

Progress Report Builder User’s Guide
3 ♦ Choose a style and/or effect.
4 ♦ Choose OK to apply the new information and return to the report layout.
Specifying Color
Report Builder applies the default color (specified in the default Settings dialog box) to a field when you insert it on the report layout. However, like all the other font information, you can change a field’s color.
Follow these steps to change the color for one or more fields on the current report layout:
1 ♦ Select the fields to which you want to apply a different color.
2 ♦ Choose Properties→ Font. The Font dialog box appears.
3 ♦ Choose a color from the Color drop-down list.
4 ♦ Choose OK to apply the new color and return to the report layout.
You must have a color printer in order to produce color output. If you apply colors to fields and then print the report on a black and white printer, the printer converts those colors either to black or to a level of gray. For example, on most laser printers a field formatted as yellow prints light gray.
Generating Bar Codes
You can generate bar codes using commercially available font packages. Different bar code fonts or standards might require you to format the value to be converted to a bar code in different ways. For example, some might expect a numeric value, while others might expect a character value. Still others might expect a character value surrounded by asterisks. If the stored data is not in the required form for the bar code font you are using, you must create a calculated field to convert the data to the appropriate form.
To convert the data to the proper form and display it as a bar code, follow these steps:
1 ♦ Create a calculated field to handle the formatting for a data field.
2 ♦ Apply the bar code font to the calculated field on the report layout.
See the documentation for the bar code font you are using for more information.
4–22

Fields
4.12 Specifying Alignment Field alignment specifies the position of the data within the width of the field. In other words, it specifies how Report Builder calculates the starting and ending positions of the field values that cannot occupy the full field width. Before you specify a field’s alignment, you must understand how each of the alignment options functions.
This section describes:
• Alignment defaults and options
• Changing field alignment
4.12.1 Alignment Defaults and OptionsA field’s default alignment is assigned when the field is created. When you create fields in Report Builder, Report Builder automatically assigns a default alignment based on the type of field you create. The field type also dictates the available alignment options. Table 4–4 lists each data type, its default alignment, and the alignment options.
NOTE: Choose Properties→ Band Line Justify to specify the position of the field within the margins of the report.
Table 4–4: Field Alignment Defaults and Options
Data Type Default Alignment Alignment Options
Text field (text string) Left Left, center, or right
NUMERIC Right Left, center, or right
CHARACTER Left Left, center, right, or word-wrap
DATE Right Left, center, or right
LOGICAL Left Left, center, or right
MEMO Word-wrap Left, center, right, or word-wrap
4–23

Progress Report Builder User’s Guide
There are four possible field alignment options:
• Left
• Center
• Right
• Word-wrap
Left-aligned Data
Report Builder starts printing a left-aligned field at the position occupied by the left edge of the field on the layout. For example, if the first letter of a left-aligned character field begins at two inches on the layout, Report Builder starts printing two inches from the left margin. The position of the last character in the field data varies depending on the font applied to the field, the length of the data, and the width of the field. Report Builder might truncate character and memo fields if the field is not wide enough.
Centered Data
Report Builder determines the position of centered data by the position of the middle character of the field value. The position of the first character in the field varies depending on the font applied to the field and the length of the data.
Right-aligned Data
Report Builder starts printing a right-aligned field so that it ends at the position occupied by the right edge of the field on the report layout. For example, if the last letter of a text field is at two inches on the layout, Report Builder adjusts the starting point of the text, depending on the field’s font, so that the field ends two inches from the left margin. The position of the first character in the field varies depending on the font applied to the field and the length of the data.
Word-wrapped Data
Report Builder continues to print the data for a word-wrapped field on subsequent lines after the data fills the field width on the first line.
When you choose the Word Wrap option, you must also specify whether the word-wrapped field will be left, right, or fully justified. Word-wrapped, left-aligned is the default format for memo fields.
4–24

Fields
The following rules control word-wrap format:
• Report Builder prints any field that is on the same band line as the word-wrapped field in the line in where it is placed on the report layout.
• Word-wrapped fields push down the fields in the column directly beneath them. However, Report Builder prints any other fields on the band line where they appear in the layout. This means that fields that the fields on the band line directly below a band line containing a word wrap field will not appear in the row on a report. To avoid having a word wrap field change the placement of the fields fields on the band line below it, create another band line of the same type directly below the band line containing the word wrap field. Then, create a text field with a series of blanks that extends the width of the fields on the band line below it.
• For word-wrapped fields in page header and page footer bands, Report Builder truncates the data to fit within the band area. For example, if there is a word-wrapped field on the second line of a three-line page header, the data wraps only for the remaining line. Because the page header band is fixed length, Report Builder does not print the data for fields placed on line 3.
• For word-wrapped fields in any other band, Report Builder prints all the data, inserting as many additional lines as necessary. The data continues to wrap from one line to the next within its field width until it is printed. Any such additional lines do not consume subsequent blank lines inserted in the band.
4.12.2 Changing Field AlignmentFollow these steps to specify field alignment:
1 ♦ Select the fields for which you want to change the alignment or select the band line or lines that contain the fields.
2 ♦ Choose Properties→ Alignment. The Alignment dialog box appears:
3 ♦ The available alignment options depend on the field’s data type.
4–25

Progress Report Builder User’s Guide
4 ♦ Choose a field alignment.
5 ♦ Choose OK to apply the new alignment and return to the report layout.
Report Builder justifies the fields on the selected lines within the margins of your report. If any line you justify contains only a single field or a series of fields merged left, Report Builder also sets the format of that field or series of fields to the specified alignment, so that the data appropriately aligns within the field width. See the “Merge Left and Field Alignment” section for more information about how these two features interact.
If more than one record is being printed horizontally across the page, the record width, not the right margin, controls the justification of record lines. See Chapter 15, “Printing,” for information about printing multiple records across the page.
4.13 Eliminating Blank Spaces Between FieldsBy default, Report Builder prints or displays a field in the position where you inserted it on the layout. However, you can choose to remove blank spaces between fields. Report Builder trims any trailing spaces stored at the end of the first field value in the database, and prints the second field immediately following the first field, regardless of its position on the report layout.
The ability to trim blank spaces allows you to eliminate space between fields whose data varies in width. For example, you can print data from State and Postal-Code fields on the same line with no space between them.
Follow these steps to print two fields without intervening space:
1 ♦ Select the field on the right.
2 ♦ Choose Properties→ Merge Left or the Merge Left button. The Merge Left dialog box appears:
3 ♦ Choose Print at End of Previous Field.
4 ♦ Choose OK to return to the report layout.
When you print or display the report, the fields have no space between them, even if they are separated by an empty area on the report layout.
4–26

Fields
You can include a single space between fields by inserting a text string consisting of one space and setting the merge left option for that field to Print at End of Previous Field. You can also insert a text string consisting of a comma and a space between the City and State fields to print the data in the appropriate format for addresses.
NOTE: You cannot use the merge left option with word-wrapped fields.
The ability to merge fields allows you to place fields on the report layout so that they will not be separated by blank spaces. For example, by default, PAGE 2 on a report layout prints as:
PAGE: 2
However, if you specify Print at End of Previous Field as the Merge Left setting, PAGE 2 prints as:
PAGE: 2
Notice that there is a space between the “Page: ” and “2". This occurs because the “Page: ” text field includes a space at the end of the string.
Also, when the merge left setting is Print at End of Previous Field, First-Name and Last-Name fields on a line print without space between them. For example, by default xxxxxxxxxxxx xxxxxxxxxx prints as:
Todd Winmill
If you specify Print at End of Previous Field for the Last-Name field, the name prints as:
ToddWinmill
To print the full name with a single space between the first and last name, you must insert a text string that consists of one space between the First-Name and Last-Name fields.
Merge Left and Field Alignment
When you merge fields to the left, you must consider field alignment. Report Builder assigns every field on the layout a default alignment when you insert the field on the report layout. As described in the previous section, the alignment options are left-aligned, centered, or right-aligned. When you apply Merge Left to multiple fields, Report Builder considers these fields as a single field for the purpose of field alignment and assigns the series the alignment of the first field in the group.
For example, if you want the page number to appear in the upper-right corner of the page as “Page: 1", you must place a “Page: ” text field and a page number calculated field on the first page header band line. If you place the right edge of the page number field at the right margin and the “Page: ” text field an inch to the left of the page number, Report Builder prints the following:
Page: 1
4–27

Progress Report Builder User’s Guide
To eliminate the blank spaces between the fields, you can specify to merge all the fields on the page header line to the left. However, because these two fields are different data types, you must consider each field’s alignment. By default, a text field is left-aligned, and a numeric field is right-aligned. Therefore, when you specify to merge all the fields on the page header band line containing these two fields, Report Builder left-aligns both fields because the first field, “Page: ”, is left-aligned. This means that Report Builder not only eliminates the spaces between the two fields, but also displays the fields at the position of the “Page: ” text field as follows:
Page: 1
This is not the result you want. To merge the page number field to the left and still print the page number at the right margin, you must change the alignment of the “Page: ” text field from left-aligned to right-aligned. When you change the text field’s alignment, Report Builder then right aligns both fields as follows:
Page: 1
A specific instance when field alignment affects how Report Builder implements the Merge Left option is when the first field in a series of fields has an alignment of centered. If you have a series of fields on a record band line and the first field is centered, Report Builder centers all the fields within the fields’ collective width. For example, if you have a centered “Customer: ” text field, customer name character field, “Number: ” text field, and a customer number character field on the band line, Report Builder displays the following output:
Customer: Chip’s Poker Number: 37
When you apply Merge Left to all the fields on a band line, Report Builder centers the fields within the collective width of all the fields. You calculate the fields’ collective width by adding all the characters allocated in the fields’ formats. The total number of characters allocated in these fields’ formats is 45 characters. Therefore, Report Builder centers the 34 characters of data within the collective width of all four fields, which is 45 characters, and displays the following output:
Customer: Chip’s Poker Number: 37
The fields appear off-center on the report. To center the fields between the page margins, use the justify band line function to center the fields. Then Report Builder displays the following:
Customer: Chip’s Poker Number: 37
If you specify to merge left for multiple fields, be aware of the alignment of the first field because it affects how Report Builder displays the fields.
4–28

Fields
4.14 Modifying Field FormatsThere are three ways to identify a field’s format:
• By default on the report layout, field symbols represent each field’s format.
• The Field Properties box identifies the field type and format.
• The status bar displays the field name and format when you select the field.
Follow these steps to change field format:
1 ♦ Select the field whose format you want to change.
2 ♦ Choose Properties→ Format. The Format dialog box for the field type appears. There are five different dialog boxes that can appear, and the format options depend on the field’s data type.
See the “Format Options” section for a description of the format options.
3 ♦ Specify a format.
4 ♦ Choose OK to apply the new format and to return to the report layout.
When you apply a format to a field, it affects only the way a field prints or displays. Because Report Builder uses unformatted field values in sorting, filters, totals, and calculations, the field format does not affect the data. For example, formatting a three-decimal-place NUMERIC field to display only two decimal places does not cause the Report Builder to ignore the thousandths value in sorts, filters, totals, and calculations that involve that field.
4–29

Progress Report Builder User’s Guide
4.14.1 Format OptionsAs shown in Table 4–5, the available Format dialog box options depend upon the field’s data type.
In all the Format dialog boxes, you can specify a field’s format in two ways:
• Enter a valid Progress 4GL syntax in the Data Type Format fill-in field.
• Use the interface elements in the dialog box.
However, if you enter 4GL syntax and do not select the corresponding user-interface elements, the format you specify will not match the other element settings and will override them. If you later try to alter the format using the other user interface elements, Report Builder resets the format in the Data Type Format fill-in field to match the format you specify with the other elements and discards any formatting that the other elements in this dialog box do not support.
Table 4–5: Format Dialog Box Field Format
Field Data Type Format Options
NUMERIC Number of integer and decimal places, leading zero and sign format, and leading and trailing text strings
CHARACTER Number of characters, field width, optional literal characters, and conversion to uppercase
DATE Date separators and two- or four-digit year
LOGICAL True and false value representation
MEMO Width
4–30

Fields
Numeric Fields
For numeric fields, you can specify the number of integer and decimal places, leading zero and sign format, and leading and trailing text strings. Figure 4–3 shows the numeric Format dialog box.
Figure 4–3: Numeric Format Dialog
This dialog box contains the following user-interface elements:
Numeric Format
Specifies valid 4GL format for the field. If you enter a 4GL formatand do not select the corresponding user-interface elements to specify the same format, the format in the Numeric Format field will override the other settings in the dialog box.
Total Number of Digits
Specifies the total number of digits. If the numeric value of a fielddoes not fit into the field’s format, Report Builder replaces the value with a string of question marks (?????). For example, if you specify three digits (>>9) for the Cust-Num field and the database contains a customer whose customer number is 1,000, that customer number prints as ???.
Number of Decimal Places
Specifies the number of decimal places.
4–31

Progress Report Builder User’s Guide
Use Thousand’s Separator ‘,’
Specifies whether to use a comma to separate thousands.
Show at Least 1 Digit
Specifies to show at least one digit.
Suppress*
Specifies to suppress any leading zeros.
Show as Blank*
Specifies to represent any leading zeros as blanks.
Show as Zero*
Specifies to show any leading zeros.
Show as Asterisk*
Specifies to represent any leading zeros as asterisks or ’stars’ (*).
NOTE: *You can choose only one of the four options marked with an asterisk.
Show Leading Sign Always
Specifies to always display the leading sign whether it is positive or negative.
Show Leading Sign on Negatives Only
Specifies to display the leading sign for negative numbers only.
Show Trailing Sign Always
Specifies to always display the trailing sign whether it is positive or negative.
Show Trailing Sign on Negatives Only
Specifies to display the trailing sign for negative numbers only.
Show Negative Numbers in Parenthesis
Specifies to display negative numbers in parentheses.
4–32

Fields
Show Negatives with Trailing ‘CR’
Specifies to display ‘CR’ after negative numbers.
Show Negatives with Trailing ‘DB’
Specifies to display ‘DB’ after negative numbers.
Show Negatives with Trailing ‘DR’
Specifies to display ‘DR’ after negative numbers.
Show Negatives with Trailing ‘cr’
Specifies to display ‘cr’ after negative numbers.
Show Negatives with Trailing ‘db’
Specifies to display ‘db’ after negative numbers.
Show Negatives with Trailing ‘dr’
Specifies to display ‘dr’ after negative numbers.
Allow Positive Numbers Only
Specifies to display positive numbers only. Report Builder displays negative numbers as errors (?????).
You can choose only one of the above 12 options.
Leading Text String
Specifies the text to display before the numeric field.
Trailing Text String
Specifies the text to display after the numeric field.
Data Dictionary Format
Displays the field’s format in the Data Dictionary.
4–33

Progress Report Builder User’s Guide
Character Fields
For character fields, you can specify the number of characters and field width and indicate whether to convert alphabetic characters to uppercase. The following dialog box is the character Format dialog box:
This dialog box contains the following user-interface elements:
Character Format
Specifies the character field format.
Inches
Specifies the field width in inches.
Characters
Specifies the width characters.
Width
Specifies the width as a number of characters or inches. The default width is the number of characters specified by the format assigned to the field in the Data Dictionary.
• Characters — Specifies to truncate or word-wrap any string that is longer than a specified number of characters. The font size and type do not affect how many characters appear.
• Inches — Specifies to truncate or word-wrap any string that is wider than that number of inches. The size of the font and the width of each character greatly affect how many characters fit into a set space.
4–34

Fields
Match Format
Matches the field width to the number of characters specified by the format. If the character string data is wider than the field, Report Builder truncates the data unless you enable word-wrapping.
Regardless of the field width or word-wrap settings, Report Builder never prints more characters than are specified by the format string.
Convert to Caps
Specifies to convert all alphabetic characters to uppercase.
Data Dictionary Format
Displays the field’s format in the Data Dictionary.
For example, if you specify a format of “X(40)” and a width of 25 characters, Report Builder displays the first 25 characters on the first line and any remaining characters on the next line. If you specify a format of “X(40)” and a width of 1 inch, Report Builder displays the number of characters that fit in one inch on the first line and any remaining characters on the following lines.
For information about word-wrapping, see the “Specifying Alignment” section earlier in this chapter.
Logical Fields
For logical fields, you can specify character strings that represent true and false conditions. This figure shows the logical Format dialog box:
4–35

Progress Report Builder User’s Guide
This dialog box contains the following user-interface elements:
Display this when TRUE
Specifies what to display when the field value is true.
Display this when FALSE
Specifies what to display when the field value is false.
Logical Format
Displays the field format.
Data Dictionary Format
Displays the field’s format in the Data Dictionary.
The field width is the number of characters required by the longer of the two strings.
Date Fields
For date fields, you can specify format. The following dialog box is the date Format dialog box:
4–36

Fields
This dialog box contains the following user-interface elements:
Date Format
Specifies the date format. If you enter a 4GL format and do not select the corresponding user-interface elements to specify the same format, the format in the Date Format field overrides the other settings in the dialog box.
99/99/99
Specifies to display dates in mm/dd/yy format.
99-99-99
Specifies to display dates in mm-dd-yy format.
99.99.99
Specifies to display dates in mm.dd.yy format.
99/99/9999
Specifies to display dates in mm/dd/yyyy format.
99-99-9999
Specifies to display dates in mm-dd-yyyy format.
99.99.9999
Specifies to display dates in mm.dd.yyyy format.
999999
Specifies to display dates in mmddyy format.
99999999
Specifies to display dates in mmddyyyy format.
You can choose only one of the above options.
4–37

Progress Report Builder User’s Guide
Data Dictionary Format
Displays the field’s format in the Data Dictionary.
NOTE: You can use the Date Format (-d) parameter to change the order of the month, day, and year.
By default, when you insert a date field on the layout, it appears in the format it was assigned in the Data Dictionary. Display formats do not affect the sort order. The following table lists and provides examples of the date format options:
If you choose . . .Then Report Builder displays
October 20, 1999 as . . .
99/99/99 10/20/99
99-99-99 10-20-99
99.99.99 10.20.99
99/99/9999 10/20/1999
99-99-9999 10-20-1999
99.99.9999 10.20.1999
999999 102099
99999999 10201999
4–38

Fields
Memo Fields
For memo fields you can specify the width of the field. The following dialog box is the memo Format dialog box:
This dialog box contains the following user-interface elements.
Inches
Specifies the field width in inches.
Characters
Specifies the width in characters.
Width
Specifies the width as a number of characters or inches depending on which option you chose. The default width is 60 characters:
For example, if you specify a width of 25 characters, Report Builder displays the first 25 characters on the first line and any remaining characters on the following lines. If you specify a width of 1 inch, Report Builder displays the number of characters that fit in one inch on the first line and any remaining characters on the following lines.
If you specify the field width in . . . Then Report Builder . . .
Characters Truncates or word-wraps any string that is longer than the specified number of characters. The font size and type do not affect how many characters appear.
Inches Truncates or word-wraps any string that is wider than that number of inches. The size of the font and the width of each character greatly affect how many characters fit into a set space.
4–39

Progress Report Builder User’s Guide
4.15 Specifying Default Logical String SettingsYou can specify the default display format for logical fields. By default, a logical field prints or displays as Yes and No unless you specifically change its format.
Follow these steps to change Report Builder’s default settings for logical strings:
1 ♦ Choose Options→ Default Settings. The Default Settings dialog box appears:
2 ♦ Choose the logical strings for True and False. The available options are Yes/No or True/False.
3 ♦ Choose OK to return to the report layout.
4–40

5Aggregate Fields
Aggregate fields are user-defined fields that compute summary information about a set of records in the report. For example, you use aggregate fields to calculate totals or subtotals. You create aggregate fields for each report definition to summarize the data for the report. You can create aggregate fields, insert them in reports, and manipulate them just as you do data and text fields.
Specifically, this chapter discusses:
• Aggregate field basics
• Aggregate field considerations
• Creating aggregate fields
• Editing aggregate fields
• Removing aggregate fields
• Using aggregate fields in reports

Progress Report Builder User’s Guide
5.1 Aggregate Field BasicsAggregate fields compute the summary information for a field based on the following factors:
• Aggregate field type
• Reset frequency
• Accumulation frequency
• Processing rate
• Included values
• Case sensitivity
5.1.1 Aggregate Field TypeWhile all aggregate fields compute summary information, you can create seven different types of aggregate fields. Each type calculates a different type of information. Table 5–1 describes the aggregate field types.
Table 5–1: Aggregate Field Types (1 of 2)
Option Description
Count Produces a count of all records unless you specify to ignore UNKNOWN or blank (zero) values. Count is the only aggregate you can apply to a LOGICAL field.
Total Calculates the total of the values in a NUMERIC field.
Average Calculates the average (mean) of the values in a NUMERIC field. By default, Report Builder includes all known values in the average and returns an UNKNOWN value if it encounters any UNKNOWN or blank records. However, you can specify to ignore any UNKNOWN or blank values.
5–2

Aggregate Fields
By default, all aggregates except Count return UNKNOWN if any of the individual record values in the aggregated field is UNKNOWN, unless you specify to ignore all the UNKNOWN or blank values. This means that if one of the values you are aggregating is UNKNOWN, Report Builder returns UNKNOWN for the aggregate value. See the “Included Values” section later in this chapter for more information about ignoring UNKNOWN or blank values.
5.1.2 Reset FrequencyThe reset frequency determines how often Report Builder resets the value of the field. For example, to produce the total for an entire report, you do not want to reset the value at all. However, to calculate the total for an individual page in the report, Report Builder must reset the field at the end of the page.Table 5–2 describes the reset choices.
Minimum Calculates the minimum value based on the field’s data type.
Field Type Minimum Value
NUMERIC Lowest value
DATE Earliest date
CHARACTER First value in alphabetical order
Maximum Calculates the maximum value based on the field’s data type.
Field Type Minimum Value
NUMERIC Highest value
DATE Latest date
CHARACTER Last value in alphabetical order
Std Deviation Calculates the square root of the variance for NUMERIC fields.
Variance Calculates the (average of NUMBER2) minus (average of NUMBER)2, where NUMBER is a numeric field and the average is computed based on the number of records totaled for numeric fields. Measures the degree to which individual field values vary from the average of all the values totaled.
Table 5–1: Aggregate Field Types (2 of 2)
Option Description
5–3

Progress Report Builder User’s Guide
5.1.3 Accumulation FrequencyThe accumulation frequency determines how often you want to calculate the value of the aggregate field. By default, most aggregates accumulate once per record. However, the following exceptions accumulate once per group:
• The field being aggregated is another aggregate field or is a calculated field that depends on the value of another aggregate field.
• Counts of group fields.
Table 5–3 describes the accumulation choices.
Table 5–2: Reset Choices
Choice Meaning
No-reset Produces one aggregate value for the entire report. Report Builder does not reset the aggregate to 0 during the course of accumulating the aggregate value. For example, with a Total aggregate, use No-reset to generate a grand total at the end of the report.
Per-page Produces an aggregate value or subtotal for each page. Report Builder automatically resets this aggregate to 0 when it starts a new page.
1-8 (group fields) Produces group subtotals. Report Builder automatically resets the aggregate to 0 when the group field value changes, after the group footer prints.
5–4
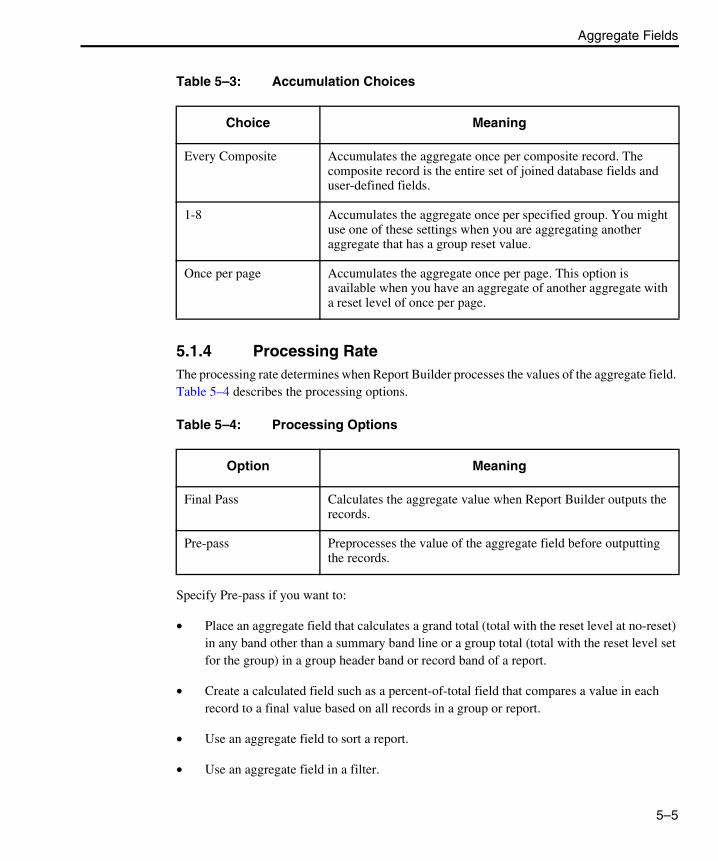
Aggregate Fields
5.1.4 Processing RateThe processing rate determines when Report Builder processes the values of the aggregate field. Table 5–4 describes the processing options.
Specify Pre-pass if you want to:
• Place an aggregate field that calculates a grand total (total with the reset level at no-reset) in any band other than a summary band line or a group total (total with the reset level set for the group) in a group header band or record band of a report.
• Create a calculated field such as a percent-of-total field that compares a value in each record to a final value based on all records in a group or report.
• Use an aggregate field to sort a report.
• Use an aggregate field in a filter.
Table 5–3: Accumulation Choices
Choice Meaning
Every Composite Accumulates the aggregate once per composite record. The composite record is the entire set of joined database fields and user-defined fields.
1-8 Accumulates the aggregate once per specified group. You might use one of these settings when you are aggregating another aggregate that has a group reset value.
Once per page Accumulates the aggregate once per page. This option is available when you have an aggregate of another aggregate with a reset level of once per page.
Table 5–4: Processing Options
Option Meaning
Final Pass Calculates the aggregate value when Report Builder outputs the records.
Pre-pass Preprocesses the value of the aggregate field before outputting the records.
5–5

Progress Report Builder User’s Guide
Because Report Builder accumulates prepass aggregates in a single preliminary pass through the data, you cannot prepass any aggregates that involve page formatting. See the following section for more information about this restriction.
Prepass Processing Restrictions
You cannot specify prepass processing for:
• Pagination-related aggregates such as page totals, aggregates whose accumulation frequency has been set to once per page, and aggregates involving calculated fields that use the PAGE-NUMBER( ) function. This restriction applies because Report Builder does not evaluate page formatting in the preliminary aggregate evaluation process.
• Aggregates of certain prepass aggregates such as any total-of-total fields where the total-of-total accumulates more frequently than the field being totalled resets (for example, a grand total, accumulating once per record, of a pre-processed group one subtotal). This restriction applies because the Report Builder evaluates prepass aggregates in a single extra pass. For these aggregates to be prepass, two extra passes are required: one for the first prepass aggregate and another for the field that totals it.
• Aggregates that reset or accumulate on group fields that are themselves prepass aggregates (or calculated fields whose expressions include prepass aggregates). This restriction is also a result of the single pass used to accumulate prepass aggregates. For these fields, two passes are required.
5.1.5 Included ValuesYou can specify what types of values you want the aggregate field to include or ignore. The default value is to include all values, including UNKNOWN, blank, and zero values.
You can specify to ignore two types of values:
• UNKNOWN values — Instructs Report Builder to ignore all UNKNOWN values when computing the aggregate. This means that Report Builder will not return UNKNOWN simply because one record contains an UNKNOWN value in the field being aggregated.
• Blanks or zeros (0) — Instructs Report Builder to omit zeros (for numeric fields) or blanks (for character fields) when computing the aggregate. This option is useful for omitting blank or zero values from Average or Minimum aggregates or for producing a Count of only nonblank, nonzero, or KNOWN records.
See the “Aggregate Field Considerations” section for a description of aggregate fields and UNKNOWN values.
5–6

Aggregate Fields
5.1.6 Case SensitivityThere are two types of case sensitivity associated with character aggregate fields. The first type is the case sensitivity that Report Builder uses when computing the aggregate value. The second is the case sensitivity that Report Builder assigns the field’s value after it has computed that value. By default, Report Builder treats the field’s value as case insensitive.
When Report Builder computes the aggregate, it uses the case sensitivity of the underlying field. For example, if you take the MINIMUM of a database field that is case sensitive, Report Builder computes the minimum value using case-insensitive string comparisons.
By default, Report Builder computes the aggregate field’s value as case insensitive. However, you can activate the Case Sensitive toggle box to specify that it treat the value as case sensitive.
See Chapter 4, “Fields,” for a complete description of how Report Builder handles case sensitivity in fields.
5.2 Aggregate Field ConsiderationsWhen you create an aggregate field, you must consider how Report Builder handles UNKNOWN values. Report Builder makes the value of an aggregate field UNKNOWN if any of the aggregated values is UNKNOWN unless you specify to ignore UNKNOWN or blank values. The exception to this rule is a COUNT aggregate. Because a COUNT aggregate just counts records without regard for the field value, a COUNT aggregate treats UNKNOWN the same as any other value. For all other types of aggregates, if one or more of the records has an UNKNOWN value in the aggregate field, the whole aggregate becomes UNKNOWN, unless you specify otherwise.
Report Builder also displays an UNKNOWN value if:
• A database field has an UNKNOWN value.
• An error occurs in a calculated, aggregate, or memo field. Report Builder displays error values as a series of question marks (?????) and UNKNOWN values as a single question mark (?).
• An aggregate field value depends on a field that has an UNKNOWN value unless you specify to ignore UNKNOWN or blank values.
See Chapter 4, “Fields,” for a complete description of how Report Builder handles UNKNOWN values, including how Report Builder processes UNKNOWN values in different types of operations.
5–7
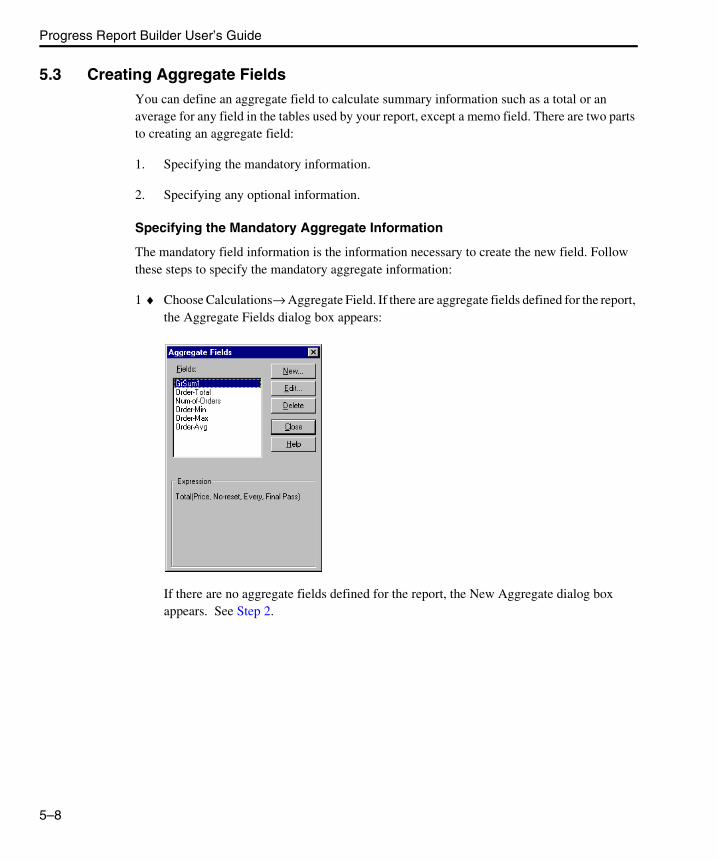
Progress Report Builder User’s Guide
5.3 Creating Aggregate Fields You can define an aggregate field to calculate summary information such as a total or an average for any field in the tables used by your report, except a memo field. There are two parts to creating an aggregate field:
1. Specifying the mandatory information.
2. Specifying any optional information.
Specifying the Mandatory Aggregate Information
The mandatory field information is the information necessary to create the new field. Follow these steps to specify the mandatory aggregate information:
1 ♦ Choose Calculations→ Aggregate Field. If there are aggregate fields defined for the report, the Aggregate Fields dialog box appears:
If there are no aggregate fields defined for the report, the New Aggregate dialog box appears. See Step 2.
5–8

Aggregate Fields
2 ♦ Choose New to create a new aggregate field. The New Aggregate dialog box appears:
3 ♦ Specify the field name in the Name fill-in field. Field names follow the same rules as 4GL field names. They can be up to 32 characters long and can consist of alphabetic characters (A-Z or a-z), digits (0-9), and special characters ($, &, #, %, -, and _). In addition, field names must begin with a letter (A-Z or a-z). The field name must also be unique within the report and cannot contain spaces.
4 ♦ Choose the appropriate radio button to specify the type of field you want to create. There are seven different types of aggregate fields.
When you apply the Minimum and Maximum types to a character field, they use the case sensitivity defined for the character field.
5 ♦ Select the field for which you want to compute the aggregate from the Field selection list. If you select Total, Average, Std. Deviation, or Variance, Report Builder displays only numeric fields in the Field list box. Table 5–5 shows the valid aggregate types for each field data type.
5–9

Progress Report Builder User’s Guide
6 ♦ Select when you want to reset the value of the field to zero from the Reset selection list.
Once you specify the reset value, you are finished defining the mandatory field information. You can now either choose OK or choose Options to access the optional field information.
7 ♦ Choose OK or Options.
Specifying the Optional Aggregate Information
If you chose the Options button, the New Aggregate dialog box expands to display additional options:
Table 5–5: Aggregate/Field Data Types
Data Type of Field Being Accumulated Valid Aggregate Types
NUMERIC Count, Total, Average, Minimum, Maximum, Std. Deviation, Variance
CHARACTER Count, Minimum, Maximum
DATE Count, Minimum, Maximum
LOGICAL Count
MEMO None
5–10

Aggregate Fields
Follow these steps to specify the optional field information:
1 ♦ Select how often you want to increment the value of the aggregate field from the Accumulation selection list.
2 ♦ Choose when you want Report Builder to process the aggregate. Final Pass is the default.
3 ♦ Specify what types of values you want the aggregate field to ignore. The default value is to include all values, including UNKNOWN and blank values. The choices are:
• Are UNKNOWN — Instructs Report Builder to ignore all UNKNOWN values when computing the aggregate.
• Are Blank — Instructs Report Builder to omit zeros (for numeric fields) or blanks (for character fields) when computing the aggregate.
4 ♦ Choose the Case-Sensitive option if you want the field’s result to be case sensitive. This option is valid only when the aggregate is a Minimum or Maximum aggregate and the field being aggregated is a character field. Table 5–6 lists the case sensitivity for aggregate fields.
5 ♦ Choose OK to create the field. The Aggregate Fields dialog box appears.
6 ♦ Choose Close to return to the report layout.
Table 5–6: Case Sensitivity for Aggregate Fields
Option Status Meaning
Activated The field takes case into consideration so that lowercase sorts higher than uppercase. For example, if Report Builder is comparing “abc” to “ABC”, the minimum value is “ABC”.
Deactivated The field does not take case into consideration.
5–11

Progress Report Builder User’s Guide
5.3.1 Inserting Aggregate FieldsFollow these steps to insert an aggregate field in a report:
1 ♦ Choose Edit→ Insert Field, or press INSERT, or click the right mouse button and choose Insert Field. The Insert Field dialog box appears.
The Database/Table Selection list displays the names of all the tables in the connected databases. The User Defined Fields option accesses all the user-defined fields for the report definition. That is, it accesses all the calculated, aggregate, and memo fields available for this report definition.
To display the aggregate fields in the Field List, click Aggregate Fields. The aggregate fields defined for the report appear in the Field List:
2 ♦ Position the edit cursor where you want to insert the field.
3 ♦ Select the field you want to insert from the Field List.
4 ♦ Choose Insert to insert the field on the report layout. The Insert Field dialog box remains open.
5 ♦ Choose Close to return to the report layout.
5.4 Editing Aggregate Fields You can edit all of the information you defined for the aggregate field. Follow these steps to edit an aggregate field:
1 ♦ Choose Calculations→ Aggregate Field. The Aggregate Fields dialog box appears.
2 ♦ Select the field you want to edit.
5–12

Aggregate Fields
3 ♦ Choose Edit to edit an aggregate field. The Edit Aggregate dialog box appears:
4 ♦ Change the necessary information as appropriate, then choose OK to modify the field and return to the Aggregate Fields dialog box.
5 ♦ Choose Close to return to the report layout.
5.5 Removing Aggregate Fields There are three different ways to remove aggregate fields:
• Cut fields from the report layout
• Delete field definitions
• Purge field definitions
When you cut an aggregate field from the report layout, you remove it from the layout, but it remains defined for the report. That means that it is a valid selection in the Insert Fields dialog box. However, once you delete or purge a field, you cannot paste it or insert it back into the report layout.
There are two differences between deleting and purging aggregate field definitions. The first difference is that while you can delete individual field definitions, purging removes all the unused aggregate field definitions not currently in the layout for the report definition. The second difference is that you cannot purge a field definition for an aggregate field that is in use on the report layout—you must delete it. You cannot purge an aggregate field definition if it is in use either on the layout or in another user-defined field.
5–13

Progress Report Builder User’s Guide
Therefore, before you attempt to remove an aggregate field from a report definition, consider whether it is in use in the report layout or if it is part of the expression of an aggregate or calculated field that is in use in the report layout. To see what aggregate fields are not in use in a report layout, choose Calculations→ Purge Calculations, choose Aggregate Fields, then choose OK. The Purge Calculations dialog box appears listing all the aggregate fields not in use.
NOTE: Report Builder cannot detect whether an aggregate field is embedded in a memo file. Therefore, if the report definition has a memo file attached that contains embedded fields, use caution when purging aggregate fields.
5.5.1 Cutting Aggregate FieldsWhen you cut an aggregate field from the report layout, Report Builder removes the field from that layout. This means that although it is not displayed in the report output, the field remains defined for the report. Because it is still defined, you can paste or insert the field back on the layout.
Follow these steps to remove fields from the report layout:
1 ♦ Select the fields you want to remove.
2 ♦ Do one of the following:
• Choose Edit→ Delete.
• Choose Edit→ Cut to cut the field.
• Choose the Trash Can button.
• Press DELETE.
Report Builder removes the selected fields from the report layout.
5–14

Aggregate Fields
5.5.2 Deleting Aggregate Fields When you delete an individual field, you remove it from the report definition even if it is in use in the report layout or used indirectly as part of the expression of a field that is in use in the report layout. This means that Report Builder automatically removes all instances of the field from the layout.
Follow these steps to delete an aggregate field:
1 ♦ Choose Calculations→ Aggregate Field. The Aggregate Fields dialog box appears.
2 ♦ Select the aggregate field you want to delete.
3 ♦ Choose the Delete button. If the field you are trying to delete is used in another aggregate field or in a calculated field calculation, Report Builder lists all calculated and aggregate fields that will be affected by the deletion.
Choose Cancel to retain the field or OK to delete it. If you choose OK, Report Builder removes the selected field from the report. If you choose to delete an aggregate field that is in use in another field’s calculation, Report Builder deletes both the selected aggregate field and all fields that contain it in their calculations.
4 ♦ Choose OK to return to the report layout.
5.5.3 Purging Aggregate Fields When you purge aggregate fields, you remove all the unused aggregate fields from the report definition. Report Builder purges only those aggregate fields that are not in use in the report layout and are not part of the expression of an aggregate or calculated field that is in use in the report layout. The aggregate fields also cannot be used as sort or group fields, or in a filter.
5–15

Progress Report Builder User’s Guide
Follow these steps to purge an aggregate field:
1 ♦ Choose Calculations→ Purge Calculations. If all the aggregate and calculated fields are in use in the report layout, Report Builder disables the Purge Calculations option. However, if there are fields not in use on the layout, you can choose the option, and the Purge Calculations dialog box appears:
If all the defined aggregate fields are in use in the report, Report Builder disables the Aggregate Fields option.
2 ♦ Activate the Aggregate Fields toggle box.
3 ♦ Choose OK. A Purge Calculations dialog box appears listing the aggregate fields you can remove:
4 ♦ Choose OK to purge all the listed fields and return to the report layout.
5–16

Aggregate Fields
5.6 Using Aggregate Fields in Reports After you define an aggregate field, you can insert it in the report layout as you would insert any other field. However, you must place a final pass aggregate on the band line that corresponds to the reset level to produce the desired calculation final pass. In contrast, you can place prepass aggregates anywhere on the layout.
Because Report Builder calculates aggregate fields cumulatively as it reads each record contributing to the total, by default the aggregate field’s final value is not available until the last record being totaled is read. However, if you specify the prepass processing option for the field, Report Builder reads all the records before outputting the report. Use the following table as a guide to placing final pass aggregate fields in your reports:
The following sections describe each of these placement options in more detail.
Grand Total for a Report
You typically place an aggregate field that calculates a grand total in a summary band line at the end of a report. For example, you can calculate the grand total of customer balances for a report. To do this, create an aggregate field, Grand-Total, that totals a customer balance field and has a reset value of “No-reset.” Then insert the Grand-Total field on the summary line.
If you want to calculate the . . . Then place it on a . . .
And set the field’s reset level to . . .
Grand total for report Summary band line No-reset
Total for each page Page footer band line Per-page
Total for each group Group footer band line of the same level as the aggregate’s reset level
1-8 group
Running total by page Page footer band line No-reset
Running total by group Group footer band line No-reset
Running total by record Record band line No-reset
5–17

Progress Report Builder User’s Guide
Figure 5–1 shows an aggregate field that calculates the grand total of the customer balance field for a report.
Figure 5–1: Aggregate Field for Grand Total
The layout shown above produces the report excerpt shown in Figure 5–2.
Figure 5–2: Report with a Grand Total
Total for Each Page
You typically place an aggregate field that calculates a total for each page in the page footer band line so that it prints at the end of each page. For example, you can calculate the total of customer balances for each page of a report. To do this, create an aggregate field, Page-Total, that totals a customer balance field and has a reset value of “Per-page.” Then place the Page-Total field on the page footer line.
5–18
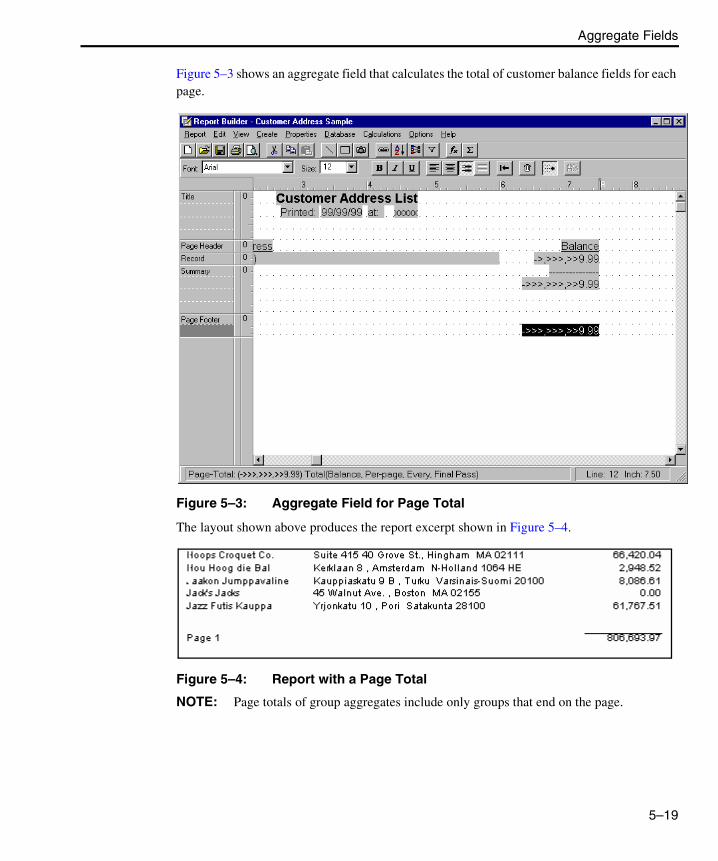
Aggregate Fields
Figure 5–3 shows an aggregate field that calculates the total of customer balance fields for each page.
Figure 5–3: Aggregate Field for Page Total
The layout shown above produces the report excerpt shown in Figure 5–4.
Figure 5–4: Report with a Page Total
NOTE: Page totals of group aggregates include only groups that end on the page.
5–19

Progress Report Builder User’s Guide
Total for Each Group
You typically place an aggregate field that calculates a total for each group in the group footer band line defined at the same level as the field’s reset level. This ensures that it calculates the total for the specified group and prints at the end of each group.
For example, you can calculate the total for each order in an order report. To do this, create an aggregate field, Order-Total, that totals the amount of each item in the order and set the reset value for the group level that corresponds to the order number. If the second group level is based on the Order-Num field, then the reset value is “2) Order-Num.” Then, place the Order-Total field on the corresponding group footer band line, 2GF-Order-Num, so that it calculates the total for each group or order. Figure 5–5 shows an aggregate field on a group footer line that calculates the total for each order and resets for every order number.
Figure 5–5: Aggregate Field for Group Total
The layout above produces the report excerpt in Figure 5–6.
5–20

Aggregate Fields
Figure 5–6: Report with Group Aggregates
Report Builder produces a total for each new group of records, that is, every time the value of the Order-Num field changes.
Running Total by Page
You can also place an aggregate field on a page footer band line to display the running accumulation of the aggregate value as Report Builder processes each page. For example, instead of calculating the total of the customer balances for each page, you can create an aggregate field to calculate the running total for each page of the report. To do this, create an aggregate field, Running-Total, that totals a customer balance field and has a reset value of “No-reset.” Then place the Running-Total field on the page footer band line.
5–21

Progress Report Builder User’s Guide
Figure 5–7 shows an aggregate field that calculates the running total of customer balance fields and displays the value at the bottom of each page.
Figure 5–7: Aggregate Field for Running Page Total
The report layout shown above produces the report excerpt shown in Figure 5–8.
Figure 5–8: Report with a Running Page Total
NOTE: If you change the Processing setting to Pre-pass, Report Builder displays the final report total on each page, not the cumulative page total.
5–22

Aggregate Fields
Running Total by Group
You can also place an aggregate field on a group footer band line to display the running accumulation of the aggregate value as Report Builder processes each group. For example, instead of calculating the total of each order, you can create an aggregate field to calculate the running total for each order in the report. To do this, create an aggregate field, Running-Total, that totals the amount of each item in the order and set the reset value to “No-reset.” Then place the Running-Total field on a group footer band line that summarizes the information for each group or order.
Figure 5–9: shows an aggregate field that calculates the running total of all the orders and displays the value at the bottom of each group.
Figure 5–9: Aggregate Field for Running Total byGroup
5–23

Progress Report Builder User’s Guide
The layout in Figure 5–9: produces the report excerpt in Figure 5–10.
Figure 5–10: Report with Running Group Total
NOTE: If you change the Processing setting to Pre-pass, Report Builder displays the final report total at the end of each group, not the cumulative group total.
Running Total by Record
You can place an aggregate field on a record band line to display the running accumulation of the aggregate value as Report Builder processes each record. You can also calculate the running total of the amount owed.
For example, instead of calculating the total of each order, you can create an aggregate field to calculate the running total for each record in the report. To do this, create an aggregate field, Running-Total, that totals the amount of each item and set the reset value to “No-reset.” Then place the Running-Total field on a record band line.
5–24

Aggregate Fields
Figure 5–11 shows an aggregate field that calculates the running total of all the items and displays the value next to each item.
Figure 5–11: Aggregate Field for Running Record Total
The report layout shown above produces the report excerpt shown in Figure 5–12.
5–25

Progress Report Builder User’s Guide
Figure 5–12: Report with Running Record Total
5.6.1 Using Aggregates in Calculations After you create an aggregate field, you cannot only use it in calculated field expressions, but also in other aggregates based on it. For example, if you create an aggregate field, Order-Total, that totals the Extended-Price for each customer order, you can create a calculated field to compute a five percent sales tax. You can also create a grand total of the Order-Total field to calculate the total of all the orders generated as the report is run.
The sales tax calculation based on the Order-Total field is typically placed in the corresponding group footer or, if each order is on a separate page, in a page footer band line.
5.6.2 Sorting on Aggregates You can sort on any aggregate field for which you specified prepass processing. For example, to produce a report listing products in order of the total number of orders, you first create a prepass order count field. Then, you choose the Sort icon to specify the order total field as the first sort field.
You can also sort on calculated fields whose expressions include prepass aggregates, unless the expressions also include table fields. For example, you can sort on a calculated field whose expression uses a prepass customer total field and a prepass order total field (for example, Order-Total/Cust-Total). However, because of the way the Report Builder processes aggregates, you cannot sort on a calculated field that figures a percent-of-aggregate by dividing a table field by a prepassed aggregate (for example, Price/Order-Total).
See Chapter 9, “Sorting and Grouping Data,” for more information on sorting pre-passed aggregates.
5–26

Aggregate Fields
5.6.3 Filtering on Aggregates When you filter on an aggregate field (or on a calculated field whose expression includes an aggregate field), Report Builder does not include records that do not satisfy the conditions established by the filter in the aggregate. For this reason, aggregate field filters might not select the records you expect unless you designate the aggregate fields as prepass. For example, to print only those orders with amounts over $1,000, make the invoice aggregate prepass and define a filter condition that selects all records in which the value of the aggregate field is greater than 1,000.
Because of the way the Report Builder processes aggregates, you cannot filter on:
• A prepass aggregate if you have defined other prepass aggregates at a higher (more inclusive) reset level. For example, you cannot filter on a prepass group total if the report also contains prepass grand totals.
• Final pass totals if your report contains any prepass totals.
See Chapter 10, “Filters,” for more information about filtering on aggregate fields.
5–27

Progress Report Builder User’s Guide
5–28
6Calculated Fields
Calculated fields are user-defined fields that calculate values as Report Builder generates the report rather than reading them from the database. You can create calculated fields, insert them in reports, and manipulate them just as you do data and text fields.
Specifically, this chapter discusses:
• Calculated field basics
• Calculated field considerations
• Creating calculated fields
• Editing calculated fields
• Removing calculated fields
• Calculated field expression syntax

Progress Report Builder User’s Guide
6.1 Calculated Field BasicsCalculated fields use user-defined expressions to calculate their values. Expressions can contain fields, constants, operators, and functions. For example, the following expression calculates the number of days between the dates in the Ship-Date and Order-Date fields:
This section describes:
• Types of expressions
• Parts of expressions
• Error conditions in evaluating conditions
• Case sensitivity
6.1.1 Types of Expressions Expressions are classified by the data type of the results they produce. Table 6–1 lists the types of calculated expressions.
Days-Between (Ship-Date, Order-Date)
Table 6–1: Types of Calculated Expressions (1 of 2)
Data Type Produces Example
CHARACTER Characters or character strings
“Dear ” + FIRSTNAME + “,” produces a character string that is a salutation, such as “Dear John,”. Character strings can also include numbers and punctuation marks and a space after “Dear”.
NUMERIC Numbers (Qty * Price) - Disc-Rate(Qty * Price) produces the value of the Extended-Price. You can use numeric expressions as logical expressions because Report Builder considers a logical expression to be true when it has a nonzero value and false when it has a zero value.
DATE Dates Order-Date + 30 produces what the date will be 30 days later than the date in the Order-Date field.
6–2

Calculated Fields
6.1.2 Parts of an Expression Expressions are made up of one or more of the following components:
• Fields
• Constants
• Operators
• Functions
For example, in the following expression, Price and Qty are fields and * is the multiplication operator:
In the following expression, IN-LIST is a function that compares the item number with the list of numbers to determine whether the numbers appear in the list, Item-Num is a field, and 20, 21, and 22 are constants:
LOGICAL Logical value of true or false
Balance > 100 produces a true value if the value in the balance field is greater than 100, a false value if the balance is less than or equal to 100.
MEMO Memo field IIF (Balance = 0, Thanks, Sendcash) means that if the balance equals 0, return the THANKS memo field; otherwise, return the SENDCASH memo field.
Only expressions that contain memo fields can produce memo fields. It is not possible to convert from any other data type to a memo field.
Price * Qty
IN-LIST (Item-Num, 20, 21, 22)
Table 6–1: Types of Calculated Expressions (2 of 2)
Data Type Produces Example
6–3

Progress Report Builder User’s Guide
Fields
Expressions can include database fields of any type (CHARACTER, NUMERIC, LOGICAL, DATE), memo fields, aggregate fields, and other calculated fields. For example, in the following expression, the Order-Total field might be an aggregate field that sums the price of individual line items:
If several tables contain fields with the same name, you must precede the field name used in an expression with a table alias. For example, if your report uses the Customer table and the Order table, they both contain the Cust-Num field. You must precede the Cust-Num field with a table alias that identifies the table it belongs to. If Order and Customer are the table aliases, you enter either Order.Cust-Num or Customer.Cust-Num. To ensure that appropriate aliases are used, select field names from the Fields selection list instead of typing the field names.
Constants
A constant is a value you specify as part of an expression. For example, if the expression for a field that calculates interest is balance times interest rate, the figure that represents the interest rate can be a constant. In the following expression, .08 is the interest rate constant:
Report Builder recognizes four types of constants:
• Numeric constants
• Character constants
• Logical constants
• Date constants
Order-Total * Ship-Charge
Balance * .08
6–4

Calculated Fields
Table 6–2 describes each type of constant.
Operators
Operators are symbols that perform operations within an expression. This section describes the types of operators and operator precedence and expression evaluation.
Report Builder supports the same operators as the Progress 4GL with the addition of the “-” string concatenation operator. Also, the same guidelines apply to using operators in expressions that apply to the 4GL, including using spaces on either side of an operator.
There are two restrictions for using relational operators (=, <>, IN-LIST, BEGINS, MATCHES) with memo fields in calculated field expressions and filter expressions:
• You cannot compare a memo field to another memo field.
• The memo field must be the left operand.
For a complete description of the BEGINS, MATCHES, and MODULO operators, see Appendix C, “Operators.”
Table 6–2: Report Builder Constant Types
Constant Description
Numeric A number that can contain a decimal point and can be preceded by a plus or minus sign. You can specify up to 15 decimal places. For example, 3.1415927 can be used as a constant in expressions that require the value of pi to seven decimal places.
Character Any character or string of characters enclosed in double quotes or single quotes. For example, the expression “Dear ” + Contact - “,” or ‘Dear ’ + Contact - ‘,’ returns a value like “Dear Gloria Shepley,”. The expression contains the character constant “Dear”. Report Builder treats character string constants as case insensitive.
Logical True or false value. The valid logical constants are true, false, yes, no. You can use uppercase or lowercase. For example, the following expression returns a true value if the value in the Balance field is greater than 200, and a false value if it is less than or equal to 200:
IIF(Balance > 200, true, false)
Date Date value. You must use slashes (/) as delimiters and specify the month, day, then year. For example, mm/dd/yy or mm/dd/yyyy. If you specify a two-digit year, Report Builder assumes the date is in the twentieth century.
6–5

Progress Report Builder User’s Guide
Table 6–3 lists the five main types of operators and the operators within each type.
Table 6–3: Arithmetic Operators (1 of 2)
Type Operator Description
Arithmetic + Addition
Subtraction
/ Division
* Multiplication
MODULO Remainder after division
Date + Addition of days to a date. For example:Order-Date + 30
Subtraction of days from a date or subtraction of one date from another. For example:Ship-Date - Order-Date
Character + Concatenation (joining two character strings into one). For example:First-name + Last-name
Concatenation after removing trailing spaces from the string before the operator. For example:First-name - " " + Last-name
Relational BEGINS Returns a logical value indicating whether the expressions begin with the same pattern.
MATCHES Returns a logical value indicating whether the expressions have the same pattern.
= or EQ Equal to
<> or NE Not equal to
< or LT Less than
<= or LE Less than or equal to
> or GT Greater than
>= or GE Greater than or equal to
6–6

Calculated Fields
The Insert Filter Condition dialog box lists the IN-RANGE and IN-LIST functions as operator choices. See Appendix B, “Report Builder Functions,” for descriptions of these functions.
NOTE: In Report Builder, the not equals (<>) operator treats the UNKNOWN value differently than the Progress 4GL. If a calculated field uses the not equals operator, Report Builder evaluates the operator as TRUE if both operands are UNKNOWN, but evaluates the operator as UNKNOWN if only one of the operands is UNKNOWN. For example, Report Builder evaluates the Order-Line.Discount <> 0 expression as UNKNOWN for any records whose Order-Line.Discount value is UNKNOWN. The 4GL evaluates the same expression as TRUE.
Report Builder evaluates expressions in an order of precedence. Table 6–4 lists the available operators in their order of precedence.
Logical NOT Logical not
AND Logical and
OR Logical or
Table 6–4: Operator Precedence (1 of 2)
Precedence Operator Description
Sixth (highest)
Unary - Treats following value as a negative.
Unary + Treats following value as a positive.
Fifth MODULO Returns the remainder after division.
/ Division
* Multiplication
Fourth - Subtraction
+ Addition
+ Concatenation
Table 6–3: Arithmetic Operators (2 of 2)
Type Operator Description
6–7

Progress Report Builder User’s Guide
Report Builder evaluates expressions using the following rules:
• Report Builder performs the operations within parentheses first. For example, the result of 1 + 4 / 2 is 3, but the result of (1 + 4) / 2 is 2.5 because Report Builder performs the operation in parentheses first.
• If parentheses are nested or embedded, as in the expression 3 * ((1 + 4) / 2), Report Builder performs the operation in the most deeply embedded parentheses first. In this case, the first operation is 1 + 4, resulting in 5, the second is 5 / 2, resulting in 2.5, and the third is 3 * 2.5, resulting in 7.5.
• If an expression contains several operators that have the same precedence, Report Builder performs the operations from left to right. For example, in the expression 1 + 4 / 2 * 6 / 3, Report Builder performs the division and multiplication operations left to right before performing the addition operation. The first operation is 4/2, resulting in 2; the second operation is 2*6, resulting in 12; the third operation is 12\3, resulting in 4; the last operation is 1+4, resulting in 5.
Third MATCHES Indicates that the expression has the same pattern.
BEGINS Indicates that the expressions begin with the same pattern.
= or EQ Equal to
<> or NE Not equal to
> or GT Greater than
>= or GE Greater than or equal to
< or LT Less than
<= or LE Less than or equal to
Second NOT Logical NOT
AND Logical AND
First (lowest) OR Logical OR
Table 6–4: Operator Precedence (2 of 2)
Precedence Operator Description
6–8

Calculated Fields
For example, Report Builder evaluates the following expression as false because the * and + operations are performed first:
The < and > operators are in the next level of precedence, so Report Builder performs them second; the logical OR is in the lowest level of precedence and, therefore, performed last. Report Builder evaluates the expression as if it were ((12 < 8) OR (4 > 5)).
In the following expression, Report Builder evaluates the > operators first. Both conditions must be true for the expression to be true. The balance must be greater than 100 and the number of days must be greater than 30:
In the following expression, Report Builder adds TODAY+30 first and then compares the result to the date returned by the DATE( ) function. Therefore, the expression is true only when TODAY+30 results in a date that is later than 7/1/93:
Functions
Functions perform special operations, such as converting data from one data type to another, calculating the elapsed time between dates, and conditionally returning values.
A single function can serve as a calculated field expression, or several functions can be included within a single expression. For example, to include the system date in a report, you can create a calculated field called Sys-Date, whose expression is TODAY( ). When you insert this field in a report layout, Report Builder prints or displays the system date when you generate the report.
Conversely, an expression can consist of a number of functions that can be nested or embedded within each other. For example, the following expression contains four functions:
The TODAY( ) function returns the system date in the format 11/04/93. The SPELL-MONTH( ) function returns the name of the month of the date supplied by TODAY( ). The YEAR( ) function returns the four-digit year of the date supplied by TODAY( ). The STRING( ) function converts this numeric year value to a four-character string so that it can be concatenated with
3 * 4 < 8 OR 4 > 3 + 2
Balance > 100 AND DAYS > 30
DATE ("7/1/93") < TODAY + 30
SPELL-MONTH(TODAY()) + -," + STRING(YEAR(TODAY()), "9999")
6–9

Progress Report Builder User’s Guide
the name of the month string and the character constant “, ”. On 11/04/93, Report Builder returns “November, 1993" for this expression.
Report Builder provides you with over 50 built-in functions, as well as the ability to create and save your own user-defined functions. For information on creating your own functions, see Chapter 7, “User-defined Functions.” For more information on the built-in Report Builder functions, see Appendix B, “Report Builder Functions.”
Wildcard Characters
You can use an asterisk (*) or a period (.) as wildcards in the right operand for the MATCHES operator in expressions or filters. These are the same wildcard characters that MATCHES supports in the 4GL.
6.1.3 Error Conditions in Evaluating Expressions When you print or preview a report, if Report Builder encounters an error in evaluating a calculated field expression, it displays question marks in the field and in any fields that total the calculated field. For example, if Report Builder tries to evaluate a date expression that adds a specified number of days to a field whose value is UNKNOWN, it displays ??/??/?? as the result, since it cannot produce a proper date.
For example, if Report Builder tries to evaluate a numeric expression that requires it to divide by zero, it displays question marks as the result, since division by zero is an undefined operation. If this calculated field were totaled, the total value would also display as question marks.
UNKNOWN sorts as the last value in an ascending sort or the first value in a descending sort. For more information about how Report Builder handles UNKNOWN values, see the “UNKNOWN Values” section of this chapter or Chapter 4, “Fields.”
6.1.4 Case SensitivityCase sensitivity affects calculated fields in two ways:
• How the operators and functions case sensitively process data
• How Report Builder determines the case sensitivity of the results of the expressions
How Operators and Functions Case Sensitively Process Data
Operators that process character string values do not apply case sensitivity unless one or more of the operands is case sensitive. This applies to operators, such as greater than (>), that compare character values but do not return them.
6–10

Calculated Fields
Built-in functions do not apply case sensitivity unless one or more arguments is case sensitive. This includes the IIF and CASE functions. If any argument passed to one of these functions is case sensitive, Report Builder processes the whole expression case sensitively.
How Report Builder Determines the Case Sensitivity of Expression Results
Report Builder determines the case sensitivity of expression results by determining:
• The case sensitivity of the result of a whole calculated field based on the setting of the case-sensitive toggle box. If the case-sensitive toggle box is not checked, the calculated field result is automatically case-insensitive. If the case-sensitive toggle box is checked Report Builder must determine the natural case-sensitivity of the expression.
• The case sensitivity of all subexpressions within a whole calculated field
• Operators that return character values return a case-insensitive value unless one or more of the operands is a case-sensitive string.
• The result of a built-in or user-defined function is case sensitive only when it returns a character string value and it has at least one argument that is case sensitive. The only exceptions to this rule are the IIF and CASE functions, whose return values match the case sensitivity of the value chosen for return.
If the database field in a calculated field expression is case sensitive the result of the subexpression is also case sensitive.
For example, in the calculated field expression:
SUBSTRING (fname,1,5) + lname
6–11

Progress Report Builder User’s Guide
If fname is a case-sensitive database field then the result of the sub-expression SUBSTRING (fname, 1,5) is also case sensitive. The natural case sensitivity of SUBSTRING (fname, 1, 5) + lname is therefore also case sensitive.
• When Report Builder evaluates an expression and one of the elements of the expression is a reference to a character field, Report Builder determines the case sensitivity of the that field according to the rules in the following table:
See Chapter 4, “Fields,” for a complete description of how Report Builder handles case sensitivity.
6.2 Calculated Field ConsiderationsWhen you create a calculated field, you must consider how Report Builder handles:
• UNKNOWN values
• Server-evaluatable fields
6.2.1 UNKNOWN ValuesReport Builder displays an UNKNOWN value if:
• A database field has an UNKNOWN value.
• A calculated field value depends on a field that has an UNKNOWN value.
• An error occurs in a calculated, aggregate, or memo field. Report Builder displays error values as a series of question marks (?????) and UNKNOWN values as a single question mark (?).
If the fields is a . . .Then Report Builder determines its case
sensitivity in the . . .
Database field Data Dictionary
Calculated field New Calculated Field or Edit Calculated Field dialog box
Aggregate field New Aggregate Field or Edit Aggregate Field dialog box
Memo field Attach Memo Field dialog box
6–12

Calculated Fields
Also, if a logical field contains an UNKNOWN value or if you use an expression that has an UNKNOWN value (such as a Boolean), Report Builder considers the UNKNOWN value as False.
See Chapter 4, “Fields,” for a complete description of how Report Builder handles UNKNOWN values.
6.2.2 Server-evaluatable FieldsServer-evaluatable fields are calculated fields you can use in a sort, join, or filter that the database server, rather than Report Builder, evaluates. Report Builder indicates that a calculated field is server evaluatable by displaying an “e” before the field’s expression in the status bar and in the Field Properties box.
A field is server evaluatable if it meets all four of these criteria:
• The field expression does not use any other operators except those that are listed below:
– Arithmetic operators — addition (+), subtraction (-), multiplication (*), division (/)
– Boolean operators — AND, OR, NOT
– Relational operators — equal to (= or EQ), not equal to (<> or NE), less than (< or LT), less than or equal to (<= or LE), greater than (> or GT), greater than or equal to (>= or GE)
6–13

Progress Report Builder User’s Guide
• The field expression uses only the following functions:
• The expression’s case sensitivity matches the case sensitivity that you specified for it in the New Calculation or Edit Calculation dialog box. Report Builder determines the expression’s case sensitivity according to the rules described in the “Case Sensitivity” section of this chapter.
• The field does not reference any aggregate fields or any other calculated fields unless they are server-evaluatable also.
You can select a server-evaluatable calculated field as the controlling table join field when defining a table join. Also, filtering and sorting on server-evaluatable calculated fields is much more efficient than filtering and sorting on calculated fields with expressions that Report Builder evaluates itself.
ABSOLUTE
ASC
CAPS
CHR
DATE
DAY
ENCODE
ENTRY
EXP
FILL
LC
LEFT-TRIM
LENGTH
LOG
MONTH
NUM-ENTRIES
OPSYS
R-INDEX
REPLACE
RIGHT-TRIM
ROUND
SQRT
SUBSTRING
TIME
TODAY
TRIM
WEEKDAY
YEAR
6–14

Calculated Fields
6.3 Creating a Calculated FieldFollow these steps to create a calculated field:
1 ♦ Choose Calculations→ Calculated Field. If there are calculated fields defined for the report, a Calculated Fields dialog box similar to the following appears. It lists the calculated fields already defined for the report:
If there are no calculated fields defined for the report, the New Calculation dialog box appears.
6–15

Progress Report Builder User’s Guide
2 ♦ Choose the New button to create a new calculated field. The New Calculation dialog box appears:
The status bar displays information when you select a field or function from the selection lists. When you select a field, it provides the field’s format; when you select a function, it describes the function’s arguments. For example, when you select the EXP function, Report Builder displays “EXP (base, exponent)” in the status bar.
3 ♦ Specify the field name in the Calculated Field Name fill-in field. Calculated field names follow the same rules as 4GL field names. They can be up to 32 characters long and can consist of alphabetic characters (A-Z or a-z), digits (0-9), and special characters ($, &, #, %, -, and _). In addition, field names must begin with a letter (A-Z or a-z). The field name must also be unique within the report and cannot contain spaces. By using a combination of uppercase and lowercase, you can enter calculated field names that are easily distinguishable from the names of table fields.
4 ♦ Enter the expression in the Expression fill-in field. Calculated field expressions can contain functions, operators, constants, database fields, memo fields, aggregate fields, and other calculated fields. You can either type these elements or select them from the selection lists and the Operator Palette. You must enter spaces around every operator in the expression. See the “Using the Selection Lists and Buttons” section for more information.
You can format the expression by pressing CTRL-TAB to indent and CTRL-RETURN to start a new line.
6–16

Calculated Fields
5 ♦ Choose Verify to check the expression syntax. If there is an error in the expression (for example, if you used an unrecognized field name or operator), Report Builder displays an error message. When possible, it also positions the cursor to the place in the expression where the error occurred.
Edit the existing expression.
6 ♦ Choose OK when the expression is complete and correct to create the field and return to the Calculated Fields dialog box.
NOTE: When you choose OK, Report Builder verifies the expression.
7 ♦ Choose Close to return to the report layout.
When you create a calculated field, Report Builder defines a format string for the field based on the field’s expression. After you insert the field on the report layout, verify that the format string is suitable for the field’s return value.
Using the Selection Lists and Buttons
The easiest way to create an expression is to select elements from the Fields and Functions selection lists, the Operator Palette, and the selection lists that display when you choose the Calc Expression or UDF Expression buttons. Because this technique reduces the amount of typing required, you can build expressions more quickly and accurately.
Table 6–5 explains how to perform basic tasks using these techniques.
Table 6–5: Using the User Interface Elements to Create an Expression(1 of 3)
Task Description
Selecting fields Double-click a field or select it from the Fields selection list and choose Insert. The selection list displays the fields from the currently joined tables and currently attached memo file (if any), as well as all calculated and aggregate fields created in the report. If the desired fields do not appear in the Fields list, select the proper database, table, or user-defined fields category in the Field Sources selection list.
Selecting functions Double-click a function or select it from the Functions selection list and choose Insert. The Functions selection list displays the built-in Report Builder functions, as well as any user-defined functions you have created.
6–17

Progress Report Builder User’s Guide
Pasting function arguments
Double-click a field name or select it from the selection list and choose Insert.
If the Paste Arguments toggle box is activated, when you insert a built-in function in the expression, Report Builder automatically highlights the symbols representing the function’s first argument. These symbols usually indicate the argument’s data type.
For example, if you select the SUBSTRING function and insert it into the field expression, this is how it appears:
SUBSTRING( char, num, opt-num )
In this example, the symbols in parentheses represent the arguments to SUBSTRING: “char” represents a required character argument; “num” a required numeric argument, and “opt num” an optional numeric argument. If you select a character field as the first argument, the field name replaces “char” in the expression. You can then supply the other function arguments as needed.
The Paste Arguments toggle box is activated by default. If you deactivate it, Report Builder inserts function names without supplying argument symbols. Instead, it inserts the function name followed by a set of parentheses — for example, SUBSTRING( ).
Selecting operators Activate the Operator Palette toggle box to display the available operators, then select the appropriate operator. See the tables earlier in this chapter for explanations of these operators and descriptions of their use in expressions.
Report Builder automatically inserts the required spaces around the operator when you choose the button.
Table 6–5: Using the User Interface Elements to Create an Expression(2 of 3)
Task Description
6–18

Calculated Fields
6.4 Editing a Calculated Field You can edit a calculated field’s name and expression. Follow these steps to edit a calculated field:
1 ♦ Choose Calculations→ Calculated Field. The Calculated Fields dialog box appears:
2 ♦ Select the calculated field you want to modify.
Copying other calculated field expressions
Choose the Calc Expression button. The Calculated Fields dialog box appears. Select a calculated field and choose OK. Report Builder inserts the expression of the selected field into the new calculated field’s expression. This allows you to create a new expression by simply modifying an existing one rather than starting from scratch.
When you select a calculated field in the Calculated Fields dialog box, Report Builder displays the field’s expression in the bottom section of the dialog box.
Copying a UDF expression
Choose the UDF Expression button. The User Defined Functions dialog box appears. Select a UDF expression and choose OK. For more information on UDFs, see Chapter 7, “User-defined Functions.”
Table 6–5: Using the User Interface Elements to Create an Expression(3 of 3)
Task Description
6–19

Progress Report Builder User’s Guide
3 ♦ Choose the Edit button. The Edit Calculation dialog box appears. You edit the expression the same way you originally created it:
4 ♦ Modify the field expression as necessary. If the calculated field’s data type changes as a result of editing and the field is used in another calculated field expression, Report Builder displays a list of calculated fields that will be affected by your change. The fields on this list will either change their data types or become impossible for the Report Builder to evaluate as a result of your change.
You can choose Cancel to cancel the change or OK to make the change. If you choose OK, Report Builder flags the fields it cannot evaluate with question marks, in the Field Menu. If you use the flagged fields in your report, you will have to edit their expressions before you can print or view the report.
NOTE: You cannot change the data type of a calculated field that is used as a join field, appears in a filter, or is totaled.
5 ♦ Choose OK to make the selected changes to the expression and return to the Calculated Fields dialog box.
6 ♦ Choose OK to return to the report layout.
Because Report Builder determines the format and width of a calculated field when you first created it, and because editing a calculation does not automatically change this estimated width, you might have to adjust the format and width of your calculated fields using Properties→ Format. For instructions on changing field width and format, see Chapter 4, “Fields.”
6–20

Calculated Fields
6.5 Removing a Calculated Field There are three different ways to remove calculated fields:
• Cut fields from the report layout.
• Delete field definitions.
• Purge field definitions.
When you cut a calculated field from the report layout, you remove it from the layout but it remains defined for the report definition. That means that it is a valid selection in the Insert Fields dialog box. However, once you delete or purge a field, you cannot paste it back into the report layout.
There are two differences between deleting and purging calculated field definitions. The first difference is that while you can delete individual field definitions, purging removes all the unused calculated field definitions not currently in the layout for the report definition. The second difference is that you cannot purge a field definition for a calculated field that is in use on the report layout—you must delete it. You cannot purge a calculated field definition if it is in use either on the layout or in another user-defined field.
Therefore, before you attempt to remove a calculated field from a report definition, consider whether it is in use in the report layout or if it is part of the expression of an aggregate or calculated field that is in use in the report layout. To see what calculated fields are not in use in a report layout, choose Calculations→ Purge Calculations, choose Calculated Fields, then choose OK. The Purge Calculations dialog box appears listing all the calculated fields not in use.
NOTE: Report Builder cannot detect whether a calculated field is embedded in a memo file. Therefore, if the report definition has a memo file attached that contains embedded fields, use caution when purging calculated fields.
6–21

Progress Report Builder User’s Guide
6.5.1 Cutting Calculated FieldsWhen you cut a calculated field from the report layout, Report Builder removes the field from that layout. Although it is not displayed in the report output, the field remains defined for the report. Because it is still defined, you can paste or insert the field back on the layout.
Follow these steps to remove one or more fields from the report layout:
1 ♦ Select the fields you want to remove.
2 ♦ Do one of the following:
• Choose Edit→ Delete.
• Choose Edit→ Cut to cut the field.
• Choose the Trash Can button.
• Press DELETE.
Report Builder removes the selected fields from the report layout.
6.5.2 Deleting a Calculated Field When you delete an individual field, you remove it from the report definition even if it is in use in the report layout or used indirectly as part of the expression of a field that is in use in the report layout. This means that Report Builder automatically removes all instances of the field from the layout.
NOTE: You cannot delete calculated fields used as join fields without first deleting the table joins that use them.
Follow these steps to delete a calculated field:
1 ♦ Choose Calculations→ Calculated Field. The Calculated Fields dialog box appears.
2 ♦ Select the calculated field you want to delete.
6–22

Calculated Fields
3 ♦ Choose the Delete button. If the field you are trying to delete is aggregated or used in another calculation, Report Builder lists all calculated and aggregate fields that will be affected by the deletion.
You can choose Cancel to retain the field or OK to delete it. If you choose OK, Report Builder removes the selected field from the report. If you choose to delete a calculated field that is in use in another field’s calculation, Report Builder deletes both the selected calculated field and all fields that contain it in their calculations.
4 ♦ Choose OK to delete the field and return to the report layout.
NOTE: You cannot delete calculated fields used as join fields without first deleting the table joins that use them.
6.5.3 Purging Calculated Fields When you purge calculated fields, you remove all the unused calculated field from the report definition. Report Builder purges only those calculated fields that are not in use in the report layout and are not part of the expression of an aggregate or calculated field that is in use in the report layout. The calculated fields also cannot be used as sort or group fields, or in a filter.
Follow these steps to purge a calculated field:
1 ♦ Choose Calculations→ Purge Calculations. If all the aggregate and calculated fields are in use in the report layout, Report Builder disables the Purge Calculations option. However, if there are fields not in use on the layout, you can choose the option. The Purge Calculations dialog box appears:
If all the defined calculated fields are in use in the report layout, Report Builder deactivates the Calculated Fields toggle box.
2 ♦ Choose the Calculated Fields toggle box.
6–23

Progress Report Builder User’s Guide
3 ♦ Choose OK. A Purge Calculations dialog box appears listing the calculated fields that you can remove:
4 ♦ Choose OK to purge all the listed fields and return to the report layout.
6–24

7User-defined Functions
User-defined functions (UDFs) are functions you create to process field values according to an expression that you define. The primary benefit of UDFs is that you can create them to perform complex operations that are not available with the built-in Report Builder functions.
Specifically, this chapter describes:
• User-defined function basics
• Creating user-defined functions
• Editing user-defined functions
• Deleting user-defined functions
• Sample user-defined functions

Progress Report Builder User’s Guide
7.1 User-defined Function BasicsUser-defined functions, like the built-in functions, are not associated with a specific report definition. Therefore, you must use parameters instead of direct table and field references in the UDF expression. Parameters pass actual values from the database or user-defined fields into the UDF expression. This indirection allows you to use the UDF with multiple reports.
When you create a UDF, Report Builder saves it in a file called prorb.udf. By default, Report Builder attempts to create prorb.udf in the Report Builder program directory. For information on how to place prorb.udf in a different location, see Appendix A, “Report Builder Administration.”
7.2 Creating User-defined FunctionsFollow these steps to create a user-defined function:
1 ♦ Choose Calculations→ User Defined Function. If there are UDFs defined, a User Defined Functions dialog box appears:
If there are no UDFs defined, the New User Defined Function dialog box appears, and you should proceed to Step 3.
7–2

User-defined Functions
2 ♦ Choose New to create a new UDF. The New User Defined Function dialog box appears:
3 ♦ Specify the function name in the User Defined Function Name fill-in field. Function names follow the same rules as 4GL field names. They can be up to 32 characters long and can consist of alphabetic characters (A-Z or a-z), digits (0-9), and special characters ($, &, #, %, -, and _). In addition, function names must begin with a letter (A-Z or a-z) and cannot contain spaces. When naming a UDF, you can use lowercase or mixed case or a particular set of characters (for example “u” or “UDF”) to distinguish its name from the names of built-in Report Builder functions.
4 ♦ Choose the New button to create the parameters you need for the expression. The New Parameter dialog box appears:
5 ♦ Specify the parameter name in the Parameter Name fill-in field. Parameter names follow the same rules as 4GL field names.
6 ♦ Specify the parameter type in the Parameter Type combo box. The default type is Character.
7 ♦ For character parameters, activate the Case Sensitive toggle box if you want the parameter to be case sensitive.
7–3

Progress Report Builder User’s Guide
8 ♦ Choose OK to return to the New User Defined Function dialog box.
9 ♦ Enter the expression in the Expression fill-in field. UDF expressions can contain built-in functions, operators, parameters, constants, and other UDFs. You can either type these elements or select them from the selection lists and Operator Palette. You must enter spaces around each operator of the expression. See the following section for more information about using the selection lists and buttons.
You can format the expression by pressing CTRL-TAB to indent and CTRL-RETURN to start a new line.
10 ♦ Choose Verify to check the expression syntax. If there is an error in the expression (for example, if you used an unrecognized operator), Report Builder displays an error message. When possible, it also positions the cursor to the place in the expression where the error occurred.
Edit the existing expression. When the expression is complete and correct, choose OK.
11 ♦ Choose OK to create the function and return to the User Defined Functions dialog box.
NOTE: When you choose OK, Report Builder verifies the expression.
12 ♦ Choose Close to return to the report layout.
Using the Selection Lists and Buttons
The easiest way to create an expression is to select the element from the Parameters and Functions selection list, the Operators palette, and the selection lists that display when you choose the Calc Expression or UDF Expression buttons. Because this technique reduces the amount of typing required, you can build expressions more quickly and accurately.
Table 7–1 explains how to perform basic tasks using these techniques.
7–4

User-defined Functions
Table 7–1: Using the User Interface Elements to Create an Expression(1 of 2)
Task Description
Selecting parameters Double-click a field, or select it from the Fields selection list, then choose Insert. The selection list displays the currently defined parameters.
Selecting functions Double-click a function, or select it from the Functions selection list, then choose Insert. The Functions selection list displays the built-in Report Builder functions, as well as any user-defined functions you have created.
Pasting function arguments
Double-click a field name, or select it from the Fields selection list, then choose Insert.
If the Paste Arguments toggle box is activated when you insert a built-in function in the expression, Report Builder automatically highlights the symbols representing the function’s first argument. These symbols usually indicate the argument’s data type.
For example, if you select the SUBSTRING function and insert it into the field expression, this is how it appears:
SUBSTRING( char , num , optnum )
In this example, the symbols in parentheses represent the arguments to SUBSTRING: “char” represents a required character argument; “num” a required numeric argument; and “opt num” an optional numeric argument.
If you select a character field as the first argument, the field name replaces “char” in the expression. You can then supply the other function arguments as needed.
The Paste Arguments toggle box is activated by default. If you deactivate it, Report Builder inserts function names without supplying argument symbols. Instead, it inserts the function name followed by a set of parentheses — for example, SUBSTRING( ).
7–5

Progress Report Builder User’s Guide
When you use a UDF in a calculated field expression, you must supply the required parameters that you declared when you created the UDF. For example, if the UDF declaration specifies one date parameter, when you include the UDF reference in a calculated field, you specify one date field as a parameter to the UDF.
When you copy a calculated field expression into a UDF, you must either remove any field references or replace them with parameter references. When you copy a UDF expression, you must change any parameter references to use the parameters defined for this UDF.
Selecting operators Activate the Operator Palette toggle box to display the available operators, then select the appropriate operator. See Chapter 6, “Calculated Fields,”for explanations of these operators and descriptions of their use in expressions.
Report Builder automatically inserts the required spaces around the operator when you choose the button.
Copying calculated expressions
Choose the Calc Expression button. The Calculated Fields dialog box appears. Select a calculated field and choose OK. Report Builder inserts the expression of the selected field into the new UDF’s expression.
When you select a calculated field in the Calculated Fields dialog box, Report Builder displays the field’s expression in the bottom section of the dialog box.
Copying a UDF expression
Choose the UDF Expression button. The User Defined Functions dialog box appears. Select a UDF expression, then choose OK. Report Builder inserts the expression of the selected field into the new UDF’s expression. This allows you to simply modify an existing expression rather than starting from scratch.
Table 7–1: Using the User Interface Elements to Create an Expression(2 of 2)
Task Description
7–6

User-defined Functions
7.3 Editing User-defined Functions You can edit the function name, expression, and parameters. Follow these steps to edit an existing UDF:
1 ♦ Choose Calculations→ User Defined Function. The User Defined Function dialog box appears.
2 ♦ Select the function you want to edit.
3 ♦ Choose Edit. The Edit User Defined Function dialog box appears:
4 ♦ Edit the function name.
5 ♦ Select the parameter you want to edit or delete.
6 ♦ Choose the Edit button to edit the selected parameter or choose the Delete button to delete the selected parameter. When you choose the Edit button, the Edit Parameter dialog box appears. Make the necessary change and choose OK to return to the Edit User Defined Function dialog box.
7–7

Progress Report Builder User’s Guide
7 ♦ Edit the expression in the Expression fill-in field. If your edits change the data type of the UDF’s return value, and it is used in another UDF or a calculated field in the current report, Report Builder displays a list of UDFs and calculated fields that will become unusable as a result of your change.
Choose either Cancel to cancel the change or OK to make the change. If you choose OK, Report Builder flags the affected UDFs and fields with question marks in the field lists. If you use any flagged UDFs or fields in your report, you must correct their expressions before you can run the report.
8 ♦ Choose Verify to check the expression syntax.
9 ♦ Choose OK to save the function edits and return to the User Defined Functions dialog box.
10 ♦ Choose Close to return to the report layout.
Because UDFs can be used in multiple reports, edit them carefully. Report Builder cannot notify you of the effect your change might have on other reports.
7.4 Deleting User-defined Functions Follow these steps to delete a user-defined function:
1 ♦ Choose Calculations→ User Defined Function. The User Defined Function dialog box appears.
2 ♦ Select the UDF you want to delete.
3 ♦ Choose the Delete button. If the function you are trying to delete is used in another UDF expression or a calculated field in the current report, Report Builder displays a list of UDFs and/or calculated fields that will be affected by the deletion.
Choose either Cancel to retain the UDF or OK to delete it. If you choose OK, Report Builder removes the selected UDF and all the affected UDFs and calculated fields.
4 ♦ Choose OK to return to the report layout.
Because UDFs can be used in multiple reports, you should be careful about deleting them. Report Builder cannot notify you of the effect your deletion might have on other reports.
7–8
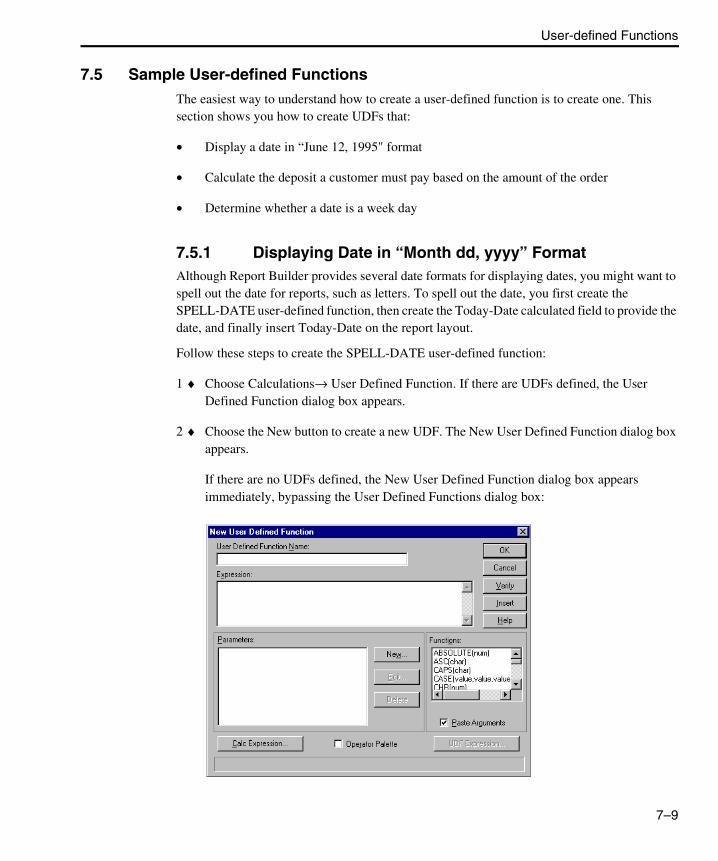
User-defined Functions
7.5 Sample User-defined Functions The easiest way to understand how to create a user-defined function is to create one. This section shows you how to create UDFs that:
• Display a date in “June 12, 1995" format
• Calculate the deposit a customer must pay based on the amount of the order
• Determine whether a date is a week day
7.5.1 Displaying Date in “Month dd, yyyy” FormatAlthough Report Builder provides several date formats for displaying dates, you might want to spell out the date for reports, such as letters. To spell out the date, you first create the SPELL-DATE user-defined function, then create the Today-Date calculated field to provide the date, and finally insert Today-Date on the report layout.
Follow these steps to create the SPELL-DATE user-defined function:
1 ♦ Choose Calculations→ User Defined Function. If there are UDFs defined, the User Defined Function dialog box appears.
2 ♦ Choose the New button to create a new UDF. The New User Defined Function dialog box appears.
If there are no UDFs defined, the New User Defined Function dialog box appears immediately, bypassing the User Defined Functions dialog box:
7–9

Progress Report Builder User’s Guide
3 ♦ Type SPELL-DATE in the User Defined Function Name fill-in field.
4 ♦ Type the following expression:
SPELL-MONTH(Letter-Date) + “ ” + STRING(DAY(Letter-Date), “>9") + “,” + STRING(YEAR(Letter-Date),“9999")
In this expression you spell out the month using the SPELL-MONTH built-in function and insert a space before printing the day and year. To format the day and year correctly, you must convert them to character strings using the STRING function, then specify the appropriate format. This expression will format out the date in the correct format, but you must pass it through the parameter, Letter-Date.
5 ♦ Choose the New button to create the Letter-Date parameter. The New Parameter dialog box appears:
6 ♦ Type Letter-Date for the Parameter Name.
7 ♦ Select Date as the parameter type, then choose OK. Report Builder returns you to the New User Defined Function dialog box.
8 ♦ Choose OK to create the user-defined function and return to the User Defined Functions dialog box. Report Builder automatically verifies the expression syntax.
9 ♦ Choose Close to return to the report layout.
Now that you have created the user-defined function to spell out the date, you can create a calculated field to put a date into the report with this format.
Follow these steps to create the calculated field:
1 ♦ Choose Calculations→ Calculated Field. If there are calculated fields defined, the Calculated Fields dialog box appears.
2 ♦ Choose New to create a new calculated field. The New Calculation dialog box appears.
If there are no calculated fields defined, the New Calculation dialog box appears immediately.
7–10

User-defined Functions
3 ♦ Type Today-Date for the calculated field name.
4 ♦ Type SPELL-DATE(TODAY()) for the expression. This expression instructs Report Builder to format the current value of the built-in function TODAY as the parameter to the SPELL-DATE user-defined function.
5 ♦ Choose OK to create the calculated field and return to the Calculated Fields dialog box.
6 ♦ Choose Close to return to the report layout.
To display the date in the report, insert the Today-Date calculated field on the report layout. When you preview or generate the report, Report Builder displays the current value of the TODAY( ) function (which should be the current system date). If you have difficulty creating the calculated field, see Chapter 6, “Calculated Fields,” for more information about creating calculated fields.
7.5.2 Calculating the Amount of DepositIn this example you create a UDF to calculate how much money a customer must pay, based on the order amount.
Follow these steps to create the DEPOSIT user-defined function:
1 ♦ Choose Calculations→ User Defined Function. If there are UDFs defined, the User Defined Function dialog box appears.
2 ♦ Choose New to create a new UDF. The New User Defined Function dialog box appears.
If there are no UDFs defined, the New User Defined Function dialog box appears immediately.
3 ♦ Type DEPOSIT in the User Defined Function Name fill-in field.
4 ♦ Type the following expression:
IIF(Amount < 500, Amount * .10, Amount * .15)
This expression calculates the amount of the deposit based on whether the order amount is less than or greater than $500. If the order is less than $500, then the deposit is 10% of the order. If the order is greater than or equal to $500, then the deposit is 15%.
Because UDFs are not associated with specific reports, you cannot specify a database field name in the expression. You must create an amount parameter through which to pass the order amount.
7–11

Progress Report Builder User’s Guide
5 ♦ Choose the New button to create the Amount parameter. The New Parameter dialog box appears.
6 ♦ Type Amount for the parameter name.
7 ♦ Select Numeric as the parameter type, then choose OK. Report Builder returns you to the New User Defined Function dialog box.
8 ♦ Choose OK to create the function and return to the User Defined Function dialog box. Report Builder automatically verifies the expression syntax.
9 ♦ Choose Close to return to the report layout.
7.5.3 Determining Whether a Date Falls on a WeekendYou can easily create a UDF to determine whether a date falls on a weekend.
Follow these steps to create the IS-WEEKEND user-defined parameter:
1 ♦ Choose Calculations→ User Defined Function. If there are UDFs defined, the User Defined Functions dialog box appears.
2 ♦ Choose New to create a new UDF. The New User Defined Function dialog box appears.
If there are no UDFs defined, the New User Defined Function dialog box appears immediately.
3 ♦ Type IS-WEEKEND in the User Defined Function Name fill-in field.
4 ♦ Type the following expression:
(WEEKDAY(Any-Date) = 7) OR (WEEKDAY(Any-Date) = 1)
This expression uses the built-in WEEKDAY( ) function, a relational operator (=), and a logical operator (OR) to operate on a date expression represented by the parameter name Any-Date. The WEEKDAY( ) function returns a number from 1 to 7 that represents the day of the week of the Any-Date expression. The = operator tests whether this number is 7 (Saturday) or 1 (Sunday). The OR operator means that if the number of the day is either 7 or 1, the expression is true, which means that the date falls on a weekend.
Now you must create the parameter to pass the date information to the expression.
5 ♦ Choose the New button to create the Any-Date parameter. The New Parameter dialog box appears.
7–12

User-defined Functions
6 ♦ Type Any-Date in the Parameter Name fill-in field.
7 ♦ Select Date as the parameter type, then choose OK. Report Builder returns you to the New User Defined Function dialog box.
8 ♦ Choose Verify to check the expression syntax. If you entered it correctly, Report Builder displays a confirmation dialog box.
9 ♦ Choose OK to create the function and return to the User Defined Function dialog box.
10 ♦ Choose Close to return to the report layout.
You can create a calculated field consisting of the following expression to display whether the current system date is a Saturday or a Sunday:
IS-WEEKEND(TODAY())
In this expression, the TODAY( ) function supplies a date value for the expression to process.
7–13

Progress Report Builder User’s Guide
7–14

8Joins
Joins are user-defined connections between tables that allow Report Builder to gather data from more than one table for a report.
This chapter describes:
• Join basics
• Defining database joins
• Editing database joins
• Deleting database joins
• Using the No Join Reorder option
• Changing the master table for a report

Progress Report Builder User’s Guide
8.1 Join BasicsWhen you create a report definition, you specify the master table. The master table is the database table that Report Builder uses as the initial source of data for the report. In addition to drawing information from the master table, Report Builder can draw information from additional tables, called related tables. To access these related tables you join them to the master table or to each other.
When you join a table to the master table or a related table, the table used to initiate the join is called the controlling table; the other table is called the related table. Because you can join tables to a related table, a table can be the related table in one join and the controlling table in another join. For example, if you create a report definition with Customer as the master table, and then join the Order table, in this join Order is the related table. However, when joining the Order-Line table to the Order table, Order is the controlling table.
When you create a join, you specify a join field pair. A join field pair is made up of one field from the controlling table and one from the related table. Report Builder uses the value in the controlling table join field to search for all records in the related table with a matching value in the related table join field. In some cases, this search results in a one-to-one match between records in the two tables. In other cases, Report Builder might find many records in the related table that match the controlling join field value.
When you define joins, Report Builder accesses the records in the specified tables. The records resulting from the joins comprise a composite table. This table is not a literal table, but a collection of all the accessed records.
NOTE: If you are using outer joins in Report Builder and your report contains filter conditions, Report Builder applies the filter conditions after it processes the joins. As a result, the composite table might contain a different set of records than the records you obtain from an equivalent join and WHERE clause in a 4GL procedure.
You can specify three different types of joins in Report Builder:
• Inner joins
• Left outer joins
• Right outer joins
If you created any report definitions in versions of Report Builder prior to Version 1.8, all the joins in those definitions are inner joins.
8–2

Joins
8.1.1 Inner JoinsAn inner join is a join that includes only those records that have matching values in both tables. Records from either table that do not have a match in the other table are not included in the report.
Figure 8–1 illustrates how inner joins work.
Figure 8–1: Inner Joins
This example shows which records Report Builder includes when you define an inner join between the Customer and Order tables on the Cust-Num field. The resulting composite table contains only those orders that match the values of the Cust-Num field in the Customer table, and only those customers who have placed orders.
Cust-Num Name
Lift Line Skiing
Urpon Frisbee
Hoops Croquet Co.
Go Fishing Ltd.
Customer Table
2
1
3
4
Cust-NumOrder-Num
1
2
2
Order Table
36
59
94
125
6
Cust-Num Cust-NumName Order-Num
Lift Line Skiing
Urpon Frisbee
Urpon Frisbee
1 1
2
2
2
2
Composite Table
36
94
125
Controlling Table Related Table
Join Field = Cust-Num
8–3

Progress Report Builder User’s Guide
8.1.2 Left Outer JoinsA left outer join is a join that includes all records in the controlling table regardless of whether there are any matching records in the related table. Report Builder includes all the records in the controlling table and any records from the related table that match the join field value in the controlling table.
Figure 8–2 illustrates how left outer joins work.
Figure 8–2: Left Outer Joins
Cust-Num Name
Lift Line Skiing
Urpon Frisbee
Hoops Croquet Co.
Go Fishing Ltd.
Customer Table
2
1
3
4
Cust-NumOrder-Num
1
2
2
Order Table
36
59
94
125
6
Cust-Num Cust-NumName Order-Num
Lift Line Skiing
Urpon Frisbee
Urpon Frisbee
1 1
2
2
2
2
Composite Table
36
94
125
Controlling Table Related Table
Join Field = Cust-Num
3
4
Hoops Croquet Co.
Go Fishing Ltd.
?
?
?
?
8–4

Joins
Figure 8–2 shows which records Report Builder includes when you define a left outer join between the Customer and Order tables on the Cust-Num field. The resulting composite table contains all the records from the Customer table and records from the Order table for which there are corresponding customer numbers. Since the composite record contains fields from both tables, when there is no matching order table record, Report Builder fills in the order fields with UNKNOWN values. Notice that there are two composite records for customer number 2 because there are two orders for that customer in the Order table.
8.1.3 Right Outer JoinsA right outer join is a join that includes all the records in the related table regardless of whether there are any matching records in the controlling table. Report Builder includes all the records in the related table and any records from the controlling table that match the related table join field.
Figure 8–3 illustrates how right outer joins work.
8–5

Progress Report Builder User’s Guide
Figure 8–3: Right Outer Joins
This example shows which records Report Builder includes when you define a right outer join between the Customer and Order tables on the Cust-Num field. The resulting composite table contains all the records from the Order table and records from the Customer table for which there are corresponding customer orders. Since the composite record contains fields from both tables, when there is no matching order table record, Report Builder fills in the order fields with UNKNOWN values. Notice that there are still two composite records for customer number 2 because there are two orders for that customer in the Order table. However, there are no records for customer numbers 3 and 4.
Cust-Num Name
Lift Line Skiing
Urpon Frisbee
Hoops Croquet Co.
Go Fishing Ltd.
Customer Table
2
1
3
4
Cust-NumOrder-Num
1
2
2
Order Table
36
59
94
125
6
Cust-Num Cust-NumName Order-Num
Lift Line Skiing
Urpon Frisbee
Urpon Frisbee
1 1
2
2
2
2
Composite Table
36
94
125
Controlling Table Related Table
Join Field = Cust-Num
? ? 59 6
8–6

Joins
8.1.4 Join ConsiderationsWhen you are defining joins, consider the following issues:
• If you specify a right outer join, you cannot specify any other joins.
• If you have already specified one or more joins, you cannot define subsequent joins as right outer joins.
• Regardless of how many joins you specify, Report Builder processes the joins from left to right. For example, when you join Table A to Table B to Table C, Report Builder selects records from tables A and B. Report Builder then takes that composite table and joins it to Table C. If the A-to-B join is an inner join and the B-to-C join is a left outer join, the composite table will not really include all records from Table B because they might have already been eliminated by the A-to-B join.
8.2 Defining Database Joins Joins connect database tables, making fields in each joined table available for your report. Follow these steps to create a database join:
1 ♦ Choose Database→ Joins. If you have already defined a join for the report, a Joins dialog box similar to the following appears. It lists the joins already defined for the report:
If there are no joins defined for the report, the New Join dialog box appears.
8–7

Progress Report Builder User’s Guide
2 ♦ Choose the New button to define a new join. The New Join dialog box appears:
3 ♦ Select the table you want to join (the related table) from the Join To Table drop-down list.
4 ♦ Specify the Table alias. By default, Report Builder uses the table name as the table alias. You must specify a table alias if you have already joined to a table with the same name or if the table name happens to be a Progress reserved word.
5 ♦ Choose the New Field Pair button. The New Join Field Pair dialog box appears:
6 ♦ Select the table from which you want to make the join (the controlling table) from the From Table drop-down list or choose Calculated Fields to join on a calculated field.
7 ♦ Select the join field from the controlling table from the From Field selection list. You can base joins on any table field except a logical field and some calculated fields.
8 ♦ Select the join field in the related table from the To Field selection list. The selection list displays the available join fields.
8–8

Joins
9 ♦ Choose OK. Report Builder returns you to the New Join dialog box. The join fields you specified appear in the Join Fields list.
You can specify more than one pair of join fields for a single join. To do so, choose New Field Pair again, and specify the join field pair. You can create up to 10 pairs of join fields. Each join field pair can have a different controlling table.
10 ♦ Specify the join type. (The default is an inner join).
11 ♦ Choose OK to create the join and return to the Joins dialog box.
12 ♦ Choose Close to return to the report layout.
You can define more than one join field pair for a single join. For example, to calculate the shipping charges for an order with data from the Newsport database, you must define several joins, including one with two field pairs. Figure 8–4 shows the joins you need to create between the tables. The direction of the arrow indicates the controlling and related tables in the join. The controlling table is the table from which the arrow originates, and the related table is the arrow destination.
Figure 8–4: Example of Two Join Field Pairs in a Single Join
Notice that there are two arrows to the Shipping-Charges table. These arrows indicate that the join consists of two field pairs: 1) Shipping-Charges.From-Region and Order.Warehouse and 2) Shipping-Charges.To-State and Customer.State.
Order Table
Order-NumWarehouseCust-Num
Order-NumItem-Num
Order-Line Table
Customer TableCust-NumState
Item Table
Item-NumWeight
Shipping-ChargesTable
From-RegionTo-StatePrice-Per-Pound
8–9

Progress Report Builder User’s Guide
The result of the join with two field pairs produces a record from the Shipping-Charges table that indicates the cost per pound for shipping an order. You can then calculate the weight of each line item with a calculated field that multiplies the quantity of the item being ordered by the shipping weight of the item. Then, create a total aggregate field that sums that result of the calculated field for each order. You then calculate the shipping charge for the order by taking the sum for the order and multiplying it by the value in the Shipping-Charges.Price-Per-Pound field.
8.3 Editing Database JoinsWhen you edit database joins, you can:
• Change the related table’s alias
• Add additional join pairs
• Edit the defined join pairs
• Delete a defined join pair
• Change the join type
Follow these steps to edit a database join:
1 ♦ Choose Database→ Joins. The Joins dialog box appears:
2 ♦ Select the join that you want to edit.
8–10

Joins
3 ♦ Choose Edit. The Edit Join dialog box appears:
4 ♦ Make changes to the join definition.
5 ♦ Choose OK to return to the Joins dialog box.
6 ♦ Choose Close to return to the report layout.
8.4 Deleting Database Joins Before you delete a join, verify that the related table is a table that is the controlling table in another join. Report Builder does not allow you to delete a join if the related table controls another join. You must first delete the dependent join, then you can delete the first join.
Follow these steps to delete a database join:
1 ♦ Choose Database→ Joins. The Joins dialog box appears.
2 ♦ Select the join you want to delete.
3 ♦ Choose Delete.
4 ♦ Choose Close to return to the report layout.
8–11

Progress Report Builder User’s Guide
8.5 Using the No Join Reorder OptionThe SQL Engine in Report Builder checks the SQL in reports to optimize performance. If you are using implicit join syntax for inner joins, the SQL Engine might change the order in which tables are listed in the FROM clause of a SELECT statement during optimization. The hierarchy the SQL Engine uses to reorder the tables might not always produce the best order to query the database.
You can specify that you do not want the tables to be reordered. Choose Database→ No Join Reorder. The SQL Engine will not reorder the tables in an implicit join. Choosing this option might improve the performance of your reports.
For example, the hierarchy ranks a field that is a unique index as better than a field that is not an index. The SQL Engine would reorder the FROM clause to query the table with the unique index field first. However, if the table with the unique index field contains 500,000 records and the table with the other field contains 30,000 records, the reordered query is less efficient than a query that looks at the smaller table first.
This option does not work if you use the -rbexpjoins startup parameter. The -rbexpjoins startup parameter forces Report Builder to use explicit join syntax for inner joins. See the Progress SQL-89 Guide and Reference for more information on the difference between implicit and explicit joins.
8.6 Changing the Master Table for a ReportWhen you create a report, you specify the master table. However, you might want to change the master table after you create the initial layout. For example, you can create a financial report with one master table, then change the master table to run it against a table that has the same structure, but contains different data.
Before you change the master table for a report, consider the following issues:
• If the master table contains a field that is used in a join, the new master table must also contain the same field. If it does not, you must delete the join before Report Builder will changes the master table.
• If the master table contains fields that are in use on the report layout or in user-defined fields, Report Builder removes the database fields from the layout that are not in the new master table. It will also remove any user-defined fields that use fields that are not in the new master table.
After you determine that these considerations will not negatively affect the report definition, you can change the master table.
8–12

Joins
Follow these steps to change the master table for a report:
1 ♦ Choose Database→ Master Table. The Master Table dialog box appears:
2 ♦ Select a new master table from the Table drop-down list. Report Builder automatically assigns the new master table an alias.
3 ♦ Change the table alias, if necessary.
4 ♦ Choose OK to change the master table and return to the report layout.
8–13

Progress Report Builder User’s Guide
8–14

9Sorting and Grouping Data
You can select up to eight sort fields to determine the order in which you want to present report data. You can also select up to eight group fields to group data into categories.
Grouping data is similar to using control breaks in a report.
This chapter explains how to use the Sort and Group dialog boxes to sort and group data, and how to sort and group with total and calculated fields.

Progress Report Builder User’s Guide
9.1 Sorting DataBy default, the order of records in the master table determines the order of your report data. You can override the database order and select sort fields to specify a new order in which to present the data in a report.
9.1.1 Sort Levels and Ascending/Descending OrderYou specify the sort order for a report by specifying sort levels (1-8) and whether each level is arranged in ascending or descending order.
Sort Levels
The first sort level of a report determines the first level of data sorting, the second level determines the second level of sorting, etc.
For example, if you specify Country as the first sort level, State as the second, and City as the third, Report Builder initially sorts the data by the customer’s country. It then sorts the records by state within each country, and then by city within each state.
This shows how such a sorting order would appear in the Sort Order dialog box:
In the Sort Order dialog box, Report Builder lists a number and a field name for each sort level. The number before the field name identifies the sort level. The number of the sort level determines the sorting order with sort level 1 as the highest level and sort level 8 as the lowest.
Ascending/Descending Order
By default, Report Builder arranges the field data in ascending order. Table 9–1 explains what ascending order means for different field data types.
9–2

Sorting and Grouping Data
You can mix ascending and descending levels within the same report definition. This means that the first and second sort levels could appear in ascending order and the third sort level could appear in descending order. For example, using the fields in the Progress Newsport database, you can specify Customer.Cust-Num as the first sort level in ascending order, Order-Order-Num as the second in ascending order, and Order-Line.Price as the third in descending order. This means that Report Builder initially sorts the data by the customer’s number (starting with the lowest customer number), then by each order number for the customer (starting with the lowest order number). Lastly, it sorts the records by the price of the items in each order (starting with the most expensive item).
9.1.2 Sorting ConsiderationsWhen you specify the sort order for a report, you must consider:
• Which fields you can use for sorting
• Which fields are best for sorting
• How Report Builder handles case sensitivity
• Sorting on indexed fields
Field Restrictions
You can sort on any type of field except memo fields.
Table 9–1: Ascending Sort Order by Data Type
Field Data Type Ascending Sort Order
CHARACTER Alphabetical
NUMERIC From negative to positive; from lowest to highest
LOGICAL False before true
DATE Chronological
9–3

Progress Report Builder User’s Guide
Best Fields for Sorting
The following fields are best for sorting:
• Database fields.
• Server-evaluatable calculated fields. Report Builder marks these fields with an “e” (for evaluatable) in the field list. See Chapter 6, “Calculated Fields,” for a description of server-evaluatable fields.
These fields are best for sorting because Progress performs the sort. If you select Report Builder aggregate fields or calculated fields that are not server-evaluatable, Report Builder performs the sorting using local temporary files. Selecting such fields for sorting might cause a significant slow down in report processing, especially for reports involving large amounts of data. It might also require a large amount of local disk space.
Case Sensitivity
Report Builder applies case sensitivity when it sorts character fields according to the case sensitivity of the field.
Sorting on Indexed Fields
To achieve more efficient performance, sort on indexed fields whenever possible.
9.1.3 Specifying the Sort OrderYou can select up to eight fields for sorting the records in your report. When you select a sort field, data in the specified field determines the order in which Report Builder arranges report records. For example, if you use the Customer table to generate a report listing the addresses of your customers, you might want to sort using the Cust-Num or Name fields. If you select Cust-Num as a sort field, Report Builder sorts the report data numerically by the customer number. If you select the Name field, Report Builder sorts the data alphabetically by the Name field of each record.
9–4

Sorting and Grouping Data
Follow these steps to specify a sort order for a report’s records:
1 ♦ Choose Database→ Sort Order or the Sort button. The Sort Order dialog box appears:
The Sort Order dialog box displays the currently defined sort order levels. In this dialog box there are no sort order levels currently defined.
2 ♦ Choose New to specify a new sort order. The Sort Level dialog box appears:
3 ♦ Select the sort order level you want to define from the Sort Level drop-down list.
4 ♦ Select the field on which you want to sort this level from the Sort Field drop-down list.
The drop-down list displays the connected databases, the joined tables, and the user-defined fields for the report definition. Choose the database, then the table that contains the field you want. Report Builder lists the fields for the selected table.
5 ♦ By default order, Report Builder sorts the field data in ascending order. Deactivate the Ascending toggle box if you want Report Builder to sort field data in descending order.
6 ♦ Choose OK. Report Builder returns you to the Sort Order dialog box and displays the newly defined sort level in the Currently Defined Sorts selection list.
7 ♦ Specify additional sort levels in the same manner, then choose OK to return to the report layout.
9–5

Progress Report Builder User’s Guide
9.1.4 Changing the Sort OrderOnce you have specified multiple sort levels, you can change the sort order by:
• Modifying sort levels
• Inserting sort levels
• Deleting sort levels
• Moving sort levels up or down
Report Builder automatically readjusts the sort field selections.
Editing a Sort Level
When you modify a sort level, you can change the sort field, the ascending order or the descending order.
Follow these steps to modify a sort level:
1 ♦ Choose Database→ Sort Order or the Sort button. The Sort Order dialog box appears.
2 ♦ Select the sort level you want to edit.
3 ♦ Choose Edit. The Sort Level dialog box appears.
4 ♦ Modify the sort level in the same manner in which you specified it.
5 ♦ Choose OK to return to the Sort Order dialog box.
6 ♦ Choose OK to save your changes and return to the report layout.
If you want to change the sort level, use the Move Up or Move Down button in the Sort Order dialog box. See the “Moving Sort Levels Up or Down” section later in this chapter.
Inserting Sort Levels
To insert a sort level into the currently defined sort levels, you do not have to renumber each of the existing levels. You simply create a new sort level with the appropriate sort level number.
Follow these steps to insert an additional sort level:
1 ♦ Choose Database→ Sort Order. The Sort Order dialog box appears.
2 ♦ Choose New. The Sort Level dialog box appears.
3 ♦ Select the desired sort level number.
9–6

Sorting and Grouping Data
4 ♦ Select the sort field.
5 ♦ Specify whether the data should appear in ascending or descending order.
6 ♦ Choose OK. Report Builder returns to the Sort Order dialog box, inserts the new sort level at the specified level number, and moves any existing sort information at that level and those below it down one level.
7 ♦ Choose OK to return to the report layout.
For example, Order-Num is the first sort level and Item-Num is the second sort level. To insert Cust-Num as the new first level sort, create a new sort level defining Cust-Num as the sort field and specifying 1 as the sort level number. When you choose OK, Report Builder inserts Cust-Num as the first sort level and reassigns Order-Num to level 2 and Item-Num to level 3.
Deleting Sort Levels
When you delete a sort level, Report Builder automatically reassigns any lower sort level numbers to fill in the deleted level.
Follow these steps to delete a sort level:
1 ♦ Choose Database→ Sort Order. The Sort Order dialog box appears.
2 ♦ Select the sort level you want to delete.
3 ♦ Choose Delete. Report Builder deletes the selected sort level and moves the levels below it up one level.
4 ♦ Choose OK to save your changes and return to the report layout.
Moving Sort Levels Up or Down
You can move sort levels up or down within the sort order list. When you move a sort level, Report Builder automatically renumbers the sort levels. Follow these steps to move a sort level:
1 ♦ Choose Database→ Sort Order. The Sort Order dialog box appears.
2 ♦ Select the sort level you want to move.
3 ♦ Choose Move Up or Move Down. Report Builder moves the selected sort level one level in the appropriate direction and renumbers all the affected sort levels.
9–7

Progress Report Builder User’s Guide
4 ♦ Repeat Step 3 until the sort level is in the desired placement.
5 ♦ Choose OK to save your changes and return to the report layout.
For example, Order-Num is the first sort level, Item-Num is the second sort level, and Cust-Num is the third sort level. To move Cust-Num to be the first level, select 3) Customer.Cust-Num, then choose Move Up twice. Report Builder moves Cust-Num to the first sort level and renumbers Order-Num and Item-Num.
9.2 Grouping DataBy default, Report Builder treats each record as a discrete unit. However, by specifying group fields, you can organize the records in your report in up to eight hierarchical categories. You can also specify a group header and/or footer for each category to identify it or to provide summary information about the records in that group. Report Builder’s group order is very similar to the concept of control breaks.
9.2.1 Group Levels The first group level determines the first level of data grouping. You can specify additional levels of grouping in group levels 2 through 8. In the Group Order dialog box, Report Builder lists a number and a field name for each group level. The number before the field name identifies the group level. The number of the group level determines the grouping order with group level 1 as the most general (most inclusive) grouping level and group level 8 as the most specific (least inclusive) grouping level.
This shows a Group Order dialog box with three group levels defined:
9–8

Sorting and Grouping Data
For example, to group item sales by State, City, and Balance, select State as group level 1, since it is the most general group. Select Balance as group level 3, since it is the most specific group. If you do not specify a sort by the same fields, you get many group headers and footers for the same data. In most cases, you want to sort by the same fields on which you are grouping the records.
9.2.2 Relationship Between Sorting and GroupingIn many cases, group fields are the same as sort fields. Therefore, the sort fields you initially select automatically become group fields. However, you can change the group field selections. This allows you to combine sort and group field selections to achieve considerable flexibility in organizing your report.
NOTE: Changing an existing sort order does not automatically change the group order.
9.2.3 Specifying the Group OrderFollow these steps to specify a group order for a report’s records:
1 ♦ Choose Database→ Group Order. The Group Order dialog box appears:
The Group Order dialog box displays the currently defined group order levels. In the dialog box shown there are no group order levels currently defined. If you select sort fields, those fields automatically become group fields.
9–9

Progress Report Builder User’s Guide
2 ♦ Choose New to specify a new group order. The Group Level dialog box appears:
3 ♦ Select the group order level you want to define in the Group Level drop-down list.
4 ♦ Select the field on which you want to group this level from the Group Field drop-down list.
The drop-down list displays the connected databases, the joined tables, and the user-defined fields for the report definition. Double-click the database, then the table that contains the field you want. Report Builder lists the fields for the selected table.
5 ♦ Specify the grouping options. The following section describes each group order attribute.
6 ♦ Choose OK to return to the Group Order dialog box.
7 ♦ Choose OK to return to the report layout.
9.2.4 Group Order AttributesThe Group Level dialog box contains the following options for each group field:
• Print Once
• Reset Page
• Swap Header
• Swap Footer
• Repeat Header
By default, each of these options is deactivated. To activate an option for a particular group level, click the appropriate toggle box. The following sections explain each of the group options.
9–10

Sorting and Grouping Data
Print Once
Print Once suppresses the printing of repeating data on record band lines. By default, data from a selected group field prints on every line that includes that field. For example, if you group the records in a report by customer name (Name) and order number (Order-num), the records print by default as follows:
However, when you activate the Print Once toggle box, Report Builder prints the customer name and order number only once for each group. For example, the previous report prints as follows with Print Once enabled:
Reset Page
You can reset the page number to 1 and start a new page for each group. By default, Report Builder numbers report pages consecutively. However, if you activate the Reset Page toggle box, Report Builder restarts the page numbering at one for each group. For example, if you are printing a series of invoices grouped by order number and each invoice contains several pages of items ordered, you can start numbering the first page of each invoice at page 1.
Swap Header
When you create a report layout that contains a group header band, you can activate the Swap Header toggle box to print the group header band instead of the page header band on pages where the group changes. By default, Report Builder prints a group header before the first record for each group and places the page header at the top of each page. When you specify to use a group as a swapped header, you instruct Report Builder to use the group header for the first page of each group and the page header on all other pages.
Name Order-num Item-num Qty Price
Thundering Surf 41 00017 99 5.95Thundering Surf 41 00045 63 81.00Thundering Surf 41 00054 87 4.86Thundering Surf 23 00018 3 225.00Thundering Surf 23 00001 62 42.95
Name Order-num Item-num Qty Price
Thundering Surf 41 00017 99 5.95 00045 63 81.00 00054 87 4.86 23 00018 3 225.00
00001 62 42.95
9–11

Progress Report Builder User’s Guide
To swap headers, the group header must have the same number of lines as the page header, since it substitutes for the page header on some pages. Group header and page header band lines must also have the same line height. Figure 9–1 shows how swapped headers work.
Figure 9–1: Swapped Headers
For example, activate the Swap Header toggle box to print customer order information grouped by order number, with the company name and customer information at the top of each page on which a new name begins. When you activate Swap Header, Report Builder prints the group header at the top of the first page of the group (each group begins on a new page) and then prints the page header at the top of each subsequent page in the group.
See the invoice chapter of the Progress Report Builder Tutorial for an example of how to use swapped headers.
Customer No.----------------------------------------------------------------------------------------------------------------------
----------------------------------------------------------------------------------------------------------------------
----------------------------------------------------------------------------------------------------------------------
PageHeader
GroupHeaderRecordGroupFooter
Page No.
Order No.All Around Sports
Order No.Customer No.Customer Name
DateItem No. Price Qty. Ext. Price
Total Price
43 13.97 4 55.88 53 8.77 97 850.69
53 5/10/00 4
2
7,396.34
Page 2
2 64.00 78 4,992.00 8 9.85 21 206 .85 19 2.75 78 214.50 30 42.75 38 1,624.50 40 61.00 72 4392.00
All Around Sports Offside Hockey 4 53 5/10/00
Page 1
Report Layout
9–12

Sorting and Grouping Data
Swap Footer
When you create a report layout that includes group footers, you can activate the Swap Footer toggle box to print a group footer instead of the page footer on each page containing the last record in a group. By default, Report Builder prints a group footer after the last record for each group and places the page footer at the bottom of each page.
To swap footers, the group footer must have the same number of lines as the page footer, since it substitutes for the page footer on some pages. Group footer and page footer lines must also have the same line height. Figure 9–2 shows how swapped footers work.
Figure 9–2: Swapped Footers
----------------------------------------------------------------------------------------------------------------------
----------------------------------------------------------------------------------------------------------------------
----------------------------------------------------------------------------------------------------------------------
PageFooter
GroupHeaderRecordGroupFooter Page No.
All Around SportsOrder No.
Customer No.Customer Name
DateItem No. Price Qty. Ext. Price
43 13.97 4 55.88 53 8.77 97 850.69
Offside Hockey 4 53 5/10/00
2
Page 2
2 64.00 78 4,992.00 8 9.85 21 206 .85 19 2.75 78 214.50 30 42.75 38 1,624.50 40 61.00 72 4392.00
All Around Sports Offside Hockey 4 53 5/10/00
Page 1
Report Layout
Grand Total
Page No. Page Total
1 6,489.77 7,396.34
All Around Sports
9–13

Progress Report Builder User’s Guide
This is especially useful when you are reporting on preprinted, multi-page forms, such as invoice forms. For example, you can use this option when printing invoices that group many pages of items by order number. In that case, for each invoice, each page but the last contains a page footer that includes a page total. However, the last page of each invoice contains the group footer with the grand total for the entire invoice.
See the invoice chapter of the Progress Report Builder Tutorial for an example of how to use swapped footers.
Repeat Header
Repeat Header allows you to reprint a group header at the top of the page when a group continues across several pages. By default, Report Builder prints the group header only once at the beginning of each group. When you activate the Repeat Header toggle box, each time Report Builder starts a new page it prints a page header, if any, and then repeats the group header before printing more data within the group.
9.2.5 Changing the Group OrderOnce you have specified multiple group fields, you can change the group order by:
• Modifying group levels
• Inserting group levels
• Deleting group levels
• Moving group levels up or down
Report Builder automatically readjusts the group level numbers.
Modifying Group Levels
When you modify a group level, you can change the group field or any of the grouping options.
Follow these steps to modify a group level:
1 ♦ Choose Database→ Group Order. The Group Order dialog box appears.
2 ♦ Select the group level you want to modify.
3 ♦ Choose Edit. The Group Level dialog box appears.
4 ♦ Modify the group level in the same manner in which you specified it.
9–14

Sorting and Grouping Data
5 ♦ Choose OK to return to the Group Order dialog box.
6 ♦ Choose OK to save your changes and return to the report layout.
If you want to change the group level, use the Move Up or Move Down button in the Group Order dialog box.
Inserting Group Levels
To insert a group level into the currently defined group levels, you do not have to renumber each of the existing levels. You simply create a new group level with the appropriate group level number.
Follow these steps to insert an additional group level:
1 ♦ Choose Database→ Group Order. The Group Order dialog box appears.
2 ♦ Choose New. The Group Level dialog box appears.
3 ♦ Select a group level number.
4 ♦ Select the group field.
5 ♦ Specify any grouping options.
6 ♦ Choose OK. Report Builder returns to the Group Order dialog box, inserts the new group level at the specified level number, and moves the current level and those below it down one level.
7 ♦ Choose OK to return to the report layout.
For example, Order-Num is the first group level and Item-Num is the second group level. To insert Cust-Num as the new first level group, you create a new group level that defines Cust-Num as the group field and specifies 1 as the group level number. When you choose OK, Report Builder inserts Cust-Num as the first group level and reassigns Order-Num to level 2 and Item-Num to level 3.
Deleting Group Levels
When you delete a group level, Report Builder automatically reassigns any lower group level numbers to fill in the deleted level.
Follow these steps to delete a group level:
1 ♦ Choose Database→ Group Order. The Group Order dialog box appears.
2 ♦ Select the group level you want to delete.
9–15

Progress Report Builder User’s Guide
3 ♦ Choose Delete. Report Builder deletes the selected group level and moves the levels below it up one number.
4 ♦ Choose OK to save your changes and return to the report layout.
Moving Group Levels Up or Down
You can move group levels up or down within the group order list. When you move a group level, Report Builder automatically renumbers the group levels.
Follow these steps to move a group level:
1 ♦ Choose Database→ Group Order. The Group Order dialog box appears.
2 ♦ Select the group level you want to move (or renumber).
3 ♦ Choose Move Up or Move Down. Report Builder moves the selected group level one level in the appropriate direction and renumbers all the affected group levels.
4 ♦ Repeat Step 3 until the group level is in the desired placement.
5 ♦ Choose OK to save your changes and return to the report layout.
For example, Order-Num is the first group level, Item-Num is the second group level, and Cust-Num is the third group level. To move Cust-Num to be the first level, select 3) Custumer.Cust-Num, then choose Move Up twice. Report Builder moves Cust-Num to the first group level and renumbers Order-Num and Item-Num.
9.3 Sort-group TechniquesYou can use various sort-group techniques to further control the order of report records. For example, you can:
• Sort and group on aggregate fields as long as you specify that the fields are prepass.
As a general rule, when you select a prepass aggregate field (or calculated field using a pre-pass aggregate) as sort level n, Report Builder inserts an implicit sort level between sort level n and n+1. The implicit sort field is the group field on which the aggregate resets. If your sort level list includes several contiguous prepass aggregates that reset on the same group field, Report Builder inserts the implicit sort level once, after the last of the contiguous aggregates.
9–16

Sorting and Grouping Data
• Sort and group on calculated fields as long as they:
– Do not use the PAGE-NUMBER, RECORD-NUMBER, or PREVIOUS functions
– Are not self-referencing
– Are not related to final pass aggregate fields
You can also group on calculated fields whose expressions include both a prepassed aggregate field and a database field. However, you cannot select such fields as sort fields. This restriction is a result of the type of processing that produces prepass aggregates. See Chapter 5, “Aggregate Fields,” for more information about prepassing aggregate fields.
9–17

Progress Report Builder User’s Guide
9–18

10Filters
Filters are conditions that allow you to narrow the focus of a report to the specific data you want to display. Filters can consist of one or more conditions that specify what data Report Builder is to retrieve for the report.
This chapter describes:
• Filtering basics
• Filtering considerations
• Creating a filter
• Editing a filter
• Deleting a filter

Progress Report Builder User’s Guide
10.1 Filtering BasicsWhen you create a filter, you specify one or more conditions by which Report Builder limits the data it displays. Each condition contains:
• A condition field
• A comparison operator
• A comparison value to which Report Builder compares the condition field value
If you are specifying multiple conditions, also include:
• AND or OR to indicate the relationship between the conditions.
• Parentheses to indicate the beginning and end of a group of conditions. If you do not use parentheses, Report Builder evaluates AND operators before OR operators.
Lastly, you can also reverse the result of the comparison by using the NOT operator.
NOTE: If you are using outer joins in Report Builder and your report contains filter conditions, Report Builder applies the filter conditions after it processes the joins. As a result, the composite table might contain a different set of records than the records you obtain from an equivalent join and WHERE clause in a 4GL procedure.
The following sections describe condition fields, comparison operators, and comparison values.
Condition Fields
The condition field can be a database field, calculated field, aggregate field, or memo field. See the following sections for information about filtering on aggregate, calculated, or memo fields.
Comparison Operators
The comparison operator defines the relationship by which Report Builder evaluates the condition. Table 10–1 describes each of the available operators.
Table 10–1: Filter Comparison Operators (1 of 2)
Operator Description
= Equal to
<> Not equal to
> Greater than
10–2

Filters
The comparison drop-down list contains only the operators that are valid for use with the specified condition field.
NOTE: In Report Builder, the not equals (<>) operator treats the UNKNOWN value differently than the Progress 4GL. If a filter condition uses the not equals operator, and if the condition field for a record has the UNKNOWN value, the filter condition screens out the record, unless the comparison value is also UNKNOWN. For example, a condition such as Order-Line.Discount <> 0 screens out any records whose Order-Line.Discount value is UNKNOWN. In the 4GL, the same filter condition accepts all records whose discount value is UNKNOWN.
Comparison Values
The comparison value is the value to which Report Builder compares the condition field. The comparison value can be:
• A field of the same data type as the condition field.
• A constant value, such as a number or character string. Enclose character strings in quotation marks(“ “). The value can be up to 502 characters long. If the value is a character string, you can enter 500 characters and the quotation marks.
• A question mark (?) to match an UNKNOWN value.
• For IN-LIST, a list of constant values, any of which can be a character string, numeric, or date value depending on the data type of the field you selected from the Field drop-down list. Separate items in the list with commas. The values can be up to 530 characters long.
>= Greater than or equal to
< Less than
<= Less than or equal to
IN-RANGE Between two values or equal to either
IN-LIST Equal to one of the listed values (up to 10 values)
MATCHES Matches the entered pattern
BEGINS Begins with the specified characters
Table 10–1: Filter Comparison Operators (2 of 2)
Operator Description
10–3

Progress Report Builder User’s Guide
• For IN-RANGE, a pair of constant values that define a range.
• For MATCHES, a character string that defines a pattern using one or more of the valid wildcard characters: an asterisk (*) or a period ( .).
When you specify a comparison value, consider the following guidelines:
• If you specify =, <>, or IN-LIST as the comparison operator, you must enter the exact value you want to match in the Comparison Value fill-in field. For example, MA matches MA, not Massachusetts or Maine.
• If either the condition or the comparison field values are case sensitive, then the filter search is case sensitive.
• If you specify a date constant for the comparison value, you must use the “mmddyy” format.
10.2 Filtering ConsiderationsThis section describes the issues to consider when:
• Filtering on aggregate values
• Filtering on calculated values
• Filtering on memo fields
• Server-evaluatable filters
The following sections describe these topics.
10–4

Filters
10.2.1 Filtering on Aggregate ValuesReport Builder allows you to filter records based on aggregate field values depending on whether your report includes pre-pass aggregates:
By default, Report Builder creates aggregate fields as running aggregates. This means that Report Builder calculates the field’s value cumulatively as it reads each record that contributes to the aggregate. However, if you specify a field as pre-pass, Report Builder calculates the final values for the aggregate before printing the report records. While you can create filters using running counts and totals with a No-reset level, these filters might not produce the information you want because only records that meet the filter conditions contribute to the aggregate. However, it is easier to predict the filter results if you filter on a prepass aggregate because Report Builder reads all records that contribute to the aggregate before applying the filter.
Filtering on Running Aggregates
You cannot filter on running aggregates if your report contains any prepass aggregates. In reports that do not contain any prepass aggregates, you can filter on running totals and counts with their reset level set to No-reset. However, since Report Builder tests the current record against the filter before computing the aggregate for that record, Report Builder applies the filter based on the aggregate value as of the previous record. In other words, since Report Builder does not calculate the aggregate for the current record before applying the filter, Report Builder decides whether to include the record based on the aggregate values of the previous record.
For example, when you filter on the running count aggregate field, Report Builder does not increment the count for the current record until after applying the filter. To use the filter to select the first three records, you must specify that the Count field value is less than 3 rather than less than or equal to 3.
To select the first three records using the Counter aggregate field, which counts the Name field, specify the following filter condition:
If your report . . . Then you can filter on . . .
Does not contain any prepass aggregates
Total and Count aggregate fields with a NO-RESET reset level
Contains prepass aggregates Aggregates that reset on the highest (most inclusive) group field for which you have defined the prepass aggregate.
Counter < 3
10–5

Progress Report Builder User’s Guide
Without the filter, the report includes the following customers, sorted by their balance in descending order:
With the filter, Report Builder selects the following records:
Filtering on Prepass Aggregates
In reports that contain prepass aggregates, you can filter on any prepass aggregate that resets at the highest group level at which you have defined any prepass aggregate. You cannot filter on running aggregates or on other prepass aggregates in the report. For example, you cannot filter on a prepass group aggregate if the report also contains prepass aggregate with a No-reset setting.
For example, you can group orders by Name and Order-num and use the Order-Total aggregate field to calculate the total for each order. The Order-Total field is a prepassed field that resets for each order. You can create a filter that selects only those records where Order-Total is greater than $500. Because of the way Report Builder accumulates prepass aggregates, none of the running aggregates in this report would be available for filtering. In addition, the filters on the prepass Order-Total aggregate are invalid if the report contains any higher level prepass aggregates. An error message notifies you of invalid filters when you try to display or print such a report.
10.2.2 Filtering on Calculated ValuesReport Builder allows you to select records based on calculated fields values except those that:
• Use the PAGE-NUMBER, RECORD-NUMBER, or REPORT-FILTER functions
• Use aggregates on which you cannot filter
Name BalanceFirst Down Football 76,904.00Fallen Arches Running 68,716.00Hoops Croquet Co. 66,421.00Jazz Futis Kauppa 61,767.00On Target Rifles 56,784.00
Name Balance CounterFirst Down Football 76,904.00 1Fallen Arches Running 68,716.00 2Hoops Croquet Co. 66,421.00 3
10–6

Filters
You can compare a field to an expression by using a calculated field in a filter. For example, to define a filter that selects all records where the value in the Amount field equals the value of Discount * Rate, create a calculated field named Disc-Rate using this expression:
Then select Disc-Rate as the value in the filter using this expression:
Depending on the complexity of the calculated field expression, Report Builder or the database server might process the filter. See the “Server-evaluatable Filters” section in Chapter 6, “Calculated Fields,” for more information about expression processing.
10.2.3 Filtering on Memo FieldsThere are two restrictions for using the =, <>, IN-LIST, MATCHES, and BEGINS operators with memo fields in calculated field expressions and filter expressions:
• You cannot compare a memo field to another memo field.
• The memo field must be the left operand.
10.2.4 Server-evaluatable FiltersServer-evaluatable filters are server-evaluatable calculated fields, database fields, or constant strings.
Using server-evaluatable filters is much more efficient than using filters Report Builder evaluates itself.
Discount * Rate
Amount = Disc-Rate()
10–7

Progress Report Builder User’s Guide
10.3 Creating a FilterYou create a filter by specifying one or more filter conditions. Follow these steps to create a filter:
1 ♦ Choose Database→ Filter. If you have already defined a filter condition for this report, the Filter dialog box appears:
2 ♦ Choose the Insert button.
If this is the first filter condition you are defining for the report, the Insert Filter Condition dialog box appears:
3 ♦ If the filter has more than one condition, use the left parenthesis option to specify the beginning of a condition group. Parentheses indicate the order in which Report Builder evaluates AND and OR in a filter condition. Report Builder evaluates operators within parentheses first, from the innermost parentheses outward. If you do not use parentheses, Report Builder evaluates AND operators before OR operators.
4 ♦ Select a field from the Field drop-down list. This is the field by which Report Builder evaluates the criteria. You can use most calculated fields, some aggregate fields, and any of the fields defined for the tables used in the report.
5 ♦ Select an operator from the Comparison drop-down list. The operator defines the relationship by which Report Builder evaluates the condition.
Not all of the operators are available for all fields. Report Builder enables different operators depending on the condition field type.
10–8

Filters
6 ♦ Specify the value to which Report Builder compares the condition field. See the “Filtering Basics” section for a complete description of the valid comparison values.
7 ♦ Specify AND or OR for multiple conditions. AND specifies that records must meet all the criteria established in all the conditions. OR specifies that records must meet the criteria for at least one of the conditions to be included in the report.
8 ♦ If you used a left parenthesis in an earlier filter condition, use the right parenthesis to specify the end of a condition group.
9 ♦ Choose NOT if you want to reverse the result of the comparison.
10 ♦ Choose OK to create the filter. The Filter dialog box appears. It displays the newly created filter.
11 ♦ Choose Verify to check the filter syntax.
12 ♦ Choose OK to return to the report layout.
10.4 Editing a FilterThere are four ways to edit a filter:
• Edit an existing condition
• Insert a new condition before a selected condition
• Append a new condition to the end of the filter
• Delete a condition
10–9

Progress Report Builder User’s Guide
10.4.1 Editing an Existing ConditionFollow these steps to edit an existing condition:
1 ♦ Choose Database→ Filter. The Filter dialog box appears listing all the conditions defined for the report:
2 ♦ Select the condition you want to modify.
3 ♦ Choose the Edit button. The Edit Filter Condition dialog box appears:
4 ♦ Modify the condition. You can change any of the condition options. For more information about the condition options, see the “Creating a Filter” section.
5 ♦ Choose OK to modify the condition and return to the Filter dialog box.
6 ♦ Choose OK to return to the report layout.
10.4.2 Inserting a New ConditionFollow these steps to insert a new condition before an existing condition in the filter:
1 ♦ Choose Database→ Filter. The Filter dialog box appears.
2 ♦ Select the condition before which you want to insert the new condition.
10–10

Filters
3 ♦ Choose the Insert button. The Insert Filter Condition dialog box appears:
4 ♦ Specify the condition. For information about creating a condition, see the “Creating a Filter” section.
5 ♦ Choose OK to create the condition and return to the Filter dialog box. Notice that the newly created condition appears before the originally selected condition.
6 ♦ Choose OK to return to the report layout.
10.4.3 Appending a New ConditionFollow these steps to append a new condition to the end of the filter:
1 ♦ Choose Database→ Filter. The Filter dialog box appears.
2 ♦ Choose the Append Button. The Append Filter Condition dialog box appears:
3 ♦ Specify the condition. For information about creating a condition, see the “Creating a Filter” section.
4 ♦ Choose OK to create the condition and return to the Filter dialog box. Notice that the newly created condition appears last in the list of filter conditions. If you do not specify AND or OR, Report Builder defaults to AND.
5 ♦ Choose OK to return to the report layout.
10–11

Progress Report Builder User’s Guide
10.4.4 Deleting a Condition Follow these steps to delete a filter condition:
1 ♦ Choose Database→ Filter. The Filter dialog box appears.
2 ♦ Select the condition you want to delete.
3 ♦ Choose the Delete button. Report Builder removes the filter condition from the filter definition.
4 ♦ Choose OK to return to the report layout.
10.5 Deleting a FilterYou cannot delete a filter as an entire unit. Instead, you must delete each unwanted condition until there are no conditions defined for the filter. When there are no longer any conditions defined, the filter no longer exists.
10–12

11Lines, Rectangles, and Shading
You can use lines, rectangles, and shading to enhance report presentation. This chapter explains how to add lines and rectangles to reports and how to add various levels of shading to report areas.

Progress Report Builder User’s Guide
11.1 Line and Rectangle Placement Guidelines and RestrictionsThe following guidelines and restrictions apply to placing lines and rectangles in reports:
• You cannot place the top or bottom of a rectangle or vertical line on a new-page line. However, if the rectangle or line extends across a new-page line, Report Builder carries the object across pages.
• For reports with multiple records across, Report Builder prints rectangles for each record in the record band as long as the rectangle begins and ends in that record band. If the rectangle begins or ends in another band, Report Builder prints the rectangle for the first record only.
• When a rectangle or vertical line extends across pages, it prints down the page until the page footer (if any) or bottom margin is reached. When the rectangle or line resumes on the next page, Report Builder skips the top margin and page header (if any). Then the rectangle or line resumes printing.
• Rectangles and vertical lines can extend across multiple band areas. The rectangle or line begins printing when the band line containing the top of the rectangle or line prints. The rectangle or line ends when the band line containing the bottom of the rectangle or line prints. If you have multiple record lines and you want the rectangle to span all of those lines, size the rectangle so that it ends in the footer or summary band instead.
• If the band line on which a rectangle or vertical line begins is suppressed as a result of a logical condition, the line or rectangle does not print. If the band line on which a rectangle or vertical line ends is suppressed as a result of a logical condition, but the band line on which it begins is not, the line or rectangle begins printing in the appropriate place. However, the line or rectangle sides print continuously to the end of the report.
• Rectangles that reside fully within a given band and are positioned underneath word-wrapped fields from the same band might not print when the field wraps. To print a rectangle underneath word-wrapped fields in the same band, set the line to freeform and increase the band line height to accommodate the box size.
11–2

Lines, Rectangles, and Shading
• When Snap To Grid is enabled, any vertical line or rectangle drawn on an automatically sized band line snaps to the top and bottom of the band line. A horizontal line snaps to the bottom of the band line. If you increase the size of any field or text on the band line, you might have to adjust the height of any boxes or vertical lines accordingly.
• Report Builder generally displays the positions and sizes of lines and rectangles in the Print Preview window accurately. However, due to the significant difference between printer and screen resolutions, sometimes objects cannot be rendered on the screen exactly as they appear on the printed page. When in doubt about line or rectangle placement or alignment, always check your printed output first before adjusting sizes or locations on the report layout.
11.2 Lines This section describes:
• Drawing lines
• Moving lines
• Copying lines
• Cutting and pasting lines
• Resizing lines
• Changing line thickness
• Changing line color
• Deleting lines
11.2.1 Drawing Lines Follow these steps to draw a line:
1 ♦ Choose Create→ Line. The cursor changes to a crosshair.
2 ♦ Move the mouse either horizontally or vertically to draw the line. If Snap To Grid is enabled, the line snaps to the ruler increments (or to the top or bottom of an automatic band line) as you draw it.
11–3

Progress Report Builder User’s Guide
3 ♦ Release the mouse button.
The status bar displays the size of the line when the line is selected.
11.2.2 Moving Lines Follow these steps to reposition a line using the mouse:
1 ♦ Select the line. Sizing handles appear at both ends of the line.
2 ♦ Position the mouse pointer on any part of the line except the handles, then drag the line to a new location.
11.2.3 Copying Lines Follow these steps to copy a line:
1 ♦ Select the line.
2 ♦ Choose Edit→ Copy.
3 ♦ Position the mouse pointer where you want to place the copy.
4 ♦ Choose Edit→ Paste Object. Report Builder places a copy of the line at the new position.
11.2.4 Cutting and Pasting Lines Follow these steps to cut and paste a line:
1 ♦ Select the line.
2 ♦ Choose Edit→ Cut.
3 ♦ Position the mouse pointer where you want to paste the line.
4 ♦ Choose Edit→ Paste Object. Report Builder places the line at the new position.
11.2.5 Resizing Lines Follow these steps to resize a line:
1 ♦ Select the line.
2 ♦ Select a size and drag until the line is the length you want it.
11–4

Lines, Rectangles, and Shading
11.2.6 Changing Line ThicknessBy default, when you draw a line, Report Builder makes it the thinnest of five available line weights. Follow these steps to change the line thickness:
1 ♦ Select the line.
2 ♦ Choose Properties→ Line Properties or double-click the line. The Line Properties dialog box appears:
3 ♦ Select a line thickness from the Thickness drop-down list.
4 ♦ Choose OK to apply the new thickness and return to the report layout.
You can change the thickness for both horizontal and vertical lines. However, increasing the line thickness affects the line’s positioning.
When you increase the thickness of a horizontal line, the bottom of the line remains anchored and the thickness increases upward. When you increase the thickness of a vertical line, the direction it increases depends upon the line’s alignment. The following table describes how Report Builder increases line thickness for each type of alignment:
11.2.7 Changing Line Color The default line color is black. Follow these steps to change the line color:
1 ♦ Select the line.
2 ♦ Choose Properties→ Line Properties or double-click the line. The Line Properties dialog box appears.
Alignment Direction Increase
Left To the right
Center To the left
Right To the left
11–5

Progress Report Builder User’s Guide
3 ♦ Select a line color from the Color drop-down list.
4 ♦ Choose OK to apply the new color and return to the report layout.
11.2.8 Deleting Lines Follow these steps to delete a line:
1 ♦ Select the line.
2 ♦ Choose Edit→ Delete, or choose the Trash Can button, or press DELETE.
When you delete a line, you cannot paste the line back into the report. If you delete a line by mistake, you can choose Edit→ Undo Last Delete or choose the Trash Can button to reinsert the most recently deleted line in its original position.
11.3 RectanglesThis section describes:
• Drawing rectangles
• Moving rectangles
• Copying rectangles
• Cutting and pasting rectangles
• Resizing rectangles
• Changing rectangle border thickness
• Changing rectangle border color
• Excluding one or more rectangle sides
• Adding shading to rectangles
• Deleting rectangles
11–6

Lines, Rectangles, and Shading
11.3.1 Drawing Rectangles Follow these steps to draw a rectangle on the report layout:
1 ♦ Choose Create→ Rectangle. The cursor changes to a combined crosshair and rectangle.
2 ♦ Position the crosshair where you want to place the rectangle’s upper-left corner, then drag.
If Snap To Grid is enabled, the rectangle outline aligns to the ruler increments. The status bar displays the size of the rectangle when the rectangle is selected.
11.3.2 Moving Rectangles Follow these steps to reposition a rectangle:
1 ♦ Select the rectangle by clicking on its border. Sizing handles appear at the corners and on the sides of the rectangle.
2 ♦ Position the mouse pointer anywhere on the border other than the handles, then drag.
11.3.3 Copying Rectangles Follow these steps to copy a rectangle:
1 ♦ Select the rectangle.
2 ♦ Choose Edit→ Copy.
3 ♦ Position the mouse pointer where you want to place the copy.
4 ♦ Choose Edit→ Paste Object. Report Builder places a copy of the rectangle at the new position.
11.3.4 Cutting and Pasting Rectangles Follow these steps to cut and paste a rectangle:
1 ♦ Select the rectangle.
2 ♦ Choose Edit→ Cut.
3 ♦ Position the mouse pointer where you want to paste the rectangle.
4 ♦ Choose Edit→ Paste Object. Report Builder places the rectangle at the new position.
11–7

Progress Report Builder User’s Guide
11.3.5 Resizing Rectangles You can resize a rectangle by changing:
• Either the width or the height of the rectangle
• Both the width and height of the rectangle
Resizing the Width or Height of a Rectangle
Follow these steps to change either the width or the height:
1 ♦ Select the rectangle. Sizing handles appear at the corners and on the sides of the rectangle.
2 ♦ Position the mouse pointer on the top, bottom, or side handle, then drag. (You can use the rulers as a sizing guide.)
The status bar displays the new size.
If Snap To Grid is enabled, the rectangle shape snaps to the horizontal and vertical ruler increments (or to the top or bottom of an automatic band line) as you size the rectangle.
Resizing Both the Width and Height of a Rectangle Proportionately
Follow these steps to change both the width and the height of a rectangle so that the proportions (aspect ratio) of the changed rectangle remain the same:
1 ♦ Select the rectangle. Sizing handles appear at the corners and on the sides of the rectangle.
2 ♦ Position the mouse pointer on one of the corner handles. Then, while holding down SHIFT, drag that corner handle into the new position. (You can use the rulers as a sizing guide.)
The status bar displays the new size.
If Snap To Grid is enabled, the rectangle shape “snaps” to the horizontal and vertical ruler increments (or to the top or bottom of an automatic band line) as you size the rectangle.
11–8

Lines, Rectangles, and Shading
11.3.6 Changing Rectangle Border ThicknessBy default, when you draw a rectangle, Report Builder makes its border the thinnest of the five available border weights. Follow these steps to change the border thickness:
1 ♦ Select the rectangle.
2 ♦ Choose Properties→ Rectangle Properties or double-click the rectangle border. The Rectangle Properties dialog box appears:
3 ♦ Select a border thickness from the Thickness drop-down list.
4 ♦ Choose OK to apply the new thickness and return to the report layout.
When you increase the thickness of a rectangle’s border, the outer edge of the rectangle remains fixed and the thickness increases inward.
11.3.7 Changing Rectangle Border Color The default border color is black. Follow these steps to change the border color:
1 ♦ Select the rectangle.
2 ♦ Choose Properties→ Rectangle Properties or double-click the rectangle border. The Rectangle Properties dialog box appears.
3 ♦ Select a border color from the Edge Color drop-down list.
4 ♦ Choose OK to apply the new color and return to the report layout.
11–9

Progress Report Builder User’s Guide
11.3.8 Excluding One or More Rectangle Edges By default, Report Builder displays all four edges of a rectangle, but you can exclude one or more edges. This is useful, for example, if you want to print a border above and below a field or group of fields. Also, by turning off all four edges of a rectangle and applying a shading pattern, you can insert borderless shading areas on your report.
Follow these steps to control which edges of a rectangle to include:
1 ♦ Select the rectangle.
2 ♦ Choose Properties→ Rectangle Properties or double-click the rectangle border. The Rectangle Properties dialog box appears.
3 ♦ Deactivate the Left, Right, Top, or Bottom toggle boxes to choose the sides you want to exclude from the rectangle.
4 ♦ Choose OK to apply the new settings and return to the report layout.
11.3.9 Adding Shading to RectanglesBy default, Report Builder applies a solid pattern with no background color and black as the foreground color to a rectangle. You can change any of these settings.
Follow these steps to specify any pattern or shading:
1 ♦ Select the rectangle.
2 ♦ Choose Properties→ Rectangle Properties or double-click the rectangle border. The Rectangle Properties dialog box appears.
3 ♦ Choose a pattern from the Pattern drop-down list.
4 ♦ If you want a foreground color, specify the color for the crosshatch pattern from the Foreground drop-down list.
5 ♦ If you select a crosshatch pattern (any pattern except the first selection), specify a color for the background of the rectangle from the Background drop-down list.
6 ♦ Choose OK to apply the new pattern and colors and return to the report layout.
11–10

Lines, Rectangles, and Shading
11.3.10 Deleting Rectangles Follow these steps to delete a rectangle:
1 ♦ Select the rectangle.
2 ♦ Choose Edit→ Delete, or choose the trash can button, or press DELETE.
When you delete a rectangle, you cannot paste it back into the report. If you delete a rectangle by mistake, you can choose Edit→ Undo Last Delete or choose the trash can button to reinsert the most recently deleted rectangle in its original position.
11–11

Progress Report Builder User’s Guide
11–12

12Images
This chapter describes how you can use bitmapped images in your reports. Specifically, it describes:
• Image basics
• Importing images
• Pasting images from the Clipboard
• Moving images
• Sizing images
• Replacing image files

Progress Report Builder User’s Guide
12.1 Image BasicsYou import images in reports by specifying the image size and placement on the report layout, then specifying the image source. The image source can be a field or pathname. When you specify a pathname, you specify the filename of a particular image. However, if you use a field, you can dynamically import different images for different records. You might want to use dynamic images for reports such as catalogs or personnel directories where you have a different picture for each record.
You can move, cut, copy, paste, or delete the inserted image just as you do any field on the layout. Report Builder performs cutting, copying, and pasting internally and does not place the image in the Windows Clipboard. If you move the image to another band of the report or if you paste it in another band, Report Builder converts the line on which the image is located to a freeform line.
12.1.1 Supported Image File TypesReport Builder supports the image file formats listed in Table 12–1. Note that .EPS, .WMF, .PCT, and .WPO file formats can include both bitmapped and vector components. For these file formats, Report Builder uses only the bitmapped graphic information.
Table 12–1: Supported Image File Types (1 of 2)
File Extension Image File Type
.BMP Windows bitmap
.CAL Computer-aided Acquisition and Logistics Support
.CUT Halo CUT
.DCX Intel FAX format
.DIB Windows device-independent bitmap
.EPS Encapsulated PostScript
.GIF CompuServe Graphics Interchange Format
.ICA IBM IOCA
..ICO Microsoft Icon File format
.IFF Amiga IFF
12–2

Images
Because Report Builder uses the image file extension to determine an image file’s format, use the appropriate extension for the image file type.
.IMG GEM bitmap
.JPG JPEG
.LV LaserView
.MAC Macintosh MacPaint
.MSP Microsoft Windows Paint
.PCD Kodak Photo CD
.PCT Macintosh PICT
.PCX PC Paintbrush
.PSD Adobe Photoshop
RAS1 Sun Raster (1-, 8-, 24-, or 32-bit Standard, BGR, RGB, and byte encoded)
.TGA TARGA
.TIF Tag image file format
.XBM (also BM) X bitmap
.XPM Pixmap
.WMF Windows metafiles
.WPG WordPerfect graphics
1 There is no standard file extension. Other variations are RAST, IM, IM1, IM8, IM24, IM32.
Table 12–1: Supported Image File Types (2 of 2)
File Extension Image File Type
12–3

Progress Report Builder User’s Guide
12.1.2 Images and Band Line HeightWhen you paste an image on a band line, its height setting changes to freeform, as indicated on the layout by small vertical arrows in the line status area. A freeform band line expands to accommodate the size of the image you insert. However, when you cut the image from the band line, the line height setting does not change back to automatic.
For detailed information about freeform and automatic band lines, see Chapter 3, “Bands.”
12.2 Importing Images Follow these steps to import a graphic image into a report:
1 ♦ Choose Create→ Image. The cursor changes to a crosshair and an outline of the Image button.
2 ♦ Position the crosshair where you want the upper-left corner of the image to begin. Click and drag the mouse down and to the right. Report Builder draws an outline of the image. When you release the mouse, the Image Properties dialog box appears:
3 ♦ Select a filename or field from the appropriate selection list. The From Field drop-down list contains only character fields.
4 ♦ Enter the width and height settings in the Width and Height fields. If you use the up and down arrows to select the size, the setting value increases or decreases in increments of one-tenth of an inch.
12–4

Images
If you incorrectly change the image size in the Width and Height fields, you can change the size using two automatic settings:
• Original Size — Returns the image to its original size (which is the image size before you imported it into Report Builder).
• Current Size — Returns the image to the size it was before you entered new values in the Width and Height fields (the size it is on the report layout).
5 ♦ Specify the image scaling. There are three scaling options:
• Zoom — (default) Maintains the image’s original aspect ratio (width to height) regardless of the dimensions of the insertion rectangle or of the specified width-to-height ratio.
• Crop — Inserts the image at its original size and does not perform any image scaling. If the image is larger than the insertion rectangle or if you enter width and height settings smaller than those of the original image, Report Builder crops the image—that is, it inserts only the top left-portion of the image that fits within the rectangle or specified dimensions.
• Stretch — Scales the image to fit the insertion rectangle or to fit the specified width and height. If the aspect ratio of the rectangle or of the specified width and height differs from the aspect ratio of the original image, Report Builder distorts the shape of the image in the report (either stretches or shrinks the image).
6 ♦ Choose OK. Report Builder inserts the image at the specified location with the specified scaling.
12.3 Pasting Images from the ClipboardFollow these steps to paste an image from the Windows Clipboard into a report:
1 ♦ Copy or cut the image to the Clipboard using an image manipulation tool.
2 ♦ Switch to or start Report Builder.
3 ♦ Position the edit cursor where you want to place the upper-left corner of the image.
4 ♦ Choose Edit→ Paste Clipboard Image. Report Builder inserts the image at the specified location. You can then move or size the image as necessary.
12–5

Progress Report Builder User’s Guide
When you save a report that contains an image pasted from the Clipboard, the Save Report dialog box appears:
This dialog box shows a thumbnail of the image and prompts you to supply a pathname. Report Builder stores the image in the file you specify and saves this information within the report definition. By default, the fill-in field displays the name of the default image file directory (if you specified one in the Default Directories dialog box).
The file extension you specify determines the graphic type of the saved image file. See Table 12–1 for a complete list of supported image types. If you do not specify an extension, Report Builder saves the graphic in .BMP format.
For example, the filename specified in the following dialog box has a .TIF extension. Therefore, Report Builder saves the graphic in TIFF format:
When you retrieve a report with an image, Report Builder looks for the image file first in the current report library directory. If it does not find the file, Report Builder then looks in the directory saved with the report. If the image file is in neither location, Report Builder looks in the default image directory.
12.4 Moving ImagesFollow these steps to move an image:
1 ♦ Select the image.
2 ♦ Click and hold the mouse anywhere on the image except at one of the eight handles around the edge. The cursor changes into a four-way arrow.
3 ♦ Drag the image to the new location.
12–6

Images
12.5 Sizing ImagesThere are two ways to size images:
• On the report layout
• In the Image Properties dialog box
12.5.1 Sizing Images on the Report Layout After you insert an image on the report layout you can change its size. For images with an image scaling setting of Stretch or Crop, you can change one dimension without changing the other. You cannot change just one dimension of an image with an image scaling setting of Zoom, since the width-to-height ratio of such an image must be maintained. See the “Importing Images” section in this chapter for a full explanation of the Image Scaling settings.
If Snap To Grid is enabled, the image shape snaps to the horizontal and vertical ruler increments as you size the image.
Follow these steps to resize an image:
1 ♦ Select the image. Sizing handles appear at each corner and at the center of each side. The following image shows how an image appears with handles:
2 ♦ Select and drag the appropriate handle. To change only the height or only the width, drag a top or bottom handle, or a side handle. Note that this will change the proportions of the image, perhaps making it look distorted. To resize without changing the proportions, hold down SHIFT and drag a corner handle.
12–7

Progress Report Builder User’s Guide
12.5.2 Sizing Images in the Image Properties Dialog BoxInstead of sizing an image on the layout, you can use the Image Properties dialog box to specify image width and height. You can:
• Change the original settings
• Reset to the original settings
Changing the Original Settings
Follow these steps to size an image using the Image Properties dialog box:
1 ♦ Choose Properties→ Image Properties or double-click the image. The Image Properties dialog box appears. The Image Size panel displays the dimensions of the image:
2 ♦ Enter or select the appropriate width and height setting in the Width and Height fields. If you use the up and down arrows to select a size, the setting value increases or decreases in increments of one-tenth of an inch.
3 ♦ Choose OK. Report Builder resizes the image based on the specified width and height settings. If the Zoom option is enabled (the default), Report Builder maintains the image’s original aspect ratio even if you specified width and height settings with a different ratio.
12–8

Images
Resetting to the Original Settings
If you decide that you do not like the new image size, you can easily return it to its original size. Follow these steps to reset the image to its original dimensions:
1 ♦ Choose Properties→ Image Properties or double-click the image. The Image Properties dialog box appears.
2 ♦ Choose the Original Size button. Report Builder displays the original dimensions of the image in the Width and Height fields.
3 ♦ Choose OK. Report Builder increases or decreases the image on the layout to match the original dimensions.
12.6 Replacing Image FilesFollow these steps to select an image to replace the current one:
1 ♦ Choose Properties→ Image Properties or double-click the image. The Image Properties dialog box appears.
2 ♦ Specify the new field or filename.
3 ♦ Choose OK to replace the file and return to the report layout.
12–9

Progress Report Builder User’s Guide
12–10

13Layout Manipulation
Report Builder allows you to manipulate the way the report layout appears and how fields appear on the layout.
This chapter describes:
• Layout basics
• Using the Instant Layout option
• Displaying or hiding the tool and format bars
• Manipulating the rulers
• Manipulating the grid
• Displaying or hiding the scroll bars
• Representing fields on the report layout
• Specifying paper size
• Specifying page orientation
• Specifying page margins
• Specifying fonts

Progress Report Builder User’s Guide
13.1 Layout BasicsFigure 13–1 shows how the Report Builder main window appears with the default layout settings.
Figure 13–1: Main Window with Default Layout Settings
This figure identifies some of the layout elements you can manipulate. There are other elements, such as page size and fonts, that affect the layout or objects on the layout but do not appear on the layout.
13.2 Using the Instant Layout OptionThe Instant Layout option creates a basic, usable report layout on which you build a report definition. The Instant Layout option allows you to specify the fields to include in the report, then automatically formats them on the report layout. It also provides a layout with five different types of band lines and some useful fields.
13–2

Layout Manipulation
Figure 13–2 shows a report layout generated with the Instant Layout option.
Figure 13–2: Example of Instant Layout Results
The Instant Layout option places fields you select from the master table on a record band line with column titles above each field on a page header band line. The Instant Layout also includes Report Builder text strings, calculated fields for date, time, page number, and number of records printed, as well as aggregate fields for the grand totals of numeric fields that have decimal places. For a complete description of the Instant Layout option, see Chapter 2, “Report Definitions and Report Libraries.”
In many cases, you can use the Instant Layout as a starting point for creating your own custom layouts. However, you might prefer to develop reports from scratch each time you start Report Builder. Report Builder allows you to specify whether to provide the Instant Layout option for new reports and, if the Instant Layout option is provided, whether to let you select the fields to include.
You can also use Report→ Instant Layout after you have started creating a report, for example, after creating joins or calculated fields. However, if you use the Instant Layout option after you have started placing fields on the layout, Report Builder replaces the layout you created with the one generated by the Instant Layout option.
The following sections describe how to perform both these tasks.
13–3

Progress Report Builder User’s Guide
13.2.1 Specifying Default PromptingFollow these steps to specify whether Report Builder prompts you to use the Instant Layout option when you create a new report:
1 ♦ Choose Options→ Preferences. The Preferences dialog box appears:
2 ♦ Choose whether you want Report Builder to prompt you for the Instant Layout. Table 13–1 lists the available options. The default is Prompt.
3 ♦ If you chose Prompt or Always Use in Step 2, choose whether you want Report Builder to automatically place all fields in the Instant Layout. Table 13–2 lists the available options. The default is Select Fields.
Table 13–1: Instant Layout Use Options
Option Description
Prompt Report Builder prompts you to use the Instant Layout each time you create a new report definition.
Always Use Report Builder provides the Instant Layout each time you create a new report definition.
Never Use Report Builder starts with a blank layout each time you create a new report.
13–4

Layout Manipulation
4 ♦ Choose OK to return to the report layout.
13.2.2 Using the Instant Layout in an Existing Report DefinitionYou can choose to restructure an existing report definition using the Instant Layout option at any time while creating a report definition. Report Builder replaces the layout you create with the one generated by the Instant Layout option, but does not affect nonlayout features of the report definition such as joins, sorting, grouping, filters, aggregate fields, calculated fields, and user-defined functions. Therefore, the newly generated instant layout can include fields from joined tables or calculated fields from the existing report definition.
Follow these steps to use the Instant Layout option in an existing report definition:
1 ♦ Choose Report→ Instant Layout. Report Builder prompts you to save the current report before creating a new instant layout.
2 ♦ Choose Yes to save the report definition or No to replace the layout without saving. If you choose Yes, Report Builder allows you to save the report definition before creating the instant layout.
After you choose whether to save the existing report definition, by default the Instant Layout Fields dialog box appears.
3 ♦ Choose the fields to insert on the layout, then choose OK. Report Builder creates the instant layout.
13.3 Displaying or Hiding the Tool and Format BarsYou can hide the tool and format bars so that you can see more of your report layout. Keep in mind that if you hide the tool and format bars, you will not have quick access to menu options. By default, Report Builder displays both bars, as indicated by the check marks next to Tool Bar and Format Bar on the View menu.
Table 13–2: Instant Report Use Options
Option Description
Select Fields Report Builder prompts you to specify which fields from the selected table you want to include.
All Fields Report Builder automatically includes all the fields from the selected table, or as many as will fit on one band line.
13–5

Progress Report Builder User’s Guide
Follow these steps to hide or display the tool or format bar:
1 ♦ Choose View from the menu bar.
2 ♦ Choose the option you want to enable or disable.
When you enable an option, a check mark appears next to it on the menu. The check mark disappears when you disable the option.
When you exit Report Builder, it saves these settings and uses them the next time you run Report Builder.
13.4 Manipulating the RulersYou can manipulate the horizontal and vertical rulers to:
• Display or hide the rulers
• Change the ruler spacing
13.4.1 Displaying or Hiding the RulersYou can either show or hide the horizontal and vertical rulers on the layout. By default, Report Builder displays both rulers, as indicated by the check marks next to Horizontal Ruler and Vertical Ruler on the View menu.
Follow these steps to hide or display the horizontal or vertical rulers:
1 ♦ Choose View from the menu bar.
2 ♦ Choose the option you want to enable or disable.
A check mark appears next to the option when it is enabled.
When you exit Report Builder, it saves these settings and uses them the next time you run Report Builder.
13–6

Layout Manipulation
13.4.2 Changing the Ruler SpacingThe ruler spacing setting controls the number of ruler increments per inch on each ruler and determines the spacing of the layout grid. There are two ways to change the ruler spacing:
• Specify the ruler spacing for individual reports.
• Specify the default ruler spacing for all reports.
Specify the Ruler Spacing for Individual Reports
Follow these steps to change ruler and grid spacing:
1 ♦ Choose Properties→ Rulers or double-click either ruler. The Ruler dialog box appears:
2 ♦ Specify the spacing in inches for each ruler.
3 ♦ Choose OK.
Specifying the Default Ruler Spacing for All Reports
You can specify the default ruler spacing for both the horizontal and vertical rulers. Because the fonts actually applied to fields in the report control the print spacing, the ruler spacing settings control only the spacing of the report layout rulers.
13–7

Progress Report Builder User’s Guide
Follow these steps to change the Report Builder default ruler spacing:
1 ♦ Choose Options→ Default Settings. The Default Settings dialog box appears:
2 ♦ Enter a ruler spacing in the Horizontal and Vertical fill-in fields. The default setting for both the rulers is 10. You can select a setting from 4 through 30.
3 ♦ Choose OK to return to the report layout.
13.5 Manipulating the GridThere are three ways to manipulate the grid:
• Display or hide the grid
• Change the grid spacing
• Enable or disable Snap To Grid
The following sections describe these tasks.
13.5.1 Displaying or Hiding the GridTo display or hide the grid, choose View→ Grid. A check mark appears next to the option when it is enabled.
13–8

Layout Manipulation
13.5.2 Changing the Grid SpacingYou can change the grid spacing by changing the ruler spacing. For information on changing the spacing, see the “Changing the Ruler Spacing” section.
13.5.3 Enabling or Disabling Snap To GridYou can also enable or disable the Snap To Grid option. When Snap To Grid is enabled, option and objects on the layout snap to the ruler increments when you insert, move, or size them.
There are two ways to enable or disable Snap To Grid:
• Specify the setting for individual reports
• Specify the default setting for all reports
Specifying Snap To Grid for Individual Reports
To set this setting for an individual report, choose the Snap To Grid button on the format bar or choose Options→ Snap To Grid.
Specifying the Default Snap to Grid Setting for All Reports
Follow these steps to change the default setting for the Snap To Grid option:
1 ♦ Choose Options→ Default Settings. The Default Settings dialog box appears.
2 ♦ Choose the Snap To Grid option.
3 ♦ Choose OK to return to the report layout.
13.6 Displaying or Hiding the Scroll BarsYou can display or hide the horizontal and vertical scroll bars.
Follow these steps to display or hide the scroll bars:
1 ♦ Choose Options→ Preferences. The Preferences dialog box appears.
2 ♦ Activate the Horizontal and Vertical Scroll Bar toggle boxes. When an option is enabled, an “x” appears in the toggle box.
3 ♦ Choose OK to return to the report layout.
13–9

Progress Report Builder User’s Guide
13.7 Representing Fields on the Report LayoutBy default, Report Builder represents fields on the report layout by indicating the field width with a shaded rectangle and specifying the field’s format.
There are two ways to change how Report Builder represents fields:
• Change the field width indicator
• Display field names instead of field formats
13.7.1 Changing the Field Width IndicatorAlthough Report Builder uses a shaded rectangle by default, you can change the field width indicator by changing the shading color or using only the rectangle outline.
Follow these steps to change Report Builder default settings for the field width indicator:
1 ♦ Choose Options→ Default Settings. The Default Settings dialog box appears.
2 ♦ Specify how you want to represent the field width. You can:
• Choose Outline Box (in the Field Width Indicator panel) to represent the field width with a rectangular outline.
• Select a different color from the Indicator Color drop-down list to represent the field width with a different shading or outline color.
3 ♦ Choose OK to return to the report layout.
When you change this setting, you change the default for the current report definition and any new report definitions you create.
13.7.2 Displaying Field Names Instead of Field FormatsBy default, Report Builder represents a field by displaying its format on the shaded rectangle. However, it can be difficult to identify a field solely by its format. To make it easier to identify a field, you can display the field name instead of the field format.
To display the field names, choose View→ Field Names. A check mark appears next to Field Names. Thus, Report Builder displays the field names for all fields on the report layout. If a field name is longer than the field width, Report Builder truncates the field name on the layout.
13–10

Layout Manipulation
13.8 Specifying Paper SizeThere are two ways to control the paper size:
• Specify the paper size for individual reports
• Specify the default paper size for all reports
13.8.1 Specifying the Paper Size for Individual ReportsFollow these steps to change paper size for individual reports:
1 ♦ Choose Properties→ Page Layout. The Page Layout dialog box appears:
2 ♦ Specify the paper size for the report page.
3 ♦ Choose OK to return to the report layout.
13–11

Progress Report Builder User’s Guide
13.8.2 Specifying the Default Paper Size for All ReportsFollow these steps to change the Report Builder default paper size:
1 ♦ Choose Options→ Default Settings. The Default Settings dialog box appears.
2 ♦ Specify the paper size for printed output. The default is Letter. The available options depend on the capabilities of the selected printer.
Some printers allow you to specify a custom paper size rather than a predefined size (although many Windows printer drivers do not support custom paper sizes). For those printers, one of the displayed choices is User Defined Size. You specify the dimensions for the User Defined Size selection using either Report→ Print Setup or the Printers option in the Windows Control Panel. When you select User Defined Size in the Page Layout dialog box, the current dimensions for that selection appear below the Paper Size panel.
3 ♦ Choose OK to return to the report layout.
13.9 Specifying Page OrientationThe page orientation determines whether Report Builder prints the data horizontally or vertically on the page. Follow these steps to specify the page orientation for a report:
1 ♦ Choose Properties→ Page Layout. The Page Layout dialog box appears.
2 ♦ Specify the page orientation for the report. There are two choices:
• Portrait — Prints the data vertically on the page. Portrait is the default setting.
• Landscape — Prints the data horizontally on the page.
3 ♦ Choose OK to return to the report layout.
NOTE: Although you can specify the page orientation in the MS-Windows printer setup dialog box (Report→ Print→ Setup or Report→ Printer Setup→ Setup), Report Builder ignores that setting and uses the orientation settings in the Page Layout dialog box.
13–12

Layout Manipulation
13.10 Specifying Page MarginsOn the layout, the right margin is indicated on the ruler by the letter “R.” Report Builder uses the right margin setting to determine placement of fields on right- or center-justified band lines. Report Builder does not prevent you from inserting a field so that it extends beyond the right margin, nor does it prevent such a field from printing beyond the right margin. However, if a field extends beyond the size of the paper, Report Builder truncates the data and prints only the information that fits on the page.
There are two ways to control the page margins:
• Specify the page margins for individual reports
• Specify the default page margins for all reports
13.10.1 Specifying the Page Margins for Individual ReportsFollow these steps to change page margins for individual reports:
1 ♦ Choose Properties→ Page Layout. The Page Layout dialog box appears.
2 ♦ Specify the margin settings for the report page.
3 ♦ Choose OK to return to the report layout.
13.10.2 Specifying the Default Page Margins for All ReportsFollow these steps to change the Report Builder default margin settings:
1 ♦ Choose Options→ Default Settings. The Default Settings dialog box appears.
2 ♦ Specify the margin settings for the report page.
3 ♦ Choose OK to return to the report layout.
13–13

Progress Report Builder User’s Guide
13.11 Specifying FontsYou can specify font characteristics such as typeface, point size, color, style, and effect. You can specify these characteristics in two ways:
• Specify the font characteristics for individual fields
• Specify the default font characteristics for all reports
The following sections describe how to perform these tasks. See Chapter 4, “Fields,” for a complete description of font characteristics.
13.11.1 Specifying the Font Characteristics for Individual FieldsFollow these steps to change the font characteristics for one or more fields on the current report layout:
1 ♦ Select the fields to which you want to apply a different font.
2 ♦ Choose Properties→ Font. The Font dialog box appears:
3 ♦ Select a font from the Font selection list.
4 ♦ Select a point size from the Size selection list. If the font you select is scalable and the point size you want does not appear on the list, enter the point size you want.
13–14

Layout Manipulation
5 ♦ Choose the styles, effects, and colors from their respective drop-down lists.
6 ♦ Choose OK to apply the new font information and return to the report layout.
You can also use the options on the format bar to change the font characteristics for individual fields.
13.11.2 Specifying the Default Font Characteristics for All Reports
Follow these steps to change the Report Builder default font, point size, and color:
1 ♦ Choose Options→ Default Settings. The Default Settings dialog box appears.
2 ♦ Select a font from the Font drop-down list.
3 ♦ Specify a point size in the Size fill-in field.
4 ♦ Select a color from the Foreground Color drop-down list.
5 ♦ Choose OK to return to the report layout.
NOTE: Any font changes you make do not affect fields currently in the layout but are applied to fields you insert after changing the default.
13–15

Progress Report Builder User’s Guide
13–16
14Form Letters
This chapter describes how to use Report Builder to create form letters, in the following sections:
• Form letter basics
• Form letter considerations
• Generating form letters
See the form letters chapter in the Progress Report Builder Tutorial for step-by-step instructions for creating two sample form letters.

Progress Report Builder User’s Guide
14.1 Form Letter BasicsTo create a form letter, Report Builder combines information from a memo file with the other report information in the report definition. A memo file is an unformatted text file that contains the text for the letter. Unformatted means that the file does not contain format information from the text editor or word processing program in which you created or edited the file. When you save a file with a text editor or word processing program, the program saves formatting codes at the beginning of the file even if you do not specify any formatting information such as fonts or styles. To save a file without any formatting information, you must save the file as a text only or unformatted ASCII file. If the memo file does contain any format information, Report Builder cannot use the file.
Before Report Builder can access the information in the memo file, you must attach the memo file to the report definition. Figure 14–1 illustrates how Report Builder uses memo files.
Figure 14–1: How Report Builder Uses Memo Files
The information in a memo file is grouped into memo fields. A memo field is a portion of text that you identify in the memo file and include in the report layout. You include memo fields in the report layout as you would any other type of field. Figure 14–2 illustrates how Report Builder incorporates memo fields on the report layout.
Figure 14–2: How Report Builder Incorporates Memo Fields
Memo File ReportDefinition
Report Builder
Memo Field 1
Memo Field 2
xxxxxxxxxxxxxxxxxxxxxxx
xxxxxxxxxxxxxxxxxxxxxxxxxxxxxxxxxx
Memo Field 1
xxxx
xxxxxxxxxxx
xxxxxxxxxxxxxxxxxxxxxxxxxx
Memo Field 2xxxxxxxxxx
Memo File Report Layout
14–2

Form Letters
Notice in Figure 14–2 that you can include more than one memo field in a memo file. You can also combine the text in a memo field with data from fields in a database.
14.2 Form Letter ConsiderationsYou must consider a number of Report Builder features that have special relevance to form letters. Although each of these features is discussed at length elsewhere in this guide, this section briefly explains five important features:
• Word-wrap format and width of memo fields
• Field width and format of embedded data fields
• Functions that conditionally include memo fields
• Options that control printing of blank lines
• Page breaks
14.2.1 Word-wrap Format of Memo FieldsWhen you first insert a memo field in a report, it defaults to left-justified, word-wrap format. While you can change the justification of the field to right or full, it is unlikely that you will change the word-wrap format. (Only if the field is word-wrapped can you be sure to print all the text from the memo field.) As you insert the memo field in your report layout, be aware of the characteristics of this format, as summarized below:
• If you place a word-wrapped memo field in a page header/footer or swap header/footer band, Report Builder wraps the text only until it encounters the end of the area. These areas are fixed length, and any data that does not fit in the area does not print.
• If you place a word-wrapped memo field in any band other than a page header/footer or swapped header/footer, Report Builder wraps the text until the entire contents of the memo field have been printed, causing these areas to vary in length.
For more information on word-wrapping and justification, see Chapter 4, “Fields.” For a definition of swapped headers and footers, see Chapter 9, “Sorting and Grouping Data.”
14–3

Progress Report Builder User’s Guide
14.2.2 Width of Memo FieldsThe width of the memo field determines the horizontal area where Report Builder wraps the text. The maximum width of a memo field is 254 characters.
Follow these steps to indent the memo text on the report:
1 ♦ Choose Properties→ Format. The Format dialog box appears:
2 ♦ Specify the memo field width in characters or inches.
3 ♦ Move the field into position in the layout; for example, as shown in Figure 14–3.
Figure 14–3: Layout Showing Memo Fields
The layout in Figure 14–3 produces the report shown in Figure 14–4.
Figure 14–4: Report with Two Memo Fields
This memo is the introductory paragraph andprints across the page from the left marginto a width of 45 characters.
This memo field is shorter and only prints within a field width of 35 characters.
14–4

Form Letters
14.2.3 Field Width and Format of Embedded FieldsNumeric, date, and logical fields embedded in a memo field appear with the same width and format that has been assigned to the fields in the report.
Follow these steps to change the field width or format of a numeric, date, or logical field that is embedded within a memo field but not inserted on the report layout:
1 ♦ Insert the field anywhere on the report.
2 ♦ Choose Properties→ Format. The Format dialog box appears.
3 ♦ Change the field width or format.
4 ♦ Erase the field from the report layout.
When the field is merged with the memo field in your report, it will have the width and format you assigned it. For any embedded character field, Report Builder removes leading and trailing spaces when the field value is printed with the memo text.
14.2.4 Conditionally Including Memo FieldsIf your form letter is composed of several memo fields, you can use the IIF or CASE function to conditionally include memo field text.
Follow these steps to conditionally print memo fields:
1 ♦ Create a calculated field with the appropriate IIF or CASE expression.
2 ♦ Insert the calculated field in your form letter where you want the memo text to appear.
NOTE: You can also use Properties→ Band Line Properties to assign a logical condition that will conditionally print any band line in the report. See Chapter 3, “Bands,” for more information.
For example, if you want to print the Pay-up memo field only if the addressee balance is past due, you can create a calculated field with the following expression:
IIF(Past-due, Pay-up, " ")
14–5

Progress Report Builder User’s Guide
This expression means that if the value in the Past-due field is true, Report Builder prints the Pay-up memo field. Otherwise, nothing prints. The empty quotation marks return an empty memo field without requiring such a field in your memo file.
NOTE: The quotation marks indicating the empty memo field must be the second return value in the expression.
Customers with a past due balance will receive letters including the text of Pay-up; paid up customers will receive letters without this text.
The CASE function can be used in a similar way to select from a series of memo fields. For example, to print different memo fields depending on the length of time customers’ bills are overdue, you might create an Overdue field that contains 0 if the bill is not overdue, 1 if it is between 30 and 60 days overdue, and 2 if it is more than 60 days overdue.
Create corresponding memos named THIRTY and SIXTY in a text file. Then create a calculated field with the following expression to conditionally print memo fields:
This expression means that if the value in the Overdue field is 2, print the SIXTY memo field; if the value in the Overdue field is 1, print the THIRTY memo field; if the value is 0 or any other value, print no memo field. Note that the quotation marks indicating the empty memo field must not be the first result in the expression.
14.2.5 Blank LinesYou can print blank lines in any report simply by inserting them on the report layout. In the title, record, group header/footer, or summary bands, Report Builder always places blank lines where you insert them relative to word-wrapped fields. For example, if a report layout contains two memo fields separated by a blank line, as shown in Figure 14–11, Report Builder prints all the text in the first field, leaves a blank line, and then prints the second memo field, as shown in Figure 14–4.
You can control the printing of lines when all fields are empty by choosing Properties→ Record Layout and setting the Suppress Empty Record/Group Lines option in the Record Layout dialog box. Disabling this setting forces Report Builder to print any record, group header, or group footer line when all fields are empty. By default, Report Builder enables this option, which suppresses printing of lines when all fields are empty. If you use an IIF or CASE expression, as explained above, to conditionally exclude memo fields, you should retain the default.
CASE(Overdue, 2, SIXTY, 1, THIRTY, " ")
14–6

Form Letters
14.2.6 Page BreaksWhen you print a series of form letters where you want to start a new page for each record or group, insert a new-page line as the last line in the record or group footer band line. For more information on inserting new-page lines, see Chapter 3, “Bands.”
14.3 Generating Form LettersNow that you understand how Report Builder uses memo files and memo fields to create form letters, you are ready to create one. Follow these basic steps to create a form letter:
1. Prepare the memo file.
2. Create the report definition.
3. Attach the memo file to the report definition.
4. Format the report layout.
5. Print the form letters.
14.3.1 Preparing the Memo FileThe first step in generating a form letter is to prepare the memo file. Before you can attach a memo file to a report, you must perform the following steps to prepare the memo field or fields in the text file:
1. Identify each separate memo in the file.
2. Mark the beginning and end of each memo with braces { }.
3. Include field names in the text.
4. Specify line endings.
5. Specify tabs and indentation.
6. Apply fonts, point sizes, and styles to text in memo fields.
Because you can use only one memo file per report, be sure to include all the memo fields you require for the report in the same file. Within this file, you might have many named memos — one or more of which can be included in your report. There is no limit to the length of the memo file or to the number of memo fields you can have in the file.
14–7

Progress Report Builder User’s Guide
Figure 14–5 shows an example of a properly formatted memo file named Recall.
Figure 14–5: Recall Memo File
This memo file is the text of a recall form letter. The following sections use excerpts from this memo file as examples to describe how to format the memo file.
Identifying Each Memo Field
Regardless of the number of memo fields included in your report, you must name each memo with a unique name. Memo names follow the same rules as 4GL field names. They can be up to 32 characters long and can consist of alphabetic characters (A-Z, a-z), digits (0-9), and special characters ($, &, #, %, -, and _). In addition, memo names must begin with a letter (A-Z or a-z). The field name must also be unique within this report and cannot contain spaces.
NEWMEMO Recall:{Dear {@Contact},
This letter is to inform you that we are recalling our All Around Sports {@Item-Name}, which is Item number: {@Item.Item-num}, because independent testing has found that normal use of this product can possibly cause injury.
Please call your sales representative to make arrangements for returning any {@Item-Name} that you have in stock. If you have sold any {@Item-Name}, please attempt to retrieve them.
We apologize for any inconvenience or injury this product may have caused.
Sincerely,
Todd A. Winmill~nQuality Assurance Manager}
14–8

Form Letters
Follow these steps to properly annotate a memo file:
1 ♦ Create or open a memo file in an editor or word processing program that allows you to save the file as an unformatted text file or ASCII file.
2 ♦ Identify each memo field in the file using the following format:
You must enter each memo field name on a separate line before the text, starting in the first column.
Marking the Beginning and End of Each Memo Field with Braces { }
Use the left brace, {, to mark the beginning of each memo field and a right brace, }, to mark the end. The left brace must be the first character on the line that follows the memo field name. In Figure 14–6 note the braces that highlight the beginning and end of the memo field.
Figure 14–6: Beginning and Ending Braces
NEWMEMO fieldname:
NEWMEMO Recall:{Dear (customer name),
This letter is to inform you that we are recalling our All Around Sports (item name), which is Item number: (item number), because independent testing has found that normal use of this product can possibly cause injury.
Please call your sales representative to make arrangements for returning any (item name) that you have in stock. If you have sold any (item name), please attempt to retrieve them.
We apologize for any inconvenience or injury this product may have caused.
Sincerely,
Todd A. WinmillQuality Assurance Manager}
14–9

Progress Report Builder User’s Guide
Include Field Names in the Memo Field Text
You can merge data from tables into memo text by including field names. You can also include the names of calculated or aggregate fields created in the report to which you will attach the memo file. These fields are called embedded fields. When you merge the memo file with the report layout and generate the report, Report Builder inserts the proper data from the specified embedded fields into the memo field text.
Follow these steps to include embedded fields in the memo field text:
1 ♦ In the text editor, position the cursor where you want the data to appear in the text.
2 ♦ Type the field name preceded by the @ sign enclosed within curly braces . The @ sign and curly braces (for example, {@Contact}) distinguish the field name from the text. If the specified field appears in more than one table, you must precede the name of the database field with the table alias (for example, {@Item.Item-num}).
Figure 14–7 shows how to include the customer contact name, the item name, and the item number from the Newsport database in the memo file for use in the recall form letter.
Figure 14–7: Embedded Field Names
NEWMEMO Recall:{Dear {@Contact},
This letter is to inform you that we are recalling our All Around Sports {@Item-Name}, which is Item number: {@Item.Item-num}, because independent testing has found that normal use of this product can possibly cause injury.
Please call your sales representative to make arrangements for returning any {@Item-Name} that you have in stock. If you have sold any {@Item-Name}, please attempt to retrieve them.
We apologize for any inconvenience or injury this product may have caused.
Sincerely,
Todd A. WinmillQuality Assurance Manager }
14–10

Form Letters
When you include this memo field in your report, the customer contact name replaces {@Contact}, the item name replaces {@Item-Name}, and the item number replaces {@Item.Item-num}.
Specifying Line Endings
If you want Report Builder to preserve the line endings in your text, you must indicate where you want line endings to occur in your memo text by preceding a return with a line ending code, ~n. The initial return and any that immediately follow it cause Report Builder to begin a new line. Unless you indicate where line endings should occur in your text, Report Builder word-wraps the text within the width of the memo field, determining its own line endings.
For example, Figure 14–8 shows that to create a separate paragraph, you enter a return immediately followed by another return. Notice that to indicate a new line for the author’s title in the closing salutation, you must enter the ~n code at the end of the line containing the author’s name.
Figure 14–8: Line Ending Codes
NEWMEMO Recall:{<FArial><P10>Dear {@Contact},
This letter is to inform you that we are recalling our <FHelvetica><B>All Around Sports {@Item-Name}<N><FArial>, which is Item number: {@Item.Item-num}, because independent testing has found that normal use of this product can possibly cause injury.
Please call your sales representative to make arrangements for returning any {@Item-Name} that you have in stock. If you have sold any {Item-Name}, please attempt to retrieve them.
We apologize for any inconvenience or injury this product may have caused.
Sincerely,
Todd A. Winmill~nQuality Assurance Manager}
14–11

Progress Report Builder User’s Guide
You can also indicate where you want line endings followed by blank lines by including multiple returns. For example, in Figure 14–8, the series of four returns following the last paragraph results in three blank lines.
NOTE: Report Builder preserves blank lines in memo fields only when the fields have a word-wrap format. If you apply a format other than word-wrap in the report layout, Report Builder changes blank lines in memo field text into a single space in your report.
Specifying Tabs and Indentation
If you want Report Builder to preserve horizontal spacing, such as paragraph indentations in the text, you must specify it. The type of word processor or editor you use dictates whether you use the SPACEBAR or TAB keys to specify spacing:
NOTE: Report Builder ignores control characters (such as form feeds) included in the text. It converts both the TAB character (character code 9) and a single carriage return into a space.
Applying Fonts, Point Sizes, and Styles to Text in Memo Fields
You can include special codes that apply fonts and/or styles to portions of the text or to embedded fields included in the text. Any fonts or styles you specify in the text itself override fonts or styles applied to the memo field on the report layout.
NOTE: Report Builder does not preserve any fonts or styles you have applied in the word processor or text editor.
If the word processor or text editor represents tabs as. . . Then use. . .
The TAB character (usually indicated by an arrow)
SPACEBAR. Report Builder treats a tab character as a single space. Space represented in the memo field text as one or more tab characters is not preserved when you generate the report.
A number of spaces TAB. Report Builder preserves spaces inserted in the memo field text when these spaces are at the beginning of a paragraph (as in a paragraph indentation). Spaces that are inserted elsewhere in the text are preserved, unless Report Builder’s word-wrap places them against the left margin of the report. In this case, the spaces are eliminated.
14–12

Form Letters
You can apply any font, point size, or style available on the currently selected MS-Windows printer. You can apply the underscore style to words and/or fields that print in any font.
You can combine fonts, point sizes, and styles. For example, if you apply a style without specifying a font, Report Builder combines the specified style with the font that is applied to the field in the report layout. However, a font or point size remains in effect until Report Builder encounters a font off code (<D> or <d>), a code for another font, or the end of the memo field.
You can specify any combination of font, point size, or style. Point sizes can have up to three integer places and one decimal place.
Follow these steps to apply fonts to selected text and/or embedded fields:
1 ♦ Position the cursor before the text where you want to apply the font.
2 ♦ Specify the font code using <Ftypeface> or <ftypeface>, where typeface is the typeface name. You can enter the typeface name in uppercase, lowercase, or mixed case.
3 ♦ Position the cursor before the text where you want to apply the point size.
4 ♦ Specify the point size using <Psize> or <psize> where size is the number indicating point size.
5 ♦ Specify the end of the font by either entering another font code, <D> or <d>, to return to the font and attribute applied to the memo field in the report layout.
6 ♦ Position the cursor before the text where you want to apply the style.
7 ♦ Specify the desired style code. Table 14–1 lists the valid codes.
You can combine codes, other than N, within angle brackets (for example, <BI> for bold and italic).
Table 14–1: Memo File Style Codes
Style Code
Bold <B> or <b>
Italic <I> or <i>
Underscore <U> or <u>
Normal <N> or <n>
14–13

Progress Report Builder User’s Guide
8 ♦ Specify the end of the style by entering another style code, <D> or <d>, to return to the font and attribute applied to the memo field on the report layout.
In Figure 14–9, the <FArial> and <P10> codes on the third line apply 10-point Arial font to all the text until the <FHelvetica> code. The <FHelvetica> code on the seventh line supercedes the previous font code and applies 10-point Helvetica to all the text following the code until Report Builder encounters another font code, including the embedded data fields. The <B> code applies the bold style to the embedded data fields. Notice that style codes supersede each other, and that you must specify the Normal style for the text that follows the embedded data fields. The second <FArial> code supercedes the <FHelvetica> code and remains in effect until the end of the memo.
Figure 14–9: Embedded Style Codes
When you insert this memo field in a report, the text prints in the specified fonts (Arial and Helvetica) if these fonts are available on the current printer. These fonts override any font applied to the memo field on the report layout. However, if you apply a style to the memo field in the report layout, Report Builder tries to combine that style with the specified font.
NEWMEMO Recall:{<FArial><P10>Dear {@Contact},
This letter is to inform you that we are recalling our <FHelvetica><B>All Around Sports {@Item-Name}<N><FArial>, which is Item number: {@Item.Item-num}, because independent testing has found that normal use of this product can possibly cause injury.
Please call your sales representative to make arrangements for returning any {@Item-Name} that you have in stock. If you have sold any {Item-Name}, please attempt to retrieve them.
We apologize for any inconvenience or injury this product may have caused.
Sincerely,
Todd A. Winmill~nQuality Assurance Manager}
14–14

Form Letters
Figure 14–10 shows the form letter generated with this memo field.
Figure 14–10: Recall Form Letter
08/02/95
Gloria ShepleyLift Line Skiing276 North StreetBoston, MA 02114
Dear Gloria Shepley,
This letter is to inform you that we are recalling our All Around Sports Swim Goggles, which is Item number: 00009, because independent testing has found that normal use of this product can possibly cause injury.
Please call your sales representative to make arrangements for returning any Swim Goggles that you have in stock. If you have sold any Swim Goggles, please attempt to retrieve them.
We apologize for any inconvenience or injury this product may have caused.
Sincerely,
Todd WinmillQuality Assurance Manager
14–15

Progress Report Builder User’s Guide
14.4 Creating the Initial Report LayoutAfter you have prepared a memo file, you are ready to create the initial report layout for the form letter report.
Follow these steps to create a report definition:
1 ♦ Start Report Builder.
2 ♦ Connect the database that contains the data you want to use in the letter.
3 ♦ Choose the New Report button. The Database Tables dialog box appears.
4 ♦ Select the master table for the report, then choose OK. Report Builder prompts you to use the Instant Layout option.
5 ♦ Choose Yes if you want to use the Instant Layout option or No to start with a blank report layout.
6 ♦ Establish any database joins required to provide information used in the report.
14.5 Attaching the Memo FileFollow these steps to attach a memo file to a report:
1 ♦ Choose Report→ Attach Memo File. The Attach Memo File dialog box appears:
2 ♦ Enter the name of the memo file in the Memo File field. Report Builder assigns an alias to the file that consists of the filename without an extension.
14–16

Form Letters
3 ♦ Specify whether to treat the fields as case sensitive, then choose OK. When you insert fields, the name of each memo defined in the memo file appears in the field list under the master table name. In this example, the Recall memo appears at the bottom of the Customer table field list.
When you save your report, Report Builder saves the memo file selection in the report definition.
14.6 Formatting the Report LayoutYou format the layout for a form letter just like you format the layout for any other report. You insert blank lines of the appropriate types in the report layout; then you fill in the lines with text and fields.
For example, Figure 14–11 shows the report layout that produced the letter in Figure 14–10.
Figure 14–11: Form Letter Layout
14–17

Progress Report Builder User’s Guide
Follow these steps to create a report layout:
1 ♦ Create the report layout for all the database fields.
2 ♦ Insert the memo fields in appropriate places in the report. Each memo field appears on the screen as a single line of m’s. The default format of the memo field is left-justified word-wrap with a width of 60 characters.
3 ♦ After you insert a memo field, choose Properties→ Format. The Format dialog box appears.
4 ♦ Set the field width to fit your report.
The image above shows the report layout to use with the Recall memo file.
14.7 Printing the Form LettersFollow these steps to print form letters:
1 ♦ Choose Database→ Sort Order and Database→ Filter to sort the report and print only selected records, if necessary.
2 ♦ Choose the Print button on the tool bar or choose Report→ Print.
14–18

15Printing
This chapter explains how to preview and print Report Builder reports. This chapter contains the following sections:
• Print-related menu options
• Selecting a printer
• Specifying a printer
• Previewing reports
• Printing reports
• Controlling pagination

Progress Report Builder User’s Guide
15.1 Selecting a Printer Before you print a report, you must verify that the currently selected printer is appropriate and select a different printer if necessary.
Follow these steps to select a printer or to verify that the currently selected printer is the one you want to use:
1 ♦ Choose Report→ Print Setup. The Printer Setup dialog box appears:
2 ♦ Select a printer from the displayed list.
3 ♦ Choose the Setup button to display the Windows printer configuration dialog box. You can change the font selections for the selected printer. These changes will then apply to any Windows application (including Report Builder) that uses this printer driver. See your Windows documentation for information about this dialog box.
NOTE: The Paper Source, Paper Size, Orientation, and Copies settings you select in Report Builder (using the Print and Page Layout dialog boxes) override the Paper Source, Paper Size, Orientation, and Copies settings displayed in this dialog box.
4 ♦ Choose OK.
15.2 Specifying Print SettingsYou can specify the following print settings:
• What you want to print (report, test pattern, or report specification)
• How many copies
• What pages to print
• Which paper tray you want to use
• What output file to print the report to
15–2

Printing
Follow these steps to set the printer settings:
1 ♦ Choose Report→ Print. The Print dialog box appears:
2 ♦ Specify whether to print the current report, a test pattern, or the report definition specification. A test pattern is the page header, page footer, and record areas in the form of text fields and field symbols (for example, AAA) that represent data fields. The report definition specification lists the report information, including software, format, and database information. See Chapter 2, “Report Definitions and Report Libraries,” for a complete description of the report definition specification.
3 ♦ If you are sending the report to a printer, specify the number of copies to print. The default is 1. The maximum is 9,999.
4 ♦ Specify the range of pages to print. The defaults are 1 to 99,999,999. You can specify any numbers within the range. However, if you specify a beginning number that is beyond the number of pages in the report, Report Builder does not print any pages. If you specify an ending number that is beyond the number of pages in the report, Report Builder prints the beginning page through the end of the report.
5 ♦ If you are sending the report to a printer, specify the paper source. You can select a paper tray or specify manual or envelope feed for the current printer.
15–3

Progress Report Builder User’s Guide
6 ♦ If you want to print the report to a file, choose the Print to file check box and enter the name of the output file where you want to print the report in the fill-in field. This means that Report Builder prints the report only to a file, not to a printer. Report Builder also prints only one copy of the specified report pages to the file, regardless of the value in the Copies field.
7 ♦ Choose OK.
Report Builder saves these settings with the report definition and overrides any corresponding Windows or default Report Builder settings.
15.3 Previewing ReportsBefore sending a report to the printer, you can preview it on screen to check fonts, field placement, page breaks, and other elements of the page layout. The Print Preview window consists of a facsimile of the first page of the report, with VCR-like buttons at the top that allow you to page forward and backward through a multi-page report, magnify portions of the page, print the current page or the entire report, and pause or cancel the preview.
You can access the Print Preview window in any of the following ways:
• Choose Report→ Print, then choose the Preview button.
• Choose the Preview button on the tool bar.
• Choose Report→ Print Preview.
The Print Preview window appears.
Figure 15–1 shows the Print Preview window control buttons.
Figure 15–1: Preview Buttons
Zoom In Zoom Out Next Page Last Page Help
PrintPrint CurrentPage
First PagePrevious Page
Pause Stop (Close)
15–4

Printing
Table 15–1 explains the purpose of each button.
15.3.1 Dealing with Low Memory Conditions In Print Preview, when you page forward through a report, Report Builder keeps the previously viewed report pages in memory. If several other Windows applications are running while you are previewing a large report, there might not be enough memory to store additional preview pages. If this occurs, Report Builder displays the following message: “Insufficient Memory to Continue Print Preview.”
You can specify one of the three actions described in Table 15–2.
Table 15–1: Print Preview Buttons
Button Description
Print Sends report to printer with current settings
Print Current Page Prints only currently displayed page
Zoom In Displays magnified page preview
Zoom Out Returns to previous magnification level
First Page Displays first page of multi-page report
Previous Page Displays previous page
Next Page Displays next page
Last Page Displays final page
Pause Pauses preview when positioning to last page
Stop Closes Preview window
15–5

Progress Report Builder User’s Guide
15.4 Printing ReportsThere are three ways to print a report:
• Print a report using the current print settings.
• Change the print settings, then print the report.
• Print a report to a file.
Once you send the print job, Report Builder displays a status box showing the report name, number of Report Builder records processed, and the page currently printing. To halt the print job at any point, choose Cancel.
Table 15–2: Actions to Deal with Low Memory
Action Description
Pause Print Process Choosing this option is equivalent to choosing the Pause button on the Preview screen. After pausing the preview, you can switch out of Report Builder and free up memory by terminating other Windows applications. You can then continue with the report preview.
Free Earlier Pages Report Builder begins removing earlier report pages (beginning with the first page) from memory until enough memory has been freed up to continue the preview. After you choose this option, Report Builder continues to free earlier pages as necessary as you page forward through the report.
To view any of the earlier pages that have been freed from memory, you must cancel and then restart Preview.
Terminate Preview Process
Choosing this option is equivalent to choosing the Stop button on the Preview screen. Report Builder returns to the layout window. If you choose Print Preview again, the preview begins at the first report page.
15–6

Printing
15.4.1 Printing Using the Current Print SettingsYou can print a report using the current page settings in three ways:
• Choose Report→ Print, then choose the Print button.
• Choose the Print button on the tool bar.
• Choose Report→ Print Preview then choose the Print button.
15.4.2 Changing the Print SettingsYou can change any of the settings in the Print dialog box before printing. For example, you might want to print multiple report copies, specify a page range to print, or select a different paper bin. You can also display the report on the screen using the Preview button or select a different printer using the Setup button.
Follow these steps to change the print settings:
1 ♦ Choose Report→ Print. The Print dialog box appears.
2 ♦ Modify the print settings as desired.
3 ♦ Choose the Print button.
15.4.3 Printing to a File You can print a report to two different types of files:
• An unformatted text file
• A formatted file
15–7

Progress Report Builder User’s Guide
Printing a Report to an Unformatted Text File
Follow these steps to print the contents of a report into an unformatted text file:
1 ♦ Create the report definition.
2 ♦ Choose Report→ Export. The Export Text dialog box appears:
3 ♦ Choose the text file’s character set.
4 ♦ Specify the placement of carriage returns in the file. You can place a carriage return at the end of every line or place one carriage return per band.
5 ♦ Specify the name of the file to which you are exporting text.
6 ♦ Choose OK to export the report to the specified file and to return to the report layout.
15–8

Printing
Printing a Report to a Formatted File
When you print a file to a formatted file, the file includes the printer codes for the currently selected Windows printer.
Follow these steps to save the contents of a report into a file with all the formatting information intact:
1 ♦ Create the report definition.
2 ♦ Choose Report→ Print. The Print dialog box appears:
3 ♦ Activate the Print to file toggle box.
4 ♦ Enter the name of the output file (optionally including a path) in the fill-in field. If you do not include a path, the file outputs to the current directory. Also, Report Builder prints only one copy of the specified report pages to the file, regardless of the value in the Copies field.
5 ♦ Choose Print to output the report to the file you specified. If you choose Cancel to return to the layout but do not output the report, Report Builder retains the Print to file setting.
The output file includes printer codes for the currently selected Windows printer. To output to a plain text file with no printer codes, choose Report→ Export.
NOTE: Because the Print to file setting is saved with the report, be sure that you set it to the appropriate setting. If you enable it, each time you print the report, Report Builder outputs the report definition to the specified print file.
15–9

Progress Report Builder User’s Guide
15.5 Controlling PaginationThe following features affect how Report Builder determines where to place automatic page breaks in your report:
• Page layout settings (paper size, margins, and orientation)
• Record layout settings
• Fields with word-wrap format
• Line heights calculated automatically by Report Builder, or manually specified with the Properties→ Band Line Properties Freeform setting
• New-page lines inserted in the report layout
• Report Builder’s automatic widow/orphan control
15.5.1 Page Layout SettingsWhen Report Builder prints your report, it uses the current paper size, top and bottom margins, and orientation settings in the Page Layout dialog box to determine how much remaining space is available on the page. See Chapter 13, “Layout Manipulation,” for information about specifying page layout settings.
15.5.2 Record Layout SettingsThe Record Layout settings determine record layout and control which records and lines Report Builder prints. All of these settings affect where Report Builder places page breaks, especially Suppress Empty Record/Group Lines, Suppress All Record Lines, and Break Record Area Across Pages.
When calculating the number of lines that can fit on the page, Report Builder ignores blank record, group header, and group footer lines compressed by the Suppress Empty Record/Group Lines option. In addition, it ignores record lines suppressed by the Suppress All Record Lines option and any lines whose printing is suppressed with the Band Line Properties Logical Field option.
Report Builder uses the Break Record Area Across Pages option to determine whether to allow page breaks to occur within record areas that occupy more than one line.
NOTE: When printing more than one record across the page, Report Builder controls pagination by using the actual number of record lines, not taking into account blank line suppression or line logical conditions.
15–10

Printing
15.5.3 Word-wrapped FieldsIf your report includes word-wrapped fields in the title, record, group header, group footer, or summary band, the number of lines the data in these fields occupies affects the report pagination. You can control the length of a word-wrapped field by using the Field Width option in the Format dialog box to change the width. See Chapter 4, “Fields,” for more information about the word-wrapped field format.
15.5.4 Line HeightsReport Builder determines how many lines can fit on a page by taking into account the height of each band line in the report. For band lines that have been assigned an automatic height, Report Builder calculates line heights automatically based on the largest font on each line. Automatic lines include a small amount of additional white space, or leading, unless you have turned off the Interline Spacing option in the Page Layout dialog box.
Follow these steps to set a specific height for any line:
1 ♦ Choose Properties→ Band Line Properties. The Band Line Properties dialog box appears.
2 ♦ Choose the Freeform option.
3 ♦ Specify a height in inches or points.
4 ♦ Choose OK.
15.5.5 New-page LinesYou can specify where page breaks should occur on your report by inserting a new-page line anywhere on the layout except in a page header or page footer band.
Follow these steps to insert a new-page line:
1 ♦ Choose Create→ Band Line. The Create Band Line dialog box appears.
2 ♦ Specify where you want to place the line (above or below the current band, or in another band of your choice).
3 ♦ Choose the New Page Line check box.
4 ♦ Choose OK. Report Builder inserts a dashed line indicating a page break.
15–11

Progress Report Builder User’s Guide
The following table explains several areas where new-page lines can be inserted to produce page breaks in different places in your report:
15.5.6 Widow/Orphan ControlIn all reports, Report Builder has automatic widow/orphan control that prevents a group footer from appearing at the bottom of a page when there is not enough room for at least one record.
If you insert a new-page line in the . . . Then the page break occurs . . .
Last line in title band After title
Last line in group footer band After group
Last line in record band After each record
First line in summary band Before summary
15–12

AReport Builder Administration
This appendix addresses Report Builder administration issues. Specifically, it describes:
• Frequently asked questions
• Startup parameters
• Internationalization
• Security
• Triggers
• Deployment issues

Progress Report Builder User’s Guide
A.1 Frequently Asked QuestionsThis section answers frequently asked questions about Report Builder functionality. It describes:
• Connection information
• Control-break issues
• Arithmetic limitations
• Version compatibility
• Viewing report library contents
• Sorting Issues
A.1.1 Connection InformationThis section describes the following database connection issues:
• Single-user databases
• Read-only (-RO) parameter
• Parameter files
Single-user Databases
Report Builder cannot connect to a single-user database that is already in use in a Progress session. In particular, if you are running the ADE and are connected to a single-user database, you cannot run Report Builder from your ADE session to execute a report against the same database.
Read-only (-RO) Parameter
Do not use the Read-only parameter when connecting to databases with Report Builder. If you want to run the Report Builder against a database that is also in use by another process (for example, the ADE), you must use a database server to allow multi-user access to the database. The -RO parameter tells Report Builder to assume that the disk file containing the database has all the information about the database; however, if another process (such as the ADE) is accessing the database, then some of the database information will be in buffers in memory, not on disk. This means that Report Builder would be getting inaccurate information about the database, and might generate reports containing incorrect data or might encounter a fatal error.
A–2

Report Builder Administration
Parameter Files
You can specify multiple database connections in parameter files when you start Report Builder and Report Engine from the command line. Report Builder and Report Engine read a parameter file during startup or when you connect to a database; they do not read the file when they open an existing report. Therefore, you can change the parameters stored in a parameter file without affecting an existing report. You can do this because Report Builder and Report Engine read all the connection information out of the file and store individual connections with all the corresponding parameters.
A.1.2 CTRL-BREAK IssueWhen Report Builder sends a database request off to the database engine, it gives control to the database engine. While the database engine is processing the request, Report Builder ignores CTRL-BREAK sequences. This is because Report Builder does not have control until the database engine finishes its task, and cannot respond to the CTRL-BREAK sequence. If you are running a report with a complicated join, the period during which the database engine has control can be long. During this time, the CTRL-BREAK sequence has no effect.
A.1.3 Arithmetic LimitationsReport Builder supports only 15 digits of precision in numeric values used in fields and calculations.
A.1.4 Version CompatibilityIf you create a report definition with an earlier version of Report Builder, you can use it with the current version. For example, you can use the Progress Version 8 Report Builder to generate a report from a report definition created with Progress Version 7.3A Report Builder. However, it doesn’t work the other way. If you create a report definition with a recent version, you cannot use it with any earlier version; report definitions are not backwards compatible.
A–3

Progress Report Builder User’s Guide
A.1.5 Viewing Report Library ContentsUse the following sample procedure called rblib.p to view the contents of a report library without running Report Builder:
A.1.6 Sorting IssueReports created in the 16-bit Report Builder with no sort order specified will sort differently when run in the 32-bit Report Builder. The new 32-bit SQL engine changes the sort order. To override the new sort order open the report in Report Builder 8.3 and define a sort order.
A.1.7 Value Returned DifferentlyWhen 16-bit Report Builder encounters an unknown value in a calculated field it displays the value on a report as a question mark (?). 32-bit Report Builder evaluates the unknown value as “true” and displays the value “yes” on the report.
A.2 Startup ParametersYou can use all the standard Progress 4GL startup parameters, including the Parameter File (-pf) parameter, when you start Report Builder and Report Engine. This section describes:
• How to use parameters when you start Report Builder and Report Engine
• Progress 4GL parameters
• Report Builder parameters
• Report Engine parameters
rblib.p
DEFINE VARIABLE rl AS CHARACTER.DEFINE VARIABLE rc AS INTEGER.DEFINE VARIABLE rp AS CHARACTER VIEW-AS SELECTION-LIST INNER-LINES 10 INNER-CHARS 32.
FORM "Number of Reports" rc SKIP rp WITH FRAME x NO-LABELS.
RUN aderb/_getname.p ("c:\rb\reports.prl", OUTPUT rl, OUTPUT rc).
rp = ?.rp:LIST-ITEMS = rl.DISPLAY rc WITH FRAME x.UPDATE rp WITH FRAME x.
A–4

Report Builder Administration
A.2.1 Using Parameters When Starting Report Builder andReport Engine
You can use startup parameters when you start Report Builder and Report Engine in different ways. Table A–1 describes the locations where you can specify startup parameters.
Table A–1: Valid Parameter Locations
Location Description
startup.pf file The startup.pf file is the parameter file that all Progress clients look at when they start. Therefore, Report Builder and Report Engine scan this file, and any parameter files referenced in it, looking for parameters. The PROSTARTUP environment variable contains the name and location of the startup.pf file. If PROSTARTUP is not defined, the default file name is startup.pf in the $DLC directory.
Because all Progress clients reference this parameter file, it cannot contain any Report Builder-specific or Report Engine-specific startup parameters. Also, do not specify database connection parameters.
rbstart.pf file The rbstart.pf file is an optional parameter file that only Report Builder and Report Engine scan. The RBSTARTUP environment variable contains the name of the Report Builder startup file. If RBSTARTUP is not defined, Report Builder and Report Engine look in the $DLC directory for a file named rbstart.pf. If they do not find the file there, they give up their search and continue their startup process. To include the RBSTARTUP environment variable in the registry or the Progress.INI file, include it in the [RBStartup] section.
You can specify Progress startup parameters, Report Builder-specific parameters, and Report Engine-specific parameters in this parameter file.
Command line When you specify parameters on the command line or in a parameter file referenced on the command line with the Parameter File (-pf) parameter, they override any other parameter values stored in the startup.pf file or the rbstart.pf file.
Note that you cannot use this technique if you are invoking Report Builder from the ADE desktop. Report Builder does not recognize parameters specified on the command line you used to start the ADE desktop.
A–5

Progress Report Builder User’s Guide
A.2.2 Progress Startup ParametersThere are many Progress 4GL startup parameters that you might want to use when you invoke Report Builder or Report Engine. For example, you can use the Date Format (-d) parameter to change the display format for dates in reports. See the Progress Startup Command and Parameter Reference for a complete listing of the Progress 4GL startup parameters.
Report Builder and Report Engine have their own startup parameters that you cannot use with any other Progress tool. See the “Report Builder Startup Parameters” and “Report Engine Parameters” sections for complete descriptions of these parameters.
A.2.3 Report Builder Startup ParametersTable A–2 lists the Report Builder startup parameters and their syntax.
The remainder of this section describes each startup parameter in alphabetical order by operating system syntax. See the “Internationalization” section for more information about using these parameters.
Table A–2: Report Builder Startup Parameters
Parameter Syntax
Report Code Page In1 -rbcpreportin codepage
Report Code Page Out -rbcpreportout codepage
UDF Code Page In1 -rbcpudfin codepage
UDF Code Page Out -rbcpudfout codepage
Explicit Join1 -rbexpjoins
1 Also used with Report Engine.
A–6

Report Builder Administration
Report Code Page In (-rbcpreportin)
codepage
Name of code page to use for the report.
This parameter allows you to override the code page name stored in any reports you open. When you save a report, Report Builder assigns it a code page. When Report Builder and Report Engine attempt to read the report, the -rbcpreportin parameter tells them to treat the report as being in the specified code page. If you do not specify a value, Report Builder and Report Engine use whatever code page was assigned to the report when it was last saved.
For example, set the Report Code Page In parameter to UNDEFINED if you are developing reports that will be run in many different environments with different code pages and you do not use constant character strings in the report.
Report Code Page Out (-rbcpreportout)
codepage
Name of code page to use for the report when it is saved.
Operating System
andSyntax
Windows -rbcpreportin codepage
UseWith
MaximumValue
MinimumValue
Single-userDefault
Multi-userDefault
– – – – –
Operating System
andSyntax
Windows -rbcpreportout codepage
UseWith
MaximumValue
MinimumValue
Single-userDefault
Multi-userDefault
– – – – –
A–7

Progress Report Builder User’s Guide
This parameter allows you to override the default code page Report Builder uses when storing a report. When you save a report, Report Builder assigns it a code page. When Report Builder attempts to save the report, the -rbcpreportout parameter tells Report Builder to save the report using the specified code page. If you do not specify a value, Report Builder saves the report in the code page specified by the -cpinternal parameter.
This parameter has no effect on any other reports in the report library — it affects only the ones you explicitly save while running Report Builder with this parameter (for example. by using the Report→ Save).
For example, set -rbcpreportin and -rbcreportout to “undefined” if you are developing reports that will run in many different environments with different code pages and you do not use constant character strings in the report:
If -rbcpreportin and -rbcreportout are both set to “undefined,” Report Builder does not attempt to convert between code pages when reading and writing reports. This enables you to create a report in one language, for example English, and later run it in another language configuration, for example Russian, without encountering errors because the code pages are incompatible.
UDF Code Page In (-rbcpudfin)
codepage
Name of code page to use for the user-defined function file.
prorb32.exe -rbcpreportin undefined -rbcreportout undefined
Operating System
andSyntax
Windows -rbcpudfin codepage
UseWith
MaximumValue
MinimumValue
Single-userDefault
Multi-userDefault
– – – – –
A–8

Report Builder Administration
This parameter allows you to override the code page name stored in the user-defined function file (PRORB.UDF). When you define a UDF, Report Builder assigns it a code page. When Report Builder and Report Engine attempt to read a report that uses a UDF, the -rbcpudfin parameter tells them to treat the UDF as being in the specified code page. If you do not specify a value, Report Builder and Report Engine use whatever code page was assigned to the UDF when it was last saved.
This parameter allows you to override the code page name stored in the user-defined function file (PRORB.UDF). When you define a UDF, Report Builder assigns it a code page. When Report Builder and Report Engine attempt to read a report that uses a UDF, the -rbcpudfin parameter tells them to treat the UDF as being in the specified code page. If you do not specify a value, Report Builder and Report Engine use whatever code page was assigned to the UDF when it was last saved.
UDF Code Page Out (-rbcpudfout)
codepage
Name of code page to use for the user-defined function file when it is saved.
This parameter allows you to override the default code page Report Builder uses when storing a user-defined function. When you create or modify a UDF, Report Builder assigns it a code page. When Report Builder attempts to save the UDF, the -rbcpudfout parameter tells Report Builder to save the UDF using the specified code page. If you do not specify a value, Report Builder uses whatever code page was assigned to the UDF when it was last saved. If this is the first time Report Builder is saving the UDF, it saves the UDF in the -cpinternal code page.
This parameter has no effect on other UDF’s that might already be in the UDF file — it applies only to the UDF’s that you edit or create while running Report Builder with this parameter.
Operating System
andSyntax
Windows -rbcpudfout codepage
UseWith
MaximumValue
MinimumValue
Single-userDefault
Multi-userDefault
– – – – –
A–9

Progress Report Builder User’s Guide
Explicit Join (-rbexpjoins)
This parameter allows you to use explicit inner join syntax rather than the default implicit syntax. When explicit syntax is used, the behavior of the optimizer in the SQL Engine is altered. There are cases when this can be beneficial depending upon the amount of data, size of records, and the structure of the SQL query.
For example, there are queries where the optimizer will reorder the tables in the From clause of the Select statement. This causes the SQL Engine to process a larger table first, making the query run slower. In certain cases, using -rbexpjoins helps reports run faster.
A.2.4 Report Engine ParametersWhen you start Report Engine, you can use not only all the standard Progress 4GL startup parameters, including the Parameter File (-pf) parameter, but you can also use some parameters that are specific to the Report Engine.
Table A–3 lists the parameters you can use with Report Engine and their syntax.
Operating System
andSyntax
Windows -rbexpjoins
UseWith
MaximumValue
MinimumValue
Single-userDefault
Multi-userDefault
– – – – –
Table A–3: Report Engine Startup Parameters (1 of 2)
Parameter Syntax
Report Engine Record Delete -rbdel
Report Status File -rbstatfile filename
Encoded Password -rbP password
Report Engine Table Name -rbtable table-name
Report Tag -rbtag tag
Report Update Status -rbupds
A–10

Report Builder Administration
The remainder of this section describes each of the Report Engine-specific startup parameters in alphabetical order by operating system syntax. See the “Report Builder Startup Parameters” section for a description of the parameters that can also be used with Report Builder.
Report Engine Record Delete (-rbdel)
This parameter tells Report Engine to delete the Report Engine table record corresponding to the report when it has finished generating the report. If you do not specify this parameter, Report Engine leaves the record intact.
Report Code Page In1 -rbcpreportin codepage
UDF Code Page In1 -rbcpudfin codepage
1 Also used with Report Builder. See the “Report Builder Startup Parameters” section for a description of these parameters.
Operating System
andSyntax
Windows -rbdel
UseWith
MaximumValue
MinimumValue
Single-userDefault
Multi-userDefault
– – – – –
Table A–3: Report Engine Startup Parameters (2 of 2)
Parameter Syntax
A–11

Progress Report Builder User’s Guide
Report Status File (-rbstatfile)
filename
The pathname of the report status file into which Report Engine will write the status information.
This parameter tells Report Engine to create a file containing information about the reports it has generated. This file is called the report status file. If the file does not exist, Report Engine creates one. If the file does exist, Report Engine overwrites it. If you do not specify the full pathname, Report Engine creates the file in the current working directory. If the Report Engine table contains multiple reports, the output file will contain information about all of the reports that were run.
See the Progress Report Builder Deployment Guide for a description of the report status file.
Encoded Password (-rbP)
password
An encoded password.
This parameter is an optional Report Engine-specific version of the Progress 4GL Password (-P) startup parameter. The -rbP parameter allows you to hide the value of a password.
Operating System
andSyntax
Windows -rbstatfile filename
UseWith
MaximumValue
MinimumValue
Single-userDefault
Multi-userDefault
– – – – –
Operating System
andSyntax
Windows -rbP password
UseWith
MaximumValue
MinimumValue
Single-userDefault
Multi-userDefault
– – – – –
A–12

Report Builder Administration
Report Engine assumes that the value of the Encoded Password (-rbP) parameter was encoded using the _RBPWENC 4GL program and therefore applies the reverse encoding and treats the result as if it had been provided by the Password (-P) parameter. See the Progress Report Builder Deployment Guide for more information about the RBPWENC program.
You can use this parameter when you invoke Report Engine on the command line or in place of the -P parameter in the RB-DB-CONNECTION field of the Report Engine table record.
Report Engine Table Name (-rbtable)
table-name
The name of the Report Engine table containing the report parameters.
If you do not specify this parameter, Report Engine assumes the table name is RBREPORT. When you invoke Report Engine, you must specify the connection parameters that tell Report Engine how to connect to the database containing this table. If you connect to more than one database on the command line, it looks for this table in the first database specified.
Operating System
andSyntax
Windows -rbtable table-name
UseWith
MaximumValue
MinimumValue
Single-userDefault
Multi-userDefault
– – – RBREPORT RBREPORT
A–13

Progress Report Builder User’s Guide
Report Tag (-rbtag)
tag
A character string that indicates which reports to run.
The Report Tag (-rbtag) parameter tells Report Engine which reports to generate. If you do not specify this parameter, Report Engine generates all the reports in the Report Engine table. If you do specify this parameter, Report Builder matches the tag value against the RB-TAG field values in each Report Engine record and skips all Report Engine records that do not match. If you use this parameter, you must have an RB-TAG field in the Report Engine table.
For example, if the Report Engine table contains report records for four different quarterly reports, you can assign each record a tag such as Q1, Q2, Q3, and Q4 in the RB-TAG field. Then when you invoke Report Engine, specify the desired tag with the -rbtag parameter for each report. To run the reports for the third quarter, you specify Q3 as the -rbtag value. Another way to use this parameter is to store the reports for multiple users in the Report Engine table, then specify a specific user’s tag to run only their reports.
Report Update Status (-rbupds)
The Report Update Status (-rbupds) parameter tells Report Engine to update the RB-STATUS field in the Report Engine table for each report. If you use this parameter, you must have an RB-STATUS field in the Report Engine table.
Operating System
andSyntax
Windows -rbtag tag
UseWith
MaximumValue
MinimumValue
Single-userDefault
Multi-userDefault
– – – – –
Operating System
andSyntax
Windows -rbupds
UseWith
MaximumValue
MinimumValue
Single-userDefault
Multi-userDefault
– – – – –
A–14

Report Builder Administration
If you specify the Report Update Status (-rbupds) parameter when you invoke Report Engine, Report Engine updates the RB-STATUS field with information describing where it is in the report generation process. Table A–4 describes the possible parameter values Report Engine can provide to the RB-STATUS field.
If you do not specify the -rbupds parameter when you invoke Report Engine, Report Engine ignores the RB-STATUS field, and the field remains blank.
A.3 InternationalizationWhen using Report Builder and Report Engine with code pages other than the Progress default, you must consider how Report Builder and Report Engine handle the following:
• Code pages
• Collation
• Double-byte characters
• Using a translated version of Report Builder or Report Engine
For more information about internationalization, including code pages and collation tables, see the Progress Programming Handbook.
Table A–4: RB-STATUS Values
Value Meaning
STARTED Report Engine has started generating the report.
COMPLETED Report Engine has finished generating the report. This does not mean the report has been printed, only that it has been sent to the printer queue.
ERROR: message Report Engine has detected an error and cannot complete generating the report.
blank The Report Update Status (-rbupds) parameter is not set or Report Engine has not yet started generating this report.
CANCELED The user canceled the report before processing completed.
A–15

Progress Report Builder User’s Guide
A.3.1 Code PagesReport Builder and Report Engine, when executing in memory, always use the code page specified by the Internal Code Page (-cpinternal) parameter to manipulate character data. In addition, when Report Builder and Report Engine display characters to the monitor, they also use the -cpinternal code page to display character data. The default code page for cpinternal is ISO8859-1.
There are many operating system files that Report Builder and Report Engine read from or write to. Some of these files might use a code page other than -cpinternal. For these files, Report Builder and Report Engine try to convert between -cpinternal and whatever code page the file uses. The conversion uses tables in the convmap.cp file.
Files
The files that Report Builder and Report Engine read from (and write to) are:
• Report Library
The report library keeps track of which code page is used in each report. Note that each report can use a different code page. This code page applies to the characters used in the report’s definition, such as the report’s name, text fields, character constants in calculated field expressions, and filters. This code page does not apply to the database data that is used to construct the report (the database data is treated separately, as described below).
In general, when Report Builder and Report Engine read a report, they convert the text in the report’s definition from the code page in which it was stored into the -cpinternal code page. Also, when you save the report to disk (for example, using Report→ Save), Report Builder generally stores the text in the report’s definition using the -cpinternal code page. However, you can override both these general rules (see the description of the Report Code Page In (-rbcpreportin) and Report Code Page Out (-rbcpreportout) parameters in the “Report Builder Startup Parameters” section).
Note that when Report Builder and Report Engine read in a report, they rely on the convmap.cp file to help them convert from the report’s code page to the code page specified by -cpinternal. If the convmap.cp file does not contain a conversion table between the report’s code page and the -cpinternal code page, Report Builder and Report Engine simply treat the report as though its code page is undefined.
A–16

Report Builder Administration
• Database Files
The character data in a database is generally stored in the same code page, and the database knows which code page that is. When Report Builder and Report Engine read data from a database, they automatically convert the data from the database’s code page to the -cpinternal code page, using the conversion tables in convmap.cp. This applies to data that is included in a report, such as customer records, and also applies to Report Engine table records, for example, records that contain report parameters.
• Memo Files
By default, Report Builder and Report Engine assume that memo files use the code page specified by the Stream Code Page (-cpstream) parameter. However, you can override that by putting a CODEPAGE line at the top of the memo file — in this case, the memo file tells Report Builder and Report Engine which code page it is in. In either case, Report Builder and Report Engine convert the memos in the file from this code page to the -cpinternal code page, using the conversions specified in convmap.cp.
• User-defined Function File
The UDF file keeps track of which code page is used in each UDF. Each UDF can use a different code page. The code page applies to the UDF’s name and to the character string constants (if any) used in the UDF’s expression. In general, when Report Builder and Report Engine read in a UDF, they convert it from the code page in which it was stored into the -cpinternal code page. Whenever you edit an existing UDF (and click OK in the edit dialog), Report Builder writes the UDF out to disk, and it generally writes the UDF out in the same code page in which it was originally stored in the UDF file. Whenever you create a new UDF (and click OK in the New User Defined Function dialog box), Report Builder generally writes the UDF out in the -cpinternal code page.
However, you can override these general rules (see the “Startup Parameters” section).
• Export File
When Report Builder and Report Engine generate export files, they generate them in the -cpstream code page. If -cpstream is different from the -cpinternal code page, then Report Builder and Report Engine convert characters from the -cpinternal code page to the -cpstream code page, using the conversion table in convmap.cp.
A–17

Progress Report Builder User’s Guide
• Print File
When Report Builder and Report Engine print a report to a file, they do not convert any characters (although the printer driver might).
• PROMSGS
When Report Builder and Report Engine display error messages from PROMSGS, they will convert the messages to the -cpinternal code page before displaying them.
Parameters
The “Startup Parameters” section describes the startup parameters you can use with Report Builder and Report Engine. This section provides some examples of how to use some of the parameters:
• Report Code Page In (-rbcpreportin) Parameter
To direct Report Builder and Report Engine to do no conversion when reading in reports, use the following parameter:
If the -rbcpreportin parameter specifies a code page that is not “undefined”, and -cpinternal is not “undefined”, and the -rbcpreportin code page is different from -cpinternal code page, then Report Builder and Report Engine will look in the convmap.cp file for the conversion from the -rbcpreportin code page to -cpinternal. They then apply this conversion to the text strings in the report’s definition when they read in the report.
• Report Code Page Out (-rbcpreportout) Parameter
If the specified code page is not “undefined” and is not the same as the -cpinternal code page, and if -cpinternal itself is not “undefined”, then when Report Builder saves a report, it converts the saved report to the specified code page, using the conversion tables in convmap.cp. This has no effect on the report in memory (which is always in the -cpinternal code page); it affects only the copy of the report being stored into the report library.
-rbcpreportin undefined
A–18

Report Builder Administration
• UDF Code Page In (-rbcpudfin) Parameter
To direct Report Builder and Report Engine to do no conversion of user-defined functions when reading them from the UDF file, use the following parameter:
If the -rbcpudfin parameter specifies a code page that is not “undefined” and is not the same as -cpinternal, and if -cpinternal itself is not “undefined”, then Report Builder and Report Engine will look in the convmap.cp file for the conversion from the specified code page to the -cpinternal code page. They then apply this conversion to the text string constants (if any) in each UDF that they read in while processing reports. Note that the -rbcpudfin parameter by itself has no effect on the code page used to save existing UDF’s back to disk when you edit them. That is, if you specify - rbcpudfin but not -rbcpudfout, and if you edit an existing UDF, Report Builder saves it back to disk using the code page in which the UDF was stored in the UDF file, not in the code page specified by -rbcpudfin.
• UDF Code Page Out (-rbcpudfout) parameter
If the code page is not “undefined” and is not the same as -cpinternal, and if -cpinternal itself is not “undefined”, then Report Builder will use the conversion table in convmap.cp to convert the UDF as it saves the UDF to disk. This has no effect on the UDF in memory (which is always in -cpinternal code page); it affects only the copy of the UDF being stored into the UDF file.
Do not specify different values for the corresponding input/output pairs in the same session. For example, do not specify ISO8859-1 for -rbcpreportin and ibm850 for -rbcpreportout.
A.3.2 CollationReport Builder and Report Engine use collation tables when performing sorts and some comparisons. On startup, Report Builder identifies one particular collation table to use, according to the following rules:
1. If the Collation Code Page (-cpcoll) parameter is specified on the command line for Report Builder and Report Engine, they go into the convmap.cp file and locate the collation table named by the -cpcoll parameter, for the -cpinternal code page. For example:
-rbcpudfin undefined
A–19

Progress Report Builder User’s Guide
directs Report Builder and Report Engine to find the collation table named LOCAL for the code page ISO8859-2.
2. If there is no -cpcoll parameter specified, but the command line contains one or more databases (for example, using the -db startup parameter), then Report Builder and Report Engine (generally) use the collation table stored in the first database they find while processing the command line. In actual detail, what they do is:
– Look in the first database for the name of the database’s code page and collation table.
– Extract from convmap.cp the collation table that matches the database’s code page and collation name.
– If the database’s code page is different from -cpinternal, Report Builder and Report Engine convert the extracted collation table to the -cpinternal code page, using the appropriate code page conversion table from convmap.cp.
That is, Report Builder and Report Engine do not actually take the collation table from the first database. Instead, they get the name of the collation from the first database and then get the collation table (with the same name) from convmap.cp. For almost all users, the collation table in convmap.cp is identical to the one stored under that name in the first database. If this is not the case, then use the -cpcoll parameter to explicitly name a collation table in convmap.cp.
NOTE: Report Builder and Report Engine choose a collation using the first database that they encounter when processing the command line. This might not be the first database that is actually identified on the command line. In particular, if the first startup parameter is a Parameter File (-pf) parameter, and the parameter file (.pf file) contains a Physical Database Name (-db) parameter, Report Builder and Report Engine encounter the -db parameter in the .pf file first, and therefore, use the collation information in that database — even if there are other databases identified explicitly on the command line (following the -pf parameter).
-cpcoll LOCAL -cpinternal iso8859-2
A–20

Report Builder Administration
3. If the command line contains neither a -cpcoll parameter nor any databases, then Report Builder and Report Engine use the “BASIC” collation in convmap.cp for the -cpinternal code page.
Once Report Builder and Report Engine identify a collation table, they use it in doing the following sorts:
• Local record sorting, when the sort is based on a character field. (When the database server itself does the sorting, it generally uses the collation table in the database.)
• Sorting report names in lists of reports.
Also, Report Builder and Report Engine use the collation table to make string comparisons in certain situations. That is, there are two types of string comparisons: sort-weighted (using the collation tables) and what might be called “numeric-weighted” (based solely on the ASCII code for the character). Report Builder and Report Engine make sort-weighted comparisons (using the collation table) in the following situations:
• String comparisons in locally evaluated calculated fields and locally evaluated filters (comparisons are =, <>, >, >=, < and <=).
• Evaluating the MINIMUM and MAXIMUM built-in functions in calculated fields.
• Evaluating the IN-RANGE and IN-LIST built-in functions in calculated fields and filters.
• Detecting group breaks that are based on character fields. (If you specify a group level that depends on a character field, Report Builder and Report Engine use the collation table to compare adjacent records to see if they are equal, and perform a break only if they are not equal according to the collation table).
• Evaluating the MINIMUM and MAXIMUM aggregate functions, when applied to character fields.
In all other string comparisons, such as the MATCHES built-in function, Report Builder and Report Engine make numeric-weighted string comparisons. Note that the choice of string comparison techniques (sort-weighted vs. numeric-weighted) might change in future releases of Progress and Report Builder.
A–21

Progress Report Builder User’s Guide
A.3.3 Double-byte CharactersReport Builder and Report Engine do not support double-byte characters.
A.3.4 Using a Translated Version of Report Builder or Report Engine
Report Builder and Report Engine use many text fields, dialog control labels, and other character strings. Many of these strings have been translated into languages other than English. Report Builder and Report Engine can use these translated strings as easily as they can use the English versions of these strings. This means that many users can run Report Builder and Report Engine and see the dialog boxes, menus, and layout window in their native language. Although Report Builder and Report Engine are translated, reports themselves are not translated.
The character strings for a particular language are stored in a resource file called the RBRES32 file. Each RBRES32 file contains strings in one language (such as English), but different files can use different languages. In other words, each language has its own RBRES32 file. There is only
one PRORB32.EXE executable and one PRORE32.EXE executable, but they both work with any valid RBRES32 file. At startup, each executable attaches an RBRES32 file and pulls character strings out of the RBRES32 file. This is what determines the language Report Builder appears in.
When Report Builder and Report Engine look for the RBRES32 file, they first check to see if the RBLNG environment variable has been defined. If so, they expect it to point directly to the RBRES32 file that they should use. Therefore, one way to choose a language for Report Builder and Report Engine is to set RBLNG to point to the RBRES32 file that corresponds to that language.
Each RBRES32 file is actually a DLL file, and the value of RBLNG must include a .DLL extension. It can be either a complete pathname or a relative filename. For example, it can be \RBAPP\RBGER32.DLL or RBGER32.DLL. If the value of RBLNG is a relative filename, Report Builder and Report Engine interpret it as relative to the directory containing the Report Builder or Report Engine executable.
NOTE: Report Builder does not look for a value of the RBLNG environment variable in the registry or PROGRESS.INI file (unlike other environment variables). This means that setting RBLNG has no effect. The only way to use RBLNG is to set it as a genuine DOS environment variable. This limitation is due to technical details of Report Builder. See the “Environment Variables” section later in this chapter for information about setting RBLNG.
A–22

Report Builder Administration
If the RBLNG variable is not set to anything, Report Builder and Report Engine look for an RBRES32 file explicitly named “RBRES32.DLL”. They will look for RBRES32.DLL in the following places, in the order specified:
1. Current working directory
2. Windows directory (containing WIN.COM)
3. Windows system directory (containing files such as GDI.EXE)
4. Directory containing the Report Builder executable
5. Directories listed in the PATH environment variable
If you do not set the RBLNG environment variable, you can also choose the language in which Report Builder and Report Engine work by copying the corresponding RBRES32 file into one of these locations (using the name RBRES32.DLL), so that Report Builder and Report Engine find it there.
The database engine, which Report Builder and Report Engine call, also uses the PROMSGS file to obtain error and warning messages. Therefore, if you want to run Report Builder and Report Engine in a certain language, make sure that the database engine can find the PROMSGS file that corresponds to that language. The database engine uses the same rules for finding the PROMSGS file as regular Progress clients. For more information, see the Progress Client Deployment Guide. For example, you can set the PROMSGS environment variable to indicate the correct manual file.
A.4 SecurityThis section describes how Report Builder and Report Engine handle the following security issues:
• Table and field level security
• Passwords
A.4.1 Table and Field-level SecurityBecause Report Builder queries are compiled by the database engine at the time a report is run, security is checked at that time, even though Progress’ security features are compile-time only. This means that the user must have read access to the tables and fields a report uses in order to run the report using Report Builder or Report Engine.
A–23

Progress Report Builder User’s Guide
When Report Builder displays a list of tables in a database, it displays all tables, even if a user does not have read access to all of them. If the user makes an unauthorized choice, Report Builder displays an error. However, when Report Builder displays a list of fields in a table, it displays only those fields that the user has permission to access.
If the report is being run by a user who has different access privileges than the user who created the report, either of the following might occur:
A.4.2 PasswordsWhen Report Builder saves the report definition, it stores a logical flag representing the presence of a password. However, it does not store the password. The following table describes the different logical flag settings:
If the user. . . Then. . .
Does not have access to a table used by the report
Report Builder reports that it cannot access the table and lets the user specify different login information or select a different table.
Report Engine does the same, unless you set the RB-DISPLAY-ERRORS parameter to false.
Does not have access to one or more fields required by the report
Report Builder acts as if the field has been removed from the table. Using Report Builder, the user can still open the report and all inaccessible fields are removed from the report.
Report Engine does not process the report, regardless of the RB-DISPLAY-ERRORS setting.
If. . . Then. . .
The database stored in the report definition requires a USERID and password
The logical value is true, and Report Builder prompts the user for a USERID and password when the user attempts to open the report definition.
The database stored in the report definition does not require a USERID and password
The logical value is false, and Report Builder connects to the specified database without prompting for the USERID and password.
A–24

Report Builder Administration
You can also override the database connection information in the report definition in the following ways:
• Copy the report definition to another library in Report Builder, then specify the connection information for the copied version.
• Specify that Report Builder always prompt users for connection information by changing the database connection prompt in the Preferences dialog box.
• Specify connection information that includes the correct Userid (-U) and Password (-P) parameters in the RB-DB-CONNECTION parameter when you run Report Engine.
A.5 TriggersThis section describes the following trigger issues:
• Database triggers
• FIND triggers
A.5.1 Database TriggersTo use Report Builder with database triggers, all trigger procedures must be compiled r-code. If you try to run Report Builder with uncompiled p-code, it will not find any records in the tables used in your reports.
If you use database triggers with Report Builder, see the Progress Programming Handbook for information about trigger behavior.
The database stored in the report definition requires a USERID but no password
The logical value is false, and Report Builder connects to the specified database without prompting for a USERID and password.
The database security changes so that it requires a password, but it did not when the user saved the report definition
Report Builder prompts the user to correct the database connection information. After the user specifies the information and saves the report, the logical value is true, and Report Builder prompts for the USERID and password unless the user is running Report Engine with an RB-DISPLAY-ERRORS setting of false.
If. . . Then. . .
A–25

Progress Report Builder User’s Guide
A.5.2 FIND TriggersIf you add a FIND trigger to a table, when Report Builder processes the report, it might not find records for which the FIND trigger attempts to update the database. This happens because Report Builder has Read-only access to the database.
A.6 Deployment IssuesWhen you deploy Report Builder for other users, you must consider the following issues:
• Registry or PROGRESS.INI file settings
• Report Builder search rules
• Environment variables
A.6.1 Registry or PROGRESS.INI File SettingsThere are four Report Builder sections in the registry or PROGRESS.INI file:
• [RBStartup]
• [ReportBuilderSaveList]
• [ReportBuilderPreferences]
• [ReportBuilderDefaults]
The following sections describe the settings in the registry or PROGRESS.INI file. Although you can specify default values for most of the settings, when the user changes the setting in Report Builder, the choices overwrite the settings in the registry or PROGRESS.INI file.
[RBStartup]
RBSTARTUP=
Specifies the name of the parameter file to use when starting Report Builder. If you specify RBSTARTUP, you must specify it in this section.
A–26

Report Builder Administration
[ReportBuilderSaveList]
NotFirstTime=
Specifies whether this installation of Report Builder has ever been run. There are two valid entries for this setting:0 = It has not been run before (default).1 = It has been run before.
Report Builder automatically changes this setting to 1 whenever you run it.
ActionBar=
Specifies whether to display the tool bar on the screen. There are two valid entries for this setting:
0 = Do not display.1 = Display (default).
Choose View→ Tool Bar to change this setting.
FormatBar=
Specifies whether to display the format bar on the screen. There are two valid entries for this setting:
0 = Do not display.1 = Display (default).
Choose View→ Format Bar to change this setting.
FieldNames=
Specifies whether to represent fields on the report layout with field names or field symbols. There are two valid entries for this setting:
0 = Field symbols (default).1 = Field names.
Choose View→ Field Names to change this setting.
A–27

Progress Report Builder User’s Guide
SortFieldNames=
Specifies whether to sort fields alphabetically in all field selection lists. There are two valid entries for this setting:
0 = Display fields in database order (default).1 = Display fields in alphabetical order.
Choose View→ Order Fields Alphabetically to change this setting.
ShowHiddenTables=
Specifies whether to display the names of hidden tables in all table selection lists. There are two valid entries for this setting:
0 = Do not display hidden tables (default).1 = Display hidden tables.
Choose View→ Show Hidden Tables to change this setting.
PasteArgs=
Specifies whether to include function arguments when pasting a function into a calculated field or user-defined function expression. There are two valid entries for this setting:
0 = Do not paste arguments.1 = Paste arguments (default).
This setting is also specified in the New Calculation, Edit Calculation, New User Defined Function, and Edit User Defined Function dialog boxes.
ShHzRul=
Specifies whether to display the horizontal ruler on the report layout window. There are two valid entries for this setting:
0 = Do not display ruler.1 = Display ruler (default).
Choose View→ Horizontal Ruler to change this setting.
A–28

Report Builder Administration
ShVtRul=
Specifies whether to display the vertical ruler on the report layout window. There are two valid entries for this setting:
0 = Do not display ruler.1 = Display ruler (default).
Choose View→ Vertical Ruler to change this setting.
ShGrid=
Specifies whether to display grid markings (dots) on the report layout window. There are two valid entries for this setting:
0 = Do not display grid markings.1 = Display grid markings (default).
Choose View→ Grid to change this setting.
Maximize=
Specifies whether to maximize the Report Builder window. There are two valid entries for this setting:
0 = Do not maximize.1 = Maximize (default).
Report Builder automatically maintains this setting based on the most recent window state.
Library=
Specifies the name of the last opened report library. Report Builder automatically maintains this setting.
Report=
Specifies the name of the last opened report. Report Builder automatically maintains this setting.
A–29

Progress Report Builder User’s Guide
[ReportBuilderPreferences]
InstantRep=
Specifies whether to use the Instant Layout option for new reports. There are three valid entries for this setting:
0 = Always use the Instant Layout.1 = Never use the Instant Layout.2 = Prompt the user to accept or reject the Instant Layout (default).
Choose Options→ Preferences to change this setting.
PromptFields=
Specifies whether to allow the user to select which fields are included in the Instant Layout. There are two valid entries for this setting:
0 = Use as many fields as will fit on the report.1 = Allow the user to select which fields to include (default).
Choose Options→ Preferences to change this setting.
ScrBarHz=
Specifies whether to include a horizontal scroll bar on the Report Builder window. There are two valid entries for this setting:
0 = Do not include scroll bar.1 = Include scroll bar (default).
Choose Options→ Preferences to change this setting.
ScrBarVt=
Specifies whether to include a vertical scroll bar on the Report Builder window. There are two valid entries for this setting:
0 = Do not include scroll bar.1 = Include scroll bar (default).
Choose Options→ Preferences to change this setting.
A–30

Report Builder Administration
PromptConnection=
Specifies whether to prompt the user to confirm or change all database connections when opening a report. There are two valid entries for this setting:
0 = Prompt only if the saved connection is invalid (default).1 = Display a Connect Database dialog box for each saved connection, allowing the user to decide whether to use the saved connection information or override it.
Choose Options→ Preferences to change this setting.
[ReportBuilderDefaults]
DefMeas=
For internal use by Report Builder. There are no user-specified settings.
PgLM=
Specifies the default paper size. Choose Options→ Default Settings to change this setting.
BotM=
Specifies the default bottom margin in hundredths of an inch. The default is 50. Choose Options→ Default Settings to change this setting.
LeftM=
Specifies the default left margin in hundredths of an inch. The default is 50. Choose Options→ Default Settings to change this setting.
RightM=
Specifies the default right margin in hundredths of an inch. The default is 50. Choose Options→ Default Settings to change this setting.
TopM=
Specifies the default top margin in hundredths of an inch. The default is 50. Choose Options→ Default Settings to change this setting.
RulPit=
Specifies the number of units per inch for the horizontal ruler. The default is 10. Choose Options→ Default Settings to change this setting.
A–31

Progress Report Builder User’s Guide
VRulPit=
Specifies the number of units per inch for the vertical ruler. The default is 10. Choose Options→ Default Settings to change this setting.
Pts=
Specifies the point size for the default font in tenths of a point (120 = 12.0 points). The default is 120. Choose Options→ Default Settings to change this setting.
SnapTo=
Specifies whether objects on the layout snap to the nearest grid marking by default. There are two valid entries for this setting:
0 = Do not snap objects to the grid.1 = Snap objects to the grid (default).
Choose Options→ Default Settings to change this setting.
Color=
Specifies the color used for the default font (colors 0 through 14). The default is 0 (black). Choose Options→ Default Settings to change this setting.
WidthRep=
Specifies how to represent a field’s width on the report layout. There are two valid entries for this setting:
0 = Use an outlined box to represent field width.1 = Use a shaded box to represent field width (default).
Choose Options→ Default Settings to change this setting.
WidthColor=
Specifies the color used for the outline or shading of the box that represents the field width. The default is 8 (silver). Choose Options→ Default Settings to change this setting.
A–32

Report Builder Administration
FaceName=
Specifies the typeface of the default font. The default is Arial. Choose Options→ Default Settings to change this setting.
LogF=
Specifies the character string used to represent a false value for a logical field. The default is No. Choose Options→ Default Settings to change this setting.
LogT=
Specifies the character string used to represent a true value for a logical field. The default is Yes. You can specify this setting by choosing Options→ Default Directories.
LibDir=
Specifies the default directory where Report Builder looks for report library (.prl) files. Choose Options→ Default Directories to change this setting.
DatabaseDir=
Specifies the default directory where Report Builder looks for local database files. Choose Options→ Default Directories to change this setting. See the “Report Builder Search Rules” section later in this appendix for more information.
ImgDir=
Specifies the default directory where Report Builder looks for image files. Choose Options→ Default Directories to change this setting. See the “Report Builder Search Rules” section later in this appendix for more information.
UDFDirectory=
Specifies the directory that contains the PRORB.UDF file (user-defined function library). You can specify this setting only by editing the registry or PROGRESS.INI file. See the “Report Builder Search Rules” section later in this appendix for more information.
MemExt=
Specifies the default extension used to search for memo files. The default is .txt. Choose Options→ Default Directories to change this setting.
A–33

Progress Report Builder User’s Guide
ImgExt=
Specifies the default extension used to search for image files. The default is .bmp. Choose Options→ Default Settings to change this setting.
ImageQuality=
Specifies the quality and speed used for printing bitmap images. There are two valid entries for this setting:
0 = Print bitmap images quickly with normal quality (default).1 = Print bitmap images with the highest possible quality. (Images might print more slowly using this setting.)
You can specify this setting only by editing the registry or PROGRESS.INI file.
A.6.2 Environment VariablesReport Builder and Report Engine can read most supported environment variables from the registry or the PROGRESS.INI file. However, they do not read the value for the RBLNG variable from the registry or the PROGRESS.INI file. Therefore, if you want to set RBLNG to use an alternate resource file, you must specify RBLNG at the operating system level using the following format:
The dll-filename is the name of the DLL file containing the resources for the specified language.
See the “Using a Translated Version of Report Builder or Report Engine” section earlier in this appendix.
SET RBLNG=dll-filename
A–34

Report Builder Administration
A.6.3 Report Builder Search RulesBecause Report Builder supports relative pathnames, you must understand the Report Builder search rules so that you know where Report Builder looks for files.
This section describes the locations and order in which Report Builder and Report Engine search for the following files:
• Image files
• Memo files
• Database files
• Report libraries
The following sections describe the search order and locations for each type of file. Each section contains a table that lists the path specification, then the locations where Report Builder and Report Engine search for the files. Grayed areas in the tables indicate that Report Builder and Report Engine do not search the specified location. “N/A” indicates that you cannot specify the path in that manner.
Image Files
Table A–5 lists the search order and locations where Report Builder and Report Engine search for image files.
Table A–5: Image File Search Order
Path SpecificationFirst
LocationSecond Location
Third Location
Absolute path specified in report definition(drive:\path\filename)
Specifieddrive:\filename
Specified filename in default directory
Specified filename in current working directory
Relative path specified in report definition(path\filename)
Specified path\filename relative to default image directory
Specified path\filename relative to current working directory
–
A–35

Progress Report Builder User’s Guide
Memo Files
Table A–6 lists the search order and locations where Report Builder and Report Engine search for memo files.
Table A–6: Memo File Search Order
Path SpecificationFirst
LocationSecond Location
Third Location
Absolute path specified in report definition (drive:\path\filename)
Specified drive:\path\filename
Specified filename in current working directory
–
Relative path specified in report definition (path\filename)
Specified path\filename relative to current working directory
– –
Absolute path specified using Report Engine parameter (drive:\path\filename in RB-MEMO-FILE)
Specified drive:\path\filename
Specified filename in current working directory
–
Relative path specified using Report Engine parameter (path\filename in RB-MEMO-FILE)
Specified path\filename relative to current working directory
– –
A–36

Report Builder Administration
Database Files
Table A–7 lists the search order and locations where Report Builder and Report Engine search for local database files.
Notice that Report Builder does not search the default database directory for a database file. The default database directory setting is used only to specify the directory that initially appears in the Find Database dialog box in Report Builder.
Table A–7: Database Files Search Order
Path SpecificationFirst
LocationSecond Location
Third Location
Absolute path specified in report definition(drive:\path\filename)
Specified drive:\path\filename
– –
Relative path specified in report definition(path\filename)
Specified path\filename relative to current working directory
– –
Absolute path specified using Report Engine parameter(drive:\path\filename in RB-DB-CONNECTION)
Specified drive:\path\filename
– –
Relative path specified using Report Engine parameter(path\filename in RB-DB-CONNECTION)
Specified path\filename relative to current working directory
– –
A–37

Progress Report Builder User’s Guide
Report Libraries
Table A–8 lists the search order and locations where Report Builder and Report Engine search for report libraries.
Table A–8: Report Library Search Order
Path SpecificationFirst
LocationSecond Location
Third Location
Absolute path specified in Report Builder(drive:\path\filename)
Specified drive:\path\filename
– –
Relative path specified in Report Builder(path\filename)
N/A N/A N/A
Absolute path specified using Report Engine parameter(drive:\path\filename in RB-REPORT-LIBRARY)
Specified drive:\path\filename
– –
Relative path specified using Report Engine parameter(path\filename in RB-REPORT-LIBRARY)
Specified path\filename relative to default library directory
Specified path\filename relative to current working directory
–
A–38

BReport Builder Functions
Report Builder provides many built-in functions that you can use in calculated field expressions. A built-in function is a formula that performs a calculation, conversion, or specified operation, such as returning the system date or the current page number.
You can also define and save your own user-defined functions (UDFs) that you can use in any report just like built-in functions. For information about UDFs, see Chapter 7, “User-defined Functions.”
This appendix provides:
• Guidelines for using Report Builder functions
• Quick reference tables that group the functions by use
• A detailed description of each function, listed alphabetically

Progress Report Builder User’s Guide
B.1 Guidelines for Using Report Builder FunctionsAlthough many of the Report Builder functions are similar to Progress 4GL functions, you must follow these guidelines for using the Report Builder functions:
• You cannot abbreviate function names.
• You must include the parentheses for functions that do not have parameters. For example, to use the TIME function in Report Builder you must enter TIME( ).
• Case sensitivity of character string values affects Report Builder in the following ways:
– When the result of an operation or function is a character string, it is not case sensitive unless one or more of the operands or arguments is a case-sensitive string. Character string constants are always case insensitive. You can specify that a calculated or aggregate field or UDF parameter is case sensitive; by default, strings are not case sensitive.
The CASE and IIF built-in functions are exceptions to this rule. The value they return is selected from a list of arguments and retains the case sensitivity of the argument.
– Operations and built-in functions that use character strings perform their calculations in a case-insensitive manner unless one or both of the operands or arguments is a case-sensitive string. For example, MATCHES compares values in a case-insensitive manner unless one of the values is case sensitive.
See Chapter 4, “Fields.” for a complete description of how Report Builder handles case sensitivity.
• Report Builder assigns an UNKNOWN value to a field if:
– There is an error in a calculation or aggregate that Report Builder cannot evaluate (for example, division by 0). If this occurs, Report Builder displays a string of question marks (?) the same width as the field width.
– The field is a database field whose value is UNKNOWN.
– The expression in a calculated field refers to an UNKNOWN value, or one of the values accumulated by an aggregate field (except a COUNT aggregate) is UNKNOWN.
See Chapter 4, “Fields.” for a complete description of how Report Builder handles UNKNOWN values.
NOTE: You can also use a question mark (?) to represent an UNKNOWN value.
B–2

Report Builder Functions
B.2 Quick Reference TablesThis section lists Report Builder functions in quick reference tables for the following categories:
• Date, day, and time
• String manipulation
• Numeric
• Report management
• Miscellaneous
B.2.1 Quick Reference Table ConventionsThis section describes the information for the following quick reference tables:
• Syntax
• Input and output data
• In 4GL
Syntax
Table B–1 describes the conventions used in Report Builder function descriptions.
Table B–1: Function Syntax Conventions (1 of 2)
Convention Description
UPPERCASE WORDS
Uppercase words are keywords. Although they are always shown in uppercase, you can enter them in either uppercase, lowercase, or mixed case.
italics Italics identify options or arguments that you must supply.
, Commas separate multiple arguments.
( ) Parentheses indicate that you must enter the enclosed elements in parentheses.
B–3

Progress Report Builder User’s Guide
Input and Output Data
Table B–2 identifies the data type abbreviations in the Input Data and Output Data columns of the quick reference tables.
In 4GL
If a Report Builder function is also a 4GL function, a check mark appears in this column.
B.2.2 Day, Date, and Time FunctionsTable B–3 lists the Report Builder functions that manipulate and provide information about the day, date, and time.
[ ] Square brackets indicate that the enclosed item is optional.
... Ellipses indicate that you can choose one or more of the preceding items. If a group of items is enclosed in brackets and followed by ellipses, you can optionally choose one or more of those items.
Table B–2: Input and Output Data Types
Date Type Description
C Character expression
D Date expression
I Item (numeric, character, date, memo, or logical)
L Logical expression
N Numeric expression
F Field name
Table B–1: Function Syntax Conventions (2 of 2)
Convention Description
B–4

Report Builder Functions
B.2.3 String-manipulation FunctionsTable B–4 lists the functions that allow you to manipulate strings.
Table B–3: Day, Date, and Time Functions
SyntaxInput Data
Output Data
In 4GL
DATE ( string )1 C D √
DAY ( date ) D N √
MONTH ( date ) D N √
QUARTER ( date ) D N –
QUARTER-START ( date ) D D –
SPELL-MONTH ( date ) D C –
SPELL-WEEKDAY ( date ) D C –
TIME ( ) N/A N √
TODAY ( ) N/A D √
WEEKDAY ( date ) D N √
YEAR ( date ) D N √
1 Report Builder functionality differs slightly from 4GL functionality.
Table B–4: String-manipulation Functions (1 of 3)
SyntaxInput Data
Output Data
In 4GL
ASC ( expression ) C N √
CAPS ( expression ) C C √
CHR ( expression ) N C √
B–5

Progress Report Builder User’s Guide
ENTRY (element, list [, character ] ) N, C, C C √
FILL ( expression, repeats ) C, N C √
FLIP ( string, delimiter ) C, C C –
INDEX ( source , target [ , starting ] ) C, C, N N √
INDEX-NTH ( source , target , occurrence ) C, C, N N –
INITIAL-CAPS ( string [ , delimiter ] ) C, C C –
IS-LETTER ( string ) C L –
IS-LOWER ( string ) C L –
IS-UPPER ( string ) C L –
LC ( string ) C C √
LEFT-TRIM ( string [ , trim-chars ] ) C, C C √
LENGTH ( string )1 C N √
LOOKUP ( expression , list [ , character ] ) C, C, C N √
NUM-ENTRIES ( list [ , character ] ) C, C N √
R-INDEX ( source , target [ , starting ] ) C, C, N N √
REPLACE ( source-string, from-string, to-string ) C, C, C C √
REPLACE-INDEXED ( source, start, length, replace-string )
C, N, N, C C –
RIGHT-TRIM ( string [ , trim-chars ] ) C, C C √
SPACE ( n ) N C –
STRING ( source [ , format ] ) 1 I, C C √
Table B–4: String-manipulation Functions (2 of 3)
SyntaxInput Data
Output Data
In 4GL
B–6

Report Builder Functions
B.2.4 Numeric FunctionsTable B–5 lists the functions that perform mathematical operations.
SUBSTRING ( source , starting , [ , length ] ) 1 C, N, N C √
SUBSTRING-COUNT ( substring, string ) C, C N –
TRIM ( string [ , trim-chars ] ) C, C C √
1 Report Builder functionality differs slightly from 4GL functionality.
Table B–5: Numeric Functions
SyntaxInput Data
Output Data
In 4GL
ABSOLUTE ( n ) N N √
EXP ( base, exponent ) N, N N √
INTEGER ( expression )1 N N √
LOG ( expression [ , base ] ) N, N N √
NUMERIC ( expression ) C N –
ROUND ( expression, precision ) N, N N √
SPELL-NUMBER ( n ) N C –
SQRT ( expression ) N N √
TRUNCATE ( expression, decimal-places ) N, N N √
1 Report Builder functionality differs slightly from 4GL functionality.
Table B–4: String-manipulation Functions (3 of 3)
SyntaxInput Data
Output Data
In 4GL
B–7

Progress Report Builder User’s Guide
B.2.5 Report Management FunctionsTable B–6 lists the functions that provide information about and for reports.
B.2.6 MiscellaneousTable B–7 lists the miscellaneous functions.
Table B–6: Report Management Functions
Syntax Input Data
Output Data In 4GL
PAGE-NUMBER ( )1 N/A N √
RECORD-NUMBER ( ) N/A N –
REPORT-COPY ( ) N/A N –
REPORT-FILTER ( ) N/a C –
REPORT-LIBRARY ( ) N/A C –
REPORT-NAME ( ) N/A C –
1 Report Builder functionality differs slightly from 4GL functionality.
Table B–7: Miscellaneous Functions (1 of 2)
SyntaxInput Data
Output Data In 4GL
CASE ( expression, when-value-a, return-value-a, when-value-b, return-value-b,..., default-return-value )
I ... I –
DBNAME ( ) N/A C √
DLLFUNC ( dll-name, function-name, string ) C, C, C C –
ENCODE ( expression ) C C √
IIF ( condition, true-value, false-value ) L, I, I I –
IN-LIST ( value, list-value1, ... , list-value-n) I, I, ... N –
B–8

Report Builder Functions
IN-RANGE ( value, low-value, high-value ) I, I, I L –
MAXIMUM ( expression , expression [ , expression ] ... )
I, I, ... I √
MINIMUM ( expression , expression [ , expression ] ... )
I, I, ... I √
OPSYS ( ) N/A C √
PREVIOUS ( field-name ) F I –
RUNTIME ( ) N/A L –
RUNTIME-PARAMETER (parameter-name) C C –
Table B–7: Miscellaneous Functions (2 of 2)
SyntaxInput Data
Output Data In 4GL
B–9

Progress Report Builder User’s Guide
B.3 Alphabetical List of Report Builder FunctionsThis section describes each of the Report Builder functions.
ABSOLUTE
Returns the absolute value of a numeric value.
SYNTAX
n
A numeric expression.
EXAMPLE
To return the absolute values for the numbers in the Numbers table, create a calculated field containing this expression:
Sample data:
ABSOLUTE ( n )
ABSOLUTE(Numbers)
Numbers ABSOLUTE(Numbers) 0.56 .56 2.35 2.35 -0.95 .95-254.38 254.38
B–10

ASC
ASC
Converts a character expression representing a single character into the corresponding ASCII (or internal character set) integer value.
SYNTAX
expression
A constant, field name, or expression with a value of a single character that you want to convert to an ASCII value. If expression is a constant, you must enclose it in quotation marks (“ “). If the value of expression is other than a single character, ASC returns the value -1.
EXAMPLE
To convert the first character of a state (State) to its numeric value, create the expression:
If the value of State is MA, then ASC returns the numeric value of the letter M, which is 77 (decimal).
CAPS
Converts lowercase letters (a-z) in a character string expression to the corresponding uppercase letters (A-Z), and returns the resulting character string.
SYNTAX
expression
A constant, field name, or expression that results in a character string.
ASC ( expression )
ASC(SUBSTRING (State, 1, 1))
CAPS ( expression )
B–11

Progress Report Builder User’s Guide
EXAMPLE
To print the city field from the Customer table in uppercase letters, create the expression:
Sample data:
CASE
Returns one of several possible results based on the value of an expression. You can use CASE instead of a nested IIF expression to return results conditionally when there are more than two possibilities. This function selects only on the basis of equality.
SYNTAX
expression
The expression that determines which value to return. The expression can be any valid Progress expression. It can include comparisons, logical operations, and parentheses.
when-value-a , when-value-b ...
An expression that evaluates to a possible value for expression. If when-value-n matches the current value of expression, then Report Builder returns the corresponding return-value. All when-values must be of the same data type as expression.
CAPS(City)
City CAPS(City)Columbia COLUMBIAJefferson City JEFFERSON CITYKansas City KANSAS CITY
CASE ( expression , when-value-a , return-value-a ,
when-value-b , return-value-b , ... ,
default-return-value )
B–12

CASE
return-value-a , return-value-b ...
The value that Report Builder returns if the corresponding when-value-n equals the expression. All return values must be of the same data type, which might be different from the data type of the expression.
default-return-value
The value the Report Builder returns if the expression is not equal to any when-value-n. The default-return-value must be of the same data type as the other return-values. All return values must be of the same data type, which might be different from the data type of the expression.
NOTE: You can use memo fields as return-value-n, but not as test values.
EXAMPLE
To assign different strings based on the item number (Item-num), create the expression:
This CASE expression is simpler than but equivalent to the following nested IIF expression:
CASE(Item-Num, 1,"Fins", 2, "Tennis Racquet", 3, "Sweatband", - ")
IIF(Item-num = 1, "Fins", IIF(Item-num = 2, "Tennis Racquet", IIF(Item-num = 3, "Sweatband", " ")))
B–13

Progress Report Builder User’s Guide
CHR
Converts an internal character set integer value to its corresponding character value.
SYNTAX
expression
An expression (constant, field name or expression with a value of an integer) that you want to convert to a character value.
If the value of expression is from 1 to 255, CHR returns a single character. This character might not be printable or might not display on certain terminals. If the value of expression is outside that range, CHR returns a null string.
You can use CHR to print or display a character for which there is no keyboard representation (for example, the bullet character). This function is the opposite of ASC.
EXAMPLE
To return the trademark symbol (�) when the Symbol font is applied to the field, use:
DATE
Converts a character string into a date.
SYNTAX
string
A character string containing a date value. The format must be month/day/year, and must use slashes (/) as the delimiter.
EXAMPLE
DATE("12/20/93") returns a date of 12/20/93.
CHR ( expression )
CHR(212)
DATE ( string )
B–14

DAY
DAY
Converts a date to a day of the month integer value from 1 to 31, inclusive.
SYNTAX
date
A constant, field name, or expression where the value is a date. If the argument is a date constant, then the argument must use the following format:
EXAMPLE
To print or display the day of the month for each invoice date (Inv-date), create the field:
If the value of Inv-date is 01/16/93, DAY(Inv-date) returns 16.
DBNAME
Returns the name of the physical database currently in use.
SYNTAX
logical-db-name
The logical name of the database enclosed in quotes. If you do not specify a logical database name, then Report Builder returns the name of the database containing the master table.
DAY ( date )
mm/dd/yy
DAY(Inv-date)
DBNAME ( [ logical-db-name ] )
B–15

Progress Report Builder User’s Guide
EXAMPLE
To display the physical name of the database currently in use, create the expression:
DLLFUNC
Lets you call a DLL-based function from within a report. You might use DLLFUNC when you want to write a DLL-based function to perform an operation that Report Builder’s functions do not support, such as a trigonometric operation.
SYNTAX
dll-name
The name of the DLL that contains the function.
function-name
The name of the function.
string
A character expression (a constant, field name, or expression that results in a character value) that is passed to the DLL function.
DBNAME("Newsport")
DLLFUNC ( dll-name , function-name , string )
B–16

ENCODE
EXAMPLE
For example, the calculated field expression:
uses the STRING function to convert the value of Distance into a character string and passes the string value to the MILES-KILO function in CONVERTS.DLL, which converts the distance in miles to kilometers.
DLLFUNC expects a Boolean return value from the called DLL function: TRUE to indicate the function executed successfully; FALSE to indicate an error. If the DLL returns a FALSE value, DLLFUNC returns an error string. If the DLL function executes successfully, it should overwrite its input string with the output string to be returned by the Report Builder DLLFUNC. Report Builder passes the input and output strings using an 8,000-byte buffer.
ENCODE
Encodes a source character string and returns the encoded character string result.
SYNTAX
expression
A constant, field name, or expression that results in a character string value. If you use a constant, you must enclose it in quotation marks (“ “).
The ENCODE function performs a one-way encoding operation that you cannot reverse.
DLLFUNC("CONVERTS.DLL","MILES-KILO",STRING(Distance))
ENCODE ( expression )
B–17

Progress Report Builder User’s Guide
ENTRY
Returns a character string entry from a list, based on an integer position. You can use this function to parse a list of values.
SYNTAX
element
An integer value that corresponds to the position of a character string in a list of values. If the value of element is unknown (?), ENTRY returns an unknown value. If element is less than or equal to 0, or is larger than the number of elements in list, ENTRY returns an error.
list
A character expression that evaluates to a list of values. The default delimiter for a list is a comma. If the value of list is unknown (?), ENTRY returns an unknown value.
character
A delimiter you define for the list. The default is a comma. This argument allows the function to operate on a noncomma-separated list.
EXAMPLE
To display the first word in a character field, Item-name, create the expression:
Sample data:
ENTRY ( element , list [ , character ] )
ENTRY(1, Item-name, " ")
Item-Name ENTRY(1, Item-name, - ")Fins FinsTennis Racquet TennisSweatband Sweatband
B–18

EXP
EXP
Returns a value that results from raising a number to a power.
SYNTAX
base
A constant, field name, or expression that evaluates to a numeric value.
exponent
A constant, field name, or expression that evaluates to a numeric value.
EXAMPLE
FILL
Repeats a character expression a specified number of times. The maximum number of characters allowed in the function result is 8,000.
SYNTAX
expression
A constant, field name, or expression that evaluates to a character value.
repeats
A constant, field name, or expression with an integer value up to 512. The FILL function uses this value to repeat the expression you specify. If the value of repeats is less than or equal to 0, FILL produces a null string.
EXP ( base , exponent )
EXP(2,3) = 8
FILL ( expression , repeats )
B–19

Progress Report Builder User’s Guide
EXAMPLE
To print a line of asterisks after each record in a report, create a calculated field containing the expression:
Include it in a record line after a line of fields, such as in the following report layout:
Sample report output:
FILL(’*’, 50)
Name Order-date Amountxxxxxxxxxxxxxxxxxxxxxxmm/dd/yy ($999.99)xxxxxxxxxxxxxxxxxxxxxxxxxxxxxxxxxxxxxxxxxxxxxxxxx
Name Order-date AmountABC Mountain Bikes 01/10/94 $216.00******************************************MAtch Point Tennis 01/10/94 $96.00******************************************Jazz Futis Kauppa 01/10/94 $144.00
B–20

FLIP
FLIP
Exchanges the data before a specified character with the data following the character. Commonly used to flip last name with first name based on a comma between the two parts of the name.
SYNTAX
string
A character expression (a constant, field name, or expression that results in a character value) that you want to flip.
delimiter
A character that divides (delimits) units of data. For example, if delimiter is a comma, FLIP eliminates the leading and trailing spaces for the part following the comma and puts a space between the flipped parts. You can include an asterisk (*) before or after the delimiter to return only part of the string. Placing an asterisk before the delimiter returns only the data before the delimiter. Placing an asterisk after the delimiter returns only the data after the delimiter.
EXAMPLE
To flip the data in a Full-name field from last-name, first-name order to first-name last-name order:
Sample data:
FLIP ( string , delimiter )
FLIP(Full-name, ’,’)
Full-name FLIP(Full-name,’,’)Winmill, Todd Todd WinmillBurleigh, Sheilah Sheilah BurleighKirkpatrick, Mike Mike KirkpatrickCameron III, Bill Bill Cameron III
B–21

Progress Report Builder User’s Guide
To return only the first name of Full-name:
Sample data:
To return only the last name of Full-name:
Sample data:
FLIP(Full-name, ’,*’)
Full-name FLIP(Full-name,’,*’)Winmill, Todd ToddBurleigh, Sheilah SheilahKirkpatrick, Mike MikeCameron III, Bill Bill
FLIP(Full-name, ’*,’)
Full-name FLIP(Full-name,’*,’)Winmill, Todd WinmillBurleigh, Sheilah BurleighKirkpatrick, Mike KirkpatrickCameron III, Bill Cameron III
B–22

IIF
IIF
Evaluates a condition and returns one of two values, depending on whether the condition is TRUE or FALSE. IIF is similar to the IF. . .THEN. . .ELSE function in the 4GL.
SYNTAX
condition
A logical expression (a constant, field name, or expression that results in a logical value).
true-value
A value (a constant, field name, or expression) that Report Builder returns if the condition is TRUE.
false-value
A value (a constant, field name, or expression) that Report Builder returns if the condition is FALSE.
NOTE: True-value and false-value must be the same data type. However, they do not have to be the same data type as the condition.
True-value and false-value can be memo fields. By using a memo field as the true-value and empty quotation marks (" ") as the false-value, you can use IIF to return an empty memo field without including an empty field in your text memo file.
NOTE: You can use the CASE statement to compress nested IIF statements.
EXAMPLE
To print the title of each name in a mailing label report based on the gender of the addressee, create this field:
To print “Missing” if the character field, Title, is empty or NULL and “Okay” if it contains information, create this field:
IIF ( condition , true-value , false-value )
IIF(Sex = ’F’,’Ms. ’, ’Mr. ’)
IIF(Title = "" OR title = ?, "Missing", "Okay")
B–23

Progress Report Builder User’s Guide
To print the Thanks memo field if DUE is 0, or memo field Sendcash if DUE is not 0, create this field:
To return the string “See Comment” if Comment contains characters and the string “No Comment” if Comment does not contain characters, create this field:
INDEX
Returns an integer that indicates the position of the target string within the source string.
SYNTAX
source
A character expression (a constant, field name, or expression that results in a character value).
target
A character expression whose position you want to locate in source. If target does not exist within source, INDEX returns a 0.
starting
An integer that specifies at which leftmost position in the string to start the search. For example, INDEX("abcdefabcdef","abc",6) returns 7. This value must be a whole number greater than 0.
IIF(DUE <> 0,Sendcash,Thanks)
IIF(Comment <> "", "See Comment", "No Comment")
INDEX ( source , target [ , starting ] )
B–24

INDEX-NTH
INDEX-NTH
Returns the beginning position of the nth occurrence of a character substring.
SYNTAX
source
A character expression (a constant, field name, or expression that results in a character value).
target
A character expression whose position you want to locate in source. If target includes fewer occurrence instances of source, INDEX-NTH returns 0.
occurrence
The numeric expression representing the number of the occurrence. If n is negative, INDEX-NTH returns UNKNOWN.
EXAMPLE
To extract the year part of a character string that contains a date delimited by slashes (/), create a field with the following expression:
A simple SUBSTRING is not useful in this example because the position of the second slash in the date string is variable depending on how many digits are used for month and day. You can extract the year part of a date field or constant using the YEAR function.
INDEX-NTH ( source , target , occurrence )
SUBSTRING(Field1, INDEX-NTH(Field1, ’/’, 2) + 1)
B–25

Progress Report Builder User’s Guide
INITIAL-CAPS
Converts the first character of each word in a character string to uppercase and any other character to lowercase. A word is a group of contiguous characters followed by a space, a hyphen, or any user-designated characters.
SYNTAX
string
A character expression (a constant, field name, or expression that results in a character value).
delimiter
A character expression that specifies the word break character(s) instead of a space or hyphen.
EXAMPLE
The following expression:
returns:
INITIAL-CAPS ( string , [ , delimiter ] )
INITIAL-CAPS("tHiS iS aN exAMple.")
This Is An Example.
B–26

IN-LIST
IN-LIST
Compares a given value with each item in a list of values to determine whether the value is included in the list. Report Builder compares the first value with each value in the list. If it does not find a match, IN-LIST returns 0. If it does find a match, it returns a number corresponding to the position of the value in the list (that is, 1 for the first value, 2 for the second value, etc.).
SYNTAX
value
A value (a constant, field name, or expression) that you want to look up within a list of values.
list-values
List of values Report Builder compares with the value. You must have at least one list-value in the value list.
NOTE: The value and all the list-values must be the same data type: CHARACTER, NUMERIC, DATE, or LOGICAL expressions. Also, if the same value appears twice in the list, Report Builder returns the position of the last (rightmost) matching value.
EXAMPLE
To test each record in the Items table to determine whether its item code field (Item-num) is one of three items in a list, create a calculated field containing this expression:
Sample data:
IN-LIST ( value , list-value1 , ... , list-value-n )
IN-LIST(Item-num,901,902,903)
Item-num IN-LIST(Item-num...)904 0903 3901 1911 0902 2
B–27

Progress Report Builder User’s Guide
IN-RANGE
Determines whether a value is within a specified range of values. Returns logical TRUE if the value is equal to or greater than the lowest value and equal to or less than the highest value. Returns FALSE if not.
SYNTAX
value
A value (a constant, field name, or expression) that you want to compare to a range of values.
low-value
The minimum value (a constant, field name, or expression) for the range against which you want Report Builder to compare the value.
high-value
The maximum value (a constant, field name, or expression) for the range against which you want Report Builder to compare the value.
NOTE: The value, low-value, and high-value must be the same data type: CHARACTER, NUMERIC, DATE, or LOGICAL expressions.
EXAMPLE
To determine whether the price of each item in the Item table is within the range of 4.95 and 6.95, create a calculated field containing this expression:
Sample data:
IN-RANGE ( value , low-value , high-value )
IN-RANGE(Price,4.95,6.95)
Item-num Price IN-RANGE(Price...)903 12.95 NO901 6.95 YES902 5.00 YES904 4.95 YES
B–28

INTEGER
INTEGER
Extracts the integer part of a numeric value.
SYNTAX
expression
A constant, field name, or expression whose value is numeric.
NOTE: In the Progress 4GL, the INTEGER function accepts strings. However, in Report Builder, INTEGER only accepts numeric values. To convert strings, use the NUMERIC function.
EXAMPLE
To convert the numbers in the Numbers table to integers, create a calculated field containing this expression:
Sample data:
INTEGER ( expression )
INTEGER(Numbers)
Numbers INTEGER(Numbers) 14.345 14 45.543 45-62.987 -62
B–29
Progress Report Builder User’s Guide
IS-LETTER
Determines whether the first character of a character expression is any uppercase or lowercase letter. Returns logical YES if true; NO if false.
SYNTAX
string
A character expression (a constant, field name, or expression that results in a character value).
EXAMPLE
To determine in which records the character field Prod-code begins with a letter, create a calculated field containing this expression:
Sample data:
IS-LETTER ( string )
IS-LETTER(Prod-code)
Prod-code IS-LETTER(Prod-code)abcd YES1bc2 NOz101 YES
B–30

IS-LOWER
IS-LOWER
Determines whether the first character of a character expression is a lowercase letter. Returns logical YES if true; NO if false.
SYNTAX
string
A character expression (a constant, field name, or expression that results in a character value).
To determine in which records the character field Prod-code begins with a lowercase letter, create a calculated field containing this expression:
Sample data:
IS-LOWER ( string )
IS-LOWER(Prod-code)
Prod-code IS-LOWER(Prod-code)ABCDE NOabcde YES
B–31

Progress Report Builder User’s Guide
IS-UPPER
Determines whether the first character of a character expression is uppercase. Returns logical YES if yes; NO if not.
SYNTAX
string
A character expression (a constant, field name, or expression that results in a character value).
EXAMPLE
To determine in which records the character field Prod-code begins with an uppercase letter, create a calculated field containing this expression:
Sample data:
IS-UPPER ( string )
IS-UPPER(Prod-code)
Prod-code IS-UPPER(Prod-code)AbCdE TRUEaBCde FALSE
B–32

LC
LC
Returns a character string with the same characters as the specified string, but converts all uppercase letters in the string to lowercase.
SYNTAX
string
A character expression (a constant, field name, or expression that returns a character value) that contains uppercase letters you want to convert to lowercase.
EXAMPLE
To convert the uppercase letters in a character field Prod-code, create a calculated field containing this expression:
Sample data:
LC ( string )
LC(Prod-code)
Prod-code LC(Prod-code)ABCD abcdABCE abce
B–33

Progress Report Builder User’s Guide
LEFT-TRIM
Removes leading white space, or other specified characters, from a character string.
SYNTAX
string
A character expression (a constant, field name, or expression that results in a character value).
trim-chars
A character expression that specifies the characters to be trimmed from string. If you do not specify trim-chars, the LEFT-TRIM function removes spaces, tabs, linefeeds, and carriage returns.
EXAMPLE
To left-justify the page number field (Page) in a document index, create a calculated field containing this expression:
Sample data:
LEFT-TRIM ( string [ , trim-chars ] )
LEFT-TRIM(STRING(Page, "x(5)"))
Topic PageWord truncation 12Word-wrap 8
B–34

LENGTH
LENGTH
Returns the length of a character string.
SYNTAX
string
A character expression (a constant, field name, or expression that results in a character value).
Report Builder counts any trailing spaces. The length of a null string is zero.
EXAMPLE
To produce a list of customers (Name) and phone numbers (Phone) with a dot leader (...) between them, use LENGTH with FILL as follows:
To make the data align to the left and right margins, you must used a fixed-pitch font.
Sample report:
LENGTH ( string )
Name + FILL(".", 60 - LENGTH(Name + Phone)) + Sales-Rep
Aerobics Valines KY............................(90) 054 6399Antin Metsastysase.............................(71) 432 1317Aragon College................................. 714/321-1800
B–35

Progress Report Builder User’s Guide
LOG
Calculates the logarithm of an expression using a specified base.
SYNTAX
expression
A numeric expression (a constant, field name, or expression whose value is numeric) of which you want the logarithm.
base
A numeric expression that is the base you want to use. If you do not specify a base, LOG returns the natural logarithm, base (e). The base must be greater than 1. If applied to a negative number or zero, LOG produces an UNKNOWN value.
EXAMPLE
To determine the natural log of 7.3891, create the field LOG(7.3891), which returns a value of 2.0000. To determine the log base 10 of 8 times 12, create the field LOG(8 * 12, 10), which returns a value of 1.98227.
LOG ( expression , [ , base ] )
B–36

LOOKUP
LOOKUP
Returns an integer that provides the position of an expression in a list. Returns a 0 if the expression is not in the list.
SYNTAX
expression
A constant, field name, or expression that results in a character value that you want to look up within a list of character expressions. If the value of expression is unknown (?), the result of the LOOKUP function is unknown. If expression contains a delimiter, LOOKUP returns the beginning of a series of entries in list. For example, LOOKUP(“a,b,c”,“x,a,b,c”) returns a 2.
list
A list of character expressions (constants, field names or expressions that result in a character value) that contains the expression you name with the expression argument. Separate each entry in list with a delimiter. The default is a comma (,). If list is the unknown value (?), the result of LOOKUP is the unknown value.
character
A delimiter you define for the list. The default is a comma (,). This allows the function to operate on a noncomma-separated list.
EXAMPLE
To look up the states in the northeastern United States in the Customer table, create a calculated field containing this expression:
LOOKUP ( expression , list [ , character ] )
LOOKUP(State, "MA,RI,CT,VT,ME,NH")
B–37

Progress Report Builder User’s Guide
MAXIMUM
Compares two or more values and returns the largest value.
SYNTAX
expression
A constant, field name, or expression. All the values must have the same data type.
When comparing character values, if at least one of the character fields is defined as case sensitive, then MAXIMUM treats all of the values as case sensitive for the sake of the comparison. If none of the values is case sensitive, MAXIMUM treats lowercase letters as if they are uppercase letters.
EXAMPLE
To prevent the discounted price from going below $10, create a calculated field containing this expression:
Discount-Price is a calculated field with the following expression:
MAXIMUM ( expression , expression [ , expression ] ... )
MAXIMUM(Discount-Price,10)
Price - Price * Discount
B–38
MINIMUM
MINIMUM
Compares two or more values and returns the smallest.
SYNTAX
expression
A constant, field name, or expression. All the values must have the same data type.
When comparing character values, if at least one of the character fields is defined as case sensitive, then MINIMUM treats all of the values as case sensitive for the sake of the comparison. If none of the values is case sensitive, MINIMUM treats lowercase letters as uppercase letters.
EXAMPLE
To prevent discounts of greater than 50%, create a calculated field containing this expression:
Discount-Rate is a calculated field with the following expression:
MINIMUM ( expression , expression [ , expression ] ... )
MINIMUM(Discount-Rate,50)
.01 * Qty
B–39

Progress Report Builder User’s Guide
MONTH
Returns the month value (from 1 to 12, inclusive) of a date you specify.
SYNTAX
date
A date expression (a constant, field name, or expression whose value is a date).
EXAMPLE
To print the number of dates in the date field Start-date, create a calculated field containing this expression:
Sample data:
MONTH ( date )
MONTH(Start-date)
Start-date MONTH(Start-date)12/10/93 1204/23/93 4
B–40

NUM-ENTRIES
NUM-ENTRIES
Returns the number of items in a list.
SYNTAX
list
A list of strings — an entry list. NUM-ENTRIES returns the number of elements in the list. Specifically, NUM-ENTRIES returns the number of delimiters plus 1, and it returns 0 if list equals double quotes ("").
character
A delimiter you define for the list. The default is a comma (,). This allows the function to operate on a noncomma-separated list.
EXAMPLE
The following expression yields 3:
NUM-ENTRIES (list [ , character ] )
NUM-ENTRIES("New Customers, Old Customers, Prospects")
B–41

Progress Report Builder User’s Guide
NUMERIC
Converts character representation of numbers into numeric values (that is, changes the data type from CHARACTER to NUMERIC). This function is the opposite of STRING.
SYNTAX
expression
A character expression (a constant, field name, or expression that results in a character string) that is the character representation of a number.
NOTE: NUMERIC ignores leading spaces.
EXAMPLE
To convert the street number portion of the Address field to a numeric value, create a calculated field containing this expression:
Sample data:
To extract the numeric portion of the character field Available, where Available represents the quantity on hand prefixed by the warehouse in which the item is stored, create a calculated field containing this expression:
NUMERIC ( expression )
INTEGER(NUMERIC(Entry(1, Address, " ")))
Address INTEGER(NUMERIC(Entry(1, Address, " ")))276 North Street 276Rattipolku ????Suite 4165 ????66 Homer Ave 66
INTEGER(NUMERIC(SUBSTRING(Available, 3)))
B–42

OPSYS
Sample data:
OPSYS
Identifies the operating system being used. Returns a string containing the name of the current operating system.
SYNTAX
EXAMPLE
If you are running on MS-Windows, and you use this expression:
Report Builder returns:
Available INTEGER(NUMERIC(SUBSTRING(Available, 3))A-105 105C-254 254D-3 3
OPSYS ( )
OPSYS
MSDOS
B–43

Progress Report Builder User’s Guide
PAGE-NUMBER
Returns the current report page number.
SYNTAX
PREVIOUS
Returns the value of the specified field in the previous record. This function is useful for suppressing repeating data in fields other than group fields and for performing calculations with fields in different composite records.
SYNTAX
field-name
The name of any field in the report.
Records that do not satisfy the filter currently in use are not accessible with this function. Also, PREVIOUS returns UNKNOWN in the first record.
EXAMPLE
If the Orders table contains fields for customer number (Cust-num), order number (Order-num), and order date (Order-date), you can use the PREVIOUS function to calculate the number of days since any customer’s previous order, assuming that orders are sorted by date within customer. The expression for a Days-since field might be:
Translated, this expression means that if the customer number is the same as the customer number in the previous composite record (in other words, if Report Builder is reading a record for a second or subsequent order by the same customer), it returns a value that is the current order date minus the order date in the previous composite record. Otherwise, it returns 0.
PAGE-NUMBER ( )
PREVIOUS ( field-name )
IIF(PREVIOUS(Cust-num) = Cust-num, Order-date - PREVIOUS(Order-date), 0)
B–44

QUARTER
QUARTER
Calculates the number of the calendar quarter of a date expression.
SYNTAX
date
A date expression (a constant, field name, or expression whose value is a date). The following table lists the quarters into which dates fall:
EXAMPLE
To calculate the quarter number of each date in the Start-Date field, create a calculated field containing this expression:
Sample data:
QUARTER ( date )
Quarter Dates
1 1/1 to 3/31
2 4/1 to 6/30
3 7/1 to 9/30
4 10/1 to 12/31
QUARTER(Start-Date)
Start-date QUARTER(Start-date)12/10/92 404/23/93 209/18/93 3
B–45

Progress Report Builder User’s Guide
QUARTER-START
Returns the date of the first day of the calendar quarter for a given date.
SYNTAX
date
A date expression (a constant, field name, or expression that results in a date value).
EXAMPLE
To calculate the first day of the quarter for the date in a date field Initial-Date, create a calculated field containing this expression:
If the value in the Initial-Date field is 5/4/93, then this expression yields 4/1/93, the first day of the second quarter.
QUARTER-START ( date )
QUARTER-START(Initial-Date)
B–46

R-INDEX
R-INDEX
Returns an integer that indicates the position of the target string within the source string. In contrast to the INDEX function, the R-INDEX performs the search from right to left.
SYNTAX
source
A character expression (a constant, field name, or expression that results in a character value).
target
A character expression whose position you want to locate in source. If target does not exist within source, R-INDEX returns 0.
If a starting parameter is not specified, the search for the target pattern begins at the rightmost character. Even though the search is started from the right, the target position is calculated from the left. For example, this expression returns 3 rather than 2:
starting
An integer that specifies the begin point for the search. This number must be a whole number greater than 0. For example, the following statement returns 1:
R-INDEX ( source , target [ , starting ] )
R-INDEX("abcd" , -c")
R-INDEX("abcdefabcdef",-abc",6)
B–47

Progress Report Builder User’s Guide
RECORD-NUMBER
Identifies the current record number. Report Builder numbers records sequentially (startingwith 1) after Report Builder does a sort and/or filter and reads all related records.
SYNTAX
EXAMPLE
To number the records in a long report, create a calculated field containing this expression:
Place the field on a record line.
REPLACE
Replaces each occurrence of a character substring with another and returns the full character string. You identify the substring by its contents, not by specifying the start position and length.
SYNTAX
source-string
Specifies the base string to make replacements in. The source-string parameter can be any expression that evaluates to a string. The REPLACE function does not change the value of source-string itself; the function returns the string with replacements.
from-string
Specifies the substring to replace. The from-string parameter can be any expression that evaluates to a string. Each occurrence of from-string within source-string is replaced.
RECORD-NUMBER ( )
RECORD-NUMBER()
REPLACE ( source-string , from-string , to-string )
B–48

REPLACE-INDEXED
to-string
Specifies the replacement substring. The to-string parameter can be any expression that evaluates to a string. Each occurrence of from-string in source-string is replaced by to-string.
EXAMPLE
To replace every occurrence of the text “PSC” with “Progress Software Corp.” in a character field named Comment, create a field containing this expression:
REPLACE-INDEXED
Replaces each occurrence of a substring with another string and returns the full string. REPLACE-INDEXED differs from the REPLACE function in that you identify the substring by specifying the start position and length instead of specifying the substring’s contents.
SYNTAX
source-string
The character expression (a constant, field name, or expression that returns a character value) that you want to change. REPLACE-INDEXED does not change the value of the source string; only the return string contains the replacement.
start
The numeric expression representing the starting position of the replacement.
REPLACE(Comment,"PSC","Progress Software Corp.")
REPLACE-INDEXED ( source-string , start , length , replace-string )
B–49

Progress Report Builder User’s Guide
length
The numeric expression representing the number of characters of source-string you want to remove.
replace-string
The character expression (a constant, field name, or expression that returns a character value) that is the replacement expression.
NOTE: The length of replace-string does not have to be the same as length.
EXAMPLE
To change four characters of Prod-Code to BB, starting with the third character, create a calculated field containing this expression:
Sample data:
REPORT-COPY
Returns the number of the report copy currently being printed.
SYNTAX
REPLACED-INDEXED(Prod-Code, 3, 4, "BB")
Prod-code REPLACED-INDEXED(Prod-Code,3,4,"BB")JTddddT JTBBTJTdefgT JTBBT
REPORT-COPY ( )
B–50

REPORT-FILTER
REPORT-FILTER
Returns the current filter expression.
SYNTAX
This function provides text only for the current filter definition. You cannot use REPORT-FILTER with any other function or with operators.
EXAMPLE
To print or display an English-like description of the current filter, create a calculated field containing only this expression:
Insert the field in the layout. Report Builder prints the English-like description of the filter using a word-wrapped, left-aligned format with a 50-character width by default. If no filter is specified for the report, this function returns “Include all records.”
REPORT-LIBRARY
Returns the full pathname of the current report library file.
SYNTAX
EXAMPLE
To include the complete path and name of the report library file, create a calculated field containing only this expression:
Insert the field on the layout.
REPORT-FILTER ( )
REPORT-FILTER( )
REPORT-LIBRARY ( )
REPORT-LIBRARY()
B–51

Progress Report Builder User’s Guide
REPORT-NAME
Returns as a character string the name of the current report.
SYNTAX
EXAMPLE
To print the report name as a title, create a calculated field containing only this expression:
Place the field in the title band of the report.
RIGHT-TRIM
Removes trailing white space, or other specified characters, from a character string.
SYNTAX
string
A character expression (a constant, field name, or expression that results in a character value).
trim-chars
A character expression that specifies the characters to trim from string. If you do not specify trim-chars, the RIGHT-TRIM function removes spaces, tabs, linefeeds, and carriage returns.
REPORT-NAME ( )
REPORT-NAME()
RIGHT-TRIM ( string [ , trim-chars ] )
B–52

ROUND
EXAMPLE
In the Customer table, to print the state next to the city with only a comma and one space between the two fields, create a calculated field containing this expression:
The Report Builder prints the field as follows:
You can also use the concatenation operator (-) to do the same thing using this expression:
ROUND
Rounds a numeric value to a specified number of places after the decimal point.
SYNTAX
expression
A numeric value (a constant, field name, or expression that results in a numeric value). A negative value rounds to the left of the decimal point.
precision
A positive or negative integer expression whose value is the number of places you want in the decimal result of the ROUND function.
RIGHT-TRIM(City) + ", " + State
Detroit, MIColumbia,MOPortland,OR
City - ", " + State
ROUND ( expression , precision )
B–53

Progress Report Builder User’s Guide
EXAMPLE
To round numbers in a numeric field Numbers to 0 decimal places, create the field:
Sample data:
To round numbers in a numeric field Numbers to the nearest multiple of 10, create the field:
To round numbers in Numbers to the nearest million, create the field:
RUNTIME
Returns FALSE if a report is run interactively or TRUE if the report is run using the Report Engine.
SYNTAX
EXAMPLE
If you develop a run-time report that uses RUNTIME-PARAMETER to incorporate a user-supplied title, you can use IIF and RUNTIME to specify an alternate title when you run the report interactively. To print “Report Title” instead of the user-specified text supplied by RUNTIME-PARAMETER, create the field:
ROUND(Numbers,0)
Numbers ROUND(Numbers,0)23453.3455 23453 (rounds down)98789.7656 98790 (rounds up)
ROUND(Numbers,-1)
ROUND(Numbers,-6)
RUNTIME ( )
IIF(RUNTIME(),RUNTIME-PARAMETER("Title"),"Report Title")
B–54

RUNTIME-PARAMETER
RUNTIME-PARAMETER
Obtains a character string specified in the RB-OTHER-PARAMETERS parameter on the command line when you run a report using Report Engine.
SYNTAX
parameter-name
A character expression (a constant, field name, or expression that results in a character string) that is the name of a Report Engine run-time parameter. See the Progress Report Builder Deployment Guide for a description of the predefined Report Engine parameters and for information about using the parameters at run time to generate a report with a Progress application.
SPACE
Produces a character expression made up of a specified number of spaces (blanks).
SYNTAX
n
A numeric expression representing the number of spaces desired.
EXAMPLE
To create an underlined blank space on a report, create a calculated field containing this expression:
Insert the field in your report layout and choose Properties→ Font to apply the underscored style. Then choose Properties→ Format to specify the width of the field. As long as the field is left-aligned, centered, or right-aligned, your report will contain an underline of the specified width.
RUNTIME-PARAMETER ( parameter-name )
SPACE ( n )
SPACE(99)
B–55

Progress Report Builder User’s Guide
SPELL-MONTH
Returns the name of the month for a given date.
SYNTAX
date
A date expression (a constant, field name, or expression that results in a date value).
EXAMPLE
To print or display the name of the month for a field Initial-Date, create a calculated field containing this expression:
If the value in the Initial-Date field is 4/1/88, SPELL-MONTH returns:
SPELL-NUMBER
Spells the integer part of a numeric expression. The first character of the resulting character string is uppercase; all other characters are lowercase. The following table lists the possible function results.
SPELL-MONTH ( date )
SPELL-MONTH(Initial-Date)
April
If . . . Then Report Builder returns . . .
The number is negative A string that begins with the word “Minus”
The integer part of the number is 0 The string “Zero”
The field is blank The string “Zero”
The string exceeds the maximum string length of 254 characters
A string of question marks
B–56

SPELL-WEEKDAY
SYNTAX
n
The numeric expression representing the number you want to spell.
EXAMPLE
To convert numbers in the Numbers field into their English equivalents, create a calculated field containing the following expression:
Sample data:
SPELL-WEEKDAY
Returns the name of the day of the week for a given date.
SYNTAX
date
A date expression (a constant, field name, or expression that results in a date value).
SPELL-NUMBER ( n )
SPELL-NUMBER(Numbers)
Numbers SPELL-NUMBER(Numbers) 0.00 Zero 0.99 Zero25.01 Twenty-five-5.99 Minus five
SPELL-WEEKDAY ( date )
B–57

Progress Report Builder User’s Guide
EXAMPLE
To print or display the day of the week for a date field Initial-Date, create a calculated field containing this expression:
If the value of the Initial-Date field is 12/7/93, SPELL-WEEKDAY returns:
SQRT
Returns the square root (as a numeric value) of a specified expression.
SYNTAX
expression
A numeric expression (a constant, field name, or expression that results in a numeric value). If the value of the expression is negative, SQRT returns the unknown value (?).
EXAMPLE
To print the square root of the contents of the numeric field Numbers, create a calculated field containing this expression:
Sample data:
SPELL-WEEKDAY(Initial-Date)
Tuesday
SQRT ( expression )
SQRT(Numbers)
Numbers SQRT(Numbers) 9 3 64 8 1024 32
B–58

STRING
STRING
Converts a value of any data type except memo into a character value.
SYNTAX
source
An expression (a constant, field name, or expression that results in a value ) of any data type, except MEMO that you want to convert to a character value.
format
The format you want to use for the new character value. This format must be appropriate to the data type of source. This is useful if you want to produce left-justified numbers. See the Progress Programming Handbook for information on data formats.
This function is the opposite of NUMERIC; that is, it constitutes a change in data type from NUMERIC to CHARACTER.
NOTE: If the value does not fit in the specified length, the STRING function returns UNKNOWN and displays it as a string of question marks.
EXAMPLE
To convert the customer number field (Cust-Num) from a numeric to a character expression, create a calculated field containing this expression:
Sample data (default length of 10 is used):
To return the time of day, create a calculated field containing this expression:
STRING ( source [ , format ] )
STRING(Cust-Num)
Cust-Num STRING(Cust-Num)15 " 15"50 " 50"
STRING(TIME( ) "HH:MM")
B–59

Progress Report Builder User’s Guide
SUBSTRING
Extracts a portion of a character string from a field or expression.
SYNTAX
source
A character expression (a constant, field name, or expression that results in a character value) from which you want to extract a string of characters.
position
An integer expression (a constant, field name, or expression that results in an integer value) that indicates the position of the first character you want to extract from source.
length
An integer expression that indicates the number of characters you want to extract from source. If you do not use the length argument, SUBSTRING extracts all characters up to the end of source.
EXAMPLE
You might have a 12-character string (abcdefghijkl) and want to return the letters after a specified location. To return only the seventh letter through the end of the string, create a calculated field containing this expression:
The expression returns “ghijkl”.
To return only the seventh through the ninth characters, create a calculated field containing this expression:
The expression returns “ghi”, which are the seventh, eighth, and ninth characters in the string.
SUBSTRING ( source , position [ , length ] )
SUBSTRING("abcdefghijkl", 7)
SUBSTRING("abcdefghijkl", 7, 3)
B–60

SUBSTRING-COUNT
SUBSTRING-COUNT
Returns the number of times a substring occurs within a character expression.
SYNTAX
string
A character expression (a constant, field name, or expression that returns a character value).
substring
A character expression (a constant, field name, or expression that returns a character value) that is a character substring of string.
EXAMPLE
You might have a 10-character field (Response) that contains the letters Y and N representing yes and no responses to a questionnaire. To count the number of Yes responses, create a calculated field containing this expression:
TIME
Returns the number of seconds since midnight (local time).
SYNTAX
EXAMPLE
Use this function with the STRING function to produce the time in hours, minutes, and seconds:
SUBSTRING-COUNT ( string , substring )
SUBSTRING-COUNT(Response, "Y")
TIME ( )
STRING(TIME( ), "HH:MM:SS")
B–61

Progress Report Builder User’s Guide
TODAY
Returns the current system date.
SYNTAX
TRIM
Removes leading and trailing white space, or other specified characters, from a character string.
SYNTAX
string
A character expression (a constant, field name, or expression that returns a character value).
trim-chars
A character expression that specifies the characters to trim from string. If you do not specify trim-chars, the TRIM function removes spaces, tabs, linefeeds, and carriage returns.
EXAMPLE
To remove leading and trailing punctuation marks and spaces from a sentence, use the following expression:
Sample data:
TODAY ( )
TRIM ( string [ , trim-chars ] )
TRIM(sentence, " .!?"
Sentence TRIM(sentence, " .!?" This is a test. This is a testIs anyone out there?! Is anyone out thereHELLO!!!!!! HELLO
B–62

TRUNCATE
TRUNCATE
Truncates a numeric value to a specified number of decimal places, returning a numeric value.
SYNTAX
expression
A numeric value (a constant, field name, or expression that results in a numeric value) that you want to truncate.
decimal-places
A positive or negative integer expression that indicates the number of decimal places you want to result from truncating the expression. A decimal-places of zero returns the same value as the INTEGER function.
EXAMPLE
To truncate a field Numbers to two decimal places, create a calculated field containing this expression:
Sample data:
TRUNCATE ( expression , decimal-places )
TRUNCATE(Numbers, 2)
Numbers TRUNCATE(Numbers, 2) 25.3342 25.33 2.4695 2.46-56.2136 -56.21
B–63
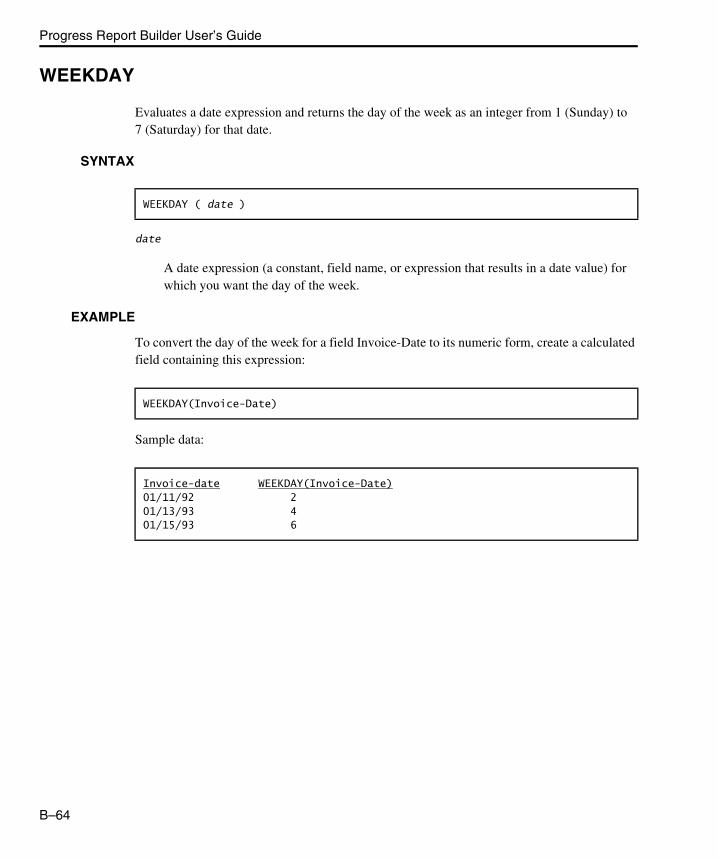
Progress Report Builder User’s Guide
WEEKDAY
Evaluates a date expression and returns the day of the week as an integer from 1 (Sunday) to 7 (Saturday) for that date.
SYNTAX
date
A date expression (a constant, field name, or expression that results in a date value) for which you want the day of the week.
EXAMPLE
To convert the day of the week for a field Invoice-Date to its numeric form, create a calculated field containing this expression:
Sample data:
WEEKDAY ( date )
WEEKDAY(Invoice-Date)
Invoice-date WEEKDAY(Invoice-Date)01/11/92 201/13/93 401/15/93 6
B–64

YEAR
YEAR
Evaluates a date expression and returns the year value of that date, including the century, as a numeric value.
SYNTAX
date
A date expression (a constant, field name, or expression that results in a date value) for which you want to determine the year.
EXAMPLE
To calculate the year number of the Birthdate field, create a calculated field containing this expression:
Sample data:
YEAR ( date )
YEAR(Birthdate)
Birthdate YEAR(Birthdate)12/10/67 196711/19/71 1971
B–65

Progress Report Builder User’s Guide
B–66

COperators
Report Builder uses operators in calculated field expressions, user-defined field expressions, and filter conditions.
This appendix provides:
• Guidelines for using Report Builder operators
• Quick reference table of the Report Builder operators
• Detailed description of each operator, listed alphabetically

Progress Report Builder User’s Guide
C.1 Guidelines for Using Report Builder OperatorsThe same guidelines apply to using operators in a Report Builder expression that apply to the Progress 4GL, including using spaces on either side of an operator. This section describes other guidelines for using Report Builder operators. Specifically, it describes:
• Operator precedence
• Order of expression evaluation
• Relational operator restrictions
C.1.1 Operator PrecedenceReport Builder evaluates expressions in an order of precedence. Table C–1 lists the available operators in their order of precedence.
Table C–1: Operator Precedence (1 of 2)
Precedence Operator Description
Sixth (highest) Unary - Treats following value as a negative
Unary + Treats following value as a positive
Fifth MODULO Returns the remainder after division
/ Division
* Multiplication
Fourth + Addition
- Subtraction
+ Concatenation
- Concatenation with trailing-space trimming
C–2

Operators
Third MATCHES Indicates that a character string matches a specified pattern
BEGINS Indicates that a character string begins with a specified value
= or EQ Equal to
<> or NE Not equal to
> or GT Greater than
>= or GE Greater than or equal to
< or LT Less than
<= or LE Less than or equal to
Second NOT Logical NOT
AND Logical AND
First (lowest) OR Logical OR
Table C–1: Operator Precedence (2 of 2)
Precedence Operator Description
C–3

Progress Report Builder User’s Guide
C.1.2 Order of Expression EvaluationReport Builder evaluates expressions using the following rules:
• Report Builder performs the operations within parentheses first. For example, the result of 1 + 4 / 2 is 3, but the result of (1 + 4) / 2 is 2.5 because Report Builder performs the operation in parentheses first.
• If parentheses are nested or embedded, as in the expression 3 * ((1 + 4) / 2), Report Builder performs the operation in the most deeply embedded parentheses first. In this case, the first operation is 1 + 4, resulting in 5, the second is 5 / 2, resulting in 2.5, and the third is 3 * 2.5, resulting in 7.5.
• If an expression contains several operators that have the same precedence, Report Builder performs the operations from left to right. For example, the expression 1 + 4 / 2 * 6 / 3 is equivalent to 1 + ( ( 4 / 2 ) * 6) / 3 ) ). Report Builder performs the division and multiplication operations left to right before performing the addition operation. The first operation is 4/2, resulting in 2; the second operation is 2*6, resulting in 12; the third operation is 12/3, resulting in 4; the last operation is 1+4, resulting in 5.
The < and > operators are in the next level of precedence, so Report Builder performs them second; the logical OR is in the lowest level of precedence and, therefore, performed last. Report Builder evaluates the expression 12 < 8 OR 4 > 5as if it were ((12 < 8) OR (4 > 5)).
For example, Report Builder evaluates the following expression as false, because the * and + operations are performed first:
In the following expression, Report Builder evaluates the > operators first. Both conditions must be true for the expression to be true. The balance must be greater than 100 and the number of days must be greater than 30:
In the following expression, Report Builder adds TODAY+30 first and then compares the result to the date returned by the DATE( ) function. Therefore, the expression is true only when TODAY+30 results in a date that is later than 7/1/93:
3 * 4 < 8 OR 4 > 3 + 2
Balance > 100 AND DAYS > 30
DATE ("7/1/93") < TODAY + 30
C–4

Operators
C.2 Quick Reference TableReport Builder supports the same operators as the Progress 4GL, plus the “-” string concatenation operator.
Table C–2 lists the five main types of operators and the operators within each type.
Table C–2: Operators (1 of 2)
Type Operator Description
Arithmetic + Addition
- Subtraction
/ Division
* Multiplication
MODULO Remainder after division
Date + Addition of days to a date. For example:Order-Date + 30
- Subtraction of days from a date or subtraction of one date from another. For example:Ship-Date - Order-Date
Character + Concatenation (joining two character strings into one). For example:First-name + Last-name
- Concatenation after removing trailing spaces from the string before the operator. For example:First-name - " " + Last-name - ""
C–5

Progress Report Builder User’s Guide
NOTE: The Insert Filter Condition dialog box lists the IN-RANGE and IN-LIST functions as operator choices. See Appendix B, “Report Builder Functions,” for descriptions of these functions.
C.2.1 Relational Operator RestrictionsThere are two restrictions for using relational operators with memo fields in calculated field expressions and filter expressions:
• You cannot compare a memo field to another memo field.
• A memo field must be the left operand in an expression.
Relational BEGINS Returns a logical value indicating whether the first operand begins with the second operand
MATCHES Returns a logical value indicating whether the first operand matches the pattern specified as the second operand
= or EQ Equal to
<> or NE Not equal to
< or LT Less than
<= or LE Less than or equal to
> or GT Greater than
>= or GE Greater than or equal to
Logical NOT Logical not
AND Logical and
OR Logical or
Table C–2: Operators (2 of 2)
Type Operator Description
C–6
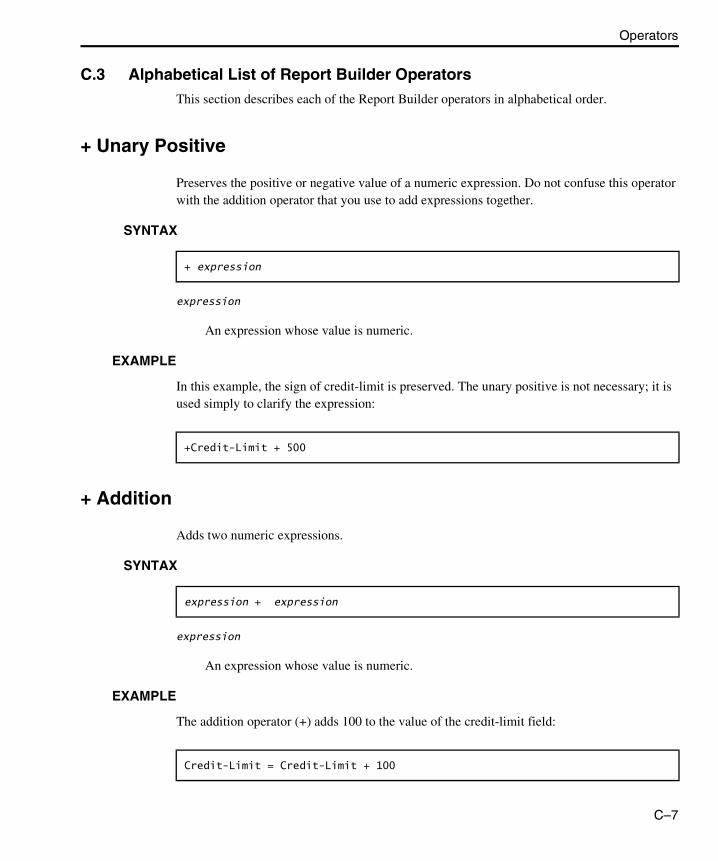
Operators
C.3 Alphabetical List of Report Builder OperatorsThis section describes each of the Report Builder operators in alphabetical order.
+ Unary Positive
Preserves the positive or negative value of a numeric expression. Do not confuse this operator with the addition operator that you use to add expressions together.
SYNTAX
expression
An expression whose value is numeric.
EXAMPLE
In this example, the sign of credit-limit is preserved. The unary positive is not necessary; it is used simply to clarify the expression:
+ Addition
Adds two numeric expressions.
SYNTAX
expression
An expression whose value is numeric.
EXAMPLE
The addition operator (+) adds 100 to the value of the credit-limit field:
+ expression
+Credit-Limit + 500
expression + expression
Credit-Limit = Credit-Limit + 100
C–7

Progress Report Builder User’s Guide
+ Concatenation
Produces a character value by joining two character strings or expressions.
SYNTAX
expression
An expression whose value is a character string.
EXAMPLE
This expression formats the city, state, and postal code for an address:
NOTE
If any of the string values you concatenate is UNKNOWN, then the result is the UNKNOWN value (?). This might lead to unexpected results if a field used in an expression is not mandatory. For example, you might have fields for a person’s first name, last name, and middle initial. You might combine these into a full name with an expression like the following:
If Mid-Init is not a mandatory field, then in some records Mid-Init can be set to UNKNOWN (?). If so, the result of the expression is UNKNOWN. You can avoid this by using the following expression:
expression + expression
City + ", " + State + " " + Postal-Code
First-Name + " " + Mid-Init + " " + Last-Name
First-Name + " " + (IIF(Mid-Init <> ?, Mid-Init + ". ", "") + Last-Name
C–8

Operators
- Concatenation
Produces a character value by joining two character strings or expressions, after trimming any trailing spaces from the first expression. Whether you should use the + or the - concatenation operator depends on whether you want to preserve trailing spaces. However, it is not always immediately obvious what will be considered a ’trailing’ space: see the first Example, below.
SYNTAX
expression
An expression whose value is a character string.
EXAMPLE
This expression formats the city, state, and postal code for an address:
But if there are any trailing spaces in the City or State fields, the result may look odd:
Using the ’-’ concatenation operator will remove trailing spaces. However, incautious use of ’-’ may also give an undesired result. Substituting ’-’ for ’+’ in the example expression above would produce
with no spaces at all, because even the literal spaces would be seen as trailing spaces and removed once they’d been appended.
expression + expression
City + ", " + State + " " + Postal-Code
Bedford , Massachusetts 01730
Bedford,Massachusetts01730
C–9

Progress Report Builder User’s Guide
To solve the problem, using the ’+’ operator behind any spaces you wish to preserve:
will produce the result desired:
NOTE
If any of the string values you concatenate is UNKNOWN, then the result is the UNKNOWN value (?). This might lead to unexpected results if a field used in an expression is not mandatory. For example, you might have fields for a person’s first name, last name, and middle initial. You might combine these into a full name with an expression like the following:
If Mid-Init is not a mandatory field, then in some records Mid-Init can be set to UNKNOWN (?). If so, the result of the expression is UNKNOWN. You can avoid this by using the following expression:
which causes the middle substring to be either Mid-Init with a space appended, or empty, depending on whether Mid-Init evaluates as not-UNKNOWN.
City - ", " + State - " " + Postal-Code
Bedford, Massachusetts 01730
First-Name + " " + Mid-Init + " " + Last-Name
First-Name + " " + (IIF(Mid-Init <> ?, Mid-Init + ". ", "") + Last-Name
C–10

Operators
+ Date Addition
Adds a number of days to a date, producing a date result.
SYNTAX
date
An expression that evaluates to a DATE value.
days
An expression with a value of the number of days you want to add to a date.
EXAMPLE
This expression calculates the arrival date of a package where the average number of days it takes to ship is seven. The expression simply adds seven days to the value in the Ship-Date field:
NOTE
The date addition operator rounds days to the nearest integer value.
- Unary Negative
Reverses the sign of a numeric expression. Do not confuse this operator with the subtraction operator that subtracts one expression from another.
SYNTAX
expression
An expression whose value is numeric.
date + days
Promise-Date + 7
- expression
C–11

Progress Report Builder User’s Guide
EXAMPLE
If you want to issue a refund to a customer who has overpaid, you can calculate the amount of the refund using the following expression:
- Subtraction
Subtracts one numeric expression from another numeric expression.
SYNTAX
expression
An expression with a numeric value.
EXAMPLE
This expression subtracts the amount of the payment from the customer balance to determine the new balance:
- Amount-Due
expression - expression
Balance - Payment
C–12

Operators
- Concatenation
Produces a character value by joining two character strings or expressions, after removing any trailing spaces from the first expression.
SYNTAX
expression
An expression whose value is a character string.
EXAMPLE
This expression formats the city, state, and postal code for an address, including removing any trailing spaces from the City, State, and Postal-Code fields:
NOTE
If any of the string values you concatenate is UNKNOWN, then the result is UNKNOWN (?). This might lead to unexpected results if a field used in an expression is not mandatory. For example, you might have fields for a person’s first name, last name, and middle initial. You might combine these into a full name with an expression like the following:
This expression returns “First-NameMid-InitLast-Name”. If you used the + concatenation operator instead of the - concatenation operator, the expression would returns “First-Name Mid-Init Last-Name”.
If Mid-Init is not a mandatory field, then in some records Mid-Init can be set to UNKNOWN (?). If so, the result of the expression is UNKNOWN. You can avoid this by using the following expression:
expression - expression
City - ", " - State - " " - Postal-Code
First-Name - " " - Mid-Init - " " - Last-Name
First-Name - " " + (IIF(Mid-Init <> ?, Mid-Init + ". ", "") + Last-Name
C–13

Progress Report Builder User’s Guide
- Date Subtraction
Subtracts a number of days from a date to produce a date result, or subtracts one date from another to produce an integer result that represents the number of days between the two dates.
SYNTAX
date
An expression that evaluates to a DATE value.
days
An expression that evaluates to a DATE value.
EXAMPLE
This expression finds orders with a promise date of more than a week ago. The expression subtracts seven days from the current system date, then compares the date to the value in the Promise-Date field:
NOTE
The date subtraction operator rounds days to the nearest integer value.
* Multiplication
Multiplies two numeric expressions.
SYNTAX
expression
An expression with a numeric value.
date - { days | date }
TODAY() - 7 > Promise-Date
expression * expression
C–14

Operators
EXAMPLE
This expression computes the extended price for an item:
/ Division
Divides one numeric expression by another numeric expression, producing a numeric result.
SYNTAX
expression
An expression that evaluates to a numeric value.
EXAMPLE
This expression divides the total for each sales representative by the total amount of all sales, then multiplies the product by 100 to make it a percentage:
NOTE
The result of dividing a number by 0 is the error value, which is displayed as a string of question marks (?????).
Price * Qty
expression / expression
Sales-Rep-Total / Grand-Total-Sales * 100
C–15

Progress Report Builder User’s Guide
AND
Returns a TRUE value if each logical expression is TRUE.
SYNTAX
expression
An expression that evaluates to a logical value (TRUE or FALSE).
EXAMPLE
This expression returns only those customers that have MA as their state of residence and who also have a balance greater than $20,000. The expression first compares the value in the State field to the text string “MA,” then checks the value in the balance field to see if it is greater than $20,000:
BEGINS
Tests a character expression to see if that expression begins with a second character expression.
SYNTAX
expression1
An expression that has a character value that you want to test to see if it begins with expression2.
expression2
An expression that has a character value that you want to compare to the beginning of expression1.
expression AND expression
State = "MA" AND Balance > 20000
expression1 BEGINS expression2
C–16

Operators
EXAMPLE
When used as a filter condition, this expression finds records for all the customers whose phone number is in the 617 area code:
NOTE
Report Builder considers trailing blanks in the BEGINS operator. For example, this statement is FALSE:
This is different than comparisons, where trailing blanks are ignored. For example, this statement IS TRUE:
EQ or =
Returns a TRUE value if two expressions are equal.
SYNTAX
expression
A constant, field name, or expression. The expressions on either side of the EQ or = must be of the same data type.
EXAMPLE
This expression compares the value of Order-Num to 210. The expression is TRUE when the order number is 210:
Phone BEGINS "617"
"x" BEGINS "x "
"x" = "x "
expression { EQ | = } expression
Order-Num = 210
C–17

Progress Report Builder User’s Guide
GE or >=
Returns a TRUE value if the first of two expressions is greater than or equal to the second expression.
SYNTAX
expression
A constant, field name, or any combination of these. The expressions on either side of the GE or >= must be of the same data type.
EXAMPLE
This expression checks inventory levels to see if the number of items on hand is greater than or equal to 120:
NOTE
If one of the expressions has an unknown value (?) and the other does not, the result is FALSE.
expression { GE | >= } expression
Item-On-Hand >= 120
C–18

Operators
GT or >
Returns a TRUE value if the first of two expressions is greater than the second expression.
SYNTAX
expression
A constant, field name, or any combination of these. The expressions on either side of the GT or > must be of the same data type.
EXAMPLE
This expression finds all the orders whose order number is greater than 200:
NOTE
If one of the expressions has an unknown value (?) and the other does not, the result is FALSE.
LE or < =
Returns a TRUE value if the first of two expressions is less than or equal to the second.
SYNTAX
expression
A constant, field name, or expression. The expressions on either side of the LE or < = must be of the same data type.
expression { GT | > } expression
Order-Num > 200
expression { LE | <= } expression
C–19

Progress Report Builder User’s Guide
EXAMPLE
Used as a filter condition, this expression finds all the records for customers whose balance is less than or equal to $20,000:
NOTE
If one of the expressions has an unknown value (?) and the other does not, the result is FALSE.
LT or <
Returns a TRUE value if the first of two expressions is less than the second.
SYNTAX
expression
A constant, field name, or expression. The expressions on either side of the LT or < = must be of the same data type.
EXAMPLE
Used as a filter condition, this expression finds the records for all the orders where the ship date is before the promise date:
NOTE
If one of the expressions has an unknown value (?) and the other does not, the result is FALSE.
Balance <= 20000
expression { LT | < } expression
Ship-Date < Promise-Date
C–20

Operators
MATCHES
Compares a character expression to a pattern and evaluates to a TRUE value if the expression satisfies the pattern criteria.
SYNTAX
expression
A character expression that you want to check to see if it conforms with the pattern.
pattern
A character expression that you want to match with the string. This can include a constant, field name, or expression whose value is a character.
The pattern can contain wildcard characters: a period (.) in a particular position indicates that any single character is acceptable in that position; an asterisk (*) indicates that any group of characters is acceptable, including a null group of characters.
EXAMPLE
Used as a filter condition, this expression displays customer information for all customers whose address ends in “St” or “Street”:
NOTE
If you want to specify a period ( . ) or an asterisk ( * ) as a literal character rather than a wildcard character in the pattern, enter a tilde (~) before the character. For example, the result of “*a.b” MATCHES “~*a~.b”is TRUE.
expression MATCHES expression
Address MATCHES "*St." OR Address MATCHES "*Street"
C–21

Progress Report Builder User’s Guide
MODULO
Determines the remainder after division.
SYNTAX
expression
An integer expression.
base
A positive integer expression that is the modulo base. For example, angles measured in degrees use a base of 360 for modulo arithmetic. The result of 372 MODULO 360 is 12.
EXAMPLE
This expression determines if a page number is even:
NOTE
The expression must be a positive number for MODULO to return a correct value.
NE or <>
Compares two expressions and returns a TRUE value if they are not equal.
SYNTAX
expression
A constant, field name or expression. The expressions on either side of the NE must be of the same data type.
expression MODULO base
Page-Number MODULO 2 = 0
expression { NE | < > } expression
C–22

Operators
EXAMPLE
Used in a filter, this expression finds only customers who owe money on their accounts:
NOT
Returns TRUE if an expression is false, and FALSE if an expression is true.
SYNTAX
expression
A logical expression (a constant, field name, or expression whose value is logical, that is, TRUE/FALSE, YES/NO).
EXAMPLE
Used in a filter, this expression finds only those items that are not back ordered:
Account-Balance <> 0
NOT expression
NOT Backordered
C–23

Progress Report Builder User’s Guide
OR
Returns a TRUE value if either of two logical expressions is TRUE.
SYNTAX
expression
A logical expression (a constant, field name, or expression whose value is logical, that is, TRUE/FALSE, YES/NO).
EXAMPLE
Used as a filter, this expression finds the customers who have no postal code (postal-code = "") or who have no telephone number (phone = ""):
expression OR expression
Postal-Code = "" OR Phone = ""
C–24

Glossary
Aggregate Field
A user-defined field that computes summary information about a set of records in the report.
ASCII
A seven-bit code representing upper and lower case letters, numbers, symbols, and punctuation marks. ASCII is an acronym for the American Standard Code for Information Interchange.
Band
An area on the report layout that controls where Report Builder displays and prints data. Bands consist of one or more band lines.
Band Area
The area at the left edge of the report layout where Report Builder identifies the band type.
Band Line
A horizontal bar within a band on which you place fields, lines, rectangles, and images.
Band Line Properties
The properties that specify additional information about how to present data on the band line.
Before-image File
A file that ensures database integrity by keeping track of the status of your database in the event that a transaction is not completed or a system failure occurs. Unless you explicitly place this file somewhere else with the Before Image File Name (-g) startup parameter, the BI file is located in the same directory as your DB file. You can think of the before-image file as a pretransaction image of the database records your application is modifying. See also after-image file.

Progress Report Builder User’s Guide
Built-in Function
A Report Builder-provided formula that performs a calculation, conversion, or specified operation such as returning the system date or the current page number.
Calculated Field
A user-defined field that calculates values as Report Builder generates the report.
Composite Record
The record resulting from joining the tables used in a report.
Composite Table
The records resulting from all the joins in a report definition.
Controlling Table
The table used to initiate a join.
Cross-tab Report
A report that provides totals for both rows and columns of data.
Field Width Indicator
The representation of a field’s width on the report layout. By default, Report Builder indicates a field’s position and width on the layout with a shaded area. However, you can modify the field width indicator by changing the shading color or simply using an outline box.
Filter
Conditions that allow you to narrow the focus of a report to the specific data you want to display. Filters can consist of one or more conditions that specify what data Report Builder is to retrieve for the report.
Font Point Size
A font’s height measured in printers’ points (1 point = 1/72 inch) which is the standard unit of measurement used by professional printers.
Footer
Text or data placed at the bottom of each page in a report. There are two types of footers in Report Builder reports: page footers and group footers.
Group Footer
Text or data on the group footer band lines that replaces the text or data in the page footer on the last page of a group. Also see page footer.
Glossary–2
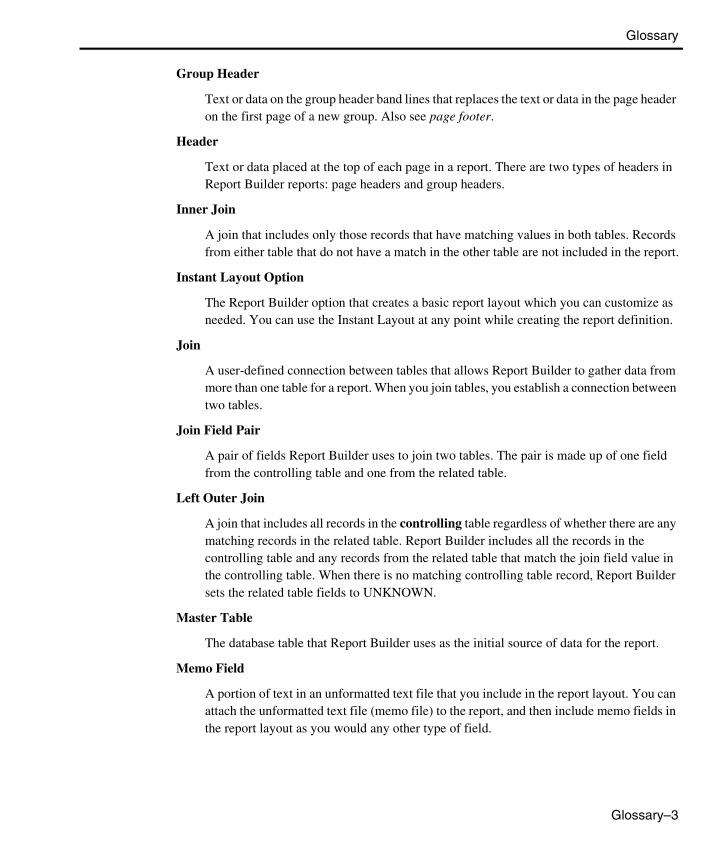
Glossary
Group Header
Text or data on the group header band lines that replaces the text or data in the page header on the first page of a new group. Also see page footer.
Header
Text or data placed at the top of each page in a report. There are two types of headers in Report Builder reports: page headers and group headers.
Inner Join
A join that includes only those records that have matching values in both tables. Records from either table that do not have a match in the other table are not included in the report.
Instant Layout Option
The Report Builder option that creates a basic report layout which you can customize as needed. You can use the Instant Layout at any point while creating the report definition.
Join
A user-defined connection between tables that allows Report Builder to gather data from more than one table for a report. When you join tables, you establish a connection between two tables.
Join Field Pair
A pair of fields Report Builder uses to join two tables. The pair is made up of one field from the controlling table and one from the related table.
Left Outer Join
A join that includes all records in the controlling table regardless of whether there are any matching records in the related table. Report Builder includes all the records in the controlling table and any records from the related table that match the join field value in the controlling table. When there is no matching controlling table record, Report Builder sets the related table fields to UNKNOWN.
Master Table
The database table that Report Builder uses as the initial source of data for the report.
Memo Field
A portion of text in an unformatted text file that you include in the report layout. You can attach the unformatted text file (memo file) to the report, and then include memo fields in the report layout as you would any other type of field.
Glossary–3
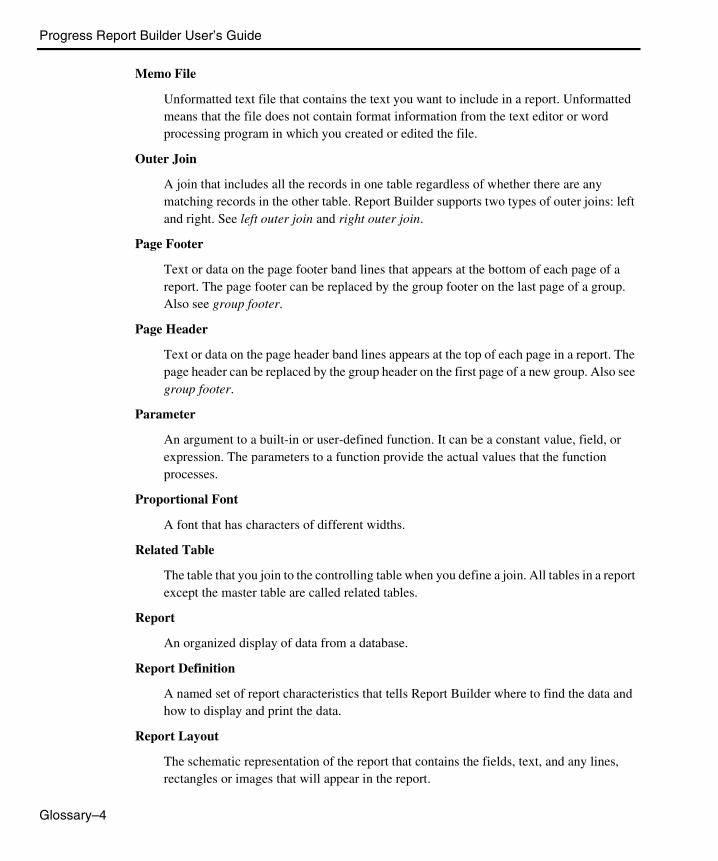
Progress Report Builder User’s Guide
Memo File
Unformatted text file that contains the text you want to include in a report. Unformatted means that the file does not contain format information from the text editor or word processing program in which you created or edited the file.
Outer Join
A join that includes all the records in one table regardless of whether there are any matching records in the other table. Report Builder supports two types of outer joins: left and right. See left outer join and right outer join.
Page Footer
Text or data on the page footer band lines that appears at the bottom of each page of a report. The page footer can be replaced by the group footer on the last page of a group. Also see group footer.
Page Header
Text or data on the page header band lines appears at the top of each page in a report. The page header can be replaced by the group header on the first page of a new group. Also see group footer.
Parameter
An argument to a built-in or user-defined function. It can be a constant value, field, or expression. The parameters to a function provide the actual values that the function processes.
Proportional Font
A font that has characters of different widths.
Related Table
The table that you join to the controlling table when you define a join. All tables in a report except the master table are called related tables.
Report
An organized display of data from a database.
Report Definition
A named set of report characteristics that tells Report Builder where to find the data and how to display and print the data.
Report Layout
The schematic representation of the report that contains the fields, text, and any lines, rectangles or images that will appear in the report.
Glossary–4

Glossary
Report Library
An operating system file that contains one or more report definitions.
Right Outer Join
A join that includes all records in the related table regardless of whether there are any matching records in the controlling table. Report Builder includes all the records in the related table and any records from the controlling table that match the join field value in the related table join field value. When there is no matching controlling table record, Report Builder sets the related table fields to UNKNOWN.
Server-evaluatable Field
A calculated field you can use in a sort, join, or filter that the database server, rather than Report Builder, is capable of evaluating.
Server-evaluatable Filter
A filter that the database server, rather than Report Builder, evaluates.
Text Field
A text string that you enter on the report layout, such as a column label or report title.
User-defined Field
A field that you create within a report, such as an aggregate, calculated, or memo field.
User-defined Function (UDF)
A function you create to supplement Report Builder’s built-in functions. You specify the function’s expression and the number and types of parameters it requires, then use the UDF in a calculated field expression as you would any built-in function. You can use a UDF in multiple reports.
Working Database
The connected database that is currently in use. Multiple databases can be connected at any time, but only one is the current, working database.
Glossary–5

Progress Report Builder User’s Guide
Glossary–6

Index1
Symbols
- operatorconcatenation operator 6–6, C–13date subtraction 6–6, C–14subtraction 6–6, C–12
precedence 6–7, 6–13unary negative 4–4, C–11
* operatormultiplication 6–6, C–14precedence 6–7, 6–13
+ operatoraddition operator 6–6, C–7
precedence 6–7, 6–13concatenation operator 6–6, C–8, C–9
precedence 6–7date addition 6–6, C–11unary positive 4–4, C–7
/ operatordivision 6–6, C–15
precedence 6–7, 6–13
A
ABSOLUTE function B–10
Accessing data 1–2
Accumulative totals 5–21, 5–23, 5–24
Addition operatorprecedence in expressions 6–7, 6–13
Addition operator (+) 6–6, C–7
Adobe Photoshop format 12–3
Aggregate fields 5–1calculations 5–26case sensitivity 5–7creating 5–8cutting from layout 5–14defining 5–8deleting 5–15editing 5–12filtering on 5–27grand total 5–17group total 5–20, 5–23inserting 5–12page total 5–18, 5–21purging 5–15record total 5–24removing 5–13sorting by 5–26types 5–2
average 5–2count 5–2maximum 5–3minimum 5–3standard deviation 5–3total 5–2variance 5–3
UNKNOWN values 5–7

Index–2
Progress Report Builder User’s Guide
Alignmentcenter 4–24fields 1–11, 4–25
changing 4–23left 4–24right 4–24word wrap 4–24
Amiga IFF format 12–2
AND operator 6–7, C–16precedence in expressions 6–8,
6–13
Appendingfilter conditions 10–11
Argumentspasting
dialog box setting 6–18, 7–5progress.ini file A–28
Arithmeticlimitations A–3
Arrays 4–2
ASC function B–11
ASCIIconversion B–14
ASCII values B–11
Attaching memo files 14–16
Audience xix
Automatic band line height 1–15, 3–5, 3–11spacing 3–13
Average aggregate fields 5–2
B
Band area 1–14, 1–15
Band labels 1–9
Band lines 1–14band area 1–9conditional printing 3–13copying 3–16creating 3–7, 3–8cutting 3–16defined 1–9deleting 3–17group footer 1–14group header 1–14, 3–2height
automatic 1–15, 3–5, 3–11freeform 1–15, 3–5, 3–11
Instant Layout option 2–3labels 1–9maximum on layout 1–19modifying characteristics 3–10moving 3–16page breaks 3–8, 15–11page footer 1–14, 3–2page header 1–14pasting 3–16print conditions 1–16, 3–5record 1–14, 3–2selecting 3–10specifying height 3–10status 1–15, 3–5status area 1–9, 1–15summary 1–14, 3–2title 1–14, 3–2
Bands 3–1labels 1–15types 1–14
Bar codes 4–22
Barsformat 1–9, 1–11, A–27menu 1–9, 1–10scroll 1–9status 1–9, 1–19title 1–9tool 1–9, 1–11, A–27
BEGINS operator 6–6, 10–3, C–16precedence in expressions 6–8
Binary operations 4–4

Index
Blank linesmemo files 14–6printing 14–6suppressing 14–6
Blank spacesinserting B–55
BMP files 12–2
Bold typefaceas typographical convention xxifont style 4–18, 4–21
Built-in functions B–1
Buttonstool bar 1–11
C
CAL files 12–2
Calculated fields 6–1case sensitivity 6–10creating 6–15cutting from layout 6–22deleting 6–22editing 6–19expressions
copying 6–19, 7–6purging 6–23removing 6–21server-evaluatable 6–13UNKNOWN values 6–12
Calculationsaverages 5–9standard deviations 5–9using aggregate fields 5–26variance 5–9
Calculations menu 1–10
CAPS function B–11
CASE function 4–5, B–12
Case sensitivity 4–7aggregate fields 5–7calculated fields 6–10expression results 6–11functions 6–10operators 6–10sorting data 9–4
Center alignment 4–24
Changingcolor 4–18, 4–19, 4–20, 4–22field alignment 4–23field format 4–8, 4–29font 4–21font effects 4–18, 4–19, 4–20,
4–21font styles 4–18, 4–19, 4–20fonts 4–18, 4–19, 4–20, 4–21joins 8–10
Character constantscalculated field expressions 6–5
CHARACTER data typecalculated expressions 6–2field alignment 4–23format 4–34
Character expressionscalculating length B–35
Character fields 4–34
Character sets B–14
Character stringscalculating length B–35checking case B–30, B–31, B–32converting
case B–11, B–33dates B–14initial caps B–26numbers B–42
encoding B–17identifying position B–47indexing B–24parsing values B–18RB-OTHER-PARAMETERS
B–55
Index–3

Index–4
Progress Report Builder User’s Guide
removing spaces B–34, B–52repeating B–19report names B–52substrings B–25, B–48, B–49,
B–60, B–61translation A–22
CHR function B–14
Closing report definitions 2–7
Code pages A–15convmap.cp file A–16, A–17,
A–19, A–20files A–16parameters A–18Report Code Page In
(-rbcpreportin) startup parameter A–6, A–7, A–11, A–18
Report Code Page Out (-rbcpreportout) parameter A–7
Report Code Page Out (-rbcpreportout) startup parameter A–6, A–18
UDF Code Page In (-rbudfcpin) startup parameter A–6, A–8, A–11, A–19
UDF Code Page Out (-rbudfcpout) startup parameter A–6, A–9, A–10, A–19
Collation Code Page (-cpcoll) startup parameter A–19, A–20
Collation tables A–19filters A–21sorting data A–21
Colorchanging 4–18, 4–19, 4–20, 4–22changing line color 11–5changing rectangle line color
11–9
Colorsdefault highlight 1–6
Composite table 8–2
CompuServe Graphics Interchange Format 12–2
Computer-aided Acquisition and Logistics Support format 12–2
Concatenation addition operator 6–6, C–8, C–9precedence in expressions 6–7
Concatenation subtraction operator 6–6, C–13
Conditional printingband lines 1–16, 3–5, 3–13
Conditionsfilters
appending 10–11deleting 10–12editing 10–10inserting 10–10
Connecting databases A–2
Constantsexpressions 6–4
Control-break keys A–3
Controllingtables 8–2
convmap.cp file A–16, A–17, A–19, A–20
Copiesreports B–50
Copyingband lines 3–16calculated field expressions
6–19, 7–6fields 4–16lines 11–4rectangles 11–7report definition 2–8UDF expressions 6–19, 7–6
Count aggregate fields 5–2

Index
-cpinternal startup parameter (Internal Code Page) A–16, A–17
-cpstream startup parameter (Stream Code Page) A–17
Create menu 1–10
Creatingaggregate fields 5–8band lines 3–8bands 3–7calculated fields 6–15fields 4–13filters 10–8joins 8–7libraries 2–11new report 2–4UDF parameters 7–3user-defined functions 7–2
Cursor locator 1–9See also Cursors
Cursors 1–20position 1–19
CUT files 12–2
Cuttingband lines 3–16fields
aggregate 5–14calculated 6–22
lines 11–4rectangles 11–7
D
Dataaccessing 1–2grouping 9–1, 9–8, 9–9
changing group field 9–14changing group order 9–14deleting group level 9–15inserting group level 9–15levels 9–8order options 9–10techniques 9–16
page placement 3–2sort order 9–2sorting 1–3, 9–1, 9–2, 9–4
best fields 9–4case sensitivity 9–4changing sort field 9–6changing sort order 9–6deleting sort level 9–7field restrictions 9–3inserting sort level 9–6levels 9–2techniques 9–16
Data typeconversion B–14, B–42, B–59
Data typesCHARACTER 4–23, 4–34, 6–2converting to characters B–59DATE 4–23, 4–36, 6–2DECIMAL 4–2expressions 6–2input/output B–4INTEGER 4–2LOGICAL 4–23, 4–35, 6–3MEMO 4–23, 4–39, 6–3NUMERIC 4–23, 4–31, 6–2text string 4–23
Database fields 4–2
Database menu 1–10
Database triggers A–25
Databasesaccess and Report Builder 1–7and Report Builder 1–2connecting A–2connecting prompt A–31default directory
progress.ini file A–33files
code pages A–17search rules A–37
Newsport 1–22returning physical name B–15tables 1–2
Date addition operator 6–6, C–11
Index–5

Index–6
Progress Report Builder User’s Guide
Date constantscalculated field expressions 6–5
DATE data typecalculated expressions 6–2field alignment 4–23format 4–36
Date fields 4–36
DATE function B–14
Date subtraction operator 6–6, C–14
Datescalendar quarters B–45, B–46converting B–56, B–57
days B–15strings B–14
current system B–62days B–57days as integers B–64determining day 7–12format 7–9months B–40, B–56year values B–65
DAY function B–15
Day of the weekprinting B–57
DBNAME function B–15
DCX files 12–2
DECIMAL data type 4–2
Decimalsrounding B–53truncating B–63
Default settingsdirectories 2–10grid display 13–8ruler spacing 13–7rulers 13–6
Definingaggregate fields 5–8joins 8–7
Deletingband lines 3–17fields 4–18
aggregate 5–15calculated 6–22
filter conditions 10–12joins 8–11lines 11–6rectangles 11–11report definition 2–9user-defined functions 7–8
DIB files 12–2
Directoriesdefault 2–10, A–33
progress.ini file A–33progress.ini setting A–33
Report Builder 1–6
DisplayingUNKNOWN values 4–3
Division operator 6–6, C–15precedence in expressions 6–7,
6–13
DLL files A–22
DLLFUNC function B–16
Double-byte characters A–22
Drawinglines 11–3rectangles 11–7
Driversprinter 1–6
E
Edit cursors See Cursors
Edit menu 1–10

Index
Editingaggregate fields 5–12calculated fields 6–19filters 10–9, 10–10, 10–11,
10–12joins 8–10user-defined functions 7–7
Embedded fields 14–5
Encapsulated PostScript format 12–2
ENCODE function B–17
Encoded Password (-rbP) startup parameter A–10, A–12
ENTRY function B–18
Environment variables A–34progress.ini file A–26promsgs file A–23RBLNG file A–22
EPS files 12–2
EQ operator 4–4, 6–6, 10–2, C–17precedence in expressions 6–8,
6–13
Equal to operator 4–4, 6–6, 10–2, C–17precedence in expressions 6–8,
6–13
Error messagesdisplaying descriptions xxviiiPROMSGS file A–18
Error values 6–10
ErrorsUNKNOWN values 4–2
Example procedures xxvi
Exiting Report Builder 1–23
EXP function B–19
Export files 15–8code pages A–17
Expressionscopying 6–19, 7–6creating 7–4data type 6–2editing 7–7errors in evaluating 6–10evaluation order C–4logarithm B–36parts
constants 6–4fields 6–4functions 6–9operators 6–5, C–1wildcard characters 6–10
position in lists B–37results
case sensitivity 6–11specifying
calculated fields 6–16user-defined functions 7–4
spelling out B–56square root B–58
F
Fieldwidth indicator A–32
Fields 4–1aggregate 5–1
case sensitivity 5–7cutting from layout 5–14deleting 5–15editing 5–12filtering 10–5inserting 5–12purging 5–15removing 5–13types 5–2UNKNOWN values 5–7
alignment 1–11, 4–25calculated 6–1
case sensitivity 6–10creating 6–15cutting from layout 6–22
Index–7

Index–8
Progress Report Builder User’s Guide
deleting 6–22editing 6–19filtering 10–6purging 6–23removing 6–21server-evaluatable 6–13UNKNOWN values 6–12
case sensitivity 4–7character 4–34copying 4–16created by Instant Layout option
2–3creating 4–13database 4–2date 4–36deleting 4–18description in status bar 1–19display format 1–17
menu option 4–11progress.ini setting A–27
embedded 14–5format 4–8format options 4–30grouping 9–14in expressions 6–4inserting 4–15Instant Layout option 2–5
progress.ini setting A–30join pairs 8–2logical 4–35memo 4–39
width 14–4merge left 4–27modifying format 4–29moving 4–17name order
progress.ini setting A–28numeric 4–31pasting 4–16representation on layout 1–17
menu option 4–11security A–23selecting 4–10sorting 9–6width indicator 1–17, 4–11,
4–12, 13–10
File typesimage 12–2
Files A–3convmap.cp A–16, A–17, A–19,
A–20database A–17, A–37DLL A–22export A–17image A–35image. See Imagesmemo A–36memo files A–17memo. See Memo filesparameter A–3, A–4print A–18progress.ini See also progress.ini
fileprogress.ini See also progress.ini
filePROMSGS A–18promsgs A–23prorb.exe A–22prorb.udf 7–2rblib.p A–4rbres A–22rbstart.pf A–5report libraries A–16, A–38,
B–51startup.pf A–5UDF See also User-defined
functions
FILL function B–19
Filters 10–1, 10–7, 11–1, B–51aggregate fields 5–27, 10–5calculated fields 10–6collation tables A–21creating 10–8editing 10–9, 10–10, 10–11,
10–12memo fields 10–7
FIND trigger A–26
FLIP function B–21

Index
Fontschanging 4–18, 4–19, 4–20characteristics 4–18color A–32default
dialog box setting 4–21progress.ini file A–33
effect 4–19, 4–20, 4–21effects 4–18pitch 4–19point size 4–19size
progress.ini file A–32spacing 4–19style 4–19, 4–20, 4–21styles 4–18
Footersgroup. See Group footerspage. See Page footers
Foreign languages. See Code pages
Form letters 14–1blank lines 14–6considerations 14–3memo files See also memo files
code pagessearch rules
Formatfield 4–8
changing 4–29options 4–30
image file 12–2
Format bar 1–9, 1–11progress.ini setting A–27
Format commandsfonts 4–21
Format, dates 7–9
Formattingmemo files 14–7
beginning and end of fields 14–9
font styles 14–12fonts 14–12
horizontal spacing 14–12line endings 14–11memo field titles 14–8
Freeform band line height 1–15, 3–5, 3–11sizing in layout 3–12
Functionsarguments 6–18, 7–5built-in 4–5, 6–14built-in See also Appendix B for
complete listCASE 4–5case sensitivity 6–10collation tables A–21day, date, and time B–4DLL-based B–16expressions 6–9guidelines B–2IIF 4–5IN-LIST 4–5, 4–6, 10–3, 10–4IN-RANGE 10–3, 10–4numeric B–7PAGE-NUMBER 10–6RECORD-NUMBER 10–6report management B–8REPORT-FILTER 10–6selecting 6–17, 7–5string manipulation B–5syntax B–3user-defined 4–6, 7–1
creating 7–2deleting 7–8editing 7–7samples 7–9
G
GE operator 4–5, 6–6, 10–3, C–18precedence in expressions 6–8,
6–13
GEM bitmap format 12–3
Generatingbar codes 4–22
GIF files 12–2
Index–9

Index–10
Progress Report Builder User’s Guide
Grand total aggregate fields 5–17
Greater than operator 4–5, 6–6, 10–2, C–19precedence in expressions 6–8,
6–13
Greater than or equal to operator 4–5, 6–6, 10–3, C–18precedence in expressions 6–8,
6–13
Grid 1–13display
progress.ini setting A–29
Grid displaydefault display setting 13–8
Grouplevels 9–8
deleting 9–15inserting 9–15
order 9–9
Group footer bands 1–14
Group header bands 1–14, 3–2
Group total aggregate fields 5–20
Grouping data 9–1, 9–8changing group field 9–14changing group order 9–14deleting group level 9–15inserting group level 9–15levels 9–8order options 9–10
print once 9–11repeat header 9–14reset page 9–11swap footer 9–13swap header 9–11
sorting 9–9specifying sort order 9–9techniques 9–16
GT operator 4–5, 6–6, 10–2, C–19precedence in expressions 6–8,
6–13
H
Halo CUT format 12–2
Headersgroup. See Group headerspage. See Page headers
Heightband lines 3–10
Help menu 1–10
Help, Progress messages xxviii
Hidden tablesprogress.ini setting A–28
Highlight colorsReport Builder 1–6
Horizontal rulers. See Rulers
Horizontal scroll bars. See Scroll bars
I
IBM IOCA format 12–2
ICA files 12–2
ICO files 12–2
Identifyingline endings 14–11memo fields 14–8, 14–9
IF...THEN...ELSE function. See IIF function
IFF files 12–2
IIF function 4–5, B–13, B–23

Index
Image files. See Images
Images 1–18, 12–1default directory A–33default extensions
progress.ini setting A–34importing 12–4moving 12–6pasting from clipboard 12–5quality
progress.ini setting A–34replacing 12–9resizing 12–7, 12–8search rules A–35supported file types 12–2
IMG files 12–3
Importingimages 12–4
INDEX function B–24
INDEX-NTH function B–25
INITIAL-CAPS function B–26
IN-LIST function 4–5, 4–6, 10–3, B–27collation tables A–21
IN-LIST functionsfilter expressions 10–3, 10–4
Inner joins 8–3
IN-RANGE function 10–3, B–28collation tables A–21
IN-RANGE functionsfilter expressions 10–4
Insertingaggregate fields 5–12band lines 3–8fields 4–15filter conditions 10–10page breaks 3–8text strings 4–16
Instant Layout option 2–2created band lines 2–3created fields 2–3default display A–30
INTEGER data type 4–2
INTEGER function B–29
Intel FAX format 12–2
Interface features 1–9
Internal Code Page (-cpinternal) startup parameter A–16, A–17
Internationalization A–15code pages A–16collation A–19double-byte characters A–22
IS-LETTER function B–30
IS-LOWER function B–31
IS-UPPER function B–32
Italic typefaceas typographical convention xxifont style 4–21
J
Join field pairs 8–2
Joins 1–2, 8–1considerations 8–7creating 8–7deleting 8–11editing 8–10field pairs 8–2inner 8–3outer
left 8–4right 8–5
JPEG format 12–3
JPG files 12–3
Index–11

Index–12
Progress Report Builder User’s Guide
K
KeysCTRL-BREAK A–3
Keystrokes xxii
Kodak Photo CD format 12–3
L
Labelsband 1–9
LaserView format 12–3
Layout area 1–9, 1–17
Layouts 1–9
LC function B–33
LE operator 4–5, 6–6, 10–3, C–19precedence in expressions 6–8,
6–13
Left alignment 4–24
Left outer joins 8–4
LEFT-TRIM function B–34
Length calculation B–35
LENGTH function B–35
Less than operator 4–5, 6–6, 10–3, C–20precedence in expressions 6–8,
6–13
Less than or equal to operator 4–5, 6–6, 10–3, C–19precedence in expressions 6–8,
6–13
Librariescreating 2–11managing 2–1, 2–10opening existing 2–12
Limitationsarithmetic A–3built-in functions B–2calculated field expressions 6–5joins 8–7master tables 8–12
Lines 1–18, 11–1changing color 11–5changing thickness 11–5copying 11–4cutting 11–4deleting 11–6drawing 11–3height
page breaks 15–11moving 11–4pasting 11–4placement rules 11–2resizing 11–4
Listscalculations B–27number of items B–41
LOG function B–36
Logarithms B–36
Logical constantscalculated field expressions 6–5
LOGICAL data typecalculated expressions 6–3field alignment 4–23format 4–35
Logical fields 4–35
Logicalsdefault values
progress.ini file A–33
LOOKUP function B–37
LT operator 4–5, 6–6, 10–3, C–20precedence in expressions 6–8,
6–13
LV files 12–3

Index
M
MAC files 12–3
Macintosh MacPaint format 12–3
Macintosh PICT format 12–3
Main windowdefault 1–8report layout 1–9
Managinglibraries 2–1, 2–10reports 2–1
Manualsyntax notation xxii
Manual, organization of xix
Marginsdefaults
progress.ini file A–31
Marking memo fields 14–9
Master tables 1–2, 8–2, 8–12specifying 2–5
MATCHES operator 6–6, 10–3, C–21filter expressions 10–4precedence in expressions 6–8
Math. See Arithmetic, Operators, Expression
Maximum aggregates 5–3
MAXIMUM function B–38collation tables A–21
MEMO data typecalculated expressions 6–3field alignment 4–23format 4–39
Memo fields 4–39calculated expressions 6–5
conditionally including in reports 14–5
filters 10–7
Memo filesattaching to reports 14–16blank lines 14–6code pages A–17default extension A–33field width 14–4formatting 14–7
beginning and end of fields 14–9
font styles 14–12fonts 14–12horizontal spacing 14–12line endings 14–11memo field titles 14–8
page breaks 14–7preparing
memo field titles 14–9word wrap 14–3
Menu bar 1–9, 1–10
Menu optionsselecting 1–10
Menuscalculations 1–10create 1–10database 1–10edit 1–10help 1–10options 1–10properties 1–10report 1–10view 1–10
Merge left 4–26field alignment 4–27
Messagesdisplaying descriptions xxviii
Microsoft Icon File format 12–2
Microsoft Windows Paint format 12–3
Index–13

Index–14
Progress Report Builder User’s Guide
Minimum aggregate fields 5–3
MINIMUM function B–39collation tables A–21
Modifyingband lines 3–10
MODULO operator 6–6, C–22precedence in expressions 6–7
Monospaced typefaceas typographical convention xxi
Monthprinting B–56
MONTH function B–40
Movingband lines 3–16fields 4–17images 12–6lines 11–4rectangles 11–7
MSP files 12–3
MS-Windows, highlight colors 1–6
Multiplication operator 6–6, C–14precedence in expressions 6–7,
6–13
N
Namesreversing order B–21
NE operator 4–4, 6–6, 10–2, C–22precedence in expressions 6–8,
6–13UNKNOWN values 6–7
New Calculation dialog 6–15
Newsport database 1–22
Not equal to operator 4–4, 6–6, 10–2, C–22precedence in expressions 6–8,
6–13UNKNOWN values 6–7
NOT operator 4–4, 6–7, 6–13, C–23precedence in expressions 6–8
NUM-ENTRIES function B–41
Numeric constantscalculated field expressions 6–5
NUMERIC data typecalculated expressions 6–2field alignment 4–23format 4–31
Numeric fields 4–31
NUMERIC function B–42
O
Openingreport definition 2–7report libraries 2–12
Operating systems B–43current date B–62
Operationsbinary 4–4unary 4–4
Operatorsaddition 6–6, 6–7, 6–13, C–7AND 6–7, 6–8, 6–13, C–16BEGINS 6–6, 6–8, 10–3, C–16case sensitivity 6–10concatenation addition 6–6, 6–7,
C–8, C–9concatenation subtraction 6–6,
C–13date addition 6–6, C–11date subtraction 6–6, C–14

Index
division 6–6, 6–7, 6–13, C–15EQ 4–4, 6–6, 6–8, 6–13, 10–2,
C–17equal to 4–4, 6–6, 6–8, 6–13,
10–2, C–17expressions 6–5, C–1GE 4–5, 6–6, 6–8, 6–13, 10–3,
C–18greater 4–5, 10–2, C–19greater or equal 4–5, 10–3greater than 6–6, 6–8, 6–13greater than or equal to 6–6, 6–8,
6–13, C–18GT 6–6, 6–8, 6–13, 10–2LE 4–5, 6–6, 6–8, 6–13, 10–3,
C–19less 4–5, 10–3, C–20less or equal 10–3, C–19less than 6–6, 6–8, 6–13less than or equal to 6–6, 6–8,
6–13LT 4–5, 6–6, 6–8, 6–13, 10–3,
C–20MATCHES 6–6, 6–8, 10–3,
10–4, C–21MODULO 6–6, 6–7, C–22multiplication 6–6, 6–7, 6–13,
C–14NE 4–4, 6–6, 6–8, 6–13, 10–2,
C–22NOT 4–4, 6–7, 6–8, 6–13, C–23not equal C–22not equal to 4–4, 6–6, 6–8, 6–13,
10–2OR 6–7, 6–8, 6–13, C–24precedence C–2relational 4–4
restrictions C–6selecting 6–18, 7–6server-evaluatable fields 6–13subtraction 6–6, 6–7, 6–13, C–12unary negative 4–4, C–11unary positive 4–4, C–7
OPSYS function B–43
Options menu 1–10
OR operator 6–7, C–24precedence in expressions 6–8,
6–13
Orderexpression evaluation C–4precedence of operators C–2search A–35, A–36, A–37, A–38sort 1–3
Outer joinsleft 8–4right 8–5
P
-P parameter (Password) A–25
Page breaksinserting 3–8line height 15–11locations 3–9memo files 14–7new page lines 15–11page layout settings 15–10record layout settings 15–10widow/orphan control 15–12word wrapped fields 15–11
Page footer bands 1–14, 3–2
Page header bands 1–14
Page total aggregate fields 5–18
PAGENO function 9–17
PAGE-NUMBER function 10–6, B–44
Pagesnumbers B–44
Pagination 15–10
Paper sizedefault
progress.ini file A–31
Index–15

Index–16
Progress Report Builder User’s Guide
Parameter files A–4rbstart.pf A–5startup.pf A–5
ParametersCollation Code Page (-cpcoll)
A–19, A–20editing 7–7Internal Code Page (-cpinternal)
A–16, A–17Password (-P) A–25Physical Database Name (-db)
A–20RB-DB-CONNECTION A–25RB-DB-PARAMETERS A–25RB-DISPLAY-ERRORS A–24RB-STATUS A–15Stream Code Page (-cpstream)
A–17UDF 7–5user-defined functions 7–2
Parameters See Startup parameters
Password (-P) parameter A–25
Passwords A–24
Pastingarguments
progress.ini file A–28band lines 3–16fields 4–16function arguments 6–18, 7–5images from clipboard 12–5lines 11–4rectangles 11–7
Pasting multiple fields 4–17
PC Paintbrush format 12–3
PCD files 12–3
PCT files 12–3
PCX files 12–3
Percent-of-total field 5–5
Physical Database Name (-db) parameter A–20
Pitch 4–19
Pixmap format 12–3
Point size 4–19default
progress.ini file A–32
Precedence of operators C–2
Previewing a report 15–4low memory problems 15–5
PREVIOUS function 9–17, B–44
Printcode pages A–18
Print positioncontrolling 4–26
Printer driversconsiderations 1–6
Printingconditional for band lines 3–13conditions for band lines 1–16,
3–5group order option 9–11reports 15–1, 15–6
changing settings 15–7printing to file 15–7using current settings 15–7
selecting a printer 15–2specifying printer settings 15–2
Proceduresexamples of xxvirblib.p A–4
Progressprogress.ini file See also
progress.ini filesecurity A–23startup parameters A–6triggers A–25

Index
progress.ini file A–22, A–30, A–32, A–33rblng file A–34RBStartup section A–26ReportBuilderDefaults section
A–31ReportBuilderPreferences
section A–30ReportBuilderSaveList section
A–27settings. See Appendix B, Report
Builder Administration
promsgs file A–23
Properties menu 1–10
prorb.exe file A–22
prorb.udf file 7–2
PSD files 12–3
Purgingaggregate fields 5–15fields
calculated 6–23
Q
QUARTER function B–45
QUARTER-START function B–46
R
Rangescalculations B–28
RAST files 12–3
-rbcpreportin startup parameter (Report Code Page In) A–6, A–7, A–11, A–18
-rbcpudfin startup parameter (UDF Code Page In) A–19
-rbcpudfout startup parameter (UDF Code Page Out) A–19
RB-DB-CONNECTION parameter A–25
RB-DISPLAY-ERRORS parameter A–24
rblib.p file A–4
RBLNG environment variable A–22, A–34
RB-OTHER-PARAMETERS parameter B–55
rbres file A–22
rbstart.pf file A–5
RBStartup section A–26
RB-STATUS parameter A–15
RECNO function 9–17
Record bands 1–14, 3–2
RECORD-NUMBER function 10–6, B–48
Recordscomposite table 8–2number B–48previous values B–44
Rectangles 1–18, 11–1adding shading 11–10border thickness 11–9changing line color 11–9copying 11–7cutting 11–7deleting 11–11drawing 11–7excluding sides 11–10moving 11–7pasting 11–7placement rules 11–2resizing 11–8
Index–17

Index–18
Progress Report Builder User’s Guide
Related tables 1–2, 8–2
Relational operators 4–4restrictions C–6
Removingaggregate fields 5–13fields
calculated 6–21
Repeat headergroup order option 9–14
REPLACE function B–48
REPLACE-INDEXED function B–49
Report Builderbuilt-in functions B–1code pages A–16connection information A–2default window
progress.ini setting A–29deployment A–26double-byte characters A–22exiting 1–23progress.ini file A–26prorb.exe file A–22rbres file A–22security A–23startup files A–3startup parameters A–4, A–5,
A–6translated versions A–22version compatibility A–3
Report Code Page In (-rbcpreportin) startup parameter A–6, A–7, A–11, A–18
Report Code Page Out (-rbcpreportout) startup parameter A–6, A–7, A–18
Report definitions 1–2closing 2–7copying 2–8
defined 1–2deleting 2–9master table 1–2, 8–12opening 2–7progress.ini file A–29report libraries A–4saving 2–6translation A–22version compatibility A–3viewing specifications 2–12
Report Enginecode pages A–16double-byte characters A–22parameters
RB-DB-CONNECTION A–25
RB-DISPLAY-ERRORS A–24
RB-STATUS A–15RB-OTHER-PARAMETERS
B–55running mode B–54startup parameters A–5, A–10translated versions A–22
Report Engine parameters A–10-rbcpreportin A–11-rbcpudfin A–11-rbdel A–10-rbP A–10-rbstatfile A–10-rbtable A–10-rbtag A–10-rbupds A–10
Report Engine Record Delete (-rbdel) startup parameter A–10, A–11
Report Engine Table Name (-rbtable) startup parameter A–10, A–13
Report layouts 1–9, 1–17band line limits 1–19field representation 1–17images 1–18

Index
Instant Layout option 2–2limits 1–19lines 1–18rectangles 1–18
Report libraries 1–4code pages A–16creating 2–11default directory
progress.ini file A–33managing 2–1, 2–10opening existing 2–12pathname B–51progress.ini file A–29search rules A–38viewing contents A–4
Report menu 1–10
Report nameincluding in report B–52
Report Status File (-rbstatfile) startup parameter A–10, A–12
Report Tag (-rbtag) startup parameter A–10, A–14
Report Update Status (-rbupds) startup parameter A–10, A–14
ReportBuilderDefaults section A–31
ReportBuilderPreferences section A–30
ReportBuilderSaveList section A–27
REPORT-COPY function B–50
REPORT-FILTER function 10–6, B–51
REPORT-LIBRARY function B–51
REPORT-NAME function B–52
Reportscopies B–50creating 2–4definitions. See Report
definitionsfilters B–51form letters 14–1libraries. See Report librariesmanaging 2–1merge considerations 14–3names B–52previewing 15–4
low memory problems 15–5printing 15–1, 15–6
changing settings 15–7printing to a file 15–7using current settings 15–7
running B–54saving
saving in a file 15–8saving to formatted file 15–9
translation A–22
Reset pagegroup order option 9–11
Resizingimages 12–7, 12–8lines 11–4rectangles 11–8
Restrictions. See Limitations
Right alignment 4–24
Right outer joins 8–5
RIGHT-TRIM function B–52
R-INDEX function B–47
ROUND function B–53
Rulers 1–9, 1–12default display setting 13–6,
13–7default units
progress.ini file A–31display
progress.ini setting A–28
Index–19

Index–20
Progress Report Builder User’s Guide
Running totals. See Accumulative totals
RUNTIME function B–54
RUNTIME-PARAMETER function B–55
S
Savingreport definitions 2–6reports 15–8
saving to formatted file 15–9
Scroll bars 1–9display
progress.ini file A–30
Search orderdatabase files A–37image files A–35memo files A–36report libraries A–38
Secondscalculating B–61
Security A–23table and field-level A–23
Selectingband lines 3–10fields 4–10functions 6–17, 7–5menu options 1–10operators 6–18, 7–6parameters 7–5printers 15–2
Server-evaluatable fields 6–13
Server-evaluatable filters 10–7
ServersReport Builder 1–7
Setting defaultsdirectories 2–10
Shading 11–1adding to a rectangle 11–10
Sizefont 4–19
Sizesfont. See Font sizepaper. See Paper size
Snap to griddefault A–32
Sortlevels 9–2
deleting 9–7inserting 9–6
order 9–4
Sort order 9–2
Sorting data 1–3, 9–1, 9–2best fields 9–4by aggregate fields 5–26case sensitivity 9–4changing sort field 9–6changing sort order 9–6collation tables A–21deleting sort level 9–7field restrictions 9–3grouping 9–9inserting sort level 9–6levels 9–2specifying sort order 9–2, 9–4techniques 9–16
SPACE function B–55
Spacescharacter expressions B–55removing B–62
Spacing 4–19
Specificationsreport definition 2–12
Specifyingfont styles for memo file text
14–12fonts for memo file text 14–12

Index
horizontal spacing in memo files 14–12
printer settings 15–2
SPELL-MONTH function B–56
SPELL-NUMBER function B–56
SPELL-WEEKDAY function B–57
SQRT function B–58
Square root B–58
Standard Deviation 5–9
Standard deviation aggregate fields 5–3
Starting the Report Builder 1–7
Startup commands 1–7
Startup parameters A–4Encoded Password (-rbP) A–10,
A–12locations A–5Progress A–6Report Builder A–5, A–6Report Code Page In
(-rbcpreportin) A–6, A–7, A–11, A–18
Report Code Page Out (-rbcpreportout) A–6, A–7, A–18
Report Engine A–5, A–10Report Engine Record Delete
(-rbdel) A–10, A–11Report Engine Table Name
(-rbtable) A–10, A–13Report Status File (-rbstatfile)
A–10, A–12Report Tag (-rbtag) A–10, A–14Report Update Status (-rbupds)
A–10, A–14UDF Code Page In (-rbcpudfin)
A–6, A–8, A–11, A–19UDF Code Page Out
(-rbcpudfout) A–6, A–9, A–10,
A–19Userid (-U) A–25
startup.pf file A–5
Statusband lines 3–5
Status bars 1–9, 1–19
Stopping Report Builder 1–23
Stream Code Page (-cpstream) startup parameter A–17
STRING function B–59
Stringscalculating length B–35converting
case B–11, B–33initial caps B–26to dates B–14to numbers B–42
encoding B–17field alignment 4–23identifying position B–47indexing B–24inserting 4–16parsing values B–18RB-OTHER PARAMETERS
B–55removing spaces B–34, B–52repeating B–19report names B–52substrings B–25, B–48, B–49,
B–60, B–61translation A–22
SUBSTRING function B–60
SUBSTRING-COUNT function B–61
Substringsreplace B–48search B–25
Subtotal fields. See Aggregate fields
Index–21

Index–22
Progress Report Builder User’s Guide
Subtraction operator 6–6, C–12precedence in expressions 6–7,
6–13
Summary bands 1–14, 3–2
Summary fields. See Aggregate fields
Sun Raster file format 12–3
Swapped footersgroup order option 9–13
Swapped headersgroup order option 9–11
Syntaxfunctions B–3
Syntax notation xxii
T
Tablescollation A–19composite 8–2controlling 8–2hidden
progress.ini setting A–28join field pairs 8–2joins 1–2, 8–1
inner 8–3outer 8–4, 8–5
master 1–2, 2–5, 8–2, 8–12related 1–2, 8–2security A–23
Tagged Image File format 12–3
TARGA format 12–3
Text stringsinserting 4–16
TGA files 12–3
Thicknesschanging line thickness 11–5changing rectangle border
thickness 11–9
TIF files 12–3
TIME function B–61
Title bands 1–14, 3–2
Title bars 1–9
TODAY function B–62
Tool bar 1–9, 1–11progress.ini file A–27
Total aggregate fields 5–2
Total fields See also Aggregate fieldsin calculationsin queriessorting on
Triggers A–25
TRIM function B–62
TRUNCATE function B–63
Typographical conventions xxi
U
UDF Code Page In (-rbcpudfin) startup parameter A–6, A–8, A–11, A–19
UDF Code Page Out (-rbcpudfout) startup parameter A–6, A–9, A–10, A–19
UDFs. See User-defined functions
Unary negative operator 4–4, C–11
Unary operations 4–4

Index
Unary positive operator (+) 4–4, C–7
Unknown value 4–2aggregate fields 5–7calculated fields 6–12displaying 4–3entering the Report Builder 4–4not equal to operator 6–7processing 4–4
User ID (-U) startup parameter A–25
User-defined functions 7–1code pages A–17creating 7–2default directory, progress.ini
setting A–33deleting 7–8editing 7–6, 7–7expressions, copying 6–19parameters 7–2samples 7–9setting A–17
USERID A–24
V
Valuesabsolute B–10ASCII B–11blank 4–2comparing B–38, B–39date B–15decimal B–53Unknown 4–2unknown 6–12
Variance 5–9
Variance aggregate fields 5–3
Versions of Report Builder A–3
Vertical rulers. See Rulers
Vertical scroll bars. See Scroll bars
View commandsAction Bar 1–11
View menu 1–10
W
WEEKDAY function B–64
Widow/orphan controlpage breaks 15–12
Width indicator (field) 4–11, 4–12, 13–10
Wildcardsexpressions 6–10
Windows Bitmap format 12–2
Windows Device-Independent bitmap format 12–2
Windows Metafile format 12–3
WMF files 12–3
Word order B–21
Word wrapmemo fields 14–3page breaks 15–11
Word wrap alignment 4–24
WordPerfect Graphic format 12–3
WPG files 12–3
Index–23

Index–24
Progress Report Builder User’s Guide
X
X bitmap format 12–3
XBM files 12–3
XPM files 12–3
Y
YEAR function B–65