representation of reserved categories in posts and ...rrcps.nic.in/user manual for ministry...
TRANSCRIPT

User Manual
Representation of Reserved Categories
In
Posts and Services in GOI
Introduction:-
RRCPS Monitoring System is a web-based application, which helps to know the status
of Vacancies and appointments for SC/ST/OBCs in all existing
Ministry/Department/Organisation(s). The application enables the DoPT to maintain a
record for the Vacancies/Appointment made in all Ministry/Department and
Organisations/Services under their administrative control.
The system has been designed in such a manner that the Nodal officer of a Ministry can view
the status of vacancies/appointments made in the concerned Ministry/Department including
all organisations/services under this Ministry/Department. This has been achieved by putting
rigorous efforts while designing the application.
The Establishment Reservation Dopt shall assign username and password to the authorized
nodal/liaison officers in all Ministries/Departments.
Ministries/Departments requested to create appropriate user accounts for various
Ministries/Departments/Organisations/Services under their administrative control. Users of
Ministries/Departments/Organisations/Services functioning under the Ministries will
thereafter fill up details about the Appointments made during the year and Total
Representation (Existing +Appointments made during previous year) as on 1st January of
Next Year in the input performa provided in RRCPS s/w and submit the same to the
administrative ministry concerned. On receipt of data from their subunits
Ministries/Departments/Organisations/Services, the Ministries will verify and then submit the
data online through RRCPS to the Dopt.
How to access The application can be accessed through a web browser (preferable Internet Explorer
6.0 onwards). The address for the portal is http://rrcps.nic.in
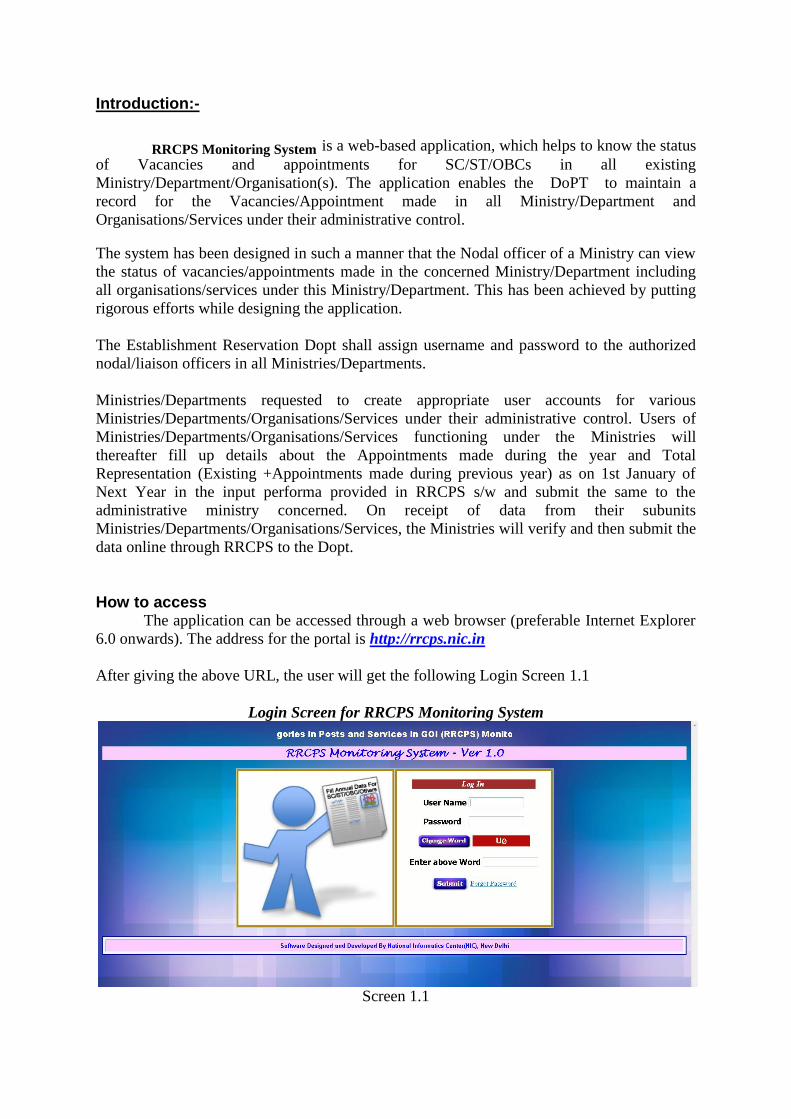
After giving the above URL, the user will get the following Login Screen 1.1
Login Screen for RRCPS Monitoring System
Screen 1.1

How to Login As shown in the diagram (Screen 1.1). Before accessing the application, the user has
to provide the valid “User Name” and “Password” assigned to them and the verification
code shown on the screen. Once the UserName and Password are validated, for the first time
user will get the Create Profile page as shown in screen 1.2.Only after creating complete
profile user can access Home page. However if user forgot his/her Password then he/she has
to click on the link “Forgot Password” for getting the new password in his/her registered
email-id.
Forgot Password On clicking “Forgot Password” link given on screen 1.3 , Forgot Password page is
displayed as shown in screen 1.31
Screen 1.3
Screen 1.31

Screen 1.311
Screen 1.312
After enter valid User Id and verification code click the submit button and user will get the
next screen as shown in screen 1.32
Screen 1.32
Then user will answer the security questions ,answer same as given at time of
registration for password and enter verification code given in image then click the submit

button. If all the 3 answers and verification code are validated then a new password will be
generated by system and mailed to the registered email-id provided in the system and
message screen 1.33 will be display.
Screen 1.33
Create Profile
Very First step of User’s is to ‘Create Profile’. Only after creating complete profile user can
access his/her home page.
Steps to Create Profile :
Change Password -> Add Users Details -> Register for New Password
After Successful login user will get the screen 1.4
Screen 1.4

Enter current password ,New password satisfies Password policy and Confirm Password then
click “Change Password”. After password changed successfully screen 1.5 will be displayed.
Screen 1.5
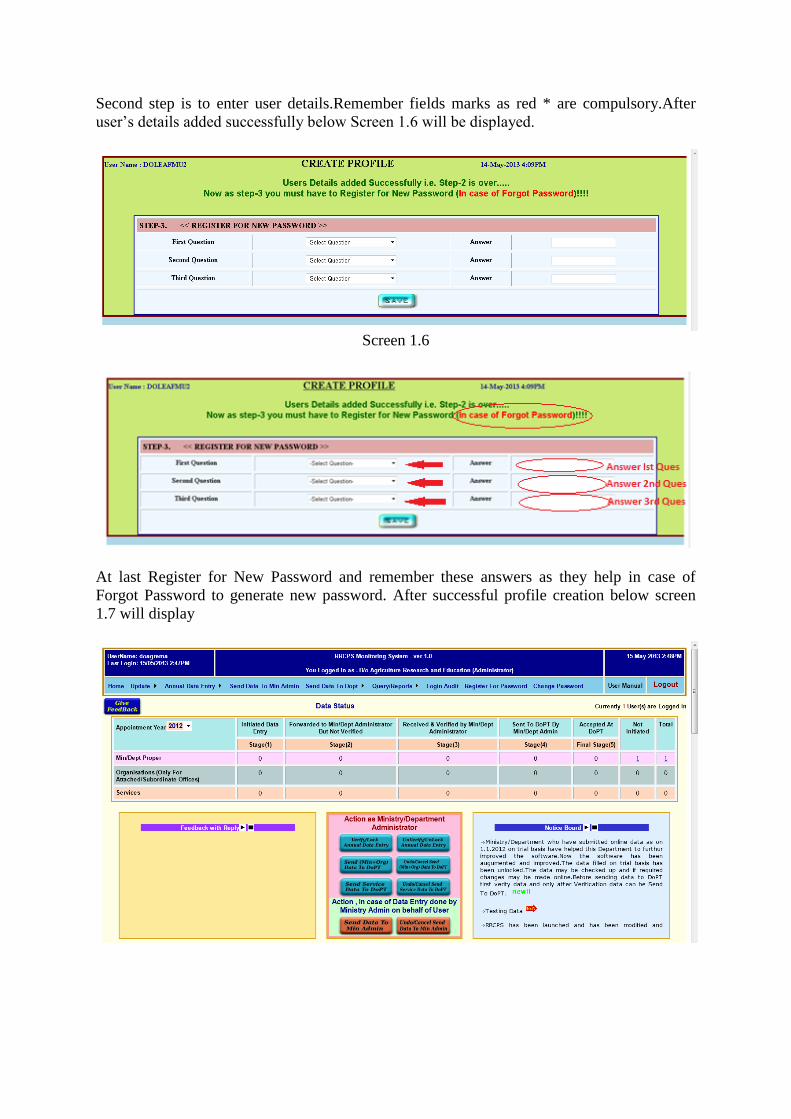
Second step is to enter user details.Remember fields marks as red * are compulsory.After
user’s details added successfully below Screen 1.6 will be displayed.
Screen 1.6
At last Register for New Password and remember these answers as they help in case of
Forgot Password to generate new password. After successful profile creation below screen
1.7 will display

Screen 1.7
Ministry/Department admin can view on Home Page
On top left side user name and last successful login date & time will display
In top centre application name and user ministry/department name with privilege will
display

In top right side current data & time will display
Then following menus will display
1. Home
2. Update
User Profile
Organisation
Service
3. Annual Data Entry
For Min/Dept Proper
For Organisation
For Service
4. Send Data to Min Admin
5. Undo/Cancel Send Data to Min Admin
6. Verify/Lock Annual Data Entry
7. Unverify/Unlock Annual Data Entry
8. Send Data To DoPT
For Ministry(s)/Department(s)/Organisation(s)
For Service(s)
9. Undo/Cancel Send (Min+Org) Data To DoPT
10. Undo/Cancel Send Service Data To DoPT
11. Query/Reports
View Output Report
View Sent Feedback/Suggestions
List of Existing Login
List of Ministries/Departments/Organisations/Services
Annual Data Status
12. Login Audit
13. Register For Password
14. Change Password
15. Give Feedback
16. Logout
Home Page Centre will contain
Currently Logged users list
Ministry/Department Proper/Organisation(Only Attached/Subordinate
Offices)/Service Online Annual Data Status
Feedback with reply display on Feedback board
Notice board display all messages DoPT want to display
Action as Ministry/Department Admin
Action in case of Data entry done by Ministry admin on behalf of Users
List of Organisations/Services under respective Ministry/Department
Login Details of Users under respective Ministry/Department
Organisations(Other than Attached/Subordinate Offices) Online Annual Data
Status
Guidelines for Nodal Officers
Procedure to Add New Organisation

First click link “Add New Organisation” as shown in below screen with red arrow and screen
1.8 will be displayed

Screen 1.8
To add new organization click “Add New Organisation “ button given at above screen and
screen 1.9 will be displayed
Screen 1.9

Field Name Description
Select Min/Dept Select Ministry Department from Dropdown Menu Mandatory.
Organisation Name Enter the Organisation name Mandatory
Organisation Type Enter the Organisation Type Mandatory
Address/Location Enter the address/Location of department Optional
Nodal Officer Name Enter the nodal officer name Optional
Officer Address Enter the Officer address/Location of department Optional
Officer Email Enter the Officer Email-Id. Optional
Officer Phone No. Enter the Officer Phone no. Optional
Officer Mobile No. Enter the Officer Mobile No. Optional
Remarks
If the admin wishes to enter any remarks pertaining
to the Organisation, he can enter in the remarks
column.
Optional
You can also update existing Organisation details by clicking “Edit” given on screen 1.8 with
red oval and on click screen 1.10 will be displayed

Screen 1.10
After add/modification you have to send organization name for approval , only after DoPT
approval data entry/login creation for that oragnisation can be done.For approval ,Check the
checkbox for respective organisation and then click ‘Click to Verify’ button as shown in
below screen 1.11
Screen 1.11

Procedure to Add New Service First click link “Add New Service” as shown in below screen with red arrow , after click
screen 1.12 will be displayed

Screen 1.12
To add new service click “Add New Service” button given on above screen and after click
screen 1.13 will display.

Screen 1.13
Field Name Description
Cadre Controlling Authority
Level Click the CCA Level radio button. Mandatory
Select CCA Min/Dept Select CCA Department from Drop Down List. Mandatory
Select CCA Organisation Select CCA Organisation corresponding to the
Ministry/Department Selected above. Optional
Service Name Enter the Service name. Mandatory.
Select Service Group Select Service group from drop down list. Optional
Remarks If the admin wishes to enter any remarks pertaining
to the service, he can enter in the remarks column. Optional
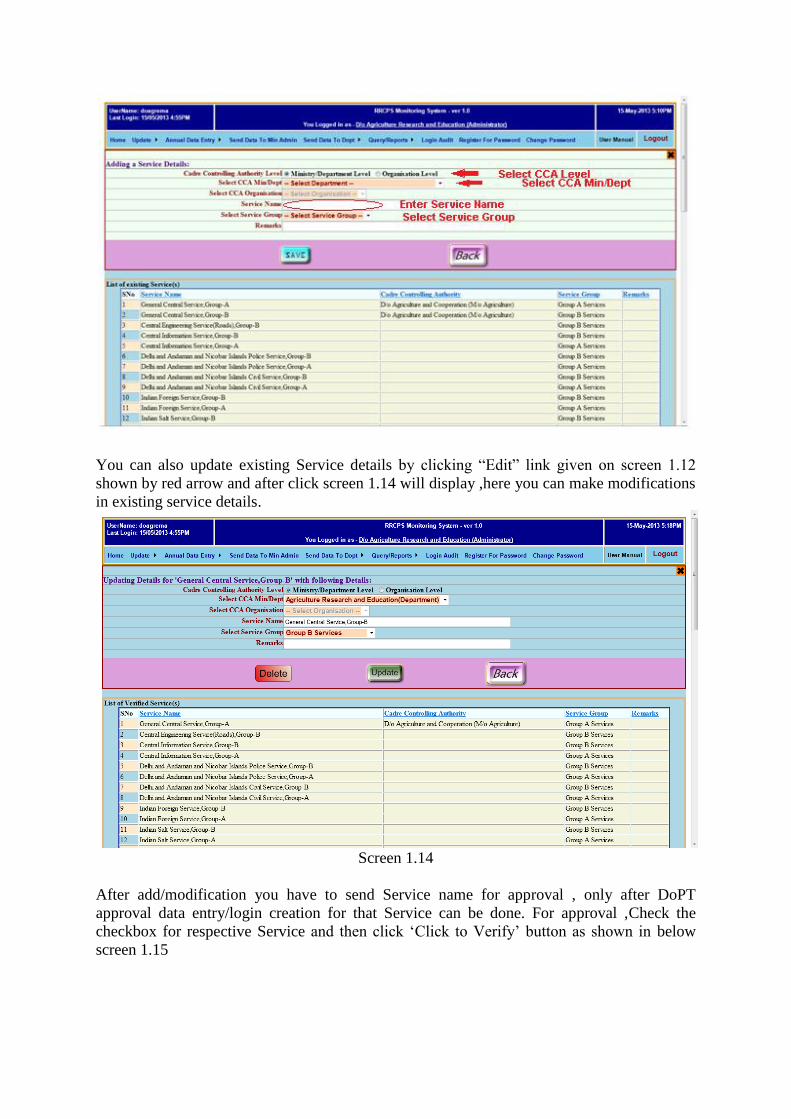
You can also update existing Service details by clicking “Edit” link given on screen 1.12
shown by red arrow and after click screen 1.14 will display ,here you can make modifications
in existing service details.
Screen 1.14
After add/modification you have to send Service name for approval , only after DoPT
approval data entry/login creation for that Service can be done. For approval ,Check the
checkbox for respective Service and then click ‘Click to Verify’ button as shown in below
screen 1.15

Screen 1.15
Only after DoPT approval Organisation/Service will be available for annual data entry and
only then you can create login for Organisation/Service as shown below
Before approval organization will not be available for Data entry and also cann’t be
able to create login for that Organisation as shown in below screens with red arrow

Only after DoPT approval respective organization will be available for Data
Entry/Login Creation as shown in below screens with red arrow

Before approval Service will not be available for Data entry and also can’t be able to
create login for that Service as shown in below screens by red arrow

Only after DoPT approval respective Service will be available for Data Entry/Login
Creation as shown in below screens with red arrow

Procedure to create New Login Click Update -> User Profile on home page to create new login as shown in below screen
, After click screen 1.16 will display

Screen 1.16
To create a new login click “Add New Login” button , screen 1.17 will display as shown
below
Screen 1.17

Screen 1.18
Field Name Description
User Name Enter user name. Mandatory.
Password
Enter Password with password policy (Password
should be between Eight to Fifteen characters. It
must contain at least one number (0-9), one
uppercase letter (A-Z), one lowercase letters (a-z)
and one special character, but no spaces. (e.g.
Indi@G@te8)).
Mandatory
Login authentication/privilege
level
Click the user privilege level radio buton. For eg.
Ministry admin/Ministry user/Organisation user
level.
Mandatory
Select Min/Dept Select the Ministry/Department name from
Dropdown menu Mandatory
Select Organisation Select Organisation corresponding to the
Ministry/Department Selected above. Optional
Login Valid Upto Enter the Login valid Upto date. Optional
Local Emp code Enter the Local employee code. Mandatory
Employee name Enter the employee name. Mandatory
Designation Enter the user designation. Optional
Address Enter the Address of Nodal Officer of the
Ministry/Department Optional
Phone No Enter the Phone No’s of Nodal Officer of the
Ministry/Department. Optional
Email Enter the Email of Nodal Officer of the
Ministry/Department. Optional
Remarks
If the admin wishes to enter any remarks pertaining
to the Nodal Officer, he can enter in the remarks
column.
Optional
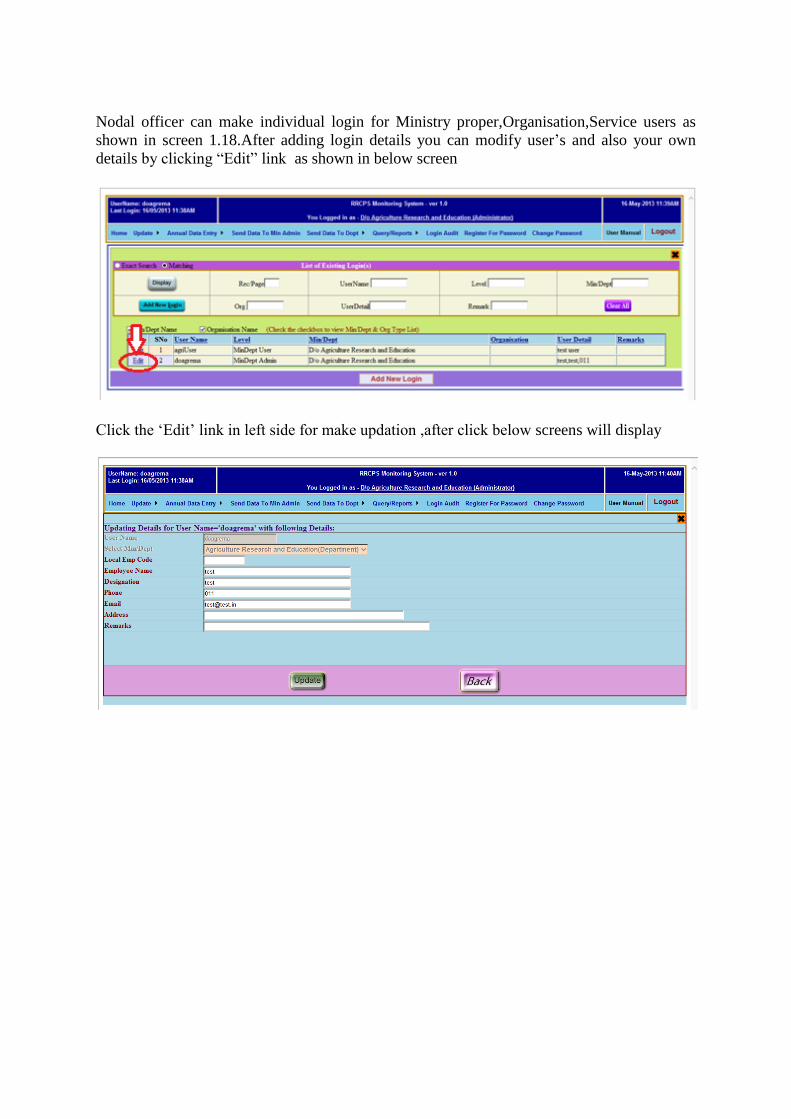
Nodal officer can make individual login for Ministry proper,Organisation,Service users as
shown in screen 1.18.After adding login details you can modify user’s and also your own
details by clicking “Edit” link as shown in below screen
Click the ‘Edit’ link in left side for make updation ,after click below screens will display

You can update/delete user’s login details any time.In future if you want to make any
Login to be disable then just enter that date after which want to disable in respective
user’s ‘Login valid Upto’ textbox and click ‘Update’ as shown in screen 1.19
Screen 1.19
Procedure to Fill Annual Data Entry For
Min/Dept Proper
For annual data entry for Min/Dept Proper click Annual Data Entry->For Min/Dept
Proper as shown in below screen by arrows , after click screen 1.20 will display

Screen 1.20
All fields are mandatory , after all selections below screen will display

If you are making appointment then select ‘Yes’ and input performa as below screen will
display.

And if you are not making appointments then select ‘No’.Here no need to fill data By
Direct,Promotion and Deputation recruitment as shown in below screen.
Fill data and click ‘Save’ button and further you can update/delete data.

Only after sending data to DoPT data will be locked and it will become readonly and then no
more modifications will be possible as shown in below screen.You have to request DoPT to
unlock data only then you can perform futher modification/correction.
Organisation
Click Annual Data Entry -> For Organisation as shown in below screen with arrows ,
after click screen 1.21 will display

Screen 1.21
If you are making appointments then click “Yes” , input performa as shown below
Will display

If you are not making appointments By Direct,Promotion and Deputaion then click ‘No’
below performa will display
Fill data and click ‘Save’ button.You can make further updation also as shown below

After sending data to DoPT data will be locked and it will become readonly as shown in
screen 1.21, no more modifications can be done.For further modifications you have to request
DoPT to unlock data only then modification/correction can be done as shown below

Screen 1.22
Service
Click Annual Data Entry -> For Service as shown in below screen by below screen , after
click screen 1.23 will display

Screen 1.22
In above screen all fields are mandatory, after all selections below screen will display
Fill annual data and click ‘Save’ button and after submit data you can make further changes
in data.

After sending data to DoPT data will be locked and it will become readonly as shown in
screen 1.23 , futher no modification will be possible.Only way for modification is DoPT ,
You have to request DoPT to unlock data only then futher modification/correction can be
done.

Screen 1.23
Procedure to Send data to DoPT
1. First Verify Annual data
2. Send Consolidate data for Ministry/Department (Ministry/Department +Organisation)
3. Send Service Annual Data
If you are doing Data entry on behalf of Ministry/Department/Organisation/Service then steps
to Send Data to DoPT
1. First Send data to Ministry/Department Admin As shown in below screen
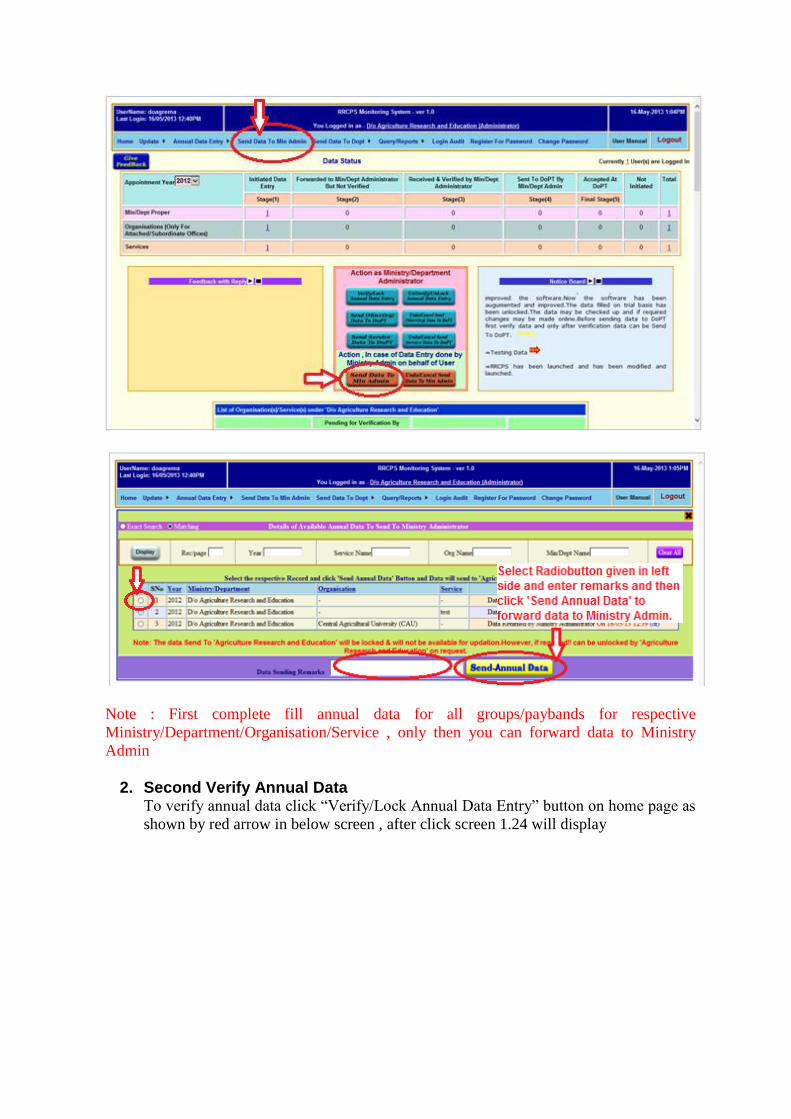
Note : First complete fill annual data for all groups/paybands for respective
Ministry/Department/Organisation/Service , only then you can forward data to Ministry
Admin
2. Second Verify Annual Data To verify annual data click “Verify/Lock Annual Data Entry” button on home page as
shown by red arrow in below screen , after click screen 1.24 will display
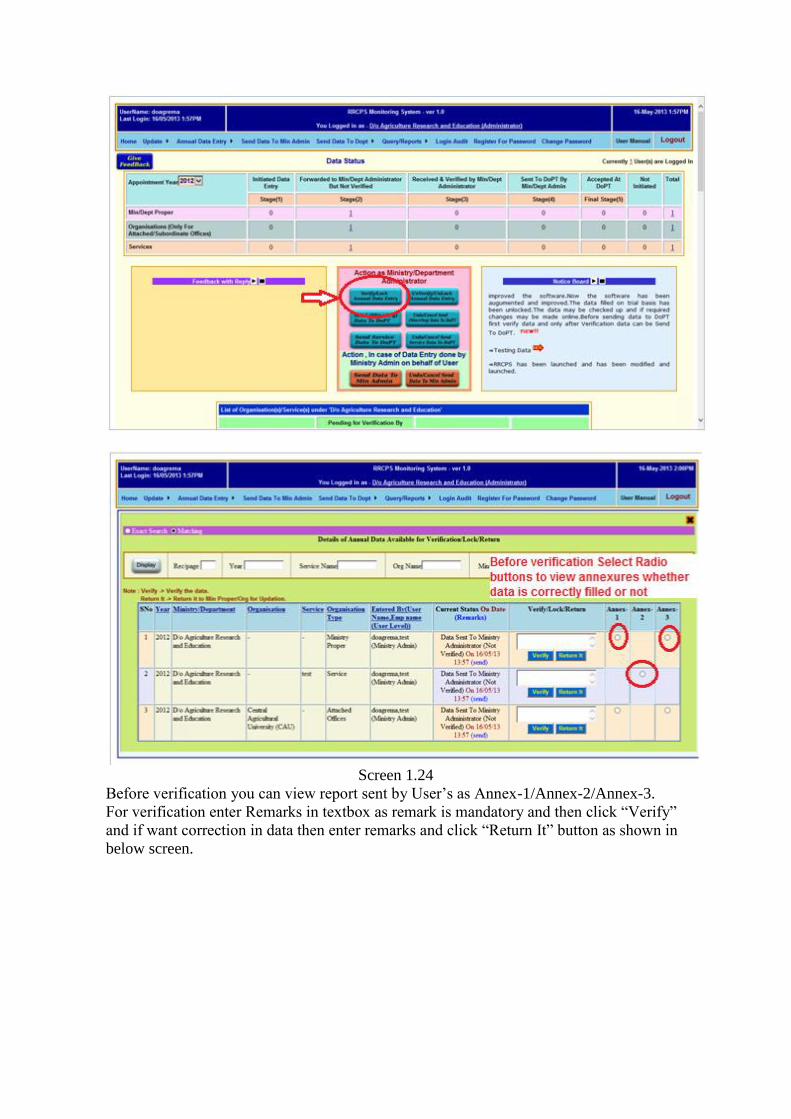
Screen 1.24
Before verification you can view report sent by User’s as Annex-1/Annex-2/Annex-3.
For verification enter Remarks in textbox as remark is mandatory and then click “Verify”
and if want correction in data then enter remarks and click “Return It” button as shown in
below screen.

3. Send Consolidate data for Ministry/Department (Ministry/Department + Organisation) to DoPT Click “Send(Min+Org) Data To DoPT” button on home page as shown by red arrow
in below screen , after clicking screen 1.25 will display

Screen 1.25
Remember one thing when you send consolidate data means sending data for Proper
Min/Dept and Organisation (Attached/Subordinate only).Before ‘Sending data to DoPT’
make sure data for proper min/dept and under attached/subordinate organisation completely
filled and verified , only then you can be able to send data to DoPT.For sending data to DoPT
select respective record ,enter remarks and click ‘Send To DoPT’ button as shown in below
screen
4. Send Service Annual Data
Send Service Data to Ministry Admin
Verify Service Data
Above two steps are same as for Min+Org
Send Service Data to DoPT
To send service data click ‘Send Service Data to DoPT’ button on home page as
shown by arrow in below screen , after clicking screen 1.26 will display

Screen 1.26
First Select radio button for respective service , enter remarks and click ‘Send To DoPT’ to
send data to DoPT.Make Sure annual data for respective Service must completely filled only
then you can send data to DoPT.
Query/Reports The following options are available there
View Output Report
List of existing Login
List of Ministry(s)/Department(s)/Organisation(s)/Service(s)
Annual Data Entered (All)
Annual Data Sent to Dopt
Annual Data Entered But not Send To Dopt
View Output Report

To view output report click ‘View Output Report’ option as shown in below screen by
arrow , after clicking user will get the screen 1.27. The following options are available
there
Display
View Report
Screen 1.27
View Report On Clicking Annex-I/III below screen will display
First click on consolidate radio button for consolidate report or individual radio button
for page wise report.

Select Report Required For – Click Proper Ministry for Ministry Report, Click
Ministry Including Organisation for Ministry and its under Organisation report and
for only Organisation Report click Organisation Only radio button.
Select Appointment Year from dropdown list.
Finally after all selection click View Report Button will display screen 1.28
Screen 1.28
You can take printout of output report by clicking ‘Print’ button.
On clicking Annex-(II) For Services as shown by arrow in below screen will display screen
1.29

Screen 1.29
First click on consolidate radio button for consolidate report or individual radio button
for page wise report.
Select Appointment Year from dropdown list.
Click the view report button to view the output report and user will get the screen 1.30

.
Screen 1.30
Click ‘Print’ button to take out the print of desired report.
List of existing login(s) On clicking the List of Existing Login user will get the screen 1.31. The following
options are available there
Display
Exact Search
Matching
Screen 1.31
Display It is a search button, it display filter data acc. to data enter in textbox (rec/page ,User Level,
User Id,Local User Code, User Name,Designation,User Details,remarks,Login created) as
shown in screen 1.32

Screen 1.32
Exact Matching By clicking exact search we can search exact data as enter in particular textboxes shown in
screen 1.33
Screen 1.33
Matching By clicking matching we can search data that match with the data enter in particular
textboxas shown in screen 1.34
Screen 1.34
List of Ministries/Departments/Organisations/Services On clicking the List of Ministries/Departments/Organisations/Services user will get the
screen 1.35. The following options are available there
Ministry(s)/Department(s) List
Organisation(s) List
Service(s) List

Screen 1.35
Click the Respective radio button to view the Existing List.
Ministry(s)/Department(s) List On clicking Ministry(s)/Department(s) List radio button will display screen 1.36.
Screen 1.36
Display It is a search button , it display filter data acc. to data enter in the textboxes (rec/page ,
Ministry,Min/Dept,DeptOfficer Detail , DeptRemarks) as shown in above screen.
Min/Dept Officer Details and Min/Dept Remarks checkbox for getting more filter data.
Organisation(s) List On clicking Organisation(s) List below will display screen 1.37.
Screen 1.37

Display It is a search button , it display filter data acc. to data enter in the textboxes (rec/page ,
Min/Dept,Org,OrgType,OrgOfficer Detail ,OrgRemarks) as shown in above screen.
Organisation Type,Org Officer Details and Org Remarks checkbox for getting more filter
data.
Service(s) List On clicking Service(s) List will display screen 1.38.
Screen 1.38
Annual Data Status On clicking Annual Data Status Ministry Admin can view current annual data status in
Consolidate/GroupWise Detailed List as shown Below
Consolidate List
GroupWise Detailed List

Login Audit
On clicking Login Audit user will get the screen 1.39. The following options are available
there
Display
Exact search
Matching
Successful Login ,Unsuccessful Login ,Invalid User ,Wrong Pwd , Logout
(Radio buttons)

Screen 1.39
Display It is a search button, it display filter data acc. to data enter in textbox (rec/page ,User Name,
Login Status, Login b/w particular dates) as shown in screen 1.40
Screen 1.40
All Click the All radio button to view all users.

Successful Login Click the successful login to view only those users list that did successful login as shown in
screen 1.41
Screen 1.41
Unsuccessful Login Click the unsuccessful login to view only those users list who did unsuccessful login(invalid
user /wrong Pwd) as shown in Screen 1.42

Screen 1.41
Invalid User Click the Invalid user to view only invalid users list.
Wrong Pwd Click the Wrong Pwd to view only those users list who try to login with wrong pwd.
Incomplete Profile Click the Incomplete profile to view those users list who didn’t create complete profile yet as
shown in below screen
Logout Click the Logout to view only those users list that did logout as shown in below screen

Register for new password form On clicking the Register for new password user will get the screen 1.42
Screen 1.42
Field Name Description
First Question Select 1st question from Dropdown Menu Mandatory.
Answer Enter the answer of 1st question Mandatory
Second Question Select 2nd
question from Dropdown Menu Mandatory
Answer Enter the answer of 2nd
question Mandatory
Third Question Select 3rd
question from Dropdown Menu Mandatory
Answer Enter the answer of 3rd
question Mandatory
After entering the questions and answers we can save the record by clicking the submit
button. After saving data if user want to update the recorded questions and answers then
again click the “Register For Password” menu and user will get the screen 1.43

Screen 1.43
After entering the questions and answers we can update the record by clicking the update
button.
Change password form On clicking the change password form user will get the screen 1.44
Screen 1.44
Field Name Description
Current Password Enter the old password. Mandatory.
New Password Enter the new password. Mandatory
Confirm Password Enter the confirm password. This field should be
same as the new password. Mandatory
If some user wants to change his password then he can use this option. He required to
enter the old password as well as new password. After that he can click change password to
store the new password.
Users are advised to change their password regularly to avoid misuse of his login.
Logout This option is used to end the current session of the system. The system displays the Screen
1.45 as shown below.

Screen 1.45