requests for getting started daily care and maintenance
TRANSCRIPT
For safe and correct use, be sure to read the Safety Information in Read This First before using the machine.
For information not in this manual, refer to the PDF files on the supplied CD.
Appendix
Daily Care and Maintenance
Getting StartedRequests for Daily Care and Maintenance

TABLE OF CONTENTS1. Getting Started
Safety Precautions.............................................................................................................................................. 3
About Operating Environments......................................................................................................................... 5
Conditions for Installation Locations............................................................................................................. 5
2. Daily Care and Maintenance
About the Frequency of Maintenance.............................................................................................................. 7
Daily Maintenance...........................................................................................................................................10
Shaking a White Ink Cartridge................................................................................................................... 10
Cleaning the Media Guides....................................................................................................................... 12
Performing Maintenance Once Every 1.5 Months....................................................................................... 14
Cleaning the Waste Ink Line....................................................................................................................... 14
Cleaning Each Time You Replace the Nozzle Cleaning Cartridge.............................................................17
Cleaning the Caps....................................................................................................................................... 17
Performing Maintenance Once a Year.......................................................................................................... 21
Cleaning the Area around the Print Heads................................................................................................21
Maintenance When Needed..........................................................................................................................26
Cleaning the Exterior................................................................................................................................... 26
Cleaning the Pre-heater...............................................................................................................................27
Cleaning the Roll Holder and Guide Groove........................................................................................... 28
Cleaning the Platen......................................................................................................................................28
Cleaning the Pinch Rollers...........................................................................................................................29
Cleaning the Media Sensors...................................................................................................................... 30
Cleaning the Nozzle Faces of the Print Heads..........................................................................................31
Replacing Consumables.................................................................................................................................. 34
Precautions for Replacing Consumables....................................................................................................34
Disposal of Used Consumables..................................................................................................................36
Replacing an Ink Cartridge.........................................................................................................................36
Replacing a Cleaning Cartridge................................................................................................................ 39
Replacing a Flushing Cartridge.................................................................................................................. 42
Replacing a Waste Ink Bottle......................................................................................................................44
3. Appendix
About Ink...........................................................................................................................................................47
Supported Ink...............................................................................................................................................47
1

Setting Order of Ink Cartridges.................................................................................................................. 48
How to Store Ink Cartridges....................................................................................................................... 48
Precautions for Handling Ink Cartridges....................................................................................................49
About Media.................................................................................................................................................... 51
Supported Media........................................................................................................................................ 51
How to Store Media....................................................................................................................................52
Precautions for Handling Media................................................................................................................ 52
About Flushing Liquid and Displacement Liquid............................................................................................ 55
How to Store Flushing Cartridges and Displacement Cartridges............................................................ 55
Precautions for Handling Flushing Cartridges and Displacement Cartridges.........................................55
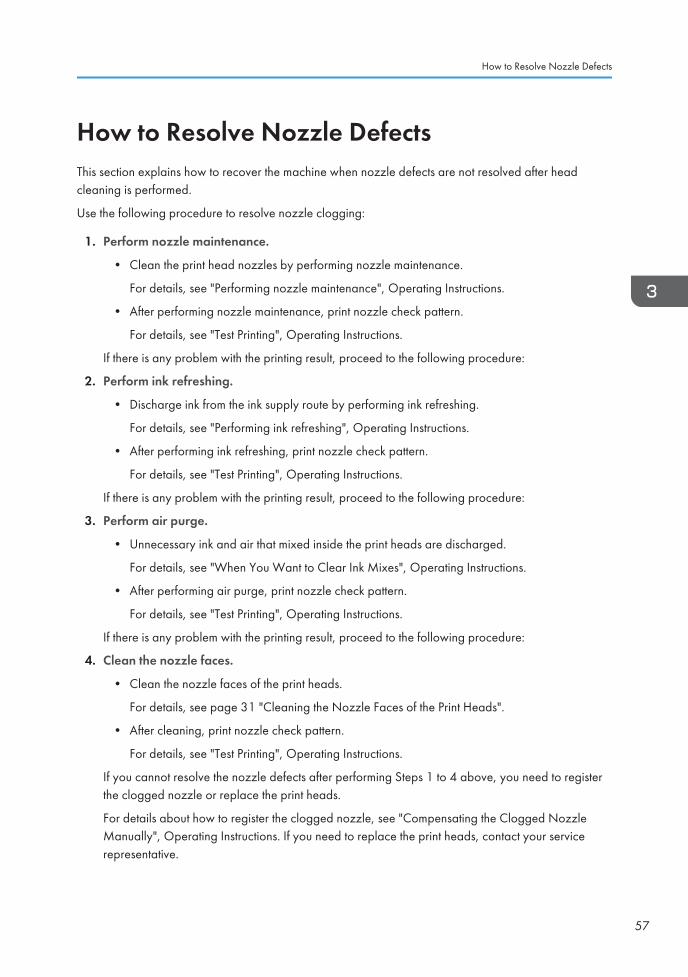
How to Resolve Nozzle Defects..................................................................................................................... 57
Example of Defects in Printing.....................................................................................................................58
List of Consumables..........................................................................................................................................60
2
1. Getting StartedThis section describes the safety precautions before use and the installation environment.
Safety Precautions
• Do not use flammable sprays or solvents in the vicinity of this machine. Also, avoid placing theseitems in the vicinity of this machine. Doing so could result in fire or electric shock.
• Do not place vases, plant pots, cups, toiletries, medicines, small metal objects, or containersholding water or any other liquids, on or close to this machine. Fire or electric shock could resultfrom spillage or if such objects or substances fall inside this machine.
• If the machine emits smoke or odours, or if it behaves unusually, you must turn off its powerimmediately. After turning off the power, be sure to disconnect the power cord plug from thewall outlet. Then contact your service representative and report the problem. Do not use themachine. Doing so could result in fire or electric shock.
• If metal objects, or water or other fluids fall inside this machine, you must turn off its powerimmediately. After turning off the power, be sure to disconnect the power cord plug from thewall outlet. Then contact your service representative and report the problem. Do not use themachine. Doing so could result in fire or electric shock.
• Do not remove any covers or screws other than those explicitly mentioned in this manual. Insidethis machine are high voltage components that are an electric shock hazard. Contact your salesor service representative if any of the machine's internal components require maintenance,adjustment, or repair.
• Do not attempt to disassemble or modify this machine. Doing so risks burns and electric shock.
• Do not place heavy objects on the machine. Doing so can cause the machine to topple over,possibly resulting in injury.
• Some of this machine's internal components get very hot. For this reason, take care whenremoving misfed and performing maintenance on the machine. Not doing so could result inburns.
• While safety measures have been installed to prevent accidents, you must not touch themachine's rollers while it is operating. Doing so could cause injury.
3
• Keep ink, flushing liquid, and displacement liquid away from an open flame. Also keep theroom well ventilated when you use or handle ink, flushing liquid, and displacement liquid.
• If ink, flushing liquid, and displacement liquid get into contact with eyes, wash eyes immediatelywith running water. Consult a doctor if necessary.
• If ink, flushing liquid, or displacement liquid are ingested, consult a doctor immediately withSafety Data Sheet (SDS).
• When removing jammed media or performing maintenance on the machine, avoid getting ink,flushing liquid, and displacement liquid on your clothing. If ink, flushing liquid, and displacementliquid come into contact with your clothing, wash the stained area with water.
• When removing jammed media, replacing media, or performing maintenance on the machine,avoid getting ink, flushing liquid, and displacement liquid on your skin. If ink, flushing liquid, anddisplacement liquid come into contact with your skin, wash the affected area thoroughly withsoap and water.
1. Getting Started
4
About Operating Environments
Conditions for Installation Locations
• Keep the machine away from humidity and dust. Otherwise a fire or an electric shock mightoccur.
• Do not place the machine on an unstable or tilted surface. If it topples over, an injury mightoccur.
• Make sure the room where you are using the machine is well ventilated and spacious. Goodventilation is especially important when the machine is used heavily.
• Do not obstruct the machine's vents. Doing so risks fire caused by overheated internalcomponents.
The following is the recommended range for the operating environment:
• Temperature: 15–30°C (59–86°F) (Recommended range: 20–25°C (68–77°F))
• Humidity: 35–80% (Recommended range: 40–60%)
• Altitude: 2,000 m (approx. 6,561.7 ft.) or less
Place the machine on a level surface. The machine must be level within 5 mm (approx. 0.2 inches): bothfront to rear and left to right.
Place the machine in a stable place where the floor is strong enough to withstand a load of 1,800N/m2 or more.
If the machine is placed somewhere where the conditions are different from those recommended, afailure may occur. Avoid the following environments when locating the machine:
• Low temperature and humidity or high temperature and humidity
• Places exposed to direct sunlight
• Places close to heaters, air conditioners, or humidifiers
• Places subject to frequent strong vibration
• Places with poor ventilation
• Dusty areas
• Places close to an oil heater or machine generating ammonia, such as a diazo copy machine
Precautions for users of ultrasonic-type humidifiers
Do not use an ultrasonic-type humidifier near this product.
About Operating Environments
5

Chlorine or mineral components atomized by an ultrasonic-type humidifier may adhere to theelectronic components inside the product, causing it to malfunction.
1. Getting Started
6

2. Daily Care and MaintenanceThis chapter describes how to care and maintain the machine.
About the Frequency of Maintenance
• Some parts of this machine must be replaced with a new one periodically by service personnel.Be sure to make a contract with your distributor or dealer for after sale service to ensure a longlife of your machine.
• If the machine's interior is not cleaned regularly, dust will accumulate. Fire and breakdown canresult from heavy accumulation of dust inside this machine. Contact your sales or servicerepresentative for details about and charges for cleaning the machine's interior.
• When cleaning the ink-station or the heads, or replacing the cleaning cartridge, make sure towear the attached goggles.
• When performing maintenance on the machine, make sure to wear the attached gloves.
• Please use protective equipment in order to avoid exposure to liquid.
• The supplied gloves are consumables. If they are damaged or lost, use polythene glovesinstead.
Perform maintenance regularly in order to use the machine at its best possible condition. Make sure tokeep the nozzle parts of the print heads that discharge ink in good condition as they may affect theprinting results due to the adherence of particles or dust.
Maintenance frequency Maintenance item Reference
RegularMaintenance Before the start of daily work
Maintenance of white ink page 10
Cleaning the media guides page 12
Once every 1.5 months Cleaning the waste ink line page 14
When replacing the cleaningcartridge
Cleaning the capspage 17
Once a yearCleaning the area around
the print heads
page 21
7
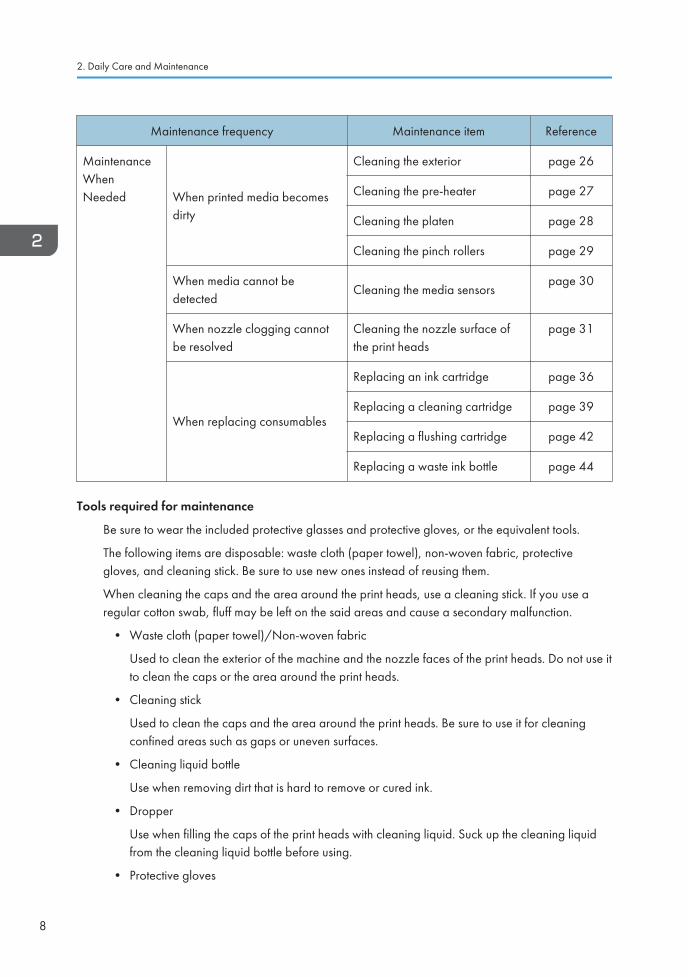
Maintenance frequency Maintenance item Reference
MaintenanceWhenNeeded When printed media becomes
dirty
Cleaning the exterior page 26
Cleaning the pre-heater page 27
Cleaning the platen page 28
Cleaning the pinch rollers page 29
When media cannot bedetected
Cleaning the media sensorspage 30
When nozzle clogging cannotbe resolved
Cleaning the nozzle surface ofthe print heads
page 31
When replacing consumables
Replacing an ink cartridge page 36
Replacing a cleaning cartridge page 39
Replacing a flushing cartridge page 42
Replacing a waste ink bottle page 44
Tools required for maintenance
Be sure to wear the included protective glasses and protective gloves, or the equivalent tools.
The following items are disposable: waste cloth (paper towel), non-woven fabric, protectivegloves, and cleaning stick. Be sure to use new ones instead of reusing them.
When cleaning the caps and the area around the print heads, use a cleaning stick. If you use aregular cotton swab, fluff may be left on the said areas and cause a secondary malfunction.
• Waste cloth (paper towel)/Non-woven fabric
Used to clean the exterior of the machine and the nozzle faces of the print heads. Do not use itto clean the caps or the area around the print heads.
• Cleaning stick
Used to clean the caps and the area around the print heads. Be sure to use it for cleaningconfined areas such as gaps or uneven surfaces.
• Cleaning liquid bottle
Use when removing dirt that is hard to remove or cured ink.
• Dropper
Use when filling the caps of the print heads with cleaning liquid. Suck up the cleaning liquidfrom the cleaning liquid bottle before using.
• Protective gloves
2. Daily Care and Maintenance
8

• Protective glasses
You can purchase additional consumables required for maintenance. For details, see page 60"List of Consumables".
About the Frequency of Maintenance
9
Daily MaintenanceThis section describes how to shake the white ink cartridge and clean the media guide. Performmaintenance before daily work so the machine may be used safely for an extended period.
Shaking a White Ink Cartridge
As the components of white ink deposit easily, pull out the white ink cartridge, and then shake it beforedaily work.
Shake the white ink cartridge when the following message appears on the display:
"White ink has settled. Please shake the white ink cartridge."
• Do not touch or stain the contacts of the ink cartridges, flushing cartridges, displacement liquidcartridges, and cleaning cartridge, as doing so may cause damage to the print circuit board.
• If ink, flushing liquid, and displacement liquid get into contact with eyes, wash eyes immediatelywith running water. Consult a doctor if necessary.
• If ink, flushing liquid, or displacement liquid are ingested, consult a doctor immediately withSafety Data Sheet (SDS).
• Please use protective equipment in order to avoid exposure to liquid.
• When performing maintenance on the machine, make sure to wear the attached gloves.
• When removing jammed media or performing maintenance on the machine, avoid getting ink,flushing liquid, and displacement liquid on your clothing. If ink, flushing liquid, and displacementliquid come into contact with your clothing, wash the stained area with water.
• When removing jammed media, replacing media, or performing maintenance on the machine,avoid getting ink, flushing liquid, and displacement liquid on your skin. If ink, flushing liquid, anddisplacement liquid come into contact with your skin, wash the affected area thoroughly withsoap and water.
• The supplied gloves are consumables. If they are damaged or lost, use polythene glovesinstead.
2. Daily Care and Maintenance
10
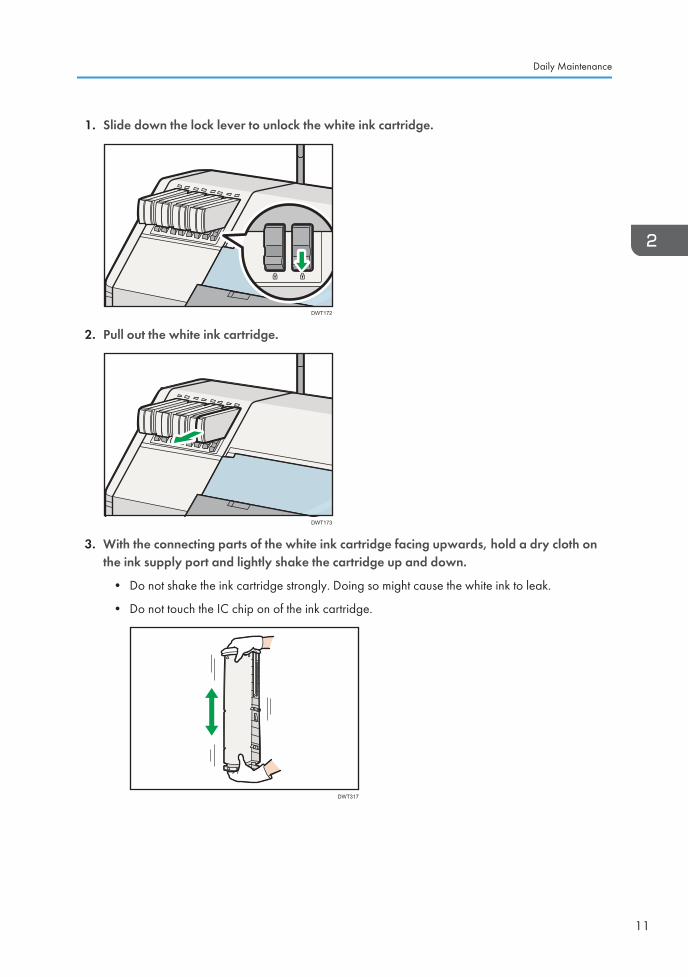
1. Slide down the lock lever to unlock the white ink cartridge.
DWT172
2. Pull out the white ink cartridge.
DWT173
3. With the connecting parts of the white ink cartridge facing upwards, hold a dry cloth onthe ink supply port and lightly shake the cartridge up and down.
• Do not shake the ink cartridge strongly. Doing so might cause the white ink to leak.
• Do not touch the IC chip on of the ink cartridge.
DWT317
Daily Maintenance
11
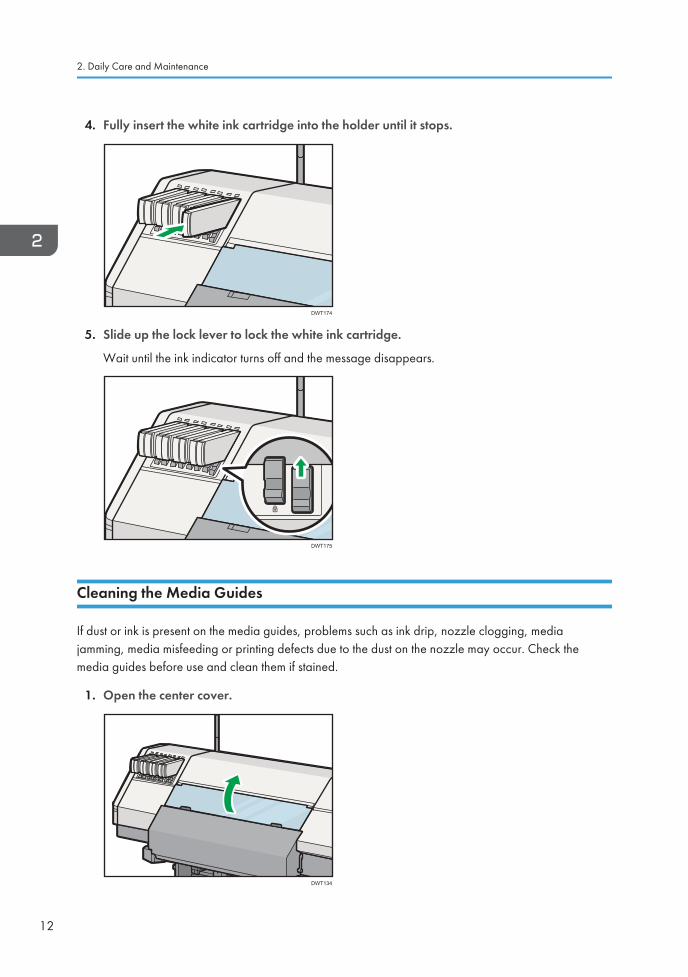
4. Fully insert the white ink cartridge into the holder until it stops.
DWT174
5. Slide up the lock lever to lock the white ink cartridge.
Wait until the ink indicator turns off and the message disappears.
DWT175
Cleaning the Media Guides
If dust or ink is present on the media guides, problems such as ink drip, nozzle clogging, mediajamming, media misfeeding or printing defects due to the dust on the nozzle may occur. Check themedia guides before use and clean them if stained.
1. Open the center cover.
DWT134
2. Daily Care and Maintenance
12
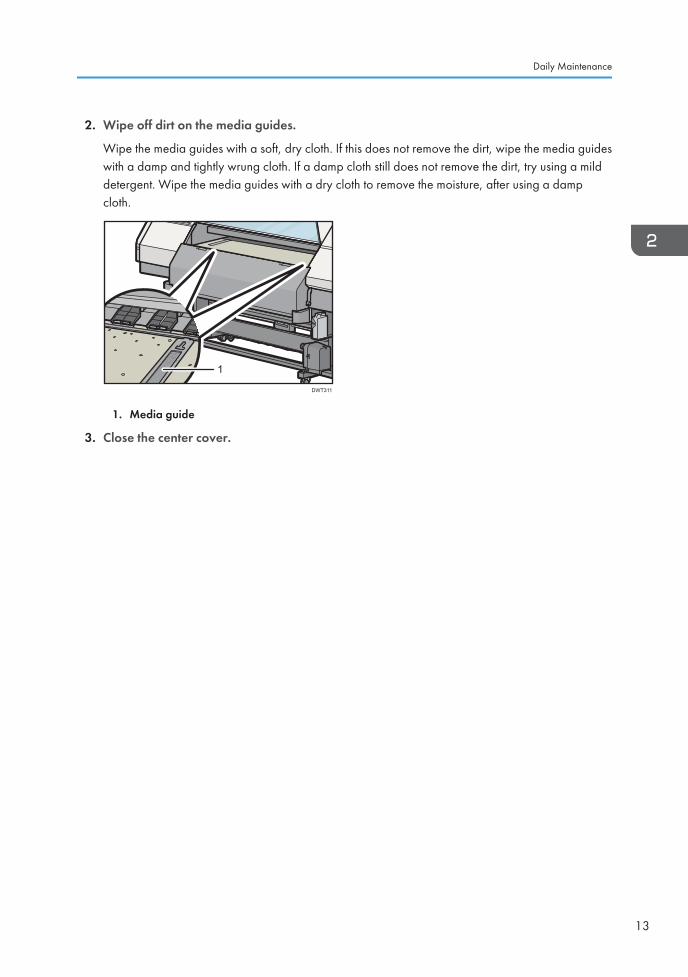
2. Wipe off dirt on the media guides.
Wipe the media guides with a soft, dry cloth. If this does not remove the dirt, wipe the media guideswith a damp and tightly wrung cloth. If a damp cloth still does not remove the dirt, try using a milddetergent. Wipe the media guides with a dry cloth to remove the moisture, after using a dampcloth.
DWT311
1
1. Media guide
3. Close the center cover.
Daily Maintenance
13
Performing Maintenance Once Every 1.5MonthsThis section describes how to clean the waste ink line.
Perform regular maintenance once every 1.5 months in order to use the machine safely for a long time.
Cleaning the Waste Ink Line
Use flushing liquid to clean inside the waste ink line.
Clean the waste ink line regularly once every 1.5 months.
Be sure to clean the waste ink line after replacing the cleaning cartridge or when the following messageappears on the display:
"The waste ink line maintenance is required. Execute the waste ink line maintenance."
• When cleaning the ink-station or the heads, or replacing the cleaning cartridge, make sure towear the attached goggles.
• When performing maintenance on the machine, make sure to wear the attached gloves.
• If ink, flushing liquid, and displacement liquid get into contact with eyes, wash eyes immediatelywith running water. Consult a doctor if necessary.
• If ink, flushing liquid, or displacement liquid are ingested, consult a doctor immediately withSafety Data Sheet (SDS).
• When removing jammed media or performing maintenance on the machine, avoid getting ink,flushing liquid, and displacement liquid on your clothing. If ink, flushing liquid, and displacementliquid come into contact with your clothing, wash the stained area with water.
• When removing jammed media, replacing media, or performing maintenance on the machine,avoid getting ink, flushing liquid, and displacement liquid on your skin. If ink, flushing liquid, anddisplacement liquid come into contact with your skin, wash the affected area thoroughly withsoap and water.
• The supplied gloves are consumables. If they are damaged or lost, use polythene glovesinstead.
2. Daily Care and Maintenance
14
• Do not place any object on the platen as the carriage moves there.
• When the carriage moves, it may make contact with media. Check that the media is not deformedor that there is no floating media.
• Make sure there is enough space in the waste ink bottle before cleaning the waste ink line.
• When 10 minutes or more have passed after the carriage moves, the machine will make a buzzersound. As nozzle dryness may cause a nozzle defect, perform nozzle maintenance promptly.
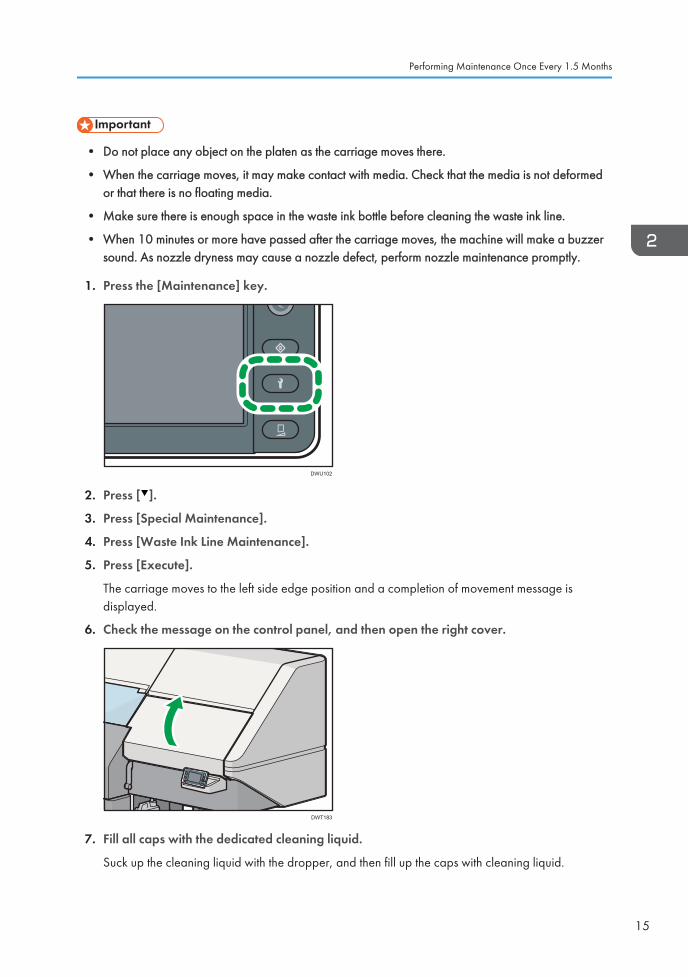
1. Press the [Maintenance] key.
DWU102
2. Press [ ].
3. Press [Special Maintenance].
4. Press [Waste Ink Line Maintenance].
5. Press [Execute].
The carriage moves to the left side edge position and a completion of movement message isdisplayed.
6. Check the message on the control panel, and then open the right cover.
DWT183
7. Fill all caps with the dedicated cleaning liquid.
Suck up the cleaning liquid with the dropper, and then fill up the caps with cleaning liquid.
Performing Maintenance Once Every 1.5 Months
15
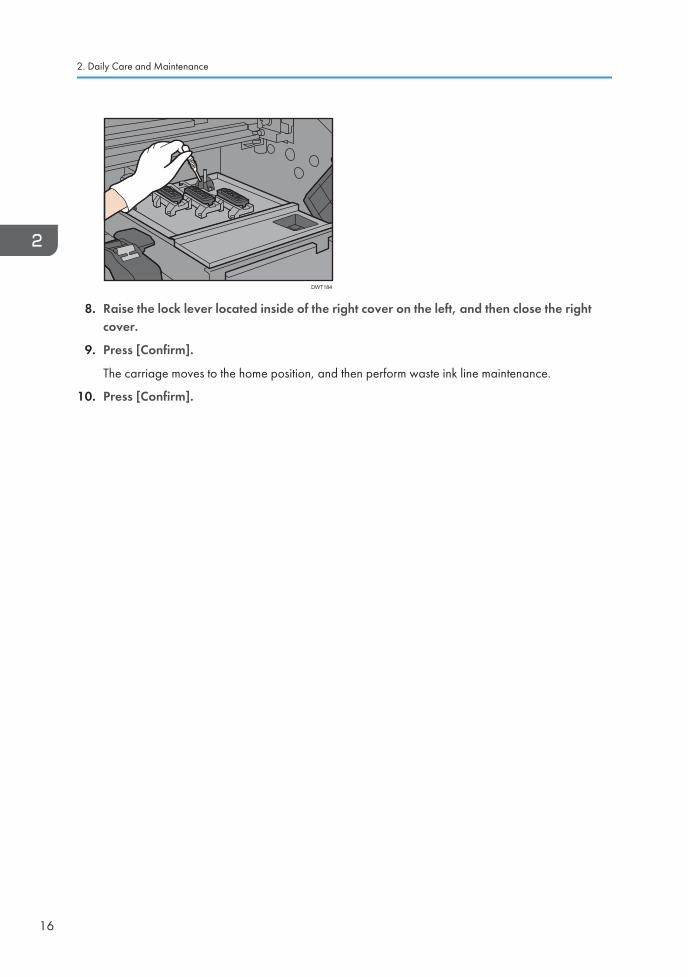
DWT184
8. Raise the lock lever located inside of the right cover on the left, and then close the rightcover.
9. Press [Confirm].
The carriage moves to the home position, and then perform waste ink line maintenance.
10. Press [Confirm].
2. Daily Care and Maintenance
16
Cleaning Each Time You Replace the NozzleCleaning CartridgeThis section describes how to clean the caps.
Perform regular maintenance each time you replace the nozzle cleaning cartridge so the machine maybe used safely for an extended period.
Cleaning the Caps
Clean the caps and the area around the print heads each time you replace the nozzle cleaningcartridge or if nozzle defects are not resolved by head cleaning or air purging. Ink clogging defectsmay be caused by dirt on the caps.
• When cleaning the ink-station or the heads, or replacing the cleaning cartridge, make sure towear the attached goggles.
• When performing maintenance on the machine, make sure to wear the attached gloves.
• If ink, flushing liquid, and displacement liquid get into contact with eyes, wash eyes immediatelywith running water. Consult a doctor if necessary.
• If ink, flushing liquid, or displacement liquid are ingested, consult a doctor immediately withSafety Data Sheet (SDS).
• When removing jammed media or performing maintenance on the machine, avoid getting ink,flushing liquid, and displacement liquid on your clothing. If ink, flushing liquid, and displacementliquid come into contact with your clothing, wash the stained area with water.
• When removing jammed media, replacing media, or performing maintenance on the machine,avoid getting ink, flushing liquid, and displacement liquid on your skin. If ink, flushing liquid, anddisplacement liquid come into contact with your skin, wash the affected area thoroughly withsoap and water.
• The supplied gloves are consumables. If they are damaged or lost, use polythene glovesinstead.
• When 10 minutes or more have passed after the carriage moves, the machine will make a buzzersound. As nozzle dryness may cause a nozzle defect, perform nozzle maintenance promptly.
Cleaning Each Time You Replace the Nozzle Cleaning Cartridge
17
• For cleaning liquid, use only the manufacturer-recommended cleaning liquid bottle. For details, seepage 60 "List of Consumables".
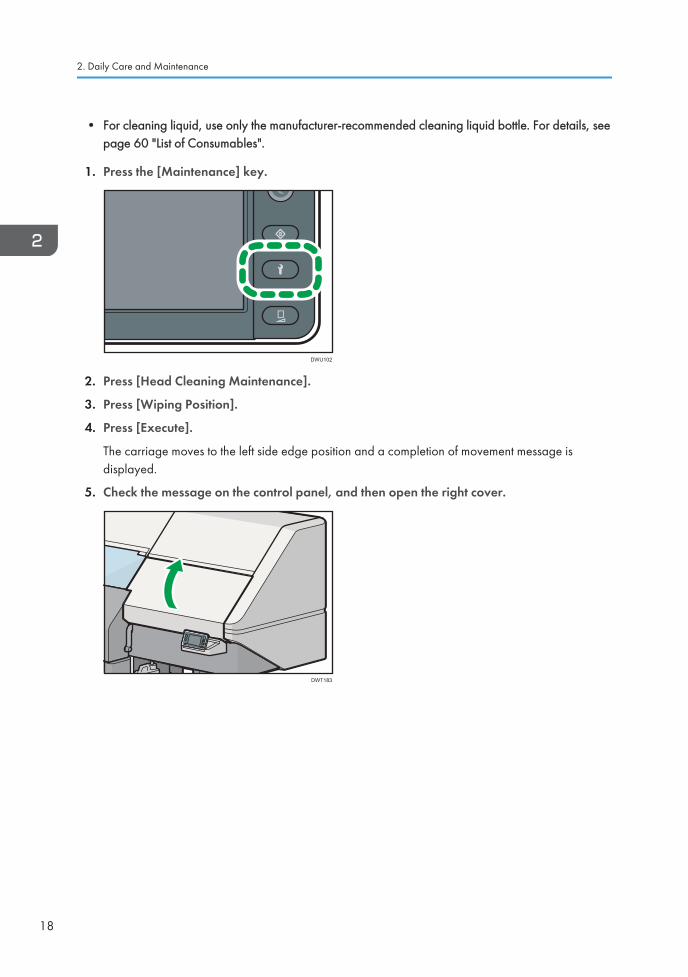
1. Press the [Maintenance] key.
DWU102
2. Press [Head Cleaning Maintenance].
3. Press [Wiping Position].
4. Press [Execute].
The carriage moves to the left side edge position and a completion of movement message isdisplayed.
5. Check the message on the control panel, and then open the right cover.
DWT183
2. Daily Care and Maintenance
18
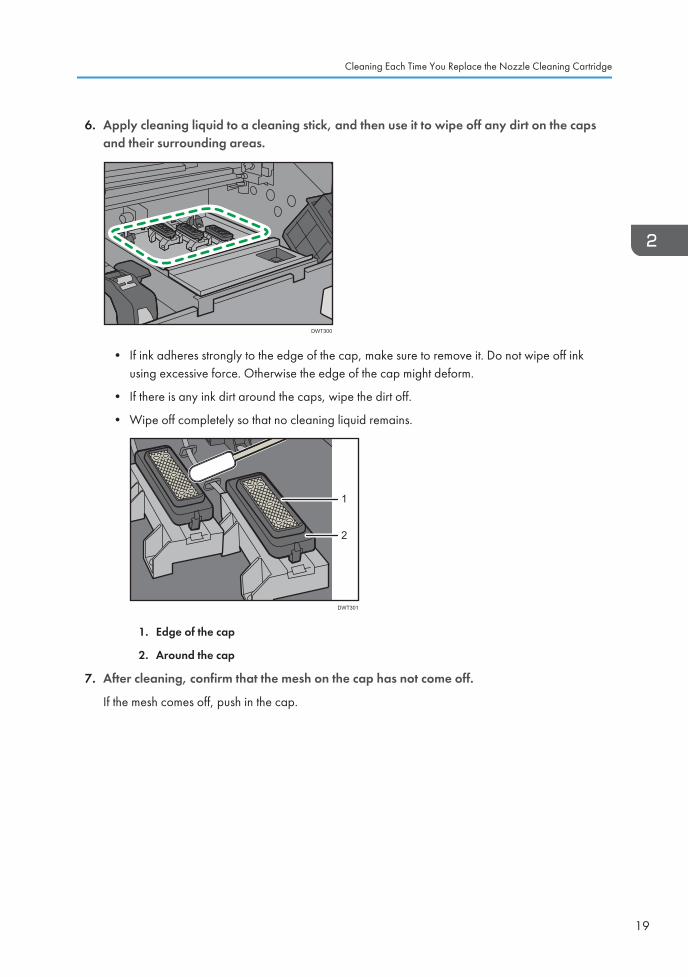
6. Apply cleaning liquid to a cleaning stick, and then use it to wipe off any dirt on the capsand their surrounding areas.
DWT300
• If ink adheres strongly to the edge of the cap, make sure to remove it. Do not wipe off inkusing excessive force. Otherwise the edge of the cap might deform.
• If there is any ink dirt around the caps, wipe the dirt off.
• Wipe off completely so that no cleaning liquid remains.
DWT301
1
2
1. Edge of the cap
2. Around the cap
7. After cleaning, confirm that the mesh on the cap has not come off.
If the mesh comes off, push in the cap.
Cleaning Each Time You Replace the Nozzle Cleaning Cartridge
19
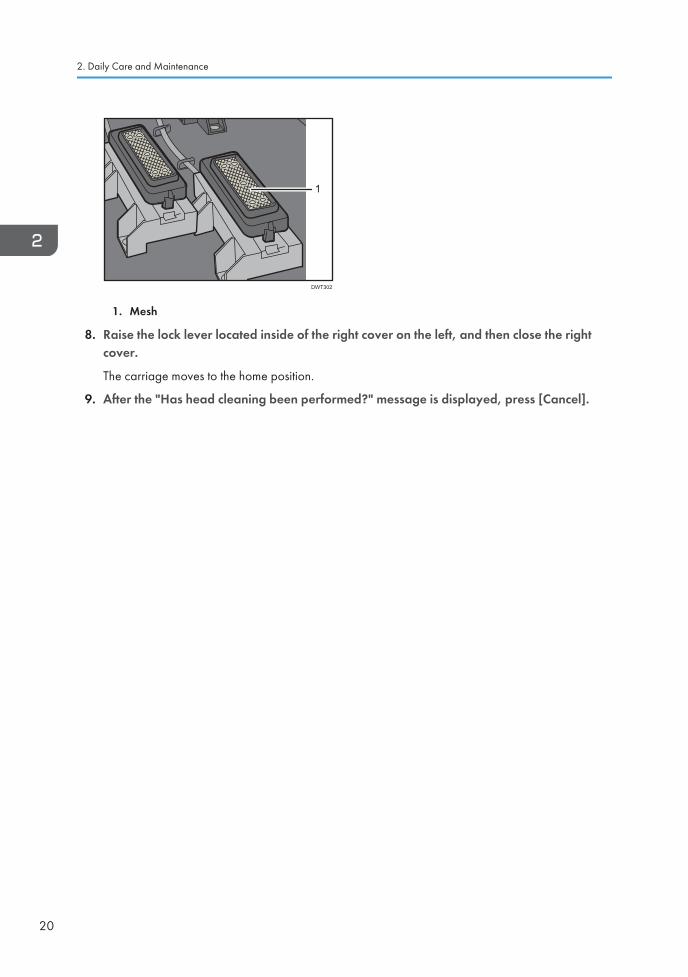
DWT302
1
1. Mesh
8. Raise the lock lever located inside of the right cover on the left, and then close the rightcover.
The carriage moves to the home position.
9. After the "Has head cleaning been performed?" message is displayed, press [Cancel].
2. Daily Care and Maintenance
20
Performing Maintenance Once a YearThis section describes how to clean the area around the print heads.
To use the machine safely over its lifetime, clean the caps each time you replace the nozzle cleaningcartridge and clean the area around the print heads annually.
Cleaning the Area around the Print Heads
Clean the caps each time you replace the nozzle cleaning cartridge and clean the area around the printheads once a year or if nozzle defects are not resolved by head cleaning or air purging. Ink cloggingdefects may be caused by dirt on the caps or the area around the print heads.
Be sure to clean the caps and the area around the print heads when the following message appears onthe display:
"The area of the print head needs cleaning. Clean the area of the print head."
• When cleaning the ink-station or the heads, or replacing the cleaning cartridge, make sure towear the attached goggles.
• When performing maintenance on the machine, make sure to wear the attached gloves.
• If ink, flushing liquid, and displacement liquid get into contact with eyes, wash eyes immediatelywith running water. Consult a doctor if necessary.
• If ink, flushing liquid, or displacement liquid are ingested, consult a doctor immediately withSafety Data Sheet (SDS).
• When removing jammed media or performing maintenance on the machine, avoid getting ink,flushing liquid, and displacement liquid on your clothing. If ink, flushing liquid, and displacementliquid come into contact with your clothing, wash the stained area with water.
• When removing jammed media, replacing media, or performing maintenance on the machine,avoid getting ink, flushing liquid, and displacement liquid on your skin. If ink, flushing liquid, anddisplacement liquid come into contact with your skin, wash the affected area thoroughly withsoap and water.
• The supplied gloves are consumables. If they are damaged or lost, use polythene glovesinstead.
Performing Maintenance Once a Year
21
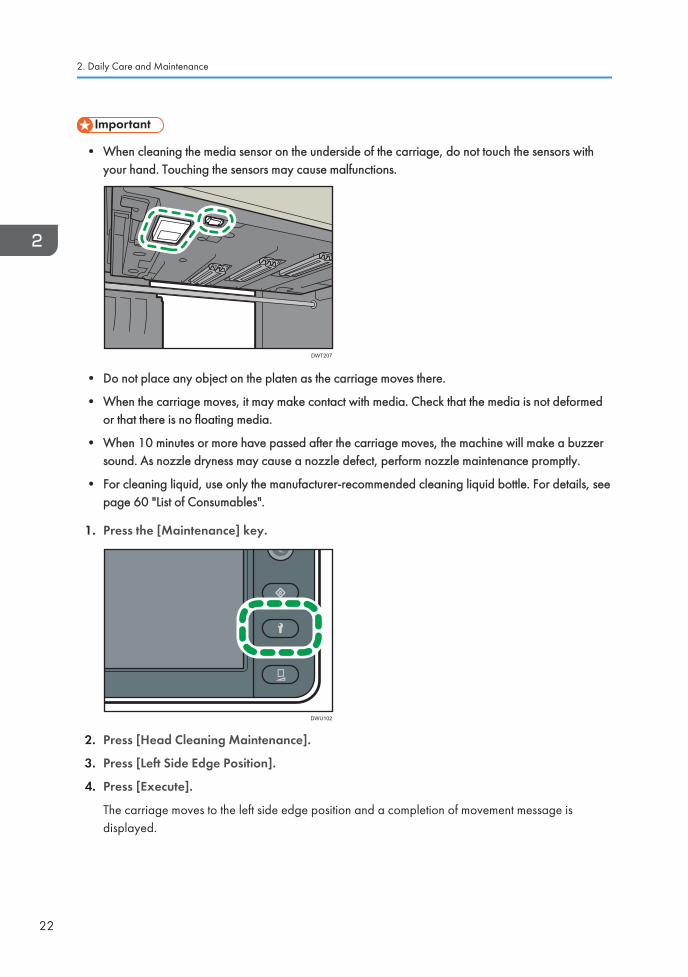
• When cleaning the media sensor on the underside of the carriage, do not touch the sensors withyour hand. Touching the sensors may cause malfunctions.
DWT207
• Do not place any object on the platen as the carriage moves there.
• When the carriage moves, it may make contact with media. Check that the media is not deformedor that there is no floating media.
• When 10 minutes or more have passed after the carriage moves, the machine will make a buzzersound. As nozzle dryness may cause a nozzle defect, perform nozzle maintenance promptly.
• For cleaning liquid, use only the manufacturer-recommended cleaning liquid bottle. For details, seepage 60 "List of Consumables".
1. Press the [Maintenance] key.
DWU102
2. Press [Head Cleaning Maintenance].
3. Press [Left Side Edge Position].
4. Press [Execute].
The carriage moves to the left side edge position and a completion of movement message isdisplayed.
2. Daily Care and Maintenance
22
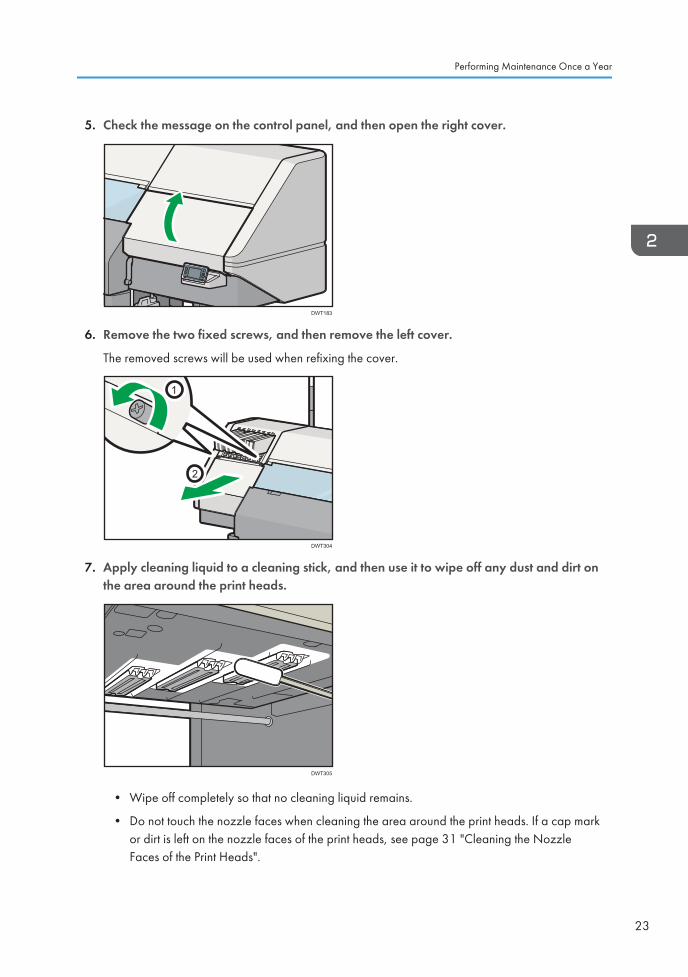
5. Check the message on the control panel, and then open the right cover.
DWT183
6. Remove the two fixed screws, and then remove the left cover.
The removed screws will be used when refixing the cover.
DWT304
1
2
7. Apply cleaning liquid to a cleaning stick, and then use it to wipe off any dust and dirt onthe area around the print heads.
DWT305
• Wipe off completely so that no cleaning liquid remains.
• Do not touch the nozzle faces when cleaning the area around the print heads. If a cap markor dirt is left on the nozzle faces of the print heads, see page 31 "Cleaning the NozzleFaces of the Print Heads".
Performing Maintenance Once a Year
23
A1
DWT306
1. Nozzle faces
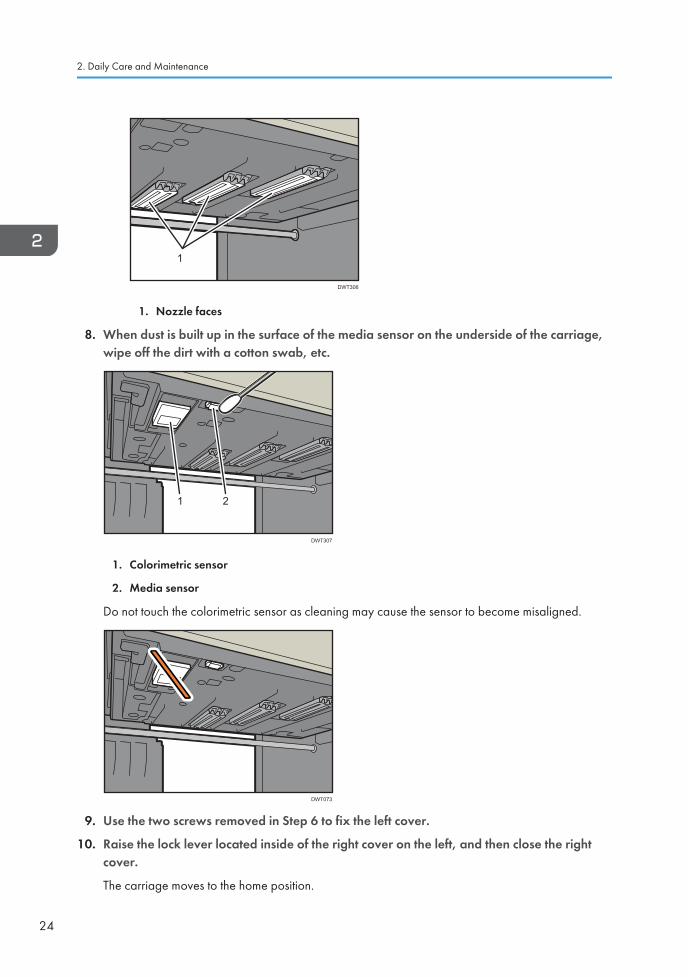
8. When dust is built up in the surface of the media sensor on the underside of the carriage,wipe off the dirt with a cotton swab, etc.
1 2
DWT307
1. Colorimetric sensor
2. Media sensor
Do not touch the colorimetric sensor as cleaning may cause the sensor to become misaligned.
DWT073
9. Use the two screws removed in Step 6 to fix the left cover.
10. Raise the lock lever located inside of the right cover on the left, and then close the rightcover.
The carriage moves to the home position.
2. Daily Care and Maintenance
24

11. After the "Has head cleaning been performed?" message is displayed, press [Execute].
Performing Maintenance Once a Year
25
Maintenance When NeededThis section describes how to deal with ink affixed to the nozzle surfaces of the print heads, and how toclean the exterior, pre-heater, platen, pinch rollers, media guides, and media sensors.
Perform maintenance when needed to ensure the safe and long-term use for the machine.
• When cleaning the ink-station or the heads, or replacing the cleaning cartridge, make sure towear the attached goggles.
• When performing maintenance on the machine, make sure to wear the attached gloves.
• If ink, flushing liquid, and displacement liquid get into contact with eyes, wash eyes immediatelywith running water. Consult a doctor if necessary.
• If ink, flushing liquid, or displacement liquid are ingested, consult a doctor immediately withSafety Data Sheet (SDS).
• When removing jammed media or performing maintenance on the machine, avoid getting ink,flushing liquid, and displacement liquid on your clothing. If ink, flushing liquid, and displacementliquid come into contact with your clothing, wash the stained area with water.
• When removing jammed media, replacing media, or performing maintenance on the machine,avoid getting ink, flushing liquid, and displacement liquid on your skin. If ink, flushing liquid, anddisplacement liquid come into contact with your skin, wash the affected area thoroughly withsoap and water.
• The supplied gloves are consumables. If they are damaged or lost, use polythene glovesinstead.
• The optimal frequency of maintenance varies depending on the period of service or the operatingenvironment of the machine. In addition, maintenance may be frequently required depending onthe types of media to be used or images to be printed. Make any necessary changes to themaintenance frequency according to the operating conditions of the machine.
Cleaning the Exterior
Depending on the operating environment, particles, or dust may adhere to the exterior of the machine.Clean the exterior if they are dirty.
2. Daily Care and Maintenance
26
• Keep the warning labels on this machine legible. If any of the warning labels become smeared, besure to wipe off any dirt.
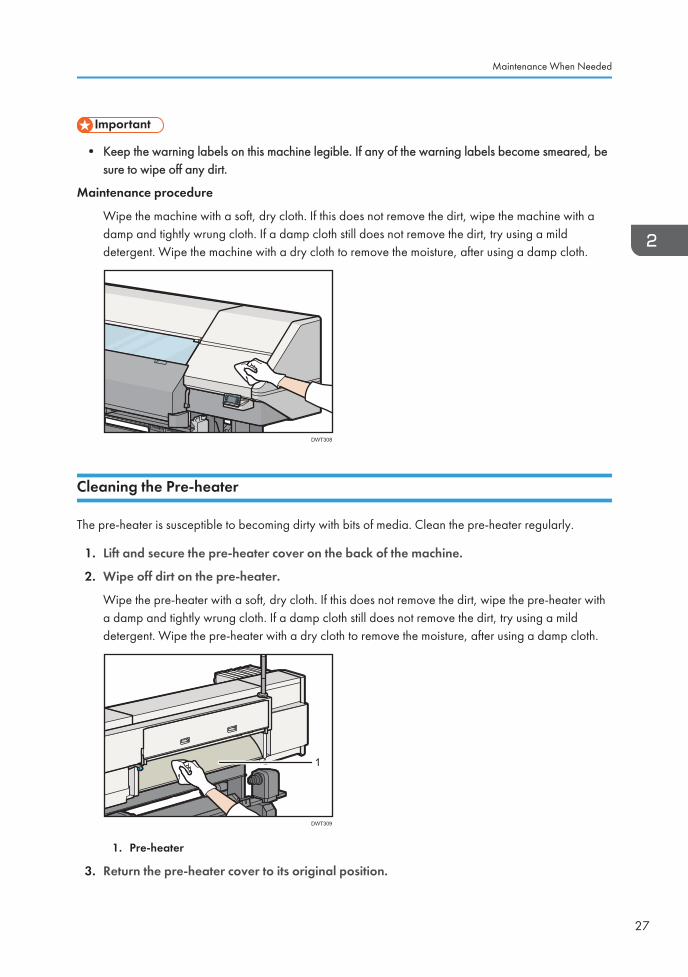
Maintenance procedure
Wipe the machine with a soft, dry cloth. If this does not remove the dirt, wipe the machine with adamp and tightly wrung cloth. If a damp cloth still does not remove the dirt, try using a milddetergent. Wipe the machine with a dry cloth to remove the moisture, after using a damp cloth.
DWT308
Cleaning the Pre-heater
The pre-heater is susceptible to becoming dirty with bits of media. Clean the pre-heater regularly.
1. Lift and secure the pre-heater cover on the back of the machine.
2. Wipe off dirt on the pre-heater.
Wipe the pre-heater with a soft, dry cloth. If this does not remove the dirt, wipe the pre-heater witha damp and tightly wrung cloth. If a damp cloth still does not remove the dirt, try using a milddetergent. Wipe the pre-heater with a dry cloth to remove the moisture, after using a damp cloth.
DWT309
1
1. Pre-heater
3. Return the pre-heater cover to its original position.
Maintenance When Needed
27
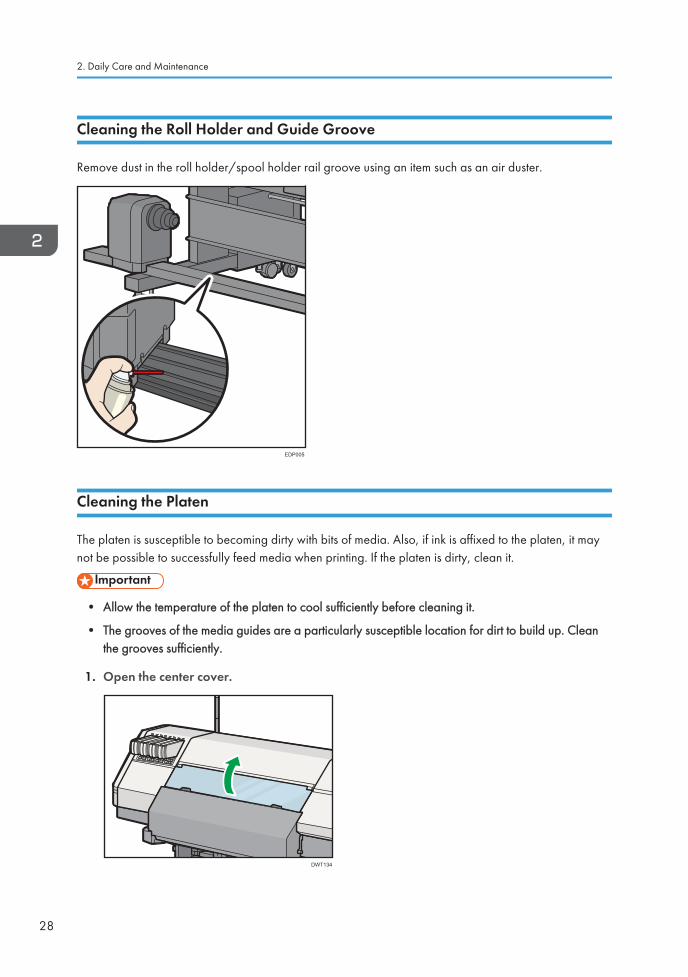
Cleaning the Roll Holder and Guide Groove
Remove dust in the roll holder/spool holder rail groove using an item such as an air duster.
EDP005
Cleaning the Platen
The platen is susceptible to becoming dirty with bits of media. Also, if ink is affixed to the platen, it maynot be possible to successfully feed media when printing. If the platen is dirty, clean it.
• Allow the temperature of the platen to cool sufficiently before cleaning it.
• The grooves of the media guides are a particularly susceptible location for dirt to build up. Cleanthe grooves sufficiently.
1. Open the center cover.
DWT134
2. Daily Care and Maintenance
28
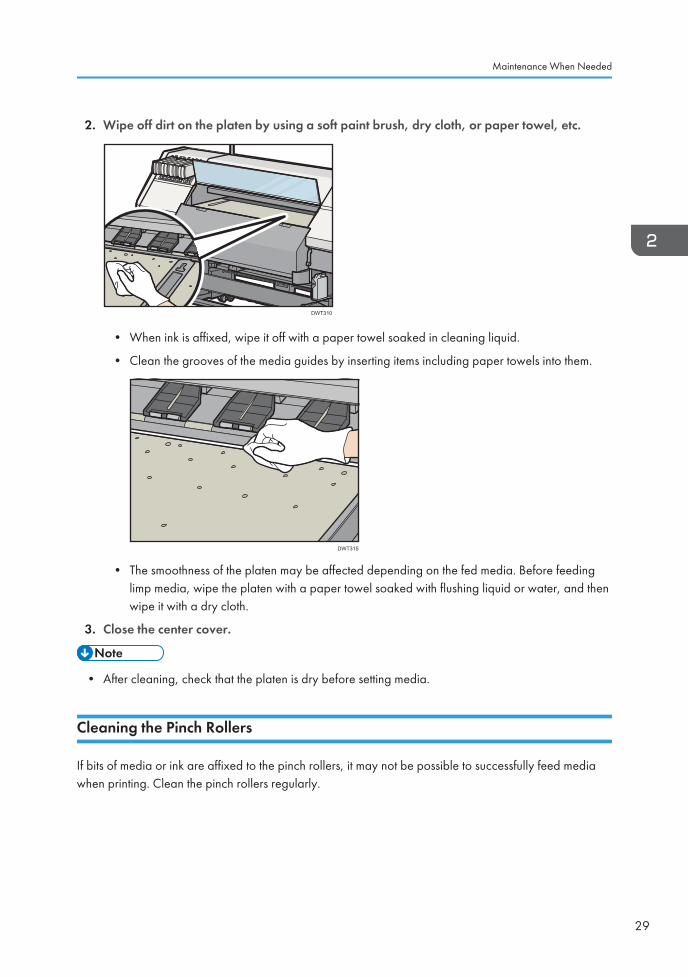
2. Wipe off dirt on the platen by using a soft paint brush, dry cloth, or paper towel, etc.
DWT310
• When ink is affixed, wipe it off with a paper towel soaked in cleaning liquid.
• Clean the grooves of the media guides by inserting items including paper towels into them.
DWT315
• The smoothness of the platen may be affected depending on the fed media. Before feedinglimp media, wipe the platen with a paper towel soaked with flushing liquid or water, and thenwipe it with a dry cloth.
3. Close the center cover.
• After cleaning, check that the platen is dry before setting media.
Cleaning the Pinch Rollers
If bits of media or ink are affixed to the pinch rollers, it may not be possible to successfully feed mediawhen printing. Clean the pinch rollers regularly.
Maintenance When Needed
29
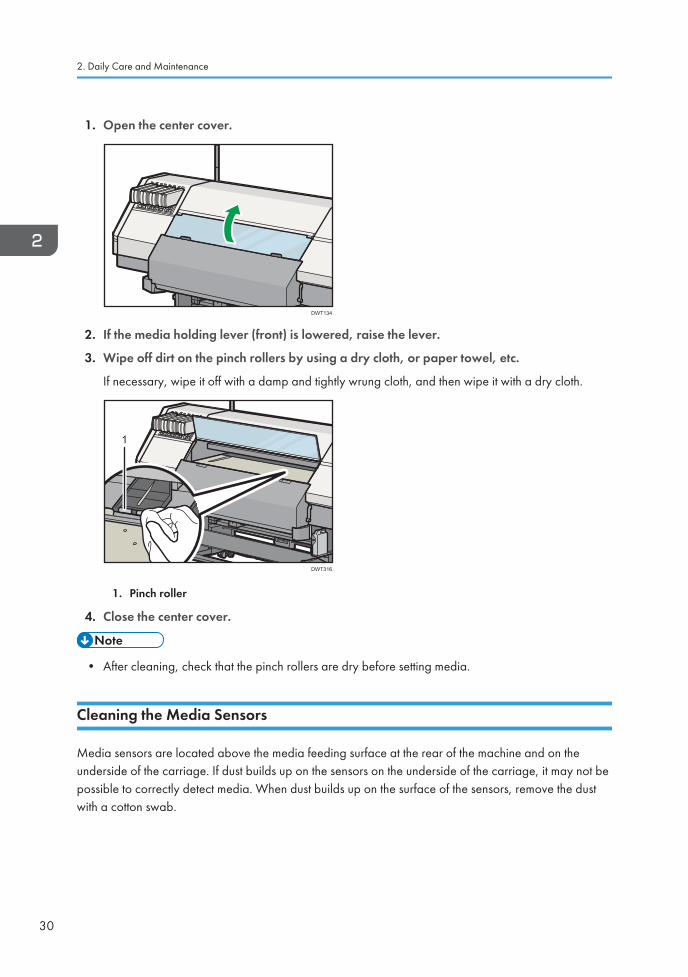
1. Open the center cover.
DWT134
2. If the media holding lever (front) is lowered, raise the lever.
3. Wipe off dirt on the pinch rollers by using a dry cloth, or paper towel, etc.
If necessary, wipe it off with a damp and tightly wrung cloth, and then wipe it with a dry cloth.
DWT316
1
1. Pinch roller
4. Close the center cover.
• After cleaning, check that the pinch rollers are dry before setting media.
Cleaning the Media Sensors
Media sensors are located above the media feeding surface at the rear of the machine and on theunderside of the carriage. If dust builds up on the sensors on the underside of the carriage, it may not bepossible to correctly detect media. When dust builds up on the surface of the sensors, remove the dustwith a cotton swab.
2. Daily Care and Maintenance
30
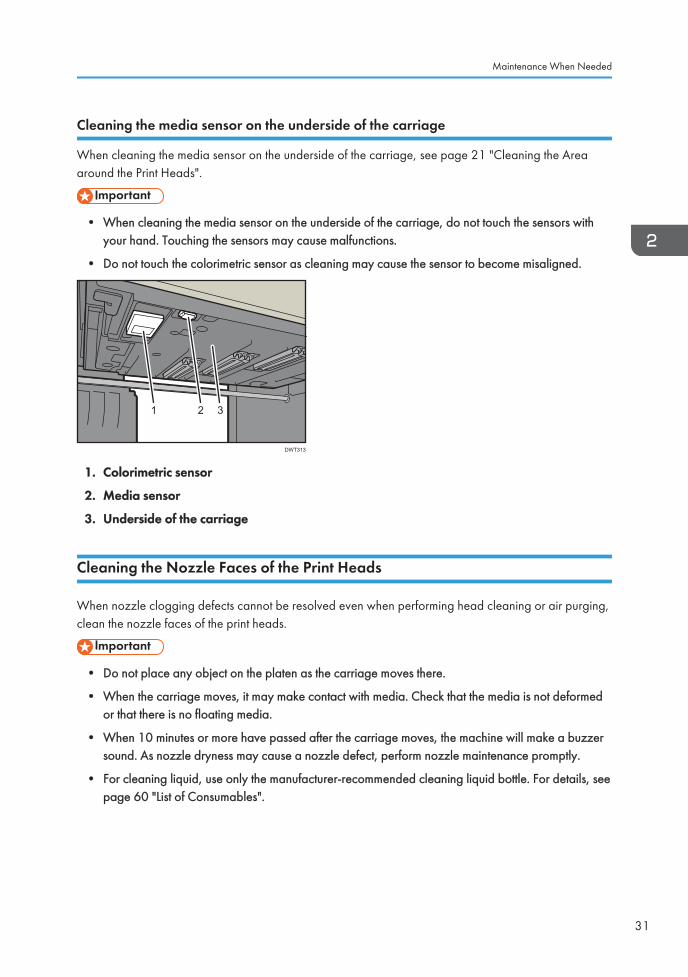
Cleaning the media sensor on the underside of the carriage
When cleaning the media sensor on the underside of the carriage, see page 21 "Cleaning the Areaaround the Print Heads".
• When cleaning the media sensor on the underside of the carriage, do not touch the sensors withyour hand. Touching the sensors may cause malfunctions.
• Do not touch the colorimetric sensor as cleaning may cause the sensor to become misaligned.
1 2 3
DWT313
1. Colorimetric sensor
2. Media sensor
3. Underside of the carriage
Cleaning the Nozzle Faces of the Print Heads
When nozzle clogging defects cannot be resolved even when performing head cleaning or air purging,clean the nozzle faces of the print heads.
• Do not place any object on the platen as the carriage moves there.
• When the carriage moves, it may make contact with media. Check that the media is not deformedor that there is no floating media.
• When 10 minutes or more have passed after the carriage moves, the machine will make a buzzersound. As nozzle dryness may cause a nozzle defect, perform nozzle maintenance promptly.
• For cleaning liquid, use only the manufacturer-recommended cleaning liquid bottle. For details, seepage 60 "List of Consumables".
Maintenance When Needed
31
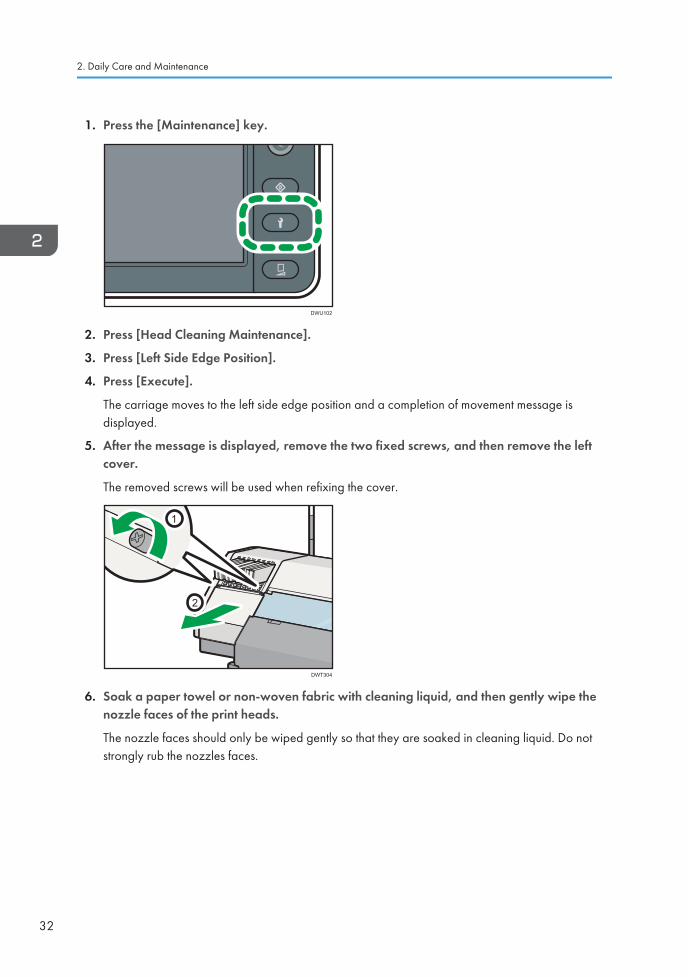
1. Press the [Maintenance] key.
DWU102
2. Press [Head Cleaning Maintenance].
3. Press [Left Side Edge Position].
4. Press [Execute].
The carriage moves to the left side edge position and a completion of movement message isdisplayed.
5. After the message is displayed, remove the two fixed screws, and then remove the leftcover.
The removed screws will be used when refixing the cover.
DWT304
1
2
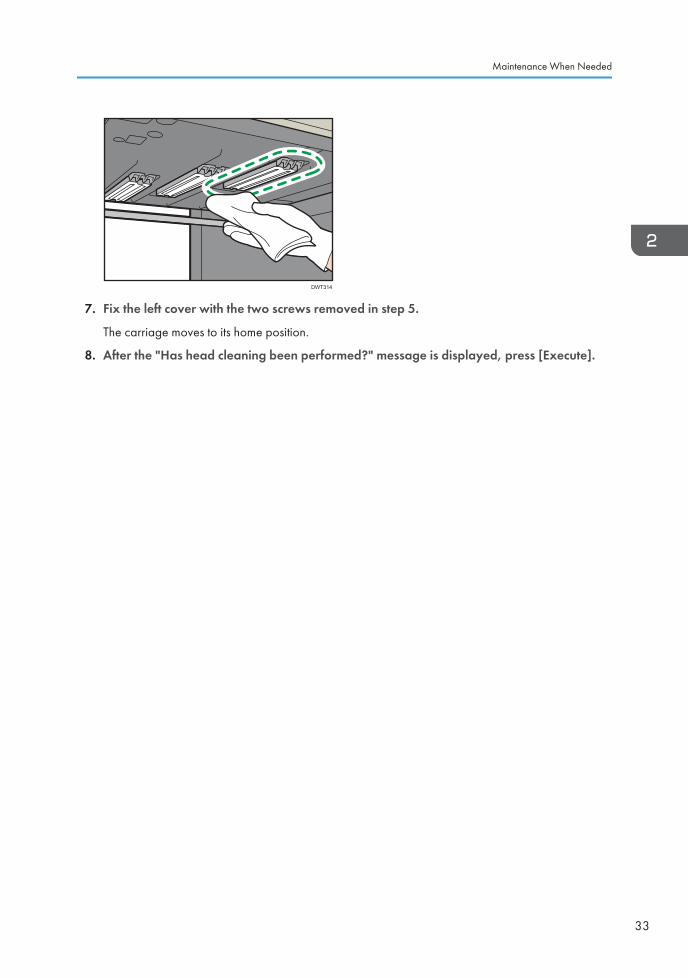
6. Soak a paper towel or non-woven fabric with cleaning liquid, and then gently wipe thenozzle faces of the print heads.
The nozzle faces should only be wiped gently so that they are soaked in cleaning liquid. Do notstrongly rub the nozzles faces.
2. Daily Care and Maintenance
32
DWT314
7. Fix the left cover with the two screws removed in step 5.
The carriage moves to its home position.
8. After the "Has head cleaning been performed?" message is displayed, press [Execute].
Maintenance When Needed
33
Replacing ConsumablesThis section describes how to replace consumables such as ink cartridges or cleaning cartridge, etc.
Always replace consumables when a notification message appears on the display panel.
Precautions for Replacing Consumables
Take the following precautions when replacing consumables.
• The following explains the warning messages on the plastic bag used in this product'spackaging.
• Keep the polythene materials (bags, gloves, etc.) supplied with this machine away frombabies and small children at all times. Suffocation can result if polythene materials arebrought into contact with the mouth or nose.
• Do not refill ink cartridges, flushing cartridges, or displacement liquid cartridges. We assume noresponsibility for any damage caused by the use of a refilled ink cartridge, flushing cartridge, ordisplacement liquid cartridge.
• Neither pound the ink cartridge, flushing cartridge, and displacement liquid cartridge nor shakethem violently, as doing so can cause leakage of ink, flushing liquid, and displacement liquid.
• Consult your sales or service representative for proper disposal of ink cartridge, flushingcartridge, cleaning cartridge, displacement liquid cartridge, and waste ink bottle. Otherwise,commission an industrial waste disposal company.
• The safety evaluation of this machine assumes that the ink recommended by this company isused. For safe usage of this machine, use the ink recommend by this company.
• If the ink cartridge is moved from a cold place to a warm place, leave it in the room temperaturefor 3 hours or more before using it.
• Open the ink cartridge just before installing it in the machine. If it is opened and left for anextended period of time, normal printing performance of the machine may not be ensured.
• Be sure to thoroughly consume the ink in the ink cartridge, once it is opened, within 3 months. Ifan extended period of time has passed away after opening the cartridge tank, printing qualitywould be poor.
2. Daily Care and Maintenance
34
• Do not touch or stain the contacts of the ink cartridges, flushing cartridges, displacement liquidcartridges, and cleaning cartridge, as doing so may cause damage to the print circuit board.
• When cleaning the ink-station or the heads, or replacing the cleaning cartridge, make sure towear the attached goggles.
• When performing maintenance on the machine, make sure to wear the attached gloves.
• Keep ink, flushing liquid, and displacement liquid away from an open flame. Also keep theroom well ventilated when you use or handle ink, flushing liquid, and displacement liquid.
• If ink, flushing liquid, and displacement liquid get into contact with eyes, wash eyes immediatelywith running water. Consult a doctor if necessary.
• If ink, flushing liquid, or displacement liquid are ingested, consult a doctor immediately withSafety Data Sheet (SDS).
• Keep ink, flushing liquid, displacement liquid, the nozzle cleaning cartridge, the waste ink bottleand the maintenance kit out of reach of children.
• Please use protective equipment in order to avoid exposure to liquid.
• When removing jammed media or performing maintenance on the machine, avoid getting ink,flushing liquid, and displacement liquid on your clothing. If ink, flushing liquid, and displacementliquid come into contact with your clothing, wash the stained area with water.
• When removing jammed media, replacing media, or performing maintenance on the machine,avoid getting ink, flushing liquid, and displacement liquid on your skin. If ink, flushing liquid, anddisplacement liquid come into contact with your skin, wash the affected area thoroughly withsoap and water.
• The supplied gloves are consumables. If they are damaged or lost, use polythene glovesinstead.
• Always replace the ink cartridge when a notification appears on the machine.
• Fault may occur if you use ink other than the recommended type.
• When replacing the ink cartridge, do not turn off the main power. If you do, settings will be lost.
• Do not shake the ink cartridge with its mouth down after removing it. Residual ink may scatter.
Replacing Consumables
35
• Do not repeatedly install and remove ink cartridges. This will result in ink leakage.
Disposal of Used Consumables
• Dispose of used ink cartridges in accordance with local regulations.
When disposing of used consumables, do the following:
Disposing of used ink cartridge, displacement cartridge, and flushing cartridge
Ink cartridge, displacement cartridge, and flushing cartridge cannot be re-used.
If you want to discard your used cartridge, please contact your local sales office. If you discard itby yourself, treat it as industrial waste material.
Disposing of used cleaning cartridge and waste ink bottle
If you want to dispose of the used cleaning cartridge and waste ink bottle, contact a company thathandles industrial waste.
Replacing an Ink Cartridge
Use the ink cartridge within 3 months after opening it.
Replace the corresponding color ink cartridge or displacement cartridge when the following messagesappear on the display:
"The ink in one of the cartridges is depleted. Replace the appropriate cartridge."
"An ink cartridge has expired. Replace the appropriate cartridge."
"The displacement cartridge is depleted. Replace the displacement cartridge."
When the following messages appear on the display panel, the corresponding color ink cartridge ordisplacement cartridge should be replaced soon. Prepare a new ink cartridge or displacementcartridge.
"The ink cartridge is almost empty. Prepare a replacement ink cartridge."
"The displacement cartridge is almost empty. Prepare the displacement cartridge."
If two ink cartridges of the same color are installed, and if one of them is usable, the machine can still beused.
Replacing an ink cartridge
This section describes how to replace the ink cartridge. When replacing the displacement cartridge,replace it according to the same procedure.
2. Daily Care and Maintenance
36
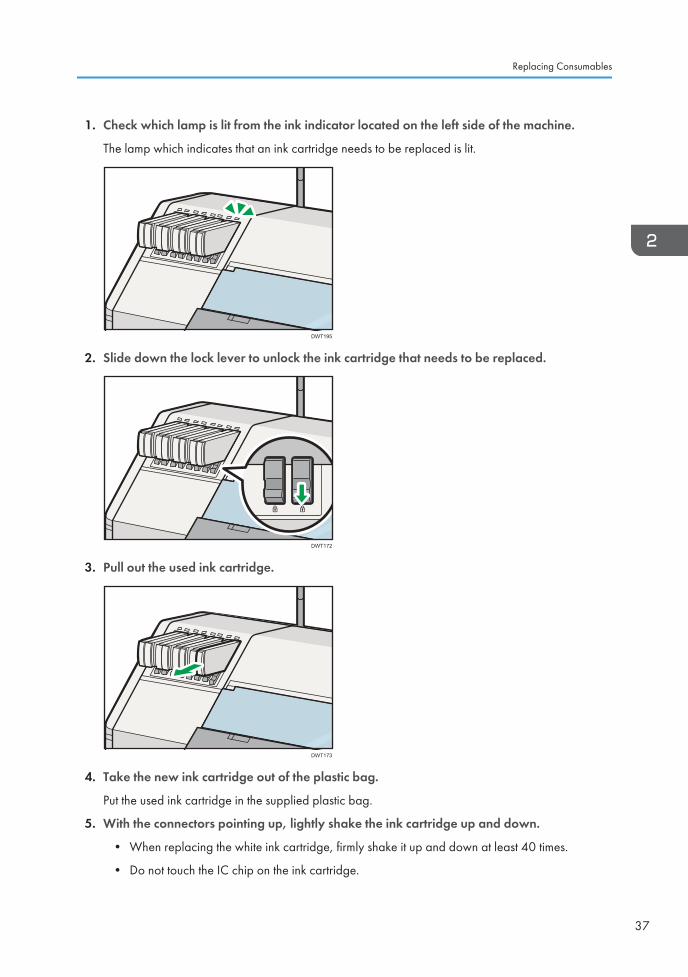
1. Check which lamp is lit from the ink indicator located on the left side of the machine.
The lamp which indicates that an ink cartridge needs to be replaced is lit.
DWT195
2. Slide down the lock lever to unlock the ink cartridge that needs to be replaced.
DWT172
3. Pull out the used ink cartridge.
DWT173
4. Take the new ink cartridge out of the plastic bag.
Put the used ink cartridge in the supplied plastic bag.
5. With the connectors pointing up, lightly shake the ink cartridge up and down.
• When replacing the white ink cartridge, firmly shake it up and down at least 40 times.
• Do not touch the IC chip on the ink cartridge.
Replacing Consumables
37
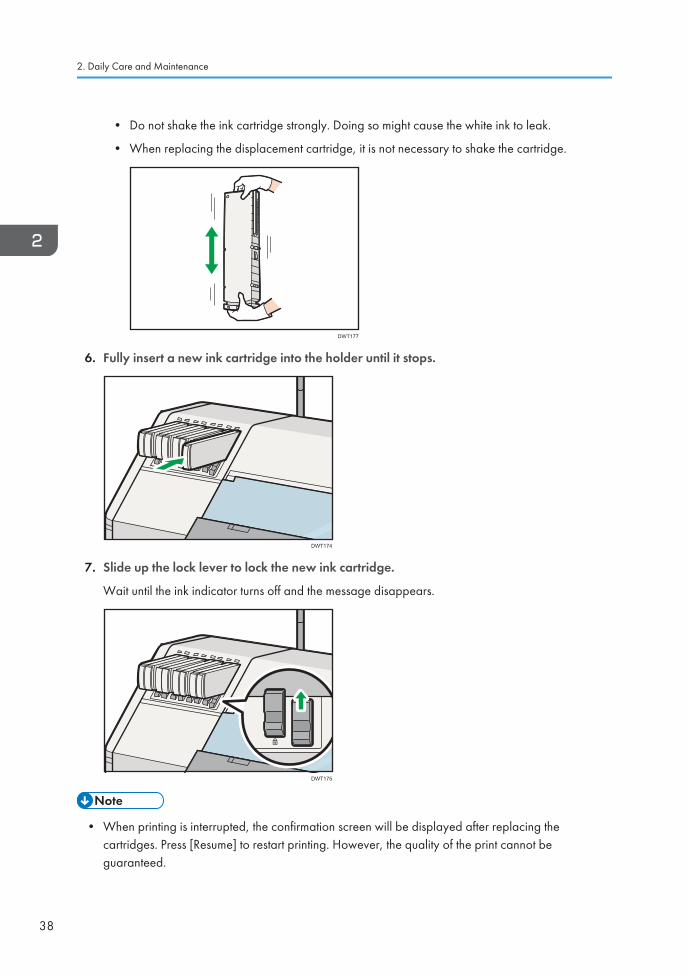
• Do not shake the ink cartridge strongly. Doing so might cause the white ink to leak.
• When replacing the displacement cartridge, it is not necessary to shake the cartridge.
DWT177
6. Fully insert a new ink cartridge into the holder until it stops.
DWT174
7. Slide up the lock lever to lock the new ink cartridge.
Wait until the ink indicator turns off and the message disappears.
DWT175
• When printing is interrupted, the confirmation screen will be displayed after replacing thecartridges. Press [Resume] to restart printing. However, the quality of the print cannot beguaranteed.
2. Daily Care and Maintenance
38
Replacing a Cleaning Cartridge
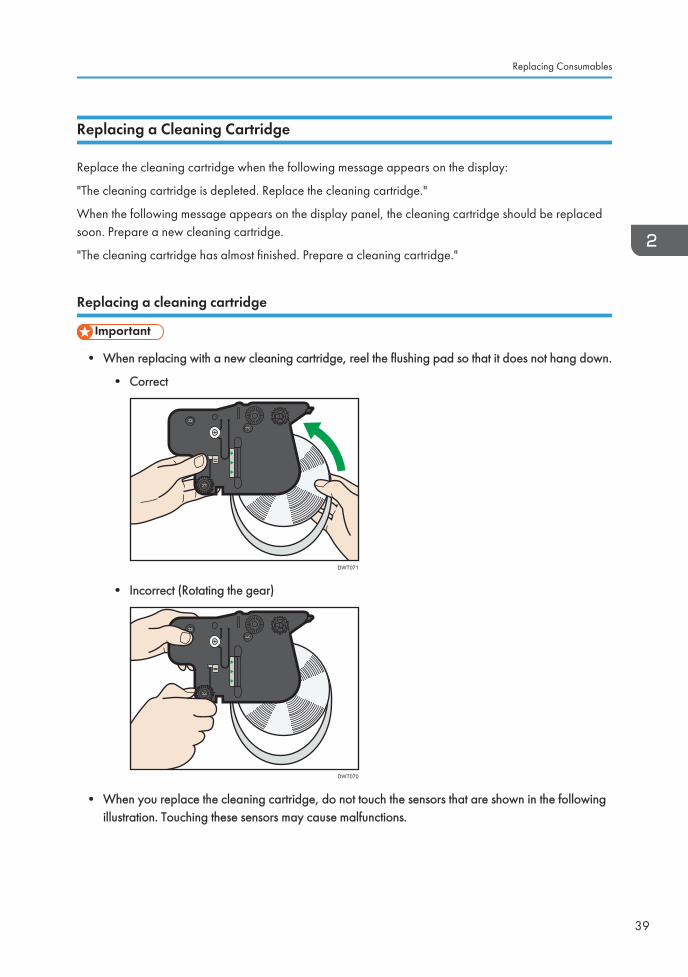
Replace the cleaning cartridge when the following message appears on the display:
"The cleaning cartridge is depleted. Replace the cleaning cartridge."
When the following message appears on the display panel, the cleaning cartridge should be replacedsoon. Prepare a new cleaning cartridge.
"The cleaning cartridge has almost finished. Prepare a cleaning cartridge."
Replacing a cleaning cartridge
• When replacing with a new cleaning cartridge, reel the flushing pad so that it does not hang down.
• Correct
DWT071
• Incorrect (Rotating the gear)
DWT070
• When you replace the cleaning cartridge, do not touch the sensors that are shown in the followingillustration. Touching these sensors may cause malfunctions.
Replacing Consumables
39
DWT214
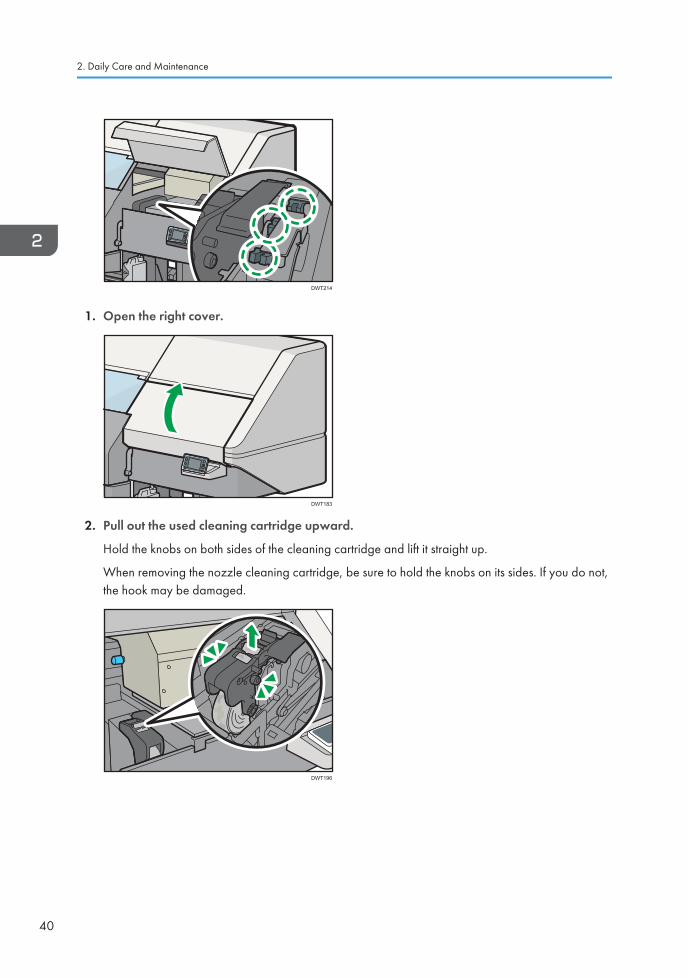
1. Open the right cover.
DWT183
2. Pull out the used cleaning cartridge upward.
Hold the knobs on both sides of the cleaning cartridge and lift it straight up.
When removing the nozzle cleaning cartridge, be sure to hold the knobs on its sides. If you do not,the hook may be damaged.
DWT196
2. Daily Care and Maintenance
40
1
2
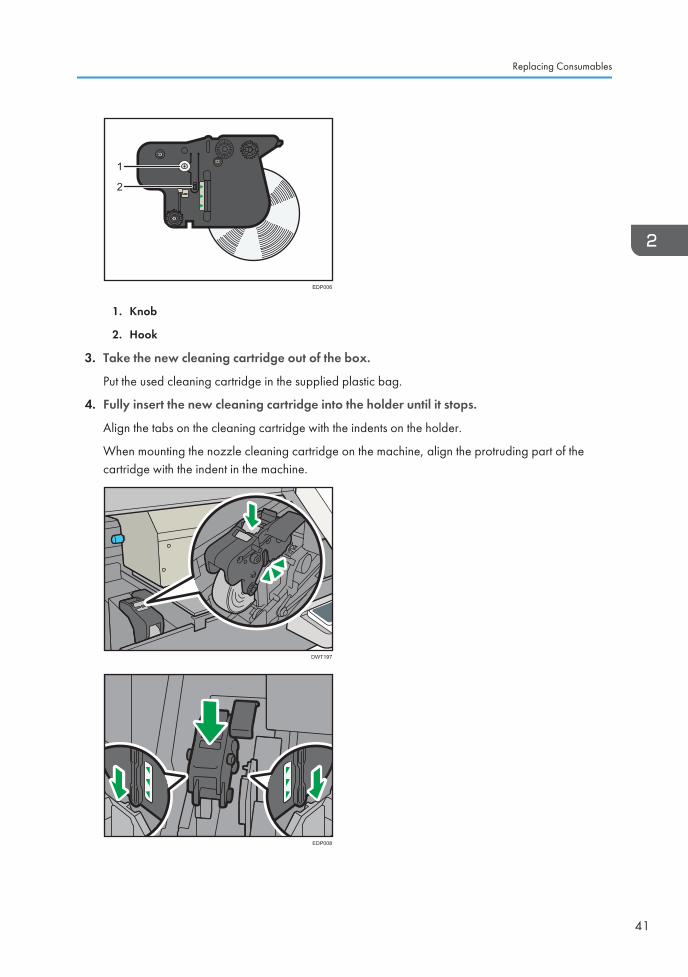
EDP006
1. Knob
2. Hook
3. Take the new cleaning cartridge out of the box.
Put the used cleaning cartridge in the supplied plastic bag.
4. Fully insert the new cleaning cartridge into the holder until it stops.
Align the tabs on the cleaning cartridge with the indents on the holder.
When mounting the nozzle cleaning cartridge on the machine, align the protruding part of thecartridge with the indent in the machine.
DWT197
EDP008
Replacing Consumables
41

1
23
4
EDP007
1. Knob
2. Hook
3. Web slack prevention member
4. Looseness prevention member
5. Raise the lock lever located inside of the right cover on the left, and then close the rightcover.
• When printing is interrupted, the confirmation screen will be displayed after replacing thecartridge. Press [Resume] to restart printing. However, the quality of the print cannot beguaranteed.
Replacing a Flushing Cartridge
Replace the flushing cartridge when the following messages appear on the display:
"The flushing cartridge is depleted. Replace the flushing cartridge."
"The flushing cartridge has expired. Check for the appropriate flushing cartridge."
When the following message appears on the display panel, the flushing cartridge should be replacedsoon. Prepare a new flushing cartridge.
"The flushing cartridge has almost finished. Prepare a flushing cartridge."
2. Daily Care and Maintenance
42

Replacing a flushing cartridge
1. Open the right cover.
DWT183
2. Pull out the used flushing cartridge.
DWT198
3. Take the new flushing cartridge out of the box.
Put the used flushing cartridge in the supplied plastic bag.
4. Fully insert the new flushing cartridge into the holder until it stops.
Align the tabs on the flushing cartridge with the indents on the holder.
DWT199
5. Raise the lock lever located inside of the right cover on the left, and then close the rightcover.
Replacing Consumables
43
• When printing is interrupted, the confirmation screen will be displayed after replacing thecartridge. Press [Resume] to restart printing. However, the quality of the print cannot beguaranteed.
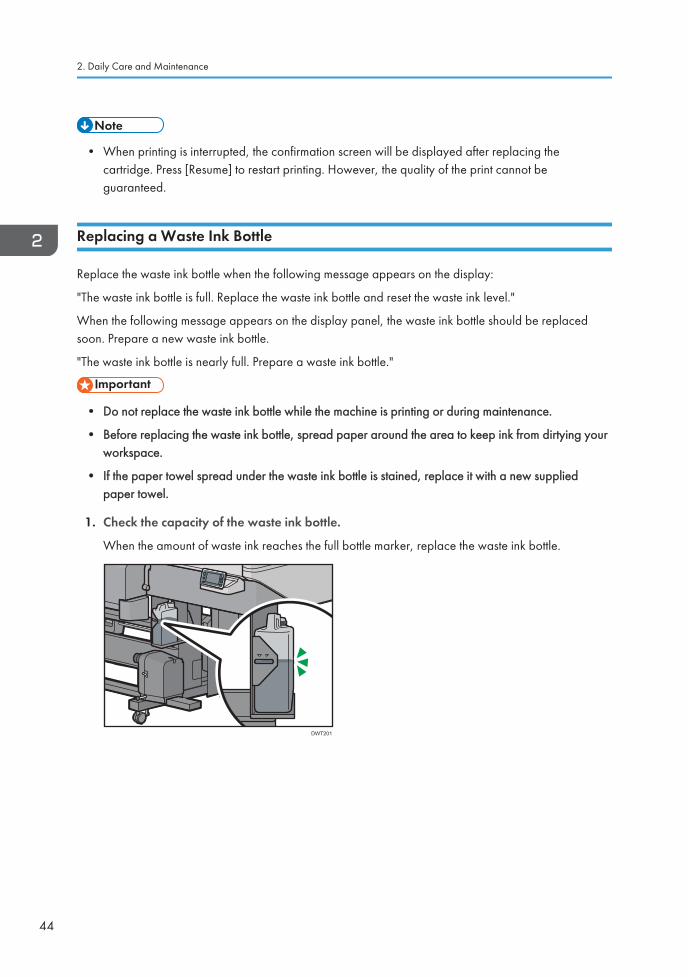
Replacing a Waste Ink Bottle
Replace the waste ink bottle when the following message appears on the display:
"The waste ink bottle is full. Replace the waste ink bottle and reset the waste ink level."
When the following message appears on the display panel, the waste ink bottle should be replacedsoon. Prepare a new waste ink bottle.
"The waste ink bottle is nearly full. Prepare a waste ink bottle."
• Do not replace the waste ink bottle while the machine is printing or during maintenance.
• Before replacing the waste ink bottle, spread paper around the area to keep ink from dirtying yourworkspace.
• If the paper towel spread under the waste ink bottle is stained, replace it with a new suppliedpaper towel.
1. Check the capacity of the waste ink bottle.
When the amount of waste ink reaches the full bottle marker, replace the waste ink bottle.
DWT201
2. Daily Care and Maintenance
44
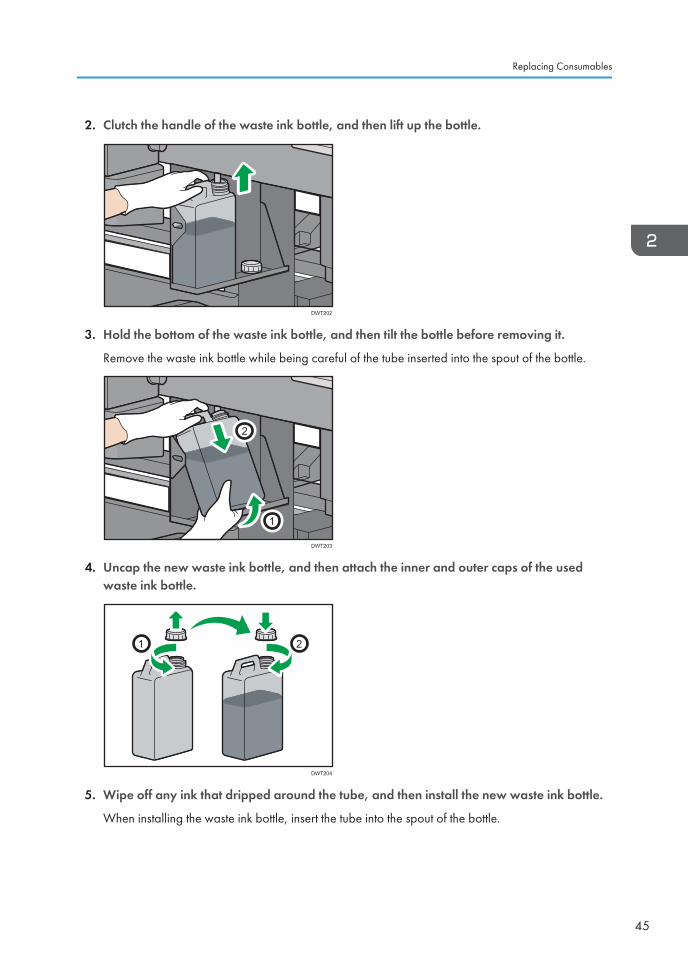
2. Clutch the handle of the waste ink bottle, and then lift up the bottle.
DWT202
3. Hold the bottom of the waste ink bottle, and then tilt the bottle before removing it.
Remove the waste ink bottle while being careful of the tube inserted into the spout of the bottle.
DWT203
1
2
4. Uncap the new waste ink bottle, and then attach the inner and outer caps of the usedwaste ink bottle.
1 2
DWT204
5. Wipe off any ink that dripped around the tube, and then install the new waste ink bottle.
When installing the waste ink bottle, insert the tube into the spout of the bottle.
Replacing Consumables
45
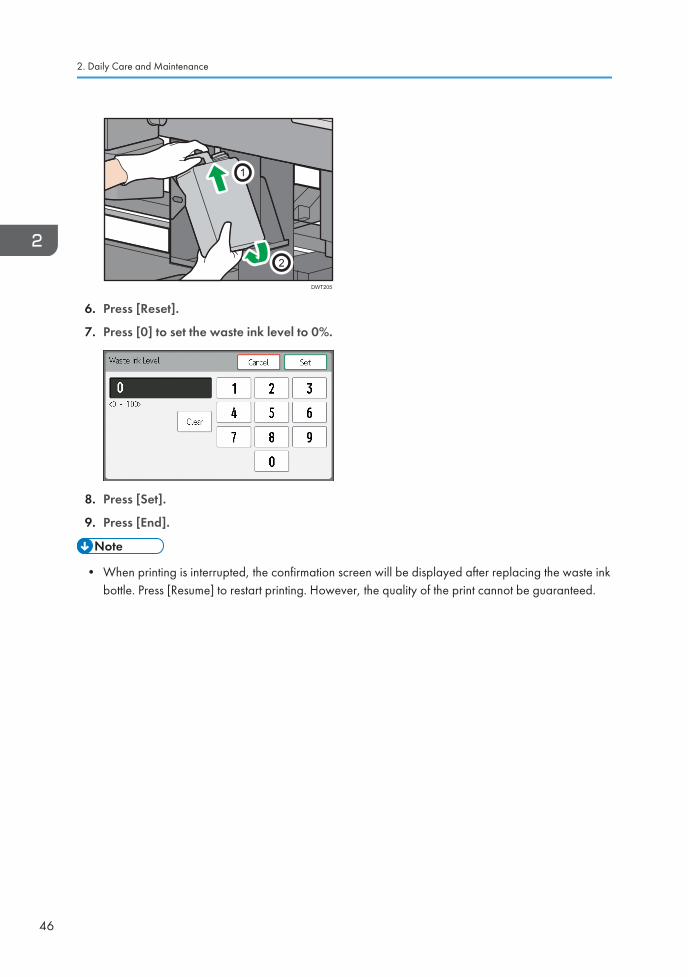
DWT205
1
2
6. Press [Reset].
7. Press [0] to set the waste ink level to 0%.
8. Press [Set].
9. Press [End].
• When printing is interrupted, the confirmation screen will be displayed after replacing the waste inkbottle. Press [Resume] to restart printing. However, the quality of the print cannot be guaranteed.
2. Daily Care and Maintenance
46
3. AppendixThis chapter explains storage methods for media and ink cartridges, how to resolve nozzle defects, anda list of consumables you can purchase.
About InkThis section describes supported ink, and how to store and handle ink cartridges.
Supported Ink
The ink combinations that can be used with this machine are as follows:
• 4C: Cyan, magenta, yellow, and black ink cartridges × 2 of each
• 4C+W: Cyan, magenta, yellow, and black ink cartridges × 1, and white ink cartridges × 4
4C represents cyan, magenta, yellow, and black.
When there is a low amount of remaining ink, a message to prompt the preparation of new ink isdisplayed on the control panel. We recommend that you contact your dealer and purchase new inkcartridges beforehand.
When using two ink cartridges of the same color, if the remaining ink in one cartridge is used up, ink willbe supplied by the second cartridge, allowing printing to continue.
For details about how to replace the ink cartridge, see page 36 "Replacing an Ink Cartridge".
About maintaining white ink
Perform the following tasks, as the components of white ink settle easily:
• Shake the white ink cartridge.
A message is displayed on the control panel when a fixed amount of time has passed with thepower turned on or at the moment the power is turned on. At the beginning of daily work,remove the white ink cartridge, and then shake it.
For details, see page 10 "Shaking a White Ink Cartridge".
• Enable the auto maintenance function.
When auto maintenance is enabled, white ink in the ink supply route can be circulatedaccording to the set frequency, and head cleaning can be performed.
For details, see "Using the Auto Maintenance Function", Operating Instructions.
• Perform ink circulation.
When the color tone of white ink is unusual, circulate the white ink in the ink supply route.
For details, see "If the Density of White Ink Is Uneven", Operating Instructions.
47
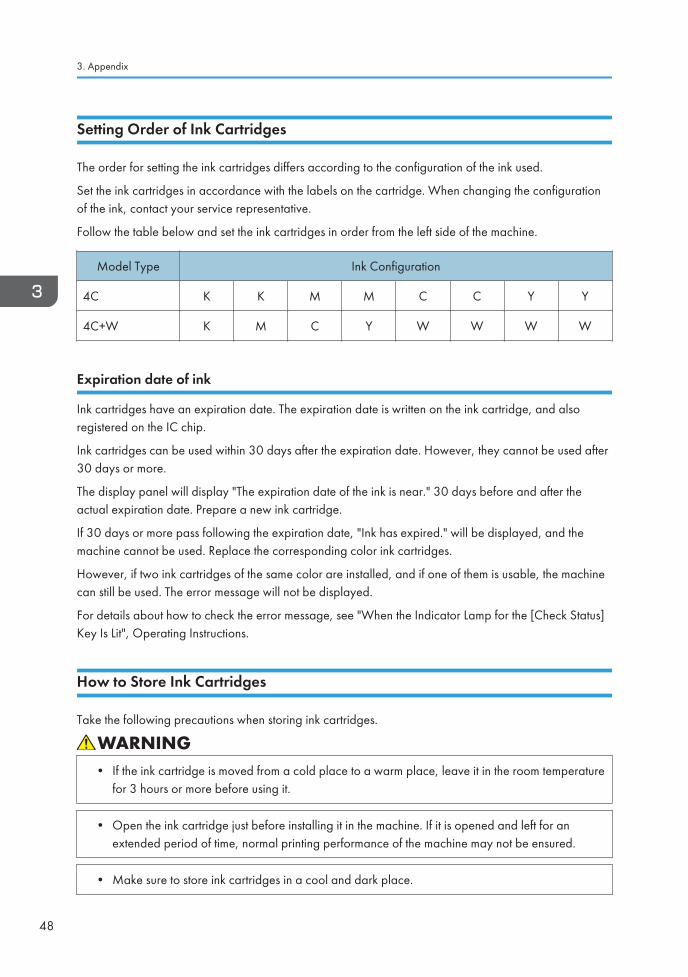
Setting Order of Ink Cartridges
The order for setting the ink cartridges differs according to the configuration of the ink used.
Set the ink cartridges in accordance with the labels on the cartridge. When changing the configurationof the ink, contact your service representative.
Follow the table below and set the ink cartridges in order from the left side of the machine.
Model Type Ink Configuration
4C K K M M C C Y Y
4C+W K M C Y W W W W
Expiration date of ink
Ink cartridges have an expiration date. The expiration date is written on the ink cartridge, and alsoregistered on the IC chip.
Ink cartridges can be used within 30 days after the expiration date. However, they cannot be used after30 days or more.
The display panel will display "The expiration date of the ink is near." 30 days before and after theactual expiration date. Prepare a new ink cartridge.
If 30 days or more pass following the expiration date, "Ink has expired." will be displayed, and themachine cannot be used. Replace the corresponding color ink cartridges.
However, if two ink cartridges of the same color are installed, and if one of them is usable, the machinecan still be used. The error message will not be displayed.
For details about how to check the error message, see "When the Indicator Lamp for the [Check Status]Key Is Lit", Operating Instructions.
How to Store Ink Cartridges
Take the following precautions when storing ink cartridges.
• If the ink cartridge is moved from a cold place to a warm place, leave it in the room temperaturefor 3 hours or more before using it.
• Open the ink cartridge just before installing it in the machine. If it is opened and left for anextended period of time, normal printing performance of the machine may not be ensured.
• Make sure to store ink cartridges in a cool and dark place.
3. Appendix
48
• Keep ink, flushing liquid, displacement liquid, the nozzle cleaning cartridge, the waste ink bottleand the maintenance kit out of reach of children.
• When storing ink cartridges, the following precautions should always be followed:
• Do not store ink cartridges where they will be exposed to direct sunlight. Store ink cartridgeswhere the temperature is 40°C (104°F) or less and the humidity is 35 to 80%. When storingink cartridges in an environment that is 32°C (90°F) or more, use them within a month.
• Store ink cartridges on a flat surface.
• Ink may freeze if stored in a cold place for a long period of time. If ink freezes, it may becomeunusable as it may deteriorate. Make sure to store ink in an environment where ink will not freeze.
Precautions for Handling Ink Cartridges
Take the following precautions when handling ink cartridges.
• Do not refill ink cartridges, flushing cartridges, or displacement liquid cartridges. We assume noresponsibility for any damage caused by the use of a refilled ink cartridge, flushing cartridge, ordisplacement liquid cartridge.
• Neither pound the ink cartridge, flushing cartridge, and displacement liquid cartridge nor shakethem violently, as doing so can cause leakage of ink, flushing liquid, and displacement liquid.
• The safety evaluation of this machine assumes that the ink recommended by this company isused. For safe usage of this machine, use the ink recommend by this company.
• Keep ink, flushing liquid, and displacement liquid away from an open flame. Also keep theroom well ventilated when you use or handle ink, flushing liquid, and displacement liquid.
• If ink, flushing liquid, and displacement liquid get into contact with eyes, wash eyes immediatelywith running water. Consult a doctor if necessary.
• If ink, flushing liquid, or displacement liquid are ingested, consult a doctor immediately withSafety Data Sheet (SDS).
• Please use protective equipment in order to avoid exposure to liquid.
About Ink
49
• The supplied gloves are consumables. If they are damaged or lost, use polythene glovesinstead.
• Use up an ink cartridge within 3 months after unsealing it. In addition, do not use an ink cartridge ifits expiration date has expired.
• Do not disassemble ink cartridges, refill or add ink to the ink cartridges.
• Do not hit or swing around the ink cartridges. Doing so might cause the ink to leak.
• Do not touch the IC (integrated circuit) chip on ink cartridges.
• To protect the print heads and ensure print quality, ink is consumed not only when printing, but alsowhen the main power switch is turned on, during head cleaning, ink refreshing, and the loading ofcartridges.
3. Appendix
50
About MediaThis section describes the media that can be used with this machine, and how to store and handlemedia.
Supported Media
Supported media are shown below. Roll media and leaf media can be used with this machine.
Types of recommended media
PVC/Tarpaulin/PET/PP/Coated Paper/Plain Paper/Soft Signage (Fabric)/Wallpaper/Canvas
Media width
• RICOH Pro L5130
297 – 1,371 mm (approx. 11.7 – 53.98 inches)
• RICOH Pro L5160
297 – 1,625 mm (approx. 11.7 – 63.98 inches)
Media thickness
0.5 mm (approx. 0.02 inches) or less
Maximum print area
• RICOH Pro L5130
Width: 1,361 mm (approx. 53.58 inches)
Length: 300,000 mm (approx. 11,811.02 inches)
• RICOH Pro L5160
Width: 1,615 mm (approx. 63.58 inches)
Length: 300,000 mm (approx. 11,811.02 inches)
Roll media
Outside diameter
A diameter of 250 mm (9.84 inches) or less
Core size (bore)
2 or 3 inches
Weight
55 kg (121.25 lb.) or less
About Media
51
• Depending on the type and thickness of media, it may be hard to dry. We recommend performinga trial print beforehand.
How to Store Media
Take the following precautions when storing media.
• Store media in a bag. Wiping off dust accumulated on media will adversely affect the mediadue to static electricity.
• Do not leave any media on the roll holder. If any media is left on the roll holder, it can get dusty.
• Make sure to store media in a place that is not exposed to direct sunlight and is free from humidityand dust.
• For leaf media that warps easily, store the media, for example, by placing it on a small table sothat the media warps down. Warped up media may be impossible to vacuum during feeding.
• Store media on a flat surface. Do not store media vertically.
• Once opened, store media in plastic bags.
Precautions for Handling Media
Take the following precautions when handling media:
• Use media recommended by RICOH to ensure reliable, high-quality printing.
• Set the heater temperature to meet the characteristics of the media. Set the temperature of thepre-heater, print heater, post-heater, and cure heater according to the type and characteristicsof the media used. Automatic temperature setting can be made on the operation panel bysetting the profile on the dedicated RIP. For setting on the RIP, see the instruction manual for yourRIP.
• Pay attention to the expansion and contraction of the media. Do not use media immediatelyafter unpacking. The media can be affected by the room temperature and humidity, and thus itmay expand and contract. The media have to be left in the atmosphere in which they are to beused for 30 minutes or more after unpacked.
3. Appendix
52
• Do not use curled media. The use of curled media cannot only cause a media jam but also affectprint quality. Straighten the sheet of media, if significantly curled, before using it for printing. If aregular-sized coated sheet of media is rolled and stored, the coated side has to face outside.
• Do not leave the media with the heater ON for a long time.
• When performing maintenance on the machine, make sure to wear the attached gloves.
• When removing jammed media or performing maintenance on the machine, avoid getting ink,flushing liquid, and displacement liquid on your clothing. If ink, flushing liquid, and displacementliquid come into contact with your clothing, wash the stained area with water.
• When removing jammed media, replacing media, or performing maintenance on the machine,avoid getting ink, flushing liquid, and displacement liquid on your skin. If ink, flushing liquid, anddisplacement liquid come into contact with your skin, wash the affected area thoroughly withsoap and water.
• The supplied gloves are consumables. If they are damaged or lost, use polythene glovesinstead.
• While handling media, be sure to wear gloves. If handling media with your bare hands, the mediamay become dirty from fingerprints or grease on your hands.
• Make sure to use the manufacturer-recommended media to maintain consistent print quality.
• Do not use warped media. Otherwise, the carriage and the media may interfere or print qualitycan be affected. Remove any warps, and then set the media.
• Do not use media that cannot be vacuumed due to warps or shifts while the carriage moves.
• When setting media, do not leave the heater turned on and unattended for a long time. This maycause media to wave or misfeeds to occur. Also, if the media holding lever is lowered, traces of theroller may be left depending on the media material. Perform a test feed, and check the state of themedia. For details about how to perform test feeding, see "Test Feeding", Operating Instructions.
• Set the heater temperature in accordance with the type and characteristics of the media. For detailsabout how to adjust the heater temperature, see "Adjusting the Heater Temperature", OperatingInstructions.
• Dust included in the packaging of roll media may have accumulated in the side of the roll. If the rollmedia is used in this state, it may cause nozzle clogging, etc. Remove dust affixed in the side of theroll before setting the media.
About Media
53

• Do not use a roll core with dents or media that is warped. The media may float, leading tointerference with the carriage, and affecting the overall print quality.
3. Appendix
54
About Flushing Liquid and Displacement LiquidThis section describes how to store and handle flushing cartridges and displacement cartridges.
How to Store Flushing Cartridges and Displacement Cartridges
Take the following precautions when storing flushing cartridges and displacement cartridges.
• Keep ink, flushing liquid, displacement liquid, the nozzle cleaning cartridge, the waste ink bottleand the maintenance kit out of reach of children.
• When storing flushing cartridges and displacement cartridges, the following precautions shouldalways be followed:
• Do not store flushing cartridges and displacement cartridges where they will be exposed todirect sunlight. Store them where the temperature is 40°C (104°F) or less and the humidity is35 to 80%. When storing flushing cartridges and displacement cartridges in an environmentthat is 32°C (90°F) or more, use them within a month.
• Store flushing cartridges and displacement cartridges on a flat surface.
• Flushing liquid and displacement liquid may freeze if stored in a cold place for a long period oftime. If they freeze, they may become unusable as they may deteriorate. Make sure to storeflushing cartridges and displacement cartridges in an environment where flushing liquid anddisplacement liquid will not freeze.
Precautions for Handling Flushing Cartridges and Displacement Cartridges
Take the following precautions when handling flushing cartridges and displacement cartridges.
• Do not refill ink cartridges, flushing cartridges, or displacement liquid cartridges. We assume noresponsibility for any damage caused by the use of a refilled ink cartridge, flushing cartridge, ordisplacement liquid cartridge.
• Neither pound the ink cartridge, flushing cartridge, and displacement liquid cartridge nor shakethem violently, as doing so can cause leakage of ink, flushing liquid, and displacement liquid.
• When performing maintenance on the machine, make sure to wear the attached gloves.
About Flushing Liquid and Displacement Liquid
55
• Keep ink, flushing liquid, and displacement liquid away from an open flame. Also keep theroom well ventilated when you use or handle ink, flushing liquid, and displacement liquid.
• If ink, flushing liquid, and displacement liquid get into contact with eyes, wash eyes immediatelywith running water. Consult a doctor if necessary.
• If ink, flushing liquid, or displacement liquid are ingested, consult a doctor immediately withSafety Data Sheet (SDS).
• The supplied gloves are consumables. If they are damaged or lost, use polythene glovesinstead.
3. Appendix
56
How to Resolve Nozzle DefectsThis section explains how to recover the machine when nozzle defects are not resolved after headcleaning is performed.
Use the following procedure to resolve nozzle clogging:
1. Perform nozzle maintenance.
• Clean the print head nozzles by performing nozzle maintenance.
For details, see "Performing nozzle maintenance", Operating Instructions.
• After performing nozzle maintenance, print nozzle check pattern.
For details, see "Test Printing", Operating Instructions.
If there is any problem with the printing result, proceed to the following procedure:
2. Perform ink refreshing.
• Discharge ink from the ink supply route by performing ink refreshing.
For details, see "Performing ink refreshing", Operating Instructions.
• After performing ink refreshing, print nozzle check pattern.
For details, see "Test Printing", Operating Instructions.
If there is any problem with the printing result, proceed to the following procedure:
3. Perform air purge.
• Unnecessary ink and air that mixed inside the print heads are discharged.
For details, see "When You Want to Clear Ink Mixes", Operating Instructions.
• After performing air purge, print nozzle check pattern.
For details, see "Test Printing", Operating Instructions.
If there is any problem with the printing result, proceed to the following procedure:
4. Clean the nozzle faces.
• Clean the nozzle faces of the print heads.
For details, see page 31 "Cleaning the Nozzle Faces of the Print Heads".
• After cleaning, print nozzle check pattern.
For details, see "Test Printing", Operating Instructions.
If you cannot resolve the nozzle defects after performing Steps 1 to 4 above, you need to registerthe clogged nozzle or replace the print heads.
For details about how to register the clogged nozzle, see "Compensating the Clogged NozzleManually", Operating Instructions. If you need to replace the print heads, contact your servicerepresentative.
How to Resolve Nozzle Defects
57
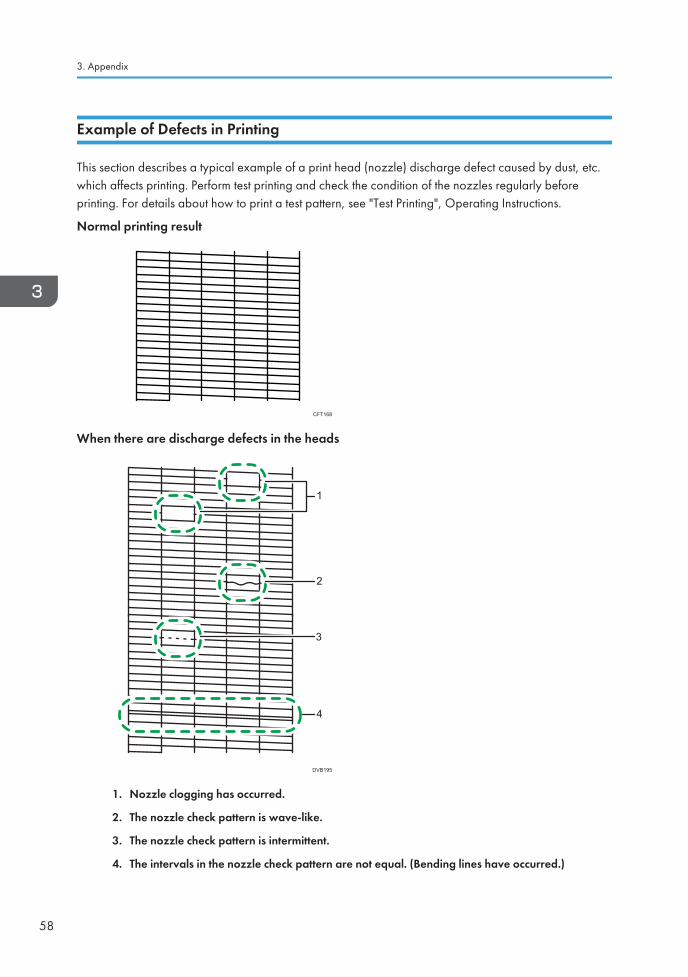
Example of Defects in Printing
This section describes a typical example of a print head (nozzle) discharge defect caused by dust, etc.which affects printing. Perform test printing and check the condition of the nozzles regularly beforeprinting. For details about how to print a test pattern, see "Test Printing", Operating Instructions.
Normal printing result
CFT168
When there are discharge defects in the heads
1
4
2
3
DVB195
1. Nozzle clogging has occurred.
2. The nozzle check pattern is wave-like.
3. The nozzle check pattern is intermittent.
4. The intervals in the nozzle check pattern are not equal. (Bending lines have occurred.)
3. Appendix
58

• Depending on the type or conditions of the media to be used, you may not obtain the print resultyou expect. Make sure to use appropriate media. For details about appropriate media, seepage 51 "About Media".
How to Resolve Nozzle Defects
59
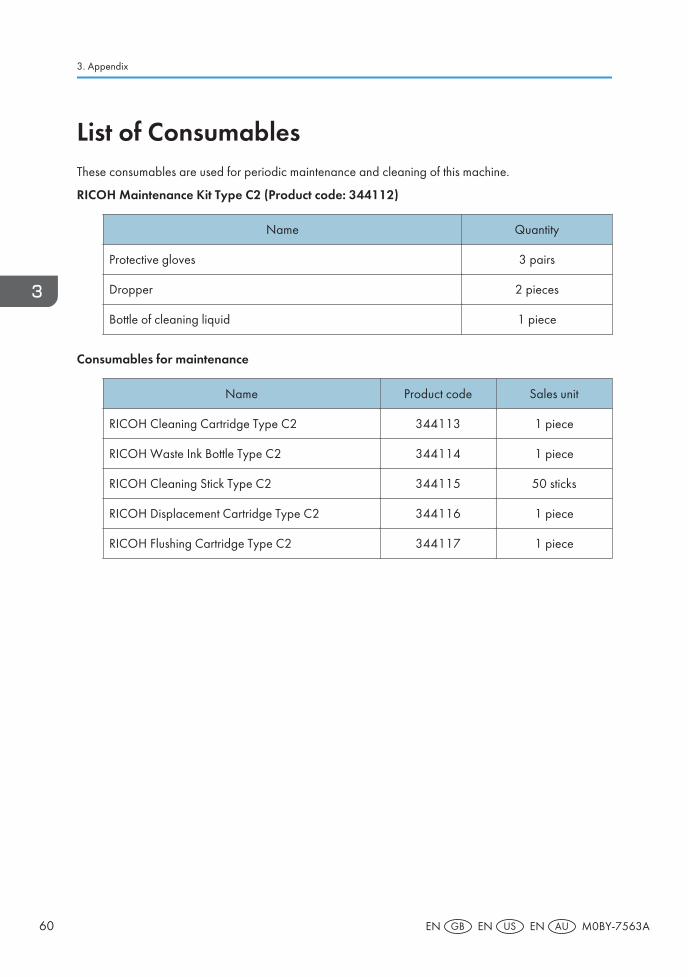
List of ConsumablesThese consumables are used for periodic maintenance and cleaning of this machine.
RICOH Maintenance Kit Type C2 (Product code: 344112)
Name Quantity
Protective gloves 3 pairs
Dropper 2 pieces
Bottle of cleaning liquid 1 piece
Consumables for maintenance
Name Product code Sales unit
RICOH Cleaning Cartridge Type C2 344113 1 piece
RICOH Waste Ink Bottle Type C2 344114 1 piece
RICOH Cleaning Stick Type C2 344115 50 sticks
RICOH Displacement Cartridge Type C2 344116 1 piece
RICOH Flushing Cartridge Type C2 344117 1 piece
3. Appendix
60 EN GB EN US EN AU M0BY-7563A

© 2018, 2019 Ricoh Co., Ltd.

M0BY-7563AAUENUSENGBEN