revere manual p/n 41186-1 nov 10/2014, rev. e · marine type life rafts. ... life raft service...
TRANSCRIPT

Revere Manual P/N 41186-1 Nov 10/2014, Rev. E

REVERE SURVIVAL INC.
AERO COMPACT OWNER’S MANUAL
2
Table of Contents
Section 1.0 Warnings and Cautions Section 2.0 Normal, Non-Emergency Handling Section 3.0 Installation and Storage Section 4.0 About Your Raft 4.1 Construction 4.2 Inflation System 4.3 Ice Build Up 4.4 Ballast Bag System 4.5 Pressure Relief Valve 4.6 Water Activated Locator Light 4.7 Canopy Section 5.0 Periodic Service and Maintenance Section 6.0 Operating Procedures 6.1 Inflation 6.2 Righting 6.3 Boarding 6.4 Cast Off 6.5 Canopy Set-Up Section 7.0 Equipment 7.1 Topping-Off with Handpump 7.2 Deflation
7.3 Sea Anchor 7.4 Bailing Bucket
Section 8.0 Survival Kit (Optional) 8.1 Sponges
8.2 Raft Repair Kit 8.3 Paddles 8.4 Signaling Devices
Section 9.0 Immediate Action Checklist

REVERE SURVIVAL INC.
AERO COMPACT OWNER’S MANUAL
3
1.0 WARNINGS AND CAUTIONS
THIS RAFT IS INTENDED FOR USE IN EMERGENCIES ONLY. IT IS
NOT A PLEASURE RAFT FOR RECREATIONAL USE.
RAFT CONTAINS COMPRESSED GAS CYLINDER UNDER PRESSURE. DO NOT EXPOSE TO HEAT OR FLAME.
DISPOSE OF CYLINDER ONLY WHEN EMPTY. DISPOSE OF IN ACCORDANCE WITH LOCAL, STATE, AND FEDERAL REGULATIONS.
TO AVOID INJURY, KEEP FACE AND EYES AWAY FROM RAFT AS IT INFLATES.
READ OWNER’S MANUAL BEFORE USE.
AVOID USING IN WEATHER BELOW FREEZING.
The raft contains a compressed gas cylinder filled with carbon dioxide gas under high pressure. Handle accordingly. Ship this raft in accordance with local, state, and federal transportation regulations for shipping a self-inflating, life-saving appliance (UN 2990).
Do not test inflate this raft for practice or amusement. Doing so may damage parts of the raft that would not need repair or replacement had a normal periodic maintenance inspection been performed at a qualified service center.
The raft's fabric valise is designed to tear apart under certain rapid inflation situations. Test inflating the liferaft may require costly repair or replacement of the valise.
Do not attempt to repack the raft yourself. The raft is designed to be folded a specific way to avoid tangling, tearing, capsizing, and fabric bursting. Only a qualified service center should repack this raft.
This raft shall only be inspected, repaired, serviced, and repacked at a REVERE AERO COMPACT authorized service facility. See Section 5.0 "Maintenance and Service". Contact REVERE for an authorized service facility near you.
Always wear a U.S. Coast Guard (USCG) approved Personal Flotation Device (PFD) or life jacket or a U.S. Federal Aviation Administration (FAA) approved Life Preserver when operating the raft.
Do not puncture or stab into the raft’s valise. Your raft is a piece of safety equipment. Handle it carefully.
This raft does not carry USCG or FAA product approval. It does not comply with carriage requirements if Federal Regulations require you to have an “approved” liferaft for your commercial vessel or aircraft.

REVERE SURVIVAL INC.
AERO COMPACT OWNER’S MANUAL
4
2.0 NORMAL, NON-EMERGENCY HANDLING
The REVERE AERO COMPACT inflatable raft, when packed in its valise, is designed to be durable and operate when handled in a variety of emergency situations. However, when the packed raft is moved or relocated in non-emergency situations, extreme care should be used. Handling the raft with care under normal circumstances will insure that it will operate when needed in an emergency. Follow these guidelines: When lifting or moving a raft packed in a valise, hold the valise
by its black handle(s) only. A handle(s) is located on the valise for easy carrying. Do not the grip the case by its fabric or red release handle when moving.
Do not drop the packed raft. Gently place it down on boat decks, docks, or hard surfaces. Dropping the raft can puncture the inflatable compartment's fabric or damage valuable safety equipment.
3.0 INSTALLATION AND STORAGE
Read this manual carefully before raft is placed on your vessel or aircraft. Understand its procedures. Explain them to your crew and passengers. Store this manual in a safe place. Review it often. Rafts packed in valises should be stowed where they can be easily reached in an emergency. Stow in a compartment with at least 1” (25mm) clearance all around for easy removal. All rafts should be stowed in a clean, dry, contaminant free area away from any heat source. Contaminants such as petroleum solvents, fuel, grease, oil, and hydraulic fluids may have detrimental effect on the fabrics and consequentially on the life and performance of the raft. If the valise becomes dirty, clean outside only with a mild all-purpose household cleaner (Examples: Formula 409, Fantastic) and a soft rag. Do not scrub. Do not use bleach. Do not use solvents. Storage Temperature Range: +5 oF to +130 oF (-15 oC to +54 oC). Operating Temperature Range: +33 oF to +130 oF (+1oC to +54 oC).
WARNING: EXPOSING THE RAFT TO HIGH TEMPERATURES
MAY RESULT IN THE RAFT INFLATING AUTOMATICALLY. AVOID EXPOSING THE RAFT TO HIGH TEMPERATURES.

REVERE SURVIVAL INC.
AERO COMPACT OWNER’S MANUAL
5
4.0 ABOUT YOUR RAFT 4.1 CONSTRUCTION
Your REVERE AERO COMPACT inflatable raft is constructed from lightweight, durable urethane coated nylon fabric. Each raft consists of a single air-holding compartment made from this fabric. The fabric is cut, shaped, and bonded to form this compartment using specially formulated adhesives and tapes and heat welding techniques.
FIGURE 1 REVERE AERO COMPACT 2 & 4
WITHOUT CANOPY SHOWN INFLATED
REVERE SURVIVAL INC.
AERO COMPACT OWNER’S MANUAL
6
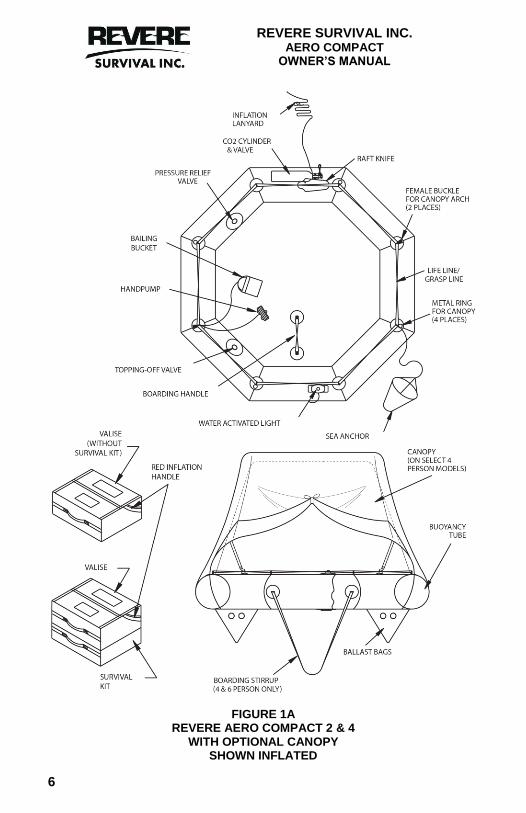
FIGURE 1A REVERE AERO COMPACT 2 & 4
WITH OPTIONAL CANOPY SHOWN INFLATED

REVERE SURVIVAL INC.
AERO COMPACT OWNER’S MANUAL
7
4.2 INFLATION SYSTEM
The raft is inflated with carbon dioxide (CO2) gas which is compressed under high pressure into a small, metal storage bottle called a cylinder. This cylinder is attached to the raft and designed to meet stringent U.S. Department of Transportation (DOT) safety requirements. The cylinder is a reusable, refillable type. To maintain the cylinder's high level of safety, the DOT requires periodic inspection and testing of this cylinder (See "Periodic Service and Maintenance" Section 5.0). This is performed as required when your raft is serviced at a qualified service and repair facility. When the inflation lanyard (See "Operating Procedures" Section 6.0) on the raft is fully extended and pulled, a spring loaded pin in the cylinder valve is released. The pin punctures through the thin walled cap at the top of the cylinder. This allows the stored carbon dioxide gas to flow from the cylinder into the cylinder valve and then through a one-way inlet valve into the raft’s buoyancy tube.
4.3 ICE BUILD UP
The flow of carbon dioxide from the high pressure storage cylinder to the low pressure buoyancy tube causes the areas of the raft it passes through to get very cold. It is therefore normal to see ice build up accumulate on the raft tube, compressed gas storage cylinder, cylinder holder, and cylinder valve. This is just the moisture in the air condensing and freezing to the cold areas of the life raft. The ice will quickly melt.
Consult Section 6.0 for detailed, step-by-step emergency inflation procedures.
4.4 BALLAST BAG SYSTEM
Two (2) ballast bags (water pockets) are attached to the underside of the raft's floor. These deploy underwater as the raft inflates. They fill with water and help prevent the raft from capsizing, especially when the raft is empty or lightly loaded.
4.5 PRESSURE RELIEF VALVE
The raft is equipped with a pressure relief valve that releases excess inflation gases and prevents the raft from over-inflation. After inflating the raft, you may here a hissing sound of gas escaping through the pressure relief valve. This is normal. The sound should stop after a few minutes.

REVERE SURVIVAL INC.
AERO COMPACT OWNER’S MANUAL
8
4.6 WATER ACTIVATED LOCATOR LIGHT
A water activated locator light is mounted to the raft to aid in locating the raft for boarding. The light will illuminate automatically when the raft is inflated in water and last at least eight hours.
4.7 CANOPY
Aero Compacts 2 and 4 are available with an optional, manually erected canopy. The canopy offers additional protection from the elements. Markings on the valise indicate if your raft is so equipped. For rafts with an optional canopy: A canopy is included inside the raft survival kit. After inflating and boarding the raft, retrieve the survival kit from the water. The kit contains the orange canopy fabric and yellow inflatable arch support tube. Orally inflate the arch tube and connect to the raft. Then attach the canopy fabric and erect using the arch tube. For rafts without a survival kit, the canopy comes already attached to the raft. Inflate the arch and make sure the canopy fabric is attached properly to the inflated arch. See Section 6.5 – Canopy Set-up for step-by-step procedures on how to attach the canopy to the raft.
5.0 PERIODIC SERVICE AND MAINTENANCE
CAUTION: NEVER ATTEMPT TO OPEN THE RAFT PACKAGE AND SERVICE THE RAFT YOURSELF. ONLY A PROFESSIONAL SERVICE FACILITY TRAINED AND AUTHORIZED BY REVERE TO SERVICE AERO COMPACT RAFTS SHOULD SERVICE YOUR RAFT.
REVERE authorized service facilities are experienced in servicing marine type life rafts. The facility will have the current service manual and maintenance documents for this raft as published by REVERE. You can return your raft to REVERE’s own facility listed below for service or contact REVERE for an authorized service facility near you.
REVERE SURVIVAL INC Life Raft Service Facility
5323 Highway Avenue, Jacksonville, Florida 32254 USA Tel. No. (904) 503-9733 Fax. No. (904) 503-9719
www.reveresurvival.com
REVERE SURVIVAL INC.
AERO COMPACT OWNER’S MANUAL
9
Your REVERE AERO COMPACT inflatable raft should have its initial periodic servicing performed twenty-four (24) months after being purchased. Subsequent periodic servicing should be performed twelve (12) months after the last servicing. Initial and annual periodic servicing shall include the opening, unpacking, inspection, testing, repairing, and repacking of the life raft. A leakage test of the inflatable compartments will be performed at each annual servicing. The raft's inflation cylinder will be removed and weighed at each annual servicing to determine if it is still correctly filled and not severely corroded. The refillable compressed gas inflation cylinder is subject to periodic hydrostatic retesting. When the raft is in for annual servicing, the facility shall check the date of the last hydrostatic testing marked on the cylinder. If the hydrostatic retest date is past due, the cylinder must be hydrostatically tested and refilled in accordance with U.S. Department of Transportation regulations before being placed back on board the aircraft. The inflation system will also be functionally tested while unattached to the raft and the valve overhauled.
6.0 OPERATING PROCEDURES
6.1 INFLATION
1. Put on your FAA approved life preserver or USCG approved PFD. 2. Gather any gear needed for raft such as ditch bags, emergency
radio beacons (PLBs, ELTs), cell phones, signal flares, etc. 3. Move the packed raft from its stowage location to an open door on
the aircraft. 4. Grab the red inflation handle. (See Figure 2).

REVERE SURVIVAL INC.
AERO COMPACT OWNER’S MANUAL
10
FIGURE 2 RED INFLATION HANDLE AND INFLATION LANYARD
5. While still holding the handle, toss the raft valise overboard into the
water (See Figure 3). The liferaft will float while still packed in its valise.
FIGURE 3
6. Pull the red inflation handle to fully extend the inflation lanyard until
it is taut and tight. This will require pulling out about 6 feet (2 meters) of line (See Figure 4).

REVERE SURVIVAL INC.
AERO COMPACT OWNER’S MANUAL
11
FIGURE 4
7. After pulling out the inflation lanyard, give a sharp, fast pull. If the
raft does not inflate, pull again harder. Continue to pull harder and harder until inflation occurs.
NOTE: A hard, forceful pull of about 20 pounds (10 kg) is
needed to begin inflation.
8. If after several tries the life raft fails to inflate, hold the raft’s valise away at arm’s length or hold the raft down by applying light pressure with your foot. Then, give the lanyard a sharp, fast pull and repeat until inflation occurs.
Upon inflation, the raft will burst out of its valise. The raft will be ready to board in seconds. A water activated locator light will activate to aid in boarding in night time.
WARNING: THE RAFT INFLATES RAPIDLY AND WITH GREAT FORCE. TO AVOID INJURY, KEEP FACE AND BODY AWAY FROM LIFE RAFT VALISE WHEN PULLING THE INFLATION LANYARD.
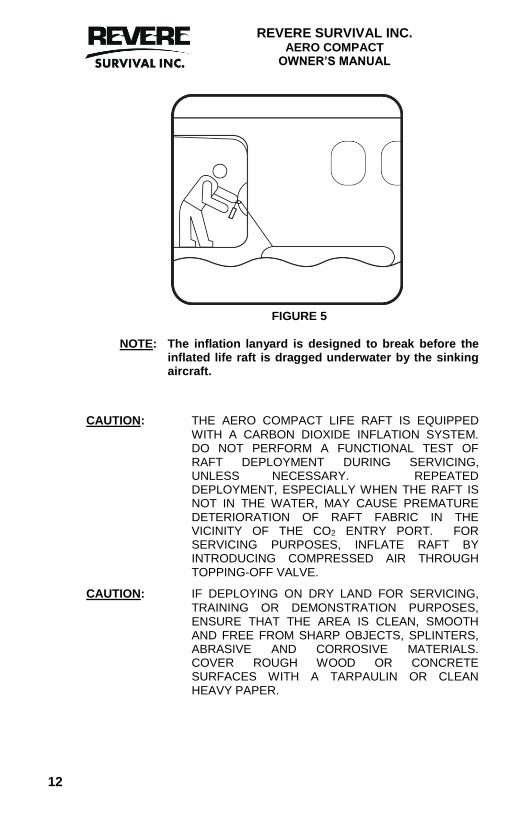
9. Once the raft is inflated, securely attach the red handle end of the
lanyard to the aircraft to prevent the raft from drifting away. Secure to a strong point such as a seat leg or door handle. (See Figure 5). After inflation, the total lanyard length is 20ft (6m).
REVERE SURVIVAL INC.
AERO COMPACT OWNER’S MANUAL
12
FIGURE 5
NOTE: The inflation lanyard is designed to break before the inflated life raft is dragged underwater by the sinking aircraft.
CAUTION: THE AERO COMPACT LIFE RAFT IS EQUIPPED
WITH A CARBON DIOXIDE INFLATION SYSTEM. DO NOT PERFORM A FUNCTIONAL TEST OF RAFT DEPLOYMENT DURING SERVICING, UNLESS NECESSARY. REPEATED DEPLOYMENT, ESPECIALLY WHEN THE RAFT IS NOT IN THE WATER, MAY CAUSE PREMATURE DETERIORATION OF RAFT FABRIC IN THE VICINITY OF THE CO2 ENTRY PORT. FOR SERVICING PURPOSES, INFLATE RAFT BY INTRODUCING COMPRESSED AIR THROUGH TOPPING-OFF VALVE.
CAUTION: IF DEPLOYING ON DRY LAND FOR SERVICING,
TRAINING OR DEMONSTRATION PURPOSES, ENSURE THAT THE AREA IS CLEAN, SMOOTH AND FREE FROM SHARP OBJECTS, SPLINTERS, ABRASIVE AND CORROSIVE MATERIALS. COVER ROUGH WOOD OR CONCRETE SURFACES WITH A TARPAULIN OR CLEAN HEAVY PAPER.

REVERE SURVIVAL INC.
AERO COMPACT OWNER’S MANUAL
13
6.2 RIGHTING
The life raft will almost always inflate right-side-up if it is thrown into the water with the top of the valise case facing up. Occasionally, the unoccupied raft will inflate upside down or capsize due to wind or wave action. If this occurs, the raft can be easily righted by a person in the water. Always don an FAA approved Life Preserver or an inflated USCG approved PFD before entering the water to right the raft. Once in the water, swim to the raft and flip the raft over about the cylinder using the handles and lifeline provided.
6.3 BOARDING
1. After the raft has inflated, pull the raft back towards the aircraft by
pulling in the lanyard.
2. While wearing an inflated life preserver or PFD, exit out the door of the aircraft into the raft. Remember to take any ditch bags, emergency radio beacons, signal flares, etc.
3. If you cannot climb from the aircraft into the raft, you should enter
the water and swim to the raft. Climb up and over the buoyancy tube then pull yourself into the raft. Use the grasp handles and lifeline provided about the raft.
6.4 CAST-OFF
1. Locate the knife pocket attached to the buoyancy tube near the
inflation cylinder. 2. Remove the knife from the pocket. 3. Locate the lanyard line that is still securing the raft to the aircraft. 4. When deemed ready to cast away from the aircraft, cut the lanyard with the knife (See Figure 6).

REVERE SURVIVAL INC.
AERO COMPACT OWNER’S MANUAL
14
FIGURE 6 CUTTING LANYARD WITH RAFT KNIFE
6.5 CANOPY SET-UP
(For Aero Compact 2, and 4 equipped with optional canopy.) For rafts without a survival kit, proceed to step 3.
1. Retrieve canopy from survival kit. It is tethered to the liferaft and
may be either floating in the water or still connected to raft valise. Open kit bag and remove canopy (See Figure 7).
2. Clip male buckles on each end of support arch to mating female buckles on raft (See Figures 8 & 9). Ensure that the red oral tube is facing the inboard side of the life raft.
FIGURE 7 FIGURE 8

REVERE SURVIVAL INC.
AERO COMPACT OWNER’S MANUAL
15
3. Inflate yellow support arch by mouth using red oral tube (See
Figure 10).
FIGURE 9 FIGURE 10
4. Locate two black Velcro® patches along the inside top of orange canopy fabric. Affix Velcro® to mating Velcro on top of yellow arch tube (See Figure 11).
5. Pull orange canopy fabric down over yellow arch tube (See Figure 12).
FIGURE 11 FIGURE 12
6. Affix first two plastic snap hooks on canopy to metal rings on raft (See Figure 13). Ring are located at corners of raft along the lifeline/grasp line.

REVERE SURVIVAL INC.
AERO COMPACT OWNER’S MANUAL
16
7. Lift canopy arch upright so that it is perpendicular to floor. Clip the remaining two plastic snap hooks to metal rings on raft (See Figure 14).
FIGURE 13 FIGURE 14
8. Tuck elasticized bottom edge of orange canopy over outside of raft tube (See Figure 15).
9. Keep canopy down and closed for maximum protection from
elements. If ventilation or viewing outside for rescue craft is desired, one or both sides of the orange canopy fabric may be raised and secured to form a doorway. Just, gather up canopy fabric and tie up using laces provided (See Figure 16).
FIGURE 15 FIGURE 16

REVERE SURVIVAL INC.
AERO COMPACT OWNER’S MANUAL
17
7.0 EQUIPMENT 7.1 TOPPING-OFF WITH HANDPUMP
1. Screw quick-release pump adapter to the handpump. Tighten hand tight. Refer to Figure 17.
2. Open the dust cover at the topping-off valve opening. Attach the pump to the valve by inserting the pump adapter into the valve until the adapter snaps into place. Valve will open automatically.
3. Inflate by applying pumping action to the hand pump until full inflation is achieved.
4. Remove pump from the valve by pulling the adapter away from the topping-off valve until the adapter unsnaps out of place. Valve will close automatically.
5. Close and secure the captive dust cover in place.
FIGURE 17 HAND PUMP OPERATION
7.2 DEFLATION
1. Remove the captive dust cover at the valve opening.
2. Depress the spring loaded poppet at the center of the topping valve with your finger. Gas will escape from the raft buoyancy tube.
3. Once the desired amount of gas is removed, replace the dust cover in place.
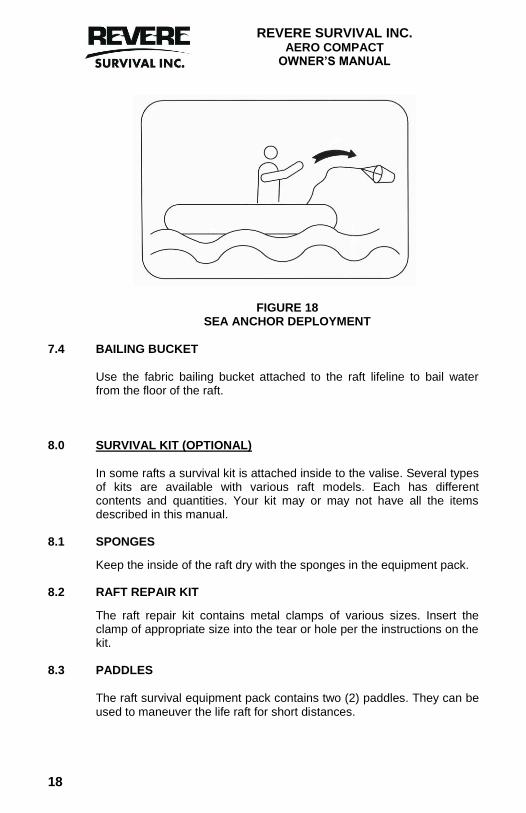
7.3 SEA ANCHOR
A fabric sea anchor is attached to the raft’s lifeline and will be lying loose on the raft floor. After boarding the raft and casting off, deploy the sea anchor. Remove the elastic bands from the sea anchor line and toss sea anchor overboard (See Figure 18). The anchor will aid in stability and prevent the raft from drifting out of the search area.
REVERE SURVIVAL INC.
AERO COMPACT OWNER’S MANUAL
18
FIGURE 18
SEA ANCHOR DEPLOYMENT 7.4 BAILING BUCKET
Use the fabric bailing bucket attached to the raft lifeline to bail water from the floor of the raft.
8.0 SURVIVAL KIT (OPTIONAL)
In some rafts a survival kit is attached inside to the valise. Several types of kits are available with various raft models. Each has different contents and quantities. Your kit may or may not have all the items described in this manual.
8.1 SPONGES
Keep the inside of the raft dry with the sponges in the equipment pack.
8.2 RAFT REPAIR KIT
The raft repair kit contains metal clamps of various sizes. Insert the clamp of appropriate size into the tear or hole per the instructions on the kit.
8.3 PADDLES
The raft survival equipment pack contains two (2) paddles. They can be used to maneuver the life raft for short distances.
REVERE SURVIVAL INC.
AERO COMPACT OWNER’S MANUAL
19
8.4 SIGNALING DEVICES 8.4.1 Signal Mirror
Use the signaling mirror even if no aircraft or ships are in sight. They can see the flash of reflected sunlight for many miles, even on hazy days.
8.4.2 Whistle
Use in rain, fog, or at night to guide nearby rescuers or to signal other survivors.
8.4.3 Flashlight
Use intermittently at night to conserve batteries.
8.4.4 Pyrotechnic Signal Flares
1. Keep flares dry at all times. 2. Do not waste flares. Use only when possible rescue craft can be
seen or heard.
3. Familiarize yourself with the directions marked on the flares. Follow them completely.
4. Handle flares carefully to avoid burns or damage to raft.
5. Hold burning flares away from body and over the side of the raft.

REVERE SURVIVAL INC.
AERO COMPACT OWNER’S MANUAL
20
9.0 IMMEDIATE ACTION CHECKLIST
After boarding raft and casting-off, take these immediate actions: 1. Salvage any floating equipment, including survival kit if equipped.
2. Check raft for proper inflation. Raft tube should be firm but not drum tight. If soft, inflate more with handpump (See Section 7.1).
3. Sit low on the raft floor with your back towards the tube. 4. Bail out any water that has entered the raft (See Section 7.4).
5. Keep sharp items out of pockets and away from buoyancy tube and floor.
6. Inventory and secure any lose gear including ditch bags,
emergency radio transmitters (ELTs, PLBs, etc.), signal flares, etc. if available.
7. Activate any emergency radio beacons (ELTs, PLBs, etc.) if
available. 8. Set-up canopy (if raft so equipped) to protect from sunburn, cold, or
rain (See Section 6.5). 9. Make a calm estimate of your situation and plan your course of
action carefully. 10. Keep calm. Do not move around unnecessarily.