robbing peter to pay paul - michigan state...
TRANSCRIPT

Robbing Peter to Pay Paul Pattern designed by Jodie Davis.
Use Jodie’s EASY curved paper piecing technique!
QuiltAllianceDocument•Preserve•ShareJoin us: www.QuiltAlliance.org
A gift to the quilting community by the Quilt Alliance. Document • Preserve • Share:
Don’t let the story of your quilt fade away. Label it!www.QuiltAlliance.org
NationalQuilting
DayMarch 19, 2016
25 anniversaryth
2016 National Quilting Day Free Pattern
Jodie Davis TheCuckooClockDesigner.com
Robbing Peter to Pay Paul
www.jodieandcompany.com

2
2
Robbing Peter To Pay Paul
Directions
Getting Started
1. Prepare 144-paper foundations by photocopying or scanning the block
pattern on page 10.
2. From the chocolate brown fabric cut 144 5” squares for Patch 1 of each
of the blocks.
3. To get started with curved paper piecing, cut the patches to be curved
pieced—numbers 2 through 5 large, at least 3” x 6”. Once you have
made a few blocks you will find what size works for you and you can
precut your fabrics into strips and then rectangles according to the size
that you are comfortable with..
4. (Optional) Using a fabric glue stick, tack the unprinted side of the paper
patterns to the wrong side of the background fabric squares.
Paper Piecing the Blocks
4. With right sides together place patch 2 against patch 1 so that the ma-
jority of patch 2 is over area 1. Leave nearly 1/2” of fabric extending
into the area marked 2. With the marked side of the paper up, stitch
along the curved seam line between areas 1 and 2. Begin and end the
stitching three or four stitches beyond the ends of the lines.
3
3
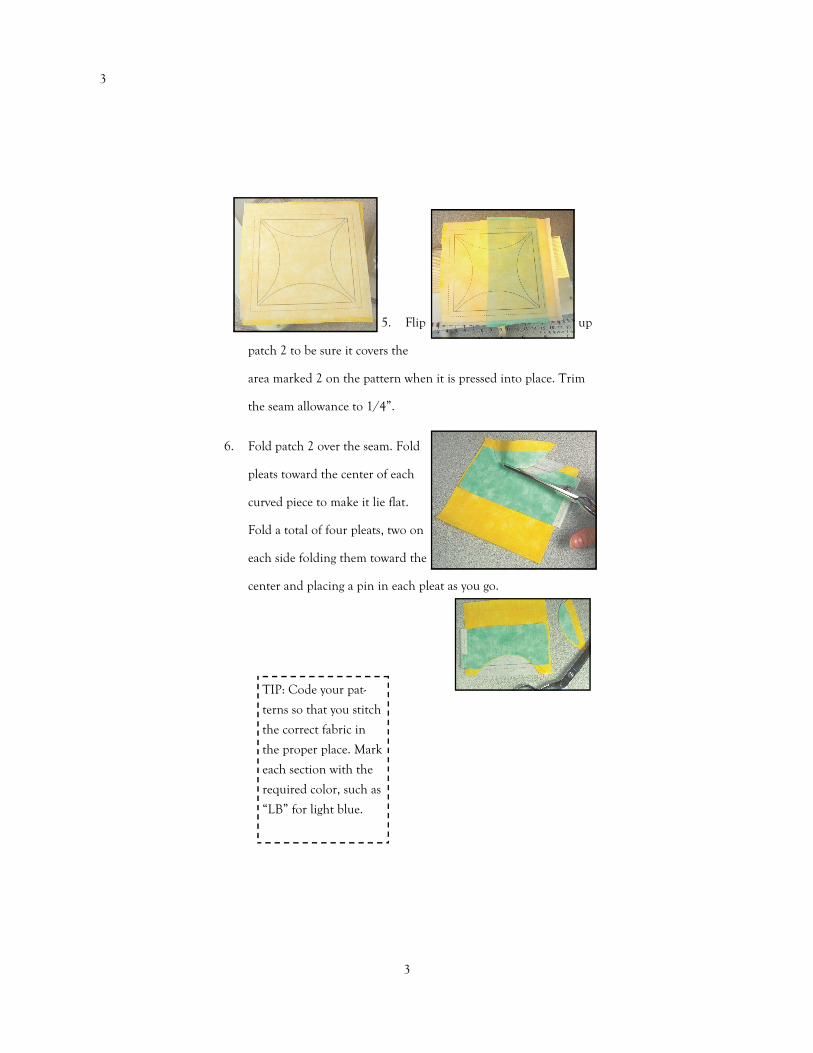
5. Flip up
patch 2 to be sure it covers the
area marked 2 on the pattern when it is pressed into place. Trim
the seam allowance to 1/4”.
6. Fold patch 2 over the seam. Fold
pleats toward the center of each
curved piece to make it lie flat.
Fold a total of four pleats, two on
each side folding them toward the
center and placing a pin in each pleat as you go.
TIP: Code your pat-
terns so that you stitch
the correct fabric in
the proper place. Mark
each section with the
required color, such as
“LB” for light blue.

4
4
Tip: Although I usually use
my 1/4” presser foot for all
quilt-related sewing, you
may find an open-toe foot
allows you to better see the
lines on the paper as you
sew.
7. Add the remaining patches in numerical order in the same manner.
Tip: Use how ever many pleats
works for you. Sometimes I
use a total of six for this block.

5
5
8. With the marked side of the paper up,
machine baste between the dashed and
solid seam markings to secure the
tucks, removing pins as you sew. Re-
peat for all of the curved patches. (Just
one is shown here.) For fastest paper
removal later, choose the longest stitch
possible… you’ll be thankful when you
remove the stitches!
9. Lay the block, fabric side
down, on a cutting mat.
Using a rotary cutter and
ruler, trim the edges of the
block along the dashed lines, cutting through the paper and fab-
ric. This leaves a 1/4” seam allowance around the block.
Tip: After sewing a test block or two, I make mine in
assembly line fashion, a group at a time. First I sew
all the patches on. Then a pleat and pin them. Next
I baste the pleats.

6
6
Tip: Leave the paper foundations in place until after your
quilt top is completed. The printed stitching lines allow for
easier alignment of the blocks and the blocks will not be-
come distorted by the tearing process once they are sewn
together.
4
40
4
32
4
24
4
16
4
8
4
Number of Blocks to Make

7
7
Assembling the Quilt Top
10. Arrange the blocks in or-
der according to the Quilt
Layout Diagram.
11. Starting at the top left, piece the
blocks together in rows. Remove
the paper from the seam allow-
ances after stitching each seam.
Press all of the seam allowances
open. Stitch the rows together.
Remove the paper from the seam
allowances. Press the seam allow-
ances open.
12. Remove the remaining paper foundations.
Tip: Newsprint is the cheapest and widely preferred choice for paper
foundations. But do give some of the papers made just for paper piec-
ing, such those by Carol Doak and C&T Publishing, Fundation, and
The Electric Quilt Company. It’s all a matter of personal choice.

8
8
15. Quilt your quilt. To emphasize the three-
dimensional effect of the curved piecing, I
quilted a simple free-form loopy pattern on
the background fabrics.
Preparing for Quilting
13. Cut the backing into two 1 1/2 yard
lengths. Remove selvedges. Cut one
of these lengths in half lengthwise.
Seam one half to each side of the
full width piece. Press seams open.
14. Lay the backing, wrong side up on a
flat surface. Center the batting over the
backing and the quilt top, right side up,
on top of both. Use safety pins to secure
the layers together.

9
9
18. Center the 52”-long binding strips on the
top and bottom edges of the quilt, leaving
about 2” extending at each end. Starting
1/4” from the corner of the quilt, stitch the
binding in place. Do not stitch through the
side bindings. Press the binding strips away
from the quilt.
Binding
16. Cut six 2 1/4”-wide strips across the width of the
binding fabric. Join them together. From this
strip, cut two pieces , each 48” -long; and two
pieces, each 52” -long. Press the strips in half
lengthwise, wrong sides facing.
17. With the binding raw edges aligned
with the quilt raw edges, stitch the 48”-
long strips to the sides of the quilt. Trim
the edges even with the top and bottom
edges of the quilt. Press the binding strips
away from the quilt.

10
10
21. Fold under the extra 2” at the ends of the top and bottom bindings,
enclosing the corners of the quilt. Fold the binding strips to the back
of the quilt so that no binding shows on the front.. Slip stitch in
place.
20. Fold the side bind-
ing strips to the back
of the quilt so that
no binding shows at
the front. Pin. Slip
Congratulations, you’ve created a treasure!
11
11
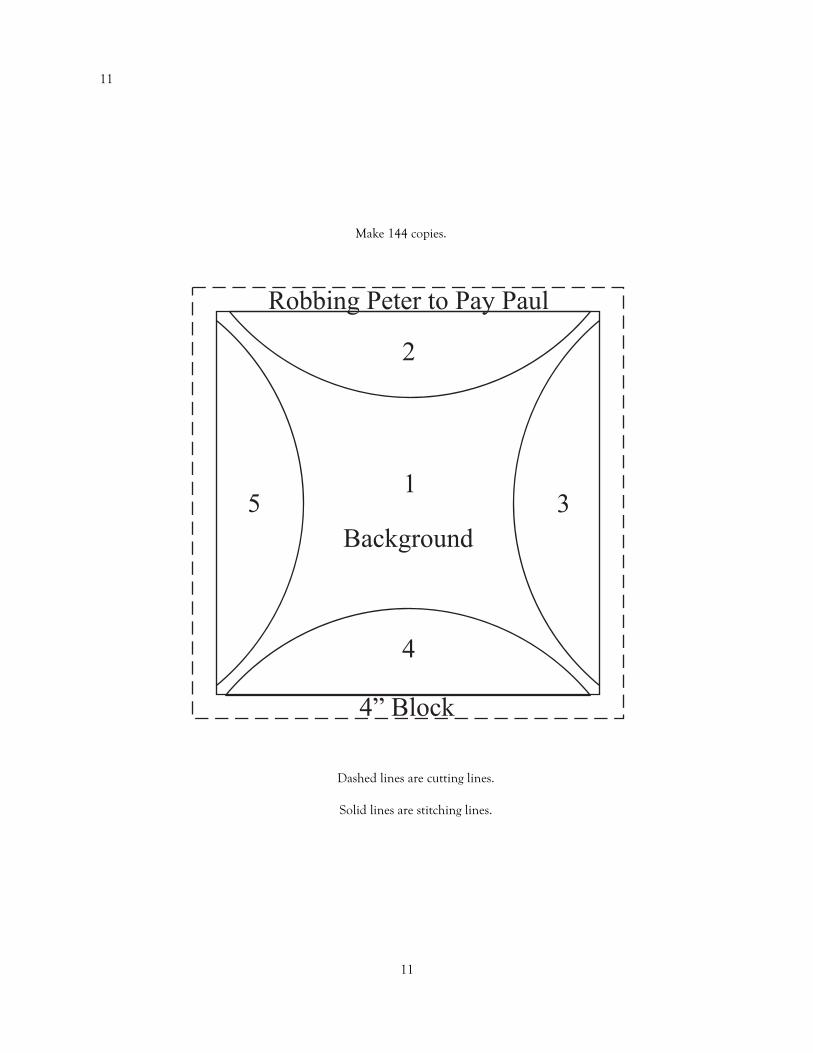
1
2
3
4
5
Background
Robbing Peter to Pay Paul
4” Block
Make 144 copies.
Dashed lines are cutting lines.
Solid lines are stitching lines.

12
12
Materials
1 1/2 yards chocolate brown fabric
1 1/2 yards Bright Yellow
1 1/2 yards California Orange
1 1/2 yards California Red
1 1/2 yards Raspberry 9805
1 1/2 yards Hot Purple
1 1/2 yards Marine Blue 9880-24
1 1/2 yards California Green
52” square batting
3 yards backing fabric
1/2 yard binding fabric
Robbing Peter to Pay Paul
© 2001 Jodie and Company, Inc. www.jodieandcmpany.com
Finished Size: 48-inches square.
This version is all about color and movement. The color, thanks to Moda Mar-
bles, and the movement the curve seamed pieces….
Alternate Layouts and Fabric Choices