robopeak mini usb display€¦ · robopeak mini usb display is a low cost display module with usb...
TRANSCRIPT

RoboPeak Mini USB Display
User Manual
Copyright 2009-2013 RoboPeak Team
http://www.RoboPeak.com
2013-12-4
Rev. 1.1

1 / 29
Copyright 2009-2013 RoboPeak
http://www.RoboPeak.com
RoboPeak Mini USB Display
User Manual
rev. 1.1
Contents:
1. Introduction ................................................................................................ 2
Features ........................................................................................................... 2
2. Typical Use Case ...................................................................................... 3
As Human Interactive Interface for Mini PC ..................................................... 3
As an additional screen for PC ........................................................................ 4
3. Basic Usage .............................................................................................. 5
Connect with Mini PC ....................................................................................... 5
Download Prebuilt Mini PC firmware provided by RoboPeak .......................... 5
Flash RoboPeak firmware to MiniPC ............................................................... 6
Touch screen calibration ................................................................................ 16
4. Advance Usage ....................................................................................... 19
Connect with Linux PC ................................................................................... 19
Uninstall Linux Driver ..................................................................................... 22
Using ARM Suite to install and configure RoboPeak Mini USB Display’s device
driver for Mini PC ........................................................................................... 23
Using dd to flash firmware to SD card in Windows ........................................ 24
5. Q&A ......................................................................................................... 27
6. Version History ........................................................................................ 29
2 / 29
Copyright 2009-2013 RoboPeak
http://www.RoboPeak.com
RoboPeak Mini USB Display
User Manual
rev. 1.1
1. Introduction
RoboPeak Mini USB Display is a low cost display module with USB connectivity for data
transmission and designed by RoboPeak Team. It can be convenient used as a Human
Interactive Interface device for various embedded devices and platforms.
Features
RoboPeak Mini USB Display comes with following features:
Ease to use, easy configuration
320x240 resolution with 65536 color
2.8-inch resistive touch screen
Up to 100hz refresh rate
Powered by USB directly, do not need extra power supply
USB connectivity, no HDMI or VGA port needed
Open source Linux device driver
Can be easily connected with Mini-PCs such as Raspberry-pi, Cubieboard(I/II/III),
pcDuino and routers with USB such as WR703

3 / 29
Copyright 2009-2013 RoboPeak
http://www.RoboPeak.com
RoboPeak Mini USB Display
User Manual
rev. 1.1
2. Typical Use Case
RoboPeak Mini USB Display can be used in multiple ways. Here we list several typical use
cases for your reference.
As Human Interactive Interface for Mini PC
Along with the popularize of ARM chips with the lower cost and higher performance,
Mini PC products such as Raspberry Pi becomes very popular. Usually, they use HDMI as
an interface to connect with TV and display. By adding USB keyboard and mouse, it looks
like a PC so called Mini PC. However, this also limited Mini PC’s portability. You needs to
bring keyboard and mouse, and can only be used in the place where have TV or display
with HDMI interface.
By using RoboPeak Mini USB Display, Mini PC becomes real. You can use it in anywhere
as soon as there’s power supply.
Figure 1 MK802 Connect RoboPeak Mini USB Display

4 / 29
Copyright 2009-2013 RoboPeak
http://www.RoboPeak.com
RoboPeak Mini USB Display
User Manual
rev. 1.1
As an additional screen for PC
A touch screen comes with PC will improve the user experience a lot. Also, you can think
about more innovative ideas with the additional screen. For example, LingRen series
laptop by Razor integrated touch screen used as game skill release panel. It also can be
used as quick entry for common functions of professional software.
Figure 2 Touch Screen integrated in Razor Blade Laptop1
Moreover, for devices without display such as Server, NAS device, touch screen can be a
good Human Interface to show devies’ status, provide management function. This will
improve device’s user experience a lot.
Figure 3 PC connected with RoboPeak Mini USB Display
1 The picture comes from Razor ’s website, copyrighted by Razor.

5 / 29
Copyright 2009-2013 RoboPeak
http://www.RoboPeak.com
RoboPeak Mini USB Display
User Manual
rev. 1.1
3. Basic Usage
Connect with Mini PC
RoboPeak Mini USB Display is designed for Mini PC at first, so it has considered many use
case for connecting with Mini PC. This is also the most convenient way to using
RoboPeak Mini USB Display.
You can choose bellow two ways to use RoboPeak Mini USB Display:
Use prebuilt Mini PC firmware image provided by RoboPeak
Install prebuilt RoboPeak Mini USB Display device driver by ARM Suite provided by
RoboPeak.
Download Prebuilt Mini PC firmware provided by RoboPeak
To facilitate the use of USB display, RoboPeak provides prebuilt Mini PC firmware. All
you need to do is simply write prebuilt firmware image to the SD card or NAND flash
comes with Mini PC. Then you can use USB display without any additional configuration.
Currently supported Mini PCs (We will provide support for more devices):
Raspberry PI
Cubieboard
Cubieboard II
pcDuino
You can download prebuilt firmware from:
http://www.robopeak.com/docs/doku.php?id=product-rpusbdisp-downloads

6 / 29
Copyright 2009-2013 RoboPeak
http://www.RoboPeak.com
RoboPeak Mini USB Display
User Manual
rev. 1.1
Flash RoboPeak firmware to MiniPC
You can follow below steps to flash your MiniPC after downloading the RoboPeak
prebuilt firmware image.
Decompress the firmware
The provided Mini PC firmware is compressed using xz2. Before use, you should use
corresponding tool to unzip it.
Decompress the firmware in Windows
The easiest way to decompress xz file in Windows is using 7Zip software. You can get
latest 7Zip from 7Zip’s official homepage.
http://www.7-zip.org/
The usage of 7Zip is out of scope of this document.
Decompress the firmware in Linux or Mac OS X
If you are using Linux system, it has contains xzutils package usually. If you’re using mac
OS X, you can install xz tools using Home Brew or Mac Ports.
Using Home Brew
brew install xz
Using Mac Ports
ports install xz
After installation, you can use xz command to decompress the firmware:
xz –kd the-path-to-the-rom.img.xz
(Replace the-path-to-the-rom.img.xz to the rom file you have downloaded)
Flash firmware accordingly
The flash approach may different according to SoC solution used by your Mini PC. Please
find appropriated approach in the bellow table to flash your firmware.
2 http://tukaani.org/xz/

7 / 29
Copyright 2009-2013 RoboPeak
http://www.RoboPeak.com
RoboPeak Mini USB Display
User Manual
rev. 1.1
Mini PC SoC Solution Flash firmware using NAND Flash firmware using SD card
pcDuino AllWinner3 A10 Flash firmware to Mini PC’s
NAND flash using Phoenix Suit
Flash the firmware to SD
card Cubieboard AllWinner A10
Cubieboard II AllWinner A20
Raspberry PI Broadcom BCM2835 N/A4
Flash firmware to Mini PC’s NAND flash using Phoenix Suit
Phoenix Suit is provided by All Winner and used to update firmware for All Winner Ax
series SoC solution. So it can only be used to flash pcDuino and Cubieboard series which
are using All Winner solution.
You can find the firmware link from RoboPeak’s wiki.
http://www.robopeak.com/docs/doku.php?id=product-rpusbdisp-downloads
Step 1 Disconnect all power supply and USB connection from Mini PC
Firstly, you need to disconnect all power supply including power cable, USB OTG cable to
make sure Mini PC has turned off.
Step 2 Using Phoenix Suit
Now, you need to open Phoenix Suit software in your PC.
3 AllWinner is ARM Soc provider in China 4 Raspberry PI’s firmware is in SD card

8 / 29
Copyright 2009-2013 RoboPeak
http://www.RoboPeak.com
RoboPeak Mini USB Display
User Manual
rev. 1.1
Figure 4 UI of Phoenix Suit
Choose Firmware tab:
Figure 5 Firmware tab of Phoenix Suit
Click “Image” Button to choose decompressed firmware image. (Note, should be *.img
file, not *.xz file)

9 / 29
Copyright 2009-2013 RoboPeak
http://www.RoboPeak.com
RoboPeak Mini USB Display
User Manual
rev. 1.1
Figure 6 Choose image file
Now, Phoenix Suit is ready to flash the firmware to your device.
Step 3 Connect Mini PC
pcDuino
Press SW2 key (right corner) in the PCB.
Figure 7 pcDuino layout (Front)5
Keep holding SW2 key and connect Mini PC’s USB OTG port to PC’s USB port. Then
pcDuino will enter DFU mode.
Cubieboard Series
Connect Mini PC’s USB OTG port to PC’s USB port using USB cable. Press FEL key next to
USB OTG port and power on Cubieboard, then Cubieboard will enter FEL mode.
5 The picture is from pcDuino’s website, copyrighted by pcDuino

10 / 29
Copyright 2009-2013 RoboPeak
http://www.RoboPeak.com
RoboPeak Mini USB Display
User Manual
rev. 1.1
Step 4 Start flash firmware
When Phoenix Suit detects Mini PC in DFU mode or FEL mode, it will pop up bellow
dialog.
Figure 8 Phoenix Suit format dialog
Press “Yes”, Phoenix Suit will prompt again. Press “Yes” again to upgrade with format the
device.
Then, Phoenix Suit will format your Mini PC automatically and load the new firmware.
The update progress will show in the Phoenix Suit’s UI.
Figure 9 Phoenix Suit upgrading firmware UI
The update process will last 5 ~ 10 minutes. Mini PC will automatically restart after
update finished. Before that, please make sure not to disconnect Mini PC with your
computer.

11 / 29
Copyright 2009-2013 RoboPeak
http://www.RoboPeak.com
RoboPeak Mini USB Display
User Manual
rev. 1.1
Flash firmware to SD card in Windows
Step 1 Download and install Win32 Disk Imager
Win32 Disk Imager is an open source disk image tool in Windows. You can download the
tool from:
http://sourceforge.net/projects/win32diskimager/
Step 2 Open Win32 Disk Imager
Win32 Disk Imager doesn’t need to install, it can be used directly after decompress.
Double click Win32DiskImager.exe to start the application。
Figure 10 UI of Win32 Disk Imager
Use “Open File” button next to Image File Box to choose firmware image. Choose SD
card drive in Device Box. Now, Write button will become available from grey. Click Write
button, Win32 Disk Imager will pop up bellow dialog to ask for confirmation.
Figure 11 Confirm dialog of Win32 Disk Imager
Press Yes button to start write. Win32 Disk Imager will write the image content to your SD
card. This process may last several minutes according to your SD card’s write speed.
12 / 29
Copyright 2009-2013 RoboPeak
http://www.RoboPeak.com
RoboPeak Mini USB Display
User Manual
rev. 1.1
Please wait the write process finish to avoid data damage which may lead to boot failure
of your Mini PC.
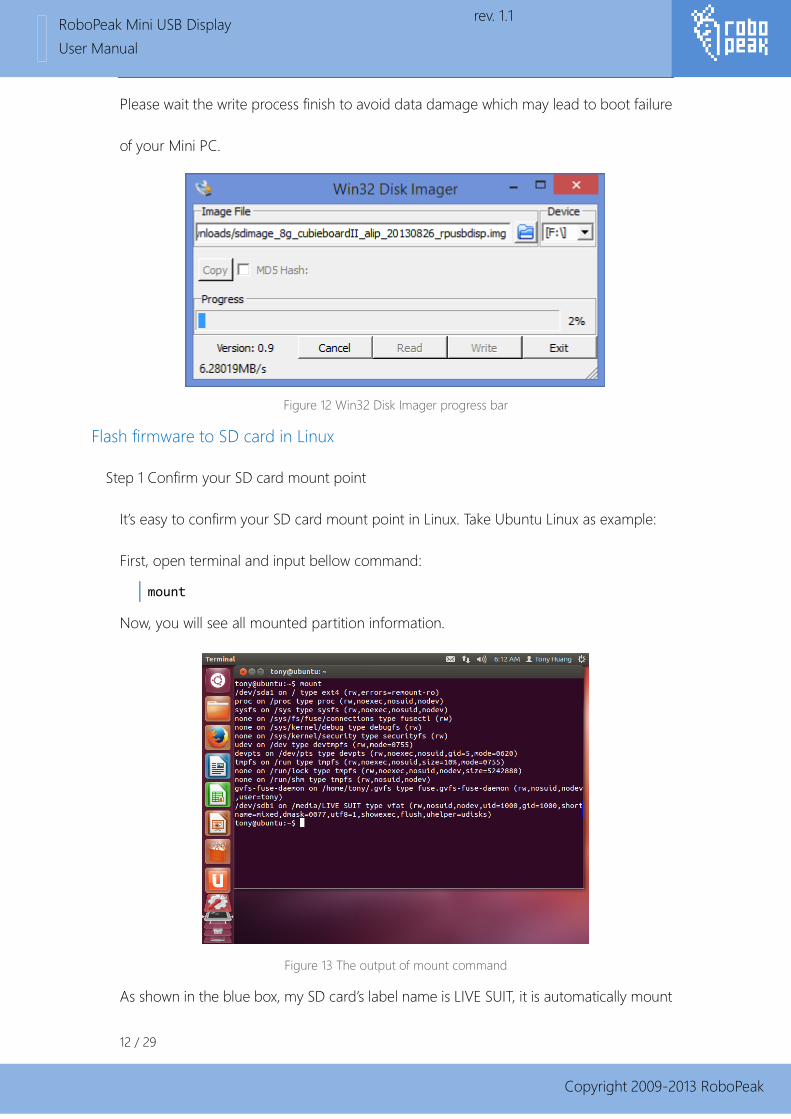
Figure 12 Win32 Disk Imager progress bar
Flash firmware to SD card in Linux
Step 1 Confirm your SD card mount point
It’s easy to confirm your SD card mount point in Linux. Take Ubuntu Linux as example:
First, open terminal and input bellow command:
mount
Now, you will see all mounted partition information.
Figure 13 The output of mount command
As shown in the blue box, my SD card’s label name is LIVE SUIT, it is automatically mount

13 / 29
Copyright 2009-2013 RoboPeak
http://www.RoboPeak.com
RoboPeak Mini USB Display
User Manual
rev. 1.1
to /media/LIVE SUIT by Ubuntu. Its device name is /dev/sdb1. Here /dev/sdb1 contains
partition information and its real device name is /dev/sdb.
Step 2 Unmount SD card
Since Ubuntu has already mounted your SD card to /media, the partition will be locked
to prevent write. We need to unmount the SD card first:
umount /dev/sdb1
When you execute mount command again, you won’t see SD card’s partition if
unmounts command executed correctly.
Step 3 Write firmware image to SD card
Using dd command to write the firmware image to SD card:
sudo dd if=path-to-sdimage.img of=/dev/sdb bs=1M
(The path-to-sdimage.img should be the full path to decompressed firmware image.
The SD card device name should use the one you get from step 1.)
WARNING: PLEASE CHECK THE PARAMETER CARFULLY. ANY WRONG PARAMETER
MAY DAMAGE YOUR COMPUTER!
After successfully write, dd command will have bellow output:
7600+0 records in
7600+0 records out
The output means your write has succeeded. You only need to insert SD card to your
mini PC now.
Flash firmware to SD card in Mac OS X
Step 1 Confirm your SD card mount point
You can use “Disk Utility” tool in Mac OS X. it’s under “Other”folder in Launchpad.

14 / 29
Copyright 2009-2013 RoboPeak
http://www.RoboPeak.com
RoboPeak Mini USB Display
User Manual
rev. 1.1
Figure 14 UI of disk utility
Open Disk Utility, you can find your SD card’s partition in the left side. In this example, it’s
LIVE SUIT. When you select it, the mount point will show in the left corner: /Volumes/LIVE
SUIT.
Then we can get SD card device name by executing bellow command in the Terminal.
mount
Now, you should see all mount information in the terminal.

15 / 29
Copyright 2009-2013 RoboPeak
http://www.RoboPeak.com
RoboPeak Mini USB Display
User Manual
rev. 1.1
Figure 15 output of mount command
From above figure, we can know /dev/disk1s1 is mounted to /Volumes/LIVE SUIT. That’s it.
It’s the partition of SD card. Accordingly, the SD card’s device name is /dev/disk1.
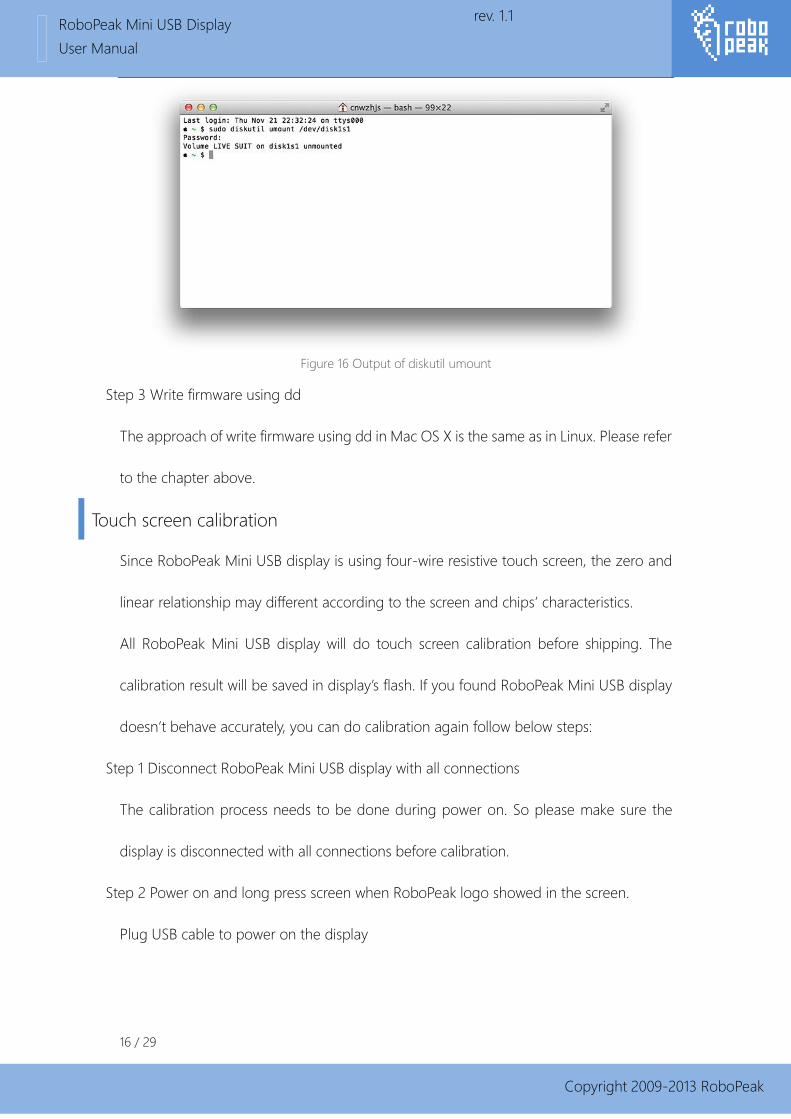
Step 2 Unmount SD card
Like Ubuntu6, Mac OS X will mount SD card’s partition automatically. We need to
unmount the SD card to avoid write-prevention.
Execute bellow command in the terminal:
sudo diskutil umount /dev/disk1s1
(The /dev/disk1s1 in the command should replace with the device name you get from
Step 1)
6 To be accurately, it should be Ubuntu is similar to Mac OS X. Mac OS implemented this feature earlier
than Ubuntu.
16 / 29
Copyright 2009-2013 RoboPeak
http://www.RoboPeak.com
RoboPeak Mini USB Display
User Manual
rev. 1.1
Figure 16 Output of diskutil umount
Step 3 Write firmware using dd
The approach of write firmware using dd in Mac OS X is the same as in Linux. Please refer
to the chapter above.
Touch screen calibration
Since RoboPeak Mini USB display is using four-wire resistive touch screen, the zero and
linear relationship may different according to the screen and chips’ characteristics.
All RoboPeak Mini USB display will do touch screen calibration before shipping. The
calibration result will be saved in display’s flash. If you found RoboPeak Mini USB display
doesn’t behave accurately, you can do calibration again follow below steps:
Step 1 Disconnect RoboPeak Mini USB display with all connections
The calibration process needs to be done during power on. So please make sure the
display is disconnected with all connections before calibration.
Step 2 Power on and long press screen when RoboPeak logo showed in the screen.
Plug USB cable to power on the display

17 / 29
Copyright 2009-2013 RoboPeak
http://www.RoboPeak.com
RoboPeak Mini USB Display
User Manual
rev. 1.1
Figure 17 RoboPeak logo showed in the screen
When RoboPeak logo showed on the screen, long press the screen until the screen
become black and showing bellow text:
Touch Screen Calibration
Please press the red flashing dot on the screen..
Figure 18 Calibration UI
Step 3 Press specified location according to the hint
You will see there’s a red pixel blink in the upper left corner. Please use touch pen or your
finger to touch that location and hold for about 1 second until promoted for touching
next calibration point.
You will be asked to touch upper left corner, left corner, right corner, upper right corner
18 / 29
Copyright 2009-2013 RoboPeak
http://www.RoboPeak.com
RoboPeak Mini USB Display
User Manual
rev. 1.1
during calibration process. After the calibration process done, the data will be saved to
your USB display’s flash. You don’t need to do calibration each time.
19 / 29
Copyright 2009-2013 RoboPeak
http://www.RoboPeak.com
RoboPeak Mini USB Display
User Manual
rev. 1.1
4. Advance Usage
Connect with Linux PC
Step 1 Connect RoboPeak Mini USB Display with computer
Connect RoboPeak Mini USB Display with computer needs:
RoboPeak Mini USB Display
Micro USB cable
Please connect Micro USB connector with RoboPeak Mini USB Display and plug USB
Type A connector to PC.
Step 2 Download and build device driver software
Since RoboPeak Mini USB Display’s driver doesn’t include in the Linux kernel by default,
we need to build our own device driver. Again, let’s take Ubuntu Desktop 12.04.2 LTS as
example to introduce how to build RoboPeak Mini USB Display device driver.
Before building driver, please make sure bellow software installed in your system:
Git
Linux Headers
GCC
Binutils
Make
You can use bellow commands to update your apt source list and install the needed
software packages.
sudo apt-get update
sudo apt-get install git linux-headers-`uname –r` gcc binutils make

20 / 29
Copyright 2009-2013 RoboPeak
http://www.RoboPeak.com
RoboPeak Mini USB Display
User Manual
rev. 1.1
Step 3 Download the source code of RoboPeak Mini USB Display’s Linux device driver
You can use git command to get the latest device driver source code from:
git clone https://github.com/robopeak/rpusbdisp.git
If the git clone command executed successfully, you will get an rpusbdisp folder in your
current path which contains RoboPeak Mini USB Display’s device driver source code and
related tools.
Step 4 Build device driver
You need to go to rpusbdisp/drviers/linux-driver folder and type make to get the driver
built.
cd rpusbdisp/drivers/linux-driver
make
If build succeed, rp_usbdisplay.ko will be generated under the current folder. You can use
bellow command to check the existence of this file.
ls *.ko
If the file doesn’t exist, that means the build is failed. It may be caused by the kernel
version mismatch or incorrect kernel configure. Please find more information from Git
Hub homepage of RoboPeak Mini USB Display project:
https://github.com/robopeak/rpusbdisp
Step 5 Install kernel module
After successfully build, you need to install the kernel module to modules folder and
update the module dependence relationship. You can execute bellow commands:
sudo install rp_usbdisplay.ko "/lib/modules/`uname -r`/kernel/rp_usbdisplay.ko"
sudo depmod -a
Step 6 Make sure kernel module has worked correctly
You can use modprobe command to load rp_usbdisplay kernel module:
sudo modprobe rp_usbdisplay
If modprobe doesn’t complain any error, congratulations! The kernel module has been
21 / 29
Copyright 2009-2013 RoboPeak
http://www.RoboPeak.com
RoboPeak Mini USB Display
User Manual
rev. 1.1
loaded successfully.
If there’s any error, you can use dmesg to diagnosis the issue. Please refer to GitHub
homepage of RoboPeak Mini USB Display project for more information:
https://github.com/robopeak/rpusbdisp
Step 7 Configure the kernel module to be loaded automatically and reboot
You can configure the RoboPeak Mini USB Display’s kernel driver to be loaded
automatically by using bellow command:
sudo echo rp_usbdisplay>>/etc/modules
If you’re using Vmware or Virtual Box VM, rp_usbdisplay kernel module maybe loaded
earlier than VM’s video kernel driver. Then the Framebuffer device number may be
different than you see currently. Strong suggest you to reboot your PC or VM
immediately now to avoid configure error in next step.
Step 8 Configure X for RoboPeak Mini USB Display
Firstly, you need to check RoboPeak Mini USB Display’s Framebuffer device name:
cat /proc/fb | grep rpusbdisp-fb
The number showed at the beginning is the display’s Framebuffer number. Take my PC as
example, the output of above command looks like this:
1 rpusbdisp-fb
That means my display’s Framebuffer number is 1, and corresponding device name is
/dev/fb1.
Then you need to install 10-disp.conf file under xserver_conf folder to your X configure
folder:
sudo cp xserver_conf/10-disp.conf /usr/share/X11/xorg.conf.d/
You can use vim editor to edit this file:
sudo vim /usr/share/X11/xorg.conf.d/10-disp.conf
Press “i" to enter edit mode in vim, move cursor to the last character of line 4, modify
22 / 29
Copyright 2009-2013 RoboPeak
http://www.RoboPeak.com
RoboPeak Mini USB Display
User Manual
rev. 1.1
/dev/fb0 to the correct framebuffer number you get above. (e.g. /dev/fb1)
Press Esc to exit edit mode and input: bellow command to exit vim and save the
modification.
:wq
Step 9 Reboot to start using RoboPeak Mini USB Display
sudo reboot
Uninstall Linux Driver
If you want to disable RoboPeak Mini USB Display, you can follow bellow steps:
Step 1 Restore X Configure file
You only need to remove RoboPeak Mini USB Display’s X server configure file and reboot
X Server to disable RoboPeak Mini USB Display. Take Ubuntu Desktop 12.04.2 as example,
you can execute bellow commands in terminal:
sudo rm -f /usr/share/X11/xorg.conf.d/10-disp.conf
sudo reboot
Now, your RoboPeak Mini USB Display has been disabled. If you want to fully remove it,
you still need to do following steps.
Step 2 Stop loading rp_usbdisplay automatically
Using vim to edit /etc/modules file:
sudo vim /etc/modules
Move cursor to rp_usbdisplay line and input dd to remove the line.
dd
Type :wq and enter to save and exit.
:wq
Step 3 Stop and Remove rp_usbdisplay kernel driver
Execute bellow commands in terminal:
sudo modprobe -r rp_usbdisplay
sudo rm -f /lib/modules/`uname -r`/kernel/rp_usbdisplay.ko

23 / 29
Copyright 2009-2013 RoboPeak
http://www.RoboPeak.com
RoboPeak Mini USB Display
User Manual
rev. 1.1
sudo depmod -a
Now, RoboPeak Mini USB Display’s driver has been fully removed from your PC.
Using ARM Suite to install and configure RoboPeak Mini USB Display’s
device driver for Mini PC
Usually, Mini PC has pre-installed Linux firmware when shipping or maybe you have
already installed Linux firmware in your Mini PC. Then you can use ARM Suite provided
by RoboPeak to install and configure device driver for RoboPeak Mini USB Display.
Step 1 Check whether your device is supported by ARM Suite
Currently, ARM Suite only supports limited devices with specific kernel version
combination. (We will add more devices in the future.) So please check your kernel
version first using bellow command:
uname -r
The current support list of ARM Suite:
Device Kernel Version
Cubieboard 3.4.43+
Cubieboard II 3.4.43+, 3.4.43.sun7i+
pcDuino 3.0.8+, 3.4.29+
Then you need to execute bellow commands in the Terminal to check kernel module
dependence:
ls /lib/modules/`uname -r`/kernel/drivers/video | grep sys
Please check bellow list from output:
sysfillrect.ko
syscopyarea.ko
sysimgblt.ko

24 / 29
Copyright 2009-2013 RoboPeak
http://www.RoboPeak.com
RoboPeak Mini USB Display
User Manual
rev. 1.1
fb_sys_fops.ko
If all these files are existed, then it means you can use ARM Suite to install and configure
driver for RoboPeak Mini USB Display.
Step 2 Download ARM Suite
You can find the latest download address of ARM Suite from our wiki page:
http://www.robopeak.com/docs/doku.php?id=product-rpusbdisp-downloads
Step 3 Upload ARM Suite to your device
Here we assume your device’s IP address is 192.168.1.19. If not, you should change IP
address to your device’s IP in the bellow command. After executing the command, ARM
Suite will be uploaded to your Mini PC:
scp rpusbdisp_arm_suite_1.0_20131117.tar.bz2 scp://192.168.1.19/arm_suite_1.0_20131117.tar.bz2
Step 4 Decompress ARM Suite and install
Execute bellow commands in your device’s terminal.
tar xf rpusbdisp_arm_suite_*.tar.bz2
cd rpusbdisp
sudo ./rpusbdisp_arm_tool.sh install_kernel_module
sudo ./rpusbdisp_arm_tool.sh auto_load
sudo reboot
rpusbdisp_arm_tool.sh will choose proper kernel module and install it automatically. It will
also auto configure your lightdm server, install daemon script and add to your upstart
script.
The last reboot command will reboot your device to make driver work.
Using dd to flash firmware to SD card in Windows
If you would like to flash firmware to SD card in windows, you can use the tool “dd for
Windows” to do this.

25 / 29
Copyright 2009-2013 RoboPeak
http://www.RoboPeak.com
RoboPeak Mini USB Display
User Manual
rev. 1.1
Step 1 Download “dd for Windows”
dd is an excellent file dump tool in *nix system. “dd for Windows” is a third-party porting
for Windows system. You can download it from:
http://www.chrysocome.net/dd
After decompress, the folder looks like this:
Figure 19 dd for Windows
Step 2 Confirm your SD card mount point
You need to use disk management tool in Windows to find your SD card’s volume id:
Figure 20 Disk Management Tool
From figure 20, my SD card is disk3, so the device name of my SD card is:
\\?\Device\Harddisk3\Partition0
If the SD card is mounted (Has assigned driver letter), you need to unmount it first:
Right click the partition, choose “Change Drive Letter and Paths” and choose “Remove”

26 / 29
Copyright 2009-2013 RoboPeak
http://www.RoboPeak.com
RoboPeak Mini USB Display
User Manual
rev. 1.1
to remove assigned driver letter. Otherwise, it will cause “Access is denied” error during
dd.
Step 3 Write firmware image to SD card using “dd for Windows”
You need to start a cmd.exe run as administrator:
Figure 21 Start a cmd.exe run as administrator
Go to “dd for Windows” folder.
C:
cd \Runtime\dd-0.6-beta3
(Modify the path according to your environment)
Write image by executing dd:
dd if=path-to-sdimage.img of=\\?\Device\Harddisk3\Partition0 bs=1M
(The path-to-sdimage.img should be the full path to the download firmware. SD card
device name is the one you find in Step 2)
WARNING: PLEASE CHECK THE PARAMETER CARFULLY. ANY WRONG PARAMETER
MAY DAMAGE YOUR COMPUTER!
After successfully write, dd command will have bellow output:
7600+0 records in
7600+0 records out
The output means your write has succeeded. You only need to insert SD card to your
mini PC now.

27 / 29
Copyright 2009-2013 RoboPeak
http://www.RoboPeak.com
RoboPeak Mini USB Display
User Manual
rev. 1.1
5. Q&A
Why is my RoboPeak Mini USB Display always showing blank screen?
The RoboPeak Mini USB display may show black screen in bellow situations:
RoboPeak Mini USB Display doesn’t connect with any PC or Mini PC.
Please check whether the USB cable is correctly connected or try to replace one
cable.
You have installed RoboPeak Mini USB driver but doesn’t configure X Server or any
other program to use it
Please follow Chapter 3 and Chapter 4 to install and configure RoboPeak Mini USB
Display.
You RoboPeak Mini USB Display is damaged.
In this case, please contact with your dealer (In warranty period) or get maintenance
service (Exceeded warranty period or damaged by yourself)
My touch screen isn’t accurate
Please follow Chapter 3 “Calibration touch screen” to re-calibrate. If it still doesn’t work
well after calibration, please contact your dealer.
How to stop using RoboPeak Mini USB Display?
You can follow Chapter 4 “Uninstall Linux Driver” step 1 to stop it.
It can work with both PC Linux driver and Mini PC Linux driver.
How to fully remove RoboPeak Mini USB Display driver?
You can follow Chapter 4 “Uninstall Linux Driver” to remove it.

28 / 29
Copyright 2009-2013 RoboPeak
http://www.RoboPeak.com
RoboPeak Mini USB Display
User Manual
rev. 1.1
It can only work with PC Linux driver.
My Mini PC has already installed Linux, is it possible to use RoboPeak Mini USBDisplay
without update firmware?
You can follow Chapter 4 “Using ARM Suite to install and configure RoboPeak Mini USB
Display’s device driver for Mini PC” to install and configure the driver manually.
Where can I find the latest information about RoboPeak Mini USB Display?
You can get the latest information from RoboPeak Mini USB Display’s official Wiki page:
http://www.robopeak.com/docs/doku.php?id=product-rpusbdisp
You can also get the latest driver and information from GitHub homepage of RoboPeak
Mini USB Display project:
https://github.com/robopeak/rpusbdisp

29 / 29
Copyright 2009-2013 RoboPeak
http://www.RoboPeak.com
RoboPeak Mini USB Display
User Manual
rev. 1.1
6. Version History
Date Description
2013-11-28 Initial version
2013-12-4 Fix typo