rocket systembuilder october 2017 sbx-652-pc-ug–01 · rocket systembuilder ... business...
TRANSCRIPT

Rocket SystemBuilderExtensible Architecture
SB/XA Designer Help
Version 6.5.2
October 2017SBX-652-PC-UG–01

2
NoticesEdition
Publication date: October 2017Book number: SBX-652-PC-UG–01Product version: Version 6.5.2
Copyright© Rocket Software, Inc. or its affiliates 1989-2017. All Rights Reserved.
Trademarks
Rocket is a registered trademark of Rocket Software, Inc. For a list of Rocket registered trademarks goto: www.rocketsoftware.com/about/legal. All other products or services mentioned in this documentmay be covered by the trademarks, service marks, or product names of their respective owners.
Examples
This information might contain examples of data and reports. The examples include the names ofindividuals, companies, brands, and products. All of these names are fictitious and any similarity tothe names and addresses used by an actual business enterprise is entirely coincidental.
License agreement
This software and the associated documentation are proprietary and confidential to Rocket Software,Inc. or its affiliates, are furnished under license, and may be used and copied only in accordance withthe terms of such license.
Note: This product may contain encryption technology. Many countries prohibit or restrict theuse, import, or export of encryption technologies, and current use, import, and export regulationsshould be followed when exporting this product.

3
Corporate informationRocket Software, Inc. develops enterprise infrastructure products in four key areas: storage, networks,and compliance; database servers and tools; business information and analytics; and applicationdevelopment, integration, and modernization.
Website: www.rocketsoftware.com
Rocket Global Headquarters77 4th Avenue, Suite 100Waltham, MA 02451-1468USA
To contact Rocket Software by telephone for any reason, including obtaining pre-sales informationand technical support, use one of the following telephone numbers.
Country Toll-free telephone number
United States 1-855-577-4323Australia 1-800-823-405Belgium 0800-266-65Canada 1-855-577-4323China 400-120-9242France 08-05-08-05-62Germany 0800-180-0882Italy 800-878-295Japan 0800-170-5464Netherlands 0-800-022-2961New Zealand 0800-003210South Africa 0-800-980-818United Kingdom 0800-520-0439
Contacting Technical Support
The Rocket Community is the primary method of obtaining support. If you have current support andmaintenance agreements with Rocket Software, you can access the Rocket Community and reporta problem, download an update, or read answers to FAQs. To log in to the Rocket Community or torequest a Rocket Community account, go to www.rocketsoftware.com/support.
In addition to using the Rocket Community to obtain support, you can use one of the telephonenumbers that are listed above or send an email to [email protected].

4
Contents
Notices................................................................................................................................................................................... 2
Corporate information......................................................................................................................................................... 3
Chapter 1: Introduction to the SB/XA Designer..................................................................................................................5New forms for XUI mode only................................................................................................................................. 5Updated forms split from GUI or Character counterpart...................................................................................... 5Visibility of the .XD item........................................................................................................................................... 5
Chapter 2: Building forms.................................................................................................................................................... 6Creating forms.......................................................................................................................................................... 6Opening existing forms............................................................................................................................................ 6Setting form parameters..........................................................................................................................................7Defining function keys and action bar options.................................................................................................... 10Placing objects on forms....................................................................................................................................... 12
Placing a label object on a form............................................................................................................... 13Placing a text field object on a form.........................................................................................................14Placing a button object on a form............................................................................................................ 14Placing a separator object on a form....................................................................................................... 15Placing a rectangle object on a form........................................................................................................16Placing an option button object on a form.............................................................................................. 16Placing a check box object on a form.......................................................................................................17Placing an image object on a form........................................................................................................... 18Placing a combo box object on a form.....................................................................................................19Placing grid objects on a form.................................................................................................................. 20
Selecting objects on forms.................................................................................................................................... 26Manipulating objects on forms..............................................................................................................................27
Resizing objects on a form........................................................................................................................ 27Moving objects on a form.......................................................................................................................... 28Aligning objects on a form.........................................................................................................................29Sending objects to the back...................................................................................................................... 29Bringing objects to the front..................................................................................................................... 30Deleting objects on a form........................................................................................................................ 30
Changing the properties of objects.......................................................................................................................31Manipulating grid data...........................................................................................................................................32
Filtering grid data....................................................................................................................................... 33Sorting grid data.........................................................................................................................................34Grouping grid data..................................................................................................................................... 35Changing grid views................................................................................................................................... 37
Chapter 3: Managing form files......................................................................................................................................... 38Saving a form..........................................................................................................................................................38Closing a form.........................................................................................................................................................38Deleting a form....................................................................................................................................................... 39Copying a form....................................................................................................................................................... 39Undoing a XUI split.................................................................................................................................................40

5
Chapter 1: Introduction to the SB/XA DesignerRunning the screen design (/SD) process in SB/XA Rich Client opens the SB/XA Designer interface,where you can create forms for SB developed applications in an intuitive, drag-and-drop designenvironment.
The SB/XA Designer is not only a graphic design interface for laying out forms, but a U2 integrateddevelopment tool. Its advantage over third-party tools is that it ties design elements to data elementsstored in the U2 database accessed by SB/XA.
The functionality of the SB/XA Designer running on SB/XA Rich Client is nearly identical to that of thefamiliar Form Painter running on SBClient. The differences in behavior are covered in this help.
The SB/XA Designer is currently available in SB/XA Rich Client only. It is not available in SB/XA BrowserClient.
New forms for XUI mode onlyThe SB/XA Designer leverages the technologies of Microsoft .NET Framework and XAML code. Formscreated in SB/XA Designer make the best use of this technology and are built to run in XUI mode only.
When you create new XUI forms in the SB/XA Designer, the tool does not create a GUI or Charactercounterpart. Forms created in the SB/XA Designer are not backward-compatible to GUI and Charactermode.
Updated forms split from GUI or Character counterpartWhen you open an existing GUI or Character form in the SB/XA Designer and save it, SB/XA creates acopy of the form for XUI mode only. It saves the new XUI form with the file extension .XD.
Saving an existing form in the SB/XA Designer effectively splits the XUI form from its GUI or Charactercounterpart. From that point forward, changes to the source file of the XUI form are not saved to theGUI or Character form.
If you want to keep a XUI form in sync with the original GUI or Character form, do not work with thatform in the SB/XA Designer. Use the Form Painter in SBClient instead.
Tip: If necessary, you can follow steps to undo a split and regenerate the XUI form from theexisting GUI or Character counterpart.
Visibility of the .XD itemWhen you create or update forms in the SB/XA Designer, they are saved with the .XD file extension.The .XD extension is hidden from the SB/XA Designer interface in most situations. You can work on theform in SB/XA Designer as normal, without concern about using the .XD extension.
The .XD extension is shown in the SB/XA Designer interface only under certain circumstances, forexample when selecting a form for a copy operation. The .XD extension is also shown in the filedictionary.

6
Chapter 2: Building formsCreating, developing, and fine-tuning a form is an iterative process that can be accomplished inseveral phases.
There is no need to plan a form before building it in the SB/XA Designer interface. You can add, move,resize, and manipulate objects, controls, and graphic elements interactively to work out designsolutions on the canvas.
Creating formsBuilding a new form starts with the task of creating a file to contain the form. When creating a form,you must specify the dictionary file name and assign a name to the new form.
Procedure
1. In SB/XA Rich Client, log to the application in which you want to create a form:a. Enter /LOGTO and the name of the account in which you want to create a form.
For example, to navigate to the SBDEMO account, enter /LOGTO SBDEMO.b. Click the name of the application in which you want to create a form.
2. To start the SB/XA Designer, enter /SD.3. If the Enter File and Screen Name window is not already open, click File>Open4. In the Enter File and Screen Name window, enter details to define the new form file.
Field Description
Dict File Name Enter the name of the dictionary file in which to store the new form.Otherwise, press F3 to browse a list of existing dictionary files and select a filefrom the list.
Screen Name Enter a unique name for the new form and press Enter.
Next step
Setting form parameters, on page 7
Opening existing formsEach form is associated with an application and a dictionary file. Opening an existing form requiresnavigating to the location in which the form is stored.
Procedure
1. In SB/XA Rich Client, log to the application in which you want to open a form:a. Enter /LOGTO and the name of the account in which you want to create a form.
For example, to navigate to the SBDEMO account, enter /LOGTO SBDEMO.b. Click the name of the application containing the form that you want to open.
2. To start the SB/XA Designer, enter /SD.3. If the Enter File and Screen Name window is not already open, click File>Open4. In the Enter File and Screen Name window, enter details to open an existing form file.

Setting form parameters
7
Field Description
Dict File Name Enter the name of the dictionary file in which the form is stored. Otherwise,press F3 to browse a list of existing dictionary files and select a file from thelist.
Screen Name Enter the name of the form and press Enter. Otherwise, press F3 to browse alist of existing forms and select a form from the list.
Next step
Setting form parameters, on page 7
Setting form parametersWhen creating or updating a form, you can set the form’s display and data parameters, and also definethe processes called by the form at run time. These parameters control the behavior of the form.
Prerequisites
Creating forms, on page 6orOpening existing forms, on page 6
Procedure
1. If the Screen Parameters window is not already open, click Options>Form Parameters.2. In the Screen Parameters window, enter a value to define each parameter for the form.
Field Description
Field Sequence(C/R/A)
Enter a value for the order in which input fields are sequenced on the form.
Value Description
C Fields are sequenced in column order. Those in the samecolumn are sequenced in row order.
R Fields are sequenced in row order starting from the top ofthe form.
A A prompt asks you to assign a sequence number to eachfield when placing it on the form.

Chapter 2: Building forms
8
Field Description
Quick Build (Y/N) Enter a value indicating whether to generate the form in Quick Build orstandard mode.
Value Description
Y Use Quick Build mode. SB/XA prompts for minimumdetails. Quick Build generates a field definition in thedictionary for each field on the form.
N Use standard mode of form building.
If the form exists and the existing value in this field is N,you cannot change the value to Y.
Prompt Source(N/S{nn}/A)
Enter a value indicating how field descriptions are derived by default. Youcan override the default value on individual fields.
Value Description
N SB/XA does not supply a label for each input field. Usethis option if you want to paint field labels manually onthe form.
S The field label is taken from the field description in FieldDefinitions and placed at the left side of the input.
The {nn} option to specify a default distance between thestart column of the field label and the start column of theinput field is not supported in the SB/XA Designer.
A The field label is taken from the field description in FieldDefinitions and placed above the input. This setting istypically used for multivalued fields with windows.
Window Co-Ords This fields applies to Character forms only. It has no effect on XUI forms.
Proc BeforeScreen
Enter the name of the process to run before the form is displayed andagain before each record is displayed. For example:SET.FLAGS
Proc After Display Enter the name of the process to run after the form is displayed butbefore any data input. This process might be called to display additionalinformation on the form. For example:SHOW.CREDIT.HISTORY
Proc After ReadRec
Enter the name of the process to run after the record has been read fromthe file. This process might be used to set the values of fields in the recordor to take action depending on data in the record. For example:FETCH.TRANS
Proc After ScreenAccpt
Enter the name of the process to run after the form input has beenaccepted but before updating the main file. This process might be used toassign values to fields in the record that are not input in the form becausethey have a fixed value or are derived from other fields. For example:ASSIGN.OTHER

Setting form parameters
9
Field Description
Proc After Update Enter the name of the process to run after the main file has been updated.The process might be used to perform secondary file updates, or multifileupdates. For example:PRINT.INVOICE
Important: The Proc After Update process is not called if the Write Recordflag is set to N.For linked screens, specify this process in the last linked screen; all priorProc After Update entries are ignored.
Proc After Esc Enter the name of the process to run on closing the form or after pressingEsc to return to the key field when current changes have not been filed (theCOMMON variables RECORD and ORIG.REC do not match). For example:ROLLBACK.DATA
Tip: If the form does not have a key step (such as reading a record), theprocess is not called unless you append [M] at the end of the process nameto make the call mandatory. For example:CHECK.INTEGRITY[M]To suppress the dialog box that warns of changes that may be lost, useoption S. For example:ROLLBACK[S]M and S options can be combined. For example,ROLLBACK[MS]
Write Record (Y/N)
Enter a value indicating whether the record is updated on disk afterpressing F2 to accept the form.
Value Description
Y Updates the record.
N Does not update the record.
Accept ScrPrompt (Y/N)
Enter a value indicating whether to include an Accept prompt on the form.
Value Description
Y Displays an Accept/Change/Delete/File prompt aftercompleting all fields and pressing F2 to save the form.Options are:
A – Accepts the form and continues to the next form ifany, otherwise files the recordC – Changes the form (goes back to the last field)D – Deletes the recordF – Files the record immediately, and returns to the firstfield
N Does not display an Accept/Change/Delete/File prompt.
Tip: If the form is used for an output process, the message “Press ReturnTo Continue” is displayed at the bottom of the screen, regardless ofwhether the setting is Y or N.
If you do not want this message at the bottom of the display, leave thisfield blank.

Chapter 2: Building forms
10
Field Description
Key Source (If NotInp)
If the key is defined outside of the form and before the form display, entera key source expression. For example:@DATE : @PORT
Otherwise, leave this field blank.
Defaults Up Front(Y/N)
Enter a value specifying how default values in fields are displayed on theform.
Value Description
Y All fields are filled with the default values when a new keyis entered. This option is useful if the majority of fieldshave default values. The defaults are assigned beforethe form is displayed, so the form can be filed withoutentering data in each field.
N The default value for a field is displayed when the cursoradvances to the field. The user must either press theEnter key to accept the default, or override it.
Named FunctionKey Set
If applicable, enter the name of the function key/action bar definition to beactive for the form. Any name entered here overrides the definition local tothe form.
3. Press the appropriate function key to accept the changes or to specify other parameters.
Function key Description
F2-Accept Accepts the changes to form parameters.
F5-Gen Default Generates a default form.
F7-XUIParameters
Enter additional parameters for an extensible user interface (XUI) form.
For further details on entering parameters, see “Screen Parameters” in Chapter 3, “Main Tools,”in the SB/XA Reference Manual.
Next step
Defining function keys and action bar options, on page 10
Defining function keys and action bar optionsFunction keys and action bar options are used to run processes for a form at run time. While creatingor updating a form, you can define the function keys and action bar options available on the form.
Prerequisites▪ Creating forms, on page 6
▪ Opening existing forms, on page 6

Defining function keys and action bar options
11
About this task
Each function key (F key) on the keyboard can be associated to a button on the form and a process tocall. A function key might open a subordinate or related form, open a file, or call any other executablefunction at run time. Options on an action bar are typically displayed on a horizontal menu across thetop of the form, and are also assigned a process to call, such as a menu to open.
Tip: Although the Edit > Delete option is an alternative method to delete a function key button,it might not produce the expected result. For example, if you delete the second of five functionkey buttons by this method, the remaining function key buttons are not redrawn, leaving a gapbetween the first and third function key buttons.
The following procedure is the best method for deleting a function key button from a form. Itredraws the buttons with equal spacing between.
Procedure
1. With the form open in the SB/XA Designer, click Options>FnKeys and Menu.2. In the Function Key/Action Bar Definitions window, enter values to define function keys and
action bar options.
Field Description
Key This field contains a list of all function keys and action bar options:▪ standard function keys (such as F1)
▪ secondary function keys (such as SF1)
▪ action bar options (such as A1)
The values in this list cannot be updated. Scroll to the line that containsthe function key or action bar option to add, update, or delete.
Description Enter the text to display as the label of the function key or action baroption on the form.
Otherwise, to delete a function key or action bar option, delete thedescription text.
Process Enter the code for the process called by the function key or action baroption.▪ For standard function keys, enter the process code alone.
▪ For secondary function keys, enter TOGGLE as a prefix to the processcode.
▪ For action bar options, enter ACTION as a prefix to the process code.
Otherwise, to delete a function key or action bar option, delete thedescription text.

Chapter 2: Building forms
12
Field Description
Reposition orresize buttons inSD
This flag controls whether buttons are repositioned and resizedautomatically after using the FnKeys and Menu (F7) option to add or editbuttons on the form. Select a value from the drop-down list.
Value Description
Y Reposition or resize buttons.
N Do not reposition and resizebuttons.
3. Press the appropriate function key to save the changes or to specify other parameters.
Function key Description
F2.Save Saves the changes to function keys and action bar options.
F5.GUI Opens the GUI Button Attributes form, where you can assign a bitmapimage and help string text to function keys and action bar options.
F6.XUI Opens an extensible user interface (XUI) form, where you can assign thename of a XAML style to function keys and action bar options.
F7.Copy Opens the Copy Function Keys form, where you can copy the function keysfrom a form or from a named function key set.
Next step
Placing objects on forms, on page 12
Placing objects on formsAfter creating a form container, you can start building the form on the design canvas. The first task isto place objects in form window.
Prerequisites▪ Creating forms, on page 6
▪ Opening existing forms, on page 6
About this task
All supported objects are available on the Palette. The Palette window opens by default when youcreate or open a form.
Procedure
1. If the Palette is not already open on the design canvas, click Window>Object Palette.

Placing a label object on a form
13
2. From the Palette, drag and drop objects onto the form, as needed.▪ Placing a label object on a form, on page 13
▪ Placing a text field object on a form, on page 14
▪ Placing a button object on a form, on page 14
▪ Placing a separator object on a form, on page 15
▪ Placing a rectangle object on a form, on page 16
▪ Placing an option button object on a form, on page 16
▪ Placing a check box object on a form, on page 17
▪ Placing an image object on a form, on page 18
▪ Placing a combo box object on a form, on page 19
▪ Placing grid objects on a form
Next step
Manipulating objects on forms, on page 27
Placing a label object on a form
Use the label object to create a text label that is not attached to a field.
Prerequisites▪ Creating forms, on page 6
▪ Opening existing forms, on page 6
About this task
The label object differs from a field label, which is attached to a text field.
Tip: When you create a text field with a description (S-side or A-above), a field label is generatedfrom the dictionary description. You do not need to create a separate label object for text fields.
Procedure
1. In the Palette, click the label object, and drag and drop it onto the form.2. In the Properties window, enter details to define the label.
Item Description
Graphic To use a bitmap image instead of text as the label, click the ... button nextto the Graphic field and browse to the bitmap (.BMP) image file.
Name Enter a unique name for the label object.
Label To use text instead of a bitmap as the label, enter the label text.
3. To render the graphic or text on the label object in the form window, press Enter.

Chapter 2: Building forms
14
Next step
Manipulating objects on forms, on page 27
Placing a text field object on a form
Use the text field object to create an input field in which users can enter a single line of text.
Prerequisites▪ Creating forms, on page 6
▪ Opening existing forms, on page 6
Procedure
1. In the Palette, click the text field object, and drag and drop it onto the form.2. In the Enter Field window, enter details to define the text field.
Item Description
Field Name Enter the field name for the text field.▪ To use an existing field name, enter the name as it is stored in the
dictionary file, or press F3 to browse field names.
▪ To create a new field name, enter a unique name. You must then enterdetails in the Field Definitions or Global Field Definition window.
Disp Prpt (N/S{nn}/A)
Enter a value to specify the location of the field label associated with thetext field. The field label is generated as the Description associated withthe Field Name of the text field in the dictionary file. Options are:▪ N: No field label. This option creates a text field without a label.
▪ S: Field label at the left side of the text field. The field label is placed atan optimal number of columns from the start of the text field.
Tip: XUI forms treat the positioning of labels differently than GUI andCharacter forms. The Snn option to specify the starting position of thefield label is not applicable in XUI forms.
▪ A: Field label above the text field.
3. To render the text field and field label in the form window, press F2.
Next step
Manipulating objects on forms, on page 27
Placing a button object on a form
Use the button object to create a button control on the form.

Placing a separator object on a form
15
Prerequisites▪ Creating forms, on page 6
▪ Opening existing forms, on page 6
About this task
A button control is connected logically to a process. When a user clicks the button on the form at runtime, the button event calls the associated process.
Procedure
1. In the Palette, click the button object, and drag and drop it onto the form.2. In the Function Key/Button Screen window, enter details to define the button.
Item Description
Function KeyNumber
Enter the number of the function key to map to the button.
Tip: If you enter 0 in this field, the button still calls the specified process.
Process To Call Enter the name of the process to be called by the button event.
XAML Style Name Optional: Enter the name of the XAML style to apply the button. This styleoverrides the default button style set at the screen level, the system level (/HK.CONTROL), or the SB instance level (/SB.PARMS).
3. To render the button in the form window, press F2.4. If the Properties window is not already open, click Window > Properties.5. In the String field, enter the text label for the button and press Enter.
Next step
Manipulating objects on forms, on page 27
Placing a separator object on a form
The separator is a graphical element that creates a visual boundary for a group of fields or an area on
the form. Use the separator object to create a separator line on the form.
Prerequisites▪ Creating forms, on page 6
▪ Opening existing forms, on page 6
Procedure
1. In the Palette, click the separator object, and drag and drop it onto the form.2. To change the position or width of the separator, drag a handle of the separator object.
If you need to place the separator at a precise coordinates on the form, enter values in the Heightand Width fields of the Properties window.

Chapter 2: Building forms
16
Next step
Manipulating objects on forms, on page 27
Placing a rectangle object on a form
The rectangle is a visual container in which to place objects on the form. Use the rectangle object to create a rectangle on the form.
Prerequisites▪ Creating forms, on page 6
▪ Opening existing forms, on page 6
Procedure
1. In the Palette, click the rectangle object, and drag and drop it onto the form.2. To change the position or width of the rectangle, drag a handle of the separator object.
If you need to place the rectangle at precise coordinates on the form, enter values in the Heightand Width fields of the Properties window.
Next step
Manipulating objects on forms, on page 27
Placing an option button object on a form
Option buttons are also commonly known as radio buttons. Use the option button object tocreate an option button group on the form.
Prerequisites▪ Creating forms, on page 6
▪ Opening existing forms, on page 6
About this task
The option button group must provide at least two controls, because the options require a mutuallyexclusive choice. The user can select only one option from the group. The values of the options aregenerated from the field definition in the dictionary file.
Procedure
1. In the Palette, click the option button object, and drag and drop it onto the form.2. In the Enter Field window, enter details to define the option button group.

Placing a check box object on a form
17
Item Description
Field Name Enter the field name for the option button group.▪ To use an existing field name, enter the name as it is stored in the
dictionary file, or press F3 to browse field names.
▪ To create a new field name, enter a unique name. You must then enterdetails in the Field Definitions or Global Field Definition window.
Disp Prpt (N/S{nn}/A)
Enter a value to specify the location of the field label associated withthe option button group. The field label is generated as the Descriptionassociated with the Field Name of the option button group in the dictionaryfile. Options are:▪ N: No field label. This option creates an option button group without a
label.
▪ S: Field label at the left side of the option button group. The field labelis placed at an optimal number of columns from the start of the optionbutton.
Tip: XUI forms treat the positioning of labels differently than GUI andCharacter forms. The Snn option to specify the starting position of thefield label is not applicable in XUI forms.
▪ A: Field label above the option button group.
3. To render the option button group and field label in the form window, press F2.
Next step
Manipulating objects on forms, on page 27
Placing a check box object on a form
The term check box is used interchangeably with toggle. Use the check box object to create acheck box control on the form.
Prerequisites▪ Creating forms, on page 6
▪ Opening existing forms, on page 6
About this task
The check box control can be used for fields that have two states: true (selected) or false (cleared).
Procedure
1. In the Palette, click the check box object, and drag and drop it onto the form.2. In the Enter Field window, enter details to define the check box.

Chapter 2: Building forms
18
Item Description
Field Name Enter the field name for the check box.▪ To use an existing field name, enter the name as it is stored in the
dictionary file, or press F3 to browse field names.
▪ To create a new field name, enter a unique name. You must then enterdetails in the Field Definitions or Global Field Definition window.
Disp Prpt (N/S{nn}/A)
Enter a value to specify the location of the field label associated with thecheck box. The field label is generated as the Description associated withthe Field Name of the text field in the dictionary file. Options are:▪ N: No field label. This option creates an option button group without a
label.
▪ S: Field label at the left side of the option button group. The field labelis placed at an optimal number of columns from the start of the optionbutton.
Tip: XUI forms treat the positioning of labels differently than GUI andCharacter forms. The Snn option to specify the starting position of thefield label is not applicable in XUI forms.
▪ A: Field label above the option button group.
3. To render the check box and field label in the form window, press F2.
Next step
Manipulating objects on forms, on page 27
Placing an image object on a form
Use the image object to create a container to hold a bitmap image on the form. This featurecurrently supports the .BMP file format only.
Prerequisites▪ Creating forms, on page 6
▪ Opening existing forms, on page 6
Procedure
1. In the Palette, click the image object, and drag and drop it onto the form.2. In the Enter Field window, enter details to define the image object.

Placing a combo box object on a form
19
Item Description
Field Name Enter the field name for the image object.▪ To use an existing field name, enter the name as it is stored in the
dictionary file, or press F3 to browse field names.
▪ To create a new field name, enter a unique name. You must then enterdetails in the Field Definitions or Global Field Definition window.
Disp Prpt (N/S{nn}/A)
Enter a value to specify the location of the field label associated with theimage object. The field label is generated as the Description associatedwith the Field Name of the text field in the dictionary file. Options are:▪ N: No field label. This option creates an option button group without a
label.
▪ S: Field label at the left side of the option button group. The field labelis placed at an optimal number of columns from the start of the optionbutton.
Tip: XUI forms treat the positioning of labels differently than GUI andCharacter forms. The Snn option to specify the starting position of thefield label is not applicable in XUI forms.
▪ A: Field label above the option button group.
Input Field (Y/N) Enter N. The image object cannot be an input field.
3. To render the image object and field label in the form window, press F2.4. If the Properties window is not already open, click Window > Properties.5. In the Properties window, set properties for the image object.
Item Description
Tile Click the ... button next to the Tile field and browse to the bitmap (.BMP)image to place inside the image container.
Scale BMP If the dimensions of the image make it too large to fit inside the imagecontainer, select this check box to decrease the size of the image.
Next step
Manipulating objects on forms, on page 27
Placing a combo box object on a form
The combo box is a control in which the user can select an item from a drop-down list or type a value
in the box. Use the combo box object to create a combo box control on the form.
Prerequisites▪ Creating forms, on page 6
▪ Opening existing forms, on page 6

Chapter 2: Building forms
20
About this task
The values of the options in the combo box drop-down list are generated from the field definition inthe dictionary file.
Procedure
1. In the Palette, click the combo box object, and drag and drop it onto the form.2. In the Enter Field window, enter details to define the combo box.
Item Description
Field Name Enter the field name for the combo box.▪ To use an existing field name, enter the name as it is stored in the
dictionary file, or press F3 to browse field names.
▪ To create a new field name, enter a unique name. You must then enterdetails in the Field Definitions or Global Field Definition window.
Disp Prpt (N/S{nn}/A)
Enter a value to specify the location of the field label associated with thecombo box. The field label is generated as the Description associated withthe Field Name of the combo box in the dictionary file. Options are:▪ N: No field label. This option creates an option button group without a
label.
▪ S: Field label at the left side of the option button group. The field labelis placed at an optimal number of columns from the start of the optionbutton.
Tip: XUI forms treat the positioning of labels differently than GUI andCharacter forms. The Snn option to specify the starting position of thefield label is not applicable in XUI forms.
▪ A: Field label above the option button group.
3. To render the combo box and field label in the form window, press F2.
Next step
Manipulating objects on forms, on page 27
Placing grid objects on a form
Use the grid object to create a grid on the form.
Prerequisites▪ Creating forms, on page 6
Opening existing forms, on page 6
▪ Add a controlling field, like a text box, to your form. Refer to Placing a text field object on a form.
Procedure
1. In the Palette, click the grid object and drag and drop it onto the form.The Add a grid dialog displays.

Placing grid objects on a form
21
2. In the Fields field, press F3, select the fields you want to appear in your grid, and click Accept.
3. In the Window size field, enter the number of rows you want the grid to contain and clickF2.Accept.Your grid displays on the form.
4. To apply styles to the entire grid, or a field within the grid, select Options → XAML Parameters.The XAML Grid Parameters dialog displays, where you can specify styles for the grid or for a fieldwithin it. Click F2-Accept to save your changes.

Chapter 2: Building forms
22
5. Resize your grid by manually resizing it on the form, or by selecting Windows → Properties.Change the grid coordinates and dimensions through this dialog box.
Notice that the name of the grid field displays at the top of the dialog box. To modify theproperties of the fields within the grid, select the field from the drop-down list at the top of thedialog box, highlighted in the following example:

Placing grid objects on a form
23
6. Press F5 to establish additional grid properties.The Amend grid dialog box displays.
7. If you want a column heading to be different from the field name, enter the new heading in theLabel field.
8. Complete the following fields, as appropriate, and click F2.Accept. To show the definition of afield in the grid, move the cursor to the field name and press F5.
Option Description
Window size Defines the maximum number of lines to be displayed for a controlling field andall of its dependent fields on each screen page.
The window size does not indicate the maximum number of lines that can beentered, only the maximum to be displayed at a time.

Chapter 2: Building forms
24
Option Description
Grid Paging Allows you to improve the speed of grid load (and, by extension, form load) bydownloading the grid in segments rather than all at once.
Enter a value representing the number of grid rows you want to download at atime. For example, if you enter 25 in this field, only the first 25 rows of a grid aredownloaded when you open a form. If there are 100 rows of data, the next 25rows are downloaded only when you navigate or scroll down through the gridand near the 25th row.
This flag is set to null by default. With a null setting, all grid data is downloadedimmediately when you open a form.
Note: While this setting applies to all screens for the user, you can turn gridpaging on and off for each screen at the screen definition level. The screendefinition setting overrides the user security setup level. In the screen designer,access the grid paging flag by clicking the multivalued field, pressing F5, andthen clicking F6.Addit.
To disable XUI grid paging on a screen, enter a value of -1.
The grid always downloads enough rows to fill the visible portion of the gridon a form. If you set the value in XUI Grid Paging to 3, but a grid has five visiblerows on your form, five rows are downloaded when you open the form. Whenyou navigate through a grid with paging in effect, pressing Ctrl+PageDowncauses all of the remaining grid data to be downloaded.
When grid paging is in effect, the grid is displayed with an orange scroll bar. Ifyou perform filtering, sorting, or grouping in a grid, grid paging is disabled andall remaining data is downloaded at once.
With grid paging in effect on an output screen with multiple grids, pressing Ctrl+PageDown causes the first grid to download its remaining rows. Pressing Ctrl+PageDown again causes the next grid to download the rest of its data.
In addition to the user security record, you can enable XUI Grid Paging in userflags (/USER.FLAGS). A value entered at either of these levels applies to all gridsfor this user.
Alternatively, you can enable XUI Grid Paging for an individual grid. In thescreen designer, click the grid field and press F5, which calls the Enter Fieldscreen. In the Enter Field screen, click F6.Addit to find the XUI Grid Paging flag.
Grid Style Enter the name of an existing XAML style to be applied to this grid or enter thename of a paragraph or expression that defines the XAML style name in the@VALUE variable. If no style is specified, or if the style does not exist in theuser’s currently loaded theme, SB/XA uses the grid style in SBPlusTheme.

Placing grid objects on a form
25
Option Description
Restrictions Indicate which restrictions to apply to your grid. Options are:▪ A - restrict Amend: Restricts users' ability to amend the form when it is run.
▪ I - restrict Insert: Restricts user's ability to insert information into the formwhen it is run.
▪ D-restrict Delete: Restricts user's ability to delete information in the formwhen it is run.
▪ E - restrict append at End: Restricts user's ability to append a new line tothe end of a grid.
▪ G - do not use Grid (GUI): This option is not applicable with XUI forms.
▪ L - Filter with "And": Allows users to perform "and" filtering on a formwhen it is run.
▪ O - Filter with "Or": Allows users to perform "or" filtering on a form when itis run.
▪ P - Enable grouping: Allows users to group data within a grid when the formis run.
DependentAMCs
If a controlling multivalue is inserted or deleted, all dependents should havea value inserted or deleted. SB+ determines which are the dependent fieldsto maintain from those painted on the screen. However, there may be otherdependent fields not on this screen that need to be maintained accordingly.
Specify these field positions (e.g. 12,13,14). If no positions are specified, SB+ willlook for additional dependents in the Control/Dep field.
Process onDelete
If a multivalue line is deleted, a process may be called before the actual deletiontakes place.
To specify this process, enter the process name (e.g. DEL.UPD). This is useful iffiles are updated while entering details on a multivalue line. If a line is deleted,details previously updated will have to be amended accordingly. Set RTN.FLAGto 1 to cancel the deletion.
Process onMV Disp
Enter the name of a process to be called prior to the display of a multivaluewindow. (This field is often used with tabbed forms.)
9.To add data to the grid, run the form by clicking Execute now .

Chapter 2: Building forms
26
10. Enter data into the grid and click F2.Save.
Next step▪ Manipulating grid data.
Selecting objects on formsBefore taking action on objects in the form window, you must first select them. You can select oneobject or multiple objects to manipulate individually or as a group.
Prerequisites▪ Placing objects on forms, on page 12
About this task
A selected object is displayed with handles, as shown here: . Handles are represented as smallsquares at the corners of the object and at the center of each plane.
The SB/XA Designer does not support a Group or Ungroup function. When you select multiple objects,you can take action on them as a group as long as they are displayed with handles. However, thegroup does not persist after the objects are unselected.

Manipulating objects on forms
27
Procedure
Select a single object or multiple objects on the form, as follows:▪
To select a single object, click the object using the pointer tool.
▪ To select multiple objects, hold down the Shift key or the Ctrl key and click each object.
▪ To select all objects on the form, click Edit>Select All.
Tip: To unselect the selected object(s), click a blank area on the form.
Next step▪ Manipulating objects on forms, on page 27
Manipulating objects on formsMuch of the visual design process consists of moving objects to create a sequence of related fields andcontrols. In the process of developing a form, you must select objects in the form window and move,resize, or manipulate them in other ways to achieve the desired design.
Prerequisites▪ Selecting objects on forms, on page 26
Procedure
Complete the following child tasks:
Manipulate the selected object(s) in any of the following ways, as needed:▪ Resizing objects on a form, on page 27
▪ Moving objects on a form, on page 28
▪ Aligning objects on a form, on page 29
▪ Sending objects to the back, on page 29
▪ Bringing objects to the front , on page 30
▪ Deleting objects on a form, on page 30
Next step▪ Changing the properties of objects, on page 31
Resizing objects on a form
When you place an object on a form, the object is created at a default size. You can then select theobject and resize it so that the content fits completely inside the object borders.
Prerequisites▪ Selecting objects on forms, on page 26

Chapter 2: Building forms
28
Procedure
Use any of the following methods to resize a selected object on the form.▪ To change the width of the object independently of other dimensions, click and hold down the
left mouse button on the center handle of the right or left plane, and drag the handle until theobject is the required width.
▪ To change the height of the object independently, click and hold down the left mouse buttonon the center handle of the upper or lower plane, and drag the handle until the object is therequired height.
▪ To change the width and height of the object proportionally, click and hold down the leftmouse button on a corner handle, and drag the handle until the object is the required size.
Next step▪ Changing the properties of objects, on page 31
Moving objects on a form
When placing an object on a form, there is no need to position it precisely. You can achieve more exactpositioning later by selecting a single object and moving it independently or by selecting multipleobjects and moving them as a group.
Prerequisites▪ Selecting objects on forms, on page 26
About this task
The SB/XA Designer renders a field label as a separate object from the associated field or control. Tomove a field label along with the associated control, you must first select both objects.
Procedure
Use one of the following methods to move the selected object or objects on the form.▪ To move a single object, click inside the object, drag the object to the desired position, and
release the mouse button.
▪ To move multiple selected objects, click inside one of the selected objects, drag the object tothe desired position, and release the mouse button.
Note: While moving multiple objects, only the object that you are dragging appears tobe moving. However, when you release the mouse button, all of the selected objects arerepositioned as a group.
Tip: Dragging objects is a quick method that works best for long moves, when precision isnot necessary. To move a selected object in pixel increments, click inside the object and pressthe Up, Down, Left, or Right Arrow key. The Arrow key method works best when you need toposition an object more precisely.

Aligning objects on a form
29
Next step▪ Changing the properties of objects, on page 31
Aligning objects on a form
When you create a grouping of fields or controls on a form, the field labels, text fields, or other controlsmight not be aligned to your liking. To achieve a better visual design, you can align the left, right, top,or bottom edges of the selected objects.
Prerequisites▪ Selecting objects on forms, on page 26
About this task
Before aligning objects, be sure that each object has no extra space at the edge to be aligned. Youmust first remove any unused space to get the expected alignment results.
Procedure
Use any of the following methods to align the selected objects on the form:▪ To align the left edges of the selected objects along the leftmost edge, click Edit>Align Left
Edges.
▪ To align the right edges of the selected objects along the rightmost edge, click Edit>AlignRight Edges.
▪ To align the top edges of the selected objects along the highest edge, click Edit>Align TopEdges.
▪ To align the bottom edges of the selected objects along the lowest edge, click Edit>AlignBottom Edges.
Next step▪ Changing the properties of objects, on page 31
Sending objects to the back
Forms developed in the SB/XA Designer contain top and bottom layers. An object can be rendered oneither layer. Use the Send Back function to move an object or group of objects to the bottom layer.
Prerequisites▪ Selecting objects on forms, on page 26
About this task
When you create an object on a form, the object is rendered on the top layer. It is placed on top of anyother objects that occupy the same space, obscuring the other objects. The Send Back function movesa selected object to the bottom layer, placing it behind the other objects that it obscured.
Chapter 2: Building forms
30
Procedure
To send the selected object or objects to the back, click Edit > Send Back.
Next step▪ Changing the properties of objects, on page 31
Bringing objects to the front
Forms developed in the SB/XA Designer contain top and bottom layers. An object can be rendered oneither layer. Use the Bring Front function to move an object or group of objects to the top layer.
Prerequisites▪ Selecting objects on forms, on page 26
About this task
When you create an object on a form, the object is rendered on the top layer. As you continue buildingthe form, you might create another object on top of the first object. The Bring Front function moves aselected object to the top layer, placing it on top of the object that obscured it.
Procedure
To bring the selected object or objects to the front, click Edit > Bring Front.
Next step▪ Changing the properties of objects, on page 31
Deleting objects on a form
When developing a form, you can use the SB/XA Designer canvas to work out the design interactivelyin the form window. Any objects that are not needed can be deleted in the process of creating orupdating a form.
Prerequisites▪ Selecting objects on forms, on page 26
About this task
The SB/XA Designer does not support an Undo or Redo feature. As a precaution, save the form beforedeleting an object. If you then decide that you want to reinstate the object on the form, you can closethe form without saving changes and reopen it.

Changing the properties of objects
31
Tip: Although the Edit > Delete option provides a quick method to delete a function key buttonfrom a form, it might not produce the expected result. For example, if you delete the second of fivefunction key buttons, the remaining function key buttons are not redrawn, leaving a gap betweenthe first and third function key buttons.
The best method for deleting a function key button is from Options > FnKey and Menu. Delete thefunction key definition from the Function Key/Action Bar Definitions form; this redraws the buttonswith equal spacing between.
Procedure
To delete the selected object or objects, click Edit > Delete.
Next step▪ Changing the properties of objects, on page 31
Changing the properties of objectsThe properties of an object define its visual characteristics and behavior. Each type of object or controlhas default characteristics. After creating an object on a form, you can change the properties of theobject to customize its appearance and behavior.
Prerequisites
Selecting objects on forms, on page 26
About this task
The properties of the selected object are displayed in the Properties window. If multiple objects areselected, the Properties window is blank.
Procedure
1. To open the Properties window, click Window>Properties.2. In the Properties window, set the characteristics that define the appearance and behavior of the
selected object or objects.
Property group Description
Border Set properties that define the appearance of the border of the selectedobject.▪ BorderColor: To change the color of the border of the object, click the
arrow next to this field. In the Available Colors window, click the color touse for the border of the object.
▪ BorderStyle: To change the border style of the object, click the arrownext to this field. From the list, click the name of the border style toapply to the object.
▪ BorderWidth: Enter the border width to apply to the object. Otherwise,click a spinner arrow next to this field and select a value from the list.

Chapter 2: Building forms
32
Property group Description
Coordinates Enter values for the left and top coordinates, specifying the position of theobject on the form. Otherwise, click a spinner arrow next to the Left or Topfield and select a value from the list.
Tip: This is the most precise method of positioning objects. You can setexact coordinates to position objects more accurately than moving themwith the Arrow keys.
Dimensions Enter or select values for the height and width of the object.
Miscellaneous Enter or select values specifying the appearance and other characteristicsof the selected object. This section contains only those fields that areapplicable to the selected object.▪ Background: To change the color of the background area of the object,
click the arrow next to the Background field. In the Available Colorswindow, click the color to use for the background area of the object.
▪ Emphasized: To show the field as available, select the check box.Otherwise, to show the field as unavailable (shaded), clear the checkbox.
▪ Font: To specify the font family, click the ... button next to the Fontfield. In the Font window, select the font family, style, size, and effects.
▪ Foreground: To change the color of the foreground of the object, clickthe arrow next to the Foreground field. In the Available Colors window,click the color to use for the foreground of the object. In text label andfield label objects, the text is the foreground.
▪ Graphic: To use a bitmap image instead of text for a text label or fieldlabel, click the ... button next to the field and browse to the bitmap(.BMP) image file.
▪ Justification: To change the justification or alignment of text in a textlabel or field label, click the arrow next to the Justification field andselect a value from the drop-down list.
▪ Scale BMP: If the dimensions of the image make it too large to fit insidethe image container, select this check box to decrease the size of theimage.
▪ Help String: Enter the text to be displayed as hover help when the userrolls the mouse over the object at run time.
▪ String: Enter the text label for the object.
3. To render the changes on the form, press Enter.
Manipulating grid dataAfter placing a grid object on a form and adding data to it, you can filter the data, sort it, or group it.You can also set the style of the grid via a set attribute.
Refer to the following:
▪ Filtering grid data
▪ Sorting grid data

Filtering grid data
33
▪ Grouping grid data
▪ Changing grid views
Filtering grid data
After creating a grid and populating it with data, you can quickly filter it by column.
Prerequisites▪ Refer to Placing a grid object on a form.
1. Select the grid on your form, and then Options → Field Definition.The Amend grid dialog box displays.
2. Make the form a sortable, output-only form by specifying options in the Restrictions field. Selectthe A, I, D, and E options, and either the L-Filter with "And" or O-Filter with "Or" option. Youcannot select both filtering options.
3. Click Accept.The options selected appear in the Restrictions field.
4. Click F2.Accept.5.
Run the form by clicking Execute now .

Chapter 2: Building forms
34
6. To filter the data in the grid, drag your mouse over a column heading and select a filter from thedrop-down list.Your screen shows the data after filtering.
7. Click F2.Save to save your results.
Sorting grid data
After creating a grid and populating it with data, you can quickly sort it.
Prerequisites▪ Refer to Placing a grid object on a form.
1. Select the grid on your form, and then Options → Field Definition.The amend grid dialog box displays.
2. Make the form an output-only form by specifying options in the Restrictions field. Select the A, I,D, and E options.
3. Click Accept.The options selected appear in the Restrictions field.
4. Click F2-Accept.5.
Run the form by clicking Execute now .6. To sort the data in the grid, click a column heading.7. Click F2-Save to save your results.
Grouping grid data
35
Grouping grid data
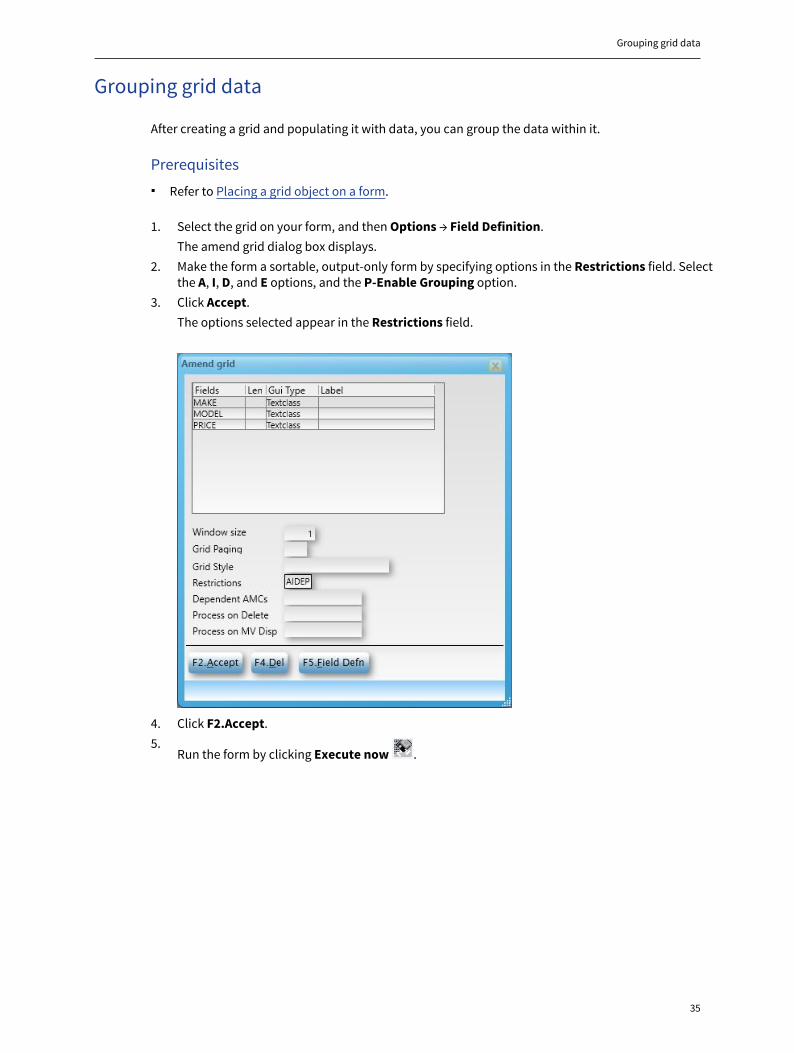
After creating a grid and populating it with data, you can group the data within it.
Prerequisites▪ Refer to Placing a grid object on a form.
1. Select the grid on your form, and then Options → Field Definition.The amend grid dialog box displays.
2. Make the form a sortable, output-only form by specifying options in the Restrictions field. Selectthe A, I, D, and E options, and the P-Enable Grouping option.
3. Click Accept.The options selected appear in the Restrictions field.
4. Click F2.Accept.5.
Run the form by clicking Execute now .

Chapter 2: Building forms
36
6. To group the data in the grid, drag a column header to the top of the grid to group by that columnYour screen shows the data after grouping. In the following example, items are grouped by price.
7. You can group by as many items as you would like. Drag another column header to the top of thegrid, either before or after the existing grouping. A blue highlight indicates the location of the newgrouping.In the following example, items will be grouped by price and then by make.
8. Click F2.Save to save your results.

Changing grid views
37
Changing grid views
After creating a grid, you can set the style of the grid via a set attribute.
Prerequisites▪ Refer to Placing a grid object on a form.
▪ Ensure more than one theme is set up. The theme that contains your new styles must be active.
1. Add an object to the form, like a button, which will trigger the new theme.The Function Key/Button Screen dialog displays.
2. In the Function Key Number field, associate a function key to this button by entering it in thisfield, and enter the button label in the Character Label field.
3. In the Process To Call field, enter the process you want to run when the button is clicked.The process used in the following example displays name of the controlling field onthe grid, the grid type, and the attribute to change. In this case, the form will use theSBXGridView style when the new button is selected. The name of the style in this example isINSBMvEditControlStyleSBXGridView and the type is SBXGridView.
P:(@VALUE=SETATTR("MV.FLD21",G.GRID.STYLE,"INSBMvEditControlStyleSBXGridView":@VM:"SBXGridView"))
4. Click F2-Save to save your results.5.
Run the form by clicking Execute now .6. Click the new button and watch the theme change.

38
Chapter 3: Managing form filesAn application may have a number of dictionary files and associated forms. To maintain an organizeddirectory of forms, you can save a form as a different item name, copy a form to create a new one, ordelete forms that are no longer needed.
Saving a formEach form is associated with a dictionary file in an application. When you save a form from the SB/XADesigner interface, the updated item is stored in the associated dictionary file.
Prerequisites▪ Creating forms, on page 6
▪ Opening existing forms, on page 6
About this task
The SB/XA Designer does not support an Undo or Redo feature. While you are developing or updatinga form, save the form after making each change as a precaution, and then proceed with the nextchange. If you want to go back to the last-saved version, you can close the form without savingchanges and reopen it.
Procedure
To save the current form, click File>Save Form.
Results
SB/XA saves the form for XUI mode only, with the file extension .XD.
Remember: When you open a GUI or Character form in the SB/XA Designer and save it, SB/XAcreates a copy of the form for XUI mode only, splitting the XUI form from its GUI or Charactercounterpart.
Closing a formAfter you have saved changes to a form, you can close the form to clear it from the SB/XA Designercanvas. In other situations, you might want to close a form before saving changes.
Prerequisites▪ Creating forms, on page 6
▪ Opening existing forms, on page 6
About this task
You might make many changes to add, manipulate, and delete objects in the course of developingor updating a form. To go back to the last-saved version of the form, close the form without savingchanges and then reopen it.

Deleting a form
39
Procedure
1. To close the current form, click File>Close Form.2. If there are any unsaved changes in the form, click a button in the Save Changes window to
perform the appropriate action.
Button Description
Cancel Cancels the close operation. The current form remains open, and you cancontinue working in it.
No Discards the changes and closes the form.
Yes Saves the changes and closes the form.
Deleting a formIf an existing form is no longer needed, you can open the form in the SB/XA Designer and delete itfrom the file system. You can also discard a new form that you are developing on the SB/XA Designercanvas, before or after saving the form.
Prerequisites▪ Creating forms, on page 6
▪ Opening existing forms, on page 6
Procedure
1. To delete the current form, click File>Delete Form.2. In the confirmation window, click a button to perform the appropriate action.
Button Description
No Cancels the delete operation. The current form remains open, and you cancontinue working in it.
Yes Deletes the form item from the associated dictionary file.
Copying a formTo create a form that is similar to an existing form, you can use this shortcut method of copying theexisting form to a new form name. You can also use the copy operation to rename an existing form.
Prerequisites▪ Refer to Creating forms
Note: You have the ability to choose if you want to copy the GUI or Character form of the screen(without the .XD extension) or the XUI form of the screen (with the .XD extension). If copying a XUIform, make sure the form that is open to be copied contains the .XD extension. Otherwise, the GUIor Character form will be copied.
1. To copy the form that is currently open on the SB/XA Designer canvas, click File>Copy Form.

Chapter 3: Managing form files
40
2. In the Copy Screen Definition window, enter your preferences for the copy operation.
Field Description
Copy From File This field contains the name of the dictionary file associated with thecurrent form by default.
Screen To Copy This field contains the name of the current form by default. This is thename of the form to be copied.
New ScreenName
Enter a unique name for the new, duplicate form.
Delete Orig (Y/N) Enter a value indicating whether to delete the original form. Options are:▪ Y: Delete the original form. Use this option if you are renaming the form.
▪ N: Keep the original form.
To accept the changes in the Copy Screen Definition window, press F2.
Undoing a XUI splitSaving a GUI or Character form in the SB/XA Designer creates a new XUI form with a file extensionof .XD. From that point forward, the XUI form is split from its GUI or Character counterpart, andchanges to the XUI form are not saved to the GUI or Character form. If you need to rejoin the XUI formwith its GUI or Character counterpart, you can undo the split at any time.
Prerequisites▪ Saving a form, on page 38
About this task
After you delete the required items, SB/XA regenerates a XUI form from the existing GUI or Characterform. You can then work with the XUI, GUI, or Character version of the form in the Form Painter inSBClient, where changes are saved to all counterparts so they are kept in sync.
Procedure
1. Navigate to the folder containing the XUI version of the form.2. Delete the following items from the form’s dictionary:
▪ DICT <file_name> <form_name>.XD
▪ DICT <file_name> <form_name>.XUI
Results
SB/XA regenerates the XUI form from the existing Character or GUI counterpart.