rocks and fossils…fantastic fossils: they learnt all about mary anning and discovered how fossils...
TRANSCRIPT

Science - Year 3
Rocks – Block 3R
Rocks and Fossils
Session 6
Resource Pack
© Original resource copyright Hamilton Trust, who give permission for it to be adapted as wished by individual users.We refer you to our warning, at the foot of the block overview, about links to other websites.

Session 6 Teachers’ Notes
Assessment
The Quiz PowerPoint will give you the opportunity to assess children’s knowledge and understanding of the learning throughout this block. If you wish to use it as an assessment activity, give the children individual quiz sheets and ask them not to discuss their answers with one another. It is suggested that each question is read aloud including the choices of answer since the assessment is of the child’s scientific knowledge and not their reading ability. If you do not wish the quiz to form part of an assessment, the children could participate in pairs to stimulate discussion around the questions and answers. If this is the case, give out one answer sheet between two children. At the end of the quiz, collect the papers in to mark later if you are doing an assessment (an answer sheet is provided in the session resources), but if not, show the Answers PowerPoint so children can mark their own or swap and mark – this will help to reinforce the learning of the block.
Museum Outcome
The final outcome of this block of sessions is to stage a Rock and Fossil Museum for parents, carers, other classes and members of the local community. A real audience is a powerful motivator for children and they will enjoy the opportunity to share their learning with others.
Group Activities
The children will work in groups to prepare exhibits and activities for the museum visitors. An exhibit is an item that is staged for visitors to look at or handle, whilst an activity is something that will engage them in a more active way and may require the children to host the task in some way.
The easiest way to organise the staging of the museum is to share out the learning content between the groups. As there were 5 learning sessions, it is suggested that 5 groups each take the learning of one session and work together as a team to stage exhibits and activities. The sessions were as follows:
Session 1 – Rock Stars: they learnt to name 6 different rocks and made detailed, labelled drawings of them
Session 2 – Rock Detectives: they learnt there are 3 different types of rock and they tested 6 rocks for clues on which they are
Session 3 – Rock Quest: they did a rock survey of the local area and found what type of rock was used for different buildings
Session 4 – Fantastic Fossils: they learnt all about Mary Anning and discovered how fossils are made
Session 5 – Super Soil: they learnt about the amazing world of soil
Some children will have a particular interest in one theme so as far as possible match children to their interests. Try to create 5 roughly equal groups, each taking the learning of one session.
A Museum ideas sheet has been provided for each group which offers suggestions of exhibits and activities they could stage to share the learning with visitors. Children are also encouraged to come up with their own ideas as well.
Display Space
Allocate each group an amount of display space, possibly two or three tables and either some portable display boards, some corrugated card (to stand up behind the tables) or some thick card (that can be attached to wall space or pegged on a line) as a vertical display space.
Resources
Folders of work and Session Resources - Groups will need access to any work that was completed during their session, e.g. task sheets, notes, observations, drawings as these may form the basis of exhibits. It is suggested these are placed in a labelled folder with the session name on the front. The groups may also need to make use of certain session resources which could be placed in a second labelled folder (e.g. game resources, labels, notes). The group sharing the learning of the Rock Quest should also have a folder of printouts of selected photographs taken on the rock survey - pictures of a range of different local buildings/ structures and close up photographs of the building materials from which they are made.
Samples and Equipment - Other resources will vary depending on the activities and exhibits they choose to provide but it is wise to think ahead and provide the resources you used for the sessions themselves (e.g. rock testing equipment, costume props, rock and soil samples) – see the Block Overview for a full list.
Display resources – Provide access to a range of paper and card that can be used for labels, headings, annotations, etc. also trimmer/s, scissors, glue and marker pens.
Technology – Provide access to computers for use by groups in a variety of ways, e.g. research, printing resources, making signs and labels.
Refreshments
Consider serving themed refreshments for visitors. Child friendly recipes for Sedimentary Sandwiches, Metamorphic Rock Cakes and Igneous Rock Sweets are provided (although children may come up with their own tasty suggestions).
On the Day
Have fun. Children will love to share their learning with others and act as hosts. Teaching others deepens and embeds understanding better than any other learning activity. Celebrate the children’s achievements with parents, carers and other members of the community whilst having fun. Take photos of your event for the Hamilton Blog – we love to see the enthusiasm and creativity of teachers and children and you will inspire others to do the same!

Name or Group Name………………………………………………………
Quiz on Rocks, Fossils and Soil
Question number Answer 1 2 3 4 5 6 7 8 9
10 11 12 13 14 15 16 17 18

Rocks, Fossils and Soil Quiz Answers
Question number Answer 1 A 2 B 3 C 4 B 5 B 6 C 7 B 8 C 9 B
10 A 11 A 12 C 13 B 14 A 15 C 16 B 17 A 18 C

Igneous Sweets
The mixture for these delicious sweets will bubble up like lava from a real volcano before cooling to make hard rock! They are very easy to make and your visitors will love them.
Ingredients
• 200g caster sugar • 4 tablespoons of golden syrup • 1 tablespoon of bicarbonate of soda • Butter to grease your baking tin
Equipment
A baking tin that is about 20cm squared, a heavy bottomed saucepan, weighing scales, a wooden spoon, a tablespoon, a rolling pin, a wooden chopping board, sandwich bags and ties
Method
1. Wash your hands thoroughly 2. Grease your baking tin with plenty of butter 3. Put your sugar and golden syrup together in your saucepan and mix them together without
any heat to begin with 4. Then melt them slowly over a low heat on the hob 5. Let it bubble gently until it begins to change colour to a rusty golden brown (it will take
roughly 4 minutes of simmering to get to this point) 6. Take it off the heat a quickly whisk in your bicarbonate of soda with your wooden spoon.
Watch the caramel foam up like lava from an erupting volcano!
7. Carefully pour the mixture into your greased tin and leave it to cool like igneous rock (this may take an hour or two!)
8. Turn your “rock” onto your wooden chopping board and break it into chunks with your rolling pin
9. Put small portions of rock into sandwich bags to serve to your visitors Mmmmm – a delicious rocky treat!
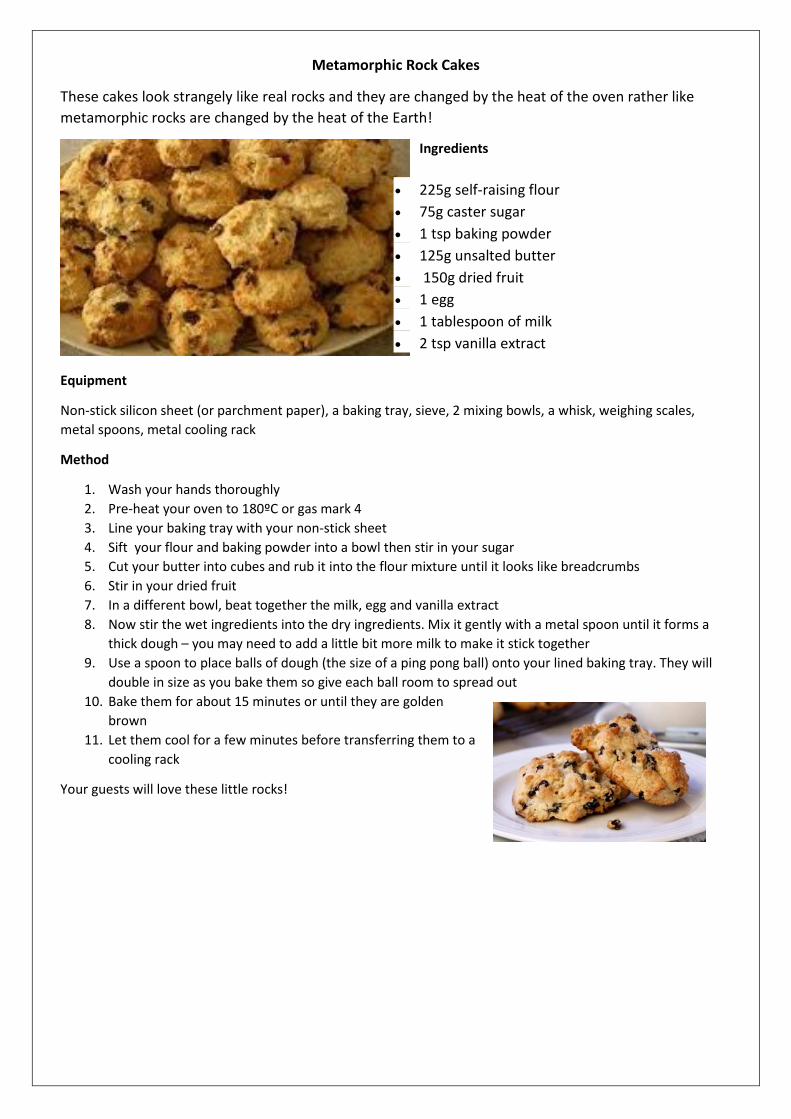
Metamorphic Rock Cakes
These cakes look strangely like real rocks and they are changed by the heat of the oven rather like metamorphic rocks are changed by the heat of the Earth!
Ingredients
• 225g self-raising flour • 75g caster sugar • 1 tsp baking powder • 125g unsalted butter • 150g dried fruit • 1 egg • 1 tablespoon of milk • 2 tsp vanilla extract
Equipment
Non-stick silicon sheet (or parchment paper), a baking tray, sieve, 2 mixing bowls, a whisk, weighing scales, metal spoons, metal cooling rack
Method
1. Wash your hands thoroughly 2. Pre-heat your oven to 180ºC or gas mark 4 3. Line your baking tray with your non-stick sheet 4. Sift your flour and baking powder into a bowl then stir in your sugar 5. Cut your butter into cubes and rub it into the flour mixture until it looks like breadcrumbs 6. Stir in your dried fruit 7. In a different bowl, beat together the milk, egg and vanilla extract 8. Now stir the wet ingredients into the dry ingredients. Mix it gently with a metal spoon until it forms a
thick dough – you may need to add a little bit more milk to make it stick together 9. Use a spoon to place balls of dough (the size of a ping pong ball) onto your lined baking tray. They will
double in size as you bake them so give each ball room to spread out 10. Bake them for about 15 minutes or until they are golden
brown 11. Let them cool for a few minutes before transferring them to a
cooling rack
Your guests will love these little rocks!

Sedimentary Sandwiches
These tasty sandwiches are made of many different layers just like sedimentary rock.
Ingredients
3 different types of sliced bread e.g. white, brown, wholemeal, multi-seed
Butter or spreading margarine
A variety of different fillings. e.g. salad leaves, sliced tomatoes, cucumber, radishes, mushrooms, sweetcorn, cheese slices, ham, chicken, salami, tuna
Mayonnaise, chutney, relish, pickles
Equipment
Plates, knives, cling film, sandwich flags, and pens
Method
1. Wash your hands thoroughly 2. Butter a slice of bread and lay one or two fillings over it 3. Butter a second slice bread (use a different type of bread if possible) and lay it butter side down on top
of your fillings 4. Now butter the top of this slice 5. Lay one or two more fillings on top 6. Butter a third slice of bread and lay it face down on top of your fillings 7. Use one hand to gently press down on your multi-layered sandwich whilst you cut it into quarters with a
knife using your other hand. Take great care when handling knives. Always cut downwards onto a board or plate.
8. Display your sedimentary sandwiches on a plate and cover with cling film so the layered fillings are clearly visible.
9. List all your fillings on a sandwich flag and stick it into the top
Mmmmm delicious!

Rock Stars (S1) – Museum Ideas
What you learnt
In this session you learnt to group rocks in different ways by using their features. You made detailed, labelled drawings of 6 rocks and then matched names to the rocks using descriptions of them. By the end of the session you knew the names of these 6 common rocks and played the game “Rock Stars.”
Below are some ideas to help your visitors learn some of this. You might have some ideas of your own for exhibits or activities.
Exhibit Ideas
• Make a display of real rocks with name labels. You could provide magnifiers to encourage your visitors to handle and examine the rocks
• Make a display of some of your labelled rock drawings – to make them look good you could mount them on backing paper
Activity Ideas for Museum Visitors
• A matching activity – give visitors a selection of rocks and a set of name labels and descriptions. Ask visitors to try to match the rock with the correct name and description. Remember you are the rock experts so you will need to be around to encourage them and help them with clues if they get stuck!
• A rock observation task – you could provide visitors with paper, pastel crayons, pencils and pens as well as a good selection of rocks and some magnifiers. Encourage them to make their own rock drawings to take home. Can they name their rock? Perhaps you could help them to see different features, e.g. layers, crystals, grainy texture.
Your task
1. Agree on what your section of the museum will have in it. Try to choose 2 exhibits and one activity to begin with (you can always work on more if you have time). You can use your own ideas or some of the ideas above
2. Share out the jobs you need to do, e.g. mounting work, writing labels, writing instructions or suggestions, gathering equipment and resources for the activities
3. Work as a team to get the tasks done 4. If you finish add another exhibit or activity to your section of the museum

Rock Detectives (S2) – Museum Ideas
What you learnt
In this session you learnt that there are 3 different ways that rocks are made. You designed your own fair tests for hardness and permeability. You also discovered that rocks that fizz when you drop a little acid (vinegar) on them are made of the shells of creatures that lived in the sea long ago. You used a key to find out what type of rock your samples are.
Below are some ideas to help your visitors learn some of this. You might have some ideas of your own for exhibits or activities.
Exhibit Ideas
• Make a display that teaches visitors the 3 different ways that rocks are made and the name of each type. You could either draw or print from the internet a picture that helps show each type and write a few sentences to explain
• Make a display of rocks of each type (igneous, metamorphic and sedimentary rocks). Perhaps you could put a collection of each type on a labelled paper plate
Activity Ideas for Museum Visitors
• Set up an activity for visitors to test the hardness of different rocks. What materials will you need to provide? Write different challenges for them to do, e.g. which is the hardest or softest rock? Can you put the samples in order of hardness?
• Set up an activity for visitors to test the permeability of different rocks – you will need to explain what permeable and impermeable mean. What materials will you need to provide? Write challenges for them to do, e.g. which rocks are permeable? Which rocks are impermeable?
• Give visitors a key to help them discover which type of rock each sample is. Explain about the acid test. What materials will you need to provide? What safety advice will you give?
Your task
1. Agree on what your section of the museum will have in it. Try to choose 2 exhibits and one activity to begin with (you can always work on more if you have time). You can use your own ideas or some of the ideas above
2. Share out the jobs you need to do, e.g. mounting work, writing labels, writing instructions or suggestions, gathering equipment and resources for the activities
3. Work as a team to get the tasks done 4. If you finish add another exhibit or activity to your section of the museum

Rock Quest (S3) – Museum Ideas
What you learnt
In this session you did a survey of the different rocks used for building in your area and probably discovered what the local stone (bedrock) is where you live. You made notes on the different building materials you saw and thought about why each was suited to the job it was doing. You learnt about erosion and looked for signs of this. You took photographs of different local buildings and structures and close up photos of the rock or building materials used.
Below are some ideas to help your visitors learn some of this. You might have some ideas of your own for exhibits or activities.
Exhibit Ideas
• Make a display of some of your survey sheets – you could mount these on backing paper to make them look good and write some labels to explain what they are
• Make a display of photographs of local buildings with labels to explain the different types of rock used and why it was suitable for that job
• Make a display showing visitors the bedrock in your area – if possible include photos of local buildings made from this type of stone/ rock, you could also include some samples of this rock for visitors to handle, a description of its features/ properties and an explanation of how it was formed (igneous, sedimentary or metamorphic)
Activity Ideas for Museum Visitors
• Set up a quiz for visitors on local buildings. Perhaps display some close up photos of the building materials for different familiar buildings and ask visitors to guess which building they are from – you could make it easier by giving them a list of buildings to choose from
• Set up a matching activity for visitors. Give them some rock samples and ask them to match it to a job it was doing in your local area. You might make cards for them to match with jobs written on like steps, wall, curb, roof, house, monument, pathway, drive, etc.
Your task
1. Agree on what your section of the museum will have in it. Try to choose 2 exhibits and one activity to begin with (you can always work on more if you have time). You can use your own ideas or some of the ideas above
2. Share out the jobs you need to do, e.g. mounting work, writing labels, writing instructions or suggestions, gathering equipment and resources for the activities
3. Work as a team to get the tasks done 4. If you finish add another exhibit or activity to your section of the museum
Fantastic Fossils (S4) – Museum Ideas
What you learnt
In this session you discovered all about the life and work of the great fossil hunter Mary Anning. You learnt how fossils are formed over millions of years through a process called mould and cast and showed this through a sequence of writing and drawings. You also made your own fake fossil from plaster.
Below are some ideas to help your visitors learn some of this. You might have some ideas of your own for exhibits or activities.
Exhibit Ideas
• Make a display of some of your task sheets that show how fossils are formed. You could mount these on backing paper to make them look good. Perhaps you could display some real fossils nearby (if you have some) for people to handle and some labels to explain what they are
• Make a display of your fake fossils. Have people on hand to explain to visitors how they were made and how this is similar to the way real fossils are formed
Activity Ideas for Museum Visitors
• Set up a quiz for visitors on the life and discoveries of the fossil hunter Mary Anning • Dress up as Mary and Joseph Anning and pretend you are them. Talk to visitors about your life and your
discoveries (you will need to learn as much information as you can from the Mary Anning sheet in your file)
Your task
1. Agree on what your section of the museum will have in it. Try to choose 2 exhibits and one activity to begin with (you can always work on more if you have time). You can use your own ideas or some of the ideas above
2. Share out the jobs you need to do, e.g. mounting work, writing labels, writing instructions or suggestions, gathering equipment and resources for the activities
3. Work as a team to get the tasks done 4. If you finish add another exhibit or activity to your section of the museum

Soil Detectives (S5) – Museum Ideas
What you learnt
In this session you learnt some amazing facts about soil. Later you investigated what soil is made of and grouped all the things you found. You looked at 3 different soils collected from different places and compared them by either shaking them up with water or by seeing how well water would drain through.
Below are some ideas to help your visitors learn some of this. You might have some ideas of your own for exhibits or activities.
Exhibit Ideas
• Make a display of drawings and labels to show what soil is made of• Make a display of fascinating facts about soil – you could use some of the facts you learnt from the “What am
I?” guessing game and you could research some facts of your own from the internet• Make a display of your Soil Shake up and Drainers and Soakers Task sheets. You could mount these on
backing paper to make them look good and write some labels to explain about the tasks
Activity Ideas for Museum Visitors
• Display the 3 Soil Shake up jars for visitors to explore. Have group members on hand to explain why the soilsettles in layers and what this can tell you about it
• Set up the Soakers and Drainers experiment to show visitors how soils can be different. Have group membersnearby to explain how the experiment was done and how you made it a fair test
• Give visitors a soil sample, plastic gloves, magnifiers and a plastic spoon so that they can investigate soilthemselves – have group members nearby to warn them about the importance of keeping soil away fromtheir faces and washing hands after the task
Your task
1. Agree on what your section of the museum will have in it. Try to choose 2 exhibits and one activity tobegin with (you can always work on more if you have time). You can use your own ideas or some of theideas above
2. Share out the jobs you need to do, e.g. mounting work, writing labels, writing instructions orsuggestions, gathering equipment and resources for the activities
3. Work as a team to get the tasks done4. If you finish add another exhibit or activity to your section of the museum