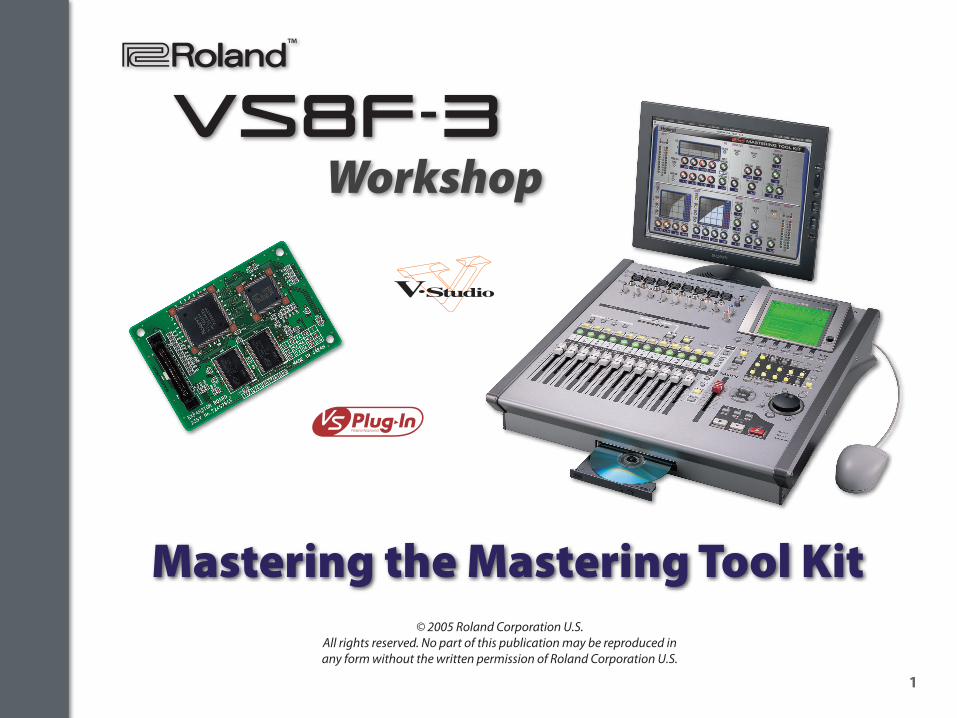
roland vs8f-3 workshop: mastering the mastering tool kit
TRANSCRIPT
1
Mastering the Mastering Tool Kit
®ÂØÒňΙ
WorkshopVS8F-3
© 2005 Roland Corporation U.S.All rights reserved. No part of this publication may be reproduced in any form without the written permission of Roland Corporation U.S.

2
About the VS8F-3 Workshop Booklets
The VS8F-3 Workshop booklets describe how to get the most out of the powerful effects processing found on the VS8F-3 Plug-In Effect Expansion Board for Roland’s V-Studios. They’re intended as companions to your VS8F-3 Owner’s Manual and the owner’s manual for your particular V-Studio.
Each booklet covers one of the VS8F-3’s factory plug-ins in detail, with easy-to-follow explanations, procedures, and illustrations. There’s also a booklet that covers the exciting option of using third-party plug-in effects with the VS8F-3, greatly expanding the processing potential of your V-Studio.
The VS8F-3 is compatible with the following V-Studios: VS-2480, VS-2400, VS-2000, VS-1824, VS-1880, and VS-1680.
Your V-Studio may require an operating system update to work with the VS8F-3. For details, visit the Roland U.S. Web site at www.RolandUS.com or contact our Product Support team at 323-890-3741.
About This Booklet
A Roland V-Studio allows you to have complete control of your music productions, from conception to audio CD. An important part of the production process is CD mastering—preparing your completed music mixes for burning onto an audio CD.
This booklet discusses using the VS8F-3’s Mastering Tool Kit plug-in to sweeten the sound of your mixes during the mastering process. We’ll dive deep into its inner workings, and offer lots of tips for creating superior master tracks.
The VS8F-2 Effects Expansion Board contains an earlier version of the Mastering Tool Kit that’s similar in function to the VS8F-3 version. Much of the material presented in this booklet can be applied to that effect processor as well.
Understanding the Symbols in This Booklet
Throughout this booklet, you’ll come across information that deserves special attention—that’s the reason it’s labeled with one of the following symbols.
A note is something that adds information about the topic at hand.
A tip offers suggestions for using the feature being discussed.
Warnings contain important information that can help you avoid possible damage to your equipment, your data, or yourself.
3
Mastering Basics
What is Mastering?
“Mastering” is the process of collecting and preparing your completed music mixes for their final playback medium, a “master” CD. The V-Studio mastering procedure can include the following steps:
• importing—your mixes into a single mastering project.• editing—the start and end points of each mix to remove
any extraneous noises.• sweetening—the sound of your mixes as needed by
processing them with the Mastering Tool Kit, capturing the results as CD-compatible disk images.
• assembling—the disk images into the order you want them to play on the CD.
• placing—CD track markers that tell a CD player how to find your songs.
• burning an audio CD—so that you can play your music on any audio CD player. This disk can also be used as a master for mass-duplication.
A Roland V-Studio equipped with a VS-compatible CD recorder and a VS8F-3 or VS8F-2 effects board allow you to accomplish all of these processes.
For detailed information about track editing, creating disk images, and burning audio CDs, see the owner’s manual for your particular V-Studio.
What Are the Advantages of Mastering?
You might be asking yourself, “Why do I need to master my recordings? Can’t I just burn my mixes to an audio CD and be done with it?”
Well, you certainly can, and the V-Studio’s “Track at Once” CD burning option makes burning songs one at a time extremely easy. And if you’re just sharing song demos, you probably don’t need to go to the trouble of mastering.
However, when you’re ready to compile a group of recordings for a final CD release, mastering has some important benefits:
• It allows you to create a good song-to-song balance on the CD—Recordings mixed at different times can sound quite different from each other. By subtly adjusting the equalization, dynamics, and level of each mix, you can make them all “live together” better on the final CD.
• You can enhance your mixes—By “polishing” the overall sound with digital processing, you can often improve the aural presentation of your songs. (Mastering can’t always solve problems with poor mixes, however. Great masters always start with great mixes.)
• It provides a fresh perspective on your music—The process of recording and mixing a song is very detail-oriented. Mastering, on the other hand, is a subtler approach, one that’s more concerned with the presentation of a collection of songs.
• It helps you compete with commercial CDs—100% of all commercially released recordings are mastered to some degree. Good mastering can help your music stand side-by-side with other recordings in areas of impact, presence, and punch. One particular benefit is in increasing the average level of the music by using an effect called “limiting.”
Ultimately, though, the goal of mastering is quite simple: To create a CD that sounds great on any system it’s played on, be it a home stereo, boom-box, car stereo, or the radio.

4
What is the Mastering Tool Kit?
The Mastering Tool Kit—or “MTK” for short—is one of the factory plug-ins that’s included with the VS8F-3. The MTK is not just one effect, but a powerful multi-processor that combines several different effects under one hood.
The VS8F-3’s Mastering Tool Kit as seen on a VGA display.
All of the MTK’s effects are specially tailored for the sweetening phase of the mastering process. These effects include:
• a four-band equalizer—for adjusting a mix’s tonality.• a bass cut filter—for removing unwanted low frequencies.• a stereo enhancer—for adding harmonics and sparkle to a
mix.• a multiband stereo expander—for emphasizing the dynamic
changes in a mix.• a multiband stereo compressor—for evening-out the
musical dynamics of a mix, adding tightness and punch.• a stereo limiter—to boost a mix’s overall level and maximize
the signal.• a “soft clip” processor—that inhibits distortion and adds
analog-style warmth to a mix.
About the VS8F-2’s MTK Processor
If you’re an experienced V-Studio user, you’re probably familiar with the Mastering Tool Kit algorithm available on the VS8F-2 Effects Expansion Board. Conceptually, the new MTK is very similar to the old: They both contain the same types of effects, and their intended usage is the same. However, the VS8F-3’s MTK provides the following benefits:
• Enhanced sound quality—By taking full advantage of the VS8F-3’s powerful 56-bit, 96 kHz-capable processing engine, the new MTK produces superlative audio quality.
• A software plug-in style user interface—Like all of the VS8F-3’s effects, the new MTK’s interface has the intuitive look and feel of a software plug-in effect. If you have a VGA-compatible V-Studio, you can use a mouse to access all of the MTK’s parameters at once on a connected VGA display.
• Informative displays—Level meter and graphic processing displays give you excellent visual feedback about the processing taking place inside the MTK.
If you don’t own a VS8F-3 yet, you don’t need to feel left out. Many of the concepts presented in this booklet can be applied to using the VS8F-2’s MTK, as well as the MTK found in some of BOSS’s BR-series recorders.
Using the MTK
To use the MTK, you’ll want to insert it on the master bus in the V-Studio’s Mastering Room. This allows you to capture your MTK-processed mixes as disk images that can be burned onto an audio CD. For instructions on using the Mastering Room, inserting effects, and opening the MTK for editing, see the VS8F-3 Owner’s Manual and the owner’s manual for your particular V-Studio.
5
A Word About Mixing with the MTK
Though it’s possible to use the MTK while mixing your songs, we don’t recommend it. It’s best to apply its processing in a second step. This approach serves two purposes:
• It gives you a clean, “pre-MTK” version of your mix that you can always return to if you like.
• It frees up the VS8F-3’s processing for other effects during mixdown.
Navigating the MTK
Once opened for editing, you’ll navigate through the MTK’s parameters in the same manner as you would with any other VS8F-3 or VS8F-2 effect. Use the V-Studio’s F buttons to page through the processor’s display screens. Highlight a parameter for editing by using the 3,4, 5, and 6 buttons, and then change the selected parameter’s value by using the VALUE dial.
Using the VS8F-3’s MTK is even easier if you have a VGA monitor and mouse connected to a VGA-compatible V-Studio. All of the MTK’s parameters can be viewed at one time on the VGA display, with easy onscreen manipulation using the mouse.
Checking Out the Presets
There are a number of factory presets that you can use to get familiar with the MTK, and to use as starting points for your sweetening applications. For information on selecting the MTK’s factory presets, see the VS8F-3 Owner’s Manual and the owner’s manual for your particular V-Studio model.
Every song is different, and usually requires its own unique processing approach. The factory presets are great starting points, but you’ll probably get the best results through careful manipulation of the MTK’s parameters.
The MTK in Detail
Signal Flow
Signals entering the MTK are processed by its effects in a sequential order as shown:
��
��������
��������
��������
�������
���������
����������Input L
Input R
Output L
Output R
The signal flows through one processor and then into the next, one after the other. This type of processing is called “serial” processing. All of the MTK’s effects can be used at once, but any individual effect can be bypassed if you don’t want to use it.
Each of the MTK’s seven different stereo effects processors can be categorized as one of two general types:
• a tone-shaping processor—which alters the sound by manipulating the frequency content of the signal.
• a dynamics processor—which alters the sound by manipulating the signal’s volume.
6
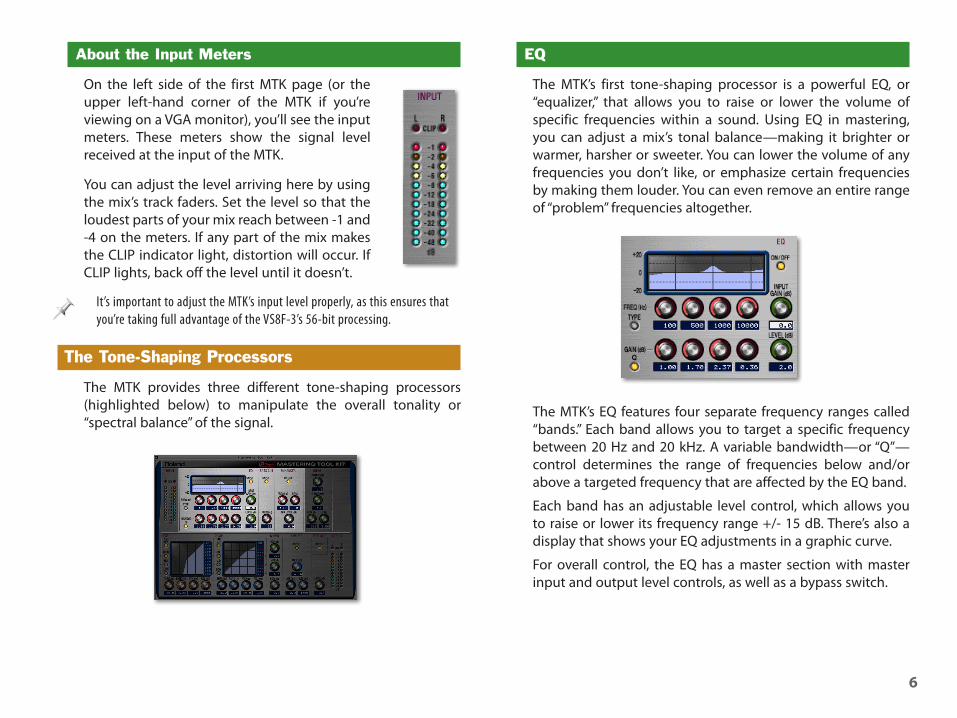
About the Input Meters
On the left side of the first MTK page (or the upper left-hand corner of the MTK if you’re viewing on a VGA monitor), you’ll see the input meters. These meters show the signal level received at the input of the MTK.
You can adjust the level arriving here by using the mix’s track faders. Set the level so that the loudest parts of your mix reach between -1 and -4 on the meters. If any part of the mix makes the CLIP indicator light, distortion will occur. If CLIP lights, back off the level until it doesn’t.
It’s important to adjust the MTK’s input level properly, as this ensures that you’re taking full advantage of the VS8F-3’s 56-bit processing.
The Tone-Shaping Processors
The MTK provides three different tone-shaping processors (highlighted below) to manipulate the overall tonality or “spectral balance” of the signal.
EQ
The MTK’s first tone-shaping processor is a powerful EQ, or “equalizer,” that allows you to raise or lower the volume of specific frequencies within a sound. Using EQ in mastering, you can adjust a mix’s tonal balance—making it brighter or warmer, harsher or sweeter. You can lower the volume of any frequencies you don’t like, or emphasize certain frequencies by making them louder. You can even remove an entire range of “problem” frequencies altogether.
The MTK’s EQ features four separate frequency ranges called “bands.” Each band allows you to target a specific frequency between 20 Hz and 20 kHz. A variable bandwidth—or “Q”— control determines the range of frequencies below and/or above a targeted frequency that are affected by the EQ band.
Each band has an adjustable level control, which allows you to raise or lower its frequency range +/- 15 dB. There’s also a display that shows your EQ adjustments in a graphic curve.
For overall control, the EQ has a master section with master input and output level controls, as well as a bypass switch.
7
EQ Types
Each of the MTK’s four EQ bands can be designated as a specific EQ type that determines the behavior of the band. These are:
• a parametric or “peaking” EQ—that allows you to target a specific frequency, called the “center frequency,” and raise or lower its volume. The Q control determines the range of frequencies around the center frequency whose volume is to be affected (the higher the Q setting, the narrower the range of affected frequencies).
• a shelving EQ—that allows you to raise or lower all the frequencies above (high shelf ) or below (low shelf ) a specified frequency. The shelving EQ requires no Q setting.
• a filter—that allows you to remove an entire range of frequencies. There are several ways a filter can work:
• A low pass filter—removes all frequency content above a specified “cutoff frequency.” It’s called a “low pass” filter because it lets all frequencies that are lower than the cutoff frequency pass through unaffected.
• A high pass filter—removes all frequency content below a specified cutoff frequency. It’s called a “high pass” filter because it lets all frequencies that are higher than the cutoff frequency pass through unaffected.
The low and high pass filters don’t drastically cut off all frequency content right at the cutoff frequency—they gradually lower it over a frequency range called a “slope.” In some instances, the slope can be adjusted with the Q control.
• A band pass filter—only allows a specified band of frequencies to pass through unaffected, removing all other frequency content below and above the selected band. The Q control determines the width of the filter band.
• A band eliminate filter—removes a specified band of frequencies. The Q control determines the width of the filter band.
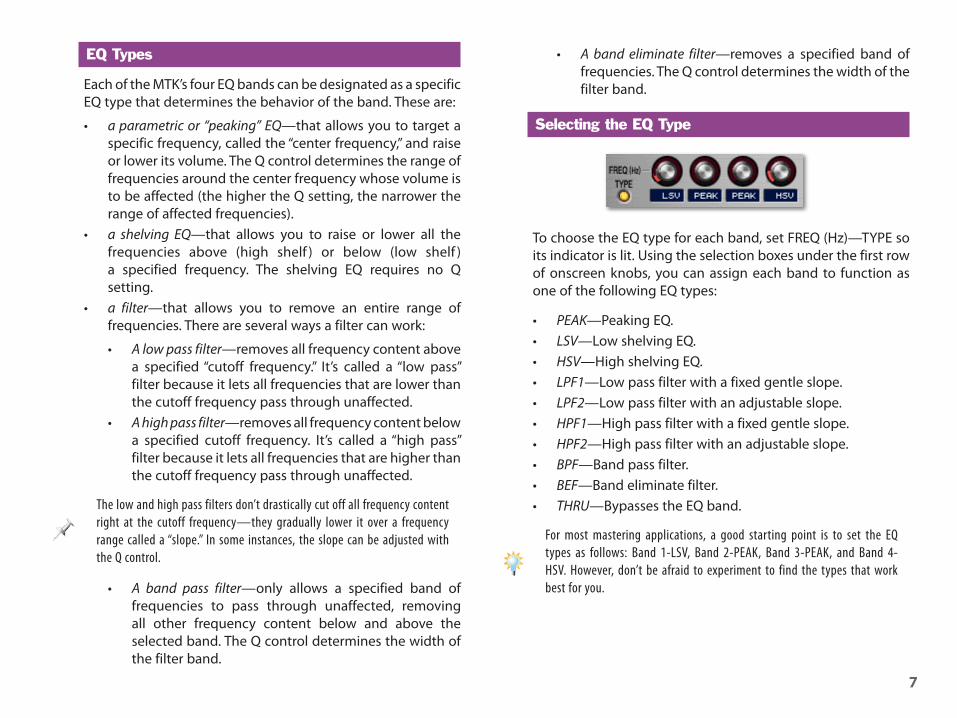
Selecting the EQ Type
To choose the EQ type for each band, set FREQ (Hz)—TYPE so its indicator is lit. Using the selection boxes under the first row of onscreen knobs, you can assign each band to function as one of the following EQ types:
• PEAK—Peaking EQ.• LSV—Low shelving EQ.• HSV—High shelving EQ.• LPF1—Low pass filter with a fixed gentle slope.• LPF2—Low pass filter with an adjustable slope.• HPF1—High pass filter with a fixed gentle slope.• HPF2—High pass filter with an adjustable slope.• BPF—Band pass filter.• BEF—Band eliminate filter.• THRU—Bypasses the EQ band.
For most mastering applications, a good starting point is to set the EQ types as follows: Band 1-LSV, Band 2-PEAK, Band 3-PEAK, and Band 4-HSV. However, don’t be afraid to experiment to find the types that work best for you.
8
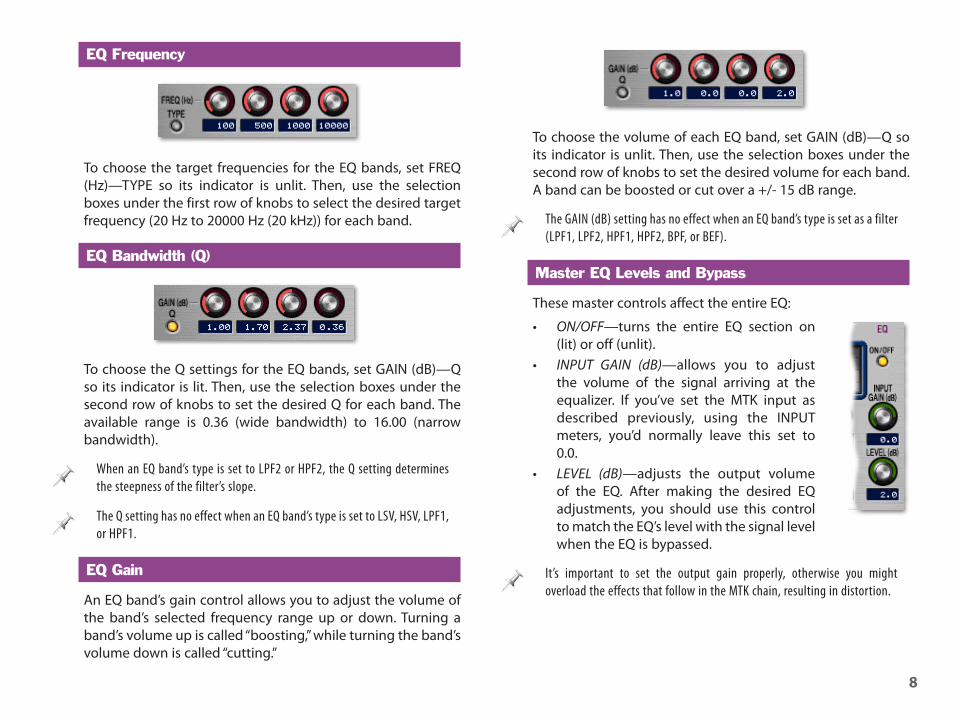
EQ Frequency
To choose the target frequencies for the EQ bands, set FREQ (Hz)—TYPE so its indicator is unlit. Then, use the selection boxes under the first row of knobs to select the desired target frequency (20 Hz to 20000 Hz (20 kHz)) for each band.
EQ Bandwidth (Q)
To choose the Q settings for the EQ bands, set GAIN (dB)—Q so its indicator is lit. Then, use the selection boxes under the second row of knobs to set the desired Q for each band. The available range is 0.36 (wide bandwidth) to 16.00 (narrow bandwidth).
When an EQ band’s type is set to LPF2 or HPF2, the Q setting determines the steepness of the filter’s slope.
The Q setting has no effect when an EQ band’s type is set to LSV, HSV, LPF1, or HPF1.
EQ Gain
An EQ band’s gain control allows you to adjust the volume of the band’s selected frequency range up or down. Turning a band’s volume up is called “boosting,” while turning the band’s volume down is called “cutting.”
To choose the volume of each EQ band, set GAIN (dB)—Q so its indicator is unlit. Then, use the selection boxes under the second row of knobs to set the desired volume for each band. A band can be boosted or cut over a +/- 15 dB range.
The GAIN (dB) setting has no effect when an EQ band’s type is set as a filter (LPF1, LPF2, HPF1, HPF2, BPF, or BEF).
Master EQ Levels and Bypass
These master controls affect the entire EQ:
• ON/OFF—turns the entire EQ section on (lit) or off (unlit).
• INPUT GAIN (dB)—allows you to adjust the volume of the signal arriving at the equalizer. If you’ve set the MTK input as described previously, using the INPUT meters, you’d normally leave this set to 0.0.
• LEVEL (dB)—adjusts the output volume of the EQ. After making the desired EQ adjustments, you should use this control to match the EQ’s level with the signal level when the EQ is bypassed.
It’s important to set the output gain properly, otherwise you might overload the effects that follow in the MTK chain, resulting in distortion.
9
Bass Cut
Bass Cut is the next tone-shaping processor. Basically, it’s a high pass filter with a very steep slope. In mastering, Bass Cut is most often used to remove “subsonic” frequencies, sounds that are below the human hearing range.
The Bass Cut effect is very simple, with just two controls:
• ON/OFF—turns the Bass Cut section on (lit) or off (unlit).
• FREQ(Hz)—sets the cutoff frequency below which all frequencies are removed. For most types of music, the default setting (20 Hz) is appropriate.
Enhancer
The MTK’s final tone-shaping processor is the Enhancer. It works by adding musical harmonics at and above a selected frequency. Depending on the setting, the Enhancer adds brilliance, edge, or “air” to the sound.
The Enhancer has the following controls:
• ON/OFF—turns the Enhancer on (lit) or off (unlit).
• FREQ(Hz)—sets the frequency at which the Enhancer begins to act. This can be set anywhere between 200 Hz and 20000 Hz (20 kHz).
• SENS—sets the amount of harmonics added to the signal. • MIX LEVEL(dB)—sets the amount of the Enhancer effect
that is blended with the mix.
The Dynamics Processors
A music mix consists of many loud and soft sounds that convey the rhythm and emotion of the performance. These variations are referred to as musical “dynamics.” The MTK provides a set of four powerful processors for controlling them.
The Mechanics of Dynamics Processing
A dynamics processor is essentially an automatic volume control. Changes in a signal’s level trigger the dynamics processor to act, adjusting the volume according to the processor’s settings.
All dynamics processors change a signal’s level based upon settings determined by the following controls:
• A threshold level setting—tells the processor to start working when the signal reaches a particular level.
• An attack setting—tells the processor how quickly it should respond after the signal reaches the threshold level.
• A ratio setting—tells the processor how much to adjust the signal’s volume. The higher the ratio, the greater amount of processing.
• A release setting—tells the processor when to stop adjusting the signal’s volume.
10
Applying dynamics processing can affect the overall loudness of the signal. To compensate for this, a gain control allows you to adjust the signal volume post-processing.
Audio engineers often refer to a post-processor gain control as “make-up gain” because it “makes up” for any volume changes caused by the processing.
Three Flavors
The MTK contains three different types of dynamics processors, all of which are available at once:
• Expander—An expander exaggerates the differences between a signal’s loudest parts and its softest parts, “expanding” the signal’s dynamic range. You can use the expander to make a mix’s original dynamics more pronounced, creating more energy and excitement. You can also use it to make unwanted background noises quieter, or remove them altogether by setting the expander to function as a “gate.”
• Compressor—The opposite of an expander, a compressor reduces the difference between a mix’s loudest and softest parts, “compressing” the dynamic range. This smooths out volume peaks, making the signal more manageable. Compression can also be used to create a tighter, thicker sound.
• Limiter—A limiter “limits” the volume of a signal’s peaks. It functions much like a compressor, but in a more extreme fashion. In mastering, limiting is used to maximize the volume of the mix, creating a loud, “in your face” sound.
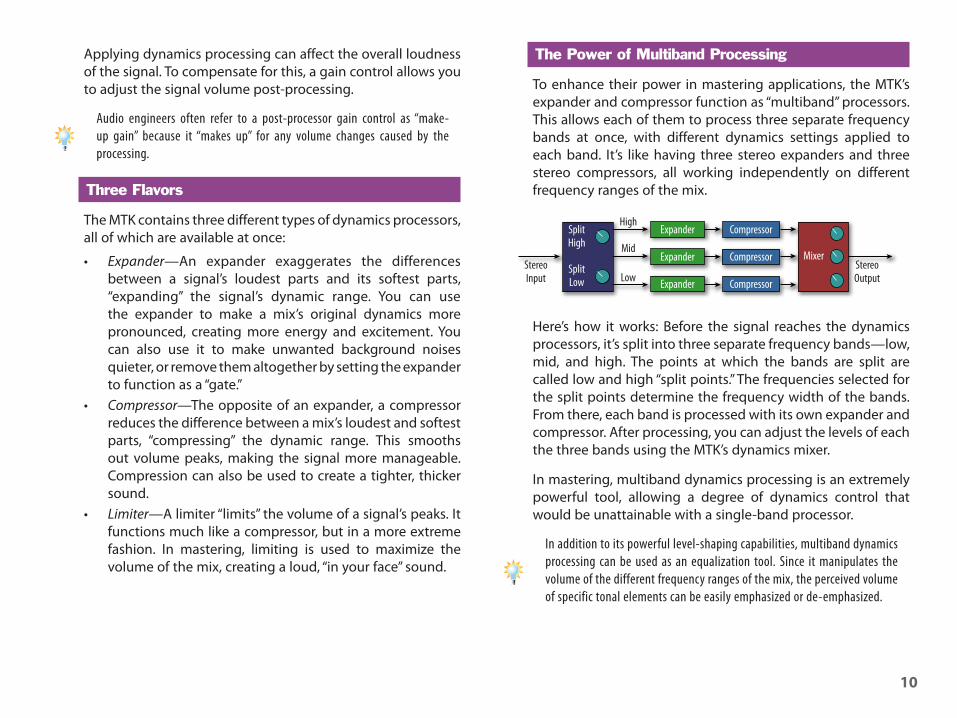
The Power of Multiband Processing
To enhance their power in mastering applications, the MTK’s expander and compressor function as “multiband” processors. This allows each of them to process three separate frequency bands at once, with different dynamics settings applied to each band. It’s like having three stereo expanders and three stereo compressors, all working independently on different frequency ranges of the mix.
���������
��������
��������
��������
��������
����������
����������
����������
�����StereoInput
StereoOutput
High
Mid
Low
Here’s how it works: Before the signal reaches the dynamics processors, it’s split into three separate frequency bands—low, mid, and high. The points at which the bands are split are called low and high “split points.” The frequencies selected for the split points determine the frequency width of the bands. From there, each band is processed with its own expander and compressor. After processing, you can adjust the levels of each the three bands using the MTK’s dynamics mixer.
In mastering, multiband dynamics processing is an extremely powerful tool, allowing a degree of dynamics control that would be unattainable with a single-band processor.
In addition to its powerful level-shaping capabilities, multiband dynamics processing can be used as an equalization tool. Since it manipulates the volume of the different frequency ranges of the mix, the perceived volume of specific tonal elements can be easily emphasized or de-emphasized.
11
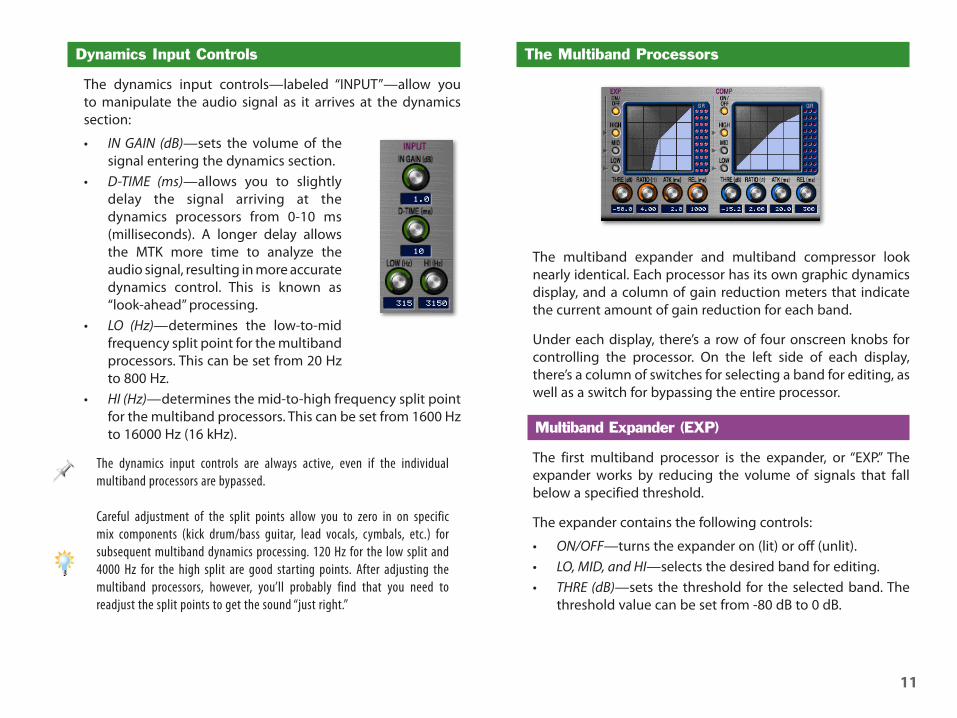
Dynamics Input Controls
The dynamics input controls—labeled “INPUT”—allow you to manipulate the audio signal as it arrives at the dynamics section:
• IN GAIN (dB)—sets the volume of the signal entering the dynamics section.
• D-TIME (ms)—allows you to slightly delay the signal arriving at the dynamics processors from 0-10 ms (milliseconds). A longer delay allows the MTK more time to analyze the audio signal, resulting in more accurate dynamics control. This is known as “look-ahead” processing.
• LO (Hz)—determines the low-to-mid frequency split point for the multiband processors. This can be set from 20 Hz to 800 Hz.
• HI (Hz)—determines the mid-to-high frequency split point for the multiband processors. This can be set from 1600 Hz to 16000 Hz (16 kHz).
The dynamics input controls are always active, even if the individual multiband processors are bypassed.
Careful adjustment of the split points allow you to zero in on specific mix components (kick drum/bass guitar, lead vocals, cymbals, etc.) for subsequent multiband dynamics processing. 120 Hz for the low split and 4000 Hz for the high split are good starting points. After adjusting the multiband processors, however, you’ll probably find that you need to readjust the split points to get the sound “just right.”
The Multiband Processors
The multiband expander and multiband compressor look nearly identical. Each processor has its own graphic dynamics display, and a column of gain reduction meters that indicate the current amount of gain reduction for each band.
Under each display, there’s a row of four onscreen knobs for controlling the processor. On the left side of each display, there’s a column of switches for selecting a band for editing, as well as a switch for bypassing the entire processor.
Multiband Expander (EXP)
The first multiband processor is the expander, or “EXP.” The expander works by reducing the volume of signals that fall below a specified threshold.
The expander contains the following controls:
• ON/OFF—turns the expander on (lit) or off (unlit).• LO, MID, and HI—selects the desired band for editing.• THRE (dB)—sets the threshold for the selected band. The
threshold value can be set from -80 dB to 0 dB.
12
• RATIO (:1)—sets the ratio of volume reduction applied to the selected band once the signal falls below the threshold. The ratio can be set anywhere from 1.00:1 to ∞:1.
When an expander band’s ratio is set to ∞:1, it functions as a gate.
• ATK (ms)—sets the attack time for the selected band. This can be set anywhere from 0.00 ms to 800 ms.
• REL (ms)—sets the release time for the selected band. This can be set anywhere from 50 to 8000 ms.
Multiband Compressor (COMP)
The second multiband processor is the compressor, or “COMP.” The converse of the expander, the compressor works by reducing the volume of signals that rise above a specified threshold.
The compressor contains the following controls:
• ON/OFF—turns the compressor on (lit) or off (unlit).• LO, MID, and HI—selects the desired band for editing.• THRE (dB)—sets the threshold for the selected band. The
threshold value can be set from -24 dB to 0 dB.• RATIO (:1)—sets the ratio of volume reduction applied to
the selected band once the signal reaches the threshold. The ratio can be set anywhere from 1.00:1 to ∞:1.
When a compressor band’s ratio is set to ∞:1, it functions as a limiter.
• ATK (ms)—sets the attack time for the selected band. This can be set anywhere from 0.00 ms to 800 ms.
• REL (ms)—sets the release time for the selected band. This can be set anywhere from 50 to 8000 ms.
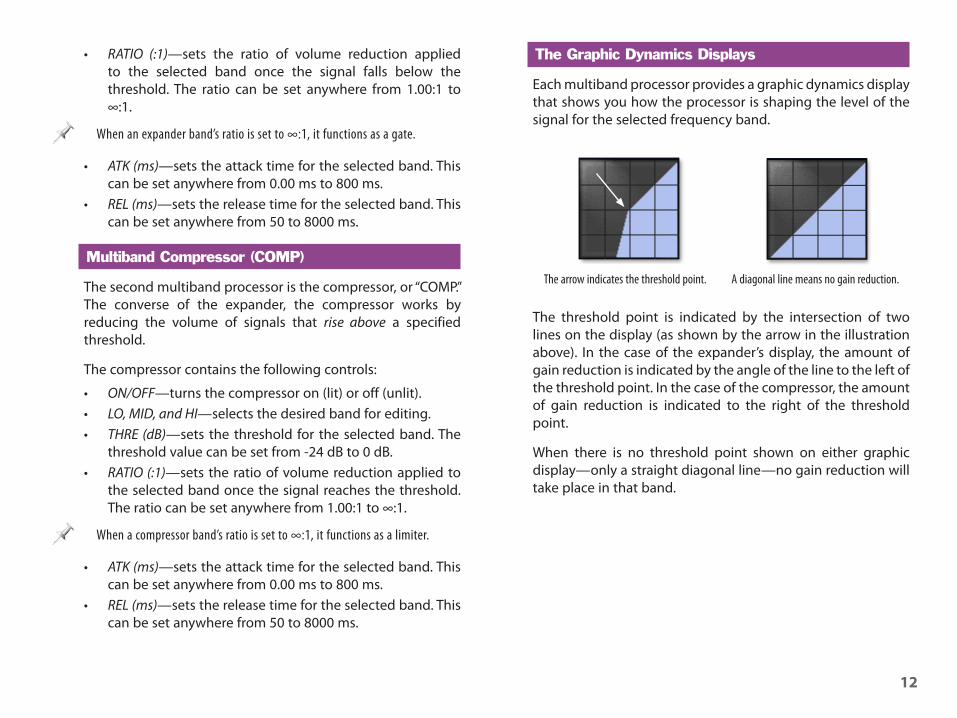
The Graphic Dynamics Displays
Each multiband processor provides a graphic dynamics display that shows you how the processor is shaping the level of the signal for the selected frequency band.
The arrow indicates the threshold point. A diagonal line means no gain reduction.
The threshold point is indicated by the intersection of two lines on the display (as shown by the arrow in the illustration above). In the case of the expander’s display, the amount of gain reduction is indicated by the angle of the line to the left of the threshold point. In the case of the compressor, the amount of gain reduction is indicated to the right of the threshold point.
When there is no threshold point shown on either graphic display—only a straight diagonal line—no gain reduction will take place in that band.
13
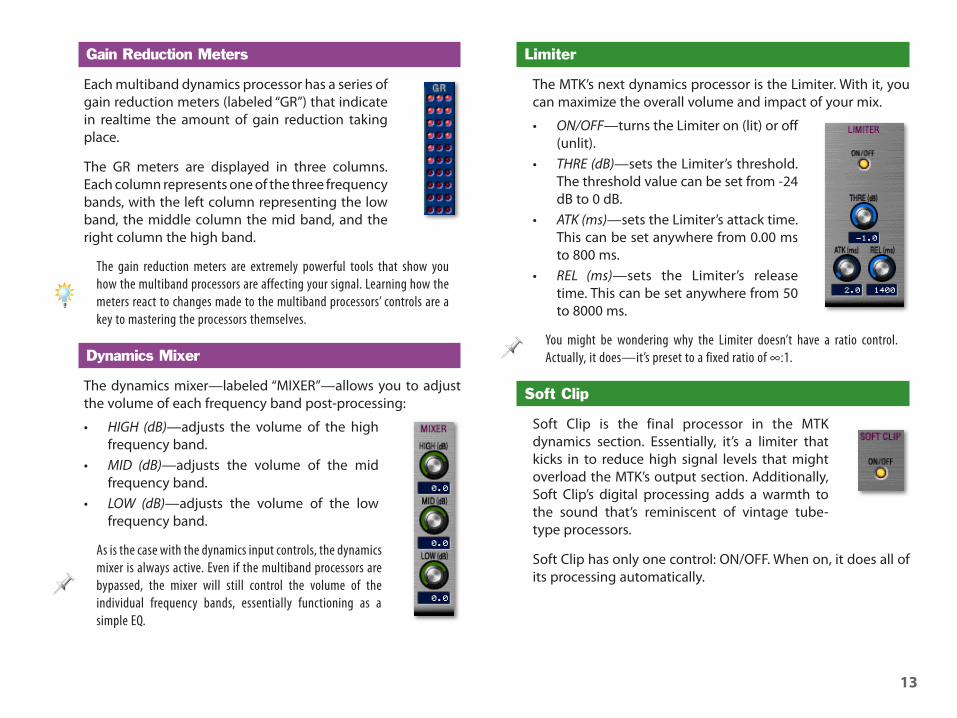
Gain Reduction Meters
Each multiband dynamics processor has a series of gain reduction meters (labeled “GR”) that indicate in realtime the amount of gain reduction taking place.
The GR meters are displayed in three columns. Each column represents one of the three frequency bands, with the left column representing the low band, the middle column the mid band, and the right column the high band.
The gain reduction meters are extremely powerful tools that show you how the multiband processors are affecting your signal. Learning how the meters react to changes made to the multiband processors’ controls are a key to mastering the processors themselves.
Dynamics Mixer
The dynamics mixer—labeled “MIXER”—allows you to adjust the volume of each frequency band post-processing:
• HIGH (dB)—adjusts the volume of the high frequency band.
• MID (dB)—adjusts the volume of the mid frequency band.
• LOW (dB)—adjusts the volume of the low frequency band.
As is the case with the dynamics input controls, the dynamics mixer is always active. Even if the multiband processors are bypassed, the mixer will still control the volume of the individual frequency bands, essentially functioning as a simple EQ.
Limiter
The MTK’s next dynamics processor is the Limiter. With it, you can maximize the overall volume and impact of your mix.
• ON/OFF—turns the Limiter on (lit) or off (unlit).
• THRE (dB)—sets the Limiter’s threshold. The threshold value can be set from -24 dB to 0 dB.
• ATK (ms)—sets the Limiter’s attack time. This can be set anywhere from 0.00 ms to 800 ms.
• REL (ms)—sets the Limiter’s release time. This can be set anywhere from 50 to 8000 ms.
You might be wondering why the Limiter doesn’t have a ratio control. Actually, it does—it’s preset to a fixed ratio of ∞:1.
Soft Clip
Soft Clip is the final processor in the MTK dynamics section. Essentially, it’s a limiter that kicks in to reduce high signal levels that might overload the MTK’s output section. Additionally, Soft Clip’s digital processing adds a warmth to the sound that’s reminiscent of vintage tube-type processors.
Soft Clip has only one control: ON/OFF. When on, it does all of its processing automatically.
14
Output Section
MTK Master Level
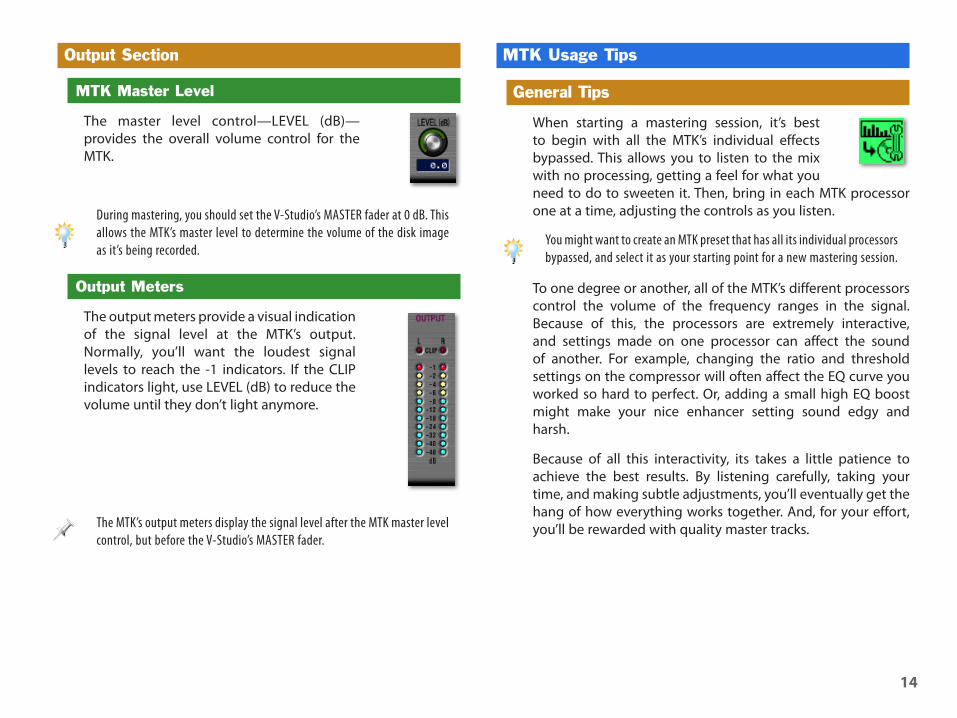
The master level control—LEVEL (dB)—provides the overall volume control for the MTK.
During mastering, you should set the V-Studio’s MASTER fader at 0 dB. This allows the MTK’s master level to determine the volume of the disk image as it’s being recorded.
Output Meters
The output meters provide a visual indication of the signal level at the MTK’s output. Normally, you’ll want the loudest signal levels to reach the -1 indicators. If the CLIP indicators light, use LEVEL (dB) to reduce the volume until they don’t light anymore.
The MTK’s output meters display the signal level after the MTK master level control, but before the V-Studio’s MASTER fader.
MTK Usage Tips
General Tips
When starting a mastering session, it’s best to begin with all the MTK’s individual effects bypassed. This allows you to listen to the mix with no processing, getting a feel for what you need to do to sweeten it. Then, bring in each MTK processor one at a time, adjusting the controls as you listen.
You might want to create an MTK preset that has all its individual processors bypassed, and select it as your starting point for a new mastering session.
To one degree or another, all of the MTK’s different processors control the volume of the frequency ranges in the signal. Because of this, the processors are extremely interactive, and settings made on one processor can affect the sound of another. For example, changing the ratio and threshold settings on the compressor will often affect the EQ curve you worked so hard to perfect. Or, adding a small high EQ boost might make your nice enhancer setting sound edgy and harsh.
Because of all this interactivity, its takes a little patience to achieve the best results. By listening carefully, taking your time, and making subtle adjustments, you’ll eventually get the hang of how everything works together. And, for your effort, you’ll be rewarded with quality master tracks.
15
Bypass Tips
During mastering (and when using any effects processing, for that matter), the ON/OFF switch is one of the most important tools you have at your disposal. Here are a few tips for using it effectively:
• During processing, compare the processed and bypassed sounds often—This tells you if the processing that you’re doing is really helping, or hurting, the final result.
• Listen to the processed and unprocessed signals at equal level—Much of the processing you’ll do in the MTK is going to add volume to the signal. Consequently, when an MTK processor is bypassed, the unprocessed sound may be quite a bit lower in volume. To accurately compare the two, adjust the MTK output section’s Level (dB) control to match their volumes as you listen.
• You don’t have to use them all—Often, you’ll find that you can get the results you need by using just one or two of the MTK’s effects and bypassing the rest.
EQ Tips
Using EQ in mastering is a lot different than using EQ in the mixing process. In mixing, EQ is applied in an isolated fashion to individual sounds. In mastering, however, you’re applying EQ to an entire musical presentation. As such, a single EQ change affects many different sounds at once. Here are a few things to keep in mind during the process:
• Only use as much EQ as necessary—Avoid the temptation to over-EQ. Just because there are four EQ bands, you don’t have to use them all. You can bypass a single EQ band by setting its type to THRU.
• Equalization in mastering is a balancing act—Applying EQ in one frequency range has a pronounced effect on the perceived EQ of other frequency ranges. Because of this, there are often a couple of different ways to get a similar result. For example, if you want to warm up the sound a little, you might boost slightly with a peak EQ in the 250-500 Hz range. Then again, you could get a similar result by cutting slightly in the 2-4 kHz area. Be aware of this interaction, and keep it in mind while working.
• Cut frequencies instead of boosting them if possible—Generally, it’s best to remove frequencies rather than to add them. This results in a cleaner, more natural sound, with less potential for distortion. This isn’t to say that all boosting is bad—it’s just good practice to try to accomplish your EQ goals with a frequency cut first.
• Work the Q—When using a peak-type EQ, the setting of the Q control determines the width of the affected range of frequencies above and below the EQ band’s center frequency. Most of the time, a wide Q sounds the most natural. For surgically eliminating problem frequencies, however, a narrower Q is the ticket.
• Avoid excessive EQ boosts—If you must boost an EQ band, be cautious. Boosting a band’s gain excessively can cause more problems than it fixes. (Of course there are exceptions to this rule, so let your ears be the final judge.)
• Use excessive EQ boosts—What? Didn’t we just say not to do that? Well, there’s one application where excessive EQ boosts are good: As an aid in identifying and fixing “problem” frequencies in the mix. Here’s how:• Set an EQ band as a peak-type EQ, and set its Q to a
narrow bandwidth.• Raise the gain on the band to a high level, around 10.0
or so. If the sound distorts, back it down a little.
16
• While the music is playing, sweep the EQ band’s center frequency to find the offending frequency.
• Once the offending frequency is found, lower the EQ band’s gain to a negative value to reduce the level of that frequency. Then, adjust the band’s Q to a value that achieves the most natural sound.
• Use shelving EQs to boost the low and high frequencies—When adjusting the low and high frequency extremes of the sound (mastering engineers call these the “corner frequencies”), shelving EQs sound the most natural. If you want to bring up the overall level of the bottom end, use a low shelf EQ set in the 60-120 Hz range. If you want to add some air and sparkle, use a high shelf EQ set in the 10-14 kHz range.
• Fix it in the mix—If you find you’re trying to fix drastic tonal problems at the mastering stage, you might want to think about going back and remixing the song entirely.
Bass Cut Tips
The normal use of the MTK’s Bass Cut is to remove subsonics, those very low frequencies that are felt more than heard. Subsonics can only be reproduced when played through a sound system that includes a subwoofer. Some systems that don’t have a subwoofer expend energy by trying to reproduce subsonics anyway, even if they’re not audible. As such, removing them can actually make the music sound better by increasing the system’s available power or “headroom.”
If your music contains a lot of low-frequency energy, and is intended to be played on sound systems with a subwoofer, you may want to turn the Bass Cut off. For most types of music, however, a Bass Cut setting of 20 Hz is usually appropriate.
Enhancer Tips
• Add a little air—The Enhancer is best used to add a little sparkle and air to the sound. The result is different than what you’d get by simply turning up the high-end of the EQ, as harmonics are actually being added to the signal. The best results are usually achieved by setting FREQ (Hz) to 4000 or higher.
• A little goes a long way—The Enhancer is a seductive effect, one that can add a lot of energy and “zing” to a mix. As such, it’s easy to get carried away with it. Be careful about how much you add, as extreme settings can sound unnatural and harsh.
Multiband Processor Tips
The MTK’s multiband expander and multiband compressor give you an enormous amount of control over the impact of the musical presentation. You can use one or the other, or both at the same time. Some general rules of thumb are:
• If you want to enhance the music’s impact and punch—use the multiband compressor.
• If you want to enhance the energy of the music—use the multiband expander.
• If you want to tame uneven dynamics—use the multiband compressor.
• If you want to eliminate noise at the beginning and end of a song, or during a silent moment in the song—use the multiband expander.
17
The expander eliminates low-level noise by automatically turning down the volume (per the threshold and ratio settings) when the noise isn’t masked by the music. Since this is a realtime process, you may not always get the result you want. Consequently, you may find that you can achieve more precision results by using the V-Studio’s Phrase Edit functions to manually remove any noise problems.
Here are a few tips to keep in mind when tweaking the multiband processors:
• In mastering applications, conservative ratio settings work best—During mixing, it’s often appropriate to apply extreme dynamics processing to individual sounds, with ratios at 4:1, 8:1, or higher. However, mastering benefits from a subtler approach. You’ll usually achieve the most natural results with ratio settings between 1.25:1 to 2.5:1.
• Work the threshold—The threshold control determines when the processor will start reducing gain on a frequency band. Subtle adjustments go a long way, so practice using them to their greatest effect.
• Use care when adjusting the attack time—Once the threshold has been reached, the attack time determines how fast the processor will act. For example, if the compressor’s attack time is too short, you’ll soften the attack of the percussive elements of the mix, making them sound squashed. Increasing the attack time a little will make the sound punchier.
• Watch the release—The release control determines when the volume reduction stops. If the release time is too long, the processor can’t recover quickly enough, resulting in a “pumping” sound. If the release time is too short, the sound will distort (especially on low frequencies).
• Keep an eye on the GR meters—The GR meters tell you when, and how much, the processor’s altering the sound. Watch them carefully to see how your dynamics settings affect each frequency band.
• Use the multiband processors like an EQ—By adjusting the split points and the output levels of each processing band, you’ll find you have a great deal of equalization control over the signal.
• Bypass the bands you don’t want to use—To bypass an expander band, set its threshold to -80 dB and its ratio to 1.00:1. To bypass a compressor band, set its threshold to 0 dB.
• Don’t get frustrated!—The right dynamics processing for a particular song is achieved with careful adjustment of the threshold, attack, and release controls. Finding the right settings can be hard, especially when you’re just starting out. But, with a lot of practice and a little patience, your efforts will pay off. By learning to get your dynamics settings “just right,” you can take the quality of your master tracks to a new level.
Limiter and Soft Clip Tips
• Making it loud—You’ve probably noticed that many commercially released CDs (especially those in the pop and R&B genres) are maximized in level. This is accomplished in the mastering process by using the Limiter. The Limiter works by lowering the volume of the music’s peaks, allowing you increase the average signal level before clipping. The peaks are controlled using the threshold control, and the average level is increased post-limiting by adjusting the MTK’s output level control.
18
There’s currently a great deal of controversy among audio engineers over the pros and cons of excessive limiting and “making your CD as loud as possible.” Unfortunately, it’s often necessary to allow your music to compete in the pop music world. Be careful though: Applying too much limiting to your music can make it fatiguing and unpleasant to listen to.
• Keep it transparent—In mastering, the goal of limiting is to raise the perceived volume transparently so that you don’t hear any audible side-effects of the process itself. This is usually best achieved with very fast attack and release settings.
• Don’t overdo it—Use care when working with the Limiter. Too much limiting can make the music loud, but small and wimpy at the same time.
• If you need a little extra volume, use Soft Clip—In addition to its signal warming effect, Soft Clip adds a bit of volume boost to the signal.
Watch Those Output Meters!
• Keep the output hot, but don’t clip the meters—If the signal causes the output meters’ clip indicators to light, the sound will distort. Back off the output section’s Level (dB) control so that the signal’s loudest parts reach -1 on the output meters.
We mentioned this earlier, but it bears repeating: During mastering, you should set the V-Studio’s MASTER fader at 0 dB to allow the MTK output section’s Level (dB) control to determine the volume of the disk image as it’s recorded.
Listening Considerations
The ultimate goal of mixing and mastering is to create a final product that sounds great on any sound system. Your V-Studio provides you with the tools necessary to complete that task, but there are a few things “outside of the box” that can have a big influence on the quality of your master CDs.
Your Speakers
While mixing and mastering, you rely on your speakers to tell you the truth—that is, to provide an accurate sonic picture on which you can base your sound-shaping decisions. When you think of it this way, your speakers are among the most critical components in your audio chain.
For the most accurate results, you should choose speakers that are made to reproduce sound in an uncolored way—not emphasizing or de-emphasizing any particular frequency areas. This is known as a “flat frequency response.” Such speakers are specifically designed for critical listening applications, and are often referred to as “reference monitors” or “studio monitors.”
Most speakers that are sold in consumer electronics stores are designed to enhance or “hype” the sound of a finished product. Because of this, they’re usually not the best choice for critical listening applications such as music mixing and mastering.
If you’re used to listening to music on consumer-type speakers, you may find that studio monitors sound a little “unexciting” at first listen. That’s because they’re reproducing the sound accurately, not hyping the sound the way consumer speakers do. It’s this very characteristic that allows you to make the best sound judgements during mixing and mastering.
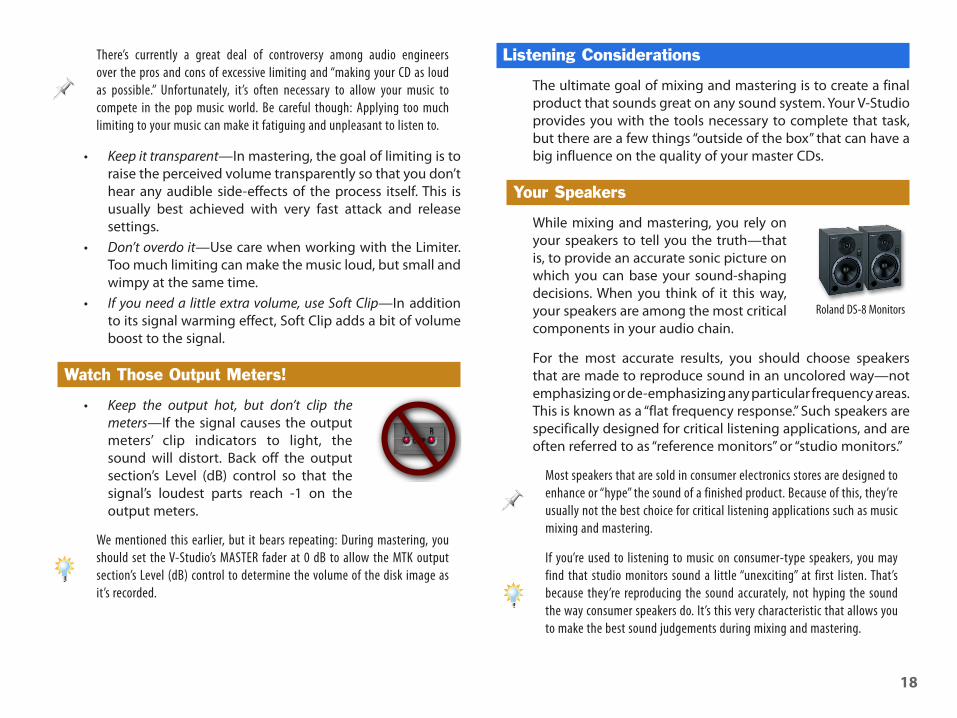
Roland DS-8 Monitors
19
The most popular type of studio monitors for home and project studios are called “near-field” monitors. They’re designed to be used in close proximity to the listener, usually three to five feet away. Many near-field monitors are “active,” containing built-in amplification that alleviates the need for an external amplifier.
Near-field monitors come in many different sizes, but for mastering your music we’d recommend you choose a model with a good low-frequency response. For example, Roland’s DS-8 or DS-7 monitors would be a great choice. They feature a very flat response with good bass extension, built-in amplification, and digital inputs for lossless connection to your V-Studio’s digital output.
Another advantage of Roland’s DS-series monitors is that they’re compatible with the COSM Speaker Modeling algorithms available in V-Studios equipped with a VS8F-2 Effects Expansion Board.
Regardless of what type of speakers you choose, the most important thing is to become accustomed to how they sound. A time-tested way to accomplish this is by critically listening to lots of commercially released CDs on them in order to learn what music “done by the pros” sounds like on your speakers. Then, while mixing and mastering your own music, you can use those CDs as a benchmark for your choices in level balancing, EQ, and so forth.
Monitoring Tips
• Don’t monitor too loud—It’s best to mix and master your music at approximately the same level as the intended listener is likely to listen at.
• Turn up the volume instead of turning up the bass—The ear is less sensitive to bass frequencies at lower volumes. Instead of adding bass, first try turning up the monitoring level to see if that fixes the problem.
• Get a second speaker opinion—When you think you’ve got it right, check your results on some other speaker systems to see how well things translate. Use the V-Studio’s Track at Once CD burning option to make one-off test CDs for this purpose.
Here’s where Roland’s DS-series monitors and the VS8F-2 come to the rescue: Using COSM Speaker Modeling, you can instantly check your results on different “virtual” speakers and save yourself the trouble (and expense) of burning a bunch of test CDs!
• Take a break—Your ears get fatigued after long periods of listening. Taking a break will allow your ears to recover so that you can make more accurate mixing and mastering decisions.
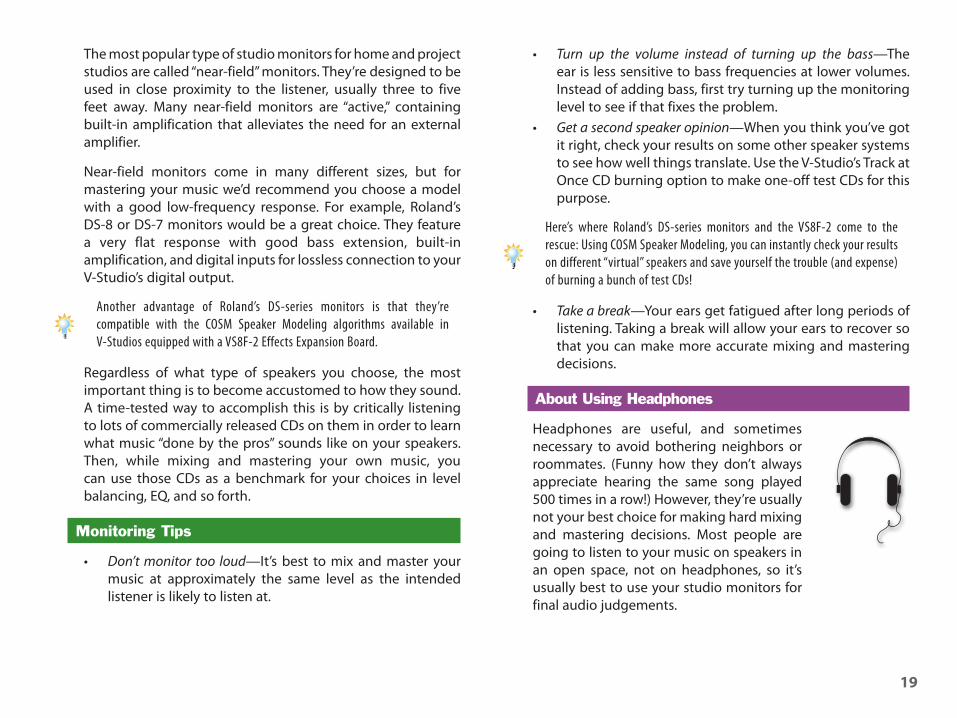
About Using Headphones
Headphones are useful, and sometimes necessary to avoid bothering neighbors or roommates. (Funny how they don’t always appreciate hearing the same song played 500 times in a row!) However, they’re usually not your best choice for making hard mixing and mastering decisions. Most people are going to listen to your music on speakers in an open space, not on headphones, so it’s usually best to use your studio monitors for final audio judgements.
20
That said, headphones can be a great aid. For one, their sound is not influenced by the room they’re in, so you can get a consistent (if not absolutely accurate) aural picture of your music. During mixing, they’re great for positioning individual musical elements in the stereo field, and their direct response can help you more easily identify when mix components are working against each other.
When you’re setting the levels of elements placed at extreme positions in the stereo field, it’s a good idea to use your speakers—headphones can be very misleading when you’re attempting to do this.
During the editing process, headphones can make it easier to hear subtle sounds that you might not hear as well in your studio monitors. They’re also helpful when using the MTK, allowing subtle changes in the processor’s settings to be more easily heard.
Like all artistic judgements, there are no hard-and-fast rules that are “right” 100% of the time. If you can achieve the results you desire by mixing and mastering using only headphones, by all means do so!
Speaker Placement and Room Acoustics
Most of us home-recordists set up shop wherever it’s convenient, and that’s often in a spare bedroom, basement, or garage. Unfortunately, these aren’t always the most optimum environments for critical listening.
Countless books and magazine articles have been written on the subject of optimizing your listening environment. We won’t attempt to provide any detailed solutions here, but we can offer a few basic things to be aware of.
Speaker Placement
How and where you set up your speakers has a great impact on their performance. Here’s a few tips for optimum results:
• When setting up your speakers the first time, listen to them in a variety of locations in the room (using a CD you know well as a reference) to determine where they sound the best.
• If possible, place your monitors so that they’re at equal distances from the room’s side walls. This will improve their stereo imaging.
• Avoid placing a speaker directly against a wall or in a corner, as this increases the amount of bass that it produces. Most near-field monitors perform most accurately when placed away from any walls.
Many of today’s active monitor designs (including Roland’s DS-series) feature bass trim controls to offset this bass increase if it’s necessary to place them against a wall or in a corner.
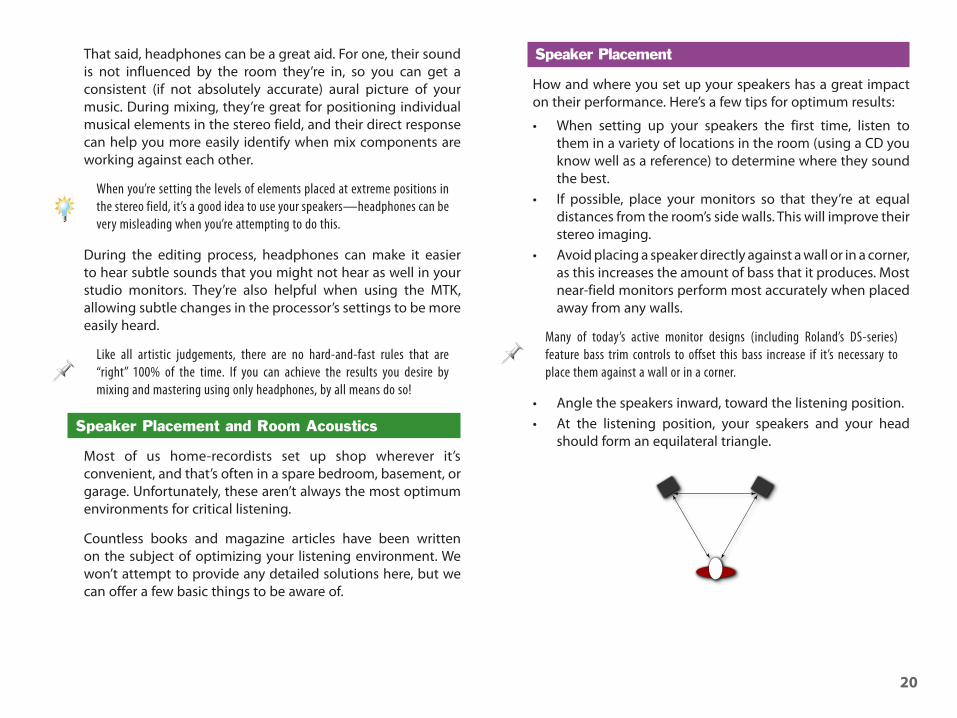
• Angle the speakers inward, toward the listening position.• At the listening position, your speakers and your head
should form an equilateral triangle.
21
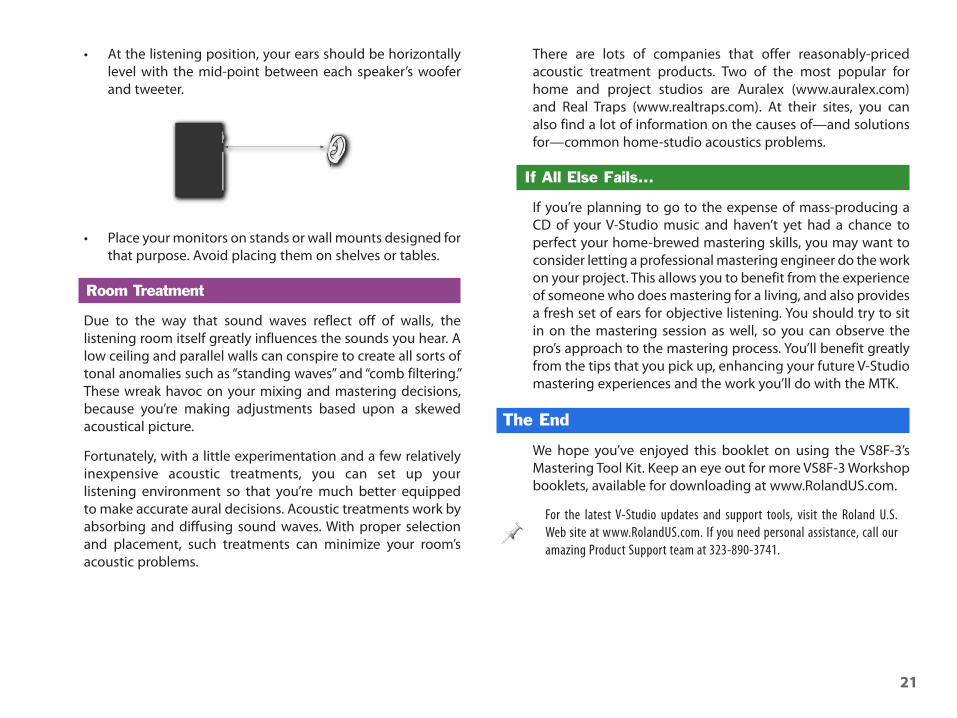
• At the listening position, your ears should be horizontally level with the mid-point between each speaker’s woofer and tweeter.
• Place your monitors on stands or wall mounts designed for that purpose. Avoid placing them on shelves or tables.
Room Treatment
Due to the way that sound waves reflect off of walls, the listening room itself greatly influences the sounds you hear. A low ceiling and parallel walls can conspire to create all sorts of tonal anomalies such as “standing waves” and “comb filtering.” These wreak havoc on your mixing and mastering decisions, because you’re making adjustments based upon a skewed acoustical picture.
Fortunately, with a little experimentation and a few relatively inexpensive acoustic treatments, you can set up your listening environment so that you’re much better equipped to make accurate aural decisions. Acoustic treatments work by absorbing and diffusing sound waves. With proper selection and placement, such treatments can minimize your room’s acoustic problems.
There are lots of companies that offer reasonably-priced acoustic treatment products. Two of the most popular for home and project studios are Auralex (www.auralex.com) and Real Traps (www.realtraps.com). At their sites, you can also find a lot of information on the causes of—and solutions for—common home-studio acoustics problems.
If All Else Fails...
If you’re planning to go to the expense of mass-producing a CD of your V-Studio music and haven’t yet had a chance to perfect your home-brewed mastering skills, you may want to consider letting a professional mastering engineer do the work on your project. This allows you to benefit from the experience of someone who does mastering for a living, and also provides a fresh set of ears for objective listening. You should try to sit in on the mastering session as well, so you can observe the pro’s approach to the mastering process. You’ll benefit greatly from the tips that you pick up, enhancing your future V-Studio mastering experiences and the work you’ll do with the MTK.
The End
We hope you’ve enjoyed this booklet on using the VS8F-3’s Mastering Tool Kit. Keep an eye out for more VS8F-3 Workshop booklets, available for downloading at www.RolandUS.com.
For the latest V-Studio updates and support tools, visit the Roland U.S. Web site at www.RolandUS.com. If you need personal assistance, call our amazing Product Support team at 323-890-3741.