roman’s holiday suit
TRANSCRIPT

TM
Shop .Weav i ngToday . c om
Project originally published in Handwoven magazine, 2013. © F+W Media, Inc. Not to be reprinted. All rights reserved. Join our online weaving community at WeavingToday.com, and visit InterweaveStore.com/weaving.html for more great projects!
page 1
Pho
to b
y jo
e co
ca
sk i rtStructureTwill.
equipment8-shaft loom, 26" weaving width; 15-dent reed; 1 shuttle.
YarnSWarp: Ecocot organic cotton (7,000 yd/lb, Silk City Fibers), Natu-rale, 1,702 yd.20/2 Tencel (8,400 yd/lb; WEBS), natural white, 1,691 yd.Tussah silk singles (2,000 yd/lb; Honey- spun, Halcyon Yarn), natu-ral, 630 yd.Weft: 30/2 Carmelina muga silk (6,800 yd/lb; Treenway Silks), natural, 3,880 yd.
Other SupplieSButterick pattern #3037; silk crepe back satin lining (same yardage as for skirt, View K); notions as speci-fied by pattern.
Warp length764 ends 5¼ yd long (allows 8" for take-up, 28" for loom waste). Two extra ends Ecocot for floating selvedges weighted off the back of the loom.
SettS Warp: 38 epi (3-2/dent in a 15-dent reed) for Ecocot and 20/2 Ten-cel; 15 epi (1/dent in a 15-dent reed) for tussah.Weft: 33 ppi.
DimenSiOnS Width in the reed: 251⁄8".Woven length (measured under tension on the loom): 153". Finished size after washing: yardage 20" × 135".
Roman’s Holiday SuitK a r e n D o n D e a n D s u s a n s t o w e l l
8-ShAFtWeb Supplement
Project originally published in Handwoven magazine, 2013. © F+W Media, Inc. Not to be reprinted. All rights reserved.
page 2
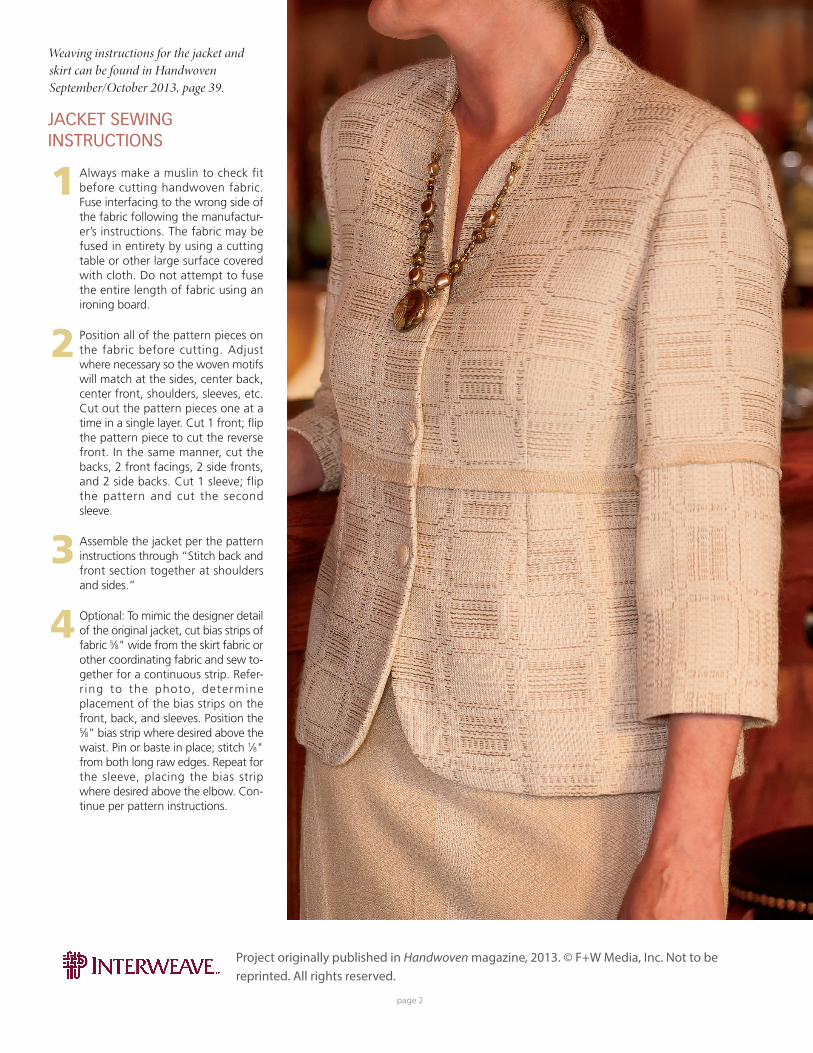
Weaving instructions for the jacket and skirt can be found in Handwoven September/October 2013, page 39.
JacKet sewing instructions
Always make a muslin to check fit before cutting handwoven fabric. Fuse interfacing to the wrong side of the fabric following the manufactur-er’s instructions. The fabric may be fused in entirety by using a cutting table or other large surface covered with cloth. Do not attempt to fuse the entire length of fabric using an ironing board.
Position all of the pattern pieces on the fabric before cutting. Adjust where necessary so the woven motifs will match at the sides, center back, center front, shoulders, sleeves, etc. Cut out the pattern pieces one at a time in a single layer. Cut 1 front; flip the pattern piece to cut the reverse front. In the same manner, cut the backs, 2 front facings, 2 side fronts, and 2 side backs. Cut 1 sleeve; flip the pattern and cut the second sleeve.
Assemble the jacket per the pattern instructions through “Stitch back and front section together at shoulders and sides.”
Optional: To mimic the designer detail of the original jacket, cut bias strips of fabric 5⁄8" wide from the skirt fabric or other coordinating fabric and sew to-gether for a continuous strip. Refer-r ing to the photo, determine placement of the bias strips on the front, back, and sleeves. Position the 5⁄8" bias strip where desired above the waist. Pin or baste in place; stitch 1⁄8" from both long raw edges. Repeat for the sleeve, placing the bias strip where desired above the elbow. Con-tinue per pattern instructions.
1
2
3
4

Project originally published in Handwoven magazine, 2013. © F+W Media, Inc. Not to be reprinted. All rights reserved.
page 3
Skirt SeWing instructions
Make a muslin to check fit before cut-ting your handwoven fabric. The straight skirt (View K) can be made into an A-line by adding 10" to the circumference of the hem for which-ever size is cut: In the middle of the front and back patterns, draw a line from the hem, straight up to the hip line. Slash and spread the pattern up to the hip line, opening a 2½" space at the hem. Insert and secure a wedge of pattern paper and draw a line to connect the hemline, which will now have a subtle arc to it.
From the handwoven fabric, cut 2 skirt fronts and 2 skirt backs one at a time, making sure to flip the pattern pieces for the right and left sides. Do not cut facings from the woven fab-ric. The remainder of the fabric is used for the bias strip details on the jacket and the skirt.
While the pattern does not call for lin-ing, the designer chose to line the skirt, which protects the inside of the skirt and reduces wear on the hand-woven fabric. Cut out the lining piec-es using the altered skirt pattern pieces and the facings. Assemble the skirt per pattern instructions for the zipper and side seams but omit the opening in the center back seam. As-semble the lining in the same manner, leaving an opening for the zipper.
Fuse interfacing to the wrong side of each facing per manufacturer’s in-structions. Turn the skirt inside out and slide the lining over the skirt with the wrong side of the lining against the wrong side of the skirt, matching the center front and side seams. Baste the lining top edge to the top unfin-ished edge of the skirt. Handsew the lining zipper opening to the zipper tape. Sew the facings per pattern in-structions. Finish the lower edges with a narrow hem or follow the di-rections below for the optional bias ruffle.
1
2
3
4
Optional: For the designer detail of the original skirt, cut bias strips of fabric 3½" wide from the skirt fabric and sew together into a continuous strip long enough to fit the circumfer-ence of the skirt’s lower edge.
Machine stitch ¼" from one long raw edge of bias strip. Press the skirt hem allowance under 5⁄8" and baste. Posi-tion the bias strip, right side up, under the basted edge of the skirt so the unstitched raw edge of the bias strip is even with the cut edge of the skirt. Pin or baste in place; stitch 1⁄8" from the turned edge of the skirt. Stitch again ¼" from the first stitching. Leave the lower edge of the bias strip unfinished.
5
6
Press the hem allowance of the lining under 5⁄8"; trim to ¼" and handsew the pressed edge over the bias strip seam. Complete per pattern instructions.
Optional: For the silk trim detail between the skirt and the bias strip, cut bias strips of silk lining 1¼" wide and sew them to-gether to make a continuous strip. Turn and press ¼" on both long sides. Position as desired, baste, and handsew in place.
7
8