roof rain water harvesting techniquessmis-ethiopia.org/wp-content/uploads/kpdocs/68 amh_module...3....
TRANSCRIPT

Training Module On
Roof Rain Water Harvesting Techniques
Prepared by SMIS project
November, 2016
Bahirdar

Table of Contents
1. General Discerptions ....................................................................................................................... 3
2. The Rainwater Harvesting Context & Potentials in Ethiopia ........................................................... 3
3. Module 1: Roof Catchment Rain Water Harvesting Techniques ...................................................... 5
3.1 Introduction ...................................................................................................................................... 5
3.2 Learning Outcomes ........................................................................................................................... 6
3.3 Purpose & Rationale for Roof Rainwater Harvesting ........................................................................ 6
3.4 Types and components of Roof Rainwater Harvesting systems ........................................................ 7
3.5 Types of Catchment Surfaces ............................................................................................................ 8
Roof Catchments................................................................................................................................. 8
3.6 Roof catchment Rainwater Conveyance Systems.............................................................................. 8
3.7 Rainwater Storage Facilities ............................................................................................................ 10
3.8 RAINWATER HARVESTING SYSTEMS AND DESIGN CONSIDERATIONS ............................................. 14
3.9 The Management of Rainwater Harvesting Systems ....................................................................... 17
3.10 Siting of Roof Catchment Rain Water Harvesting Technologies ................................................ 21
3.11 Period/phases for implementation ........................................................................................... 22
3.12 Suitability, agro-ecology and adaptability based upon local knowledge ................................... 22
3.13 Technical Description ................................................................................................................ 22
3.14 Potential to increase/sustain productivity and environmental protection ............................... 23
Minimum surveying and tools requirements .................................................................................... 23
Min. technical standards ................................................................................................................... 23
3.15 Work norm ................................................................................................................................ 23
3.16 Integration opportunities/requirements ................................................................................... 23
3.17 Institutional responsibility and implementation arrangements ................................................ 23
3.18 Treatment of Stored Rainwater................................................................................................. 23
Appendixes ....................................................................................................................................... 24
References ............................................................................................................................................ 25

1. General Descriptions
This training manual is prepared by SMIS Project National office to enhance the efficiency and
effectiveness of planning, design, development and operation of Rain Water Harvesting(RWH)
for small scale & household micro irrigation. Through the adoption of efficient strategic
approach to usewater in general and RWH in particular forplanning, responsible institutions will
be able to: better manage water resources in a sustainable way; better plan, develop, maintain
and operate supply systems and optimize the use ofexistingRain water resource. In doing so,
this training manual consists of some training topicswhich will be conducted in a minimum of 3-
day periods including practical field visit and observations. At the end of the program,
participants will have developed a preliminary strategic plan for their organization. The plan
may need to be later revisited as part of the normal annual work and annual review process.
Each training topics contains a brief introduction to each segment outlining the basic concepts
needed to include in the Roof Water Harvesting techniques.
2. The Rainwater Harvesting Context& Potentials in Ethiopia
The history of rainwater harvesting practices in Ethiopia dates back as early as 560 BC, during
the AxumiteKingdom. In those days, rainwater was harvested and stored in ponds for
agriculture and water supply purposes, which are evidenced with documented literature and
visual observations on the remains of ponds that were once used for irrigation during that
period. Even these days, there are several traditional rainwater-harvesting technologies in
Ethiopia, which have been used by communities in areas of water shortage. For many
traditional communities in rural areas where natural sources of water are lacking, collectionof
rainwater from pits on rock outcrops and excavated ponds are common practices. In many
semi-arid lowland areas of Ethiopia, where rainfall is not adequate for crop growth, farmers use
runoff irrigation as a source of life-saving irrigation supplies.
Despite the enormous potential of its natural resource bases and the development efforts
being made by the various actors in the country, Ethiopia’s chronic food shortages and drought-
induced famines have continued to be common phenomena during the past few decades
(Asmare 1998).
In line with this, the Ministry of Agriculture (MOA) has been making some efforts towards the
development and promotion of rainwater-harvesting technologies as part of its

extensionprogramme. The above facts strongly support the need to focus on development and
promotion of rainwater harvesting technologies as one of the alternatives to enhance water
availability for different uses including domestic water supply, sanitation and food
production/agricultural Development. This is therefore; Ethiopia has to feed itself by enhancing
its agricultural production, yet it’s predominantly rain fed agriculture has been constrained by
the unpredictable variability of the rainfall pattern. Obviously, this situation brings about the
need to maximize the use of existing or unexploited sources of freshwater.Given the good
potential of Ethiopia’s agro climatic resources, the prevailing limitations in terms of rainfall
distribution and amount could be effectively addressed if rainwater harvesting is seriously
taken. Applications of rainwater-harvesting techniques, however, are constrained by the
limited availability of information on the technologies and relevant traditional practices, lack of
resources to conduct local specific research on the performance of available techniques and
inadequate attention to avail and promote suitable extension packages to the end users. For
effective and efficient use of rainwater harvesting to address domestic supply and food
production, all concerned should give timely and adequate attention.

3. Roof Catchment Rain Water Harvesting Techniques
3.1 Introduction
This training module is part of the other HHMI capacity enhancement modules prepared for
zonal and district staff which will be cascaded down to majority of the community in a manner
that suits to the needs of woreda’s experts and technicians in the field.
As well known, Rainwater harvesting is a broad subject covering RWH from roofs, ground
surfaces, and rock outcrops, through the construction of RWH systems that include various
types of storage reservoirs such as surface and subsurface tanks, ponds and various kinds of
dams. The water harvested is used for various purposes, both domestic and agricultural. RWH
also includes soil and water conservation activities that protect water from running off and
stored in the soil and ground aquifers. For this reason, it is necessary to be selective and to
focus on certain aspects of RWH. Therefore, this part of module focuses mainly on harvesting
water from Roof catchments, storing it in storage tanks, for use in domestic & Agricultural
purposes. The manual will encompass both the conceptual and practical aspects of Roof RWH.
It is complemented by annexes, drawings and pictures that are relevant and useful.
Training Objectives: - After this training the participants will be able to:
Define the Purpose & Rationale for Rainwater Harvesting
Identify types and components of Roof rainwater harvesting systems
Describe Roof rainwater demand and supply for domestic use
Design Roof rainwater harvesting systems
Describe the Management of Roof Rainwater Harvesting Systems
Identify technical Description for reservoir
Integrate Roof RWH with other opportunities/requirements
Identify Institutional responsibility and implementation arrangements
Provide technical support for the treatment of Stored Rainwater
Materials:Flip Chart, Markers, meter, PPT, handout, Gutters, Iron sheet etc.
Time required: three days (one day for class presentation, and two days for field work)

Methods of facilitations: - PPT presentations, Group work, Gallery walk presentation, field
observations, feedback from field observations, Identification of
performance tasks, Action plan preparations etc.
3.2 Learning Outcomes
The general learning outcomes of this training module is to provide skill based capacity building
training for zonal &woreda experts and private sectors who are engaged in the Rain water
harvesting from their roof and sub catchment. However; the specific objectives are as follows:
To provide zonal experts, Districts experts and private trainees with a working skills &
knowledge of Roof Rain water harvesting and its operations, and proper maintenance
procedures used for water reservoir to provide adequate timely support on the
maintenance as well.
To provide trainees with a working knowledge of the different types of the Roof Rain water
harvesting and their basic operations.
Enhanced skills and knowledge, Strengthened administration and management of the Rain
water harvesting.
Improved coordination, collaboration and synergy among implementers, &Support for all
stakeholders will be strengthened
3.3 Purpose &Rationale for Roof Rainwater Harvesting
The Roof RWH option has certain merits over surface and ground sources that can make it play
a real role in providing total or complementary water supply for domestic and agricultural
purposes. It is available nearly everywhere, is relatively clean needing only simple treatment,
and depending upon situations and the technology used it can also be cheaper. Harvested rain
water, in most cases, does not need pumping; also, it does not need to be transported unless
the user is located far away from the collection point. Roof RWH schemes are simple and
render themselves easily to individual ownership, managed by households or decentralized
communities. From the domestic water supply point of view, most consumers provided with
improved water supplies are in many cases inadequately served, they also encounter frequent
supply interruptions; the water may sometimes be contaminated. Many poorer segments of
the communities collect water from communal water points located at some distance are
common.
The operation and maintenance of domestic RWH systems is also relatively simple. The real
limitation of domestic RWH systems is that the unit costs of water storage tanks per user or per
unit volume of water they produce per unit time. Traditional communal rainwater storage
ponds from ground catchments are common, particularly in areas where there are no nearby
surface or groundwater sources for domestic use. There are more and more people building
their houses with roofs made from corrugated iron sheets; this creates an ideal situation for the
wider promotion of domestic roof water harvesting both in urban and rural areas. It is now
clear that rainwater has an important place and role to play in providing the water needed for
various purposes; and to contribute to the attainment of the community needs.
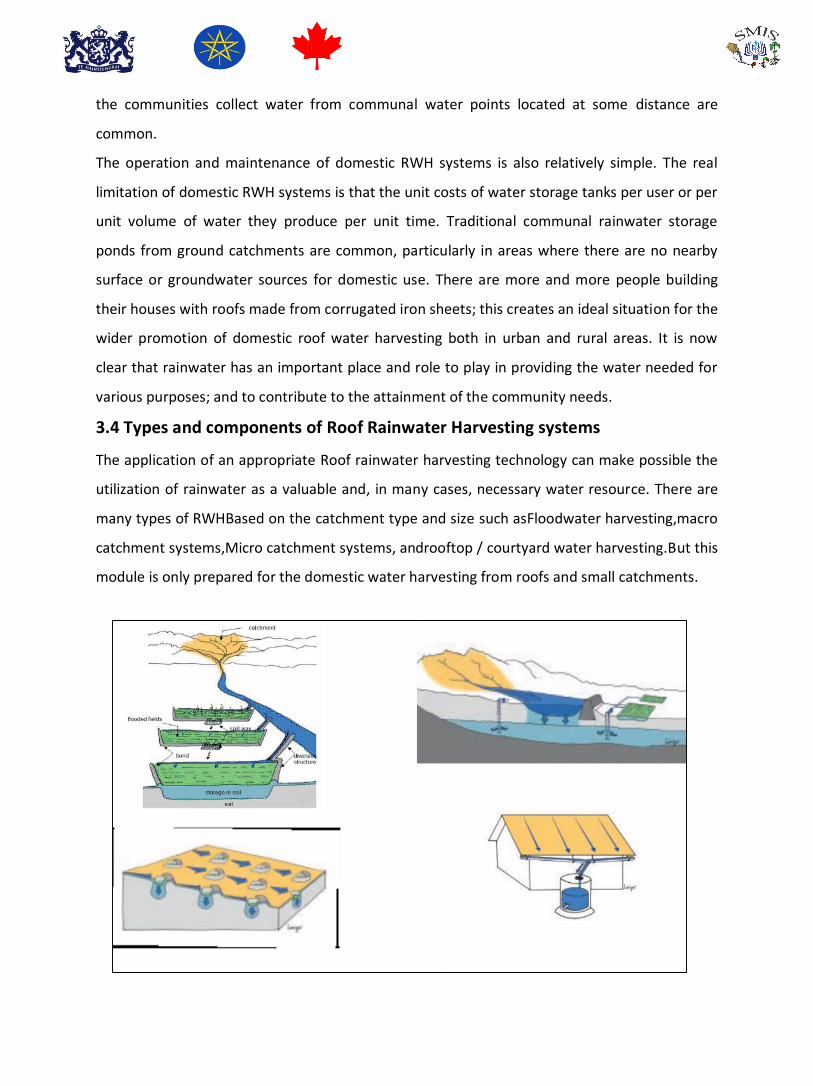
3.4 Types and components of Roof Rainwater Harvesting systems
The application of an appropriate Roof rainwater harvesting technology can make possible the
utilization of rainwater as a valuable and, in many cases, necessary water resource. There are
many types of RWHBased on the catchment type and size such asFloodwater harvesting,macro
catchment systems,Micro catchment systems, androoftop / courtyard water harvesting.But this
module is only prepared for the domestic water harvesting from roofs and small catchments.

The basic components of Roof RWH systems are;
Roof catchment surface from which rainwater is collected;
conveyance system to collect and transport them to storage facilities;
Storage facilities or reservoir, and storage related inflow and outflow devices/facilities.
3.5 Types of Catchment Surfaces
Roof Catchments
The roof of a building or house is the obvious first choice for catchment. Roof catchments are
the most commonly used for domestic RWH. Roofs have to be impervious, durable and clean
and types of roofing material used for domestic RWH are such as corrugated iron sheets,
corrugated plastics and tiles. All are suitable to serve as Roof catchment surfaces; however,
corrugated iron sheets are the most ideal and the most rapidly expanding as they are smoother.
If painted roofs are to be used, it is necessary to make sure that the paints are free from lead
contents, if the water is to be used for drinking.
3.6 Roof catchment Rainwater Conveyance Systems
Rainwater conveyance systems are components of a RWH system that collect water from
catchment surfaces and transport it to the inlets of storage facilities such as Roof Catchment
Conveyance Systems, Ground Catchment Conveyance Systems, &Rock Catchment Conveyance
Systems. Each type of rainwater catchment has aconveyance system that is appropriate to the
specific type of RWH system. In Roof Catchment Conveyance SystemsGutters and down pipes
are the most common roof catchment conveyance systems. They are fixed on roofs, even

without RWH systems, to protect walls and to safely dispose of water without causing erosion
on the ground next to buildings. When used in RWH systems, gutters and down pipes must be
able to intercept runoff water from roofs and convey it to storage tanks.
Roof conveyance systems consist of gutters suspended along the lower edges of roofs that
project over the walls, sloping towards down pipes leading rainwater to storage tanks.
Gutters are normally fixed to fascia boards. Appropriate gutter slopes are necessary to keep
their sizes and costs of installation to a minimum.
Examples of other types of roof conveyance systems are;
Surface drains/cement channels on the surface of courtyards used to divert water to
sub-surface tanks. They may be a cheaper option but need to be cleaned regularly.
Stone or cement glides built as slanting ridges on the roof itself, to divert runoff
sideways towards a receiving inlet to the tank. These works well in flat surfaced
roofs rather than the ridged or corrugated.
The most common materials used for making gutters and down pipes are metals and
PVC. They are much more durable when compared to other traditional material such
as wood and bamboo; and they cost effective.
Roof Catchment
surfaces
Conveyance facilities
(e.g. gutters, downpipes)
Storage facilities
(e.g. tanks)

3.7 Rainwater Storage Facilities
The most expensive component of a RWH system is the water storage facilities which
sometimes lead to direct use of rainwater. It is therefore necessary to pay due attention to the
selection, design and construction of reservoirs, always keeping in mind cost aspects along with
other considerations.
There are three broad categories of rainwater storage facilities;
Surface tanks or above ground tanks;
Sub-surface tanks or underground tanks; and
Dammed reservoirs and ponds. Once water is stored it can be used for any
purposes as discussed.
Surface Tanks
Surface tanks are used for harvesting water from elevated catchment surfaces, e.g. large roofs.
The materials used for construction are ferrocement, blocks (of concrete, brick and rubble
stone), concrete in situ, plastic, metals and wood. The tanks should be watertight, durable,
affordable, and non-contaminant.
The selection of the material depends on local situations; e.g. metals are not suited to saline
areas, plastic to strong light areas, and wood to termite areas. Other factors include
construction costs, and availability of material. Surface tanks vary in size; for household
usebetween oil drum size (200 liters or even lower) to 40 m3. For communal tanks built in large
blocks such as schools, the size can go even beyond 100 m3. The selection of an actual size
depends on various factors such as the amount and distribution of rainfall over the year,
available roof area, household demand, and thepresence of other supply sources.
The advantages of surface tanks over sub-surface tanks are that:
Water can easily be abstracted by gravity;
Allow for easy inspection of cracks and leakages; and
Smaller sizes render themselves for central production and transportation,which is good
for the quality control of certain tank types such as plasticor ferrocement.
The disadvantages are however that:
They are relatively expensive when compared with subsurface storagetanks; and

They require space, generally a problem in urban areas.
Sub-surface Tanks
Subsurface tanks are mostly associated with the purpose built ground catchment surfaces; they
are however used for roof catchments as well. They share much of the features of surface tanks
regarding construction material and methods. Sub-surface tanks are built in excavated ground
where the soil isbackfilled upon completion. Where the soil is firm, excavated holes can be
linedwith ferrocement chicken wire mesh and barbed wire for reinforcement, and cement
directly plastered onto it this type saves costs significantly and the need for formwork. In places
where the soils are clay, and impervious, it is possible to build unlined sub-surface tanks, but
they suffer from seepage, evaporation and poor water quality.
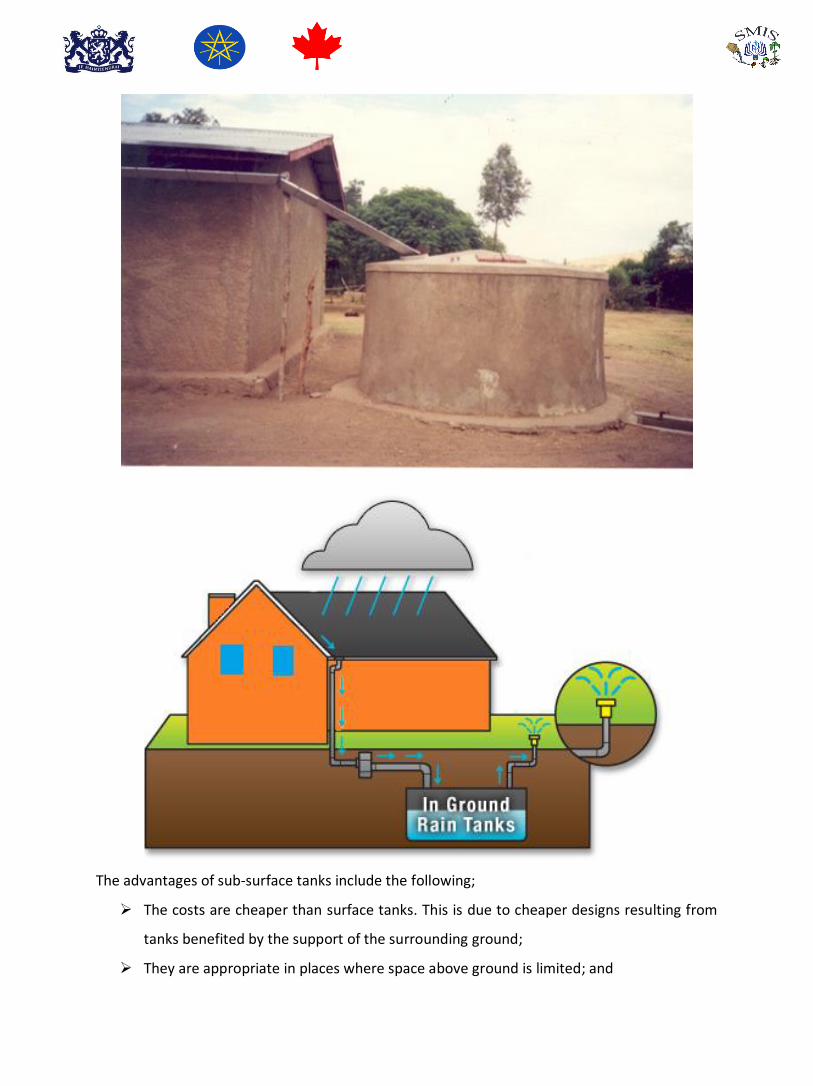
The advantages of sub-surface tanks include the following;
The costs are cheaper than surface tanks. This is due to cheaper designs resulting from
tanks benefited by the support of the surrounding ground;
They are appropriate in places where space above ground is limited; and

The water is cooler.
The disadvantages are;
Pump or some kind of abstraction device (such as rope and bucket) is required to access
water. An alternative to this is to construct steps to a tap stand from where the water
can be abstracted by gravity.
When they use ground catchments, they suffer from contamination and sediment
inflow.
Leakages and failure is difficult to detect; and
They cannot be easily drained for cleaning.
Dammed Reservoirs and Ponds
These are reservoirs that make use of larger natural catchmentspurposely built for RWH. They
are used at community level rather than owned individually by a household. The reservoirs can
be created by constructing rock catchment dams, sub-surface/sand dams, earth dams or ponds.
Dams are built across natural water courses at the downstream side of natural depressions.
Ponds can however be constructed at any convenient site outside natural waterways.
The water from these sources may be used for domestic and livestock water supply and/or for
irrigation purposes. When used for domestic purpose they need some form of treatment to
make them safer and potable. The selection of site for dam or pond construction should follow
certain criteria that are suitable for the particular type selected for construction. The
catchments ideally need to be protected from pollution and erosion to protect the water from
contamination, and the reservoirs from silt deposition. Sediments should be removed from
small reservoirs to maintain their capacity.
The advantage of dammed reservoirs and ponds is that relatively large volumes of rainwater
can be stored when compared to that of surface or sub-surface tanks. The main disadvantage of
such reservoirs is that the water is liable to pollution and contamination due to unprotected
catchments. Seepage and evaporation losses are also problems owing to the fact that the
reservoirs are built on natural ground and that they are mostly too wide to provide cover.
Examples of dammed reservoirs are;
Rock Catchment dams
Sand River Storage

Earth dams
Ponds
Rainwater Supply
The volume of rainwater supply over a given period depends upon the amount of rainfall in that
period, the catchment area and the runoff coefficient. The formula relating these variables is
straight forward; it would though be necessary to be watchful of the units.
Therefore, rainfall amount and pattern should be analyzed and compared with demand
distribution to help come up with the most appropriate and economical storage tank size. If
rainfall is uniformly distributed over the year, then, storage requirement/tank size is smaller; if
it is highly seasonal, the storage required would be bigger for the same amount of rainfall.
3.8 RAINWATER HARVESTING SYSTEMS AND DESIGN CONSIDERATIONS
This part will mainly look into considerations for the planning and design of surface tanks (i.e.
plastic tanks, concrete rings tanks, ferrocement tanks) and for storing water from roofs, as this
is the most important type of RWH systems for domestic supply used.
Roof Gutters and Downpipes
Gutters
A well designed, installed and maintained gutter system is necessary for a roof RWH system to
operate efficiently and effectively. A good gutter is expected to perform well in intercepting
and conveying water to the downpipe/gutter or the tank; it should also be reasonably cheap as
well as durable. As indicated earlier however, it is in practice the most poorly performing
component, and thus the commonest source of failure of the whole RWH system. The usual
problems include gutters clogged with debris and not cleaned, not properly sloping, not
intercepting runoff properly, overflowing, making use of only part of the roof area, twisted,
leaking, broken and not repaired. Gutters should neither be too small nor too large; if too large
they become expensive; if too small they cannot be able to accommodate heavy storms and
cause overflow. Gutters are governed by the principles of open channel hydraulics, and thus
Volume of rainwater supply = rainfall amount x catchment/roof area x runoff
coefficient (Cr).

their water conveyance capacity depends on gutter cross sectional area, shape, roughness and
slope.
Rainfall intensity and roof area also need to be considered in determining appropriate gutter
sizes. In general cases (by Gould and Petersen, 1999 and Hasse, 1989) it is suggested to make
use of at least 1cm2 gutter cross sectional area for every 1m2 roof area. For example a 100cm2
cross sectional area gutter can be used for a 100m2 (20m x 5m) roof area.
It would be safe to install gutters at a gradient of 1:100 (1%). This slope increases the carrying
capacity of gutters, owing to the high velocity of water, thus water will not be wasted due to
overflow. The high velocity also enables the transportation of debris to sieves on tank inlets
without clogging gutters. Gutters normally have uniform slopes along horizontal roof edges. For
long roofs with no splash-guards, considering a lower gradient at the upper stretch and
increasing it down the gutter towards the outlet may be useful. This helps avoid spill over at the
lower edges of the roof, due to reduced gap between the roof and the gutter. Semi-circular
gutters are the most efficient at conveying water, as they have the largest cross sectional area
for a given perimeter. Trapezium gutters with all three sides equal, although lower than the
semicircular, also have higher cross sectional area when compared with other gutter shapes.
Square shaped gutters are also used to convey runoff water. As indicated earlier, for large roofs
such as those of schools V-shaped gutters, with splash-guard and steeper than 1% gradient, can
cope with heavy down pours without large losses due to overflow. There are various material
used for gutters. These include galvanized metal sheets, aluminum and plastic. However, the
use of galvanized metals is recommended due to strength and or cost reasons, but for the
coastal zones it is preferable to use plastic materials to avoid rusting. When installing gutters,
they must be placed 3 cm inward from the roof edge in order to catch the back drop of water
from light showers. Placing tanks at the end of long roofed buildings such as schools, requires
large gutters. If instead, they are placed in the middle, they allow smaller gutters which can be
easily and cheaply installed. Gutter brackets must be strong enough so as not to bend under
the added weight of water, and pressure from wind.
Down pipes
In gutters that are not used for RWH, down pipes are normally vertical and may have smaller
cross sectional area as the water flows faster downward. In roof RWH systems however, they
often are not vertical; and usually the gutter channels themselves are extended to convey
water to the tanks. For this reason, they are called down gutters. This arrangement avoids
water wastage, because it does not reduce the speed of the water, and debris are easily flushed
away at the slopping screen cover of the tank without causing blockage. Both the gutters and
down gutters should have similar shapes and dimensions, although the down gutters have
steeper slopes.
Downpipes can also be used to receive water from gutters and convey it to tanks. In the first
case where down gutters are used, one of the following two arrangements can be made.
In the first arrangement, a tank is built with its center in line with the gutter. In this case,
the gutter is simply extended with same size and shape to the tank inlet. The slope of
the down gutter will be 2% (1:50); and needs to be supported at both ends.
In the second arrangement, the discharging end of the roof gutter is provided with a
hole at the bottom.
The water flowing through the hole is received by a down gutter (with same size and shape as
the gutter and at 2% slope) and conveyed in any direction to a tank inlet. The advantage of the
second arrangement is that it is possible to feeda single tank from two gutters installed
particularly on the front and back roofs of a building. Downpipes may receive water from a
funnel below the gutter, and convey it to the tank inlet. As long as the required head is
provided, pipes can follow any route to the tank, along walls, above or below ground, etc.
Whichever of the three arrangements is used, it is not advisable to place tanks too far from a
building, for the sake of shorter down pipes. A downpipe should normally enter a tank at the
highest point of the tank to maximize volume. To exclude leaves and debris from entering
tanks, a coarse 5mm or smaller wire mesh may be placed over the top of a downpipe inlet, at
the end of the gutter. This should be inspected regularly so that it is not blocked. A better
alternative is however, the use of a self-cleaning tank inlet or guttersnipe.
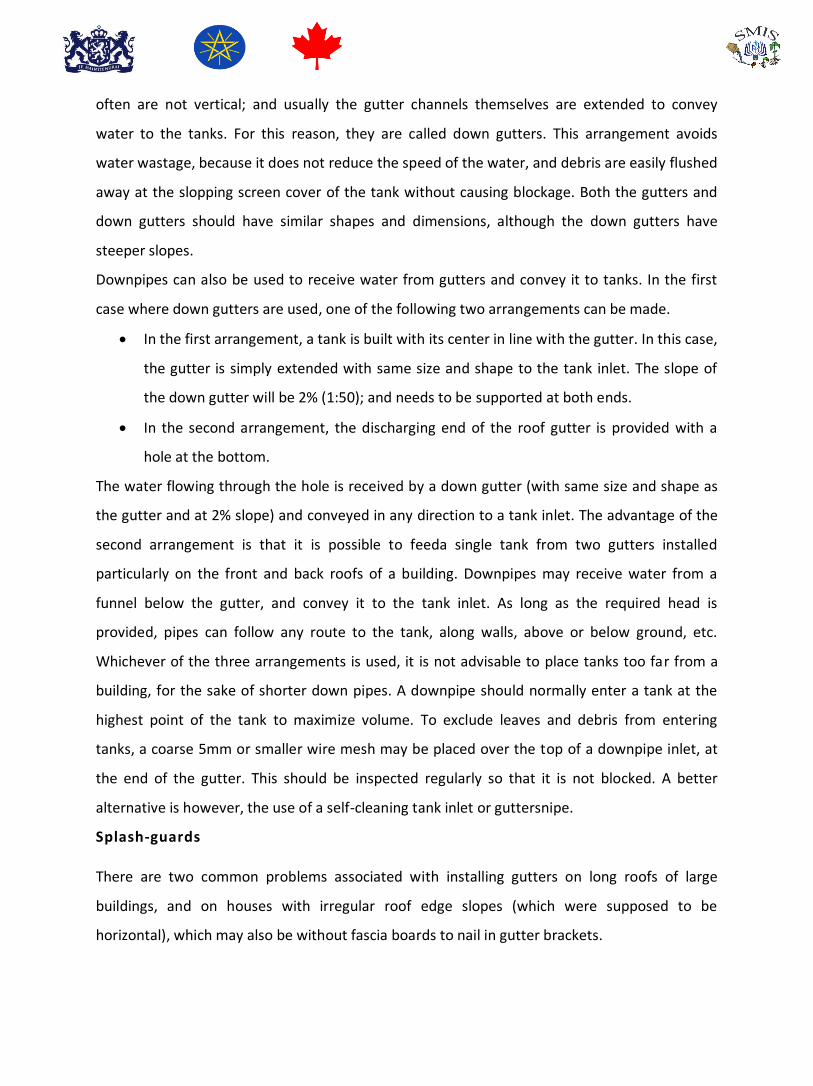
Splash-guards
There are two common problems associated with installing gutters on long roofs of large
buildings, and on houses with irregular roof edge slopes (which were supposed to be
horizontal), which may also be without fascia boards to nail in gutter brackets.

In the first case, long roof means that the gap between the edge and the gutter widens
along the slope, and the gutters are hung many cm below the roof. This causes the roof
runoff to overshoot and miss the gutter totally or partially wasting rainwater. The gutter
cannot be raised, because that will reduce or reverse its gradient.
In the second case, the uneven roof edges pose problems while trying to provide the
correct uniform slope to gutters, this results with irregular slopes of the gutters
themselves and causes water to overflow and spillover the gutters. Houses without fascia
boards also mean that there is no provision for the gutter brackets to be fitted on.
A splash-guard consists of a long strip of sheet metal 30cm long, bent at an angle and hung over
the edge of the roof by 2-3cm to ensure that all runoff enters the gutter. The vertical leap of
the splash guard intercepts the overshooting runoff and directs it straight into the gutter.This
solves the problems of houses without fascia boards. The gutter hangers are made by bending
3mm GI wire into a triangular or any gutter shape; the gutter can then be mounted onto these
hangers. The triangular shaped gutter, though not as efficient hydraulically as the other shapes,
it has the advantage that it is more stable, owing to the fact that in is fitted into the triangular
shaped 3 mm wires that do not buckle easily under the weight of water to which it is subjected.
The adjustable wires enable an even gradient (1:100), by keeping the gutter suspended in the
correct position under the eve.
3.9The Management of Rainwater Harvesting Systems
Once a Roof catchment rainwater harvesting system is planned and designed properly, and
built with good construction material and workmanship, it is ready to provide the services
expected and aimed at meeting the objectives set for it in a sustainable manner. This however
requires certain arrangement in terms of putting in place a management system/mechanism
that is capable of ensuring the proper operation, maintenance and repair of the RWH system.
It is necessary that the management of Roof RWH systems is done by the users themselves,
unlike design and construction which in many cases are initiated and implemented by experts.
The users of Roof RWH systems could be individual households, institutions such as schools, or
communities for whom the RWH systems are built for communal use.
The management of RWH systems needs to lay out clear duties and responsibilities in respect
of the following items.

The management arrangement/system and responsibilities;
Physical safety and protection of the RWH system;
Maintenance and control of water quality;
Operation, maintenance and repair of the system; and
Like any other water supply system, it is important that communities should aware of/educated
on matters related to hygiene and sanitation. In any case, proper maintenance is an important
aspect in the management of RWH systems and needs to include, among others, the following
activities;
Inspection, regular cleaning and minor repair of the whole RWH system; the catchment,
the conveyance, the tank and the various tank components such as tap.
Removal of branches of trees over hanging on roofs. Not only leaves and debris, but also
the droppings of birds and small animals contaminate rainwater. Dust and other such
dirt also need to be cleaned regularly from the catchment/roof.
Cleaning and minor repair of the conveyance system (gutters and downpipes/gutters) at
least once a year;
Inspection of water quality in the tank, testing from time to time and
treating/disinfecting regularly.
There should be no opening that allows small animals to enter into the tank; it is
therefore necessary to inspect, clean and repair/replace screens and filters. Screens and
filters unless cleaned regularly can themselves be a source of water contamination.
Clean/wash-out accumulated sediment and sludge when necessary; take the
opportunity to clean the tank when it is empty.
There should be no tree growing within 10 m from the tank to protect the foundation
from damage/crack by roots searching for moisture underneath.
Inspect regularly the amount of water in the tank, and compare with demand and
abstraction rates.
Repair of Rainwater Tanks
The repair of RWH tanks, unlike maintenance, is not a regular activity; nevertheless, it is one of
the most important tasks in the management of RWH systems. The repair of tanks normally
involves locating leakage points and making them water tight. Most of the following remedies
are suggested to repair tank leakages:
(a) Leakage between wall and foundation: -Many tanks built of masonry leak water through
the joint where the wall joins the foundation. The reasons could be insufficient reinforcement,
poor mixture of mortar, or lack of cleanlines when the joint was made. The joint can be made
watertight by cleaning the joint, adding more reinforcement and making strong in both sides of
the joint. The procedure for this is as follows.
Drain all water out of the tank and clean the floor and the foundation on the outer side
of the tank.
Chisel a groove (on the wall), about 3cm x 3cm, all around the joint on both the interior
and external sides of the tank.
Roughen a 15cm wide stretch of the foundation on both sides of the joint. Clean the
joint and the roughened surface with plenty of water.
Wrap 5 rounds of barbed wire tightly around the tank in the external groove.
Compact mortar 1:3 into the external and internal grooves with a piece of timber.
Compact a 15cm wide and 10cm high apron over the external and internal grooves.
(b) Leakage through a cracked foundation: -Water may leak through cracks in the foundation.
The reasons for this could be soft soil under the foundation, insufficient reinforcement, and
poor mixture of concrete or improper curing. The leakage can be sealed by constructing a new
foundation onto the old cracked foundation. The procedure is as follows.
Drain all water out of the tank and clean the floor.
Fill all cracks with some strong paste.
Cut sheets of weld mesh to fit the foundation. All overlaps must be at least 20cm and
tied together with binding wire for every 10cm.
Mix concrete (1:3:3). Compact a 7cm thick layer of concrete onto the old foundation.
Lay the weld mesh on the concrete in the tank.
Compact a second layer of 7cm concrete onto the weld mesh in the tank.
Compact a 1cm thick layer of mortar 1:3 onto the concrete.
The next day, compact a rounded apron into the joint between the new foundation and
the wall.

Keep the foundation moist and under shade for 3 weeks.
(c) Leakage through walls without cracks: -Water may leak through the wall of a water tank,
although the wall has no cracks. This is due to porosity caused by mortar mixture with
insufficient cement, insufficient curing or poor workmanship. The wall can be sealed by
replacing the porous parts with mortar. The procedure is as follows;
Drain all water out of the tank and clean its interior.
Chisel away the porous parts of the interior wall.
Clean the chiseled parts with water & throw dry cement onto the watered parts of the
wall.
Mortar of 1:3 and throw a thin layer of it onto the watered parts of the wall.
Next day, fill up the coated parts with mortar 1:3 and apply with a square steel trowel.
Should the tank still leak, its internal side has to be painted with a water proofer, such
as swimming pool paint, non-toxic bitumen, oil paint or 1 part of cement with 10 parts
of lime mixed with water.
(d) Leakage through cracked walls: -Water may leak through cracks and fissures in the wall of a
water tank. The reason for this could be vertical cracks that are caused by insufficient horizontal
reinforcement and/or incorrect joining of bricks and blocks; or horizontal cracks due to
incorrect joining between the horizontal courses between bricks and blocks. The remedy for
this is to build a new wall on the outside of the cracked tank by wrapping reinforcement mesh
or wire around the tank and plastering it. The procedure for this is as follows;
Drain all water out of the tank and clean it.
Chisel off any loose part on the external side of the tank wall.
Tie sheets of weld mesh together with binding wire and wrap them tightly around the
tank and plaster the outside of the tank.
(e) Repair of leaking ferrocement tank walls: -The repair of ferrocement tanks is relatively easy
and involves the following steps;
Chisel out the damaged area around the leak;
Wet the whole area to make it really moist;
Apply new mortar with the same cement to sand ratio as the original;
Apply a coat of Nil the next day; and

Cover the patch with plastic sheet and cure for at least for 3 weeks
The key points to remember here are:
The quality and mix ratio of the material (cement, sand and water) used should be the
same as that used for the initial construction; and
If a different mix ratio or sand type is used, then, there will be differential expansion
stresses, and thus a new leak.
Small leaks in ferrocement tanks are much easier to repair in rainwater tanks.
(f) Plastic and metal tanks: -Plastics and metals are harder to repair. It may however be
possible to use water tight plastic or rubber liners. Plastic jerry cans are repaired by sealing the
leaking points with melted plastic material. Corrugated iron tanks can be lined with cement or
ferrocement.
Mix cement with coarse river sand at a ratio of 1:3
Smear the mixture onto the inside in 1 cm thick layer and let it dry for a day
Next day, apply a 2cm thick 1:3 mixture on to the previous layer and smoothen it
Within the same day, apply Nil (cement slurry) and press it with a trowel onto the
plaster
Keep the oil drum under shade and sprinkle the plaster 3 times a day for a week, then
fill up with water
3.10Siting of Roof Catchment Rain Water Harvesting Technologies
The catchment area is the first point of contact for rainfall. For the vast majority of tank-based
rainwater harvesting systems, the catchment area is the roof surface. There are some
important factors about the roof to consider when planning for a RWH system:
Roof Material – It’s important to avoid wood shingles or metal flashing that contains lead.
Slope – The slope of the roof affects how quickly water will runoff during a rain event. A steep
roof will shed runoff quickly and more easily clean the roof of contamination. A less-steep,
flatter roof will cause the water to move more slowly, raising the potential for contamination to
remain on the catchment surface.

Sizing a Catchment Area – The size of the catchment area or roof will determine how much
rainwater that you can harvest. The area is based on the “footprint” of the roof, which can be
calculated by finding the area of the building and adding the area of the roof’s overhang.
3.11Period/phases for implementation
The application of an appropriate rainwater harvesting technology can make possible the
utilization of rainwater as a valuable and, in many cases, necessary water resource. As the main
objectives of harvesting Roof Rainwater is to use the water during the dry seasons and/or
during the rain seasons for both domestic and agricultural purposes, the establishments of the
system should be as early of the rainy time. Accordingly, it is recommended once during the dry
season, &should be finished before the rainy season commences.
3.12Suitability, agro-ecology and adaptability based upon local knowledge
More suitable in high rainfall areas for frequent filling of storage reservoirs;
Suitable for arid and semi-arid areas where rainwater is the most accessible water
source
3.13Technical Description
A rainwater harvesting system consists of three basic elements: a collection area, a conveyance
system, and storage facilities. The collection area in most cases is the roof of a house or a
building. The effective roof area and the material used in constructing the roof influence the
efficiency of collection and the water quality.
A conveyance system usually consists of gutters or pipes that deliver rainwater falling on the
rooftop to cisterns or other storage vessels. Both drainpipes and roof surfaces should be
constructed of chemically inert materials such as wood, plastic, aluminum, or fiberglass, in
order to avoid adverse effects on water quality.
The water ultimately is stored in a storage tank or cistern, which should also be constructed of
an inert material. Reinforced concrete, fiberglass, or stainless steel is suitable materials. Storage
tanks may be constructed as part of the building, or may be built as a separate unit located
some distance away from the building.

3.14Potential to increase/sustain productivity and environmental protection
. Allows safe disposal of rain water from roofs for direct use
. Reduce workload of women by availing water at home
. No effect on environment
Minimum surveying and tools requirements
. Pipes
. Cement
. Gutters
Min. technical standards
Calculate the area of your roof in m2
Calculate the average yearly rainfall in mm
Calculate the cubic meter of roof water(area of roof, m2 x yearly rainfall, m)
Establish the size of water tanker, which isequal to the annual volume of water
from roof.
3.15Work norm
It requires skilled manpower in constructing the gutters, pipes and storage tanks.
3.16Integration opportunities/requirements
This system could be integrated with vegetable gardening and livestock rearing (small scale
poultry production).
3.17Institutional responsibility and implementation arrangements
Individual household are responsible for planning and implementation of the activity. Itrequires
skilled manpower for installation of this system.Responsibility is at household level with
support provided by water harvesting experts and Development Agents.
3.18Treatment of Stored Rainwater
The aim of water treatment is to make water safe (from harmful substances/chemicals and
organisms); to make it good in appearance and attractive for human consumption. There are
various methods and stages of water treatment which include screening, sedimentation,
filtration (with fine granular materials such as sand and gravel), disinfection, and miscellaneous

other treatments to reduce chemical levels, improve taste, hardness etc. The treatment of
rainwater is done in the tank itself or after it is drawn and taken home. There is however
various newly emerging treatment methods mentioned as follows:-
(a) Chlorination: -Chlorination is done either in the tank or after the water is collected and
taken home. Chlorine is very effective in killing micro-organisms, but requires care because it
can affect the taste of water and over application may cause certain problems.
(b) Use of filters: - Sand filters are simple to use and cheap to acquire. They can as well be used
at home, but require proper operation and maintenance. They filter fine suspended material
and also much of the bacteria, and improve physical qualities such as color, taste and odour.
(c) Boiling: -Boiling for two to three minutes makes water free from any harmful bacteria. But it
is not always a practical option as it requires of fuel, and needs waiting for the water to cool.
(d) Sunlight: -Putting water in clear glass or plastic bottles, and placing it in direct sunlight for
several hours kills both bacteria and other microorganisms.

References
1. Rain water harvesting structures in Ethiopia by Marco and Hune, 2000
2. Rainwater Harvesting and Utilization by HuneNega, Sept. 2006
3. Handbook of Civil Engineering, V.N.Vazirani&S.P.Chandola, 3rd Edition, 2008
4. HHWH Design, Construction & Management Training Manual by BegashawMolla in
SWHISA, March 2008
5. Planning, Design and Construction of WHS Manual by AkliluMesfin in Amhara, BoA and
Begashaw Molla in SWHISA, August 2010
6. Rainwater Champions: Stories from Ethiopia, Kenya & Uganda. May,2005 by RAIN in
Netherlands