roofing training - basics
TRANSCRIPT

Roofing Training - Basics
Sandy Wesch
March 2019
March 2019

March 2019
Tools
Hammer
Measuring Tape
Chalk Line & Chalk
Speed Square
Framing Square or Shingle Cutter
Utility Knife
Metal Snips
Extension Ladder(s)
2

March 2019
Reminder…DAHFH Construction Staff may ask volunteers to vary from the practices
included in the Construction Manual due to a change in materials, procedures, or other
special circumstances.
3

Safety
Any tools or material up on the roof must be secured with nails or cleats or in a tool belt
Volunteers may not wear leather-soled or slick-soled shoes on the roof; soft-soled shoes are recommended
Lift with your legs not your back – a bundle of shingles weighs 60 to 80 pounds
Do not carry shingles up the ladder - use the shingle lift
4 March 2019

Safety
Handle metal flashing carefully – the edges are
very sharp
Sweep the roof periodically to remove any dirt or
loose particles from the shingles – warn the
people working below
At the end of a row do not nail a shingle in place,
allowing it to run long, and then lean over to cut
flush with the drip edge
Remind volunteers not to “chase” anythingEstablish a drop zone
5 March 2019

Safety – Extension Ladders
Extension ladders should be
properly positioned and stable
Build and secure a proper
ladder block
Extension ladders should
never be moved if there are
people on the roof
Ladders should extend at
least three rungs above the
edge of the roof
6 March 2019

Safety – HUGS(Horizontal Under-Eave Guard System)
Do not lean against any of the HUGS rails
Do not use the HUGS as a foot hold
Do not lean any material against rail system
7 March 2019
March 2019
Before Starting…✓ Verify kick-out flashing has been installed
✓ Verify fascia is installed
Then…Install the drip edge
Tape decking and drip edge seams
8

March 2019
Kick Out Flashing
9
2017 Construction Manual, Section 8.1
Figure 8-1

March 201910
2
1
Behind the fascia and under the drip edge
2017 Construction Manual, Section 8.1
Figure 8-2

Drip Edge
Easiest to install with two people
Plan ahead so short pieces (2 feet or
less) are not used on long runs
Bottom of the drip edge is against
the fascia, but do not forced
Do the eaves first and start from the
back of the house and work towards
the street
Overlap by at least 3 to 4 inches
Use a roofing nail every 16 to 18
inches
Nail from one end to the other
11
2017 Construction Manual, Section 8.2
Rake
Eave
Figure 8-3
March 2019

Drip Edge
12
Eave
Rake
2017 Construction Manual, Section 8.2
Figure 8-7
Figure 8-5
Figure 8-6
March 2019

Drip Edge Corners
13
2017 Construction Manual, Section 8.2.2
Figure 8-4
Eave
Rake
March 2019

March 2019
5
1
14
Taping Sequence
Eave
Ridge
Drip Edge
2 2 2 2
3
4 4 4 4
6 6 6 6
7
8 8 8 8
9
10 10

March 2019
Taping Drip Edge
15
Rake
Eave

Types of Shingles
Architectural3-Tab
16
2017 Construction Manual, Section 8.4
March 2019
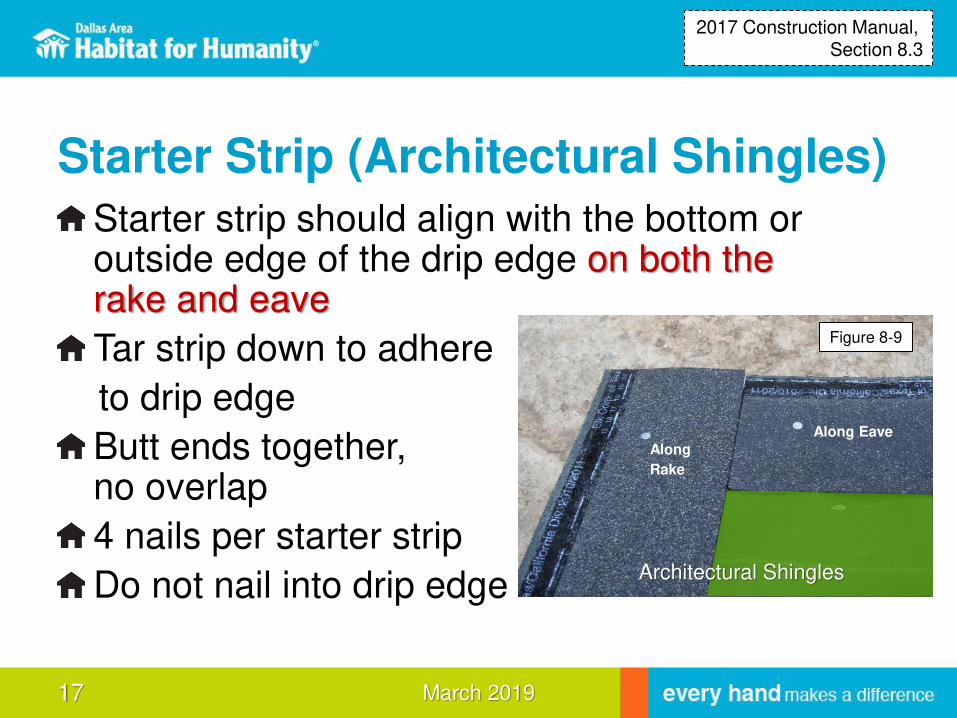
Starter Strip (Architectural Shingles)
Starter strip should align with the bottom or outside edge of the drip edge on both the rake and eave
Tar strip down to adhere
to drip edge
Butt ends together, no overlap
4 nails per starter strip
Do not nail into drip edge
17
2017 Construction Manual, Section 8.3
Along Eave
Along
Rake
Architectural Shingles
Figure 8-9
March 2019

Nailing Patterns
Use four nails for full shingles
Use three nails for shingles less than 13
inches
Do not nail into the drip edge
18
Architectural
2017 Construction Manual, Section 8.4
Figure 8-12
March 2019

Shingle Placement
For the first row of shingles, the bottom edge should align with the bottom edge of the drip edge
Start shingling from the front of the house
The side of a shingle should butt up to the
one next to it; do not overlap
19
2017 Construction Manual, Section 8.4
March 2019

Architectural Shingles Alignment
Bottom edge of shingles
should be flush with the
top of the cut or ridge of
the shingle below
Measure every 5 to 6
rows; if the
measurements varies by
more than ½-inch, snap
a chalk line to correct
20
2017 Construction Manual, Section 8.4.1
Ridge
Line
March 2019

Staggering Seams (Architectural Shingles)
Align the first row flush
with the starter strip
along the eave and
rake
Create a stagger at the
beginning of the row so
the seams do not line
up
21
2017 Construction Manual, Section 8.4.1
Figure 8-13
(Rake)
Eave
March 2019

Other Shingle “Rules”Last shingle of the row is cut to fit – do
not nail in place and then cut
No cuts should be less than 10 inches
Seams should be a minimum of 6
inches apart
Minimize walking and standing on
shingles – do not lay on shingles
Have volunteers work from the top side
of the shingles to prevent damage
22
2017 Construction Manual, Section 8.4
March 2019

March 2019
Cutting Shingles
23
If using the shingle cutter, cut:
o Architectural shingles rock side up
If using a board and knife, cut from the back side

March 2019
At the Peak or Ridge
Shingle until the
nailing line (see
Slide 17) is within 5
inches of the peak
Overlap the peak
from both sides of
the roof
24
5” 5”
Na
ilin
g L
ine
2017 Construction Manual, Section 8.4
March 2019
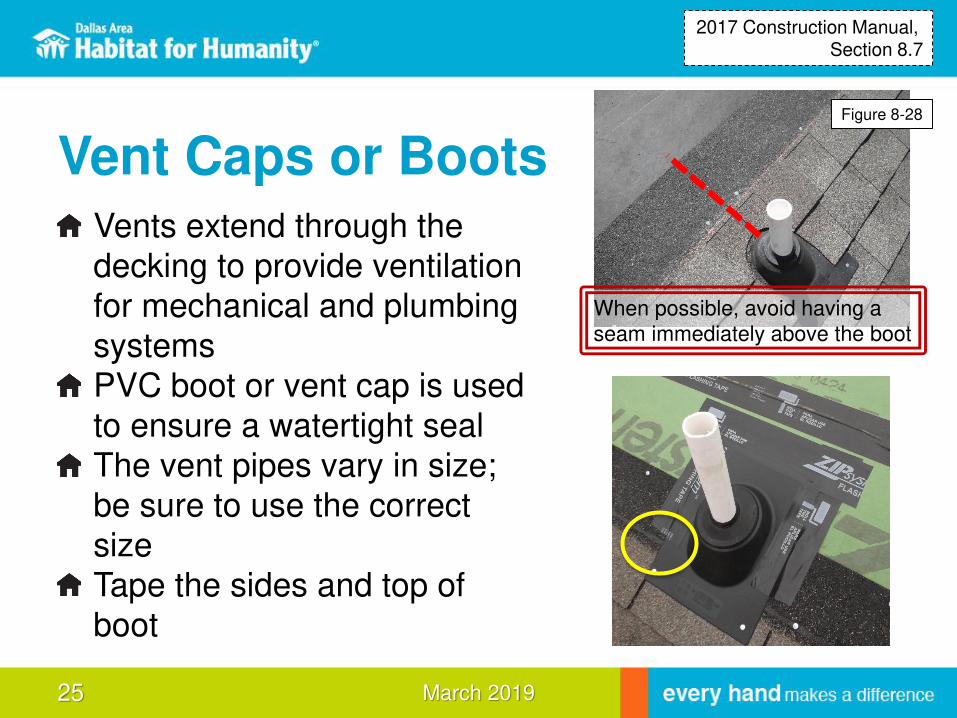
Vent Caps or BootsVents extend through the
decking to provide ventilation
for mechanical and plumbing
systems
PVC boot or vent cap is used
to ensure a watertight seal
The vent pipes vary in size;
be sure to use the correct
size
Tape the sides and top of
boot
25
When possible, avoid having a
seam immediately above the boot
2017 Construction Manual, Section 8.7
Figure 8-28

March 201926
Row 1

March 201927
• If the bottom edge of the
boot is above the nailing
line, the shingle will go
under the boot
• If the bottom edge of the
boot is below the nailing
line, nail the boot in place
and cut the shingle to go
around the top of the boot
Row 1Reminder: Using flashing tape, tape sides, then top of boot

March 201928
Row 2

March 201929
Row 3
March 201930
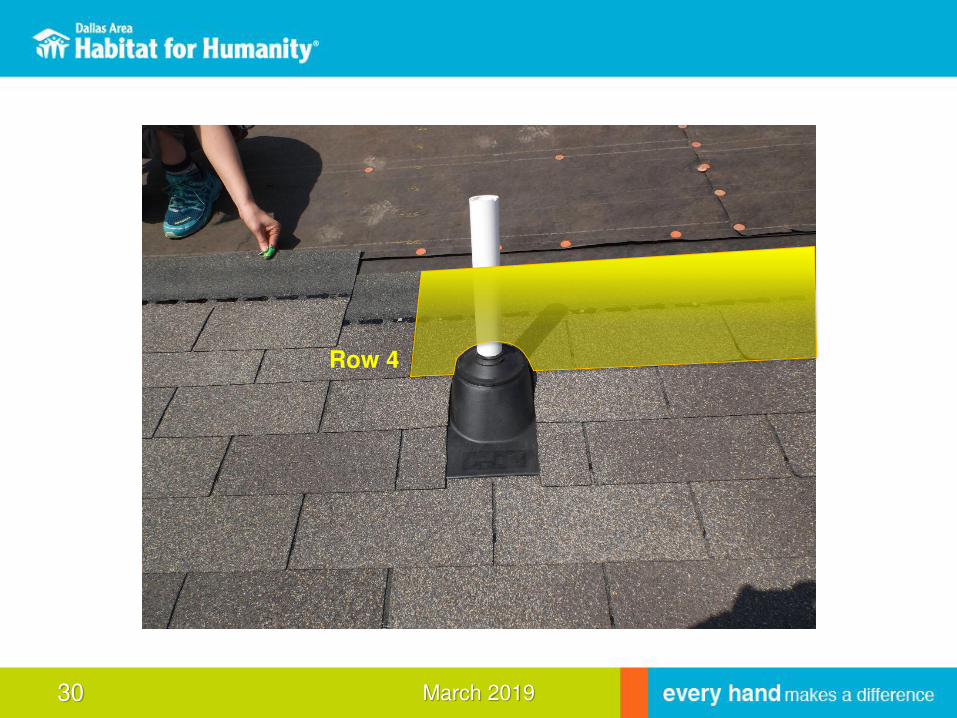
Row 4

March 201931
Row 1
Row 2
Row 3
Row 4

Brick Ledger Board
Supports/distributes the weight of the masonry
Install using 4-inch deck screws spaced at 24 inches to secure into the gable
32
2017 Construction Manual, Section 8.5
OSB Spacer
3 - 2x6 Brick Ledger Boards
Brick Flashing
Cross-Section View
Blue Board
Figure 8-23
March 2019

March 2019
Step Flashing
33

March 2019
Step Flashing
Must be installed as the roof is
shingled
Step A - Set the step flashing in
place. Use the orange or white
line or tar line of the course
below as a guide for the bottom
edge of the flashing; flashing
should not protrude farther than
the bottom edge of the next
shingle.
Step B - Set the shingle in place
Step C - Nail the shingle in place
Step D - The end nail of the shingle should also go through the step flashing and hold it in place
34
Figure 8-24
2017 Construction Manual, Section 8.6

March 2019
Ridge Cap
May be cut from 3-tab shingles
On one side of the roof, snap a chalk line 5½ inches down from the peak (ridge line)
Use this line as a guide for cap
For the main roof, start at both ends and meet in the middle
For smaller sections (over porch or garage), start at the front of the house and work back
Use two roofing nails per cap; four on last piece
35
2017 Construction Manual, Section 8.8
Figure 8-29
Figure 8-30
Cut lines (in red) for creating ridge
cap from 3-tab shingles

March 201936

March 2019
Ridge Cap
37
2017 Construction Manual, Section 8.8
Figure 8-33

March 2019
Finishing
Spray paint pipes black to retard UV damage from the sun
Tar any exposed nails, remember the vent caps and final pieces of ridge cap
38
2017 Construction Manual, Section 8.10
Apply tar

March 2019
Brick Flashing
39
Install brick flashing over the brick ledger board after the roof is complete
The top flange of the flashing goes behind the Blue Board

March 2019
Quality
Rows should be straight and not wavy
As the rows approach the ridge, the row
should be parallel to the ridge
Check for exposed nails
40

Questions?