roofkit white membrane pocket guide
DESCRIPTION
Roofkit White Membrane Pocket GuideTRANSCRIPT

White MembranePocket Application Guide


2
Table of ConTenTs
Page 3 . . . . . . . . . . . . . . . . . . . . . . . . . . . General Information
Page 3 . . . . . . . . . . . . . . . . . . . . . . . . Cautions and Warnings
Page 5 . . . . . . . . . . . . . . . . . . . . . . . . . . Recommended Tools
Page 5 . . . . . . . . . . . . . . . . . . . . . . . . . . . . Available Products
Page 6 . . . . . . . . . . . . . . . . . . . . . . . . . . . Surface Preparation
Page 7, 8 . . . . . . . . . . . . . . . . . . . . . . . . . . . . . . . . Installation
Page 9 . . . . . . . . . . . . . . . . . . . . . . . . . . . Seaming Membrane
Page 10 . . . . . . . . . . . . . . . . . . . . . . . . . . . . . .Termination Bar
Page 10 . . . . . . . . . . . . . . . . . . . . . . . . Outside Corner Detail
Page 11, 12 . . . . . . . . . . . . . . . . . . . . . . . Inside Corner Detail
Page 13 . . . . . . . . . . . . . . . . . . . . . . . . . . . . . . . . . Cover Strip
Page 14 . . . . . . . . . . . . . . White Pipe Boot with Steel Clamp
Page 15 . . . . . . . . . . . . . . . . . . . . . . . . . . . . . . . . . . . . T-Joints
Page 15 . . . . . . . . . . . . . . . . . . Field Seam at Vertical Change
Page 15 . . . . . . . . . RoofKit Membrane to Shingle Transition
Page 16 . . . . . . Repair of RoofKit White Roofing Membrane
Page 17, 18 . . . . . . . . . . . . . . . . . . . . . . . . . . . . . . . . Glossary
Page 19 . . . . . . . . . . . . . . . Review of Application Procedures
Page 21-26 . . . . . . . . . . . . . . . . . . . . . . . . . . . CAD Drawings
3
GeneRal InfoRMaTIon
This APPLICATION GUIDE has been designed to give the installer a GENERAL DESCRIPTION of a RoofKit fully adhered white roof system . This APPLICATION GUIDE is intended as a reference aid only and is not intended or meant to be all-inclusive .
RoofKit User Cautions and Warnings!
• The White Membrane is slippery especially when wet, dusty or covered with snow, frost or ice . Please read and follow all cautions and warnings, including notice on the white membrane roll .
• Always use fall protection systems when working on rooftops.
• Be sure to comply with all OSHA and other safety standards while working on a roof.
• Be sure to stay well away from overhead obstructions and power lines making sure neither your body nor equipment has contact with them .
• Safeguard against falling by reading ladder manufacturer's warnings; and by establishing a perimeter warning system utilizing ropes with flags attached. Always work with a friend and never work with your back to the roof's edge.
• Read Caution labels on all adhesive, primer and sealant containers . These materials may contain petroleum distillates and can be extremely flammable. Care must be taken to avoid open flames. Do not smoke when using these products . Material Safety Data Sheets (MSDS) are available for these products and should be consulted .
• Adhesives should be used in a well-ventilated area . Avoid inhalation of any fumes. Care should be taken to ensure fumes do not enter the building through windows or fresh-air-intake ventilation fans.
• Avoid adhesive contact with skin. Chemically resistant gloves are required. If adhesive comes in contact with skin, wash with soap and water .

4
• Avoid adhesive contact with eyes. Safety glasses should be worn . If adhesive comes in contact with eyes, flush for 15 minutes and call a physician .
• Care must be taken with fasteners that penetrate the deck to avoid contact with electrical wiring and plumbing .
• Reroofing over a wet substrate is not good roofing practice . All wet materials should be removed before proceeding with the installation of new materials .
• Condensation may occur when applying adhesives at temperatures below 40o F . especially when there is high humidity . If droplets of water are discovered, discontinue installation until weather conditions improve . At that time reapply a thin coat of adhesive over the old coat of adhesive and continue installation . Note: All adhesives should be applied at temperatures above 40o F . DO NOT ALLOW ADHESIVE TO FREEZE.
• When using White Membrane Water Based Bonding Adhesive in a "contact" or two-sided application allow adhesives to adequately dry to avoid blistering of the membrane . Note: The RoofKit White Reinforced Membrane may be applied directly into wet White Membrane Water Based Bonding Adhesive (one-sided application method) for horizontal field applications .
• Positive drainage of at least one-eighth inch (1/8") in twelve inches (12") is required for warranty coverage.
• Petroleum products such as asphalt roof cements and solvent based coatings will deteriorate the RoofKit White Reinforced Membrane and should never be used on this type of roof membrane.
Note: RoofKit White Membrane Water Based Adhesive has been tested to ensure compatibility with the RoofKit White Reinforced Membrane . Use of non-RoofKit products will void the membrane warranty .

5
ReCoMMended Tools
The following list is for reference only, as tools and equipment may vary from project to project:
• 2-inch steel or hard roller• Soft bristle push broom• Scissors• Chalk line• Tape measure• Solvent resistant rubber gloves• Stir stick for adhesives• 9-inch paint roller frame and several large nap, solvent
compatible roller covers• Caulk gun• Extension Ladder• Screw gun and hammerdrill
RoofKIT PRodUCTs avaIlable
• RoofKit White Reinforced Membrane (45 mil thickness) available 6'6" x 20' (1 or 2/tube), 10' x 20', or 10' x 100'.
• RoofKit White Membrane Water Based Bonding Adhesive in 1 gallon and 3 .5 gallon containers (coverage rate 100 sq. ft./gal).
• RoofKit Seam Primer in 1 gallon containers
• RoofKit White Membrane Seam Kit contents include: primer (pint), seam tape (25'), scrub pad, seam roller and wipe cloths .
• RoofKit White Membrane Seam Tape in rolls 3" wide by 50' length
• RoofKit White Membrane Cover Strip in rolls 6" wide by 50' lengths
• RoofKit White Membrane Caulk in 10 oz . tubes (20 lineal feet/tube)
• RoofKit White P/S Pipe Boot and Steel Clamp 1 per box
• Roof Kit White Decorative Term Bar 1 .75" x 10'
• Roof Kit White Decorative Term Bar Cover 1 .75" x 10'
• RoofKit Aluminum Fastening/Termination Bar in 5' & 10' lengths
• RoofKit Water Stop in 11 oz. tubes (20 lineal feet/tube)

6
• RoofKit White Membrane Patch and Corner Cover Kit (6) 8" Repair Patches, 1 pint seam primer, scrub pad, 1 seam roller, and 2 wipe cloths
• RoofKit White Skylight Flashing 8" x 14'
• RoofKit Fastening Screws and Plates 100 of each; both 3"
Roof sURfaCe PRePaRaTIonRoofKit White Reinforced Membrane will adhere to insulation boards compatible with RoofKit adhesives (this does not include polystyrene insulation) . The roof membrane will adhere to plywood, OSB (Oriented Strand Board), one-half inch (1/2") high-density wood fiberboard, and concrete. If polystyrene insulation is used, cover the insulation with one-half inch (1/2") high-density wood fiberboard. Butt all insulation boards together, staggering all of the joints. All spaces larger than 1/4" must be filled to provide a uniform, smooth surface .
Fastening Screws and Plates shall be applied at the minimum rate of ten (10) per 4 ft . x 8 ft . board of insulation, and five (5) per 4 ft. x 4 ft. board, or as required by the insulation manufacturer . When installing insulation around the perimeter, the fastening pattern is one (1) fastening screw and plate every two (2) square feet (16 per 4 ft. x 8 ft. board). Examples of fastening patterns are shown in Figure 1 . NOTE: Extra fastening screws should be installed around protrusions such as pipes, chimneys, skylights and irregularities in the roof deck.
Do not install more insulation than can be covered with RoofKit White Reinforced Membrane by the end of the day .
Reroofing over a wet substrate is not good roofing practice . All wet materials should be removed and replaced prior to the installation of new materials .
The roof surface must be dry . Moisture will cause poor mem-brane adhesion and blistering .
The roof surface should be swept to remove dirt, dust and other loose particles .
Good roofing practice dictates that the roof surface must have positive drainage of at least 1/8" in 12 inches.

7
InsTallaTIon
Unroll the RoofKit White Reinforced Membrane over the substrate so that the sheet is in the desired position and is wrinkle free. If more than one roll of membrane is required, subsequent rolls must over lap the prior roll a minimum of three inches (3") for seaming . Start at the low side of roof if seaming rolls. Care should be taken to ensure the membrane overhangs the perimeter of the roof at least three inches (3") .
Allow the RoofKit White Reinforced Membrane to relax for approximately 25 minutes depending upon weather conditions .
Fold the membrane onto itself so that one-half (1/2) of the underside of the membrane is exposed. Take care to avoid wrinkles.
White Membrane Water Based Bonding Adhesive: (Plastic Container)
(May be applied in one of two methods)
One-Sided Application Method for Field of Roof: Open and thoroughly stir the Water Based Bonding Adhesive . Using a 3/4 “large nap paint roller, apply the Water Based Bonding Adhesive to the substrate at a rate of 100 square feet per gal-lon . Then carefully fluff air under the top half of the membrane and roll the membrane into the wet adhesive starting from the middle of the membrane first, followed by the ends . DO NOT let the ends of the membrane roll ahead of the middle . Lightly broom the membrane to remove any air pockets or wrinkles and to ensure transfer of adhesive to the bottom side of the membrane . Caution: limit foot traffic on the membrane while
FIGURE 1 - Fastening Pattern

8
adhesive is curing . Repositioning of the membrane is possible while the adhesive is still wet . After the adhesive begins to set-up (approximately 20 to 35 minutes) apply pressure with a push broom to ensure good contact. This application requires a porous substrate, such as High Density Fiberboard, OSB or plywood .
Contact Application Method: For vertical or horizontal applications . Open and thoroughly stir the White Membrane Water Based Bonding Adhesive . Using a large nap roller, apply White Membrane Water Based Bonding Adhesive to both the substrate and the membrane at a rate of 100 square feet per gallon . Use care not to get the adhesive into the seam area(s) . The adhesive is white when applied, but will turn clear when ready for bonding . When adhesive is dry (clear) on both surfaces, carefully fluff air under the top half of the membrane and roll the membrane into the glued substrate . Roll the middle of the membrane first, followed by the ends . DO NOT let the ends of the membrane roll ahead of the middle . Finally, apply pressure to the installed membrane with a push broom to ensure good contact. Fold back the remaining unglued portion of membrane and repeat this process .
If installing more than one roll, always install the membrane so that the flow of water goes over and not against the lapped edges . Start at the low side of roof if seaming rolls .Allow the next roll of membrane to over lap the previous roll of membrane a minimum of three inches (3") . Again, fold the membrane onto itself so that one-half of the under side of the membrane is exposed . Apply White Membrane Water Based Bonding Adhesive to the substrate and proceed as you did with the first roll .

9
seaMInG MeMbRane
The top membrane should overlap the bottom sheet by 3". Mark a line ½ inch out from the edge of the top roof membrane . Fold back the top 3" overlap and clean both surfaces of the area to be seamed with the RoofKit Seam Primer using scrubbie pad and allow to dry completely . Fold the top membrane sheet back to expose the seam area. (HINT: A small piece of seam tape that is tacky on both sides is useful to tack the membrane back.) Ensure the entire area is primed past the seam edge to the marked line.
Unroll the Seam Tape along the length of the seam, paper side up, aligning the Seam Tape paper with the marked line. Then with the release paper still in place, roll the Seam Tape with a steel or hard roller. This will set the Seam Tape into place and keep air from being trapped under the tape . Fold the top membrane back onto the Seam Tape release paper .
Reaching under the top ply of membrane, pull the release paper away from the Seam Tape at a 45o angle to the seam . While removing the paper, draw your hand across the seam, from the back to the leading edge. This will prevent wrinkles and fishmouths from forming in the seam . After
the paper is removed, roll the entire length of the seam with a steel or hard roller – first, across the seam, and then the length of the seam .
IMPORTANT! If the White Seam Tape does not visibly extend beyond the leading seam edge, the edge should be cleaned with Seam Primer and sealed with White Membrane Caulk.
NOTE: When splicing the ends of Seam Tape together, overlap each piece a minimum of one inch (1") and firmly roll with a steel or hard roller .
seamed with the RoofKit Seam Primer using scrubbie pad and

10
TeRMInaTIon baR
When using the Termination Bar to secure the White Reinforced Membrane over the edge of the roof, make sure that the sheet extends a minimum three inches over the roof’s edge . Center the bar in the 3” overhang and secure with fastening screws . The screws should be positioned through the pre-drilled holes along the length of the Termination Bar. Use a utility knife, to trim any excess membrane below the bar for a finished look.
When using the Termination Bar to secure membrane that has been placed up a wall, the Bar will be positioned a minimum of 12” from the wall base . The membrane should have, at this point, been adhered to the wall using the appropriate RoofKit adhesive. Peel back the top of the glued membrane from the wall and apply a heavy bead of RoofKit Water Stop caulk between the membrane and the wall . The RoofKit Water Stop caulk should be applied so that the final position of the Termination Bar will be directly over the Water Stop (see fig . WRK202, pg . 24) . The Bar should be secured with proper fasteners, depending on the substrate. Using a utility knife, trim the excess membrane just above the Termination Bar. Finish the termination by sealing the top edge of the membrane using RoofKit White Membrane Caulk.
When using wood shakes or other siding materials, the Termination Bar is not required if the siding material is brought down at least eight inches (8”) beyond the top of the RoofKit White Roofing Membrane. All siding must be kept a minimum of 4” above the roof deck.
oUTsIde CoRneR deTaIl
Using scrub pad, clean entire area with Roof Kit Seam Primer . Allow to dry .
Fold 8" round corner in half, remove top half of paper
backing and position ½ of each top fold onto the outside corner .
Step 1
Step 2

11
Use roller to ensure good contact of top half of corner .
Remove paper backing from bottom half of corner .
Gently work the bottom half of corner into place . Be sure not to overstretch .
Use roller to ensure good contact throughout the
completed corner .
Use RoofKit White Caulk around all edges of the completed corner .
InsIde CoRneR deTaIl
Using scrub pad, clean entire area with RoofKit Seam Primer . Allow to dry .
Step 1
Step 4
Step 5
Step 6
Step 7
Step 3

12
Fold 8" round corner in half, remove top half of paper backing and position ½ of each top fold into the corner .
Use roller to ensure good contact of top half of corner .
Fold bottom half of corner to create a flap or “pig's ear".
Remove the remaining paper backing and press the flap
against itself sealing the flap or “pig's ear".
Clean the area behind the flap and apply RoofKit MultiPurpose Adhesive to the back side of the flap. Allow adhesive to dry . Mate flap to corner .
Use roller to ensure good contact throughout the
completed corner .
Step 3
Step 4
Step 5
Step 6
Step 7
Step 2

13
Use RoofKit White Caulk around all edges of the completed corner .
CoveR sTRIP
Clean and/or prime the area to be covered . CAUTION: Wear protective gloves when using solvent/primer.
Center coverstrip over the prepared surface .
Peel back about 8" of paper to expose the adhesive sideof the strip .
Remove release paper at a 45° angle .
Gently mate the coverstrip by hand, avoiding stretching or wrinkles.
Step 1
Step 2
Step 3
Step 4
Step 5
Step 8
14
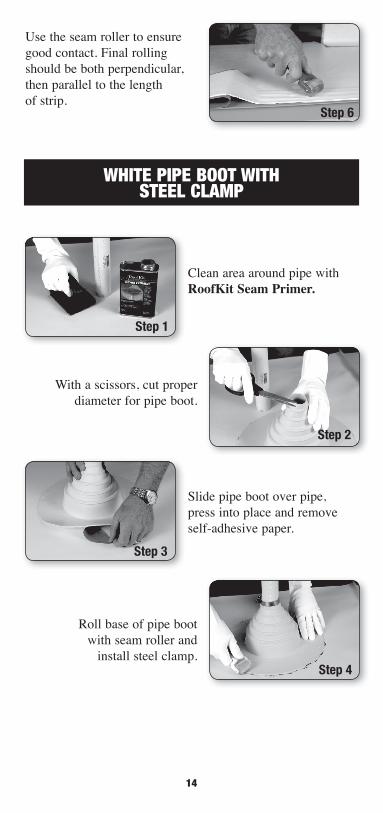
Use the seam roller to ensure good contact . Final rolling should be both perpendicular, then parallel to the length of strip .
WHITe PIPe booT WITHsTeel ClaMP
Clean area around pipe with RoofKit Seam Primer.
With a scissors, cut proper diameter for pipe boot .
Slide pipe boot over pipe, press into place and remove self-adhesive paper .
Roll base of pipe boot with seam roller and
install steel clamp .
Step 1
Step 2
Step 3
Step 4
Step 6

15
PaTCHes aT T-JoInTsA T-Joint is formed when two layers of RoofKit White Roof Membrane form a seam that travels under, or over, a third layer of membrane. The center of the “T" is where the middle layer ends and the top layer bridges over the middle layer . This T-Joint can provide an opportunity for water to seep under the membrane . To avoid problems at this area, a patch should be installed as follows:Clean the membrane with Seam Primer at least four inches (4") in all directions from the T-Joint and allow to dry .Using the White Membrane Patch centered over the junction of the three layers of membrane, remove paper backing and carefully smooth in by hand to avoid wrinkling and roll with a steel or hard roller. Use RoofKit White Membrane Caulk to seal all edges .
fIeld seaM aT veRTICal CHanGeWhere a field seam makes a sharp angle change (turns up a wall), a White Membrane Patch is to be adhered over the seam . Follow standard installation for patches and clean the membrane with RoofKit Seam Primer and scrub pad . Install the patch so that the patch is centered on the seam . Finally, use RoofKit White Membrane Caulk to seal all edges.
RoofKIT MeMbRane To sHInGle TRansITIonWhen installing a RoofKit White Roofing Membrane system with a tie-in to an existing shingle roof, remove a minimum of three (3) courses of shingles . Install White Membrane Coverstrip up side down at the base of the angle change and fasten using RoofKit Plates and screws 12" on center, leaving the paper backing on the Cover Tape. Scrub Tape Primer on corresponding back of membrane and allow to dry. Carefully peel the release paper off the inverted or up side down Cover Strip. Mate the back of the membrane to the exposed white tape as you finish installing up the wall . Adhere the mem-brane onto the sloped roof deck. Peel the top of the mem-brane back and apply a bead of RoofKit Water Stop between the membrane and the deck. Nail the top of the membrane every six inches (6") and install the shingles over the RoofKit membrane .

16
Keep the bottom course of shingles a minimum of four inches (4") above the roof angle change . To adhere the bottom course of loose shingle tabs to the membrane, lift each tab and apply a bead of RoofKit White Membrane Caulk.
PaTCHInG RoofKIT WHITe RoofInG MeMbRane
Using scrub pad, clean entire area with RoofKit Seam Primer . Allow to dry .
Remove paper backing from 8" round patch and
position the patch over the damaged area .
Use the seam roller to ensure good contact .
Caulk around the patch with RoofKit White Caulk.
Step 2
Step 1
Step 3
Step 4

17
GlossaRYBRIDGING: Occurs when the membrane is unsupported at a juncture or angle change. Moisture condensing on the bottom of the membrane can cause further delamination . Areas where bridging occurs should be repaired and re-flashed .
COVER STRIP: Six inch (6") wide cured white membrane with butyl tape laminated to one side . Used when stripping in metal edge details, repairing cuts in the field membrane .
FASTENING SCREWS AND PLATES: Used to mechani-cally attach (fasten) the insulation board to the roof deck.
TERMINATION BAR: Extruded aluminum bar used to ter-minate the membrane at parapet walls, chimneys, skylights, and AC curbs . Also used to terminate membrane fascia when no metal drip edge is used . The proper fastener should be installed in every hole and a one-quarter inch (1/4") space maintained between bars . (Also available in Decorative white version .)
FISHMOUTH: A wrinkle that is formed when an increas-ing amount of membrane is forced onto an area too small to accommodate the material. When the wrinkle ends at the edge of the material, a conical opening is formed called a Fishmouth. Wrinkles and Fishmouths in seams are not accept-able . They must be removed and flashed in .
FLASHED OFF: Allowing the solvents in the adhesives or primer to evaporate, leaving the material in a tacky, not wet or stringy condition, before mating the two surfaces together . If the proper Flash Off time is not allowed, blisters will form in the membrane . Blisters will not harm the membrane and over time, will usually disappear
WHITE MEMBRANE WATER BASED BONDING ADHESIVE (WMWB): Used to adhere the field membrane to the substrate . It should be thoroughly stirred before using and is white in color . It can be applied in two sided or single sided applications . Note: All adhesives should be applied at temperatures above 40o F . DO NOT ALLOW ADHESIVE TO FREEZE.
METAL EDGE DETAIL: Used to create a finished appear-ance and prevent water from running down the surface of fascias and walls . The Metal Edge is made from painted alu-minum and galvanized or painted steel . This is not a RoofKit Product.

18
WHITE PIPE BOOT AND CLAMP: Pre-molded white boot . The most cost effective way to flash pipe protrusions . The stainless steel clamp is used to secure the top of the pipe to the Pipe Boot .
WHITE CAULK: Applied at the top of all Fastening/Termination Bar applications; at the top of Pipe Boots and after the Pipe Boot Clamp has been installed, seams, patches, and to adhere shingle tabs to RoofKit White Roofing Membrane .
SEAM PRIMER: Solvent based primer used to clean and prime the RoofKit White Roofing Membrane before applying White Seam Tape or any cured or uncured tape backed mem-brane . Applied using a scrub pad . DO NOT APPLY PRIMER DIRECTLY TO TAPE . Primer is only applied to surfaces being prepared to accept tape products .
WHITE MEMBRANE SEAM TAPE: White butyl tape used to splice two layers of membrane into a watertight seam . Available in a width of three-inches (3") .
SIX (6") REINFORCED STRIP: RoofKit Reinforced Strip is six inches (6") wide . Used with RoofKit Multi-Purpose Bonding Adhesive and Fastening Screws and Plates to secure base flashings at walls and curbs (chimneys, skylights, etc).
SUBSTRATE: The surface on which the membrane is applied (brick, concrete block, high-density wood fiberboard, ply-wood, OSB, isocyanurate insulation) . NOTE: Should not be applied to asphalt roofing, shingles, or polystyrene insulation .
T-JOINT: An area formed when two layers of RoofKit White Roofing Membrane form a seam that travels under, or over, a third layer . The center of the "T" is where the middle layers ends and the top layer bridges over the middle layer .
WATER STOP: Used to create a waterproof compression gasket whenever the RoofKit White Roofing Membrane is mechanically fastened using a Fastening/Termination Bar or Pipe Boot Steel Clamp . Water Stop is applied between the membrane and the pipe or wall . The mechanical termination is installed over the membrane, compressing the Water Stop and creating the gasket. Also used for all gasket seals at drain clamping rings .

19
RevIeW of aPPlICaTIonPRoCedURes
1. SUBSTRATEa . Plywood, OSB or high-density wood fiberboard .b . Concrete .c . Insulation boards – all but polystyrene .
2. INSULATIONa. Insulation joints are butted together with no gaps.b. Correct fastener pattern and quantity used.c . 100% adhesion of the membrane to the substrate .
3. FIELD SEAMSa . Seam Primer should be visible past the leading edge of the
field seams (over scrub) .b. There are no wrinkles, void or fishmouths in any portion of
the field seams .c . All angle changes in the field seams are flashed over with
one ply of Tape Flashing .d . Seam Tape should extend past leading edge of the seam .
4. FASTENING/TERMINATION BARa . Apply Water Stop behind membrane prior to installing the
Fastening/Termination Bar.b . Install fastener in every hole and maintain a one-fourth inch
(1/4") space between Bars.c. Fastening/Termination Bar installed on parapet walls a
minimum of twelve inches (12") above the roof deck.d . White Caulk applied over top of Fastening/Termination Bar.
5. PENETRATIONSa . Tape Flashing is applied in two layers a minimum of eight
inches (8") above the roof deck.b . Pipe Boots have Water Stop applied between the pipe and
boot, are terminated with a Pipe Boot Steel Clamp and are caulked with White Caulk.
6. METAL EDGE DETAILa . Metal Edge is prepped (cleaned and seam primer), and of
sufficient gauge and adequately fastened to withstand wind uplift .
b . Properly stripped in using six inch (6") wide White Cover Strip . Cover Strip should extend a minimum of two inches (2") beyond any fastener .

20
7. OVERALL APPEARANCEa. Fastening/Termination Bars are level.b . Seam widths are uniform and completely rolled in .c. All trash or debris is removed from job site.
NOTE: OVERALL APPEARANCE IS VERY IMPORTANT.

21
ROOFKIT WATER STOP
APPROVED INSULATIONAPPROVED DECKING
ROOFKIT REINFORCEDWHITE MEMBRANE
TREATED WOOD BLOCKING 6” ROOFKIT COVER STRIP
METAL FASCIAFASTENED AT 4” O.C.
CONTINUOUS CLIP STRIPFASTENED AT 12” O.C.
PERIMETER METAL DRIP EDGE
WRK 101
6”
22
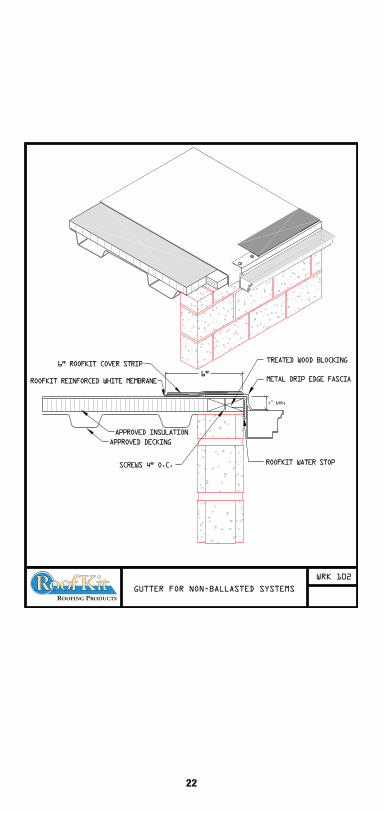
APPROVED INSULATION
APPROVED DECKING
ROOFKIT WATER STOP
ROOFKIT REINFORCED WHITE MEMBRANE
6” ROOFKIT COVER STRIPTREATED WOOD BLOCKING
METAL DRIP EDGE FASCIA
SCREWS 4” O.C.
6”
GUTTER FOR NON-BALLASTED SYSTEMS
WRK 102

23
REFER T0 TERMINATION DETAILS
ROOFKIT REINFORCED WHITE MEMBRANEWMWB ADHESIVE IN CONTACT METHODWMWB ADHESIVE IN CONTACT METHODROOFKIT FASTENING SCREWS AND PLATES
ROOFKIT 6” REINFORCED STRIP
APPROVED INSULATION
APPROVED DECKING
REINFORCED MEMBRANE STRIPAT BASE TERMINATION
WRK 201
24
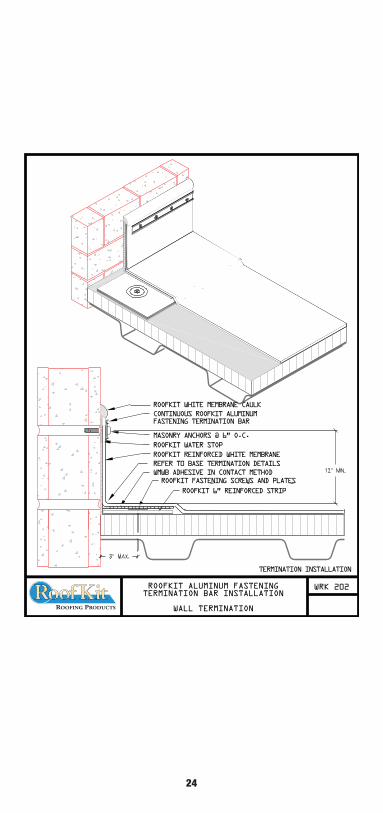
ROOFKIT WHITE MEMBRANE CAULK
CONTINUOUS ROOFKIT ALUMINUMFASTENING TERMINATION BAR
MASONRY ANCHORS @ 6” O.C.
ROOFKIT WATER STOP
ROOFKIT REINFORCED WHITE MEMBRANE
REFER T0 BASE TERMINATION DETAILSWMWB ADHESIVE IN CONTACT METHODROOFKIT FASTENING SCREWS AND PLATES
ROOFKIT 6” REINFORCED STRIP
TERMINATION INSTALLATION
ROOFKIT ALUMINUM FASTENINGTERMINATION BAR INSTALLATION
WALL TERMINATION
WRK 202

25
METAL COPING
TREATED WOOD BLOCKING
CONTINUOUS CLIP STRIPSECURED @ 12” O.C.
ROOFKIT REINFORCED WHITE MEMBRANE
WMWB ADHESIVE IN CONTACT METHOD
REFER TO BASE TERMINATION DETAILS
METAL COPING
TERMINATION
WRK 401

26
ROOFKIT WATER STOP
DRAIN HUB
ROOFKIT REINFORCED WHITE MEMBRANE
APPROVED INSULATION
MAX. SLOPE INTO DRAINPUMP IS 4:12 (33.36%)
DRAIN STRAINER
BOLT
APPROVEDSTRUCTURALDECKING ROOFKIT WATER STOP
DRAIN HUB
1. IF SEAMS RUN WITHIN 12” OF DRAIN, INSTALL A 4’ X 4’ MIN. MEMBRANE PATCH ON TOP OF MEMBRANE ENSURING SEAM IS COVERED.
2. REROOFING APPLICATIONS: A. REMOVE EXISTING FLASHING DOWN TO METAL SUMP.
B. REPAIR OR REPLACE BROKEN CLAMPING RING.
C. ALL BOLTS AND CLAMPS MUST BE PROPERLY INSTALLED TO MAINTAIN CONSTANT COMPRESSION ON ROOFKIT WATERSTOP SEALANT.
D. DRILL AND TAP BROKEN DRAIN BOLTS AND REPLACE AS NEEDED.
NOTE:
TYPICAL ROOF DRAINWRK 501

27
Materials Estimating ChartIte
mCo
nten
t/Siz
e/Co
vera
geEs
timat
eQ
tyPr
ice
Tota
l
3 Rol
l Size
s(1
) 6'6
" x 2
0' –
130
sq
ft pe
r rol
l (13
0 sq
ft p
er tu
be)
(2) 6
'6" x
20'
– 1
30 s
q ft
per r
oll (
260
sq ft
per
tube
)10
' x 2
0' –
200
sq
ft pe
r rol
l 1
0' x
100
' – 1
000
sq ft
per
roll
1 Ga
llon
3-1/
2 Ga
llon
1 ro
ll 3”
x 2
5' o
f sea
m ta
pe, 1
pin
t sea
m p
rimer
,sc
rub
pad,
1 se
am ro
ller a
nd 2
wip
e cl
oths
3” x
50'
Roof
Kit R
einf
orce
dW
hite
Mem
bran
e
Roof
Kit
Whi
te M
embr
ane
Wat
er-B
ased
Adhe
sive
Roof
Kit
Whi
te M
embr
ane
Seam
Kit
Roof
Kit
Whi
te M
embr
ane
Seam
Tap
e

28
Item
Cont
ent/S
ize/
Cove
rage
Estim
ate
Qty
Pric
eTo
tal
8" x
14'
6” x
50'
(6)
8" R
epai
r Pat
ches
, 1 p
int s
eam
prim
er,
scru
b pa
d,1
seam
rolle
r, an
d 2
wip
e cl
oths
1 pi
pe b
oot &
1 c
lam
p
Materials Estimating Chart
Roof
Kit W
hite
Sk
ylig
ht F
lash
ing
Roof
Kit
Whi
te M
embr
ane
Cove
r Stri
p w
/ Tap
e
Roof
Kit
Whi
te M
embr
ane
Patc
h &
Cor
ner
Cove
r Kit
Roof
Kit W
hite
Peel
& S
tick
Pipe
Boo
t

29
noTesIte
mCo
nten
t/Siz
e/Co
vera
geEs
timat
eQ
tyPr
ice
Tota
l
5' le
ngth
s or
10'
leng
ths
1-3/
4" x
10'
10.3
oz
100
piec
es o
f eac
h pe
r box
Alum
inum
Te
rmin
atio
n Ba
r
Roof
Kit W
hite
Ter
m B
ar&
Ter
m B
ar C
over
(Sol
d Se
para
te)
Roof
Kit
Whi
te M
embr
ane
Caul
k
3" F
aste
ners
/Pla
tes

30
noTes

7095 Americana Parkway • Reynoldsburg, OH 430681-800-225-4714 EXT. 7889 • www.RoofKitRoofing.com