root box instructions - home | nrcs 3 ¾” from each edge of the square board and make a mark for...
TRANSCRIPT
1
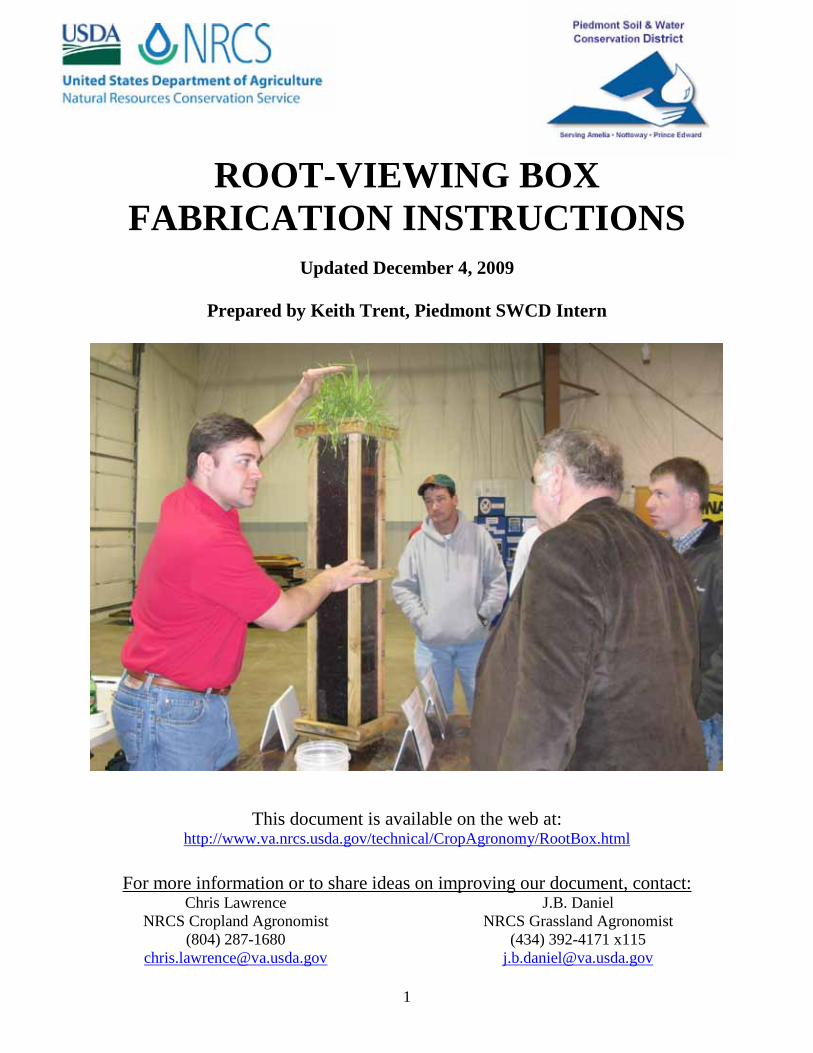
ROOT-VIEWING BOX FABRICATION INSTRUCTIONS
Updated December 4, 2009
Prepared by Keith Trent, Piedmont SWCD Intern
This document is available on the web at: http://www.va.nrcs.usda.gov/technical/CropAgronomy/RootBox.html
For more information or to share ideas on improving our document, contact:
Chris Lawrence NRCS Cropland Agronomist
(804) 287-1680 [email protected]
J.B. Daniel NRCS Grassland Agronomist
(434) 392-4171 x115 [email protected]

2
TABLE OF CONTENTS ABOUT THE AUTHOR- KEITH TRENT .................................................................................3
MATERIALS .................................................................................................................................4
TOOLS AND TIME ......................................................................................................................5
CONSTRUCTION .........................................................................................................................6
1. BOTTOM ASSEMBLY ............................................................................................................................................................ 6 2. SIDE RAILS ........................................................................................................................................................................... 8 3. PLEXIGLAS PREPARATION .................................................................................................................................................... 9 4. SIDE & BOX ASSEMBLY ..................................................................................................................................................... 10 5. BOTTOM ATTACHMENT ..................................................................................................................................................... 14 6. SIDE SLIDE COVERS ........................................................................................................................................................... 14 7. TOP ASSEMBLY .................................................................................................................................................................. 16 8. BOTTOM RACK .................................................................................................................................................................. 22 9. RULER MARKS ................................................................................................................................................................... 23 10. HALF-HEIGHT/SHORTER BOXES ...................................................................................................................................... 24 11. DO YOU HAVE A BETTER IDEA? ...................................................................................................................................... 24
GROWING PLANTS IN ROOT-VIEWING BOXES .............................................................25
1. HELP US IMPROVE THIS SECTION ................................................................................................................................. 25 2. PACK SOIL INTO BOXES BEFORE STARTING PLANTS .................................................................................................... 25

3
About the Author- Keith Trent
I am currently a senior at Virginia Tech majoring in Crop and Soil Environmental Science. I grew up in Lunenburg County, VA. My family runs a local land surveying business, Trent Land Surveying, where I have been working part-time since I was in middle school. I give my dad the credit for teaching me the importance of hard work.
Some of my hobbies include playing the guitar/banjo, working on cars/motorcycles, wood-working/cabinet making, and building computers. I enjoy working with my hands and being outdoors. I also like growing a vegetable garden in the summertime.
For the past two summers, I have interned with the Piedmont Soil and Water Conservation District in Farmville, Virginia. I have been involved in creating educational programs and helping to implement Best Management Practices (BMP’s). This internship has given me a greater understanding and appreciation of natural resources conservation.
During August 2009, I partnered with JB Daniel and Chris Lawrence of the Natural Resources Conservation Service to improve the design of their root-viewing box. I also assembled a significant number of boxes, some of which will be distributed among local NRCS and SWCD offices in Virginia. I created this instruction manual so that you, the reader, can build your own boxes. It was an honor to be able to put my wood-working skills to use in creating these wonderful teaching tools. I hope you find these instructions clear and helpful.
I am currently pursuing employment beginning in January 2010. I graduate from Virginia Tech in December 2009 and would love to find a position pertaining to my degree and in which my skills will be useful. If you would like to know more about me or know of any employment opportunities, my contact information is below. Thank you! David “Keith” Trent 11138 Lunenburg County Road Keysville VA, 23947 434-390-1460 434-736-0911 [email protected]

4
We strongly recommend that you read through these entire instructions before purchasing materials or beginning construction!
Materials The following list includes the materials needed to produce a set of three boxes, with some leftovers. We recommend building a set of three or more boxes. Multiple boxes allow for comparisons (different planting dates, different species, etc.) which are usually the best way to convey your educational message. All materials were purchased at Lowe’s. Therefore, you should be able to find similar materials at similar prices anywhere in the state. As indicated below, the materials for three boxes which will run about $150-200, or roughly $50 per box. Your final cost will depend in part on how efficiently you can use your lumber and materials. Item Unit cost Quantity Cost
2x2x42” Baluster Treated Decking Lumber
$1.15/piece 24 $27.60
½” Treated Plywood 4x8’ sheet $27.00/sheet 1 $27.00 2” Decking Screws- Coated/Galvanized
$7.29/ 1 lb box 1 $7.29
1 ¼” Decking Screws- Coated/Galvanized
$7.29/ 1 lb box 1 $7.29
Wire Mesh – Aluminum (fine enough so an earthworm can’t get through)
$8.48/roll 1 $8.48
3 ½” Door Hinge $1.58 3 $4.74 Latch $2.98 3 $8.94 Plexiglas- 1 sheet 44x32” - 0.080” thickness (see page 9 for discussion of Plexiglas selection)
$21.36 3 $64.08
Staples- T50 $3.00/ pack of 250 1 $3.00 ¾” Wood Bore Bit $4.00 1 $4.00 3/32” Drill Bit $3.00 1 $3.00
Approximate total cost (3 boxes) $165 Approximate cost per box $55
NOTE: If you plan to move your boxes around much after filling with soil, a hand cart will be very useful.

5
Tools and Time
· Table Saw · Miter Saw · Jigsaw · Cord/Cordless Drill · Staple Gun · Various Drill Bits/Drivers · Carpenter’s square · Straightedge at least 42” in length · Safety glasses · Tape Measure
Count 1 to 1 ½ days to build a set of three root boxes. Each box takes roughly 3 hours to assemble.
6
Construction
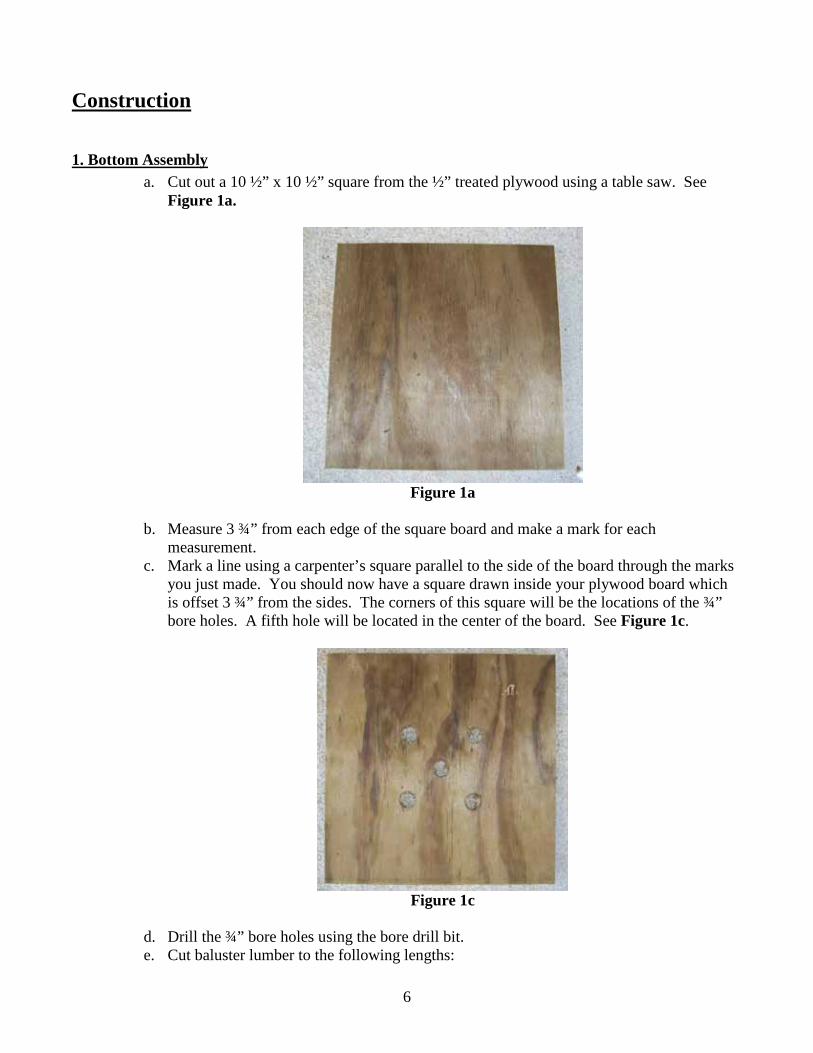
1. Bottom Assembly a. Cut out a 10 ½” x 10 ½” square from the ½” treated plywood using a table saw. See
Figure 1a.
Figure 1a
b. Measure 3 ¾” from each edge of the square board and make a mark for each
measurement. c. Mark a line using a carpenter’s square parallel to the side of the board through the marks
you just made. You should now have a square drawn inside your plywood board which is offset 3 ¾” from the sides. The corners of this square will be the locations of the ¾” bore holes. A fifth hole will be located in the center of the board. See Figure 1c.
Figure 1c
d. Drill the ¾” bore holes using the bore drill bit. e. Cut baluster lumber to the following lengths:

7
i. Two (2) pieces at 4 ¾” ii. Two (2) pieces at 7 ¼”
f. Position these four pieces of baluster you just cut in a square pattern as seen in Figure 1f with the smaller pieces on the inside of the square.
Figure 1f
g. Fasten these pieces together with four 2” screws in the corners. The screws should go
through the 7 ¼” pieces and into the ends of the shorter 4 ¾” pieces. h. Flip entire assembly over and fasten the square baluster unit to the square plywood piece
using eight 1 ¼” screws. Ensure that the baluster square is centered correctly before driving the screws. See Figure 1h for screw pattern.
i. Cut out a 6”x 6” square piece of aluminum screen material using scissors or a utility knife and attach to the top of the square assembly with staples as shown in Figure 1h.
Figure 1h

8
2. Side Rails a. With the guard removed from the table saw, set the rip fence to 5/8”. Now adjust the
blade to a height of 3/8”. See Figure 2a. Make sure the table saw is unplugged when measuring the blade height.
Figure 2a
b. Choose four pieces of 42” baluster lumber which are relatively straight and not bowed.
These will be your vertical or side rails. c. Be very cautious when running the table saw without the blade guard! d. Turn on the table saw and slowly slide each piece through once to cut the first slot for the
plexiglass. Keep the wood tight against the table saw fence as you cut to make sure the slot is straight. See Figure 2d.
Figure 2d
e. Now rotate each piece ¼ of a turn and run it through the saw once more to make the
second slot. Each rail should now have two slots running down the full length as shown in Figure 2e.

9
Figure 2e
3. Plexiglas Preparation Plexiglas Selection Note: We used Plexiglas with 0.080” thickness for making windows in these boxes. We tested this relatively thin material by filling boxes such as shown here with both potting soil and field soil. The material seemed to do well with a minimum of bowing. Using thicker Plexiglas may give you some insurance against cracking, bowing, or breakage. However, it will likely cost more. Based on our testing, we felt 0.080” thickness was a good compromise. Check Plexiglas prices locally and consider your goals. Be aware that using thicker window material will require wider slots in your box rails, possibly requiring use of a dado blade.
a. Reattach the guard on the table saw. Ensure the blade is raised high enough to cut
through the Plexiglas. b. Set the rip fence to 2 ¼”. c. Run the Plexiglass through the table saw to remove 2 ¼” from the 44” sheet. You should
now have a sheet of Plexiglas with a length of roughly 41 ¾”, which better matches your rail length.
d. Set the rip fence to 5 5/8”. e. Rotate the Plexiglas sheet ¼ of a turn and run through the saw four times. You should
now have four separate pieces of Plexiglas measuring 41 ¾” x 5 5/8”.

10
4. Side & Box Assembly a. Cut baluster lumber to make the following crosspieces:
i. Six (6) pieces at 10.5” ii. Six (6) pieces at 7 ¾”
b. Take two of the long side rails you just cut and lay on a flat table with two slots facing down towards the surface and two slots facing each other.
c. Slide a piece of Plexiglas through the slots facing each other and squeeze the rails together. See Figure 4c.
Figure 4c
d. Lay a 7 ¾” crosspiece on both ends of the rails flush with the sides and top/bottom.
Make sure there is a slight gap (roughly 1/16”) between the Plexiglas and the rails in each slot for the Plexiglas to slide freely.
e. Drill a pilot hole using the 3/32” bit through both ends of the crosspieces into the rail. See Figure 4e.
Figure 4e
f. Drive a 2” screw into each pilot hole while firmly holding the assembly. Check to make
sure the assembly is square after the screws are installed. Also check to make sure the Plexiglas can still slide freely. See Figure 4f.

11
Figure 4f
g. Measure down from the top 18” and make a mark on the two rails. See Figure 4g.
Figure 4g
h. Place a 7 ¾” crosspiece in the middle of the rails while lining it up with the marks made
in step “g.” See Figure 4h. Drill pilot holes on both ends of the crosspiece and attach using 2” screws.
Figure 4h

12
i. Repeat steps a-h to build a second side assembly. j. Place both assemblies facing each other as shown in
Figure 4j. Slide a piece of Plexiglas into the slots and squeeze together.
Figure 4j
k. Lay a 10 ½” crosspiece at each end of the rails and another in the middle, lining them up
with the shorter crosspieces already attached. Again allow for a small gap (roughly 1/16”) between the Plexiglas and rail in each slot for the Plexiglas to slide freely. Attach the crosspieces to the rails with six 2” screws as seen in Figure 4k. Drill 3/32” pilot holes to avoid splitting the lumber.
Figure 4k

13
l. Square up the entire assembly using a carpenter’s square and drive six more 2” screws
beside the previous screws about an inch towards the inside. Make sure to drill pilot holes with the 3/32” drill bit before driving the screws to prevent the rails from splitting. See Figure 4l.
Figure 4l
m. Flip the assembly over and repeat steps j-l to complete the box assembly. A large clamp
can be used to pull the pieces together or spread them apart depending on your needs. See Figure 4m.
Figure 4m

14
5. Bottom Attachment a. Stand your box up on the ground (bottom side up). b. Lay the bottom onto the box as seen in Figure 5b.
Figure 5b
c. Screw the bottom to the lower crosspieces using eight 1 ¼” screws as seen in Figure 5c.
Figure 5c
6. Side Slide Covers a. Cut out four pieces from the ½” treated plywood measuring 4 7/8” x 41 ¾” using the
table saw. b. Now measure down from one end of the plywood 15 inches and make a mark in the
middle of the board. See Figure 6b.

15
Figure 6b
c. Drill halfway though the plywood with the ¾” bore bit to make a finger notch for raising
and lowering the slide cover. Make sure not to go through the board completely. See Figure 6c. Repeat steps b and c for the next three boards.
Figure 6c
d. Slide the four cover pieces into the space between the Plexiglas and the crosspieces. See
Figure 6d.
16
Figure 6d
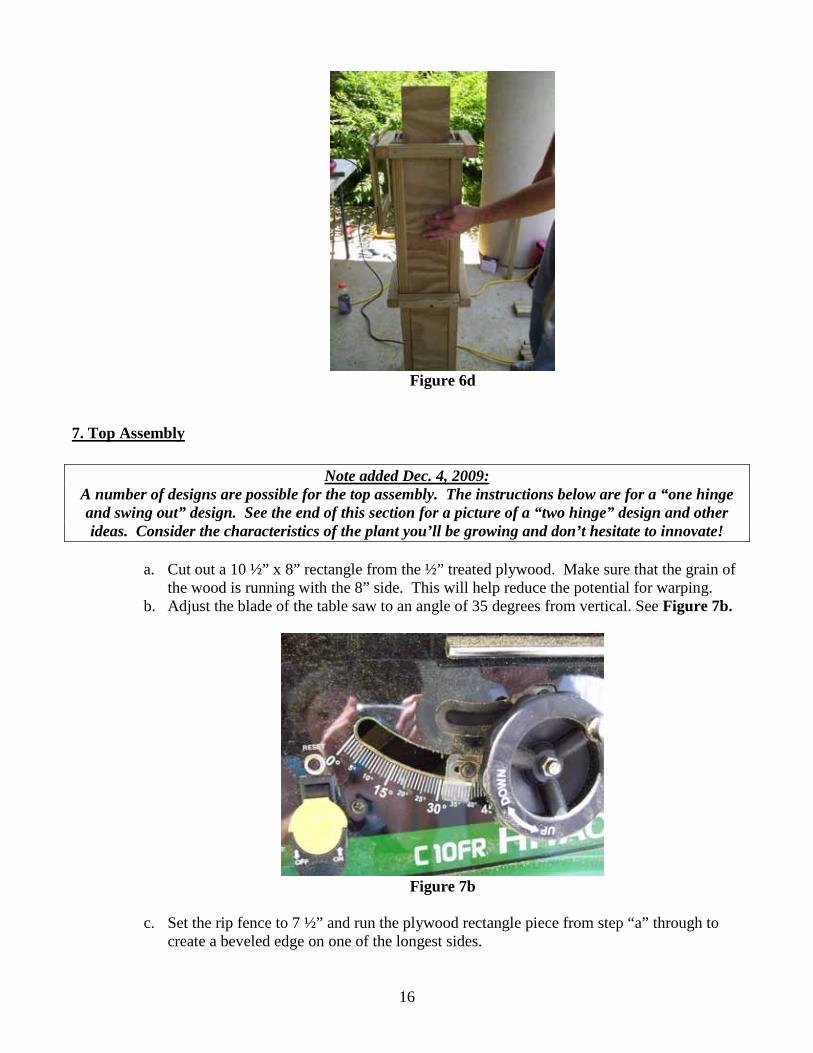
7. Top Assembly
Note added Dec. 4, 2009: A number of designs are possible for the top assembly. The instructions below are for a “one hinge and swing out” design. See the end of this section for a picture of a “two hinge” design and other ideas. Consider the characteristics of the plant you’ll be growing and don’t hesitate to innovate!
a. Cut out a 10 ½” x 8” rectangle from the ½” treated plywood. Make sure that the grain of
the wood is running with the 8” side. This will help reduce the potential for warping. b. Adjust the blade of the table saw to an angle of 35 degrees from vertical. See Figure 7b.
Figure 7b
c. Set the rip fence to 7 ½” and run the plywood rectangle piece from step “a” through to
create a beveled edge on one of the longest sides.

17
d. Measure in 2 ¼"from the two short sides and make a mark. Also measure in 2 ¼” from the long side with the beveled edge and make a mark. See Figure 7d.
Figure 7d
e. Using a carpenter’s square, draw lines through the marks you just made which are
parallel to the sides of the rectangle piece. You should now have a “U” shaped outline inside the rectangle piece as shown below in Figure 7e.
Figure 7e
f. Cut out the piece inside the rectangle in Figure 7c using a jigsaw. Your top should now
look like Figure 7f.
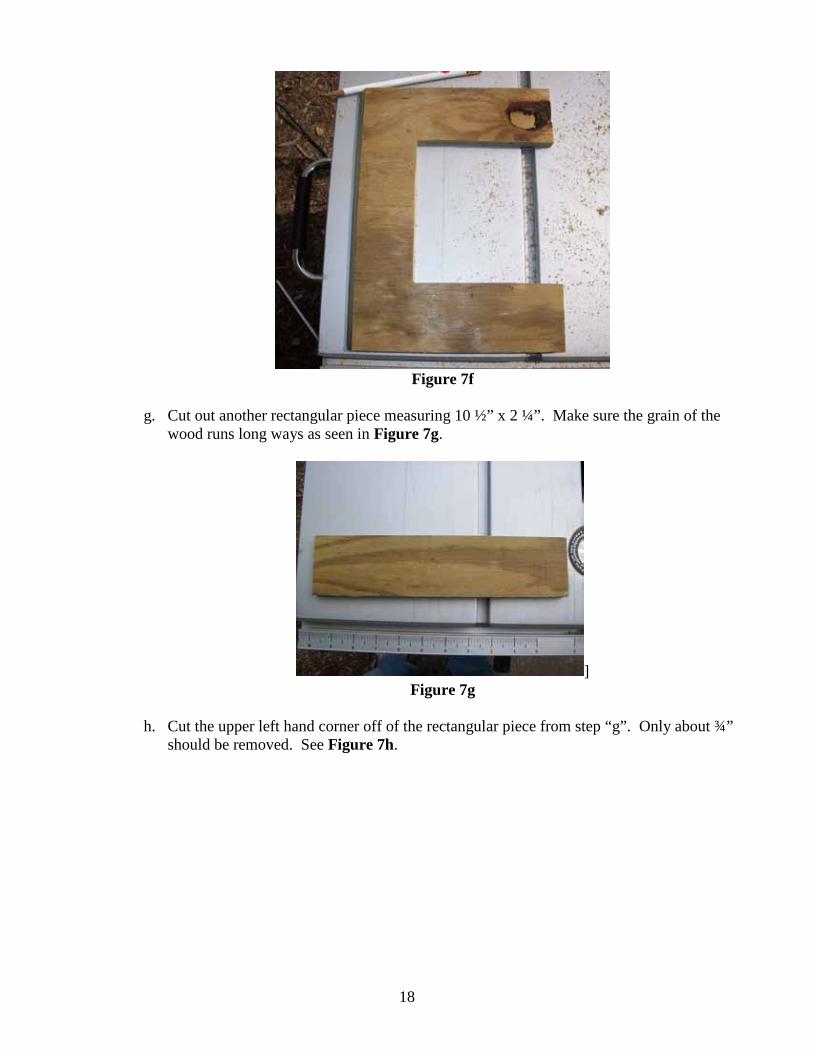
18
Figure 7f
g. Cut out another rectangular piece measuring 10 ½” x 2 ¼”. Make sure the grain of the
wood runs long ways as seen in Figure 7g.
] Figure 7g
h. Cut the upper left hand corner off of the rectangular piece from step “g”. Only about ¾”
should be removed. See Figure 7h.

19
Figure 7i
i. Lay the rectangle piece on top of the root box assembly with the notch facing the
opposite edge as shown in Figure 7i. Drill a pilot hole on the left side of the rectangle about an inch from the end with the 3/32” drill bit.
j. Attach the rectangular piece by driving a 2” screw through the pilot hole drilled in step “i”. This should hold the cover in place and allow it to swing open clockwise.
k. Lay the U-shaped piece flat on a table with the opening facing you and the beveled edge facing up.
l. Install the latch on the right hand side as shown in Figure 7l with the three small screws included with the latch kit. Allow the latch to hang over the end of the plywood about an inch.
Figure 7l

20
m. Lay the U piece on top of the root box assembly to cover up the rest of the top edges.
Install the 3 ½” door hinge on the back of the U piece as shown in Figure 7m. The hinge should screw to the U shaped plywood and the top crosspiece on the box.
Figure 7m
n. Install the latch hook on the lower right hand corner as shown in Figure 7n.
Figure 7n

21
o. Other designs. See Figure 7o below for a picture of a “two hinge” top assembly on a box
recently built by the VA Tech Department of Plant Pathology, Physiology, and Weed Science (PPWS). Another design approach not shown is a “two piece slide” design. Imagine the two U-shaped pieces on the PPWS box below sliding in towards each other instead of lifting on a hinge. Consider your needs and don’t hesitate to innovate!
Figure 7o

22
8. Bottom Rack
a. To help hold a set of three root boxes together, a rack can be made out of extra baluster lumber pieces.
b. Cut the following baluster pieces to length. a. Six (6) pieces at 7 ¾” b. Two (2) pieces at 32”
c. Position the pieces as seen in Figure 8c leaving approximately 7 ¾” in each of the three spaces.
Figure 8c
d. Screw the 7 ¾” pieces to the 32” rail with 2” screws. e. Cut out a piece of ½” plywood measuring 3” x 10 ½” and screw on the ends of the rack using
the 1 ¼” screws.

23
9. Ruler Marks On the front of the root box, make marks on one side rail to show soil depth (6” increments work well) down from the bottom of the top crosspiece with a permanent marker. When filling your soil box, you’ll line the soil surface up with the bottom of the top crosspiece. See Figure 9a.
Figure 9a
Your root box is now complete. The U-shaped part of the lid flips back and the front rectangle part of the lid rotates to allow you to remove all four sliding covers to observe what’s happening inside the box. This two-piece lid design is needed because a one-piece lid attached with a hinge will not pass over plants with any meaningful height.

24
10. Half-Height/Shorter Boxes These instructions show you how to build boxes with a rooting depth of roughly 40 inches. These tall boxes are ideal for showing the remarkable rooting depth of certain crops, but their size can also present some disadvantages, particularly if you intend to move them around a lot (it is pretty much impossible to stand a 42” tall root box containing plants upright in a sedan; with some effort it can be done in an SUV). Depending on your needs and the educational points you want to make, you may want to build shorter boxes. For example, a half-height box provides a rooting depth just over 18”, which is sufficient for certain purposes. In order to create a shorter box, follow all the instructions in this document, but change the length of the side rails, Plexiglas, and side covers to your desired length. There is also no need to put a crosspiece in the middle. Not only are shorter boxes more portable, but the cost of materials is reduced. Materials cost for half-height boxes are estimated at $30-35 per box. See Figure 10 below for a side-by-side image of a full-height and a half-height box.
Figure 10
11. Do You Have A Better Idea? We believe that each person who builds and uses these boxes will likely come up with some improvement to the design shown here. Please share with us any ideas you have for improving these root box construction instructions. As you gain experience with these boxes, also share with us your ideas regarding growing plants in them.

25
Growing Plants In Root-Viewing Boxes
1. Help Us Improve This Section We would like to provide in this section detailed practical recommendations for successfully growing plants and educating target audiences using root-viewing boxes. If you would like to write or contribute to this section, just contact us!
2. Pack Soil Into Boxes Before Starting Plants Either potting soil (preferably with complete nutrients already in the mix) or field soil may be used in root-viewing boxes. One common issue observed by users of these boxes is that potting soil will tend to settle over time. Be sure to compact your potting soil properly before starting plants. Otherwise a gap will form between the top of the box and the surface of the soil, potentially reducing your rooting depth and throwing off your ruler marks. A minor gap is visible in the picture below. .
If field soil is used, consider drying and tilling your field soil to achieve better packing. Cloddy material packed in the box will result in potentially large voids which may not effectively replicate field conditions
HELP US IMPROVE THIS DOCUMENT – SEND US YOUR
INPUT TO ADD TO THIS SECTION!