routing & switchings3. manual describes how to access all the feature of our routing &...
TRANSCRIPT

Routing & Switching
Rack Rental Access Guide
Editor: Stephen Satchell
Version 1.4 (4)
R&S Rack Rental Access Guide version 1.4 – i – Copyright © 2012 INE, Inc.

INE, Inc.Suite E200
170 120th Ave NEBellevue, WA 98005
R&S Rack Rental Access Guide version 1.4 – ii – Copyright © 2012 INE, Inc.

Copyright InformationCopyright Information
Copyright © 2012 INE, Inc. All rights reserved.
This publication, R&S Rack Rental Access Guide, was developed by INE, Inc. All rights reserved. No part of this publication may be reproduced or distributed in any form or by any means without the prior written permission from INE, Inc.
Cisco®, Cisco Systems®, CCIE, CCNA, CCENT, and Cisco Certified Internetwork Expert, are registered trademarks of Cisco Systems, Inc., and its affiliates in the United States and certain countries.
All other products and company names mentioned in this Guide are the trademarks, registered trademarks, and service marks of the respective owners. Throughout this Access Guide, the authors have used their best efforts to distinguish proprietary trademarks from descriptive name by following the capitalization styles used by the manufacturer.
R&S Rack Rental Access Guide version 1.4 – iii – Copyright © 2012 INE, Inc.

DisclaimerDisclaimer
This publication, R&S Rack Rental Access Guide, is designed to assist candidates in their preparation for the Cisco Systems’ Routing & Switching Certification Exam.
The enclosed material is presented to you on an “as is” basis. Every effort has been taken to ensure that all material contained in this Guide is complete and accurate. The contributors, editor, and INE, Inc. assume no liability or responsibility to any person or entity with respect to loss or damages incurred by using the information contained in this Access Guide.
This Access Guide was developed by INE, Inc. and is an original work of the aforementioned editor and contributors. Any similarities between material presented in this guide and actual Cisco® exam material is completely coincidental.
We apologize if this document contains any errors or omissions. Please send your comments and corrections to [email protected].
R&S Rack Rental Access Guide version 1.4 – iv – Copyright © 2012 INE, Inc.

Table of Contents
Section 1. Introduction....................................................................................................1 1.1. Rack Reservation Confirmation Letter......................................................................................1 1.2. Lab Rack Access Overview......................................................................................................1 1.3. Session Activity Overview........................................................................................................2 1.4. Passwords..................................................................................................................................2 1.5. IP addressing.............................................................................................................................2
Section 2. Lab Rack Wiring Diagram...........................................................................3 2.1. Physical LAN cabling...............................................................................................................3 2.2. Physical WAN Cabling.............................................................................................................3
Section 3. Getting Started At Your Location................................................................4 3.1. Minimum Necessary Equipment...............................................................................................4 3.2. Optional Equipment and Software............................................................................................4 3.3. Firewall Information..................................................................................................................4
Section 4. Loading Initial Configurations.....................................................................5
Section 5. Accessing Routers and Etherswitches..........................................................8 5.1. Single TELNET connection to multiple devices.......................................................................8 5.2. Multiple TELNET Connections to Console Lines..................................................................12 5.3. Clearing a Busy Access-Server Console Line.........................................................................14 5.4. Clearing All Access Server Console Lines.............................................................................15
Section 6. Power-Cycling Your Lab Rack Devices.....................................................17
Section 7. Saving Your Configurations For Later Reloading...................................19 7.1. Taking a Snapshot Of Your Current Work.............................................................................19 7.2. Loading a Saved Configuration...............................................................................................21
Section 8. Lab Rack Support........................................................................................24 8.1. Scope Of INE Lab Rack Support............................................................................................24 8.2. Knowledge Base......................................................................................................................25 8.3. Common Lab Rack Access Problems And Their Solution.....................................................25
8.3.1. Cannot Connect To TELNET Gateway racks.ine.com...................................................25 8.3.2. “Line In Use”...................................................................................................................25 8.3.3. Cannot Connect To My Lab Rack...................................................................................26 8.3.4. Lab Rack Connection Intercepted...................................................................................27 8.3.5. Cannot Connect To A Device..........................................................................................27 8.3.6. Cannot Bring Up a Link..................................................................................................28 8.3.7. When Loading or Saving Configurations, I Don't See Progress Reports........................28
8.4. Restore Lab Rack Password....................................................................................................28 8.5. Submitting An Emergency Support Ticket ...............................................................................i 8.6. Submitting A Support Request Ticket.....................................................................................iv
Appendix A. Downloading Product Configurations............................................................................v
Appendix B. Downloading Your Saved Configurations....................................................................vii
R&S Rack Rental Access Guide version 1.4 – v – Copyright © 2012 INE, Inc.
Appendix C. Backbone Routers.........................................................................................................viii
R&S Rack Rental Access Guide version 1.4 – vi – Copyright © 2012 INE, Inc.

Section 1. IntroductionThis manual describes how to access all the feature of our Routing & Switching Lab Racks. Specifically, it details how to access each of the devices described below within the lab rack from your location, and how to use our automation system's customer control panels.
Your R&S lab rack consists of:
• Six configurable routers• Four configurable Etherswitches• Three backbone routers (not configurable)• One access server for console port access to routers and switches
The document CCIE Routing and Switching Hardware Specification describes how all these components are wired together. Section 2 provides a summary of the inter-device connections in an R&S Lab Rack.
Not included in this manual are details about the facilities to control an INE R&S Mock Lab session. That information may be found in the companion document, Routing & Switching Mock Lab Guide, published separately.
1.1. Rack Reservation Confirmation Letter
When you scheduled your R&S lab rack session, you received a confirmation e-mail message that includes (1) the date and time of your lab rack session, (2) authentication tokens for that lab rack session, and (3) useful links to information on how to effectively use the racks, including a link to this document. The authentication tokens are provided to you in a block that looks like this:
########### QUICK LOGIN INFORMATION ###########
Rack Time/Date: 06/26/2010 3:00 AM - 8:30 AM PDT
Telnet Access Information: racks.ine.com You may use port 23 or 60023
Authentication: Username: rsrack42 Password: bc78ad
The user name and password are case-sensitive.
1.2. Lab Rack Access Overview
• The routers and Etherswitches are accessed using TELNET connections to the console command line interface (CLI) in each device.
R&S Rack Rental Access Guide version 1.4 – 1 – Copyright © 2012 INE, Inc.

1.3. Session Activity Overview
Step 1. Load initial configurations into all configurable routers and Etherswitches. Step 2. Connect to the routers and Etherswitches in the lab rack to set configuration. Step 3. Test your set-up by using ping, traceroute, the various show commands, and debug
commands.
Repeat these steps, as appropriate, to adjust and test your configurations to fix problems and issues.
When using the INE R&S Workbooks, you will be instructed to clear all devices and load initial configurations from our database
1.4. Passwords
Unless otherwise directed in the Workbook Labs or Mock Lab, if you need to set an enable password or vty password, please use the user name “cisco” and password “cisco” , all lower case.
In particular, do not use any password other than "cisco" on the 3550 or 3560 Etherswitches, because password recovery can only be done by our technicians physically accessing the device.
1.5. IP addressing
In INE study materials, some of the IP addresses are specific ally tailored to the R&S lab rack to which you are assigned. In those material, you will see addresses of the form “54.X.1.254”; replace the “X” with the number of the rack:
Rack ID “X”
RSRack1 1
RSRack2 2
RSRack3 3
... ...
RSRack29 29
RSRack30 30
R&S Rack Rental Access Guide version 1.4 – 2 – Copyright © 2012 INE, Inc.

Section 2. Lab Rack Wiring Diagram
2.1. Physical LAN cabling
2.2. Physical WAN Cabling
R&S Rack Rental Access Guide version 1.4 – 3 – Copyright © 2012 INE, Inc.

Section 3. Getting Started At Your LocationThis section describes the minimum equipment you need to effectively work the labs in our R&S workbooks.
3.1. Minimum Necessary Equipment
The minimum equipment you need at your location is a commodity computer with a Microsoft Windows operating system (XP, XP pro, or Windows 7) or a Macintosh computer with the Mac OS X operating system. Verify you have suitable software installed that offer these services:
• TELNET client1
• Traceroute utility
Static IP address recommended: We strongly recommend you use an Internet connection at your location that utilizes a static IP address to link to your ISP. Students have successfully worked with our racks using services that lease IP addresses via DHCP; some students, though, have found that the ISP lease policies of the service they use cause frequent disconnections. Also, ISPs who give you a static IP address typically don't block the TCP ports you need to work with our racks.
Users of a local wireless access point need to verify that neither the access point(s) nor the uplink service are blocking necessary TCP ports as described in the subsection “Firewall Information” below.
3.2. Optional Equipment and Software
There is no optional equipment or software needed to effectively use our R&S Lab Racks.
3.3. Firewall Information
This section is provided for those people who run into trouble reaching our lab racks. In most cases, you should not need any of this information. The information here becomes extremely useful if you find yourself behind a corporate or hotel firewall, behind a personal firewall set to a mostly-closed configuration, or using an ISP with unusual characteristics.
TELNET access to our gateway at racks.ine.com uses port 23/TCP.2
1 Access to our lab racks is not possible using SSH or Web browsers.2 Access using an alternative port, such as 60023/TCP, is under development but not available at this time.
R&S Rack Rental Access Guide version 1.4 – 4 – Copyright © 2012 INE, Inc.

Section 4. Loading Initial Configurations
The control panel described in this section is only available during your session proper. It is not available before the published start time of the session, nor after your session(s) are over.
Our rack automation system includes a method for clearing and loading router and Etherswitch initial configurations automatically. You do this from the Lab Rack control panel.
Make sure you have Java and JavaScript enabled in your browser for the domain “ine.com”
To request a configuration load:
• Log into your members site account, at http://members.ine.com• Click on the gray “Rack Rentals” tab• Scroll down to “My Current and Future Rack Rental Sessions”• Find your current R&S rack session• Click on the link Control Panel >>. You should see this:
R&S Rack Rental Access Guide version 1.4 – 5 – Copyright © 2012 INE, Inc.

• Click on the button “Config Options” at the top of the white part of the window. You should see this:
• In the box “Load Product Configs”, use the pull-down list to select a configuration to load. A product configuration usually consists of a SKU code prefix for the product, the version, and the specific configuration. For the workbooks, the SKU codes are:
SKU code, version Workbook Product
IEWB.RS.VOL1-V5.0 R&S Workbook Volume 1
IEWB.RS.VOL2-V5.0 R&S Workbook Volume 2
IEWB.RS.VOL3-V4.10 R&S Workbook Volume 3
IEWB.RS.VOL4.V1.0 R&S Workbook Volume 4
Other configurations are labeled with skew codes for other products: “IEML.RS”, “IEBC.RS”, and more . Do not confuse those configurations, that use these other skew code prefixes, with the skew codes for the Workbook configurations.
R&S Rack Rental Access Guide version 1.4 – 6 – Copyright © 2012 INE, Inc.

There are two additional initial configurations that are called for in our workbooks:
✔ NO.CONFIGURATION : This initial configuration will return all configurable lab rack devices to their factory default state.
✔ IPV6.NO.CONFIGURATION : This initial configuration brings the configurable lab rack devices to their factory default state, and then conditions the 3560 Etherswitches to work with IPv6 addresses; this saves you from having to select the SDM (“Switch database management”) template in the Etherswitches for IPv6 and restart them manually.
• Once you have selected the desired initial configuration set, press the button “Load config” that is in the “Load Product Config” box. (Do not press the similar button in the “Load My Configs” box.) The control panel will instruct the rack automation to erase all configurations from all configurable devices in the Lab Rack, and load the pre-defined configuration in its place.
The configuration-loading process can take from 11 to 20 minutes, depending how much work the software must do to prepare the lab rack devices for the new configuration. During the loading process, our control panel will display the status of the load request. Do not close the browser window until the load process reports completion.
If, after 20 minutes, the panal does not report the process as complete, try logging into your rack; if you can successfully connect to the lab rack access server, the configuration load was complete (possibly with errors) and you can continue your work.Otherwise, submit an emergency trouble ticket (subject “Control panel”) and our technical staff can determine the status of your configuration load request.
R&S Rack Rental Access Guide version 1.4 – 7 – Copyright © 2012 INE, Inc.
Section 5. Accessing Routers and EtherswitchesRouters and Etherswitches are accessed using TELNET connections each through the access server to the device console port's command line interface (CLI) of the devices. You have two options which can be, with limitations, mixed and matched:
• Single TELNET connection, accessing the lab rack access server's console, and using the access server's command line to telnet to each device
• Multiple TELNET connections, accessing the lab rack access server's direct line to the device
There is no direct access over the Internet to the lab rack devices; you cannot make a direct TCP connection to a device's virtual console port. We currently don't offer VPN connection to our R&S lab racks.
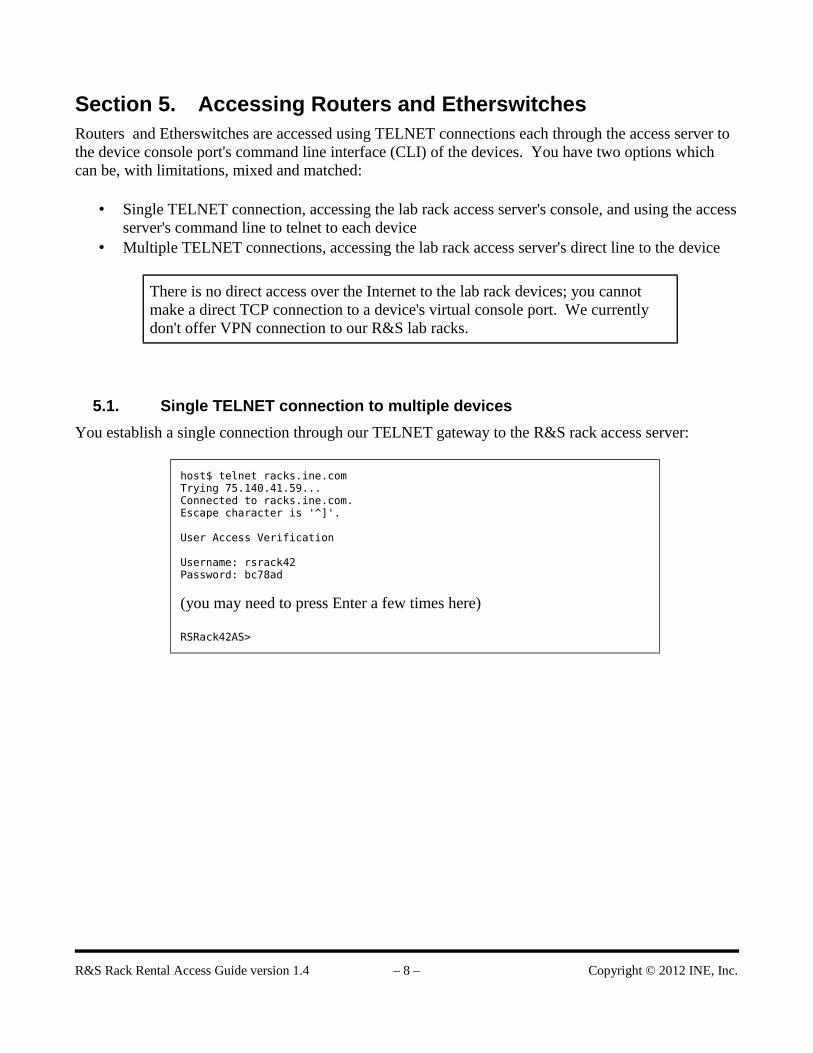
5.1. Single TELNET connection to multiple devices
You establish a single connection through our TELNET gateway to the R&S rack access server:
host$ telnet racks.ine.comTrying 75.140.41.59...Connected to racks.ine.com.Escape character is '^]'.
User Access Verification
Username: rsrack42Password: bc78ad
(you may need to press Enter a few times here)
RSRack42AS>
R&S Rack Rental Access Guide version 1.4 – 8 – Copyright © 2012 INE, Inc.

From here, you can access the console of almost any device in the rack. First, list the hosts available to you:
RSRack42AS>show hosts Default domain is not set Name/address lookup uses static mappings
Codes: UN - unknown, EX - expired, OK - OK, ?? - revalidate temp - temporary, perm - permanent NA - Not Applicable None - Not defined
Host Port Flags Age Type Address(es) SW4 2010 (perm, OK) ** IP 1.1.1.1 SW3 2009 (perm, OK) ** IP 1.1.1.1 BB1 2011 (perm, OK) ** IP 1.1.1.1 SW2 2008 (perm, OK) ** IP 1.1.1.1 R4 2004 (perm, OK) ** IP 1.1.1.1 R1 2001 (perm, OK) 19 IP 1.1.1.1 R6 2006 (perm, OK) ** IP 1.1.1.1 R2 2002 (perm, OK) 19 IP 1.1.1.1 R3 2003 (perm, OK) ** IP 1.1.1.1 R5 2005 (perm, OK) ** IP 1.1.1.1 SW1 2007 (perm, OK) ** IP 1.1.1.1 BB2 2012 (perm, OK) ** IP 1.1.1.1 BB3 2013 (perm, OK) ** IP 1.1.1.1
Note the device names in the “Host” column: you can type any name from this list then hit “Enter”, and the access-server will reverse-telnet to the specific device. Hit “Enter” again to see the router prompt of the newly-connected device.
RSRack42AS>r1 Trying R1 (1.1.1.1, 2001)... Open
Rack42R1>
Press “Ctrl-Shift-6” (all at once) then release and press "x" to return back to the access-server prompt. Enter the special “w” command (“where”), which shows you the currently open sessions:
RSRack42AS>w Conn Host Address Byte Idle Conn Name * 1 R1 1.1.1.1 0 0 R1
RSRack42AS>
R&S Rack Rental Access Guide version 1.4 – 9 – Copyright © 2012 INE, Inc.

Now you can open connection to another router, using its hostname from the list you get using the show host command.
RSRack42AS>r2Trying R2 (1.1.1.1, 2002)... Open
RSRack42R2#
Press “Ctrl-Shift-6, (then) x” again to return back to the access-server prompt. Now the “w” command reveals two active connections:
RSRack42AS>w Conn Host Address Byte Idle Conn Name 1 R1 1.1.1.1 0 0 R1 * 2 R2 1.1.1.1 0 0 R2
Note the numbers in the “Conn” column: it’s the connection number for that connection. At the access-server prompt, you can enter the connection number to switch back to the respective router. For example, now you can enter “1” or “2” to switch back to R1 or R2. If you simply hit “Enter” at the access-server prompt, it resumes the last active connection (marked by the “*” sign in the “w” command output).
RSRack42AS>1 [Resuming connection 1 to R1 ... ]
Rack42R1#
R&S Rack Rental Access Guide version 1.4 – 10 – Copyright © 2012 INE, Inc.

When using the access-server with a single TELNET connection from your location, we recommend you open connections to all devices in the rack, and switch between them using “Ctrl-Shift-6-x” and then entering the connection number in the access-server prompt. When you finish opening all the connections, the output of the “w” command would look like this:
RSRack42AS>w Conn Host Address Byte Idle Conn Name 1 R1 1.1.1.1 0 0 R1 2 R2 1.1.1.1 0 2 R2 3 R3 1.1.1.1 0 0 R3 4 R4 1.1.1.1 0 0 R4 5 R5 1.1.1.1 0 0 R5 6 R6 1.1.1.1 0 0 R6 7 SW1 1.1.1.1 0 0 SW1 8 SW2 1.1.1.1 0 0 SW2 9 SW3 1.1.1.1 0 0 SW3 * 10 SW4 1.1.1.1 0 0 SW4
When you instruct our automation to load an initial configuration, all the connections to all the devices will be forced closed; you will need to re-open the connections when the configuration loading is complete.
To locate certain problems, you have limited, read-only access to the backbone servers. If you look in the host table displayed at the beginning of this section, you will see three additional host names: “BB1”, “BB2”, and “BB3”. You use the same technique to access them as the other devices.
Do not become dependent on seeing information on the backbone routers; use this debug method as a last resort for your studies. During the actual certification exam, you do not have any access to the backbone routers in the exam's Test Lab Rack.
R&S Rack Rental Access Guide version 1.4 – 11 – Copyright © 2012 INE, Inc.

5.2. Multiple TELNET Connections to Console Lines
Flipping back and forth from device to device using the access server to do the multiplexing can become tiring, especially when you try to make a configuration change that affect two ends of the same link. Windows, Mac, and Linux users can have multiple windows open, each with a TELNET session. Modern versions of programs like Secure CRT offer tabbing, so that changing the focus to another device is a single mouse-click.
If you prefer that method of working with multiple devices, you start an instance of TELNET for each device on your computer. Within each instance, you log into the rack and the device:
window1$ telnet racks.ine.comTrying 75.140.41.59...Connected to racks.ine.com.Escape character is '^]'.
User Access Verification
Username: rsrack42r1Password: bc78ad
(you may need to press Enter a few times here)
Rack42R1#
Now change to (or create) your second window or tab
window2$ telnet racks.ine.comTrying 75.140.41.59...Connected to racks.ine.com.Escape character is '^]'.
User Access Verification
Username: rsrack42r2Password: bc78ad
(you may need to press Enter a few times here)
RSRack42R2#
R&S Rack Rental Access Guide version 1.4 – 12 – Copyright © 2012 INE, Inc.

Now change to (or create) your third window or tab
window3$ telnet racks.ine.comTrying 75.140.41.59...Connected to racks.ine.com.Escape character is '^]'.
User Access Verification
Username: rsrack42r3Password: bc78ad
(you may need to press Enter a few times here)
RSRack42R3#
Continue the process, in additional windows or tabs, specifying the user names “rsrack42r4”, “rsrack42r5”, “rsrack42r6”, “rsrack42sw1”, “rsrack42sw1”, “rsrack42sw2”, “rsrack42sw3”, and “rsrack42sw4”. You end up with six windows or tabs, one per device.
When you instruct our automation to load an initial configuration, all the connections to all the devices will be forced closed; you will need to re-open the connections when the configuration loading is complete.
You can get read-only access to the backbone servers using this technique by using the user names “rsrack42bb1”, “rsrack42bb2”, and “rsrack42bb3”.
Do not become dependent on seeing information on the backbone routers; use this debug method as a last resort for your studies. During the actual certification exam, you have no access to the backbone routers in the exam's Test Lab Rack.
With windows, you can shift them around so that you can see the contents of one window while keying configuration data into another. Another benefit of using multiple windows is you can see error messages on multiple devices at the same time, so you can trace and debug problems like connection flapping.
On the other hand, tabs require only one mouse movement plus one click to change focus, and you don't have to shift anything to see the entire output.
Which method you use is a matter of personal style and preference.
R&S Rack Rental Access Guide version 1.4 – 13 – Copyright © 2012 INE, Inc.

5.3. Clearing a Busy Access-Server Console Line
Occasionally you may get disconnected from the access server as a result of a temporary network outage or your ISP's DHCP changing your local IP address. You may find that the router refuses your attempt to log in again with the messages similar to this one:
host$ telnet racks.ine.comTrying 75.140.41.59...Connected to racks.ine.com.Escape character is '^]'.
User Access Verification
Username: rsrack1r3Password: mn98ty
+-----------------------------------------------------+| || Line in use. Login to the access server using the || username clearrsrack1 and manually clear the line. || |+-----------------------------------------------------+
Connection closed by foreign host.
In order to fix this problem, you need to clear the access server's connection to the console line for the router you wish to access. To do this, you use a special log-in sequence to our TELNET gateway:
host$ telnet racks.ine.comTrying 75.140.41.59...Connected to racks.ine.com.Escape character is '^]'.
User Access Verification
Username: clearrsrack42Password: bc78ad
R&S Rack Rental Access Guide version 1.4 – 14 – Copyright © 2012 INE, Inc.

When the authentication is successful, you will see this menu:
Server "RSRack42AS" Line 189 Terminal-type (unknown)
+---------------------------------------------------------------------+ | | | Access Server Menu | | | +---------------------------------------------------------------------+
0. Clear the Console connection 1. Clear R1's line 2. Clear R2's line 3. Clear R3's line 4. Clear R4's line 5. Clear R5's line 6. Clear R6's line 7. Clear SW1's line 8. Clear SW2's line 9. Clear SW3's line 10. Clear SW4's line 11. Clear BB1's line 12. Clear BB2's line 13. Clear BB3's line Exit Exit
Please enter your selection:
If you are unable to gain access to the command line of the access server from our TELNET gateway, then key “0” followed by ENTER to remove the blocking connection. After doing this, you can then use the TELNET gateway to make a connection to the access server.
This menu can also be used to clear a console connection from the access server to a specific device. You key the menu number of the console line you want to clear, followed by ENTER. The access server will then clear the line. For example, to clear R3's console line, press “3” followed by ENTER. You can achieve the same end by using the access server command “clear line #”, replacing the pound sign with the number shown in the access table. For example, “clear line 9” will clear the line for SW3.
5.4. Clearing All Access Server Console Lines
The alternative to clearing just selected lines as described above is to clear all console lines using the rack control panel:
• Log into your members site account, at http://members.ine.com• Click on the gray “Rack Rentals” tab• Scroll down to “My Current and Future Rack Rental Sessions”• Find your current R&S rack session
R&S Rack Rental Access Guide version 1.4 – 15 – Copyright © 2012 INE, Inc.

• Click on the link Control Panel >>. You should see this:
• Click the “Clear All Lines” button.
Our automation system will then clear connections from all console lines on the access server: R1 through R6, SW1 through SW4, BB1 through BB3, and the console tty on the access server itself.
The control panel shown here is only available during your session proper. It is not available before the published start time, nor after your session(s) is over.
R&S Rack Rental Access Guide version 1.4 – 16 – Copyright © 2012 INE, Inc.

Section 6. Power-Cycling Your Lab Rack DevicesSometimes your configuration can cause a router or Etherswitch to “blow out” like an out-of-control oil well; you can't stop its output or break it out of a frozen state. When that happens, we offer a way to power-cycle a specific device to “bring it back”. Here's how:
• Log into your members site account, at http://members.ine.com• Click on the gray “Rack Rentals” tab• Scroll down to “My Current and Future Rack Rental Sessions”• Find your current R&S rack session• Click on the link Control Panel >>. You should see this:
• Click the “Power Cycle Device” button corresponding to the device you need to turn off and turn back on.
The control panel will then instruct the automation to turn off the device for five seconds, then turn it back on. We recommend that you have a TELNET session to monitor the power-up and IOS loading.
R&S Rack Rental Access Guide version 1.4 – 17 – Copyright © 2012 INE, Inc.

If your configuration that caused the device to go insane had been saved to NVRAM, you may want to force the device into ROMMON mode to bypass loading the problem configuration saved in the device. Use the device-specific method for clearing out the configuration from NVRAM, then let the device boot again.
There is rarely any reason to power-cycle all the routers and Etherswitches in your rack, but if you feel you need to, we provide you with a button to do so. This button only cycles R1 through R6, and SW1 through SW4; it does not affect the backbone routers or the access server.
The control panel shown here is only available during your session proper. It is not available before the published start time, nor after your session(s) is over.
R&S Rack Rental Access Guide version 1.4 – 18 – Copyright © 2012 INE, Inc.

Section 7. Saving Your Configurations For Later ReloadingSaving and reloading router and Ethernet configurations can be a chore. We have provided a system for saving your configurations into our database, and reloading that configuration – perhaps into a different lab rack – using our control panel.
This is particularly handy if you try to schedule two back-to-back sessions, and our scheduler has to assign the sessions on different lab racks. What you do in that case is, just before the end of the first session, save your working configuration as described in the next sub-section. When the next session starts, instruct our system to load your saved configuration onto the new rack. The automation sets up the new rack to use the old rack's IP addressing scheme, so all your notes and working diagrams are valid.
If you like, you can download saved configurations for off-line study; see Appendix B for details.
The control panels shown in this section are only available during your session proper. They are not available before the published start time, nor after your session(s) is over.
7.1. Taking a Snapshot Of Your Current Work
When you come to a stopping point, you can save your current work. Our automation also tries to save your work at the end of your session(s) before preparing the lab rack for the next user. The advantage of doing the configuration state save operation yourself is you can be sure the equipment is in a state where the configs can be saved.
Make sure you have Java and JavaScript enabled in your browser for the domain “ine.com”
So here's how to save your current work:
• Ensure all devices are at a command prompt, and that there isn't continuous console output.• Log into your members site account, at http://members.ine.com• Click on the gray “Rack Rentals” tab• Scroll down to “My Current and Future Rack Rental Sessions”• Find your current R&S rack session
R&S Rack Rental Access Guide version 1.4 – 19 – Copyright © 2012 INE, Inc.

• Click on the link Control Panel >>. You should see this:
• Click on the button “Config Options” at the top of the white part of the window. You should see this:
R&S Rack Rental Access Guide version 1.4 – 20 – Copyright © 2012 INE, Inc.

• In the box “Save My Configs” press the button “Save Config”. The control panel will tell our automation to disconnect your TELNET session(s) and save the current running configuration of each device in our database. This process takes less than two minutes. The control panel will tell you the state of the save operation.
• Press the red link “reload” (just underneath the “Rack Controls” and “Config Options” buttons) to refresh the list of configurations you have in our database.
• In the “Load My Configs” box, click on the link “Rename this config” Type a short label for your saved configuration. You can use this label later to reload your configuration, perhaps on a different rack, and continue from where you left off.
7.2. Loading a Saved Configuration
Loading a saved configuration is similar to loading a product configuration, except that the configuration you tell us to load is unique to you. If you saved your configuration yourself using the procedure in the save process above, you use the label that you attached to the configuration. If you are looking for a configuration that was auto-saved by the rack automation, you need to know the date, session number, and rack ID of the session whose configuration you want to retrieve.
Make sure you have Java and JavaScript enabled in your browser for the domain “ine.com”
Here's an example: a user had a session on RSRack42 on June 1, 2010 during the S4 session. The name of the configuration saved for this customer is 2010.06.01-S2-02.39-RSRACK42. (2010 June 1, S2, 2:39 am PDT, RSRack42).
To conserve storage space, our automation system only saves customer configurations for one month. See Appendix B to learn how to download your saved configurations.
To load a saved configuration, you:
• Log into your members site account, at http://members.ine.com• Click on the gray “Rack Rentals” tab• Scroll down to “My Current and Future Rack Rental Sessions”• Find your current R&S rack session
R&S Rack Rental Access Guide version 1.4 – 21 – Copyright © 2012 INE, Inc.

• Click on the link Control Panel >>. You should see this:
• Click on the button “Config Options” at the top of the white part of the window. You should see this:
R&S Rack Rental Access Guide version 1.4 – 22 – Copyright © 2012 INE, Inc.

• In the box “Load My Configs”, use the pull-down list to select a configuration to load. The list will include the save configurations you have labeled, and the configurations automatically saved by the rack automation.
• Press the button “Load config” that is in the “Load My Configs” box. (Do not press the similar button in the “Load Product Configs” box.) The control panel will instruct the rack automation to erase all configurations from all configurable devices in the Lab Rack, and load the pre-defined configuration in its place.
The configuration-loading process can take from 11 to 20 minutes, depending how much work the software must do to prepare the lab rack devices for the new configuration. During the loading process, our control panel will display the status of the load request. Do not close the browser window until the load process reports completion.
If, after 20 minutes, the panal does not report the process as complete, submit an emergency trouble ticket (subject “Control panel”) and our technical staff can determine the status of your configuration load request. Also, you can try logging into your rack; if you can successfully connect to the lab rack access server, the configuration load was complete (possibly with errors) and you can continue your work.
R&S Rack Rental Access Guide version 1.4 – 23 – Copyright © 2012 INE, Inc.

Section 8. Lab Rack SupportMost of the time, for most people, the facilities we provide to support your rental of an R&S lab rack is sufficient to let you be productive in your preparation for your lab exam. Sometimes, though, things do go wrong with your rack rental, so we have a technical support staff on-call to help you with failures in our lab racks. This section details that support.
8.1. Scope Of INE Lab Rack Support
The INE Lab Rack technical staff are trained to:
• perform repairs on or, if necessary, perform replacement of our routers, Etherswitches, security appliances, and cabling within our lab racks and within our infrastructure
• identify in-the-cloud issues with your access to our TELNET and VPN gateways• fix authentication issues with your access to our TELNET and VPN gateways• use our cable and interface check reports, generated before your session or sessions start, to
speed repair of your lab rack, and to verify that the repair was effective• fix problems with lab rack bookings
The cable and interface check, that is run before your session or sessions, sniffs out problems with the rack before you start, and pinpoints the failures it detects. This facility eliminates the need for our technicians to perform diagnostic checking during your rack session to locate a failed cable or interface. Our automation also keeps extensive logs of its actions, and the results of those actions, again to speed identification of the root cause of a problem.
The INE, Inc. sales team handle:
• purchase and accounting of lab rack tokens• bulk booking of lab rack sessions• conflicts between Boot Camps and self-paced customer rentals
INE staff handles issues for its products via the INE Online Community (http://www.IEOC.com) for its products:
• INE workbooks• INE on-demand products• INE Bootcamps and Workshops• INE purchases and discounts• Details on setting up Cisco equipment to implement a lab solution or scenario requirement• Operation of Cisco software• Technology questions, such as questions about BGP, EIRGP, RIP, or OSPF configuration
R&S Rack Rental Access Guide version 1.4 – 24 – Copyright © 2012 INE, Inc.

8.2. Knowledge Base
INE, Inc. maintain a Knowledge Base of information to help troubleshoot common issues, problems, and questions. The link for INE's Knowledge Base is:
http://support.ine.com/index.php?_m=knowledgebase&_a=view
8.3. Common Lab Rack Access Problems And Their Solution
This section provides a quick troubleshooting guide of common issues and their resolution.
8.3.1. Cannot Connect To TELNET Gateway racks.ine.com
The most common reasons that you cannot reach our TELNET gateway to access your lab rack:
• Trying to use an SSH client, a Web browser, or using TELNET over SSL• Port 23/TCP is firewalled in your computer, or your local network
The “Firewall” section of this document can help you with finding and opening the needed port to access our TELNET gateway.
If you determine that a firewall isn't blocking port 23/TCP, generate a traceroute to racks.ine.com, then follow the instructions in “Submitting An Emergency Trouble Ticket”. Include the traceroute report in your ticket. Our technicians will then check for the problem.
8.3.2. “Line In Use”
You are able to reach our gateway, but when you attempt to connect to your lab rack, you see a screen like this one:
R&S Rack Rental Access Guide version 1.4 – 25 – Copyright © 2012 INE, Inc.

host$ telnet racks.ine.comTrying 75.140.41.59...Connected to racks.ine.com.Escape character is '^]'.
User Access Verification
Username: rsrack1Password: mn98ty
+-----------------------------------------------------+| || Line in use. Login to the access server using the || username clearrsrack1 and manually clear the line. || |+-----------------------------------------------------+
Connection closed by foreign host.
See the section on “Clearing a Busy Access-Server Console Line”. When trying to access the lab rack using the name, like “rsrack1”, you want to select the menu item “0”. When trying to access a lab rack device directly, like “rsrack1r3”, use the corresponding menu item to clear the device console connection; in this example, use menu item “3” for the device “r3”.
8.3.3. Cannot Connect To My Lab Rack
You are able to reach our gateway, but your attempts to get to your lab rack appear to fail. Try using the Cisco escape sequence, in case the access server's console is linked to a lab rack device console; if this is the problem, you will be returned to an access-server command prompt. When that fails, hit ENTER a few times to see if you get a response. Most times, you will see something.
When all else fails, clear all the lines using the procedure in “Clearing a Busy Console Line” to clear the console connection (menu item “0”).
If you still don't get a response. Follow the instructions in “Submitting An Emergency Trouble Ticket”. Our technicians will then check for the problem.
R&S Rack Rental Access Guide version 1.4 – 26 – Copyright © 2012 INE, Inc.

8.3.4. Lab Rack Connection Intercepted
In certain circumstances, you will see a screen that looks like this when you try to connect to your lab rack via our TELNET gateway:
The current time is Wed Jan 12 13:20:34 PST (GMT-08) 2011
This is the INE Lab Rack System. The password for this rack login has been temporarily disabled. There are several possible reasons that the password would be temporarily disabled:
1. Your session has not yet started. Our sessions start at 03:00 (GMT-08), 09:00 (GMT-08), 15:00 (GMT-08), and 21:00 Pacific time (GMT-08). 2. Your session has already ended. Our sessions end at 02:30 am (GMT-08), 08:30 am (GMT-08), 14:30 pm (GMT-08), and 20:30 pm (GMT-08). 3. Our rack automation is still preparing the rack for your session. 4. You have requested the loading of a product configuration, or one of your saved configurations, and our rack automation is still working on your request. 5. You are taking a Mock Lab and our rack automation is capturing your rack for grading, or preparing your rack for the next part.
Connection closed by foreign host.
In the first line, you see the current time in our time zone. The time follows the Daylight Savings Time rules for the United States Pacific time zone. If you see this message, it's possible you are trying too early (or too late) to connect to your lab rack.
When our automation system is performing a task on your rack, we disconnect you from your lab rack devices, and the access server, and also block you from logging into your rack. This is done so you don't accidentally corrupt your rack or the operation in progress. When the operation is complete, the system restores your ability to log into your rack via the TELNET gateway.
This lockout is particularly important for Mock Labs, because the scoring is based on the automation being able to properly configure your rack for each part of the test, and to capture your settings when each part completed. Disrupting your rack will cause you to receive a lower grade.
On very, very rare occasions, you may find that you don't have proper access to your rack at the beginning of the session, and you haven't asked the automation system to perform any tasks for you. In that case, wait 15 minutes and try again; if you continue to see the banner, follow the instructions in “Restore Lab Rack Password” to regain access to your rack.
8.3.5. Cannot Connect To A Device
You try to connect to a device, either from the access server or using the device-specific login sequence on our TELNET gateway. Try using the Cisco escape sequence first. When that fails, hit ENTER a few times to see if you get a response.
R&S Rack Rental Access Guide version 1.4 – 27 – Copyright © 2012 INE, Inc.

When all else fails, try power-cycling the device as described in “Power-Cycling Your Lab Rack Devices”. We recommend strongly that, before you perform the power cycle, you have a TELNET window open to the device (either directly, or through the access server) so that you can watch the boot-up messages as they are output by the router. If you see a serious error message, follow the instructions in “Submitting An Emergency Trouble Ticket” and include the error message. Our technicians will then check for the problem.
8.3.6. Cannot Bring Up a Link
The vast majority of the time, problems with bringing up a link between two devices is a configuration issue, although on rare occasion an interface will die or a cable be knocked loose. Before submitting a trouble ticket, enable CDP on both devices, configure the interface on each end of the link to its default, issue “no shutdown” commands to the interfaces, wait 60 seconds, then use “show cdp neighbor” to verify the cable is in place. Then use “show ip interface brief” to see if the link is reported as “up/up”.
If the link will not come up after this procedure, follow the instructions in “Submitting An Emergency Trouble Ticket” and include the text of your testing on both ends of the link. Our technicians will then check for the problem.
8.3.7. When Loading or Saving Configurations, I Don't See Progress Reports
Be sure you have Java and JavaScript enables for the domain “ine.com” -- most browsers will let you restrict the ability to execute scripts to specific domains, so you don't expose your system to Web sites with malicious scripts.
8.4. Restore Lab Rack Password
The control panel shown here is only available during your session proper. It is not available before the published start time, nor after your session(s) is over.
When your password has been disabled, and you believe that there is no good reason for it to be disabled, use this process. Do not use this process during a Mock Lab; submit an emergency trouble ticket instead. To restore your password:
• Log into your members site account, at http://members.ine.com• Click on the gray “Rack Rentals” tab• Scroll down to “My Current and Future Rack Rental Sessions”• Find your current R&S rack session
R&S Rack Rental Access Guide version 1.4 – 28 – Copyright © 2012 INE, Inc.

• Click on the link Control Panel >>. You should see this:
• Click on the button “Reset Rack Password”.
When the password reset is successful, you will see a status message at the top of the control panel window, like this:
R&S Rack Rental Access Guide version 1.4 – 29 – Copyright © 2012 INE, Inc.

If the password reset is blocked because of automation activity on your rack, you will see this status message at the top of the window:
R&S Rack Rental Access Guide version 1.4 – 30 – Copyright © 2012 INE, Inc.

8.5. Submitting An Emergency Support Ticket
An emergency ticket is warranted in the following situations:
• Hardware failure in any device of the lab rack• Can't login via racks.ine.com• Can't connect to lab rack devices from the access server• Rack control panel failure
If your issue is not one of these, use the information in the next subsection, “Submitting A Support Request Ticket.”
The emergency ticket system is only available during your session proper. It is not available before the published start time, nor after your session(s) is over.
We assume that, before you submit an emergency rack trouble ticket, you have tried the troubleshooting tips described in “Common Problems and Their Solution”, above, and that the tips didn't clear the problem. We also assume that you have collected debugging information to show the problem, and include that debug information in your ticket.
NOTE: the examples shown here are submitting a ticket against a Voice rack session. The process is identical for an R&S lab rack session.
To submit a trouble ticket, go to your Member's Site page:
http://members.ine.com/member/911_tickets/active_session_support.php
If you are not logged into your Member's Site page, you will be asked to sign in:
Use the e-mail address and password for your INE Members account. You will need to click the link again to get to the active support page.
R&S Rack Rental Access Guide version 1.4 – i – Copyright © 2012 INE, Inc.

http://members.ine.com/member/911_tickets/active_session_support.php
If you are already signed in to your Member's Site page, our system bypasses this sign-in screen.
In either case, you will then see this screen:
I
If you have multiple rack reservations, you will need to select which lab rack is the one that is the subject of the ticket. Use the pull-down list to indicate which rack is the subject of your trouble ticket.
Select the “type of problem” from the pull-down list (shown in its expanded form) that best describes the nature of the problem. In the problem description, provide as much information as you can to show the nature of the problem and what you've done to resolve it. Then, press the “Submit” button (hidden in the picture above underneath the pull-down list) to launch your ticket.
• For problems connecting to our TELNET gateway, please include a traceroute report (not just a ping report) from your location to racks.ine.com so we can begin investigating the problem when we get the ticket.
You will then see this page, to let you know that your ticket has been accepted.
R&S Rack Rental Access Guide version 1.4 – ii – Copyright © 2012 INE, Inc.

Initial submission of an emergency ticket causes our system to page the on-duty technician, so he is aware there is a serious problem to be addressed. Additions to an emergency ticket do not cause the technician to be paged.
Our response time to emergency tickets is usually under half an hour. If the problem can't be fixed quickly, our on-duty technician will respond to your ticket and then perform adjustments, then respond again when the work is completed.
R&S Rack Rental Access Guide version 1.4 – iii – Copyright © 2012 INE, Inc.

8.6. Submitting A Support Request Ticket
You submit support request tickets by sending electronic mail to specific mail addresses. These addresses are used for tickets that aren't in the emergency-ticket class, described in the previous section. Tickets sent to these addresses are normally handled during United States Pacific coast business hours. The e-mail address varies by the classification of the ticket:
• Racks: [email protected]• Sales Issues: [email protected]• Customer Service: [email protected]• Support: [email protected]
When submitting tickets to our technicians, we need not only a statement of the problem, but supporting information so we may start working on resolving the ticket when we receive it. Please use a descriptive subject line. When the ticket is about a specific rack session, please include in the body of your e-mail message:
• the identification of the rack (like “RSRack4”)• the password for the rack session• the starting time of the session, using Pacific time;
The password and starting time can be found in your rack reservation confirmation letter described in the “Introduction”; the information may also be found by clicking the link “Rack Access Info...” to obtain information similar to:
R&S Rack Rental Access Guide version 1.4 – iv – Copyright © 2012 INE, Inc.

Appendix A. Downloading Product Configurations
Sometimes you may want to look at a product initial configuration, and don't want to spend the tokens to rent a rack just to read what gets loaded. Or, you have built your own study rack and need to download the initial product configurations so you can successfully work the lab tasks. Some people prefer to load the product initial configurations manually.
So we make product initial configurations easy to download. Here's how you do it:
• Log into your members site account, at http://members.ine.com• Click on the gray “Subscriptions & Classes” tab (in most cases, this tab will be white, which
shows it is already selected.)• Click on the white “Routing & Switch” table (in most cases, this tab will already be selected.)• Scroll down to “Workbooks, and click on the R&S workbook product • Find the block “Download Initial Configs”:
• Each downloaded configuration is customized for a specific R&S Lab rack. From the first pull-down list pick the rack for which you want to have the configuration customizes. (For study purposes, we recommend you leave the selection as “rsrack1”.) From the second pull-down list, select the desired product initial configuration.
For R&S Workbook Volume 1, the configurations are named for the particular section, like “EIGRP.” For R&S Workbook Volume 2, there are two initial configurations per numbered lab, a “Configuration” [task-based test] configuration and a “Troubleshooting” configuration (with “.TS” as the suffix). For R&S Workbook Volumes 3 and 4, the configurations are named for the lab number being worked.
• Click “Submit”. The Members Web site will send a ZIP file containing a complete set of initial configurations for the selected rack, including reference configurations for the three backbone routers.
To download Mock Lab initial configurations, find the section “v4 Mock Labs” and click on the link in the first bullet. The page has the same “Download Initial Configs” block and controls as the Workbook product controls.
R&S Rack Rental Access Guide version 1.4 – v – Copyright © 2012 INE, Inc.

The above system allows you to download configurations one lab or scenario at a time, customized for a specific rack. Another option is to download all the initial configurations for a product, customized for a specific rack. Here's how to get all the initial configurations for the product:
• Log into your members site account, at http://members.ine.com• Click on the gray “Subscriptions & Classes” tab (in most cases, this tab will be white, which
shows it is already selected.)• Click on the white “Routing & Switch” table (in most cases, this tab will already be selected.)• Scroll down to “Workbooks, and click on the R&S workbook product • Find the block “Download Initial Configs”:
• Each downloaded configuration is customized for a specific R&S Lab rack. From the pull-down list in the highlighted area, pick the rack for which you want to have the configuration customizes. (For study purposes, we recommend you leave the selection as “rsrack1”.)
• Click the “Submit” button in the highlighted area. The Members Web site will send a ZIP file containing a complete set of initial configurations for the selected rack, including reference configurations for the three backbone routers, for the entire product.
For Mock Labs, you can get all the initial configurations in a single ZIP file using the same feature in the Mock Lab page.
R&S Rack Rental Access Guide version 1.4 – vi – Copyright © 2012 INE, Inc.

Appendix B. Downloading Your Saved Configurations
Our automation system stores the configuration in your routers, if it can, in our database. You can request a snapshot be saved into our database of a rack session's current configuration using the control panel. In either case, our system will store these saved configurations for one month. If you want to preserve your saved configuration for a longer period, you can download the saved configuration to your computer. Here's how to do it:
• Log into your members site account, at http://members.ine.com• Click on the gray “Rack Rentals” tab• Scroll down to “My Current and Future Rack Rental Sessions”• Click on the link “View My Saved Configs” You will then see a pop-up windows like this:
• Scroll to the saved configuration you want to download, then click on to start the download.
R&S Rack Rental Access Guide version 1.4 – vii – Copyright © 2012 INE, Inc.

Appendix C. Backbone Routers
Part of the equipment complement for a Routing & Switching lab rack are three non-configurable routers that imitate the Internet at the remote end of WAN links to the world, including Frame Relay links. In the real Certification exam, you have no access to the backbone routers; we provide a limited read-only access to the backbone routers so that you can troubleshoot external routing problems.
BB1 implements the Frame Relay switch used in our R&S Lab Racks, and also has an internal link to BB3. BB2 and BB3 are connected to the rest of the rack using Ethernet links. The configuration of the backbones are fixed. The same backbone configuration used in the R&S Lab Racks are also used for the Security and Service Provider Lab Racks.
You access the backbone routers using the techniques described in the section “Accessing Routers and Etherswitches”. You reference BB1, BB2, and BB3 as the host names at the Lab Rack access server command line, or use the “bb1”, “bb2” and “bb3” suffixes for the gateway user name in the multiple-TELNET method. When you connect to the backbone router, you will see a banner like this one (the example here uses BB1's banner):
RSRack42AS>bb1 Trying BB1 (1.1.1.1, 2011)... Open
+-----------------------------------------------------------------------+ | | | Welcome to BB1. These commands are available for use at privilege 0 | | | | ping show ip bgp | | telnet show ip bgp neighbors | | traceroute show ip bgp summary | | show ip route show ip interface brief | | show ip protocols | | | | The reference configuration for this device is available at: | | http://www.ine.com/downloads/bb1.txt | | | +-----------------------------------------------------------------------+
RS.42.42.BB1>
The information in the Welcome banner for each backbone router shows the commands you may use to investigate the running state of the router.
The reference configurations may be downloaded using the following links:
http://www.ine.com/downloads/bb1.txthttp://www.ine.com/downloads/bb2.txthttp://www.ine.com/downloads/bb3.txt
R&S Rack Rental Access Guide version 1.4 – viii – Copyright © 2012 INE, Inc.