running drake on a network drake on a network ... from the home window in drake, ... each station...
TRANSCRIPT
Drake Software User’s Manual Running Drake on a Network
Tax Year 2012 15
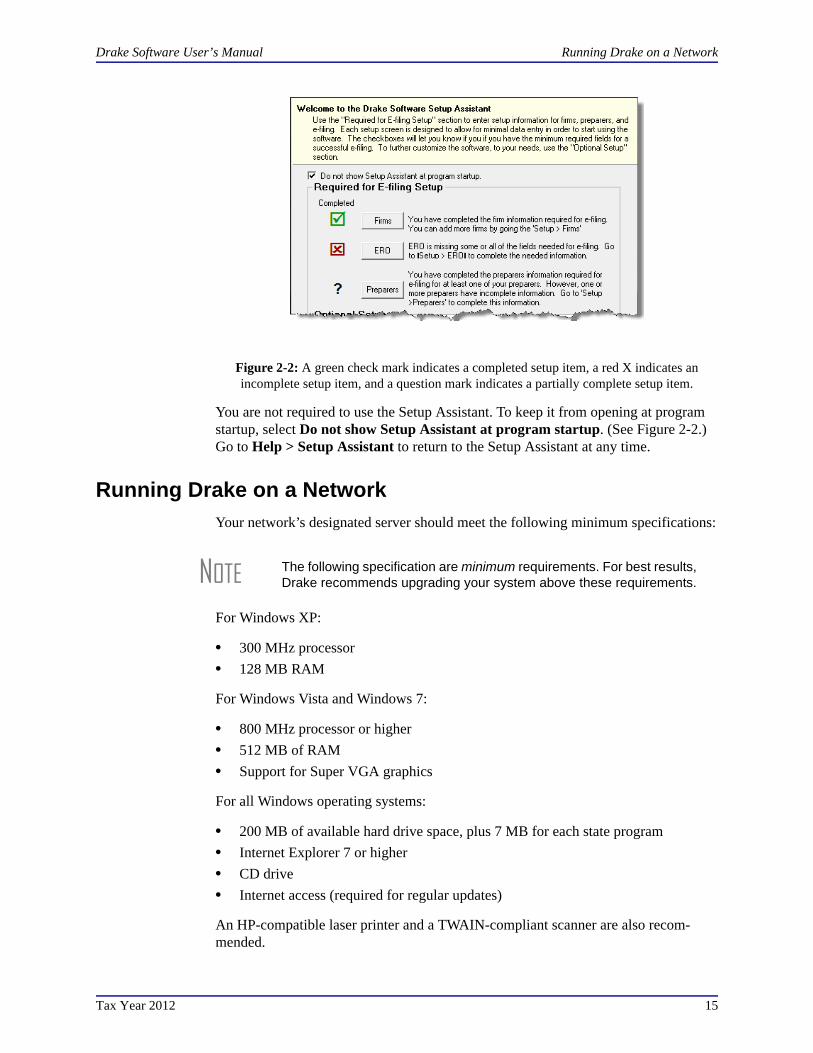
Figure 2-2: A green check mark indicates a completed setup item, a red X indicates an incomplete setup item, and a question mark indicates a partially complete setup item.
You are not required to use the Setup Assistant. To keep it from opening at program startup, select Do not show Setup Assistant at program startup. (See Figure 2-2.) Go to Help > Setup Assistant to return to the Setup Assistant at any time.
Running Drake on a Network
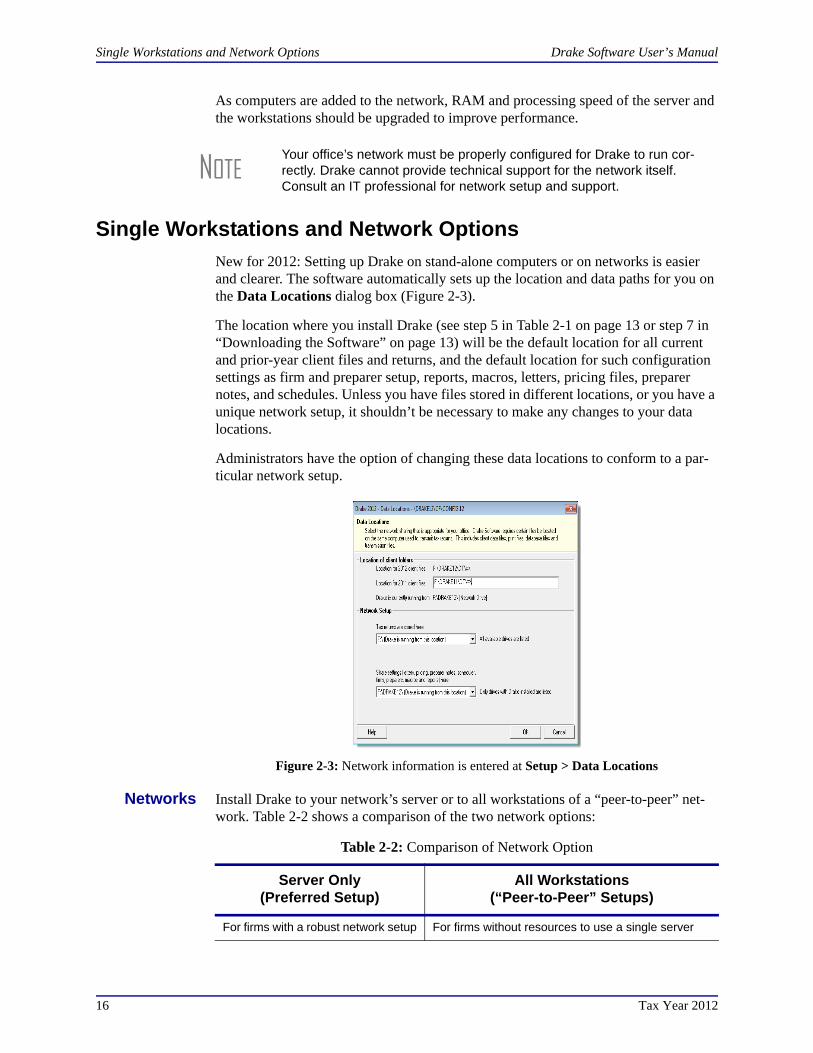
Your network’s designated server should meet the following minimum specifications:
For Windows XP:
• 300 MHz processor
• 128 MB RAM
For Windows Vista and Windows 7:
• 800 MHz processor or higher
• 512 MB of RAM
• Support for Super VGA graphics
For all Windows operating systems:
• 200 MB of available hard drive space, plus 7 MB for each state program
• Internet Explorer 7 or higher
• CD drive
• Internet access (required for regular updates)
An HP-compatible laser printer and a TWAIN-compliant scanner are also recom-mended.
NOTE The following specification are minimum requirements. For best results, Drake recommends upgrading your system above these requirements.
Single Workstations and Network Options Drake Software User’s Manual
16 Tax Year 2012
As computers are added to the network, RAM and processing speed of the server and the workstations should be upgraded to improve performance.
Single Workstations and Network Options
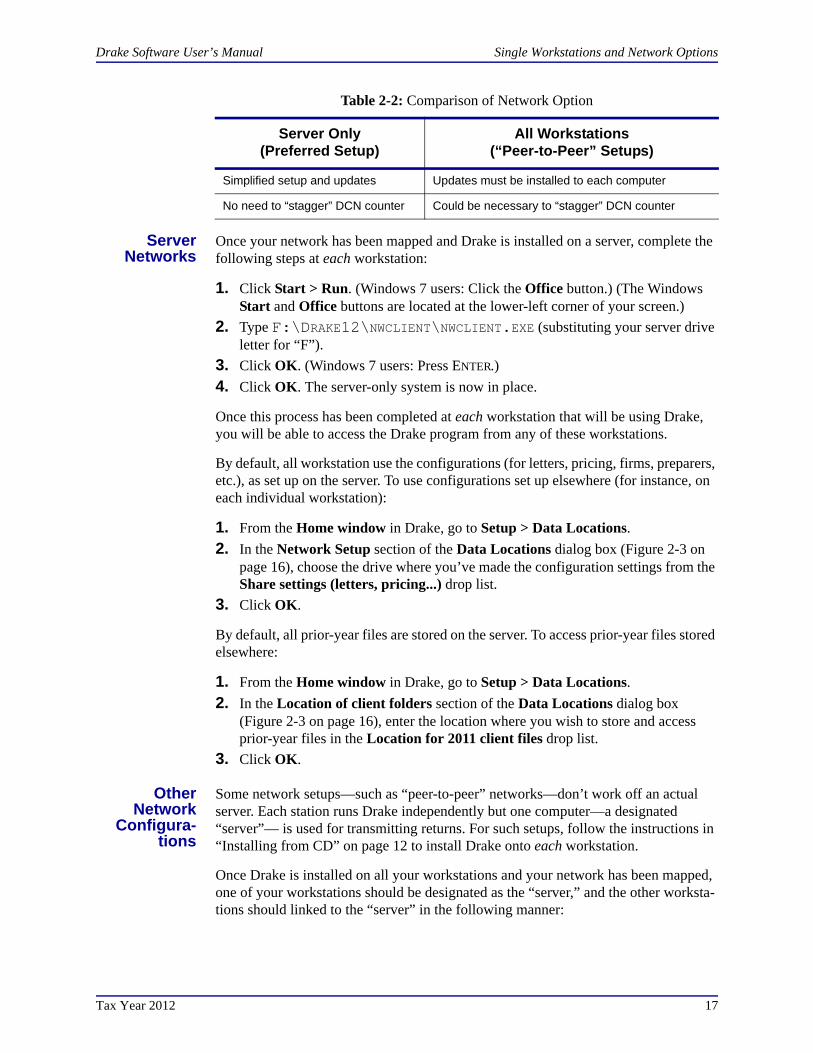
New for 2012: Setting up Drake on stand-alone computers or on networks is easier and clearer. The software automatically sets up the location and data paths for you on the Data Locations dialog box (Figure 2-3).
The location where you install Drake (see step 5 in Table 2-1 on page 13 or step 7 in “Downloading the Software” on page 13) will be the default location for all current and prior-year client files and returns, and the default location for such configuration settings as firm and preparer setup, reports, macros, letters, pricing files, preparer notes, and schedules. Unless you have files stored in different locations, or you have a unique network setup, it shouldn’t be necessary to make any changes to your data locations.
Administrators have the option of changing these data locations to conform to a par-ticular network setup.
Figure 2-3: Network information is entered at Setup > Data Locations
Networks Install Drake to your network’s server or to all workstations of a “peer-to-peer” net-work. Table 2-2 shows a comparison of the two network options:
NOTEYour office’s network must be properly configured for Drake to run cor-rectly. Drake cannot provide technical support for the network itself. Consult an IT professional for network setup and support.
Table 2-2: Comparison of Network Option
Server Only(Preferred Setup)
All Workstations(“Peer-to-Peer” Setups)
For firms with a robust network setup For firms without resources to use a single server
Drake Software User’s Manual Single Workstations and Network Options
Tax Year 2012 17
ServerNetworks
Once your network has been mapped and Drake is installed on a server, complete the following steps at each workstation:
1. Click Start > Run. (Windows 7 users: Click the Office button.) (The Windows Start and Office buttons are located at the lower-left corner of your screen.)
2. Type F:\DRAKE12\NWCLIENT\NWCLIENT.EXE (substituting your server drive letter for “F”).
3. Click OK. (Windows 7 users: Press ENTER.)
4. Click OK. The server-only system is now in place.
Once this process has been completed at each workstation that will be using Drake, you will be able to access the Drake program from any of these workstations.
By default, all workstation use the configurations (for letters, pricing, firms, preparers, etc.), as set up on the server. To use configurations set up elsewhere (for instance, on each individual workstation):
1. From the Home window in Drake, go to Setup > Data Locations.
2. In the Network Setup section of the Data Locations dialog box (Figure 2-3 on page 16), choose the drive where you’ve made the configuration settings from the Share settings (letters, pricing...) drop list.
3. Click OK.
By default, all prior-year files are stored on the server. To access prior-year files stored elsewhere:
1. From the Home window in Drake, go to Setup > Data Locations.
2. In the Location of client folders section of the Data Locations dialog box (Figure 2-3 on page 16), enter the location where you wish to store and access prior-year files in the Location for 2011 client files drop list.
3. Click OK.
OtherNetwork
Configura-tions
Some network setups—such as “peer-to-peer” networks—don’t work off an actual server. Each station runs Drake independently but one computer—a designated “server”— is used for transmitting returns. For such setups, follow the instructions in “Installing from CD” on page 12 to install Drake onto each workstation.
Once Drake is installed on all your workstations and your network has been mapped, one of your workstations should be designated as the “server,” and the other worksta-tions should linked to the “server” in the following manner:
Simplified setup and updates Updates must be installed to each computer
No need to “stagger” DCN counter Could be necessary to “stagger” DCN counter
Table 2-2: Comparison of Network Option
Server Only(Preferred Setup)
All Workstations(“Peer-to-Peer” Setups)

Software Setup Drake Software User’s Manual
18 Tax Year 2012
1. From the Home window in Drake, go to Setup > Data Locations to open the Data Locations dialog box. (See Figure 2-3 on page 16.)
2. In the Network Setup section, select the drive of the workstation designated as the “server” from the Tax returns are stored here drop list.
3. Click OK.
By default, all workstation using Drake on a “peer-to-peer” network use the configu-ration files as set up on the individual workstations. To share the same configuration files as the “server” or some other workstation:
1. From the Home window in Drake, go to Setup > Data Locations.
2. In the Network Setup section of the Data Locations dialog box (Figure 2-3 on page 16), choose the drive letter where you’ve stored the configuration settings from the Share settings... drop list.
3. Click OK.
By default, all prior-year files are stored on the individual workstations. If your work-stations should share the prior-year files:
1. From the Home window in Drake, go to Setup > Data Locations.
2. In the Location of client folders section of the Data Locations dialog box, enter the drive letter of the “server” workstation in the Location for 2011 client files drop list.
3. Click OK.
Software Setup
Perform setup procedures before attempting to prepare or e-file returns. Some setup procedures are required; others are optional.
IMPORTANT
All computers on the network must have access to the “server’s” drive – the drive on which the tax returns are stored and from which the returns will be e-filed. Map to the “server’s” drive—not to the Drake12 folder.
All drives properly mapped and with Drake Software installed will appear in the Tax returns are stored here drop list and the Share settings... drop list. If the drive of the “server” does not appear in these lists, consult an IT professional. Drake cannot provide technical support for the network itself.
CAUTION Do not change the Data Locations settings during tax season! If a change is necessary, contact Drake Support.
Table 2-3: Setup Procedures: Required and Optional
Required Setup Procedure Optional Setup Procedures
Firm(s) (See “Firm Setup” on page 20.) Options (See “Options Setup” on page 27.)

Drake Software User’s Manual Software Setup
Tax Year 2012 19
If you used Drake last year, you can bring forward most required program settings from your 2011 program. See “Updating Settings” on page 79 for details.
Logging in as an Administrative User
Log in as ADMIN to enter setup information. The administrator can access the follow-ing features not available to non-administrative users:
• Preparer setup security features in Setup > Preparer(s)
• Additional features in Setup > Firm(s)
• Network options (Setup > Data Locations)
• The Administrative Options tab of Setup > Options
• Additional tracking information on the ADMN screen in data entry
Setting anADMIN
Password
An ADMIN password is not required. If your firm chooses to have an ADMIN pass-word, keep a record of the password. Drake cannot retrieve lost or forgotten login passwords.
To set a password for the ADMIN account (optional):
1. From the Drake Home window, select Setup > Preparer(s).
Shortcut: Double- click the ADM row to edit it.
2. Click the Administrator (ADM) row, and then click Edit Preparer.
3. Enter a password in the Password field under Login Information. A password can be up to eight characters (alphabetic and/or numeric) and is not case-sensitive.
4. Re-enter the password in the Password (Repeated) field.
5. Click Save, and then click Exit.
ERO (See “ERO Setup” on page 21.) Pricing (See “Pricing Setup” on page 37.)
Preparer(s) (See “Preparer Setup” on page 22.) Macros (See “Macros Setup” on page 38.)
Data Locations (See “Single Workstations and Network Options” on page 16.)
Letters (See “Letters Setup” on page 43.)
Pay Per Return (PPR clients only; see PPR manual on CD, from the Home window of the software at Help > Online Resources, or from the Drake Support website.)
Colors (See “Color Setup” on page 46.)
Printing (See “Printing Setup” on page 47.)
Table 2-3: Setup Procedures: Required and Optional
Required Setup Procedure Optional Setup Procedures
NOTEIf no PTIN has been entered, you will be asked if you want to exit the window without entering a PTIN. Click Yes, or click No and enter a PTIN before saving and exiting. (A PTIN is required for e-filing.)

Software Setup Drake Software User’s Manual
20 Tax Year 2012
Firm Setup
Firm setup must be completed before preparing and e-filing returns. If data is inaccu-rate or missing, tax returns might be e-filed with incorrect information.
Adding aFirm
To add a firm in Firm Setup:
1. From the Drake Home window, go to Setup > Firm(s).
2. Click Add to activate the bottom half of the Firm Setup window.
3. Enter your firm’s general and banking information. Fields needed for e-filing are indicated by red text.
• General Information — Enter contact and identification information, includ-ing firm name, address, phone and fax numbers, contact name, e-mail address, Employer Identification Number (EIN), and Electronic Filer’s Identification Number (EFIN). If the firm is not located in the U.S., enter the province or state, the country, and the postal code.
– A DCN serial number is assigned to each return based on the firm’s EFIN and DCN. If two returns have the same DCN, the IRS rejects one of the returns. To avoid duplications, DCNs are automatically advanced for each return calculated.
– Non-paid-prep — If the firm is not a paid preparer, enter a non-paid code here. Acceptable codes are VI (VITA), VT (VITA–T), TE (TCE–X), IP (IRS–PREPARED), AND IR (IRS–REVIEWED).
• Banking Information — Choose a bank and include add-on fees.
– If you’ve completed your online Drake bank application through the Enterprise Office Manager (EOM), click Retrieve to import your banking information directly from the bank application. (For information on the EOM, see “Banking Application” on page 206.)
– Select a bank and enter the applicable add-on fee and the name of the per-son or entity that will receive the add-on fee. (This name will appear on the client’s “Bank Information Sheet,” generated with the return.) For more on available options, see Table 7-4 on page 209. For more on indi-vidual bank selections, see Chapter 7, “Banking.”
NOTE
To ensure that all information needed for e-filing is entered for a firm, firms with incomplete information are highlighted in red in the Setup > Firm(s) grid. Fields required for e-filing are marked by red text.
With the click of a button, you can now import the information from your firm’s bank application into the Drake program. (See “Banking Informa-tion,” below.)
NOTEOffices that use multiple computers that are not networked must “stag-ger” DCNs to avoid duplication. DCNs should be staggered before cre-ating any 2012 returns. For instructions on staggering DCNs, see “Staggering DCNs” on page 234.
Drake Software User’s Manual Software Setup
Tax Year 2012 21
4. Click Save. The program assigns a number for each firm entered in Firm Setup.
Editing FirmInformation
To edit a firm’s information:
1. From the Drake Home window, go to Setup > Firm(s).
Shortcut: Double- click a firm’s row to edit firm data.
2. Select the firm to edit and click Edit Firm to activate the bottom half of the Firm Setup window.
3. Edit the firm information. (See “Adding a Firm” on page 20 for information on individual fields.)
4. Click Save, and then click Exit to close the Firm Setup window.
Deleting aFirm
To delete a firm from Firm Setup:
1. From the Drake Home window, go to Setup > Firm(s).
2. Select the firm to delete and click Delete.
3. Click Yes, and then click Exit to close the Firm Setup window.
Printing aList of Firms
To print a list of firms entered in the program:
1. From the Drake Home window, go to Setup > Firm(s).
2. Click Print. The Report Viewer displays the report on the screen.
3. Click Print to open the Print ‘Drake Report’ dialog box.
4. Change any print options necessary, and then click Print again.
5. Click Exit, and then click Exit again to close the Firm Setup window.
ERO Setup
An Electronic Return Originator (ERO) must complete ERO Setup in order to e-file returns, use the Drake e-mail program, download software updates, and access the online e-filing database. Required fields for e-filers are marked in the program by red text.
To set up your firm as an ERO in Drake:
1. From the Drake Home window, go to Setup > ERO to open the Electronic Fil-ing Setup dialog box.
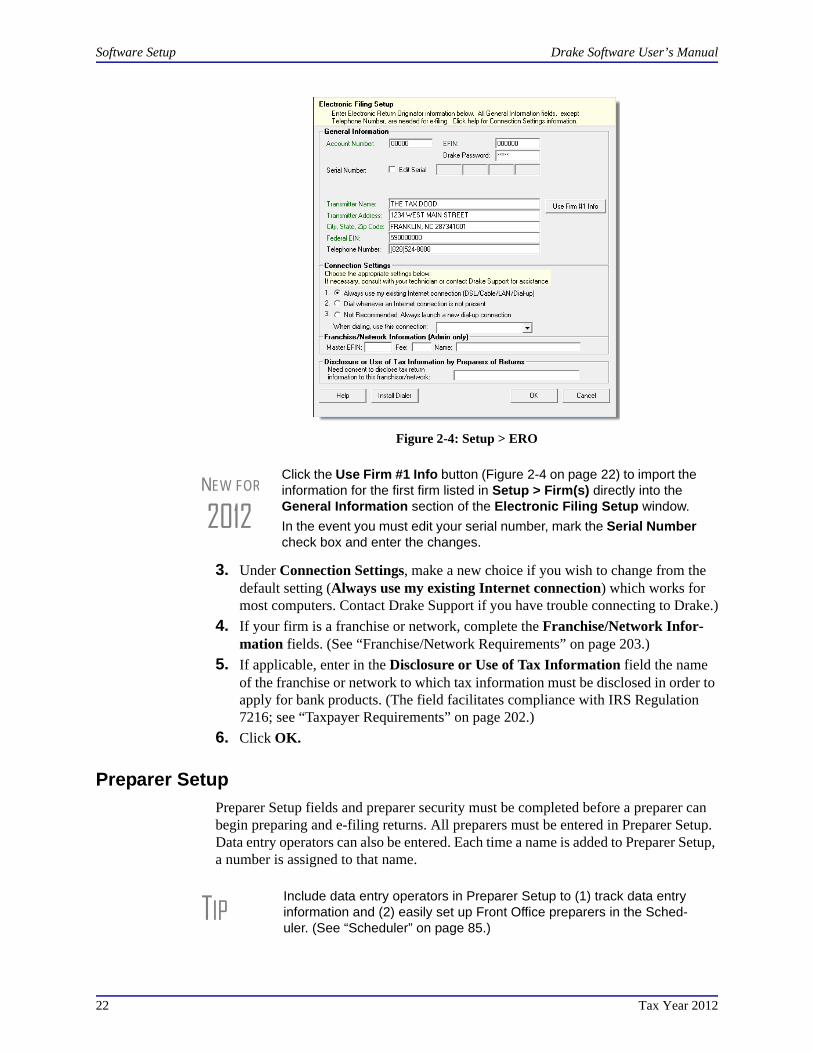
2. In the General Information section, enter the account number, EFIN, Drake password, name, address, ZIP code, and EIN of the ERO. Fields required for e-fil-ers are marked by red text. (See Figure 2-4 on page 22.)
NOTES
To view a report of the revenue you’ve earned from the additional (add-on) fees for e-filing, log in to Support.DrakeSoftware.com and go to My Account > Bank Application. Log in to the EOM with your EFIN and Drake password, then, from the blue sidebar menu, click Reporting.
These fees are listed when the returns are funded, not as the returns are transmitted.
Software Setup Drake Software User’s Manual
22 Tax Year 2012
Figure 2-4: Setup > ERO
3. Under Connection Settings, make a new choice if you wish to change from the default setting (Always use my existing Internet connection) which works for most computers. Contact Drake Support if you have trouble connecting to Drake.)
4. If your firm is a franchise or network, complete the Franchise/Network Infor-mation fields. (See “Franchise/Network Requirements” on page 203.)
5. If applicable, enter in the Disclosure or Use of Tax Information field the name of the franchise or network to which tax information must be disclosed in order to apply for bank products. (The field facilitates compliance with IRS Regulation 7216; see “Taxpayer Requirements” on page 202.)
6. Click OK.
Preparer Setup
Preparer Setup fields and preparer security must be completed before a preparer can begin preparing and e-filing returns. All preparers must be entered in Preparer Setup. Data entry operators can also be entered. Each time a name is added to Preparer Setup, a number is assigned to that name.
NEW FOR
2012
Click the Use Firm #1 Info button (Figure 2-4 on page 22) to import the information for the first firm listed in Setup > Firm(s) directly into the General Information section of the Electronic Filing Setup window.
In the event you must edit your serial number, mark the Serial Number check box and enter the changes.
TIPInclude data entry operators in Preparer Setup to (1) track data entry information and (2) easily set up Front Office preparers in the Sched-uler. (See “Scheduler” on page 85.)
Drake Software User’s Manual Software Setup
Tax Year 2012 23
Adding aPreparer
Information entered here determines what preparer information appears on the tax returns. To add a new preparer in Drake:
1. From the Drake Home window, go to Setup > Preparer(s).
2. Click Add to activate the bottom half of the Preparer Setup window.
3. Enter General Information. Fields required for e-filers are indicated by red text. Note that a PTIN is required by the IRS.
To apply for a PTIN, go online at www.irs.gov /For-Tax-Pros and click Apply for PTIN.
4. Enter Login Information. Note that a login name is needed for e-filing and use of a password is optional.
5. If applicable, click Registration to enter your state registration ID (California, Maryland, New York, Oregon, and Virginia only). Click OK to save.
6. Indicate Return Signature Options.
• PIN Signature — Enter the preparer’s five-digit PIN Signature.
• Use PIN for:
– 8879 PIN Signature — Select to activate the 8879 PIN signature.
– Alternative Electronic Signature — Select to automatically populate any field requiring electronic signature with the preparer’s name.
7. If applicable, enter the firm’s Republic Bank Identification Number (RBIN).
8. Enter Power of Attorney information (necessary for Form 2848, Power of Attor-ney and Declaration of Representative).
– Preparer Designation — Select the designation under which the preparer is authorized to practice before the IRS.
– CAF Number — Enter the preparer’s Central Authorization File (CAF) number assigned by the IRS.
– Jurisdiction — Enter the jurisdiction in which the preparer is authorized to practice before the IRS. If the preparer is an IRS Enrolled Agent (EA), enter the EA number here.
9. Enter W-7 Acceptance Agent information for the preparer, if applicable.
You are now ready to set up preparer security. If you click Save at this point, you will be reminded that security rights need to be set before the preparer can access any fea-tures in the program. If you select to close Preparer Setup now, be aware that you’ll have to return at some point to set the preparer’s security rights.
To proceed, go to Step 4 in the following section, “Setting Up Preparer Security.”
IMPORTANT
The alternative electronic signature is printed on the “Preparer’s signature” at the bottom of returns that have not been e-filed and on returns where the preparer and ERO are different (for exam-ple, if an override field on screen 1 is used). To have the alterna-tive electronic signature printed on a return that has been e-filed, you must re-enter this number in the PIN for preparer’s alterna-tive e-signature field on the PRNT screen for that return.

Software Setup Drake Software User’s Manual
24 Tax Year 2012
Setting UpPreparerSecurity
This feature establishes security settings for an individual preparer. To assign the same security level to many preparers, the Group Security feature may be a better option. See “Setting Up Group Security” on page 25.
To customize security settings for a preparer:
1. From the Drake Home window, go to Setup > Preparer(s).
2. Select a preparer and click Edit Preparer.
3. Select Security > Custom Security.
4. In the Preparer Security Setup window, select a menu, and then select the items to which the preparer should be allowed access. Items left blank will be inaccessi-ble to the preparer. (See Figure 2-5 on page 24.)
Figure 2-5: Security setup
5. Click Save. When prompted, click OK. Click Exit to close Preparer Setup.
Other options available under the Security button are shown in Table 2-4.
NOTE Only administrative users can set security rights. Settings must be established before a preparer can begin working in the software.
Table 2-4: Preparer Security Options
Security Option Description
Set Security to Allow No Options Employee cannot access any part of the program.
Set Security to Allow All Options Employee can access all parts of the program, except for administrative-only features.
Set Security Equal to Existing Preparer Employee is given security settings to match those of another preparer on the list.
Add Preparer to Security Group Add preparer to a pre-established security group. (See “Setting Up Group Security,” following.)
Front Office (Scheduling Only) Employee can access the Scheduler only.
Administrator (Full ADMIN Rights) Employee can access all parts of the program, including administrative-only features.
Drake Software User’s Manual Software Setup
Tax Year 2012 25
To remove security rights from all preparers (other than administrative users), go to Setup > Preparers and click Remove Rights. To remove rights for an individual employee, set that person’s security to Allow No Options.
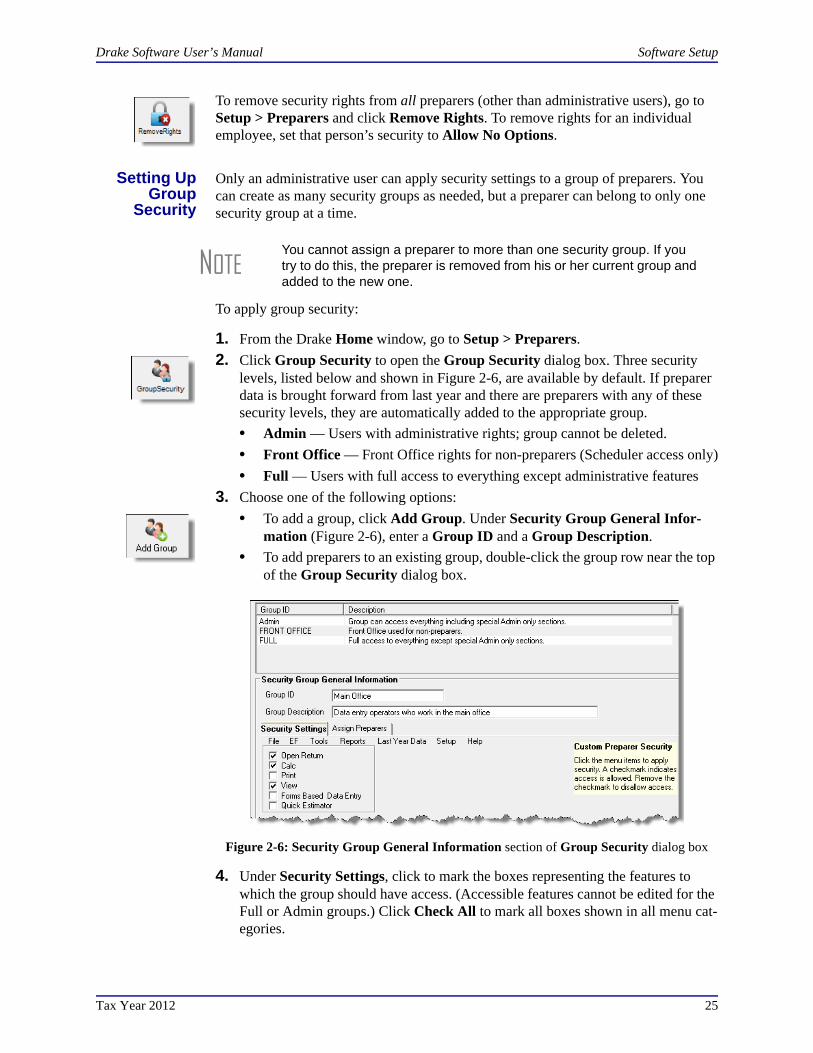
Setting UpGroup
Security
Only an administrative user can apply security settings to a group of preparers. You can create as many security groups as needed, but a preparer can belong to only one security group at a time.
To apply group security:
1. From the Drake Home window, go to Setup > Preparers.
2. Click Group Security to open the Group Security dialog box. Three security levels, listed below and shown in Figure 2-6, are available by default. If preparer data is brought forward from last year and there are preparers with any of these security levels, they are automatically added to the appropriate group.
• Admin — Users with administrative rights; group cannot be deleted.
• Front Office — Front Office rights for non-preparers (Scheduler access only)
• Full — Users with full access to everything except administrative features
3. Choose one of the following options:
• To add a group, click Add Group. Under Security Group General Infor-mation (Figure 2-6), enter a Group ID and a Group Description.
• To add preparers to an existing group, double-click the group row near the top of the Group Security dialog box.
Figure 2-6: Security Group General Information section of Group Security dialog box
4. Under Security Settings, click to mark the boxes representing the features to which the group should have access. (Accessible features cannot be edited for the Full or Admin groups.) Click Check All to mark all boxes shown in all menu cat-egories.
NOTEYou cannot assign a preparer to more than one security group. If you try to do this, the preparer is removed from his or her current group and added to the new one.

Software Setup Drake Software User’s Manual
26 Tax Year 2012
5. Under the Assign Preparers tab, select the preparers to be assigned to the group. (To select a preparer, double-click a name or click the name and click Select. Selected preparers are listed in the Preparers in Security Group column.)
6. Click Save.
To edit group settings or members, select a group name and click Edit Group. To delete a group, select a group name and click Delete Group. Note that a group must be empty (must contain no preparers) in order to be deleted.
GroupSecurityReports
The Group Security feature allows you to view and print two reports related to group security settings:
• Group Security report — Lists group security settings for each group. Groups are listed in order of creation, with default groups first.
• Group Preparers report — List all groups and their assigned preparers.
Reports are shown in the Report Viewer, which allows options for printing and exporting the reports. To access reports, click Print in the Group Security toolbar. The program displays the “Group Security” report first. To access the “Group Prepar-ers” report, click Exit in the Report Viewer toolbar. Once the “Group Preparers” report is open, click Exit again to return to the Group Security dialog box.
OtherFeatures
Other features available under Setup > Preparer(s) include the ability to create a pre-parer’s daily schedule, the ability to print a list of preparers, and the ability to run a search on preparers. To access these features, use the following procedures.
To create a preparer’s daily schedule:
1. From the Drake Home window, go to Setup > Preparer(s).
2. Select a preparer and click Edit Preparer.
3. Click Schedule.
4. Select day and “in” and “out” times.
5. Click Apply, and then click Save to save the schedule.
See “Scheduler” on page 85 for more information on using the Drake Scheduler.
To print a list of preparers entered into the program:
1. From the Drake Home window, go to Setup > Preparer(s).
2. Click Print. The Report Viewer displays the current preparer listing.
3. Click Print, and then click Print again.
4. Click Exit to close the Report Viewer. Click Exit again to close the Preparer Setup dialog box.
See “Report Viewer” on page 323 for more on using the Drake Report Viewer.
NOTE You do not have to assign preparers when creating a group. Assign preparers at any time by returning to the Group Security dialog box.

Drake Software User’s Manual Software Setup
Tax Year 2012 27
To search for preparers entered into the program:
1. From the Drake Home window, go to Setup > Preparer(s).
2. Click Search.
3. Enter preparer information in the Find Preparer Record box. As you type, the software locates (and highlights) the record.
4. Click Close. Click Exit to close the Preparer Setup dialog box.
Pay Per Return Setup (PPR Clients Only)
For information on setting up PPR, see Drake Software User’s Manual Supplement: Pay Per Return (PPR), available on your Drake CD, through the software (from the Home window in Drake, go to Help > Online Resources) and on the Drake Support site at http://Support.DrakeSoftware.com (Training Tools > Manuals).
Data Locations Setup
Data location settings (formerly Directories/Paths settings), which manage the loca-tions for data access and storage, is now configured when you install the program. To change your settings (ADMIN only), select Setup > Data Locations from the Home window. For more information, see “Single Workstations and Network Options” on page 16.
Options Setup
Options Setup is not required for completing or e-filing tax returns.
The tax software is shipped with the most common preferences set as the defaults. Use Options Setup (accessible by clicking Setup > Options from the Home window) to view or change the defaults for the various options available. Options are categorized into tabs, as shown in Figure 2-7. (Only administrative users have the Administrative Options tab.)
Figure 2-7: Tabs in Options Setup
CAUTION
Directory and path settings should not be changed during tax sea-son.Changing a drive letter during tax season can cause problems in file storage and e-file processing. For details on setting network con-figurations, see “Single Workstations and Network Options” on page 16. For assistance, contact your office IT professional or Drake Support.

Software Setup Drake Software User’s Manual
28 Tax Year 2012
Table 2-5 through Table 2-12 describe the options available on each tab in Options Setup.
Data EntryOptions
Options under the Data Entry tab are described in Table 2-5.
Table 2-5: Options Setup: Data Entry
Option Description
Maximize data entry screens where possible for easier viewing
Increase the size of the Drake screen to fill your monitor. Effective at all monitor resolutions.
Size data entry screens to show most fields without scrolling
Decrease the size of large Drake screens so they fit on your monitor. Effective only when monitor resolution is set to 1024x768 or smaller.
Disable sizing of data entry screens Keep preparer from resizing screens. Effective usually for monitor resolu-tion set to 800 x 600 or smaller.
Tab to ZIP code field (skip city/state and use ZIP code database)
Press the TAB key while entering an address in data entry to bypass the City and State fields and go directly to the ZIP field. City and State fields are completed automatically based on the ZIP code entered.
Show notes/reminders to preparer when opening a return
Show all notes and reminders from the NOTE and PAD screens every time you open a client file that contains notes or reminders.
Verify SSN when creating new return Require double entry of SSN or EIN, helping eliminate erroneous entries.
Enable Windows standard keystrokes CTRL+X = cut; CTRL+C = copy; CTRL+V = paste; SHIFT+CTRL+X = autofill amended screen;SHIFT+CTRL+C = calculate return; SHIFT+CTRL+V = view return
Autofill preparer and firm number on new returns
Automatically enter the firm number and preparer number where required on data entry screens.
Magnify data entry Enlarge the active field for easier reading.
Activate W-2 wage and federal with-holding verification fields
To ensure accuracy of data entry, require wage and withholding amounts be entered twice on the W2 screen.
Do not restrict minimum font size in 800x600
This is a sizing option for computers using an 800x600 resolution. If this option is selected, the program will not attempt a font substitution to retain readability. Text on screens will shrink to fit as needed.
Use grid data entry format on avail-able screens
Allows you to type information into a spreadsheet environment, which can result in faster data entry. This feature is available for the Dependents, INT, DIV, 8949, D, and 4562 screens.
Language Options (1040 package only)
Choose between English and Spanish for menus, data entry screens, field-specific help text, and error codes.
Letter case for data entry Choose between all uppercase letters and mixed case.
Override field indicator Format override fields in data entry; see “Override & Adjustment Fields” on page 72.
Adjustment field indicator Format adjustment fields in data entry; see “Override & Adjustment Fields” on page 72.
Display warning for missing required fields
Choose to receive a warning: whenever a required field is empty; once per data-entry session; not at all.
Drake Software User’s Manual Software Setup
Tax Year 2012 29
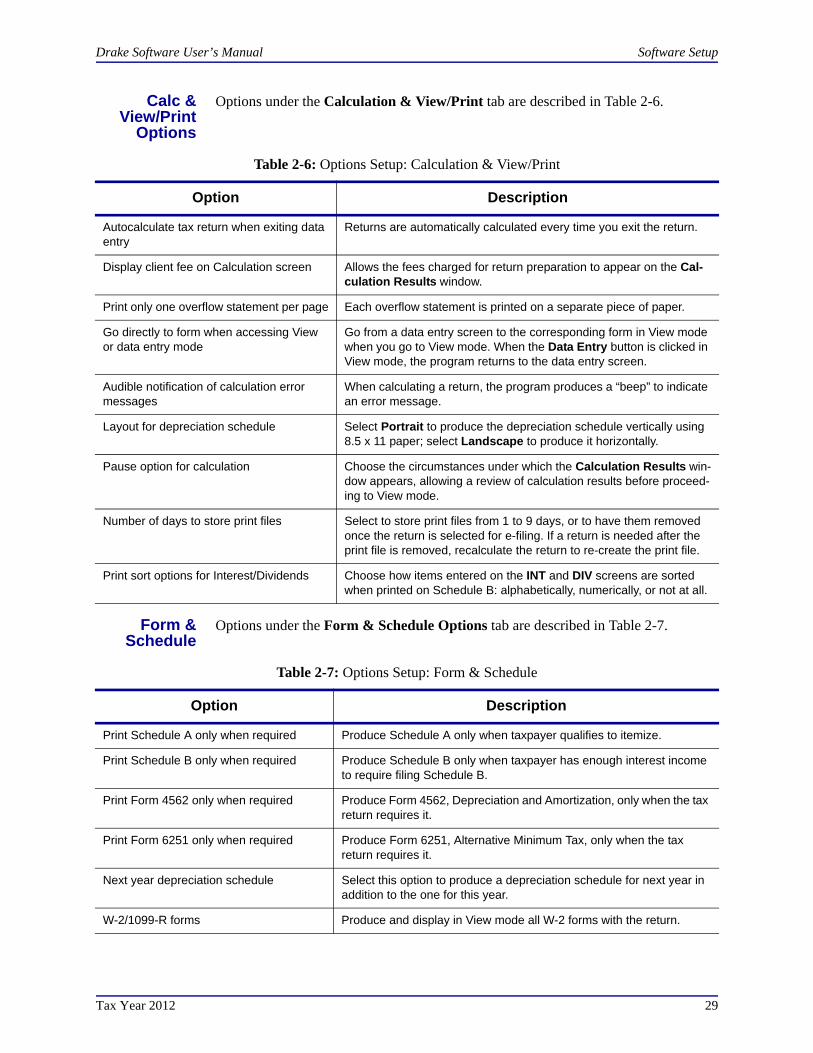
Calc &View/Print
Options
Options under the Calculation & View/Print tab are described in Table 2-6.
Form &Schedule
Options under the Form & Schedule Options tab are described in Table 2-7.
Table 2-6: Options Setup: Calculation & View/Print
Option Description
Autocalculate tax return when exiting data entry
Returns are automatically calculated every time you exit the return.
Display client fee on Calculation screen Allows the fees charged for return preparation to appear on the Cal-culation Results window.
Print only one overflow statement per page Each overflow statement is printed on a separate piece of paper.
Go directly to form when accessing View or data entry mode
Go from a data entry screen to the corresponding form in View mode when you go to View mode. When the Data Entry button is clicked in View mode, the program returns to the data entry screen.
Audible notification of calculation error messages
When calculating a return, the program produces a “beep” to indicate an error message.
Layout for depreciation schedule Select Portrait to produce the depreciation schedule vertically using 8.5 x 11 paper; select Landscape to produce it horizontally.
Pause option for calculation Choose the circumstances under which the Calculation Results win-dow appears, allowing a review of calculation results before proceed-ing to View mode.
Number of days to store print files Select to store print files from 1 to 9 days, or to have them removed once the return is selected for e-filing. If a return is needed after the print file is removed, recalculate the return to re-create the print file.
Print sort options for Interest/Dividends Choose how items entered on the INT and DIV screens are sorted when printed on Schedule B: alphabetically, numerically, or not at all.
Table 2-7: Options Setup: Form & Schedule
Option Description
Print Schedule A only when required Produce Schedule A only when taxpayer qualifies to itemize.
Print Schedule B only when required Produce Schedule B only when taxpayer has enough interest income to require filing Schedule B.
Print Form 4562 only when required Produce Form 4562, Depreciation and Amortization, only when the tax return requires it.
Print Form 6251 only when required Produce Form 6251, Alternative Minimum Tax, only when the tax return requires it.
Next year depreciation schedule Select this option to produce a depreciation schedule for next year in addition to the one for this year.
W-2/1099-R forms Produce and display in View mode all W-2 forms with the return.

Software Setup Drake Software User’s Manual
30 Tax Year 2012
OptionalDocuments
Options under the Optional Documents tab are described in Table 2-8.
Print two W-2/1099-Rs per page If return has more than one W-2 or 1099-R form, print two per page.
Carryover worksheet Produce any carryover worksheets associated with the return.
Print page 2 of Schedule K-1 ... Produce page 2 of Schedule K-1 for Forms 1120S, 1065, and 1041.
Form 8879 bank account options Select bank account printing options on Form 8879.
1040A/EZ suppress Automatically suppress Form 1040A or 1040EZ.
Form 1045 page 2 (NOL) Automatically produce Form 1045, page 2, if the return has NOL.
Select to Turn On ___ list if greater than... Produce lists of these items (W-2, W-2G, 1099-M, 1099-R, dividends, interest, K-1) when the selected number in the drop list is exceeded.
NOTE Many of these settings can be adjusted on a per-return basis. See “Making Changes on the Fly” on page 52.
Table 2-7: Options Setup: Form & Schedule
Option Description
Table 2-8: Options Setup: Optional Documents
Option Description
Folder coversheet This option generates a folder cover sheet containing the taxpayers’ names and the name, address, and phone number of the preparer’s firm.
Prior year(s) comparison form Select this option to produce a comparison sheet containing data from the cur-rent and prior-year returns.
Return summary Select this option to produce a return summary with every return prepared.
Bill summary Select this option to produce a summary of the taxpayer’s bill with each return.
Federal filing instructions Displays detailed federal filing information, including the date to file, form to be filed, address to file, and payment amount. The instructions are listed as FILEINST.PG in View mode. Activated by default. Clear the check box to dis-able, or use the PRNT screen to activate or disable on a single return.
State filing instructions Displays detailed state filing information, including the date to file, form to be filed, address to file, and payment amount. The instructions are listed as “STINST.PG” (“ST” refers to the state abbreviation; for example, OHINST.PG for Ohio instructions). Activated by default. Clear the check box to disable, or use the PRNT screen to activate or disable on a single return.
Labels Select this option to print a sheet of “mail to” addresses on Avery 5160 labels
Envelope Sheet (address drop lists)
Choose the size of the envelope on which to print the addresses of the tax-payer, the IRS Service Center, the state tax department, the city tax office, and for Forms K-1.
Estimated payment coversheet Select this option to print estimated coversheet payment addresses to envelope Nelco ENV500 dimensions for 1040 and 1041 returns with quarterly taxes.
Drake Software User’s Manual Software Setup
Tax Year 2012 31
OptionalItems on
Return
Options under the Optional Items on Return tab are described in Table 2-9.
NELCO hyperlink Click this link to go to the NELCO website to order such Drake-compatible prod-ucts as envelopes, IRS forms, and checks.
Letter Options (all packages) Select the result letter templates to be used for each package.
Include privacy letter with returns Select this option to print the privacy disclosure letter with every return.
Include engagement letter with returns
Select this option to print engagement letters for all packages when the return is calculated. At the end of the letter template are spaces for client and preparer signatures. Engagement letters can also be produced prior to completion of the return using Tools > Letters > Letters.
Include customized supplemen-tal letter with returns
Print a customized letter that can be used for various purposes.(See Table 2-14 on page 43.)
Include K-1 letter with returns Print the cover letter for individual K-1s (1065, 1120S, and 1041 packages).
Referral Coupons (3 per sheet) Enter the number of sheets per return or the coupon amount.
NOTE To override the default letter for an individual client, see “Overriding Letters Setup” on page 58.
Table 2-8: Options Setup: Optional Documents
Option Description
Table 2-9: Options Setup: Optional Items on Return
Option Description
Date on return The default is the current date. To change this date, enter the required date on the PRNT screen. If desired, select to print dates for taxpayer and spouse signatures (excluding 1040).
Print dates for taxpayer and spouse signatures (excludes 1040)
Select this option to print the signature dates for taxpayer and spouse signa-tures on the return (excluding 1040).
Taxpayer phone number Select this option to print the taxpayer’s phone number entered on screen 1.
Third party designee Select the preparer number of the preparer designated as the third-party des-ignee to be printed on the main form of the return.
Rounding amounts Select Dollar or Penny rounding. Dollar rounding is required for e-filing. Penny rounding prints penny amounts on all forms.
Interest and Penalty Calculation Calculate penalties and interest on returns filed after the due date based on interest rates entered. For more information, see “Penalty and Interest Calcu-lation” on page 181.
Software Setup Drake Software User’s Manual
32 Tax Year 2012
Billing Options under the Billing options tab are described in Table 2-10.
States To select options for state returns, select the States tab, and then select a state abbrevi-ation from the drop list. When the options are displayed, select to activate or disable them as desired and click OK. Available options depend on the chosen state. For more on specific states, see the FAQ screen for each state program.
E-filing Options under the EF tab are described in Table 2-11. Some can be adjusted for an individual return from the EF screen in data entry.
Table 2-10: Options Setup: Billing
Option Description
Print taxpayer’s SSN on the bill Select this option to print the taxpayer's SSN on the bill.
Show preparer fees withheld from bank product
Select this option to print on the bill the preparer fees withheld from the bank product amount.
Print taxpayer’s phone number on the bill
Select this option to have the taxpayer’s phone number (entered on screen 1) printed on the bill.
Print taxpayer’s e-mail address on the bill
Select this option to have the taxpayer’s e-mail address (entered on screen 1) printed on the bill.
Sales Tax Enter the sales tax rate to add to each bill. Number must be greater than 1. For example, 4.5 would represent a sales tax rate of 4.5%.
Billing statement format Select among seven formatting options, including:
- Billing by time (preparing bill based on time spent preparing return multiplied by preparer's hourly rate as defined in Setup > Preparers)
- Billing by form (preparing bill based on forms necessary to complete return by price entered in Setup > Pricing); program prepares a bill summary along with the option selected here unless the Bill Summary option is cleared at Setup > Options, Optional Documents tab.
Header on bill Select among options for the header to be printed on the bill.
Custom Paragraph Choose to have a custom paragraph printed on the bill. Select a location, and then write the paragraph in the supplied text box.
Table 2-11: Options Setup: EF
Option Description
Auto-generate taxpayer(s) PIN Have the software assign a randomly generated PIN. (1040 only)
Require ‘Ready for EF’ indicator on EF screen
Requires that the Ready for EF indicator on the EF screen be marked before a return can be selected for e-filing.
Lock client data file after EF accep-tance
Locks the client's data file once it has been e-filed. Opening a locked file requires you to acknowledge a warning screen before you can edit the return. You can also access a locked file at Tools > File Maintenance > Unlock Client Files.
Print 9325 when eligible for EF Prints Form 9325, Acknowledgment and General Information for Taxpayers Who File Returns Electronically, for every eligible return.
Drake Software User’s Manual Software Setup
Tax Year 2012 33
Admin.Options
To access the Administrative Options tab, a user must have administrative rights. Options under the Administrative Options tab are described in Table 2-12.
Suppress federal EF Prevents e-filing of the federal return.
Print EF status page Generates the EF Status page for any return that is eligible for e-file.
Alert preparer when bank product is not included
Alert the preparer via an EF message that a return does not include a bank product (To override, see “Overriding Bank-Product Alert” on page 238.)
Activate imperfect return election in data entry
Activates Imperfect Return Election check box on EF screen in data entry.
Allow selection for EF from the ‘Cal-culation Results’ screen
Allows preparer to send the currently active return directly from the Calcu-lations Results window to the e-filing queue. (The return is then transmit-ted automatically the next time you e-file returns.)
Enable prompting before automatic transmission of ‘Check Print Records’
Allows program to notify you before it transmits the Check Print Records.
E-mail 9325 Notice to Taxpayer (automatic from Drake Processing Center)
Form 9325, Acknowledgment and General Information for Taxpayers Who File Returns Electronically, is automatically e-mailed to taxpayer when return is accepted. (E-mail address must be present on screen 1.)
Default ERO Choose a preparer number, Paid Preparer, or None to indicate the ERO name that should appear on return documents. This choice can be overrid-den on screen 1 and the PREP screen in data entry.
Check for e-mail during EF transmit/receive
The program checks for e-mail received every time you transmit returns or pick up acknowledgments.
Combine EF steps (Select, Transmit, Post Acks)
Combines all e-filing steps. Click OK or press ESC on selected returns to e-file, pick up any new acknowledgments, and process the acknowledgments in one step.
Transmit return data to Drake for multi-office web reports
Sends Client Status Manager (CSM) data sent automatically to the Multi-Office Manager (MOM) during the EF process.
State EF Suppress e-filing of all state returns, or select states to suppress while other state returns remain eligible.
EF Selection Report Options Customize EF selection reports by specifying which columns (such as SSN/EIN, client name, refund/balance due, etc.) should be included in the EF selection report.
Table 2-11: Options Setup: EF
Option Description
Table 2-12: Options Setup: Administrative Options
Option Description
Use customized data entry selection menu
Mark the check box, click the top Customize box, and then select the pack-age and package type to customize. Click Load Menu. When the data entry screen is opened, click (uncheck) items to disable them in the Data Entry Menu. Click Save. The selected (unchecked) items will not be visible or accessible to any user other than those with administrative rights. (See “Locking Screens” on page 34.)
Software Setup Drake Software User’s Manual
34 Tax Year 2012
LockingScreens
An administrative user can “lock” selected screens, making them inaccessible to other users.
1. Go to Setup > Options, Administrative Options.
2. Select Use Customized data entry selection menu.
3. Click Customize.
After loading a selected menu, click a screen’s check box to lock the screen or to make it visible or hidden. (Default is “visible.”) Examples are shown in Figure 2-8 and described below the figure.
Customize user-defined data entry fields
Create option lists for the Miscellaneous Codes fields on screen 1 and the Adjustments and Payments fields on the BILL screen. For step-by-step instructions on this feature, see “Customized Drop Lists” on page 35.
Use customized flagged fields on all returns
Select this box, click Flag, and select a package type. When the Data Entry Menu is opened, click the desired screen and click each field to flag. Click a field a second time to clear it. Press ESC to save your changes.
Note: This option is available for federal packages only.
Apply current-year Admin flag set-tings when updating from prior year
Flags set globally in 2011 are set globally after updating data from Last Year Data > Update from 2011 to 2012.
Print due diligence documents Print due diligence documents generated from the EIC1, EIC2, EIC3, and EIC4 screens.
Require applicable due diligence screens to be completed
Require that applicable fields on the EIC1, EIC2, EIC3, EIC4 screens be completed before the return can be e-filed.
Enable logged in preparer’s Per-sonal Client Manager
Display the Personal Client Manager on the Drake Home window for the logged-in preparer (check box is marked by default).
Display program update availability to:
Select which preparer groups can view update availability. Selections are Administrators (users with administrative rights) and All preparers.
Bank Products - State laws regard-ing fees: Charge ALL taxpayers the same fees
Select this box to charge all clients the same supplementary fees (software, franchise/network, and additional fees), regardless of whether a bank prod-uct is included. For more information, click the Program Help link.
Drake PDF Printer Password Options
Choose to automatically password-protect any generated PDF documents. Passwords can be assigned to PDF documents that are sent using the Drake e-mail program. The default password format is the first four charac-ters of the client’s name plus the last five digits of the client’s ID. The Default password drop list includes other format options. These settings can be overridden during printing from the Print Selection dialog box.
Return Status Notification Programs New for 2012: Use this option to receive return status notification through TaxPoint or ABCvoice. Select to generate 7216 consent forms for the cus-tomer to sign. Select to require contact information (phone number and/or e-mail address on screen 1, or on the ABCV screen (for ABCvoice) or on the CALL screen (for TaxPoint).
Table 2-12: Options Setup: Administrative Options
Option Description

Drake Software User’s Manual Software Setup
Tax Year 2012 35
Figure 2-8: Locked, Visible, and Hidden screens
• Locked — Menu items with a shaded check mark are not visible or accessible.
• Visible — Menu items with a black check mark are both visible and accessible.
• Hidden — Menu items with no check mark are not visible but can be accessed using the selector field.
4. Click Save to save any changes or Cancel to close the menu with no changes saved.
Selections made here do not apply for users with administrative rights.
CustomizedDrop Lists
Your firm can create drop lists for the Miscellaneous Codes on screen 1 and the Adjustment and Payment description fields on the BILL screen. Once you have cre-ated a drop list, it appears in the selected field. In Figure 2-9, a drop list has been cre-ated for Miscellaneous Code 1 and Code 2 on screen 1. As shown in the example, Code 2 has the user-defined referral codes BUSREF (business reference) and WOM-REF (word-of-mouth reference).
Figure 2-9: Screen 1 drop lists and user-defined miscellaneous codes
The instructions below explain how to create the drop list like the one in Figure 2-9.
To create a drop list:
1. From the Home window, select Setup > Options and click the Administrative Options tab.
2. Click the second Customize button (Figure 2-10).
Figure 2-10: Click Customize to customize user-defined data entry fields.
3. In the Customizable Dropdowns in Data Entry dialog box, double-click a field to customize, or select a field and click Edit. The Edit Entries dialog box is opened.

Software Setup Drake Software User’s Manual
36 Tax Year 2012
4. In the fields of the Add Entry section (Figure 2-11 on page 36), enter a Code (eight or fewer characters) and a Description (25 or fewer characters).
Figure 2-11: Enter code and description in the Add Entry fields.
5. Click Add.
6. Repeat the previous two steps for additional drop list items. When added, items are displayed in the Entry List on the left side of the dialog box (Figure 2-12).
Figure 2-12: Entry list of Edit Entries dialog box
7. Click Save Changes to close the Edit Entries dialog box.
Click Exit to return to the Administrative Options tab. The drop list is now available in data entry.
The Edit Entries dialog box also offers the following options:
• Changing the order of a listed item — Use the Move Up, Move Down, Sort Ascending, and Sort Descending buttons to change the order of items in the drop list. (See Figure 2-12.)
• Removing a listed item — Select an item and click Remove. (See Figure 2-12.)
• Editing a listed item — Double-click an item. The Selected Entry box (see Figure 2-11) is activated with the item properties. Make changes and click Save.
NOTEYou can also create drop lists for the Adjustments and Payments field of the BILL screen.
When viewing a customized drop list in data entry, click F1 to see the item descriptions.
Drake Software User’s Manual Software Setup
Tax Year 2012 37
Pricing Setup
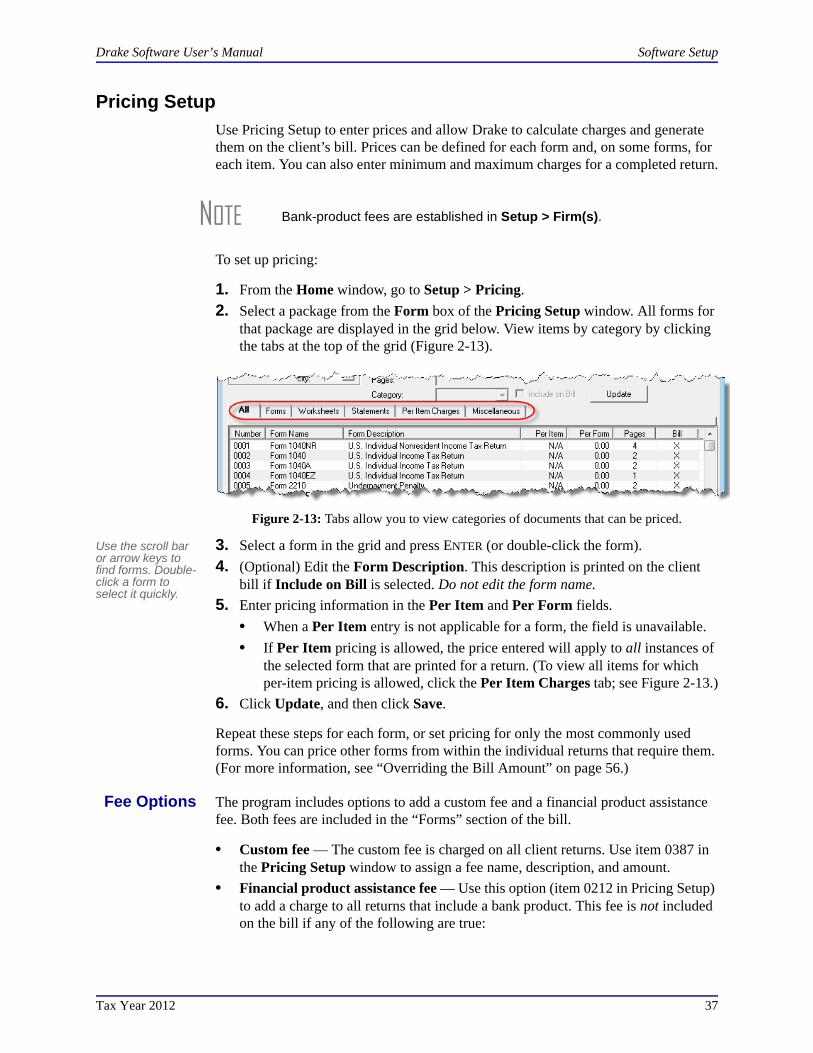
Use Pricing Setup to enter prices and allow Drake to calculate charges and generate them on the client’s bill. Prices can be defined for each form and, on some forms, for each item. You can also enter minimum and maximum charges for a completed return.
To set up pricing:
1. From the Home window, go to Setup > Pricing.
2. Select a package from the Form box of the Pricing Setup window. All forms for that package are displayed in the grid below. View items by category by clicking the tabs at the top of the grid (Figure 2-13).
Figure 2-13: Tabs allow you to view categories of documents that can be priced.
Use the scroll bar or arrow keys to find forms. Double-click a form to select it quickly.
3. Select a form in the grid and press ENTER (or double-click the form).
4. (Optional) Edit the Form Description. This description is printed on the client bill if Include on Bill is selected. Do not edit the form name.
5. Enter pricing information in the Per Item and Per Form fields.
• When a Per Item entry is not applicable for a form, the field is unavailable.
• If Per Item pricing is allowed, the price entered will apply to all instances of the selected form that are printed for a return. (To view all items for which per-item pricing is allowed, click the Per Item Charges tab; see Figure 2-13.)
6. Click Update, and then click Save.
Repeat these steps for each form, or set pricing for only the most commonly used forms. You can price other forms from within the individual returns that require them. (For more information, see “Overriding the Bill Amount” on page 56.)
Fee Options The program includes options to add a custom fee and a financial product assistance fee. Both fees are included in the “Forms” section of the bill.
• Custom fee — The custom fee is charged on all client returns. Use item 0387 in the Pricing Setup window to assign a fee name, description, and amount.
• Financial product assistance fee — Use this option (item 0212 in Pricing Setup) to add a charge to all returns that include a bank product. This fee is not included on the bill if any of the following are true:
NOTE Bank-product fees are established in Setup > Firm(s).
Software Setup Drake Software User’s Manual
38 Tax Year 2012
– The firm state is Arkansas, Maryland, Maine, or New York (See Program Help link in Setup > Options, Administrative Options tab.)
– In Setup > Options, Administrative Options tab, the option to charge all taxpayers the same fees is marked
– In Setup > Pricing, the Include on Bill box is not marked for this fee
Minimum &Maximum
Fees
To set minimum and maximum fees to be charged for a return:
1. From the Home window, go to Setup > Pricing and select a package from the Form box. All forms for that package are displayed in the grid below.
Use the scroll bar or arrow keys to find forms.
2. Scroll down to Forms 0255 and 0256 (the minimum and maximum fee settings).
3. Double-click a row and enter the fee. Repeat for the other form, if desired.
4. Click Update, and then click Save.
Macros Setup
Macros are a series of commands and functions that allow a combination of keys to accomplish tasks. Also called shortcut keys, some macros are already available in the program; for example, CTRL+V opens View mode. You can edit existing macros or create new ones to meet your office’s needs.
You can also use macros for data that is used often by your office. For example, if many of your local clients use Small Town Bank, you can arrange for the program to enter “Small Town Bank” every time you press a particular shortcut key combi-nation.
UsingMacros
To insert macro data, place the cursor in the field and press the applicable shortcut key (macro) combination. To view available macros, press CTRL+SHIFT+M from within a field to open the Data Entry - Macros window. To insert macro data from the list, select a macro and click Execute (or double-click the row). The Data Entry - Macros window is closed automatically.
CreatingNew Macros
To set up your own macros in Drake:
1. From the Drake Home window, go to Setup > Macros. The Setup Macros dialog box shows the shortcut keys (Hot Key column) and their associated tasks (Data column).
To view a list of macros in data entry, press CTRL+SHIFT+M.
2. Double-click a line to open the Edit Macro window and enter a new macro or edit an existing macro.
NOTE If incorrect charges are generated on bills, check the minimum and maximum fees to see if the settings are affecting the totals.
NEW FOR
2012The Setup Macros screen has changed slightly, making it easier to enter longer macros, and a new Record feature allows you to create new macros more quickly.
Drake Software User’s Manual Software Setup
Tax Year 2012 39
3. In the Edit Macro pane, construct a simple formula or words and operators that will enter the data you choose. Symbols for non-character shortcuts are listed in Table 2-13.
4. Click Save.
For instance, if you wanted to create and use an address macro for 1234 Peachtree Street, Atlanta, GA 30331, Fulton County, using keys ATL+L for your macro:
1. From the Drake Home window, go to Setup > Macros.
2. In the Setup Macros window, double click an empty Data line line.
3. In the Edit Macro window, enter 1234 Peachtree Street>> Atlanta>Ga>30331>Fulton>>GA
4. Click Save.
5. Go to screen 1 in Drake.
6. Click in the Street address field and press ALT+L.
The macro enters 1234 Peachtree Street for the Street address line, jumps the Apt # field and enters Atlanta in the City field, enters GA in the State field, enters 30331 in the ZIP code, enters Fulton in the County field, then jumps ahead two fields and enters GA in the Resident State field.
“Recording”Macros
New for 2012: Click the Record button on the Edit Macro window and you can use key strokes to enter certain macro operators. For instance, click Record and:
• The ENTER key or the TAB key inserts the “field forward” (>) operator.
• SHIFT+ENTER or SHIFT+TAB inserts the “field back” (<) operator.
• ALT+D inserts the “date” ([D]) operator.
• ESC inserts the “escape from screen” (~) operator.
• CTRL+N inserts the “heads-down mode” (#) operator.
The following tables lists all the operators used in building macros:
TIP
If a single macro is to allow data entry in multiple fields, use heads-down mode and right angle brackets (>) to jump to a field.
Example: The macro EF>#25>X>#~ would open the EF screen (EF>), toggle heads-down data entry mode to ON (#), enter field 25 (25>), select the box to Suppress Federal/State EF and all Bank Products (X), toggle heads-down mode to OFF (#), and save the data and escape the EF screen (~).
Table 2-13: Macro Symbols
Symbol Action
< Move cursor back one field. If the (<) symbol is inserted in front of selected data in a macro, the pro-gram moves the cursor back one field from the active field before inserting the data. If inserted after the data, the program inserts the data in the active field then moves the cursor back a field.
> Move cursor forward one field. If the (>) symbol is inserted in front of the selected data in a macro, the program jumps ahead one field from the active field before inserting the data. If inserted after the selected data, the program inserts the data first, and then moves the cursor forward a field.
Software Setup Drake Software User’s Manual
40 Tax Year 2012
Introduction to Letters in Drake
The letters program generates various types of client letters, from engagement letters to the return’s cover letter. In some cases, letter content is automatically based on data from the tax return. For example, if a return with a federal balance due has been e-
~ Escape. If the (~) symbol is inserted after the selected data in a macro, the program inserts the selected data, saves the data, and exits the screen.
[D] Insert date. If [D] is part of a macro, the program enters the current date into the active field.
# Launch heads-down data entry mode. If the (#) symbol is inserted after the selected data in a macro, the program enters the data then activates heads-down data entry. To have heads-down closed from the macro, add a second (#) symbol. (See “Heads-Down Data Entry” on page 75.)
* Bypass the Existing Forms List when performing the task set by a macro. Enter an asterisk (*) only once in any macro, and place it at the beginning of the macro. (When you open a screen that has mul-tiple records, an Existing Forms List is displayed, and you have the choice of selecting an existing record or creating a new one. To bypass the New Record option and open the first record listed, enter the (*) symbol in front of the macro. For example, *C opens the first Schedule C record. To open the second record, enter a 2 inside brackets ([2]), thus the macro *C[2] opens the second C screen, *C[3] opens the third, etc.)
[New] Perform the assigned task on a new record. For example, *C[New] opens a new C screen. The aster-isk (*) bypasses the Existing Forms list. It must be present for the [New] function to work properly.
[Home] Return to first field on a screen. If [Home] is inserted into a macro, the cursor moves to the first field on the screen.
[End] Move to last field on a screen. If [End] is inserted into a macro, the cursor moves to the last field on the screen.
[FF:#] Cursor jumps ahead a prescribed number of fields. For instance, [FF:5] jumps the cursor ahead five fields. This macro is not compatible with macros that use, or are initiated in, heads-down mode.
[FB:#] Cursor jumps back a prescribed number of fields. For instance, [FB:5] would jump the cursor back five fields.
[FJ:#] Cursor jumps to the prescribed field number. For instance, [FJ:25] would jump the cursor to field # 25. (Obtain field numbers by viewing the screen in heads-down mode. This macro is not compatible with macros that use or are initiated in heads-down mode.
+ Prevents a macro from clearing a flagged field.
[PAGEDOWN] Move to the next screen in a list. For instance, in a return with several W2s screens, Dependent screens, or 4562 detail screens, press the macro to move from one screen to the next.
[PAGEUP] Move to the previous screen in a list. For instance, in a return with several W2s screens, Dependent screens, or 4562 detail screens, press the macro to move from one screen to the next.
[NEXTTAB] Move from one linked screen to the next linked screen. For instance, for clients who receive a K-1 from a partnership, press the macro and go from the 1065 K1 13-20 screen to the Basis Worksheet screen.
[PREVTAB] Move from a linked screen to the previous one. For instance, for clients who receive a K-1 from a part-nership, press the macro and go from the Basis Worksheet screen to the 1065 K1 1-12 screen.
Table 2-13: Macro Symbols
Symbol Action
Drake Software User’s Manual Software Setup
Tax Year 2012 41
filed and the client has opted to mail a check to the IRS, the accompanying result letter will state the balance due amount, provide the e-filing information, and give instruc-tions for mailing the check.
Because so much of the letters program is automatic, you may not have to edit the let-ter templates at all. If you do need to make changes, Drake has provided numerous options for doing so.
Before making changes, please continue reading this introduction to ensure that you understand how the templates and the Client Communications Editor are structured.
Parts of aLetter
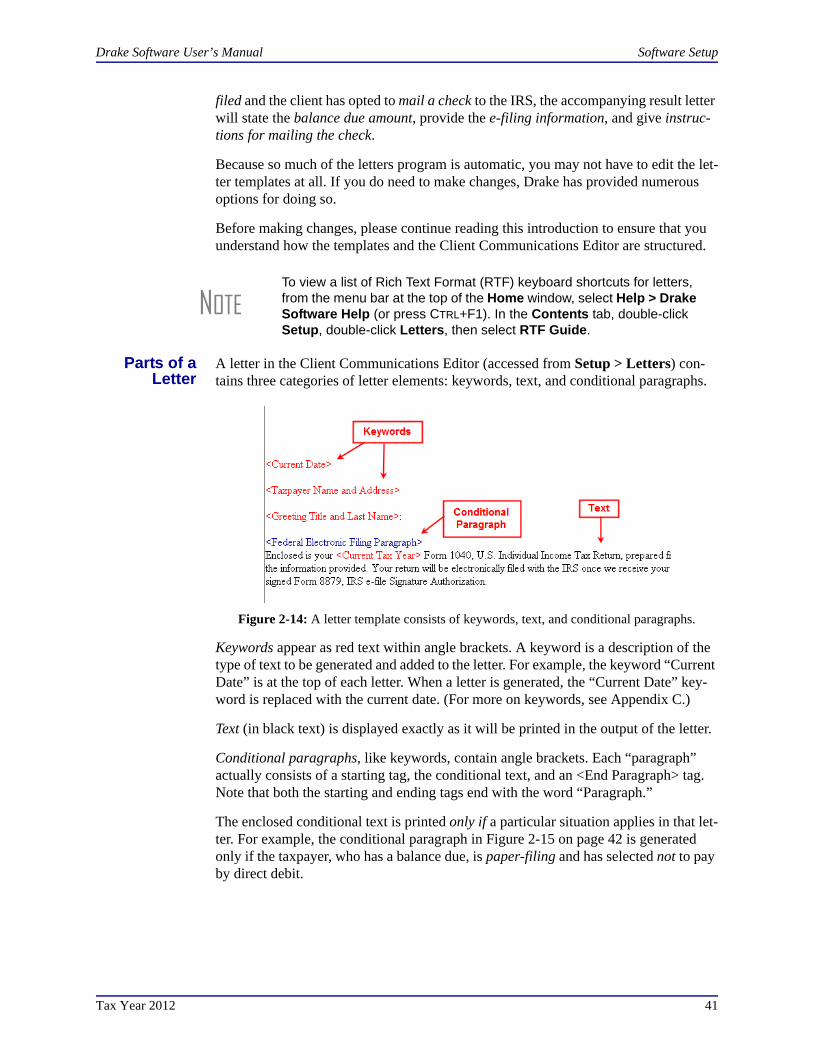
A letter in the Client Communications Editor (accessed from Setup > Letters) con-tains three categories of letter elements: keywords, text, and conditional paragraphs.
Figure 2-14: A letter template consists of keywords, text, and conditional paragraphs.
Keywords appear as red text within angle brackets. A keyword is a description of the type of text to be generated and added to the letter. For example, the keyword “Current Date” is at the top of each letter. When a letter is generated, the “Current Date” key-word is replaced with the current date. (For more on keywords, see Appendix C.)
Text (in black text) is displayed exactly as it will be printed in the output of the letter.
Conditional paragraphs, like keywords, contain angle brackets. Each “paragraph” actually consists of a starting tag, the conditional text, and an <End Paragraph> tag. Note that both the starting and ending tags end with the word “Paragraph.”
The enclosed conditional text is printed only if a particular situation applies in that let-ter. For example, the conditional paragraph in Figure 2-15 on page 42 is generated only if the taxpayer, who has a balance due, is paper-filing and has selected not to pay by direct debit.
NOTETo view a list of Rich Text Format (RTF) keyboard shortcuts for letters, from the menu bar at the top of the Home window, select Help > Drake Software Help (or press CTRL+F1). In the Contents tab, double-click Setup, double-click Letters, then select RTF Guide.

Software Setup Drake Software User’s Manual
42 Tax Year 2012
Figure 2-15: Conditional paragraph
ParagraphNesting
Many conditional paragraphs are nested within larger ones. Different nesting levels are indicated by different colors. In Figure 2-16, the Federal No Dir Debit (Paper) Paragraph from Figure 2-15 is nested inside the Federal Balance Due Paragraph. The green and purple text show where each paragraph begins and ends.
Figure 2-16: Nested Conditional Paragraph
In this example, the Federal No Dir Debit (Paper) Paragraph is generated only if the Federal Balance Due Paragraph is generated, and only if applicable for a return.
ClientCommunica-tions Editor
The Client Communications Editor, accessed from Setup > Letters, is where you can read, edit, re-write, print, and save the letters contained in the program. You can also add your company letterhead and logo to the letters. The right pane of the Editor dis-plays the letter template. The left pane displays, in tree view, the applicable para-graphs and keywords by category (Figure 2-17). Click [+] to expand a category, or click [-] to contract it. Hover your pointer over a keyword to view its description.
Figure 2-17: Category tree (left pane of Client Communications Editor)
While the result letters are designed with keywords inserted to handle most situations, additional keywords are available if you want to further customize the letter.
Drake Software User’s Manual Software Setup
Tax Year 2012 43
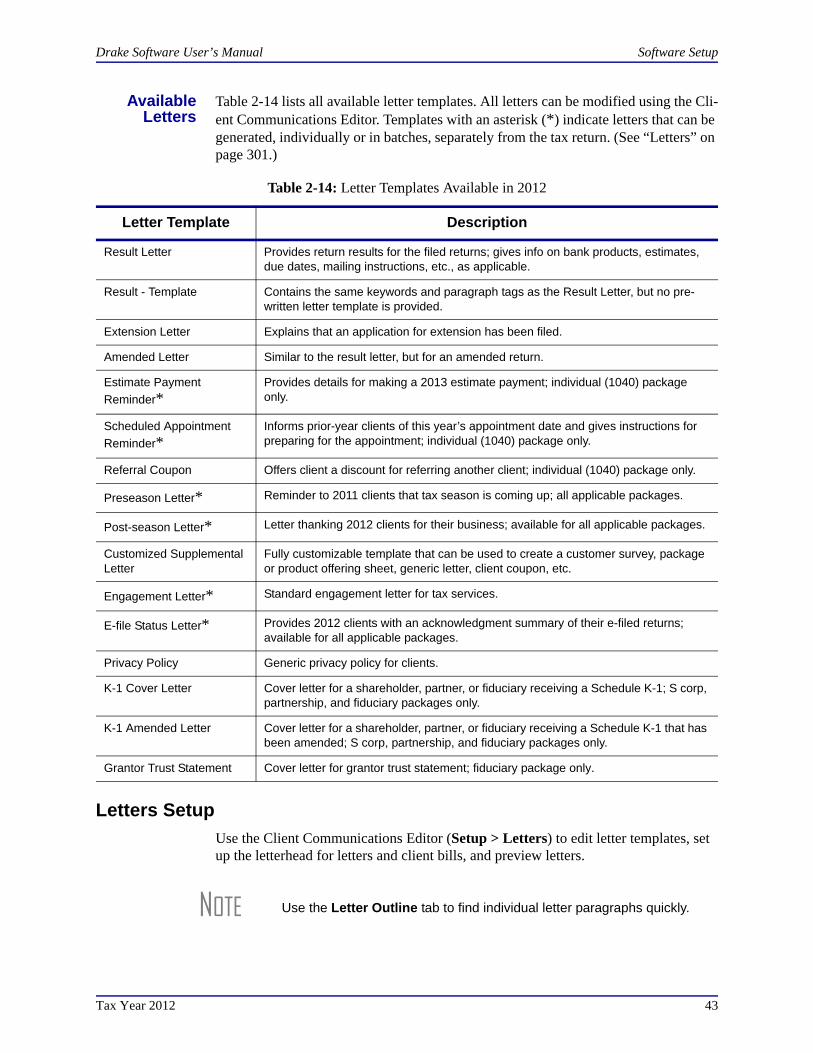
AvailableLetters
Table 2-14 lists all available letter templates. All letters can be modified using the Cli-ent Communications Editor. Templates with an asterisk (*) indicate letters that can be generated, individually or in batches, separately from the tax return. (See “Letters” on page 301.)
Letters Setup
Use the Client Communications Editor (Setup > Letters) to edit letter templates, set up the letterhead for letters and client bills, and preview letters.
Table 2-14: Letter Templates Available in 2012
Letter Template Description
Result Letter Provides return results for the filed returns; gives info on bank products, estimates, due dates, mailing instructions, etc., as applicable.
Result - Template Contains the same keywords and paragraph tags as the Result Letter, but no pre-written letter template is provided.
Extension Letter Explains that an application for extension has been filed.
Amended Letter Similar to the result letter, but for an amended return.
Estimate Payment
Reminder*Provides details for making a 2013 estimate payment; individual (1040) package only.
Scheduled Appointment
Reminder*Informs prior-year clients of this year’s appointment date and gives instructions for preparing for the appointment; individual (1040) package only.
Referral Coupon Offers client a discount for referring another client; individual (1040) package only.
Preseason Letter* Reminder to 2011 clients that tax season is coming up; all applicable packages.
Post-season Letter* Letter thanking 2012 clients for their business; available for all applicable packages.
Customized Supplemental Letter
Fully customizable template that can be used to create a customer survey, package or product offering sheet, generic letter, client coupon, etc.
Engagement Letter* Standard engagement letter for tax services.
E-file Status Letter* Provides 2012 clients with an acknowledgment summary of their e-filed returns; available for all applicable packages.
Privacy Policy Generic privacy policy for clients.
K-1 Cover Letter Cover letter for a shareholder, partner, or fiduciary receiving a Schedule K-1; S corp, partnership, and fiduciary packages only.
K-1 Amended Letter Cover letter for a shareholder, partner, or fiduciary receiving a Schedule K-1 that has been amended; S corp, partnership, and fiduciary packages only.
Grantor Trust Statement Cover letter for grantor trust statement; fiduciary package only.
NOTE Use the Letter Outline tab to find individual letter paragraphs quickly.
Software Setup Drake Software User’s Manual
44 Tax Year 2012
Editing aLetter
Template
To edit a letter:
1. In the Client Communications Editor, click Open and select a package and letter to edit. The pane on the right displays the selected template.
The Client Communications Editor opens to the last letter template viewed.
• To edit the letter contents, add, edit, or delete text as you would in a program like Microsoft Word. From the toolbar, specify font properties, typeface (bold, italic, underlined), and alignment; and copy, cut, and paste.
• To add a keyword or conditional paragraph to the letter, place your cursor where you want the new item to go, and then locate and double-click a key-word or paragraph from the pane on the left. To delete a keyword or condi-tional paragraph, select it in the letter template and press DELETE.
CTRL+X deletes a selected item.
2. Click Save.
Setting UpLetterhead
Arrange to have your firm’s information and logo generated on client bills and letters.
To set up your letterhead:
1. In the Client Communications Editor, go to Setup > Letterhead and Margins.
You can also use the Client Commu-nications Editor to set up letterhead for bills.
2. Select options from the Letter/Bill Indicators section.
3. Designate Coordinates. In the right column, number settings indicate the position of the firm information and logo. Settings for the default graphic are:
• Left-most column for logo — 8
• Top-most row for logo — 3
• Left-most column for firm info — 25
• Top-most row for firm Info — 4
4. Enter the path to the graphic in the Path/Filename for Bitmap Logo text box (or use the Browse button). The full path and filename are required. To use the simple default graphic, enter C:\Drake12\CF\LOGO.BMP. (“C” indicates the drive letter to which the Drake program is installed. Change if necessary.) Leave blank for no logo.
5. Click OK.
ChangingLetter
Margins
The left margin of a letter can be changed to suit your printing needs. To change the left margin of the default letter:
1. In the Client Communications Editor, select Setup > Letterhead and Margins.
2. Enter a number under the Left Margin Adjustment box (Figure 2-18 on page 45).
NOTEThe Client Communications Editor does not allow you to save any letter in which text within angle brackets (in other words, the names of keywords or conditional paragraphs) has been changed.
Drake Software User’s Manual Software Setup
Tax Year 2012 45
Figure 2-18: Left Margin Adjustment feature
Values are in inches. An entry of 1, for example, adjusts the margin one inch to the right, and an entry of 1.5 adjusts it an inch and a half. Values can also be entered in increments of one-tenth of an inch. For example, an entry of .1 adjusts the mar-gin one-tenth of an inch to the right (see example in Figure 2-18).
3. Click OK.
The appearance of the margin in the letter template will not change; however, when a letter is generated with a return, you’ll be able to see the margin change both in View mode and on the printed letter.
Naming aTemplate
Each template has a default name (see Table 2-14 on page 43). To assign a new name:
1. From the Client Communications Editor, click Open and select a letter template.
Press CTRL+N to quickly access the Rename Letter dialog box.
2. Click Setup > Rename Letter.
3. Enter a new name in the Rename Letter dialog box and click OK.
The new name is displayed in the Client Communications Editor title bar.
Restoring aTemplate
To restore a template to its original (default) format, open the template and select Setup > Restore Original Letter.
NOTE An entry of “0” applies the default margins. Drake does not accept neg-ative numbers or numbers with two decimal values (such as 1.25).

Software Setup Drake Software User’s Manual
46 Tax Year 2012
ViewingLetters for
SampleReturn
The preview feature allows you to open View mode and view a sample letter for one of 10 return types:
• An e-filed return with refund
• An e-filed return with balance due
• A paper-filed return with refund
• A paper-filed return with balance due
• An e-filed return with an extension
• An e-filed return with an extension and balance due
• A paper-filed return with a refund and an extension
• A paper-filed return with a balance due and an extension
• A paper-filed amended return with a refund
• A paper-filed amended return with a balance due
To access the preview feature, click the Preview button in the toolbar of the Client Communications Editor.
BringingForward aTemplate
To replace a current-year template with a prior-year one:
1. From the Client Communications Editor, click Open and select the template to replace.
2. Go to Setup > Update Prior Year Letter and click OK.
3. Select the drive of the Drake program that contains the prior-year letter.
4. Select a prior-year letter.
5. Click Continue.
6. When prompted, click Yes.
Be sure to read through the replacement letter to ensure that the information is current.
Color Setup
Use the Color Setup feature to tailor Drake screens to meet your firm’s preferences.
ProgramColors
To customize program colors:
1. From the Drake Home window, go to Setup > Colors.
2. Under Program Colors, choose one of the following options:
• Use Windows System Colors — Program screens inherit the color scheme used by the operating system.
Use Define Custom Colors to create a new color.
• Use Custom Created Colors — The Program text color and Program background color boxes to the right become available. Click a box to view the Windows color palette and choose a color.
TIPIf you used Drake last year, consider customizing colors to make your 2012 program look different from your 2011 program. If you must open the 2011 program during tax season, customized colors will help you avoid entering data into the old program by mistake.
Drake Software User’s Manual Software Setup
Tax Year 2012 47
3. Click OK.
Data EntryColors
To change the color of a specific area in data entry:
1. From the Drake Home window, go to Setup > Colors.
2. Click a color box in the Data Entry Colors box to open a Windows color palette.
3. Select a color and click OK.
4. Once all color selections are made, click OK.
5. To restore the original color settings in Setup > Colors, click Restore, and then click OK.
Printing Setup
Use the Printer Setup to:
• Establish the printer to be used with Drake
• Install a “Print to PDF” option that allows you to create PDF files
• See if your printer is HP PCL-5e compliant
EditingPrinter
Settings
To edit settings for the printer used for printing tax returns:
1. From the Drake Home window, go to Setup > Printing > Printer Setup.
2. Enter setup changes as needed. Details on each tab are provided in Table 2-15 on page 48.
3. Click Save.
NOTEYour Windows default printer is designated as the Drake default printer when Drake is installed. You do not have to add or set up a printer in Drake if the printer is already set up in Windows. Printer settings are carried forward automatically each year.
TIPWatermarks can be added on the fly via the Print Selection dialog box (the box that is displayed when you click Print in Drake). You can opt to print a custom watermark that you specify (see “Watermark Text” in Table 2-15 on page 48) or to print “Client Set” or “Preparer Set” as a watermark.
Software Setup Drake Software User’s Manual
48 Tax Year 2012
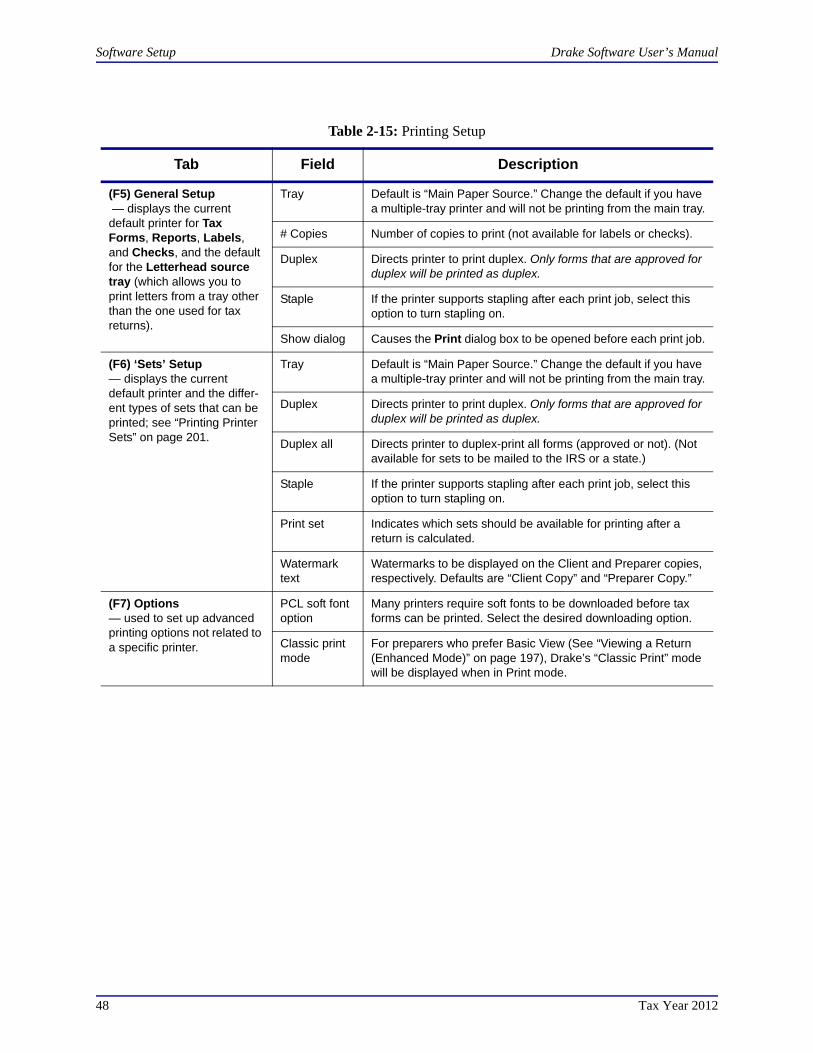
Table 2-15: Printing Setup
Tab Field Description
(F5) General Setup — displays the current default printer for Tax Forms, Reports, Labels, and Checks, and the default for the Letterhead source tray (which allows you to print letters from a tray other than the one used for tax returns).
Tray Default is “Main Paper Source.” Change the default if you have a multiple-tray printer and will not be printing from the main tray.
# Copies Number of copies to print (not available for labels or checks).
Duplex Directs printer to print duplex. Only forms that are approved for duplex will be printed as duplex.
Staple If the printer supports stapling after each print job, select this option to turn stapling on.
Show dialog Causes the Print dialog box to be opened before each print job.
(F6) ‘Sets’ Setup— displays the current default printer and the differ-ent types of sets that can be printed; see “Printing Printer Sets” on page 201.
Tray Default is “Main Paper Source.” Change the default if you have a multiple-tray printer and will not be printing from the main tray.
Duplex Directs printer to print duplex. Only forms that are approved for duplex will be printed as duplex.
Duplex all Directs printer to duplex-print all forms (approved or not). (Not available for sets to be mailed to the IRS or a state.)
Staple If the printer supports stapling after each print job, select this option to turn stapling on.
Print set Indicates which sets should be available for printing after a return is calculated.
Watermark text
Watermarks to be displayed on the Client and Preparer copies, respectively. Defaults are “Client Copy” and “Preparer Copy.”
(F7) Options— used to set up advanced printing options not related to a specific printer.
PCL soft font option
Many printers require soft fonts to be downloaded before tax forms can be printed. Select the desired downloading option.
Classic print mode
For preparers who prefer Basic View (See “Viewing a Return (Enhanced Mode)” on page 197), Drake’s “Classic Print” mode will be displayed when in Print mode.
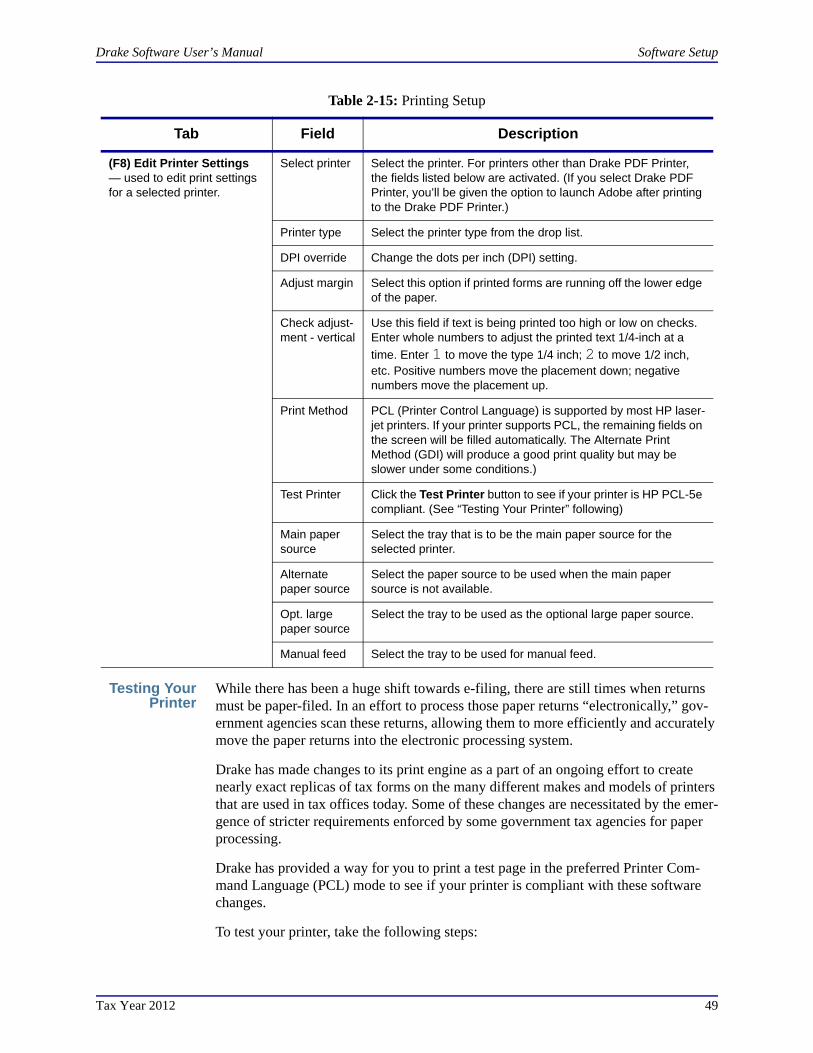
Drake Software User’s Manual Software Setup
Tax Year 2012 49
Testing YourPrinter
While there has been a huge shift towards e-filing, there are still times when returns must be paper-filed. In an effort to process those paper returns “electronically,” gov-ernment agencies scan these returns, allowing them to more efficiently and accurately move the paper returns into the electronic processing system.
Drake has made changes to its print engine as a part of an ongoing effort to create nearly exact replicas of tax forms on the many different makes and models of printers that are used in tax offices today. Some of these changes are necessitated by the emer-gence of stricter requirements enforced by some government tax agencies for paper processing.
Drake has provided a way for you to print a test page in the preferred Printer Com-mand Language (PCL) mode to see if your printer is compliant with these software changes.
To test your printer, take the following steps:
(F8) Edit Printer Settings— used to edit print settings for a selected printer.
Select printer Select the printer. For printers other than Drake PDF Printer, the fields listed below are activated. (If you select Drake PDF Printer, you’ll be given the option to launch Adobe after printing to the Drake PDF Printer.)
Printer type Select the printer type from the drop list.
DPI override Change the dots per inch (DPI) setting.
Adjust margin Select this option if printed forms are running off the lower edge of the paper.
Check adjust-ment - vertical
Use this field if text is being printed too high or low on checks. Enter whole numbers to adjust the printed text 1/4-inch at a
time. Enter 1 to move the type 1/4 inch; 2 to move 1/2 inch, etc. Positive numbers move the placement down; negative numbers move the placement up.
Print Method PCL (Printer Control Language) is supported by most HP laser-jet printers. If your printer supports PCL, the remaining fields on the screen will be filled automatically. The Alternate Print Method (GDI) will produce a good print quality but may be slower under some conditions.)
Test Printer Click the Test Printer button to see if your printer is HP PCL-5e compliant. (See “Testing Your Printer” following)
Main paper source
Select the tray that is to be the main paper source for the selected printer.
Alternate paper source
Select the paper source to be used when the main paper source is not available.
Opt. large paper source
Select the tray to be used as the optional large paper source.
Manual feed Select the tray to be used for manual feed.
Table 2-15: Printing Setup
Tab Field Description
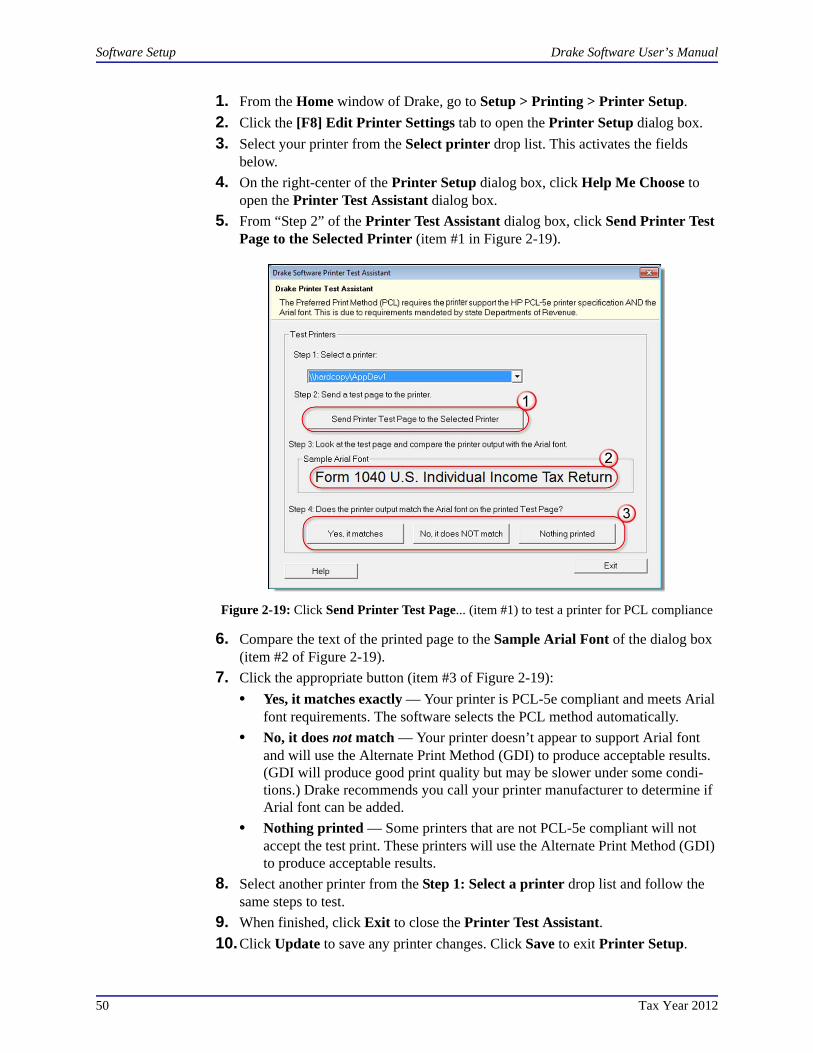
Software Setup Drake Software User’s Manual
50 Tax Year 2012
1. From the Home window of Drake, go to Setup > Printing > Printer Setup.
2. Click the [F8] Edit Printer Settings tab to open the Printer Setup dialog box.
3. Select your printer from the Select printer drop list. This activates the fields below.
4. On the right-center of the Printer Setup dialog box, click Help Me Choose to open the Printer Test Assistant dialog box.
5. From “Step 2” of the Printer Test Assistant dialog box, click Send Printer Test Page to the Selected Printer (item #1 in Figure 2-19).
Figure 2-19: Click Send Printer Test Page... (item #1) to test a printer for PCL compliance
6. Compare the text of the printed page to the Sample Arial Font of the dialog box (item #2 of Figure 2-19).
7. Click the appropriate button (item #3 of Figure 2-19):
• Yes, it matches exactly — Your printer is PCL-5e compliant and meets Arial font requirements. The software selects the PCL method automatically.
• No, it does not match — Your printer doesn’t appear to support Arial font and will use the Alternate Print Method (GDI) to produce acceptable results. (GDI will produce good print quality but may be slower under some condi-tions.) Drake recommends you call your printer manufacturer to determine if Arial font can be added.
• Nothing printed — Some printers that are not PCL-5e compliant will not accept the test print. These printers will use the Alternate Print Method (GDI) to produce acceptable results.
8. Select another printer from the Step 1: Select a printer drop list and follow the same steps to test.
9. When finished, click Exit to close the Printer Test Assistant.
10.Click Update to save any printer changes. Click Save to exit Printer Setup.
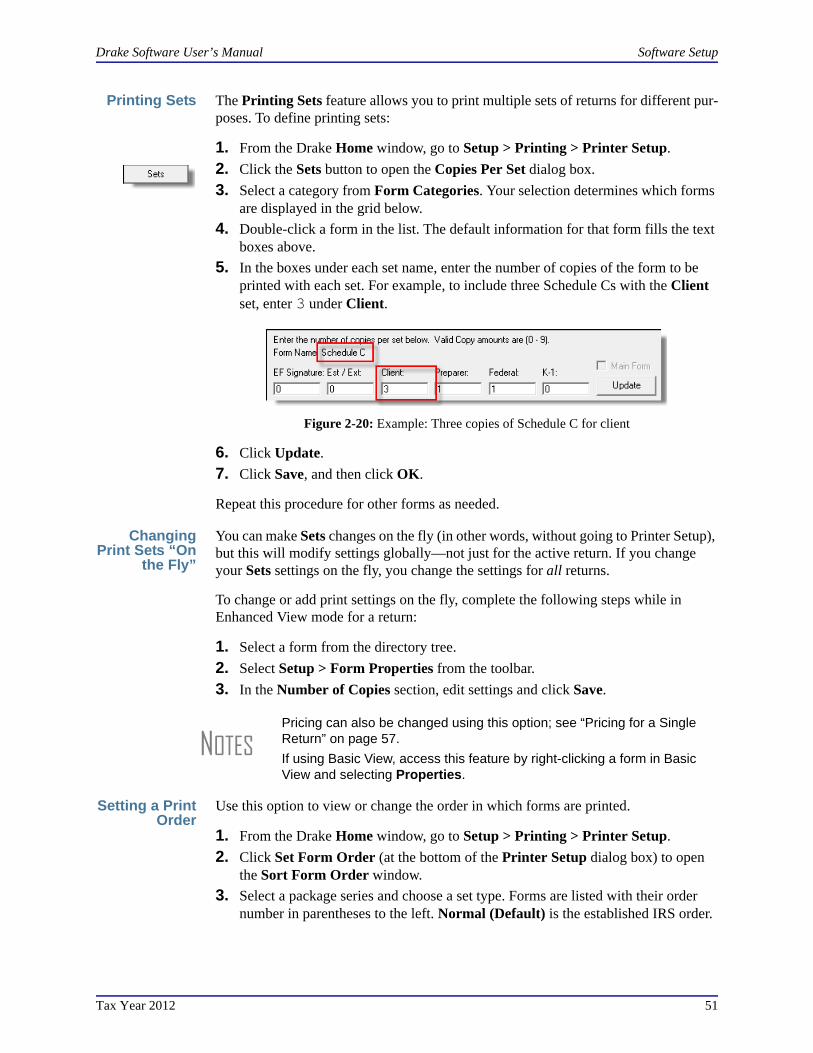
Drake Software User’s Manual Software Setup
Tax Year 2012 51
Printing Sets The Printing Sets feature allows you to print multiple sets of returns for different pur-poses. To define printing sets:
1. From the Drake Home window, go to Setup > Printing > Printer Setup.
2. Click the Sets button to open the Copies Per Set dialog box.
3. Select a category from Form Categories. Your selection determines which forms are displayed in the grid below.
4. Double-click a form in the list. The default information for that form fills the text boxes above.
5. In the boxes under each set name, enter the number of copies of the form to be printed with each set. For example, to include three Schedule Cs with the Client set, enter 3 under Client.
Figure 2-20: Example: Three copies of Schedule C for client
6. Click Update.
7. Click Save, and then click OK.
Repeat this procedure for other forms as needed.
ChangingPrint Sets “On
the Fly”
You can make Sets changes on the fly (in other words, without going to Printer Setup), but this will modify settings globally—not just for the active return. If you change your Sets settings on the fly, you change the settings for all returns.
To change or add print settings on the fly, complete the following steps while in Enhanced View mode for a return:
1. Select a form from the directory tree.
2. Select Setup > Form Properties from the toolbar.
3. In the Number of Copies section, edit settings and click Save.
Setting a PrintOrder
Use this option to view or change the order in which forms are printed.
1. From the Drake Home window, go to Setup > Printing > Printer Setup.
2. Click Set Form Order (at the bottom of the Printer Setup dialog box) to open the Sort Form Order window.
3. Select a package series and choose a set type. Forms are listed with their order number in parentheses to the left. Normal (Default) is the established IRS order.
NOTESPricing can also be changed using this option; see “Pricing for a Single Return” on page 57.
If using Basic View, access this feature by right-clicking a form in Basic View and selecting Properties.

Making Changes on the Fly Drake Software User’s Manual
52 Tax Year 2012
4. To change the sequence in which the forms are printed, click and drag form names until the forms are listed in the desired order.
5. Click Save.
DocumentManager
Setup
For details on how to set up and use the Document Manager, see Chapter 13, “Suite Products.”
Making Changes on the Fly
When you make changes “on the fly,” you override program calculations and defaults (set by either the program or by the preparer in Setup) for the open return. The rest of this chapter focuses on actions you can take while in data entry to “override” these global settings in an individual (1040) return. Comparable options for other packages (such as the business packages) are provided in the manual supplements for those packages, available at http://Support.DrakeSoftware.com.
Suppressing/Forcing Documents
The PRNT screen allows you to indicate which forms should and should not be gener-ated for a return, regardless of program calculations and established defaults.
SuppressingItems from
BeingGenerated
Table 2-16 lists items that can be suppressed using the PRNT screen.
NOTE To back up the print order and restore it to another machine, choose to back up the setup files from Tools > File Maintenance > Backup.
Table 2-16: Items That Can Be Suppressed from the PRNT Screen
Item Description
1040EZ Prevents Form 1040EZ from being prepared; program prepares either Form 1040 or 1040A instead.
1040A and EZ Prevents Forms 1040A and 1040EZ from being prepared; program pre-pares Form 1040 instead.
State short form
Forces state return to be printed on the state long form.
8801 Suppresses printing of Form 8801, Credit for Prior Year Minimum Tax - Individuals, Estates, and Trusts, if the form is not required. (This form is generated by default on certain returns that have a credit carryforward.)
WK_PAL Prevents Passive Activity Deduction Worksheet from being prepared. This worksheet shows how much (if any) the taxpayer is taking in passive activ-ity loss deductions this year and how much is being carried over.
WK_6251B Suppresses exemption worksheet for Form 6251, Alternative Minimum Tax.
WK179LMT Prevents section 179 Business Income Limit Worksheet from being pre-pared. This worksheet shows the amount (if any) of section 179 deductions taken this year and how much is being carried over.
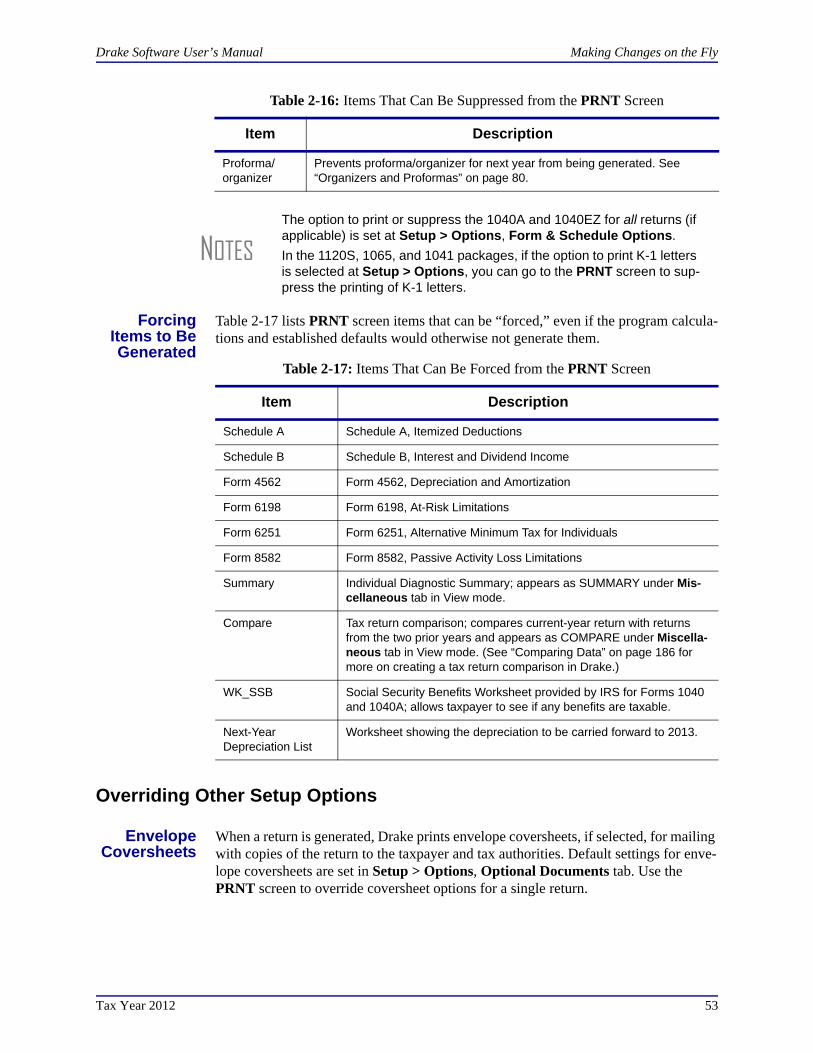
Drake Software User’s Manual Making Changes on the Fly
Tax Year 2012 53
ForcingItems to BeGenerated
Table 2-17 lists PRNT screen items that can be “forced,” even if the program calcula-tions and established defaults would otherwise not generate them.
Overriding Other Setup Options
EnvelopeCoversheets
When a return is generated, Drake prints envelope coversheets, if selected, for mailing with copies of the return to the taxpayer and tax authorities. Default settings for enve-lope coversheets are set in Setup > Options, Optional Documents tab. Use the PRNT screen to override coversheet options for a single return.
Proforma/organizer
Prevents proforma/organizer for next year from being generated. See “Organizers and Proformas” on page 80.
Table 2-16: Items That Can Be Suppressed from the PRNT Screen
Item Description
NOTESThe option to print or suppress the 1040A and 1040EZ for all returns (if applicable) is set at Setup > Options, Form & Schedule Options.
In the 1120S, 1065, and 1041 packages, if the option to print K-1 letters is selected at Setup > Options, you can go to the PRNT screen to sup-press the printing of K-1 letters.
Table 2-17: Items That Can Be Forced from the PRNT Screen
Item Description
Schedule A Schedule A, Itemized Deductions
Schedule B Schedule B, Interest and Dividend Income
Form 4562 Form 4562, Depreciation and Amortization
Form 6198 Form 6198, At-Risk Limitations
Form 6251 Form 6251, Alternative Minimum Tax for Individuals
Form 8582 Form 8582, Passive Activity Loss Limitations
Summary Individual Diagnostic Summary; appears as SUMMARY under Mis-cellaneous tab in View mode.
Compare Tax return comparison; compares current-year return with returns from the two prior years and appears as COMPARE under Miscella-neous tab in View mode. (See “Comparing Data” on page 186 for more on creating a tax return comparison in Drake.)
WK_SSB Social Security Benefits Worksheet provided by IRS for Forms 1040 and 1040A; allows taxpayer to see if any benefits are taxable.
Next-YearDepreciation List
Worksheet showing the depreciation to be carried forward to 2013.
Making Changes on the Fly Drake Software User’s Manual
54 Tax Year 2012
FilingInstructions
When a return is generated, Drake prints federal and state filing instructions. Default settings are established from Setup > Options, Optional Documents tab. Use the PRNT screen to override the default and force or suppress the filing instructions.
DueDiligence
Documents
EIC due diligence information is entered on screens EIC1, EIC2, EIC3, and EIC4. The PRNT screen includes options to print EIC due-diligence documents with a selected return. (These options are set globally from the Administrative Options tab in Setup > Options.)
Dates on theReturn
A default due date for filing is printed on returns and all letters and filing instructions generated with a return. Use the PRNT screen to override this default date. These changes cannot be set globally from Setup.
Override the default date by entering an alternate due date in the Date to print on returns or Due date to print on letter and filing instructions fields in the Print Overrides section of the PRNT screen.
ReturnIndicators
By default, the program displays certain indicators (such as “Hurricane Katrina”) on applicable returns. Use the PRNT screen to force certain indicators to be displayed.
BillingFormat
The following global setup options are set from Setup > Options, Billing tab, and can be changed on the fly by using the BILL screen in data entry:
For more on the BILL screen, see “Overriding the Bill Amount” on page 56.
NOTEIf a return qualifies for special treatment due to a disaster, the required literal should be entered in the Disaster designation field. An entry here will be printed at the top of the main federal form and will be included in the transmission file for e-filed returns.
Table 2-18: Billing Options That Can Be Changed on the Fly
Option Choices
Billing Statement Format Total only; Forms and total; Forms, prices, and total; Bill by time; Charge per form
Custom Paragraph None; Top of bill; Bottom of bill
NOTE Write the custom paragraph for the bill in the Custom Paragraph field at Setup > Options, Billing tab.
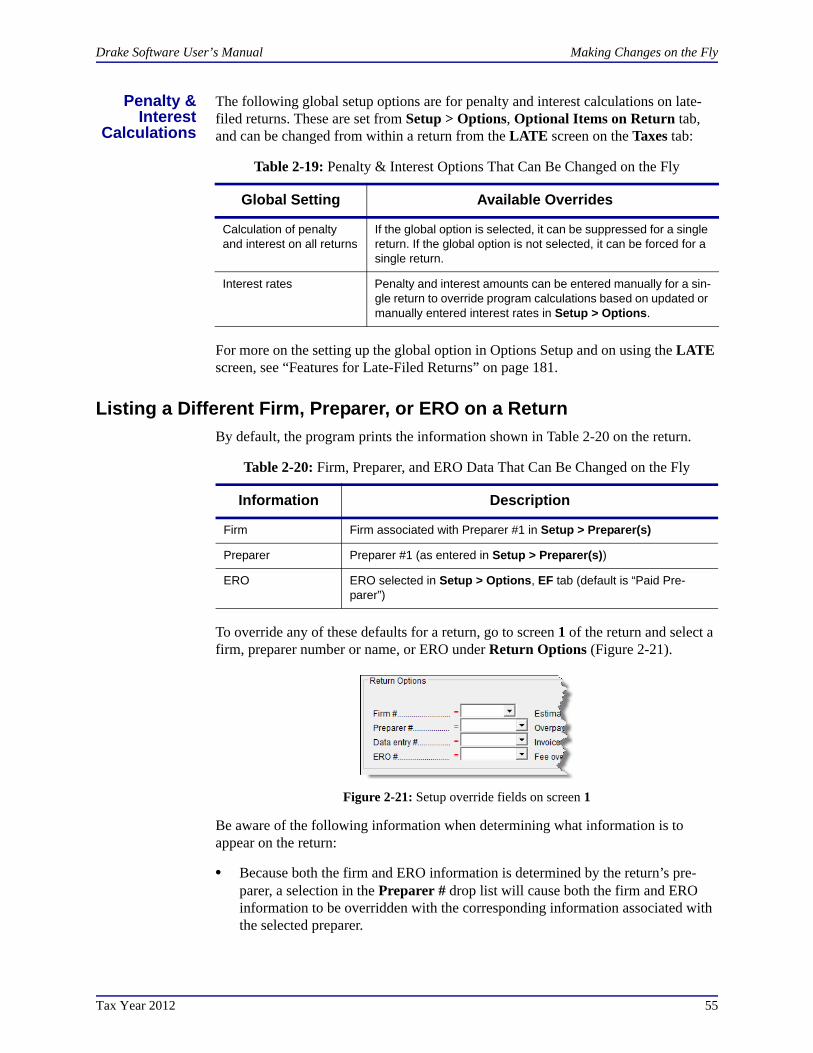
Drake Software User’s Manual Making Changes on the Fly
Tax Year 2012 55
Penalty &Interest
Calculations
The following global setup options are for penalty and interest calculations on late-filed returns. These are set from Setup > Options, Optional Items on Return tab, and can be changed from within a return from the LATE screen on the Taxes tab:
For more on the setting up the global option in Options Setup and on using the LATE screen, see “Features for Late-Filed Returns” on page 181.
Listing a Different Firm, Preparer, or ERO on a Return
By default, the program prints the information shown in Table 2-20 on the return.
To override any of these defaults for a return, go to screen 1 of the return and select a firm, preparer number or name, or ERO under Return Options (Figure 2-21).
Figure 2-21: Setup override fields on screen 1
Be aware of the following information when determining what information is to appear on the return:
• Because both the firm and ERO information is determined by the return’s pre-parer, a selection in the Preparer # drop list will cause both the firm and ERO information to be overridden with the corresponding information associated with the selected preparer.
Table 2-19: Penalty & Interest Options That Can Be Changed on the Fly
Global Setting Available Overrides
Calculation of penalty and interest on all returns
If the global option is selected, it can be suppressed for a single return. If the global option is not selected, it can be forced for a single return.
Interest rates Penalty and interest amounts can be entered manually for a sin-gle return to override program calculations based on updated or manually entered interest rates in Setup > Options.
Table 2-20: Firm, Preparer, and ERO Data That Can Be Changed on the Fly
Information Description
Firm Firm associated with Preparer #1 in Setup > Preparer(s)
Preparer Preparer #1 (as entered in Setup > Preparer(s))
ERO ERO selected in Setup > Options, EF tab (default is “Paid Pre-parer”)
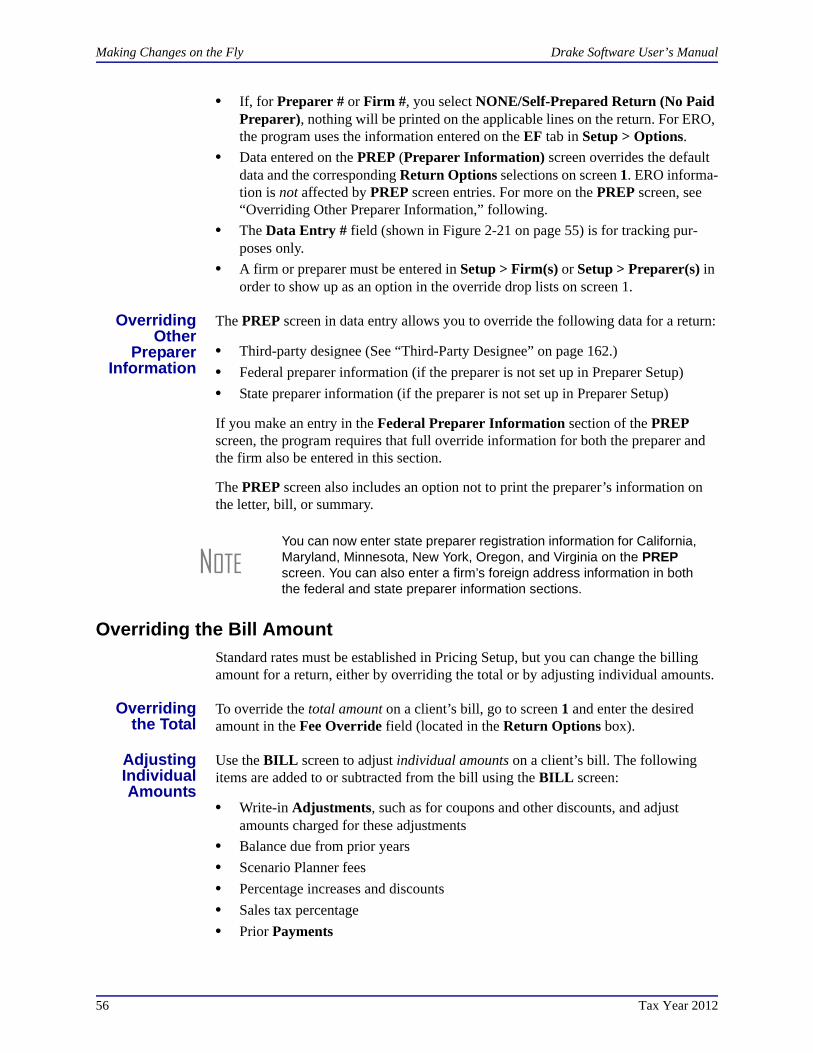
Making Changes on the Fly Drake Software User’s Manual
56 Tax Year 2012
• If, for Preparer # or Firm #, you select NONE/Self-Prepared Return (No Paid Preparer), nothing will be printed on the applicable lines on the return. For ERO, the program uses the information entered on the EF tab in Setup > Options.
• Data entered on the PREP (Preparer Information) screen overrides the default data and the corresponding Return Options selections on screen 1. ERO informa-tion is not affected by PREP screen entries. For more on the PREP screen, see “Overriding Other Preparer Information,” following.
• The Data Entry # field (shown in Figure 2-21 on page 55) is for tracking pur-poses only.
• A firm or preparer must be entered in Setup > Firm(s) or Setup > Preparer(s) in order to show up as an option in the override drop lists on screen 1.
OverridingOther
PreparerInformation
The PREP screen in data entry allows you to override the following data for a return:
• Third-party designee (See “Third-Party Designee” on page 162.)
• Federal preparer information (if the preparer is not set up in Preparer Setup)
• State preparer information (if the preparer is not set up in Preparer Setup)
If you make an entry in the Federal Preparer Information section of the PREP screen, the program requires that full override information for both the preparer and the firm also be entered in this section.
The PREP screen also includes an option not to print the preparer’s information on the letter, bill, or summary.
Overriding the Bill Amount
Standard rates must be established in Pricing Setup, but you can change the billing amount for a return, either by overriding the total or by adjusting individual amounts.
Overridingthe Total
To override the total amount on a client’s bill, go to screen 1 and enter the desired amount in the Fee Override field (located in the Return Options box).
AdjustingIndividualAmounts
Use the BILL screen to adjust individual amounts on a client’s bill. The following items are added to or subtracted from the bill using the BILL screen:
• Write-in Adjustments, such as for coupons and other discounts, and adjust amounts charged for these adjustments
• Balance due from prior years
• Scenario Planner fees
• Percentage increases and discounts
• Sales tax percentage
• Prior Payments
NOTEYou can now enter state preparer registration information for California, Maryland, Minnesota, New York, Oregon, and Virginia on the PREP screen. You can also enter a firm’s foreign address information in both the federal and state preparer information sections.
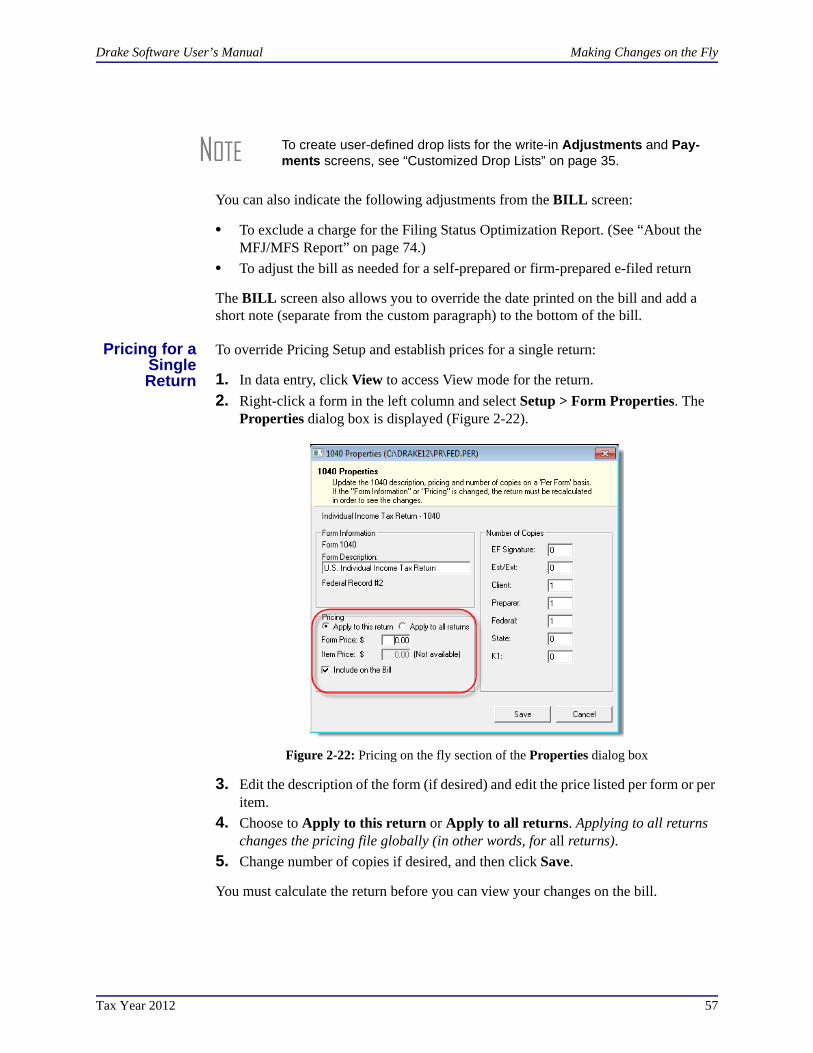
Drake Software User’s Manual Making Changes on the Fly
Tax Year 2012 57
You can also indicate the following adjustments from the BILL screen:
• To exclude a charge for the Filing Status Optimization Report. (See “About the MFJ/MFS Report” on page 74.)
• To adjust the bill as needed for a self-prepared or firm-prepared e-filed return
The BILL screen also allows you to override the date printed on the bill and add a short note (separate from the custom paragraph) to the bottom of the bill.
Pricing for aSingleReturn
To override Pricing Setup and establish prices for a single return:
1. In data entry, click View to access View mode for the return.
2. Right-click a form in the left column and select Setup > Form Properties. The Properties dialog box is displayed (Figure 2-22).
Figure 2-22: Pricing on the fly section of the Properties dialog box
3. Edit the description of the form (if desired) and edit the price listed per form or per item.
4. Choose to Apply to this return or Apply to all returns. Applying to all returns changes the pricing file globally (in other words, for all returns).
5. Change number of copies if desired, and then click Save.
You must calculate the return before you can view your changes on the bill.
NOTE To create user-defined drop lists for the write-in Adjustments and Pay-ments screens, see “Customized Drop Lists” on page 35.

Making Changes on the Fly Drake Software User’s Manual
58 Tax Year 2012
Overriding Letters Setup
Letters options and defaults can be set from both Setup > Options, Optional Docu-ments tab and Setup > Letters. Use the LTR screen, accessible from the Other Forms tab, to override global options on a per-return basis.
The LTR screen allows you to make the following changes to the letters in a return:
• Have a result letter other than the default printed with the return.
• Enter a personalized letter greeting.
• Add a custom paragraph.
In addition, it provides the following options:
• Force-print a letter for a paper-filed return or extension application, even if the return/application is eligible for e-file.
• Force-print a letter for an e-filed return or extension application, even if the return/application is ineligible for e-file.
• Force (or suppress) a customized supplemental letter, engagement letter, or pri-vacy policy letter.
DefaultResult Letter
The result letter is the standard letter that is printed with a return. It tells the client that the return has been prepared from the information provided, states the amount of the refund or balance due, and provides instructions for mailing the return (if paper-fil-ing). The program uses Result Letter #1 as the default.
To change the default letter for a return, go to the LTR screen and select a new letter from the Letter # drop list. In addition to other result letter templates, you can have the program generate a result letter in Spanish (Figure 2-23), an extension letter, or an amended return letter instead of the program default letter.
Figure 2-23: Selecting the Spanish letter as the default letter for a return (LTR screen)
NOTETo change the default letter for all returns, go to the Optional Doc-uments tab in Setup > Options and select a template from the applicable package in the Result Letter section of the dialog box.
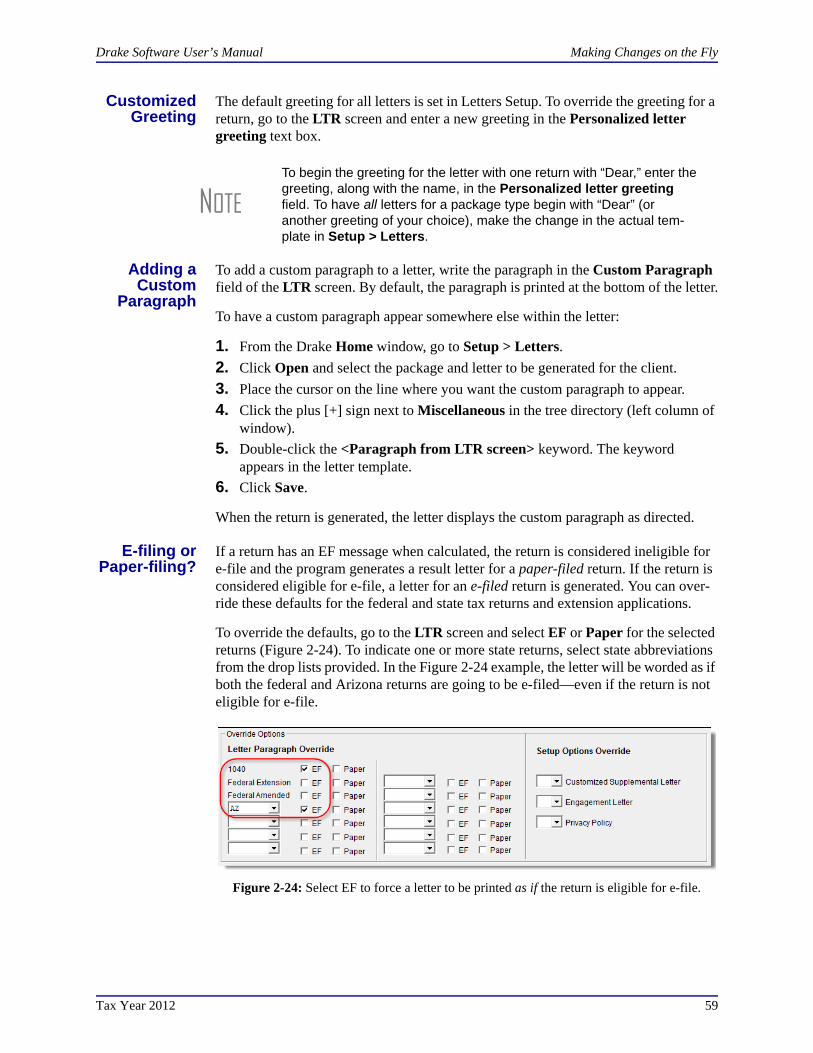
Drake Software User’s Manual Making Changes on the Fly
Tax Year 2012 59
CustomizedGreeting
The default greeting for all letters is set in Letters Setup. To override the greeting for a return, go to the LTR screen and enter a new greeting in the Personalized letter greeting text box.
Adding aCustom
Paragraph
To add a custom paragraph to a letter, write the paragraph in the Custom Paragraph field of the LTR screen. By default, the paragraph is printed at the bottom of the letter.
To have a custom paragraph appear somewhere else within the letter:
1. From the Drake Home window, go to Setup > Letters.
2. Click Open and select the package and letter to be generated for the client.
3. Place the cursor on the line where you want the custom paragraph to appear.
4. Click the plus [+] sign next to Miscellaneous in the tree directory (left column of window).
5. Double-click the <Paragraph from LTR screen> keyword. The keyword appears in the letter template.
6. Click Save.
When the return is generated, the letter displays the custom paragraph as directed.
E-filing orPaper-filing?
If a return has an EF message when calculated, the return is considered ineligible for e-file and the program generates a result letter for a paper-filed return. If the return is considered eligible for e-file, a letter for an e-filed return is generated. You can over-ride these defaults for the federal and state tax returns and extension applications.
To override the defaults, go to the LTR screen and select EF or Paper for the selected returns (Figure 2-24). To indicate one or more state returns, select state abbreviations from the drop lists provided. In the Figure 2-24 example, the letter will be worded as if both the federal and Arizona returns are going to be e-filed—even if the return is not eligible for e-file.
Figure 2-24: Select EF to force a letter to be printed as if the return is eligible for e-file.
NOTETo begin the greeting for the letter with one return with “Dear,” enter the greeting, along with the name, in the Personalized letter greeting field. To have all letters for a package type begin with “Dear” (or another greeting of your choice), make the change in the actual tem-plate in Setup > Letters.

Making Changes on the Fly Drake Software User’s Manual
60 Tax Year 2012
PrintingAdditional
Letters
From Setup > Options, Optional Documents tab, you can select to have the custom-ized supplemental letter, engagement letter, and privacy policy letter printed with all returns. To override the established defaults for a single return, go to the return’s LTR screen and select Yes or No for the desired letter types. In Figure 2-24 on page 59, the user has selected not to have the engagement letter printed for the client.
Overriding EF Setup
The EF screen in data entry allows you to suppress federal and state e-filing on a per-return basis. (The program default in Setup > Options, EF tab is that all eligible forms will be e-filed.) For more information on the EF screen, see “EF Override Options in Data Entry” on page 236.
NOTEIn the 1120S, 1065, and 1041 packages, you can print K-1 letters for a return by entering the signing information on the LTR screen. This is necessary only if the global option to print K-1 letters is not selected in Options Setup.