running kmeans mapreduce code on amazon awsdmkd.cs.vt.edu/tutorial/bigdata/running kmeans mapreduce...
TRANSCRIPT

Running Kmeans Mapreduce code on Amazon AWS
Pseudo Code
Input: Dataset D, Number of clusters k
Output: Data points with cluster memberships
Step 1: for iteration = 1 to MaxIterations do
Step 2: Mapper: Read D and centroids from HDFS
Step 3: Mapper: Compute the distance between each point in D and each point in centroids
Step 4: Mapper Output: Key-value pairs with key as centroid id and value as data point id and
distance between them
Step 5: Shuffle and Sort: Aggregate for each key (centroid)
Step 6: Reducer: Sort distances and associate data points to the nearest centroid
Step 7: Reducer: Recompute the centroids
Step 8: Reducer Output: Write centroids to HDFS
Step 9: end for
How to run the code
Tools Required
1. Amazon AWS Account
2. PuTTy Windows Client (to connect to Amazon EC2 instance)
3. PuTTYgen (to generate private key – this will be used in putty to connect to EC2 instance)
4. WinSCP (secury copy)
1. Setting up Amazon EC2 Instances
With 4 node clusters and minimum volume size of 8GB there would be an average $2 of
charge per day with all 4 running instances. You can stop the instance anytime to avoid the
charge, but you will loose the public IP and host and restarting the instance will create new
ones. You can also terminate your Amazon EC2 instance anytime and by default it will
delete your instance upon termination, so just be careful what you are doing.
1.1 Get Amazon AWS Account

If you do not already have an account, please create a new one. Amazon EC2 comes with
eligible free-tier instances.
1.2 Sign In to AWS
Once login into Amazon Web Services website (http://aws.amazon.com) by clicking Sign In
to the Console
After successful signing in to AWS, click EC2

Then click Launch Instance
1.3 Select AMI
Under the Quick Start column on the left, click Community AMIs. search and select
Ubuntu Server 12.04 Server 64-bit OS

1.4 Select Instance Type
Select the micro instance and click on „Next: Configure Instance Details‟; on bottom right.
1.5 Configure Number of Instances
We are setting up 4 node Hadoop cluster, so please enter 4 as number of instances. Please
check Amazon EC2 free-tier requirements, you may setup 3 node cluster with < 30GB
storage size to avoid any charges. In production environment you want to have
SecondayNameNode as separate machine. Click on „Next: Add Storage‟; at bottom right.

1.6 Add Storage
Minimum volume size is 8GB. Change it to 20GB (since we can add upto 30GB in free tier)
and also change the volume type to “General Purpose (SSD)”. Click on „Next: Tag
Instance‟; at bottom right.
1.7 Instance Description
Give your instance name as “HadoopEC2MultiNodeCluster” and click on „Next: Configure
Security group‟; at bottom right.
1.8 Define a Security Group
Create a new security group, later on we are going to modify the security group and add
new rules which will allow seamless interaction between instances. Name it
„HadoopEC2SecurityGroup‟. Click Review and Launch at bottom right.

1.9 Launch Instance and Create Security Pair
Review and Launch Instance.
Amazon EC2 uses public–key cryptography to encrypt and decrypt login information.
Public–key cryptography uses a public key to encrypt a piece of data, such as a password,
then the recipient uses the private key to decrypt the data. The public and private keys are
known as a key pair.
Create a new keypair and give it a name “hadoopec2cluster” and download the keypair
(.pem) file to your local machine. Click Launch Instance

1.10 Launching Instances
Once you click “Launch Instance” 4 instance should be launched with “pending” state
Once in “running” state we are now going to rename the instance name as below.
1. HadoopNameNode (Master)
2. HadoopSecondaryNameNode
3. HadoopSlave1 (data node will reside here)
4. HaddopSlave2 (data node will reside here)
You can rename the instance by clicking by hovering on the name and clicking on the pen icon
showed next to it. Once renamed click on the tick mark.
Please note down the Instance ID, Public DNS/URL like (ec2-54-209-221-112.compute-
1.amazonaws.com) and Public IP for each instance for your reference. We will need it later
on to connect from Putty client. Also notice we are using “HadoopEC2SecurityGroup”.

Modify Security Group
You can use the existing group or create a new one. When you create a group with default
options it add a rule for SSH at port 22.In order to have TCP and ICMP access we need to
add 2 additional security rules. Add „All TCP‟, „All ICMP‟ and „SSH (22)‟ under the inbound
rules to “HadoopEC2SecurityGroup”. This will allow ping, SSH, and other similar commands
among servers and from any other machine on internet. Make sure to “Apply Rule changes”
to save your changes.
These protocols and ports are also required to enable communication among cluster
servers. As this is a test setup we are allowing access to all for TCP, ICMP and SSH and
not bothering about the details of individual server port and security.
Please note that without adding these rules, the instances in Hadoop cluster with default
security group won‟t be able to communicate between each other‟s.

2. Setting up client access to Amazon Instances
Now, let‟s make sure we can connect to all 4 instances. For that we are going to use Putty
client. We are going setup password-less SSH access among servers to setup the cluster.
This allows remote access from Master Server to Slave Servers so Master Server can
remotely start the Data Node and Task Tracker services on Slave servers.
We are going to use downloaded hadoopec2cluster.pem file to generate the private key
(.ppk). In order to generate the private key we need Puttygen client. You can download the
putty and puttygen and various utilities in zip from here.
2.1 Generating Private Key
Let‟s launch PUTTYGEN client and import the key pair we created during launch instance
step – “hadoopec2cluster.pem”
Navigate to Conversions and “Import Key”

Once you import the key you can enter passphrase to protect your private key or leave the
passphrase fields blank to use the private key without any passphrase. But for now leave it
blank. Passphrase protects the private key from any unauthorized access to servers using
your machine and your private key.

Any access to server using passphrase protected private key will require the user to enter
the passphrase to enable the private key enabled access to AWS EC2 server.
2.2 Save Private Key
Now save the private key by clicking on “Save Private Key” and click “Yes” as we are going
to leave passphrase empty.
Save the .ppk file and give it the same name.

Now we are ready to connect to our Amazon Instance Machine for the first time.
2.3 Connect to Amazon Instance
Let‟s connect to HadoopNameNode first. Launch Putty client, grab the public URL (the DNS
ec2-….-amazonaws.com from the console step 1.10), import the .ppk private key that we
just created for password-less SSH access. As per amazon documentation, for Ubuntu
machines username is “ubuntu”
2.3.1 Provide private key for authentication

2.3.2 Hostname and Port and Connection Type
Host name will be like “[email protected]”
Click “Open” to launch putty session.

When you launch the session first time, you will see below message, click “Yes”
If everything goes well you will be presented welcome message with Unix shell at the end.
If there is a problem with your key, you may receive below error message. Check manual
again and eradicate the error.

Similarly connect to remaining 3 machines HadoopSecondaryNameNode, HaddopSlave1
and HadoopSlave2 respectively to make sure you can connect successfully.
2.4 Enable Public Access Issue ifconfig command in the terminal and note down the ip address. Next, we are going to
update the hostname with ec2 public URL and finally we are going to update /etc/hosts file to
map the ec2 public URL with ip address. This will help us to configure master and slaves
nodes with hostname instead of ip address.
Following is the output on HadoopNameNode ifconfig
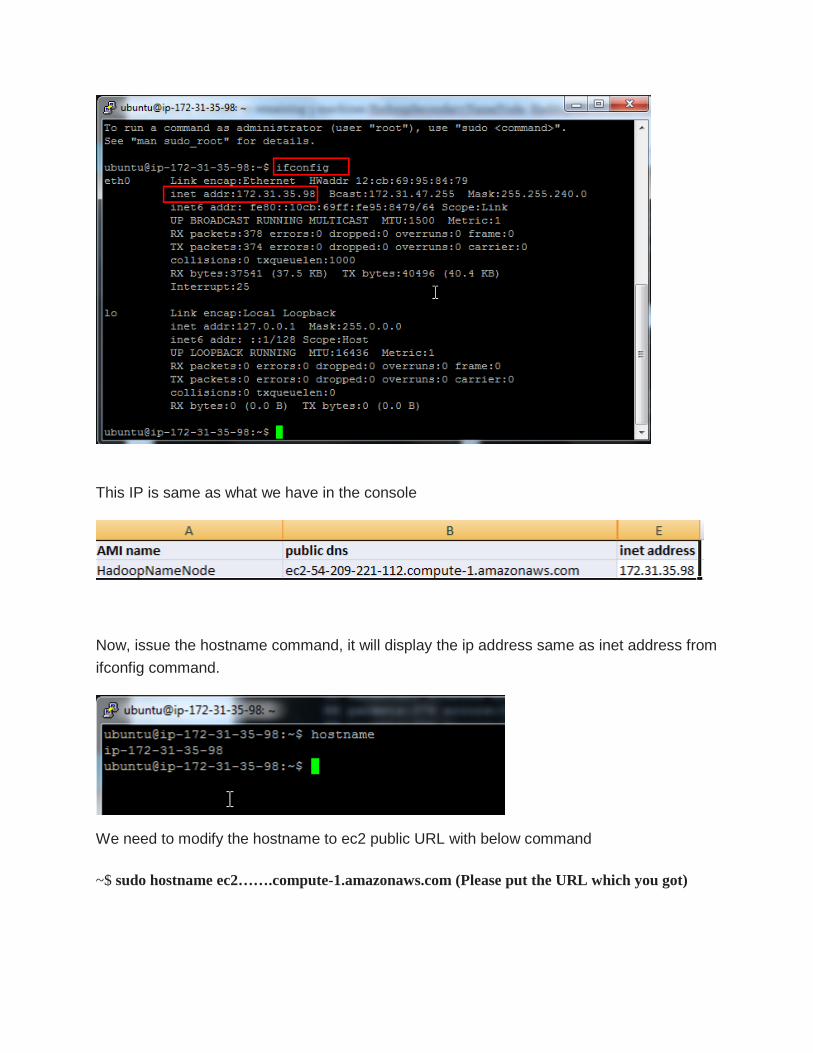
This IP is same as what we have in the console
Now, issue the hostname command, it will display the ip address same as inet address from
ifconfig command.
We need to modify the hostname to ec2 public URL with below command
~$ sudo hostname ec2…….compute-1.amazonaws.com (Please put the URL which you got)

2.5 Modify /etc/hosts
Let‟s change the host to EC2 public IP and hostname.
Open the /etc/hosts in „VI‟ with “sudo vi /etc/hosts” command, in a very first line it will show
127.0.0.1 localhost, we need to replace that with amazon ec2 hostname and ip address we
just collected.
Modify the file and save your changes. To save a file you need to type the following
sequence
1. Esc , to quit edit mode and fallback to command mode
2. :wq , start with a colon and then press w and q to write and quit
3. Then press Enter to validate.

Repeat 2.3 and 2.4 sections for remaining 3 machines.
3. Setup WinSCP access to EC2 instances
In order to securely transfer files from your windows machine to Amazon EC2 WinSCP is a
handy utility.
Provide hostname, username and private key file and save your configuration and Login
(Same credentials which were used for putty login)

If you see above error, just ignore and you upon successful login you will see unix file
system of a logged in user /home/ubuntu your Amazon EC2 Ubuntu machine.

Upload the .pem file to master machine (HadoopNameNode). It will be used while
connecting to slave nodes during hadoop startup daemons.
1. Apache Hadoop Installation and Cluster Setup 1.1 Update the packages and dependencies.
Let‟s update the packages, I will start with master, repeat this for SecondaryNameNode and 2
slaves.
Open the connection to the MatserNode using the steps provided in „2.3 Connect to Amazon
Instance‟
Type the following in the opened terminal
$ sudo apt-get update
Once it‟s complete, let‟s install java
1.2 Install Java
Add following PPA and install the latest Oracle Java (JDK) 7 in Ubuntu

$ sudo add-apt-repository ppa:webupd8team/java
Then type
$ sudo apt-get update && sudo apt-get install oracle-jdk7-installer
Check if Ubuntu uses JDK 7
Type:
$ java –version
The response should be like this
Repeat this for SNN and 2 slaves.
1.3 Download Hadoop
I am going to use haddop 1.2.1 stable version from apache download page and here is the 1.2.1
mirror
Issue wget command from shell
$ wget http://apache.mirror.gtcomm.net/hadoop/common/hadoop-1.2.1/hadoop-1.2.1.tar.gz

Unzip the files and review the package content and configuration files.
$ tar -xzvf hadoop-1.2.1.tar.gz
For simplicity, rename the „hadoop-1.2.1‟ directory to „hadoop‟ for ease of operation and
maintenance.
$ mv hadoop-1.2.1 hadoop
1.4 Setup Environment Variable
Setup Environment Variable for „ubuntu‟ user
Update the .bashrc file to add important Hadoop paths and directories.
Navigate to home directory
$ cd

Open .bashrc file in vi edit
$ vi .bashrc
Add following at the end of file
export HADOOP_CONF=/home/ubuntu/hadoop/conf
export HADOOP_PREFIX=/home/ubuntu/hadoop
#Set JAVA_HOME
export JAVA_HOME=/usr/lib/jvm/java-7-oracle
# Add Hadoop bin/ directory to path
export PATH=$PATH:$HADOOP_PREFIX/bin
Save and Exit by pressing escape and typing „:wq‟ and enter to validate.
To check whether it has been updated correctly or not, reload bash profile, use following
commands
$ source ~/.bashrc
By typing the following two commands, there should be some value which should come up
$ echo $HADOOP_PREFIX
$ echo $HADOOP_CONF
Repeat 1.3 and 1.4 for remaining 3 machines (SNN and 2 slaves).
1.5 Setup Password-less SSH on Servers
Master server remotely starts services on salve nodes, which requires password-less
access to Slave Servers. AWS Ubuntu server comes with pre-installed OpenSSh server.
Quick Note:
The public part of the key loaded into the agent must be put on the target system in
~/.ssh/authorized_keys. This has been taken care of by the AWS Server creation process
Now we need to add the AWS EC2 Key Pair identity „HaddopEc2cluster.pem‟ to SSH
profile. In order to do that we will need to use following ssh utilities

„ssh-agent‟ is a background program that handles passwords for SSH private keys.
„ssh-add‟ command prompts the user for a private key password and adds it to the list
maintained by ssh-agent. Once you add a password to ssh-agent, you will not be asked to
provide the key when using SSH or SCP to connect to hosts with your public key.
Amazon EC2 Instance has already taken care of „authorized_keys‟ on master server,
execute following commands to allow password-less SSH access to slave servers.
First of all we need to protect our keypair files, if the file permissions are too open (see
below) you will get an error
To fix this problem, we need to issue following commands
$ chmod 644 authorized_keys
Quick Tip: If you set the permissions to „chmod 644′, you get a file that can be written by
you, but can only be read by the rest of the world.
$ chmod 400 haddoec2cluster.pem
Quick Tip: chmod 400 is a very restrictive setting giving only the file onwer read-only
access. No write / execute capabilities for the owner, and no permissions what-so-ever for
anyone else.
To use ssh-agent and ssh-add, follow the steps below:
1. At the Unix prompt, enter: eval `ssh-agent`
Note: Make sure you use the backquote (`), located under the tilde (~), rather than
the single quote (').
2. Enter the command: „ssh-add hadoopec2cluster.pem‟. Make sure you are in the directory
where this .pem file is.

It should work this time.
Keep in mind ssh session will be lost upon shell exit and you have repeat ssh-agent
and ssh-add commands.
Remote SSH
Let‟s verify that we can connect into SNN and slave nodes from master
$ ssh ubuntu@<your-amazon-ec2-public URL for SNN or any of your slave nodes>
On successful login the IP address on the shell will change.
Type the following to exit from SNN or other nodes and to come back to the master node.
$ exit

1.6 Hadoop Cluster Setup
This section will cover the hadoop cluster configuration. We will have to modify
hadoop-env.sh - This file contains some environment variable settings used by Hadoop.
You can use these to affect some aspects of Hadoop daemon behavior, such as where log
files are stored, the maximum amount of heap used etc. The only variable you should need
to change at this point is in this file is JAVA_HOME, which specifies the path to the Java
1.7.x installation used by Hadoop.
core-site.xml – key property fs.default.name – for namenode configuration for
e.g hdfs://namenode/
hdfs-site.xml – key property - dfs.replication – by default 3
mapred-site.xml - key property mapred.job.tracker for jobtracker configuration for
e.g jobtracker:8021
We will first start with master (NameNode) and then copy above xml changes to remaining
3 nodes (SNN and slaves)
Finally, in section 1.6.2 we will have to configure conf/masters and conf/slaves.
masters - defines on which machines Hadoop will start secondary NameNodes in our multi-
node cluster.
slaves - defines the lists of hosts, one per line, where the Hadoop slave daemons
(datanodes and tasktrackers) will run.
Lets go over one by one. Start with masters (namenode).
Perform the following
hadoop-env.sh
$ vi $HADOOP_CONF/hadoop-env.sh and add JAVA_HOME shown below and save
changes.
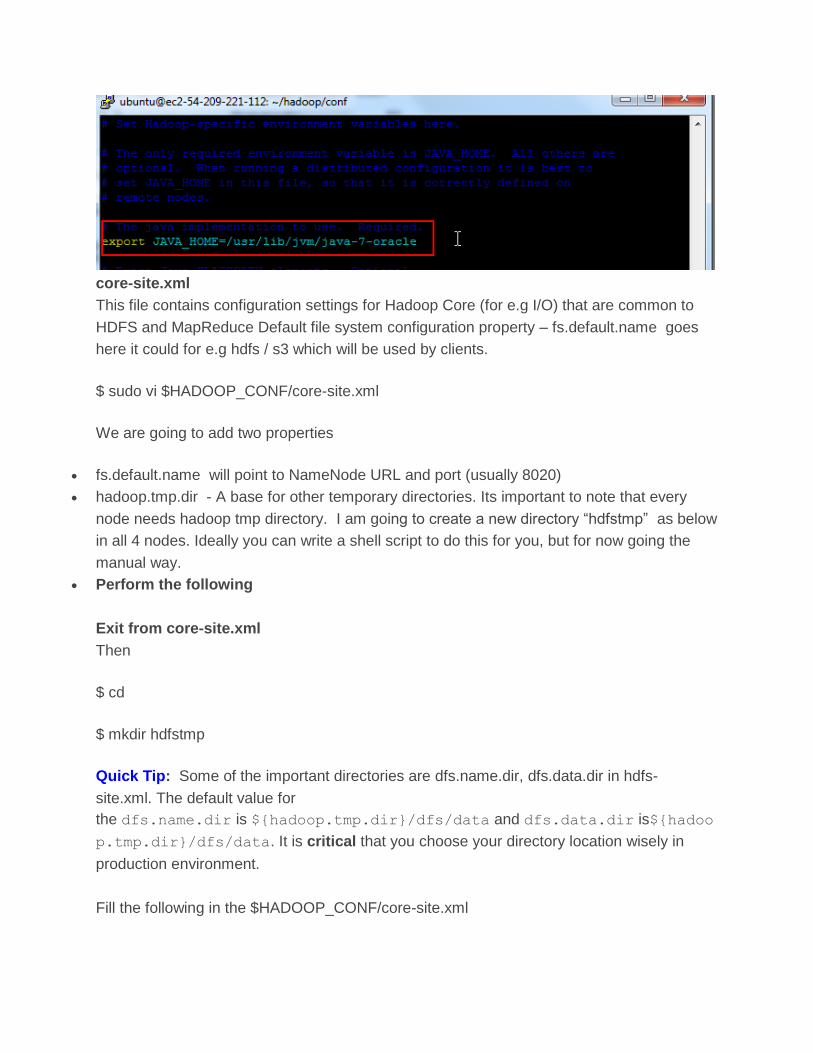
core-site.xml
This file contains configuration settings for Hadoop Core (for e.g I/O) that are common to
HDFS and MapReduce Default file system configuration property – fs.default.name goes
here it could for e.g hdfs / s3 which will be used by clients.
$ sudo vi $HADOOP_CONF/core-site.xml
We are going to add two properties
fs.default.name will point to NameNode URL and port (usually 8020)
hadoop.tmp.dir - A base for other temporary directories. Its important to note that every
node needs hadoop tmp directory. I am going to create a new directory “hdfstmp” as below
in all 4 nodes. Ideally you can write a shell script to do this for you, but for now going the
manual way.
Perform the following
Exit from core-site.xml
Then
$ cd
$ mkdir hdfstmp
Quick Tip: Some of the important directories are dfs.name.dir, dfs.data.dir in hdfs-
site.xml. The default value for
the dfs.name.dir is ${hadoop.tmp.dir}/dfs/data and dfs.data.dir is${hadoo
p.tmp.dir}/dfs/data. It is critical that you choose your directory location wisely in
production environment.
Fill the following in the $HADOOP_CONF/core-site.xml

<configuration>
<property>
<name>fs.default.name</name>
<value>hdfs://ec2-54-209-221-112.compute-1.amazonaws.com:8020</value>
</property>
<property>
<name>hadoop.tmp.dir</name>
<value>/home/ubuntu/hdfstmp</value>
</property>
</configuration>
Save and Exit
hdfs-site.xml
This file contains the configuration for HDFS daemons, the NameNode,
SecondaryNameNode and data nodes.
We are going to add 2 properties
dfs.permissions.enabled with value false, This means that any user, not just the “hdfs”
user, can do anything they want to HDFS so do not do this in production unless you have a
very good reason. if “true”, enable permission checking in HDFS. If “false”, permission
checking is turned off, but all other behavior is unchanged. Switching from one parameter
value to the other does not change the mode, owner or group of files or directories. Be very
careful before you set this
dfs.replication – Default block replication is 3. The actual number of replications can be
specified when the file is created. The default is used if replication is not specified in create
time. Since we have 2 slave nodes we will set this value to 2.
Perform the following
$ sudo vi $HADOOP_CONF/ hdfs-site.xml
Fill it with the following
<configuration>
<property>
<name>dfs.replication</name>
<value>2</value>
</property>

<property>
<name>dfs.permissions</name>
<value>false</value>
</property>
</configuration>
Save and exit
mapred-site.xml
This file contains the configuration settings for MapReduce daemons; the job tracker and
the task-trackers.
The mapred.job.tracker parameter is a hostname (or IP address) and port pair on which the
Job Tracker listens for RPC communication. This parameter specify the location of the Job
Tracker for Task Trackers and MapReduce clients.
JobTracker will be running on master (NameNode)
Perform the following
$ sudo vi $HADOOP_CONF/mapred-site.xml
Fill it with the following
<configuration>
<property>
<name>mapred.job.tracker</name>
<value>hdfs://ec2-54-209-221-112.compute-1.amazonaws.com:8021</value>
</property>
</configuration>
Save and Exit

1.6.1 Move configuration files to Slaves
Now, we are done with hadoop xml files configuration master, lets copy the files to
remaining 3 nodes using secure copy (scp)
start with SNN, if you are starting a new session, follow ssh-add as per section 1.5
from master‟s unix shell issue below command
$ scp hadoop-env.sh core-site.xml hdfs-site.xml mapred-site.xml ubuntu@<URL of your
Secondary Name node>:/home/ubuntu/hadoop/conf
Repeat this for slave nodes and check if they got copied in all the nodes
1.6.2 Configure Master and Slaves
Every hadoop distribution comes with master and slaves files. By default it contains one
entry for localhost, we have to modify these 2 files on both “masters” (HadoopNameNode)
and “slaves” (HadoopSlave1 and HadoopSlave2) machines – we have a dedicated machine
for HadoopSecondaryNamdeNode.

1.6.3 Modify masters file on Master machine
conf/masters file defines on which machines Hadoop will start Secondary NameNodes in
our multi-node cluster. In our case, there will be two machines HadoopNameNode and
HadoopSecondaryNameNode
Hadoop HDFS user guide : “The secondary NameNode merges the fsimage and the edits
log files periodically and keeps edits log size within a limit. It is usually run on a different
machine than the primary NameNode since its memory requirements are on the same order
as the primary NameNode. The secondary NameNode is started by “bin/start-dfs.sh“ on the
nodes specified in “conf/masters“ file.“
Perform the following
$ vi $HADOOP_CONF/masters and provide an entry for the hostename where you want to
run SecondaryNameNode daemon. In our case HadoopNameNode and
HadoopSecondaryNameNode
1.6.4 MODIFY THE SLAVES FILE ON MASTER MACHINE
The slaves file is used for starting DataNodes and TaskTrackers
$ vi $HADOOP_CONF/slaves
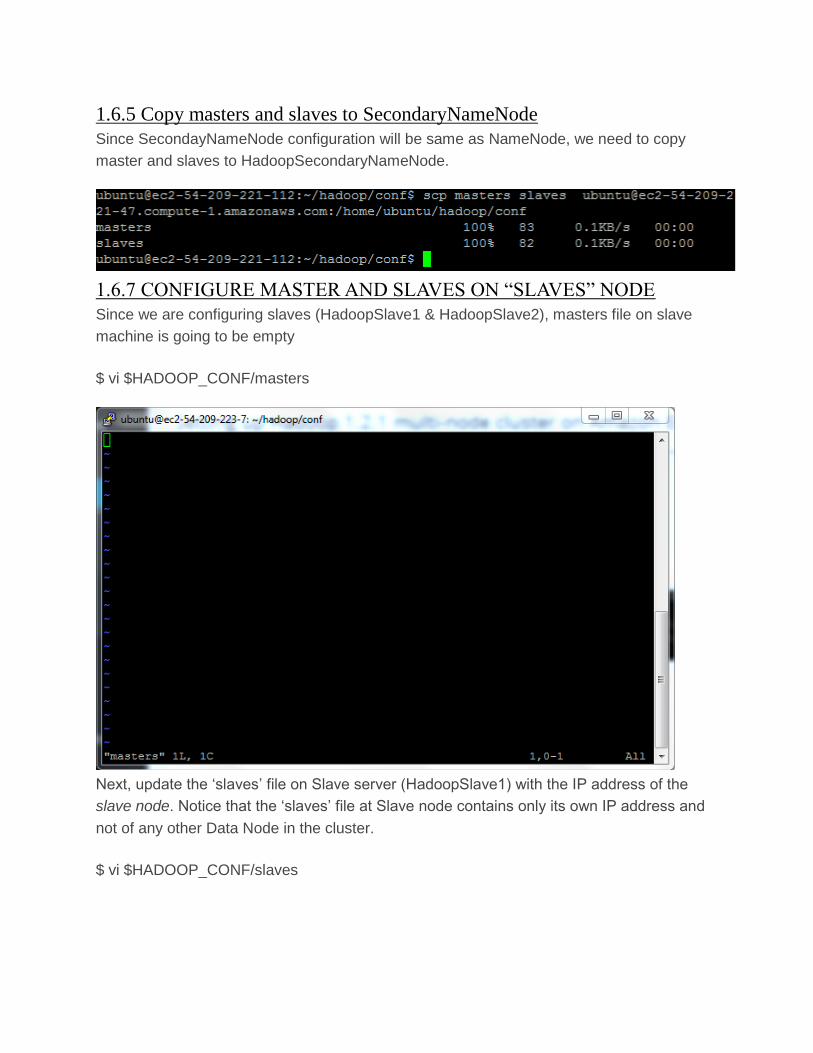
1.6.5 Copy masters and slaves to SecondaryNameNode
Since SecondayNameNode configuration will be same as NameNode, we need to copy
master and slaves to HadoopSecondaryNameNode.
1.6.7 CONFIGURE MASTER AND SLAVES ON “SLAVES” NODE
Since we are configuring slaves (HadoopSlave1 & HadoopSlave2), masters file on slave
machine is going to be empty
$ vi $HADOOP_CONF/masters
Next, update the „slaves‟ file on Slave server (HadoopSlave1) with the IP address of the
slave node. Notice that the „slaves‟ file at Slave node contains only its own IP address and
not of any other Data Node in the cluster.
$ vi $HADOOP_CONF/slaves

Similarly update masters and slaves for HadoopSlave2
1.7 Hadoop Daemon Startup
The first step to starting up your Hadoop installation is formatting the Hadoop filesystem
which is implemented on top of the local filesystems of your cluster. You need to do this the
first time you set up a Hadoop installation. Do not format a running Hadoop filesystem,
this will cause all your data to be erased.
To format the namenode
Goto Namenode(master node) and perform the following
$ hadoop namenode -format

Lets start all hadoop daemons from HadoopNameNode
$ cd $HADOOP_CONF
$ start-all.sh
This will start
NameNode,JobTracker and SecondaryNameNode daemons on HadoopNameNode

SecondaryNameNode daemons on HadoopSecondaryNameNode
and DataNode and TaskTracker daemons on slave
nodes HadoopSlave1 and HadoopSlave2

We can check the namenode status from http://ec2-54-209-221-112.compute-
1.amazonaws.com:50070/dfshealth.jsp
Check Jobtracker status : http://<Your AMAZON MASTER URL>:50030/jobtracker.jsp

Slave Node Status for HadoopSlave1 : http://<YOUR AMAZON MASTER
URL>:50060/tasktracker.jsp
Slave Node Status for HadoopSlave2 : http://ec2-54-209-219-2.compute-
1.amazonaws.com:50060/tasktracker.jsp

Running The Code: Browse the MapReduce_Kmeans directory and locate the following files
MapRedKMeans.jar, data.txt, centroids.
Step 1: Create folders in HDFS
hadoop fs -mkdir /user/ubuntu/data
hadoop fs -mkdir /user/ubuntu/clusters
Step 2: From PuTTy change the current directory to MapReduce_Kmeans and use
the following commands to copy the files from local disk to HDFS
hadoop fs -copyFromLocal data.txt /user/ubuntu/data
hadoop fs -copyFromLocal centroids.txt /user/ubuntu/clusters
Step 3: Run the Hadoop jar file with following command
hadoop jar MapRedKMeans.jar KMeans /user/ubuntu/data
/user/ubuntu/clusters 3
This command will run Kmeans algorithm for three iterations.
Note: We are providing the data file and the centroids fie separately. The
centroids.txt file can be generated from data file by randomly sampling. In our
experiment, to keep consistency across all the platforms we select first k rows as
centroids.
Step 4: Checking the resultant centroids after Kmeans completion. Each iteration
will create a folder in HDFS named clusterX where X is the number of iteration.
For example, after running Kmeans with the above command, we can view the
contents with the following command
Hadoop fs –cat /user/ubuntu/clusters/clusters2/part-r-00000
Or, we can download the resultant folder to our local disk with the following
command
Hadoop fs –copyToLocal /user/ubuntu/clusters2 /home/Ubuntu/

Stopping the Hadoop Daemon
$ cd $HADOOP_CONF
$ stop-all.sh
Cleanup (Important) Step 1: Logon to Amazon AWS and under Services select „Ec2‟.
Step 2: Under the „Instances‟ tab in the left column; click on „Instances‟.
Step 3: Locate all your Hadoop instances and select them. On the top locate „Actions‟ drop down
button and click „Stop‟ to stop the instances. You can start it and connect to the same settings
whenever you want. If you terminate it, you have to create a new instance all together.
Caveats
When you stop and restart the amazon instances, the Public IP and the URL of the
instances changes. You have to make changes in the following with the new URLs
1. hostname
2. Step 2.3.2
3. /etc/hosts
4. $HADOOP_CONF/ core-site.xml
5. $HADOOP_CONF/ core-site.xml
6. $HADOOP_CONF/ masters
7. $HADOOP_CONF/ slaves
8. Repeat Step 1.5
9. No need to format the namenode
10. Start the Hadoop daemon