s. army hand-to-hand combat - archive
TRANSCRIPT

POOR MAN'S JAMES BOND Vol. 1 ARMY HAND-TO-HAND COMBAT
U. S. ARMY HAND-TO-HAND COMBATDEPARTMENT OF THE
Field Makbai-1 DEPARTMENT OF THE ARMYNo. 21-160 / Washington 26, D. C,
HAND-TO-HAND COMBAT
Paragraph
Chafteb 1. INTRODUCTION. i, 2
2. FUNDAMENTALS OFHAND-TO-HAND COM-BAT.____ __ 3_8
3. VULNERABLE POINTSSection I. Introduction 9-1]
II. Head and neck. 13-21III. Trunk _ __. 23-29IV. Limbs ... 80-35V. Attacking the vulnerable points
with available weapons 36-41
Cbaptbe 4. KNIFE ATTACK... _. 42-46
5. SILENCING SENTRIES.— J7-52
6. FALL POSITIONS ANDTHROWS
Section I. Side tall positions __ 63-56II. Over shoulder throw fall post-_——_ __
INTRODUCTION
1. Purpose and Scope
This manual ia -written to teach you hand-to-handcombat. It describes the various blows, holds, foot-work, armwork, and other maneuvers used to disableor kill an enemy in hand-to-hand fighting. It alsoexplains how to use all available objects as weapons.Hand-to-hand combat stresses simple, aggressivetactics. Tou can subdue an opponent only throughoffensive measures.
2. Necessity for Training
The average soldier, if trained only in the use ofhis basic weapon, loses his effectiveness if his weaponfails to fire or if he should lose or break it. With.a knowledge of hand-to-hand combat and the confi-
ARMY FIELD MANUAL*l°n- 57,58 56
III. Baflie throws 59-62 58IV. Variations 63-65 66
Chaptek 7. HOLDS AND ESCAPESSection I. Holds 66-74 72
II. Escape from holds __ 75-86 83
Chapteb 8. DISARMING METHODSSection I. Bayanet disarming 87-93 101
II. Knife disarming... 94^100 115III. Rifle disarming 101-103 129IV. Pistol disarming. __ 104-113 134
Chapter 9. PRISONER HANDLINGSection I. Searching 114-121 15B
II. Securing.. 122-126 163III. Gagging... 127-129 169
Chapteb 10. ADVICE TO INSTRUC-TORS
Section I. The instructor and safety pre-cautions 130-132 172
II. Conduce of training I33-1B5 174III. The training area 136-138 176IV, Minimum training program 139 178
Appendix REFERENCES- 180
lMDBX -- 181
dence and aggressiveness to fight hand-to-hand, thesoldier is abb to attack and dispose of his opponentTraining in hand-to-hand combat is also useful fornight patrols and other occasions when silence is re-quired. This type fighting is taught to soldiers inrear areas as well as those in front lines because ofthe threat of infiltration, airborne attacks, andguerilla warfare.
CHAPTER 2
FUNDAMENTALS OF HAND-TO-HANDCOMBAT
3. General
Five fundamentals are used as a guide in learninghand-to-hand combat. These fundamentals are mak-ing full use of any available weapon; attacking ag-gressively by using your maximum strength againstyour enemy's weakest point; maintaining your bal-
POOR MAN'S JAMES BOND Vol . 1 ABMY HAND-TO-HAND COMBAT
ancs and destroying your opponent's; using your
opponent's momentum to advantage; and learning
each phase of all the movements precisely and accu-
rately before attaining speed through constant
practice.
4. Using Available Weapons
a. When fighting hand-to-hand, your life is al-
ways at stake. The use of any object as a weapon,
therefore, is necessary to help subdue your enemy.
You can make your opponent duck or turn aside by
throwing sand or dirt in his face or by striking at
him with an entrenching tool, a steel helmet, or a
web belt. When no object is available, just the pre-
tense of throwing something may cause an enemy to
flinch and cover up. When he does this, you must
take advantage- of his distraction to attack aggres-
sively with but one purpose in mind—TO KILL-
5
i. If no objects are available to use as a weapon,
you must make full use of your natural weapons.
These are
—
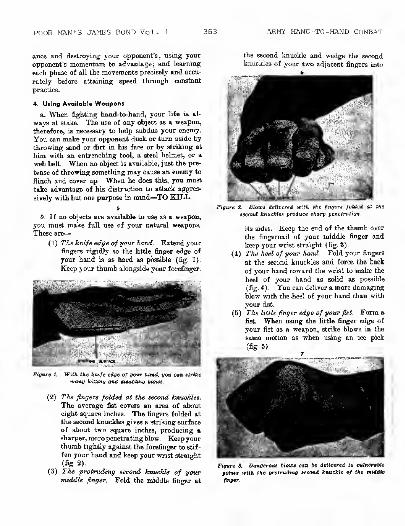
(1) The knife edge of your hand. Extend your
fingers rigidly so the little finger edge of
your hand is as hard as possible {fig. 1).
Keep your thumb alongside your forefinger.
the second knuckle and wedge the secondknuckles of your two adjacent fingers into
ire 1. With the. knife edge of your hand, you can strike
maun killing and disabling blown.
(2) The fingers folded at the second hnucklee.
The average fist covers an area of about
eight square inches. The fingers folded at
the second knuckles gives a striking surface
of about two square inches, producing asharper, more penetrating blow. Keep yourthumb tightly against the forefinger to stif-
fen your hand and keep your wrist straight
(%• 2).
(3) The protruding second knuckle of yourmiddle finger. Fold the middle finger at
Figure S. Blow* delivered icilft (ho fingers folded at the
second knucMes produce sharp penetration.
its sides. Keep the end of the thumb over
the fingernail of your middle ringer and
keep your wrist straight (fig. 3)
.
(4) The heel of your hand. Fold your fingers
at the second knuckles and force the back
of your hand toward the wrist to make the
heel of your hand as solid as possible
(fig. 4). You can deliver a more damaging
blow with the -heel of your hand than with
your fist.
(5) The little finger edge of your fht. Formafist. When using the little finger edge of
your fist as a weapon, strike blows in the
same motion as when using an ice pick
(fig- 5).
Figure J. Dangerous blows can be delivered to vulnerable
points with the protruding second knuckle of the middle
finger.

POUR MAM'G JAMB'S DOKU Vol ARMY Hand -TO-HAND CCMRAT
ation, some extremely vulnerable area of youropponent is open, for attack. By aggressively as-
FtQure (.
effectiv
The heel of the hand is particularly
icfien attacking parts of the face.
(6) Your hoot. For most kicks, use the outsideor inside edge of your boot rather than thetoe. This provides a much larger strikingsurface with which to attack small, exposedbony areas (fig. 6).
(7) In addition to the natural weapons alreadymentioned, you can use your elbows, knees,head, shoulders, and teeth to disable anopponent.
5. Maximum Strength Against Weakest Point
Using maximum strength against your enemy'sweakest point is an axiom of war that equally appliesto combat between two individuals. In every situ-
Figure 6. The inside or outside edge of the boot is moreeffective than the toe, wfiicfc j»oy aiip off small areas.
saulting these vulnerable areas, using the maximumstrength offered by your position, you can gain aquick victory. Attacking rather than defending is
the keynote because only through the use of offensive
tactics are yon able to dispose of 7our enemy.6. Balance
a. Keeping your own balance, while causing youropponent to lose his, is an important essential of suc-cessful fighting. Assume the guard position whenengaging your opponent (fig. 7). This position is
similar to a boxer's crouch and enables you to reactrapidly and move in any direction. Spread yourfeet about shoulder's width apart, with your left heelgenerally on line with your right toe. If you areleft handed, reverse this position and bring your left
foot behind your right foot. Bend your body for-10
ward at the waist and at the knees slightly. Holdthe hands at face level and slightly in front of it.
Extend and join your fingers, with the thumbs alongthe forefingers and the palms facing inward. Faceyour opponent squarely. The guard position offers
you the best balanced position you can obtain beforeclosing with your opponent. You will improve yoursense of balance and learn to destroy your opponent'sbalance after closing with him by practicing the
maneuvers presented in this manual.h. When fighting, keep your feet spread laterally
to maintain balance. Destroy your opponent's men-tal balance by growling and yelling as you strike
at him.

POOR MAN'S JAKES BOND Vol ARMY HAND-TO-HAND COMBAT
Figure 7. The guard position offers good balance and good
all-around protection.
7. Momentum
Using your opponent's momentum to your own ad-
vantage is another fundamental. Always assume
that your opponent is stronger than you and never
oppose him directly in a test of strength. Instead,
utilize his momentum and strength to overcome him.
Examples of using your opponent's momentum are
tripping him, side stepping as he rushes you, or
ducking his blow.
8. Accuracy and Speed
You will have little time to stop and think whenengaging in hand-to-hand combat. Therefore, your
actions must be automatic. At the beginning, learn
each phase of each movement separately and accu-
rately, putting the stress on precision alone. As youprogress, work for speed through constant practice.
Speed is essential to the successful employment of
most of the maneuvers outlined in this manual.
CHAPTER 3
VULNERABLE POINTS
Section I. INTRODUCTION
9. General
a. Vulnerable points are areas of the body that are
particularly susceptible to blows or pressure.
Knowledge of these points and how to attack them,
plus aggressiveness and confidence, will enable you
to attack and quickly disable or kill the enemy you
meet in hand-to-hand combat.
b. When you are attacking an opponent, your
first reaction is probably to strike him on the jaw
with your closed fist. This is one of the poorest
ways to fight. A better attack is to strike your op-
ponent across the bridge of his nose with the knife
edge of your hand. This type blow could easily
break the thin bone in his nose, causing extreme pain
and temporary blindness. A severe blow could drive
bone splinters into his brain and cause instant death.
These actions must be performed without hesitation
and with aggressiveness.
10. Body Regions
The body is divided into three regions: The head
and neck, the trunk, and the limbs. Here is a list of
the major vulnerable points of each region
—
Heatt and peck Trunk Limbsa. Eyes. a. Groin B. Instep
6. Nose 6. Solar plexus 6. Anklec. Adam's apple e. Spine 0. Kneetf. Temple d. Kidney a, Shouldere. Side of neck e. Collar bone B . Elbowf. Nape t- Floating ribs t. Wrlat
g. Upper lip e- Stomach a- Flngera
ft. Ears h. Armpitt. Bitf of throat
J. Chin
11. Caution
Only a small amount of pressure or a light blow is
needed to injure or kill a man when attacking someof the vulnerable points. It is important, therefore,
to strike very light blows in training when learning
how to attack these points. When thoroughlytrained, you may add a little more force to yourblows; but still remember the vulnerability of thearea being attacked in order not to injure your train-
ing partner.
Section II. HEAD AND NECK12. Eyes
There are various ways to blind an opponent. Oneis to drive your index and middle fingers, formedinto a V, into your opponent's eyes (fig. 8). Keepyour fingers stiff and your wrist firm. You can also
use the second knuckles of two adjacent fingers in asharp thrust at the eyes. The eyes can be gougedout by using your thumbs or fingers.
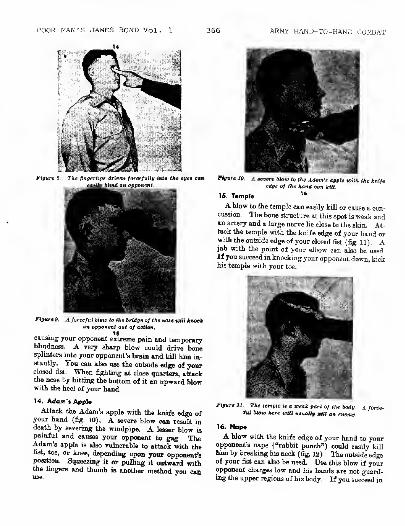
13. Nose
When attacking the nose, strike a forceful blowwith the knife edge of your hand across the bridge(fig 9). This blow can easily break the thin bone,
POOR MAN ' S JAMES BOND Vol . 1
14
ARMY HAND-TO-HAND COMBAT
Figure 8. The fingertipe driven forcefully into the eyei «mtgaily 6Mint an opponent.
flflure 9. A farceful blow to the bridge of the note Mill knoekan opponent out of action,
IScausing your opponent estreme pain and temporaryblindness. A very sharp blow could drive bonesplinters into your opponent's brain and kill him in-stantly. You can also use the outside edge of yourClosed list. When fighting at close quarters, attackthe nose by hitting the bottom of it an upward blowwith the heel of your hand.
14. Adam's Apple
Attack the Adam's apple with the knife edge ofyour hand (fig. 10). A severe blow can result indeath by severing the windpipe. A lesser blow ispainful and causes your opponent to gag. TheAdam's apple is also vulnerable to attack with thefist, toe, or knee, depending upon your opponent'sposition. Squeezing it or pulling it outward withthe fingers and thumb is another method you can
apple Kith the knifeFigure 10. A severe blow to the Adan
edge of the hand cai
15. Temple 16
A blow to the temple can easily kill or cause a con-cussion. The bone structure at this spot is weak andan artery and a large nerve lie close to the skin. At-tack the temple with the knife edge of your hand orwith the outside edge of your closed fist (fig. 11). Ajab with the point of your elbow can also be used.If you succeed in knocking your opponent down, kickhis temple with your toe.
io^'lH 2k. V1
m H*^Bc
tfigure 11. The temple is a tceak part of the hady. A force-
ful bttno here will usually kill an enemy.
16. Napa
A blow with the knife edge of your hand to youropponent's nape ("rabbit punch") could easily kill
him by breaking his neck {fig. 12). The outside edgeof your fist can also be used. Use this blow if youropponent charges low and his hands are not guard-ing the upper regions of his body. If you succeed in
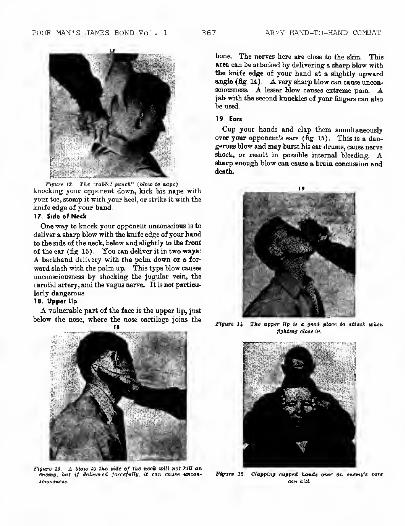
POOR MAM'S JAMES EOND Vol. 1 AR1MY HAND-TO-HAND COMBAT
Figure tS. The "rabbit punch" (Wow Jo nope).
knocking your opponent down, kick his nape with
your toe, stomp it with your heel, or strike it with the
knife edge of your hand.
17. Side of Neck
One way to knock your opponent unconscious is to
deliver a sharp blow with the knife edge of your hand
to the side of the neck, below and slightly to the front
of the ear (fig. 13). You can deliver it in two ways:
A backhand delivery with the palm down or a for-
ward slash with the palm up. This type blow causes
unconsciousness by shocking the jugular vein, the
carotid artery, and the vagus nerve. It is not particu-
larly dangerous.
16. Upper Lip
A vulnerable part of the face is the upper lip, just
below the nose, where the nose cartilage joins the
it
bone. The nerves here are close to the skin. Thisarea can be attacked by delivering a sharp blow withthe knife edge of your hand at a slightly upwardangle (fig. 14). A very sharp blow can cause uncon-sciousness. A lesser blow causes extreme pain. Ajab with the second knuckles of your fingers can also
be used.
19. Ears
Cup your hands and clap them simultaneously
over your opponent's ears ( fig. 15) . This is a dan-gerous blow and may burst his ear drums, cause nerveshock, or result in possible internal bleeding. Asharp enough blow can cause a brain concussion anddeath.
Figure 1J,. The upper Up it a good place to attack whenfighting close-in.
Figure IS. A J/tow to the tide of the neck wilt not ftll! onenemy, 6«< if delivered forcefully, it can mute, uncon-
tctoumett.
Fipare 15. Clapping cupped hands over an enemy't can

POOR MAN'S JAMES BOND Vol. 1 ARMY HAKD-TO-HAND COMBAT
20. Base of Throat
One way to break an opponent's hold on you ia to
quickly thrust one or two extended fingers into thesmall indentation at the base of his throat (fig. 16).
The blow is painful and causes him to gag and cough.Severe injury could result if the thin layer of skinat this point is pierced.
Figure IS. Jabbing a finger or fingers into Ifte base of anopponent throat causes him to loosen a hold.
21. Chin
An effective blow can he delivered to your oppo-nent's chin with the heel of your hand, which is better
than a closed fist ( fig. 17) . You may break a bonein your hand by using your fist.
Section 111. TRUNK22. Groin
When closing with an opponent, keep in mind thatone of the best points to attack is the groin. Attackit by kicking up forcefully with your knee (knee-lift) (fig. 18). You can also use your closed fist, theknife edge of your hand, grasping fingers, a toe kick,or a heel stomp.
23. Solar Plexus
The solar plexus is at the bottom of the rib cage,just beneath the breast bone. To attack this area,thrust sharply with the second knuckle of the pro-truding middle finger (fig. 19). This method per-mits sharp penetration and is, therefore, more effec-tive than striking this small target with the fist
Attacking the groin is one of the most effeciitmethods of subduing an opponent.
Figure JT. Striking an opponent on the chin vnth the keel
of the hand ia better than striking him icith a list.
Figure 19. A blow to the solar plexus vAth the protrudingknuckle of the middle finger permits sharp penetration.

POOR MAN'S JAMES BOND Vol ARMY HAND-TO-IIAND COMBAT
or the knife edge of your hand. Any sharp blowto the solar plexus causea extreme pain and mayeither bend your opponent forward or drop him to
his knees. Death may result from a severe blow.
24. Spine
The spinal column houses the spinal cord and a.
blow here can cause derangement of the column, re-
sulting in paralysis or death. If you succeed in
knocking your opponent down, a blow with your
knee, your elbow, the heel of your shoe, or a toe kick
can easily kill or seriously injure him (fig. 20).
The best place to strike this blow is three or four
inches above the belt line where the spine is least
protected.
Figure SO. A blow to the tpine can eatily kill or seriously
injure an opponent.
25. Kidney"
Certain large nerves, branching from the spine,
are very close to the skin surface over the kidneys.
A blow here can rupture the kidney and cause severe
nervous shock or death unless the victim receives
immediate medical attention. To attack this area,
use the knife edge of your hand (fig. 21). Other
effective blows can be delivered with fingers folded
at the second joints, the outside edge of your fist, the
knee, or a toe kick.
26. Collar Bona
A forceful blow delivered straight down on the
collar bone at the side of the neck with the knife edgeof your hand can fracture the bone and cause your
opponent to drop to his knees (fig. 22). Anotherway of attacking this point, and a particularly good
25
way if your opponent is shorter than you, is todrive your elbow down into the collar bone.
Figure St. The knife edge of the hand U an effective
weapon to use against the collar bone.
27. Floating Ribs
Attack the floating ribs from either the front or
rear, but, if possible, strike the blow to your op-
ponent's right side. The liver is located here just
below the ribs, and thB blow causes terrific shock to
this organ. Attack this area with the knife edge of
your hand (fig. 23), the outside edge of your fist,
the knuckles folded at the second joints, the heel,"the
toe, or the knee.

POOR MAN'S JAMES BOND Vol. 1 ARMY HAND-TO-HAND COMBAT
28. Stomach
A blow to your opponent's stomach with yourknuckles folded at the second joints causes himto loosen his hold on you (fig. 24). If he bends for-
Flsare 24. To treat a hold, hit an opponent i* hit stomachKitK the knuckles folded at the second joints.
17ward, strike him in the face with your knee or deliver
a "rabbit punch" to his nape. The knuckle blowgives sharper penetration than a blow with the elbowor fist. A toe kick or a kneelift can also be usedand could cause serious injury.
29. Armpit
A largB nerve is close to the skin in the armpits.
A blow to this area causes severe pain and temporarypartial paralysis. If you succeed in knocking youropponent down, attack the armpit with a toe kick
(fig. 25).
Ail armpitto cause temporary partial paralysis
Section IV. LIMBS30. Irtttep
The small bones of the instep can easily be brokenwith a stomp, causing severe pain to your opponent
21
as well as limiting his movement. When facingyour opponent, deliver a stomp with the edge of yourleft hoot to his left instep or with the edge of yourright boot to his right instep (fig. 26). This typedeliver}- protects your groin area as you turn. Fol-
low the blow to the instep with a blow to the ankle.Kick your opponent sharply on the outside of his
ankle with tlie outside edge of your boot. Do not usea toe kick because it may slip off your opponent'sankle without doing damage.
Fiaure 26. A stomp to an opponent's instep can easily break
(As bones here.31. Knee
Kick your opponent's knee or kneecap with theedge of your boot (fig. 27). The blow will tearligaments and cartilage, causing him extreme painand affecting his mobility. If you succeed in getting

POOR MAN'S JAMES BOND Vol. 1 ARMY HAND-TO-HAND COMBAT
Figure 27. A kick to an opponent'* knee will hinder hi*
mobility.
behind your opponent, a sharp toe kick to the back of
his knee will penetrate his flesh and injure the nerves.
32. Shoulder
AftBr you knock your opponent down, you caneasily dislocate his shoulder by twisting his armbehind his back and dropping on his shoulder withyour weight on one knee (kneedrop) (fig.28). Whenyou are in position to do this, you also can fall onyour opponent's spine, causing paralysis or immedi-ate death.
The elbow joint is a comparatively weak part of the
body and a forceful blow can dislocate it. Graspyour opponent's wrist or forearm and pull it be-
hind him, stiffening his whole arm (fig. 29). As
Figure 29. Once an opponent'! elbow is broken, he ceases to
be dangerout.n
you do this, give his elbow a sharp blow with the
heel of your hand. The knife edge of your handor your knee can also be used.
34. Wrist
Bending the wrist excessively in any direction
causes extreme pain. Use a wristlock when attack-
ing this area. Place both your thumbs on the back
of your opponent's hind. Bend the wrist at a right
angle to his forearm (fig. SO). You can control your
opponent when you get him in this position.
Figure 28. A kneedrop to an opponent'* shoulder will dit
locate this part of the tody and make his arm useless.
Figure SO. A torlstlock produces severe pain. An opponent
can be controlled in tMJ position.
35. Fingers
To break an underarm hold around your waist
from the rear, grasp any one of your opponent's fin-
gers with one hand while securing his wrist with
the other (fig. 31). Push down on his wrist and, at

POOR KAK'S .JAMES BOND Vol. 1 ARMY IIANU-TO-HAND COMBAT
the same time, bend his finger back toward his wrisThis will break hia finger.
Figure SI. The fingers are vulnerable to attack if an oppo-nent has secured a icawf hold.
Section V. ATTACKING THE VULNERABLEPOINTS WITH AVAILABLE WEAPONS
36. General
You can attack many of the vulnerable points moreeffectively by Using many objects as weapons.
37. Bayonet Hill and Tent Peg KnobGrasp the bayonet or the tent peg so the hilt of
the bayonBt or the knob of the tent peg protrudesfrom the little finger edge of your hand (fig. 32).
36. Homemade Blackjack
You can make a blackjack by placing wet sand ora bar of soap in a sock. Tie a knot in the sock just
be used to xih-:>cc ant'-n-n- The hill of the bayonet ca
enemy sentry.above the sand or the soap. When attacking an op-ponent, strike him on the back of his head (fig. 33).
39. Blunt Object!
By striking your opponent between the shoulderblades on his spine with a blunt object, you can knockhim out noiselessly. You can use the blunt end of ahand axe or the butt of a rifle (fig. 34). A blow withthe toe of the rifle or the edge of the axe will kill
your opponent instead of stunning him.
40. Tent Rope
You can strangle an unsuspecting enemy sentryby using a tent rope or a piece of wire (pars. 50and 51).
figure Si. To stun an enemy, use the butt end of ITie rifle.
To kill hint, *tse the toe.1*
41. Other Weapons
When you find yourself unarmed, you can, on mostoccasions, find a piece of equipment, a rock, a stack,

POOR KAN'S JAMES BOND Vol. 1 ARMY HAND-TO-HAND COMBAT
or a club to use as a weapon. By using these and byattacking viciously, concentrating on your oppo-nent's vulnerable points, you can quickly kill or dis-
able him.
CHAPTER 4
KNIFE ATTACK
42. General
A knife, properly employed, is a, most deadly"weapon. You can use it on. patrols when silence is
necessary to prevent an outcry by an enemy sentry,
or you can use it for cloae-in fighting when yourrifle or carbine is not available.
43. Grip
To grip the knife properly, lay it diagonally across
the outstretched palm of your hand. Grasp the
small part of the handle next to the cross guard with
your thumb and forefinger. Your middle finger en-
circles the knife over the handle at its largest diam-eter (fig. 35). With thB knife held in this manner,it is easily maneuvered in all directions. You can
control the direction of the blade by a combination
movement of the forefinger and middle finger and a
turning of the wrist. When the palm is turned upand you are holding the knife in your right hand,
you can slash to the right or left. When the palmis turned down, you can also slash in either direction.
You can thrust when the palm is held either up or
down. When the knife makes contact, it is grasped
tightly by all fingers.
44. StanceWhen engaging in a knife attack, you are in a
crouch with your left hand forward and the knife
held close to your body at the right hip (fig. 36)
.
Your outstretched left hand acts as a guard, a foil,
or a parry, and it helps create the opening for a slash
or a thrust. You may also use your left hand to dis-
tract your opponent's attention by waving it in his
face, by throwing something, or by making sudden
darting motions toward him. When you are in this
type crouch, your flexed knees provide extreme mo-
bility and you have good balance. In the crouch,
you are also able to protect your midsection and
throat area.
45. Where To Attack
a. When a man is attacked from the front with a
knife, he instinctively tries to protect his stomach
and throat. If he is wounded in one of these places,
his fear is SO great that he may forget to defend him-
A gao& grip on a knife is essential for control.
Figure 36. A proper stance provUtev nwoitity and eooAprotection.
self further. His opponent, therefore, can easily
kill him.
h. You can attack the throat with either a thrust
or a slash. The thrust is the most effective if the
knife is driven into the base of the throat just belowthe Adam's apple (fig. 37) . This type blow cuts the
jugular vein and results in instant death. A slash
to either side of the neck cuts the carotid artery,
which carries blood to the brain. Your opponentwill die from loss of blood within a few seconds.
c. A thrust (fig. 38) combined with a slash to thestomach produces great shock. Your enemy will bestunned and will forget to defend himself. You canthen deliver a killing blow. A deep wound in thestomach causes death if the wound is unattended.
d. A thrust to the heart (fig. 39) causes instant
death. This spot, however, is difficult to hit because

POOR MAN'S JAMES BOND Vol. 1 374 ARMY HAND-TO-HAND COMBAT
Figure 37. An enemy will die immediately if a knife is
thrust into the *base of his throat.
of the protecting ribs. Usually, a hard thrust will
slip off the rib and penetrate the heart.
e. A slash to the wrist (fig. 40) will sever the radial
artery, causing death within two minutes. This typeattack is excellent if your opponent attempts to graspyour clothing or arm. The radial artery is only one-
quarter inch below the surface of the skin. Uncon-sciousness results in about 30 seconds.
f. A slash to the upper arm just above the insideof the elbow (fig. 41) cuts the brachial artery andcauses death within 2 minutes. This artery is aboutone-half inch below the skin surface. Unconscious-ness occurs in about 15 seconds.
g. A slash to the inside of the leg near the groin(fig. 42) severs the arteries there and makes thatlimb useless.
Figure 40. A slash to the wrist cuts the radial artery andwill kill an enemy within two minutes.
Figure SS. A thrust to the stomach produces great shock.40
Figure 39. A thrust to the heart causes instant death. Theheart, however, is protected by ribs. Figure 41. The upper arm is vulnerable to a slash.
POOR MAN'S JAMES BOND Vol. 1 ARMY HAND-TO-HAND COMBAT
Figure +8. A slash to the inside of the leg willtmnntbilise. an opponent,
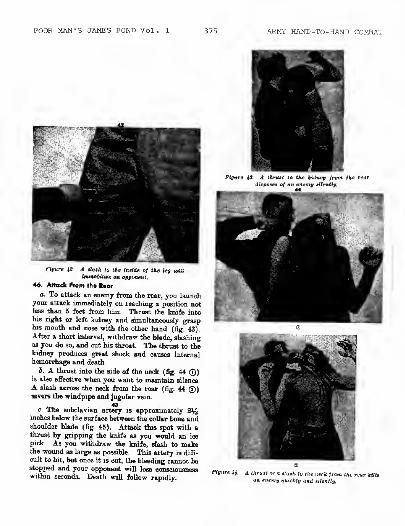
46. Attack Prom the Rear
a. To attack an enemy from the rear, you launchyour attack immediately on reaching a position notless than 5 feet from him. Thrust the knife intohis right or left kidney and simultaneously grasphis mouth and nose with the other hand (fig. 43).After a short interval, withdraw the blade, slashingas you do so, and cut his throat. The thrust to thekidney produces great shock and causes internalhemorrhage and death.
b, A thrust into the side of the nBck (fig. 44 Q)is also effective when you want to maintain silence.
A slash across the neck from the rear (fig. 44 ®)severs the windpipe and jugular vein.
o. The subclavian artery is approximately 2^inches below the surface between the collar bone andshoulder blade (fig. 45). Attack this spot with athrust by gripping the knife as you would an ice
pick. As you withdraw the knife, slash to makethe wound as large as possible. This artery is diffi-
cult to hit, but once it is cut, the bleeding cannot bestopped and your opponent will lose consciousnesswithin seconds. Death will follow rapidly.
Figure \S. A. thrust to the kidney front the rear
dispose* of an enemy silently.
thrust or a slash In the neck from the rear leilli
an enemy quickly ana silently.
P003 MAN'S JAMES BOND Vol. 1 ARMY HAND-TO-HAND COMBAT
IP '
A^^. .
;. i
1C4^C\ 1
^^k£tfk Jl^^kP^H ^^
^^B«
.'.:.; ^M ^m» -&C.1 1 ^El
Figure jo. Attaching the jutcfflfiort arterj/.
CHAPTER 5
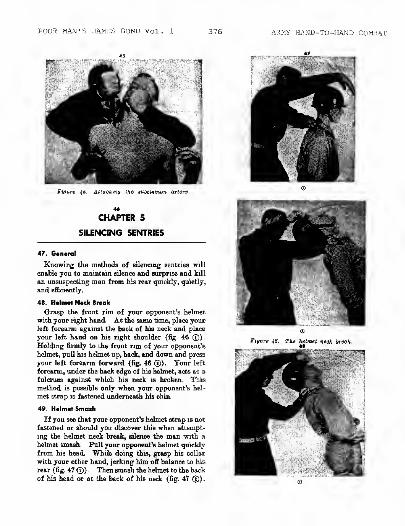
SILENCING SENTRIES
47. General
Knowing the methods of silencing sentries will
enable you to maintain silence and surprise and kill
an unsuspecting man from his rear quickly, quietly,
and efficiently.
48. Helmel Neck Break
Grasp the front rim of your opponent's helmet
with your right hand. At the same time, place your
left forearm against the back of his neck and place
your left hand on his right shoulder (fig. 46 ®).Holding firmly to the front rim of your opponent's
helmet, pull hia helmet up, hack, and down and press
your left forearm forward (fig. 46 ®). Tour left
forearm, under the hack edge of hia helmet, acts as a
fulcrum against which his neck is broken. This
method is possible only when your opponent's hel-
met strap is fastened underneath his chin.
49. Helmet Smash
If you see that your opponent's helmet strap is not
fastened or should you discover this when attempt-
ing the helmet neck break, silence the man with a
helmet smash. Pull your opponent's helmet quickly
from his head. While doing this, grasp his collar
with your other hand, jerking him off balance to his
rear {fig. 47 ©) . Then smash the helmet to the back
of his head or at the back of his neck (fig. 47 ®).

POOR MAM'S JAMES BOM) Vol. 1 ARMY HAND-TO-HAND COMBAT
Figure jV. fas the helmet smaah alien an opponent'» helmetstrap it not fastened,
49Your opponent may have a chance to yell when this
method is used.
50. Strangulation With Wire or Cord
For this method of strangling an opponent to
death, you need a piece of flexible wire or a piece ofcord about three feet in length. Approach theenemy from his reap, holding an end of the wire orcord in each hand. Toss the wire or cord over hisneck from his left and place the heel of your left
hand, still holding the end of the wire or cord, onhis shoulder near his nape. At the same time, placeyour knee in the small of the man's back and pullback on the cord or wire forcefully with your righthand while pushing with the left hand (fig. 48).If this is done quickly, your opponent cannot cry out.You can tie the ends of the rope or wire around twoshort sticks for ;i better hold.
51. Two Hand LoopHold an end of the wire or cord in each hand.
Place your left forearm across the back of your op-ponent's neck as shown in figure 49 ©. Swing yourright arm over your opponent's head from hi3 right,
looping the wire or cord in front of his throat.
Complete the loop and jerk your arms sharply inopposite directions, tightening the loop and stran-
gling your opponent (fig. 49 ®). Quick application
of this method prevents your opponent from cryingout. You can cause unconsciousness or death, de-
pending on the force used and the length of time the
hold is applied.52. Othar Methods
Other methods of silencing sentries can be foundthroughout this manual under other chapter head-ings. To help you find these methods, a list of themand the chapters and paragraphs where they arefound are given below.
a. Knife attack, chapter 4.
(1) Thrust to kidney (par. 46a).
(2) Thrust to side of neck (par. 465).
(3) Throat slash (par. 46ft).
b. Available weapons, chapter 3, section V.(1) Striking an opponent on his spine with a
blunt object to stun him and with a sharpobject to kill (par. 39)
.
(2) Use of the homemade blackjack (par. 38).
c. Natural weapons, chapter 3, section II. Strik-ing an opponent on the base of the skull with tieknife edge of your hand or the little finger edge ofyour fist (par. 16).
d. Holds, chapter 7, section I.
(1) Taking a man down from his rear (par. 69).
(2) Locked rear strangle hold (par. fS)
.
PitWe 4S. A piece of wire or cord it a silent weapon

POOR MAN'S JAMES BOND Vol, ARMY HAND-TO-HAND COMBAT
Figure iB. The lira hand loop metkod Of strangulation it
quick and (ileal.
CHAPTER 6FALL POSITIONS AND THROWS
Section I. SIDE FALL POSITIONS53. GeneralYou must learn various fall positions before you
attempt the throws that are taught in unarmed com-bat. Constant practice in these positions will enable
you to be thrown without being injured.54. Left Side Foil Position
Figure 50 shows the left side fall position. Thecheck points for this position are
—
a. Tour right foot is driven to the ground, takingup the initial shock of the falL, It strikes the groundbefore jour body and is crossed over your left leg at
the knee. The sole of your foot is fiat on the ground.
b. Your left arm is the "beating" arm and takes upadditional shock, It is extended along the ground,
palm down, at an angle of 45° to the body. This armmakes contact with the ground at the same time your"shock absorber" foot does.
i. Your chin is tusked into your chest. Keep yourneck tense to prevent your head from being injured.
d. Your right arm is folded across your chest.
This prevents injury to your right elbow and offers
some protection to the head and body from the blows
of your opponent.
e. The entire left side of your body makes solid
contact with the ground. To relax your left leg,
bend it slightly to prevent it from being injured.
/. The check points tor the right side fall position
are the same as those. for the left side fall position.
Simply substitute the words "right" for "left" and"left" for "right."
55. Practicing the Falls
a. Figure 51 illustrates a method of practicing the
fall positions. Your training partner assumes a po-sition on his hands and knees. Lie with your back
Figure 50. Every soldier must Uam Sow to fall propertyto prevent injury.
34across his back and position your legs and right arminto the proper position for the fall. Fold your leftarm across your chest,
Figure St. A tatio way to practice tHe left aide fall positionit to fall off a training partner's lack fn the properfttttton.
b. Watch the ground over your left shoulder andswing your left arm forcefully to your left, rolling
off your partner's back. Your left hand and rightfoot strike the ground first, taking up the initial
shock of the fall. The right side fall position canbe practiced in a similar manner.54. Advanced Falling Practice
a. Start from the guard position. Take several
steps forward to build up momentum. When yourleft foot strikes the ground, kick your right leg

POOR MAN'S JAMES BOND Vol. 1 ARMY HAND-TO-HAND CCMBA'I
vigorously into the air. At the same time, thrust
with your left foot so that your body is propelled
into the air, feet first, and is parallel to the ground,
»While in midair, twist your body 90° to the left and,
at the same time, cross your right foot over your
left leg at the knee. The sole of your right foot faces
toward the ground so it will strike the ground first,
thus taking up the initial shock of the fall. While
still in the air, estend your left arm in front and at
a 45° angle to your hody. Your palm is down to
take up the additional shock of the fall and to pre-
vent injury to the elbow. Tuck your chin into your
chest and fold your right arm across your chest.
This prevents injury to your head and right armwhen you make contact with the ground. When you
strike the ground, you hare good contact along the
entire left side of the body, your right foot having
absorbed most of the shock. The right side fall
position can be practiced in a similar manner.
b. Start from the right side fall position on the
ground. Push off the ground vigorously with your
left foot and right arm in order to turn your body
to the left side. During the turn, pull your knees
against your chest and thrust them vigorously up-
ward and outward at an angle of 15° so that your
entire hody is lifted off the ground. Once you are in
the air, twist 90" to your left, assuming the left side
fall position. By completely clearing the ground
when changing from the right to the left side fall
position, you obtain practice in absorbing landing
shock. The right side fall position can be practiced
from the left side in a similar manner.
Section II. OVER SHOULDER THROW FALL
POSITION
57. From a Standing Position
Use this fall position when your opponent throws
you over his shoulder. To practice this fall posi-
tion, start from the guard position. Take several
steps forward to build up momentum, and then as-
sume a squatting position as if going into a forward
roll. Place your hands between your knees, with
the palms flat on the ground. Arch your hack and
tuck your chin into your chest to keep your head from
striking the ground (fig. 52 (T)). Roll forward in
a somersault. At the peak of the forward roll, drive
the soles of the feet to the ground about shoulder's
width apart, keeping your lower legs at a 90° angle
to the ground. This takes up the initial shock of the
fall. Keep your stomach muscles tightened so your
Figure 52—-Codtimed.buttocks will not strike the ground when you land.At thB same time your feet strike the ground, slapboth hands to the ground. The arms are fully es-tended and the palms down, forming a 45" angle toyour body. This slapping motion gives you contactwith the ground along both firms and across theshoulders, taking up the fall's additional shock (fig.
52 (§)). After completing the fall, check the fol-lowing points
:

POOR MAWS JAMES BOND Vol. ARMY HAND-TO-HAND COMBAT
a- Are the soles of both feet flat on the ground ''(
b. Are the lower legs at a 90° angle to the ground ?
e. Are the buttocks well off the ground?
d. Is the chin tucked into the chest°
e. Are the shoulders and arms flat on the ground,
palms down, with the arms at a 45° angle to the body i
56. From ihs Ground
To practice the over shoulder throw fall position
without coming to a standing position, do the fol-
lowing :
a. Lie down on the ground, draw your knees upto your chest, fold your arms across your chest, and
rock into a sitting position.
o. Roll backward as if going into a backward roll.
c. At the peak of your backward roll (when your
shoulders touch the ground), thrust your feet vigor-
ously upward and outward at an angle of 15°. rais-
ing your body completely off the ground.
d. While in midair, tighten your stomach muscles
and strike the soles of your feet to the ground.
e. Make contact with the ground with your
shoulders, arms, and sales of the feet all at the same
time.
Section 111. BASIC THROWS59. GeneralAt times in hand-to-hand combat, you have to
throw your opponent to the ground before yon canattack a vulnerable part of his body. Three basicthrows used are the right hip throw, the overshoulder throw, and the reverse,hip throw. Varia-tions of these throws can be used and new onestaught after you have learned the basic ones. An
Madditional basic throw, the leg hock, is not described
in this manual.
a. Speed is the primary factor in throwing anopponent in combat. In training, however, strive
for precision and accuracy. Do each phase of thethrows with deliberate action. Once you have thor-
oughly learned the throws, work for speed throughconstant practice.
6. In the beginning, your partner should offer noresistance. He should cooperate and permit youto execute the throw while he concentrates on assum-ing a good fall position.
e. The three throws described in this section maybe executed from either side simply by substitutingthe words "right" for "left" and "left" for "right."
60. Right Hip Throw
a\ Start the right hip throw from the guard posi-tion, facing your opponent. Place your left foot
in front of and slightly inside of your opponent'sleft foot. At the same time, strike your opponentvigorously on his right shoulder with the heel of yourleft hand and grasp his clothing here (fig. 53 ©J
.
This blow knocks him off balance.
b. Pivot to your left 180° on the ball of yourleft foot. During your pivot, place your right armaround your opponent's waist and jerk him forwardforcefully with both arms, driving his midsection
into your buttocks. This maneuver bends your op-ponent over your right hip at bis waist and leaves
him partially suspended in this position. At thecompletion of this maneuver, your buttocks are into
your opponent's midsection, your right foot is in frontof and slightly outside of his right foot, and yourknees are bent (fig. 53 ® )
.
wiili 0<>th urmi
Figure S3, lllgkl hip throw

POOR MAN'S JAMES 30ND Vol. 1 ARMY HAND-TO-HAND COMBAT
c. Straighten your legs quickly, thrusting yourbuttocks forcefully into your opponent's midsection.
At the same time, bend forward at the waist andpull forward and down with both arms, driving youropponent to the ground (fig. 53 ®). Use your hip
as a fulcrum, throwing the man over your right hip
and not over the outside of your leg. At the comple-
tion of the throw, your opponent lands in the left
side fall position. You are poised to deliver a blow
to a vulnerable part of his 1
© Br ream ta UellVw m Hilling blotf t
Figure SS. Right hip thrtno—Continued,
61. Over Shoulder Throw
a. Start the over shoulder throw from the guardposition, facing your opponent. The first phase of
this throw is identical to the first phase of the right
hip throw and the foot work is identical throughout
to that of the right hip throw. Place your left foot62
in front of and slightly inside of your opponent's
left foot. At the same time, strike him vigorously
on his right shoulder with the heel of your left handand grasp his clothing here (fig. 53 ©)
.
J. Pivot to your left 180" on the ball of your left
foot. Keep your right arm in position to protect
your head and neck region until you near the com-
pletion of the pivot. Then reach up and grasp your
opponent's clothing at his right shoulder with your
right hand, gripping him here with a double hand
hold. As you complete your pivot, pull your oppo-
nent forward and drive his midsection into your but-
tocks (fig. 54 0). Tour buttocks are directly in
front of your opponent's hips, your right foot is in
front of and slightly outside of your opponent's
right foot, your elbows are as close to your body as
possible, and your knees are bent.
e. Straighten your legs, bend at the waist, and pull
downward with both hands (fig. 54®). This action
will catapult him over your shoulder. Tour part-
ner assumes the over shoulder throw fall position as
he strikes the ground.62. Havana Hip Throw
a. Start the reverse hip throw from the guard posi-
tion, facing your opponent. Stand slightly closer
to him than in the two previous throws. Take a long
step forward with your left foot and place it slightly
outside of and a few inches beyond your opponent's
right foot. Most of your weight is supported on
your left foot. At the same time, strike your op-
ponent forcefully on his right upper arm with your
left hand and grasp his arm at this point with that
hand (fig. 56 <T)). This blow causes him to lose his
balance to the rear.
Figure Si. The aver etiottlder threw.

PCOR MAN'S JAMES BOND Vol. 1 ARMY HAND-TO-HAND COMBAT
t knock tke man ont. *lir«c a blewvulnsraDle point
Reverie hip lAroio—Conunuea.
h. Step around your opponent with your right foot
and place it directly behind him. At the same time,
encircle his waist with your right arm. Push yourhips to your right as far as possible to gain buttockto buttock contact, and pull your opponent in posi-
tion on your right hip. At this time, lock your op-ponent's right arm into your side with your left
elbow (fig. 55 ®}.a. Straighten your legs, use your right hip as a
fulcrum, and slam the man to the ground (fig. 55 ®).Be sure to use your hip as a fulcrum and throw your
•a
opponent over your hip, not over the side of yourright leg. Notice in figure 55 ® that you retain thearmlock on your opponent's right arm. Also notice
that the man who was thrown has assumed the left
side fall position.
Section IV. VARIATIONS
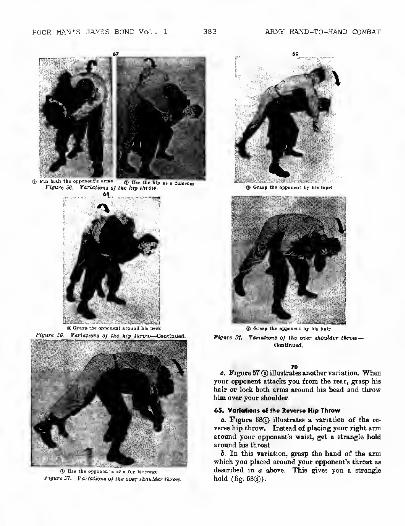
63. Variations of the Hip Throw
o. Figure 56© illustrates a variation of the left hipthrow. Both of your opponent's arms are securelypinioned, his right arm with a single elbowlock andhis left arm clasped at the elhow.
h. Figure 56® illustrates another variation. Thistime you grasp your opponent's right arm with bothhands and again use your hip as a fulcrum.
c. In a third variation, place your right armaround your opponent's neck as you pivot, ratherthan around his waist. Your left hand locks youropponent's right arm (fig 56<a)>.
64. Variations of the Over Shoulder Throw
a. Figure 57® illustrates a variation of the overshoulder throw. While facing your opponent, grasphis right wrist with your left hand. Then pivot toyour left 180°, pulling him forward as you do so.
Grasp his right upper arm with your right hand andthrow him over your shoulder as described in para-graph 61.
6. Figure 57® illustrates another variation of theover shoulder throw. From a position facing youropponent, grasp his left lapel with your right hand.Maintain this hold and pivot 180° to the left, plac-
ing your right forearm under his right armpit asyou complete the pivot. Grasp his right arm at theelbow as you execute your pivot.
POOR MAN'S JAMES BOND Vol. 1 ARMY HAND-TO-HAND COMBAT
S fin bull! the opponent', mni(j, r,„ tct b]p a9 „ fll„.-^jj
Fttfuj'e 56. Vartat«Mij of the htp throw.
Figure 5S. V •f the Kip throw—Continued.
Idtf^^^B i ' -
:^l> *y%
* SB*: .'A.'EDm the opponent's aim fur le>e
J? ijrore J7. Variations o.I the oner shoulder throw.
FifWre 57. Variation! oj the over shoulder (ftroio-
Contlnued,
c. Figure 57© illustrates another variation. Whenyour opponent attacks you from the rear, grasp his
hair or lock both arms around his head and throwhim over your shoulder.
65. Variations of the Reverse Hip Throw
a. Figure 58® illustrates a variation of the re-
verse hip throw. Instead of placing your right armaround your opponents waist, get a strangle hold
around his throat.
h. In this variation, grasp the hand of the armwhich you placed around your opponent's throat as
described in a above. This gives you a strangle
hold (fig. 68®).
POOR MAN'S JAt/ES BOND Vol. 1 ARMY" HAND-TO-HAND COMRAT
Figure 56. Variation of the
Figure 58. Variatie i of the reverie hip throat—Continued.
CHAPTER 7
HOLDS AND ESCAPES
Section HOLDS
66. General
The two purposes of a hold ore
—
a. To kill your opponent immediately by applying
enough pressure to certain parts of the body.
b. To hold your enemy until you can follow
through with a blow to a vulnerable part of the body.
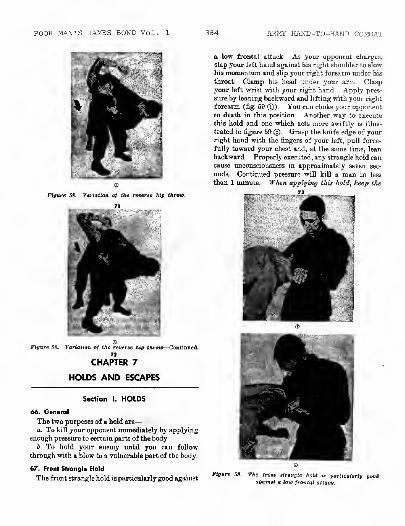
67. Front Strangle Hold
The front strangle hold is particularly good against
a low frontal attack. As your opponent charges,
slap your left hand against his right shoulder to slow
his momentum and slip your right forearm under his
throat. Clamp his head under your arm. Claspyour left wrist with your right hand. Apply pres-
sure by leaning backward and lifting with your right
forearm (fig. 59 ©). You can choke your opponentto death in this position. Another way to execute
this hold and one which acts more swiftly is illus-
trated in figure 59 ®. Grasp the knife edge of yourright hand with the fingers of your left, pull force-
fully toward your chest and, at the same time, lean
backward. Properly executed, any strangle hold cancause unconsciousness in approximately seven sec-
onds. Continued pressure will kill a man in less
than 1 minute. ~Wk#n applying this hold, keep the
The front ttranuie hold it particularly goodagainst a low frontal attack.

>00H MAM'S JAMES BONJ Vol. I ARMY HAND-TO-HAND COMBAT
bony, inside edge of your forearm across your oppo-
nent's Adams apple for maximum, effectiveness.
68. Side Collar Strangle Hold
Grip your opponent well hack on his collar with
both hands, palms down. Use the back of his collar
for leverage and roll the second knuckles of your
forefingers into the carotid arteries at the sides of
his neck. Place both your thumbs below his Adam'sapple, applying continuous pressure inward and up-
ward (fig. 60). This hold is best used when your
opponent is on the ground and unable to attack your
groin. It causes unconsciousness and eventual death
by stopping the flow of blood to the brain.
side. Pull strongly with your fingers and scissor
your arm against your opponent's throat (fig. 62).
He will drop to the ground unconscious. This stran-
gle hold can also be executed from the rear. Cross
your arms in front of your opponent's throat, seize
his clothing at the neck, and press your arms into
his throat by pulling tight.
71. Full Nelson
Execute this hold on your enemy from the rear.
Place both your arms well up into your opponent's
armpits and place your hands on the hack of his
head. Interlock your fingers (fig. 63 ®). Applydownward pressure on his head and upward pressure
under his arms (fig. 63 ©)
,
Figure 6V. The tide collar ttrangle hold itaps the flow of
Blood lo the Dram and causes eventual death.7%
69. Taking a Man Down From Hi* Rear
Figure 61 <jj illustrates the start of the proper
method of taking a man down from his rear. Yourhands and foot make contact with your opponent's
body simultaneously. Clap your hands down on his
shoulders and, at the same, time, pull backward.
Kick the sole of the right foot forcefully against the
back of your victim's knee joint (fig. 61 ®). This
attack drops your victim to the ground instantly
and places him in a position to he disabled or killed
quickly. To knock your enemy unconscious, drive
your knee to the base of his skull as he goes down.
70. Cross Cottar Strangle Hold
To be effective, this hold must be executed on anindividual who is wearing an open collar or who has
open lapels on his coat or jacket. Cross your hands
at the wrist and grasp the collar opening with your
fingers on the inside and your thumbs on the out-
Figure SI. If ett opponent has his buck turned, he can entity
Be (Arou.il ta tha ground and killed quteklu.
The orotn collar strangle hold, executed properly,
caatet anconxcioitaneai.

POOR MAN'S. JAMES BOND Vol. 1 ARMY KAND-TO-HAND COMBAT
Figure 63. The full nelson is executed when an opponent hashis back turned.
72. Hammerlock
To execute this hold from the rear, grasp youropponent's hand or wrist and pull backward. Then,force his forearm up toward his head (fig. 64). Bykeeping your right hand at his right elbow and bycontinuing to force up on. his arm, you can easily
dislocate his shoulder. To execute a hammerlockwhen facing your opponent, grasp his right wristwith both hands. Pivot to your left 180°. Duringyour pivot, raise your opponent's arm above yourhead and step beneath it and behind him at the com-pletion of your turn.
73. Locked Roar Strangle HoldUse the locked rear strangle hold when approach-
ing your opponent from his rear. Place your lefthand on the back of his head and, at the same time,cross your right forearm under his neck from theright (fig. 66 ©) . Bring your right forearm to theleft and lock it to your left upper arm (fig. 65 ®).In this position, push with your hand on the back ofh:s head and lean forward. Enough pressure canbreak his neck. Keep the inside, bony edge of theright forearm, over your opponent's Adam's applefor best effect.
Figure 64. An opponent's /boulder can easilyby using the hammerlock.
dislocated

POOR MAN'S JAKES BOND Vol ARMY HAND-TO-HAND COMBAT
74. Double WristlockBl
To execute a double wristlock, grasp your op-ponent's right wrist with your left hand (fig. 66 ©)
.
Pass your right hand and arm over his right upperarm, under his bent elbow, and clasp your left wrist,
completing the double wristlock (fig. 66 ©). Con-tinue the movement by jerking his arm up and backinto a twisting hammerlock (fig. 66 ®). Figure
illustrates_a variation of the double wristlock.
Figure es. The ioulle Krittlock may becontinued into a hammerlock—Continued
Section II. ESCAPE FROM HOLDS75. General
If your opponent succeeds in getting a hold on you,
you must break this hold before or immediately
after he completes it. Bite, kick, or strike him at
vulnerable points to help loosen or break the holdbefore he can apply pressure. By escaping fromyour opponent's grasp immediately, you can take the
offensive again and attack him.
76. Escape From Choke Hold
When your opponent attempts to choke you (fig.
&i ® ) i"se the arm swing tc break his hold. Swing
your arm over his arms in a forceful roundhouseblow. As you do this, pivot in the direction of yourswing to get as much of your body weight behindyour arm as possible (fig. 67 <D) . This causes youropponent to loosen his hold. Be prepared to strike
him across the face or the side of the neck with abackhanded blow with the knife edge of your handbefore he recovers. This escape can also be usedagainst a choke hold from the rear. Swing yourarm and pivot around, facing your attacker as youswing.
77. Second Escape From Choke Hold
As your opponent gains the hold, clasp your handstogether (fig. 68 ®). Grip the knife edge of yourleft hand with the fingers of your right, and tightly
wrap the left thumb around the right thumb. Donot interlock your fingers. Drive your hands up be-
tween your opponent's arms, forcing him to loosen
his hold (fig.68©). From this position, smash yourclasped hands on the bridge of his nose (fig. 68 ©)
,
or grasp the back of his head and pull it down, meet-

FOCR MAN'S JAMES BoNC Vol. 1 ARMY HAND-TO-HAND COMBAT
Fiyuru S7. Tie ehoke hold is irokenty a roundhnuse ana sitting.
Figure 68. Ike cftofte hold can Be broken and an opponentinjured in one continuous motion.
ing it with a knee-lift. You can also separate jourhands after breaking the hold and strike his collar
bone with the knife edges of your hands.
78. Escape From Two-Hand StrangU Hold WhenPinned Against Wall
Ordinarily, an opponent attempting to strangleyou while your back is to a wall extends his arms,squeezes with his fingers, and pushes you against thewall (fig. 69 ®). To escape from this hold, placethe heel of your right hand on his left elbow andthe heel of your left hand on bis right elbow. Applypressure inward and away from you (fig. 69 (§)).
This prevents your opponent from using the powerof his fingers and he cannot choke you. To drivehim back, drive your knee or toe into his groin.
79. Escape From One-Arm Strangle Hold From theRear
When your opponent attacks as shown in figure
70 (T), reach up with your left hand and grasp hisclothing at his right elbow. Pull down on his elbowand, at the same time, tuck your chin into its crookso he cannot choke you. Grasp your opponent'sright shoulder with your right hand (fig. 70 <§)).
Push backward with your buttocks against his mid-section, retaining your hold on his upper arm andshoulder with both hands. Bend from the waistswiftly and throw your opponent over your headand to the ground (fig. 70 ©).
POUR MAN'S JAMES BOND Vol, 1 389 ARMY HAND-TO-HAND COMBAT
*7
Figure 69. Escape from lioo-band
front strangle hold when ginned ayain&t toall.
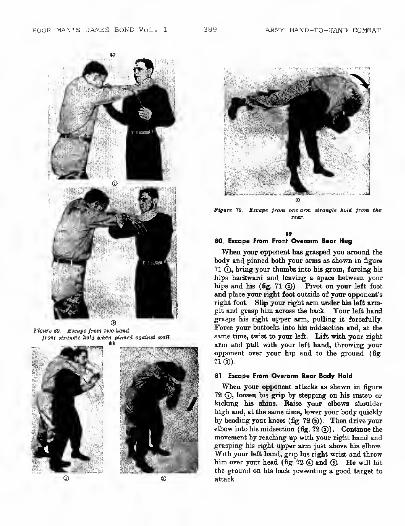
80. Escape From Front Overarm Bear Hug
When, your opponent has grasped you around the
body and pinned both your arms as shown in figure
71 tT>, bring your thumbs into his groin, forcing his
hips backward and leaving a space between your
hips and his (fig. 71 ©). Pivot on your left foot
and place your right foot outside of your opponent's
right foot. Slip your right arm under his left arm-pit and grasp him across the back. Your left handgrasps his right upper arm, pulling it forcefully.
Force your buttocks into his midsection and, at the
same time, twist to your left. Lift with your right
arm and pull with your left hand, throwing youropponent over your hip and to the ground (fig.
71®).
81. Escape From Overarm Rear Body Hold
When your opponent attacks as shown in figure
72 <Tj, loosen his grip by stepping on his instep orkicking his shins. Raise your elbows shoulder
high and. at the same time, lower your body quickly
by bending your knees (fig, 72® ) . Then drive yourelbow into his midsection (fig. 72 ® ) . Continue the
movement by reaching up with your right hand andgrasping his right upper arm just above his elbow.
With your left hand, grip his right wrist and throwhim over your head (fig. 72 © and ©. He will hit
the ground on his back presenting a good target to
attack.

POOR MAN'S JAMES BOND Vol. 1 390 ARMY HAND-TO-HAND COMBAT
Ftf/ure 73. Escape from overarm rear body hold—
82. Escape From Front Underarm Bear Hug
Figure 73 (t) shows that your opponent has lockedhis arras around your waist and is attempting to bendyou over backward. Close the fingers of your lefthand and place the thumb underneath the base of hisnose. Put your right arm around his waist. Bypressing with your left thumb and pulling his waisttoward you, he either loosens his grip or is forcedbackward (fig. 73 ©).

POOR MAN'S JAMES BOND Vol. 1 ARMY HAND-TO-HAND COMBAT
Figure 13. Escape from front underarm bear hug.
83. Escape From Rear Underarm Body HoldWhen your opponent grasps you as shown in fig-
ure 74 ®, reach down with your left hand and place
it just above his left knee. Press down on this spotwith most of your weight {fig. 74®). You now havea firm base on which to pivot. Lift both your feet
Figure 7\. fiztape from rear underarm body hold.
from the ground and switch your left leg behind youropponent's right leg. As soon as your feet are firmly
planted on the ground, bring your left hand underyour opponent's left knee and your right hand under
hisrightknee (fig. 74®). Lift, up and raise him off
the ground (fig. 74 ®). If your opponent releases
his hold, you can drive his head into the ground. If
he keeps his hold, fall on him and force his head into
the ground.
Figure J4- Escape fro ndcrarm body hold—Coo,
84. Second Escape From Rear Underarm Body Hold
Your opponent uses the same grasp around yourwaist as explained in paragraph 83, but this time hebraces himself by placing one leg between your legs
and putting his bead behind your shoulder blade outof reach of your arms (fig. 75 ®). To break this
hold,bend swiftly from the waist and grasp the ankleof the foot which he has between your legs (fig.
73 ® ) . Keep your hold on his ankle and straighten
your body. This puts pressure on your opponent'sknee, causing him to release his hold and drop on his
back (fig. 75 ®). If your opponent keeps his hold,
fall backward on top of him, driving your weight
POOR MAN'S JAMES BOND Vol, 1 ARf-^Y HAND-TO-HAND COMBAT
into his midsection.
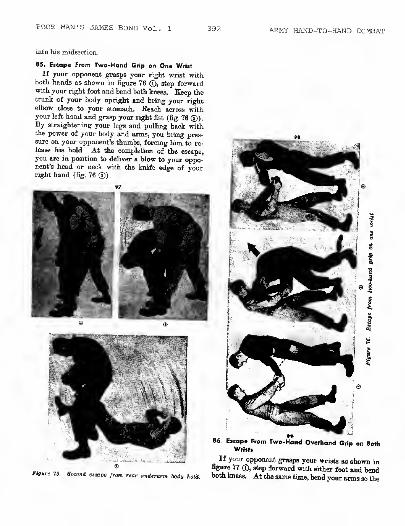
85. Escape From Two-Hand Grip on One Wrist
If your opponent grasps your right wrist withboth hands as shown in figure 76 ©, step forwardwith your right foot and bend both knees. Keep thetrunk of your body upright and bring your rightelbow close to your stomach. Reach across withyour left hand and grasp your right fist (fig. 76 ©)
.
By straightening your legs and pulling back withthe power of your body and arms, you bring pres-sure on your opponent's thumbs, forcing him to re-lease his hold. At the completion of the escape,you are in position to deliver a blow to your oppo-nent's head or neck with the knife edge of yourright hand (fig. 76 @).
Figure 75. SemnA eiaape from rear underarm body KoltL
8o. Escape From Two-Hand Overhand Grip an BothWrists
If your opponent grasps your wrists as shown infigure 77 ®, step forward with either foot and bendboth knees. At the same time, bend your arms so the

POOP. MAN'S JAMES BOND Vol. 1 ARMY HAND-TO-HAND COMBA-1
elbows are close to the lower abdomen (fig. 77 ©).
Execute the escape by straightening your legs, pull-
ing back with your body, and pushing your arms
upward in one motion (fig. 77 ®)- The faster
you work this escape, the more effective it is.
ponent whether he uses a long thrust or a short thrust.
The reason, the text differentiates between a short
thrust and a long thrust is to enable you to gage the
distance between the point of the bayonet and your
body when practicing these techniques. When prac-
ticing the snort thrust, you should be approximately
arm's distance from the point of the bayonet. Whenpracticing the long thrust, the distance is increased
one foot. The unarmed man in training should wait
until the armed man has committed himself before
going into his disarming maneuver.
88. Counter Against Short Thrust
a. If your opponent attacks you with a short
thrust, twist your body to the left but keep your feet
in place. At the same time, slap your right forearm
or wrist against the barrel of his rifle, deflecting the
bayonet from your body (fig. 78 ©}
.
b. As soon as the bayonet has passed your body,
grasp your opponent's left hand with your right
hand. At the same time, take a long step with your
left foot toward your opponent's right, reach under
CHAPTER 8
DISARMING METHODS
Section I. BAYONET DISARMING
37. General
In training, yon arc taught bayonet disarming
methods for both long thrust and short thrust at-
tacks. In combat, however, any of the methods da-
scribed in this section can bo used to disarm an op-
Fiffure 78. Counter againtt thort thruit.
the rifle with your left hand, and press your left
shoulder against the upper handguard. With your
left hand, grasp his right hand where it holds the
top of the small of the stock (fig. 78 ®).
c. Pull with your left hand and push with your
right hand. Keep your weight on your left foot and
kick your attacker with the calf of your right leg
behind the knee joint of his right leg (fig. 78 <£).
Your opponent will fall to the ground and loosen
his grip on the rifle.
99. Second Counter Against Short Thrust
a. As your opponent makes his thrust, use the heel

POOR MAN'S JAMES BOND Vol ARMY HAND-TO -HAKD COMBAT
of your right hand to parry his bayonet- to yourleft and, at the same time, side-step to your right
oblique. You are now in a position facing the rifle
from the side with your groin area protected by yourrightleg (fig. 79®).
Figure 78. Counter
b. With your left hand, palm up, grasp the rifle onthe upper handguard. At the same time, strike the
inaide of your opponent's left elbow sharply with the
knife edge of your right hand ( fig. 79 ®)
.
o. Keep a firm hold on the rifle. Step through
with your left foot, moving quickly past your at-
tacker on his left, and j erk the rifle up and backwardin an arc over his shoulder (fig. 79®). If he keeps
hia hold on the rifle, kick him. and yank the rifle
loose. Whirl and attack him with the bayonet Figure 73. Second counter againxt thort thruit—Continued.

POOR MAN'S JAMES BOND Vol ARMY HAND-TO-HAND COMBAT
90. Third Counter Against Short Thrust
a. As your opponent makes his thrust, use the heel
of your left hand to parry the bayonet to your right
and side-step to your left oblique. You are now in
position facing the side of the rifle with your groin,
area protected by your left leg (fig. 80 ® ).
Fit/are SO. Third counter aoainnl short thrust.
b. With your right hand, palm up, grasp the rifle
anywhere on the upper handguard and with the left
hand, palm down, grasp the receiver (fig. BO ®).e. Keep a firm hold on the rifle with both hands
and step through with your right foot, moving
quickly past your opponent. Jerk the rifle sharply
up and backward in an arc over the attacker's
shoulder and twist it out of his hands (fig. 80 ®).Whirl and smash him with the butt or attack him
with the bayonet.
dmk IfSlb*-
Figure 80. Third counter against short thrift—Continued.IM
91. Counter Agoirnt Long Thrust
a. As your opponent executes the long thrust,
parry the bayonet to your left by slapping it with
the heel of your right hand and side-step to the right
oblique. Tou are now in a position facing the side
of the rifle with your groin area protected by your
right leg (fig. 81 ©). With your left hand, palm
up, grasp your opponent's lefthand and the rifle fromunderneath (fig. 81 ®) . Twist your body to the left
in front of your opponent and place your right leg in
front of his body (fig. SI ®).
Figure 81. Counter against tonff thrust.
b. With the right hand, palm down, grasp youropponent's left hand and rifle from above. Twistthe rifle and pull your opponent across your right
leg. At the same time, exert pressure with the right

POOR MAN'S .JAMES 3C:JD Vol. 1 ARMY HAND-TO-HAND COMSAT
Fit/are 81. Counter againtt Ions thrutt—Continued.Ill
elbow against the outside of his left arm and elbow(fig. 81 ©) . Sufficient pressure downward with yourelbow, while twisting and pulling up on the rifle, canbreak your opponent's elbow.
a. Continue the twisting motion, pulling your op-ponent completely across your leg and throwing himto the ground (fig. 81 ©). Regrasp the rifle andfollow through with an attack.
92. Second Counter Againtt Lang Thrust
«. Asyour opponent executes the long thrust, parryhis bayonet to your right with a sharp slappingmovement with the heel of your left hand. As youparry with your left hand, move your body to theleft oblique, stepping off to your left front withyour left foot. You are now in position facing therifle from the side with your groin area protected byyour left leg (fig. 83®).
h. Strike the open palms of both hands down onthe rifle near the muzzle, driving the point of thebayonet into the ground (fig. 82®). Do not followthe rifle all the way to the ground, but allow your op-ponent's momentum to imbed the bayonet into theground.
c. Grasp the butt of the rifle with your left handand with the right hand grasp your opponent any-where on his back or head (fig. 82 ®). To com-pletely disarm him, drive the stock of the rifle intoyour opponent's body and, at the same time, pull himwith your right hand, spinning him to the ground(fig. 82 ®). You are now in position to recoverthe riflB and attack him.

POOR MAIS' S JAMES BOND Vol. 1 ARMY HAND-TO-HAND COMBAT
Figure 8M. Second counter avainti tone thrutt.113
ST??
Figure Si. Second counter ayaintt long thrutt—Contlnaed,
114
93. Third Counter Agoimt Long Thrust
a. This counter is essentially the same as themethod described in paragraph 92 except that youparry left instead of right. This time as you parry,
step to your right front with your right foot (fig.
83®).
Figure . Third counter agaimt long thrutt.
b. Execute the same movement as described in
paragraph 9*2J. Use the open palms of both handsand drive the bayonet into the. ground.
o. It may be difficult to reach across your oppo-
nent's body to grasp the butt of the rifle. Therefore,
grasp his clothing with both hands and pull himforward, throwing him to the ground (fig. 83 ®).

POOH MAN'S JAMES BOND Vol. 1
Figure 83. Third counter againit long (Arwi—Continued.
Section II. KNIFE DISARMING
94. Counter Against Downward Stroke
a. If your opponent attacks as shown in figure
84 ©, stop the blow bj catching his wrist in thepocket formed by bending your fist forward at yourright wrist Step through with your right foot toprotect your groin area. At the same time, strikehim sharply in the crook of his right elbow with thethumb aide of your forearm or wrist. This causeshia arm to bend.
b. Bring your left hand behind his right forearmand underneath your right wrist, and grasp yourright forearm. Bring your elbows close to yourbody (fig. 64©).
AKMY HAKD-TO-HAND COMBAT
Figure 84. Counter against downward stroke.HT
C. Bend swiftly from the waist, putting pressure
on your opponent's arm (fig. 84 ®). This causes
him to fall backward and lose his weapon.,.- ^_
W£$$!$P~'""""'^
^^^,: j |B^J
1- *1
[ -.c^ !-- , ™
E5JL ^H j
t *^wwjjL m-I ^^K^^F
j^%\ -":
-:
''*'BiWBmSisMmmKGm -— :zz£—
'
.-*'._.'.J
Figure &J. Counter againtt downward ttroke—Continued.
95. Second Counter Against Downward Stroke
a. Stop the blow by catching your opponent'swrist in the pocket formed at your left wrist bybending your fist forward. Step through with yourright foot to protect your groin area. Keep yourleft forearm horizontal to the ground. At the sametime, bring your right hand underneath your op-
ponent's knife arm and grasp your left fist (fig,
85©).i. Bend swiftly forward from the waist and put
pressure on your opponent's arm (fig. 85 ©). This
causes him to fall backward and lose his weapon.

POOR MAN'S JAMES BOND Vol. 1 ARMY HAND-TO-HAND COMBAT
Figure 85. Second counter agisinil downward itrote.119
96. Counter Against Upward Stroke
a. Block an upward knife stroke by catching youropponent's wrist or forearm in the pocket formedat your left wrist by bending your fist forward.
Keep your elbow low. At the same time, twist yourbody to the right (fig. 86 ©)
.
6. As soon as you stop the blow, grasp your at-
tacker's right hand with your right hand and place
your thumb on the back of his hand. Reinforce this
hold by grasping bis wrist with your left hand andplacing your left thumb on the back of his hand(fig. 86©).
e. Twist his wrist to your left and bend his handtoward his forearm, causing him to fall to the ground(fig. 86®). Figure 86. Counter againxt aptsard stroke—Continued.

POOR MAN'S JAMES 30ND Vol, 1 ARMY HAKD-TO-EAND COKBAT
97. Second Counter Against Upward Stroke
a. Another method of defending yourself againstan upward stroke is to block your opponent's wristor forearm in a "V" formed by your hands (fig.
87 ®). Keep your arms extended. Take a shortcrowhop to the rear as you block his thrust so yourmidsection is further from the point of the knife(fig. 78®).
ogainst upward ttrohe.
b. Grasp your opponent's wrist tightly with bothhands and pivot to your left on the ball of your left
foot. At the same time, raise your opponent's knifehand and step directly beneath his arm (fig. 87 ®).From this position, snap his arm forward and down-ward, bending at the waist and, at the same time,drive him to the ground with a whipping action(fig-87©).
«I upward itroke—
Fiffurt Second counter against «pir;«rd ttrohe—Continued
9«. Third Counter Against Upward Stroke
a. This phase is the same as that described in para-graph 97a.
5. Grasp your opponent's wrist tightly with bothhands and pivot to your right. Kaise his hand andbring his arm down over your left Bhoulder fflz88 0).
v 6
e. Apply downward pressure on bis arm. Thiswill throw him to the ground or break his arm Thismethod can be varied by stepping completely underhis arm and behind his back and forcing him to dropthe knife by bending his arm (fig. 88 ©) . Ton mustpivot qmcklj to prevent him from spinning out ofthe hold.
POOR MAN'S JAMES BOND Vol. 1 401 ARMY HAND-TO-HAND COMBAT
Figure 88. Third counter against upward stroke.125
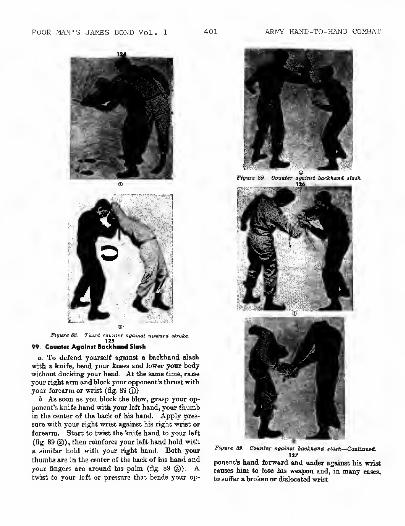
99. Counter Against Backhand Slash
a. To defend yourself against a backhand slash
with a knife, bend your knees and lower your body
without ducking your head. At the same time, raise
your right arm and block your opponent's thrust with
your forearm or wrist (fig. 89 Q).o. As soon as you block the blow, grasp your op-
ponent's knife hand with your left hand, your thumbin the center of the back of his hand. Apply pres-
sure with your right wrist against his right wrist or
forearm. Start to twist the knife hand to your left
(fig. 89 ©), then reinforce your left-hand hold with
a similar hold with your right hand. Both your
thumbs are in the center of the back of his hand and
your fingers are around his palm (fig. 89 ©). Atwist to your left or pressure that bends your op-
Figure 89. Counter agaimt backhand slatli—Continued.
ponent's hand forward and under against his wrist
causes him to lose his weapon and, in many cases,
to suffer a broken or dislocated wrist.
POOR MAN'S JAMES BOND Vol ARMY HAND-TO-HAND COMBAT
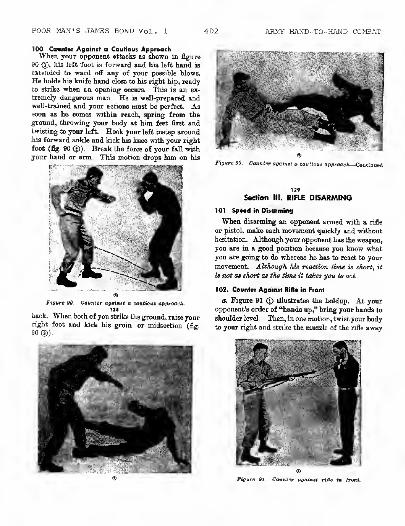
100. Counter Against a Cautious ApproachWhen your opponent attacks as shown in figure
90 <T), his left foot is forward and his left hand is
extended to ward off any of your possible blows.
He holds his knife hand close to his right hip, readyto. strike when an opening occurs. This is an ex-
tremely dangerous man. He is well-prepared andwell-trained and your actions must be perfect. Assoon as he comes within reach, spring from the
ground, throwing your body at hirq feet first andtwisting to your left. Hook your left instep aroundMs forward ankle and kick his knee with your right
foot (fig. 90 ®). Break the force of your fall withyour hand or arm. This motion drops him on his
Figure SO, Counter againit a caution* approach.128
back. When both ofyou strike the ground, raise yourright foot and kick his groin or midsection (fig.
90®).
at approach—Continued
Section III. RIFLE DISARMING
101. Speed in Disarming
When disarming an opponent armed with a rifle
or pistol, make each movement quickly and without
hesitation. Although your opponent has the weapon,
you are in a good position because you know whatyou are going to do whereas he has to react to your
movement. Although his reaction time u short, it
is not as short as the time it takes you to net.
102. Counter Against Rifle in Front
a. Figure 91<J)
illustrates the holdup. At youropponent's order of "hands up," bring your hands to
shoulder level. Then, in one motion, twist your bodyto your right and strike the muzzle of the rifle away
Filjure 91. Counter againil rifle in trout.

POOR MAN'S JAMES BOND Vol. 1 ARMY HAND-TO-HAND COMBAT
^nW ^w %
" t
'..*£] ": ;j
-HIFipure 91. Cortnta jTQnt—Continued
from your body with your left forearm or wrist
(fig. 91®).b. As you strike the muzzle, step forward with
your left foot and grasp the upper handguard with
your right hand and the small of the stock with your
left hand (fig. 91 ®).c. Pull with your left hand and push with your
right and step to your opponent's right with your
own right foot. This knocks him oS balance and,
at the same time, enables yon to strike him on the head
with the muzzle of the rifle or to take the rifle from
him by twisting it over his right shoulder (fig. 91 ©).103. Counter Against Rifle in Back
a. When your opponent has his rifle in your back
as shown in figure 92 ©, start to elevate your handsas ordered. When your hands reach shoulder height,
131
twist from the hips to your right and bring your right
elbow back, striking the muzzle of the rifle. This
deflects the rifle away from your body. Do not as
yet move your feet from their original position (fig.
92 <g).
agttinit rifle in front—Continued
Counter against rijle in fiacfc.
b. Turn to thB right by pivoting on your right foot.
Pace your opponent and bring your right arm under
the rifle and over your opponent's left wrist Place
your left hand on your opponent's right hand where
it grasps the stock (fig. 92 ©). This prevents him
from executing a butt stroke.
e. Pull with your left hand and push with your
right shoulder and arm, forcing your opponent to
the ground and making him release his grip on the
rifle (fig. 92©).

POOR MAN'S JAMES BOND Vol. 1 ARMY HAND-TO-HAND COMBAT
ft—Continued
Seelion IV. PISTOL DI5ARMING
104. Counter Against Plitol in Front
a. Your opponent orders you to raise jour hands.As you do so, keep your elbows as low as possible
(fig. 93 ®) . Twist your body to the right and strike
your opponent's wrist with your left forearm (fig.
93®).b. Grasp the bottom of the barrel with your right
hand, making certain that your hand is not near the
muzzle. At the same time, strike downward on youropponent's wrist with your left fist (fig. 93 ©).While applying pressure with your left fist, bendthe pistol towards your opponent's body with yourright hand, causing him to release his grip (fig.
Figure Si. Counter against rifle in back—Continued
Figure 93. Counter against pistol to front.
93 © ).
If he should retain his grip, his index fingerwill be broken. From this position, you can strikeyour opponent on his temple with the butt of thepistol.
105. Second Counter Against Pistol in Front
As you begin to raise your hands, bring themquickly forward and, at the same time, twist to yourleft away from the line of fire (fig. 94 ©). Bringyour right hand under your opponent's wrist eitherwith a grasping or a striking motion and, simul-taneously, grasp the barrel of the pistol with yourleft hand (fig. 94 ©). Push up ou the wrist withjour nght hand and down and out on the pistol withyour left hand (fig. 94 ©) . Tour opponent will re-lease his grip.

POOR MAN'S JAMES BOND Vol. 1 405 ARMY HAND-TO-HAND COMBAT
Figure 93. Counter against pistol in front—Continued
106. Counter Against Pistol in Back
a. This counter should be used only when you are
certain that the pistol is in your opponent's right
hand (fig. 95 (7)). As you raise your hands, keep
your elbows as close to the waist as possible. Twist
your body to the right and, at the same time, bring
your right elbow against your opponent's forearm137
-•sa
Figure 93. Counter against pistol in front—Continued
138
Figure 94. Second counter against pistol in front.

POOR MAN'S JAMES BOND Vol. 1 406 ARMY HAND-TO-HAND COMBAT
{fig. 95 ®). Keep your feet in place. Bring yourright arm under your opponent's right forearm andplace it on hie elbow joint bo that his forearm rests
in the crook of your right elbow (fig. 95 ©}.b. Grasp your right hand with your left hand and
bend swiftly from the waist (fig. 95 ©), By doingthis, you force your opponent to the ground andcause him to drop his weapon.
107. Second Counter Against Pistol In Back
a. Use this counter when you are certain that youropponent is holding the pistol in his right hand.Keep yonr elbows as close to your waist as possible.
Twist to the left, striking your opponent's wrist or
forearm with your left elbow (fig. 96 ®). Bringyour left arm behind your opponent's right elbow
Figure 95. Counter against pistol in ftoofc—CouUnued
so that his forearm or wrist rests on your shoulder or
neck (fig. 96©).b. Grasp your left hand with your right hand and
press your left forearm against your opponent's right
elbow (fig. 96 ©). A swift twist to the front brings
yonr opponent to the ground. With added pressure,
you can break his arm. During the entire operation,
the muzzle of the pistol is always pointed elsewhere.
108. Third Counter Against Pistol in Back
In this counter, it does not matter whether youropponent holds the pistol in his right or left handbecause your actions are the same. The description
given is for the pistol held in the left hand. Figure97© illustrates the holdup.

POOR MAN'S JAMES BOND Vol. 1 ARMY HAND-TO-HAND COMBAT
m ?'MIfchff'
tk'i'ig^**jj ;'
:'>Hj 1' ^hs1 fc#
!- i1 «
11 IB
Jv^"iM&3b
o. Twist your body to the right striking your right
elbow against vour opponent's hand or wrist (fig.
97©).b. Pivot to the right and place your left wrist
against your opponent's left wrist, grasping the pis-
to] barrel with your right hand, palm up. Applypressure to his hand and trigger finger by pushingthe barrel toward his upper arm. This releases his
hold on the pistol and may break his index finger
(fig, 97 ©). You now have the pistol in your right
hand, opposite your left shoulder. By twisting force-
fully to the right, you can strike your opponent onthe chin or neck with the pistol butt (fig. 97 ©).
109. Counter Against Pistol in Back of Neck
a. This counter is practical only when you are
certain that the pistol is held in your opponent's right
Figure 96. Second counter againtt pittol in &acfc—Continues Figure 97. Third counter ofains £ ptifoiin laek.

POOH MAN'S JAMES BOND Vol. 1 ARMY HAND-TO-HAND COMBAT
Figure SI. Third affainat-piatoVin back—Continued
hand. In raising your arms, bring your elbowsshoulder high (fig. 98 ©). Twist your body to theleft and bring your left arm under your attacker's
right elbow (fig. 98 ®).b. Beach aeross with your right hand and grasp
your own -left hand. Twist forward and put pres-
sure on your opponent's elbow with your left fore-
arm. You can either break his arm or force him to
the ground, causing him to release his weapon (fig.
980).
110. Second Counter Against Pistol in Back of Neck
Use this counter primarily for an attack with the
pistol held in thB right hand. The initial move, how-ever, can be used for a right- or left-handed attack.
a. Hold the elbows shoulder high (fig. 99 ®).
Figure B8. Counter aoaintt pistol in back of neck.
Twist your body to the right and, at the same time,bring your right upper arm over your opponent'sright wrist ( if the pistol should be in your opponent'sleft hand, bring it over his left wrist) (fig. 99 ©)
.
5. Pivot on your right foot and place your left
foot close to your opponent's right foot. Hold youropponent's wrist close to your right side with yourright upper arm. Cross your left arm under hisright upper arm and grasp the left lapel of hisshirt or jacket with your left hand (fig. 99 ©) . Holdhis right wrist close to your side and lift with yourleft upper arm, applying pressure to his elbow.
111. Third Counter Against Pistol in Back of Nock
Hold the elbows shoulder high (fig. 100©). Theinitial movement in this action is identical with that

PC.^' MAN'S JAMES BOND Vol. I ARMY HAND-TO-HAND C0M3AT
Figure $9. Second counter against pistol in back of neck.
149
shown in figure 99 ®. Twist your body to the right
and strike your opponent's left wrist with your right
arm (fig. 100 ©) . Pirot on your right foot and place
your left hand against your opponent's shoulder or
upper arm. Bring your right forearm or wrist un-
der your opponent's left elbow and lock it to your
left forearm (fig. 100 ©). Apply pressure andcause your attacker to drop his weapon. Severe
pressure can break his arm.
112. Helping a Friend
As you approach an unsuspecting opponent fromhis rear who is holding up a friend, carry your right
hand low and your left hand shoulder high (Eg.
101 (£)). You must grasp your opponent with both
!*• ^ J
Figure 99. Second counter against pijfoi in back of neck ®CoatJnaed Figure 100. Third counter against pistol in back of neck.

POOR MAN'S JAMES BOND Vol. 1 ARMY HAND-TO-HAND C0MBA1
Figure 100. Third counter against pistol In back of neck—Continued
hands at the same time. Your right hand, palm up,
grasps the hand holding the pistol and lifts it, while
your left hand pushes his right upper arm from be-
hind (fig. 101 @). Turn your body to the left andcontinue to apply pressure by pushing with your left
hand and pulling his right hand backward (fig.
101 (U). This causes him to drop to the ground or
suffer a dislocated shoulder.
113. Actions Against Opponent Who Is Holding Youand Your Friend at Gun Point
The original position in this holdup is shown in
figure 102 ®, The gunman is moving the muzzleof the pistol from your friend to you and back again.
Ton are standing on your friend^ left.
Figure 101. Attacking tat unsuspecting gunman- from kit
rear—Continued
a. As the weapon swings away from you, step
forward with your left foot, place your left hand on
the back of the attacker's gun hand, and push force-
fully to his left (fig. 102 ®).b. Take a step with your right foot and a quick
long step with your left foot. Your movement
brings you in front of your opponent, with your back
to him. At the same time, twist his hand to his left,
turning it so his palm is turned up and his right
elbow comes in contact with your left armpit (6g.
102 ©). Bear down on his right elbow with your
armpit and lift up on his hand, causing him to re-
lease his weapon or suffer a broken arm.
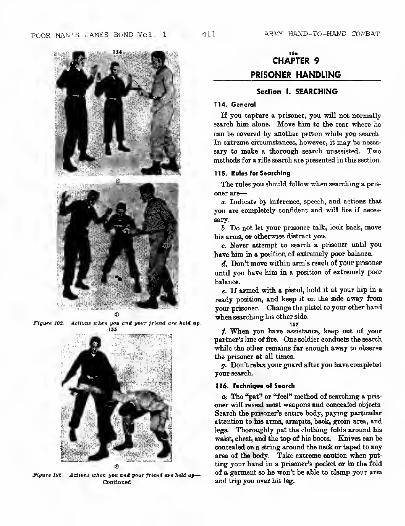
POOR MAN'S JAMES BOND Vol ARMY HAND-TO-HAND COMBAT
CHAPTER 9
PRISONER HANDLING
Figure JOB. Action* tcken you and your friend are held up
Figure 102. Actions alien you and your friend are held I
Section I. SEARCHING
114. General
If you capture a prisoner, you will not normally
search him alone. Move him to the rear where he
can be covered by another person while you 3earch.
In extreme circumstances, however, it may be neces-
sary to make a thorough search unassisted, Twomethods for a rifle search are presented in this section.
115. Rules for Searching
The rules you should follow when searching a pris-
oner are
—
a. Indicate by inference, speech, and actions that
you are completely confident and will fire if neces-
sary.
b. Do not let your prisoner talk, look back, move
his arms, or otherwise distract you.
c. Never attempt to search a prisoner until you
have him in a position of extremely poor balance.
d. Don't move within arm's reach of your prisoner
until you have him in a position of extremely poor
balance.
e. If armed with a pistol, hold it at your hip in a
ready position, and keep it on the side away from
your prisoner. Change the pistol to your other hand
when searching his other side.
137
/. When yon have assistance, keep out of your
partner's line of fire. One soldier conducts the search
while the other remains far enough away to observe
the prisoner at all times.
g. Don't relax your guard after you have completed
your search.
116. Tathnique of Search
Os The "pat" or "feel" method of searching a pris-
oner will reveal most weapons and concealed objects.
Search the prisoner's entire body, paying particular
attention to his arms, armpits, back, groin area, and
legs. Thoroughly pat the clothing folds around his
waist, chest, and the top of his boots. Knives can be
concealed on a string around the neck or taped to any
area of the body. Take extreme caution when put-
ting your hand in a prisoner's pocket or in the fold
of a garment so he won't be able to clamp your armand trip you over his leg.

FOGS MAWS JAMES BOND Vol. I ARMY HAND-TO-HAND COMBAT
b. After the initial search, a detailed search is madewhen the prisoner is moved to the rear. Force himto disrobe completely and examine his entire body
from the soles of his feet to the top of his head.
117. Prone Method of Searching When Armed With a
Rifle
Make the prisoner lie down on his stomach so that
his arms are completely over his head and close to-
gether. His legs are also completely extended, feet
close together. Place the muzzle of the rifle in the
smaJl of his back, keeping the gun upright. Graspthe rifle tightly around the small of the stock, index
finger on the trigger (fig. 103). After searching
his baek, order him to turn over and repeat the proc-
ess. Twist the muzzle into the prisoner's clothing
Figure 103. The prone method of /earchtng makes it difficult
lor a prisoner to disarm his searcher.
to prevent it from slipping. Yon can also use this
method when armed with a pistol. Keep the pistol
at your hip while searching. You will have to use
arm-and-hand signals for non-English speakingprisoners.
118. Kneeling Method of Searching When ArmedWith a Rifle
The prisoner interlocks his hands behind his headand kneels. He bends forward as far as possible
until he is just able to maintain his balance. Whilesearching his left side, hold the rifle in your righthand, muzzle jammed into the small of his back.Put your left leg between his legs and against his
buttocks (%. 104) . In this position, you can quicklyknock him flat by thrusting with the left knee. Whensearching his right side, hold the rifle in your left
hand and put your right leg between his legs, kneeagainst his buttocks. Yon can also use this methodwhen armed with a pistol. Keep the pistol at yourhip while searching.
Figure 104. The searcher keeps his left teg pressed into theprisoner's buttocks to knock the prisoner off balance, ifthe situation arises.
T19. Wall Method of Searching When Armed Withthe Pistol (For Another Method of Woll Search-ing See FM 79-5)
Have the prisoner lean against a wall or a tree,
one hand over the other and feet, together andcrossed as far to the rear as possible. This gives himextremely poor balance. To search his left side,place your left foot in front of his feet, keeping thepistol at your right hip (fig. 105). If the prisonerattempts to move, kick his feet out from under him.To search his right side, move to that side, switchingthe pistol to your left hand and placing your rightfoot in front of his feet.
Figure 105. The prisoner is kept off balance 6y leaning i»Rforward Kith hit legs and arms crossed.

POOP, MAN'S JAMES BOND Vol ARMY HAND-TO-HAND COMBAT
120. Standing Method oF Searching When ArmedWith a Pistol
Make the prisoner spread his legs far apart andplace his hands on top of his head, fingers interlocked.
While searching, keep as far from him as possible
(fig. 106 ©). When yon have to move close to himto search his front, place your foot against his heel,
turning your body to the side to protect your groin
(fig. 106©).
121. Searching More Than One Prisoner
a. A man armed with a pistol can search morethan one prisoner at a time, using any of the methods
presented in this section. While searching several
prisoners, keep your eyes on all of them and do not
look at your "patting" hand.
p.-
•• : tfai
u
|
W •i' ^i i
i^
r / ^ ^ -;-..]
5. When using the wall method, keep the pistol in
your right hand and search the left side of the first
prisoner (fig. 107©). Step back and have him moveto the far end of the line and resume the searchposition against the wall. Search the left side ofthe remaining men in the same manner. Then moveto the other end of the line (fig. 107 ®). Hold thepistol in your left hand and search the right side of
Figvre 10S. Search the prisoner well, but be alert at all timet.
Figure 101, When tearching more tftdn tmc prisoner, haveeach searched man move to the end of the line.
1*3
each prisoner, having each one move to the far end
of the line as you finish.
c. To search more than one prisoner using the
kneeling, prone, or standing methods, make themall assume the same position, in column about four
or five feet apart (fig. 108) . Search the rear manand then have him move to the front and resume
the search position. Search the remaining prisoners
from the rear, moving each to the front as you finish

POOR MAN'S JAMES BOND Vol. ARMY HAND-TO-HAND COMBAT
with himkneeling
When alone and armed wsearch is the best method to
ith a
use.
rifle, the
*<st'
:
-'1
'^^fcl.
j jjjjliifl
Figure 108. The kneeling search is the best method if aloneand lehen searching more than one prisoner.
Section II. SECURING
122. General
The most effective way of controlling a prisoner
is to tie him. Yon can use pieces of clothing orequipment to tie him securely, such as shoe laces,
leather orweb belts, neckties, handerchiefS. or twisted
strips of cloth. If a night patrol has the missionof capturing prisoners, it should always carry apiece of rope or flexible wire.
123. Bell Tie
Tate the prisoner's belt and order him to lie onhis stomach. Cross, his arms behind his back and
Wtplace the running end of the belt toward his feet,
buckle toward his back. Hold the buckle on the
wrist of his bottom arm and tightly wrap the run-
ning end around his wrist several times (fig. 109 ©).Place the running end of the belt parallel with his
spine and outside the wrist of the upper arm. Nowwrap the running end around the wrist of the upperarm several times (fig. 100 ©). Be sure to keep the
prisoner's arms as close together as possible and to
wrap the belt as tight as possible. Fasten the belt
in the buckle (fig. 109 ®). Although this is an ef-
fective means of tieing, you should use it only whenthe prisoner is under close watch.
124. Shoe String Tie
Two 27-inch shoe strings or larger are needed forthis tie. Have the prisoner remove his shoe or boot
Figure 109. The belt He.
109. The bell lie—Continued
You can make this tie with the prisoner'shands either in front of his body or behind his back,the latter being more effective. Place his hands backto back, wrists touching each other. Take one stringand tightly wrap it completely around both wristsseveral times. Now wrap the end of the stringaround the cord between the insides of his wrist
14*
This will further tighten the outside loops. Tie theends of the string together with any conventionalknot (fig. 110 ©). Neit tie the two little fingers
together, using one end of the second string. Passthe remainder of the string over the loop around the
wrists and tie his thumbs together. When you pass
the second string around the wrists, be sure to pull it
POOR MAN'S JAMES BOND Vol. I ARMY HAKD-TO-HAND COMBAT
Iff"v
i- ,.
1- '^^^^Jlfiuure J03, Tfte ItciJ lie—Continued* 1 *>"~tf*S
125. Lend Tie
A piece of rope or two long hoot laces are neededfor this tie. Make the prisoner lie down. Tie his
hands behind his back, using any conventional knot.
Figure 110. Many available objects can be used to He a
tight and keep it tight when tieing the thumbs (fig. prisoner's hand; such as shoe strings—Continued
110®).
Fiffnre 110. Many available objects can be usedprisoner's hands, such as shoe strings.
Force his arms up behind his back in a strained posi-
tion. Pass the rope around his neck and tie it
around his wrists. The length of the loop around Msneck should be short enough to force the man to
keep his arms in a strained position to relieve pres-
sure on his throat (fig. 111). The prisoner can be
easily subdued by jerking on the rope aa you walkbehind him.
126. Hog Tie
Tie the prisoner in the lead tie (fig, 111). Cross

'COR MAN'S JAMES BOND Vol. 1 ARMY-HAND-TO-HAND COMBAT
his ankles and, after doubling his legs up behindhim, tie them with the rope so that they remain inposition. Any struggle to free himself will result
in strangulation (fig, 112). When correctly applied,
there is no escape from this tie.
Section HI. GAGGING137. Handkerchief
A gag prevents a prisoner from crying out. Forcea handkerchief or a strip of cloth into the prisoner
around his neck (fig. 114).
129. Adhesive Tope
Place several strips of tape across the prisoner's
month. The tape should be at least one inch wideand five inches long (fig. 115). Stuffing a handker-
chief or strip of cloth into his mouth will make the
gag muchmore effective.
Figure 112. Sag tie.
mouth. A lump of turf will suffice if nothing else is
available. Tie a handkerchief around the prisoner's
mouth (fig.113).
Figure Hi. Stick sag. Figure US. AdAerive tape gag.
CHAPTER 10
ADVICE TO INSTRUCTORS
Figure US. Handkerchief gag.
128. Slick
If a strip of cloth is not available, a stick can be
used. Stuff the prisoner's mouth with a piece of turf.
Force the stick between his teeth like a bit in a horse's
mouth. Tie thB stick with a piece of shoe string
Section I. THE INSTRUCTOR AND SAFETYPRECAUTIONS
130. The Instructor
The instructor should be in good physical condi-tion and should be able to demonstrate all the maneu-vers described in this manual. He must at all timesdisplay intense enthusiasm, rigor, and leadershipqualities that will inspire the best efforts of the menbeing trained. He shoald train assistant instructorsto closely supervise all practical work and to demon-strate new material.
131. General Precautions
The following safety precautions must be strictlyfollowed during all training in unarmed combat—
a. Supervise all practical work closely and con-stantly. Never leave a class unsupervised.
b. Familiarize the students with each maneuverby complete explanation and demonstration beforeattempting any practical work.
a. During the learning stages, do not let the stu-

J00K HAN'S JAMES BOND Vol. 1 ARMY HAND-TO-HAND COMBAT
dents get ahead of your instruction. This prevents
accidents.
d. During the stages of learning and perfection
of technique, the training partner offersno resistance.
He should allow the maneuver to be freely executed.
e. Insure adequate space for all practical work.
A space at least 8 feet wide by 8 feet long is needed
for each pair of students.
1/3
/. Have the men empty their pockets before thepractical work period and remove any jewelry, iden-tification tags, etc.
132. Specific Precautions
The following precautions are applicable to theparticular phases of training listed
—
a. Vulnerable Points. Stress that only gentle
blows are struck during the initial practical work.As students become more advanced, harder blowsmay be used. But students at all times must be cau-
tioned against using excessive force, since serious
injury could result.
b. Fall Positions, Throws, Holds,
(1) Establish a signal that can be given by theindividual student to stop the application of
pressure when practicing holds. All stu-
dents must know this signal, particularly
when practicing strangle holds. This sig-
nal can, for example, be a clap of the handsor tapping your training partner.
(2) Be sure all men are warmed up before do-ing any practical work.
(3) Teach fall positions before conducting prac-tical work in throws.
(4) Caution the men to apply very light pres-sure until they become familiar with thehold.
c. Disarming.
(1) While the men are learning bayonet disarm-ing methods, keep scabbards on the bay-onets and keep the bayonets firmly attachedto the rifles.
(2) Use tent pegs or bayonet scabbards to simu-late knives in learning knife disarming.
(3) Caution the men who are to be disarmed notto place their fingers in the trigger guardsof their pistols or rifles while practicing dis-
arming with these weapons.
Section II. CONDUCT OF TRAINING
133. Formations
aj Regulation physical training formations maybe used for practice (FM 21-20). From the ex-
tended platoon formation, have the 1st and 3d ranks
face the 2d and 4th ranks, so that each man will have
a partner. Even numbered men do not uncover. It
is recommended, when practicing throws, that twice
the normal distance be taken between ranks.
b. For disarming methods, it is recommended that
you use a formation of two concentric training circles
or a formation that employs only two1 well-extendedranks. In forming the concentric training circle,
pair the men off so that each will have a partner to
work with.
134. Commends
a. Most of the maneuvers described in this manualcan be divided into several steps or phases. To fa-
cilitate learning and to insure that the student learns
each movement of an entire maneuver accurately,
each maneuver is presented by phases.
b. For example, the right hip throw (par. 60) is
a three phase maneuver. In the first phase, the stu-
dent places his left foot in front of and slightly to
the inside of his partner's left foot. At the same
time, he strikes his partner on his right shoulder andgrasps his clothing at this point. The command for
this movement is phase one op the hip theow,MOVE. At the command MOVE, the student ex-
ecutes phase one and holds his position until given
the subsequent command for the next movements.
These commands are phase two <three), MOVE.When the students have become proficient in their
movements, you can then work for speed. The phases
of the maneuver are combined into a continuous
movement by commanding hip throw, MOVE. Atfirst, the maneuver is executed slowly. Studentsgain speed through constant practice.
c. Paragraph 92 explains the second counter
against the long bayonet thrust. This disarming
method is divided into three phases. For the first
phase (par. 92a) , the armed student is given the pre-
paratory command long thrust, and the unarmedstudent is given the preparatory command parkyrioht. Since you want both students to halt their
movements and remain in position for a subsequent
command, you must command hold. The entire
command for tftB first phase, therefore, is longTHRUST, PARRY RIOHT, AND HOLD, MOVE. The nexttwo phases of the movement are executed while the
armed man is extended in the long thrust. Thecommand for the second phase (par. 926) is groundand hold, MOVE. The command for the third
phase (par. 92c) is disarm and hold, MOVE. Thecommand for executing this disarming maneuver is
DISARM PROM THE LONG THRUST, MOVE.
135. Exercise
a. Recommendations for Warm-up Exercises.
Use combative exercises, grass drills, and tumblingexercises to warm up your men. The aggressive na-

POOR MAN'S JAMES BOND Vol. ARMY HAND-TO-HAND COMBAT
ture of these warm-up drills lend themselves to the
spirit of hand-to-hand combat (FM 21-20).
b. Recommended Drill for Parry SxercUe. It ia
important that your men be trained in the bayonetdisarming parry movements before practicing thedisarming methods, To do this, have the pairedmenassume their respective guard positions with the chinof the unarmed man 6 to 8 inches from the point ofthe bayonet. The armed man stands fast in theguard position during the entire exercise. The un-armed man parries the bayonet first to the right and
174
then to the left, on command. As he parries to the
right, he side-steps to his left oblique with his left
foot, brings his right foot slightly to the rear of his
left, and faces the side of the rifle. When he parries
kft, he side-steps with his right foot to his right
oblique.
Section 111. THE TRAINING AREA
The training pit thould be lares enough to allow
maneuvering by the ttvdenti.
a. The most suitable area for teaching fall posi-
tions, throws, and counters is the sawdust pit. Youcan get sawdust easily at most stations. Figure 116
177
shows such an area. Each pit will accommodatetwelve pairs of men. If you need additional room,fill in the area to the sides of each pit, as shown.
b. To construct a pit, either dig out 12 inches of
ground or build a retaining wall of dirt about 12
inches high around the sawdust pit.
c. Place a raised platform, about 14 feet square,
in the center of the pit area for demonstrations.
Cover it with a removable mat. This platform is
big enough to hold both the demonstrators and prin-cipal instructor during the demonstration.
d. The men gather around the platform to watchthe demonstrations.
137. Other Arnai
a. Any large grassy or sandy area is suitable forwork in disarming methods and throws. Studentsshould be taught fall positions before learning throwson a hard grassy area.
6. Classes in unarmed combat can also be con-ducted indoors. In this case, the floor and wallsshould be matted. The difficulty here is that onlya small group of men can participate at one time,since an area eight feet square should be allotted foreach two men.
138. Variation in Minimum Training Program
Periods eight and nine of the subject schedule in-clude work in throws, falls, and escapes from basicholds. This time, however, may be spent in review-ing previous lessons, if the instructor thinks the stu-dents need review. The throws, falls, and escapescan be included in the physical training program.
Section IV. MINIMUM TRAINING PROGRAM*
139. Subjact Breakdown
Period BnblKt Tyj» An*OwwnJ mbtsdj aaputmsat
BtuSeal equipment References
1 INTRODUCTION, basic
fundamentals attacking
vulnerable points.STRANGLE HOLDS.
C, D, PE Field One tent peg per tiro
students.
FM 2I-1M;chs. 1, 2,
3,7.
POCR MAN'S JAMES BOND Vol ARMY HAND-TO-HAND COMBAT
2 Review Vulnerable Points C, D, PE --do One tent rope snd one FM 21-180,
and Strangles, silencing steel helmet per two chs. 5 4 7.
Sentries, HOLDS. students.
3 Review PE Strangle Holds C, D,FE ...do One tent rope, 1 tent peg FM 21-160,
and Silencing Sentries. or bayonet scabbard, eh. i.
KNIFE ATTACK. and 1 steel helmet per
two students.
i Review Knife Attack, Bay- C, D, PE ...do One tent peg and 1 rifle FM 21- ISO,
onet Disarming. w/bayonet and scab-
bard per two students.
section I,
eh. 3.
5 Review Bayonet Disarm- C, D, PE Field One tent peg and 1 rifle FM 21-150,
ing, Knife Disarming. with bayonet and scab-
bard per two students.
section 1 1,
Oh. 8.
6 Review Knife Disarming, C, D, PE -.-do One tent peg and 1 FM 21-150,
Pistol Disarming. wooden pistol per 2
students.
section IV,
ah. 8.
7 Review Pistol Disarming, C, D, PE ...do One wooden pistol and 1 FM 21-150
Rifle Disarming. rifle per 2 students. section 111,
oh. 8.
8 Side Fall Position, HipThrow, Reverse Hip oh. 6.
Throw.
9 Over Shoulder Full Posi-
tion, Over Shoulder eh. 5 4 7.
Throw, Escapes bomHolds.
10 One belt, I pair shoe
strings, 1 rifle, 1 cb. 3.
wooden pistol, one 15-
foot rope per 2
students.
INDEX
Accuracy:
In movements---..- 8
In throws 59
Adhesive tape gag 129
Attacking:
Adam's apple 14
Armpit .—;29
Base of throat 20
Chin 21
Collarbone 26
Ears 19
Elbow 33
Eyes 12
Fingers 35
Floating ribs 27
Groin 22
Instep _ --_ 30
Kidney 25
Knea 31
Nape 16
Nose 13
Shoulder 32
Side of neck 17
Solar plexus 23
Stomach 2gTemple-. 15Upper lip _ 18Wrist 34
Backhand slash, counter 99Balance 5
Guard position «Bayonet hilt, attacking vulnerable points 37Belt tie _ 133Blunt objects, attacking vulnerable points... 39
Body regions:
Head and neck 10Limbs toTrunk 10
Boot, attacking 4Instep ___ 30Knee- ___ 31
Brachial artery, knife attack 45
Carotid artery 17Knife attack 45
Cautious knife approach, counter 100Choke hold, escape 76-77Commands 134

POOR MAM'S JAMES BOND Vol. 1 ARMY HAND-TO-HAND COMBAT
Cross collar strangle hold 70
Disarming:
Bayonet __ 87-93General 87Long thrust. __ ___ __ 91-93Short thrust 88-90
Knife __ __ 94-200Backhand slash 99Cautious approach _ 100Downward stroke B4-B5Upward stroke _ _ 96-98
Pistol... _ ___ 104-113Actions when you and friend are
held up.. _ 113Helping a friend 1]2In back 106-108In hack of neck 109-111In front __ 104-105
Bine— _ _ 101-103In back __ 103In front _ _ 102Speed 101
Double wristlock 74Downward knife stroke, counters 94-95
Elbow:
Attacking collar bono 28Attacking spine 24
Exercises:
Warm-up- _ _ !35P»"T -_ 135
Fall positions . _ 53—68Advanced practice 55General., __,_ 53Left side 54,
Over shoulder throw:
From the ground 58From standing position _„_ 57
Practicing __ __ 35Right side_ .. 54
Fingers:
Extended, attacking base of throat 20Index -and middle, attacking eyes 12
Fingers folded at second knuckles.. 4Attacking:
Floating ribs 27Kidney ___ 25Stomach . _ 28Upper lip ___ __ [g
Formations 133Front overarm bear hug, escape 80Front strangle hold 67Front underarm bear hug, escape -___ 82Full nelson 71Fundamental 3_g
Accuracy and speed gBalance 5
Guard position 8General __ _ 3Maximum strength against weakestpoint 5
Momentum. _. 7 21Using natural weapons 4 4
Boot _ 4 4Fingers folded at second knuckles..4 4Heel of hand 4 4Knife edge of hand 4 4
Using natural weapons;Little finger edge of fist 4 4Others 4 4
Fundamentals—ContinuedUsing natural weapons—Continued
Protruding second knuckle of mid-dle finger... 4 t
Gagging 127-129 169Adhesive tape _ 229 170Handkerchief 227 1 69
„B'iok 128 170
(juard position _ 6 8
Hanimerlockf2 7s
Handkerchief gag _ ]27 169Hands, cupped:
Attacking ears __ 19 18Heel of hand 4 4
Attacking:
Chil> - — 21 20Elbow 33 29N<»e - --.. 13 13
Heel Ptomp:
To groin _. _ _ _ 22T°nape _'
iaHelmet neck break 43Helmet smash 4gHogtie_ _ 126Holds - B6-74
Cross collar strangle ... 70Double wristlock 74Front strangle 87Full nelson _„_ J2General ggHammerlock 72Locked rear strangle 73Side collar strangle ggTaking a man dawn from his rear... 69
Holds, escape 75-86Choke hold ___. , 76-77 83Front:
Overarm bear hug.., 80 89Underarm bear hug 82 93
General 75 33One-arm strangle from rear 79 86
Holds, escape—ContinuedOverarm rear body 81 89Rear underarm body 83-84 93Two-hand grip on one wrist 85 96Two-hand overhand grip on both wrists. 86 99Two-hand strangle when pinned against
wall_ 78 86Homemade blackjack, attacking vulnerable
paints 38 32
Instructor 130 172
Jugular vein 27 17

300R MAN'S JAMES BOND Vol. 1 ARMY HAND-TO-HAND COMBAT
Knife attack — — 45. 4B
Attacking:
Elbow 33
Floating ribs 27Kidney 25
Spinc_ 24
Kneedrup to shoulder 32
Kneeiift:
To groin 22
To stomach 28
Knife:
Attacking:
Heart— 45
Inside of leg 45
Kidney - 4Q
Side of tieck_ 46Stomach 45
Subclavian artery - 46
Attacking:
Throat 45,46Upper arm 45
Wriat 45General 42Grip _ _ 43Stance.. _ 44
Knife, counters 94-100
Backhand slash.. 96Cautious approach 100
Downward stroke ............. 94-95Knife, counters—Continued
"Upward atroke _ 96-98
Knife edge of hand:
Attacking:
Adam's apple 14
Collarbone — _ - 26
Elbow 33
Hosting ribs 27
Groin 22
Kidney 25
Napa 16
Nose 13
Side of neck 17
Temple 15
Upper lip 18
Lead tie 125
Left aide fall position 54
Little finger edge of fist 4
Attacking:
Floating ribs — 27
Kidney 23
Nape -- 18
Nose 13
Temple 15
Locked rear strangle hold 73
Long thrust, counter -- 91-93
Maximum strength against weakest point- .
.
5
Minimum training;
Program - -— 138
Schedule Sect IV, chap 10
Momentum 7
Need for training -- 2
One-arm strangle hold from rear, escape 79
Overarm rear body hold, escape.-- — - 81
Overshoulder throw 61
Variations — __— . 64
Overshoulder throw fall position:
From a standing position 57
From the ground 58
Pistol, counters 104-113
Actions when you and friend are held up. 113
Hstol, counters—Continued
Helping a friend 112
In back 106-108
In back of neck 109-111
In front - 104-105
Precautions:
General 131
Specifio --- 132
Prisoners:
Gagging 127-12B
Adhesive tape 129
Handkerchief 127
Stick.- --_ 128
Searching 114-121
General 114
Kneeling method when armed with
rifle- -_ 118
More than one 121
Prone method when armed with
title 117
Bules_ 115
Standing method when armed with
pistol -_ 120
Techniques . _ 116
Wall method when armed with
pistol—- 119
Securing 122-126
Belt tie 123
General IBS
Hog tie.— 128
Lead tie 125
Shoestring tie— 124
Protruding second knuckle of middle finger.. 4
Attacking solar plexus 23
Rabbit punch 18
Radial artery, knife attack 45
Rear underarm body bold, escape 88-84
References AppReverse hip throw 62
Variations _ 65
Rifle, counters. 101-103
In back- - 103Rifle, counters—Continued
In front 102
Speed- 101
Right hip throw 60Variations 63
Right side fall position 54
Searching _ 114-121
General 114
Kneeling method when armed with rifle. 118
More than one prisoner., —— .— ___ 121
Prone method when armed with rifle 117

FOQR MAN'S JAMES BOND Vol. ARKY HAND-TO-HAND COMBAT
Rules U5Standing method when armed with
pistol _. 120Techniques 118Wall method when armed with pistol 119
Securing _ 123-128Belt tie .. 123General 122Hog tin _._ J2BLead tie 12J5
Shoestring tie 121Shoe string tie 124Short thrust, counters 88-80Side collar strangle hold 68Signals for practice 132Silencing sentries 47-52
General 47Helmet neck break 48Helmet smash 49Other methods _ 52Strangulation with wire or cord- _ 50Two-hand loop-, 51
Slash, knife:
To inside of leg 45To neck 40To stomach 45To subclavian artery. 46To throat 45To upper arm . 45
Speed?™1 «Disarming 101Movements 8Throws-. _ 59
Stick gag _ 128Strangulation:
Tow-hand loop - 51With wire or cord 50
Subclavian artery, knife attaok 48
Taking a man down from his rear 69Tent peg knob, attacking vulnerable points.. 37Tent rope, attacking vulnerable points 40Throws _„ 59-65
General 5gOver shoulder 01Reverse hip 62Right hip 60Variations;
Kip _ 63Over shoulder 64Reverse hip B5
Thrust, knife:
To heart 45To kidney 40To side of neck 40To stomach 45To subclavian artery 46To throat 45
Toe kick:
To armpit 29To back of knee .. 31To floating ribs 27To groin 22
To kidney _ 25 24To spine 24 23To stomach 28 25
Training areas _ 137 17-Trainingplt- rge I76Two-hand grip on one wrist, escape. _ 85 geTwo-hand loop 51 50Two-hand overhand grip on both wrists,
«"=ape _ _ $6 93Two-hand strangle hold when pinned against
wall, escape 78 86
Upward knife stroke, counters _.. 06-98 119Using available weapons 4
Boot 4Finger folded at second knuckles 4Heel ot hand 4Knife edge of hand 4Little finger edge of fist 4Othera.__ _ 4Protruding second knuckle of middle
finger __ 4 4
Vaguanerve— 17 17Vulnerable points:
Attacking with available weapons 36-41 32Bayonet hilt 37 32Blunt objects...... _ 39 33General 38 32Homemade blackjack 38 32Others 41 35Tent peg knob 37 32Tent rope 40 33
Body regions 10 12Caution H 13General 9 12Head and neck 12-21 13
Adam's apple 14 15Base of throat 20 20Chin 21 20Eara _ 19 isEyEs _ 12 13Nape. 18 16Nose „ 13 13Side of neck 17 17Temple 15 16Upper lip IS 17
Limbs 30-35 27Elbow _,_ 33 29Fingers. _ 35 31Instep 30 27Knee 31 28Shoulder 32 29Wrist _ S4 31
Trunk 22-29 21Armpit _ 29 27Collar bone _. 20 24Floating ribe 27 25Groin. ._ 22 21Kidney _._ 2a 24Solar plexus 23 21Spine 24 23Stomach 28 25
Wrlstlock 34 31