s creening individual hybridomas by microengr aving to
TRANSCRIPT

Screening individual hybridomas bymicroengraving to discover monoclonal antibodies
The MIT Faculty has made this article openly available. Please share how this access benefits you. Your story matters.
Citation Ogunniyi, Adebola O et al. “Screening individual hybridomasby microengraving to discover monoclonal antibodies.” NatureProtocols 4.5 (2009): 767-782.
As Published http://dx.doi.org/10.1038/nprot.2009.40
Publisher Nature Publishing Group
Version Author's final manuscript
Citable link http://hdl.handle.net/1721.1/69976
Terms of Use Creative Commons Attribution-Noncommercial-Share Alike 3.0
Detailed Terms http://creativecommons.org/licenses/by-nc-sa/3.0/

1
Screening Individual Hybridomas by Microengraving to Discover Monoclonal Antibodies
Adebola O. Ogunniyi1, Craig M. Story2, Eliseo Papa3, Eduardo Guillen4, and J. Christopher Love1,5*
1Department of Chemical Engineering, Massachusetts Institute of Technology, 77 Massachusetts Ave., Cambridge, MA 02139 2Gordon College, Department of Biology, 255 Grapevine Rd., Wenham, MA 01984
3Harvard/MIT Health Science & Technology Institute, 77 Massachusetts Ave., Cambridge, MA 02139
4Whitehead Institute for Biomedical Research, Nine Cambridge Center, Cambridge, MA 02139
5The Eli and Edythe L. Broad Institute, Seven Cambridge Center, Cambridge, MA 02139
*Correspondence should be addressed to: J. Christopher Love, Ph.D. Department of Chemical Engineering Massachusetts Institute of Technology 77 Massachusetts Ave., Bldg. 66-456 Cambridge, MA 02139 Phone : 617-324-2300 Fax: 617-258-5042 Email : [email protected] Email addresses of co-authors : [email protected] [email protected] [email protected] [email protected]
Published as: A. O. Ogunniyi, C. M. Story, E. Papa, E. Guillen, J. C. Love, Screening individual hybridomas by microengraving
to discover monoclonal antibodies. Nature Protocols 4, 767 (2009).

2
ABSTRACT
The demand for monoclonal antibodies in biomedical research is significant, but
the current methodologies used to discover them are both lengthy and costly.
Consequently, the diversity of antibodies available for any particular antigen remains
limited. Microengraving is a soft lithographic technique that provides a rapid and
efficient alternative for discovering new monoclonal antibodies. This protocol describes
how to use microengraving to screen mouse hybridomas to establish new cell lines
producing unique monoclonal antibodies. Single cells from a polyclonal population are
isolated into an array of microscale wells (~105 cells per screen). The array is then used
to print a protein microarray where each element contains the antibodies captured from an
individual well. The antibodies on the microarray are screened with an antigen of
interest, and mapped to the corresponding cells, which are then recovered from their
microwells by micromanipulation. Screening and retrieval requires ~1-3 days (9-12 days
including the steps for preparing arrays of microwells).
Keywords. Cell sorting; immunoanalysis; immunoassay; microsystem;
polydimethylsiloxane (PDMS).

3
INTRODUCTION
Monoclonal antibodies (mAbs) are a class of biomolecules that bind their cognate
antigen with high specificities and affinities (often with a dissociation constant (Kd) of
10 nM or less). One convenient feature of mAbs is that they contain within their
structures common protein sequences that allow subsequent detection or enrichment of
the target antigen, or purification by affinity chromatography using other commercial
reagents (e.g, anti-antibody antibodies). Monoclonal antibodies, therefore, have become
ubiquitous reagents for biomedical research. Their applications include basic
biochemical assays to study cellular functions and phenotypes, as well as therapeutic
interventions and diagnostics for numerous diseases, including cancer1, 2, autoimmune
disorders3, and infectious diseases4, 5. Despite their broad utility as reagents for
biochemical studies, the number and diversity of mAbs available for studying common
model organisms such as planaria and zebrafish used in developmental biology, many
parasites (malaria and helminthes), and even human biology remain limited 6, 7. The costs
and time required to generate and validate a new mAb are two significant factors that
hinder the development of libraries of mAbs that would facilitate the studies of both
protein interaction networks and epigenetic regulation across diverse groups of species.
Hybridomas. The most common experimental route to generate new mAbs remains
immunization of a host animal, usually a mouse, followed by the production of
‘hybridomas’ by the fusion of the host’s B cells with myeloma cells8-10. The resulting
polyclonal populations of cells are screened by multiple rounds of limiting serial-dilution
and analysis of the antibodies secreted into the culture supernatants using enzyme-linked

4
immunosorbent assays (ELISAs) or western blotting. This process can identify stable,
monoclonal lines of unique antibody-producing cells, but it often takes several weeks (4-
6 weeks) to recover a small number of candidate antibodies (~1-10 for small-scale
screens). The cost can range from ~$500-$10,000 per clone depending on the source
(lab-initiated project or outsourced production), the immunogenicity of the target, and the
difficulty of the screening assay used. Together, the time and costs have limited the
production of mAbs by this process to individual, defined targets of interest rather than
libraries of related targets (e.g., a family of kinases or transcription factors).
Selection from recombinant libraries. Another strategy to produce mAbs involves
panning libraries of variable regions of antibodies cloned from polyclonal populations of
cells. These libraries are constructed by cloning the genes encoding antibodies from a
population of B cells, usually derived from a blood sample. These genetic constructs can
then be recombined in vitro and expressed as single-chain antibody proteins (scFv) on the
surfaces of phage, bacteria, or yeast11-15. Identification of antibody fragments that bind
specific antigens requires multiple rounds of selection by fluorescence-activated cell
sorting (FACS) to enrich the population for those clones expressing fragments of interest.
Specific clones are eventually isolated, and their antibodies determined by sequencing.
Subsequent rounds of mutagenesis and selection can be performed to refine the
characteristics of the antibodies, including specificity and affinity. To produce full-length
antibodies from these fragments, genetic constructs must be created for both the heavy
and light chains that contain both the variable regions and constant regions of the
antibody; these constructs are then inserted into an expression vector, and usually

5
transformed into a mammalian cell line for production. Stable cell lines are then
generated by chemical selection. Each round of panning, selection, and sequencing
typically requires 3-6 weeks, and expression of the full-length construct in a suitable cell
line can require an additional 4-8 weeks. This strategy for producing antibodies has been
adopted widely for generating antibodies with potential therapeutic value and for refining
the characteristics of existing antibodies (e.g., affinity). The approach, however, has been
less important to date to create mAbs used in routine biochemical processes.
Microengraving. Here we describe a detailed protocol for screening and retrieving
individual antibody-secreting cells in a rapid and high-throughput manner using a soft
lithographic process called microengraving16-19. Microengraving was first used to isolate
hybridomas producing mAbs specific for mouse class I major histocompatibility (MHC)
complexes16. We have also used the process described here to identify antigen-specific
primary B cells from both mice and humans17, 18. The technique uses an array of
microfabricated wells molded into a thin slab of polydimethylsiloxane (PDMS) (2-5 mm
thick) to isolate large numbers of single cells (~105) (Figure 1). An array of microwells
is loaded with cells by allowing them to settle from suspension into the individual wells.
The array is then placed in contact with a glass slide appropriately functionalized to bind
the antibodies secreted from the cells. This configuration seals each microwell to define a
collection of independent subnanoliter cultures. During a short period of incubation (10-
60 min), the antibodies secreted from each cell are captured on the surface of the glass.
The result is a protein microarray where each spot on the array corresponds to an
individual cell remaining in the PDMS device. During the analysis of the microarray, the

6
cells continue to grow and divide within the microwells. The microarrays are
interrogated in a manner identical to other protein microarrays using fluorescently-
labeled antigens to reveal antibodies that have desired specificities. The cells that map to
the antibodies of interest can later be retrieved from individual wells by manual or
automated micromanipulation.
Advantages of the microengraving approach. There are four major advantages
associated with the use of microengraving to isolate cell lines producing new mAbs.
1. The process can yield a clonal line of hybridomas that produces the
antibody of interest directly. This result makes it possible to expand the
production of a desired antibody rapidly, without the need for additional
cloning or selection of a suitable cell line for production. Furthermore,
microengraving can itself be used to assess the clonality of antibody-
secreting hybridoma cell lines.
2. The total time required for screening and isolating desired clones (1-3
days) is significantly less than that required for screening either by
limiting serial dilution or by panning libraries of scFvs (3-6 weeks). This
reduction in required time also reduces the costs for both labor and the
materials required for a primary screen.
3. The method typically yields large numbers of clones that produce
antibodies specific for the target of interest compared to traditional
screening by limiting serial dilution. Although the results will vary
depending on the immunogen used, one microarray generated by

7
microengraving from a population of hybridomas usually has 102-103
antigen-positive elements. We have not fully characterized the variety of
clones that can be retrieved in a single screen, but our experience to date is
that multiple unique clones can be recovered by screening a single
polyclonal population.
4. The use of fluorescence labels for imaging the microarray makes the
approach suitable for multiplexed screening of a polyclonal population of
cells with a panel of antigens. We believe the combination of throughput
and multiplexed analysis makes the method a cost-effective alternative to
traditional methods for generating multiple clonal lines that produce
antibodies with diverse antigen-specificities and affinities.
Limitations of the microengraving approach. This protocol focuses on screening
mouse hybridomas because they remain the most accessible, renewable source of mAbs
for use in basic research. One caution, however, is that hybridomas are naturally
unstable, and establishing robust cell lines can sometimes require multiple rounds of
subcloning. Microengraving does not address this intrinsic biological challenge directly.
The strength of the method for generating clonal lines of hybridomas is that the different
antigen-specific clones present initially in a polyclonal population after fusion can be
segregated more rapidly than is possible by traditional limiting serial dilution. This
attribute can highlight unique antibodies within the population that may be otherwise
obscured and can retain the diversity of clones present in the polyclonal mixture. We
have found that a large degree of diversity in antigen-specific clones is present one to two

8
weeks after the fusion, but that the diversity diminishes with time as rapidly dividing,
non-producing clones begin to dominate. Our experience to date suggests that the rate of
success for generating stable lines without additional subcloning can vary among fusions.
For routinely generating mAbs using hybridomas and microengraving, we
recommend retrieving multiple clones of interest, and then reassessing the clones by a
facile secondary assay (e.g., ELISA) after a week. Those that retain antigen reactivity and
exhibit steady growth can be carried forward. We do not present detailed protocols for
appropriate secondary assays here since many protocols for standard immunoassays are
already available elsewhere (e.g., this journal or Current Protocols in Immunology20).
The design of those assays for a particular project will depend on the application for
which the mAbs are intended. The incremental costs associated with retrieving multiple
clones during the primary screen make ‘oversampling’ a cost-effective strategy to yield a
set of diverse antibodies against one antigen or for producing small libraries of antibodies
to a set of antigens.
EXPERIMENTAL DESIGN
Design and fabrication of microwells. Microengraving is a soft lithographic method21-
24. An array of microwells is produced by molding a biocompatible, elastomeric rubber
(polydimethylsiloxane, PDMS) against a topographically-patterned surface, or “master”.
The pattern on the master is transferred to the molded rubber in bas relief. The master
used here is a silicon wafer supporting a pattern of photoresist, and made using standard
equipment for photolithography found in cleanroom facilities at most universities or

9
nanofabrication centers (e.g., Centers in the National Nanotechnology Infrastructure
Network, NNIN). Alternatively, there are also several fee-for-service foundries available
for producing masters and devices—e.g., Stanford Microfluidics Foundry
(http://thebigone.stanford.edu/foundry/), The KNI Microfluidic Foundry
(http://kni.caltech.edu/foundry/index.html), Harvard Center for Nanoscale Systems
(http://www.cns.fas.harvard.edu/facilities/tool_detail.php?MID=174).
Many arrangements and sizes of microwells can be used for microengraving. We
describe here one representative design for an array of microwells used to screen
antibody-secreting cells by microengraving (Figure 2). The design for the array can be
created in a computer-assisted drawing (CAD) software program and printed on a
transparency film for use as a photomask. The overall dimensions of the array are
designed to be compatible with 25 mm × 60 mm coverslips and standard glass slides used
for microscopy. This format is consistent with that used for most protein microarrays,
and thus, compatible with many of the commercial supplies and equipment used to
process protein microarrays. The square-shaped microwells are arranged in 5 × 7 blocks
with a center-to-center distance of 100 µm between wells. These blocks are themselves
organized in a 32 × 68 array. Microchannels (50 µm in width) partition the array of
blocks into 4 × 4 groups, and are included in the design to improve adhesion at the
glass/PDMS interface by allowing drainage of media from the interior surfaces of the
array to the edges of the device. The arrangement of microwells in the design presented
here has been optimized to match the field of view available on a common CCD used in
many commercial cameras (Sony ICX-285, 1360 × 1024 pixels) when magnified at 10×

10
on a standard optical microscope. The size of the microwells (50 µm × 50 µm × 50 µm)
minimizes the number of cells loaded per well, while facilitating recovery of cells from
wells by manual micromanipulation. The complete array described here contains 76,160
wells (CAD file available on request).
The square shape of the wells makes it possible to assess the quality of printed
microarrays quickly by visual inspection. The shape also distinguishes positive elements
from artifacts: Non-specific fluorescent features are similar in size to the features
generated by microengraving, but usually appear round, diffuse, or non-distinct in shape.
Certain wells within each of the blocks have been rotated 45° (i.e., diamonds) to indicate
the orientation of the array and the absolute position of a given block within the entire 32
× 68 array (Figure 2b). This coding facilitates the unambiguous determination of the
position of a block and well within the array during micromanipulation.
Preparation of polyclonal cells for screening. This protocol focuses on the use of
microengraving to isolate and retrieve monoclonal mouse hybridomas producing
antibodies of interest. We do not include in this protocol the detailed methods for
designing and preparing appropriate antigens for immunization, for immunizing mice, or
for generating polyclonal populations of hybridomas by fusion. There are a number of
excellent protocols available in the literature for these processes, including Harlow and
Lane25, and Current Protocols in Immunology20. The myeloma lines we use for fusions
are NS-1 (ATCC # TIB-18) and Sp2/mIL-6 (ATCC # CRL-2016) at ratios between 1:3 to
1:10 (myeloma:splenocyte). The fused cells are usually plated into 6-well or 24-well

11
plates for 7-10 days in HAT selection medium before screening. For 6-well plates, the
fused cells are divided evenly into 8-12 wells (2 plates) with media containing 20%
serum and 10% cloning supplement (Hybridoma Cloning Factor, Bioveris). Both
immunization and fusion can be outsourced, but the polyclonal hybridomas should be
available for screening 7-14 days after the fusion. Note that immunizations of mice
require approved protocols from your local institution’s committee governing the care
and use of animals in experiments.
Design of the immunoassay. The materials and steps outlined in this protocol for the
preparation of slides have been optimized to capture antibodies secreted from mouse
hybridomas, and to determine specificity using fluorescently-labeled antigens. Our
experience has shown that a mixture of polyclonal goat anti-mouse antibodies from
different suppliers (e.g., Southern Biotech and Zymed) can provide a significantly higher
signal-to-noise ratio than one brand alone when capturing secreted antibodies19. The
antigen used for detection can often be the same as that used for immunization, but must
be labeled with fluorescent dyes for imaging on a microarray scanner. For screening, we
have successfully used several forms of antigens, including whole proteins in their native
conformations, streptavidin tetramers of biotinylated proteins, detergent-denatured
protein lysates, and peptides conjugated to fluorescent carriers such as dextran. If the
antigen was conjugated to a carrier protein for immunization, e.g., keyhole limpet
hemocyanin (KLH), it must be conjugated to an alternative carrier for screening to avoid
detecting antibodies specific for the carrier itself. Many commercial kits are available for
labeling either small (100 µg) or large quantities (1 mg) of proteins; some vendors

12
include Invitrogen, Thermo Scientific, AnaSpec, Jena Bioscience, and Promokine.
Appropriate labels must be selected that are compatible with the instrument available for
scanning; the most common labels are Cy3 and Cy5, or related variants. (The number of
fluorophores conjugated to the target protein can be determined by UV/Vis spectroscopy;
this procedure is typically described in the instructions for a specific manufacturer’s kit.
It is ideal to have at least two fluorophores per molecule of protein.) The protocol
presented here reserves one fluorescence channel for an appropriate secondary antibody
(e.g. anti-mouse Ig(H+L) or isotype-specific anti-mouse Ig) to facilitate the determination
of the position of the printed array on the glass slide. Multiplexed detection is possible
on scanners with more than two data channels (e.g., GenePix 4200, Tecan LS Reloaded).
This protocol does not detail specific, alternative designs for the format of the
immunoassay. Minor modifications in the preparation of the capture slide and the
detection reagents, however, can be made to enable a reverse-phase microarray in which
antigen is immobilized on the surface of the glass, and bound antibodies are subsequently
identified by fluorescent secondary antibodies16, 26. If the number of positive spots is
small, it may be difficult to determine accurately the location of clones of interest using
this configuration. We note that the reverse-phase format also requires more antigen per
unit area to obtain comparable signal resolution than the procedure outlined here. This
constraint will increase the cost per screen if the antigen is expensive or difficult to
obtain.

13
For all formats of the assay, it may be possible to construct a simple ‘cell-free’
assay to verify the reagents used for both capture and detection. Prepare a slide for
capture as described in the protocol (Steps 11-19), but instead of engraving with an array
of cells, apply a set of small (~1 µL) drops of media or buffered solution containing the
ligand for the capture reagents (e.g, mouse antibodies (1-10 ng/mL) on a glass slide
coated with an anti-mouse antibody). After allowing the drops to sit on the slide in a
humidified chamber for ~1 h, rinse the slide in blocking buffer, and continue with the
post-processing steps to stain the hand-spotted microarray (Steps 49-58). This process
allows validation of the capture reagents, but requires appropriate reagents (e.g., another
known purified antibody against the target of interest) to validate the reagents prepared
for detection. It is most critical to ensure the quality of the reagents used to capture the
antibodies of interest during microengraving; we have used untested, labeled lysates or
other proteins to detect antigen-specific cells successfully in a primary screen. In those
circumstances, it is best to apply the fluorescently labeled probe at concentrations less
than 1 µg/mL at first, and then adjust accordingly in subsequent experiments if needed.
Microengraving. The process of loading cells into microwells and applying them to a
glass slide is most similar to the engraving process known as intaglio printing27. Cells are
allowed to settle into the microwells by gravity from suspension, and then the wells are
rinsed to remove excess cells from the top surface of the array. The cells distribute into
wells at a density of 1-3 cells per well, and the typical efficiency for loading is 50-75%.
If clonality is critical in the initial screen, the array can be loaded sparsely (30-50% filled)
to increase the likelihood of single cells in wells.

14
Certain steps in the protocol are critical for generating high-quality prints and for
maintaining the viability of the cells. First, the excess media on the surface of the PDMS
must be removed by aspiration before placing it in contact with a functionalized glass
slide. Excess residual liquid between the cell array and the glass slide allows the array to
slip around on the surface of the slide, and results in smeared or diffuse signals. Over-
aspiration, however, can result in rapid evaporation of liquid from the wells, and can
damage the cells. Excessive aspiration of media can also cause bubbles to form in the
wells and hinder the capture of secreted antibodies on the slide. We have found that
aspiration is sufficient when the outline of the microchannels separating groups of blocks
begins to appear, and a very thin layer of media remains on the surface.
Two other important steps are 1) the application of the PDMS to the
functionalized glass slide before incubation, and 2) the separation of the PDMS from the
slide after incubation. The PDMS should be laid onto the glass slide by hand or with
tweezers by placing one end of the array on the slide, and then gently lowering the array
onto the slide. Placement and sealing of the microwells is most easily accomplished by
placing the array of microwells face down onto the slide. It is critical to avoid moving
the PDMS after placing it on the glass slide to prevent smearing of the print or double-
images. The slide and array are held together by clamping them between the plates of a
hybridization chamber (Die-tech, DT-1001) with screws substituted from a DT-2002
(Die-tech). This substitution allows the chamber to accommodate the thickness of PDMS
arrays (2-5 mm) used in microengraving. We find that the pressure applied to seal the

15
microwells is optimal when the screws are turned about ¼-turn beyond the point of initial
resistance (i.e., finger-tight). Loose screws cause poor contact between the slide and the
array, and the wells will deform if the screws are over-tightened. The assembled
incubation chamber is then inverted such that the slide rests on the array for subsequent
transportation and incubation. This arrangement allows any dislodged cells to resettle
and adhere to the bottom of the wells during incubation. After incubation, the array of
microwells is separated from the glass slide by peeling it off with tweezers or by hand.
Visual observation suggests a portion of the liquid in the microwells is transferred to the
slide during this separation. We recommend immediately submerging the microwells
gently into media to prevent further drying of the wells, and then placing the printed slide
in blocking buffer. Antibodies captured on the slides may dry briefly without adverse
effects on quality. The microarrays are then processed in a manner similar to other
protein microarrays26, 28, 29 or plate-bound immunoassays30. When preparing to
implement this technique, we suggest using an established hybridoma cell line that
secretes antibodies to a readily obtained antigen (e.g. HYB9901 producing antibodies
against ovalbumin, or 12CA5 producing antibodies against hemagglutinin) to ensure that
the microarrays produced by microengraving are consistent, and to develop familiarity
with the various procedures in this protocol.
Image analysis. Analysis of the collected images of the microarrays of antibodies can be
accomplished using both commercial and open-source programs. Examples include
GenePix Pro (Molecular Devices) and SpotFinder (http://www.tm4.org/spotfinder.html).
To determine the location of cells producing antibodies of interest in GenePix Pro, a
16
template for the spatial arrangement of the microwells is generated and superimposed on
the image. The format for these templates is a GenePix Array List (GAL); these files can
be edited in a text editor or spreadsheet application to assign a unique name to each well
in the array (e.g. block number, column number, row number). Alignment of the
template to the scanned image is most easily achieved using the reference channel that
highlights all captured mouse IgG. In this channel, the number of resolvable spots should
be significantly greater than the number of spots in the antigen-specific channel.
Each printed microarray exhibits slight distortions and deviations from the ideal
arrangement of the template. Rough positioning of the template on the image of the
microarray is often sufficient for subsequent, software-assisted alignment of individual
blocks and wells. We recommend manual inspection to verify the automated alignment.
Some arrays with sparse numbers of positive elements may require manual alignment
(typically ~1 hr per array). The standard features in GenePix Pro are sufficient to extract
the information about each spot from the array, and to analyze each for specificity to the
antigen of interest.
Retrieval of cells by micromanipulation. After locating the positions of wells
containing cells of interest by analysis of the microarray, it is necessary to retrieve them
by micromanipulation. We describe here a manual approach that uses a standard
micromanipulator mounted on an inverted microscope (Figure 3). Using this equipment,
our experience has been that ~15-30 clones can be retrieved in ~1 hr. Microcapillary tips
of sufficient quality may be formed by hand using a Bunsen burner or torch to soften and

17
shape the stock capillaries. To position the tip of the capillary near the bottom of the
microwells, it is important to introduce a bend into the glass capillary after forming the
tip. A number of capillaries may be prepared at one time, and kept in a box or Petri dish
adhered to a loop of tape until needed.
It is possible to retrieve and expand single cells, but we recommend culturing the
cells in the microwells for 1-3 days to allow the cells to divide once or twice. Individual
cells are less likely to survive in culture than small groups of cells, as they seem to
support their own growth. Alternative approaches to retrieve cells from microwells in an
automated fashion are possible using automated micromanipulators (e.g., CellCelector,
AVISO GmbH) or related technologies such as optofluidic cell sorting31.
MATERIALS REAGENTS
• Potassium phosphate monobasic, KH2PO4 (Calbiochem, Cat. No. 529568) • Sodium phosphate dibasic, Na2HPO4 (Calbiochem, Cat. No. 567547) • Sodium chloride, NaCl (EMD Omnipur, Cat. No. 7760) • Tween-20 (Sigma-Aldrich, Cat. No. P7949) • Powdered non-fat milk (e.g. Carnation) • PDMS, Sylgard 184 silicone elastomer (Dow Corning) ▲ CRITICAL Elastomer base and curing agent should be handled with powder-free gloves.
• BSA Fraction V (EMD Omnipur, Cat. No. 2930) • Goat anti-mouse Ig, 1 mg/mL (Southern Biotech, Cat. No. 1010-01) • Goat anti-mouse IgG, 2 mg/mL (Zymed, Cat. No. 62-6600) • Goat anti-mouse IgG (H+L)-Alexa 647 (or Alexa 532), 2 mg/mL
(Invitrogen, Cat. No. A-21235) • DMEM with glucose, L-glutamine and sodium pyruvate (Mediatech, Cat.
No. 10-013-CV) • Fetal Bovine Serum, FBS (PAA, Cat. No. A15-351) • Hybridoma cloning factor, HCF (BioVeris Corporation, Cat. No. 210001) • Penicillin-Streptomycin, Pen-Strep 100× (Mediatech, Cat. No. 30-002-CI) • HEPES buffer, 1 M (Mediatech, Cat. No. 25-060-CI)

18
• MEM non-essential amino acids, 100× (Mediatech, Cat. No. 25-025-CI) • 2-Mercaptoethanol, (Fluka Biochemika, Cat. No. 63689) • Dimethyl sulfoxide, DMSO (EMS, Cat. No. 13390) ! CAUTION
Substance is harmful and inhalation or exposure to skin and eyes should be avoided. Wear adequate personal protective equipment when handling.
• (Tridecafluoro-1,1,2,2-tetrahydrooctyl)-1-trichlorosilane (UCT, Cat. No. T2492) ! CAUTION Material is extremely toxic and should not be inhaled or ingested. Wear appropriate personal protective equipment when handling and dispose as hazardous waste.
• Acetone (Mallinckrodt Chemicals, Cat. No. 2400-16) ! CAUTION Solvent is extremely flammable and should be handled with care. Wear adequate personal protective equipment and use under a fume hood.
• Hexanes (Mallinckrodt Chemicals, Cat. No. 5189-16) ! CAUTION Solvent is extremely flammable and should be handled with care. Wear adequate personal protective equipment and use under a fume hood. Hexanes should be disposed as hazardous waste.
• Fluorescently-labeled antigen or antibodies for detection. Fluorescent probes can be created by conjugation of fluorophores to proteins with a commercial labeling kit (e.g. Alexa Fluor Microscale Protein Labeling Kits, Invitrogen). For detection on a four-channel GenePix 4200 microarray scanner, fluorophores used must have excitation wavelengths close to 488nm, 532nm, 594nm or 635nm.
• Sodium tetraborate decahydrate (Mallinckrodt Chemicals, Cat. No. 7460-20)
• Sodium azide (Sigma Aldrich, Cat. No. S8032) ! CAUTION Substance is highly toxic and adequate personal protective equipment should be worn when handling. Material is harmful to the environment and must be disposed appropriately.
• Sucrose (EMD Omnipur, Cat. No. 8510) or D-(+)-Trehalose dehydrate (Tokyo Chemical Industry Co., Cat. No. T0331)
• Mineral oil (Sigma Aldrich, Cat. No. M5904) • Glass capillaries (Narishige, Cat. No. GC-1)
EQUIPMENT
• Micromanipulator (Narishige IM-9A) mounted on an inverted microscope • Microscope stage insert for 96-well plate • Plasma cleaner (Harrick PDC-32G) • Vacuum pump (e.g. Edwards RV-12 or Varian DS-102) • Convection oven (e.g. Precision STC-80) • Hybridization chamber (Die-tech, Cat. No. DT-1001), replace screws with
those from DT-2002 (Die-tech) • LifterSlips, 25 × 60 mm (Erie Scientific Company, Cat. No. 2-4789) • Micro-fabricated silicon wafers for masters, see Experimental Design • Microcentrifuge with maximum speed of ~20,800g, (e.g. Eppendorf 5810) • Benchtop centrifuge (e.g. VWR Galaxy or Eppendorf)

19
• Microarray centrifuge (e.g. VWR Galaxy MiniArray Microcentrifuge) • Microarray scanner (e.g. GenePix 4000B or 4200 Autoloader) • Bench-top shaker, orbital or lateral (e.g. Labnet Reciprocal 30) • Vortex mixer (e.g. VWR, Cat. No. 58816-121) • Vacuum desiccators (e.g. Bel-Art) • Bright-field inverted microscope (e.g. Nikon TMS) • Hemacytometer (e.g. Hausser Scientific) • Sterile filter tips, 10 µL (VWR, Cat No. 89003-046), 40 µL (VWR, Cat.
No. 89003-048), 200 µL (VWR, Cat. No. 89003-056), 1000 µL (VWR, Cat. No. 89003-060)
• Biosafety cabinet for cell culture • SuperEpoxy2 glass slides (ArrayIt, Cat. No. SME2) or 3” × 1” glass slides
(Corning, Cat. No. 2947-3x1) coated with poly-lysine according to J. DeRisi’s protocol (http://cat.ucsf.edu/pdfs/PolylysineSlides.pdf).
• 96-well plate, flat or round-bottom (e.g. Costar, BD Falcon) • 24-well plate (e.g. BD Falcon, Cat. No. 353935) • 4-well plate (Nalge Nunc, Cat. No. 267061) • Culture flasks, T25 (e.g. BD Falcon) • Petri dishes, 100 × 15 mm (BD Falcon, Cat. No. 351029), 150 × 15 mm
(BD Falcon, Cat. No. 351058) • Sterile microcentrifuge tubes, 1.5 mL (e.g. VWR, Cat. No. 89000-028) • Cryovials, 2 mL (Corning, Cat. No. 430488) • Sterile conical tubes, 15 mL and 50 mL (e.g. BD Falcon) • Fine forceps • Scalpels for cutting PDMS • Disposable plastic knives and cups (16oz) for mixing PDMS • Frosted Scotch Tape • Ultra-fine permanent marker • Kimwipes® (Kimberly-Clark) • Bunsen burner or plumber’s propane torch
REAGENT SETUP PBS solution (PBS) Prepare a 10× stock containing 9 mM KH2PO4, 100 mM Na2HPO4, 1.5 M NaCl and dilute stock as needed to 1× with deionized (DI) water. PBS, Tween-20 solution (PBST) 1× PBS, 0.05 % (wt/vol) Tween-20 (dilute from 10% stock) Blocking buffer 1× PBS, 3 % (wt/vol) powdered milk, 0.05 % (vol/vol) Tween-20 ▲ CRITICAL Can be stored at 4 °C for up to 4 days, after which solution should be discarded. Borate Buffer 50 mM sodium borate, pH 9; 50 mM sucrose (or trehalose); 80 mM NaCl

20
▲ CRITICAL Can be stored at 4 °C for several months, after which solution should be discarded appropriately. Array deposition buffer 1× PBS, 0.1 % (wt/vol) BSA, 0.05 % (vol/vol) Tween-20 ▲ CRITICAL Can be stored at 4 °C for up to 4 weeks, after which solution should be discarded. Capture antibody solution Mix the following reagents to make solution for each slide Reagent Amount (µL) Borate Buffer 76.5 Goat anti-mouse Ig, 1 mg/mL (Southern Biotech) 9 Goat anti-mouse IgG, 2 mg/mL (Zymed) 4.5 DMEM-5 DMEM, 5 % (vol/vol) FBS, 1× Pen-Strep ▲ CRITICAL Proper sterile techniques should be used when handling solution to avoid contamination. Stock can be stored at 4 °C, but media to be used in process must be warmed to 37°C and equilibrated in carbon dioxide. DMEM-20 DMEM, 20 % (vol/vol) FBS, 1× Pen-Strep ▲ CRITICAL Proper sterile techniques should be used when handling solution to avoid contamination. Stock can be stored at 4 °C, but media to be used in process must be warmed to 37 °C and equilibrated in carbon dioxide. Cloning Media DMEM, 20 % (vol/vol) FBS, 10 % (vol/vol) HCF, 1× Pen-Strep, 50µM 2-Mercaptoethanol, 10 mM HEPES, 1× MEM non-essential amino acids. ▲ CRITICAL Proper sterile techniques should be used when handling solution to avoid contamination. Stock can be stored at 4 °C, but media to be used in process must be warmed to 37 °C and equilibrated in carbon dioxide. EQUIPMENT SETUP Preparation of glass capillary tips. Heat and rotate the capillary for 1-2 s over the flame of a Bunsen burner or torch to soften the glass. Then, remove the glass from the flame and rapidly pull on both ends to stretch the glass to the appropriate size (~5-8 cm). Use a pair of tweezers to break the capillary at a narrow region; one capillary will generate two tips. Reheat each capillary where it begins to narrow gently in the flame, and using a second pair of forceps, carefully bend the glass ~45-90°. This modification allows the tip to enter the microwells in a nearly perpendicular manner. Store until needed. ! CAUTION Glass capillaries are fragile and have fine tips that can easily be damaged. Moreover, tip end can scratch or puncture skin even when wearing gloves, so capillaries should be handled with care. PROCEDURE

21
Production of PDMS Microwell Array ●TIMING 5-6 d (steps can be performed weeks ahead of screen).
1| Add 1-2 drops (~10-20 µL) of (tridecafluoro-1,1,2,2-tetrahydrooctyl)-1-trichlorosilane into a glass vial, and place the vial along with newly fabricated wafers in a desiccator overnight under vacuum. ▲ CRITICAL STEP Exceeding the recommended number of drops may lead to the formation of a thick, cloudy layer of silane on the wafer, and can interfere with the resolution of engraved features when microwell array is produced.
2| Combine Sylgard 184 silicone elastomer base and curing agent (10:1 weight ratio,
respectively) in a disposable plastic cup, and mix with a plastic knife until an even distribution of bubbles is visible (~2-3 min).
3| Degas the mixture under vacuum for ~1 h at room temperature (20-25 °C), and
pour the mix over a silane-treated master in a Petri dish. ▲ CRITICAL STEP PDMS will cure at room temperature. If deaeration proceeds for longer than ~1 h, there is an increased likelihood that air trapped between the master and the PDMS while pouring will not escape before the PDMS solidifies, rendering the array optically translucent. For ease of handling, thickness of PDMS should be between 2-5 mm.
4| Cure PDMS overnight (~12-18 h) at 80 °C in a convection oven. ▲ CRITICAL STEP Ensure that shelves in the oven are level, so that the thickness of the fabricated PDMS microwell arrays are even from one side to another.
5| Cut around microwells with a sharp scalpel and gently peel the array off of the
master. ! CAUTION Silicon masters are brittle and will shatter under excessive pressure. To avoid damaging masters when cutting out the array, apply just enough pressure to keep the scalpel in contact with the surface of the master. Also, avoid cutting over the patterned photoresist, and thus, damaging the master itself. ? TROUBLESHOOTING
6| Clean exposed surfaces of arrays by applying and peeling off Scotch Tape. 7| Swell arrays of microwells in hexanes for 20-24 h over a stirrer, exchanging with
fresh solvent after 10-12 h. 8| Deswell arrays of microwells in acetone for 20-24 h, exchanging with fresh
solvent after 10-12 h. 9| Dry arrays overnight in an oven (100-150 °C for 12-18 h).
10| Protect microwells from dust and debris by applying a piece of Scotch tape to the
molded side of the slab, and store in a dry container.

22
■ PAUSE POINT Arrays of microwells can be stored for up to 3-6 months at room temperature until needed.
Slide Preparation ●TIMING ~2 h (preparation may be started a day in advance of sample screening).
11| Place SuperEpoxy2 or poly-lysine-coated glass slides in a 150-mm Petri dish (maximum of 4 slides per dish), with the coated surface face up. Label the top end of each slide with experiment name and number using an ultra-fine permanent marker. ▲ CRITICAL STEP Slides should be handled with forceps to avoid scratching the coated surface.
12| Place 85 µL of capture antibody solution in the center of each slide, and gently
place a LifterSlip over the drop to spread the solution uniformly over a section of the slide. Alternatively, place the LifterSlip on the slide and deposit liquid at one end of the slip to fill the cavity by capillarity. ▲ CRITICAL STEP Mix the solution of capture antibodies thoroughly before use, and be sure to note the area of the slide over which the secondary antibodies are deposited; microarrays will only form within this region. ? TROUBLESHOOTING
13| Incubate slides in a humidified container (e.g. Petri-dish or plastic box with a
dampened Kimwipe® or with water sprayed on the lid) at room temperature for 1 h. ■ PAUSE POINT Alternatively, incubation can be performed overnight at 4 °C in a humidified container.
14| Add ~100 mL of blocking buffer to the Petri dish containing the slides. The slips
will float off the slides. Carefully remove slips without contacting the surface of the slides. It may be necessary to gently nudge the LifterSlip at one edge or corner, with a pair of forceps, to release the slip from the slide.
15| Place the Petri dish on a bench-top shaker (100-150 rpm), and block slides for 10
min at room temperature. 16| Decant blocking buffer and replace with ~75 mL of PBST to remove unbound
proteins. Wash slides 2 × 10 min.
17| Decant PBST solution and replace with PBS (~75 mL). Wash slides for 5 min. 18| Dip each slide once in a 50-mL conical tube filled with DI water.
19| Dry slides in microarray centrifuge and keep in a humidified container (e.g., slide
box, Petri dish) until microengraving. ! CAUTION Do not open centrifuge until moving parts come to a stop.

23
■ PAUSE POINT Slides processed to this stage can be stored for use the following day in a humidified chamber kept at 4 °C.
Microengraving ●TIMING Depends of the number of prints to be acquired (approximately 2-3 h for 4 samples with optional steps included).
20| Sterilize a hybridization chamber and screws (min. 3) by autoclaving the loosely assembled chamber at 121 °C and 20 psi for 30 min. This step can be done in advance.
21| Remove protective layer of tape from array of microwells and clean by blotting
with tape. 22| Place array with microwells face-up on a 3” × 2” glass slide, and insert into the
plasma cleaner.
23| Close the vent on the lid of the plasma cleaner and turn on the vacuum pump connected to the chamber.
24| Allow the pressure in the chamber to reduce to ~200 mTorr, and wait for 1 min.
25| Turn RF dial to ‘high’, and slowly open the valve on the lid to leak in oxygen.
The bluish plasma in the chamber will become bright pink.
26| Maintain the plasma for a minimum of 30 s. Adjust valve as needed to retain pink color of plasma.
27| Turn off the current flowing through the RF coil, open the valve completely, and
then turn off the vacuum pump. ▲ CRITICAL STEP Opening the valve prior to shutting off the vacuum pump will extend the life of the pump. Also, be prepared to catch the lid when the chamber re-pressurizes. At this point, the microwell array is sterile and should be handled as such in subsequent steps.
28| (Optional. Include if the cells are difficult to retrieve from microwells during micromanipulation because they are strongly adhered to the PDMS). Block the microwells by placing the array face down in a 100-mm Petri dish containing ~20 mL of PBS and BSA (1 % wt/vol) for 1 h at room temperature, then rinse with ~5-10 mL of PBS.
29| Place the array face down in a 100-mm Petri dish containing ~20 mL of PBS. ■ PAUSE POINT Arrays can be stored in this state for up to a week, but add sodium azide (0.05 % wt/vol) to the PBS to maintain sterility. Sodium azide must be removed by washing with sterile PBS before adding cells.

24
30| Determine density of cells in culture with a hemacytometer. 31| Centrifuge cell suspension at ~450 g for 5 min at room temperature and aspirate
the supernatant.
32| Resuspend cells in DMEM-5 so there is at least 3 mL of cell suspension available for loading cells into wells. The final concentration of the cell suspension should be such that the number of cells per mL is ~2-4× the number of microwells in the array (use ~200,000 cell/mL for the design of the array here).
33| In a laminar flow hood, position the microwell array with the wells face up, and aspirate the PBS in the dish completely. Then aspirate the surface of the array until nearly dry. A thin layer of PBS should remain covering the wells.
34| Rinse microwell array with ~5 mL of DMEM-5 to fill wells with media, and then
aspirate the excess until a thin film remains. ? TROUBLESHOOTING
35| Load the microwell array by dispensing 500 µL of the cell suspension dropwise
onto the array. Cover evenly. The cells will settle into the wells within 2-5 min. Gentle agitation by hand can facilitate loading.
36| Examine loading at 10× magnification under a bright-field inverted microscope.
When 60-70 % of the microwells are occupied by single cells, continue to the next step.
37| Rinse microwell array with 5-10 mL DMEM-5. If the number of cells deposited
into wells is insufficient, repeat Step 35. ▲ CRITICAL STEP For best results, microwell array should be tilted during wash, and media should be dispensed rapidly over the entire surface of the array.
38| Place a prepared slide into the bottom of a sterile hybridization chamber with the coated surface face up for printing.
39| Aspirate cell array along the outside edges until the outline of the microchannels
separating groups of blocks begins to appear. Proceed immediately to Step 40. ▲ CRITICAL STEP When the layer of media is thin, evaporation is rapid, so excessive aspiration can lead to drying of the wells and cell death. Also, excessive drying may result in air being trapped between the slide and liquid volume in microwells; this condition can hinder the capture of secreted antibodies.
40| Pick up the microwell array, turn it over (face down), and starting from one end, place it gently on the region of the slide coated with capture antibody. This process can be done with sterile tweezers or by hand, after sterilizing gloves with 70 % ethanol.

25
▲ CRITICAL STEP Once the array contacts the slide, the array should not be moved so that the secreted antibodies remain localized to the area of the slide exposed to each well.
41| Seal the microwell array to the slide by clamping between the plates of the hybridization chambers and tightening screws until just finger-tight (tightening ¼-turn past the initial point of resistance is a good estimate). Use three screws arranged such that they form the corners of an isosceles triangle. ▲ CRITICAL STEP The assembly of the chamber plates, slide and microwell array should be held firmly in place with one hand while the screws are tightened with the other. If the pressure from the screws is excessive, the PDMS will deform, making the location of the wells harder to resolve in the resulting microarray. Additional screws may be added after assembling the chamber with the first three screws. ? TROUBLESHOOTING
42| Incubate the assembled chamber at 37 °C for 30 min, oriented such that the slide rests on top of array (the hybridization chamber should rest on the screw heads).
43| Dispense ~75 mL blocking buffer into a 150-mm Petri dish (one dish holds a
maximum of 4 slides), and 7 mL of DMEM-20 into each well of a 4-well plate (one well per microwell array).
44| Transfer the hybridization chamber from the incubator to a biosafety cabinet, and
then remove the screws to disassemble the hybridation chamber. Separate the plates of the chamber from the bound slide and microwell array. The array will usually be stuck to both the slide and the top of the hybridization chamber.
45| Separate the microwell array from the slide, and immediately submerge the array
into one well of the 4-well plate. Then, immerse the slide in blocking buffer. ▲ CRITICAL STEP The array of microwells should be peeled swiftly from the slide in one motion to minimize loss of cells and to prevent smearing the captured antibodies on the slide.
46| (Optional. Data generated in this step is helpful to verify the clonality of cells in
microwells of interest before secondary assays are performed. This step can be omitted if the array has been sparsely-loaded (< 50%), if additional subcloning is expected, or if time is of the essence). Image the array of microwells to record the original occupancy of each well immediately after the printing. This step can be accomplished as follows: Partially dry the bottom of the array and transfer to an empty well of the 4-well plate - the microwell array should be immobilized in the well by capillarity; Dispense 500 µL of DMEM-20 over the microwells to prevent cells from drying; Acquire phase contrast images of the microwells at 5× or 10×; Transfer the microwell array back to the 4-well plate containing media. ? TROUBLESHOOTING

26
47| Place 4-well plates with arrays in incubator at 37 °C for cells to recover and expand until retrieval by micromanipulation 1-3 days later (Steps 63-72).
48| (Optional. This step is applicable if the number of analytes to be studied exceeds the number of channels available on the slide scanner, if prints must be repeated on multiple slides, or if one is interested in secretion profiles over time). If multiple prints from the same array of cells are desired, incubate cells for 15 min before repeating Steps 38-45. ▲ CRITICAL STEP Experimental results indicate that at least 7 prints can be obtained from a given microwell array. Some loss of cells can occur (5-15%). ■ PAUSE POINT To allow for simultaneous processing of multiple prints, slides can be placed in a dish of blocking buffer or PBS, and stored temporarily at 4 °C for up to 3 days, before continuing with the microarray interrogation steps.
Microarray Interrogation ●TIMING Depends of the number of prints to be processed (approximately 2 h for 4 – 8 microarrays).
49| Block slides as described in Steps 14-15 for 15 min. 50| Repeat Steps 16-19.
51| Prepare a detection solution containing both anti-mouse IgG-Alexa 647 (or 532)
and the fluorescently-labeled antigen (at least 90 µL per slide) by dilution into array deposition buffer. Typical concentrations range from 500 ng/mL to 10 µg/mL. For new experiments, we recommend concentrations of 1 µg/mL anti-IgG (H+L) and 5 µg/mL labeled antigen, but suggest optimizing these values to maximize the signal-to-noise ratio for a particular combination of antigen and dye. Vortex prepared solution briefly to mix before use (1-2 s).
52| Place 85 µL of the detection solution in the center of each slide, and gently place
a LifterSlip over the drop to spread the solution uniformly over a section of the slide. Alternatively, place LifterSlip on the slide and deposit the solution at one end to fill the cavity by capillarity. ? TROUBLESHOOTING
53| Incubate the slides in the dark at room temperature for 1 h in a humidified
container.
54| Add ~100 mL of PBST to float LifterSlips off the slides, and carefully remove the slips without contacting the surface of the slides. It may be necessary to nudge the LifterSlip gently with a pair of tweezers before the slip releases.
55| Repeat Steps 16-19. Keep the Petri dish covered with aluminum foil to minimize
photobleaching.
27
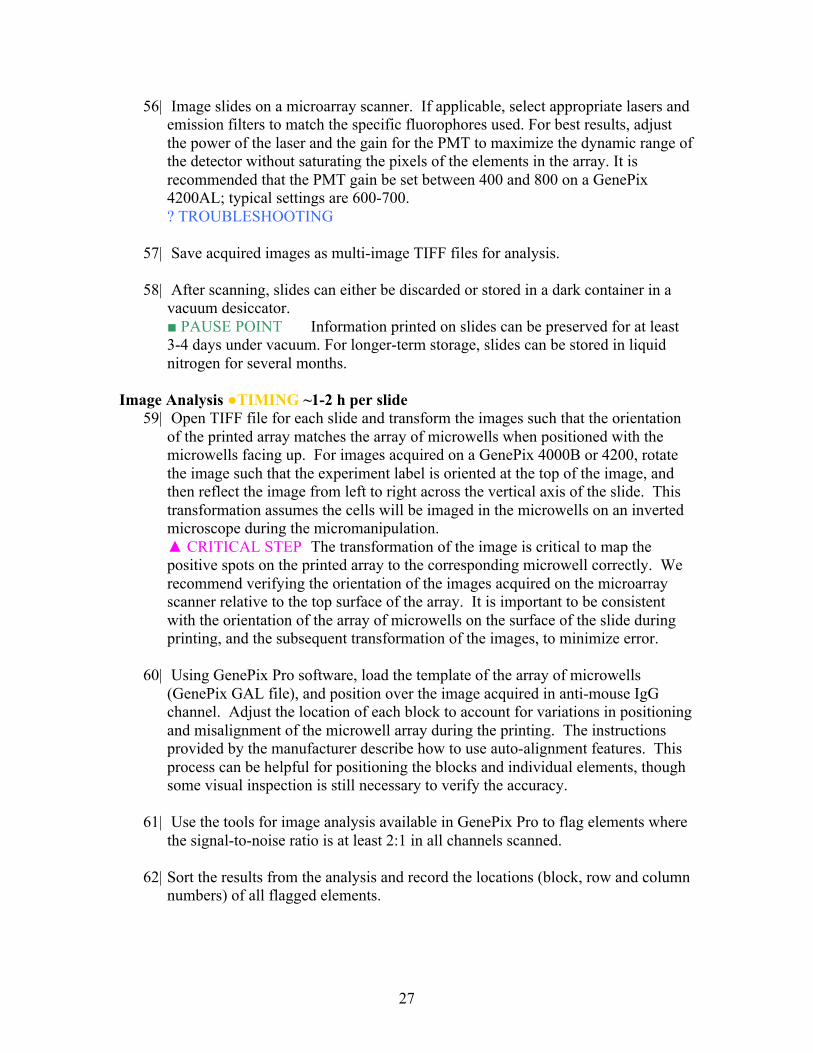
56| Image slides on a microarray scanner. If applicable, select appropriate lasers and emission filters to match the specific fluorophores used. For best results, adjust the power of the laser and the gain for the PMT to maximize the dynamic range of the detector without saturating the pixels of the elements in the array. It is recommended that the PMT gain be set between 400 and 800 on a GenePix 4200AL; typical settings are 600-700. ? TROUBLESHOOTING
57| Save acquired images as multi-image TIFF files for analysis.
58| After scanning, slides can either be discarded or stored in a dark container in a
vacuum desiccator. ■ PAUSE POINT Information printed on slides can be preserved for at least 3-4 days under vacuum. For longer-term storage, slides can be stored in liquid nitrogen for several months.
Image Analysis ●TIMING ~1-2 h per slide
59| Open TIFF file for each slide and transform the images such that the orientation of the printed array matches the array of microwells when positioned with the microwells facing up. For images acquired on a GenePix 4000B or 4200, rotate the image such that the experiment label is oriented at the top of the image, and then reflect the image from left to right across the vertical axis of the slide. This transformation assumes the cells will be imaged in the microwells on an inverted microscope during the micromanipulation. ▲ CRITICAL STEP The transformation of the image is critical to map the positive spots on the printed array to the corresponding microwell correctly. We recommend verifying the orientation of the images acquired on the microarray scanner relative to the top surface of the array. It is important to be consistent with the orientation of the array of microwells on the surface of the slide during printing, and the subsequent transformation of the images, to minimize error.
60| Using GenePix Pro software, load the template of the array of microwells (GenePix GAL file), and position over the image acquired in anti-mouse IgG channel. Adjust the location of each block to account for variations in positioning and misalignment of the microwell array during the printing. The instructions provided by the manufacturer describe how to use auto-alignment features. This process can be helpful for positioning the blocks and individual elements, though some visual inspection is still necessary to verify the accuracy.
61| Use the tools for image analysis available in GenePix Pro to flag elements where
the signal-to-noise ratio is at least 2:1 in all channels scanned.
62| Sort the results from the analysis and record the locations (block, row and column numbers) of all flagged elements.

28
Retrieval of Cells by Micromanipulation ●TIMING Depends on the number of clones to be recovered (~15-30 clones per 1 h).
63| Prepare the micromanipulator by purging with mineral oil to fill lines and remove any air in tubing. Then, load a capillary tip carefully so as not to reintroduce any bubbles into the lines. Calibrate the position of the tip on the microscope at 10× magnification. It is convenient to leave the tip centered over the field of view of the objective during the following steps. Most inverted microscopes allow the arm above the stage to tilt back. This feature makes it easy to clear the micromanipulator from the sample area while exchanging source and target plates.
64| Fill an appropriate number of wells in a 96-well plate with 200 µL of cloning
media.
65| Prepare the microwell array for cell retrieval by immobilizing the array in a dry well of a 4-well plate. To immobilize the microwell array, the bottom of the array should be partially dried with a Kimwipe®, and then the array placed in the center of a dry well. Also, to ensure that surface of the array does not dry during the manipulation, gently dispense ~1 mL of prewarmed DMEM-20 over the array. ? TROUBLESHOOTING
66| Place the 96-well plate containing media on the microscope. Position one well in the center of the field of view at 10× magnification. Position the capillary above the well. Aspirate in air (~1 mm). Lower the capillary into the microwell. Aspirate media (~2-3 mm). Withdraw the micromanipulator and remove the 96-well plate from the stage.
67| Place the 4-well plate with the immobilized array on the microscope stage and adjust the microscope to position the well of interest in focus at the center of the field of view at 10× magnification. ▲ CRITICAL STEP The immobilized microwell array should be handled gently to avoid redistributing cells. ? TROUBLESHOOTING
68| Position the micromanipulator such that the tip of the capillary is positioned at the mouth of the well of interest. Lower the tip approximately halfway into the well. Aspirate to pick up cells from well. ▲ CRITICAL STEP The best results for transfer occur when the minimal volumes necessary to extract the cells are aspirated.
69| Withdraw the capillary tip and micromanipulator. Swap the 4-well plate with the 96-well plate containing cloning media.
70| Lower the capillary tip into a well of the preloaded 96-well plate and dispense the tip contents into the well. This process can be monitored on the microscope if desired. Stop when air begins to appear at the end of the tip.

29
71| Repeat Steps 66-70 to retrieve desired cells from other wells of interest. ▲ CRITICAL STEP If the film of media on the surface of the array breaks when moving around the immobilized microwell array, gently dispense 1 mL of DMEM-20 over the array to prevent drying of the microwells. After picking clones for ~1 h, it is recommended that ~250-500 µL of fresh, prewarmed DMEM-20 be dispensed over the array.
72| Incubate 96-well plates at 37 °C and culture the cells for 5-7 days. ■ PAUSE POINT If you are unable to retrieve all desired cells within an allotted period of time, microwell arrays can be frozen and stored at -80 °C. To freeze cells in the microwell array, submerge the array in a solution of FBS and 20 % (vol/vol) DMSO before placing PDMS in -80 °C freezer. To thaw frozen cells, place the array in an incubator at 37 °C until solution liquefies and replace with DMEM-20. The frozen cells in the microwells will remain viable for months at -80 °C.
Secondary Screening and Storage ●TIMING ~1.5 h per plate of isolates (plus secondary assays)
73| Pipette ~150 µL of supernatant from the top of each well of the 96-well plate where cultures have expanded. Do not disturb the culture at the bottom of each well. Transfer supernatants to microcentrifuge tubes or a sterile 96-well plate.
74| Pipette the remaining supernatant to resuspend the cells, and transfer contents to
a well of a 24-well plate with 1 mL of prewarmed media. Replace media in 96-well plate and incubate both plates for 5-7 days at 37 °C. The 96-well plate provides a reserve in case of contamination or other adverse events.
75| Use 100 µL of the original supernatant collected for ELISA or other secondary
assay to determine the isotype and to verify specificity of the secreted antibodies.
76| Freeze the remaining supernatant from samples showing desired antigen specificity in liquid nitrogen or add sodium azide (0.01 % wt/vol) and keep at 4 °C for future use.
77| Transfer cultures in 24-well plate into 15-mL conical tubes, and remove an
aliquot to count the density of cells on a haemocytometer. Centrifuge the remaining suspension to pellet the cells (1200 g for 5 min).
78| Collect supernatant from each culture to perform any additional assays required
for characterization of the isolated cell lines (e.g., western blot, immunostaining).
79| To store cells, resuspend precipitated cells in DMEM containing 10 % (vol/vol) DMSO at a concentration of ~1,000,000 cells/mL and freeze 1.2 mL aliquots; there should be sufficient numbers of cells for 2-3 samples. Alternatively, if

30
additional supernatants of the antibodies are needed, or if immediate subcloning is desired, transfer cells into 5 mL of DMEM-20 and in a T25 culture flask to expand. Cells can be gradually weaned to lower levels of FBS over time. If desired, cell lines may be subcloned (re-cloned) by limiting dilution in 96-well plates, or repeating the microengraving process. ■ PAUSE POINT After freezing, cells can be stored in liquid nitrogen indefinitely until needed.
●TIMING Production of PDMS microwell arrays Steps 1-10, 5-6 d Slide preparation Steps 11-19, ~2 h Printing/Microengraving of microwell arrays Steps 20-48, depends on the number of prints to be generated, ~2-3 h to print 4 samples, including optional steps. Microarray interrogation Steps 49-58, depends on the number of prints to be processed, ~3-4 h for 4-8 microarrays. Image analysis Steps 59-62, ~1 h per slide Cell retrieval Steps 63-72, depends on the number of clones to be recovered, ~15-30 clones per 1 h Secondary screening and storage Steps 73-79, ~1.5 h per plate of isolates to maintain cultures plus secondary screens ? TROUBLESHOOTING Troubleshooting advice can be found in Table 1. ANTICIPATED RESULTS
Microengraving has been employed successfully to obtain novel monoclonal
antibodies against several diverse types of antigens, including tetramers of MHC
proteins16, peptide-KLH conjugates (E.G., C.M.S., J.C.L. unpublished results), and
complex mixtures of cellular antigens. In each of the above cases, the numbers of
potential antibodies that were identified in each primary screen (~102-103 per microarray
generated) far exceeded the number of cell lines that could be retrieved by manual

31
micromanipulation for practical reasons, and have yielded new monoclonal antibodies
against the targets of interest. Here, we demonstrate the use of microengraving to
retrieve hybridomas that produce mAbs recognizing epitopes shared between two
subtypes of hepatitis B surface antigen (HBSAg), which is commercially available in a
number of sub-types. This specific example for an immunogen foreign to the host
illustrates the typical efficiency and expected rate of success for identifying novel
monoclonal antibodies when using microengraving in combination with manual
micromanipulation to retrieve hybridomas identified in the screen. Two Balb/c mice
were immunized and boosted twice using recombinant HBSAg subtypes ayw and ad
(ViroStat, Portland, ME) emulsified with Complete Freund’s Adjuvant (CFA, first
immunization) or Incomplete Freund’s Adjuvant (IFA, boosters). Subtype ad was used
for the initial immunization, followed by boosts with ayw on day 11, and ad again on day
21; 10 µg of HBSAg protein was used for each immunization. 11 days after
administration of the last boost, one mouse was injected with ayw antigen in PBS by tail
injection (10 µg in 200 µl). Three days later, 1.2 × 10⁸ splenocytes were fused with 4.6 ×
107 SP2/0 mIL-6 fusion partners (ATCC# CRL-2016). After fusion, cells were plated
into 8 separate wells of 6-well culture plates under HAT selection. After 10 days,
microcolonies had appeared, and the cells from pairs of wells were pooled. Primary
hybridomas were diluted to 2 × 10⁵ cells/ml and then deposited onto four PDMS arrays of
microwells. The array of microwells used for microengraving in this example had a total
of 22,400 wells arranged in 2 rows of 7 blocks which each contained a set of wells (40 ×
40) of 100 µm diameter. Surplus cells were frozen at this point in eight separate vials,
one per well. Mice employed in these experiments received human care in accordance

32
with the guidelines specified by the Department of Comparative Medicine at MIT under
protocol #1005-070-08.
The arrays of microwells loaded with hybridomas were applied to glass slides
supporting anti-mouse capture antibodies for 90 minutes. After printing, the arrays of
microwells were placed in media and incubated. The slides were stored in PBS with
1.5% BSA and 0.05% T20 for three days (for convenience of timing). The slides were
then washed with PBS, dried, and then probed with a mixture of three fluorescent
molecules: anti-mouse IgG-Alexa 647, HBSAg-ayw-549, HBSAg-ad-488. Labeling of
HBSAg was done using the DyLight Microscale Protein Labeling kit (Thermo
Scientific/Pierce). The degree of labeling was calculated to be 0.48 and 0.16 moles fluor
per moles protein for ad and ayw, respectively.
A representative section from one of the microarrays generated by
microengraving is shown in Figure 4. For analysis, the template of blocks was aligned in
GenePix Pro using the reference channel (anti-IgG) for guidance. The intensities of the
elements in the microarray were extracted and then filtered to retain only spots with no
saturated pixels in the reference channel (F635% Sat = 0), a low degree of covariance in
the reference channel (F635CV < 100), and high signal-to-noise ratios (SNR 635 or SNR
532 and SNR 488 > 1.5). These criteria were selected to provide a large, inclusive
dataset. The individual elements were rank-ordered according to median fluorescent
intensities, and used for determining the best candidates for retrieval. In this example,
36% of the elements scored were IgG-positive; that is, the corresponding microwells
contained at least one IgG-secreting cell (n=8,064). Of these IgG+ elements, 17% were
also HBSAg-specific. The cells were allowed to grow for 3 days after screening in the

33
microwells, and then retrieved for expansion in culture. This period of incubation is
useful because it is easy to determine whether cells are non-dividing, or have formed
colonies (here, approximately 12 to 30 cells). Cells may also be missing from wells,
either lost during separation of the glass slide and PDMS array, or during handling of the
array post-printing; we have estimated this loss is less than 5-10 % of cells screened. In
this experiment, 51 colonies were retrieved by micromanipulation. These colonies were
chosen because their corresponding elements on the microarray had the highest signal
intensities (SNR >> 1.5). Each colony was placed into 200 µl of prewarmed cloning
media in a well of a 96-well microtitre plate. Over 90% of the retrieved cells continued
to grow. After 10 days, the supernatants were extracted and the cells were frozen.
Supernatants from 23 of the expanded colonies were chosen at random for testing
by western blotting using the SurfBlot system (Idea Scientific). For this assay, a
complete lysate of COS-1 cells was prepared by denaturation in 5% SDS at 95 °C. Two
blots were generated. For the first blot, the gel was loaded with 200 µg of COS cell
lysate, while for the second, 10 µg HBSAg was spiked into the cell lysate prior to loading
the gel. Samples were prepared in reducing SDS-PAGE buffer, and heated at 95 °C for 5
min before loading. Each of these blots was probed with the collected supernatants, as
well as serum from the immunized mouse. After a short exposure, a strong band was
observed in the HBSAg-spiked blot for seven of the supernatants (Figure 5). The
apparent molecular weight of this band (25-27 kDa) is consistent with the expected mass
of monomeric HBSAg32; this band was not observed in the control blot. The serum
collected from the immunized mouse (at 1:200 dilution) had a similar pattern of
reactivity, albeit of lower intensity. Subsequent blots revealed that of 51 supernatants

34
collected, 14 displayed a strong HBSAg band on western blots. Each of these antibodies
reacted with both ad and ayw subtypes, consistent with the original microarray data. The
diversity of epitopes recognized requires more stringent mapping than has been tested
here.
Microengraving is easy to learn and apply: the technique has been successfully
taught to several individuals with no prior knowledge of the method and little laboratory
experience, including undergraduates, technicians, and persons with standard laboratory
training in molecular and cell biology. By the second or third iteration through the
protocol, such individuals have been able to produce consistent prints of high quality,
where blocks of individual spots are clear on the micrograph, and the intensity of the
surrounding background is low (Figure 6a). The two most common artifacts observed on
micrographs generated by microengraving are double-printing and diffuse features
(Figure 6b,c). The first flaw arises due to movement of the loaded array over the surface
of the glass slide after application or during separation; the second due to inadequate
compression of the array during the incubation. After establishing proficiency in the
individual steps of the protocol, the typical times required to screen a population of
hybridomas comprises 6-8 hours to generate and image microarrays by microengraving,
1-3 hours of data analysis to determine the location of clones of interest, and 2-4 hours of
micromanipulation to retrieve clones of interest.
ACKNOWLEDGMENTS
This research was supported by the Eli and Edythe L. Broad Institute, and used facilities
at the Center for Nanoscale Systems at Harvard University supported by the NSF under

35
the National Nanotechnology Infrastructure Network. E.P. was a NSERC postgraduate
fellow. C.S. thanks Gordon College for sabbatical leave. The authors thank Jehnna
Ronan and Jae Hyeok Choi for helpful discussions on this protocol.
Conflict of interest statement: The authors declare no competing financial interests. REFERENCES 1. Barrett W. Newsome, M.S.E. The clinical pharmacology of therapeutic
monoclonal antibodies in the treatment of malignancy; have the magic bullets arrived? British Journal of Clinical Pharmacology 66, 6-19 (2008).
2. Finn, O.J. Molecular origins of cancer - Cancer immunology. N. Engl. J. Med. 358, 2704-2715 (2008).
3. Buttmann, M. & Rieckmann, P. Treating multiple sclerosis with monoclonal antibodies. Expert Review of Neurotherapeutics 8, 433-455 (2008).
4. Jennifer, M.D. & Stuart, M.L. Prospects for development of vaccines against fungal diseases. Drug resistance updates : reviews and commentaries in antimicrobial and anticancer chemotherapy 9, 105-110 (2006).
5. Keller, M.A. & Stiehm, E.R. Passive immunity in prevention and treatment of infectious diseases. Clin Microbiol Rev 13, 602-614 (2000).
6. Elective affinities. Nat Meth 5, 851-851 (2008). 7. Uhlen, M., Gräslund, S. & Sundström, M. A pilot project to generate affinity
reagents to human proteins. Nat. Methods 5, 854 - 855 (2008). 8. Dessain, S.K. et al. High efficiency creation of human monoclonal antibody-
producing hybridomas. J Immunol Methods 291, 109-122 (2004). 9. Kohler, G. & Milstein, C. Continuous cultures of fused cells secreting antibody of
predefined specificity. Nature 256, 495-497 (1975). 10. Shulman, M., Wilde, C.D. & Kohler, G. A better cell line for making hybridomas
secreting specific antibodies. Nature 276, 269-270 (1978). 11. Clackson, T., Hoogenboom, H.R., Griffiths, A.D. & Winter, G. Making antibody
fragments using phage display libraries. Nature 352, 624-628 (1991). 12. Boder, E.T. & Wittrup, K.D. Yeast surface display for screening combinatorial
polypeptide libraries. Nature Biotechnology 15, 553-557 (1997). 13. Fuchs, P., Breitling, F., Dubel, S., Seehaus, T. & Little, M. Targeting recombinant
antibodies to the surface of escherichia-coli - fusion to a peptidoglycan associated lipoprotein. Bio-Technology 9, 1369-1372 (1991).
14. Lee, C.M.Y., Iorno, N., Sierro, F. & Christ, D. Selection of human antibody fragments by phage display. Nature Protocols 2, 3001-3008 (2007).
15. Chao, G. et al. Isolating and engineering human antibodies using yeast surface display. Nature Protocols 1, 755-768 (2006).
16. Love, J.C., Ronan, J.L., Grotenbreg, G.M., van der Veen, A.G. & Ploegh, H.L. A microengraving method for rapid selection of single cells producing antigen-specific antibodies. Nature Biotechnology 24, 703-707 (2006).

36
17. Bradshaw, E.M. et al. Concurrent detection of secreted products from human lymphocytes by microengraving: antigen-reactive antibodies and cytokines. Clin. Immunol. 129, 10-18 (2008).
18. Story, C.M. et al. Profiling antibody responses by multiparametric analysis of primary B cells. Proc Natl Acad Sci U S A 105, 17902-17907 (2008).
19. Ronan, J.L., Story, C.M., Papa, E. & Love, J.C. Optimization of the surfaces used to capture antibodies from single hybridomas reduces the time required for microengraving. J Immunol Methods 340, 164-169 (2009).
20. Coligan, J.E. (Greene Pub. Associates and Wiley-Interscience, New York; 1992-). 21. Love, J.C., Wolfe, D.B., Gates, B.D. & Whitesides, G.M. in McGraw-Hill
Yearbook of Science and Technology 323-326 (McGraw-Hill, New York; 2004). 22. Kane, R.S., Takayama, S., Ostuni, E., Ingber, D.E. & Whitesides, G.M. Patterning
proteins and cells using soft lithography. Biomaterials 20, 2363-2376 (1999). 23. Park, J.W., Vahidi, B., Taylor, A.M., Rhee, S.W. & Jeon, N.L. Microfluidic
culture platform for neuroscience research. Nature Protocols 1, 2128-2136 (2006).
24. Tourovskaia, A., Figueroa-Masot, X. & Folch, A. Long-term microfluidic cultures of myotube microarrays for high-throughput focal stimulation. Nature Protocols 1, 1092-1104 (2006).
25. Harlow, E. & Lane, D. Antibodies: A Laboratory Manual. (Cold Spring Harbor Laboratory Press, Cold Spring Harbor, New York, USA; 1988).
26. Espina, V. et al. Protein microarrays: Molecular profiling technologies for clinical specimens. Proteomics 3, 2091-2100 (2003).
27. Saff, D. & Sacilotto, D. Printmaking: History and Process. (Holt, Rinehart, Winston, 1978).
28. MacBeath, G. & Schreiber, S.L. Printing Proteins as Microarrays for High-Throughput Function Determination. Science 289, 1760-1763 (2000).
29. Kramer, S., Joos, T.O. & Templin, M.F. Protein Microarrays. (John Wiley & Sons, Inc., 2005).
30. Engvall, E. & Perlmann, P. Enzyme-Linked Immunosorbent Assay, Elisa: III. Quantitation of Specific Antibodies by Enzyme-Labeled Anti-Immunoglobulin in Antigen-Coated Tubes. J Immunol 109, 129-135 (1972).
31. Kovac, J.R. & Voldman, J. Intuitive, image-based cell sorting using optofluidic cell sorting. Analytical Chemistry 79, 9321-9330 (2007).
32. Simon, K., Lingappa, V.R. & Ganem, D. Secreted Hepatitis-B Surface-Antigen Polypeptides Are Derived from a Transmembrane Precursor. J. Cell Biol. 107, 2163-2168 (1988).

37
Figure 1: Schematic diagram of the processes described in this protocol. Steps shown parallel to one another can be performed concurrently. Figure 2: Design of an array of microwells for microengraving. (a) Schematic representation of the top-left corner of the array showing a network of microchannels and 4 × 4 groups of blocks containing microwells. (b) Annotated illustration of one block comprising a 5 × 7 arrangement of microwells. Each well projects a square cross-section, and has a cuboid geometry in the molded array. Certain wells are rotated 45° within a given block to encode the precise position of that block within the array of blocks (e.g., 32 x 68). The rotated well in the top left corner of a block establishes the orientation of the array, and is present in the same position in every block. The presence or absence of rotated wells in other areas of the block encodes the location (row and column) of the block within the entire array. Here, the areas outlined with red, dashed lines indicate the block column and row numbers as two-digit integers (columns 01-32, rows 01-68). In the area labeled on the schematic for encoding the column, the topmost region (bound by red, dashed lines) is used to indicate the first digit of the column number, while the region immediately below indicates the second digit of column number. The same scheme is applied in the lower region of the block to encode the row. The position of a rotated well within these designated areas specifies the first or second digit of the column or row number; zero is indicated by the absence of a rotated well. In the example shown here, the positions of the rotated wells, read from top to bottom, indicate Block 06,07 (column, row). (c) Transmitted-light micrograph of Block 06,07 loaded with hybridoma cells (HYB9901) acquired at 10× magnification with a Hamamatsu ORCA-AG digital camera. The entire field-of-view of the camera is shown. Scale bar, 50 µm. Figure 3: Retrieval of cells from microwells with a micromanipulator. (a) Phase contrast image of a section of a microwell array with a 20-µm diameter GC-1 capillary tip (Narishige), attached to an IM-9A micromanipulator (Narishige), inserted into a well loaded with cells. (b) Phase contrast image of the microwell array section in a with the cells selectively removed from the central microwell. (c) Cells recovered from the central microwell in a were transferred into a well of a 96-well plate containing cloning media, and cultured until confluent. Note that the design of the array of microwells used here differs from the example shown in Figure 2. Scale bar, 100 µm. Figure 4: Microarrays of antibodies produced by microengraving. The source of cells was a polyclonal population of murine hybridomas generated from a mouse immunized with hepatitis B antigens, HBSAg-ayw and HBSAg-ad. (a) Composite fluorescence micrograph showing signals from both HBSAg-ad (red) and IgG (green). HBSAg-ad specific antibodies appear yellow in the micrograph. (b) Composite fluorescence micrograph showing subset of antibodies in a with specificity to HBSAg-ad (red) and HBSAg-ayw (blue). Antibodies that bind epitopes on both HBSAg-ad and HBSAg-ayw appear purple in the micrograph.

38
Figure 5: “Curtain” western blot of 12.5% polyacrylamide gel loaded with 200 µg of complete COS-1 cell lysate with 10 µg HBSAg (ViroStat). Using a Surfblot device (Idea Scientific), a different culture supernatant was applied to each strip, numbered 1-23, except lane 15 to which sera from the immunized mouse (1:200 dilution) was applied (asterisk). The film for the blot shown was exposed for 60 s. A duplicate blot without added HBSAg was blank (not shown). Figure 6: Examples of potential variations in the quality of the microarrays produced by microengraving. (a) Micrograph of a typical, high-quality microarray resulting from successful application of the technique. The position of each positive spot is unique, and each spot has a well-defined shape. (b) Micrograph from a microarray obtained from a print in which the array of microwells moved while sealing to or separating from the glass slide. Double printing will occur if the array is lifted and repositioned, dragged over the surface of slide, or if uneven pressure is applied to PDMS; the latter two may also result in smeared features. Arrowheads highlight some features that are out of register. (c) Micrograph of a microarray resulting from poor contact between the glass slide and the array of microwells. Secreted antibodies diffused over the surface of the glass, and individual, localized features are not evident. The contrast and brightness of each image was optimized automatically by GenePix Pro. Note that the format of the arrays in these images differs slightly from scheme shown in Figure 2; the blocks in these arrays comprised 7 × 7 microwells. Scale bars, 500 µm.


39
Table 1: Troubleshooting guide Step Problem Possible Reason Solution 5 Thickness of
microwell arrays is uneven. Bubbles are visible within PDMS.
PDMS is viscous and may not have spread evenly over the surface of the silicon master before curing. Bubbles introduced during mixing, or air trapped between wafer and PDMS when pouring, did not escape before PDMS cured.
Remake PDMS and after pouring over the surface of the silicon master, let sit on a flat surface at room temperature for ~1 h, before placing in oven to cure. Check levelness of dish in oven.
12, 52 Air trapped under LifterSlip prevents uniform deposition of antibody over surface of slide.
Move the Lifterslip around gently just until area of the slide under the bubble is wet. This should ensure that antibody is deposited evenly.
34 Media does not wet the surface of microwell array.
Surface of the array may have become hydrophobic.
Rinse microwell array with water, then dry and repeat treatment with oxygen plasma (Steps 22-27).
41 Top plate of hybridization chamber is not in contact with entire backside of microwell array
Thickness of microwell array is uneven, and/or screws are tightened unevenly.
Loosen screws used to seal the array to the slide and make sure that the plate is in contact prior to retightening screws.
46, 65 Microwell array is not immobilized on the plate.
Bottom of array is still wet. Dry the bottom of the stamp further.
56 No signal detected on slides.
Concentration of probe used may be too low. Probes did not bind to captured antibodies.
Reacquire prints on new slides and deposit the detection species using a higher concentration of probes (i.e. repeat Steps 35-55). If alternative samples of the defective probes are readily available, reacquire prints on new slides and detect secreted antibodies with new probes (i.e. repeat Steps 35-55). If not, repeat the entire procedure

40
Background intensity on image is high. Unexpected signal present in a given channel. In a section of the image, signal from wells is diffuse or irresolvable.
PMT gain and laser power settings were not optimal. Probe is binding non-specifically. Probes used may be cross-reactive. Poor contact between slide and microwell array during printing because array was inadequately dried or pressure applied with hybridization chamber screws was insufficient.
when new probes become available. Make sure slides were scanned with the appropriate laser. Rescan slides at a lower gain and/or power setting. Settings should be adjusted so the ratio of intensities between signals from the different channels is ~1.0. If alternative samples of the defective probes are readily available, reacquire prints on new slides and detect secreted antibodies with new probes (i.e. repeat Steps 35-55). If not, repeat the entire procedure when new probes become available. Identify cross-reactive probes and replace with new samples that do not exhibit cross-reactivity. If alternative samples of the defective probes are readily available, repeat Steps 35-55 on new slides. If not, repeat the entire procedure when new probes become available. If less than 25 % of the print was affected, continue with image analysis, otherwise prints must be reacquired on a new slide, making sure to dry the array until grid outline just begins to show, and/or applying more
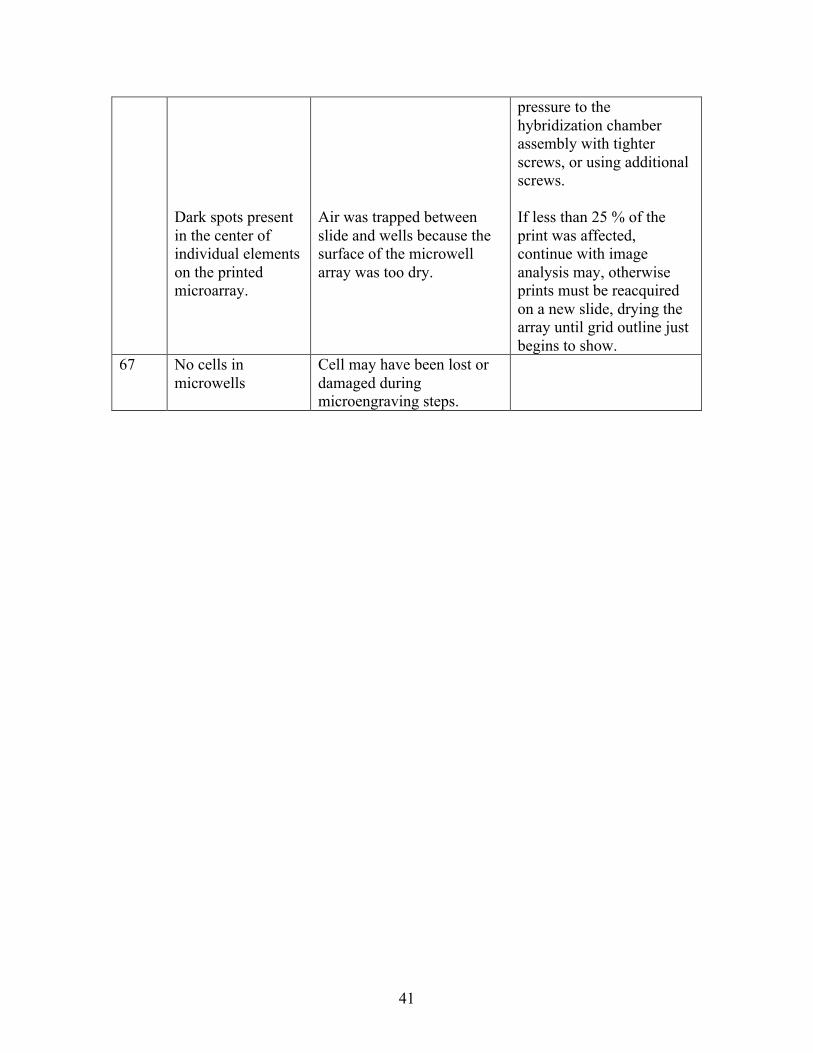
41
Dark spots present in the center of individual elements on the printed microarray.
Air was trapped between slide and wells because the surface of the microwell array was too dry.
pressure to the hybridization chamber assembly with tighter screws, or using additional screws. If less than 25 % of the print was affected, continue with image analysis may, otherwise prints must be reacquired on a new slide, drying the array until grid outline just begins to show.
67 No cells in microwells
Cell may have been lost or damaged during microengraving steps.