s4h25 opensap: unit 7 embedded analytics
TRANSCRIPT

s4h25 – Unit 7 exercises
s4h25 openSAP: Unit 7 Embedded Analytics
PUBLIC
Exercise 1: Check prerequisites for rapid
activation
Exercise 2: Configure embedded analytics in SAP S/4HANA
Exercise 3: Configure Enterprise Search
Exercise 4: Working with end user apps
Exercise 5: Working with analytics specialist apps

s4h25 – Unit 7 exercises
2
TABLE OF CONTENTS
Contents BEFORE YOU START ...................................................................................................... 3
Prerequisites for this exercise ........................................................................................ 3
Logon Data ................................................................................................................... 3
Logon to system (SAP S/4HANA)................................................................................... 3
Additional information: ................................................................................................... 3
Exercise 1: Check prerequisites for Rapid Activation .......................................................... 4
Overview ....................................................................................................................... 4
Objective ................................................................................................................... 4
Prerequisites: ............................................................................................................. 4
Exercise Description ................................................................................................... 4
Exercise 2: Configure embedded analytics in SAP S/4HANA ............................................ 10
Overview ..................................................................................................................... 10
Objective ................................................................................................................. 10
Prerequisites: ........................................................................................................... 10
Exercise Description ................................................................................................. 10
Exercise 3: Configure Enterprise Search .......................................................................... 25
Overview ..................................................................................................................... 25
Objective ................................................................................................................. 25
Prerequisites: ........................................................................................................... 25
Exercise Description ................................................................................................. 25
Exercise 4: Working with end user apps ........................................................................... 34
Overview ..................................................................................................................... 34
Objective ................................................................................................................. 34
Prerequisites: ........................................................................................................... 34
Exercise Description ................................................................................................. 34
Exercise 5: Working with analytics specialist apps ............................................................ 42
Overview ..................................................................................................................... 42
Objective ................................................................................................................. 42
Exercise Description ................................................................................................. 42

s4h25 – Unit 7 exercises
3
BEFORE YOU START
Prerequisites for this exercise
You need to have completed all exercises of Unit 01. For exercises 1, 2 and 3 you must have created your own instance of 3: “SAP S/4HANA target system after technical conversion before additional config”
https://cal.sap.com/subscription?sguid=4336a3fb-2fc9-4a93-9500-c65101ffc9d7
For exercises 4 and 5 you must have created your own instance of 4: “SAP S/4HANA target system including additional config”
https://cal.sap.com/subscription?sguid=f48f2b77-389f-488b-be2b-1c14a86b2e69
Logon Data
Refer to the welcome page on the desktop of your SAP CAL instance.
User ID Password Client number
10steps2s4 <your SAP CAL instance
master password>
100
Logon to system (SAP S/4HANA)
3: “SAP S/4HANA target system after technical conversion before additional config” https://cal.sap.com/subscription?sguid=4336a3fb-2fc9-4a93-9500-c65101ffc9d7
4: “SAP S/4HANA target system including additional config” https://cal.sap.com/subscription?sguid=f48f2b77-389f-488b-be2b-1c14a86b2e69
Additional information:
Icons in use may appear differently compared to the screenshots depending on whether you are using SAP GUI for HTML, SAP GUI for Java or SAP GUI for Windows respectively with different versions of SAP GUI
that you might be using. Such differences can be that “Execute” icons or “Save” buttons might be in the top menu bar or at the bottom of the screen, for example.

s4h25 – Unit 7 exercises
4
Exercise 1: Check prerequisites for Rapid
Activation
Overview
Estimated time: 20 mins
Objective
You will check prerequisite settings for Rapid Activation of SAP Fiori content.
In this exercise you will check the prerequisite settings for Rapid Activation of SAP Fiori content. You can find all of the settings via
SAP Note 2902673 - Rapid Activation for SAP Fiori in SAP S/4HANA – Overview and navigating from there to the Rapid Activation note for your SAP S/4HANA release and feature pack
stack. For example, for SAP CAL solution 3 (SAP S/4HANA 2020 Initial
Shipment Stack), the relevant SAP Note is 2947824 - Composite SAP note: Rapid Activation for SAP Fiori in SAP S/4HANA 2020.
Prerequisites: • You have applied the latest version of the task lists
o SAP Note 2712785 - Fiori Setup: Initial Setup for Fiori Applications S/4 (see exercises of Unit 02, this has already been done in your
SAP CAL instance).
Exercise Description Perform the following tasks:
• Check prerequisite settings for Rapid Activation of SAP Fiori content
• Create a package ZFIORI to store your activation changes
• Create a transport request to capture activation items that can be transported

s4h25 – Unit 7 exercises
5
What to Do What You Will See
1. Activate your instance of SAP CAL solution 3 and log on to your SAP S/4HANA system: User: 10steps2s4 Password: <your SAP CAL instance master password>
2. Check that the required product versions are installed. Go to Menu → System → Status. Review the product version details to see the Installed Product Versions. You should see the following components:
• SAP FIORI for SAP S/4HANA (which contains the code for the apps)
• SAP FIORI FES FOR SAP S/4HANA (which contains the SAP Fiori launchpad and foundation)
3. Check whether the initial security tables have been filled. Go to transaction SU25. Answer Yes to the prompt regarding checking SAP Note 440231 - SU25 | FAQ: Upgrade

s4h25 – Unit 7 exercises
6
postprocessing for Profile Generator Check “Initial fill of customer tables was performed (1)” has been executed. It will show the date/time/user of execution.
4. The SAP profiles have not been updated for some time. You will need to update the profiles. Select the Execute button to run the step Automatic Comparison with SU22 Data (2a).
5. Execute the Automatic Comparison between SU22 and SU24 using the standard settings, i.e. for all SAP Standard Applications. This will take approximately 5 minutes. When it is complete you will see the message: “Automatic Comparison completed successfully”.

s4h25 – Unit 7 exercises
7
6. You need to create a development Package to store the roles and configuration settings that will be generated by the activation process. Go to transaction SE80. In the Repository Browser tab, select Package. Enter the package name ZFIORI. Then press the Display (glasses) icon to start creating the package.
7. Click on the Display icon as shown in the figure on the right.
8. Answer Yes to the question “Do you want to create the object” to confirm that you want to create the package ZFIORI.

s4h25 – Unit 7 exercises
8
9. Enter a short description. You can leave the other default values. Press Continue (green tick icon) to save the package.
10. When you are prompted to create a transport request, press Create to create a new transport request.
11. You will use this transport request to capture transportable changes you make as part of the activation process. Give the transport request a short description and press Save.
12. Press Continue to use the new transport request
s4h25 – Unit 7 exercises
9
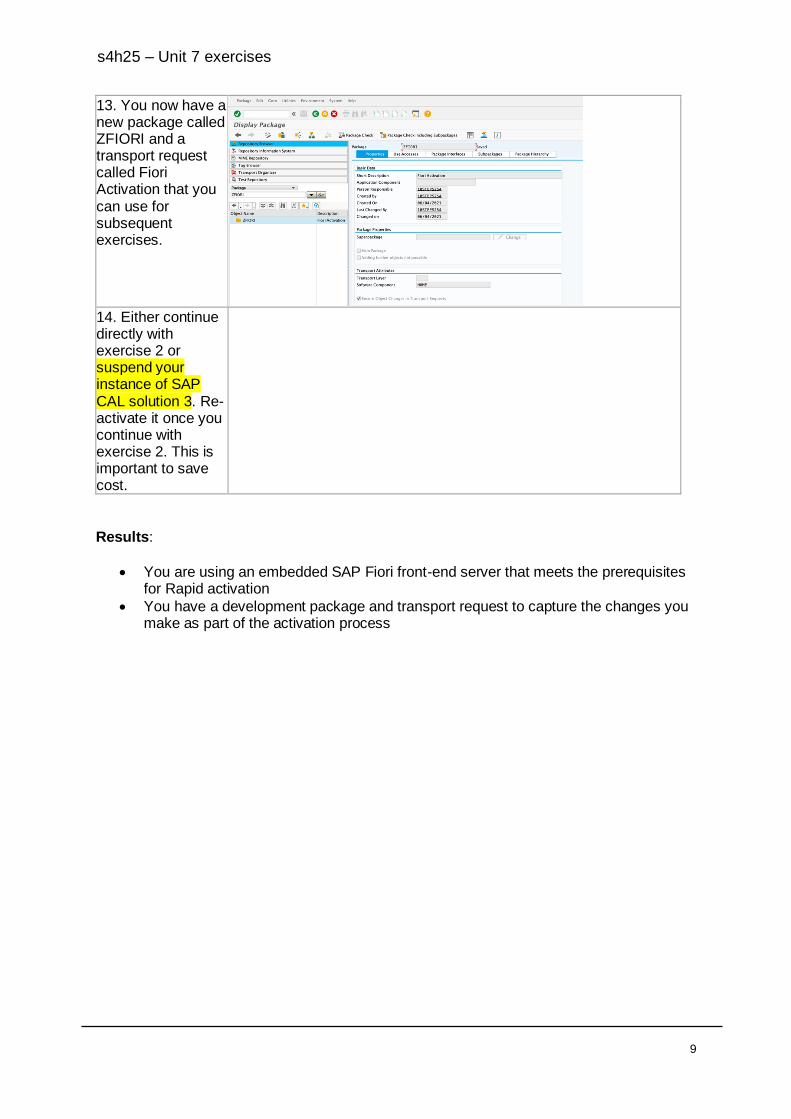
13. You now have a new package called ZFIORI and a transport request called Fiori Activation that you can use for subsequent exercises.
14. Either continue directly with exercise 2 or suspend your instance of SAP CAL solution 3. Re-activate it once you continue with exercise 2. This is important to save cost.
Results:
• You are using an embedded SAP Fiori front-end server that meets the prerequisites for Rapid activation
• You have a development package and transport request to capture the changes you make as part of the activation process

s4h25 – Unit 7 exercises
10
Exercise 2: Configure embedded analytics in SAP
S/4HANA
Overview
Estimated time: 40 mins
Objective Setting up SAP S/4HANA embedded analytics is a prerequisite to activating SAP Fiori.
This is because most SAP Fiori apps use embedded analytics to some degree – many apps are analytical (provide analytics) or translytical (provide transactional
capabilities and related analytics in the same app. You will run the task list SAP_BW_SETUP_INITIAL_S4HANA to set up
embedded analytics. This task list runs in the client you nominate as the BW client.
You are recommended to review the SAP Note 2303900 - Latest Information about BW Setup in S/4HANA Systems before running
the checklist for latest recommendations and troubleshooting advice.
Prerequisites: None
Exercise Description Perform the following tasks:
• Check the prerequisite settings for embedded analytics
• IMPORTANT: In this exercise you will use client 100 as the BW Client.
• Only 1 client per system is needed as a BW Client, regardless of how many clients exist in the system.
• Follow the steps described in SAP Note 2289865 - Configuration steps for SAP S/4HANA Analytics including the subordinate notes:
o SAP Note 2636754 - Configuration steps for embedded Analytics in ABAP based Applications
o SAP Note 2915255 - Adapting the currency display in multidimensional analytical UIs
• Review the SAP Note 2303900 - Latest Information about BW Setup in S/4HANA Systems
o Create a background RFC destination and user as explained in SAP Note 2469988 - ESI - How to create Supervisor Destination in SBGRFCCONF
• Execute the task list SAP_BW_SETUP_INITIAL_S4HANA

s4h25 – Unit 7 exercises
11
What to Do What You Will See
1. Continue on your CAL solution 3 instance. Make sure logical system ‘ABACLNT100’ for embedded analytics is set. Navigate to transaction BD54. Check if a logical system name is assigned to the BW Client. You will use Client 100 as the BW Client.
2. Make sure a logical system for embedded analytics is assigned to the target client. Go to transaction SCC4. Select the details of client 100.
3. Check the logical system that was given in transaction BD54 is assigned to your client 100 in transaction SCC4. Check your client 100 is set to “Automatic recording of changes” so that changes can be made.

s4h25 – Unit 7 exercises
12
4. Make sure changes to repository and cross-client changes are allowed. This is needed for running the task list – you can change them back afterwards. Go to SE03. Expand the folder Administration. Select “Set system change option”. Double-click on this option.
5. Make sure the system change option is set to “Modifiable”.
s4h25 – Unit 7 exercises
13
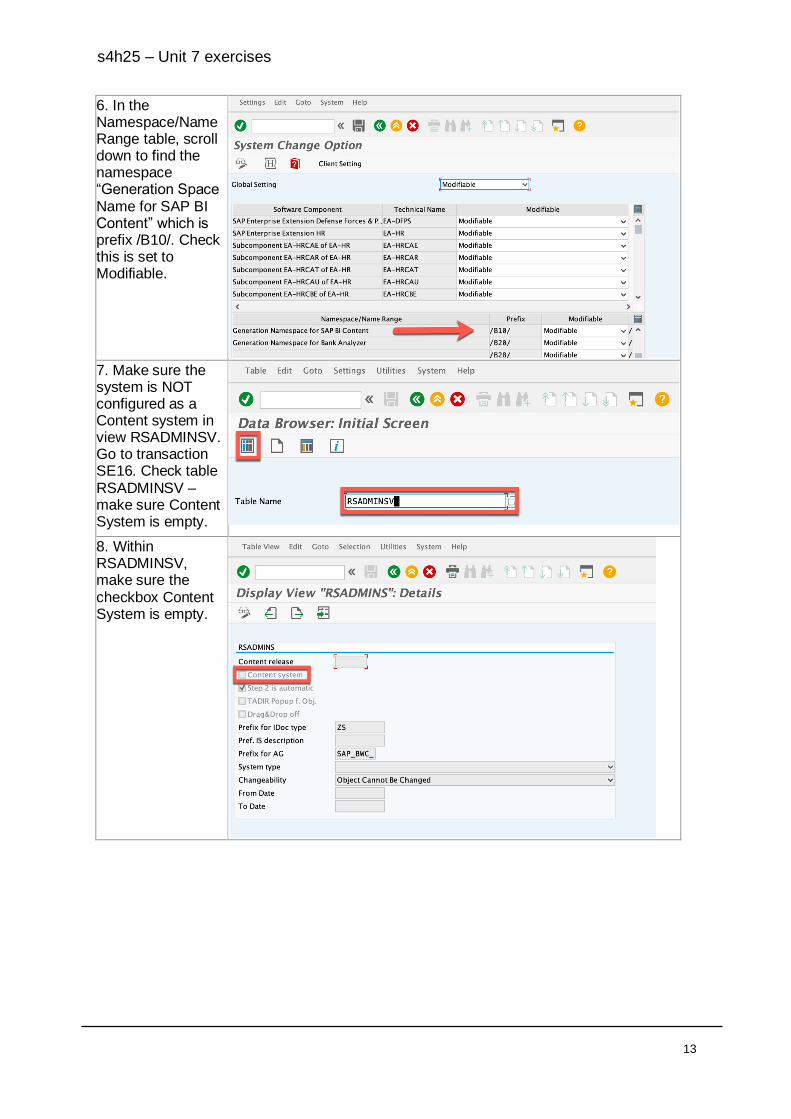
6. In the Namespace/Name Range table, scroll down to find the namespace “Generation Space Name for SAP BI Content” which is prefix /B10/. Check this is set to Modifiable.
7. Make sure the system is NOT configured as a Content system in view RSADMINSV. Go to transaction SE16. Check table RSADMINSV – make sure Content System is empty.
8. Within RSADMINSV, make sure the checkbox Content System is empty.

s4h25 – Unit 7 exercises
14
9. Changing the BW Client has consequences. Make sure no BW Client has been set already. Go to transaction SE37 to execute function module RS_MANDT_UNIQUE_GET.
10. Execute the function module.
11. Check that the message “BW client not specified” is returned. You do not need to change anything. Hint: In your own development system, if an existing BW client was already set, you can either use that client or follow SAP Note 2952974 - Change of BW client in ERP or SAP S/4HANA system

s4h25 – Unit 7 exercises
15
12. You need to create a background RFC destination and user. Go to transaction SBGRFCCONF. Go to the tab Define Supervisor Dest. If there is no supervisor destination maintained, press Create.
13. Enter the destination name BGRFC_SUPERVISOR. Select Create User. Enter the user id BGRFC_USER. Enter a password, e.g. Welcome123. Then press Save. IMPORTANT: You MUST use the destination name and user id exactly. You cannot choose your own destination name or user id. The password must be at least 10 characters in length. For more information refer to: SAP Note 2469988 How to create Supervisor destination in SBGRFCCONF
s4h25 – Unit 7 exercises
16
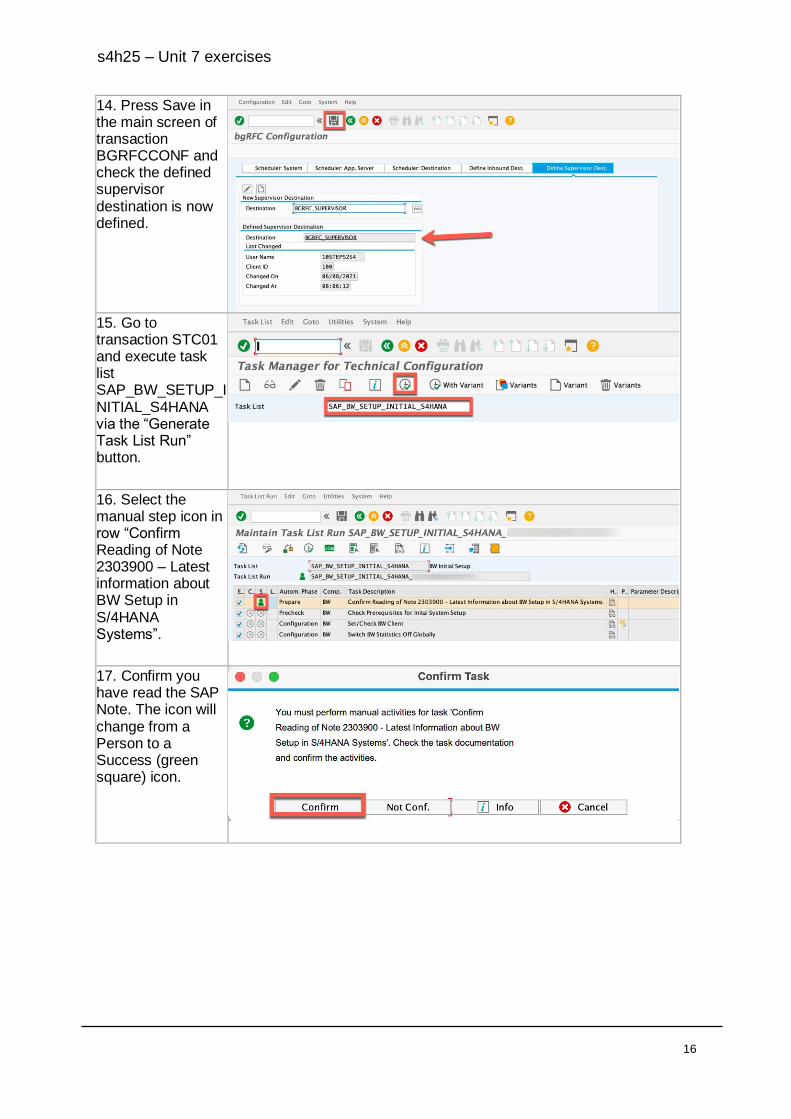
14. Press Save in the main screen of transaction BGRFCCONF and check the defined supervisor destination is now defined.
15. Go to transaction STC01 and execute task list SAP_BW_SETUP_INITIAL_S4HANA via the “Generate Task List Run” button.
16. Select the manual step icon in row “Confirm Reading of Note 2303900 – Latest information about BW Setup in S/4HANA Systems”.
17. Confirm you have read the SAP Note. The icon will change from a Person to a Success (green square) icon.

s4h25 – Unit 7 exercises
17
18. Select the Fill Parameters icon
for the row “Set/Check BW Client”.
19. Check it shows your chosen BW Client as client 100. Save and then press the << Back arrow icon to return to the task list.
20. Select the Fill Parameters icon
for the row “Install Essential BW Content”.
21. Set the checkbox “Force installation” and press Save. Press back to return to the task list.
22. Start the task list in Background mode by selecting the icon “Start/Resume Task List Run in Background (F9)”. The task list will take approx. 10 minutes to run. You

s4h25 – Unit 7 exercises
18
can use the Refresh button to check the current status.
23. You can use the Refresh or Auto Refresh buttons to check the current status of the task list as it executes. The processing (gear wheel) icon shows which task is currently being processed.
24. You may get an error on task Check Master Data Read Classes. Press the Display/Change toggle button to edit the task list. Deselect the task “Check Master Data Read Classes”. Then resume the task list again using the “Start/Resume Task List Run in Background (F9)” button and wait for the task list to complete. Hint: You can find the resolution for this error in SAP Note 2908739 - Error executing rsd_time_tct_mreadclass_check. Exe
Ignore and move to the next steps in case you do not get any error

s4h25 – Unit 7 exercises
19
25. Check that the task list has completed successfully. You will see the message “Task list run execution ended with status ‘Finished successfully’” in the status bar.
26. Next you will configure Design Studio. Design Studio is used to provide multidimensional reports in both SAP Fiori and ABAP Web Dynpro. Go to transaction SICF. Search for the Service Path /sap/bw
27. Activate the services: /sap/bw/ina and all of its subordinate services by using the context menu to Activate Service, and then choose the Yes with subordinates button.

s4h25 – Unit 7 exercises
20
28. Activate the service
/sap/bw/Mime using the context menu option Activate Service.

s4h25 – Unit 7 exercises
21
29. Resolve the error reported by the task list. Go to transaction SA38 and run report RSD_TIME_TCT_MREADCLASS_CHECK
30. This confirms which time characteristics are not yet active. Get the list of characteristics in the “With Master Data Flag” section.
s4h25 – Unit 7 exercises
22
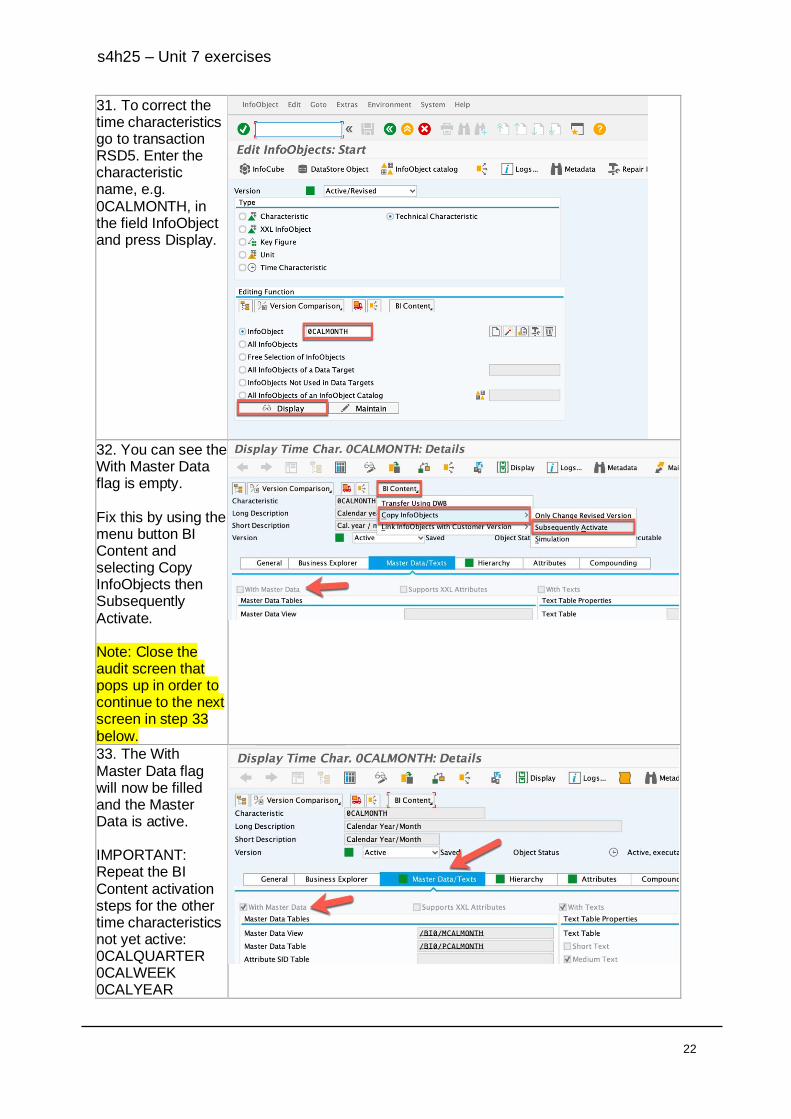
31. To correct the time characteristics go to transaction RSD5. Enter the characteristic name, e.g. 0CALMONTH, in the field InfoObject and press Display.
32. You can see the With Master Data flag is empty. Fix this by using the menu button BI Content and selecting Copy InfoObjects then Subsequently Activate. Note: Close the audit screen that pops up in order to continue to the next screen in step 33 below.
33. The With Master Data flag will now be filled and the Master Data is active. IMPORTANT: Repeat the BI Content activation steps for the other time characteristics not yet active: 0CALQUARTER 0CALWEEK 0CALYEAR

s4h25 – Unit 7 exercises
23
0FISCYEAR
34. Once all the time characteristics are active, go to transaction SA38 and run report RSD_TIME_TCT_MREADCLASS_CHECKagain. Verify that everything is ok. In the With Master Data Flag section you should see the message “None of the InfoObjects checked shows a difference to the content version”.
35. Go to transaction SE37 and execute the function module RSR_HIERARCHY_VIRT_ACTIVATE.
36. Select the icon to enter data into the table I_T_HIENM.

s4h25 – Unit 7 exercises
24
37. Add 4 entries in the column HIENM: 0YEA_QUA_MON 0YEA_QUA_MON_DAY 0YEA_MON_DAY 0WEEK_DAY Use the << Back button to return to the input parameters.
38. Select Execute to run the function module with the parameters. Hint: After execution the output parameter E_T_BAPIRET2 will have 0 entries.
39. Either continue directly with exercise 3 or suspend your instance of SAP CAL solution 3. Re-activate it once you continue with exercise 3. This is important to save cost.
Results:
• The embedded analytics engine is active

s4h25 – Unit 7 exercises
25
Exercise 3: Configure Enterprise Search
Overview
Estimated time: 3.5 hours
Objective You will run the task lists SAP_ESH_RESET and SAP_ESH_INITIAL_SETUP_WRK_CLIENT to set up Enterprise Search.
Arguably the “killer app” of the SAP Fiori launchpad is Enterprise Search. It can even be used for reporting purposes as explained in the openSAP microlearning Using Enterprise Search for Reporting in SAP Fiori. Please note: If you do not configure enterprise search, you can only search for apps. This step can also be performed at the end of unit 08, i.e. after activating your embedded gateway, SAP Fiori launchpad, and SAP Fiori content.
This exercise takes quite some time to run and is OPTIONAL. No other exercises are depending on its completion
Prerequisites: It is recommended to reset the enterprise search using the task list SAP_ESH_RESET to avoid any clashes with inherited search settings.
Exercise Description
Perform the following tasks:
• Execute the task list SAP_ESH_RESET
• Execute the task list SAP_ESH_INITIAL_SETUP_WRK_CLIENT

s4h25 – Unit 7 exercises
26
What to Do What You Will See
1. Continue on your CAL solution 3 instance. Go to transaction STC01 and execute task list SAP_ESH_RESET via the “Generate Task List Run” button.
2. Select the Fill Parameters icon
for the row “Reset Enterprise Search to Initial State”.
3. Set the checkbox “Reset confirmed for this client”. Press Save and then << Back to return to the task list.

s4h25 – Unit 7 exercises
27
4. Start the task list in Background mode by selecting the icon “Start/Resume Task List Run in Background (F9)”. The task list will take approx. 15 minutes to run.
5. You can use the Refresh button or Auto Refresh button to check the current status. IMPORTANT: Make sure the task list has completed before running the next step.
6. Check that the task list has completed successfully. You should see a message in the log “Enterprise Search was reset to initial state”. You can ignore any warnings.

s4h25 – Unit 7 exercises
28
7. Go to transaction STC01 and execute task list SAP_ESH_INITIAL_SETUP_WRK_CLIENT via the “Generate Task List Run” button.
8. Select the Fill Parameters icon
for the row “Set TREX Destination or HANA DB Connection”.
9. Save the default settings to confirm that you want to use the SAP HANA Primary DB Connection: DEFAULT. Press << Back to return to the task list.

s4h25 – Unit 7 exercises
29
10. Select the Fill Parameters icon
for the row “Select Models to Create Connectors.”.
11. Check the box “Tick if software component is missing in drop down”. Enter the Software Component SAPAPPLH. IMPORTANT: This is the software component for all SAP S/4HANA provided searches. Note: Execute this step only if the software component does not appear in the drop-down selection. Otherwise, just continue with step 12 below.
s4h25 – Unit 7 exercises
30
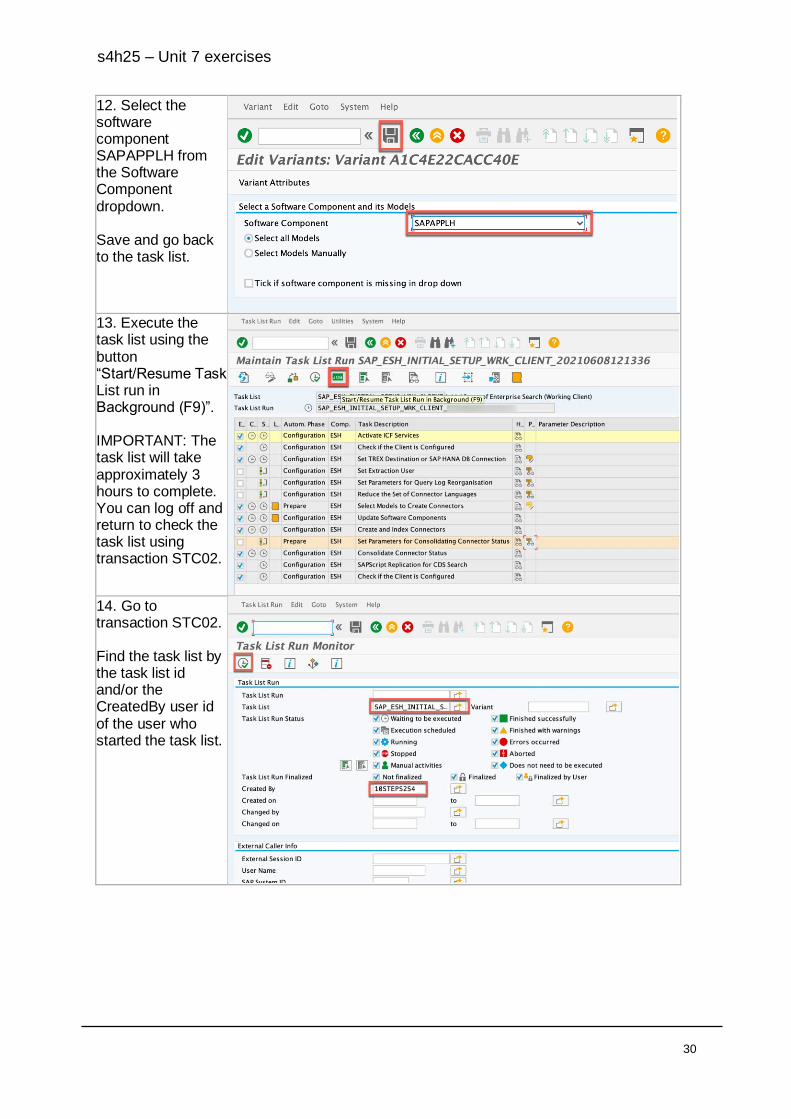
12. Select the software component SAPAPPLH from the Software Component dropdown. Save and go back to the task list.
13. Execute the task list using the button “Start/Resume Task List run in Background (F9)”. IMPORTANT: The task list will take approximately 3 hours to complete. You can log off and return to check the task list using transaction STC02.
14. Go to transaction STC02. Find the task list by the task list id and/or the CreatedBy user id of the user who started the task list.

s4h25 – Unit 7 exercises
31
15. Check that the task list has completed successfully, i.e. shows the ok (green square) icon.
16. To check the details of what has been activated, double-click on the row and check the Display Log.

s4h25 – Unit 7 exercises
32
17. You can download the log to a spreadsheet for further analysis.
18. You want to check the status of the Enterprise Search Objects that have been activated. Go to transaction ESH_TEST_SEARCH. Execute the program for all Object types, i.e. set the Object Type to wildcard *, then press Execute.
19. You can see all search objects that are active (green square traffic light icon). You can see how many objects are found for each search object in the Results column. Review what data is found for a search object by double-clicking on the row.

s4h25 – Unit 7 exercises
33
20. Suspend your SAP CAL solution 3 instance until you continue with the exercises of unit 8. This is important to save cost.
Results:
• The Enterprise Search has been configured.

s4h25 – Unit 7 exercises
34
Exercise 4: Working with end user apps
Overview
Estimated time: 15 mins
Objective Use the Overdue Purchase Order Items apps ( App ID: F0343 )
With the Overdue Purchase Order Items app, the number of purchase order items with delivery dates in the past and those yet to be delivered are calculated. You can also use this app to analyze the delivery dates of purchase order items sent to the supplier. The role Strategic Buyer (SAP_BR_BUYER) is required to access the app. The KPI is displayed in the following views:
• By Supplier
• By Plant
• By Material Group
• By Purchasing Group
• By Purchasing Category
• Document
Make sure that the following authorization objects are maintained in SU22 -
• F_BKPF_BUK
• M_BEST_WRK
• M_BEST_EKG
• M_BEST_EKO
Prerequisites: The role SAP_BR_BUYER is assigned to the user. Additionally, make sure that
you have read through SAP Note 2719300 and ensure that the table DATEFUNCTION_VAL is updated.
Exercise Description
Perform the following tasks:
• Open the SAP Fiori Launchpad
• Try the app – Overdue Purchase Order Items
Note: The rest of the following two apps shown during the video demo are covered in
the Unit 08 exercises:
• Procurement Overview
• Monitor Purchase Order Items

s4h25 – Unit 7 exercises
35
What to Do What You Will See
1. Please note that starting from this exercise all remaining exercises of this unit have to be executed in your instance of SAP CAL solution 4, not SAP CAL solution 3. Activate your instance of SAP CAL solution 4, connect to RDP – Windows Remote Desktop with: User: Administrator Password: <your SAP CAL instance master password>. Within RDP open SAP GUI and log on to your SAP S/4HANA system: User: 10steps2s4 Password: <your SAP CAL instance master password> Go to transaction /n/UI2/FLP or use the following URL to launch the FLP
https://vhcalabaci.dummy.nodomain:9443/sap/bc/ui2/flp#Shell-home. Confirm the security warning prompt and continue. You should be able to see the app under My Home.
s4h25 – Unit 7 exercises
36
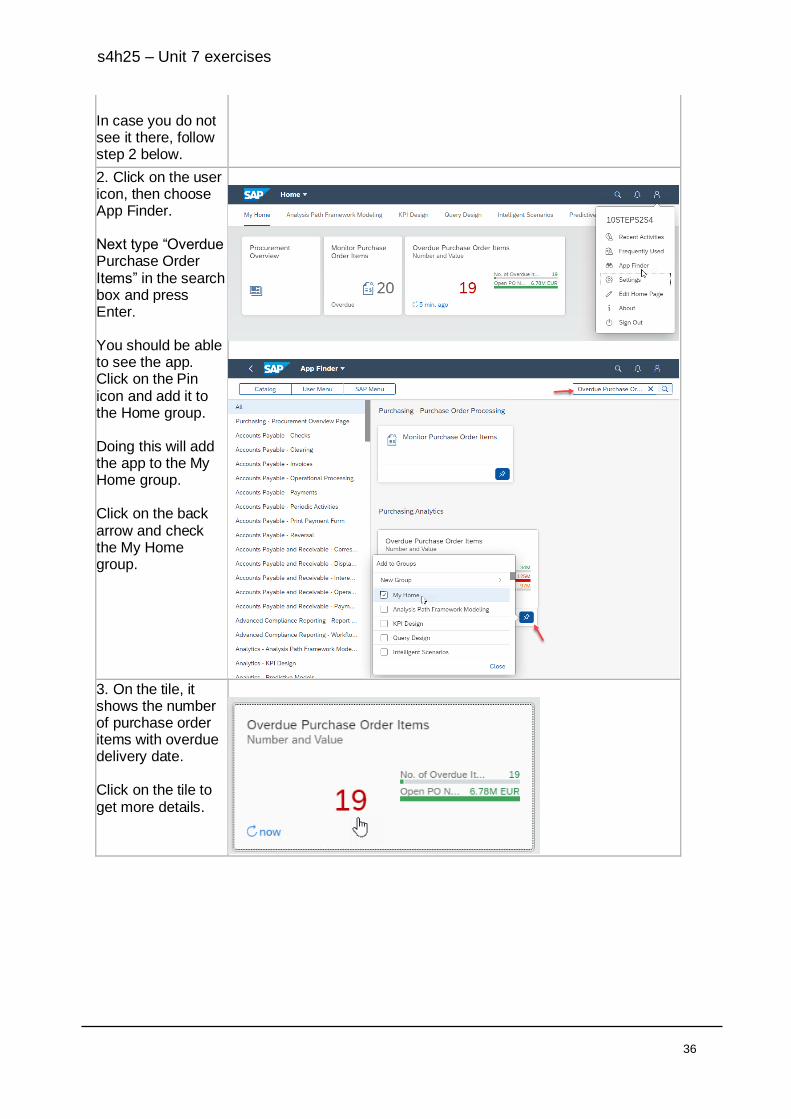
In case you do not see it there, follow step 2 below.
2. Click on the user icon, then choose App Finder. Next type “Overdue Purchase Order Items” in the search box and press Enter. You should be able to see the app. Click on the Pin icon and add it to the Home group. Doing this will add the app to the My Home group. Click on the back arrow and check the My Home group.
3. On the tile, it shows the number of purchase order items with overdue delivery date. Click on the tile to get more details.

s4h25 – Unit 7 exercises
37
4. As you can see in the drop-down box, you can choose a KPI for running the analysis. The orange bars that you see show you the ‘Number of overdue Items’
5.From the chart types option, you can choose different types of charts based on your requirement.
6. Switch to tabular view to details in a table.

s4h25 – Unit 7 exercises
38
You can see Number of overdue items against the vendor with Open PO Net Value

s4h25 – Unit 7 exercises
39
7. You can add another KPI to see the specific data by clicking on a line item, for example “By Plant”.

s4h25 – Unit 7 exercises
40
8. You can also open this information in the related apps by clicking on the link ‘Open In …’ at the bottom right. Let’s say you would like to see details of all these Overdue purchase order items. You can navigate to the app – ‘Manage Purchase Orders’. 9. You can see the details of all these Overdue purchase order items for further analysis. After analysis, you can click on the back icon to come return to the Overdue app.

s4h25 – Unit 7 exercises
41
10. The Overdue app also has a functionality to create a new SAP Fiori tile based on your analysis. To do this, you can choose “Save as Tile” option. Doing so will create a new SAP Fiori tile in your SAP Fiori Launchpad.
11. Either continue directly with exercise 5 or suspend your instance of SAP CAL solution 4. Re-activate it once you continue with exercise 5. This is important to save cost.

s4h25 – Unit 7 exercises
42
Exercise 5: Working with analytics specialist apps
Overview
Estimated time: 15 mins
Objective Create a Custom Analytical Query App. For this exercise we will use the app Query Designer
Query Designer is a tool used for reporting and analysis. With this app you can transform and organize raw data delivered from business documents into a meaningful grid. It abstracts the process of writing structured queries in a way that you don’t have to understand the query language or the technical details. The tool provides the fields required to design a query. You can select the required fields and set filters for your query. You can also preview the query results. The table below displays the tasks and the corresponding options in Query Designer that you can use to perform this task:
• Search for a query
• Create a new query
• Modify and reuse the new query
• Add or remove custom fields in the new query
• Create Restricted Measures, Calculated Measures and User Input Filters
• Create Hierarchies
• Preview result sets after modifying the query
Make sure that following PFCG role is assigned to the user
• SAP_BR_ANALYTICS_SPECIALIST
Exercise Description Perform the following tasks:
• Open the SAP Fiori Launchpad
• Try the app – Custom Analytical Query

s4h25 – Unit 7 exercises
43
What to Do What You Will See
1. Continue on your CAL solution 4 instance. Go to transaction /n/UI2/FLP or you can use the following URL to launch the FLP
https://vhcalabaci.dummy.nodomain:9443/sap/bc/ui2/flp#Shell-home Next go to the group ‘Query Design‘ and click on the tile “Custom Analytical Queries”
2. Next, click on Create to create a new query
3. Configure the query name, the data source and a prefix is set automatically. Query Name: “ZZ1_” + GLITEMQ_001” DataSource: I_GLACCOUNTLINEITEMCUBE Note: Query name ZZ1_GLITEMQ_000 is already in the system. Please choose a new suffix like ‘001’.

s4h25 – Unit 7 exercises
44
4. Set the Label
Label: Custom Analytical Query CAQ 000 Replace 000 with your suffix that you provided in the above step
5. Press "Field Selection" and go to the field selection screen
6. Add the measure “AmountIn CompanyCodeCurrency”.
Type "AmountIn" in the search window to search. Add the measure by checking the “Selection” checkbox.
7. Add the following fields in the same way:
- Controlling area (ControllingArea) - Cost center (CostCenter) - Segment - G/L account (GLAccount) - Fiscal year (FiscalYear)
Exclude the following by pressing the icon:
- Account Assignment (AccountAssignment)
Selected fields

s4h25 – Unit 7 exercises
45
should be as in the screenshot on the right.
8. Configure the display settings for each field.
Click next tab “Display” to go to the configuration screen and select "Fiscal Year".
9. Choose the following settings:
- Display Result: Check
- Dimension Format: Text
- Axis: Row
10. Select “G/L
Account” and set as
following:
- Dimension Format: Key and Text
- Axis: Row
- Enable Hierarchy: Check
- Hierarchy ID: YCOA (Enter this value manually)

s4h25 – Unit 7 exercises
46
11. Choose your filter settings.
Press “Filters” to go
to the filter settings screen and select
“Fiscal year”.
12. Set as following:
- Select 'User Input Values'
- Mandatory: Check
- Default value: 2021
13. Press “Save Draft” at the bottom right of the screen to save the draft.
Press “Preview” to
execute.
Save Draft
Preview
14. The SAP Fiori Design Studio launches, reads the query you just created, and executes the report. A prompt displays the filter for the fiscal year you have set. Click OK to view the results.
Result

s4h25 – Unit 7 exercises
47
15. Move the “Cost Center” in the “Dimensions” to the “Rows” on the left-hand side of the screen.
You can see that the
dimension “Cost
Center” is expanded
Result

s4h25 – Unit 7 exercises
48
16. Return with the "Back" button and press the "Publish" button at the bottom right of the screen to publish the Analytical Query you have just created.
Back
Publish
17. Execute the Analytical Query you created from the Query Browser.
Press the home button, go back to the home screen, and press “F1068 Query Browser” in the “Query Browser” group.
The PFCG role “SAP_BR_EMPLOYEE” is required.
18. Set the Analytical Query “ZZ1_GLITEMQ_000' to your search criteria, search and execute.
Click the search results to view the definition.
Note: Use your query name “ZZ1_GLITEMQ_XXX’ that you used
in the previous step. Where XXX is your chosen suffix

s4h25 – Unit 7 exercises
49
19. Select the query
and select “Open for
Analysis” to launch
the SAP Fiori Design Studio screen and run multidimensional reports.
The query is displayed as we had seen it earlier.
20. The query definition can be saved as a tile for yourself in a group and launched later from the FLP.
Click on the icon in the upper-right corner of the screen and press “Save as Tile”.
Set the following and press OK:
- Title: Custom Query View 000
- Subtitle: My Query Group: My Home
Click OK.
Replace 000 with your suffix that you provided in the above step

s4h25 – Unit 7 exercises
50
(You can choose any group to which you would like to add this new tile. For this demo, we will just add it to ‘My Home’)
21. Now go back to the home and you should see the newly added SAP Fiori tile there.
Click on the tile
“Custom Analytical
Query CAQ 000” on
“My Home”.
Replace 000 with your suffix that you provided in the above step

s4h25 – Unit 7 exercises
51
22. Identify the name of the query.
The Analytical Query you created is “ZZ1_GLITEMQ_000”.
The system would generate an executable query in the background with a different technical name.
Press gear icon on the screen and jump
to “Information…”.
Replace 000 with your suffix that you provided in the above step
23. Click on the Information link to see the name of the query.
The query name is needed to create a Fiori application in the next step.

s4h25 – Unit 7 exercises
52
24. Open SAP GUI and go to transaction RSRT. Specify the query name and execute it from there.
There are different options to choose from, for example, if you choose ‘WD Grid’, it will display the aggregated data in the app.
For this exercise choose the option “List” and click on “Execute”.
25. Enter “2021” as
Fiscal Year and aggregated data for that year will be shown on the screen.
Click on “Execute”.
s4h25 – Unit 7 exercises
53
26. Suspend your SAP CAL solution 4 instance until you continue with the exercises of unit 9. This is important to save cost.

s4h25 – Unit 7 exercises
54
www.sap.com/contactsap
© 2021 SAP SE or an SAP affiliate company. All rights reserved. No part of this publication may be reproduced or transmitted in any form or for any purpose without the express permission of SAP SE or an SAP affiliate company. The information contained herein may be changed without prior notice. Some software products marketed by SAP SE and its distributors contain proprietar y software components of other software vendors. National product specifications may vary. These materials are provided by SAP SE or an SAP affiliate company for informational purposes only, without representation or warranty of any kind, and SAP or its affiliated companies shall not be liable for errors or omissions with respect to the materials. The only warranties for SAP or SAP affiliate company products and services are those that are set forth in the express warranty statements accompanying such products and services, if any. Nothing herein should be construed as constituting an additional warranty. In particular, SAP SE or its affiliated companies have no obligation to pursue any course of business outlined in this document or any related presentat ion, or to develop or release any functionality mentioned therein. This document, or any related presentation, and SAP SE’s or its affiliated companies’ strategy and possible future developments, products, and/or platform directions and functionality are all subject to change and may be changed by SAP SE or its affiliated companies at any time for any reason without notice. The information in this document is not a commitment, promise, or legal obligation to deliver any material, code, or functionality. All forward-looking statements are subject to various risks and uncertainties that could cause actual results to differ materially from expectations. Readers are cautioned not to place undue reliance on these forward-looking statements, and they should not be relied upon in making purchasing decisions. SAP and other SAP products and services mentioned herein as well as their respective logos are trademarks or registered trademarks of SAP SE (or an SAP affiliate company) in Germany and other countries. All other product and service names mentioned are the trademarks of their respective companies. See www.sap.com/copyright for additional trademark information and notices.
Coding Samples Any software coding or code lines/strings (“Code”) provided in this documentation are only examples and are not intended for use in a production system environment. The Code is only intended to better explain and visualize the syntax and phrasing rules for certain SAP coding. SAP does not warrant the correctness or completen ess of the Code provided herein and SAP shall not be liable for errors or damages cause by use of the Code, except where such damages were caused by SAP with intent or with gross negligence.