safecom go konica minolta administrator's manual go/safecom go... · safecom go konica minolta...
TRANSCRIPT

Nuance SafeCom Go Konica Minolta Administrator’s Manual D60713-23 May 2016

D60713-23 2
Trademarks: Nuance, the Nuance logo, SafeCom, SafeCom Go, SafeCom P:Go, SafeCom ePay and the SafeCom logo are trademarks of Nuance Communications, Inc. or its affiliates in the United States and/or other countries. All other trademarks referred to herein are the property of their respective owners. Nuance Communications, Inc. cannot be held responsible for any technical or typographical errors and reserves the right to make changes to products and documentation without prior notification. Third Party Software: This software may contain third party software which requires notices and/or additional terms and conditions. Such required third party software notices and/or additional terms and conditions are located in the SafeCom Third Party Notice document. Patent: Nuance Communications, Inc. has received the following British patent GB 2350 713 B, US patent US 6,952,780 B2 and Europe EUR EP1 120 701. © Copyright 1995 - 2016 Nuance Communications, Inc. All rights reserved
Nuance Communications, Inc. E-mail: [email protected]
Web: safecom.eu

D60713-23 3
Table of contents
1 Introduction ............................................................................................5 1.1 SafeCom Go Konica Minolta .............................................................. 5 1.2 Requirements ............................................................................... 5 1.3 Supported ID devices ...................................................................... 5 1.4 Preparing the MFP ......................................................................... 6
1.4.1 Allow use of OpenAPI: ..................................................... 6 1.4.2 Ensuring SSDP is switched on ............................................. 6 1.4.3 Enable SSL certificate: .................................................... 6 1.4.4 Allow print without authentication: .................................... 7 1.4.5 On bizhub C35: Configure driver ........................................ 7 1.4.6 On bizhub C284e and C654e: Configure driver ........................ 8
1.5 Available documentation ................................................................. 9 1.6 About this manual .......................................................................... 9 1.7 Document history ........................................................................ 10
2 SafeCom Go Konica Minolta ....................................................................... 13 2.1 Overview ................................................................................... 13 2.2 SafeCom Device Server installation ................................................... 13
2.2.1 Windows firewall - Ports that must be opened ..................... 14 2.3 Configure SafeCom Device Server ..................................................... 15
2.3.1 Login to SafeCom Device Server ....................................... 15 2.3.2 Add SafeCom Server ..................................................... 15 2.3.3 Device Server config.ini ................................................. 16
2.4 Add device to the SafeCom Device Server ........................................... 17 2.4.1 Device icons ............................................................... 17 2.4.2 Add device via the SafeCom Administrator .......................... 17 2.4.3 Add device via the SafeCom Device Server .......................... 21
2.5 Configure device in SafeCom Device Server ......................................... 22 2.6 SafeCom Go Konica Minolta - How to ................................................. 26
2.6.1 Register device ........................................................... 26 2.6.2 Change login method .................................................... 26 2.6.3 Post tracking setup....................................................... 27 2.6.4 Check device properties ................................................ 29 2.6.5 Install card reader ....................................................... 30 2.6.6 Set ID & Print to OFF .................................................... 30 2.6.7 Open up for copy without authentication ........................... 31 2.6.8 Control user access rights .............................................. 31 2.6.9 Uninstall SafeCom Go Konica Minolta................................. 31
2.7 SafeCom Go Konica Minolta device trace facility .................................. 32
3 Using SafeCom Go Konica Minolta ............................................................... 34 3.1 Control panel ............................................................................. 34 3.2 Login ........................................................................................ 35 3.3 Pull Print - Document list ............................................................... 36 3.4 Copy ........................................................................................ 37 3.5 E-mail ...................................................................................... 37 3.6 Logout ...................................................................................... 37 3.7 Register card with PUK code ........................................................... 37
4 Troubleshooting ..................................................................................... 38 4.1 SafeCom Help Desk Assistant .......................................................... 38 4.2 Servlets .................................................................................... 38 4.3 SafeCom Device Server does not start ............................................... 38 4.4 Authentication Version 2.0 Not Found ............................................... 38 4.5 At the device: printing fails mid-job ................................................. 39 4.6 At the device: printing fails when post tracking is enabled ...................... 39

D60713-23 4
4.7 Device Server: Configuration of devices failed ..................................... 42 4.8 Device Server: Error when upgrading existing device server installation ...... 42
5 Regulatory information ............................................................................ 44
6 Index ................................................................................................... 45

1 Introduction
D60713-23 5
1 Introduction
1.1 SafeCom Go Konica Minolta
SafeCom Go Konica Minolta is the internal solution for Konica Minolta MFPs. It integrates with the touch-screen control panel of the Konica Minolta MFP and offers user authentication by code and/or card. SafeCom Go Konica Minolta works together with the SafeCom G4 Server software and is designed to help companies and organizations gain control over their printing costs and document security. The SafeCom solution can be enhanced with add-on modules to build customer specific and scalable solutions.
1.2 Requirements
SafeCom Go Konica Minolta supports OpenAPI 2.1 or higher MFPs listed here.
SafeCom device license.
SafeCom ID device license.
The MFP must be prepared so it allows use of OpenAPI, SSL on port number 50003 and print without authentication (1.4).
The appropriate ID Device must be connected to the MFP’s USB port if users are to login by card.
SafeCom G4 Server version S82 070.500*02 or later.
SafeCom Device Server version S82 060.070*02 or later.
The SafeCom Device Server REQUIRES Java Runtime Environment (JRE) version 1.7 or later. If SafeCom Device Server is installed on a 64 bit operation system, you must install the 32-bit Java version included with the installer.
1.3 Supported ID devices
HID Reader (AU-201H): To install and get the reader to work on a Konica Minolta device, a Loadable driver has to be installed. This loadable driver is device dependent and also provided by Konica Minolta.
Other ID Devices: Please contact [email protected].
The Konica Minolta device must be configured to use ID device (2.6.5). Note: ID devices require unique ID Device Licenses. SafeCom ID devices come with ID device licenses, whereas ID device licenses for 3rd party ID devices must be purchased separately.

1 Introduction
D60713-23 6
1.4 Preparing the MFP
The MFP must be prepared as follows:
Allow use of OpenAPI.
Ensure that SSDP protocol is switched on.
Use SSL on port number 50003 (assuming an SSL certificate is installed).
Allow print without authentication. Note: The instructions below may vary between the different models. If in doubt please consult the appropriate documentation from Konica Minolta. Note: These steps are required on a fresh device or a device that has had its hard disk drive formatted. The settings are preserved when the printer firmware is updated.
1.4.1 Allow use of OpenAPI:
1. On the MFP’s touch-screen open the Administrator settings 2. Enter the administrator password. 3. Select System connection 4. Select Open API settings 5. Change the setting from Restrict to Allow.
1.4.2 Ensuring SSDP is switched on
1. Open the web page of the MFP and login as administrator. 2. Click the Network tab. 3. Select SSDP settings. 4. Ensure that SSDP is switched to On.
1.4.3 Enable SSL certificate:
1. Open the web page of the MFP and login as administrator. 2. Click the Security tab. 3. Click PKI Settings. 4. Click Device Certificate Setting. 5. Create New Registration of SSL certificate. 6. In SSL Setting choose Admin mode and User mode. 7. Click the Network tab. 8. Click OpenAPI Settings. 9. Set SSL to SSL Only. 10. Click TCP Socket Setting. 11. Check Use SSL/TLS. Note: For Bizhub model C224, you need to remove the default/original SSL certificate after creating and enabling the new one. On Konica xx50 devices, do the following: 1. Open the web page of the MFP and login as administrator. 2. Click the Security tab.

1 Introduction
D60713-23 7
3. Create a new SSL certificate, using a similar method as outlined above. 4. Click the Network tab. 5. Ensure that SSDP is enabled. 6. Browse to the HTTP settings and activate SSL. 7. Click OpenAPI Settings. 8. Set SSL to SSL Only. 9. Click TCP Socket Setting. 10. Check Use SSL/TLS. 11. Open the SafeCom Device Server webpage, and add the device to
SafeCom. 12. Click Save.
1.4.4 Allow print without authentication:
1. On the MFP’s touch-screen press the Utility/Counter button. 2. Tap Administrator Settings. 3. Enter the Administrator Password and tap OK. 4. Tap User Authentication / Account Track. 5. Set Print without Authentication to Allow. 6. Tap OK and restart the MFP.
1.4.5 On bizhub C35: Configure driver
Note: Do not configure the driver until you have added the C35 to the device server, see 2.4 Add device to the SafeCom Device Server. 1. In Windows open Devices and Printers then right-click the C35 device
and select Printer properties. 2. In the KONICA MINOLTA bizhub C35 Properties window, go to the
Configure tab. 3. In the Device Option section select User Authentication, then in the
Setting drop-down list select On (Enhanced Server). 4. Click the Acquire Settings button. 5. In the Acquire Settings window select Specify IP Address or Printer
Name and then type in the bizhub C35’s IP address manually. Click OK. 6. In the KONICA MINOLTA bizhub C35 Properties window click Apply, then
go to the General tab and click the Preferences… button. 7. In the KONICA MINOLTA bizhub C35 Printing Preferences window go to
the Basic tab and click Authentication/Account Track. 8. In the Enhanced Authentication Server Settings window remove the
checkmark from Public User. 9. In User Code type in anything. Do not click Verify as it will not work.
Click OK. 10. In the KONICA MINOLTA bizhub C35 Printing Preferences window click
Apply and then OK. 11. In the KONICA MINOLTA bizhub C35 Properties window click OK. Note: Changing the port configuration after having configured the driver may result in the device losing the authentication configuration, which can be restored by repeating the steps above.

1 Introduction
D60713-23 8
1.4.6 On bizhub C284e and C654e: Configure driver
Note: Do not configure the driver until you have added the C284e/C654e to the device server, see 2.4 Add device to the SafeCom Device Server. 1. In Windows open Devices and Printers then right-click KM device and
select Printer properties. 2. In the KONICA MINOLTA <devicemodel> Properties window, go to the
Configure tab. 3. In the Device Option section select Model, then use the Setting
dropdown list to select the device model. 4. Select User Authentication, then in the Setting drop-down list select On
(Enhanced Server). 5. Click the Obtain Settings button. 6. In the Obtain Settings window uncheck the Auto checkbox, select Specify
IP Address or Printer Name and then type in the device IP address manually. Click OK.
7. In the KONICA MINOLTA <devicemodel> Properties window click Apply, then go to the General tab and click the Printing Preferences… button.
8. In the Printing Preferences window go to the Basic tab and click Authentication/Account Track.
9. In the Enhanced Authentication Server Settings window remove the checkmark from Public User.
10. In User Code type in anything. Do not click Verify as it will not work. Click OK.
11. In the Printing Preferences window click Apply and then OK. 12. In the Properties window click OK. Note: Changing the port configuration after having configured the driver may result in the device losing the authentication configuration, which can be restored by repeating the steps above.

1 Introduction
D60713-23 9
1.5 Available documentation
SafeCom Smart Printing
SafeCom Smart Printing Administrator’s Quick Guide D10600 How to install a SafeCom Smart Printing solution.
SafeCom G4
SafeCom G4 Administrator’s Manual D60650 A comprehensive manual that the administrator should consult to make a successful SafeCom solution. Includes information about SafeCom Tracking, SafeCom Rule Based Printing, SafeCom Client Billing, and SafeCom Pay.
SafeCom Go Konica Minolta
SafeCom Go Konica Minolta Administrator’s Manual D60713 (this manual) Manual on how to install, configure and use SafeCom Go Konica Minolta.
SafeCom Go Konica Minolta User’s Guide D20713 User's Guide on how to use SafeCom Go Konica Minolta.
1.6 About this manual
This manual applies to Nuance SafeCom G4 Server version S82 070.520*09 and Nuance SafeCom Device Server version S82 060.090*08. This manual is organized as follows:
Chapter 1 Introduction lists the supplied SafeCom documentation, introduces system requirements, and describes how this manual is organized.
Chapter 2 SafeCom Go Konica Minolta describes the installation and the web interface of the internal solution for Konica Minolta MFPs.
Chapter 3 Using SafeCom Go Konica Minolta describes how to interact with the Konica Minolta MFP’s control panel when SafeCom Go Konica Minolta is installed.
Chapter 4 Troubleshooting contains hints for troubleshooting.
Chapter 5 Regulatory information contains regulatory information.

1 Introduction
D60713-23 10
1.7 Document history
Revision D60713-23
Nuance SafeCom G4 Server version S82 070.520*09
Added information on device server installation on mixed device fleets (2.2).
Added a note on registering new cards (3.7).
Added a note on post tracking mixed sized documents (2.6.3). Revision D60713-22
Added instructions for setting SSL on xx50 devices (1.4.3). Revision D60713-21
Replaced supported device list with link pointing to relevant website. Revision D60713-20
Nuance SafeCom G4 Server version S82 070.520*07 and Nuance SafeCom Device Server version S82 060.090*08
Added support for bizhub C3350, C3850, 4050, and 4750 devices.
Added information on solving issues with printing failing mid-job (4.5). Revision D60713-19
Nuance SafeCom Device Server version S82 060.090*07.
Added information on configuring bizhub C284e and C654e devices (1.4.6).
Updated information on Device Server failover configuration (2.3.2).
Added information on correcting printing failure when post tracking is enabled (4.5).
Added information on SSDP requirement (1.4.2). Revision D60713-18
Updated instructions on adding a device server to SafeCom Administrator (2.4.2)
Added support for bizhub 224e, 284e, 364e, 454e, 554e, 654e, 754e devices.
Revision D60713-17
Added support for C224e, C284e, C364e, C454e, C554e, C654e, C754e devices.
Revision D60713-16
Clarified Print All function and added Note about the interworking of Scan and E-mail in section (2.6.8)

1 Introduction
D60713-23 11
Revision D60713-15
Updated firmware table. Revision D60713-14
Nuance SafeCom G4 Server version S82 070.510*01 and Nuance SafeCom Device Server version S82 060.080*01
Updated section 1.2 Requirements
Upload log to server (2.5) Revision D60713-13
Nuance SafeCom Device Server version S82 060.070*02
New Bizhub models supported: C224, C284, C383, C454, C554, C654, C754 (1.2).
Added section on device Administrator username and password. Revision D60713-12
Nuance SafeCom Device Server version S82 060.070*01
Nuance SafeCom G4 Server version S82 070.500*01
Support for bizhub C35
Edited section 2.5 Configure device in SafeCom Device Server
Added info about ID device license (1.3)
Added section on Device Server config.ini (2.3.3)
Revision D60713-11
SafeCom Device Server version S82 060.060*04.
Added section 2.6.8 Control user access rights Revision D60713-10
SafeCom Device Server version S82 060.060*03.
Added information about delegated print and group print.
Removed section Configure Device Server Failover. Revision D60713-09
SafeCom Device Server version S82 060.050*02
Updated to reflect the new SafeCom Device Server. Revision D60713-08
SafeCom Device Server version S82 060.020*08.
Update to troubleshooting section.

1 Introduction
D60713-23 12
Revision D60713-07
SafeCom Device Server version S82 060.020*08.
Updated to reflect the introduction of SafeCom G3 Server.
Sections added to trouble shooting
Update to the supported Konica Minolta MFPs
Revision D60713-06
SafeCom Device Server version S82 060.010*02.
Initial version.

2 SafeCom Go Konica Minolta
D60713-23 13
2 SafeCom Go Konica Minolta
2.1 Overview
Make sure the SafeCom G4 Server software installation has been completed as described in the SafeCom Smart Printing Administrator’s Quick Guide D10600. Note: The MFP must be prepared so it allows use of OpenAPI, SSL on port number 50003, and print without authentication (Refer to section 1.4).
2.2 SafeCom Device Server installation
Install SafeCom Device Server: 1. Download the safecom_device_server_nnn.exe file from the link supplied
to you. The installation must be Run as administrator. When the installation program is launched click Next. Note: if your device fleet includes HP Pro devices, ensure that the HP Pro devices are using a dedicated device server, and select the Install only HP Pro option for that device server on the SafeCom Go Selection screen. Otherwise, select the Install without HP Pro option.
2. Choose the destination folder for the files. Click Next. The default installation folder is:
C:\Program Files\
SafeCom\SafeCom Device Server
On Windows 64-bit:
C:\Program Files (x86)\
SafeCom\SafeCom Device Server 3. Click Next. 4. Choose destination folder. Click Next. 5. Detecting Java version. Click Next. 6. Review settings before copying of files starts. Click Next. 7. Click Finish.

2 SafeCom Go Konica Minolta
D60713-23 14
2.2.1 Windows firewall - Ports that must be opened
If Windows Firewall is enabled it may prevent the SafeCom Device Server from working. Disable the firewall or run the following script: 1. Browse to the SafeCom Device Server installation folder. 2. Right-click open_firewall_safecom_device_server.cmd. The command file
must be Run as administrator. In the file you can see which TCP and UDP ports are opened.
You can also manually ensure that the port numbers below are open.
SafeCom
Device Server
Web
Browser
SafeCom
Server
TCP
80
443
50003
TCP
7500
7700
UDP
5742
TCP
9100
UDP
161
TCP
8080
TCP
443
50002
TCP Inbound on SafeCom Device Server Protocol
80 Used to contact MFP during initial setup HTTP
443 Used to contact MFP during operation HTTPS
8080 Web browser HTTP
50002 Device HTTPS
UDP Inbound on SafeCom Device Server Protocol
161 Used to register notifications SNMP
TCP Outbound on SafeCom Device Server Protocol
443 Used to contact MFP during operation HTTPS
7500 SafeCom Server (Job Server) SafeCom
7700 SafeCom Server (Job Server) SafeCom
50003 Device HTTPS
UDP Outbound on SafeCom Device Server Protocol
5742 SafeCom Server (Broadcast Server) SafeCom
TCP Protocol
9100 Used for printing RAW

2 SafeCom Go Konica Minolta
D60713-23 15
2.3 Configure SafeCom Device Server
The SafeCom Device Server must be configured manually to reference the right SafeCom Server. This is done by adding the SafeCom Server in the SafeCom Device Server. Furthermore a list of failover SafeCom Servers can be set up.
2.3.1 Login to SafeCom Device Server
To login to SafeCom Device Server: 1. Open a web browser and enter the server address (IP address or
hostname) for the device server followed by :8080/safecom in the address field. Example: http://localhost:8080/safecom Note: Use of JavaScript (Active Scripting) must be enabled.
2. Enter Username (default is admin) and Password (default is nimda). 3. Click OK. If a Limited access dialog opens, click OK.
2.3.2 Add SafeCom Server
1. Open a web browser and login to the SafeCom Device Server (2.3.1). 2. Click Device Server in the menu to the left.
3. Under SafeCom Servers, click the [+] icon to add a failover SafeCom
Server. 4. Enter the server address and click OK. To add localhost as the server,
leave the Address field blank and click OK.

2 SafeCom Go Konica Minolta
D60713-23 16
5. Click Save. Note: To use device server failover, group your devices via SafeCom Administrator. Device servers belonging to the same group monitor the status of the group members, and in case of a group member failing or shutting down, the rest of device server group distributes the workload of the downed device server among the rest. For more information, see section 5.14.4. Grouping device servers in SafeCom G4 Administrator’s Manual. The SafeCom Server is now added, and the next step is to add a device to the device server (2.4).
2.3.3 Device Server config.ini
The following settings can be set by modifying the config.ini file located in the <installdir>/equinox folder. After editing the config.ini file, the SafeCom Device Server service must be restarted in order for the changes to take effect. Note: DO NOT use Windows Notepad, as it will mangle line endings. WordPad, or another editor that understands Unix line endings are recommended. Editing the config.ini must be done with due diligence as it otherwise will break the runtime.
Setting Description Default
deviceserver.encryptconfig
Defines if configuration file is encrypted: ‘true’=enable, 'false'=disable.
true
deviceserver.configuredevices
Option to disable the configuration code against devices. Useful mostly for testing purposes to support simulated devices.
true
deviceserver.trace If set to 'true' it enables the server trace files
false
deviceserver.protocol.trace If set to 'true' it enables the safecom protocol trace files
false
deviceserver.serverAddress Sets the address that the devices must refer to.
InetAddress.getLocalHost()
deviceserver.config.dir Sets the location of the configuration directory
config
deviceserver.trace.file.size
Defines the max size of each trace file. Defined in bytes but takes a postfix for larger units: KB, MB or GB
10MB
deviceserver.trace.file.count Defines the number of old trace files to keep.
5

2 SafeCom Go Konica Minolta
D60713-23 17
2.4 Add device to the SafeCom Device Server
The device can be added to the SafeCom Device Server in one of the following two ways:
Via the SafeCom Administrator (2.4.2). This is the recommended method and it works for SafeCom G3 Server version S82 070.410*05 or newer.
Via the SafeCom Device Server (2.4.3). Solutions based on SafeCom G2 must use this method.
2.4.1 Device icons
In the SafeCom Device Server the following device icons represents the status of the device.
User is logged in at the device.
Device is idle, no user logged in.
Wait for at least 2 minutes. If the warning signal is gone, the printer is now configured. If the warning signal remains, the printer cannot be configured because, for example the SSL is not on, or another device server is trying to configure the printer.
An error occurred.
The printer is receiving print data.
Device server cannot contact the printer.
2.4.2 Add device via the SafeCom Administrator
Before adding a device server device in SafeCom Administrator a SafeCom Device Server must be added to the SafeCom. If the device server is not yet added in the SafeCom Administrator, see the instructions above (section 2.3) for configuring a SafeCom Device Server and adding it to a SafeCom Server. If the device server is already added in the SafeCom Administrator, go to Add device server device below.

2 SafeCom Go Konica Minolta
D60713-23 18
Note: To delete the device server you right-click the device server and select Delete device server, then click OK. The SafeCom Device Server is now added to SafeCom Administrator and you can now add a device. Add device server device 1. Click the Devices container, right-click the content area and then Add
device. The Add device wizard is now launched. 2. From the Device server drop down menu, select the SafeCom Device
Server and click Next.
3. Information is retrieved from the device server to establish the status of
device server. Click Next. 4. Enter the Printer address (the device IP address or host name) and click
Next.
5. Information is then retrieved from the device. Click Next. 6. Now select SafeCom Go Konica Minolta as the type of device and click
Next.

2 SafeCom Go Konica Minolta
D60713-23 19
7. Enter the username and password, as specified on the device web page and click Next.

2 SafeCom Go Konica Minolta
D60713-23 20
8. The device properties dialog now opens. Make sure to specify on the Settings tab the device server and the capabilities of the device.
9. Click Add to register the device and save it in the database. After approx.
2 minutes the device is added to the device server and available to be configured in SafeCom Device Server.
The device server device is now added and listed both under Devices and under the device server under Device servers with the name SafeCom Device Server.
10. Go to section 2.5 to continue with the configuration of the device.

2 SafeCom Go Konica Minolta
D60713-23 21
2.4.3 Add device via the SafeCom Device Server
1. Click Device Server in the left menu.
2. Click the Add device button and the Add device wizard launches. 3. Enter the hostname or the IP address of the device. If you want to use
dynamic IP address, then enter the device hostname in the Address field. 4. Enter the administrator name and password for the device and click Next.
6. Information is retrieved from the device to establish the type of device.
Make the necessary adjustments to the Required Device properties (2.5).
7. Click Finish. 8. On the device settings page, make sure the settings are correct and click
Save

2 SafeCom Go Konica Minolta
D60713-23 22
Note: The device is now added to the SafeCom solution, but it does not appear in the SafeCom Administrator before a user logs in at the device.
2.5 Configure device in SafeCom Device Server
The Device tab is used to configure SafeCom Go Konica Minolta with regards to which device it is connected to, how users are to be identified etc. Note: If the configuration of the devices fails it might be because the Device Server is installed on a server that has multiple NICs or IPs. Refer to section 4.5 for a resolution. To save any changes you make to the configuration, click Save in the upper right corner of the web page. Note: If you click Save and then in the Device Message field see the message "Unable to configure device because: Device is configured against a different server", it is because the device is configured to a different server. To be able to make changes to the device configuration, you must first click Reconfigure device which configures the device to your server, make the necessary changes, and then click Save.

2 SafeCom Go Konica Minolta
D60713-23 23
Change the settings according to the following descriptions:
Device information o Manufacturer and Description are automatically filled-in and
together with Location they are also viewable in the Device properties dialog in SafeCom Administrator.
o Contact and Location provides useful information in maintaining the SafeCom solution.
Network settings o Address: The IP address of the device. o RAW print port: The TCP port used to send print data. o SNMP Put Community name: This must match the SNMPGet
Community Name if this is different from public. By default SNMP GetCommunity name is public.

2 SafeCom Go Konica Minolta
D60713-23 24
Device settings o Administrator name: The user name with which the administrator
can log in to device. o Administrator password (mandatory): The device password with
which the administrator can log in to device. o Login method: This determines how users log in. Choose between:
- Card - ID code - Card or ID code - Card or Windows: Allows the user to log in by either card or
by entering their Windows username, password, and domain. Note: Identification by card requires connecting a USB ID Device (card reader). The option Card or Windows allows the user to log in by either card or by entering their Windows username, password, and domain. The SafeCom G4 server must be a member of the domain or trusted by the domain.
o Default domain: Specify the domain to pre-fill the domain for users when logging into a device.
o Language: Specify a specific language if you want SafeCom Device Server to override the language on the device.
o Hide domain: Usable if you specified a default domain. Check to allow the users to log in without typing in the domain.
o Enable post tracking: This is relevant only with SafeCom Tracking. Refer to SafeCom G4 Administrator’s Manual D60650
o Reverse document list: Check to show the latest printed documents at the top of the document list.
Drivers: When Pull Printing, SafeCom compares the driver name embedded in the print job with its list of driver names. If no match is found and if Show fidelity warning is checked in the Server properties in the SafeCom Administrator, the document appears with a question mark [?] in the document list. This way the user is warned that fidelity is low and the document may print incorrectly. o Click Get All to obtain the list of drivers from the SafeCom Server,
or add and delete drivers manually.

2 SafeCom Go Konica Minolta
D60713-23 25
Device Properties: o AllowManualInput: Check to allow users to manually enter e-mail
addresses and fax numbers. o CardTypeOverride: If using a card reader that is not supported by
SafeCom, the administrator needs to specify which card type is used, since this cannot be identified automatically.
Property value Description
FELICA_IDM Felica
TYPE_A MiFare
HID_PROX HID
MAGNETIC_CARD Magnetic
o HID length: If using a card reader that is not supported by SafeCom
and HID cards, the administrator must specify the HID length, since this cannot be identified automatically
Device applications: Lists the applications that users are allowed to access. Uncheck the applications that do not require user authentication.
The settings under Device applications are tied to the welcome screen. If none of the check boxes are selected the welcome screen only shows the option to Login and, if enabled, Windows login.
Enable logging: Select if log information should be collected.
If Upload log to server is enabled the device will upload the log to the server once an hour. The feature should only be enabled as per instruction by SafeCom Support. If the device is unable to upload to the server, the device will keep the log and try to upload again after yet another hour. Note: The device will always log performance data (network latency, authentication duration of successful logins, number of Out of order occurrences and duration, failover and failback between G4 servers, device reboots, changes in firmware and Go versions).
Restore factory default: Set all settings to their default value. Except from the password.
Reconfigure device: Reference the device to the current SafeCom Device Server.

2 SafeCom Go Konica Minolta
D60713-23 26
2.6 SafeCom Go Konica Minolta - How to
2.6.1 Register device
To register the device with the SafeCom solution, add the device in the SafeCom Administrator using Add device.
2.6.2 Change login method
The following section shows how to change the login method. If for example the device has a card reader installed (2.6.5), you must change the Login method to a method that includes Card. Note: This can only be done through the SafeCom Device Server web page and not through the SafeCom Administrator. To change the login method: 1. Login to SafeCom Device Server. 2. In the left pane, expand Device Server and click on the device to open
the Device tab. 3. Change the login method as needed. 4. Click Save.
Note: Expect between 60 and 90 seconds for the saved changes to take
effect if they involve changes to selected setting like the Login method. During the update the device icon has a yellow warning sign and the device shows the text: Now Remote Operating. Please do not turn off the Power.

2 SafeCom Go Konica Minolta
D60713-23 27
2.6.3 Post tracking setup
For post tracking to work the printer driver MUST have User Authentication enabled and configured with a user named safecompullprint. Note: Be aware that in case of print jobs with mixed paper sizes, the device may not provide fully accurate post tracking information due to firmware limitations. Enable Post tracking for the device: 1. Login to SafeCom Device Server (2.3.1). 2. In the left pane expand Device Server and click on the device to open
Device tab (2.5). 3. Check Post tracking and click Save. Setup the printer driver: 1. Open the Properties dialog for the printer and click the Configure tab. 2. In the Device Option list scroll to and click User Authentication. 3. Change Setting to ON (Device) and click Apply.
4. Click on the General tab and select Printing Preferences…

2 SafeCom Go Konica Minolta
D60713-23 28
5. On the Basic tab click Authentication/Account Track…
6. Select Recipient User and enter username as safecompullprint and click OK.

2 SafeCom Go Konica Minolta
D60713-23 29
2.6.4 Check device properties
If the device was added to the SafeCom Device Server (2.4.3) it was also added to the SafeCom solution and will appear in the list of devices in SafeCom Administrator. 1. Click Start, point to All Programs, SafeCom G4, and click SafeCom
Administrator. 2. In SafeCom Administrator click on the server to login. 3. Enter User logon (default is ADMIN) and Password (default is nimda). 4. Open the list of devices. If the device you added is not present press F5
to refresh the list. Double-click the device to open the Device properties dialog.
5. On the Settings tab make the appropriate changes. In particular make sure that Duplex supported and Color supported is set correctly.
6. On the Charging scheme tab select the appropriate charging scheme. 7. On the License tab check the appropriate licenses. 8. Click OK. Note: Open in browser opens the web page of the device in a web
browser. Update software is not relevant and should not be used. To update the SafeCom Device Server just install it again (2.2).

2 SafeCom Go Konica Minolta
D60713-23 30
2.6.5 Install card reader
This section is only relevant if users will login by card. Connect the ID Device directly to the external USB port located at the rear next to the network port. It may be necessary to remove the right-rear cover to access the USB port. Note: ID devices require unique ID Device Licenses. SafeCom ID devices come with ID device licenses, whereas ID device licenses for 3rd party ID devices must be purchased separately. 1. On the MFP press the Utility/Counter button. 2. Tap Meter Count. 3. Tap Check Details. 4. Press the Stop button. 5. On the keypad enter 00 (zero zero). 6. Press the Stop button. 7. On the keypad enter 01 (zero one). 8. Press the Stop button. 9. On the keypad enter 9 (nine). 10. Tap Management Function Choice. 11. Tap Authentication Device2. 12. Tap Card. 13. Tap END. 14. Tap Exit on the Service Mode screen. 15. Power the device off.
Wait 10 seconds or more before turning power on again. Note: Performing the above steps may change the ID & Print setting away from OFF. Please set it back to OFF (2.6.6).
2.6.6 Set ID & Print to OFF
1. On the MFP press the Utility/Counter button. 2. Tap Administrator Settings. 3. Enter Password. Tap OK. 4. Tap User Authentication / Account Track. 5. Tap User Authentication Settings. 6. Tap Administrative Settings. 7. Tap ID & Print Settings. 8. Set ID & Print to OFF. 9. Tap OK. 10. Press the Utility/Counter button.

2 SafeCom Go Konica Minolta
D60713-23 31
2.6.7 Open up for copy without authentication
There are two ways of opening up for copy without authentication on Konica Minolta: Via General settings: 1. Press the Function counter button and then Administrator settings. 2. Enter the code '12345678'. 3. Select User Authentication/Account track. 4. Select General settings. 5. Tap Public user Access and then set it to ON (without login). Via User registration: 1. Press the Function counter button and then Administrator settings. 2. Enter the code '12345678'. 2. Select User Authentication/Account track. 3. Select User Authentication Settings and then User Registration. 5. Tap 000/Public and then Edit. 6. Unselect Print.
2.6.8 Control user access rights
When using SafeCom G3 server version S82 070.440*03 or newer, you can control users’ access rights to specific features via SafeCom Administrator, refer to SafeCom G4 Administrator’s Manual D60650. You can control access rights to the following features:
Copy
Scan
Fax Note: If Scan is enabled, E-mail will also become enabled, and the other way around. Controlling these two settings separately is not possible.
2.6.9 Uninstall SafeCom Go Konica Minolta
To uninstall the SafeCom Go Minolta software from the device: 1. Open a web browser and login to the SafeCom Device Server (2.3.1). 2. Click Device server in the menu and select the device from which the
SafeCom Go solution must be uninstalled. 3. Click the Delete icon in the top menu to uninstall. 4. Click Save.

2 SafeCom Go Konica Minolta
D60713-23 32
2.7 SafeCom Go Konica Minolta device trace facility
Note: Use the SafeCom trace facility only if SafeCom Support instructs you to do so. Used for troubleshooting, the SafeCom trace facility is enabled through the Configuration web page: 1. Open the device web page and log in (2.3.1). 2. Click the General tab, and then click SafeCom in the menu to the left. 3. If the log is disabled, click the Enable button to the right. 4. To save the log, click Show complete log, select the log information and
copy it into a *.txt file and save it. Alternatively, enable the trace facility through the SafeCom Device Server: 1. Open the SafeCom Device Server and log in (2.3.1). 2. Select a device in the device server pane and make sure that the
checkbox Logging enabled at the bottom of the page is selected. 3. Click Save. In order to see the trace files generated by the Device Server: 1. Go to the destination folder for the log files:
The default installation folder is:
C:\Program Files\
SafeCom\SafeCom Device Server\logs
On Windows 64-bit:
C:\Program Files (x86)\
SafeCom\SafeCom Device Server\logs 2. If you need to send the log files, make sure to save and send the folder
logs as a compressed/zipped folder. You can configure the size of the trace files as well as how many are generated.
1. Browse to the config.ini file:
C:\Program Files\
SafeCom\SafeCom Device Server\equinox\config.ini
On Windows 64-bit:
C:\Program Files (x86)\
SafeCom\SafeCom Device Server\equinox\config.ini

2 SafeCom Go Konica Minolta
D60713-23 33
2. Double-click the config.ini file. In the open file, scroll to the bottom and add:
deviceserver.trace.file.size – to configure file size. Size is written as a number with an optional qualifier. For example: ten is 10 bytes, ten kilobytes is 10KB, ten megabytes is 10MB, and one gigabyte is 1GB.
deviceserver.trace.file.count – to configure how many trace files are generated. Enter the number of files you want to generate as a number.
After configuring the trace files restart the SafeCom service.

3 Using SafeCom Go Konica Minolta
D60713-23 34
3 Using SafeCom Go Konica Minolta
3.1 Control panel

3 Using SafeCom Go Konica Minolta
D60713-23 35
3.2 Login
Login with card: 1. Use card reader. Login with card and PIN code: 1. Use card reader. 2. Tap PIN code on the touch-screen. 3. Enter PIN code and tap OK. Login with ID code: 1. Tap ID code on the touch-screen. 2. Enter ID code on the screen and tap OK.
3. Tap Login or press the Access button Login with ID code and PIN code: 1. Tap ID code on the touch-screen. 2. Enter ID code and tap OK.
3. Tap Login or press the Access button 4. Tap PIN code on the touch-screen. 5. Enter PIN code and tap OK. Login with Windows: If Login method is Card or Windows it is possible to login by either using your card or entering your Windows login credentials: 1. Tap Username on the touch-screen. 2. Enter Username and tap OK. 3. Tap Password on the touch-screen. 4. Enter Password and tap OK. 5. Tap Domain on the touch-screen. 6. Enter Domain and tap OK. Note: Username and Password cannot be blanks.

3 Using SafeCom Go Konica Minolta
D60713-23 36
3.3 Pull Print - Document list
Tap Pull Print to access the Document list that allows you to print individual documents. Documents appear in chronological order with the newest at the top of the list. Note: If there are more than 100 documents in the list of pull print documents, only the 100 most recent documents can be shown in the list. The Print all command still print all documents, and the document count is still the full amount of documents. 1. Tap Select All or select document(s). If there are more than 5 documents
tap Forward to see additional documents. 2. Press the Start button to print the selected documents. 3. Tap Job End or press the yellow [//] Reset button to exit the document
list.
Note: The document list does look slightly different from the above. In the in the document list a document with a preceding R shows the document is retained. A delegated document will have a preceding D. Tap the Info button to see information about who delegated the document. A group print document will have a preceding G.
Tap Reset to deselect documents.
Tap Update List to update the list of documents with pending documents that has finished spooling after the user logged in.
Tap Copies to request multiple copies of the selected documents. To set the number of copies tap Copies and then press the C button to set copies to 0 and then enter the number of desired copies. Tap OK or Cancel.
Tap Delete to delete the selected documents. To confirm that the documents should be deleted tap Delete or tap Save to cancel the operation.

3 Using SafeCom Go Konica Minolta
D60713-23 37
Tap More… and then Info to see information about the selected document, including cost, driver name, use of color and duplex. Tap OK. Tap OK.
Tap More… and then Retained if you want document to remain on the list (server) after they have been printed. Tap OK and then Update List. A retained document is listed with a preceding R.
3.4 Copy
Press the Copy button and then press the Start button to copy the documents placed in the automatic document feeder (ADF).
3.5 E-mail
Press the Fax/Scan button. Tap E-Mail Me and then press the Start button to scan and e-mail the document to the e-mail address of the logged in user. Note: E-mail is tracked and charged as if it was a Scan to folder job.
3.6 Logout
There is a configurable Timeout that defaults to 60 seconds and is controlled by the device. The logout process is initiated if no buttons are taped for this period. To logout actively:
Press the Access button
3.7 Register card with PUK code
Register card with PUK code: 1. Use card reader. If the card is unknown and there is an available PUK
code in the SafeCom system the user is asked to enter his PUK code. 2. Tap PUK code on the touch-screen. 3. Enter PUK code and tap OK. 4. Tap PIN code on the touch-screen. 5. Enter PIN code and tap OK. 6. The card is registered and you are asked to login again. Note: Registering a new, unknown card requires a PUK code, and cannot be done with Windows credentials only.

4 Troubleshooting
D60713-23 38
4 Troubleshooting This chapter contains troubleshooting hints for the SafeCom Go Konica Minolta product. Additional troubleshooting hints are available in the Troubleshooting chapter in SafeCom G4 Administrator’s Manual D60650.
4.1 SafeCom Help Desk Assistant
We want your SafeCom solution to be one that reduces not only print costs, but is also easy to support. In the following you will find useful troubleshoot hints. The most common problems reported by end-users have been compiled into an online SafeCom Help Desk Assistant available at safecom.eu/help
4.2 Servlets
SafeCom has implemented two servlets to improve diagnostics data in SafeCom Device Server:
/debug/dump/heap
/debug/dump/threads Enter the path to the SafeCom Device Server in a browser followed by the paths to the servlets. Example: http://<DeviceServerAddress>:8080/debug/dump/heap Note: These servlets have been implemented in order to assist SafeCom Support in diagnosing severe failures regarding SafeCom Device Server. Therefore we recommend only making the thread and heap dump on request from SafeCom Support Technician.
4.3 SafeCom Device Server does not start
Ensure that your Java Runtime Environment is working properly.
4.4 Authentication Version 2.0 Not Found
If you see this error message “Authentication version 2.0 not found” after updating F/W in the device, you need to change the Software Switch Setting to the following in the Service Mode on the device: Switch No.: 25 HEX Assignment: 20 Change Software Switch Settings: 1. On the device press the Function Counter button. 2. Tap the Meter Count button on the display, and then Check details. 3. Enter the Service mode, by pressing the Stop button, enter '00', press
Stop again, and then '01'.

4 Troubleshooting
D60713-23 39
4. In the service mode tap System 2. 5. Tap Software Switch Settings. 6. Type '25' in Switch No. field. 7. Type '20' in Hex Assignment field. 8. Tap Fix.
4.5 At the device: printing fails mid-job
The Device Server periodically sends SNMP requests to devices in order to get
information about their current state. Under certain circumstances, certain
devices stop responding to these requests, resulting in a cancelled
communication as well as failed print jobs. To solve this, add the following line
to the config.ini file (located in equinox subfolder of the SafeCom
installation folder):
deviceserver.printerStateCheckUnderPrinting=false
4.6 At the device: printing fails when post tracking is enabled
If you have post tracking enabled, and your print jobs fail, you may to reconfigure your device properties due to device-specific User Authentication naming.

4 Troubleshooting
D60713-23 40
1. Login to SafeCom Device Server (2.3.1). 2. In the left pane expand Device Server and click on the device to open
Device tab (2.5). 3. Ensure that Post tracking is checked and click Save (if applicable). 4. Open the Properties dialog for the printer and click the Configure tab. 5. In the Device Option list scroll to and click User Authentication. 6. Change Setting to ON (Enhanced Server) (for older devices, it is the ON
(Device) option)and click Apply.

4 Troubleshooting
D60713-23 41
7. Click Obtain Settings and Specify IP Address or Printer Name.
8. Click OK, then click Apply on the Configure tab. 9. Click on the General tab and select Printing Preferences… 10. On the Basic tab click Authentication/Account Track…
4 Troubleshooting
D60713-23 42
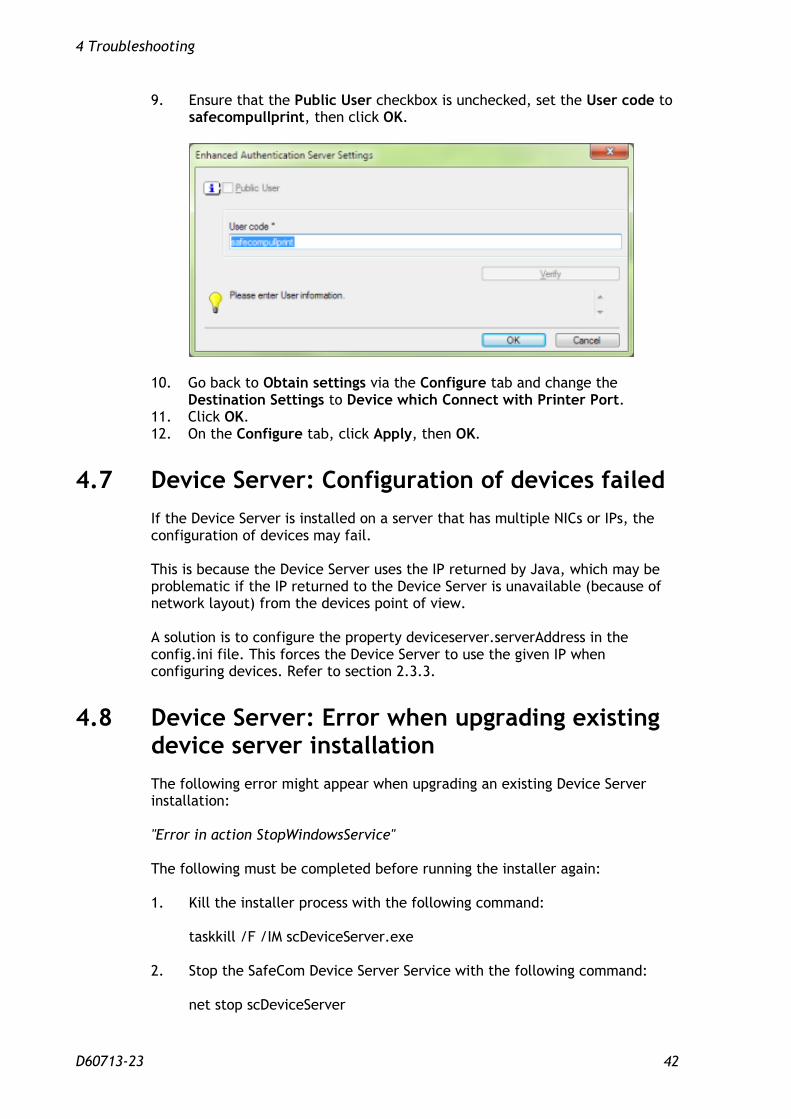
9. Ensure that the Public User checkbox is unchecked, set the User code to safecompullprint, then click OK.
10. Go back to Obtain settings via the Configure tab and change the
Destination Settings to Device which Connect with Printer Port. 11. Click OK. 12. On the Configure tab, click Apply, then OK.
4.7 Device Server: Configuration of devices failed
If the Device Server is installed on a server that has multiple NICs or IPs, the configuration of devices may fail. This is because the Device Server uses the IP returned by Java, which may be problematic if the IP returned to the Device Server is unavailable (because of network layout) from the devices point of view. A solution is to configure the property deviceserver.serverAddress in the config.ini file. This forces the Device Server to use the given IP when configuring devices. Refer to section 2.3.3.
4.8 Device Server: Error when upgrading existing device server installation
The following error might appear when upgrading an existing Device Server installation: "Error in action StopWindowsService" The following must be completed before running the installer again: 1. Kill the installer process with the following command: taskkill /F /IM scDeviceServer.exe 2. Stop the SafeCom Device Server Service with the following command: net stop scDeviceServer

4 Troubleshooting
D60713-23 43
3. Start the SafeCom Device Server again with the following command: net start scDeviceServer 4. Re-run the SafeCom Device Server installer.

5 Regulatory information
D60713-23 44
5 Regulatory information WARNING NOTE: This equipment has been tested and found to comply with the limits for a Class A digital device, pursuant to part 15 of the FCC Rules. These limits are designed to provide reasonable protection against harmful interference in a residential installation. This equipment generates uses and can radiate radio frequency energy and, if not installed and used in accordance with the instructions, may cause harmful interference to radio communications. However, there is no guarantee that interference will not occur in a particular installation. If this equipment does cause harmful interference to radio or television reception, which can be determined by turning the equipment off and on, the user is encouraged to try to correct the interference by one or more of the following measures —Reorient or relocate the receiving antenna. —Increase the separation between the equipment and receiver. —Connect the equipment into an outlet on a circuit different from that to
which the receiver is connected. —Consult the dealer or an experienced radio/TV technician for help. CAUTION: Changes or modifications not expressly approved by SafeCom a/s could void the user’s authority to operate this equipment according to part 15 of the FCC rules. This equipment generates, uses, and can radiate radio frequency energy and if not installed and used in accordance with the instruction manual, may cause interference to radio communications. It has been tested and found to comply with the limits for a Class A computing device pursuant to Subpart B of Part 15 of FCC Rules, which are designed to provide reasonable protection against such interference when operated in a commercial environment. Operation of this equipment in a residential area is likely to cause interference in which case the user will be required to take whatever measures may be required to correct the interference at the user's own expense. CE conformance: This product has been developed and produced in accordance with the EMC directive and the Low Voltage directive and therefore carries the CE mark. EMC directive: This product observes the rules and regulations of the EMC directive. If so required, a declaration of conformity in local language stipulating the applied rules and regulations can be obtained.

6 Index
D60713-23 45
6 Index Document history, 9
Help Desk Assistant, 36
ID code, 22
Manuals, 8
Patent, 2
Post track, 22
Regulatory information, 38
SafeCom Go Konica Minolta, 5
SafeCom Help Desk Assistant,
36
System requirements
SafeCom Go Konica Minolta, 5
Third Party Software, 2
Tracking data adjustment, 22
Trademarks, 2
Troubleshooting, 36