safer stronger homes - reducing your risk during a … stronger homes reducing your risk during a...
TRANSCRIPT
Safer, Stronger Homes Reducing Your Risk DuringA Natural Disaster
U.S. Department of Housing and Urban Development | Office of Policy Development and Research

Safer, Stronger Homes
Reducing Your Risk During a Natural Disaster
Order number C-CHI-01087, CHI-T0001 dated September 28, 2010
Under GSA Contract GSA MOBIS–GS-10F-0516N
Prepared for
U.S. Department of Housing and Urban Development
Office of Policy Development and Research
Washington DC
Prepared by Newport Partners LLC
Davidsonville, MD
and ARES Consulting
West River, Maryland
November 2011

Acknowledgements
The authors of this report extend our thanks to the advisory group assembled for this project. The individuals listed below contributed their ideas and experience in identifying strategies identified in this report, and recommended approaches for packaging the materials and disseminating them to the building industry.
Bill Coulbourne, Applied Technology Council, Rehoboth Beach, Delaware
Chip Dence, East End Builders, Victoria, Texas
Hank Hofford, Bennett Hofford Construction Company, Charleston, South Carolina
Doug Harvey, Building Officials Association of Florida, Lake Mary, Florida
Fred Malik, Insurance Institute for Business & Home Safety, Tampa, Florida
Randy Noel, Reve Inc., Laplace, Louisiana
Randy Shackleford, Simpson Strong-Tie Co., McKinney, Texas
Len Tylka Jr., LTL Builders Inc., West Palm Beach, Florida
Disclaimer
Although the authors practiced diligence in researching the contents of this report, they, nor the members of the advisory group or the organizations they represent, the U.S. Department of Housing and Urban Development, ARES, nor Newport Partners LLC and their employees or owners, make any warranties or guarantees as to the accuracy and applicability of information in this document. The users of information herein are advised to always check with a qualified individual and their local building department before implementing any of the strategies.

Table of Contents Introduction .................................................................................................................................1
How to Use This Guide ...............................................................................................................1
Building Codes & Building Better ................................................................................................3
Why Mitigate? .............................................................................................................................3
When to Mitigate? .......................................................................................................................4
Benefits of Mitigation...................................................................................................................4
Where to Mitigate?......................................................................................................................5
Basics of Good Practice............................................................................................................11
Catalogue of Enhanced Mitigation Strategies............................................................................14
Other Considerations ................................................................................................................14
Table of Figures Figure 1: Presidential Disaster Declarations................................................................................4
Figure 2: High Wind Region Map ................................................................................................6
Figure 3: Wind-Driven Rain Map .................................................................................................7
Figure 4: Damaging Earthquakes in the US (1750-1996) ............................................................8
Figure 5: Seismic Design Category in United States ...................................................................9
Figure 6: Example of a Flood Plain Map ...................................................................................10
Figure 7: Wind Load Test in a Laboratory Setting .....................................................................12
Figure 8: Illustration of Continuous Load Path to Resist Wind ...................................................13

- 1 -
Introduction “An ounce of prevention is worth a pound of cure.”
~ B. Franklin
Why should I consider improving the way my home is built? Don’t building codes already ensure a home is safe enough? And doesn’t insurance take care of any damage anyway? How much does it cost and what do I get in return? — These are just a few of the questions that come to mind when considering decisions related to upgrading the construction of your new home.
At a very basic level, most people probably will admit that they want to avoid costly forms of damage to their home, personal contents, and harm to human life. Yet there are natural forces all around us that we often ignore or pay little attention to for various reasons. We tend to assume the big events like hurricanes and earthquakes are already taken care of through building codes. As you read through this document, you will find that building codes don’t fully protect you or your home all of the time. Further, they don’t often address damage from smaller events that can prove costly.
Mit·i·gate \ mi-te-gāt \ 1: to make less harsh or hostile 2: to make less severe or painful (The Merriam Webster Dictionary, 1994)
The first step to considering improvements during construction, or mitigation as it is often called, is to become an informed builder or consumer. That is the primary goal of this guide.
Here, you will find that it includes answers to important questions which will help consumers, builders, and others become wise decision-makers. It is not about “pushing” disaster mitigation so much as it is about explaining it so that individuals can make sensible decisions.
“Mitigation is all about avoiding bad things before they happen whereas insurance is all about paying for bad things before and after they happen.”
~ R.U. Redy
How to Use This Guide This mitigation guide allows you to shop for specific disaster mitigation solutions and associated resources. When you consider one mitigation strategy, other related strategies will be brought to your attention for consideration. Often, you will find that the best value comes in a package deal rather than a piecemeal approach. So, please browse this catalogue for items that make sense to you for your particular situation. And, along the way, pay attention to any other considerations associated with a particular mitigation strategy.

- 2 -
BUILDERS: If you already have a strong and current building code in your area, you can use this catalogue to design optional upgrades or include quality features in your homes that will differentiate you from other builders. If you are not in an area where the risk of a disaster is high or if there is an older or no building code, you should first look at the section in this report on the basics of good practice to help prevent damage from ground movements, winds, and flooding.
HOMEBUYERS: Use this catalogue to shop for features you want and to compare builder practices.
If you are ready to begin examining options for enhanced mitigation ideas, click here to skip to the Catalogue of Enhanced Mitigation Strategies in this document. For those who prefer an overview of the basics, continue reading on.
Who pays for natural disasters?
The consumer pays for disasters. Put more succinctly: you pay! Insurance is a means to help
individual consumers and society pay for disaster losses in a manageable way. Invariably, if a
consumer’s property is insured, the cost of future claims is paid through periodic insurance premiums.
If there is a deductible amount in the insurance coverage, then the consumer also pays for the first
portion of damage incurred. If there are exclusions or conditions in the insurance coverage, the
consumer could pay for the full amount of some types of damage. If the consumer is uninsured, then
the consumer pays out-of-pocket to recover all losses or potentially loses everything, including a
place to live, irreplaceable items such as family heirlooms, personal items, etc.
The bottom line is that, whether insured or uninsured, the consumer ultimately pays for any lack of
effective mitigation to protect against future natural disasters such as extreme wind events,
earthquakes, wind-driven rain, or flooding. This concern extends beyond economic loss to include the
safety and protection of building occupants. Therefore, it is important to understand your options
when it comes to managing risk through use of disaster mitigation strategies as well as insurance.

- 3 -
Building Codes & Building Better The first mitigation decision to address is whether to simply “build to code” or to put resources into building “beyond code” based on costs, benefits, and other factors. Clearly, building to code is an important first step because it is a local regulatory requirement, although building codes may not be adopted, enforced, or up-to-date in some areas of the United States. The local code establishes the minimum level of disaster mitigation that is legally permissible or politically acceptable from the standpoint of public safety and general welfare. The local building code can be viewed as a minimum “one-size-fits-all” solution, and we know from experience that such solutions may be good for the whole, but they are not always optimal for any one individual’s circumstances. This guide will help individuals (builders and consumers) make optimal decisions to go beyond the “one-size-fits-all” approach of minimum building code requirements, but only to the extent that it makes sense for their particular situation.
Basic code requirements won’t prevent all damage or address every possible level of disaster. They do not necessarily address other important considerations such as moisture intrusion during wind-driven rain events or structural safety in the case of a tornado. There will always be a chance of a home seeing a storm that exceeds the forces anticipated by the code. Thus, a basic understanding of code requirements is a good thing even if you don’t think you will ever see “the big one.” Builders and homeowners far from the high-risk zones will benefit by considering some of the code requirements or concepts from higher risk areas.
Why Mitigate? While many people may be caught off guard when a natural disaster strikes, we should not consider such things to be unexpected. Each year in the United States, thousands of homes are damaged or destroyed by disasters such as floods, severe wind events (thunderstorms, down-bursts, hurricanes, and tornadoes) and earthquakes. Perhaps a good way to start assessing your risk is by examining the distribution of disasters in the United States. Figure 1 presents this distribution based on Presidential Disaster Declarations. Figure 1 also illustrates how nearly every area of the country has been impacted by a natural disaster at one time or another.
While the risk of an extreme event happening to any individual home varies geographically and is relatively low overall, it is a real risk with potentially high consequences (e.g., loss of home, loss of life, injury). On the other hand, damage from more routine events may not be as catastrophic but can come with a high cost (e.g., water damage to building contents, siding and roofing damage).
“When it comes to natural disasters, it is not a matter “if” but when and where will it happen next.”
~ Silence Dogood II

- 4 -
Figure 1: Presidential Disaster Declarations
Source: http://www.fema.gov/pdf/hazard/map/declarationsmap1964_07.pdf (3/23/2011)
The chance of experiencing a natural disaster is far greater than winning the lottery. Should you buy a lottery ticket, you are taking a large risk with a small part of your income for an extremely small chance of winning a big sum of money. Would you not then also consider investing a modest sum of money to better your odds of surviving a more likely future natural disaster and enjoy the investment paying itself back over time? This document is based on the expectation that your answer to this question is ‘YES.’
When to Mitigate? The best time to mitigate is now! It is too late after disaster strikes. It is also much more expensive to do it after construction is completed. Mitigation is an investment today for a safer and less costly tomorrow.
Benefits of Mitigation Some of the general benefits of implementing disaster mitigation strategies include the following:
• Better protect your home’s occupants (family, friends, pets, etc.) from harm’s way.
• Potentially decrease hazard insurance rates or out-of-pocket losses (i.e., deductable payments).

- 5 -
• Avoid loss of irreplaceable or uninsured building contents and keepsakes.
• Minimize potential displacement and disruption of life following a disaster.
• Peace of mind in knowing that you’ve done what you can to plan for the unexpected and protect your home and family.
Where to Mitigate? Experience has shown that there are more hazards or risks to mitigate than money or resources to get the job done. So, one must be practical and selective in choosing what to mitigate. This document addresses natural hazards or risks that have historically posed a significant and continuing threat to public safety and economic welfare. As you read through the fact sheets on specific strategies at the end of this document, the following symbols are used to help determine if one strategy or group of strategies are appropriate in a given area:
Wind (hurricanes, thunderstorms, tornadoes)
Wind-Driven Rain (associated with hurricanes, tropical storms, thunderstorms)
Earthquakes
Flooding (coastal and inland)
Natural hazards vary significantly on a regional scale and also on a local or site-specific scale. It is important to understand and assess natural hazards as they apply to a specific site because this assessment should factor into any decision to mitigate. It will also help you to judge how much mitigation is enough. Some building sites and locations are much more hazardous than others, but this doesn’t always mean that local building requirements vary accordingly to give a level of protection consistent with the hazard. The maps that follow are intended as general guidance for determining which strategies are appropriate for a given area. The maps are guidelines and do not imply that there would be no benefit outside the areas shown on each one.
- 6 -
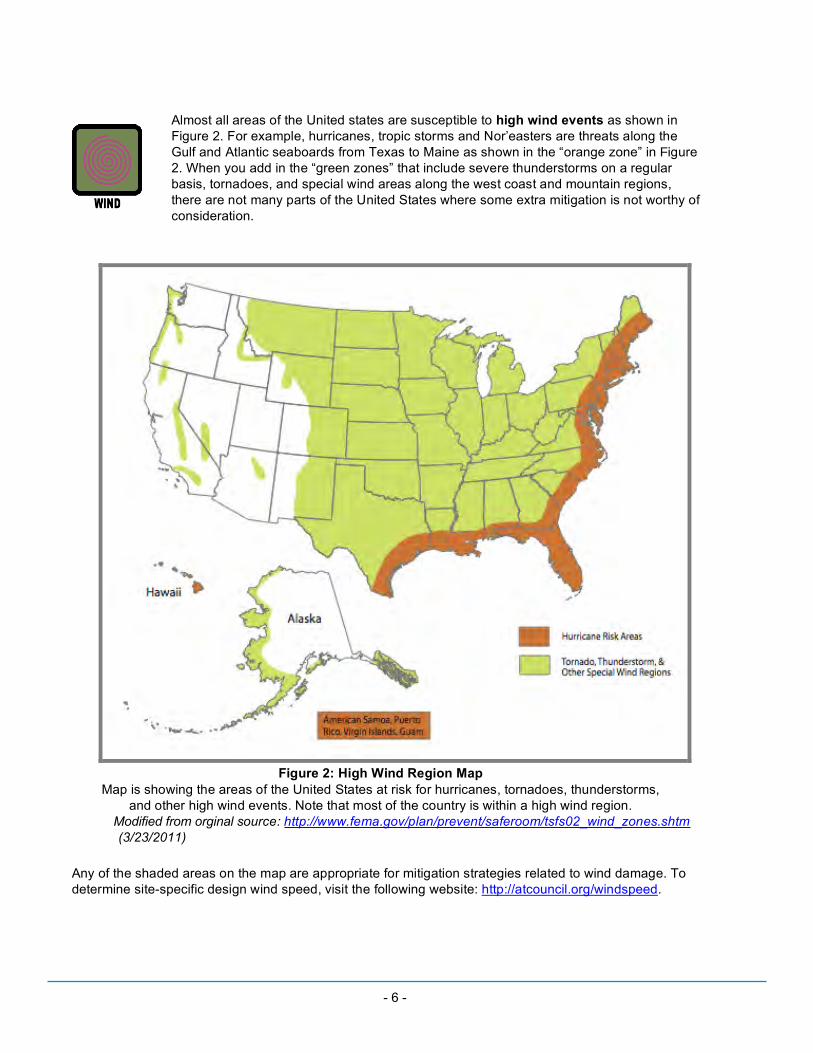
Almost all areas of the United states are susceptible to high wind events as shown in Figure 2. For example, hurricanes, tropic storms and Nor’easters are threats along the Gulf and Atlantic seaboards from Texas to Maine as shown in the “orange zone” in Figure 2. When you add in the “green zones” that include severe thunderstorms on a regular basis, tornadoes, and special wind areas along the west coast and mountain regions, there are not many parts of the United States where some extra mitigation is not worthy of consideration.
Figure 2: High Wind Region Map
Map is showing the areas of the United States at risk for hurricanes, tornadoes, thunderstorms, and other high wind events. Note that most of the country is within a high wind region.
Modified from orginal source: http://www.fema.gov/plan/prevent/saferoom/tsfs02_wind_zones.shtm (3/23/2011)
Any of the shaded areas on the map are appropriate for mitigation strategies related to wind damage. To determine site-specific design wind speed, visit the following website: http://atcouncil.org/windspeed.

- 7 -
Wind-driven rain occurs in many areas of the United States. as a result of thunderstorms and other storm events. However, the “hot-spots” shaded in Figure 3 experience a particularly severe amount of wind driven rain (horizontal rainfall amount) year after year. In these areas, rainfall can overwhelm ordinary weather protection and cause significant water damage which can lead to mold or hidden structural deterioration within a home due to corrosion or rot.
Figure 3: Wind-Driven Rain Map
Source: Underwood, U. of Ga., 1999 as reported in Moisture Resistant Homes (HUD 2006)

- 8 -
Earthquakes have occurred in most areas of the United States. The most severe areas are at tectonic plate boundaries along the west coast, and southern Alaska and Hawaii. There are also two areas in the eastern United States that have experienced major earthquakes in the past couple hundred years – Charleston, SC and New Madrid, MO (near Memphis, TN and St. Louis, MO). These quakes caused masonry chimneys to topple over at distances of hundreds of miles from the epicenter.
US Earthquakes Causing Damage 1750-1996
Modified Mercalli Intensity VI - XII
Continental U.S.
Alaska
Hawaii
Figure 4: Damaging Earthquakes in the US (1750-1996) Source: http://earthquake.usgs.gov/earthquakes/states/us_damage_eq.php (3/23/2011)
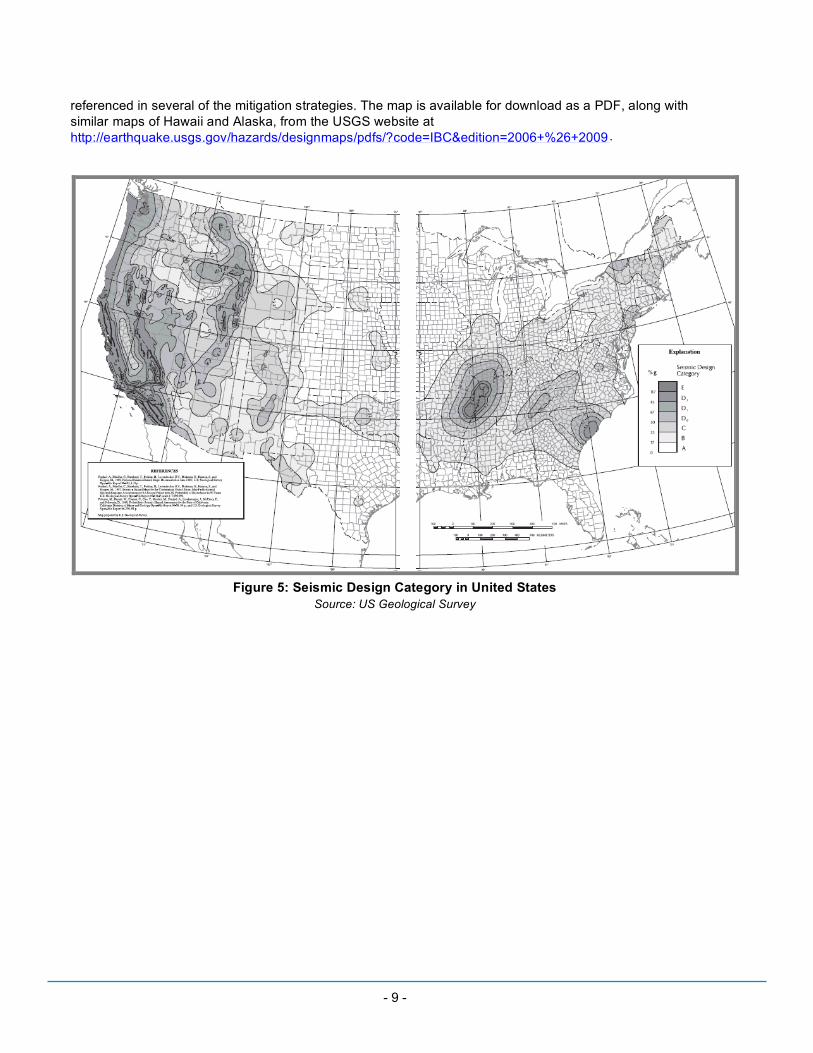
Figure 4 illustrates how widespread seismic events have been in the United States. The 2009 International Residential Code (IRC), published by the International Code Council (www.iccsafe.org), also contains seismic risk maps that identify the relative risk by category. The IRC maps were developed by the U.S Geological Survey (USGS). The map of the US mainland shown in Figure 5 can be used to identify the seismic design category
- 9 -
referenced in several of the mitigation strategies. The map is available for download as a PDF, along with similar maps of Hawaii and Alaska, from the USGS website at http://earthquake.usgs.gov/hazards/designmaps/pdfs/?code=IBC&edition=2006+%26+2009 .
Figure 5: Seismic Design Category in United States
Source: US Geological Survey

- 10 -
Flooding accounts for as much as one third of Presidential-declared disasters and is prominent in all coastal regions and low-lying areas near waterways, such as the Mississippi River valley. In other areas that are normally “dry,” flash floods can be a major hazard. For areas that have been subject to a flood study, FEMA publishes Flood Insurance Rate Maps (FIRMs). The map in Figure 6 shows a flood map, which can be created online. It shows the extent that flood waters may extend inland from waterways – this is known as the Flood Plain.
Figure 6: Example of a Flood Plain Map
Source: http://www.fema.gov/hazard/map/index.shtm

- 11 -
Basics of Good Practice Well-built homes are often hard to tell apart from others that may be considered average or typical. The features that determine a well-built, disaster resistant home are generally not seen when the house is done. They are hidden features that must be “built in” from the start.
There are five very important things that help distinguish a well-built home:
#1 – Good Plans. The plans clearly indicate how the home is to be constructed – don’t just rely on vague “built-to-code” statements and generic details.
#2 – A Good Code. Modern building codes have minimum disaster-resistant features and this provides the starting point for good practice and any well-built home.
#3 – Code Enforcement. Local building departments vary in their ability or approach to code enforcement. However, effective code enforcement provides accountability.
#4 – Attention to Details. Significant attention must be given to construction details (connections, flashing, material specification, etc.) – it’s the little things that often make a big difference in disaster resistance.
#5 – Workmanship & Quality Control. Installers must be trained in the use of proper construction methods and materials in accordance with the building code, approved construction plans and specifications, and product manufacturer installation instructions. Installed work should be routinely inspected and corrected during construction. Don’t rely exclusively on limited building department spot checks.
The above factors, when used together with appropriate enhancements featured in this document, should help your home stand up to “the test of time.” Once you have the above steps in place, you should consider two important items in your design. One deals with the load path necessary to keep the structure intact and the other with pathways for water. These are critical paths for any builder to follow to help mitigate losses from natural events whether currently required by code or not.
RECOMMENDATION: If there is no building code in your area, it is strongly recommended that you build at least to the minimum requirements of a modern model building code, such as the 2009 International Residential Code (www.iccsafe.org). Voluntary “above-code” programs such as FORTIFIED for Safer Living® may also be considered (www.ibhs.org).
- 12 -
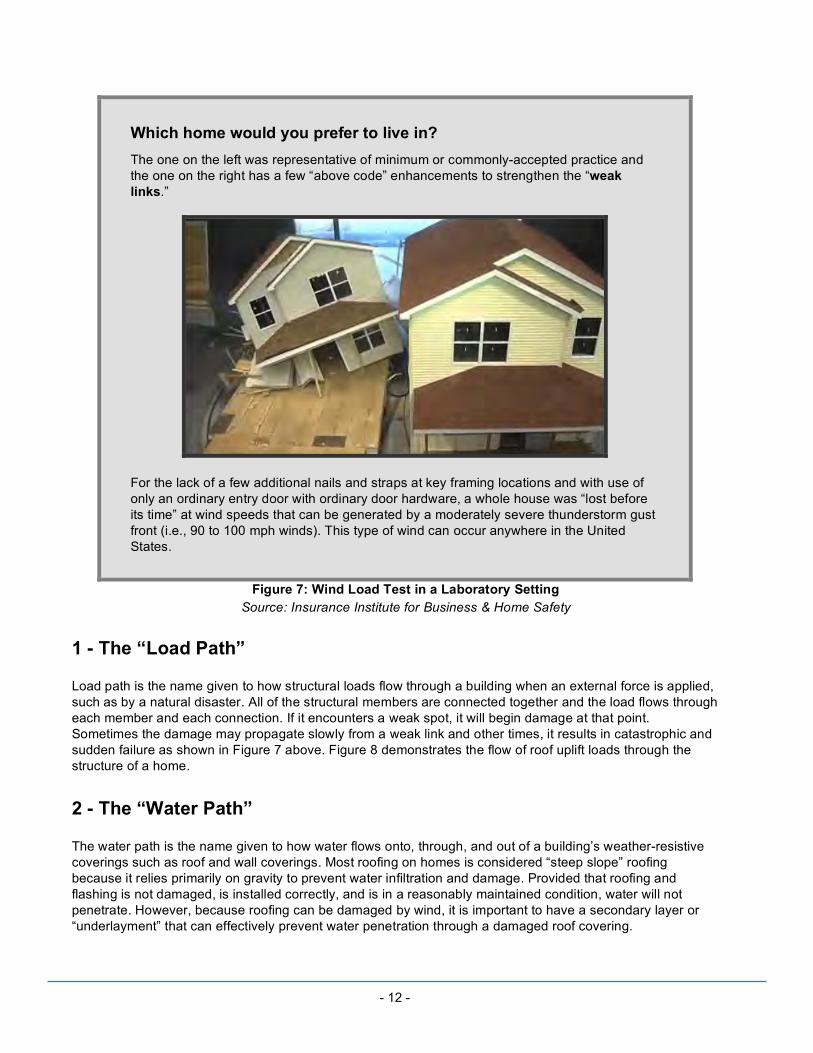
Which home would you prefer to live in? The one on the left was representative of minimum or commonly-accepted practice and the one on the right has a few “above code” enhancements to strengthen the “weak links.”
For the lack of a few additional nails and straps at key framing locations and with use of only an ordinary entry door with ordinary door hardware, a whole house was “lost before its time” at wind speeds that can be generated by a moderately severe thunderstorm gust front (i.e., 90 to 100 mph winds). This type of wind can occur anywhere in the United States.
Figure 7: Wind Load Test in a Laboratory Setting Source: Insurance Institute for Business & Home Safety
1 - The “Load Path”
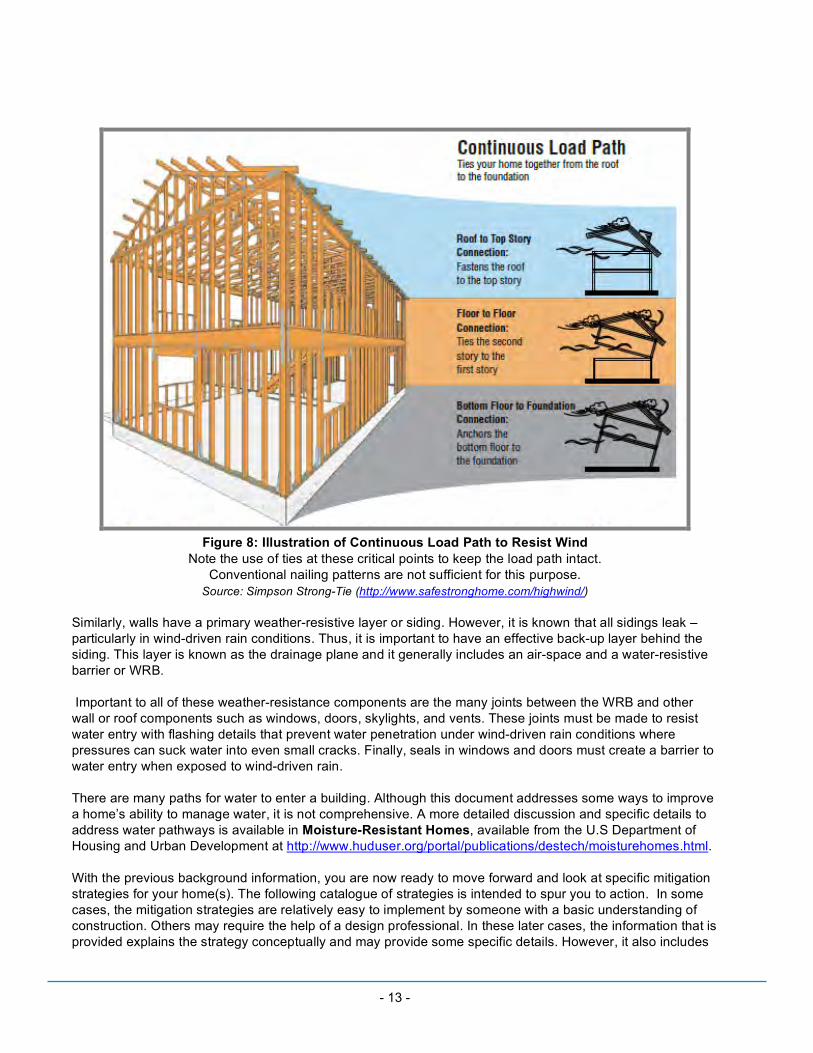
Load path is the name given to how structural loads flow through a building when an external force is applied, such as by a natural disaster. All of the structural members are connected together and the load flows through each member and each connection. If it encounters a weak spot, it will begin damage at that point. Sometimes the damage may propagate slowly from a weak link and other times, it results in catastrophic and sudden failure as shown in Figure 7 above. Figure 8 demonstrates the flow of roof uplift loads through the structure of a home.
2 - The “Water Path”
The water path is the name given to how water flows onto, through, and out of a building’s weather-resistive coverings such as roof and wall coverings. Most roofing on homes is considered “steep slope” roofing because it relies primarily on gravity to prevent water infiltration and damage. Provided that roofing and flashing is not damaged, is installed correctly, and is in a reasonably maintained condition, water will not penetrate. However, because roofing can be damaged by wind, it is important to have a secondary layer or “underlayment” that can effectively prevent water penetration through a damaged roof covering.
- 13 -
Figure 8: Illustration of Continuous Load Path to Resist Wind
Note the use of ties at these critical points to keep the load path intact. Conventional nailing patterns are not sufficient for this purpose.
Source: Simpson Strong-Tie (http://www.safestronghome.com/highwind/)
Similarly, walls have a primary weather-resistive layer or siding. However, it is known that all sidings leak – particularly in wind-driven rain conditions. Thus, it is important to have an effective back-up layer behind the siding. This layer is known as the drainage plane and it generally includes an air-space and a water-resistive barrier or WRB.
Important to all of these weather-resistance components are the many joints between the WRB and other wall or roof components such as windows, doors, skylights, and vents. These joints must be made to resist water entry with flashing details that prevent water penetration under wind-driven rain conditions where pressures can suck water into even small cracks. Finally, seals in windows and doors must create a barrier to water entry when exposed to wind-driven rain.
There are many paths for water to enter a building. Although this document addresses some ways to improve a home’s ability to manage water, it is not comprehensive. A more detailed discussion and specific details to address water pathways is available in Moisture-Resistant Homes, available from the U.S Department of Housing and Urban Development at http://www.huduser.org/portal/publications/destech/moisturehomes.html.
With the previous background information, you are now ready to move forward and look at specific mitigation strategies for your home(s). The following catalogue of strategies is intended to spur you to action. In some cases, the mitigation strategies are relatively easy to implement by someone with a basic understanding of construction. Others may require the help of a design professional. In these later cases, the information that is provided explains the strategy conceptually and may provide some specific details. However, it also includes

- 14 -
references to specific documents for more detailed information or recommends the use of a design professional.
The list of strategies presented here is not comprehensive. Rather, it was identified with the assistance of an advisory committee of builders and others who have had direct experience in dealing with disasters. The emphasis in this document is for the most part on mitigation strategies that have good benefits and low to moderate costs. There are many other strategies that may cost more or offer various levels of benefit that are worth considering. For additional information and other strategies, the following resources are recommended:
• International Code Council, Inc. - http://www.iccsafe.org • FORTIFIED For Safer Living - http://www.disastersafety.org/fortified?type=fortified_safer_living • FEMA 499 Home Builder’s Guide to Coastal Construction -
http://www.fema.gov/rebuild/mat/mat_fema499.shtm • http://www.floridadisaster.org
Catalogue of Enhanced Mitigation Strategies The mitigation strategies in the chart below are featured in this document. Specific fact sheets on each strategy follow the chart. You can go directly to a specific strategy by clicking on the title in the chart.
Application Fact Sheet No.
Title Wind Damage
Wind-Driven Rain Damage
Flood Damage
Earthquake Damage
01 Wind-Resistant Roof Configurations X 02 Enhanced Roof Sheathing Attachment X X 03 Wind and Water-Resistant Roofing Underlayment X X 04 Wind-Resistant Roof Coverings X X 05 Improved Gable Overhang Framing X 06 Reinforced Gable End Wall Construction X X 07 Improved Siding and Other Exterior Wall Finishes X X X 08 Enhanced Wind Pressure and Rain-Resistant
Window and Door Components X X
09 Roof Ventilation Practices to Prevent Wind-Driven Rain Penetration
X
10 Enhanced Water-Resistive Barrier and Flashing Practices
X
11 Reinforced Continuous Load Path X X 12 Earthquake and Wind-Resistant Chimneys X X 13 Extra Elevated Foundations X 14 Prevention of Tree-Fall Damage with Wind-Resistant
Landscaping X
Other Considerations The fact sheets are designed to be used either collectively or as individual fact sheets. However, it is important to understand that many of the strategies are interdependent. Although you will see improvements in performance with the individual strategies, some may be rendered less effective if other weak links in the building are not also addressed. For example, better roof coverings or underlayment won’t be very helpful if

- 15 -
the roof sheathing is blown off, taking the shingles with it. To the extent feasible, the fact sheets contain a section called “Other Considerations” that identify groups of strategies that are interrelated. Again, each strategy will provide some extra level of protection, but will work even better with these related strategies.
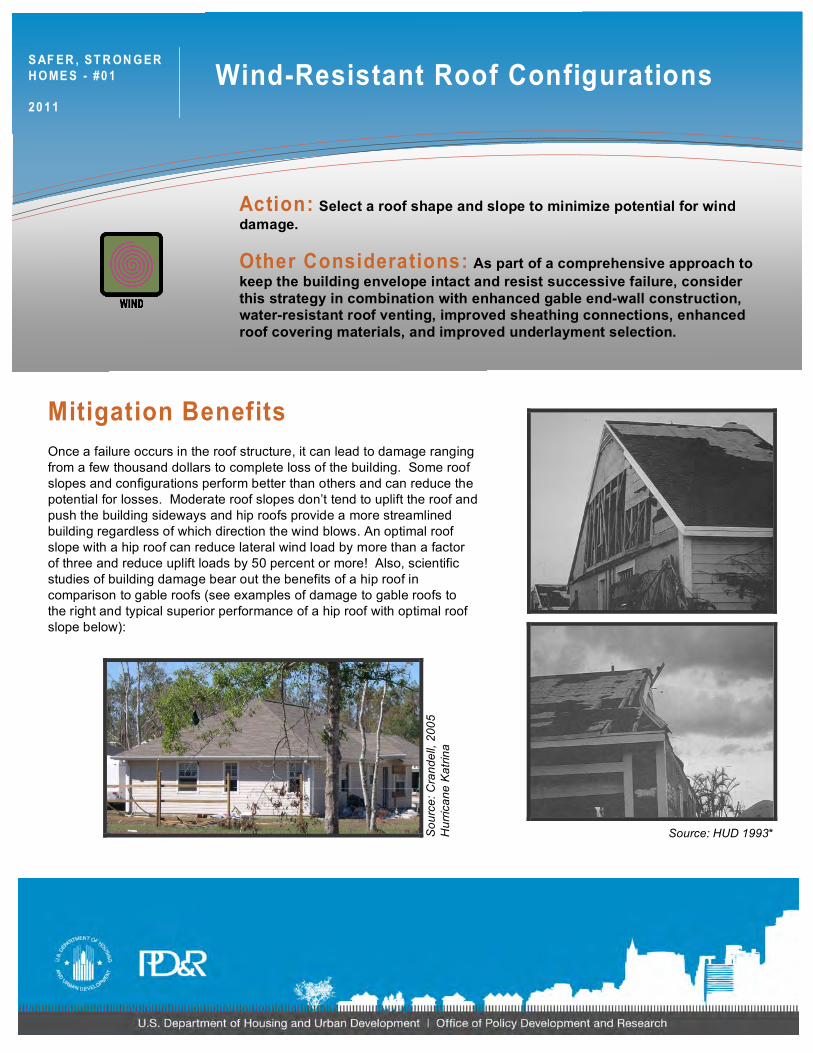
Mitigation Benefits Once a failure occurs in the roof structure, it can lead to damage ranging from a few thousand dollars to complete loss of the building. Some roof slopes and configurations perform better than others and can reduce the potential for losses. Moderate roof slopes don’t tend to uplift the roof and push the building sideways and hip roofs provide a more streamlined building regardless of which direction the wind blows. An optimal roof slope with a hip roof can reduce lateral wind load by more than a factor of three and reduce uplift loads by 50 percent or more! Also, scientific studies of building damage bear out the benefits of a hip roof in comparison to gable roofs (see examples of damage to gable roofs to the right and typical superior performance of a hip roof with optimal roof slope below):
Action: Select a roof shape and slope to minimize potential for wind damage.
Other Considerations: As part of a comprehensive approach to keep the building envelope intact and resist successive failure, consider this strategy in combination with enhanced gable end-wall construction, water-resistant roof venting, improved sheathing connections, enhanced roof covering materials, and improved underlayment selection.
Source: HUD 1993*
Wind-Resistant Roof Configurations
Sou
rce:
Cra
ndel
l, 20
05
Hur
rican
e K
atrin
a
S AF ER , ST R ON G ER H O ME S - #0 1 20 1 1
- 2 -
Safer, Stronger Homes - #01
Cost Above Conventional Practice Moderate: $1,000 to $3,000 - Depends on complexity of roof among other factors.
Typical Practice
Roof configuration and slope of the roof are not dictated by the building code, although some development covenants or local architectural standards may apply. In today’s market, roof slopes are getting steeper, with 8:12 or higher slopes not uncommon. At the other end of the range, very low slope roofs are still popular in many southern states. Although hip roofs have grown in popularity in the last few decades, a gable end is still the dominant roof type.
The roof system protects building contents from weather and other environment exposures, transfers and distributes loads to walls, and ties the overall building together as a structural unit. Roof slope and configuration design decisions are primarily driven by local market preferences. Thus, roof configuration is generally not considered at the building design stage from a wind damage mitigation perspective. A structural design professional is not likely to recommend changes to architectural plans to optimize resistance to wind, but will rather design the structural elements and fasteners to comply with the minimum code requirements. Although roofs of different slopes or configurations theoretically meet the same design criteria, they have been proven to perform at different levels.
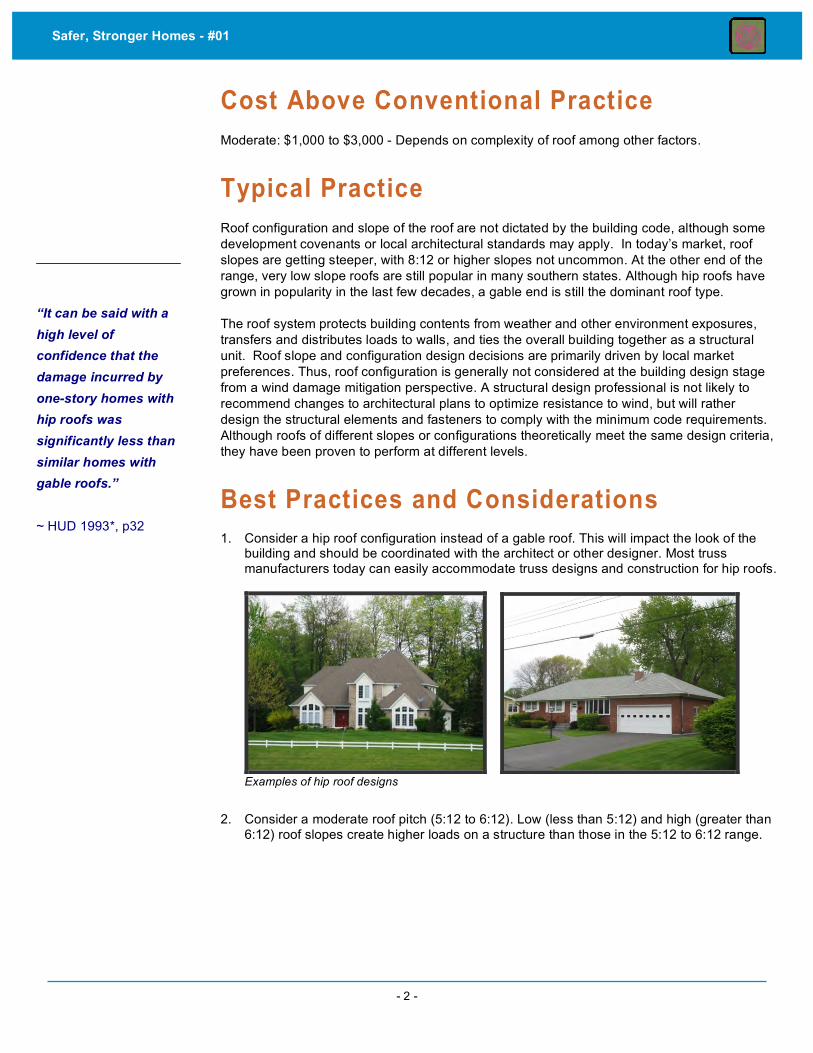
Best Practices and Considerations 1. Consider a hip roof configuration instead of a gable roof. This will impact the look of the
building and should be coordinated with the architect or other designer. Most truss manufacturers today can easily accommodate truss designs and construction for hip roofs.
Examples of hip roof designs
2. Consider a moderate roof pitch (5:12 to 6:12). Low (less than 5:12) and high (greater than 6:12) roof slopes create higher loads on a structure than those in the 5:12 to 6:12 range.
“It can be said with a high level of confidence that the damage incurred by one-story homes with hip roofs was significantly less than similar homes with gable roofs.” ~ HUD 1993*, p32

- 3 -
Safer, Stronger Homes - #01
As with the choice of roof configuration, the slope will impact the look of the home and should be coordinated with the designer or buyer to be satisfied with the final product. However, moderate slopes are fairly common in most areas and can be part of a well designed and aesthetically pleasing home. As with roof configuration, truss manufacturers are capable of modifying designs to most any roof pitch and still meet structural requirements at little to no difference in cost.
Additional Resources/Links Residential Structural Design Guide, U.S. Department of Housing and Urban Development, Washington, DC, 2001, http://www.huduser.org/portal/publications/destech/residential.html.
Coastal Construction Manual, FEMA 55, Fourth edition, Federal Emergency Management Agency, Washington, DC 2011, http://www.fema.gov/rebuild/mat/fema55.shtm.
*HUD 1993, Assessment of Damage to Single-Family Homes Caused by Hurricanes Andrew and Iniki, U.S. Department of Housing and Urban Development, Washington, DC, 1993.

Mitigation Benefits Improved roof sheathing attachment will better prevent a home’s structural “shell” from being compromised during an extreme wind event due to blow-off of roof sheathing. Experience has shown that loss of even one roof sheathing panel can multiply damage and losses. Roof sheathing attachment is the first connection in the “continuous load path” that transfers wind uplift loads from the roof to the ground. Once a section of sheathing is lost from a home, it can result in hundreds or thousands of dollars in water damage during a rain event at the low end to successive structural damage and complete loss of the building at the other end of the scale. On the other hand, even upgrading to a different fastener type can double the withdrawal capacity over more typical nails used for sheathing attachment. Similar increases in withdrawal capacity can be achieved by reducing the spacing between fasteners.
Cost Above Conventional Practice Low: Typically less than $250. The cost of extra or improved fasteners is minimal, although installation may take slightly longer if more fasteners are used. It may be helpful to have a specific inspection for the fastening stage that may require some extra cost if done by a third party.
Action: Strengthen roof sheathing attachment.
Other Considerations: If the roof framing is not as secure as the roof sheathing there is little benefit in enhanced roof sheathing attachment. Make sure the entire load path is continuous between components from the roof down to the foundation.
Many homes in Hurricane Andrew experienced low or moderate loss of roof sheathing. Although the rest of the structure may stay intact, the damage from water entry is often extensive. Source: U.S. Department of Housing and Urban Development
Enhanced Roof Sheathing Attachment
S AF ER , ST R ON G ER H O ME S - #0 2 20 1 1

- 2 -
Safer, Stronger Homes - #02
Typical Practice
Structural roof sheathing provides bracing to roof framing, supports the roof covering, and generally ties together the roof system to distribute wind load to wall systems and then down to the foundation. Modern building codes and standards have improved minimum roof sheathing attachment requirements (see figure below). Most codes including the 2009 International Residential Code (IRC) Table R602.3(1) provide detailed requirements. However, the IRC requirements for fasteners are minimum requirements and some simple enhancements can provide much improved performance.
Code minimum requirements are a good starting point for design. However, more often the failure of roof sheathing attachment is due to mistakes outside of the design. Wrong size nails or spacing, nail heads over-driven, panel joints not carefully aligned over framing, edge distance of fasteners less than 3/8”, and nails missing framing members (“shiners”) are common installation problems. Thus, you don’t always get what was designed and the result can lead to significant failure.
- 3 -
Safer, Stronger Homes - #02
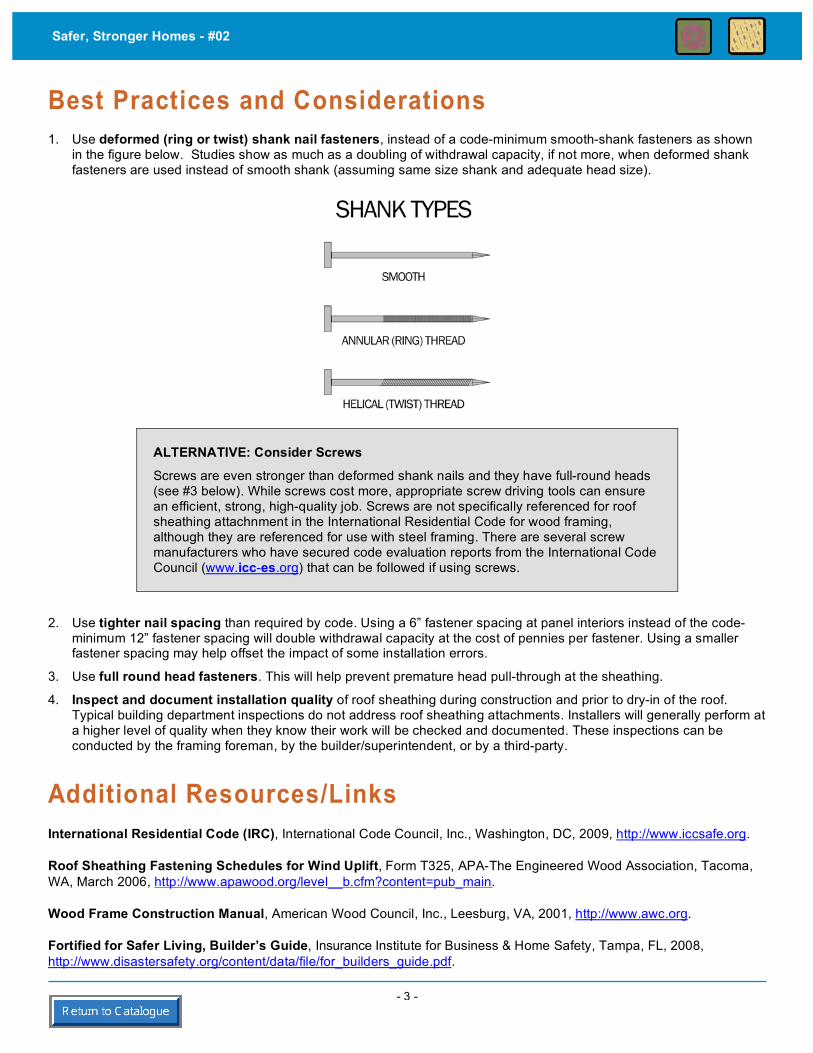
Best Practices and Considerations 1. Use deformed (ring or twist) shank nail fasteners, instead of a code-minimum smooth-shank fasteners as shown
in the figure below. Studies show as much as a doubling of withdrawal capacity, if not more, when deformed shank fasteners are used instead of smooth shank (assuming same size shank and adequate head size).
ALTERNATIVE: Consider Screws
Screws are even stronger than deformed shank nails and they have full-round heads (see #3 below). While screws cost more, appropriate screw driving tools can ensure an efficient, strong, high-quality job. Screws are not specifically referenced for roof sheathing attachnment in the International Residential Code for wood framing, although they are referenced for use with steel framing. There are several screw manufacturers who have secured code evaluation reports from the International Code Council (www.icc-es.org) that can be followed if using screws.
2. Use tighter nail spacing than required by code. Using a 6” fastener spacing at panel interiors instead of the code-minimum 12” fastener spacing will double withdrawal capacity at the cost of pennies per fastener. Using a smaller fastener spacing may help offset the impact of some installation errors.
3. Use full round head fasteners. This will help prevent premature head pull-through at the sheathing.
4. Inspect and document installation quality of roof sheathing during construction and prior to dry-in of the roof. Typical building department inspections do not address roof sheathing attachments. Installers will generally perform at a higher level of quality when they know their work will be checked and documented. These inspections can be conducted by the framing foreman, by the builder/superintendent, or by a third-party.
Additional Resources/Links International Residential Code (IRC), International Code Council, Inc., Washington, DC, 2009, http://www.iccsafe.org.
Roof Sheathing Fastening Schedules for Wind Uplift, Form T325, APA-The Engineered Wood Association, Tacoma, WA, March 2006, http://www.apawood.org/level__b.cfm?content=pub_main.
Wood Frame Construction Manual, American Wood Council, Inc., Leesburg, VA, 2001, http://www.awc.org.
Fortified for Safer Living, Builder’s Guide, Insurance Institute for Business & Home Safety, Tampa, FL, 2008, http://www.disastersafety.org/content/data/file/for_builders_guide.pdf.
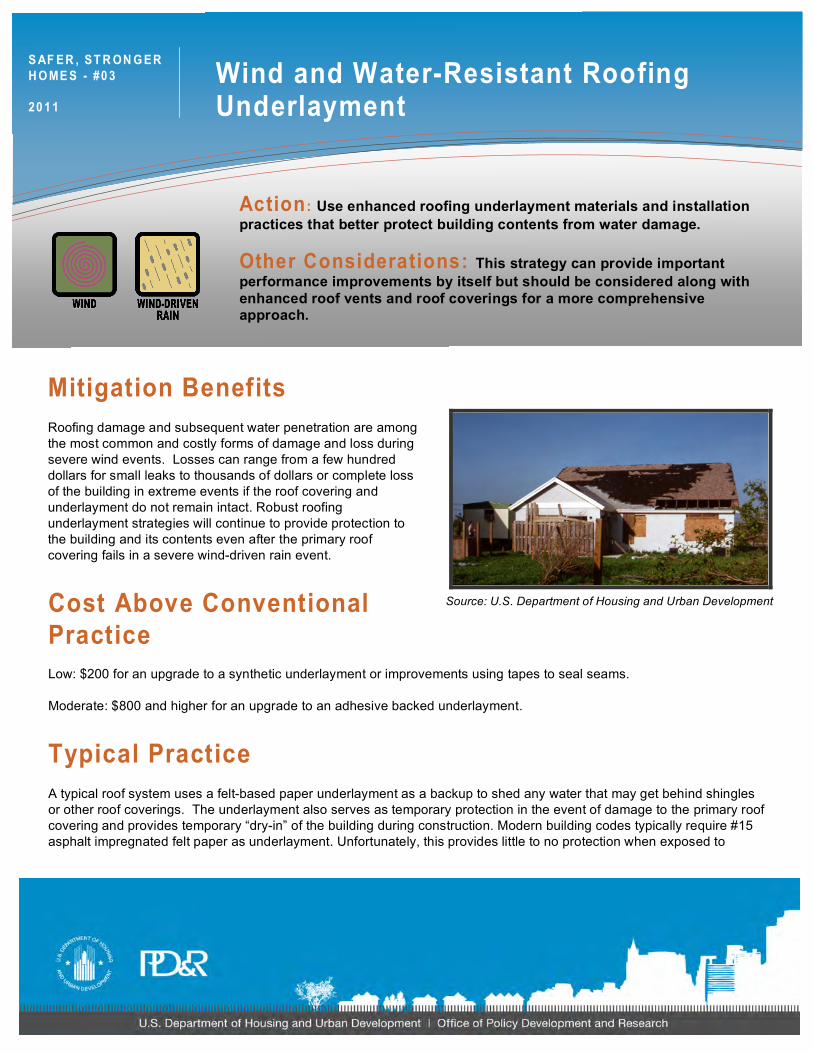
Mitigation Benefits Roofing damage and subsequent water penetration are among the most common and costly forms of damage and loss during severe wind events. Losses can range from a few hundred dollars for small leaks to thousands of dollars or complete loss of the building in extreme events if the roof covering and underlayment do not remain intact. Robust roofing underlayment strategies will continue to provide protection to the building and its contents even after the primary roof covering fails in a severe wind-driven rain event.
Action: Use enhanced roofing underlayment materials and installation practices that better protect building contents from water damage.
Other Considerations: This strategy can provide important performance improvements by itself but should be considered along with enhanced roof vents and roof coverings for a more comprehensive approach.
Source: U.S. Department of Housing and Urban Development
Wind and Water-Resistant Roofing Underlayment
Cost Above Conventional Practice Low: $200 for an upgrade to a synthetic underlayment or improvements using tapes to seal seams.
Moderate: $800 and higher for an upgrade to an adhesive backed underlayment.
Typical Practice
A typical roof system uses a felt-based paper underlayment as a backup to shed any water that may get behind shingles or other roof coverings. The underlayment also serves as temporary protection in the event of damage to the primary roof covering and provides temporary “dry-in” of the building during construction. Modern building codes typically require #15 asphalt impregnated felt paper as underlayment. Unfortunately, this provides little to no protection when exposed to
S AF ER , ST R ON G ER H O ME S - #0 3 20 1 1

- 2 -
Safer, Stronger Homes - #03
severe winds and/or wind-driven rain that causes failure of the primary roofing material. Traditional roofing underlayment is only intended to protect against water penetration due to incidental water leakage through an otherwise intact or substantially undamaged roof covering.
Best Practices and Considerations 1. Use a quality bituminous (“peel and stick”) flashing tape on roof sheathing joints and at
penetrations through the roof sheathing. Then apply underlayment and roofing following code requirements and manufacturer installation instructions.
Bituminous ‘peel-and-stick’ flashing tape applied to roof sheathing joints. Photo Source: Insurance Institute for Business & Home Safety.
2. Upgrade from #15 felt roofing paper to a reinforced synthetic roofing underlayment. These enhanced proprietary materials offer better protection against wind blow-off and water entry than the more traditional roofing paper.
3. For the greatest degree of protection (highest cost), use self-adhering membrane roofing underlayment. These products basically are robust membranes that are secured by adhesives. They are extremely resistant to being blown off by wind. In climates subject to snow accumulation on the roof during the winter, this practice also protects against water intrusion due to roof eave ice dams.
Adhesive-backed membrane
Source: Blok-Lok, Used with permission
“The wind resistance of a secondary water penetration barrier using self-adhesive roll flashing was studied. Tests showed that 4- or 6-inch wide strips resisted uplift pressures as high as 250 psf when applied over a ½-inch gap between sheathing. The rolls of self-adhesive flashing are commercially available from a number of manufacturers and usually cost less than $20 for a 100-foot roll.” ~ Dr. David Prevatt,

- 3 -
Safer, Stronger Homes - #03
Additional Resources/Links Fortified for Safer Living, Builder’s Guide, Insurance Institute for Business & Home Safety, Tampa, FL, 2008, http://www.disastersafety.org/content/data/file/for_builders_guide.pdf.
FEMA 499, Home Builder’s Guide to Coastal Construction, Federal Emergency Management Agency, Washington, DC, 2010, http://www.fema.gov/rebuild/mat/mat_fema499.shtm.
Moisture Resistant Homes, U.S. Department of Housing and Urban Development, Washington, DC, 2006, http://www.huduser.org/portal/publications/destech/moisturehomes.html.

Mitigation Benefits The roofing material and its installation form the primary line of defense against water penetration and damage to a building and its contents. Even a small loss of the primary roof covering can lead to hundreds or thousands of dollars in repair costs. Blown-off roof materials can also inflict damage on neighboring homes by creating projectiles under high wind conditions. Applying “above code minimum” wind resistant roof coverings will provide benefits in reducing the most common source of damage in severe wind and wind-driven rain events.
Cost Above Conventional Practice Low: Less than $1,000 for improvements to installation practice.
Moderate: $1000 to $3000 for upgrades to higher wind resistance within the same class of material.
High: Over $3000 for an upgrade to a higher-performing material.
Action: Select high wind-resistant primary roof coverings and use higher-performing installation practices.
Other Considerations: Even the best primary roof covering should be backed up with a good secondary system. Consider an upgraded roof underlayment along with this strategy.
Dislodged roofing tiles due to inadequate anchorage or
fastening. Source: FEMA 549
Source: FEMA 549 – Summary Report on Building
Performance, Hurricane Katrina, April 2006
Wind-Resistant Roof Coverings
S AF ER , ST R ON G ER H O ME S - #0 4 20 1 1

- 2 -
Safer, Stronger Homes - #04
Typical Practice
Roof coverings provide the primary line of defense against rainwater penetration into buildings. In general, roofing installation requirements in modern building codes and manufacturer installation requirements vary in accordance with the site’s design wind speed or hazard. Roof covering requirements are found in Chapter 9 of the 2009 International Residential Code (IRC) and in Chapter 5 of the International Code Council (ICC) 600 Standard for Residential Construction in High-Wind Regions. Failures occur when the product selected is not adequate for the wind zone, is not properly designed, or not installed according to the specifications or code.
“You have several choices when choosing a roof covering for your home…All of these types of roof coverings can perform well IF they are attached properly.”
~ Blueprint for Safety NEWS, Vol. 3, Issue 2, www.flash.org
Best Practices and Considerations 1. Consider upgrading to a metal roof system. “It is notable that MAT investigations from 1998 to 2008 continue to
observe good performance of metal-pane roof systems.” (FEMA Local Officials Guide for Coastal Construction). Metal roofing systems and their attachment methods vary. Be sure to identify a metal roof system that is rated, designed, and detailed for the wind conditions in your area. In fact, consider specifying a metal roofing system that exceeds the minimum code wind pressure requirements. Strict adherence to the manufacturer’s installation details is very important. Also, installation over solid roof sheathing is recommended to reduce wind pressure acting on the metal roofing. Refer to the MBMA/AISI “Metal Roofing System Guide Specification” (http://www.mbma.com/downloads/SpecsStandards.doc) for additional technical information.
2. Tile roofing also must be installed in accordance with the manufacturer’s installation instructions. In some cases, specific minimum installation requirements are also detailed in the building code. It is considered good practice to mechanically attach (screw) and use adhesive foam to attach tiles at the roof eaves and ridge. Refer to the Concrete and Clay Roof Tile Installation Manual for additional guidance (http://www.tileroofing.org/uploadedFiles/TRI_SITEv2/Publications/FSRA_Install_GuideWEB.pdf).
3. Use asphalt/composition shingles that are code-compliant and properly rated for the local wind speed condition or, better yet, use the next greater shingle class. Standardized classes for wind resistance of asphalt shingles are shown below.
Wind Classification of Asphalt Shingles
For Wind Zone Required Shingle Wind Classification
Up to and including 90 mph Class D
Up to and including 120 mph Class G
Up to and including 150 mph Class H
Source: www.asphaltroofing.org/pdf/downloads_high-winds.pdf, 5/1/11
4. Follow best practices for installation of asphalt/composition roof shingles (see below) and adhere closely to the manufacturer’s installation and requirements.

- 3 -
Safer, Stronger Homes - #04
Source: FEMA 499
Additional Resources/Links FEMA 499, Home Builder’s Guide to Coastal Construction, Federal Emergency Management Agency, Washington, DC, 2010, http://www.fema.gov/rebuild/mat/mat_fema499.shtm.
ICC 600: Standard for Residential Construction in High-Wind Regions, International Code Council, Washington, DC, 2008, http://www.iccsafe.org.
High-Wind Asphalt Roofing, Coastal Contractor, Fall 2004, http://www.coastalcontractor.net/pdf/2004/0409/0409high.pdf.
Metal Roofing in High Wind Regions , Federal Emergency Management Agency, Hurricane Ike Recovery Advisory, Washington, DC, http://www.fema.gov/library/file?type=publishedFile&file=fema499_7_6.pdf&fileid=d3537d20-1fe9-11e0-835b-001cc4568fb6 .
Installing Metal Roofing on Residential Homes in High Wind Areas, Institute for Building Technology and Safety, Tampa, FL, http://www.ibts.org/testimonials/innovation/best-practices/metal-roofing.pdf.
Tile Roofs for Hurricane Zones, Coastal Contractor, http://www.coastalcontractor.net/article/114.html.

Mitigation Benefits Gable end roof overhang framing is a common “weak link” in gable roof system framing. It is located at one of the highest wind load regions of a gable roof. When a gable end roof overhang fails, it generally damages roof sheathing and roof coverings leading to failure of the gable end wall and severe water damage to building contents. Slight or modest improvements to the way this detail is framed can save hundreds or thousands of dollars to repair localized damage or even the whole building if loss of the gable overhang leads to subsequent loss of other structural elements.
Cost Above Conventional Practice Low: Less than $1,000 to switch from a ladder-type framing to an alternative approach.
Action: Use strong-back gable roof overhang framing to strengthen resistance to wind damage rather than weaker ladder-type framing.
Improved Gable Overhang Framing
S AF ER , ST R ON G ER H O ME S - #0 5 20 1 1
Many homes in Hurricane Andrew experienced loss of gable end overhang framing, often leading to progressive loss of adjacent roof sheathing. Source: U.S. Department of Housing and Urban Development
Typical Practice In hurricane prone areas, modern codes and standards generally require strong-back (outrigger) framing for gable end wall overhangs, especially for overhangs that extend more than 8” to 12” beyond the gable end wall. The use of strong-back gable overhang framing is not commonly used in low wind hazard regions where severe winds from thunderstorms and tornadoes are still possible. In these areas, ladder-type framing is used. Ladder framing is usually constructed on the ground and then attached to the side of the gable end, with very weak connection to the rest of the structure.

- 2 -
Safer, Stronger Homes - #05
Why are roof overhangs important?
Roof overhangs provide important protection to building walls in routine rainfall events. They also provide shading to lower air-conditioning costs in hot climates. Therefore, eliminating or minimizing roof overhangs to avoid special wind-resistant overhang framing requirements is not generally recommended. For additional information on designing roof overhangs for rainwater protection of building walls, refer to Moisture Resistant Homes in the resource section of this fact sheet.
Best Practices and Considerations 1. Apply an appropriately designed gable end wall overhang framing detail using strong-backs or outriggers as illustrated
below.
2. Don’t use ladder framing in high wind areas. When ladder framing is used in other locations for gable end wall overhangs, limit overhang width to 8 inches and be sure sheathing is properly nailed to the gable end framing.

- 3 -
Safer, Stronger Homes - #05
Source: FEMA 499
Additional Resources/Links Wood Frame Construction Manual, American Wood Council, Inc., Leesburg, VA, 2001, http://www.awc.org/standards/wfcm.html.
Fortified for Safer Living, Builder’s Guide, Insurance Institute for Business & Home Safety, Tampa FL, 2008, http://www.disastersafety.org/content/data/file/for_builders_guide.pdf.
Moisture Resistant Homes, U.S. Department of Housing and Urban Development, Washington, DC, 2006, http://www.huduser.org/portal/publications/destech/moisturehomes.html.
FEMA 499, Home Builder’s Guide to Coastal Construction, Federal Emergency Management Agency, Washington, DC, 2010, http://www.fema.gov/rebuild/mat/mat_fema499.shtm.

Mitigation Benefits “Improperly constructed gable-end walls are a known weakness in residential structures in hurricane-prone regions. With many of today’s architectural designs using increased wall heights and roof slopes, gable-end walls can even be a concern in buildings with wood-roof framing systems in areas of low-wind design speeds…”1 Failure of a gable end wall leads to significant wind-driven rain damage and can cause the building to become pressurized such that it essentially “blows-up.” A little additional effort beyond code minimum practices can prevent thousands of dollars in damages during severe thunderstorms or complete building failure in a hurricane or more extreme event. This same benefit extends to heavy wall construction (e.g., masonry and veneer construction) in areas subject to even moderate earthquakes.
1 Partrain, Jason A., “Proper Design and Construction of Gable-End Walls”, Wood Design Focus, Winter 2010¸ Forest Products Society, Madison, WI.
Cost Above Conventional Practice Low: Less than $1000.
Action: Strengthen gable end wall construction to provide at least the same strength as other building exterior walls.
Other Considerations: This strategy is part of a good continuous load path. To maximize its effect, make sure the load path is complete throughout the building and that weak links such as overhangs on gable end walls are built with outrigger framing instead of ladder-type overhangs.
Source: U.S. Department of Housing and Urban Development
Reinforced Gable End Wall Construction
S AF ER , ST R ON G ER H O ME S - #0 6 20 1 1
- 2 -
Safer, Stronger Homes - #06
Typical Practice
Gable end walls are often viewed as less important because they are technically non-load bearing in that they don’t carry the gravity loads down to the next floor level. However, they are an important part of the building’s structure and contribute to preventing severe damage during a high wind or earthquake event.
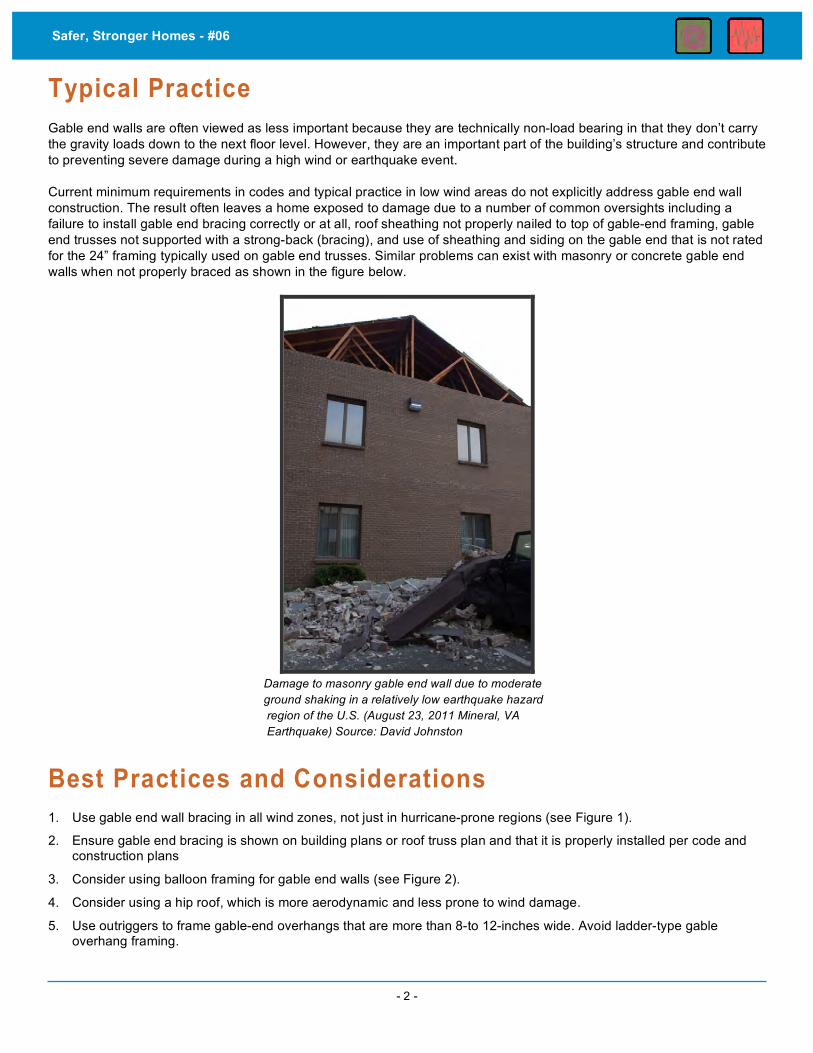
Current minimum requirements in codes and typical practice in low wind areas do not explicitly address gable end wall construction. The result often leaves a home exposed to damage due to a number of common oversights including a failure to install gable end bracing correctly or at all, roof sheathing not properly nailed to top of gable-end framing, gable end trusses not supported with a strong-back (bracing), and use of sheathing and siding on the gable end that is not rated for the 24” framing typically used on gable end trusses. Similar problems can exist with masonry or concrete gable end walls when not properly braced as shown in the figure below.
Damage to masonry gable end wall due to moderate ground shaking in a relatively low earthquake hazard region of the U.S. (August 23, 2011 Mineral, VA Earthquake) Source: David Johnston
Best Practices and Considerations 1. Use gable end wall bracing in all wind zones, not just in hurricane-prone regions (see Figure 1).
2. Ensure gable end bracing is shown on building plans or roof truss plan and that it is properly installed per code and construction plans
3. Consider using balloon framing for gable end walls (see Figure 2).
4. Consider using a hip roof, which is more aerodynamic and less prone to wind damage.
5. Use outriggers to frame gable-end overhangs that are more than 8-to 12-inches wide. Avoid ladder-type gable overhang framing.

- 3 -
Safer, Stronger Homes - #06
6. Use 16”oc framing instead of 24”oc framing for gable ends (including gable end trusses) to ensure adequate support and attachment for sheathing and siding materials.
7. Securely tie interior wall top plates and exterior side wall top plates into the gable end wall top plate (see Figure 3).
8. When constructing a masonry or concrete gable end wall, the top of the wall should provide anchorage to the roof system and the roof system must be capable of resisting earthquake forces and transferring them to the roof diaphragm (sheathing). For details used to achieve this goal, see the resources at the end of this fact sheet.
9. When applying brick veneer to a light-frame home, use gable end braces or balloon framed gable ends as shown in Figures 1 and 2 to ensure that the wall is able to support earthquake forces from heavy veneer and ensure that veneer ties are in compliance with code, including preferable use of screw or ring-shank galvanized nails to fasten brick ties to framing.
Figure 1 – Example of a Gable End Wall Brace (number of braces required varies)

- 4 -
Safer, Stronger Homes - #06
Figure 2 – Example of Balloon Frame Gable End Wall

- 5 -
Safer, Stronger Homes - #06
Figure 3 – Lapped and Reinforced Top Plate at Corner of Gable End Wall
Additional Resources/Links ICC 600: Standard for Residential Construction in High-Wind Regions, International Code Council, Washington, DC, 2008, http://www.iccsafe.org.
Fortified for Safer Living, Builder’s Guide, Insurance Institute for Business & Home Safety, Tampa, FL, 2008, http://www.ibhs.org/content/data/file/for_builders_guide.pdf.
Concrete Masonry Homes: Recommended Best Practices, U.S. Department of Housing and Urban Development, Washington, DC, 1999, http://www.huduser.org/portal/publications/pdf/conrpt1-2.pdf.
FEMA 499, Home Builder’s Guide to Coastal Construction, Masonry Details, Fact Sheet 4.2, Federal Emergency Management Agency, Washington, DC, 2010, http://www.fema.gov/rebuild/mat/mat_fema499.shtm.
Wood Frame Construction Manual, American Wood Council, Inc., Leesburg, VA, http://www.awc.org/standards/wfcm.html.

Mitigation Benefits Even if you view “good looks’ as the primary purpose of your wall cladding, keep in mind that most every home will see damage to siding or other cladding during its lifetime. Further, because siding damage often is only to one side or a limited part of the wall, it typically falls under the deductible for homeowners insurance. As a homeowner, you will pay the first $500 or so in a low risk area and thousands of dollars in a higher risk area. And even in the lower risk areas, many homes sustain siding damage multiple times in their life due to events like thunderstorms.
A second benefit of improving the siding selection and installation is due to the functional purpose of claddings as the first line of defense between the house and water damage from leakage and wind-driven rain that can get behind even the best cladding. Carefully considering siding material specifications and installation methods and going beyond code minimum requirements can dramatically reduce the potential for damage. Even when water damage is isolated to a small area, it can lead to rot, mold, corrosion and other issues that cost hundreds or even thousands of dollars to repair. With an extreme event like a hurricane, tornado, or earthquake, the damage is usually visible. However, with leakage during more frequent rain events, damage often goes undetected until it is extensive.
Action: Specify better performing siding or other wall finishes and improved installation methods for all wall coverings.
Other Considerations: Selecting a cladding appropriate for a specific hazard and installing it correctly is the first step in keeping the cladding intact. You should also consider improvements to the water-resistive barrier and flashing at openings to avoid damage when (not if) water gets behind the primary cladding.
This home suffered loss of siding that could have been avoided with improved siding installation practices. Further, it left the wall open to water damage without the siding or a water-resistant barrier installed underneath.Source: U.S. Department of Housing and Urban Development
Improved Siding and Other Exterior Wall Finishes
S AF ER , ST R ON G ER H O ME S - #0 7 20 1 1

- 2 -
Safer, Stronger Homes - #07
Cost Above Conventional Practice Low: Less than a few hundred dollars to use improved installation and construction practices.
Moderate to High: $1000 to $10,000 or more, if upgrading to a more expensive cladding material.
Premature siding loss due to lack of proper siding installation (missing fastener at lap joints) as investigated in a full-scale wind tunnel facility. Source: Insurance Institute for Business & Home Safety
Typical Practice
Building codes typically defer to manufacturer’s installation instructions for siding or claddings and supplement these in some cases to address specific hazards or issues. For example, in the International Residential Code (IRC) Section R703.4 for exterior wall covering installation requirements, fasteners are specified and must be driven into studs, unless manufacturer installation instructions specifically permit fastening to a nail-base sheathing material. In high wind regions, fastening requirements are addressed in ICC 600, Standard for Residential Construction in High-Wind Regions.
The prevention of water or weather-related damage to wall structures and building interiors is addressed in the building code but not often to the level of detail needed to address wind driven rain or leakage around openings and unusual configurations.
Another significant issue with typical practice is that, except in some of the hurricane areas where enforcement has risen to an appropriate level, installation is not consistent with the basic requirements even when that is the original intention. Thus, buildings are still vulnerable to damage because siding fasteners are not the right type, number, or size; fasteners are not installed into studs as required; fasteners are corroded; or the material selected is not rated high enough for the wind zone.
Best Practices and Considerations For specific types of cladding, there are some improvements that can make your installation perform at a higher level. Some materials are also better selections in certain hazards:
1. Vinyl Siding – Vinyl siding is great for earthquake-prone areas because of its light weight and flexibility; for wind resistance, however, carefully consider the following:
a. Ensure proper wind-rated siding is used for the local design wind speed and, if available, use a siding and fastening method rated for a greater wind speed condition than required locally. Wind ratings for vinyl siding should be based on third-party code evaluation reports. A double nailed hem is a common feature of high-wind resistant vinyl siding materials (see figure below).
Follow manufacturer’s detailed

- 3 -
Safer, Stronger Homes - #07
b. Follow manufacturer’s detailed installation guidelines and/or code evaluation reports for the specified wind rating. Ensure siding fasteners are the right size and driven into studs. Don’t assume it is o.k. to nail into OSB, plywood, or other sheathing. Consider using ring shank siding fasteners for improved performance and use the largest fastener head diameter compatible with the vinyl siding material.
c. If installing vinyl siding material over foam plastic insulating sheathing (without combined use of structural sheathing), be sure that the vinyl siding’s wind pressure rating complies with 2009 IRC Section R703.11.2. In addition, be sure that the foam sheathing is specified in accordance with Testing & Engineering Report (TER) No. 1006-01, Prescriptive Wind Pressure Performance of Foam Plastic Insulation used as Insulating Sheathing in Exterior Wall Covering Assemblies (available at www.foamsheathing.org).
d. Ensure vinyl accessories, especially vinyl soffit or porch roof finishes, are installed in accordance with manufacturer instructions and fastened to prevent blow-off during severe wind events. Blown-off vinyl soffit vents account for significant water damage to building interiors during severe wind-driven rain events.
e. Closely follow industry installation guidelines (http://www.vinylsiding.org/installation/manual/)
IMPORTANT NOTE: Code-minimum or minimum standard vinyl siding is rated for a 110 mph exposure B or 90 mph Exposure C design wind condition. If your building is more than 30-feet tall at the eaves or the site is located where wind speeds are greater than 110 mph in Exposure B (suburban or wooded terrain) or greater than 90 mph in open flat terrain, or on an exposed topographic feature, then a higher minimum rated vinyl siding should be considered or may be required to meet code.
Source: FEMA 499
2. Lap Siding -- Fiber cement lap siding is a naturally strong and durable siding material for high wind areas; however, it will add some additional load to the building in earthquakes. Wood lap siding, which is lighter, also performs well when properly installed, but may require more maintenance over time.
a. Follow manufacturer’s fastening schedules, including face-nailing to resist local design wind speed.
b. Make sure nails are driven into studs unless manufacturer approved nail-base sheathing is used. Consider using stainless steel ring-shank siding nails.

- 4 -
Safer, Stronger Homes - #07
3. Brick Veneer – Brick veneer is a durable and wind resistant cladding provided brick ties are spaced and fastened properly to prevent failure during severe wind or earthquake events. Consider using extra corrosion resistant brick ties (i.e., stainless steel) when located near the coast and use hot-dipped galvanized ring-shank nails or screws to attach brick ties to framing (see photo below).
4. Portland Cement Plaster (Conventional 3-coat Stucco) – Portland cement plaster exterior wall coverings are durable and strong when properly installed. However, it is a brittle wall covering and may not be the best selection under earthquake loading.
5. Exterior Insulation Finish Systems (EIFS) – Similar in appearance to Portland cement plaster, yet light in weight and available with ornate architectural details, EIFS is both earthquake resistant and wind resistant when properly specified and installed. Be sure to apply high-quality water resistive barrier materials and details and use a drainable EIFS product as required by code for homes. In severe wind hazard regions, consider use of both mechanical and adhesive attachment of EIFS to building walls. If adhesives are used, they must be applied to a substrate that is at least equally adhered or fastened to the wall structure.
Additional considerations for all cladding types:
1. Consider conducting independent specific inspections of siding, water-resistive barrier, and flashing installations. Errors can be costly and hard to detect once the installation is complete.
2. In areas subject to urban wild fires, non-flammable siding materials should be considered and may be required depending on local urban wild fire regulations.
3. If using furring for improved siding drainage, siding attachment to furring and furring attachment to framing must be capable of resisting the required design wind loads. For guidance on appropriate attachment of furring to resist wind loads refer to Tech Matters, Attaching Exterior Wall Coverings Through Foam Sheathing to Wood or Steel Wall Framing (www.foamsheathing.org).
4. Use a sheathing material rated for wind pressure resistance on gable attic end walls as backing for siding and to reduce wind pressure load on the siding. See photo below of typical damage to gable ends with siding not backed by appropriate sheathing material. (Codes do not require sheathing behind siding).
5. Use corrosion resistant fasteners for all siding types and stainless steel should be preferred for any exposed fastener, especially in coastal environments.
A corroded brick tie was not able to hold the brick in place at the time when it was needed most. Exterior wall covering attachments should exceed code-minimum corrosion resistance requirements and, in coastal areas, stainless steel fasteners and connectors should be used.

- 5 -
Safer, Stronger Homes - #07
Earthquake Tip: In earthquake-prone areas, use siding materials that are light and non-brittle to minimize potential for building damage and damage to the siding itself.
Additional Resources/Links Hurricane Ike Recovery Advisory, Siding Installation in High-Wind Regions, Federal Emergency Management Agency, Washington DC, January 2009, http://www.fema.gov. (Type Hurricane Ike MAT into search box.)
Hurricane Ike Recovery Advisory, Attachment of Brick Veneer in High-Wind Regions, Federal Emergency Management Agency, Washington, DC, February 2009, http://www.fema.gov. (Type Hurricane Ike MAT into search box.)
FEMA 499, Home Builder’s Guide to Coastal Construction, Federal Emergency Management Agency, Washington, DC, 2010, http://www.fema.gov/rebuild/mat/mat_fema499.shtm.
ICC 600: Standard for Residential Construction in High-Wind Regions, International Code Council, Washington, DC, 2008, http://www.iccsafe.org/Store/Pages/Product.aspx?category=0&cat=ICCSafe&id=7027X08.
Moisture Resistant Homes, U.S. Department of Housing and Urban Development, Washington, DC, 2006, http://www.huduser.org/publications/pdf/moisturehomes.pdf.
ASTM E2266, Standard Guide for Design and Construction of Low-Rise Frame Building Wall Systems to Resist Water Intrusion, ASTM International, West Conshohocken, PA, 2004, http://www.ASTM.org.
Vinyl Siding Installation Manual, Vinyl Siding Institute, Washington, DC, 2010, http://www.vinylsiding.org/installation/manual/.
Water Penetration Resistance, Technical Notes 7A and 7B, Brick Industry Association, Reston, VA, http://www.gobrick.com/TechnicalNotes/tabid/7658/Default.aspx.
Vinyl siding wind ratings are usually for applications over “solid walls” or sheathing designed to resist wind load and act as an air-barrier. Without this, the code-minimum standard wind ratings for vinyl siding should be multiplied by 0.27 (or divided by 4).
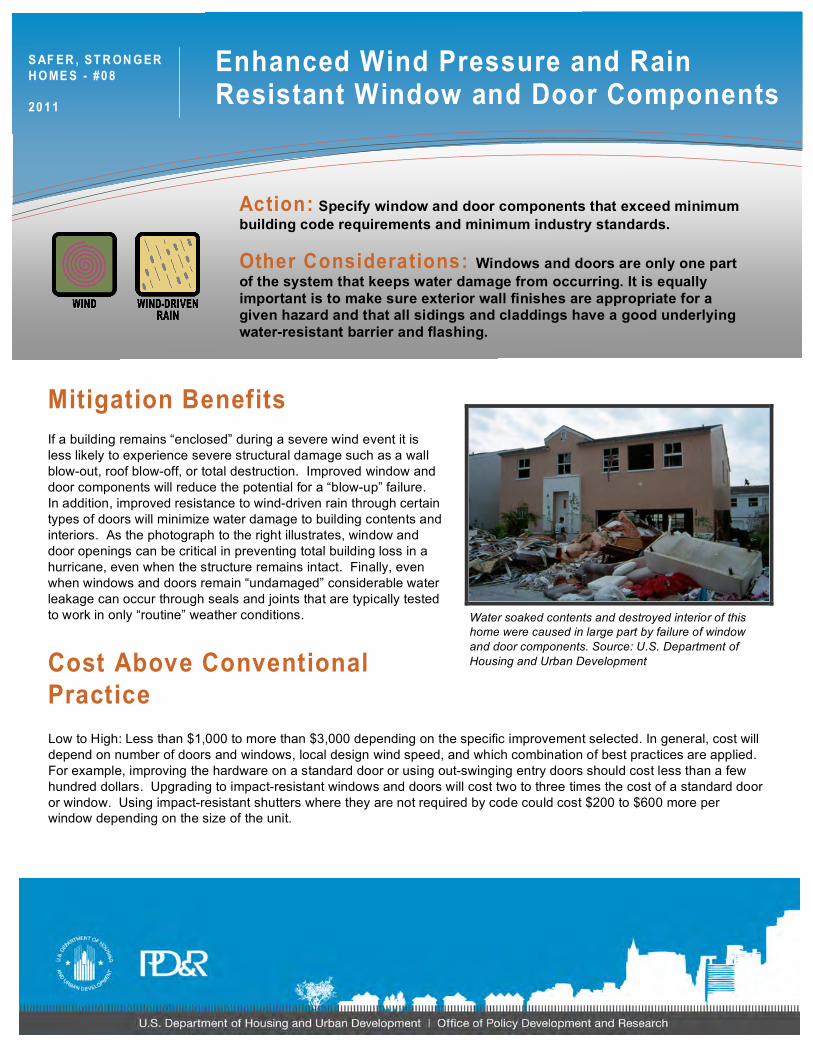
Mitigation Benefits If a building remains “enclosed” during a severe wind event it is less likely to experience severe structural damage such as a wall blow-out, roof blow-off, or total destruction. Improved window and door components will reduce the potential for a “blow-up” failure. In addition, improved resistance to wind-driven rain through certain types of doors will minimize water damage to building contents and interiors. As the photograph to the right illustrates, window and door openings can be critical in preventing total building loss in a hurricane, even when the structure remains intact. Finally, even when windows and doors remain “undamaged” considerable water leakage can occur through seals and joints that are typically tested to work in only “routine” weather conditions.
Cost Above Conventional Practice
Action: Specify window and door components that exceed minimum building code requirements and minimum industry standards.
Other Considerations: Windows and doors are only one part of the system that keeps water damage from occurring. It is equally important is to make sure exterior wall finishes are appropriate for a given hazard and that all sidings and claddings have a good underlying water-resistant barrier and flashing.
Water soaked contents and destroyed interior of this home were caused in large part by failure of window and door components. Source: U.S. Department of Housing and Urban Development
Enhanced Wind Pressure and Rain Resistant Window and Door Components
Low to High: Less than $1,000 to more than $3,000 depending on the specific improvement selected. In general, cost will depend on number of doors and windows, local design wind speed, and which combination of best practices are applied. For example, improving the hardware on a standard door or using out-swinging entry doors should cost less than a few hundred dollars. Upgrading to impact-resistant windows and doors will cost two to three times the cost of a standard door or window. Using impact-resistant shutters where they are not required by code could cost $200 to $600 more per window depending on the size of the unit.
S AF ER , ST R ON G ER H O ME S - #0 8 20 1 1

- 2 -
Safer, Stronger Homes - #08
Typical Practice Current minimum practice in high wind areas without a code or limited enforcement is standard windows and doors with little attention to wind-driven rain or blow-out potential. In other words, window and doors are for light, ventilation, and entry/exit purposes, and often selected solely on their appearance and price.
In hurricane zones where wind-driven rain damage has been severe, modern building code practice is more along the lines described in 2009 International Residential Code (IRC) Section R612. The IRC references the window and door industry standard, AAMA/WDMA/CSA 101/I.S.2/A440 (see resources at the end of this factsheet). This standard provides minimum wind pressure ratings and wind-driven rain pass/fail criteria as summarized in the table below.
Product Performance Class Performance Grade (Design Wind Pressure, PSF)
Minimum Water Resistance Test Pressure (PSF)
Windows & Doors
R LC C HC AW
15 25 30 40 40
2.9 3.75 4.5 6.0 8.0
Unit Skylights and Roof Windows
R C HC
15 30 40
2.9 4.5 6.0
One problem with the code requirements designed to prevent water penetration is that they provide minimal protection. The design wind pressure ratings for “non-structural” window and door components are based on a safety factor of 1.5 whereas other structural assemblies of a building are designed with a safety factor of at least 2. Further, the highest rated assemblies in the table only achieve a rating of 40 pounds per square foot (psf) even though design wind pressures in high wind areas reach 70 psf. This level of performance is considered acceptable as a minimum code requirement, but can result in premature failure of windows and doors which triggers higher internal pressures and increased likelihood of structural damage. Also, standardized wind-driven rain water penetration tests are conducted with wind pressures that are only 15 to 20 percent of the design wind pressure. For example, the lowest class or code-minimum window and door product is a “Class R.” Its wind driven rain penetration pass/fail test is based on a 2.9 psf wind pressure. This wind pressure corresponds to about a 35 mph wind speed event which is equivalent to a common thunderstorm gust front. As a result, wind-driven rain will be almost guaranteed to penetrate typical minimum code-compliant windows and door components in design wind events and to some degree in more routine wind events, even when they are properly installed and flashed.
Even if you have doors and windows that prevent wind-driven rain, it won’t matter if the window or door, including your garage door, blows in (or out) during a high wind event. If the house does not implode from internal pressure build up, it likely will suffer severe water damage. Off the shelf, everyday type hardware and installation, which is common practice in most areas, can set you up for failure when the big event hits.
Best Practices and Considerations 1. Use windows, entry doors and garage door products that have been tested and rated for wind conditions above the
minimum for your area. A manufacturer should be able to provide substantiation for their ratings. For example, use a better than “R” performance grade (the minimum grade) even in low risk areas. If you are in a high wind area or subject to frequent thunderstorms, consider jumping up to at least an “HC” performance grade product or one that is rated for a 30% greater design wind pressure than required by code.
- 3 -
Safer, Stronger Homes - #08
2. Be sure to use wind-borne debris impact-resistant window and door products or code-compliant, operable storm shutters in areas subject to wind-borne debris (mainly hurricane-prone coastal regions).
3. Install exterior doors to be out-swinging and use out-swinging casement windows whereby positive wind pressure will tend to compress seals rather than open them up for direct water intrusion.
4. Avoid double swinging doors and sliders unless specified and installed for high wind pressure resistance. Consider additional reinforcement at the center of double doors and include reinforced jambs and hardware for all doors.
5. Use above-code minimum wind pressure rated garage doors. Consider jumping up to the next higher wind design zone than the one you live or build in.
6. Use multiple small garage doors rather than a single large garage door.
Additional Resources/Links Moisture Resistant Homes, U.S. Department of Housing and Urban Development, Washington, DC, 2006, http://www.huduser.org/portal/publications/destech/moisturehomes.html.
AAMA/WDMA/CSA 101/I.S.2/A440, Standard/Specification for Windows, Doors and Unit Skylights, American Architectural Manufacturers Association, Schaumburg, IL, 2005, http://www.aamanet.org.
Tech Set 7: Wind Resistant Openings, NAHB Research Center, Upper Marlboro, MD, http://www.toolbase.org/Home-Building-Topics/Natural-Disasters/wind-resistant-openings.

Mitigation Benefits Wind-driven rain is able to penetrate common varieties of gable end vents, ridge vents, and soffit/eave vents. Rainwater is actually drawn into the attic space due to the tendency for a negative or suction internal pressure caused by the wind. Use of upgraded roof ventilation products or unvented roof construction provides enhanced protection against water damage to building contents in hurricanes, tropical storms, nor’easters, and thunderstorms. In high wind events, the damage from wind-driven rain can range dramatically from a few hundred dollars to thousands for moderate events. In extreme wind events like a hurricane, the entire home and contents can be lost due to water damage.
Cost Above Conventional Practice High (Option 1): More than $3,000 for an unvented roof.
Low to Moderate (Option 2): Less than $1,000 for enhanced roof vents, depending on the number of vents.
Action: Option 1 – Construct unvented, conditioned attic space to eliminate roof vents or Option 2 – Use vents that are resistant to wind-driven rain entry.
Other Considerations: This strategy will provide benefits by itself. For maximum benefit, consider this as part of a comprehensive approach to resist water penetration along with enhanced materials and practices for roofing, roof underlayment, siding, water-resistive barriers, and window and door components.
Typical entry points for wind-driven rain in a conventional, vented attic space.
Roof Ventilation Practices to Prevent Wind-Driven Rain Penetration
S AF ER , ST R ON G ER H O ME S - #0 9 20 1 1

- 2 -
Safer, Stronger Homes - #09
Is it worth it? While the mitigation benefits of Option #1 (unvented roof system) are potentially high, the cost of this mitigation approach is also high. Some of this cost may be offset by reduced heating and cooling bills, mainly due to creation of a conditioned attic space for ductwork if a forced air HVAC system is used. A conditioned attic space can add more useable or habitable space and square footage value to a home.
Typical Practice
Attic vents are typically installed because codes have required them in the past for the purpose of removing interior moisture vapor that makes its way into the attic space. It also helps moderate attic and roof surface temperatures in the summer and in colder climates keeps the roof cold to prevent ice dam formation at eaves. Typically, ventilation is achieved by providing “net free cross ventilation area” equal to 1/150th to 1/300th of the attic floor area. For an average size attic, the net free ventilation area provided is similar to a hole as large as 2-foot by 2-foot through which wind-driven rain can penetrate into the attic space. Vents definitely serve a purpose in an unconditioned attic under normal conditions. Unfortunately, they can become a liability during wind-driven rain events. Fortunately, there are options for better vents. In addition, newer codes including the 2009 International Residential Code (IRC) recognize the many benefits of turning attic space into useable space by using conditioned, unvented roof construction.
Best Practices and Considerations OPTION 1 – UNVENTED ROOF/ATTIC
When using the unvented attic approach, be sure to comply with appropriate model or local building code requirements for this type of construction. Refer to detailed requirements in the 2009 IRC Section R806.4 and the conceptual construction details shown below.
While unvented attic assemblies may be code-recognized, some experts believe that a traditionally ventilated roof provides for better drying and detection of roof leaks in the event of periodic incidental water penetration. Conversely, others point out that during warm humid months traditional roof ventilation can introduce humid air into an attic which can condense on air-conditioning ducts or other surfaces and cause moisture problems. In addition, some asphalt composition roof shingle manufacturers have product warranties that require roof ventilation as a means to moderate roof surface temperatures to increase product longevity. Studies have shown this effect to have at best a modest impact on composition shingle performance. Other roof coverings can be considered if a manufacturer won’t support an unvented attic approach.
Unfortunately, there is no “perfect” roof system approach. Although some conceptual sketches of an unvented attic are provided here, this is one design that should involve a professional with experience in building science and building codes. It is not for the do-it-yourself or uninformed contractor to adopt without some design assistance. With any design, the IRC requires a few must-do requirements including:
1. The attic must be completely inside the thermal envelope (i.e., the insulation surrounding the attic).
2. The vapor retarder sometimes used in the roof-ceiling assembly at the attic floor level is not permitted with this type of construction.
3. An air gap is required between wood shingle roof coverings and the underlayment.
4. A vapor retarder is required in direct contact with the underside of the insulation in cold climates (Climate Zone 5 or higher) unless the insulation itself is air-impermeable such as with some spray foam products. The manufacturer should be able to provide information on this attribute of their insulation.
5. Typically, the insulation must be installed snug against the underside of the roof sheathing. There are some unique options the code recognizes if the insulation is considered to be air-impermeable. For these situations, refer to the IRC-specific language.

- 3 -
Safer, Stronger Homes - #09
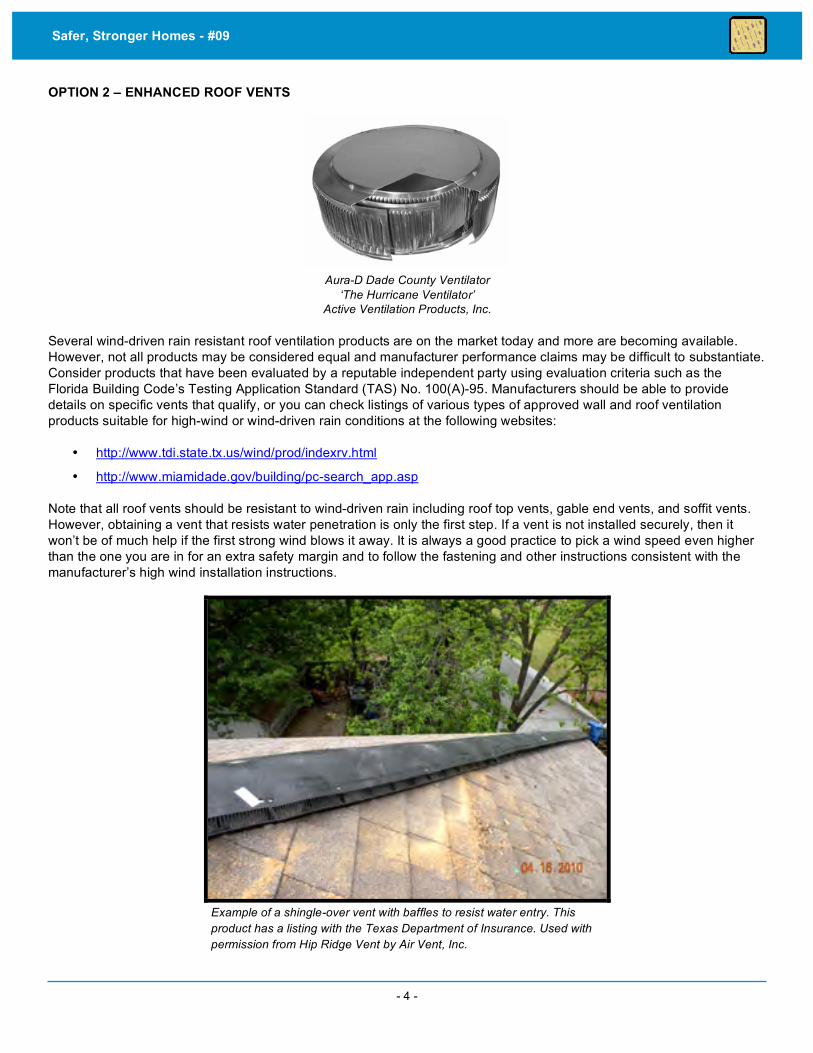
- 4 -
Safer, Stronger Homes - #09
OPTION 2 – ENHANCED ROOF VENTS
Aura-D Dade County Ventilator
‘The Hurricane Ventilator’ Active Ventilation Products, Inc.
Several wind-driven rain resistant roof ventilation products are on the market today and more are becoming available. However, not all products may be considered equal and manufacturer performance claims may be difficult to substantiate. Consider products that have been evaluated by a reputable independent party using evaluation criteria such as the Florida Building Code’s Testing Application Standard (TAS) No. 100(A)-95. Manufacturers should be able to provide details on specific vents that qualify, or you can check listings of various types of approved wall and roof ventilation products suitable for high-wind or wind-driven rain conditions at the following websites:
• http://www.tdi.state.tx.us/wind/prod/indexrv.html
• http://www.miamidade.gov/building/pc-search_app.asp
Note that all roof vents should be resistant to wind-driven rain including roof top vents, gable end vents, and soffit vents. However, obtaining a vent that resists water penetration is only the first step. If a vent is not installed securely, then it won’t be of much help if the first strong wind blows it away. It is always a good practice to pick a wind speed even higher than the one you are in for an extra safety margin and to follow the fastening and other instructions consistent with the manufacturer’s high wind installation instructions.
Example of a shingle-over vent with baffles to resist water entry. This product has a listing with the Texas Department of Insurance. Used with permission from Hip Ridge Vent by Air Vent, Inc.
Additional Resources/Links Moisture Resistant Homes, U.S. Department of Housing and Urban Development, 2006. Available for download at http://www.huduser.org/portal/publications/destech/moisturehomes.html

- 5 -
Safer, Stronger Homes - #09
Additional Resources/Links
Moisture Resistant Homes, U.S. Department of Housing and Urban Development, Washington, DC, 2006, http://www.huduser.org/portal/publications/destech/moisturehomes.html.
International Residential Code, International Code Council, Inc., Washington, DC, 2009, http://www.iccsafe.org.
EEBA Builder’s Guide (available for all climate types), Energy and Environmental Building Alliance, Eden Prairie, MN, http://www.eeba.org.

Mitigation Benefits An enhanced WRB installation and flashing not only prevents wind-driven rain penetration and damage to walls, it also prevents routine water penetration that can lead to rot, mold, and structural problems over time. Good water management is extremely important to the long-term structural performance of homes. In the photo to the right, poor flashing and WRB installation resulted in structural weakening inside the wall of this home well before Hurricane Katrina hit. As this picture demonstrates, repairs can cost thousands of dollars under routine circumstances but can lead to much larger losses in extreme events like a hurricane. In areas where the risk of a significant event like a hurricane or tornado is low, small leaks over time are often not discovered until they become significant issues. The more usual scenario is that these otherwise easy-to-prevent but hidden problems become visible after their cost to repair has become much more significant.
Cost Above Conventional Practice Low: Less than $1,000. Actual cost will vary significantly from a few hundred dollars to as much as a thousand depending on the building geometry and size.
Action: Use enhanced water-resistive barrier (WRB) materials and flashing practices to keep water out of walls and buildings during severe and routine rain events.
Other Considerations: This strategy addresses the back-up system once the primary siding or cladding fails. It is important to install the exterior wall covering with the same level of diligence.
“All sidings leak.” It is for this reason that a water-resistive barrier should be installed behind all siding materials and integrated with flashings at all transitions and openings. Source: J. Crandell
Enhanced Water-Resistive Barrier and Flashing Practices
S AF ER , ST R ON G ER H O ME S - #1 0 20 1 1

- 2 -
Safer, Stronger Homes - #10
Typical Practice
Model building codes have strengthened water-resistive barrier requirements only within the past 10 to 15 years. Therefore, they may not yet be adopted or consistently enforced in all local jurisdictions. In addition, WRB installation is not a common inspection item for local building jurisdictions.
Code requirements for a water resistant barrier also tend to be vague and general in nature. The 2009 International Residential Code (IRC), Section R703.1.1 states that the “exterior wall envelope shall be designed and constructed in a manner that prevents the accumulation of water within the wall assembly by providing a water-resistant barrier behind the exterior veneer as required by Section R703.2 and a means of draining to the exterior water that enters the assembly.” This is usually interpreted to mean 15# felt building paper or a synthetic house wrap. In many cases, the water-resistant barrier is not installed right and can cause more harm than good.
Further, for many trade contractors, good flashing is a lost art. As with the water-resistant barrier, flashing in codes, even modern codes, can’t provide all of the level of detail for every situation. Even the 2009 IRC in Section R703.8 is somewhat general in nature. It states “Approved corrosion-resistant flashing shall be applied shingle-fashion in a manner to prevent entry of water into the wall cavity or penetration of water to the building structural framing components. Self-adhered membranes used as flashing shall comply with AAMA 711. The flashing shall extend to the surface of the exterior wall finish.” The IRC goes on to describe the locations where flashing is required but does not provide specific installation details.
The result of buildings that comply with the minimum code requirements for flashing and a water-resistant barrier is minimal back-up to the siding or other cladding under normal weather conditions. But even this result varies because codes are not interpreted consistently. WRB installation is not a common inspection item for local building jurisdictions. Quality of installation and attention to installation details varies widely in practice. In poorer quality installations, WRB joints may not be lapped properly and taped or flashed at window and door openings. The minimum code requires only a 2” horizontal lap joint for #15 felt building paper. With wind pressure acting on a wall during severe wind-driven rain events, water can be driven through joints in the WRB even when lapped as much as 12 inches.
Best Practices and Considerations 1. Enhanced WRB Installation -- Tape the WRB horizontal and vertical lap joints rather than just lapping them over the
section below or adjacent. Use the building wrap manufacturer’s approved tape. Another alternative is to increase the overlap of the building paper or wrap at joints. Use a minimum 12” horizontal lap between courses as opposed to the code-minimum of two inches.
2. Consider an alternative to traditional building paper or synthetic house wrap. A significant step up in performance would be a self-adhering bituminous membrane or continuous spray-applied WRB. These systems must be code approved and installed in strict compliance with manufacturer installation instructions. Be sure that moisture vapor transmission code requirements are met with the combination of materials used on the overall wall assembly and in consideration of the local climate. Although these types of materials provide perhaps the most robust of WRBs, you may want to retain a professional with experience in moisture management issues.
3. Effectively integrate flashing with the WRB at wall component intersections and openings. Tape the connection between the flashing and WRB at window and door components and other through-wall penetrations.
4. Develop specific flashing details for all intersections, openings, or other areas where water may drain or be driven into the building. This will require some research well beyond the scope of this fact sheet. However, you can consult the resources listed below for additional information and guidance. When using self-adhering bituminous tape as flashing, be sure it is high quality, compatible with the materials it is applied to, and installed in accordance with manufacturer instructions.

- 3 -
Safer, Stronger Homes - #10
Best Practices for Stucco and Masonry Walls Florida and other gulf-coast states experience some of the worst wind-driven rain events in the United States. In 2004, several such events overwhelmed typical Florida masonry walls and stucco finishes, causing water intrusion and damage to interiors of homes. For guidance on best practices to prevent rainwater intrusion for these types of walls and finishes based on lessons learned in Florida, refer to the following study published for the Florida Home Builders Association by Building Science Corporation:
Rainwater Management Performance of Newly Constructed Residential Building Enclosures During August and September 2004 at http://www.safewalls.com/PDF/Florida_Report_opt.pdf
Additional Resources/Links Moisture Resistant Homes, U.S. Department of Housing and Urban Development, Washington, DC, 2006, http://www.huduser.org/portal/publications/destech/moisturehomes.html.
Durability by Design, U.S. Department of Housing and Urban Development, Washington, DC, 2002, http://www.huduser.org/portal/publications/destech/durdesign.html.
ASTM E2266, Standard Guide for Design and Construction of Low-Rise Frame Building Wall Systems to Resist Water Intrusion, ASTM International, West Conshohocken, PA, 2004, http://www.astm.org.
ASTM E2112-01 Standard Practice for Installation of Exterior Windows, Doors, and Skylights, ASTM International, West Conshohocken, PA, http://www.astm.org.
FEMA 499, Home Builder’s Guide to Coastal Construction, Federal Emergency Management Agency, Washington, DC, 2010, http://www.fema.gov/rebuild/mat/mat_fema499.shtm.

Mitigation Benefits Together with adequate roof sheathing attachment and protection of openings, a continuous load path is the most important structural safety feature of disaster resistant construction. Failure of the uplift load path due to wind (as shown to the right) can occur at various points in the continuous load path from the roof to the foundation. While uplift forces are not so severe in an earthquake, lateral forces and overturning forces also must have a continuous load path. The continuous load path will always fail at the weakest link. With a continuous load path, the little things really do mean a lot. Based on studies at Clemson University, adding a simple H2.5 metal roof tie can increase roof-to-wall uplift connection capacity from about 400 lbs (for a standard code-minimum toe-nail connection) to more than 1,600 lbs. For the price of a $2 metal tie, this key connection can be strengthened about 4-fold! This can make the difference between low or no damage and major damage or total loss of a building.
Action: Reinforce connections between building components and assemblies to more reliably transfer loads along a continuous path to the foundation.
Other Considerations: This mitigation strategy requires all of the structural elements to be tied together effectively from the roof sheathing down through the walls, floors, and ultimately to the foundation.
This house probably would have survived a close call from an F-3 tornado had the roof sheathing attachment been enhanced and the uplift load path included additional ties from the wall to the 2nd floor framing which appears to have been the weak link in this otherwise well-built and code-compliant home. Source: Jay Crandell
Reinforced Continuous Load Path
S AF ER , ST R ON G ER H O ME S - #1 1 20 1 1
Cost Above Conventional Practice Low to Moderate: $1,000 to $3,000 depending on location and size of home.
Even in non-hurricane prone or earthquake regions where thunderstorms and tornadoes tend to dominate, reinforced connections at some key framing locations beyond code practice can make a big difference at a very low cost.

- 2 -
Safer, Stronger Homes - #11
Typical Practice
Practice varies according to local wind conditions, local code, and local enforcement. In general modern building codes require use of engineered or prescribed metal connectors or other suitable details to resist design wind loads and seismic forces. In low wind areas outside of the seismic zones, standard practice may rely more on traditional toe-nails to hold the frame together. Often uplift or other forces are not even considered. These connections have generally worked successfully under “normal” conditions, but much better performance and safety can be achieved with a few extra dollars invested in reinforcing continuous load path connections.
Even in areas where codes are up to date, some common problems occur that emphasize the need to inspect all work for correct installation. Common shortcomings include uplift straps missing or installed incorrectly (wrong nail type, missing nails, etc.); conventional toe-nail connections not installed with good workmanship resulting in split lumber and weakened joints; uplift forces on interior bearing walls not considered and detailed; concentrated uplift forces at edges of large openings or below roof support beams or girder trusses not considered and detailed; and porches and carports not detailed or framed to include continuous load transfer. In fact, porches and carports are often add-ons or afterthoughts and are the first parts of a structure to fail. Often they take other parts of the main structure with them when they fail and become sources of wind-borne debris causing damage to buildings downwind.
Best Practices and Considerations Connect building assemblies and framing members together to transfer wind uplift forces from the roof to the foundation.
1. If you are not using tie downs or straps, you are probably not in a high risk area or there is no local or modern code in effect. A good place to start is to follow the requirements in Chapters 3, 4, 6, and 8 of the International Residential Code (2009) available from the International Code Council at www.iccsafe.org. To get the most from your investment, consider jumping up to the requirements for a higher wind load area than where you live or build. Likewise, for seismic design, consider the next higher risk category.
Figures 1 and 2 show some of the basics for a continuous load path for wind and earthquake. Refer to the International Residential Code and/or a professional designer for specific tie down/fastener requirements.
2. Implement continuous load path concepts for porches and carports where the code may be “silent.” Figure 3 shows some of the elements that are critical to address, but are not captured in the prescriptive requirements in building codes, especially outside of the high risk areas.

- 3 -
Safer, Stronger Homes - #11
Figure 1 – Continuous Load Path for Wind Forces
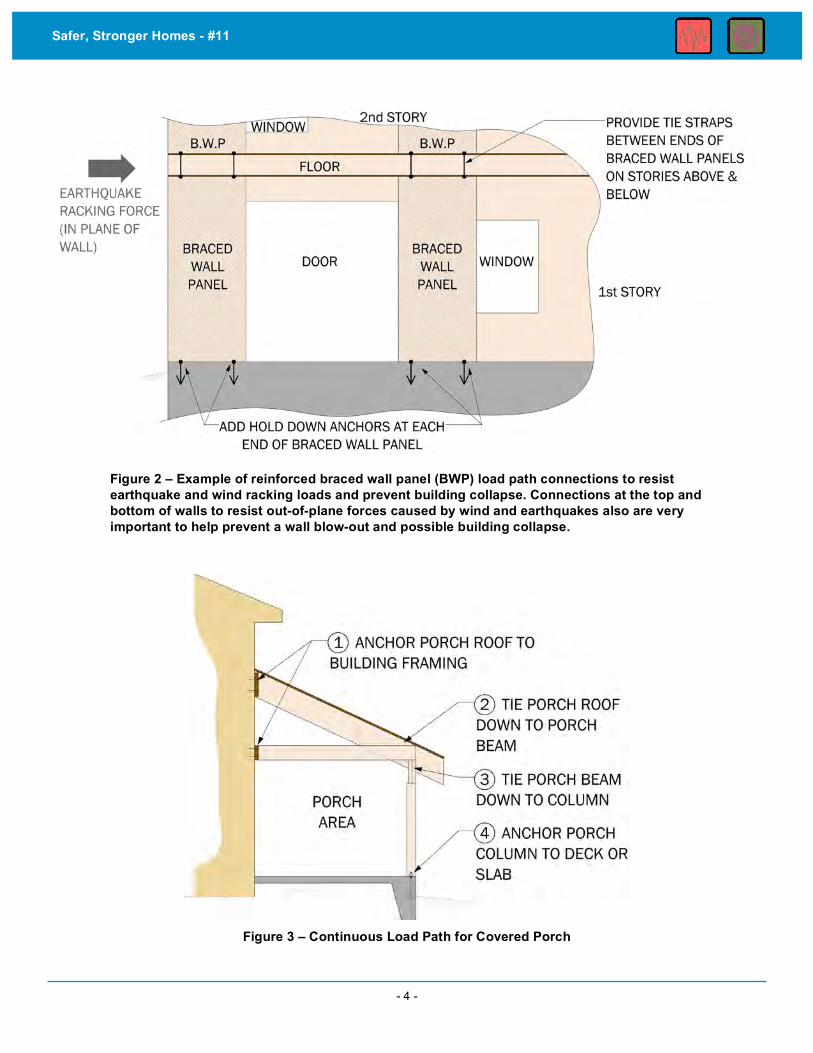
- 4 -
Safer, Stronger Homes - #11
Figure 2 – Example of reinforced braced wall panel (BWP) load path connections to resist earthquake and wind racking loads and prevent building collapse. Connections at the top and bottom of walls to resist out-of-plane forces caused by wind and earthquakes also are very important to help prevent a wall blow-out and possible building collapse.
Figure 3 – Continuous Load Path for Covered Porch
- 5 -
Safer, Stronger Homes - #11
Additional Resources/Links FEMA 499, Home Builder’s Guide to Coastal Construction, Federal Emergency Management Agency, Washington, DC, 2010, http://www.fema.gov/rebuild/mat/mat_fema499.shtm.
Residential Structural Design Guide, U.S. Department of Housing and Urban Development, Washington, DC, 2000, http://www.huduser.org/portal/publications/destech/residential.html.
Wood Frame Construction Manual, American Wood Council, Inc., Leesburg, VA, 2001, http://www.awc.org/standards/wfcm.html.

Mitigation Benefits Damage to masonry chimneys and the homes they are connected to is a major and wide-spread problem in earthquakes. Similarly, light-weight framed chimney chases may be torn from a building under severe wind conditions or earthquakes if not adequately attached to the building. Use of best practices will avoid this common source of damage to buildings, which can also injure building occupants. Some low to moderate costs incurred during construction can later save from several thousand dollars for a framed chimney to as much as $8,000 to $10,000 to repair or replace a masonry chimney, independent of any damage to repair nearby or adjacent structures that may be damaged.
Cost Above Conventional Practice Low: Less than $200 to reinforce the attachment of a light framed chimney to a home.
Moderate: $1000 to $3000 to install a wider masonry chimney and/or provide it with proper reinforcement and anchorage to the home.
Action: Select appropriate chimney construction materials and enhanced detailing to resist damage from earthquakes and severe wind.
Broken massonry chimney (Northridge Earthquake, 1994)
Earthquake and Wind-Resistant Chimneys
S AF ER , ST R ON G ER H O ME S - #1 2 20 1 1
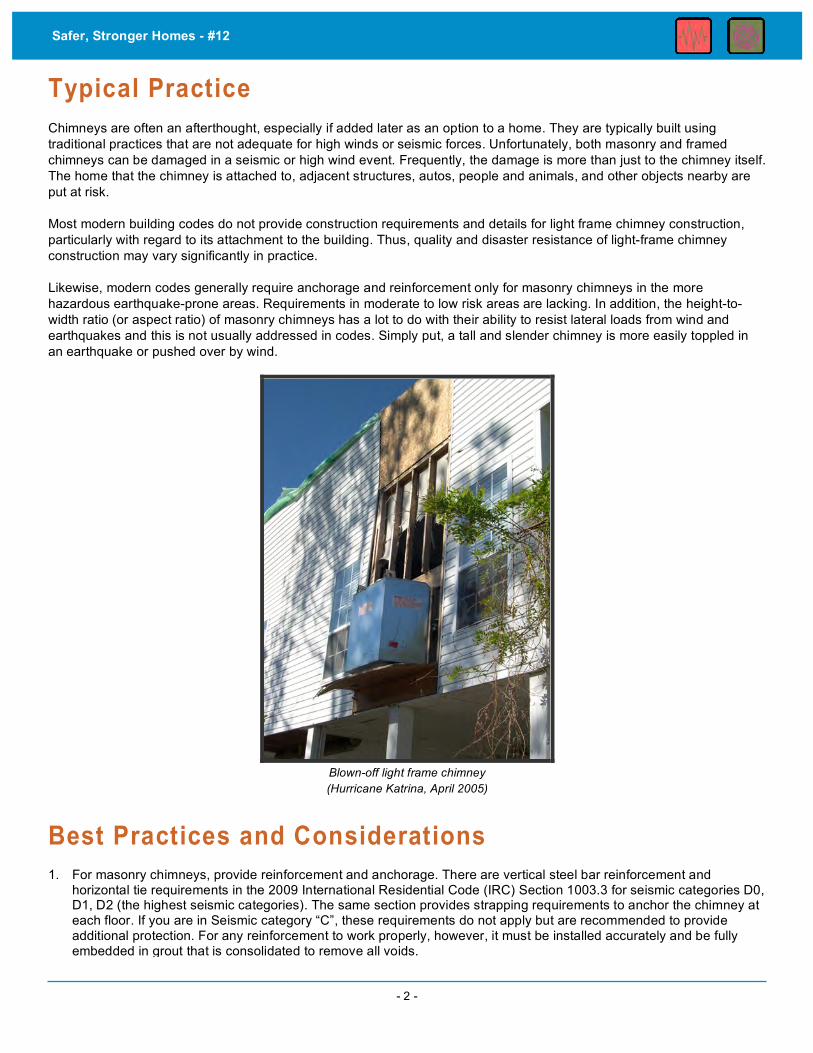
- 2 -
Safer, Stronger Homes - #12
Typical Practice
Chimneys are often an afterthought, especially if added later as an option to a home. They are typically built using traditional practices that are not adequate for high winds or seismic forces. Unfortunately, both masonry and framed chimneys can be damaged in a seismic or high wind event. Frequently, the damage is more than just to the chimney itself. The home that the chimney is attached to, adjacent structures, autos, people and animals, and other objects nearby are put at risk.
Most modern building codes do not provide construction requirements and details for light frame chimney construction, particularly with regard to its attachment to the building. Thus, quality and disaster resistance of light-frame chimney construction may vary significantly in practice.
Likewise, modern codes generally require anchorage and reinforcement only for masonry chimneys in the more hazardous earthquake-prone areas. Requirements in moderate to low risk areas are lacking. In addition, the height-to-width ratio (or aspect ratio) of masonry chimneys has a lot to do with their ability to resist lateral loads from wind and earthquakes and this is not usually addressed in codes. Simply put, a tall and slender chimney is more easily toppled in an earthquake or pushed over by wind.
Blown-off light frame chimney (Hurricane Katrina, April 2005)
Best Practices and Considerations 1. For masonry chimneys, provide reinforcement and anchorage. There are vertical steel bar reinforcement and
horizontal tie requirements in the 2009 International Residential Code (IRC) Section 1003.3 for seismic categories D0, D1, D2 (the highest seismic categories). The same section provides strapping requirements to anchor the chimney at each floor. If you are in Seismic category “C”, these requirements do not apply but are recommended to provide additional protection. For any reinforcement to work properly, however, it must be installed accurately and be fully embedded in grout that is consolidated to remove all voids.

- 3 -
Safer, Stronger Homes - #12
Side view of chimney anchorage locations.
Source: FEMA 232
Cross-section detail for chimney anchor installation
showing vertical reinforcement in chimney. Source: FEMA 232
Top view detail of anchorage tie into floor of roof framing
and chimney reinforcement. Source: FEMA 232
2. Locate fireplace and chimney to not exceed the code-required minimum extension above the roof.
3. For light-frame chimneys attached to the side of an exterior wall, the framing should be connected to the main building framing using deformed-shank nails, screw fasteners, or metal connectors.
4. For light-framed chimneys that extend through the roof, use enhanced connection details to ensure adequate support and attachment of the chimney to the main roof structure. One such detailing practice is shown below. For chimneys that extend more than 5 feet above the roof surface, an engineered design is recommended. The Insurance Institute for Business & Home Safety’s “Fortified for Safer Living” recommends a minimum 700 lb. capacity strap at each tie down location and the use of structural sheathing on all four sides of the chimney. This will provide significantly improved wind resistance in low to moderate wind areas. In hurricane and other high wind regions, an engineer should specify the capacity of the straps based on the actual conditions and geometry of the chimney, and taking into account the impact on the roof framing members. An alternative to strapping is to continue the chimney framing down into the roof structure and attach it to the trusses or rafters. If enough space is available, the framing can be extended down to the ceiling level to make a second attachment to the building frame.

- 4 -
Safer, Stronger Homes - #12
“Although it may be possible with systematic engineering design to mitigate damage often seen in masonry chimneys and fireplaces, the lower weight and greater flexibility of factory-built fireplaces and [light-frame] chimneys make them the better choice for light-frame houses in earthquake-prone areas.”
~ Homebuilder’s Guide to Earthquake-Resistant Design and Construction, FEMA 232 – June 2006, p132
CHIMNEY TIE-DOWN TYPICAL DETAIL
Source: Insurance Institute for Business & Home Safety

- 5 -
Safer, Stronger Homes - #12
Additional Resources/Links FEMA 232, Homebuilder’s Guide to Earthquake-Resistant Design and Construction, Federal Emergency Management Agency, Washington, DC, June 2006, http://www.fema.gov/library/viewRecord.do?id=2103.
International Residential Code (Chapter 10 – Chimneys and Fireplaces), International Code Council, Washington, DC, 2009, http://www.iccsafe.org.
Fortified for Existing Homes Engineering Guide, Insurance Institute for Business & Home Safety, 2010 Hurricane Season Edition, Tampa, FL, http://www.disastersafety.org/fortified?type=fortified_existing_homes.
.
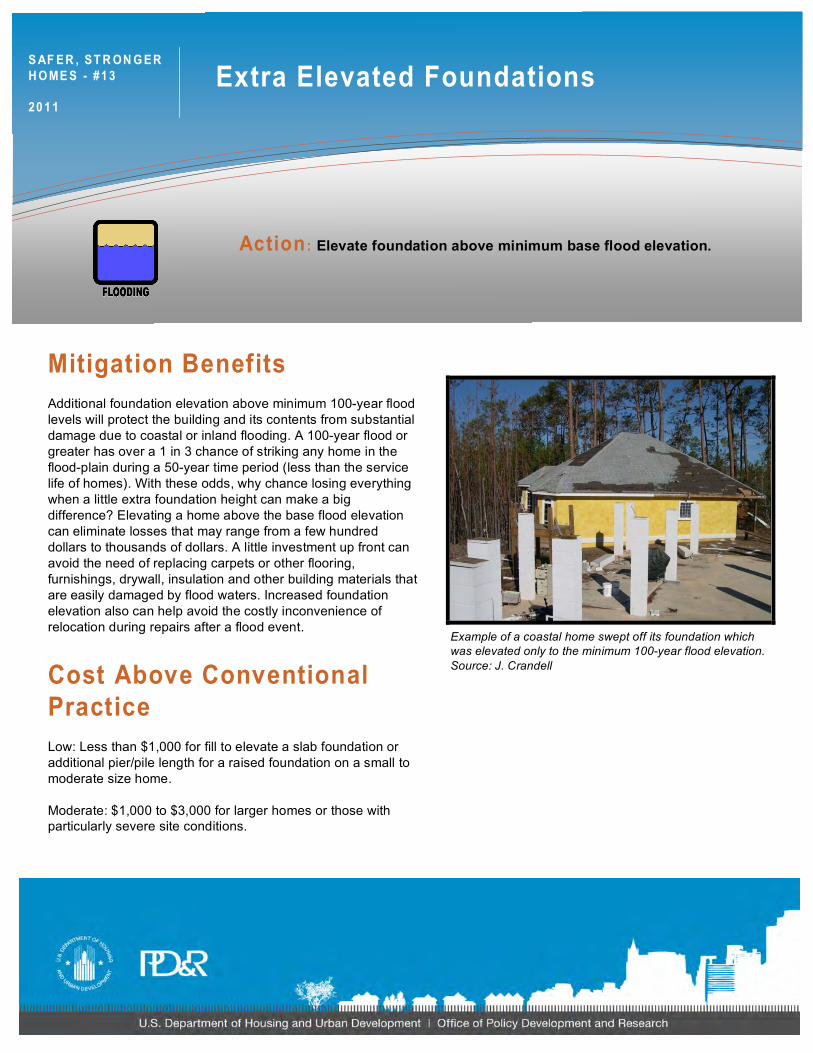
Mitigation Benefits Additional foundation elevation above minimum 100-year flood levels will protect the building and its contents from substantial damage due to coastal or inland flooding. A 100-year flood or greater has over a 1 in 3 chance of striking any home in the flood-plain during a 50-year time period (less than the service life of homes). With these odds, why chance losing everything when a little extra foundation height can make a big difference? Elevating a home above the base flood elevation can eliminate losses that may range from a few hundred dollars to thousands of dollars. A little investment up front can avoid the need of replacing carpets or other flooring, furnishings, drywall, insulation and other building materials that are easily damaged by flood waters. Increased foundation elevation also can help avoid the costly inconvenience of relocation during repairs after a flood event.
Cost Above Conventional Practice Low: Less than $1,000 for fill to elevate a slab foundation or additional pier/pile length for a raised foundation on a small to moderate size home.
Moderate: $1,000 to $3,000 for larger homes or those with particularly severe site conditions.
Action: Elevate foundation above minimum base flood elevation.
Example of a coastal home swept off its foundation which was elevated only to the minimum 100-year flood elevation. Source: J. Crandell
Extra Elevated Foundations
S AF ER , ST R ON G ER H O ME S - #1 3 20 1 1
- 2 -
Safer, Stronger Homes - #13
Why add freeboard to your foundation? Adding extra elevation, known as “freeboard,” has been shown to be cost-effective in reducing future losses:
“Although not directly linked to FEMA’s Hurricane Katrina work, a related study examined the benefits and costs of incorporating freeboard on new home construction. The report …concluded that due to damages avoided and flood insurance premium reductions, the benefits of adding freeboard exceed the added construction cost over a wide range of coastal flood conditions.”
~ John Ingargiola, Federal Emergency Management Agency (FEMA), Building Safety Journal, September 2008
Typical Practice
Minimum practice in many states is regulated by the National Flood Insurance Program (NFIP) based on mitigating floods up to a minimum 100-year flood elevation. Some states have added additional elevation or “freeboard” when joining the NFIP program. Acceptance of federal relief funds requires that the NFIP requirements be implemented.
Minimum 100-year flood elevations will not eliminate the potential for damage and will practically guarantee at least some damage during the life of the building. There is considerable uncertainty in flood maps and local conditions that result in more severe flood elevation or flow velocity than anticipated. For example, areas with recent substantial growth in new construction may have altered flood hazards that are not reflected on the latest available flood maps.
Best Practices and Considerations 1. Avoid building in the designated flood plain if possible. In many areas of the coast, this is already forbidden.
2. Realizing that Recommendation 1 might exclude otherwise valuable building lots and is not always practical in coastal areas, a reasonable alternative would be to elevate the foundation above minimum 100-year base flood elevation (BFE). Raise the elevation of the lowest floor with at least 1 or more feet of “freeboard” (see figure below). The 100-yr BFEs are generally available on Flood Insurance Rate Maps (FIRMs) at www.fema.gov/hazard/map/index.shtm. Note that the difference between coastal A and V flood zones in the figure is the amount of wave action contributing to the flood elevation. V-zones are generally directly on the coast and exposed to the largest and most destructive waves during a hurricane storm surge. FEMA recommends using elevated “V-zone” type foundations in both coastal V and A zones with unenclosed space at the elevated foundation level.

- 3 -
Safer, Stronger Homes - #13
Source: FEMA 499
3. In coastal flood zones, site the building with the greatest feasible setback from the beach or shoreline. As you move further from the shoreline, the same foundation will naturally be higher above the flood elevation due to the drop off in the flood elevation with distance from the shore.
Source: FEMA 499
Additional Resources/Links FEMA 499, Home Builder’s Guide to Coastal Construction, Federal Emergency Management Agency, Washington, DC, 2010, http://www.fema.gov/rebuild/mat/mat_fema499.shtm.
FEMA 55, Coastal Construction Manual, Federal Emergency Management Agency, Washington, DC, http://www.fema.gov/rebuild/mat/fema55.shtm.
ASCE Standard 24 Flood Resistant Design And Construction, American Society of Civil Engineers, 2005, http://cedb.asce.org/cgi/WWWdisplay.cgi?0500268.
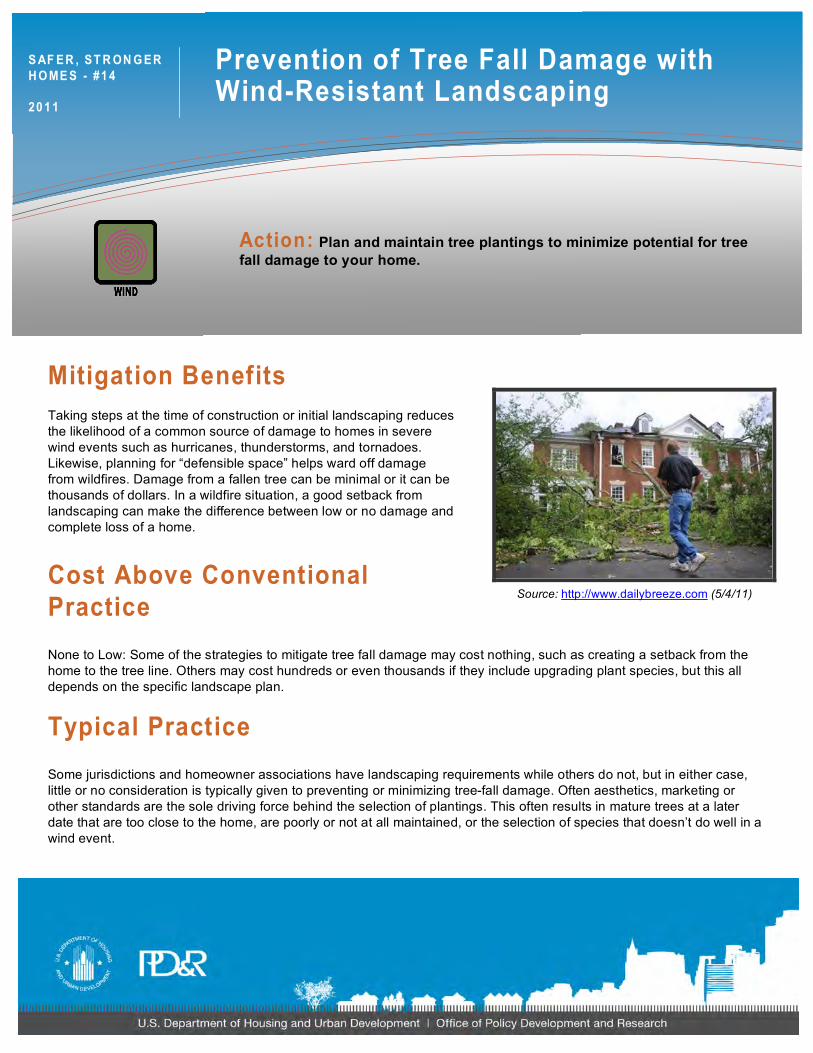
None to Low: Some of the strategies to mitigate tree fall damage may cost nothing, such as creating a setback from the home to the tree line. Others may cost hundreds or even thousands if they include upgrading plant species, but this all depends on the specific landscape plan.
Typical Practice Some jurisdictions and homeowner associations have landscaping requirements while others do not, but in either case, little or no consideration is typically given to preventing or minimizing tree-fall damage. Often aesthetics, marketing or other standards are the sole driving force behind the selection of plantings. This often results in mature trees at a later date that are too close to the home, are poorly or not at all maintained, or the selection of species that doesn’t do well in a wind event.
Mitigation Benefits Taking steps at the time of construction or initial landscaping reduces the likelihood of a common source of damage to homes in severe wind events such as hurricanes, thunderstorms, and tornadoes. Likewise, planning for “defensible space” helps ward off damage from wildfires. Damage from a fallen tree can be minimal or it can be thousands of dollars. In a wildfire situation, a good setback from landscaping can make the difference between low or no damage and complete loss of a home.
Cost Above Conventional Practice
Action: Plan and maintain tree plantings to minimize potential for tree fall damage to your home.
Source: http://www.dailybreeze.com (5/4/11)
Prevention of Tree Fall Damage with Wind-Resistant Landscaping
S AF ER , ST R ON G ER H O ME S - #1 4 20 1 1

- 2 -
Safer, Stronger Homes - #14
Best Practices and Considerations 1. Professional tree maintenance with preventative and structural pruning will prevent decay and weakening of trees.
Have dead or dying trees and limbs professionally removed.
2. Select quality trees like those in Tables 1 and 2 that are appropriate for the given location. Many state agricultural agencies and land grant universities provide similar lists. Seek professional advice when in doubt. Remember that no tree is “wind proof” and poor site or growing conditions can make any tree vulnerable.
3. Avoid planting of trees in wet soil conditions (high water table) that result in shallow roots and greater likelihood of tree fall in a severe wind event.
4. Trees in larger groups tend to do better in wind events. If isolated trees are desired, trees with a smaller height at maturity do better than larger ones.
5. Perhaps most important is to reduce the risk from the start by keeping the heaviest part of trees away from the house by a distance not less than ¾ times the tree’s mature height (see image below). Larger setbacks are even better.
Table 1. Coastal Plain Trees
Greatest Wind Resistance
Intermediate Wind Resistance
Least Wind Resistance
Live* and sand oaks Sabal palm Southern magnolia Bald cypress Florida scrub hickory American holly Crape myrtle Dogwood Sweet gum*
Wax myrtle Silver maple Pindo palm Longleaf and slash pines Washington fan palm Dahoon holly Turkey oak Pignut hickory
Sand, loblolly and spruce pines Laurel and water* oaks Southern red oak* Southern red cedar* Carolina laurel cherry Black cherry* Loquat Pecan* Sycamore Tulip poplar Bradford pear Red maple*

- 3 -
Safer, Stronger Homes - #14
Table 2. Tropical/Subtropical Trees
Greatest Wind Resistance
Intermediate Wind Resistance
Least Wind Resistance
Dicots Live oak* Sand live oak Southern magnolia Boxleaf stopper Florida scrub hickory* American holly Crap myrtle Dogwood Gumbo limbo Conifers Bald cypress Palms Sabal palm Christmas palm Pygmy date palm Areca palm
Dicots Wax myrtle Mahogany Laurel oak* Dahoon holly Sea grape Mango White cedar Strangler fig* Tropical almond Conifers South Florida slash pine Longleaf pine* Palms Washington fan palm Coconut palm Royal palm
Dicots Citrus spp Southern red cedar Black olive Avocado Sycamore* Hong Kong orchid Bottlebrush Weeping fig Caribbean trumpet tree Red maple* Conifers Sand pine Norfolk Island pine* Palms Queen palm
*Lose a lot of branches Tables courtesy of: Duryea, Kampf and Littlel, University of Florida
Additional Resources/Links Storm Damage Prevention and Treatment, Lessons Learned, University of Florida, July 29, 2011, http://hort.ifas.ufl.edu/woody/what-we-learned.shtml.