safety first and warranty conditions · or filing to neatly spigot into the cnc machined recess in...
TRANSCRIPT

1
Safety First and Warranty Conditions
RRS has designed and tested quality products for specific usage and applications. It is intended that all RRS products will enhance all normal street usage situations provided that they are installed according to RRS instructions as laid out in the installation manual. RRS provides proven and predictable outcomes for all of our product applications. The duty of care of correct and safe installation is the sole responsibility of the installer. If an incorrect installation or product application takes place for whatever reason; the vehicle will not be deemed road worthy under any circumstances and it should be noted that RRS is not responsible for any adverse outcomes resulting from
1. Choosing an incorrect product application. 2. Installing an incorrect product application. 3. Modifying any RRS products in any way. 4. Not following RRS installation procedures. 5. Not filling out the RRS safety and warranty card check list. 6. Not following RRS maintenance procedures. 7. Using non-compatible components to RRS products that are not within the
RRS specifications. 8. Using a vehicle fitted with RRS products in any off road activity. 9. The safe usage of RRS products becomes the sole responsibility of the end
user once the warranty period has expired. 10. The RRS product has not been subjected to conditions beyond those,
which was intended such as being used in any form of motor sport. 11. That the installation of any RRS product has been checked by a qualified
technician. 12. RRS will not be held responsible in any way shape or form for any activity
that may require dismantling, reassembly, overhaul and or modification to any RRS product.
RRS is excluded from any responsibility or adverse outcomes that may result from any unusual adverse weather conditions or any adverse road surfaces that could promote rapid wear or fatigue. Safe driving and roadworthiness is the sole responsibility of the installer and technician who signs the warranty and safety first checklist. It is necessary for this checklist to be returned to your nearest RRS representative within 21 days of completion
All RRS products incorporate the most advanced quality and manufacturing processes available today. RRS design
solves complex problems with simple solutions.

2
Safety First and Warranty Check List Rear Brake Kit RRS constantly strives for the safest ultimate performance outcomes; therefore it is in the best interest of the owner of a vehicle fitted with RRS products to fill out these important safety checks. OWNER NAME: OWNER ADDRESS: MAKE/MODEL: REGISTRATION No. CHASSIS/VIN No. STRUT SERIAL No. INSTALLER NAME & ADDRESS: TECHNICIAN NAME & ADDRESS:
ITEMS TO BE CHECKED – please tick yes or no
Yes No
1 Confirm kit fitted has been ordered correctly for vehicle 2 Rear Brake kit components appear in sound condition 3 Other brake components appear to be in sound condition 4 Confirm brake lines are free of interference and not strained at
any point of suspension travel or lock to lock
5 Check that all nuts & bolts are adequately tightened 6 Check tightness of wheel nuts 7 Road test vehicle to assess braking performance 8 Conduct brake testing using Brake Inertia Tester 9 Make the driver aware that re-torque and maintenance of all RRS
products should be done according to the RRS installation manual
Installed by:……………………………..……..……….. Signed:…………………….………… Check conducted by:…………………….……………… Signed:……………………….……… Please return this document in the envelope supplied so that RRS can give you the best after sale service and you will also automatically become a member of the RRS preferred customer programme.

3
RRS appreciates any comments or feedback you are willing to give. If you have a photograph or testimony of your RRS enhanced vehicle to be posted on our “RRS RIDES” website notice board please attach to this form or email to [email protected] COMMENTS: ____________________________________________________________________________________________________________________________________________________________________________________________________________________________________________________________________________________________________________________________________________________________________________________
RRS is certified member of SEMA, FAPM and Australian Automotive Aftermarket Association
ATTENTION: IT IS VITALLY IMPORTANT THAT PRIOR TO COMMENCEMENT OF THE INSTALLATION OF ANY RRS COMPONENTS, ALL INSTRUCTIONS, WARRANTY CONDITIONS, WARNING AND SAFETY CHECKS ARE READ AND UNDERSTOOD, TO AVOID ANY UNNECESSARY COMPLICATIONS. RRS Product Information All RRS products are designed and developed for street and recreational use only and will not be warranted when subjected to conditions beyond their intended use (eg. motor-sport). WARRANTY RRS will guarantee any product found to be faulty in workmanship or materials within 12 months or 20,000 km/12,000 miles use (whichever occurs first). Warranty is not available for faults or failure caused by ordinary wear and tear, misuse, use of incorrect or defective associated component parts, or any cause occurring after the product has left RRS control. This warranty does not affect consumers' rights and remedies under local laws. Further information: If you need advise on correct fitting procedures or any other aspects of our product range, please phone your enquiry to the RRS office +1 866 597 4662 +61 2 9907 3755. All RRS products incorporate the most advanced quality and manufacturing processes available today. RRS design solves complex problems with simple solutions RRS advise any steering and suspension modifications to your vehicle must be inspected by a certified engineer to comply with state regulations.

4

5

6
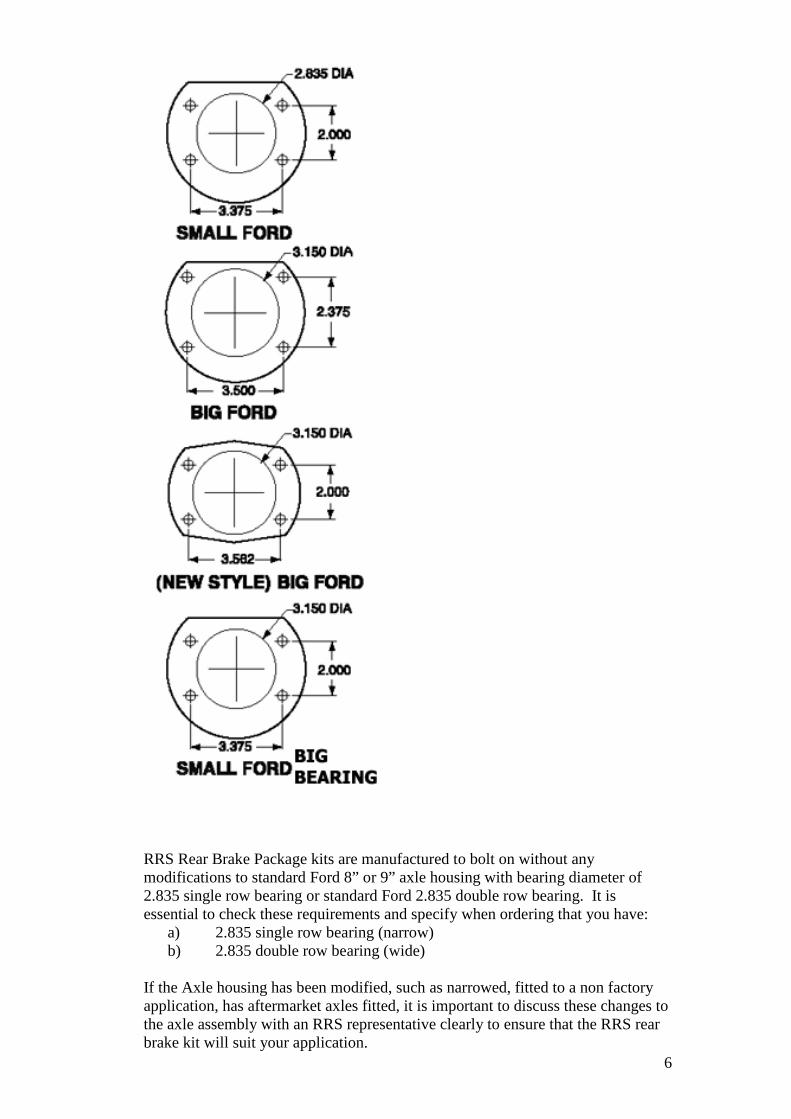
RRS Rear Brake Package kits are manufactured to bolt on without any modifications to standard Ford 8” or 9” axle housing with bearing diameter of 2.835 single row bearing or standard Ford 2.835 double row bearing. It is essential to check these requirements and specify when ordering that you have:
a) 2.835 single row bearing (narrow) b) 2.835 double row bearing (wide)
If the Axle housing has been modified, such as narrowed, fitted to a non factory application, has aftermarket axles fitted, it is important to discuss these changes to the axle assembly with an RRS representative clearly to ensure that the RRS rear brake kit will suit your application.

7
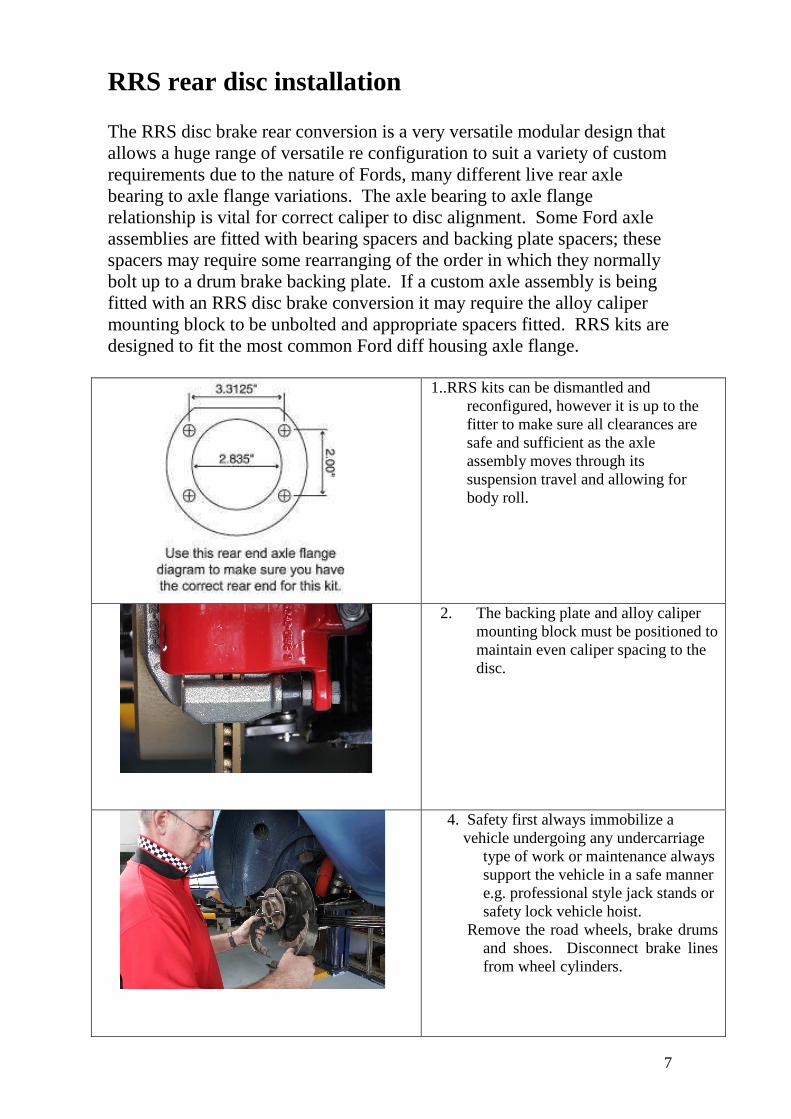
RRS rear disc installation The RRS disc brake rear conversion is a very versatile modular design that allows a huge range of versatile re configuration to suit a variety of custom requirements due to the nature of Fords, many different live rear axle bearing to axle flange variations. The axle bearing to axle flange relationship is vital for correct caliper to disc alignment. Some Ford axle assemblies are fitted with bearing spacers and backing plate spacers; these spacers may require some rearranging of the order in which they normally bolt up to a drum brake backing plate. If a custom axle assembly is being fitted with an RRS disc brake conversion it may require the alloy caliper mounting block to be unbolted and appropriate spacers fitted. RRS kits are designed to fit the most common Ford diff housing axle flange.
1..RRS kits can be dismantled and reconfigured, however it is up to the fitter to make sure all clearances are safe and sufficient as the axle assembly moves through its suspension travel and allowing for body roll.
2. The backing plate and alloy caliper mounting block must be positioned to maintain even caliper spacing to the disc.
4. Safety first always immobilize a vehicle undergoing any undercarriage
type of work or maintenance always support the vehicle in a safe manner e.g. professional style jack stands or safety lock vehicle hoist.
Remove the road wheels, brake drums and shoes. Disconnect brake lines from wheel cylinders.

8
5. Remove park brake cable from
backing plate. RRS suggest tapping a box wrench over the park brake cable finger cone clip, to make it easier to pull the cable through the backing plate
6. Remove axle assembly and
backing plate. Check the axle seal and bearing for wear or leakage and replace if necessary. Check axle flange is free from burrs on the mounting face so that the RRS brake mounting plate fits squarely to the flange. Stamping flash is quite common on Ford axle housings and may require grinding or filing to neatly spigot into the CNC machined recess in the RRS brake mounting plate
7. the spigot machined into the RRS mounting plate is clearly seen. Place the mounting plate onto the axle flange, making sure that it mounts flush to the axle housing by hand.
8. Fit the new RRS wheels studs to your axle, making sure that the axle flange is free from burrs. Any distortion of the axle flange or burrs could cause disc run out. Slide the axle back into place being careful not to damage the axle seal. Make sure the bearing retaining plate is turned upside down to clear the handbrake mechanism. Torque the axle retaining bolts to 30 ft lbs of torque. NB do not force the RRS backing plate over the axle flange as distortion could occur and cause caliper misalignment. If the mounting plate does not appear to sit flush to the axle housing prior to final bolt up, the axle housing must be re checked for stamping flash.

9
9. fit the RRS cable adaptor over the
finger cone clip of your original park brake cable
10.RRS supplies a park brake cable mounting clamp so that if there is a clearance issue resulting from the RRS conversion of the cable to any other vehicle components such as exhaust, the cable mounting clamp can be used to secure the cable to the chassis or floor panels
11.Fit factory cable end to RRS cable
anchor. To make fitment easier, depress spring and hold with a pair of pliers. The RRS park brake mechanism will operate with all factory park brake cables regardless if it is foot or hand operated.
12.Fit the RRS disc, make sure the
studs are fully engaged. The RRS supplied studs have longer shanks to accurately locate the new rotor. It is suggested that you use wheel nuts and washers to fully locate the disc on the axle. If the axle is in good condition and the disc is secure to the axle flange, the disc will run true.

10
13. bolt the RRS caliper in place. Secure the flexible brake line so that adequate flex is maintained to allow for pad wear and caliper movement.
14.once the caliper is bolted in place,
make sure the gap between the RRS caliper housing and disc is evenly spaced. If a misalignment occurs check that the disc is properly mounted, or the backing plate is properly mounted or alternatively consult with your nearest RRS supplier before road testing. NB do not shim or file to fit.
15. most RRS kits are supplied with a
single flare tube nut style hose end which may require re flaring the original brake line and bending to suit. RRS has an optional braided flex line that will be compatible with a factory style double flare line end and 3/8 UNF tube nut
Make sure brake line does not interfere with bump stop rubber.
16. After the brake line has been flared and reshaped, tighten the tube nut and make sure the line will not foul on any other components such as the bump stop. Only use and re-flare lines that are in good serviceable condition, free from rust or damage. Most brake shops will be able to make new lines to suit if necessary. Finally bleed the brakes and check for leaks

11
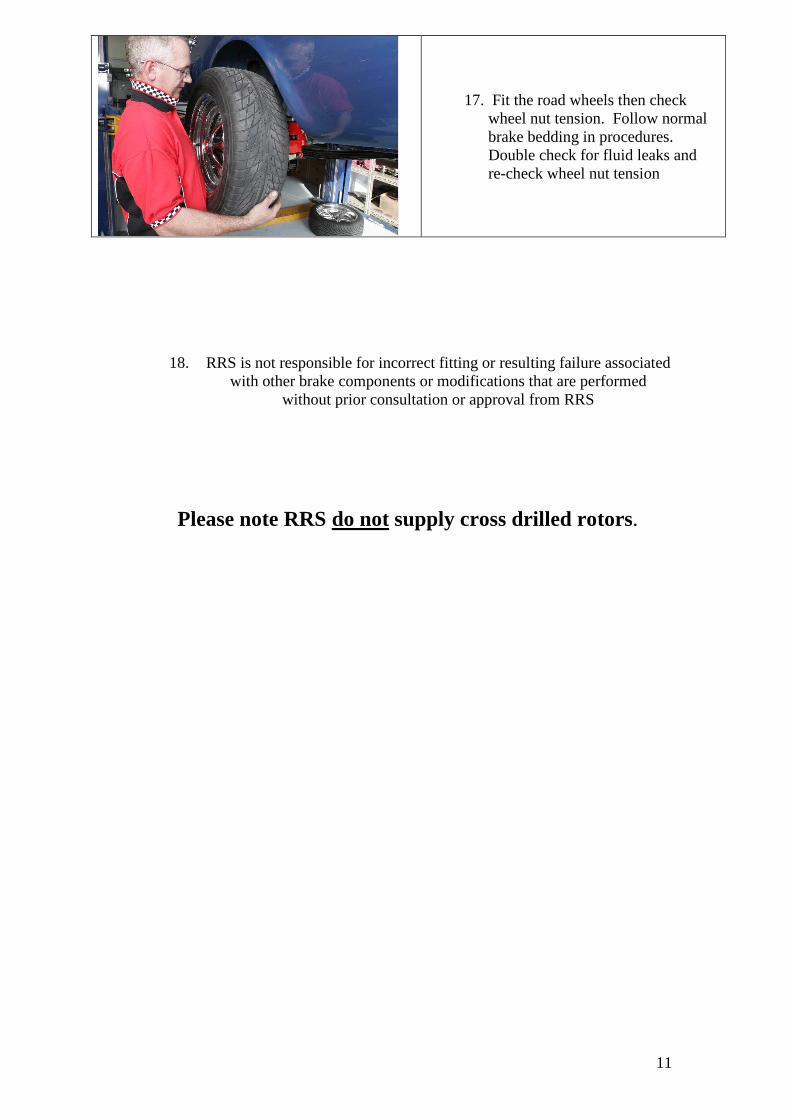
17. Fit the road wheels then check wheel nut tension. Follow normal brake bedding in procedures. Double check for fluid leaks and re-check wheel nut tension
18. RRS is not responsible for incorrect fitting or resulting failure associated with other brake components or modifications that are performed
without prior consultation or approval from RRS
Please note RRS do not supply cross drilled rotors.

12

1
Safety First and Warranty Conditions
RRS has designed and tested quality products for specific usage and applications. It is intended that all RRS products will enhance all normal street usage situations provided that they are installed according to RRS instructions as laid out in the installation manual. RRS provides proven and predictable outcomes for all of our product applications. The duty of care of correct and safe installation is the sole responsibility of the installer. If an incorrect installation or product application takes place for whatever reason; the vehicle will not be deemed road worthy under any circumstances and it should be noted that RRS is not responsible for any adverse outcomes resulting from
1. Choosing an incorrect product application. 2. Installing an incorrect product application. 3. Modifying any RRS products in any way. 4. Not following RRS installation procedures. 5. Not filling out the RRS safety and warranty card check list. 6. Not following RRS maintenance procedures. 7. Using non-compatible components to RRS products that are not within the
RRS specifications. 8. Using a vehicle fitted with RRS products in any off road activity. 9. The safe usage of RRS products becomes the sole responsibility of the end
user once the warranty period has expired. 10. The RRS product has not been subjected to conditions beyond those,
which was intended such as being used in any form of motor sport. 11. That the installation of any RRS product has been checked by a qualified
technician. 12. RRS will not be held responsible in any way shape or form for any activity
that may require dismantling, reassembly, overhaul and or modification to any RRS product.
RRS is excluded from any responsibility or adverse outcomes that may result from any unusual adverse weather conditions or any adverse road surfaces that could promote rapid wear or fatigue. Safe driving and roadworthiness is the sole responsibility of the installer and technician who signs the warranty and safety first checklist. It is necessary for this checklist to be returned to your nearest RRS representative within 21 days of completion
All RRS products incorporate the most advanced quality and manufacturing processes available today. RRS design
solves complex problems with simple solutions.

2
Safety First and Warranty Check List Rear Brake Kit RRS constantly strives for the safest ultimate performance outcomes; therefore it is in the best interest of the owner of a vehicle fitted with RRS products to fill out these important safety checks. OWNER NAME: OWNER ADDRESS: MAKE/MODEL: REGISTRATION No. CHASSIS/VIN No. STRUT SERIAL No. INSTALLER NAME & ADDRESS: TECHNICIAN NAME & ADDRESS:
ITEMS TO BE CHECKED – please tick yes or no
Yes No
1 Confirm kit fitted has been ordered correctly for vehicle 2 Rear Brake kit components appear in sound condition 3 Other brake components appear to be in sound condition 4 Confirm brake lines are free of interference and not strained at
any point of suspension travel or lock to lock
5 Check that all nuts & bolts are adequately tightened 6 Check tightness of wheel nuts 7 Road test vehicle to assess braking performance 8 Conduct brake testing using Brake Inertia Tester 9 Make the driver aware that re-torque and maintenance of all RRS
products should be done according to the RRS installation manual
Installed by:……………………………..……..……….. Signed:…………………….………… Check conducted by:…………………….……………… Signed:……………………….……… Please return this document in the envelope supplied so that RRS can give you the best after sale service and you will also automatically become a member of the RRS preferred customer programme.

3
RRS appreciates any comments or feedback you are willing to give. If you have a photograph or testimony of your RRS enhanced vehicle to be posted on our “RRS RIDES” website notice board please attach to this form or email to [email protected] COMMENTS: ____________________________________________________________________________________________________________________________________________________________________________________________________________________________________________________________________________________________________________________________________________________________________________________
RRS is certified member of SEMA, FAPM and Australian Automotive Aftermarket Association
ATTENTION: IT IS VITALLY IMPORTANT THAT PRIOR TO COMMENCEMENT OF THE INSTALLATION OF ANY RRS COMPONENTS, ALL INSTRUCTIONS, WARRANTY CONDITIONS, WARNING AND SAFETY CHECKS ARE READ AND UNDERSTOOD, TO AVOID ANY UNNECESSARY COMPLICATIONS. RRS Product Information All RRS products are designed and developed for street and recreational use only and will not be warranted when subjected to conditions beyond their intended use (eg. motor-sport). WARRANTY RRS will guarantee any product found to be faulty in workmanship or materials within 12 months or 20,000 km/12,000 miles use (whichever occurs first). Warranty is not available for faults or failure caused by ordinary wear and tear, misuse, use of incorrect or defective associated component parts, or any cause occurring after the product has left RRS control. This warranty does not affect consumers' rights and remedies under local laws. Further information: If you need advise on correct fitting procedures or any other aspects of our product range, please phone your enquiry to the RRS office +1 866 597 4662 +61 2 9907 3755. All RRS products incorporate the most advanced quality and manufacturing processes available today. RRS design solves complex problems with simple solutions RRS advise any steering and suspension modifications to your vehicle must be inspected by a certified engineer to comply with state regulations.

4

5

6
RRS Rear Brake Package kits are manufactured to bolt on without any modifications to standard Ford 8” or 9” axle housing with bearing diameter of 2.835 single row bearing or standard Ford 2.835 double row bearing. It is essential to check these requirements and specify when ordering that you have:
a) 2.835 single row bearing (narrow) b) 2.835 double row bearing (wide)
If the Axle housing has been modified, such as narrowed, fitted to a non factory application, has aftermarket axles fitted, it is important to discuss these changes to the axle assembly with an RRS representative clearly to ensure that the RRS rear brake kit will suit your application.

7
RRS rear disc installation The RRS disc brake rear conversion is a very versatile modular design that allows a huge range of versatile re configuration to suit a variety of custom requirements due to the nature of Fords, many different live rear axle bearing to axle flange variations. The axle bearing to axle flange relationship is vital for correct caliper to disc alignment. Some Ford axle assemblies are fitted with bearing spacers and backing plate spacers; these spacers may require some rearranging of the order in which they normally bolt up to a drum brake backing plate. If a custom axle assembly is being fitted with an RRS disc brake conversion it may require the alloy caliper mounting block to be unbolted and appropriate spacers fitted. RRS kits are designed to fit the most common Ford diff housing axle flange.
1..RRS kits can be dismantled and reconfigured, however it is up to the fitter to make sure all clearances are safe and sufficient as the axle assembly moves through its suspension travel and allowing for body roll.
2. The backing plate and alloy caliper mounting block must be positioned to maintain even caliper spacing to the disc.
4. Safety first always immobilize a vehicle undergoing any undercarriage
type of work or maintenance always support the vehicle in a safe manner e.g. professional style jack stands or safety lock vehicle hoist.
Remove the road wheels, brake drums and shoes. Disconnect brake lines from wheel cylinders.

8
5. Remove park brake cable from
backing plate. RRS suggest tapping a box wrench over the park brake cable finger cone clip, to make it easier to pull the cable through the backing plate
6. Remove axle assembly and
backing plate. Check the axle seal and bearing for wear or leakage and replace if necessary. Check axle flange is free from burrs on the mounting face so that the RRS brake mounting plate fits squarely to the flange. Stamping flash is quite common on Ford axle housings and may require grinding or filing to neatly spigot into the CNC machined recess in the RRS brake mounting plate
7. the spigot machined into the RRS mounting plate is clearly seen. Place the mounting plate onto the axle flange, making sure that it mounts flush to the axle housing by hand.
8. Fit the new RRS wheels studs to your axle, making sure that the axle flange is free from burrs. Any distortion of the axle flange or burrs could cause disc run out. Slide the axle back into place being careful not to damage the axle seal. Make sure the bearing retaining plate is turned upside down to clear the handbrake mechanism. Torque the axle retaining bolts to 30 ft lbs of torque. NB do not force the RRS backing plate over the axle flange as distortion could occur and cause caliper misalignment. If the mounting plate does not appear to sit flush to the axle housing prior to final bolt up, the axle housing must be re checked for stamping flash.

9
9. fit the RRS cable adaptor over the
finger cone clip of your original park brake cable
10.RRS supplies a park brake cable mounting clamp so that if there is a clearance issue resulting from the RRS conversion of the cable to any other vehicle components such as exhaust, the cable mounting clamp can be used to secure the cable to the chassis or floor panels
11.Fit factory cable end to RRS cable
anchor. To make fitment easier, depress spring and hold with a pair of pliers. The RRS park brake mechanism will operate with all factory park brake cables regardless if it is foot or hand operated.
12.Fit the RRS disc, make sure the
studs are fully engaged. The RRS supplied studs have longer shanks to accurately locate the new rotor. It is suggested that you use wheel nuts and washers to fully locate the disc on the axle. If the axle is in good condition and the disc is secure to the axle flange, the disc will run true.

10
13. bolt the RRS caliper in place. Secure the flexible brake line so that adequate flex is maintained to allow for pad wear and caliper movement.
14.once the caliper is bolted in place,
make sure the gap between the RRS caliper housing and disc is evenly spaced. If a misalignment occurs check that the disc is properly mounted, or the backing plate is properly mounted or alternatively consult with your nearest RRS supplier before road testing. NB do not shim or file to fit.
15. most RRS kits are supplied with a
single flare tube nut style hose end which may require re flaring the original brake line and bending to suit. RRS has an optional braided flex line that will be compatible with a factory style double flare line end and 3/8 UNF tube nut
Make sure brake line does not interfere with bump stop rubber.
16. After the brake line has been flared and reshaped, tighten the tube nut and make sure the line will not foul on any other components such as the bump stop. Only use and re-flare lines that are in good serviceable condition, free from rust or damage. Most brake shops will be able to make new lines to suit if necessary. Finally bleed the brakes and check for leaks

11
17. Fit the road wheels then check wheel nut tension. Follow normal brake bedding in procedures. Double check for fluid leaks and re-check wheel nut tension
18. RRS is not responsible for incorrect fitting or resulting failure associated with other brake components or modifications that are performed
without prior consultation or approval from RRS
Please note RRS do not supply cross drilled rotors.

12

1
Safety First and Warranty Conditions
RRS has designed and tested quality products for specific usage and applications. It is intended that all RRS products will enhance all normal street usage situations provided that they are installed according to RRS instructions as laid out in the installation manual. RRS provides proven and predictable outcomes for all of our product applications. The duty of care of correct and safe installation is the sole responsibility of the installer. If an incorrect installation or product application takes place for whatever reason; the vehicle will not be deemed road worthy under any circumstances and it should be noted that RRS is not responsible for any adverse outcomes resulting from
1. Choosing an incorrect product application. 2. Installing an incorrect product application. 3. Modifying any RRS products in any way. 4. Not following RRS installation procedures. 5. Not filling out the RRS safety and warranty card check list. 6. Not following RRS maintenance procedures. 7. Using non-compatible components to RRS products that are not within the
RRS specifications. 8. Using a vehicle fitted with RRS products in any off road activity. 9. The safe usage of RRS products becomes the sole responsibility of the end
user once the warranty period has expired. 10. The RRS product has not been subjected to conditions beyond those,
which was intended such as being used in any form of motor sport. 11. That the installation of any RRS product has been checked by a qualified
technician. 12. RRS will not be held responsible in any way shape or form for any activity
that may require dismantling, reassembly, overhaul and or modification to any RRS product.
RRS is excluded from any responsibility or adverse outcomes that may result from any unusual adverse weather conditions or any adverse road surfaces that could promote rapid wear or fatigue. Safe driving and roadworthiness is the sole responsibility of the installer and technician who signs the warranty and safety first checklist. It is necessary for this checklist to be returned to your nearest RRS representative within 21 days of completion
All RRS products incorporate the most advanced quality and manufacturing processes available today. RRS design
solves complex problems with simple solutions.

2
Safety First and Warranty Check List Rear Brake Kit RRS constantly strives for the safest ultimate performance outcomes; therefore it is in the best interest of the owner of a vehicle fitted with RRS products to fill out these important safety checks. OWNER NAME: OWNER ADDRESS: MAKE/MODEL: REGISTRATION No. CHASSIS/VIN No. STRUT SERIAL No. INSTALLER NAME & ADDRESS: TECHNICIAN NAME & ADDRESS:
ITEMS TO BE CHECKED – please tick yes or no
Yes No
1 Confirm kit fitted has been ordered correctly for vehicle 2 Rear Brake kit components appear in sound condition 3 Other brake components appear to be in sound condition 4 Confirm brake lines are free of interference and not strained at
any point of suspension travel or lock to lock
5 Check that all nuts & bolts are adequately tightened 6 Check tightness of wheel nuts 7 Road test vehicle to assess braking performance 8 Conduct brake testing using Brake Inertia Tester 9 Make the driver aware that re-torque and maintenance of all RRS
products should be done according to the RRS installation manual
Installed by:……………………………..……..……….. Signed:…………………….………… Check conducted by:…………………….……………… Signed:……………………….……… Please return this document in the envelope supplied so that RRS can give you the best after sale service and you will also automatically become a member of the RRS preferred customer programme.

3
RRS appreciates any comments or feedback you are willing to give. If you have a photograph or testimony of your RRS enhanced vehicle to be posted on our “RRS RIDES” website notice board please attach to this form or email to [email protected] COMMENTS: ____________________________________________________________________________________________________________________________________________________________________________________________________________________________________________________________________________________________________________________________________________________________________________________
RRS is certified member of SEMA, FAPM and Australian Automotive Aftermarket Association
ATTENTION: IT IS VITALLY IMPORTANT THAT PRIOR TO COMMENCEMENT OF THE INSTALLATION OF ANY RRS COMPONENTS, ALL INSTRUCTIONS, WARRANTY CONDITIONS, WARNING AND SAFETY CHECKS ARE READ AND UNDERSTOOD, TO AVOID ANY UNNECESSARY COMPLICATIONS. RRS Product Information All RRS products are designed and developed for street and recreational use only and will not be warranted when subjected to conditions beyond their intended use (eg. motor-sport). WARRANTY RRS will guarantee any product found to be faulty in workmanship or materials within 12 months or 20,000 km/12,000 miles use (whichever occurs first). Warranty is not available for faults or failure caused by ordinary wear and tear, misuse, use of incorrect or defective associated component parts, or any cause occurring after the product has left RRS control. This warranty does not affect consumers' rights and remedies under local laws. Further information: If you need advise on correct fitting procedures or any other aspects of our product range, please phone your enquiry to the RRS office +1 866 597 4662 +61 2 9907 3755. All RRS products incorporate the most advanced quality and manufacturing processes available today. RRS design solves complex problems with simple solutions RRS advise any steering and suspension modifications to your vehicle must be inspected by a certified engineer to comply with state regulations.

4

5

6
RRS Rear Brake Package kits are manufactured to bolt on without any modifications to standard Ford 8” or 9” axle housing with bearing diameter of 2.835 single row bearing or standard Ford 2.835 double row bearing. It is essential to check these requirements and specify when ordering that you have:
a) 2.835 single row bearing (narrow) b) 2.835 double row bearing (wide)
If the Axle housing has been modified, such as narrowed, fitted to a non factory application, has aftermarket axles fitted, it is important to discuss these changes to the axle assembly with an RRS representative clearly to ensure that the RRS rear brake kit will suit your application.

7
RRS rear disc installation The RRS disc brake rear conversion is a very versatile modular design that allows a huge range of versatile re configuration to suit a variety of custom requirements due to the nature of Fords, many different live rear axle bearing to axle flange variations. The axle bearing to axle flange relationship is vital for correct caliper to disc alignment. Some Ford axle assemblies are fitted with bearing spacers and backing plate spacers; these spacers may require some rearranging of the order in which they normally bolt up to a drum brake backing plate. If a custom axle assembly is being fitted with an RRS disc brake conversion it may require the alloy caliper mounting block to be unbolted and appropriate spacers fitted. RRS kits are designed to fit the most common Ford diff housing axle flange.
1..RRS kits can be dismantled and reconfigured, however it is up to the fitter to make sure all clearances are safe and sufficient as the axle assembly moves through its suspension travel and allowing for body roll.
2. The backing plate and alloy caliper mounting block must be positioned to maintain even caliper spacing to the disc.
4. Safety first always immobilize a vehicle undergoing any undercarriage
type of work or maintenance always support the vehicle in a safe manner e.g. professional style jack stands or safety lock vehicle hoist.
Remove the road wheels, brake drums and shoes. Disconnect brake lines from wheel cylinders.

8
5. Remove park brake cable from
backing plate. RRS suggest tapping a box wrench over the park brake cable finger cone clip, to make it easier to pull the cable through the backing plate
6. Remove axle assembly and
backing plate. Check the axle seal and bearing for wear or leakage and replace if necessary. Check axle flange is free from burrs on the mounting face so that the RRS brake mounting plate fits squarely to the flange. Stamping flash is quite common on Ford axle housings and may require grinding or filing to neatly spigot into the CNC machined recess in the RRS brake mounting plate
7. the spigot machined into the RRS mounting plate is clearly seen. Place the mounting plate onto the axle flange, making sure that it mounts flush to the axle housing by hand.
8. Fit the new RRS wheels studs to your axle, making sure that the axle flange is free from burrs. Any distortion of the axle flange or burrs could cause disc run out. Slide the axle back into place being careful not to damage the axle seal. Make sure the bearing retaining plate is turned upside down to clear the handbrake mechanism. Torque the axle retaining bolts to 30 ft lbs of torque. NB do not force the RRS backing plate over the axle flange as distortion could occur and cause caliper misalignment. If the mounting plate does not appear to sit flush to the axle housing prior to final bolt up, the axle housing must be re checked for stamping flash.

9
9. fit the RRS cable adaptor over the
finger cone clip of your original park brake cable
10.RRS supplies a park brake cable mounting clamp so that if there is a clearance issue resulting from the RRS conversion of the cable to any other vehicle components such as exhaust, the cable mounting clamp can be used to secure the cable to the chassis or floor panels
11.Fit factory cable end to RRS cable
anchor. To make fitment easier, depress spring and hold with a pair of pliers. The RRS park brake mechanism will operate with all factory park brake cables regardless if it is foot or hand operated.
12.Fit the RRS disc, make sure the
studs are fully engaged. The RRS supplied studs have longer shanks to accurately locate the new rotor. It is suggested that you use wheel nuts and washers to fully locate the disc on the axle. If the axle is in good condition and the disc is secure to the axle flange, the disc will run true.

10
13. bolt the RRS caliper in place. Secure the flexible brake line so that adequate flex is maintained to allow for pad wear and caliper movement.
14.once the caliper is bolted in place,
make sure the gap between the RRS caliper housing and disc is evenly spaced. If a misalignment occurs check that the disc is properly mounted, or the backing plate is properly mounted or alternatively consult with your nearest RRS supplier before road testing. NB do not shim or file to fit.
15. most RRS kits are supplied with a
single flare tube nut style hose end which may require re flaring the original brake line and bending to suit. RRS has an optional braided flex line that will be compatible with a factory style double flare line end and 3/8 UNF tube nut
Make sure brake line does not interfere with bump stop rubber.
16. After the brake line has been flared and reshaped, tighten the tube nut and make sure the line will not foul on any other components such as the bump stop. Only use and re-flare lines that are in good serviceable condition, free from rust or damage. Most brake shops will be able to make new lines to suit if necessary. Finally bleed the brakes and check for leaks

11
17. Fit the road wheels then check wheel nut tension. Follow normal brake bedding in procedures. Double check for fluid leaks and re-check wheel nut tension
18. RRS is not responsible for incorrect fitting or resulting failure associated with other brake components or modifications that are performed
without prior consultation or approval from RRS
Please note RRS do not supply cross drilled rotors.

12

1
Safety First and Warranty Conditions
RRS has designed and tested quality products for specific usage and applications. It is intended that all RRS products will enhance all normal street usage situations provided that they are installed according to RRS instructions as laid out in the installation manual. RRS provides proven and predictable outcomes for all of our product applications. The duty of care of correct and safe installation is the sole responsibility of the installer. If an incorrect installation or product application takes place for whatever reason; the vehicle will not be deemed road worthy under any circumstances and it should be noted that RRS is not responsible for any adverse outcomes resulting from
1. Choosing an incorrect product application. 2. Installing an incorrect product application. 3. Modifying any RRS products in any way. 4. Not following RRS installation procedures. 5. Not filling out the RRS safety and warranty card check list. 6. Not following RRS maintenance procedures. 7. Using non-compatible components to RRS products that are not within the
RRS specifications. 8. Using a vehicle fitted with RRS products in any off road activity. 9. The safe usage of RRS products becomes the sole responsibility of the end
user once the warranty period has expired. 10. The RRS product has not been subjected to conditions beyond those,
which was intended such as being used in any form of motor sport. 11. That the installation of any RRS product has been checked by a qualified
technician. 12. RRS will not be held responsible in any way shape or form for any activity
that may require dismantling, reassembly, overhaul and or modification to any RRS product.
RRS is excluded from any responsibility or adverse outcomes that may result from any unusual adverse weather conditions or any adverse road surfaces that could promote rapid wear or fatigue. Safe driving and roadworthiness is the sole responsibility of the installer and technician who signs the warranty and safety first checklist. It is necessary for this checklist to be returned to your nearest RRS representative within 21 days of completion
All RRS products incorporate the most advanced quality and manufacturing processes available today. RRS design
solves complex problems with simple solutions.

2
Safety First and Warranty Check List Rear Brake Kit RRS constantly strives for the safest ultimate performance outcomes; therefore it is in the best interest of the owner of a vehicle fitted with RRS products to fill out these important safety checks. OWNER NAME: OWNER ADDRESS: MAKE/MODEL: REGISTRATION No. CHASSIS/VIN No. STRUT SERIAL No. INSTALLER NAME & ADDRESS: TECHNICIAN NAME & ADDRESS:
ITEMS TO BE CHECKED – please tick yes or no
Yes No
1 Confirm kit fitted has been ordered correctly for vehicle 2 Rear Brake kit components appear in sound condition 3 Other brake components appear to be in sound condition 4 Confirm brake lines are free of interference and not strained at
any point of suspension travel or lock to lock
5 Check that all nuts & bolts are adequately tightened 6 Check tightness of wheel nuts 7 Road test vehicle to assess braking performance 8 Conduct brake testing using Brake Inertia Tester 9 Make the driver aware that re-torque and maintenance of all RRS
products should be done according to the RRS installation manual
Installed by:……………………………..……..……….. Signed:…………………….………… Check conducted by:…………………….……………… Signed:……………………….……… Please return this document in the envelope supplied so that RRS can give you the best after sale service and you will also automatically become a member of the RRS preferred customer programme.

3
RRS appreciates any comments or feedback you are willing to give. If you have a photograph or testimony of your RRS enhanced vehicle to be posted on our “RRS RIDES” website notice board please attach to this form or email to [email protected] COMMENTS: ____________________________________________________________________________________________________________________________________________________________________________________________________________________________________________________________________________________________________________________________________________________________________________________
RRS is certified member of SEMA, FAPM and Australian Automotive Aftermarket Association
ATTENTION: IT IS VITALLY IMPORTANT THAT PRIOR TO COMMENCEMENT OF THE INSTALLATION OF ANY RRS COMPONENTS, ALL INSTRUCTIONS, WARRANTY CONDITIONS, WARNING AND SAFETY CHECKS ARE READ AND UNDERSTOOD, TO AVOID ANY UNNECESSARY COMPLICATIONS. RRS Product Information All RRS products are designed and developed for street and recreational use only and will not be warranted when subjected to conditions beyond their intended use (eg. motor-sport). WARRANTY RRS will guarantee any product found to be faulty in workmanship or materials within 12 months or 20,000 km/12,000 miles use (whichever occurs first). Warranty is not available for faults or failure caused by ordinary wear and tear, misuse, use of incorrect or defective associated component parts, or any cause occurring after the product has left RRS control. This warranty does not affect consumers' rights and remedies under local laws. Further information: If you need advise on correct fitting procedures or any other aspects of our product range, please phone your enquiry to the RRS office +1 866 597 4662 +61 2 9907 3755. All RRS products incorporate the most advanced quality and manufacturing processes available today. RRS design solves complex problems with simple solutions RRS advise any steering and suspension modifications to your vehicle must be inspected by a certified engineer to comply with state regulations.

4

5

6
RRS Rear Brake Package kits are manufactured to bolt on without any modifications to standard Ford 8” or 9” axle housing with bearing diameter of 2.835 single row bearing or standard Ford 2.835 double row bearing. It is essential to check these requirements and specify when ordering that you have:
a) 2.835 single row bearing (narrow) b) 2.835 double row bearing (wide)
If the Axle housing has been modified, such as narrowed, fitted to a non factory application, has aftermarket axles fitted, it is important to discuss these changes to the axle assembly with an RRS representative clearly to ensure that the RRS rear brake kit will suit your application.
7
RRS rear disc installation The RRS disc brake rear conversion is a very versatile modular design that allows a huge range of versatile re configuration to suit a variety of custom requirements due to the nature of Fords, many different live rear axle bearing to axle flange variations. The axle bearing to axle flange relationship is vital for correct caliper to disc alignment. Some Ford axle assemblies are fitted with bearing spacers and backing plate spacers; these spacers may require some rearranging of the order in which they normally bolt up to a drum brake backing plate. If a custom axle assembly is being fitted with an RRS disc brake conversion it may require the alloy caliper mounting block to be unbolted and appropriate spacers fitted. RRS kits are designed to fit the most common Ford diff housing axle flange.
1..RRS kits can be dismantled and reconfigured, however it is up to the fitter to make sure all clearances are safe and sufficient as the axle assembly moves through its suspension travel and allowing for body roll.
2. The backing plate and alloy caliper mounting block must be positioned to maintain even caliper spacing to the disc.
4. Safety first always immobilize a vehicle undergoing any undercarriage
type of work or maintenance always support the vehicle in a safe manner e.g. professional style jack stands or safety lock vehicle hoist.
Remove the road wheels, brake drums and shoes. Disconnect brake lines from wheel cylinders.

8
5. Remove park brake cable from
backing plate. RRS suggest tapping a box wrench over the park brake cable finger cone clip, to make it easier to pull the cable through the backing plate
6. Remove axle assembly and
backing plate. Check the axle seal and bearing for wear or leakage and replace if necessary. Check axle flange is free from burrs on the mounting face so that the RRS brake mounting plate fits squarely to the flange. Stamping flash is quite common on Ford axle housings and may require grinding or filing to neatly spigot into the CNC machined recess in the RRS brake mounting plate
7. the spigot machined into the RRS mounting plate is clearly seen. Place the mounting plate onto the axle flange, making sure that it mounts flush to the axle housing by hand.
8. Fit the new RRS wheels studs to your axle, making sure that the axle flange is free from burrs. Any distortion of the axle flange or burrs could cause disc run out. Slide the axle back into place being careful not to damage the axle seal. Make sure the bearing retaining plate is turned upside down to clear the handbrake mechanism. Torque the axle retaining bolts to 30 ft lbs of torque. NB do not force the RRS backing plate over the axle flange as distortion could occur and cause caliper misalignment. If the mounting plate does not appear to sit flush to the axle housing prior to final bolt up, the axle housing must be re checked for stamping flash.

9
9. fit the RRS cable adaptor over the
finger cone clip of your original park brake cable
10.RRS supplies a park brake cable mounting clamp so that if there is a clearance issue resulting from the RRS conversion of the cable to any other vehicle components such as exhaust, the cable mounting clamp can be used to secure the cable to the chassis or floor panels
11.Fit factory cable end to RRS cable
anchor. To make fitment easier, depress spring and hold with a pair of pliers. The RRS park brake mechanism will operate with all factory park brake cables regardless if it is foot or hand operated.
12.Fit the RRS disc, make sure the
studs are fully engaged. The RRS supplied studs have longer shanks to accurately locate the new rotor. It is suggested that you use wheel nuts and washers to fully locate the disc on the axle. If the axle is in good condition and the disc is secure to the axle flange, the disc will run true.

10
13. bolt the RRS caliper in place. Secure the flexible brake line so that adequate flex is maintained to allow for pad wear and caliper movement.
14.once the caliper is bolted in place,
make sure the gap between the RRS caliper housing and disc is evenly spaced. If a misalignment occurs check that the disc is properly mounted, or the backing plate is properly mounted or alternatively consult with your nearest RRS supplier before road testing. NB do not shim or file to fit.
15. most RRS kits are supplied with a
single flare tube nut style hose end which may require re flaring the original brake line and bending to suit. RRS has an optional braided flex line that will be compatible with a factory style double flare line end and 3/8 UNF tube nut
Make sure brake line does not interfere with bump stop rubber.
16. After the brake line has been flared and reshaped, tighten the tube nut and make sure the line will not foul on any other components such as the bump stop. Only use and re-flare lines that are in good serviceable condition, free from rust or damage. Most brake shops will be able to make new lines to suit if necessary. Finally bleed the brakes and check for leaks

11
17. Fit the road wheels then check wheel nut tension. Follow normal brake bedding in procedures. Double check for fluid leaks and re-check wheel nut tension
18. RRS is not responsible for incorrect fitting or resulting failure associated with other brake components or modifications that are performed
without prior consultation or approval from RRS
Please note RRS do not supply cross drilled rotors.

12
1
Safety First and Warranty Conditions
RRS has designed and tested quality products for specific usage and applications. It is intended that all RRS products will enhance all normal street usage situations provided that they are installed according to RRS instructions as laid out in the installation manual. RRS provides proven and predictable outcomes for all of our product applications. The duty of care of correct and safe installation is the sole responsibility of the installer. If an incorrect installation or product application takes place for whatever reason; the vehicle will not be deemed road worthy under any circumstances and it should be noted that RRS is not responsible for any adverse outcomes resulting from
1. Choosing an incorrect product application. 2. Installing an incorrect product application. 3. Modifying any RRS products in any way. 4. Not following RRS installation procedures. 5. Not filling out the RRS safety and warranty card check list. 6. Not following RRS maintenance procedures. 7. Using non-compatible components to RRS products that are not within the
RRS specifications. 8. Using a vehicle fitted with RRS products in any off road activity. 9. The safe usage of RRS products becomes the sole responsibility of the end
user once the warranty period has expired. 10. The RRS product has not been subjected to conditions beyond those,
which was intended such as being used in any form of motor sport. 11. That the installation of any RRS product has been checked by a qualified
technician. 12. RRS will not be held responsible in any way shape or form for any activity
that may require dismantling, reassembly, overhaul and or modification to any RRS product.
RRS is excluded from any responsibility or adverse outcomes that may result from any unusual adverse weather conditions or any adverse road surfaces that could promote rapid wear or fatigue. Safe driving and roadworthiness is the sole responsibility of the installer and technician who signs the warranty and safety first checklist. It is necessary for this checklist to be returned to your nearest RRS representative within 21 days of completion
All RRS products incorporate the most advanced quality and manufacturing processes available today. RRS design
solves complex problems with simple solutions.

2
Safety First and Warranty Check List Rear Brake Kit RRS constantly strives for the safest ultimate performance outcomes; therefore it is in the best interest of the owner of a vehicle fitted with RRS products to fill out these important safety checks. OWNER NAME: OWNER ADDRESS: MAKE/MODEL: REGISTRATION No. CHASSIS/VIN No. STRUT SERIAL No. INSTALLER NAME & ADDRESS: TECHNICIAN NAME & ADDRESS:
ITEMS TO BE CHECKED – please tick yes or no
Yes No
1 Confirm kit fitted has been ordered correctly for vehicle 2 Rear Brake kit components appear in sound condition 3 Other brake components appear to be in sound condition 4 Confirm brake lines are free of interference and not strained at
any point of suspension travel or lock to lock
5 Check that all nuts & bolts are adequately tightened 6 Check tightness of wheel nuts 7 Road test vehicle to assess braking performance 8 Conduct brake testing using Brake Inertia Tester 9 Make the driver aware that re-torque and maintenance of all RRS
products should be done according to the RRS installation manual
Installed by:……………………………..……..……….. Signed:…………………….………… Check conducted by:…………………….……………… Signed:……………………….……… Please return this document in the envelope supplied so that RRS can give you the best after sale service and you will also automatically become a member of the RRS preferred customer programme.

3
RRS appreciates any comments or feedback you are willing to give. If you have a photograph or testimony of your RRS enhanced vehicle to be posted on our “RRS RIDES” website notice board please attach to this form or email to [email protected] COMMENTS: ____________________________________________________________________________________________________________________________________________________________________________________________________________________________________________________________________________________________________________________________________________________________________________________
RRS is certified member of SEMA, FAPM and Australian Automotive Aftermarket Association
ATTENTION: IT IS VITALLY IMPORTANT THAT PRIOR TO COMMENCEMENT OF THE INSTALLATION OF ANY RRS COMPONENTS, ALL INSTRUCTIONS, WARRANTY CONDITIONS, WARNING AND SAFETY CHECKS ARE READ AND UNDERSTOOD, TO AVOID ANY UNNECESSARY COMPLICATIONS. RRS Product Information All RRS products are designed and developed for street and recreational use only and will not be warranted when subjected to conditions beyond their intended use (eg. motor-sport). WARRANTY RRS will guarantee any product found to be faulty in workmanship or materials within 12 months or 20,000 km/12,000 miles use (whichever occurs first). Warranty is not available for faults or failure caused by ordinary wear and tear, misuse, use of incorrect or defective associated component parts, or any cause occurring after the product has left RRS control. This warranty does not affect consumers' rights and remedies under local laws. Further information: If you need advise on correct fitting procedures or any other aspects of our product range, please phone your enquiry to the RRS office +1 866 597 4662 +61 2 9907 3755. All RRS products incorporate the most advanced quality and manufacturing processes available today. RRS design solves complex problems with simple solutions RRS advise any steering and suspension modifications to your vehicle must be inspected by a certified engineer to comply with state regulations.

4

5

6
RRS Rear Brake Package kits are manufactured to bolt on without any modifications to standard Ford 8” or 9” axle housing with bearing diameter of 2.835 single row bearing or standard Ford 2.835 double row bearing. It is essential to check these requirements and specify when ordering that you have:
a) 2.835 single row bearing (narrow) b) 2.835 double row bearing (wide)
If the Axle housing has been modified, such as narrowed, fitted to a non factory application, has aftermarket axles fitted, it is important to discuss these changes to the axle assembly with an RRS representative clearly to ensure that the RRS rear brake kit will suit your application.

7
RRS rear disc installation The RRS disc brake rear conversion is a very versatile modular design that allows a huge range of versatile re configuration to suit a variety of custom requirements due to the nature of Fords, many different live rear axle bearing to axle flange variations. The axle bearing to axle flange relationship is vital for correct caliper to disc alignment. Some Ford axle assemblies are fitted with bearing spacers and backing plate spacers; these spacers may require some rearranging of the order in which they normally bolt up to a drum brake backing plate. If a custom axle assembly is being fitted with an RRS disc brake conversion it may require the alloy caliper mounting block to be unbolted and appropriate spacers fitted. RRS kits are designed to fit the most common Ford diff housing axle flange.
1..RRS kits can be dismantled and reconfigured, however it is up to the fitter to make sure all clearances are safe and sufficient as the axle assembly moves through its suspension travel and allowing for body roll.
2. The backing plate and alloy caliper mounting block must be positioned to maintain even caliper spacing to the disc.
4. Safety first always immobilize a vehicle undergoing any undercarriage
type of work or maintenance always support the vehicle in a safe manner e.g. professional style jack stands or safety lock vehicle hoist.
Remove the road wheels, brake drums and shoes. Disconnect brake lines from wheel cylinders.

8
5. Remove park brake cable from
backing plate. RRS suggest tapping a box wrench over the park brake cable finger cone clip, to make it easier to pull the cable through the backing plate
6. Remove axle assembly and
backing plate. Check the axle seal and bearing for wear or leakage and replace if necessary. Check axle flange is free from burrs on the mounting face so that the RRS brake mounting plate fits squarely to the flange. Stamping flash is quite common on Ford axle housings and may require grinding or filing to neatly spigot into the CNC machined recess in the RRS brake mounting plate
7. the spigot machined into the RRS mounting plate is clearly seen. Place the mounting plate onto the axle flange, making sure that it mounts flush to the axle housing by hand.
8. Fit the new RRS wheels studs to your axle, making sure that the axle flange is free from burrs. Any distortion of the axle flange or burrs could cause disc run out. Slide the axle back into place being careful not to damage the axle seal. Make sure the bearing retaining plate is turned upside down to clear the handbrake mechanism. Torque the axle retaining bolts to 30 ft lbs of torque. NB do not force the RRS backing plate over the axle flange as distortion could occur and cause caliper misalignment. If the mounting plate does not appear to sit flush to the axle housing prior to final bolt up, the axle housing must be re checked for stamping flash.

9
9. fit the RRS cable adaptor over the
finger cone clip of your original park brake cable
10.RRS supplies a park brake cable mounting clamp so that if there is a clearance issue resulting from the RRS conversion of the cable to any other vehicle components such as exhaust, the cable mounting clamp can be used to secure the cable to the chassis or floor panels
11.Fit factory cable end to RRS cable
anchor. To make fitment easier, depress spring and hold with a pair of pliers. The RRS park brake mechanism will operate with all factory park brake cables regardless if it is foot or hand operated.
12.Fit the RRS disc, make sure the
studs are fully engaged. The RRS supplied studs have longer shanks to accurately locate the new rotor. It is suggested that you use wheel nuts and washers to fully locate the disc on the axle. If the axle is in good condition and the disc is secure to the axle flange, the disc will run true.

10
13. bolt the RRS caliper in place. Secure the flexible brake line so that adequate flex is maintained to allow for pad wear and caliper movement.
14.once the caliper is bolted in place,
make sure the gap between the RRS caliper housing and disc is evenly spaced. If a misalignment occurs check that the disc is properly mounted, or the backing plate is properly mounted or alternatively consult with your nearest RRS supplier before road testing. NB do not shim or file to fit.
15. most RRS kits are supplied with a
single flare tube nut style hose end which may require re flaring the original brake line and bending to suit. RRS has an optional braided flex line that will be compatible with a factory style double flare line end and 3/8 UNF tube nut
Make sure brake line does not interfere with bump stop rubber.
16. After the brake line has been flared and reshaped, tighten the tube nut and make sure the line will not foul on any other components such as the bump stop. Only use and re-flare lines that are in good serviceable condition, free from rust or damage. Most brake shops will be able to make new lines to suit if necessary. Finally bleed the brakes and check for leaks

11
17. Fit the road wheels then check wheel nut tension. Follow normal brake bedding in procedures. Double check for fluid leaks and re-check wheel nut tension
18. RRS is not responsible for incorrect fitting or resulting failure associated with other brake components or modifications that are performed
without prior consultation or approval from RRS
Please note RRS do not supply cross drilled rotors.

12

1
Safety First and Warranty Conditions
RRS has designed and tested quality products for specific usage and applications. It is intended that all RRS products will enhance all normal street usage situations provided that they are installed according to RRS instructions as laid out in the installation manual. RRS provides proven and predictable outcomes for all of our product applications. The duty of care of correct and safe installation is the sole responsibility of the installer. If an incorrect installation or product application takes place for whatever reason; the vehicle will not be deemed road worthy under any circumstances and it should be noted that RRS is not responsible for any adverse outcomes resulting from
1. Choosing an incorrect product application. 2. Installing an incorrect product application. 3. Modifying any RRS products in any way. 4. Not following RRS installation procedures. 5. Not filling out the RRS safety and warranty card check list. 6. Not following RRS maintenance procedures. 7. Using non-compatible components to RRS products that are not within the
RRS specifications. 8. Using a vehicle fitted with RRS products in any off road activity. 9. The safe usage of RRS products becomes the sole responsibility of the end
user once the warranty period has expired. 10. The RRS product has not been subjected to conditions beyond those,
which was intended such as being used in any form of motor sport. 11. That the installation of any RRS product has been checked by a qualified
technician. 12. RRS will not be held responsible in any way shape or form for any activity
that may require dismantling, reassembly, overhaul and or modification to any RRS product.
RRS is excluded from any responsibility or adverse outcomes that may result from any unusual adverse weather conditions or any adverse road surfaces that could promote rapid wear or fatigue. Safe driving and roadworthiness is the sole responsibility of the installer and technician who signs the warranty and safety first checklist. It is necessary for this checklist to be returned to your nearest RRS representative within 21 days of completion
All RRS products incorporate the most advanced quality and manufacturing processes available today. RRS design
solves complex problems with simple solutions.

2
Safety First and Warranty Check List Rear Brake Kit RRS constantly strives for the safest ultimate performance outcomes; therefore it is in the best interest of the owner of a vehicle fitted with RRS products to fill out these important safety checks. OWNER NAME: OWNER ADDRESS: MAKE/MODEL: REGISTRATION No. CHASSIS/VIN No. STRUT SERIAL No. INSTALLER NAME & ADDRESS: TECHNICIAN NAME & ADDRESS:
ITEMS TO BE CHECKED – please tick yes or no
Yes No
1 Confirm kit fitted has been ordered correctly for vehicle 2 Rear Brake kit components appear in sound condition 3 Other brake components appear to be in sound condition 4 Confirm brake lines are free of interference and not strained at
any point of suspension travel or lock to lock
5 Check that all nuts & bolts are adequately tightened 6 Check tightness of wheel nuts 7 Road test vehicle to assess braking performance 8 Conduct brake testing using Brake Inertia Tester 9 Make the driver aware that re-torque and maintenance of all RRS
products should be done according to the RRS installation manual
Installed by:……………………………..……..……….. Signed:…………………….………… Check conducted by:…………………….……………… Signed:……………………….……… Please return this document in the envelope supplied so that RRS can give you the best after sale service and you will also automatically become a member of the RRS preferred customer programme.

3
RRS appreciates any comments or feedback you are willing to give. If you have a photograph or testimony of your RRS enhanced vehicle to be posted on our “RRS RIDES” website notice board please attach to this form or email to [email protected] COMMENTS: ____________________________________________________________________________________________________________________________________________________________________________________________________________________________________________________________________________________________________________________________________________________________________________________
RRS is certified member of SEMA, FAPM and Australian Automotive Aftermarket Association
ATTENTION: IT IS VITALLY IMPORTANT THAT PRIOR TO COMMENCEMENT OF THE INSTALLATION OF ANY RRS COMPONENTS, ALL INSTRUCTIONS, WARRANTY CONDITIONS, WARNING AND SAFETY CHECKS ARE READ AND UNDERSTOOD, TO AVOID ANY UNNECESSARY COMPLICATIONS. RRS Product Information All RRS products are designed and developed for street and recreational use only and will not be warranted when subjected to conditions beyond their intended use (eg. motor-sport). WARRANTY RRS will guarantee any product found to be faulty in workmanship or materials within 12 months or 20,000 km/12,000 miles use (whichever occurs first). Warranty is not available for faults or failure caused by ordinary wear and tear, misuse, use of incorrect or defective associated component parts, or any cause occurring after the product has left RRS control. This warranty does not affect consumers' rights and remedies under local laws. Further information: If you need advise on correct fitting procedures or any other aspects of our product range, please phone your enquiry to the RRS office +1 866 597 4662 +61 2 9907 3755. All RRS products incorporate the most advanced quality and manufacturing processes available today. RRS design solves complex problems with simple solutions RRS advise any steering and suspension modifications to your vehicle must be inspected by a certified engineer to comply with state regulations.

4

5

6
RRS Rear Brake Package kits are manufactured to bolt on without any modifications to standard Ford 8” or 9” axle housing with bearing diameter of 2.835 single row bearing or standard Ford 2.835 double row bearing. It is essential to check these requirements and specify when ordering that you have:
a) 2.835 single row bearing (narrow) b) 2.835 double row bearing (wide)
If the Axle housing has been modified, such as narrowed, fitted to a non factory application, has aftermarket axles fitted, it is important to discuss these changes to the axle assembly with an RRS representative clearly to ensure that the RRS rear brake kit will suit your application.

7
RRS rear disc installation The RRS disc brake rear conversion is a very versatile modular design that allows a huge range of versatile re configuration to suit a variety of custom requirements due to the nature of Fords, many different live rear axle bearing to axle flange variations. The axle bearing to axle flange relationship is vital for correct caliper to disc alignment. Some Ford axle assemblies are fitted with bearing spacers and backing plate spacers; these spacers may require some rearranging of the order in which they normally bolt up to a drum brake backing plate. If a custom axle assembly is being fitted with an RRS disc brake conversion it may require the alloy caliper mounting block to be unbolted and appropriate spacers fitted. RRS kits are designed to fit the most common Ford diff housing axle flange.
1..RRS kits can be dismantled and reconfigured, however it is up to the fitter to make sure all clearances are safe and sufficient as the axle assembly moves through its suspension travel and allowing for body roll.
2. The backing plate and alloy caliper mounting block must be positioned to maintain even caliper spacing to the disc.
4. Safety first always immobilize a vehicle undergoing any undercarriage
type of work or maintenance always support the vehicle in a safe manner e.g. professional style jack stands or safety lock vehicle hoist.
Remove the road wheels, brake drums and shoes. Disconnect brake lines from wheel cylinders.

8
5. Remove park brake cable from
backing plate. RRS suggest tapping a box wrench over the park brake cable finger cone clip, to make it easier to pull the cable through the backing plate
6. Remove axle assembly and
backing plate. Check the axle seal and bearing for wear or leakage and replace if necessary. Check axle flange is free from burrs on the mounting face so that the RRS brake mounting plate fits squarely to the flange. Stamping flash is quite common on Ford axle housings and may require grinding or filing to neatly spigot into the CNC machined recess in the RRS brake mounting plate
7. the spigot machined into the RRS mounting plate is clearly seen. Place the mounting plate onto the axle flange, making sure that it mounts flush to the axle housing by hand.
8. Fit the new RRS wheels studs to your axle, making sure that the axle flange is free from burrs. Any distortion of the axle flange or burrs could cause disc run out. Slide the axle back into place being careful not to damage the axle seal. Make sure the bearing retaining plate is turned upside down to clear the handbrake mechanism. Torque the axle retaining bolts to 30 ft lbs of torque. NB do not force the RRS backing plate over the axle flange as distortion could occur and cause caliper misalignment. If the mounting plate does not appear to sit flush to the axle housing prior to final bolt up, the axle housing must be re checked for stamping flash.
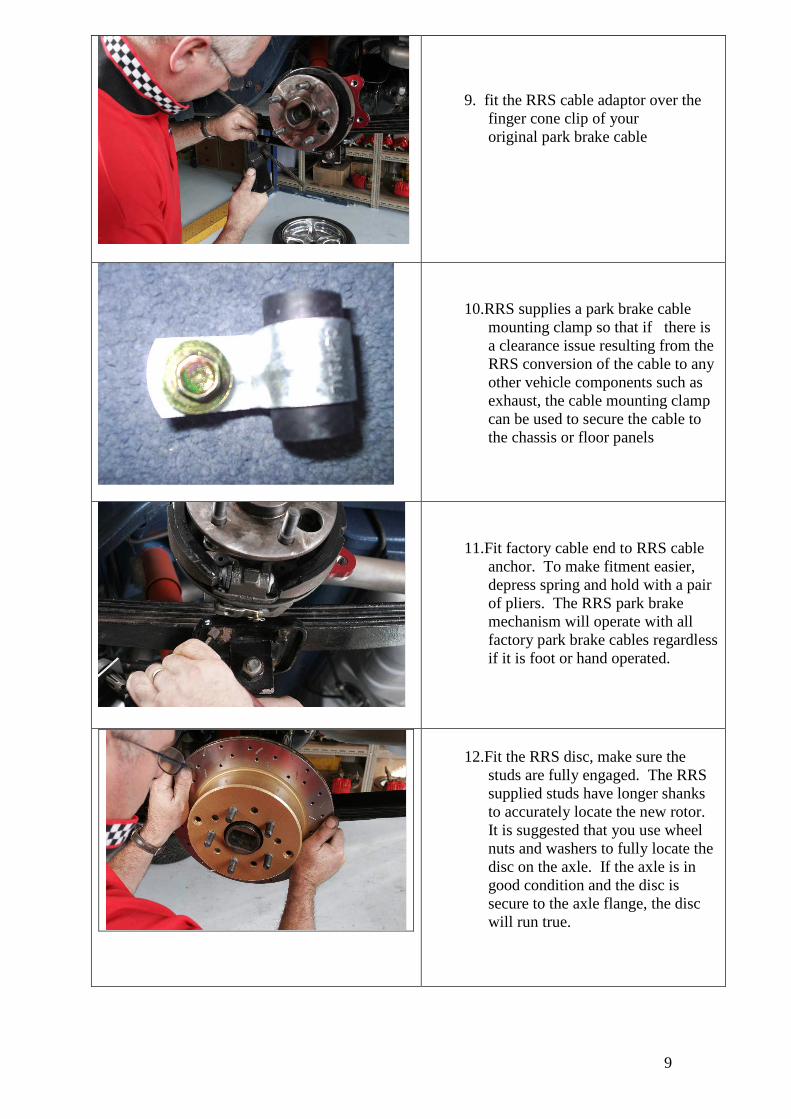
9
9. fit the RRS cable adaptor over the
finger cone clip of your original park brake cable
10.RRS supplies a park brake cable mounting clamp so that if there is a clearance issue resulting from the RRS conversion of the cable to any other vehicle components such as exhaust, the cable mounting clamp can be used to secure the cable to the chassis or floor panels
11.Fit factory cable end to RRS cable
anchor. To make fitment easier, depress spring and hold with a pair of pliers. The RRS park brake mechanism will operate with all factory park brake cables regardless if it is foot or hand operated.
12.Fit the RRS disc, make sure the
studs are fully engaged. The RRS supplied studs have longer shanks to accurately locate the new rotor. It is suggested that you use wheel nuts and washers to fully locate the disc on the axle. If the axle is in good condition and the disc is secure to the axle flange, the disc will run true.

10
13. bolt the RRS caliper in place. Secure the flexible brake line so that adequate flex is maintained to allow for pad wear and caliper movement.
14.once the caliper is bolted in place,
make sure the gap between the RRS caliper housing and disc is evenly spaced. If a misalignment occurs check that the disc is properly mounted, or the backing plate is properly mounted or alternatively consult with your nearest RRS supplier before road testing. NB do not shim or file to fit.
15. most RRS kits are supplied with a
single flare tube nut style hose end which may require re flaring the original brake line and bending to suit. RRS has an optional braided flex line that will be compatible with a factory style double flare line end and 3/8 UNF tube nut
Make sure brake line does not interfere with bump stop rubber.
16. After the brake line has been flared and reshaped, tighten the tube nut and make sure the line will not foul on any other components such as the bump stop. Only use and re-flare lines that are in good serviceable condition, free from rust or damage. Most brake shops will be able to make new lines to suit if necessary. Finally bleed the brakes and check for leaks

11
17. Fit the road wheels then check wheel nut tension. Follow normal brake bedding in procedures. Double check for fluid leaks and re-check wheel nut tension
18. RRS is not responsible for incorrect fitting or resulting failure associated with other brake components or modifications that are performed
without prior consultation or approval from RRS
Please note RRS do not supply cross drilled rotors.

12

1
Safety First and Warranty Conditions
RRS has designed and tested quality products for specific usage and applications. It is intended that all RRS products will enhance all normal street usage situations provided that they are installed according to RRS instructions as laid out in the installation manual. RRS provides proven and predictable outcomes for all of our product applications. The duty of care of correct and safe installation is the sole responsibility of the installer. If an incorrect installation or product application takes place for whatever reason; the vehicle will not be deemed road worthy under any circumstances and it should be noted that RRS is not responsible for any adverse outcomes resulting from
1. Choosing an incorrect product application. 2. Installing an incorrect product application. 3. Modifying any RRS products in any way. 4. Not following RRS installation procedures. 5. Not filling out the RRS safety and warranty card check list. 6. Not following RRS maintenance procedures. 7. Using non-compatible components to RRS products that are not within the
RRS specifications. 8. Using a vehicle fitted with RRS products in any off road activity. 9. The safe usage of RRS products becomes the sole responsibility of the end
user once the warranty period has expired. 10. The RRS product has not been subjected to conditions beyond those,
which was intended such as being used in any form of motor sport. 11. That the installation of any RRS product has been checked by a qualified
technician. 12. RRS will not be held responsible in any way shape or form for any activity
that may require dismantling, reassembly, overhaul and or modification to any RRS product.
RRS is excluded from any responsibility or adverse outcomes that may result from any unusual adverse weather conditions or any adverse road surfaces that could promote rapid wear or fatigue. Safe driving and roadworthiness is the sole responsibility of the installer and technician who signs the warranty and safety first checklist. It is necessary for this checklist to be returned to your nearest RRS representative within 21 days of completion
All RRS products incorporate the most advanced quality and manufacturing processes available today. RRS design
solves complex problems with simple solutions.

2
Safety First and Warranty Check List Rear Brake Kit RRS constantly strives for the safest ultimate performance outcomes; therefore it is in the best interest of the owner of a vehicle fitted with RRS products to fill out these important safety checks. OWNER NAME: OWNER ADDRESS: MAKE/MODEL: REGISTRATION No. CHASSIS/VIN No. STRUT SERIAL No. INSTALLER NAME & ADDRESS: TECHNICIAN NAME & ADDRESS:
ITEMS TO BE CHECKED – please tick yes or no
Yes No
1 Confirm kit fitted has been ordered correctly for vehicle 2 Rear Brake kit components appear in sound condition 3 Other brake components appear to be in sound condition 4 Confirm brake lines are free of interference and not strained at
any point of suspension travel or lock to lock
5 Check that all nuts & bolts are adequately tightened 6 Check tightness of wheel nuts 7 Road test vehicle to assess braking performance 8 Conduct brake testing using Brake Inertia Tester 9 Make the driver aware that re-torque and maintenance of all RRS
products should be done according to the RRS installation manual
Installed by:……………………………..……..……….. Signed:…………………….………… Check conducted by:…………………….……………… Signed:……………………….……… Please return this document in the envelope supplied so that RRS can give you the best after sale service and you will also automatically become a member of the RRS preferred customer programme.
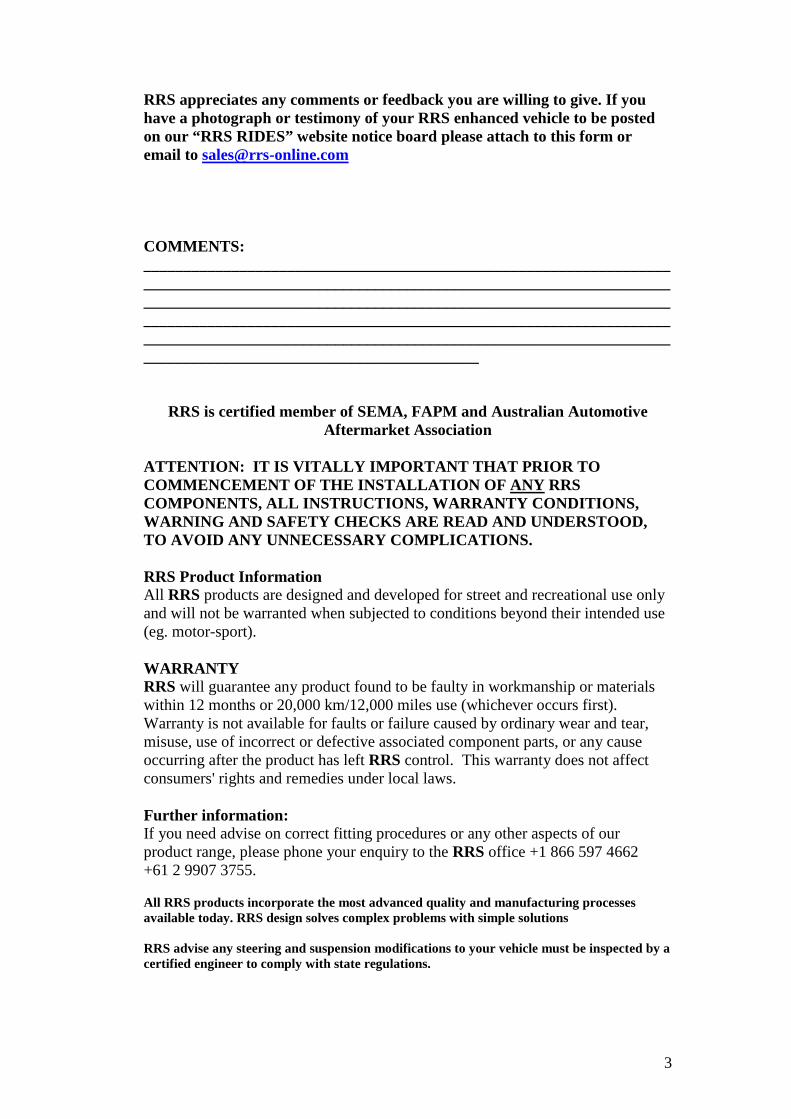
3
RRS appreciates any comments or feedback you are willing to give. If you have a photograph or testimony of your RRS enhanced vehicle to be posted on our “RRS RIDES” website notice board please attach to this form or email to [email protected] COMMENTS: ____________________________________________________________________________________________________________________________________________________________________________________________________________________________________________________________________________________________________________________________________________________________________________________
RRS is certified member of SEMA, FAPM and Australian Automotive Aftermarket Association
ATTENTION: IT IS VITALLY IMPORTANT THAT PRIOR TO COMMENCEMENT OF THE INSTALLATION OF ANY RRS COMPONENTS, ALL INSTRUCTIONS, WARRANTY CONDITIONS, WARNING AND SAFETY CHECKS ARE READ AND UNDERSTOOD, TO AVOID ANY UNNECESSARY COMPLICATIONS. RRS Product Information All RRS products are designed and developed for street and recreational use only and will not be warranted when subjected to conditions beyond their intended use (eg. motor-sport). WARRANTY RRS will guarantee any product found to be faulty in workmanship or materials within 12 months or 20,000 km/12,000 miles use (whichever occurs first). Warranty is not available for faults or failure caused by ordinary wear and tear, misuse, use of incorrect or defective associated component parts, or any cause occurring after the product has left RRS control. This warranty does not affect consumers' rights and remedies under local laws. Further information: If you need advise on correct fitting procedures or any other aspects of our product range, please phone your enquiry to the RRS office +1 866 597 4662 +61 2 9907 3755. All RRS products incorporate the most advanced quality and manufacturing processes available today. RRS design solves complex problems with simple solutions RRS advise any steering and suspension modifications to your vehicle must be inspected by a certified engineer to comply with state regulations.

4

5

6
RRS Rear Brake Package kits are manufactured to bolt on without any modifications to standard Ford 8” or 9” axle housing with bearing diameter of 2.835 single row bearing or standard Ford 2.835 double row bearing. It is essential to check these requirements and specify when ordering that you have:
a) 2.835 single row bearing (narrow) b) 2.835 double row bearing (wide)
If the Axle housing has been modified, such as narrowed, fitted to a non factory application, has aftermarket axles fitted, it is important to discuss these changes to the axle assembly with an RRS representative clearly to ensure that the RRS rear brake kit will suit your application.

7
RRS rear disc installation The RRS disc brake rear conversion is a very versatile modular design that allows a huge range of versatile re configuration to suit a variety of custom requirements due to the nature of Fords, many different live rear axle bearing to axle flange variations. The axle bearing to axle flange relationship is vital for correct caliper to disc alignment. Some Ford axle assemblies are fitted with bearing spacers and backing plate spacers; these spacers may require some rearranging of the order in which they normally bolt up to a drum brake backing plate. If a custom axle assembly is being fitted with an RRS disc brake conversion it may require the alloy caliper mounting block to be unbolted and appropriate spacers fitted. RRS kits are designed to fit the most common Ford diff housing axle flange.
1..RRS kits can be dismantled and reconfigured, however it is up to the fitter to make sure all clearances are safe and sufficient as the axle assembly moves through its suspension travel and allowing for body roll.
2. The backing plate and alloy caliper mounting block must be positioned to maintain even caliper spacing to the disc.
4. Safety first always immobilize a vehicle undergoing any undercarriage
type of work or maintenance always support the vehicle in a safe manner e.g. professional style jack stands or safety lock vehicle hoist.
Remove the road wheels, brake drums and shoes. Disconnect brake lines from wheel cylinders.

8
5. Remove park brake cable from
backing plate. RRS suggest tapping a box wrench over the park brake cable finger cone clip, to make it easier to pull the cable through the backing plate
6. Remove axle assembly and
backing plate. Check the axle seal and bearing for wear or leakage and replace if necessary. Check axle flange is free from burrs on the mounting face so that the RRS brake mounting plate fits squarely to the flange. Stamping flash is quite common on Ford axle housings and may require grinding or filing to neatly spigot into the CNC machined recess in the RRS brake mounting plate
7. the spigot machined into the RRS mounting plate is clearly seen. Place the mounting plate onto the axle flange, making sure that it mounts flush to the axle housing by hand.
8. Fit the new RRS wheels studs to your axle, making sure that the axle flange is free from burrs. Any distortion of the axle flange or burrs could cause disc run out. Slide the axle back into place being careful not to damage the axle seal. Make sure the bearing retaining plate is turned upside down to clear the handbrake mechanism. Torque the axle retaining bolts to 30 ft lbs of torque. NB do not force the RRS backing plate over the axle flange as distortion could occur and cause caliper misalignment. If the mounting plate does not appear to sit flush to the axle housing prior to final bolt up, the axle housing must be re checked for stamping flash.

9
9. fit the RRS cable adaptor over the
finger cone clip of your original park brake cable
10.RRS supplies a park brake cable mounting clamp so that if there is a clearance issue resulting from the RRS conversion of the cable to any other vehicle components such as exhaust, the cable mounting clamp can be used to secure the cable to the chassis or floor panels
11.Fit factory cable end to RRS cable
anchor. To make fitment easier, depress spring and hold with a pair of pliers. The RRS park brake mechanism will operate with all factory park brake cables regardless if it is foot or hand operated.
12.Fit the RRS disc, make sure the
studs are fully engaged. The RRS supplied studs have longer shanks to accurately locate the new rotor. It is suggested that you use wheel nuts and washers to fully locate the disc on the axle. If the axle is in good condition and the disc is secure to the axle flange, the disc will run true.
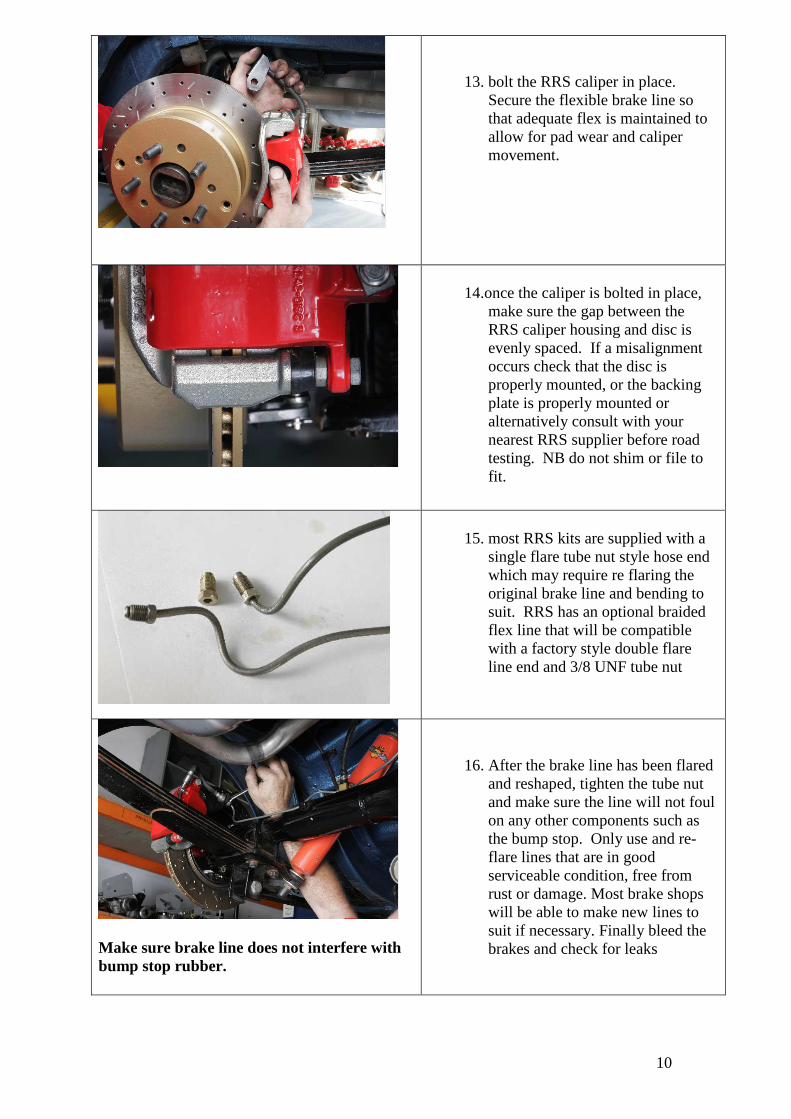
10
13. bolt the RRS caliper in place. Secure the flexible brake line so that adequate flex is maintained to allow for pad wear and caliper movement.
14.once the caliper is bolted in place,
make sure the gap between the RRS caliper housing and disc is evenly spaced. If a misalignment occurs check that the disc is properly mounted, or the backing plate is properly mounted or alternatively consult with your nearest RRS supplier before road testing. NB do not shim or file to fit.
15. most RRS kits are supplied with a
single flare tube nut style hose end which may require re flaring the original brake line and bending to suit. RRS has an optional braided flex line that will be compatible with a factory style double flare line end and 3/8 UNF tube nut
Make sure brake line does not interfere with bump stop rubber.
16. After the brake line has been flared and reshaped, tighten the tube nut and make sure the line will not foul on any other components such as the bump stop. Only use and re-flare lines that are in good serviceable condition, free from rust or damage. Most brake shops will be able to make new lines to suit if necessary. Finally bleed the brakes and check for leaks

11
17. Fit the road wheels then check wheel nut tension. Follow normal brake bedding in procedures. Double check for fluid leaks and re-check wheel nut tension
18. RRS is not responsible for incorrect fitting or resulting failure associated with other brake components or modifications that are performed
without prior consultation or approval from RRS
Please note RRS do not supply cross drilled rotors.

12

1
Safety First and Warranty Conditions
RRS has designed and tested quality products for specific usage and applications. It is intended that all RRS products will enhance all normal street usage situations provided that they are installed according to RRS instructions as laid out in the installation manual. RRS provides proven and predictable outcomes for all of our product applications. The duty of care of correct and safe installation is the sole responsibility of the installer. If an incorrect installation or product application takes place for whatever reason; the vehicle will not be deemed road worthy under any circumstances and it should be noted that RRS is not responsible for any adverse outcomes resulting from
1. Choosing an incorrect product application. 2. Installing an incorrect product application. 3. Modifying any RRS products in any way. 4. Not following RRS installation procedures. 5. Not filling out the RRS safety and warranty card check list. 6. Not following RRS maintenance procedures. 7. Using non-compatible components to RRS products that are not within the
RRS specifications. 8. Using a vehicle fitted with RRS products in any off road activity. 9. The safe usage of RRS products becomes the sole responsibility of the end
user once the warranty period has expired. 10. The RRS product has not been subjected to conditions beyond those,
which was intended such as being used in any form of motor sport. 11. That the installation of any RRS product has been checked by a qualified
technician. 12. RRS will not be held responsible in any way shape or form for any activity
that may require dismantling, reassembly, overhaul and or modification to any RRS product.
RRS is excluded from any responsibility or adverse outcomes that may result from any unusual adverse weather conditions or any adverse road surfaces that could promote rapid wear or fatigue. Safe driving and roadworthiness is the sole responsibility of the installer and technician who signs the warranty and safety first checklist. It is necessary for this checklist to be returned to your nearest RRS representative within 21 days of completion
All RRS products incorporate the most advanced quality and manufacturing processes available today. RRS design
solves complex problems with simple solutions.

2
Safety First and Warranty Check List Rear Brake Kit RRS constantly strives for the safest ultimate performance outcomes; therefore it is in the best interest of the owner of a vehicle fitted with RRS products to fill out these important safety checks. OWNER NAME: OWNER ADDRESS: MAKE/MODEL: REGISTRATION No. CHASSIS/VIN No. STRUT SERIAL No. INSTALLER NAME & ADDRESS: TECHNICIAN NAME & ADDRESS:
ITEMS TO BE CHECKED – please tick yes or no
Yes No
1 Confirm kit fitted has been ordered correctly for vehicle 2 Rear Brake kit components appear in sound condition 3 Other brake components appear to be in sound condition 4 Confirm brake lines are free of interference and not strained at
any point of suspension travel or lock to lock
5 Check that all nuts & bolts are adequately tightened 6 Check tightness of wheel nuts 7 Road test vehicle to assess braking performance 8 Conduct brake testing using Brake Inertia Tester 9 Make the driver aware that re-torque and maintenance of all RRS
products should be done according to the RRS installation manual
Installed by:……………………………..……..……….. Signed:…………………….………… Check conducted by:…………………….……………… Signed:……………………….……… Please return this document in the envelope supplied so that RRS can give you the best after sale service and you will also automatically become a member of the RRS preferred customer programme.

3
RRS appreciates any comments or feedback you are willing to give. If you have a photograph or testimony of your RRS enhanced vehicle to be posted on our “RRS RIDES” website notice board please attach to this form or email to [email protected] COMMENTS: ____________________________________________________________________________________________________________________________________________________________________________________________________________________________________________________________________________________________________________________________________________________________________________________
RRS is certified member of SEMA, FAPM and Australian Automotive Aftermarket Association
ATTENTION: IT IS VITALLY IMPORTANT THAT PRIOR TO COMMENCEMENT OF THE INSTALLATION OF ANY RRS COMPONENTS, ALL INSTRUCTIONS, WARRANTY CONDITIONS, WARNING AND SAFETY CHECKS ARE READ AND UNDERSTOOD, TO AVOID ANY UNNECESSARY COMPLICATIONS. RRS Product Information All RRS products are designed and developed for street and recreational use only and will not be warranted when subjected to conditions beyond their intended use (eg. motor-sport). WARRANTY RRS will guarantee any product found to be faulty in workmanship or materials within 12 months or 20,000 km/12,000 miles use (whichever occurs first). Warranty is not available for faults or failure caused by ordinary wear and tear, misuse, use of incorrect or defective associated component parts, or any cause occurring after the product has left RRS control. This warranty does not affect consumers' rights and remedies under local laws. Further information: If you need advise on correct fitting procedures or any other aspects of our product range, please phone your enquiry to the RRS office +1 866 597 4662 +61 2 9907 3755. All RRS products incorporate the most advanced quality and manufacturing processes available today. RRS design solves complex problems with simple solutions RRS advise any steering and suspension modifications to your vehicle must be inspected by a certified engineer to comply with state regulations.

4

5

6
RRS Rear Brake Package kits are manufactured to bolt on without any modifications to standard Ford 8” or 9” axle housing with bearing diameter of 2.835 single row bearing or standard Ford 2.835 double row bearing. It is essential to check these requirements and specify when ordering that you have:
a) 2.835 single row bearing (narrow) b) 2.835 double row bearing (wide)
If the Axle housing has been modified, such as narrowed, fitted to a non factory application, has aftermarket axles fitted, it is important to discuss these changes to the axle assembly with an RRS representative clearly to ensure that the RRS rear brake kit will suit your application.

7
RRS rear disc installation The RRS disc brake rear conversion is a very versatile modular design that allows a huge range of versatile re configuration to suit a variety of custom requirements due to the nature of Fords, many different live rear axle bearing to axle flange variations. The axle bearing to axle flange relationship is vital for correct caliper to disc alignment. Some Ford axle assemblies are fitted with bearing spacers and backing plate spacers; these spacers may require some rearranging of the order in which they normally bolt up to a drum brake backing plate. If a custom axle assembly is being fitted with an RRS disc brake conversion it may require the alloy caliper mounting block to be unbolted and appropriate spacers fitted. RRS kits are designed to fit the most common Ford diff housing axle flange.
1..RRS kits can be dismantled and reconfigured, however it is up to the fitter to make sure all clearances are safe and sufficient as the axle assembly moves through its suspension travel and allowing for body roll.
2. The backing plate and alloy caliper mounting block must be positioned to maintain even caliper spacing to the disc.
4. Safety first always immobilize a vehicle undergoing any undercarriage
type of work or maintenance always support the vehicle in a safe manner e.g. professional style jack stands or safety lock vehicle hoist.
Remove the road wheels, brake drums and shoes. Disconnect brake lines from wheel cylinders.
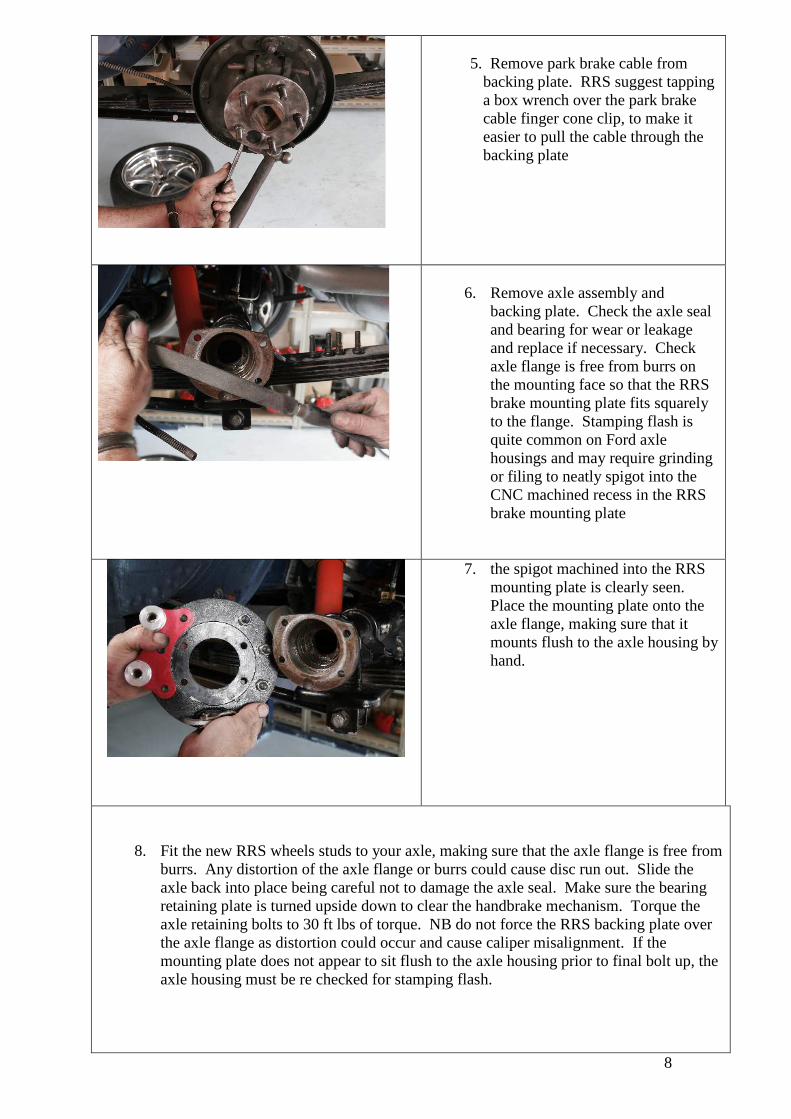
8
5. Remove park brake cable from
backing plate. RRS suggest tapping a box wrench over the park brake cable finger cone clip, to make it easier to pull the cable through the backing plate
6. Remove axle assembly and
backing plate. Check the axle seal and bearing for wear or leakage and replace if necessary. Check axle flange is free from burrs on the mounting face so that the RRS brake mounting plate fits squarely to the flange. Stamping flash is quite common on Ford axle housings and may require grinding or filing to neatly spigot into the CNC machined recess in the RRS brake mounting plate
7. the spigot machined into the RRS mounting plate is clearly seen. Place the mounting plate onto the axle flange, making sure that it mounts flush to the axle housing by hand.
8. Fit the new RRS wheels studs to your axle, making sure that the axle flange is free from burrs. Any distortion of the axle flange or burrs could cause disc run out. Slide the axle back into place being careful not to damage the axle seal. Make sure the bearing retaining plate is turned upside down to clear the handbrake mechanism. Torque the axle retaining bolts to 30 ft lbs of torque. NB do not force the RRS backing plate over the axle flange as distortion could occur and cause caliper misalignment. If the mounting plate does not appear to sit flush to the axle housing prior to final bolt up, the axle housing must be re checked for stamping flash.

9
9. fit the RRS cable adaptor over the
finger cone clip of your original park brake cable
10.RRS supplies a park brake cable mounting clamp so that if there is a clearance issue resulting from the RRS conversion of the cable to any other vehicle components such as exhaust, the cable mounting clamp can be used to secure the cable to the chassis or floor panels
11.Fit factory cable end to RRS cable
anchor. To make fitment easier, depress spring and hold with a pair of pliers. The RRS park brake mechanism will operate with all factory park brake cables regardless if it is foot or hand operated.
12.Fit the RRS disc, make sure the
studs are fully engaged. The RRS supplied studs have longer shanks to accurately locate the new rotor. It is suggested that you use wheel nuts and washers to fully locate the disc on the axle. If the axle is in good condition and the disc is secure to the axle flange, the disc will run true.

10
13. bolt the RRS caliper in place. Secure the flexible brake line so that adequate flex is maintained to allow for pad wear and caliper movement.
14.once the caliper is bolted in place,
make sure the gap between the RRS caliper housing and disc is evenly spaced. If a misalignment occurs check that the disc is properly mounted, or the backing plate is properly mounted or alternatively consult with your nearest RRS supplier before road testing. NB do not shim or file to fit.
15. most RRS kits are supplied with a
single flare tube nut style hose end which may require re flaring the original brake line and bending to suit. RRS has an optional braided flex line that will be compatible with a factory style double flare line end and 3/8 UNF tube nut
Make sure brake line does not interfere with bump stop rubber.
16. After the brake line has been flared and reshaped, tighten the tube nut and make sure the line will not foul on any other components such as the bump stop. Only use and re-flare lines that are in good serviceable condition, free from rust or damage. Most brake shops will be able to make new lines to suit if necessary. Finally bleed the brakes and check for leaks

11
17. Fit the road wheels then check wheel nut tension. Follow normal brake bedding in procedures. Double check for fluid leaks and re-check wheel nut tension
18. RRS is not responsible for incorrect fitting or resulting failure associated with other brake components or modifications that are performed
without prior consultation or approval from RRS
Please note RRS do not supply cross drilled rotors.

12