sage abra sql hrms - human resource management system .../media/category... · sage abra sql hrms...
TRANSCRIPT

Sage Abra SQL HRMS Getting Started User Guide

© 2010 Sage Software, Inc. All rights reserved. Sage, the Sage logos, and the Sage product and service names mentioned herein are registered trademarks or trademarks of Sage Software, Inc., or its affiliated entities. Business Objects, the Business Objects logo, and Crystal Reports are registered trademarks of SAP France in the United States and in other countries. NetLib is a registered trademark of Communication Horizons. OrgPlus is a trademark of HumanConcepts, LLC. TextBridge is a registered trademark of ScanSoft, Inc. Microsoft, Outlook, Windows, Windows NT, Windows Server, the .NET logo, Windows Vista and the Windows logo are trademarks or registered trademarks of Microsoft Corporation in the United States and /or other countries. The names of all other products and services are the property of their respective holders.
Sage has made every effort to ensure this documentation is correct and accurate but reserves the right to make changes without notice at its sole discretion. Use, duplication, modification, or transfer of the product described in this publication, except as expressly permitted by the Sage License Agreement is strictly prohibited. Individuals who make any unauthorized use of this product may be subject to civil and criminal penalties.
For additional assistance on this and other Sage products and services, visit our Web site at: http://www.sageabra.com

Getting Started i
Table of Contents Start Your System .......................................................................................................... 1
To Start Sage Abra SQL HRMS.......................................................................................................................... 1 Log On to Sage Abra SQL HRMS ...................................................................................................................... 1
Log On Using Sample Data ......................................................................................................................... 1 Log On Using Live Data .............................................................................................................................. 2 Use the Abra Initialization File ................................................................................................................... 2 Rebuild System Files .................................................................................................................................... 2 Uninstall Sage Abra SQL HRMS................................................................................................................. 3
Sage Abra SQL HRMS Setup Checklists ...................................................................... 5
Abra HR Setup Checklist .................................................................................................................................... 5 Time Off Setup Checklist .................................................................................................................................... 5 Training Setup Checklist..................................................................................................................................... 6
Navigating Sage Abra SQL HRMS................................................................................ 9
Access Activities in Sage Abra SQL HRMS...................................................................................................... 9 The Main Menu............................................................................................................................................. 9 The Quick Launch Toolbar .......................................................................................................................... 9 The Organizer................................................................................................................................................ 9 The Scheduler .............................................................................................................................................. 10 Using the Abra SQL HRMS Desktop ....................................................................................................... 10 Use the Navigation Pane............................................................................................................................ 11 Use the Main Menu .................................................................................................................................... 13 The File Menu.............................................................................................................................................. 13 The Edit Menu............................................................................................................................................. 13 The Help Menu ........................................................................................................................................... 14 The Employer Filter List ............................................................................................................................ 14 The Help Button.......................................................................................................................................... 15 Move Around in a Page ............................................................................................................................. 15 Shortcut Keys............................................................................................................................................... 19 Find an Employee ....................................................................................................................................... 22 Advanced Find............................................................................................................................................ 23 Employee Information Bar ........................................................................................................................ 24

ii Sage Abra SQL HRMS
Use the Quick Launch Toolbar ................................................................................................................. 26 Use the Organizer and Scheduler............................................................................................................. 26
Set Up Sage Abra SQL HRMS...................................................................................... 39
Set Up the Enterprise......................................................................................................................................... 40 Set Up the Audit Trail ....................................................................................................................................... 43 Set Up Employers .............................................................................................................................................. 45 Set Up User Preferences .................................................................................................................................... 47
General Preferences Tab ............................................................................................................................ 47 Setup Interviews Tab.................................................................................................................................. 48
Set Up Code Tables............................................................................................................................................ 49 Build Code Tables....................................................................................................................................... 49 Set Up Code Tables..................................................................................................................................... 50
Set Up Security ................................................................................................................................................... 53 Set Up Page Security .................................................................................................................................. 53 Set Group Security...................................................................................................................................... 55 Set Field Level Security .............................................................................................................................. 59 Set Product Group Filters .......................................................................................................................... 61 Set Ad Hoc Reporting Security ................................................................................................................. 63 Set a Groupʹs Ad Hoc Reporting Security Level .................................................................................... 66
Index ............................................................................................................................ 69

Getting Started 1
Start Your System After you install the system, you are ready to start Sage Abra SQL HRMS and begin to learn about and use the system’s features.
To Start Sage Abra SQL HRMS 1. From the Start menu, select All Programs > Sage > Sage Abra SQL HRMS Client > Sage Abra
SQL HRMS Client
2. The Logon page opens. Enter User name and password and then select to use sample or live data.
Log On to Sage Abra SQL HRMS When logging on to Sage Abra SQL HRMS, you can select sample data or live data. The sample data includes employees and scheduled tasks in the Organizer, which mimic how an actual company may use Sage Abra SQL HRMS. If you are new to Sage Abra SQL HRMS, the sample data allows you to familiarize yourself with entering data and using features without adversely affecting your company’s production (or live) data.
Note: Press Ctrl + U on the Logon page if you want to update system files before logging on to Sage Abra SQL HRMS.
When logging on to Sage Abra SQL HRMS, you must enter a user ID and password to access either database.
Log On Using Sample Data
Sage Abra SQL HRMS provides a default user name for logging on to sample data.
1. Enter MASTER in the Username field.
2. Leave the Password field blank.
3. Select Sample Data.
4. Click Logon.
Live data is your companyʹs production database, which contains employee information and other company data. Sage Abra SQL HRMS provides a default user name and password for you to log on for the first time. After logging on, change the login credentials and set up security according to your companyʹs requirements.

Log On to Sage Abra SQL HRMS
2 Sage Abra SQL HRMS
Log On Using Live Data
1. Enter your user name in the Username field. If you are logging on for the first time, enter MASTER.
2. Enter your password in the Password field. If you are logging on for the first time, leave the field blank.
3. Click Live Data.
4. Click Logon.
After logging on to Sage Abra SQL HRMS, you can switch between live and sample data anytime. This is useful if you want to see how a feature or process works in the sample data before implementing it in your live data. To switch between live and sample data, select File > Logout in Sage Abra SQL HRMS.
Use the Abra Initialization File
Sage Abra SQL HRMS provides the Abra initialization (ABRAWIN.INI) file to customize your Abra environment according to your needs. This feature provides additional capabilities for using Sage Abra SQL HRMS on Local Area Networks (LANs).
After installing Sage Abra, you can use the ABRAWIN.INI file to specify any directory for the following items: live data, sample data, temp file directory, and export directory.
Photos (.jpg, .gif, or .bmp files) displayed on the Demographics page are, by default, stored in …\Sage\SageAbraSQLHRMSServer\Data\Photos. You can also use the ABRAWIN.INI file to provide a different storage location by entering the appropriate path.
If you are using a LAN, you can keep the Sage Abra SQL HRMS programs (executable files) on your local PC for fast access and then obtain information from a common server. By using the ABRAWIN.INI file, you can assign the required paths to locate the information.
Rebuild System Files
When you first install Sage Abra SQL HRMS or start Sage Abra SQL HRMS, the system automatically initializes your system and rebuilds your system files for you. This ensures you can access the features that you are registered to use.
There might be times, such as with a power failure, when you need to rebuild your system files to ensure you can access your installed options.
Note: Press Ctrl + U on the Logon page if you want to rebuild system files before logging on to Sage Abra SQL HRMS.

Log On to Sage Abra SQL HRMS
Getting Started 3
1. From the Navigation Pane, select Setup > System > Maintenance > Rebuild System Files.
2. Click Yes. The process begins and requires no other action on your part. When the process is complete, you are returned to the log‐in page.
Uninstall Sage Abra SQL HRMS
Warning! If you set up the enterprise and added employers using live data, you should back up all the files located in the \DATA subdirectory of your Sage Abra SQL HRMS system. If necessary, you can restore the files and access the data after re‐installing Sage Abra SQL HRMS.
To completely uninstall Sage Abra SQL HRMS, you must uninstall the clients and the server. If your system includes Payroll, there are several payroll modules that will also be uninstalled.
The following figure shows the programs that are installed for an HR/Payroll system. Only the first two programs, Sage Abra SQL HRMS Client and Sage Abra SQL HRMS Server, are installed for both HR and Payroll. The remaining programs are the payroll modules.
To uninstall Sage Abra SQL HRMS, remove the following programs, in the order listed. You must have administrator privileges to uninstall.
Note: Note: You can only use the Add/Remove Programs function to uninstall the Sage Abra SQL HRMS application. You cannot use setup.exe to uninstall.
1. Go to Add/Remove Programs.
2. Remove Sage Abra SQL HRMS Client. Note that when the client is uninstalled, all Payroll modules are also removed.
3. Remove Sage Abra SQL HRMS Server.

Log On to Sage Abra SQL HRMS
4 Sage Abra SQL HRMS

Getting Started 5
Sage Abra SQL HRMS Setup Checklists Abra HR Setup Checklist Before you begin using Abra HR you must complete several steps. These setup steps allow you to customize the system to meet your employerʹs requirements precisely.
1. Set up the enterprise. Consider the enterprise as the parent company of your organization. The enterprise contains the standards for your system. You can insert a logo and specify organization titles as you set up the enterprise.
2. Set up the audit trail for the enterprise. The Audit Trail gives you the ability to track changes made to the system databases. You can select the database files and fields to audit as well as choose to enable or disable the audit.
3. Add employers. Before you can set up an employer, you must add an employer to the system. You enter its name and address as you want them to appear on reports. You can also define the way your employer pays most of its employees, including frequency and units.
4. Set up employers. For each Sage Abra HRMS product you are using (Abra HR and Time Off), you must define unique parameters for each employer you add to your system.
5. Set up Code Tables. Your system uses codes to manage and store information in files. These codes provide abbreviated and standard references to specific information. This step enables you to modify or add to those codes as you customize Abra HR to the way you do business.
6. Set up Benefits. Abra HR uses the guidelines you define for employee benefits. This step allows you to easily manage even the most complex benefit plan, including your employerʹs insurance and savings plans as well as any rate tables used by the plans.
7. Set up security. The system provides an extensive, flexible and easy‐to‐use security system to help you protect your data. During this final step in the setup procedure, you establish security limits and privileges for all system users. The security system breaks out functions by product, employer, activity, task, and step. When you set up security, you assemble users in security groups and establish passwords for each user.
Time Off Setup Checklist Time Off uses the records in Abra HR to help you build your attendance tracking system so you can administer attendance benefits and track employee absences.
After you set up your enterprise, employers, code tables, and security in Abra HR, you are ready to provide Time Off with the basic information necessary to start tracking and accruing employee absences and benefits.
You must complete several steps before you begin using Time Off.

Training Setup Checklist
6 Sage Abra SQL HRMS
1. Set up the enterprise. Consider the enterprise as the parent company of your organization. The enterprise contains the standards for your system. You can insert a logo and specify organization titles as you set up the enterprise.
2. Set up the audit trail for the enterprise. The Audit Trail gives you the ability to track changes made to the system databases. You can select the database files and fields to audit as well as choose to enable or disable the audit.
3. Add employers. Before you can set up an employer, you must add an employer to the system. You enter its name and address as you want them to appear on reports. You can also define the way your employer pays most of its employees, including frequency and units.
After adding your employer, you can begin setting up the employer and your code tables. You must first set up your employer and codes in Abra HR.
4. Set up an employer for Time Off. For each Sage Abra SQL HRMS product you are using (Abra HR and Time Off), you must define unique parameters for each employer you add to your system.
5. Set up code tables. Your system uses codes to manage and store information in files. These codes provide abbreviated and standard references to specific information. This step enables you to modify or add to those codes as you customize the system to the way you do business.
6. Set up security. After setting up your employers and code tables, you are ready to set up security. The system provides an extensive, flexible, and easy‐to‐use security system to help you protect your data. During this final step in the setup procedure, you establish security limits and privileges for all system users. The security system breaks out functions by product, employer, activity, task, and step. When you set up security, you assemble users in security groups and establish passwords for each user.
7. Set up attendance plans.
After you complete the preceding steps, you are ready to enroll employees into attendance plans. Use the Attendance Summary page to enroll each employee in an attendance plan, include year‐to‐date absence and attendance benefits information, enter the previous year’s carryover units and modify the information as needed. Abra Attendance provides the procedures and utilities to assist you as you fulfill your employer’s attendance tracking requirements.
Training Setup Checklist These setup steps are a one‐time procedure. After you complete these steps, you will be ready to begin using the Training feature.
1. Set up the enterprise. Consider the enterprise the parent company of your organization. The enterprise contains the standards for your system. You can insert a logo and specify organization titles as you set up the enterprise. See Setting Up the Enterprise.
2. Set up the audit trail for the enterprise. The Audit Trail gives you the ability to track changes made to the system databases. You can select the database files and fields to audit as well as choose to enable or disable the audit. See Setting Up the Enterprise.

Training Setup Checklist
Getting Started 7
3. Add an employer. Before you can begin using the system, you must add an employer. You enter the employer’s name and address as you want them to appear on reports.
4. Select a Training Employer. If you have multiple employers in your system, decide whether you want to store all training information in a single employer, called the Training Employer, or whether you want to keep training information separate for your different employers.
5. Set up code tables. Training uses codes to manage and store information in files. For example, every course, certification and program is assigned its own code to uniquely identify it. You can modify or add to the codes in Training to tailor the system to meet your needs.
6. Set up security. The system provides an extensive, flexible, and easy‐to‐use security system to help you protect your data. You can establish security limits and privileges for all system users. When you set up security, you assemble users in security groups and establish passwords for each user. See Setting Up Security.
7. Define titles for the miscellaneous fields in Training. Training provides miscellaneous fields for you to record information specific to your needs. You can define your own titles for these fields.

Training Setup Checklist
8 Sage Abra SQL HRMS

Getting Started 9
Navigating Sage Abra SQL HRMS Access Activities in Sage Abra SQL HRMS Sage Abra SQL HRMS provides different ways to access activities. Activities perform the same functions, regardless of how they are accessed. Use whichever feature is most convenient for you.
The Main Menu
The main menu appears at the top of the page. It is always visible and provides access to all activities.
The Quick Launch Toolbar
The Quick Launch toolbar provides access to the Organizer, your installed Abra products, Crystal Reports, Sage University, and your installed Microsoft Office applications.
Note: If you do not have a product installed, the product icon does not appear on the Quick Launch toolbar.
The Organizer
The Organizer enables you to schedule and carry out tasks. You can also record information and plan system events. All uncompleted activities and information are rolled over from day to day. Access the Organizer by clicking the Organizer icon on the Quick Launch toolbar.

Access Activities in Sage Abra SQL HRMS
10 Sage Abra SQL HRMS
The Scheduler
The Scheduler enables you to schedule new tasks, information items or system events for yourself or someone else. When you schedule these items, they appear in the Task, Information or System Event list in the Organizer.
Using the Abra SQL HRMS Desktop
Sage Abra SQL HRMS Desktop allows you to view and perform your HR, Payroll, Training, and Attendance tasks. The desktop can be customized to suit the way you work.
The desktop is divided in five areas
Main Menu
Toolbars ‐ For Employees, Training, and Time Off (if installed).
Navigation Pane ‐ Use the Navigation Pane to access modules like Employee, Benefits, Payroll, Training, Reports, and System Setup.
Work Area ‐ Displays information related to the module you selected.
Status Bar ‐ Displays status messages.

Access Activities in Sage Abra SQL HRMS
Getting Started 11
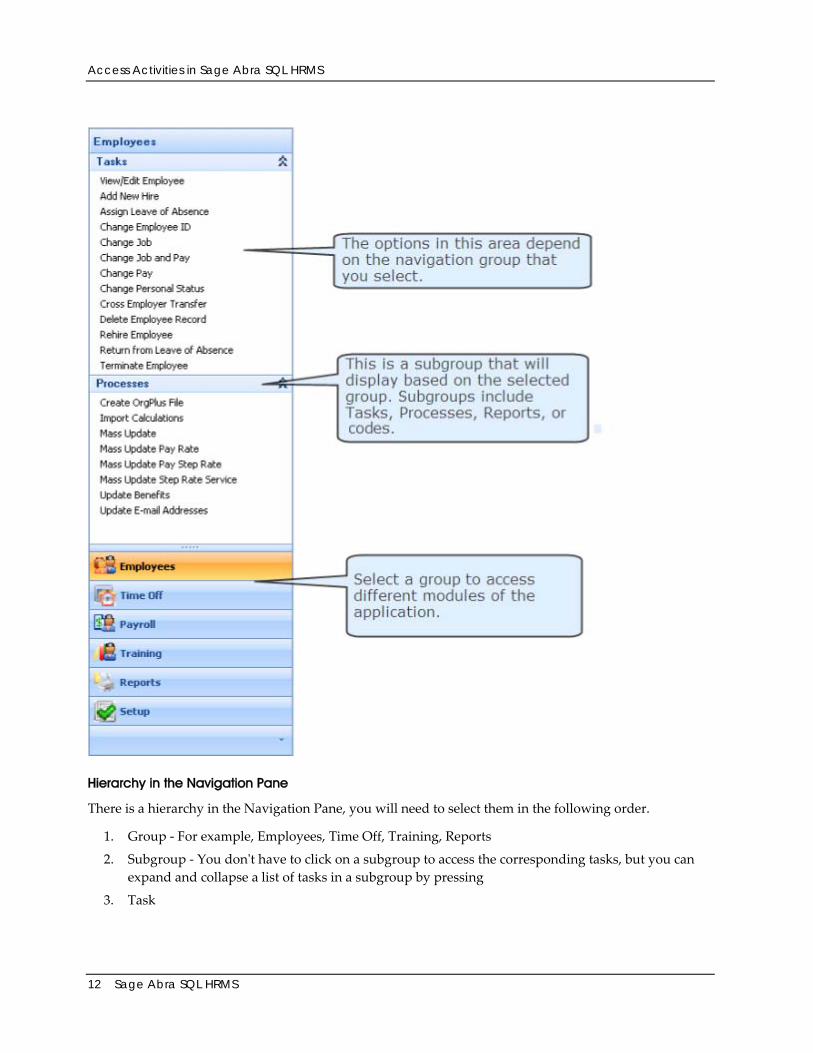
Use the Navigation Pane
The Navigation Pane on the left hand side of the desktop provides quick and easy access to the major features of the application.
Note: Groups, tasks, and processes that you do not have security access do not display on the Navigation Pane.
Access Activities in Sage Abra SQL HRMS
12 Sage Abra SQL HRMS
Hierarchy in the Navigation Pane
There is a hierarchy in the Navigation Pane, you will need to select them in the following order.
1. Group ‐ For example, Employees, Time Off, Training, Reports
2. Subgroup ‐ You donʹt have to click on a subgroup to access the corresponding tasks, but you can expand and collapse a list of tasks in a subgroup by pressing
3. Task
Access Activities in Sage Abra SQL HRMS
Getting Started 13
4. Links
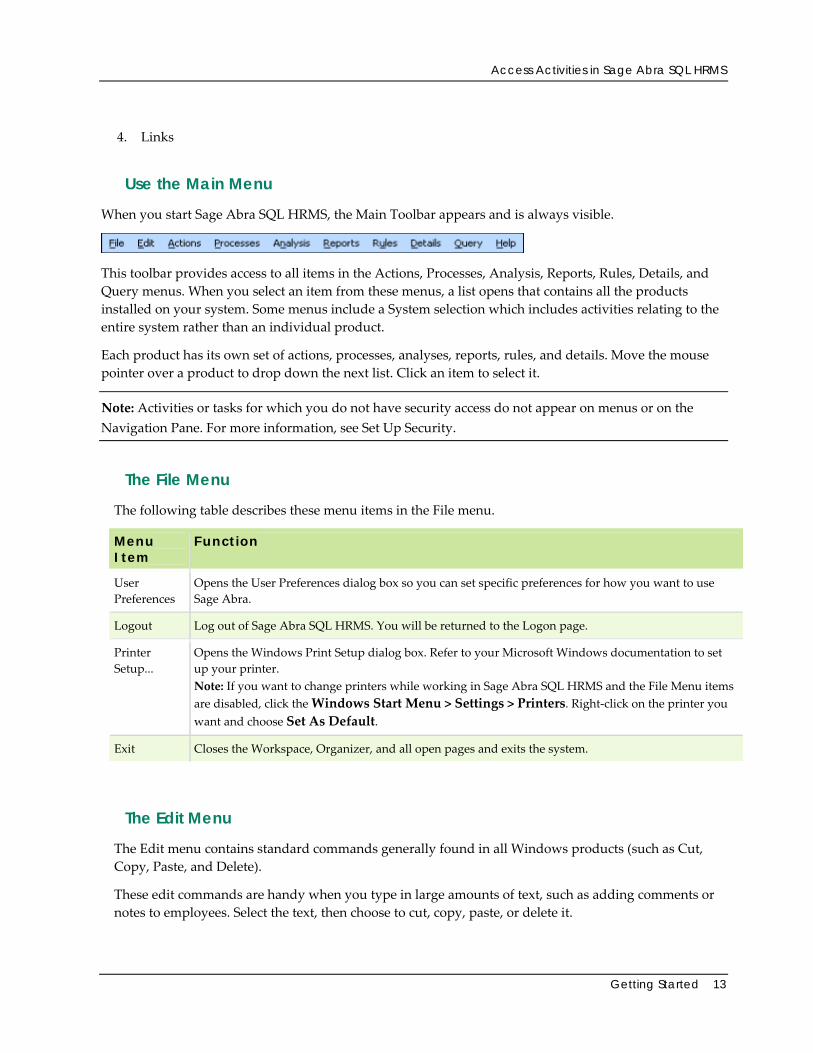
Use the Main Menu
When you start Sage Abra SQL HRMS, the Main Toolbar appears and is always visible.
This toolbar provides access to all items in the Actions, Processes, Analysis, Reports, Rules, Details, and Query menus. When you select an item from these menus, a list opens that contains all the products installed on your system. Some menus include a System selection which includes activities relating to the entire system rather than an individual product.
Each product has its own set of actions, processes, analyses, reports, rules, and details. Move the mouse pointer over a product to drop down the next list. Click an item to select it.
Note: Activities or tasks for which you do not have security access do not appear on menus or on the Navigation Pane. For more information, see Set Up Security.
The File Menu
The following table describes these menu items in the File menu.
Menu Item
Function
User Preferences
Opens the User Preferences dialog box so you can set specific preferences for how you want to use Sage Abra.
Logout Log out of Sage Abra SQL HRMS. You will be returned to the Logon page.
Printer Setup...
Opens the Windows Print Setup dialog box. Refer to your Microsoft Windows documentation to set up your printer. Note: If you want to change printers while working in Sage Abra SQL HRMS and the File Menu items are disabled, click the Windows Start Menu > Settings > Printers. Right‐click on the printer you want and choose Set As Default.
Exit Closes the Workspace, Organizer, and all open pages and exits the system.
The Edit Menu
The Edit menu contains standard commands generally found in all Windows products (such as Cut, Copy, Paste, and Delete).
These edit commands are handy when you type in large amounts of text, such as adding comments or notes to employees. Select the text, then choose to cut, copy, paste, or delete it.

Access Activities in Sage Abra SQL HRMS
14 Sage Abra SQL HRMS
In addition, it enables you to access the Employee Find command to search for an employee.
The Help Menu
The Help menu contains standard commands, most of which are found in all Windows products.
The following table describes these menu items.
Menu Item Function
Contents Opens the Table of Contents for online Help, where you can click the topic for which you want Help.
Search for Help on Opens the Index for online Help. Enter a keyword or phrase and then click Display.
Additional Documentation
Opens the Help folder (at C:\Program Files\Sage Software\Sage Abra HRMS\10.10\Programs\Help by default) included with your Sage Abra SQL HRMS installation, where you can access additional documentation about Sage Abra SQL HRMS.
Sage Web Site Opens the Sage North America Web site in Microsoft Internet Explorer. If you do not have Internet Explorer installed, this option is disabled.
Sage Abra SQL HRMS Customer Support
Opens the Sage Abra Customer Support Web site using Internet Explorer. If you do not have Internet Explorer installed, this option is disabled.
Sage Abra SQL HRMS Training
Opens the Sage Training Web site using Internet Explorer. If you do not have Internet Explorer installed, this option is disabled.
Product Feedback Opens the Sage Abra SQL HRMS portal on the IdeaScope web site, where you can provide feedback and comments about Sage Abra SQL HRMS.
Show Welcome Page Opens the Welcome Page.
About Sage Abra SQL HRMS
Opens the About Sage SQL HRMS dialog box for you to view information about your system or read the End‐User License Agreement. If you want to be removed from the Product Enhancement Program, select the I want to opt out of the Product Enhancement Program check box. If you want to be removed from the Product Survey Program, select the I want to opt out of the Product Survey Program check box.
Tip: You can also access context‐sensitive Help at any time by clicking the Help button.
The Employer Filter List
To set the Employer Filter, click the down arrow and select the Enterprise or the employer you want to work with. The list displays each employerʹs description and three letter code.

Access Activities in Sage Abra SQL HRMS
Getting Started 15
The system lets you set up more than one employer in your enterprise. All the employees you add to your employers exist in the database. Before you find the employee you want to work with, use the Employer Filter list to filter your employers so it is easier to find the employee.
Note: After you add a new employer, you must log out of the system and log back on in order to see the new employer in the Employer Filter drop‐down list.
For example, suppose you set up four different employers in your enterprise with a total of 2,500 employees. You want to start processing employee records for just one employer, Z‐Systems, Inc. (ZSI). Instead of searching through all 2,500 employees, you can select ZSI from the Employer Filter list to work with only employees assigned to ZSI.
If you set your employer filter to ZSI, only ZSI and its employees are available in the following areas of the system:
• Employee Find. When working with detail pages or actions, the system searches through only the records in ZSI to find the employee. Note that each time you change the employer filter and search for an employee, the system adjusts the record set to match the selected filter.
• Standard reports. When selecting criteria for reports, only ZSI appears in the Employer drop‐down list on the Standard Criteria tab.
• Rules. When adding or editing code tables, only ZSI appears in the Employer drop‐down list.
• Analyses. Only ZSI data appears in the selection tree.
The Help Button
The Help button is always accessible to the far right of the Main Menu. Click it to open the online Help for Sage Abra SQL HRMS. Refer to Use Sage Abra SQL HRMS Help to learn how to use online Help.
Move Around in a Page
A page contains several fields into which you enter data or select data from a list. When you work inside a page, you move from field to field to enter information. When you highlight the field, you can enter information into it. The following table lists some ways to move around in a page.

Access Activities in Sage Abra SQL HRMS
16 Sage Abra SQL HRMS
Use This To Perform This Task
Tab Move forward from field to field (left to right and top to bottom).
Shift + Tab Move from previous field to field (right to left and bottom to top).
↓↑→← Move the selection cursor from field to field or within a field.
Mouse Place the selection cursor in a field or within a text box.
Use Tabs
Many pages contain two or more tabs. Each tab contains different fields. For example, the Demographics page contains three tabs:
Address and Phone ‐ Contains the employee’s address and phone number.
Personal ‐ Contains the employee’s personal information.
Photo ‐ Contains the employee’s photograph.
To move to another tab, click on the tab label. For example, click the Personal tab label to view the Personal page. You can also press the Right Arrow→ key on your keyboard to move to the next tab or the Left Arrow← key to move to the previous tab.
Select From a Drop-Down List Box
To fill in a field, select from a drop‐down list box. A drop‐down list box lets you select one item from a list of several items. The following figures show examples of a closed and open drop‐down list.
Closed
Open

Access Activities in Sage Abra SQL HRMS
Getting Started 17
The following table describes how to open and select items from a drop‐down list box. Make sure you highlight the field on which you want to work before you perform the following actions:
To Do This Do This
Open the list using the keyboard
Press the Spacebar.
Open the list using the mouse
Click the arrow.
Close the list using the keyboard
Press the Spacebar.
Close the list using the mouse
Select an item or click outside the list.
Select an item using the keyboard
From either an open or closed list, type the first letter of the item, or press ↑or ↓to find the item.
Select an item using the mouse
From an open list, click the item.
Enter Text in a Text Box
For a description of the database files used by Sage Abra SQL HRMS, including field names and lengths, refer to the Data Dictionary Overview.
Entering information in a text box is another way to fill in a field. Each text box limits the number of characters or digits you can enter. The Data Dictionary contains the limit for each database field. The following figures show empty and filled text boxes.
Empty

Access Activities in Sage Abra SQL HRMS
18 Sage Abra SQL HRMS
Filled
Note: If you are using the add‐on import/export application, Abra Link, to export your data to ADP PC/Exchange, be aware that some fields can accommodate more characters than ADP can accommodate. For a description of these fields, refer to your Abra Link manual.
The following table describes the different functions you can perform inside a text box.
To Do This Do This
Enter information in a blank field
Type characters and digits up to the field maximum.
Replace information in a field
Click and drag the mouse over the field to highlight; then type characters and digits up to the field maximum.
Delete all characters in a field
Click and drag the mouse over the field to highlight and click Delete.
Delete one character in a field
Place the cursor to the left of the character to delete and click Delete.
Insert one character in a field
Place the cursor to the right of the insertion point and type.
To Enter a Date in a Text Box
Entering a date in a text box is a bit different from entering text in a text box. A date always contains the month, day, and year. Therefore, the slashes between the month and day are permanently included in the text box. An example of a date text box appears below.

Access Activities in Sage Abra SQL HRMS
Getting Started 19
To type a date into a text box, highlight the field. Then, type two digits for the month, two digits for the day, and four digits for the year. For example, we typed ʺ01111953ʺ for the figure above.
As an alternative to typing the date, you can click the right mouse button. A calendar control opens enabling you to select a date from the calendar display. The calendar opens displaying the current date circled in red. Click a date to select it and close the calendar. Selected dates are highlighted in gray.
Clicking the arrows in the top left or top right of the calendar displays the previous or next month. Click on the month to display a pop‐up menu that lists all months within the year. Select a month from the list.
Click on the year to display arrows which enable you to move the year up or down. Return to the current day by clicking Today at the bottom of the calendar.
Click OK to close the calendar. The date you selected appears in the text box.
To change an existing date, right‐click the field to open the calendar, or highlight the date and do one of the following:
Type the new date
Click + or ‐ to increase or decrease the date
Close and Resize pages
To close a page, click the Close button located in the top right‐hand corner of the page title bar. If you have made changes, the system will ask whether you want to save your changes. Yes saves the changes and close the page; No closes the page without saving the changes.
To enlarge a page, click the Maximize button located in the top right‐hand corner of the title bar. If the page is already enlarged, you can reduce its size by clicking the Restore button.
Access Context-Sensitive Help
You can access Help for each page by clicking the Help button on the actual page you are working in . This provides information about the page with which you are working.
Shortcut Keys
Sage Abra SQL HRMS is designed to be used with a mouse pointing device. By using the mouse, it is easier to point to and select fields and buttons on the page. However, in some situations, you might find it easier to use your keyboard. Sage Abra SQL HRMS adheres to the Microsoft Windows standard for mouse‐equivalent keystrokes.
Accessing the Main Menu Instead of using the mouse, you can use the keyboard to access and select items from the Main Menu. For instance, instead of clicking on Analysis, you can hold down Alt and press L. To access Processes, hold down Alt and press R. The underlined letter in each menu category indicates the letter to press to select the menu category.

Access Activities in Sage Abra SQL HRMS
20 Sage Abra SQL HRMS
Press This To Select this Menu Item
Alt + F File
Alt + E Edit
Alt + I Actions
Alt + R Processes
Alt + L Analysis
Alt + R Reports
Alt + U Rules
Alt + D Details
Alt + Q Query
Alt + H Help
After you have selected a Main Menu item, you can use the keyboard to do one of the following:
Press ↓ to navigate to the other options for the selected menu item.
Press � to highlight the next menu category.
Press one of the underlined letters to display the corresponding drop‐down menu.
Press Enter to open the selected menu item.
Press Esc to cancel your action and return to the task on which you were working.
Note: Certain hot keys may change when you access certain pages in Sage Abra SQL HRMS. If there is more than one item with the same hot key, you can press the hot key again to toggle between them. Press ↓ to access the options for the selected menu item.
Using the Tab Key Use the Tab key to move from one field to another within a page or dialog box. For example, as you complete the Record New Hire action, the Add New Employee page enables you to enter a first, middle, and last name for the new employee. After you enter the first name, press Tab to move to the middle name field. You can also press and hold down Shift and press Tab to move up or backwards one field.
This feature is particularly useful when you are working on a page which contains many fields. You can keep your hands on the keyboard while you navigate around the fields in the page using the Tab key.
Access Activities in Sage Abra SQL HRMS
Getting Started 21
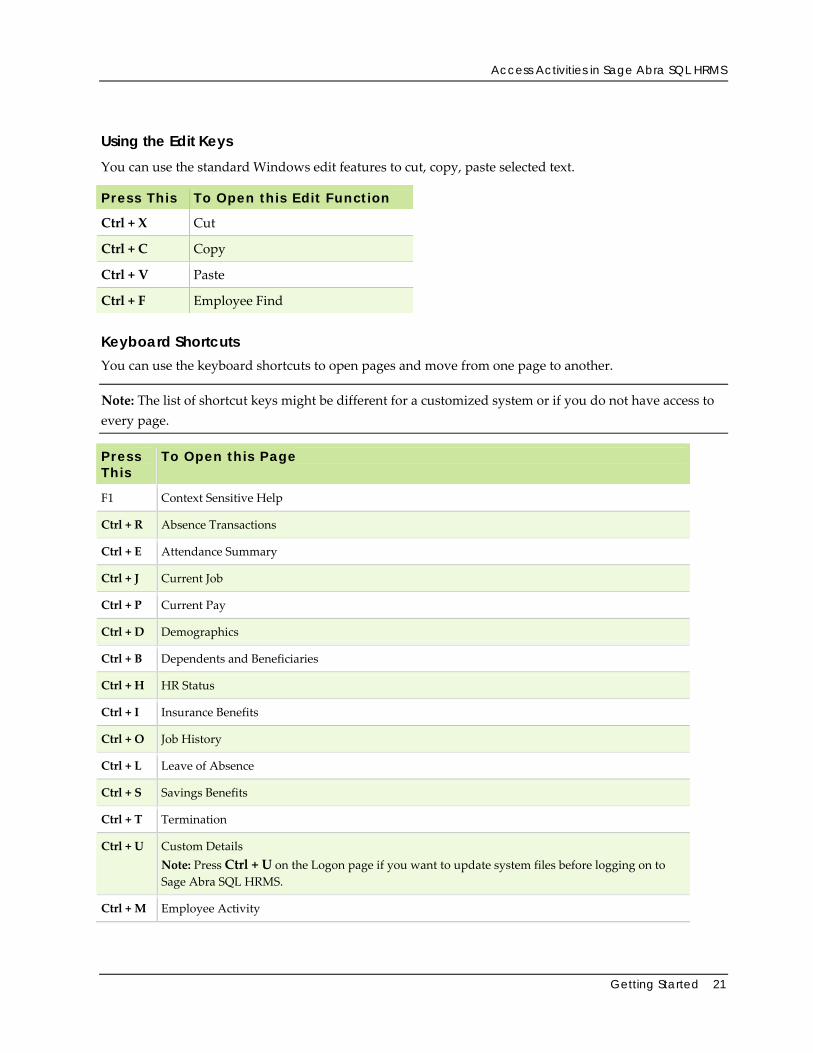
Using the Edit Keys You can use the standard Windows edit features to cut, copy, paste selected text.
Press This To Open this Edit Function
Ctrl + X Cut
Ctrl + C Copy
Ctrl + V Paste
Ctrl + F Employee Find
Keyboard Shortcuts You can use the keyboard shortcuts to open pages and move from one page to another.
Note: The list of shortcut keys might be different for a customized system or if you do not have access to every page.
Press This
To Open this Page
F1 Context Sensitive Help
Ctrl + R Absence Transactions
Ctrl + E Attendance Summary
Ctrl + J Current Job
Ctrl + P Current Pay
Ctrl + D Demographics
Ctrl + B Dependents and Beneficiaries
Ctrl + H HR Status
Ctrl + I Insurance Benefits
Ctrl + O Job History
Ctrl + L Leave of Absence
Ctrl + S Savings Benefits
Ctrl + T Termination
Ctrl + U Custom Details Note: Press Ctrl + U on the Logon page if you want to update system files before logging on to Sage Abra SQL HRMS.
Ctrl + M Employee Activity

Access Activities in Sage Abra SQL HRMS
22 Sage Abra SQL HRMS
Press This
To Open this Page
Ctrl + 4 Employee Payroll
Ctrl + Y Transaction History
Find an Employee
The Employee Find enables you to search for an employee by status, last and first name, ID and Social Security Number.
You will need to find an employee before you can view details and perform tasks.
Fields on the Employee Find
The following fields are available on the Employee Find:
Search Field
Definition
Last Name Enter a value to search by the last name. When searching by Last Name and First Name, the Last Name field acts as a ʺgo toʺ feature navigating you to the matching name on the list.
First Name Enter a value to search by the first name. When searching by Last Name and First Name, the First Name field acts as filter, narrowing down your search to the employees with that value you enter in the field.
ID Enter a value to search by the employee ID.
SSN Enter a value to search by the Social Security Number.
Active Select this option to include active employees.
Terminated Select this option to include terminated employees.
LOA Select this option to include employees on leave of absence.
Other Select this option to include other statuses like COBRA dependents, or non‐employees.
Find an Employee
1. From the Navigation Pane, select Employees > View/Edit Employee. The Employee Find page will display.
Note: To open the Employee Find page, you can also use the shortcut key combination CTRL+F.

Access Activities in Sage Abra SQL HRMS
Getting Started 23
2. Select the statuses you want to work with (Active, Terminated, LOA, or Other). Disable the ones you donʹt want to include in the search. The number of Records Found will be based on status.
3. Enter the search criteria in the fields. As you type the values in the field, the system will highlight the matching record, or closest matching record in the search results.
Note: If you enter a value and the system does not find a match, ʺNot Foundʺ will display next to the search field.
4. After you have found the employee you are searching for, you can double click the employee name, or click OK. The employee detail page will display for the selected employee.
Navigating through a list of Employees while on Detail Pages
You have the ability to navigate through the list of employees from your initial search by using the First, Previous, Next, and Last buttons on the Employee Information Bar.
Advanced Find
The Advanced Find is accessed by selecting More Options on the Employee Find page. With the Advanced Find you can further narrow your search by entering additional criteria about organization levels, supervisor, employee type, as well as other fields.
When using Advanced Find, the search results expand to display the additional criteria fields.
Note: Collapsing the Advanced Find saves the search criteria for the next time you open the Advanced Find. However, when it is collapsed, the Advanced Find search criteria does not affect the navigation.
Fields on the Advanced Find
The following fields are available.
Search Field Definition
Organization Levels (1 thru 5)
Search by organization levels that you have specified in Enterprise Setup. If All is selected, all records are considered in the search results. If None Specified is selected, only employees without values in the corresponding fields are considered in the search results. Note: If an Organization Level Title does not exist, the label will display as None.
Supervisor Search by a list of primary supervisors. If All is selected, all records are considered in the search results. If None Specified is selected, only employees without a primary supervisor are considered in the search results.

Access Activities in Sage Abra SQL HRMS
24 Sage Abra SQL HRMS
Search Field Definition
Note: If an employer is selected in the Employer Filter, only supervisors for the selected employer are available. If the Enterprise is selected, all supervisors in the system are available.
Employee Type Search by the employee type. If All is selected, all records are considered in the search results.
Salaried/Hourly Search by the employeeʹs salary or hourly status. If All is selected, all records are considered in the search results.
Job Title Search by the job title. Enter a value in the field. The search results area will filter and display employees that match the criteria you entered.
State Search by state.
Last Hire Date Search by last hire date. Enter a ʺFromʺ and ʺToʺ Date to search by. If From and To dates are entered, the search results display all employees with the matching criteria. Note: You have the option to search only with a From or only with a To date.
Using the Advanced Find
1. From the Navigation Pane, select Employees > View/Edit Employee. The Employee Find page displays.
2. Select More Options.
3. Enter criteria in the fields to narrow your search. Results will display in the list with the closet matching record.
Employee Information Bar
The Employee Information Bar appears on Detail Pages and enables you to quickly invoke the Employee Find or navigate through a list of employees you have searched for.

Access Activities in Sage Abra SQL HRMS
Getting Started 25
Fields and Buttons on the Employee Information Bar
Field/Button Definition
Employee Displays the employee name
SSN Displays the employeeʹs Social Security Number
Status Displays the employeeʹs status
ID Number Displays the employee ID
Find Opens the Employee Find
First Navigate to the first record on the search results list
Previous Navigate to the previous record you were viewing
Next Navigate to the next record on the search results list
Last Navigate to the last record on the search results list

Access Activities in Sage Abra SQL HRMS
26 Sage Abra SQL HRMS
Use the Quick Launch Toolbar
The Quick Launch toolbar at the bottom of the desktop window provides shortcut buttons that allow you to quickly access Sage Abra features, office applications, links, interfaces, and other product functionality.
Quick Launch toolbar buttons Sage Abra SQL HRMS provides the following buttons on the Quick Launch toolbar:
Organizer ‐ Allows you to access the Organizer.
Whoʹs Online ‐ Click this button to open the Whoʹs Online page, which allows you to see the list of users currently logged on to Sage Abra SQL HRMS.
Crystal
Office ‐ Click this button to open a menu that displays shortcuts to your installed Microsoft Office applications. Click a shortcut to launch that application.
Note: Icons for the following Microsoft Office products will appear if the products are installed on your hard drive or on a network and registered in your Windows registry file: Word, Excel, PowerPoint, Outlook, and Internet Explorer. If you have none of these applications installed, the Office button will not appear.
Links ‐ Access the links or interfaces you have registered on your system. Available links are Sage Abra HR for MAS 90 Link, Sage Abra MAS 200 G/L Interface (Payroll systems only), Sage Abra X3 G/L Interface (Payroll systems only).
Sage University
Workforce Connection ‐ Click this button to launch Abra Workforce Connections (if installed).
Abra OrgPlus
Use the Organizer and Scheduler
The Organizer shows you tasks and information items scheduled for you. The Organizer includes the Scheduler, which allows you to plan tasks for yourself or someone else.
Click the Organizer icon on the Quick Launch toolbar to open the Organizer.
Note: Select Organizer in the Default View field on the User Preferences page if you want the Organizer to open in the workspace after you log on to Sage Abra SQL HRMS.

Access Activities in Sage Abra SQL HRMS
Getting Started 27
To Use the Organizer The Organizer you see when you use Sage Abra SQL HRMS is your own personal Organizer; all scheduled tasks and information items are yours.
The Organizer first opens to the current date and provides three lists: tasks, information, and system events. It displays all tasks, messages, and events scheduled for the current date.
Using the Organizer lists, you can schedule and carry out tasks. You can also record information and plan system events. All uncompleted activities and information are rolled over from day to day.
Move Around in the Organizer Use any of the following methods to move around the calendar:
To jump to the current date, click the Date button on the Organizer toolbar.
To move to a different day in the current month, click the day in the calendar.
To move to a different month, right‐click the month. A list drops down from which you can select a new month.
You can also move to the previous month by clicking the first date in the calendar or any date belonging to the previous month, or move to the next month by clicking the last date in the calendar or any date belonging to the next month.
To move to another year, right‐click the year. A list drops down from which you can select a different year.

Access Activities in Sage Abra SQL HRMS
28 Sage Abra SQL HRMS
You can also use the keyboard to move to a different date, as described in the following table.
To Press This
Move to the previous day. ←
Move to the next day. →
Move to the previous week. ↑
Move to the next week. ↓
Move to the beginning of the month. Home
Move to the end of the month. End
Move to the previous month. Page Up
Move to the next month. Page Down
Use the Organizer Toolbar The Organizer toolbar, located just above the Organizer, enables you to start tasks, jump to today’s date, schedule items, delete or edit items in the lists, and update the Organizer.
The Organizer toolbar contains six buttons.
Button Button Name
Description
Execute a Task
Use this button to complete a specific task in the Task list. To start a task, click the task description and click the Start button. Tip: Instead of using the Start button, you can also double‐click the task to start it. Depending on what the task is, the first scheduled step in the task appears. For example, if you scheduled the Record New Hire action as your task and you start the task, the Add New Employee dialog box opens for you to enter the name of the new employee. This is the first step for recording a new hire. Note: The only type of item you can start is a task. However, you can edit or delete all types of items, including tasks, information items, and system events.
Jump to Todayʹs Date
The Date button enables you to quickly jump to the current date.
Add Item to Scheduler
The Scheduler lets you schedule a new task, information item or system event. To access the Scheduler, click the Scheduler button.

Access Activities in Sage Abra SQL HRMS
Getting Started 29
Button Button Name
Description
Delete Item in Scheduler
The Delete button deletes a task, information item or system event. As a precaution, the system asks you to confirm the deletion. To delete an item, highlight it and click the Delete button. Note: A system event can only be deleted by the user for whom it is scheduled.
Edit Item in Scheduler
The Edit button enables you to change information for a specific item. To edit an item, highlight it and click the Edit button. The Scheduler opens for you to edit the itemʹs information. Note: A system event can only be edited by the user for whom it is scheduled.
Refresh Organizer
The system frequently refreshes your Organizer and brings it up to date with items other users might have scheduled for you. Additionally, you can click the Update button any time you want to refresh your Organizer.
Use the Organizer Lists
Consider these your ʺto‐doʺ lists. You use the Scheduler to place items on these lists. At a glance, you can browse through all tasks, information items and system events that were placed on your Organizer for the selected day.
Items on the list are either completed or uncompleted. All uncompleted tasks and information items scheduled for dates prior to the current day are rolled over when you log on to the system.
There are three lists in the Organizer:
Use the Task List A task is an Action, Process, Report, Analysis, Rule, or Detail. When you schedule a task, it appears on your Organizer or another userʹs Organizer if you scheduled it for someone else.
The Task list shows all tasks scheduled for you. At the time you complete the scheduled task, the Completed field is automatically selected, indicating the task has been completed.
The following table describes how to work with the Task list.
To Do This
Start a Task Click the task and click the Execute a Task button. ‐or‐ Double‐click the task.
Edit a Task Click the task and click the Edit Item in Scheduler button. ‐or‐ Click the + button next to the task. The Scheduler appears. Change the necessary information.

Access Activities in Sage Abra SQL HRMS
30 Sage Abra SQL HRMS
To Do This
Delete a Task Click the task and click the Delete Item in Scheduler button. Confirm the deletion. ‐or‐ Click the + button next to the task. The Scheduler appears. Click Delete. Confirm the deletion.
Display the taskʹs Note page
Right‐click the task. The Notes page opens. Edit the information as necessary. Click OK to save your changes and return to the Organizer. Note: You can also edit Notes in the Scheduler.
See tasks that extend beyond the list
Use the vertical and horizontal scroll bars.
Change status to Completed
Select the Completed check box. ‐or‐ Click the task and click the Edit button to open the Scheduler. Select the This Item is Complete check box. ‐or‐ The system detects when the item is complete and automatically selects the Completed check box.
Change status to not completed
Clear the Completed check box. ‐or‐ Click the task and click the Edit button to open the Scheduler. Clear the This Item is Complete check box. You can only clear a Completed check box for tasks completed on the current day. When viewing past dates, you cannot change the status to not completed.
Use the Information List Use the Information list to schedule any type of information. You can use this as a personal to‐do list to remind yourself of anything from scheduling a meeting to making hotel reservations for your next business trip.
Like the Task list, the Completed field indicates the completion status. However, an information item is not an Action, Process, Analysis, Report, Rule, or Detail, so your system cannot detect whether or not it is complete. You must change an information itemʹs status.
The following table describes how to work with the Information list.
To Do This
Edit an Information Item
Click the information item and click the Edit Item in Scheduler button to open the Scheduler.

Access Activities in Sage Abra SQL HRMS
Getting Started 31
To Do This
‐or‐ Click the + button next to the item to open the Scheduler. Change the necessary information.
Delete an Information Item
Click the information item and click the Delete Item in Scheduler button. Confirm the deletion. ‐or‐ Click the + button next to the item. The Scheduler appears. Click Delete. Confirm the deletion.
Display the item’s Note page
Right‐click the Information item. The Notes page opens. Edit the information as necessary. Click OK to save your changes and return to the Organizer. Note: You can also edit Notes in the Scheduler.
See items that extend beyond the list
Use the vertical and horizontal scroll bars.
Change status to Completed
Select the Completed check box. ‐or‐ Click the information item and click the Edit button to open the Scheduler. Select the This Item is Complete check box.
Change status to not completed
Clear the Completed check box. ‐or‐ Click the information item and click the Edit button to open the Scheduler. Clear the This Item is Complete check box.
Use the System Event List If you need to schedule a task that pertains to the entire system, you can schedule a system event. You can schedule any task to be a system event, that is, any Action, Process, Analysis, Report, Rule, or Detail.
You can also schedule an information item as a system event if you like. For example, you can remind everyone to back up their databases every Friday.
The following table describes how to work with the System Event list.
To Do This
Edit a system event
Click the system event and click the Edit Item in Scheduler button to open the Scheduler.
‐or‐
Click the + button next to the event to open the Scheduler. Change the necessary information.
Access Activities in Sage Abra SQL HRMS
32 Sage Abra SQL HRMS
To Do This
Note: Only the user for whom the system event is scheduled can edit it.
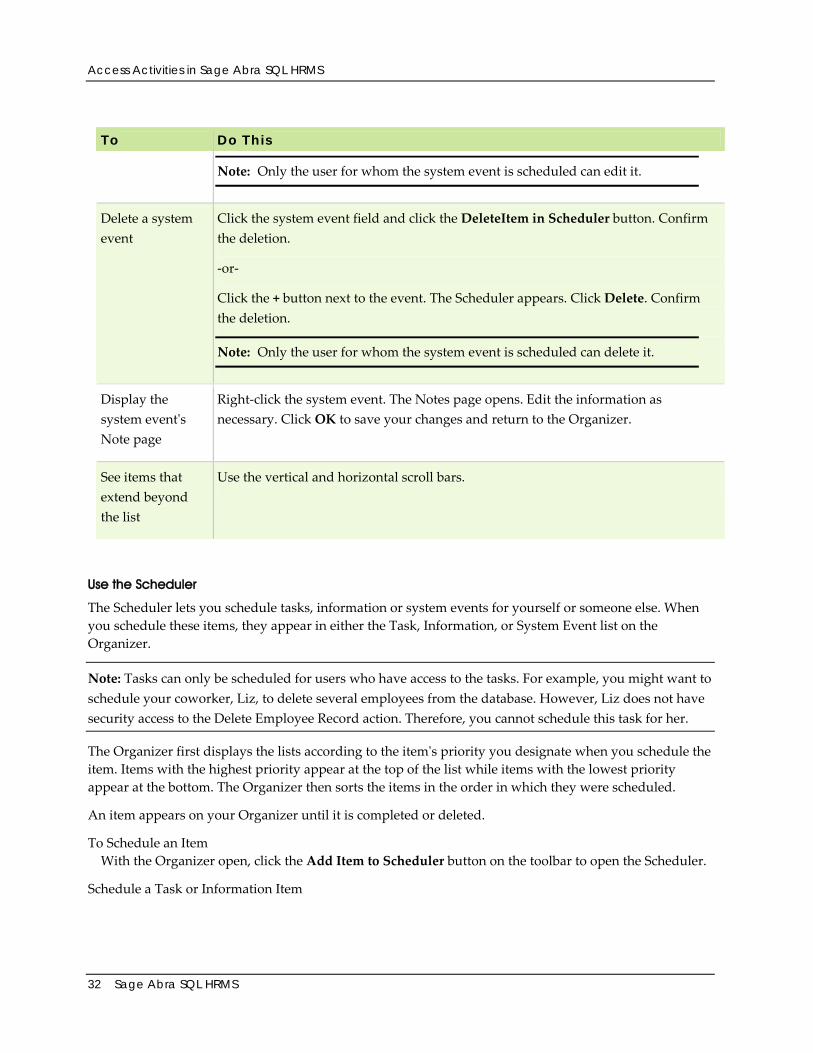
Delete a system event
Click the system event field and click the DeleteItem in Scheduler button. Confirm the deletion.
‐or‐
Click the + button next to the event. The Scheduler appears. Click Delete. Confirm the deletion.
Note: Only the user for whom the system event is scheduled can delete it.
Display the system eventʹs Note page
Right‐click the system event. The Notes page opens. Edit the information as necessary. Click OK to save your changes and return to the Organizer.
See items that extend beyond the list
Use the vertical and horizontal scroll bars.
Use the Scheduler
The Scheduler lets you schedule tasks, information or system events for yourself or someone else. When you schedule these items, they appear in either the Task, Information, or System Event list on the Organizer.
Note: Tasks can only be scheduled for users who have access to the tasks. For example, you might want to schedule your coworker, Liz, to delete several employees from the database. However, Liz does not have security access to the Delete Employee Record action. Therefore, you cannot schedule this task for her.
The Organizer first displays the lists according to the itemʹs priority you designate when you schedule the item. Items with the highest priority appear at the top of the list while items with the lowest priority appear at the bottom. The Organizer then sorts the items in the order in which they were scheduled.
An item appears on your Organizer until it is completed or deleted.
To Schedule an Item With the Organizer open, click the Add Item to Scheduler button on the toolbar to open the Scheduler.
Schedule a Task or Information Item

Access Activities in Sage Abra SQL HRMS
Getting Started 33
Click the appropriate radio button, either Task or Information, for the type of item you are scheduling. When you select Information, the Activity and Product fields are disabled because they do not apply to information items.
Select the Taskʹs Activity This field specifies the activity containing the task. For example, if you schedule the Mass Update task, select Process. Or if you are scheduling the Rehire Employee task, select Action. These two tasks, Mass Update and Rehire Employee, are a process and an action, respectively.
Select the Taskʹs Product All Sage Abraproducts appear in this list, as well as System. System includes activities pertaining to your entire system rather than an individual product.
Select the Task This field contains the task you are scheduling. The list contains all the tasks included in the selected taskʹs activity and product. The list changes when the taskʹs activity and product change.
If you are scheduling an information item, the Task field is disabled.
Select the Sub‐Task Some tasks have associated sub‐tasks. A sub‐task is simply another level of task within the task you select. If sub‐tasks do not apply to your selected task, the field is disabled.
Select the Employer For most tasks, you are required to select an employer. For example, if you are working with Abra HR and select the Record Performance Review action, you must select which employer contains the employee for whom you want to record a performance review.
The Employer field is disabled if there is only one employer set up in your enterprise or if the task is an Information item.
Select a Subject Tasks require specific information before they are processed. For example, the Rehire Employee action requires an employeeʹs name. The items in the list change according to the task you select. If you forget to select a subject, the system warns you when you click OK to close the Scheduler.
If you are scheduling an information item, the Subject field is disabled.
Enter a Description This is a short description of the task, information item or system event. The description appears on the Organizer of the user for whom the item is scheduled. If you are scheduling a task, the system fills in the description automatically by combining the task (or sub‐task, if one is selected) and the subject.
You can change the Description field as necessary, but you cannot leave it blank. If you accidentally leave the Description field blank, the system fills it in for you.
Add a Note The Notes text area of the Scheduler enables you to fully describe the item. You can enter an unlimited number of characters. Use the scroll bars as necessary.

Access Activities in Sage Abra SQL HRMS
34 Sage Abra SQL HRMS
When you work with the Organizer and want to see the note associated with a task, information item or system event, right‐click the item to read and edit the note.
Schedule the Date To Be Done This is the date on which the item is scheduled for completion. The item appears on the Organizer on this date. Sage Abra SQL HRMS automatically schedules the item for the day currently selected in the calendar, but you change the date.
Enter the To Be Done date in mm/dd/yyyy format. For example, enter March 27, 2007 as 03272007 (slashes are preformatted).
The Scheduled date is the date on which the item is being scheduled. It defaults to the current date and cannot be changed.
Automatic Advancement of Uncompleted Items If tasks or information items are not completed on the scheduled dates, the system automatically rolls them over to the next time the user logs into the system. For example, a task on Lynn’s Organizer should be completed on the 18th, but Lynn cannot complete the task on the 18th. She doesn’t use her system again until the 23rd. The task rolls over to the 23rd and stays on her Organizer until she either completes or deletes the task.
Note: Unlike tasks and information items, system events are not moved forward.
Select the User for Whom the Item is Scheduled The Scheduled For list contains users who are assigned user IDs and passwords when security was set up for your system. If you are scheduling a task, only the users who have security rights to perform that task appear in the list. For more information, see Setting Up Security.
Note: The name of the user who is scheduling the item is shown in the Scheduled By field and cannot be changed. This is the user who logged into the system.
Set the Priority You can choose from five levels of item priority: very high, high, medium, low, and very low. This indicates the importance of the item you are scheduling. The selected priority determines the order in the Organizer’s tasks and information lists.
Set the Frequency The Frequency indicates how many times the item should occur. The list includes Once, Daily, Weekly, Bi‐Weekly, Monthly, Bi‐Monthly, Quarterly, and Yearly. If you want the task to repeat, select any frequency other than Once.
For example, you might want to archive terminated employees once a month. In this case, select Monthly as the frequency.
When you select a frequency, the Repeating Task dialog box automatically opens for you to describe the taskʹs repeat frequency.

Access Activities in Sage Abra SQL HRMS
Getting Started 35
The text entered in the Schedulerʹs Description text area appears in the Task Information field. The Scheduled Date and Repeat Frequency carry over from the Scheduler. These three fields cannot be changed.
Repeat Items
The Repeat This Item field lets you specify the number of times to repeat this item. Except for a Repeat Frequency of Daily, you can repeat an item as many times as required up to a five year limit. For a daily repeat frequency, you can repeat an item up to 365 times.
The Repeat Frequency is the number of times an item will appear on the Organizer in addition to the first date you schedule. For example, if you schedule an item to be done on Tuesday, 4/12, and the repeat frequency is weekly and the number of times you want to repeat the item is three, then your Organizer shows the item on 4/12 (the first occurrence), 4/19, 4/26, and 5/3.
Use the arrows to select the repeat number or type a number in the text box. However, if you type a number exceeding the Repeat Frequency limit, the number automatically changes to the allowable limit. For example, if you type 6 for the number of years an item is to occur, the number automatically changes to 5, the allowable limit.
Tip: Each time you schedule an item to be repeated, the repeat occurrence of the item is a separately scheduled item. If you edit a repeat item, the Frequency field on the Scheduler is disabled. If you find you need to change the repeat frequency of an item that is already scheduled to repeat, do not edit the item. Rather, schedule a new item and its related repeat frequency. Then, delete the old item.
Maintain the Day of the Week
You can choose to maintain the day of the week the item repeats. For example, if you always want to repeat the item on a Thursday,select the check box and select Thursday from the drop‐down list.
If maintaining the day of the week does not matter, clear the check box. The item then repeats on the same numerical date of the month. For example, if you schedule an item on April 15 and you want it repeated every month, the next occurrences will be May 15,June 15,July 15, and so on, regardless of the day of the week.
If the box is selected, the Move to Closest Date, Forward to Next Available Date, and Backward to Last Available Date options become enabled.
Note: The Maintain Day of Week check box and drop‐down list are disabled when your Repeat Frequency is daily, weekly, or biweekly, because they do not apply. In turn, the related radio buttons are disabled.
Move to Closest Date
This selection instructs the Scheduler to repeat the task on the date falling closest to the next date to repeat the task while at the same time maintaining the day of the week. This selection lets the Scheduler

Access Activities in Sage Abra SQL HRMS
36 Sage Abra SQL HRMS
choose the next date to repeat the task. It either chooses a date previous to or following the scheduled repeat date. Move to Closest Date is the default value.
For example, suppose you want to repeat an item monthly and always want it to be done on Wednesday. Schedule the first task for Wednesday, 11/17. In December, the 17th falls on a Friday. The Move to Closest Date selection tells the Scheduler to move this task to Wednesday, 12/15 because it is only two days from the 17th, whereas the 22nd, also a Wednesday, is five days from the 17th.
Forward to Next Available Date
This selection instructs the Scheduler to repeat the task on whatever the date is that matches the specified day of the week and follows the date on which the task is to be repeated. Unlike Move to Closest Date or Backward to Last Available Date, the Scheduler must move forward to select the repeat task date.
Using the same example as above, you want to repeat an item monthly and always want it to be done on Wednesday. You scheduled the first task to be done Wednesday, 11/17. In December, the 17th falls on a Friday. The Forward to Next Available Date selection tells the Scheduler to move this task to Wednesday, 12/22, because it must move forward to the 22nd, not backward to the 15th.
Backward to Last Available Date
This selection instructs the Scheduler to repeat the task on whatever the date is that matches the specified day of the week and precedes the date to repeat the task. Unlike Move to Closest Date and Forward to Next Available Date, the Scheduler must move backward to select the repeat task date.
Using the same example as above, you want to repeat an item monthly and always want it to be done on Wednesday. You scheduled the first task to be done Wednesday, 11/17. In December, the 17th falls on a Friday. The Backward to Last Available Date selection tells the Scheduler to move this task to Wednesday, 12/15, because it must move backward to the 15th, not forward to the 22nd.
When you complete setting values for the Repeating Task dialog box, click OK to save the changes and return to the Scheduler.
Schedule a Task in Microsoft Outlook When you schedule a task in the Scheduler, you can also schedule it in Outlook. User Preferences enables you to set the check box as always selected.
When the Schedule Task in Microsoft Outlook check box is enabled, an e‐mail of the task is sent to the person for whom it is scheduled. When they accept the task, it is scheduled in their Outlook Task Manager.
If the person declines the task in Outlook, an e‐mail is sent to the person who scheduled the task; however, the task is not updated in the Scheduler.
After the task is completed in Sage Abra, it is automatically marked as completed in Outlook.

Access Activities in Sage Abra SQL HRMS
Getting Started 37
Note: Refer to the Microsoft Outlook online help for further information regarding the features of Outlook.
Schedule a System Event You can schedule a system‐wide item, a System Event, pertaining to all users on the system. To schedule a System Event, select System Event from the Priority drop‐down list.
Scheduling a System Event is a bit different from scheduling a Task or Information item. When you schedule a System Event, it is automatically placed on your Organizer in the System Event list and it is placed on every Sage Abra SQL HRMS userʹs Organizer as well. This allows you to convey a message to all other users on the system.
Here are two examples of a system event:
Suppose you want to perform the Mass Update process in Abra HR on December 5 at 5:00 PM. You need all other users on the system to exit Abra HR before 5:00 so you can run the process.
1. In Abra HR, schedule the Mass Update process for yourself (the default) with the Priority as System Event. Schedule the process to be done 12/5/07. Add a message in the Note text area: ʺMass Update will occur at 5:00 today, December 5. Please exit Abra HR by 4:55 PM.ʺ
2. The Mass Update process appears on everyoneʹs Organizer in the System Event section on December 5. Each user can view the note by clicking the + button next to the item to open the scheduler, or by right‐clicking the item. That way, all users know to exit Abra HR before 5:00. However, the Mass Update process only appears in the Task section of the person scheduled to complete it.
Letʹs say you routinely perform E‐mail maintenance every Friday at 5:30 and want all users to exit E‐mail before you begin maintenance work.
1. Since this is not a system task, schedule this as an Information item. Specify the Frequency as Weekly and the Priority as System Event. Add a message in the Note text area: ʺPlease exit E‐mail by 5:30 today for weekly maintenance.ʺ
2. The Information item is placed on everyoneʹs Organizer each Friday. Users can view the note by clicking the + button next to the item to open the scheduler, or by right‐clicking the item.
Note: Only the user for whom the system event is scheduled can edit, delete, or reschedule the system event.
Mark an Item as Complete
The Task has been completed check box in the lower left corner of the Scheduler indicates if the item is complete. When you edit a Task or an Information item, the Scheduler opens with this check box enabled.
To signify the item is complete, select the check box. If you are editing a task you have completed, the system automatically marks the item as complete. When you click OK to return to the Organizer, the itemʹs Completed check box is selected.

Access Activities in Sage Abra SQL HRMS
38 Sage Abra SQL HRMS
The Task has been completed check box is disabled when you:
Schedule a new task or information item.
Schedule a system event, as there is no completed status for a system event.
Edit an item completed prior to the current day.

Access Activities in Sage Abra SQL HRMS
Getting Started 39
Set Up Sage Abra SQL HRMS Set Up the Enterprise Before adding employers and setting up their different requirements, you must set up the enterprise. The Sage Abra SQL HRMS enterprise feature lets you handle a group of employers as one. The enterprise is an efficient time‐saver used to manage multiple employers. The enterprise has no employees, but it does provide access to code tables that set the standards for your system.
Understand the Enterprise The enterprise lets you group employers together and handle them as one. An enterprise is not actually an employer, even though it appears in a list of employers on your system. The enterprise has no employees, but it does help you establish standards for all the employers in your system.
Think of the enterprise as the ʺcorporate level,ʺ encompassing all employers under a single umbrella. You have only one enterprise in your system, but you can have numerous employers.
Each employer can have different setup specifications, such as different codes for the jobs in the company or different salary grade structures. When you set up your employers, you can specify different sets of specifications for each employer.
The enterprise feature helps you in two ways:
You save time because it allows you to manipulate several employersʹ data at one time rather than working with individual employers to complete identical tasks one at a time.
The information from all your employers is available to you when you are viewing data or printing reports.
Enterprise as a Time-Saver The enterprise feature saves you time when you are setting up and managing multiple employers. For example, you have an umbrella corporation called National Systems, Inc., with three subsidiary employers called A Corp., B Corp., and C Corp. The umbrella company, National Systems, and its three subsidiaries all have the same benefit plans.
If you are using Abra HR, all the codes in the enterprise benefit plan code table apply to all employers in your system, unless you set up a different plan for a particular employer.
Therefore, when you first set up your three corporations, A Corp., B Corp., and C Corp., they automatically use the enterprise benefit plan code tables. You do not have to set up separate benefit plans for each employer because they all conform to the enterprise standards.
If you need to set up a unique plan for one of your employers, the enterprise still saves you time. Copy an enterprise benefit plan to the employer, make your changes and save the benefit table with an employer

Set Up the Enterprise
40 Sage Abra SQL HRMS
code. Now you have a unique benefit plan for this employer and you did not have to create it from scratch.
The enterprise also efficiently handles changes to your setup. For example, if you have a rate change in a dental plan and three employers use the enterprise dental plan, simply change the rate once in the enterprise dental plan rather than three times. The rate change you make at the enterprise level affects every employer in your system except those who have unique dental plans.
Enterprise as the Panoramic View Use the enterprise feature to see a panoramic view of information in Sage Abra. For example, when you print a report, select the enterprise and Sage Abra prints information from all your employers in one report. When using the filter feature to control the information you want to use, select the enterprise to give yourself access to data for all employers in the system.
Set Up the Enterprise Log on to Sage Abra SQL HRMS. From the Navigation Pane, select Setup > System > Setup > Enterprise Setup.
After you define the enterprise setup information, click OK to accept your changes and close the Enterprise Setup page. You can also click Apply to save your changes but remain on the page. For example, you may want to enter information on the Enterprise Options tab, click Apply to save your changes, then move to the Organization Titles tab.
Define Enterprise Options

Set Up the Enterprise
Getting Started 41
The Enterprise Options tab of the Enterprise Setup page contains general setup information for your system.
Country. Select the country that represents the employers in your enterprise. The country you select determines what information is displayed in your Sage Abra SQL HRMS system. For example, if an entire Detail page or a particular field on a Detail page does not apply for a country, it either does not display or it is disabled for an employer in that country.
• Select U.S. if all employers in the enterprise are United States employers.
• Select Canada if all employers in the enterprise are Canadian employers.
• Select Both if there are both United States and Canadian employers in the enterprise.
The first time you log on to Sage Abra SQL HRMS, the system asks you for a country setting for your employers. If you need to change the country setting after the initial setting, you can do so on the Enterprise Setup page. When you change the country setting, you must exit Sage Abra SQL HRMS and log on again to complete the country setting change.
Note: After initial setup of your enterprise, if you re‐register with a new installation code to either add U.S. payroll to a Canadian payroll system or add Canadian payroll to a U.S. payroll system, you must change the Country setting to Both after re‐registering and restarting Sage Abra SQL HRMS.
Field Description
Enterprise Name Enter the name of the enterprise. This name is shown on reports and forms
Address and City Enter up to two street addresses and the city.
State/Province and Zip/Postal Code
If the country setting is set to U.S., select the state and enter the zip. If the country setting is set to Canada, select either State or Province, select the appropriate state or province from the next drop‐down list, and then enter the Zip code or postal code. The State/Province is a required field.
Phone Enter the telephone number
Training Employer If you are using Training, you can select a Training Employer. If you are not using Abra train, this field is disabled
Fed Tax ID/Business Number
Enter either a Federal Tax Identification number (for a U.S. company) or a Business Number (for a Canadian company)
Phone Number Format
Select the format in which you want the employee telephone numbers to display.
Report Footer When you generate reports, the date appears at the bottom of each page. You can choose to display both the date and time, or only the date.
Show SSN/SIN on Detail Headers
Choose to show or hide the employeeʹs social security number (for U.S.) or social insurance number (for Canada) in the top section of each employee Detail page.

Set Up the Enterprise
42 Sage Abra SQL HRMS
Field Description
Show Union Data Choose to show or hide an employeeʹs union affiliation.
Benefit History Choose to enable or disable historical benefit information for employees.
Automatically Recalculate Benefits
Choose to automatically calculate benefits: Daily – to update benefits only when the user logs into Sage Abra SQL HRMS. If you select this option, Sage Abra SQL HRMS will not update benefits when the user changes Employee pages. By Employee – to update benefits only when the user makes changes on Employee pages that trigger Sage Abra SQL HRMS to update benefits. If you select this option, Sage Abra SQL HRMS will not update benefits when the user logs into Sage Abra. Daily and By Employee – to update benefits when the user logs into Sage Abra and when the user makes changes on Employee pages that trigger Sage Abra SQL HRMS to update benefits. Never – to manually update benefits. Tip: When setting up your system, select Daily or Never to prevent the system from updating after every change.
Define Organization Titles The Organization Titles tab of the Enterprise Setup page enables you to define up to five organization levels for your enterprise. Use these levels as a way to organize your employees.
For example, Richard Miller accepts a marketing position with Multimedia Communications. You add the new employee (Richard Miller) to one of your employers, Multimedia Communications. You specify the department as Marketing and the division as Central. For this example, you define two Organization Titles: Department and Division.
After defining the organization titles, set up the codes for each organization title in your Organization code tables. In the above example, Marketing is a code under the Department organization title and Central is a code under the Division organization title.
Enter titles for up to five organization levels.
When you set up your Organization code tables, you can choose from this list of titles for your enterpriseʹs organization levels and then set up the codes for each organization level.
Select the Enterprise Logo The reports you generate within Sage Abra SQL HRMS can include the name and address of your employer as well as a logo for your enterprise. The Logo Setup tab of the Enterprise Setup page enables you to select your logo.
Before selecting a logo, you must be able to access it as a bitmap file, a file with the .BMP extension. A bitmap is a collection of picture elements arranged in a pattern resembling a picture.

Set Up the Audit Trail
Getting Started 43
Note: You can create a bitmap file from scratch using any graphic editing package, such as Microsoft Paint. You can also scan your logo and save it as a bitmap file.
If you are working with live data (rather than sample data), the Logo Setup tab is blank the first time it is opened.
If you are working with sample data, the Logo Setup tab contains the ZSI logo the first time it is opened.
To Select a Logo To select a logo, click Select. A dialog box opens so you can select the appropriate logo.
Select the correct path and name of your logoʹs bitmap file. Only those files with a .BMP extension appear. Click Select. The bitmap appears on the Logo Setup tab.
To Remove a Logo To remove a logo from your system, click Remove on the Logo Setup tab.
When you remove a logo, you do not remove the bitmap file from your disk, only from the Sage Abra SQL HRMS database. You can select the file again any time you want.
Set Up the Audit Trail The Audit Trail Setup tab of the Enterprise Setup page enables you to set up the audit trail.
The audit trail provides the ability to track changes a user makes to an action or page. This is an extremely useful tool for safeguarding Sage Abra SQL HRMS data. Auditing changes enables you to:
• Check who is making changes to the system and if the correct changes are being made
• Measure users’ performance
• Determine the number of changes users make and how often corrections are being made
The audit trail provides a before and after image of changes. It also keeps track of the date and time and the user who made the change.
The following standard reports are available to monitor the audit trail. To access the audit trail reports, select Reports > Audit Trail Reports from the Navigation Pane .
• The Audit Trail Report by User provides a list of audit trail records sorted by the users who implemented the changes.
• The Audit Trail Report by Date provides a list of audit trail records sorted by the date on which the changes were made.
• The Audit Trail Report by File/Field provides a list of audit trail records sorted by the files and fields in which the changes were made.
To Set Up the Audit Trail 1. Click the Audit Trail Setup tab on the Enterprise Setup page.

Set Up the Audit Trail
44 Sage Abra SQL HRMS
2. In the Enable Auditingfield, select Yes to turn the Audit Trail on and to enable the rest of the fields on the tab.
Note: Note: Turning the Audit Trail on or off does not affect the audit status of your selected files and fields. You can choose to audit any files and fields by setting their Audit Status to Yes or No. If you turn the Audit Trail on, the selected files and fields will be audited. If you turn the Audit Trail off, the files and fields will not be audited, but their audit status is maintained.
3. In the Select File to Audit field, scroll through the list of databases and click a database containing the fields you want to audit. As you select databases, the list of fields in the lower portion of the page changes to display the fields in the selected database.
4. If you want the system to audit the selected database file, select the Enable File Audit check box. Otherwise, clear the check box. The database file is preceded by a Yes (the file will be audited) or No (the file will not be audited), depending on whether you chose to audit the file.
5. The system provides three ways in which you can enable or disable auditing for the fields in the selected database file.
• To enable auditing for all the fields in the selected database file, select Yes from the Audit All Fields in File drop‐down list. A check appears in the Audit column next to each field in the file to indicate the audit status is Yes.
• To disable auditing for all the fields in the selected database file, select No from the Audit All Fields in File drop‐down list. The check is removed from the Audit column next to each field in the file to indicate the audit status is No.
• To enable or disable auditing for individual fields in the selected database file, select or clear the check box in the Audit column next to the field for which you want to change the audit status.
Note: You can set audit status to Yes for any editable field in a database. However, the system only audits the field if you have enabled auditing on the database file that contains the field. For example, you set your audit status to Yes for the Performance Review Rating field in the Employee Personnel database file. However, you did not enable file audit for the Employee Personnel database file. In this case, the system will not audit the Performance Review Rating field (or any field in the Employee Personnel file).
6. When you have finished your audit trail setup, click OK to save your changes and close the page, or click Apply to save your changes and remain on the page. The system proceeds to modify the audited fields list.
Define User‐Defined Code Table Titles The User Defined Code Table Titles tab enables you to define titles for your user‐defined code tables.

Set Up Employers
Getting Started 45
Set Up Employers Add an Employer
After setting up your enterprise, you are ready to start working with your employers. Setting up your employers is much easier if you gather all the required information beforehand.
You can have as many employers as you like. Each of these employers can have different specifications, such as different codes for jobs in the company, or different salary grade structures. When you set up your employers, you define different sets of specifications for each employer.
When adding an employer to your system, you must define some basic information, such as your employer’s name and address. The employerʹs name is at the top of most pages and prints on most standard reports.
You can also define setup information for each Sage Abra SQL HRMS product you are using. The system provides the Add Employer action so you can add an employer at any time.
If your system includes Payroll
If your system is Sage Abra SQL HRMS U.S. or Canadian Payroll, you must first set up a SQL Database, and run database setup, and employer configuration before you add an employer with these steps. Go to Configuring Sage Abra SQL HRMS Payroll Link for setting up a new database, and then return here to add the payroll employer in Sage Abra SQL HRMS.
To Add an Employer 1. From the Navigation Pane, select Setup > System > Setup > Add Employer to open the Steps for
Add Employer Task page.
2. Check the steps you want to complete. Depending on the products you installed, you must set up the employer for each product you are using. Complete each step now or schedule steps for yourself or another user to do later. Add Employer is a required step.
3. Click OK to start moving through the steps. The Employer Setup page opens.
4. Select the country in which the employer does business, enter U.S.

Set Up Employers
46 Sage Abra SQL HRMS
5. Enter the Employer Code that uniquely identifies the employer. You must enter three characters.
6. Enter the Employer Name. This field is required because the name appears at the top of pages and prints on most reports. You can also add the employer’s street address, city, state, zip, telephone number and fax number. The City and State fields are required.
7. Select the Pay Frequencyused for the majority of the employees.
8. In the Normal Units field, enter the hours or units per pay period worked by most employees. For example, if employees are paid each week for a 40‐hour week, enter 40.00. If employees are paid every two weeks for a 37.5‐hour week, enter 75.00.
9. Select the employerʹs main spoken language.
Note: The selections you make for steps 7 ‐10 are the defaults when you add new employees to this employer.
11. If you have Sage Abra SQL HRMS Payroll installed, the Payroll Database ID field appears. In this field, enter the ID for the SQL payroll database you created and set up.
12. When you finish, click OK. The system adds the employer. If you selected to complete additional setup steps, the appropriate page (HR Setup, Attendance Setup or Training Setup) opens.
13. Log out of Sage Abra SQL HRMS by selecting File > Logout, then log back in to see the new employer in the Employer filter drop‐down.
To Modify an Employer 1. From the Navigation Pane, select Setup > System > Setup > Modify Employer. If you have more
than one employer defined, you must select the employer you want to modify.
2. Review and edit the information as necessary. You cannot change the employerʹs Country or Code.
3. If you are using Sage Abra SQL HRMS Payroll, you must enter the ID for the payroll database you created in SQL Enterprise Manager, in the Payroll Database ID field.
4. Click OK to save your changes or Cancel to discard them.
To Delete an Employer You can delete any employer added to your Sage Abra SQL HRMS system, for example, an employer you added by mistake.
The system provides two options to delete an employer:
Delete the employer and employee information but maintain the security information and employer setup information.
Delete all employer and employee information (including security options and employer setup information).

Set Up User Preferences
Getting Started 47
Warning: Deleting an employer permanently deletes all the related employee information. Before deleting an employer, back up the employer’s databases. If you need to restore information, you can restore the databases from the backup.
Note: If you are using Sage Abra SQL HRMS Payroll, employee information will only be deleted from Sage Abra SQL HRMS databases, not Payroll databases.
1. From the Navigation Pane, select Setup > System > Setup > Delete Employer .
2. Select the employer you want to delete and select the appropriate option for deleting the employer information.
3. Click OK to delete the employer. The system asks you to confirm the deletion.
4. Click Yes to delete the employer or No to cancel the process.
Set Up User Preferences Sage Abra SQL HRMS allows you to customize specific features to suit your needs. The system tracks these preferences for each user logging on to Sage Abra SQL HRMS.
For example, you can select which Navigation Pane group opens when you log on to Sage Abra SQL HRMS.
From the Main Menu, select File > User Preferences to open the User Preferences page.
The User Preferences page contains two tabs on which to enter information: General Preferences and Setup Interviews.
General Preferences Tab
Use the fields on the General Preferences tab to select your user preferences.
Default View. Select the Navigation Pane group or feature that you want to open in the workspace when you log on to Sage Abra SQL HRMS. By default, the Welcome to Sage Abra SQL HRMS page opens in the workspace after you log on to Sage Abra SQL HRMS. If you want to hide the Welcome to Sage Abra SQL HRMS page and display only the item you select in this field after you log on, select Do not show me this page again on the Welcome to Sage Abra SQL HRMS page.
Employees Toolbar Default. Select the employee‐related page you want to automatically open when you log on to Sage Abra SQL HRMS.
Note: The Employees Toolbar Default list includes only the pages to which you have security access. If you select a default page that the system administrator might later restrict you from accessing, Sage Abra SQL HRMS assigns the next available page in the list as the default. If the

Set Up User Preferences
48 Sage Abra SQL HRMS
restricted page was last in the list, Sage Abra SQL HRMS assigns the first page in the list as the default.
Training Toolbar Default. Select the training‐related page you want to automatically open when you log on to Sage Abra SQL HRMS. This field does not display if you do not have Training installed.
Note: The Training Toolbar Default list includes only the pages to which you have security access. If you select a default page that the system administrator might later restrict you from accessing, Sage Abra SQL HRMS assigns the next available page in the list as the default. If the restricted page was last in the list, Sage Abra SQL HRMS assigns the first page in the list as the default.
Default Employee Status Selection. By default, the Employee Find function searches through all employees, regardless of their status, when you look for an employee. This is because, by default, all statuses are selected for the Default Employee Status Selection user preference.
You can change the default status selections by selecting or clearing the appropriate check boxes: Active, LOA, Terminated, or Other.
For example, if you select Active and clear all other status selections, the Employee Find only searches through employees with a status of Active. However, you can override the default Employee Status Selection by changing the status selections directly on the Employee Find dialog box.
US Payroll Employer Default. This drop‐down list shows all US Payroll employers that have been set up in your system (with the assigned Payroll Database ID). The employer you select here is the one that will be used when non‐employee level payroll pages are opened, regardless of whether the Employer Filter is set to Enterprise. For example, if you are working with payroll processes and your default US Payroll Employer is US/ABC, the data used in the payroll processes will be for employer US/ABC.
Canadian Payroll Employer Default. This drop‐down list shows all Canadian Payroll employers that have been set up in your system (with the assigned Payroll Database ID). The employer you select here is the one that will be used when non‐employee level payroll pages are opened, regardless of whether the Employer Filter is set to Enterprise. For example, if you are working with payroll processes and your default US Payroll Employer is Can/ABC, the data used in the payroll processes will be for employer Can/ABC.
Automatically schedule tasks in Microsoft Outlook. When selected, all tasks listed in Scheduler will be communicated through Microsoft Outlook to the assigned user.
Note: An e‐mail address for the assigned user must be previously entered in User Security.
Setup Interviews Tab
Enable or disable setup interviews at the user level. If you enable a Setup Interview, Sage Abra SQL HRMS asks you if you want to use the setup interview to help you set up an insurance plan or savings plan.

Set Up Code Tables
Getting Started 49
On this tab, select if you want to enable the interview for the Insurance Plan Setup and the Savings Plan Setup.
Set Up Code Tables Sage Abra SQL HRMS uses codes to manage and store information in files. These codes provide abbreviated, standard references to specific information. Sage Abra SQL HRMS stores these codes and their associated descriptions in code tables.
A list of state and province abbreviations is an example of a code table. Instead of typing or re‐entering a state name (such as Mississippi) in a field, you can select the appropriate code (MS) from a list of predefined codes contained in a code table. Instead of typing British Columbia, you can select the code BC. Code tables contain one column for the code and a second column for the code description.
A drop‐down list provides information for a field related to a code table. For instance, if a page contains a field for the state, a drop‐down list provides a list of state codes, such as MO, IA, and FL, from which you can choose.
Benefits of Using and Defining Code Tables Code tables provide several advantages. Using code tables allows you to:
Customize information to meet your employerʹs needs.
For example, you can define unique divisions, departments and locations specific to your employer.
Save time.
When you enter information for hundreds of employees, it is much easier and more efficient to type or select RFT for each employee rather than type Regular Full Time.
Ensure accuracy and consistency.
Without a uniform coding scheme, a data entry clerk might enter a department code in several different ways (ENGDEPT, ENGRDEPT, ENG or ENGR) for several different employees. Even though the clerk describes the same department, Sage Abra SQL HRMS interprets the entries as four different pieces of information for four different departments. If the entries are inconsistent,Sage Abra SQL HRMS will not be able to calculate department totals accurately.
Build Code Tables
Most code tables in Sage Abra SQL HRMS are two‐column tables containing codes in the left column and brief descriptions in the right column. However, some tables are more complex (benefit plans, for instance) and contain more information than can fit in two columns. The instructions for copying, adding, editing, and deleting codes are identical, whether you work with two‐column or multi‐column tables.

Set Up Code Tables
50 Sage Abra SQL HRMS
Most code tables have recommended default values. You can add, edit, or delete values to suit your employer’s needs.
All of the predefined code tables in Sage Abra SQL HRMS are enterprise code tables. You can adjust these code tables to contain the codes most frequently used by the employers in your system. These codes then become the standard for your system.
When you initially set up a code table, the codes are blank. As long as the Codes area is blank, an individual employer uses the codes from the enterprise code table. As soon as you add a new code, the system recognizes you are creating a code table that no longer references the enterprise code table. To add a code for a specific employer from the list of enterprise codes, copy the enterprise code table to the employer code table and then add the unique code to the employer’s code table.
For example, if two of three employers in your system use the same codes, edit the enterprise code tables to accommodate the two employers. When you then set up codes for the two employers who share common codes, they automatically use the enterprise codes unless you create new codes in their code tables.
For the third employer who uses a slightly different set of codes, you can copy the enterprise code table and then make whatever minor changes are necessary to meet the third employer’s coding requirements. Therefore, you save time by not having to create a whole new set of codes from scratch, yet you are still able to customize the code table to the third employer’s specifications.
Set Up Code Tables
Sage Abra SQL HRMS allows you to quickly and easily add, edit, copy, and delete codes so you can meet each employerʹs specific coding requirements. For instance, you might want to change a previously defined code to reflect a change in your organization.
Notes: After you save a code, the following fields are disabled.
Benefit Rate Tables
Benefit Savings Plans
Attendance Plans
Absence Reason Codes
FMLA Event Reason Codes
Working with Sage Abra SQL HRMS Code Tables
Sage Abra SQL HRMS allows you to quickly and easily add, edit, copy, and delete codes so you can meet each employerʹs specific coding requirements. For instance, you might want to change a previously defined code to reflect a change in your organization. The following sections describe how to work with Sage Abra SQL HRMS code tables.
To Copy Code Tables

Set Up Code Tables
Getting Started 51
1. From the Navigation Pane, select Setup > Employees, Time Off, Payroll, or Training > Click the link for the type of codes you want to work with . The code table you selected opens.
2. Select the employer with whom you want to work.
3. Click Copy. Only those employers with codes defined in the current table appear in the selection list. The employer with whom you are working does not appear in the list because you cannot copy codes from an employer to itself.
4. Highlight the enterprise or employer whose codes you want to copy and click OK. For most code tables, the Select Codes to Copy page opens. The Available list shows all the defined codes for that code table. The Selected list shows those codes you select.
Note: When copying some codes you are first shown a dialog box informing you of the related codes which will be updated to correspond with those you are copying (see Job Codes below). Click Yes to continue or click No to return to the code table page.
5. From the Available list box, double‐click the codes you want to copy. The selected codes appears in the right list box. If you want to remove a code from the Selectedlist, highlight it and click Remove.
6. Click OK. The system checks to see if the codes to be copied are the same as any which already exist for the employer receiving them. If there are any duplicates, Sage Abra SQL HRMS asks whether you want the old code to be overwritten with the new. Select Yes or No.
7. The new codes are copied to the employer with which you are working. To adapt the code table to this employer’s needs, you can add additional codes to the list.
8. Click the Close button after you finish making your changes.
To Add Codes 1. From the Navigation Pane, selectSetup > Employees, Time Off, Payroll, or Training > Click the
link for the type of codes you want to work with . The code table you selected opens.
2. Select the employer with whom you want to work.
3. Click Add. The codes detail page opens.
4. Enter at least a code and description. Some code tables ask for additional information to be supplied for the added code. Other code tables contain a blank code described as None Specified. This allows you to leave a field blank when you are entering information. To provide this option for your own code tables, include a blank code along with the description None Specified.
5. Click OK. Sage Abra SQL HRMS checks for duplicate codes and saves the changes if no duplicate exists. If a duplicate is found, the system prompts you to enter a different code.
To Edit Codes 1. From the Navigation Pane, selectSetup > Employees, Time Off, Payroll, or Training > Click the
link for the type of codes you want to work with . The code table you selected opens.
2. Select the employer with whom you want to work.
3. Highlight the code you want to edit and click More…. The detail page for the code you selected opens.

Set Up Code Tables
52 Sage Abra SQL HRMS
Notes: Codes that have been set up in the following code tables cannot be changed. If you need to change a code name, create a new code and delete the old one.
• Benefit Rate Tables
• Benefit Savings Plans
• Attendance Plans
• Absence Reason Codes
• FMLA Event Reason Codes
4. Edit the information and click OK.
To Delete Codes 1. From the Navigation Pane, selectSetup > Employees, Time Off, Payroll, or Training > Click the
link for the type of codes you want to work with . The code table you selected opens.
2. Select the employer with whom you want to work.
3. Highlight the code you want to delete and click Delete. Sage Abra SQL HRMS prompts you to confirm the deletion. Also, deleting a code could affect history files and reports that contain the code.
4. Click Yes to delete the record, or click No to cancel the deletion.
5. Click the Close button when you finish.
Add Codes From Details You can also directly add codes to a code table when you are working with details pages. For every field that references a code table, Sage Abra SQL HRMS provides a drop‐down list of codes. For example, on the Current Job page, the Job Code field accesses the Job Codes table.
Sage Abra SQL HRMS provides an option that enables you to add a new code while you are entering information on the page. When working with Abra HR, you can add codes from pages for all Abra HR code tables except for the Benefit Insurance Plans, Benefit Savings Plans, and Benefit Rate Tables. You must access these code tables in Rules to work with them.
To Add a Code From a Detail
For more information about using drop‐down lists, see Using pages.
Open the drop‐down list for the field that references the code table you want to update.
Scroll to the bottom of the list and select Add New Code. A page opens so you can add a new code.
Enter the information for the new code and click OK. Sage Abra SQL HRMS adds the code to the list and selects the new code for the field.

Set Up Security
Getting Started 53
Set Up Security
Set Up Page Security
When setting up security for your system, you can define the access rights for specific pages. Different users might have different kinds of security access to specific pages. When you find an employee from a page, the only employees who appear are those you have permission to view.
For example, there are two security rules defined for a user named Joan Martin:
Martin can view the Current Pay pages for employees in employer ABC and employer DEF.
Martin can view the Wellness pages for employees only in employer ABC.
When Joan Martin is working on the Current Pay page and wants to find an employee, she can see all employees in ABC and DEF. However, if she is working on the Wellness page and wants to find an employee, she is only able to see the employees in ABC. She cannot view or work on the Wellness page of any employee in employer DEF because the system denies her access to that information.
Sage Abra SQL HRMS has an extensive, flexible, and easy‐to‐use security system to protect your data. You have complete precision in restricting access because the security system breaks down functions within Sage Abra SQL HRMS by employer, product, activity, task, step, and groups of employees.
If you are the system administrator or the sole user of your system, you can set up Sage Abra SQL HRMS to have access to all security options. Usually an organization’s system administrator sets up and changes security privileges for all Abra system users. For instance, as the system administrator, you can allow a user access to all employee information except current pay data. Or, you can give a user the ability to enter only demographic information for new employees.
As a normal user, you are assigned a user ID and password which establish your ability to view, change, and process data. In this capacity, you are limited to changing your own password.
Security Concepts Each person accessing Sage Abra SQL HRMS has a user ID, and each user ID is associated with a password. You probably want to establish the same level of security access for a group of users (not just one user), and the Abra security system lets you create security groups and establish different access rights for each group.
Group Security A security group is a collection of one or more users with the same access rights. Each security group has a name (assigned when you create the group), and each user (other than the system administrator) is a member of a group. As the system administrator, you assign access rights to the group and not to an individual user. The group a user belongs to determines the access rights of an individual user. As the system administrator, you automatically have access to all functions.

Set Up Security
54 Sage Abra SQL HRMS
Note: The sole purpose of the security system is to restrict access to various areas within Sage Abra. The system does not keep track of failed attempts to access system features or report on the functions accessed by users.
User Security Each security group contains one or more users assigned to the group. You provide a user name, ID, and password for each user. Before beginning to assign users to groups and access rights, collect the IDs, names, and passwords of the employees.
Before You Begin Prior to setting up access rights for your users, you must set up several components in your Abra system.
1. Set up the enterprise.
2. Add and set up your employers.
3. Design any custom pages you want to use with your Sage Abra products.
Establish Access Rights Establish access rights if you want to restrict any portion of the Abra system to one or more users. However, it might not be necessary for you to set up security for your Abra system. Consider the following two situations, neither of which require any security setup.
You are the system administrator and you are the only one using Sage Abra. You do not need to set up security. When you sign on using MASTER as the user ID, you automatically have access to the entire system.
You want all users to have unrestricted access to the system. Rather than setting up any security, have each user log on using MASTER as the user ID. Each user can access the entire system.
Note: If you receive updates to Sage Abra SQL HRMS that include new features, the MASTER user ID is automatically updated and always has access to all features. For any additional security groups you created previously, you must update the security group information to provide access to the new features. This provides a safeguard so you can always decide who can access the new features.
This next situation requires security setup. You are the system administrator and install the following products on your system: Time Off, Abra HR, and Training. You want to set up two users for the employer ZSI.
The first user can only enter new employees into the system. The second user has access to the entire system but cannot view or update certain fields. You must:
Set Up a Security Group for User #1
Set Up a Security Group for User #2
Set Up Users

Set Up Security
Getting Started 55
If you must further restrict your users and disallow access rights to specific employee records, refer to Product Group Filters.
Set Group Security
A security group is a collection of one or more users with the same access rights. Each security group has a name (assigned when you create the group), and each user (other than the system administrator) is a member of a group. As the system administrator, you assign access rights to the group and not to an individual user. The group a user belongs to determines the access rights of an individual user. As the system administrator, you automatically have access to all functions.
Note: The sole purpose of the security system is to restrict access to various areas within Sage Abra. The system does not keep track of failed attempts to access system features or report on the functions accessed by users.
Security Levels When you (as the system administrator) set up security for a group, you can establish access rights at the following levels:
Employer
Product
Activity
Task
Step
Field
The employers include all the employers you set up in your enterprise.
You assign access rights to products depending on the products you have installed and set up on your Abra system. The System is treated as a separate product to help organize tasks.
Note: You must first select N/A for the employer before you can select System as a product.
The activities you can assign access rights to include: Action, Analysis, Detail, Process, Report, and Rule. There is a different set of tasks for each activity and a different set of steps for each task.
You can also set view and update rights for groups of specific fields in an employee’s record, such as address and phone, salary, or EEO information.
Setting the Ad Hoc Reporting Security Level enables you to establish an access level for Crystal and Abra Secure Query. This access level determines which fields in the Abra system databases are able to be accessed by the security group’s users whenever they use Crystal or Abra Secure Query.
To Add a Group

Set Up Security
56 Sage Abra SQL HRMS
1. From the Navigation Pane, select Setup > System > Security > Group Security.
2. To add a group, click Add. In the New Group Name field enter the name of the group you are adding (up to 20 letters and numbers). Click OK.
3. Click Yes to verify you are adding the group. The program builds the access rights structure for this group. The Security Group page opens.
4. Initially a new group has no access rights. Accordingly, the page has no entries in any of the columns. The Modify button at the bottom of the Employer column is enabled, indicating you can modify access rights at the employer level. All other Modify buttons are disabled.
5. Click Modify. The Employer Selection dialog box opens. The Allow Access column for each employer is initially set to No.
Note: The Employer list also contains the N/A option. Change the access to Yes for N/A in order to access System in the Product column on the Security Group page.
6. Double‐click the employer to change the access to Yes.
Warning: If you allow a security group to access Group Security under System Rules, users in that group can change their own security access rights. They can let their security group (and any other security group) access all features, which is the same as no security at all. We recommend limiting the access rights of all security groups to only one security feature: Change Password. The MASTER user ID has access to all Abra system features.
7. Click OK. The system rebuilds the information on the Security Group page.
8. Click Modify in the Product column to open the Product Selection dialog box. The Allow Access column for each product is initially set to Yes.
Note: If you have U.S. Payroll and Canadian Payroll installed and want to restrict access to either U.S. Payroll or Canadian Payroll, you must set the security in two steps. Letʹs say you want to restrict access so that users will only be able to access Canadian Payroll. In the Product Selection dialog box, set the Allow Access to Yes for Canadian Payroll. Then set the Allow Access to No for Payroll (which is U.S. Payroll). It is imperative that you set the access correctly for both U.S. Payroll and Canadian Payroll.
9. Double‐click the products to change the access to No.
10. Click OK to return to the Security Group page.
11. Select the product for which you are setting security. All activities, tasks, and steps appear in the related columns.
12. Click Modify in the Activity column to open the Activity Selection dialog box. The Allow Access column for each activity is initially set to Yes.
13. Double‐click the activity to change the access to No.
14. Click OK to return to the Security Group page.
Set Up Security
Getting Started 57
15. Select the activity for which you are setting security. The tasks and steps appear in the related columns.
16. Click Modify in the Task column to open the Task Selection dialog box. The Allow Access column for each task is initially set to Yes.
17. Double‐click the task to change the access to No.
18. Click OK to return to the Security Group page.
Note: If a user has a task assigned on their Scheduler, the security system does not allow you to restrict that user’s access to that task. Therefore, because the user is a member of a security group, the security system does not allow you to restrict that group’s access to that task.
19. Select the task for which you are setting security.
20. Click Modify in the Step column to open the Step Selection dialog box. The Allow Access column for each step is initially set to Yes.
21. Double‐click the step to change the access to No. If you selected Detail in the Activity column, double‐click the steps to change access to View, Update, or None.
22. Click OK to return to the Security Group page.
23. Repeat steps 4 through 22 to set access rights for another employer, product, activity, task, or step.
24. Click OK to return to the Security Groups dialog box.
To Edit a Group 1. From the Navigation Pane, select Setup > System > Security > Group Security.
2. Select the group with whom you want to work.
3. Click More…. The Security Group page opens.
4. Edit information as necessary.
5. Click OK.
To Delete a Group 1. From the Navigation Pane, select Setup > System > Security > Group Security.
2. Highlight the group you want to delete and click Delete.
3. Confirm the deletion.
• If there are no users in the group, the system deletes the group.
• If there are users in the group, the system alerts you and asks you to confirm the deletion again. If you select Yes, the group and any users within the group are deleted.
• If a user within the group has tasks scheduled on their Organizer, the system alerts you and does not allow you to delete the group. Click OK to display the user’s task schedule.

Set Up Security
58 Sage Abra SQL HRMS
Note: Before deleting the group, remove the scheduled tasks from the user’s Organizer. Delete the user or assign the user to another security group. Repeat the above procedure to delete the group.
4. Review the list of tasks. To print the tasks for easy reference, click Print. Click the Close button to return to the Group Security dialog box.
Each security group contains one or more users assigned to the group. You provide a user name, ID, and password for each user. Before beginning to assign users to groups and access rights, collect the IDs, names, and passwords of the employees.
To Add a User 1. From the Navigation Pane, select Setup > System > Security > User Security.
2. Click Add. The User Security dialog box opens.
3. Enter up to ten characters for the User ID. You can enter the user’s initials, the first name, and the first letter of the last name or any other suitable abbreviation. The system converts all characters to upper‐case.
4. Enter up to 25 numbers or characters for a user name. It can be any combination of upper‐case and lower‐case letters and numbers. The user name should contain the userʹs full first and last name. It is used in the scheduler for task assignments.
5. Enter up to eight characters for the user’s password. For security reasons, you will not see the password that you enter. Only asterisks appear in the field. The system automatically converts all characters to upper‐case.
6. Enter up to 64 characters for the e‐mail address assigned to the user.
7. From the Group drop‐down list, select the group to which you are assigning the user.
If you are also using Abra Link, the Allow Access to Abra Link radio buttons are enabled. If you do not want this user to have access to Abra Link, click No. Otherwise, click Yes.
8. Click OK. The Password Verification dialog box opens.
9. Enter the userʹs password again for verification and click OK. The system records the password and returns to the User Security page.
10. Repeat steps 2 through 10 to set up additional users. When you finish, click the Close button to close the Security Groups dialog box.
To Edit a User 1. From the Navigation Pane, select Setup > System > Security > User Security.
2. Select the user with whom you want to work.
3. Click More…. The User Security dialog box opens.
4. Edit information as necessary.

Set Up Security
Getting Started 59
Note: If you are editing a user and changing the security group to restrict the user’s access, make sure you reassign the tasks this user is no longer able to perform due to restricted access. For information about assigning tasks, see Use the Scheduler.
5. Click OK.
To Delete a User 1. From the Navigation Pane, select Setup > System > Security > User Security.
2. Select the user you want to delete.
3. Click Delete. If the user is not scheduled to perform any tasks, confirm the deletion. If the user has tasks scheduled on their Organizer, the Abra system alerts you and does not allow you to delete the user. Click OK to display the user’s task schedule.
4. Review the list of tasks. To print the tasks for easy reference, click Print. Click the Close button to return to the User Security dialog box.
Before deleting the user, remove the scheduled tasks from the user’s Organizer. After deleting the tasks, repeat the above procedure to delete the user.
Set Field Level Security
Field Level Security lets you limit access to certain categories of data for a specific employer. It is available for Crystal Reports, Abra Secure Query and some Abra detail pages. Field Level Security is set at the group level, and all the users you assign to the group must adhere to the type of security you select for each category.
When you initially add a security group, the group does not have access to view or update fields containing information in the following categories: Address/Phone, Salary, and EEO.You can provide access to view or update these fields through field level security.
Note: Field security is not available for standard reports. If you need to prevent certain employees from viewing specific fields on standard reports, consider removing the entire report from the menus to which the employees have access (use group security to remove reports from menus).
Field Level Access Fields in the Address/Phone category pertain to home, not business information. This information is located on the Demographics page and includes the telephone number, street address, city, state and zip code, county, and country.
Fields in the Salary category are found on the Payroll Status page in Abra Payroll and the Current Pay Status page in Abra HR. Information includes the
unit pay rate
pay period salary

Set Up Security
60 Sage Abra SQL HRMS
hours/units worked per pay period
pay frequency
annual pay
shift premium
last pay change amount or percent bonus amount (if applicable)
salary grade
frequency of the employee’s contribution to savings plans
The EEO category controls access to EEO information and includes marital status, ethnic origin, gender and disability.
Note: Not all these fields are contained in the Sage Abra system databases. Therefore, for some fields, you can only set field level security if you selected products other than the Sage Abra system.
Set Field Level Security 1. From the Navigation Pane, select Setup > System > Security > Group Security.
2. Select the group with whom you want to work.
3. Click More…. The Security Group page opens.
4. Click the Field Level Security tab.
5. Select an employer from the Employer Selection list.
6. For each applicable category, select the appropriate access level by selecting one of the options listed in the following table. Access rights to fields containing Address/Phone, Salary, or EEO information initially default to Not View.
Option Description
Not View Restricts users from viewing and updating the data. When users access areas of the system containing these fields, the word Hidden is displayed. Note: If users cannot view a field which appears on a report, they are restricted from generating that report.
View Enables users to view the data but restricts them from updating it.
Update Enables users to view and update the data.
7. Click Apply to save your changes. You can then select another employer and set field security for that employer.
8. When you are finished setting field security for employers, you can move to another tab on the Security Group page or click OK to close the page.

Set Up Security
Getting Started 61
Set Product Group Filters
In addition to restricting access to specific fields with the field level security function, you can select specific employees you want the security group users to access. For example, if you want users of a security group to access only employees whose original hire date is prior to June 1, 2002, the Abra system lets you set a product group filter allowing access to only employees fitting that criteria.
To Set a Product Group Filter To tell the system which database records you want a security group’s users to be able to access, build an expression on the Product Group Filters tab of the Security Group page.
1. From the Navigation Pane, select Setup > System > Security > Group Security.
2. Select the group you want to work with.
3. Click More…. The Security Group page opens.
4. Click the Product Group Filters tab.
5. Select the product you are using for this group filter.
Note: If Payroll is included with your system, any product group filters you set for HR automatically apply to Payroll. Therefore, if you select Payroll as your Product Selection, the Fields listed are disabled and cannot be specifically selected for Payroll.
6. Build the expression. An expression consists of a field, relationship, and value. The following sections step you through building an expression.
Field
The Fields list contains every field in the master file corresponding to your product. For example, for Abra HR, the list includes every field in the Employee Personnel file.
Use the scroll bar in the Fields list to locate the field and double‐click to select it. The field appears in the Expression box.
Relationship
The Operators list contains the mathematical operators signifying the relationship in our expression. Operators specify a relationship between the field and the value. Refer to the following Operators table to see the valid operators and their descriptions.
Use the scroll bar to locate the operator and double‐click to select it. The operator is added to the expression in the Expression box.

Set Up Security
62 Sage Abra SQL HRMS
Operators Operator Description
= Equal to
!= Not equal to
> Greater than
>= Greater than or equal to
< Less than
<= Less than or equal to
AND And ‐ for compound expressions
OR Or ‐ for compound expressions
+ Add ‐ used when computing a value
- Subtract ‐ used when computing a value
* Multiply ‐ used when computing a value
/ Divide ‐ used when computing a value
Value
Enter the expression’s value directly into the expression. For example, you want users of a security group to access only employees whose original hire date is prior to June 1, 2002. Place your cursor to the right of the operator. Enter the date in numeric form and enclose it in braces. Your expression reads:
P_ORIGHIRE < {06/01/2002}
The expression is complete.
Note: The maximum length of an expression is 200 characters.
Verify the Expression Click Verify to make sure your expression is built in a format the system can interpret. The system indicates if the expression is valid. If it is not, determine your error, place your cursor in the Expression box, and then correct the error. Use the Backspace and Delete keys to clear the expression as necessary.
When your expression is correct, click Apply to save your changes and remain on the Security Group page, or click OK to save your changes and close the Security Group page.
Note: You can also build a compound expression. For example, if you want to limit access to employees whose original hire date is between April 1, 2002 and June 1, 2002, your expression reads:

Set Up Security
Getting Started 63
P_ORIGHIRE > {03/31/2002} AND P_ORIGHIRE < {06/02/2002}
Tip: The format of expressions is consistent with the Xbase programming language standards, except the AND and OR operators do not need to be enclosed with periods. If you are familiar with formatting expressions, you might find it easier and faster to enter the complete expression simply by clicking in the expression box and typing the entire expression.
To Edit or Delete a Product Group Filter 1. From the Navigation Pane, select Setup > System > Security > Group Security.
2. Select the group with whom you want to work.
3. Click More…. The Security Group page opens.
4. Click the Product Group Filters tab.
5. Select the product for which you want to edit or delete the group filter.
6. Place your cursor in the Expression box and edit the expression as needed. If you want to delete the filter altogether, use the Backspace and Delete keys to clear the entire expression.
7. Click Apply to save your changes and remain on the Security Group page, or click OK to save your changes and close the Security Group page.
Set Ad Hoc Reporting Security
Crystal Reports for Sage and Abra Secure Query enable you to design and generate your own queries and reports using system database files. Any user who has access to Crystal or Abra Secure Query can view any field without restrictions. Ad Hoc Reporting Security lets you restrict the database files and fields available to a security group using Crystal or Abra Secure Query.
When you set up security for a group, you can assign an Ad Hoc Reporting Security Level to each securitygroup. To further restrict access to the user, Ad Hoc Reporting Security lets you assign an access level to each field included in your Abra databases.
Note: The access levels you assign here affect access only in Crystal and Abra Secure Query and do not impact the rest of the system.
How Access Levels Work Before changing access levels, you need to understand how access levels work. This section illustrates why you would change access levels for your database fields.
The Ad Hoc Reporting Security page displays.
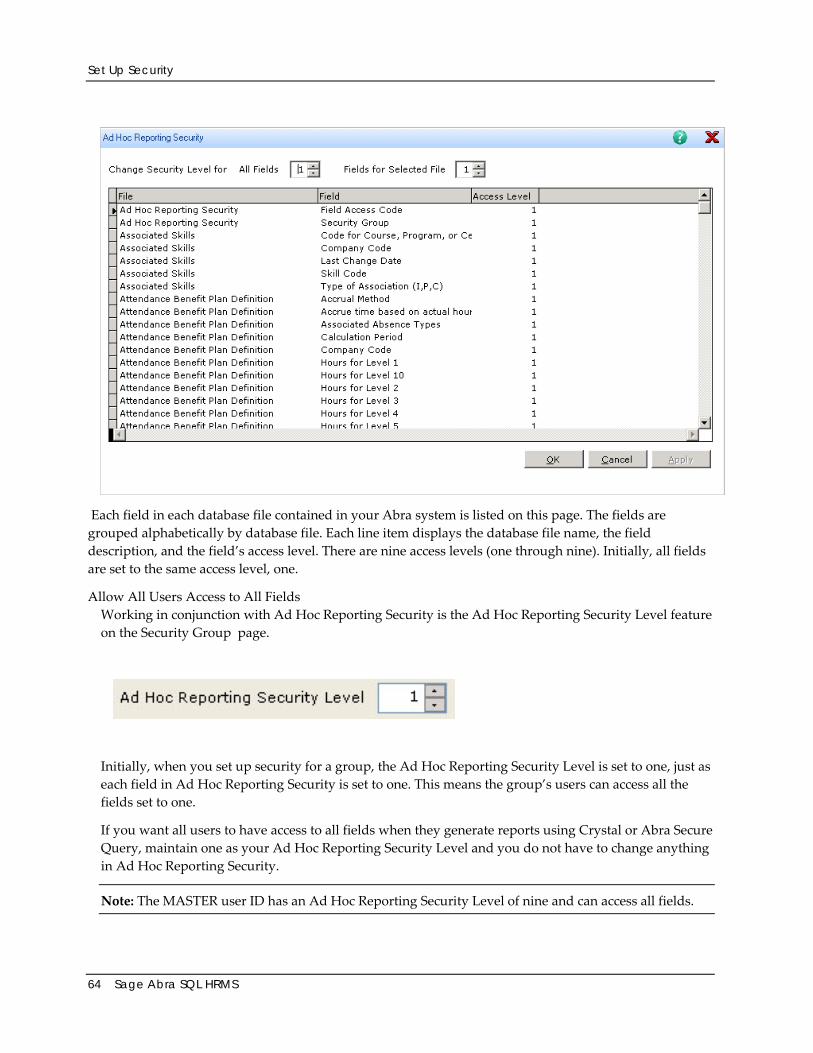
Set Up Security
64 Sage Abra SQL HRMS
Each field in each database file contained in your Abra system is listed on this page. The fields are grouped alphabetically by database file. Each line item displays the database file name, the field description, and the field’s access level. There are nine access levels (one through nine). Initially, all fields are set to the same access level, one.
Allow All Users Access to All Fields Working in conjunction with Ad Hoc Reporting Security is the Ad Hoc Reporting Security Level feature on the Security Group page.
Initially, when you set up security for a group, the Ad Hoc Reporting Security Level is set to one, just as each field in Ad Hoc Reporting Security is set to one. This means the group’s users can access all the fields set to one.
If you want all users to have access to all fields when they generate reports using Crystal or Abra Secure Query, maintain one as your Ad Hoc Reporting Security Level and you do not have to change anything in Ad Hoc Reporting Security.
Note: The MASTER user ID has an Ad Hoc Reporting Security Level of nine and can access all fields.

Set Up Security
Getting Started 65
Restrict User Access to Fields To restrict a user’s access to specific fields in a database, change the field’s access level as well as the Ad Hoc Reporting Security Level for the user’s security group. The combination of a group’s Ad Hoc Reporting Security Level and a field’s access level set in Ad Hoc Reporting Security determines if the field is accessible by a user. Consider the following example:
We have two security groups and one user in each group. The first group, Data Entry, has a user called DE. The second group, Pay Manager, has a user called PM. Except for one restriction, we want these users to have the same capabilities generating custom reports in Crystal and Abra Secure Query. However, we donot want DE to have the capabilities to generate a custom report containing the Earnings/Deductions Code field.
In Ad Hoc Reporting Security, we change the access level for the Earnings/Deductions code to five. We leave the Ad Hoc Reporting Security Level at one for the Data Entry group, and change it to five for the Pay Manager group.
Now, when DE (a member of the Data Entry group) accesses Crystal or Abra Secure Query, DE cannot create a report containing the Earnings/Deductions Code field. DE’s security group is set at access level one, which prohibits DE from accessing any Abra fields with an access level higher than one.
In order to access the Earnings/Deductions Code field, a user’s group must have an Ad Hoc Reporting ADA Security Level of at least five. Consequently, user PM can access this field. In addition, if we set the Ad Hoc Reporting Security access level to six for the Earnings/Deductions Code field, even PM is unable to use that field in Crystal or Abra Secure Query, because PMʹs access level is only five.
To Set Access Levels The Ad Hoc Reporting Security page has the means to quickly and easily change access levels for fields in your databases. Before setting access levels, determine to which fields you want to restrict access.
You can set the access level of all fields in all database files, all fields within one database file or one field at a time. The database files and the fields within the files are listed alphabetically. Use the product’s Data Dictionary to help you locate a specific field within a database file.
1. From the Navigation Pane, select Setup > System > Security > Ad Hoc Reporting Security .
2. Set the access levels as necessary.
3. To set all fields in all database files, enter a number from one to nine in the All Fields number box at the top of the page. You can also use the arrows to set the level. All fields change to the access level you set.
4. To set all fields within one database file, locate the database file and click any line item within the file. Enter a number from one to nine in the Fields for Selected File number box at the top of the panel. You can also use the arrows to set the level. All fields within the selected database file change to your selected access level.
5. To set one field at a time, use the scroll bar to locate the field. To set the access level, click the line item to select it and enter a number from one to nine.

Set Up Security
66 Sage Abra SQL HRMS
Tip: Set the access level for all fields in all database files first. If you want a different access level for specific files, set them next. Remember, setting an access level for all fields overrides any previously established field settings.
Set a Group's Ad Hoc Reporting Security Level
Setting a group’s access level for Crystal and Abra Secure Query works in conjunction with setting Ad Hoc Reporting Security. When you set security for Crystal and Abra Secure Query, you can define access rights at the field level, and each field in your Abra system is assigned its own level of security.
When you set up security for a group using Setup > System > Security > Group Security from the Navigation Pane , you establish an access level for Crystal and Abra Secure Query. This access level determines which fields in the Abra system databases are able to be accessed by the security group’s users whenever they use Crystal or Abra Secure Query.
For example, if you set the Ad Hoc Reporting Security Level to one, users can only access database fields with an access level of one. If you set the Ad Hoc Reporting Security Level to two, users can access database fields whose access levels are one or two. Following this logic, if you set the Ad Hoc Reporting Security Level to nine, users can access all database fields and have access to levels one through nine.
To Set a Group's Ad Hoc Reporting Security Level 1. From the Navigation Pane, select Setup > System > Security > Group Security.
2. Double‐click the group you want to work with to open the Security Groups page.
3. Set security for Employer, Product, Activity, Task, and Step.
4. If necessary, set a product group filter and field level security.
5. Change the Ad Hoc Reporting Security Level by entering a number from one to nine or use the arrows to change the number.
5. Click OK to save your changes and return to the Security Groups dialog box.
6. Click the Close button to close the Security Groups dialog box.
Change a Password As system administrator, you might want to change a user’s password. Individual users can also change their own passwords unless it is restricted by their security.
If you are the system administrator, log on to the system as MASTER, and change the password of a system user by accessing the User Security dialog box. See the section Setting User Security.
If you are a non‐administrator, follow the next set of instructions.

Set Up Security
Getting Started 67
To Change a Password 1. From the Navigation Pane, select Setup > System > Maintenance > Change Password.
2. Enter up to ten characters (this includes alphanumeric upper and lower case characters, as well as special characters).
Note: Spaces are not permitted when creating or changing a password.
3. Click OK. To help maintain security, the password does not appear on the page as it is entered.
4. Enter your new password again for verification. Click OK. The system records your new password.
5. Click OK.
Quick Launch Toolbar Security You can establish or remove access rights to any application, including the Microsoft Office applications, on the Quick Launch toolbar.
To Set Up Quick Launch Toolbar Security 1. From the Navigation Pane, select Setup > System > Security > Group Security .
2. Select the security group with whom you want to work.
3. Click More…. The Security Group page opens.
4. Select N/A under the Employer, System under the Product, Quick Launch under the Activity, and the application to restrict access to under Task.
5. Click Modify in the Step column to open the Step Selection dialog box. The Allow Access column for each application is initially set to Yes.
6. Double‐click the applications to change the access to No.
7. Click OK to return to the Security Group page.

Set Up Security
68 Sage Abra SQL HRMS

Getting Started 69
Index A
activities, 9
accessing from Activity Center, 9
accessing from Main menu, 9
accessing from Quick Launch toolbar, 9
ways to access, 9
Activity Center
definition, 9
Ad Hoc Reporting Security page, 63
add employer, 45
Attendance
setup checklist, 5
audit trail
audit status, 43
setting up, 43
C
code tables, 50
adding codes from pages, 50
adding: editing and deleting codes, 50
copying codes, 50
defining titles for user defined code tables, 44
defining titles for user‐defined code tables, 44
setting up, 50
company logo
removing, 42
selecting, 42
D
details
accessing, 15
adding codes from, 50
defining field level security, 59
entering information into, 15
moving around in, 15
opening Help, 15
resizing, 15
E
Edit menu, 13
employee
finding, 22
employer filter, 14
employers, 45
adding, 45
deleting, 47
overview, 45
selecting for scheduling a task or event, 32
entering information on details, 15
enterprise
advantages of setting up, 40
defining organization titles, 42
Enterprise Setup, 40

Index
70 Sage Abra SQL HRMS
removing the logo, 42
selecting the logo, 42
setting up, 40
setting up the audit trail, 43
enterprise logo
removing, 42
selecting, 42
establish access rights, 54
Expressions
building for product group filters, 61
F
field level security, 59
File menu, 13
finding employees, 22
FMLA Event Reason code table, 50
G
group filters, 61
building an expression for, 61
editing or deleting, 61
fields, 61
operators, 61
relationships, 61
values, 61
group security, 55
overview, 55
setting up, 55
H
Help button, 15
Help menu, 14
HR
setup checklist, 5
I
Information list, 30
editing and deleting information, 29
L
live data, 1
log on using, 1
logging in
to live data, 1
logging on, 1
to sample data, 1
logo
removing, 42
selecting, 42
M
main menu, 9
definition, 9
menus in Sage Abra
Edit menu, 13
File menu, 13
Help menu, 14
Main menu, 13

Index
Getting Started 71
O
Organizer
completing a task, 37
definition, 9
Information list, 30
System Event list, 29
Task list, 29
using the lists, 29
Organizer lists, 29
completing items on, 29
definitions, 29
editing items on, 29
Information list, 30
System Event list, 29
Task list, 29
Organizer toolbar
Edit button, 29
Scheduler button, 28
Update button, 29
P
password
assigning, 58
changing, 66
product group filters, 61
building an expression for, 61
editing or deleting, 61
fields, 61
operators, 61
relationships, 61
values, 61
Q
Quick Launch toolbar, 26
accessing details, 15
accessing Microsoft Office applications, 26
definition, 9
overview, 26
product buttons, 26
setting security for, 67
using, 26
R
rebuilding system files, 2
removing programs, 3
S
Sage Abra
initialization file, 2
sample data, 1
log on using, 1
Scheduler, 10
definition, 9
repeating a task, 32
scheduling a task or item, 32
system events, 34
using, 36

Index
72 Sage Abra SQL HRMS
security
changing a user password, 66
concepts, 53
deleting a group, 55
group security, 55
password, 66
Quick Launch toolbar, 67
security groups, 56
selecting applications to access, 67
setting a groupʹs ad hoc reporting security level, 66
setting ad hoc reporting security, 63
setting field level, 59
setting group filters, 61
setting up, 54
user ID, 66
user name, 66
security groups
adding, 56
deleting, 58
Setting up ad hoc reporting security, 63
setting up page security, 53
setting up Sage Abra, 45
ad hoc reporting security, 63
add employers, 45
audit trail, 43
code tables, 50
defining organization titles, 42
field level security, 59
group security, 55
overview of enterprise setup, 40
product group filters, 61
selecting enterprise logo, 42
setting up the audit trail, 43
setup checklist, 5, 6
setup checklists, 5, 6
shortcut keys, 19
access the menu, 19
edit keys, 21
function keys, 21
tab key, 20
starting Sage Abra
using sample or live data, 1
using the initialization file, 2
System Event list, 29
editing and deleting events, 29
system events, 37
marking as complete, 37
scheduling, 33
System Event list, 29
system files, 2
rebuilding, 2
T
Task list, 29
changing task status, 29
editing and deleting tasks, 29
starting tasks, 29

Index
Getting Started 73
tasks, 32
adding a note, 32
changing task status, 29
deleting, 29
editing, 29
marking as complete, 37
repeating, 34
scheduling, 33
sub‐tasks, 33
Task list, 29
toolbars
Quick Launch toolbar, 9
Train
setup checklist, 6
U
uninstalling, 3
user name
assigning, 58
ID and password, 58
user security, 66
changing a password, 66