sailing manual
TRANSCRIPT
8/3/2019 Sailing Manual
http://slidepdf.com/reader/full/sailing-manual 1/113
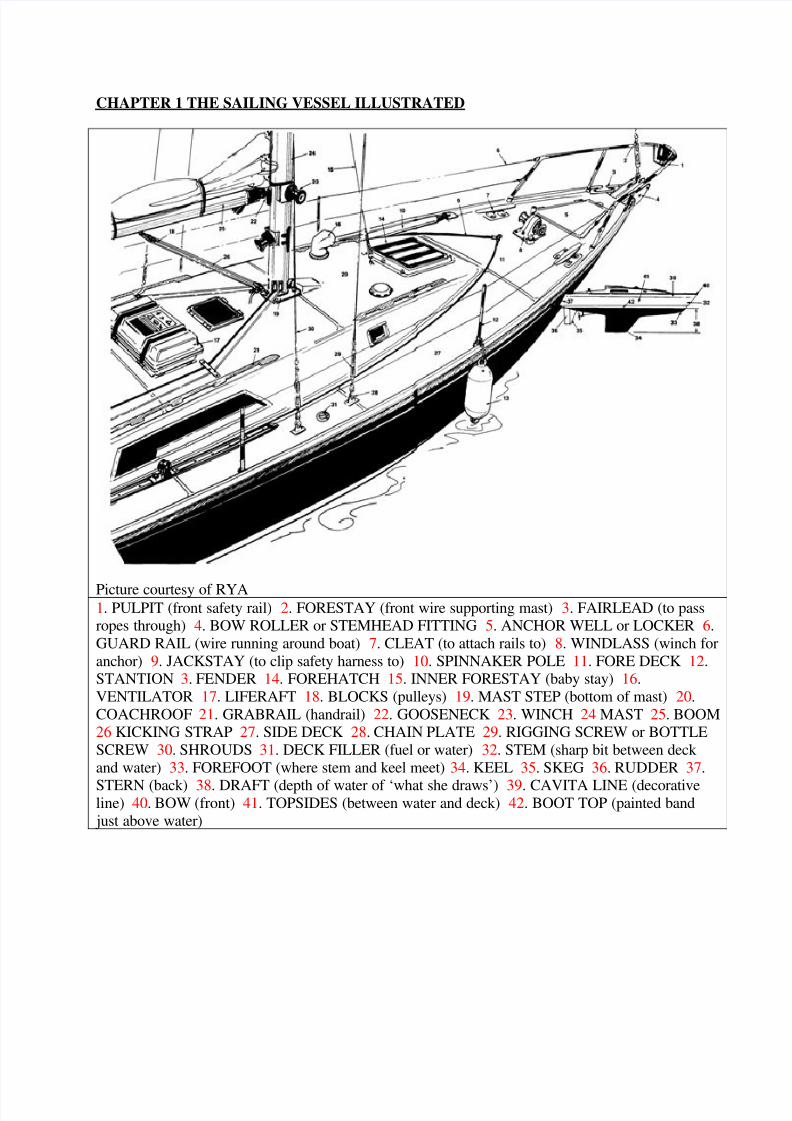
CHAPTER 1 THE SAILING VESSEL ILLUSTRATED
Picture courtesy of RYA1. PULPIT (front safety rail) 2. FORESTAY (front wire supporting mast) 3. FAIRLEAD (to passropes through) 4. BOW ROLLER or STEMHEAD FITTING 5. ANCHOR WELL or LOCKER 6.
GUARD RAIL (wire running around boat) 7. CLEAT (to attach rails to) 8. WINDLASS (winch for
anchor) 9. JACKSTAY (to clip safety harness to) 10. SPINNAKER POLE 11. FORE DECK 12.STANTION 3. FENDER 14. FOREHATCH 15. INNER FORESTAY (baby stay) 16.
VENTILATOR 17. LIFERAFT 18. BLOCKS (pulleys) 19. MAST STEP (bottom of mast) 20.
COACHROOF 21. GRABRAIL (handrail) 22. GOOSENECK 23. WINCH 24 MAST 25. BOOM26 KICKING STRAP 27. SIDE DECK 28. CHAIN PLATE 29. RIGGING SCREW or BOTTLE
SCREW 30. SHROUDS 31. DECK FILLER (fuel or water) 32. STEM (sharp bit between deck
and water) 33. FOREFOOT (where stem and keel meet) 34. KEEL 35. SKEG 36. RUDDER 37.
STERN (back) 38. DRAFT (depth of water of ‘what she draws’) 39. CAVITA LINE (decorativeline) 40. BOW (front) 41. TOPSIDES (between water and deck) 42. BOOT TOP (painted band
just above water)

8/3/2019 Sailing Manual
http://slidepdf.com/reader/full/sailing-manual 2/113
Picture courtesy of RYA
1. ANCHOR LOCKER, ANCHOR WELL or CHAIN LOCKER (Often where the main anchor[bower] is stowed. Anchor cable is sometimes kept here or in a separate chain locker) 2.
FORWARD BULKHEAD 3. FORE CABIN, FORE PEAK or FO’C’SLE (cabin in the bows) 4.
CEILING (cabin sides) 5. SAIL LOCKER (sometimes aft) 6. PIPE COT (folding bed) 7. LEE-CLOTH (stops you falling out of bed) 8. BULKHEAD (wall) 9. HANGING LOCKER (wardrobe –
if used for wet oilies it is called a wet locker) 10. HEADS (lavatory) 11. SEACOCKS (valves to let
water in and out) 12. PILOT BERTH 13. MAIN SALOON (cabin) 14. LOCKER (cupboard) 15.
SETEE BERTH 16. CABIN SOLE (floor) 17. BILGE (where the bottom of the boat joins the sidesor the space under the sole)

8/3/2019 Sailing Manual
http://slidepdf.com/reader/full/sailing-manual 3/113
Picture courtesy of RYA
1. COMPANIONWAY (entrance to cabin) 2. WASH BOARDS (drop in boards) 3. FIRE
EXTINGUISHER 4. FLARES (not always here) 5. COMPANIONWAY STEPS 6. FIREBLANKET 7. QUARTER BERTH (bed) 8. DECK HEAD (ceiling) 9. CHART TABLE
(navigation area) 10. GALLEY (kitchen) 11. ICE BOX or COOL BOX 12. GIMBALLED STOVE
(swings with the ships movements) 13. SAFETY STRAP FOR COOK 14. HALF-BULKHEADS
15. GRAB RAILS 16. LOCKERS (cupboards) 17. CABIN SOLE (floor)

8/3/2019 Sailing Manual
http://slidepdf.com/reader/full/sailing-manual 4/113
Picture courtesy of RYA

8/3/2019 Sailing Manual
http://slidepdf.com/reader/full/sailing-manual 5/113
Picture courtesy of RYA

8/3/2019 Sailing Manual
http://slidepdf.com/reader/full/sailing-manual 6/113
CHAPTER 2 RIGS of SAILING VESSELS
Sloop Cutter

8/3/2019 Sailing Manual
http://slidepdf.com/reader/full/sailing-manual 7/113
Ketch Yawl
Lateen
Barque

8/3/2019 Sailing Manual
http://slidepdf.com/reader/full/sailing-manual 8/113
Barquentine
Brigantine

8/3/2019 Sailing Manual
http://slidepdf.com/reader/full/sailing-manual 9/113
Staysail Schooner
Fully Rigged

8/3/2019 Sailing Manual
http://slidepdf.com/reader/full/sailing-manual 10/113
CHAPTER 3 HOW A BOAT SAILS
The Theory of Sailing
The earliest sailing craft carried a square sail and sailed only before the wind. In any otherdirection they used sweeps or paddles, or simply waited until the wind was in a favourable
direction. The first development of fore and aft rig, with the ability to sail against the wind, was
seen in the Arab dhow, a type of rig still basically unchanged to this day. The modern fore and
aft rig, with the leading edge of the sail secured to a mast or stay, was a much later development. As the knowledge and understanding of sailing developed, so the design of ships gradually
changed. Keels were deepened to create greater lateral resistance, while the high poops and
forecastles were reduced in order to offer less wind resistance. Although it was realised that
ships could sail against the wind, it was not until the development of the airplane, and the
consequent study of aerodynamics, that the reasons for this were fully understood. It had been
discovered that it was not merely pressure under the wings that lifted an airplane into the air, butalso the low pressure area created above the wings by flowing more quickly over the curved
surface. It was soon realised that the same principle applied to sails of modern sailing vessels. The air accelerates over the arc of the sail, causing a reduction in pressure on the upper side, thus
pressure on the underside of the sail is greater than the pressure on the upper side. The natural
tendency of different pressures to try to equalize creates a push or lift on the underside of the
sail. Since the sail is attached to a body resting in a fluid mass, that body is moved through the
mass by the lift on the sail, in other words the vessel is moved through the water. When a single sail is used the air flow over the sail is not even, turbulence and eddies being
formed on the leeward side of the sail of the sail which tends to reduce the venturi effect andconsequent lift. If a second overlapping sail is added much of this turbulence is removed, thus
increasing the lift created by the mainsail. When sailing to windward, only a small proportion of the force of the wind is used in driving the
vessel forward. Most of the effort is wasted trying to push the vessel sideways or heeling it over
against the righting moment of the ballast. This can be illustrated by the use of a parallelogram
of forces which divides the lift of the sail into a forward and leeward component. The sketch
below shows a vessel sailing close to the wind and reaching off the wind, with lines A-B
indicating the direction and force of the forward lift. By completing the parallelogram it will be
seen that A-C is proportional to the leeward drive in A-B, while A-D is proportional to the
forward drive. As the point of sailing changes, so the proportions of the forces change, this
explains why a vessel sails faster on a reach then when close to the wind.

8/3/2019 Sailing Manual
http://slidepdf.com/reader/full/sailing-manual 11/113

8/3/2019 Sailing Manual
http://slidepdf.com/reader/full/sailing-manual 12/113
CHAPTER 4 POINTS OF SAILING
Close Hauled
The yacht is sailed as close to the wind as possible without losing forward drive, with the sails
sheeted in towards the yacht's centre-line. Depending on the design, a modern yacht willnormally point between 40o and 50o from the true wind or 30o to 40o from the apparent wind; this
is the term used to describe the wind direction when the yacht is moving through the water.
Thus a masthead wind indicator would show the apparent wind when the yacht is underway, and
the true wind when stationary. As a yacht increases speed on a given course, the apparent wind
direction will move forward.
Close Reach

8/3/2019 Sailing Manual
http://slidepdf.com/reader/full/sailing-manual 13/113
The wind is forward of the beam, but the yacht is not fully close hauled. The sheets are eased asfar as possible without spilling the wind and the headsail is set to follow the same curve as the
main. This is normally the fastest point of sailing.
Beam Reach
The wind is on the beam and the sheets eased further, using the same principles as for a close
reach.
Broad Reach
The wind is abaft the beam and the sheets eased still further.
Running
The wind is over the port or starboard quarter, and the sheets eased until the sails are about right
angles to the wind direction. The "lift" effect of the wind over the curvature of the sails has nowbeen lost, and the wind is simply pushing the yacht through the water.
Goosewinging
When the yacht is running almost directly downwind, the main and the headsail set on oppositesides, usually with the headsail boomed out to windward. As more sail area is presented to the
wind the speed of the yacht will increase. Under running conditions a “lazy guy” or “preventer”
rigged from the end of the boom to the bow should be used to prevent an accidental gybe and to
keep the mainsail steady.
Running by the Lee
When running, the boom is set on the windward side in the same quarter as the wind. Apart
from reducing the efficiency of the sails, this point of sailing may cause a dangerous accidental
gybe if no preventer is rigged.
In Irons
The yacht is lying exactly head to wind without enough momentum to pass through the windonto another tack. In this situation the sails will not fill and the yacht will gradually lose way.
To remedy this situation the headsail must be sheeted in hard either to port or starboard, when
the sail will fill and the yacht begin to pay off on the opposite tack. When the normal directionof sailing is reached the windward headsail sheet is freed and the leeward sheet is taken in. As
the yacht begins to make steerageway, head and mainsheets are trimmed in the normal way.

8/3/2019 Sailing Manual
http://slidepdf.com/reader/full/sailing-manual 14/113

8/3/2019 Sailing Manual
http://slidepdf.com/reader/full/sailing-manual 15/113
CHAPTER 5 MANOEUVERING UNDER SAIL
Tacking
In this manoeuvre the bow of the yacht is steered through the wind from one tack to another. Aseries of tacks close hauled along a mean course allows the desired course to be made good.
This is known as "Beating to Windward"
A good desired course that is not exactly into the wind may also be made good by varying the
lengths of legs between tacks. In a modern cruising yacht a tacking angle of 90o
to 110o
between
tacks can be expected. Gybing
This entails turning the stern of the yacht through the wind from one tack or gybe to the other. Instrong winds it is a potentially dangerous manoeuvre, and should always be controlled by
sheeting in the mainsail to the centre line before the gybe commences.
Tacking Downwind
This is a method of sailing downwind by gybing about the desired course on a series of legs,
with the wind first on one quarter and then on the other.

8/3/2019 Sailing Manual
http://slidepdf.com/reader/full/sailing-manual 16/113
In certain conditions it may be preferable to running dead downwind, with less likelihood of an
accidental gybe. Heaving to
This manoeuvre is used to slow the yacht almost to a halt and to leave the tiller virtuallyunattended. It can be very useful in bad weather or when all hands are needed to attend to any
damage or repairs. It is achieved by sheeting the headsail in to windward, easing the mainsail
slightly and lashing the tiller to leeward. The exact position of sheets and tiller can be found
only by experiment and experience. Under this rig a modern cruising yacht will normally sail
very slowly at about right angles to the wind. The sequence of progression that occurs when a yacht is hove to is illustrated. The backed headsail fills and swings the yacht's head to leeward. (Fig a) As the yacht turns to leeward the mainsail fills and gives the yacht a little headway. (Fig b) With the tiller lashed to leeward the rudder turns the yacht's head into wind. (Fig c) The backed headsail then fills again and the process is repeated. When heaving to by reason of
heavy weather, the size of headsail and the amount of reefing in the mainsail should be adjusted
according to conditions. All yachts act differently whilst hove to, a yacht with a long keel will tend to sit quietly.Yachts
with a fin keel will tend to fore reach slowly (track forward through the water)

8/3/2019 Sailing Manual
http://slidepdf.com/reader/full/sailing-manual 17/113

8/3/2019 Sailing Manual
http://slidepdf.com/reader/full/sailing-manual 18/113
CHAPTER 6 HELMSMANSHIP AND SAIL BALANCE
Helmsmanship can be described as the art of sailing a yacht to the best advantage, and of
knowing instinctively whether the sails are correctly balanced and trimmed for the desired course
or whether too much or too little sail is being carried for the current weather conditions. Tobecome a good helmsman takes practice and experience, but it is made easier if the principles of
sail balance are understood.
The underwater profile of a yacht is designed to create a resistance to sideways movement
caused by air pressure on the sails. This is known as Lateral Resistance, and the point through
which the resultant of all the lateral forces is designed to act is the Centre of Lateral Resistance
(CLR). Similarly, the forces of wind acting on the sails can be reduced to a single resultant
acting through one point being called the Centre of Effort (CE). If the CE is aligned exactly
above the CLR, the yacht will be perfectly balanced, but if the two points are not aligned a
turning moment is created and the yacht will react accordingly. If the CE is aft of the CLR the
yacht will tend to turn towards the wind, this is called “Weather Helm”. If the CE is forward of the CLR the yacht will tend to turn away from the wind, Called “Lee Helm”.
Normally a yacht is designed to carry slight weather helm, which gives a positive feel to the tiller
and makes it easier to sail close to the wind. A yacht with lee helm is very uncomfortable to sail,
and under certain conditions can be positively dangerous.
The position of the CLR in a fixed keel yacht cannot be changed except by structural alteration,
but the position of the CE can be varied by changes in the sail plan, and to some extent the rake
of the mast. Excessive weather helm can be corrected by reducing the size of the mainsail or
increasing the size of the headsail, thus moving the CE forward and closer to the CLR. Lee helm
can be corrected by reducing the size of the headsail and increasing the size of the mainsail, or, if
the condition is inherent, by raking the mast further aft. Correct sail balance must be maintained
when sail is reduced in heavy weather, thus it may be necessary to set a smaller headsail when
the mainsail is reefed.

8/3/2019 Sailing Manual
http://slidepdf.com/reader/full/sailing-manual 19/113
CHAPTER 7 SAIL TRIM
Trimming the Headsail
The factors affecting headsail trim are the tension on the forestay, the tension on the luff of thesail, the position of the sheet fairleads and the tension on the leech line. Forestay Tension
Many modern yachts are fitted with some form of backstay adjuster that serves to vary the
tension in the forestay according to weather conditions. In light winds the forestay should be just
firm enough to prevent the headsail from sagging away to leeward. As winds get stronger the
backstay should be progressively tightened to increase the tension in the forestay until it is as
tight as the strength of the rig and the condition of the hull will allow. On fractional rigs with aft
raked spreaders an over tightened backstay will cause the cap shrouds to become dangerously
loose. Over tightening may also cause irreparable damage to the hull of the yacht.
Headsail Luff Tension
Variation in the tension on the luff of the headsail has an effect on the position of the Centre of
Effort of the sail. A light tension will tend to move the CE further aft, while increased tension
will move it further forward. In light winds the luff tension should be eased slightly, and then
progressively tightened as the wind increases. Sheet Fairlead Position
Most yachts are fitted with tracks on which the position of the sheet fairleads can be alteredaccording to conditions. Every headsail has an optimum position for the fairlead, depending on
the cut of the sail, the type of rig and the design of the yacht. Any change in this position will
also change the direction of the pull of the sheet on the clew of the headsail, and normally the
angle of the sheet should subtend a line just above the bisecting seam of the headsail. In light airs or when sailing off the wind the fairlead may be moved forward a little in order to
increase the curvature of the sail, but when sailing close-hauled care must be taken not to stretch
the leech out of shape, or to allow the upper part of the sail to touch the outer end of the
spreaders. Leech Line Tension
If the leech of the headsail flutters when the yacht is close-hauled, it means that it has been made
incorrectly or that it has been stretched out of shape. When a leech line is fitted this may be
tightened slightly to remove the flutter, but overtightening will produce a pronounced hook to
windward in the leech, which in turn distorts the smooth flow of wind over the mainsail. In these
circumstances the flutter in the leech may be accepted as the lesser of the two evils.
8/3/2019 Sailing Manual
http://slidepdf.com/reader/full/sailing-manual 20/113
Trimming the Mainsail
The trim of the mainsail is controlled by the tension of the rig, the luff, the foot of the mainsail
and the position of the direction of pull of the mainsheet and kicking strap. Rig Tension
Tension on the backstay induces a bend in the mast that tends to flatten the mainsail. This is of
some advantage when sailing close-hauled in strong winds. Luff Tension
Tension on the luff in all conditions should always be sufficient to set up the sail so that there are
no bags or wrinkles in the luff of the sail. In light winds the luff may be eased slightly and in
strong winds it should be tightened. This has the effect of altering the CE and fullness of the sail
in the same way as it does with the headsail. Foot Tension
In light airs the mainsail should be fairly full while in strong winds it should be much flatter.
Increasing the tension along the foot of the mainsail helps to flatten the sail and make it more
efficient in strong winds, but the tension must be released when conditions do not require it. The Mainsheet Traveller
Most yachts are fitted with an adjustable mainsheet traveller, and this can be used to advantage
in various wind conditions. The direction of pull on the sheet can be altered by changing the
position of the traveller, and it should be moved to windward when sailing close-hauled, andpushed leeward when sailing off the wind. The Kicking Strap
When sailing off the wind in strong winds the boom tends to lift in the air, thus creating an
inefficient belly and twist in the mainsail. The lift of the boom can be controlled by the kicking
strap, adjusting the tension to achieve the correct curvature in the sail. When sailing close to the
wind tension on the kicking strap will help to prevent the boom from bending, thus keeping the
sail flatter and more efficient for the conditions.

8/3/2019 Sailing Manual
http://slidepdf.com/reader/full/sailing-manual 21/113
CHAPTER 8 GETTING UNDERWAY
From between Piles - Head to Wind
a. Single up stern warps, and rig slip line.
b. Move forward under control of stern and bow warps, and adjust bow warps on
piles so that they can be cast off easily, then haul yacht back to original position. c. Make mainsail and headsail ready for hoisting. d. Cast off stern warp and haul forward hard on the bow warps, making sure that
they are led over the pulpit. e. When level with piles flick off bow warps and stow them quickly. f. Ensure yacht head to wind, hoist mainsail, and when clear of obstructions turn
yacht until mainsail fills, then hoist headsail. From between Piles - Wind Astern
As for getting under way when head to wind, except that the headsail is hoisted first, not the
mainsail. When the yacht is clear of the piles and has sufficient headway luff up to wind and
hoist the mainsail. The mainsail should never be hoisted when the wind is astern. From a Jetty - Wind Offshore
a. Prepare headsail for immediate hoisting. b. Take off springs. c. Hoist headsail and let go bow warp. d. When yacht has turned downwind let go stern warp.

8/3/2019 Sailing Manual
http://slidepdf.com/reader/full/sailing-manual 22/113
e. When sufficient way is on and yacht is clear of any obstruction's luff up and hoist
mainsail. From a Lee Shore Berth
a. If necessary warp the yacht round so that the wind is forward of the beam and
adjust warps so that as much space as possible is available forward of the bow. b. Prepare mainsail for immediate hoisting. c. Take a long stern warp to a bollard or post as far forward as possible and double it
back to the stern of the yacht. (Slip line)
d. Take off all other mooring warps. e. Steering the yacht to windward and pushing out on the bow with the boathook,
pull in hard on the stern slip line, at the same time fending off the stern so that it is just
clear of the jetty.

8/3/2019 Sailing Manual
http://slidepdf.com/reader/full/sailing-manual 23/113
f. When sufficient way is on the yacht slip the stern line and haul in. g. As the yacht goes through the wind hoist the mainsail and then the headsail.
From an Anchorage

8/3/2019 Sailing Manual
http://slidepdf.com/reader/full/sailing-manual 24/113
CHAPTER 9 BERTHING
Berthing into the Wind
a. Drop headsail when well downwind of selected berth. b. Allowing for any leeway in a strong wind, luff up and drop mainsail when yacht
has sufficient way to reach the selected berth without sails. Much experience and practice is needed before the exact position to drop sails can be
determined. If the approach is too fast the way can be taken off by making a tight circle, and if too slow the headsail can be hoisted and the yacht sailed out of harbour to start the maneuver
again. Berthing Downwind

8/3/2019 Sailing Manual
http://slidepdf.com/reader/full/sailing-manual 25/113
a. When well upwind of selected berth, luff up into wind and lower the mainsail. b. Lower headsail when the yacht has just sufficient headway and distance off to
reach the selected berth without sail. Although it is sometimes necessary in very crowded harbours, a lee berth, and even a lee
harbour, should be avoided if possible. Berthing Between Piles

8/3/2019 Sailing Manual
http://slidepdf.com/reader/full/sailing-manual 26/113
The outer line of piles should be treated as a jetty or harbour wall, and the approach made in the
same way as described in Berthing into the Wind and Berthing Downwind. The bow warps are
laid out as shown in Fig a with the port bow warp laid around the yacht outside all shrouds and
rails to the starboard quarter, and the starboard bow warp laid down to the starboard side about
midships position, again outside all shrouds and rails. If the approach is made from the opposite
direction, the position of the warps will of course be reversed. Both warps should be finishedwith a bowline or running bowline large enough to pass over the top of piles. As the yacht comes alongside the line of piles the bowlines are laid over the appropriate piles,
any headway on the yacht being taken off by the warp on the after pile. Using the other warp
would turn the yacht sharply into the line of piles, and would also prevent the helmsman from
steering away from the line in order to bring the stern of the yacht into a more convenient
position. Keeping the yacht fended off from the piles, with the help of two bow warps, the stern
of the yacht is maneuvered between the piles until it is in the position shown in Fig b. By
hauling in on the bow warps the yacht is guided astern with the help of the rudder until the
mooring position is reached and a stern warp is attached ashore. Bow and stern warps are then
adjusted and made fast.

8/3/2019 Sailing Manual
http://slidepdf.com/reader/full/sailing-manual 27/113
CHAPTER 10 ANCHORING
As harbours become more crowded and harbour dues continue to rise, more and more people are
resorting to anchoring their yachts and, if necessary, going ashore by dinghy. Provided that a
suitable anchorage is used and the correct drill is carried out, lying to an anchor has greatadvantages over berthing in a crowded harbour that more that compensates for the possible
inconvenience of not being able to step directly ashore. Selecting an Anchorage
When deciding upon a suitable place for anchoring the first and most important consideration
must be the weather conditions. Anchoring close to a lee shore in a rising wind, or even a
weather shore when a complete change in wind is forecast, might lead to a nerve racking and
sometimes dangerous experience of trying to beat away from a lee shore at night in a strong
wind. Full use should be made of any local knowledge as well as recommendations made in
pilot books or given on charts, while information about the quality of the bottom would be usedto decide whether the selected anchorage has good holding ground. The proximity of underwater
cables or other obstacles should be checked, and where the tidal stream or current may change in
direction allowance must be made for the yacht to swing full circle without hitting an obstruction
or going aground. The depth of the water in the anchorage is important and selection is to some
extent conditioned by the length of the chain or warp carried on board. The depth to be allowed
for is the maximum envisaged during the period of time at anchor. Preparations for Anchoring
It is most important that all preparations are made and all ground tackle laid out ready for use
well before the actual approach to the selected anchoring position.
Where a stemhead roller is fitted the chain is shackled directly to the anchor lying in position on
the roller. The length of chain required for anchoring is then flaked down on the foredeck. This
ensures that no jamming will occur in the hawse pipe or anchor locker. The length of chain
required is 4 times (6 if using chain leader and warp) the maximum depth of water that will occur
while the yacht is at anchor. The inboard end of the chain must be secured with a stout rope
lashing to a strong point in the chain locker. When anchoring on a rocky bottom, or whenever there is a possibility of the anchor fouling an
underwater obstruction, it is good practice to buoy the anchor. A length of strong line at least
equal to the depth of the water is attached to the crown of the anchor with a fisherman's bend,seized if anchoring for any length of time, with the other end secured to the buoy. The line and
buoy are then laid out neatly on the foredeck ready to be paid out after the anchor is cast. Anchoring Drill
In non tidal waters the approach to the selected position should be made into the wind, and the
anchor cast or lowered when all way is off the yacht. As the yacht begins to fall astern the chain

8/3/2019 Sailing Manual
http://slidepdf.com/reader/full/sailing-manual 28/113

8/3/2019 Sailing Manual
http://slidepdf.com/reader/full/sailing-manual 29/113
In restricted areas the swinging circle of the yacht must be controlled, a bow and stern anchor
may be used, but this has the disadvantage of exposing the stern to the weather, with all the
consequent discomforts.
A better method is shown below. The kedge anchor is lowered as the yacht is approaching the
anchorage, and after finally coming to rest on the main anchor the two warps are shackled
together just above the waterline. Sufficient bow warp is then veered out to take the kedge warp
just below the surface. The yacht will now ride to one anchor or the other as the wind or current
changes, with only a small swinging circle.

8/3/2019 Sailing Manual
http://slidepdf.com/reader/full/sailing-manual 30/113

8/3/2019 Sailing Manual
http://slidepdf.com/reader/full/sailing-manual 31/113
CHAPTER 11 GROUNDING
Running aground in non tidal waters sometimes presents problems, there being no rising tide to
lift the yacht off. There are many different methods of dealing with this emergency, but
experience has shown that the following drill generally gives the best chance of success:
a. As soon as grounding occurs bring all crew weight amidships.
b. Lower all sails and furl them neatly, ensuring that all sheets and halyards are
inboard.
c. Take time to stop, think and weigh up the situation.
d. Start motor, and try to motor off in a reciprocal direction to the grounding course.
e. If this fails, stop motor and inflate dinghy.
f. Bending warps together if necessary, lay the anchor and the longest possible warp
in the dinghy, row out to known deep water as far from the yacht as possible and cast
anchor.
g. Recover the dinghy crew.
h. Using crew weight, fairleads or winches, haul in on the anchor from the most
convenient position until the yacht floats off.
i. Stop hauling, establish exact position and decide on the course necessary to reachdeep water.
j. Recover the anchor and sail away.
If this is unsuccessful, another variation of the method is to greatly increase the angle of heel
either by swinging out the boom with one or two crew members straddling it, or hauling in from
the top of the mast by attaching the main halyard to the anchor warp.

8/3/2019 Sailing Manual
http://slidepdf.com/reader/full/sailing-manual 32/113
Man Overboard
As this is one of the most difficult and potentially hazardous situations that can occur
when sailing, it is a sensible precaution for all members of the crew to have a clear
idea of the action to be taken in the event of such an emergency.
Many articles have been written and many recommendations made on the subject,
often advocating widely different drills for dealing with the situation, but the
“Quickstop” method given below has proved itself in many cases. It can also be easily
learnt by a novice (and it could be the skipper who is overboard!). The “Reach-Tack-
Reach” method also works well in certain cases. This method is also described below.
Whichever method is chosen, it must be practiced until all members of the crew are
familiar with it, and action becomes instinctive if an actual emergency arises.
Man Overboard - Quickstop
Shout “MAN OVERBOARD” push the tiller well to leeward and throw a lifebuoy to
the man in the water.
On hearing the shout, all hands turn out on deck and the first one is detailed to watch
and keep pointing at the man overboard.
With the tiller to leeward the boat tacks through the wind; the headsail is left aback, as
soon as the main boom comes across to the new leeward side the tiller is again pushed
to leeward and held there. The boat is effectively hove-to and stopped, possibly within
talking distance of the man in the water. Adjust sheets if necessary.
Clear any trailing sheets or lines, start engine and motor to the man in the water,
lowering or freeing sails as necessary.
If there is no engine, let go the headsail halyard (the sail will fall onto the foredeck);
gybe or tack and sail to the man in the water.
Man Overboard - Reach-Tack-Reach
Shout “MAN OVERBOARD” and throw a lifebuoy to the man in the water.
On hearing the shout all hands turn out on deck, the first one being detailed to watch
and keep pointing at the man overboard.
At the same time the helmsman immediately turns the yacht onto the nearest beamreach, notes the compass course and starts counting steadily. As soon as the yacht is
settled on the reach, the hand pointing at the casualty takes over the count.
As soon as all hands are an deck and ready for action, the helmsman tacks the yacht
through the wind, at the same time noting the count that has been reached. The yacht
then sails back on a reciprocal course, with the count starting again as the tack is
completed.
When the count comes to the same figure that was reached before tacking, the yacht
should be in the same position as when the man went overboard, and the casualty
spotted in the proximity of the yacht. As soon as this happens, the yacht should be

8/3/2019 Sailing Manual
http://slidepdf.com/reader/full/sailing-manual 33/113
manoeuvred to a position just downwind of the casualty, who is then approached in
exactly the same way as coming alongside a mooring.
Hours of Darkness
During the hours of darkness the problem of keeping the man in the water underobservation becomes more difficult or even impossible, and in these circumstances it
is essential that a lifebuoy fitted with an efficient light is used. For this reason, regular
checks on this equipment should be made.
Recovering Man in Water
When the yacht has been manoeuvred alongside the casualty, he must be made fast to
the yacht immediately. Even with a strong crew he will be extremely difficult to lift
out of the water without some extra purchase, and this can be provided by passing a
rope under his armpits and securing it with a bowline; a bowline on a long bight, with
one bight under the armpits and one under the backs of the knees will lift even anunconscious man safely. If he is wearing a harness, a line or a snap shackle on a line
can be attached to it.
If the casualty is unconscious or completely exhausted the problem of getting him
back aboard becomes more difficult. In these circumstances it may be necessary to put
another man into the water to help to attach the lines or lifting tackle, but if this is
done he must be wearing a lifejacket and safety harness and be attached to the yacht
with a strong line.
One trialled method of lifting a man from the water is to drop the mainsail, and use
the main halyard. This has the advantage of running from the back of the mast, and
can be easily brought aft of the shrouds. Using the main halyard a man can be
winched from the water and safely lowered, even through the companionway and into
the saloon.

8/3/2019 Sailing Manual
http://slidepdf.com/reader/full/sailing-manual 34/113
CHAPTER 13 KNOTS, BENDS & HITCHES, WHIPPING & SPLICING
There are many kinds of knots that have been developed over the years for specific purposes. Those
used by seamen have stood the test of time and weather, and there is a correct knot, hitch or bend for
every purpose on board. To be fit for their purpose they have to satisfy a number of requirements;
they must not come undone when shaken or rocked about, they must not slip under load, they must not jam and they must be easy to undo.
The number of knots with which the average yachtsman must be familiar is not large, but he should be
able to make them rapidly and correctly under any conditions, and in the dark if necessary.
Round Turn and Two Half Hitches
A simple and useful method of making fast to a
ring or a post. As the load is taken by the round
turn, the two half hitches will not jam.
Fisherman's Bend
A variation of the round turn and two hitches in
which the first half hitch is made inside the round
turn. This prevents the round turn from
tightening up on the post or ring. As an added
safety measure the free end may be seized with
twine to the standing part. The fisherman's bend
is invariably used when attaching a warp to an
anchor.

8/3/2019 Sailing Manual
http://slidepdf.com/reader/full/sailing-manual 35/113
Clove Hitch
A simple non-slipping hitch which must be used
with caution. It should not be used to secure the
end of a rope which may be subjected to strain as
it may jam and prove very difficult to release. Itmay be used for attaching fenders to lifelines, or
for attaching the signal halyard to the burgee staff.
Rolling Hitch
This hitch will not slip when a sideways pull is
exerted, and is in effect a clove hitch with an
extra turn on the side of the pull. It is often used
for securing the tail of a purchase to a warp or a
sheet so that the strain can be temporarily
transferred in order to release a riding turn from a
winch or some other jamming of the sheet or
warp.
Figure of Eight Knot
A simple stopper knot formed in the bitter end of
a rope to prevent it running through a block, or
fairlead. The knot looks just like its name.
Double Overhand Knot
A non-jamming stopper knot used at the ends of sheets or halyards; it is used in preference to a figure-
of-eight knot as it can always be released by breaking the two turns apart with the fingers.

8/3/2019 Sailing Manual
http://slidepdf.com/reader/full/sailing-manual 36/113
Single and Double Sheet Bend
An extremely useful bend can be used for
securing the ends of two ropes together, especially
when they are wet or of unequal size. In the
double sheet bend the running end is passed round
twice for added grip and security.
Reef Knot
A useful knot for joining two ends of two small
ropes, but it should not be used for large ropes or
ropes of different sizes, as it may capsize and fail
under load.
Bowline
An essential knot for use at sea whenever a non-slip loop is required in the end of a rope. It will never jam, however much strain is put on the rope.

8/3/2019 Sailing Manual
http://slidepdf.com/reader/full/sailing-manual 37/113
Running Bowline
A bowline with the standing part passed through
to form a slipping loop. It can be used when a
very large loop is required to be passed over the
top of a mooring post and then tightened up when
in position.
Bowline on a Bight
This can be used to form a loop in the middle of a line, as an emergency bosun's chair, and, with long
loops, as a cradle for lifting a body.
To form a bowline on a bight, take a bight of the rope, and begin the knot as if the bight were a single
line. When the loop is passed through the twist in the standing part, the protruding "ear" is spread and
passed completely over the two hanging parts of the bight and the twist, to form the completed
bowline on a bight.

8/3/2019 Sailing Manual
http://slidepdf.com/reader/full/sailing-manual 38/113
Whipping
The usual method of whipping the end of synthetic rope is to heat-seal it by melting the ends of the
fibers into a solid mass. This should be backed up by whipping.
Common Whipping
There are a number of ways to make a common whipping, the differences being only in the ways in
which the loose ends of twine are secured and concealed. One method, which works as well as any, is
to lay a bight of twine along the rope, wind the long end of the twine tightly around the rope and both
parts of the twine until the whipping is long enough, usually about 12 turns. Hold the whipping tight
and feed the spare through the bight. Pull the other end of the twine until the bight and the spare enddisappear under the whipping. Cut off spare ends

8/3/2019 Sailing Manual
http://slidepdf.com/reader/full/sailing-manual 39/113
Short Splice
A strong splice used for joining the ends of two ropes together: it's only disadvantage is that the splice
is thicker than the rest of the rope. To form the splice, unlay the two ends of the rope to be joined and
tape or whip the ends of each strand. Marry the two ends, so that each strand is between two opposite
strands. Tape or whip one set of strands temporarily. Tuck each of the free strands in turn under and
over the adjacent strands of the other rope, against the lay. After three or four tucks of each strand,
remove tape or whipping from the free strands and repeat. Cut off the excess from the strands leaving
a small amount protruding. Roll the splice underfoot to settle it.

8/3/2019 Sailing Manual
http://slidepdf.com/reader/full/sailing-manual 40/113
Eye Splice
A strong permanent eye in the end of a rope. Unlay a length of the rope and whip or tape the end of
each strand. Tuck the middle strand under a strand of the rope at the point where the throat of the eye
is required. Now tuck the strand nearest the middle of the eye under the strand next to the first, both
against the lay. The third strand is then tucked under the remaining free strand of the rope, but from
around the back, with the free strand being turned so that it can be tucked under against the lay.
Finish as for a short splice

8/3/2019 Sailing Manual
http://slidepdf.com/reader/full/sailing-manual 41/113
Definitions

8/3/2019 Sailing Manual
http://slidepdf.com/reader/full/sailing-manual 42/113

8/3/2019 Sailing Manual
http://slidepdf.com/reader/full/sailing-manual 43/113
CHAPTER 14 THE WEATHER
Weather Forecasting
In order to understand properly and to make use of weather forecasts, it is necessary to have
some knowledge of simple meteorology. As the yachtsman is essentially interested only in thedirection and strength of the wind and the possibility of fog or poor visibility it does not requirean expert knowledge, but merely an understanding of certain basic principles.
The weather in the sea areas of the Western Baltic is considerably influenced by the depressions
which form on the Polar front and move across the area in an easterly or north-easterly direction.These depressions usually have ridges of high pressure between them. The low pressure areas
are caused by warm air rising and cooling, bringing with them rain and strong winds, while high
pressure areas are caused by air from the upper regions dropping towards the earth, theassociated weather normally being dry with light winds.
The air movement round a low pressure area travels in an anti-clockwise direction (in theNorthern Hemisphere) and increases in strength towards the centre, while round a high pressure
area it travels in a clockwise direction and decreases in strength towards the centre. From this
knowledge an important rule, known as Buys Ballot Law, may be learned and understood. This
states that in the Northern Hemisphere an observer facing the wind have low pressure on hisright and high pressure on his left.
Another important and helpful rule is called Cross Winds Rule. This rule lays down that if anobserver with his back to the surface wind has the upper wind, indicated by the movement and
direction of high cloud, coming from his left, the weather can expect to deteriorate, and if coming from his right it will normally improve.
Due to gravity the air exerts a force called atmospheric pressure, expressed in units of measurements called millibars. The average atmospheric pressure at sea level is about 1000
millibars, written as 1000 mb. On a weather or synoptic chart, the line joining the points of equal
atmospheric pressure at any given time is called an isobar, and as the wind is caused by airmoving due to changes of pressure, it follows that a stronger wind will be experienced where the
isobars are closer together, while light winds can be expected where they are widely spaced.
The function of the barometer is to indicate visually changes of atmospheric pressure as they
occur, while the barograph will also record these changes of pressure. Changes of pressureshould be recorded at regular intervals so that a barometric gradient may be built up. The greater
the gradient, the closer will be the isobars and thus the stronger the winds. When the barometer
remains steady more settled conditions can be expected, although there will always be someslight variation in pressure during the day even during long settled periods. This is known as
Diurnal Wave. Gale warnings are normally issued when a rise or fall of 10 millibars in 3 hours
has been recorded, but even a change of 5 millibars in the same time will usually herald a strongblow.
8/3/2019 Sailing Manual
http://slidepdf.com/reader/full/sailing-manual 44/113
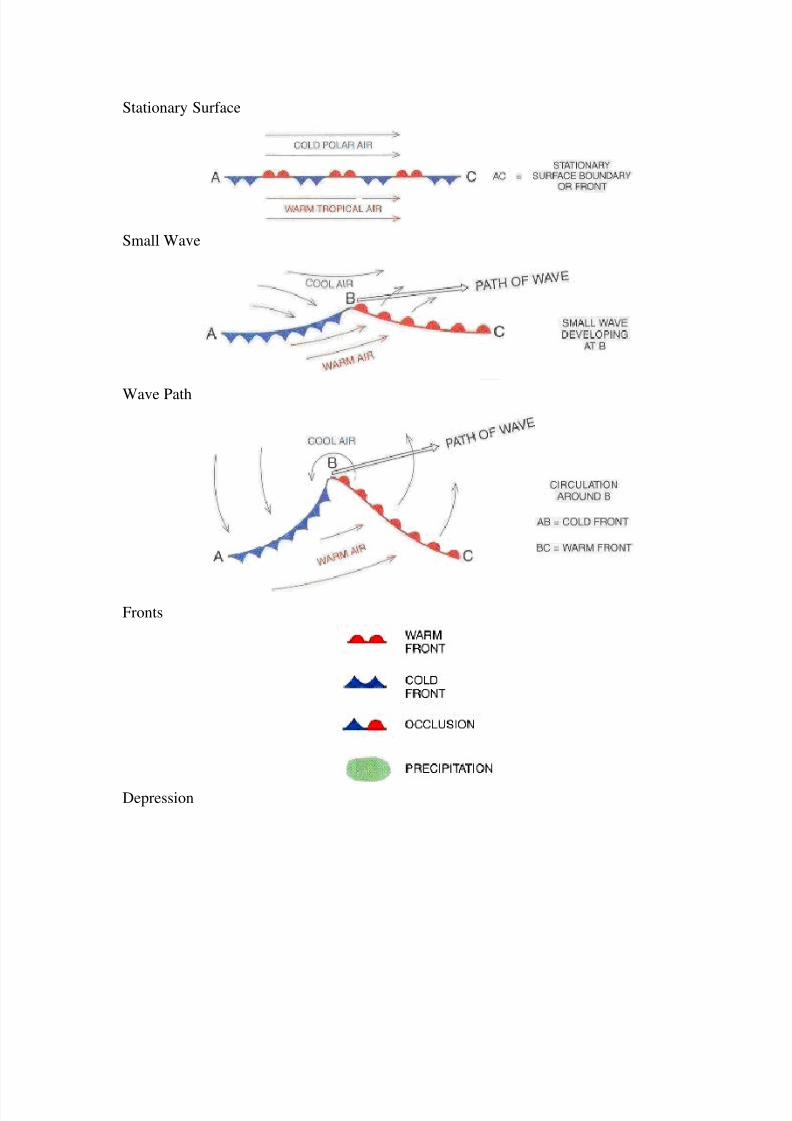
Stationary Surface
Small Wave
Wave Path
Fronts
Depression

8/3/2019 Sailing Manual
http://slidepdf.com/reader/full/sailing-manual 45/113
Direction

8/3/2019 Sailing Manual
http://slidepdf.com/reader/full/sailing-manual 46/113
CHAPTER 16 THE BEAUFORT SCALE
Force Wind Speed Description Sea State
Knots m/sec
0 0 - 1 0.0 - 0.2 Calm Like a mirror
1 1 - 3 0.3 - 1.5 Light Air Ripples only2 4 - 6 1.6 - 3.3 Light Breeze Small wavelets, not breaking
3 7 - 10 3.4 - 5.4 Gentle Breeze Large wavelets, crestsbreaking, white horses
4 11 - 16 5.5 - 7.9 Moderate Breeze Small waves with frequentwhite horses
5 17 - 21 8.0 -
10.7
Fresh Breeze Moderate waves, many white
horses, some spray
6 22 - 27 10.8 -
13.8
Strong Breeze Large waves with white
crests, some spray
7 28 - 33 13.9 -
17.1
Near Gale Sea heaping up, foam streaks
blowing from crests8 34 - 40 17.2 -
20.7Gale High waves with crests
breaking into spindrift
9 41 - 47 20.8 -24.4
Severe Gale High waves with tumblingcrests, streaks of foam
10 48 - 55 24.4 -
28.4
Storm Very high waves with long
overhanging crests
11 56 - 63 28.5 -
32.6
Violent Storm Exceptionally high waves,
sea covered with foam
12 64 Plus 32.7 &
Over
Hurricane Air filled with foam, sea
white with driving spray
NOTE: It will be observed that there is a steady approximate ratio of 2 : 1 between metres persecond and knots for each wind force in the Beaufort scale. In Danish and Swedish weather
forecasts wind strength is given in metres per second, not in the Beaufort Scale.

8/3/2019 Sailing Manual
http://slidepdf.com/reader/full/sailing-manual 47/113
CHAPTER 17 HEAVY WEATHER SAILING
The most frequent reason for being caught out in heavy weather is lack of time. When planning
a cruise, allowance should always be made for an element of time to be used for the purpose of
sheltering in bad weather. In this way the necessity of sailing when it would be more prudent notto do so may be avoided.
Given the availability of weather forecasts a yacht should never have to face heavy weather
without some prior warning. Even without a weather forecast, the tell-tale signs in the sky and a
quickly falling barometer will give early warning of deteriorating conditions ahead.
When it is obvious that the weather will deteriorate, there are a number of precautions and
preparations that the prudent skipper should make. One of the most important is to decide on
how much sail is to be carried. This must always be done in advance of immediate necessity, for
the longer the decision to reef or to change headsails is deferred, the harder it will be to carry out.
A cruising yacht should carry enough sails to suit the squalls and gusts, not the mean force of thewind, which may sometimes be much less. When sailing off the wind, there is an inclination to
carry more sail than is prudent in the conditions. In heavy weather it is good seamanship to carry
only sufficient sail to suit close-hauled sailing, whatever the actual point of sailing. This enables
the helmsman to react immediately in any emergency and be in complete control even if having
to round up head to wind.
Bad weather usually brings poor visibility, and every effort must be made to determine the
yachts exact position, and then to keep an accurate plot of dead reckoning (DR) and estimated
position (EP). The fact that leeway will be more pronounced in strong winds should be allowed
for when calculating EP.
If no suitable shelter is available within a reasonable distance the only safe alternative is to stay
at sea. In this case it will be necessary to have plenty of sea-room and be well clear of the
shipping routes and shallow water.
All the crew should wear warm clothing, safety harnesses and life jackets, and all gear on deck,
especially halyard and sheet ends, should be checked and made secure. The bilge should be
pumped dry and checked regularly, and the engine checked for easy starting in an emergency.
Moveable gear below should be safely stowed away, and safety items such as torches, flares,
foghorn, warps and reefing gear be readily available. Cockpit drains must be checked and the
main companionway closed and washboards fitted. Meanwhile sandwiches or similar food and
vacuum flasks of soup or coffee should be prepared before conditions make it impossible to
work in the galley.
As winds and seas increase it may be impossible to make any real progress and it may become
necessary to heave-to. Most yachts, especially long-keeled types, will heave-to satisfactorily, but
this is something that should have already been practiced under less demanding conditions. It is
quite surprising how comfortable a yacht can be properly hove-to even in a gale force wind.

8/3/2019 Sailing Manual
http://slidepdf.com/reader/full/sailing-manual 48/113
As conditions get even more severe it may be necessary to lie a-hull, that is with all sails
lowered, and the yacht allowed to drift as she pleases. As seas will break on board, the crew
should stay below if possible, and be well prepared for violent movement of the hull. Even in
less severe weather in the Baltic, for example when sudden violent line squalls pass during
comparatively easy sailing weather, it is often advisable to lie a-hull for the short period that the
squall will last, with no discomfort and no danger of sails or rigging being damaged.
Provided there is ample sea-room to leeward, it may be an advantage to run downwind under
bare poles, streaming warps over the stern in order to reduce speed and keep the yacht end on to
the sea. To have any effect the warp must be the longest and largest available and towed in a
bight over the stern, each end being made securely fast to opposite quarters.
A more modern concept of riding out gales in light displacement vessels is to run at speed under
much reduced canvas with the seas being taken on the quarter. This manoeuvre requires a good
deal of sea-room and some skill and experience on the part of the helmsman, and is rarely
advisable or even possible in the restricted waters of the Baltic Sea.
Anyone who has read accounts of sailor's experiences of storm conditions will be aware that not
all advocate the same course of action. However, two points are common to all recommended
methods for dealing with such conditions: the boat must be properly prepared, crew properly
dressed and warm, everything lashed and stowed, sail plan adjusted to the conditions and plan of
action; and there must be plenty of sea-room.
CLOUD FORMATIONS
Stratocumulus
Picture courtesy of K Pilsbury
Stratus

8/3/2019 Sailing Manual
http://slidepdf.com/reader/full/sailing-manual 49/113
Picture courtesy of K Pilsbury
Altostratus
Picture courtesy of K Pilsbury
Altocumulus

8/3/2019 Sailing Manual
http://slidepdf.com/reader/full/sailing-manual 50/113
Picture courtesy of K Pilsbury
Cirrostratus
Picture courtesy of K Pilsbury

8/3/2019 Sailing Manual
http://slidepdf.com/reader/full/sailing-manual 51/113
Picture courtesy of K Pilsbury
Cumulus
Picture courtesy of K Pilsbury
Cirrus

8/3/2019 Sailing Manual
http://slidepdf.com/reader/full/sailing-manual 52/113
Picture courtesy of K Pilsbury
Cumulonimbus
Picture courtesy of K Pilsbury

8/3/2019 Sailing Manual
http://slidepdf.com/reader/full/sailing-manual 53/113
CHAPTER 18 FOG
Radiation (Land) Fog
Radiation fog occurs at night over land, and is caused by the rapid radiation of land heat into the
lower atmosphere. This causes the land temperature to drop sharply and so cool the layer of airimmediately above it until the dew-point is reached. Although it does not actually form over the
sea, it can drift out from land for two or three miles and persist for several hours.
Advection (Sea) Fog
Advection fog may occur on land or sea at any time, and is caused by the horizontal movement
of warm air over a cold surface, with the air temperature falling to dew-point. It often occurs in
spring, when the land mass has begun to warm up but the sea remains cold. Advection fog is
invariably accompanied by wind, which sometimes can be quite strong, but which will not
necessarily disperse the fog; this will occur only when the wind changes and a warmer drier air
stream appears, or when the sun becomes strong enough to raise the air temperature above dew-point. Radiation fog however, will not persist in anything more that the lightest of breezes.
Sailing in Poor Visibility
When there is any possibility of sailing into conditions of reduced visibility, it is of vital
importance to obtain an accurate position fix before visibility deteriorates so much that nothing
can be seen. The time, log readings an speed should be noted, and the course to steer adjusted as
necessary according to the circumstances.
Unless the wind is strong which is unlikely though not impossible in foggy conditions, there is
little point in trying to reduce speed of a yacht under sail, on the principle that the slower the
speed the less the ability to take avoiding action, although, it is good practice to clear the
foredeck by handing the head sail and sailing under main sail alone. Under these conditions a
forward watch will be easier to maintain, and preparations for anchoring, if necessary, can be
made without much trouble.
The principle danger to a yacht in fog is the risk of being run down by a larger vessel, but this
can be avoided by sailing out of the shipping lanes into shallow water. There remains the danger
of collision with other small craft, but in this respect a vessel under sail has one great advantage
over other vessels, and that is silence, thus for early warning of approaching danger a really good
listen out is probably more important than a good look out. The prescribed fog signal should be
sounded if necessary, but otherwise the crew should maintain silence and look and listen.
The steps to be taken when sailing into reduced visibility may be summed up as follows:
a. Obtain an accurate fix, note time, log readings and speed. Adjust course to steer
according to circumstances.
b. Reduce speed, if necessary by shortening sail or handing the head sail.
c. Hoist radar reflector if not permanently hoisted.
d. Have foghorn ready and prepare to sound prescribed signal.
e. Record depths at regular intervals.

8/3/2019 Sailing Manual
http://slidepdf.com/reader/full/sailing-manual 54/113
f. Post a good look and listen-out in the bow, and tell him to point in the direction of
anything he sees or hears.
g. If conditions warrant it, life jackets should be worn.
h. Check life raft and/or dinghy is ready for launching.
i. Prepare the anchor for letting go in the prescribed manner.
j. At night have signal flares and a powerful torch ready for use.k. Check that the engine is ready for instant starting. The best advice that can be
given in respect of fog is to try to avoid it. If there is a forecast of poor visibility or it is
already poor it may be advisable to stay in harbour, particularly if the planned course
involves crossing shipping lanes.

8/3/2019 Sailing Manual
http://slidepdf.com/reader/full/sailing-manual 55/113
CHAPTER 19 SAFETY EQUIPMENT
Most accidents at sea are caused through carelessness and inefficiency, and seldom through
stress of weather or the caprice of the elements. A well found yacht handled by an efficient crew
will rarely run into serious trouble but it must be equipped with the proper safety gear and
equipment. All crew members must know where each item of safety equipment is, and how, andin what circumstances, to operate it.
Fire Extinguishers
Extinguishers should be of the dry powder type, and should be located at exits, cooker and
engine compartments.
Lifebuoys
Two lifebuoys with sea anchors should be provided, located near the cockpit so that they can be
easily removed and used in an emergency. At least one of the buoys should be equipped with asafety light, and this should be checked daily. A danbuoy on a line attached to one of the buoys
is an additional safeguard.
Life-Raft
A self inflating life-raft is carried on deck in an easily accessible position, with the painter firmly
secured to a strong point on the yacht. All crew members of the crew must be familiar with the
drill for launching the life-raft.
Lifejackets
One lifejacket for each member of the crew is provided on board. It must be worn by all non-
swimmers when on deck, and by all hands at the skippers discretion, when abandoning to the
life-raft and when going into the dinghy.
Safety Harness
On the principle that prevention is better than cure, a safety harness is probably more important
than a lifejacket. It should be fitted individually and be made ready for use at all times, and be
worn by clipping on in heavy weather, especially when moving forward out of the cockpit.
Safety harnesses will always be used at night and any crew member who is seasick is to be
clipped on for his own safety.
Distress Flares
Flares should be securely stored in a dry place where there is no danger of accidental ignition or
deterioration through damp. All members of the crew should be familiar with the operation of
the flares.

8/3/2019 Sailing Manual
http://slidepdf.com/reader/full/sailing-manual 56/113
Bilge Pumps
All yachts carry two hand operated bilge pumps, one in the cockpit and one below decks, this is
in addition to any other type of pump. The bilge pumps should be checked for efficient
operation before departure, checks must also be made to ensure that any limber holes are clear
for the passage of bilge water.
Fog Horn
A “lung” operated fog horn is provided. One short blast is a sufficient check for correct
operation.
First Aid Kit
Every yacht is equipped with a first aid kit. Hints on first aid afloat are in a later Chapter of this
handbook.

8/3/2019 Sailing Manual
http://slidepdf.com/reader/full/sailing-manual 57/113
CHAPTER 20 RADIO TELEPHONY
All yachts are fitted with VHF radios capable of simplex two way communication. All members
of the crew must be able to use the radio telephone in an emergency and to this end a plaque,
giving step by step instructions for sending a distress message, including the MMSI number,
should be mounted near the set.
The most important details of operation should be known by the skipper, even though he may not
be qualified as an operator; these are listed and described below:
The vessel requires a ship's licence.
Transmissions must be controlled by the holder of a Short Range Certificate. (VHF only).
The set must have: Digital Selective Calling (DSC). Channel 16 Distress, Safety and Calling
Frequency. Channel 6 Primary Inter-ship Channel. One other Channel.
A listening watch should be maintained on Channel 16, at all times, when at sea.
No one may operate the Radio Telephone without the authority of the skipper.
Except in an emergency, no one may operate the Radio Telephone unless under the control of a
licensed operator.
The following only may take place on Channel 16: Distress Working. Urgency Traffic. Initial
contact with another station.
The definitions of Distress and Urgency are:
Distress: A vessel or a life is threatened by grave and imminent danger and requests immediate
assistance.
Urgency: The station sending has a very urgent message to transmit concerning the safety of a
vessel or the safety of a person.
To make a distress call: Check the set is switched on and high power is selected, ensure Channel
16 is selected. Press and hold the red DSC button for five seconds to send an undesignated
distress call. Follow immediately with voice message. Hold microphone a short distance from
mouth, press press-to-talk switch and say:
MAYDAY MAYDAY MAYDAY
THIS IS (Yacht's name) THIS IS (Yacht's name) THIS IS (Yacht's name)
MY MMSI NUMBER IS ………. (Nine digit number)
MAYDAY ...................................... (Yacht's name)
MY POSITION IS ....................(Bearing and distance FROM a prominent object or Lat and
Long)
..................................... (Nature of distress)
...........................(Any other relevant information)
I REQUIRE IMMEDIATE ASSISTANCE

8/3/2019 Sailing Manual
http://slidepdf.com/reader/full/sailing-manual 58/113
OVER.
RELEASE PRESS-TO-TALK SWITCH.
Repeat and continue to repeat (leaving time (approx. 30 seconds) between transmissions to hear
any answer) as necessary.
The obligation to accept distress calls is absolute.
To make an urgency call: prepare the equipment as for distress calls. Say:
PAN-PAN PAN-PAN PAN-PAN
HELLO ALL STATIONS ALL STATIONS ALL STATIONS
THIS IS (Yacht's name) THIS IS (Yacht's name) THIS IS (Yacht's name)
MY MMSI is ........................ (Nine digit number)
MY POSITION IS...................(Bearing and distance FROM a prominent object or Lat and Long)
....................................... (Nature of urgency)
............................ (Any other relevant information)
OVER.
RELEASE PRESS-TO-TALK SWITCH.
Examinations for the Short Range Certificate (VHF/DSC only) are held regularly by the KTC,
details can be obtained from the Courses Clerk.

8/3/2019 Sailing Manual
http://slidepdf.com/reader/full/sailing-manual 59/113
CHAPTER 21 INTERNATIONAL REGULATIONS FOR PREVENTING COLLISIONS
AT SEA
RYA Book G2 explains fully all aspects of the regulations, a summary of which is given below.
Rules for Sailing Vessels
A vessel sailing on the port tack keeps out of the way of a vessel sailing on a starboard tack.
When two vessels are sailing on the same tack, the windward vessel keeps out of the way of the
other vessel.
A vessel under power normally keeps out of the way of a vessel under sail, but attention is drawnto the necessity of giving a safe passage in restricted waters to vessels, which by virtue of there
size and lack of manoeuverability cannot alter course.
Any vessel overtaking any other vessel shall keep out of the way of the vessel being overtaken.
A vessel shall be deemed to be overtaking when coming up with another vessel from a direction
more than 22.5 degrees abaft her beam, that is, in such a position with reference to the vessel sheis overtaking, that at night she would be able to see only the stern light of that vessel but neither
of her sidelights.
Any subsequent alteration of the bearing between the two vessels shall not make the overtaking
vessel a crossing vessel within the meaning of the Rules or relieve her of the duty of keeping
clear of the overtaken vessel until she is finally past and clear.
Most of the rules applying to sailing vessels are illustrated below. The diagram shows how the
rules affect the yacht sailed by YOU, while how they affect yachts A, B, C and D.

8/3/2019 Sailing Manual
http://slidepdf.com/reader/full/sailing-manual 60/113
Yacht A Keeps clear of B, as she is to leeward.
Stands on for C, close hauled on port tack.
Stands on for D, who has wind on her port side.
Stands on for E and YOU.
Yacht B Stands on for A, who is windward.
Stands on for C, close hauled on port tack.
Stands on for D, who has wind on port side.
Stands on for E and YOU.
Yacht C Keeps clear of A, who has wind on starboard side.
Keeps clear of B, close hauled on starboard tack.
Stands on for D, who is windward.
Keeps clear of E and You, both on starboard tack.

8/3/2019 Sailing Manual
http://slidepdf.com/reader/full/sailing-manual 61/113
Yacht D Keeps clear of A, who has wind on starboard side.
Keeps clear of B, who has wind on starboard side.
Keeps clear of C, who is to leeward.
Keeps clear of E and YOU, both on starboard tack.
in addition, a sailing vessel underway keeps out of the way of a vessel not under command, a
vessel restricted in her ability to manoeuvre and a vessel engaged in fishing.
Rules for Power Vessels (including sailing vessels under power)
When two power vessels are meeting on reciprocal or nearly reciprocal courses so as to involve
risk of collision, each shall alter her course to starboard so that each shall pass on the port side of
the other.
When two power vessels are crossing so as to involve risk of collision, the vessel which has the
other on her starboard side shall keep out of the way and shall, if the circumstances of the case
permit, avoid crossing ahead of the other vessel.
Important Local Rules
Within the confines of Kiel Fiord, inside a line drawn from Bulk Lt through Kiel Lt to Stein, allyachts and pleasure craft must keep out of the way of commercial traffic passing through the
shipping lanes.
If it is possible, it is advisable for sailing vessels to keep outside the shipping channels in the
Fiord.

8/3/2019 Sailing Manual
http://slidepdf.com/reader/full/sailing-manual 62/113
CHAPTER 22 LIGHT AND SHAPES CARRIED BY VESSELS
Daymarks
These are shown by day on vessels to denote activities in which the vessels are
engaged.
Lights
Lights are shown by vessels from Sunset to Sunrise and during the day in poor
visibility.
ARCS OF VISIBILITY OF A VESSEL'S NAVIGATION LIGHTS
LIGHTS
View from Ahead View from AsternView from Port Side

8/3/2019 Sailing Manual
http://slidepdf.com/reader/full/sailing-manual 63/113
Power Driven Vessel Over 50m Underway
Daymark None
Lights Two White Masthead Lights, Red and Green Sidelights, White Sternlight
Power Driven Vessel Under 50m Underway
Daymark None
Lights White Masthead Lights, Red and Green Sidelights, White Sternlight
Sailing Vessel Underway Not Using PowerDaymark None
Lights Red and Green Sidelights, White Sternlight
Vessels Under 12m
Sidelights and Sternlight may be combined into one Masthesd Lantern
Vessels Under 7m and Vessels Under oars
White light in sufficient time to prevent collision
Vessel At Anchor
Daymark One Black Ball in forepart of Vessel
Lights Two all-round White Lights, Aft lower that Fore; Vessels under 50m need
only show the higher light; Vessels over 100m also illuminate their decksFOR THE REST OF THIS SECTION THE FOREGOING ARE REFEERED TO AS
8/3/2019 Sailing Manual
http://slidepdf.com/reader/full/sailing-manual 64/113
NORMAL NAVIGATION LIGHTS OR MARKS AND ANCHOR LIGHTS AS
APPROPRIATE
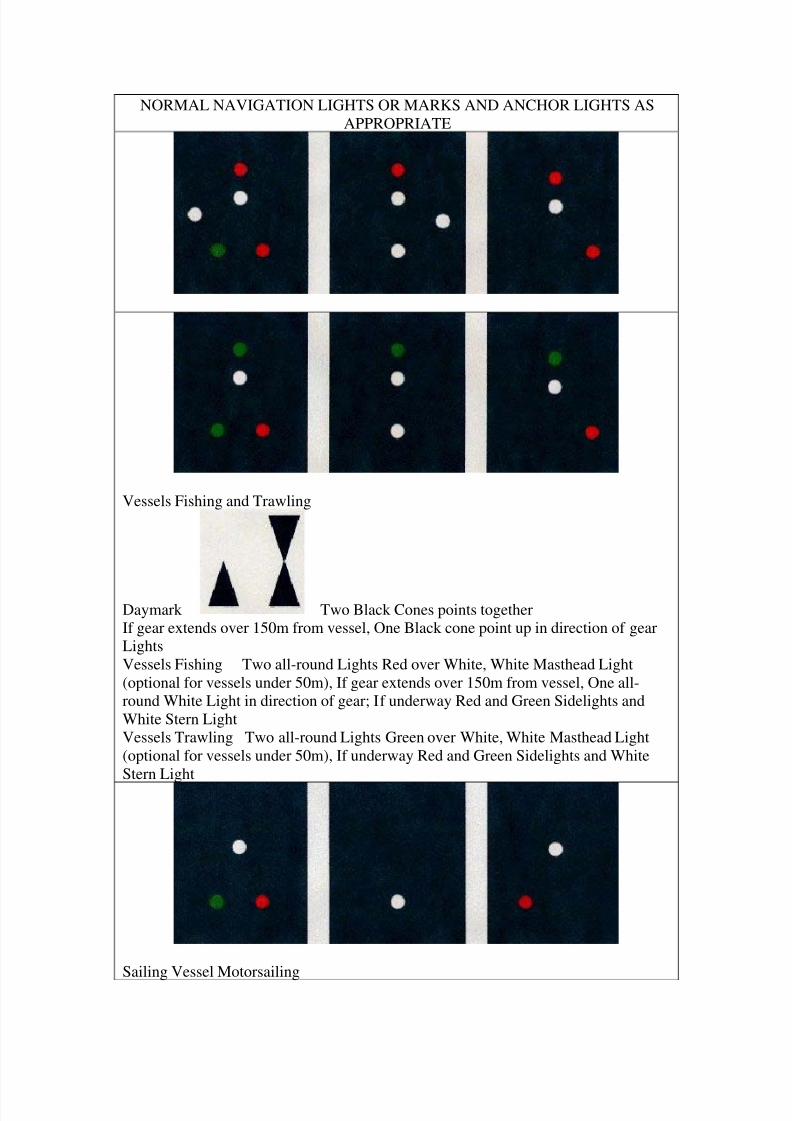
Vessels Fishing and Trawling
Daymark Two Black Cones points together
If gear extends over 150m from vessel, One Black cone point up in direction of gear
Lights
Vessels Fishing Two all-round Lights Red over White, White Masthead Light
(optional for vessels under 50m), If gear extends over 150m from vessel, One all-
round White Light in direction of gear; If underway Red and Green Sidelights and
White Stern Light
Vessels Trawling Two all-round Lights Green over White, White Masthead Light
(optional for vessels under 50m), If underway Red and Green Sidelights and White
Stern Light
Sailing Vessel Motorsailing

8/3/2019 Sailing Manual
http://slidepdf.com/reader/full/sailing-manual 65/113
Daymark One Black cone point down, forward where best seen
Lights As for Power driven Vessels
Pilot Vessel on Duty
Daymark Pilot Jack
Lights Two all-round lights - White over Red,
If underway Red and Green Sidelights and White Sternlight.
If at anchor - anchor lights
Vessel Constrained by Her Draught
Daymark One Black Cylinder
Lights Three all-round Red Lights, Normal Navigation Lights
Vessel Restricted in Her Ability to Manoeuvre

8/3/2019 Sailing Manual
http://slidepdf.com/reader/full/sailing-manual 66/113
Daymark Black Ball over Black Diamond over Black Ball;
Plus anchor shape when at anchor
Lights Three all-round Lights Red over White over Red; Normal Navigation Lights
Vessel Engaged in Underwater Operations or Dredging
Daymarks
As for vessel Restricted in Her Ability To Manoeuvre, plus Two Black Balls on the
side of the Obstruction, and Two Black Diamonds on the side on which the vessel
may pass. Vessels too small to show the above marks show a rigid replica of code flag
‘A’ at least 1m high
Lights As for vessel Restricted in Her Ability To Manoeuvre, plus Two all-round
red Lights on the side of the obstruction, and two all-round Green Lights on the side
the vessel may pass
When making way, normal Navigation lights are shown but Anchor Lights are not
shown when the vessel is at anchor

8/3/2019 Sailing Manual
http://slidepdf.com/reader/full/sailing-manual 67/113
Vessel Towing - Length of Tow less than 200m (Measured from Stern of Towing
Vessel to Stern of Vessel Towed)
Daymark None
Lights Two White Masthead Lights, Yellow Towing Light above Stern Light, Red
and Green Sidelights, Vessel Towed shows Side and Stern Lights
Vessel Towing - Length of Tow over 200m
Daymark
One Black Diamond on Vessel Towing, One Black Diamond on Vessel Towed
Lights Three White Masthead Lights, Yellow Towing Light above Stern Light, Red
and Green Sidelights, Vessel Towed shows Side and Stern Lights
Vessel Engaged in Minesweeping (Dangerous to approach within 1000m astern or
500m each side)
Daymarks Three Black Balls
Lights Three all-round Green Lights, Normal Navigation lights

8/3/2019 Sailing Manual
http://slidepdf.com/reader/full/sailing-manual 68/113
Vessel Aground (NOT Distress)
Daymark Three Black Balls
Lights Two all-round Red Lights, Anchor lights
Vessel Not Under Command
Daymark Two Black Balls
Lights Two all-round Red Lights, If underway Red and Green sidelights, White
sternlights

8/3/2019 Sailing Manual
http://slidepdf.com/reader/full/sailing-manual 69/113
CHAPTER 23 SOUND SIGNALS
Short Blast - About 1 second in duration.
Prolonged Blast - 4-6 seconds duration.
Sound Signals given in Clear VisibilityI am altering course to starboard.
I am altering course to port.
I am operating astern propulsion.
or more, I fail to understand your
intentions or actions / I doubt if you are
taking sufficient action to avoid collision.I intend to overtake you on your
starboard side.
I intend to overtake you on your port
side.
I understand your overtaking intentions.
Vessel approaching bend in channel, and
reply.
Sound Signals given in Restricted Visibility
Power driven vessel making way,
sounded at intervals of not more than two
minutes.
Power driven vessel not making way,
sounded at intervals of not more than two
minutes.
A vessel not under command, a vessel
restricted in ability to manoeuvre, a
vessel constrained by draft, a sailing
vessel, a vessel engaged in fishing, or a
vessel towing or pulling
A manned vessel being towed or the lastvessel of the tow, at intervals of not more
than two minutes, immediately after the
signal made by the towing vessel.
5 Sec 5 Sec
A vessel at anchor shall at intervals of not
more that one minute ring a bell rapidly
for about five seconds. In a vessel of
100m or more in length the bell shall be
sounded in the forepart of the vessel and
immediately after the ringing of the bell,
a gong shall be sounded for about five
seconds in the after part of the vessel.

8/3/2019 Sailing Manual
http://slidepdf.com/reader/full/sailing-manual 70/113
In addition to the above a vessel at anchor
may sound one short, one prolonged and
one short blast in succession to give
warning of her position to an approaching
vessel.
3 Times 5 Sec 3 Times
5 Sec
A vessel aground shall in addition to the
bell and gong signal, give three
distinctive strokes on the bell
immediately before and after the rapid
ringing of the bell.
A vessel less than 12m in length is not
obliged to give the signals mentioned
above, but if she does not, shall make
some other sufficient sound signal at
intervals of not more than two minutes.

8/3/2019 Sailing Manual
http://slidepdf.com/reader/full/sailing-manual 71/113
CHAPTER 24 DISTRESS SIGNALS AND INTERNATIONAL CODE
SIGNALS
INTERNATIONAL CODE OF SIGNALS,
CODE FLAGS, MORSE SYMBOLS
AND SINGLE LETTER SIGNALS
A Alfa
I have a diver down, keep well clear at
slow speed
*B Bravo
I am taking in, discharging, or carrying
dangerous goods
*C Charlie
Yes (affirmative)
*D Delta
Keep clear of me; I am manoeuvring with
difficulty
*E Echo
I am altering course to starboard
F Foxtrot
I am disabled, communicate with me
*G Golf
I require a pilot
*H Hotel
I have a pilot on board
*I India
I am altering my course to port
J Juliet
I am on fire and have dangerous cargo on
board: keep well clear of me

8/3/2019 Sailing Manual
http://slidepdf.com/reader/full/sailing-manual 72/113
K Kilo
I wish to communicate with you
L Lima
You should stop your vessel instantly
*M Mike
My vessel is stopped and making no way
through the water
N November
No (negative)
O Oskar
Man overboard
P Papa
In harbour: all persons should report on
board as the vessel is about to proceed to
sea
Q Quebec
My vessel is healthy and I request free
pratique
R Romeo
(no single letter meaning)
*S Sierra
I am operating astern propulsion
*T Tango
Keep clear of me; I am engaged in pair
trawling
U Uniform
You are running into danger
V Victor
I require assistance

8/3/2019 Sailing Manual
http://slidepdf.com/reader/full/sailing-manual 73/113
W Whiskey
I require medical assistance
X X-ray
Stop carrying out your intentions and
watch for my signals
Y Yankee
I am dragging my anchor
*Z Zulu
I require a tug
Notes:1. Single-letter signals may be made by any method of signalling. Those marked *
when made by sound must comply with the International Regulations for Preventing
Collisions at Sea, Rules 34 and 35.
Code and Answering Pendant
1.
2.
3.
4.
5.
6.

8/3/2019 Sailing Manual
http://slidepdf.com/reader/full/sailing-manual 74/113
7.
8.
9.
0.
First Substitute Second Substitute
Third Substitute
DISTRESS SIGNALS
When a vessel is in distress and requires assistance the following signals may be used
or displayed, either together or separately:-
A gun or explosive signal fired at intervals of one minute.
A continuous sounding of the fog siren or signal.
Rockets or shells throwing red stars fired one at a time at short intervals.
A smoke signal giving off a volume of orange coloured smoke.
The International Code Signal of distress NC, flags or sound signal
/ A signal consisting of a square or anything resembling a square having above or
below it a ball or anything resembling a ball.
A spoken radio message using the "Mayday" procedure.
Slowly and repeatedly raising and lowering the arms outstretched from side to side.

8/3/2019 Sailing Manual
http://slidepdf.com/reader/full/sailing-manual 75/113
CHAPTER 25 NAVIGATION INSTRUMENTS
Dividers
Dividers are used for measuring or marking off distance on a chart. They are usually
bronze and should be rust proof.
Parallel Rules
These rules are used to transfer course lines from the compass rose on a chart. They
can be difficult to use in the restricted space of a small chart table.
Set Squares
A pair of set squares fitted with large handles for easy movement are often more
convenient than parallel rules for the transfer of course lines.
Plotter
Most yachts carry a plotter, which is usually made up of a compass rose etched into a
transparent square, with a straight edge which swings about the centre of the compass
rose. This is a simple and convenient means of plotting courses and bearings.
Log
Most yachts are fitted with mechanical or electronic logs which provide distance and
speed, derived from the rate of revolution of a hull mounted impeller or sensor.
Lead Line
This consists of a weighted line marked at intervals to show depths. It is now almost
entirely replaced by the electronic echo sounder, which is quicker, easier and more
accurate, although a good skipper will check his echo sounder with a lead line from
time to time.
Deck Log
The information contained in the yacht's Deck Log is a most important and useful aidto navigation, for examples: the hourly record of barometric pressure will give
indication of weather tendencies, a record of course and distance run is essential
information.
Steering Compass
Every yacht has a steering compass, normally fixed in a position easily visible to the
helmsman. Deviation and Variation errors are explained in the section on chartwork.
Hand Held Compass

8/3/2019 Sailing Manual
http://slidepdf.com/reader/full/sailing-manual 76/113
Most instruments listed in this section need no further explanation, but obtaining
accurate bearings using the hand held compass is so fundamental to safe navigation
that its properties and use are described in more detail. Most position lines drawn on
a chart are obtained using this instrument. It should be treated with care.
Many styles of hand held compass can be obtained. All are similar, and simple to use,and most can be read at night by means of built in illumination.
The compass normally consists of a body enclosing a damped compass card marked
in divisions of 10 with numerical notation every 50. It has marks or grooves whereby
an observer can align the compass body with an object on which a bearing is to be
taken, and at the same time read off the bearing from the card, usually through a
prism.
Practice in use of the compass is essential if accurate bearings are to be obtained.
Errors result from:
Trying to take bearings to quickly.
Not holding the compass body level.
Not aligning the compass body properly in relation to the line of sight.
Allowing metal objects - rigging, radios, contents of pockets - to deflect the card.
THE HAND HELD COMPASS
Horizontal, steady and properly aligned.
8/3/2019 Sailing Manual
http://slidepdf.com/reader/full/sailing-manual 77/113
CHAPTER 26 CHARTS
There are three basic types of chart normally used by the cruising yachtsman.
The passage chart is a small scale chart that covers the whole area of a planned
passage from point of departure to point of arrival.
Coastal charts are larger scale charts that give details of the coastline, navigation
marks, channels and approaches to harbours.
Harbour charts are drawn to a very large scale in order to show full details of
harbours. They may be given as inserts on coastal charts or included in pilots and
guide books.
Chart Projection
There are two main types of projection used in the preparation of charts.
Most charts are drawn to Mercator's projection, in which meridians (lines of
longitude) are shown as equally spaced parallel lines running from top to bottom of
the chart, and not converging towards the poles. The parallels of latitude, which in
reality are equally spaced, are drawn on the chart as being further and further apart
from the equator to the poles; (this compensates for the non-convergence of the
meridians).
On a Mercator's chart, angles on the earth's surface are equal to corresponding angles
on the chart, and the scale of distance as given on the latitude scale at the latitude
concerned is correct. The disadvantage of a Mercator's projection is that the shortest
distance between two points, that of a great circle, would appear as a curved line on
the chart, but this has no material effect except for very long direct passages.
To overcome this difficulty, Gnomic projection is used for great circle charts, and also
for large scale harbour charts. Gnomic projection is made from the centre of the earth
to a tangential plane on the earth's surface, so that meridians converge to the poles,
lines of latitude are drawn as curves and great circles appear as straight lines. Large
scale Gnomic charts used as harbour charts give a truer representation of the area, and
may be treated as Mercator's charts. The slight distortion involved has no effect at
such a large scale.
Chart Scale
The amount of detail shown on a chart depends on the scale to which it is drawn.
Coastal charts are usually at a scale of about 1 : 50 000, while passage charts will be
about 1 : 1 000 000. The scale of harbour charts normally depends on the actual size
of the harbour.
It is important that the largest scale chart practicable is used, because much inshore
detail is deliberately omitted from small scale charts.

8/3/2019 Sailing Manual
http://slidepdf.com/reader/full/sailing-manual 78/113
CHAPTER 27 CHARTWORK
Navigation
Navigation can be defined as the science of determining a vessel's position at sea andcalculating a safe course to another position.
Coastal navigation is used when a vessel is within sight of or close to land, when it's
position can be established by the observation of prominent objects or physical
features.
Astro navigation is used in long sea passages out of sight of land, where position is
determined by taking sights of celestial bodies.
Radio navigation can be used in all waters, when position is found by taking bearings
of radio transmitters, or by the interpretation of special radio signals.
Chartwork
The principle requirements of chartwork are:
1. To calculate the compass course required to move a vessel in safety from one
point to another on a chart.
2. To keep up a continuous running plot of the progress of the vessel.
3. To obtain fixes of the position of the vessel at regular intervals.
4. To maintain the chart in good condition.
Points to note:
a. All chartwork must be done with a 2B pencil, anything harder makes grooves
in the chart, which cannot be erased.
b. Chartwork should not be erased when the chart is wet.
c. Chartwork should not be erased until the end of a passage when it should be
erased, unless required for record purposes.
Measurement of Distance
The unit of measurement on the chart is the nautical mile, which in fact is one minute
of arc measured along a meridian. The actual length of the arc varies slightly between
the equator and the poles, but a mean length of 6080 feet or 1852 metres is now
universally adopted as the International Nautical Mile.
Distances on the chart are measured on the degree and minute scale that forms the
border margin of the vertical side of the chart. They must be taken at the latitude of
the measurement required, because in Mercator's projection the distances between
lines increase towards the poles, and so the scale will vary at different latitudes.
One tenth of a nautical mile is called a cable, and for all practical purposes this is
taken to measure 600 feet or 200 metres.
Measurement of Speed

8/3/2019 Sailing Manual
http://slidepdf.com/reader/full/sailing-manual 79/113
The speed of a vessel is measured in knots, one knot being the equivalent of one
nautical mile in one hour. A speed of ten knots is equal to about 11.5 statute miles per
hour or 20 kilometres per hour.
Magnetic Variation
Magnetic North does not coincide with True North, but varies on either side of it by
reason of a slow continuous movement that takes place over the centuries. The
difference between true and magnetic north is called Magnetic Variation, and this
varies over the surface of the earth and does not remain constant anywhere.
In the Baltic magnetic variation is, at present, from about 0030
W to almost nil, the
actual variation for any area given on the compass rose or roses printed on the chart.
For example, it may be given as "Var 200
10' W (1991) decreasing abt 3' annually",
and this will indicate the variation at the actual location of the compass rose on which
it appears, not necessarily for the whole area of the chart.
The conversion of Magnetic to True North or vice-versa can easily be understood by
simply visualising the True North point of the compass rose. If Magnetic North is to
the left of True North, that is westerly variation, then obviously the compass bearing
of any given course will be more than the true bearing. Similarly if Magnetic North is
to the right of True North, that is an easterly variation, the compass bearing will be
less than that of the true bearing.
Compass Deviation
Compass deviation is created when the local magnetic field in a yacht deflects the
compass needle away from Magnetic North, to which it would otherwise be pointing.
Unlike variation, deviation alters according to the direction in which the yacht is
heading. Temporary deviation can be caused by placing a ferrous or magnetic article
near the steering compass, but this can be avoided with proper care, eg don't put the
portable radio right underneath the bulkhead compass!
Permanent deviation caused by engines and other fixed installations can be eliminated
by the use of small corrector magnets, and this is normally done by a skilled compass
adjuster. Afterwards the vessel is "swung" through various headings, preferably on a
proper compass swinging range, and any residual deviation recorded on a deviation
card. Ideally compasses should be swung at the start of every sailing season and anew deviation card compiled.
Deviation is applied to a compass course in exactly the same manner as variation,
westerly deviation being added and easterly deviation subtracted in order to ascertain
the correct magnetic course.
Apart from the deviation table, it is good practice to check the accuracy of the steering
compass from time to time by comparing the heading shown with known bearings
such as leading marks and transits.
The Basic Calculation

8/3/2019 Sailing Manual
http://slidepdf.com/reader/full/sailing-manual 80/113
a. From a start point, A, on the chart, plot the required course to B. Find the true
(T) bearing of this line by using the plotter, or transferring the line to the compass
rose.
b. Apply Variation to this bearing by adding Westerly Variation or subtracting
Easterly - this is then the Magnetic (M) bearing.
c. Apply Deviation in the same way to get the Compass Course (C).
True bearing 085o
(T)
Apply Variation, say, 2 W 085o
(T) + 2o
= 087o
(M)
Apply Deviation, say, 4o
E 087o
(M) - 4o
= 083o
(C)
083o
is the compass course Note that bearings and courses are always given in three
figures. The calculation is always done in the same order, and in reverse when
working from compass to chart.
To Compensate for Tide or Current
If a boat was steered straight across a fast flowing river, it would be swept
downstream before reaching the far bank, in order for it to get straight across, the boat
would have to point partly upstream. Tides and Currents have the same effect, and
the solution is also the same, except that out at sea, there are few convenient banks
from which to judge the amount of compensation required.
a. Plot the desired course between A and B as before. The remainder of this
calculation does not have to be done on this line, or even on the chart at all, although
it is usually most convenient to do it there. See page 27 - 5.
b. From point A draw a line in the direction that the tidal stream or current is
flowing, say one hours worth of flow, eg: for a one knot current, mark off one nautical
mile to C.c. From C scribe an arc, of radius equivalent of the boat's speed through the
water for one hour, to cut line AB at D. eg: for a boat speed of 4 knots, the radius of
arc is four nautical miles at the same scale at which the current was measured.
d. Join CD, this is the True Bearing of course required, now repeat the basic
calculation to find the compass course.
To Compensate for Leeway
Leeway is created by the wind pushing the yacht sideways through the water. The
amount of leeway depends on a number of factors, the principle of which are the
design of the yacht, the point of sailing and the weather, and it may be estimated byobserving the angle between the fore and aft line of the yacht and the "wake course"

8/3/2019 Sailing Manual
http://slidepdf.com/reader/full/sailing-manual 81/113
stretching out astern. Compensation for leeway can be made by adding or subtracting
this angle to or from the magnetic course.
In conditions where the total amount of correction for variation, deviation, current and
leeway adds up to a considerable difference between the true course and the course to
steer, correction for deviation should be the last to be applied, otherwise the changesin deviation for various headings may create an unacceptably large error.
Plotting the Course
A continuous running plot of the course is maintained by plotting Dead Reckoning
positions (DR) and Estimated Positions (EP) at intervals during the passage.
The yacht's DR position is assumed to be at the distance logged from the last fixed
point on the magnetic bearing steered, with no allowance made for either current or
leeway. The DR position is marked with a cross.
The yacht's EP is then calculated by allowing for current and leeway, and this is doneby drawing a current vector diagram as already described. The EP is marked with a
triangle, and the time and log readings entered alongside.
The DR and EP should be plotted during the course of a passage until each definite fix
of the yacht's position is made, from where it is continued until the next fix is
obtained.
Position Fixing
Position fixing is a means of determining the position of a vessel at sea and is
normally done by establishing the intersection of two or more position lines. A fix is
marked on the chart with a circle, and a dot where necessary. The time, and log
reading or estimated log reading should be entered alongside.

8/3/2019 Sailing Manual
http://slidepdf.com/reader/full/sailing-manual 82/113
Position Lines
If an observer on a boat takes an accurate compass bearing on a positively identified
object, and transfers that bearing to the appropriate chart as a line from the object, the
line is known as a position line, and for as long as it remains in the same place, the
boat must be on the position line somewhere. It follows two or more position lines,from bearings taken within a short space of time, will "fix" the boat's position on the
chart. Bearings marked on the chart are always shown with an arrow pointing away
from the object on which the bearing was taken. Position lines do not have to be
bearings - as will be seen.
Simple Cross Bearings
The bearings of two positively identified objects on shore are taken, converted to
reverse and then plotted on the chart. The intersection of the two lines will give a
reasonable fix, particularly if the two objects chosen are roughly at right angles to
each other.
Three Cross Bearings
The intersection of the position lines plotted from three objects on shore will usually
result in a triangular” area of doubt", known as a Cocked Hat. Traditionally the fix is
taken as being in the centre of the Cocked Hat, but if there is any nearby hazard or
danger the yacht's position is assumed to be at the point of the triangle nearest to the
danger.
Transit and Compass Bearing

8/3/2019 Sailing Manual
http://slidepdf.com/reader/full/sailing-manual 83/113
The most accurate position line is a transit bearing, when two positively identified
objects on shore are observed to be in line with each other. At the time of observation
the yacht's position must be somewhere on a line drawn through the two positions and
extended to seaward, and if at the same time a compass bearing of a third object is
taken, the intersection of the two position lines will give an accurate fix.
Circle of Position and Compass Bearing
A useful method of position finding at night in good visibility is to observe a
lighthouse that is just seen to appear over the horizon. By reference to the appropriate
Rising and Dipping Tables, or by calculation, distance off can be found and an arc of
position plotted. A compass bearing on the light will give a second position line, andthus a fix is obtained.
Doubling the Angle on the Bow
The same procedure as in a four point bearing is used, except that the observer can
take a bearing on the object at any time and at any angle less that 45o. The second
bearing is taken when the first included angle has doubled, when the distance run
between the two bearings will be equal to the distance from the position of the second

8/3/2019 Sailing Manual
http://slidepdf.com/reader/full/sailing-manual 84/113
bearing to the observed object. It will be seen that in both these methods an isosceles
triangle is constructed, where two sides and two included angles are equal.
Transferred Position Line
This method may be used where a bearing can be taken on an object on shore, or
where a bearing can be taken on one object that then goes out of sight and a second
bearing taken on another object further along the coast. Once again speed and course
must be accurately determined, and maintained.
In the first case, the yacht's course and speed is known, however the distance off the
coast is not known and may be to one side or the other of the assumed course plotted
on the chart. A bearing is taken on an object ashore and log and time noted. After thevessel has continued on her course until the bearing of the object has changed by
about 60o or more, a second bearing is taken on the object and the time and log
recorded. The actual distance covered is then calculated, making adjustments for
current or tidal stream.
This distance is then plotted from any convenient point on the first position line on a
line parallel to the course line, and the first bearing transferred to the new position.
The point where the transferred line crosses the second bearing line is the position of
the vessel at the time of taking the second bearing. (The transferred position line is
marked with an arrow at each end).

8/3/2019 Sailing Manual
http://slidepdf.com/reader/full/sailing-manual 85/113
When taking bearings on two objects on shore at different times, speed and coursemust again be known. A bearing is obtained on the first object seen, which later
passes out of sight. A bearing is then obtained on a second object that has appeared
on shore, and the actual distance covered between the two bearings is calculated.
As in this example, this distance is plotted on a line drawn from the first position line,
parallel to the course line, the first bearing transferred to this position, and the point
where it crosses the second bearing is the fix at the time the second bearing was taken.
Any method of obtaining a fix that requires the speed and course to be known is
called a running fix. Owing to the inevitable errors that will occur in assessing
distance run and steering a steady course a running fix is usually less accurate than
cross bearings.
Line of Soundings
As well as taking bearings from objects on shore, an estimate of position and distance
off can sometimes be made with the help of soundings taken with the echo sounder. A
line of soundings is taken at regular intervals, reduced to chart datum if necessary, and

8/3/2019 Sailing Manual
http://slidepdf.com/reader/full/sailing-manual 86/113
the resulting line plotted on tracing paper or the edge of ordinary paper. From this
trace, an approximate distance off shore can be deduced by laying it on the chart
parallel to the course being steered and moving it about until the soundings coincide
with those on the chart. In poor visibility this method can be very useful, particularly
where the seabed has a distinctive contour line.

8/3/2019 Sailing Manual
http://slidepdf.com/reader/full/sailing-manual 87/113
CHAPTER 28 PILOTAGE
Pilotage is the name given to the navigation of inshore waters and channels by the use
of buoys, beacons, leading marks or lights and topographical features in conjunction
with the chart, pilot book, compass and echo sounder.
It usually demands concentration and attention to detail on the part of the navigator,
as well as a complete knowledge of the meaning of various types of buoys and
beacons.
Leading Marks and Lights
Leading marks and lights are set up in pairs on or near the shore, the inshore mark is
always behind and above the other. They indicate a safe channel or approach to a
harbour when they are in transit. By day they are clearly visible marks in a distinctive
colour. They may be lit at night with lights of the same or different characteristics
and shown on the chart thus "Lights in Line 353o", this being the true bearing of the
transit from seaward.
A single leading light or sectored light may sometimes be used, in which case it will
normally be split into three adjacent sectors, the centre safe sector white, the port
sector red and the starboard sector green. When beating against the wind in an
approach channel, the change of colour from white to red or white to green gives a
perfect warning of when to change tack, particularly when at some distance from the
light source.

8/3/2019 Sailing Manual
http://slidepdf.com/reader/full/sailing-manual 88/113
CHAPTER 29 LIGHTS
Lights used as aids to navigation may emanate from lighthouses, light vessels, buoys
or beacons.
Lights on lighthouses and shore beacons may show a different colour light in adjacent
sectors in order to indicate danger areas or a safe channel. Some importantlighthouses may also show different light characteristics in adjacent sectors. Where
arcs of visibility are given on the chart, the bearings are true from seaward, measured
clockwise from 000o
to 360o.
On the chart a full description of all lights is given in abbreviated form in the
following order:-
a. Name or number of light (if any).
b. Characteristics or appearance of the light.
c. Colour or colours of the light.
d. Time taken to complete one complete cycle of the light pattern of illumination.
e. The height of the light source above mean sea level in metres / feet (in the Baltic).
f. On lighthouses and shore beacons, the visible range of the light in clear weather.g. Any other details such as fog signal, signal station, radio beacon, etc.
The principle characteristics are:-
Class of Light Description Abbreviation
a. Fixed A continuous steady light F
b. Flashing Lit period shorter than the
eclipsed period
Fl
c. Group Flashing Two or more flashes followed
by longer eclipsed period
eg Fl(3)
d. Quick Flashing Continuous flashing at to 60
times a minute
Q
e. Very Quick Flashing 100 or 120 flashes a minute VQ
f. Ultra Quick Flashing More than 160 flashes a
minute
UQ
g. Interrupted Quick Flashing Quick flashing periods
followed by eclipsed periods
IQ
h. Group Quick Flashing Two or more eclipsed periods
followed by longer lit periods
eg Q(2)
i. Occulting Long lit period followed byshort eclipsed period
Occ
j. Group Occulting Two or more eclipsed periods
followed by longer lit period
eg Occ(3)
k. Isophase Lit and eclipsed periods of
equal duration
Iso
l. Alternating Alternate colours shown at
equal and regular intervals
eg Al WR
m. Fixed and Flashing Fixed lights showing regular
flashes of greater brilliance
F Fl
n. Morse Code Continuous flashing of one or
more letters in the Morse Code
eg Mo(K)

8/3/2019 Sailing Manual
http://slidepdf.com/reader/full/sailing-manual 89/113
The colours of lights are abbreviated and shown as follows:-
White W (may be omitted)
Red R
Green G
Yellow Y
Blue BuViolet Vi
The time period of a light, is the time taken to complete one whole cycle of the
characteristics of the light, which is from the start of one cycle to the start of the next.
This is shown on the chart in seconds, abbreviated to 's'.
The theoretical range of visibility of a light, is given in sea miles, either as a single
figure, or two figures where different colours of varying visibility are used. They are
shown thus:-
Single Range eg 20M
Two Ranges eg 16/12MThree or more Ranges eg 20-16M
Other details such as fog horn or radio beacon will be added in abbreviated form at
the end of all other information concerning the light. From this information a full
description of any lighthouse is shown as:-
Fl(3) WRG 20s 15m 18-12M
This would indicate that it is a group flashing three lights with white, red and green
sectors, the light period is twenty seconds, the elevation is 15 metres, and the range of
the three different colours is from eighteen to twelve sea miles.
Admiralty List of Lights
Names, descriptions, locations in Latitude and Longitude and characteristics of
individual lights can be found in the Admiralty List of Lights. The list is particularly
useful for confirming the identification of a light structure in daylight. It also contains
tables of distances of visibility.

8/3/2019 Sailing Manual
http://slidepdf.com/reader/full/sailing-manual 90/113
CHAPTER 30 IALA BUOYAGE SYSTEM ‘A’
All European and Mediterranean countries conform to the IALA Buoyage System A.
(c) Crown copyright 2004, Published by the Met Office
In this system there are five types of mark which may be used in any combination.
Lateral marks indicate the port and starboard sides of a channel in the direction
coming from seaward. In tidal waters the direction is normally defined as the
direction of the rising tide or stream, while in non-tidal waters it is decided arbitrarily
by the buoyage authorities. In Danish waters the direction from seaward is generally
north to south and west to east, with variations to suit local geographical conditions.These variations will be shown on the chart.

8/3/2019 Sailing Manual
http://slidepdf.com/reader/full/sailing-manual 91/113
Cardinal marks are used to indicate the direction in which a hazard or danger lies, and
the marks are named according to the quadrant in which they lie in relation to the
hazard or danger. They may be placed in a group of two, three or four round the area
of the hazard, or individually to indicate the extremity of a hazard or danger, the limit
of an area of shoal water or a bend in a channel.
Isolated Danger marks are placed on or above an isolated danger such as a rock or
wreck with navigable water all round.
Special marks are used to indicate areas or features that do not primarily affect
navigation, such as restricted or prohibited areas, firing ranges and pipe lines.
Safe water marks indicate mid-channel, routes or landfalls.
Details of all marks, symbols and abbreviations used an charts of the IALA system A
are given in the British Hydrographic Office Publication Chart Number 5011.

8/3/2019 Sailing Manual
http://slidepdf.com/reader/full/sailing-manual 92/113
CHAPTER 31 PORT TRAFFIC SIGNALS
1. The main signal is always 3 vertical lights.
2. Exemption signals are made by a yellow light to the left of the main signal.
3. Special local signals may be displayed to the right of the main signal.
F
l
a
s
h
i
n
g
Serious emergengy
Stop, or obey instructions
Vessels shall not proceed
Vessels may proceed
One way traffic
F
i
x
e
d
o
r
S
l
o
w
Vessels may proceed
Two way traffic

8/3/2019 Sailing Manual
http://slidepdf.com/reader/full/sailing-manual 93/113
A vessel may proceed only
when she has specific
orders to do so
Vessels may not proceed,
except that vessels which
navigate outside of the
main channel need not
comply with the main
message
O
c
c
u
lt
i
n
g
A vessel may proceed only
when she has received
orders to do so, except that
vessels which navigate
outside of the main
channel need not comply
with the main message
8/3/2019 Sailing Manual
http://slidepdf.com/reader/full/sailing-manual 94/113
CHAPTER 32 RESPONSIBILITIES OF A SKIPPER
The skipper is responsible at all times for the safety and well being of his ship and his
crew, and is always the final decision maker on board. In official documents in the
Merchant Service he is referred to as "Master under God” and this description, with
all that such a title implies, is equally true of the skipper of a small sailing yacht.
He is, in the first place responsible for ensuring that his yacht is seaworthy, well
found and in all respects ready for sea before leaving harbour. He must be certain that
both he and all members of his crew are familiar with the stowage plan of the yacht,
the position and method of use of all safety equipment and the action to be taken in
case of fire.
Briefing the Crew
A novice will not know Port from Starboard, or how to coil a rope or that he must not
fiddle with flares, or that he is not going to drown when the boat heels.
An experienced hand will want to know where he's going and when, which sails to
bend on, and the plan for getting underway.
The skipper will need his crew to know these things, and more, they won't if he
doesn't tell them. At the start of a trip, and frequently thereafter, a good skipper will
tell his crew what he expects of them, and how to achieve it if they don't know, where
they are going, and what is going to happen next. He will reassure the inexperienced,
and make sure that all know how to behave on his boat, and what to do in an
emergency.
A short, but comprehensive briefing must be a skippers first action on taking on a new
crew.
Takeover of a Club Yacht
This is one of the skippers responsibilities. Club yachts carry an inventory that is
written in the form of a stowage plan and this should be studied carefully by all crew
members. This will facilitate the handover at the end of the charter period.
The following procedure for taking over and checking the ship's stores and equipmentshould be followed by the skipper or delegated member of the crew:-
a. Check and take over the inventory of stores and equipment (skipper).
b. Check all safety equipment.
c. Check all sailing gear, including sails, sheets, spinnaker gear,
handybilly, main sheet, kicking strap, as well as mooring warps, lines and
fenders.
d. Check engine, starting, batteries, fuel, oil, water, maintenance and
tools.
e. Check the heads, including pumps and seacocks and method of
operation.

8/3/2019 Sailing Manual
http://slidepdf.com/reader/full/sailing-manual 95/113
f. Check electric light circuits, ensuring that all navigation lights are
functioning.
g. Check all navigation equipment, including the compass and all
instruments, pilot books and other publications such as list of lights or nautical
almanac, and the ship's log book.
h. Check that the ship's papers, showing proof of ownership are on board.i. Ensure that the fuel tank and water tank are full, and that a spare gas
cylinder is carried and emergency water cans are filled.
j. Re-stow all stores and gear according to the inventory, bearing in mind
the maxim
"A place for everything and everything in its place".
Passage Planning
After completing the takeover of a club yacht and stowing food and drink,
inexperienced skippers may be tempted to cast off and sail away without any furtherpreparation. However, the more experienced and seamanlike skipper will know that
additional preparations are necessary if the first passage of the cruise is to be
successfully completed.
The first and most important consideration must be the state of the weather, both
actual and forecasted. Conditions inside a sheltered harbour can be misleading, and
very different from what may be faced at sea. If in any doubt, a walk or ride to a
vantage point where open sea conditions may be observed could be time well spent.
A reliable weather forecast must always be obtained before starting a passage. BBC
transmissions do not cover Baltic Areas, the nearest areas being Fisher and German
Bight, but they give a good overall picture of the weather state, and are very helpful in
assessing the possible future conditions.
Another important factor in passage planning is the strength and competence of the
crew. It may happen that a skipper finds himself in charge of a novice crew, in which
case it may be wiser to spend a couple of hours sailing in sheltered waters in order to
give everyone a chance of learning the ropes and finding their sea legs before setting
off on the actual passage.
The time of departure on passage is also important. It is generally most un-
seamanlike to take a novice crew in a strange craft straight off into the rigours of anight passage. This should only be done in settled weather with an experienced crew;
otherwise it is often better to plan for a night's sleep and a crack of dawn departure.
There will be time enough for night sailing later in the cruise, when the crew is more
familiar with the yacht and the cruising area.
If the cruise has no particular objective it could be good planning and even better
psychology to make the first passage sailing in a free wind if possible. Nothing could
do more to dismay and disenchant a novice crew than a long hard flog to windward on
their first day at sea. Such conditions are almost certain to occur at some time during
an extended cruise, but when they do the crew should be well settled down and able to
cope with whatever nature has in store.

8/3/2019 Sailing Manual
http://slidepdf.com/reader/full/sailing-manual 96/113
Having to spend long periods working below deck in even a moderate sea is a
common cause of seasickness, and this unpleasant possibility can be minimised if not
avoided by a little forward planning. The navigator should decide on and record his
passage plan before departure, thus avoiding having to spend much time at the chart
table under sail. Similarly, a midday snack and beverages prepared beforehand would
lessen the time required to be spent in the least congenial of all places during roughweather, the galley.
The skipper will finally have to decide which sails he will use, bearing in mind the
weather forecast and his own observation of conditions. He should also remember
that, at sea, it is far easier to increase sail area than reduce it.
When considering the extent of the cruise, some thought must be given to the
unpopular subject of the return journey. Changes of weather can play havoc with a
well planned itinerary, with adverse weather conditions resulting in a hold up of the
yacht a long way from the home port. It is a wise precaution to keep some time in
hand to allow for this eventuality.
Once underway and on passage, a proper system of watchkeeping should be brought
into use and maintained throughout the cruise. A good watchkeeping routine ensures
that all duties, both pleasant and otherwise, are fairly shared by all, and will do
wonders for the morale of the crew. If either by choice or force of circumstances a
passage is extended to include night sailing it will also reduce the possibility of key
members of the crew becoming overtaxed and overtired, with all the attendant
dangers of such a situation.
Boat Husbandry
This is the general term covering every aspect of the day to day maintenance of the
yacht, and implied in the term is good knowledge of the correct way to maintain all
the items of the yachts inventory. The more important of these are given below, but
the list is by no means comprehensive, there is always something to be done.
The Hull
Normally a GRP hull needs no day to day maintenance except cleaning. This must
never be done with any type of abrasive cleaner, as this will eventually wear through
the waterproof coat of the hull. Oil and grease should be removed with a liquidsolvent, while the hull itself can be cleaned with a warm soap or detergent solution.
Any impact or other damage to the hull should be reported as soon as possible.
The Sails
Modern sails are normally made of synthetic materials. While they are impervious to
rot and mildew, they should not be stored in damp conditions for any length of time,
but hung up and dried out in the open air at the first opportunity. Continuous
exposure to the ultraviolet rays of the sun can also have a damaging effect on the
fibres, but this can be minimised by the use of sail covers and sail bags when the sails
are not in use.

8/3/2019 Sailing Manual
http://slidepdf.com/reader/full/sailing-manual 97/113
Synthetic materials can be stored in bags in a random manner without detriment, but
if they are "sail-maker folded" in concertina fashion from the foot, they will occupy
much less stowage space and will be far easier to hank onto the forestay when being
set.
All stitching on the sails should be checked occasionally, particularly at any pointswhere chafe is likely to occur. "A stitch in time saves nine" is a doubly true saying in
the matter of sail maintenance.
When folding the mainsail on the boom the sail battens should be arranged to lay flat
along the length of the boom. This will prevent possible breakage of the battens and
consequent damage to the batten pockets.
The Rigging
An adjustment to the tune of the standing rigging is a job for experts only. Others
should leave it severely alone, or in cases where something is obviously wrong, ask for help.
Rigging screws and shackles should be checked regularly to ensure that they are not
slacking off, and that the split pins or other locking devices on the rigging screws are
still doing there job. Any sharp projections such as the ends of split pins should be
firmly taped over to prevent the snagging of sails or sheets. Running rigging should
also be regularly checked, particularly where wire and rope are spliced together,
ensuring that there are no fraying strands.
Mooring Warps, Lines and Springs
Chafe at the fairleads or at the dockside is the commonest cause of wear to warps, this
can be minimised by parcelling the rope with cloth or plastic tube at the crucial points.
If a warp passes over the sharp edge of a concrete or steel wall, wear can be reduced
by placing a small piece of timber under the warp, so as to raise it clear of the sharp
edge. An even better method is to find mooring points on the face of the wall if
possible thus eliminating the source of wear altogether.
At least two warps and two springs should be carried on board, for it is bad practice to
make one warp or spring do the work of two. All rope ends should be securely
whipped, and in the case of synthetic ropes this can easily be done by meting the endstrands with a flame and then squeezing them together This should not be done with
the bare hands! A whipping should then be added for greater security.
When not in use warps should be neatly coiled and stowed, and prepared and laid out
in position well beforehand when approaching a mooring. For a normal mooring only
the ends of the warps are ashore, any spare length being neatly coiled on deck, turned
over in readiness to run out or take in as required.
The Bilges
The bilges should be cleaned out thoroughly with salt water at regular intervals.Fresh water will turn rancid and smell abominably if allowed to lie in the bilges for

8/3/2019 Sailing Manual
http://slidepdf.com/reader/full/sailing-manual 98/113
only a few days. Limber holes must be kept clean and open so as to allow bilge water
to flow freely to the pump pick up position. Diesel fuel in the bilge should be cleaned
up with a strong detergent, and the reason for it being there checked and rectified
immediately.
Labelled bottles or cans should never be stowed in the bilges, as the labels willinevitably float off and choke the limber holes and strum box. It is in any case a most
unhygienic practice, and should be avoided if possible.
The Engine
Before starting the engine, the oil level in the sump and gearbox should be checked
and topped up if necessary.
As soon as the engine is running, a check should be made on the exhaust and cooling
water outlet, to ensure that the cooling water is circulating correctly. If not, the
engine must be switched off immediately and a check made on the inlet valves, waterpump and pipes.
Most damage to engine transmissions, thrust bearings and propeller shafts is caused
by panic gear changing from forward to astern or vice-versa at full throttle. Before
engaging or changing gear the throttle must always be returned to the tickover
position, and then opened up again after the gear has been engaged.
The level of diesel fuel in the tank must never be allowed to fall so low that there is
any danger of air being drawn into the fuel pipes.
Navigation Lights
When there is any possibility or intention of sailing at night, all navigation lights
should be checked and any faults rectified during the hours of daylight. After
darkness has fallen it is usually too late.
The Galley
The comfort and well being of the crew depends to a large extent on the cleanliness
and efficiency of the galley and those who use it. Frying in fat is a popular and easy
method of cooking, but it causes most problems, with oil-laden fumes depositing agreasy layer over the deck head and spilled fat congealing in some hidden corner and
turning rancid and evil smelling in a matter of days. These effects can be reduced by
keeping fried meals to a minimum and by making sure that pans are covered when
frying. This may also have the bonus of reducing the incidence of sea sickness in the
crew.
With the restricted space available, it is also good practice for the cook to wash up
and stow all utensils as he uses them, rather than leave the task until an unmanageable
pile of washing up has collected. The actual stowage of food onboard is an important
subject, perhaps the two most important factors being dry conditions and a good air
circulation, the latter much easier to achieve than the former.

8/3/2019 Sailing Manual
http://slidepdf.com/reader/full/sailing-manual 99/113
The Main Cabin
The main cabin or saloon is the living room for the whole crew, and as such it should
be kept as clean, dry, and as tidy and habitable as possible. It should be ventilated
thoroughly whenever conditions allow all lockers and cupboards opened and
mattresses and cushions aired and dried out to get rid of the effects of condensation.
The Ship’s Log
All yachts should carry a Deck Log. This is the legal log, and must be completed at
regular intervals when at sea, usually every hour. It will normally record the time,
course, distance run, weather, barometric pressure, wind direction and strength and
sailing speed. Other information which may be recorded are course changes, weather
forecasts, sail changes, passing vessels or navigation marks and any other happening
that affects the running of the yacht. The Deck Log is an invaluable aid to navigation
and weather forecasting, and in the event of an incident likely to lead to an insurance
claim, a properly completed Deck Log is a most important legal document.
The Fair Log is sometimes carried and records of the cruise written in narrative form,
and is compiled for the benefit of the club records and for the information and interest
of future users of the yacht. For this reason it should not be a slavish copy of the Deck
Log, but an interesting and informative account of the cruise that will become part of
the yacht's history.
Flags and Flag Etiqette
Over the years flag etiquette has become less formal, and varies from country to
country. Traditionally, flags are flown from sunrise to sunset, sunrise being taken to
be at 0800 hours during the summer months. Club yachts should maintain a high
standard of flag etiquette, particularly when visiting foreign harbours.
The Red Ensign is normal flag of any British registered or British owned vessel, and
may be worn by British nationals without restriction. It is the ensign of the British
Kiel Yacht Club.
The Blue Ensign, undefaced or defaced, is worn by certain Services and Government
departments and by yacht owners who have been granted an Admiralty Warrant by
virtue of being members of certain privileged yacht clubs. The privilege of wearing aspecial ensign applies only when the owner is on board or in charge of the warranted
vessel, but in the case of vessels that are owned by privileged clubs a special
dispensation has been made whereby trustees are appointed by the club as owners,
and the special ensign may be worn when a qualified club member is in charge of the
vessel. The Admiralty Warrant and Certificate or British Registration must always be
carried on board when the special ensign is worn, and any abuse of the privilege can
lead to very heavy fines, as well as the loss of the warrant.
The White Ensign is worn by the Royal Navy, and also by warranted vessels owned
by members of the Royal Yacht Squadron.

8/3/2019 Sailing Manual
http://slidepdf.com/reader/full/sailing-manual 100/113
Ensigns are flown from 0800 to sunset when in harbour, and when sailing in coastal
waters or within sight of other vessels at sea. Should a yacht be left unattended in
harbour until after sunset, it is acceptable practice to lower the ensign before leaving
the vessel.
Paying compliments or Saluting is made by lowering the ensign two thirds of the waydown the ensign staff and holding it there until the saluted vessel has responded and
begins to re-hoist her ensign. Salutes should be given to the Royal Navy or foreign
warships and to Flag Officers of the saluting vessel's club, or to any other vessel as a
mark of greeting or respect.
The burgee is a triangular pennant worn at the mast head or close up on the port
spreader signal halyard, and will normally identify the club to which the owner of the
vessel belongs. Flag Officers' burgees are swallow tailed broad pennants carrying
various marks to indicate the Flag rank of the owner. Theoretically the burgee should
be flown by day and night when the vessel is in commission, but in practice it is
acceptable to lower it at night when in harbour. A vessel wearing a privileged ensignmust also wear the burgee of the club to which the privileged pennant pertains. When
racing the burgee is replaced with a rectangular racing pennant.
The Courtesy Flag is a small maritime or national flag of a foreign country being
visited, worn as a mark of courtesy, as the name implies. It is normally worn close up
on the starboard spreader signal halyard, and never subordinate to any other flag.
House flags, association flags or the burgees of other clubs may be worn on the port
spreader signal halyard subordinate to the BKYC burgee. All ensigns and flags must
always be worn close up on tight halyards.
Salvage
The laws relating to salvage at sea are very complex, and well outside the scope of
this handbook. RYA Pamphlet G6 gives some explanation of the laws as they apply to
yachtsmen
In the event of a Club yacht being involved in a situation where outside assistance is
required to safeguard the lives of the crew, this would not normally lead to any claim
for salvage. However, when assistance is required in other circumstances the most
important precaution is to obtain some form of agreement on payment of compensation beforehand, preferably based on the "no cure - no pay" principle. If
assistance is rendered by a fellow yachtsman, or member of a recognised yacht club, it
should not be necessary to obtain any special agreement, but it is a wise precaution to
do so for all others. The form of agreement included in the ships papers will give
adequate legal cover.
Another sensible precaution is to demonstrate that all hope has not been abandoned
and the yacht and crew is not left to the mercy of the elements, a most unlikely
situation in the Baltic in any case. This can be done by the crew being active in their
attempts to retrieve the situation, by using the yacht's warps and gear rather than that
of the assisting vessel, and by generally showing that while help may be welcome, thesituation is not hopeless as far as the crew is concerned.

8/3/2019 Sailing Manual
http://slidepdf.com/reader/full/sailing-manual 101/113
CHAPTER 33 FIRST AID AFLOAT
All Club yachts are supplied with a small first aid outfit sufficient to deal with the
treatment of minor injuries and illnesses. The following notes are given in
amplification of the instructions contained in these outfits.
Seasickness
Medication is too late when the patient has succumbed to seasickness. Anyone
susceptible to seasickness should commence a course of proprietary seasickness
tablets at least four hours before going to sea. Stugeron is a highly recommended
brand of tablets. If seasickness has already begun the patient must be encouraged to
continue to eat some dry food such as bread or biscuits to avoid retching on an empty
stomach. Some brands of tablets enhance the effects of alcohol and cause drowsiness,
and this combined with lethargy brought on by seasickness may result in a lack of
safety consciousness in the patient. For this reason seasick crew should be watched
with special care when on deck or in the cockpit, and clipped on when heaving overthe side!
Cuts and Wounds
Apply a standard dressing as directed on the package. If bleeding is severe the
dressing should be applied, and a further dressing applied over the first one if
bleeding does not stop. For a leg injury the patient should be laid down and the leg
supported as high as possible in comfort. For an arm injury the arm should be secured
across the chest with the hand on the opposite shoulder. Always bandage from joint
to joint to prevent oedema.
Fractured Limbs
A suspected fracture should not be set with a splint by other than a qualified person.
The broken limb should be secured to the body as firmly as possible so that the body
itself acts as the splint. An arm should be secured across the chest with the hand on
the opposite shoulder and padding placed in the hollows between the arm and chest.
If the elbow cannot be bent, secure the arm along the side, with the palm touching the
thigh and again pad the hollow places. For a leg or thigh fracture the feet and legs
should be lashed together, again padding the hollow places between ankles, calves
and knees.
Fractured Ribs
The patient should be put into a comfortable position, that does not impede normal
breathing. If unconscious the patient should not be laid down on the injured ribs as
this may cause further damage to the lungs.
Nosebleed
Nosebleed is best treated by sitting the patient up and leaning forward, not laying
them down, and by pinching the nostrils until the bleeding stops. Cold compressesmay also help, by causing constriction of the blood vessels.

8/3/2019 Sailing Manual
http://slidepdf.com/reader/full/sailing-manual 102/113
Head Injuries
The patient must be kept warm and at rest, the use of alcohol as a stimulant must not
be allowed. If unconscious, no form of fluids should be given and any obstructions
must be removed from the mouth, eg false teeth, and make sure the tongue is forward.Place the patient in the recovery position.
Sprains
These are stretched or torn ligaments, the best treatment being to keep them firmly
bandaged with a standard dressing, with a pad of the dressing over the area of the
injury. A cold compress assists in reducing swelling.
Burns
Burns can be treated by flooding with cool, CLEAN water. This relieves pain,reduces shock and aids healing, if this is not possible, a standard burn dressing is the
best treatment, laid on dry without any form of ointment. Blisters should not be
broken. Do not remove burnt clothing, it may have adhered to the skin. If clothing is
soaked in boiling water, this may be removed gently, as it will hold the heat.
Boils and Skin Eruptions
These may occur on skins not accustomed to rough clothing, limited washing
facilities and the effect of sun and salt water, or through a change of diet and an
excess of greasy food. Boils should be treated carefully, cutting away any hair, gently
washing and drying the area and covering the boil with an Elastoplast dressing.
Within a couple of days the boil will have resolved itself either by discharging
completely or fading away under the dressing. It is best to allow nature to take its
course rather than trying to hasten things by squeezing the boil. Once the contents of
the boil have been discharged, the area should be cleaned and a new dressing applied
to protect the wound.
Stomach Upsets
Most stomach upsets are due to indigestion brought on by over indulgence in fried
food, stews and curries, the easiest meals to cook on board a small yacht. If the paindoes not respond to a dose of bicarbonate of soda, or if the patient remains feverish
after two or three hours, medical attention should be obtained as soon as possible. In
any case aperients such as castor oil should not be given under these circumstances.
Until treatment can be obtained the patient should be kept lying down and warm, and
nothing given but liquids in small quantities.
Toothache
Aspirin or Codeine crushed in the mouth near the offending molar will often give
some relief from pain, but nothing short of a visit to the dentist will remove the cause.
Clove oil will give quick relief.

8/3/2019 Sailing Manual
http://slidepdf.com/reader/full/sailing-manual 103/113
Fever
It is difficult for the layman to interpret a single reading on a thermometer. It is
preferable to check a feverish condition by noting the patients’ apparent temperature
from signs such as perspiration, trembling and breathlessness. If the feverish
conditions persist medical attention should be obtained as soon as possible. Liquidssuch as soup or beef tea may be given if the patient feels like it, but not if he also has
a stomach ache. No form of alcohol should be given.
Choking
The patient should be bent over and given up to 5 backslaps followed by 5 abdominal
thrusts, continue this cycle until obstruction clears or casualty becomes unconscious
then CPR. If this does not remove the obstruction the patients mouth should be held
open with a cork or piece of wood and have the back of the mouth searched with
fingers in order to dislodge whatever is stuck there. Dentures lodged in the back of
the throat are a common cause of obstruction.
Apparent Drowning
Unconsciousness and collapse due to apparent drowning and shock must be treated
immediately by means of artificial respiration, which must be continued until the
patient recovers or medical assistance arrives. Where no pulse is evident External
Cardiac Massage must be applied immediately.
External Cardiac Massage
The patient must be on his back on a firm surface, e.g. cabin sole. Kneel alongside
the patient's chest and place one hand over the other so that the heel of the lower hand
is in the middle of the patient's chest. Push the chest down firmly about 4-5 cm and
release quickly, at a rate of one push per 2 seconds. Push less hard in case of young
children or if the patients ribs are cracked. Inflate the patient's lungs at least 12 times
a minute - this can be done by a second person. A pink warm skin and constricting
pupils are good signs, and returning consciousness means success.
Mouth to Mouth Resuscitation
PLACE CASUALTY ON HIS BACK IMMEDIATELY
Loosen all clothing around neck and chest, QUICKLY.
QUICKLY CLEAR MOUTH AND THROAT
By removing all mucus, food dentures and any other mouth or throat obstructions to
ensure a clear airway.
TILT HEAD BACK AS FAR AS POSSIBLE AND PUSH CHIN UP
The head should be in a "chin up " or "sniff" position. Placing a pad under the back of the neck may help.

8/3/2019 Sailing Manual
http://slidepdf.com/reader/full/sailing-manual 104/113
LIFT LOWER JAW
Grasp the jaw by placing thumb in the corner of mouth, and pull forward. Do not hold
or depress the tongue.
PINCH THE NOSE SHUT WITH THE FINGERS
This is in order to prevent air leakage during resuscitation.
OPEN YOUR OWN MOUTH WIDE AND BLOW INTO THE PATIENTS MOUTH
Take a deep breath and blow into the patient's mouth until you see their chest rise.
REMOVE YOUR MOUTH AND LISTEN FOR EXHALATION
Quickly remove your own mouth when chest rises. Lift jaw higher if gurgling or
snoring sound is heard.
REPEAT THE LAST TWO STAGES TWELVE TO TWENTY TIMES A MINUTE
Resuscitation must be continued until the casualty begins to breathe normally and
regularly. Beware of any relapse, and keep the patient warm.
In case of an infant casualty, both the mouth and nose should be covered and sealed
with your mouth, and gentle puffs of air blown in from your cheeks, watching the
chest rise so that you do not damage the infant's lungs.
The current CPR cycle is 30 compressions to 2 inflations.

8/3/2019 Sailing Manual
http://slidepdf.com/reader/full/sailing-manual 105/113
CHAPTER 34 GLOSSARY
ABAFT Behind. On the after side of.
ABEAM At right angles to the centreline of the boat.
AFT Near the stern.
A HULL; TO LIE To lie under bare poles.APPROACHES The waterways that give access or passage to
harbours, channels, etc.
BACK Change of wind direction in anti-clockwise
direction
BACKSTAYS Rigging leading aft from masthead to support a
mast.
BAR A shallow patch extending across some harbour
entrances.
BATTEN Flat stiffener to after edge (Leech) of a sail.
BEACON A fixed artificial navigation mark, lit or unlit, set onthe shore or rocks.
BEAM Width of a boat.
BEAM-ENDS A vessel is on her beam-ends when hove over until
her decks are nearly vertical
BEAM, ON THE In a direction abeam of the vessel.
BEAR AWAY Turn away from the wind.
BEAR DOWN To approach from windward.
BERTH; TO GIVE A WIDE To keep well away from another vessel or any
feature.
BEAT, TO The process of gaining towards the direction from
which the wind blows by sailing a zigzag coursetowards the wind.
BEND ON; TO Secure a rope. To fit a sail.
BERMUDAN RIG Rig where a tall triangular sail is set aft of the mast.
BILGES Bottom of boat where water collects.
BLOCK Pulley.
BLOWN OUT A sail blown to pieces by a strong wind.
BOBSTAY A stay holding the bowsprit down.
BOLLARD Strong vertical post to receive mooring lines.
BOOMKIN Spar extending aft of stern to which mizzen sheets
are secured.BOOT-TOPPING A band of paint at the waterline between "wind and
water".
BOSUNS CHAIR Canvas or wood seat with bridle to carry a man
aloft.
BOWSPRIT Spar extending forward of bow to which headsails
are secured.
BREAST ROPES Mooring lines from the bow and stern of a vessel to
a dockside or another vessel which prevents the
bow or stern from swinging out. Used in
conjunction with springs. (See definition)
BROACH; TO To swing uncontrolled broadside to wind or heavyseas.

8/3/2019 Sailing Manual
http://slidepdf.com/reader/full/sailing-manual 106/113
BULKHEAD Partition separating different compartments of a
vessel.
BULWARKS A low wall surrounding the yacht, sometimes
referred to as the TOERAIL on small yachts.
CABLE A unit of measurement, being one tenth of a sea
mile. (See Knot)CARVEL-BUILT Built smooth sided with planking edge to edge.
CATAMARAN Twin hulled vessel.
CELESTIAL NAVIGATION A method of calculating a vessel's position on the
chart by measuring the angle of celestial bodies.
CENTREBOARD Plate lowered through the bottom of a vessel to
increase keel area.
CDI (GPS) Course Deviation Indicator
CHART DATUM A level so low that the tide will not frequently fall
below it. It is the level below which soundings are
given on Admiralty charts, and above which are
given the drying heights of features.
CHRONOMETER Special accurate watch or clock necessary for
celestial navigation.
CLAW OFF To beat or reach to windward away from a lee
shore.
CLEARING MARKS Selected marks, natural or otherwise, which in
transit clear a danger or which mark the boundary
between safe and dangerous areas for navigation.
CLINKER BUILT Built with overlapping side planks.
CLOSEHAULED Sailing as close to the wind as a vessel can lie with
advantageCLOSE-REEFED Reefed down to smallest sail area.
COACHROOF A part of the deck which is raised for increasing
headroom inside.
COCKED HAT The triangle sometimes formed by the intersection
of three lines of bearing on the chart.
COCKPIT Open area where steering is situated.
COG (GPS) Course Over Ground.
COME ABOUT(or TACK) To head the boat into the wind and then steer a
course with the wind coming over the opposite side
of the boat when beating or tacking to windward.
CONTOUR A line joining points of the same height above or
depths below, the chart datum.
CORIOLIS FORCE An apparent force acting on a body in motion, due
to the rotation of the Earth, causing deflection (e.g.
winds and currents), to the right in the northern
hemisphere and to the left in the southern
hemisphere.
COUNTER An overhang of the stern.
COURSE The intended direction of the vessel’s head.
COURSE MADE GOOD The resultant horizontal direction of actual travel.
The direction of a point of arrival from a point of departure.

8/3/2019 Sailing Manual
http://slidepdf.com/reader/full/sailing-manual 107/113
CTS (GPS) Course to Steer
CROSS TREES /
SPREADERS
Cross bars on the main mast to spread the load of
the rigging and lessen strain.
CURRENT The non-tidal horizontal movement of the sea
which may be in the upper, lower or in all layers.
In some areas this may be nearly constant in rateand direction while in others it may vary seasonally
or fluctuate with changes in meteorological
conditions.
CUT The intersection on the chart of two or more
position lines.
CUTTER A vessel rigged with two foresails in line.
DEAD BEFORE With the wind exactly aft of the vessel.
DISPLACEMENT The weight of water displaced by a vessel.
DEAD RECKONING(DR) Finding the vessel's position by using the compass,
the log (or estimate of miles run).
DEGAUSSING RANGE An area about 2 cables in extent set aside for
measuring ship’s magnetic fields. Sensing
instruments are installed on the seabed in the range
with cables leading to a control ashore.
DEPTH The vertical distance from the sea surface to the
seabed, at any state of the tide.
DOWNHAUL A rope for pulling down a sail or boom.
DRAUGHT The depth of water occupied by a vessel at any
time.
DSC Digital Selective Calling.
EARRING Rope used for bending a clew cringle to a boom.ECHO SOUNDER An electronic device which measures the depth of
water under the sounding head by means of
electrical impulses.
ESTIMATED POSITION
(EP)
Vessel's position after wind and current effects
have been applied to DR.
EPE (GPS) Estimated Position Error
ETE (GPS) Estimated Time En route
ETA (GPS) Estimated Time of Arrival
FAIRWAY The main navigable channel, often buoyed, in a
river, or running through or into a harbour
FATHOM A unit of measurement used for soundings. Equal
to six feet.
FETCH The area of the sea surface over which seas are
generated by a wind having a constant direction and
speed.
FENDER Any device placed between a vessel's topsides and
a jetty or another vessel to avoid damaging contact.
Normally of tough plastic, air filled.
FILL When the wind stretches the sheets and "fills" the
sail.
FIX The position of the vessel determined byobservations.

8/3/2019 Sailing Manual
http://slidepdf.com/reader/full/sailing-manual 108/113
FLUSH DECKED Vessel without a coachroof.
FOREPEAK The forward compartment of a vessel.
FORCE A system of designating the winds force called the
Beaufort Scale and graduated from zero (complete
calm) to force 12 (hurricane).
FORE-REACHING To make headway when hove to.FORESTAY The stay on which the foresail or headsail is
attached and which also holds the mast upright.
FOLLOWING SEA One running in the same direction as the ship is
steering.
FREEBOARD The distance from the waterline to the deck.
FULL AND BY Closehauled on the wind with the sails filled.
FULL MAIN A mainsail which is not reefed.
GAFF The spar supporting the head of a gaff mainsail.
GAT A swashway, gut or natural channel through shoals
GENOA A large headsail overlapping the mast.GIMBALS Arrangements of suspending a ship's stove or lamps
so that they remain level when the ship rolls.
GMDSS Global Maritime Distress and Safety System.
GPS Global Positioning System
GYBE Turning the vessel so the wind will strike from the
opposite side by turning downwind as opposed to
tacking. Gybing is considered dangerous by many,
but is only so when the crew is taken unawares. It
is then called accidental gybing and a severe
accidental gybe can dismast a vessel.
GOOSENECK A swivel fitting that secures the boom to the mast.GUY Forward line to prevent a spar from slamming at
sea.
HALYARD or HALLIARD A rope or wire used for hoisting a sail.
HAND, TO To lower, take in or furl a sail.
HANDY BILLY A system of blocks and tackles to reduce the effort
required to do any task
HARD A strip of gravel, stone or concrete, built on a beach
across the foreshore to facilitate landing or the
hauling up of boats.
HEADS The toilet.
HEADSAIL Any sail set forward of the mast.
HEAD SEA A sea coming from the direction in which a vessel
is heading; the opposite to a following sea.
HEADING Synonymous with vessel’s head.
HEAVE TO To slow down a vessel by making one or more sails
counteract the other. Heaving to also helps steady a
vessel in strong winds and keep her head into the
wind.
HELM A vessel's steering device. Usually a tiller or a
wheel.
IALA International Association of LighthouseAuthorities.

8/3/2019 Sailing Manual
http://slidepdf.com/reader/full/sailing-manual 109/113
JAMMING CLEAT Cleat with V-shaped jaws that "jam" and hold a
rope fast.
JIB Triangular sail set at the forward end of vessel.
JURY RIG Improvised rig to work a disabled vessel to port.
KEDGE Auxiliary anchor for mooring a vessel.
KEDGE; TO To carry out an anchor and haul or winch a vesselup to it, also used to moor for short stops.
KETCH A twin masted vessel with the aft mast stepped
forward of the rudder post.
KNOT A nautical speed measure equalling one nautical
mile per hour. A nautical mile is 6080 feet
(1852m) and is the distance subtended by one
minute of latitude.
KNOCKED DOWN Violently heeled over and out of control.
LATITUDE Degrees North or South of the equator.
LEADING LIGHTS Lights at different elevations so situated as todefine a leading line when in transit.
LANYARDS Small lines to make anything fast. Formerly rope
rove through deadeyes to set up rigging.
LEEBOARD Large board that suspends over the side to lessen
leeway, also bunk boards or cloths.
LEESHORE A shore downwind of a vessel (no longer such a
danger to modern sailing craft as it was to the
square riggers, provided the wind is not so strong
that no sail can be carried. However still beware).
LEEWARD Downwind
LEEWAY The drift of a vessel sideways due to the pressure of the wind. The smaller the keel the greater the
leeway.
LET DRAW To allow a vessel to fill on the correct tack.
LOA Abbreviation of length overall of a vessel.
LOG An instrument which measures the distance covered
through the water.
LOG BOOK Concise daily record of things of importance
aboard ship, often abbreviated to log.
LONGITUDE Degrees East or West of Greenwich Meridian.
LWL Abbreviation for load waterline length which is the
length of the hull immersed in water when the
vessel is floating normally.
MAST TRACK A track running up the mast to carry the luff of the
mainsail.
MIZZEN MAST The aft mast of a ketch or yawl.
MOORED To secure a vessel, craft, or boat, or other floating
object by ropes, chains, etc, to the shore or to
anchors. Also, to ride with both anchors down laid
at some distance apart and the vessel lying midway
between them.
NAVIGATION The art of determining a vessel’s position and of taking her safely from one place to another.

8/3/2019 Sailing Manual
http://slidepdf.com/reader/full/sailing-manual 110/113
OUTHAUL A line used to haul a sail out to the extremity of a
spar.
OVERHANG That part of a vessel which overhangs the water
measured from the waterline of a hull.
PAY OFF A vessel is said to pay off when her head falls away
from the wind.PILOT (Book) A guide book for seamen describing the sea and
coast.
PITCH Angular motion of a vessel in the for-and-aft plane.
PORT SIDE Left side of vessel looking towards the bow.
POSITION LINE A line on a chart, representing a line on the earth’s
surface, on which a vessel’s position can be said to
lie, such as might be obtained from a single
bearing, or an arc of a range circle.
POOPED; TO BE To be buried below a wave, when running ahead of
big seas.
PREVENTER Extra rope to prevent spars slamming at sea.
PULPIT Protective railing fixed to bows or stern (when
known as stern pulpit, or colloquially, pushpit).
QUARTERING WINDS A wind blowing from aft at about 45o
to the
centerline of the boat.
REACHING Sailing with the apparent wind 45o
either side of the
beam.
REEFING Reducing the area of sail normally carried.
RIDE TO THE ANCHOR To lie at anchor with freedom to yaw and swing.
RIGGING The fixed wires holding the mast upright are called
the standing rigging. The ropes and wirescontrolling the sails are called running rigging.
ROLL The angular motion of a vessel in the athwartship
plane.
ROLLER REEFING A device for reefing by rolling the mainsail around
the boom, or the headsail or mainsail around a luff
spar or wire.
RUNNERS The stays holding the mast aft and which have to be
quickly released each time a boat comes about.
The weather runner is always tensioned.
RUNNING Sailing before the wind.
SAMSON POST Strong vertical post passing through the foredeck
for making fast mooring lines or the anchor chain.
SCHOONER Fore and aft rigged vessel with generally two masts
in which the fore mast is no taller that the other.
SEA ANCHOR A stout open mouthed bag used in stormy weather
by small ships in an effort to slow down the boat by
trailing the bag at the end of a heavy rope or the
anchor chain.
SEACOCK A valve bonded or bolted to the hull which can be
shut off to prevent the inflow of water. Used in
conjunction with sink outlets, toilet intake andoutlet, cooling water intake etc.

8/3/2019 Sailing Manual
http://slidepdf.com/reader/full/sailing-manual 111/113
SEA ROOM Space clear of the shore which offers no danger to
navigation and affords freedom of manoeuvre.
SET; OF THE STREAM The direction in which a tidal stream or current is
flowing.
SEXTANT A navigation instrument used by seaman for
measuring angles of heavenly bodies.SHACKLE A connecting link easily removed by unscrewing a
pin.
SHACKLE OF CABLE The length of a continuous portion of chain cable
between two adjoining shackles. In British vessels
the standard length of a shackle of cable is 15
fathoms (27.432m).
SHEER A vessel is said to take a sheer if, usually due to
some external influence, her bows unexpectedly
deviate from her course.
SHEER LINE The curved fore and aft profile of a vessel’s deck.
SHEER STRAKE The upper line of planking on a vessel's side.
SHEET A rope controlling the angle of a sail to the wind.
SHIP’S HEAD OR
HEADING
The direction in which a vessel is pointing at any
moment.
SHOAL Shallow water.
SHROUDS The permanent wires supporting the mast on either
side.
SLOOP A single masted fore and aft rigged vessel with
only one sail forward of the mast.
SOG (GPS) Speed Over Ground.
SOUND A passage having an outlet at either end. An arm of the sea or large inlet
SOUNDING Measured or charted depth of water or the
measurement of such a depth.
SPINNAKER Large triangular sail boomed out on the opposite
side from the mainsail when running before the
wind.
SPRINGS Mooring warps put out from the extremities of a
vessel to the shore, at the opposite end of the
vessel, to prevent the vessel surging backwards and
forwards.
SPRIT A spar which crosses a mainsail diagonally from
the lower part of the mast to the peak of the sail.
STAND ON To continue on the same course.
STARBOARD SIDE The right side of a vessel when facing forward.
STAY A fore and aft wire supporting a mast.
STAYSAIL A headsail set on an inner forestay (from any mast).
STEERAGE WAY The minimum speed necessary before the rudder
will have control of the vessel’s direction.
STEM THE TIDE To proceed against the tidal stream at such a speed
that the vessel remains stationary over the ground.
Also, to turn the bows into the tidal stream.STERN GLAND A lubricated bearing at the point where the

8/3/2019 Sailing Manual
http://slidepdf.com/reader/full/sailing-manual 112/113
propeller shaft exits from the hull.
STORM JIB A very small jib made out of heavy canvas and
used in stormy weather.
SURGING The horizontal movement of a vessel alongside due
to waves or swell.
TACK A yacht is said to be on port tack when the wind iscoming from that particular side and the main boom
is being carried on the opposite side.
TACKLE A rope running through pulleys in order to gain a
mechanical increase in power.
TOERAIL See Bulwarks.
TOPPING LIFT A rope or wire from the end of the boom to the top
of the mast to prevent the boom from hitting the
deck when lowering the sail, and to relieve the sail
from the weight of the boom.
TOPSIDES The side of the boat between water and the deck.
TRANSIT Two objects in line are said to be ‘in transit’
TRANSOM The flat part of the stern of a vessel, at right angles
to the fore and aft line of the vessel.
TRIMARAN A triple hulled vessel.
TRIM To adjust the sail for the best possible speed. Also
to balance the weight in the hull.
TROT A line or system of mooring buoys between which
a number of small craft can be secured, head and
stern.
TROUGH The hollow between two waves.
TRYSAIL A small sail of very strong canvas used instead of the mainsail in heavy weather.
UNDER WAY When a vessel is not at anchor, or made fast to the
shore, or aground.
UTC Co-ordinated Universal Time. To pay out rope or
chain. Also shift of wind in clockwise direction.
VEER To pay out rope or chain. Also shift of wind in
clockwise direction.
VMG (GPS) Velocity Made Good.
WAY The motion of a vessel through the water.
WARPS Heavy ropes for towing or mooring.
WARP; TO To move a vessel by handling warps.
WEATHER HELM The tendency of a sailing vessel to try to turn up
into the wind unless the helmsman holds the helm
up.
WIND; HARD ON THE When sailing as close to the wind as possible with
advantage. PINCHING is sailing the vessel so
close to the wind that the sails shiver. LUFFING is
turning into the wind.
WINDLASS Winch to haul up anchor and chain.
WIND-RODE An anchored or moored vessel is wind-rode when
heading, or riding, into the wind.WORKING The slight movement of the vessel’s various parts

8/3/2019 Sailing Manual
http://slidepdf.com/reader/full/sailing-manual 113/113
which cause it to leak.
WORKING SAIL The fore and aft sails ordinarily used under average
force wind.
XTE (GPS) Cross Track Error
YAW Unavoidable oscillations of the vessels head either
side of the course being steered or when at anchor,due to wind and waves.
YAWL A twin masted vessel with the aft mast considerably
smaller than the main mast. The aft mast is stepped
aft of the rudder post.
The names of other parts of a yacht, sails and rigging are shown in the drawings in
chapters 1 and 2.