sam ii hr - statewide advantage for missouri · · 2017-03-28sam ii hr employee maintenance...
TRANSCRIPT

SAM II HR Employee Maintenance

Table of Contents
TOPIC 1: Introduction .......................................................... Page 2
TOPIC 2: Adding an Employee ............................................... Page 7
TOPIC 3: Establishing Employee Attributes............................Page 29
TOPIC 4: Employee ID and Name Change ..............................Page 61
TOPIC 5: Performing Personnel Actions ................................Page 70
TOPIC 6: Terminating Employees .........................................Page 82
TOPIC 7: Rehiring Employees ...............................................Page 96
TOPIC 8: Multiple Appointments........................................ Page 108
TOPIC 9: User Defined Windows ........................................ Page 120
TOPIC 10: Employee Maintenance Inquiries and Reports...... Page 130
Center for Management and Professional Development Information Technology and Computer Skills Training PAGE 2

TOPIC 1: INTRODUCTION TO EMPLOYEE MAINTENANCE SAM II HR Employee Maintenance processes support the establishment and maintenance of employee information. This includes basic employee information; employee attribute information such as addresses, emergency contacts, and licenses or certificates; and agency specific and accounting data. Personnel actions such as promotions and separations are also part of the employee maintenance process. The various employee maintenance inquiries will also be briefly discussed.
Center for Management and Professional Development Information Technology and Computer Skills Training PAGE 3

EMPLOYEE MAINTENANCE PROCESS
Step 1: Establish an Employment Status Maintenance Transaction (ESMT)
Step 2: Establish and Maintain Employee Attributes •Address (ADDR) •Attributes (ATTR) •Agency Specific and Accounting Data (AGYS) •Licenses and Certifications (LCNS) •Emergency Contact (EMER) •Pass (PASS) •Employee ID Change (EIDC) •Employee Name Change (ENCH) •User Defined Windows (USR2-USR9)
Step 3: Perform Personnel Actions •Promoting an Employee •Separating an Employee •Removing Previously Processed Personnel Actions •Correcting Previously Processed Personnel Actions
Step 4: Employee Maintenance Inquiries •Employee Roster by Name (QXRF) •Employee Roster by Employee ID (QXR2) •Employee Roster by Social Security Number (QXR4) •Employee Roster by Pay Location (QXR5) •Employee Roster by Agency/Org (QXR6) •Employee Folder (QXRSF) •Employee Pay Rate History (QRTE) •Employee Pay Summary Inquiry (QPSM) •Employment Verification (QVER) •Employee Education Summary (QEDS) •Historical Name Change Cross Reference (QNCX) •Employment Status Maintenance Log Detail (QESD) •County by Name (QCTY)
Center for Management and Professional Development Information Technology and Computer Skills Training PAGE 4

EMPLOYEE MAINTENANCE PROCESS The Employee Maintenance process allows for the establishment and maintenance of employee information and the completion of personnel actions. Remember, each employee must be tied to an approved and open position. One benefit of this link is that information that was already entered during the position control process can be inferred when you are establishing the employee. While the designation of the labor distribution profile was completed on position, you also have the opportunity to change this when you establish the employee. It is important to remember that any changes you make to the labor distribution only effect the employee and will not affect the position. The first step in the process to establish an employee is the completion of the Employment Status Maintenance (ESMT) transaction. Additional information is added using various employee attribute transactions. Personnel actions such as promoting or separating an employee are also handled using the ESMT. Establishing an Employee
The Employment Status Maintenance (ESMT) transaction is used to enter an employee in SAM II HR. The ESMT must be completed, approved and accepted by the system before any other transactions relating to a new employee can be processed. The ESMT window is comprised of five separate panels: Job Assignment, Dates, Assignment Attributes, Pay Parameters, and Certificate/Remark.
The ESMT requires five levels of approval. For UCP agencies, the first three approvals are applied by the agency and the last two approvals are applied by the Office of Administration, Division of Personnel (OA). Non-UCP agencies will determine how the five levels will be set in their agency, multiple levels of approval can be assigned to one person if the agency desires.
Establish and Maintain Employee Attributes
There are various transactions that record additional attribute information for an employee. These transactions are:
• Employee Address Maintenance (ADDR) – records employee home and mailing address information.
• Employee Attribute Maintenance (ATTR) – records basic employee information such as EEO information, date of birth, and veteran information.
• Agency Specific and Accounting Data (AGYS) – records agency-specific information and accounting attributes for an employee. Some agencies will break this down into the Agency Specific Data (AGYD) and Employee Accounting Data (AGYA) transactions. These agencies implement their human resources processes so that one person would not be able to enter all of this information on the AGYS.
Center for Management and Professional Development Information Technology and Computer Skills Training PAGE 5

• Licenses and Certifications (LCNS) – records information about an employee’s licenses or certifications.
• Emergency Contact (EMER) – records employee’s emergency contact information.
• Pass (PASS) – records information about passes issued to employees to access certain facilities.
• Employee ID Change (EIDC) – records any changes to an employee ID number.
• Employee Name Change (ENCH) – records any changes to an employee name.
• User Defined Window 1 (USR1) – records special date information such as employee’s total state service, service within a specific agency, and other agency defined dates of importance that are not captured elsewhere in SAM II.
• User Defined Window 2 (USR2) – records tickler dates and reasons for personnel/payroll actions that is not captured elsewhere in SAM II.
• User Defined Windows 3-9 (USR3 – USR9) – records agency specific information. These windows are designed to meet specific agency needs.
Perform Personnel Actions
The Employment Status Maintenance (ESMT) transaction is used for adding an employee to the system. It is also the transaction used to perform in-service personnel actions (promotions, reclassifications, salary changes, leaves of absence, etc.) and separations.
Employee Maintenance Inquiries
Employee maintenance inquiries allow you to view online information about employees or information you may need to complete the establishment of an employee. Inquiries are automatically updated once a transaction has received the final level of approval and is accepted by the system. The employee maintenance inquiries are:
• Employee Roster by Name (QXRF) – lists all employees and basic information sorted in alphabetical order by employee name.
• Employee Roster by Employee ID (QXR2) – lists all employees and basic information sorted by employee ID.
Center for Management and Professional Development Information Technology and Computer Skills Training PAGE 6

• Employee Roster by Social Security Number (QXR4) – lists all employees and basic information sorted by social security number.
• Employee Roster by Pay Location (QXR5) – lists all employees and basic information sorted by Pay Location codes, and then alphabetically by employee name.
• Employee Roster by Agency and Organization (QXR6) – lists all employees and basic information sorted first by agency, organization and then alphabetically by employee’s last name.
• Employee Pay Rate History (QRTE) – displays detailed pay rate information for an employee.
• Employee Pay Summary Inquiry (QPSM) – displays an employee’s earnings for a calendar year as well as the breakdown of earnings by quarter.
• Employment Verification (QVER) – displays consolidated employee information from the ESMT, ADDR, and ATTR transactions.
• Historical Name Change Cross-Reference (QNCX) – permits the tracking of name changes for applicants and employees by displaying a cross-reference of an applicant’s or employee’s historical and current names.
• Employment Status Maintenance Log Detail (QESD) – provides a quick way to scan a broad range of basic employee information that has been entered through the ESMT.
• County by Name (QCTY) – lists detailed county information that is sorted alphabetically by county name.
• Employee Service History (QEHS)- displays the SAM II personnel action information and Missouri Employment Service History (MESH) data in a summary format
• Employee Service History Detail (QEHD)- This window enables access to employee historical records in the Data Warehouse without having to log into the Data Warehouse front end
Center for Management and Professional Development Information Technology and Computer Skills Training PAGE 7

TOPIC 2: ADDING AN EMPLOYEE The objectives of this topic are to learn how to add an employee into SAM II HR, familiarize users with the role of the Employment Status Maintenance (ESMT) window, explain the distinctions between appointments and assignments, and provide a basic understanding of effective dating.
EMPLOYEE STATUS MAINTENANCE (ESMT)
Center for Management and Professional Development Information Technology and Computer Skills Training PAGE 8
ADDING AN EMPLOYEE To add an employee in SAM II HR, the Employment Status Maintenance (ESMT) window must be completed and approved. The ESMT establishes an employee in SAM II HR. It also sets up basic information and pay parameters for an employee. There are numerous transactions that record comprehensive employee attributes such as address, attributes, emergency contact, etc. The ESMT must be completed, approved, and accepted by the system before any other transactions related to a new employee may be processed.
Any new employee entered into the employee database must be tied to a position. To tie an employee with a position, the “Position Number” field must be populated.
The ESMT window is comprised of a header and five separate panels: Job Assignment, Dates, Assignment Attributes, Pay Parameters and Certificate/Remark. Some of the fields on each panel require completion in order to process the transaction. Other fields are optional for processing, but may be completed in order to track certain information. All fields will be discussed in this course.
The Header fields are always present no matter which panel is selected. It consists of basic information regarding the employee: Employee ID, Appointment ID, Alternate ID, Name, Effective Date, Expiration Date and Original Appointment Date.
The Job Assignment panel is made up of two parts. The first part captures information on the type of personnel action being performed (i.e., New Hire). The second part is Assignment Information, which associates the employee with the appropriate agency, organization and specifies assignment attributes. This is accomplished through populating the “Position Number” field on the ESMT.
The Dates panel allows the user to enter probation start and end dates. In addition, pay, benefits and leave progression dates can be specified if applicable.
The Assignment Attributes panel consists of the Position Attributes and Overrides. The Position Attributes specify various traits associated with a position such as Payroll Number, Title, Subtitle and Pay Class. When data inferred from the position information is used, most of these fields will be filled in with data from the Position Status Maintenance (PSMT) window. Depending on the policies of individual agencies, the user may be allowed to enter grade, pay policy, leave policy, benefits policy and FLSA status. Populating these fields will override employee specific data on the Title (TITL) and Subtitle (STTL) window.
The Pay Parameters panel allows the user to establish pay information that is specific to the employee. Population of fields in this panel is required depending upon the value entered for table-driven pay on the PSMT. If base pay is employee-specific, the pay parameters must be entered. When an employee is table-driven, base pay will not be used in this parameter. This panel includes pay type, amount percent indicator, effective date and expiration date.
Center for Management and Professional Development Information Technology and Computer Skills Training PAGE 9

Merit system agencies will use the Certificate/Remark panel which captures certification information and additional comments. This panel includes certificate number, certificate date and remarks. The Remarks section can be used by all agencies.
When the user enters the position number and updates the ESMT, position-related data will be brought forward from the PSMT to the ESMT. Understanding how overriding position-related information work on the ESMT plays an important role in completing the ESMT transaction. The position attributes inferred from the PSMT include Payroll Number, Title/Subtitle, Pay Class and Civil Service Status. In addition, if fields for Override Profile and Pay were populated on the PSMT, they will be brought into fields in the ESMT Overrides. These override fields consist of Grade, Pay Policy, Leave Policy, Benefits Policy, FLSA Exempt classification and FLSA Profile. All overrides for UCP agencies must be done at the position level on the PSMT. Likewise, the Table Driven Pay flag on the PSMT is referenced to verify if an employee’s pay rate is established on a table or at the employee level. These inferences take place when the user updates the ESMT entry by selecting Process: Update. The position attributes fields (Payroll Number, Title/Subtitle, and Pay Class) can be overridden on the ESMT. The only exception is that overriding “Title” must be in the same “Title Category” in which the position “Title” resides.
If the Table Driven Pay flag on the PSMT has a value of either “Use Table” or “Do Not Use Table,” the same values must be consistently selected on the ESMT. Otherwise, an error will be issued. If the PSMT option is “Determined by Employee,” then either a value of “Use Table” or “Do Not Use Table” can be selected. Rates for table-driven paid employees are set up on tables that are accessed using attributes such as grade and step. These tables are established for groups of employees who share the same pay rate structures. Choosing the option “Do Not Use Table” will require you to assign specific pay parameters to the employee.
The ESMT requires agency and/or Office of Administration, Division of Personnel approval before it is finally accepted by the system and updates the database. Uniform Classification and Pay agencies have three levels of approval on the ESMT, with the OA/Division of Personnel applying the fourth and fifth levels of approval. Non-UCP agencies apply approvals through the fifth level.
Center for Management and Professional Development Information Technology and Computer Skills Training PAGE 10

SCENARIO 1 A decision has been made by the Department of Insurance, Financial Institutions and Professional Registration (DIFP), to hire Jenny Sue Grant to fill the position of Personnel Analyst I effective today. This is Jenny’s first job with the State of Missouri. The first thing that needs to be done is to establish Jenny as an employee in SAM II HR using the Employment Status Maintenance (ESMT) transaction, followed by completing other transactions. The information below, which has been derived from Jenny’s application and resume, will be used.
SSN STUDENT CARD
Birthdate OCTOBER 23, 1970
Address 2401 EAST MCCARTY JEFFERSON CITY, MO 65101
Place of birth JEFFERSON CITY, MO
Ethnicity WHITE
Disability NONE
Citizenship Status NATURAL CITIZEN
Conviction NONE
Marital Status SINGLE
Country of Residence USA
Education at Appointment BACHELOR’S DEGREE IN BUSINESS ADMINISTRATION; MINOR IN COUNSELING
Veteran Information NOT A VETERAN
License/Certification Type CPR AND FIRST RESPONDER
Issue Country USA
Issue State MO License/Certificate Number 99-01
Effective Date FEBRUARY 1, 2013
Expiration Date FEBRUARY 1, 2020
Center for Management and Professional Development Information Technology and Computer Skills Training PAGE 11

Jenny resides with her sister, Jody, who is designated as her contact in case of emergency. Jody’s office phone number is 659-1003; their home number is 893-9891. Jenny will receive an employee ID badge and an office key.
It is necessary that additional information be acquired to establish Jenny as an employee in the system – that is, agency information such as: Position Number, Agency and Organization Codes, Personnel Action, Job/Employment Status information, salary information, and certificate information. The means of communicating this information to you may vary from one agency to another (standard written form, verbal communication from the hiring supervisor, etc.).
Next, we will walk you through the necessary steps to complete the ESMT on Jenny by providing the definition of each field on the transaction and the specific information to be entered.
Center for Management and Professional Development Information Technology and Computer Skills Training PAGE 12
EMPLOYMENT STATUS MAINTENANCE (ESMT)
Center for Management and Professional Development Information Technology and Computer Skills Training PAGE 13

EMPLOYMENT STATUS MAINTENANCE (ESMT) Following are instructions for completing the fields located on the ESMT. Each field will be noted as Required (completion is necessary for processing), Optional (optional for processing but may, at agency discretion, be completed in order to track certain information), Conditional (may or may not be completed based on other related factors), or Display Only (data in this field is inferred and for display only).
To open ESMT from SAM II HR Desktop Navigator window, click on the Go To icon. Type ESMT in the "CODE". Click on the Open button.
EMPLOYEE ID – Required. Enter the employee’s social security number. SEE STUDENT CARD.
APPOINTMENT ID – Conditional. This field requires input only if the employee is working in multiple positions concurrently. If processing a primary appointment, leave this field blank. If processing a secondary appointment, a character must be entered.
ALTERNATE ID – Not used by the State of Missouri.
PREFIX –Leave blank
FIRST – Required. Enter the employee’s first name. Type JENNY.
MIDDLE – Optional. Leave blank, or enter the employee’s middle name or initial. Type SUE.
LAST – Required. Enter the employee’s last name. Type GRANT.
SUFFIX – Optional. Leave blank, or enter the employee’s name suffix (valid values: II, III, IV, JD, JR, MD, PHD, SR). Valid values are located on the Name Suffix (SUFX) window.
EFFECTIVE DATE – Required. Enter the date (mm/dd/yy) the employee information is effective. Type TODAY’S DATE.
EXPIRATION DATE – Inferred. Displays the last date (mm/dd/yy) the employee information is in effect.
Center for Management and Professional Development Information Technology and Computer Skills Training PAGE 14

EMPLOYMENT STATUS MAINTENANCE (ESMT) ORIGINAL APPT DATE – Required. Enter the date (mm/dd/yy) of the employee’s initial employment with the state for this appointment. This is not a calculated date, as breaks in service are not considered. Type TODAY'S DATE.
JOB ASSIGNMENT
The Job Assignment panel captures information on the type of personnel action being performed (i.e., New Hire) and associates the employee with the appropriate agency, organization and position.
PERSONNEL ACTION – Required. Enter the appropriate personnel action code. Personnel action values for entering an employee include “NHIRE” (new hire) and “RHIRE” (rehire). All valid values are located on the Personnel Action Code (PACT) window. Enter “NHIRE” if the employee’s information does not exist on the database. Enter “RHIRE” if the employee’s information already exists on the database (i.e., the employee held an appointment in the past). Type NHIRE.
REASON – Required. Enter the reason code for the personnel action. Valid values are located on the Personnel Action Reason (PART) window. The valid values associated with entering an employee in the system begin with the letter “A”. Type A05.
JOB STATUS – Required. Enter the job status code to indicate the status of the employee’s appointment (i.e., temporary, probationary, etc.). Valid values are located on the Job Status (JOBS) window. Type P.
EMPLOYMENT STATUS – Required. Enter the employee’s employment status code. A code of “1” indicates an Active Employee. All valid values are located on the Employment Status (EMPS) window. Type 1.
AGENCY – Required. Enter the code for the agency to which the employee reports. Valid values are located on the Agency Index (AGCY) window. Type 375.
ORGANIZATION – Required. Enter the code for the organization to which the employee reports. Valid values are located on the Organization Index (ORGN) window. Type 1375.
POSITION NUMBER – Required. Enter the appropriate position number. The Position by Title Inquiry (QPTL) and the Position Status Inquiry (QPST) windows are available for reference. SEE STUDENT CARD.
Center for Management and Professional Development Information Technology and Computer Skills Training PAGE 15

% FULL-TIME – Required. Enter the percent of full-time the employee works in this position. For example, enter 1.0 if the employee works full-time or 0.5 if the employee works 50% time. Default is 1.0. Type 1.0.
TABLE DRIVEN PAY – Required. If “Use Table” or “Do Not Use Table” was selected on the Position Status Maintenance (PSMT) window, the information will infer from the PSMT. The “Use Table” option indicates that the employee’s base pay is table-driven (tied to a pay grid), such as UCP grid A, Highway Patrol grid D, Conservation grid, etc. If “Determine by Employee” was selected on the PSMT, the “Selection Required” field will infer on the ESMT, prompting the user to choose either “Use Table” or “Do Not Use Table,” whichever is applicable. Select USE TABLE.
STEP – Conditional. Enter the employee’s pay step code if “Use Table” is selected under “Table Driven Pay”; otherwise this field is optional. Valid values are located on the Step (STEP) window. Type D.
EEO FULL-TIME – Required. For primary appointments, select Yes if the employee is considered full-time for EEO classification purposes. Select No if the employee is not considered full-time for EEO classification purposes. Select N/A if there is a secondary appointment ID in the “Appointment ID” field, as EEO information is reported only on the primary appointment. Default is N/A. Select YES.
DATES
The Dates panel allows the user to enter probation start and end dates. Also, pay, benefits, and leave progression dates can be specified if applicable.
PROBATION START – Conditional. Required if Probation Required Flag on the Personnel Action (PACT) window for the specified Personnel Action is Yes; otherwise, this field is optional. Enter the start date of the employee's probation period, if applicable. Type TODAY'S DATE.
PROBATION END – Conditional. Required if Probation Start Date is entered; otherwise, leave blank. Enter the end date of the employee's probation period, if applicable. Type the date that is 6 MONTHS FROM TODAY.
Note: Completion of the Probation Start and Probation End date fields is required when processing personnel actions/reasons that have probationary periods associated with them, such as new hires in classified positions in merit UCP agencies. Some actions will not require completion of these two fields. The Probation End Date will be specific to the Agency/Title.
PAY PROGRESSION START -This field is not used by the State of Missouri.
Center for Management and Professional Development Information Technology and Computer Skills Training PAGE 16

TIME LIMIT CONTROL – Optional. To track employees with limited assignment (i.e. probationary, temporary) enter the date the employee should no longer be paid for this assignment. This date could be the day the probationary period ends or the last day of a temporary assignment.
BENEFITS PROGRESSION START – Required. This field will be used to determine employee eligibility for the MO State Employee Deferred Compensation (with match). SAM II will subtract the Benefits Progression Start date from the Benefits Progression date to determine if an employee qualifies for a match. (Pending 1 year of continuous state service). This process will enroll the employee into this benefit match program. For employees with a break in service, agencies will need to calculate and enter the appropriate benefit progression start date. Type TODAY'S DATE.
LEAVE PROGRESSION START – Required. Enter the date (mm/dd/yy) that begins the counting period for an employee’s leave tenure. If an employee has never worked for a state agency, this would be their initial start date. If an employee has previously worked for the state, this date must be a calculated date that includes prior state tenure. For prior continuous service, enter the initial employment start date; for prior service, which included break(s), this date is calculated by subtracting the break period(s) from the total service. Type TODAY'S DATE.
ASSIGNMENT ATTRIBUTES
The Assignment Attributes panel consists of the Position Attributes and Overrides. The Position Attributes specify various traits associated with a position such as Payroll Number, Title, Subtitle, and Pay Class. Depending upon the agency’s policies, the user may be allowed to enter grade, pay policy, leave policy, benefits policy, and FLSA status to override employee specific data on the Title (TITL) and Subtitle (STTL) window.
In this scenario, information in the Position Attributes fields will be inferred from the Position Status Maintenance (PSMT) transaction that has already been established. When you select Process: Update, information already established on the SAM II HR database will automatically populate the appropriate fields.
Position Attributes
PAYROLL NUMBER – Required. If left blank, this field will be inferred from the Position Status Maintenance (PSMT) window when the transaction is processed. Enter the employee's payroll number code to override the Payroll Number inferred from the PSMT. Valid values are located on the Payroll Number (PYNO) window. Type 375
TITLE – Required. If left blank, this field will be inferred from the Position Status Maintenance (PSMT) window when the transaction is processed. Enter the employee's title code (i.e., class code/index number) to override the title inferred from the Position Status Maintenance (PSMT). The title input must be either identical to the title on the PSMT or in the same “Title Category” in which the title from the PSMT resides. Valid values are
Center for Management and Professional Development Information Technology and Computer Skills Training PAGE 17

located on the Title (TITL) window. Note that all UCP title valid values begin with the number “0”. Title valid values for non-UCP agencies begin with a character that corresponds with the agency’s identifiers. Type 000627.
SUB-TITLE – Required. If left blank, this field will be inferred from the Position Status Maintenance (PSMT) window when the transaction is processed. Enter the employee’s sub-title code to override the sub-title inferred from the PSMT. The sub-title establishes different pay, leave and deduction policies associated with a particular title. Valid values are located on the Sub-Title (STTL) window. Type L1
PAY CLASS – Required. If left blank, this field will be inferred from the Position Status Maintenance (PSMT) window when the transaction is processed. Enter the employee's pay class code (i.e., hourly/positive pay, salaried/exception pay, etc.) to override the pay class inferred from the PSMT. Valid values are located on the Pay Class (PYCL) window. Note: The PAY CLASS field should not be used to change an employee’s work schedule unless changing the number of days off in the work schedule. Changing an employee’s pay class on an ESMT impacts the employee’s pay, not just the work schedule. Work schedule changes that include the same number of days off should be done using the WORK CYCLE field on the AGYS transaction. Type HRLY
TIME CLASS – Not used by the State of Missouri.
CIVIL SERVICE STATUS – Inferred. This field is inferred from the Position Status Maintenance (PSMT) window when the transaction is processed.
ASSIGNMENT TYPE – Optional. If a value is not selected, this field will be inferred from the Position Status Maintenance (PSMT) window when the transaction is processed. Defaults to None. Select a value to indicate the employee's assignment type. Valid values are Permanent, Temporary and None.
Overrides
If an override for Grade, Pay Policy, Leave Policy, Benefits Policy, and FLSA Profile exists on the Position Status Maintenance (PSMT) window for the position, it will be inferred when the transaction is processed. If no overrides exist, the following fields in the Overrides portion of the ESMT will remain blank
GRADE – Optional. Override capability is determined by Civil Service Status. To override the grade, enter the grade that is appropriate for the employee. Valid values are located on the Grade (GRDE) window.
PAY POLICY – Optional. Override capability is determined by Civil Service Status. To override the pay policy associated with employee’s title/sub-title, enter the pay policy which should govern the employee’s pay. Valid values are located on the Pay Policy (PPOL) window.
Center for Management and Professional Development Information Technology and Computer Skills Training PAGE 18

LEAVE POLICY – Optional. Override capability is determined by Civil Service Status. To override the leave policy associated with the employee’s title/sub-title, enter the leave policy which should govern the employee’s leave accrual and usage. Valid values are located on the Leave Policy (LPOL) window.
BENEFITS POLICY – Optional. Override capability is determined by Civil Service Status. To override the benefits policy associated with the employee’s title/sub-title, enter the benefits policy which should govern the employee’s deductions. Valid values are located on the Deduction Policy (DPOL) window.
FLSA – Conditional. Override capability is determined by Civil Service Status. This field must be left blank for secondary appointment. Otherwise, this field is optional. Select a value to override the FLSA status associated with the employee’s title. Valid values are Exempt, Non-exempt and No Override.
FLSA PROFILE – Conditional. Override capability is determined by Civil Service Status. Must be left blank for secondary appointments. Otherwise, this field is optional. To override the FLSA profile associated with the employee’s sub-title, enter the FLSA profile code which should govern the way FLSA is calculated for the employee. Valid values are located on the FLSA profile (FLPR) window.
PAY PARAMETERS
The Pay Parameters panel is used to enter regular pay for employees whose pay is not table-driven.
PAY TYPE – Conditional. Enter the type of pay (i.e., emergency squad, shift differential, etc.). Valid values are located on the Event (EVNT) window. If “Use Table” was not selected on the Job Assignment panel of the ESMT, at least one pay type must be entered to represent the employee’s base pay. If “Use Table” was selected, pay type represents additional types of pay above base pay.
A/P IND – Conditional. Specify whether the rate of pay is expressed as an amount or percent. Valid values are “A” for amount and “P” for percent. An entry is required if the “Use Table” was not selected on the Job Assignment panel of the ESMT and “Pay Type” represents base pay.
AMOUNT/PERCENT – Conditional. An entry in this field is required if “A/P Ind” is specified; otherwise, leave blank.
Enter a dollar amount only if the “A/P Ind” is “A” and the pay type amount does not appear on the Pay Event Type (PPET) window (i.e., the amount represents base pay for an unclassified employee).
Center for Management and Professional Development Information Technology and Computer Skills Training PAGE 19

Note: The amount that is entered is the amount that will be paid. For example, an employee with a monthly base pay rate of $2,000 (semi-monthly, $1,000) works 50% time. The amount entered is $500 (50% of the semi-monthly $1,000 rate).
Enter a percentage if the “A/P Ind” is “P”, whether or not the percentage appears on the Pay Event Type (PPET) window. The percentage must be entered using a decimal point (i.e., 9% would be entered .09).
EFFECTIVE DATE – Conditional. Enter the date (mm/dd/yy) that pay type information is effective. Entry is required if “Pay Type” is entered; otherwise, leave blank.
EXPIRATION DATE – Optional. This field defaults to “99/99/99”; however, an entry can be made if an expiration date is relevant.
CERTIFICATE/REMARK
Certificate information is available to merit Uniform Classification and Pay (UCP) agencies through the Management and Applicant Information Resource System (MAIRS).
The Certificate portion of the Certificate/Remarks panel provides merit UCP agencies the ability to associate a certificate number and certificate date with an appointment. The Remarks portion provides space for remarks/comments regarding the action taken.
CERTIFICATE NUMBER – Conditional. For Merit Agencies, enter the Certificate Number from which the employee was selected. For non-merit agencies, leave blank. Type: 00500.
CERTIFICATE DATE – Conditional. For Merit Agencies, enter the Effective Date of the Certificate. For non-merit agencies, leave blank. Type: 09/01/13.
REMARKS -Optional. Enter remarks to record additional information pertaining to a personnel action.
Center for Management and Professional Development Information Technology and Computer Skills Training PAGE 20

PROCESS AND UPDATE EMPLOYMENT STATUS MAINTENANCE (ESMT) You have completed entering the field information for the ESMT. Remember that the Process: Update step checks the transaction for errors. After a transaction is free of errors, the necessary levels of approvals must be applied. Remember that the type of transaction and, in some cases, whether or not you are a UCP or Non-UCP agency, determine levels of approval needed for a transaction. Your ability to apply approvals is determined by the security profile that you have been assigned.
Workflow also plays a role in the approval process. Items will enter and leave your worklists based upon what stage of the editing and approval process the transaction is in, what your security profile allows you to do, and your agency's workflow rules.
Remember, in training you have an Approval Level 2 security profile and the instructor has an Approval Level 5 security profile. When you get back to your offices, how many approvals you are able to apply and how things move within your worklists will be determined by your security profile and your agency's workflow rules.
Now, let’s complete the approval processing of the ESMT:
Step 1 Select Process: Update.
If the transaction contains errors, messages will appear specifying the errors. You would need to correct the errors and repeat Step 1. If your transaction is free of errors, a message will appear in the yellow message bar at the bottom of the transaction window telling you that approvals are ready to be applied.
In some instances, error messages pertaining to appointments will appear. These errors must be resolved by individuals having the appropriate security/ approval authority.
An employee can hold more than one appointment in the system. Examples might include an employee transferring from one agency to another without a break in service and an employee actually occupying two appointments in the same or different agencies.
If the message “DUPS Existing Appointment” appears, information on that particular employee already exists on the database. This problem will be resolved in a later topic.
Center for Management and Professional Development Information Technology and Computer Skills Training PAGE 21

PROCESS AND UPDATE EMPLOYMENT STATUS MAINTENANCE (ESMT) You have completed entering the field information for the ESMT and it is time to update and approve the transaction. Remember that the Process: Update step checks the transactions for errors. After a transaction is free of errors, the necessary levels of approvals are applied. The type of transaction and whether or not you are a UCP or Non-UCP agency, determine Approval levels for each transaction. Your ability to apply approvals is determined by the security profile that you have been assigned. Also, remember that items will enter and leave your worklists based upon what stage of the editing and approval process the transaction is in, what your security profile allows you to do, and your agencies workflow rules.
Now, let’s complete the approval processing of the ESMT:
Step 2 Close the transaction. Workflow will now route the transaction as needed.
Note: For training purposes, you will stop at this point. The instructor will complete the next step. However, in the “real world”, you would perform one of the following steps to apply additional levels of approval. Your ability to apply different levels of approval will be determined by your security profile.
Applying Additional but Not Final Approvals
Step 3 Select Process: Approve.
Step 4 Close the transaction. Workflow will now route the transaction as needed.
OR
Applying Final Approval
Step 3 Select Process: Approve-Update.
Step 4 Close the transaction.
Center for Management and Professional Development Information Technology and Computer Skills Training PAGE 22
Center for Management and Professional Development Information Technology and Computer Skills Training PAGE 23

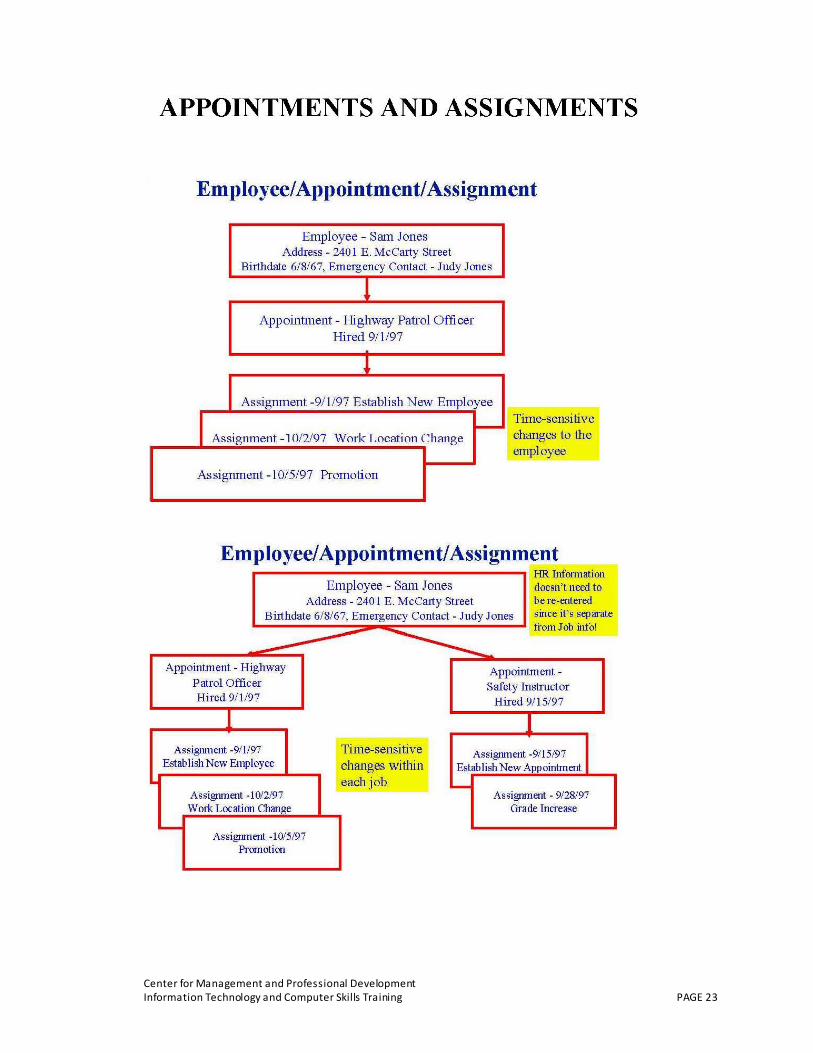
APPOINTMENTS AND ASSIGNMENTS You have been introduced to the primary transaction used to initially enter an employee into the system, the ESMT. Now, let's discuss "appointments" and "assignments."
Appointment – The particular job (or jobs) that an employee holds.
Appointment Record – If an employee holds more than one job with the State of Missouri, that employee may have an Appointment Record for each job for the discrete period of time the job is held.
Primary Appointment - If an employee holds only one job with the State of Missouri that is their primary appointment. If an employee holds more than one job, the job representing the largest FTE will be their primary appointment. This will impact EEO and FLSA processing and reporting.
Secondary Appointment – Represents additional job(s) an employee may hold.
Assignment – Provides activity information about the job an employee holds for a specific period of time. For example, a new hire is an assignment; a promotion is a different assignment with the same “job”. Any personnel action on an ESMT or AGYS is an “assignment”.
Assignment Record - An Assignment record is created every time something unique about an employee’s appointment changes. For example, if an employee gets a new position or title, or is promoted or demoted, a new Assignment Record is created by the system. This provides a complete electronic personnel file about each discrete appointment or condition under which the employee works. One assignment record must be effective at all times, and there cannot be any gaps between Assignment Records. It is important to know that personnel information is stored in the system at the employee level. The first illustration on the left indicates an example of appointment/assignments of an employee. The appointment is the employee’s job - Highway Patrol Officer; the assignments (or activities within the job) include establishing a new employee, changing the work location and receiving a promotion. These represent time-sensitive changes to the employee. The second illustration reflects a second appointment and related assignments for the same employee. As noted in this illustration, HR (or personnel) information does not need to be re-entered since it is separate from Job information.
Center for Management and Professional Development Information Technology and Computer Skills Training PAGE 24

Assignments and Effective-Dating
Judy Jones-Hired Effective Date Expiration Date 1/15/13 3/31/13
Judy Jones-Promoted Effective Date Expiration Date 4/1/13 5/31/13
Judy Jones-Change Work Location Effective Date Expiration Date 6/1/13 99/99/99
Center for Management and Professional Development Information Technology and Computer Skills Training PAGE 25
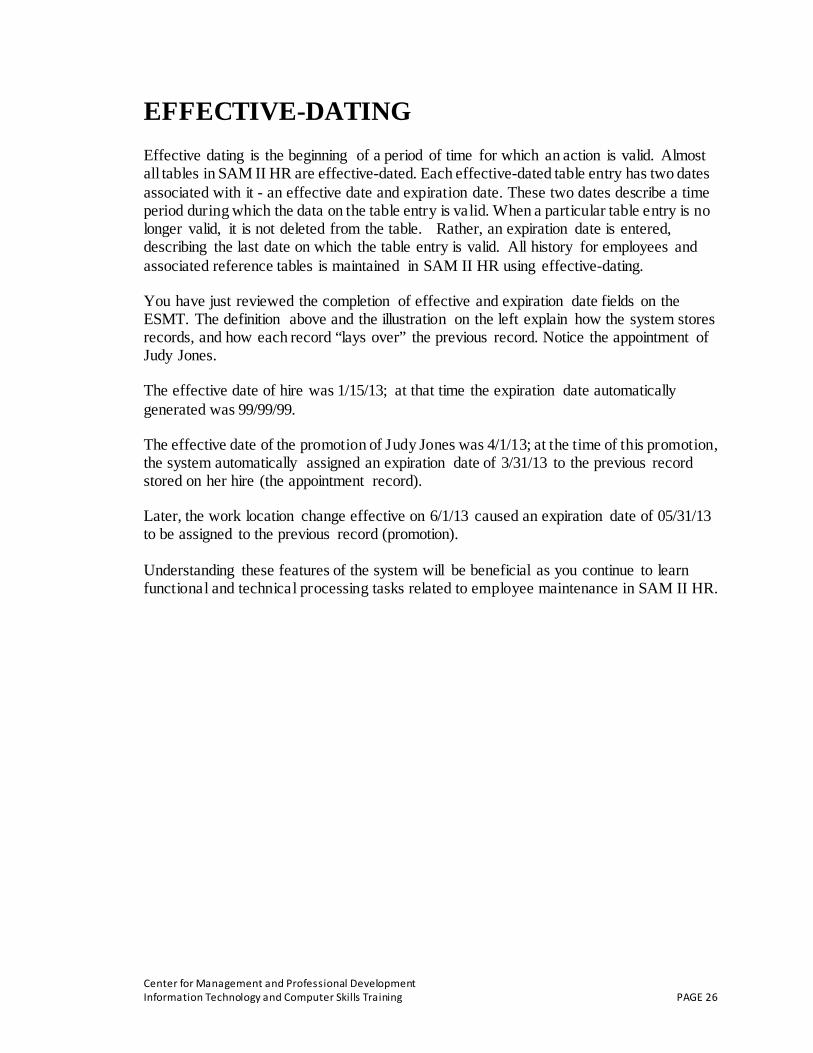
EFFECTIVE-DATING Effective dating is the beginning of a period of time for which an action is valid. Almost all tables in SAM II HR are effective-dated. Each effective-dated table entry has two dates associated with it - an effective date and expiration date. These two dates describe a time period during which the data on the table entry is valid. When a particular table entry is no longer valid, it is not deleted from the table. Rather, an expiration date is entered, describing the last date on which the table entry is valid. All history for employees and associated reference tables is maintained in SAM II HR using effective-dating.
You have just reviewed the completion of effective and expiration date fields on the ESMT. The definition above and the illustration on the left explain how the system stores records, and how each record “lays over” the previous record. Notice the appointment of Judy Jones.
The effective date of hire was 1/15/13; at that time the expiration date automatically generated was 99/99/99.
The effective date of the promotion of Judy Jones was 4/1/13; at the time of this promotion, the system automatically assigned an expiration date of 3/31/13 to the previous record stored on her hire (the appointment record).
Later, the work location change effective on 6/1/13 caused an expiration date of 05/31/13 to be assigned to the previous record (promotion).
Understanding these features of the system will be beneficial as you continue to learn functional and technical processing tasks related to employee maintenance in SAM II HR.
Center for Management and Professional Development Information Technology and Computer Skills Training PAGE 26

Scenario 2 Now that you have an understanding of how to enter an employee in SAM II HR, let’s complete an ESMT based on the scenario below. Information such as Employee ID and Position Number will be given to you on your student card.
Your Department has hired Ms. Carla J. Benson to fill a part-time position of Personnel Analyst effective today. Below you will see information required to complete this exercise. Employee ID: SEE STUDENT CARD Appointment ID Blank Effective Date: TODAY'S DATE Original Appointment Date: TODAY'S DATE Date Personnel Action/Reason: NHIRE/A05 Job Status: P Employment Status: 1 Agency: 375 Organization: 1375 Position Number: SEE STUDENT CARD % Full Time: 1.0 Table Driven Pay: USE TABLE Step: E EEO FULL TIME Probation Start: TODAY'S DATE Probation End: 6 MONTHS FROM TODAY'S DATE Benefits Progression Start: TODAY'S DATE Leave Progression Start: TODAY'S DATE Payroll: 375 Title: 000627 Subtitle: L1 Certificate Number: 00700 Pay Class: HRLY Certificate Date: 02/01/00
Center for Management and Professional Development Information Technology and Computer Skills Training PAGE 27

TOPIC 3: ESTABLISHING EMPLOYEE ATTRIBUTES The purpose of this topic is to present the procedures related to entering basic employee information in SAM II HR. Once the ESMT has been completed, approved and accepted, there are several other transactions that are used to enter employee information. This topic will look at the three additional required transactions - Employee Address Maintenance (ADDR), Employee Attributes Maintenance (ATTR), and Agency Specific and Accounting Data (AGYS) transactions. Several optional transactions will also be covered, including the Licenses and Certifications (LCNS), Emergency Contact Information (EMER), and Pass Information (PASS).
Center for Management and Professional Development Information Technology and Computer Skills Training PAGE 28
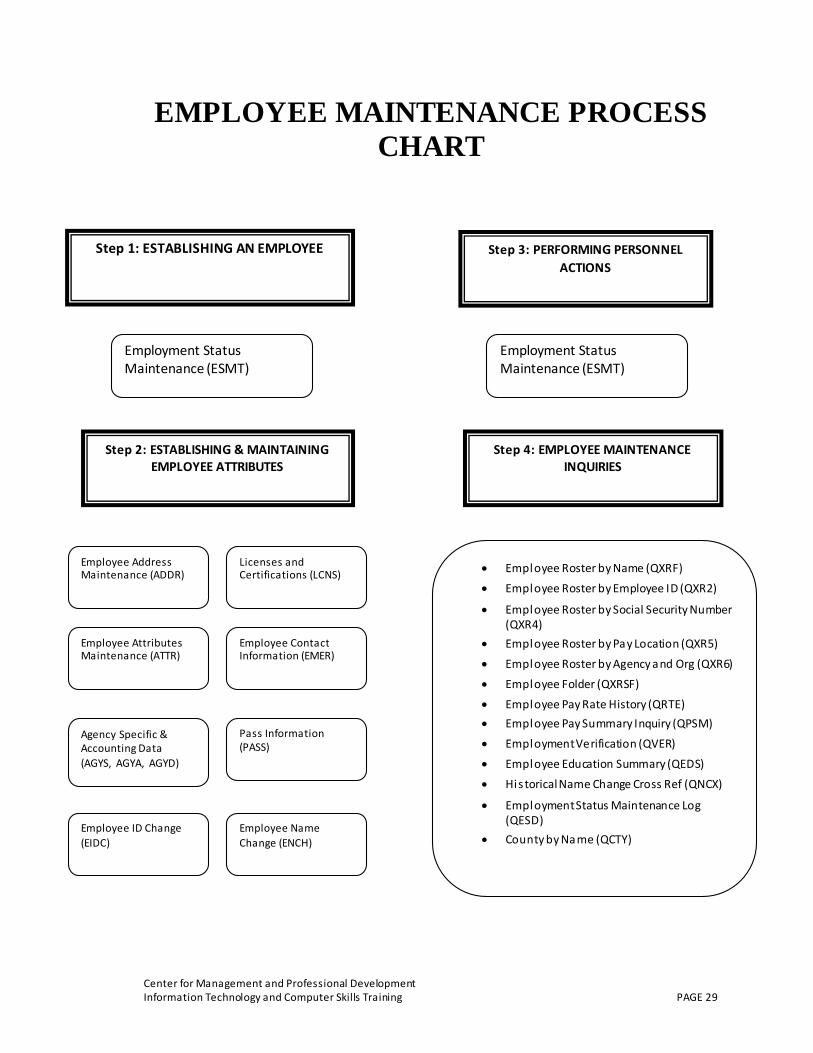
EMPLOYEE MAINTENANCE PROCESS CHART
Step 1: ESTABLISHING AN EMPLOYEE
Employment Status Maintenance (ESMT)
Step 2: ESTABLISHING & MAINTAINING EMPLOYEE ATTRIBUTES
Employee Address Maintenance (ADDR)
Employee Attributes Maintenance (ATTR)
Agency Specific & Accounting Data (AGYS, AGYA, AGYD)
Employee ID Change (EIDC)
Step 3: PERFORMING PERSONNEL ACTIONS
Employment Status Maintenance (ESMT)
Step 4: EMPLOYEE MAINTENANCE INQUIRIES
• Employee Roster by Name (QXRF)
• Employee Roster by Employee ID (QXR2)
• Employee Roster by Social Security Number (QXR4)
• Employee Roster by Pay Location (QXR5)
• Employee Roster by Agency and Org (QXR6)
• Employee Folder (QXRSF)
• Employee Pay Rate History (QRTE) • Employee Pay Summary Inquiry (QPSM)
• Employment Verification (QVER)
• Employee Education Summary (QEDS)
• Historical Name Change Cross Ref (QNCX)
• Employment Status Maintenance Log (QESD)
• County by Name (QCTY)
Employee Contact Information (EMER)
Pass Information (PASS)
Employee Name Change (ENCH)
Licenses and Certifications (LCNS)
Center for Management and Professional Development Information Technology and Computer Skills Training PAGE 29

EMPLOYEE INFORMATION
Once the ESMT has been completed, approved and accepted, there are additional transactions the user must enter to capture basic employee information into the system. These transactions relate to basic personal information and specific accounting information. Processing of the ESMT and other necessary transactions is required before any employee can be paid by SAM II HR.
Transactions required to enter basic employee information are the Employee Address Maintenance (ADDR), the Employee Attributes Maintenance (ATTR) and the Agency Specific and Accounting Data (AGYS). The ADDR records the employee’s home address and mailing address. The ATTR records basic employee personal attributes such as EEO information, date of birth and veteran information. The AGYS records agency specific information and accounting attributes relating to the employee.
There are other transactions used by SAM II HR to enter additional employee information. These transactions are optional to complete and may or may not be used by your agency. This topic will include the steps necessary to fill out the Licenses and Certifications (LCNS), the Emergency Contact Information (EMER) and the Pass Information (PASS) transactions.
Center for Management and Professional Development Information Technology and Computer Skills Training PAGE 30

EMPLOYEE ADDRESS MAINTENANCE (ADDR)
Center for Management and Professional Development Information Technology and Computer Skills Training PAGE 31

EMPLOYEE ADDRESS MAINTENANCE (ADDR) Let’s take a look at the Employee Address Maintenance (ADDR) transaction. As mentioned earlier, the ADDR transaction is used to view or record an employee's address and phone number. It is also used to record any changes to the address or phone. Now we will enter Jenny Grant’s address information. Her address is as follows: 2401 East McCarty, Jefferson City, Mo., 65101.
Step 1 To open ADDR from the SAM II Desktop Navigator window, click on the Go To icon. Type ADDR in the “CODE”. Click on the Open button.
Step 2 Populate the following fields on the ADDR.
NAME - Inferred. The name of the employee is displayed.
EMPLOYEE ID - Required. Enter the employee’s social security number. SEE STUDENT CARD.
EFFECTIVE DATE - Required. Enter the date the home or mailing address is effective. Type TODAY'S DATE.
EXPIRATION DATE – Inferred. This field defaults to “99/99/99”.
RELEASE HOME ADDRESS - Required. Select “Yes” if the employee has authorized the state to release the address to non-State of Missouri parties. Select NO.
MAILING ADDRESS SAME AS HOME ADDRESS - Required. The employee’s home address will serve as their mailing address if the “Mailing Address Same as Home Address” checkbox is selected. If the employee’s mailing address is different from the home address, do not select. CHECK BOX.
RESIDENCY-Not used by the State of Missouri.
Home Address
HOME ADDRESS - Required. Enter the employee’s home address (street number, street, and apartment number, if applicable). Use the second line to continue the home address if additional space is needed. Type 2401 EAST MCCARTY.
CITY - Required. Enter the city name of the employee’s home address. Type JEFFERSON CITY.
STATE - Required. Enter the state code of the employee’s home address. Valid values are located on the State (ST) window. Type MO.
Center for Management and Professional Development Information Technology and Computer Skills Training PAGE 32
EMPLOYEE ADDRESS MAINTENANCE (ADDR) ZIP - Required. Enter the zip code of the employee’s home address. Type 65101.
COUNTY – Required. Enter the code indicating the county in which the employee resides. Valid values are located on the County (CNTY) window. Type 051.
PHONE – Optional. Leave blank, or enter the telephone number (area code and number) of the employee’s home address. Type 573-893-9891.
EXT – Optional. Leave blank, or enter the extension to the employee’s home address telephone number.
COUNTRY – Conditional. Enter the country code of the employee’s home address. Valid values are located on the Country (CTRY) window.
Mailing Address
MAILING ADDRESS - Conditional. Required if the “Mailing Address Same as Home Address” checkbox is not selected. Enter the employee’s mailing address (street number, street, and apartment number, if applicable).
CITY - Conditional. Required if the “Mailing Address Same as Home Address” checkbox is not selected. Enter the city name of the employee’s mailing address.
STATE - Conditional. Required if the “Mailing Address Same as Home Address” checkbox is not selected. Enter the state code of the employee’s mailing address. Valid values are located on the State (ST) window.
ZIP -Conditional. Required if the “Mailing Address Same as Home Address” checkbox is not selected. Enter the zip code of the employee’s mailing address.
COUNTRY – Conditional. Required if the “Mailing Address Same as Home Address” checkbox is not selected. Default is USA. If different, enter the country code of the employee’s mailing address. Valid values are located on the Country (CTRY) window. Let’s complete the approval processing of the ADDR:
Step 1 Select Process: Update.
If the transaction contains errors, messages will appear specifying the errors. You would need to correct the errors, and select Process: Update. If your transaction is free of errors, a message will appear in the yellow message bar at the bottom of the transaction window telling you that the update was successful.
Center for Management and Professional Development Information Technology and Computer Skills Training PAGE 33

CHANGING EMPLOYEE INFORMATION ON THE (ADDR)
Center for Management and Professional Development Information Technology and Computer Skills Training PAGE 34

CHANGING EMPLOYEE INFORMATION ON THE (ADDR) Jenny's mailing address has changed. In order to change the mailing address on the ADDR, the information must be entered on the ADDR.
Step 1 Open the ADDR.
Step 2 Enter the required information in the following field. EMPLOYEE ID (social security number) SEE STUDENT CARD. Select DISPLAY: BROWSE DATA to view the existing address information.
Step 3 Enter the information you are changing on the ADDR window. EFFECTIVE DATE – Type TODAY’S DATE
HOME ADDRESS – Type 2104 EAST MCCARTY.
NOTE: In SAM II HR, the Effective Date and Expiration Date fields are very important. When a new effective date is entered, an expiration date will be entered on the previous transaction, which is one day before the new effective date. This enables the State of Missouri to maintain historical data. You have completed entering the field information for the ADDR and it is time to update the transaction.
Select Process: Update.
If the transaction contains errors, messages will appear specifying the errors. You would need to correct the errors and, select Process: Update. If your transaction is free of errors, a message will appear in the yellow message bar at the bottom of the transaction window telling you that the update was successful.
Center for Management and Professional Development Information Technology and Computer Skills Training PAGE 35

EMPLOYEE ATTRIBUTE MAINTENANCE (ATTR)
Center for Management and Professional Development Information Technology and Computer Skills Training PAGE 36

EMPLOYEE ATTRIBUTE MAINTENANCE (ATTR) The Employee Attribute Maintenance (ATTR) transaction is used to record and view basic employee personal attributes such as date of birth, education at appointment and veteran information. Let’s enter Jenny Grant’s information. She was born on October 23, 1970 in Jefferson City, MO. Jenny is a single white woman with a Bachelor’s degree in Business Administration. She graduated in 1993 from Missouri University.
Step 1 To open ATTR from the SAM II Desktop Navigator window, click on the Go To icon. Type ATTR in the “CODE”. Click on the Open button.
Step 2 Populate the following fields on the ATTR.
EMPLOYEE ID - Required. SEE STUDENT CARD.
NAME - Inferred. The name of the employee is displayed.
Personal Information
BIRTHDATE – Required. Enter the employee’s birthdate (mm/dd/ccyy). Type 10/23/1970.
SOCIAL SECURITY NUMBER - Inferred. If this field is left blank, it will default to employee ID. The employee's SSN will automatically be displayed based on the fact that the State of Missouri is using the SSN as the employee ID.
PLACE OF BIRTH - Optional. Enter the place the employee was born. Type JEFFERSON CITY, MO.
ETHNICITY – Required. Enter the employee’s ethnicity code. Valid values are located on the Ethnicity (ETHN) window. Type W.
DISABILITY - Optional. Enter the code for the employee's self-declared disability. Valid values are on the Disability Type (DSBL) window.
CITIZENSHIP STATUS – Required. Select the radio button to indicate the employee’s citizenship status. Select NATURAL CITIZEN.
GENDER – Required. Select the employee’s gender. Select FEMALE.
CONVICTION - Optional. Defaults to N/A. Refer to agency policy. Select NO.
DATE OF DEATH - Optional. Enter the date of the employee's death.
Center for Management and Professional Development Information Technology and Computer Skills Training PAGE 37

EMPLOYEE ATTRIBUTE MAINTENANCE (ATTR) Step 2 Continue to populate the fields on the ATTR.
MARITAL STATUS - Optional. Enter the code for marital status. Valid values are located on the Marital Status (MSTS) window. Type S.
COUNTRY OF RESIDENCE - Optional. Enter the country where the employee has residency status. Valid values are located on the Country (CTRY) table. Type USA.
Note: Notice that both the Education at Appointment and the Veteran Information are optional sections. It will be up to your agency as to whether or not you will fill out these sections. If you fill out the Veteran Information section, you must fill out the entire section, including discharge, dates and service branch. You may choose not to fill out this section because you do not have all of the required information available for a specific employee.
Education at Appointment
VERIFY DEGREE -Optional. Check this box to verify if employee has a degree at the time of employment. Leave blank if the employee does not have a degree. CHECK BOX.
DEGREE - Conditional. Required if Verify Degree is checked (Yes). Enter the degree code for the degree obtained. Valid values are located on the Degree (DEGR) window. Type B.
MAJOR - Conditional. Required if Verify Degree is checked (Yes). Enter the code for the educational major. Valid values are located on the Formal Education Major (MAJR) window. Type BA.
SCHOOL - Conditional. Optional if Verify Degree is checked (Yes). Enter the code for the school attended. Valid values are located on the School (SCHL) window. Type UMC.
YEAR COMPLETED - Conditional. Required if Verify Degree is checked (Yes). Enter the year the employee finished the degree in ccyy format. Type 1993.
Veteran Information
VETERAN STATUS – Optional. Default is "Unknown". Enter the code that indicates whether the employee is a veteran. Valid values are located on the Veteran Status (VETS) window.
Center for Management and Professional Development Information Technology and Computer Skills Training PAGE 38

EMPLOYEE ATTRIBUTE MAINTENANCE (ATTR) PREF CREDIT USED DATE – Optional. Leave blank, or enter the date (mm/dd/yy) that the employee used veteran's credits.
SERVICE BRANCH - Conditional. Required if Veteran Status indicates the employee is a veteran. Enter the code that indicates the branch of the Armed Forces in which the employee has served. Valid values are located on the Military Branch (MILB) window.
RESERVE BRANCH - Conditional. Required if Veteran Status indicates the employee is a veteran. Enter the code that indicates whether the employee is in the reserves, and what kind of reserve the employee is in. Valid values are located on the Military Branch (MILB) window.
RETRO SENIORITY DATE – Optional. Leave blank or enter the employee's retroactive seniority date (mm/dd/yy).
HIGHEST RANK - Conditional. Required if Veteran Status indicates the employee is a veteran. Enter the code that indicates the highest military rank held by the employee while in active service. Valid values are located on the Military Rank (MILR) window.
DISCHARGE - Conditional. Required if Veteran Status indicates the employee is a veteran. Enter the discharge type code. Valid values are located on the Discharge Type (DSCG) window.
DISCHARGE DATE - Conditional. Required if Veteran Status indicates the employee is a veteran. Enter the date the employee was discharged from the military.
User Fields
USER FIELDS 1 - Optional. These fields are for agency specific use.
USER FIELDS 2 - Optional. These fields are for agency specific use.
USER FIELDS 3 - Optional. These fields are for agency specific use.
USER FIELDS 4 - Optional. These fields are for agency specific use.
USER FIELDS 5 - Optional. These fields are for agency specific use.
Center for Management and Professional Development Information Technology and Computer Skills Training PAGE 39

PROCESS AND UPDATE EMPLOYEE ATTRIBUTE MAINTENANCE (ATTR)
You have completed entering the field information for the ATTR and it is time to update the transaction.
Select Process: Update.
If the transaction contains errors, messages will appear specifying the errors. You would need to correct the errors and select Process: Update. If your transaction is free of errors, a message will appear in the yellow message bar at the bottom of the transaction window telling you that the update was successful.
Center for Management and Professional Development Information Technology and Computer Skills Training PAGE 40

AGENCY SPECIFIC AND ACCOUNTING DATA (AGYS) So far in this course you have added an employee to SAM II HR by completing the ESMT and other required transactions (ADDR and ATTR). The system also requires accounting and agency information to be established for the employee. Completion and processing of the Agency Specific and Accounting information transaction windows are discussed here. The associated transactions are the Employee Accounting Data (AGYA) window, the Agency Specific Data (AGYD) window, and the combined view of the two windows - the Agency Specific and Accounting Data (AGYS) window. These screens can be used to make either a permanent or a one-time change to an employee’s accounting and agency information. The Employment Status Maintenance (ESMT) transaction, which records basic personnel and pay information on a new employee, must be completed, approved and accepted by the system before the Agency Specific and Accounting Data (AGYS) transaction can be completed.
The Agency Specific and Accounting Data (AGYS) window provides you the ability to modify parameters that apply to the employee’s agency identification information (i.e., home organization, pay and work location and check distribution information) and employee accounting information (i.e., the employee’s labor distribution). This can be used by anyone who has authority to view and change both location and labor distribution data.
The Employee Accounting Data (AGYA) window is used to record and view agency-specific accounting attributes for a particular employee. The employer is responsible for maintaining the accounting attributes for the employee's labor expense distribution.
The Agency Specific Data (AGYD) window is used to record and view information regarding an employee's home organization, pay and work locations, agency-specific identification, seniority, work cycle, and check distribution.
Agency and accounting information is needed by SAM II HR to correctly accumulate year-to-date information. It also describes where the money used to pay the employee comes from. This is part of the labor distribution for that employee, i.e., how the employee's labor is broken out and where (which account/"accounting bucket") each chunk of labor/work will be charged.
Center for Management and Professional Development Information Technology and Computer Skills Training PAGE 41

AGENCY SPECIFIC AND ACCOUNTING DATA (AGYS)
Temporary accounting event changes can also be handled. For example, if an employee works on a temporary assignment for another organization, you can charge those hours to the organization where the employee is working without changing the employee’s permanent assignment data. The way to change the accounting for an employee is by overriding the current labor distribution associated with that employee. These overrides are located on the AGYA and AGYS screens. For example if an employee’s regular days off are Saturday and Sunday but they need to change that to Tuesday and Wednesday of this week. The Work cycle needs to be modified.
The transactions required to enter/change basic employee information include the Employee Accounting Data (AGYA) window, the Agency Specific Data (AGYD) window, and the Agency Specific and Accounting Data (AGYS) window. The AGYS contains all of the fields of both the AGYA and the AGYD windows. The AGYS window is used to view\add\modify\update both the agency-specific information and accounting attributes relating to an employee.
Users with access to Payroll can update/view the AGYA and AGYS both. Users with access to Personnel can update/view the AGYD only. Some users may have the ability to view additional windows dependent on their inquiry access.
Center for Management and Professional Development Information Technology and Computer Skills Training PAGE 42
AGENCY SPECIFIC AND ACCOUNTING DATA (AGYS) We will continue to enter information for Jenny Grant, this is Jenny’s first job with the State of Missouri.
Step 1 To open AGYS from the SAM II Desktop Navigator window, click on the Go To icon. Type AGYS in the “CODE”. Click on the Open button.
Step 2 Populate the following fields on the AGYS.
NAME – Inferred. The employee’s full name (last name, first name, and middle initial) is displayed.
EMPLOYEE ID – Required. Enter the employee’s social security number. SEE STUDENT CARD.
APPOINTMENT ID – Conditional. If the employee has only a primary appointment, leave this field blank. This field is populated only if the employee is working in multiple positions concurrently. If the employee has a secondary appointment, i.e., holds more than one position, enter a character in this field to indicate which position is affected.
Select DISPLAY: BROWSE DATA.
Step 3 Populate the remaining fields on the AGYS window.
Agency Information
AGENCY ACTION – Required. Enter the appropriate personnel action code for an employee, which is AGY*. Type AGY*.
REASON – Required. Enter the reason code for the action. Valid values are located on the Personnel Action Reason (PART) window. Type C54.
Center for Management and Professional Development Information Technology and Computer Skills Training PAGE 43

AGENCY SPECIFIC AND ACCOUNTING DATA (AGYS) EFFECTIVE DATE – Required. Enter the date (mm/dd/yy) the employee information becomes effective. Type TODAY'S DATE.
EXPIRATION DATE – Inferred. Displays the last date (mm/dd/yy) the agency-specific information is in effect. Note: The system displays 99/99/99 as the expiration date on the most recent transaction. As a subsequent transaction is completed, the expiration date for the previous transaction is automatically updated to the day before the effective date of the new transaction.
HOME AGENCY – Inferred. Displays the code for the agency to which the employee reports.
HOME ORGANIZATION – Required. Enter the code for the organization to which the employee reports. Valid values are located on the Organization (ORGN) window. Type 1375.
PAY LOCATION – Required. Enter the code identifying the location to which an employee’s paycheck will be routed. Valid values are located on the Location (LOC) window. Type 375.
WORK LOCATION – Conditional. If the Pay Location and Work Location are the same, then the value for Work Location will be inferred from Pay Location. If Pay Location and Work Location are different, then a Work Location must be entered. Valid values are located on the Location (LOC) window.
WORK LOCATION PHONE 1 – Optional. Leave this field blank or enter the employee’s first work location telephone.
Center for Management and Professional Development Information Technology and Computer Skills Training PAGE 44

AGENCY SPECIFIC AND ACCOUNTING DATA (AGYS) EXT (1) – Optional. Leave this field blank. Or enter the extension to the employee’s first work location telephone number.
AGENCY SPECIFIC ID – Optional. Leave this field blank or enter the employee’s agency specific identification number.
WORK LOCATION PHONE 2 – Optional. Enter the employee’s second work location phone number.
EXT (2) – Optional. Leave this field blank or enter the extension to the employee’s second work location telephone number.
SENIORITY DATE – Optional. Leave this field blank or enter the employee’s seniority date.
SENIORITY NUMBER – Optional. Leave this field blank or enter the employee’s seniority number.
WORK CYCLE – Optional. Enter the code that defines the scheduled shifts, hours, and days that constitute the employee’s work cycle. Valid values are located on the Work Cycle (WKCY) window.
Note: The WORK CYCLE field on the AGYS should be used to change an employee’s work schedule if the number of days off is the same as the previous work schedule. The Pay Class will need to be changed if the number of days off has changed from the employee’s previous work schedule. Refer to Topic 5 – Performing Personnel Actions for more information on changing an employee’s Work Cycle and/or Pay Class. Refer to the Pay For Agencies course, Topic 3 – Pay Calculations for more information on changing an employee’s Pay Class when moving the employee from exception to positive paid or vice versa.
Center for Management and Professional Development Information Technology and Computer Skills Training PAGE 45
LABOR DISTRIBUTION OVERRIDE OPTION - Required. Enter the override option. This specifies the option used to manage labor cost accounting attributes. This field displays a message “Selection Required.” This is not a valid entry; it only indicates that a valid option must be selected to complete this field. The valid options, found in the drop down box, are:
• Use Entered Accounting Values – This option requires entry of accounting distribution, which will be used as override information.
• Use Entered Profile - This option requires entry of a labor distribution profile, which will be used as override information.
• Use Position Assignment - This allows the accounting attributes assigned to the employee's position to be used.
Select USE POSITION ASSIGNMENT
The State of Missouri highly recommends that labor distribution profiles be established at the position level (on the PSMT), not at the employee level. In most cases, the labor distribution profile established at the position level will be used to pay a new employee. Should the profile change, it can be temporarily overridden, for a specified period of time, at the employee level on the AGYS.
If the profile established at the position level is being used, Use Position Assignment will be selected.
To override the profile established on the position and generate pay for the employee from another source, select Use Entered Profile or Use Entered Accounting Values.
Choosing Use Entered Accounting Values requires that the accounting attributes, such as Fund, Agency, Organization/Sub, be entered in the Override Accounting Distribution portion of the AGYS. This customizes the labor distribution profile and charges labor costs to one accounting distribution.
Choosing Use Entered Profile requires an entry in the Labor Distribution Profile field and signifies that a pre-determined profile is appropriate for the employee.
Center for Management and Professional Development Information Technology and Computer Skills Training PAGE 46

AGENCY SPECIFIC AND ACCOUNTING DATA (AGYS) LABOR DISTRIBUTION PROFILE - Conditional. This is required if “Use Entered Profile” is selected as the Labor Distribution Override Option. Otherwise leave this field blank. If Use Entered Profile is selected, select the appropriate code listed on the Labor Distribution Profile (LDPR) window that matches the profile from which pay should be generated.
Note: The remaining fields on the AGYS window below this point are used only if the choice on the Labor Distribution Override Option is “Use Entered Accounting Values.” Some of them are required, while others are optional.
Override Accounting Distribution
FUND - Conditional. Required if “Labor Distribution Override Option” is “Use Entered Accounting Values”; otherwise, leave blank. Enter the fiscal or accounting entity under which the position falls. Valid values are located on the Fund Index (FUND) window.
AGENCY -Conditional. Required if the “Labor Distribution Override Option” is “Use Entered Accounting Values”; otherwise, leave blank. Enter the override agency code. Agency must be valid with the entered fund. Valid fund and agency combinations are located on the Fund Agency Index (FAGY) window.
ORGANIZATION -Conditional. Required if “Labor Distribution Override Option” is “Use Entered Accounting Values”; otherwise, leave blank. Enter the override organization code. Valid values are located on the Organization Index (ORGN) window.
SUB-ORGANIZATION - Conditional. Optional if “Labor Distribution Override Option” is “Use Entered Accounting Values” and “Organization” is entered; otherwise, leave blank. Enter a sub-organization code. Valid values are located on the Sub-Organization (SORG) window.
APPR UNIT (Appropriation Unit) -Conditional. Required if “Labor Distribution Override Option” is “Use Entered Accounting Values”; otherwise, leave blank. Enter the appropriation unit code representing the dollar amount designated by law for a specific purpose. Valid values are located on the Appropriation Index (APPR) window.
Center for Management and Professional Development Information Technology and Computer Skills Training PAGE 47

AGENCY SPECIFIC AND ACCOUNTING DATA (AGYS) ACTIVITY - Conditional. Required if “Labor Distribution Override Option” is “Use Entered Accounting Values”; otherwise leave blank. Enter the activity code used for a further breakdown of financial activity. Valid values are located on the Activity Index (ACTV) window.
FUNCTION – Conditional. Required if “Labor Distribution Override Option” is “Use Entered Accounting Values”; otherwise leave blank. Enter the function code representing the budget for a group-related activity that is aimed at accomplishing a major service or regulatory responsibility. Valid values are located on the Function (FUNC) window.
OBJECT – Conditional. Required if “Labor Distribution Override Option” is “Use Entered Accounting Values”; otherwise, leave blank. Enter the object code corresponding to the object of expense provided by the position. Valid values are located on the Object Index (OBJT) window.
SUB-OBJECT -Conditional. Optional if “Labor Distribution Override Option” is “Use Entered Accounting Attributes” and “Object” is entered; otherwise, leave blank. Enter a sub-object code if a further breakdown of object is employed. Valid values are located on the Sub-Object (SOBJ) window.
JOB -Conditional. Optional if “Labor Distribution Override Option” is “Use Entered Accounting Values”; otherwise, leave blank. Enter the job code used to track specific costs associated with particular projects or jobs. Valid values are located on the Job Index (JOBT) window.
REPORTING CATEGORY - Conditional. Optional if “Labor Distribution Override Option” is “Use Entered Accounting Values”; otherwise, leave blank. Enter the reporting category into which the position falls. Valid values are located on the Reporting Category (RPTG) window.
CHECK DISTRIBUTION – Required. Select a value that denotes where the employee’s paycheck is to be delivered. Valid values are:
“Home” if the check is to be mailed to the employee’s home “Pay Location” if the check is to be sent to a specified pay location
Center for Management and Professional Development Information Technology and Computer Skills Training PAGE 48

PROCESS AND UPDATE AGENCY SPECIFIC AND ACCOUNTING DATA (AGYS) You have entered the field information for the AGYS and it is time to update and approve the transaction. Remember that the Process: Update step checks the transactions for errors. After a transaction is free of errors, the necessary levels of approvals are applied. The type of transaction and, in some cases, whether or not you are a UCP or Non-UCP agency, determine Approval levels for each transaction. Your ability to apply approvals is determined by the security profile that you have been assigned. Also, remember that items will enter and leave your worklists based upon what stage the editing and approval process the transaction is in, what your security profile allows you to do, and your agency’s workflow rules.
Now, let’s complete the approval processing of the AGYS.
Step 1 Select Process: Update.
If the transaction contains errors, messages will appear specifying the errors. You would need to correct the errors and repeat Step 1. If your transaction is free of errors, a message will appear in the yellow message bar at the bottom of the transaction window telling you that approvals are ready to be applied.
Step 2 Close the AGYS window. Workflow will now route the transaction as needed.
Note: For training purposes, you will stop at this point. The instructor will complete the next step. However, in the “real world”, you would perform one of the following steps to apply additional levels of approval. Your ability to apply different levels of approval will be determined by your security profile.
Center for Management and Professional Development Information Technology and Computer Skills Training PAGE 49

PROCESS AND UPDATE AGENCY SPECIFIC AND ACCOUNTING DATA (AGYS) Let’s continue to complete the approval processing of the AGYS. Applying Additional but Not Final Approvals Step 3 Select Process: Approve. Step 4 Close the transaction. Workflow will now route the transaction as needed. OR
Applying Final Approval
Step 3 Select Process: Approve-Update.
Step 4 Close the transaction.
Center for Management and Professional Development Information Technology and Computer Skills Training PAGE 50

LICENSES AND CERTIFICATIONS (LCNS) The Employment Status Maintenance (ESMT) transaction must be completed, approved and accepted by the system before the Licenses and Certifications (LCNS) transaction can be completed. The LCNS is an optional transaction used to record any professional licenses or certificates that an employee might have. It is also used to track the expirations of these licenses and certifications. Looking into the profile of Jenny Sue Grant it is discovered that she has a CPR and First Responder certificate.
To open LCNS from the SAM II Desktop Navigator window, click on the Go To icon. Type LCNS in the “CODE”. Click on the Open button.
NAME -Inferred. The name of the employee is displayed.
EMPLOYEE ID – Required. Enter the employee’s social security number. SEE STUDENT CARD.
LICENSE/CERTIFICATION TYPE -Required. Enter the code for the type of license/certificate being recognized. Valid values are located on the License Type (LTYP) window. Type CPR1S.
ISSUE COUNTRY - Optional. Enter the code for the country that issued the license. Valid values are located on the Country (CTRY) window. Type USA.
ISSUE STATE - Optional. Enter the state that issued the license. Valid values are located on the State (ST) window. Type MO.
LICENSE/CERTIFICATE NUMBER – Required. Enter the number of the license or certificate. Type 99-01.
EFFECTIVE DATE – Required. Enter the date (mm/dd/yy) the information is effective. Type 02/01/13.
EXPIRATION DATE – Optional. Default is 99/99/99. Enter the last date (mm/dd/yy) the license/certificate is in effect, if applicable. Type 02/01/15 COMMENTS – Optional. Enter any additional comments. You have completed entering the field information for the LCNS and it is time to update the transaction.
Select Process: Update. If the transaction contains errors, messages will appear specifying the errors. You would need to correct the errors and select Process: Update. If your transaction is free of errors, a message will appear in the yellow message bar at the bottom of the transaction window telling you that the update was successful.
Center for Management and Professional Development Information Technology and Computer Skills Training PAGE 51

EMERGENCY CONTACT INFORMATION (EMER)
Center for Management and Professional Development Information Technology and Computer Skills Training PAGE 52
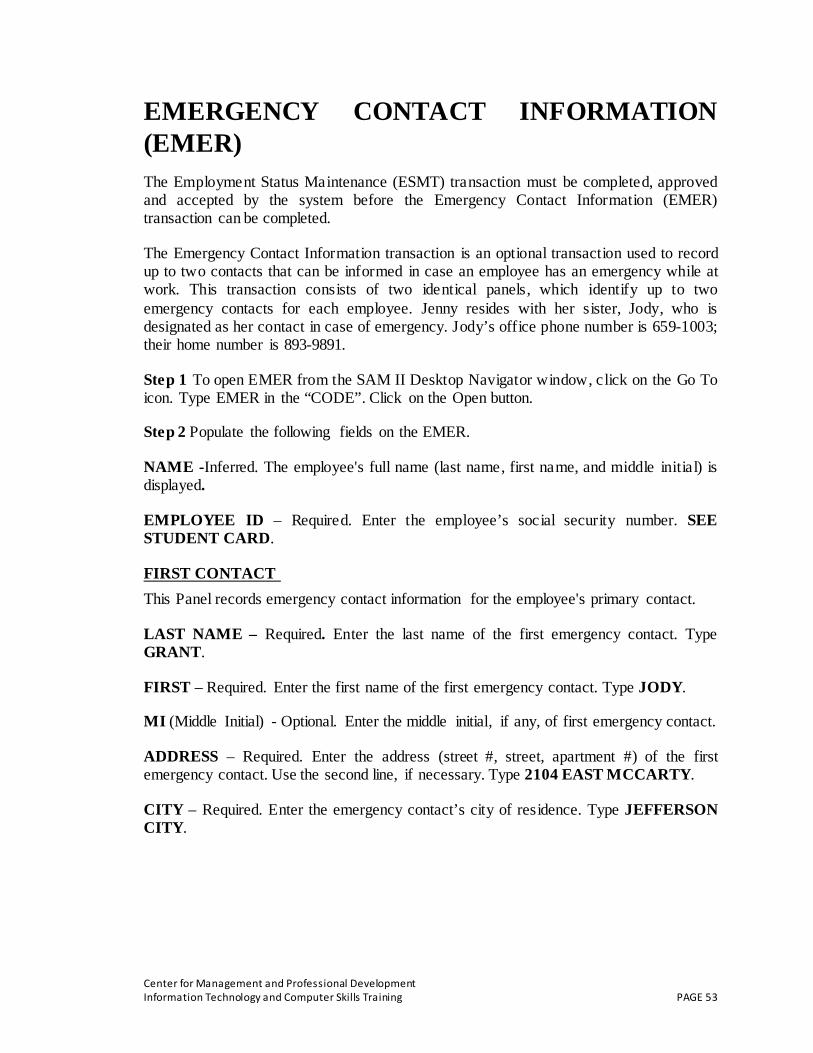
EMERGENCY CONTACT INFORMATION (EMER) The Employment Status Maintenance (ESMT) transaction must be completed, approved and accepted by the system before the Emergency Contact Information (EMER) transaction can be completed.
The Emergency Contact Information transaction is an optional transaction used to record up to two contacts that can be informed in case an employee has an emergency while at work. This transaction consists of two identical panels, which identify up to two emergency contacts for each employee. Jenny resides with her sister, Jody, who is designated as her contact in case of emergency. Jody’s office phone number is 659-1003; their home number is 893-9891.
Step 1 To open EMER from the SAM II Desktop Navigator window, click on the Go To icon. Type EMER in the “CODE”. Click on the Open button.
Step 2 Populate the following fields on the EMER.
NAME -Inferred. The employee's full name (last name, first name, and middle initial) is displayed.
EMPLOYEE ID – Required. Enter the employee’s social security number. SEE STUDENT CARD.
FIRST CONTACT This Panel records emergency contact information for the employee's primary contact.
LAST NAME – Required. Enter the last name of the first emergency contact. Type GRANT.
FIRST – Required. Enter the first name of the first emergency contact. Type JODY.
MI (Middle Initial) - Optional. Enter the middle initial, if any, of first emergency contact.
ADDRESS – Required. Enter the address (street #, street, apartment #) of the first emergency contact. Use the second line, if necessary. Type 2104 EAST MCCARTY.
CITY – Required. Enter the emergency contact’s city of residence. Type JEFFERSON CITY.
Center for Management and Professional Development Information Technology and Computer Skills Training PAGE 53

EMERGENCY CONTACT INFORMATION (EMER) STATE – Required. Enter the emergency contact’s state of residence. Type MO.
ZIP - Optional. Enter the emergency contact's zip code, if known. Type 65101.
COUNTRY - Optional. This field will default to USA. Enter the country in which the emergency contact lives. Valid values are located on the Country (CTRY) window. Type USA.
HOME PHONE – Conditional. Entry in this field is required if the Work Phone field is left blank. Enter the home telephone number (area code and number) of the first emergency contact. Type 573-893-9891.
EXT - Optional. Enter the four-digit phone number extension.
WORK PHONE – Conditional. Entry in this field is required if the Home Phone field is left blank. Enter the work telephone number (area and number) of the first emergency contact. Type 573-659-1003.
EXT - Optional. Enter the four digit phone number extension.
RELATIONSHIP - Optional. Enter the appropriate code to indicate the relationship of the employee to the emergency contact. Valid values are located on the Relationship (RELT) window. Type SISTR.
COMMENTS- Optional. Enter any comments you may have.
SECOND CONTACT
This Panel records emergency contact information for the employee's secondary contact.
LAST NAME – Required. Enter the last name of the first emergency contact.
FIRST – Required. Enter the first name of the first emergency contact.
MI (Middle Initial) - Optional. Enter the middle initial, if any, of first emergency contact.
Center for Management and Professional Development Information Technology and Computer Skills Training PAGE 54

EMERGENCY CONTACT INFORMATION (EMER) ADDRESS – Required. Enter the address (street #, street, apartment #) of the first emergency contact. Use the second line, if necessary.
CITY – Required. Enter the emergency contact’s city of residence.
STATE – Required. Enter the emergency contact’s state of residence.
ZIP - Optional. Enter the emergency contact's zip code, if known.
COUNTRY - Optional. This field will default to USA. Enter the country the emergency contact lives in. Valid values are located on the Country (CTRY) window.
HOME PHONE – Conditional. Entry in this field is required if the Work Phone field is left blank. Enter the home telephone number (area code and number) of the first emergency contact.
EXT - Optional. Enter the four digit phone number extension.
WORK PHONE – Conditional. Entry in this field is required if the Home Phone field is left blank. Enter the work telephone number (area and number) of the first emergency contact.
EXT - Optional. Enter the four digit phone number extension.
RELATIONSHIP - Optional. Enter the appropriate code to indicate the relationship of the employee to the emergency contact. Valid values are located on the Relationship (RELT) window. COMMENTS - Optional. Enter any comments you may have.
You have completed entering the field information for the EMER and it is time to update the transaction.
Select Process: Update.
If the transaction contains errors, messages will appear specifying the errors. You would need to correct the errors and select Process: Update. If your transaction is free of errors, a message will appear in the yellow message bar at the bottom of the transaction window telling you that the update was successful.
Center for Management and Professional Development Information Technology and Computer Skills Training PAGE 55

PROCESS AND UPDATE EMERGENCY CONTACT INFORMATION (EMER) .
Center for Management and Professional Development Information Technology and Computer Skills Training PAGE 56
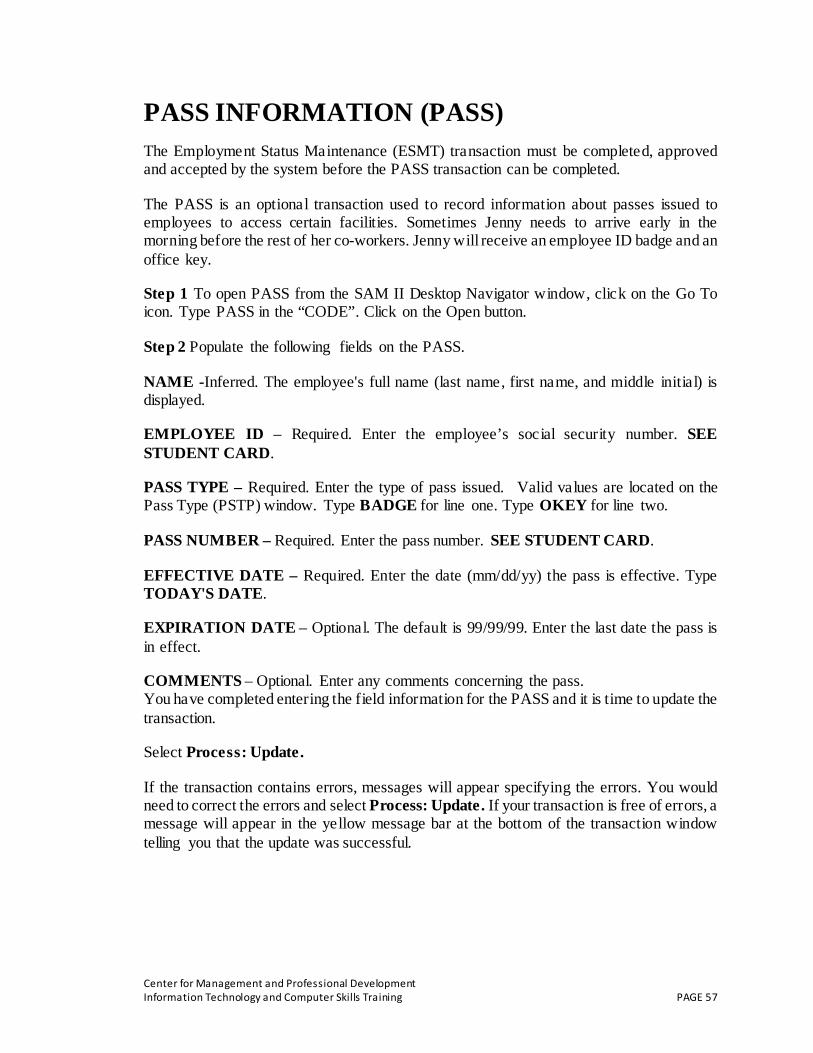
PASS INFORMATION (PASS) The Employment Status Maintenance (ESMT) transaction must be completed, approved and accepted by the system before the PASS transaction can be completed.
The PASS is an optional transaction used to record information about passes issued to employees to access certain facilities. Sometimes Jenny needs to arrive early in the morning before the rest of her co-workers. Jenny will receive an employee ID badge and an office key.
Step 1 To open PASS from the SAM II Desktop Navigator window, click on the Go To icon. Type PASS in the “CODE”. Click on the Open button.
Step 2 Populate the following fields on the PASS.
NAME -Inferred. The employee's full name (last name, first name, and middle initial) is displayed.
EMPLOYEE ID – Required. Enter the employee’s social security number. SEE STUDENT CARD.
PASS TYPE – Required. Enter the type of pass issued. Valid values are located on the Pass Type (PSTP) window. Type BADGE for line one. Type OKEY for line two.
PASS NUMBER – Required. Enter the pass number. SEE STUDENT CARD.
EFFECTIVE DATE – Required. Enter the date (mm/dd/yy) the pass is effective. Type TODAY'S DATE.
EXPIRATION DATE – Optional. The default is 99/99/99. Enter the last date the pass is in effect.
COMMENTS – Optional. Enter any comments concerning the pass. You have completed entering the field information for the PASS and it is time to update the transaction.
Select Process: Update.
If the transaction contains errors, messages will appear specifying the errors. You would need to correct the errors and select Process: Update. If your transaction is free of errors, a message will appear in the yellow message bar at the bottom of the transaction window telling you that the update was successful.
Center for Management and Professional Development Information Technology and Computer Skills Training PAGE 57
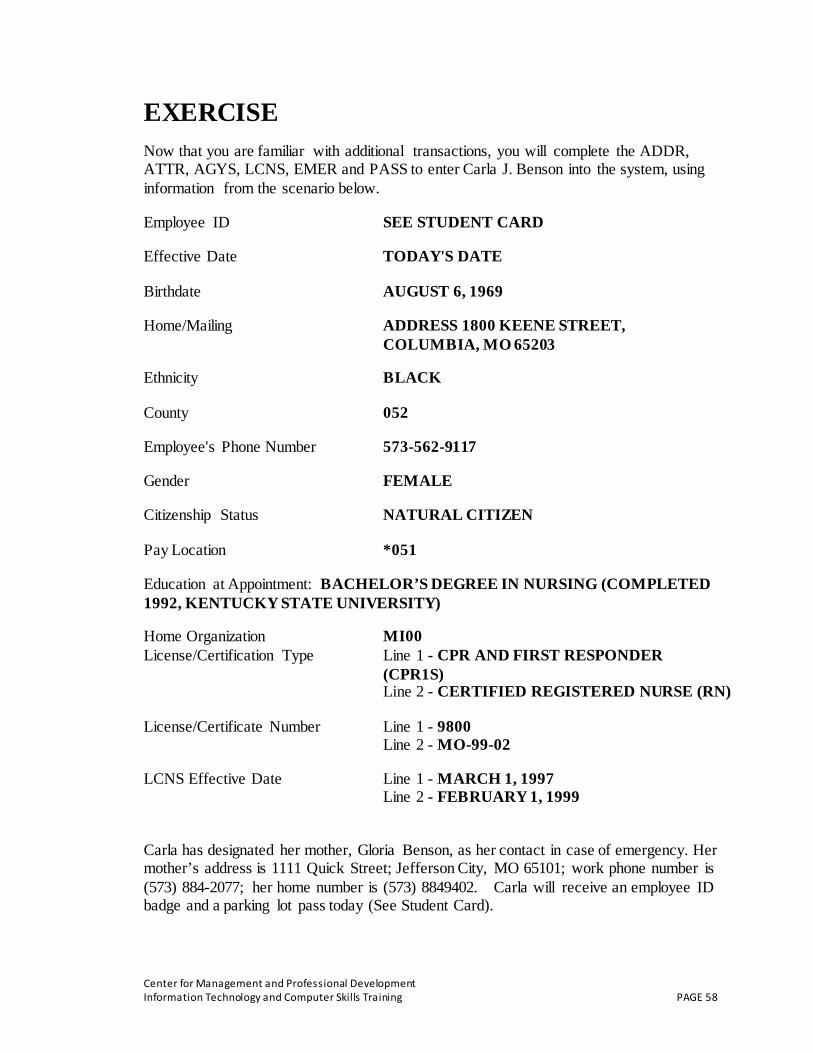
EXERCISE Now that you are familiar with additional transactions, you will complete the ADDR, ATTR, AGYS, LCNS, EMER and PASS to enter Carla J. Benson into the system, using information from the scenario below.
Employee ID SEE STUDENT CARD
Effective Date TODAY'S DATE
Birthdate AUGUST 6, 1969
Home/Mailing ADDRESS 1800 KEENE STREET, COLUMBIA, MO 65203
Ethnicity BLACK
County 052
Employee's Phone Number 573-562-9117
Gender FEMALE
Citizenship Status NATURAL CITIZEN
Pay Location *051
Education at Appointment: BACHELOR’S DEGREE IN NURSING (COMPLETED 1992, KENTUCKY STATE UNIVERSITY)
Home Organization MI00 License/Certification Type Line 1 - CPR AND FIRST RESPONDER
(CPR1S) Line 2 - CERTIFIED REGISTERED NURSE (RN)
License/Certificate Number Line 1 - 9800 Line 2 - MO-99-02
LCNS Effective Date Line 1 - MARCH 1, 1997 Line 2 - FEBRUARY 1, 1999
Carla has designated her mother, Gloria Benson, as her contact in case of emergency. Her mother’s address is 1111 Quick Street; Jefferson City, MO 65101; work phone number is (573) 884-2077; her home number is (573) 8849402. Carla will receive an employee ID badge and a parking lot pass today (See Student Card).
Center for Management and Professional Development Information Technology and Computer Skills Training PAGE 58

TOPIC 4: EMPLOYEE IDENTIFICATION NUMBER AND EMPLOYEE NAME CHANGE At some point, it will become necessary to edit or change basic employee information. This topic will describe how to change the employee's ID and name. The transactions associated with these tasks are the Employee ID Change (EIDC) and the Employee Name Change (ENCH).
Center for Management and Professional Development Information Technology and Computer Skills Training PAGE 59

EMPLOYEE IDENTIFICATION CHANGE (EIDC)
Center for Management and Professional Development Information Technology and Computer Skills Training PAGE 60

EMPLOYEE IDENTIFICATION CHANGE (EIDC) The Employment Status Maintenance (ESMT) transaction, which records basic personnel and pay information on a new employee, must be completed, approved and accepted by the system before the Employee ID can be changed.
The Employee ID is established initially on the ESMT. This suffices until an employee ID change becomes necessary. The transaction required to change the employee ID is the Employee ID Change (EIDC) window. This window has only two fields that must be completed. It is one of the most straightforward windows in SAM II HR. If you do not know the existing employee ID, you can look it up on the Employee Roster by Employee Name (QXRF) window.
SCENARIO Jenny Sue Grant’s employee ID was previously entered in the system by mistake. It is necessary that this be corrected. As a result, we will need to complete and process the Employee ID Change (EIDC) window.
To open EIDC from the SAM II Desktop Navigator window, click on the Go To icon. Type EIDC in the “CODE”. Click on the Open button.
Populate the following fields on the EIDC.
NAME – Inferred. The employee's full name (last name, first name, and middle initial) is displayed.
CURRENT EMPLOYEE ID – Required. Enter the employee’s existing social security number. SEE STUDENT CARD.
NEW EMPLOYEE ID – Required. Enter the employee’s new or changed social security number. SEE STUDENT CARD.
Center for Management and Professional Development Information Technology and Computer Skills Training PAGE 61
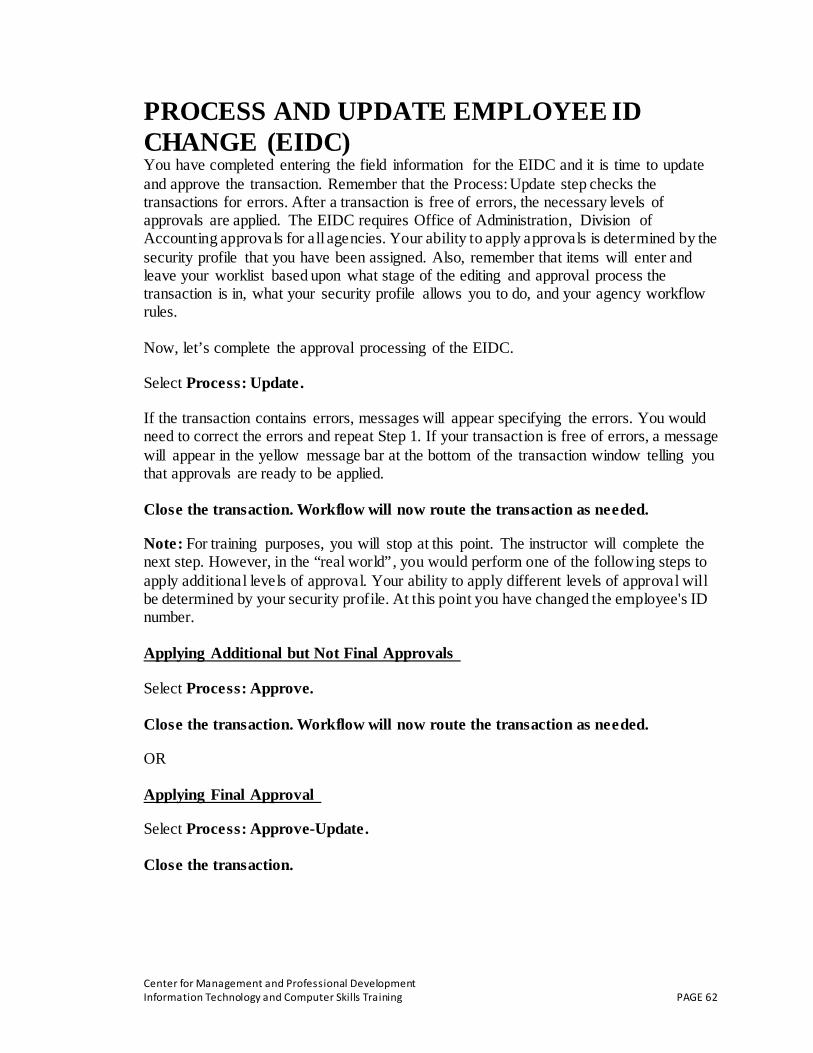
PROCESS AND UPDATE EMPLOYEE ID CHANGE (EIDC) You have completed entering the field information for the EIDC and it is time to update and approve the transaction. Remember that the Process: Update step checks the transactions for errors. After a transaction is free of errors, the necessary levels of approvals are applied. The EIDC requires Office of Administration, Division of Accounting approvals for all agencies. Your ability to apply approvals is determined by the security profile that you have been assigned. Also, remember that items will enter and leave your worklist based upon what stage of the editing and approval process the transaction is in, what your security profile allows you to do, and your agency workflow rules.
Now, let’s complete the approval processing of the EIDC.
Select Process: Update.
If the transaction contains errors, messages will appear specifying the errors. You would need to correct the errors and repeat Step 1. If your transaction is free of errors, a message will appear in the yellow message bar at the bottom of the transaction window telling you that approvals are ready to be applied.
Close the transaction. Workflow will now route the transaction as needed.
Note: For training purposes, you will stop at this point. The instructor will complete the next step. However, in the “real world”, you would perform one of the following steps to apply additional levels of approval. Your ability to apply different levels of approval will be determined by your security profile. At this point you have changed the employee's ID number.
Applying Additional but Not Final Approvals
Select Process: Approve.
Close the transaction. Workflow will now route the transaction as needed.
OR
Applying Final Approval
Select Process: Approve-Update.
Close the transaction.
Center for Management and Professional Development Information Technology and Computer Skills Training PAGE 62

EMPLOYEE NAME CHANGE (ENCH)
Center for Management and Professional Development Information Technology and Computer Skills Training PAGE 63

EMPLOYEE NAME CHANGE (ENCH) The employee name is established on the Employment Status Maintenance (ESMT) window. At some point, an employee’s name may need to be changed on SAM II HR. The next change we will make is an employee name change, using the Employee Name Change (ENCH) window. In the system you are provided with windows that allow you to make changes to an employee’s name and other identification data. When the data is changed in the applicable window, it is automatically updated in other places where it appears. If you do not know the existing employee ID, you can look it up on the Employee Roster by Employee Name (QXRF) window.
SCENARIO Jenny is getting married today to Josh Jacobsen! Her name will become Jenny Sue Jacobsen. We have the opportunity to now complete another transaction – the Employee Name Change (ENCH).
To open ENCH from the SAM II Desktop Navigator window, click on the Go To icon. Type ENCH in the “CODE”. Click on the Open button.
Populate the following fields on the ENCH.
CURRENT NAME -Inferred. The employee's old full name (last name, first name, and middle initial) is displayed.
EMPLOYEE ID – Required. Enter the employee's social security number. SEE STUDENT CARD.
EFFECTIVE DATE – Required. Enter the date that the new name becomes effective. You cannot immediately update the database by entering a future date for a name change. However, if you wish to do so, you can enter a future date and suspend it (update it to the suspense file) for processing at a later date. The other option is to wait until a later date to process this transaction. Type TODAY’S DATE.
EXPIRATION DATE – Inferred. Displays the last date the existing name is in effect.
NAME CHANGE REASON – Optional. Leave blank, or enter the name change reason code. Valid values are located on the Name Change Reason (NMCR) window. Type MRGE.
Center for Management and Professional Development Information Technology and Computer Skills Training PAGE 64
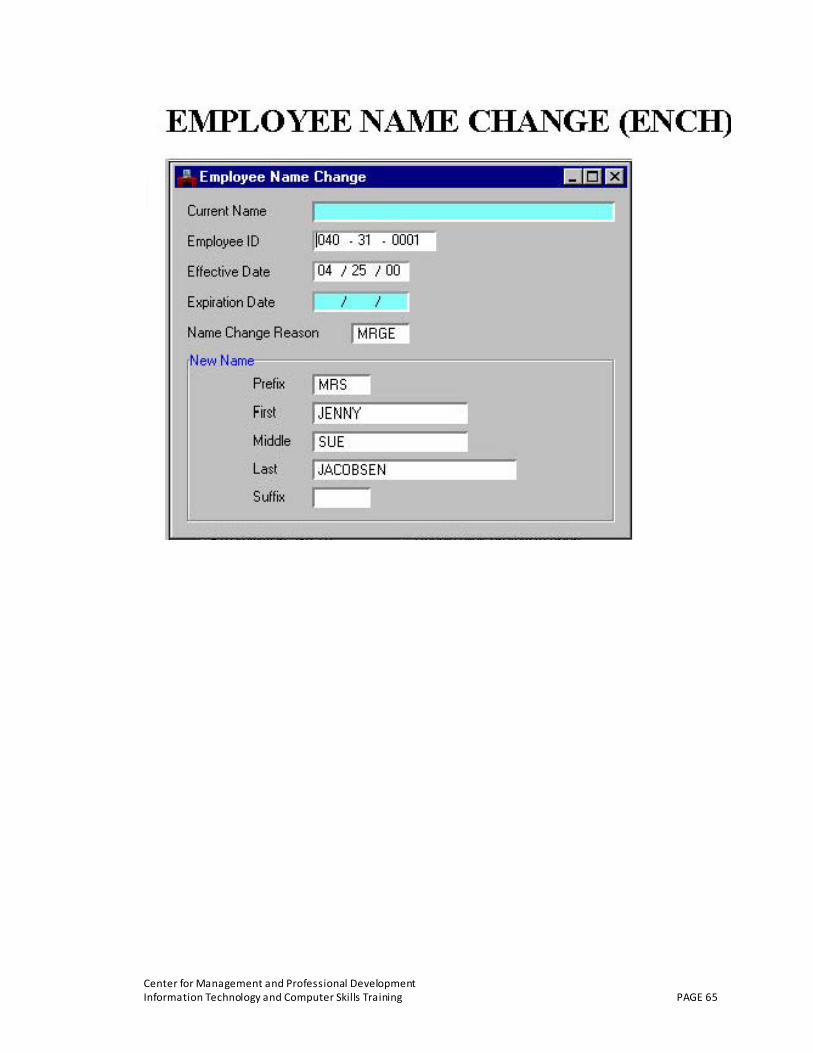
Center for Management and Professional Development Information Technology and Computer Skills Training PAGE 65

EMPLOYEE NAME CHANGE (ENCH) New Name
PREFIX – Optional. Leave blank, or enter the employee’s new name prefix. Valid values are located on the Name Prefix (PREX) window. Type MRS.
FIRST – Required. Enter the employee's new first name. Type JENNY.
MIDDLE – Optional. Leave blank, or enter the employee’s new middle name or initial. Type SUE.
LAST– Required. Enter employee's new last name. Type JACOBSEN.
SUFFIX – Optional. Leave blank, or enter the employee’s new name suffix. Valid values are located on the Name Suffix (SUFX) window. You have completed entering the field information for the ENCH and it is time to update the transaction. Remember that the Process: Update step checks the transactions for errors.
Now, let’s complete the approval processing of the ENCH.
Select Process: Update.
If the transaction contains errors, messages will appear specifying the errors. You would need to correct the errors and repeat Step 1. If your transaction is free of errors, a message will appear in the yellow message bar at the bottom of the transaction window telling you that the update was successful.
Center for Management and Professional Development Information Technology and Computer Skills Training PAGE 66

EXERCISE Now that you are familiar with the EIDC and ENCH transactions, you will now make changes to Carla J. Benson’s records, using the information below.
EIDC
Using the employee we’ve established, Carla Benson, imagine that an entry error was discovered in her Employee ID. It is imperative that this be corrected. The current and new Employee ID numbers will be provided to you by the instructor for this exercise.
ENCH
Carla is getting married today to Sam Jackson! She will then become Carla Jackson.
Center for Management and Professional Development Information Technology and Computer Skills Training PAGE 67

TOPIC 5: PERFORMING PERSONNEL ACTIONS The purpose of this topic is to present the procedures related to performing personnel actions, resulting in a change in status or function in SAM II HR. Three types of personnel actions will be examined.
Once the Employment Status Maintenance (ESMT) has been completed, approved and accepted, there are several actions that can be taken on the ESMT transaction that can be used to modify employee status. This topic will look at the actions necessary to effect the desired change(s) on the ESMT.
Additionally, this topic will cover the procedures necessary to remove or correct a personnel action that has already been processed.
Center for Management and Professional Development Information Technology and Computer Skills Training PAGE 68

Step 1: ESTABLISHING AN EMPLOYEE
Employment Status Maintenance (ESMT)
Step 2: ESTABLISHING & MAINTAINING EMPLOYEE ATTRIBUTES
Employee Address Maintenance (ADDR)
Employee Attributes Maintenance (ATTR)
Agency Specific & Accounting Data (AGYS, AGYA, AGYD)
Employee ID Change (EIDC)
Step 3: PERFORMING PERSONNEL ACTIONS
Employment Status Maintenance (ESMT)
Step 4: EMPLOYEE MAINTENANCE INQUIRIES
• Employee Roster by Name (QXRF)
• Employee Roster by Employee ID (QXR2)
• Employee Roster by Social Security Number (QXR4)
• Employee Roster by Pay Location (QXR5) • Employee Roster by Agency and Org (QXR6)
• Employee Folder (QXRSF)
• Employee Pay Rate History (QRTE)
• Employee Pay Summary Inquiry (QPSM)
• Employment Verification (QVER)
• Employee Education Summary (QEDS)
• Historical Name Change Cross Ref (QNCX)
• Employment Status Maintenance Log (QESD)
• County by Name (QCTY)
Employee Contact Information (EMER)
Pass Information (PASS)
Employee Name Change (ENCH)
Licenses and Certifications (LCNS)
Center for Management and Professional Development Information Technology and Computer Skills Training PAGE 69

PERFORMING PERSONNEL ACTIONS There are three types of personnel actions that can occur in SAM II HR. They are Appointments, In-Service Changes and Separations.
The Appointment personnel actions include New Hire and Rehire. You have already utilized a New Hire action by processing an ESMT, which placed an employee in the job.
Once the ESMT has been completed, the employee exists on the database. When an in-service change that requires an entry into the database occurs to describe the new assignment of the employee, a personnel action must be entered on the ESMT. This is required for SAM II HR to accurately track and pay employees of the State of Missouri. These transactions relate to employee changes such as promotion, reclassification, salary change, leave of absences, etc.
Separation personnel actions, also recorded on an ESMT, include retirement, resignation, dismissals, and other terminations of employment. Procedures for terminating employees will be covered in Topic Seven of this manual.
So far in this course, you have added an employee to SAM II HR by completing the ESMT and other required transactions. At some point in the life of an employee, you will need to make changes to their personnel records.
Personnel actions and reasons affecting an employee will be entered on the ESMT and related windows as necessary. These windows will be completed whenever an employee has a change of assignment. Such assignment changes include Personnel Actions and Reasons. Examples would include new hire, class transfer, promotion, title change and many others.
Center for Management and Professional Development Information Technology and Computer Skills Training PAGE 70

PERFORMING PERSONNEL ACTIONS Changing an employee’s Pay Class and/or Work Day Schedule
If an employee has changed work day schedules with the same number of days off then this change should be made on the Agency Specific and Accounting Data (AGYS) window. The new work day schedule can be recorded on the Work Cycle field. The employee’s Pay Class should not be changed unless the new work day schedule has a different number of days off from the previous work day schedule or the employee is moving from exception to positive paid (or vice versa).
If an employee’s Pay Class is being changed because the number of days off has changed then the agency needs to make the change on the first day of the FLSA cycle. If changing from a positive-paid to exception-paid Pay Class or vice-versa, then refer to the Pay for Agencies course, Topic 3: Pay Calculations, under the “Changing Pay Class During a Pay Period” heading. All changes to an employee’s Work Day Schedule (work cycle) must be made on the first day of the FLSA cycle.
For example, an employee normally works Sunday - Thursday (Pay Class code: PFS) and their FLSA cycle is Sunday - Saturday. The employee’s schedule has changed effective September 15
th
and the employee will start working Tuesday – Saturday (Work Cycle code: OUM). This Work Cycle code change should be done on the first day of the FLSA cycle; in this example it would be effective on Sunday the 17
th
of September. This change should be made to the Work Cycle field on the AGYS.
Note: All changes to an employee’s work schedule should be effective on the first day of the employee’s FLSA cycle, regardless of whether this is done through the Pay Class (on ESMT) or Work Cycle (on AGYS). Changes from exception-paid to positive-paid (or vice-versa) should only be effective the first day of a pay period.
Center for Management and Professional Development Information Technology and Computer Skills Training PAGE 71

EMPLOYMENT STATUS MAINTENANCE (ESMT)
Center for Management and Professional Development Information Technology and Computer Skills Training PAGE 72

PERFORMING PERSONNEL ACTIONS SCENARIO 7 Jenny has successfully completed a full year in her position as Personnel Analyst I. She will be reclassified to Personnel Analyst II accompanied by a salary increase.
This action will be accomplished using the ESMT. The following pages will define the fields and provide the necessary information to process this action. As discussed earlier, the Employee Status Maintenance (ESMT) must be completed, approved and accepted by the system before any changes can be made to an employee’s record.
Step 1 To open ESMT from SAM II HR Desktop Navigator window, click on the Go To icon. Type ESMT in the “CODE”. Click on the Open button.
Step 2 Populate the following field.
EMPLOYEE ID -SEE STUDENT CARD
Select Display: Browse Data to view the existing employee information.
Step 3 Enter the following information on the Header and Job Assignment panel of the
ESMT:
EFFECTIVE DATE – Use TODAY’S DATE
PERSONNEL ACTION/REASON – Type CHCON/C12
JOB STATUS – Type R STEP – Type K
Step 4 Enter the following information on the Assignment Attributes panel of the ESMT:
TITLE – Type 000412
Center for Management and Professional Development Information Technology and Computer Skills Training PAGE 73

EMPLOYMENT STATUS MAINTENANCE (ESMT)
Center for Management and Professional Development Information Technology and Computer Skills Training PAGE 74

PROCESS AND UPDATE EMPLOYEE STATUS MAINTENANCE (ESMT) You have completed entering the field information for the ESMT and it is time to update and approve the transaction. Remember that the Process: Update step checks the transactions for errors. After a transaction is free of errors, the necessary levels of approvals are applied. The type of transaction and, in some cases, whether or not you are a UCP or Non-UCP agency, determine Approval levels for each transaction. Your ability to apply approvals is determined by the security profile that you have been assigned. Also, remember that items will enter and leave your worklists based upon what stage of the editing and approval process the transaction is in, what your security profile allows you to do, and your agencies workflow rules.
Now, let’s complete the approval processing of the ESMT:
Select Process: Update.
If the transaction contains errors, messages will appear specifying the errors. You would need to correct the errors and repeat Step 1. If your transaction is free of errors, a message will appear in the yellow message bar at the bottom of the transaction window telling you that approvals are ready to be applied.
Close the transaction. Workflow will now route the transaction as needed.
Note: For training purposes, you will stop at this point. The instructor will complete the next step. However, in the “real world”, you would perform one of the following steps to apply additional levels of approval. Your ability to apply different levels of approval will be determined by your security profile.
Applying Additional but Not Final Approvals
Select Process: Approve.
Close the transaction. Workflow will now route the transaction as needed.
OR
Applying Final Approval
Select Process: Approve-Update.
Close the transaction.
Center for Management and Professional Development Information Technology and Computer Skills Training PAGE 75

REMOVING/CORRECTING PREVIOUSLY PROCESSED PERSONNEL ACTIONS
A personnel action that was erroneously entered on the ESMT can be removed if payroll has NOT been run against the information. In order to correct an ESMT, the fifth level of approval is necessary. A user with the third level of approval can initiate the removal/correction process that will create a pending transaction on the Employee Transaction Listing (SUSE). A user with less than the third level of approval can only initiate a removal/correction of an ESMT.
If the erroneous personnel action has been processed and updated to the database, and payroll HAS been run against this transaction, the user can no longer remove/correct an ESMT transaction. Another personnel action on an ESMT must be performed to correct the data.
Center for Management and Professional Development Information Technology and Computer Skills Training PAGE 76

REMOVING/CORRECTING PREVIOUSLY PROCESSED PERSONNEL ACTIONS If ESMT is in ACCPT status, another personnel action on an ESMT must be performed to correct the data.
To open ESMT from SAM II HR Desktop Navigator window, click on the Go To icon. Type ESMT in the “CODE”. Click on the Open button.
Complete the appropriate fields on the Job Assignment panel of the ESMT.
EMPLOYEE ID – Required. Enter the employee’s social security number.
APPOINTMENT ID - Conditional. This field requires input only if the employee is working in multiple positions concurrently. If correcting a personnel action on an employee’s primary appointment, leave this field blank. If the personnel action affects a secondary appointment, a character must be entered here. By all means, ensure that you are changing the personnel action on the correct appointment for that individual.
EFFECTIVE DATE – Required. Enter the date of the Personnel Action you want to correct.
Execute DISPLAY:BROWSE DATA. Employee information already established on the database will automatically populate fields on the ESMT.
If applicable, make corrections to fields on the Job Assignment panel of the ESMT as follows:
PERSONNEL ACTION/REASON - Required. If the personnel action was previously entered in error, enter the code that corrects the action. Valid values are located on the Personnel Action (PACT) window. If correcting other information on the ESMT, select “CORR” (Corrections) as the personnel action.
REASON – Required. Enter the reason code for the personnel action. Valid values are located on the Personnel Action Reason (PART) window. If the personnel action chosen was “CORR”, provide comments as to the reason for the change on the Certificate/Remark panel.
Center for Management and Professional Development Information Technology and Computer Skills Training PAGE 77

REMOVING / CORRECTING PREVIOUSLY PROCESSED PERSONNEL ACTIONS
Center for Management and Professional Development Information Technology and Computer Skills Training PAGE 78

REMOVING/CORRECTING PREVIOUSLY PROCESSED PERSONNEL ACTIONS • Make any necessary changes to fields on the Dates panels of the ESMT. • Make any necessary changes to fields on the Assignment Attributes panels of the
ESMT. • Make any necessary changes to fields on the Pay Parameters panel of the ESMT. • Make any necessary changes to fields on the Certificate/Remark panel of the ESMT. If
the personnel action chosen on the Job Assignment was “CORR”, provide comments as to the reason for the change on the Certificate/Remark panel.
Now, let’s complete the approval processing of the ESMT:
Select Process: Update .
If your transaction is free of errors, a message will appear in the yellow message bar at the bottom of the transaction window telling you that approvals are ready to be applied. If the transaction contains errors, messages will appear specifying the errors. You would need to correct the errors and repeat step 1.
Close the transaction. Workflow will now route the transaction as needed.
Note: For training purposes, you will stop at this point. The instructor will complete the next step. However, in the “real world”, you would perform one of the following steps to apply additional levels of approval. Your ability to apply different levels of approval will be determined by your security profile.
Applying Additional but Not Final Approvals
Select Process: Approve.
Close the transaction. Workflow will now route the transaction as needed. OR Applying Final Approval
Select Process: Approve-Update.
Close the transaction. OR Making Changes to a Transaction
Select Process: Update.
Close the transaction. Workflow will now route the transactions as needed.
Center for Management and Professional Development Information Technology and Computer Skills Training PAGE 79

TOPIC 6: TERMINATING EMPLOYEES The purpose of this topic is to present the procedures for terminating an employee in SAM II HR. Terminations happen when an employee leaves their current position. Reasons for terminations include resignation, retirement, dismissal, or the death of an employee. The terminating agency may need to complete two Employment Status Maintenance (ESMT) transactions to complete the termination process. In addition, other steps will be necessary to complete the recording of time and leave during the last active pay period, to pay off leave, and to terminate benefits and deductions.
Center for Management and Professional Development Information Technology and Computer Skills Training PAGE 80
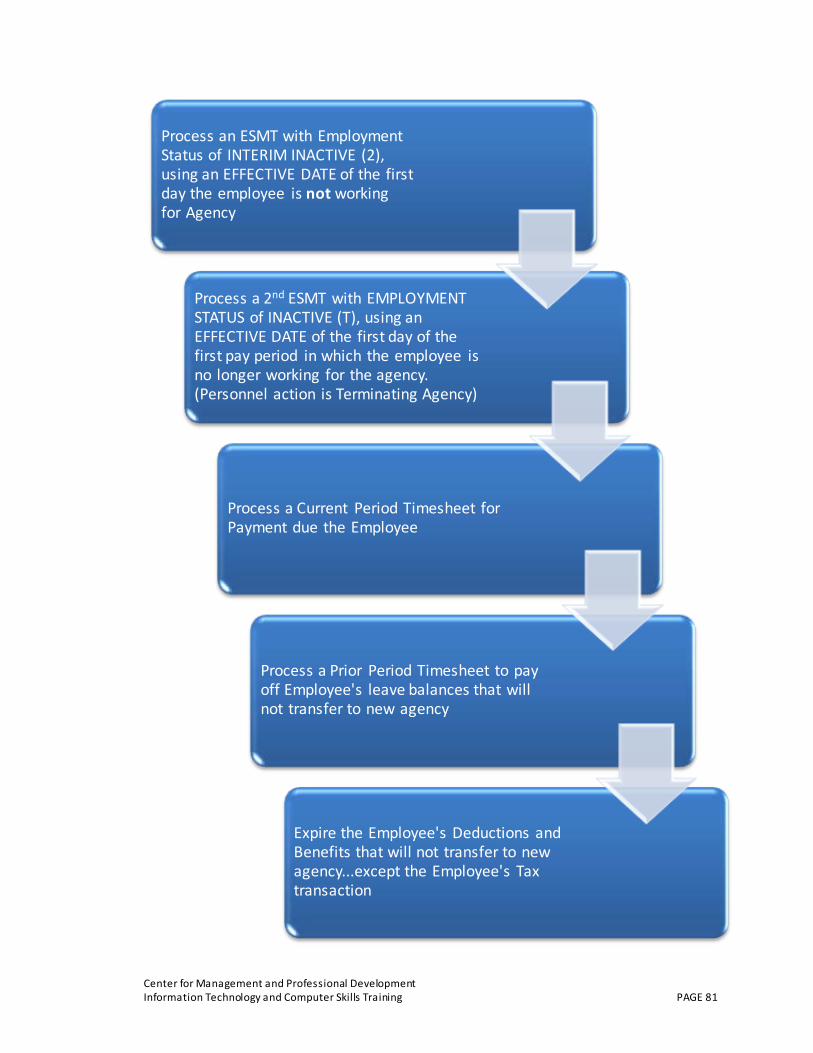
Process an ESMT with Employment Status of INTERIM INACTIVE (2), using an EFFECTIVE DATE of the first day the employee is not working for Agency
Process a 2nd ESMT with EMPLOYMENT STATUS of INACTIVE (T), using an EFFECTIVE DATE of the first day of the first pay period in which the employee is no longer working for the agency. (Personnel action is Terminating Agency)
Process a Current Period Timesheet for Payment due the Employee
Process a Prior Period Timesheet to pay off Employee's leave balances that will not transfer to new agency
Expire the Employee's Deductions and Benefits that will not transfer to new agency...except the Employee's Tax transaction
Center for Management and Professional Development Information Technology and Computer Skills Training PAGE 81

TERMINATING EMPLOYEES
Several steps are necessary when terminating an employee in SAM II HR to ensure consistent and accurate reporting. Those steps will vary, depending on whether or not the employee is being rehired by the state and, if so, the date of the rehire. Terminations include resignation, retirement, dismissal, deceased, and other terminations. Agencies are highly encouraged to process terminations as soon as they are aware of them, especially when the employee is being rehired. The following situations determine which process is used to terminate employees:
• To terminate an employee who is leaving state service entirely;
• To terminate an employee who is being rehired in a later pay period;
• To terminate an employee who is being rehired by another state agency within the same pay period; and
• To terminate an employee who is being rehired by another state agency without a break in service.
Let’s look at the steps involved in the first two situations.
Terminating an Employee who is Rehired in a Later Pay Period
The agency must process an Employment Status Maintenance (ESMT) transaction to place the employee in an Employment Status of Interim Inactive (2). This status continues to associate the employee with their old position for the remainder of the pay period, and ensures that the employee’s deductions and benefits will be processed accurately.
The agency must process another ESMT to place the employee in an Employment Status of Inactive (T) effective the first day of the first pay period in which the employee is no longer working for the agency. This status ensures that the employee cannot have any pay event codes accepted and that the employee is no longer associated with the position. A specific Personnel Action (Terminating Agency) is to be used on this transaction.
NOTE: The PAYROLL NUMBER field on the Assignment Attributes panel should be left alone at this point. In most cases, the Payroll Number Code will be equal to the Agency Code and should always remain as such (i.e. Payroll number should be the same on the employee’s final ESMT as it was the entire time the employee was with your agency). If changes are made, the employee’s final pay and/or leave payoffs could be affected.
Center for Management and Professional Development Information Technology and Computer Skills Training PAGE 82

TERMINATING EMPLOYEES (Continued) Terminating an Employee who is Rehired in a Later Pay Period
The agency must process a current period timesheet to generate any pay due the employee for their work hours. Depending upon the particular document(s) used by the agency, this would be one of the following: a Current Period Timesheet (CPER); Current Period Individual Timesheet (CITS); or Current Period Crew Timesheet (CREW). The purpose of these documents and how they are used are explained in the Time and Leave Course.
The agency must process a Prior Period Timesheet (PPER) to liquidate or pay off the employee’s unused leave balance (annual leave and compensatory time), if any. Such payment will be received by the employee in a separate paycheck that is generated after the employee’s last regular paycheck. This process is explained in the Time and Leave Course, Leave Liquidation.
The agency should expire any of the terminating employee’s deductions (except the employee’s TAX transaction) that have been entered on the following transactions: Miscellaneous Deductions (MISC), and the Savings Bond Deductions (SAVB). The procedures for expiring deductions and benefits is covered in the Deductions and Benefits Course.
A similar process is necessary to terminate an employee who is leaving an agency/organization and being rehired without a break in service and to terminate an employee who is leaving an agency/organization and being rehired in the same pay period. That process will be described later in this topic.
Let’s look at an example of how you would effective date the two ESMT’s that need to be processed.
Center for Management and Professional Development Information Technology and Computer Skills Training PAGE 83

TERMINATING EMPLOYEES Employee terminates during a pay period
ESMT #1
Effective Date: December 9, 2013
Employment Status: Interim Inactive
ESMT #2
Effective Date: December 16, 2013
Employment Status: Inactive
Employee terminates the first day of a pay period
ESMT #1
Effective Date: December 16, 2013
Employment Status: Interim Inactive
ESMT #2
Effective Date: December 16, 2013
Employment Status: Inactive
NOTE: Employment Status on ESMT # 2 becomes Inactive-Payroll Number does not change
Center for Management and Professional Development Information Technology and Computer Skills Training PAGE 84

TERMINATING EMPLOYEES Terminating an Employee who is Rehired in a Later Pay Period
When processing the ESMT transactions for the terminating employee who will be rehired in a later pay period, the effective dates to be used will vary depending on whether the employee terminates on the first day of a pay period (the 1
st
or 16th
) or on any other date during the pay period. The following describes each situation:
Example - Employee terminates state service during a pay period
An employee resigns from an agency effective December 9, 2013. This means that the last day the employee worked was December 8, 2013.
First ESMT:
This transaction would be effective dated December 9, 2013, and contain an Employment Status of Interim Inactive.
Second ESMT:
This transaction would be effective dated December 16, 2013 with an Employment Status of Inactive and a Personnel Action of Terminating Agency.
NOTE: The PAYROLL NUMBER field on the Assignment Attributes panel should be left alone at this point. In most cases, the Payroll Number Code will be equal to the Agency Code and should always remain as such (i.e. Payroll number should be the same on the employee’s final ESMT as it was the entire time the employee was with your agency). If changes are made, the employee’s final pay and/or leave payoffs could be affected.
Example - Employee terminates state service the first day of a pay period
An employee resigns from an agency effective December 16, 2013. This means that the last day the employee worked was December 15, 2013.
First ESMT:
This transaction would be effective dated December 16, 2013, and contain an Employment Status of Interim Inactive.
Second ESMT:
This transaction would be effective dated December 16, 2013 with an Employment Status of Inactive and a Personnel Action of Terminating Agency.
Center for Management and Professional Development Information Technology and Computer Skills Training PAGE 85

PROCESS CHART FOR TERMINATING EMPLOYEES WHO LEAVE STATE SERVICE AND ARE REHIRED WITHOUT A BREAK IN SERVICE AND
EMPLOYEES WHO LEAVE STATE SERVICE AND ARE REHIRED IN THE SAME PAY PERIOD
Process an ESMT with EMPLOYMENT STATUS of INTERIM INACTIVE(2), using an EFFECTIVE DATE of the first day the employee is not working for agency
Process a CURRENT PERIOD TIMESHEET for PAYMENT due the employee
Process a PRIOR PERIOD TIMESHEET to Pay off Employees’ Leave Balances
Process a PRIOR PERIOD TIMSHEET to Pay off Employee’s Leave Balances that will not transfer to the new agency
EXPIRE the EMPLOYEE’S DEDUCTIONS and BENEFITS that will not transfer to the new agency except the Employee’s TAX transaction
Center for Management and Professional Development Information Technology and Computer Skills Training PAGE 86

TERMINATING EMPLOYEES The following termination process is used in these two situations:
• to terminate an employee who is being rehired by another state agency within the same pay period; and
• to terminate an employee who is being rehired by another state agency without a break in service.
Step 1 The agency must process an Employment Status Maintenance (ESMT) transaction
to place the employee in an Employment Status of Interim Inactive (2). This status continues to associate the employee with their old position for the remainder of the pay period, and ensures that the employee’s deductions and benefits will be processed accurately.
Step 2 The agency must process a current period timesheet to generate any pay due the employee for their work hours. Depending upon the particular document(s) used by the agency, this would be one of the following: a Current Period Timesheet (CPER); Current Period Individual Timesheet (CITS); or Current Period Crew Timesheet (CREW). The purpose of these documents and how they are used are explained in the Time and Leave Course.
Step 3 The agency must process a Prior Period Timesheet (PPER) document to liquidate or pay off the employee’s unused leave balances (annual leave and compensatory time), if any. Such payment will be received by the employee in a separate paycheck that is generated after the employee’s last regular paycheck. This process is explained in the Time and Leave Course, Leave Liquidation.
Step 4 The agency should expire any of the terminating employee’s deductions (except the employee’s TAX transaction) that have been entered on the following transactions: Miscellaneous Deductions (MISC), and the Savings Bond Deductions (SAVB). The procedures for expiring deductions and benefits are covered in the Deductions and Benefits Course.
Center for Management and Professional Development Information Technology and Computer Skills Training PAGE 87

TERMINATING EMPLOYEES SCENARIO:
TERMINATING AN EMPLOYEE WHO IS REHIRED IN A LATER PAY PERIOD.
Carla J. Benson is resigning her Registered Nurse Senior position with the Department of Mental Health effective December 9, 2013. She will be rehired by the Department of Health as a Registered Nurse Senior effective December 20, 2013.
This termination process will require the completion and approval of two Employment Status Maintenance (ESMT) transactions.
Our scenario describes the situation of an employee resigning and being rehired in a later pay period. Please note that only one ESMT is required and that a different effective date is used if the employee terminates and is rehired without a break in service or is rehired in the same pay period.
Center for Management and Professional Development Information Technology and Computer Skills Training PAGE 88

TERMINATING EMPLOYEES
Center for Management and Professional Development Information Technology and Computer Skills Training PAGE 89

TERMINATING EMPLOYEES Terminating an Employee who is Rehired in a Later Pay Period
Let’s begin our process by completing the first Employment Status Maintenance (ESMT) transaction to place the employee in an Employment Status of Interim Inactive.
To open the ESMT from SAM II HR Desktop Navigator window, click on the Go To icon. Type ESMT in the “CODE”. Click on the Open button.
Populate the following field.
EMPLOYEE ID – Enter the EMPLOYEE ID NUMBER.
Select Display: Browse Data to view existing employee information.
Enter the following information on the Header portion of the ESMT:
EFFECTIVE DATE –The effective date needs to be the first day the employee no longer works for the agency. Using an effective date of December 9, 2000 means that the last day the employee worked for the agency was December 8, 2000. (The effective date for a deceased employee would be the day after the employee’s death.)
JOB ASSIGNMENT
Enter the following information on the Job Assignment panel of the ESMT:
PERSONNEL ACTION – Change the Personnel Action to the appropriate personnel action code. Do not use Terminating Agency (TRMAG). (For a deceased employee, the personnel action is OTERM.)
PERSONNEL REASON – Choose the appropriate personnel reason for the personnel action taken. (For a deceased employee, the personnel reason is O10.)
EMPLOYMENT STATUS – Change the employment status to Interim Inactive. Type 2. This status continues to associate the employee with their old position for the remainder of the pay period, and ensures that deductions and benefits will be processed accurately.
PAY PARAMETERS
Check the Pay Parameters panel of the ESMT. If pay events have been entered on this panel, change the effective date(s) to equal the effective date of the Interim Inactive status (same effective date used in header). If pay events have not been entered on the Pay Parameters panel, no action is necessary. Complete the approval process as you normally would.
Center for Management and Professional Development Information Technology and Computer Skills Training PAGE 90

Center for Management and Professional Development Information Technology and Computer Skills Training PAGE 91

TERMINATING EMPLOYEES You have completed the ESMT to place the employee in an Interim Inactive status. Now it is necessary to complete the second ESMT to actually terminate the employee from the agency by placing him/her in an Inactive status. This status ensures that the employee cannot have any pay event codes accepted and that the employee is longer associated with the position. Agencies are encouraged to complete this ESMT immediately after the first ESMT.
To open the ESMT from SAM II HR Desktop Navigator window, click on the Go To icon. Type ESMT in the “CODE”. Click on the Open button.
Populate the following field.
EMPLOYEE ID – Enter EMPLOYEE’S ID NUMBER.
Select Display: Browse Data to view existing employee information.
Enter the following information on the Header portion of the ESMT:
EFFECTIVE DATE – The effective date is the first day of the first pay period in which the employee is longer working for the agency.
JOB ASSIGNMENT
Enter the following information on the Job Assignment panel of the ESMT:
PERSONNEL ACTION – Type TRMAG. This is the Terminate Agency Personnel Action code.
PERSONNEL REASON – Leave blank.
EMPLOYMENT STATUS – Change the employment status to Inactive. Type T. This status ensures that pay events are no longer accepted for the employee.
NOTE: The PAYROLL NUMBER field on the Assignment Attributes panel should be left alone at this point. In most cases, the Payroll Number Code will be equal to the Agency Code and should always remain as such (i.e. Payroll number should be the same on the employee’s final ESMT as it was the entire time the employee was with your agency). If changes are made, the employee’s final pay and/or leave payoffs could be affected.
Center for Management and Professional Development Information Technology and Computer Skills Training PAGE 92

POSITION NUMBER – Delete the position number entry, so that the employee is no longer associated with the position. The position is now vacant, and available to be re-filled.
PAY PARAMETERS
Check the Pay Parameters panel of the ESMT. If pay events have been entered on this panel, change the effective date(s) to equal the effective date of the Inactive status (same effective date used in header). If pay events have not been entered on the Pay Parameters panel, no action is necessary.
Complete the approval process as you normally would.
NOTE:
At this point, three final steps are necessary in completing the entire termination process:
• processing a current timesheet (CPER, CITS, or CREW) to generate any pay due the employee for their work hours (covered in various topics of the Time and Leave Course);
• liquidating any compensable leave the employee has (covered in Leave Liquidation in the Time and Leave Course);
• expiring the employee’s deduction and benefit information (except the employee’s TAX transaction) from the system (covered in the Deduction and Benefits Course).
REMEMBER: If you are terminating an employee who is being rehired without a break in service or who is being rehired within the same pay period, you would only process the first ESMT placing them in an Employment Status of Interim Inactive (2).
Center for Management and Professional Development Information Technology and Computer Skills Training PAGE 93

TOPIC 7: REHIRING AN EMPLOYEE The objective of this topic is to present the steps necessary to rehire an employee who has previously worked for the State of Missouri.
REHIRING A PREVIOUS EMPLOYEE
When an Agency tries to hire an employee who has already been established in the SAM II database, this is considered a rehire. When the ESMT is processed to establish the employee, you may receive an error message that reads “ACTION NOT AUTHORIZED” or “DUPS EXISTING APPT”. This error means that the employee is currently associated with another Agency or with another Organization within your Agency. If the rehired employee’s ESMT processes without either of these errors, then their last active assignment was within your Organization.
If the current employment status is T (Inactive) or 2 (Interim Inactive), then the employee can be considered a rehire. If the current employment status is anything other than these, then the appointment is not a rehire but a secondary appointment. In this situation, refer to the Multiple Appointment Policy and Procedure.
The Rehire Process
You will note that the rehire process is different than the new hire process. This is due to the fact that when an employee “belongs” to an Agency and/or Organization other than yours, the security in the system (set up by Agency/Organization) might not allow you to view, much less modify, their information. Therefore the steps you must complete to re-establish an employee may vary.
We will look at scenarios involving rehiring an employee:
1. The last assignment was within the same organization,
2. The last assignment was with another organization within the same agency, or
3. The last assignment was with a different agency.
Center for Management and Professional Development Information Technology and Computer Skills Training PAGE 94

REHIRING WITHIN YOUR ORGANIZATION
Open an ESMT. Enter an individual's SSN in the Employee
ID field and Display Browse Data.
Information will populate the fields.
Leave the Appointment ID field blank.
Enter RHIRE in the Personnel Action field.
Confirm and modify the remaining fields as necessary.
Complete Approval Process.
Center for Management and Professional Development Information Technology and Computer Skills Training PAGE 95

Center for Management and Professional Development Information Technology and Computer Skills Training PAGE 96

REHIRING A PREVIOUS EMPLOYEE FROM YOUR OWN ORGANIZATION REHIRING A PREVIOUS EMPLOYEE SCENARIO 1: REHIRING WITHIN THE SAME AGENCY AND ORGANIZATION
Carla Benson comes to work for your Organization. You determine through the interview process that she is not currently working for the state and Carla previously worked for your organization.
Since Carla’s last active assignment was within your Organization, you will have access to her information and can process an ESMT to establish her new assignment information. Remember, she would have the Personnel Action Reason of RHIRE (Rehire).
Access an Employment Status Maintenance (ESMT) transaction.
EMPLOYEE ID – Enter the employee’s social security number.
Select Display: Browse Data.
Modify the following fields.
APPOINTMENT ID – Ensure this field is blank.
EFECTIVE DATE – Enter the date the appointment would be effective.
Job Assignment Panel PERSONNEL ACTION – Enter RHIRE. This Personnel Action code is for a Rehire only.
PERSONNEL REASON – Enter an appropriate personnel action reason.
EMPLOYMENT STATUS - Enter a 1. This is the active employee status code.
POSITION NUMBER – Enter the position number for this assignment.
Continue to complete the additional required fields on the Job Assignment Panel for this new assignment.
Center for Management and Professional Development Information Technology and Computer Skills Training PAGE 97

Center for Management and Professional Development Information Technology and Computer Skills Training PAGE 98
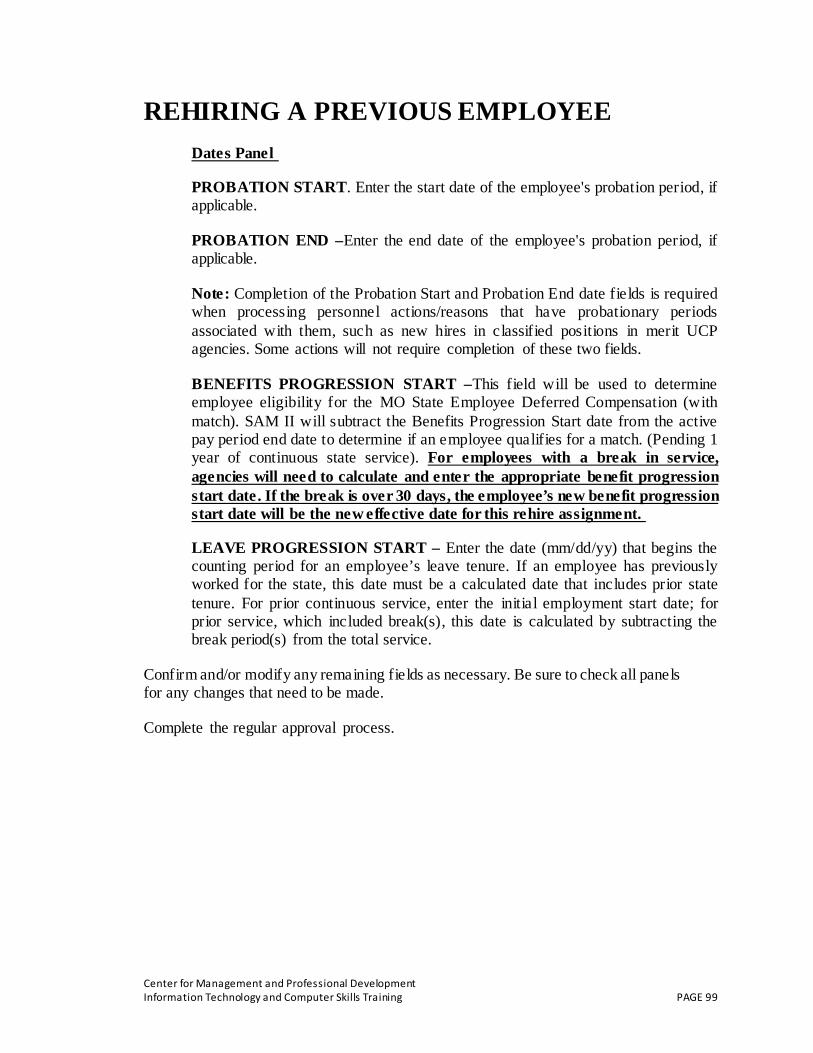
REHIRING A PREVIOUS EMPLOYEE Dates Panel
PROBATION START. Enter the start date of the employee's probation period, if applicable.
PROBATION END –Enter the end date of the employee's probation period, if applicable.
Note: Completion of the Probation Start and Probation End date fields is required when processing personnel actions/reasons that have probationary periods associated with them, such as new hires in classified positions in merit UCP agencies. Some actions will not require completion of these two fields.
BENEFITS PROGRESSION START –This field will be used to determine employee eligibility for the MO State Employee Deferred Compensation (with match). SAM II will subtract the Benefits Progression Start date from the active pay period end date to determine if an employee qualifies for a match. (Pending 1 year of continuous state service). For employees with a break in service, agencies will need to calculate and enter the appropriate benefit progression start date. If the break is over 30 days, the employee’s new benefit progression start date will be the new effective date for this rehire assignment.
LEAVE PROGRESSION START – Enter the date (mm/dd/yy) that begins the counting period for an employee’s leave tenure. If an employee has previously worked for the state, this date must be a calculated date that includes prior state tenure. For prior continuous service, enter the initial employment start date; for prior service, which included break(s), this date is calculated by subtracting the break period(s) from the total service.
Confirm and/or modify any remaining fields as necessary. Be sure to check all panels for any changes that need to be made.
Complete the regular approval process.
Center for Management and Professional Development Information Technology and Computer Skills Training PAGE 99
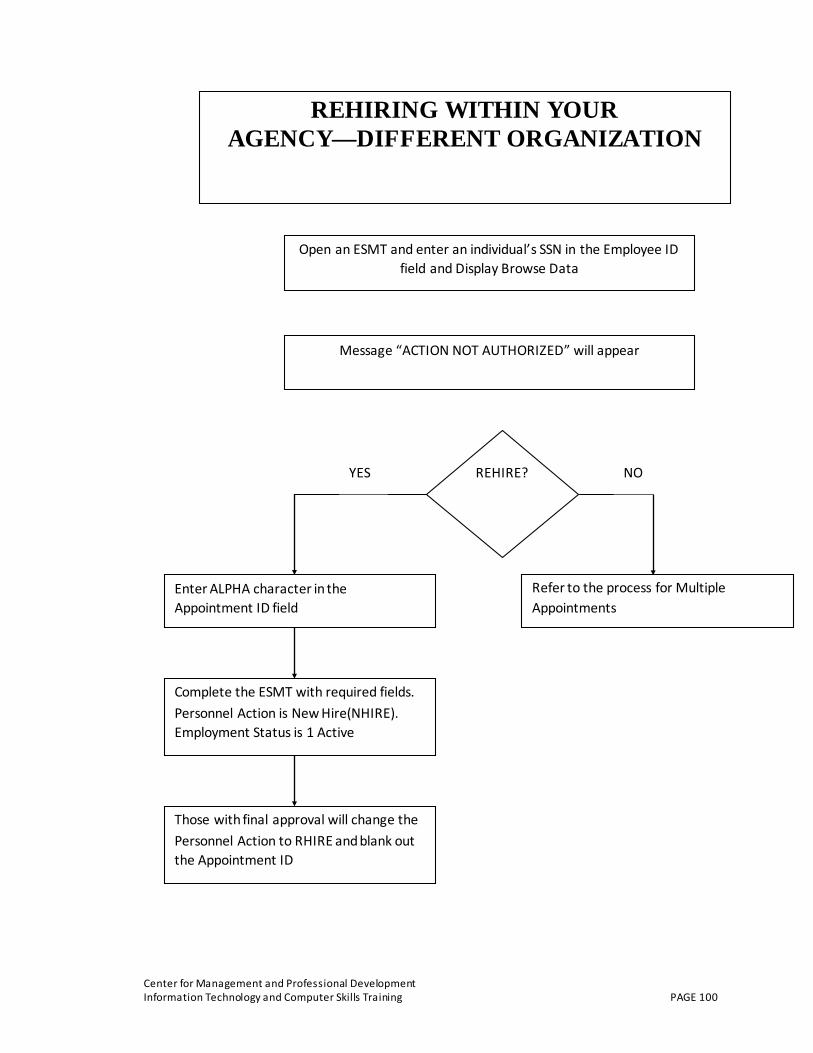
REHIRING WITHIN YOUR AGENCY—DIFFERENT ORGANIZATION
Open an ESMT and enter an individual’s SSN in the Employee ID field and Display Browse Data
Message “ACTION NOT AUTHORIZED” will appear
REHIRE? YES NO
Enter ALPHA character in the Appointment ID field
Refer to the process for Multiple Appointments
Complete the ESMT with required fields. Personnel Action is New Hire(NHIRE). Employment Status is 1 Active
Those with final approval will change the Personnel Action to RHIRE and blank out the Appointment ID
Center for Management and Professional Development Information Technology and Computer Skills Training PAGE 100

REHIRING A PREVIOUS EMPLOYEE SCENARIO 2: REHIRING WITHIN THE SAME AGENCY FROM A DIFFERENT ORGANIZATION
A person comes to work for your Organization. You determine through the interview process they are not currently employed by the state and their last job with the State of Missouri was with your agency but in a different organization. You will rehire this individual by doing the following steps.
Access an Employment Status Maintenance (ESMT).
EMPLOYEE ID – STUDENT CARD.
Select Display: Browse Data.
You should receive the message "ACTION NOT AUTHORIZED". Since you know this is a rehire, complete all applicable fields on the ESMT for this individual.
Complete the following in these fields.
APPOINTMENT ID – Enter an ALPHA Character in this field. This indicates that this is a rehire position. DO NOT enter a numeric value in this field.
EFFECTIVE DATE – Enter the date the appointment would be effective.
ORIGINAL APPT DATE – Enter the initial date of the employee’s employment with the state for this appointment. Note that if using a Personnel Action of “NHIRE”, the ORIGINAL APPT DATE must match the EFFECTIVE DATE.
Job Assignment Panel PERSONNEL ACTION – Enter NHIRE. This will be changed to rehire before the final approval has been applied.
PERSONNEL REASON – Enter the appropriate personnel action reason.
EMPLOYMENT STATUS - Enter a 1. This is the active employee status code.
POSITION NUMBER – Enter the position number for this assignment.
Center for Management and Professional Development Information Technology and Computer Skills Training PAGE 101

Continue with the editing and approval process.
For UCP Agencies, the third level of approval within your Agency will modify the following fields:
APPOINTMENT ID – Blank out this field. It is CRITICAL to blank out this field. Otherwise, the employee’s assignment will be seen as a multiple appointment. All additional transactions to establish tax, health care, etc. would need to be modified later.
PERSONNEL ACTION – Change to RHIRE (Rehire).
The third level of approval will then be applied. It will continue through the regular processing cycle.
For Non-UCP Agencies, the final level of approval within your Agency would complete the above process.
Center for Management and Professional Development Information Technology and Computer Skills Training PAGE 102

REHIRING FROM A DIFFERENT AGENCY
Open an ESMT and enter an individual’s SSN in the Employee ID field and Display Browse Data
Message “ACTION NOT AUTHORIZED” will appear
REHIRE? YES NO
Enter ALPHA character in the Appointment ID field
Refer to the process for Multiple Appointments
Begin the approval process
OA Personnel will change the Personnel Action to RHIRE and blank out the Appointment ID field.
Rather than applying the final level of approval, Non-UCP Agency Personnel need to update SUSE and then call OA Personnel to coordinate the rehire
UCP NON UCP
Center for Management and Professional Development Information Technology and Computer Skills Training PAGE 103

REHIRING A PREVIOUS EMPLOYEE SCENARIO 3, PART 1: REHIRING FROM ANOTHER AGENCY
If you rehire a person whose last active appointment was with another Agency, you would complete the same steps listed in Scenario 2 except for the final approval process.
UCP Agencies
For rehires from another Agency, OA Personnel will blank out the Appointment ID field and change the Personnel Action to Rehire. They will also apply the final approvals.
Non-UCP Agencies
The agency will update the SUSE window and contact OA Personnel. OA Personnel will need to blank out the Appointment ID field and change the Personnel Action to Rehire and apply the final approval.
NOTE: Do not apply the final level of approval before contacting OA Personnel
Center for Management and Professional Development Information Technology and Computer Skills Training PAGE 104

TOPIC 8 - MULTIPLE APPOINTMENTS
The purpose of this topic is to explain how to establish an employee who holds other appointments within the State of Missouri. Some employees may hold more than one position with the State of Missouri. The first, original appointment (position) with the State of Missouri is considered to be the employee’s primary appointment. If the employee is hired with another agency while still holding their primary appointment, then the second position is considered to be the employee’s secondary appointment.
In some cases, an employee may terminate their primary appointment with the State of Missouri. If the employee still holds their secondary appointment then this appointment needs to be moved to the employee’s primary appointment. We will cover this scenario as well.
Center for Management and Professional Development Information Technology and Computer Skills Training PAGE 105
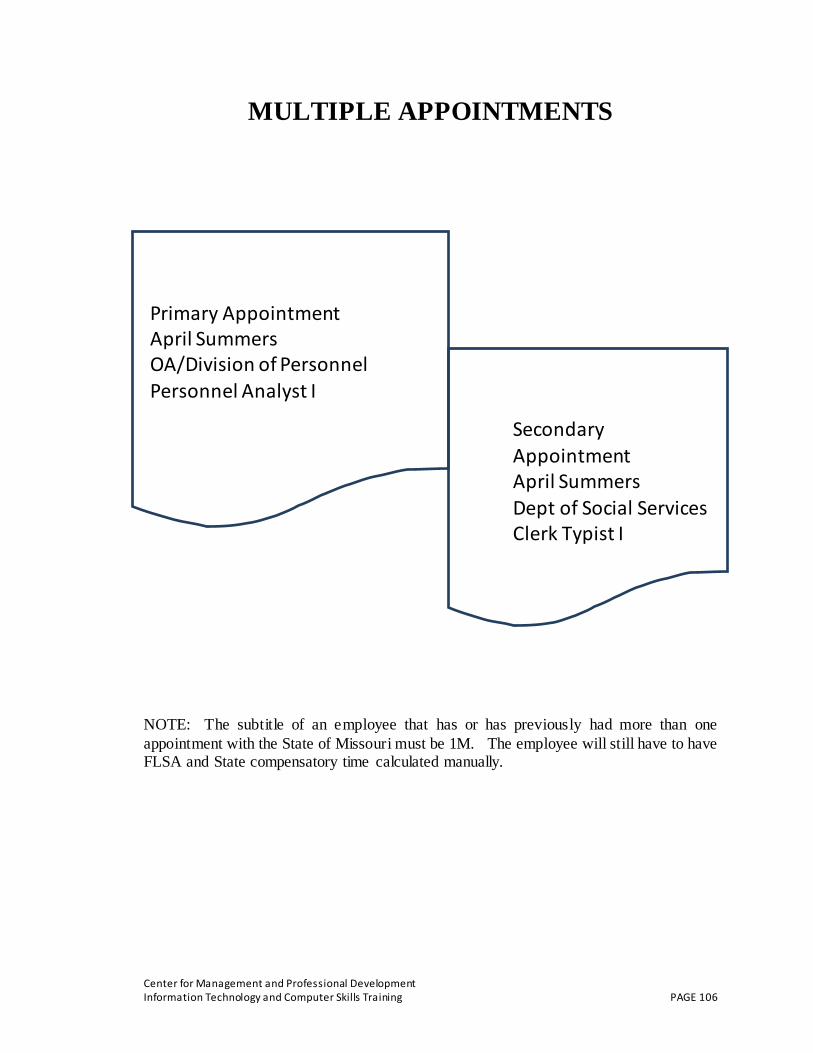
MULTIPLE APPOINTMENTS
NOTE: The subtitle of an employee that has or has previously had more than one appointment with the State of Missouri must be 1M. The employee will still have to have FLSA and State compensatory time calculated manually.
Secondary Appointment April Summers Dept of Social Services Clerk Typist I
Primary Appointment April Summers OA/Division of Personnel Personnel Analyst I
Center for Management and Professional Development Information Technology and Computer Skills Training PAGE 106

ESTABLISHING MULTIPLE APPOINTMENTS
When an employee is hired within the State of Missouri, an Employment Status Maintenance (ESMT) transaction is completed. If the employee did not let the hiring Agency know that he/she holds another appointment with the State of Missouri, then when updating the ESMT the hiring Agency will receive an error message that reads “ACTION NOT AUTHORIZED” or “DUPS EXISTING APPT”. This error means that the employee is currently associated with another Agency. The hiring Agency will need to verify if the employee is currently working for the State or has previously worked for the State. If the employee notifies the hiring Agency that he/she holds another appointment with the State of Missouri, then the hiring Agency will need to establish this position as a secondary appointment.
When an employee holds multiple appointments, all automatic compensatory time (FLSA and state) accruals must be turned off. Any compensatory time accrued in either position would need to be entered on a timesheet using the appropriate accrual event codes. This process is discussed in the Timekeeping for Multiple Appointment topic in the Time and Leave manual.
If the employee does hold another appointment with the State of Missouri, then after completing the ESMT to establish the appointment, Non-UCP Agencies need to notify OA/Division of Personnel that they have established a multiple appointment. OA Personnel will then work with the Agency holding the primary position so that all automatic compensatory time accruals have been turned off. Since OA applies the final approvals on ESMT’s for UCP Agencies, they will coordinate notifying the primary appointment Agency automatically. If both appointments are within the same Agency, then ESMT’s updating both appointments can be completed by the Agency and routed through their normal approval process.
NOTE: If the hiring Agency does not contact OA/Division of Personnel to set up the employee’s FLSA and Client profiles then the employee WILL NOT receive a paycheck or will receive an inaccurate paycheck.
The following scenario describes how to set up an employee who holds another position with the State of Missouri.
Center for Management and Professional Development Information Technology and Computer Skills Training PAGE 107

EMPLOYMENT STATUS MAINTENANCE (ESMT)
Center for Management and Professional Development Information Technology and Computer Skills Training PAGE 108

ESTABLISHING A MULTIPLE APPOINTMENT
Your Agency has hired April Summers for a part-time position. April has let you know that she is currently working for OA/Division of Personnel. You will need to complete an ESMT for this employee and confirm all of the employee’s attributes and set up any deductions and benefits for this new position.
n order to establish a multiple appointment for an employee, we must first establish the employee in the system.
To open the ESMT from SAM II HR Desktop Navigator window, click on the Go To icon. Type ESMT in the “CODE”. Click on the Open button.
Complete the following required fields in the Header portion of the ESMT. EMPLOYEE ID – Required. STUDENT CARD.
Select Display: Browse Data.
If you receive the error message “INVALID EMPLOYEE ID”, this tells you that the employee is not in SAM II HR.
If you receive the error message “ACTION NOT AUTHORIZED”, this tells you that the employee is currently in SAM II HR. The employee may not be currently employed by the State of Missouri but has previously worked for the State of Missouri.
APPOINTMENT ID – Required. When processing a secondary appointment, a NUMERIC character must be entered to differentiate the two appointments that the employee holds.
FIRST – Required. ENTER THE EMPLOYEE’S FIRST NAME.
LAST – Required. ENTER THE EMPLOYEE’S LAST NAME.
EFFECTIVE DATE – Required. Enter the date (mm/dd/yy) the employee information is effective.
ORIGINAL APPOINTMENT DATE – Required. Enter the date (mm/dd/yy) of the employee’s initial employment with the state. This is not a calculated date, as breaks in service are not considered.
Complete the following fields on the Job Assignment panel.
PERSONNEL ACTION – Required. Enter the appropriate personnel action code.
PERSONNEL REASON – Required. Enter the appropriate personnel reason code
Center for Management and Professional Development Information Technology and Computer Skills Training PAGE 109

JOB STATUS – Required. Enter the job status code to indicate the status of the employee’s appointment (i.e., temporary, probationary, etc.).
EMPLOYMENT STATUS – Required. Enter the employee’s employment status code. A code of “1” indicates an Active Employee.
AGENCY – Required. Enter the code for the agency to which the employee reports.
ORGANIZATION – Required. Enter the code for the organization to which the employee reports.
POSITION NUMBER – Required. Enter the appropriate position number.
% FULL-TIME – Required. Enter the percent of full-time the employee works in this position.
TABLE DRIVEN PAY – Required. If “Use Table” or “Do Not Use Table” was selected on the Position Status Maintenance (PSMT) window, the information will infer from the PSMT. The “Use Table” option indicates that the employee’s base pay is table-driven (tied to a pay grid), such as UCP grid A, Highway Patrol grid D, Conservation grid, etc. If “Determine by Employee” was selected on the PSMT, the “Selection Required” field will infer on the ESMT, prompting the user to choose either “Use Table” or “Do Not Use Table,” whichever is applicable.
STEP – Conditional. Enter the employee’s pay step code if “Use Table” is selected under “Table Driven Pay”; otherwise this field is optional.
EEO FULL-TIME – Required. Select N/A if there is a secondary appointment ID in the “Appointment ID” field, as EEO information is reported only on the primary appointment. Default is N/A.
Complete the following fields on the Dates panel.
PROBATION START – Conditional. Required if Probation Required Flag on the Personnel Action (PACT) window for the specified Personnel Action is Yes; otherwise, this field is optional. Enter the start date of the employee's probation period, if applicable.
PROBATION END – Conditional. Required if Probation Start Date is entered; otherwise, leave blank. Enter the end date of the employee's probation period, if applicable.
BENEFITS PROGRESSION START – Required. This field will be used to determine employee eligibility for the MO State Employee Deferred Compensation (with match). SAM II will subtract the Benefits Progression Start date from the active pay period end date to determine if an employee qualifies for a match.
Center for Management and Professional Development Information Technology and Computer Skills Training PAGE 110

(Pending 1 year of continuous state service). This process will enroll the employee into this benefit match program. For employees with a break in service, agencies will need to calculate and enter the appropriate benefit progression start date.
LEAVE PROGRESSION START – Required. Enter the date (mm/dd/yy) that begins the counting period for an employee’s leave tenure. If an employee has never worked for a state agency, this would be their initial start date. If an employee has previously worked for the state, this date must be a calculated date that includes prior state tenure. For prior continuous service, enter the initial employment start date; for prior service, which included break(s), this date is calculated by subtracting the break period(s) from the total service.
Update and verify the fields on the Assignment Attributes panel.
PAYROLL NUMBER – Required. If left blank, this field will be inferred from the Position Status Maintenance (PSMT) window when the transaction is processed. Enter the employee's payroll number code to override the Payroll Number inferred from the PSMT.
TITLE – Required. If left blank, this field will be inferred from the Position Status Maintenance (PSMT) window when the transaction is processed. Enter the employee's title code The title input must be either identical to the title on the PSMT or in the same “Title Category” in which the title from the PSMT resides. Valid values are located on the Title (TITL) window.
SUB-TITLE: Required. Replace the current sub-title with 1M. ALWAYS use this sub-title. This is the sub-title that has been created for multiple appointments.
The 1M sub-title has been established with a Pay Policy, Leave Policy, and Deduction (Benefits) Policy of STAND. If the employee is eligible for a Pay, Leave, or Deduction (Benefits) Policy other than STAND, this would need to be changed in the appropriate field in the Overrides area.
PAY CLASS – Required. If left blank, this field will be inferred from the Position Status Maintenance (PSMT) window when the transaction is processed. Enter the employee's pay class code (i.e., hourly/positive pay, salaried/exception pay, etc.) to override the pay class inferred from the PSMT. Valid values are located on the Pay Class (PYCL) window.
Overrides View
PAY POLICY: Enter a value in this field if the employee is eligible for a Pay Policy that is not the STAND pay policy.
LEAVE POLICY: Enter a value in this field if the employee is eligible for a Leave Policy that is not the STAND leave policy.
Center for Management and Professional Development Information Technology and Computer Skills Training PAGE 111

ESTABLISHING A MULTIPLE APPOINTMENT
Continue to Update and verify the fields on the Assignment Attributes panel.
BENEFITS POLICY: Enter a value in this field if the employee is eligible for a Deduction Policy that is not the STAND deduction policy.
FLSA: Select the EXEMPT option. ALWAYS select the EXEMPT option.
Remember that when you update the ESMT, all of the applicable position information is inferred from the PSMT.
Enter any pay events associated with this position on the Pay Parameters panel.
Populate the following field on the Certificate/Remark panel.
REMARKS –Required. Enter remarks to record the position that the employee currently holds.
Complete the normal editing and approval process.
Non-UCP Agencies Only—Notify OA Division of Personnel that you have established this multiple appointment. They will coordinate changing the primary appointment information with the Agency that holds that primary appointment.
Primary Appointment Agency
The primary appointment Agency would update an ESMT for that employee changing the information on the ASSIGNMENT ATTRIBUTES panel in the same manner as the secondary appointment.
If the same Agency holds both the primary and secondary (or all multiple) appointments, they can complete an ESMT for each appointment to establish and update the appropriate information.
NOTE: If the federal and state compensatory processes are set in both positions so that accruals are automatic, the employee WOULD NOT receive a paycheck after payroll is run.
Center for Management and Professional Development Information Technology and Computer Skills Training PAGE 112

MOVING A SECONDARY APPOINTMENT TO A PRIMARY APPOINTMENT When an employee who holds multiple appointments terminates employment from their primary appointment, the secondary appointment needs to be changed to become their new primary appointment. Also, if a secondary appointment’s FTE percentage is greater than the primary appointments FTE, the primary appointment and secondary appointment need to be switched. For example, Jenny Grant resigns her primary appointment with OA/Division of Personnel, but keeps her secondary appointment with Social Services. This makes Social Services her primary appointment. Social Services will need to change Jenny’s information in SAM II HR.
Step 1 Social Services would need to complete an ESMT as outlined in the Rehiring an employee that terminated from another agency or Rehiring an employee that terminated within the same agency Policy and Procedure. This process would move Jenny’s secondary appointment to her primary appointment.
As a result of this change, Jenny only has one appointment with the State of Missouri. The sub-title on her Social Services position would be modified so that FLSA and State compensatory accruals would be “turned on” again. Timekeepers would no longer manually calculate and accrue compensatory time. They would enter time for Jenny the same as any other non-multiple appointment employee. The system would automatically calculate and accrue compensatory time.
Step 2 Once the ESMT has been processed and approved, the Leave Balances that need to be brought over from Jenny’s secondary position would be processed through Leave Accrual (LEAV) documents. Social Services will need to process a LEAV document with negative accruals to subtract the hours from the secondary Appointment ID and another LEAV document will need to be processed to accrue the employee’s time to the new primary appointment. Since Jenny will not lose Sick Leave, the Sick Leave balance from Jenny’s secondary appointment will add to her Sick Leave balance in her new primary appointment. Listed below are the appropriate leave event codes to transfer leave balances:
SLXFR TRANSFER OF SICK LEAVE
SCXFR XFR STATE COMP TO PRIMARY JOB
HCXFR XFR HOL COMP TO PRIMARY JOB
FCXFR XFR FED COMP TO PRIMARY JOB
ALXFR TRANSFER OF ANNUAL LEAVE
Center for Management and Professional Development Information Technology and Computer Skills Training PAGE 113

MOVING A SECONDARY APPOINTMENT TO A PRIMARY APPOINTMENT Step 3: You will need to do the following for the employee’s deductions and benefits.
• Confirm that all the employee’s personal information, deductions, and benefits that were valid for the employee’s original primary appointment apply to the “new” primary appointment.
• Establish any new deductions and benefits that the employee wants. • Expire all of the deductions and benefits from the secondary appointment.
How to establish deductions and benefits for an employee will be covered in the Deductions and Benefits course. Refer to the Policies and Procedures for enrolling employees into benefits and establishing their deductions.
Center for Management and Professional Development Information Technology and Computer Skills Training PAGE 114

TOPIC 9: USER DEFINED WINDOWS The purpose of this topic is to provide an overview of the nine User Defined windows that can track additional employee information. These windows allow agencies to record additional information that is not captured elsewhere in SAM II HR. Each of the User Defined Windows 1-7 (USR1-7) contains fields that are used to record special conditions and specific information associated with an employee, such as tickler dates for certain personnel/payroll actions or dates needed to calculate service tenure.
Center for Management and Professional Development Information Technology and Computer Skills Training PAGE 115

Center for Management and Professional Development Information Technology and Computer Skills Training PAGE 116

USING A USER DEFINED WINDOW? On occasion you might not find a field anywhere in any of the transactions we’ve talked about to track something your agency wants to track. In these situations you can use one of the nine user defined windows to track that important employee information.
Each of the User Defined Windows 1-7 (USR1-7) contains fields in which to record special conditions and specific information associated with an employee.
User Defined Windows 1 and 2 (USR1 and USR2) have fields that have been predefined by SAM II HR System. Even though these two windows look exactly like the other five, SAM II HR System has determined what type of information should be entered into the fields on these windows. This allows for similar types of information to be entered statewide on these two windows.
User Defined Windows 3 through 7 (USR3 – USR7) can be designed at the discretion of your agency to capture desired information.
Let’s take a look at USR1 and USR2.
Center for Management and Professional Development Information Technology and Computer Skills Training PAGE 117
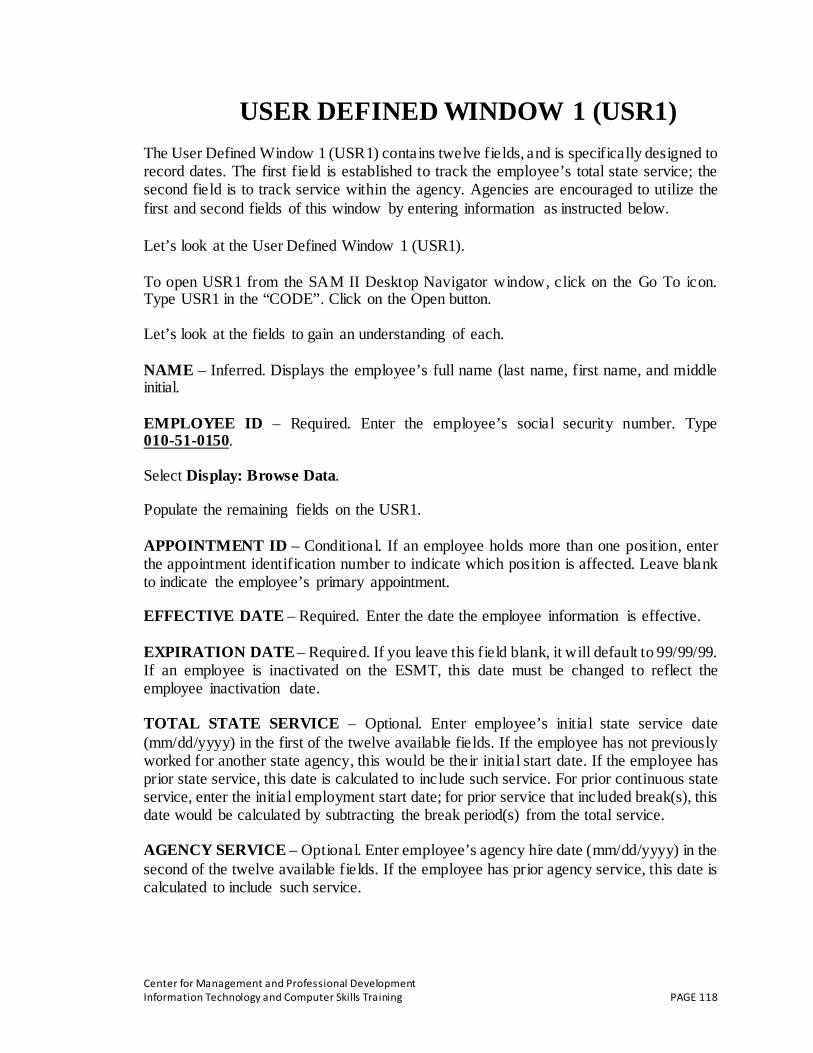
USER DEFINED WINDOW 1 (USR1)
The User Defined Window 1 (USR1) contains twelve fields, and is specifically designed to record dates. The first field is established to track the employee’s total state service; the second field is to track service within the agency. Agencies are encouraged to utilize the first and second fields of this window by entering information as instructed below.
Let’s look at the User Defined Window 1 (USR1).
To open USR1 from the SAM II Desktop Navigator window, click on the Go To icon. Type USR1 in the “CODE”. Click on the Open button.
Let’s look at the fields to gain an understanding of each.
NAME – Inferred. Displays the employee’s full name (last name, first name, and middle initial.
EMPLOYEE ID – Required. Enter the employee’s social security number. Type 010-51-0150.
Select Display: Browse Data.
Populate the remaining fields on the USR1.
APPOINTMENT ID – Conditional. If an employee holds more than one position, enter the appointment identification number to indicate which position is affected. Leave blank to indicate the employee’s primary appointment.
EFFECTIVE DATE – Required. Enter the date the employee information is effective.
EXPIRATION DATE – Required. If you leave this field blank, it will default to 99/99/99. If an employee is inactivated on the ESMT, this date must be changed to reflect the employee inactivation date.
TOTAL STATE SERVICE – Optional. Enter employee’s initial state service date (mm/dd/yyyy) in the first of the twelve available fields. If the employee has not previously worked for another state agency, this would be their initial start date. If the employee has prior state service, this date is calculated to include such service. For prior continuous state service, enter the initial employment start date; for prior service that included break(s), this date would be calculated by subtracting the break period(s) from the total service.
AGENCY SERVICE – Optional. Enter employee’s agency hire date (mm/dd/yyyy) in the second of the twelve available fields. If the employee has prior agency service, this date is calculated to include such service.
Center for Management and Professional Development Information Technology and Computer Skills Training PAGE 118

USER DEFINED WINDOW 1 (USR1) The ten remaining fields on the USR1 are also designed to record dates and are optional for agency use. These fields may be used at an agency’s discretion to track dates specific to particular events or actions associated with an employee, such as eligibility dates for particular advancements, reclassifications, time in class, etc. If an agency chooses to use the discretionary fields, they must specifically and consistently use the same fields to capture the same type of information. For instance, if the third field is intended to record salary advancement eligibility, that field must be used for that purpose for all employees in the agency.
After completing the USR1 window you need to select Process: Update to successfully add the transaction.
Center for Management and Professional Development Information Technology and Computer Skills Training PAGE 119

USER DEFINED WINDOW 2 (USR2)
Center for Management and Professional Development Information Technology and Computer Skills Training PAGE 120

USER DEFINED WINDOW 2 (USR2)
The User Defined Window 2 (USR2) contains twelve fields, and is specifically designed for tickler dates and reasons. The fields will be identified as “Tickler #1” and “Tickler Date Reason #1”, through “Tickler #6” and “Tickler Date Reason #6”. Agencies that choose to utilize this window must internally define their uses for each of the fields on this window, and consistently use the fields for the specified purpose for all employees in the agency. Let’s look at the User Defined Window 2 (USR2).
To open USR2 from the SAM II Desktop Navigator window, click on the Go To icon. Type USR2 in the “CODE”. Click on the Open button.
Let’s look at the fields to gain an understanding of each.
NAME – Inferred. Displays the employee’s full name (last name, first name, and middle initial.
EMPLOYEE ID – Required. Enter the employee’s social security number. Type SEE STUDENT DATA CARD.
Select Display: Browse Data.
APPOINTMENT ID – Conditional. If an employee holds more than one position, enter the appointment identification number to indicate which position is affected. Leave blank to indicate the employee’s primary appointment.
EFFECTIVE DATE – Required. Enter the date the employee information is effective.
EXPIRATION DATE – Required. If you leave this field blank, it will default to 99/99/99. If an employee is inactivated on the ESMT, this date must be changed to reflect the employee inactivation date. TICKLER #1 – Optional. Leave blank or enter the date (mm/dd/ccyy) to indicate when further action regarding an employee is required.
TICKLER DATE REASON #1 – Optional. Enter the reason of the action.
TICKLER #2 – Optional. Leave blank or enter the date (mm/dd/ccyy) to indicate when further action regarding an employee is required.
TICKLER DATE REASON #2 – Optional. Enter the reason of the action.
TICKLER #3 – Optional. Leave blank or enter the date (mm/dd/ccyy) to indicate when further action regarding an employee is required.
TICKLER DATE REASON #3 – Optional. Enter the reason of the action. After completing the USR2 window you need to select Process: Update to successfully add the transaction.
Center for Management and Professional Development Information Technology and Computer Skills Training PAGE 121

USER DEFINED WINDOW 3 (USR3)
The User Defined Windows 3 through 7 (USR3 – USR7) can be individually designed at the discretion of each agency to capture desired information. Agencies that choose to utilize these windows must internally define their uses for each field on the windows, and consistently use the fields for the specified purpose for all employees in the agency. If the fields are used, enter your assigned agency identification code as the first character of information put in any field.
NOTE: Information entered on USR1-USR7 windows are tied to the Employee ID and Appointment ID, if applicable. For this reason, agencies may choose to expire the information on these windows at the time of an employee’s separation to another agency. To expire the information, enter the appropriate date in the Expiration Date field. The receiving agency will populate the fields according to their specified purposes.
Center for Management and Professional Development Information Technology and Computer Skills Training PAGE 122

TOPIC 10: EMPLOYEE MAINTENANCE INQUIRIES AND REPORTS
The final topic in the Employee Maintenance course is material on Inquiry windows. Inquiries provide the user with the ability to look up information about a particular employee and to verify entered information. The purpose of this course is to learn the processes necessary to obtain summary/detailed information regarding employees.
Center for Management and Professional Development Information Technology and Computer Skills Training PAGE 123

Employee Maintenance Inquiries and Reports
Inquiries provide management reports for easy viewing of pertinent information. Some inquiries contain cross-reference information taken from several tables, which allows you to see highlights or information pertaining to a specific topic without having to open additional windows. Inquiry windows are used to view information only. They cannot be used to update the database. Another important aspect of inquiry windows is that it utilizes an idea called “Real Time”. Real Time is the idea that when an action is taken that impacts an Inquiry, its effects are immediately activated in SAM II HR as long as the information has been accepted and updated the database.
• Employee Roster by Employee Name (QXRF)
• Employee Roster by Employee ID (QXR2)
• Employee Roster by Employee Social Security Number (QXR4)
• Employee Roster by Pay Location (QXR5)
• Employee Roster by Agency and Organization (QXR6)
• Issued Check/Advices (QISS)
• Payroll Check Status Inquiry (QCHK)
• Employee Pay Rate History Inquiry (QRTE)
• Employee Pay Summary Inquiry (QPSM)
• Employment Verification Inquiry (QVER)
• Leave Usage and Accrual by Month Inquiry (QLAU)
• Employee Leave Activity Inquiry (QLDT)
• Employee Leave Balance Inquiry (QLBL)
• Employee Monthly Service Hours Inquiry (QSVM)
• Historical Name Change Cross-Reference Inquiry (QNCX)
• Employment Status Maintenance Log Detail Inquiry (QESD)
• County by Name (QCTY)
• Employee Service History (QEHS)
• Employee Service History Detail (QEHD)
Center for Management and Professional Development Information Technology and Computer Skills Training PAGE 124
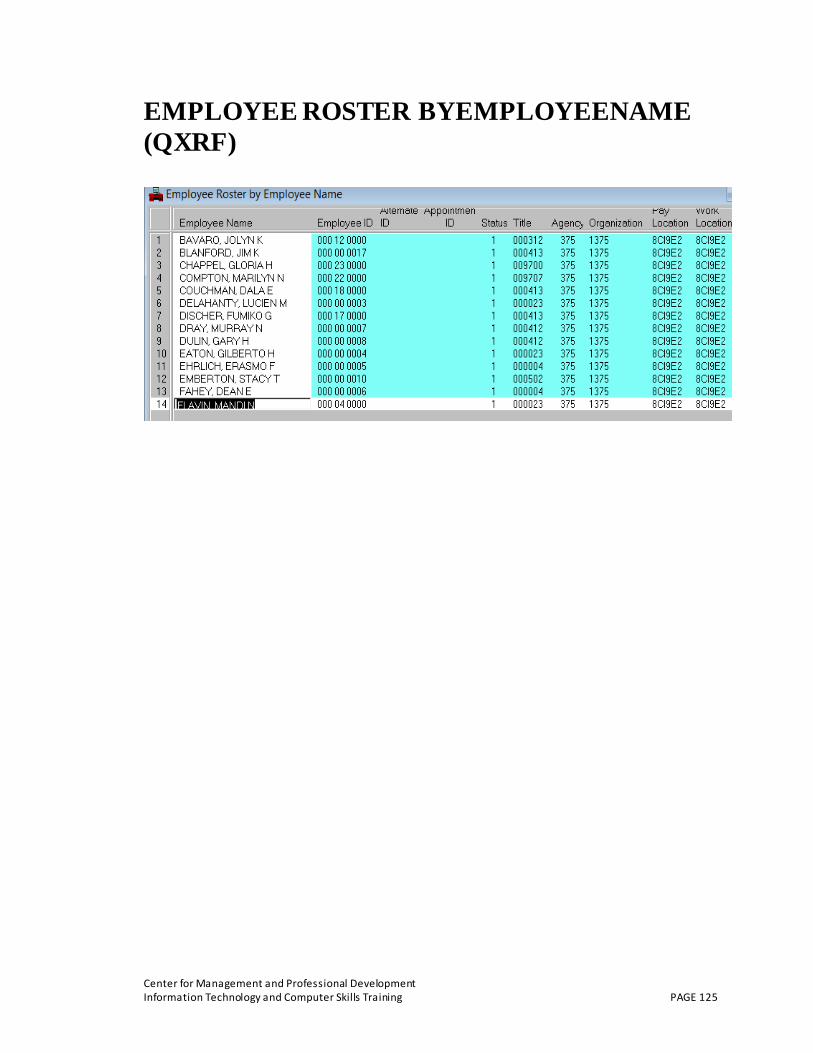
EMPLOYEE ROSTER BYEMPLOYEENAME (QXRF)
Center for Management and Professional Development Information Technology and Computer Skills Training PAGE 125

EMPLOYEE ROSTER BY NAME (QXRF) The QXRF is an on-line window that displays a list of all employees and basic information sorted in alphabetical order by employee name. The employee’s name is the main character that allows you to access information on this window. To open the QXRF from the SAM II Desktop Navigator window, click on the GO TO icon.
Type QXRF in the “CODE”. Select OPEN.
Select DISPLAY: BROWSE DATA to display employee records.
Let’s look at the fields to gain an understanding of each.
EMPLOYEE NAME – Displays the employee's full name (last name, first name,
and middle initial).
EMPLOYEE ID – The employee’s ID is displayed.
ALTERNATE ID – The employee’s alternate ID, if any, is displayed.
APPOINTMENT ID – If the employee holds more than one position, an appointment ID is assigned to identify the secondary appointment. If this field is blank, the employee data pertains to the employee’s primary appointment.
STATUS – The employee’s employment status is displayed.
TITLE – The employee’s title is displayed.
AGENCY – The agency (i.e., operating entity) the employee reports to is displayed. ORGANIZATION – The organization the employee reports to is displayed.
PAY LOCATION – The location where the employee’s paycheck is delivered is displayed. WORK LOCATION – The location where the employee works is displayed.
Center for Management and Professional Development Information Technology and Computer Skills Training PAGE 126

EMPLOYEE ROSTER BY EMPLOYEE ID (QXR2)
Center for Management and Professional Development Information Technology and Computer Skills Training PAGE 127

EMPLOYEE ROSTER BY ID (QXR2) The QXR2 is an on-line window that displays a list of all employees and basic information for each employee sorted by employee ID. The Employee’s ID is the main character that allows you to access information on this screen.
To open the QXR2 from the SAM II Desktop Navigator window, click the GO TO icon. Type QXR2 in the “CODE”. Select OPEN.
Select DISPLAY: BROWSE DATA to display employee records.
Let’s look at the fields to gain an understanding of each.
EMPLOYEE ID -Displays the employee’s social security number. The social security number can be entered to access information specific to a particular employee.
EMPLOYEE NAME – Displays the employee's full name (last name, first name, and middle initial).
ALTERNATE ID – Displays the employee's alternate ID, if any.
APPOINTMENT ID – If this field is blank, the employee data pertains to the employee's primary appointment; however if this field contains an ID, data pertains to the identified secondary appointment.
EMPLOYMENT STATUS – Displays the employee's employment status.
TITLE – Displays the employee’s title.
AGENCY – Displays the agency (i.e., operating entity) to which the employee reports.
ORGANIZATION – Displays the organization to which the employee reports.
PAY LOCATION – Displays the location where the employee's paycheck is delivered.
WORK LOCATION – Displays the location where the employee works.
Center for Management and Professional Development Information Technology and Computer Skills Training PAGE 128

EMPLOYEE ROSTER BY SOCIAL SECURITY NUMBER (QXR4)
Center for Management and Professional Development Information Technology and Computer Skills Training PAGE 129

EMPLOYEE ROSTER BY EMPLOYEE SOCIAL SECURITY NUMBER (QXR4)
The QXR4 is an on-line window that displays a list of all employees and basic information sorted by employee’s social security number. The employee’s social security number is the main character that allows you to access information on this window.
To access the QXR4, click the Go To icon. Type QXR4 in the text box below the Code column. Select OPEN.
Select DISPLAY: BROWSE DATA to display employee records.
Let’s look at the fields to gain an understanding of each.
SSN -An employee’s social security number can be entered to access a specific employee's information. Displays the employee's social security number.
EMPLOYEE NAME – Displays the employee's full name (last name, first name, and middle initial).
EMPLOYEE ID – Displays the employee’s ID (social security number).
APPOINTMENT ID – If this field is blank, the employee data pertains to the employee's primary appointment; however if this field contains an ID, data pertains to the identified secondary appointment.
EMPLOYMENT STATUS – Displays the employee's employment status.
TITLE – Displays the employee's title.
AGENCY – Displays the agency (i.e., operating entity) to which the employee reports.
ORGANIZATION – Displays the organization to which the employee reports.
PAY LOCATION – Displays the location where the employee's paycheck is delivered.
WORK LOCATION – Displays the location where the employee works.
Center for Management and Professional Development Information Technology and Computer Skills Training PAGE 130

EMPLOYEE ROSTER BY PAY LOCATION (QXR5)
Center for Management and Professional Development Information Technology and Computer Skills Training PAGE 131

EMPLOYEE ROSTER BY PAY LOCATION (QXR5) The QXR5 is an on-line window that displays a list of all employees and basic information sorted by employee’s pay location codes, then alphabetically by employee’s name. The pay location code is the main character that allows you to access information on this window.
To access the QXR5, click the Go To icon. Type QXR5 in the text box below the Code
column header. Select Open.
Select DISPLAY: BROWSE DATA to display employee records.
Let’s look at the fields to gain an understanding of each.
PAY LOCATION -Displays all pay locations. A pay location can be entered to access information specific to that location.
EMPLOYEE NAME – Displays the employee's full name (last name, first name, and middle initial).
EMPLOYEE ID – Displays the employee's ID.
ALTERNATE ID – Displays the employee's alternate ID, if any.
APPOINTMENT ID – If this field is blank, the employee data pertains to the employee's primary appointment; however if this field contains an ID, data pertains to the identified secondary appointment.
STATUS – Displays the employee's employment status.
TITLE – Displays the employee's title.
AGENCY – Displays the agency (i.e., operating entity) to which the employee reports.
ORGN – Displays the organization to which the employee reports.
WORK LOCATION – Displays the location where the employee works.
Center for Management and Professional Development Information Technology and Computer Skills Training PAGE 132
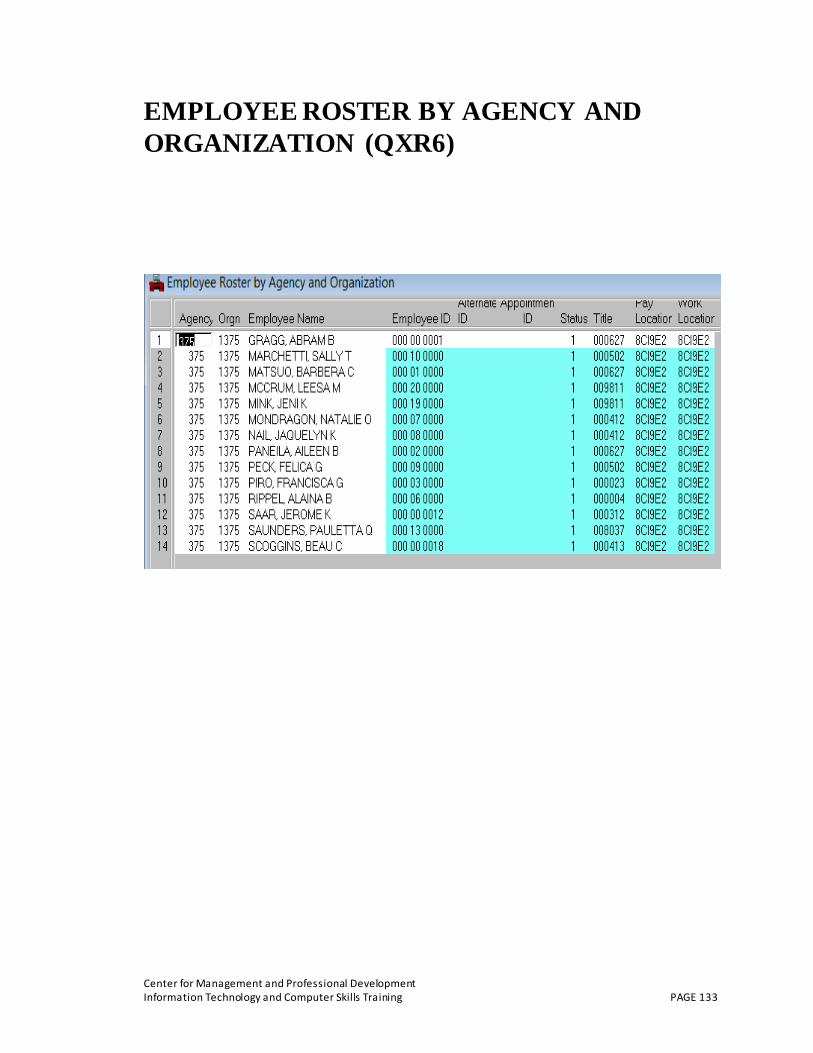
EMPLOYEE ROSTER BY AGENCY AND ORGANIZATION (QXR6)
Center for Management and Professional Development Information Technology and Computer Skills Training PAGE 133

EMPLOYEE ROSTER BY AGENCY AND ORGANIZATION (QXR6)
The QXR6 is an on-line window that displays a list of all employees and basic information sorted by Agency/Organization order, then alphabetically by employee name. The Agency/Organization is the main character that allows you to access information on this window
To access the QXR6, use the GO TO icon. Type QXR6 in the text box below the Code column header. Select Open.
Enter an agency number in the AGENCY field to begin the list at a specific pay location. Select DISPLAY: BROWSE DATA to display employee records.
Let’s look at the fields to gain an understanding of each.
AGENCY -Displays the agency; however, based on the security levels established, an agency can be entered to access information for employees in that specific agency.
ORGN – Displays the organization; however, based on the security levels established, an organization can be entered to access information for employees in that specific organization.
EMPLOYEE NAME – Displays the employee's full name (last name, first name, and middle initial).
EMPLOYEE ID – Displays the employee’s social security number.
ALTERNATE ID – Displays the employee's alternate ID, if any.
APPOINTMENT ID – If this field is blank, the employee data pertains to the employee's primary appointment; however if this field contains an ID, data pertains to the identified secondary appointment.
STATUS – Displays the employee's employment status.
TITLE --Displays the employee's title.
PAY LOCATION – Displays the employee's pay location.
WORK LOCATION – Displays the employee's work location.
Center for Management and Professional Development Information Technology and Computer Skills Training PAGE 134

EMPLOYEE PAY RATE HISTORY INQUIRY (QRTE)
Center for Management and Professional Development Information Technology and Computer Skills Training PAGE 135

EMPLOYEE PAY RATE HISTORY INQUIRY (QRTE)
The Employee Pay Rate History Inquiry (QRTE) window displays detailed pay rate information for an employee. This window can also be used to scan an employee’s pay progression.
To access the QRTE, use the GO TO icon. Type QRTE in the text box below the Code column header. Select Open.
Populate the following field to narrow your search on the QRTE window.
NAME – Inferred. Displays the employee's full name (last name, first name, and middle initial).
EMPLOYEE ID – Required. Enter the employee’s social security number. Type SEE STUDENT DATA CARD
APPOINTMENT ID – Optional. If the employee holds more than one position, enter the appointment identification number to indicate which position is affected. Leave blank to indicate the employee’s primary appointment.
SELECTION DATE – Optional. The current date is displayed; however, you may enter a date to retrieve information for a specific day.
PAY TYPE – Optional. You can enter a specific pay type to see the information for the current year or a specified year. Valid values are located on the Event Type (EVNT) window. The type of pay the employee received on the given date is displayed. If blank, only rates for base pay type are displayed.
Select DISPLAY: BROWSE DATA to display employee information.
EFFECTIVE DATE – The date data became effective is displayed.
EXPIRATION DATE – Displays the date data expires.
PERSONNEL ACTION – Displays the personnel action performed on the employee.
EMPLOYMENT STATUS – Displays the employee's employment status. TITLE/SUB-TITLE – Displays the employee's title and sub-title, if applicable.
TABLE-DRIVEN PAY – Indicates if the employee's base pay is table driven.
GRADE – Displays the employee's pay grade.
Center for Management and Professional Development Information Technology and Computer Skills Training PAGE 136
STEP – Displays the employee's step.
AGENCY – Displays the agency the employee reports to. ORGANIZATION – Displays the organization the employee reports to.
AMOUNT BASIS –Displays the amount basis the employee is paid by.The basis can be annually, hourly, daily, or by pay period.
PAY RATE – Displays the pay rate for this event. If no pay rate can be found for the employee, asterisks are displayed for base pay.
COMPONENT PAY TYPE – Displays the component pay type associated with this pay event.
Center for Management and Professional Development Information Technology and Computer Skills Training PAGE 137

EMPLOYEE PAY SUMMARY INQUIRY (QPSM)
Center for Management and Professional Development Information Technology and Computer Skills Training PAGE 138

EMPLOYEE PAY SUMMARY INQUIRY (QPSM)
The QPSM is an on-line window used to look up an employee’s wages during a specified time period. This inquiry displays an employee’s earnings for a calendar year a well as the breakdown of earnings by quarter. It is available for one or all of an employee’s pay categories for multiple years, with the most recent year displayed first.
To access the QPSM, use the GO TO icon. Type QPSM in the text box below the Code column header. Select Open.
Populate the following field to narrow your search on the QPSM window.
NAME – Displays the employee’s full name (last name, first name and middle initial).
EMPLOYEE ID -Required. Enter the employee’s social security number. SEE STUDENT DATA CARD
SELECTION YEARS: From – Optional. Default is the current year. You can enter a year (yy) to start the display at a specific year. To – Optional. Default is the From year entry. You can enter a year (yy) to end the display at a specific year. You can only enter a value in this field if a value was entered in the From field.
PAY TYPE – Conditional. If Pay Category is entered, this field must be Not Applicable; otherwise, this field defaults to All Pay. You can enter a specific pay category type to view pay summaries for that type. Valid values are All Pay, Reimbursable Pay, Fringe Pay, Non-fringe Pay and Not Applicable.
PAY CATEGORY -Conditional. If Pay Type is entered, this field must be blank; optional otherwise. You can enter a specific pay category to see the deductions for the current year or a specified year. Valid values are located on the Event Category (CATG) window. The code indicating the pay category of the employee’s pay is displayed. If blank, all pay categories are displayed.
Select DISPLAY: BROWSE DATA to display employee information.
Center for Management and Professional Development Information Technology and Computer Skills Training PAGE 139

Let’s look at the fields to gain an understanding of each.
TOTAL – The total amount of pay the employee earned over the selected years is displayed. This total is broken down into five amounts: total annual amount, total amount for the first quarter, total amount for the second quarter, total amount for the third quarter, and total amount for the fourth quarter. These totals represent the grand totals of all of the selected pay summary records, even if the pay summaries displayed are from multiple years. Therefore, each quarterly total represents the total amount the employee earned in that quarter over the selected years. The total annual amount is a sum of all four quarterly totals.
YEAR – Displays the year the following pay category was paid.
PAY CATEGORY – If Pay Type is entered, this field must be blank. Optional otherwise. You can enter a specific pay category to see the deductions for the current year or a specified year. Valid values are located on the Event Category (CATG) window. The code indicating the category of the employee's pay is displayed. If blank, all pay categories are displayed.
SHORT DESCRIPTION – Displays the pay category code.
ANNUAL AMOUNT – Displays the total annual amount of the pay category for the year. If the current year is displayed the total is the pay total-to-date.
FIRST QUARTER – Displays the total accrued pay in the first quarter (the first three months) of the year.
SECOND QUARTER – Displays the total accrued pay in the second quarter of the year.
THIRD QUARTER – Displays the total accrued pay in the third quarter of the year.
FOURTH QUARTER – Displays the total accrued pay in the fourth quarter (the last three months) of the year.
Center for Management and Professional Development Information Technology and Computer Skills Training PAGE 140
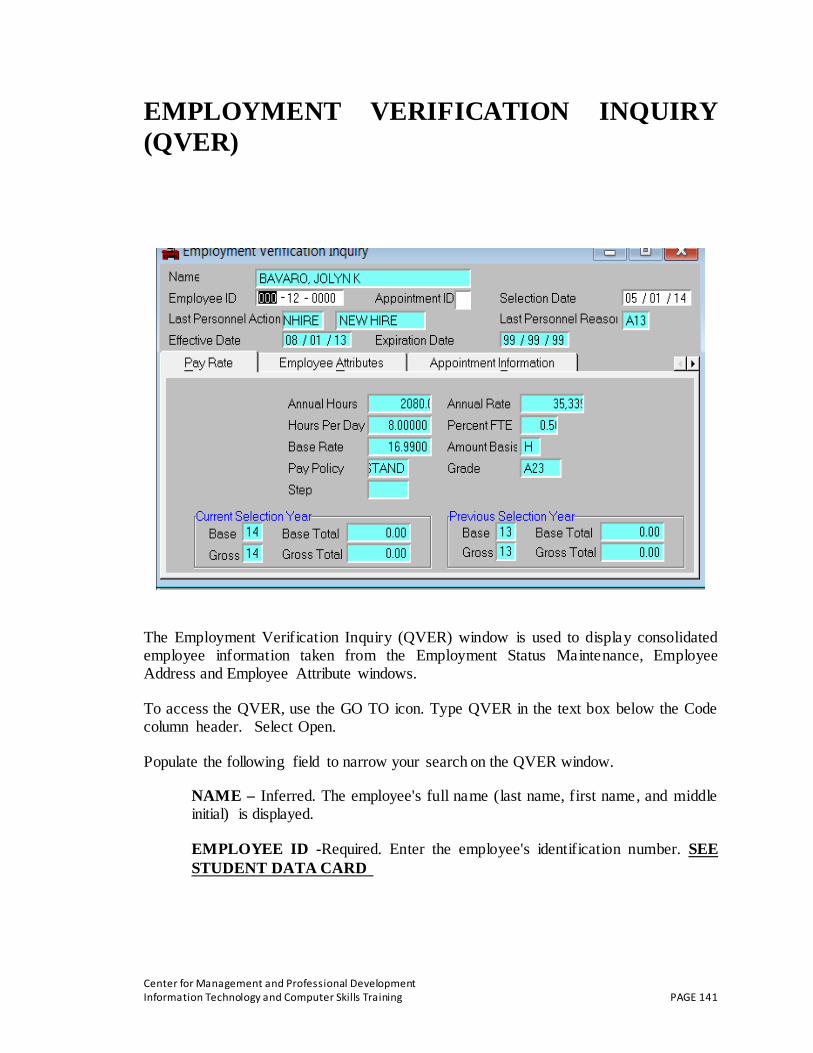
EMPLOYMENT VERIFICATION INQUIRY (QVER)
The Employment Verification Inquiry (QVER) window is used to display consolidated employee information taken from the Employment Status Maintenance, Employee Address and Employee Attribute windows.
To access the QVER, use the GO TO icon. Type QVER in the text box below the Code column header. Select Open.
Populate the following field to narrow your search on the QVER window.
NAME – Inferred. The employee's full name (last name, first name, and middle initial) is displayed.
EMPLOYEE ID -Required. Enter the employee's identification number. SEE STUDENT DATA CARD
Center for Management and Professional Development Information Technology and Computer Skills Training PAGE 141

APPOINTMENT ID -Optional. If the employee holds more than one position, an Appointment ID is assigned to an employee to identify secondary appointments. If you leave this field is blank, the displayed employee data pertains to the employee's primary appointment. If you enter an ID in this field, the employee data pertains to the identified secondary appointment.
SELECTION DATE -Optional. Enter the date for which you want to view employee data. This field defaults to the system date.
Select DISPLAY: BROWSE DATA to display employee information.
LAST PERSONNEL ACTION – The last personnel action taken on the employee is displayed. Both the code and description are displayed.
LAST PERSONNEL REASON – The reason for the last personnel action taken on the employee is displayed.
EFFECTIVE DATE – The date the assignment became effective is displayed.
EXPIRATION DATE – The date the assignment expires is displayed.
PAY RATE
The Pay Rate panel displays pay information for the employee. ANNUAL HOURS – Displays the average number of hours the employee has been slated to work in the selection year.
ANNUAL RATE – Displays the employee's annual salary.
HOURS PER DAY – Displays the average number of hours the employee works per day for the given assignment.
PERCENT FTE – Displays the percentage of full time the employee works.
BASE RATE – Displays the employee's base rate of pay.
AMOUNT BASIS – Displays the amount basis for the base rate (i.e., annual, hourly, weekly, and daily).
PAY POLICY – Displays the employee's pay policy.
GRADE – Displays the employee's grade.
STEP – Displays the employee's step.
Current Selection Year:
Center for Management and Professional Development Information Technology and Computer Skills Training PAGE 142
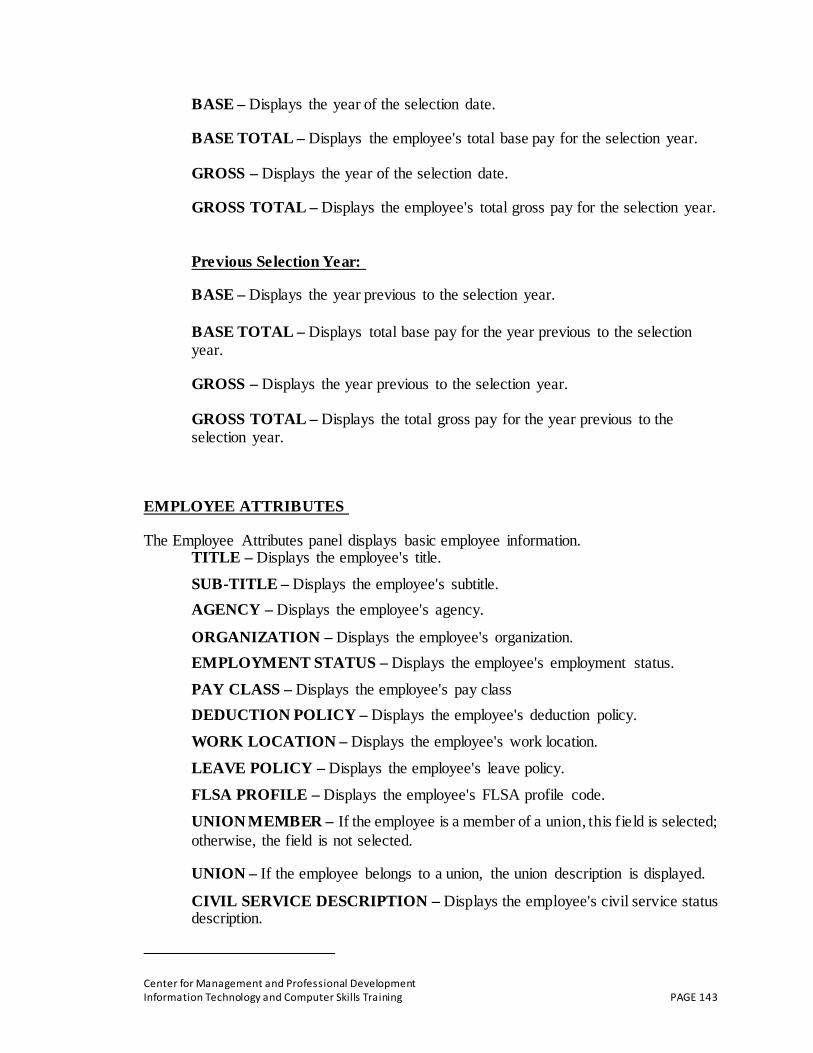
BASE – Displays the year of the selection date.
BASE TOTAL – Displays the employee's total base pay for the selection year.
GROSS – Displays the year of the selection date.
GROSS TOTAL – Displays the employee's total gross pay for the selection year.
Previous Selection Year:
BASE – Displays the year previous to the selection year.
BASE TOTAL – Displays total base pay for the year previous to the selection year.
GROSS – Displays the year previous to the selection year.
GROSS TOTAL – Displays the total gross pay for the year previous to the selection year.
EMPLOYEE ATTRIBUTES
The Employee Attributes panel displays basic employee information. TITLE – Displays the employee's title.
SUB-TITLE – Displays the employee's subtitle. AGENCY – Displays the employee's agency.
ORGANIZATION – Displays the employee's organization. EMPLOYMENT STATUS – Displays the employee's employment status.
PAY CLASS – Displays the employee's pay class DEDUCTION POLICY – Displays the employee's deduction policy.
WORK LOCATION – Displays the employee's work location.
LEAVE POLICY – Displays the employee's leave policy.
FLSA PROFILE – Displays the employee's FLSA profile code.
UNION MEMBER – If the employee is a member of a union, this field is selected; otherwise, the field is not selected.
UNION – If the employee belongs to a union, the union description is displayed.
CIVIL SERVICE DESCRIPTION – Displays the employee's civil service status description.
Center for Management and Professional Development Information Technology and Computer Skills Training PAGE 143

APPOINTMENT INFORMATION
The Appointment Information panel displays detailed information regarding the employee’s appointment.
ORIGINAL APPOINTMENT DATE – Displays the employee’s original appointment date.
ELAPSED TIME – Displays the number of years and months between the selection date and the original appointment date.
SERVICE HOURS – Displays the actual number of hours the employee has worked in the year selected, if applicable.
LEAVE PROGRESSION START DATE – Displays the date the employee’s leave progression began.
ELAPSED TIME – Displays the number of years and months between the selection date ant the leave progression start date.
PAY PROGRESSION START DATE – Displays the date the employee’s pay progression began.
ELAPSED TIME – Displays the number of years and months between the selection date and the leave progression start date.
EMPLOYMENT STATUS -Displays the employment status for the appointment selected.
APPOINTMENT ID -Displays the employee's appointment ID for the appointment selected.
TITLE – Displays the employee's title for the appointment selected.
SUB-TITLE – Displays the employee's sub-title for the appointment selected.
SUB-TITLE DESCRIPTION – Displays the long description of the employee’s sub-title.
Center for Management and Professional Development Information Technology and Computer Skills Training PAGE 144

EFFECTIVE DATE -Displays the date the assignment for the appointment selected became effective.
EXPIRATION DATE – Displays the date the assignment for the appointment selected expires.
BASE PAY RATE – Displays the base pay rate for the employee.
AMOUNT BASIS – Indicates the employee's time-based pay rate.
PERSONAL INFORMATION
The Personal Information panel displays the employee’s personal information such as
date of birth and address.
DATE OF BIRTH – Displays the employee's birthdate.
AGE – Displays the employee's age.
ADDRESS (1-3) – If the employee's mailing address and home address differ, the mailing address is displayed. Otherwise, the employee's home address is displayed.
CITY – Displays the employee's city.
STATE – Displays the employee's state.
ZIP – Displays the employee's zip code.
COUNTRY – Displays the employee's country.
PHONE – Displays the employee's phone number.
EXT. – Displays the employee's phone extension.
Center for Management and Professional Development Information Technology and Computer Skills Training PAGE 145
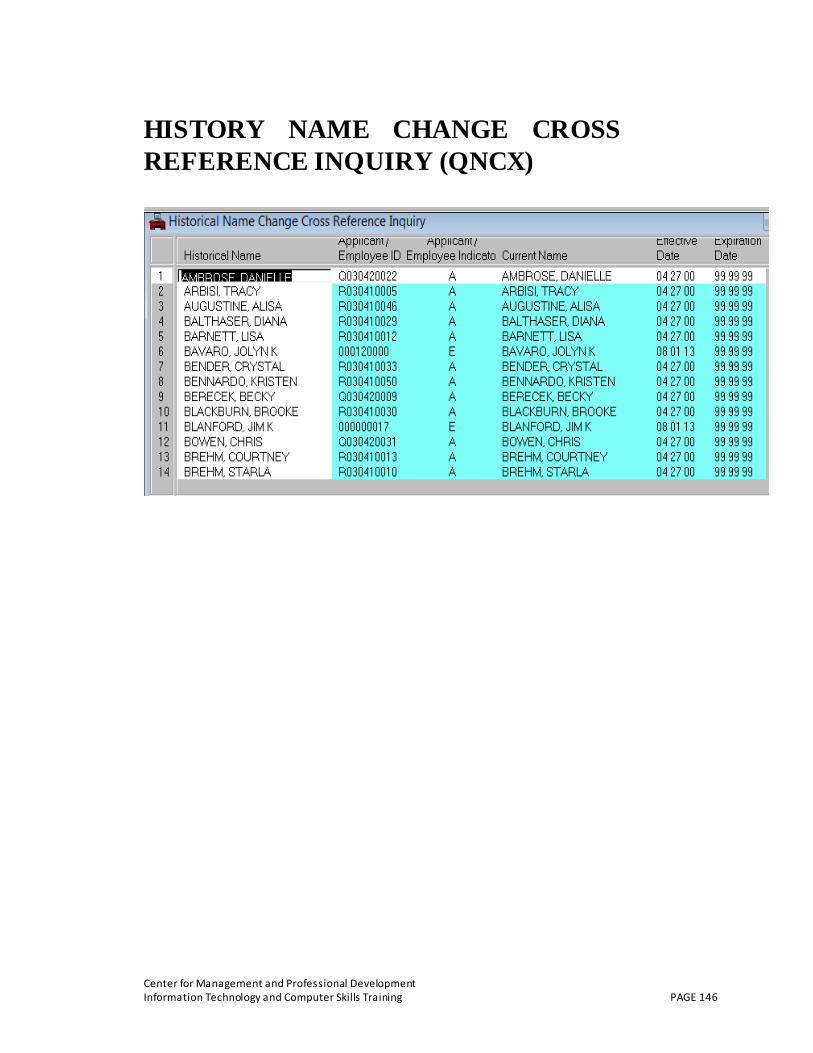
HISTORY NAME CHANGE CROSS REFERENCE INQUIRY (QNCX)
Center for Management and Professional Development Information Technology and Computer Skills Training PAGE 146

HISTORY NAME CHANGE CROSS REFERENCE INQUIRY (QNCX)
The Historical Name Change Cross Reference Inquiry (QNCX) window enables you to track name changes for applicants and employees across the entire system by displaying a cross-reference of an applicant’s or employee’s historical and current names. This window lists the applicant’s or employees historical name, applicant or employee ID, current name, and the effective and expiration dates of the name.
To access the QNCX, use the GO TO icon. Type QNCX in the text box below the Code column header. Select Open.
Select DISPLAY: BROWSE DATA to display employee information.
Let’s look at the fields to gain an understanding of each.
HISTORICAL NAME – Enter the historical name or a partial name to access information about a specific employee or applicant. The full name (last name, first name, and middle initial) is displayed.
APPLICANT/EMPLOYEE ID – The number assigned to identify the applicant or employee is displayed.
APPLICANT/EMPLOYEE INDICATOR – Indicates if this ID is an applicant ID (A) or an Employee ID (E).
CURRENT NAME –The current name of the applicant or employee is displayed.
EFFECTIVE DATE – The date the name became effective is displayed.
EXPIRATION DATE – The date the name expired is displayed. The expiration for the current name is 99/99/99.
Center for Management and Professional Development Information Technology and Computer Skills Training PAGE 147

EMPLOYEE STATUS MAINTENANCE LOG DETAIL INQUIRY (QESD)
Center for Management and Professional Development Information Technology and Computer Skills Training PAGE 148
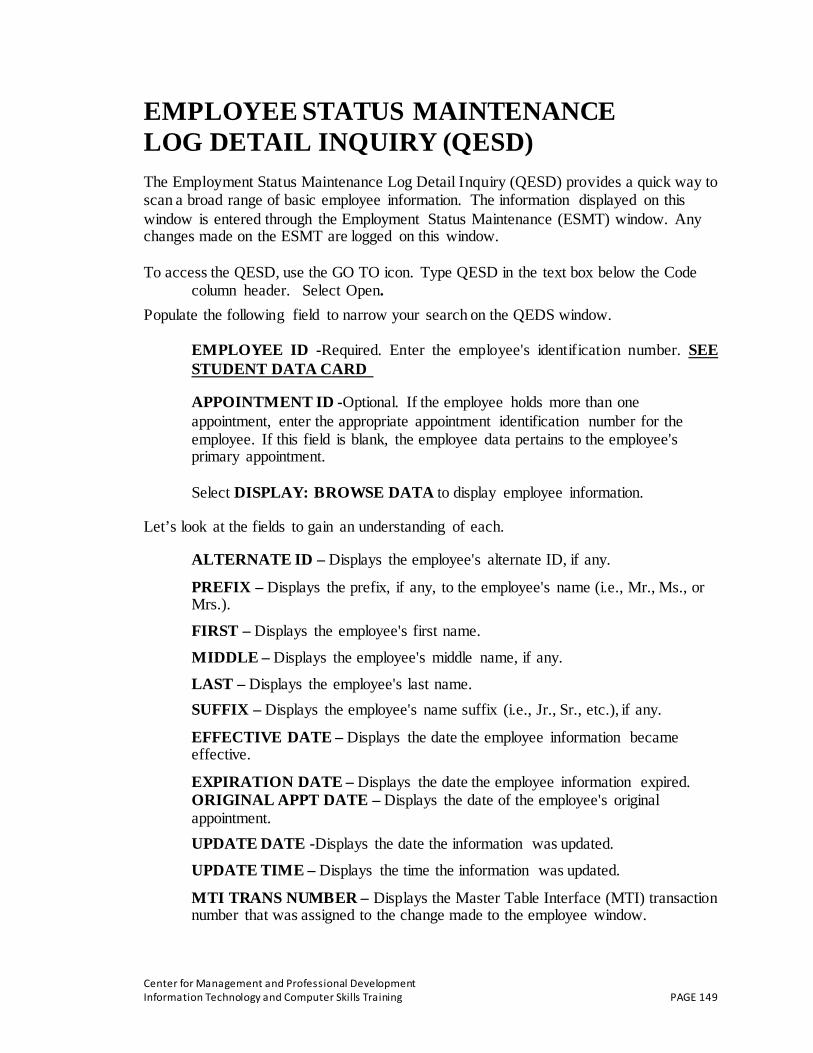
EMPLOYEE STATUS MAINTENANCE LOG DETAIL INQUIRY (QESD) The Employment Status Maintenance Log Detail Inquiry (QESD) provides a quick way to scan a broad range of basic employee information. The information displayed on this window is entered through the Employment Status Maintenance (ESMT) window. Any changes made on the ESMT are logged on this window.
To access the QESD, use the GO TO icon. Type QESD in the text box below the Code column header. Select Open.
Populate the following field to narrow your search on the QEDS window.
EMPLOYEE ID -Required. Enter the employee's identification number. SEE STUDENT DATA CARD
APPOINTMENT ID -Optional. If the employee holds more than one appointment, enter the appropriate appointment identification number for the employee. If this field is blank, the employee data pertains to the employee's primary appointment.
Select DISPLAY: BROWSE DATA to display employee information.
Let’s look at the fields to gain an understanding of each.
ALTERNATE ID – Displays the employee's alternate ID, if any.
PREFIX – Displays the prefix, if any, to the employee's name (i.e., Mr., Ms., or Mrs.).
FIRST – Displays the employee's first name.
MIDDLE – Displays the employee's middle name, if any.
LAST – Displays the employee's last name. SUFFIX – Displays the employee's name suffix (i.e., Jr., Sr., etc.), if any.
EFFECTIVE DATE – Displays the date the employee information became effective.
EXPIRATION DATE – Displays the date the employee information expired. ORIGINAL APPT DATE – Displays the date of the employee's original appointment. UPDATE DATE -Displays the date the information was updated.
UPDATE TIME – Displays the time the information was updated.
MTI TRANS NUMBER – Displays the Master Table Interface (MTI) transaction number that was assigned to the change made to the employee window.
Center for Management and Professional Development Information Technology and Computer Skills Training PAGE 149
JOB ASSIGNMENT The Job Assignment panel displays information on the type of personnel action being performed and associates the employee with the appropriate agency, organization and position.
PERSONNEL ACTION/REASON – Displays the type of personnel action being effected. If a reason for the personnel action was entered, it is also displayed.
JOB STATUS – Displays the employee’s job status.
EMPLOYMENT STATUS – Displays the employee's employment status.
AGENCY – Displays the agency (i.e., operating entity) to which the employee reports.
ORGANIZATION – Displays the organization to which the employee reports. UNION AFFILIATION – Displays the employee's union affiliation, if any.
POSITION NUMBER – The position number is used to verify authorizations and infer position attributes for the appointment process.
% FULL-TIME – Displays the percentage of time that the employee works full-time in this position (title).
TABLE-DRIVEN PAY – Indicates if a table drives the employee’s base pay.
STEP – Displays the employee's step.
EEO FULL-TIME – If the employee is considered full-time for EEO classification purposes. Yes is indicated. Otherwise, No or Not Applicable is indicated.
UNION MEMBER – If the employee is a union member, Yes is indicated. Otherwise, No or Not Applicable is indicated.
APPLICANT ID – If the Applicant Tracking Subsystem (ATS) is utilized, displays the Applicant ID, if any.
JOB NOTICE ID – If the Applicant Tracking Subsystem (ATS) is utilized, displays the Job Notice ID, if any.
DATES
The Dates panel displays probation start and end dates. Also, pay, benefits and leave progression dates can be viewed.
PROBATION START – Displays the first date of an employee's probation, if applicable.
PROBATION END – Displays the last date of an employee's probation, if applicable.
PAY PROGRESSION – Displays the progression start date used in calculating table driven pay.
Center for Management and Professional Development Information Technology and Computer Skills Training PAGE 150

TIME LIMIT CONTROL – Displays the employee’s time limit control date, if applicable.
BENEFITS PROGRESSION – Displays the date used to calculate a rate for certain benefits, if applicable.
LEAVE PROGRESSION – Displays the date used to calculate the rate used for automated leave accrual.
ASSIGNMENT ATTRIBUTES
The Assignment Attributes panel displays the position attributes and overrides.
PAYROLL NUMBER – Displays the employee's payroll number. TITLE – Displays the employee's title.
SUB-TITLE – Displays the employee's sub-title, if any.
PAY CLASS – Displays the employee's pay class.
TIME CLASS – Displays the employee's time class. CIVIL SERVICE STATUS – Displays the employee's civil service status.
ASSIGNMENT TYPE – The employee's type of assignment is either indicated as Permanent, Temporary, or None.
GRADE – Displays the employee's grade override, if any.
PAY POLICY – Displays the employee's pay policy override code, if any. LEAVE POLICY – Displays the employee's leave policy override code, if any.
BENEFITS POLICY – Displays the employee's benefits policy override code, if any. FLSA – Displays whether the employee's FLSA eligibility has been overridden.
FLSA PROFILE – Displays the employee's FLSA profile override code, if any.
PAY PARAMETERS
The Pay Parameters panel displays regular pay information for employees whose pay is not table-driven. PAY TYPE – Displays the employee's pay type.AMT AND % -Selects Amt if the pay rate is based on a specific amount. Selects % if the pay rate is based on a percentage.
INCOME – The amount of income is displayed if amount was selected. The
percentage of base pay is displayed if percent was selected.
EFFECTIVE DATE– Displays the date pay data became effective.
EXPIRATION DATE– Displays the date pay data expires.
Center for Management and Professional Development Information Technology and Computer Skills Training PAGE 151

CERTIFICATE/REMARK
The Certificate/Remark panel displays certificate information. CERTIFICATE NUMBER – Displays the number of the certificate that an employee is on when hired or promoted in a merit agency.
CERTIFICATE DATE – Displays the date (mm/dd/yy) of the certificate that an employee is on when hired or promoted in a merit agency.
REMARKS – Displays any additional comments.
Center for Management and Professional Development Information Technology and Computer Skills Training PAGE 152

Center for Management and Professional Development Information Technology and Computer Skills Training PAGE 153

COUNTY BY NAME (QCTY) The County by Name Inquiry (QCTY) window enables you to obtain the county code and name used by the SAM II system. This window lists the county name, county code, state, the effective and expiration date of the county entry, and the short and long descriptions that identifies the county. To access the QCTY, use the GO TO icon. Type QCTY in the text box below the Code column header. Select Open. Select DISPLAY: BROWSE DATA to display county information.
COUTY NAME - The name of the county is displayed
COUNTY CODE - The three-digit numerical code associated with the county is displayed.
STATE - The state associated with the county is displayed. COUNTRY CODE - The country associated with the state is displayed.
EFFECTIVE DATE - The date that the code for that county becomes valid is displayed.
EXPIRATION DATE - The date for which the code is no longer valid is displayed.
Center for Management and Professional Development Information Technology and Computer Skills Training PAGE 154

Center for Management and Professional Development Information Technology and Computer Skills Training PAGE 155
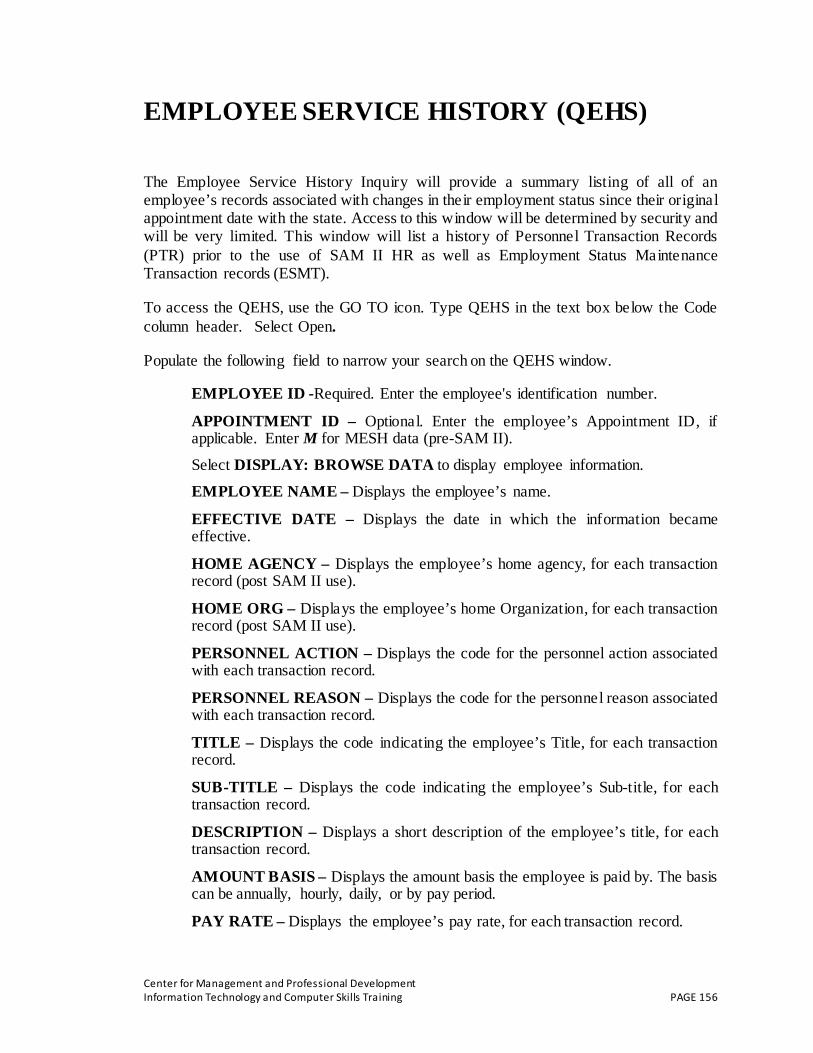
EMPLOYEE SERVICE HISTORY (QEHS) The Employee Service History Inquiry will provide a summary listing of all of an employee’s records associated with changes in their employment status since their original appointment date with the state. Access to this window will be determined by security and will be very limited. This window will list a history of Personnel Transaction Records (PTR) prior to the use of SAM II HR as well as Employment Status Maintenance Transaction records (ESMT).
To access the QEHS, use the GO TO icon. Type QEHS in the text box below the Code column header. Select Open.
Populate the following field to narrow your search on the QEHS window.
EMPLOYEE ID -Required. Enter the employee's identification number.
APPOINTMENT ID – Optional. Enter the employee’s Appointment ID, if applicable. Enter M for MESH data (pre-SAM II).
Select DISPLAY: BROWSE DATA to display employee information.
EMPLOYEE NAME – Displays the employee’s name.
EFFECTIVE DATE – Displays the date in which the information became effective.
HOME AGENCY – Displays the employee’s home agency, for each transaction record (post SAM II use).
HOME ORG – Displays the employee’s home Organization, for each transaction record (post SAM II use).
PERSONNEL ACTION – Displays the code for the personnel action associated with each transaction record.
PERSONNEL REASON – Displays the code for the personnel reason associated with each transaction record.
TITLE – Displays the code indicating the employee’s Title, for each transaction record.
SUB-TITLE – Displays the code indicating the employee’s Sub-title, for each transaction record.
DESCRIPTION – Displays a short description of the employee’s title, for each transaction record.
AMOUNT BASIS – Displays the amount basis the employee is paid by. The basis can be annually, hourly, daily, or by pay period.
PAY RATE – Displays the employee’s pay rate, for each transaction record.
Center for Management and Professional Development Information Technology and Computer Skills Training PAGE 156

GRADE – Displays the employee’s pay grade record (grid and range), for each transaction record.
STEP – Displays the employee’s pay step, for each transaction record.
DEPT – Displays the employee’s Department, for each transaction record (prior SAM II use). DIV – Displays the employee’s Division, for each transaction record (prior SAM II use).
SEC – Displays the employee’s section, for each transaction record (prior SAM II use). STATUS – Displays the employee’s employment status, for each transaction record.
TIME LIMIT DATE – Displays the time limit control date for each transaction record, if applicable.
Center for Management and Professional Development Information Technology and Computer Skills Training PAGE 157

EMPLOYEE SERVICE HISTORY DETAIL (QEHD)
Center for Management and Professional Development Information Technology and Computer Skills Training PAGE 158
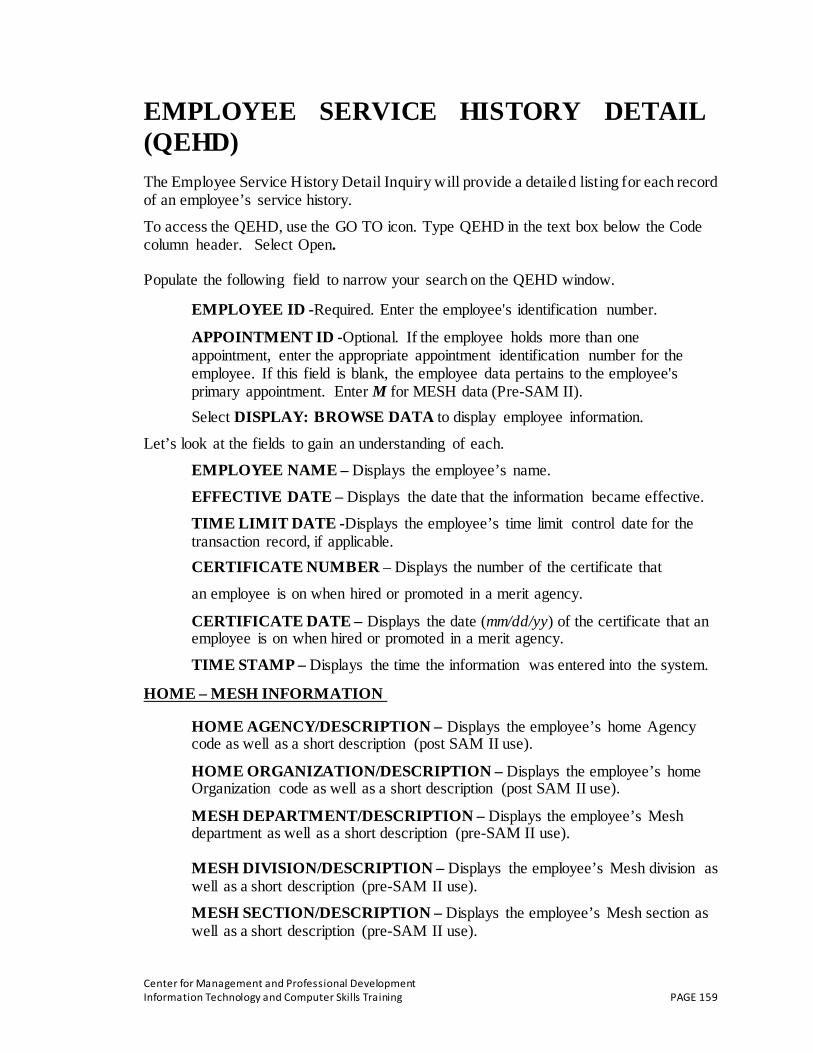
EMPLOYEE SERVICE HISTORY DETAIL (QEHD) The Employee Service History Detail Inquiry will provide a detailed listing for each record of an employee’s service history.
To access the QEHD, use the GO TO icon. Type QEHD in the text box below the Code column header. Select Open. Populate the following field to narrow your search on the QEHD window.
EMPLOYEE ID -Required. Enter the employee's identification number.
APPOINTMENT ID -Optional. If the employee holds more than one appointment, enter the appropriate appointment identification number for the employee. If this field is blank, the employee data pertains to the employee's primary appointment. Enter M for MESH data (Pre-SAM II). Select DISPLAY: BROWSE DATA to display employee information.
Let’s look at the fields to gain an understanding of each.
EMPLOYEE NAME – Displays the employee’s name.
EFFECTIVE DATE – Displays the date that the information became effective.
TIME LIMIT DATE -Displays the employee’s time limit control date for the transaction record, if applicable. CERTIFICATE NUMBER – Displays the number of the certificate that
an employee is on when hired or promoted in a merit agency.
CERTIFICATE DATE – Displays the date (mm/dd/yy) of the certificate that an employee is on when hired or promoted in a merit agency.
TIME STAMP – Displays the time the information was entered into the system.
HOME – MESH INFORMATION
HOME AGENCY/DESCRIPTION – Displays the employee’s home Agency code as well as a short description (post SAM II use).
HOME ORGANIZATION/DESCRIPTION – Displays the employee’s home Organization code as well as a short description (post SAM II use).
MESH DEPARTMENT/DESCRIPTION – Displays the employee’s Mesh department as well as a short description (pre-SAM II use).
MESH DIVISION/DESCRIPTION – Displays the employee’s Mesh division as well as a short description (pre-SAM II use).
MESH SECTION/DESCRIPTION – Displays the employee’s Mesh section as well as a short description (pre-SAM II use).
Center for Management and Professional Development Information Technology and Computer Skills Training PAGE 159
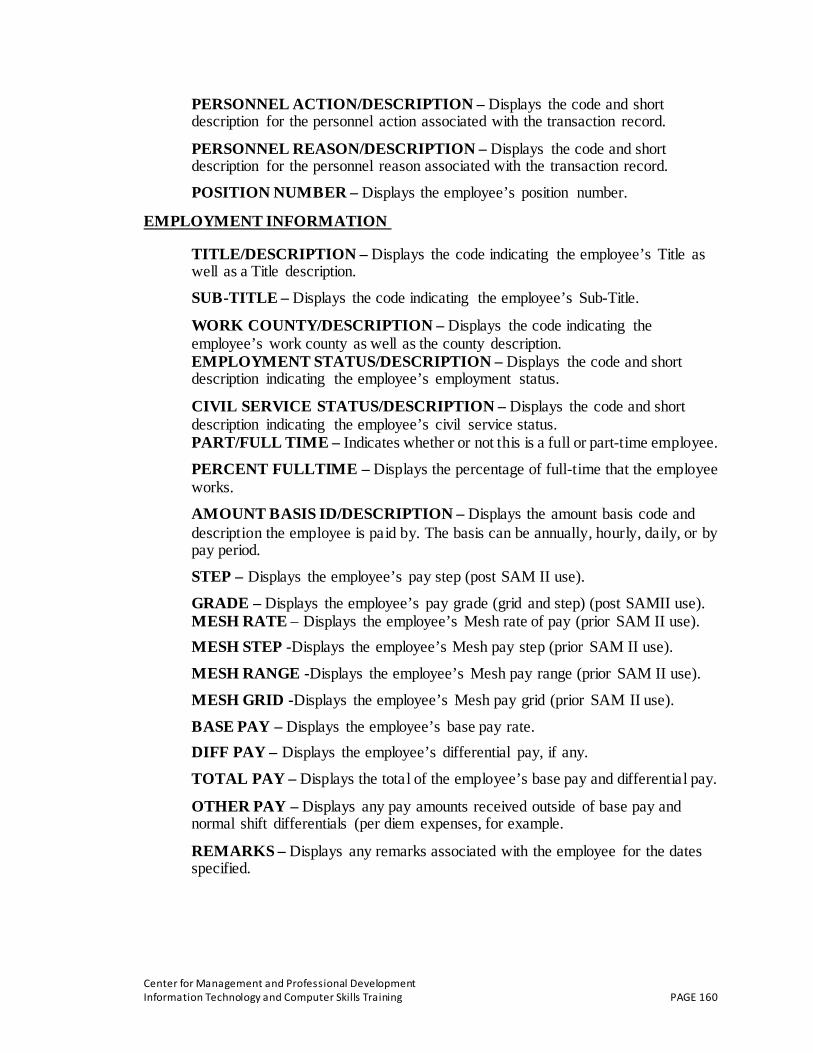
PERSONNEL ACTION/DESCRIPTION – Displays the code and short description for the personnel action associated with the transaction record.
PERSONNEL REASON/DESCRIPTION – Displays the code and short description for the personnel reason associated with the transaction record.
POSITION NUMBER – Displays the employee’s position number.
EMPLOYMENT INFORMATION
TITLE/DESCRIPTION – Displays the code indicating the employee’s Title as well as a Title description.
SUB-TITLE – Displays the code indicating the employee’s Sub-Title.
WORK COUNTY/DESCRIPTION – Displays the code indicating the employee’s work county as well as the county description. EMPLOYMENT STATUS/DESCRIPTION – Displays the code and short description indicating the employee’s employment status.
CIVIL SERVICE STATUS/DESCRIPTION – Displays the code and short description indicating the employee’s civil service status. PART/FULL TIME – Indicates whether or not this is a full or part-time employee.
PERCENT FULLTIME – Displays the percentage of full-time that the employee works.
AMOUNT BASIS ID/DESCRIPTION – Displays the amount basis code and description the employee is paid by. The basis can be annually, hourly, daily, or by pay period.
STEP – Displays the employee’s pay step (post SAM II use).
GRADE – Displays the employee’s pay grade (grid and step) (post SAMII use). MESH RATE – Displays the employee’s Mesh rate of pay (prior SAM II use). MESH STEP -Displays the employee’s Mesh pay step (prior SAM II use).
MESH RANGE -Displays the employee’s Mesh pay range (prior SAM II use).
MESH GRID -Displays the employee’s Mesh pay grid (prior SAM II use).
BASE PAY – Displays the employee’s base pay rate. DIFF PAY – Displays the employee’s differential pay, if any.
TOTAL PAY – Displays the total of the employee’s base pay and differential pay.
OTHER PAY – Displays any pay amounts received outside of base pay and normal shift differentials (per diem expenses, for example.
REMARKS – Displays any remarks associated with the employee for the dates specified.
Center for Management and Professional Development Information Technology and Computer Skills Training PAGE 160

Center for Management and Professional Development Information Technology and Computer Skills Training PAGE 161