sample file -...
TRANSCRIPT
L I N E O F F I R E > T H E L O C K ’ N L O A D P U B L I S H I N G M A G A Z I N E
ISSUE #12
PLUS !• In-Depth Articles on Forgotten Heroes 2• Previews of Honneur et Patrie and Into the Breach• Reviews of Band of Brothers and Singapore 1942• A World at War HQ Variant• An Interview with Gottardo Zancani
SCENARIOS• Forgotten Heroes 2• White Star Rising• A Solitaire World at War Scenario • Part 1 (of 2) of a World at War Modulette on the Second Sino-Vietnamese Border War
• 88 New Counters Including Nicaraguans for a Lock ‘n Load Scenario Based on Events in America Conquered!
AND MUCH MORE!!
INCLUDES
RAID &RIPOSTE
A complete game
by Mark H. WalkerSa
mpl
e file
H 1 H
LINE OF FIRE > Table of Contents
ARTICLESOn the Table: A Review of Forgotten Heroes 2 ............................................................................... 3Men with Painted Faces: On the LRRPs in Forgotten Heroes 2 ..................................................... 8Forgotten History ............................................................................................................................. 10Show Me the Hue: A Battle Report of the FH2 Scenario “River of Perfume”................................... 16Interview: Gottardo Zancani ........................................................................................................... 20The More War: A Preview of Into the Breach .................................................................................. 22The French Connection: On the Design of Honneur et Patrie ......................................................... 24No Time for Tea: A Preview of In Defeat, Defiance .......................................................................... 26Tactical Cheeseburgers: A Review of Band of Brothers: Screaming Eagles ................................... 28If at First you Don’t Succeed: A Review of Field Command: Singapore 1942 ................................. 30A New Cue for the HQ: A Command-and-Control Variant for World at War .................................... 32The Blogs of War ............................................................................................................................ 33The Cardboard Curmudgeon........................................................................................................... 34
SCENARIOS Lock ‘n LoadAmbush! .......................................................................................................................................... 35Stay Behind ..................................................................................................................................... 37On Patrol ........................................................................................................................................ 38Act of Valor ..................................................................................................................................... 42
White Star RisingQueen of Battle ............................................................................................................................... 44
World at WarThe Battle of Bitterfeld .................................................................................................................... 45Far from Home ................................................................................................................................ 46Solidarność and the Fifth Partition................................................................................................... 47
World at War Modulette, Jungle Blood & Sweat: Part IIntroduction ...................................................................................................................................... 51Black Flags ...................................................................................................................................... 53Foot Blitzkrieg .................................................................................................................................. 54Into the Fire ..................................................................................................................................... 55
Raid and Riposte: A Complete Game by Mark H. Walker ............................................................. 57
CONT
ENTS
Sam
ple
file
H 2 H
LINE OF FIRE > Editor’s Page > Credits
Editor’s Page
CREDITS:
Publisher: Mark H. WalkerEditor: Jeff LewisArt Director: Guillaume Ries
Contributors: Pete Atack, Peter Bogdasarian, Sean Druelinger, Ralph Ferrari, Dale Holmstrom,David Julien, Jeff Lewis, Roger Lewis, Konstantin Lubsky, Norm Lunde, Richard Mataka, Jeff Schulte, Brad Smith, Lt. Col. Robert Smith, Arrigo Velicogna, Mark H. Walker
Lock ‘n Load Counter Art: David JulienWorld at War Counter Art: Pete AbramsRaid & Riposte Counter Art: Gabriel GendronRaid & Riposte Map Art: Guillaume Ries
Special Thanks to Gottardo Zancani
Circulation: Janice Walker, Tracie Arrington, Ayron Walker, Whip Wilson
How to Reach Us:
Lock ‘n Load Publishing1327 Deer Trail RoadHenry, VA 24102USA
Phone: (540) 420-2279www.locknloadgame.comE-mail: [email protected]
The late Whitney Houston had hit song in the ‘80s containing a maudlin lyric: “I believe the children are our future . . .” (A quick internet search reveals the name of this song to be “Greatest Love of All”.) The lyric, despite its lack of profundity, makes for a good starting point for this editorial, which is about kids and the future of gaming.
Once a week I teach/coach the chess club at the elementary school in Roanoke, VA, where my wife teaches. I’ve played chess for many years and know a lot about it, though I’ve never played competitively. The leap from chess to war games isn’t a big one. In my opinion, chess is THE war game, and the perfect game. And I think the best war games are as thought-provoking as chess but with the added dimensions of weapons and art and history—and fantasy and sci-fi, too, of course—which all in all add up to be a springboard toward a more expansive minds-cape. Odds and luck play a part, too, giving war games another factor of intrigue. With chess, everything is stripped bare—though there are some ornately designed chess sets out there—and it’s a game of mind against mind, each player with the same force.
I was surprised by how well organized the city’s chess program is. Every school, from the elementary to the high school level, has a club, and a couple hundred students are involved. There are five tournaments a year, plus the best players compete at the state level, and if successful, at the national level too. My students are in Kindergarten to 5th Grade. At first I had 14 students, but once word got around that I brought snacks and made lots of jokes, the roster grew to 21. Twenty-one kids, ages five to eleven, were interested in playing chess, this somewhat odd-looking, rigid game played in silence save for the soft sound of the pieces
being set in a new square and the mumble of the word check. The best player in the class is in Kindergarten, surprisingly. He’s five years old and he’s beaten everyone. He’s won two beginner-level tournaments, also playing against kids as old as 5th Grade; he’s a prodigy in the making. (And, no, the student has yet to beat the teacher, in case you’re wondering.) Put a chess situation/problem in front of him on a board and he will solve it.
You would think chess wouldn’t stand a chance versus all of the digital distractions within reach of today’s youth. But the kids
are there every week, and about half of them are very in-terested in the lessons, their young minds aflame with many possibilities that the board presents from move
to move. From here it’s not a big leap to the more colorful
pastures of hobby time know as gaming—war, board, Euro, or whatnot. The audio/visual onslaught, which certainly has its merits and can be a great time, is only going to get increasingly more lifelike, but there will always be, I hope, a place for the abstract pleasures that can be induced by the simple and less-distracting components of a board and a few pieces, be it pawns or counters. It just has to be offered. I’m sure it wouldn’t take long to get them excited to play a game like All Things Zombie or Space Infantry. Warparty, too, seems like a game that could rope a kid into the hobby. Exposure to the components is all that is needed. Kings, queens, knights, zombies, space creatures, dwarves, vampires . . . where else can they thrive best but in the imagination?
Note: New contributors are always welcome. If you’d like to contribute, contact me through www.boardgamegeek.com; my geekmail is Fenster400. General feedback is always wel-come, too.
Sam
ple
file
BackgroundThe Vietnam War has a long and troubled history. Many people associate the Vietnam War with Presidents Johnson
and Nixon. However, it really began back in the 1940s and came to a head with the rise of com-munist power in North Vietnam during the Cold War. It was the Cold War that pushed the United States into the conflict because we saw it as an expansion to communism. In 1955 President Eisenhower began to send military advisors to South Vietnam to aid them in their training against the communist North.
The U.S. government viewed their involvement in the conflict as a way to stop the spread of communism to the South. The North viewed the South as a puppet government of the United States that it wanted to overthrow. U.S. involve-ment in the conflict escalated in the early ‘60s and went through a couple of troop-level tripling deployments. However, in 1965 the war spread across other borders with Laos and Cambodia being heavily bombed.
The philosophy of fighting between the op-ponents was markedly different. The U.S. and South Vietnam believed in air superiority, mass firepower, large-scale bombings and masses of troops to conduct search-and-destroy operations involving ground forces, airstrikes and artillery. The Viet Cong, on the other hand, were lightly armed and ran a guerilla war with hit-and-run tactics. Occasionally the North would mass a large contingent of units in battle, but not very often. For the South and U.S. forces, it was often very difficult to tell friend from foe.
The GameForgotten Heroes Vietnam Second Edition (FH2) is a tactical-level game using a squad-based system. The units
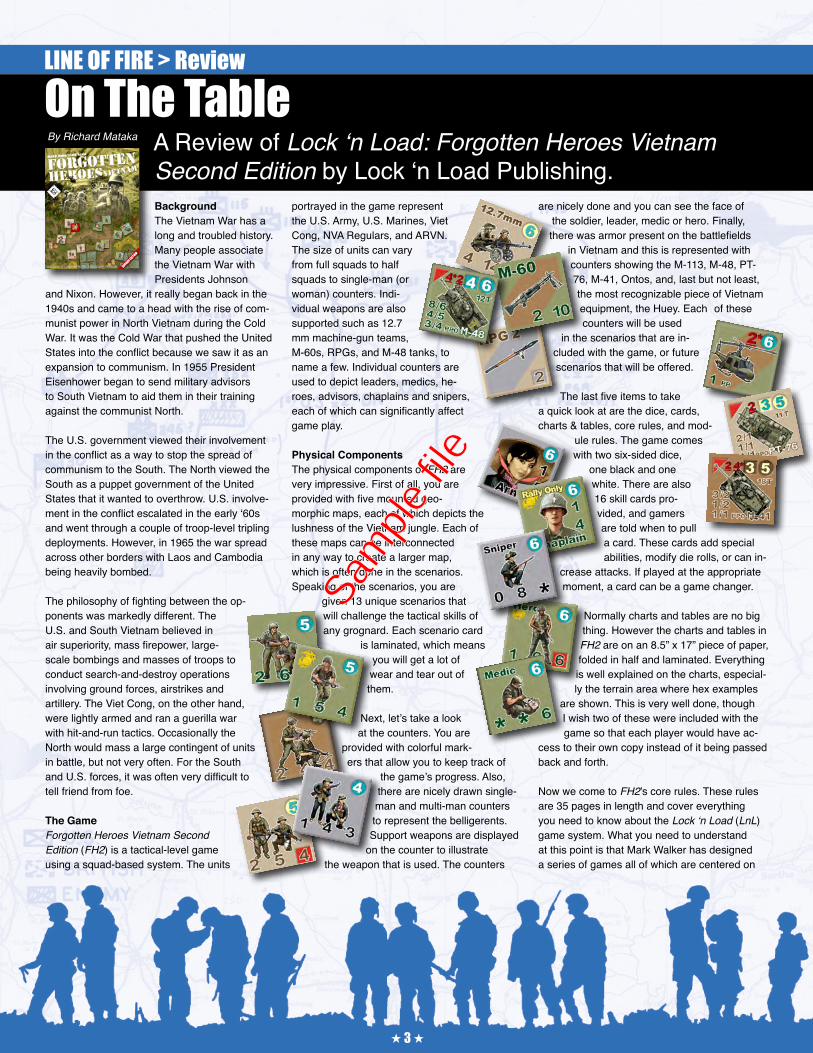
portrayed in the game represent the U.S. Army, U.S. Marines, Viet Cong, NVA Regulars, and ARVN. The size of units can vary from full squads to half squads to single-man (or woman) counters. Indi-vidual weapons are also supported such as 12.7 mm machine-gun teams, M-60s, RPGs, and M-48 tanks, to name a few. Individual counters are used to depict leaders, medics, he-roes, advisors, chaplains and snipers, each of which can significantly affect game play.
Physical ComponentsThe physical components of FH2 are very impressive. First of all, you are provided with five mounted geo-morphic maps, each of which depicts the lushness of the Vietnam jungle. Each of these maps can be interconnected in any way to create a larger map, which is often done in the scenarios. Speaking of the scenarios, you are
given 13 unique scenarios that will challenge the tactical skills of any grognard. Each scenario card
is laminated, which means you will get a lot of wear and tear out of them.
Next, let’s take a look at the counters. You are
provided with colorful mark-ers that allow you to keep track of
the game’s progress. Also, there are nicely drawn single-man and multi-man counters to represent the belligerents. Support weapons are displayed
on the counter to illustrate the weapon that is used. The counters
are nicely done and you can see the face of the soldier, leader, medic or hero. Finally, there was armor present on the battlefields
in Vietnam and this is represented with counters showing the M-113, M-48, PT-76, M-41, Ontos, and, last but not least, the most recognizable piece of Vietnam equipment, the Huey. Each of these counters will be used
in the scenarios that are in-cluded with the game, or future scenarios that will be offered.
The last five items to take a quick look at are the dice, cards, charts & tables, core rules, and mod-
ule rules. The game comes with two six-sided dice,
one black and one white. There are also 16 skill cards pro-vided, and gamers are told when to pull a card. These cards add special abilities, modify die rolls, or can in-
crease attacks. If played at the appropriate moment, a card can be a game changer.
Normally charts and tables are no big thing. However the charts and tables in FH2 are on an 8.5” x 17” piece of paper, folded in half and laminated. Everything is well explained on the charts, especial-ly the terrain area where hex examples
are shown. This is very well done, though I wish two of these were included with the game so that each player would have ac-
cess to their own copy instead of it being passed back and forth.
Now we come to FH2’s core rules. These rules are 35 pages in length and cover everything you need to know about the Lock ‘n Load (LnL) game system. What you need to understand at this point is that Mark Walker has designed a series of games all of which are centered on
H 3 H
LINE OF FIRE > Review
On The TableA Review of Lock ‘n Load: Forgotten Heroes Vietnam Second Edition by Lock ‘n Load Publishing.
By Richard Mataka
Sam
ple
file

H 4 H
LINE OF FIRE > Reviewthese rules. Stating it simply, once you learn one game, you know them all, which means the learning curve for any of the other titles is very short. At the moment there are well over a half-dozen LnL titles available, with more on the horizon.
Finally we come to the module-specific rules. In this area any special leaders, units and weapons are presented. For FH2 this consists of three pages, but gives the core rules their own person-ality for squad-sized battles during the Vietnam War.
The ScaleThe scale of FH2 is 50 meters per hex with the multi-man counters (MMCs) representing a squad of 8 to 12 men; half-squad units, 4 to 6 men; single-man counters (SMCs) representing leaders, heroes, medics, etc.; weapons teams; support weapons (SWs); and individual vehicles. The size of the counters varies from 5/8” (MMCs, SMCs, SWs) to 7/8” (vehicles) depending on the unit type being represented. As you can see, and as I mentioned before, this is a squad-level game.
The RulesI will endeavor to give you an idea of the game system employed in LnL. I am not going to cover every rule or nuance of the game, but I will try and provide readers with an insight in to game mechanics and how it fits in with the game system.
Outline of PlayThe LnL game system uses a straight-forward intuitive sequence of play that is very simple to remember but provides challenging games. The sequence or outline is:• Rally Phase• Operations Phase• Administrative Phase
Simple, right? Well, it is in the outline of play’s simplicity where the challenge to the game ex-ists.
Rally PhaseThe first thing that is accomplished in the Rally Phase is players roll 1d6 to determine initiative. It is the high-roller who has the Initiative this
turn—ties reverting to who had the initiative on the last turn. What is interesting is that a player can go last on one turn and get the Initiative the next turn and can really take advantage of his opponent’s tactical situation. This brings up a different type of strategy that the player must always be aware of during his phase.
Also, it is in the Rally Phase that shaken units can be rallied and half-squads can be combined. This is the time that units can pick up or drop off support weapons, too. The player with the initiative rallies all his units starting with leaders, followed by his opponent.
Operations PhaseThe Operations Phase of this game consists of innumerable, alternating impulses. During an impulse, a player activates and controls the units in one hex, or more hexes if a leader is in the primarily activated hex. The player with the initiative goes first and then his opponent and so on until both players pass and then the phase is complete and the sequence progresses to the Administrative Phase.
During an impulse, the active player can activate all the units in a hex or if there is a leader in the hex, he can also activate units in adjacent hexes. Once a unit is activated it may either move or
fire, but not both. The exception to this is the as-sault move. Not all of the units in the same hex need to perform the same function, however they must all fire at the same target. Finally, units that have moved, fired, spotted or per-formed an action, have a Moved, Fired or Ops Complete marker placed on top of the unit. That is not to say that a unit’s actions are complete for the turn; there are exceptions in which a unit under an Ops Complete marker can perform actions, or an opponent’s unit(s) may initiate melee.
Administrative PhaseOnce all units have either moved or fired, or after three consecutive passes, the Operations Phase is over and the Administrative Phase be-
gins. During this phase, all Moved, Fired, Assault Move, Stealth Move, Low Crawl, Ops Complete, Spotted, and FFE (Fire For Effect, artillery or mortar) markers are removed. Finally, any Smoke 1 markers are turned over to their Smoke 2 side and any Smoke 2 markers are removed from play. Once all of this bookkeeping is completed, players start all over again by beginning anew at the Rally Phase unless victory conditions for that scenario have been met.
Direct Fire CombatFiring on enemy units must meet some specific requirements that are identical to many other games of this genre. There are only three spe-cific requirements that the firing unit must meet, and they are:
• The target must be within the range of the firing unit(s) and/or its support weapon
• The target must be within the firing unit(s)’s Line of Sight
• The target unit must have been spotted
If these three criteria are met by the attacker, the unit can fire. What happens next is simple addition, subtraction and luck. The attacker adds its firepower number from the counter (bottom left) to a 1d6 die roll. To that the player adds any leadership or target-movement bonuses to find a total, and then subtracts any modifiers because
of degrading terrain. The final result I will call the Unit Attack Number. If there are multiple firing units in a hex, the attacking player can choose the counter with the highest firepower (FP) to lead the attack and then each additional MMC infantry unit adds ½
of its FP to the total. A hero, machine gun or flamethrower support weapon adds its full FP to
the FP total, which is then rounded up.
Now that we have a base number for the attacker, we need to perform a similar action for the defender. The defender rolls a 1d6 and adds the target modifier (TM) of the
terrain that the unit is occupying—if any. Play-ers now compare the die rolls. If the attacker’s die roll is less than or equal to the defender’s die roll, the attack is a failure. If the attacker’s die roll is greater than the defender’s, all of the
Sam
ple
file
H 5 H
LINE OF FIRE > Reviewdefending units in a hex must take a damage check. The procedure for a damage check is straightforward and simple to remember. First of all, in the previous step when we compared the attacker’s die roll to the defender’s die roll, a differential amount was created. You take this differential amount and add it to a 1d6 die roll for each unit in the defending hex. You cross reference this result against the defending unit’s morale number. You then look at the Direct Fire Table (DFT) and this is where you are informed of the result for that combat.
Assault MovementIn many war games, assault move-ment would be considered similar to melee combat. However, in FH2 that is not the case. To begin an explanation of assault movement you need to remember that during
an impulse in an Operations Phase, units in a hex can either move or fire but not both. Assault movement is the only condition in which a unit can move and fire. Now, when I first read this rule it didn’t make any sense. However, the more I analyzed this rule, and understood the game system, and remembered the period of history the core rules cover, the rule made perfect sense.
The rule states that if a unit’s movement factor (MF) is within a red square it can assault move, which means it can move half of its movement factor and fire during the same impulse (or wait to fire or opportunity fire in a later impulse). This is similar to a combat unit charging ahead and firing as he runs. He will not reach his destina-tion but he is attacking. So now let’s put this in game terms.
If a player has a unit that has a MF of 4 and a weapon range of 6 and he is 8 hexes distant from an enemy unit, he can still attack during his impulse using Assault Move. By declaring an Assault Move he can move 2 hexes, which brings him into range to fire his weapon at the target unit, whereas if he just moves, he will not be able to fire this impulse.
Once you begin to look at this rule and how it fits in the game system, you can see that it is very subtle and adds a new dimension to your game with all new kinds of tactics.
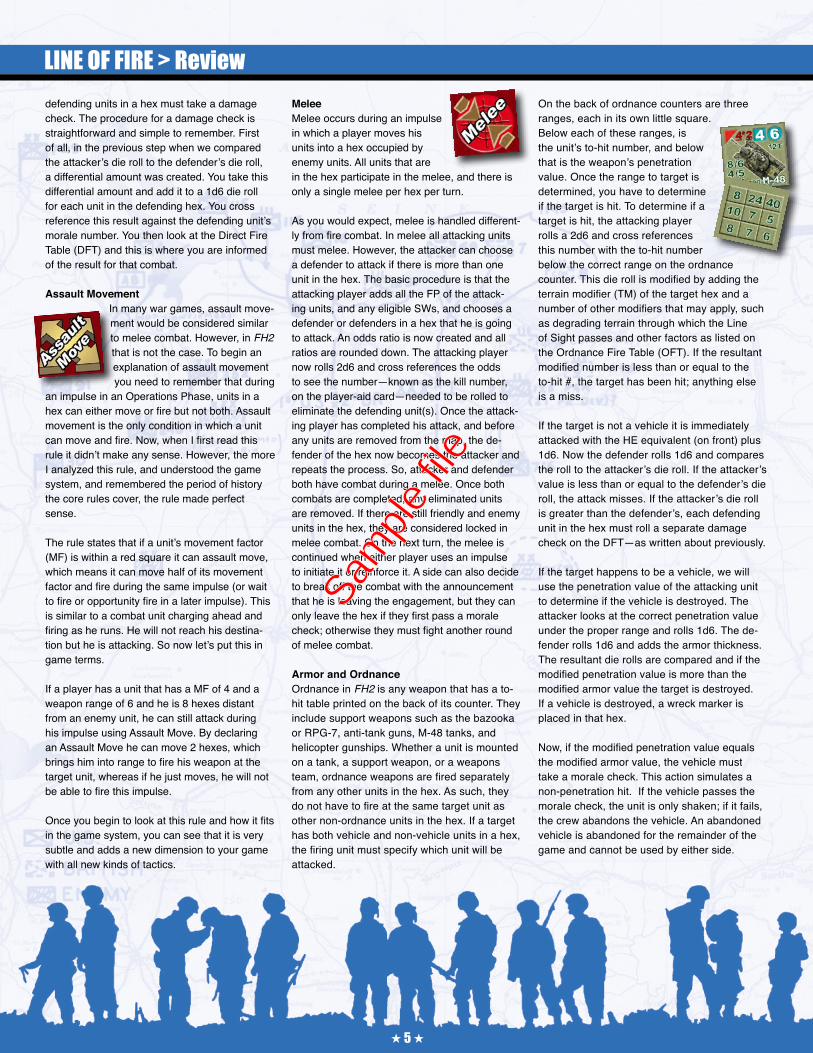
MeleeMelee occurs during an impulse in which a player moves his units into a hex occupied by enemy units. All units that are in the hex participate in the melee, and there is only a single melee per hex per turn.
As you would expect, melee is handled different-ly from fire combat. In melee all attacking units must melee. However, the attacker can choose a defender to attack if there is more than one unit in the hex. The basic procedure is that the attacking player adds all the FP of the attack-ing units, and any eligible SWs, and chooses a defender or defenders in a hex that he is going to attack. An odds ratio is now created and all ratios are rounded down. The attacking player now rolls 2d6 and cross references the odds to see the number—known as the kill number, on the player-aid card—needed to be rolled to eliminate the defending unit(s). Once the attack-ing player has completed his attack, and before any units are removed from the map, the de-fender of the hex now becomes the attacker and repeats the process. So, attacker and defender both have combat during a melee. Once both combats are completed, any eliminated units are removed. If there are still friendly and enemy units in the hex, they are considered locked in melee combat. On the next turn, the melee is continued when either player uses an impulse to initiate it or reinforce it. A side can also decide to break off the combat with the announcement that he is leaving the engagement, but they can only leave the hex if they first pass a morale check; otherwise they must fight another round of melee combat.
Armor and OrdnanceOrdnance in FH2 is any weapon that has a to-hit table printed on the back of its counter. They include support weapons such as the bazooka or RPG-7, anti-tank guns, M-48 tanks, and helicopter gunships. Whether a unit is mounted on a tank, a support weapon, or a weapons team, ordnance weapons are fired separately from any other units in the hex. As such, they do not have to fire at the same target unit as other non-ordnance units in the hex. If a target has both vehicle and non-vehicle units in a hex, the firing unit must specify which unit will be attacked.
On the back of ordnance counters are three ranges, each in its own little square. Below each of these ranges, is the unit’s to-hit number, and below that is the weapon’s penetration value. Once the range to target is determined, you have to determine if the target is hit. To determine if a target is hit, the attacking player rolls a 2d6 and cross references this number with the to-hit number below the correct range on the ordnance counter. This die roll is modified by adding the terrain modifier (TM) of the target hex and a number of other modifiers that may apply, such as degrading terrain through which the Line of Sight passes and other factors as listed on the Ordnance Fire Table (OFT). If the resultant modified number is less than or equal to the to-hit #, the target has been hit; anything else is a miss.
If the target is not a vehicle it is immediately attacked with the HE equivalent (on front) plus 1d6. Now the defender rolls 1d6 and compares the roll to the attacker’s die roll. If the attacker’s value is less than or equal to the defender’s die roll, the attack misses. If the attacker’s die roll is greater than the defender’s, each defending unit in the hex must roll a separate damage check on the DFT—as written about previously.
If the target happens to be a vehicle, we will use the penetration value of the attacking unit to determine if the vehicle is destroyed. The attacker looks at the correct penetration value under the proper range and rolls 1d6. The de-fender rolls 1d6 and adds the armor thickness. The resultant die rolls are compared and if the modified penetration value is more than the modified armor value the target is destroyed. If a vehicle is destroyed, a wreck marker is placed in that hex.
Now, if the modified penetration value equals the modified armor value, the vehicle must take a morale check. This action simulates a non-penetration hit. If the vehicle passes the morale check, the unit is only shaken; if it fails, the crew abandons the vehicle. An abandoned vehicle is abandoned for the remainder of the game and cannot be used by either side.
Sam
ple
file

H 6 H
LINE OF FIRE > ReviewEvent Markers
There are two types of event mark-ers: they are Line of Sight (LOS) and Occupation. The scenario card
will tell you if there are event markers in play and what to do when the requirements for the event marker are met. If it is a LOS event marker, the side specified triggers the event if it
has LOS to the hex in which the event marker is located. Occupation means the side specified on the scenario card must occupy the hex.
Triggering events causes the player(s) to read paragraphs that are on the scenario cards. It is recommended that you do not read these paragraphs ahead of time and wait until you are instructed to do so by the scenario. Some of the events could introduce units to an already started game or fire missions to one side or the other, just to name a few. The events add a new dimension of uncertainty to the game.
FH2 Module RulesThe module rules are specific modi-fications to the game to update it to the historical situation. For Vietnam there are not many changes, most
of them introduce the belligerents involved and some weapons specific to this time period. In these sections you are informed of any terrain modifiers, unit uniqueness, or morale changes. Two new weapons systems are also introduced: the Ontos and Claymore Mines. Here you are told either how the unit can be used or the effect of the weapon on the battlefield. The module-specific rules are only about 2 ¾ pages long but provide the necessary information to take the LnL system and make it specific to Vietnam.
Scenario Card FormatEach scenario follows the same general format. At the top of the first page there is a short description of the scenario. Next is the order of battle, where players are told which units they will use, and their initial deployment. On the back of the scenario card you are given a picture of the map that will be used. Underneath the order of battle, you are informed of the scenario length and victory conditions. After this are the locations of the Event markers, and below them are the paragraphs.
The final item that is covered on the scenario card is the designer’s notes. Here you gain an insight to the scenario and what the designer had in mind.
Playing the GameAs a quick example of play, we will take a look at one of the simpler scenarios called “A Friend In Need.” This battle occurred in May 1969 in the A Shau Valley when US Army forces advanced on a village. Each side knew the other was there, but neither expected a battle.
Set-upThe scenario takes place on Map #1 with three Event markers. The US units begin off the map and enter via the west (left) edge. The Viet Cong (VC) begin on the map, though their sniper is to be brought in per the rules of the game. The rule concerning snipers says that the player can place the sniper in any hex desired at any time just as long as the hex he is placed in has a positive terrain modifier. The VC player decides to wait and see how the US units will advance before committing a unit that cannot move. The philosophy behind the deployment of the VC (3 x Squads, 1 x RPD + Lt. Diem) is to protect the village (which means victory points) and create killing zones where possible. To this end, the RPD is placed with a squad in hex I5, which has a strong central position with ad-ditional views to the left and right flanks. Another VC squad is placed in the huts in K4, with a fire
lane down the main road and into the light jungle on the right flank. The final VC squad is placed in reserve in the light building in L3. Finally, Lt. Diem, the Charis-matic leader, is placed in hex J5
because of his leadership skills: during the Rally Phase, Lt. Diem can rally units in his own hex and also, because his troops revere him, units in adjacent hexes; thus here he can rally either or both squads that are adjacent to him (see Figure 1).
Turn 1According to the scenario, the US player has the initiative on Turn 1 and begins by bringing in units from the west edge of the map. He decides to split his force in to two platoons (three squads + 1 M-60 each), with the medic in one group
and Lt. Jensen, who has the Bull skill card (he can be wounded twice without dying instead of once) with the other. Partial hexes are in play, thus units must pay the terrain costs to enter the map. The platoon with the medic enters via hex A8 and moves in the open to the south of the heavy jungle. The VC player passes. Lt. Jensen’s platoon enters the map on the road in hex A4 and double-times (adds 2 MF because of leader) up the road, ending its move in the cover of the kunai grass in E3. But this triggers opportunity fire from the VC squad with the RPD in I5 (see Figure 2). Contact has been made. The Americans can be fired on because they are under a Moved marker, and thus spotted, and within range and line of sight of the VC. The attack die-rolls go as follows: The VC rolls a 1 on a 1d6, adds the RPD’s firepower (FP) of 2 and the FP of 1 for the VC squad, for a total of 4. There is an additional +1 die-roll modifier be-cause the Americans are under Moved marker, but there’s also a –1 because the Americans are in kunai grass, which negates the +1 for firing on a moving infantry unit; thus the total for the VC attack is 4. The Americans now roll 1d6; kunai grass has no terrain modifier (but it did negate the attacker’s +1 bonus for firing on units
FIG. 1: VC SETUP
FIG. 2: CONTACT
Sam
ple
file
H 7 H
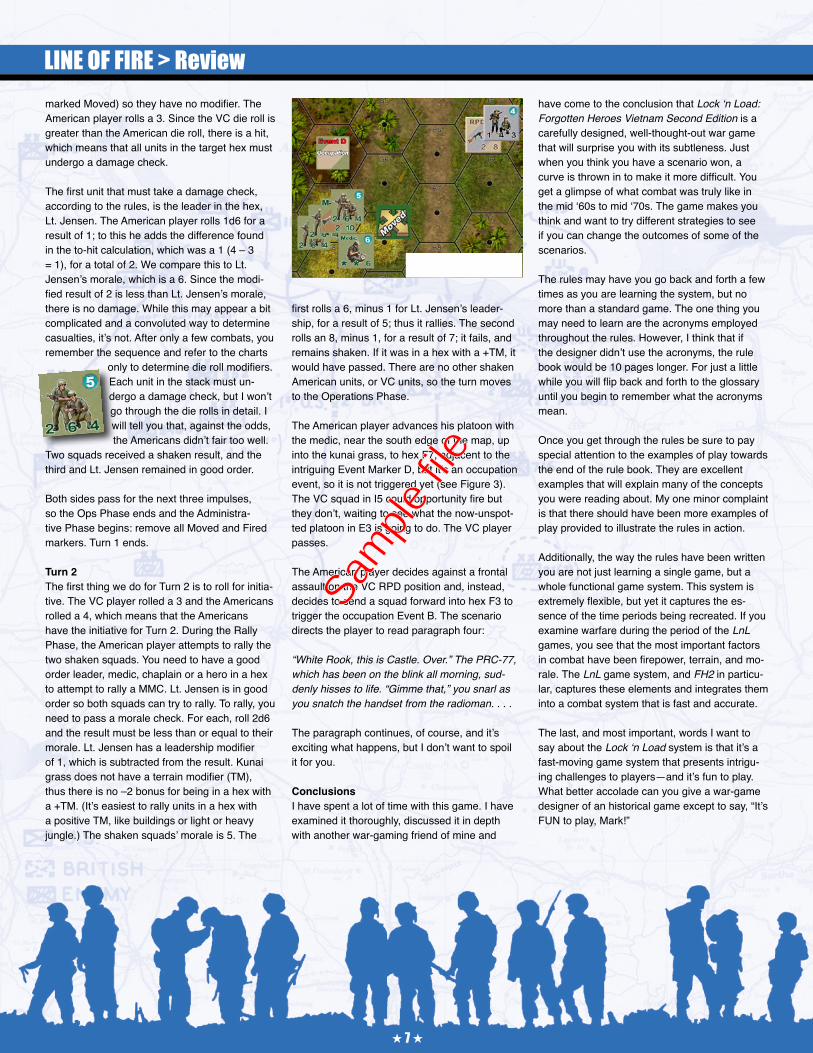
LINE OF FIRE > Reviewmarked Moved) so they have no modifier. The American player rolls a 3. Since the VC die roll is greater than the American die roll, there is a hit, which means that all units in the target hex must undergo a damage check.
The first unit that must take a damage check, according to the rules, is the leader in the hex, Lt. Jensen. The American player rolls 1d6 for a result of 1; to this he adds the difference found in the to-hit calculation, which was a 1 (4 – 3 = 1), for a total of 2. We compare this to Lt. Jensen’s morale, which is a 6. Since the modi-fied result of 2 is less than Lt. Jensen’s morale, there is no damage. While this may appear a bit complicated and a convoluted way to determine casualties, it’s not. After only a few combats, you remember the sequence and refer to the charts
only to determine die roll modifiers. Each unit in the stack must un-dergo a damage check, but I won’t go through the die rolls in detail. I will tell you that, against the odds, the Americans didn’t fair too well.
Two squads received a shaken result, and the third and Lt. Jensen remained in good order.
Both sides pass for the next three impulses, so the Ops Phase ends and the Administra-tive Phase begins: remove all Moved and Fired markers. Turn 1 ends.
Turn 2The first thing we do for Turn 2 is to roll for initia-tive. The VC player rolled a 3 and the Americans rolled a 4, which means that the Americans have the initiative for Turn 2. During the Rally Phase, the American player attempts to rally the two shaken squads. You need to have a good order leader, medic, chaplain or a hero in a hex to attempt to rally a MMC. Lt. Jensen is in good order so both squads can try to rally. To rally, you need to pass a morale check. For each, roll 2d6 and the result must be less than or equal to their morale. Lt. Jensen has a leadership modifier of 1, which is subtracted from the result. Kunai grass does not have a terrain modifier (TM), thus there is no –2 bonus for being in a hex with a +TM. (It’s easiest to rally units in a hex with a positive TM, like buildings or light or heavy jungle.) The shaken squads’ morale is 5. The
first rolls a 6, minus 1 for Lt. Jensen’s leader-ship, for a result of 5; thus it rallies. The second rolls an 8, minus 1, for a result of 7; it fails, and remains shaken. If it was in a hex with a +TM, it would have passed. There are no other shaken American units, or VC units, so the turn moves to the Operations Phase.
The American player advances his platoon with the medic, near the south edge of the map, up into the kunai grass, to hex F7, adjacent to the intriguing Event Marker D, but it’s an occupation event, so it is not triggered yet (see Figure 3). The VC squad in I5 could opportunity fire but they don’t, waiting to see what the now-unspot-ted platoon in E3 is going to do. The VC player passes.
The American player decides against a frontal assault on the VC RPD position and, instead, decides to send a squad forward into hex F3 to trigger the occupation Event B. The scenario directs the player to read paragraph four:
“White Rook, this is Castle. Over.” The PRC-77, which has been on the blink all morning, sud-denly hisses to life. “Gimme that,” you snarl as you snatch the handset from the radioman. . . .
The paragraph continues, of course, and it’s exciting what happens, but I don’t want to spoil it for you.
ConclusionsI have spent a lot of time with this game. I have examined it thoroughly, discussed it in depth with another war-gaming friend of mine and
have come to the conclusion that Lock ‘n Load: Forgotten Heroes Vietnam Second Edition is a carefully designed, well-thought-out war game that will surprise you with its subtleness. Just when you think you have a scenario won, a curve is thrown in to make it more difficult. You get a glimpse of what combat was truly like in the mid ‘60s to mid ‘70s. The game makes you think and want to try different strategies to see if you can change the outcomes of some of the scenarios.
The rules may have you go back and forth a few times as you are learning the system, but no more than a standard game. The one thing you may need to learn are the acronyms employed throughout the rules. However, I think that if the designer didn’t use the acronyms, the rule book would be 10 pages longer. For just a little while you will flip back and forth to the glossary until you begin to remember what the acronyms mean.
Once you get through the rules be sure to pay special attention to the examples of play towards the end of the rule book. They are excellent examples that will explain many of the concepts you were reading about. My one minor complaint is that there should have been more examples of play provided to illustrate the rules in action.
Additionally, the way the rules have been written you are not just learning a single game, but a whole functional game system. This system is extremely flexible, but yet it captures the es-sence of the time periods being recreated. If you examine warfare during the period of the LnL games, you see that the most important factors in combat have been firepower, terrain, and mo-rale. The LnL game system, and FH2 in particu-lar, captures these elements and integrates them into a combat system that is fast and accurate.
The last, and most important, words I want to say about the Lock ‘n Load system is that it’s a fast-moving game system that presents intrigu-ing challenges to players—and it’s fun to play. What better accolade can you give a war-game designer of an historical game except to say, “It’s FUN to play, Mark!”
FIG. 3: ADVANCE
Sam
ple
file

What’s a Lurp?Lurp is a fun word to say. Say it: “Lurp.” Again: “Lurp.” See what I mean? But what’s a Lurp? A Lurp is not some sort of Dr. Seuss character. It sounds like one, but
it isn’t. A Lurp is a member of an U.S. Special Forces team. More specifically, a Lurp is a mem-ber of a Special Forces team that conducted Long-Range Recon Patrols (LRRP) during the Vietnam War. A far cry from Dr. Seuss and Who-ville, for sure. So, out of the acronym LRRP, with its exceptionally long-R sound, comes Lurp.
Overview & RolesThe Lurps did what their acronym suggests: they went on long-range recon patrols, often in dangerous terrain, deep behind enemy lines and within contact-range of NVA and Viet Cong forces.
The Lurps had many roles. They would, as the second R in their acronym implies, conduct recon operations, but they also conducted intel-ligence-gathering missions, located new landing zones (LZs) for future operations, assessed the damage from bombing attacks, directed artillery and air-to-ground attacks, conducted raids and ambushes (see the scenario “Stay Behind” in this issue of Line of Fire), overwatch and even prisoner-of-war rescue attempts. They typically went on patrol in teams of six men, but could have more or less, depending on the operation. For example, if they were conducting a raid they may have a dozen or more personnel, whereas
a team directing fire for bombers may have had only three or four personnel.
The Lurps were irregular soldiers. In 1965, as American troop levels began to increase in Vietnam, there was no existing units that had specifically been trained to perform LRRP-type operations. The Viet Cong were fighting a guerilla war, and to defeat them the Americans had to find a way to out-guerilla the guerillas. A certain type of soldier was required for these operations. They had to be “unique,” as Michael Lee Lanning wrote in his indispensible book on the subject, Inside the LRRPS: Rangers in Vietnam. According to Lanning:
The troops who volunteered for LRRP duty were a unique group in a unique war. They were not “super soldiers” any more than their brother infantrymen in the regular combat line units. Yet they performed “super feats” that earned the respect of ally and enemy alike. (Lanning, 1988.)
The volunteers ranged from officers to privates, but rank didn’t matter while on patrol. Each team had a team leader who, for example may be a sergeant, while another member of the team was a lieutenant or captain. On a LRRP team, role was more important than rank. A typical six-man team had a team leader, an assistant team lead-er, two radio operators (RTOs), a point man, and a rear-security man. It was also not uncommon for mercenaries to accompany the team, lending local knowledge and contacts; these men were usually motivated by hatred for the VC or NVA and were looking to enact revenge or retribution. (The scenario “On Patrol” in this issue of Line of Fire has a Montagnard Mercenary in the OOB—an ARVN Hero is used.)
The Lurps armed themselves with whatever each member of the team preferred to use, including enemy weapons like the AK-47—which also served as a deception tactic, as the NVA often fired AK-47 rounds as a means of com-munication. Dress was also unique to the team member: from head cover to boots, whatever
camouflage was best for the mission; and again, even enemy clothing was used at times. And they all used black or vegetal-colored grease-paint on their faces. As Michael Lee Lanning wrote, “Captured documents and prisoner inter-rogations revealed that the enemy’s common name for LRRPs was ‘the men with painted faces.’” Having such a name among your en-emies is a testament to your effectiveness.
As their success and importance increased, so did their numbers. In 1969 they became redesignated as Rangers and organized in to companies within the 75th Ranger Infantry Regi-ment, which eventually became what is known today as the 75th Ranger Regiment—elements of which fought in Mogadishu, Somali in 1993, the conflict depicted in the Lock ‘n Load module A Day of Heroes. But this article is about the Lurps, or Rangers, in Forgotten Heroes 2.
LRRPs in FH2In Forgotten Heroes (1 & 2), the LRRPs are represented as Squads and Half-squads, and if
the Self-Rallying Half-squad, at 2-4-4-6 and with the Assault Move capability, wasn’t power-ful enough, there’s the Squad with an intimidating 3-5-5-6 with
Assault Move and Self-Rally. Put an M-60 in the hands of one of the team members and sudden-ly one Squad has the formidable Firepower of 5 at a Range of up to five hexes—not to mention 2 FP at up to 10, to pick off distant and unwitting enemies. The bottom line is, moving adjacent to a well-armed LRRP Squad is to invite not just trouble but the promise of devastation. These guys are, for lack of a better word, badasses. And you have to be when your job is to out-guerilla the guerilla.
Though LRRP teams were usually comprised of six men, a Squad, which in LnL depicts 8–12 men, may seem too big of a unit; but given that they did go out in larger numbers than six and had superior acumen with their weapons, plus
H 8 H
LINE OF FIRE > Article
Men With Painted FacesOn the LRRPs in Forgotten Heroes 2.By Jeff Lewis
Sam
ple
file
H 9 H
LINE OF FIRE > Articletraining in combat medicine, the extra step is warranted. I tend to think of a LRRP Squad as the traditional six-man team and the Half-squad as two to three men. One curious omission in the LRRP skill set, in my opinion, is that, given their proclivity to move about the jungle undetected, it’s a little odd that they do not have Stealth Movement. The simple inference is that Stealth Movement was yet to be a rule in the original version of Forgotten Heroes. It made its debut with the Scout in Anzac Attack and then again in Band of Heroes. Stealth Movement (Movement Factor within a yellow square) would still grant them Assault Movement but with the addition of not being spotted when moving in hexes with a positive Terrain Modifier, like Light or Heavy Jungle, even when adjacent to enemy units. It’s certainly worth trying as a house rule—if both players agree, of course.
Where can you find the LRRPs in Forgotten Heroes? They are in the Order of Battle (OOB) in only one scenario in FH2, “Prelude to Lang Vei,” in which case they are accompanying two platoons of ARVN infantry to secure hills overlooking Highway 9. Not exactly a patrol, but a role they would certainly fill. They also may turn up elsewhere, but events will dictate (hint). They are in the OOB in the scenario “Catecka Tea Plantation,” which was in Forgotten Heroes 1, but substituted out for the second edition. They also make an appearance, albeit as Green Berets, in the scenario “Snakes in the Grass,” which was in Line of Fire #2. So, they aren’t in a lot of scenarios, and that’s why I chose to design two scenarios for them for this issue of Line of Fire. I wanted the scenarios to illustrate the LR-RPs’ traditional roles and experiences. Neither scenario is based on a specific historical action. They are titled “Stay Behind” and “On Patrol.”
“Stay Behind”This scenario is a short one, but that doesn’t mean it’s simple, nor was it simple to design. Mark Twain has a pithy comment about the writ-ing of letters in which he states that if you don’t have time to write a short letter, write a long one. The point being, creating something concise and intricate is much more difficult and time consuming than something large, sprawling and unfocused.
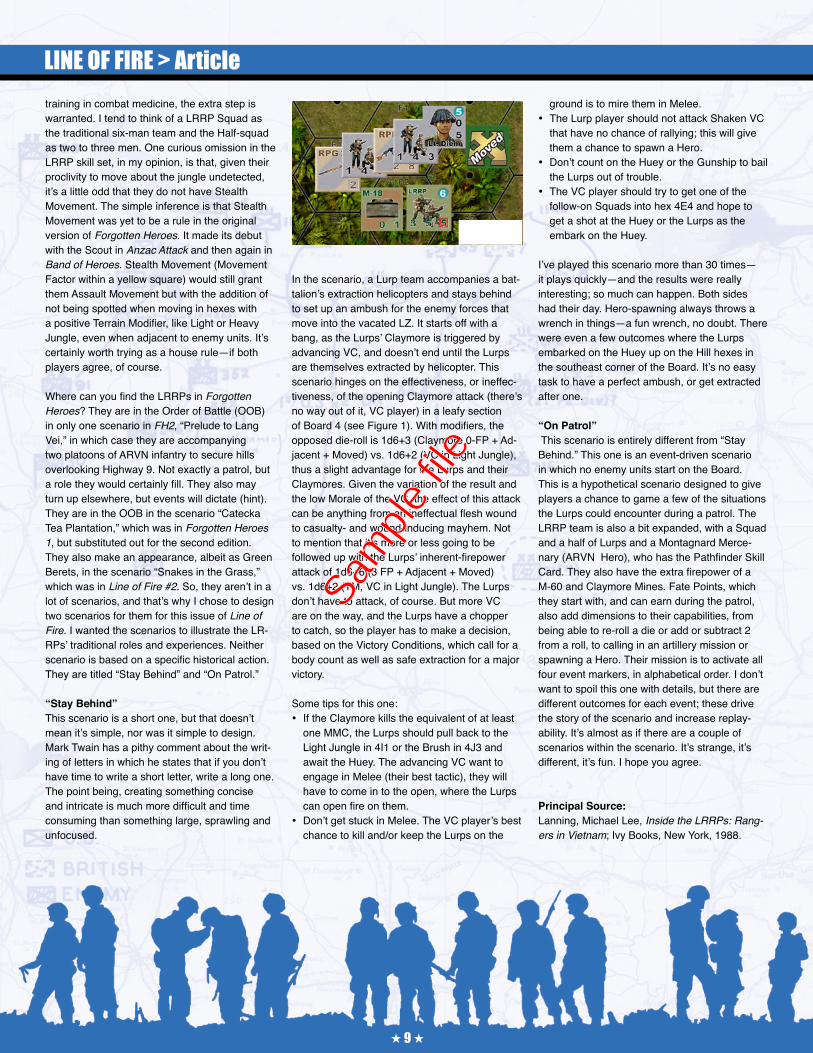
In the scenario, a Lurp team accompanies a bat-talion’s extraction helicopters and stays behind to set up an ambush for the enemy forces that move into the vacated LZ. It starts off with a bang, as the Lurps’ Claymore is triggered by advancing VC, and doesn’t end until the Lurps are themselves extracted by helicopter. This scenario hinges on the effectiveness, or ineffec-tiveness, of the opening Claymore attack (there’s no way out of it, VC player) in a leafy section of Board 4 (see Figure 1). With modifiers, the opposed die-roll is 1d6+3 (Claymore 0-FP + Ad-jacent + Moved) vs. 1d6+2 (VC in Light Jungle), thus a slight advantage for the Lurps and their Claymores. Given the variation of the result and the low Morale of the VC, the effect of this attack can be anything from an ineffectual flesh wound to casualty- and wound-inducing mayhem. Not to mention that it’s more or less going to be followed up with the Lurps’ inherent-firepower attack of 1d6+6 (3 FP + Adjacent + Moved) vs. 1d6+2 (TM, VC in Light Jungle). The Lurps don’t have to attack, of course. But more VC are on the way, and the Lurps have a chopper to catch, so the player has to make a decision, based on the Victory Conditions, which call for a body count as well as safe extraction for a major victory.
Some tips for this one:• If the Claymore kills the equivalent of at least
one MMC, the Lurps should pull back to the Light Jungle in 4I1 or the Brush in 4J3 and await the Huey. The advancing VC want to engage in Melee (their best tactic), they will have to come in to the open, where the Lurps can open fire on them.
• Don’t get stuck in Melee. The VC player’s best chance to kill and/or keep the Lurps on the
ground is to mire them in Melee.• The Lurp player should not attack Shaken VC
that have no chance of rallying; this will give them a chance to spawn a Hero.
• Don’t count on the Huey or the Gunship to bail the Lurps out of trouble.
• The VC player should try to get one of the follow-on Squads into hex 4E4 and hope to get a shot at the Huey or the Lurps as the embark on the Huey.
I’ve played this scenario more than 30 times—it plays quickly—and the results were really interesting; so much can happen. Both sides had their day. Hero-spawning always throws a wrench in things—a fun wrench, no doubt. There were even a few outcomes where the Lurps embarked on the Huey up on the Hill hexes in the southeast corner of the Board. It’s no easy task to have a perfect ambush, or get extracted after one.
“On Patrol” This scenario is entirely different from “Stay Behind.” This one is an event-driven scenario in which no enemy units start on the Board. This is a hypothetical scenario designed to give players a chance to game a few of the situations the Lurps could encounter during a patrol. The LRRP team is also a bit expanded, with a Squad and a half of Lurps and a Montagnard Merce-nary (ARVN Hero), who has the Pathfinder Skill Card. They also have the extra firepower of a M-60 and Claymore Mines. Fate Points, which they start with, and can earn during the patrol, also add dimensions to their capabilities, from being able to re-roll a die or add or subtract 2 from a roll, to calling in an artillery mission or spawning a Hero. Their mission is to activate all four event markers, in alphabetical order. I don’t want to spoil this one with details, but there are different outcomes for each event; these drive the story of the scenario and increase replay-ability. It’s almost as if there are a couple of scenarios within the scenario. It’s strange, it’s different, it’s fun. I hope you agree.
Principal Source:Lanning, Michael Lee, Inside the LRRPs: Rang-ers in Vietnam; Ivy Books, New York, 1988.
FIGURE 1
Sam
ple
file