sample preparation techniques - electron · pdf fileemunit, hku electron microscope unit the...
TRANSCRIPT
EMUn
it, H
KU
Electron Microscope UnitThe University of Hong Kong
SAMPLE PREPARATION TECHNIQUESON ELECTRON MICROSCOPY
Page
(A) Processing of fresh specimen for TEM study 1
a) Manual processing procedure for soft tissue 1b) Manual processing procedure for hard tissue 2c) Manual processing procedure for enamel 3d) Rapid processing procedure 4e) Semi-automatic processing procedure 5
(B) Processing of formalin fixed tissue for TEM study 9
(C) Processing of paraffin embedded specimen for TEM study 10
(D) Processing of paraffin section or monolayer for TEM study 11
(E) Processing of cell suspension for TEM study 13
a) Bovine serum albumin (BSA) gel method 13b) Agar gel method 14
(F) Preparation of buffers 15
(G) Preparation of fixatives 16
(H) Preparation of embedding media 18
(I) Sectioning and staining for TEM study 20
a) Semi-thin sections 20b) H&E staining for semi-thin sections 21c) Ultra-thin sections 22
(J) Preparation of staining solutions 23
(K) Negative staining for TEM study 24
a) Traditional method 24b) Modified method 25

EMUn
it, H
KU
Page
(L) Preparation of carbon-formvar coated copper grids 26
(M) Processing of fresh biological specimen for SEM study 27
a) Critical point drying procedure 27b) Freeze drying procedure 28c) Freeze cleavage procedure 29
(N) X-ray analysis of 30
a) Inclusions in paraffin embedded tissue 30b) Ferruginous bodies in tissue blocks 31
(O) Specimen preparation for IEM study 32
a) Pre-embedding immunoperoxidase staining (ABC method) 32b) Pre-embedding immunoperoxidase staining (frozen section) 34c) Post-embedding immunoperoxidase staining (ABC method) 36d) Post-embedding immunoperoxidase staining (STP-gold method) 38e) Immunogold staining for bacterial suspension 40f) Demonstration of myeloid peroxidase (MPO) on haematological specimen 41g) Demonstration of platelet peroxidase (PPO) on haematological specimen 42
(P) Preparation and staining of DNA and protein-DNA complex 43
(Q) Laboratory safety for electron microscopy 44
EMUn
it, H
KU
1
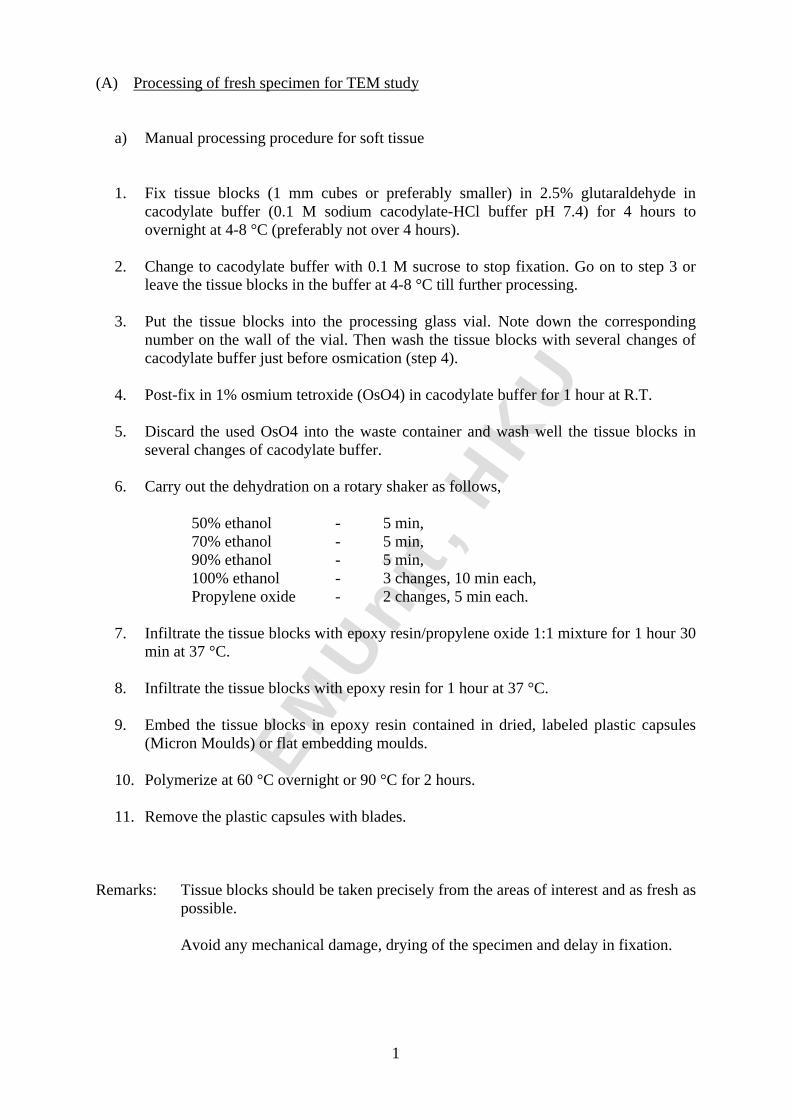
(A) Processing of fresh specimen for TEM study
a) Manual processing procedure for soft tissue
1. Fix tissue blocks (1 mm cubes or preferably smaller) in 2.5% glutaraldehyde in cacodylate buffer (0.1 M sodium cacodylate-HCl buffer pH 7.4) for 4 hours to overnight at 4-8 °C (preferably not over 4 hours).
2. Change to cacodylate buffer with 0.1 M sucrose to stop fixation. Go on to step 3 or leave the tissue blocks in the buffer at 4-8 °C till further processing.
3. Put the tissue blocks into the processing glass vial. Note down the corresponding number on the wall of the vial. Then wash the tissue blocks with several changes of cacodylate buffer just before osmication (step 4).
4. Post-fix in 1% osmium tetroxide (OsO4) in cacodylate buffer for 1 hour at R.T.
5. Discard the used OsO4 into the waste container and wash well the tissue blocks in several changes of cacodylate buffer.
6. Carry out the dehydration on a rotary shaker as follows,
50% ethanol - 5 min,70% ethanol - 5 min,90% ethanol - 5 min,100% ethanol - 3 changes, 10 min each,Propylene oxide - 2 changes, 5 min each.
7. Infiltrate the tissue blocks with epoxy resin/propylene oxide 1:1 mixture for 1 hour 30 min at 37 °C.
8. Infiltrate the tissue blocks with epoxy resin for 1 hour at 37 °C.
9. Embed the tissue blocks in epoxy resin contained in dried, labeled plastic capsules (Micron Moulds) or flat embedding moulds.
10. Polymerize at 60 °C overnight or 90 °C for 2 hours.
11. Remove the plastic capsules with blades.
Remarks: Tissue blocks should be taken precisely from the areas of interest and as fresh aspossible.
Avoid any mechanical damage, drying of the specimen and delay in fixation.

EMUn
it, H
KU
2
b) Manual processing procedure for hard tissue:
Prolong infiltration is required for hard tissue such as bony tissue, uterus, nerve, etc.
1. Fix tissue blocks (1 mm cubes or preferably smaller) in 2.5% glutaraldehyde in cacodylate buffer (0.1 M sodium cacodylate-HCl buffer pH 7.4) for 4 hours to overnight at 4-8 °C (preferably not over 4 hours).
2. Change to cacodylate buffer with 0.1 M sucrose to stop fixation. Go on to step 3 or leave the tissue blocks in the buffer at 4-8 °C till further processing.
3. Put the tissue blocks into the processing glass vial. Note down the corresponding number on the wall of the vial. Then wash the tissue blocks with several changes of cacodylate buffer just before osmication (step 4).
4. Post-fix in 1% osmium tetroxide (OsO4) in cacodylate buffer for 1 hour at R.T.
5. Discard the used OsO4 into the waste container and wash well the tissue blocks in several changes of cacodylate buffer.
6. Carry out the dehydration on a rotary shaker as follows,
50% ethanol - 10 min,70% ethanol - 10 min,90% ethanol - 10 min,100% ethanol - 3 changes, 20 min each,Propylene oxide - 2 changes, 10 min each.
7. Infiltrate the tissue blocks with epoxy resin/propylene oxide mixture,
1:2 mixture - 1 hour 30 min, 37 °C1:1 mixture - 1 hour 30 min, 37 °C2:1 mixture - overnight, R.T.
8. Infiltrate the tissue blocks with fresh epoxy resin for 1 hour 30 min at 37 °C, preferably with the help of vacuum oven.
9. Embed the tissue blocks in fresh epoxy resin contained in dried, labeled plastic capsules (Micron Moulds) or flat embedding moulds.
10. Polymerize at 60 °C overnight or 90 °C for 2 hours.
11. Remove the plastic capsules with blades.
Remarks: Tissue blocks should be taken precisely from the areas of interest and as fresh as possible.
Avoid any mechanical damage, drying of the specimen and delay in fixation.

EMUn
it, H
KU
3
c) Manual processing procedure for enamel:
1. Fix tooth in 2.5% glutaraldehyde in cacodylate buffer (0.1 M sodium cacodylate-HCl buffer pH 7.4) for overnight at 4-8 °C.
2. Cut section (approx. 200 µm thick) from tooth using hard tissue sectioning machine.
3. Grind the section to 100 µm thick.
4. Either select areas of interest or the whole section for further processing.
5. Post-fix in 1% osmium tetroxide (OsO4) in cacodylate buffer if required. (If post-fixation is done, discard the used OsO4 into the waste container and wash well the section in several changes of cacodylate buffer.)
6. Carry out the dehydration on a rotary shaker as follows,
50% ethanol - 4 hr,70% ethanol - 4 hr,90% ethanol - overnight,100% ethanol - 2 changes, 4 hr each,
1 change, overnight,Propylene oxide - 2 changes, 4 hr each.
7. Infiltrate tissue with ultra low viscosity (ULV) resin/propylene oxide 1:1 overnight at R.T.
8. Infiltrate tissue with pure ULV resin for 2 changes, 4 hr each and then 1 change, overnight.
9. Embed the sections in fresh ULV resin contained in dried, labeled plastic capsules (Micron Moulds) or flat embedding moulds. The inverted capsule method can be used for the whole section.
10. Polymerize at 60 °C overnight or 90 °C for 2 hours.
11. For whole section, cut out the resin blocks with a saw or razor blade.
12. Grind the tip of the block to a sharp edge.
13. Cut ultra-thin section with diamond knife.
Remarks: Made up the ULV resin according to the formula for harder block.

EMUn
it, H
KU
4
d) Rapid processing procedure:
Carry out step 1 to step 6 on a rotary shaker.
1. Fix tissue blocks (0.5 mm cubes or preferably smaller) in pre-warmed 2.5% glutaraldehyde in cacodylate buffer (0.1 M sodium cacodylate-HCl buffer pH 7.4) for 30 min at R.T.
2. Wash in cacodylate buffer with 0.1 M sucrose for 2 x 2 min.
3. Wash in cacodylate buffer only for 2 x 2 min.
4. Post-fix the tissue blocks in 1% osmium tetroxide (OsO4) in cacodylate buffer for 30 min at R.T.
5. Discard the used OsO4 into the waste container and wash the tissue blocks in cacodylate buffer for 3 x 2 min.
6. Dehydrate the tissue blocks as follows,
50% ethanol - 3 min,70% ethanol - 3 min,90% ethanol - 3 min,100% ethanol - 3 changes, 5 min each,Propylene oxide - 2 changes, 5 min each.
7. Infiltrate the tissue blocks with epoxy resin/propylene oxide 1:1 mixture for 30 min at 37 °C.
8. Infiltrate the tissue blocks with fresh epoxy resin under vacuum for 1 hour at 45 °C.
9. Embed the tissue blocks in partially polymerized epoxy resin contained in dried, labeled plastic capsules (Micron Moulds) or flat embedding moulds.
10. Polymerize for 1 hour in an oven pre-heated to 100 °C.
11. Remove the plastic capsules with blades.
Remarks: Tissue blocks should be taken precisely from the areas of interest and as fresh as possible. The tissue blocks should be kept as small as possible.
Avoid any mechanical damage, drying of the specimen and delay in fixation.
The fixatives should be pre-warmed to room temperature.
Agitation for all steps is preferred.
The polymerization oven should be pre-warmed to 100 °C.

EMUn
it, H
KU
5
e) Semi-automatic processing procedure:
LYNX microscopy tissue processor is used to process the specimens semi-automatically as follows,
1. Place the baskets required in the loading jig cavities.
2. Place the threaded foot between the pins on the loading jig.
3. Flood the baskets with 0.1 M sodium cacodylate buffer.
4. Transfer the tissue blocks (primarily fixed and kept in cacodylate buffer with 0.1 M sucrose) to the basket compartment and record the location and number of blocks. If the tissue blocks are smaller than the holes on the wall of the basket, place a strip of paper in between. A strip of paper with the corresponding Accession No. is also put into the compartment.
5. Place lids over all baskets used.
6. Insert the 'R' clip into the required position on the stem. For example, insert the 'R' clip into the second hole from the foot of the stem for 2 baskets.
7. Pick up the baskets onto the stem (start from the basket #1).
8. Secure the stack with the threaded foot.
9. Place the basket and stem assembly into a vial with cacodylate buffer.
10. Wash in several changes of cacodylate buffer.
11. Post-fix in 1% osmium tetroxide (OsO4) in cacodylate buffer for 1 hour at R.T.
12. While the specimens are being osmicated, remove the turntable from the machine. Fill the vials on the turntable with the required volume (which can cover the basket and stem assembly during processing and agitating, max. 13 ml) of corresponding reagents according to the list of programmes on the following page. The vials should be pushed until touching the line marked on the turntable. The vial retaining band should be fitted securely. Put the turntable back into the machine, secure the lid and raise the turntable.
13. After the completion of osmication, discard the used OsO4 into the waste container and wash the specimens briefly in 3 changes of cacodylate buffer.
14. Transfer the basket and stem assembly to the tissue processor agitation arm and lower the arm into position manually.
15. Centre the stem and place the metal vial cover around the stem and above the incubation chamber, with the raised ridge of the vial cover uppermost.

EMUn
it, H
KU
6
16. Secure the lid, select the required programme number and press 'RUN' to start the programme.
17. At the completion of the programme press 'PAUSE', raise the processor lid and then remove the vial cover.
18. Release the stem assembly from the agitation arm and take it out. Avoid spillage of epoxy resin with a piece of paper towel.
19. Dismantle the stem and basket assembly in the reverse order to the loading procedure. (Use a piece of absorbing paper but not the loading jig. Note that the baskets are released in reverse order, i.e. the biggest number basket, the first being removed from the stem.)
20. Embed the tissue blocks in epoxy resin contained in dried, labeled plastic capsules (Micron Moulds) or flat embedding moulds.
21. Polymerise the embedded blocks at 60 °C overnight or 90 °C for 2 hours.
22. Remove the turntable, discard the reagents, clean the processor, replace and raise the turntable, secure the lid, and switch off the machine then the wall socket.
23. After polymerisation, remove the plastic capsules with blades.
EMUn
it, H
KU
7
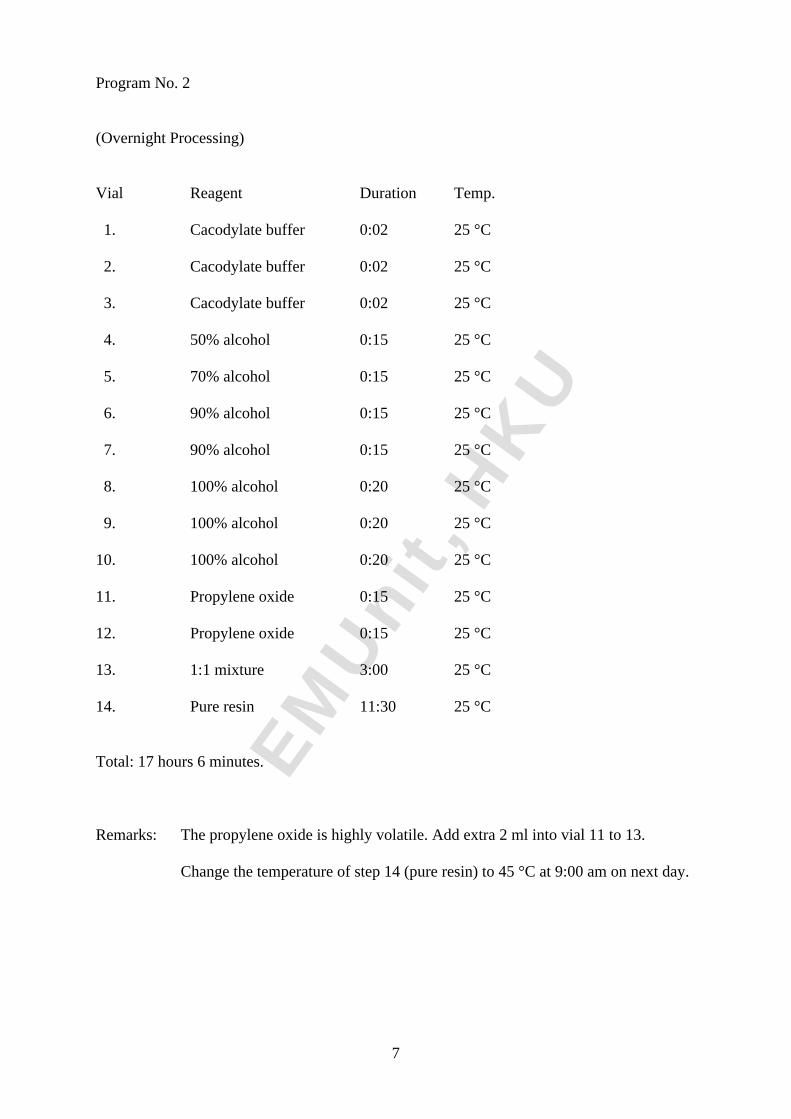
Program No. 2
(Overnight Processing)
Vial Reagent Duration Temp.
1. Cacodylate buffer 0:02 25 °C
2. Cacodylate buffer 0:02 25 °C
3. Cacodylate buffer 0:02 25 °C
4. 50% alcohol 0:15 25 °C
5. 70% alcohol 0:15 25 °C
6. 90% alcohol 0:15 25 °C
7. 90% alcohol 0:15 25 °C
8. 100% alcohol 0:20 25 °C
9. 100% alcohol 0:20 25 °C
10. 100% alcohol 0:20 25 °C
11. Propylene oxide 0:15 25 °C
12. Propylene oxide 0:15 25 °C
13. 1:1 mixture 3:00 25 °C
14. Pure resin 11:30 25 °C
Total: 17 hours 6 minutes.
Remarks: The propylene oxide is highly volatile. Add extra 2 ml into vial 11 to 13.
Change the temperature of step 14 (pure resin) to 45 °C at 9:00 am on next day.
EMUn
it, H
KU
8
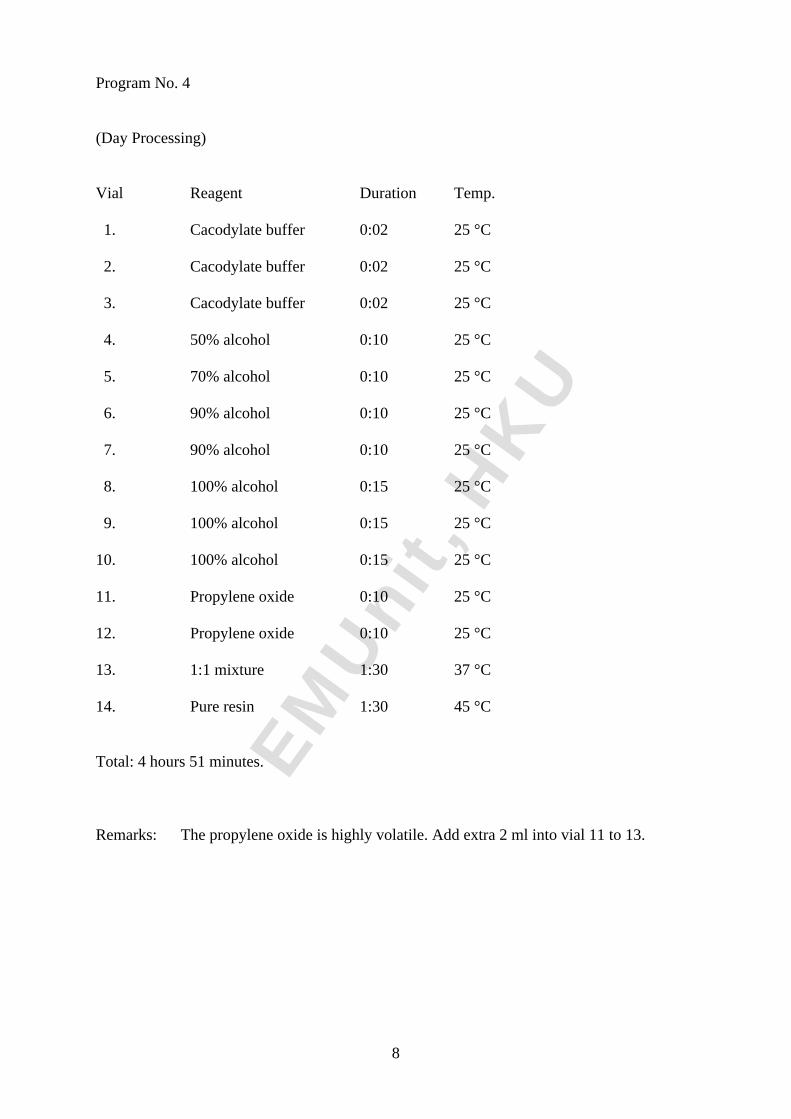
Program No. 4
(Day Processing)
Vial Reagent Duration Temp.
1. Cacodylate buffer 0:02 25 °C
2. Cacodylate buffer 0:02 25 °C
3. Cacodylate buffer 0:02 25 °C
4. 50% alcohol 0:10 25 °C
5. 70% alcohol 0:10 25 °C
6. 90% alcohol 0:10 25 °C
7. 90% alcohol 0:10 25 °C
8. 100% alcohol 0:15 25 °C
9. 100% alcohol 0:15 25 °C
10. 100% alcohol 0:15 25 °C
11. Propylene oxide 0:10 25 °C
12. Propylene oxide 0:10 25 °C
13. 1:1 mixture 1:30 37 °C
14. Pure resin 1:30 45 °C
Total: 4 hours 51 minutes.
Remarks: The propylene oxide is highly volatile. Add extra 2 ml into vial 11 to 13.
EMUn
it, H
KU
9
(B) Processing of formalin fixed tissue for TEM study
Specimens already well fixed in formalin should be treated as follows,
1. Take tissue blocks (1 mm cubes or preferably smaller) precisely from the areas of interest and as close to the surface as possible.
2. Keep in formalin till further processing [start from step 2 of manual processing or wash well in cacodylate buffer (0.1 M sodium cacodylate-HCl buffer pH 7.4) with 0.1 M sucrose and transfer into the basket as described in step 4 of semi-automatic processing].
Remarks: Tissue blocks are recommended to be kept in formalin because the formaldehyde reaction is reversible.

EMUn
it, H
KU
10
(C) Processing of paraffin embedded specimen for TEM study
Specimens removed from paraffin block should be treated as follows,
1. Remove the areas of interest from the paraffin block and cut into 1 mm cubes.
2. Put the blocks into the processing glass vial. Note down the corresponding number on the wall of the vial.
3. Dewax in xylene for 4 x 30 min at 37 °C.
4. Rehydrate through series of ethanol on a rotary shaker:
100% ethanol - 4 changes, 10 min each70% ethanol - 5 min30% ethanol - 5 min
5. Wash well in cacodylate buffer with 0.1 M sucrose. Soak in buffer for at least 30 min or keep in buffer at 4-8 °C till further processing.
6. Carry on processing from step 3 of manual processing (for soft/hard tissue) and rapid processing or step 4 of semi-automatic processing.
Remarks: The areas of interest have to be selected from the remaining paraffin block with the help of a stained section which should be an adjacent section of the remaining block surface.
Good ultrastructural preservation depends on the initial fixation and proper processing for paraffin embedding.

EMUn
it, H
KU
11
(D) Processing of paraffin section or monolayer for TEM study
1. Mark the areas of interest on the undersurface of the glass slide with a diamond pen.
2. Remove the coverslip and permount.
3. Rehydrate the section down to cacodylate buffer with 0.1 M sucrose. If the specimen has been stained, try to remove the stain otherwise metallic deposits will interfere the electron microscopic image.
4. Go on to step 5 or keep in cacodylate buffer with sucrose 4-8 °C till further processing. (Soak in buffer for at least 5 min.)
5. Wash the section with several changes of cacodylate buffer and then flood the section with 1% osmium tetroxide (OsO4) in cacodylate buffer to post-fix for 15 min at R.T.
6. Discard the used OsO4 into the waste container. Wash well in cacodylate buffer and dehydrate through graded series of ethanol.
7. Replace alcohol with 2 changes of propylene oxide, 5 min each.
8. Infiltrate with epoxy resin/propylene oxide 1:1 mixture for 30 min at 37 °C. Any kind of resin which is more brittle is not suitable because difficulties will be encountered in separation of the resin sheet/block from the slide after polymerisation.
9. Drain and wipe off excess mixture with cotton wool and propylene oxide.
10. Flood and infiltrate with fresh epoxy resin for 30 min at 37 °C.
11. Drain and wipe off excess resin. Apply a few drops of fresh epoxy resin to cover the entire section, or embed with inverted capsules which are filled with fresh epoxy resin (the inverted capsules are placed upon the areas of interest only).
12. Place the slide horizontally in an oven and cure overnight at 60 °C.
13. Mark the areas of interest on the hardened resin sheet corresponding to the markings on the undersurface of the slide.
14. Place the slide on a hot plate set at 120 °C.
15. Add a drop of water to the edge of the resin sheet or the inverted capsules and use the tip of a scalpel to separate the sheet or blocks from the glass slide.
16. The resin blocks from inverted capsules are ready for sectioning. For the resin sheet, place it with the side of embedded section facing downward, on a clean glass slide and put back into the oven to flatten.
17. Afterward cut the marked area into 1 mm square piece and mount on a dummy resin block with epoxy glue. The 'section side' should be uppermost. It is then ready for sectioning.

EMUn
it, H
KU
12
Remarks: Good ultrastructural preservation depends on the initial fixation and proper processing for paraffin embedding. Artefacts produced while paraffin sectioning should also be avoided.
The stain on the section should be tried to remove. Metallic deposits will interfere the electron microscopic image.
Any kind of resin which is more brittle is not suitable because difficulties will be encountered in separation of the resin sheet from the slide.
An alternative method was described by W. L. Yau et al for processing of paraffin sections. Briefly a 5 µm paraffin section is prepared and brought down to cacodylate buffer 'free-floatingly'. It is mounted carefully on a clean glass slide, blotted dry and then post-fixed in OsO4. The other steps are same as the procedure described above. Omission of the water bath and oven for floating and drying section respectively is an important point. The other point is that the section is allowed to recover the shrinkage caused by paraffin embedding. This method bridges the gap between the technique of reprocessing paraffin embedded tissues and that of reprocessing paraffin sections. Ultrastructural preservation is good and the technique is non-destructive to the paraffin block. However it is not suitable for fragmented tiny specimens and is more time-consuming.
EMUn
it, H
KU
13
(E) Processing of cell suspension for TEM study
a) Bovine serum albumin (BSA) gel method:
1. For EDTA anticoagulant added blood sample wash in several changes of phosphate buffer to remove the anticoagulant.
2. Transfer the cell suspension, which may be fully fixed, briefly fixed or unfixed, to a micro-centrifuge tube. [Briefly fixed, if desired, in equal volume of 2.5% glutaraldehyde in cacodylate buffer (0.1 M sodium cacodylate-HCl buffer pH 7.4) for 15 min.]
3. Centrifuge at 500 rpm for 5 min and discard the supernatant.
4. Re-suspend in 3 drops of 8% BSA in TRIS buffer and centrifuge immediately at 1500 rpm for 5 min.
5. Slide down 3 drops of 25% glutaraldehyde to the mixture. Centrifuge immediately at 2500 rpm for 5 min.
6. Remove the gel block, cut into 1 mm cubes and fix in 2.5% glutaraldehyde in cacodylate buffer for 2 hours. Skip this step for the fully fixed cell blocks.
7. Change to cacodylate buffer with 0.1 M sucrose to stop fixation.
8. Carry on processing from step 3 of manual processing (for soft/hard tissue) and rapid processing or step 4 of semi-automatic processing.
EMUn
it, H
KU
14
b) Agar gel method:
1. Fix the cell suspension in equal volume of 2.5% glutaraldehyde in cacodylate buffer (0.1 M sodium cacodylate-HCl buffer pH 7.4) for 1 hr at 4-8 °C.
2. Transfer to a micro-centrifuge tube, centrifuge at 1000 rpm for 10 min and then discard the supernatant.
3. Change to cacodylate buffer with 0.1 M sucrose and re-suspend the cells. Centrifuge the mixture at 1000 rpm for 10 min and then discard the supernatant.
4. Re-suspend the cell pellet in cacodylate buffer, centrifuge the mixture at 1000 rpm for 10 min and then discard the supernatant.
5. Re-suspend the cell pellet and fix in 1% osmium tetroxide (OsO4) in cacodylate buffer for 30 min at R.T.
6. Centrifuge the mixture at 1000 rpm for 10 min. Discard the used OsO4 (supernatant) into the waste container.
7. Change to cacodylate buffer and re-suspend the cells. Centrifuge the mixture at 1000 rpm for 10 min and then discard the supernatant.
8. Pre-warm the 2% agar stock in a 60 °C water bath until liquefied. Pre-warm the cell pellet in the bath for 10 min.
9. Add about equal volume of pre-warmed agar solution onto the cell pellet. Re-suspend the mixture and centrifuge immediately at 2500 rpm for 10 min.
10. Remove the gel block, cut into 1 mm cubes and carry on processing from step 6 of manual processing (for soft/hard tissue) and rapid processing or step 4 of semi-automatic processing (skip steps 10 & 11).
Remarks: 2% agar in distilled water is prepared by boiling in a water bath until completely dissolved. The stock solution may be allotted in sterilized containers and kept in refrigerator at 4-8 °C.
Always keep the cell pellet and the agar solution at or below 60 °C. Overheat will cause heat damage to the cell blocks.
EMUn
it, H
KU
15
(F) Preparation of buffers
a) 0.2 M sodium cacodylate-HCl buffer (for preparation of fixative)
Sodium cacodylate 21.4 gm1 N HCl 6 mlDistilled water to make 500 ml
b) 0.1 M sodium cacodylate-HCl buffer with 0.1 M sucrose
Sodium cacodylate 21.4 gmSucrose 34.2 gm1 N HCl 4-5 mlDistilled water to make 1000 ml
c) 0.1 M sodium cacodylate-HCl buffer
Sodium cacodylate 21.4 gm1 N HCl 4-5 mlDistilled water to make 1000 ml
Remarks: Sodium cacodylate buffers contain arsenic which is toxic, and they have an unpleasant smell. Therefore they should always be handled in a fume cupboard.
The pH of the buffers should be checked regularly and adjust the volume of 1 N HCl to maintain at pH 7.2 to 7.4.
The buffers are kept in refrigerator at 4-8 °C.
EMUn
it, H
KU
16
(G) Preparation of fixatives
a) 2.5% glutaraldehyde in 0.1 M sodium cacodylate buffer
0.2 M sodium cacodylate buffer 50 ml25% EM grade glutaraldehyde 10 mlDistilled water40 ml
1. Measure the required volume of cacodylate buffer and distilled water with a measuring cylinder.
2. In the fume cupboard, break the neck of the ampoule of glutaraldehyde with the ampoule breaker.
3. Remove the glutaraldehyde with a syringe and inject into the plastic bottle.
4. Wash the ampoule with the diluted cacodylate buffer.
5. Empty the ampoule and the cylinder into the plastic bottle.
6. Re-cap the plastic bottle, shake well and keep at 4-8 °C.
Remarks: The fixative is stable for about 3 weeks at 4-8 °C.
The pH should be maintained at 7.2 to 7.4 by adjusting the pH of the 0.2 M sodium cacodylate buffer.
The fixative is irritant and has an unpleasant smell. It should always be handled in the fume cupboard.

EMUn
it, H
KU
17
b) 1% osmium tetroxide in 0.1 M sodium cacodylate buffer
0.1 M sodium cacodylate buffer 100 mlOsmium tetroxide crystal 1 gm
1. Wash thoroughly the ampoule containing osmium tetroxide crystals and rinse in distilled water.
2. In the fume cupboard, drop the ampoule into a brown glass-stoppered bottle and shake until the ampoule is broken.
3. Add immediately the pre-measured cacodylate buffer and shake well.
4. Store the stoppered bottle in a air-tight jar and keep at 4-8 °C.
Remarks: OsO4 is extremely toxic and volatile. Its vapour readily fixes the cornea of eye. It should always be handled with great care in the fume cupboard.
OsO4 crystal dissolves very slowly in the buffer. Therefore the fixative should be prepared 1 day in advance.
Discard the OsO4 fixative when it turns yellow. The waste should be put into the designated waste container and neutralised with 2 parts of corn oil.

EMUn
it, H
KU
18
(H) Preparation of embedding media
a) According to Luft, 1961:
mixture A: Epon 62 mlDDSA (dodecenyl succinic anhydride) 100 ml
mixture B: Epon 100 mlNMA (nadic methyl anhydride) 89 mlor named MNA (methyl nadic anhydride)
1.5 - 2% of accelerator (DMP-30) to the final volume is added.
The hardness of the block is determined by the ratio of mixture A to mixture B. Softer blocks are resulted with greater proportion of mixture A.
b) In order to facilitate the preparation of embedding medium, the following reagents are mixed and kept in the freezer. Let the epoxy resin restore to room temperature before use. (The ratio of mixture A to mixture B is around 1:1.)
Epon 812 epoxy resin 90 mlDDSA 60 mlNMA 50 mlDMP-30 4 ml
Add Epon 812, DDSA and NMA into a measuring cylinder in the order given. (Make sure to clean thoroughly the caps and mouths of the bottles.) Pour the mixture into a 500 ml beaker. Cover the beaker and leave it in the fume cupboard until all the air bubbles have escaped. Mix thoroughly with a magnetic stirrer for 30 min. Avoid creation of air bubbles during the process. Add DMP-30, while stirring, to the mixture. Stir for an additional 30 min.

EMUn
it, H
KU
19
c) Pre-measured kits are also commercially available. The quality should be tested beforehand. Usually kits of medium hardness are ordered. For the preparation of the embedding medium, empty one bottle each of epoxy resin and hardener of same volume package (vary the proportion according to the instruction sheet or the result of trials) into a 500 ml beaker, mix and add the activator as above-mentioned.
Remarks: Store the resin in tightly stoppered polythene bottles. It can be kept in freezer for about 2 months before too viscous for infiltration. Resin taken out from freezer must be left at R.T. for at least 1 hour before opening the cap of the bottle. It may otherwise absorb moisture and causes difficulties in sectioning.
Epoxy resins, hardeners and, in particular, accelerators/activators are toxic or suspected carcinogenic. The polymerised resin is inert.
Apparatus used for preparation of epoxy resin should be cleaned with commercial acetone. They should be marked 'Epon' and kept away from other usage because the resin may not be removed completely.
EMUn
it, H
KU
20
(I) Sectioning and staining for TEM study
a) Semi-thin sections
1. Trim the resin blocks to expose tissue and shape as trapezium.
2. Cut semi-thin sections in 0.4 µm thickness with glass knife or histo/semi diamond knife and ultramicrotome. Place sections onto a drop of distilled water on the glass slide cleaned with absolute alcohol.
3. For collagen-rich specimen, soak the cotton tip of a cotton stick in chloroform and then place above the sections which can then be flattened by the chloroform vapour (acetone or xylene vapour, or heat from e.g. a heat pen may be applied instead).
4. Place the slide on a hot plate at 120 °C and let the sections dry completely.
5. Stain with 0.5% toluidine blue in 1% sodium borax for 30 sec, with the slide laying on the hot plate.
6. Wash thoroughly in running tap water and rinse in distilled water.
7. Dry on the hot plate.
Results
Nuclei, cytoplasm and tissue elements various shades of blueMetachromatic, e.g. unsaturated lipids grass green
Remarks: The thickness of semi-thin sections may be varied according to the needs. The staining time may vary for different nature of the specimens.

EMUn
it, H
KU
21
b) H&E staining for semi-thin sections
1. Remove the resin with aged methoxide.
2. Rinse in methanol and then wash thoroughly in running tap water.
3. Stain with Lillie’s Mayer haematoxylin for 15 min.
4. Differentiate in 0.5% acid alcohol.
5. Blue in running tap water.
6. Stain with 1% eosin.
7. Wash, dehydrate, clear and mount.
Results
Nuclei blueCytoplasm, RBC, muscle, collagen, etc. various shading of red to pink
Remarks: The aged methoxide is prepared by saturation of potassium hydroxide in absolute methanol (~1 gm/40 ml). Let the mixture stand for a few days until turning brown before use.
EMUn
it, H
KU
22
c) Ultra-thin sections
1. Re-trim the selected blocks to a suitable size and good shaping of trapezium. Retaining of the areas of interest is in the first priority.
2. Cut ultra-thin sections in 100 nm thickness (gold colour) with glass/diamond knife and ultramicrotome.
3. Soak the cotton tip of a cotton stick in chloroform and then place above the sections which can then be flattened by the chloroform vapour (acetone or xylene vapour, or heat from e.g. a heat pen may be applied instead).
4. Mount on the 150 mesh hexagonal copper grids cleaned with absolute alcohol.
5. Dry the sections in a dry box for at least 30 min.
6. Insert the grid into the slit of a plastic grid holder which is then flooded with staining solution, or into a droplet of about 50-100 µl of staining solution on a sheet of clean parafilm.
7. Stain with 2% aqueous uranyl acetate for 20 min.
8. Wash well in running Milli-Q filtered distilled water and dry with filter paper.
9. Stain with commercial or home-made Reynold's lead citrate for 15 min.
10. Wash well in running Milli-Q filtered distilled water.
11. Dry with filter paper and keep in the labelled petri dish.
Results
Nuclei, cytoplasm and tissue elements various intensity of electron opaque
Remarks: Solutions of uranyl acetate are photolabile and should be protected from strong light during use and during storage. Staining should be carried out in dark by such as covering with a black box (the Kodak sheet film container).
Contamination can be disastrous. Therefore all equipment used for staining should be scrupulously clean and free from grease.
When dispensing staining solutions, discard the first few drops from a pipette or syringe.
Precipitates of the uranium and especially the lead form readily when contact with carbon dioxide. Therefore avoid breathing directly onto the staining solution.
In order to enhance the efficiency on getting rid of carbon dioxide, a few pellets of sodium hydroxide are put inside the covered area.
EMUn
it, H
KU
23
(J) Preparation of staining solutions
a) 0.5% toluidine blue in 1% sodium borax
Distilled water 100 mlSodium borax 1 gmUntil completely dissolved add toluidine blue 0.5 gm
Filter before use.
Remarks: One pellet of sodium hydroxide may be added to increase pH so that the cytoplasm will be stained more magenta. Stain for 20-30 sec at 80 °C and dry at R.T.
b) 2% aqueous uranyl acetate
Uranyl acetate 2 gmAdd distilled water to the volumetric flask to make 100 ml
After uranyl acetate is completely dissolved, filter the solution into a conical flask with ground-glass stopper by a 0.22 µm millipore filter. Cover the flask with aluminium foil in order to be light tight.
c) Reynold's lead citrate (home-made)
Lead nitrate 1.33 gmSodium citrate 1.76 gmDistilled water* 30 ml
Pour into a volumetric flask and then shake vigorously for 1 min. Shake occasionally for another 30 min. Add 8 ml 1 N NaOH** and then make to 50 ml with distilled water*. Filter into a conical flask with ground-glass stopper by a 0.22 µm millipore filter.
Remarks: * Distilled water should be boiled to get rid of any carbon dioxide, and then cool down to room temperature before use.
** 1 N NaOH solution should be freshly prepared with the distilled water described above.

EMUn
it, H
KU
24
(K) Negative staining for TEM study
a) Traditional method
1. Ultra-centrifuge the purified specimen at 4 °C.
2. Discard the supernatant and add a few drops of phosphate buffer (the volume of buffer should be just enough to allow the solution to appear turbid after re-suspending the pellet).
3. Add equal volume of PTA solution [freshly prepared 3% aqueous phosphotungstic acid adjusted to pH 6.3 with 10% potassium hydroxide (pH 4.5 for rotavirus)].
4. Mix and pipette one drop of this mixture onto each of the 400 mesh carbon-formvar coated copper grids.
5. Allow the grids to stand for 10 min.
6. Absorb from the top surface of the drop with a piece of filter paper until a thin film is left.
7. Irradiate the film and then the undersurface of the grid with ultraviolet light (short wavelength, 1250 mW) at 3 inches above for 15 min each.
8. Keep in the labelled petri dish and wait for examination under electron microscope.
Results
Background, spaces filled with PTA, and various intensity of electron opaqueall electron dense substances

EMUn
it, H
KU
25
b) Modified method
1. Centrifuge 10% suspension of the specimen at 2,000 rpm for 30 min.
2. Keep the supernatant for negative staining.
3. Float the 400 mesh carbon-formvar coated copper grids, with the carbon-formvar film facing downward, onto a 30 µl droplet of the sample for 30 sec.
4. Wipe off excess fluid with a piece of filter paper and float the grid, with the specimen facing downward, onto a 30-50 µl droplet of freshly prepared 3% aqueous phosphotungstic acid adjusted to pH 6.3 with 10% potassium hydroxide (pH 4.5 for rotavirus) for 30 sec.
5. Wipe off excess fluid with a piece of filter paper.
6. Irradiate the grid, with the specimen facing upward with ultraviolet light (short wavelength, 1250 mW) at 3 inches above for 15 min.
7. Keep in the labelled petri dish and wait for examination under electron microscope.
Results
Background, spaces filled with PTA, and various intensity of electron opaqueall electron dense substances
EMUn
it, H
KU
26
(L) Preparation of carbon-formvar coated copper grids
Prepare the grids at relative humidity below 40% as follows,
1. Clean 400 mesh copper grids with acetone.
2. Pre-dry the glassware in oven.
3. Freshly prepare 0.25-0.5% formvar in 1,2-dichloro-ethane.
4. Dip a clean slide into the formvar solution.
5. Allow the slide to stand for a few seconds in a wide mouth bottle which is saturated with 1,2-dichloro-ethane vapour.
6. Dry the slide by hanging in the warm air over a hot plate.
7. Score the edges of the slide and float the formvar film onto a dish of distilled water.
8. Place the cleaned and dried copper grids up-side down onto the satisfactory portions of the floating film.
9. Pick up the film with a piece of cardboard (the film is uppermost with the grids inside the sandwich).
10. Air-dry in a desiccator or dry box.
11. Coat a thin layer of carbon on the grids with a vacuum evaporator.
EMUn
it, H
KU
27
(M) Processing of fresh biological specimen for SEM study
a) Critical point drying procedure:
1. Wash the specimens with normal saline or buffer to remove blood, mucus or tissue fluid before fixation.
2. Fix the tissue blocks in 2.5% glutaraldehyde in cacodylate buffer (0.1 M sodium cacodylate-HCl buffer pH 7.4) or 10% neutral buffered formalin for 4 to 24 hours at 4-8 °C.
3. Wash well in several changes of cacodylate buffer with 0.1 M sucrose to remove excess fixative. Go on to step 4 or leave the tissues in the buffer at 4-8 °C till further processing. (Change to buffer with sucrose once only if for prolong storage.)
4. Post-fixation of the tissue blocks in 1% osmium tetroxide (OsO4) in cacodylate buffer is optional. If selected, wash tissues in several changes of cacodylate buffer just before osmication. Post-fix in OsO4 for 1 hour at R.T. Discard the used OsO4 into the waste container and wash well in several changes of cacodylate buffer.
5. Dehydrate tissues in an up-grading series of ethanol (the time interval depends on the size of the tissue samples, larger specimens require longer time):
30% ethanol - 2 changes, 5-15 min each50% ethanol - 2 changes, 5-15 min each70% ethanol - 2 changes, 5-15 min each90% ethanol - 2 changes, 10-20 min each100% ethanol - 3 changes, 10-20 min each
6. Dry the tissue samples in a Critical Point Dryer using liquid carbon dioxide as transitional fluid.
7. Mount the dried specimens on SEM specimen holders (aluminium stubs), using double-sided adhesive tape, glue, colloidal silver or colloidal carbon.
8. Coat a thin layer (100-200 Å ) of metallic film on the specimen surface for electrical conduction by using either a sputter coater or a vacuum evaporator. Gold, gold-palladium, platinum, aluminium or carbon are commonly used to form the thin conducting film. Carbon is recommended if x-ray analysis is requested.
9. Put the coated specimens into the SEM for examination or keep them in a desiccator or dry box.
Remarks: Avoid touching the surface to be examined with the tools such as forceps, blades, in order to prevent mechanical damage.
Do not allow the specimen surface to be exposed to air to prevent air-drying before and during processing.
EMUn
it, H
KU
28
b) Freeze drying procedure:
1. Wash the specimens with normal saline or buffer to remove blood, mucus or tissue fluid before fixation.
2. Fix the tissue blocks in 2.5% glutaraldehyde in cacodylate buffer (0.1 M sodium cacodylate-HCl buffer pH 7.4) or 10% neutral buffered formalin for 4 to 24 hours at 4-8 °C.
3. Wash well in several changes of cacodylate buffer with 0.1 M sucrose to remove excess fixative. Go on to step 4 or leave the tissues in the buffer at 4-8 °C till further processing. (Change to buffer with sucrose once only if for prolong storage.)
4. Post-fixation the tissue blocks in 1% osmium tetroxide (OsO4) in cacodylate buffer is optional. If selected, wash tissues in several changes of cacodylate buffer just before osmication. Discard the used OsO4 into the waste container and wash well in several changes of cacodylate buffer.
5. Cryoprotect the specimens with glycerol, DMSO, ethylene glycol or water saturated with chloroform.
6. Slightly blot the specimens.
7. Quench the specimens rapidly with pre-cooled isopentane or liquid nitrogen.
8. Transfer the specimens quickly onto the pre-cooled platform of a freeze dryer. Carry out the procedure as described in the operation manual.
9. Mount the dried specimens on SEM specimen holders (aluminium stubs), using double-sided adhesive tape, glue, or colloidal silver or colloidal carbon.
10. Coat a thin layer (100-200 Å ) of metallic film on specimen surface, using either a sputter coater or a vacuum evaporator, for electrical conduction. Gold, gold-palladium, platinum, aluminium or carbon are commonly used to form the thin conducting film. Carbon is recommended if x-ray analysis is requested.
11. Put the coated specimens into the SEM for examination or keep them in a desiccator or dry box.
EMUn
it, H
KU
29
c) Freeze cleavage procedure:
1. Fix tissue blocks in 2.5% glutaraldehyde in cacodylate buffer (0.1 M sodium cacodylate-HCl buffer pH 7.4) or 10% neutral buffered formalin for 4 to 24 hours at 4-8 °C.
2. Wash well in several changes of cacodylate buffer with 0.1 M sucrose to remove excess fixative.
3. Post-fix the tissue blocks in 1% osmium tetroxide (OsO4) in cacodylate buffer for 1.5 hours at R.T.
4. Discard the used OsO4 into the waste container and wash well in several changes of cacodylate buffer.
5. Cryoprotect the tissue blocks with 25% and 50% aqueous DMSO for 30 min each.
6. Freeze the tissue blocks by immersion in isopentane pre-cooled with liquid nitrogen.
7. Transfer the tissue blocks to liquid nitrogen in a small wide-mouth container.
8. Cleave the tissue blocks with a razor blade in the liquid nitrogen.
9. Thaw in 50% DMSO at R.T.
10. Wash in cacodylate buffer.
11. Treat with 1% OsO4 in cacodylate buffer for 1 hour.
12. Transfer to 0.1% OsO4 in cacodylate buffer for 6-12 days at 20°C with 2-3 changes.
13. Discard the used OsO4 into the waste container and wash in cacodylate buffer.
14. Treat with 1% aqueous tannic acid for 1 hour.
15. Wash in cacodylate buffer.
16. Treat with 1% OsO4 in cacodylate buffer for 1 hour.
17. Discard the used OsO4 into the waste container and wash in cacodylate buffer.
18. Dehydrate and critical point dry.
EMUn
it, H
KU
30
(N) X-ray analysis of:
a) Inclusions in paraffin embedded tissue:
1. Cut a 6-8 µm section and mount on a piece of transparency sheet (pre-tested for unexpected energy peak or simply mount on a carbon stub instead).
2. Cut an adjacent section and stained for H&E to assist diagrammatically localisation of the inclusions.
3. Completely remove the paraffin wax in xylene.
4. Replace xylene with alcohol.
5. Allow to air-dry.
6. Mark the areas of interest, if possible.
7. Coat a thin layer of carbon on section surface for electrical conduction by using a vacuum evaporator.
8. Locate and examine the inclusions in SEM.
9. Perform x-ray analysis and plot the spectrum of counts vs x-ray energy.
10. Identify the elements (peaks of the spectrum).

EMUn
it, H
KU
31
b) Ferruginous bodies in tissue blocks:
1. Weigh the tissue blocks if quantitative analysis is required.
2. Dissolve the soft tissue in 1 litre (approx. 20 ml per gm of tissue) of Clorox for 24 hours.
3. Discard the supernatant.
4. Extract the carbonaceous material by adding equal parts of chloroform and 50% alcohol.
5. Shake vigorously.
6. Centrifuge at 800 rpm for 10 min.
7. Discard the supernatant.
8. Repeat the extraction procedure (steps 4-7) for 4 times.
9. Place a drop of the sediment onto a carbon stub using a dropper.
10. After evaporation of the chloroform/alcohol, examine and perform x-ray analysis under SEM.
11. For TEM diffraction pattern observation, place a drop of the sediment onto a carbon-formvar coated grid.
EMUn
it, H
KU
32
(O) Specimen preparation for IEM study
a) Pre-embedding immunoperoxidase staining (ABC method):
1. Fix fresh tissue in a suitable fixative for a pre-determined length of time (e.g. 4% paraformaldehyde + 0.1% glutaraldehyde in 0.1 M phosphate buffer pH 7.4 for 2 hours at 4-8 °C).
2. Wash in several changes of phosphate buffer for 30 min.
3. Transfer to 30% sucrose in phosphate buffer for 3 changes, and leave overnight at 4-8 °C (or until the tissue blocks sink to the bottom of the sucrose solution).
4. Gently blot tissue and snap frozen in liquid nitrogen. (Frozen tissues may then be wrapped in aluminium foil and stored at -70 °C until further processing.) Transfer back to 30% sucrose solution.
5. Wash in several changes of 0.1 M phosphate buffer saline pH 7.4 (PBS).
6. Prepare 20-30 µm tissue slices by using a tissue sectioner (the tissue blocks are pre-embedded in 2.5% agar) or a vibratome.
7. Incubate tissue slices in normal serum, diluted 1:10 in PBS, for 30 min at R.T.
8. Transfer to suitably diluted primary antibody and leave overnight at 4-8 °C in a moist chamber (e.g. for the demonstration of human lymphocyte surface antigens by using T11 & B1 monoclonal antibodies, the recommended dilution is 1:10 in normal serum/PBS).
9. Wash in 3 changes of PBS for 45 min.
10. Transfer to suitably diluted secondary antibody (e.g. biotinylated sheep anti-mouse IgG, diluted 1:100 in normal serum/PBS) for 1 hour at R.T.
11. Wash in 3 changes of PBS for 30 min, then wash in 0.05 M TRIS buffer saline pH 7.6 (TBS) for 15 min.
12. Treat with ABC solution (5 ml avidin + 5 ml biotin-peroxidase + 250 ml 0.2% BSA/TBS, freshly prepared 30 min before use.) for 1 hour at R.T.
13. Wash in 3 changes of TBS for 45 min.
14. Treat with DAB solution for 10 min at R.T. in a spot plate. [Add the pre-mixed reagent (25 mg DAB in 1 ml TBS) to 49 ml TBS.]
15. Then add H2O2 to the DAB solution (in a proportion of 15 ml 30% H2O2 to 50 mlDAB solution). Transfer tissue slices to this solution and leave to react for 5 min at R.T.
16. Wash in 3 changes of TBS for 45 min.
EMUn
it, H
KU
33
17. Treat with 1% osmium tetroxide for 30 min at R.T.
18. Discard the used OsO4 into the waste container and wash in several changes of distilled water for 10 min.
19. Dehydrate, infiltrate and embed tissue slices in epoxy resin.
Remarks: 30% sucrose is used as cryoprotectant.
Micro-cracks are produced by freezing and thawing to facilitate the penetration of anti-sera.
Successfully detected antigens:
B1 (CD 20)T11 (CD 2)

EMUn
it, H
KU
34
b) Pre-embedding immunoperoxidase staining (frozen section)
1. Briefly fix fresh tissue in a suitable fixative for 30 min at 4-8 °C (e.g. 4% paraformaldehyde + 0.1% glutaraldehyde or PLP in 0.1 M phosphate buffer pH 7.4).
2. Cryo-protect the specimen in series (5%, 10%, 20%, 30%) of sucrose solutions.
3. Slightly blot dry and freeze the specimen in OCT compound with liquid nitrogen.
4. Cut 8 µm thick frozen sections.
5. Apply normal serum, diluted 1:10 in 0.1 M phosphate buffer saline pH 7.4 (PBS), for 30 min at R.T.
6. Drain off and apply suitably diluted primary antibody for 30 min at 37 °C.
7. Wash in 3 changes of 0.05 M TRIS buffer saline pH 7.6 (TBS) for 3 min each.
8. Apply 'biotinylated' secondary antibody for 30 min.
9. Wash in 3 changes of TBS for 3 min each.
10. Apply ABC solution (10 ml avidin + 10 ml biotin-peroxidase + 980 ml normal serum, diluted 1:10, freshly prepared before use) for 30 min.
11. Wash in 3 changes of TBS for 3 min each.
12. Fix in 2.5% glutaraldehyde for 10 min at R.T.
13. Wash in 3 changes of TBS for 3 min each.
14. Develop in DAB/H2O2 for 3 min.
15. Wash in 3 changes of TBS for 3 min each.
16. Post-fix in 1% osmium tetroxide for 10 min at R.T.
17. Discard the used OsO4 into the waste container and wash well in distilled water.
18. Dehydrate in 50%, 70%, 90% ethanol for 3 min each and 3 changes of 100% ethanol for a total of 30 min.
19. Transfer to 2 changes of propylene oxide for 5 min each.
20. Infiltrate with epoxy resin/propylene oxide 1:1 mixture for 30 min at 37 °C.
21. Drain and wipe off excess mixture with cotton wool and propylene oxide.
22. Flood and infiltrate with fresh epoxy resin for 30 min at 37 °C.

EMUn
it, H
KU
35
23. Drain and wipe off excess resin. Apply a few drops of fresh epoxy resin to cover the entire section.
24. Place the slide horizontally in an oven and cure overnight at 60 °C.
25. Place the slide on a hot plate set at 120 °C.
26. Add a drop of water to the edge of the resin sheet and use the tip of a scalpel to separate the resin sheet from the glass slide.
27. Cut selected area into 1 mm square piece and mount on a dummy block with epoxy glue. The 'section side' should be uppermost.
28. Cut ultra-thin sections and mount on copper grids.
29. Counterstain the ultra-thin sections optionally.
30. Examine under transmission electron microscope.
Successfully detected antigens:
fibrinogenJ5 (CALLA)
References:
1. Chien K, Vande Velde R, Shintaku IP, Sassoon AF. Processing immunoperoxidase labelled cell monolayers and cryostat sections for electron microscopy. Proceedings of the 43rd Annual Meeting of EMSA 1985; 43: 714-715.
2. Or SB, Chan KH, Ngai HK, Yau WL. A simple method for in situ embedding of cell monolayers for electron microscopy. J. Med. Technol. Assoc. (HK) 1985; 3: 35-40.

EMUn
it, H
KU
36
c) Post-embedding immunoperoxidase staining (ABC method)
1. Cut 100 nm ultra-thin sections and mount on nickel grids.
2. Etch sections in 10% aqueous H2O2 for 10 min at R.T.
3. Wash thoroughly in distilled water.
4. Treat with normal serum, diluted 1:30 in buffer (0.2% BSA/0.05 M TBS pH 7.6) for 20 min at R.T.
5. Drain sections and transfer to suitably diluted primary antibody in buffer. Incubate inside a moist chamber at 4-8 °C overnight.
6. Wash in 0.05 M TRIS buffer saline pH 7.6 (TBS), 5 changes for 5 min each.
7. Transfer to 'biotinylated' secondary antibody, diluted 1:100 in TBS for 1 hour at R.T.
8. Wash in TBS, 5 changes for 5 min each.
9. Treat with ABC solution (5 ml avidin + 5 ml biotin-peroxidase + 250 ml 0.2% BSA in TBS, freshly prepared 30 min before use) for 1 hour at R.T.
10. Wash in TBS, 5 changes for 5 min each.
11. Treat with DAB solution for 5 min at R.T. [Add the pre-mixed reagent (25 mg DAB in 1 ml TBS) to 49 ml TBS and add 15 ml of 30% H2O2 just before use, with stirring of the solution.]
12. Wash in TBS, 5 changes for 5 min each.
13. Treat with 1% osmium tetroxide for 20 min at R.T.
14. Discard the used OsO4 into the waste container and wash thoroughly in distilled water.
15. Counterstain with uranyl acetate and lead citrate optionally.
Remarks: Apply 30 µl reagents for each floating grid with sections facing downward.
Buffers for washing are filtered with 1 µm millipore filter while those for serum dilution are filtered with 0.22 µm millipore filter.
Trypsinisation with 0.05% trypsin and 0.05% CaCl2 in 0.05 M TRIS buffer (freshly prepared) may be applied optionally for 30 min at R.T. before treatment with normal serum.
Apply saturated aqueous sodium metaperiodate for 20 minutes at R.T., instead of H2O2, for OsO4 fixed tissue.

EMUn
it, H
KU
37
Successfully detected antigens:
kappa light chain,lambda light chain.
EMUn
it, H
KU
38
d) Post-embedding immunogold staining (STP-gold method)
1. Cut 100 nm ultra-thin sections and mount on nickel grids.
2. Etch sections in 10% aqueous H2O2 for 10 min at R.T.
3. Wash thoroughly in distilled water.
4. Treat with normal serum, diluted 1:30 in buffer (0.2% BSA/0.05 M TBS pH 7.6) for20 min at R.T.
5. Drain sections and transfer to suitably diluted primary antibody in buffer. Incubate inside a moist chamber at 4-8 °C overnight.
6. Wash in 0.05 M TRIS buffer saline pH 7.6 (TBS), 5 changes for 5 min each.
7. Transfer to 'biotinylated' secondary antibody, diluted 1:100 in TBS for 1 hour at R.T.
8. Wash in TBS, 2 changes for 5 min each.
9. Wash in 1% BSA/0.02 M TBS pH 8.2, 2 changes for 5 min each.
10. Treat with STP-gold, diluted 1:10 in 1% BSA/0.02 M TBS pH 8.2 for 1 hour at R.T.
11. Wash in 0.2% BSA/0.02 M TBS pH 8.2, 3 changes for 5 min each.
12. Wash well in distilled water.
13. Counterstain lightly with uranyl acetate for 2 min and lead citrate for 1 min.
Remarks: Apply 30 µl reagents for each floating grid with sections facing downward.
Buffers for washing are filtered with 1 µm millipore filter while those for serum dilution are filtered with 0.22 µm millipore filter.
Trypsinisation with 0.05% trypsin and 0.05% CaCl2 in 0.05 M TRIS buffer (freshly prepared) may be applied optionally for 30 minutes at R.T. before treatment with normal serum.
Protein A-gold or protein G-gold may be used instead of STP-gold and the secondary antibody can be omitted. However the species producing the primary antibody should be determined according to the capability of protein A or protein G.
Apply saturated aqueous sodium metaperiodate for 20 minutes at R.T., instead of H2O2, for OsO4 fixed tissue.
EMUn
it, H
KU
39
Successfully detected antigens:
kappa light chain,insulin,glucagon,GH (Growth Hormone),VIP,desmin*,vimentin*,cytokeratin*,synaptophysin**.
* Fixed in 4% paraformaldehyde + 0.1% glutaraldehyde for 2 hours at 4-8 °C.
** Fixed in 2% paraformaldehyde + 0.1% glutaraldehyde for 2 hours at 4-8 °C and apply primary antibody at dilution of 1:5; or fixed in periodic-lysine-paraformaldehyde for 2 hours at 4-8 °C and apply neat primary antibody.
EMUn
it, H
KU
40
e) Immunogold staining for bacterial suspension
1. Prepare bacterial suspension from freeze-dried bacteria (0.14 mg/ml in PBS) or from culture (O.D. = 1).
2. Wash the suspension twice with borate buffer (BS) with 0.5% BSA and 0.005% Tween 20, pH 8.6 (8.66 gm boric acid + 9.53 gm sodium borate + 4.38 gm sodium chloride + 5 gm BSA + 0.5 ml Tween 20 + 1 litre double distilled water).
3. Place a drop of the suspension onto a carbon-formvar coated nickel grid and let stand for 10 min.
4. Blot dry and float the grid upside down on BS with BSA and Tween 20 for 5 min.
5. Blot dry and incubate with the monoclonal antibody (raised in mouse against the bacteria) diluted 1:100 with BS plus BSA and Tween 20 for 30 min at R.T.
6. Wash with BS containing BSA and Tween 20 for 5 times, 5 min each. Blot dry between each wash.
7. Treat with goat anti-mouse IgG conjugated to 20 nm gold particles (diluted 1:10 with BS plus BSA and Tween 20) for 30 min at R.T.
8. Wash in water for 5 times and blot dry.
9. Negatively stain the sample by pipetting one drop of 1% PTA solution (1% aqueous phosphotungstic acid adjusted to pH 6.3 with 10% potassium hydroxide) onto the grid and stand for 10 min.
10. Remove excess PTA solution and let dry.
References:
1. Devine DA, Gmür R, Handley PS. Ultrastructure, serogrouping and localization of surface antigens of Bacteroides intermedius.

EMUn
it, H
KU
41
f) Demonstration of myeloid peroxidase (MPO) on haematological specimen
1. Fix the cells in 3% glutaraldehyde in 0.1 M phosphate buffer, pH 7.2 for 30 min at 4-8 °C.
2. Wash in phosphate buffer for 3 times. Centrifuge at 1500 rpm for 5 min at each time.
3. For marrow particles, pre-incubate the cells in freshly prepared 0.05% DAB in 0.05 M TRIS buffer, pH 7.6 for 1 hour at 4-8 °C.
4. Incubate the cells in freshly prepared 0.01% H2O2 in DAB medium for 30 min at R.T. in the dark.
5. Wash in phosphate buffer for 2 times. Centrifuge at 1500 rpm for 5 min at each time.
6. Apply the cells into a plastic pasteur pipette with tip sealed & cut to open at the other end. Re-suspend the cells in 8% bovine serum albumin in phosphate buffer, then centrifuge at 1500 rpm for 5 min. Carefully remove the supernatant without disturbing the cell pellet.
7. Slowly lay down 2% glutaraldehyde in phosphate buffer onto the cell pellet.
8. After the pellet is congealed, cut it into 1 mm cubes and post-fix immediately in 1% osmium tetroxide.
9. Proceed with standard processing procedure.
EMUn
it, H
KU
42
g) Demonstration of platelet peroxidase (PPO) on haematological specimen
1. Fix the cells in 0.5% glutaraldehyde in 0.1 M phosphate buffer, pH 7.2 for 10 min at 4-8 °C. Centrifuge at 1500 rpm for 5 min. Discard the supernatant. Fix again in 1% tannic acid + 2% paraformaldehyde + 0.5% glutaraldehyde in 0.1 M phosphate buffer, pH 7.2 for 50 min at 4-8 °C.
2. Wash in phosphate buffer for 3 times. Centrifuge at 1500 rpm for 5 min at each time.
3. For marrow particles, pre-incubate the cells in freshly prepared 0.2% DAB in 0.05 M TRIS buffer, pH 7.6 for 1 hour at 4-8 °C.
4. Incubate the cells in freshly prepared 0.01% H2O2 in DAB medium for 60 min at R.T. in the dark.
5. Wash in phosphate buffer for 2 times. Centrifuge at 1500 rpm for 5 min at each time.
6. Apply the cells into a plastic pasteur pipette with tip sealed & cut to open at the other end. Re-suspend the cells in 8% bovine serum albumin in phosphate buffer, then centrifuge at 1500 rpm for 5 min. Carefully remove the supernatant without disturbing the cell pellet.
7. Slowly lay down 2% glutaraldehyde in phosphate buffer onto the cell pellet.
8. After the pellet is congealed, cut it into 1 mm cubes and post-fix immediately in 1% osmium tetroxide.
9. Proceed with standard processing procedure.

EMUn
it, H
KU
43
(P) Preparation and staining of DNA and protein-DNA complex
1. Extract, purify and concentrate the specimen to 50 µg/ml in 150 mM NaCl.
2. Float the glow-discharged* carbon-formvar coated grid, with the film facing downward, onto a 30 µl droplet of the specimen for 3 min.
3. Blot and dry for 30 sec.
4. Float the grid, with the film and specimen facing downward, onto a 30 µl droplet of 2% aqueous uranyl acetate for 1 min.
5. Blot the grid and wash in high grade water** for 1 sec.
6. Blot and air-dry.
Remarks :
1. * Remove the alloy plate from the sputter coater and run the machine as if specimen coating for 2 x 100 sec.
2. Place the formvar grids on a glass slide with the film facing upward, and then put onto the specimen stage.
3. Run the machine as if specimen coating for 5 x 30 sec.
4. Store the grids in dry box.
5. Re-mount the alloy plate, etc.
**Millipore "Milli-Q RG" purified distilled water.
EMUn
it, H
KU
44
(Q) Laboratory safety for electron microscopy
The following instructions are extra guidelines for the laboratory safety for electron microscopy. Readers should observe the general regulations for laboratory safety such as prohibition of eating, drinking and smoking in the laboratory.
a) Routine handling of fixatives
Types of hazard:
All fixatives are potentially poisonous through inhalation, ingestion and contact. Hazards can be avoided by methods as follows,
1. Handle the fixatives in a fume cupboard.
2. Eating, drinking and smoking are prohibited. Wash hands frequently.
3. Wear protective gloves and safety goggles.
Spillages:
1. Always wear suitable protective clothing to minimise personal contamination in the event of a spillage.
2. Mop up the spillage with an excess of water.
Routine manipulations:
1. Use gloves if there is a serious risk of fixative coming into contact with hands.
2. Wash hands often, with soap and cold water only.
3. Wear goggles if splashing of fixative may occur.
4. Solutions of formaldehyde and glutaraldehyde should be prepared in a fume-cupboard but can be used in well-ventilated open laboratory.
5. Osmium tetroxide has a much higher vapour pressure and should always be handled only in an efficient fume-cupboard.
6. Cacodylate buffer contains arsenic and can be absorbed through the skin and/or by droplet inhalation. Reaction with reducing agents can produce volatile arsenical compounds.
Waste disposal:
1. Solutions of formaldehyde, glutaraldehyde and cacodylate buffer may be disposed down a sink and flush with a large excess of cold water.
2. Waste osmium tetroxide should be put into the specific waste container, neutralised with 2 parts of corn oil and removed by Safety Office.

EMUn
it, H
KU
45
b) Routine handling of resins
Types of hazard:
All resins are poisonous, irritant and/or suspected carcinogenic through inhalation, ingestion and contact. Hazards can be avoided by methods as follows,
1. Handle the resins in a fume cupboard.
2. Eating, drinking and smoking are prohibited.
3. Wear protective clothing.
4. Wear glove, but provide only partial protection; none are impermeable to resins.
5. Hands must be washed well after gloves are removed, or immediately if large spillage contaminates a glove. Wash with soap and cold water only.
Spillage:
1. Absorb with paper towel or cotton wool and put in a polythene bag for disposal.
2. Clean the fume cupboard, bench or floor with tissue paper or cotton wool soaked with acetone or alcohol.
3. Clean contaminated skin by washing or showering with soap and cold water for several minutes.
Handling of unpolymerised resin and tissue:
1. Prepare resin mixtures in the fume cupboard. Mix with magnetic stirrer or disposable rod.
2. Waste resin should be placed in waste container in the fume cupboard.
3. Polymerisation should be done in the oven inside the fume cupboard or in an oven vented to the outside.
Handling of polymerised resin blocks:
1. Potential hazards arise from dust produced by sawing, filing and from small chips.
2. Dust should not be left on a bench or swept into a waste paper basket. It should be collected with a disposable damp cloth, paper towel or vacuum cleaner.
Waste disposal:
1. Resin mixtures should be carefully polymerised and then disposed of.
2. Contaminated paper, gloves, etc. should be collected in polythene bag in fume cupboard. The bag is then sealed and sent for burning or burial.