sams case management - typepad
TRANSCRIPT
Printed on 6 June, 2008
State of Massachusetts Edition
SAMS Case Management 1.10.x

Copyright © 1997-2008 Harmony Information Systems, Inc. All rights reserved.
The software contains proprietary information of Harmony Information Systems, Inc.; it is provided under a license agreement containing restrictions on use and disclosure and is also protected by copyright law. Reverse engineering of the software is prohibited.
Due to continued product development this information may change without notice. The information and intellectual property contained herein is confidential between Harmony Information Systems, Inc. and the consumer and remains the exclusive property of Harmony Information Systems, Inc. If you find any problems in the documentation, please report them to us in writing. Harmony Information Systems, Inc. does not warrant that this document is error-free.
No part of this publication may be reproduced, stored in a retrieval system, or transmitted in any form or by any means, electronic, mechanical, photocopying, recording or otherwise without the prior written permission of Harmony Information Systems, Inc.
Microsoft Word, Microsoft Office, Windows®, and Windows 2000™ and later are trademarks of the Microsoft Corporation.
Harmony Information Systems, Inc. 25 New England Drive
Essex Junction, VT 05452
(802) 878-8514 Web site: http://www.harmonyis.com

i
Contents
Introduction 3
Consumer Data Entry 4 Customizing the Consumer List....................................................................................................................5 Preventing Duplicate Consumer Records .....................................................................................................6 Modifying Consumer Records......................................................................................................................8 Contacts ......................................................................................................................................................11 Consumer Care Enrollments .......................................................................................................................13 Care Managers ............................................................................................................................................14 Activities & Referrals .................................................................................................................................15
Editing Activities & Referrals .........................................................................................................17 Consumer Journal .......................................................................................................................................18
Printing Consumer Journals.............................................................................................................19
Assessments 20 SAMS Assessments/Consumer Fields........................................................................................................21 Assessment Data Entry ...............................................................................................................................24
Top Row..........................................................................................................................................25 Second Row.....................................................................................................................................26

ii Contents
Entering an Assessment ..............................................................................................................................27 Viewing or Modifying Narratives...............................................................................................................31 Printing Assessments ..................................................................................................................................32 Assessment Data Entry Practice .................................................................................................................34
Calculating Co-Pays 35
Consumer Care Enrollments 41
Care Plans 43 Creating Care Plans ....................................................................................................................................44 Care Plan Summary ....................................................................................................................................46 Worksheet ...................................................................................................................................................47 Service Plan ................................................................................................................................................49 Understanding Service Plan Calculations ...................................................................................................55 Service Plan Practice ..................................................................................................................................57 Service Calendar .........................................................................................................................................58 Goal Statements ..........................................................................................................................................59 Care Plan Journal ........................................................................................................................................61 Care Managers ............................................................................................................................................62 Diagnosis Codes .........................................................................................................................................64 Printing Care Plan Logs..............................................................................................................................66 Service Program Cost Caps ........................................................................................................................68 Care Plan Practice.......................................................................................................................................69
Generating Service Order Authorizations 71
Service Suspensions 74
Consumer Billing 78 Billing Practice ...........................................................................................................................................83
Activities & Referrals (toolbar view) 84
Reports 87 Running/Generating Reports ......................................................................................................................88
Thanks! 91
Glossary of Terms 93

3
Welcome to Case Management training! Case Management Training covers SAMS (Social Assistance Management System) features related to care planning, assessments, and consumer data entry.
During the course of this half-day session, you'll learn more about:
The Consumer list screen and consumer data entry Assessments Consumer Reassessments Care Management and Care Plans Service Orders Reports
This course assumes that you've either completed SAMS Overview Training or have a basic familiarity with SAMS. If at any time you have questions, please don't hesitate to ask them. We are here to help you learn.
Additional Resources
This training manual provides an overview of SAMS. It does not attempt to provide complete system information.
Every SAMS version has an online help system and printable manual. After logging in, press F1 or use the Help menu to access an indexed help system with step-by-step procedures. The manual, supplied in PDF format, contains the same information as the online help system. If you need additional written resources, check the Harmony Web site for more information. Our web address is http://www.harmonyis.com.
If you need more help than the documentation can provide, check with your department's IT, MIS, or SAMS subject matter expert. Any questions not resolved by your organization can be brought to the attention of the EOEA through a formal escalation process. The EOEA will work with Harmony on questions that cannot be corrected or resolved at the state level.
Introduction
Don't confuse SAMS with SIMS - SIMS is the deployment of a suite of software throughout the Massachusetts Aging Network. SAMS is the name of the software program that you'll be learning about today and that you'll use for some portion of your work responsibilities.

4 SAMS Case Management
Consumer Data Entry reviews information about consumer records. Let's open the consumer you created during SAMS Overview Training and look at the key parts of their record. If you have not completed the SAMS Overview Training, choose a consumer record as directed by your trainer.
Consumer Data Entry
Clients are referred to as Consumers throughout SAMS.

Consumer Data Entry 5
Customizing the Consumer List In SAMS Overview Training, you learned how to format and filter the Consumers list screen. Filtering makes it easier to find the consumers you work with on a regular basis. Let's review how to filter the Consumers list.
To filter the consumer list by case manager
1 Click Consumers on the toolbar.
2 Click Filter on the toolbar.
3 Under the Care heading, select Assigning Supervisor as the Primary Care Manager.
4 Click OK.
5 The Consumers list screen changes to show only the consumers with Assigning Supervisor as their Primary Care Manager.
6 Click Clear on the toolbar.
7 At the prompt, click Yes to return to the default view.

6 SAMS Case Management
Preventing Duplicate Consumer Records
This section briefly reviews SAMS Client IDs and preventing duplicate consumer records.
Consumer Search
Before creating a new record, it is a good idea to use the Consumer Search feature to make sure that the consumer is not already in the database. If you do need to create a new record, SAMS automatically populates the record with any information entered into the Search Consumers screen when you click the Add New... button.

Consumer Data Entry 7
About Consumer IDs
Your system administrator can configure SAMS to generate consumer IDs based on either the consumer's DOB and SSN, or to generate random IDS not based on personal data.
If IDs are based on consumer DOB/SSN and the information is not entered for consumers at the time of intake, then SAMS creates a Temporary ID until the DOB/SSN are entered.
Since randomly-generated IDs are not tied to personal information, they do not change.
The Massachusetts Aging Network uses randomly generated IDs.
Consumer Duplication Checks
SAMS checks for duplicates when creating consumers. SAMS considers a consumer a duplicate when five of seven fields match another consumer record. SAMS checks these fields:
Birth Date Gender Primary Ethnic Race First Name Last Name Home Phone Number Residential Address
If SAMS finds any consumers that are potential duplicates, a prompt appears before you save the consumer that lists the flagged records. Review the list for potential duplicates and click Yes to continue adding the new record, if necessary.

8 SAMS Case Management
In addition, SAMS has a Consumer Merge feature that combines duplicated consumer records. Only SAMS administrators or users who have additional system rights can use the Consumer Merge.
Modifying Consumer Records To open a consumer record and change an address
1 Click Search .
2 In the Search Consumers screen, enter your last name in the Last name is like field and click Find.
3 Highlight a consumer whose name is close to yours in the search results
pane.
4 Click OK.

Consumer Data Entry 9
5 SAMS displays the Consumer Summary screen, with hyperlinked headings to key consumer areas.
6 Click Residential Address.
7 Change Street 1 under Residential Address.
Consumer Details stores most of a consumer's demographic and personal data.
10 SAMS Case Management
8 Click Save on the toolbar.
By default, SAMS uses the Residential Address as the consumer's Mailing Address.

Consumer Data Entry 11
Contacts The Contacts area stores relationship, address, and telephone information for people other than caregivers, care recipients, or care managers who have a relationship to the consumer.
Additionally, Contacts is used to enter billing addresses for Bill To Contacts.
To add a contact record 1 Click Contacts in Consumer Details.
2 Click Add Contact on the toolbar.
-OR- From the File menu, select Add Contact.
3 Enter the information shown above.
4 Click the Contact Locations tab.
5 Click Add.
6 Enter an address Type, Street 1, Town, State, and Zip Code.
It is important to note that if you create a Bill To Contact, you must enter an address Type of Mailing in order for SAMS to create invoices for them.
7 Click OK.

12 SAMS Case Management
8 We'll skip adding any Contact Phones for today, so click OK again to
close the Add Contact dialog.
9 Click Save to save the changes.
You can enter multiple contacts, locations, phone numbers, and user fields for each consumer by clicking Add Next.

Consumer Data Entry 13
Consumer Care Enrollments Care enrollments are an important part of the SAMS system. They determine which services consumers can receive within SAMS. Each consumer care plan is associated with a Care Enrollment. You'll review Care Enrollments when we talk about Assessments later in the training.
14 SAMS Case Management
Care Managers Users can enter multiple care managers for a consumer. If necessary for reporting at your agency, enter both the case manager and supervisor. Mark the case manager as the Primary care manager.
SAMS also stores care managers with individual consumer care plans. Entering Care Managers in the general consumer record creates defaults for care plans.
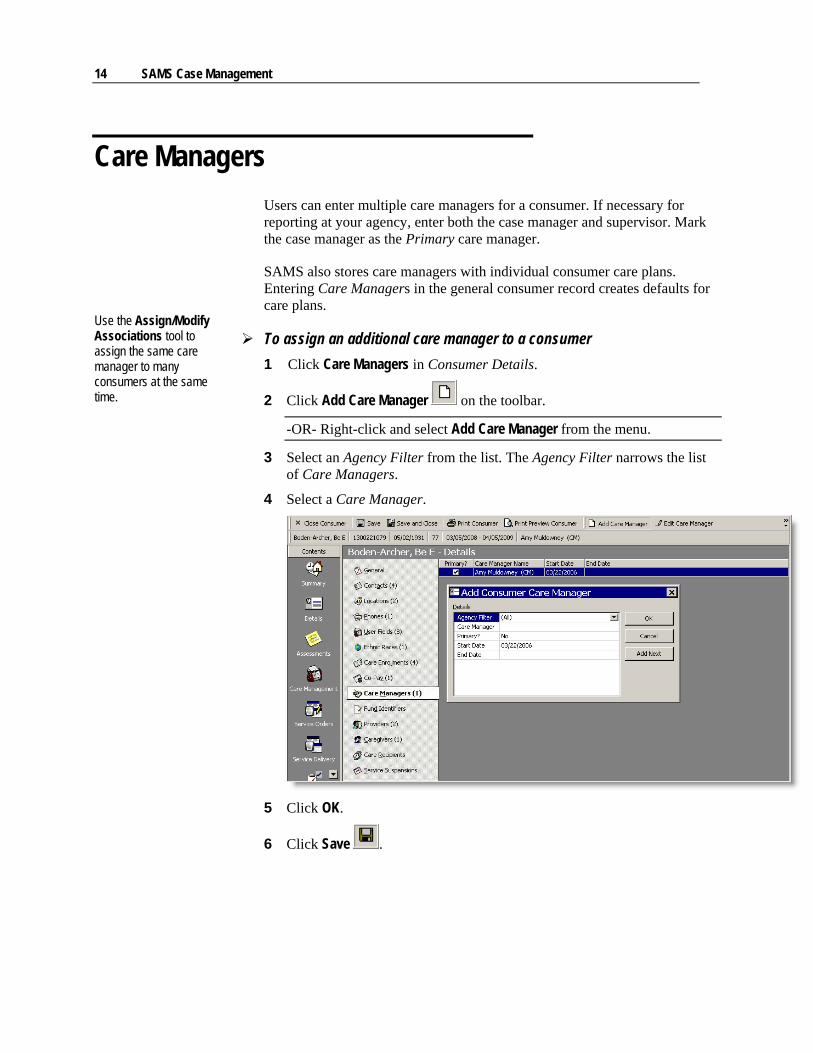
To assign an additional care manager to a consumer 1 Click Care Managers in Consumer Details.
2 Click Add Care Manager on the toolbar.
-OR- Right-click and select Add Care Manager from the menu.
3 Select an Agency Filter from the list. The Agency Filter narrows the list of Care Managers.
4 Select a Care Manager.
5 Click OK.
6 Click Save .
Use the Assign/Modify Associations tool to assign the same care manager to many consumers at the same time.

Consumer Data Entry 15
Activities & Referrals Use the Activities & Referrals area of the consumer record to view and document the assessments, meetings, phone calls, and other tasks completed with, or on behalf of, a specific consumer or consumer group. You can also use this feature to make consumer referrals to any other organization using SAMS within your database.
You can also access a consolidated listing of agency-wide activities and referrals by clicking the Activities & Referrals button on the SAMS toolbar. We'll talk about that in a little while.
Using the Activities & Referrals List
You can sort the Activities & Referrals list by any of the columns displayed on the screen. Click a column title once and the list sorts in ascending alphabetical or numerical order. Click once more to sort the records in descending order.
Use the Group Activities/Referrals list at the far right to group records by status. Select the blank from the list to return the screen to the ungrouped view.
To add an assessment status to a consumer 1 Click Activities & Referrals in the navigation pane.
2 Click Add Activity/Referral on the toolbar.
3 Enter a Subject of "Financial Assessment."

16 SAMS Case Management
4 Select an Action of Assessment. 5 Enter a Due Date of this coming Friday. You can do this by typing the
date in the field, using the Browse [...] button to pop up a calendar, or just double-clicking the appropriate day on the calendar displayed.
6 Click Apply and Close .
7 Click Save .
Consumer Data Entry 17
Editing Activities & Referrals To change an activity/referral
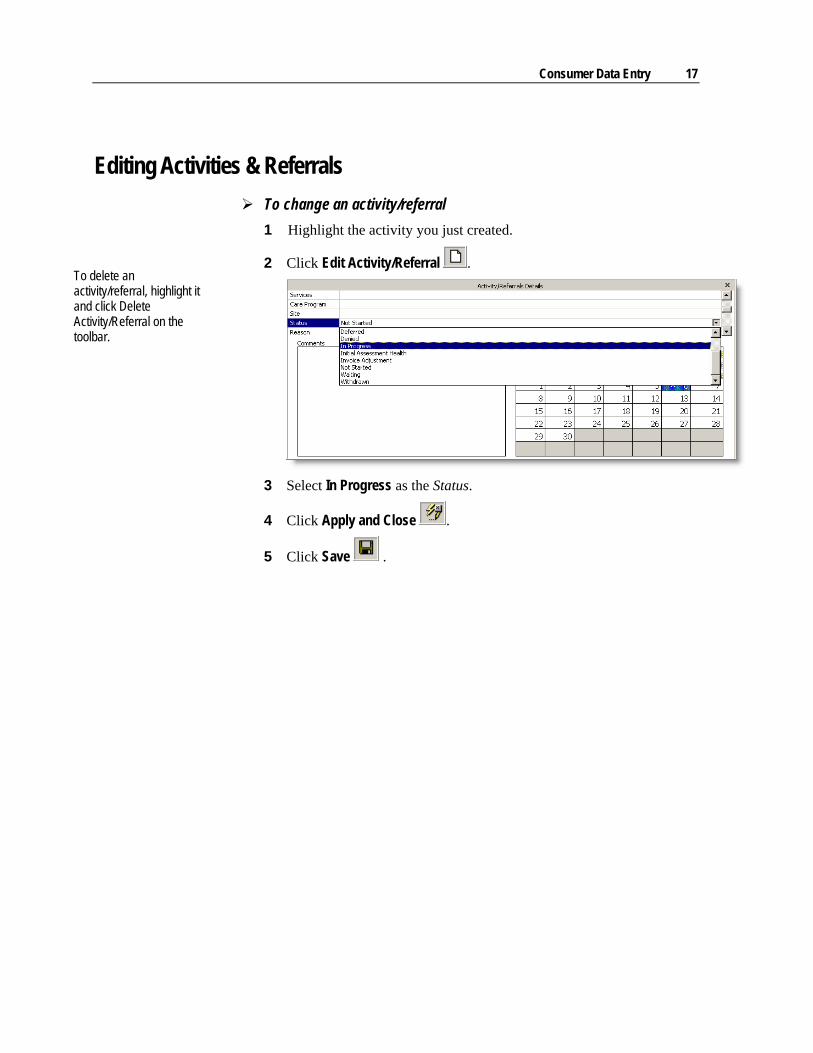
1 Highlight the activity you just created.
2 Click Edit Activity/Referral .
3 Select In Progress as the Status.
4 Click Apply and Close .
5 Click Save .
To delete an activity/referral, highlight it and click Delete Activity/Referral on the toolbar.

18 SAMS Case Management
Consumer Journal Use the Consumer Journal to enter progress notes.
To add a general journal entry 1 Click Consumer Journal in the navigation pane.
2 Click Add Journal Entry .
3 Select Progress Notes from the Journal Type list.
4 Enter a Subject of "Practice Journal."
5 Add the sample journal entry shown or make up your own.
6 Click Apply and Close .
7 Click Save to save the changes to the consumer.
Right-click or select Spelling from the Tools menu to perform a spell check.

Consumer Data Entry 19
Printing Consumer Journals You can print a list of consumer journal entries, the details for any one journal entry, or a journal log. The journal log prints the entries you select in one report.
To print a consumer journal entry 1 Highlight the journal entry you just created.
2 Click Print Preview Journal Entry .
-OR- From the File menu, select Print Preview.
3 Select Details for selected journal entry.
4 Click Preview. SAMS displays the Print Preview screen.
5 We'll skip actually printing the report for today, so click Close .
6 Click Save and Close.

20 SAMS Case Management
Harmony's comprehensive Assessments system offers quick data entry and flexible information storage. Assessments are stored in the Omnia Repository, integrating the Omnia assessment system and SAMS.
The Omnia System, which includes Omnia Interviewer, OmniaCE, Omnia Designer, and Omnia Analyzer, is a stand-alone system used by organizations to design, store, and report on assessments. By using Omnia Interviewer and OmniaCE, agencies can avoid the work of transferring information from paper forms into SAMS/Omnia. Caseworkers can pre-load consumer information onto a laptop or Pocket PC (PDA) and enter assessments in the field. Mobile Assessment Training explains how to prepare and use laptops and Pocket PCs for assessments.
For this training session, you'll review entering assessments into SAMS. SAMS can also pre-fill appropriate responses for a reassessment using any previous assessment.
Assessment Security
SAMS has two different types of assessment security: password and assessment expiration.
You can add an assessment password while creating a new assessment or at any time while editing. A password prevents users who might ordinarily have access to an assessment from viewing or changing it. SAMS administrators can reset forgotten assessment passwords.
SAMS also offers assessment expiration. Set by user name, agencies can use assessment expiration to require that assessments be completed in a set number of days after creation. SAMS has separate Write and Read levels of access expiration. Please refer to the SAMS documentation for more information on assessment security.
Indicators
Many SAMS assessment forms have Indicators, formulas calculated based on assessment responses. Indicators prevent human errors in calculation and make it easy to report on important assessment data. Indicators calculate cost-shares/co-pays in the Home Care Financial Assessment and other key assessment calculations, such as High Nutritional Risk, ADLs, and IADLs.
Assessments

Assessments 21
Required Questions
SAMS does not require you to enter assessment questions in any particular order. However, many assessment forms have required questions. If your department formally closes an assessment, turn on the Required Questions prompt in Options under the Tools menu. The required questions prompt displays how many required questions have been left unanswered when saving an assessment.
SAMS Assessments/Consumer Fields SAMS can use the data entered into assessments to automatically update consumer records.
The following table lists the SAMS fields updated by assessments. All questions have a Question Identifier, used to link information between different assessment forms and to SAMS. You can view a Question ID (identifier) while editing an assessment by highlighting the question and clicking Properties.
SAMS Field Name Omnia Question ID Omnia Question Name First Name 1128 Client first name
MI 1129 Client middle initial
Last Name 1127 Client last name
Birth Date 1134 Date of birth
Age* 1496 Age
SSN 1131 Social security number
Prefix 3948 Client name prefix
Suffix 1407 Client name suffix
Gender 1133 Gender
Marital Status 1010 Marital status
In Poverty 2115 In poverty
Is Rural* 2117 Lives in rural area
1493 AKA first name
AKA Name 1494 AKA middle initial
1492 AKA last name
Directions to Home 1505 Directions to home
By default, SAMS updates the consumer record after you save an assessment. To turn this feature off, select Never in Update Client Record? under Assessments in Options from the Tools menu.

22 SAMS Case Management
SAMS Field Name Omnia Question ID Omnia Question Name Nationality 4144 Nationality
Home Phone Area Code
Home Phone Number 1495 Primary telephone
Home Phone Extension
Mailing Address Street 1 1497 Mailing address - Street/P.O. Box
Mailing Address Street 2 3750 Mailing address - Street address second line.
Mailing Address State 1499 Mailing address - State
Mailing Address ZIP Code 1500 Mailing address - ZIP Code
Mailing Address County 1715 Mailing address - county
Residential Address Town 1502 Residential address - City/Town
Residential Address State 1408 Client state of residence
Residential Address ZIP Code
1409 Client zip code
Residential Address County
1724 Residential address - county
Emergency Contact Name 2400 Emergency Contact - Name of Friend to contact.
Emergency Contact Relationship
2401 Emergency Contact - Rel of Friend to contact.
Emergency Contact Business Phone Area Code
Emergency Contact Business Phone Number
2403 Emergency Contact - Work Tel. of Friend to contact.
Emergency Contact Business Phone Extension
Emergency Contact Home Phone Area Code
Emergency Contact Home Phone Number
2402 Emergency Contact -Home Tel. of Friend to contact.
Emergency Contact Home Phone Extension
Primary Physician Business Phone Area Code
Primary Physician Business Phone Number
1028 Primary doctor work phone
Primary Physician Business Phone
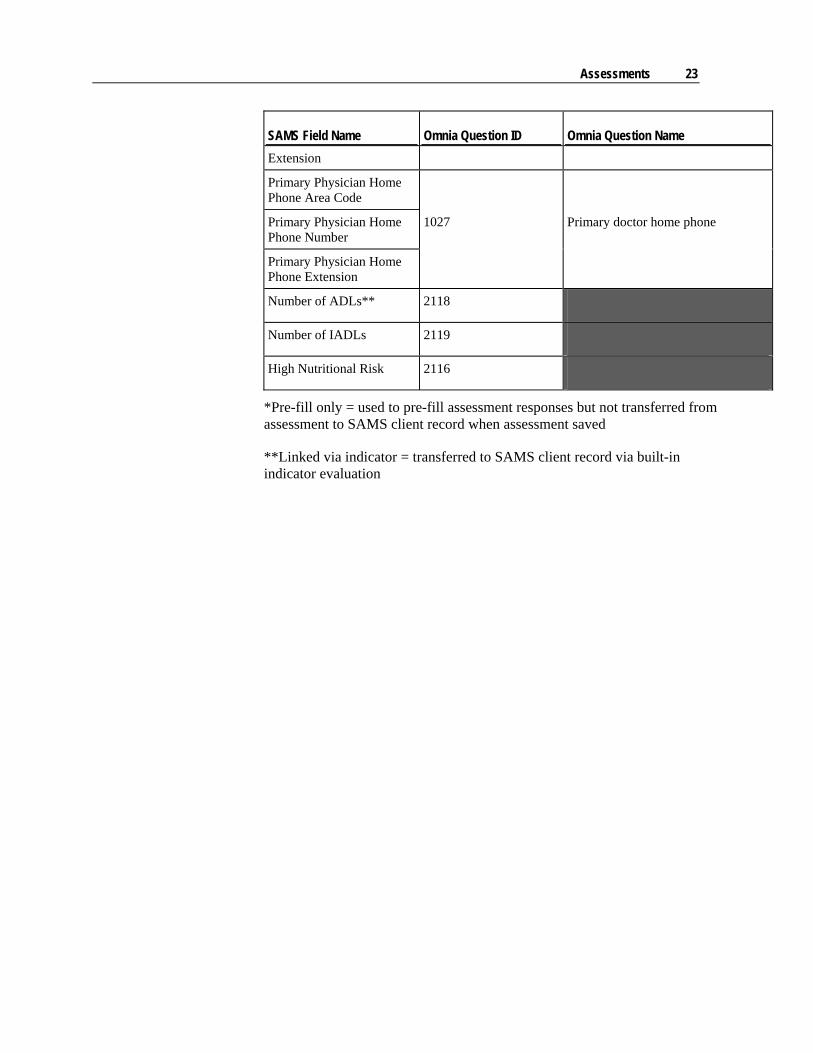
Assessments 23
SAMS Field Name Omnia Question ID Omnia Question Name Extension
Primary Physician Home Phone Area Code
Primary Physician Home Phone Number
1027 Primary doctor home phone
Primary Physician Home Phone Extension
Number of ADLs** 2118
Number of IADLs 2119
High Nutritional Risk 2116
*Pre-fill only = used to pre-fill assessment responses but not transferred from assessment to SAMS client record when assessment saved
**Linked via indicator = transferred to SAMS client record via built-in indicator evaluation

24 SAMS Case Management
Assessment Data Entry The SAMS Assessment Data Entry screen has two main panes: the assessment navigation and data entry panes. The program displays the major sections and subsections of the assessment form in the navigation pane. The questions and fields for response appear on the right, in the data entry pane.
If you click History, Notes, or Properties on the toolbar, a History pane, Notes pane, and/or Properties pane appear. To remove these panes from view, simply click the buttons once more.

Assessments 25
Navigation Pane
Use the plus signs to expand section and subsection headings. Click a section or subsection to have the appropriate questions appear in the Data Entry pane. The Narrative section always appears at the very bottom of the Navigation pane.
Data Entry Pane
A question mark appears to the left of each question. All questions without responses appear with a blue question mark in a circle with a white background. Questions with responses have white question marks in a blue circle. A question with a pencil on top indicates that the response has a note associated with it.
Assessment Form Toolbar
The Assessment Form toolbar switches between several parts of an assessment and accesses important functions. The two lists that follow describe the functions of the buttons as they appear from left to right on the toolbar.
Top Row Edit - access the assessment session Properties screen. Includes
Assessor, Comment, Date of Assessment, Next Assessment Date, and Password information.
Save - save the assessment.
Save and Close - save the assessment and close out of this assessment session.
Print - bring up a print dialog box to print the current assessment or assessment form.
Collapse All - compact the tree in the Navigation pane to show only major sections or headings.
Expand All - expand the tree in the Navigation pane to show all sections and subsections.
History - view a history of consumer responses to the highlighted question.
Notes - enter notes about the currently highlighted question.
Properties - access additional information regarding a question, section, subsection, or indicator.

26 SAMS Case Management
Second Row Previous - go to the previous question in the assessment.
Next - go to the next question in the assessment.
First Unanswered Question - jump to the first assessment question without a response.
Previous Unanswered Question - jump to the first assessment question before the current one without a response.
Next Unanswered Question - jump to the next assessment question without a response.
Find Question - search for a question within the assessment.
Copy Response - copy a previous assessment response from the History pane into the current response. You must activate the History pane before you can use this function, otherwise the button is unavailable.
Clear Response - remove the information entered into the question.
Go to Narrative - access the narrative section of the assessment.
Refresh - re-create the screen with the newest information from the database.

Assessments 27
Entering an Assessment Let's enter a new assessment for your consumer.
Home Care Financial Assessment
The Home Care Financial Assessment calculates consumer cost share/co-pays. Financial Assessment data entry is the same as in other assessment. We'll start a Home Care Financial Assessment here and come back to it when we look at co-pays.
To create a new assessment
1 Click Assessments in the Navigation pane.
2 Click New Assessment on the toolbar.
-OR- From the File menu, select New Assessment....

28 SAMS Case Management
3 Select [Browse...] in the Filename list to find the "2008 - Home Care Financial Assessment." Your trainer will walk you through the process of finding the assessment. In actual practice, assessment forms are stored on a shared network drive such as the S: drive. Once you've assessed a consumer using a form, it appears in the Filename list.
4 Highlight the form and click Open.
5 Under the Assessment heading, SAMS automatically enters the Date of Assessment and Next Assessment Date using today's date and the Reassessment Date default. Enter your name in Assessor. You can choose to password protect this assessment by entering a Password and then entering it again in Verify Password.

Assessments 29
6 Click OK.
7 At the prompt, click Yes to activate the form's Indicators. Indicators are
automatically calculated values based on assessment responses.
8 SAMS copies any existing information from the consumer's record into assessments. Certain consumer fields, such as Ethnicity, can store multiple records. SAMS prompts you to select the correct assessment response based on the values already entered. Use the lists in Assessment Response to fill in the appropriate responses.

30 SAMS Case Management
9 Click OK when finished.
10 Use the plus sign to expand section headings to see subsections in the Navigation pane.
11 In the Navigation pane, highlight the first section (section A) of the assessment.
12 Fill out the entire section. Select No for Does the Applicant have a Spouse?. Use the keyboard as much as possible when adding data. The LEFT and RIGHT ARROW keys scroll through possible question choices. ENTER or the DOWN ARROW moves you to the next question.
13 When finished with the section, click Save.

Assessments 31
Viewing or Modifying Narratives Entering a narrative on any assessment form is straightforward. The Narrative is always the last section of an assessment. You can also click Go
To Narrative on the toolbar at any time.
To review or change a narrative 1 Click the Narrative section at the bottom of the Navigation pane.
2 Enter "Client was distracted during assessment."
3 When finished, click Save and Close.
Don't use narratives for content more appropriately entered in the Consumer Journal or Actions. Narratives are for information about the assessment only.
32 SAMS Case Management
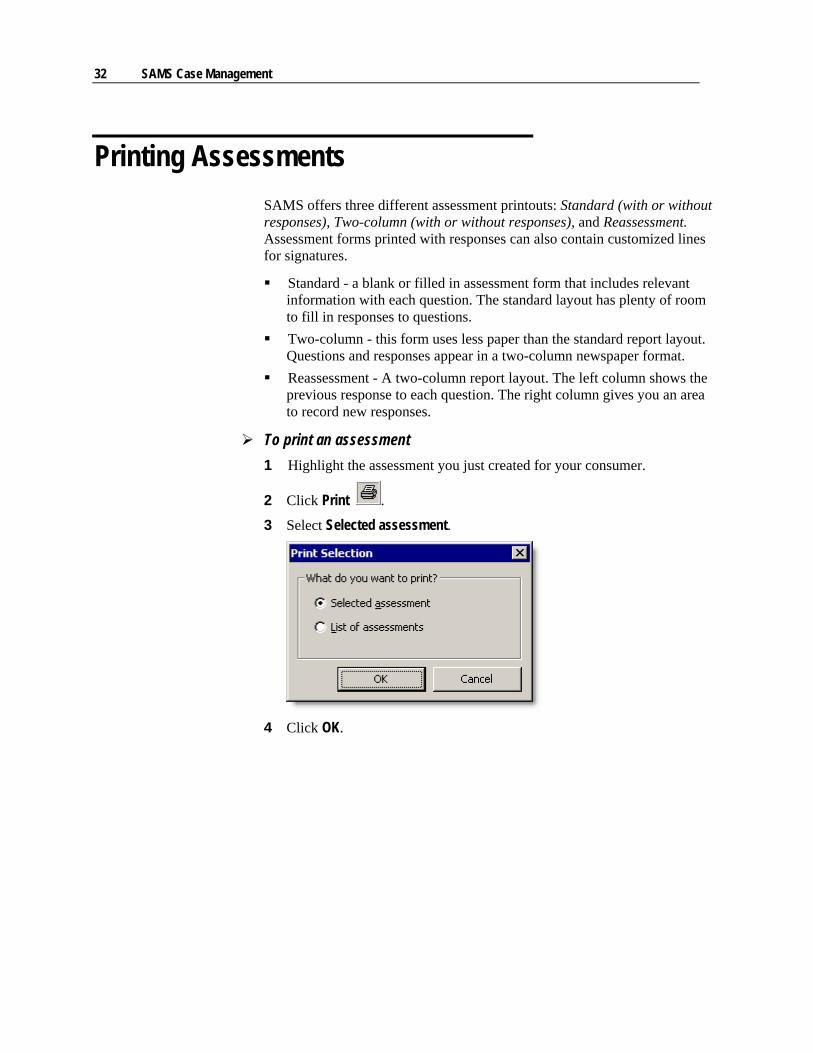
Printing Assessments SAMS offers three different assessment printouts: Standard (with or without responses), Two-column (with or without responses), and Reassessment. Assessment forms printed with responses can also contain customized lines for signatures.
Standard - a blank or filled in assessment form that includes relevant information with each question. The standard layout has plenty of room to fill in responses to questions.
Two-column - this form uses less paper than the standard report layout. Questions and responses appear in a two-column newspaper format.
Reassessment - A two-column report layout. The left column shows the previous response to each question. The right column gives you an area to record new responses.
To print an assessment 1 Highlight the assessment you just created for your consumer.
2 Click Print .
3 Select Selected assessment.
4 Click OK.

Assessments 33
5 For this exercise, select the Two column layout with responses shown in the following screen. If necessary, clear the check boxes in the Settings area.
6 Click Preview.
7 We're not going to print the report, so click Close .
8 Click Save and Close.
34 SAMS Case Management
Assessment Data Entry Practice Edit the assessment you just created. (Highlight and click Edit
Assessment .) Change the Applicant's Last Name. Save and close the assessment. Click Details in the navigation pane. Notice that the Last Name is
changed in the consumer's record.
NOTES:_____________________________________________________
____________________________________________________________
____________________________________________________________
____________________________________________________________
____________________________________________________________

Calculating Co-Pays 35
As we touched on earlier, consumer co-pays are calculated by SAMS using the 2008 - Home Care Financial Assessment. In order for the information to calculate, you must fill out parts 1 and 2 of section A. Section B is not required unless the consumer owns rental property.
To calculate a co-pay 1 Open the Financial Assessment. you were working on before.
2 Double-check that section A.1 is filled out, and that you have selected No for Does the Applicant have a Spouse?. This question is an indicator that must be filled out in order for the cost share to calculate.
3 Go to section A.2.
4 Fill out fields I.a. and (A) a - (A) p. with the information shown below.
Calculating Co-Pays

36 SAMS Case Management
5 Go to section C. A cost share should be calculated for you.
6 Click Save. When you calculate a cost share for the first time, or if you
update the financial assessment with information that changes the cost share, a Review SAMS Co-Pay Records screen appears.
7 Click Add Co-Pay.

Calculating Co-Pays 37
8 SAMS populates Co-Pay Details with today's date as the Start Date and the Co-Pay amount. Let's leave this information as is.

38 SAMS Case Management
9 Click Select in the Co-Pay Care Programs area.
10 Select the Caring Homes/Non-Waiver Care Program. You can select as
many cost sharing care programs as needed, but you must select at least one.
11 Click OK. Notice that the Co-Pay Indicator History now displays your co-pay information in bold text. A Co-Pay Indicator History only appears when a cost share is calculated by assessment.
12 We'll skip adding a co-pay relation today.

Calculating Co-Pays 39
13 Click OK to close the Add Copay screen.
14 Click Done to close the Review... screen.
15 Click Save and Close in the Assessment Data Entry screen.
16 Click Details.
For more information about Co-Pay Relations, see the SAMS documentation.

40 SAMS Case Management
17 Click Co-Pay. This is where SAMS stores the history of the co-pay you just added. You can add, edit, delete, or print co-pay information from this area.

Consumer Care Enrollments 41
After assessment, a consumer is typically enrolled into one or more care programs. Care enrollments are a vital part of the SAMS system and determine which services consumers can receive. Each consumer care plan is associated with a Care Enrollment.
To add consumer care enrollments 1 Click Care Enrollments.
2 Click Add Care Enrollment.
3 Add a Level of Care, Service Program, and Care Program Name as directed by your trainer.
4 Click OK.
5 Click Save.
Consumer Care Enrollments


43
Now that we've finished looking at Assessments and consumer data entry, let's move to Care Management.
Click Care Management in the Navigation pane. SAMS displays a list of all existing care plans for the consumer.
Each consumer care plan is associated with one care enrollment. Care enrollments control the services that users can allocate, order (authorize), and ultimately deliver to consumers.
A consumer care plan contains a worksheet, service plan, goals, journal, diagnosis codes, and associated care managers. SAMS Overview User Training included a brief overview of care plans. This session explores care planning in more depth.
Care Plans
44 SAMS Case Management
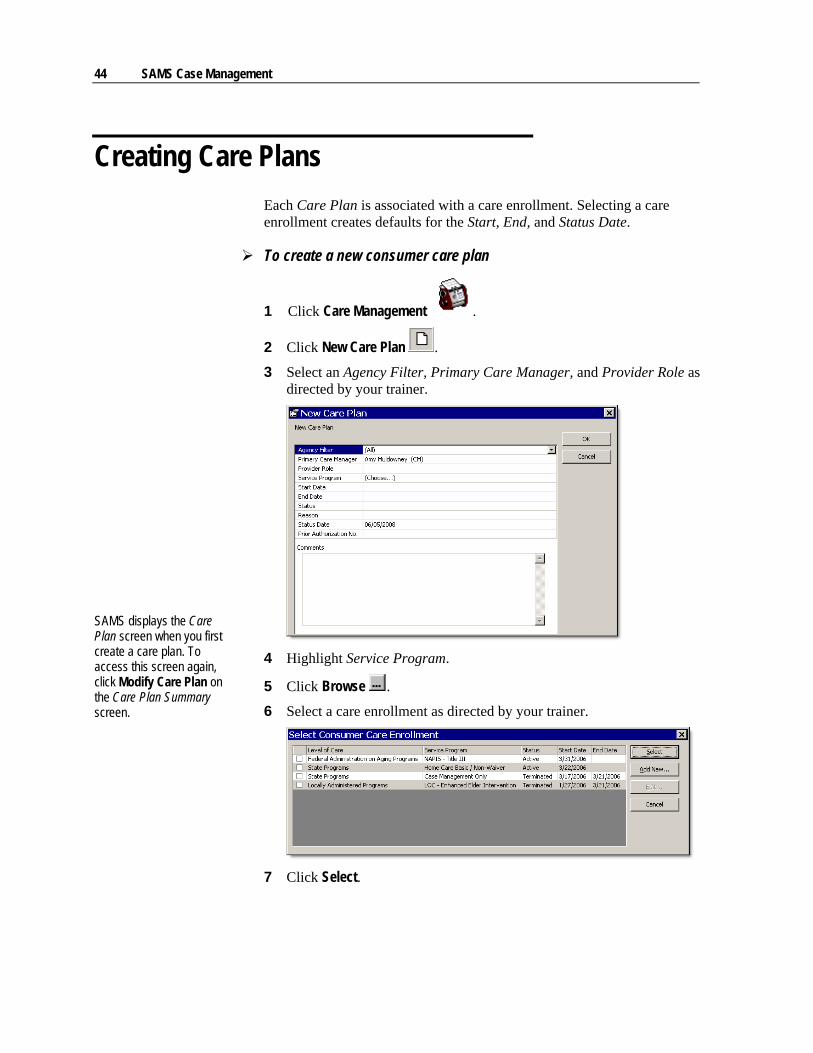
Creating Care Plans Each Care Plan is associated with a care enrollment. Selecting a care enrollment creates defaults for the Start, End, and Status Date.
To create a new consumer care plan
1 Click Care Management .
2 Click New Care Plan .
3 Select an Agency Filter, Primary Care Manager, and Provider Role as directed by your trainer.
4 Highlight Service Program.
5 Click Browse .
6 Select a care enrollment as directed by your trainer.
7 Click Select.
SAMS displays the Care Plan screen when you first create a care plan. To access this screen again, click Modify Care Plan on the Care Plan Summary screen.

Care Plans 45
8 Change the Start Date to the day after the End Date of the previous program (6 months from the default End Date). The future Start Date prevents an overlap with the care plan created in SAMS Overview Training. The care plan's Start Date defaults to the Start Date of the care enrollment. Care enrollment start dates default to and must be on or after the consumer's Date Registered.
9 SAMS automatically fills in the End Date based on a default number of
months after the Start Date. You can change the Default Duration using Options under the Tools menu.
10 Select Active as the care plan's Status.
11 Click OK to create the care plan.
46 SAMS Case Management
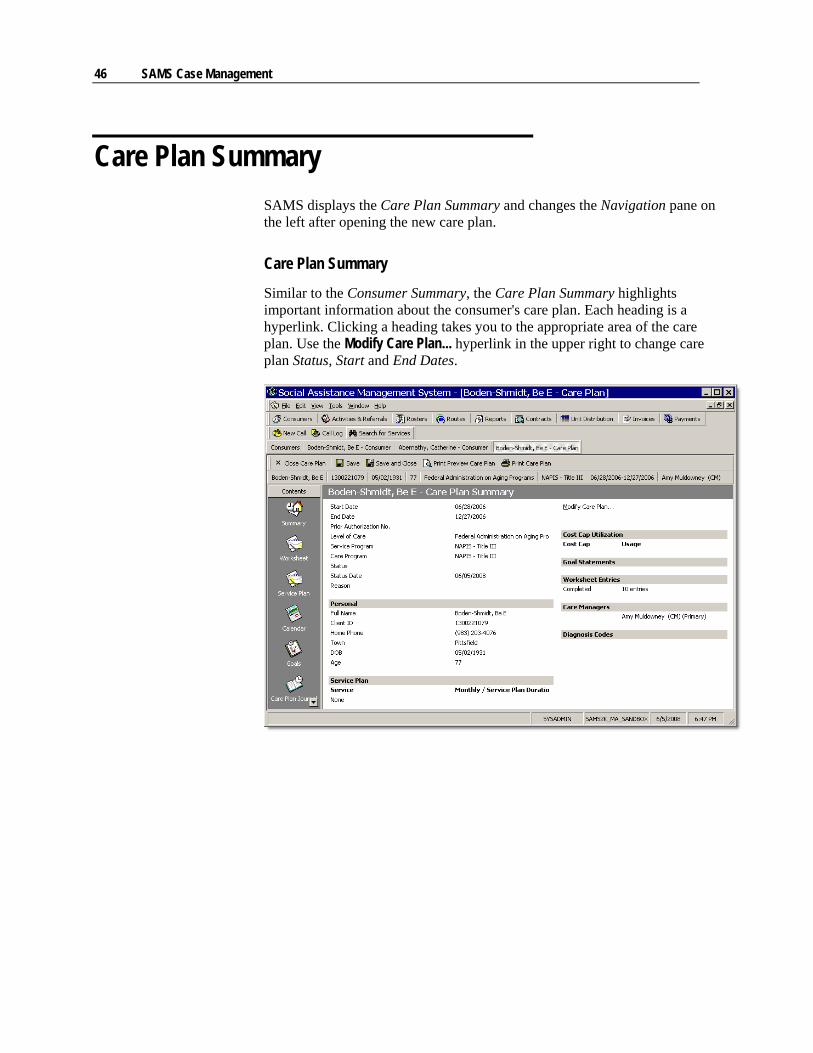
Care Plan Summary SAMS displays the Care Plan Summary and changes the Navigation pane on the left after opening the new care plan.
Care Plan Summary
Similar to the Consumer Summary, the Care Plan Summary highlights important information about the consumer's care plan. Each heading is a hyperlink. Clicking a heading takes you to the appropriate area of the care plan. Use the Modify Care Plan... hyperlink in the upper right to change care plan Status, Start and End Dates.

Care Plans 47
Worksheet The optional Care Plan Worksheet helps you determine consumer needs. The worksheet displays functional areas grouped by several functional categories in a convenient spreadsheet view. The EOEA has customized the functional areas for all agencies. In a future release, worksheet entries will be linked directly to assessment questions or indicators.
Worksheet Flag/Check Mark System
To the left of each functional category, you'll see a red or yellow flag or a check mark. A red flag means that the functional category has no entries. Functional categories with entered but unmet needs have yellow flags. The check mark shows that the consumer has no needs associated with that functional category.
Worksheet Data Entry
To enter data into the worksheet, select from lists in the columns, check appropriate boxes, or enter notes using the Browse button in the correct cell. SS stands for Self-Sufficient. Select the SS check box if a consumer has no needs in that functional area.
To enter data into a care plan worksheet 1 Click Worksheet in the Navigation pane.
2 Click the plus sign to the left of Cognitive Functioning.
3 Select the SS (Self Sufficient) check boxes in all functional areas. SAMS changes the red flag to a green check mark because all needs have been met for this functional category.
4 Click Expand on the toolbar.
Use the worksheet to enter information about services an individual may be getting through third party or informal supports.
To show a summary of care needs, open the care plan worksheet or run an assessment report.

48 SAMS Case Management
5 Fill out some ADL and IADL information.
6 When finished, click Save .
The TAB button goes from field to field. Use the UP and DOWN arrows to move between rows.

Care Plans 49
Service Plan A Service Plan creates service allocations designed to meet consumer needs. Care managers can use service allocations to automatically generate service orders. Service orders are service authorizations for Providers (vendors) to deliver services.
Service Plan Allocations
Each service within a service plan has an Allocation Type. Allocation types specify the length of time for the planned service. SAMS has five types of service plan allocations: Weekly, Monthly, Yearly, Care Plan, and Duration Specified.
Weekly - enter the service units by week. Users can plan services for specific days of the week and weekly Frequencies (biweekly, triweekly).
Monthly - plan units for a month. Care plan costs are calculated by multiplying the services by the number of months in the care plan.
Yearly - enter service allocations for an entire year. Care Plan - units of service entered are the total units for the length of the
care plan. Duration Specified - allocations for one-time instances of planned
services or those services that do not fit into Care Plan or other durations.
50 SAMS Case Management
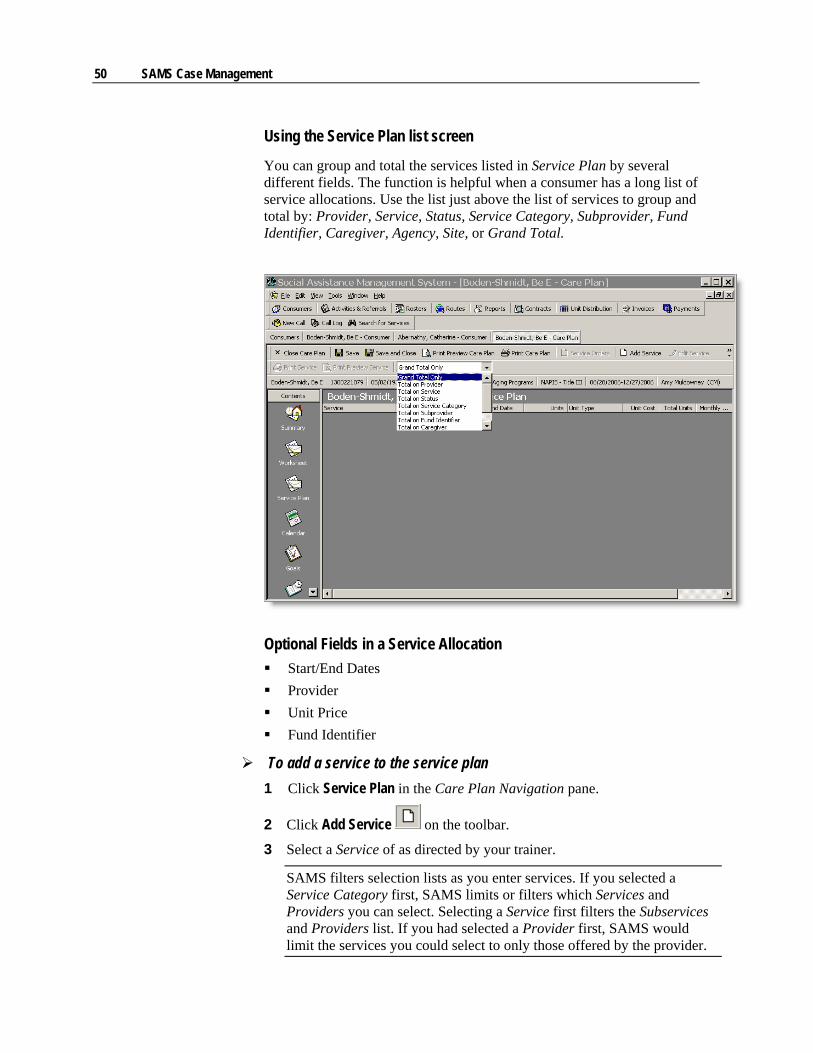
Using the Service Plan list screen
You can group and total the services listed in Service Plan by several different fields. The function is helpful when a consumer has a long list of service allocations. Use the list just above the list of services to group and total by: Provider, Service, Status, Service Category, Subprovider, Fund Identifier, Caregiver, Agency, Site, or Grand Total.
Optional Fields in a Service Allocation Start/End Dates Provider Unit Price Fund Identifier
To add a service to the service plan 1 Click Service Plan in the Care Plan Navigation pane.
2 Click Add Service on the toolbar.
3 Select a Service of as directed by your trainer.
SAMS filters selection lists as you enter services. If you selected a Service Category first, SAMS limits or filters which Services and Providers you can select. Selecting a Service first filters the Subservices and Providers list. If you had selected a Provider first, SAMS would limit the services you could select to only those offered by the provider.

Care Plans 51
4 Select a Provider and Agency as directed by your trainer.
5 SAMS automatically enters a Unit Price based on the Agency and
Provider. SAMS generates the Unit Price using the rate information entered into SAMS Administrator or active service contracts. You can find out what a service unit represents by looking at the Unit Type.
6 Add this allocation to the service schedule. Under Service Plan Schedule,
click Add .

52 SAMS Case Management
7 If necessary, select Weekly as the Allocation Type. SAMS enters the Allocation Type from the default in Options for your Virtual Gateway logon.
8 Highlight Week Detail.
9 Enter "2" in Mo(nday). The Units Allocated automatically updates to 2.
10 Enter "2" on Wednesday and on Friday. The Units Allocated updates to 6.
11 Enter "1" in Frequency to create a weekly service allocation. The Frequency tells SAMS how often to repeat the service: weekly (1), biweekly (2), triweekly (3), and so on.
12 Click Apply & Close in the Service Plan Schedule pane.

Care Plans 53
13 Click Show Calendar . The calendar displays the schedule of the service allocation.
14 Click Hide Calendar to return to the Care Plan Service Plan screen.
15 Click Apply & Close . Apply saves your work and keeps the window open. Apply and Close saves your work and closes the current window. You've just scheduled two units of Homemaker services for every Monday, Wednesday, and Friday within the care enrollment.
16 Click Save to commit the changes to the service plan.
Click Apply to commit services to the service plan. Click Save when you want to save the entire care plan, including the current screen contents, to the database. In a nutshell, Apply commits the current changes on the screen against the care plan without saving to the database. Save records your changes to the database.

54 SAMS Case Management
To create a bi-weekly service allocation
1 Click Add Service on the toolbar.
2 Select a Service, Agency, and Provider as directed by your trainer.
3 Under Service Plan Schedule, click Add .
4 If necessary, select Weekly as the Allocation Type.
5 Highlight Week Detail.
6 Enter "4" in Monday. The Units Allocated automatically updates to 4.
7 Enter "2" as the Frequency to create a bi-weekly allocation.
8 Add a week to the default Start Date to create a bi-weekly allocation that's offset from the start date of the service plan.
9 Click Apply & Close in the Service Plan Schedule pane.
10 Click Apply & Close on the middle left toolbar.
11 Click Save to commit the changes to the service plan.

Care Plans 55
Understanding Service Plan Calculations
Notice the Average Weekly Cost, Monthly Cost, Total Units, and Total Cost in the middle of the screen. SAMS displays different costs and averages based on the Allocation Type chosen. Let's take a closer look at how SAMS calculates those totals.
All service plan calculations use calendar months. If a care plan extends into a month, even just for one day, SAMS considers it a whole month. For example, if a care plan runs from February 1 to July 1, SAMS uses seven months for calculations, not six.
Weekly
The Weekly Allocation Type schedules units of service per week. SAMS calculates the total units based on the number of actual planned days within the care plan. The average monthly cost is calculated by dividing the Total Costs by the number of calendar months in the care plan.
Monthly
For a Monthly allocation, units entered are delivered through the course of a calendar month. For this Allocation Type, the Monthly Cost equals the Unit Price multiplied by the number of Units entered. SAMS calculates the Total Cost and Units by multiplying the Monthly Cost and number of Units by the number of months in the care plan.
Care Plan
A Care Plan allocation spreads the Units out over the time period of the care plan. The Total Units equal the number of Units entered. The Total Cost equals the Units multiplied by the Unit Cost. SAMS also calculates an Average Monthly Cost.

56 SAMS Case Management
Duration Specified
Duration specified spreads the Units entered over the Start and End dates of the service allocation. For the example below, a duration of 04/01/2006 to 05/31/2006 - 2 months was entered with 4 units over the duration. SAMS calculates an Average Monthly Cost based on 2 units per month. The Total Units and Total Cost equal the Units and Unit Price respectively.
Yearly
For a Yearly allocation, Units entered are delivered throughout the course of a calendar year.
Care Plans 57
Service Plan Practice Add a service and provider as directed by your trainer to your
consumer’s service plan. Allocate four units per week. Double-check the Average Monthly Cost
and Total Cost SAMS calculates. Apply and then save the service to the service plan.
NOTES:_____________________________________________________
____________________________________________________________
____________________________________________________________
____________________________________________________________
____________________________________________________________
____________________________________________________________

58 SAMS Case Management
Service Calendar The Calendar displays all planned services over the duration of the care plan. We just saw the calendar for the individual planned services. Now, let's see what those services look like in a combined view.
To view and print a combined service calendar 1 Click Calendar in the Navigation pane.
2 Select a month from the list near the top of the calendar. SAMS displays
the service allocations (Monthly Details) for just the month you select on the right of the screen.
3 To print the calendar, click Print Calendar on the toolbar and click OK. For the purposes of this training session, click Cancel.

Care Plans 59
Goal Statements Use Goals to enter targets for improvements or care plan achievements.
To create a new goal statement 1 Click Goals in the Care Plan Navigation pane.
2 Click Add Goal Statement on the toolbar.
-OR- Select Add Goal Statement from the File menu.
3 Select a Goal from the list.
4 Enter today's date as the Target Date.
5 Click Apply .
6 Select Yes in Achieved.
7 SAMS automatically fills in today's date in Actual Date. Enter a date that falls within the date range of your care plan. A date of 9 months from today should do the trick. (Be sure to change the year, if necessary.)

60 SAMS Case Management
8 Click Apply .
9 SAMS displays the goal with a line through it to show that it has been
achieved.
10 Click Save .

Care Plans 61
Care Plan Journal The Care Plan Journal stores notes and journal entries for each care plan. SAMS also has a general consumer journal, which you've already seen. Enter Progress Notes in the Consumer Journal. The EOEA discourages the use of the care plan journal area.

62 SAMS Case Management
Care Managers You can enter multiple care managers for each care plan and mark one care manager as Primary. For instance, if your agency needs to run reports for both the case supervisor and caseworker, then enter both individuals in Care Managers. Mark the caseworker as the primary care manager.
MassHealth/Medicaid Billing
MassHealth consumers must have an authorizing physician entered as a Care Manager within the appropriate care plan with the Provider Role of Primary Care Physician. The EOEA requires an authorizing physician in order to bill Medicaid for the services delivered under the care plan.
Let's enter a case supervisor for the consumer you created.
To add additional care managers to a care plan 1 Click Care Managers.
2 Click Add Care Manager on the toolbar.
3 Select a Care Manager and Provider Role.
4 Click Apply and Close .

Care Plans 63
5 Click Save to add the care manager to the care plan.

64 SAMS Case Management
Diagnosis Codes A Diagnosis Code is an ICD-9 code used to invoice Medicaid for services. Use this section as a reference if you are required to enter a diagnosis code for a consumer. We'll skip this section for this training session.
To enter and prioritize care plan diagnosis codes 1 Click Diagnosis Codes in the Care Plan Navigation pane. You may need
to scroll down.
2 Click Add Diagnosis Code on the toolbar.
3 Make sure that the Diagnosis Code field is highlighted and click Browse
.
4 Type "diab" in the Short Name field.
The EOEA requires a primary diagnosis code to bill Medicaid for services delivered under the care plan.

Care Plans 65
5 Click Find.
6 Highlight "Diabetes Mellitus."
7 Click Select.
8 Enter "1" for the Priority of the primary diagnosis code.
9 Click Apply and Close .
The checkbox in the list displays the Specific? status of a code. Highlight a code to select it.

66 SAMS Case Management
Printing Care Plan Logs Use the care plan log to print information about all aspects of a consumer's care plan.
To print or preview a care plan log
1 Click Print Preview Care Plan .
2 In Care Plan Print, clear the Goals and Journal check boxes to prevent those parts of the care plan from printing.
Click Print Care Plan in step one to send the care plan log to the printer without previewing it first.
Care Plans 67
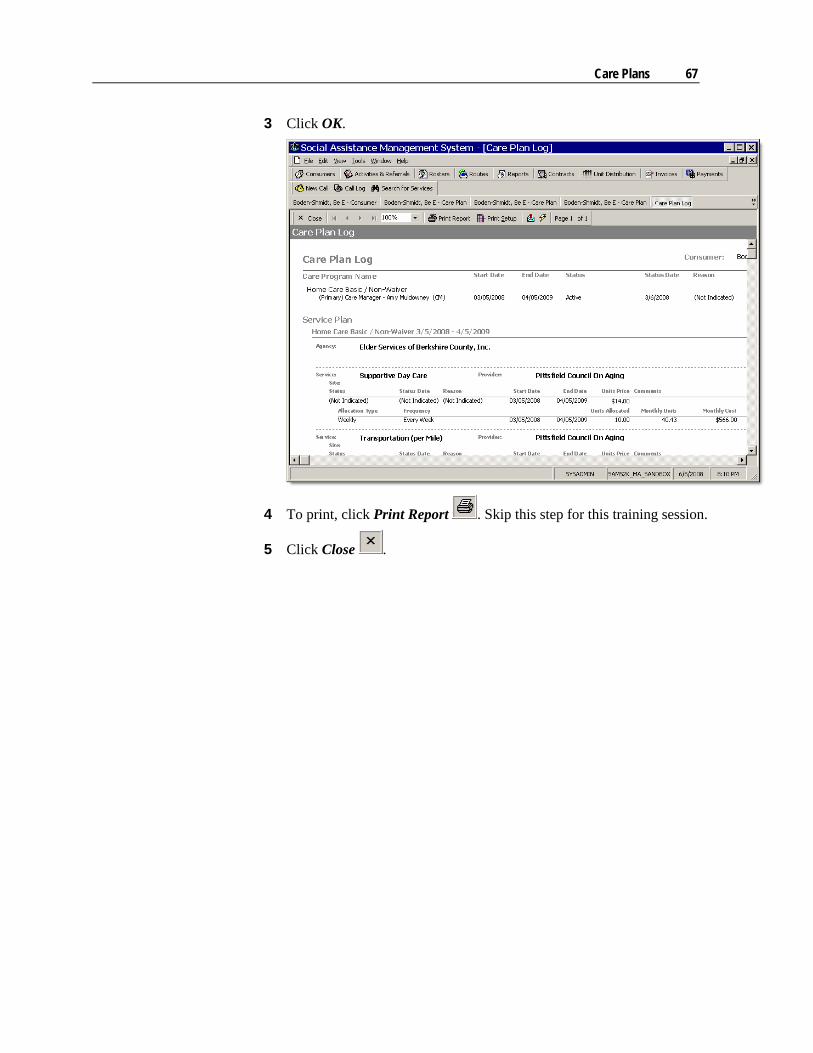
3 Click OK.
4 To print, click Print Report . Skip this step for this training session.
5 Click Close .

68 SAMS Case Management
Service Program Cost Caps SAMS administrators can enter monthly, yearly, and lifetime cost limits for service programs. SAMS tracks costs and displays cost information on the Care Plan Summary screen. You can also review consumer cost information using the Consumer Cost Report in Care Plan Reports and in the Payment Voucher Reporter.
To view service program cost caps 1 Click Summary. SAMS displays the Consumer Plan Summary.
2 View the Cost Cap Utilization in the upper right corner of the Care Plan
Summary.
SAMS displays cost caps as a planning aid, however, they are not enforced.

Care Plans 69
Care Plan Practice Fill out the Emotional Status and Nutrition functional categories of the
worksheet for your consumer. Save your work. Allocate four units of a per month. Plan 2 units every other week. View them on the combined calendar. Delete the service allocation you just created. (Highlight and click Delete
Service .) Save all changes without closing the care plan.
NOTES:_____________________________________________________
____________________________________________________________
____________________________________________________________
____________________________________________________________
____________________________________________________________
____________________________________________________________

71
Service Orders are future or authorized services for consumers. SAMS can track service orders against service contracts, service deliveries, and service allocations.
SAMS can require service orders for the entry of service deliveries. In the Massachusetts Aging Network, most service deliveries require the entry of a service order. In most cases, creating a service order requires a corresponding allocation in the consumer's service plan.
Case managers can automatically generate service orders from service plan allocations or create individual service orders. Let's automatically generate service orders from within a service plan.
About Service Orders
Each service order has two parts: Details and Items. Enter the Care Program associated with this service order, Agency, Provider, and Effective and Expiration Dates in Details. All Service Orders are composed of one or more service items. Service Items store the service authorized, numbers of units, Status, and any Comments.
To automatically generate service orders 1 Click Service Plan.
2 Highlight your service allocation.
3 Click Service Orders.
4 Click Generate.
Generating Service Order Authorizations

72 SAMS Case Management
5 In the Service Orders Properties screen, enter an End Date of three months from the default Start Date. You can adjust the Start and End Date and any information not already named in the service allocation.
6 Click OK.
7 SAMS generates the service orders and lists them on the screen.
8 Click OK to save the service orders.

Generating Service Order Authorizations 73
9 SAMS displays the progress of saving the orders.
10 Click Done after reviewing.
11 Highlight a service order.
12 The order appears on the lower pane. The left pane shows Agency, Provider, and Date information. The right pane shows order items. You can add, edit, or delete items in this pane. The Reset Order button reverts the order to the last saved version. Use Print List or Print Order to get the appropriate printouts from this screen.
13 Click Close.
14 Click Save and Close to close the care plan.

74 SAMS Case Management
SAMS' service suspensions temporarily suspend consumer service deliveries and routes. Use service suspensions to prevent services from being delivered while a consumer is away from home or during hospitalizations.
Users can still create service plans and orders during a suspension. Any suspended orders display an exceptions field so that you can view the suspension that effects both the general order and any items. Suspended service plans appear in red on the Calendar in Care Management.
You can elect to suspend just certain services or providers or all services and all providers. SAMS suspends services on the day of the Start Date through the End Date. The service suspension lifts automatically after the End Date.
To suspend services for a consumer
1 Click Details .
2 At the bottom of the list, click Service Suspension.
3 Click Add Service Suspensions on the toolbar.
Service Suspensions
You can also suspend consumers from services that they do not have scheduled, or that they have previously received, in order to better manage rosters and routes. See the SAMS documentation for more information.
Service Suspensions 75
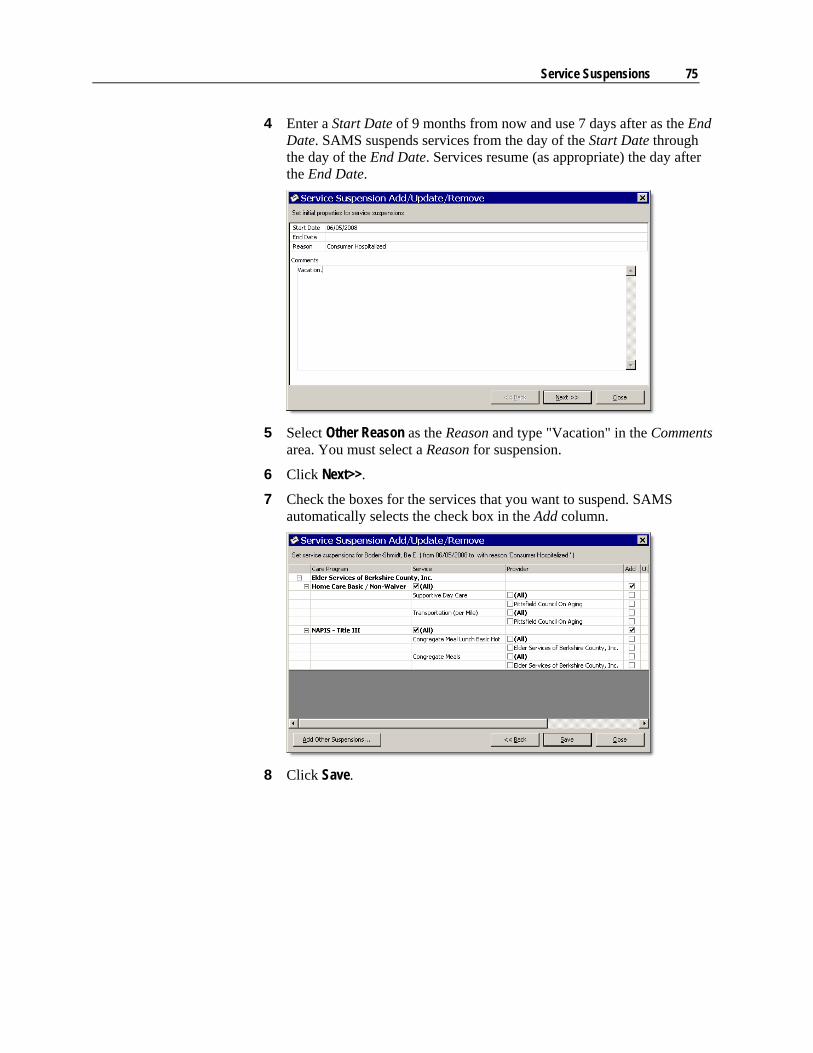
4 Enter a Start Date of 9 months from now and use 7 days after as the End Date. SAMS suspends services from the day of the Start Date through the day of the End Date. Services resume (as appropriate) the day after the End Date.
5 Select Other Reason as the Reason and type "Vacation" in the Comments
area. You must select a Reason for suspension.
6 Click Next>>.
7 Check the boxes for the services that you want to suspend. SAMS automatically selects the check box in the Add column.
8 Click Save.

76 SAMS Case Management
9 Review the suspension quick update log.
10 Click Close.
11 Click Save to commit the suspension to the consumer's record.
Service Suspensions 77
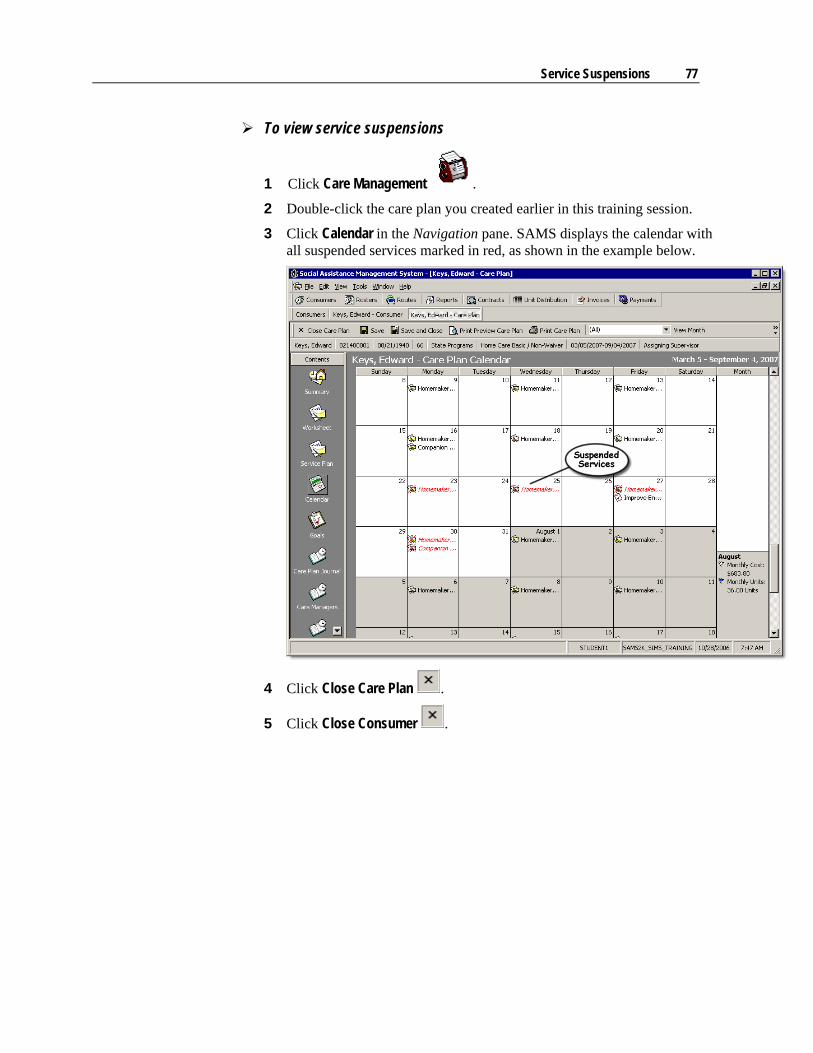
To view service suspensions
1 Click Care Management .
2 Double-click the care plan you created earlier in this training session.
3 Click Calendar in the Navigation pane. SAMS displays the calendar with all suspended services marked in red, as shown in the example below.
4 Click Close Care Plan .
5 Click Close Consumer .
78 SAMS Case Management
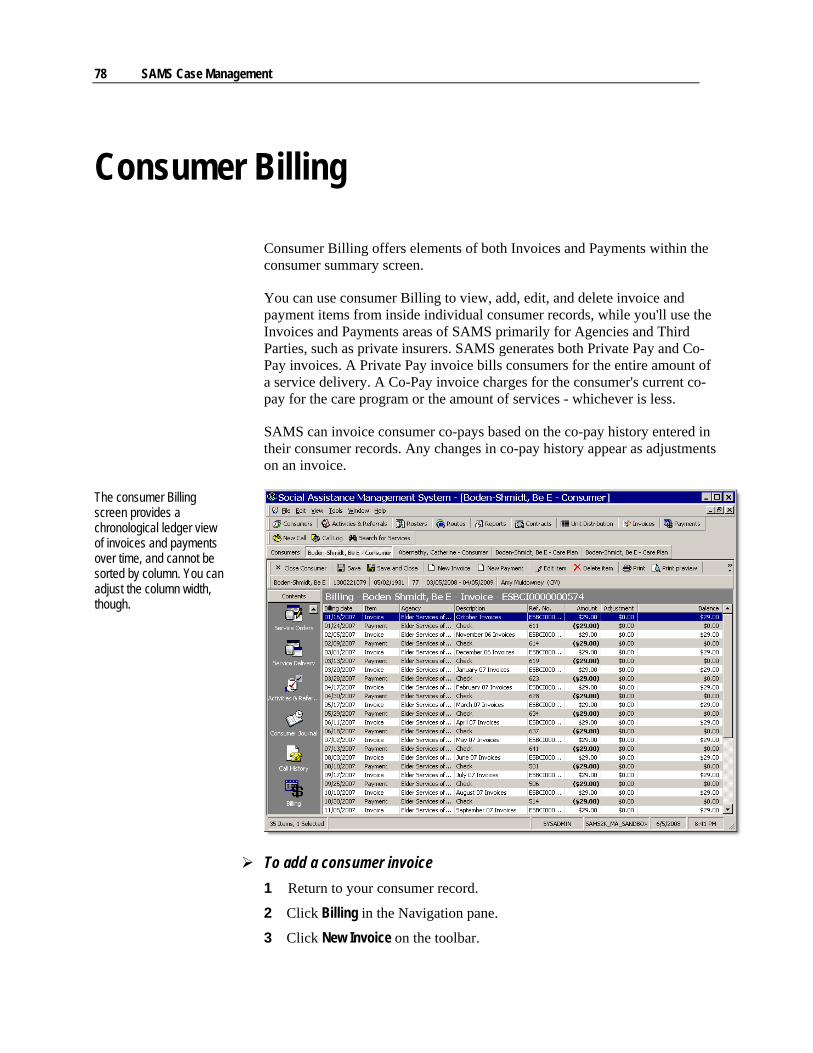
Consumer Billing offers elements of both Invoices and Payments within the consumer summary screen.
You can use consumer Billing to view, add, edit, and delete invoice and payment items from inside individual consumer records, while you'll use the Invoices and Payments areas of SAMS primarily for Agencies and Third Parties, such as private insurers. SAMS generates both Private Pay and Co-Pay invoices. A Private Pay invoice bills consumers for the entire amount of a service delivery. A Co-Pay invoice charges for the consumer's current co-pay for the care program or the amount of services - whichever is less.
SAMS can invoice consumer co-pays based on the co-pay history entered in their consumer records. Any changes in co-pay history appear as adjustments on an invoice.
To add a consumer invoice 1 Return to your consumer record.
2 Click Billing in the Navigation pane.
3 Click New Invoice on the toolbar.
Consumer Billing
The consumer Billing screen provides a chronological ledger view of invoices and payments over time, and cannot be sorted by column. You can adjust the column width, though.

Consumer Billing 79
4 Select Private Pay Invoice
5 Enter a Description, Invoicer - Agency, and Invoicee -Consumer as
directed by your trainer.
6 Leave today's date as the default Invoice Date.
7 Click Service Delivery Items in the Navigation pane.
8 Click Add Items on the toolbar.
-OR- Right-click and select Add Items.
9 In the Add Service Delivery Items dialog, enter criteria into at least 2 Filter By fields to locate service delivery records to add to the invoice. Your trainer will help you find an item to add.
10 Select an invoice item and click OK.
11 Save and close the invoice.
12 Now let's add a payment against the invoice you just created.
The Massachusetts Aging Network uses auto numbering, which means that you cannot enter an Invoice Number. The field populates automatically when you save the record.

80 SAMS Case Management
To add a payment 1 Click New Payment on the toolbar.
2 Enter a Payment Ref. No. of 1.
3 In the Payee - Agency field, select the same agency that you entered into the invoice as the Invoicer - Agency.
4 Click Items in the Navigation pane.
5 Click Add Items in the toolbar.
-OR- Right-click and select Add Items.

Consumer Billing 81
6 Enter Filter By criteria as needed to locate your invoice item. If you don't enter any criteria, SAMS returns all open invoice items.
7 When you find the correct item, select it and click OK.

82 SAMS Case Management
8 Click Details in the Navigation pane. You'll notice that the Credit Balance equals the total of the invoice item you just selected. Enter the full Payment Amount. of the Credit Balance.
9 Save and close the payment.

Consumer Billing 83
Billing Practice Create a co-pay invoice for your consumer. Save and close the invoice. Create a payment for the invoice. Save and close the payment. Save and close the consumer record.
NOTES:_____________________________________________________
____________________________________________________________
____________________________________________________________
____________________________________________________________
____________________________________________________________

84 SAMS Case Management
As you've seen, you can access consumer-specific Activity/Referral information from within consumer records. Accessing Activities & Referrals from the SAMS toolbar provides a list of all the activities/referrals associated with your organization. Since the process of adding, editing, and deleting an activity/referral here is virtually the same as doing it within a consumer record, we're not going repeat that process here. Instead, we'll look at filtering the Activities & Referrals list.
Quick Filters
Quick Filters provide you with an easy way to limit the number of consumers in view. Use the three quick filter lists to make your selections. Filter by Date, Provider, and/or Status.
Activities & Referrals (toolbar view)
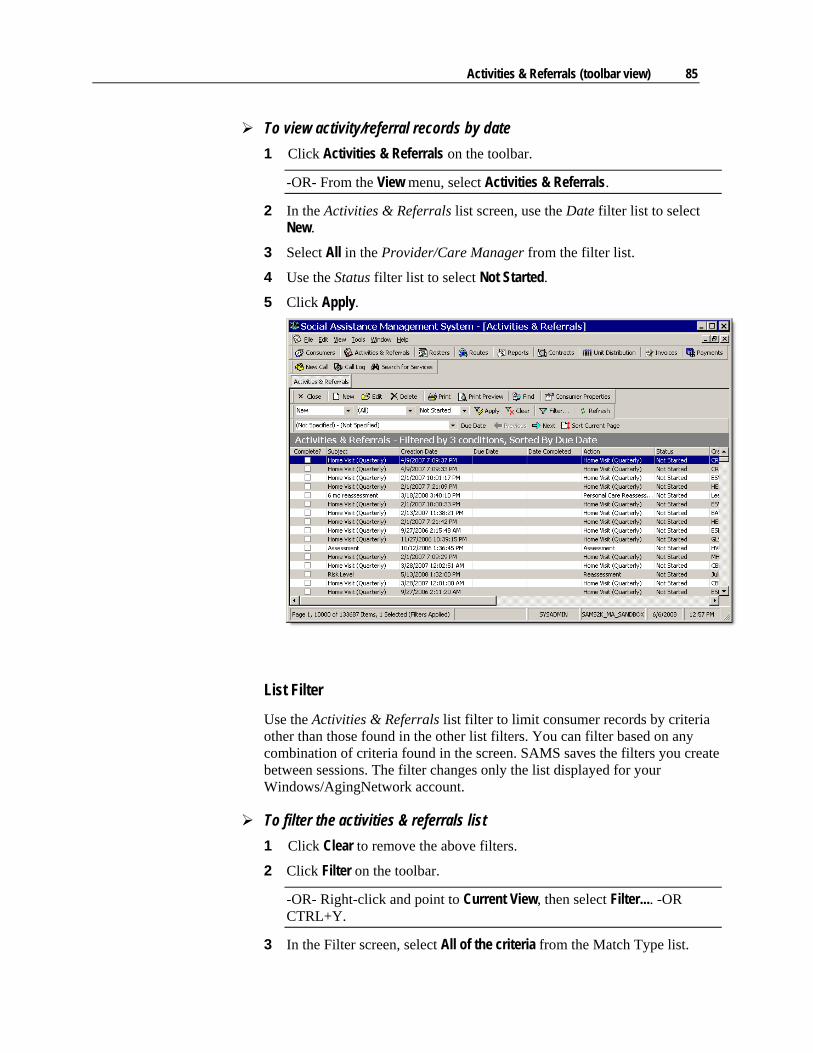
Activities & Referrals (toolbar view) 85
To view activity/referral records by date 1 Click Activities & Referrals on the toolbar.
-OR- From the View menu, select Activities & Referrals.
2 In the Activities & Referrals list screen, use the Date filter list to select New.
3 Select All in the Provider/Care Manager from the filter list.
4 Use the Status filter list to select Not Started.
5 Click Apply.
List Filter
Use the Activities & Referrals list filter to limit consumer records by criteria other than those found in the other list filters. You can filter based on any combination of criteria found in the screen. SAMS saves the filters you create between sessions. The filter changes only the list displayed for your Windows/AgingNetwork account.
To filter the activities & referrals list 1 Click Clear to remove the above filters.
2 Click Filter on the toolbar.
-OR- Right-click and point to Current View, then select Filter.... -OR CTRL+Y.
3 In the Filter screen, select All of the criteria from the Match Type list.

86 SAMS Case Management
4 Use the Action list to select Assessment. 5 Enter today's date as the Due Date.
6 Click OK. SAMS displays the Activities & Referrals list with only the
records meeting your specifications. The title bar shows the number of filter criteria, or just the criteria itself if you only entered one filter.
7 Clear the filters.

Reports 87
Reports in SAMS offer flexibility and ease of use. The SAMS reporting system has two parts: Reports and Report Definitions. A report, created by Synergy Software or your organization, has several grouping, filtering, and layout options. A report definition stores your filters and customizations to a report. Use report definitions to run periodic reports quickly and easily.
SAMS Report Categories
SAMS groups reports into eight categories. After accessing the Reports area, select one of the following categories in the Navigation pane.
Assessments - generate reassessment reports and blank assessment forms. Print filled-in assessment forms from the appropriate consumer record.
Consumers - generate lists of goals, consumer directories, mailing labels, and service orders.
Services - report on service deliveries with agency summaries, consumer lists and summaries, and NSIP meal information.
Contracts - generate monitoring reports with service delivery records for service contracts.
Care Plans - monitor care plan services and totals. Billing - generate reports on invoices, payments, and co-pays. Activities & Referrals - report and print mailing labels based on
consumer activities and referrals. Administrative - print mailing labels and print the provider/services
structure.
Reports
.
For MA users, an I & R Reports category also appears. See the SAMS I&R Companion Guide for more information.

88 SAMS Case Management
Running/Generating Reports Let's run an Activities & Referrals report.
To run the report
1 Click Reports . 2 Click Activities & Referrals.

Reports 89
3 Double-click Consumer Activity/Referral Report in the Reports pane.
4 Enter "Practice Report" as the report title.
5 Under the Activity/Referral heading, select Assessment from the Action list.
6 Enter a Status Date (on or after) of 01/01/2008.
7 Under the Consumer Details heading, select Yes from the Active list.
8 Under Advanced Filters, select Female from the Gender list under the Personal heading.
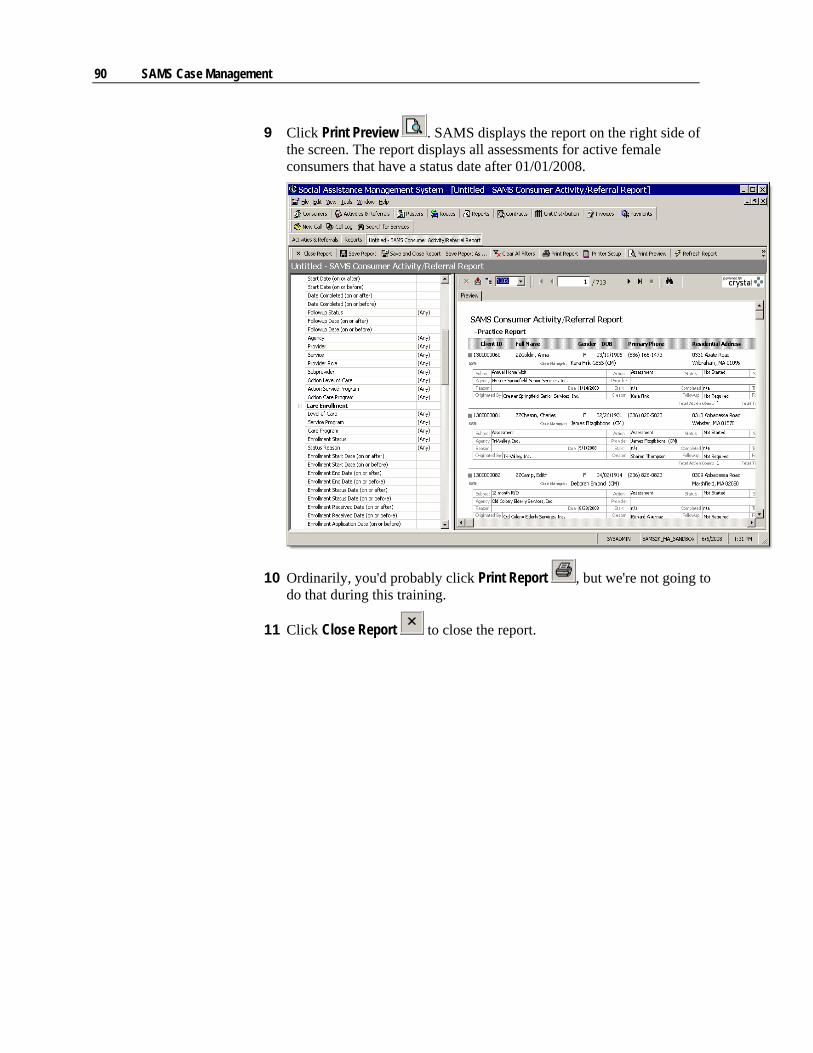
90 SAMS Case Management
9 Click Print Preview . SAMS displays the report on the right side of the screen. The report displays all assessments for active female consumers that have a status date after 01/01/2008.
10 Ordinarily, you'd probably click Print Report , but we're not going to do that during this training.
11 Click Close Report to close the report.

Thanks! 91
We hope that you have enjoyed learning about SAMS. If you have any questions, please don't hesitate to ask.
As you begin working in SAMS, remember that you can access additional information from the Help menu or by pressing F1.
Thanks for attending and we look forward to working with you!
Thanks!


93
A Actions Meetings, phone calls, or other similar events with a consumer.
Agency (EOEA: Provider) An organization contracted by a state or other government body to oversee/supervise the care of consumers within an area. Agencies can contract with service providers or act directly as the service provider.
Allocation Type A service plan represents a planned allocation of one or more services a consumer should receive. The allocation type dictates the frequency of the planned service. SAMS offers 'Weekly,' Monthly,' 'Care Plan,' and 'Duration Specified.'
C Care Enrollment The association of a consumer with a care program. A care enrollment record tracks status and key dates. All services are planned, ordered, and provided to a consumer under a care enrollment. Users can enroll consumers into multiple care programs.
Care Plan Section of a consumer record that records care management activities. Users associate a care plan with a care enrollment. Each care plan includes a service plan, goals, journal entries, and a planning worksheet. Care plans have start and end dates that typically coincide with a consumer's eligibility determination date and required re-assessment date.
Care Program A unique combination of a level of care and service program. A care program may have the same name as the service program, depending on the setup of the organization.
Care Recipient A consumer who receives services from another consumer.
Caregiver A consumer who provides services to another consumer.
Consumer Group A collection of several consumers treated as one consumer. Members of a consumer group usually have something in common, such as attendance at an event or the use of a facility. Individual consumer information such as Name or Social Security Number are not known.
Contract An agreement between a single Agency and Provider over a fiscal period for the delivery of services to consumers. SAMS contracts store fund source (fund identifiers) and unit rates.
I Invoice A billing for services delivered to consumers. SAMS can generate invoices for Consumers, Third Parties (Insurance), and Agencies. Also see Ledger Item.
Glossary of Terms

94 SAMS Case Management
L Ledger Item Called an Invoice by the EOEA. A method for Agencies to report back to the State Unit or other government body any expenses incurred by cost center and expenses category against a budget.
Level of Care A top-level classification defining the type of care required by a consumer. Upon completion of an assessment, a consumer should be assigned a Level of Care. Service administration and data entry begins with a Level of Care classification.
Location Address information with additional data such as Directions, Neighborhood, and Municipality.
P Progress Notes Progress notes are entered as SAMS journal entries. SAMS has two areas for creating journal entries: one associated with each care plan and a general consumer journal. Which area you use to enter progress notes depends on agency policy, the relevancy to the care plan, and the sensitivity of the data.
Provider Also see Agency. A vendor or subcontractor in EOEA terminology. An individual or organization providing services to consumers under the direction of one or more agencies.
R Relationships In SAMS, these are called Contacts.
Roster Stored filters used to generate lists of consumers. Users can quickly enter service delivery data using the consumer lists.
Route A list of consumers, usually with one or more common attributes, that users can custom sort.
S SAMS Social Assistance Management System - consumer/client-based software that tracks services.
Service Plan Found within a care plan, service plans identify one or more services required to meet the needs of the consumer. Services can be provided by informal supports, third parties, or providers who work directly with the agency. Users can enter frequencies and optional caps with each service.
Service Programs A group of services that can be delivered to a consumer, based on eligibility requirements. Also see Care Program.
SIMS Senior Information Management System
Sub-provider Individual or organization delivering services directly to the consumer under a Provider.
Subservice A further classification of services. For example, the service "Home Delivered Meals" could be associated with "Chinese" or "Kosher" subservices.
V Vendor An individual or organization providing services to consumers under the direction of one or more agencies. SAMS calls vendors Providers.